IXI Mobile OGOCC10 Messaging device User Manual 2 1 Spark 0 22
IXI Mobile, Inc. Messaging device 2 1 Spark 0 22
Contents
- 1. User Manual
- 2. Users manual
- 3. Users Manual
Users Manual

CC-10 User Manual
OGOUserManual
ii
Table of Contents
Features ................................................................................................... 2
Accessories ............................................................................................... 2
Charging the Battery .................................................................................. 3
Checking the Battery Power ........................................................................ 3
Identifying the Low Battery Warnings ..................................................... 3
Interacting with Your Ogo – Terminology & Tips ............................................ 4
Powering On Your Ogo for the First Time ...................................................... 5
Keyboard Functionality ............................................................................... 6
Navigation Keys ................................................................................... 7
Shortcut Keys ...................................................................................... 7
Inserting Text ........................................................................................... 8
Using Text Insertion Keys ...................................................................... 8
Using the Extended Character Palette ..................................................... 9
Changing the Writing Language ............................................................. 9
Working with QuickText ........................................................................ 9
Overview of the Ogo Screen ...................................................................... 11
Status Bar ......................................................................................... 11
Application Area ................................................................................. 13
Home Screen .......................................................................................... 14
Setting the Wallpaper from the Home Screen......................................... 15
Setting Your Home Screen Layout ........................................................ 15
Configuring Your Favorites .................................................................. 16
Checking for Unread Messages and Open Chats ........................................... 18
Setting up Your IM Accounts ..................................................................... 19
Setting up Your Windows Live Messenger Account .................................. 20
Setting up Your ICQ Account ............................................................... 21
Editing Your IM Account Settings .......................................................... 21
Removing Your IM Account .................................................................. 22
Working with Instant Messaging ................................................................ 23
Signing In ............................................................................................... 24
Signing Out ............................................................................................. 24

錯誤
!
使用
[
常用
]
索引標籤將
TOAHeading
套用到您想要在此處顯示的文字。
iii
IM Status Icons ....................................................................................... 25
Changing Your Status ............................................................................... 26
Sending an Instant Message ..................................................................... 27
Adding Emoticons to Your Instant Messages .......................................... 27
Receiving an Instant Message ................................................................... 28
Closing an IM Chat Session ....................................................................... 28
Managing Your IM Contacts ....................................................................... 29
Adding an IM Contact ......................................................................... 29
Viewing Contact Details ....................................................................... 30
Assigning an Alerticon to an IM Contact ................................................ 30
Blocking/Unblocking an IM Contact ....................................................... 31
Deleting an IM Contact ....................................................................... 32
Setting Up Your E-Mail Accounts ................................................................ 33
Setting Up Your Hotmail Account .......................................................... 34
Setting Up Your Yahoo E-mail Account .................................................. 35
Setting Up Your Gmail Account ............................................................ 36
Setting Up Your “Other” Email Account ................................................. 37
Editing Your E-mail Account Settings .................................................... 38
Removing an E-mail Account ............................................................... 38
Accessing the Messages Application ........................................................... 39
Viewing Your Message Lists ....................................................................... 40
Composing a Message .............................................................................. 42
Working with Messages ............................................................................ 44
Viewing a Message ............................................................................. 44
Viewing an Attachment ....................................................................... 45
Forwarding a Message ........................................................................ 45
Replying to a Message ........................................................................ 46
Deleting Messages .............................................................................. 46
Finding a Message .............................................................................. 48
Checking for New Messages ................................................................. 48
Sorting Your Messages ........................................................................ 49
Viewing Your Outgoing Messages ......................................................... 49
Working with IMAP Folder Options ........................................................ 50
Making a Call .......................................................................................... 51
Dialing a Phone Number ...................................................................... 52
Calling a Contact ................................................................................ 53
OGOUserManual
iv
Dialing a Number from the Call Log ...................................................... 54
Redialing a Number ............................................................................ 55
Handling Incoming Calls ........................................................................... 56
Handling an Incoming Call ................................................................... 56
Handling a Waiting Call ....................................................................... 56
Handling Multiple Calls ............................................................................. 56
Swapping Calls .................................................................................. 56
Placing a Conference Call .................................................................... 57
Making another Call While Talking on the Phone ..................................... 57
Ending a Call ........................................................................................... 58
Muting/Unmuting a Call ............................................................................ 58
Viewing Your Call Lists .............................................................................. 59
Call Timers ............................................................................................. 60
Adding Contacts ...................................................................................... 62
Deleting Contacts .................................................................................... 63
Viewing Contact Cards .............................................................................. 64
Viewing/Editing Contact Details ................................................................. 65
Assigning a Picture to a Contact ........................................................... 66
Assigning an Alerticon to a Contact ....................................................... 66
Assigning a Ringtone to a Contact ........................................................ 67
Working with Contact Groups .................................................................... 67
Creating a Group ................................................................................ 67
Adding Contacts to Groups .................................................................. 68
Removing Contacts from Groups .......................................................... 68
Sending a Message to a Group ............................................................. 68
Removing a Contact Group .................................................................. 69
Exporting Contacts ................................................................................... 69
Importing Contacts .................................................................................. 70
Synchronizing Contacts with OgoSync ........................................................ 70
Working with the Address Clipboard ........................................................... 71
Creating a Contact from the Clipboard .................................................. 71
Adding an Appointment ............................................................................ 74
Opening/Editing an Appointment ............................................................... 75
Deleting an Appointment .......................................................................... 75
Deleting Old Appointments ........................................................................ 76
Deleting All Appointments ......................................................................... 76
Appointment Reminders ........................................................................... 77

錯誤
!
使用
[
常用
]
索引標籤將
TOAHeading
套用到您想要在此處顯示的文字。
v
Synchronizing Your Calendar with OgoSync ................................................. 78
Accessing News (RSS) Feeds ..................................................................... 79
Adding a News Feed ................................................................................. 81
Requesting a Specific URL ......................................................................... 84
Changing the Web Browser’s Viewing Mode ................................................. 84
Working with Bookmarks .......................................................................... 85
Adding a Bookmark ............................................................................ 85
Removing a Bookmark ........................................................................ 85
Adding a Folder .................................................................................. 86
Opening a Bookmark .......................................................................... 86
Viewing Your Browsing History .................................................................. 86
Downloading Content ............................................................................... 87
Opening Folders ...................................................................................... 89
Sorting Folder Contents ............................................................................ 90
Opening a File ......................................................................................... 90
Opening an Audio File ......................................................................... 90
Opening a Video File ........................................................................... 91
Opening an Image File ........................................................................ 91
Managing Files/Folders ............................................................................. 93
Creating a New Folder ......................................................................... 93
Moving a File ..................................................................................... 94
Copying a File .................................................................................... 94
Renaming a File/Folder ....................................................................... 94
Deleting a File/Folder .......................................................................... 95
Setting an Image File as Wallpaper ............................................................ 95
Setting an Image File as a Contact Picture .................................................. 95
Setting an Audio File as a Ringtone ............................................................ 96
Setting an Audio File as a Contact Ringtone ................................................ 96
Viewing Memory Details ............................................................................ 97
Viewing File Details .................................................................................. 97
Opening a File in the Player ....................................................................... 99
Player Features ....................................................................................... 99
Track Operations ................................................................................ 99
Repeat All ....................................................................................... 100
Repeat This Track ............................................................................. 101
Audio Features ................................................................................. 101
OGOUserManual
vi
Equalizer ......................................................................................... 102
Setting the Alarm Clock .......................................................................... 103
Playing Ogy ........................................................................................... 104
Playing OgoBlocks .................................................................................. 106
Viewing Technical Support Information ..................................................... 106
Configuring the Phone Settings ................................................................ 108
Configuring the IM Settings ..................................................................... 111
Configuring Your E-Mail Settings .............................................................. 112
Configuring Your Web Browser Settings .................................................... 113
Configuring the Device Settings ............................................................... 114
Configuring the Sound Settings ............................................................... 117
Configuring the Calendar Settings ............................................................ 119
Configuring the Time and Date Settings .................................................... 120
Configuring the Network Settings ............................................................. 121
Viewing Your System Settings ................................................................. 122
OgoSync Workflow ................................................................................. 124
Installing OgoSync ................................................................................. 125
Synchronizing Your Ogo .......................................................................... 127
Step 1: Launching OgoSync ............................................................... 127
Step 2: Connecting the Ogo to Your PC ............................................... 128
Step 3: Synchronizing ....................................................................... 129
Step 4: Reporting ............................................................................. 131
OgoSync Settings .................................................................................. 131
Troubleshooting ..................................................................................... 134
Exceeding the Ogo’s Storage Capacity ................................................ 134
Disconnection .................................................................................. 134
Important Safety Information .................................................................. 135
Important Safety Information – Wireless Devices ................................. 135
Pictograms and Graphic Symbols ............................................................. 135
Product Handling ................................................................................... 136
General Statement on Handling and Use ............................................. 136
Electrical Safety ............................................................................... 138
Interference .................................................................................... 138
Explosive Environments .................................................................... 140
Declaration of Conformity .................................................................. 143

錯誤
!
使用
[
常用
]
索引標籤將
Heading1
套用到您想要在此處顯示的文字。
錯誤!使用[常用]索引標籤將Heading2套用到您想要在此處顯示的文字。1
IntroducingtheOgo
Ogoisaneasy‐to‐usehandhelddevicethatoffersavarietyofmobile
communicationmethodsincludinge‐mail,instantmessaging,SMS,RSS,voice,and
Webbrowsing.Ogo'sinterfaceandfunctionalityweredesignedtoenhanceWeb2.0
usabilityfeaturingahighresolutionscreen,andbuilt‐inspeakerforanoptimal
audio‐visualexperience.Thefullkeyboardandsleekdesignencourageuser
interactionforconstantconnectivitytolivecommunitiesanduser‐content
generatedsites.
Figure1:OgoDevice

OGOUserManual
2錯誤!使用[常用]索引標籤將Heading2套用到您想要在此處顯示的文字。
Features
ThekeyfeaturesofyourOgoinclude:
TextandInstantMessaging:Sendaquicktextmessage(SMS)orchatwith
contactsonyourICQorWindowsLiveMessengerlists.Ogo'sfingerfriendly
full‐featuredkeyboardmakesitfast,efficientandeasy.
E‐mailAnywhere:Readandreplytoemailfrommultipleaccounts.Ogoletsyou
managemessagesfrommultipleaccountseasilyandefficiently,whetheryou're
sittinginarestaurant,ridingthebus,orrelaxingonthebeach.WithOgoyou
canhandleattachmentswithease.Youcanviewphotos,textversionsofWord
documents,PDFfilesandmore.AndOgo'sPUSHemailfeaturemeansyouget
emailassoonasithitsyourinbox,sothere'snoneedtowait.
MediaGallery&Player:Store,view,andplaymusicandvideoclipsanywhere,
anytime,withtheOgoPlayer.WithOgoyoucandownloadnewfilestothe
device,oraccessyourfavoritefilesonyourMicroSDcard.
RSSNewsFeeds:Stayintouchwithyourworld.SetupRSSnewsfeedsforupto
themomentnews,informationandalertsaboutthesubjectsyoucareabout
most.
VoiceCalls:Ogo’sfull‐featuredandeasytousemobilephonefunctionality
makesitmucheasiertostayconnected.
SurftheWeb:Browsethewebfrompracticallyanywhere.Blog,browse,check
outyourfavoritewebsitesorthelatestnewsandgossip—withOgoyou'rein
touch.
ContactListandCalendar:Ogo'sPersonalInformationManagerletsyoucarry
yourcalendarandcontacts’informationwithyou.
Note: Theavailabilityofsomeoftheservicesdescribedinthismanualdepends
onthespecificversionoftheproductpurchased.
Accessories
YourOgoisprovidedwiththefollowingaccessories:
3.7VLi‐ionbattery920mAh(100hoursstandby,4hoursusage)
Chargerwithmini‐USBconnection

錯誤
!
使用
[
常用
]
索引標籤將
Heading1
套用到您想要在此處顯示的文字。
錯誤!使用[常用]索引標籤將Heading2套用到您想要在此處顯示的文字。3
ChargingtheBattery
Thefirsttimeyouchargethebattery,itisrecommendedthatyouchargeitfor8
hours.
► Tochargethebattery:
1 Withthebatteryproperlyinserted,connectthecharger’smini‐USBpowerplug
tothemini‐USBconnectoronthefrontofyourOgo.
2 Plugthechargerintoanelectricaloutlet.
Whilethebatteryischarging,ananimatedbatteryiconisdisplayed.Whenthe
batteryisfullycharged,theicondisplaysfoursolidbars.
CheckingtheBatteryPower
Ogo’spowerconsumptiondependsonyourcurrentusage.Forexample,whenyou
aresendingalotofe‐mailsorparticipatinginnumerousInstantMessagingchat
sessions,thebatterypowerweakensfasterthanwhenyourdeviceisinactive,but
poweredon.
Thepowerlevelisindicatedbythenumberofbarsonthebatterylevelicon,which
appearonthestatusbar.
IdentifyingtheLowBatteryWarnings
Whenbatterypowerbecomeslow,aBatteryLowpop‐upmessageappears.When
thishappens,chargeyourOgoassoonaspossible.
Ifthebatterylevelbecomescriticallylow,anadditionalBatteryLow!pop‐up
messageappears,indicatingthatyoumustshutdownthedeviceandrechargeits
battery.Formoreinformation,seeChargingtheBatteryonpage3.

OGOUserManual
4錯誤!使用[常用]索引標籤將Heading2套用到您想要在此處顯示的文字。
WorkingwiththeOgo
TomakeiteasyforyoutoenjoyOgo,we
recommendthatyoutakeafewminutestoget
acquaintedwiththescreen,thekeyboard,andafew
ofthegeneralfeatures.
InteractingwithYourOgo–
Terminology&Tips
Inthismanual,thefollowingtermshavebeenused
intheinstructionstodescribethewaysinwhichyou
interactwithyourOgo:
Selectreferstomovingthefocusonthescreentoatab,field,buttonoroption.
Theselectedoptionishighlightedonthescreen.Itemsareselectedusingeither
the4‐wayNavigationKey.Formoreinformation,seeNavigationKeysonpage7.
Scrollreferstomovingupordownwithintheitemsinalistormenu.
Pressalwaysreferstothepressingofphysicalkeysonthekeyboard.
Insertreferstotheenteringoftextusingthekeyboardwhencompletingforms
orcomposingmessages.Formoreinformation,seeInsertingTextonpage8.
IninteractingwithyourOgo,notethefollowing:
PressingEnter/Selectconfirmsaselection.Thisisaccomplishedbypressingthe
EnterkeyorbypressingtheSelectkeyatthecenteroftheArrowkeys.
PressingEnter/Selectwhenacheckboxoptionishighlightedtogglesthesetting
betweenselected(checked)andcleared(unchecked).
PressingtheOptionskeydisplaystheOptionsmenu.Theavailableoptionsvary
accordingtoyourcurrentlocationintheapplication.Toselectanoption,
simplypressthecorrespondingnumberonthekeyboard.Alternatively,youcan
scrolltotheoptioninthemenuandpressEnter/Select.
Whenscrollingthroughalistofitems,youcantypethefirstletter(s)ofan
item’snametojumptothefirstitemthatstartswiththedesignatedletter(s).

錯誤
!
使用
[
常用
]
索引標籤將
Heading1
套用到您想要在此處顯示的文字。
錯誤!使用[常用]索引標籤將Heading2套用到您想要在此處顯示的文字。5
PoweringOnYourOgofortheFirstTime
OnceyourOgoisfullycharged,youarereadytobegintouseyourOgo.
ThefirsttimeyouturnonyourOgo,asetupwizardappears,readytoguideyou
throughtheinitialstagesofsettingupyourOgo.
► Topoweronandsetupyourdevice:
1 HolddownthePowerkey untilthescreenturnson.Thefirsttimeyouturn
onyourOgo,aLanguageselectionscreenisdisplayed.
Note: IfyouarepromptedtoentertheGPRSAPN,enterthedetailsas
instructedbyyourserviceproviderandpressNext.
2 Scrolltothelanguagethatyouwanttouseonthedeviceandpress
Enter/Select.SelectNextandpressEnter/Selecttocontinue.
TheSetupWizardisautomaticallylaunched,promptingyoutosetupyour
InstantMessaging(IM)accountsontheOgo.
YoucansetupyourIMaccountsnow,oryoucancompletetheprocesslater
fromtheSettingsscreen.
3 TosetupyourIMaccountsnow,selecttheIMProvider(WindowsLive
MessengerorICQ)andpressEnter/Select.ThenselectNextandpress
Enter/SelecttoconfiguretheIMaccountintheSetupwizard.
4 Followtheon‐screeninstructionsfortheselectedIMProvider,asdescribedin
SettingupYourWindowsLiveMessengerAccountandSettingupYourICQ
Account,respectively.
Note: TocontinuewithoutsettingupyourIMaccount(s),scrolldownto
selectNextandpressEnter/Select.TheE‐MailSetupWizardis
displayedautomatically.
5 AftersettingupanIMaccount,theaccountislistedintheInstantMessaging
screenoftheSetupWizard.TosetupanadditionalIMaccount,selecta
differentprovider.Tocontinuewiththedevicesetupprocess,scrolldownand
selectNextandpressEnter/Select.
Next,theSetupWizardpromptsyoutosetupyourE‐mailaccountsontheOgo.
Youcansetupyoure‐mailaccountsnow,oryoucancompletetheprocess
laterfromtheSettingsscreen.
6 Tosetupyoure‐mailaccountsnow,selecttheE‐mailProvider(WindowsLive
MessengerorICQ)andpressEnter/Select.
OGOUserManual
6錯誤!使用[常用]索引標籤將Heading2套用到您想要在此處顯示的文字。
7 Followtheon‐screeninstructionsfortheselectedE‐mailProvider,asdescribed
inSettingUpYourHotmailAccount,SettingUpYourYahooE‐mailAccount,
SettingUpYourGmailAccount,andSettingUpYour“Other”EmailAccount,
respectively.
Note: Tocontinuewithoutsettingupyoure‐mailaccount(s),scrolldownto
selectFinishandpressEnter/Select.TheSetupWizardcloses.
8 Aftersettingupanemailaccount,theaccountislistedintheE‐mailscreenof
theSetupWizard.Tosetupanadditionale‐mailaccount,selectadifferent
provider.Tocompletethedevicesetupprocess,selectFinishandpress
Enter/Select.
TheHomescreenisnowdisplayed,enablingyoutoeasilyaccessOgo’s
functionality.ForadescriptionoftheHomescreen,seeHomeScreenon
page14(Whichpage?).
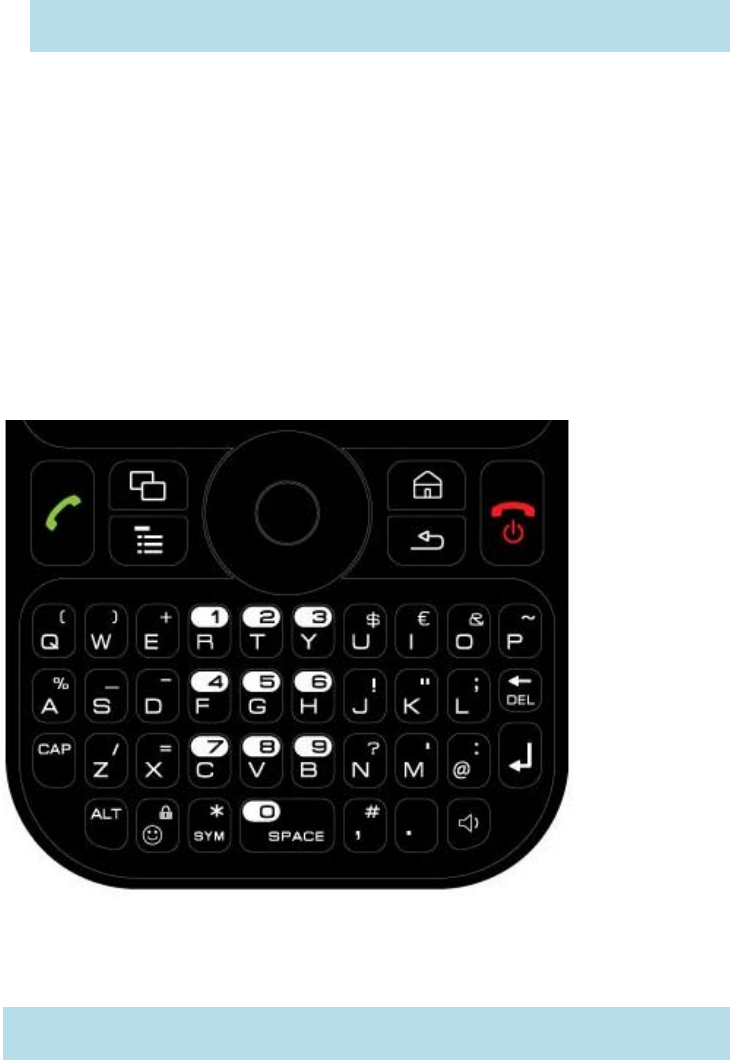
KeyboardFunctionality
TheconvenientlayoutoftheOgokeyboardenablesyoutoeasilyaccessthevarious
functionsofyourOgodevice.
Figure2:OgoKeyboard
Thekeyboardincludesnavigationandselectionkeys,shortcutkeys,and
text/characterinsertionkeys.
Note: Dependingonthemodel,yourOgomayhaveeitheraQWERTYora
QWERTZkeyboard.
錯誤
!
使用
[
常用
]
索引標籤將
Heading1
套用到您想要在此處顯示的文字。
錯誤!使用[常用]索引標籤將Heading2套用到您想要在此處顯示的文字。7
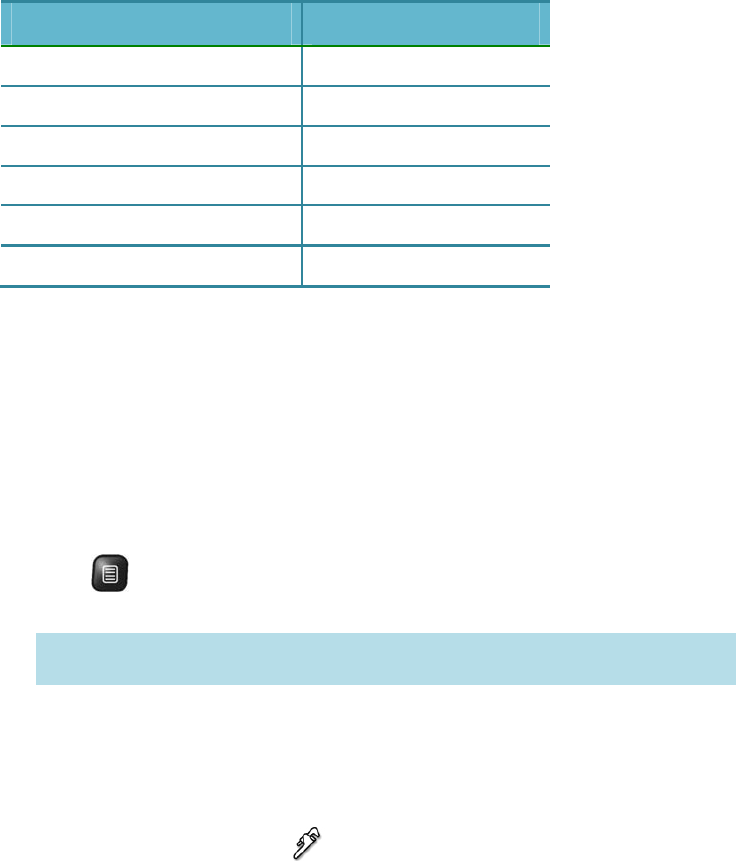
NavigationKeys
ThefollowingkeysenableyoutonavigatewithintheOgo’sscreens,andtoselect
andactivatetheavailableitems.
Table1:NavigationandSelectionKeys
KeyNameFunction
EnterActivatestheselecteditemonthe
screen.
4‐way
NavigationKey
Thearrowkeysenableyoutomoveleft
andrightorupanddownwithinascreen
orwithinlinesoftext.
OptionsDisplaystheOptionsmenuforthe
currentscreen,ifavailable.
ShortcutKeys
Thefollowingshortcutkeysmakeiteasytonavigatebetweenthemostcommonly
usedfeaturesonyourOgo.
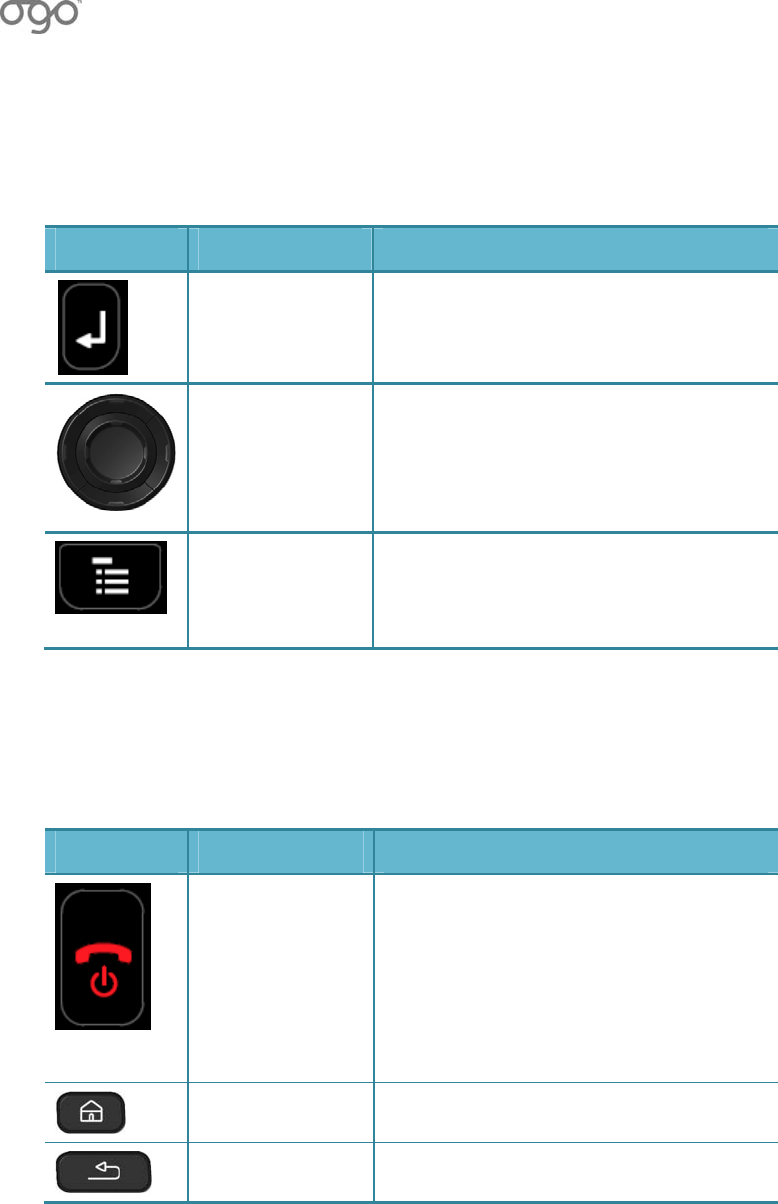
Table2:ShortcutKeys
KeyNameFunction
Power AlongpressonthePowerkeyturns
yourOgoonandoff.
WhentheOgoispoweredon,ashort
pressonthePowerkeydisplaysthe
DeviceOptionsmenu,providingaquick
waytoturnthedevicesoundand
vibrationonoroff.
HomeNavigatestotheHomescreen.
BackDisplaysthepreviouslyviewedscreen.
OGOUserManual
8錯誤!使用[常用]索引標籤將Heading2套用到您想要在此處顯示的文字。
InsertingText
UsingyourOgokeyboard,youcaninserttext,symbols,andemoticons.Youcan
alsotakeadvantageofOgo’sQuickTextfeaturetoinsertpredefinedorcustomized
text.Fordetails,seeWorkingwithQuickTextonpage9(?).
Note: Dependingonyourregionandwirelesscarrier,youmayalsoabletoinsert
non‐Englishcharacters.Fordetails,seeUsingtheExtendedCharacter
Paletteonpage9.
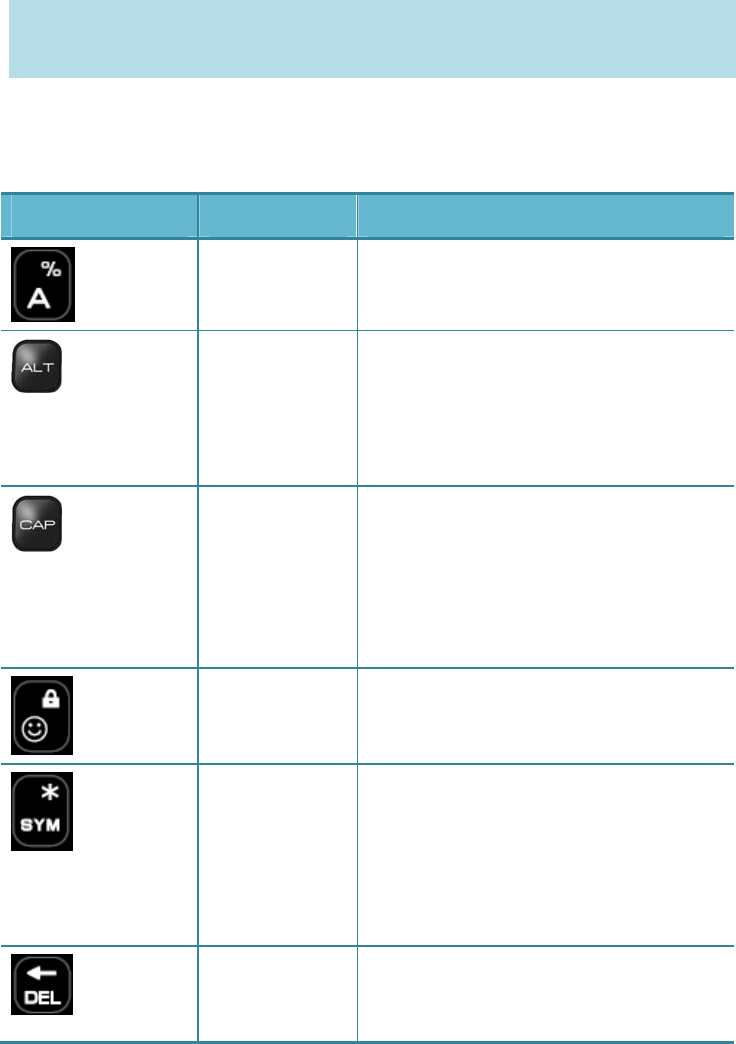
UsingTextInsertionKeys
Table3:TextInsertionKeys
KeyNameFunction
LetterkeysInsertsletters,numbersandother
symbols.
AlternateInsertsthesymbollocatedabovethe
letteronthekey.Forexample,hold
downtheALTkeyandpresstheB
keytoinsertthenumber7.
CapitalizeInsertsacapitalletter.Forexample,
holddowntheCAPkeyandpressD
toinsertthecapitalletterD.
HoldingdowntheCAPkeyformore
than3secondslockstheCAPkey.To
releasetheCAPkey,pressitagain.
EmoticonDisplaystheemoticonpalette,
enablingyoutoincludeemoticonsin
yourinstantmessages.
SymbolWhenpressedalone,insertsaspace
intext.
Whenpressedinconjunctionwith
ALT,displaystheSymbolpalette,
enablingyoutoinsertspecial
characters.
DeleteDeletesthelastcharacterinsertedin
atextfield(pressonceforeach
character),oraselectediteminalist.
錯誤
!
使用
[
常用
]
索引標籤將
Heading1
套用到您想要在此處顯示的文字。
錯誤!使用[常用]索引標籤將Heading2套用到您想要在此處顯示的文字。9
UsingtheExtendedCharacterPalette
Dependingonyourregionandyourwirelesscarrier,youmaybeabletoinsert
non‐Englishcharacters,suchasaccentedlettersandsymbols,intoyourmessages
usingtheExtendedCharacterpalette.
► Toenteranextendedcharacterinafield:
1 AccesstheExtendedCharacterpalettebylong‐pressingoneofthekeys
associatedwiththeletteryouwanttotype;theExtendedCharacterpaletteis
displayed.
2 Keeppressingthekeytoscrollthroughtheaccentedcharacters.Press
Enter/Selectorsimplyreleasethekeytoclosethepaletteandinsertthe
selectedcharacterintoyourmessage.
ChangingtheWritingLanguage
DependingonthespecificversionofyourOgo,thekeyboardmayincludeanon‐
Latinalphabet(suchasRussian),inadditiontotheLatincharacterset.
Toinsertcharactersusingtheadditionalalphabet,presstheand keys
together.Thelanguageindicatorinthestatusbarchangesaccordingly.
Pressingtheandkeysagainreturnstheoriginalwritinglanguage.
WorkingwithQuickText
Canyoutype“Talktoyousoon”withjustthreekeystrokes?Well,nowyoucan.
QuickTextprovidesafunandfastwaytocommunicateatthetouchofakey.Use
yourOgo’spredefinedorcustomizedone‐linerswithyourfavoritephrases.
ThereareeightpredefinedQuickTextitemsavailableforquickinsertionintoanyIM,
e‐mail,orSMSmessagefield.
► ToinsertQuickText:
1 Whilecomposingyourmessage,press andselectInsertQuickTextfrom
theOptionsmenu.TheInsertQuickTextscreenisdisplayed,listingtheavailable
QuickTextitems.
2 SelecttheQuickTextitemyouwanttoinsertandpressEnter/Select(orpress
thenumberofQuickTextitem).TheInsertQuickTextscreenclosesandthe
QuickTextisinsertedintothemessagefield.

OGOUserManual
10錯誤!使用[常用]索引標籤將Heading2套用到您想要在此處顯示的文字。
► ToeditQuickText:
1 Whilecomposingamessage,press andselectEditQuickTextfromthe
Optionsmenu.TheChooseQuickTexttoEditscreenisdisplayed,listingthe
availableQuickTextitems.
2 SelecttheQuickTextitemyouwanttoeditandpressEnter/Select(orpressthe
numberofQuickTextitem).TheEditQuickTextscreenisdisplayed.
3 Editthetext.
4 SelectSaveandpressEnter/Select.ThemodifiedQuickTextissavedandready
forinsertionintoyourmessage(s).
錯誤
!
使用
[
常用
]
索引標籤將
Heading1
套用到您想要在此處顯示的文字。
錯誤!使用[常用]索引標籤將Heading2套用到您想要在此處顯示的文字。11
OverviewoftheOgoScreen
TheOgoscreenisdividedintotwomainareas:
StatusBar
ApplicationArea
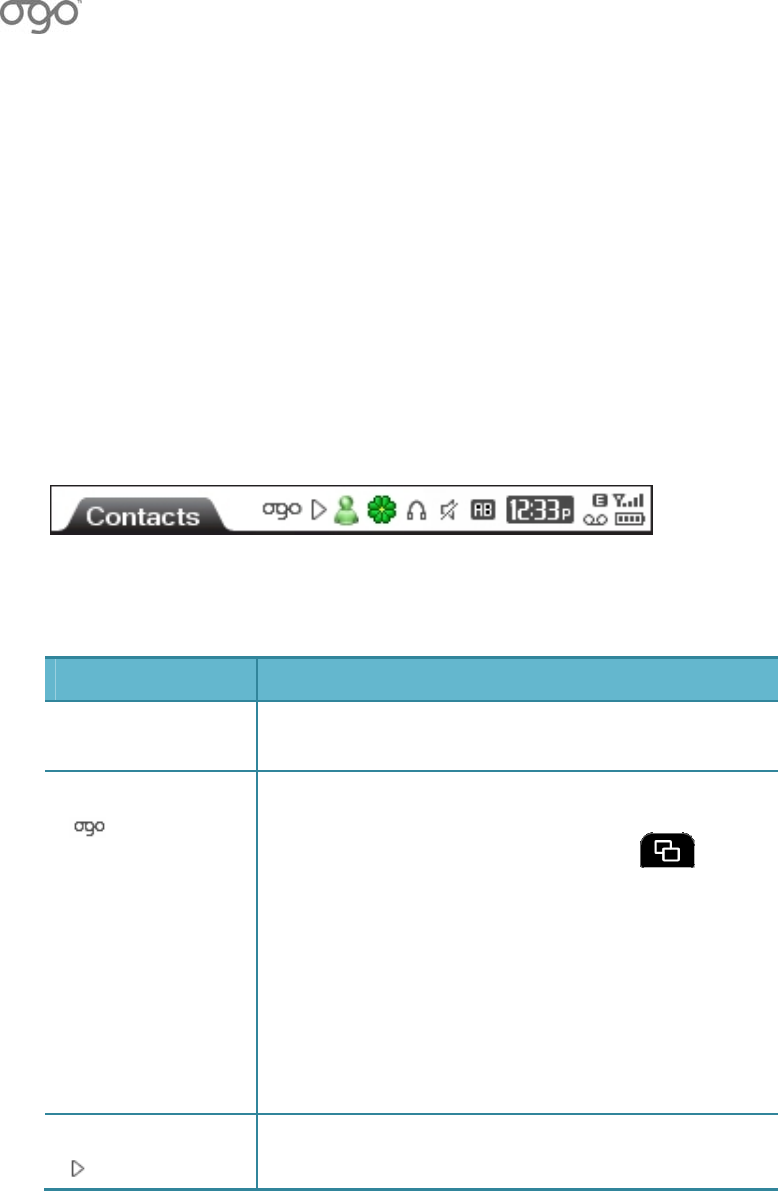
StatusBar
TheOgostatusbarappearsatthetopofyourOgoscreen,anddisplaysthenameof
theactivescreen,togetherwithinformationaboutthesystemstatus,new
messages,headsetconnection,InstantMessagingstatus,batterylevel,current
time,andmore.
Figure3:SampleStatusBar
TheitemsdescribedinTable4appearonthestatusbar,fromlefttoright.
Table4:StatusBarItems
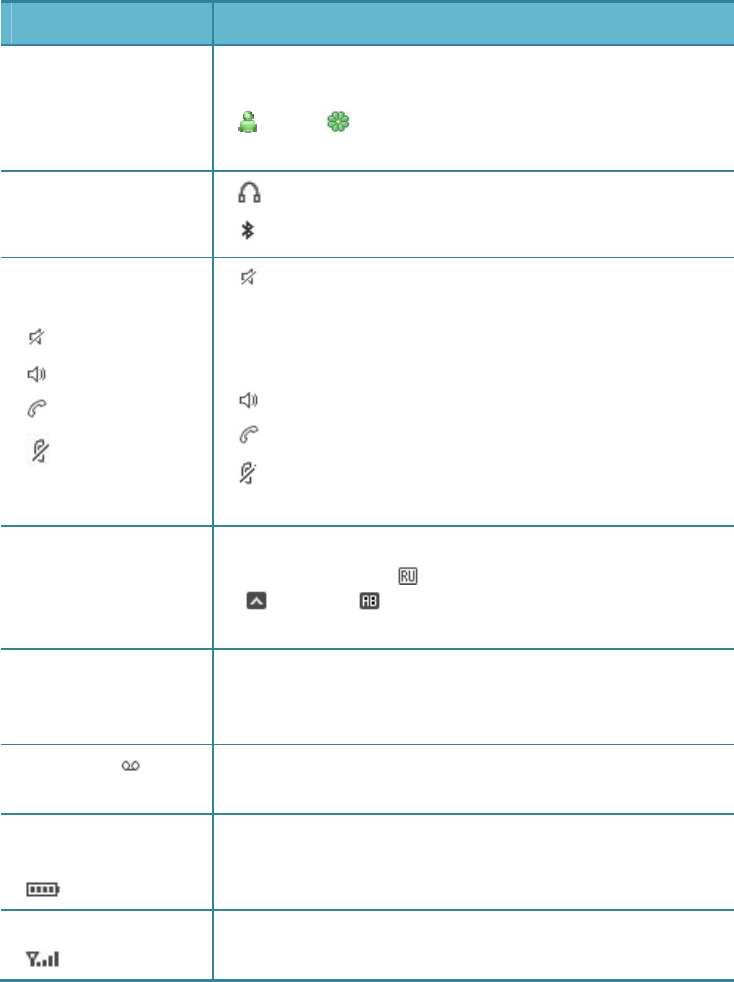
StatusBarItemDescription
ScreenTitleThenameofcurrentscreen(forexample,Homeor
Compose).
Ogoindicator
Thisanimatediconspinsandflipsoverwhenyouhave
newunreadmessages(e‐mail,SMS,Instant
Messaging)ormissedcalls.Pressthekeyto
viewthelistofallnewitems.
Ifyouhaveopenedthelistofunreadmessagesbut
havenotyetviewedallofthem,theOgoindicator
gentlyfloatsupanddown.
Whenthisindicatorisstill,youhavenounread
messagesonyourOgo.
Formoreinformation,seeCheckingforUnread
MessagesandOpenChatsonpage18.
Playindicator
Thisiconappearswhenanaudioorvideofileisbeing
played.
OGOUserManual
12錯誤!使用[常用]索引標籤將Heading2套用到您想要在此處顯示的文字。
StatusBarItemDescription
InstantMessaging
status
Thestatusoftheconfiguredinstantmessaging
communities,forexample,WindowsLiveMessenger
orICQ.ForIMstatusiconsanddescriptions,see
IMStatusIconsonpage25.
Headset
connectionicons
:AheadsetisconnectedtotheOgo.
:ABluetoothheadsetisconnectedtotheOgo.
Audio&Voice
statusicons
Silent
Speaker
Call
Mute
:TheOgoisinSilentmode,wherenosoundsare
played,exceptfortheAlarmClockandMediaPlayer.
Duringacall,thefollowingiconsindicatetheaudio
andvoicestatus:
:TheOgoisinSpeakerphonemode.
:Aheadset(wiredorBluetooth)isactive.
:Themicrophoneismuted.Fordetails,see
Muting/UnmutingaCallonpage58.
Language,ALT,
CAP
Thisiconindicatesthewritinglanguagecurrentlyin
use(forexample,forRussian).WhenusingtheALT
()orCAP( )keys,thisisindicatedontopofthe
languageicon.
TimeDisplaysthecurrenttime.Tochangethetimeformat
(24hoursorAM/PM),seeConfiguringtheCalendar
Settingsonpage119.
Voicemail Thisiconappearswhenyouhaveavoicemail.(This
featureisnotprovidedbyallnetworks.)
Batterycharge
level
Thenumberofverticalbarsindicatesthebattery
chargelevel.Formoreinformation,seeCheckingthe
BatteryPoweronpage3.
Signalstrength
Thenumberofverticalbarsindicatesthestrengthof
Ogo’snetworkconnection.
錯誤
!
使用
[
常用
]
索引標籤將
Heading1
套用到您想要在此處顯示的文字。
錯誤!使用[常用]索引標籤將Heading2套用到您想要在此處顯示的文字。13
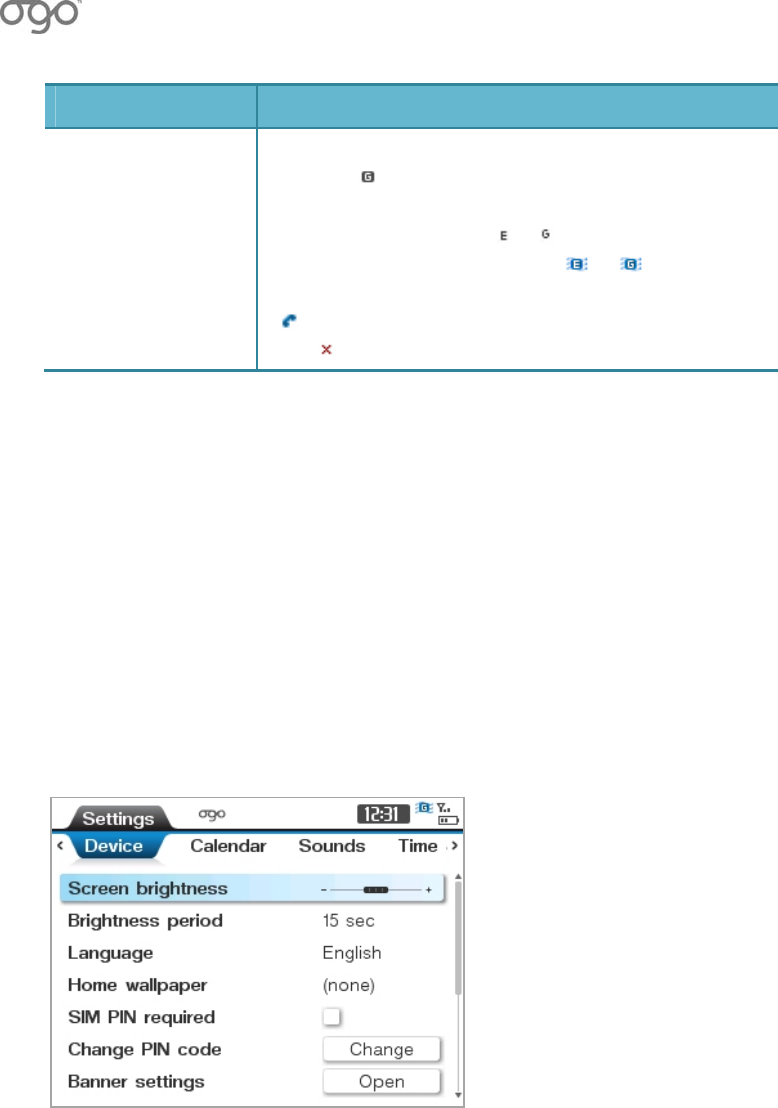
StatusBarItemDescription
DataConnection
Status
Thisiconindicatesthecurrentdataconnectionstatus,
showingforGPRS.
Whenthedataconnectionisavailable(readyfor
connection),theiconisor,respectively.Theicon
ishighlightedandanimated(or)whiledata
transfertakesplace.
appearsduringacall(whendatatransferispaused),
andappearswhennosignalisreceived.
ApplicationArea
TheApplicationareaappearsbelowtheOgostatusbar(whichdisplaysthenameof
theactivescreen).
ThecontentandlayoutoftheApplicationareavaryaccordingtothecurrentscreen
andactivefunctionality.
ManyofyourOgoscreensaremadeupofmultiplepagesor"tabs".Thenamesof
theavailabletabsappearimmediatelybelowtheOgostatusbar.
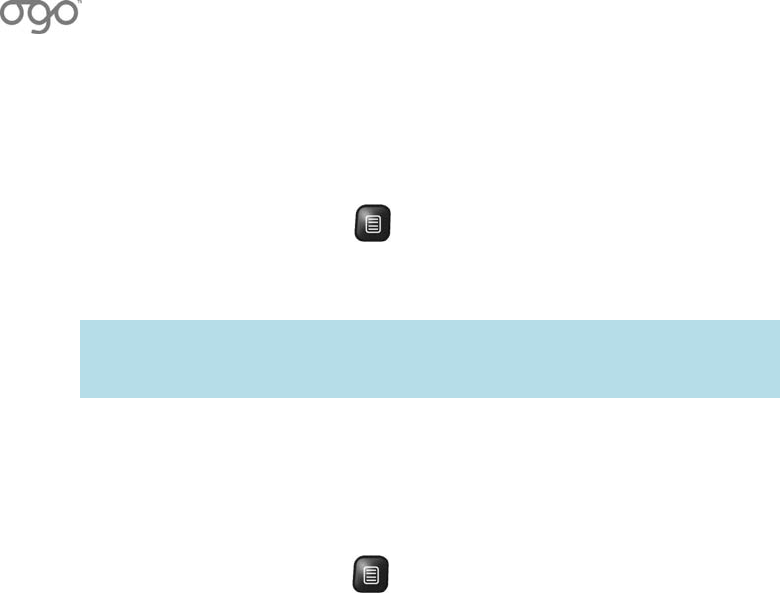
Forexample,Figure4showsasampleofaSettingsscreen,whichincludesmultiple
tabs.
Youcanmovebetweenthetabsbypressingtheouterrightandleftarrowkeyson
the4‐waynavigationkey.The>ontherightendofthetabbarindicatesthatyou
canscrolltotherightorlefttoviewadditionaltabs.
Figure4:SampleSettingsScreen

OGOUserManual
14錯誤!使用[常用]索引標籤將Heading2套用到您想要在此處顯示的文字。
HomeScreen
TheHomescreenisdisplayedaftertheOgoispoweredonandcompletesthestart‐
upprocess.ToreturntotheHomescreen,press.
Figure5:HomeScreen
ThenameoftheselectedapplicationisdisplayedatthebottomoftheHome
screen.
TheOperator'snameandthecurrentdateappearatthetopoftheHomescreen.
WhiletheHomescreenisdisplayed,thefollowingoptionsareavailablefromthe
Optionsmenu:
1 SetWallpaper:EnablesyoutoselectthewallpaperforyourOgo.Fordetails,
seeSettingtheWallpaperfromtheHomeScreen,onpage15.
2 ChangeLayout:Enablesyoutochangethewayiconsaredisplayedonyour
Ogo.Fordetails,seeSettingYourHomeScreenLayout,onpage15.
3 ConfigureFavorites:EnablesyoutosetwhichFavoritesiconsappearonyour
Ogo.Fordetails,seeConfiguringYourFavorites,onpage16.
4 Allapplications:DisplaystheApplicationmenu(錯誤!找不到參照來源。).
錯誤
!
使用
[
常用
]
索引標籤將
Heading1
套用到您想要在此處顯示的文字。
錯誤!使用[常用]索引標籤將Heading2套用到您想要在此處顯示的文字。15
SettingtheWallpaperfromtheHomeScreen
YoucanselectthewallpaperforyourOgofromtheHomescreen.
► TosettheWallpaper:
1 FromtheHomescreen,pressandselectSetWallpaperfromtheOptions
menu.TheWallpaperscreenisdisplayed,showingthewallpaperoptions.
2 SelectthewallpaperofyourchoiceandpressEnter/Select.
Note: YoucanalsoselectanimagefromtheGalleryandsetitasyour
wallpaper.Todoso,selecttheitemSelectfromGalleryandpress
Enter/Select.
SettingYourHomeScreenLayout
► TosetthelayoutofyourHomescreen:
1 FromtheHomescreen,pressandselectChangeLayoutfromtheOptions
menu.
2 Selectoneofthefollowinglayoutoptionsfromthesub‐menuthatisdisplayed:
• Default:Displaysallapplicationiconsinagrid.
• Favorites:DisplaysiconsforyoursevenfavoriteOgoapplicationsinarow
atthebottomofthescreen.Fordetailsonconfiguringyourfavorite
applications,seeConfiguringYourFavorites.
• Wallpaperonly:Displaysyourwallpaperwithoutanyapplicationicons.
YourHomescreenisupdatedtoreflecttheselectedlayoutoption.
OGOUserManual
16錯誤!使用[常用]索引標籤將Heading2套用到您想要在此處顯示的文字。
ConfiguringYourFavorites
YoucandeterminewhichsevenOgoapplicationsiconsaredisplayedinFavorites
layout,andinwhatorder.
► ToconfigureyourFavorites:
1 FromtheHomescreen,pressandselectConfigureFavoritesfromthe
Optionsmenu.TheFavoriteApplicationsscreenisdisplayed.
2 Toreplaceanexistingapplicationiconwithadifferentapplicationicon:
• SelecttheicontobereplacedandpressEnter/Select.Theavailable
applicationsarelistedinapopuplist.
• SelecttheapplicationthatyouwanttoappearinyourFavoriteslayout,and
pressEnter/Select.
3 Repeatforadditionalapplicationiconsuntilyouhavethedesiredsetoficons,
inthedesiredorder.
4 SelectDoneandpressEnter/SelecttoreturntotheHomescreen.
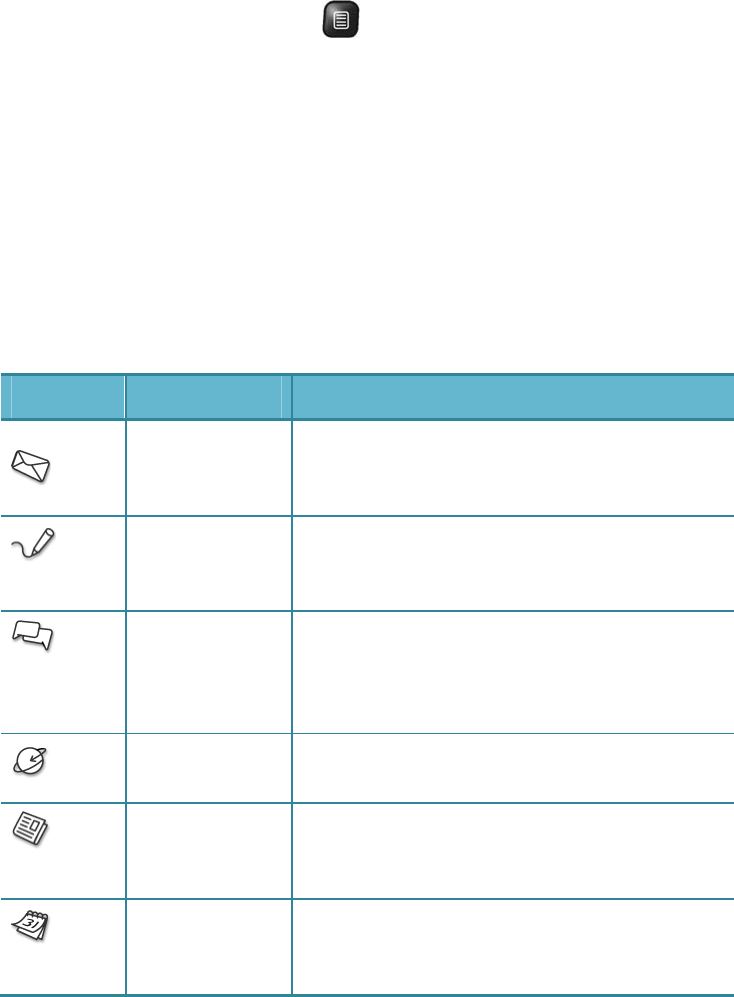
Table5:HomeScreenItems
ItemNameFunction
Messages
Enablesyoutoview,sort,andsende‐mail
andSMSmessages.Fordetails,seeViewing
YourMessageListsonpage40.
ComposeEnablesyoutocomposeandsendanSMS
messageoranEmailMessage.Fordetails,see
ComposingaMessageonpage42.
Instant
Messaging
(IM)
EnablesyoutomanageyourICQand/or
WindowsLiveMessengercontacts,sendand
receivemessages,andmore.Fordetails,see
InstantMessagingonpage19.
Web
Browser
EnablesyoutosurftheInternet.Fordetails,
seeBrowsingtheWebonpage83.
NewsEnablesyoutoviewRSSfeedsandstayon
topofcurrentevents.Fordetails,seeViewing
theNewsonpage79.
CalendarEnablesyoutomanageyourschedule.For
details,seeWorkingwiththeCalendaron
page73.
錯誤
!
使用
[
常用
]
索引標籤將
Heading1
套用到您想要在此處顯示的文字。
錯誤!使用[常用]索引標籤將Heading2套用到您想要在此處顯示的文字。17
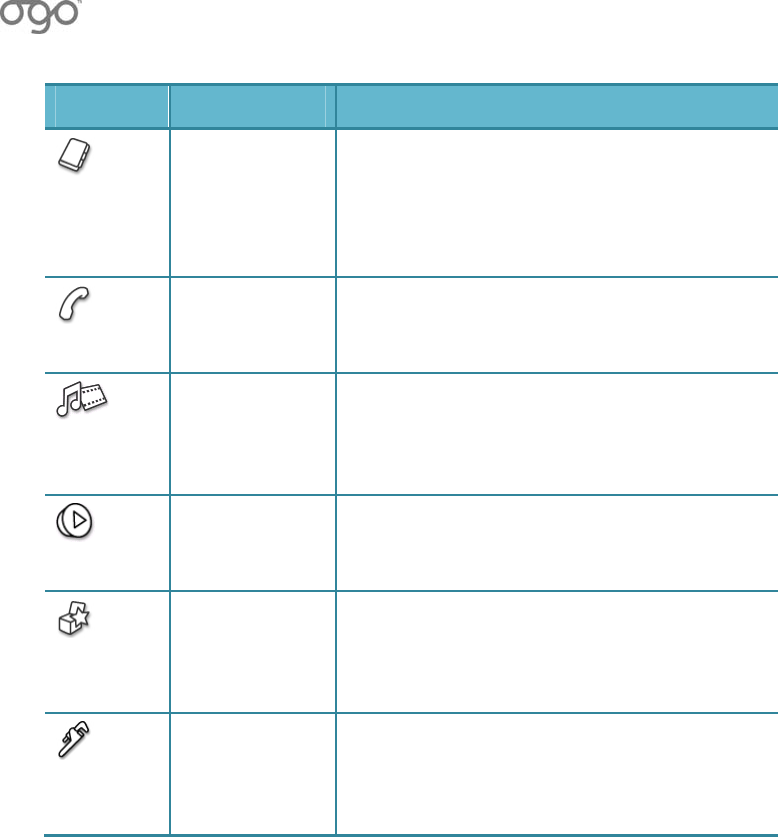
ItemNameFunction
ContactsEnablesyoutostorecontactprofile
informationforpeopletowhomyoucall,or
sende‐mailorSMSmessages(regardlessof
whethertheyuseIM).Fordetails,see
ManagingYourOgoContactListonpage61.
PhoneEnablesyoutomakeandreceivephonecalls.
Fordetails,seeUsingYourOgoasaPhoneon
page51.
GalleryEnablesyoutoviewyourfilesandfolders,
andselecttodisplayimagesorplayaudioand
videofiles.Fordetails,seeNavigatingYour
Galleryonpage88.
PlayerEnablesyoutoplayaudioandvideofiles.For
details,seePlayingMusicandVideowith
Playeronpage98.
ExtrasEnablesyoutoselectfromvariousexternal
applications,andprovidestechnicalsupport
contactdetails.Fordetails,seeOgoExtrason
page103.
SettingsEnablesyoutoconfigureyourphone,IM,
E‐mail,WebBrowser,andotherdevice
settings.Fordetails,seeDeviceand
ApplicationSettingsonpage107.

OGOUserManual
18錯誤!使用[常用]索引標籤將Heading2套用到您想要在此處顯示的文字。
CheckingforUnreadMessagesandOpenChats
WithOgo,youcancheckfornewmessagesofalltypesandopenchatsinoneeasy
step–simplypressonthekeyboardtodisplaytheOgoquick‐accesslist.
YourOgoquick‐accesslistshowsallrecentunreade‐mailandSMSmessages,open
InstantMessagingchatsessions,anddraftsofmessagesnotyetsent.Italsolists
missedcallsthathaveyetbeennotviewed,andshowsthecurrentcall.
Tosynchronizeyouremail,selectSend/ReceiveatthebottomoftheOgoquick‐
accesslist,andpressEnter/Select.

錯誤
!
使用
[
常用
]
索引標籤將
Heading1
套用到您想要在此處顯示的文字。
錯誤!使用[常用]索引標籤將Heading2套用到您想要在此處顯示的文字。19
InstantMessaging
YoucanuseyourOgotochatwithfriendsandcolleaguesusingtheWindowsLive
Messengerand/orICQinstantmessagingcommunities.
Note: TheavailabilityofInstantMessagingcommunitiesonyourOgodependson
thepackageofferedbyyourwirelesscarrier/operator.
InstantMessagingisalsoreferredtoasIM,forshort.
SettingupYourIMAccounts
IMaccountscanbesetupineitherofthefollowingways:
UsingtheSetupWizardthatisdisplayedthefirsttimeyouuseyourOgo
FromtheIMtaboftheSettingsscreen
YouneedtohaveyourIMaccountdetails(usernameandpassword)readyinorder
tosetupanIMaccountonyourOgo.
Note: IfyouareusingyourOgoforthefirsttime,theSetupWizardisdisplayed
immediatelyafteryouselectthelanguage.
► ToaddanIMaccountfromtheSettingsscreen:
1 IntheHomescreen,selectSettingsandpressEnter/Select.TheSettings
screenisdisplayed.
2 SelecttheIMtab.
Note:IfyouhavealreadyconfiguredanIMaccount,theusernameis
indicatedandtheEditbuttonisenabled.
3 SelectAddintherowforthetypeofIMaccountthatyouwanttoaddand
pressEnter/Select.
Note: Youcanuseonlyoneaccountforaprovideratanygiventime.Ifan
accounthasalreadybeensetupforanIMProvider,theEditbuttonis
displayed,enablingyoutochangeorremovetheaccountyouhavejust
configured.
4 Followtheon‐screeninstructionsfortheselectedIMProvider,asdescribedin
SettingupYourWindowsLiveMessengerAccountandSettingupYourICQ
Account,respectively.

OGOUserManual
20錯誤!使用[常用]索引標籤將Heading2套用到您想要在此處顯示的文字。
SettingupYourWindowsLiveMessengerAccount
Youneedtohavethee‐mailaddressandpasswordofyourexistingWindowsLive
MessengeraccountinordertosetupthisaccountonyourOgo.
► TosetupaWindowsLiveMessengeraccount:
1 IfyouselectWindowsLiveMessengerastheIMProviderintheSetupWizard
orintheIMtaboftheSettingsscreen,theWindowsLiveTermsofUseare
displayed.
2 Beforeyouconfiguretheaccount,youmustacceptthetermsofuse.Readthe
termsofuse.ThenselectAccepttoindicateyouragreementandpress
Enter/Select.Ifyoudonotagreetotheterms,selectDeclineandpress
Enter/Select.TheWindowsLiveMessengerSetupscreenisdisplayed.
3 IntheE‐mailAddressfield,inserttheE‐mailAddressassociatedwiththe
WindowsLiveMessengeraccountyouwanttoadd.Ifyouareusinga
hotmail.com,msn.comorlive.come‐mailaddress,youdonotneedtoinclude
thedomainname.
4 Ifyouwanttochangethedomainnamecurrentlydisplayed,selectthe
requireddomain(@hotmail.com;@msn.com;@live.comorOther)andpress
Enter/Select.
5 InthePasswordfield,insertyourpassword.
Note: Thelettersaredisplayedoneatatimeasyouinsertthem;upon
insertingthenextletterthepreviouslyenteredoneismaskedwithan
asterisk.
6 SelectRemembermypasswordcheckboxifyouwantyourpasswordtobe
storedonyourOgo.Asecuritytipwillbedisplayed.Ifyouprefernottohave
thepasswordstoredonyourOgo,youwillbeaskedtoinsertiteachtimeyou
sign‐in.
Note: IfyouselectYes,asecuritywarningisdisplayedadvisingyoutogoto
the.NETpasswordwebsiteandchangeyourpasswordintheeventthat
yourOgoislostorstolen.PressEnter/Selecttocontinue.
7 ToautomaticallysigninwheneveryourOgoisturnedon,selectSigninwhen
poweredonandpressEnter/Select.
Note: ThisoptionispartoftheIMSettings,andcanalsobemodifiedlater
8 SelectOKandpressEnter/Select.
TheIMaccountsetupprocessiscomplete.
IfyouaddtheaccountfromtheSettingsscreen,theIMtabofSettingsis
displayed.TheEditbuttonisdisplayedintherowfortheIMprovider.

錯誤
!
使用
[
常用
]
索引標籤將
Heading1
套用到您想要在此處顯示的文字。
錯誤!使用[常用]索引標籤將Heading2套用到您想要在此處顯示的文字。21
IfyouaddtheaccountthefirsttimeyouuseyourOgo,youshouldselectNext
tosetupyoure‐mailaccount(s).Fordetails,seeSettingUpYourE‐Mail
Accountsonpage33.
SettingupYourICQAccount
YouneedtohavetheICQ#andpasswordofyourexistingICQaccountinorderto
setupyourICQaccountonyourOgo.
► TosetupyourICQaccount:
1 SelectICQastheIMProviderintheSetupWizardorintheIMtabofthe
Settingsscreen,theICQSetupscreenisdisplayed.
2 IntheICQ#field,insertyourICQnumber.
3 InthePasswordfield,insertyourpassword.
Note: Thelettersaredisplayedoneatatimeasyouinsertthem;upon
insertingthenextletterthepreviouslyenteredoneismaskedwithan
asterisk.
Whenyouattempttomovetothenextfield,youarepromptedtoconfirmthat
youwanttostoreyourpasswordonyourOgo.
4 SelectYestosavethepasswordonyourOgoorselectNoifyouprefertoenter
thepasswordeachtimeyousignin.Then,pressEnter/Select.
5 ToautomaticallysigninwheneveryourOgoisturnedon,selectConnectwhen
poweredonandpressEnter/Select.
6 SelectOKandpressEnter/Select.
TheIMaccountsetupprocessiscomplete.
IfyouaddtheaccountfromtheSettingsscreen,theIMtabofSettingsis
displayed.TheEditbuttonisdisplayedintherowfortheIMprovider.
IfyouaddtheaccountthefirsttimeyouuseyourOgo,youshouldselectNext
tosetupyoure‐mailaccount(s).Fordetails,seeSettingUpYourE‐Mail
Accountsonpage33.
EditingYourIMAccountSettings
Youcanview/editthedetailsofanexistingIMaccount,includingyourdefault
presencesettingandtheAutomaticallysign‐in/Connectwhenpoweredonoption.
► ToedityourIMaccountsettings:
1 IntheIMtaboftheSettingsscreen,selectEditintherowfortheexistingIM
accountandpressEnter/SelecttodisplaytheAccountSettingsscreen.The
currentsettingsfortheselectedIMaccountarelisted.
2 Afterreviewingormodifyingthesettings,selectOKandpressEnter/Select.
OGOUserManual
22錯誤!使用[常用]索引標籤將Heading2套用到您想要在此處顯示的文字。
RemovingYourIMAccount
IfyounolongerwanttouseaspecificIMaccountonyourOgo,youcanremovethe
IMaccountsettingsfromyourOgo.
► ToremoveyourIMaccount:
1 IntheIMtaboftheSettingsscreen,selectEditintherowfortheexistingIM
accountandpressEnter/SelecttodisplaytheAccountSettingsscreen.The
currentsettingsfortheselectedIMaccountarelisted.
2 SelectRemoveandpressEnter/Select.Youarepromptedtoconfirmthatyou
wanttoremovetheIMaccount.
3 SelectYesandpressEnter/Select.TheIMaccountisremovedfromyourOgo.
錯誤
!
使用
[
常用
]
索引標籤將
Heading1
套用到您想要在此處顯示的文字。
錯誤!使用[常用]索引標籤將Heading2套用到您想要在此處顯示的文字。23
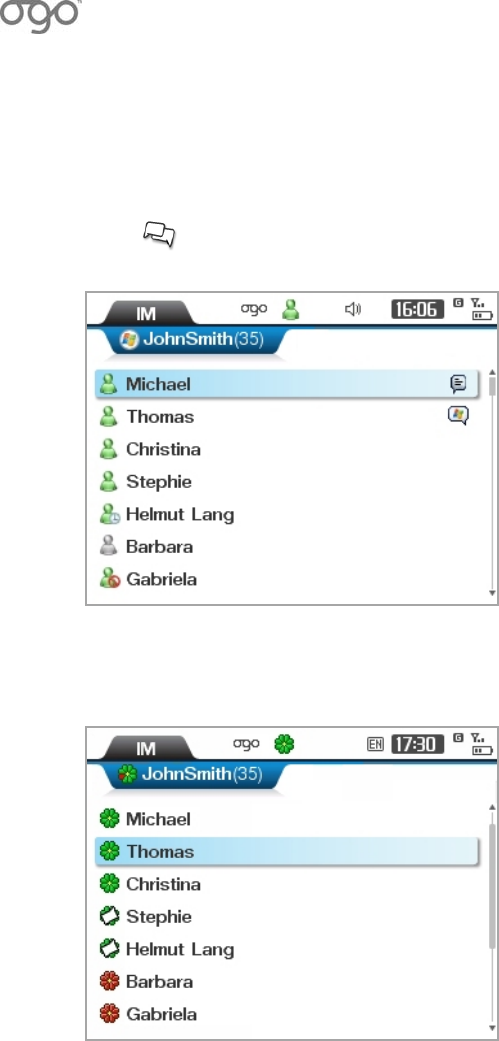
WorkingwithInstantMessaging
► ToaccessInstantMessaging:
1 Select IntheHomescreenandpressEnter/Select.TheIMapplication's
contactlistscreenisdisplayed.
Figure6:IMContactList(WindowsLiveMessenger)
Figure7:IMContactList(ICQ)
AtabisdisplayedforeachoftheconfiguredIMcommunities(ICQand/or
WindowsLiveMessengerappearinseparatetabs).
YourIMstatusfortheconfiguredIMcommunitiesisdisplayedinthestatusbar.

OGOUserManual
24錯誤!使用[常用]索引標籤將Heading2套用到您想要在此處顯示的文字。
2 SelectthetabfortheIMcommunitythatyouwanttoworkwith.Whenatabis
selected,thedisplaynameappearsonthetab,andthecontactlistdisplays
yourexistingcontacts.
Note: Ifnocontactshavebeendefined,amessageisdisplayedindicatingthat
theIMcontactlistisempty.Toaddauser,pressEnter/Select.For
details,seeAddinganIMContactonpage29.
Statusiconsareusedtoindicatethemessagingstatusofyourcontacts.The
iconsvaryaccordingtotheselectedcommunity.
SigningIn
IfyouhavenotconfiguredyourOgotoautomaticallysignyouinwheneveritis
turnedon,youcanmanuallysigninwhenitsuitsyou.Oryoucansigninagain,if
youhavesignedoutforanyreason.
► TosignintotheIM:
1 NavigatetotheInstantMessagingapplicationandselectthetabfortheIM
community(ICQorWindowsLiveMessenger).Youarepromptedtosignin.
2 PressEnter/Select.TheSignInscreenisdisplayed,listingyourdefaultsignin
details.
3 Tosigninusingthespecifieddetails,selectOKandpressEnter/Select.Youare
signedintotheIMcommunity.
Note: Tosigninasadifferentuser,inserttherequireddetailsbeforeselecting
OKandpressingEnter/Select.
SigningOut
► Tosignout:
IntheIMcontactlistscreen,press,selectSignOut/Disconnectfromthe
Optionsmenu,andpressEnter/Select.YouaredisconnectedfromtheIM
community.
Note: Alternatively,youcanselectSignOut/DisconnectfromtheOptions
menuinaChatscreen.
錯誤
!
使用
[
常用
]
索引標籤將
Heading1
套用到您想要在此處顯示的文字。
錯誤!使用[常用]索引標籤將Heading2套用到您想要在此處顯示的文字。25
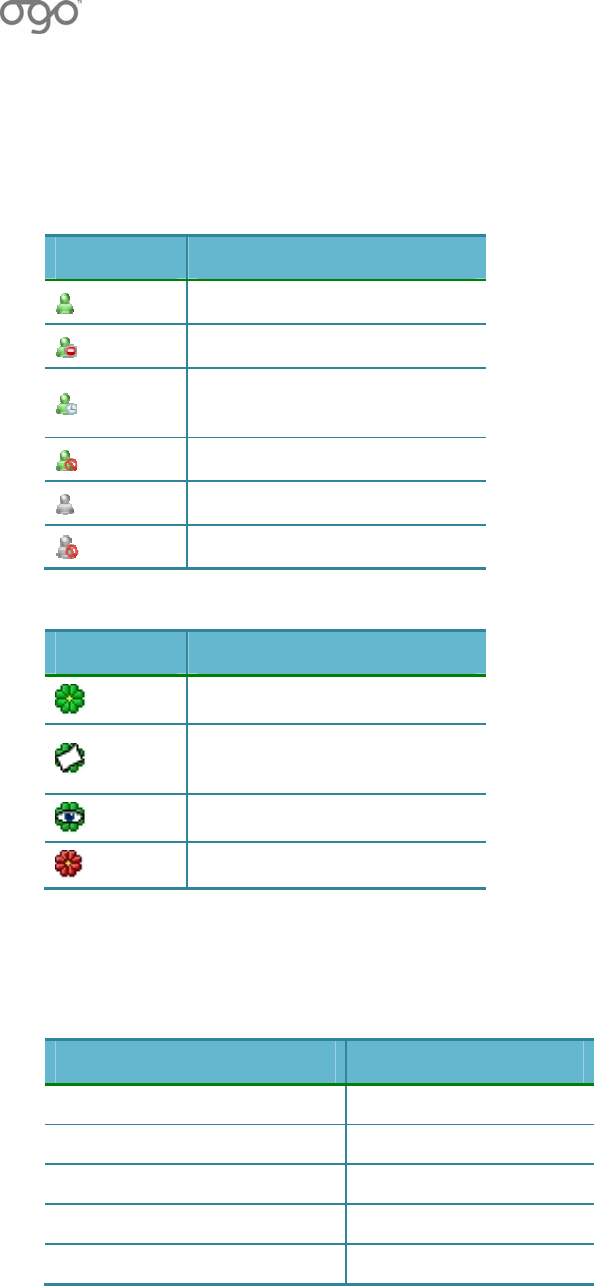
IMStatusIcons
StatusiconsindicatethestatusofotherIMusers.Thespecificiconsvaryaccording
totheIMcommunityinuse(WindowsLiveMessengerorICQ).
Table6:WindowsLiveMessengerStatusIcons
IconStatus
Online
Busy/OnthePhone
Away/OuttoLunch/BeRight
Back
OnlineBlocked
Offline
OfflineBlocked
Table7:ICQStatusIcons
IconStatus
Online
Away/Occupied/DND/Not
Available
Invisible
Offline
WhileviewingtheIMcontactlistscreen,thefollowingoptionsareavailablefrom
theOptionsmenu:
Table8:IMOptions(IMContactListScreen)
WindowsLiveMessengerICQ
ContactUser
AddaContactAddaUser
MyProfileMyProfile
MyStatusMyStatus
SignOutDisconnect
OGOUserManual
26錯誤!使用[常用]索引標籤將Heading2套用到您想要在此處顯示的文字。
WhilechattingwithanIMcontact,thefollowingoptionsareavailablefromthe
Optionsmenu:
Table9:IMOptions(ChatScreen)
WindowsLiveMessengerICQ
QuickTextQuickText
ContactUser
AddressClipboardAddressClipboard
MyProfileMyProfile
MyStatusMyStatus
CloseChat CloseChat
ChangingYourStatus
Youcandefinethewayinwhichyourstatusisdisplayedtoothersintheircontact
lists.
► Tochangeyourstatus:
1 AccesstheIMapplicationandselectthetabfortheIMcommunity(Windows
LiveMessengerorICQ).
2 Press andselectMyStatusfromtheOptionsmenu.Alistofavailable
statusesisdisplayed.
Note: Alternatively,youcanselectMyStatusfromtheOptionsmenuina
Chatscreen.
3 SelectthestatusthatyouwanttobedisplayedandpressEnter/Select.Your
statusisupdatedaccordingly,andisreflectedonthecorrespondingiconinthe
statusbar.
► TochangethedefaultIMstatusdisplayedwhenyourOgosigns‐in:
1 IntheHomescreen,selectSettingsandpressEnter/Select.TheSettings
screenisdisplayed.
2 SelecttheIMtab.
3 Scrolldowntoselectyourcommunity(WindowsLiveMessengerorICQ)and
pressEnter/Select.TheIMcommunitysettingsscreenisdisplayed.
4 SelectDefaultpresenceandpressEnter/Select.Selectthestatustobe
displayedtoyourcontactsafteryousign‐infromthelist.
5 SelectSaveorSignInandpressEnter/Select.Thechangeissaved.
錯誤
!
使用
[
常用
]
索引標籤將
Heading1
套用到您想要在此處顯示的文字。
錯誤!使用[常用]索引標籤將Heading2套用到您想要在此處顯示的文字。27
SendinganInstantMessage
AssoonasyouhavesetupyourIMaccount(s)ontheOgo,youcanexchange
messageswithyourcontacts.
► Tosendaninstantmessage:
1 AccesstheIMapplicationandselectthetabfortheIMcommunity(Windows
LiveMessengerorICQ).
2 Selectthecontacttowhomyouwanttosendamessage,andpress
Enter/Select.TheChatscreenisdisplayed.
3 InsertyourmessagetextandpressEnter/Select.Yourmessageissenttothe
selectedcontact,andisdisplayedinthetophalfofthescreen.
Note: YoucanuseQuickTexttoquicklyinsertpredefinedorcustomizedtexts.
Fordetails,seeWorkingwithQuickTextonpage9.
AddingEmoticonstoYourInstantMessages
Youcanuseavarietyofemoticonstopersonalizeyourchatmessages.
► Toaddanemoticontoaninstantmessage:
PresstheEmoticonkey onthekeyboard.Anemoticonpaletteisdisplayed.
Scrollthroughthepalettetoselectthedesiredemoticonandpress
Enter/Select.TheASCIIcodeoftheemoticonisaddedtoyourmessagetext,
thegraphicemoticonappearsinthetophalfofthescreenafteryoupress
Enter/Select.
Notes:Whenanemoticonisselectedforafewseconds,aTooltipappearswith
theASCIIequivalentoftheicon(e.g. is“:‐)”).YoucaninserttheASCII
stringtoincludetheemoticoninyourmessage.
TheavailableemoticonsvaryaccordingtotheIMprovider.
OGOUserManual
28錯誤!使用[常用]索引標籤將Heading2套用到您想要在此處顯示的文字。
ReceivinganInstantMessage
WhenaninstantmessagearrivesonyourOgoandtheChatscreenisnotopen,a
bannermessageappearsbrieflyatthetopofthescreen.
Ifanalerticonhasbeenassignedtothecontacttomakeiteasyforyoutoidentify
whenthecontactsendsyouamessage,thealerticonanimationisplayed,along
withitsuniquesound.Fordetails,seeAssigninganAlerticontoanIMContacton
page30.
Duringanongoingchat,anincomingmessagefromthesamecontactis
automaticallyaddedtothedialoginthetophalfofthescreen.
► Toviewaninstantmessage:
1 Inanyscreen,press todisplaytheogoquick‐accesslist.Chatswithnew
messagesappearatthetopofthelist,withanimatedindicationsnexttothem.
2 SelectthecontactnameandpressEnter/SelecttodisplaytheChatscreen.
Note: Ifyoureceiveamessagefromcontactsthatarenotinyourcontactlist
(butwerepreviouslyaccepted),usetheogoquick‐accesslisttoviewthe
message.
► ToviewaninstantmessagefromtheIMcontactlistscreen:
1 WhenyouopentheIMcontactlistscreen,a“chatballoon”animationappears
nexttoanycontactfromwhomyouhaveunreadmessages.
2 SelectthecontactandpressEnter/Select.TheChatscreenisdisplayed,with
thesender’smessageinthetophalfofthescreen.
ClosinganIMChatSession
YoucancloseanopenIMchatsessionineitherofthefollowingways:
IntheChatscreenfortheopensession,press andselectCloseChatfrom
theOptionsmenu.
IntheOgoquick‐accesslist,selecttheIMchatsessionandpressonthe
keyboard.
FromIMContactlistscreen,pressinanopenchat.

錯誤
!
使用
[
常用
]
索引標籤將
Heading1
套用到您想要在此處顯示的文字。
錯誤!使用[常用]索引標籤將Heading2套用到您想要在此處顯示的文字。29
ManagingYourIMContacts
Youcanadd,deleteandblockspecificcontactsinyourcontactlistfromyourOgo.
Inaddition,youcanassignAlerticonstospecificcontactssothatananimatedalert
popsupwhenevertheysendyoumessagesorbecomeonline.
Note: ChangesmadefromtheOgoaffecttheIMcontactlistasiftheyweremade
fromaPC,exceptforAlerticons,whichareusedonlyonyourOgo.
AddinganIMContact
It’seasytoaddnewcontactstoyourIMcontactlist(s)fromyourOgo.
► ToaddanIMcontact(WindowsLiveMessenger):
1 IntheIMcontactlistscreen,press andselectAddaContactfromthe
Optionsmenu.TheAddaContactscreenisdisplayed.
2 Inserttheuser’se‐mailaddress.
3 SelectAddaContactandpressEnter/Select.Thecontactisaddedtoyour
contactlist.
► ToaddanIMUser(ICQ):
1 IntheIMcontactlistscreen,press andselectAddaUserfromtheOptions
menu.TheAddaUserscreenisdisplayed.
2 Inserttheuser’sICQ#.
3 SelectAddaUserandpressEnter/Select.Theuserisaddedtoyourcontactlist.
Note: IfyoureceiveamessagefromacontactthatisnotonyourIMcontactlist
yet,usetheogoquickaccesslisttoviewit,andthenyoucanselectthe
AddtoContactListoptionfromtheChatscreentoaddthiscontactto
yourcontactlist.
OGOUserManual
30錯誤!使用[常用]索引標籤將Heading2套用到您想要在此處顯示的文字。
ViewingContactDetails
YoucanviewthecontactdetailsofyourIMcontacts.
Note: DifferentIMcommunitiesuseslightlydifferentterms("Contact"in
WindowsLiveMessengerand"User"inICQ).Allrelevanttermsare
specified,asapplicable.
► Toviewcontactinformation:
1 IntheIMcontactlistscreen,selectthecontact.
2 Press andselectContact/Buddy/UserDetailsandpressEnter/Select.
ThenselectContactInfofromthesub‐menutodisplaytheContactInfo/User's
Detailsscreen.ThespecificdetailsdisplayeddependontheselectedIM
community.
AssigninganAlerticontoanIMContact
Ogo’sanimatedAlerticonsmakeiteasyforyoutoidentifywhensomeone
importanttoyouhassentyouamessage.SimplyassignanAlerticontoacontact
andananimationwillappearinthebannermessagewheneverthatcontactsends
youamessageorbecomesonline.Theanimationisaccompaniedbyaunique
sound,enablingyoutoidentifythecontactevenwhentheOgo’sscreenisoff.
Note: Fordetailsonhowtoenablebannermessages,seeConfiguringtheDevice
Settingsonpage114.
► Toassignanalerticon:
1 AccesstheIMapplicationandselectthetabfortheIMcommunity(ICQor
WindowsLiveMessenger).
2 Selectthecontact.
3 Press andselectContact>ContactInfofromtheOptionsmenu.The
ContactInfo/User'sDetailsscreenisdisplayed.
4 ScrolldowntoselectAlerticonandpressEnter/Select.TheAssignAlerticon
screenisdisplayed.
5 SelectthedesiredAlerticon.
Note: WhenanAlerticonisselected,theanimationisplayed.Youcanscroll
throughandviewthevariousanimationsbeforemakingyourselection.
6 PressEnter/Select.
錯誤
!
使用
[
常用
]
索引標籤將
Heading1
套用到您想要在此處顯示的文字。
錯誤!使用[常用]索引標籤將Heading2套用到您想要在此處顯示的文字。31
7 SelectOKandpressEnter/Select.TheselectedAlerticonisassignedtothe
contact,andappearsnexttothecontactinthecontactlist.TheAlerticon's
animationwillappeareachtimeabannerindicatesthatamessageisreceived
fromthecontact,orthatthecontact’sstatushaschangedtoonline.
Blocking/UnblockinganIMContact
► ToblockanIMcontact(WindowsLiveMessenger):
1 IntheIMcontactlistscreen,selectthecontacttobeblocked.
2 Press andselectContact>BlockContactfromtheOptionsmenu.
Note: Alternatively,youcanselectBlockContactfromtheOptionsmenuin
theChatscreen.
TheBlockUserscreenisdisplayed,promptingyoutoconfirmthatyouwantto
blockthecontact.
3 SelectYesandpressEnter/Select.Thecontact’sstatusisupdatedintheIM
contactlist;thecontactisblockedandisunabletosendyouinstantmessages.
► TounblockanIMcontact(WindowsLiveMessenger):
1 IntheIMcontactlistscreen,selecttheblockedcontact.
2 Press andselectContact>UnblockContactfromtheOptionsmenu.The
UnblockUserscreenisdisplayed,promptingyoutoconfirmthatyouwantto
unblockthecontact.
3 SelectYesandpressEnter/Select.Thecontact’sstatusisupdatedintheIM
Contactlist;thecontactisunblockedandcanseeyourpresenceandsendyou
messages.
► ToblockanIMUser(ICQ):
1 IntheIMcontactlistscreen,selectthecontacttobeblocked.
2 Press andselectUser>BlockUserfromtheOptionsmenu.
Note: Alternatively,youcanselectUser>BlockUserfromtheOptionsmenu
intheChatscreen.
TheBlockUserscreenisdisplayed,promptingyoutoconfirmthatyouwantto
blockthecontact.
3 SelectYesandpressEnter/Select.TheuserisremovedfromtheIMcontactlist;
theuserisblockedandisunabletosendyouinstantmessages.
Note: AnICQusercannotbeunblockedwhenusingamobiledevice.Youcan,
however,unblocktheuserfromyourPC'sICQclient.

OGOUserManual
32錯誤!使用[常用]索引標籤將Heading2套用到您想要在此處顯示的文字。
DeletinganIMContact
YoucanremovecontactsfromyourIMcontactlist.
► TodeleteanIMcontact:
1 IntheIMcontactlistscreen,selectthecontacttobedeleted.
2 Press andselectDeleteContact/Buddy/UserfromtheOptionsmenu.The
DeleteUserscreenisdisplayed,promptingyoutoconfirmthatyouwantto
deletethecontact.
3 Ifyouwanttoblockthecontact,andnotonlydeleteit,selecttheAlsoblock
thiscontactcheckbox.
Note: Deletingacontactdoesnotblockit.Youcanstillreceivemessagesfrom
thiscontact,unlessyouchoosetoblockthecontactaswell.
4 SelectDeleteandpressEnter/Select.ThecontactisdeletedfromyourIM
contactlist.

錯誤
!
使用
[
常用
]
索引標籤將
Heading1
套用到您想要在此處顯示的文字。
錯誤!使用[常用]索引標籤將Heading2套用到您想要在此處顯示的文字。33
Messages(EMailandSMS)
Ogoletsyoumanagemessagesfromvariouse‐mailaccountseasilyandefficiently,
whetheryou'resittinginarestaurant,ridingthebus,orrelaxingonthebeach.
Ogo'sPUSHe‐mailfeaturemeansyougete‐mailassoonasithitsyourinbox,so
there'snoneedtowait.
SettingUpYourEMailAccounts
YourOgosupportstheabilitytosend/receivee‐mailfromuptofiveexistinge‐mail
account(s).
Dependingonyourwirelesscarrier/operator,youmaybeabletosetupmultiplee‐
mailaccountsfordifferente‐mailproviders(forexample,Hotmail,Yahoo,or
Gmail).
E‐mailaccountscanbesetupineitherofthefollowingways:
UsingtheSetupWizardthatisdisplayedthefirsttimeyouuseyourOgo
FromtheE‐mailtaboftheSettingsscreen
Youneedtohaveyoure‐mailaccountdetails(e‐mailaddressandpassword)ready
inordertosetupane‐mailaccountonyourOgo.Forcustomemailaccounts,you
maybeaskedtoprovideyourusernameandserverdetailsaswell.
► TosetupanE‐mailaccountfromtheSettingsscreen:
1 IntheHomescreen,selectSettingsandpressEnter/Select.TheSettings
screenisdisplayed.
2 SelecttheE‐mailtab.
3 IntheAddE‐mailAccountrow,selectAddandpressEnter/Select.TheAddE‐
mailAccountscreenisdisplayed.
4 SelectAddintherowforthetypeofemailaccountthatyouwanttoadd
(Hotmail,G‐mail,orOtherE‐mailaccount)andpressEnter/Select.
Note: Ifanaccounthasalreadybeensetup,theEditbuttonisdisplayed.To
addanotheraccountforthesameprovider(exceptforHotmail),you
needtoselecttheOtherE‐mailaccountoption.
5 Selectthee‐mailprovider(Hotmail,Gmail,Yahoo,orOthere‐mailaccount)and
pressEnter/Select.TheE‐mailSetupscreenisdisplayed.

OGOUserManual
34錯誤!使用[常用]索引標籤將Heading2套用到您想要在此處顯示的文字。
6 Followtheon‐screeninstructionsfortheselectede‐mailprovider,asdescribed
inSettingUpYourHotmailAccount,SettingUpYourYahooE‐mailAccount,
SettingUpYourGmailAccount,andSettingUpYour“Other”EmailAccount,
respectively.
Note: YoucanexittheAddE‐mailAccountscreenwithoutcompletingthe
processbyselectingCancelandpressingEnter/Select.However,any
informationenteredislostwhenthewizardiscancelled.
SettingUpYourHotmailAccount
IfyouhaveaHotmaile‐mailaccount,youcanconfigureyourOgotosendand
receivee‐mailforthoseaccounts(subjecttotheservicesprovidedbyyourwireless
operator).
► TosetupyourHotmaile‐mailaccount:
1 SelectAddintherowfortheHotmailintheAddE‐mailAccountscreenor
SetupWizard.
2 IfyouhavenotsetupaHotmail/WindowsLiveMessengerAccount,the
WindowsLiveTermsofUsearedisplayed.
3 Beforeyouconfiguretheaccount,youmustacceptthetermsofuse.Readthe
termsofuse.ThenselectAccepttoindicateyouragreementandpress
Enter/Select.ThenselectNextandpressEnter/Select.TheHotmailSetup
screenisdisplayed.
Note: IfyouhavesetupaHotmail/WindowsLiveMessengerAccountorIM
account,thentheHotmailSetupscreenisdisplayedimmediately.(You
donotneedtoacceptthetermsofuseagain.)
4 IntheE‐mailAddressfield,insertthee‐mailaddressofyourexistingemail
account.Youdonotneedtoinsertthedomainname.
Note: IfyouhavealreadyconfiguredWindowsLiveMessengerorAOL,your
respectiveconfigureduserdetailsaredisplayedbydefault.
5 Ifyouwanttochangethedomainnamecurrentlydisplayed,selectthe
requireddomain(@hotmail.com;@msn.com;orOther)andpressEnter/Select.
6 PressEnter/Select.
7 InthePasswordfield,insertyourpassword.
Note: Thelettersaredisplayedoneatatimeasyouinsertthem;upon
insertingthenextletterthepreviouslyenteredoneismaskedbyan
asterisk.
Whenyouattempttomovetothenextfield,youarepromptedtoconfirmthat
youwanttostoreyourpasswordonyourOgo.

錯誤
!
使用
[
常用
]
索引標籤將
Heading1
套用到您想要在此處顯示的文字。
錯誤!使用[常用]索引標籤將Heading2套用到您想要在此處顯示的文字。35
8 SelectYestosavethepasswordonyourOgoorselectNoifyouprefertoenter
thepasswordeachtimeyousignin.Then,pressEnter/Select.
Note: IfyouselectYes,asecuritywarningisdisplayedadvisingyoutogoto
changeyourpasswordintheeventthatyourOgoislostorstolen.Press
Enter/Selecttocontinue.
9 SelectOKandpressEnter/Select.
Ifyouaddthee‐mailaccountfromtheSettingsscreen,thewizardcompletes
andtheE‐MailtabofSettingsisdisplayed.TheEditbuttonisdisplayedinthe
rowforthee‐mailproviderandatabisaddedforthee‐mailaccountin
Messagesscreen.
Ifyouaddthee‐mailaccountthefirsttimeyouuseyourOgo,youmaysetup
additionale‐mailaccount(s)orselectFinishtoclosetheSetupWizard.
SettingUpYourYahooEmailAccount
IfyouhaveaYahooe‐mailaccount,youcanconfigureyourOgotosendand
receivee‐mailforthataccounts(subjecttotheservicesprovidedbyyourwireless
operator).
► TosetupyourYahooe‐mailaccount:
1 SelectAddintherowforYahoointheAddE‐mailAccountscreenorSetup
Wizard.TheYahooSetupscreenisdisplayed.
2 IntheE‐mailAddressfield,insertthee‐mailaddressofyourexistingemail
account.Youdonotneedtoinsertthedomainname.
3 PressEnter/Select.
4 InthePasswordfield,insertyourpassword.
Note: Thelettersaredisplayedoneatatimeasyouinsertthem;upon
insertingthenextletterthepreviouslyenteredoneismaskedbyan
asterisk.
Whenyouattempttomovetothenextfield,youarepromptedtoconfirmthat
youwanttostoreyourpasswordonyourOgo.
5 SelectYestosavethepasswordonyourOgoorselectNoifyouprefertoenter
thepasswordeachtimeyousignin.ThenpressEnter/Select.
6 SelectOKandpressEnter/Select.
Ifyouaddthee‐mailaccountfromtheSettingsscreen,theE‐Mailtabof
Settingsisredisplayed.TheEditbuttonisdisplayedintherowforthee‐mail
providerandatabisaddedforthee‐mailaccountinMessagesscreen.
Ifyouaddthee‐mailaccountthefirsttimeyouuseyourOgo,youare
promptedtosetupadditionale‐mailaccount(s)orselectFinishtoclosethe
SetupWizard.

OGOUserManual
36錯誤!使用[常用]索引標籤將Heading2套用到您想要在此處顯示的文字。
SettingUpYourGmailAccount
IfyouhaveaGmailorothere‐mailaccount(s),youcanconfigureyourOgotosend
andreceiveemailforthoseaccounts(subjecttotheconditionsimposedbyyour
wirelessoperator).
IfyouaresettingupaGmailaccount,youwillneedtoenableyouraccount’sPOP
Downloadoption(inGmail'swebsite)inordertoaccessGmailfromyourOgo.To
doso,logintoyourGmailaccountfromaPC,navigatetotheAccountSettings>
ForwardingandPOPsection,andthenselectEnable.
► TosetupyourGmaile‐mailaccount:
1 SelectAddintherowforGmailintheAddE‐mailAccountscreenorSetup
Wizard.Youarepromptedtoenteryourlogininformation.
2 IntheE‐mailaddressfield,insertyoure‐mailaddress.
3 InthePasswordfield,insertyourpassword.
Note: Thelettersaredisplayedoneatatimeasyouinsertthem;upon
insertingthenextletterthepreviouslyenteredoneismaskedbyan
asterisk.
4 IntheDisplaynamefield,enterthenametoappearintheFromfieldof
messagesthatyousendfromthise‐mailaccount.
5 SelectOKandpressEnter/Select.
6 Apopupmessagesadvisesyouthatwillneedtoenableyouraccount’sPOP
Downloadoption(inGmail'swebsite)inordertoaccessGmailfromyourOgo.
Todoso,selectEnableIMAPinyourGmailAccountSettings(intheForwarding
andPOPsection).
7 SelectOKandpressEnter/Select.
Ifyouaddthee‐mailaccountfromtheSettingsscreen,thewizardcompletes
andtheE‐MailtabofSettingsisdisplayed.TheEditbuttonisdisplayedinthe
rowforthee‐mailproviderandatabisaddedforthee‐mailaccountin
Messagesscreen.
Ifyouaddthee‐mailaccountthefirsttimeyouuseyourOgo,youmaysetup
additionale‐mailaccount(s)orselectFinishtoclosetheSetupWizard.

錯誤
!
使用
[
常用
]
索引標籤將
Heading1
套用到您想要在此處顯示的文字。
錯誤!使用[常用]索引標籤將Heading2套用到您想要在此處顯示的文字。37
SettingUpYour“Other”EmailAccount
Ifyouhaveothere‐mailaccount(s),youcanconfigureyourOgotosendand
receiveemailforthoseaccounts(subjecttotheconditionsimposedbyyour
wirelessoperator).
IfyouaresettingupanaccountthatdoesnotappearintheOgo’slistofpredefined
e‐mailaccounts,youwillneedtohavethecompleteaccountinformationready,
includingtheusername,E‐mailprotocol,incomingserverandoutgoingserver.
► Tosetupyour“other”e‐mailaccount:
1 SelectOthere‐mailaccountasthee‐mailproviderintheAddE‐mailAccount
screenorSetupWizard.Youarepromptedtoenteryourlogininformation.
2 IntheE‐mailaddressfield,insertyoure‐mailaddress.(Besuretoincludethe
domainname.)
3 InthePasswordfield,insertyourpassword.
Note: Thelettersaredisplayedoneatatimeasyouinsertthem;upon
insertingthenextletterthepreviouslyenteredoneismaskedbyan
asterisk.
4 InthePasswordfield,enteryourusername.
5 IntheDisplaynamefield(optional),enterthenameyouwanttobedisplayed
toyourIMcontacts.
6 SelectOKandpressEnter/Select.Youarepromptedtoenterthefollowinge‐
mailaccountconfigurationinformation:
7 IntheE‐mailprotocollist,selecttheappropriatee‐mailprotocol(POP3or
IMAP4).
8 IntheIncomingserverfield,enterthenameoftheincomingmailserver.
9 IntheOutgoingserverfield,enterthenameoftheoutgoingmailserver.
Note: Ifyoudonothaveyourincomingandoutgoingserveraddresses,please
contactyourE‐mailprovider.
10 SelectOKandpressEnter/Select.
Ifyouaddthee‐mailaccountfromtheSettingsscreen,thewizardcompletes
andtheE‐MailtabofSettingsisdisplayed.TheEditbuttonisdisplayedinthe
rowforthee‐mailproviderandatabisaddedforthee‐mailaccountin
Messagesscreen.
Ifyouaddthee‐mailaccountthefirsttimeyouuseyourOgo,youmaysetup
additionale‐mailaccount(s)orselectFinishtoclosetheSetupWizard.
OGOUserManual
38錯誤!使用[常用]索引標籤將Heading2套用到您想要在此處顯示的文字。
EditingYourEmailAccountSettings
Youcanview/editthedetailsofanexistinge‐mailaccount,andsethowoftento
checkformessagesandforwhattimeperiod.
► Toedityoure‐mailaccountsettings:
1 IntheE‐mailtaboftheSettingsscreen,selectEditintherowfortheexistinge‐
mailaccountandpressEnter/SelecttodisplaytheAccountSettingsscreen.
Thecurrentsettingsforthee‐mailaccountarelisted.
2 Inadditiontothesettingsconfiguredinthesetupprocess,youcanconfigure
thefollowingproperties:
• SelectCheckbacktosethowfarbacktocheckformessages(All,1week,2
weeks,1month,or2months).
• SelectCheckE‐mailtosethowtheOgochecksformessages(Automatically
orManually).
3 Afterreviewingormodifyingthesettings,selectOKandpressEnter/Select.
RemovinganEmailAccount
IfyounolongerwanttouseyourOgotoaccessaspecifice‐mailaccount,youcan
removethee‐mailaccountfromyourOgosettings.
► Toremoveane‐mailaccount:
1 IntheE‐mailtaboftheSettingsscreen,selectRemoveintheRemoveE‐mail
AccountrowtodisplaytheRemoveE‐mailAccountscreen.Thecurrently
configurede‐mailaccountsarelisted.
2 Selectthecheckbox(es)ortheaccount(s)thatyouwanttoremove.
3 SelectRemoveandpressEnter/Select.Aconfirmationmessageisdisplayed.
4 SelectYesandpressEnter/Select.Theselectedaccountsareremoved.
錯誤
!
使用
[
常用
]
索引標籤將
Heading1
套用到您想要在此處顯示的文字。
錯誤!使用[常用]索引標籤將Heading2套用到您想要在此處顯示的文字。39
AccessingtheMessagesApplication
TheMessagesapplicationiswhereyoucanmanageandviewyoure‐mailandSMS
messages.
► ToaccesstheMessagesapplication:
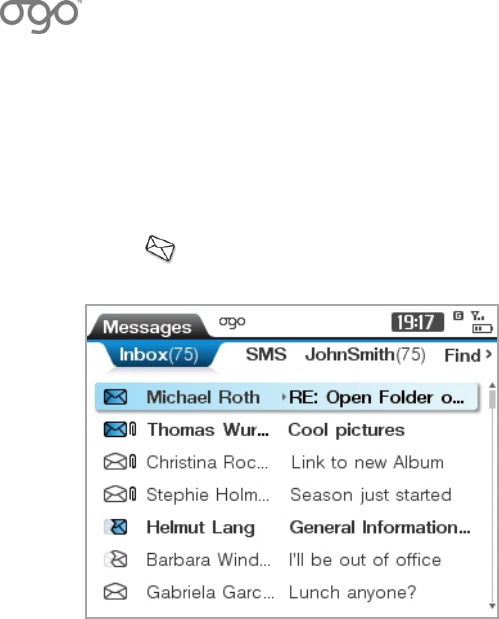
Select IntheHomescreenandpressEnter/Select.TheMessages
applicationisdisplayed.
Figure8:MessagesApplication
TheMessagesapplicationprovidesmessagelistsinthefollowingtabs:
• Inbox
• SMS
• E‐mailaccount(s)(ifsetupontheOgo)
• Find
• Outgoing
OGOUserManual
40錯誤!使用[常用]索引標籤將Heading2套用到您想要在此處顯示的文字。
ViewingYourMessageLists
TheInboxtabshowsacombinedlistofallyoure‐mailandSMSmessages.The
mostrecentlyreceivedmessagesappearatthetopofthelist.
Alternatively,youcanviewonlymessagesofaspecifictypeorforaspecifice‐mail
addressinthecorrespondingtab.Forexample,toviewonlySMSmessages,select
theSMStab.
Thefollowingdetailsappearforeachmessage:
Anicon,indicatingthetypeandstatusofthemessage(seeTable10)
Anicon,indicatingwhetherthereareattachmentsforthisemail
Thenameofthesender
Thesubjectofthemessage(fore‐mailmessages)orthebeginningofthe
message(forSMSmessages).Intheselectedmessage,thispartalternateswith
thedisplayofsendingtime&date.
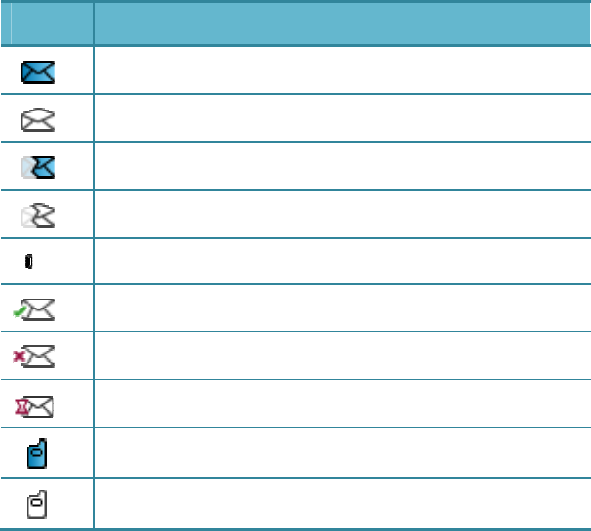
Table10:MessageIcons
IconMessageType/Status
E‐mail–Unread
E‐mail–Read
E‐mail–Unread,partiallyretrieved
E‐mail–Read,partiallyretrieved
Attachmentsincluded
E‐mail–Sent
E‐mail–Sent(failure)
E‐mail‐Pending
SMS/text–Unread
SMS/text–Read
錯誤
!
使用
[
常用
]
索引標籤將
Heading1
套用到您想要在此處顯示的文字。
錯誤!使用[常用]索引標籤將Heading2套用到您想要在此處顯示的文字。41
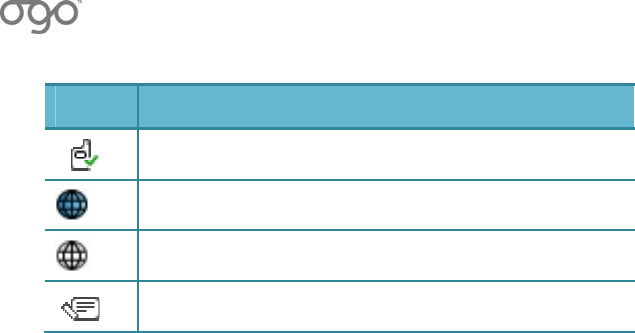
IconMessageType/Status
SMS/text–Sent
Servicemessage‐Unread
Servicemessage‐Read
Draftmessage
WhileviewingamessageintheInboxtab(orinane‐mailaccounttab),the
followingoptionsareavailablefromtheOptionsmenu:
Newmessage:Enablesyoutocomposeanewmessage.Fordetails,see
ComposingaMessageonpage42.
Folder…:Enablesyoutomoveamessagetoaspecificmailfolder,openane‐
mailfoldertoviewitscontents,orrefreshthefolderlist.Theseoptionsareonly
availablefore‐mailaccountsthatsupporttheuseIMAPfolders.Fordetails,see
WorkingwithIMAPFolderOptionsonpage50.
MarkasRead/Unread:TogglesthemessagestatusbetweenReadandUnread.
Reply:Enablesyoutosendareplytothesenderofthemessage.Fordetails,
seeReplyingtoaMessageonpage46.
ReplytoAll:Enablesyoutosendareplytoallrecipientsofthemessage,
includingthesender.Fordetails,seeReplyingtoaMessageonpage46.
Forward:Enablesyoutoforwardthemessage.Fordetails,seeForwardinga
Messageonpage46.
Delete:EnablesyoutodeleteamessagefrombothyourOgo(DeleteLocally)
and/orthemailboxmaintainedbythee‐mailserviceprovider(DeleteThis
Message).Fordetails,seeDeletingMessagesonpage46.
SortbySender/Date&Time:Enablesyoutochangethewaymessagesare
sortedintheMessageslist.Fordetails,seeSortingYourMessagesonpage49.
DeleteAll:EnablesyoutodeletemultiplemessagesyourOgo.Fordetails,see
DeletingMessagesonpage46.
Send/Receive:Fordetails,seeCheckingforNewMessagesonpage48.
OGOUserManual
42錯誤!使用[常用]索引標籤將Heading2套用到您想要在此處顯示的文字。
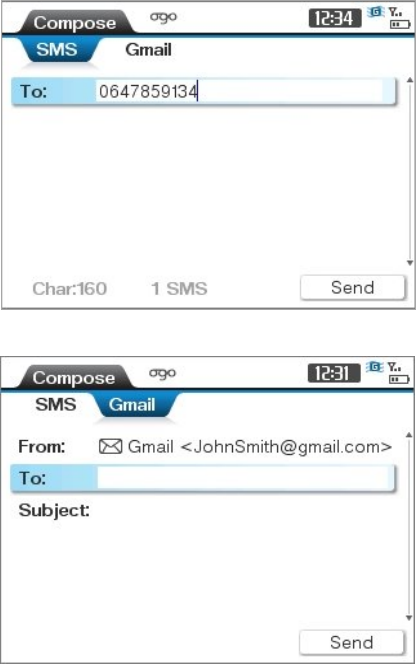
ComposingaMessage
YoucancomposeandsendSMSand/ore‐mailmessagesintheComposescreen.
► ToaccesstheComposescreen:
SelectComposeIntheHomescreenandpressEnter/Select.TheCompose
screenisdisplayed.
Typically,theComposescreenincludesthefollowingtabs:
• SMS
• E‐mailaccount(s)(ifsetupontheOgo)
Figure9:ComposeScreen–SMSTab
Figure10:ComposeScreen–E‐mailTab
錯誤
!
使用
[
常用
]
索引標籤將
Heading1
套用到您想要在此處顯示的文字。
錯誤!使用[常用]索引標籤將Heading2套用到您想要在此處顯示的文字。43
► TocomposeanSMSmessage:
1 SelectComposeIntheHomescreenandpressEnter/Select.SelecttheSMStab.
OR
IntheSMStaboftheMessagesapplication,pressandselectNew
messagefromtheOptionsmenu.TheComposescreenisdisplayed,withthe
SMStabselected.
2 Inserttherecipient’smobilenumberintheTofield.
Note: Ifyoutypeinthefirstletter(s)ofthecontact’sname,theContactListis
openedinapopuplist,displayingcontactswhosenamesbeginwith
thatletter.YoucanselecttheContactandpressEnter/Selectto
automaticallyinsertthecorrespondingmobilenumber.
3 Scrolldownandinsertthemessagetext.
Note: Acounteratthebottomofthescreenindicatestheremainingnumber
ofcharactersthatcanbeinsertedintothemessage.AsingleSMS
messagecanincludeupto160characters.Ogoallowsyoutocreatea
longermessage,andbreaksitintouptofourseparatepartswhen
sending.
4 SelectSendandpressEnter/Select.
► Tocomposeane‐mailmessage:
1 SelectComposeIntheHomescreenandpressEnter/Select.Selectthe
requiredE‐mailtab.
OR
IntheE‐mailtaboftheMessagesapplication,pressandselectNew
messagefromtheOptionsmenu.TheComposescreenisdisplayed,withthe
E‐mailtabselectedandtheFromdetailsautomaticallyinserted.
2 Inserttherecipient’se‐mailaddress,themessagesubject,andmessagetextin
thedesignatedfields.
Note: Ifyoutypeinthefirstletter(s)ofthecontact’snameore‐mailaddress,
apopuplistisdisplayedincludingcontactsandtheire‐mailaddresses,
aswellase‐mailaddressestowhichmessageshavebeensentinthe
past.YoucanselecttherequiredaddressandpressEnter/Selectto
automaticallyinserttheaddress.
3 SelectSendandpressEnter/Select.
Note: IfyouattempttoleavetheComposescreenwithoutsendingthe
message,youarepromptedtosaveitasadraft.SelectYestosavethe
draft,Notodiscardthemessage,orCanceltoremaininthescreen.

OGOUserManual
44錯誤!使用[常用]索引標籤將Heading2套用到您想要在此處顯示的文字。
WorkingwithMessages
YoucanviewfromthevarioustabsoftheMessagesapplication.Unreadmessages
canalsobeviewedfromtheogoquick‐accesslist.
Whileviewingamessage,thefollowingoptionsareavailablefromtheOptions
menu:
1 AddSendertoContacts:Enablesyoutoaddthesenderofthemessagetoyour
contactlist.
2 Reply:Enablesyoutosendareplytothesenderofthemessage.Fordetails,
seeReplyingtoaMessageonpage46.
3 ReplytoAll:Enablesyoutosendareplytoallrecipientsofthemessage,
includingthesender.Fordetails,seeReplyingtoaMessageonpage46.
4 Forward:Enablesyoutoforwardthemessage.Fordetails,seeForwardinga
Messageonpage46.
5 Delete:EnablesyoutodeletethemessagefrombothyourOgoandthe
mailboxmaintainedbythee‐mailserviceprovider.Fordetails,seeDeleting
Messagesonpage46.
6 DeleteLocally:EnablesyoutodeletethemessagefromyourOgoonly(without
deletingitfromthemailboxmaintainedbythee‐mailserviceprovider).For
details,seeDeletingMessagesonpage46.
7 AddressClipboard:Enablesyoutouseinformationfromthecontentofa
messageforaddingnewcontactstoyourOgoContactList,ortosenda
messageorplaceacalldirectly,withoutaddinganewcontact.Fordetails,see
WorkingwiththeAddressClipboardonpage71.
ViewingaMessage
► Toviewamessage:
1 SelecttherequiredtabintheMessagesapplication.
2 SelectthemessageinthemessagelistandpressEnter/Select.
Themessageisdisplayed,includingdetailsregardingthemessagesender,
destinatione‐mailaddressormobilenumber,dateandtimethemessagewas
sent,subjectandtext,asapplicable.
Whenapplicable,attachmentsarelistedbelowthemessage'ssubject.
Note: Pressing displaystheogoquick‐accesslist,whereunreadmessages
arelisted(sendernameisdisplayed).Selectthemessageandpress
Enter/Selecttoviewthemessage.

錯誤
!
使用
[
常用
]
索引標籤將
Heading1
套用到您想要在此處顯示的文字。
錯誤!使用[常用]索引標籤將Heading2套用到您想要在此處顯示的文字。45
ViewinganAttachment
Youcanreceiveandviewe‐mailattachmentsonyourOgo,includingimagefiles
(.jpg,.bmp,.gif),anddocuments(Word,Excel,PDFfilesandmore)whichare
displayedasplaintext.
Notes:Theavailabilityofviewingattachmentsdependsontheserviceprovided
byyourcellularoperator,andtheattributesofyouremailaccount.
AttachmentsarenotsupportedforWindowsLiveMail.
► Toviewanattachment:
1 SelecttheattachmentintheAttachmentslistandpressEnter/Select.Apop‐up
menuisdisplayed.
2 Toviewasummaryoftheattachmentproperties(filename,type,sizeand
status),selectDetails.
OR
Toviewtheattachment’scontent,selectViewtext(foradocument),orView
Image.Thetext"Downloading…"isdisplayedatthebottomofthescreenwhile
theattachmentisdownloaded.
Note: Iftheattachmentisofanon‐supportedfiletype,theoptionsViewTextor
ViewImagearenotavailable.
ForwardingaMessage
Youcanforwardamessagetofriendsandcolleagues.
► Toforwardamessage:
1 Inthemessagescreen(orinoneoftheMessagesapplicationtabs,withthe
messageselected),pressandselectForwardfromtheOptionsmenu.The
Composescreenisdisplayed,withtheoriginalmessagelistedinthemessage
area.
2 InsertthedetailsoftheintendedrecipientintheTofield.
3 (Optional)Addtooreditthemessagetextifdesired.
4 SelectSendandpressEnter/Select.The“SendMessage?”screenisdisplayed.
5 SelectYesandpressEnter/Select.
Note: Ifoneormorerecipient/senderisnotinyourOgoContactList,youare
promptedtosavetheirdetailsatthistime.Todoso,selectSaveandpress
Enter/SelecttodisplaytheAddressClipboardscreen.Fordetailsonsaving
contactsfromtheAddressClipboard,Fordetails,seeCreatingaContact
fromtheClipboardonpage71.
OGOUserManual
46錯誤!使用[常用]索引標籤將Heading2套用到您想要在此處顯示的文字。
ReplyingtoaMessage
Youcanreplytoyourincomingmessages.
► Toreplytoamessage:
1 Intheviewedmessagescreen,selectReplyandpressEnter/Select.
OR
Inthemessagescreen(orinoneoftheMessagesapplicationtabs,withthe
messageselected),pressandselectoneofthefollowingoptionsfromthe
Optionsmenu:
• Toreplytothesenderonly,ReplyandpressEnter/Select.
• Toreplytothesenderandallotherrecipients,selectReplytoAllandpress
Enter/Select.
TheComposescreenisdisplayed,includingtheoriginalmessage,andwith
sender’saddressintheTofield.
2 Youcaneditthemessagetextifdesired.
3 SelectSendandpressEnter/Select.The“SendMessage?”confirmation
messagemaybedisplayed.Ifyouwanttosendmessageswithouta
confirmationmessage,selectDon'tshowmeagainandpressEnter/Select.
4 SelectYesandpressEnter/Select.Abriefanimationisdisplayed,indicating
thatthemessageisabouttobesent.
DeletingMessages
Bydefault,messagesdeletedonyourOgoarealsodeletedfromthemailbox
maintainedbythee‐mailserviceprovider.However,youcanchooseDeleteLocally,
whichremovesthemessagefromtheOgo,butkeepsthemessageunharmedon
themailboxmaintainedbyyoure‐mailprovider.
► Todeletethecurrentlydisplayedmessage:
Inthemessagescreen,press andselectoneofthefollowingoptionsfrom
theOptionsmenu:
• TodeletethemessagefromyourOgowithoutremovingitfromthe
mailboxmaintainedbythee‐mailserviceprovider,selectDeleteLocally
andpressEnter/Select.
• Todeletethemessageentirely,selectDeleteandpressEnter/Select.
Themessageisdeletedaccordingtoyourselection.
Note: Alternatively,youcanpressthe keywhenthemessageisviewedto
deletethedisplayedmessage(thisperformsregulardelete,notlocal
delete).
錯誤
!
使用
[
常用
]
索引標籤將
Heading1
套用到您想要在此處顯示的文字。
錯誤!使用[常用]索引標籤將Heading2套用到您想要在此處顯示的文字。47
► TodeleteamessagefromthelistintheMessagesapplication:
1 IntheMessagesscreen,selectthemessage.
2 Press andselectDeletefromtheOptionsmenu.Themessageisdeleted.
Note: Alternatively,youcanpressthe keywhenthemessageisviewedto
deletethedisplayedmessage(thisperformsregulardelete,notlocal
delete).
► TodeletemultiplemessagesfromtheselectedtaboftheMessagesapplication:
Note: Tomarkmultiplemessagesfordeletion,selectamessageandpressthe
Spacekey.ThenfollowtheinstructionsbelowandselectDeleteAll
Selected.
1 IntheMessagesscreen,press andselectDeleteAll…fromtheOptions
menu.Asub‐menuisdisplayed:
2 Selectoneofthefollowingoptionsfromthesub‐menu:
• Todeleteallofthemessagesfromthecurrenttab,selectDeleteAll
Messages.
• Todeleteallreadmessagesfromthecurrenttab,selectDeleteAllRead.
• Todeleteallselectedmessagesfromthecurrenttab,selectDeleteAll
Selected.(Thisoptionisenabledonlyifoneormoremessagesare
selected.)
• Toselectallofthemessagesinthecurrenttab,selectSelectAllMessages.
• Tounselectallofthemessagesinthecurrenttab,selectUnselectAll
Messages.(Thisoptionisenabledonlyifoneormoremessagesare
selected.)
Allmessagesofthetypeyouhavechosenareselectedordeletedaccordingto
yourselection.
OGOUserManual
48錯誤!使用[常用]索引標籤將Heading2套用到您想要在此處顯示的文字。
FindingaMessage
TheFindtabletsyousearchforaparticularmessagebasedonatextstring
containedanywherewithinthemessage,includingtheaddress,subjectormessage
contentfields.
► Tofindamessage:
1 IntheMessagesapplication,selecttheFindtab.
2 Insertthesearchcriteriaintheemptyfield.(Thesearchcriteriacanbeapartial
word,wholeword,phrases,numbers,andsoon.)Youcansearchforupto32
characters(includingsymbols).
3 PressEnter/Select.Thesearchresultsarelistedinthescreen.
Note: Toviewthecontentofamessagethatappearsintheresults,selectthe
messageandpressEnter/Select.
4 Tosortthesearchresults,press andselectSortbyRecipient/Senderfrom
theOptionsmenu.
5 Toclearthesearchresults,press andselectClearResultsfromtheOptions
menu.
CheckingforNewMessages
Newe‐mailmessagesare"pushed"toyourOgoastheyarrivetoyourmailbox
(dependingontheserviceprovidedbyyourcellularoperator,andtheattributesof
thee‐mailaccount).
Inaddition,yourOgochecksfornewe‐mailatsettimeintervals,whichcanbe
configuredwhenyousetupyoure‐mailaccounts,andviatheE‐mailsettings.
Atanytime,youcanpromptyourOgotocheckfornewe‐mailandsendany
messagespendingontheOgo,usingthesend/receiveoption.
Note: SomeoftheSend/Receiveoptionsdescribedhereinmaynotbeavailable
inyourspecificversion.
► Tosend/receivee‐mailforallyouremailaccounts:
Intheogoquick‐accesslist,selectSend\ReceiveandpressEnter/Select.
OR
IntheInboxtaboftheMessagesapplication,pressandselect
Send/ReceivefromtheOptionsmenu.
YourOgostartstoretrievenewmessagesforallyouremailaccounts,andthe
messagelistsareupdatedaccordingly.
錯誤
!
使用
[
常用
]
索引標籤將
Heading1
套用到您想要在此處顯示的文字。
錯誤!使用[常用]索引標籤將Heading2套用到您想要在此處顯示的文字。49
► Tosend/receiveemailforaselectedemailaccount:
1 Inthetaboftheselectede‐mailaccount,press andselectSend/Receive
fromtheOptionsmenu.TheSend/Receivescreenisdisplayed,showingthe
time&dateofthelastSend/Receiveoperation.
2 SelectStartandpressEnter/Select.
YourOgostartstoretrieveanynewmessagesfortheselectede‐mailaccount,
andthemessagelistinthistabisupdatedaccordingly.Tocanceltheemail
retrieval,selectStopandpressEnter/Select.
Note: Whene‐mailretrievaliscomplete,abannermessageappearsbriefly
indicatingthenumberofnewe‐mailmessages.
SortingYourMessages
YoucansortthemessagesthatappearintheInboxorinane‐mailaccounttab
accordingtothemessage’ssenderormessagetime/date.
► Tosortthemessages:
Tosortthemessagesaccordingtosender,press andselectSortbySender
fromtheOptionsmenu.
OR
Tosortthemessagesaccordingtotimeanddate,pressandselectSortby
Time/DatefromtheOptionsmenu.
ViewingYourOutgoingMessages
Thelateste‐mailandSMSmessagesyouhavesentfromyourOgoarelistedinthe
OutgoingtaboftheMessagesapplication.
Youcanreviewyoursentmessages,forwardthemtoadditionalrecipients,or
deletethemiftheyarenolongerrequired.
ThenumberofsentemailmessageskeptinthislistcanbemodifiedintheEmail
tabintheSettingsscreen.Fordetails,seeConfiguringYourE‐MailSettingsonpage
112.
OGOUserManual
50錯誤!使用[常用]索引標籤將Heading2套用到您想要在此處顯示的文字。
WorkingwithIMAPFolderOptions
IftheuseofIMAPfoldersissupportedbyyoure‐mailproviderthenthefollowing
optionsareavailablewhenyouselectFolderfromtheOptionsmenuwhenthe
specificE‐mailaccounttabisdisplayed:
Movetofolder:Enablesyoutomoveselectede‐mailmessagestoaspecific
folderunderthee‐mailaccount.
Open:Liststhefoldersforthee‐mailaccount.Whenyouselectoneofthe
foldersfromthelist,itscontentsareretrievedandlistedonthetabofyoure‐
mailaccount.MessagesfromtheInboxfolderofthisaccountremaininthe
MessagesAlltab.
RefreshFolderlist:Refreshesthelistoffolders.
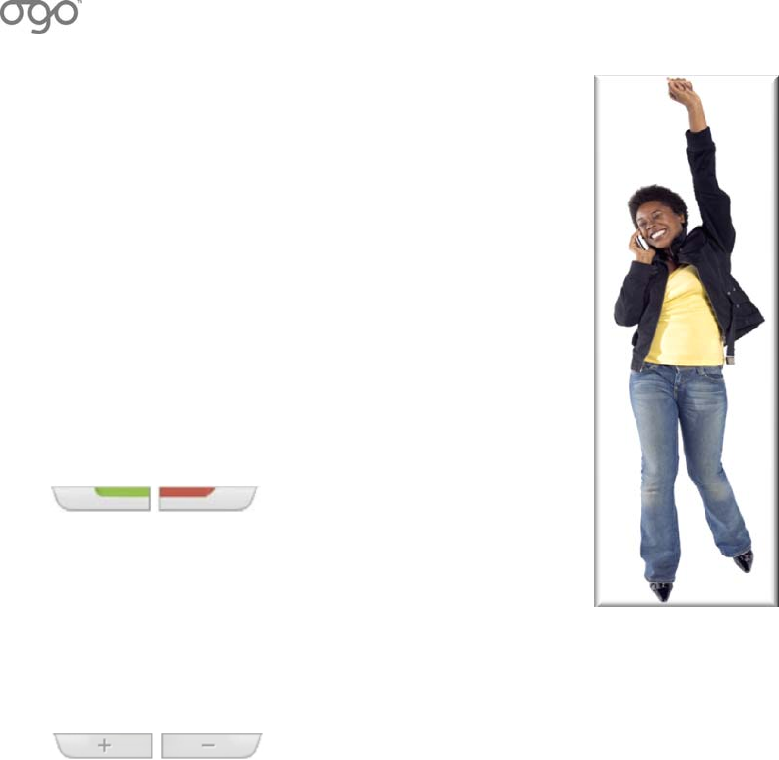
錯誤
!
使用
[
常用
]
索引標籤將
Heading1
套用到您想要在此處顯示的文字。
錯誤!使用[常用]索引標籤將Heading2套用到您想要在此處顯示的文字。51
UsingYourOgoasaPhone
AsbrilliantasOgoisattextbasedmessaging,sometimes
youjustneedtotalktosomeone.
ThePhoneapplicationenablesyoutomakeandanswer
phonecalls,aswellasviewphonenumberspreviously
dialed,andthecallsreceivedandcallsmissedlists.
CallandEndButtons
Foraddedconvenience,yourOgofeaturesCall(green)and
End(red)buttons.
Figure11:CallandEndButtons
AdjustingtheVolume
YoucanadjustthevolumeonyourOgobysimplypressingthevolume+and–
buttonsontheedgeoftheOgo.Or,tosilencetheOgo,holddownthevolume–
buttonforafewsecondstoturnoffthesoundentirely.
Figure12:VolumeButtons
MakingaCall
It’seasytomakecallsonyourOgo—andinsomanyways:
SimplystartdialingintheHomescreenbypressingthenumberkeys.
CallacontactfromtheDialtabbyenteringthefirstletter(s)ofthecontact
nameandselectingthecontactfromthelistdisplayedintheDialtab.
SelectacontactinContactListandselectDialfromtheOptionsmenu.
SelectoneofthecallsinthePhone'scalllog(Dialed/Missed/Receivedcalls)and
pressEnter/Selecttodialthatnumber.
PresstheCallkeytwicetoredialthelastdialedcall.
Pressandholddownoneofthenumberkeys,afterassigningacontacttothat
speeddialnumber.
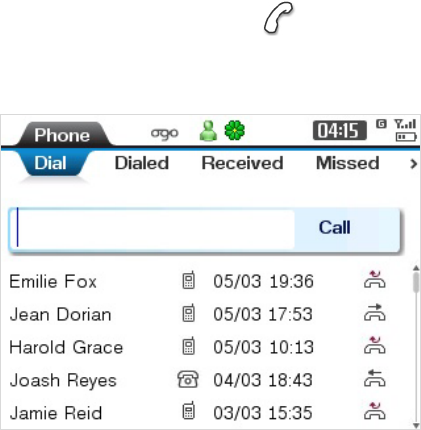
OGOUserManual
52錯誤!使用[常用]索引標籤將Heading2套用到您想要在此處顯示的文字。
DialingaPhoneNumber
YoucanplaceacallbymanuallyinsertingthephonenumberintheDialtab.
► TodisplaytheDialtab:
IntheHomescreen,selectPhoneandpressEnter/Select,orpressa
numberorletterkeywhiletheHomescreenisdisplayed.
TheDialtabofthePhonescreenisdisplayed.
Figure13:PhoneScreen
WhiletheDialtabisdisplayed,thefollowingoptionsareavailablefromtheOptions
menu:
1 Contacts:DisplaysyourContactlistinapopupwindow,enablingyoutoselect
andcallacontact.
2 CreateContact:Enablesyoutocreateanewcontactbasedonthenumber
currentlyinsertedintheDialfield.Selectthetypeofnumberfromthepopup
menutodisplaytheContactProfilescreenanddefineanewcontact.For
details,seeAddingContactsonpage62.
3 AddtoContact:EnablesyoutoaddthenumbercurrentlyinsertedintheDial
fieldtoanexistingcontact.Selectthecontacttowhichyouwanttoaddthe
numberfromthepopupmenuandthenselectthetypeofnumberfromthelist
thatisdisplayed.Thenumberisaddedtothecontact’sprofile.
4 ComposeSMS:DisplaystheSMStaboftheComposescreen,withthenumber
currentlyinsertedintheDialfieldautomaticallyinsertedintheTofield.For
details,seeComposingaMessageonpage42.
5 CallVoiceMail:Automaticallydialsthevoicemailretrievalsystemsetupby
yourserviceprovider.
6 SpeedDial:DisplaysthelistofspeeddialnumbersdefinedonyourOgo.Select
anentryinthelistandpressEnter/Selecttodialthenumber.Fordetailson
definingspeeddialnumbers,seeConfiguringthePhoneSettingsonpage108.

錯誤
!
使用
[
常用
]
索引標籤將
Heading1
套用到您想要在此處顯示的文字。
錯誤!使用[常用]索引標籤將Heading2套用到您想要在此處顯示的文字。53
► Todialaphonenumber:
1 IntheHomescreen,selectPhoneandpressEnter/Select.TheDialtabis
displayed,showingthePhone'scalllog.
Note: PressingthenumberorletterkeyswhiletheHomescreenisdisplayed
alsoopenstheDialtab.
2 Insertthephonenumbertobedialed.(YoudonotneedtopressALTwhen
dialingaphonenumber.)
Note: Ifyouhaveassignedaspeeddialnumberfortherequiredphone
number,longpressthecorrespondingspeeddialnumbertoplacethe
call.Ifnocontactnumberhasbeenassignedtothisspeeddialnumber,
longpressdisplaystheAssignSpeedDialscreen.Fordetailsondefining
speeddialnumbers,seeConfiguringthePhoneSettingsonpage108.
WhenyouinsertanumberintheDialfield,contactsthatbeginwiththe
correspondingletter(asindicatedonthekey)aredisplayedinthe
lowerportionoftheDialtab,enablingyoutoeasilyselectandcalla
contact.
3 PressEnter/Select,orpresstheCallbutton(thegreenbuttonontheedgeof
yourOgo).Yourcallisplaced.TheCallscreenisdisplayed.
4 Whenthecallrecipientpicksup,atimerisdisplayedthattracksthedurationof
theongoingcall.
Note: Toendthecall,presstheEndbutton(theredbuttonontheedgeof
yourOgo),orscrolltoHangUpandpressEnter/Select.
CallingaContact
YoucanselectandcallacontactfromtheContactsscreenorthePhonescreen.
Alternatively,youcaninsertthefirstletter(s)ofthecontactnameinhomescreen,
andthePhone'sDialtabwillbedisplayed.
► TocallacontactfromtheDialtab:
1 IntheHomescreen,selectPhoneandpressEnter/Select.TheDialtabis
displayed.
Note: IfyoupressEnter/Selectagain,beforeinsertinganynumberorletters,
theContactListwillbeopenedinapopuplist,andyouwillbeableto
selecttheContactyouwanttocall.
2 Insertthefirstletter(s)ofthecontact’sname(orthecorrespondingnumberon
thekeyboard).
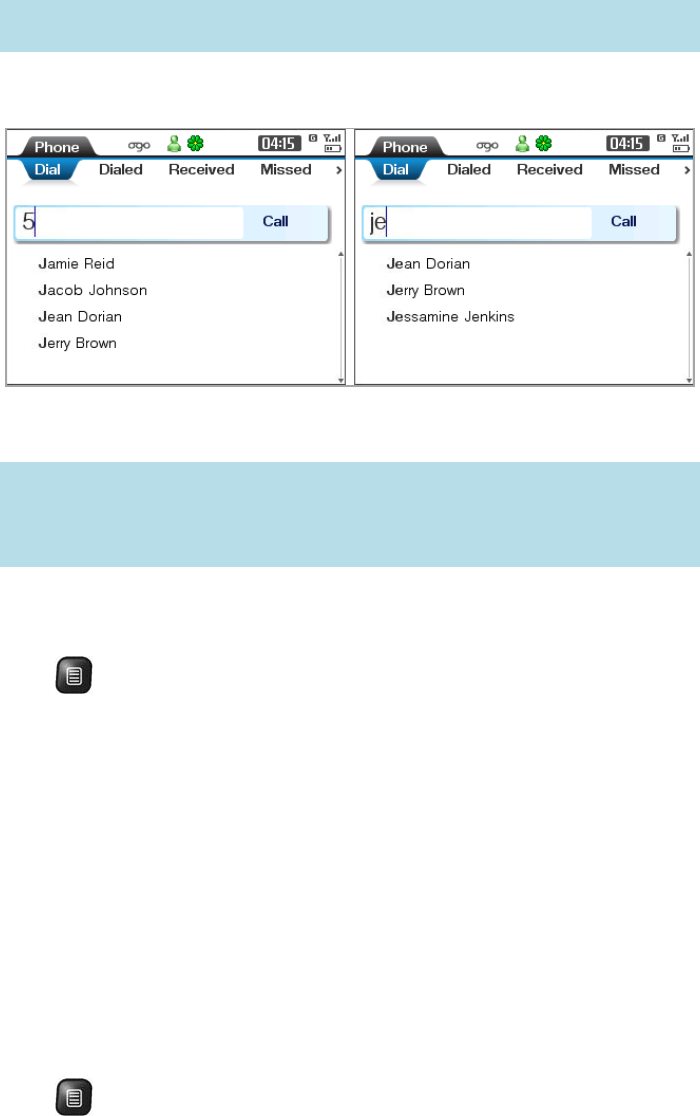
OGOUserManual
54錯誤!使用[常用]索引標籤將Heading2套用到您想要在此處顯示的文字。
Note: Ifthefirstletterappearsonanumberkey(Y,U,I,H,J,K,B,N,orM),
thecorrespondingnumberisenteredintheDialfield.
Allofyourcontactswhosenames(firstorlast)beginwiththeletter(s)thatyou
insertedaredisplayedinthelowerportionoftheDialtab.
3 Scrolldowntoselectthecontacttobecalled,andpressEnter/Select.Yourcall
isplacedandtheCallscreenisdisplayed.
Note: Iftheselectedcontacthasmorethanonephonenumberstored,a
symbolisincludedwiththecontactname.Whenyoupress
Enter/Select,alistoftheavailablephonenumbersforthecontactis
displayed;SelecttherequirednumberandpressEnter/Selectagain.
► TocallacontactfromtheContactList:
1 IntheContactList,selectthecontactthatyouwanttocall.
2 Press andselectDialfromtheOptionsmenu.Yourcallisplacedandthe
Callscreenisdisplayed.
DialingaNumberfromtheCallLog
Youcandialanumberdirectlyfromthecallloglist.
► TocallanumberfromtheCalllog:
TheDialtab,beforeinsertinganynumberorletter,displaysthelistofallDialed,
Received,orMissedcalls.Selectthecaller/numberyouwanttodial,andpress
Enter/Select.
Alternatively,intheDialed/Received/Missedtab,selectthecaller/numberyou
wanttodial,andpressEnter/Select.
OR
PressandselectCallThisNumberfromtheOptionsmenu.
ThecallisplacedandtheCallscreenisdisplayed.

錯誤
!
使用
[
常用
]
索引標籤將
Heading1
套用到您想要在此處顯示的文字。
錯誤!使用[常用]索引標籤將Heading2套用到您想要在此處顯示的文字。55
RedialingaNumber
YoucanredialthelastnumberthatyoudialedonyourOgo.
► Toredialthelastnumber:
PresstheCallkey.Acallisplacedtothelastnumberthatyoucalled.

OGOUserManual
56錯誤!使用[常用]索引標籤將Heading2套用到您想要在此處顯示的文字。
HandlingIncomingCalls
WheneveryourOgoispoweredon,youcanreceivecallsonit.
HandlinganIncomingCall
IfyouareusingyourOgoandacallarrives,theIncomingCallscreenpromptsyou
todecidewhetheryouwanttoaccept,reject,orsilencethecall.
IfthecallisfromanumberthatislistedinyourOgoContactList,thenthecaller’s
nameisdisplayed.Ifnot,thecaller’sphonenumberisdisplayed.Ifthecallerhas
optedtoblockhis/hercallerID,“PrivateNumber”isdisplayed.
► Toanswerorrejectthecall(Ogoison):
WhenyouhearyourOgoringtone,pressCall(thegreenbuttonontheleftof
yourOgo)toanswerorpressEnd(theredbutton)torejectthecall.
Pressthe volumekeytosilencetheincomingcall.Theringtonestops,
withoutdisconnectingthecall.
HandlingaWaitingCall
Ifanotherpartycallsyouwhileyouaretalkingonthephone,anIncomingCall
screenisdisplayed.
Youcanchooseoneofthefollowingoptions:
Toacceptthenewcallandplacetheexistingcallonhold,selectAnswerand
pressEnter/Select,ORpressCallkey(greenbutton)
Toendtheexistingcallandacceptthenewcallinitsplace,selectReplaceand
pressEnter/Select.
Torejectthenewcallandcontinuetheexistingcall,selectRejectandpress
Enter/SelectORpresstheEndkey(redbutton).
HandlingMultipleCalls
YoucanjugglemultiplecallsonyourOgo,freelyswitchingbetweenongoingcalls,
orjoiningthemintoaconferencecall.
SwappingCalls
Ifyouareengagedintwocallssimultaneously,talkingtoonepersonwhilethe
otherisonhold,Ogoallowsyouto"swap"betweenthecalls–placingtheactive
callonholdsothatyoucantalktotheotherperson.
錯誤
!
使用
[
常用
]
索引標籤將
Heading1
套用到您想要在此處顯示的文字。
錯誤!使用[常用]索引標籤將Heading2套用到您想要在此處顯示的文字。57
► Toswapcalls:
1 SimplypressCall(greenbutton)orpressEnter/Select.Thecallmenuis
displayed.
2 SelectSwapandpressEnter/Select.Thecallsareswapped.
PlacingaConferenceCall
Youcancalltwodifferentphonenumbersandcreateathree‐wayconferencecall.
► Tocreateaconferencecall:
1 Insert/selectthefirstphonenumbertobedialedinoneofthewaysdescribed
inMakingaCallonpage51(?),andpressCall(thegreenbuttonontheleftof
yourOgo).TheoutgoingcallisdisplayedintheDialtab.
2 Afterthecallisanswered,dialorselectanothernumberandpresstheCall
buttonagaintoplacethesecondcall.Thesecondoutgoingcallisdisplayedin
theDialtab.
3 PresstheCallbuttonagaintoconnectthetwocalls.
► Tosplitthecalls:
1 Press andselectSplitfromtheOptionsmenu.Thelistofpartiesis
displayed.
2 SelectthepartyyouwanttotalkwithandpressEnter/Select.Thecallsaresplit.
Eachcallreturnstoitspreviousstate(activeoronhold).
MakinganotherCallWhileTalkingonthePhone
Youcanmakeanewoutgoingcallwhileanexistingcallisongoing.
► Tomakeanewcallwhiletalkingonthephone:
1 PressEnter/Select.Thecallmenuisdisplayed.
2 SelectNewCallfromthecallmenu.Adialpopupwindowisdisplayed.
3 InsertthephonenumberforthenewcallandpressEnter/Select.Thecallis
dialed.Whenthecallisanswered,youcantalkwhilekeepingthepreviouscall
onhold.
Notes:Alternatively,ifyousimplystartdialing,adialpopupwindowisdisplayed.
Optionally,youcanswapbetweentheactivecallsorcombinethemintoa
conferencecall.

OGOUserManual
58錯誤!使用[常用]索引標籤將Heading2套用到您想要在此處顯示的文字。
EndingaCall
Itiseasytoendacall,simplypressEnd(theredbuttonontherightofyourOgo),
orselectHangUpintheCalltabandpressEnter/Select.Thecallisdisconnected.
Alternatively,youcanpressEnter/SelectintheCalltab,andselectHangUpfrom
thecallmenu.
Note: WhenyouselectHangUp,alloftheparticipantsintheconferencecallare
disconnected.
Muting/UnmutingaCall
Everneedtosaysomethingthatyoudon’twantthepersononthelinetohear,but
youaren’treadytohangupyet?Then,mutingthecallisthesolutionforyou.
MutingacalltemporarilydisablesOgo’smicrophonesothattheotherpartycannot
hearyou.
► Tomuteacall:
IntheCalltab,selectMuteandpressEnter/Select.The iconisdisplayed.
► Tounmuteacall:
Tore‐enablethemicrophone,selectUnmuteandpressEnter/Select.
The icondisappears.

錯誤
!
使用
[
常用
]
索引標籤將
Heading1
套用到您想要在此處顯示的文字。
錯誤!使用[常用]索引標籤將Heading2套用到您想要在此處顯示的文字。59
ViewingYourCallLists
TheOgostoreslistsofdialed,receivedandmissedcalls.
Eachcalllistentryincludesthefollowing:
Thephonenumbercalledorthenameofthecontactifitappearsinyour
ContactList."Private"appearsifthecallingnumberisnotdisclosedbythe
network.
Atimestamp,indicatingwhenthecallwasdialed,orreceived,ormissed.
Acallicon,indicatingthetypeofcall:
IndicatesaDialedCall
IndicatesaReceivedCall
IndicatesaMissedCall
Note: PressingtheCallkeydisplaystheDialedtab,withthelastcallhighlighted.
► Toviewahistoryofrecentcalls:
SelecttheDialtab,withoutinsertinganynumberorletter.Acombinedlistof
allDialed,ReceivedorMissedcallsisdisplayed.
or
Selectthetabforthetypeofcalllist(Dialed,Received,orMissed).The
correspondingcalllistisdisplayed.
Whileviewingacalllist,pressEnter/Selecttocalltoaselectedcallnumber.
Inaddition,thefollowingoptionsareavailablefromtheOptionsmenufora
selectedentry:
1 ViewDetails:DisplaystheCallDetailsscreen,includingthephonenumberand
anyavailablecallerdetails.
2 CallThisNumber:DisplaystheCallscreen,andplacesacalltotheselected
number.
3 UseNumber:DisplaystheCallscreen,withthenumberinsertedbydefault.
Thecallisnotplaced;youcaneditthenumberandpressEnter/Selecttodial.
4 ComposeSMS:DisplaystheComposeSMSscreen,withthenumberinsertedin
theTofieldbydefault.Fordetails,seeComposingaMessageonpage42.
5 AddtoContact:Enablesyoutoaddtheselectednumbertoanexistingcontact.
6 CreateContact:Enablesyoutocreateanewcontactwiththeselectednumber.

OGOUserManual
60錯誤!使用[常用]索引標籤將Heading2套用到您想要在此處顯示的文字。
7 DeleteItem:Removesaselectedentryfromthecalllist.
8 ClearList:Removesallentriesfromthecurrentlydisplayedcalllist.
CallTimers
TheTimerstabdisplaysthefollowingtimers:
Lastcallduration:Thedurationofthelastcall,eitherdialedoutorreceived.
Receivedcallsduration:Theaccumulateddurationofallincomingcallslistedin
theReceivedcallshistory.
Dialedcallsduration:Theaccumulateddurationofalloutgoingcallslistedin
theDialedcallshistory.
Allcallsduration:Theaccumulateddurationofallcalls,bothincomingand
outgoing,listedintheDialedcallsandReceivedcallshistories.(Thistimer
cannotbecleared).
► Toresetthetimers:
1 IntheTimerstab,selectClearandpressEnter/Select.TheResetTimersscreen
isdisplayed.
2 SelectYesandpressEnter/Selecttoconfirmthatyouwanttoresetthecall
timers.TheLastcallduration,ReceivedcallsdurationandDialedcalls
durationtimersarereset.
Note: TheAllcallsdurationtimerisnotreset.
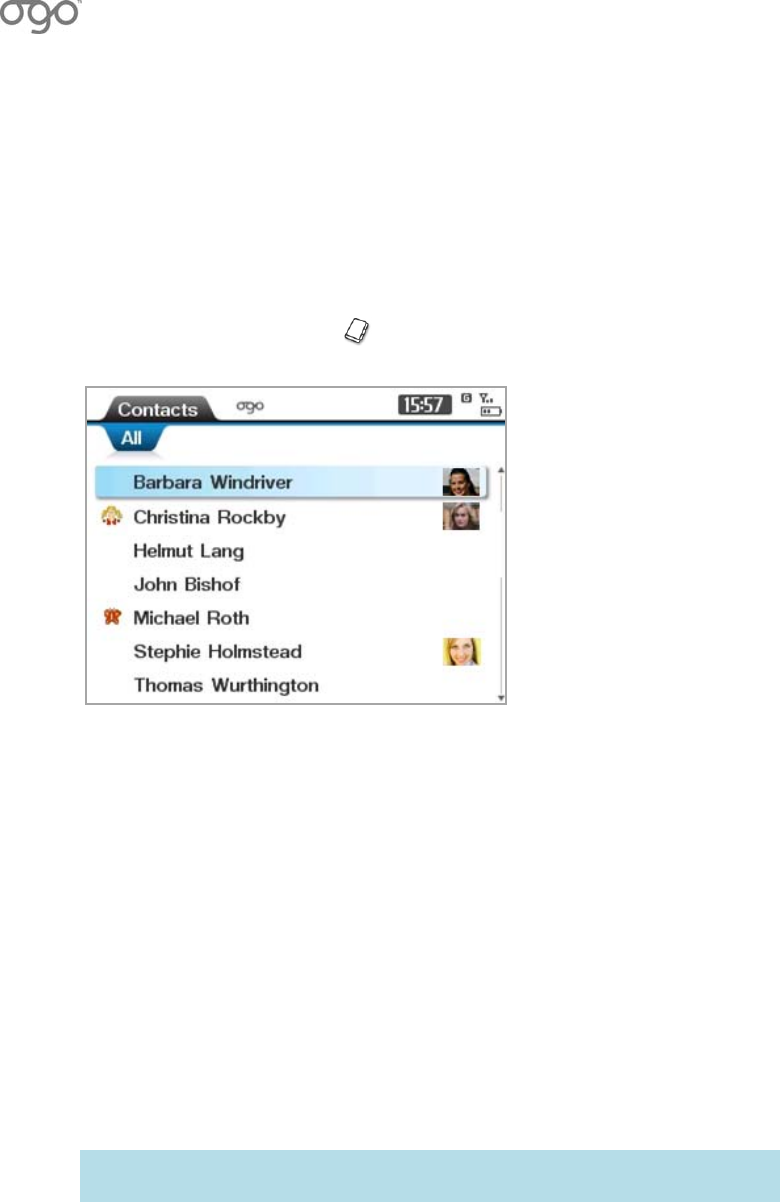
錯誤
!
使用
[
常用
]
索引標籤將
Heading1
套用到您想要在此處顯示的文字。
錯誤!使用[常用]索引標籤將Heading2套用到您想要在此處顯示的文字。61
ManagingYourOgoContactList
YourOgoContactsListsletsyousetup,findandmanagecontactinformationfor
peoplewithwhomyouexchangee‐mail,SMSmessages,andphonecalls.
► ToaccesstheContactList:
IntheHomescreen,select andpressEnter/Select.TheContactListis
displayed.
Figure14:ContactList
TheAlltablistsallofyourcontacts.Anadditionaltabisdisplayedforeach
ContactsGroup(ifdefined).
WhileviewingtheContactList,thefollowingoptionsareavailablefromtheOptions
menuforaselectedentry:
1 Dial:DisplaystheCallscreen,andplacesacalltotheselectednumber.Ifthe
Contacthasmultiplenumbers,youarepromptedtoselecttherequired
numberfromalist.
2 EditContactProfile:DisplaystheContactProfilescreen,enablingyoutoaddto
oredittheexistingcontactdetails.Fordetails,seeViewing/EditingContact
Detailsonpage65.
3 ComposeMessage:DisplaystheComposescreen,withthecontact’s
number/emailaddressinsertedintheTofield.Fordetails,seeComposinga
Messageonpage42.
Note: Ifthecontacthasmorethanasingleaddress(SMSnumberore‐mail),
youarepromptedtoselecttherequiredaddressfromalist.
4 NewContact:EnablesyoutocreateanewcontactintheContactProfilescreen.
Fordetails,seeAddingContactsonpage62.

OGOUserManual
62錯誤!使用[常用]索引標籤將Heading2套用到您想要在此處顯示的文字。
5 DeleteContact:RemovestheselectedcontactfromtheContactList.For
details,seeDeletingContactsonpage63.
6 DeleteAllContacts:RemovesallcontactsfromtheContactList.Fordetails,see
DeletingContactsonpage63.
7 NewGroup:EnablesyoutocreateagroupwithinyourContactList.Fordetails,
seeWorkingwithContactGroupsonpage67.
8 ExporttoSIM:EnablesyoutoexportyourContactListfromtheOgodevice
memorytotheSIMcardmemory.Fordetails,seeExportingContactsonpage
69.
9 ImportfromSIM:EnablesyoutoimportyourContactListfromtheSIMcard
memoryintotheOgodevicememory.Fordetails,seeImportingContactson
page70.
10 Synchronize:EnablesyoutosynchronizeyourOgoContactListwithyour
OutlookcontactsonyourPCusingOgoSync.Fordetails,seeSynchronizingon
page70.
AddingContacts
YoucanaddcontactstoyourOgoContactListatanytime.
► Toaddacontact:
1 IntheContactList,press andselectNewContactfromtheOptionsmenu.
TheContactProfilescreenisdisplayed.
2 Insertthedisplayedcontactdetails(FirstName,LastName,MobilePhone,
andE‐mailAddress)asrequired.
Note: Youmustprovideeitherthefirstorlastname.
3 Toassignapicturetothiscontact,selectPictureandpressEnter/Selectto
selectanimageforthecontact.Fordetails,seeSettinganImageFileasa
ContactPictureonpage95.
4 ToassignanAlerticontothiscontact,selectAlerticonandpressEnter/Select
toselectanalerticonforthecontact.Fordetails,seeAssigninganAlerticontoa
Contactonpage66.
5 Toassignaringtonetothiscontact,selectRingtoneandpressEnter/Selectto
selectaringtoneforthecontact.Fordetails,seeAssigningaRingtonetoa
Contactonpage67.
錯誤
!
使用
[
常用
]
索引標籤將
Heading1
套用到您想要在此處顯示的文字。
錯誤!使用[常用]索引標籤將Heading2套用到您想要在此處顯示的文字。63
6 Toincludeadditionalfieldsforthiscontact,suchasPostalAddress,Web
Addressoradditionalphonenumbers,oremailaddresses:
• SelectAddFieldandpressEnter/Select.Amenuofoptionalfieldsis
displayed.SelectthedesiredfieldnameandpressEnter/Selecttoadditto
theform.
• Inserttherelevantinformationinthenewfield.
• Repeatforadditionaldatafieldsifrequired.
7 SelectSave&CloseandpressEnter/Select.Thenewcontactissaved.
DeletingContacts
YoucanremovecontactsfromyourOgoContactList.
► Todeleteacontact:
1 IntheContactList,selectthecontactyouwanttodelete.
2 Pressthe key,orpress andselectDeleteContactfromtheOptions
menu.
Aconfirmationmessageisdisplayed.
3 SelectYestoconfirmthedeletionandpressEnter/Select.Thecontactis
deletedfromyourOgoContactList.
► Todeleteallyourcontacts:
1 IntheContactList,press andselectDeleteAllContactsfromtheOptions
menu.Aconfirmationmessageisdisplayed.
2 SelectYestoconfirmthedeletionandpressEnter/Select.Thecontactis
deletedfromyourOgoContactList.
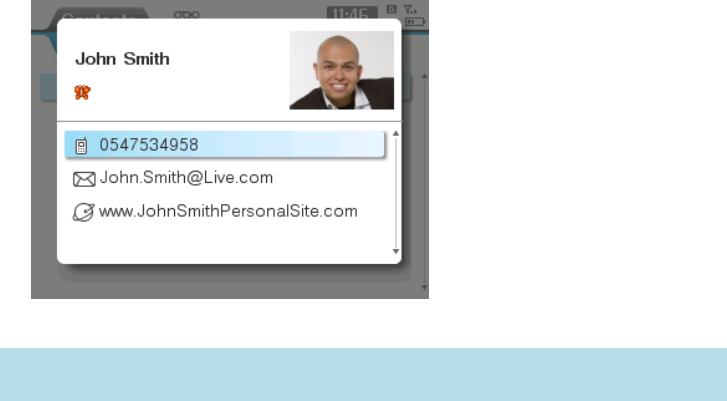
OGOUserManual
64錯誤!使用[常用]索引標籤將Heading2套用到您想要在此處顯示的文字。
ViewingContactCards
Youcanviewasummaryoftheprofileforaselectedcontact,includingthe
contact’smobilephonenumber,emailaddress,websiteandContactPicture,if
defined.
► Toviewacontactcard:
IntheContactList,selectthecontactandpressEnter/Select.TheContactCard
screenisdisplayedfortheselectedcontact.
Thesummaryinformationisdisplayedinread‐onlyformat.
Note: AdditionaldetailscanbeviewedandeditedintheContactProfilescreen,
asdescribedinViewing/EditingContactDetailsonpage65.
YoucantakethefollowingactionsfromtheContactCardscreen:
Tocallthiscontact,selectthephonenumberandpressEnter/Select.TheCall
screenisdisplayedandthecontact’snumberisdialed.
Tosendanemailmessagetothiscontact,selecttheemailaddressandpress
Enter/Select.TheComposescreenisdisplayed,withthecontact’semail
addressinsertedintheTofield.
Tonavigatetothecontact’swebpage,selecttheURLandpressEnter/Select.
TheWebBrowserscreenopenstothespecifiedwebpage.
WhileviewingtheContactCardscreen,thefollowingoptionsareavailablefromthe
Optionsmenuaccordingtotheselectedfield:
1 Dial:DisplaystheCallscreen,andplacesacalltothecontact.IftheContacthas
multiplenumbers,youarepromptedtoselecttherequirednumberfromalist.
2 ComposeSMS:DisplaystheComposescreen,withthecontact’snumber
insertedintheTofield.Fordetails,seeComposingaMessageonpage42.
3 ComposeEmail:DisplaystheComposescreen,withthecontact’semailaddress
insertedintheTofield.Fordetails,seeComposingaMessageonpage42.
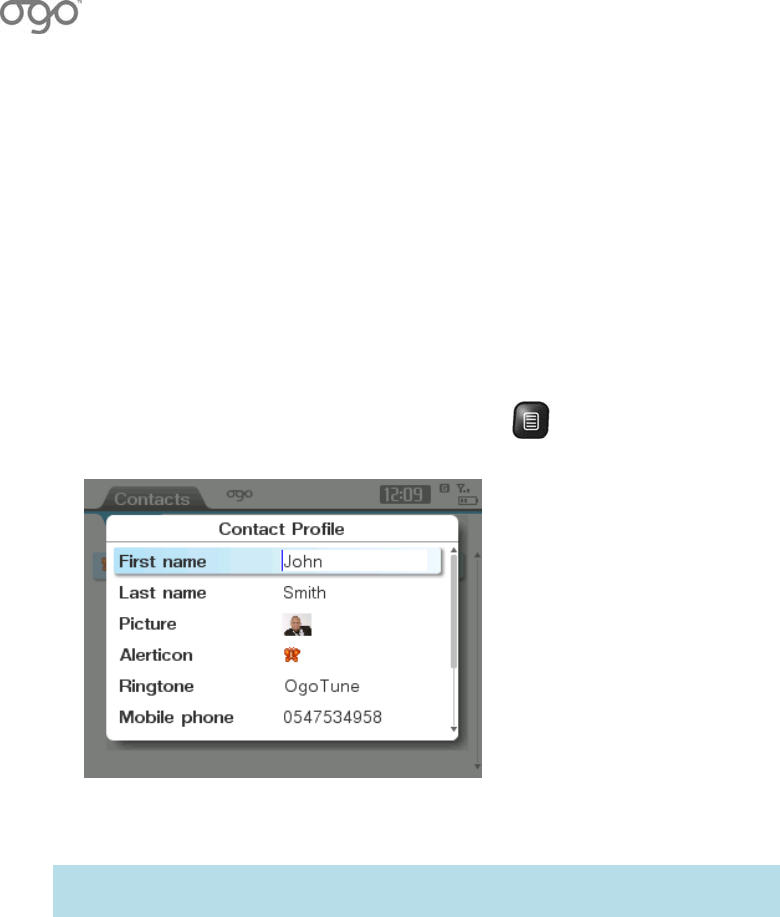
錯誤
!
使用
[
常用
]
索引標籤將
Heading1
套用到您想要在此處顯示的文字。
錯誤!使用[常用]索引標籤將Heading2套用到您想要在此處顯示的文字。65
4 EditContactProfile:DisplaystheContactProfilescreen,enablingyoutoaddto
oredittheexistingcontactdetails.Fordetails,seeViewing/EditingContact
Detailsonpage65.
5 DeleteContact:DisplaystheDeleteContactscreen,promptingyoutoconfirm
thatyouwanttodeletethecontact.
Viewing/EditingContactDetails
Youcanviewexistingcontactprofilesandedittheinformationtheycontain.
► Toeditacontactprofile:
1 IntheContactList,selectthecontactandpress.ThenselectEditContact
DetailsfromtheOptionsmenu.TheContactProfilescreenisdisplayed.
2 Editthecontactdetailsasrequired.
3 SelectDoneandpressEnter/Selecttosaveanychanges.
Note: Fordetailsondefiningthevariouscontactprofiledetails,seeAdding
Contactsonpage62.

OGOUserManual
66錯誤!使用[常用]索引標籤將Heading2套用到您想要在此處顯示的文字。
AssigningaPicturetoaContact
Ogo’smakesiteasyforyoutoidentifyyourfavoritecallersbyallowingyouto
assignapicturetoacontact.Thecontactpictureisdisplayedeachtimeyoureceive
acallfromthecontact.
Note: YoucanalsoselectapictureintheGalleryandassignittoacontact,as
describedinSettinganImageFileasaContactPictureonpage95.
► Toassignapicturetoacontact:
1 IntheContactProfilescreen,selectthePicturefieldandpressEnter/Select.
TheSelectContactPicturescreenisdisplayed.
2 Ifthedesiredpictureislocatedinsideoneofthefoldersdisplayedinthelist,
selectedthisfolderandpressEnter/Selecttoopenit.
3 Selectthedesiredpicture,andpressEnter/Select.Theselectedpictureis
assignedtothecontact,andisdisplayedeachtimeanincomingcallisreceived
fromthecontact.
AssigninganAlerticontoaContact
Ogo’sanimatedAlerticonsmakeiteasyforyoutoidentifywhensomeone
importanttoyouhassentyouamessage.SimplyassignanAlerticontoacontact
andananimationpopsupinthebannermessagelistwheneverthatcontactsends
youamessage.Theanimationwillbeaccompaniedbyauniquesound,whichwill
allowyoutoidentifythecontactevenwhentheOgo’sscreenisoff.
► Toassignanalerticon:
1 IntheContactProfilescreen,selecttheAlerticonfieldandpressEnter/Select.
TheAssignAlerticonscreenisdisplayed.
2 ScrollandselectthedesiredAlerticon.
Note: WhenanAlerticonisselected,theanimationisplayed.Youcanscroll
throughandviewthevariousanimationsbeforemakingyourselection.
3 PressEnter/Select.
4 SelectDoneandpressEnter/Select.TheselectedAlerticonisassignedtothe
contact,andisdisplayedontheOgoeachtimeamessageisreceivedfromthe
contact.

錯誤
!
使用
[
常用
]
索引標籤將
Heading1
套用到您想要在此處顯示的文字。
錯誤!使用[常用]索引標籤將Heading2套用到您想要在此處顯示的文字。67
AssigningaRingtonetoaContact
Ogo’sringtonesmakeiteasyforyoutoidentifywhensomeoneimportanttoyouis
callingbyallowingyoutoassignringtonestospecificcontacts.
Note: YoucanalsoselectaringtoneintheGalleryandassignittoacontact,as
describedinSettinganAudioFileasaContactRingtoneonpage96.
► Toassignaringtonetoacontact:
1 IntheContactProfilescreen,selecttheRingtonefieldandpressEnter/Select.
Apopupmenuofavailableringtonesisdisplayed.
2 Scrollandselectthedesiredringtone.
Note: Whenaringtoneisselected,itisplayed.Youcanscrollthroughand
listentothevariousringtonesbeforemakingyourselection.
3 PressEnter/Select.
4 SelectDoneandpressEnter/Select.Theselectedringtoneisassignedtothe
contact,andisplayedeachtimeanincomingcallisreceivedfromthecontact.
WorkingwithContactGroups
OrganizingyourcontactsintoContactGroupsmakesiteasyforyoutolocatethat
specialperson’sdetailswhenyouneedthem.Similartoamailinglist,anOgo
ContactGroupisalistofaddressesthatalsoenablesyoutosende‐mailandSMS
messagestotheentiregroupatonce.
CreatingaGroup
YoucancreateContactGroupsandthenaddmultiplecontactstothegroups.
Note: Thesamecontactcanbeaddedtomorethanonegroup.
► Tocreateagroup:
1 IntheOgoContactList,press andselectNewGroupfromtheOptions
menu.TheNewGroupscreenisdisplayed.
2 Insertanameforthegroup,forexample,family.
3 SelectOKandpressEnter/Select.Atabisaddedforthenewgroup.
OGOUserManual
68錯誤!使用[常用]索引標籤將Heading2套用到您想要在此處顯示的文字。
AddingContactstoGroups
YoucanassignacontacttooneormoreContactGroups.Thecontactwillcontinue
toappearintheAlltabaswellasinthetab(s)forthegroup(s)towhichithasbeen
added.
► Toaddacontacttoagroup:
1 Inthegroup’stab,press andselectAddContacttoGroupfromthe
Optionsmenu.Yourexistingcontactsarelistedinapop‐uplist.
2 Selectthecontacttobeaddedtothegroup,andpressEnter/Select.The
contactislistedinthegroup’stab.
Note: Ifthecontacthasmorethanoneaddress(SMSorE‐mail),youare
promptedtoselecttherequiredaddressfromalist.
RemovingContactsfromGroups
YoucanremoveacontactfromaContactGroup.(Thecontactwillcontinueto
appearintheAlltab.)
► Toremoveacontactfromacontactgroup:
1 Inthegroup’stab,selectthecontact.
2 Press andselectRemovefromGroupfromtheOptionsmenu.Thecontact
isremovedfromthegroup.
SendingaMessagetoaGroup
Youcansendamessagetoanentiregroupofcontactsatthesametime,without
havingtoinserttheindividualaddressoneatatime.
► Tosendamessagetoagroup:
1 Inthegroup’stab,press andselectComposeMessagetoGroupfromthe
Optionsmenu.TheComposescreenisdisplayedwithyourdetailsintheFrom
fieldandthegroupnameintheTofield.
OR
IntheTofield,inComposescreen,pressEnter/SelectandselectaContact
GroupfromtheContactList.
2 Insertthesubjectandmessagetext.
3 SelectSendandpressEnter/Select.Themessageissenttoallcontactsinthe
group.
錯誤
!
使用
[
常用
]
索引標籤將
Heading1
套用到您想要在此處顯示的文字。
錯誤!使用[常用]索引標籤將Heading2套用到您想要在此處顯示的文字。69
RemovingaContactGroup
YoucanremoveaContactGroup.
Note: RemovingaContactGroupdoesnotremovethecontactsfromtheContact
List.ExistingcontactscontinuetoappearintheAlltab.
► Toremoveacontactfromagroup:
1 Inthegroup’stab,press andselectRemoveGroupfromtheOptionsmenu.
Aconfirmationmessageisdisplayed.
2 SelectYesandpressEnter/Select.Thegroup’stabisremoved.
ExportingContacts
YoucanexportspecificcontactsoryourentireOgoContactListfromthedevice
memorytoyourSIMcard,forexample,tomakethecontactinformationavailable
onanotherdevice.
► Toexportcontacts:
1 IntheContactList,press andselectExporttoSIMfromtheOptionsmenu.
Asub‐menuisdisplayed.
2 ToexporttheentireContactList,selectAllRecordsandpressEnter/Select.
OR
Toexportonlytheselectedcontact,selectThisRecordandpressEnter/Select.
TheExportRecord(s)screenisdisplayed.
3 Selectthecheckboxesforthetypesofphonenumberstobeexported.
Note: Theremaybealimittothenumberofcharacters/fieldsthatmaybe
exported.
4 SelectExportandpressEnter/Selecttoexportthecontactdata.Apop‐up
messageindicatestheprogressoftheexportprocess.
OGOUserManual
70錯誤!使用[常用]索引標籤將Heading2套用到您想要在此處顯示的文字。
ImportingContacts
YoucanimportcontactsfromyourSIMcardtoyourOgoContactList.
► Toimportcontacts:
1 IntheContactList,press andselectImportfromSIMfromtheOptions
menu.TheImportRecord(s)screenisdisplayed,advisingyouthatboththe
devicecardandtheSIMcardmaycontaindifferentnumbersforthesame
contactfields.
2 Tooverridethelocalentries,selectYesandpressEnter/Select.
OR
Tomanuallyresolveanypotentialconflicts,selectNoandpressEnter/Select.
TheCopyingscreenisdisplayedwhiletherecordsarecopied.
Note: Ifyouopttomanuallyresolveconflictsandconflictsaredetected,youare
promptedtooverridethelocalentry.(SelectYesorNo,asrequired,and
pressEnter/Select.)
SynchronizingContactswithOgoSync
OgoSyncenablesyoutoinitiateon‐demandsynchronizationofyourcontactlist.
Note: ThisfeaturerequiresthatOgoSyncbeinstalledonyourPCandthatyour
OgobeconnectedtoyourPCusingtheprovidedmini‐USBcable.
► ToinitiatesynchronizationfromyourOgoContactList:
1 VerifythatyourOgoisconnectedtothePCusingtheprovidedmini‐USBcable.
2 IntheContactList,press andselectSynchronizefromtheOptionsmenu.
TheSynchronizationscreenisdisplayed.Thedateandtimewhenyoulast
synchronizedyourOgocontactsand/orcalendarislisted(ifapplicable).
3 Tosynchronizeyourcontacts,selectSyncNowandpressEnter/Selecttobegin
thesynchronizationprocess.
Note: ForadditionaldetailsonworkingwithOgoSync,includinghowtoresolve
conflictsthatmayariseinthesynchronizationprocess,seeWorkingwith
OgoSynconpage124.

錯誤
!
使用
[
常用
]
索引標籤將
Heading1
套用到您想要在此處顯示的文字。
錯誤!使用[常用]索引標籤將Heading2套用到您想要在此處顯示的文字。71
WorkingwiththeAddressClipboard
TheAddressClipboardmakesiteasytoaddnewcontactstoyourOgoContactList
oraddnewinformationtoexistingcontactsbasedonthecontactdataavailable
fromthemessagesinyourmailbox.Youcanalsosendamessageorplaceacall
directlyfromtheclipboard,withoutaddinganewcontact.
Menuoptionsvaryaccordingtotypeofentryselectedinclipboardandmayinclude
acombinationofthefollowing:
AddtoContact:Enablesyoutoaddanumberore‐mailaddresstoanexisting
contact.
CreateNewContact:Enablesyoutocreateanewcontact.Fordetails,see
CreatingaContactfromtheClipboardonpage71.
Compose:EnablesyoutosendanSMSore‐mailmessageusingaddressonthe
clipboard,withoutaddinganewcontact.Fordetails,seeComposingaMessage
onpage42.
Call(SMSonly):Enablesyoutoplaceanoutgoingcalltothespecifiednumber.
Open(URLonly):EnablesyoutobrowsetothespecifiedURL.
CreatingaContactfromtheClipboard
YoucancreateacontactdirectlyfromwithinamessageusingtheAddress
Clipboard.
► Tocreateanewcontactfromtheclipboard:
1 WhenviewinganEmailorSMSmessage,orintheIMChatscreen,press
andselectAddressClipboardfromtheOptionsmenu.TheAddressClipboardis
displayed.
2 SelecttheentryinthedisplayedlistandpressEnter/Select.Apop‐upmenuis
displayed.
3 SelectCreateNewContactandpressEnter/Select.TheContactProfilescreen
isdisplayed.
Note:Ifyouselectane‐mailaddressitisinsertedautomatically.Ifyouselect
aphonenumber,youarepromptedtoselectthetypeofnumber
(MobilePhone,MainPhone,HomePhone,WorkPhone,Fax,orPager).
4 Addtooreditthedisplayedcontactdetails(FirstName,LastName,Mobile
Phone,andE‐mailAddress)asrequired.
5 (Optional)SelectAlerticonandpressEnter/Selecttoselectanalerticonforthe
contact.(Fordetails,seeAssigninganAlerticontoaContactonpage66.)
OGOUserManual
72錯誤!使用[常用]索引標籤將Heading2套用到您想要在此處顯示的文字。
6 (Optional)Toaddanadditionaldatafield:
• SelectAddFieldandpressEnter/Select.Amenuofoptionalfieldsis
displayed.SelectthedesiredfieldnameandpressEnter/Selecttoadditto
theform.
• Inserttherelevantinformationinthenewfield.
7 SelectSave&CloseandpressEnter/Select.Thenewcontactissaved.
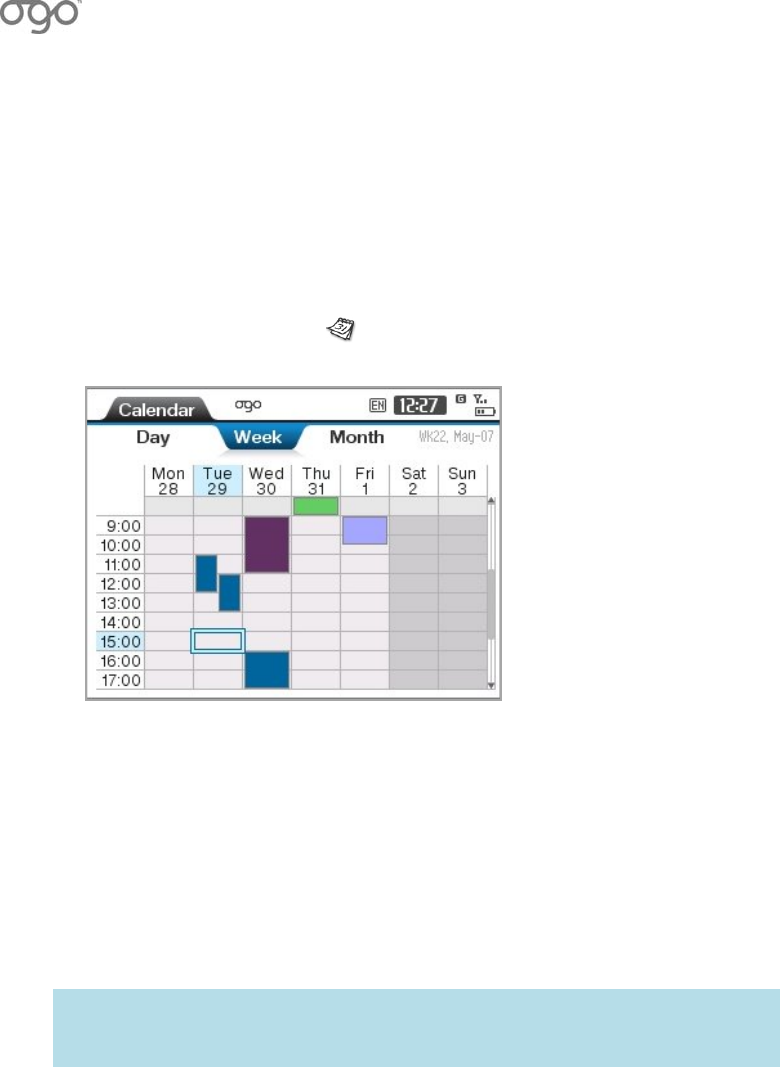
錯誤
!
使用
[
常用
]
索引標籤將
Heading1
套用到您想要在此處顯示的文字。
錯誤!使用[常用]索引標籤將Heading2套用到您想要在此處顯示的文字。73
WorkingwiththeCalendar
Ogo’sCalendarenablesyoutomanageyourscheduleonthego.Viewyour
appointmentsfortoday,thisweek,orthismonth,andgetremindersinadvance.
► ToaccesstheCalendar:
IntheHomescreen,select CalendarandpressEnter/Select.TheCalendar
isdisplayed.
Figure15:Calendar
TheCalendarincludesthreetabs:
Day/Summary:Displaysyourscheduleforasingleday,orasummaryviewof
theappointmentsscheduledfor3days.
Week:Displaysyourscheduleforaweek,withacolumnforeachdayofthe
week.
Month:Displaysyourscheduleforamonth,witharowforeachweekinthe
month.
Note: Onallthreetabs,timeblocksforwhichappointmentsexistaremarkedin
differentcolors,accordingtotheir“Showas”value–bluefor“busy”,
purplefor“outofoffice”,lilacfor“tentative”,andgreenfor“free”.
ThefollowingoptionsareavailablefromtheOptionsmenuintheCalendar
dependingontheitemselected:
NewAppointment:Enablesyoutoaddanewappointment.Fordetails,see
AddinganAppointmentonpage74.
OpenAppointment:OpenstheAppointmentscreen,enablingyoutoviewand
edittheappointmentdetails.Fordetails,seeOpening/EditinganAppointment
onpage75.

OGOUserManual
74錯誤!使用[常用]索引標籤將Heading2套用到您想要在此處顯示的文字。
DeleteAppointment:Removestheappointmentfromyourschedule.For
details,seeDeletinganAppointmentonpage75.
SummaryMode:Displaysalistoftheappointmentsinyourcalendar.
DayView:ChangestheviewfromSummaryModetoDayView.
Today:Highlightsthecurrentday’sscheduleonthescreen.
Clean‐Up:Enablesyoutodeleteoldappointmentsfromyourcalendar.For
details,seeDeletingOldAppointmentsonpage76.
Synchronize:EnablesyoutosynchronizeyourOgocalendarwiththeOutlook
calendaronyourPC.Fordetails,seeSynchronizingYourCalendarwithOgoSync
onpage78.
AddinganAppointment
AddingappointmentstoyourOgocalendarmakesiteasierforyoutokeeptrackof
yourschedule.
► Toaddanappointment:
1 IntheCalendar,press andselectNewAppointmentfromtheOptions
menu.TheAppointmentscreenisdisplayed.
2 InsertthesubjectintheSubjectfield.(InsertingtheLocationfieldisoptional.)
3 Ifyouareschedulinganall‐dayappointment,selectAll‐dayeventandpress
Enter/Select.
4 Ifyouaresettinganappointmentforpartofaday,insertthetimesanddates
intheStartandEndfields.
5 SelectShowasandpressEnter/Select.Adrop‐downlistofavailablestatusesis
displayed.Selectthestatustobeshownonyourcalendarandpress
Enter/Select.
6 Bydefault,areminderwillbedisplayed15minutesbeforethisappointment.If
youwanttochangethistimeorcancelthereminder,selectReminderand
pressEnter/Select.Adrop‐downlistisdisplayed.Selecthowfarinadvanceyou
wanttoberemindedfromthelistofavailablevalues,orselectnoneifyoudo
notwanttoberemindedaboutthisappointment.
7 (Optional)Tosetthepriorityoftheappointment,selectImportanceandpress
Enter/Select.Selectthedesiredpriority(Low,Normal,orHigh)fromthesub‐
menu.ThedefaultpriorityisNormal.
8 (Optional)InsertanoteintheNotefield.
9 SelectSaveandpressEnter/Selecttoaddtheappointmenttoyourcalendar.
錯誤
!
使用
[
常用
]
索引標籤將
Heading1
套用到您想要在此處顯示的文字。
錯誤!使用[常用]索引標籤將Heading2套用到您想要在此處顯示的文字。75
Opening/EditinganAppointment
Youcanviewandupdatetheappointmentdetails,forexample,ifthelocationor
timehasbeenchanged.
► Toopen/editanappointment:
1 IntheDaytaboftheCalendar,selecttheappointmentandpressEnter/Select.
Notes:Alternatively,youcanpress andselectOpenAppointmentfrom
theOptionsmenu.
Ifmorethanoneappointmentisscheduledfortheselectedhour,you
arepromptedtoselecttheappointmentyouwanttoopen.
TheAppointmentscreenisdisplayed.
2 Changetheappointmentdetails,asrequired.Fordetails,seeAddingan
Appointmentonpage74.
3 SelectSaveandpressEnter/Select.Theappointmentdetailsareupdated
accordingly.
DeletinganAppointment
Themeetingwascancelled.Noproblem.Youcandeletetheappointmentfrom
yourcalendar.
► Todeleteanappointment:
1 IntheDaytaboftheCalendar,selecttheappointmentyouwanttodelete.
2 Pressthe key,orpress andselectDeleteAppointmentfromthe
Optionsmenu.
TheDeleteAppointmentscreenisdisplayed.
3 SelectYestoconfirmthedeletionandpressEnter/Select.Theappointmentis
deletedfromyourschedule.
Note: Ifmorethanoneappointmentisscheduledfortheselectedhour,youare
promptedtoselecttheappointmentyouwanttodelete.

OGOUserManual
76錯誤!使用[常用]索引標籤將Heading2套用到您想要在此處顯示的文字。
DeletingOldAppointments
Youcandeleteoutdatedappointmentsfromyourcalendar.
► Todeleteoldappointments:
1 IntheCalendar,press andselectCleanupfromtheOptionsmenu.Asub‐
menuisdisplayed.
2 SelectDeleteOldAppointmentstodeleteappointmentsaccordingto
scheduleddates.TheDeleteOldAppointmentsscreenisdisplayed.
3 PressEnter/Selectandselectthetimeframetoserveasthebasisfordeleting
oldappointments(olderthan1week,2weeks,andsoon).
4 SelectOKandpressEnter/Select.Appointmentsthatpredatedthesettime
framearedeletedfromthecalendar.
DeletingAllAppointments
Youcandeleteallofyourappointmentsfromyourcalendar.
► Todeleteallappointments:
1 IntheCalendar,press andselectCleanupfromtheOptionsmenu.Asub‐
menuisdisplayed.
2 SelectDeleteAllAppointmentstodeleteappointmentsaccordingtotheir
scheduleddates.TheDeleteAppointmentsscreenisdisplayed.
3 SelectYestoconfirmthedeletionandpressEnter/Select.Allappointmentsare
deletedfromyourschedule.

錯誤
!
使用
[
常用
]
索引標籤將
Heading1
套用到您想要在此處顯示的文字。
錯誤!使用[常用]索引標籤將Heading2套用到您想要在此處顯示的文字。77
AppointmentReminders
Appointmentremindersaredisplayedbeforethetimeinwhichtheappointment
takesplace,accordingtothevalueselectedintheReminderfieldwhenthe
appointmentwascreated.
TheReminderscreendisplaystheappointment’ssubject,location,andthetime
remainingbeforetheappointmenttakesplace.
Youarepromptedtotakeoneofthefollowingactions:
Remindmein:EnablesyoutosetatimeintervalafterwhichtheReminderwill
pop‐upagain.
Snooze:TheReminderscreenwillpop‐upagainafterthetimeintervaldefined
intheRemindmeinfield.
Dismiss:TheReminderscreenisdismissedanddoesnotre‐appear.
Open:OpenstheAppointmentscreen.
SelectthedesiredoptionandpressEnter/Selecttocontinue.

OGOUserManual
78錯誤!使用[常用]索引標籤將Heading2套用到您想要在此處顯示的文字。
SynchronizingYourCalendarwithOgoSync
OgoSyncenablesyoutoinitiateon‐demandsynchronizationofyourcalendar.
Note: ThisfeaturerequiresthatOgoSyncbeinstalledonyourPCandthatyour
OgobephysicallyconnectedtoyourPC.
► ToinitiatesynchronizationfromyourOgocalendar:
1 VerifythatyourOgoisconnectedtothePCusingtheprovidedmini‐USBcable.
2 IntheCalendar,press andselectSynchronizefromtheOptionsmenu.The
Synchronizationscreenisdisplayed.Thedateandtimewhenyoulast
synchronizedyourOgocontactsand/orcalendarislisted(ifapplicable).
3 Tosynchronizeyourcalendar,selectSyncNowandpressEnter/Selecttobegin
thesynchronizationprocess.
Note: ForadditionaldetailsonworkingwithOgoSync,includinghowtoresolve
conflictsthatmayariseinthesynchronizationprocess,seeWorkingwith
OgoSynconpage124.
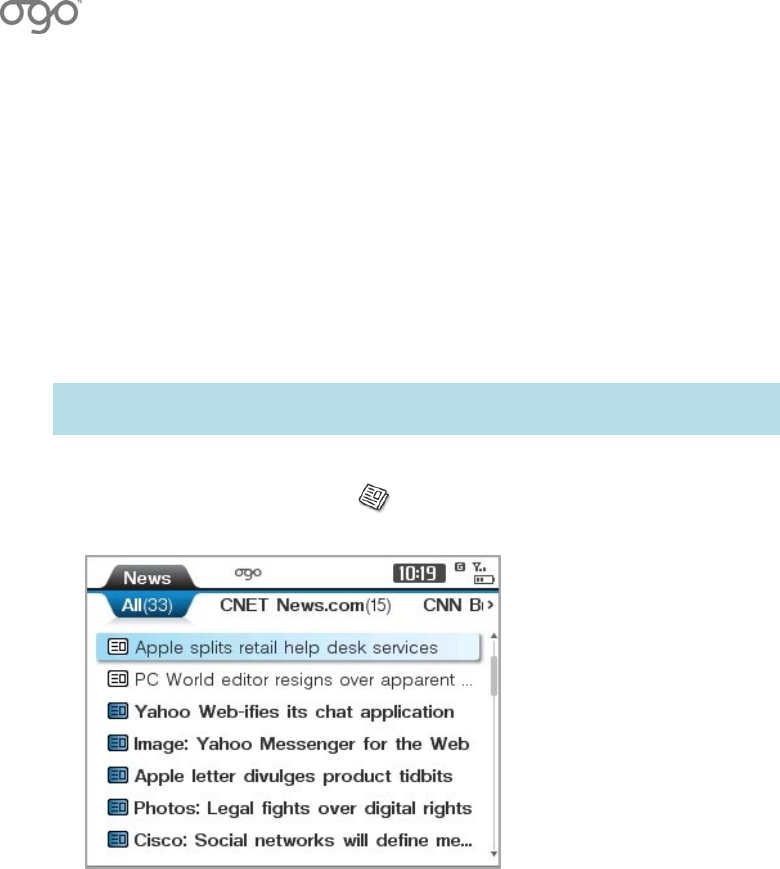
錯誤
!
使用
[
常用
]
索引標籤將
Heading1
套用到您想要在此處顯示的文字。
錯誤!使用[常用]索引標籤將Heading2套用到您想要在此處顯示的文字。79
ViewingtheNews
Tostayintouchwithyourworld,OgoenablesyoutogetRSSnewsfeedsforupto
themomentnews,information,andalertsaboutthesubjectsyoucareaboutmost.
TheOgoNewsapplicationprovidesasimpleandintuitiveinterfaceforreceiving
updatesfromwebsitesfeaturingstandardRSSfeeds.Youcanmonitorseveral
feedsconcurrently.
Note: TheNewsapplicationmaynotbeavailableonyourspecificversionofthe
Ogo.
► ToaccessNews:
IntheHomescreen,selectNewsandpressEnter/Select.TheNews
applicationisdisplayed.
Figure16:News
AccessingNews(RSS)Feeds
TheNewsapplicationcontainsseveraltabs.
TheAlltablistsalloftheavailablenewitems.Eachoftheadditionaltabsdisplaysa
singlesourceofnews(anRSSFeed),exceptfortheMyFeedstabwheretheuser
canviewthefeedproperties,addanewRSSfeed,deleteafeedorrefreshafeed.
Thenumberofunreadnewsitemsoneachtabappearsinparenthesisafterthetab
name.
Ineachnewsitemslist,thecoloroftheiconindicatesthestatusoftheitem:a
color‐fillediconindicatesanunreadnewsitem.Awhiteiconindicatesthattheitem
hasbeenread.
OGOUserManual
80錯誤!使用[常用]索引標籤將Heading2套用到您想要在此處顯示的文字。
► TorefreshalltheNewsFeeds:
IntheAlltaboftheNewsapplication,press andselectRefreshAllFeeds
fromtheOptionsmenu.Afterafewseconds,allnewsitemslistsbeginupdating.
► TorefreshoneoftheFeeds:
1 NavigatetothetabholdingtheFeedofinterest.
2 Press andselectRefreshfromtheOptionsmenu.Afterafewseconds,the
currentnewsitemslistbeginsupdating.
► Toviewanewsitem:
1 SelectthenewsitemandpressEnter/Select.Theitemisdisplayed,including
thetime,dateandsupplyingfeed.
2 PressBacktoreturntothelist,andselectanotheritemofinterest,
OR
SelectNextorPreviousbuttonatthebottomofthescreenandpress
Enter/Select,toviewthenext/previousnewsitem.
► ToviewthefullnewsitemintheWebBrowser:
1 SelectthenewsitemintheNewslist.
2 Press andselectOpeninBrowserfromtheOptionsmenu,andpress
Enter/Select.ThefullnewsitemisopenedintheWebBrowser
► Tomarkanitemasread/unread:
Selectthenewsitem,thenpress andselectMarkasUnread/MarkasRead
fromtheOptionsmenu.Thestatusofthenewsitemchangesaccordingly.
錯誤
!
使用
[
常用
]
索引標籤將
Heading1
套用到您想要在此處顯示的文字。
錯誤!使用[常用]索引標籤將Heading2套用到您想要在此處顯示的文字。81
AddingaNewsFeed
YourOgoispreconfiguredwithasetofavailablefeeds.Youcanaddfeedsuptoa
totalof10feeds.
► Toaddacustomnewsfeed:
1 IntheAlltaboftheNewsapplication,press andselectAddNewFeed
fromtheOptionsmenu.TheFeedSelectionscreenisdisplayed,withtheoption
"[Custom]"highlighted.
2 SelectDoneandpressEnter/Select.TheFeedSettingsscreenisdisplayed.
3 IntheFeedTitlefield,insertthenameyouwanttouseforthisfeed.
4 IntheFeedURLfield,insertthefeedsURLaddress.
5 InthePollingPeriodfield,settheintervalbetweencheckingfornewsupdates.
(ItcanalsobesettoOff,inwhichcasenewswillberetrievedonlywhenyou
selectRefreshfromtheOptionsmenu.)
6 Ifyouwanttogetanalertbannereachtimenewsitemsarereceived,select
BreakingNewsandpressEnter/Select.
7 SelectDoneandpressEnter/Select.Atabisaddedforthenewfeedand
relevantnewsitemsareretrievedautomatically.
► Toaddapredefinednewsfeed:
1 IntheAlltaboftheNewsapplication,press andselectAddNewFeed
fromtheOptionsmenu.TheFeedSelectionscreenisdisplayed,withtheoption
"[Custom]"highlighted.
2 PressEnter/Select.Alistofavailablefeedsisdisplayed.
3 SelectthedesiredfeedandpressEnter/Select.
4 SelectDoneandpressEnter/Select.Atabisaddedforthenewfeedand
relevantnewsitemsareretrievedautomatically.
► ToaddanRSSfeedfromOgo’sWebBrowser:
1 WhenviewingapageinyourOgo’sWebBrowser,andfindingalinktoa
desiredRSSfeed(usuallymarkedwiththestandardRSSicon),selectthe
hyperlink,andpressEnter/Select.TheAddNewFeedscreenisdisplayed,
automaticallylistingtheFeedTitleandURL.
2 Tosubscribetothefeed,selectAddandpressEnter/Select.IntheNewsscreen,
atabisaddedforthenewfeedandrelevantnewsitemsareretrieved
automatically.
OGOUserManual
82錯誤!使用[常用]索引標籤將Heading2套用到您想要在此處顯示的文字。
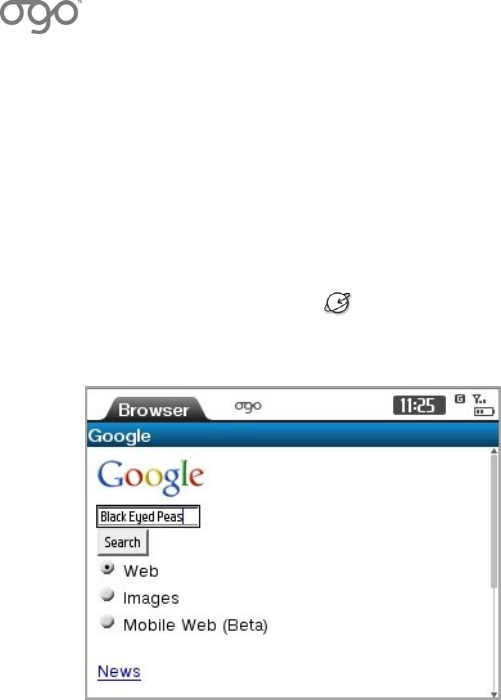
錯誤
!
使用
[
常用
]
索引標籤將
Heading1
套用到您想要在此處顯示的文字。
錯誤!使用[常用]索引標籤將Heading2套用到您想要在此處顯示的文字。83
BrowsingtheWeb
WithOgo,youcanbrowsethewebfrompracticallyanywhere.
► ToopentheWebBrowser:
IntheHomescreen,select WebBrowserandpressEnter/Select.TheWeb
Browserisdisplayed.Whentheconnectionisestablished,yourhomepage
appears.
Figure17:WebBrowser
WhilebrowsingtheInternet,thefollowingoptionsareavailablefromtheOptions
menu:
1 GotoURL:Enablesyoutoopenaspecificwebpage.Fordetails,see
RequestingaSpecificURLonpage84.
2 Navigate:Displaysasubmenuofstandardnavigationoptions,including
Refresh,Forward,Back,Stop,HomepageandHistory.
3 Bookmarks:Enablesyoutoviewyourbookmarksandbrowsinghistory.For
details,seeOpeningaBookmarkonpage86.
4 AddtoBookmarks:Enablesyoutocreatebookmarkstoselectedwebpages.
Fordetails,seeAddingaBookmarkonpage85.
5 Zoom:Displaysasubmenuofstandardzoomingoptions,includingZoomin,
Zoomout,andResetzoom.
6 ViewingOptions:Displaysasubmenuofstandardviewingoptions,including
Show/HideThumbnailView,Show/HideImages,andFullScreen/Normal
Screen.

OGOUserManual
84錯誤!使用[常用]索引標籤將Heading2套用到您想要在此處顯示的文字。
7 Renderingmode:Displaysasubmenu,enablingyoutodeterminehowcontent
isdisplayedintheWebBrowserscreen.TheavailableoptionsareStandard,
Textwrap,andScreenoptimized.Fordetails,seeChangingtheWebBrowser’s
ViewingModeonpage84.
8 PageInfo:DisplaysasubmenuthatincludesSecurity(displaysactivesession
andsessioncertificateinformationforthecurrentwebpage,whenapplicable)
andProperties(displaysthepropertiesofthecurrentwebpage,includingpage
title,address,andpagesize).
9 KeyboardShortcuts:Liststhepredefinedkeyboardshortcuts,asdescribedin
錯誤!找不到參照來源。,below.
RequestingaSpecificURL
IfyouknowtheURLofthewebpageyouwouldliketoview,youcaninserttheURL
andviewitonyourOgo.
► TogotoaspecificURL:
1 IntheWebBrowser,press andselectGotoURLfromtheOptionsmenu.
TheOpennewpagescreenisdisplayed,includingahistoryofpreviouslytyped
URLs.
2 Inthehttp://field,inserttheURLofthepagethatyouwanttoopenandpress
Enter/Select.
OR
IfyouhaverecentlytypedtheURL,selectitinthehistorylistandpress
Enter/Select.
YourOgoWebBrowserconnectstoanddisplaystherequestedURL.
ChangingtheWebBrowser’sViewingMode
TheRenderingModedetermineshowwebcontentispresentedontheOgoScreen.
► Tochangetherenderingmode:
1 IntheWebBrowser,press andselectRenderingmodefromtheOptions
menu.Asub‐menuisdisplayed.
Thefollowingrenderingmodesareavailable:
• Standard:Displaysthewebpageinitsoriginalform.Horizontalscrollingis
availableifneeded.
• Textwrap:Wrapsthetextcontentofthewebpagesothatitisnotbroken.
Horizontalscrollingisavailableifneeded.

錯誤
!
使用
[
常用
]
索引標籤將
Heading1
套用到您想要在此處顯示的文字。
錯誤!使用[常用]索引標籤將Heading2套用到您想要在此處顯示的文字。85
• Screenoptimized:Wrapsthewebpageintoasinglescreenwidth,sothat
theentirecontentcanbeviewedbyverticalscrolling.
2 SelectthepreferredrenderingmodeandpressEnter/Select.Thearrangement
ofcontentintheWebBrowserismodifiedaccordingly.
WorkingwithBookmarks
Creatingbookmarksmakesiteasiertoreturntothewebpagesthatyouneedthe
most.Andyoucanmakeiteasiertofindyourbookmarksbyorganizingtheminto
personalfolders.
AddingaBookmark
Youcancreateabookmarktoanywebpagethatyouexpecttovisitfrequently.
► Toaddabookmark:
1 WhileviewingapageintheWebBrowser,press andselectAddto
BookmarksfromtheOptionsmenu.TheAddtoBookmarksscreenisdisplayed.
ThescreennameandURLofthecurrentlydisplayedpageareinserted
automatically.
2 (Optional)Insert/editthebookmarktitle.
3 SelectOKandpressEnter/Select.TheBookmarksscreenisdisplayed,withthe
itemAddherehighlighted.
Tosavethebookmarkinmaindirectory,pressEnter/Select,
OR
Tosavethebookmarkinanexistingfolder,selectthefolderandpress
Enter/Select.AddHereishighlighted.PressEnter/Selecttoaddthebookmark.
RemovingaBookmark
Youcanremovebookmarkstowebpagesthatarenolongerofinteresttoyou.
► Toremoveabookmark:
1 IntheBookmarksscreen,selectthebookmark.
2 Press andselectDeletefromtheOptionsmenu.Thebookmarkisdeleted
fromyourBookmarkslist.
OGOUserManual
86錯誤!使用[常用]索引標籤將Heading2套用到您想要在此處顯示的文字。
AddingaFolder
Foreasiernavigation,youcancreatefoldersforyourbookmarks.
► Toaddafolder:
1 IntheBookmarksscreen,press andselectCreatenewfolderfromthe
Optionsmenu.TheEnter/Selectfoldernamescreenisdisplayed.
2 Insertthefoldername.
3 SelectOKandpressEnter/Select.ThefolderisaddedintheBookmarksscreen.
OpeningaBookmark
Selectingabookmarkisafastandeasywayofopeningawebpage.
► Toopenapageusingabookmark:
1 IntheWebBrowserscreen,press andselectOpenfromtheOptionsmenu.
Asub‐menuisdisplayed.
2 SelectBookmarksandpressEnter/Select.TheBookmarksscreenisdisplayed.
3 SelectabookmarkandpressEnter/Selecttodisplaythecorrespondingweb
page.
ViewingYourBrowsingHistory
YoucanviewalistoftheURLsrecentlyopenedonyourOgo.
► Toviewthehistory:
1 IntheWebBrowser,press andselectNavigationfromtheOptionsmenu.
Asub‐menuisdisplayed.
2 SelectHistoryandpressEnter/Select.TheHistoryscreenisdisplayed.
Thesitesaccessedaresortedaccordingtoday,fromthecurrentdaybackward.
YoucantakethefollowingactionsfromwithintheHistoryscreen:
• Toviewthesitesaccessedaspecificday,selectthedayandpress
Enter/Select.
• Tosortthesites(bydate,bysite,bylastvisited,orbymostvisited),press
andselectSortfromtheOptionsmenu.
• Toviewalistofpagesaccessedonaspecificsite,selecttheURLandpress
Enter/Select.
• Todisplayaspecificpage,selectthepageinthelistandpressEnter/Select.
錯誤
!
使用
[
常用
]
索引標籤將
Heading1
套用到您想要在此處顯示的文字。
錯誤!使用[常用]索引標籤將Heading2套用到您想要在此處顯示的文字。87
• Todeleteaselectedsite/page,press andselectDeletefromthe
Optionsmenu.
• Tocleartheentirehistory,press andselectDeleteallfromthe
Optionsmenu.
DownloadingContent
YoucandownloadcontentfromtheInternetusingtheOgoWebBrowser.
► Todownloadanaudioorvideofile:
1 IntheWebBrowser,selecttheitemthatyouwanttodownloadfromthe
relevantwebpage.
2 PressEnter/Select.TheFilePropertiesscreenisdisplayed.
3 SelectDownloadandpressEnter/Select.TheFileNamescreenisdisplayed.
Thefileformatandthenameofthefolderinwhichitistobesavedare
indicated.
4 (Optional)IntheRenamefield,setthenameofthefileasitistobesavedon
theOgo.
5 SelectOKandpressEnter/Select.TheDownloadingscreenisdisplayed.A
progressbarindicatestheprogressofthedownloadingprocess.Whenthe
downloadiscomplete,amessageisdisplayedindicatingthattheoperationhas
completedsuccessfully.
► Todownloadanimagefile:
1 IntheWebBrowser,selecttheitemthatyouwanttodownloadfromthe
relevantwebpage.
2 PressEnter/Select.Theimageisdisplayed.
3 Press andselectSaveasfromtheOptionsmenu.TheFileNamescreenis
displayed.Thefileformatandthenameofthefolderinwhichitistobesaved
areindicated.
4 (Optional)IntheRenamefield,setthenameofthefileasitistobesavedon
theOgo.
5 SelectOKandpressEnter/Select.TheSavingprogressscreenisdisplayed.
Whenthedownloadiscomplete,amessageisdisplayedindicatingthatthe
operationhascompletedsuccessfully.
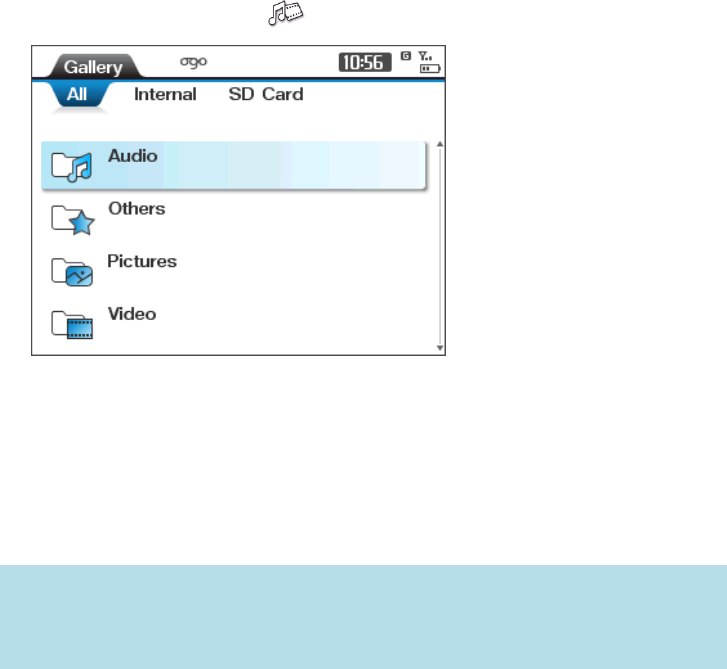
OGOUserManual
88錯誤!使用[常用]索引標籤將Heading2套用到您想要在此處顯示的文字。
NavigatingYourGallery
YourOgoGalleryallowsyoutoviewyourfilesandfoldersintheorderand
structurethattheyarearrangedontheOgo.
Inaddition,youcantakeadvantageofMassStoragemodetotransferfilesto/from
yourOgousingaUSBconnection.Fordetails,seeConfiguringtheDeviceSettings
onpage114.
► ToaccesstheGallery:
IntheHomescreen,select andpressEnter/Select.TheGalleryisdisplayed.
Figure18:Gallery
TheGalleryincludesthefollowingtabs:
All:DisplaysboththeSDCardfilesandinternalfilesandfolders.
Internal:DisplaysonlythosefileslocatedontheOgo'sinternalmemory.
SDCard:DisplaysonlythosefileslocatedontheSDCard.
Note: WhenyouconnecttheOgotoaPCusingtheprovidedmini‐USBcable,you
arepromptedtoselectaUSBmode.WhenMassStoragemodeisselected,
theGallerybecomeslockedtoplayingormanipulatingfilesuntiltheUSB
cableisdisconnected.

錯誤
!
使用
[
常用
]
索引標籤將
Heading1
套用到您想要在此處顯示的文字。
錯誤!使用[常用]索引標籤將Heading2套用到您想要在此處顯示的文字。89
ThefollowingoptionsareavailablefromtheOptionsmenuinthemainGallery
screen:
1 OpenFolder:Displaysthecontentsofaselectedfolder.Fordetails,see
OpeningFoldersonpage89.
2 SortBy:Sortthecontentsofthedisplayedlistaccordingtofilename,date,size,
ortype.Fordetails,seeSortingFolderContentsonpage90.
3 MemoryDetails:Displaysdetailsregardingtheamountofspaceavailablein
theOgo’smemory.Fordetails,seeViewingMemoryDetailsonpage97.
Note: Theexactoptionsvaryaccordingtothetypeoffolderoritemselected
(Pictures,Audio,Video,orOthers).
OpeningFolders
TheGalleryhasfourtoplevelpredefinedfolders:Pictures,Audio,Videoand
Others.
Note: WhenablankSDcardisinsertedintheOgo,theOgoautomaticallycreates
thesetofpredefinedfoldersontheSDcard.
► Toopenafolder:
SelectthefolderintheGalleryandpressEnter/Select.Thefoldercontentsare
listed,includingthetype,size,anddatesavedofeachfile.
Whileviewingthecontentsofamediafolder,thefollowingoptionsareavailable
fromtheOptionsmenu:
1 ViewPicture/Play:Enablesyoutoviewanimagefileorplayanaudioorvideo
file.Fordetails,seeOpeningaFileonpage90.
2 Setas:EnablesyoutosetanimagefileastheWallpaperorContactPicture,or
anaudiofileasyourRingtoneorasaContactRingtone.
3 Manage:Enablesyoutocreatefolders,andcopy,move,andrenamefolders
andfiles.Fordetails,seeManagingFiles/Foldersonpage93.
4 Delete:Enablesyoutodeleteafileorfolder.Fordetails,seeDeletinga
File/Folderonpage95.
5 SortBy:Sortthecontentsofthedisplayedlistaccordingtofilename,date,size,
ortype.Fordetails,seeSortingFolderContentsonpage90.
6 FileDetails:Displaysthebasicpropertiesoftheselectedfile.Fordetails,see
ViewingFileDetailsonpage97.
7 MemoryDetails:Displaysdetailsregardingtheamountofspaceavailablein
theOgo’smemory.Fordetails,seeViewingMemoryDetailsonpage97.
OGOUserManual
90錯誤!使用[常用]索引標籤將Heading2套用到您想要在此處顯示的文字。
SortingFolderContents
Youcansortthecontentsofafolderaccordingtofilename,date,size,ortype.
► Tosortthecontentsofthedisplayedfolder:
1 Press andselectSortbyfromtheOptionsmenu.Asub‐menuisdisplayed.
2 Selectthecriteriaaccordingtowhichyouwanttosortthefoldercontents
(Name,Date,Size,orType),andpressEnter/Select.Thefoldercontentsare
sortedaccordingly.
OpeningaFile
Filesareopenedaccordingtothefiletype:
AudioandvideofilesareopenedinthePlayer.
ImagefilesareopenedintheImageviewer.
Selectingamediafile(audioorvideo)willplayallthemediafilesintheselected
folder,oneafteranother,intheorderinwhichtheyappearinthefolder.
Note: FordetailsonworkingwiththePlayer,seePlayingMusicandVideowith
Playeronpage98.
OpeninganAudioFile
► Toopenanaudiofile:
1 Selecttheaudiofilethatyouwouldliketoopen.
2 PressEnter/Select,orpress andselectPlayfromtheOptionsmenu.The
audiofileisopenedinthePlayer.Whilelisteningtotheaudioselection,you
canpauseorstopaselectedtrack,aswellasnavigatetolocationswithinthe
currenttrack.Fordetails,seeTrackOperationsonpage99.
錯誤
!
使用
[
常用
]
索引標籤將
Heading1
套用到您想要在此處顯示的文字。
錯誤!使用[常用]索引標籤將Heading2套用到您想要在此處顯示的文字。91
OpeningaVideoFile
► Toopenanvideofile:
1 Selectthevideofilethatyouwouldliketoopen.
2 PressEnter/Select,orpress andselectPlayfromtheOptionsmenu.The
videofileisopenedinthePlayer.
Whileplayingavideofile,youcanpauseorstop,aswellasnavigateto
locationswithinthecurrenttrack.Fordetails,seeTrackOperationsonpage99.
Note: Topauseavideofilewhiledisplayedinfullscreen,pressanykey.The
Trackingoptionsappearbelowthevideodisplay.
OpeninganImageFile
► Toopenanimagefile:
1 Selecttheimagefilethatyouwouldliketoopen.
2 PressEnter/Select,orpress andselectViewPicturefromtheOptions
menu.TheimageisdisplayedintheImageViewer.
Note: Toclosetheimagefileandreturntothepreviousscreen,press.
WhileviewinganimageintheImageViewer,thefollowingoptionsare
availablefromtheOptionsmenu:
1 Zoom:Enablesyoutozoominandouttogetacloser/moredistantviewof
theimage.Fordetails,seeZoomingIn/OutintheImageViewer,page92.
2 Rotate:Enablesyoutorotatetheimagefile.Fordetails,seeRotatingan
Image,page93.
3 Normalview/fullscreen:Enablesyoutoswitchbetweenfullscreenand
normalviewingoptions.Fordetails,seeAlternatingBetweenFulland
NormalView,page92.
4 SetAsWallpaper:Youcanalsosetthepictureasyourwallpaperorasa
contactpicture.Fordetails,seeSettinganImageFileasWallpaperonpage
95andSettinganImageFileasaContactPictureonpage95.
Inaddition,youcanpanacrosstheimagetochangetheportionofthepicture
currentlyinview.Fordetails,seePanningintheImageVieweronpage92.

OGOUserManual
92錯誤!使用[常用]索引標籤將Heading2套用到您想要在此處顯示的文字。
ZoomingIn/OutintheImageViewer
YoucanzoominandoutoftheimageusingtheNavigationkeyorbyselectingthe
relevantzoomoptionfromtheOptionsmenu.
► TozoominoroutusingtheNavigationkey:
Tozoomin,presstheupperarrowkeyontheouterringofthenavigationkey.
Thecurrentzoomlevelisdisplayedinthelowerrightcornerofthescreen.To
zoomincloser,pressthekeyagainorholditdownuntilthedesiredzoomis
reached.
Tozoomout,presstheupperlowerkeyontheouterringofthenavigationkey.
Thecurrentzoomlevelisdisplayedinthelowerrightcornerofthescreen.To
zoomoutmore,pressthekeyagainorholditdownuntilthedesiredzoomis
reached.
► TozoominoroutfromtheOptionsmenu:
1 PressandselectZoomfromtheOptionsmenu.Asub‐menuisdisplayed.
2 Selectthedesiredview(Zoomin,Zoomout,Fittoscreen,orActualsize)and
pressEnter/Select.Theviewisadjustedaccordingly.
PanningintheImageViewer
Whenthedisplayedimageexceedstheedgesofthescreen,youcanuseNavigation
keytopanleftorright,orupanddown,inordertochangetheportionofthe
imagethatiscurrentlyinview.
Topanup,pressthetoparrowkeyontheInnerringofthenavigationkey.To
movefurtherup,pressthekeyagainorholditdownuntilthedesiredviewis
reached.
Topandown,pressthebottomarrowkeyontheInnerringofthenavigation
key.Tomovefurtherdown,pressthekeyagainorholditdownuntiltheviewis
reached.
Topanleft,presstheleftarrowkeyontheInnerringofthenavigationkey.To
movefurtherleft,pressthekeyagainorholditdownuntilthedesiredviewis
reached.
Topanright,presstherightarrowkeyontheInnerringofthenavigationkey.
Tomovefurtherright,pressthekeyagainorholditdownuntilthedesired
viewisreached.
錯誤
!
使用
[
常用
]
索引標籤將
Heading1
套用到您想要在此處顯示的文字。
錯誤!使用[常用]索引標籤將Heading2套用到您想要在此處顯示的文字。93
AlternatingBetweenFullandNormalView
Bydefault,picturesareopenedintheImageViewerinFullscreenview.Youcan
changetheviewtoNormalviewatanytimebypressingEnter/Select,orby
selectingthefollowingmenuoptions:
1 TochangetheviewtoNormalview,press andselectNormalviewfrom
theOptionsmenu.Theviewisadjustedaccordingly.
2 TochangetheviewbacktoFullscreenview,press andselectFullscreen
fromtheOptionsmenu.Theviewisadjustedaccordingly.
RotatinganImage
Youcanrotateanimagethatisdisplayedinthebrowser,Galleryormailbox,by
Enter/SelectandselectingRotatefromtheOptionsmenu.Thenselectthedesired
rotationoptionfromthesub‐menuthatisdisplayed,90⁰Right,90⁰Left,or180⁰.
Note: Theimageisrotatedfordisplaypurposesonly.Theimageitselfisnot
changed;thenexttimeyouopentheimageitisdisplayedinitsoriginal
version.
ManagingFiles/Folders
CreatingaNewFolder
YoucancreatenewfolderswithintheGallery’spredefinedfolders,enablingyouto
organizethecontentsofthepredefinedfolderstomeetyourneeds.
► Tocreateanewfolder:
1 Press andselectManagefromtheOptionsmenu.Asub‐menuisdisplayed.
2 SelectCreatenewfolderandpressEnter/Select.TheCreatenewfolderpopup
windowisdisplayed.
Note: Thefolderlocationcannotbeedited.
3 InsertthefoldernameintheNamefieldandselectOK.Thenewfolderis
added.
Note: Ifafolderwiththesamenamealreadyexistsinthefolder,youare
promptedtorenamethefolder.InsertanewnameandselectOK.
OGOUserManual
94錯誤!使用[常用]索引標籤將Heading2套用到您想要在此處顯示的文字。
MovingaFile
YoucanmoveafilefromonefoldertoanotherfolderintheGallery.
► Tomoveafile:
1 SelectthefileintheGallery.
2 Press andselectManagefromtheOptionsmenu.Asub‐menuisdisplayed.
3 SelectMoveandpressEnter/Select.TheMovetopopupwindowisdisplayed.
Note: IfyouinstalledanSDCardonyourOgo,youwillbeaskedtoselectthe
desireddestination–InternalorSDCard.
4 Selectthelocationintowhichyouwanttomovetheselectedfileandpress
Enter/Select.Thefiledirectorylocationliststhetargetlocation.
5 SelectMoveHereandpressEnter/Selecttomovethefiletothecurrent
location.
CopyingaFile
YoucancopyafilefromonefoldertoanotherfolderintheGallery.
► Tocopyafile:
1 SelectthefileintheGallery.
2 Press andselectManagefromtheOptionsmenu.Asub‐menuisdisplayed.
3 SelectCopyandpressEnter/Select.TheCopytopopupwindowisdisplayed.
Note: IfyouinstalledanSDCardonyourOgo,youwillbeaskedtoselectthe
desireddestination–InternalorSDCard.
4 Selectthelocationintowhichyouwanttoplaceacopyoftheselectedfileand
pressEnter/Select.Thefiledirectorylocationliststhetargetlocation.
5 SelectCopyHereandpressEnter/Selecttocopythefiletothecurrentlocation.
TheCopyingpopupwindowisdisplayedbrieflywhilethefileiscopied.
RenamingaFile/Folder
YoucanchangethenameofafileorfolderintheGallery.
Note: Youcannotrenamepredefinedfolders.
► Torenameafile/folder:
1 SelectthefileorfolderintheGallery.
2 Press andselectManagefromtheOptionsmenu.Asub‐menuisdisplayed.
錯誤
!
使用
[
常用
]
索引標籤將
Heading1
套用到您想要在此處顯示的文字。
錯誤!使用[常用]索引標籤將Heading2套用到您想要在此處顯示的文字。95
3 SelectRenameandpressEnter/Select.TheRenamepopupwindowis
displayed.
4 Insertthenewfile/foldernameintheNamefieldandselectOK.Thenameis
changed.
Note: Ifafailed/folderwiththesamenamealreadyexistsinthecurrentfolder,
youarepromptedtorenamethefile/folder.Insertanewnameandselect
OK.
DeletingaFile/Folder
YoucandeleteafileorfolderintheGallery.
► Todeleteafile/folder:
1 Selectthefileorfolderthatyouwouldliketodelete.
2 Pressthebutton,orpress andselectDeletefromtheOptionsmenu.
TheDeleteconfirmationscreenisdisplayed.
Note: Iftheselectedfile/folderisinuse,thefileinusescreenisdisplayed,
promptingyoutoclosefileandtotryagain.
3 SelectYestoconfirm.Theselectedfileorfolderisdeleted.
SettinganImageFileasWallpaper
Youcansetimagefilesaswallpaper.
► TosetapictureasWallpaper:
1 Selectanimagefile,press andselectSetasfromtheOptionsmenu.Asub‐
menuisdisplayed.
2 SelectWallpaperandpressEnter/Select.Aprogressbarisdisplayedbrieflyin
theWallpaperscreen.Thewallpaperissetandamessageisdisplayed
indicatingthattheoperationhascompletedsuccessfully.
SettinganImageFileasaContactPicture
YoucanselectanimagefileintheGalleryandassignittoaspecificcontact.The
ContactPictureisdisplayedintheContactProfileandContactCard,andappears
duringanincomingcallfromthecontact.
► TosetapictureasaContactPicture:
1 Selectanimagefile,press andselectSetasfromtheOptionsmenu.Asub‐
menuisdisplayed.
OGOUserManual
96錯誤!使用[常用]索引標籤將Heading2套用到您想要在此處顯示的文字。
2 SelectContactpictureandpressEnter/Select.TheContactspopupwindowis
displayed.
Note: Ifnocontactsareavailable,theContactpicturesub‐menuoptionis
disabled.
3 NavigatetothepreferredcontactandpressEnter/Select.
Thecontactpictureissetandamessageisdisplayedindicatingthatthe
operationhascompletedsuccessfully.
SettinganAudioFileasaRingtone
Youcansetaudiofilesasringtones.
► Tosetanaudiofileasaringtone:
1 Selectanaudiofile,press andselectSetasfromtheOptionsmenu.Asub‐
menuisdisplayed.
2 SelectRingtoneandpressEnter/Select.
Theringtoneissetandamessageisdisplayedindicatingthattheoperationhas
completedsuccessfully.
SettinganAudioFileasaContactRingtone
YoucanselectanaudiofileintheGalleryandsetitastheringtoneforaspecific
contact.
Note: YoucanalsosettheringtoneforacontactintheContactProfile,as
describedinAssigningaRingtonetoaContactonpage67.
► Tosetanaudiofileasacontactringtone:
1 Selectanaudiofile,press andselectSetasfromtheOptionsmenu.Asub‐
menuisdisplayed.
2 SelectContactRingtoneandpressEnter/Select.TheContactspopupwindowis
displayed.
Note: Ifnocontactsareavailable,theContactpicturesub‐menuoptionis
disabled.
3 NavigatetothepreferredcontactandpressEnter/Select.Amessageis
displayedindicatingthattheoperationhascompletedsuccessfully.
Note: Ifthereisnotenoughmemorytosetanewringtoneasacontactringtone,
theNotEnoughMemorymessageisdisplayedpromptingyoutoremovea
differentcontactringtoneandtotryagain.

錯誤
!
使用
[
常用
]
索引標籤將
Heading1
套用到您想要在此處顯示的文字。
錯誤!使用[常用]索引標籤將Heading2套用到您想要在此處顯示的文字。97
ViewingMemoryDetails
Youcanviewdetailsregardingtheamountofspaceavailableforsavingmultimedia
files.
► Toviewthememoryutilization:
IntheGallery,press andselectMemoryDetailsfromtheOptionsmenu.
TheMemoryDetailspopupwindowisdisplayed,listingtheamountofspace
availableintheOgo’sinternalmemoryandontheSDcard(ifinstalled).
ViewingFileDetails
Youcanviewthebasicpropertiesofamultimediafile.
► Toviewthefileproperties:
IntheGallery,press andselectFileDetailsfromtheOptionsmenu.The
FileDetailspopupwindowisdisplayed,listingthefilename,format,creation
date,size,resolution,andcolordepth.
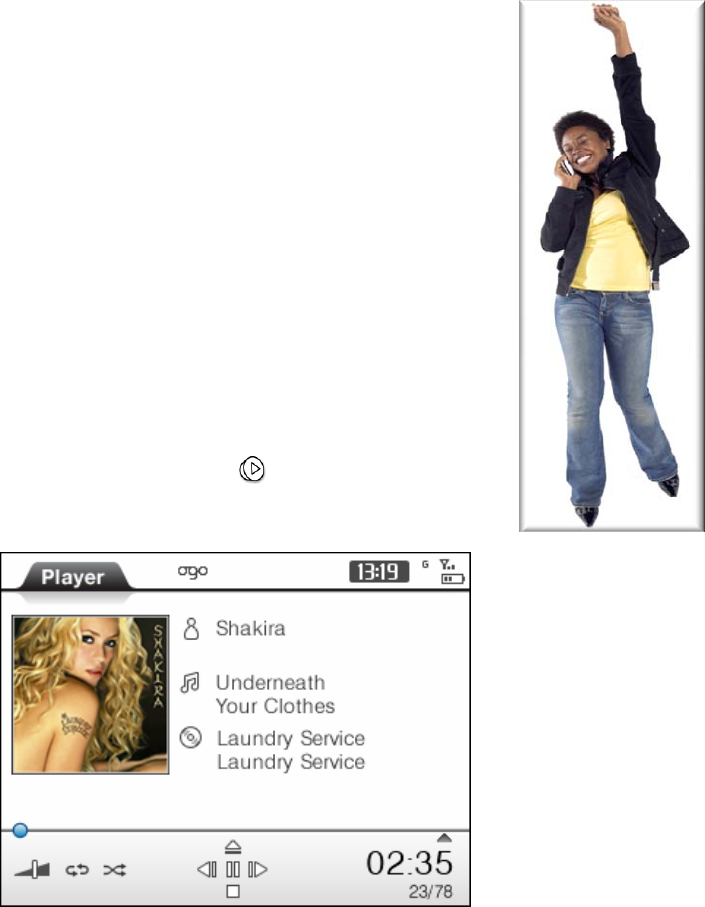
OGOUserManual
98錯誤!使用[常用]索引標籤將Heading2套用到您想要在此處顯示的文字。
PlayingMusicandVideowithPlayer
ThePlayerplaysaudioandvideofilesthatareopenedfrom
theGallery,WebBrowser,andE‐mailmodules.Youcanalso
selectandplayfilesfromwithinthePlayer.
YoucanusethePlayerto:
Playaudiofiles.
Playvideofiles.
Performbasictrackoperations(Play,Stop,Pause,Next,
Previous,FastForward,andRewind).
► ToaccessthePlayer:
IntheHomescreen,select andpressEnter/Select,or
openanaudioorvideofileonyourOgo.ThePlayeris
displayed.
Figure19:Player
ThefollowingoptionsareavailablefromtheOptionsmenuinthePlayer:
OpenFromGallery:EnablesyoutoselectapicturefromtheGalleryanddisplay
itinthePlayer.Fordetails,seeOpeningaFileinthePlayeronpage99.
GetMore:OpenstheWebBrowser,enablingyoutoformorecontentitemson
theInternet.Fordetails,seeBrowsingtheWebonpage83.
Repeat:Enablesyoutorepeatthecurrentlyplayingtrackoralltracks.For
details,seeRepeatAllandRepeatThisTrackonpage100.
錯誤
!
使用
[
常用
]
索引標籤將
Heading1
套用到您想要在此處顯示的文字。
錯誤!使用[常用]索引標籤將Heading2套用到您想要在此處顯示的文字。99
SetasRingtone:SetsthecurrentlyplayingaudiotrackasyourOgoringtone.
(Thisoptionisavailablyonlywhenanaudiofileisselected).
Equalizer:EnablesyoutoselecttheEqualizersettings.Fordetails,seeEqualizer
onpage102.
OpeningaFileinthePlayer
WiththePlayeropen,youcanselectandplayaudioandvideofilesfromwithinthe
Galleryandplaythem.
► ToopenafilefromtheGallery:
1 InthePlayer,press andselectOpenfromGalleryfromtheOptionsmenu.
Theavailablefoldersarelisted.
2 SelectafolderandpressEnter/Selecttoviewthefoldercontents.Togoback
tothepreviouslocation,press.
3 SelectamediafileandpressEnter/SelecttoopenthefileinthePlayer.Thefile
beginstoplayinthePlayer.
PlayerFeatures
TrackOperations
YoucanperformbasicoperationsinthePlayerwhilelisteningtoorviewingaudio
and/orvideofiles.Theseincludeplaying,pausing,andstoppingthecurrently
playedtrack,aswellasnavigatingtolocationswithinthetrack.
Thetrackoperationsareperformedbypressingtheinnerorouterarrowkeysof
the4‐waynavigationkey,asdescribedinTable11.
Table11:TrackOperationOptionsusingthe4‐wayNavigationKey
OptionDescription
Play/Pause
PresstheinneruparrowkeyorpressEnter/Selectto
startplayingthetrack.Thecontrolmaptogglesto
showthePauseicon.
Whenatrackisplaying,pressagaintopausethetrack.
Stop
Presstheinnerdownarrowkeytostopthecurrent
track,andreturntothebeginningofthistrack.
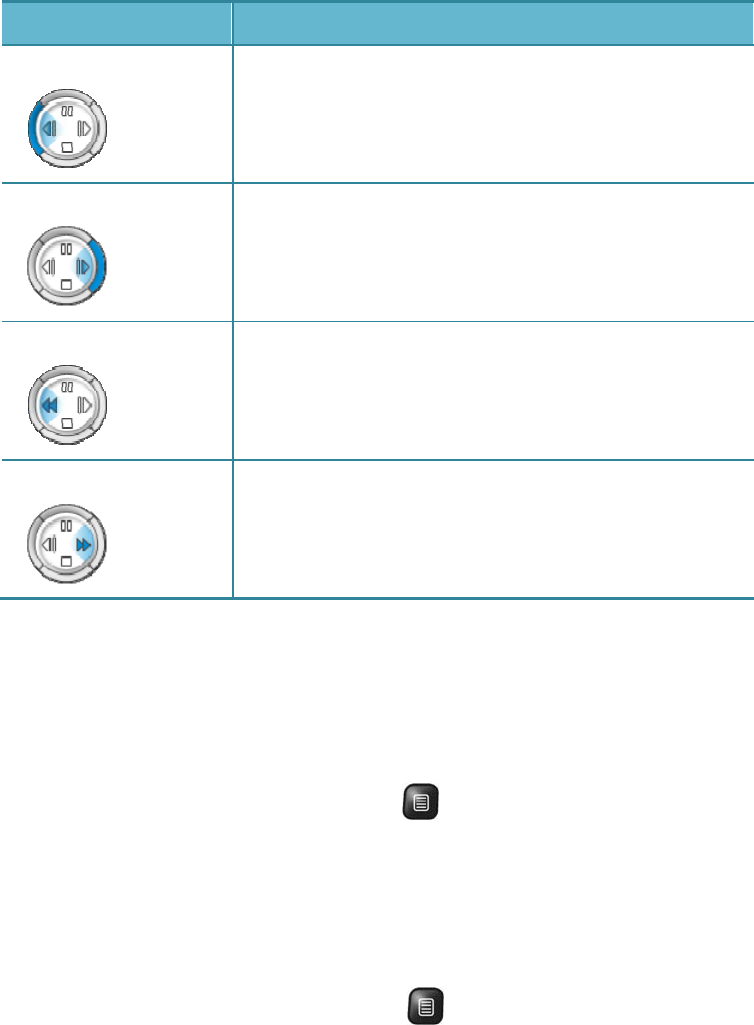
OGOUserManual
100錯誤!使用[常用]索引標籤將Heading2套用到您想要在此處顯示的文字。
OptionDescription
Previous
Tostartthetrackoverwhileitisplaying,pressthe
outerleftarrowkey.Toselecttheprevioustrack,
presstwice.
Next
Toskiptothenexttrackinthelistwhileatrackis
playing,presstheouterrightarrowkey.
Rewind
Torewindthroughthetrackwhileitisplaying,press
andholdtheinnerleftarrowkeyuntilyoureachthe
desiredlocation.
FastForward
Tofastforwardthroughthetrackwhileitisplaying,
pressandholdtheinnerleftarrowkeyuntilyoureach
thedesiredlocation.
RepeatAll
YoucanopttoplayanentirefolderoverandoveragainbyselectingtheRepeatAll
option.
► ToactivatetheRepeatAlloption:
1 Openanaudioorvideofile,press andselectRepeatfromtheOptions
menu.Asub‐menuisdisplayed.
2 SelectAllandpressEnter/Select.ThePlayerplaysallthetracksinthecurrent
folder.Whenthelastsongonthelistends,theplayerresumesplayingthefirst
trackonthelist.
► TocanceltheRepeatAlloption:
Openanaudioorvideofile,press andselectCancelRepeatfromthe
Optionsmenu.TheRepeatAlloptioniscancelled.
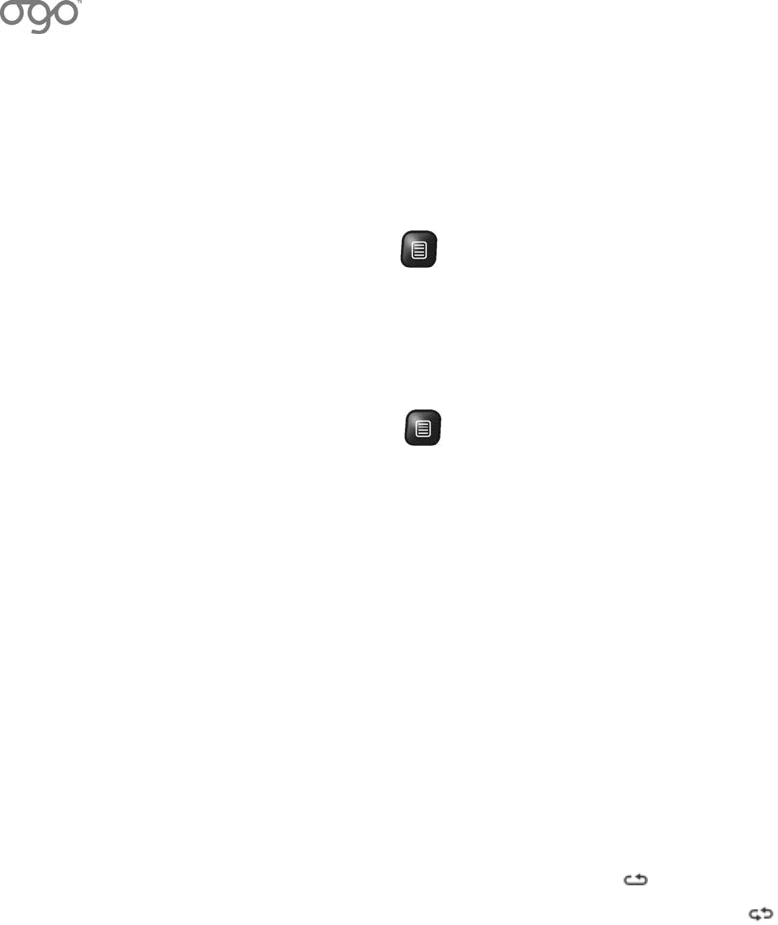
錯誤
!
使用
[
常用
]
索引標籤將
Heading1
套用到您想要在此處顯示的文字。
錯誤!使用[常用]索引標籤將Heading2套用到您想要在此處顯示的文字。101
RepeatThisTrack
YoucanopttoplaythesametrackoverandoveragainbyselectingtheRepeat
ThisTrackoption.
► ToactivatetheRepeatThisTrackoption:
1 Openanaudioorvideofile,press,andselectRepeatfromtheOptions
menu.Asub‐menuisdisplayed.
2 SelectThisTrackandpressEnter/Select.ThePlayerplaystheselectedtrack
repeatedlyuntiltherepeatoptioniscanceled.
► TocanceltheRepeatThisTrackoption:
Openanaudioorvideofile,press,andselectCancelRepeatfromthe
Optionsmenu.ThePlayerstopsrepeatingthetrack.
AudioFeatures
Whenplayinganaudiofile,thePlayerdisplaysthefollowingdetailsandoptions:
InformationArea:Displaysthefollowingdetails:
• Artist:Thetrack’sartist’sname.
• Track:Thetrackname.
• Album:Thealbumname.
TrackNumber:Asingletrackispresentedas1/1.Ifthetrackispartofafolder,
thisparameterispresentedas1/X.
ModeIndication:IndicatesthecurrentRepeatmode.Thefollowingmodesare
available:
• Repeat:Whenonetrackissettorepeat,theRepeaticon isdisplayed.
• RepeatAll:Whenalltracksaresettoberepeated,theRepeatAllicon
isdisplayed.
WhenRepeatisnotset,themodeindicationremainsempty.
CurrentPlayTime:Displaysthetrack’scurrentplaytime.
TrackProgressBar:Displaysthetrack’scurrentlocationinrelativetothe
track’sentireduration.

OGOUserManual
102錯誤!使用[常用]索引標籤將Heading2套用到您想要在此處顯示的文字。
Equalizer
TheOgoPlayerisprovidedwiththreepresetequalizeroptions(Classic,Jazz,and
Optimized).Inaddition,youcanconfigureyourowncustomsettings.
► Tosettheequalizer:
1 InthePlayer,press andselectEqualizerfromtheOptionsmenu.The
Equalizerscreenisdisplayed.
2 SelectPresentandpressEnter/Selecttodisplaytheavailableequalizeroptions
(Classic,Jazz,Custom,orOptimized).
3 SelectthetypeofequalizeryouwanttouseandpressEnter/Select.
4 Ifyouselectapresettypeofequalizer,youdonotneedtoconfigureany
additionalvalues.SelectDoneandpressEnter/Selecttosaveyourselection.
5 IfyouselectCustom,theEditoptionisenabled.SelectEditandpress
Enter/Selecttocustomizethesettings.TheCustomScreenisdisplayed,
enablingyoutoraiseorlowerthevaluesassignedtoeachaspectofthe
equalizer.Afteradjustingthesettingstomatchyourpreferences,selectOKand
pressEnter/SelecttoreturntotheEqualizerscreen.SelectDoneandpress
Enter/SelecttosavetheEqualizersettings.
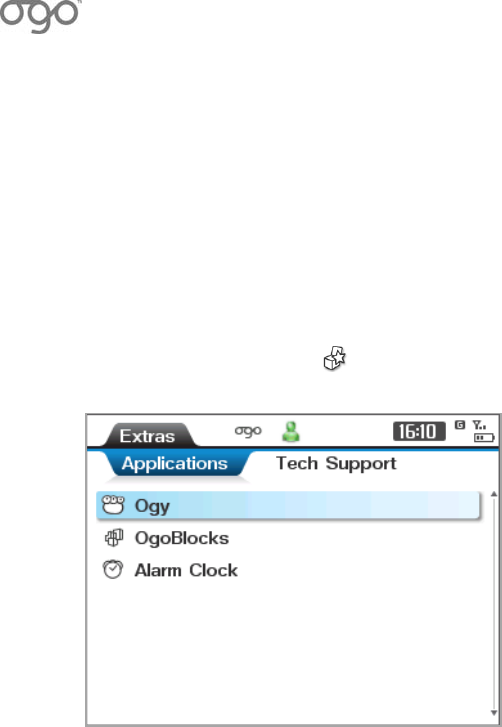
錯誤
!
使用
[
常用
]
索引標籤將
Heading1
套用到您想要在此處顯示的文字。
錯誤!使用[常用]索引標籤將Heading2套用到您想要在此處顯示的文字。103
OgoExtras
TheOgoExtrasprovideaccesstoanyadditionalapplicationsavailableontheOgo,
suchasOgoBlocksandtheAlarmClock,aswellastothecontactdetailsfor
technicalsupportpurposes.
► ToaccessExtras:
IntheHomescreen,select ExtrasandpressEnter/Select.TheExtrasscreen
isdisplayed.
Figure20:OgoExtras
TheExtrasscreenincludestwotabs:
Applications:Listsanypre‐installedapplicationsavailableontheOgo.
TechSupportInfo:Liststhecontactdetailsfortechnicalsupportpurposes.
SettingtheAlarmClock
YoucantakeadvantageofOgo’sbuiltinalarmclocktowakeyouupinthemorning
ortoremindyouofanimportantappointments.
Tosetanalarm:
1 IntheAlarmscreen,selectSetAlarmandpressEnter/Select.TheSetAlarm
screenisdisplayed.
2 IntheAlarmtimefield,setthetimeatwhichyouwantthealarmtogooff.
3 SelectActivateandpressEnter/Select.Thealarmisactivated.

OGOUserManual
104錯誤!使用[常用]索引標籤將Heading2套用到您想要在此處顯示的文字。
Toconfigurethealarmclock:
1 IntheApplicationtaboftheExtrasscreen,selectAlarmClockandpress
Enter/Select.
2 SelectConfigureandpressEnter/Select.TheConfigureAlarmscreenis
displayed.
3 SelectRecurrenceandpressEnter/Select.Amenuoffrequenciesisdisplayed.
Scrollandselectthedesiredfrequency(Once,Daily,orWorkingDays),and
pressEnter/Select.
4 SelectAlarmtoneandpressEnter/Select.Amenuofalarmsoundsis
displayed.Scrollandselectthedesiredringtone.
Note: Whenanalarmtoneisselected,itisplayed.Youcanscrollthroughand
listentothevariousalarmtonesbeforemakingyourselection.
5 Toenablethevibratingalert,selectVibrationandpressEnter/Select.
(PressingEnter/Selectwhentheoptionisalreadyselectedclearsthecheckbox,
anddisablesthevibratingalert.)
6 SelectOKandpressEnter/Selecttosavethealarmconfiguration.
Tocancelanalarm:
1 IntheApplicationtaboftheExtrasscreen,selectAlarmClockandpress
Enter/Select.
2 SelectDeactivateandpressEnter/Select.Thealarmiscancelled.
Toturnoffanalarm:
Whenthealarmclockgoesoff,thealarmtoneisplayedandtheAlarmscreenis
automaticallydisplayed.
Toturnoffthealarm,selectDismissandpressEnter/Select.
Tosetthealarmtogooffagainafterapresetinterval,selectSnoozeandpress
Enter/Select.
Note: ThedefaultsnoozeperiodisdefinedintheCalendartaboftheSettings
screen.
PlayingOgy
TakecontroloverOgy,thethree‐eyedmonster.Rollandbouncearoundstages,
andfindyourwaytotheexitofeachstagetounlockmorestagesandbonuses.
ManydifferentobstaclesandsituationsawaitOgyasittriestocollectasmanyOgo
devicesaspossible.
錯誤
!
使用
[
常用
]
索引標籤將
Heading1
套用到您想要在此處顯示的文字。
錯誤!使用[常用]索引標籤將Heading2套用到您想要在此處顯示的文字。105
TrytobeateachstageasfastasyoucanwhilecollectingasmanyOgodevicesas
youcantogetthehighestscorepossible–IfyoumanagetocollectalltheOgo
devicesinthestage,youwillgetaperfectbonusandeventuallyunlocksecret
bonusstages!
Yourprogresswillalwaysbeautomaticallysaved,andyoucancontinueplaying
fromthelaststagethatyoureached.Youcanalsopausethegameatanypointand
returntoitatalatertime,continuingfromtheexactsamespotthatyouleft.
► ToplayOgy:
1 IntheApplicationtaboftheExtrasscreen,selectOgyandpressEnter/Select.
2 SelectStartNewGamefromthegamemenutobegintheadventure.
3 Usethecontrolkeys(Table12)tomoveOgyaroundwhileplayingthegame.
Table12:OgyGameControls
ControlKeyFunctionality
Left/RightArrows
OrA/Skeys
RollOgyclockwiseorcounterclockwise.
Enter/Select/UparrowMakeOgyjump.
Arrowkeys MovetheworldviewtolookaroundOgyand
seethesurroundingarea.
RRestartthestage.AllyourcollectedOgo'sin
thatstagewillbelost.
P,Space Pausesorresumesanactivegame.
Space‐whileoveraninfo
sign
Readaninfosignforinformationandtips
aboutthegame.
BackPausesthegameautomatically,andgoesback
tothegamemenu.
Youwillbeabletocontinueplayingfromthe
samespotatalatertime.
• Toresumeplayingfromwhereyoupausedthegame,selectResumeGame
fromthegamemenu.
• Toviewyourscores,playanystagethatyoupreviouslyreached,andcheckif
youcanplaythesecretbonusstages,selectStageSelectionfromthegame
menu.

OGOUserManual
106錯誤!使用[常用]索引標籤將Heading2套用到您想要在此處顯示的文字。
PlayingOgoBlocks
TheBlocksgamecomespre‐installedonyourOgo.Inthisgame,yourotateshapes
astheyfallsothattheyfittogethertoformafullhorizontalrow.
► ToplayOgoBlocks:
1 IntheApplicationtaboftheExtrasscreen,selectOgoBlocksandpress
Enter/Select.
2 Usethegamecontrolkeystocontrolthemovementofthefallingblocks.
Table13:BlocksGameControls
ControlKeyFunctionality
A,Z(inaQWERTYkeyboard)
orY(inaQWERTZkeyboard),
leftarrowkey
Movesapiecetotheleft
L","rightarrowMovesapiecetotheright
S,X,K,M,Uparrowkey,
outeruparrowkey
Rotatesapiece
Space,downarrowkey,
downarrowkey
Dropsthepiece,orresumesapausedgame
P,Space Pausesorresumesanactivegame
ViewingTechnicalSupportInformation
Thephonenumberande‐mailaddressofthetechnicalsupportarelistedinthe
TechSupportInfotab.

錯誤
!
使用
[
常用
]
索引標籤將
Heading1
套用到您想要在此處顯示的文字。
錯誤!使用[常用]索引標籤將Heading2套用到您想要在此處顯示的文字。107
DeviceandApplicationSettings
YoucanconfigurevarioussettingsforyourOgo,includingthedefaultmethodsfor
handlingcalls,IM,ande‐mailmessagesontheOgo.
EachofthetabsintheSettingsscreenincludesthesettingforoneofthe
applicationsoraspecificissueofthedevicebehavior,asfollows:
Phone:EnablesyoutoconfiguresettingsrelatedtoyourOgophone
functionality.Fordetails,seeConfiguringthePhoneSettingsonpage108.
IM:EnablesyoutoconfigureyourIMaccountssettings.Fordetails,see
ConfiguringtheIMSettingsonpage111.
E‐mail:Enablesyoutoconfiguree‐mailrelatedsettings.Fordetails,see
ConfiguringYourE‐MailSettingsonpage112.
WebBrowser:EnablesyoutoconfigurethedisplayofInternetcontentonyour
Ogo.Fordetails,seeConfiguringYourWebBrowserSettingsonpage113.
Device:EnablesyoutocustomizethelookofyourOgoHomescreen,and
configuregeneraldeviceoptionssuchasbacklight,bannersandmore.For
details,seeConfiguringtheDeviceSettingsonpage114.
Calendar:EnablesyoutoconfigurethedisplayandhandlingyourCalendar.For
details,seeConfiguringtheCalendarSettingsonpage119.
Sounds:EnablesyoutoconfigurethesoundsmadebyyourOgoinvarious
situations.Fordetails,seeConfiguringtheSoundSettingonpage117.
Time&Date:EnablesyoutoconfigurethetimeanddatesettingsonyourOgo.
Fordetails,seeConfiguringtheTimeandDateSettingsonpage120.
Network:Enablesyoutoviewandconfigureyournetworksettings.Fordetails,
seeConfiguringtheNetworkSettingsonpage121.
System:EnablesyoutoviewyourOgo’ssystemcapacitiesandidentifying
characteristics.Fordetails,seeViewingYourSystemonpage122.
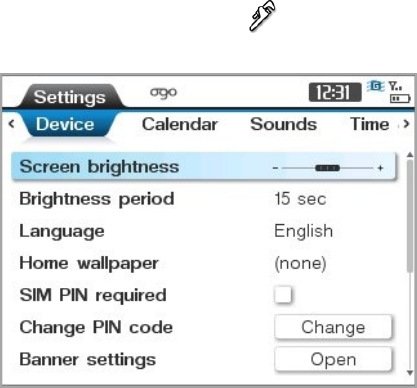
OGOUserManual
108錯誤!使用[常用]索引標籤將Heading2套用到您想要在此處顯示的文字。
► ToaccessSettings:
IntheHomescreen,select SettingsandpressEnter/Select.TheSettings
screenisdisplayed.
Figure21:TypicalSettingsScreen
ConfiguringthePhoneSettings
ThesettingsconfiguredinthePhonetabdeterminehowyourOgorespondsto
variouscallingconditions.
► ToconfigurethePhonesettings:
1 InSettings,selectthePhonetab.
2 SelectandeditoneormoreofthePhonesettings,asrequired.ThePhone
settingsaredescribedinTable14.

錯誤
!
使用
[
常用
]
索引標籤將
Heading1
套用到您想要在此處顯示的文字。
錯誤!使用[常用]索引標籤將Heading2套用到您想要在此處顯示的文字。109
Table14:PhoneSettings
ItemDescription
CallforwardingThefollowingcallforwardingoptionsmaybeconfigured
toEnableorDisable:
• Forwardallcalls:Ogore‐routesallincomingcallsto
anotherpre‐determinednumber.
• Forwardifbusy:Ogore‐routesincomingcallsto
anotherpre‐determinednumberifyouareengagedin
anactivephonecall.
• Forwardifnotanswered:Ogore‐routesanincoming
calltoanotherpre‐determinednumberifyoudonot
answerthecall.
• Forwardifnotreachable:Ogore‐routesanincoming
calltoanotherpre‐determinednumberifthenetwork
cannotlocateyourOgotodeliverthecall.
• Cancelall:Activatethisoptiontodisableallofthe
Forwardoptionsthathavebeenenabled.
Toaccessthesettings,selectConfigureandpress
Enter/SelecttodisplaytheCallForwardingscreen.Select
ConfigureforeachoftheCallforwardingoptionsandset
theoptionstoEnableorDisable.(PressQueryifyou
wanttoviewthecurrentsetting).SelectDoneandpress
Enter/Select.
Voicemailbox
number
Thephonenumberusedtoretrieveyourvoicemail.(This
numberisassignedbyyourcellularoperator.)
SelectEditandpressEnter/SelecttodisplaytheVoice
mailnumberscreen.Insertthenumber,selectDoneand
pressEnter/Select.
Ownnumber
setting
Thissettingdefineswhetherthepersonyouarecalling
canviewyourphonenumberoncallerID‐equipped
telephones:
• On:Yournumberisdisplayed.
• Off:Yournumberisnotdisplayed.
• SetbyNetwork:Theoptionissetatthediscretionof
yourcellularservicecarrier(usuallyOn).
PressEnter/Selectandselectyourpreferencefromthe
list.

OGOUserManual
110錯誤!使用[常用]索引標籤將Heading2套用到您想要在此處顯示的文字。
ItemDescription
CallwaitingWhenenabled,Ogonotifiesyouofanincomingcallwhile
acallisinprogress,ratherthandeliveringabusysignalto
thenewcaller.
Toaccessthesettings,selectConfigureandpress
Enter/SelecttodisplaytheCallwaitingscreen.Select
EnableorDisable,andpressEnter/Select.PressQueryto
viewthecurrentsetting.
Incomingcall
alert
Thewaysinwhichyouarealertedtoanincomingcall,
includingthetypeofringtone,itsvolume,and/or
vibration.
Toaccessthesettings,selectConfigureandpress
Enter/SelecttodisplaytheIncomingCallAlertscreen.
Tosettheringtone,selectRingingtoneandpress
Enter/Select.Thenselectthedesiredringtonefromthe
list.Eachringtoneinthelistwillplaywhenhighlighted
forafewseconds.
Tosetthevolume,selectRingingvolumeandadjustthe
volumebymovingtheindicatoronthesliderusingthe
innerleftandrightarrowkeys.
Toenablethevibratingalert,selectVibratingalertand
pressEnter/Select.PressingEnter/Selectwhenthe
optionisalreadyselectedclearsthecheckbox,and
disablesthevibratingalert.
SelectDoneandpressEnter/Select.
SpeeddialYoucancreateshortcutsfordialingyourmostcommonly
needednumbers.
Toaccessthesesettings,selectConfigureandpress
Enter/SelecttodisplaytheSpeeddialscreen.
Selectanumberforwhichyouwanttoassignthespeed
dialoption,andpressEnter/Select.TheContactList
appears,enablingyoutoselectthetelephonenumberto
beassignedtothenumberyouhavechosen.(Repeatto
assignadditionalspeeddialnumbers.)
SelectCloseandpressEnter/Select.

錯誤
!
使用
[
常用
]
索引標籤將
Heading1
套用到您想要在此處顯示的文字。
錯誤!使用[常用]索引標籤將Heading2套用到您想要在此處顯示的文字。111
ConfiguringtheIMSettings
YourIMaccountsettingscanbeconfiguredintheIMtab.
► ToconfigureyourIMsettings:
1 InSettings,selecttheIMtab.
2 SelectandeditoneormoreoftheIMsettings,asrequired.TheIMsettingsare
describedinTable15.
Table15:IMSettings
ItemDescription
WindowsLive
Messenger
SelectAddandpressEnter/SelecttoconfigureyourIM
account.SelectEditandpressEnter/Selecttoview/edit
thefollowingpropertiesofyourWindowsLive
MessengeraccountintheIMAccountSettingswindow:
e‐mailaddress,password,defaultpresence,andtheSign
inwhenpoweredonoption.
ToremovetheIMaccount,selectRemoveintheIM
AccountSettingswindow.
ICQSelectAddandpressEnter/SelecttoconfigureyourICQ
account.
SelectEditandpressEnter/Selecttoview/editthe
followingpropertiesofyourICQaccountintheIM
AccountSettingswindow:ICQaccount:ICQnumber,
Password,Defaultpresence,andtheConnectwhen
poweredonoption.
ToremovetheIMaccount,selectRemoveintheIM
AccountSettingswindow.

OGOUserManual
112錯誤!使用[常用]索引標籤將Heading2套用到您想要在此處顯示的文字。
ConfiguringYourEMailSettings
Youre‐mailaccountsettingscanbeconfiguredfromtheE‐mailtab.
► Toconfigureyoure‐mailsettings:
1 InSettings,selecttheE‐mailtab.
2 SelectandeditoneormoreoftheE‐mailsettings,asrequired.TheE‐mail
settingsaredescribedinTable16.
Table16:E‐mailSettings
ItemDescription
[E‐mailaccount]Enablesyoutoview/editthedetailsofanexistinge‐mail
account,includinghowoftentocheckformessagesand
forwhattimeperiod.Thisitemisdisplayedonlyfor
previouslysetupe‐mailaccounts.
SelectEditandpressEnter/SelecttodisplaytheAccount
Settingsscreen.
SelectCheckbacktosethowfarbacktocheckfor
messages(All,1week,2weeks,1month,or2months).
SelectCheckE‐mailtosethowtheOgochecksfor
messages(AutomaticallyorManually).
Afterreviewingormodifyingthesettings,selectOKand
pressEnter/Select.
Adde‐mail
account
Enablesyoutoaddane‐mailaccount.
SelectAddandpressEnter/Select.TheE‐mailWizardis
displayed.Fordetails,seeSettingUpYourE‐Mail
Accountsonpage33.
Removee‐mail
account
Enablesyoutoremoveanexistinge‐mailaccount.
SelectRemoveandpressEnter/Select.TheAccount
Summaryscreenisdisplayed.Clearthecheckboxforthe
e‐mailaccounttoberemovedandpressNext.
Personal
signature
Youcaninsertapersonalsignatureattheendofyour
e‐mailmessages.
SelectOpenandpressEnter/Selecttodisplaythe
PersonalSignaturescreen.
SelectEditandpressEnter/Selecttoinsert/edityour
personalsignature.SelectSaveandpressEnter/Select.
SelecttheNewmessagesand/orRepliedandforwarded
checkboxestodeterminetowhichmessagesyour
signatureisattached.

錯誤
!
使用
[
常用
]
索引標籤將
Heading1
套用到您想要在此處顯示的文字。
錯誤!使用[常用]索引標籤將Heading2套用到您想要在此處顯示的文字。113
ItemDescription
Replywith
original
Includestheoriginalmessagewhenyoureplytoa
message.
Brandauto
signature
Insertsabrandingmessageattheendofyoure‐mail
message.
ConfiguringYourWebBrowserSettings
ThesettingsconfiguredintheWebBrowsertabdeterminehowInternetcontentis
displayedonyourOgo.
► ToconfigureyourWebBrowsersettings:
1 InSettings,selecttheWebBrowsertab.
2 EditoneormoreoftheWebBrowsersettings,asrequired.TheWebBrowser
settingsaredescribedinTable17.
Table17:WebBrowserSettings
ItemDescription
Requestmobile
content
Whenthisoptionischecked,theOgoidentifiesasa
mobiledevicewhenbrowsing,inordertoobtaincontent
optimizedforamobiledevice,fromwebsitesthat
supportthis.
EnablescriptsEnablestheuseofjavascriptswhenbrowsing.
EnablecookiesEnablestheuseofcookieswhenbrowsing.
EncodingDeterminesthetypeofencodingused.
PressEnter/Selectandselecttheencodingtype(Auto‐
Select,Latin‐1;UTF‐16,UCS‐2,UTF‐8,orLatin‐2)fromthe
list.
PrivatedataEnablesyoutocleartheprivatedatastoredontheOgo
(cache,cookies,andhistory).
SelectConfigureandpressEnter/Selecttodisplaythe
Privatedatascreen.Foreachoftheitems(Cache,
CookiesandHistory),youcanselectClearandpress
Enter/Selecttoclearthesaveddata.
Security
warning
Whenthisoptionischecked,asecuritywarningis
displayedbeforenavigatingtoawebsitewhichisnot
secure.

OGOUserManual
114錯誤!使用[常用]索引標籤將Heading2套用到您想要在此處顯示的文字。
ConfiguringtheDeviceSettings
ThesettingsconfiguredintheDevicetabenableyoutocustomizethelookofyour
OgoHomescreen,andsetthegeneraldeviceoptions,suchasbacklight,banners
andmore.
► Toconfigureyourdevicesettings:
1 InSettings,selecttheDevicetab.
2 Editoneormoreofthedevicesettings,asrequired.TheDevicesettingsare
describedinTable18.
Table18:DeviceSettings
ItemDescription
Screen
brightness
ThelevelofbrightnessoftheOgoscreendisplay.
Adjustthebrightnessbymovingtheindicatorontheslider
usingtheinnerright/leftarrowkeysonthe4‐wayselection
key.Thescreenbrightnesschangesimmediatelyasyou
movefromoneleveltothenext.
Brightness
period
Thetimeintervalforwhichthescreenbrightnessis
maintainedwhennokeysarepressed.Thelongerthe
brightnessperiod,themorebatterypowerconsumed.
PressEnter/Selectandselectthedesiredperiodfromthe
list.
LanguageThelanguageoftheOgouserinterface.
PressEnter/Selectandselectthepreferredlanguagefrom
thelist.
SIMPIN
required
Forsecuritypurposes,enablingthisoptionpromptsyouto
enteraPINwhentheOgoispoweredon.
WARNING!IfyouforgetyourSIMPIN,youhaveonlythree
opportunitiestocorrectlyenterit.Afterthreefailed
attempts,youareaskedtoenteryourPUKcodeinorder
toreactivateyourSIM.Youmustcontactyourcarrierif
youdonothavethePUKcode.Youhaveonlyten
opportunitiestocorrectlyenteryourPUKcode.Afterten
failedattempts,yourSIMcardisirretrievablyunusable.
ChangePIN
code
ChangesyourPINcode.Besuretokeeparecordofyour
newcodeinasafeplace.
SelectChangeandpressEnter/Selecttodisplaythe
ChangePINcodescreen.Enter/SelecttheoldPINcode,set
yournewPINcode,andselectDone.

錯誤
!
使用
[
常用
]
索引標籤將
Heading1
套用到您想要在此處顯示的文字。
錯誤!使用[常用]索引標籤將Heading2套用到您想要在此處顯示的文字。115
ItemDescription
Banner
settings
Enablesyoutocontrolwhetherornotbannersappear
whennewmessagesarereceivedand/orwhenIM
contactscomeonline.
SelectOpenandpressEnter/SelecttodisplaytheBanner
Settingsscreen.Selecttheeventsforwhichyouwantto
receivebannernotification(newIM,newSMS,newe‐mail,
and/orIMcontactcomesonline),andselectDone.
ResetdeviceResetsyourOgotoitsoriginalfactorysettings,
permanentlyremovingallpersonalandaccount
information.
SelectResetandpressEnter/Select.Aconfirmation
messageisdisplayed.SelectOKandpressEnter/Selectto
resetthedevice.TheOgorestartsafterresetting.
Confirmmsg.
delete
Whenthisoptionisselected,Ogopromptsyoufor
confirmationeachtimeyouchoosetodeleteamessage.
Auto‐
capitalization
Whenthisoptionisselected,yourOgo’sappliesdefault
capitalizationrulestotextthatyouenterfromtheOgo
keyboard.
Auto‐completeWhenthisoptionisselected,ifyouenteraletteror
numberonthekeyboard,Ogodisplaysapop‐uplistof
namesornumbersthatbeginwiththecorresponding
number/letter(s).Youcanthenselectanitemfromthelist.
Prompttoadd
contacts
Promptsyoutoaddacontactwhenyousendane‐mailor
SMSmessagetoanaddress/numberthatisnotalreadyin
yourOgoContactList.
Restore
canceled
pop‐ups
Restoresallcanceledpop‐upmessages.

OGOUserManual
116錯誤!使用[常用]索引標籤將Heading2套用到您想要在此處顯示的文字。
ItemDescription
Bluetooth
settings
EnablesyoutoconfiguretheuseofBluetoothaccessories
withyourOgo.
Note:TheavailabilityofthisoptiondependsonyourOgo
modelandcellularoperator.
SelectOpenandpressEnter/Selecttodisplaythe
Bluetoothsettingsscreen.
Configurethefollowingparameters:
• Localdevicename:ThedesignatedBluetoothnameof
theOgodevice.OtherBluetoothdevicessearchingfor
thisOgorecognizeitbythisdesignation.
• Changename:ThesettingusedtochangetheLocal
devicename.
• Mydevices:ThenamesofalloftheBluetoothdevices
thatarepairedwiththeOgodevice.
• Searchfordevices:Anoptionscansforavailable
Bluetoothdevicestoconnectto.SelectScanandpress
Enter/Select;apop‐upmessageappearsindicatingthat
asearchisinprogress.
• Temporaryvisibility:Toprotectitselffromundesired
contacts,theOgoisnormally"invisible"torandom
searches.Whenyouwanttobefound,theOgomustbe
made"visible"totheairwaves.SelectEnableandpress
Enter/Select;apop‐upmessageappearsinformingyou
thatyourOgowillbetemporarilyvisiblefor1minute.

錯誤
!
使用
[
常用
]
索引標籤將
Heading1
套用到您想要在此處顯示的文字。
錯誤!使用[常用]索引標籤將Heading2套用到您想要在此處顯示的文字。117
ItemDescription
USBmodeToconfiguretheOgotopromptyoutoselecttherelevant
USBmodeeachtimetheOgoisconnectedtoaPCviathe
USBsocket,selectAskMe.
TosetaparticularUSBmode,selectoneofthefollowing
options:
• Chargingonly:ConnectingtheUSBsocketwillonly
invokecharging.
• MassStorage:ConnectingtheUSBsocketputstheOgo
deviceintoMassStoragemode,wherebyfilescanbe
transferredto/fromtheconnectedPC.
• OgoSync:TheUSBconnectionistobeusedfor
synchronizationwiththePC.
Note:WhenMassStoragemodeisselectedandtheOgois
connectedtoaPCviatheUSBsocket,youcan
continuetoreceivemessagesorphonecalls.
ChangingtheUSBmodeoptionwhentheOgoisalready
connectedtakeseffectonlyafterdisconnectingtheUSB
cable.
ConfiguringtheSoundSettings
ThesettingsconfiguredintheSoundstabenableyoutodeterminethesounds
madebyyourOgoinvarioussituations.
► Toconfigureyoursoundssettings:
1 InSettings,selecttheSoundstab.
2 Editoneormoreofthesoundsettings,asrequired.TheSoundssettingsare
describedinTable19.

OGOUserManual
118錯誤!使用[常用]索引標籤將Heading2套用到您想要在此處顯示的文字。
Table19:SoundsSettings
ItemDescription
Ringtones Enablesyoutosetthevolumeoftheringtoneplayedto
indicateanincomingcall.
Adjustthevolumebymovingtheindicatorontheslider
usingtheinnerleftandrightarrowkeysonthe4‐way
selectionkey.Theringtoneisplayedaftereachchangeof
thevolumelevel,enablingyoutoheartheactualvolume
levelbeingconfigured.
SystemsoundsEnablesyoutosetthevolumeofthesoundsplayedto
indicatevarioussystemevents.
Adjustthevolumebymovingtheindicatorontheslider
usingtheinnerleftandrightarrowkeysonthe4‐way
selectionkey.Abeepisplayedaftereachchangeofthe
volumelevel,enablingyoutoheartheactualvolume
levelbeingconfigured.
AlertsEnablesyoutosetthevolumeofthesoundsplayedto
indicateanalert(suchasreceivinganewmessage).
Adjustthevolumebymovingtheindicatorontheslider
usinginnerleftandrightarrowkeysonthe4‐way
selectionkey.Abeepsoundisplayedaftereachchange
ofthevolumelevel,enablingyoutoheartheactual
volumelevelbeingconfigured.
SilentSilencesalloftheOgosounds(ringtones,systemsounds
andalert).
VibrationWhenthisoptionisselected,thevibrationalertis
enabled.Thevibrationalertcanbeactivatedforan
incomingcall(dependingontheoptioninIncomingCall
Alertscreen),and(iftheSilentoptionisselected)forany
eventthatdisplaysabanner,whenacontactcomes
online,orwhenanewmessageisreceived.
KeytonesTurnson/offthesoundmadewhenOgokeysare
pressed.
Alerticon
sounds
Turnson/offthesoundsassociatedwithalerticons.
MessageeventsTurnson/offthesoundsmadewhenmessagesare
received.
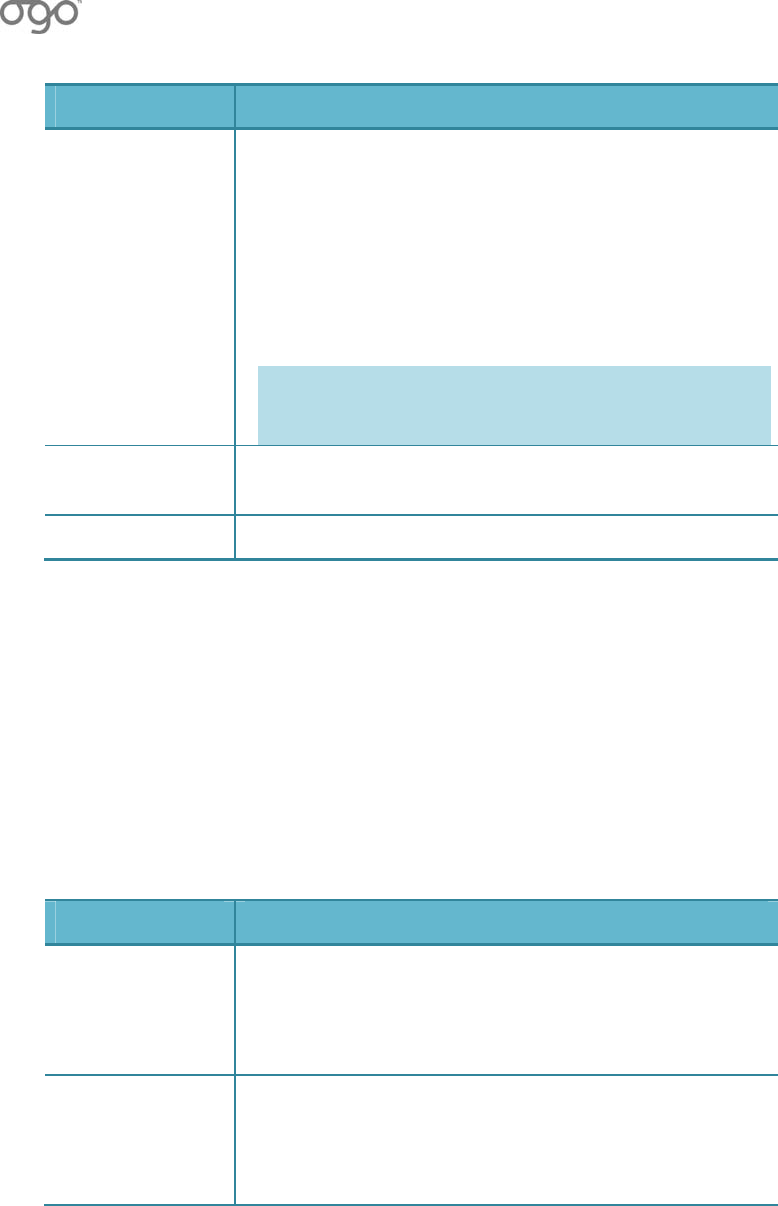
錯誤
!
使用
[
常用
]
索引標籤將
Heading1
套用到您想要在此處顯示的文字。
錯誤!使用[常用]索引標籤將Heading2套用到您想要在此處顯示的文字。119
ItemDescription
SMSAlertEnablesyoutosethowtheOgoalertsyoutothearrival
ofSMSmessages.
SelectOpenandpressEnter/Selecttodisplaythe
ConfigureSMSSoundscreenisdisplayed.Thenscrolland
selectthedesiredsoundfromtheSMSAlertlist,and
pressEnter/Select.Youcanalsoconfigureavibrating
alertbyselectingtheVibratingAlertcheckbox.SelectOK
andpressEnter/Selecttoapplyyoursettings.
Note:Whenasoundisselected,itisplayed.Youcan
scrollthroughandlistentothevarioussounds
beforemakingyourselection.
PresenceeventsTurnson/offthesoundsmadewhenIMcontactsbecome
online.
SystemsoundsTurnson/offthesoundsmadewhenyoupoweron/off.
ConfiguringtheCalendarSettings
ThesettingsconfiguredintheCalendartabdeterminehowyourcalendaris
displayedandmanagedonyourOgo.
► ToconfigureyourCalendarsettings:
1 InSettings,selecttheCalendartab.
2 Editoneormoreofthecalendarsettings,asrequired.Thecalendarsettings
aredescribedinTable20.
Table20:CalendarSettings
ItemDescription
DefaultviewThedefaulttimetabviewforyourcalendar(Day,Week,
orMonth).
PressEnter/Selectandselectthedesiredoptionfromthe
list.
Defaultday
view
ThedefaultviewfortheDaytabinthecalendar
(Detailed,Summary,orLastviewed).
PressEnter/Selectandselectthedesiredoptionfromthe
list.

OGOUserManual
120錯誤!使用[常用]索引標籤將Heading2套用到您想要在此處顯示的文字。
ItemDescription
Default
reminder
Thedefaulttime(inminutes)inadvancetobereminded
ofanupcomingappointment.
PressEnter/Selectandselectthedesiredoptionfromthe
list.
WorkweekThestandardworkweeksettings,includingthestarting
andendingworkinghoursandthefirstdayoftheweek.
SelectOpenandpressEnter/SelecttodisplaytheWork
weekscreen.
Defaultsnooze
period
Thedefaulttime(inminutes)afterwhicharepeat
reminderisdisplayed.
PressEnter/Selectandselectthedesiredtimeinterval
fromthelist.
Deleteitems
olderthan
ThetimeintervalusedwhenselectingDeleteOld
AppointmentsfromtheCalendar.
PressEnter/Selectandselectthedesiredoptionfromthe
list.
Delete
confirmation
Whenthisoptionischecked,aconfirmationmessageis
displayedbeforedeletinganappointmentfromthe
calendar.
Tooltipsinweek
view
Whenthisoptionischecked,atooltipwiththe
appointmentsubjectisdisplayedwhenanappointment
isselectedinweekview.
ConfiguringtheTimeandDateSettings
WhenyourOgoispoweredon,itautomaticallysynchronizeswiththecurrenttime
fromyourcarrier’snetwork.Ifforsomereasonthenetworkisnotavailable,you
cansetthetimeanddatemanuallyusingthesettingsontheTime&Datetab.
► Toviewandconfigureyourtimeanddatesettings:
1 InSettings,selecttheTimeandDatetab.
2 Editoneormoreofthetimeanddatesettings,asrequired.Thetimeanddate
settingsaredescribedinTable21.

錯誤
!
使用
[
常用
]
索引標籤將
Heading1
套用到您想要在此處顯示的文字。
錯誤!使用[常用]索引標籤將Heading2套用到您想要在此處顯示的文字。121
Table21:TimeandDateSettings
ItemDescription
DevicetimeDisplaysthecurrenttimeanddateascurrentlyseton
yourOgo(cannotbeedited).
NetworktimeDisplaysthecurrenttimeanddateonthenetwork
(cannotbeedited).
UsenetworktimeWhenthisoptionisselected,thenetworktimeisused
asthedefaulttimeonyourOgo.
SetTime&DateEnablesyoutomanuallysetthetimeanddate.
SelectOpenandpressEnter/SelecttodisplaytheSet
Time&Datescreen.Selectyourtimezone,selectthe
Daylightsavingoption,insertthedateandtime,and
thenselectDone.
Note:Manuallysettingthetimeanddatestops
automaticupdates.
TimeformatDeterminestheformatfordisplayingtimeonyourOgo
(24HorAM/PM).
PressEnter/Selectandselectthedesiredtimeformat
fromthelist.
DateformatDeterminestheformatfordisplayingdatesonyourOgo
(DD/MM/YYorMM/DD/YY).
PressEnter/Selectandselectthedesireddateformat
fromthelist.
ConfiguringtheNetworkSettings
ThesettingsconfiguredintheNetworktabaretypicallyusedbyyourcellular
operatorfortroubleshooting.
► Toviewandconfigureyournetworksettings:
1 InSettings,selecttheNetworktab.
2 Editoneormoreofthenetworksettings,asrequired.Thenetworksettingsare
describedinTable22.

OGOUserManual
122錯誤!使用[常用]索引標籤將Heading2套用到您想要在此處顯示的文字。
Table22:NetworkSettings
ItemDescription
ActivenetworkDisplaysthenameoftheactivenetwork(cannotbe
edited).
Messaging
center
Displaysthephonenumberofthemessagingcenterto
becalledtoretrieveyourSMSMessages.Youcanmodify
thisnumber;seeEditSMSCnumber.
EditSMSC
number
ThenumberofthemessagingcenterforSMSservices.
SelectEditandpressEnter/SelecttodisplaytheEdit
SMSCnumberscreen.Insert/editthenumberandselect
Done.
GPRSstatusThestatusofyourGPRSconnection(Connected,Not
connected,Connectiondenied,Paused,orNotavailable).
DatacountersEnablesyoutoviewthecumulativevolumeofincoming
andoutgoingdata.Youcanmanuallyresetthese
counters.
SelectOpenandpressEnter/SelecttodisplaytheData
countersscreen.Toresetthecounters,selectResetand
pressEnter/Select.
ViewingYourSystemSettings
TheSystemtabdisplaysthecurrentcapacitiesandidentifyingcharacteristicsof
yourOgo.
► Toviewyoursystemsettings:
InSettings,selecttheSystemtab.ThesystemsettingsaredescribedinTable23.
Table23:SystemSettings
ItemDescription
Devicememory
&SDCard
DisplaystheavailablespaceintheDevicememory,andin
theSDCard(ifinstalled).
ContactsThenumberofexistingcontactrecords;thenumberof
contactrecordsavailableforfutureuse.
SoftwareTheversionnumberofthesoftwareonyourOgo(for
example,v3.0_PRO(20121).
IMSITheuniqueidentifieroftheSIMcard.

錯誤
!
使用
[
常用
]
索引標籤將
Heading1
套用到您想要在此處顯示的文字。
錯誤!使用[常用]索引標籤將Heading2套用到您想要在此處顯示的文字。123
ItemDescription
IMEITheuniqueidentifierofthedevice.
Checkfor
updates
Enablesyoutomanuallycheckforavailablesoftware
updatesforyourOgo.
SelectCheckandpressEnter/Select.
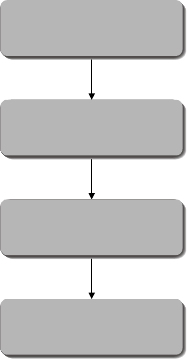
OGOUserManual
124錯誤!使用[常用]索引標籤將Heading2套用到您想要在此處顯示的文字。
WorkingwithOgoSync
OgoSyncisanoptionalapplicationthatcanbeinstalledonyourPCtoenablebi‐
directionalsynchronizationofthecontactsandcalendarappointmentsonyour
Ogo™withthecontactsandcalendarappointmentsinOutlookonyourPC.After
synchronization,youwillhavethesamecontactsandcalendarappointmentsin
boththeOgoandinOutlook.
OgoSyncenablesyoutomakechoiceswhenaconflictisdetected.Aconflictoccurs
whenacontactorcalendarappointmentwaschangedonboththeOgoandin
Outlook.
ConnectyourOgotoyourPCusingtheprovidedmini‐USBcabletoenable
synchronization.YoucanstartsynchronizationeitherfromthePC(byselectingthe
Synchronizebutton)orfromyourOgo(byselectingtheSynchronizeoptionfrom
theOptionsmenu).
OgoSyncWorkflow
[Optional]
Setting Up Ogo Sync
Step 1
Step 2
Synchronizing the Ogo
Step 3
Reporting
Step 4
Installing Ogo Sync
Step1:InstallingOgoSync,asdescribedonpage125.
Step2:SettingUpOgoSync.Afterinstallation,OgoSyncisreadytogo.
Optionally,youcanmodifyitsdefaultbehavior,asdescribedonpage131.
Step3:SynchronizingtheOgo.UseOgoSynctosynchronizeyourcontactsand
calendarappointmentsasdescribedonpage129.
Step4:Reporting.Aftersynchronizingyourcontactsandcalendar
appointments,youcanviewasummaryofthemodifications,asdescribedon
page131.

錯誤
!
使用
[
常用
]
索引標籤將
Heading1
套用到您想要在此處顯示的文字。
錯誤!使用[常用]索引標籤將Heading2套用到您想要在此處顯示的文字。125
InstallingOgoSync
OgoSyncisasimpleapplicationthatcanbeinstalledonanyPCwithMicrosoft
WindowsXPorWindows2000operatingsystemsandOutlook2002or2003.
Installationisperformedusingawizard,asdescribedbelow.
► ToinstallOgoSync:
1 RuntheOgoSync_En.exefile.
Note: Awindowmaybedisplayedinwhichyoucanchoosethelanguageof
theinstallation.
2 Inthefirstpageoftheinstallationwizard,clickNextandthenwaitwhilethe
OgoSyncInstallationWizardpreparesforinstallation.
Note: IftheSoftwareInstallationwarningwindowisdisplayed,clickContinue
AnywayandthenclickNext.
TheOgoSyncLicenseAgreementwindowisdisplayed.
3 Readthelicenseagreementcarefully,andifyouagree,selectAccepttheterms
oftheLicenseAgreementandclickNext.
4 ClickInstalltoinstalltheOgoSyncapplication.TheInstallingOgoSyncwindow
isdisplayed,withaprogressbarindicatingtheprogressoftheinstallation.
5 Whentheinstallationprocessiscomplete,theInstallCompletedwindowis
displayed.
6 ClickFinishtoclosetheOgoSyncInstallationWizard.
7 BeforeyoucanuseOgoSync,youneedtoinstalltheOgoUSBdriver.Connect
yourOgotoyourPCusingtheprovidedmini‐USBcable.TheUSBConnected
pop‐upisdisplayed.
8 TouseOgoSync,selectOgoSyncandpressEnter/Select.TheFoundNew
HardwareWizardisdisplayedonyourcomputerscreen.
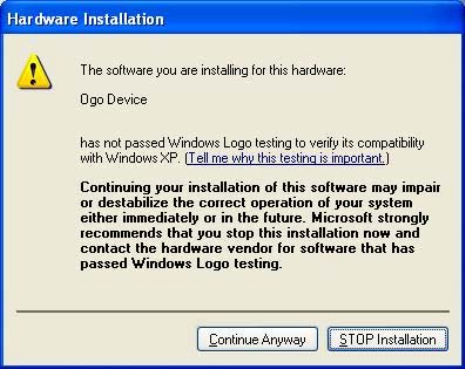
OGOUserManual
126錯誤!使用[常用]索引標籤將Heading2套用到您想要在此處顯示的文字。
9 IntheFoundNewHardwareWizard,makesurethattheYes,Thistimeonly
optionisselectedandclickNext.
10 InthenextFoundNewHardwareWizardwindow,makesurethattheInstall
thesoftwareautomaticallyoptionisselectedandclickNext.
11 IfyouareinstallingonWindowsXP,awindowmaybedisplayedspecifyingthat
thedriverisnotdigitallysignedbyWHQL.Ifso,clickContinueAnyway.
12 IntheFoundNewHardwareWizard,clickFinish.
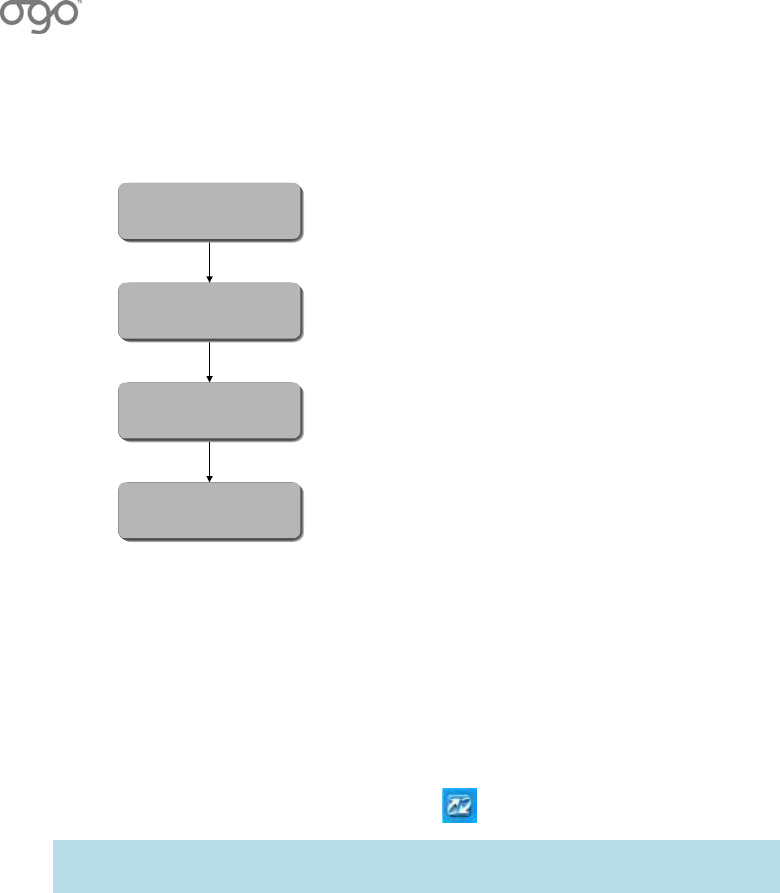
錯誤
!
使用
[
常用
]
索引標籤將
Heading1
套用到您想要在此處顯示的文字。
錯誤!使用[常用]索引標籤將Heading2套用到您想要在此處顯示的文字。127
SynchronizingYourOgo
Connecting the Ogo to
Your PC
Step 1
Step 2
Synchronizing
Step 3
Reporting
Step 4
Launching Ogo Sync
Step1:LaunchingOgoSync
AssumingthatyouhaveinstalledOgoSyncwithitsdefaultsettings,OgoSync
launchesautomaticallyeachtimeyourPCstartsup.
Alternatively,youcanselectStart>Programs>OgoSync>OgoSynctolaunchthe
application.
PlaceaSparkpicture
AfterOgoSyncislaunched,theOgoSynciconappearsinyourPCtray.
Note: YoucancloseOgoSyncbyright‐clickingtheOgoSynctrayiconand
selectingtheExitoption.
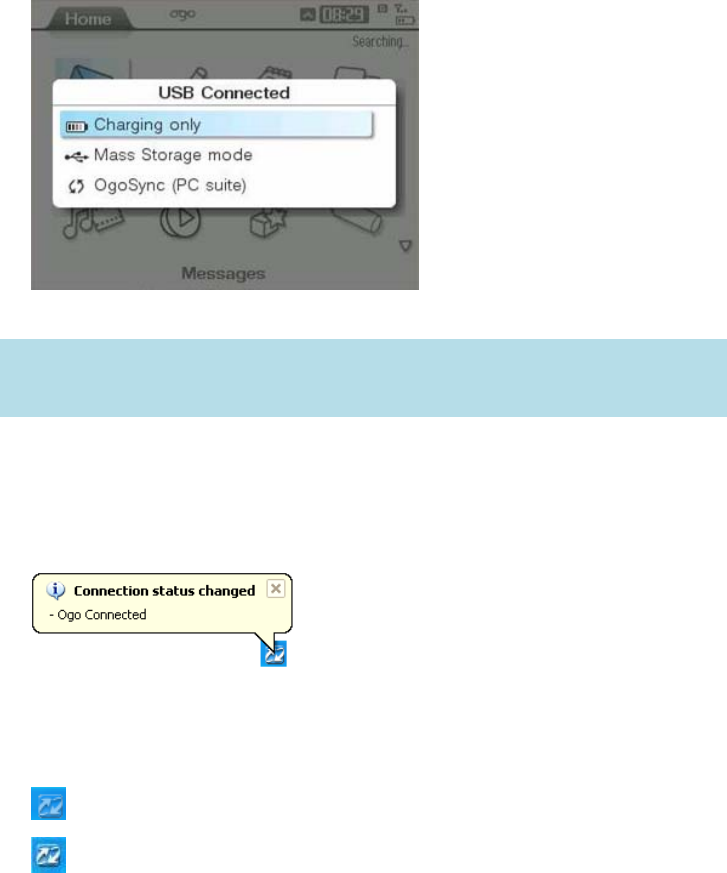
OGOUserManual
128錯誤!使用[常用]索引標籤將Heading2套用到您想要在此處顯示的文字。
Step2:ConnectingtheOgotoYourPC
InordertouseOgoSyncwithyourOgoyouneedconnectyourOgotoyourPCand
selecttheOgoSyncUSBconnectionmode.
► TosettheUSBconnectionmodeonyourOgo:
1 ConnecttheOgotoyourPCusingtheprovidedmini‐USBcable.TheUSB
Connectedpop‐upisdisplayed.
2 TouseOgoSync,selectOgoSyncandpressEnter/Select.
Note: ToautomaticallysettheOgoSyncconnectionmodeeachtimethemini‐
USBcableisconnected,settheUSBmodevaluetoOgoSyncintheDevice
taboftheSettingsscreen.
► ToviewtheconnectionstatusonthePC:
TheconnectionstatusofyourOgoisshownonyourPC,asfollows:
YourPCdisplaysapopupmessageontheOgoSynctrayiconwhenitidentifies
thattheOgohasbeenconnectedordisconnected.
ThetitlebaroftheOgoSyncwindowindicateswhethertheOgoisconnectedor
disconnected.
TheOgoSynciconappears,asfollows:
NotConnected
Connected
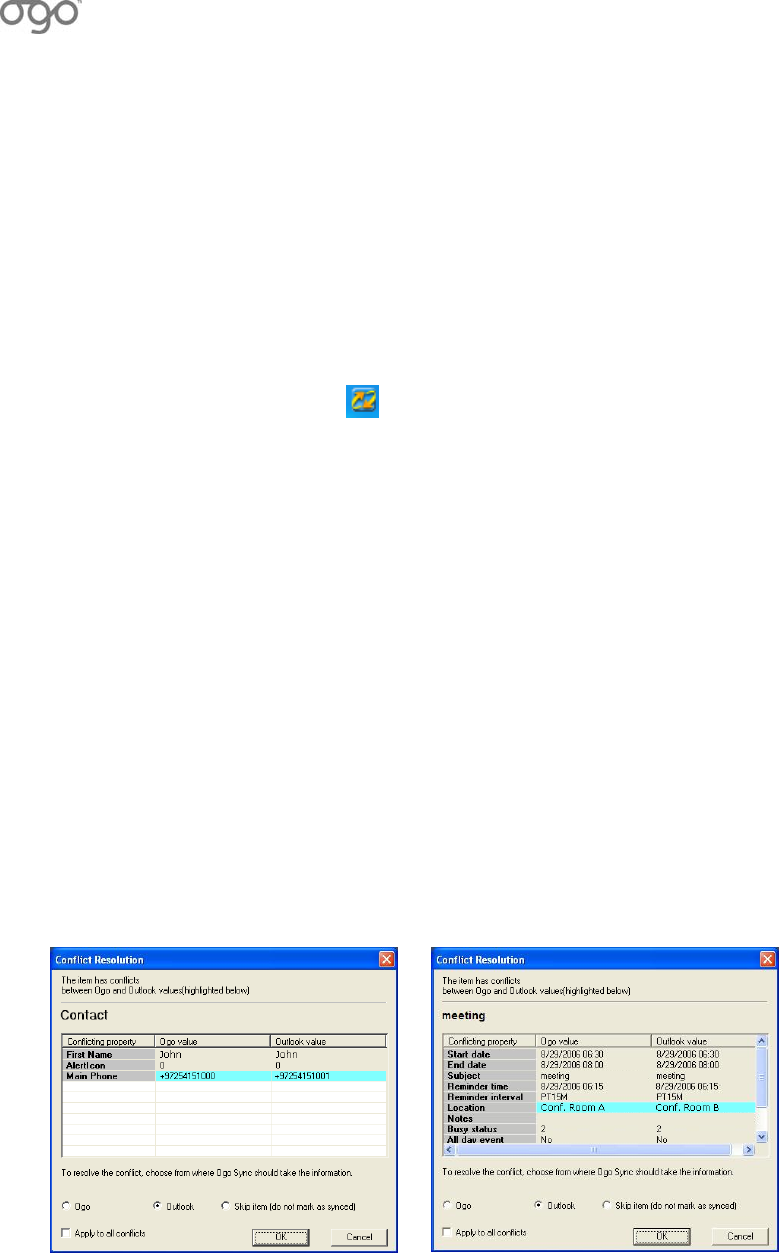
錯誤
!
使用
[
常用
]
索引標籤將
Heading1
套用到您想要在此處顯示的文字。
錯誤!使用[常用]索引標籤將Heading2套用到您想要在此處顯示的文字。129
Step3:Synchronizing
Thefollowingprovidesanoverviewofthesynchronizationprocessandreferences
tothesectionswithmoredetails.
► TosynchronizeyourOgo:
1 Startsynchronizationbydoingoneofthefollowing:
• Double‐clickingtheOgoSynciconinthetraytoopentheOgoSyncwindow
andthenclickingtheSynchronizebutton.
• Right‐clickingtheOgoSynctrayiconandselectingSynchronize.
Duringthesynchronizationprocess,aprogresswindowisdisplayedandthe
OgoSynciconappearsorange.
2 WhileOgoSyncsynchronizesthecontactsandcalendarappointmentsonyour
OgoandinOutlook,youmayneedtoperformanyofthefollowing:
• Resolveconflicts,asdescribedonpage129.
• ConfirmdeletionsfromOutlook,asdescribedonpage130.
• Handlewarnings,asdescribedonpage134.
3 Oncesynchronizationiscomplete,themessageSynchronizationCompleted
appears.YoucanthenclicktheViewReportbuttontodisplayareportofthe
synchronization,asdescribedonpage131.
ResolvingConflicts
Duringsynchronization,OgoSyncmaydetectthatanitem(eitheracontactora
calendarappointment)waschangedbothontheOgoandinOutlook.Inthiscase,
itsdefaultoption(AskMe)displaysaquestionaskingwhethertousetheOgoitem
ortheOutlookitem.Ifyouwanttoreconfigurethisoption,seeOgoSyncSettings
onpage131.
Ifaconflictisdetected,aConflictResolutionwindowisdisplayed,indicatingthe
propertiesoftheContactorMeetingforwhichaconflicthasbeenencountered.
Contact ConflictCalendar Appointment Conflict
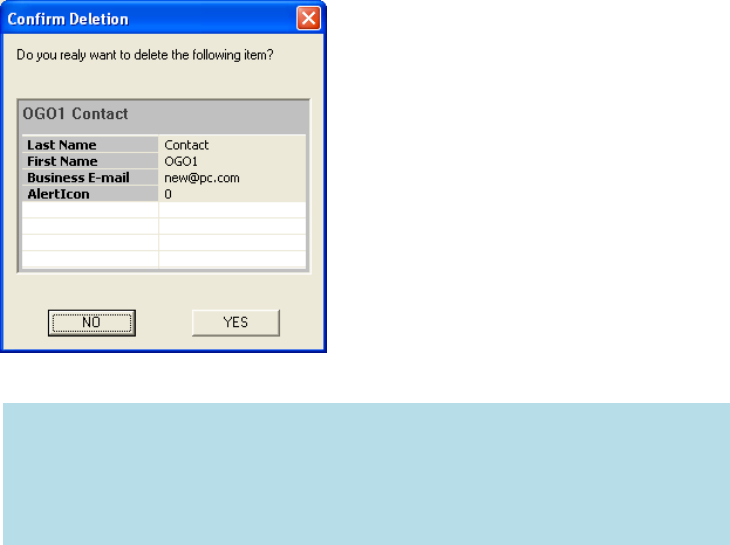
OGOUserManual
130錯誤!使用[常用]索引標籤將Heading2套用到您想要在此處顯示的文字。
ThemiddlecolumnshowsthedetailsoftheOgoitemandthecolumnontheright
sideshowsthedetailsofthissameiteminOutlook.Themodifieddetailsare
highlighted.
Selectoneofthefollowingoptionstoresolvetheconflict:
Ogo:TheOgoitemdetailswilloverwritetheOutlookitemdetails.
Outlook:TheOutlookitemdetailswilloverwritetheOgoitemdetails.
Skipitem:Thedetailswillremainastheyare,meaningthattheywillbe
differentontheOgoandinOutlook.
ConfirmingDeletions
OgoSync’sdefaultoption(AskmebeforedeletingitemsfromOutlook)specifies
thatOgoSyncrequestsyourpermissiontodeleteacontactoracalendar
appointmenteachtimeitfindsthatonehasbeendeletedontheOgo,butwasnot
deletedinOutlook.
ClickYestodeleteitfromOutlook,orNotoleaveitinOutlook.
Ifyouwanttoreconfigurethisoption,seeOgoSyncSettingsonpage131.
Notes:IfyouusetheDeleteAllContactsortheDeleteAllAppointmentsoption
onyourOgoandthensynchronizeusingOgoSync,yourOutlookcontacts
orcalendarappointmentswillnotbedeleted.
DeletinganiteminOutlookwilldeletethesameiteminOgoduring
synchronizationwithoutrequestingconfirmation.
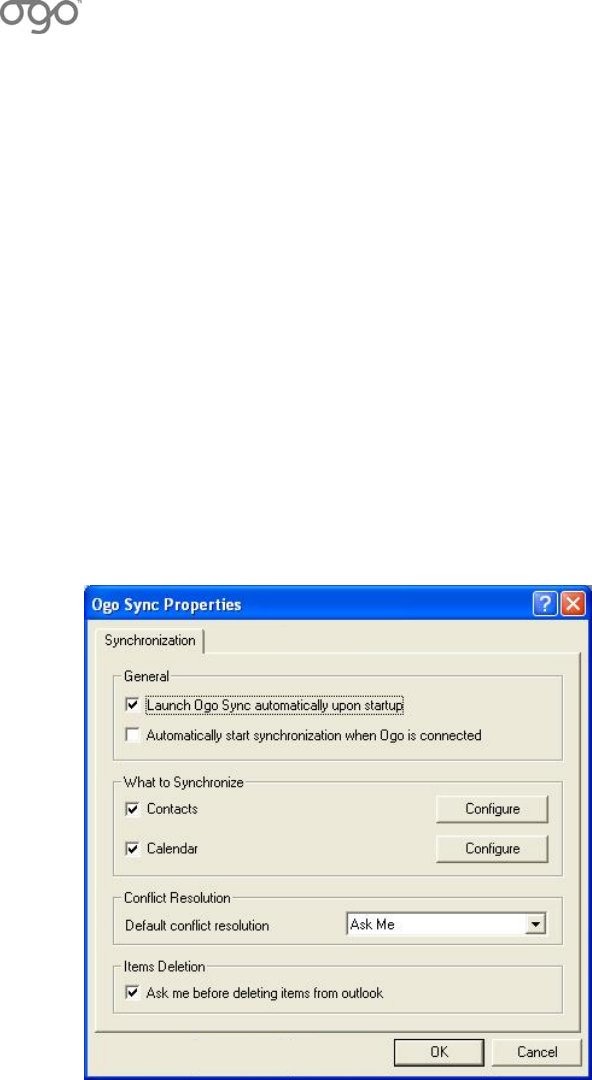
錯誤
!
使用
[
常用
]
索引標籤將
Heading1
套用到您想要在此處顯示的文字。
錯誤!使用[常用]索引標籤將Heading2套用到您想要在此處顯示的文字。131
Step4:Reporting
OgoSyncenablesyoutodisplayareportofthelatestsynchronizationactions.This
reportspecifieshowmanycontactsand/orcalendarappointmentswereupdated,
addedorskipped,andhowmanyerrorsorwarningsoccurredduringtheprocess.
► Todisplayareport:
Right‐clicktheOgoSynctrayiconandselectReport,orclickReportinthe
OgoSyncwindow.
OgoSyncSettings
Afterinstallation,OgoSyncisreadyforuse.However,ifyouwanttomodifyits
defaultbehavior,youcandosointheOgoSyncPropertieswindow.
► TomodifyOgoSyncsettings:
1 Right‐clicktheOgoSynctrayiconandselectProperties,orclickPropertiesin
theOgoSyncwindow.TheOgoSyncPropertieswindowisdisplayed.
2 Editthegeneralsynchronizationpropertiesasfollows:
• LaunchOgoSyncautomaticallyuponstartup:SpecifiesthatOgoSyncis
launchedwhenyourcomputerstartsup.IfyoudonotwantOgoSyncto
launchautomatically,clearthisoption.Thisoptioncanalsobesetbyright‐
clickingtheOgoSynctrayiconandselectingtheEnableonstartupoption.
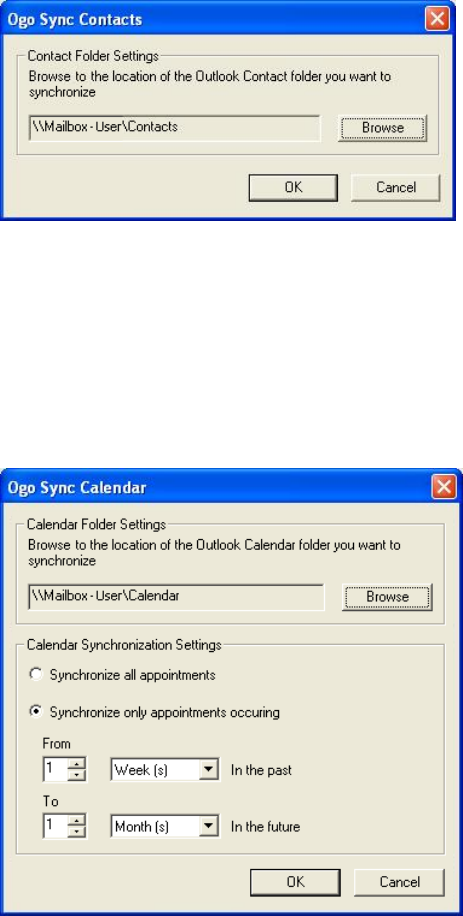
OGOUserManual
132錯誤!使用[常用]索引標籤將Heading2套用到您想要在此處顯示的文字。
• SelecttheAutomaticallystartsynchronizationwhenOgoisconnected
checkboxtospecifythatOgoSyncautomaticallystartssynchronizingwith
OutlookassoonasitdetectsthattheOgoisconnected.
3 ToconfigureOgoSynctosynchronizethecontactsonyourOgowiththe
contactsinOutlook,selecttheContactscheckbox.(Thisisthedefaultsetting.)
• ClicktheConfigurebuttonnexttotheContactscheckboxtochangethe
OutlookContactsfolderthatissynchronized.
• ClicktheBrowsebuttontodisplayawindowinwhichyoucanselect
anotherfolder.ThedefaultfolderisthedefaultOutlookContactsfolder.
YoucanselectanyvalidOutlookContactsfolder.
4 ToconfigureOgoSynctosynchronizethecalendarappointmentsonyourOgo
withthecalendarappointmentsinOutlook,selecttheCalendarcheckbox.(This
isthedefaultsetting.)
• ClicktheConfigurebuttonnexttotheCalendarcheckboxtodisplaythe
followingwindow:

錯誤
!
使用
[
常用
]
索引標籤將
Heading1
套用到您想要在此處顯示的文字。
錯誤!使用[常用]索引標籤將Heading2套用到您想要在此處顯示的文字。133
• ClicktheBrowsebuttontodisplayawindowinwhichyoucanselect
anotherfolder.ThedefaultfolderisthedefaultOutlookCalendarfolder.
YoucanselectanyvalidOutlookCalendarfolder.
• Selectoneofthefollowingoptionstospecifytheperiodofthecalendar
appointmentsthataresynchronized:
• Synchronizeallappointments:Specifiesthatallappointmentsare
synchronized.
• Synchronizeonlyappointmentsoccurring:Specifiestheperiodofthe
calendarappointmentsthataresynchronized.Thedefaultisoneweek
inthepastandonemonthinthefuture.
Note: Ifarecurringcalendarappointmentfallswithinthetimeperiodtobe
synchronized,thenalloccurrencesofthatcalendarappointmentwillalso
besynchronized,eveniftheyareoutsidethespecifiedtimeperiod.
5 TheDefaultconflictresolutionoptionenablesyoutospecifythedefault
behaviorofOgoSyncwhenaconflictofcontactsorcalendarappointments
arises.Aconflictoccurswhenthesamecontactorcalendarappointmenthas
beenchangedbothonyourOgoandinOutlook.Selectoneofthefollowing
actionstobetakenwhenaconflictisdetectedduringsynchronization:
• AskMe:TheConflictResolutionwindowisdisplayed,promptingyouto
choosehowtohandletheconflict.Fordetails,seeResolvingConflictson
page129.
• Skip:TheitemsintheOgoandinOutlookremaindifferent.
• OverwriteOutlook:TheitemontheOgooverwritestheiteminOutlookso
thattheyarethesame.
• OverwriteOgo:TheiteminOutlookoverwritestheitemontheOgoso
thattheyarethesame.
6 ToconfigureOgoSynctorequestyourpermissiontodeleteacontactor
calendarappointmenteachtimeitfindsthatonehasbeendeletedintheOgo,
butwasnotdeletedinOutlook,selecttheAskmebeforedeletingitemsfrom
Outlookoption(selectedbydefault).Fordetails,seeConfirmingDeletionson
page130.
Note: Ifthisoptionisnotselected,thenitemsaredeletedfromOutlookduring
synchronizationwhendetectedwithoutaskingforconfirmation.
7 ClickOKtoapplythesechangestoOgoSyncorCanceltoexitthiswindow
withoutapplyinganychanges.
OGOUserManual
134錯誤!使用[常用]索引標籤將Heading2套用到您想要在此處顯示的文字。
Troubleshooting
Duringsynchronization,amessagemaybedisplayedindicatingthatanerrorthat
hasoccurred.
Thissectiondescribessomeofthepossibleproblemsandhowtheycanbe
addressed.
ExceedingtheOgo’sStorageCapacity
AnerrormessagemayappearontheOgowhenthequantityofcontactsor
calendarappointmentsaddedtotheOgoexceedsitsstoragecapacity.
► Iftheerrormessageindicatestoomanycontacts:
1 SelecttheDeleteAllContactsoptionontheOgo.
2 InOutlook,createanewContactsFolder,andcopyonlythecontactsthatyou
wanttobeontheOgotothenewfolderinOutlook.
3 InOgoSync,selectthePropertiesbuttonandthenclicktheConfigurebutton
nexttotheContactscheckbox.
4 ChangetheOutlookContactsfoldertobesynchronized,andclickOK.
5 ClickOKagain.
6 ClicktheSynchronizebuttontostartsynchronization.
► Iftheerrormessageindicatestoomanycalendarappointments:
1 SelecttheDeleteAllAppointmentsoptionontheOgo.
2 InOgoSync,selectthePropertiesbutton,andthenclicktheConfigurebutton
nexttotheCalendarscheckbox.
3 ShortenthesynchronizationperiodintheCalendarSynchronizationSettings,as
describedonpage131.
4 ClickOK.
5 ClicktheSynchronizebuttontostartsynchronization.
Disconnection
IftheOgoandthePCdisconnectduringsynchronization,themessageConnection
Lostisdisplayed.Closethewindow,reconnectthemini‐USBcable,andstartagain.
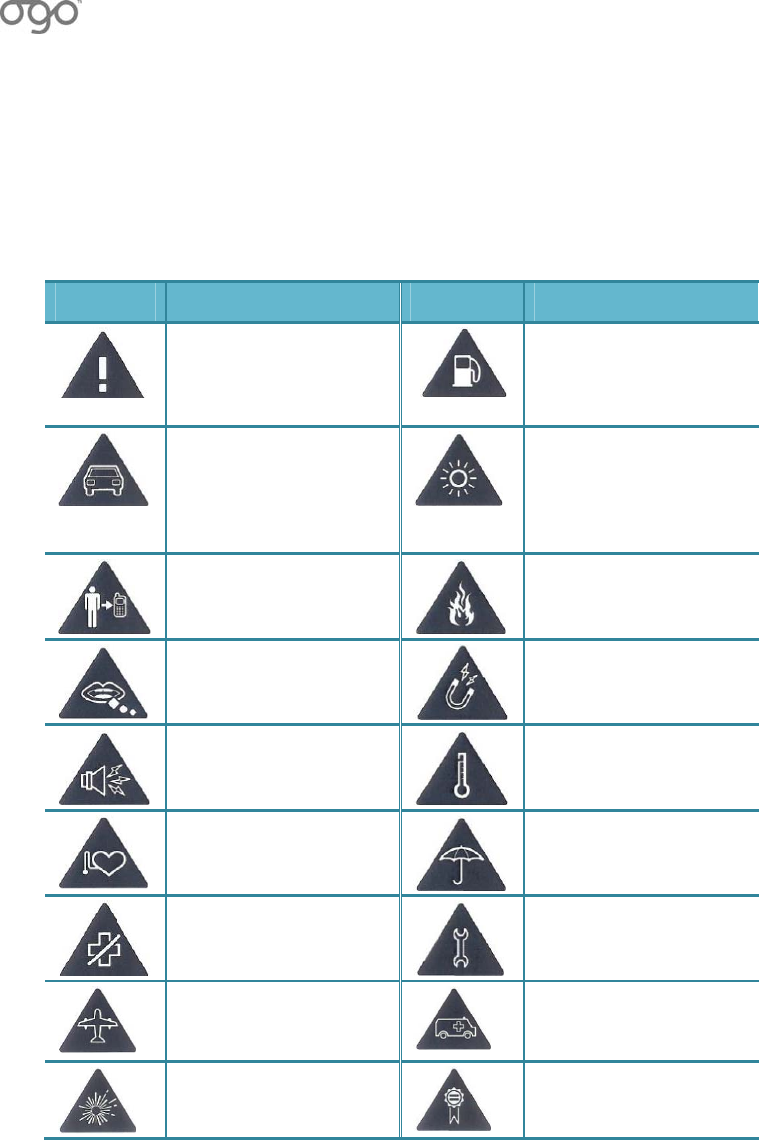
錯誤
!
使用
[
常用
]
索引標籤將
Heading1
套用到您想要在此處顯示的文字。
錯誤!使用[常用]索引標籤將Heading2套用到您想要在此處顯示的文字。135
ImportantSafetyInformation
ImportantSafetyInformation–WirelessDevices
PictogramsandGraphicSymbols
SymbolDescriptionSymbolDescription
ReadtheProductSafety
Informationsectionofthis
userguideonpage錯誤!
尚未定義書籤。.
Donotusewhilerefueling.
Considerroadsafetyand
obeyalllocallaws.Always
keepyourhandsfreeto
operatethevehiclewhile
driving.
Thisdevicemayproducea
brightorflashinglight
Forbody‐wornoperation
maintainaseparationof
1.5cm(0.6inches)
Donotdisposeofinafire
Smallpartsmaycausea
chokinghazard
Avoidcontactwith
magneticmedia
Thisdevicemayproducea
loudsound
Avoidextreme
temperatures
Keepawayfrom
pacemakersandother
personalmedicaldevices
Avoidcontactwithliquid,
keepdry
Switchoffwheninstructed
inhospitalsandmedical
facilities
Onlyusequalifiedservice
personneltorepairthis
product
Switchoffwheninstructed
inaircraftsandairports
Donotrelyonthisdevice
foremergency
communication
Switchoffinexplosive
environments
Onlyuseapproved
accessories
OGOUserManual
136錯誤!使用[常用]索引標籤將Heading2套用到您想要在此處顯示的文字。
ProductHandling
GeneralStatementonHandlingandUse
Youaloneareresponsibleforhowyouuseyourphoneandanyconsequencesofits
use.
Youmustalwaysswitchoffyourphonewherevertheuseofaphoneisprohibited.
Useofyourphoneissubjecttosafetymeasuresdesignedtoprotectusersandtheir
environment.
Alwaystreatyourphoneanditsaccessorieswithcareandkeepitinacleanand
dust‐freeplace.
Donotexposeyourphoneoritsaccessoriestoopenflamesorlittobacco
products.
Donotexposeyourphoneoritsaccessoriestoliquid,moistureorhigh
humidity.
Donotdrop,throwortrytobendyourphoneoritsaccessories.
Donotuseharshchemicals,cleaningsolventsoraerosolstocleanthedeviceor
itsaccessories.
Donotpaintyourphoneoritsaccessories.
Donotattempttodisassembleyourphoneoritsaccessories,onlyauthorized
personnelmustdoso.
Donotexposeyourphoneoritsaccessoriestoextremetemperatures:‐5°C
(minimum),+50°C(maximum).
Pleasechecklocalregulationsfordisposalofelectronicproducts.
Donotcarryyourphoneinyourbackpocketasitcouldbreakwhenyousitdown.
SmallChildren
Donotleaveyourphoneanditsaccessorieswithinthereachofsmallchildrenor
allowthemtoplaywithit.Theycouldhurtthemselvesorothers,orcould
accidentallydamagethephone.
Yourphonecontainssmallpartswithsharpedgesthatmaycauseaninjuryor
whichcouldbecomedetachedandcreateachokinghazard.
Demagnetization
Toavoidtheriskofdemagnetization,donotallowelectronicdevicesormagnetic
mediaclosetoyourphoneforalongtime.

錯誤
!
使用
[
常用
]
索引標籤將
Heading1
套用到您想要在此處顯示的文字。
錯誤!使用[常用]索引標籤將Heading2套用到您想要在此處顯示的文字。137
ElectrostaticDischarge(ESD)
DonottouchtheSIMcard'smetalconnectors.
Antenna
Donottouchtheantennaunnecessarily.
Whenplacingorreceivingaphonecall,holdyourphonetoyourear,withthe
bottomtowardsyourmouthorasyouwouldafixedlinephone.
Airbags
Donotplaceaphoneintheareaoveranairbagorintheairbagdeploymentarea.
Storethephonesafelybeforedrivingyourvehicle.
Seizures/Blackouts
Thisphoneiscapableofproducingbrightflashinglights.
RepetitiveMotionInjuries
TominimizetheriskofRSI,whentextingorplayinggameswithyourphone:
Donotgripthephonetootightly.
Pressthebuttonslightly.
Makeuseofthespecialfeaturesinthehandset,whichminimizethenumberof
buttonswhichhavetobepressed,suchasmessagetemplatesandpredictive
text.
Takelotsofbreakstostretchandrelax.
EmergencyCalls
Thisphone,likeanywirelessphone,operatesusingradiosignals,whichcannot
guaranteeconnectioninallconditions.Therefore,youmustneverrelysolelyon
awirelessphoneforemergencycommunications.
LoudNoise
Thisphoneiscapableofproducingloudnoises,whichmaydamageyourhearing.
BrightLight
Thisphoneiscapableofproducingflashlightorcanbeusedasatorch,donotuse
ittooclosetotheeyes.
PhoneHeating
Yourphonemaybecomewarmduringchargingandduringnormaluse.
OGOUserManual
138錯誤!使用[常用]索引標籤將Heading2套用到您想要在此處顯示的文字。
ElectricalSafety
Accessories
Useonlyapprovedaccessories.
Donotconnectwithincompatibleproductsoraccessories.
Takecarenottotouchorallowmetalobjects,suchascoinsorkeyrings,to
contactorshort‐circuitthebatteryterminals.
ConnectingtoCar
Seekprofessionaladvicewhenconnectingaphoneinterfacetothevehicle's
electricalsystem.
FaultyandDamagedProducts
Donotattempttodisassemblethephoneoritsaccessories.
Onlyqualifiedpersonnelmustserviceorrepairthephoneoritsaccessories.
Ifyourphoneoritsaccessorieshavebeensubmergedinwater,punctured,or
subjectedtoaseverefall,donotuseituntilyouhavetakenittobecheckedatan
authorizedservicecenter.
Interference
GeneralStatementonInterference/FaultFreeOperation
Specialcaremustbetakenwhenusingthephoneincloseproximitytopersonal
medicaldevices,suchaspacemakersandhearingaids.
ForGermany:
ConformitywiththeActonRadioInstallationandTelecommunications
TerminalEquipment
TheEuropeanParliament'sandCouncil'sDirective1999/5/EG,datedMarch9,
1999onRadioInstallationandTelecommunicationsTerminalEquipmentand
theirconformity'smutualapproval(R&TTEDirective/CEIdentification)
RFInterference/Compatibility
Insomeinstances,yourdevicewillcauseinterferencewithotherelectronicdevices.
Hereareafewrulestofollow:
Poweroffyourdeviceinanyfacilityorarea,suchashospitalsorinblasting
areas,wherepostednoticesinstructyoutodoso.Thisincludesnoticessaying:
“Turnofftwo‐wayradio.”
Followinstructionsfromairlinecrewforuseofthisdeviceonanairplane.

錯誤
!
使用
[
常用
]
索引標籤將
Heading1
套用到您想要在此處顯示的文字。
錯誤!使用[常用]索引標籤將Heading2套用到您想要在此處顯示的文字。139
Ifyouuseapacemaker,hearingaidorothermedicaldevicethatmaybe
affectedbyRF,consultyourhealthcareproviderorthemanufacturer’s
recommendationsbeforeusingthisdevice.Generally,theyrecommendthat
youholdadevicethatisONmorethansixinches(10cm)fromthepacemaker
anddonotcarryitinyourbreastpocket.
Checkyourvehicleowner’smanualoryourdealertobesurethatyoucanuse
thisdeviceinyourvehicleanditwillnotinterferewithanyofyourvehicle’s
electronicsystems.Foranyequipmentaddedtoyourvehicle,checkwiththe
equipmentmanufacturerorwhereyoupurchasedit.
Pacemakers
Pacemakermanufacturersrecommendthataminimumseparationof15cmbe
maintainedbetweenamobilephoneandapacemakertoavoidpotential
interferencewiththepacemaker.Toachievethis,usethephoneontheopposite
eartoyourpacemakeranddonotcarryitinabreastpocket.
HearingAids
Peoplewithhearingaidsorothercochlearimplantsmayexperienceinterfering
noiseswhenusingwirelessdevicesorwhenoneisnearby.
Thelevelofinterferencewilldependonthetypeofhearingdeviceandthe
distancefromtheinterferencesource;increasingtheseparationbetweenthem
mayreducetheinterference.Youmayalsoconsultyourhearingaid
manufacturertodiscussalternatives.
MedicalDevices
Pleaseconsultyourdoctorandthedevicemanufacturertodetermineifoperation
ofyourphonemayinterferewiththeoperationofyourmedicaldevice.
Hospitals
Switchoffyourwirelessdevicewhenrequestedtodosoinhospitals,clinicsor
healthcarefacilities.Theserequestsaredesignedtopreventpossible
interferencewithsensitivemedicalequipment.
Aircraft
Switchoffyourwirelessdevicewheneveryouareinstructedtodosobyairportor
airlinestaff.
Consulttheairlinestaffabouttheuseofwirelessdevicesonboardtheaircraft.If
yourdeviceoffersa'flightmode',thismustbeenabledpriortoboardingthe
aircraft.
OGOUserManual
140錯誤!使用[常用]索引標籤將Heading2套用到您想要在此處顯示的文字。
InterferenceinCars
Pleasenotethatbecauseofpossibleinterferencetoelectronicequipment,some
vehiclemanufacturersforbidtheuseofmobilephonesintheirvehiclesunlessa
hands‐freekitwithanexternalantennaisincludedintheinstallation.
ExplosiveEnvironments
PetrolStationsandExplosiveAtmospheres
Inlocationswithpotentiallyexplosiveatmospheres,obeyallpostedsignstoturn
offwirelessdevicessuchasyourphoneorotherradioequipment.
Areaswithpotentiallyexplosiveatmospheresincludefuellingareas,belowdecks
onboats,fuelorchemicaltransferorstoragefacilities,areaswheretheaircontains
chemicalsorparticles,suchasgrain,dust,ormetalpowders.
BlastingCapsandAreas
Turnoffyourmobilephoneorwirelessdevicewheninablastingareaorinareas
thatarepostedwithturnoff"two‐wayradios"or"electronicdevices"toavoid
interferingwithblastingoperations.
FCCRegulations:
zThisdevicecomplieswithpart15oftheFCCRules.Operationissubjecttothe
followingtwoconditions:(1)Thisdevicemaynotcauseharmfulinterference,and
(2)thisdevicemustacceptanyinterferencereceived,includinginterferencethat
maycauseundesiredoperation.
zThisdevicehasbeentestedandfoundtocomplywiththelimitsforaClassB
digitaldevice,pursuanttoPart15oftheFCCRules.Theselimitsaredesignedto
providereasonableprotectionagainstharmfulinterferenceinaresidential
installation.Thisequipmentgenerates,usesandcanradiatedradiofrequency
energyand,ifnotinstalledandusedinaccordancewiththeinstructions,may
causeharmfulinterferencetoradiocommunications.However,thereisno
guaranteethatinterferencewillnotoccurinaparticularinstallationIfthis
equipmentdoescauseharmfulinterferencetoradioortelevisionreception,which
canbedeterminedbyturningtheequipmentoffandon,theuserisencouragedto
trytocorrecttheinterferencebyoneormoreofthefollowingmeasures:
‐Reorientorrelocatethereceivingantenna.

錯誤
!
使用
[
常用
]
索引標籤將
Heading1
套用到您想要在此處顯示的文字。
錯誤!使用[常用]索引標籤將Heading2套用到您想要在此處顯示的文字。141
‐Increasetheseparationbetweentheequipmentandreceiver.
‐Connecttheequipmentintoanoutletonacircuitdifferentfromthattowhichthe
receiverisconnected.
‐Consultthedealeroranexperiencedradio/TVtechnicianforhelp.
Changesormodificationsnotexpresslyapprovedbythepartyresponsiblefor
compliancecouldvoidtheuser‘sauthoritytooperatetheequipment.
zTheantenna(s)usedforthistransmittermustnotbeco‐locatedoroperatingin
conjunctionwithanyotherantennaortransmitter.
4RFExposureInformation(SAR)
Thismodeldevicemeetsthegovernment’srequirementsforexposuretoradio
waves.
Thisdeviceisdesignedandmanufacturednottoexceedtheemissionlimitsfor
exposuretoradiofrequency(RF)energysetbytheFederalCommunications
CommissionoftheU.S.Government.
Theexposurestandardforwirelessdevicesemploysaunitofmeasurementknown
astheSpecificAbsorptionRate,orSAR.TheSARlimitsetbytheFCCis1.6W/kg.
*TestsforSARareconductedusingstandardoperatingpositionsacceptedbythe
FCCwiththedevicetransmittingatitshighestcertifiedpowerlevelinalltested
frequencybands.AlthoughtheSARisdeterminedatthehighestcertifiedpower
level,theactualSARlevelofthedevicewhileoperatingcanbewellbelowthe
maximumvalue.Thisisbecausethedeviceisdesignedtooperateatmultiple
powerlevelssoastouseonlytheposerrequiredtoreachthenetwork.Ingeneral,
thecloseryouaretoawirelessbasestationantenna,thelowerthepoweroutput.
ThehighestSARvalueforthemodeldeviceasreportedtotheFCCwhentestedfor
useattheearis0.284W/kgandwhenwornonthebody,asdescribedinthisuser
guide,is0.479W/kg(Body‐wornmeasurementsdifferamongdevicemodels,
dependinguponavailableenhancementsandFCCrequirements.)
WhiletheremaybedifferencesbetweentheSARlevelsofvariousdevicesandat
variouspositions,theyallmeetthegovernmentrequirement.

OGOUserManual
142錯誤!使用[常用]索引標籤將Heading2套用到您想要在此處顯示的文字。
TheFCChasgrantedanEquipmentAuthorizationforthismodeldevicewithall
reportedSARlevelsevaluatedasincompliancewiththeFCCRFexposure
guidelines.SARinformationonthismodeldeviceisonfilewiththeFCCandcanbe
foundundertheDisplayGrantsectionofhttp://www.fcc.gov/oet/fccidafter
searchingonFCCID:SOW‐OGOCC10.
ThisdeviceiscompliancewithSARforgeneralpopulation/uncontrolledexposure
limitsinANSI/IEEEC95.1‐1999andhadbeentestedinaccordancewiththe
measurementmethodsandproceduresspecifiedinOETBulletin65SupplementC.
Forbodywornoperation,thisdevicehasbeentestedandmeetstheFCCRF
exposureguidelinesforusewithanaccessorythatcontainsnometalandthe
positionsthehandsetaminimumof1.5cmfromthebody.Useofother
enhancementsmaynotensurecompliancewithFCCRFexposureguidelines.Ifyou
donotuseabody‐wornaccessoryandarenotholdingthedeviceattheear,
positionthehandsetaminimumof1.5cmfromyourbodywhenthedeviceis
switchedon.
錯誤
!
使用
[
常用
]
索引標籤將
Heading1
套用到您想要在此處顯示的文字。
錯誤!使用[常用]索引標籤將Heading2套用到您想要在此處顯示的文字。143
DeclarationofConformity
Iherebydeclarethattheproduct
NameofEUT:Messagingdevice;TradeName:OGO;ModelName:CC‐10
(Nameofproduct,typeormodel,batchorserialnumber)
satisfiesallthetechnicalregulationsapplicabletotheproductwithinthescopeof
Council
Directives2006/95/EC,2004/108/ECand99/5/EC:
EN301511V9.0.2
EN300328V1.7.1
EN301489‐1V1.6.1/‐7V1.3.1/‐17V1.3.2
EN50332‐2:2003
EN60950‐1:2001+A11:2004
(Title(s)ofregulations,standards,etc.)
Allessentialradiotestsuiteshavebeencarriedout.
NOTIFIEDBODY:EMCCertDr.RasekGmbH
Boelwiese5
91320
Ebermannstadt
Germany
EUIdentification
Number:0678
MANUFACTURERorAUTHORISEDREPRESENTATIVE:
Address:
IXIMobile
11MosheLeviSt.,
RishonLezion75658,
Israel
Thisdeclarationisissuedunderthesoleresponsibilityofthemanufacturerand,if
applicable,hisauthorisedrepresentative.
E
MCC
D
R. RAŠEK
™

OGOUserManual
144錯誤!使用[常用]索引標籤將Heading2套用到您想要在此處顯示的文字。