IXI Mobile OGOCT25C MESSAGE DEVICE User Manual
IXI Mobile, Inc. MESSAGE DEVICE
USERS MANUAL
Table of Contents
Table of Contents.............................................................................2
Welcome! ..........................................................................................4
Getting to Know Your Ogo..............................................................5
External Parts.................................................................................5
External Keys.................................................................................6
Identifying the Keyboard Functions...............................................7
Shortcut Keys.................................................................................8
Navigation Keys .............................................................................8
Text Keys .......................................................................................9
Getting Started ...............................................................................10
Installing the Battery.....................................................................10
Charging the Battery ....................................................................10
Powering On Your Ogo ................................................................10
Using the Messaging Wizard........................................................11
Using the Home Screen ...............................................................11
Using the Application Selector .....................................................12
Using the Ogo as a Phone ...........................................................12
Bluetooth Pairing instructions.......................................................12
Data Sheet.......................................................................................13
Using the Mailbox ..........................................................................15
Accessing the Mailbox..................................................................15
Using the Compose Screen .........................................................15
Saving a Draft of a Message........................................................18
Deleting the Draft of a Message...................................................19
Instant Messaging (IM)...................................................................20
Accessing the IM Screen..............................................................20
Identifying IM Contacts Status Icons............................................21
Reading and Composing IM Chat Messages...............................21
Using the Phone.............................................................................24
Accessing the Phone Screen .......................................................24
Receiving an Incoming Phone Call ..............................................25
Ending a Phone Call ....................................................................26
Muting a Phone Call.....................................................................26
Dialing an Outgoing Phone Call ...................................................27
Using the My Status Screen..........................................................29
Accessing the My Status Screen..................................................29
Logging On/Off or Signing In/Out.................................................29
Changing Your IM Status .............................................................30
Adding a New IM Account or E-mail Account...............................30
Removing an E-mail Account.......................................................31
Using the News Screen..................................................................33
Adding News Feeds .....................................................................33
Accessing News Feeds................................................................34
Using the Extras Screen................................................................36
Viewing Games............................................................................36
Viewing Technical Support Information........................................37
Setting Your Preferences ..............................................................39
Accessing the Settings Screen.....................................................39
Setting Phone Preferences ..........................................................40
Setting IM Preferences.................................................................41
Setting E-mail Preferences...........................................................41
Setting Device Preferences..........................................................42
Setting Sounds.............................................................................45
Setting the Time and Date............................................................46
Setting Network Preferences........................................................47
Setting System Preferences.........................................................48

Welcome!
Thank you for joining the Ogo community!
Ogo is all about connecting, creating and sharing with anyone, from anywhere, all the time. You can flirt,
chat, rant or sweet-talk from the bus, the bar or a park bench.
Read on to see how to get started!
For all things Ogo and staying in touch with other Ogolovers, go to http://www.ogo.com.
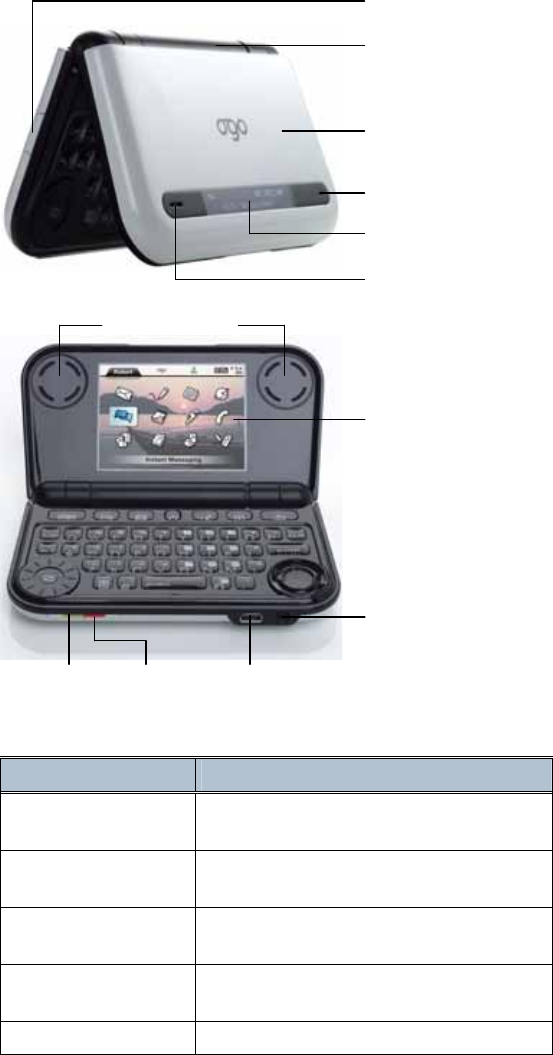
Getting to Know Your Ogo
Interchangeable Ogo Clip
Volume Keys
External Speaker
External LCD
Earpiece and Microphone
Flip Cover
Main Screen
Call
Key USB Charger
Socket
End
Key
Stereo Speakers
Headphone Socket
External Parts
Part Description
External LCD Displays time, messages and status
information when the flip cover is closed.
Earpiece and
Microphone
Lets you conduct a phone call when the flip
cover is closed.
Ogo Clip Can be replaced by any of the Ogo Clip
accessories.
USB Charger Socket Connects to the provided USB cable for
charging the device.
Headphone Socket Connects to the provided headphones
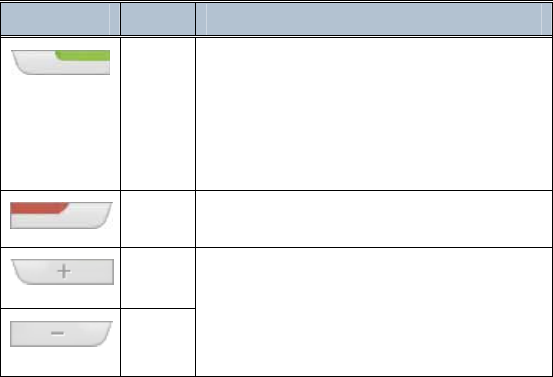
External Keys
Key Name Description
Call Press this key to accept an incoming call
or to switch between the active call and
the call on hold. When no call is active,
press this key to see the list of dialed
calls, or to initiate a call to the highlighted
item.
End Press this key to hang up the active call
or to reject the incoming call.
Vol +
Vol -
Use these keys to adjust the speaker or
headphone volume during a call or to
adjust the ringer volume when no call is
active. You can silence the Ogo by
pressing and holding the Vol - key
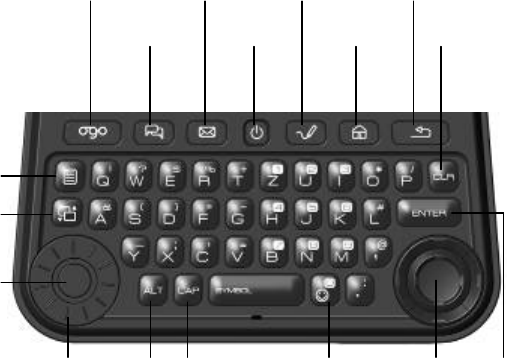
Identifying the Keyboard Functions
Figure 1: Ogo Keyboard
Ogo
Options
Application
Selecto
r
Scroll
Wheel
Scroll
Wheel
Button
ALT CAP
Clear
EnterEmoticons
Mailbox Compose Back
Power
On/Off
Instant
Messaging Home
8-way
Key
Shortcut Keys
Key Name Description
Power On/Off Powers your Ogo on and off.
Mailbox Shortcut to your Inbox, where you
can see incoming email and text
messages.
Instant
Messaging
Shortcut to the Instant Messaging
screen where you can chat with your
contacts.
Compose For writing a new email or text
message.
Home Returns to the Home screen.
Ogo Displays a list of current chats,
unread and draft email and text
messages.
Navigation Keys
Key Name Description
Applicatio
n Selector Press this key to display the Application
Selector, which enables you to navigate
to any application, from anywhere in the
Ogo.
Scroll
Wheel
Rotate the Scroll Wheel in either
direction to change the selection or to
move the text cursor when editing text.
Scroll
Wheel
Button
Press the button in the center of the
Scroll Wheel to select the highlighted
item.
Outer
Arrows Press the:
• Left and right arrows to move
between tabs.
• Up and down arrows to scroll one
page at a time (page up/down).
In a text message, press the:
• Left and right arrows to move to the
beginning and end of a line of text.
• Up and down arrows to move to the
beginning and end of a message.
Key Name Description
Inner
Arrows Press the:
• Left and right arrows to scroll left and
right within a screen or a line of text.
• Up and down arrows to move
between lines in a screen or the lines
of text in a message.
Enter Press this key to activate the highlighted
item on the screen.
Back Press this key to go to the previous
screen. Pressing this key also closes
any element open on top of the main
screen, such as a menu or a pop-up
window.
Options Opens the Options menu for the current
screen, if available.
Text Keys
Key Name Description
Letter
Keys
Inserts letters, numbers and other
symbols. A long press on an accented
letter key opens a palette with the
available accented options, such as:
“Ã Ä À”.
Capitalize Shifts the letter keys to capitals. For
example, press CAP and then the A key
to type an uppercase "A". Pressing the
A key without CAP types a lowercase
"a".
Alternate Shifts the letter keys to the symbol
located above the letter on the key.
For example, press the ALT key and
then the A key to insert “&”.
ALT +
Spacebar Pressing ALT together with the
spacebar opens a symbol palette that
enables you to insert special characters
into your email or text messages.
Emoticons Opens an emoticon palette that enables
you to insert emoticons into your text
messages.
Clear Deletes the highlighted item in a list.
Deletes the last character or emoticon
inserted in a text field.
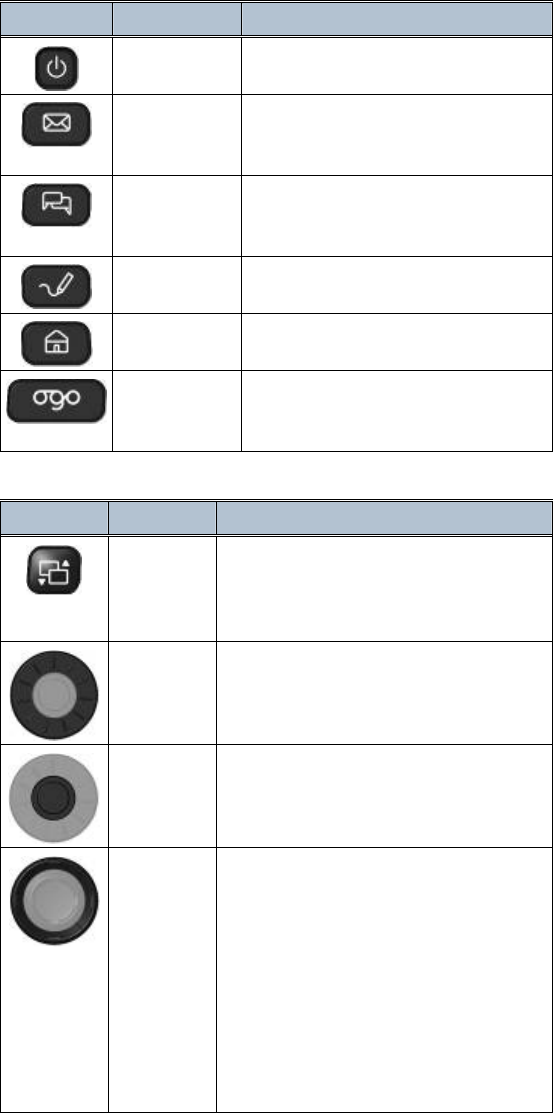
Getting Started
Installing the Battery
1 Turn your Ogo over and remove the back cover.
2 With the battery label facing up, match the battery contacts with the contacts in the battery slot. Push
the battery in, with the contacts side down first, as shown below:
Figure 2: Installing the Battery
3 Push the other side down to slide the battery into place.
4 Replace the back cover.
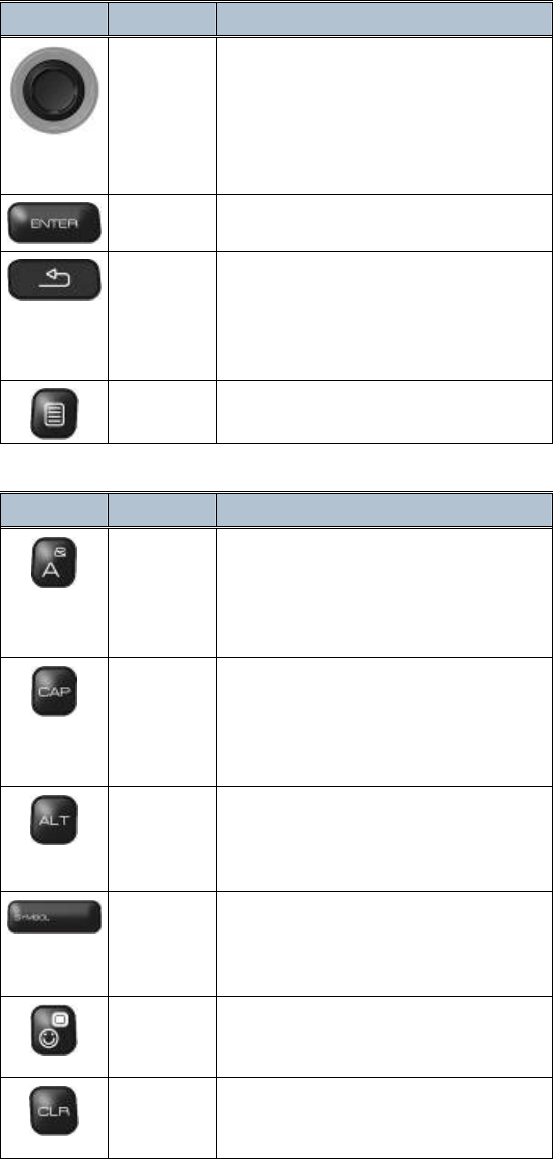
Charging the Battery
Connect the charger's power plug to the charging socket on the front of your Ogo (Figure 3). Charge your
Ogo for 12 hours.
Figure 3: Connecting the Charger
Note: Make sure that the battery has been properly installed before charging or powering on your Ogo.
Powering On Your Ogo
After your Ogo is fully charged, press the Power On/Off key until the startup animation appears on the
screen.

Using the Messaging Wizard
Once your device is powered on for the first time, the Messaging Wizard screen appears. Follow the
instructions displayed by the Messaging Wizard to set up your Instant Messaging and email accounts.
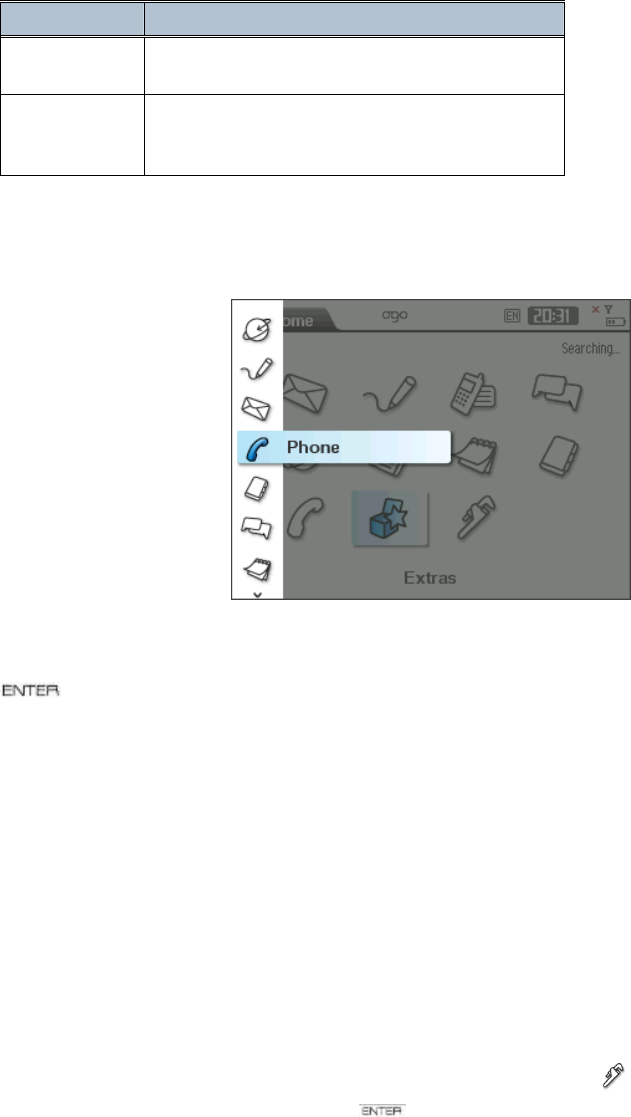
Using the Home Screen
Once you have configured your Ogo with your instant messaging and email accounts, the Home screen
(Figure 4) appears. This is the screen that is displayed each time you power on.
Figure 4: Home Screen
Each icon represents one of the Ogo's applications. Use the arrow keys or the Scroll Wheel to highlight the
desired icon. The name of the application is shown at the bottom of the screen.
Press to open the selected application. You can always return to the Home screen by pressing
Back key ( ) several times.
Tip: To initiate a call, you can start dialing from the Home screen.
The following describes the Ogo applications:
Application Enables you to…
Status bar (top
of screen) See current application and message indications
and device status.
Mailbox Read, write and manage email and text messages.
Compose Write and send email and text messages.
Instant
Messaging (IM) Chat with your IM contacts.
Browser Surf the Web. The Homepage provides useful
Internet functions and services.
News Read latest news via RSS feeds.
Calendar Manage your appointments from a daily, weekly or
monthly view.
Contacts Manage your contacts and to store contacts’
phone numbers, email and other addresses.
Phone Make phone calls, view missed calls and
previously dialed and received calls.
Application Enables you to…
Extras Play games and find contact information to Ogo’s
technical support.
Settings Choose a ring tone, set the date and time and
configure all of the Ogo options according to your
preferences.
Using the Application Selector
From any application you can quickly navigate to another application by pressing the Application Selector
key. A list of applications is then displayed, as shown below:
Figure 5: Application Selector
Use the Scroll Wheel to highlight the desired application and then press the Scroll Wheel's button (or press
) to go there. You can also press the Application Selector key again, to navigate into the sub-menus
of the highlighted application.
Using the Ogo as a Phone
You have several options for using the Ogo as a phone:
• When the flip is closed, hold the device so that the earpiece is next to your ear and the
microphone is placed near your mouth. Accept or Reject incoming calls using the external
keys.
• When the flip cover is open and no headset is connected, your Ogo is in speakerphone mode.
Use the navigation keys to access all phone options.
• Alternatively, you can use the wired headset provided in the package or use any Bluetooth
headset, after pairing it with the Ogo, as described below.
Bluetooth Pairing instructions
To pair a Bluetooth device with your Ogo, navigate to Settings (marked by ), and navigate to the Device
tab. Scroll to the bottom of the tab and press when the item Bluetooth settings is highlighted. In the
displayed window, select Search for devices, after turning on your Bluetooth device. Ogo will scan for
Bluetooth devices and offer you the option to pair after it detects your device.
Data Sheet
QVGA display, stereo speakers & QWERTY keyboard
• Instant Messaging with MSN & ICQ
• Push Email
• Integrated phone
• Multimedia player with removable microSD memory
• HTML Web Browser
• RSS reader
• CDMA2000 1xEV-DO(Rel.0), Dual band, Bluetooth 2.0
• Contact & Calendar—synchronized OTA, Bluetooth
or USB
• And…OgoClips, keep expanding your Ogo…
IM—MSN and ICQ built–in; other communities can easily
be supported
• Email—push Email supporting POP3, IMAP4, SSL, MS
Exchange server, and MSN Hotmail—supports multiple
Email accounts simultaneously
• Phone application—fully integrated and with speakerphone
• Multimedia—video, music, ring tones and DRM
• Email attachments—Images, PDF, DOC, TXT, PPT and
more, with data traffic optimization
• Java—full support of Java applications
• SMS—fully integrated with Email application
• Browser—HTML and WAP
• RSS—dedicated reader with configurable channels
• Calendar and Contacts
• Synchronization—Over–the–Air, Bluetooth or USB
Size [mm] 118 (L) x 72.5 (W) x 21 (H)
Weight [g] 150
Keyboard 5 row QWERTY or QWERTZ
Navigation 8–way navigation, menu selection
wheel, application hard
keys, talk/end & volume
Display QVGA 320x240 TFT 262k colors
Sub display 132x32 pixels, mono STN
Memory 64MB RAM, 128MB Flash
Connectivity Bluetooth 2.0, GPS
Wireless CDMA2000 1xEV-DO(Rel.0) Dual band
Cellular bands/PCS bands
Battery life 2hr talk time, 160hr standby time
Removable memory microSD
Connectors Mini-USB (charging and synchronization),
stereo 2.5mm
headset connector
Using the Mailbox
The Mailbox screen lets you see and manage your e-mail and SMS/text messages. If you see a number
displayed in the Mailbox icon (錯誤! 找不到參照來源。), you have new or unread e-mail or SMS/text
messages.
Before you can send an e-mail message, you must first set up an e-mail account with a portal provider. If
you have not set up an e-mail account during registration, you see “SMS Only” in the From field on the
Compose screen.
For information about setting up an e-mail account, see
錯誤
!
找不到參照來源。
on page 錯誤! 尚未定義書
籤。.
E-mail messages can contain up to 4000 characters, including spaces. SMS/text messages are limited to
600 characters, including spaces.
Note: SMS messages may be referred to as Text messages; your SMS number may also be referred to as
your Text number.
Accessing the Mailbox
You can access the Mailbox screen in two ways:
• From the Home screen, select the Mailbox icon and press ENTER.
• Press the Mailbox key.
The Mailbox screen (錯誤! 找不到參照來源。) displays four default tabs and in addition, a tab for each e-
mail account you add. The Inbox tab is selected by default. Each of the other tabs displays a single category
of messages – all messages for a single e-mail provider, all SMS/text messages, all outgoing messages, etc.
Using the Compose Screen
Accessing the Compose Screen
You can access the Compose screen in two ways:
• Press the Compose key.
• From the Contacts screen, in the following manner:
1. From the Home screen, select the Contacts icon (Figure 6) and press ENTER to display the Contacts
screen.
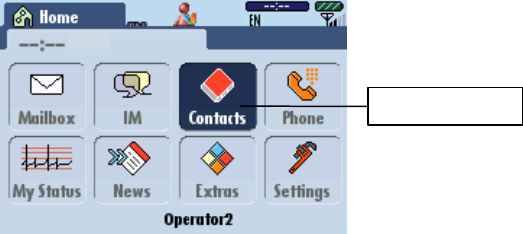
Contacts
icon
Figure 6: Identifying the Contacts icon
2. Scroll to highlight the contact you wish to send an e-mail to and press the Options key; an Options pop-
up window will appear (錯誤! 找不到參照來源。).
3. Make sure that Compose is highlighted and press ENTER; a blank Compose screen with that
contact's e-mail address already inserted into the To field will appear.
Sending an E-mail or SMS/Text Message
1. Access the Compose screen (錯誤! 找不到參照來源。) as described on page 15.
2. Add an address to the To field; do one of the following:
• Type the e-mail or SMS/text address in the To field.
• With the cursor in the To field, long press ENTER and then select the desired contact and
address from your contact list.
Notes:
• If you accessed the Compose screen through Contacts, the recipient's e-mail address will already
appear in the To field.
• You can send the same message to both e-mail and SMS/text addresses.
3. Use the inner ring of the 8-Way Navigation key to move to the Subject field and then type the subject of
your message.
4. Scroll to the message text box and type your message.
Note: E-mail messages can contain up to 4000 characters, including spaces. SMS/text
messages have a limit of 600 characters (up to 4 concatenated messages), including spaces.
Optional: You can also use accented Latin characters commonly used in European languages with your
Ogo’s Extended Character palette. For more information, see
錯誤
!
找不到參照來源。
on page 錯誤! 尚未定
義書籤。.
5. Scroll to select Send and press ENTER.
Note: You can also press the Options key, select Send (
錯誤
!
找不到參照來源。
), and press ENTER to
send your message.
For more information on addressing e-mail or SMS/text messages, see
錯誤
!
找不到參照來源。
on page 錯
誤! 尚未定義書籤。.
Note: An e-mail message can include up to 4000 characters. E-mail messages that exceed this limit trigger
the following pop-up window: “This message exceeds the maximum allowed text limit and will be trimmed
accordingly.”
Choosing an E-mail Address in the From Field
If you have more than one e-mail account, you can choose the address from which you want to send your
message.
1. On the Compose screen, select the From field and press ENTER.
2. Select the e-mail address for the message and press ENTER; your message now reflects the new
address in the From field.
Changing Your Default E-mail Address for
Sending Messages
When composing an e-mail message, your default e-mail address (in the From field) is the address of the
first (or the only) e-mail account you originally set up on your Ogo.
If you have more than one e-mail account and want to change your default e-mail address:
1. From the Home screen, select Settings and press ENTER.
2. Select the E-mail tab.
3. Select the name of the e-mail account you want to make your default account and press ENTER.
4. In the Mailbox Settings screen scroll down to select the Default Account checkbox.
5. Press ENTER to select the checkbox.
6. Scroll down to select Done and press ENTER; your Compose E-mail screen now lists the new
default address in the From field.
Sending SMS/Text Messages
If all of the recipient addresses for your message are mobile phone numbers, your message is sent as an
SMS/text. The From address that the recipients see is your SMS/text (also called MSISDN) number. The
From address you see when sending the message from your Ogo is your default e-mail address.
Saving a Draft of a Message
After composing a message, if you want to save it as a draft; press the Options key, select Save as draft
and press ENTER.
You can find your draft later by pressing the Mailbox key.
In the Inbox message list, drafts are indicated by the draft icon:
Note: You can also quickly save your draft while in the Compose screen by pressing the Up key. The Save
draft? pop-up window appears asking you if you want to save changes to the draft (
錯誤
!
找不到參照來源。
);
select Yes to save.
Deleting the Draft of a Message
If you decide not to keep a draft message, perform one of the following operations:
• While composing a message, press the Options key and select Delete this message. Press
ENTER to delete; a pop-up window appears asking you to confirm that you want to delete the
message.
• From the Mailbox screen, select the message and press the Options key. Select Delete this
Message and press ENTER.
• Press the Ogo key, select the draft message to be deleted, and press CLR.
Instant Messaging (IM)
The IM screen allows you to chat with your IM contacts in MSN. The number displayed in the IM icon
indicates the number of open chat sessions (read and unread).
Accessing the IM Screen
You can access the IM screen in two ways:
• From the Home screen, select the IM icon and press ENTER.
• Press the Instant Messaging key.
Note: You may be prompted to log on; sign in if you have not already done so.
Your IM contacts are displayed in the IM screen (錯誤! 找不到參照來源。). Each line shows the contact’s
alert icon (if applicable), contact’s screen name, and IM status (Away, Online, etc.).
You can IM chat with an IM contact by pressing ENTER when an IM contact’s name is selected.
Note: The maximum number of active IM chats is 20.
When one of your contacts sends you an instant message, you receive an IM Chat alert next to that
contact’s online status indicator. IM Chat alerts are animated if the IM chat message is unread.
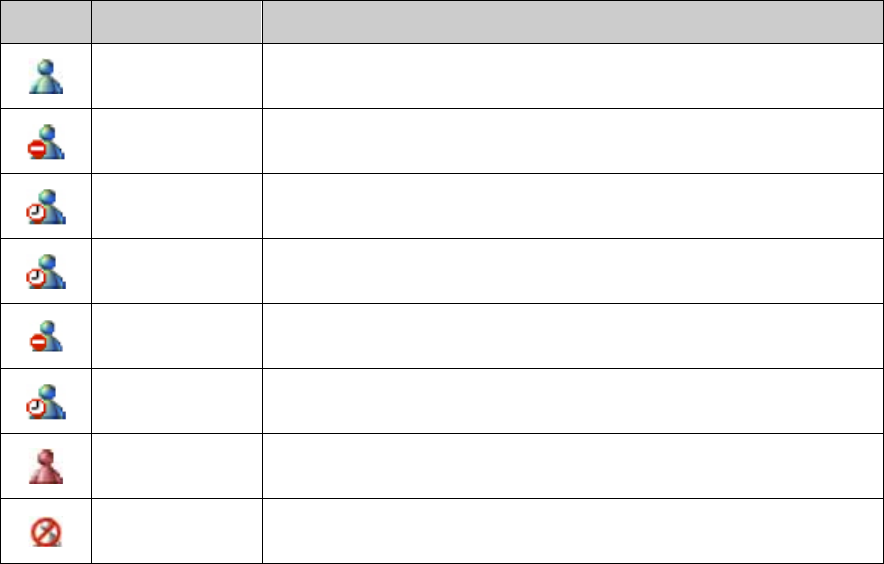
Identifying IM Contacts Status Icons
You can identify the presence of your IM contacts by simply looking at the IM status icon located on the IM
screen. Table 1 describes the various IM contact status icons that may appear.
Table 1: IM contact status icons
Icon Name Description
Online Indicates that your contact is connected to the IM community and is
available for an IM chat.
Busy Indicates that your contact is connected to the IM community, but may or
may not be readily available to respond to an instant message you send.
Be Right Back Indicates that your contact is connected to the IM community, but is
momentarily unavailable.
Away Indicates that your contact is connected to the IM community, but is
temporarily unavailable.
On the phone Indicates that your contact is connected to the IM community, but is using
the phone, and may or may not respond to your instant message.
Out to Lunch Indicates that your contact is connected to the IM community, but is out to
lunch.
Offline Indicates that your contact is not connected to the IM community, and is
unavailable for instant messaging.
Blocked Indicates you have blocked this contact. You appear offline to blocked
contacts.
Reading and Composing IM Chat Messages
Accessing IM Chat Messages Using the Ogo Key
An easy way to read and respond to IM chat messages is to use the Ogo key. You can press this key at any
time to access a list of your current IM chats, as well as recent e-mail and SMS/text messages. For more
information about the Ogo key see
錯誤
!
找不到參照來源。
on page 錯誤! 尚未定義書籤。.
Sending an Instant Message (Starting an IM Chat
Session)
1. Press the Instant Messaging key, or select IM from the Home screen and press ENTER.
2. Select the screen name of the contact with whom you want to IM chat. Make sure that the contact is
available. Press ENTER to open an IM chat window.
3. Type your message.
4. Select Send and press ENTER to send your message.
Note: You cannot IM chat with a contact who is offline. For MSN, a Compose message screen opens so that
you can e-mail the offline contact.
Adding Emoticons to Your IM Chat
You can use the set of emoticons supported by MSN to personalize your IM chat messages. Emoticons can
be used only in IM chat sessions.
1. Press the Emoticon key. An emoticon palette appears (for example, see 錯誤! 找不到參照來源。).
2. Using the 8-Way Navigation key, select the emoticon you want, and press ENTER to insert it.
You can also insert the selected emoticon by pressing the corresponding letter key on your Ogo’s
keyboard.
Emoticons appear in the view message section (upper portion) of your IM chat screen.
Note: For MSN emoticons, ALT toggles between emoticon palettes.
For a list of emoticons, see
錯誤
!
找不到參照來源。
on page 錯誤! 尚未定義書籤。.
Closing an IM Chat Session
You can close an IM chat session in the following ways:
• Ogo key: Press the Ogo key to display the Ogo pop-up window. Then select the IM chat session
and press CLR.
• Options key: While in an IM chat session, press the Options key, select Close Chat and press
ENTER.
IM chat sessions are automatically closed under the following circumstances:
• Log Off/Sign out: log off or sign out of MSN from the Options menu to close all open IM chat
sessions.
• Power off: all chat sessions are closed when you power off.
• There is no IM chat activity from either IM contact in a 24-hour period.
• The maximum number of active IM chats (20) is reached.
Using the Phone
The Phone screen allows you to make phone calls, view phone numbers previously dialed, call received and
missed calls. If you see a number displayed in the Phone icon, you have that many waiting voice messages.
Note: You must have a Bluetooth headset paired with your Ogo in order to use the device as a cellular
phone. For more information see
錯誤
!
找不到參照來源。
on page
錯誤
!
尚未定義書籤。
.
Accessing the Phone Screen
You can access the Phone screen by selecting the Phone icon from the Home screen and pressing
ENTER.
The following tabs are available in the Phone screen:
Dial – enter a phone number and place the call.
Dialed – a list of the recently dialed numbers.
Received – a list of phone numbers from which phone calls were received. If a call was from someone in
your contacts list, the name will appear.
Missed – phone numbers (or names) of calls that were not answered.
Timers – measured times of selected call parameters.

Receiving an Incoming Phone Call
When a call comes in to your Ogo, a pop-up window will appear asking if you want to Accept the call, Reject
it or Silence it (錯誤! 找不到參照來源。):
Press ENTER to accept the call; the connection will be made and an Incoming Call screen will be
displayed showing the caller's name or phone number, and a call-duration timer (錯誤! 找不到參照來源。):
Caller's name or number:
• The caller's name will be displayed if the incoming call is from a number who is listed in your Ogo
Contacts list.
• The caller's phone number will be displayed if the caller is not listed in the Contacts list.
• Private number will be displayed if the caller's Own number sending option is blocked.
Other options for incoming calls:
• ends the incoming call before it is answered and lists it in the Received calls tab.
• stops the ring and displays a pop-up window showing the call's origin and offering the
Accept, Reject and Silence options.
Ending a Phone Call
To end a phone call press the ENTER button; a Call options pop-up window will appear in the Call
screen :
Hang Up is the default option in the pop-up window. Press ENTER again to end the call; the Dial screen
will be displayed.
Muting a Phone Call
To mute a phone call (disable the Ogo's microphone so the other party cannot hear you):
1. Press ENTER and scroll down to the Mute option in the Call options pop-up window (錯誤! 找不到參
照來源。).
2. Press ENTER again; the pop-up window will disappear and a Muted flag will be displayed on the Call
screen (錯誤! 找不到參照來源。):
To Unmute the call (re-enable the Ogo's microphone):
1. Press ENTER and scroll down to the Unmute option in the Call Options pop-up window.
2. Press ENTER again; the Muted flag will disappear and you may resume the conversation.
Dialing an Outgoing Phone Call
Dialing a New Phone Number
When you want to call a phone number that is not recorded in your Contacts, proceed as follows:
1. Access the Phone screen by selecting the Phone icon from the Home screen and pressing ENTER.
2. Type the phone number on the Ogo's keypad; the number will appear as typed in the Dial screen's
Dialed number field. Type the phone number as an uninterrupted string with no spaces. The +, * and #
characters may be used when necessary.
Press ENTER to initiate the call. When the call is answered the Outgoing Call screen will be displayed,
showing the number being called and the call duration timer.
Using the My Status Screen
From the My Status screen you can log on/off or sign in/out and change your IM status.
The My Status screen shows whether you are online and available. Use the outer ring of the 8-Way
Navigation key to switch between the IM and E-mail tabs.
Accessing the My Status Screen
From the Home screen, select the My Status icon (錯誤! 找不到參照來源。) and press ENTER to display
the My Status screen (錯誤! 找不到參照來源。).
Logging On/Off or Signing In/Out
1. Press the Options key.
2. Select Log on/off and press ENTER.
Changing Your IM Status
Note: You must be signed into MSN to change your IM status.
1. From the Home screen, select My Status and press ENTER; the My Status screen appears
(錯誤! 找不到參照來源。).
2. Select MSN and press ENTER.
3. From the status pop-up window select the status you want and press ENTER.
To change your IM status when your Ogo is closed:
1. From the Home screen select My Status and press ENTER.
2. Select When Closed and press ENTER; the selections include:
• No Change (default setting)
• Away
• Busy
• Be Right Back
3. Scroll to select the status you want and press ENTER; your IM status when Ogo is closed is set.
Adding a New IM Account or E-mail Account
1. From the Home screen select My Status and press ENTER.
2. Select either the IM tab or the E-mail tab.
3. Press the Options key, then select Add IM (or Add E-mail) Account and press ENTER; you are taken
to the Messaging Wizard.
4. Provide the requested information to set up your new account. See
錯誤
!
找不到參照來源。
on page 錯
誤! 尚未定義書籤。 for step-by-step information.
Removing an E-mail Account
1. From the Home screen select My Status and press ENTER.
2. Use the outer ring of the 8-Way Navigation key to select the E-mail tab.
3. Press the Options key, then select Remove E-mail Account and press ENTER; the Account
Summary screen appears.
4. Select the e-mail account you want to remove and press ENTER.
5. Select Next and press ENTER; a message appears indicating that the account has been removed.
6. Select Finish and press ENTER to return to the My Status screen.
Note: If you want to delete your IM account, you must use the Settings menu (Settings > IM > Remove).
Using the News Screen
From the Home screen select the News icon (錯誤! 找不到參照來源。) and press ENTER to display the
News screen (錯誤! 找不到參照來源。).
News Reader provides a simple and intuitive interface for receiving updates from web sites featuring
standard RSS feed. The user can monitor several feeds concurrently.
Adding News Feeds
The first time you access the News Reader window, you are asked to contact Customer Care or browse the
web site in order to obtain news feeds. You can select the news bundles that interest you, and they will be
automatically provided to your Ogo.
To activate new news feeds, power up your Ogo and select Check for updates on the System tab of the
Settings screen. Your Ogo will display a pop-up notification that news channels were successfully
configured on the device.
Accessing News Feeds
The News Reader screen (錯誤! 找不到參照來源。) may contain several tabs, depending on the number of
news feeds you have configured. Each of the other tabs displays a single category of news.
Green envelope icons indicate unread items and pink envelope icons indicate items that have been read.
Select a news item and press ENTER to read it.
Using the Extras Screen
From the Home screen select the Extras icon (錯誤! 找不到參照來源。) and press ENTER to display the
Extras screen.
From the Extras screen you can access technical support information and play games on your Ogo.
Use the outer ring of the 8-Way Navigation key to switch between the Games and Tech Support Info tabs.
Viewing Games
The Games tab (錯誤! 找不到參照來源。) provides access to games that are available on your Ogo.
Select a game and press ENTER to start it.
The Blocks Game
The Blocks game comes pre-installed on your Ogo. In this game, you rotate shapes as they fall so that they
fit together with as few spaces between them as possible.
Table 2 shows the keys that can be used to play the Blocks game.
Table 2: Blocks Game Controls
Control Functionality
A, Z, Left (inner ring) Move a piece to the left
L "," Right (inner ring) Move a piece to the right
S,X,K,M, Up (inner ring), Page Up (outer ring) Rotate a piece
Space, Down (inner ring), Page Down (outer ring) Drop the piece, or Un-pause a paused game
P Pause or Un-pause an active game
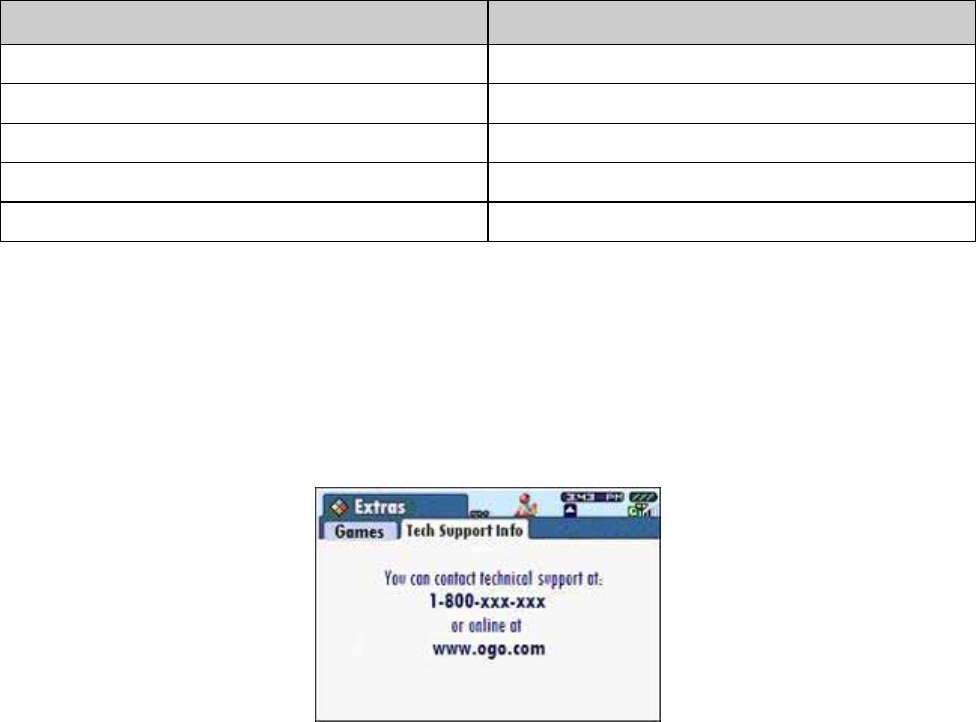
Viewing Technical Support Information
The Tech Support Info tab (Figure 7) displays Ogo’s technical support phone number and Internet contact
information.
Note: Tech Support Info screens may vary by carrier. Figure 7 represents an example of a Tech Support
Info screen that you may see.
Figure 7: Tech Support Information tab
Setting Your Preferences
You can control many aspects of how your Ogo looks, sounds and behaves by customizing the settings.
Accessing the Settings Screen
From the Home screen select the Settings icon (錯誤! 找不到參照來源。) and press ENTER to display
the Settings screen.
The Settings screen (錯誤! 找不到參照來源。) includes the following tabs. Select a tab by pressing left or
right on the outer ring of the 8-Way Navigation key:
• Phone
• IM
• E-mail
• Device
• Sounds
• Time & Date
• Network
• System
Setting Phone Preferences
Use the settings on the Phone tab to configure how your Ogo will respond to various calling conditions.
Table 3: Phone Settings
Option Description
Call forwarding
The following Call forwarding options may be configured to Enable or Disable:
• Forward all calls – Ogo will re-route all incoming calls to another pre-
determined number.
• Forward if busy - Ogo will re-route incoming calls to another pre-
determined number if you are engaged in an active phone call.
• Forward if not answered – Ogo will re-route an incoming call to another
pre-determined number if you do not answer the call.
• Forward if not reachable – Ogo will re-route an incoming call to another
pre-determined number if the network cannot locate your Ogo to deliver the
call.
Activating the Query button in the four Forward configuration screens will tell
you if the option is enabled or disabled.
Cancel all – activate this option to disable all of the Forward options that have
been enabled.
Voice mailbox number Use this option to change the phone number of the mailbox where you receive
voice messages (this number is assigned by your cellular service carrier).
Own number sending
Own number sending means that the person you are calling can read your
phone number on caller ID-equipped telephones:
• Set to On – your number can be read by the person you are calling.
• Set to Off – your number cannot be read by the person you are calling.
• Set by Network – leaves this option setting to the discretion of your cellular
service carrier (usually On).
Call waiting When enabled, Ogo will notify you of an incoming while you have a call in
progress rather than delivering a busy signal to the new caller.
Incoming call alert
• The type of ring tone may be changed to any of the available options.
• The ring tone's volume may be adjusted.
• The vibrating option may be turned on or off.
Setting IM Preferences
Use settings on the IM tab to manage your IM accounts.
Table 4: IM Settings
Option Description
MSN Sign In The IM tab includes Sign In options for each of the providers you chose:
• MSN Sign In
Add IM account To add an IM account select Add IM account and then press ENTER.
Remove IM account To remove an IM account select Remove IM account and then press ENTER.
Setting E-mail Preferences
Use settings on the E-mail tab to manage your e-mail accounts and the stored e-mail messages you have
sent.
Table 5: E-mail Settings
Option Description
Mailbox name
When the mailbox name is selected (i.e., MSN Hotmail), press ENTER to
display the Mailbox Settings screen. See Table 6 on page 42 for more
information.
Add account To add an e-mail account, select Add account, and press ENTER.
Remove account To remove an e-mail account, select Remove account, and press ENTER.
Brand autosignature
When this box is checked, the following message is inserted at the end of your
e-mail messages:
These words brought to you by Ogo. Find out more at www.ogo.com.
Sent items to keep
To set the number of sent items you want to keep in the Outbox tab, select
Sent items to keep, and press ENTER; a pop-up window appears on screen.
Select the number of items (from 10–50) and press ENTER again.
Table 6: Mailbox Settings
Option Description
Mailbox name Enter the name of your mailbox. This is the custom name of the account and is
displayed as a tab in the Mailbox and in the E-mail tab of My Status.
E-mail address Enter your e-mail address for the selected Mailbox.
User name Enter your user name for the e-mail account.
Password Enter your password for the e-mail account.
Default account
If you have only one e-mail account set up, this check box is selected by
default. If you have more than one account, press ENTER to select the
checkbox next to the e-mail account you want to set as the default. When you
compose a message, it is sent from the account selected as default.
Display name Enter the name that appears in the From field of an e-mail account that you
send from this account.
Server name
If you have a custom e-mail account set up, this field displays the server name
for that account. It cannot be directly edited, but you can click Configure server
to edit it.
Configure server Open to configure your e-mail port settings. This option is unavailable if you
have configured only an MSN e-mail account.
Check interval Change intervals for Ogo to check for new e-mail messages. Choose from OFF,
10m, 30m, 1h, 2h, 4h, 12h.
Setting Device Preferences
Use the settings on the Device tab to control the look of your Ogo screen and how it displays alerts when
messages are received, sent, or deleted.
Table 7: Device Settings
Option Description
Contrast
To set the contrast level for your Ogo screen, select Contrast. Then use the
inner ring of the 8-Way Navigation key and press left or right to decrease or
increase the level. The contrast level of Ogo’s screen changes immediately as
you move from one level to the next. Choose from six levels of contrast.
Screen Backlight
Choose a backlight duration time: 15 seconds, 30 seconds, 45 seconds,
1 minute, or 2 minutes. The longer the backlight time, the more battery power is
consumed.
Message font size
To choose a font size for messages, select Message font size and press
ENTER, then from the pop-up window that appears on screen, choose either
Normal or Large, and press ENTER.
Table 7: Device Settings (continued)
Option Description
Change PIN code Changes your PIN code. Be sure to keep a record of your new code in a safe
place.
Banner settings
Controls whether banners appear when you receive new messages or IM
contacts come online. See
錯誤
!
找不到參照來源。
on page 錯誤! 尚未定義書
籤。 for more information.
Language Choose your preferred language for your Ogo: English or Tűrkçe.
Reset Device
Removes all personal and account information from your Ogo permanently (for
example, if you are preparing to give the device to someone else). This option
deletes all IM and e-mail accounts and all contact information, as well as
restores all default settings (for sounds, alerts, etc.).
To reset the device, from the pop-up window that appears on screen, select OK
and press ENTER.
Press OK at the confirmation pop-up window.
NOTE: THE DEVICE WILL RESTART AFTER RESETTING.
Confirm msg. delete To have your Ogo ask you for confirmation when you delete a message, select
Confirm msg. delete, then press ENTER to select or clear the checkbox.
Prompt to add contacts
When you send an e-mail or SMS/text message to an address that is not
already in your contacts list, you can have Ogo ask whether you want to add
that address to your contacts list after sending the message.
To activate or deactivate this setting, select Prompt to add contacts, then press
ENTER to select or clear the checkbox.
Restore canceled
pop-ups
To restore canceled pop-up windows select Restore canceled pop-up windows
and press ENTER. This option is unavailable.
Table 7: Device Settings (continued)
Option Setting Description
Bluetooth settings Local device name
This is the designated Bluetooth name of the Ogo device.
Other Bluetooth devices searching for this Ogo will
recognize it by this designation.
Change name
This is the setting used to change the Local device name.
Select Open and press ENTER; a pop-up window
appears in which the designated name may be changed.
My devices
Select Open and press ENTER; a pop-up window
appears exhibiting the names of all of the Bluetooth devices
that are paired with the Ogo device, and offers the option of
un-pairing them.
Search for devices
This option scans the airwaves for available Bluetooth
devices to connect to. Select Scan and press ENTER; a
pop-up window appears showing that a search is in
progress.
Temporary visibility
To protect itself from undesired contacts, the Ogo is
normally "invisible" to random searches. When you wish to
be found, the Ogo must be made "visible" to the airwaves.
Select Enable and press ENTER; a pop-up window
appears informing you that your Ogo will be temporarily
visible for 1 minute. After that one minute, it automatically
goes back to being invisible.
Setting Sounds
Use the settings on the Sounds tab to control the different kinds of sounds your Ogo makes.
Table 8: Sound Settings
Option Description
Volume
To set the volume level for all of Ogo’s sounds, select Volume, then use the
inner ring of the 8-Way Navigation key to increase (right) or decrease the
volume (left). The volume level of Ogo’s sounds changes immediately as you
move from one level to the next. Choose from nine volume levels.
Mute
To make Ogo operate silently select Mute, then press ENTER to select the
checkbox.
Note: When you select Mute, all of Ogo’s sounds are muted, including
key tones.
Vibration
Alerts you when contacts come online or when you receive new messages by
vibration. To turn vibration on or off, select Vibration, then press ENTER to
select or clear the checkbox. Only occurs when your Ogo is powered on and
closed.
Note: Vibration occurs only for events which are selected in your Banner Alert
settings. Please refer to 錯誤! 找不到參照來源。 on page
錯誤
!
尚未定義書
籤。
.
Key tones To turn on or off the sounds Ogo makes whenever you press a key, select Key
tones, and then press ENTER to select or clear the checkbox.
Alerticon sounds To turn on or off the sounds associated with alerticons, select Alerticon sounds,
and then press ENTER to select or clear the checkbox.
Message events To turn on or off the sounds Ogo makes when messages are received, select
Message events, and then press ENTER to select or clear the checkbox.
Presence events To turn on or off the sounds Ogo makes when IM contacts sign on, select
Presence events, then press ENTER to select or clear the checkbox.
System sounds
To turn on or off the sounds Ogo makes when you power on/off, or when you
open or close the device, select System sounds, then press ENTER to select
or clear the checkbox.
Using Volume/Vibration Shortcuts
You can set the volume, choose mute/un-mute, or turn on/off vibration for your Ogo from the
Volume/Vibration pop-up window. You can activate the Volume/Vibration pop-up window (錯誤! 找不到參照
來源。) from any screen by pressing ALT and any portion of the 8-Way Navigation key at the same time.
Note: After the Volume pop-up window appears, it remains visible for two seconds.
With the Volume/Vibration pop-up window displayed:
• Use the inner ring of the 8-Way Navigation key, and press up or down to increase or decrease the
volume (with audio tone).
• To mute your Ogo, press down on the outer ring of the 8-Way Navigation key. To un-mute, press
up.
• To turn vibration on or off, press left or right on the inner or outer ring of the 8-Way Navigation key.
Setting the Time and Date
When your Ogo is powered on, it automatically synchronizes with the current time from your carrier’s
network. If for some reason the network is not available, you can set the time and date manually using the
settings on the Time & Date tab.
Note: If your network does not provide the time and date, the time and date settings are lost if you remove
the battery.
Table 9: Time and date settings
Option Description
Device Time Displays the time as it is currently set on your Ogo.
Set time
You can access the time manually or copy the network time. In most cases you
want to copy the network time.
To set the time by copying the network time:
1. Select Set time and press ENTER.
2. Select Copy network time and press ENTER.
3. Select Done and press ENTER.
To set the time manually:
1. Select Set time and press ENTER.
2. Select Time.
3. Type numbers for the hour and minute and press ENTER.
Note: Only numbers can be typed in the hour and minute fields, so using the
ALT key to type numbers is not necessary.
Table 9: Time and date settings (continued)
Option Description
Set date
You can set the date manually or copy the network date. In most cases you
want to copy the network date. To set the date by copying the network date:
1. Select Set date and press ENTER.
2. Select Copy network date and press ENTER.
3. Select Done and press ENTER.
To set the date manually:
1. Select Set date and press ENTER.
2. Type numbers in the Date fields (for example, 28/04/2005).
3. Select Done and press ENTER.
Time format Select the format you want to use for displaying the time.
Date format Select the format you want to use for displaying the date.
Network time Shows the current time and date on the network.
Setting Network Preferences
Network settings are primarily used by your carrier to help troubleshoot issues with your Ogo.
Table 10: Network Settings
Option Description
Active network Shows the name of the active network.
Network Selection Select Network Selection and then press ENTER; from the pop-up window
that appears on screen, select Auto or Manual and then press ENTER.
Scan for networks To scan for available networks, select Scan for networks and press ENTER.
This option is disabled.
SMS settings
Select Edit and then press ENTER to enter the Username and Password for
sending SMS/text messages; this information must be entered in order to send
or receive SMS/text.
Network services
Select Open to open the Network services screen, where you can send a
network command. The USSD (Unstructured Supplementary Service Data)
mechanism allows you to execute commands such as pre-paid card activation,
balance check, balance reload, or cost information manipulation.
GPRS status
Indicates the status of your GPRS connection (Connected, Not connected,
Connection denied, Paused, or Not available). Customer Care uses this
indicator of GPRS connection to troubleshoot your device.
Setting System Preferences
System settings show capacities and identifying characteristics for your Ogo.
Table 11: System Settings
Option Description
Contact Records Shows percentage of storage available for contact records.
Software Shows the version number of the software on your Ogo (for example,
1.0.70.2750).
IMSI Not used
IMEI Not used
Battery Shows battery level as a percentage (for example, 56% of full charge).
Check for updates
Enables you to manually check whether software updates are available for your
Ogo.
• Check indicates that new software updates are available and ready to
install.
• Checking… indicates that your Ogo is checking for updates.
• Downloading upgrade is displayed while software upgrades are being
downloaded to your Ogo.
• Software update is ready indicates that software download has been
completed. The upgrade takes effect the next time you power on your Ogo.
www.ogo.com

Part # IXP00228 REV1 © 2007 IXI Mobile, Inc. All rights reserved.
FCC Regulations:
zThis mobile phone complies with part 15 of the FCC Rules. Operation is subject to the following two
conditions: (1) This device may not cause harmful interference, and (2) this device must accept any
interference received, including interference that may cause undesired operation.
zThis mobile phone has been tested and found to comply with the limits for a Class B digital device,
pursuant to Part 15 of the FCC Rules. These limits are designed to provide reasonable protection against
harmful interference in a residential installation. This equipment generates, uses and can radiated radio
frequency energy and, if not installed and used in accordance with the instructions, may cause harmful
interference to radio communications. However, there is no guarantee that interference will not occur in a
particular installation If this equipment does cause harmful interference to radio or television reception,
which can be determined by turning the equipment off and on, the user is encouraged to try to correct the
interference by one or more of the following measures:
-Reorient or relocate the receiving antenna.
-Increase the separation between the equipment and receiver.
-Connect the equipment into an outlet on a circuit different from that to which the receiver is connected.
-Consult the dealer or an experienced radio/TV technician for help.
Changes or modifications not expressly approved by the party responsible for compliance could void the
user‘s authority to operate the equipment.

4RF Exposure Information (SAR)
This model phone meets the government’s requirements for exposure to radio waves.
This phone is designed and manufactured not to exceed the emission limits for exposure to radio frequency
(RF) energy set by the Federal Communications Commission of the U.S. Government.
The exposure standard for wireless mobile phones employs a unit of measurement known as the Specific
Absorption Rate, or SAR. The SAR limit set by the FCC is 1.6W/kg. *Tests for SAR are conducted using
standard operating positions accepted by the FCC with the phone transmitting at its highest certified power
level in all tested frequency bands. Although the SAR is determined at the highest certified power level, the
actual SAR level of the phone while operating can be well below the maximum value. This is because the
phone is designed to operate at multiple power levels so as to use only the poser required to reach the
network. In general, the closer you are to a wireless base station antenna, the lower the power output.
The highest SAR value for the model phone as reported to the FCC when tested for use at the ear is 0.905
W/kg and when worn on the body, as described in this user guide, is 1.33 W/kg (Body-worn measurements
differ among phone models, depending upon available enhancements and FCC requirements.)
While there may be differences between the SAR levels of various phones and at various positions, they all
meet the government requirement.
The FCC has granted an Equipment Authorization for this model phone with all reported SAR levels
evaluated as in compliance with the FCC RF exposure guidelines. SAR information on this model phone is
on file with the FCC and can be found under the Display Grant section of http://www.fcc.gov/oet/fccid after
searching on FCC ID: SOW-OGOCT25C.
For body worn operation, this phone has been tested and meets the FCC RF exposure guidelines for use
with an accessory that contains no metal and the positions the handset a minimum of 1.5 cm from the body.
Use of other enhancements may not ensure compliance with FCC RF exposure guidelines. If you do no t
use a body-worn accessory and are not holding the phone at the ear, position the handset a minimum of 1.5
cm from your body when the phone is switched on.