Ibm 000 8697 Users Manual Informix OnLine Database Server Administrator's Guide, Version 5.x
000-8697 to the manual d64eda7c-5f30-498e-91c7-80e21a9f0c47
2015-02-02
: Ibm Ibm-000-8697-Users-Manual-431831 ibm-000-8697-users-manual-431831 ibm pdf
Open the PDF directly: View PDF ![]() .
.
Page Count: 702 [warning: Documents this large are best viewed by clicking the View PDF Link!]
- Informix Online Documentation
- Table of Contents
- Introduction
- Installation and Initial Configuration
- In This Chapter
- Define Your Starting Point
- Overview of OnLine Initial Configuration Tasks
- Set Up Your Initial Configuration
- Root Dbspace Configuration Guidelines
- Mirroring Configuration Guidelines
- Physical Log Configuration Guidelines
- Logical Log Configuration Guidelines
- Message File Guidelines
- Archive Tape Device Guidelines
- Logical Log Tape Device Guidelines
- Identification Parameter Guidelines
- Shared-Memory Parameter Guidelines
- Machine- and Product-Specific Parameter Guidelines
- OnLine Disk Space Allocation
- Configuration Checklist
- Enter Your Configuration and Initialize OnLine
- Errors During Initialization
- System Architecture
- In This Chapter
- Initialization
- Initialization Commands
- What Happens During Shared-Memory Initialization
- Shared-Memory Initialization Procedure
- Step 1: Calculate Configuration Values
- Step 2: Create Shared Memory
- Step 3: Attach to Shared Memory
- Step 4: Initialize Shared Memory Structure
- Step 5: Wake Parent Process
- Steps 6 and 7: Initiate Fast Recovery and First Checkpoint
- Step 8: Drop Temporary Tables (Optional)
- Step 9: Document Configuration Changes
- Step 10: Check for Forced Residency
- Step 11: Begin Looping as Master Daemon
- What Happens During Disk-Space Initialization
- Step 1: Calculate Configuration Values
- Step 2: Create OnLine Shared Memory
- Step 3: Attach to Shared Memory
- Step 4: Initialize Shared-Memory Structures
- Step 5: Initialize Disk Space
- Step 6: Wake Parent tbinit Process
- Step 7: Initiate First Checkpoint
- Step 8: Change to Quiescent Mode
- Step 9: Set Forced Residency
- Step 10: Loop as Master Daemon
- UNIX Kernel and Semaphore-Allocation Parameters
- OnLine User Processes
- OnLine Daemon Processes
- Shared Memory and Process Communication
- Shared Memory and Buffer Locks
- Managing Shared-Memory Resources
- Shared-Memory Header
- Shared-Memory Internal Tables
- Shared-Memory Buffer Pool
- OnLine LRU Queues
- LRU Queues and Buffer Pool Management
- How a User Process Acquires a Buffer
- Physical Log Buffer
- Logical Log Buffer
- OnLine Checkpoints
- What Happens During a Checkpoint
- When the Daemons Flush the Buffer Pool
- How OnLine Synchronizes Buffer Flushing
- Write Types Describe Flushing Activity
- Writing Data to a Blobspace
- Disk Data Structures
- OnLine Disk Space Terms and Definitions
- Structure of the Root Dbspace
- Structure of a Regular Dbspace
- Structure of an Additional Dbspace Chunk
- Structure of a Blobspace
- Structure of a Blobspace or Dbspace Mirror Chunk
- OnLine Limits for Chunks
- Reserved Pages
- Chunk Free-List Page
- tblspace Tblspace
- Database Tblspace
- Create a Database: What Happens on Disk
- OnLine Limits for Databases
- Create a Table: What Happens on Disk
- Create a Temporary Table: What Happens on Disk
- Structure of an Extent
- Next Extent Allocation
- Structure of a Dbspace Page
- Data Row Format and Rowid
- Data Pages and Data Row Storage
- Structure of an Index Page
- Structure of a Dbspace Bit-Map Page
- Blob Storage and the Blob Descriptor
- Structure of a Dbspace Blob Page
- Blobspace Page Types
- Structure of a Blobspace Blobpage
- Physical Log
- Logical Log Files
- Operating OnLine
- In This Chapter
- Changing Modes
- Logical Log Administration
- Examine Your Logical Log Configuration
- Change Pathname of Logical Log Tape Device
- Change Block Size of Logical Log Tape Device
- Change Tape Size of Logical Log Tape Device
- Change Maximum Number of Logical Log Files
- Change Size of Logical Log Files
- Logical Log File Status
- Logical Log File ID Numbers
- Add a Logical Log File
- Drop a Logical Log File
- Move a Logical Log File to Another Dbspace
- Change the Logging Status of a Database
- Back Up a Logical Log File
- Start Continuous Logical Log Backup
- End Continuous Logical Log Backup
- Switch to the Next Logical Log File
- Free a Logical Log File
- If the Logical Log Backup Cannot Complete
- Archive Administration
- Archive Types
- How Long Will an Archive Take?
- Plan the Archive Schedule
- Examine Your Archive Configuration
- Change Pathname of Archive Tape Device
- Change Block Size of Archive Tape Device
- Change Tape Size of Archive Tape Device
- Create an Archive, Any Type
- If the Logical Log Files Fill During an Archive
- If an Archive Terminates Prematurely
- Monitor OnLine Activity
- Monitor Archive History
- Monitor Blobs in a Blobspace
- Monitor Blobs in a Dbspace
- Monitor Buffers
- Monitor Buffer-Pool Activity
- Monitor Checkpoints
- Monitor Chunks
- Monitor Configuration Information
- Monitor Databases
- Monitor Dbspaces
- Monitor Disk Pages
- Monitor Extents
- Monitor Index Information
- Monitor Logging Activity
- Monitor the Message Log
- Monitor OnLine Profile
- Monitor Shared Memory and Latches
- Monitor Tblspaces
- Monitor Users and Transactions
- Modify OnLine Configuration
- Create a Blobspace
- Drop a Blobspace
- Change the Number of Buffers in the Pool
- Change the Size of Either Log Buffer
- Add a Chunk
- Change the Maximum Number of Chunks
- Create a Dbspace
- Drop a Dbspace
- Enforce/Turn Off Residency for This Session
- Enforce/Turn Off Residency
- Change the Status of a Mirrored Chunk
- Enable Mirroring
- Start/End Mirroring in a Blobspace or Dbspace
- Change Physical Log Location or Size
- Change the Checkpoint Interval
- Change the Destination of Console Messages
- Change the Maximum Number of Dbspaces
- Change the Maximum Number of Locks
- Change the Maximum Number of Tblspaces
- Change the Maximum Number of Users
- Change the Number of Page Cleaners
- Things to Avoid
- Data Consistency, Recovery, and Migration
- In This Chapter
- Consistency Checking
- Mirroring
- OnLine Logging Overview
- What Happens During Logical Log Backup
- What Happens During an Archive
- Read Archive History Information
- Mount a Tape on TAPEDEV
- Verify the Archive Level
- Check Free Space in the Logical Log
- Force a Checkpoint
- Synchronize tbtape and tbinit Activities
- Write Tape Header Page
- Archive Reserved Pages
- Determine Archive Criteria
- Archive Disk Pages That Meet Criteria
- Monitor and Archive Physical Log Pages
- Write a Trailer Page
- Update the Reserved Pages
- Fast Recovery
- Data Restore: When Should You Do It?
- Steps That Occur During a Data Restore
- Gather All Tapes Needed for Restore
- Verify OnLine Configuration
- Initiate Data Restore from Offline Mode
- Mount Level-0 Archive Tape
- Verify Current Configuration
- Prompt for Logical Log Backup
- Write Each Archive Page to Disk
- Initialize Shared Memory
- Roll Forward Logical Logs
- OnLine Is Quiescent
- Database and Table Migration
- How to Improve Performance
- DB-Monitor Screens
- Utilities
- In This Chapter
- dbexport: Unload a Database and Schema File
- dbimport: Create a Database
- dbload: Load Data from a Command File
- dbschema: Output SQL Statements
- tbcheck: Check, Repair, or Display
- tbinit: Initialize OnLine
- tbload: Create a Database or Table
- tblog: Display Logical Log Contents
- tbmode: Mode and Shared-Memory Changes
- tbparams: Modify Log Configuration Parameters
- tbspaces: Modify Blobspaces or Dbspaces
- tbstat: Monitor OnLine Operation
- tbtape: Logging, Archives, and Restore
- tbunload: Transfer Binary Data in Page Units
- OnLine Message Log
- Product Environment
- In This Chapter
- The OnLine Environment
- What Is Multiple Residency?
- OnLine Administration with IBM Informix STAR
- Sharing Data by Using IBM Informix STAR
- IBM Informix STAR and Two-Phase Commit Protocol
- Two-Phase Commit and Automatic Recovery
- Independent Action and Manual Recovery
- Heuristic Decisions: What and Why
- Heuristic Rollback
- Heuristic End-Transaction
- Two-Phase Commit Protocol Errors
- Two-Phase Commit and Logical Log Records
- Determining Database Consistency
- IBM Informix STAR Configuration Parameters
- Track a Transaction with tbstat Output
- Notices
- Index

IBM Informix OnLine
Database Server
Administrator’s Guide
Version 5.x
December 2001
Part No. 000-8697

ii IBM Informix OnLine Database Server Administrator’s Guide
This document contains proprietary information of IBM. It is provided under a license agreement and is
protected by copyright law. The information contained in this publication does not include any product
warranties, and any statements provided in this manual should not be interpreted as such.
When you send information to IBM, you grant IBM a nonexclusive right to use or distribute the information
in any way it believes appropriate without incurring any obligation to you.
© Copyright International Business Machines Corporation 1996, 2001. All rights reserved.
US Government User Restricted Rights—Use, duplication or disclosure restricted by GSA ADP Schedule
Contract with IBM Corp.
Note:
Before using this information and the product it supports, read the information in the
appendix entitled “Notices.”

Table of Contents
Table of
Contents
Introduction
In This Introduction ................. 3
About This Manual .................. 3
Organization of This Manual ............. 4
Demonstration Database .............. 5
IBM Informix OnLine ................. 7
Product Overview................. 7
IBM Informix OnLine and Other IBM Informix Products . . . 7
Documentation Conventions .............. 8
Typographical Conventions ............. 8
Icon Conventions ................. 9
Command-Line Conventions ............. 9
Sample Code Conventions .............. 12
Additional Documentation ............... 14
Printed Manuals ................. 14
Error Message Files ................ 15
Documentation Notes, Release Notes, Machine Notes .... 18
Related Reading ................... 19
Compliance with Industry Standards ........... 19
IBM Welcomes Your Comments ............. 20

iv IBM Informix OnLine Database Server Administrator’s Guide
Chapter 1 Installation and Initial Configuration
In This Chapter ................... 1-5
Define Your Starting Point ............... 1-6
Upgrade an Earlier Version of OnLine ......... 1-7
Overview of OnLine Installation Steps ......... 1-10
Overview of OnLine Initial Configuration Tasks ....... 1-10
OnLine Configuration Files ............. 1-11
Contents of tbconfig.std .............. 1-13
Set Up Your Initial Configuration ............ 1-20
Root Dbspace Configuration Guidelines......... 1-21
Mirroring Configuration Guidelines .......... 1-24
Physical Log Configuration Guidelines ......... 1-25
Logical Log Configuration Guidelines ......... 1-26
Message File Guidelines .............. 1-28
Archive Tape Device Guidelines ........... 1-28
Logical Log Tape Device Guidelines .......... 1-29
Identification Parameter Guidelines .......... 1-31
Shared-Memory Parameter Guidelines ......... 1-32
Machine- and Product-Specific Parameter Guidelines .... 1-39
OnLine Disk Space Allocation ............ 1-40
Configuration Checklist ................ 1-50
Enter Your Configuration and Initialize OnLine ....... 1-51
Setting Shared Memory Parameters .......... 1-53
Initialize OnLine ................. 1-54
Set Your Environment Variables ........... 1-54
Modify UNIX Startup and Shutdown Scripts ....... 1-56
Create Blobspaces and Dbspaces ........... 1-59
Errors During Initialization .............. 1-59
OnLine Error Message Format ............ 1-60
UNIX Error Message Format............. 1-60

Table of Contents v
Chapter 2 System Architecture
In This Chapter .................. 2-7
Initialization ................... 2-7
Initialization Commands ............. 2-8
What Happens During Shared-Memory Initialization . . . 2-10
What Happens During Disk-Space Initialization ..... 2-14
UNIX Kernel and Semaphore-Allocation Parameters .... 2-18
OnLine User Processes ................ 2-22
How User Processes Attach to Shared Memory ...... 2-24
User Processes and Critical Sections.......... 2-28
OnLine User Process Status and States ......... 2-29
OnLine Database Server Process ........... 2-30
Orphaned Database Server Processes ......... 2-31
OnLine Daemon Processes .............. 2-33
tbinit Daemon ................. 2-33
tbundo Daemon ................ 2-34
tbpgcl Daemon ................. 2-34
Shared Memory and Process Communication ........ 2-36
Shared Memory and Buffer Locks .......... 2-38
Managing Shared-Memory Resources ......... 2-39
Shared-Memory Header.............. 2-47
Shared-Memory Internal Tables ........... 2-48
Shared-Memory Buffer Pool ............ 2-55
OnLine LRU Queues ............... 2-57
LRU Queues and Buffer Pool Management ....... 2-58
How a User Process Acquires a Buffer ......... 2-60
Physical Log Buffer ............... 2-63
Logical Log Buffer................ 2-66
OnLine Checkpoints ............... 2-70
What Happens During a Checkpoint ......... 2-72
When the Daemons Flush the Buffer Pool........ 2-73
How OnLine Synchronizes Buffer Flushing ....... 2-74
Write Types Describe Flushing Activity ........ 2-75
Writing Data to a Blobspace ............ 2-78
Disk Data Structures ................ 2-81
OnLine Disk Space Terms and Definitions ....... 2-81
Structure of the Root Dbspace............ 2-87
Structure of a Regular Dbspace ........... 2-89
Structure of an Additional Dbspace Chunk ....... 2-90
Structure of a Blobspace .............. 2-91

vi IBM Informix OnLine Database Server Administrator’s Guide
Structure of a Blobspace or Dbspace Mirror Chunk ..... 2-92
OnLine Limits for Chunks ............. 2-93
Reserved Pages ................. 2-95
Chunk Free-List Page ...............2-103
tblspace Tblspace.................2-104
Database Tblspace ................2-107
Create a Database: What Happens on Disk ........2-108
OnLine Limits for Databases.............2-110
Create a Table: What Happens on Disk .........2-110
Create a Temporary Table: What Happens on Disk .....2-113
Structure of an Extent ...............2-114
Next Extent Allocation ...............2-117
Structure of a Dbspace Page .............2-120
Data Row Format and Rowid ............2-123
Data Pages and Data Row Storage ...........2-125
Structure of an Index Page .............2-133
Structure of a Dbspace Bit-Map Page ..........2-143
Blob Storage and the Blob Descriptor ..........2-145
Structure of a Dbspace Blob Page ...........2-146
Blobspace Page Types ...............2-148
Structure of a Blobspace Blobpage ...........2-149
Physical Log ....................2-152
Logical Log Files ..................2-154
Fast Recovery and Data Restore............2-154
File Rotation ..................2-155
File Contents ..................2-156
Number and Size.................2-156
Blobspace Logging ................2-158
Long Transactions ................2-159

Table of Contents vii
Chapter 3 Operating OnLine
In This Chapter .................. 3-5
Changing Modes .................. 3-6
Types of OnLine Modes .............. 3-6
From Offline to Quiescent ............. 3-8
From Offline to Online .............. 3-8
From Quiescent to Online ............. 3-9
Gracefully from Online to Quiescent ......... 3-10
Immediately from Online to Quiescent......... 3-11
From Any Mode Immediately to Offline ........ 3-12
Logical Log Administration .............. 3-13
Examine Your Logical Log Configuration ........ 3-14
Change Pathname of Logical Log Tape Device ...... 3-18
Change Block Size of Logical Log Tape Device ...... 3-21
Change Tape Size of Logical Log Tape Device ...... 3-22
Change Maximum Number of Logical Log Files ..... 3-23
Change Size of Logical Log Files ........... 3-24
Logical Log File Status .............. 3-26
Logical Log File ID Numbers ............ 3-27
Add a Logical Log File .............. 3-28
Drop a Logical Log File .............. 3-30
Move a Logical Log File to Another Dbspace ...... 3-31
Change the Logging Status of a Database ........ 3-33
Back Up a Logical Log File ............. 3-36
Start Continuous Logical Log Backup ......... 3-37
End Continuous Logical Log Backup ......... 3-38
Switch to the Next Logical Log File .......... 3-39
Free a Logical Log File .............. 3-39
If the Logical Log Backup Cannot Complete ....... 3-42
Archive Administration ............... 3-43
Archive Types ................. 3-43
How Long Will an Archive Take? .......... 3-46
Plan the Archive Schedule ............. 3-47
Examine Your Archive Configuration ......... 3-50
Change Pathname of Archive Tape Device ....... 3-52
Change Block Size of Archive Tape Device ....... 3-55
Change Tape Size of Archive Tape Device........ 3-56
Create an Archive, Any Type ............ 3-57

viii IBM Informix OnLine Database Server Administrator’s Guide
If the Logical Log Files Fill During an Archive....... 3-59
If an Archive Terminates Prematurely ......... 3-60
Monitor OnLine Activity ............... 3-61
Monitor Archive History .............. 3-61
Monitor Blobs in a Blobspace ............ 3-63
Monitor Blobs in a Dbspace ............. 3-65
Monitor Buffers ................. 3-66
Monitor Buffer-Pool Activity............. 3-68
Monitor Checkpoints ............... 3-69
Monitor Chunks ................. 3-70
Monitor Configuration Information .......... 3-73
Monitor Databases ................ 3-74
Monitor Dbspaces ................ 3-75
Monitor Disk Pages ................ 3-77
Monitor Extents ................. 3-78
Monitor Index Information ............. 3-79
Monitor Logging Activity.............. 3-80
Monitor the Message Log .............. 3-82
Monitor OnLine Profile .............. 3-83
Monitor Shared Memory and Latches.......... 3-84
Monitor Tblspaces ................ 3-85
Monitor Users and Transactions ........... 3-86
Modify OnLine Configuration ............. 3-87
Create a Blobspace ................ 3-88
Drop a Blobspace................. 3-91
Change the Number of Buffers in the Pool ........ 3-92
Change the Size of Either Log Buffer .......... 3-93
Add a Chunk .................. 3-94
Change the Maximum Number of Chunks ........ 3-96
Create a Dbspace................. 3-97
Drop a Dbspace ................. 3-99
Enforce/Turn Off Residency for This Session .......3-100
Enforce/Turn Off Residency .............3-100
Change the Status of a Mirrored Chunk .........3-101
Enable Mirroring.................3-104
Start/End Mirroring in a Blobspace or Dbspace ......3-105
Change Physical Log Location or Size .........3-107
Change the Checkpoint Interval ...........3-109
Change the Destination of Console Messages .......3-110

Table of Contents ix
Change the Maximum Number of Dbspaces....... 3-111
Change the Maximum Number of Locks ........ 3-112
Change the Maximum Number of Tblspaces....... 3-113
Change the Maximum Number of Users ........ 3-114
Change the Number of Page Cleaners ......... 3-115
Things to Avoid .................. 3-116
Chapter 4 Data Consistency, Recovery, and Migration
In This Chapter .................. 4-5
Consistency Checking ................ 4-6
Using the tbcheck Commands............ 4-6
Using the OnLine Message Log ........... 4-8
Setting Consistency-Checking Variables ........ 4-9
Recovering from Corruption ............ 4-12
Mirroring .................... 4-14
Beginning................... 4-15
Processing .................. 4-16
Recovery ................... 4-17
Ending.................... 4-17
OnLine Logging Overview .............. 4-18
Dbspace Logging ................ 4-19
Blobspace Logging................ 4-22
What Happens During Logical Log Backup ........ 4-26
Ready LTAPEDEV................ 4-27
Locate the Next Logical Log ............ 4-27
Copy Blobpages ................ 4-27
Place Log Header on Tape ............. 4-28
Write Log Records to Tape ............. 4-29
Write Trailer Page ................ 4-30
What Happens During an Archive ........... 4-30
Read Archive History Information .......... 4-31
Mount a Tape on TAPEDEV ............ 4-31
Verify the Archive Level.............. 4-32
Check Free Space in the Logical Log ......... 4-32
Force a Checkpoint ............... 4-32
Synchronize tbtape and tbinit Activities ........ 4-33
Write Tape Header Page .............. 4-35
Archive Reserved Pages .............. 4-36
Determine Archive Criteria............. 4-37
Archive Disk Pages That Meet Criteria......... 4-38

xIBM Informix OnLine Database Server Administrator’s Guide
Monitor and Archive Physical Log Pages ........ 4-38
Write a Trailer Page ................ 4-38
Update the Reserved Pages ............. 4-38
Fast Recovery ................... 4-39
How Does OnLine Initiate Fast Recovery? ........ 4-39
Fast Recovery and Logging ............. 4-40
Step 1: Checkpoint Condition ............ 4-41
Step 2: Find Checkpoint Record in Logical Log ...... 4-41
Step 3: Roll Forward Log Records ........... 4-43
Step 4: Roll Back Incomplete Transactions ........ 4-44
Data Restore: When Should You Do It? .......... 4-45
Steps That Occur During a Data Restore......... 4-45
Gather All Tapes Needed for Restore .......... 4-47
Verify OnLine Configuration............. 4-48
Initiate Data Restore from Offline Mode ......... 4-49
Mount Level-0 Archive Tape............. 4-49
Verify Current Configuration ............ 4-50
Prompt for Logical Log Backup............ 4-50
Write Each Archive Page to Disk ........... 4-51
Initialize Shared Memory .............. 4-51
Roll Forward Logical Logs ............. 4-51
OnLine Is Quiescent................ 4-52
Database and Table Migration .............. 4-52
Description of Migration Methods........... 4-54
Which Migration Method Is Best for You? ........ 4-57
Using UNLOAD with LOAD or dbload ......... 4-60
Using dbexport and dbimport ............ 4-62
Using tbunload and tbload ............. 4-63
Migrating Data from OnLine to SE........... 4-65
Migrating Data from SE to OnLine........... 4-66

Table of Contents xi
Chapter 5 How to Improve Performance
In This Chapter .................. 5-3
Disk Layout ................... 5-4
Optimize Blobspace Blobpage Size ........... 5-5
tbcheck -pB and tbcheck -pe Utility Commands...... 5-5
Blobpage Average Fullness ............. 5-7
Apply Effective Criteria .............. 5-8
Eliminate User-Created Resource Bottlenecks ........ 5-8
When Is Tuning Needed? ............... 5-10
% Cached Fields ................ 5-10
ovtbls, ovlock, ovuser, and ovbuff Fields ........ 5-11
Bufsize Pages/IO Fields .............. 5-11
Shared-Memory Buffers ............... 5-13
When Is Tuning Necessary? ............ 5-13
How Is Tuning Done? .............. 5-13
Shared-Memory Resources .............. 5-14
When Is Tuning Necessary? ............ 5-14
How Is Tuning Done? .............. 5-15
Log Buffer Size .................. 5-15
Logging Status ................. 5-15
How Is Tuning Done? .............. 5-16
Page-Cleaner Parameters ............... 5-17
Efficient Page Cleaning .............. 5-17
How Is Tuning Done? .............. 5-19
Checkpoint Frequency ................ 5-20
Performance Tradeoffs .............. 5-20
How Is Tuning Done? .............. 5-21
Psort Parallel-Process Sorting Package .......... 5-22
How Psort Works ................ 5-22
Tuning Psort .................. 5-23
Psort and Shared Memory ............. 5-24
SPINCNT Configuration Parameter ........... 5-24

xii IBM Informix OnLine Database Server Administrator’s Guide
Chapter 6 DB-Monitor Screens
In This Chapter ................... 6-3
Main Menu................... 6-4
Status Menu .................. 6-5
Parameters Menu ................ 6-6
Dbspaces Menu ................. 6-7
Mode Menu .................. 6-8
Force-Ckpt Option ................ 6-9
Archive Menu.................. 6-10
Logical-Logs Menu ................ 6-11
Chapter 7 Utilities
In This Chapter ................... 7-5
dbexport: Unload a Database and Schema File ........ 7-5
Syntax .................... 7-6
Destination Options................ 7-7
Contents of the Schema File ............. 7-9
dbimport: Create a Database .............. 7-10
Syntax .................... 7-11
Input File Location Options ............. 7-12
Create Options ................. 7-14
dbload: Load Data from a Command File .......... 7-15
Syntax .................... 7-16
Command-File Syntax Check ............ 7-18
Starting Line Number ............... 7-18
Batch Size ................... 7-19
Bad-Row Limits ................. 7-20
How to Create a Command File............ 7-21
dbschema: Output SQL Statements ............ 7-32
Syntax .................... 7-32
Include Synonyms ................ 7-33
Include Privileges ................ 7-34
Specify a Table, View, or Procedure .......... 7-35
tbcheck: Check, Repair, or Display ............ 7-36
Syntax .................... 7-38
Option Descriptions................ 7-39
tbinit: Initialize OnLine ................ 7-45
Syntax .................... 7-46

Table of Contents xiii
tbload: Create a Database or Table ............ 7-47
Syntax .................... 7-48
Specify Tape Parameters.............. 7-49
Create Options ................. 7-50
tblog: Display Logical Log Contents ........... 7-51
Syntax .................... 7-51
Log-Record Read Filters.............. 7-52
Log-Record Display Filters ............. 7-54
Interpreting tblog Output ............. 7-55
tbmode: Mode and Shared-Memory Changes ........ 7-64
Syntax .................... 7-65
Change OnLine Mode .............. 7-66
Force a Checkpoint ............... 7-67
Change Shared-Memory Residency .......... 7-68
Switch the Logical Log File............. 7-68
Kill an OnLine Server Process ............ 7-69
Kill an OnLine Transaction ............. 7-69
tbparams: Modify Log Configuration Parameters ...... 7-70
Syntax .................... 7-70
Add a Logical Log File .............. 7-70
Drop a Logical Log File .............. 7-71
Change Physical Log Parameters........... 7-72
tbspaces: Modify Blobspaces or Dbspaces ......... 7-73
Syntax .................... 7-73
Create a Blobspace or Dbspace ........... 7-74
Drop a Blobspace or Dbspace ............ 7-75
Add a Chunk ................. 7-76
Change Chunk Status............... 7-77
tbstat: Monitor OnLine Operation ............ 7-78
Syntax .................... 7-80
Option Descriptions ............... 7-82
tbtape: Logging, Archives, and Restore .......... 7-102
Syntax .................... 7-103
Request a Logical Log Backup............ 7-104
Start Continuous Backups ............. 7-104
Create an Archive ................ 7-105
Perform a Data Restore .............. 7-105
Change Database Logging Status........... 7-106

xiv IBM Informix OnLine Database Server Administrator’s Guide
tbunload: Transfer Binary Data in Page Units ........7-107
Syntax ....................7-108
Specify Tape Parameters ..............7-109
Chapter 8 OnLine Message Log
In This Chapter ................... 8-3
OnLine Message Log ................. 8-3
Alphabetized Messages ................ 8-5
Chapter 9 Product Environment
In This Chapter ................... 9-3
The OnLine Environment ............... 9-3
OnLine Features ................. 9-3
Features Beyond the Scope of OnLine.......... 9-6
What Is Multiple Residency? .............. 9-7
How Multiple Residency Works ........... 9-10
How to Set Up Multiple Residency .......... 9-11
OnLine Administration with IBM Informix STAR ....... 9-15
Sharing Data by Using IBM Informix STAR........ 9-15
IBM Informix STAR and Two-Phase Commit Protocol .... 9-19
Two-Phase Commit and Automatic Recovery ....... 9-23
Independent Action and Manual Recovery........ 9-29
Heuristic Decisions: What and Why .......... 9-30
Heuristic Rollback ................ 9-36
Heuristic End-Transaction ............. 9-40
Two-Phase Commit Protocol Errors .......... 9-43
Two-Phase Commit and Logical Log Records ....... 9-44
Determining Database Consistency .......... 9-51
IBM Informix STAR Configuration Parameters ...... 9-57
Track a Transaction with tbstat Output ......... 9-58
Appendix A Notices
Index

Introduction
Introduction
In This Introduction .................. 3
About This Manual................... 3
Organization of This Manual .............. 4
Demonstration Database ............... 5
IBM Informix OnLine .................. 7
Product Overview.................. 7
IBM Informix OnLine and Other IBM Informix Products .... 7
Documentation Conventions ............... 8
Typographical Conventions .............. 8
Icon Conventions .................. 9
Command-Line Conventions .............. 9
Elements That Can Appear on the Path ......... 10
How to Read a Command-Line Diagram ........ 11
Sample Code Conventions ............... 12
Additional Documentation ................ 14
Printed Manuals .................. 14
Error Message Files ................. 15
Using the ASCII Error Message File .......... 15
Using the PostScript Error Message Files ........ 18
Documentation Notes, Release Notes, Machine Notes ..... 18
Related Reading.................... 19
Compliance with Industry Standards ............ 19
IBM Welcomes Your Comments .............. 20

2IBM Informix OnLine Database Server Administrator’s Guide

Introduction 3
In This Introduction
This introduction provides an overview of the information in this manual
and describes the conventions it uses.
About This Manual
The IBM Informix OnLine Administrator’s Guide describes the powerful
Informix online transaction processing (OLTP) database server.
You do not need database management experience or familiarity with
relational database concepts to use this manual. However, a knowledge of
SQL (StructuredQueryLanguage)wouldbeuseful. For detailedinformation
about IBM Informix SQL, see the IBM Informix Guide to SQL: Tutorial and the
IBM Informix Guide to SQL: Reference.
This manual serves as both an administrator and operator guide and a
reference manual. Chapter 1, “Installation and Initial Configuration,”
supports the instructions provided in the UNIX Products Installation Guide.
Chapter2,“SystemArchitecture,”providesanoptional,technicaldiscussion
oftheIBM InformixOnLinesystemarchitecture.Subsequentchaptersexplain
how to take advantage of all the features and functionality of the
IBM Informix OnLine database server.

4IBM Informix OnLine Database Server Administrator’s Guide
Organization of This Manual
Organization of This Manual
This manual includes the following chapters:
■Chapter 1, “Installation and Initial Configuration,” provides a step-
by-step explanation of OnLine database server installation and
setup. The chapter includes a worksheet to assist you in planning
your system and in documenting your configuration.
■Chapter 2, “System Architecture,” provides optional reference
material about OnLine operation that is intended to deepen your
understanding of OnLine 5.x.
■Chapter3,“OperatingOnLine,”explainstheroutinetasksofOnLine
administration: startup and shutdown, logical log management,
archive management, monitoring OnLine activity, and managing
disk space.
■Chapter 4, “Data Consistency, Recovery, and Migration,” provides
background information and instructions for using the high-avail-
ability features of OnLine.
■Chapter5, “How to Improve Performance,” describesstrategies you
can use to obtain maximum performance within your processing
environment.
■Chapter 6, “DB-Monitor Screens,” explains how to use the
DB-Monitor menu facility provided with OnLine.
■Chapter 7, “Utilities,” describes the function and syntax of each of
the 14 OnLine utilities.
■Chapter 8, “OnLine Message Log,” provides reference material that
documents the internal messages that OnLine generates during
processing.
■Chapter 9, “Product Environment,” describes three possible OnLine
environments. First, this chapter describes the OnLine features that
are available to you within a single-system environment. Second,
this chapter describes how to configure and administer OnLine
database servers if you are running more than one OnLine database
server on a single host machine. Finally, this chapter describes
OnLine administration issues that arise when you use the
IBM Informix STAR product to run OnLine in a client/server
environment.

Introduction 5
Demonstration Database
A Notices appendix contains information about IBM products, services, and
features. An index directs you to areas of particular interest.
Demonstration Database
Your IBM Informix OnLine software includes a demonstration database
calledstores5thatcontainsinformationaboutafictitious wholesale sporting-
goods distributor. The sample command files that make up a demonstration
application are included as well.
Most of the examples in this manual are based on the stores5 demonstration
database. The stores5 database is described in detail and its contents are
listed in IBM Informix Guide to SQL: Reference. For further information about
using DB-Access to manipulate the data in the demonstration database, refer
to the DB-Access User Manual.
The script you use to install the demonstration database is called
dbaccessdemo5 and is located in the $INFORMIXDIR/bin directory. The
database name that you supply is the name given to the demonstration
database.Ifyoudonotsupplyadatabasename,thenamedefaultstostores5.
Follow these rules for naming your database:
■Names for databases can be up to 10 characters long.
■The first character of a name must be a letter.
■You can use letters, characters, and underscores (_) for the rest of the
name.
■DB-Access makes no distinction between uppercase and lowercase
letters.
■The database name should be unique.
When you run dbaccessdemo5, you are, as the creator of the database, the
owner and Database Administrator (DBA) of that database.
After you install OnLine, the files that make up the demonstration database
are protected so that you cannot make any changes to the original database.

6IBM Informix OnLine Database Server Administrator’s Guide
Demonstration Database
You can run the dbaccessdemo5 script again whenever you want a fresh
demonstration database to work with. The script prompts you when the
creation of the database is complete and asks if you would like to copy the
sample command files to the current directory. Answer “N” to the prompt if
you have made changes to the sample files and do not want them replaced
with the original versions. Answer “Y” to the prompt if you want to copy
over the sample command files.
To create and populate the demonstration database in the IBM Informix OnLine
environment
1. SettheINFORMIXDIRenvironmentsothatitcontainsthenameofthe
directory in which your IBM Informix products are installed.
Set SQLEXEC to $INFORMIXDIR/lib/sqlturbo. (For a full description
of environment variables, see IBM Informix Guide to SQL: Reference.)
2. Create a new directory for the SQL command files.
Create the directory by entering:
mkdir dirname
3. Make the new directory the current directory by entering:
cd dirname
4. Create the demonstration database and copy over the sample
command files by entering:
dbaccessdemo5 dbname
The data for the database is put into the root dbspace.
To give someone else the SQL privileges to access the data, use the GRANT
and REVOKE statements. The GRANT and REVOKE statements are described
in IBM Informix Guide to SQL: Reference.
To use the command files that have been copied to your directory, you must
have UNIX read and execute permissions for each directory in the pathname
of the directory from which you ran the dbaccessdemo5 script. To give
someone else the permissions to access the command files in your directory,
use the UNIX chmod command.

Introduction 7
IBM Informix OnLine
IBM Informix OnLine
Product Overview
The IBM Informix OnLine database server combines high-availability, online
transaction-processing(OLTP)performance with multimedia capabilities.By
managing its own shared-memory resources and disk I/O, OnLine delivers
process concurrency while maintaining transaction isolation. Table data can
spanmultipledisks,freeingadministratorsfromconstraintsimposedbydata
storage limitations. The IBM Informix STAR product brings OnLine perfor-
mance to users throughout a client/server environment. The IBM Informix
TP/XA product allows you to use the OnLine database server as a Resource
Manager within an X/Open environment.
IBM Informix OnLine and Other IBM Informix Products
IBM provides a variety of application development tools, CASE tools,
database servers, utilities, and client/server products. DB-Access is a utility
that allows you to access, modify, and retrieve information from OnLine
relational databases. IBM Informix OnLine supports all application devel-
opment tools currently available, including products like IBM Informix SQL,
IBM Informix 4GL and Interactive Debugger, and the Informix embedded
language products, such as IBM Informix ESQL/C.IBM Informix OnLine also
works with third-party application development tools through the
IBM Informix ODBC Driver and the IBM Informix JDBC Driver.
For running applications on a network, IBM Informix STAR provides
distributed database access to multiple IBM Informix OnLine database
servers.

8IBM Informix OnLine Database Server Administrator’s Guide
Documentation Conventions
Documentation Conventions
This section describes the conventions that this manual uses. These
conventionsmakeiteasiertogatherinformationfromthisandothervolumes
in the documentation set.
The following conventions are discussed:
■Typographical conventions
■Icon conventions
■Command-line conventions
■Example code conventions
Typographical Conventions
This manual uses the following conventions to introduce new terms,
illustrate screen displays, describe command syntax, and so forth.
Tip: When you are instructed to “enter” characters or to “execute” a command,
immediately press RETURN after the entry. When you are instructed to “type” the
text or to “press” other keys, no RETURN is required.
Convention Meaning
KEYWORD All primary elements in a programming language statement
(keywords) appear in uppercase letters in a serif font.
italics
italics
italics
Withintext,newtermsandemphasizedwordsappearinitalics.
Within syntax and code examples, variable values that you are
to specify appear in italics.
boldface
boldface Names of program entities (such as classes, events, and tables),
environment variables, file and pathnames, and interface
elements (such as icons, menu items, and buttons) appear in
boldface.
monospace
monospace Informationthat theproductdisplays andinformation thatyou
enter appear in a monospace typeface.
Introduction 9
Icon Conventions
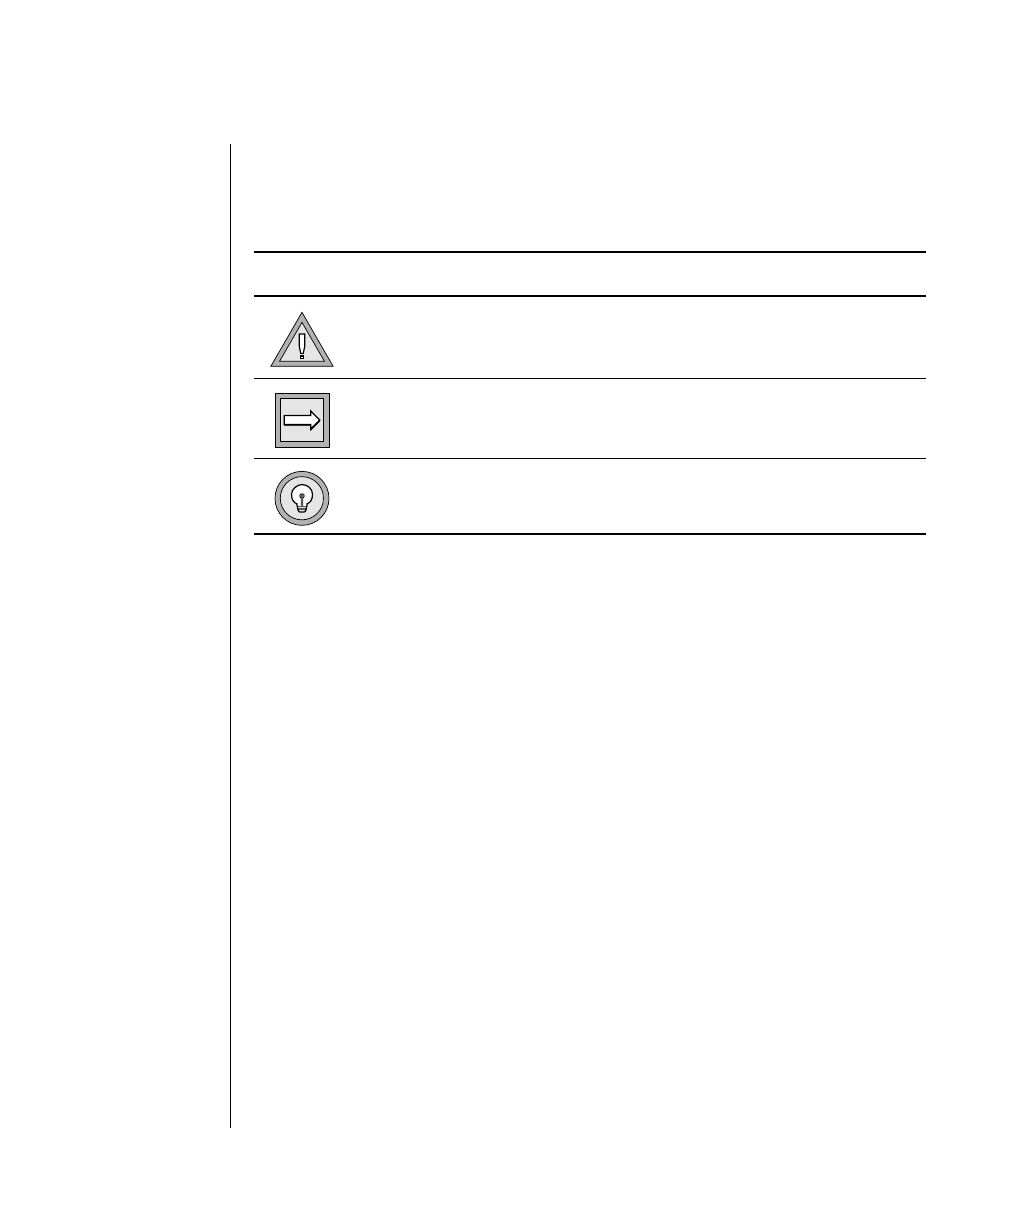
Icon Conventions
Comment icons identify three types of information, as the following table
describes. This information always appears in italics.
Command-Line Conventions
OnLine supports a variety of command-line options. These are commands
that you enter at the operating system prompt to perform certain functions
as part of OnLine administration.
This section defines and illustrates the format of the commands. These
commands have their own conventions, which may include alternative
forms of a command, required and optional parts of the command, and so
forth.
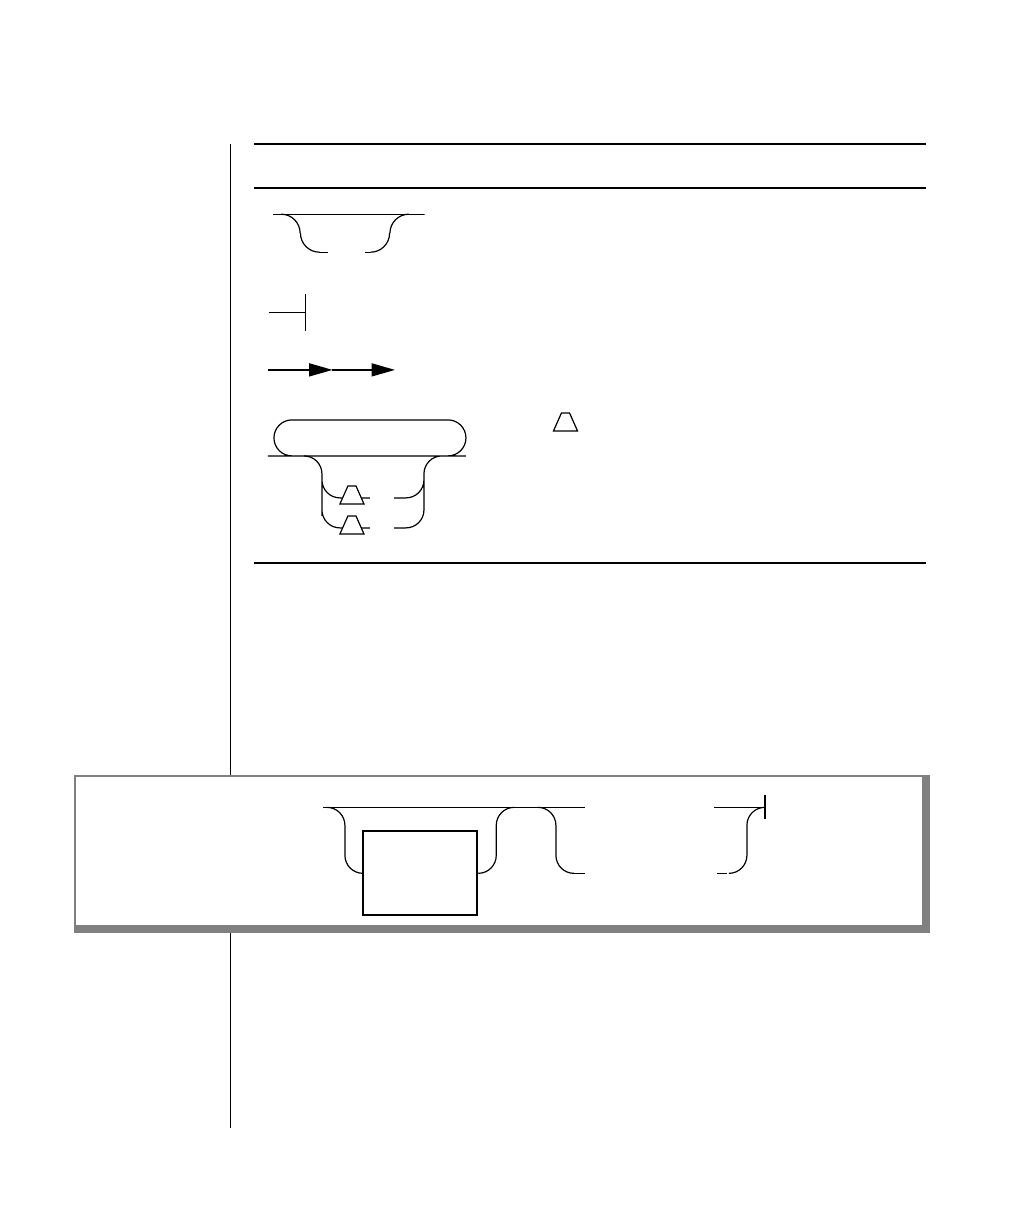
Each diagram displays the sequences of required and optional elements that
arevalidinacommand.Adiagrambegins at the upper left with a command.
It ends at the upper right with a vertical line. Between these points, you can
traceanypaththatdoesnotstoporbackup.Each pathdescribesavalidform
of the command. You must supply a value for words that are in italics.
Icon Label Description
Warning: Identifies paragraphs that contain vital instructions,
cautions, or critical information
Important: Identifies paragraphs that contain significant
information about the feature or operation that is
being described
Tip: Identifies paragraphs that offer additional details or
shortcuts for the functionality that is being described

10 IBM Informix OnLine Database Server Administrator’s Guide
Command-Line Conventions
Elements That Can Appear on the Path
You might encounter one or more of the following elements on a path.
Element Description
command This required element is usually the product name or
other short word used to invoke the product or call the
compiler or preprocessor script for a compiled
Informix product. It may appear alone or precede one
or more options. You must spell a command exactly as
shown and must use lowercase letters.
variable A word in italics represents a value that you must
supply, such as a database, file, or program name. The
natureof thevalueis explainedimmediatelyfollowing
the diagram.
-flag A flag is usually an abbreviation for a function, menu,
or option name or for a compiler or preprocessor
argument. You must enter a flag exactly as shown,
including the preceding hyphen.
.ext Afilenameextension,suchas.sqlor .cob,mightfollow
a variable representing a filename. Type this extension
exactlyasshown,immediatelyafterthenameofthefile
and a period. The extension may be optional in certain
products.
(.,;+*-/) Punctuation and mathematical notations are literal
symbols that you must enter exactly as shown.
"" Double quotes are literal symbols that you must enter
as shown. You can replace a pair of double quotes with
a pair of single quotes, if you prefer. You cannot mix
double and single quotes.
A reference in a box represents a subdiagram on the
same page or another page. Imagine that the subdi-
agram is spliced into the main diagram at this point.
A shaded option is the default. Even if you do not
explicitly type the option, it will be in effect unless you
choose another option.
(1 of 2)
Privileges
p. 6-17
ALL
Introduction 11
Command-Line Conventions
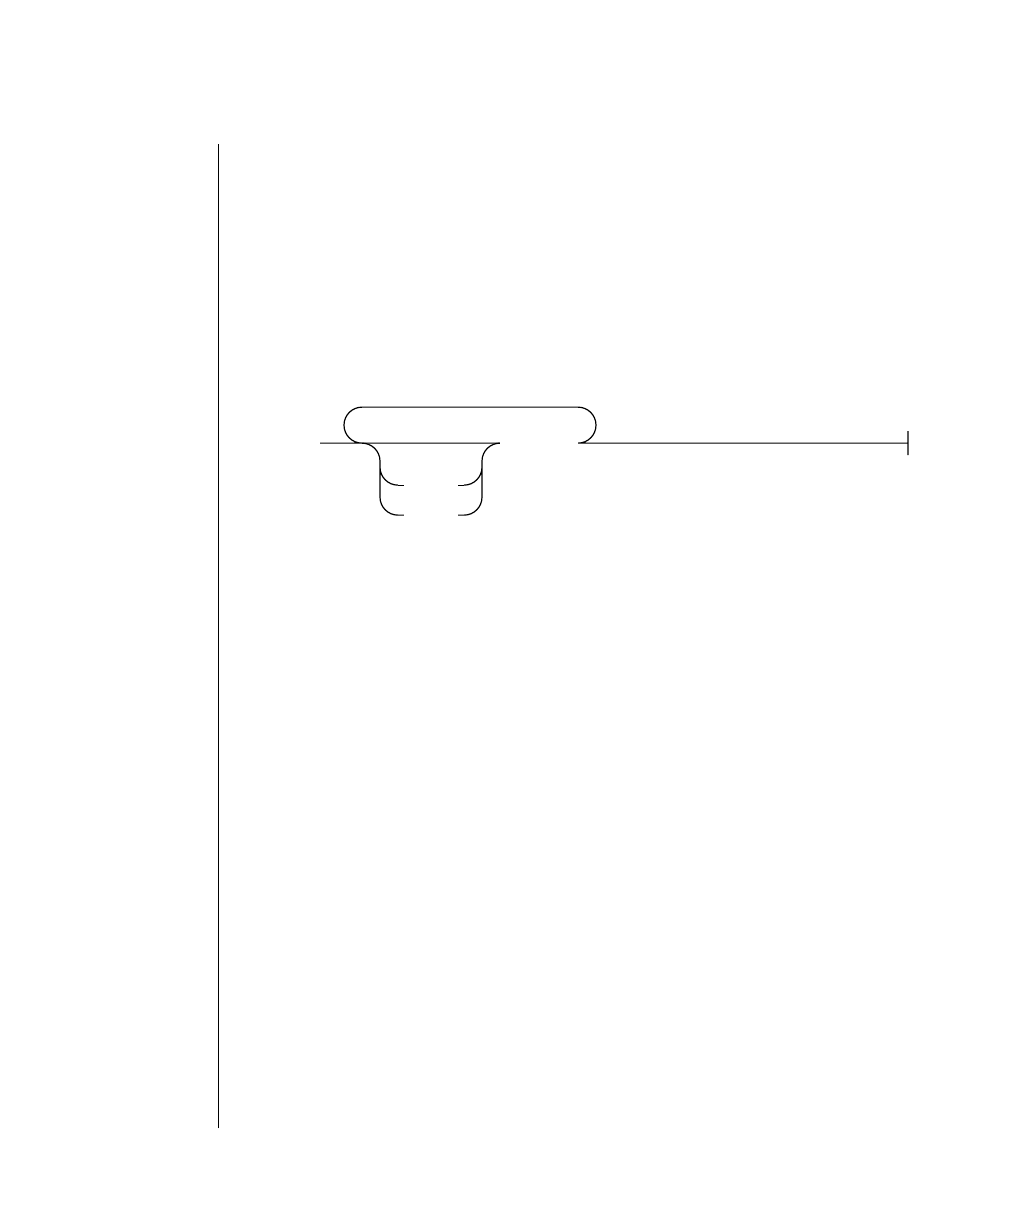
How to Read a Command-Line Diagram
Figure 1 shows the elements of an OnLine utility command used to unload
OnLine data in binary, disk-page units:
A branch below the main line indicates an optional
path.
The vertical line is a terminator and indicates that the
statement is complete.
Commands enclosed in a pair of arrows indicate that
this is a subdiagram.
A gate ( ) in an option indicates that you can only
use that option once, even though it is within a larger
loop.
Element Description
(2 of 2)
-
-s
-t
1
1
1
Figure 1
Example of a Command-Line Diagram
Specify
Tape
Parameters
p. 7-109
tbunload database
table name

12 IBM Informix OnLine Database Server Administrator’s Guide
Sample Code Conventions
To construct a similar command, start at the top left with the command
tbunload. Then follow the diagram to the right, including the elements that
you want. Figure 1 illustrates the following steps.
1. Type tbunload.
2. Optionally,changetheparametersofthetapedevicethatistoreceive
the data.
If you wish to do this, turn to page 7-109 for further syntax informa-
tion. Otherwise, tbunload uses the current archive tape device.
3. Specify either a database name or a table name to indicate the data
that you wish to copy to tape.
You can take the direct route to the terminator, or you can take an
optional path indicated by any one of the branches below the main
line.
Once you are back at the main diagram, you come to the terminator.
Your tbunload command is complete.
4. Press RETURN to execute the command.
Sample Code Conventions
Examples of SQL code appear throughout this manual. Except where noted,
the code is not specific to any single Informix application development tool.
If only SQL statements are listed, they are not delineated by semicolons.
For instance, you might see the following example code:
DATABASE stores
.
.
.
DELETE FROM customer
WHERE customer_num = 121
.
.
.
COMMIT WORK
CLOSE DATABASE

Introduction 13
Sample Code Conventions
To use this SQL code for a specific product, you must apply the syntax rules
for that product. For example, if you are using DB-Access or IBM Informix
SQL, you must delineate the statements with semicolons. If you are using an
embedded language, you must use EXEC SQL and a semicolon (or other
appropriate delimiters) at the start and end of each statement, respectively.
For detailed directions on using SQL statements for a particular application
development tool, see the manual for your product.
Tip: Ellipsis points in a code example indicate that more code would be added in a
full application, but it is not necessary to show it to describe the concept being
discussed.

14 IBM Informix OnLine Database Server Administrator’s Guide
Additional Documentation
Additional Documentation
For additional information, refer to the following types of documentation:
■Printed manuals
■Error message files
■Documentation notes, release notes, and machine notes
■Related reading
Printed Manuals
You might want to refer to a number of related Informix product documents
that complement this manual.
■If you have never used SQL (Structured Query Language) or an
Informix application development tool, read IBM Informix Guide to
SQL: Tutorial to learn basic database design and implementation
concepts.
■A companion volume to the tutorial, IBM Informix Guide to SQL:
Reference, provides full information on the structure and contents of
thedemonstrationdatabasethatisprovidedwithOnLine.Itincludes
details of the Informix system catalog tables, describes Informix and
commonUNIXenvironmentvariablesthatshouldbeset,anddefines
column data types supported by Informix products. Further, it
provides a detailed description of all the SQL statements supported
by Informix products. It also contains a glossary of useful terms.
■You, or whoever installs OnLine, should refer to the UNIX Products
Installation Guide for your particular release to ensure that OnLine is
properly set up before you begin to work with it.
■IfyouareusingOnLineacrossanetwork,youmayalsowanttorefer
to the IBM Informix NET and IBM Informix STAR Installation and Config-
uration Guide.

Introduction 15
Error Message Files
■The DB-Access User’s Manual describes how to invoke the utility to
access, modify, and retrieve information from OnLine relational
databases.
■When errors occur, you can look them up by number and find their
cause and solution in the IBM Informix Error Messages manual. If you
prefer, you can look up the error messages in the online message file
described in “Error Message Files” on page 15.
Error Message Files
Informix software products provide ASCII files that contain all the Informix
error messages and their corrective actions. To access the error messages in
the ASCII file, Informix provides scripts that let you display error messages
on the terminal or print formatted error messages.
The optional IBM Informix Messages and Corrections product provides
PostScriptfilesthatcontain the errormessagesandtheir correctiveactions.If
you have installed this product, you can print the PostScript files on a
PostScript printer.
Using the ASCII Error Message File
You can use the file that contains the ASCII text version of the error messages
and their corrective actions in two ways:
■Use the finderr script to display one or more error messages on the
terminal screen.
■Use the rofferr script to print one error message or a range of error
messages.
The scripts are in the $INFORMIXDIR/bin directory. The ASCII file has the
following path:
$INFORMIXDIR/msg/errmsg.txt
The error message numbers range from -1 to -33000. When you specify these
numbersforthefinderr orrofferrscripts,you canomittheminussign.A few
messages have positive numbers; these messages are used solely within the
applicationdevelopmenttools.Intheunlikelyeventthatyouwanttodisplay
them, you must precede the message number with a + sign.
16 IBM Informix OnLine Database Server Administrator’s Guide
Error Message Files
Themessagesnumbered-1to-100canbeplatform-dependent.Ifthemessage
text for a message in this range does not apply to your platform, check the
operating system documentation for the precise meaning of the message
number.
The finderr Script
Use the finderr script to display one or more error messages, and their
correctiveactions,ontheterminalscreen.Thefinderrscripthasthefollowing
syntax:
You can specify any number of error messages per finderr command. The
finderr command copies all the specified messages and their corrective
actions to standard output.
For example, to display the -359 error message, you can enter the following
command:
finderr -359
The following example demonstrates how to specify a list of error messages.
ThisexamplealsopipestheoutputtotheUNIX morecommandtocontrolthe
display. You can also redirect the output to another file so that you can save
or print the error messages:
finderr 233 107 113 134 143 144 154 | more
msg_num is the number of the error message to display.
finderr
-
+
msg_num
Introduction 17
Error Message Files
The rofferr Script
Use the rofferr script to format one error message or a range of error
messages for printing. By default, rofferr displays output on the screen. You
need to send the output to nroff to interpret the formatting commands and
then to a printer, or to a file where the nroff output is stored until you are
readytoprint.Youcanthenprintthefile.Forinformationonusingnroff and
on printing files, see your UNIX documentation.
The rofferr script has the following syntax:
The following example formats error message -359. It pipes the formatted
error message into nroff and sends the output of nroff to the default printer:
rofferr 359 | nroff -man | lpr
The following example formats and then prints all the error messages
between -1300 and -4999:
rofferr -1300 -4999 | nroff -man | lpr
start_msg Is the number of the first error message to format
This error message number is required.
end_msg Is the number of the last error message to format
This error message number is optional. If you omit end_msg,
only start_msg is formatted.
-
+
start_msgrofferr
end_msg
+
-

18 IBM Informix OnLine Database Server Administrator’s Guide
Documentation Notes, Release Notes, Machine Notes
Using the PostScript Error Message Files
Use the IBM Informix Messages and Corrections product to print the error
messages and their corrective actions on a PostScript printer. The PostScript
error messages are distributed in a number of files of the format errmsg1.ps,
errmsg2.ps, and so on. These files are located in the $INFORMIXDIR/msg
directory. Each file contains approximately 50 printed pages of error
messages.
Documentation Notes, Release Notes, Machine Notes
In addition to the IBM Informix set of manuals, the following online files,
locatedinthe$INFORMIXDIR/releasedirectory,supplementtheinformation
in this manual. Please examine these files because they contain vital infor-
mation about application and performance issues.
Online File Purpose
ONLINEDOC_5 The documentation notes file for your version of this manual
describes features that are not covered in the manual or that
were modified since publication.
ENGREL_5 The release notes file describes feature differences from earlier
versions of IBM Informix products and how these differences
might affect current products. This file also contains infor-
mation about any known problems and their workarounds.
ONLINE_5 The machine notes file describes any special actions that you
musttake toconfigureanduseIBM Informixproductsonyour
computer.Machinenotesarenamed fortheproductdescribed.

Introduction 19
Related Reading
Related Reading
If you have had no prior experience with database management, you may
want to refer to an introductory text like C. J. Date’s An Introduction to
Database Systems: Seventh Edition (Addison-Wesley Publishing, 1999). If you
want more technical information on database management, consider
consulting the following tests:
■Database Systems: A Practical Approach to Design, Implementation, and
Management, 3rd Edition, by C. Begg and T. Connolly (Addison-
Wesley Publishing, 2001)
■Inside Relational Databases, 2nd Edition, by M. Whitehorn and B.
Marklyn (Springer-Verlag, 2001)
This guide assumes you are familiar with your computer operating system.
If you have limited UNIX system experience, you may want to look at your
operating system manual or a good introductory text before starting to learn
about IBM Informix OnLine.
Some suggested texts about UNIX systems follow:
■A Practical Guide to the UNIX System, 3rd Edition by M. Sobell
(Addison-Wesley Publishing, 1994)
■LearningtheUNIXOperatingSystembyJ.Peek(O’Reilly&Associates,
1997)
■Design of the UNIX Operating System by M. Bach (Prentice-Hall, 1987)
Compliance with Industry Standards
The American National Standards Institute (ANSI) has established a set of
industry standards for SQL.IBM Informix SQL-based products are fully
compliantwithSQL-92EntryLevel(publishedasANSIX3.135-1992), whichis
identical to ISO 9075:1992. In addition, many features of Informix database
servers comply with the SQL-92 Intermediate and Full Level and X/Open
SQL CAE (common applications environment) standards.

20 IBM Informix OnLine Database Server Administrator’s Guide
IBM Welcomes Your Comments
IBM Welcomes Your Comments
To help us with future versions of our manuals, we want to know about any
correctionsorclarificationsthatyouwouldfinduseful.Includethefollowing
information:
■The name and version of your manual
■Any comments that you have about the manual
■Your name, address, and phone number
Send electronic mail to us at the following address:
doc@informix.com
This address is reserved for reporting errors and omissions in our documen-
tation. For immediate help with a technical problem, contact Customer
Services.
We appreciate your suggestions.

1
Chapter
Installation and Initial
Configuration
In This Chapter .................... 1-5
Define Your Starting Point ................ 1-6
Upgrade an Earlier Version of OnLine ........... 1-7
Compare Your Current Configuration to OnLine 5.x .... 1-7
Create a Level-0 Archive .............. 1-8
Load the Software and Execute the install Script ...... 1-8
Initialize Shared Memory .............. 1-8
Run tbcheck .................. 1-9
Create a New Level-0 Archive ............ 1-9
Overview of OnLine Installation Steps........... 1-10
Overview of OnLine Initial Configuration Tasks......... 1-10
OnLine Configuration Files .............. 1-11
Contents of tbconfig.std ................ 1-13
Set Up Your Initial Configuration .............. 1-20
Root Dbspace Configuration Guidelines .......... 1-21
ROOTNAME .................. 1-21
ROOTPATH .................. 1-22
ROOTOFFSET.................. 1-22
ROOTSIZE ................... 1-23
Mirroring Configuration Guidelines ........... 1-24
MIRROR.................... 1-24
MIRRORPATH ................. 1-24
MIRROROFFSET................. 1-25
Physical Log Configuration Guidelines .......... 1-25
PHYSDBS ................... 1-25
PHYSFILE ................... 1-25
Logical Log Configuration Guidelines ........... 1-26
LOGFILES ................... 1-27
LOGSIZE ................... 1-27

1-2 IBM Informix OnLine Database Server Administrator’s Guide
Message File Guidelines ................ 1-28
MSGPATH................... 1-28
CONSOLE ................... 1-28
Archive Tape Device Guidelines ............. 1-28
TAPEDEV ................... 1-28
TAPEBLK ................... 1-29
TAPESIZE ................... 1-29
Logical Log Tape Device Guidelines............ 1-29
LTAPEDEV ................... 1-30
LTAPEBLK ................... 1-30
LTAPESIZE ................... 1-31
Identification Parameter Guidelines............ 1-31
SERVERNUM .................. 1-31
DBSERVERNAME ................ 1-32
Shared-Memory Parameter Guidelines........... 1-32
RESIDENT ................... 1-32
USERS .................... 1-33
TRANSACTIONS................. 1-33
LOCKS .................... 1-33
BUFFERS ................... 1-34
TBLSPACES................... 1-34
CHUNKS ................... 1-35
DBSPACES ................... 1-35
PHYSBUFF ................... 1-35
LOGBUFF ................... 1-36
LOGSMAX ................... 1-36
CLEANERS................... 1-36
SHMBASE ................... 1-37
CKPTINTVL .................. 1-37
LRUS ..................... 1-37
LRU_MAX_DIRTY ................ 1-37
LRU_MIN_DIRTY ................ 1-38
LTXHWM ................... 1-38
LTXEHWM................... 1-38
Machine- and Product-Specific Parameter Guidelines...... 1-39
DYNSHMSZ.................. 1-39
GTRID_CMP_SZ ................. 1-39
DEADLOCK_TIMEOUT .............. 1-39
TXTIMEOUT .................. 1-39
SPINCNT ................... 1-40

Installation and Initial Configuration 1-3
OnLine Disk Space Allocation ..............1-40
Allocate Raw Disk Space or Cooked Files?.........1-40
How Much Disk Space Do You Need? ..........1-41
How Should You Apportion Disk Space? .........1-43
How to Allocate Disk Space..............1-47
Evaluate UNIX Kernel Parameters ...........1-49
Configuration Checklist..................1-50
Enter Your Configuration and Initialize OnLine .........1-51
Setting Shared Memory Parameters ............1-53
Initialize OnLine ...................1-54
Set Your Environment Variables..............1-54
SQLEXEC ....................1-55
TBCONFIG ...................1-55
Modify UNIX Startup and Shutdown Scripts .........1-56
Startup .....................1-57
Shutdown ....................1-58
Create Blobspaces and Dbspaces .............1-59
Errors During Initialization ................1-59
OnLine Error Message Format ..............1-60
UNIX Error Message Format...............1-60

1-4 IBM Informix OnLine Database Server Administrator’s Guide

Installation and Initial Configuration 1-5
In This Chapter
This chapter describes how to get started administering your IBM Informix
OnLine environment.
You need the following items to install your OnLine database server:
■UNIX Products Installation Guide
■IBM Informix OnLine electronic media
■IBM Informix OnLine serial number keycard
The specific steps that you should follow as part of your installation depend
on your environment. To find the starting point that is right for you, refer to
page 1-6.
Installation refers to the three-step procedure of preparing your UNIX
environment, loading the product files onto your UNIX system, and running
theinstallation script tocorrectlysetup the productfiles. An overviewof the
installation procedure is illustrated on page 1-10 and described in detail in
the UNIX Products Installation Guide.
Initial configuration refers to the set of values that OnLine reads and imple-
ments the first time that you initialize OnLine disk space. The initial
configuration receives special attention because of the number of adminis-
trative issues that you must consider as you define the values for your initial
configuration.
Initial configuration tasks refers to the steps that you complete as you take
OnLine to online mode for the first time and prepare your OnLine system to
receive data. This chapter explains each of the configuration tasks, including
how to arrive at the initial configuration values that are correct for your
OnLine environment and how to enter these values and initialize OnLine.

1-6 IBM Informix OnLine Database Server Administrator’s Guide
Define Your Starting Point
Define Your Starting Point
Thissectiondirectsyoutothestartingpoint for your specific installationand
configuration.
If you are installing an IBM Informix OnLine 5.x product for the first time,
follow all the steps illustrated on page 1-10. After you complete the software
load and installation, turn to page 1-10 of this manual for instructions on
completing your initial configuration for OnLine 5.x.
If you are replacing an IBM Informix SE or other database server with the
OnLine 5.x database server, you must unload your current data. The OnLine
utilities for importing data accept ASCII files as input. Read the sections in
this manual that discuss data migration before you unload your data. (Refer
to page 4-52.) When you are ready to install OnLine 5.x, follow all the steps
illustrated on page 1-10. After you complete the software load and instal-
lation, turn to page 1-10 of this manual for instructions on completing your
initial configuration for OnLine 5.x.
If you are installing OnLine 5.x and plan to run more than one independent
OnLine 5.x database server on the same host machine, you must define
different configuration files for each instance of OnLine. This situation of
multiple OnLine 5.x systems is referred to as multiple residency. Refer to
page 9-7 for a complete discussion of multiple-residency issues. When you
are ready to install OnLine 5.x, follow all the steps illustrated on page 1-10.
After you complete the software load and installation, turn to page 1-10 of
this manual for instructions on completing your initial configuration for
OnLine 5.x.
If you are installing OnLine 5.x and plan to run it on the same host machine
where you are running IBM Informix SE, you can load the OnLine 5.x
software into the same $INFORMIXDIR directory that contains your
IBM Informix SE software. You do not need to define a different value for
INFORMIXDIR. To install OnLine 5.x, follow the steps illustrated on
page 1-10, beginning with the second step, loading the software. After you
complete the software load and installation, turn to page 1-10 of this manual
for instructions on completing your initial configuration for OnLine 5.x.
Installation and Initial Configuration 1-7
Upgrade an Earlier Version of OnLine
If you are installing OnLine 5.x and plan to run it on the same host machine
where you are running an earlier version of OnLine, you must load the
OnLine 5.x software into a different $INFORMIXDIR directory than the one
thatcontainsyourearlierserversoftware.ToinstallOnLine5.x,followallthe
steps illustrated on page 1-10. Be sure that you define the OnLine 5.x INFOR-
MIXDIR and PATH environment variables correctly for user informix. After
you complete the software load and installation, turn to page 1-10 of this
manual for instructions on completing your initial configuration for
OnLine 5.x.
Upgrade an Earlier Version of OnLine
IfyouareupgradinganearlierversionofOnLine,youdonotneedtoallocate
more UNIX disk space than is already set aside for OnLine. The tasks in the
upgrade procedure follow:
1. Compare Your Current Configuration to OnLine 5.x.
2. Create a Level-0 Archive.
3. Load the Software and Execute the install Script.
4. Initialize Shared Memory.
5. Run tbcheck to verify database integrity.
6. Create a New Level-0 Archive.
Warning: Do not initialize disk space if you are upgrading your OnLine system. If
you initialize disk space, you destroy your current OnLine system and all existing
data.
Compare Your Current Configuration to OnLine 5.x
OnLine 5.x adds 10 configuration parameters to support features and
improved performance. Informix recommends that you compare the
contents of tbconfig.std to your current configuration file before you
initialize shared memory. You might decide to modify your current configu-
ration or to specify nondefault values when you initialize shared memory to
bettertakeadvantageofOnLine5.xfeatures.Thecontentsoftbconfig.stdare
described on page 1-13. Guidelines for setting the values of the parameters
begin on page 1-20.

1-8 IBM Informix OnLine Database Server Administrator’s Guide
Upgrade an Earlier Version of OnLine
Create a Level-0 Archive
Ask all users to exit their applications before you begin the upgrade
procedure. (Perform a graceful shutdown by executing tbmode -s from the
commandline.)Createalevel-0archiveofyourcurrentOnLinesystem.Keep
a copy of your current configuration file for reference.
Load the Software and Execute the install Script
Take OnLine to offline mode. (Execute tbmode -ky.) Verify that you are
loggedinasuserroot.(ThescriptinstallsOnLine5.xintothe$INFORMIXDIR
directory specified for user root.)
Instructions for loading the software and executing the installation script are
contained in the UNIX Products Installation Guide. OnLine 5.x overwrites any
OnLine database server products that might exist in the $INFORMIXDIR
directory.
Initialize Shared Memory
Log out as user root and log in again as user informix. Reinitialize OnLine
shared memory from the DB-Monitor Parameters menu, Shared-Memory
option, or from the command line (execute tbinit). When you initialize
shared memory, your current OnLine configuration file is updated for
OnLine 5.x. If you do not specify values for the new parameters, default
values are assigned.
If you are unfamiliar with the shared-memory initialization procedure, turn
to page 3-8.

Installation and Initial Configuration 1-9
Upgrade an Earlier Version of OnLine
Run tbcheck
Verifythe integrity of the upgraded 5.x databasesbeforeyou continue. To do
this, execute the following commands from the system prompt:
If you encounter any inconsistencies, refer to page 4-6.
Create a New Level-0 Archive
After OnLine 5.x is initialized, create a level-0 archive of the OnLine 5.x
system. When the archive is completed, take OnLine to online mode.
Databases are automatically upgraded to OnLine 5.x format when they are
openedforthefirst time.Partoftheupgradingprocedurefordatabasesisthe
creation of Version 5.x system catalog tables for each database. For further
information about the 5.x SQL system catalog, refer to the IBM Informix Guide
to SQL: Reference.
tbcheck -ci dbname Checks and verifies the integrity of the database
indexes.
tbcheck -cD dbname Checksandverifiestheintegrityofdatabasedata.
tbcheck -cc dbname Checks and verifies the integrity of the OnLine
5.x system catalog tables.
tbcheck -cr Checks and verifies the integrity of the OnLine
5.x reserved pages.

1-10 IBM Informix OnLine Database Server Administrator’s Guide
Overview of OnLine Installation Steps
Overview of OnLine Installation Steps
InstallingOnLine5.xinvolvesthreemajorsteps,whicharesummarizedhere.
For detailed information, see the UNIX Products Installation Guide.
Important: For each step, you must be logged in as root.
1. Create UNIX environment:
■Create user informix.
■Set INFORMIXDIR.
■Set PATH.
■Change your directory to $INFORMIXDIR.
2. Load OnLine 5.x software:
■Copy Informix files into the Informix installation directory.
3. Install OnLine 5.x:
■Run ./installonline to change owner, group, and mode of
product files.
Overview of OnLine Initial Configuration Tasks
OnLineinitial configuration includes configuration planning and disk-space
initialization. The rest of this chapter provides instructions for the initial
configuration tasks.
Since OnLine 5.x is already installed in $INFORMIXDIR, you can use a UNIX
editor to examine the configuration file tbconfig.std that is described in the
followingpages.YoucanalsoaccesstheOnLinemonitorfacility,DB-Monitor.
To do so, log in as user informix and enter the command tbmonitor at the
command line.

Installation and Initial Configuration 1-11
OnLine Configuration Files
OnLine Configuration Files
You are not limited to just one configuration file. You can create and manage
multiple OnLine configuration files, and each file can contain a unique set of
configuration parameter values. This section explains how multiple configu-
ration files are created and managed.
As part of OnLine 5.x installation, the product software is loaded into the
Informix product directory, specified as the environment variable INFOR-
MIXDIR. One of the files loaded during installation is tbconfig.std, which is
locatedinthedirectory$INFORMIXDIR/etc.Thetbconfig.stdfilecontainsthe
default values for the configuration parameters and serves as the template
for all other configuration files that you create.
The OnLine environment variable TBCONFIG specifies the name of the UNIX
file (which must be located in the directory $INFORMIXDIR/etc) that is read
as input to either the disk-space or shared-memory initialization procedure.
The TBCONFIG environment variable enables you to create and maintain
multiple configuration files, each with different values. As user informix,
youcaninitializeOnLinesharedmemorywithadifferentsetofconfiguration
parameters by resetting the value of TBCONFIG.
The default value of TBCONFIG is defined as tbconfig. When you first load
the OnLine 5.x software, the file tbconfig does not exist. The tbconfig file is
created for you the first time that you initialize OnLine. If you initialize from
withinDB-Monitor,thetbconfigfilecontainstheparametervaluesenteredas
part of initialization. If you initialize from the command line, using the
OnLine utility tbinit, the tbconfig file contains default values obtained from
tbconfig.std.
You set the value of TBCONFIG when you define the environment variables
as one of your last tasks during installation.
You can modify the configuration file from withinDB-Monitor while OnLine
is online. The changes you make are written immediately to the file specified
asTBCONFIG.IfTBCONFIGisnotspecified,OnLinemodifiesthefiletbconfig.
Buteven though thevalues in the file change,most changes to the parameter
values do not take effect until you reinitialize OnLine shared memory. Until
you take this step, it is possible that the values in the file specified as
TBCONFIG do not match the values in your current, effective configuration.

1-12 IBM Informix OnLine Database Server Administrator’s Guide
OnLine Configuration Files
If you modify the configuration file while OnLine is online, you might want
tocomparethecurrentconfigurationvalueswiththenewvaluesstoredinthe
file specified as TBCONFIG.
To obtain a copy of your current, effective OnLine configuration through
DB-Monitor, choose the Status menu, Configuration option. You are asked to
supply a filename for the output file. If you supply a filename (without a
directory location), a copy of the current configuration is stored in
filename.out in the current working directory.
To display a copy of the configuration file, $INFORMIXDIR/etc/$TBCONFIG,
execute the command tbstat -c at the UNIX prompt while OnLine is running.
(If TBCONFIG is not specified, OnLine displays the contents of $INFOR-
MIXDIR/etc/tbconfig by default.)
You can use a UNIX system editor to create other configuration files (apart
fromtbconfig.std, tbconfig,andthefilespecifiedbyTBCONFIG).Eachconfig-
uration file must be located in the $INFORMIXDIR/etc directory. The
requirement that all configuration files must exist in $INFORMIXDIR/etc
means that you cannot make the directory read-only. If you do, you are
unable to save any parameter changes you make from DB-Monitor during
OnLineoperation.Theinstallation procedurecreatesthe$INFORMIXDIR/etc
with read-only permissions for all users except root and user informix.
Do not add parameters to a configuration file that are not included in
tbconfig.std. If you do, the next time you attempt to modify a configuration
parameter or initialize shared memory through DB-Monitor, OnLine detects
thatthe unknown parameters donot exist intbconfig.std and rejectsthem as
invalid. OnLine removes any parameters from the configuration file that do
not exist in tbconfig.std.
Do not remove the tbconfig.std file. If you do, OnLine is unable to create a
new configuration file the first time you attempt to modify a parameter or
initialize shared memory through DB-Monitor.
Informix recommends that you do not alter the contents of the tbconfig.std
file. All supported parameters are contained in tbconfig.std.

Installation and Initial Configuration 1-13
Contents of tbconfig.std
Contents of tbconfig.std
The tbconfig.std file contains all OnLine configuration parameters. The
paragraphs that follow name each parameter and provide a brief definition.
The parameters are listed in alphabetic order, not in the order in which they
appear in tbconfig.std.Figure 1-1 displays a copy of the tbconfig.std file.
(If you are unfamiliar with the terms used by Informix to describe units of
disk space, refer to the IBM Informix Guide to SQL: Tutorial.)
BUFFERS specifies the number of OnLine shared-memory page buffers
available to OnLine user processes. Refer to page 1-34 for information about
setting the value of this parameter.
BUFFSIZE is an unalterable configuration parameter that specifies the page
size for this platform. Changes made to the value shown for BUFFSIZE have
no effect.
CHUNKS specifies a value that approximates the maximum number of
chunks that OnLine can support on this specific hardware platform. The
number of chunks can be system-dependent. Refer to page 1-35 for infor-
mation about setting the value of this parameter.
CKPTINTVL specifies the maximum interval, expressed in seconds, that can
elapse before OnLine checks to determine if a checkpoint is needed. When a
checkpointoccurs,pages in the shared-memorybufferpooldiskaresynchro-
nized with the corresponding pages on disk. Refer to page 1-37 for
information about setting the value of this parameter.
CLEANERS specifies the number of dedicated page-cleaner daemons to
initialize for this OnLine configuration. Refer to page 1-36 for information
about setting the value of this parameter.
CONSOLE specifies the pathname destination for console messages. The
default value, /dev/console, sends messages to the system console screen.
Refer to page 1-28 for information about setting the value of this parameter.
DBSERVERNAME specifies the unique name of this OnLine database server,
as distinguished from other OnLine database servers that might exist in the
$INFORMIXDIR directory or in a client/server environment. Refer to
page 1-32 for information about setting the value of this parameter.

1-14 IBM Informix OnLine Database Server Administrator’s Guide
Contents of tbconfig.std
DBSPACES specifies the maximum number of dbspaces supported by this
OnLine configuration. Like CHUNKS, the number of dbspaces can be system-
dependent. Refer to page 1-35 for information about setting the value of this
parameter.
DEADLOCK_TIMEOUT specifies the maximum number of seconds that an
OnLine user process can wait to acquire a lock in a client/server
environment. The parameter is used only if this OnLine configuration uses
thedistributedcapabilitiesofIBM InformixSTAR. Refertopage 9-57forinfor-
mation about setting the value of this parameter.
DYNSHMSZ specifies the amount of shared memory that is allocated during
initialization and made available to the database servers during execution.
This parameter is only used by the IBM Informix TP/XA product. Refer to the
IBM InformixTP/XAUserManualforinformationaboutsettingthevalueofthis
parameter.
GTRID_CMP_SZ specifies the number of bytes to compare for global trans-
action identification numbers. This parameter is only used by the
IBM InformixTP/XAproduct.RefertotheIBM InformixTP/XAUserManualfor
information about setting the value of this parameter.
LOCKS specifies the maximum number of locks available to OnLine user
processes. Refer to page 1-33 for information about setting the value of this
parameter.
LOGBUFF specifiesin kilobytes the sizeof each of thethreelogicallogbuffers
that reside in shared memory. Refer to page 1-36 for information about
setting the value of this parameter.
LOGFILES specifies the number of logical log files currently configured for
OnLine. You set this value initially. However, if you add or drop logs during
OnLine operation, this value is updated automatically. Refer to page 1-27for
information about setting the value of this parameter.
LOGSIZE specifies in kilobytes the size of each logical log file maintained by
OnLine. The total disk space dedicated to the logical logs is equal to
LOGFILES multiplied by LOGSIZE. Refer to page 1-27 for information about
setting the value of this parameter.
LOGSMAX specifies the maximum number of logical log files supported by
this OnLine configuration. Refer to page 1-36 for information about setting
the value of this parameter.

Installation and Initial Configuration 1-15
Contents of tbconfig.std
LRUS specifies the number of LRU (least-recently used) queues. The LRU
queues manage the shared-memory buffer pool. Refer to page 1-37 for infor-
mation about setting the value of this parameter.
LRU_MAX_DIRTY specifies the percentage of modified pages in the LRU
queues that, when reached, flags the queue to be cleaned. Refer to page 1-37
for information about setting the value of this parameter.
LRU_MIN_DIRTY specifies the percentage of modified pages in the LRU
queues that, when reached, flags the page cleaners that cleaning is no longer
mandatory, although it might continue for other reasons. Refer to page 1-38
for information about setting the value of this parameter.
LTAPEBLK specifies in kilobytes the size of the tape block for the logical log
backup tape device. Refer to page 1-30 for information about setting the
value of this parameter.
LTAPEDEV specifies the device pathname of the logical log backup tape
device. Refer to page 1-30 for information about setting the value of this
parameter.
LTAPESIZE specifiesinkilobytesthemaximumamountofdatathatshouldbe
stored on a tape mounted on the logical log backup tape device. Refer to
page 1-31 for information about setting the value of this parameter.
LTXEHWM specifies the “long transaction, exclusive access, high-water
mark.” The LTXEHWM is a higher percentage than the LTXHWM percentage.
IfthelogicallogfillstoLTXEHWM,thelongtransactioncurrentlybeingrolled
backisgiven“exclusive”accesstothe logicallog.Theterm“exclusive”isnot
entirelyaccurate.MostOnLineactivityissuspendeduntilthetransactionhas
completed its rollback, but transactions that are in the process of rolling back
or committing retain access to the logical log. Refer to page 1-38 for infor-
mation about setting the value of this parameter.
LTXHWM specifies the “long transaction high-water mark.” The value of
LTXHWM is the percentage of available logical log space that, when filled,
triggers the tbinit daemon to check for a long transaction. If a long trans-
actionisfound,thetransactionisabortedandtheexecutingOnLinedatabase
server process rolls back all modifications associated with it. Refer to
page 1-38 for information about setting the value of this parameter.

1-16 IBM Informix OnLine Database Server Administrator’s Guide
Contents of tbconfig.std
MIRROR specifies whether OnLine blobspace and dbspace mirroring is
enabled. Refer to page 1-24 for information about setting the value of this
parameter.
MIRROROFFSET specifies in kilobytes the offset into the disk partition or into
the device to reach the beginning of the mirror chunk. Refer to page 1-25 for
information about setting the value of this parameter.
MIRRORPATHspecifiesthepathnameofthemirrorchunkwherethemirrored
root dbspace resides. Informix recommends that this value be a linked
pathnamethatpointstothemirror-chunkdevice.Refertopage 1-24 forinfor-
mation about setting the value of this parameter.
MSGPATH specifies the pathname of the OnLine message log. The message
log contains diagnostic and status messages that document OnLine
operation. Refer to page 1-28 for information about setting the value of this
parameter.
PHYSBUFF specifies in kilobytes the size of each of the two physical log
buffers that reside in shared memory. Refer to page 1-35 for information
about setting the value of this parameter.
PHYSDBS specifies the name of the dbspace where the physical log resides.
WhenOnLinediskspaceisfirstinitialized,thephysicallogmustresideinthe
rootdbspace.Afterinitializing,you can movethe physical log outof the root
dbspace to improve performance. Refer to page 1-25 for information about
setting the value of this parameter.
PHYSFILE specifiesinkilobytesthesizeofthephysicallog.Refertopage 1-25
for information about setting the value of this parameter.
RESIDENT indicates whether OnLine shared memory will remain resident in
UNIX physical memory. Not all UNIX operating systems support forced
residency. Refer to page 1-32 for information about setting the value of this
parameter.
ROOTNAME specifies the name of the root dbspace. Refer to page 1-21 for
information about setting the value of this parameter.
ROOTOFFSETspecifiesinkilobytestheoffsetintothediskpartitionorintothe
device to reach the beginning of the initial chunk of the root dbspace. Refer
to page 1-22 for information about setting the value of this parameter.

Installation and Initial Configuration 1-17
Contents of tbconfig.std
ROOTPATH specifies the pathname of the chunk where the root dbspace
resides. Informix recommends that this value be a link that points to the root
dbspace chunk device. Refer to page 1-22 for information about setting the
value of this parameter.
ROOTSIZE specifies the size of the root dbspace in kilobytes. Refer to
page 1-23 for information about setting the value of this parameter.
SERVERNUM specifies a unique identification number which, along with the
DBSERVERNAME, distinguishes this OnLine database server from all others.
Refer to page 1-31 for information about setting the value of this parameter.
SHMBASE specifies the address that serves as the base of shared memory
when shared memory is attached to the memory space of a user process.
Refer to page 2-26 for information about the value of this parameter.
SPINCNT is supported by some multiprocessor machines. Refer to page 1-40
for information about setting the value of this parameter.
TAPEBLK specifies in kilobytes the size of the tape block for the archive tape
device. Refer to page 1-29 for information about setting the value of this
parameter.
TAPEDEV specifies the device pathname of the archive tape device. Refer to
page 1-28 for information about setting the value of this parameter.
TAPESIZE specifies in kilobytes the maximum amount of data that should be
stored on a tape mounted on the archive tape device. Refer to page 1-29 for
information about setting the value of this parameter.
TBLSPACES specifies the maximum number of open or active tblspaces
supported by this OnLine configuration. Refer to page 1-34 for information
about setting the value of this parameter.
TRANSACTIONS specifies the maximum number of concurrent OnLine user
processes supported by this OnLine configuration. As a general guideline,
TRANSACTIONS is set to the value of USERS. Refer to page 1-33 for infor-
mation about setting the value of this parameter.
TXTIMEOUT specifies, for a client/server environment, the maximum
number of seconds that an OnLine database server waits for a transaction
during a two-phase commit. This parameter is used only if OnLine uses the
distributed capabilities of IBM Informix STAR. Refer to page 9-57 for infor-
mation about setting the value of this parameter.

1-18 IBM Informix OnLine Database Server Administrator’s Guide
Contents of tbconfig.std
USERS specifies the maximum number of OnLine user processes that can
attach to shared memory concurrently. A user process is broadly defined as a
processthatis,orwillbe,attachedtosharedmemory. User processesinclude
database server processes, daemon processes, and utility processes. (In this
manual, no reference is made to application tool processes.) Refer to
page 1-33 for information about setting the value of this parameter.
Figure 1-1
The Contents of tbconfig.std
#**************************************************************#
# #
# INFORMIX SOFTWARE, INC. #
# #
# Title: tbconfig.std #
# Sccsid:@(#)tbconfig.std 8.5 6/11/91 16:19:05 #
# Description: INFORMIX-OnLine Configuration Parameters #
# #
#**************************************************************#
# Root Dbspace Configuration
ROOTNAME rootdbs # Root dbspace name
ROOTPATH /dev/online_root
# Path for device containing root dbspace
ROOTOFFSET 0 # Offset of root dbspace into device (Kbytes)
ROOTSIZE 20000 # Size of root dbspace (Kbytes)
# Disk Mirroring Configuration
MIRROR 0 # Mirroring flag (Yes = 1, No = 0)
MIRRORPATH # Path for device containing root
dbspace mirror
MIRROROFFSET 0 # Offset into mirror device (Kbytes)
# Physical Log Configuration
PHYSDBS rootdbs # Name of dbspace that contains physical log
PHYSFILE 1000 # Physical log file size (Kbytes)
# Logical Log Configuration
LOGFILES 6 # Number of logical log files
LOGSIZE 500 # Size of each logical log file (Kbytes)
# Message Files
MSGPATH /usr/informix/online.log
# OnLine message log pathname
CONSOLE /dev/console
# System console message pathname
# Archive Tape Device

Installation and Initial Configuration 1-19
Contents of tbconfig.std
TAPEDEV /dev/tapedev
# Archive tape device pathname
TAPEBLK 16 # Archive tape block size (Kbytes)
TAPESIZE 10240 # Max. amount of data to put on tape (Kbytes)
# Logical Log Backup Tape Device
LTAPEDEV /dev/tapedev
# Logical log tape device pathname
LTAPEBLK 16 # Logical log tape block size (Kbytes)
LTAPESIZE 10240 # Max amount of data to put on log tape
(Kbytes)
# Identification Parameters
SERVERNUM 0 # Unique id associated with this OnLine
instance
DBSERVERNAME ONLINE # Unique name of this OnLine instance
# Shared Memory Parameters
RESIDENT 0 # Forced residency flag (Yes = 1, No = 0)
USERS 20 # Maximum number of concurrent user processes
TRANSACTIONS 20 # Maximum number of concurrent transactions
LOCKS 2000 # Maximum number of locks
BUFFERS 200 # Maximum number of shared memory buffers
TBLSPACES 200 # Maximum number of active tblspaces
CHUNKS 8 # Maximum number of chunks
DBSPACES 8 # Maximum number of dbspaces and blobspaces
PHYSBUFF 32 # Size of physical log buffers (Kbytes)
LOGBUFF 32 # Size of logical log buffers (Kbytes)
LOGSMAX 6 # Maximum number of logical log files
CLEANERS 1 # Number of page-cleaner processes
SHMBASE 0x400000 # Shared memory base address
CKPTINTVL 300 # Checkpoint interval (in seconds)
LRUS 8 # Number of LRU queues
LRU_MAX_DIRTY 60 # LRU modified begin-cleaning limit (percent)
LRU_MIN_DIRTY 50 # LRU modified end-cleaning limit (percent)
LTXHWM 80 # Long TX high-water mark (percent)
LTXEHWM 90 # Long TX exclusive high-water mark (percent)
# Machine- and Product-Specific Parameters
DYNSHMSZ 0 # Dynamic shared memory size (Kbytes)
GTRID_CMP_SZ 32 # Number of bytes to use in GTRID comparison
DEADLOCK_TIMEOUT 60 # Max time to wait for lock in distributed
env.
TXTIMEOUT 300 # Transaction timeout for I-STAR (in seconds)
SPINCNT 0 # No. of times process tries for latch

1-20 IBM Informix OnLine Database Server Administrator’s Guide
Set Up Your Initial Configuration
(multiprocessor-machine default is 300)
STAGEBLOB # INFORMIX-OnLine/Optical staging area
# System Page Size
BUFFSIZE machine-specific # Page size (do not change!)
Set Up Your Initial Configuration
This chapter uses a workbook approach to help you define your initial
configuration. The configuration worksheet lists each parameter needed for
initialization. The default value for the parameter is displayed in bold type
next to the parameter name. Additional lines are provided for you to record
your parameter values where they differ from the default. Where appro-
priate, the worksheet includes calculation workspace.
In the pages that follow, each tbconfig. std parameter group is defined in
detail, along with guidelines and instruction to help you choose a value that
is appropriate for your environment. The topics are organized according to
the layout of the tbconfig.std file.
Before you begin, decide on your immediate use for OnLine. Do you plan to
use OnLine in a learning environment for a short time, or do you plan to use
OnLine in a production environment right away?
If you plan to experiment with OnLine as part of learning the product, you
can use the default configuration parameters wherever they are provided. If
your goal is to initialize OnLine for a production environment right away,
carefully consider the effect of each parameter within your application
environment.
Refer to page 1-23 for an explanation of how this decision (default or custom
configuration) affects the size of the root dbspace.

Installation and Initial Configuration 1-21
Root Dbspace Configuration Guidelines
Root Dbspace Configuration Guidelines
The root dbspace, like all dbspaces, consists of at least one chunk. You can
add other chunks to the root dbspace after OnLine is initialized. All disk
configuration parameters refer to the first (initial) chunk of the root dbspace.
The root dbspace contains information that is critical for OnLine operation.
Specific control and tracking information needed for OnLine operation is
stored in the root dbspace reserved pages.
At initialization, the root dbspace also contains the physical log and all
OnLine logical log files. After OnLine is initialized, you can move the logs to
other dbspaces to improve performance.
During operation, the root dbspace is the default location for all temporary
tables created implicitly by OnLine to perform requested data management.
The root dbspace is also the default dbspace location for any CREATE
DATABASE statement.
ROOTNAME
Select a name for the root dbspace for this OnLine configuration. The name
mustbeuniqueamongalldbspacesandblobspaces.Thenamecannotexceed
18 characters. Valid characters are restricted to digits, letters, and the under-
score.Informixrecommendsthatyouselectanamethatiseasilyrecognizable
as the root dbspace. The default value of ROOTNAME is rootdbs.

1-22 IBM Informix OnLine Database Server Administrator’s Guide
Root Dbspace Configuration Guidelines
ROOTPATH
The ROOTPATH parameter specifies the pathname of the initial chunk of the
root dbspace. ROOTPATH is stored in the OnLine reserved pages as a chunk
name.
Informixrecommendsthat,insteadofenteringtheactualdevicenameforthe
initial chunk, you define ROOTPATH as a pathname that is a link to the root
dbspaceinitialchunk.The link enables you toquicklyreplacethediskwhere
the chunk is located. The convenience becomes important if you need to
restore your OnLine data. The restore process requires that all chunks that
were accessible at the time of the last archive are accessible when you
perform the restore. The link means that you can replace a failed device with
another device and link the new device pathname to ROOTPATH. You do not
need to wait for the original device to be repaired.
For now, select a link pathname as the chunk pathname for ROOTPATH.You
will determine the actual chunk pathname for the root dbspace when you
allocate disk space. (Refer to page 1-40.) Since the number of chunks
managed by OnLine is affected by the length of the chunk names, select a
short pathname. The default value of ROOTPATH is the link pathname
/dev/online_root.
ROOTOFFSET
ROOTOFFSET specifies the offset into the disk partition or into the device to
reach the initial chunk. Leave this worksheet field blank until you allocate
OnLine disk space. (Refer to page 1-40.) The default value of ROOTOFFSET is
0 KB.

Installation and Initial Configuration 1-23
Root Dbspace Configuration Guidelines
ROOTSIZE
ROOTSIZEspecifiesthesizeoftheinitialchunkoftherootdbspace,expressed
in kilobytes. The size that you select depends on your immediate plans for
OnLine.
The ROOTSIZE default value is 20,000 KB (about 19.5 MB).
If you are configuring OnLine for a learning environment, plan to make the
root dbspace 20 to 60 MB. If you plan to add test databases to this system,
choose the larger size. Enter this value in two places on the configuration
worksheet.First,enteritasthesizeoftherootdbspaceintheROOTSIZE field.
Second, enter it into the field labeled Size of the root dbspace on the
second page under the heading Disk Layout.
If you are configuring OnLine for a production environment, you need to
calculate an appropriate size for the root dbspace.
At the time of initial configuration, the root dbspace must be large enough to
accommodate five possible components:
■Physical log
■Logical log files
■Disk space allocated to accommodate temporary internal tables
needed by OnLine for processing
■Diskspaceallocatedtoaccommodateanydatabasesortblspacesthat
you might want to store in the root dbspace
■Disk space to accommodate OnLine control information
Yourworksheetcontainsblanksforyou toenterthesizesofthesecomponent
parts of the root dbspace, as you determine them. Do not complete this
sectionofyourworksheetnow.Youwillcompleteeachblank,AthroughJ,as
you work through the disk allocation tasks. (Refer to page 1-40.)

1-24 IBM Informix OnLine Database Server Administrator’s Guide
Mirroring Configuration Guidelines
Mirroring Configuration Guidelines
Mirroringisnotrequired,but it isstronglyrecommended.Refertopage 4-14
for a complete discussion of mirroring and mirroring administration.
Mirroringis astrategythatpairsprimarychunksofonedefined blobspaceor
dbspace with equal-sized mirror chunks. Writes to the primary chunk are
duplicated asynchronously on the mirror chunk.
Any database that has extreme requirements for reliability in the face of
hardwarefailureshould be located inamirroreddbspace. Above all, the root
dbspace should be mirrored.
The same OnLine database server on the same host machine must manage
both chunks of a mirrored set. Mirroring on disks managed over a network
is not supported. For a complete description of mirroring and how it works,
refer to page 4-14.
MIRROR
The MIRROR parameter is a flag that indicates whether mirroring is enabled
for OnLine. The default value of MIRROR is 0, indicating mirroring is
disabled. The alternative value of MIRROR is 1, indicating mirroring is
enabled.
Enable mirroring if you plan to create a mirror for the root dbspace as part of
initialization. Otherwise, leave mirroring disabled. If you later decide to add
mirroring, you can change the parameter value through DB-Monitor or by
editing your configuration file. (Refer to page 3-104.)
MIRRORPATH
The MIRRORPATH parameter specifies the full pathname of the chunk that
willserveasthemirrorfortheinitialchunkoftherootdbspace(ROOTPATH).
MIRRORPATH should be a link to the chunk pathname of the actual mirror
chunk for the same reasons that ROOTPATH is specified as a link. (Refer to
page 1-22.) Similarly, you should select a short pathname for the mirror
chunk. No default value is provided, but /dev/mirror_root is one suggestion
for a link pathname.

Installation and Initial Configuration 1-25
Physical Log Configuration Guidelines
MIRROROFFSET
The MIRROROFFSET parameter specifies the offset into the disk partition or
into the device to reach the chunk that serves as the mirror for the root
dbspace initial chunk. Leave this worksheet field blank until you allocate
OnLine disk space.
Physical Log Configuration Guidelines
This section describes how to assign values to the physical log parameters.
The physical log is a block of contiguous disk space that serves as a storage
area for copies of unmodified disk pages. The physical log is a component of
OnLine fast recovery, a fault-tolerant feature that automatically recovers
OnLine data in the event of a system failure. Refer to page 4-39 for more
information about fast recovery. Refer to page 2-152 for detailed information
about the physical log.
PHYSDBS
PHYSDBS specifies the name of the dbspace that contains the physical log.
For the initial configuration, the physical log must be created in the initial
chunk of the root dbspace. For this reason, you do not specify PHYSDBS as
partoftheconfiguration.ItisassignedbydefaulttothevalueofROOTNAME.
After additional dbspaces have been defined, you can move the physical log
to another dbspace to reduce disk contention.
PHYSFILE
PHYSFILE specifies the size of the physical log in kilobytes. A general
guideline for sizing your physical log is that the size of the physical log
should be about twice the size of one logical log file.
A more precise guideline is that total disk space allocated to the physical log
and the logical log files should equal about 20 percent of all dbspace
dedicated to OnLine. The ratio of logical log space to physical log space
should be about 3:1.

1-26 IBM Informix OnLine Database Server Administrator’s Guide
Logical Log Configuration Guidelines
Refertopage 1-42forguidelinesondecidinghowmuchdiskspaceshouldbe
dedicated to OnLine dbspaces. Refer to page 1-26 for information about
sizing the logical log files.
The default value of PHYSDBS is 1,000 KB.
The default values included in the tbconfig.std file adhere to both of the
guidelinesjustdescribed.Thesizeofthephysicallogis1,000KB.Thedefault
value of LOGSIZE is 500 KB. The default value of LOGFILES is 6. Thus, total
logical log size is 3,000 KB. Total space devoted to the physical and logical
logs is 4,000 KB. This value meets the first criterion of 20 percent of the root
dbspace, which is 20,000 KB. The strategy also meets the second recommen-
dation to allocate logging space in a ratio of 3:1, logical log space to physical
log space.
Logical Log Configuration Guidelines
Thissectiondescribeshowtoassigninitialconfigurationvaluestothelogicallog
parameters. Refer to page 3-14 for a detailed discussion of logical log configu-
rationguidelines.Refertopage 4-18foranoverviewofthemechanicsofOnLine
blobspace and dbspace logging.
OnLine supports transaction logging, which is the ability of the database
server to track and, if needed, to roll back all changes made to the database
during application transactions. OnLine transaction logging is implemented
by recording each change made to a database in disk space allocated for the
OnLine logical log files.
Thelogicallogfiles contain a historyofalldatabase changes since the timeof
the last archive. At any time, the combination of OnLine archive tapes plus
OnLine logical log files contain a complete copy of your OnLine data.
AsOnLine administrator, youdecide on the optimum total size ofthe logical
log:LOGFILES multipliedbyLOGSIZE.Theoptimumsize of thelogicallogsis
based on the length of individual transactions. (OnLine does not permit a
singletransactiontospanall logicallogfiles.)Refertopage 2-156fordetailed
information on selecting values for LOGFILES and LOGSIZE that are specifi-
cally tuned to your application environment.

Installation and Initial Configuration 1-27
Logical Log Configuration Guidelines
LOGFILES
LOGFILES specifies the number of logical log files managed by OnLine.
The minimum number required for OnLine operation is three log files. The
maximum number is determined by the number of logical log descriptors
that can fit on a page. For a 2-KB page, the maximum number is about 60 log
files. The default value of LOGFILES is 6.
Select the number of logical log files after you determine a general size for
total logical log size and you select a size for each logical log file.
LOGSIZE
LOGSIZE specifies the size of each logical log file managed by OnLine.
The minimum size for a single logical log file is 200 KB. The default value of
LOGSIZE is 500 KB.
A general guideline for sizing the individual logical log files is derived from
the guideline for all logging space: the total disk space allocated to the
physical log and the logical log files should equal about 20 percent of all
dbspace dedicated to OnLine. The ratio of logical log space to physical log
space should be about 3:1.
The default values included in the tbconfig.std file adhere to the guideline
just described. The default value of LOGSIZE is 500 KB. The default value of
LOGFILES is 6. Total logical log size is 3,000 KB. The size of the physical log is
1,000KB.Totalspacedevotedtothephysicalandlogicallogsis4,000KB.This
value meets the first criterion of 20 percent of the root dbspace, which is
20,000 KB. The strategy also meets the second recommendation to allocate
logging space in a ratio of 3:1, logical log space to physical log space.

1-28 IBM Informix OnLine Database Server Administrator’s Guide
Message File Guidelines
Message File Guidelines
The console receives messages that deserve your immediate attention–for
example,alertingyou that your logical logsarefull.TheOnLinemessagelog
contains a more complete set of messages that record OnLine activity but
rarely require immediate action.
MSGPATH
MSGPATH specifies the UNIX pathname of the OnLine message file. OnLine
writes status messages and diagnostic messages to this message file during
operation. The default value for MSGPATH is /usr/informix/online.log.
CONSOLE
CONSOLE specifies the pathname destination for console messages. The
default value for CONSOLE is /dev/console, which sends messages to the
system console screen.
Archive Tape Device Guidelines
This section describes how to assign initial configuration values to the
archive tape device parameters. Refer to page 3-50 for a detailed discussion
of archive tape configuration guidelines.
As OnLine administrator, you are responsible for creating and maintaining
archives. OnLine supports several different archiving strategies, including
online archiving, remote archiving, and incremental archiving.
Informix strongly recommends that your OnLine environment include two
tape devices, one for archiving and a second for backing up the logical log
files to tape. If you must use the same device for archiving and for backing
up the logical logs, plan your archive schedule carefully to eliminate
contention for the one tape device. Refer to page 3-49.
TAPEDEV
TAPEDEV specifies the archive tape device. TAPEDEV can be a link pathname
that points to the actual tape device to provide flexibility in case the actual
device is unavailable.

Installation and Initial Configuration 1-29
Logical Log Tape Device Guidelines
The default value of TAPEDEV is /dev/tapedev.
You can set the value of TAPEDEV to /dev/null if you are testing or proto-
typing an application, or if you are using OnLine in a learning environment.
During OnLine operation, some tasks require that you create an archive. If
you set TAPEDEV to /dev/null, you can create an archive instantly, without
overhead. However, you are not archiving your OnLine data. You cannot
perform a restore.
You can set the value of TAPEDEV to specify a tape device on another host
machineandcreatearchivesacrossyournetwork.Forinstructionsonhowto
do this, refer to page 3-54.
Tapedevicesthatdonot rewindautomaticallybeforeopeningand onclosing
are considered incompatible with OnLine operation.
TAPEBLK
TAPEBLK specifies the block size of the archive tape device, in kilobytes.
Specifythelargestblocksizepermittedbyyourtapedevice.Ifthetapedevice
pathname is /dev/null, the block size is ignored. The default value of
TAPEBLK is 16KB.
TAPESIZE
TAPESIZE specifies the maximum amount of data that should be written to
each tape, expressed in kilobytes. If the tape device pathname is /dev/null,
the tape size is ignored. The default value of TAPESIZE is 10,240KB.
Logical Log Tape Device Guidelines
This section describes how to assign values to the logical log backup tape
deviceparameters. Refer to page 3-13 fora complete list of logical log admin-
istration topics related to logical log backups.
As OnLine administrator, you are responsible for the prompt back up of the
logical log files. The logical log backup tapes, along with the archive tapes,
constitute a complete copy of your OnLine data.

1-30 IBM Informix OnLine Database Server Administrator’s Guide
Logical Log Tape Device Guidelines
OnLine supports a logical log backup option called Continuous-Logging,
which backs up each logical log as soon as it becomes full. The Continuous-
LoggingoptionisrecommendedforallOnLineconfigurations,butitrequires
a dedicated tape device while the option is active.
Informix strongly recommends that your OnLine environment include two
tape devices, one for continuous backup of the logical logs and one for
archiving.
LTAPEDEV
LTAPEDEV specifies the logical log backup tape device. LTAPEDEV can be a
link pathname that points to the actual tape device to provide flexibility in
case the actual device is unavailable.
The default value of LTAPEDEV is /dev/tapedev.
You can set the value of LTAPEDEV to /dev/null if you are testing an appli-
cation or if you are using OnLine in a learning environment. The only
advantage of doing this is to eliminate the need for a tape device. However,
you cannot recover OnLine data beyond that which is stored as part of an
archive.
You can set the value of LTAPEDEV to specify a tape device on another host
machine and perform logical log backups across your network. For instruc-
tions on how to do this, refer to page 3-19.
Tapedevicesthatdonot rewindautomaticallybeforeopeningand onclosing
are considered incompatible with OnLine operation.
LTAPEBLK
LTAPEBLK specifies the block size of the logical log backup tape device, in
kilobytes. Specify the largest block size permitted by your tape device. If the
pathname of the tape device is /dev/null, the block size is ignored. The
default value of LTAPEBLK is 16KB.

Installation and Initial Configuration 1-31
Identification Parameter Guidelines
LTAPESIZE
LTAPESIZE specifies the maximum amount of data that should be written to
each tape, expressed in kilobytes. If the pathname of the tape device is
/dev/null, the tape size is ignored. The default value of LTAPESIZE is
10,240KB.
Identification Parameter Guidelines
This section describes how to assign values to the OnLine identification
parameters.
OnLine identification parameters are an issue if you are configuring more
than one OnLine database server for a single host machine or if you plan to
integrate this OnLine database server into a network of OnLine servers that
use the client/server capabilities of IBM Informix STAR.
In either case, the database server processes require a method to uniquely
identify their associated OnLine shared memory space within UNIX shared
memory. The identification key is linked to the value of the SERVERNUM
parameter.
For a complete discussion of configuration issues affected by multiple
residency, refer to page 9-7. For information about IBM Informix STAR config-
urationissues,refertotheIBM InformixNETandIBM InformixSTAR Installation
and Configuration Guide. For more information about the IBM Informix STAR
configuration parameters in the tbconfig.std file, refer to page 9-57.
SERVERNUM
SERVERNUM specifies a unique identification number associated with this
specificoccurrenceofOnLine.TheidentifierdistinguishesthisOnLineserver
from all other database servers in the $INFORMIXDIR directory and the
network, if one exists.
The default value of SERVERNUM is 0. The value cannot exceed 255.
If OnLine and earlier database servers co-exist on the same machine, they
musthaveuniquevaluesforSERVERNUM. The SERVERNUM valueforearlier
serversisimplicitlysetto0.Therefore,OnLinerequiresa valuethatisgreater
than 0.

1-32 IBM Informix OnLine Database Server Administrator’s Guide
Shared-Memory Parameter Guidelines
DBSERVERNAME
DBSERVERNAME specifies a unique name associated with this specific occur-
rence of OnLine. The identifier distinguishes this OnLine server from all
other database servers in the $INFORMIXDIR directory and the network, if
one exists.
The value of DBSERVERNAME cannot exceed 18 characters. Valid characters
are restricted to digits, letters, and the underscore. The default value of
DBSERVERNAME is ONLINE.
Shared-Memory Parameter Guidelines
This section describes how to assign values to the OnLine shared-memory
parameters.
As part of the initialization procedure, DB-Monitor prompts you to enter the
values of all but eight of the shared-memory parameters listed in
tbconfig.std.
These eight parameters are used to tune performance. Default values are
used during initialization. Tuning is best done later, when you can monitor
and evaluate OnLine performance under typical working conditions. The
eightperformanceparametersdonotappearonthe configuration worksheet
but they are described in this section.
RESIDENT
The value of RESIDENT indicates whether OnLine shared memory remains
resident in UNIX physical memory. If your UNIX system supports forced
residency, you can specify that OnLine shared memory is not swapped to
disk.
The size of OnLine shared memory is a factor in your decision. Before you
decide on residency, verify that the amount of physical memory available
aftersatisfyingOnLinerequirementsissufficienttoexecuteallrequiredUNIX
and application processes.
The default value of RESIDENT in tbconfig.std is 0, indicating that residency
is not enforced. A value of 1 indicates that residency is enforced.

Installation and Initial Configuration 1-33
Shared-Memory Parameter Guidelines
USERS
USERS specifies the maximum number of user processes that can concur-
rently attach to shared memory. The value can have a large effect on the size
of shared memory because it determines the minimum values for four other
shared-memory parameters (LOCKS,TBLSPACES,BUFFERS, and
TRANSACTIONS.)
To arrive at a value for USERS,specifythehighestlikelyvalue for the number
of user processes active at any one time plus the value of CLEANERS, plus 4.
Add one more user process if you intend to implement mirroring.
The minimum value is equal to the value of CLEANERS plus 4, plus 1 if
mirroring is enabled. The maximum value is 1000. The default value is 20.
(The four required user processes are the master daemon, tbinit; the under-
taker daemon, tbundo; the DB-Monitor process, tbmonitor; and one
additional user process to ensure a slot for an administrative process. If you
enable mirroring, an additional mirror daemon is needed.)
TRANSACTIONS
The value of TRANSACTIONS refers to the maximum number of concurrent
transactions supported by OnLine.
The minimum value of TRANSACTIONS is the value of USERS. The
maximum value is the number of transactions that can fit into a checkpoint
record, which for OnLine 5.x is 1,364.
By default, OnLine sets the value of TRANSACTIONS equal to the value of
USERS.DB-Monitor does not prompt for this value during initialization. The
default value is appropriate unless you plan to use OnLine in an X/Open
environment. If you are configuring OnLine for use with IBM Informix
TP/XA, refer to the IBM Informix TP/XA User Manual.
LOCKS
LOCKS specifies the maximum number of locks available to OnLine user
processesduringprocessing.Thenumberoflockshasarelativelysmalleffect
on the size of shared memory. The minimum value for LOCKS is equal to 20
locks per user process. The maximum value is 8 million. The default value is
2000.

1-34 IBM Informix OnLine Database Server Administrator’s Guide
Shared-Memory Parameter Guidelines
BUFFERS
BUFFERSspecifiesthemaximumnumberofshared-memorybuffersavailable
to OnLine user processes during processing.
The minimum value for BUFFERS is 4 per user process. The maximum value
is 32,000. The default value is 200.
As a general guideline, buffer space should range from 20 to 25 percent of
physical memory. Informix recommends that you initially set BUFFERS so
that buffer space (the value of BUFFERS multiplied by BUFFSIZE) is equal to
20 percent of physical memory. Then calculate all other shared-memory
parameters.
Ifyoufindthatafteryouhave configuredallotherparametersyoucanafford
to increase the size of shared memory, increase the value of BUFFERS until
buffer space reaches the recommended 25 percent upper limit.
TBLSPACES
TBLSPACES specifies the maximum number of active (open) tblspaces.
Temporary tables and system catalog tables are included in the active table
count.
The minimum value for TBLSPACES is 10 per user process. This minimum
must be greater than the maximum number of tables in any one database,
including the system catalog tables, plus 2. (This minimum is required to
permit OnLine to execute a DROP DATABASE statement.) The maximum
valueis32,000.Thedefault value is 200. Consider thedemandsofyourappli-
cation when you assign a value.

Installation and Initial Configuration 1-35
Shared-Memory Parameter Guidelines
CHUNKS
CHUNKS specifies the maximum number of chunks supported by OnLine.
The value specified should be as close as possible to the maximum number
permitted, which is operating-system dependent.
The maximum number of chunks is the lesser of two values:
■The number of chunk entries (pathnames) that can fit on an OnLine
page
■The maximum number of open files per process allowed by the
operating system, minus 6
The default value for CHUNKS is 8. For specific instructions on how to
calculatethenumberofchunkentriesthatcanfitonapage,refertopage 2-93.
DBSPACES
DBSPACES specifies the maximum number of dbspaces supported by
OnLine.ThemaximumnumberofdbspacesisequaltothevalueofCHUNKS,
since each dbspace requires at least one chunk. The minimum value is 1,
representing the root dbspace. The default value is 8.
PHYSBUFF
PHYSBUFF specifies the size in kilobytes of each of the two physical log
buffers in shared memory. Double buffering permits user processes to write
to the active physical log buffer while the other buffer is being flushed to the
physical log on disk.
The recommended value for PHYSBUFF is 16 pages, or 16 multiplied by
BUFFSIZE. (BUFFSIZE is the machine-specific page size and is the last
parameter listed in tbconfig.std.) The default value is 32KB.
LOGBUFF
LOGBUFF specifiesthe size in kilobytesof each of thethreelogicallogbuffers
in shared memory. Triple buffering permits user processes to write to the
activebufferwhileoneoftheotherbuffersisbeingflushedtodisk.Ifflushing
isnotcompletebythetimetheactivebufferfills,userprocessesbeginwriting
to the third buffer.

1-36 IBM Informix OnLine Database Server Administrator’s Guide
Shared-Memory Parameter Guidelines
The recommended value for LOGBUFF is 16 pages, or 16 multiplied by
BUFFSIZE.(BUFFSIZE isthemachine-specificpagesizeandthelastparameter
listed in tbconfig.std.) The default value is 32KB.
LOGSMAX
LOGSMAX specifies the maximum number of logical log files that OnLine
supports. OnLine requires at least three logical log files for operation. In
general,you can set thevalue of LOGSMAX equal tothe value ofLOGFILES.If
you plan to relocate the logical log files out of the root dbspace after you
initializeOnLine,assignLOGSMAX thevalueofLOGFILES, plus 3. Thereason
for this is explained on page 3-31, which describes how to move the logical
log files to another dbspace.
ThedefaultvalueofLOGSMAXis6.Themaximumnumberoflogicallogfiles
that you can display using DB-Monitor is 50. (You can display any number of
log files using the tbstat utility.)
CLEANERS
CLEANERS specifies the number of additional page-cleaner daemon
processes available during OnLine operation. (By default, one page-cleaner
process is always available.)
A general guideline is one page cleaner per physical device, up to a
maximumofeight.Youmightbeabletotune thevaluetoachieveanincrease
in performance. Refer to page 5-19.
The maximum value for CLEANERS is 32. The minimum value is 0. The
default value is 1. (The value specified has no effect on the size of shared
memory.)
SHMBASE
SHMBASE specifies the base address where shared memory is attached to the
memory space of a user process. Do not change the value of SHMBASE. The
default value for SHMBASE is platform-dependent. DB-Monitor does not
prompt for this value during initialization. For more information about the
role of SHMBASE in initialization, refer to page 2-26.

Installation and Initial Configuration 1-37
Shared-Memory Parameter Guidelines
CKPTINTVL
CKPTINTVL specifies the maximum interval, expressed in seconds, that can
elapse before OnLine checks to determine if a checkpoint is needed. The
default value for CKPTINTVL is 300 seconds, or five minutes.
DB-Monitordoesnotpromptforthisvalueduringinitialization.Youcantune
this parameter to affect performance. Refer to page 5-20.
LRUS
LRUS specifies the number of LRU (least recently used) queues in the shared-
memory buffer pool. The role of the LRU queues is described on page 2-58.
The default value for LRUS is the larger of USERS/2 or 8, where USERS is the
value of the configuration parameter. DB-Monitor does not prompt for this
value during initialization. You can tune this parameter to affect perfor-
mance. Refer to page 5-19.
LRU_MAX_DIRTY
LRU_MAX_DIRTY specifies the percentage of modified pages in the LRU
queues that, when reached, flags the queue to be cleaned. The interaction
betweenthepage-cleanerdaemonprocessesandtheLRUqueuesisdescribed
on page 2-58.
The default value for LRU_MAX_DIRTY is 60 percent.
DB-Monitordoesnotpromptforthisvalueduringinitialization.Youcantune
this parameter to affect performance. Refer to page 5-19.
LRU_MIN_DIRTY
LRU_MIN_DIRTY specifies the percentage of modified pages in the LRU
queues that, when reached, flags the page cleaners that cleaning is no longer
mandatory. Page cleaners might continue cleaning beyond this point under
some circumstances. The interaction between the page-cleaner daemon
processes and the LRU queues is described on page 2-58.
The default value for LRU_MAX_DIRTY is 50 percent.

1-38 IBM Informix OnLine Database Server Administrator’s Guide
Shared-Memory Parameter Guidelines
DB-Monitordoesnotpromptforthisvalueduringinitialization.Youcantune
this parameter to affect performance. Refer to page 5-19.
LTXHWM
LTXHWM specifiesthe“longtransactionhigh-watermark.”Inthelogicallog,
LTXHWM is the percentage of available logical log space that, when filled,
triggersthetbinitdaemontocheckforlongtransactions.Ifalongtransaction
isfound,thetransactionisabortedandtheexecutingOnLinedatabaseserver
process rolls back all modifications associated with this transaction.
ThedefaultvalueforLTXHWM is50percent.Thismeansthatupto50percent
oftheavailablelogspacecanbespannedbyoneuser'stransaction.Whenthis
level is exceeded, the OnLine database server process is signalled to immedi-
atelyrollbackthat transaction. The rollbackprocedure continues togenerate
logical log records, however, so the logical log continues to fill. This is the
reason for the LTXEHWM parameter.
DB-Monitor does not prompt for this value during initialization. Refer to
page 2-159 for more information about LTXHWM.
LTXEHWM
LTXEHWM specifies the “long transaction, exclusive access, high-water
mark.” The LTXEHWM must be a higher percentage than the LTXHWM
percentage.IfthelogicallogsfilltoLTXEHWM,the long transaction currently
beingrolledback(refertoLTXHWM)isgiven“exclusive”accesstothelogical
log. The term “exclusive” is not entirely accurate. Most OnLine activity is
suspended until the transaction has completed its rollback, but transactions
that are in the process of rolling back or committing retain access to the
logical log.
The default value for LTXEHWM is 60 percent.
DB-Monitor does not prompt for this value during initialization. Refer to
page 2-159 for more information about LTXEHWM.

Installation and Initial Configuration 1-39
Machine- and Product-Specific Parameter Guidelines
Machine- and Product-Specific Parameter Guidelines
Because your machine or product environment might not support these
parameters, they do not appear on the configuration worksheet. DB-Monitor
does not prompt for any of these values during initialization.
DYNSHMSZ
The DYNSHMSZ parameter affects your OnLine configuration only if you
plantouseOnLinewiththeIBM InformixTP/XAlibraryproduct.Thedefault
value for DYNSHMSZ is 0. After you initialize OnLine, you can modify the
value as required by your environment. Refer to theIBM Informix TP/XA
product documentation for information about setting this parameter.
GTRID_CMP_SZ
TheGTRID_CMP_SZ parameteraffectsyourOnLineconfigurationonly if you
are planning to use OnLine with the IBM Informix TP/XA library product.
Thedefault value forGTRID_CMP_SZ is 32 bytes. After you initialize OnLine,
you can modify the value as required by your environment. Refer to the
IBM Informix TP/XA product documentation for information about setting
this parameter.
DEADLOCK_TIMEOUT
TheDEADLOCK_TIMEOUTparameteraffectsyourOnLineconfigurationonly
ifyouareplanningto useOnLinewithIBM InformixSTAR.Refertopage 9-57
for information about using OnLine in a client/server environment.
TXTIMEOUT
TheTXTIMEOUTparameter affectsyourOnLineconfigurationonlyif you are
planning to use OnLine with IBM Informix STAR. Refer to page 9-57 for infor-
mation about using OnLine in a client/server environment.

1-40 IBM Informix OnLine Database Server Administrator’s Guide
OnLine Disk Space Allocation
SPINCNT
The SPINCNT parameter affects only multiprocessor machines that use spin-
and-retry latch acquisition. SPINCNT specifies the number of times that a
process attempts to acquire a latch in shared memory before it enters a wait
mode.
The default value of SPINCNT on a uniprocessor machine is 0. The default
value of SPINCNT on a multiprocessor machine is 300. Refer to page 5-24 for
information about tuning the value of this parameter.
OnLine Disk Space Allocation
This section explains how to allocate disk space for OnLine. The disk space
allocation task can be divided into four smaller tasks:
■Decidewhetherto dedicate raw diskspaceor cooked files toOnLine
■Determine how much disk space to dedicate to OnLine
■Decide how to apportion the disk space (disk layout)
■Allocate the disk space
Allocate Raw Disk Space or Cooked Files?
This section describes the advantages and trade-offs between either
allocating raw disk space managed by OnLine or storing OnLine data in
cooked file space. As a general guideline, you experience greater perfor-
mance and increased reliability if you allocate raw disk space.
Each chunk (unit of disk space) that is dedicated to OnLine can be either one
of the following:
Cookedfilesareeasiertoallocatethanrawdiskspace.However,yousacrifice
reliability and experience lower performance if you store OnLine data in
cooked files.
Raw disk space I/O is managed by OnLine.
Cooked file The file contents are managed by OnLine, but the I/O
is managed by the UNIX operating system.

Installation and Initial Configuration 1-41
OnLine Disk Space Allocation
Cooked files are unreliable because I/O on a cooked file is managed by the
UNIX operating system. A write to a cooked file can result in data being
writtento a memorybufferinthe UNIX file managerinstead of beingwritten
immediately to disk. As a consequence, UNIX cannot guarantee that the
committed data has actually reached the disk. This is the problem. OnLine
recovery depends on the guarantee that data written to disk is actually on
disk. If, in the event of system failure, the data is not present on disk, the
OnLine automatic recovery mechanism could be unable to properly recover
the data. (The data in the UNIX buffer could be lost completely.) The end
result could be inconsistent data.
Performance degrades if you give up the efficiency benefits of OnLine-
managed I/O. If you must use cooked UNIX files, try to store the least
frequently accessed data in the cooked files. Try to store the files in a file
system that is located near the center cylinders of the disk device, or in a file
system with minimal activity. In a learning environment, where reliability
and performance are not critical concerns, cooked files are acceptable. (Since
OnLine manages the internal arrangement of data, you cannot edit the
contents of a cooked file.)
Significant performance advantages and increased data reliability are
ensuredwhenOnLineperformsitsowndiskmanagementonrawdiskspace.
Raw disk space appears to your UNIX operating system as a disk device or
partofadiskdevice.In most operatingsystems,thedeviceisassociatedwith
both a block-special file and a character-special file in the /dev directory.
When you link your raw disk space to an OnLine chunk pathname, verify
thatyouuse the character-special file forthechunk name, not the block-special
file. (The character-special file can directly transfer data between the address
space of a user process and the disk using direct memory access (DMA),
which results in orders-of-magnitude better performance.)
How Much Disk Space Do You Need?
This section applies only if you are configuring OnLine for a production
environment.Thefirststepin answering the question “How much space?”is
to calculate the size requirements of the root dbspace. The second step is to
estimate the total amount of disk space to allocate to all OnLine databases,
including space for overhead and growth.

1-42 IBM Informix OnLine Database Server Administrator’s Guide
OnLine Disk Space Allocation
Calculate Root dbspace Size
Analyze your application to estimate the amount of disk space that OnLine
might require for implicit temporary tables, which are tables OnLine creates
aspartofprocessing.Implicittemporarytables arestoredintherootdbspace
and deleted when the database server process ends.
The following types of statements require temporary tblspace:
■Statements that include a GROUP BY clause
■Statements that include subqueries
■Statements that use distinct aggregates
■Statements that use auto-index joins
Trytoestimatehowmany ofthesestatementswillrunconcurrently. Estimate
the size of these temporary tblspaces by estimating the number of values
returned.
Enter this value in the field labeled E under ROOTSIZE on the configuration
worksheet (page 1-21).
Next, decide if users will store databases or tables in the root dbspace. One
advantage to root dbspace storage is that the dbspace is usually mirrored. If
root dbspace is the only dbspace you intend to mirror, place all critical data
there for protection. Otherwise, store databases and tables in another
dbspace.
Estimate the amount of disk space, if any, that you will allocate for root
dbspace tables. Enter this value in the field labeled F under ROOTSIZE on the
worksheet (page 1-21).
Now calculate the size of the root dbspace, using the fields A through J that
appear on the first page of the configuration worksheet.
The amount of disk space required for OnLine control information is 3
percent of the size of the root dbspace, plus 14 pages, expressed as kilobytes
(or 14 x BUFFSIZE).
Complete the worksheet calculations to arrive at the size of the initial chunk
for the root dbspace. Enter this value in two places on the configuration
worksheet.First,enteritasthesizeoftherootdbspaceintheROOTSIZE field.
Second, enter it into the field labeled Size of the root dbspace, on the second
page, under the heading Disk Layout.

Installation and Initial Configuration 1-43
OnLine Disk Space Allocation
Project Total Space Requirements
The amount of additional disk space needed for OnLine data storage
dependsonyourproductionenvironment.Everyapplicationenvironmentis
different.Thefollowinglistsuggestssomeofthestepsyoumighttaketohelp
you calculate the amount of disk space to allocate (beyond the root dbspace):
1. Decide how many databases and tables you need to store. Calculate
the amount of space required for each one.
2. Calculate a growth rate for each table and assign some amount of
disk space to each table to accommodate growth.
3. Decide which databases and/or tables you want to mirror.
Refer to IBM Informix Guide to SQL: Tutorial for instructions about calculating
the size of your data bases.
After you arrive at a value, enter it on the second page of the configuration
worksheet, in the field labeled Additional disk space for OnLine chunks.
How Should You Apportion Disk Space?
When you allocate disk space (raw disk or cooked files), you allocate it in
units called chunks. A dbspace or a blobspace is associated with one or more
chunks. You must allocate at least one chunk for the root dbspace.
(Refer to page 2-81 for a discussion of the relationships among chunks,
dbspaces, blobspaces, databases, and tblspaces.)
Informix recommends that you format your disk(s) so that each chunk is
associated with its own UNIX disk partition. When every chunk is defined as
a separate partition (or device), you will find it is easy to track disk space
usage. You avoid errors caused by miscalculated offsets.
If you are working with a disk that is already partitioned, you might be
required to use offsets to define a chunk.

1-44 IBM Informix OnLine Database Server Administrator’s Guide
OnLine Disk Space Allocation
After you decide how you plan to define the chunks, decide on the number
ofchunks you plan tocreateanda size for each.The size of achunk is mostly
determined by storage considerations:
■With which blobspace or dbspace is this chunk associated?
■Whichdatabases,tables,orblobcolumnsarestoredinthisblobspace
or dbspace?
■Howmanychunks(of whatsize)composethedbspaceorblobspace?
Issues of disk contention and mirroring should also influence your decisions
regarding the size of the chunks:
■Where should high-use tables be located to reduce contention?
■Where should the mirror chunks for each primary chunk be located
to maximize fault tolerance?
Space Allocation in a Learning Environment
If you are configuring OnLine for a learning environment, allocate a single
chunk for the root dbspace. Allocate a second chunk on a different device if
you plan to mirror the root dbspace. Ideally, different controllers should
managethedevices.Themirrorchunkshouldbethesizeoftherootdbspace,
specified as ROOTSIZE.
Space Allocation in a Production Environment
Theconfigurationworksheetprovidesspaceforyou torecordyourdecisions
regarding each chunk: its size, linked pathname, actual pathname, and
associated dbspace or blobspace. Refer to ROOTPATH and MIRRORPATH for
the linked pathnames for the root dbspace chunk and the mirror root chunk,
respectively. Guidelines for making these decisions follow.
In a production environment, your goal is to minimize hardware disk
contention; that is, to limit the amount of disk head movement across a disk
and reduce the number of times processes compete for access to the same
disk.
Installation and Initial Configuration 1-45
OnLine Disk Space Allocation
Figure 1-2illustratesfourguidelinesforplanningthephysicallayoutofyour
OnLine data. Each guideline is described in detail in the text that follows.
Figure 1-2
Guidelines for planning your disk layout
Consider mirroring
Locate a primary chunk and its mirror chunk on different disks.
primary mirror
high-use table Locatehigh-usetablesontheirowndeviceatthecenterofthedisk
or spread them across multiple devices.
Isolate high-use tables
Consider rapidly growing tables
table 1 extents
table 2 extents
table 3 extents
Avoid dbspace fragmentation caused by improperly sized extents.
Plan for the final location of the physical and logical logs
Separate the logs and locate them on disks not shared by active tables.
logical log physical log
disk platter

1-46 IBM Informix OnLine Database Server Administrator’s Guide
OnLine Disk Space Allocation
Criticaltablesanddatabasesshould bemirrored.Therootdbspaceshouldbe
mirrored. Mirroring is specified by chunk. Locate the primary and the
mirrored chunk on different disks. Ideally, different controllers should
handle the disks.
You can placea table withhigh I/O activity on a disk device thatis dedicated
to its use. When disk drives have different performance levels, you can put
the tables with the most use on the fastest drives. Separate disk devices
reduce competition for disk access when joins are formed between two high-
demand tables.
To reduce contention between programs using the same table, you can
attempt to spread the table across multiple devices. To do this, locate a
tblspace in a dbspace that includes multiple chunks, each of which are
located on different disks. Although you have no control over how the table
data is spread across the chunks, this layout might result in multiple disk
access arms for one table.
To minimize disk head movement, place the most frequently accessed data
as close to the middle partitions of the disk as possible. (When a disk device
is partitioned, the innermost partitions have cylinder numbers that are
nearestthemiddleoftherangeofcylindernumbersandgenerallyexperience
thefastest access time.) Place theleast frequentlyused data on the outermost
partitions. This overall strategy minimizes disk head movement.
When two or more large, growing tables share a dbspace, their new extents
can be interleaved. This interleaving creates gaps between the extents of any
one table. Performance might suffer if disk seeks must span more than one
extent. Work with the table owners to optimize the table extent sizes, or
consider placing the tables in separate dbspaces.
Boththelogicallogfilesandthephysicallogareextremelyactiveandshould
begivenpriorityindiskplacement.Bothshouldbeonthefastestdevices and
on the most central disk cylinders.
Theinitialconfigurationautomaticallyplacesthephysical and logical logs in
the initial chunk of the root dbspace. Since the root dbspace also is extremely
active, you can place the root dbspace on the most central disk cylinder and
createotherdbspacesforuserdatabasetables.Anotherstrategyistoimprove
performance by physically separating the logs and placing them in separate
dbspacesondiskdevicesthatarenotsharedbyactivetables.Forinstructions
on how to change the location of the logical and physical log after initial-
ization, refer to page 3-31 and page 3-107, respectively.

Installation and Initial Configuration 1-47
OnLine Disk Space Allocation
The logs contain critical information and should be located in mirrored
dbspaces, despite the fact that their high level of activity makes it costly (in
terms of performance) to do so.
Compare the total amount of dbspace disk space (exclude blobspaces) that
you intend to allocate to OnLine with the amount of space dedicated to
OnLinelogging(physicallogsizeplustotalspaceallocatedforthelogicallog
files). Ideally, logging space should be about 20 percent of total dbspace.
Adjust your worksheet values, if necessary.
(You should have values entered for all parameters on the worksheet except
for ROOTOFFSET and MIRROROFFSET. Guidelines for these parameters are
described as part of the next topic.)
How to Allocate Disk Space
This section provides instructions for allocating raw disk space or cooked
files.
Cooked File Space
To allocate cooked file space, concatenate null to a pathname that represents
one chunk of cooked file space. The cooked disk space file should have
permissions set to 660 (rw-rw----). Group and owner must be set to informix.
# become root
su root
password:
# create file for the cooked device
cat /dev/null > chunk_pathname
# establish correct ownership
chown informix chunk_pathname
chgrp informix chunk_pathname
chmod 660 chunk_pathname
exit
Ifyouareplanningtolocateyourrootdbspaceinacookedfile,verifythatthe
pathnameforthecookedfileisthevalueofROOTPATH onyourconfiguration
worksheet.

1-48 IBM Informix OnLine Database Server Administrator’s Guide
OnLine Disk Space Allocation
Raw File Space
Consult your UNIX system manuals for instructions on how to create and
install a raw device.
In general, you can either repartition your disks or unmount an existing file
system.Ineithercase,takeproperprecautionstobackupanyfilesbeforeyou
unmount the device.
Change the group and owner of the character-special devices to informix.
(The filename of the character-special device usually begins with the letter r
(for example, /dev/rsd1f).
Verify that the UNIX permissions on the character-special devices are 660.
Usually,the character-specialdesignation and device permissions appearas
crw-rw---- if you execute the UNIX ls -l command on the filename. (Some
UNIX systems vary.)
Many UNIX systems keep partition information for a physical disk drive on
the drive itself in a volume table of contents (VTOC). The VTOC is commonly
stored on the first track of the drive. A table of alternate sectors (and bad-
sector mappings) can also be stored on the first track.
If you plan to allocate partitions at the start of a disk, use offsets to prevent
OnLine from overwriting critical information required by UNIX. Specify an
offset for the root dbspace or its mirror with the ROOTOFFSET and
MIRROROFFSET parameters, respectively.
Create a link between the character-special device name and another
filename with the UNIX link command, usually ln.
Do not mount the character-special device. Do not create file systems on the
character-special devices.
ExecutetheUNIX commandls-lgonyourdevicedirectorytoverifythatboth
the devices and the links exist. An example output follows, although your
UNIX system display might differ slightly:
crw-rw---- 1 informix Mar 7 14:30 /dev/rxy0h
crw-rw---- 1 informix Mar 7 14:30 /dev/rxy0a
lrwxrwxrwx 1 informix Mar 7 15:15 /dev/my_root@->/dev/rxy0h
lrwxrwxrwx 1 informix Mar 7 15:15 /dev/raw_dev2@->/dev/rxy0a

Installation and Initial Configuration 1-49
OnLine Disk Space Allocation
Evaluate UNIX Kernel Parameters
Your OnLine product arrives with a machine-specific file, $INFOR-
MIXDIR/release/ONLINE_5.x, that contains recommended values for UNIX
kernel parameters. Compare the values in this file with your current UNIX
configuration.
If the recommended values for OnLine differ significantly from your current
environment, consider modifying your UNIX kernel settings.
Background information that describes the role of the UNIX kernel param-
eters in OnLine operation is provided on page 2-18.

1-50 IBM Informix OnLine Database Server Administrator’s Guide
Configuration Checklist
Configuration Checklist
Figure 1-3 is a checklist to help you verify that you have correctly completed
the initialization preparation tasks.
Figure 1-3
Checklist to
verify that the
preparation
tasks for OnLine
initialization
have been
completed
correctly
✔ Create user and group informix
The only member of the group informix is user informix. Perform OnLine
administrative actions as user informix.
✔ Create raw devices
Do not mount raw devices. Raw devices should not include file systems.
✔ Set device permissions
Each raw device should display informix as its group and owner. Permissions
on each raw device are set to 660 (crw-rw----).
✔ Verify UNIX kernel parameters
The recommendations for UNIX kernel parameters included in the machine-
specific ONLINE_5.x file are compatible with your current UNIX kernel
parameters.
✔ Verify chunk offsets, if needed
If your system uses track 0 for control information and if the root dbspace or its
mirror is at the start of a partition, check that you included an offset into the
device.
✔ Verify size of root dbspace
Check that the initial chunk of the root dbspace is large enough to contain the
physical log, all logical logs, and OnLine overhead requirements.
✔ Verify OnLine shared-memory size
CheckthatthesizeyouselectedforOnLinesharedmemoryfitswithintheamount
of shared memory available on your UNIX machine.

Installation and Initial Configuration 1-51
Enter Your Configuration and Initialize OnLine
Enter Your Configuration and Initialize OnLine
When you configure OnLine for the first time, you specify two sets of
parameter values through DB-Monitor. The first set of parameters is the disk
parameters; the second set is the shared memory parameters. Each set of
values is specified on its own DB-Monitor screen. After you complete both
screens, OnLine prompts you to begin the initialization.
Verify that you are logged into your UNIX system as user informix and that
your path includes $INFORMIXDIR/bin. To access DB-Monitor, enter the
following command at the UNIX prompt:
tbmonitor
The main DB-Monitor menu appears, as follows:
From the main menu, select the Parameters option. From the Parameters
menu options, select Initialize.
INFORMIX-OnLine: Status <Parameters> Dbspaces Mode Force-Ckpt ...
Set configuration parameters.
-------------------Off-line------------------ Press CTRL-W for Help. ------

1-52 IBM Informix OnLine Database Server Administrator’s Guide
Enter Your Configuration and Initialize OnLine
The disk parameters initialization screen appears. Some fields contain
default values. The following screen representation replaces the default
values in each field with the name of the OnLine configuration parameter
associated with that field:
To initialize OnLine, enter the values for the disk parameters and use your
worksheet as reference.
As you enter values, the last line in the screen changes dynamically,
depending on your cursor location. The last line always contains a brief
explanation of the value you should enter in the current field. If you press F2
or CTRL-F, additional help messages appear that pertain to the field where
your cursor is located.
Atanytimeduringtheinitialconfigurationsetup,youcanpresstheInterrupt
key to abort your changes and return to the Parameters menu options.
After you complete this disk parameters screen, press ESC to record the
values entered. Automatically, the shared-memory parameters screen
appears.
INITIALIZATION: Make desired changes and press ESC to record changes.
Press Interrupt to abort changes. Press F2 or CTRL-F for field-level
help.
DISK PARAMETERS
Page Size [BUFFSIZE ] Kbytes Mirror [MIRROR ]
Sys. Log File [MSGPATH ]
System Msgs. [CONSOLE ]
Tape Dev. [TAPEDEV ]
Block Size [TAPEBLK ] Kbytes Total Tape Size [TAPESIZE ] Kbytes
Log Tape Dev. [LTAPEDEV ]
Block Size [LTAPEBLK ] Kbytes Total Tape Size [LTAPESIZE ] Kbytes
Root Name [ROOTNAME ] Root Size [ROOTSIZE] Kbytes
Primary Path [ROOTPATH ]
Offset [ROOTOFFSET ] Kbytes
Mirror Path [MIRRORPATH ]
Offset [MIRROROFFSET ] Kbytes
Phy. Log Size [PHYSFILE ] Kbytes Log. Log Size [LOGSIZE ] Kbytes
Number of Logical Logs [LOGFILES ]

Installation and Initial Configuration 1-53
Setting Shared Memory Parameters
Setting Shared Memory Parameters
Like the disk parameters screen, the shared-memory parameters screen
appears with some default values in some fields. In the following represen-
tation of the shared-memory parameters screen, each default value has been
replaced with the name of the OnLine configuration parameter associated
with that field:
Enter the values for each parameter. After you verify that the values are
correct, press ESC to indicate that you wish to record your changes. OnLine
prompts a verification:
Do you want to keep these changes to the parameters (y/n)?
If you enter n for no, DB-Monitor returns to the Parameters menu. You can
begin again if you wish.
Ifyouenteryforyes,OnLinestorestheconfigurationparametervaluesinthe
current configuration file, if one exists. If no configuration file exists, OnLine
creates a configuration file for you. The file OnLine creates is placed in the
$INFORMIXDIR/etc directory. The configuration file is named according to
the value specified by TBCONFIG, if it is set. If TBCONFIG is not set, the file is
named tbconfig by default.
SHARED MEMORY: Make desired changes and press ESC to record changes.
Press Interrupt to abort changes. Press F2 or CTRL-F for field-level help.
SHARED MEMORY PARAMETERS
Page Size [ BUFFSIZE ] Kbytes
Server Number [ SERVERNUM ] Server Name [ DBSERVERNAME ]
Deadlock Timeout [ DEADLOCK_TIMEOUT ] Seconds
Forced Residency [ RESIDENT ]
Number of Page Cleaners [ CLEANERS ]
Physical Log Buffer Size [ PHYSBUFF ] Kbytes
Logical Log Buffer Size [ LOGBUFF ] Kbytes
Max # of Logical Logs [ LOGSMAX ]
Max # of Users [ USERS ]
Max # of Locks [ LOCKS ]
Max # of Buffers [ BUFFERS ]
Max # of Chunks [ CHUNKS ]
Max # of Open Tblspaces [ TBLSPACES ]
Max # of Dbspaces [ DBSPACES ]
============
Shared memory size _________ Kbytes

1-54 IBM Informix OnLine Database Server Administrator’s Guide
Initialize OnLine
Initialize OnLine
OnLinepromptsyouforconfirmationthatyouwishtoinitializeimmediately
using these current values:
Do you really want to continue? (y/n)
WARNING: The root dbspace will be initialized.
All previous data will be destroyed.
When you initialize OnLine starting from the DB-Monitor Initialize option
(disk parameters screen), you are initializing both disk space and shared
memory. When you initialize disk space, you automatically re-create a new
OnLine database server and destroy all existing data in that space.
Enter y to direct the tbinit process to initialize both OnLine disk space and
shared memory.
Ifyouentern,thechangedparametervaluesareretainedintheconfiguration
file and DB-Monitor returns to the Parameters menu.
If you receive any error messages as OnLine attempts to initialize, turn now
to page 1-60. Otherwise, OnLine displays messages as the initialization
proceeds. When initialization is complete, OnLine is in quiescent mode.
AfterOnLineisinitialized,continuewiththeremainingtaskstoprepareyour
system to receive data:
■Set your environment variables
■Modify UNIX startup and shutdown scripts, if desired
■Create blobspaces and additional dbspaces, if desired
Set Your Environment Variables
You already set the INFORMIXDIR and PATH environment variables before
you loaded the software. This section instructs you in setting two additional
environment variables:
SQLEXEC The pathname of the database server
TBCONFIG The OnLine configuration file

Installation and Initial Configuration 1-55
Set Your Environment Variables
SQLEXEC
The value of SQLEXEC directs the front-end processes to a specific database
serverwithinthe$INFORMIXDIR directory.ThedefaultvalueforSQLEXEC is
$INFORMIXDIR/lib/sqlturbo, the OnLine database server. If OnLine is the
only database server in your $INFORMIXDIR directory, you do not need to
define SQLEXEC.
IfyouworkedwithanIBM InformixSE databaseserveronthismachineinthe
past, you might have an SQLEXEC environment variable already set for use
withSE.Ifyouarenotplanningtomaintainthe SE databaseserverbutintend
to run only OnLine on this machine, you might need to modify SQLEXEC to
ensure that it now reflects the OnLine database server.
IfyouintendtomaintainbothanSE databaseserverandanOnLinedatabase
server on the same machine, ensure that all users have their SQLEXEC
variable properly set. (The pathname of the SE database server is
$INFORMIXDIR/lib/sqlexec.)
Set the SQLEXEC environment variable as follows:
TBCONFIG
The TBCONFIG environment variable performs two tasks:
■Directs the tbinit process to the OnLine configuration file that is to
be read for initialization values
■Directs the OnLine server process (sqlturbo) to the correct OnLine
shared-memory space
The TBCONFIG value is not a full pathname; therefore, all OnLine configu-
ration files must reside in the directory $INFORMIXDIR/etc.
C shell: setenv SQLEXEC sqlexec_value
Bourne shell: SQLEXEC=sqlexec_value
export SQLEXEC

1-56 IBM Informix OnLine Database Server Administrator’s Guide
Modify UNIX Startup and Shutdown Scripts
If your environment contains a single OnLine database server, you do not
need to explicitly set TBCONFIG. If the tbinit process cannot find the file
specified by TBCONFIG, it creates a copy of tbconfig.std, places the copy in
the file specified by TBCONFIG, and uses the values in that file for
initialization.
You must set TBCONFIG if you changed the name of your configuration file
to something other than tbconfig, or if your environment supports two or
more OnLine database servers on the same machine. In the latter case, each
OnLine server requires a separate, unique configuration file that is stored in
$INFORMIXDIR/etc. (Refer also to the discussion of multiple residency on
page 9-7.)
Since each OnLine configuration file requires a unique value for
SERVERNUM, you might prefer to name each file so that it can easily be
related to a specific value. For example, the file tbconfig3 could indicate that
this configuration file specifies the unique SERVERNUM of 3.
Set the TBCONFIG environment variable as follows:
Modify UNIX Startup and Shutdown Scripts
You can modify your UNIX startup file to initialize OnLine automatically
when your machine enters multiuser mode. You can also modify your UNIX
shutdown file to shut down OnLine in a controlled manner whenever UNIX
shuts down.
C shell: setenv TBCONFIG config_filename
Bourne shell: TBCONFIG=config_filename
export TBCONFIG

Installation and Initial Configuration 1-57
Modify UNIX Startup and Shutdown Scripts
Startup
Add UNIX and OnLine utility commands to the UNIX startup script that
perform the following steps:
1. Set the INFORMIXDIR environment variable to the full pathname of
the directory in which OnLine is installed. (If multiple versions of
OnLine are running on your UNIX system, you must reset INFOR-
MIXDIR for each OnLine system that you initialize.)
2. Set the PATH environment variable to include the $INFOR-
MIXDIR/bin directory.
3. SettheTBCONFIG environmentvariabletothedesiredconfiguration
file.
4. Execute tbinit, which starts OnLine and leaves it in online mode.
Examples of these commands for the C shell and Bourne shell follow:
C shell: setenv INFORMIXDIR/directory_name
setenv PATH $PATH:$INFORMIXDIR/bin
setenv TBCONFIG config_filename
tbinit
Bourne shell: INFORMIXDIR= /directory_name
export INFORMIXDIR
PATH=$PATH:$INFORMIXDIR/bin
export PATH
TBCONFIG=config_filename
export TBCONFIG
tbinit

1-58 IBM Informix OnLine Database Server Administrator’s Guide
Modify UNIX Startup and Shutdown Scripts
Shutdown
Add UNIX and OnLine utility commands to the UNIX shutdown script that
perform the following steps:
1. Set the INFORMIXDIR environment variable to the full pathname of
the directory in which OnLine is installed. (If multiple versions of
OnLine are running on your UNIX system, you must reset INFOR-
MIXDIR for each OnLine system that you shut down.)
2. Set the PATH environment variable to include the $INFOR-
MIXDIR/bin directory.
3. SettheTBCONFIG environmentvariabletothedesiredconfiguration
file.
4. Execute tbmode -ky, which initiates immediate shutdown and takes
OnLine offline.
Thesecommandsshouldexecute after all useranddatabaseserver processes
have finished working.
Examples of these commands for the C shell and Bourne shell follow:
C shell: setenv INFORMIXDIR /directory_name
setenv PATH $PATH:$INFORMIXDIR/bin
setenv TBCONFIG config_filename
tbmode -ky
Bourne shell: INFORMIXDIR= /directory_name
export INFORMIXDIR
PATH=$PATH:$INFORMIXDIR/bin
export PATH
TBCONFIG=config_filename
export TBCONFIG
tbmode -ky

Installation and Initial Configuration 1-59
Create Blobspaces and Dbspaces
Create Blobspaces and Dbspaces
After OnLine is initialized, you can create blobspaces and dbspaces as
desired. If you plan to use blobspaces, Informix recommends that you create
one or two blobspaces before you create a dbspace. The reason for this is the
way that OnLine archives data. During an archive, OnLine temporarily
blocks blobpage allocation in a chunk until the chunk is archived. Since
chunks are archived in order, it is to your advantage to create a blobspace
early to ensure that the chunks in the blobspace receive low chunk ID
numbers. This guarantees that the chunk is archived early in the process and
available to receive blobs for the duration of the online archive. Refer to
page 4-35 for more information about what happens during an online
archive.
For more information about how to create a blobspace, refer to page 3-88.
For more information about how to create a dbspace, refer to page 3-97.
Errors During Initialization
Figure 1-3 on page 1-51 contains a list of preparatory tasks that must be
performed properly for initialization. If any of these actions are omitted or
performed incorrectly, errors can result.
If you receive an error during initialization, verify that you performed these
tasks properly. If the list does not identify the error, use the following infor-
mationtohelpyouinterprettheerrormessage.Thesourceofaninitialization
error message could be either OnLine or your UNIX operating system.

1-60 IBM Informix OnLine Database Server Administrator’s Guide
OnLine Error Message Format
OnLine Error Message Format
The OnLine error message format is straightforward:
-nn Explanatory statement of error condition
OnLine messages begin with a number that identifies the category of error.
Explanatory text follows. Use the error message number as a key into the
InformixErrorMessagesmanual. The manuallists all Informixerrormessages
(not just OnLine messages), along with information about the cause of the
error and corrective actions available to you. An example of an OnLine error
message follows:
-146 ISAM error: The other copy of this disk
is currently disabled or non-existent.
UNIX Error Message Format
UNIXoperating-systemerrormessagesarepassedontoyoubyOnLine.Most
initialization errors generated by UNIX refer to shared-memory resource
deficiencies.ThesemessagesarereturnedtotheOnLineinitializationprocess
tbinit. For this reason, tbinit often appears first in the error message text.
The tbinit process name is typically followed by three items of information
generated by UNIX. The specifics of the messages vary, depending both on
theerrorandonyourmachineplatform.Ingeneral,themessageconformsto
the following format:
tbinit:UNIX_call[mnemonic][associated_values]
Your UNIX documentation contains precise information about the cause of
any UNIX errors and detailed information about corrective actions.
Usually, UNIX system call errors indicate a deficiency in a shared-memory
resource when OnLine is attempting to create its own shared memory. The
informationonpage 2-18describeshow OnLineusestheUNIX kernelparam-
eters in shared-memory creation. You might be able to diagnose the problem
and identify the appropriate corrective action from this information.

2
Chapter
System Architecture
In This Chapter .................... 2-7
Initialization ..................... 2-7
Initialization Commands ............... 2-8
Shared Memory Commands ............. 2-9
Disk Space Commands............... 2-10
What Happens During Shared-Memory Initialization ..... 2-10
Shared-Memory Initialization Procedure......... 2-11
Step 1: Calculate Configuration Values ......... 2-11
Step 2: Create Shared Memory ............ 2-12
Step 3: Attach to Shared Memory ........... 2-12
Step 4: Initialize Shared Memory Structure ........ 2-12
Step 5: Wake Parent Process ............. 2-13
Steps 6 and 7: Initiate Fast Recovery and First Checkpoint . . 2-13
Step 8: Drop Temporary Tables (Optional) ........ 2-13
Step 9: Document Configuration Changes ........ 2-14
Step 10: Check for Forced Residency .......... 2-14
Step 11: Begin Looping as Master Daemon ........ 2-14
What Happens During Disk-Space Initialization ....... 2-14
Step 1: Calculate Configuration Values ......... 2-15
Step 2: Create OnLine Shared Memory ......... 2-16
Step 3: Attach to Shared Memory ........... 2-16
Step 4: Initialize Shared-Memory Structures ....... 2-16
Step 5: Initialize Disk Space ............. 2-16
Step 6: Wake Parent tbinit Process ........... 2-17
Step 7: Initiate First Checkpoint ............ 2-17
Step 8: Change to Quiescent Mode........... 2-18
Step 9: Set Forced Residency ............. 2-18
Step 10: Loop as Master Daemon ........... 2-18
UNIX Kernel and Semaphore-Allocation Parameters...... 2-18

2-2 IBM Informix OnLine Database Server Administrator’s Guide
OnLine User Processes.................. 2-22
How User Processes Attach to Shared Memory ........ 2-24
Step 1: Obtain SERVERNUM ............. 2-24
Step 2: Calculate Shared-Memory Key Value ....... 2-25
Steps 3 and 4: Request Shared-Memory Segment and
Attach to SHMBASE ............. 2-25
Step 5: Attach Additional Segments .......... 2-27
User Processes and Critical Sections............ 2-28
OnLine User Process Status and States ........... 2-29
OnLine Database Server Process ............. 2-30
Orphaned Database Server Processes ........... 2-31
OnLine Daemon Processes ................ 2-33
tbinit Daemon ................... 2-33
tbundo Daemon .................. 2-34
tbpgcl Daemon ................... 2-34
Shared Memory and Process Communication.......... 2-36
Shared Memory and Buffer Locks ............ 2-38
Buffer Share Lock................. 2-38
Buffer Update Lock ................ 2-38
Buffer Exclusive Lock ............... 2-39
Managing Shared-Memory Resources ........... 2-39
Shared-Memory Latches .............. 2-41
OnLine Timestamps ................ 2-44
Hash Tables and the Hashing Technique ......... 2-46
Shared-Memory Header................ 2-47
Shared-Memory Internal Tables ............. 2-48
OnLine Buffer Table ................ 2-48
OnLine Chunk Table................ 2-49
OnLine Dbspace Table ............... 2-50
OnLine Latch Table ................ 2-51
OnLine Lock Table ................ 2-51
OnLine Page-Cleaner Table ............. 2-52
OnLine Tblspace Table ............... 2-52
OnLine Transaction Table .............. 2-54
OnLine User Table ................ 2-54
Shared-Memory Buffer Pool .............. 2-55
Regular Buffers ................. 2-56
Big Buffers ................... 2-56
OnLine LRU Queues ................. 2-57

System Architecture 2-3
LRU Queues and Buffer Pool Management..........2-58
LRU_MAX_DIRTY .................2-59
LRU_MIN_DIRTY .................2-59
How a User Process Acquires a Buffer ...........2-60
Step 1: Identify the Data ...............2-61
Step 2: Determine Lock-Access Level ..........2-61
Step 3: Locate the Page in Memory ...........2-61
Step 4: Read the Page in from Disk ...........2-62
Steps 5-7: Lock Buffer, Release Lock, and Wake
Waiting Processes ..............2-62
Physical Log Buffer ..................2-63
Double Buffering .................2-64
Causes of Flushing .................2-64
Flushing a Full Buffer ................2-65
Logical Log Buffer ..................2-66
Triple Buffering ..................2-66
Buffer Contents ..................2-68
Causes of Flushing .................2-68
Flushing a Full Buffer ................2-69
OnLine Checkpoints .................2-70
Main Events During a Checkpoint ...........2-70
Initiating a Checkpoint ...............2-70
Fast Recovery...................2-71
Archive Checkpoints ................2-71
What Happens During a Checkpoint ............2-72
When the Daemons Flush the Buffer Pool ..........2-73
How OnLine Synchronizes Buffer Flushing..........2-74
Write Types Describe Flushing Activity ...........2-75
Sorted Write ...................2-76
Idle Write ....................2-76
Foreground Write .................2-77
LRU Write ....................2-77
Chunk Write ...................2-77
Big-Buffer Write ..................2-78
Writing Data to a Blobspace ...............2-78
Disk Data Structures ...................2-81
OnLine Disk Space Terms and Definitions ..........2-81
Chunk .....................2-82
Page ......................2-82
Blobpage ....................2-84

2-4 IBM Informix OnLine Database Server Administrator’s Guide
Dbspace and Blobspace............... 2-84
Database .................... 2-85
Tblspace .................... 2-85
Extent..................... 2-85
Physical Log .................. 2-86
Logical Log ................... 2-86
Structure of the Root Dbspace .............. 2-87
Structure of a Regular Dbspace ............. 2-89
Structure of an Additional Dbspace Chunk ......... 2-90
Structure of a Blobspace ................ 2-91
Structure of a Blobspace or Dbspace Mirror Chunk ...... 2-92
OnLine Limits for Chunks ............... 2-93
Reserved Pages ................... 2-95
PAGE_PZERO .................. 2-97
PAGE_CONFIG ................. 2-97
PAGE_CKPT .................. 2-97
PAGE_DBSP .................. 2-99
PAGE_PCHUNK .................2-100
PAGE_MCHUNK.................2-101
PAGE_ARCH ..................2-102
Chunk Free-List Page.................2-103
tblspace Tblspace ..................2-104
tblspace Tblspace Entries ..............2-105
Tblspace Number.................2-105
tblspace Tblspace Size ...............2-106
tblspace Tblspace Bit-Map Page ............2-107
Database Tblspace ..................2-107
Create a Database: What Happens on Disk .........2-108
Allocate Disc Space ................2-109
Track Systems Catalogs...............2-109
OnLine Limits for Databases ..............2-110
Create a Table: What Happens on Disk...........2-110
Allocate Disc Space ................2-111
Add Entry to tblspace Tblspace ............2-111
Add Entry to System Catalog Tables ..........2-111
Create a Temporary Table: What Happens on Disk.......2-113
Placement ...................2-113
Tracking ....................2-113
Cleanup ....................2-114

System Architecture 2-5
Structure of an Extent .................2-114
Extent Size....................2-114
Page Types ...................2-115
Next Extent Allocation .................2-117
Structure of a Dbspace Page ...............2-120
Page Header ...................2-121
Timestamp ...................2-121
Slot Table ....................2-121
Data Row Format and Rowid ..............2-123
Data Pages and Data Row Storage .............2-125
Single-Page Storage ................2-126
Multipage Storage .................2-127
Storage of Modified Rows ..............2-129
Page Compression .................2-133
Structure of an Index Page ...............2-133
The Root Node Page ................2-134
Leaf Node Pages .................2-136
Index Key Entries .................2-138
Branch Node Pages.................2-141
Structure of a Dbspace Bit-Map Page ............2-143
2-Bit Bit-Mapped Pages ...............2-143
4-Bit Bit-Mapped Pages ...............2-144
Blob Storage and the Blob Descriptor ............2-145
Structure of a Dbspace Blob Page .............2-146
Blobspace Page Types .................2-148
Blobspace Free-Map Page ..............2-148
Blobspace Bit-Map Page ...............2-148
Blobpage ....................2-149
Structure of a Blobspace Blobpage .............2-149
Physical Log......................2-152
Logical Log Files ....................2-154
Fast Recovery and Data Restore..............2-154
File Rotation ....................2-155
File Contents ....................2-156
Number and Size...................2-156
Blobspace Logging ..................2-158
Long Transactions ..................2-159

2-6 IBM Informix OnLine Database Server Administrator’s Guide

System Architecture 2-7
In This Chapter
In this guide, system architecture is interpreted broadly to include OnLine
database server processes as well as OnLine shared memory and disk data
structures.ThischapterprovidesoptionalreferencematerialaboutOnLine5.x
operation that is intended to deepen your understanding. Topics in other
chapters contain cross-references to specific topics in this chapter if
additional information could prove helpful for understanding.
OnLine system architecture can be separated into two major categories:
■Shared memory
■Disk data structures
Thefirsthalfofthischapter coversshared-memorytopics.Thesecondhalf of
this chapter, which begins on page 2-81, describes information related to the
disk data structures.
Initialization
OnLine initialization refers to two related activities: shared-memory initial-
ization and disk-space initialization. To initialize OnLine, you execute the
tbinit process. You can do this directly from the UNIX command line or
indirectlyviaDB-Monitor.Theoptions you include inthe tbinit command or
the option you select from DB-Monitor determines the specific initialization
procedure that tbinit executes.
Refer to page 2-10 for a detailed description of what happens during shared-
memory initialization.
Refer to page 2-14 for a detailed description of what happens during disk-
space initialization.

2-8 IBM Informix OnLine Database Server Administrator’s Guide
Initialization Commands
Shared-memory initialization establishes the contents of shared memory
(OnLine internal tables and buffers) according to the parameter values
containedintheconfigurationfile.Thetbinitprocessreadstheconfiguration
file and detects and implements any changes in the size or location of any
OnLine shared-memory structure since the last initialization. A record of the
changes is written to the OnLine message log as well.
Two key differences distinguish shared-memory initialization from disk-
space initialization:
■Shared-memory initialization has no effect on disk space allocation
or layout; no data is destroyed.
■Fast recovery is performed as part of shared-memory initialization.
(Refer to page 4-39 for a description of fast recovery.)
Disk-space initialization uses the values stored in the configuration file to
create the initial chunk of the root dbspace on disk and to initialize shared
memory. When you initialize disk space, shared memory is automatically
initialized for you as part of the process.
When you initialize OnLine disk space, you overwrite whatever is on that
disk space. If you reinitialize disk space for an existing OnLine system, all
data in the earlier OnLine system becomes inaccessible and, in effect, is
destroyed.
The tbinit process is the first OnLine process executed by an administrator.
During initialization, the tbinit process forks and spawns a tbinit child
process,whichisthetbinitdaemon.Thetbinitdaemonprocessdoesmostof
the initialization work and, after initialization is complete, serves as the
master OnLine daemon.
Initialization Commands
Only user informix or root can execute tbinit and initialize OnLine. OnLine
must be in offline mode when you begin initialization.
You execute the tbinit process by entering the command tbinit (with or
without command-line options) at the UNIX prompt or by requesting initial-
ization through DB-Monitor.

System Architecture 2-9
Initialization Commands
As tbinit executes, it reads the configuration file named by the environment
variable TBCONFIG. Refer to page 1-11 for further information about OnLine
configuration files and TBCONFIG.
Shared Memory Commands
You can direct OnLine to initialize shared memory in any one of six ways:
■tbinit (UNIX command line)
■tbinit -p (UNIX command line)
■tbinit -s (UNIX command line)
■tbinit -p -s (UNIX command line)
■Mode menu, Startup option (DB-Monitor)
■Parameters menu, Shared-Memory option (DB-Monitor)
If you execute tbinit without options, OnLine is left in online mode after
shared memory is initialized.
You can also include a -y option to automatically respond “yes” to all
prompts.
The -p option directs the tbinit daemon not to search for (and delete)
temporary tables left by database server processes that died without
performing cleanup. If you use this option, OnLine returns to online mode
more rapidly, but space used by temporary tables left on disk is not
reclaimed.
The -s option initializes shared memory and leaves OnLine in quiescent
mode.
The Mode menu, Startup option initializes shared memory and leaves
OnLine in quiescent mode.
Youdonotreinitializesharedmemory when you merelychangemodesfrom
quiescent to online.
The Parameters menu, Shared-Memory option displays the values in the
configuration file before tbinit initializes shared memory, enabling you to
review and modify the values. This option initializes shared memory and
leaves OnLine in quiescent mode.

2-10 IBM Informix OnLine Database Server Administrator’s Guide
What Happens During Shared-Memory Initialization
Disk Space Commands
You can direct OnLine to initialize disk space (and automatically initialize
shared memory) in any one of three ways:
■tbinit -i (UNIX command line)
■tbinit -i -s (UNIX command line)
■Parameters menu, Initialize option (DB-Monitor)
When you initialize disk space, all existing data on the disk you are initial-
izing is destroyed.
Ifyouuseonlythe -i option, OnLine is left inonlinemodeafterinitialization.
If you use both the -i and -s options, OnLine is left in quiescent mode. If you
initialize OnLine via DB-Monitor, OnLine is left in quiescent mode.
What Happens During Shared-Memory Initialization
Thetbinit processinitializessharedmemory,without initializing diskspace,
when user informix or root executes any one of the following commands:
■tbinit
■tbinit -p
■tbinit -s
■tbinit -p -s
You can execute any one of these commands from the UNIX prompt. If you
initialize shared memory from within DB-Monitor, the tbmonitor process
executestbinit -s foryou,either fromtheParametersmenu,Shared-Memory
option, or from the Mode Menu, Startup option. Refer to page 2-8 for further
information about each of the tbinit command-line options.
The following list outlines the main tasks completed during shared-memory
initialization.

System Architecture 2-11
What Happens During Shared-Memory Initialization
Shared-Memory Initialization Procedure
1. The tbinit process calculates configuration values.
2. The tbinit daemon creates OnLine shared memory.
3. The tbinit daemon attaches to shared memory.
4. The tbinit daemon initializes shared-memory structures.
5. The tbinit daemon wakes parent tbinit process.
6. The tbinit daemon initiates fast recovery.
7. The tbinit daemon initiates the first checkpoint.
8. The tbinit daemon drops temporary tables (optional).
9. The tbinit daemon documents changes in the configuration
parameter values.
10. The tbinit daemon sets forced residency, if specified.
11. The tbinit daemon begins looping as master daemon.
The tbinit daemon allocates OnLine shared-memory segments during
shared-memory initialization. OnLine shared-memory space cannot be
allocated or deallocated dynamically. If you change the size of shared
memory by modifying a configuration file parameter, you must reinitialize
shared memory by taking OnLine offline and then taking it to quiescent
mode.
Step 1: Calculate Configuration Values
The tbinit process reads the configuration values contained in the file
specified by $INFORMIXDIR/etc/$TBCONFIG. If TBCONFIG is not specified,
tbinit reads the values from $INFORMIXDIR/etc/tbconfig.Iftbconfig cannot
be found and TBCONFIG is not set, tbinit reads the values from tbconfig.std.
If TBCONFIG is set but the specified file cannot be accessed, an error message
is returned. Refer to page 1-11 for further information about the OnLine
configuration files.
The process compares the values in the current configuration file with the
previous values, if any, that are stored in the root dbspace reserved page,
PAGE_CONFIG. Where differences exist, tbinit uses the values from the
configurationfileforinitialization.Refer to page 2-95 for further information
about root dbspace reserved pages.

2-12 IBM Informix OnLine Database Server Administrator’s Guide
What Happens During Shared-Memory Initialization
Thetbinitprocessusestheconfigurationvaluesto calculate therequiredsize
of OnLine shared memory.
Step 2: Create Shared Memory
After tbinit finishes computing the configuration values, it forks a child
process, which becomes the tbinit daemon. From this point on, the child
(daemon)processperformstheinitializationtasks.Theparentprocesssleeps
until the child wakes it.
The tbinit daemon creates shared memory by acquiring the shared-memory
space from UNIX. The first segment size tbinit tries to acquire is the size of
shared memory, rounded up to the nearest multiple of 2 KB.
If tbinit cannot acquire a segment this large, it tries to acquire two shared-
memory segments that are each half the size of shared memory.
This “halve the size and double the number” tactic is repeated until tbinit
acquires enough segments to meet OnLine requirements.
Step 3: Attach to Shared Memory
Next, tbinit attaches the OnLine shared-memory segments to its virtual
address space. Refer to page 2-24 for a detailed explanation of how tbinit
finds and attaches to shared memory.
Step 4: Initialize Shared Memory Structure
After attaching to shared memory, the tbinit daemon clears the shared-
memoryspace ofuninitialized data. Next tbinit lays out the shared-memory
header information and initializes data in the shared-memory structures.
(For example, tbinit lays out the space needed for the logical log buffer,
initializes the structures, and links together the three individual buffers that
form the logical log buffer.)
After tbinit remaps the shared-memory space, it registers the new starting
addresses and sizes of each structure in the new shared-memory header.

System Architecture 2-13
What Happens During Shared-Memory Initialization
Duringshared-memoryinitialization,diskstructuresanddisklayoutarenot
affected. Essential address information (such as the locations of the logical
and physical logs) is read from disk. These addresses are used to update
pointers in shared memory.
Step 5: Wake Parent Process
After the tbinit daemon updates all pointers, it wakes the parent tbinit
process and writes a “shared-memory initialization complete” message in
theOnLinemessagelog (specifiedasMSGPATHin theconfigurationfile).The
prompt returns to the user at this point, and any error messages that might
havepassedfromthedaemontotheparentprocessaredisplayed.Theparent
process goes away at this point. Its role is ended.
Steps 6 and 7: Initiate Fast Recovery and First Checkpoint
Shared memory is initialized. The tbinit daemon initiates fast recovery.
(Refer to page 4-39 for further information about fast recovery.)
After fast recovery executes, tbinit initiates a checkpoint. (Refer to page 2-70
for further information about checkpoints.) As part of the checkpoint
procedure (page 2-72), tbinit checks the database tblspace index to verify
that all database names are unique. (Refer to page 2-107 for further infor-
mation about the database tblspace.)
After the checkpoint completes, the daemon writes a “checkpoint complete”
message in the OnLine message log.
OnLine is in quiescent mode.
Step 8: Drop Temporary Tables (Optional)
The tbinit daemon begins a search through all dbspaces for temporary
tblspaces. (If you executed tbinit with the -p option, tbinit skips this step.)
These temporary tblspaces would have been left by user processes that died
prematurely and were unable to perform proper cleanup. Any temporary
tblspaces are deleted and the disk space is reclaimed.

2-14 IBM Informix OnLine Database Server Administrator’s Guide
What Happens During Disk-Space Initialization
Step 9: Document Configuration Changes
The tbinit daemon compares the values stored in the configuration file with
the values formerly stored in the root dbspace reserved pagePAGE_CONFIG.
Where differences exist, tbinit notes both values (old and new) in a message
written to the OnLine message log. This action is for documentation only;
tbinit has already written the new values from the configuration file into the
root dbspace reserved page.
Step 10: Check for Forced Residency
ThetbinitdaemonreadsthevalueofRESIDENT,theconfigurationparameter
that describes shared-memory residency. If RESIDENT is set to 1, tbinit calls
the tbmode utility process, which tries to enforce residency of shared
memory. If the host UNIX system does not support forced residency, the
initialization procedure continues and residency is not enforced. An error is
returned.
Step 11: Begin Looping as Master Daemon
Setting residency is the last initialization task that the daemon performs.
After the RESIDENT parameter is processed, the tbinit daemon remains
running indefinitely. From this point forward, tbinit serves as the OnLine
master daemon.
What Happens During Disk-Space Initialization
The tbinit process initializes disk space when user informix or root executes
either of the following commands:
■tbinit -i
■tbinit -i -s
You can execute either of these commands from the UNIX prompt. If you
initialize shared memory from within DB-Monitor, the tbmonitor process
executes tbinit -i -s from the Parameters menu, Initialize option. Refer to
page 2-8 for further information about each of the tbinit command-line
options.

System Architecture 2-15
What Happens During Disk-Space Initialization
Important: Do not initialize disk space without careful consideration. As part of the
procedure, initialization destroys all data on the portion of the disk where the new
root dbspace (and its mirror) will be located.
Here are the main tasks that are completed during disk-space initialization:
1. The tbinit process calculates configuration values.
2. The tbinit daemon creates OnLine shared memory.
3. The tbinit daemon attaches to shared memory.
4. The tbinit daemon initializes shared-memory structures.
5. The tbinit daemon initializes disk space.
6. The tbinit daemon wakes parent tbinit process.
7. The tbinit daemon initiates the first checkpoint.
8. OnLine changes to quiescent mode.
9. The tbinit daemon sets forced residency, if specified.
10. The tbinit daemon begins looping as master daemon.
When you initialize disk space, shared memory is automatically initialized.
However,disk-spaceinitializationdoesnotfollowthesamestepsoutlinedon
page 2-10. Disk-space initialization and shared-memory initialization are
interrelatedbutdisk-spaceinitializationismorethanextrastepsaddedtothe
shared-memory initialization procedure.
Step 1: Calculate Configuration Values
The tbinit process reads the configuration values contained in the file
specified by $INFORMIXDIR/etc/$TBCONFIG. If TBCONFIG is not specified,
tbinit reads the values from $INFORMIXDIR/etc/tbconfig.Iftbconfig cannot
be found and TBCONFIG is not set, tbinit reads the values from tbconfig.std.
If TBCONFIG is set but the specified file cannot be accessed, an error message
is returned. Refer to page 1-11 for further information about the OnLine
configuration files.
The tbinit process writes all the values from the configuration file into its
private data space. Then tbinit uses the values to calculate the required size
of OnLine shared memory. In addition, tbinit computes additional configu-
ration requirements from internal values. Space requirements for overhead
are calculated and stored where it is available to tbinit.

2-16 IBM Informix OnLine Database Server Administrator’s Guide
What Happens During Disk-Space Initialization
After tbinit finishes computing the configuration values, it forks a child
process, which becomes the tbinit daemon. From this point on, the child
(daemon)processperformstheinitializationtasks.Theparentprocesssleeps
until the child wakes it.
Step 2: Create OnLine Shared Memory
The tbinit daemon creates shared memory by acquiring the shared-memory
space from UNIX. The first segment size tbinit tries to acquire is the size of
shared memory, rounded up to the nearest multiple of 2 KB.
If tbinit cannot acquire a segment this large, it tries to acquire two shared-
memory segments that are each half the size of shared memory.
This “halve the size and double the number” tactic is repeated until tbinit
acquires enough segments to meet OnLine requirements.
Step 3: Attach to Shared Memory
Next, tbinit attaches the OnLine shared-memory segments to its virtual
address space. Refer to page 2-24 for a detailed explanation of how tbinit
finds and attaches to shared memory.
Step 4: Initialize Shared-Memory Structures
After attaching to shared memory, the tbinit daemon clears the shared-
memoryspaceofuninitializeddata. Then tbinit lays out the shared-memory
header information and initializes data in the shared-memory structures.
(For example, tbinit lays out the space needed for the logical log buffer and
then initializes and links together the three individual buffers that become
the logical log buffer.)
Step 5: Initialize Disk Space
After shared-memory structures are initialized, the tbinit daemon begins
initializing the disk. It initializes all 12 reserved pages that are maintained in
the root dbspace on disk and writes PAGE_PZERO control information to the
disk.(Refer to page 2-95for further informationabout rootdbspace reserved
pages.)

System Architecture 2-17
What Happens During Disk-Space Initialization
Next, tbinit reserves space in the initial chunk of the root dbspace for the
physicalandlogicallogs.Aspartofthesamestep,tbinitupdatesthepointers
in shared memory with the new disk addresses. The daemon repeats this
process for each disk structure. In each pass, tbinit reads configuration
values from its private data space, creates a structure and then updates any
associated structures in shared memory with required address information.
If mirroring is enabled and a mirror chunk is specified for the root dbspace,
spaceforthemirrorchunkisreservedduringthisprocess.Inthisway,shared
memory is initialized structure by structure.
Next, tbinit initializes the tblspace tblspace, which is the first tblspace in the
rootdbspace.Thetblspacetblspacesize is calculated fromthesizeoftheroot
dbspace. (Refer to page 2-104 for further information about the tblspace
tblspace.)
The database tblspace is initialized next. (Refer to page 2-107 for further
information about the database tblspace.)
Step 6: Wake Parent tbinit Process
After the tbinit daemon builds the database tblspace, it wakes the parent
tbinit processandwritesan“initializationcomplete”message in the OnLine
message log (specified as MSGPATH in the configuration file). The prompt
returns to the user at this point. Any error messages that might have been
passed from the daemon to the parent process are displayed, either at the
UNIX command line or within DB-Monitor. The parent process goes away at
this point. Its role is ended.
Step 7: Initiate First Checkpoint
Next, the tbinit daemon begins the first OnLine checkpoint. Data buffers are
flushed, including the logical log and physical log buffers. The daemon
creates a unique index for the database tblspace on the column that contains
database names and continues with the checkpoint. (The index is used later
to ensure that all database names are unique.) After the checkpoint
completes, the daemon writes a “checkpoint complete” message in the
OnLine message log. (Refer to page 2-70 for further information about
checkpoints.)

2-18 IBM Informix OnLine Database Server Administrator’s Guide
UNIX Kernel and Semaphore-Allocation Parameters
Step 8: Change to Quiescent Mode
Afterthecheckpointcompletes,the tbinit daemontakesOnLinetoquiescent
mode. All configuration information in the tbinit private data space is
written to the second reserved page in the initial chunk of the root dbspace,
PAGE_CONFIG.Iftbinit was executed with the -s option, OnLine remains in
quiescent mode. Otherwise, tbinit takes OnLine to online mode.
Step 9: Set Forced Residency
Once OnLine reaches its destination mode, either quiescent or online, the
tbinitdaemonreadsthevalueofRESIDENT,theconfigurationparameterthat
describes shared-memory residency. If RESIDENT is set to 1, tbinit calls the
tbmode utilityprocess,whichtriesto enforceresidencyofsharedmemory.If
the host UNIX system does not support forced residency, the initialization
procedure continues and residency is not enforced. An error is returned.
Step 10: Loop as Master Daemon
Setting residency is the last initialization task that the daemon performs.
After the RESIDENT parameter is processed, the tbinit daemon remains
running indefinitely. From this point forward, tbinit serves as the OnLine
master daemon.
UNIX Kernel and Semaphore-Allocation Parameters
Nine UNIX configuration parameters can affect the use of shared memory by
OnLine. (Parameter names are not provided because they vary among
platforms. Not all parameters exist on all platforms.)
For specific information about your UNIX environment, refer to the machine-
specific file, $INFORMIXDIR/release/ONLINE_5.x, that arrived with the
OnLine product.
Six of the nine parameters are kernel parameters:
■The maximum shared-memory segment size, expressed in kilobytes
or bytes
■The minimum shared-memory segment size, expressed in bytes
■The maximum number of shared-memory identifiers

System Architecture 2-19
UNIX Kernel and Semaphore-Allocation Parameters
■The shared-memory lower-boundary address
■The maximum number of attached shared-memory segments per
process
■The maximum amount of shared memory system-wide
The remaining three parameters are semaphore-allocation parameters:
■The maximum number of semaphore identifiers
■The maximum number of semaphores
■The maximum number of semaphores per identifier
When tbinit creates the required shared-memory segments, it attempts to
acquire as large a segment as possible. The first segment size tbinit tries to
acquire is the size of shared memory, rounded up to the nearest multiple of
2 KB.
OnLinereceivesanerrorfromtheoperatingsystem if therequestedsegment
size is greater than the maximum allowable size. If OnLine receives an error,
tbinit divides the requested size by 2 and tries again. For most installations,
more than one segment is required because of a UNIX kernel limitation.
Attempts at acquisition continue until the largest segment size that is a
multiple of 2 KB can be created. Then tbinit creates as many additional
segments as are required to meet shared-memory requirements.
Shared-memory identifiers affect OnLine operation when a user process
attempts to attach to shared memory. For most operating systems, there are
no limits on the number of shared-memory identifiers that a particular user
process can create or attach to. Instead, user processes receive identifiers on
a “first come, first served” basis, up to the limit that is defined for the
operating system as a whole.
You might be able to calculate the maximum amount of shared memory that
the operating system can potentially allocate by multiplying the number of
shared-memory identifiers by the maximum shared-memory segment size.
Checkthatthemaximumamountofmemorythatcanbeallocatedisequalto
the total addressable shared-memory size for a single operating-system
process. The following display expresses the concept another way:
Maximum amount of shared memory =
(Maximum number of attached shared-memory segments per process) x
(Maximum shared-memory segment size)

2-20 IBM Informix OnLine Database Server Administrator’s Guide
UNIX Kernel and Semaphore-Allocation Parameters
If this relationship does not hold, either one of two undesirable situations
could develop:
■If the total amount of shared memory is less than the total
addressable size, you are able to address more shared memory for
the operating system than that which is available.
■If the total amount of shared memory is greater than the total
addressable size, you can never address some amount of shared
memory that is available. That is, space that could potentially be
used as shared memory cannot be allocated for that use.
OnLine operation requires one UNIX semaphore for each user structure in
shared memory. During shared-memory creation, tbinit attempts to allocate
semaphores in blocks of 25. If the maximum number of semaphores per
shared-memory identifier is fewer than 25, tbinit receives an error when it
attempts to allocate the semaphores. The maximum number of semaphore
identifiersshouldbeclosetothemaximumnumberofOnLineusersonahost
machine, divided by 25.
When OnLine user processes attach to shared memory, each user process
specifies the address at which to attach the first segment. This address is the
OnLine parameter SHMBASE.
OnLine assumes that the next segment can be attached at the address of the
previous segment, plus the size of the shared-memory segment; that is,
contiguous to the first segment. However, your UNIX system might set a
parameter that defines the lower-boundary address of shared memory for
attaching shared-memory segments. If so, the next shared-memory segment
attempts to attach at the address of the previous segment, plus the value of
the lower-boundary address. If the lower-boundary address is greater than
the size of the shared-memory segment, the next segment is attached to a
point beyond the end of the previous segment, creating a gap between the
two segments. Since shared memory must be attached to a user process so
that it looks like contiguous memory, this gap creates problems. If this
situationoccurs,OnLinereceiveserrorsduringtheattach.Anexampleofthis
situation is shown in Figure 2-1.
System Architecture 2-21
UNIX Kernel and Semaphore-Allocation Parameters
Figure 2-1
Shared memory
must be attached to
a user process so
that it looks like
contiguous
memory.
Operating system memory
User process
SHMBASE
Next segment
attaches here when
lowerboundaryistoo
large.
Next segment of
shared memory
should attach here.
Gap
Shared-memory
segment
Shared-memory
segment

2-22 IBM Informix OnLine Database Server Administrator’s Guide
OnLine User Processes
OnLine User Processes
An OnLine user process is any process that eventually needs to attach to
OnLine shared memory. User processes include three types:
■OnLine database server processes named
$INFORMIXDIR/lib/sqlturbo
■OnLine daemon processes, such as tbinit,tbundo, and tbpgcl
■OnLine utility processes, such as tbmode, tbmonitor, and tbtape
An application development tool, such as an IBM Informix 4GL program, is
nota user processbythis definition. All OnLine user processes,regardlessof
type, communicate with each other through OnLine shared memory.
Shared memory is implemented by giving all OnLine user processes access
to the same shared-memory segment (or group of segments) associated with
an OnLine database server. Processes communicate with each other as they
request, lock, and release various shared-memory resources. Each process
manages its work by maintaining its own set of pointers to shared-memory
addresses for resources such as buffers, locks, and latches.
When a user process requires access to OnLine shared-memory resources, it
attaches shared-memory segments to its virtual address space.
Every OnLine user process manages a portion of memory that is not within
sharedmemory. Thismemoryspaceisreferredtoastheuserprocess’svirtual
address space. Within this address space, the user process maintains shared,
executableOnLinecode(Cprogramtext)andprivatedata.Iftheuserprocess
requires additional memory, it can be dynamically allocated from UNIX.
Dynamic allocation of additional memory is accomplished with C library
calls, such as malloc(). This dynamic allocation is in contrast to OnLine
shared memory, which does not grow.
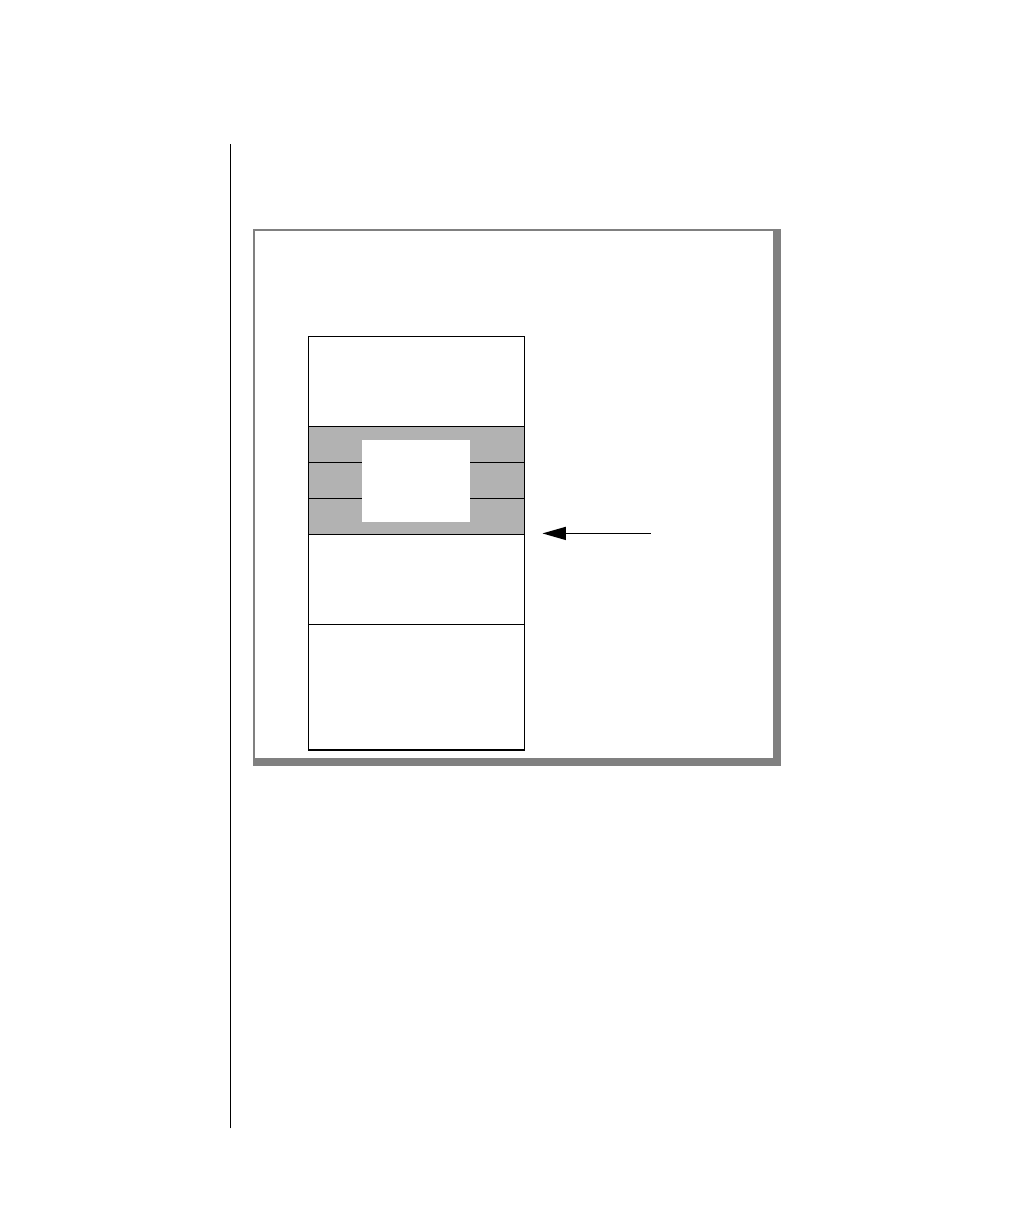
System Architecture 2-23
OnLine User Processes
Figure 2-2illustratesthevirtualaddressspaceof a user processaftertheuser
process has attached to shared memory. For a detailed discussion of how a
user process attaches to shared memory, refer to page 2-24.
Figure 2-2
An example of a
user process virtual
address space.
Depending on the
machine, shared
memory is
allocated “above”
or “below” the
value of SHMBASE.
Unallocated space
OnLine shared-
memory
segments
SHMBASE
Private data
Shareddatabaseservercode
(C program text)
User process virtual
address space
UNIX memory

2-24 IBM Informix OnLine Database Server Administrator’s Guide
How User Processes Attach to Shared Memory
How User Processes Attach to Shared Memory
OnLinerequiresatechniquetoensurethatallOnLineuserprocessesfindand
gain access to the same shared-memory segments. If two or more OnLine
database servers exist on a single UNIX host machine, the shared-memory
segments associated with each OnLine server exist at different locations in
physical memory. The shared-memory segments for each OnLine server
must be uniquely identifiable to the database user processes.
The following list outlines the major steps that are completed when an
OnLine user process attaches to shared memory:
1. User process obtains SERVERNUM from configuration file.
2. User process calculates a shared-memory key value using
SERVERNUM.
3. User process requests a shared-memory segment using the shared-
memory key value. UNIX returns the shared-memory identifier for
the first shared-memory segment.
4. User process directs UNIX to attach the shared-memory segment to
its process space at SHMBASE.
5. If required, additional shared-memory segments are attached to be
contiguous with the first segment.
The tbinit daemon process creates the OnLine shared-memory segments
during initialization. (Refer to page 2-10.) Associated with each shared-
memory segment are two pieces of information:
■A shared-memory key value
■A shared-memory identifier
Step 1: Obtain SERVERNUM
When a user process directs the UNIX operating system to a shared-memory
segment,itdefinesthesegmentitneedsusingtheshared-memorykeyvalue.
Toattachtothesegment,theuser processmustacquirefromUNIX the shared
memory identifier that is associated with that segment. The UNIX operating
system uses these identifiers to track each shared-memory segment.

System Architecture 2-25
How User Processes Attach to Shared Memory
Step 2: Calculate Shared-Memory Key Value
Whenauserprocessisreadytoattachtosharedmemory, itcalculatesavalue
that serves as the shared-memory key to identify to UNIX the first shared-
memory segment. To ensure that all user processes within a single OnLine
system attach to the same shared-memory segments, the key value must be
shared among all OnLine user processes. To ensure that the user processes
from independent OnLines do not become entangled, the key value must be
unique for each OnLine system.
The shared-memory key value that each user process arrives at is defined by
the calculation:
(SERVERNUM * 65536) + shmkey
The database configuration parameter SERVERNUM uniquely identifies the
shared-memory segments for each OnLine system. If more than one OnLine
databaseserver exists ona single host machine,the calculated keyvalues are
separated by the difference between the two values of SERVERNUM, multi-
plied by 65536.
The value of shmkey is set internally and cannot be changed by the user. (The
shmkey value is 52564801 in hexadecimal representation or 1,381,386,241 in
decimal.)
The value (SERVERNUM *65536) is the same as multiplying SERVERNUM by
hexadecimal 1000.
Steps 3 and 4: Request Shared-Memory Segment and Attach to
SHMBASE
The user process transfers to UNIX the calculated shared-memory key value.
In return, the UNIX operating system passes back the shared-memory
segment identifier associated with the value of the shared-memory key.
Using this identifier, the user process requests that the operating system
attach this segment of shared memory to the user process space at the
address specified as the OnLine configuration parameter SHMBASE.

2-26 IBM Informix OnLine Database Server Administrator’s Guide
How User Processes Attach to Shared Memory
The first shared-memory segment is attached to the virtual address space of
each process at the same virtual address defined as SHMBASE.SHMBASE
identifies the specific virtual address where the database server processes
attach the first, or base, shared-memory segment. (Refer to Figure 2-2 on
page 2-23 for an illustration of the virtual address space of a database server
process.)
The reason that all user processes share the sameSHMBASE value is to speed
execution. All user processes can reference locations in shared memory
withoutrecalculatingshared-memoryaddressesbecauseall addressesbegin
at the same base address. All addresses assume that shared memory begins
at the address specified as SHMBASE. That is, all addresses are relative to
SHMBASE. If each user process attached to shared memory at a different
location, shared-memory addresses would be relative to the start of shared
memory and would have to be recalculated for each user process, slowing
execution.
The specific value of SHMBASE is often machine-dependent. It is not an
arbitrary number. Informix selects a value for SHMBASE that will keep the
shared-memory segments safe in case the user process dynamically acquires
additional memory space.
DifferentUNIX systemsaccommodateadditionalmemory atdifferentvirtual
addresses.SomeUNIX architecturesextend the highest virtual addressofthe
user process data segment to accommodate the next segment. In this case, it
is possible that the data segment could grow into the shared-memory
segment.
The server process function stack or (heap) can pose another threat. Some
UNIX architectures begin the function stack at a high virtual address to keep
it clear of the growing data segments. If the stack begins too close to the
shared-memorysegments,thestackcanoverwritetheendofsharedmemory.
Some versions of UNIX require the user to specify a SHMBASE of virtual
address of 0. The 0 address informs the UNIX kernel that the kernel should
pick the best address at which to attach the shared-memory segments. This
kernel-selects option is an attempt to respond to the many different ways that
anapplicationcanaffectthegrowthof the serverprocess.However, allUNIX
architecturesdonotsupportthekernel-selectsoption. Moreover,thekernel’s
selection is not always the best choice for all applications.
Informix recommends that you do not attempt to change the value of
SHMBASE.

System Architecture 2-27
How User Processes Attach to Shared Memory
The user process lays out the first shared-memory segment, which includes
the shared-memory header. Sixteen bytes into the header, the user process
obtains the following data:
■The total size of shared memory for this OnLine server
■The size of each shared-memory segment
The user process then calculates how much shared memory it has and how
much is still required. (Each user process must acquire the total amount of
shared memory.)
Step 5: Attach Additional Segments
Ifoneormoreshared-memorysegmentsarerequired,theuserprocessmakes
an additional request to the UNIX operating system. To obtain the key value
fortheshared-memorysegmentthatitneeds,theuserprocessaddsthevalue
1 to the previous value of shmkey. (Given the initial calculation of
(SERVERNUM * 65536) + shmkey, this means that any OnLine server can
request up to 65,536 shared-memory segments before the possibility arises
that one OnLine system could request a shared-memory key value used by
another OnLine system.)
Justasbefore,theuserprocesstransfers the keyvaluetoUNIX,whichreturns
a shared-memory identifier. The user process directs the operating system to
attach the segment at the address defined by the relation:
SHMBASE + (seg_size x number of attached segments)
(If your operating system uses a parameter to define the lower boundary
address, and this parameter is set incorrectly, it can prevent the shared-
memory segments from being attached contiguously. Refer to page 2-20 for
more information about UNIX parameters and attaching to shared memory.)
After the new shared-memory segment is attached, the user process again
compares the total size of shared memory with the amount of shared
memory now attached. If additional memory is needed, the user process
recalculates the next shared-memory key value and requests the associated
shared-memory segment from UNIX. This process repeats until the user
process has acquired the total amount of shared memory.

2-28 IBM Informix OnLine Database Server Administrator’s Guide
User Processes and Critical Sections
User Processes and Critical Sections
Acritical section is a section of OnLine code that comprises a set of disk
modificationsthatmustbeperformedasasingleunit;eitherallofthemodifi-
cations must occur or none can occur. OnLine designates critical sections to
maintain physical consistency in a way that is analogous to the way that
transactions maintain logical consistency.
Important: If any user process dies while it is in a critical section, OnLine initiates
an abort by executing an immediate shutdown.
The abort is required to maintain the physical and logical consistency of
OnLinedata.AnOnLineuserprocessinacriticalsectionisprobablyholding
shared-memory resources needed to modify data. If the user process dies
prematurely, it might be unable to release all these resources.
Within the space ofa critical section, it isimpossible for OnLine to determine
which shared-memory resources should be released and which changes
should be undone to return all data to a consistent point. Therefore, if a user
process dies while it is in a critical section, OnLine immediately takes action
to return all data to the last known consistent point.
Fast recovery is the procedure OnLine uses to quickly regain physical and
logical data consistency up to and including the last record in the logical log.
OnLineinitiatesfastrecoveryindirectlybystartinganimmediateshutdown.
After immediate shutdown, the subsequent startup initiates fast recovery
and returns OnLine data to physical and logical consistency. (Refer to
page 4-39 for further information about fast recovery.)

System Architecture 2-29
OnLine User Process Status and States
OnLine User Process Status and States
The tbstat -u command prints a profile of user process activity. To interpret
why a user process might be waiting for a latch or waiting for a checkpoint
to complete, refer to the information contained on the pages indicated.
OnLine user process status flags occupy the first flag position of each entry
in the tbstat -u display, users section. These flags describe a process that is
waiting. The flags indicate which of the following events is causing the wait:
Transactionstatusflagsoccupythesecondposition ofeachentryinthetbstat
-u display, users section. These flags describe the state of the transaction
associated with this user process. (Each OnLine user process is associated
with a transaction.) This transaction state information is informative but not
required, unless you are administering OnLine in the X/Open environment.
If you are interested in transaction status information, which is especially
helpful if you are administering IBM Informix STAR, refer to page 9-58.
If you are usingIBM Informix TP/XA, refer to the product documentation.
The user process state flags occupy the third position of each entry in the
tbstat-udisplay,userssection.TheseflagsindicateiftheOnLineuserprocess
either is reading data (flag is R) or is inside a critical section of a transaction
(flag is X). Refer to page 2-27 for a definition of a critical section.
BWaiting for a needed buffer to be released (refer to page 2-53)
CWaiting for a checkpoint to complete (refer to page 2-72)
GWaiting for the physical or logical log buffer to flush (refer to
page 2-74)
LWaiting for a needed lock to be released (refer to page 2-38)
SWaiting for a needed latch to be released (refer to page 2-41)
TWaiting for a transaction (valid only in the X/Open environment)
XWaiting for the rollback of a long transaction to complete (refer to
page 2-158)

2-30 IBM Informix OnLine Database Server Administrator’s Guide
OnLine Database Server Process
The user process type flags occupy the fourth position of each entry in the
tbstat -u display, users section. These flags provide the following
information:
OnLine Database Server Process
The database server process, which can also be referred to as the database
engineprocess,managesallaccesstothedatabase.Thedatabaseserverprocess
existstoservicetheneedsoftheapplicationdevelopmenttool.Thetwowork
in a partnership. The application sends a request for data to the database
server. The server process executes the database query, acquires the
requested information, and sends the results back to the application devel-
opment tool process.
If OnLine is initialized, the tool process forks itself and then performs the
UNIX execv() function call. The database server process that is spawned is
specified by the SQLEXEC environment variable. If SQLEXEC is not specified,
an OnLine database server process is spawned by default.
OnLinesystemarchitecturemaintainsaone-to-onecorrespondencebetween
applicationprocessesanddatabaseserverprocesses.Theapplicationprocess
is the parent process; the database server process is the child process. The
OnLine database server process is $INFORMIXDIR/lib/sqlturbo.
In the OnLine system, many server processes coexist, any one or all of which
might be active at any time. For the processes that are not active, their status
can be either “ready-to-run,” awaiting CPU resources, or suspended,
awaiting the completion of some other activity before they can be executed.
Processes that are suspended and waiting for some external event are said to
be sleeping.
CTheuserprocessisdeadandwaitingforproperclean-up.(Referto
page 2-33.)
DThe user process is either tbinit or tbundo. (Refer to page 2-33.)
FThe user process is a page-cleaner daemon, tbpgcl. (Refer to
page 2-33.)
MThe user process is a DB-Monitor process, tbmonitor.
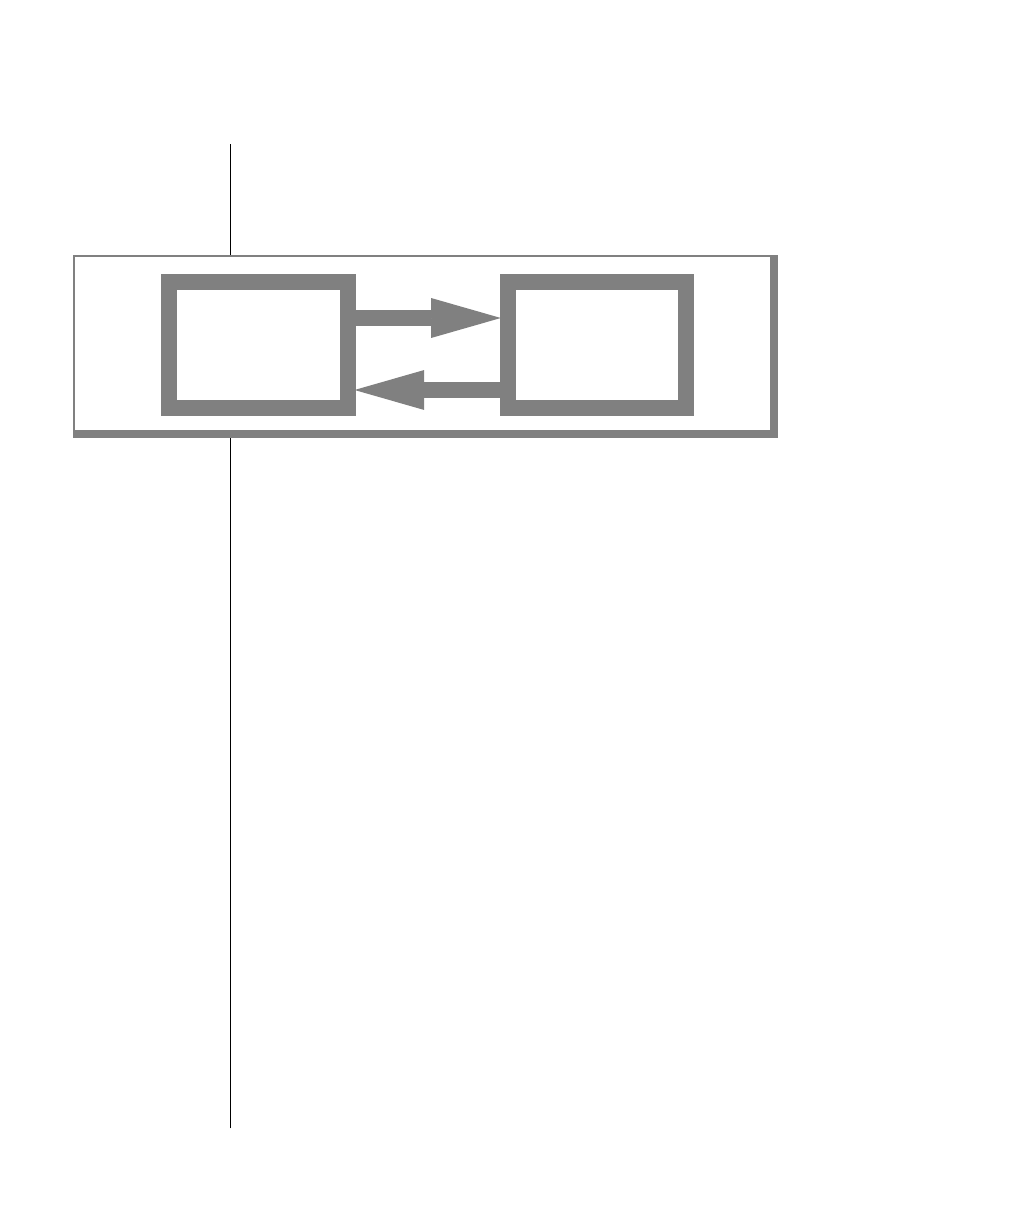
System Architecture 2-31
Orphaned Database Server Processes
The application development tool process and the database server process
communicate with each other through unnamed UNIX pipes. Each process
reads from one pipe and writes to the other. This interaction is illustrated in
Figure 2-3.
Orphaned Database Server Processes
Adatabaseserverprocessisconsideredorphanedwhentheapplicationdevel-
opment tool process (the parent process) dies prematurely and cannot
terminate its associated database server process (the child process). The
database server process continues working, orphaned, and can create bottle-
necks in the system. For example, an orphaned server process might hold
shared-memory resources without properly releasing them, forcing legit-
imateserverprocessestowaitindefinitely.Youmightbeunableto gracefully
take OnLine to quiescent mode if an orphaned process remains attached to
shared memory. The lingering process must be killed before OnLine can be
brought to offline mode.
The database server process eventually discovers that its parent process has
died when the server process begins reading from or writing to a pipe. If the
server process is reading from a pipe, it receives a -1 or 0 from the blocked
read.If theserverprocessiswritingto apipe,itreceivesa SIGPIPE signal.The
SIGPIPE signal indicates that the server is trying to write to a pipe whose
opposite end has been closed. At this point, the server process automatically
performs cleanup and terminates gracefully.
You might be tempted to kill a server process if you suspect the process is
orphaned. If the database server process is doing work, you might find
yourselfwaiting for the processtoreturntothepipetoreadorto write. If the
server process is in a wait state, waiting for a latch or a lock to be released,
this delay could be lengthy.
Figure 2-3
The application
process and the
database server
process
communicate
through unnamed
UNIX pipes.
Read
Application
process Database
server
process
Write
Read Write

2-32 IBM Informix OnLine Database Server Administrator’s Guide
Orphaned Database Server Processes
Never kill an OnLine database server process with the UNIX kill -9 command.If
you execute the kill -9 command and generate a SIGKILL signal while that
server process is holding a latch or is in a critical section of a transaction,
OnLine aborts with an immediate shutdown to preserve data consistency.
Never kill an application tool process with a SIGKILL signal. An application tool
process can, on occasion, get the attention of the database server process by
sending a signal that the server process can trap. The only signal that the
server process cannot trap is the SIGKILL signal. Therefore, there is no reason
for an administrator to use the SIGKILL signal to terminate application
processes. When you kill an application process with kill -9, you can
create an orphaned database server process.
If you suspect a database server process has been orphaned, follow these
steps to verify that the process is not doing any database work before you
attempt to kill it:
1. Obtain the database server process identification (pid) number from
tbstat -u output.
2. Check that the process is not in a critical section. Look at the third-
positionflagofthetbstat-uoutput.IftheprocessflagisX,donotkill
the process; if you do, OnLine aborts with an immediate shutdown.
3. Check that the process is not holding a latch. Obtain the address of
the process from the tbstat -u output. Execute tbstat -s to look at a
summaryoflatchinformation.Verifythattheaddressofthisprocess
is not listed as the owner of any latch. If the process address is
associated with a latch, do not kill the process; if you do, OnLine
aborts with an immediate shutdown.
4. If the server process is not in a critical section and is not holding a
latch, user informix or root can kill the process with the command
tbmode -z pid.
Do not kill a database server process that is in a critical section or is holding
a latch; if you do, OnLine initiates an abort. Instead, wait until the server
process has exited the section or released the latch.
If the server process does not exit the section or release the latch, user
informix or root can execute tbmode -k to detach all processes from shared
memory and take OnLine to offline mode.

System Architecture 2-33
OnLine Daemon Processes
OnLine Daemon Processes
Daemon processes are OnLine user processes that perform system-wide
tasks. Unlike database server processes, a daemon process is not associated
with a corresponding application development tool process.
The OnLine system employs three different types of daemons, which are
listed below.
■tbinit, the master daemon
■tbundo, the undertaker daemon
■tbpgcl, a page-cleaner daemon
Daemon processes are identified in tbstat -u output by a D (daemon) flag or
an F (page cleaner or “flusher”) flag in the fourth flag position of the user
entry.
tbinit Daemon
Thetbinit daemonisspawnedbythetbinit processearlyintheinitialization
process. The tbinit daemon occupies the first entry in the shared-memory
user table, which is represented by the first entry in tbstat -u output.
The tbinit daemon is responsible for most of the tasks of disk space and
shared-memory initialization. (Refer to page 2-7.)
The tbinit daemon also schedules the work of the page-cleaner daemons. If
no page-cleaner daemons exist, tbinit takes over page-cleaning responsibil-
ities. (Refer to page 2-74 for a detailed explanation of buffer page flushing,
which is the responsibility of the page-cleaner daemons.)

2-34 IBM Informix OnLine Database Server Administrator’s Guide
tbundo Daemon
tbundo Daemon
The tbundo daemon is called by the tbinit daemon to perform cleanup for
database server processes that die abnormally. As part of cleanup, tbundo
rolls back incomplete transactions and releases shared-memory resources
(such as locks and buffers) held by the server process when it died. The
tbundo daemonalsoremovestheserverprocessfromanybufferwait lists. If
a server process had begun to commit a transaction before the process died
prematurely, tbundo detects that the commit is partially accomplished and
the daemon completes the commit.
The tbundo daemon occupies the second entry in the shared-memory user
table, which is represented by the second entry in tbstat -u output.
The tbundo daemon is not started until needed. Until it is started, tbundo
appearsintheusertablewithaprocessidentificationnumber(pid)of0.Once
called, tbundo receives the next pid from UNIX. After cleanup is complete,
the old pid assigned to tbundo is visible residually in the display of user
processesuntiltbundoiscalledonagain,whenitreceivesthenextsequential
pid number. The pid number that appears in the user process display has no
relation to the number of times that tbundo has been called. Some UNIX
systemsareunabletorenameprocesses.Inthissituation,thetbundodaemon
appears as a second invocation of tbinit.
tbpgcl Daemon
Page-cleaner daemons, named tbpgcl, are maintained to flush dirty pages
from the shared-memory buffer pool to disk. Page-cleaner daemons are
identified in the tbstat -u output by an F that appears in the fourth position
of the user entry.
As OnLine administrator, you determine the number of page-cleaner
daemons in your system (specified as CLEANERS in the configuration file). If
you choose to allocate zero page-cleaner daemons, tbinit performs all page
flushing. If you choose a value greater than zero, tbinit acts as the master
page cleaner, scheduling the work of the page cleaners.

System Architecture 2-35
tbpgcl Daemon
When OnLine is initialized, all page-cleaner daemons are started and placed
in idle mode. As master daemon, tbinit directs each tbpgcl to an LRU queue
of shared-memory buffers. (Refer to page 2-57 for more information about
the LRU queues.) Periodically, tbpgcl wakes and searches through the LRU
queues, looking for buffers that need to be flushed. (Refer to page 2-58 for
information about the LRU queues and buffer flushing.)
Page-cleaner daemons (or the tbinit daemon) also perform the flushing
required during a checkpoint when OnLine shared-memory data is synchro-
nizedwiththedatastoredondisk.(Refertopage 2-70forfurtherinformation
about checkpoints.)
Therecommendednumber of page-cleaner daemons isone daemon for each
disk dedicated to OnLine. The maximum number of page-cleaner daemons
permitted in OnLine is 32. (Refer to page 5-19 for further information on
tuning the value of CLEANERS to improve performance.)
The state of each page-cleaner daemon is tracked in the page-cleaner table in
shared memory and can be displayed with the command tbstat -F. (Refer to
page 7-87 for further information about monitoring page-cleaner activity
with tbstat -F.)

2-36 IBM Informix OnLine Database Server Administrator’s Guide
Shared Memory and Process Communication
Shared Memory and Process Communication
Shared memory refers to the use of the same memory segments by more than
one OnLine user process, enabling interprocess communication. Figure 2-4
onpage 2-37showshowmultipleuserprocessescancommunicatebywayof
shared memory.
Interprocess communication via shared memory has the following advan-
tagesoversystemsinwhichserverprocesseseachmaintaintheirownprivate
copy of data:
■Disk I/O is reduced because buffers, which are managed as a
common pool, are flushed on a system-wide basis instead of a per-
process basis.
■Execution time is reduced because only one copy of a data or index
page is maintained in shared memory. Processes do not need to
reread shared-memory buffers to ensure that their data is current.
Often, processes do not need to read a page in from disk if the page
is already in shared memory as a result of an earlier query.
System Architecture 2-37
Shared Memory and Process Communication
Figure 2-4
Multiple user
processes can
communicate by
way of shared
memory.
Unallocated space
Private data
Shareddatabaseservercode
(C program text)
OnLine shared-
memory segments
Unallocated space
Private data
Shared database server
code (C program text)
User process B
virtual address space
User process A
virtual address space

2-38 IBM Informix OnLine Database Server Administrator’s Guide
Shared Memory and Buffer Locks
Shared Memory and Buffer Locks
A primary benefit of shared memory is the ability of multiple OnLine user
processes to share access to disk pages stored in the shared-memory buffer
pool. OnLine maintains process isolation while achieving this increased
concurrency through a strategy of buffer locking.
OnLineusesthreetypesoflockstomanageaccesstoshared-memorybuffers:
■Share locks
■Promotable, or update, locks
■Exclusive locks
Each of these lock types enforces the required level of OnLine process
isolation during execution.
Output from OnLine utilities, such as tbstat -k, uses the flags S, U, and X to
indicate the respective lock types.
For further information about locking and shared memory, refer to the
discussion of the shared-memory lock table (page 2-51) and shared-memory
buffer management (page 2-55).
Detailed information about locking and process isolation during SQL
processing is provided in IBM Informix Guide to SQL: Tutorial.
Buffer Share Lock
A buffer is in share mode, or has a share lock, if one or more OnLine user
processes have access to the buffer to read the data and none intends to
modify the data.
Buffer Update Lock
Abufferisinupdatemode,orhasanupdatelock,ifoneuser processintends
to modify the contents of the buffer. Multiple user processes can share the
buffer for reading, but no other user process can obtain an update lock or an
exclusive lock on this buffer. Processes requesting update or exclusive lock
access for this buffer are placed on the buffer’s user wait list until the update
lock is released.

System Architecture 2-39
Managing Shared-Memory Resources
Buffer Exclusive Lock
A buffer is in exclusive mode, or has an exclusive lock, if a user process
demandsexclusiveaccesstothebuffer.Allotheruserprocessesrequestingto
lock the buffer are placed on the user wait list for this buffer. When the
executing process is ready to release the exclusive lock, it wakes the next
process in the wait-list queue.
Managing Shared-Memory Resources
Shared memory is commonly divided into three sections:
■Header
■Internal tables
■Buffer pool
ThesecomponentsofsharedmemoryareillustratedinFigure 2-5.Thesizeof
OnLine shared memory, expressed in kilobytes, is displayed in any tbstat
output header.
In the broadest sense, shared-memory resources can be thought of as the set
of all entries in the shared-memory internal tables and page buffers. For
example,whenauserprocessneedsaccesstosharedmemory,itmustacquire
an entry in the shared-memory user table. When a user process needs access
to an OnLine table, it must acquire an entry in the shared-memory tblspace
table. When a user process needs access to an OnLine page buffer, it must
acquire the entry in the buffer header table associated with that buffer.
2-40 IBM Informix OnLine Database Server Administrator’s Guide
Managing Shared-Memory Resources
Considerwhathappenswhentwo OnLineserverprocessesattemptto attach
to shared memory simultaneously. Both server processes attempt to access
thenextavailable slot intheuser table. OnLine requirestechniquesby which
it can control concurrent access to individual shared-memory resources.
OnLine employs four mechanisms as part of shared-memory resource
management:
■Buffer locks
■Latches
■Timestamps
■Hash tables
Figure 2-5
Components of
shared
memory. The
shared-
memory header
contains
pointers to all other
shared-
memory
structures.
Shared-
memory header User table
Lock table
Hash table
Dbspace table
Transaction table
Latch table
Tblspace table
Hash table
Buffer header table
Hash table
Chunk table
Page-cleaner table
Buffer pool

System Architecture 2-41
Managing Shared-Memory Resources
Buffer locks ensure process isolation while user processes contend for the
same shared-memory resources. (Refer to page 2-38 for further information
about buffer locks.)
Latchesensurethatonly one OnLine user processata time cangain access to
anyoneshared-memoryresource.(Refertopage 2-41forfurtherinformation
about latches.)
Timestamps provide a method of coordinating sequential activity. (Refer to
page 2-44 for further information about timestamps.)
Hashing is a technique that associates a hash table with a frequently used
table. The hash table permits rapid searches through a table to which items
are added unpredictably. (Refer to page 2-46 for further information about
hash tables.)
Shared-Memory Latches
OnLine uses latches to coordinate user processes as they attempt to modify
entries in shared memory. Every modifiable shared-memory resource is
associated with a latch. Before an OnLine user process can modify a shared-
memory resource (such as a table or buffer), it must first acquire the latch
associated with that resource. After the user process acquires the latch, it can
modify the resource. When the modification is complete, the user process
releases the latch.
If a user process tries to obtain a latch and finds it held by another user
process, the incoming process must wait for the latch to be released. If more
than one process needs a specific latch, the later processes must wait.
For example, two server processes can attempt to access the same slot in the
chunktable,butonlyonecanacquirethelatchassociatedwiththetable.Only
the process holding the latch can write its entry in the chunk table. The
second process must wait for the latch to be released.
As administrator, you cannot specify the number of latches available. The
numberoflatchesavailablewithinOnLineisfixed,definedbythenumberof
modifiable shared-memory resources that result from your specific
configuration.
Refer to page 7-97 for information about monitoring latches using tbstat -s.

2-42 IBM Informix OnLine Database Server Administrator’s Guide
Managing Shared-Memory Resources
If an OnLine user process requires a specific latch, how does it determine if
the latch is available? The user process has two options:
■Test for the latch; if unavailable, do not wait (that is, do not block).
■Test for the latch; if unavailable, wait (that is, block).
Test-and-Set Institutions
Mostmachinesuseasingletest-and-setinstructionaspartofthetestthateach
user process performs in its attempt to acquire a shared-memory latch. Test-
and-set, or TAS, prevents confusion between two user processes in a
multiuser environment. Without TAS, a user process could be interrupted
betweenthetestofthelatch(toseeifitisavailable)andthesettingofthelatch
(to make it unavailable to other user processes). The interrupt could create a
situation in which more than one user process received“exclusive” access to
a resource.
To see how this confusion could occur, consider the following scenario.
Server Process A needs to acquire latch 201. Process A performs a test for the
latch and receives a positive response; the latch is available. Then the
processing time period for Process A ends. Process B begins executing.
Process B also needs latch 201. Process B performs a test for the latch and
receivesapositiveresponsesincethelatchis still available. ProcessBsetsthe
latch and continues processing. Process B is interrupted (that is, its timeslice
expired) before it is ready to release the latch. When Process A continues
executing, it incorrectly assumes that it can claim latch 201. The test-and-set
instruction performs the latch test and sets the latch as a single, uninter-
ruptable event, eliminating confusion among processes.
Spin and Test Again
WhenanOnLine user processattempts to acquirea latch, it teststhe latch for
availability. If the latch is not available, the user process can either block or
notblock.AthirdoptionisavailableonsomemultiprocessorUNIXoperating
systems: spin and test again. The benefit of spinning instead of blocking is
that a user process can test for latch availability multiple times without the
overhead cost of putting the user process to sleep and later waking it. The
configuration parameter SPINCNT specifies the number of times that a user
process can spin and test without actually going to sleep. (Refer to page 5-24
for information about tuning this parameter to improve performance.)

System Architecture 2-43
Managing Shared-Memory Resources
Semaphores
When an OnLine user process attempts to acquire a latch and finds that the
latchisunavailable,theuserprocesscanblockuntilthelatchisavailable.The
mechanism that signals the process to wake when the latch becomes
available is a UNIX semaphore.
The semaphore mechanism works likes this. Every OnLine user process is
associated with a semaphore. If a user process finds a latch unavailable, the
semaphore associated with the process is placed on a list of waiting
semaphores.Whentheuserprocessholdingthelatchisreadytoreleaseit,the
holding user process looks to see if any user processes are waiting for the
latch. If so, the holding process releases the latch and wakes the first appro-
priate user process in the semaphore list.
Ifthe latch to be releasedisa bufferlatch, the holdinguser process wakes the
first waiting process that has a compatible lock access type. (Refer to
page 2-60 for further information about buffer acquisition.)
All semaphores are created when shared memory is created. In most UNIX
operating systems, the number of semaphores permitted is equal to the
maximum number of concurrent user processes, specified as USERS in the
OnLine configuration file.
UNIXkernelparameterscanaffectthenumberofsemaphorescreatedbyyour
UNIX operating system. (Refer to page 2-18 for a description of the role
played by UNIX kernel parameters.)
Forced Abort
If you explicitly kill a user process that is holding a latch, OnLine immedi-
atelyinitiatesanaborttopreservedataconsistency.IfanOnLineuserprocess
is holding a latch, the implication is that the user process is intent on
modifying shared memory. When a user process terminates, the tbinit
daemoninitiates propercleanup, releasingall locks andother resourcesheld
by the user process.
Although tbundo can perform routine cleanup for processes that die prema-
turely, data consistency prevents tbinit from releasing shared-memory
latchesaspartofcleanup.Itisimpossible for tbinit todeterminewhetherthe
user process concluded its modifications before it was terminated or if the
database is in a consistent state.

2-44 IBM Informix OnLine Database Server Administrator’s Guide
Managing Shared-Memory Resources
OnLine resolves the dilemma by forcing an abort. When OnLine comes back
online, fast recovery occurs automatically. Fast recovery returns OnLine to a
consistent state through the last completed transaction.
(Refertopage 2-32forinstructionsontheproperwaytokilladatabaseserver
process. Refer to page 4-39 for further information about fast recovery.)
OnLine Timestamps
OnLine uses a timestamp to identify a time when an event occurred relative
to other events of the same kind. The timestamp is a 4-byte integer that is
assigned sequentially. The timestamp is not a literal time that refers to a
specific hour, minute, or second. When two timestamps are compared, the
one with the lower value is determined to be the older.
Each disk page has one timestamp in the page header and a second
timestamp in the last four bytes on the page. The page-header and page-
ending timestamps are synchronized after each write, so they should be
identical when the page is read from disk. Each read compares the times-
tamps as a test for data consistency. If the test fails, an error is returned to the
OnLine user process, indicating either that the disk page was not fully
written to disk, or that the page has been partially overwritten on disk or in
sharedmemory.(Refertopage 4-6for further information aboutconsistency-
checking errors and corrective actions.)
Refer to page 2-120 for further information about the layout of timestamp
information on a disk page.
In addition to the page-header and page-ending timestamp pair, each disk
page that contains a blob also contains one member of a second pair of times-
tamps.Thissecondpairoftimestampsisreferredtoastheblobtimestamppair.
Theblobtimestampthatappears onthediskpageispairedwithatimestamp
thatisstoredwiththeforwardpointertothisblobsegment,eitherinthedata
row (with the blob descriptor) or with the previous segment of blob data.
(Refer to page 2-143 for more information about blob storage in the data row
and the blob descriptor.)

System Architecture 2-45
Managing Shared-Memory Resources
The blob timestamp on the disk page changes each time the blob data on the
page is overwritten. The blob timestamp stored with the forward pointer
changeseachtimeanewblobreplacestheoldblob.Forexample,whenablob
in a data row is updated, the new blob is stored on disk, and the forward
pointerstoredwiththeblobdescriptorisrevisedtopointtothenewlocation.
The blob timestamp in the data row is updated and synchronized with the
blobtimestamponthenewblob’sdiskpage.Theblobtimestamp onthenow-
obsolete disk page is no longer synchronized. (An illustration of blobspace
blob storage shows this in Figure 2-39 on page 2-150.)
Because retrieving a blob can involve large amounts of data, it might be
impossible to retrieve the blob data simultaneously with the rest of the row
data. Coordination is needed for blob reads that OnLine user processes may
perform at the Dirty Read or Committed read level of isolation. Therefore,
each read compares the two members of the blob timestamp pair as a test for
logicalconsistencyofdata.Ifthetwotimestampsinthepairdiffer,thisincon-
sistency is reported as a part of consistency checking. (Refer to page 4-6 for
further information about consistency-checking errors and corrective
actions.)Theerrorindicateseitherthatthepageshavebeencorruptedorthat
the blob forward pointer read by the OnLine user process is no longer valid.
To understand how a forward pointer stored with a blob descriptor or with
the previous segment of blob data may become invalid, consider this
example.AprogramusingDirtyReadisolationis abletoreadrowsthathave
beendeletedprovidedthedeletionhasnotyetbeencommitted.Assumethat
one OnLine server process is deleting a blob from a data row. During the
delete process, another OnLine server process operating with a Dirty Read
isolation level reads the same row, searching for the blob descriptor infor-
mation. In the meantime, the first transaction completes, the blob is deleted,
the space is freed, and a third process starts to write new blob data in the
newly freed space where the first blob used to exist. Eventually, when the
second OnLine server process starts to read the blob data at the location
where the first blob had been stored, the process compares the value of the
timestampreceivedfromtheblobdescriptorwiththevalueofthetimestamp
that precedes the blob data. The timestamps will not match. The blob
timestampontheblobpagewill begreaterthanthetimestamp intheforward
pointer,indicatingto the server processthat the forwardpointerinformation
it has is obsolete.

2-46 IBM Informix OnLine Database Server Administrator’s Guide
Managing Shared-Memory Resources
If a program is using Committed Read isolation, the problem just described
cannot occur since the database server does not see a row that has been
marked for deletion. However, under Committed Read, no lock is placed on
an undeleted row when it is read. BYTE or TEXT data is read in a second step,
after the row has been fetched. During this lengthy step, it is possible for
anotherprogramtodeletetherowandcommitthedeletionandforthespace
on the disk page to be reused. If the space has been reused in the interim, the
blob timestamp will have been incremented and will be greater than the
timestamp in the forward pointer. In this case, the comparison will indicate
the obsolete pointer information and the inconsistency will be reported as a
part of consistency checking.
Hash Tables and the Hashing Technique
Hashing is a technique that permits rapid lookup in tables where items are
added unpredictably. Three OnLine shared-memory tables have an
associated hash table. These three tables are the lock table, the active tblspace
table, and the buffer table.
Eachentry that isto be placedin any OnLine table has a unique key.Ifa hash
table is used, then the unique key is “hashed,” which means a specific
algorithm is used to map the keys onto a set of integers, which are the hash
values. The algorithm is selected so that the keys, once hashed, are fairly
evenly distributed over a range. The result is not a unique mapping; two
different keys may map onto the same hash value. Entries are stored by their
hash value and not solely by their unique key value.
For example, a simple hashing algorithm is “divide the key value by 100 and
use the remainder.” With this algorithm, you could expect 100 different hash
values equal to each possible remainder, from 0 to 99. Each of these hash
values would correspond to an entry in the hash table.
To locate an item in the table, the item key is passed through the hashing
algorithmand its hash value iscomputed. Using this hash value,the entry at
that location in the hash table is examined.
Each hash-table entry contains a pointer to entries in the associated table
(lock, tblspace, or user) with the corresponding hash value. Multiple entries
with the same hash value are chained together in a linked list.
System Architecture 2-47
Shared-Memory Header
OnLine compares the item key with the key value it is searching for. If the
values match, the item is located. If not, each item in the linked list is
examined in succession until the item is found or the search is ended.
Figure 2-6illustratesahashingtechniquethatusesanalgorithmthatlooksat
the first letter of the key value.
Shared-Memory Header
The shared-memory header contains a description of the size of all other
structures in OnLine shared memory, including internal tables and the
OnLine buffer pool. (The tbstat display header contains the size of shared
memory, expressed in kilobytes.)
The shared-memory header also contains pointers to the location of these
structures. When a user process first attaches to shared memory, it reads
address information in the shared-memory header for directions to all other
structures.
The size of the shared-memory header is about one kilobyte, although the
size varies, depending on the machine platform. The administrator cannot
tune the size of the header.
Figure 2-6
This simple
example of a
hashing technique
uses an algorithm
that looks at the
first letter of the key
value.
F - L
A - E
M - Q
R - T
U - Z
Nguyen
Nguyen
Hash value
Key value
Hash algorithm Hash-table entries Linked list of entries
with same hash value

2-48 IBM Informix OnLine Database Server Administrator’s Guide
Shared-Memory Internal Tables
The header also contains the OnLine “magic number,” which is used to
synchronizeuserprocesses.EachOnLinereleaseisassignedamagicnumber.
In addition, the same magic number is contained within the user process
code. Whenever a user process attempts to attach to shared memory, these
magicnumbersarecompared.Iftheyarenotcompatible,anerrorisreturned.
The magic-number check ensures that the database server processes are
compatible.
Shared-Memory Internal Tables
OnLine shared memory contains nine internal tables that track shared-
memory resources. (Refer to Figure 2-5 on page 2-40.) Three of these nine
tables are paired with hash tables. Each of the nine is described next.
OnLine Buffer Table
Thebufferheadertabletrackstheaddressandstatusoftheindividualbuffers
in the shared-memory pool. When a buffer is used, it contains an image of a
data or index page from disk.
The buffer header table contains the following control information, which is
needed for buffer management:
■Buffer status
Buffer status is described as empty,unmodified, or modified. An
unmodified buffer contains data, but this data can be overwritten. A
modified, or dirty, buffer contains data that must be written to disk
before it can be overwritten.
■User processes currently accessing the buffer
Thelistofuserprocessesis storedasabitmap.Eachusersharingthe
buffer accounts for one of the bits set in the bit map and increments
the buffer’s shared-user count, which is stored separately.
■Current lock-access level
Buffersreceivelock-accesslevelsdependingonthetypeofoperation
the user process is executing. OnLine supports three buffer lock-
access levels: shared, promotable (update), and exclusive.

System Architecture 2-49
Shared-Memory Internal Tables
■User processes waiting for the buffer
Each buffer header maintains a list of the user processes that are
waiting for the buffer and the lock-access level that each waiting
process requires.
Each OnLine buffer is represented as one entry in the buffer header table.
Each entry in the buffer header table occupies 54 bytes.
Thenumberof entries in thebufferheaderhashtable is based onthenumber
of allocated buffers. The maximum number of hash values is the largest
power of 2 that is less than the value of BUFFERS.
Each entry in the buffer hash table occupies 16 bytes.
The minimum number of OnLine buffers is based on the number of OnLine
user processes (specified as USERS in the configuration file). You must
allocate at least four buffers per user process. The maximum number of
allocated buffers is 32,000.
OnLine Chunk Table
ThechunktabletracksallchunksintheOnLinesystem.Ifmirroringhasbeen
enabled, an identical mirror chunk table is created when shared memory is
initialized. The mirror chunk table tracks all mirror chunks. If mirroring is
not enabled, the mirror chunk table is not created.
ThechunktableinsharedmemorycontainsinformationthatenablesOnLine
to locate chunks on disk. This information includes the chunk number and
the next chunk in the dbspace. Flags also describe chunk status: mirror or
primary; offline, online, or recovery mode; and whether this chunk is part of
a blobspace.
The maximum number of entries in the chunk table is equal to the value of
CHUNKS, as specified in the configuration file.
Refer to page 3-70 for information about monitoring the chunks using
tbstat -d and tbstat -D.
The maximum number of chunks that can exist within an OnLine configu-
ration might be operating-system dependent. The maximum value is the
lesser of two values:

2-50 IBM Informix OnLine Database Server Administrator’s Guide
Shared-Memory Internal Tables
■The number of chunk entries (pathnames) that can fit on an OnLine
page
■The operating-system value of maximum number of open files per
process, minus 6
Refertopage 2-93forinstructionsoncalculatingthenumberofchunkentries
per OnLine page.
OnLine Dbspace Table
The dbspace table tracks both dbspaces and blobspaces in the OnLine
system.
Thedbspacetableinformationincludesthefollowinginformationabouteach
dbspace in the OnLine configuration:
■Dbspace number
■Dbspace name and owner
■Dbspace mirror status (if mirrored or not)
■Date and time the dbspace was created
If the space is a blobspace, flags indicate the medium where the blobspace is
located, either magnetic or removable.
The maximum number of entries in the dbspace table is equal to the value of
DBSPACES, the maximum number of dbspaces permitted in OnLine, as
specified in the configuration file.
Each entry in the dbspaces table occupies 46 bytes.
Refertopage 3-75for informationaboutmonitoringdbspacesusingtbstat -d
and tbstat -D.
The maximum number of dbspaces plus blobspaces that can exist within an
OnLine configuration is the number of chunks that can exist within this
configuration, since each dbspace requires at least one chunk.
Themaximum number ofchunks that canexist within a configuration might
be operating-system dependent. Refer to page 2-49 for general information
about the maximum number of chunks or to page 2-93 for specific infor-
mation about calculating the maximum value.

System Architecture 2-51
Shared-Memory Internal Tables
The minimum value of DBSPACES is 1, representing the root dbspace.
OnLine Latch Table
Thelatch table is not a table in the samesense as other tables, but it functions
in a similar manner to track all latches in the OnLine system. Refer to
page 2-41foradetaileddiscussionofhowOnLineuseslatchestocontroland
manage modifications to OnLine shared memory.
The number of latch entries is equal to the number of shared-memory
resources configured for the OnLine system. As OnLine administrator, you
cannot modify the number of latches.
You can obtain information about latches from the tbstat -s output. You can
use the user process information from the tbstat -u output to determine if a
user process is holding a latch.
OnLine Lock Table
The lock table represents the pool of available locks. Each entry in the lock
table represents one lock. A single transaction can own multiple locks. A
single user process is limited to 32 concurrent table locks. The lock table
includes an associated hash table.
When an entry in the lock table is used, a lock is created. The information
stored in the table describes the lock. The lock description includes the
following four items:
■The address of the user process that owns the lock
■The type of lock (exclusive, update, shared, byte, or intent)
■The page and/or rowid that is locked
■The tblspace where the lock is placed
The number of entries in the lock table is equal to the maximum number of
locksinthisOnLinesystem,specifiedasLOCKSintheconfigurationfile.Each
entry in the lock table occupies 32 bytes.
Refer to IBM Informix Guide to SQL: Tutorial for an explanation of locking and
SQL statements. Refer to page 2-38 for a detailed explanation of the effect of
locks on buffer management. Refer to page 7-88 for information on
monitoring locks with tbstat -k.

2-52 IBM Informix OnLine Database Server Administrator’s Guide
Shared-Memory Internal Tables
Abyte lock is only generated if you are using VARCHAR data types. The byte
lock exists solely for rollforward and rollback execution, so you must be
working in a database that uses logging. Byte locks only appear in tbstat -k
output if you are using row-level locking; otherwise, they are merged with
the page lock.
Theupperlimitfor the maximum numberoflocks(specified as LOCKS in the
configuration file) is 256,000. The lower boundary for LOCKS is the number
of user processes (the current value of USERS) multiplied by 20.
Thenumberofentriesinthe lock hashtableisbasedonthenumberofentries
inthelockstable(specifiedasLOCKSintheconfigurationfile).Themaximum
number of hash values is the largest power of 2 that is less than the value
specified by the expression (LOCKS divided by 16). Each entry in the lock
hash table occupies 12 bytes.
OnLine Page-Cleaner Table
The page-cleaner table tracks the state and location of each of the page-
cleaner daemons, tbpgcl, that was specified during configuration.
The page-cleaner table always contains 32 entries, regardless of the number
of page cleaners specified by CLEANERS in your configuration file.
Each entry in the page-cleaner table occupies 20 bytes.
The upper limit for the maximum number of page cleaners (specified as
CLEANERSintheconfigurationfile)is32.ThelowerboundaryforCLEANERS
is 0.
When CLEANERS is set to 0, the tbinit daemon assumes responsibility for
page cleaning. When CLEANERS is set to any value greater than 0, that is the
number of tbpgcl daemon processes managed by tbinit.
OnLine Tblspace Table
The tblspace table tracks all active tblspaces in the OnLine system. An active
tblspace is currently open to any OnLine user process. The count of active
tblspaces includes database tables, temporary tables, and internal control
tables, such as system catalog tables. Each active table receives one entry in
the active tblspace table. Entries in the tblspace table are tracked in an
associated hash table.

System Architecture 2-53
Shared-Memory Internal Tables
Eachtblspacetableentryincludesheaderinformationabout the tblspace,the
tblspace name, and pointers to the tblspace tblspace in the root dbspace on
disk. (Do not confuse the shared-memory active tblspace table with the
tblspace tblspace, which is described on page 2-104.)
The number of entries in the tblspace table is equal to the maximum number
ofopentblspacespermittedinthisOnLinesystem,specifiedasTBLSPACES in
the configuration file. If a user process attempts to open an additional table
after all entries are used, an error is returned. A single user process is limited
to 32 concurrent table locks.
Each entry in the tblspace table occupies 232 bytes.
Referto page 3-85for information about monitoring tblspaces using tbstat -t.
The upper limit for the maximum number of tblspaces (specified as
TBLSPACES in the configuration file) is 32,000. The lower boundary for
TBLSPACES is the number of user processes (specified as USERS in the config-
uration file) multiplied by 10. The minimum value for TBLSPACES is 10 per
user. This minimum also must be greater than the maximum number of
tables in any one database, including the system catalog tables, plus 2. (This
minimum is required to permit OnLine to execute a DROP DATABASE
statement.)
The default value is 200.
The number of entries in the tblspace hash table is based on the number of
allocated tblspaces (specified as TBLSPACES in the configuration file). The
maximumnumber ofhash values is the largestpower of twothat isless than
the value specified by the expression (TBLSPACES divided by 4).
Each entry in the lock hash table occupies four bytes.
Refer to page 2-46 for an explanation of the hash table.

2-54 IBM Informix OnLine Database Server Administrator’s Guide
Shared-Memory Internal Tables
OnLine Transaction Table
The transaction table tracks all transactions in the OnLine system.
ThetransactiontablespecificallysupportstheX/Openenvironment,inwhich
the concept of a global transaction replaces the traditional UNIX architecture
of one application tool process associated with one database server process.
Inaglobaltransaction,morethanonedatabaseserverprocesscanbeenlisted
to perform work on behalf of a single application tool process. That is, the
transactionbecomesthecentralstructureinsteadoftheuserprocess.Support
for the X/Open environment requires IBM Informix TP/XA.
Within the OnLine environment, the concept of transaction has been added
tothetraditionalUNIX architecture.EachOnLinetransactionisconsideredto
be associated with a single user process. Some information that had been
tracked in the user table in earlier releases is now tracked in the transaction
table.Trackinginformationderivedfromboththetransactionandusertables
appearsinthetbstat -u display,althoughthe information is organizedalittle
differently. For further information about using the tbstat -u display to track
transactions, refer to page 9-58.
OnLine User Table
The user table tracks all processes that attach to shared memory.
Every OnLine database server maintains at least two entries in the user table
while running. The first entry in the user table is reserved for tbinit, the
masterdaemon.Thesecondentryintheusertableisreservedfortbundo,the
daemon process that is responsible for rolling back transactions associated
with a process that has died prematurely or has been killed. The tbundo
daemonisforkedfromtbinit.InUNIX systemsthat do not allow processesto
be renamed, the tbundo daemon appears as a second tbinit daemon.
In the user table, and in tbstat -u output, the process ID for the tbundo
daemon displays as 0 until the process is actually needed. When tbundo is
started, the actual user process ID is used.
Thenextentriesintheusertablebelongtothepage-cleanerdaemons,tbpgcl,
if any daemons are specified.
The database server processes currently running are the next entries.

System Architecture 2-55
Shared-Memory Buffer Pool
The last available entry slot in the user table is always reserved for a
tbmonitor process, regardless of whether any other tbmonitor processes are
currently running.
The number of entries in the user table is equal to the maximum number of
users permitted on this OnLine system, specified as USERS in the configu-
rationfile. If anadditional user processattemptstoattach to sharedmemory,
an error is returned.
Each entry in the user table occupies 102 bytes.
The upper limit for the maximum number of users (specified as USERS in the
configuration file) is 1000. The lower boundary for the value of USERS is the
number of page cleaners (specified as CLEANERS in the configuration file)
plus 4, plus 1 if mirroring is enabled. The four minimum user entries are
reserved for tbinit,tbundo,tbmonitor, and an entry for an administrative
user.
Shared-Memory Buffer Pool
The OnLine buffer pool contains two types of buffers:
■Regular buffers
■Big buffers
If data pages are modified, entries are made in two other shared-memory
buffers that function solely to ensure the physical and logical consistency of
OnLine data:
■Physical log buffer
■Logical log buffer
The functions of the physical and logical log buffers are described on
page 2-63 and page 2-66, respectively.

2-56 IBM Informix OnLine Database Server Administrator’s Guide
Shared-Memory Buffer Pool
Regular Buffers
The regular buffers store dbspace pages read from disk. The status of the
regular buffers is tracked through the buffer header table. Within shared
memory, regular buffers are organized into LRU buffer queues. (Refer to
page 2-57 for further information about the LRU queues.) Buffer allocation is
managedthroughtheuseoflatchesandlockaccessinformation. Bufferinfor-
mation is available through four options of tbstat:
■-b and -B options display general buffer information.
■-R displays LRU queue statistics.
■-X displays information about OnLine user processes that are
sharing or waiting for buffers.
Each regular buffer is the size of one OnLine page, specified as BUFFSIZE in
theconfiguration file. Ingeneral, OnLine performsI/O in full-page units,the
size of a regular buffer. The two exceptions are I/O performed from big
buffers and I/O performed from blobspace buffers. (Refer to page 2-78 for
further information about blobspace buffers.)
Big Buffers
For every 100 regular buffers, OnLine allocates one additional big buffer.
OnLine creates at least one big buffer, even if BUFFERS is less than 100. A big
buffer is a single buffer that is the size of eight pages.
Thefunction of the bigbuffersistoincreaseperformanceon largewritesand
reads. For example, OnLine tries to use a big buffer if it is writing a dbspace
blob into shared memory or performing a series of sequential reads. After
disk pages are read into the big buffer, they are immediately allocated to
regular buffers in the buffer pools. The big buffers are also used in sorted
writes and during checkpoints, if possible. (Refer to page 2-75 for more
details about sorted and chunk writes.)
Multiple big buffers cannot be combined for contiguous I/O reads that are
greater than eight pages. The number of big-buffer reads is displayed as part
of the tbstat -P output.
System Architecture 2-57
OnLine LRU Queues
OnLine LRU Queues
Each regular buffer is tracked through several linked lists of pointers to the
bufferheadertable.These linked listsaretheleast-recentlyused(LRU) queues.
When OnLine is initialized, the configuration parameter LRUS specifies the
number of LRU queues or lists to create. The minimum number of LRU
queues is three. The maximum number of LRU queues is the smaller of two
values: (USERS divided by 2) or 8. The default number of queues created is
equaltothenumberofUSERSdividedby2androundedup,uptothevalue 8.
(Referto page 5-19for further information about setting the value of LRUS to
improve performance.)
Each LRU queue is actually a pair of linked lists:
■One list tracks free or unmodified pages in the queue.
■One list tracks modified pages in the queue.
The free/unmodified page list is referred to as the FLRU queue of the queue
pair, and the modified page list is referred to as the MLRU queue. The two
separate lists eliminate the need to search a queue for a free or unmodified
page. Figure 2-7 illustrates the structure of the LRU queues.
Figure 2-7
The structure of the
LRU queues
LRU queues
Least-recently used------------------------------- Most-recently used
FLRU 1
MLRU 1
Pointertoamodifiedpageinthe
buffer header table
Pointer to an empty page in the
buffer header table
Pointertoanunmodifiedpagein
the buffer header table

2-58 IBM Informix OnLine Database Server Administrator’s Guide
LRU Queues and Buffer Pool Management
LRU Queues and Buffer Pool Management
Before processing begins, all page buffers are empty. Every page buffer is
associated with a buffer header in the buffer table. Every buffer header is
represented by an entry in one of the FLRU queues. The buffer headers are
evenly distributed among the FLRU queues. (Refer to page 2-57 for more
information about the FLRU and MLRU queues.)
When a user process needs to acquire a buffer, OnLine randomly selects one
oftheFLRU queuesandusesthe“oldest”or“least-recentlyused”entryinthe
list. If the least-recently used page can be latched, that page is removed from
the queue.
If the FLRU queue is locked and the end page cannot be latched, OnLine
randomly selects another FLRU queue.
If a user process is searching for a specific page currently stored in shared
memory, it obtains the page’s LRU queue location from the control infor-
mation stored in the buffer table.
After an executing process finishes its work, it releases the buffer. If the page
has been modified, the buffer is placed at the “most-recently used” end of an
MLRU queue. If the page was read but not modified, the buffer is returned to
the FLRU queue at its “most-recently used” end.
You can monitor LRU status by executing the command tbstat -R.

System Architecture 2-59
LRU Queues and Buffer Pool Management
LRU_MAX_DIRTY
Periodically, the modified buffers in the MLRU queue are written (flushed)to
disk by the page-cleaner daemons. You can specify the point at which
cleaning begins.
The LRU_MAX_DIRTY configuration parameter limits the number of page
buffers that can be appended to the MLRU queues. The default value of
LRU_MAX_DIRTY is 60, meaning that page cleaning begins when 60 percent
ofthetotalnumberofbuffersaremodified. (Inpractice,pagecleaningbegins
underseveral conditions, only one ofwhich is when an MLRU queuereaches
the specific number that represents this 60 percent limitation. Refer to
page 2-73 for further information about initiating page cleaning.) The
followingexampleshowshowthevalueofLRU_MAX_DIRTYisappliedtothe
buffer pool to arrive at the maximum number of page buffers in an MLRU
queue:
BUFFERS specified as 8000
LRUS specified as 8
LRU_MAX_DIRTY specified as 60
Cleaning begins when the number of buffers in the MLRU queue is
equal to (Total buffers/LRU queues) multiplied by LRU_MAX_DIRTY
percentage.
Buffers in MLRU = (8000/8) * 60%
Buffers in MLRU = 1000 * 0.60
Buffers in MLRU = 600
LRU_MIN_DIRTY
You can also specify the point at which MLRU cleaning can end. The
LRU_MIN_DIRTY configuration parameter specifies the acceptable
percentage of modified buffers in an MLRU queue. The default value of
LRU_MIN_DIRTY is 50, meaning that page cleaning is no longer required
when50percentofthetotalnumber ofbuffersaremodified.Inpractice,page
cleaning can continue beyond this point as directed by the tbinit daemon
process.

2-60 IBM Informix OnLine Database Server Administrator’s Guide
How a User Process Acquires a Buffer
The following example shows how the value of LRU_MIN_DIRTY is applied
to the buffer pool to arrive at the number of page buffers in an MLRU queue
that, when reached, can signal a suspension of page cleaning:
BUFFERS specified as 8000
LRUS specified as 8
LRU_MIN_DIRTY specified as 50
Number of buffers in the MLRU queue when cleaning can be suspended
is equal to (Total buffers/Number of LRU queues) multiplied by the
percentage specified by LRU_MIN_DIRTY.
Buffers in MLRU = (8000/8) * 50%
Buffers in MLRU = 1000 * 0.50
Buffers in MLRU = 500
Refertopage 2-74foradescriptionofdatabufferflushing.Refertopage 5-19
for more details about tuning the values of LRU_MAX_DIRTY and
LRU_MIN_DIRTY.
How a User Process Acquires a Buffer
OnLine shared-lock buffering allows more than one OnLine user process to
simultaneously access the same buffer in shared memory. OnLine provides
thisconcurrencywithoutaloss in process isolation by usingbufferlocksand
three categories of lock access (share, update, and exclusive).
The buffer-acquisition procedure comprises seven steps:
1. Identify the data requested by physical page number.
2. Determine the level of lock access needed by the user process for the
requested buffer.
3. Attempt to locate the page in shared memory.
4. Ifthepageis notinsharedmemory,locateabufferinanFLRUqueue
and read the page in from disk.
5. Proceed with processing, locking the buffer if necessary.
6. After the user process is finished with the buffer, release the lock on
the buffer.
7. Wake waiting processes with compatible lock access types, if any
exist.

System Architecture 2-61
How a User Process Acquires a Buffer
Step 1: Identify the Data
OnLine user processes request a specific data row by rowid. (Refer to
page 2-123foradefinitionofrowid.)OnLinetranslatesthelogicalrowidinto
a physical page location. The user process searches for this page.
Step 2: Determine Lock-Access Level
Next OnLine determines the level of lock access required by the requesting
userprocess:share,update,orexclusive.(Refertopage 2-38 for further infor-
mation about buffer locks.)
Step 3: Locate the Page in Memory
The user process first attempts to locate the requested page in shared
memory.Todothis,ittriestoacquirealatchonthehashtableassociatedwith
the buffer table. If the process can acquire the latch, it searches the hash table
tosee if an entry matches the requestedpage.If it finds an entry for thepage,
it releases the latch on the hash table and tries to acquire the latch on the
buffer header entry in the buffer table.
With access to the buffer header, the requesting process adds its user process
IDtotheuser listbitmapforthebufferandincrementstheshared-usercount
by 1.
The user process tests the current lock-access level of the buffer.
If the levels are compatible, the requesting user process gains access to the
buffer. If the current lock-access level is incompatible, the requesting process
puts itself on the user wait list of the buffer. The buffer state, unmodified or
modified, is irrelevant; even unmodified buffers can be locked.
For further information about the entry stored in the buffer table, refer to
page 2-48.

2-62 IBM Informix OnLine Database Server Administrator’s Guide
How a User Process Acquires a Buffer
Step 4: Read the Page in from Disk
If the requested page must be read from disk, the user process first locates a
usable buffer in the FLRU queues. (Refer to page 2-57.) OnLine selects an
FLRU queue at random and tries to acquire the latch associated with the
queue.Ifthelatchcanbeacquired,thebufferatthe“least-recentlyused”end
of the queue is used. If another process holds the FLRU queue latch, the user
process tries to acquire a latch associated with another FLRU queue.
After a usable buffer is found, the buffer is temporarily removed from the
linked list that is the FLRU queue. The user process acquires a latch on the
buffertablehashstructureandcreatesanentryinthe buffertableasthepage
is read from disk into the buffer.
Steps 5-7: Lock Buffer, Release Lock, and Wake Waiting Processes
Iftheuserprocessreadsthebufferwithout modifyingthedata,itreleasesthe
buffer as unmodified. If the user process had acquired the buffer with an
update or exclusive lock, other user processes may be waiting to read the
buffer.
The release of the buffer occurs in steps. First, the releasing user process
acquires a latch on the buffer table that enables it to modify the buffer entry.
Next, it looks to see if other user processes are sleeping or waiting for this
buffer. If so, the releasing user process wakes the first process in the wait-list
queue that has a compatible lock-access type. The waiting processes are
queued according to priorities that encompass more than just “first-come,
first served” hierarchies. (Otherwise, user processes waiting for exclusive
access could wait forever.)
If no user process in the wait-list queue has a compatible lock-access type,
any user process waiting for that buffer can receive access.
Ifnoprocessiswaitingforthebuffer, thereleasingprocesstriesto releasethe
buffertotheFLRU queuewhereitwasfound.Ifthe latch for that FLRU queue
is unavailable, the process tries to acquire a latch for a randomly selected
FLRU queue. When the FLRU queue latch is acquired, the unmodified buffer
is linked to the “most-recently used” end of the queue.
After the buffer is returned to the FLRU queue or the next user process in the
wait list is awakened, the releasing process removes itself from the user list
bit map for the buffer and decrements the shared-user count by one.

System Architecture 2-63
Physical Log Buffer
If the user process intends to modify the buffer, it acquires a latch on the
buffer and changes the buffer lock-access type to exclusive.
A copy of the “before-image” of the page is needed for data consistency. The
userprocessdeterminesifa“before-image”ofthispage waswrittentoeither
the physical log buffer or the physical log since the last checkpoint. If not, a
copy of the page is written to the physical log buffer.
The data in the page buffer is modified, including the timestamps on the
page. When the modification is complete, the latch on the buffer is released.
If any transaction records are required for logging, those records are written
to the logical log buffer.
After the latch on the buffer is released, the user process is ready to release
thebuffer. First,the releasinguser processacquiresalatch on the buffertable
that enables it to modify the buffer entry.
The releasing process updates the timestamp in the buffer headerso that the
timestamp on the buffer page and the timestamp in the header match.
Statistics describing the number and types of writes performed by this user
process are updated.
The lock is released as described in the previous section, but the buffer is
appendedtotheMLRU queueassociated with its original queue set.(Referto
page 2-57). If the latch for that MLRU queue is unavailable, the process tries
to acquire a latch for a randomly selected MLRU queue. When the MLRU
queue latch is acquired, the modified buffer is linked to the “most-recently
used” end of the queue.
Physical Log Buffer
OnLine uses the shared-memory physical log buffer as temporary storage of
“before-images”ofdisk pages. Beforeadisk page can be modified,a “before-
image”ofthe page ondisk must alreadybe storedinthe physical logondisk
or one must be written to the physical log buffer. In the latter case, the
physical log buffer must be flushed to disk before the modified page can be
flushed to disk. Writing the “before-image” to the physical log buffer and
then flushing the buffer page to disk is illustrated in Figure 2-8 on page 2-64.
Both the physical log buffer and the physical log maintain the physical and
logical consistency of OnLine data.

2-64 IBM Informix OnLine Database Server Administrator’s Guide
Physical Log Buffer
Refer to page 2-151 for further information about the physical log.
Double Buffering
The physical log buffer is actually two buffers. The size of each buffer is
specified(inkilobytes)by the configuration file parameterPHYSBUFF.Double
buffering permits user processes to write to the active physical log buffer
while the other buffer is being flushed to the physical log on disk. A pointer
in shared memory indicates the current buffer to which processes write their
“before-images.”
Causes of Flushing
Three events cause the physical log buffer to flush:
■One of the physical log buffers becomes full.
■A modified page in shared memory must be flushed.
■A checkpoint occurs.
Figure 2-8
The physical log
buffer and its
relation to the
physical log on disk
Current physical log
buffer (now filling)
Physical log buffer
(flushing)
Writesperformed byOnLine
user processes
Writes performed by
page-cleaner daemons
Physical log buffers
Physical log files

System Architecture 2-65
Physical Log Buffer
The contents of the physical log buffer must always be flushed to disk before
anydatabuffers.Thisruleisrequiredforfastrecovery.(Refertopage 4-39for
a definition of fast recovery. Refer to page 2-74 for a description of physical
log buffer flushing when it is prompted by the need to flush the shared-
memory buffer pool. Refer to page 2-72 for a description of the checkpoint
procedure.)
Flushing a Full Buffer
Buffer flushing that results from the physical log buffer becoming full
proceeds as follows.
When a user process needs to write a page to the physical log buffer, it
acquires the latch associated with the physical log buffer and the latch
associated with the physical log on disk. If another user process iswriting to
the buffer, the incoming user process must wait for the latches to be released.
After the incoming user process acquires the latches, before the write, the
user process first checks the physical log for fullness. If the log is more than
75 percent full, the user process sets a flag to request a checkpoint, performs
the write to the physical log buffer, and then releases the latch. The check-
point cannot begin until all shared-memory latches, including this one, are
released.
If the log is less than 75 percent full, the user process compares the incre-
mented page counter in the physical log buffer header to the buffer capacity.
If this one-page write does not fill the physical log buffer, the user process
reserves space in the log buffer for the write and releases the latch. Any user
process waiting to write to the buffer is awakened. At this point, after the
latch is released, the user process writes the page to the reserved space inthe
physical log buffer. This sequence of events eliminates the need to hold the
latch during the write and increases concurrency.
If this one-page write fills the physical log buffer, flushing is initiated as
follows.

2-66 IBM Informix OnLine Database Server Administrator’s Guide
Logical Log Buffer
First, the page is written to the current physical log buffer, filling it. Next, the
user process latches the other physical log buffer. The user process switches
the shared-memory current-buffer pointer, making the newly latched buffer
the current buffer. The latch on the physical log on disk and the latch on this
new, current bufferarereleased,which permits otheruser processes to begin
writing to the new current buffer. Last, the full buffer is flushed to disk and
the latch on the buffer is released.
Logical Log Buffer
OnLine uses the shared-memory logical log buffer as temporary storage of
records that describe modifications to OnLine pages. From the logical log
buffer, these records of changes are written to the current logical log file on
disk, and eventually to the logical log backup tapes. Refer to page 2-153 for a
description of the functions of the logical log files and their contents.
Triple Buffering
There are three logical log buffers. Each buffer is the size (expressed in
kilobytes)thatisspecifiedbytheconfigurationfileparameterLOGBUFF. This
triple buffering permits user processes to write to the active buffer while one
of the other buffers is being flushed to disk. Flushing might not complete by
the time the active buffer fills. Writing then begins in the third buffer. A
shared-memory pointer indicates the current buffer.
System Architecture 2-67
Logical Log Buffer
Figure 2-9
The logical log
buffer and its
relation to the
logical log files on
disk
Current logical log
buffer (now filling)
Logical log buffer
(ready to accept data)
Writes performed by
OnLine user processes
Writes performed
by page-cleaner
daemons
Logical log buffer
(flushing)
Logical log buffers
Current logical log file
Free logical log file
Free logical log file

2-68 IBM Informix OnLine Database Server Administrator’s Guide
Logical Log Buffer
Buffer Contents
Logical log records are written continuouslyduring OnLine operation. Even
if a database is not created with transaction logging, administrative changes
(such as adding a dbspace or a chunk) and data definition statements, such
as CREATE TABLE or DROP TABLE, are logged. (SELECT statements are never
logged.) The logical log files contain five types of records:
■SQL data definition statements for all databases
■SQL data manipulation statements for databases that were created
with logging
■Record of a change to the logging status of a database
■Record of a checkpoint
■Record of a change to the configuration
(Refer to page 2-155 for further information about the factors that influence
the number and size of logical log records that are written to the logical log
files.)
Causes of Flushing
Three events cause the logical log buffer to flush:
■One of the logical log buffers becomes full.
■A transaction is committed within a database that uses unbuffered
logging.
■A checkpoint occurs.
Refer to page 2-70 for a definition of a checkpoint. Refer to page 2-72 for a
description of the checkpoint procedure.
If a transaction is committed in a database with unbuffered logging, the
logical log buffer is immediately flushed. This might appear to be a source of
some disk space waste. Typically, many logical log records are stored on a
singlepage.Butbecausethelogicallogbufferisflushedinwholepages,even
ifonlyonetransactionrecordisstoredonthepage,thewholepageisflushed.
Intheworstcase, a single COMMIT logicallogrecord(“commitwork”) could
occupyapageondisk,andallremainingspaceonthepagewouldbeunused.

System Architecture 2-69
Logical Log Buffer
Note,however, that this cost ofunbuffered logging isminor comparedto the
benefits of ensured data consistency. (Refer to page 3-34 for further infor-
mation about the benefits of unbuffered logging compared to buffered
logging.)
Flushing a Full Buffer
When a user process needs to write a record to the logical log buffer, it
acquires the latch associated with the logical log buffer and the latch
associated with the current logical log on disk. If another user process is
writing to the buffer, the incoming user process must wait for the latches to
be released.
After the incoming user process acquires the latches, before the write, the
user process first checks how much logical log space is available on disk. If
the percentage of used log space is greater than the long transaction high-
water mark (specified by LTXHWM), the user process wakes the tbinit
daemon to check for a long transaction condition. (Refer to page 2-158 for a
definition of a long transaction and its effect on the logical logs.)
If there is no long-transaction condition, the user process compares the
available space in the logical log buffer with the size of the record to be
written. If this write does not fill the logical log buffer, the record is written,
latches are released, and any user process waiting to write to the buffer is
awakened.
If this write fills the logical log buffer exactly, flushing is initiated as follows:
1. The user process latches the next logical log buffer. The user process
thenswitchestheshared-memorycurrent-bufferpointer,makingthe
newly latched buffer the current buffer.
2. Theuserprocesswritesthenewrecordtothenewcurrentbuffer.The
latch on the logical log on disk and the latch on this new, current
buffer are released, permitting other user processes to begin writing
to the new current buffer.
3. Thefulllogicallogbufferisflushedtodiskandthelatchonthebuffer
is released. This logical log buffer is now available for reuse.

2-70 IBM Informix OnLine Database Server Administrator’s Guide
OnLine Checkpoints
OnLine Checkpoints
The term checkpoint refers to the point in OnLine operation when the pages
on disk are synchronized with the pages in the shared-memory buffer pool.
When a checkpoint completes, all physical operations are complete and
OnLine is said to be physically consistent.
Outlined below are the main events that occur during a checkpoint. Refer to
page 2-72 for a detailed description of what happens during a checkpoint.
Main Events During a Checkpoint
■Physical log buffer is flushed to the physical log.
■Modified pages in the buffer pool are flushed to disk. Flushing is
performed as a chunk write.
■Checkpoint record is written to the logical log buffer.
■Physical log on disk is logically emptied (current entries can be
overwritten).
■Logical log buffer is flushed to current logical log file on disk.
Initiating a Checkpoint
Any user process can initiate a check to determine if a checkpoint is needed.
A checkpoint is initiated under any one of four conditions:
■The default checkpoint interval has elapsed (a default checkpoint
frequency is specified by the configuration parameter CKPTINTVL)
and one or more modifications have occurred since the last
checkpoint.
■The physical log on disk becomes 75 percent full.
■OnLine detects that the next logical log file to become current
contains the most-recent checkpoint record.
■The OnLine administrator initiates a checkpoint from the
DB-Monitor, Force-Ckpt menu or from the command line using
tbmode -c.

System Architecture 2-71
OnLine Checkpoints
Onereasonanadministrator might want to initiatea checkpoint would be to
force a new checkpoint record in the logical log. Forcing a checkpoint would
be a step in freeing a logical log file with status U-L. (Refer to page 3-41.)
Fast Recovery
Acheckpointiscritical to the operation of thefast-recoveryprocess.(Referto
page 4-39.) As fast recovery begins, OnLine data is brought to physical
consistency as of the last checkpoint by restoring the contents of the physical
log.
During fast recovery, OnLine reprocesses the transactions contained in the
logical logs, beginning at the point of the last checkpoint record and
continuingthroughalltherecordscontainedinthesubsequentlogicallog(s).
After fast recovery completes, the OnLine data is consistent up through the
last completed transaction. That is, all committed transactions recorded in
thelogicallogsondiskareretained;allincompletetransactions(transactions
with no COMMIT WORK entry in the logical logs on disk) are rolled back.
Archive Checkpoints
Checkpoints that occur during an online archive may require slightly more
time to complete. The reason is that the archiving procedure forces pages to
remaininthephysicalloguntilthetbtapeprocess(thatperformsthearchive)
has had a chance to write the “before-image” pages to the archive tape. This
mustbe done to ensurethatthearchivehasalltimestampedpages needed to
complete the archive. (Refer to page 4-30 for more information about what
happens during online archiving.)

2-72 IBM Informix OnLine Database Server Administrator’s Guide
What Happens During a Checkpoint
What Happens During a Checkpoint
The checkpoint procedure is prompted by any one of four conditions (refer
topage 2-70). This description begins whenthe checkpoint-requestedflag is set
by an OnLine user process after one of the four conditions is found to exist.
The checkpoint-requested flag wakes the tbinit daemon if it is not already
awake. Once this flag is set, OnLine user processes are prevented from
entering portions of code that are considered critical sections. (Refer to
page 2-27.) User processes that are within critical sections of code are
permitted to continue processing.
After all processes have exited from critical sections, tbinit resets the shared-
memory pointer from the current physical log buffer to the other buffer and
flushes the buffer. After the buffer is flushed, tbinit updates the shared-
memorystructurethatcontainsatimestampindicatingthemost-recentpoint
at which the physical log buffer was flushed.
Next,tbinitortbpgcl(page-cleaner)daemonsflushall modified pages inthe
shared-memory pool. This flushing is performed as a chunk write. (Refer to
page 2-77 for further information about chunk writes.)
Afterthe modified pages havebeen written to disk,tbinit writes a checkpoint-
completerecordinthelogicallogbuffer.Afterthisrecordiswritten,thelogical
log buffer is flushed to disk.
The tbinit daemon next begins writing all configuration and archive infor-
mation to the appropriate reserved page, whether or not changes have
occurred since the last checkpoint. (Refer to page 2-95 for more information
about the reserved pages.)
When dbspaces, primary chunks, or mirror chunks are added or dropped
from OnLine, the changes are recorded in descriptor tables in shared
memory.If changes haveoccurredsince the last checkpoint, tbinit writes the
descriptor tables from shared memory to the appropriate reserved page in
the root dbspace. Otherwise, tbinit ignores the reserved pages that describe
thedbspaces, primary chunks, andmirrorchunks.The tbinit daemon writes
all checkpoint statistics to the appropriate reserved page in the root dbspace.
Next, tbinit looks for logical log files that can be freed (status U-L) and frees
them. (Refer to page 3-41.) Last, the checkpoint-complete record is written to
the OnLine message log.

System Architecture 2-73
When the Daemons Flush the Buffer Pool
When the Daemons Flush the Buffer Pool
Buffer flushing is managed by the tbinit master daemon and performed by
tbinit or by one or more tbpgcl (page-cleaner) daemons. (If no tbpgcl
daemons have been configured for your OnLine server, the tbinit daemon
performs page-cleaner functions.)
Flushing the modified shared-memory page buffers, the physical log buffer,
and the logical log buffer must be synchronized with page-cleaner activity
according to specific rules designed to maintain data consistency.
The overriding rule of buffer flushing is this: first flush the “before-images”
of modified pages to disk before you flush the modified pages themselves.
Inpractice,thismeansthatthefirstphysicallogbufferisflushedandthenthe
buffers containing modified pages from the shared-memory buffer pool.
Therefore, even when the need to flush a shared-memory page buffer arises
because that buffer is needed by another user process (a foreground write,
refer to page 2-75), the page buffer cannot be flushed until it is verified that
the“before-image”ofthepagehasalreadybeenwrittentodisk.Ifthiscannot
be verified, the physical log buffer must be flushed first, before the single
shared-memory page buffer is flushed. (Refer to page 2-74 for more infor-
mation about how this sequence of events is enforced.)
Buffer-pool flushing is initiated under any one of four conditions:
■A requirement for page cleaning, determined by the value of
LRU_MAX_DIRTY (refer to page 2-58)
■Aneedtoflushafulllogical log bufferorphysicallogbuffer(referto
page 2-63 and page 2-66, respectively)
■Aneedtoflushthe logicallogbufferafteracommittedtransactionin
an unbuffered database (refer to page 2-66)
■A need to execute a checkpoint (refer to page 2-70)

2-74 IBM Informix OnLine Database Server Administrator’s Guide
How OnLine Synchronizes Buffer Flushing
How OnLine Synchronizes Buffer Flushing
Bufferflushingoccurs within thecontext of OnLine activity. When OnLine is
firstinitiated,allbuffersareempty. Asprocessingoccurs,datapagesareread
from disk into the buffers and user processes begin to modify these pages.
(Refertopage 2-73foranexplanationofthe“before-imagesfirst”rule,which
isthereasonthatsynchronizationisnecessary.In addition,page 2-73liststhe
four events that prompt buffer-pool flushing and cross-references to further
background information.)
Before a page in shared memory is modified for the first time, a copy of the
page“before-image”is written to the physical log buffer. Subsequentmodifi-
cations to that page in shared memory do not result in additional “before-
images”being written to thephysicallog; only thefirstmodification does so.
After each modification, a record of the change is written to the logical log
buffer if the database was created with logging or if the change affected the
database schema.
MLRU queuesbegintofillwithmodifiedpages.Each modified pageincludes
a timestamp that describes the time at which the page was modified.
Eventually the number of modified buffers in the MLRU queues reaches
LRU_MAX_DIRTY and page cleaning begins.
The pages in the physical log buffer are always flushed to disk prior to
flushing the pages that are contained in the modified buffers in the shared-
memory buffer pool. (Refer to page 2-73.)
When page cleaning is initiated from the shared-memory buffer pool, the
daemon process performing the page cleaning must coordinate the flushing
so that the physical log buffer is flushed first.
Howisthisdone? The answer istimestampcomparison.(Refer to page 2-44 for
a definition of a timestamp.)
Shared memory contains a structure that stores a timestamp each time the
physical log buffer is flushed. If a tbpgcl or tbinit daemon needs to flush a
page in a shared-memory buffer, the daemon process compares the
timestampinthemodifiedbufferwiththetimestampthatindicatesthepoint
when the physical log buffer was last flushed.

System Architecture 2-75
Write Types Describe Flushing Activity
Ifthetimestamponthepageinthebufferpoolisequaltoormorerecentthan
the timestamp for the physical log buffer flush, the “before-image” of this
page conceivably could be contained in the physical log buffer. If this is the
case, the physical log buffer must be flushed before the shared-memory
buffer pages are flushed.
Beforethe tbinit daemoncanflushthephysicallogbuffer, itmustacquirethe
latch for the shared-memory pointer structure and reset the pointer from the
current physical log buffer to the other buffer. After the pointer is reset, the
physical log buffer is flushed.
Next, the daemon process updates the timestamp in shared memory that
describes the most-recent physical log buffer flush. The specific page in the
shared-memory buffer pool that is marked for flushing is flushed. The
number of modified buffers in the queue is compared to the value of
LRU_MIN_DIRTY. If the number of modified buffers is greater than the value
represented by LRU_MIN_DIRTY, another page buffer is marked for flushing.
The timestamp comparison is repeated. If required, the physical log buffer is
flushed again.
When no more buffer flushing is required, the page-cleaner processes
calculate a value that represents a span of time during which the cleaner
processesremainasleep.This value, referredtoassnoozetime,is based on the
number of pages that the cleaner processes flushed in this last active period.
(Refer to page 5-17 for further information about tuning the page-cleaning
parameters to improve OnLine performance.)
Write Types Describe Flushing Activity
OnLine provides you with some information about the specific condition
thatpromptedbuffer-flushingactivity bydefiningsixtypesofOnLinewrites
and keeping count of how often each write occurs:
■Sorted write
■Idle write
■Foreground write
■LRU write
■Chunk write
■Big-buffer write

2-76 IBM Informix OnLine Database Server Administrator’s Guide
Write Types Describe Flushing Activity
Data is always written to the primary chunk first. If a mirror chunk is
associatedwiththeprimarychunk,thewriteisrepeatedonthemirrorchunk.
The write to the mirror chunk is also included in these counts.
Refer to page 5-17 for a discussion of tuning OnLine performance by
monitoring write-type statistics.
Refer to page 7-87 for information about monitoring write types (and buffer
flushing) using tbstat -F.
Sorted Write
AnyOnLineprocessthatiswritingmorethanonepagetothesamedisksorts
the pages into disk sequence and writes the pages in disk-sequence order.
(The disk-sequence information is contained in the physical address of the
page, which is contained in the page header.) This technique is referred to as
asorted write.
Sorted writes are more efficient than either idle writes or foreground writes
because they minimize head movement (disk seek time) on the disk. In
addition, a sorted write enables the page cleaners to use the big buffers
during the write, if possible. (Refer to page 2-55 for more information about
big buffers.)
Chunk writes, which occur during checkpoints, are performed as sorted
writes.(Chunk writes arethemost efficient writes available to OnLine. Refer
to page 2-77.)
Idle Write
Writes that are initiated by the page cleaners are called idle writes. The page-
cleaner daemon wakes periodically and searches through the MLRU queues
to determine if the number of modified buffers is equal to or greater than the
value represented by LRU_MAX_DIRTY.
If a page cleaner determines that the buffer pool should be flushed, it marks
a page for flushing, flushes the page (after first checking to determine if the
physical log buffer must be flushed first), and then rechecks the percentage.
This process repeats until the number of modified buffers is less than the
value represented by LRU_MIN_DIRTY.

System Architecture 2-77
Write Types Describe Flushing Activity
If OnLine is configured for more than one page-cleaner daemon process, the
LRU queues are divided among the page-cleaner daemons for more efficient
flushing.
Foreground Write
If a database server process searches through the FLRU queues and cannot
locate an empty or unmodified buffer, the server process itself marks a page
forflushing.Iftheserverprocessmustperformbufferflushingjusttoacquire
a shared-memory buffer, performance can suffer. Writes that the server
process performs are called foreground writes. Foreground writes should be
avoided. If you find that foreground writes are occurring, increase the
number of page cleaners or decrease the value of LRU_MAX_DIRTY. (Refer to
page 5-17 for more information about tuning the values of the page-cleaner
parameters.)
LRU Write
Foreground writes alert the master daemon, tbinit, that page cleaning is
needed. Once alerted, the tbinit daemon wakes the page cleaners or, if none
have been allocated in this OnLine configuration, the tbinit daemon begins
pagecleaning. An LRU writeoccurs as a resultoftbinit prompting,insteadof
as a result of the page cleaners waking by themselves.
Chunk Write
Chunk writes are performed by page cleaners during a checkpoint or when
every page in the shared-memory buffer pool is modified. Chunk writes,
which are performed as sorted writes, are the most efficient writes available
to OnLine.
During a chunk write, each page cleaner is assigned to one or more chunks.
Each page cleaner reads through the buffer headers and creates an array of
pointers to pages that are associated with its specific chunk. (The page
cleaners have access to this information because the chunk number is
containedwithinthephysicalpagenumberaddress,whichispartofthepage
header.) This sorting minimizes head movement (disk seek time) on the disk
and enables the page cleaners to use the big buffers during the write, if
possible. (Refer to page 2-55.)

2-78 IBM Informix OnLine Database Server Administrator’s Guide
Writing Data to a Blobspace
In addition, since database server processes must wait for the checkpoint to
complete, the page-cleaner daemons are not competing with a large number
ofprocessesfor CPU time. As a result,thepage cleaners can finish theirwork
with less context switching.
Big-Buffer Write
Each OnLine big buffer is the size of eight regular buffers, or eight times
BUFFSIZE. Whenever multiple pages to be written to disk are physically
contiguous,OnLineusesabigbuffertowriteuptoeightpagesinasingleI/O
operation. Refer to page 2-55 for more details about the big buffers.
Writing Data to a Blobspace
Blobdata(BYTE andTEXTdatatypes)iswrittentoblobspacepagesaccording
toa procedurethatdiffersgreatly fromthe single-page I/O that is performed
whenthe shared-memorybufferpoolis flushed. (Blobdata that is storedina
dbspace is written to disk pages in the same way as any other data type is
written. Refer also to page 2-148 for more information about the structure of
a blobspace blobpage and to page 2-145 for more information about the
structure of a dbspace blob page.)
OnLine provides blobspace blobpages to store large BYTE and TEXT data
types. OnLine does not create or access blobpages by way of the shared-
memorybufferpool.Blobspaceblobpagesarenotwrittentoeitherthelogical
or physical logs.
The reason that blobspace data is not written to shared memory or to the
OnLine logs is that the data is potentially voluminous. If blobspace data
passed through the shared-memory pool, it would dilute the effectiveness of
thepoolbydrivingoutindexanddatapages.Inaddition,themanykilobytes
of data per blobspace blob would overwhelm the space allocated for the
logical log files and the physical log.
Instead, blobpage data is written directly to disk when it is created.
Blobpages stored on magnetic media are written to archive and logical log
tapes, but not in the same method as dbspace pages. (Refer to page 4-22 for
further information about blobspace logging.)

System Architecture 2-79
Writing Data to a Blobspace
At the time that the blob data is being transferred, the row itself may not yet
exist. During an insert, for example, the blob is transferred before the rest of
the row data. After the blob is stored, the data row is created with a 56-byte
descriptor that points to the location of the blob. (Refer to page 2-143 for
further information on blob storage and the blob descriptor that is stored in
the data row.)
During the procedure for writing blob data to a blobspace, OnLine attempts
to perform I/O based on the user-defined blobpage size. If, for example, the
blobpage size is 32 KB, OnLine attempts to read or write blob data in 32,768-
byte increments. If the underlying hardware (such as the disk controller)
cannot transfer this amount of data in a single operation, the UNIX kernel
loopsinternally(inkernelmode)untilthetransferiscomplete.Thefollowing
paragraphs describe this procedure as it occurs when a blob is inserted into
a blobspace.
To receive blob data from the application development tool, the OnLine
server process establishes an open blob for the specific table and row,
meaning that a blob is about to be created.
Aspartofestablishinganopenblob,asetofblobspaceblobbuffersiscreated.
The set is always composed of two buffers, each the size of one blobspace
blobpage. At any time, only one set of blobspace blob buffers can be used to
transfer blobspace blob data. That is, only one user process can transfer
blobspaceblobdatatothediskatatime.Only the OnLine serverprocessthat
established the open blob can gain access to the buffers.
Blobdataistransferredfromtheapplicationdevelopment tool to the OnLine
database server in 1-KB chunks. The server process begins filling the buffers
with the 1-KB pieces and attempts to buffer two blobpages at a time. The
reasonfor the attempttofillbothbuffersis todetermineifthisisthelastpage
to be written or if a forwarding pointer to the next page is needed. If both
buffers fill, the server process learns that it must add a forwarding pointer to
the data in the first blobpage buffer when it is stored.
When the OnLine server process begins writing the first blobspace blobpage
buffer to disk, it attempts to perform the I/O based on the blobpage size, as
explained earlier.
2-80 IBM Informix OnLine Database Server Administrator’s Guide
Writing Data to a Blobspace
The blobspace buffers remain until the OnLine server process that opened
the blob is finished. When the application tool process terminates the server
process, the buffers are also terminated. Figure 2-10 illustrates the process of
creating a blobspace blob.
Figure 2-10
Data is written to a
blobspace without
passing through
shared memory.
Writing Data to a Blobspace:
1.Blobspacedataflowsfromthepipe,throughtemporarybuffersinthedatabaseserverprocess
memoryspace,andiswrittendirectlytodisk.Blobspaceblobpagesareallocatedandtrackedvia
the free-map page. Links connecting the blobpages and pointers to the next blob segments are
created as needed. (Refer to page 2-147.)
2. A record of the operation (insert, update, or delete) is written to the logical log buffer if the
database uses logging. (Refer to page 4-22 for more information about blobspace logging.)
OnLine
Shared
Memory OnLine disk
Blobspace
Private
portion of
virtual
Pipe
1
2
Logical
log
buffer
Database server process
Temporary blob buffer
Application process
Temporary blob buffer

System Architecture 2-81
Disk Data Structures
Disk Data Structures
OnLine achieves its high performance by managing its own I/O. Storage,
search, and retrieval are all managed by OnLine. As OnLine stores data, it
creates the structures it needs to search and retrieve the data later. OnLine
disk structures also store and track control information needed to manage
logging and archiving. OnLine structures must contain all information
needed to ensure data consistency, both physical and logical.
OnLine Disk Space Terms and Definitions
During OnLine operation, either UNIX or OnLine can manage physical disk
I/O. Two terms describe the space:
■Cooked file space, in which UNIX manages physical disk I/O
■Raw disk space, in which OnLine manages physical disk I/O
Physical space managed by OnLine is allocated in four different units:
■A chunk
■An extent
■A page
■A blobpage
Overlying these physical units of storage space, OnLine data is organized
into five conceptual units associated with database management:
■A blobspace
■A dbspace
■A database
■A tblspace
■A table

2-82 IBM Informix OnLine Database Server Administrator’s Guide
OnLine Disk Space Terms and Definitions
OnLine maintains three additional disk space structures to ensure physical
and logical consistency of data:
■A logical log
■A physical log
■Reserved pages
Figure 2-11 on page 2-83 illustrates the relationships among these physical
and logical units of disk space. A basic definition of each unit is provided in
the paragraphs that follow.
Chunk
The chunk is the largest unit of physical disk that is dedicated to OnLine data
storage.The chunk can represent an allocation of cooked disk space or raw
disk space.
If a chunk is an allocation of raw disk space, the name of the chunk is the
name of the character-special file in the /dev directory. In many operating
systems,thecharacter-specialfilecanbedistinguishedfromtheblock-special
file by the letter r, which appears as the first letter in the filename (for
example, /dev/rdsk0a). Space in a chunk of raw disk space is physically
contiguous.
If a chunk is an allocation of cooked disk space, the name of the chunk is the
complete pathname of the cooked file. Since the chunk of cooked disk space
isreservedasanoperating-systemfile, thespaceinthechunkmight ormight
not be contiguous.
Page
All space within a chunk is divided into pages. All I/O is done in units of
whole pages. The size of a page is specified as BUFFSIZE in the configuration
file and cannot be changed.
System Architecture 2-83
OnLine Disk Space Terms and Definitions
Figure 2-11
The logical units of OnLine disk space can be envisioned as overlaying the physical units.
Blob-
page
Initial
extent Add’tl
extent
Blobspace
tblspace
Database UNIX
file
Page - Blob
Page - Index
Page - Data
Dbspace
Chunk
Disk unit
Chunk
Chunk
Chunk
Chunk
Add’tl
extent
Several rules of OnLine space allocation are illustrated here. The chunks that compose a dbspace (or blobspace) need not
becontiguous.Asingledbspacecanincludechunkslocatedincookedandrawfilespace.Adatabasecancontaindatastored
in both dbspaces and blobspaces. A tblspace can span chunks, but extents cannot. The tblspace is a logical concept that
embraces all data that is allocated to a specific table, including regular data and index pages. Pages that store blobs within
a blobspace can be larger than the pages that store blobs within a dbspace.

2-84 IBM Informix OnLine Database Server Administrator’s Guide
OnLine Disk Space Terms and Definitions
Blobpage
Ablobpage is the unit of disk space allocation used to store BYTE and TEXT
data within a blobspace. The size of a blobpage is selected by the user who
creates the blobspace; the size of a blobpages can vary from blobspace to
blobspace. Blobpage is specified as a multiple of BUFFSIZE, the page size
defined in the configuration file. For more information, refer to page 2-147.
A dbspace contains databases and tables. You can store BYTE and TEXT data
within a dbspace, but if the blobs are larger than two dbspace pages, perfor-
mance can suffer.
Thefunctionof the blobspace isto storeonlyBYTE and TEXT data in themost
efficientwaypossible.Blobsassociatedwithseveraldifferenttablesallcanbe
stored within the same blobspace. Blob data that is stored in a blobspace is
written directly to disk and does not pass through shared memory. For more
information, refer to page 2-78.
Dbspace and Blobspace
Adbspaceor blobspace is composed of one or morechunks. When you createa
dbspace or blobspace, you assign to it one or more primary chunks. You can
add more chunks anytime. One of the key tasks of an OnLine administrator
is to monitor the chunks for fullness and anticipate the need to allocate more
chunks to a dbspace or blobspace.
Dbspaces or blobspaces that are mirrored require one mirror chunk for each
primarychunk. As soon asamirrorchunkis allocated, all spaceinthe chunk
appears as full in the status displays output from tbstat -d or the Dbspaces
menu, Info option.
The initial chunk of the root dbspace and its mirror are the only chunks
createdduringdiskspaceinitialization. The initialchunk of the rootdbspace
containsspecificreservedpagesandinternaltablesthatdescribeandtrackall
other dbspaces, blobspaces, chunks, databases, and tblspaces.

System Architecture 2-85
OnLine Disk Space Terms and Definitions
Database
Adatabase resides in the dbspace named in the SQL statement CREATE
DATABASE. If no dbspace is specified, the database resides in the root
dbspace. When a database is located in a dbspace, it means two things:
■The database system catalog tables are stored in that dbspace.
■That dbspace is the default location of tables that are not explicitly
created in other dbspaces.
Users create a table by executing the SQL statement CREATE TABLE. A table
resides completely in the dbspace specified in the SQL statement. If no
dbspace is specified, the table resides in the same dbspace as its database.
Blob data associated with the table can reside either in the dbspace with the
rest of the table data or in a separate blobspace.
Tblspace
The total of all disk space allocated to a table is that table’s tblspace. The
tblspace includes the following pages:
■Pages allocated to data
■Pages allocated to indexes
■Pages used to store blob data in the dbspace (but not pages used to
store blob data in a separate blobspace)
■Bit-map pages that track page usage within the table extents
The pages that belong to the tblspace are allocated as extents. Extents can be
scattered throughout the dbspace where the table resides. For this reason, all
pages that compose the tblspace are not necessarily contiguous within the
dbspace.
Multiple tblspaces can reside in a single dbspace.
Extent
As more rows of data or indexes are added to a table, OnLine allocates disk
spacetoatableinunitsofphysicallycontiguouspagescalledextents.Thefirst
extent allocated to a table is the initial extent. Each subsequent extent is
referred to as a next extent.

2-86 IBM Informix OnLine Database Server Administrator’s Guide
OnLine Disk Space Terms and Definitions
Extents for a single table can be located within different chunks of the same
dbspace. However, extents must be located wholly in one chunk or another;
extents cannot span chunk boundaries. All data within an extent pertains to
a single tblspace.
The initial extent of a table and all subsequent “next” extents may differ in
size. The size of the table extents are specified as part of the SQL statement
CREATE TABLE.
Physical Log
The physical log is a unit of physically contiguous disk pages that contain
“before-images” of pages that have been modified during processing. When
the physical log “before-images” are combined with the most-recentrecords
stored in the logical logs, OnLine can return all data to physical and logical
consistency, up to the point of the most-recentlycompleted transaction. This
is the concept of fast recovery. Refer to page 4-39 for more information about
fast recovery.
Logical Log
The logical log disk space is composed of three or more allocations of physi-
cally contiguous disk pages. Each allocation of space is called a logical log file.
The logical log contains a record of logical operations performed during
OnLine processing. If a database is created with transactions, all transaction
informationis storedinthe logical log files. Referto page 3-13 formoreinfor-
mation about the administrative aspects of the logical log. Refer to page 4-18
for more information about the role of the logical log in logging operations.
(Refertopage 2-153formoreinformationaboutthestructureandcontentsof
the logical log files.)
When the logical log record of operations is combined with the archive tapes
of OnLine data, the OnLine data can be restored up to the point of the most-
recently stored logical log record. This is the concept of a data restore. (Refer
to page 4-45 for more information about the data restore procedure.)

System Architecture 2-87
Structure of the Root Dbspace
Structure of the Root Dbspace
The OnLine configuration file contains the location of the initial chunk of the
rootdbspace.Iftherootdbspaceismirrored,themirrorchunklocationisalso
specified in the configuration file.
As part of disk space initialization, the tbinit daemon initializes the
following structures in the initial chunk of the root dbspace:
■Twelve reserved pages (page 2-95)
■The first chunk free-list page (page 2-103)
■The tblspace tblspace (page 2-104)
■The database tblspace (page 2-107)
■The physical log (page 2-151)
■The logical log files (page 2-153)
■Unused pages
Figure 2-12 illustrates the structures residing in the root dbspace following
disk space initialization. Each of these structures is described in the
paragraphs that follow. To see that your root dbspace follows this organi-
zation, execute the command tbcheck -pe, which produces a dbspace usage
report, by chunk. (The database tblspace does not appear in the tbcheck -pe
output.)
2-88 IBM Informix OnLine Database Server Administrator’s Guide
Structure of the Root Dbspace
Figure 2-12
Structures within
the initial chunk of
the root dbspace
following disk
space
initialization
Reserved pages
Chunk free-list page
Physical log
Root dbspace
(initial chunk)
Unused pages
Logical log files
Database tblspace
Tblspace tblspace
System Architecture 2-89
Structure of a Regular Dbspace
Structure of a Regular Dbspace
After disk space initialization, you can add new dbspaces. When you create
a dbspace, you assign at least one chunk (either raw or cooked disk space) to
the dbspace. This is the initial, primary chunk. Figure 2-13 illustrates the
structure of the initial chunk of a regular (nonroot) dbspace.
When the dbspace is first created, it contains the following structures:
■Two reservedpages (duplicates ofthe first two reservedpagesinthe
root dbspace, page 2-95)
■The first chunk free-list page in the chunk (page 2-103)
■The tblspace tblspace for this dbspace (page 2-104)
■Unused pages
Figure 2-13
Structures within
theinitialchunk of a
regular dbspace,
after the dbspace is
created
Reserved
pages
Chunk free-list page
Tblspace tblspace
Dbspace
(initial chunk)
Unused pages

2-90 IBM Informix OnLine Database Server Administrator’s Guide
Structure of an Additional Dbspace Chunk
Structure of an Additional Dbspace Chunk
You can create a dbspace that comprises more than one chunk. The initial
chunkinadbspacecontainsthetblspacetblspaceforthedbspace.Additional
chunks do not. When an additional chunk is first created, it contains the
following structures:
■Two reservedpages (duplicates ofthe first two reservedpagesinthe
root dbspace, page 2-95)
■The first chunk free-list page (page 2-103)
■Unused pages
Figure 2-14 illustrates the structure of all additional chunks. (The structure
also applies to additional chunks in the root dbspace.)
Figure 2-14
Structures within
additional chunks
of a dbspace, after
the chunk is
created.
Dbspace
(additional chunk)
Reserved
pages
Chunk free-list page
Unused pages

System Architecture 2-91
Structure of a Blobspace
Structure of a Blobspace
After disk initialization, you can create blobspaces.
When you create a blobspace, you can specify the effective size of the blob-
holding pages, called blobpages. The blobpage size for the blobspace is
specified when the blobspace is created as a multiple of BUFFSIZE (the page
size). All blobpages within a blobspace are the same size, but the size of the
blobpagecanvarybetweenblobspaces. Blobpagesizecanbegreaterthanthe
pagesizebecauseblobdatastoredinablobspaceisneverwritten tothepage-
sized buffers in shared memory.
The advantage of customizing the blobpage size is storage efficiency. Within
ablobspace,blobsarestoredinoneormoreblobpages but blobs do notshare
blobpages.Blob storage is mostefficientwhentheblob is equal to,or slightly
smaller than, the blobpage size.
The blobspace free-map pages and bit-map pages are the size specified as
BUFFSIZE, which enables them to be read into shared memory and to be
logged. When the blobspace is first created, it contains the following
structures:
■Blobspace free-map pages (page 2-147)
■The bit map that tracks the free-map pages (page 2-147)
■Unused blobpages
2-92 IBM Informix OnLine Database Server Administrator’s Guide
Structure of a Blobspace or Dbspace Mirror Chunk
Figure 2-15 illustrates the blobspace chunk structure as it appears immedi-
ately after the blobspace is created.
Structure of a Blobspace or Dbspace Mirror Chunk
Each mirror chunk must be the same size as its primary chunk. When a
mirror chunk is created, tbinit schedules a daemon process to immediately
write the contents of the primary chunk to the mirror chunk.
Themirrorchunkcontainsthesame controlstructuresastheprimarychunk.
Adiskspaceallocationreport(tbstat-d)alwaysindicatesthatamirrorchunk
is full and has no unused pages. Even though the chunk free-list page in the
mirror chunk duplicates the chunk free-list page in the primary chunk, all
OnLine output that describes disk space indicates that the mirror chunk is
100 percent full. The “full” mirror chunk indicates that none of the space in
the chunk is available for use other than as a mirror of the primary chunk.
The status remains full for as long as both primary chunk and mirror chunk
are online.
Figure 2-15
Structures within a
blobspace, after the
blobspace is
created. Blobpage
size must be a
multiple of page
size.
Free-map pages
Blobspace
(any chunk)
Unused space initialized as blobpages
Bit map that tracks the free-map pages
System Architecture 2-93
OnLine Limits for Chunks
If the primary chunk goes down and the mirror chunk becomes the primary
chunk, disk space allocation reports will accurately describe the fullness of
the new primary chunk.
Figure 2-16illustratesthemirrorchunkstructureasitappearsafterthechunk
is created.
OnLine Limits for Chunks
The maximum number of chunks that can exist within an OnLine configu-
ration might be operating-system dependent. The maximum value is the
lesser of the following two values:
■Thenumberofchunkentries(pathnames)thatcanfitonapage.(Use
tbcheck -pr to display chunk pathnames. Refer to page 2-100.)
■The maximum number of files a user process can hold open, minus
6. (The maximum number is defined by the operating system.)
OnLineallocatesonepageformaintainingitslistofchunks.OnLineinstalled
on a machine with a 4-KB page size can accommodate twice as many equal-
sized chunk entries as can an OnLine database server installed on a machine
with a 2-KB page.
Figure 2-16
Structures within a
mirror chunk after
the chunk is
created
Number and type of control pages varies,
depending on chunk type.
Generic mirror
chunk
Remainingspace inamirror
chunk is marked as full.
Control pages

2-94 IBM Informix OnLine Database Server Administrator’s Guide
OnLine Limits for Chunks
The size of each chunk entry on the chunk-tracking page is the length of the
chunk pathname plus 29 bytes. The available space on the tracking page is
BUFFSIZE minus 28 bytes. As you calculate the number of possible chunk
entries,rememberthat each chunkentrymightrequireuptothreeadditional
bytes to accommodate 4-byte alignment. In the example calculation that
follows, it is assumed that all chunk pathnames are the same size, 10 bytes,
and the page size is two kilobytes:
Each chunk pathname is 10 bytes.
Additional chunk information requires 29 bytes.
Each chunk entry requires a total of 39 bytes.
For 4-byte alignment, each chunk entry requires a total of 40
bytes.
BUFFSIZE is equal to 2 kilobytes or 2048 bytes.
Space available on the chunk-tracking page
is equal to 2048 - 28 or 2020 bytes.
The maximum number of chunk entries that can fit on the chunk-
tracking page is equal to 2020/40 or 50.
Toavoiddifficultiesthatmightoccurifyourunoutofspaceforchunkentries
or if you start to exceed the maximum number of available files, follow these
suggestions:
■Select short chunk pathnames.
■Create large chunks.
Add chunks only as needed. You can easily add chunks during OnLine
operation. However, if you over-allocate chunks to a blobspace or dbspace
when you first create it, the space remains tied up but unused. You cannot
drop or move individual chunks from a blobspace or dbspace.

System Architecture 2-95
Reserved Pages
Reserved Pages
The first 12 pages of the initial chunk of the root dbspace are reserved pages.
Copies of the first two reserved pages are also found on every other OnLine
chunk.
Each reserved page contains specific control and tracking information used
bytbinit. Below arelistedthe function of each of the 12reservedpages. Each
reserved page is described, by field, in the pages that follow in this section.
Beginning with the third reserved page, PAGE_1CKPT, the pages are
organized into pairs. These pairs become important when tbinit begins to
update the reserved pages as part of the checkpoint procedure.
Duringevery checkpoint, tbinit writes the system identification information
in shared memory to PAGE_PZERO, whether or not that information has
changed since the last checkpoint. Similarly, tbinit always overwrites
PAGE_CONFIG with the configuration file (specified as TBCONFIG).
Order Page Name Page Usage
1 PAGE_PZERO System identification
2 PAGE_CONFIG Copy of configuration file
3 PAGE_1CKPT Checkpoint / logical log tracking
4 PAGE_2CKPT Alternate CKPT page
5 PAGE_1DBSP Dbspace descriptions
6 PAGE_2DBSP Alternate DBSP page
7 PAGE_1PCHUNK Primary chunk descriptions
8 PAGE_2PCHUNK Alternate PCHUNK page
9 PAGE_1MCHUNK Mirror chunk descriptions
10 PAGE_2MCHUNK Alternate MCHUNK page
11 PAGE_1ARCH Archive tracking
12 PAGE_2ARCH Alternate ARCH page

2-96 IBM Informix OnLine Database Server Administrator’s Guide
Reserved Pages
The reserved page checkpoint information is stored in a two-page pair,
PAGE_1CKPT and PAGE_2CKPT. This information changes for each check-
point. During each checkpoint, tbinit writes the latest checkpoint
informationtooneofthepagesinthepair.Duringthenextcheckpoint,tbinit
writesthe information to theother page in thepair. At anypoint, one page in
the checkpoint reserved page pair contains a copy of information written at
the most-recent checkpoint and the other page in the pair contains a copy of
information written at the second most-recent checkpoint.
Thetbinit daemonfollowsadifferentprocedureforupdatinginformationin
the next three reserved page pairs. The tbinit daemon only updates the
dbspace, primary chunk, or mirror chunk reserved pages when a change
occurs. The tbinit daemon learns of a change from flags that are set on the
dbspace, primary chunk, and mirror descriptor tables in shared memory.
During the checkpoint, tbinit checks each shared-memory descriptor table
for a change flag.
If the flag is set, tbinit prepares to write the modified descriptor information
to the appropriate page in the reserved page pair. First, tbinit switches from
the current page (which is the page that received the last write) to the other
page in the pair. Second, tbinit writes the information to the reserved page.
Third,tbinit updatesthefieldsthatcontainthe numbers of the currentpages
for the dbspace, primary chunk, or mirror chunk information. (These fields
are located on the PAGE_1CKPT and PAGE_2CKPT pages.)
The last pair of reserved pages contains archive information. During a check-
point, tbinit always updates one of the pages in the PAGE_1ARCH/
PAGE_2ARCHreserved-pagepair.Thetbinitdaemonalternatesbetweeneach
page in the pair with every checkpoint.
Refer to page 2-72 for a description of the complete checkpoint procedure.

System Architecture 2-97
Reserved Pages
PAGE_PZERO
The first reserved page in the root dbspace is PAGE_PZERO. Below are listed
the PAGE_PZERO fields and definitions. To obtain a listing of the reserved
page, execute the command tbcheck -pr.
PAGE_CONFIG
The second reserved page in the root dbspace is PAGE_CONFIG. This page
contains either a copy of the configuration file specified by $INFOR-
MIXDIR/etc/$TBCONFIG or, if TBCONFIG is not set, the file
$INFORMIXDIR/etc/tbconfig,bydefault.(Refertopage 1-13foralistingofall
configuration file parameters.)
PAGE_CKPT
The third reserved page in the root dbspace is PAGE_1CKPT. The fourth
reserved page, PAGE_2CKPT, is the second page in the pair.
The tbinit daemon uses the checkpoint and logical log file information for
checkpoint processing. The date and time of the last checkpoint, available
from the Force-Ckpt menu, is obtained from this reserved page. (Refer to
page 2-72 for a complete explanation of the checkpoint procedure.)
Field Name Description
Identity IBM Informix OnLine copyright
Database system state Unused
Database system flags Unused
Page size Page size for this machine, in bytes
Date/time created Date and time of disk space initialization
Version number Unused
Last modified timestamp Unused (although a 1 appears)

2-98 IBM Informix OnLine Database Server Administrator’s Guide
Reserved Pages
Below are listed the checkpoint and logical log file tracking fields and defini-
tions. To obtain a listing of the reserved page, execute the command
tbcheck -pr.
Field Name Description
Timestamp of checkpoint Timestamp of the last checkpoint,
displayed as decimal value
Checkpoint time Time the last checkpoint occurred
Physical log begin address Beginning address of the physical log
Physical log size Number of pages in the physical log
Physical log position, Ckpt Physicallocationfor thestart ofthe nextset
of “before-images”
Logical log unique ID ID numberofthe logical logfilestoring the
most-recent checkpoint record
Logical log position, Ckpt Physical location of this checkpoint record
in the logical log file
Dbspace descriptor page Address of the current dbspace reserved
page
Primary chunk descriptor page Address of the current primary chunk
reserved page
Mirror chunk descriptor page Address of the current mirror chunk
reserved page
The following fields display for each OnLine logical log file.
Log file number Number of this logical log file
Logical log file flags:
0x01
0x02
0x04
0x08
0x10
Log file in use
Log file is the current log
Log file has been backed up
Log file is newly added
Log file has been written to archive tape
Timestamp Timestamp when log filled (decimal)
(1 of 2)

System Architecture 2-99
Reserved Pages
PAGE_DBSP
ThefifthreservedpageintherootdbspaceisPAGE_1DBSP.Thesixthreserved
page, PAGE_2DBSP, is the second page in the pair.
The tbinit daemon uses the dbspace page to describe each dbspace and its
current status.
Below are listed the dbspace description fields and definitions. To obtain a
listing of the reserved page, execute the command tbcheck -pr.
Date/time file filled Date and time that this log filled
Unique ID ID number of this logical log file
Physical location Address of this logical log file on disk
Log size Number of pages in this logical log file
Number pages used Number ofpagesused inthislogical logfile
Field Name Description
Dbspace number Dbspace number
Dbspace flags:
0x01
0x02
0x04
0x08
0x10
0x80
Dbspace is not mirrored
Dbspace includes mirror chunks
Dbspace contains a down chunk
Dbspace is newly mirrored
Dbspace is a blobspace
Blobspace has been dropped
First chunk Number of the dbspace initial chunk
Number of chunks Number of chunks in the dbspace
(1 of 2)
Field Name Description
(2 of 2)

2-100 IBM Informix OnLine Database Server Administrator’s Guide
Reserved Pages
PAGE_PCHUNK
TheseventhreservedpageintherootdbspaceisPAGE_1PCHUNK.Theeighth
reserved page, PAGE_2PCHUNK, is the second page in the pair.
The tbinit daemon uses the primary chunk page to describe each chunk, its
pathname, its relation to the dbspace, and its current status.
Below are listed the primary chunk fields and definitions. To obtain a listing
of the reserved page, execute the command tbcheck -pr.
Date/time created Date and time the dbspace was created
Dbspace name Dbspace name
Dbspace owner Dbspace owner
Field Name Description
Primary chunk number Chunk number
Next chunk in dbspace Number of the next chunk in the dbspace
Chunk offset Offset of chunk, in pages
Chunk size Number of pages in the chunk
Number of free pages Number of free pages in the chunk
Dbspace number Number of this chunk’s dbspace
Overhead Free-map page address (blobspace only)
(1 of 2)
Field Name Description
(2 of 2)

System Architecture 2-101
Reserved Pages
PAGE_MCHUNK
The ninth reserved page in the root dbspace is PAGE_1MCHUNK. The tenth
reserved page, PAGE_2MCHUNK, is the second page in the pair.
The tbinit daemon uses the mirror chunk page to describe each mirror
chunk, its pathname, its relation to the dbspace, and its current status.
Belowlisted the mirrorchunkfieldsand definitions. To obtain a listingof the
reserved page, execute the command tbcheck -pr.
Chunk flags:
0x01
0x02
0x04
0x08
0x20
0x40
0x80
0x100
0x200
0x400
Raw device
Block device
UNIX file
Needs sync() to operating system
Chunk is offline
Chunk is online
Chunk is in recovery
Chunk is newly mirrored
Chunk is part of a blobspace
Chunk is being dropped
Chunk name length Length of the chunk pathname
Chunk path Operating system path for chunk
Field Name Description
Primary chunk number Chunk number
Next chunk in dbspace Number of the next chunk in the dbspace
Chunk offset Offset of chunk, in pages
Chunk size Number of pages in the chunk
Number of free pages Number of free pages in the chunk
Dbspace number Number of this chunk’s dbspace
(1 of 2)
Field Name Description
(2 of 2)

2-102 IBM Informix OnLine Database Server Administrator’s Guide
Reserved Pages
PAGE_ARCH
The eleventh reserved page in the root dbspace is PAGE_1ARCH. The twelfth
reserved page, PAGE_2ARCH, is the second page in the pair.
The tbinit daemon uses the archive reserved pages to describe the most-
recent and the second most-recent archives.
Below are listed the archive description fields and definitions. To obtain a
listing of the reserved page, execute the command tbcheck -pr.
Overhead Free-map page address (blobspace only)
Chunk flags:
0x01
0x02
0x04
0x08
0x10
0x20
0x40
0x80
0x100
0x200
0x400
Raw device
Block device
UNIX file
Needs sync() to operating system
Chunk is a mirror chunk
Chunk is offline
Chunk is online
Chunk is in recovery
Chunk is newly mirrored
Chunk is part of a blobspace
Chunk is being dropped
Chunk name length Length of the chunk pathname
Chunk path Operating-system path for chunk
Field Name Description
Archive level Level of this archive (0, 1, or 2)
Real time archive began Date and time of this archive
(1 of 2)
Field Name Description
(2 of 2)

System Architecture 2-103
Chunk Free-List Page
Chunk Free-List Page
Ineverychunk,thepagethatfollowsthelastPreservedpageisthefirstofone
or more chunk free-list pages that tracks available space in the chunk. A
chunkfree-listpage contains the starting page (page offsetintothe chunk) of
each section of free space and the length of the free space measured in
number of pages.
Initially, the chunk free-list page has a single entry. For example, in any
dbspace initial chunk other than root, the starting page number of free space
isthree.Thereservedpagesfillthe first twopages and the chunk freelistfills
thethird.The lengthofthefreespace in thefirstentryisthesizeofthechunk,
minus three pages.
When chunk pages are allocated, the loss of free space is recorded by
changing the starting page offset and the length of the unused space.
When chunk pages are freed (for example, if a table is dropped), entries are
added that describe the starting page and length of each section of newly
freed, contiguous space.
Timestamp archive Timestamp for this archive (decimal)
Logical log unique ID ID number of the logical log file containing the
record of this archive
Logical log position Physical location of this checkpoint record in the
logical log file
Figure 2-17
The chunk free-list
page
follows the
reserved pages in
every chunk.
Field Name Description
(2 of 2)
Reserved pages
Chunk free-list page
Free pages
Chunk
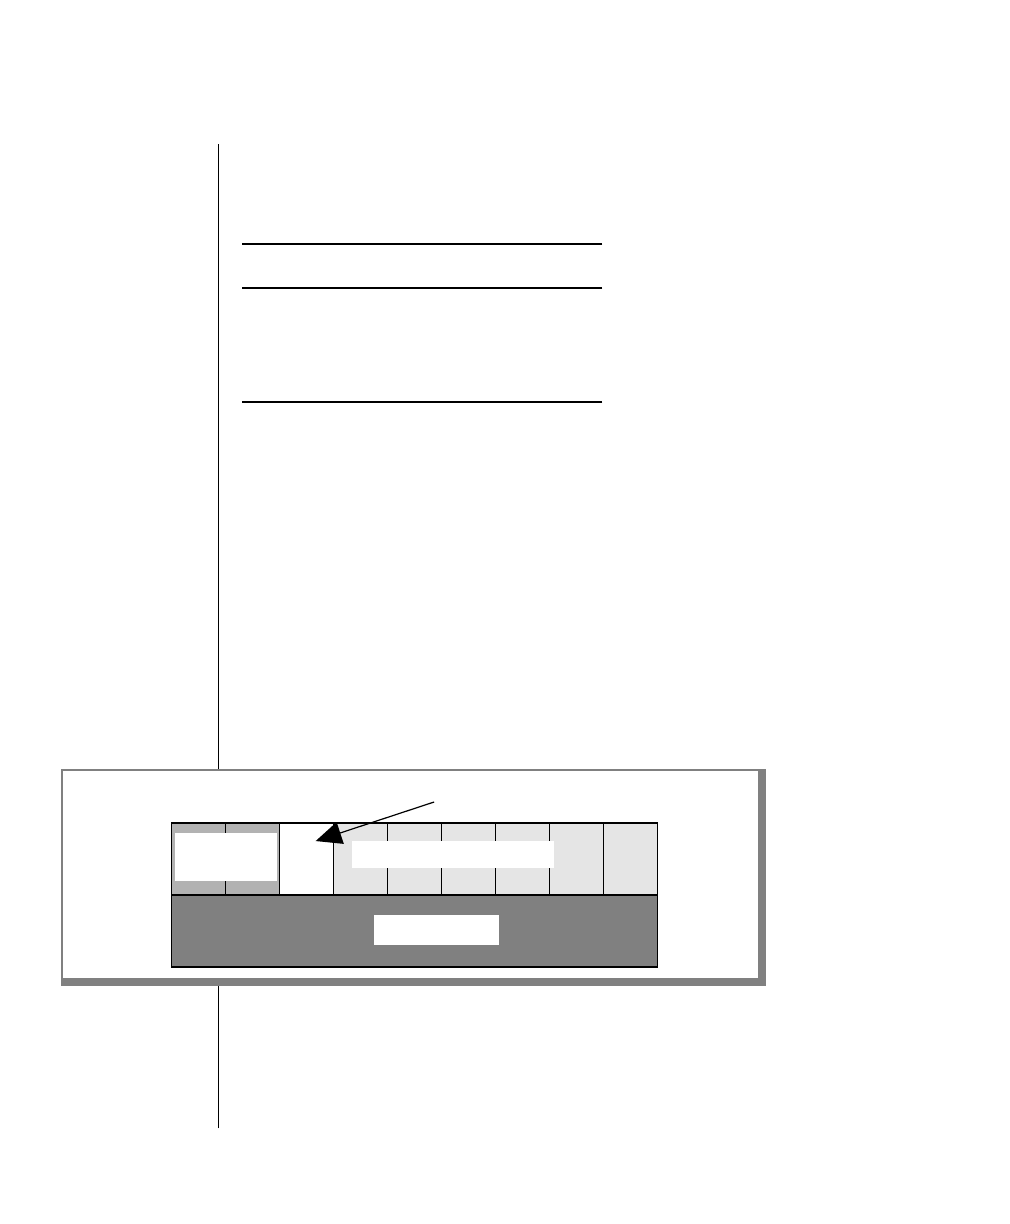
2-104 IBM Informix OnLine Database Server Administrator’s Guide
tblspace Tblspace
Ifnewly freedspace is contiguouswith existing freespace,onlythe length of
the existing entry is changed; otherwise, a new entry is created.
Illustrated here is a sample listing from a chunk free-list page.
If an additional chunk free-list page is needed to accommodate new entries,
anewchunkfree-listpageiscreatedinoneofthefreepagesinthechunk.The
chunk free-list pages are chained in a linked list. Each free-list page contains
entriesthatdescribe all freespacestartingwiththenext page andcontinuing
to the next chunk free-list page or to the end of the chunk.
tblspace Tblspace
Intheinitialchunkofeverydbspace,thepage that followsthechunkfree-list
page is the first page of the tblspace tblspace. The tblspace tblspace is a
collection of pages that describe the location and structure of all tblspaces in
this dbspace. Figure 2-18 illustrates the location of the tblspace tblspace.
Chunk Offset Number of Free Pages
14 28
123 36
208 52
Figure 2-18
The tblspace
tblspace appears in
every dbspace,
following the
reserved pages and
the chunk free-list
page.
Tblspace tblspace
Chunk
Reservedpages
Chunk free-list page
Free pages

System Architecture 2-105
tblspace Tblspace
tblspace Tblspace Entries
Eachdata page inthe tblspace tblspacedescribes one tblspacein the dbspace
and is considered one entry. Entries in the tblspace tblspace are added when
anewtable is created.Thefirstpagein every tblspace tblspaceisa bit mapof
the pages in the tblspace tblspace. The second page is the first tblspace entry,
and it describes itself. The third page describes the first user-created table in
this dbspace. Each tblspace tblspace entry (page) includes the following
components:
Tblspace Number
Each tblspace that is described in the tblspace receives a tblspace number.
This tblspace number is the same value that is stored as the partnum field in
the systables system catalog table. It also appears in a tbstat -t listing.
The tblspace number (partnum) is stored as an integer (4 bytes). The
following SQL query retrieves the partnum for every table in the database
anddisplaysitalongwiththetablenameandthehexadecimalrepresentation
of partnum:
SELECT tabname, partnum, HEX(partnum) hex_tblspace_name FROM systables
Page header 24 bytes, standard page header information
Page-ending timestamp 4 bytes
Tblspace header 56 bytes, general tblspace information available
from a tbcheck -pt display
Column information Each special column in the table is tracked with
an8-byteentry.(Aspecialcolumnisdefinedasa
VARCHAR,BYTE, or TEXT data type.)
Index information Each indexon the table is tracked with a16-byte
entry.
Index column information Each column component in each index key is
tracked with a 4-byte entry.
Extent information Each extent allocated to this tblspace is tracked
with an 8-byte entry.
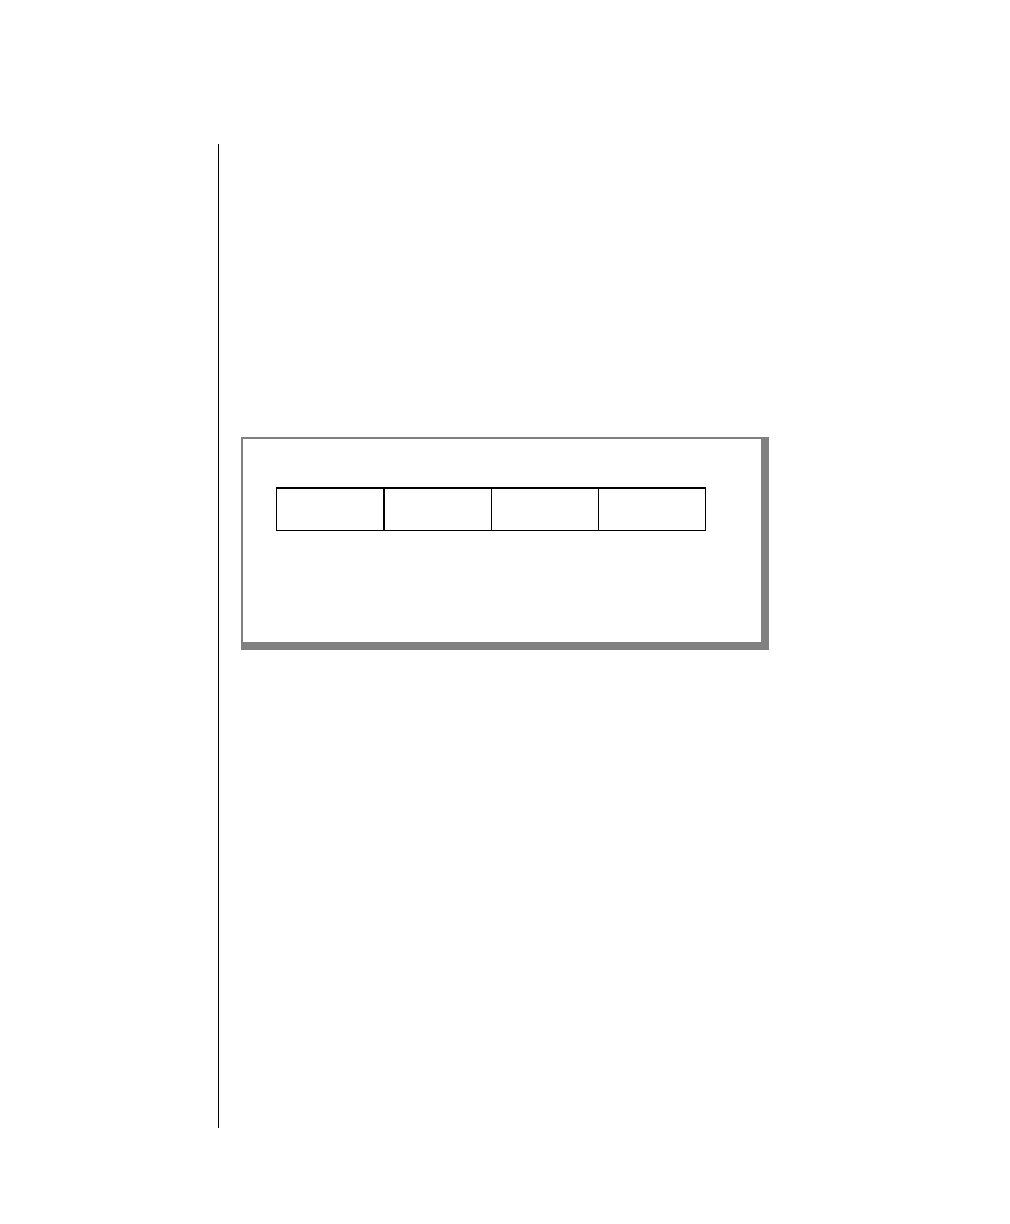
2-106 IBM Informix OnLine Database Server Administrator’s Guide
tblspace Tblspace
The hexadecimal representation of partnum is actually a composite of two
numbers. The most-significant 8 bits indicate the dbspace number where the
tblspaceresides.Theleast-significant24bitsindicatethelogicalpagenumber
where the tblspace is described. Figure 2-19 on page 2-106 illustrates the
elements of a tblspace number.
Logical page numbers are relative to the tblspace. That is, the first page in a
tblspace is logical page 0. (Physical page numbers refer to the address of the
pageinthechunk.)Forexample,thetblspacenumberofthetblspacetblspace
in the root dbspace is always 0x1000001. This means that the root space
tblspacetblspace is alwayscontained in the firstdbspace and onlogical page
1 within the tblspace tblspace. (The bit-map page is page 0.)
tblspace Tblspace Size
The tblspace tblspace pages are allocated as an extent when the dbspace is
initialized.
Usually, the initial size of the tblspace tblspace is 2 percent of the initial
chunk, plus five pages. However, this is not the case if the initial chunk is so
large that the resulting tblspace tblspace would be bigger than a single bit-
map page could manage. In this circumstance, the tblspace tblspace is sized
accordingtothemaximumnumberofpagesthatthesinglebit-mappagecan
manage.
If a database server process attempts to create a table and the tblspace
tblspace is full, the server process allocates a next extent to the tblspace.
Additional bit-map pages are allocated as needed.
When a table is removed from the dbspace, its corresponding entry in the
tblspace tblspace is deleted. The space in the tblspace is released and can be
used by a new tblspace.
Figure 2-19
The tblspace
number is
composed of the
dbspace number
and a page number
in the tblspace
tblspace.
0
31 23
0 - 23 page number within the tblspace tblspace
24 - 31 dbspace number
Tblspace number
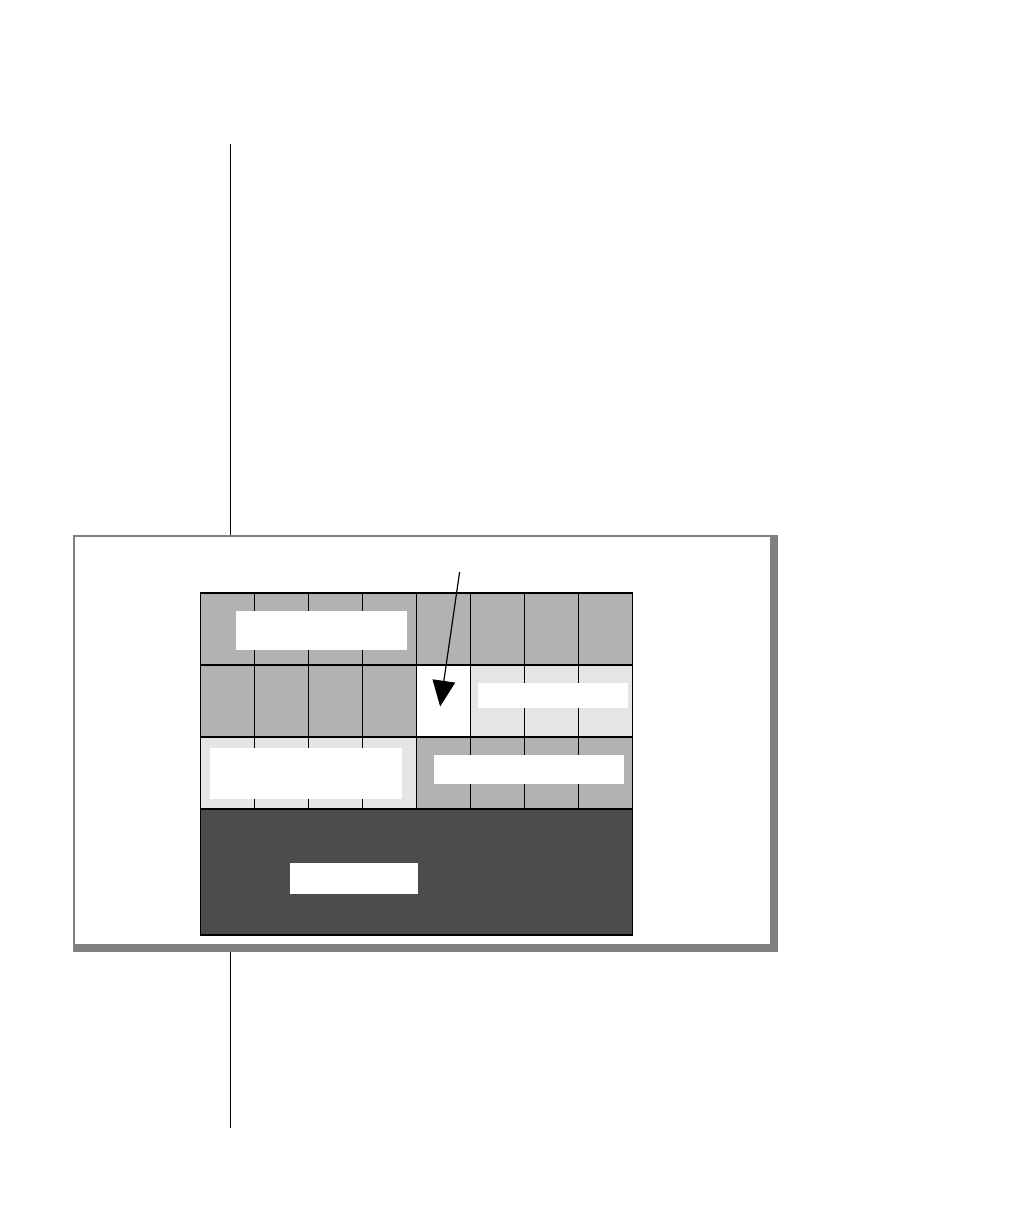
System Architecture 2-107
Database Tblspace
tblspace Tblspace Bit-Map Page
The first page of the tblspace tblspace, like the first page of any initial extent,
isabitmapthatdescribesthepagefullnessofthefollowingpages.Eachpage
that follows has an entry on the bit-map page. If needed, additional bit-map
pagesarelocatedthroughoutthecontiguousspaceallocatedforthetblspace,
arrangedsothateachbitmapdescribesonlythepagesthatfollowit,untilthe
next bit map or the end of the dbspace. The bit-map pages are chained in a
linked list.
Database Tblspace
The database tblspace appears only in the initial chunk of the root dbspace.
The database tblspace contains one entry for each database managed by
OnLine. Figure 2-20 illustrates the location of the database tblspace.
The tblspace number of the database tblspace is always 0x1000002. This
tblspacenumberappearsinatbstat-tlistingifthedatabasetblspaceisactive.
Refer to page 2-104 for more details about the tblspace number.
Figure 2-20
The database
tblspace appears
only in the root
dbspace,
following the
tblspace tblspace.
Reserved pages
Tblspace tblspace
Database tblspace
Chunk-free-list page
Tblspace tblspace
(continued)
Root dbspace initial chunk
free pages

2-108 IBM Informix OnLine Database Server Administrator’s Guide
Create a Database: What Happens on Disk
Each database tblspace entry includes four components:
■Database name
■Database owner
■Date and time the database was created
■The tblspace number of the systables system catalog table for this
database
The database tblspace includes a unique index on the database name to
ensure that every database is uniquely named. For any database, the
systablestabledescribeseachpermanenttableinthedatabase.Therefore,the
database tblspace only points to the detailed database information located
elsewhere. When the root dbspace is initialized, the database tblspace first
extent is allocated. The initial extent size and the next extent size for the
database tblspace are four pages. You cannot modify these values.
Create a Database: What Happens on Disk
After the root dbspace exists, users can create a database. The SQL statement
CREATE DATABASE allowsuserstospecifythedbspacewherethe database is
to reside. This dbspace is the location for the database system catalog tables
and all data and corresponding index information. (Blob data can be stored
in a separate blobspace.)
By default, the database is created in the root dbspace. Users can place the
database in another dbspace by specifying the dbspace name in the CREATE
DATABASE statement.
The paragraphs that follow describe the major events that occur on disk
when OnLine adds a new database.
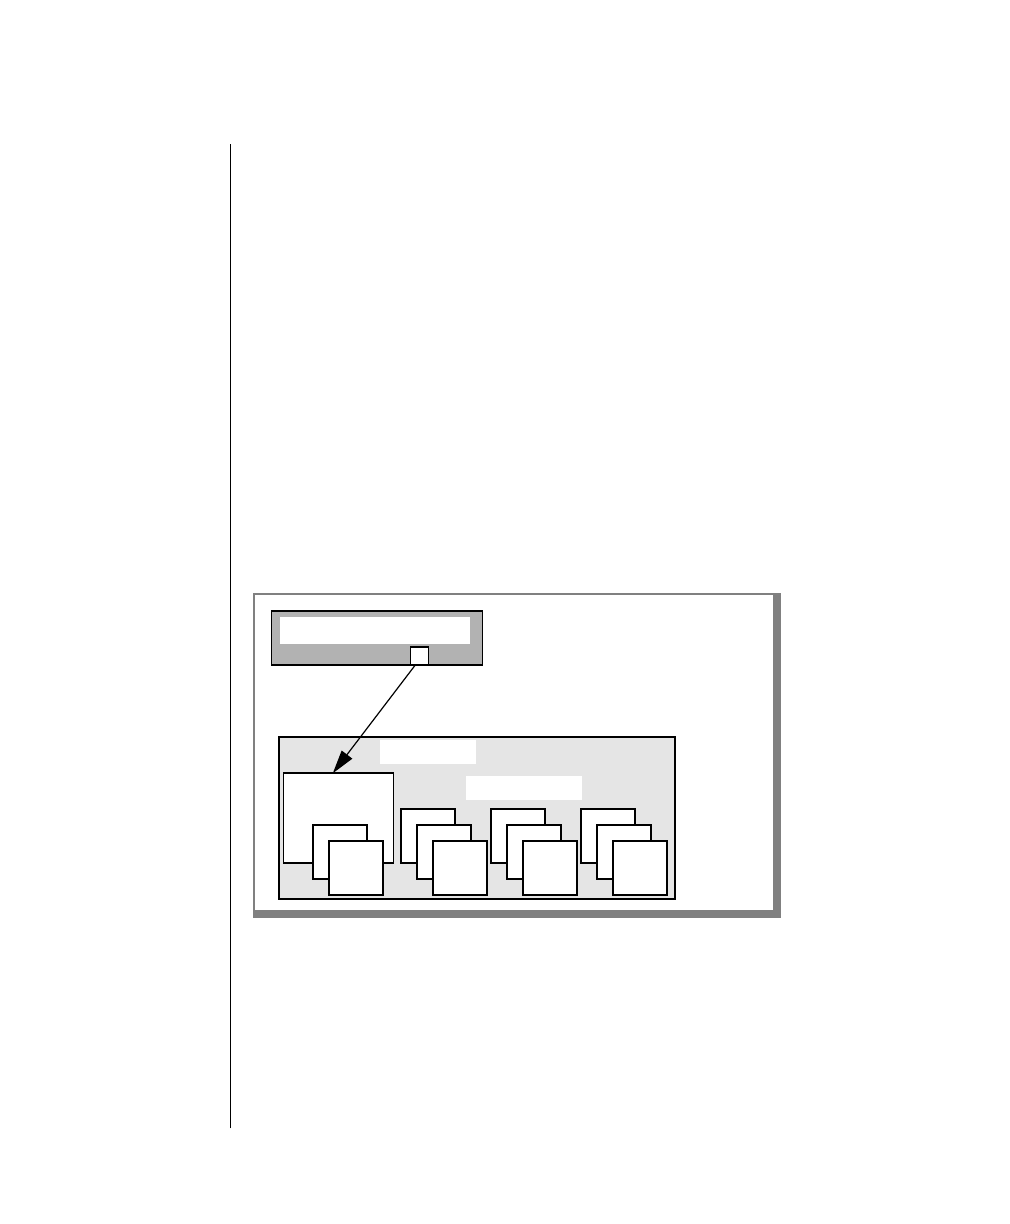
System Architecture 2-109
Create a Database: What Happens on Disk
Allocate Disc Space
OnLine searches the linked list of chunk free-list maps in the dbspace,
looking for free space in which to create the system catalog tables. For each
table in turn, OnLine allocates eight contiguous pages, the size of the initial
extent of each system catalog table. The tables are created individually and
do not necessarily reside next to each other in the dbspace. They might be
located in different chunks. As adequate space is found for the initial extent
of each table, the pages are allocated and the associated chunk free-list page
is updated.
Track Systems Catalogs
Anentrydescribingthedatabaseisaddedtothedatabasetblspaceintheroot
dbspace. For each system catalog table, OnLine adds a one-page entry to the
tblspace tblspace in the dbspace. Figure 2-21 illustrates the relationship
between the database tblspace entry and the location of the systables table
for the database.
Figure 2-21
OnLine tracks
databases in the
database tblspace,
which resides in the
root dbspace.
Anentryinthedatabasetblspacepointsto
the database systables table.
Database tblspace
Tblspacessystables
Dbspace

2-110 IBM Informix OnLine Database Server Administrator’s Guide
OnLine Limits for Databases
OnLine Limits for Databases
The size limits that apply to databases are related to their location in a
dbspace.
Youcanspecifythedbspacewhereadatabaseresides,butyoucannotcontrol
the placement of database tables within the dbspace chunks. If you want to
be certain that all tables in a database are created on a specific physical
device, assign only one chunk to the device and create a dbspace that
contains only that chunk. Place your database in that dbspace. (This also
limits the size of the database to the size of the chunk.)
Tables cannot grow beyond the space available in the dbspace. You can limit
the growth of a table by refusing to add a chunk to the dbspace when it
becomes full.
DB-Monitor displays the first 100 databases you create through the Status
menu,Databasesoption.Althoughyoucancontinuetocreatedatabases,you
are unable to view them through DB-Monitor. It is possible that, without
documentation,youcould lose track ofthe names of theseunseendatabases.
Forthisreason,Informixrecommendsthatyou keep recordsof the databases
you create. Although the tbcheck -pe listing includes all databases, it could
be time-consuming to assemble a database list from the tbcheck -pe output.
Create a Table: What Happens on Disk
After the root dbspace exists and a database has been created, users with the
necessary SQL privileges can create a database table.
The table attributes are specified in the SQL statement CREATE TABLE. Users
can place the table in a specific dbspace by naming the dbspace in the
statement. Otherwise, by default, the table is created in the dbspace where
the database resides.
When users create a table, OnLine allocates disk space for the table in units
called extents.
An extent is a block of physically contiguous pages from the dbspace. The
CREATE TABLE statementcanspecifyasize(inkilobytes)fortheinitialextent
and for every next extent that follows. Otherwise, the default value for each
extentiseightpages.(Refer to page 2-114formoreinformationaboutextents
and to page page 2-117 for more information about next extent allocation.)

System Architecture 2-111
Create a Table: What Happens on Disk
The paragraphs that follow describe the major events that occur when
OnLine creates a table and allocates the initial extent of disk space.
Allocate Disc Space
OnLine searches the linked list of chunk free-list maps in the dbspace for
contiguous free space equal to the initial extent size for the table. When
adequate space is found, the pages are allocated and the associated chunk
free-list page is updated. If space for the extent cannot be found, an error is
returned. (Since an extent is, by definition, contiguous disk space, extents
cannot span two chunks.)
Add Entry to tblspace Tblspace
OnLine adds a one-page entry for this table to the tblspace tblspace in this
dbspace. The tblspace number assigned to this table is derived from logical
page number in the tblspace tblspace where the table is described. (Refer to
page 2-104 for further information about the tblspace tblspace.)
The tblspace number indicates the dbspace where the tblspace is located.
Tblspace extents can be located in any of the dbspace chunks. Execute
tbcheck -pe for a listing of the dbspace layout by chunk if you must know
exactly where the tblspace extents are located.
Add Entry to System Catalog Tables
Thetableitself is fully describedin entries storedinthe system catalog tables
forthe database. Eachtable is assigneda table identificationnumber or tabid.
Thetabid value ofthe first user-definedtablein a databaseis always 100. For
a complete discussion of the system catalog, refer to IBM Informix Guide to
SQL: Tutorial.

2-112 IBM Informix OnLine Database Server Administrator’s Guide
Create a Table: What Happens on Disk
Figure 2-22 illustrates the pointers within the disk data structures that track
and monitor the disk space allocated to a table.
Figure 2-22
A table can be
located in a
dbspace that is
different than the
dbspace that
contains the
database. The
tblspace itself is the
sum of allocated
extents, not a
single, contiguous
allocation of space.
OnLine tracks
tblspaces
independently of
the database.
Tblspace
Tblspace
Tblspace
Tblspace tblspace
Initial extent
Initial extent
Dbspace
Initial extent
Next extent
Initial extent
Tblspace
Dbspace

System Architecture 2-113
Create a Temporary Table: What Happens on Disk
Create a Temporary Table: What Happens on Disk
After the root dbspace exists, users with the necessary SQL privileges can
create an explicit temporary table by executing the SQL statement CREATE
TABLE with the TEMP keyword. During processing, OnLine user processes
may create implicit temporary tables as part of SQL statement processing. If a
user creates a temporary table by executing a SELECT ... INTO TEMP
statement, OnLine handles the table as if it were an explicit temporary table.
Placement
By default, temporary tables are created in the root dbspace.
Users can create explicit temporary tables in some other dbspace by speci-
fying the dbspace name in the CREATE TABLE statement. Users can also
specify sizes of the initial extent and the next extents for an explicit
temporary table in the statement. If initial and next extent sizes are not
specified, the default sizes are eight pages.
Temporary tables created as part of internal processing or by using the
SELECT ... INTO TEMP statement always reside in the root dbspace. For an
implicit temporary table, the initial and next extent sizes are always eight
pages.
Tracking
The tasks involved in creating temporary tables are similar to the tasks
OnLine performs when it adds a new permanent table. The key difference is
that temporary tables do not receive an entry in the system catalog for the
database.(Refertopage 2-110fora descriptionofwhathappenswhenatable
is created.)

2-114 IBM Informix OnLine Database Server Administrator’s Guide
Structure of an Extent
Cleanup
Explicit temporary tables are dropped when the OnLine user process exits.
Implicit temporary tables may be dropped at any time during processing.
Ifthe OnLine database server shuts down without adequate timeto clean up
temporarytables, the tbinit daemonperforms the cleanupas part ofthe next
OnLine initialization. (To request shared-memory initialization without
temporary table cleanup, execute tbinit with the -p option. Refer to page 2-8
for further information about initialization commands.)
Structure of an Extent
An extent is a collection of pages within a dbspace. Every permanent
database table has two extent sizes associated with it. The initial extent size
is the number of kilobytes allocated to the table when it is first created. The
next extent size is the number of kilobytes allocated to the table when the
initial extent, and every extent thereafter, becomes full.
Blobspaces do not employ the concept of an extent.
Refer to page 2-117 for a description of next extent allocation. Refer to
IBM InformixGuide to SQL:Tutorialforspecificinstructions how to specify and
calculate the size of an extent.
Extent Size
The minimum size of an extent is four pages. No maximum limit exists,
although a practical limit is about two gigabytes (or as much space as is
available within the chunk). Extent sizes must be an even multiple of the
page size, specified as BUFFSIZE in the configuration file. The default size of
an extent is eight pages.
The maximum size of an extent is determined by the largest page number
that can be accommodated in a rowid. (Refer to page 2-123 for further infor-
mation about rowids.) Since the page number in a rowid cannot exceed
16,777,215, this is the upper limit of the number of pages that a single extent
can contain.

System Architecture 2-115
Structure of an Extent
Page Types
Within the extent, individual pages contain different types of data. Extent
pages can be separated into five categories:
■Data pages
■Index pages (root, branch, and leaf pages)
■Bit-mappages(a4-bitbitmapifthetablecontainsaVARCHAR,BYTE,
orTEXTdatatypeorifthelengthofonerowisgreaterthanBUFFSIZE;
otherwise, a 2-bit bit map)
■Blob pages
■Free pages
Refer to page 2-120 for further information about the structure of a dbspace
data page. Refer to page 2-133 for further information about the structure of
a dbspace index page. Refer to page 2-142 for further information about the
structure of a dbspace bit-map page. Refer to page 2-145 for further infor-
mation about the structure of a dbspace blob page.
An extent might or might not include all five page types. Each page type
serves a different function within the extent.
Data pages contain the data rows for the table.
Index pages contain the index information for the table.
Bit-map pages contain control information that monitors the fullness of every
page in the extent.
Blob pages contain blobs that are stored with the data rows in the dbspace.
(Blobs that reside in a blobspace are stored in blobpages, a structure that is
completely different than the structure of a dbspace blob page. Refer to
page 2-148 for further information about storing a blob in a blobspace
blobpage.)
Freepagesarepagesintheextentthatareallocatedfortblspaceusebutwhose
function has not yet been defined. Free pages can be used to store any kind
of information: data, index, blob, or bit-map.
Figure 2-23 illustrates the possible structure of a table with an initial extent
size of 8 pages and a next extent size of 16 pages.
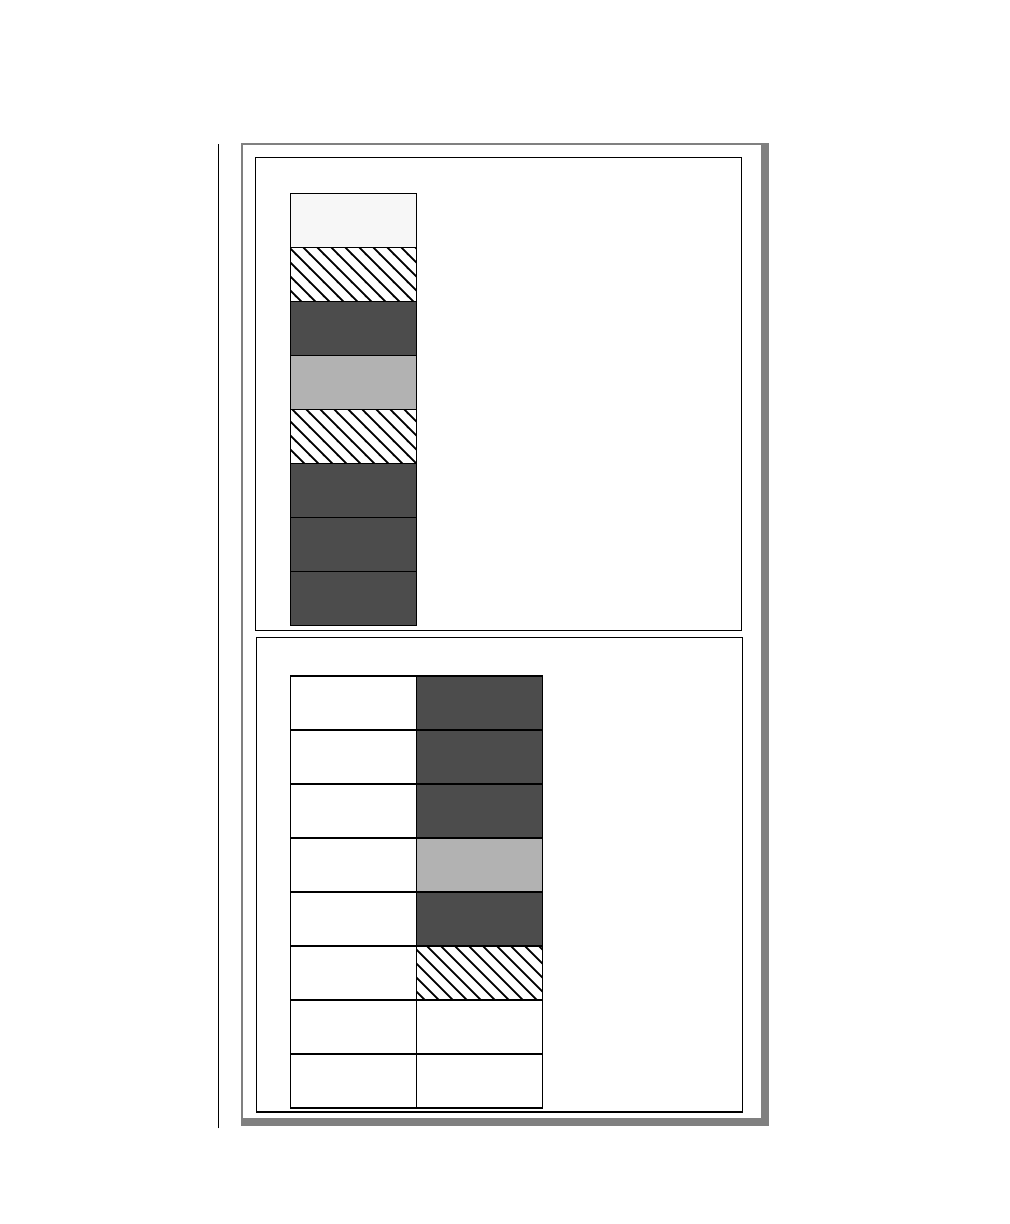
2-116 IBM Informix OnLine Database Server Administrator’s Guide
Structure of an Extent
Figure 2-23
The initial extent
size for this table is
8 pages; the next
extent size is 16
pages. Dbspace
pages remain free
until they are
needed for data
storage.
Bit-map page
Index page
Data page
Blob page
Index page
Data page
Data page
Data page
Next extent
Data page
Blob page
Data page
Data page
Free page
Index page
Data page
Initial extent

System Architecture 2-117
Next Extent Allocation
Next Extent Allocation
When an extent fills, OnLine attempts to allocate another extent of
contiguous disk space.
Extent information is tracked as one component of the tblspace tblspace
information for a table. The maximum number of extents allocated for any
tblspace is application- and machine-dependent since it varies with the
amount of space available on the tblspace tblspace entry. (Refer to
page 2-104.)
The number of kilobytes OnLine allocates for a next extent is, in general,
equal to the size of a next extent, as specified in the SQL statement CREATE
TABLE. However, the actual size of the next extent allocation may deviate
from the specified size because the allocation procedure takes into account
three factors:
■Number of existing extents for this tblspace
■Availability of contiguous space in the chunk and dbspace
■Location of existing tblspace extents
Theeffectof each ofthese factors on next extent allocation isexplained in the
paragraphs that follow and in Figure 2-24 on page 2-119.
If a tblspace already has 64 extents allocated, OnLine automatically doubles
the size of the next extent and attempts to allocate this doubled size for the
65th extent, and every next extent thereafter, up to the 128th next extent.
Automatic doubling of the next extent size occurs at every multiple of 64
(for example, 128, 192, 256). This feature reduces the number of extents
needed to store data for large tables.
If OnLine cannot find available contiguous space in the first chunk equal to
thesizespecifiedfor the next extent, itextendsthesearchintothenextchunk
in the dbspace. Extents are not allowed to span chunks.
If OnLine cannot find adequate contiguous space anywhere in the dbspace,
itallocatestothetablethelargestavailableamountofcontiguousspace.(The
minimumallocationisfourpages.Thedefaultvalueiseightpages.)No error
message is returned if an allocation is possible, even when the amount of
space allocated is less than the requested amount.

2-118 IBM Informix OnLine Database Server Administrator’s Guide
Next Extent Allocation
Ifthediskspaceallocatedforanextextentisphysicallycontiguouswithdisk
spacealreadyallocatedtothesametable,OnLineallocatesthediskspacebut
does not consider the new allocation as a separate extent. Instead, OnLine
extendsthe size of theexistingcontiguous extent. Thereafter, all OnLine disk
spacereportsreflectthe allocation as anextensionof the existing extent.That
is, the number of extents reported by OnLine is always the number of physi-
callydistinctextents,notthenumberoftimesanextextenthasbeenallocated
plus one (the initial extent).
Once disk space has been allocated to a tblspace as part of an extent, that
space remains dedicated to the tblspace. Even if all extent pages become
empty as a result of deleting data, the disk space remains unavailable for use
by other tables.
As OnLine administrator, you can reclaim the disk space in empty extents
and make it available to other users by rebuilding the table. You can accom-
plish this rebuilding in either one of two ways:
■Ifthetablewiththeemptyextentsincludesanindex,youcanexecute
the ALTER INDEX statement with the TO CLUSTER keywords.
Clustering an index rebuilds the table in a different location within
the dbspace. Any extents that remain completely empty after
rebuilding the table are freed and reentered onto the chunk free-list
page.
■If the table does not include an index, you can unload the table, re-
createthe table (eitherinthesamedbspaceorinanother),and reload
the data using OnLine utilities or the UNLOAD and LOAD state-
ments. (For further information about selecting the correct utility or
statement to use, refer to page 4-57.)
System Architecture 2-119
Next Extent Allocation
Figure 2-24
When one extent
fills, another is
automatically
allocated. Because
OnLine considers
several factors
during allocation,
the size of the next
extent may not
always be the size
specified in the
CREATE TABLE
statement.
Chunk 1
Chunk 1
3rd extent Next extent allocation
3rd extent
Chunk 1
3rd extent
Chunk 6
64th extent 65th extent size is doubled
Next Extent Allocation Strategies
Extent sizes double every 64 extents.
Ifthedbspaceistoofulltoaccommodatethenextextentsize,OnLineallocatesthe
largest available contiguous block of disk space.
4th extent
If the next extent is physically contiguous with an existing extent for the same
tblspace, the disk space is treated as a single extent.
Some other tblspace extent
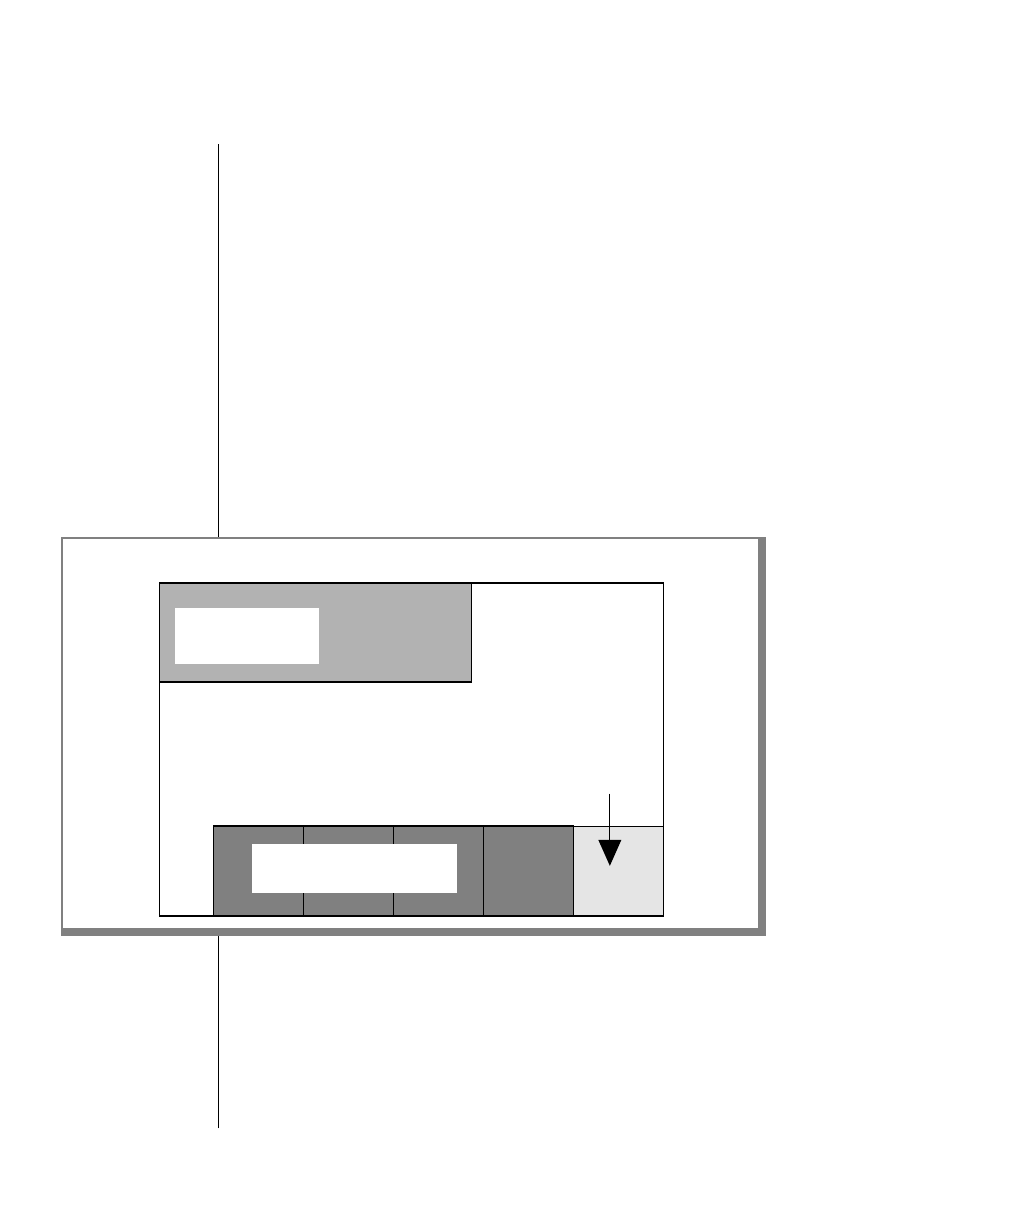
2-120 IBM Informix OnLine Database Server Administrator’s Guide
Structure of a Dbspace Page
Structure of a Dbspace Page
The basic unit of OnLine I/O is a page. Page size might vary among
machines. The page size for your machine is specified as BUFFSIZE in the
configuration file. You cannot modify the page size.
Pages in a dbspace are allocated in a group called an extent. Pages can be
categorized according to the type of information they contain. All pages
managed by OnLine adhere to a similar structure, although the function of
the page can alter slightly the size of structures within the page. Figure 2-25
illustrates the three structures that appear on every OnLine page:
■Page header (24 bytes including one 4-byte timestamp)
■Page-ending timestamp (4 bytes)
■Slot table (4 bytes per entry)
Figure 2-25
Every dbspace page
managed by OnLine
contains three
structures: a page
header, a page-
ending timestamp,
and a a slot table.
Timestamp
(4 bytes)
Page header
(24 bytes)
Page structure
Slot table
(4 bytes per entry)
Free space in the page

System Architecture 2-121
Structure of a Dbspace Page
Page Header
The page header includes six components:
■Page identification number (address of the page on disk)
■Number of slot table entries used on the page (used to calculate
where to locate the next slot table entry)
■Number of free bytes left on the page
■Pointertothecontiguousfreespaceonthepage thatliesbetweenthe
last data entry and the first slot table entry
■Timestamp that changes each time the page contents are modified
■Two index-related pointers (used if the page is used as an index
page)
Timestamp
The page-header timestamp and the page-ending timestamp function as a pair to
validate page consistency. Each time the page contents are modified, a
timestamp is placed in the page header. At the end of the write, the header
timestampiscopiedintothe lastfourbytesonthepage.Subsequentaccess to
the page checks both timestamps. If the two timestamps differ, this inconsis-
tency is reported as a part of consistency checking. (Refer to page 4-6 for
further information about consistency checking errors and corrective
actions.)
Slot Table
The slot table is a string of 4-byte slot table entries that begins at the page-
ending timestamp and grows toward the beginning of the page. The entries
in the slot table enable OnLine user processes to find data on dbspace pages.
Each entry in the slot table describes one segment of data that is stored in the
page.Thenumberoftheslottableentryisstoredasa1-byteunsignedinteger.
Theslottableentriescannotexceed255.Thisistheupperlimitonthenumber
of rows, or parts of a row, than can be stored in a single data page.
The slot table entry is composed of two parts:
■Page offset where the data segment begins
■Length of the data segment

2-122 IBM Informix OnLine Database Server Administrator’s Guide
Structure of a Dbspace Page
For example, in a data page, the slot table entry would describe the page
offset where the data row (or portion of a data row) starts and the length of
the row (or portion of a row). (Refer to the discussion of data row storage,
which begins on page 2-125, for more details about the function of the slot
table.)
Thenumberoftheslottableentryisstoredaspartofthedatarowrowid.The
data row rowid is a unique identifier for each data row. It is composed of the
page number where the row is stored and the number of the slot table entry
that points to that data row.
As part of a rowid, the number of the slot table entry is stored as a 1-byte
unsigned integer. Since the rowid cannot store a slot table entry greater than
255, this is the upper limit on the number of rows than can be stored in a
single data page.
(Refer to page 2-123 for more detailed information about the data row rowid
and the rowid structure.)
The slot table is the only OnLine structure that points to a specific location in
adatapage.For this reason,OnLinecan initiate page compressionwhenever
required, according to internal algorithms. Typically, page compression
changes the location of the data row in the page and, therefore, generates a
newpage offset that iswritten into the slot tableentry. However, thenumber
of the slot table entry remains fixed. Thus all forwarding pointers and
descriptor values that rely on a rowid value remain accurate. Refer to
page 2-132 for more information about page compression.

System Architecture 2-123
Data Row Format and Rowid
Data Row Format and Rowid
OnLine can store rows that are longer than a page. OnLine also supports the
VARCHAR data type, which results in rows of varying length.
Asaresult,rowsdo not conformtoasingleformat.Thefollowingfactsabout
rows must be considered when OnLine stores data rows in a page:
■Rows within a table are not necessarily the same length.
■The length of a row may change when it is modified.
■The length of a row can be greater than a page.
■Blobs are not stored within the data row. Instead, the data row
contains a 56-byte descriptor that points to the location of the blob.
(The descriptor can point to either a dbspace blob page or a
blobspace blobpage.)
Refer to IBM Informix Guide to SQL: Tutorial for instructions about how to
estimate the length of fixed-length and variable-length data rows.
The term rowid refers to a unique 4-byte integer that is a combination of a
page identification number (the logical page number) and the number of an
entry in the slot table on that page. The rowid defines the location of a data
row.(Refertopage 2-121foradefinitionoftheslottableandhow itstoresthe
location of a data row on a page.) The page that contains the first byte of the
datarowisthepagethatisspecifiedbytherowid.Thispageiscalledthedata
row home page.
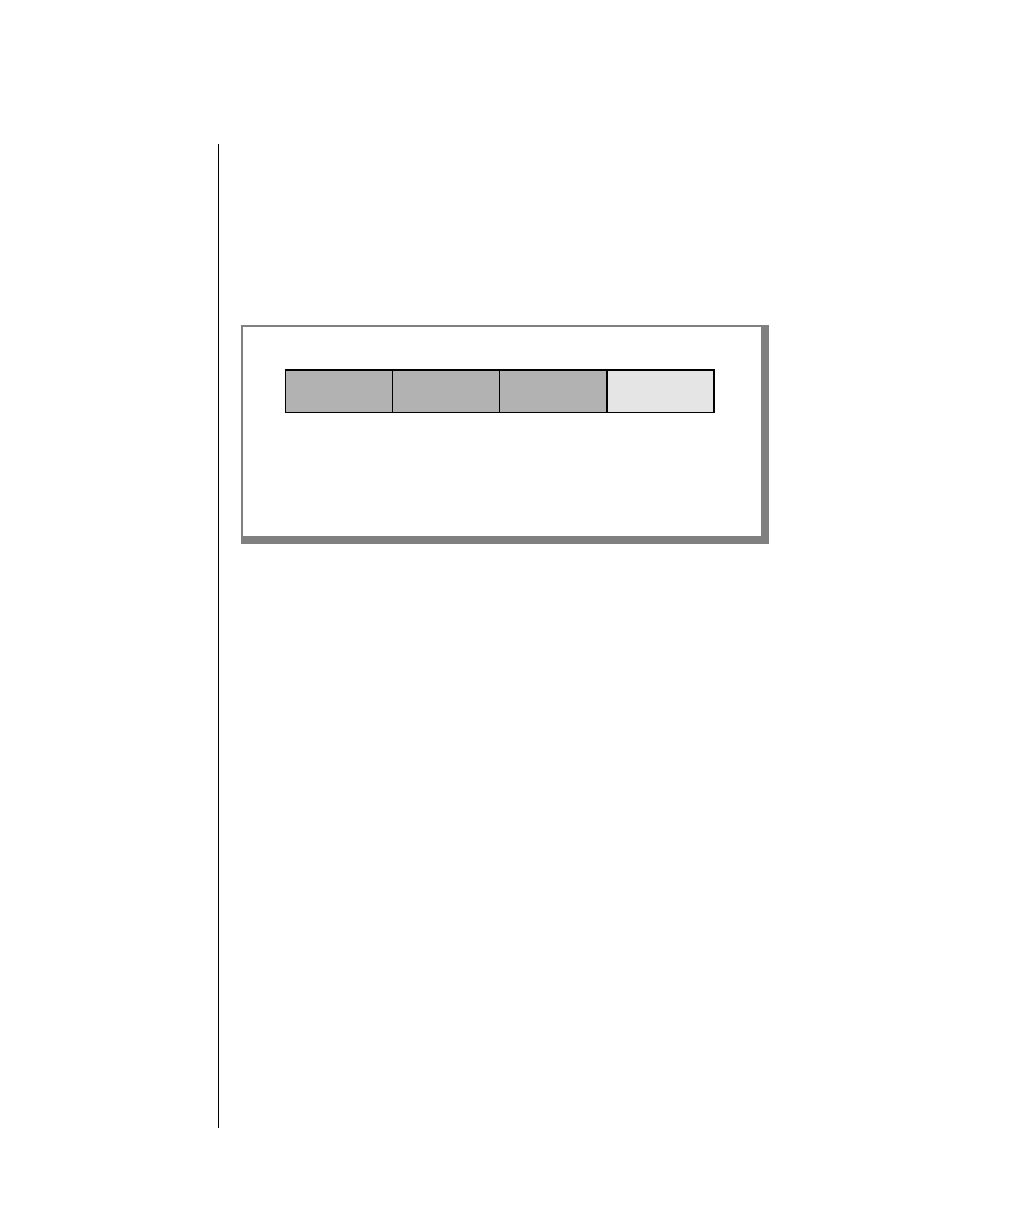
2-124 IBM Informix OnLine Database Server Administrator’s Guide
Data Row Format and Rowid
The rowid structure permits the length of the row and its location on a page
to change without affecting the contents of the rowid. Either change—a
change in length caused by an insert or a delete, or a change in location on
the page caused by OnLine page compression—is reflected in the entry
stored in the slot table. If the page where the data row is stored changes, a
forward pointer is left on the home page. In all cases, the rowid remains
accurate. Figure 2-26 illustrates the rowid format.
Thelogicalpagenumberdescribesthedatarowhomepage.Thelogicalpage
number is stored in the most significant three bytes of the rowid as an
unsigned integer. Logical pages are numbered relative to the tblspace. That
is, the first logical page in a tblspace is page 0. (Physical page numbers refer
totheaddressofthepageinthechunk.)Forexample,ifyoucreateatableand
the resulting initial extent is located in the middle of a chunk, the physical
addressofthefirstpageintheextentrepresentsthelocationinthechunk.The
logical address for the same page is 0. Since the largest number that can be
stored in the rowid is 16,777,215, this is the upper limit of the number of
pages that can be contained in a single tblspace.
Every OnLine data row is uniquely identified by an unchanging rowid. The
rowidisstoredintheindex pages associated with thetable to whichthe data
row belongs. When a database server process requires a data row, it searches
the index to find the rowid and uses this information to locate the requested
row. If the table is not indexed, the database server process may sequentially
read all the rows in the table. Another possibility is that the server process
may build an implicit table that is indexed.
Figure 2-26
The rowid
format permits the
data length and
location on the
page to change
without
affecting the value
of the rowid.
31 - 08 Logical page number where the data is located
0 - 07 Number of the slot table entry on this page
Rowid format
31 07 0

System Architecture 2-125
Data Pages and Data Row Storage
Eventually, a row may outgrow its original storage location. If this occurs, a
forward pointer to the new location of the data row is left at the position
defined by the rowid. The forward pointer is itself a rowid that defines the
page and the location on the page where the data row is now stored. (Refer
to page 2-127 for further information about the role of the forward pointer in
row storage.)
Data Pages and Data Row Storage
The variable length of a data row has consequences for row storage:
■A page may contain one or more whole rows.
■A page may contain portions of one or more rows.
■A page may contain a combination of whole rows and partial rows.
■An updated row may increase in size and become too long to return
to its original storage location in a row.
The following paragraphs describe the guidelines OnLine follows during
datastorage. Refer topage 2-121 for further information about the roleof the
slot table in data storage. Refer to page 2-123 for further information about
the role of the rowid in data storage.
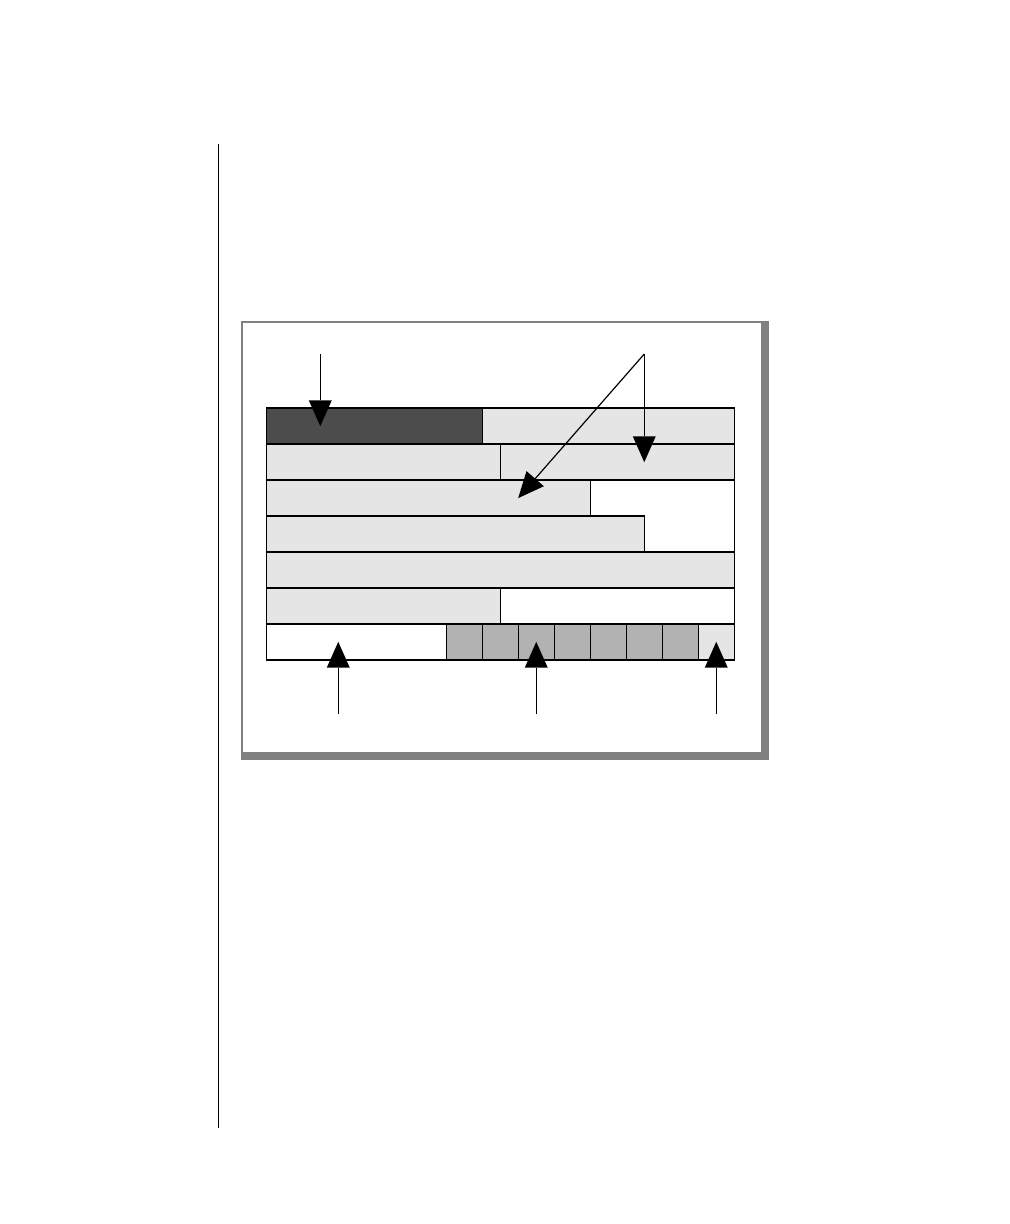
2-126 IBM Informix OnLine Database Server Administrator’s Guide
Data Pages and Data Row Storage
Single-Page Storage
To minimize retrieval time, rows are not broken across page boundaries
unnecessarily. Rows that are shorter than a page are always stored as whole
rows. A page is considered full when the count of free bytes is less than the
number of bytes needed to store a row of maximum size. Figure 2-27 illus-
trates data storage when rows are less than a page.
Figure 2-27
Rows that are
shorter than a page
are stored as whole
rows.
Page header Complete data rows
TimestampSlot table entriesFree space
System Architecture 2-127
Data Pages and Data Row Storage
Multipage Storage
When OnLine receives a row that is longer than a page, the row is stored in
asmany whole pages as possible. The trailing portion is less thana full page.
The page that contains the first byte of the row is the row home page. The
number of the home page becomes the logical page number contained in the
rowid. Each full page that follows the home page is referred to as a big-
remainder page. If the trailing portion of the row is less than a full page, it is
storedonaremainderpage.Figure 2-28illustrates the concepts ofhomepage,
big-remainder page, and remainder page.
When a row is longer than one page but less than two pages, the home row
contains a forward pointer to a remainder page. The forward pointer is
always stored as the first four bytes in the data portion of the page. The
forward pointer contains the rowid of the next portion of the row. A flag
valueis added to theslot table entry ofthe data rowto indicate thata pointer
exists.
When a row is longer than two pages, the home row and each big-remainder
pagecontainforwardpointerstothenextportionofthedatarow.Figure 2-25
illustrates data storage for rows that are longer than two pages.
Figure 2-28
Data rows are
originally stored as
whole-page sized
segments,
measured from the
leading end of the
data row.
Data row represented in whole-page sized segments
Home page
Big-remainder page
Big-remainder page
Remainder page
2-128 IBM Informix OnLine Database Server Administrator’s Guide
Data Pages and Data Row Storage
Figure 2-29
Rows that are
longer than two
pages are stored in
home pages, big-
remainder pages,
and remainder
pages.
Data
Header
Data
Header
Home page Forward pointer
Timestamp
Slot table entry
Data
Big-remainder page
Trailing portion of the data row
Free space
Header
Remainder page
Header
Big-remainder page

System Architecture 2-129
Data Pages and Data Row Storage
Storage of Modified Rows
When a row is modified, OnLine attempts to return the modified row to its
current location. If the row size is unchanged, no changes are needed in the
slot table. If the row is smaller than before, OnLine changes the slot table
entry for this row to reflect the new row length. If the row no longer fits,
OnLine attempts to store the row in another location on the same page. If
OnLine can do this, the slot table entry is changed to reflect both the new
starting offset and the new length of the row.
If the modified data row is shorter than a page but cannot be accommodated
on the current page, a 4-byte forwarding pointer (containing the new rowid)
is stored on the home page. The data row retains its original rowid, which is
stored in the index page. The data is moved to the new page and the space
freed by the move is available for other rows. Figure 2-30 illustrates data
storage if the updated row is too large for the home page but shorter than a
whole page.

2-130 IBM Informix OnLine Database Server Administrator’s Guide
Data Pages and Data Row Storage
If the modified data row is longer than a page, OnLine first begins to divide
the data into whole-page segments, starting from the tail end of the row.
OnLine then attempts to fit the leading segment plus four bytes (for the
forwardpointer)intothe currentlocation of therowonthe home page. If the
leading segment fits, the whole-page tail segments are stored in big-
remainder pages and forwarding pointers are added.
Figure 2-30
Updated rows that
no longer fit in their
original pages but
are shorter than a
full page receive a
forward pointer and
are stored on a
different page.
Modified row
New, longer row after processing
Header
Original row size and location
Header
Forward pointer (rowid) to new location
1. Data storage before data is modified
3. Data storage after data is modified
Newly freed space
Header
2. Data is modified
Modified slot table
entry for data row

System Architecture 2-131
Data Pages and Data Row Storage
If the leading segment cannot fit into the current location of the row on the
home page, OnLine divides the page into whole-page segments again, this
time beginning with the leading end of the row. OnLine stores only a
forwarding pointer in the current page location. The rest of the data row is
stored in whole-page segments on one or more big-remainder pages.
Forward pointers are added to each page. The trailing portion of the row is
storedonaremainderpage.Figure 2-31illustratesstorageofanupdatedrow
that is longer than a whole page.
2-132 IBM Informix OnLine Database Server Administrator’s Guide
Data Pages and Data Row Storage
Figure 2-31
An updated row
that is longer than a
full page can be
stored as a leading
segment, with a
forward pointer to a
big-remainder
page. If the leading
segment does not
fit in the current
page location, the
entire data row is
moved and only a
forward pointer is
left in the current
row position.
Whole-page segment of the modified row
Modified row size is longer than a page
Header
Original row size and location
Header
Forward pointer (rowid) to new location
1. Data storage before data is modified
3. Data storage after data is modified
Leading segment of row
Header
2. Data is modified

System Architecture 2-133
Structure of an Index Page
Page Compression
Over time, the free space on a page can become fragmented. When OnLine
attempts to store data, it first checks row length against the number of free
bytesonapagetodetermineiftherowfits.Ifthereisadequatespace,OnLine
checks to see if the page contains adequate contiguous free space to hold the
row(orrowportion). If the freespace is not contiguous, OnLinecallsforpage
compression.
During page compression, a user process locates a free buffer in the shared-
memory buffer pool and copies to the buffer the data page header and page
timestamp. Then, starting from the first slot table entry, the user process
copies each slot table entry and its associated data, updating the slot table
information as the data is written to the buffer. When the process completes
the rewriting, the newly compressed page is written back to the data page.
As a result, all free space in the data page is contiguous and the row (or row
portion)isstoredaccordingtotheusualprocedureofwritingthedataandits
associated slot table entry.
Structure of an Index Page
OnLine employs a B+ tree structure for organizing table index information.
A fully developed index is composed of three different types of index pages:
■One root node page, which can contain pointers to branch pages,
pointers to leaf pages, or key values and rowids
■One or more branch node pages, which can contain pointers to leaf
pages or key values and rowids
■One or more leaf node pages, which can contain only key values and
rowids
Each type of index page serves a different function. The following
paragraphs describe each page and the role it plays in information storage.
Refer to IBM Informix Guide to SQL: Tutorial for a general discussion of how to
estimate the number of pages needed for a table index.
Refertopage 2-121foradescriptionof the slot table, which appears on every
index page.

2-134 IBM Informix OnLine Database Server Administrator’s Guide
Structure of an Index Page
Figure 2-33 through Figure 2-36 illustrate the progressive creation of a
complete index. A complete index is represented by Figure 2-36, which
displays a root page, four branch pages, and an unspecified number of leaf
pages.
The rules governing index creation, page splitting, and page merging are far
more complicated than the treatment provided in this manual. In addition,
this manual does not include topics such as index-traversing, latching, and
deadlock-avoidance strategies that OnLine employs during modifications.
This section provides general information only. For detailed information
regarding B+ tree operations, refer to the C-ISAM Programmer’s Manual.
When index pages become empty, either because the rows whose keys filled
an index page are deleted or because the index is dropped, the pages are
completely freed. Former index pages remain dedicated to the extent, but
they are marked as free on the extent bit map and are available for
reassignment to store data, blobs, or other index information.
The Root Node Page
When a user creates an index, OnLine creates a B+ tree for the specified table
if data exists in the table. If the table is empty, only the root node page is
created.InthefollowingSQLexample,asimpleascendingindexiscreatedon
the lname column:
CREATE INDEX lastname ON customer (lname)
If you are creating an index on an empty table, the first page of the index is
allocated as part of the statement execution, but it remains empty until data
is inserted into the table. The first page created is called the root node but, in
the beginning, the root node functions like a leaf node. As data is inserted
into the table, the first index page fills with an entry for each key value. The
index key value includes the rowid.
The index key value is composed of two parts:
■Abyte part, which expresses the value of the specified index key
■Arowid part, which contains one or more rowids to data rows that
share the same key value
System Architecture 2-135
Structure of an Index Page
The byte part of the index key value is as long as needed to contain the value
of the index key. If the indexed data is a VARCHAR data type, the calculated
length of the index key is the maximum length plus 1. The additional byte is
a required-length byte, which precedes the VARCHAR data when it is stored
in the database. Therefore, the maximum VARCHAR that can be indexed is
254 bytes.
As an example of an index key value, consider row 101 in the table
stores5:customer. The lname value of row 101 is Pauli. The index key value
for this lname value is composed of a byte entry, Pauli, and a 4-byte rowid
entry for data row 101.
If two or more rows share the same lname value, the rowid part of the index
keyvalueisa list of rowidsforrowsthat sharethiskeyvalue. In this way, the
bytes part remains unique within the index. Figure 2-32 illustrates the
concept of the index key value.
When the first row of data is inserted into a table, the root node index page
receives one index key value and one 2-byte slot table entry. The root node
page serves as a leaf node page until it becomes full.
Figure 2-32
Index key
values contain two
parts: a byte part
and one or more
rowids.
Index key values
rowid
rowid rowid
bytes
bytes
n30
3 07n
2-136 IBM Informix OnLine Database Server Administrator’s Guide
Structure of an Index Page
Figure 2-33representsthisinitialphaseofindexstorage.(Refertopage 2-121
for a general explanation of the function of the slot table. Refer to page 2-121
for more information about the page-header and page-ending timestamp
pair.)
Leaf Node Pages
When the first index page becomes full, the page splits into three pages: one
root node page and two leaf node pages. The root node page now contains
two index key value entries. Each entry is a pointer to the first data that
appears on one of the leaf pages.
In addition, the root page now includes a third entry called the infinity slot.
The infinity slot points to the node that contains all byte values greater than
the last value actually stored at this level. One infinity slot exists at the root
node level and at each branch node level. (Refer to page 2-138 for more infor-
mation about the root node infinity slot.)
Horizontallinksexistbetweenthetwoleafpages.Allnodesonthesamelevel
are horizontally linked, branch-to-branch or leaf-to-leaf. The links are imple-
mented as pointers to the next page. These pointers, which are stored in the
branch or leaf page header, facilitate OnLine sequential reads.
Figure 2-33
The first index page
fills with index key
values and slot
table entries until
there is no room for
an additional index
entry on the page.
At this point, the
first page splits into
three pages.
Page header
Index key values
Slot table entries Timestamp

System Architecture 2-137
Structure of an Index Page
Following is an example of some sample data from the stores5:customer
table that is included in Figure 2-34 on page 2-137 and Figure 2-35 on
page 2-139.
Last Name (lname) Customer number
(customer_num)
Albertson 114
Baxter 118
Beatty 113
Currie 103
Keyes 111
Lawson 112
Lessor 128
Miller 109
Neelie 126
O’Brien 122
Wallack 121
Watson 106
2-138 IBM Informix OnLine Database Server Administrator’s Guide
Structure of an Index Page
Figure 2-34 illustrates the root node page and the two leaf node pages that
result from a split after the root node fills.
Index Key Entries
Figure 2-34 includes index key entries on the root node index page that take
the following form:
■A byte value followed by one address of a branch or leaf node page
■Only a node address (the infinity slot)
In addition, a third form is possible:
■A byte value followed by a rowid, followed by two node addresses
(indicating a range of pages)
These three types of index key entries are described in the paragraphs that
follow. The entry types are illustrated in Figure 2-35 on page 2-139.
When the byte value is followed by a single branch or leaf node address, the
index key entry indicates that only one rowid exists for this byte value. The
byte-addresspair entrypointstothefirstdataslotonthe nodepagespecified
bytheaddress.Thenodepagecanbeeitheraleafnodepageorabranchnode
page.
Figure 2-34
After the root node
page fills, it splits
into two leaf nodes.
The infinity slot
points to the node
that contains all
byte values greater
than the last value
actually stored at
this level. In this
example, the
infinity slot points
to all values greater
than O’Brien.
KeyvaluesfromAlbertsontoMiller,
arranged in byte:rowid entries KeyvaluesfromO’BrientoWatson,
arranged in byte:rowid entries
O’Brien: leaf node address
Page header
Infinity slot
Albertson: leaf node address
Header Header
Root node
Leaf nodes
Horizontal
Link

System Architecture 2-139
Structure of an Index Page
Whenthebytevalueisfollowedbyarowidandtwoaddresses,theindexkey
entry indicates that more than one data row shares the same byte value. The
two addresses are a range of pages. The first address specifies the node page
where the specified rowid (the first rowid with this key value) appears. The
second address points to the last node page that contains a rowid for this
same byte value.
One index key entry on the root node page contains only an address. That
dataslot is referredtoasthe infinity slot.The infinity slot alwayspoints to the
next level beneath, to the node that contains all values greater than the last
value stored at this current level.
In general, the far-right slot (the last one) of the far-right node at every
nonleaf level is an infinity slot.
2-140 IBM Informix OnLine Database Server Administrator’s Guide
Structure of an Index Page
Figure 2-35
To aid
understanding, this
figure uses last
names and
customer numbers
as index key values
instead of a bytes
part and a rowid.
The Tsonga root-
page entry
represents a single-
byte value and
rowid, indicating
the first entry on a
branch page. The
Smith root-page
entry represents a
byte value, rowid,
and two page
addresses,
indicating a range
of pages that
contain rowids for
the same byte
value. The last
entry, 1099,
represents the
infinity slot.
256, 385, 786, 646,
611, 577...
Last Name
(lname) Customer number
(customer_num)
Smith 148, 193, 232, 256, 385, 459,
475, 513, 542, 577, 598, 611,
639, 646, 773. 786,790,821
Tsonga 523
Watson 106
Smith 542, 639, 790,
148, 232, 193... Tsonga 523
Tsonga 1087
Smith 542 1054 1056
1099
459, 475, 513,
193, 821
Watson 106
Root node index page
Branch node index pages
Address 1054 Address 1087
Address 1099
Address 1056

System Architecture 2-141
Structure of an Index Page
Branch Node Pages
Thefirstindexbranchnodeis createdaftertherootnodeandatleasttwoleaf
nodesexist. Regardlessof which page fills first, either the rootnodeorone of
the leaf nodes, the result is the creation of a branch node.
If the root node becomes full, it splits and creates two branch nodes, each
withhalfoftherootnodeentries.Therootnoderetainsonlythreeentries:one
pointer to each of the branch nodes and one to the infinity slot.
If one of the leaf nodes becomes full, it splits into two leaf nodes and one
branch node.
Splitting logic is one of the most complicated aspects of index maintenance.
It is not described in detail here. Figure 2-36 illustrates an index with a root
node, two branch nodes, and several leaf nodes.
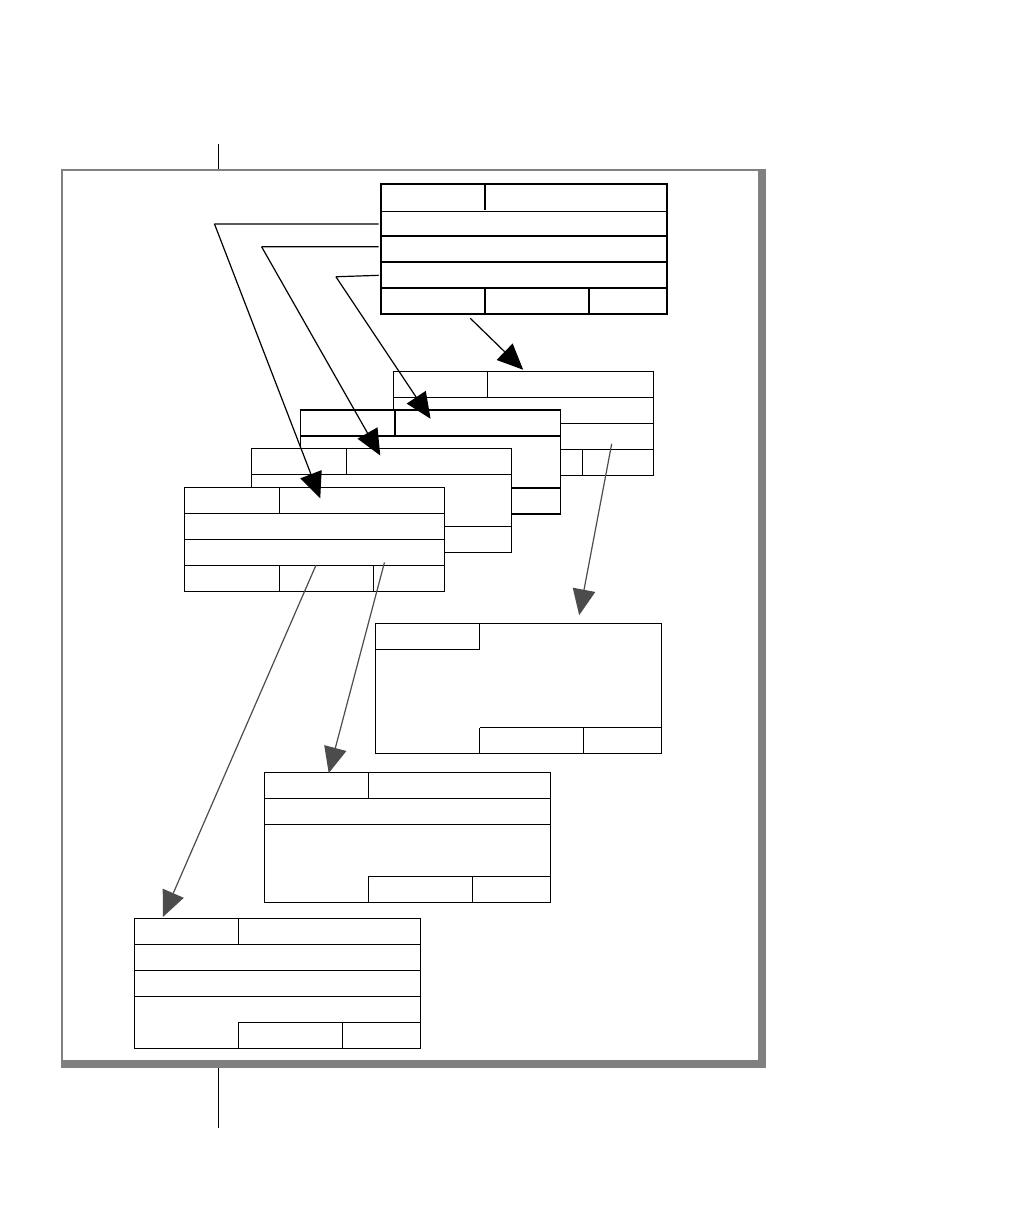
2-142 IBM Informix OnLine Database Server Administrator’s Guide
Structure of an Index Page
Figure 2-36
This representation
of a complete index
includes a root
node, selected
branch nodes, and
selected leaf nodes.
Branch nodes
header node address
header node
header nodeaddress
Leaf nodes
Root node
header node address
header node address
key: node address
key: node address
key: rowid, node, node
key: node address
key: rowid, node, node
le tmstp
tmstp
stp
header key, rowid
rowid, rowid, rowid
rowid, rowid, rowid
rowid, rowid, rowid
header key, rowid
key, rowid
key, rowid, rowid
key, rowid, rowid, rowid
header key, rowid
key, rowid
key, rowid
key, rowid
tmstpinfinity slot table
tmstpslot table
tmstpslot table
tmstpslot table
tmstpslot table

System Architecture 2-143
Structure of a Dbspace Bit-Map Page
Structure of a Dbspace Bit-Map Page
Extentscontainoneormorebit-mappagesthattrackfreepagesintheextent.
Each bit-map entry describes the fullness of one page in the extent. The
number of bit-map pages needed for an extent depends on three variables:
■Number of pages in the extent, which affects the number of bit-map
entries needed
■Page size, which affects the number of bit-map entries that can fit on
a page
■Typeofthebit-mapentries,whichdependsonthetypeofdatastored
on the page
Allbit-map pages are initialized and linkedwhen the extentis allocated. The
bit-map pages are scattered throughout the extent. The first page in the
extent, and every (n +1)th page thereafter, is designated as a bit-map page,
where nis the number of bit-map entries that fit on a single page. The pages
described by a bit-map page can span extents.
OnLine uses two types of bit-map pages, a 2-bit bit-map page (which
contains2-bitentries) and a 4-bitbit-map page (which contains4-bitentries).
2-Bit Bit-Mapped Pages
The 2-bit bit-map pages track available space in extents allocated to tables
that meet two criteria:
■The table contains fixed-length rows that are smaller than a page.
■The table does not contain VARCHAR,BYTE, or TEXT data types.

2-144 IBM Informix OnLine Database Server Administrator’s Guide
Structure of a Dbspace Bit-Map Page
Two bits are all that are needed to describe page fullness for these limited
conditions, as illustrated here.
4-Bit Bit-Mapped Pages
The 4-bit bit-map pages track available space in extents allocated to tables
thatcontainrowslongerthanapage,orrowsthatinclude VARCHAR,BYTE,
or TEXT data types. Four bits are needed to describe all possible combina-
tions of page fullness for these extents, as illustrated below. The terms used
to describe page fullness describe row segments as whole-page,partial-page,
and small. These segment sizes are relative to available free space and are
selected on the basis of performance.
Bit Values Description of Page Fullness
00 Page is unused
10 Page is used completely (index page)
01 Page is partially used (data page)
11 Page is full (data page)
Bit Values Description of Page Fullness
0000 Page is unused
0100 Home data page has room for another data row
1000 Page is used completely (index page)
1100 Home data page is full
0001 Remainder page, can accept whole-page segments
0101 Remainder page, room for partial-page segments
1001 Remainder page, room for small segments
1101 Remainder page, no room for even small segments
0010 Blob page, can accept whole-page segments
(1 of 2)

System Architecture 2-145
Blob Storage and the Blob Descriptor
Blob Storage and the Blob Descriptor
Datarowsthatincludeblobdatadonotincludetheblobdataintherowitself.
Instead, the data row contains a 56-byte blob descriptor that includes a
forward pointer (rowid) to the location where the first segment of blob data
is stored. The descriptor can point to a blob page (if the blob is stored in a
dbspace) or a blobpage (if the blob is stored in a blobspace).
Following is the structure of the 56-byte blob descriptor:
typedef struct tblob
{
short tb_fd; /* blob file descriptor (must be first) */
short tb_coloff; /* Blob column offset in row */
long tb_tblspace; /* blob table space*/
long tb_start; /* starting byte*/
long tb_end; /* ending byte: 0 for end of blob */
long tb_size; /* Size of blob */
long tb_addr; /* Starting Sector or BlobPage */
long tb_family; /* Family Number (optical support)*/
long tb_volume; /* Family Volume */
short tb_medium; /* Medium - one if optical */
short tb_bstamp; /* first BlobPage Blob stamp */
short tb_sockid; /* socket id of remote blob*/
short tb_flags; /* flags */
long tb_sysid; /* optical system identifier*/
long tb_reserved2; /* reserved for the future*/
long tb_reserved3; /* reserved for the future*/
long tb_reserved4; /* reserved for the future*/
} tblob_t;
When a row containing blob data is to be inserted, the blobs are created first.
After the blobs are written to disk, the row is updated with the blob
descriptor and inserted.
0110 Blob page, room for partial-page segments
1010 Blob page, room for small segments
1110 Blob page, no room for even small segments
Bit Values Description of Page Fullness
(2 of 2)

2-146 IBM Informix OnLine Database Server Administrator’s Guide
Structure of a Dbspace Blob Page
Blobs are never modified: only inserted or deleted. When blob data is
updated,anewblobiscreatedandthedatarowisupdatedwiththenewblob
descriptor.Theoldimageofthe rowcontainsthedescriptorthatpoints tothe
obsolete blob value. The obsolete blob is deleted after the update is
committed. Blobs are automatically deleted if the rows containing their blob
descriptors are deleted. (Blobpages that stored a deleted blob are not
available for reuse until the logical log in which the COMMIT logical log
record appears is freed. For more information, refer to page 2-157.)
The largest blob that the blob descriptor can accommodate is (231 - 1), or
about2 gigabytes. This limitis imposed bythe 4-byte integer thatdefines the
sizeoftheblobintheblobdescriptor.Inpractice,blobsizeisprobablylimited
at a size less than 2 gigabytes because of the number of available OnLine
locks that would be required during blob storage.
Structure of a Dbspace Blob Page
Blob data that is stored in the dbspace is stored in a blob page. The structure
of a dbspace blob page is similar to the structure of a dbspace data page. The
only difference is an extra 12 bytes that might be stored along with the blob
data in the data area.
Blobs can share dbspace blob pages if more than one blob can fit on a single
page or if more than one trailing portion of a blob can fit on a single page.
Refer to IBM Informix Guide to SQL: Tutorial for a general discussion of how to
estimate the number of dbspace blob pages needed for a specific table.
Each segment of blob data stored in a dbspace page may be preceded by up
to 12 bytes of information that do not appear on any other dbspace page.
These extra bytes contain up to three pieces of information:
■A 4-byte blob timestamp for this blob segment (required)
■A 4-byte forward pointer (rowid) to the next portion of the blob
segment, if one exists (optional)
■A 4-byte blob timestamp stored with the forward pointer to the next
portion of the blob segment (required if a forward pointer exists)
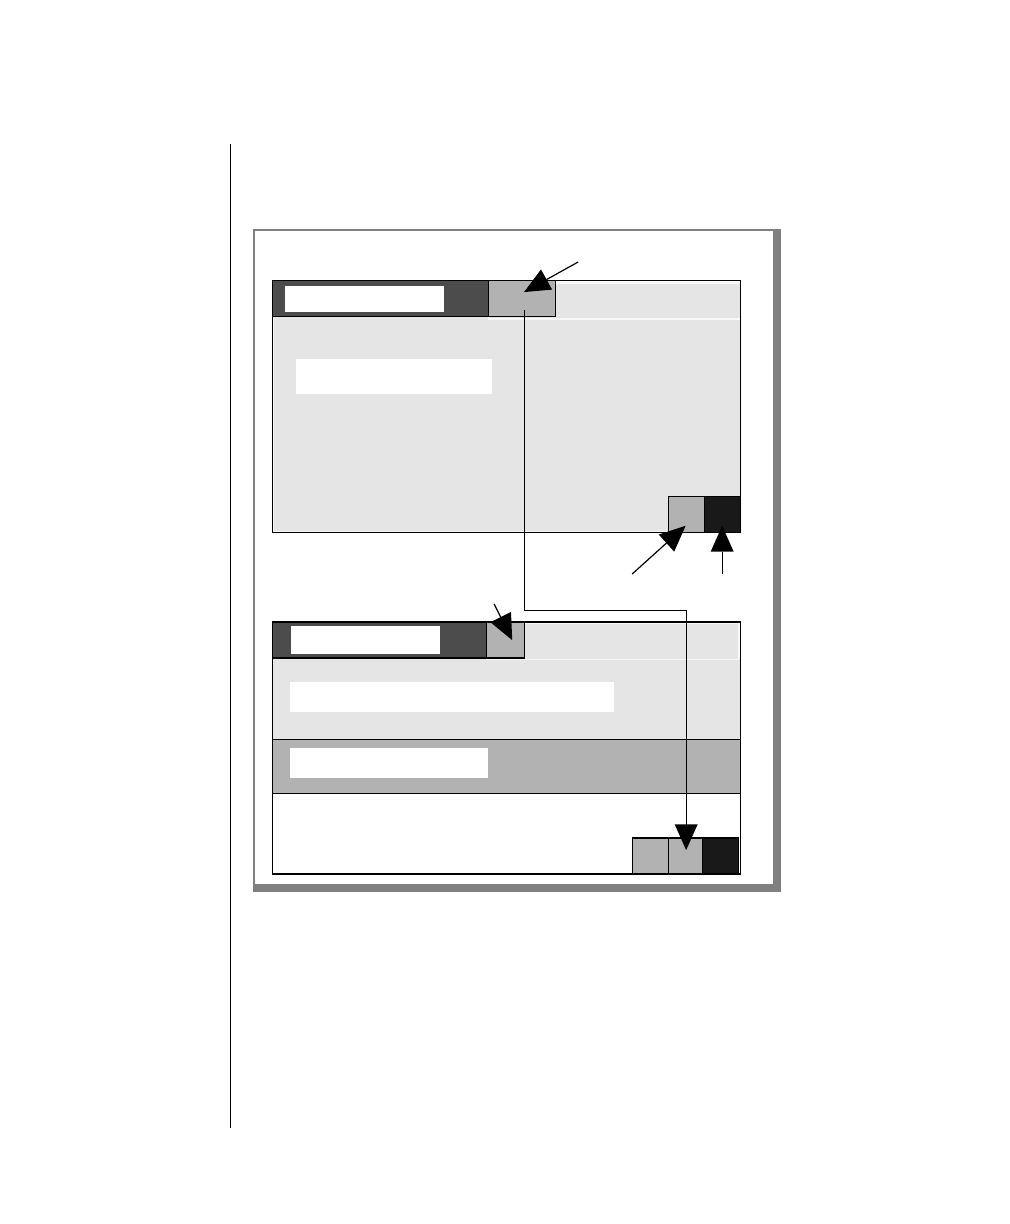
System Architecture 2-147
Structure of a Dbspace Blob Page
For more information about the role of the blob timestamps in maintaining
theconsistencyoftheblobdata,refertopage 2-44.Figure 2-37illustratesblob
data storage in a dbspace.
Figure 2-37
Extra information is
stored with the blob
data. This extra
information
includes a forward
pointer if the blob is
larger than a page.
More than one blob
data segment can
share a dbspace
blob page.
Page header
Blob data segment (first part)
Slot table entry
Blob timestamp and forward-pointer information
Blob data segment (trailing part)
Blob timestamp
Page header
Timestamp
Free space
Blob data segment

2-148 IBM Informix OnLine Database Server Administrator’s Guide
Blobspace Page Types
Blobspace Page Types
Every blobspace chunk contains three types of pages:
■Blobspace free-map page
■Bit-map page (which tracks the blobspace free-map pages)
■Blobpage
Blobspace Free-Map Page
Theblobspacefree-mappagelocatesunusedblobpagesandallocatesthemas
part of blob creation. When a blobpage is allocated, the free-map entry for
that page is updated. All entries for a single blob are linked.
A blobspace free-map page is the size of one page (specified as BUFFSIZE in
theconfigurationfile).Eachentryonafree-mappageis8bytes,storedastwo
32-bit words:
■Thefirstbitinthe first wordspecifieswhethertheblobpageis freeor
used.
■The next 31 bits in the first word identify the logical log that was
current when this blobpage was written. (This is needed for
blobpage logging when the logical log file is backed up. Refer to
page 4-26.)
■The second word contains the tblspace number associated with the
blob stored on this page.
The number of entries that can fit on a free-map page depends on the page
size of your machine. The number of free-map pages in a blobspace chunk
depends on the number of blobpages in the chunk.
Blobspace Bit-Map Page
The blobspace bit-map page tracks the fullness and number of blobspace
free-map pages in the chunk. Each blobspace bit-map page is capable of
tracking a quantity of free-map pages that represent more than four million
blobpages. Each blobspace bit-map page is the size of one page (specified as
BUFFSIZE in the configuration file).

System Architecture 2-149
Structure of a Blobspace Blobpage
Blobpage
Theblobpagecontainstheblobdata.BlobpagesizeisspecifiedbytheOnLine
administrator who creates the blobspace. Blobpage size is specified as a
multiple of the page size: for example, four times BUFFSIZE or 20 times
BUFFSIZE.
(Refertopage 5-5forfurtherinformationaboutselectingblobpagesize.Refer
to page 2-148 for further information about the structure of a blobspace
blobpage.)
Structure of a Blobspace Blobpage
Blobs in a blobspace do not share pages. (This differs from the storage
strategy used to store blobs in a dbspace. Refer to page 2-145.) OnLine does
not combine whole blobs or portions of a blob on a single blobpage. For
example, if blobspace blobpages are 24 KB, each blob that is 26 KB is stored
on two 24-kilobyte pages. The extra 22 KB of space remain unused.
The structure of a blobpage includes a blobpage header, the blob data, and a
page-ending timestamp. The blobpage header includes, among other infor-
mation, the page-header timestamp and the blob timestamp associated with
the forward pointer in the data row. If a blob is stored on more than one
blobpage, a forward pointer to the next blobpage and another blob
timestamp are also included in the blobpage header. (Refer to page 2-44 for
more information about the role of the page-header and page-ending
timestamp pair and the blob timestamp pair.)
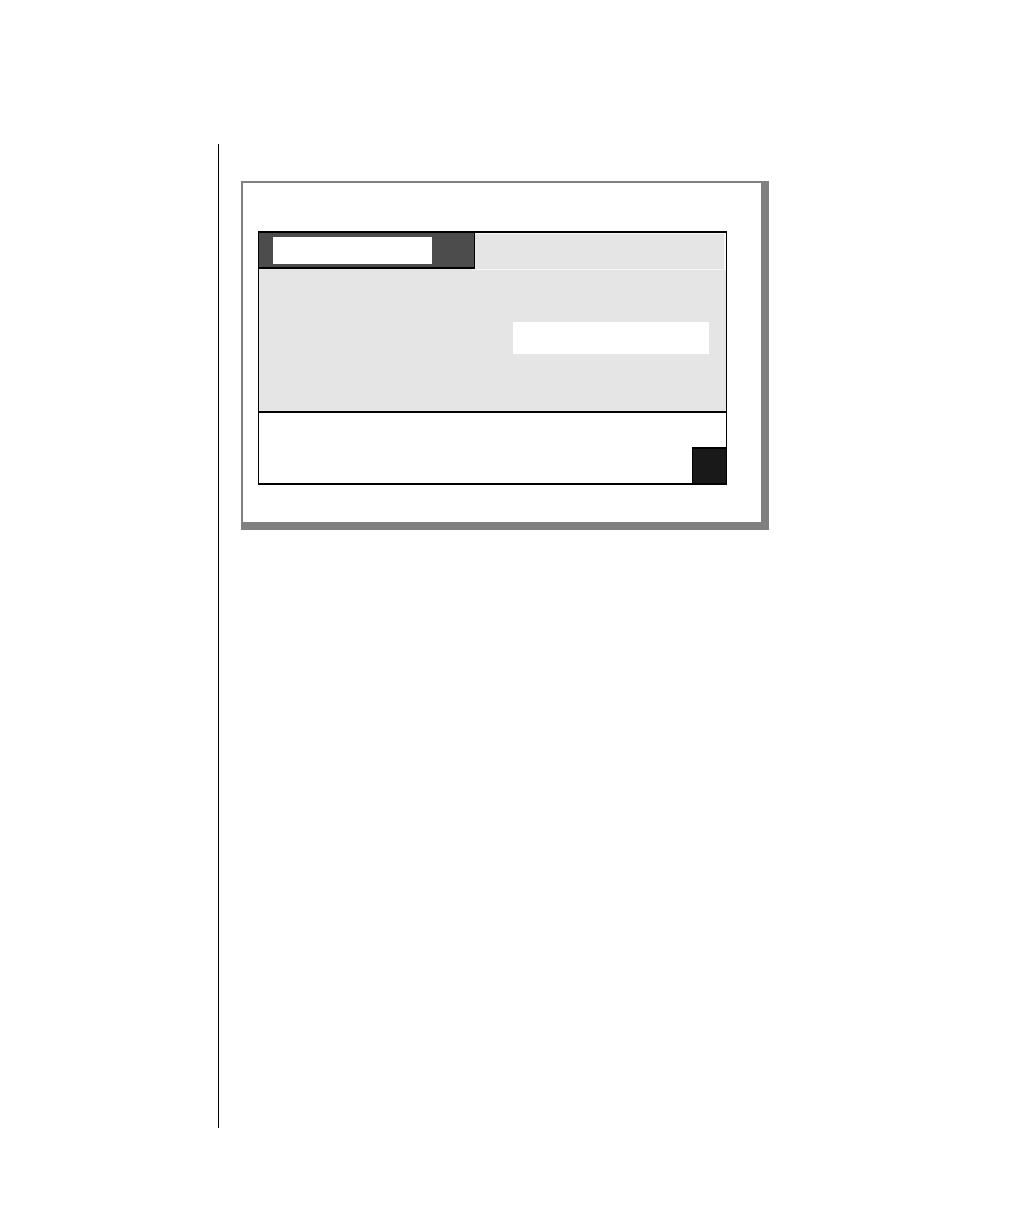
2-150 IBM Informix OnLine Database Server Administrator’s Guide
Structure of a Blobspace Blobpage
Figure 2-38 illustrates the structure of a blobpage.
The blobpage header includes the following information:
■The physical address of the blobpage
■A page-header timestamp that indicates the last time this blobpage
was modified
■A forward pointer to the blobpage that holds the next segment of
blobdataandan associated blob timestamp, ifanextsegment exists;
otherwise, only the current page number appears, indicating this is
the last page
■Ablobtimestampthatdescribesthe lasttimethispagewasallocated
(when blob data was written to the page)
■The size of this blobpage
■A percentage of blobpage fullness
■Auniqueidentifierthatiswrittenwhenablobpageiswrittentotape
(used only during the data restore procedure)
Figure 2-38
General
structure of a
blobpage. The size
of a blobpage must
be a multiple of the
page size.
Blob data segment
Page header
Free space
Timestamp
Blobpage structure

System Architecture 2-151
Structure of a Blobspace Blobpage
Figure 2-39 illustrates the different locations of the two pairs of timestamps
that appear on the blobspace blobpage.
Figure 2-39
Blob
timestamps
register the most-
recent point in time
when this blobpage
was allocated.
Page-header and
page-ending
timestamps
validate page
consistency and
confirm that the
page write was
successful.
Blob timestamp pair
Free space
Blob data segment
Free space
Header
Header
Page-header and page-ending timestamps
Before the blob is overwritten
After the blob is overwritten
003
003
004
Blob data segment
Blob descriptor
74
74
004
96
96
Blob descriptor

2-152 IBM Informix OnLine Database Server Administrator’s Guide
Physical Log
Physical Log
The function of the physical log is to maintain a set of “before-images” of
dbspace pages that represent a time at which all data is both physically and
logically consistent. The physical log “before-images” can be combined with
thelogicallogrecordsoftransactionstorecoveralltransactionsthatoccurred
since the most-recent point of known consistency. The point of known
physical consistency in an OnLine database server system is called a check-
point.ThephysicallogisusedinthefirstphaseoffastrecoverywhenOnLine
returnstheentiresystemtothe state of the most-recent checkpoint (thepoint
of known physical consistency).
For further information about the role of the physical log in fast recovery,
refer to page 4-39. For further information about the checkpoint procedure,
refer to page 2-72.
When OnLine is initialized, the physical log is created in the root dbspace.
After OnLine has been taken to quiescent mode, you can move the physical
log to another dbspace. You may want to do this to try to improve perfor-
mance. Refer to page 1-47.
The location of the physical log is specified in the configuration file
parameterPHYSDBS.Thisparametershould bechangedonlyifyoudecideto
move the physical log file from the root dbspace. Otherwise, the parameter
contains the name of the root dbspace by default.
The size of the physical log is specified, in kilobytes, in the configuration file
parameter PHYSFILE.
For further information about changing the physical log location and size,
refer to page 3-107.
The physical log is a set of contiguous disk pages, each of which contains a
copy of a specific OnLine page. The OnLine pages in the physical log can be
anyOnLine page except a blobspace blobpage. Evenoverheadpages such as
chunk free-list pages, blobspace free-map pages, and blobspace bit-map
pages to the free-map pages are all copied to the physical log before data on
the page is modified and flushed to disk.

System Architecture 2-153
Physical Log
Blobspace blobpages do not appear in the physical log because blobs are
logged differently than all other data types. (For further information about
blobspace logging, refer to page 4-22.)
The first time following a checkpoint that a page is modified, the “before-
image” of the page is written to the physical log buffer in shared memory.
Before the modified page can be flushed to disk from the shared-memory
bufferpool,the“before-image”ofthepagemustbeflushedfromthephysical
log buffer to the physical log. Only the first modification causes a “before-
image” to be written to the physical log. These precise rules are required for
fast recovery. (Refer to page 2-73 for more details about required coordi-
nation for writing “before-images” and flushing the logical log buffer.)
The physical log begins filling after each OnLine checkpoint. Immediately
after the checkpoint occurs, OnLine data is at a point of known physical
consistency,andthephysicallog“before-images”arenolongerneeded.(This
is true even for ongoing transactions. If a transaction must be rolled back, all
the information required for the rollback is contained in the logical log files.)
The checkpoint procedure empties the physical log by resetting a pointer in
the physical log that marks the beginning of the next group of required
“before-images.” OnLine manages the physical log as a circular file,
constantly overwriting unneeded data.
The checkpoint procedure is the only mechanism that empties the physical
log. If the physical log becomes 75 percent full, this event, in itself, initiates a
checkpoint.
The physical log should not fill during a checkpoint if you have followed the
sizing guidelines for the physical log and the logical log files. However, it is
possible to imagine a scenario in which this could occur.
Undernormalprocessing,onceacheckpointisrequestedandthecheckpoint
begins, all user processes are prevented from entering critical sections of
code. (Refer to page 2-27 for more details about critical sections.) However,
user processes currently in critical sections can continue processing. It is
possible for the physical log to become full if many processes in critical
sections are processing work and if the space remaining in the physical log is
very small. The many writes performed as processes completed their critical
section processing could conceivably fill the physical log.

2-154 IBM Informix OnLine Database Server Administrator’s Guide
Logical Log Files
This same unlikely scenario could occur during the rollback of a long trans-
action even after the LTXEHWM is reached. (Refer to page 2-158 for more
details about the long transaction exclusive high-water mark.) After the
LTXEHWM is reached, and after all processes have exited critical sections,
only the database server process that is performing the rollback has access to
the physical and logical logs. However, if many processes were in critical
sections,andifthe space remaininginthe physical log wereverysmall at the
time the LTXEHWM was reached, it is conceivable that the writes performed
as user processes completed their processing could fill the physical log
during the rollback.
Logical Log Files
The function of the logical log is to store a record of changes to OnLine data
since the last OnLine archive. OnLine manages the logical log as three or
more separate allocations of disk space, each of which is referred to as a
logical log file. Each logical log file is associated with a unique identification
number.
Refer to page 3-13 for a listing of logical log administration topics.
Fast Recovery and Data Restore
The logical log records can be applied to the OnLine system to recover all
transactions that occurred since the most-recent point of known physical
consistency. The point of known consistency in an OnLine database server
system is called a checkpoint. The logical log records are used in the second
phase of fast recovery when OnLine returns the entire system to a state of
logical consistency up to the point of the most-recent logical log record.
For further information about the role of the logical log in fast recovery, refer
to page 4-39. For further information about checkpoints, refer to page 2-70.
For further information about how to display the logical log records, refer to
page 7-51.
Backup tapes of the logical log files can be combined with the most-recent
OnLine archives to re-create the OnLine system up to the point of the most-
recent logical log record.

System Architecture 2-155
File Rotation
Forfurtherinformationaboutwhathappensduringa logical logbackupthat
makes this possible, refer to page 4-26. For further information about what
happensduringanOnLinerestorewitharchiveandlogicallogbackuptapes,
refer to page 4-45.
File Rotation
OnLine safeguards the logical log records by requiring that a full logical log
file is marked with a status of used until it is backed up to tape and it is no
longer needed for fast recovery. This second requirement is met if all the
records in the logical log file are associated with closed transactions. If both
oftheseconditionsaremet,thelogicallogfileismarkedwithstatusfree and
it can be overwritten with new logical log records.
During processing, OnLine fills free logical log files in numeric sequence.
When the first logical log file becomes full, OnLine begins to fill the next free
logfile.Ifthestatusofthenextlogfileinthesequenceisused insteadoffree,
normalOnLineprocessingissuspended.OnLinecannotskiptheusedlogfile
and begin filling some other, free log file. It is the OnLine administrator’s
responsibility to ensure that free logical log files are always available during
processing.
OnLine requires a minimum of three logs to facilitate the rotation of the
logicallogfiles.Whileone log file receivesthecurrentrecords,OnLinemight
be backing up another log to tape. The third log is needed in case the current
log fills before the backup is complete. (This is similar to the strategy that is
used with the three logical log buffers.) (Refer to page 3-27 for more infor-
mation about logical log ID numbers and logical log file numeric sequence.
Refer to page 3-39 for more information about how to free a logical log file.)
The logical log backup tape is labeled with the unique number of the logical
logitcontains. The logical logID numbers incrementeach time a logisfilled.
For example, in an OnLine configuration that contains three logical logs, the
log files receive the identification numbers 1, 2, and 3. The first time that
logical log file 1 is freed for reuse, it becomes logical log 4. The second time,
it will become logical log file 7. (For further information about logical log
identification numbers and logical log backup, refer to page 3-27.)

2-156 IBM Informix OnLine Database Server Administrator’s Guide
File Contents
File Contents
The logical log files contain five types of records:
■SQL data definition statements for all databases
■Record of a checkpoint
■Record of a change to the configuration
■SQL data manipulation statements for databases that were created
with logging
■Record of a change to the logging status of a database
The logical log files receive the first three types of records during processing
evenifnodatabasesarecreatedwithtransactionlogging.Logicallogrecords
can span OnLine pages, but they cannot span logical log files.
Number and Size
The configuration file contains two parameters that describe the logical log
files:
■LOGFILES specifies the number of logical log files.
■LOGSIZE specifies the size of each logical log file.
AsOnLine administrator, youdecide on the optimum total size ofthe logical
log: LOGFILES *LOGSIZE. The optimum size for the logical log files in your
OnLine environment is based on the length of individual transactions. Your
goal is to reduce the likelihood that any single transaction will span a large
percentage of logical log space, creating a long transaction error. (Refer to
page 2-158.)
When OnLine is initialized, the logical log files are created in the root
dbspace.
After OnLine has been taken to quiescent mode, you can drop one or more
logicallog files fromtherootdbspaceandadd one or morelogical log files to
another dbspace. You might want to do this to try to improve performance.
(Refer to page 1-47.)

System Architecture 2-157
Number and Size
You cannot change the size of the logical log files after OnLine disk space is
initialized. If a logical log file is dropped, the disk space formerly occupied
by the file is freed and added to the chunk free-list page.
For further information about logical log management and administration,
refer to page 3-13.
As OnLine administrator, you determine the size of each logical log file and
the total disk space allocated for the log.
Theminimumamountofdisk spacethatmustbeallocatedtoeach logicallog
file is 200 KB.
The minimum number of logical log files is three. The maximum number of
logical log files is determined by the number of logical log descriptors that
can fit on a page. For a 2-kilobyte page, the maximum number is about 60.
Four factors influence the size and duration of a single transaction:
■Size of the logical log records
■Length of time the transaction is open
■Activity levels in the CPU and the logical log
■Frequency of transaction rollbacks
The sizes of the logical log records vary, depending on both the processing
operation and the current OnLine environment. In general, the longer the
data rows, the larger the logical log records.
Beyond this, other factors can contribute to the size and duration of a single
transaction.Forexample,asingleALTER TABLE statementgeneratesalogical
log record for each insert into the new, altered table. Both row size and table
size affect the number and length of the logical log records generated. In
other situations, row size is irrelevant. A checkpoint record in the logical log
containsanentry for each opentransactionat the time ofthecheckpoint. The
size of the checkpoint record reflects the level and type of current database
activity, not any specific row size.

2-158 IBM Informix OnLine Database Server Administrator’s Guide
Blobspace Logging
The duration of a transaction is a key variable that might be beyond your
control. An application that does not require much space for logical log
records might generate long transaction errors if the users permit transac-
tions to remain open for long periods of time. The more logical log space is
available, the longer a transaction may be permitted to remain open before a
long-transaction error condition develops. (Refer to page 2-158 for further
information about long transactions.)
The amount of CPU activity can affect the ability of OnLine server processes
tocompletethetransaction.Repeatedwritestothelogicallogfileincreasethe
amount of CPU time each server process needs to complete the transaction.
Increased logical log activity can imply increased contention of logical log
locks and latches as well. (This is the reason you might want to move your
logical log files from the root dbspace to another, less active, dbspace.)
The frequency of rollbacks affects the rate at which the logical log fills. The
rollbacks themselves require logical log file space, although the rollback
recordsaresmall.Inaddition,rollbacksincreasetheactivityinthelogicallog.
The number of logical log files affects the frequency of logical log backups
and, consequently, the rate at which blobspace blobpages can be reclaimed.
Blobspace blobpages emptied after a DELETE statement cannot be freed for
use by other blobs until the log file in which the DELETE statement is occurs
is freed.
Blobspace Logging
OnLine uses the information that is stored in the logical log to help it track
and log blobs stored in a blobspace. This creates some cause-and-effect
relationships that may not be immediately obvious to the administrator. The
method that OnLine uses to log blobspace blobs is described on page 4-22.
(To compare blobspace logging to dbspace logging, refer to page 4-18 for an
overview, and page 4-19 for description of what happens during dbspace
logging.) The paragraphs that follow highlight the interaction between the
logical logs and management of blobspace blobs.
The status of a logical log can affect the availability of disk space in
blobspaces. Even after a transaction that deleted blobs is committed, the
blobspace blobpages that stored those blobs are not marked as free until the
logical log file containing the transaction record is marked as free.

System Architecture 2-159
Long Transactions
To free a logical log, the log must be backed up to tape and all records with
the logical log must be part of closed transactions. If any record in the log is
part of an open transaction, the log file cannot be freed.
The backup strategy for OnLine requires that the statement that creates a
blobspace and the statements that insert blobs into that blobspace must
appear in separate logical log files.
Therefore, after you create a blobspace, you must switch to a new logical log
before you can insert a blob into that blobspace. Execute tbmode -l to switch
to a new logical log.
The blobspace logging procedure affects the way that blobspaces are treated
during an archive. During an archive, the tbtape process blocks allocation of
blobspace blobpages in a chunk until it has read the chunk and archived all
used blobpages therein. As soon as the chunk is archived, blobpage
allocation in that chunk resumes.
One implication of this procedure is that during an online archive, blobs
cannot be inserted into a blobspace until the blobspace chunk has been
archived.Sincechunksarereadandarchivedbytbtape inorderofthechunk
identification numbers, you can minimize this inconvenience by creating
blobspaces early, ensuring them a low chunk ID number.
To understand why the archive must block allocation, referto page 4-30 fora
full description of what happens during an archive.
Long Transactions
A long-transaction condition occurs when the logical log fills past the mark
specifiedbythe first long-transaction high-water mark,LTXHWM. The sourceof
the long-transaction condition is an open transaction that is preventing the
operator from freeing logical log files to create additional free space in the
log. (No log file can be freed if any records in the file are associated with an
open transaction.) The open transaction might not be generating many
logical log records itself; the problem might be the duration of the trans-
action. If the open transaction spans several logical log files, records written
byother processes can fill the logicallog while the open transaction prevents
individual logical log files from becoming free.

2-160 IBM Informix OnLine Database Server Administrator’s Guide
Long Transactions
The second long-transaction high-water mark, LTXEHWM, indicates that the
logical log has filled to a critical level. Most user processes are denied access
to the logical log. Only user processes currently rolling back transactions
(including the long transaction) and database server processes currently
writingCOMMIT recordsareallowedaccessto the logicallog.The intent isto
preserve as much space as possible for rollback records being written by the
user processes that are rolling back transactions.
If LTXHWM is defined as 50, a long transaction condition exists when 50
percent of the logical log space is considered “used.” The problem presented
by the long transaction is this: to increase the amount of free space in the
logical log, you must free one or more of the logical log files. However,
OnLine cannot free a logical log file until all the transactions associated with
the records in the file are closed. If a single transaction stays open for an
extended period of time, OnLine cannot free the log file where that trans-
action began. Because OnLine writes to the logical log files in a sequential
order,if OnLine tries to write in the next log file and findsthatitis“used,”all
OnLine processing is suspended. OnLine cannot skip over a used logical log
file to find another that is free.
When the logical log fills to the high-water mark specified by LTXHWM, the
tbinit daemon begins searching for an open transaction in the oldest, used
(but not freed) logical log file. If a long transaction is found,tbinit directs the
executing database server process to begin to roll back the transaction. More
than one transaction may be rolled back if more than one long transaction
exists.
The transaction rollback itself generates logical log records, however, and as
other processes continue writing to the logical log, the log continues to fill.
Thegoalistofreetheoldestusedlogicallogfilebeforethelogfillstoacritical
point.
As the logical log continues to fill, it might reach a second high-water mark
specified as the exclusive-access, long-transaction high-water mark. This second
boundary is specified by the LTXEHWM configuration file parameter. The
default value of LTXEHWM is 60 percent.
If the logical log files fill to the point defined by LTXEHWM, most OnLine
server processes are denied access to the current logical log file. Only
database server processes that are rolling back transactions are allowed to
write to the file. (If a database server process is currently writing a COMMIT
record or is currently rolling back a transaction, it is allowed to continue.)

System Architecture 2-161
Long Transactions
If the transactions cannot be rolled back before the logical log fills, OnLine
shuts down. If this occurs, you must perform a data restore. During the data
restore, you must not roll forward the last logical log file. Doing so re-creates
the problem by filling the logical log again.


3
Chapter
Operating OnLine
In This Chapter .................... 3-5
Changing Modes ................... 3-6
Types of OnLine Modes ................ 3-6
Offline Mode .................. 3-7
Quiescent Mode ................. 3-7
Online Mode .................. 3-7
Recovery Mode ................. 3-7
Shutdown Mode ................. 3-7
From Offline to Quiescent ............... 3-8
From Offline to Online ................ 3-8
From Quiescent to Online ............... 3-9
Gracefully from Online to Quiescent ........... 3-10
Immediately from Online to Quiescent .......... 3-11
From Any Mode Immediately to Offline .......... 3-12
Logical Log Administration ................ 3-13
Examine Your Logical Log Configuration.......... 3-14
Your Configuration File .............. 3-14
Logical Log File Backups .............. 3-14
Freeing the Logical Log Files ............ 3-15
Verify the Size and Number of Files .......... 3-15
Configuration Parameters.............. 3-16
LTAPEBLK and LTAPESIZE ............. 3-17
Location of Logical Log Files............. 3-18
Change Pathname of Logical Log Tape Device ........ 3-18
Change Block Size of Logical Log Tape Device ........ 3-21
Change Tape Size of Logical Log Tape Device ........ 3-22
Change Maximum Number of Logical Log Files ....... 3-23
Change Size of Logical Log Files ............. 3-24

3-2 IBM Informix OnLine Database Server Administrator’s Guide
Logical Log File Status ................ 3-26
Logical Log File ID Numbers .............. 3-27
Add a Logical Log File ................ 3-28
Drop a Logical Log File ................ 3-30
Move a Logical Log File to Another Dbspace......... 3-31
Change the Logging Status of a Database .......... 3-33
Adding Logging to a Database ............ 3-34
Ending or Modifying Logging from DB-Monitor ...... 3-35
ANSI Compliance ................ 3-36
Back Up a Logical Log File ............... 3-36
Start Continuous Logical Log Backup ........... 3-37
End Continuous Logical Log Backup ........... 3-38
Switch to the Next Logical Log File ............ 3-39
Free a Logical Log File ................ 3-39
Long Transactions ................ 3-40
Status A .................... 3-41
Status U .................... 3-41
Status U-B ................... 3-41
Status U-C ................... 3-41
Status U-B-L .................. 3-41
If the Logical Log Backup Cannot Complete ......... 3-42
Archive Administration ................. 3-43
Archive Types ................... 3-43
Level-0 Archive ................. 3-44
Level-1 Archive ................. 3-45
Level-2 Archive ................. 3-45
Incremental Archive Strategy............. 3-45
How Long Will an Archive Take?............. 3-46
Plan the Archive Schedule ............... 3-47
Minimize Restore Time ............... 3-48
Minimize Archive Time............... 3-49
Online Archives ................. 3-49
Single Tape Drive ................. 3-49
Operator Availability ............... 3-50
Examine Your Archive Configuration ........... 3-50
Your Configuration File............... 3-50
The Archives .................. 3-51
TAPEDEV Configuration Parameter .......... 3-51
TAPEBLK and TAPESIZE .............. 3-52

Operating OnLine 3-3
Change Pathname of Archive Tape Device ..........3-52
Change Block Size of Archive Tape Device ..........3-55
Change Tape Size of Archive Tape Device ..........3-56
Create an Archive, Any Type...............3-57
If the Logical Log Files Fill During an Archive.........3-59
Two Tape Drives..................3-59
One Tape Drive ..................3-60
If an Archive Terminates Prematurely ...........3-60
Monitor OnLine Activity .................3-61
Monitor Archive History ................3-61
Monitor Blobs in a Blobspace ..............3-63
Monitor Blobs in a Dbspace ...............3-65
Monitor Buffers ...................3-66
tbstat -b.....................3-66
tbstat -X ....................3-66
tbstat -B.....................3-67
tbstat -p.....................3-67
Monitor Buffer-Pool Activity...............3-68
tbstat -F.....................3-68
tbstat -R ....................3-69
tbstat -D ....................3-69
Monitor Checkpoints .................3-69
Monitor Chunks ...................3-70
Monitor Configuration Information ............3-73
Monitor Databases ..................3-74
Monitor Dbspaces ..................3-75
Monitor Disk Pages ..................3-77
Monitor Extents ...................3-78
Monitor Index Information ...............3-79
Monitor Logging Activity ................3-80
Monitor the Message Log ................3-82
Monitor OnLine Profile.................3-83
Monitor Shared Memory and Latches............3-84
Monitor Tblspaces ..................3-85
Monitor Users and Transactions..............3-86

3-4 IBM Informix OnLine Database Server Administrator’s Guide
Modify OnLine Configuration ............... 3-87
Create a Blobspace.................. 3-88
Drop a Blobspace .................. 3-91
Change the Number of Buffers in the Pool ......... 3-92
Change the Size of Either Log Buffer ........... 3-93
Add a Chunk ................... 3-94
Change the Maximum Number of Chunks ......... 3-96
Create a Dbspace .................. 3-97
Drop a Dbspace................... 3-99
Enforce/Turn Off Residency for This Session ........3-100
Enforce/Turn Off Residency ..............3-100
Change the Status of a Mirrored Chunk ..........3-101
Enable Mirroring ..................3-104
Start/End Mirroring in a Blobspace or Dbspace........3-105
Preliminary Considerations .............3-105
Start Mirroring..................3-105
End Mirroring ..................3-106
Change Physical Log Location or Size ...........3-107
Change the Checkpoint Interval .............3-109
Change the Destination of Console Messages ........3-110
Change the Maximum Number of Dbspaces .........3-111
Change the Maximum Number of Locks ..........3-112
Change the Maximum Number of Tblspaces.........3-113
Change the Maximum Number of Users ..........3-114
Change the Number of Page Cleaners ...........3-115
Things to Avoid ....................3-116

Operating OnLine 3-5
In This Chapter
Occasionally, administrators conceive of a shortcut that seems like a good
idea. Because of the complexity of OnLine, an idea that appears to be an
efficienttime-saver cancreateproblemselsewhereduring operation.Thelast
section in this chapter, “Things to Avoid,” attempts to safeguard you from
bad ideas that sound good.
You start up and shut down OnLine by changing the mode. The first section,
“Changing Modes,” describes each OnLine mode and how to move OnLine
from one mode to another.
Logical log administration is required even if none of your databases use
transaction logging. Half of logical log administration is configuration; the
other half is backing up the logical log files.
Instructionsformodifying the logical logconfiguration, and forcreatingand
maintaining the logical log backup tapes, are provided in the second section,
“Logical Log Administration.”
At the heart of archive administration is the archive schedule. The third
section,“ArchiveAdministration,”providesyouwithadviceand guidelines
for scheduling and coordinating archive activity with other tasks. Archive
administration also includes your configuration decisions regarding the
archive tape device. Creating and maintaining the archive tapes is the third
major topic covered in this section.
OnLine design enables you to monitor every aspect of operation. The next
section, “Monitor OnLine Activity,” groups available information under 19
general topics listed on page 3-61. For each topic, you are provided with
descriptions of the available information, instructions for how to obtain it,
and suggestions for its use.

3-6 IBM Informix OnLine Database Server Administrator’s Guide
Changing Modes
Inthefinalsection,“ModifyOnLineConfiguration,”configuration-changing
actionsaredividedintoeightcategories,accordingtotheareaofOnLinethat
is affected:
■Blobspaces (creating or dropping)
■Buffers (changing the size of the logical or physical log buffer, or
changing the number of buffers in the shared-memory buffer pool)
■Chunks (adding a chunk or changing its status)
■Dbspaces (creating or dropping)
■Forced residency (on or off, temporarily or for this session)
■Mirroring (starting or ending, taking down or restoring a chunk)
■Physical log (changing the location or size)
■Shared-memory parameters (changing the values)
Changes associated with the logical log files or archive administration are
addressed separately under those topics. Performance tuning is discussed in
Chapter 5, “How to Improve Performance.”
Changing Modes
This section defines the OnLine operating modes, and provides instructions
for moving from one mode to another.
Types of OnLine Modes
OnLine has five modes of operation:
■Offline mode
■Quiescent mode
■Online mode
■Shutdown mode
■Recovery mode
The last two modes, shutdown and recovery, are transitory and indicate that
OnLine is moving from one mode to another.

Operating OnLine 3-7
Types of OnLine Modes
You can determine the current OnLine mode by executing tbstat. The mode
isdisplayedintheheader.Themodealsoappearsinthestatuslinedisplayed
in DB-Monitor.
Offline Mode
WhenOnLineisinofflinemode,itisnotrunning.OnLinemustbeofflinewhen
you initiate a data restore.
Quiescent Mode
WhenOnLineisinquiescentmode,no usercanstartadatabaseserverprocess.
Only user informix can access the administrative options of DB-Monitor.
Administrative procedures that require a pause in database activity are
performed when OnLine is in quiescent mode. Quiescent mode cannot be
considered a “single-user” mode since any user can gain access to
DB-Monitororruntbstat.Userroot canexecutecommand-line utilities while
OnLine is in quiescent mode.
Online Mode
When OnLine is in online mode, access is unrestricted. You can change many
OnLineconfigurationparametervalueswhileOnLineisonlineifyouusethe
command-line utilities instead of DB-Monitor.
Recovery Mode
RecoverymodeoccurswhenOnLineismovingfromofflinetoquiescentmode.
Fast recovery is performed when OnLine is in recovery mode. (Refer to
page 4-39 for further information about fast recovery.)
(Itispossiblefor a mirroredchunktobeinrecoverystate,butthisisdifferent
than OnLine recovery mode.)
Shutdown Mode
Shutdown mode occurs when OnLine is moving from online to quiescent
mode or from online (or quiescent) to offline mode. Once shutdown mode is
initiated, it cannot be cancelled.

3-8 IBM Informix OnLine Database Server Administrator’s Guide
From Offline to Quiescent
From Offline to Quiescent
When OnLine changes from offline to quiescent mode, the tbinit daemon
process reinitializes shared memory.
When OnLine is in quiescent mode, no user can start a database server
process.
Ifyouareuserinformix, you can take OnLine fromofflinetoquiescent mode
from within DB-Monitor or from the command line. If you are root, you can
only use the command-line option.
From DB-Monitor
Two options within DB-Monitor take OnLine from offline to quiescent mode.
■Select the Mode menu, Startup option to take OnLine to quiescent
mode with a minimum of keystrokes.
■If you prefer, you can review and change shared-memory param-
eters before you initialize shared memory. To do this, select the
Parameters menu, Shared-Memory option.
From the Command Line
Execute tbinit -s from the command line to take OnLine from offline to
quiescent mode.
To verify that OnLine is running, execute tbstat from the command line. The
header on the tbstat output gives the current operating mode.
For further information about the tbinit utility, refer to page 7-45.
From Offline to Online
When you take OnLine from offline to online mode, OnLine reinitializes
shared memory.
When OnLine is in online mode, it is accessible all OnLine user processes.
If you are user informix or root, you can take OnLine from offline to online
mode from the command line.

Operating OnLine 3-9
From Quiescent to Online
Execute tbinit from the command line to take OnLine from offline to online
mode.
To verify that OnLine is running, execute tbstat from the command line. The
header on the tbstat output gives the current operating mode.
For further information about the tbinit utility, refer to page 7-45.
From Quiescent to Online
When you take OnLine from quiescent to online mode, all users gain access.
Ifyouareuserinformix,youcantakeOnLinefromquiescenttoonlinemode
from within DB-Monitor or from the command line. If you are root, you can
only use the command-line option.
If you took OnLine from online mode to quiescent mode earlier and are now
returning OnLine to online mode, users who were interrupted in earlier
processing must reselect their database and redeclare their cursors.
From DB-Monitor
From within DB-Monitor, select the Mode menu, online option to take
OnLine from quiescent to online mode.
From the Command Line
From the command line, execute tbmode -m from the command line to take
OnLine from quiescent to online mode.
To verify that OnLine is running in online mode, execute tbstat from the
command line. The header on the tbstat output gives the current operating
mode.
For further information about the tbmode utility, refer to page 7-64.

3-10 IBM Informix OnLine Database Server Administrator’s Guide
Gracefully from Online to Quiescent
Gracefully from Online to Quiescent
Take OnLine gracefully from online to quiescent mode when you want to
restrict access to OnLine without interrupting current processing.
If you are user informix, you can take OnLine gracefully from online to
quiescent mode from within DB-Monitor or from the command line. If you
are root, you can only use the command-line option.
After you execute this task, OnLine sets a flag that prevents new database
serverprocessesfromgaining access to OnLine.Currentserverprocessesare
allowed to finish processing.
Once you initiate the mode change, it cannot be cancelled.
From DB-Monitor
From within DB-Monitor, select the Mode menu, Graceful-Shutdown option
to take OnLine gracefully from online to quiescent mode.
DB-Monitordisplaysalistofallactiveusersandupdatesiteveryfiveseconds
until the last user completes work or until you leave the screen.
From the Command Line
From the command line, execute tbmode -s or tbmode -sy from the
command line to take OnLine gracefully from online to quiescent mode.
A prompt asks for confirmation of the graceful shutdown. The -y option to
tbmode eliminates this prompt.
To verify that OnLine is running in quiescent mode, execute tbstat from the
command line. The header on the tbstat output gives the current operating
mode.
For further information about the tbmode utility, refer to page 7-64.

Operating OnLine 3-11
Immediately from Online to Quiescent
Immediately from Online to Quiescent
Take OnLine immediately from online to quiescent mode when you want to
restrict access to OnLine as soon as possible. Work in progress can be lost.
If you are user informix, you can take OnLine immediately from online to
quiescent mode from within DB-Monitor or from the command line. If you
are root, you can only use the command-line option.
A prompt asks for confirmation of the immediate shutdown. If you confirm,
OnLine sends a disconnect signal to all database server processes that are
attached to shared memory. The processes have 10 seconds to comply before
OnLine terminates them.
OnLine users receive either error message, -459 indicating that OnLine was
shut down, or error message, -457 indicating that their database server
process was unexpectedly terminated.
Thetbinitdaemonprocessperformspropercleanuponbehalfofalldatabase
server processes that were terminated by OnLine. Active transactions are
rolled back.
From DB-Monitor
From within DB-Monitor, select the Mode menu, Immediate-Shutdown
option to take OnLine immediately from online to quiescent mode.
From the Command Line
From the command line, execute tbmode -u or tbmode -uy from the
command line to take OnLine immediately from online to quiescent mode.
Apromptasks forconfirmationoftheimmediateshutdown.The-yoption to
tbmode eliminates this prompt.
To verify that OnLine is running in quiescent mode, execute tbstat from the
command line. The header on the tbstat output gives the current operating
mode.
For further information about the tbmode utility, refer to page 7-64.

3-12 IBM Informix OnLine Database Server Administrator’s Guide
From Any Mode Immediately to Offline
From Any Mode Immediately to Offline
This is the proper action to take if you receive a message that the OnLine
daemon is no longer running. After you take OnLine to offline mode, reini-
tialize shared memory by taking OnLine to quiescent or online mode.
If you are user informix, you can take OnLine from any mode to offline
(bypassing quiescent mode) from within DB-Monitor or from the command
line. If you are root, you can only use the command-line options.
Apromptasksforconfirmationtogo offline.Ifyou confirm, OnLine initiates
a checkpoint request and sends a disconnect signal to all database server
processesthat areattachedtosharedmemory.Theprocesseshave10seconds
to comply before OnLine terminates them.
OnLine users receive either error message, -459 indicating that OnLine was
shut down, or error message, -457 indicating that their database server
process was unexpectedly terminated.
Thetbinitdaemonprocessperformspropercleanuponbehalfofalldatabase
server processes that were terminated by OnLine. Active transactions are
rolled back.
Taking OnLine offline removes the shared-memory segment. OnLine shared
memory must be reinitialized.
From DB-Monitor
From within DB-Monitor, select the Mode menu, Take-Offline option to take
OnLine offline immediately.
From the Command Line
From the command line, execute tbmode -k or tbmode -ky from the
command line to take OnLine offline immediately.
Apromptasks forconfirmationoftheimmediateshutdown.The-yoption to
tbmode eliminates this prompt.
For further information about the tbmode utility, refer to page 7-64.

Operating OnLine 3-13
Logical Log Administration
Logical Log Administration
This section discusses configuration and backup of logical log files.
For an overview discussion of the function of the logical log, refer to
page 4-18. For background information about the role of the logical log in
OnLine fast recovery, refer to page 4-39. For background information about
what happens when OnLine backs up a logical log file, refer to page 4-26.
This section discusses the following Configuration and Backup topics:
■“Examine Your Logical Log Configuration” on page 3-14
■“Change Pathname of Logical Log Tape Device” on page 3-18
■“Change Block Size of Logical Log Tape Device” on page 3-21
■“Change Tape Size of Logical Log Tape Device” on page 3-22
■“Change Maximum Number of Logical Log Files” on page 3-23
■“Change Size of Logical Log Files” on page 3-24
■“Logical Log File Status” on page 3-26
■“Logical Log File ID Numbers” on page 3-27
■“Add a Logical Log File” on page 3-28
■“Drop a Logical Log File” on page 3-30
■“Move a Logical Log File to Another Dbspace” on page 3-31
■“Change the Logging Status of a Database” on page 3-33
■“Back Up a Logical Log File” on page 3-36
■“Start Continuous Logical Log Backup” on page 3-37
■“End Continuous Logical Log Backup” on page 3-38
■“Switch to the Next Logical Log File” on page 3-39
■“Free a Logical Log File” on page 3-39
■“If the Logical Log Backup Cannot Complete” on page 3-42

3-14 IBM Informix OnLine Database Server Administrator’s Guide
Examine Your Logical Log Configuration
Examine Your Logical Log Configuration
Complete the tasks outlined here to examine your logical log configuration
and to verify that it is appropriate for your OnLine environment.
Your Configuration File
To examine your specified configuration, you need a copy of your OnLine
configuration file, $INFORMIXDIR/etc/$TBCONFIG. Execute tbstat -c while
OnLine is running.
The configuration displayed by DB-Monitor (Status menu, Configuration
option) is a copy of your current OnLine configuration, which could differ
from the values stored in your configuration file.
Forfurtherinformationabouttherelationshipofthecurrentconfigurationto
the values in the configuration file ($INFORMIXDIR/etc/$TBCONFIG), refer
to page 1-11.
Logical Log File Backups
During OnLine operation, transaction log records are stored on disk in the
logical log files. When the current logical log file becomes full, OnLine
switches to the next one. When OnLine reaches the last defined logical log
file, it repeats the sequence in a never-ending loop. (Refer to page 3-27 for
more information about the rotation of the logical log files.)
It is the operator’s responsibility to back up each logical log file to tape or to
/dev/nullasitbecomesfull.Thelogfiledataiscrucialintheeventofafailure.
Thelogicallogfilescompose a recordofalldatabaseactivityfromthetimeof
the last archive. If a failure occurs, you can restore all data up to the point of
the failure by first restoring the archive tapes and then rolling forward the
transaction records saved in the logical log file backups. Without the logical
log file backup tapes, you can restore your data only to the point of your
most-recent archive.

Operating OnLine 3-15
Examine Your Logical Log Configuration
Freeing the Logical Log Files
The operator should monitor backed-up logical log files to ensure that they
are being freed (released forreuse) in a timely manner. Even a backed-up log
file cannot be freed (its status remains unreleased) if it contains records
belonging to an open transaction. (Refer to page 3-26 for more information
about log file status.)
IfOnLine attempts to switchto the nextlogical log file andfinds that thenext
log file in sequence is unreleased (status displays as U), OnLine immediately
suspends all processing. Even if other logical log files are free and available,
OnLine cannot skip an unreleased file and write to another, free file.
OnLine must suspend processing when it encounters an unreleased, backed-
up log file to protect the data within the log file. If the log file is backed-up
but not free, a transaction within the log file is still open. If the open trans-
actioniseventuallyrolledback,thedatawithinthelog is critically important
for the roll back operation. Refer to page 3-39 for more information about
freeing a logical log file.
Verify the Size and Number of Files
The logical log files contain five types of records:
■SQL data definition statements for all databases
■Record of a checkpoint
■Record of a change to the configuration
■SQL data manipulation statements for databases that were created
with logging
■Record of a change to the logging status of a database
The logical log files receive the first three types of records during processing
even if no databases are created with transaction logging.
Total space allocated to the logical log files is equal to the number of logical
log files multiplied by the size of each log (LOGFILES x LOGSIZE) as specified
in the configuration file.

3-16 IBM Informix OnLine Database Server Administrator’s Guide
Examine Your Logical Log Configuration
If you modify the initial configuration values, you might be able to improve
performance. Weigh these three considerations:
■Size the logical log large enough to prevent a long transaction
condition. (Refer to page 3-39 for a definition of a long transaction.)
■Create enough logical log files so that you can switch log files if
needed without running out of free logical logs.
■Ifyourtapedevice isslow,ensurethatthe logicallogissmallenough
to be backed up in a timely fashion.
Refer to page 2-156 for a detailed discussion of the factors that affect the rate
at which the logical log files fill.
Configuration Parameters
The LTAPEDEV configuration parameter specifies the logical log backup
device. The value you choose for LTAPEDEV has the following implications:
■If the logical log device differs from the archive device, you can plan
your backups without considering the competing needs of the
archive schedule.
■If you specify /dev/null as the logical log backup device, you avoid
havingtomountandmaintain backuptapes.However,youcanonly
recoverOnLinedatauptothepointofyourmost-recentarchivetape.
You cannot restore work done since the archive.
■You can specify a logical log backup device attached to another host
system and perform backups across your network.
Look at the copy of your configuration file and compare the values specified
by LTAPEDEV and TAPEDEV.LTAPEDEV is the logical log tape device.
TAPEDEV is the archive tape device.
Ideally,LTAPEDEV andTAPEDEV each specifyadifferentdevice.Whenthisis
the case, you can invoke the Continuous-Backup option to automatically
copythelogicallogfilestotapeasthey fill. The archivescheduleisirrelevant.

Operating OnLine 3-17
Examine Your Logical Log Configuration
If the LTAPEDEV and TAPEDEV values are the same, you must plan your
logicallog file backupsto leave themaximum amount offreespaceavailable
before the archive begins. If the logical log files fill while the archive is under
way, normal OnLine processing stops. If this happens, your options are
limited. You can either abort the archive to free the tape device and back up
the logical logs or leave normal processing suspended until the archive
completes.
You might decide to set LTAPEDEV to /dev/null (and not keep logical log file
backups) under the following conditions:
■If your environment does not include a tape device but you want to
use OnLine, set both LTAPEDEV and TAPEDEV (the archive tape
device) to /dev/null.
■If you do not care about data recovery beyond the information that
is available from archives, set LTAPEDEV to /dev/null. If data
recoveryisirrelevant,setboth LTAPEDEV and TAPEDEV to /dev/null.
WhenLTAPEDEVissetto/dev/null,OnLinedoesnotwaitforabackupbefore
markingthelogicallogfilesasbackedup.Instead,assoonasalogicallogfile
becomes full, it is immediately marked as backed up (status B).
When the last open transaction in the log is closed, the log file is marked free
(status F). As a result, no logical log data is stored. This means that, in the
event of failure, you cannot restore work done since the most-recent archive.
LTAPEBLK and LTAPESIZE
Verify that the current block size and tape size are appropriate for the device
specified. The block size of the logical log tape device is specified as
LTAPEBLK. The tape size is specified as LTAPESIZE.
If LTAPEDEV is specified as /dev/null, block size and tape size are ignored.
Specify LTAPEBLK as the largest block size permitted by your tape device.
Specify LTAPESIZE as the maximum amount of data you can write to this
tape.

3-18 IBM Informix OnLine Database Server Administrator’s Guide
Change Pathname of Logical Log Tape Device
Location of Logical Log Files
When OnLine disk space is initialized, the logical log files are located in the
root dbspace. You cannot control this.
After OnLine is initialized, you can improve performance by moving the
logical log files out of the root dbspace and onto one or more disks that are
not shared by active tables. This can reduce disk contention.
If you do not know where your logical log files currently reside, select the
Status menu, Logs option.
If you decide to move the logical log files, refer to page 3-31.
Change Pathname of Logical Log Tape Device
The logical log tape device is specified as LTAPEDEV in the configuration file.
You can change the value of LTAPEDEV while OnLine is in online mode. The
change takes effect immediately.
Be prepared to create a level-0 archive immediately after you make the
change, unless you change the value to /dev/null.
You can establish the value of LTAPEDEV as a symbolic link, enabling you to
switch between more than one tape device without changing the pathname.
Important: Any time you change the physical characteristics of the tape device, you
mustcreatealevel-0 archive. Otherwise, you might be unableto restorethecomplete
set of tapes. OnLine cannot switch tape devices during a restore. OnLine will expect
all logical log backup tapes to have the same block size and tape size as were specified
at the time of the most recent level-0 archive.
If you change the pathname to /dev/null, the change proceeds more
smoothly if you make the change while OnLine is offline. If LTAPEDEV is set
to /dev/null, you can restore OnLine data only up to the point of your most-
recent archive. You cannot restore work done since then.
The tape device specified by the pathname must perform a rewind before
opening and on closing.

Operating OnLine 3-19
Change Pathname of Logical Log Tape Device
Ifyou are logged inas user informix, you canchange thevalue of LTAPEDEV
from within DB-Monitor or from the command line. If you are logged in as
root, you must use the command-line option.
Preliminary Consideration
Tape devices must rewind before opening and on closing to be compatible
with OnLine operation. The reason for this is a series of checks that OnLine
performs before writing to a tape.
Whenever OnLine attempts to write to any tape other than the first tape in a
multivolume backup or archive, OnLine first reads the tape header to make
surethat thetapeisavailableforuse. Thenthedeviceisclosedand reopened.
OnLine assumes the tape was rewound on closing and begins to write.
Whenever OnLine attempts to read a tape, it first reads the header and looks
for the correct information. OnLine does not find the correct header infor-
mation at the start of the tape if the tape device did not rewind on closing
during the write process.
Createalevel-0archiveimmediatelyafteryouchangethevalueofLTAPEDEV
to ensure a proper restore. This is done for two reasons.
First, the OnLine restore procedure cannot switch tape devices as it attempts
to read the logical log backup tapes. If the physical characteristics of the log
filetapeschangeduringtherestore,eitherbecauseofanewblocksize ortape
size, the restore fails.
Second, the restore fails if the tape device specified as LTAPEDEV at the time
of the level-0 archive is unavailable when the restore begins.
Important: At the beginning of a restore, the OnLine configuration, including
logical log devices, must reflect the configuration as it was when the level-0 archive
was created.
To specify a logical log backup tape device on another host machine, use the
following syntax:
host_machine_name:tape_device_pathname:
The following example specifies a logical log backup tape device on the host
machine kyoto:
kyoto:/dev/rmt01

3-20 IBM Informix OnLine Database Server Administrator’s Guide
Change Pathname of Logical Log Tape Device
The host machine where the tape device is attached must permit user
informix to run a UNIX shell from your machine without requiring a
password. If your machine does not appear in the hosts.equiv file of the
other host machine, then it must appear in the .rhosts file in the home
directory of the informix login. If you are backing up logical log files as root,
the machine name must appear in the .rhosts file for root on the other host
machine.
Verify that the block size and the tape size are correct for the new device.
Block size for the logical log tape device is specified as LTAPEBLK. Tape size
is specified as LTAPESIZE. If you need to change these values, you can do so
at the same time that you change the value of LTAPEDEV.
Specify LTAPEBLK as the largest block size permitted by your tape device.
SpecifyLTAPESIZE as themaximumamountof data that shouldbewrittento
this tape.
If you are changing the value of LTAPEDEV from a pathname to /dev/null,
take OnLine offline before you execute this change. If you make the change
whileOnLineisineitherquiescentoronlinemode,youcancreateasituation
in which one or more log files are backed up, but never freed. This can
interrupt processing because OnLine stops if it finds that the next logical log
file (in sequence) is not free.
Assoon as youmake the change, you areonlyableto restoreyoursystem up
to the point of your most recent archive and any previously backed-up
logical logs. You cannot restore work done since then.
From DB-Monitor
1. FromwithinDB-Monitor,selecttheLogical-Logsmenu,Tape-Param-
eters option to change the value of LTAPEDEV.DB-Monitor displays
the current value.
2. Enter the new full pathname value for the logical log tape device in
the Log Tape Device field.
3. Enter new values in the device Block Size and Tape Size fields, if
appropriate.

Operating OnLine 3-21
Change Block Size of Logical Log Tape Device
From the Command Line
To change the value of LTAPEDEV from the command line, use an editor to
edit the file specified by $INFORMIXDIR/etc/$TBCONFIG. Change the value
of LTAPEDEV (and LTAPEBLK and LTAPESIZE, if appropriate).
Change Block Size of Logical Log Tape Device
The block size of the logical log tape device is specified as LTAPEBLK in the
configuration file. The block size is expressed in kilobytes.
You can change the value of LTAPEBLK while OnLine is in online mode. The
change takes effect immediately.
Specify the largest block size permitted by your tape device.
If the tape device pathname is /dev/null, the block size is ignored.
If you are logged in as user informix, you can change the value of LTAPEBLK
from within DB-Monitor or from the command line. If you are logged in as
root, you must use the command-line option.
Important: Any time you change the physical characteristics of the tape device, you
mustcreatealevel-0 archive. Otherwise, you might be unableto restorethecomplete
set of tapes. OnLine cannot switch tape devices during a restore. OnLine expects all
logical log backup tapes to have the same block size and tape size as were specified at
the time of the most recent level-0 archive.
OnLine does not check the tape device when you specify the block size.
Verifythatthe tape device specifiedin LTAPEDEV can readtheblocksizethat
you specified. If not, you cannot restore the tape.
From DB-Monitor
1. Selectthe Logical-Logs menu, Tape-Parameters option tochange the
value of LTAPEBLK.DB-Monitor displays the current value.
2. Enter the new block size expressed in kilobytes in the Block Size
field that appears under the Log Tape Device field.

3-22 IBM Informix OnLine Database Server Administrator’s Guide
Change Tape Size of Logical Log Tape Device
From the Command Line
1. Use an editor to edit the file specified by
$INFORMIXDIR/etc/$TBCONFIG.
2. Change the value of LTAPEBLK to the new block size, expressed in
kilobytes.
Change Tape Size of Logical Log Tape Device
The tape size of the logical log tape device is specified as LTAPESIZE in the
configuration file. Tape size refers to the maximum amount of data that
should be written to this tape, expressed in kilobytes.
You can change the value of LTAPESIZE while OnLine is in online mode. The
change takes effect immediately.
If the tape device pathname is /dev/null, the tape size is ignored.
If you are logged in as user informix, you can make this change from within
DB-Monitoror fromthe command line.If you areloggedinas root, youmust
use the command-line option.
Important: Any time you change the physical characteristics of the tape device, you
mustcreatealevel-0 archive. Otherwise, you might be unableto restorethecomplete
set of tapes. OnLine cannot switch tape devices during a restore. OnLine will expect
all logical log backup tapes to have the same block size and tape size as were specified
at the time of the most recent level-0 archive.
From DB-Monitor
1. Selectthe Logical-Logs menu, Tape-Parameters option tochange the
value of LTAPESIZE.DB-Monitor displays the current value.
2. Enterthenew tape size expressedin kilobytes in the Tape Size field
that appears under the Log Tape Device field.

Operating OnLine 3-23
Change Maximum Number of Logical Log Files
From the Command Line
1. To change the value of LTAPESIZE, use an editor to edit the file
specified by $INFORMIXDIR/etc/$TBCONFIG.
2. Change the value of LTAPESIZE to the new tape size, expressed in
kilobytes.
Change Maximum Number of Logical Log Files
The maximum number of logical log files is specified as LOGSMAX in the
configuration file.
Do not confuse the maximum number of logical log files with the actual
number of log files. You specify the actual number of log files during the
initial configuration as LOGFILES. Thereafter, OnLine tracks the number and
adjusts the value of LOGFILES as you add or drop log files.
To obtain the current value of LOGSMAX, examine your copy of the config-
urationfileorselecttheParametermenu,Shared-Memoryoptionandlookat
the value in the field:
Max # of Logical Logs.
To obtain the actual number of log files in your current configuration, either
execute tbstat -l or select the Status menu, Logs option.
You can change the maximum number of logical log files while OnLine is in
online mode, but it will not take effect until you reinitialize shared memory
(take OnLine offline and then bring it to quiescent mode).
If you are logged in as user informix, you can change the value of LOGSMAX
from within DB-Monitor or from the command line. If you are logged in as
root, you must use the command-line option.

3-24 IBM Informix OnLine Database Server Administrator’s Guide
Change Size of Logical Log Files
From DB-Monitor
1. From within DB-Monitor, select the Parameters menu, Shared-
Memory option to change the value of LOGSMAX.DB-Monitor
displays the current value.
2. Enter the new value for LOGSMAX in the Max # of Logical Logs
field.
3. Reinitialize shared memory (take OnLine offline and then to
quiescent mode) for the change to take effect.
From the Command Line
1. To change the value of LOGSMAX from the command line, use an
editor to edit the file specified by $INFORMIXDIR/etc/$TBCONFIG.
2. Change the value of LOGSMAX.
3. Reinitialize shared memory (take OnLine offline and then to
quiescent mode) for the change to take effect.
Change Size of Logical Log Files
The size of the logical log files is specified as LOGSIZE in the configuration
file. Log size is expressed in kilobytes. To change the size of the logical log files,
you must reinitialize disk space, which will destroy all existing data in the process.
ConsiderthesizeofthelogicallogfilestobefixedwhenyouinitializeOnLine
disk space. You cannot change the size of the log files unless you reinitialize
OnLine disk space. To do so destroys all existing data.
If you intend to change the logical log file size, you must unload all OnLine
data, reinitialize disk space, re-create all databases and tables, and reload all
data.
You cannot use the OnLine restore option, since a restore would return
LOGSIZE to its previous value.
If you are logged in as user informix, you can make this change from within
DB-Monitoror fromthe command line.If you areloggedinas root, youmust
use the command-line option.

Operating OnLine 3-25
Change Size of Logical Log Files
From DB-Monitor
1. From within DB-Monitor, first unload all OnLine data. Refer to
page 4-53.
2. Select the Parameters menu, Initialize option to reinitialize disk
space.Changethevalue inthefieldlabelledLog.Log Size. Proceed
with OnLine disk space initialization. For more information about
the disk space initialization procedure, refer to page 1-52.
3. After OnLine disk space is initialized, re-create all databases and
tables. Then reload all OnLine data.
From the Command Line
1. To change the value of LOGSIZE from the command line, use an
editor to edit the file specified by $INFORMIXDIR/etc/$TBCONFIG.
2. Unload all OnLine data. Refer to page 4-53.
3. Execute tbinit -i from the command line to reinitialize disk space.
When you execute this option, you destroy all existing data.
4. After OnLine is configured and initialized, re-create all databases
and tables. Then reload all OnLine data.

3-26 IBM Informix OnLine Database Server Administrator’s Guide
Logical Log File Status
Logical Log File Status
You can display the status of the logical logs through the Status menu, Logs
option, or by executing tbstat -l (lowercase L).
The status portion of the logical log display contains two columns, Number
andFlags.ThenumbersaretheIDnumbersoftheindividuallogicallogfiles.
(Refertopage 3-27formoreinformationabouttheIDnumbers.)Theflagsare
the logical log status flags. An example of the status portion of a display
follows:
Theflagdisplaycontainssevenpositions.Flagsappearinthefirst,third,fifth,
and seventh positions.
In position 1, any one of three possible flags appears: A,F,orU. In position 3,
the Bflag might or might not appear; in position 5, the Cflag might or might
not appear; and in position 7, the L flag might or might not appear.
Number Flags
1 U---C-L
2 F------
3 U-B----
4 A------
Position Flag Description
1 A The logical log file is newly added. It does not become
available until after you create a level-0 archive.
F The logical log file is free and available for use.
U The logical log file is unreleased. In general, a logical log
file is freed after it is backed up and all transactions within
the log file are closed.
(1 of 2)

Operating OnLine 3-27
Logical Log File ID Numbers
Logical Log File ID Numbers
OnLine tracks the logical log files by assigning each free log file a unique
number. The sequence begins with 1, which is the first log file filled after
OnLine disk space is initialized. The ID number for each subsequent log file
is incremented by 1.
For example, if you configured your environment for six log files, these files
would be identified as 1 through 6 after OnLine disk space is initialized.
OnLine rotates through the logical log files during processing. Each set of
records in the logical log file is uniquely identified by incrementing the ID
number each time a log file fills, as displayed in the example below.
Figure 3-1
Relationship between
logical log files and their ID numbers
3 B The logical log file is backed up.
5 C The logical log file is the current log.
7 L The logical log file contains the most recent checkpoint
record in the logical log (all log files). You cannot free this
file until a new checkpoint record is written to the logical
log. (Refer to page 3-39.)
Logical
log file 1st rotation
ID number 2nd rotation
ID number 3rd rotation
ID number 4th rotation
ID number
1 1 7 13 19
2 2 8 14 20
3 3 9 15 21
(1 of 2)
Position Flag Description
(2 of 2)

3-28 IBM Informix OnLine Database Server Administrator’s Guide
Add a Logical Log File
In general, log files become free after the file has been backed up to tape and
all logical log records within the file are associated with closed transactions.
(Refertopage 3-39.)Itispossibleforonelogical log file tobecomefreeearlier
than another logical log file with a lower ID number. For example, nothing
preventslogicallog number 10 frombecomingfree(status F) whilethestatus
of logical log number 8 remains unreleased (status U).
However,OnLine cannot skip a logicallog file that isunreleasedtomakeuse
of the space available in the free logical log file. That is, although the logical
logfilesdonot necessarily become freeinsequence, OnLine is requiredtofill
the logical log files in sequence. If OnLine fills the current logical log file and
the next logical log file in sequence is unreleased (status U), OnLine
processing is suspended until the log file is freed. It makes no difference that
other logical log files are free.
Add a Logical Log File
Add a log file to increase the total amount of disk space allocated to the
OnLine logical log.
You cannot add a log during an archive (quiescent or online).
The newly added log or logs do not become available until you create a
level-0 archive.
Verifythat you willnot exceed the maximum numberof logical logs allowed
in your configuration, specified as LOGSMAX.
If you are logged in as user informix, you can make this change from within
DB-Monitoror fromthe command line.If you areloggedinas root, youmust
use the command-line option.
OnLine must be in quiescent mode. You add log files one at a time.
4 4 10 16 22
5 5 11 17 23
6 6 12 18 24
Logical
log file 1st rotation
ID number 2nd rotation
ID number 3rd rotation
ID number 4th rotation
ID number
(2 of 2)

Operating OnLine 3-29
Add a Logical Log File
From DB-Monitor
1. From within DB-Monitor, select the Parameters menu, Add-Log
option to add a logical log file.
2. Enter the name of the dbspace where the new logical log file will
reside in the field labelled Dbspace Name. Because you cannot
change the size of the logical log file unless you reinitialize OnLine
disk space, the size of the log file automatically appears in the
Logical Log Size field.
3. Toverifythatthenewlogfilehasbeenadded,selecttheStatusmenu,
Logs option. The status of the new log file is A.
The newly added log file becomes available after you create a level-0 archive.
From the Command Line
1. Fromthe commandline,executethetbparamsutility withthe-aand
-d options to add a logical log file.
2. The -a option indicates that you are adding a log file. When the -a
option is followed by -d, the -d introduces the name of the dbspace
where the logical log file will reside, as shown in the following
example:
tbparams -a -d dbspace_1
To verify that the new log has been added, execute tbstat -l. The status of the
new log file is A.
The newly added log file becomes available after you create a level-0 archive.

3-30 IBM Informix OnLine Database Server Administrator’s Guide
Drop a Logical Log File
Drop a Logical Log File
You can drop a log to increase the amount of the disk space available within
a dbspace. If you are logged in as user informix, you can drop a logical log
file from within DB-Monitor or from the command line. If you are logged in
as root, you must use the command-line option.
When dropping a log file, consider the following requirements:
■OnLinerequiresaminimum of threelogical log files at alltimes.You
cannot drop a log if your logical log is composed of only three log
files.
■You drop log files one at a time. After your configuration reflects the
desired number of logical log files, create a level-0 archive.
■OnLine must be in quiescent mode.
■You can only drop a log file that has a status of Free (F) or newly
Added (A).
■You must know the ID number of each logical log that you intend to
drop.
■To obtain the status and ID number of a logical log file, select the
Status menu, Logs option or execute tbstat -l (lowercase L) from the
command line while OnLine is running.
■Afteryoudroponeormorelogicallogs,thelevel-0archiveisanextra
precaution. The archive ensures that the configuration of the logical
logs is registered with OnLine. This prevents OnLine from
attempting to use the dropped logs during a restore.
From DB-Monitor
1. From within DB-Monitor, select the Parameters menu, Drop-Log
option to drop a logical log file. Use the arrow keys to select the log
you want to drop and press CTRL-B or F3. You are asked to confirm
your choice.
2. Create a level-0 archive after your configuration reflects the desired
number of logical log files.

Operating OnLine 3-31
Move a Logical Log File to Another Dbspace
From the Command Line
1. Fromthecommandline,executethetbparams utilitywiththe-dand
-l (lowercase L) option to drop a logical log file.
The -d option indicates you are dropping a log file. When the -d
option is followed by the -l option, the -l introduces the ID number
ofthelogicallogfileyou aredropping.The followingexampledrops
the logical log file with ID number 121:
tbparams -d -l 121
2. Create a level-0 archive after your configuration reflects the desired
number of logical log files.
Move a Logical Log File to Another Dbspace
Changing the location of the logical log files is actually a combination of two
simpler actions:
■Dropping the logical log files from their current dbspace
■Adding the logical log files to their new dbspace
Although moving the logical logs is easy to do, it can be time-consuming
because you must create two, separate level-0 archives as part of the
procedure.
You can improve performance by moving the logical log files out of the root
dbspace. When OnLine disk space is initialized, the logical log files and the
physical log are placed in the root dbspace. To reduce the number of writes
to the root dbspace and minimize contention, move the logical log files to a
dbspace on a disk that is not shared by active tables or the physical log.
Important: You must be logged in as user informix or root to add or drop a logical
log, and OnLine must be in quiescent mode.
The logical log files contain critical information and should be mirrored for
maximum data protection. If the dbspace to which you are moving the log
files is not already mirrored, plan to add mirroring to the dbspace.

3-32 IBM Informix OnLine Database Server Administrator’s Guide
Move a Logical Log File to Another Dbspace
The following example illustrates moving six logical log files from the root
dbspace to another dbspace, dbspace_1. For more information about
completing a specific step, turn to the page indicated.
1. Free all log files except the current log file. A log file is free if it has
been backed up and all records with the log file are part of closed
transactions. (Refer to page 3-39.)
2. Verify that the value of MAXLOGS is greater than or equal to the
number of log files after the move, plus 3. In this example, the value
of MAXLOGS must be greater than or equal to 9. Change the value of
MAXLOGS, if necessary. (Refer to page 3-23.)
3. Dropallbutthreeofthelogicallogfiles.You cannot dropthe current
log file. If you only have three logical log files in the root dbspace,
skip this step. (Refer to page 3-30.)
4. Add the new logs to the dbspace. In this example, add six new logs
to dbspace_1. (Refer to page 3-28.)
5. Create a level-0 archive to make the new logs available to OnLine.
(Refer to page 3-57.)
6. Switch the logical logs to start a new current log file. (Refer to
page 3-39.)
7. Back up the former “current log file” to free it. (Refer to page 3-36.)
8. Drop the three log files that remain in the root dbspace. (Refer to
page 3-30.)
9. Mirror the dbspace where the new log files reside, if it is not already
mirrored. (Refer to page 3-105.)
10. Create a level-0 archive to make the new logs available and to
complete the mirroring procedure. (Refer to page 3-57.)

Operating OnLine 3-33
Change the Logging Status of a Database
Change the Logging Status of a Database
You can make any one of the following changes to a database:
■Add logging (buffered or unbuffered) to a database
■End logging for a database
■Change logging from buffered to unbuffered
■Change logging from unbuffered to buffered
■Make a database ANSI-compliant
Add logging to a database to take advantage of transaction logging or other
OnLine features that require logging, such as deferred checking.
End logging to reduce the amount of OnLine processing: for example, if you
areloading manyrowsintoa singledatabasefroma recoverablesource,such
as tape or an ASCII file. (However, if other users are active, you lose the
records of their transactions until you reinitiate logging.)
If you are operating in an IBM Informix STAR environment, you might need
to change the logging status from buffered to unbuffered, or vice versa, to
permit a multidatabase query. (Refer to the SET LOG statement in
IBM Informix Guide to SQL: Reference.)
You can only make a database ANSI-compliant from within DB-Monitor;
therefore, you must be logged in as user informix. All other logging status
changes can be performed by either user informix or root.
If you use DB-Monitor to make any of these changes, you must take OnLine
to quiescent mode. If you use the command-line utilities, you can make the
changes while OnLine is in online mode.
You must create a level-0 archive before you add logging to a database. How
you create the archive (in online or quiescent mode) has implications for
database management. Read the following paragraphs to help you decide
which approach to use.

3-34 IBM Informix OnLine Database Server Administrator’s Guide
Change the Logging Status of a Database
Adding Logging to a Database
Unbuffered logging is the best choice for most databases. In the event of a
failure, only the single alteration in progress at the time of the failure is lost.
If you use buffered logging and a failure occurs, you could lose more than
just the current transaction. In return for this risk, performance during alter-
ations is slightly improved.
Buffered logging is best for databases that are updated frequently (so that
speedofupdatingisimportant)aslongasyoucanre-createtheupdates from
other data in the event of failure.
If you are working in a single-tape-drive environment without an easy way
to ensure that logical log files do not fill during an archive, you might need
to create your level-0 archive in quiescent mode.
Ifthisisthecase,youmustcreatethelevel-0archivefromwithinDB-Monitor.
If you use the command-line option to create an archive, the flag indicating
that you created the necessary archive is reset as soon as you enter
DB-Monitortochangetheloggingstatus.DB-Monitorrequiresyoutoredothe
archive.
From DB-Monitor
Follow these steps to add logging to a database:
1. Take OnLine to quiescent mode. (Refer to page 3-10.)
2. Create a level-0 archive from DB-Monitor. (Refer to page 3-57.)
3. Select the Logical-Logs menu, Databases option. Specify the
database and add logging, following the screen directions. (This is
described in the following paragraphs.)
From the Command Line
Ifyou can createanonlinearchiveandwish to do sofromthecommand line,
you can save yourself a step and request the change in logging status as part
of the same command. However, the drawback is that the database remains
locked for the duration of the level-0 archive. Users cannot access it.

Operating OnLine 3-35
Change the Logging Status of a Database
Add logging to a database by executing one of these two commands:
tbtape -s -B database (buffered logging)
tbtape -s -U database (unbuffered logging)
You can change logging status for any number of databases with the same
command. For further information about the tbtape utility, refer to
page 7-102.
If you can create an online archive and you do so from DB-Monitor, users are
able to access all databases during the archive. After the archive completes,
change the database status before you exit DB-Monitor. If you exit, the flag
indicating that you created the necessary archive is reset. DB-Monitor will
require you to redo the archive when you reenter.
To add logging to a database
1. Create an online, level-0 archive from DB-Monitor. (Refer to
page 3-57.)
2. Select the Logical-Logs menu, Databases option.
3. Use the Arrow keys to select the database to which you want to add
logging. Press CTRL-B or F3.
4. When the logging options screen appears, DB-Monitor displays the
current log status of the database. Use the arrow keys to select the
kind of logging you want. Press CTRL-B or F3.
Ending or Modifying Logging from DB-Monitor
1. To end logging for a database from within DB-Monitor, select the
Logical-Logs menu, Databases option.
2. Use the arrow keys to select the database to which you want to add
logging. Press CTRL-B or F3.
When the logging options screen appears, DB-Monitor displays the current
log status of the database. Use the arrow keys to select the kind of logging
you want, including no logging. Press CTRL-B or F3.
To end logging for a database from the command line, execute the following
command:
tbtape -N database (no logging)

3-36 IBM Informix OnLine Database Server Administrator’s Guide
Back Up a Logical Log File
Youcanchangetheloggingstatusforanynumberofdatabaseswiththesame
command.
To change buffered logging to unbuffered logging, or vice versa, execute one
of the following commands:
tbtape -B database (buffered logging)
tbtape -U database (unbuffered logging)
Youcanchangetheloggingstatusforanynumberofdatabaseswiththesame
command. For further information about the tbtape utility, refer to
page 7-102.
ANSI Compliance
You must use DB-Monitor to make a database ANSI-compliant. Select the
Logical-Logs menu, Databases option.
Use the Arrow keys to select the database to which you want to add logging.
Press CTRL-B or F3.
When the logging options screen appears, DB-Monitor displays the current
log status of the database. Use the Arrow keys to select Unbuffered
Logging, Mode ANSI. Press CTRL-B or F3.
Back Up a Logical Log File
OnLine automatically switches to a new logical log file when the current log
file fills. The full logical log file displays an unreleased status, U. After you
back it up, the status changes to U-B. (The logical log file is not free until all
the transactions within the log file are closed.)
You should attempt to back up each logical log file as soon as it fills. (If you
are running OnLine with the Continuous-Backup option, OnLine performs
backups automatically. Refer to page 3-37.)
When you explicitly request a backup, OnLine backs up all full logical log
files. It also prompts you with an option to switch the log files and back up
the formerly “current” log.
If you press the Interrupt key while a backup is under way, OnLine finishes
the backup and then returns control to you. Any other full log files are left
with unreleased status, U.

Operating OnLine 3-37
Start Continuous Logical Log Backup
If you are logged in as user informix, you can back up a log file from within
DB-Monitoror fromthe command line.If you areloggedinas root, youmust
use the command-line option.
You can back up a log file while OnLine is in online mode.
From DB-Monitor
FromwithinDB-Monitor,select the Logical-Logsmenu, Auto-Backup option
to explicitly request the backup of all full logical log files.
When you do so, DB-Monitor executes the tbtape process and an interactive
dialogue is begun on the DB-Monitor screen. You are prompted to mount a
tape on the logical log backup tape device. You are also prompted if an
additional tape is needed.
From the Command Line
Execute tbtape -a from the command line to explicitly request the backup of
all full logical log files
Donotback up a logical logfilefromthecommandlinein backgroundmode
(thatis,usingtheUNIX &operatoron thecommandline).Thetbtapeprocess
initiates an interactive dialogue, prompting for new tapes if necessary. It is
easy to miss the prompts and delay the backup process if it is executed in
background mode.
For further information about the tbtape utility, refer to page 7-102.
Start Continuous Logical Log Backup
When the Continuous-Backup option is on, OnLine automatically backs up
each logical log file as it becomes full. When this option is on, you are
protected against ever losing more than a partial log file, even in the worst-
case media failure (the chunk that contains your logical log fails).
Continuous logging requires a dedicated terminal or window. The terminal
user must remain within DB-Monitor while Continuous-Backup is running.
You must mount a write-enabled tape in the logical log tape device while
Continuous-Backup is running.

3-38 IBM Informix OnLine Database Server Administrator’s Guide
End Continuous Logical Log Backup
When you initiate Continuous-Backup, OnLine backs up any full logical log
files immediately. Continuous-Backup does not back up the current log
(status C).
If you press the Interrupt key while a backup is under way, OnLine finishes
the backup and then returns control to you. If OnLine is waiting for a log file
to fill, the option is ended immediately.
If you are logged in as user informix, you can start the Continuous-Backup
option from within DB-Monitor or from the command line. If you are logged
in as root, you must use the command-line option.
You can start continuous logging in online mode.
From DB-Monitor
From within DB-Monitor, select the Logical-Logs menu, Continuous-Backup
option to start continuous logging.
When you do so, DB-Monitor executes the tbtape process and an interactive
dialogue is begun on the DB-Monitor screen. You are prompted to mount a
tape on the logical log backup tape device. You are also prompted if an
additional tape is needed.
From the Command Line
Execute tbtape -c from the command line to start continuous logging.
Donotstartcontinuousloggingfromthecommandlineinbackgroundmode
(thatis,usingtheUNIX &operatoron thecommandline).Thetbtapeprocess
initiates an interactive dialogue, prompting for new tapes if necessary. It is
easy to miss the prompts and delay the backup process if it is executed in
background mode.
For further information about the tbtape utility, refer to page 7-102.
End Continuous Logical Log Backup
ToendtheContinuous-Backupoption,presstheInterruptkeyattheterminal
that is dedicated to the backup.

Operating OnLine 3-39
Switch to the Next Logical Log File
You must explicitly request logical log backups (using the DB-Monitor Auto-
Backup option or its command-line equivalent, tbtape -a) until you restart
continuous logging.
If you press the Interrupt key while a backup is underway, OnLine finishes
the backup and then returns control to you.
If you press the Interrupt key while OnLine is waiting for a log file to fill, the
option is ended immediately.
Switch to the Next Logical Log File
There are two reasons why you might want to switch to the next logical log
file before the current file becomes full:
■You must switch to the next logical log file after you create a
blobspace if you intend to insert blobs in the blobspace right away.
Thestatement that createsablobspaceand the statements that insert
blobs into that blobspace must appear in separate logical log files.
This requirement is independent of the logging status of the
database.
■You also must switch to the next logical log file if you want to back
up the log file with the status of C or current.
Youmust be logged in as user informix or root to switch to thenextavailable
log file. You can make this change while OnLine is in online mode.
Executetbmode-l(lowercaseL)fromthecommandlinetoswitchtothenext
available log file. You cannot do this from within DB-Monitor.
Free a Logical Log File
A logical log file is considered to be free (status F) when the log file is backed
up and all transactions within the log are closed. Three conditions must exist
before you can free a logical log file:
■The log file is backed up to tape.
■Allrecordswithinthelogfileareassociatedwithclosedtransactions.
■The log file does not contain the most recent checkpoint record.

3-40 IBM Informix OnLine Database Server Administrator’s Guide
Free a Logical Log File
Refertopage 3-15fora discussionabouttheimportanceoffreeingthelogical
log files in a timely manner. Refer to page 3-26 for information about the
logical log file status flags. Refer to page 3-27 for more information about
how the logical log files rotate through ID numbers.
OnLine user processes attempt to free logical log files under the following
conditions:
■The first OnLine user process that writes to a new logical log file
attempts to free the previous log.
■Eachtimetbtape completesitsbackupofalogicallogfile,itattempts
to free the log file.
■Each time an OnLine database server process commits or rolls back
atransaction, it attemptsto freethelogical log filein which thetrans-
action began.
■EachtimeanOnLineuserprocessattemptstousethenextlogicallog
file, it attempts to free the log file, if it is not already free.
Long Transactions
Along transaction is an open transaction that starts in the first logical log file
(theonewiththelowestIDnumberatanytime).Sincealogicallogfilecannot
be freed until all records within the file are associated with closed transac-
tions, the long transaction prevents the first logical log file from becoming
free and available for reuse. The logged data must be kept intact (not
overwritten) in case the open transaction must be rolled back.
Ifalongtransactionwerepermittedtocontinue,itcouldposeathreattoyour
OnLine processing. If OnLine attempted to fill the next logical log file in
sequence but found that it was unreleased (status U) and not freed, OnLine
processing would be suspended to protect the data in the logical log file.
Long transactions are handled automatically by OnLine. For further infor-
mation about how OnLine handles long transactions internally, refer to the
discussion of the LTXHWM and LTXEHWM configuration file parameters on
page 2-159.

Operating OnLine 3-41
Free a Logical Log File
Status A
If a log file is newly added (status A), create a level-0 archive to activate the
log file and make it available for use.
Status U
If a log file contains records but is not yet backed up (status U), execute
tbmode -a to back up the log from the command line, or (if you are logged in
as user informix) select the Logical-Logs menu, Auto-Backup option. (Refer
to page 3-36.) If backing up the log file does not free it, its status is eitherU-B
or U-B-L. Refer to the following subsections.
Status U-B
If a log file is backed up but unreleased (status U-B), some transactions in the
log file are still underway. If you do not want to wait until the transactions
complete,takeOnLinetoquiescentmode(ImmediateShutdown).Anyactive
transactions are rolled back.
Status U-C
If you want to free the current log file (status C), execute tbmode -l from the
command line to switch to the next available log file. Now back up the log
file. If the log file is still not free, its status is U-B.
If you are logged in as user informix, a second option is to request the Auto-
BackupoptionfromtheDB-MonitorLogical-Logsmenu.Afterallfulllogsare
backed up, you are prompted to switch to the next available logical log file
and back up the former current log file. The log file status thus changesfrom
U-C to U-B. (It is possible, if all transactions in the former current log file are
closed, that this action would change the status from U-C to F.)
Status U-B-L
A special case exists in which a log file is not freed even though the log file is
backed up to tape and all transactions within are closed. This special case is
indicated by log status L, which means that this logical log file contains the
most recent checkpoint record in the logical log on disk.

3-42 IBM Informix OnLine Database Server Administrator’s Guide
If the Logical Log Backup Cannot Complete
OnLine cannot free this log. To do so would permit new records to overwrite
the most recent record in the logical log that designates a time when both
physical and logical consistency was ensured. If this happened, OnLine
would be unable to execute fast recovery. (Refer to page 4-39.)
Therefore, this log file maintains a backed-up status until a new checkpoint
record is written to the current logical log file. If you are logged in as user
informix, you can force a checkpoint by requesting the DB-Monitor Force-
Ckpt option. You can also force a checkpoint from the command line by
executing tbmode -c. (Refer to page 7-67.)
If the Logical Log Backup Cannot Complete
If a failure occurs while OnLine is backing up a logical log file, it handles the
situation in the following manner.
During a restore, you can roll forward any log files that were already backed
up to tape before the failure. The partial log remains on the tape as well. The
logical log file on disk that was in the process of being backed up at the time
of the failure is not marked as backed up.
If a logical log backup fails, the next logical log backup session begins with
the logical log file that was being backed up when the failure occurred.
Even if the failure was so severe as to require an immediate restore, the
restore procedure provides you with the opportunity to back up to tape any
logical log files on disk that are not marked as backed up.
Here is an example. A logical log file is being backed up and a failure occurs.
The backup is interrupted. A restore is needed. How does the restore handle
the partial backup on tape?
Callthistape,whichcontainsbothvalidbacked-up log filesandapartiallog,
Tape A.
When the restore procedure begins, OnLine reads the appropriate archive
tapes. After reading and restoring the archive tapes, OnLine prompts for the
first logical log file since the last archive. Assume that log file is the first log
file on Tape A. The operator mounts Tape A.
OnLinereadseachlogical log filein sequence. WhenOnLine reachesthe end
of the first log file, it rolls forward all the operations described by the records
contained in that file.

Operating OnLine 3-43
Archive Administration
Thisprocesscontinues with eachlogfileonTapeA.Whentherestoreprocess
encounters the partial log at the end of Tape A, it reads what records it can.
Because OnLine has not reached the end of the log file, it prompts the
operator for the next tape.
The operator mounts Tape B. OnLine reads the logical log header indicating
that this is the beginning of the same log file that has been partially read. At
this point, the restore procedure ignores the partial log information read at
the end of Tape A and begins to read the complete log as it exists on Tape B.
If, in response to the prompt for the next tape, the operator indicates that no
more tapes exist, the restore process begins to roll forward whatever records
it can from the partial log on Tape A. All records that are part of incomplete
transactions are rolled back.
Archive Administration
For an explanation of what happens during an archive and how OnLine
determines which disk pages to copy to tape, refer to page 4-30.
For information about the role of an archive in an OnLine data restore, refer
to page 4-45.
Archive Types
An archive is a copy of OnLine data at a specific time, stored on one or more
volumes of tape. OnLine supports three-tiered incremental archives:
■Level-0, the base-line archive
■Level-1, all changes since the last level-0 archive
■Level-2, all changes since the last level-1 or level-2 archive
You can create archives (any level) when OnLine is in online mode or
quiescent mode. You can also create an archive remotely: that is, when the
tape device is managed by a different machine. Each of these archives is
explained in the following paragraphs.

3-44 IBM Informix OnLine Database Server Administrator’s Guide
Archive Types
An online archive is an archive that is created while OnLine is online and
database server processes are modifying data. Allocation of some disk pages
in dbspaces and blobspaces might be temporarily frozen during an online
archive. (Refer to page 4-30 for an explanation of how OnLine manages an
online archive.)
Aquiescent archive is an archive that is created while OnLine is in quiescent
mode. No database activity occurs while the archive is being made.
Aremote archive is an archive that is created on a tape device managed by
another host machine. You can create a remote archive in either online or
quiescent mode. (Refer to page 3-53 for instructions on how to specify an
archive device on another machine.)
Level-0 Archive
Alevel-0 archive is the baseline archive. It contains a copy of every used disk
page (dbspace and blobspace) that would be needed to restore an OnLine
system to that point in time. All disk page copies on the tape reflect the
contents of the disk pages at the time the level-0 archive began. This is true
even for online archives, which are created while users continue to process
data.(Refertopage 4-30foradescriptionof what happensduringanOnLine
archive.)
During a level-0 archive, OnLine copies disk pages selectively; not every
usedpageiscopied.DbspacepagesallocatedtoOnLine but not yet allocated
to an extent are ignored. (Refer to page 2-114 for a detailed discussion of
extents and allocating pages to an extent.) Pages allocated to the logical log
or physical log are ignored. Temporary tables are scanned and can be copied
during a level-0 archive.
Blobspace blobpages are scanned. OnLine might need to copy specific disk
pages that contain deleted blobs because of requirements related to the
restore procedure. (Refer to page 4-45.)
Mirror chunks are not archived if their primary chunks are accessible.
The configuration file is not part of an OnLine archive.
Refer to page 4-37 for more information about the archive criteria and how
OnLine determines whether or not a page should be copied to disk during a
level-0 archive.

Operating OnLine 3-45
Archive Types
Level-1 Archive
Alevel-1archivecontainsa copy of every disk page that has changedsincethe
lastlevel-0archive.Alldiskpagecopiesonthetapereflectthecontentsofthe
disk pages at the time the level-1 archive began.
Level-2 Archive
Alevel-2archivecontainsa copy of every disk page that has changedsincethe
last level-0 or level-1 archive, whichever is most recent. All disk page copies
onthetapereflectthecontentsofthediskpagesatthetimethelevel-2archive
began.
Incremental Archive Strategy
Figure 3-2 illustrates an incremental archiving strategy. Each of the archive
levels is defined as follows:
■Level-0 archive is created once every nine days.
■Level-1 archive is created once every three days.
■Level-2 archive is created once a day.
Figure 3-2
Incremental archive example
Mon Tue Wed Thu Fri Sat Sun Mon Tue Wed Thu
0 0
1 1
2 2 2 2 2 2 2

3-46 IBM Informix OnLine Database Server Administrator’s Guide
How Long Will an Archive Take?
How Long Will an Archive Take?
Thenumberof variables that youmustconsider in estimating thetimefor an
archive make the task more of an art than a science. Each of the following
items has an impact on the time needed to complete the archive:
■Overall speed of the tape device, including operating-system
overhead
■Level of the archive (level-0, level-1, or level-2)
■Volume of used pages managed by OnLine
■Amount and type of database activity during the archive
■Amount and type of database activity in the period since the last
archive
■Alertness of the operator to tape-changing demands
Unfortunately, the UNIX time command cannot help you estimate the time
needed to complete an archive. The best approach is to create an archive and
try to gauge the time for subsequent archives using the first one as a base of
comparison.
If you create an archive through the DB-Monitor Archive menu, Create
option, messages display the percentage of the archive that is complete.
These messages might help you estimate how much time and tape you need
to complete the archive, but the %done value can be misleading. The
confusion arises because the calculation for %done is based on total allocated
OnLine space, but only used pages are archived.
Consider this example. A 100-megabyte chunk allocated to OnLine contains
75megabytes of used pages and 25 megabytes of freespace,which is located
at the end of the chunk. The archive proceeds at a steady rate as the %done
value climbs from 0 %done to 75 %done. When tbtape reaches the last 25
percent of the chunk, it determines that the remaining pages are free space
and therefore are not archived. The value of %done suddenly jumps from 75
to 100 and the archive is complete.

Operating OnLine 3-47
Plan the Archive Schedule
Plan the Archive Schedule
Each of the following considerations affects the archive schedule you create
for your environment:
■If you want to minimize the time for a restore
■If you want to minimize the time to create an archive
■If you want to create online archives
■Ifyoumustusethesametapedrive to createarchivesandtobackup
the logical logs
■If the operator is periodically unavailable
Try to avoid unscheduled archives. Because the following administrative
changes require a level-0 archive as part of the procedure, consider waiting
to make these changes until your next regularly scheduled level-0 archive:
■Changing a tape device pathname from /dev/null (archive after)
■Adding logging to a database (archive before)
■Mirroring a dbspace that contains logical log files (archive after to
initiate mirroring)
■Adding a logical log file (archive after to make log file available)
■Dropping a logical log file (archive after)
■Moving one or more logical log files (archives during the procedure)
■Changing the size of the physical log (archive after reinitializing
shared memory)
To ensure the integrity of your archives, periodically verify that all OnLine
dataandcontrolinformationisconsistent beforeyoucreatealevel-0archive.
You need not perform this checking before every level-0 archive, but
Informixrecommendsthatyoukeepthenecessarytapesfromthemostrecent
archivecreatedimmediatelyafterOnLinewasverifiedtobeconsistent.Refer
to page 4-6 for a detailed explanation of this consistency check.
During a restore, OnLine reads and writes all relevant archive tapes to disk.
Then OnLine reads all logical log files since the last archive and rolls the log
records forward. The time required to perform a restore is a function of two
things:

3-48 IBM Informix OnLine Database Server Administrator’s Guide
Plan the Archive Schedule
■Size and number of archives. The minimum number of archives is
just the single level-0 archive. The maximum number is three, one
archive of each level.
■Size and number of logical log files since the last archive.
The size of the level-0 archive is fixed because it is the sum of all in-use data.
The size of the level-1 archive is a function of the time between your level-0
archives. The more often you create level-0 archives, the smaller each level-1
archive will be. This same relationship holds between level-1 archives and
level-2 archives and between level-2 archives and the number of logical log
files.
Minimize Restore Time
Usethe following strategy to minimize the timeneeded to restorean OnLine
system:
■Createalevel-0archiveas oftenasispracticable,perhapseverythree
days.
■Create a level-1 archive daily.
■Do not use level-2 archives.
The time required for any possible restore is limited to the time needed to
read and process the following data:
■A level-0 archive, representing the whole system
■A level-1 archive, representing from one to three days’ activity
■Logical log files, representing less than a day’s work

Operating OnLine 3-49
Plan the Archive Schedule
Minimize Archive Time
You can reduce the number of disk pages that must be copied during an
archivebystoringexplicitlycreatedtemporarytablesinadedicated dbspace
and then dropping that dbspace before you archive.
For example, suppose an application in your environment uses temporary
tables to load data. If you load 250,000 rows into a temporary table and then
laterdeletethattemporarytable,thepagesthatwereallocatedtothetableare
archived. If, however, you create the temporary table in a separate dbspace
dedicated to temporary tables and then drop the dbspace before the archive,
none of the pages is archived.
Online Archives
If the archives must be created online, be aware of some of the inconve-
niences associated with the online archive. Online archive activity forces
pages to remain in the physical log until the archive process, tbtape, has
verified that it has a copy of the unchanged page. In this way, the online
archive can slow checkpoint activity, which can contribute to a loss in
performance.
Single Tape Drive
Ifyou arecreatingan archivewith the onlyavailable tape device, you cannot
back up any logical log files until the archive is complete. If the logical log
files fill during the archive, normal OnLine processing halts.
Thisproblemcannotoccurifyoucreateyourarchivesinquiescentmode. But
if you want to create online archives with only one tape device, you can take
the following precautions:
■Configure OnLine for a large logical log.
■Store all explicitly created temporary tables in a dedicated dbspace
and drop that dbspace before each archive.
■Create the archive when database activity is low.
■Free as many logical log files as possible before you begin the
archive.

3-50 IBM Informix OnLine Database Server Administrator’s Guide
Examine Your Archive Configuration
If the logical log files fill in spite of these precautions, you can either leave
normal processing suspended until the archive completes or cancel the
archive.
(It is possible that even the archive will hang eventually, the result of a
deadlock-like situation. The archive is synchronized with OnLine check-
points. It can happen that the archive procedure must wait for a checkpoint
to synchronize activity. The checkpoint cannot occur until all user processes
exit critical sections of code. The user processes cannot exit their sections of
code because normal OnLine processing is suspended.)
Operator Availability
The operator should be available throughout a multivolume archive to
mount tapes as prompted.
An archive might take several reels of tape. If an operator is not available to
mount a new tape when one becomes full, the online archive waits.
During this wait, OnLine suspends checkpoint activity. If an operator
permits the archive to wait long enough, OnLine processing can hang,
waiting for a checkpoint.
In addition, if you are working in a single-tape-device environment, the
logical logs can fill, which can hang processing as well.
Examine Your Archive Configuration
Complete the steps outlined here to examine your archive configuration and
verify that it is appropriate for your OnLine environment. Consider the
planning issues raised in the scheduling topic, which begins on page 3-47.
Your Configuration File
To examine your specified configuration, you need a copy of your OnLine
configuration file, $INFORMIXDIR/etc/$TBCONFIG. Execute tbstat -c while
OnLine is running.
The configuration displayed by DB-Monitor (Status menu, Configuration
option)isa copy of yourcurrentOnLineconfiguration,whichcan differfrom
the values stored in your configuration file.

Operating OnLine 3-51
Examine Your Archive Configuration
Forfurtherinformationabouttherelationshipofthecurrentconfigurationto
the values in the configuration file ($INFORMIXDIR/etc/$TBCONFIG), refer
to page 1-11.
The Archives
In the event of a system failure, OnLine can restore all data that has been
archived. Without archives, you cannot perform a restore.
Do not use the OnLine data-migration utilities to unload data as a substitute
for a complete archive. None of the data-migration utilities are coordinated
with the information stored in the logical log files. You cannot roll forward
information from the logical log without the archives.
To ensure the integrity of your archives, periodically verify that all OnLine
dataandcontrolinformationisconsistent beforeyoucreatealevel-0archive.
Refer to page 4-6 for a detailed explanation of this consistency check.
TAPEDEV Configuration Parameter
The TAPEDEV configuration parameter specifies the archive tape device. The
value you choose for TAPEDEV has the following implications:
■If the archive device differs from the logical log backup device, you
can schedule online archives without regard to the amount of free
space remaining in the logical log.
■You can create remote archives if you specify TAPEDEV to be a tape
device managed by another host machine.
■If you specify /dev/null as the archive device, you avoid the
overhead of the archive. However, you cannot perform a restore.
Look at the copy of your configuration file and compare the values specified
by TAPEDEV and LTAPEDEV.LTAPEDEV is the logical log tape device.
Ideally,TAPEDEV andLTAPEDEV eachspecifyadifferentdevice.Whenthisis
the case, you can execute online archives whenever you choose. The amount
of free space in the logical log is irrelevant.

3-52 IBM Informix OnLine Database Server Administrator’s Guide
Change Pathname of Archive Tape Device
IftheTAPEDEV and LTAPEDEV values arethesame,youmust ensurethatthe
logical logs do not fill before the archive completes. If the logical log files fill
while the archive is under way, normal OnLine processing stops. Refer to
page 3-47 for guidelines on planning an archive schedule. Refer to page 3-59
for an explanation of what happens if the logical log files become full during
an archive.
TAPEBLK and TAPESIZE
Verify that the current block size and tape size are appropriate for the device
specified.TheblocksizeofthelogicallogtapedeviceisspecifiedasTAPEBLK.
The tape size is specified as TAPESIZE.
If TAPEDEV is specified as /dev/null, block size and tape size are ignored.
Specify TAPEBLK as the largest block size permitted by your tape device.
OnLine does not check the tape device when you specify the block size.
Verify that the TAPEDEV tape device can read the block size that you specify.
If not, you cannot restore the tape.
Specify TAPESIZE as the maximum amount of data that should be written to
this tape.
Change Pathname of Archive Tape Device
The archive tape device is specified as TAPEDEV in the configuration file.
You can change the value of TAPEDEV while OnLine is in online mode. The
change takes effect immediately.
Be prepared to create a level-0 archive immediately after you make the
change, unless you change the value to /dev/null.
You can establish the value of TAPEDEV as a symbolic link, enabling you to
switch between more than one tape device without changing the pathname.
Important: Any time you change the physical characteristics of the tape device, you
mustcreatealevel-0 archive. Otherwise, you might be unableto restorethecomplete
set of tapes. OnLine cannot switch tape devices during a restore. OnLine will expect
allarchivetapes to have the same blocksize and tape size aswerespecified at the time
of the most recent level-0 archive.

Operating OnLine 3-53
Change Pathname of Archive Tape Device
If you change the pathname to /dev/null, the change proceeds more
smoothly if you make the change while OnLine is offline. If TAPEDEV is set
to /dev/null, you cannot perform a restore.
The tape device specified by the pathname must perform a rewind before
opening and on closing.
If you are logged in as user informix, you can change the value of TAPEDEV
from within DB-Monitor or from the command line. If you are logged in as
root, you must use the command-line option.
Preliminary Considerations
Tape devices must rewind before opening and on closing to be compatible
with OnLine operation. The reason for this is a series of checks that OnLine
performs before writing to a tape.
Whenever OnLine attempts to write to any tape other than the first tape in a
multivolumebackup or archive,OnLine first readsthetape header to ensure
the tape is available for use. Then the device is closed and reopened. OnLine
assumes the tape was rewound on closing and begins to write.
Whenever OnLine attempts to read a tape, it first reads the header and looks
for the correct information. OnLine cannot find the correct header infor-
mation at the start of the tape if the tape device did not rewind on closing
during the write process.
Create a level-0 archive immediately after you change the value of TAPEDEV
to ensure a proper restore. This is done for two reasons.
First, the OnLine restore procedure cannot switch tape devices as it attempts
to read the archive tapes. If the physical characteristics of the archive tapes
change during the restore, either because of a new block size or tape size, the
restore fails.
Second,therestorefailsif the tape devicespecifiedasTAPEDEV at the timeof
the level-0 archive is unavailable when the restore begins.
Important: At the beginning of a restore, the OnLine configuration, including
archive devices, must reflect the configuration as it was when the level-0 archive was
created.

3-54 IBM Informix OnLine Database Server Administrator’s Guide
Change Pathname of Archive Tape Device
To specify an archivetape device on another hostmachine, use the following
syntax:
host_machine_name:tape_device_pathname:
The following example specifies an archive tape device on the host machine
kyoto:
kyoto:/dev/rmt01
The host machine where the tape device is attached must permit user
informix to run a UNIX shell from your machine without requiring a
password. If your machine does not appear in the hosts.equiv file of the
otherhost machine, it must appearin the .rhosts file in thehome directory of
the informix login. If you are creating archives as root, the machine name
must appear in the .rhosts file for root on the other host machine.
Verify that the block size and the tape size are correct for the new device.
Block size for the archive tape device is specified as TAPEBLK. Tape size is
specified as TAPESIZE. If you need to change these values, you can do so at
the same time that you change the value of TAPEDEV.
Specify TAPEBLK as the largest block size permitted by your tape device.
Specify TAPESIZE as the maximum amount of data that should be written to
this tape.
Changing the value of TAPEDEV from a real device to /dev/null proceeds
more smoothly if you do it when OnLine is offline. As soon as you make the
change, you are only able to restore your system to the point of your most-
recent archive and logical log backup tapes. You cannot restore work done
since then.
From DB-Monitor
1. Select the Archive menu, Tape-Parameters option to change the
value of TAPEDEV. DB-Monitor displays the current value.
2. Enterthefullpathnamevalueforthearchivetapedeviceinthe Tape
Device field.
3. Enter new values in the device Block Size and Tape Size fields, if
appropriate.

Operating OnLine 3-55
Change Block Size of Archive Tape Device
From the Command Line
1. Use an editor to edit the file specified by
$INFORMIXDIR/etc/$TBCONFIG.
2. Change the value of TAPEDEV.
3. Change the values for the archive device block size (TAPEBLK) and
tape size (TAPESIZE) at the same time, if appropriate.
Change Block Size of Archive Tape Device
TheblocksizeofthearchivetapedeviceisspecifiedasTAPEBLK intheconfig-
uration file. The block size is expressed in kilobytes.
You can change the value of TAPEBLK while OnLine is in online mode. The
change takes effect immediately.
Specify the largest block size permitted by your tape device.
If the tape device pathname is /dev/null, the block size is ignored.
If you are logged in as user informix, you can change the value of TAPEBLK
from within DB-Monitor or from the command line. If you are logged in as
root, you must use the command-line option.
Important: Any time you change the physical characteristics of the tape device, you
mustcreatealevel-0 archive. Otherwise, you might be unableto restorethecomplete
set of tapes. OnLine cannot switch tape devices during a restore. OnLine will expect
allarchivetapes to have the same blocksize and tape size aswerespecified at the time
of the most recent level-0 archive.
OnLine does not check the tape device when you specify the block size.
Verify that the tape device specified in TAPEDEV can read the block size that
you specified. If not, you cannot restore the tape.
From DB-Monitor
1. From within DB-Monitor, select the Archive menu, Tape-Parameters
option to change the value of TAPEBLK.DB-Monitor displays the
current value.
2. Enter the new block size expressed in kilobytes in the Block Size
field that is associated with the Tape Device field.

3-56 IBM Informix OnLine Database Server Administrator’s Guide
Change Tape Size of Archive Tape Device
From the Command Line
1. To change the value of TAPEBLK from the command line, use an
editor to edit the file specified by $INFORMIXDIR/etc/$TBCONFIG.
2. Change the value of TAPEBLK to the new block size, expressed in
kilobytes.
Change Tape Size of Archive Tape Device
Thetape size of the archivetapedevice is specified as TAPESIZE in the config-
uration file. Tape size refers to the maximum amount of data that should be
written to this tape, expressed in kilobytes.
You can change the value of TAPESIZE while OnLine is in online mode. The
change takes effect immediately.
If the tape device pathname is /dev/null, the tape size is ignored.
If you are logged in as user informix, you can make this change from within
DB-Monitoror fromthe command line.If you areloggedinas root, youmust
use the command-line option.
Important: Any time you change the physical characteristics of the tape device, you
mustcreatealevel-0 archive. Otherwise, you might be unableto restorethecomplete
set of tapes. OnLine cannot switch tape devices during a restore. OnLine will expect
allarchivetapes to have the same blocksize and tape size aswerespecified at the time
of the most recent level-0 archive.
From DB-Monitor
1. From within DB-Monitor, select the Archive menu, Tape-Parameters
option to change the value of TAPESIZE.DB-Monitor displays the
current value.
2. Enterthenew tape size expressedin kilobytes in the Tape Size field
that is associated with the Tape Device field.

Operating OnLine 3-57
Create an Archive, Any Type
From the Command Line
1. To change the value of TAPESIZE from the command line, use an
editor to edit the file specified by $INFORMIXDIR/etc/$TBCONFIG.
2. Change the value of TAPESIZE to the new tape size, expressed in
kilobytes.
Create an Archive, Any Type
An archive can require multiple tapes. After a tape fills, OnLine rewinds the
tape, prompts the operator with the tape number for labelling, and prompts
the operator again to mount the next tape, if one is needed.
Preliminary Considerations
You can create an archive while OnLine is in online or quiescent mode.
Each time you create a level-0 archive, also create a copy of the OnLine
configurationfileasitexistsatthetimethatthearchivebegins.Youwillneed
this information if you must restore OnLine from the archive tape.
If the total available space in the logical log files is less than half of a single
log file, OnLine does not create an archive. Back up the logical log files and
then request the archive again.
You cannot add a logical log file or mirroring during an archive.
If only one tape device is available on your system, refer to page 3-49 for
more information about the steps you can take to reduce the likelihood of
filling the logical log during the archive.
The terminal from which you initiate the archive command is dedicated to
the archive (displaying messages) until the archive is complete.
Ifyouareloggedinasuserinformix,youcancreateanytypeofarchivefrom
within DB-Monitor or from the command line. If you are logged in as root,
you must use the command-line option.

3-58 IBM Informix OnLine Database Server Administrator’s Guide
Create an Archive, Any Type
Agoodpracticetofollowistolabel archivetapeswiththearchivelevel,date,
time, and tape number provided by OnLine, as shown in the following
example:
Level 1: Wed Nov 27, 1991 20:45 Tape # 3 of xx
Each archive begins with its first tape reel numbered 1 and each additional
tape reel incremented by 1. A five-volume archive is numbered 1 through 5.
(You must supply the value for xx after the archive completes.)
From DB-Monitor
1. From within DB-Monitor, take OnLine to the appropriate mode,
online or quiescent.
2. Select the Archive menu, Create option to begin the archive.
DB-Monitor executes the tbtape process, which begins an interactive
dialogue on the screen.
3. Place a write-enabled tape on the tape drive device (defined by
TAPEDEV). Put the device online with the appropriate operating-
system command.
The prompts from DB-Monitor ask you to specify the archive level.
4. Follow the prompts for labelling and mounting new tapes. A
message informs you when the archive is complete.
From the Command Line
1. From the command line, take OnLine to the appropriate mode,
online or quiescent.
2. Execute tbtape -s.
Do not create an archive from the command line in background
mode (that is, using the UNIX &operator on the command line). The
create-archive process is interactive, prompting for new tapes if nec-
essary. It is easy to miss the prompts and delay the archive process if
it is executed in background mode.

Operating OnLine 3-59
If the Logical Log Files Fill During an Archive
3. Place a write-enabled tape on the tape drive device (defined by
TAPEDEV). Put the device online with the appropriate operating-
system command.
The prompts from tbtape ask you to specify the archive level.
4. Follow the prompts for labelling and mounting new tapes. A
messageinformsyouwhenthearchiveiscomplete.Forfurtherinfor-
mation about the tbtape utility, refer to page 7-102.
If the Logical Log Files Fill During an Archive
Ifthe logical log files fill during anarchive,OnLine displays amessage at the
system console and normal processing is suspended.
Two Tape Drives
If you have two tape devices available to OnLine, log in as user informix at
a free terminal.
Verify that LTAPEDEV and TAPEDEV specify different pathnames that corre-
spond to separate tape devices. If they do, back up the logical log files by
executing either tbtape -a or tbtape -c, or by selecting either the Automatic-
Backup or Continuous-Backup option from the Logical-Logs menu.
If LTAPEDEV and TAPEDEV are identical, you might be able to assign a
different value to the logical log tape device (LTAPEDEV) and initiate logical
log file backups. However, this option is only a solution if the new value of
LTAPEDEV is compatible with the block size and tape size used to create
earlier logical log file backups. (All tapes must reflect the physical character-
isticsspecifiedatthetimeofthemostrecentlevel-0archive.)Otherwise,your
options are to either leave normal OnLine processing suspended until the
archive completes or cancel the archive.

3-60 IBM Informix OnLine Database Server Administrator’s Guide
If an Archive Terminates Prematurely
One Tape Drive
If only one tape device is available to OnLine, you can take either one of two
actions:
■Leave OnLine processing suspended while the archive completes.
■Cancel the archive and try again later.
The archive messages display an estimate of how much of the archive is
complete, expressed as a percentage. If the archive is nearly complete, you
might be willing to hold up your users until the archive finishes. The archive
might hang eventually; however, it is impossible to determine ahead of time
if this is the case.
To cancel the archive, press the Interrupt key at the terminal dedicated to the
archive process. By cancelling the archive, you free the tape device so that it
can be used to back up the full logical log files.
If an Archive Terminates Prematurely
If an archive is cancelled or interrupted, there is a slight chance that the
archive progressed to the point where it can be considered complete.
Use DB-Monitor to determine if the archive must be redone. Select the Status
menu, Archive option. The screen display lists all completed archives. If the
archive just terminated is displayed on this screen, the tape output was
completed. Otherwise, you must redo the archive.

Operating OnLine 3-61
Monitor OnLine Activity
Monitor OnLine Activity
Many OnLine structures can be monitored for more than one kind of infor-
mation. For example, you can monitor chunks for either fragmentation or
page usage.
Other OnLine entities are too general to be researched directly. For example,
table information is too broad a category. What aspect of the table interests
you? Indexes? Number of data rows? Disk space usage by extent and page
type?
For background information about internal OnLine structures mentioned in
this section, refer to Chapter 2, “System Architecture.”
Monitor Archive History
DB-Monitor lists the archive tapes and logical log backup tapes needed to
perform a restore of the current OnLine system.
From DB-Monitor
From DB-Monitor, select the Status menu, Archive option.
The display lists the archives that you would need to perform an OnLine
restore now. For this reason, after you create a new level-1 archive, earlier
level-2 archives no longer appear.
The following information displays for each archive:
■Archive level (0, 1, or 2)
■Date and time of the archive
■IDnumberofthelogicallogthatwascurrentwhenthearchivebegan

3-62 IBM Informix OnLine Database Server Administrator’s Guide
Monitor Archive History
From the Command Line
From the command line, execute tbcheck -pr to display root dbspace
reserved page information. The last pair of reserved pages contains the
following information for the most recent archive:
■Archive level (0, 1, or 2)
■Effective date and time of the archive
■Time stamp describing when the archive began (expressed as a
decimal)
■IDnumberofthelogicallogthatwascurrentwhenthearchivebegan
■Physicallocationinthe logical log ofthecheckpoint record(thatwas
written when the archive began)
The effective date and time of the archive are the date and time of the check-
point that this archive took as its starting point.
For example, if no one had accessed OnLine since Tuesday at 7 p.m. and you
createanarchiveonWednesday morning, theeffectivedateandtimeforthat
archive would be Tuesday night, reflecting the time of the last checkpoint.
(No checkpoints are performed if activity is zero.)
Refer to page 2-102 for further information about the fields related to
archiving that appear in the reserved page display.

Operating OnLine 3-63
Monitor Blobs in a Blobspace
Monitor Blobs in a Blobspace
DB-Monitor measures blobspace availability by providing the number of
used disk pages in the chunk. The tbstat -d display attempts to describe the
the number of blobpages used. The tbcheck -pB display provides the most
accurate assessment of current blobspace storage efficiency.
From DB-Monitor
From DB-Monitor, select the Status menu, Spaces option.
The first screen display lists the blobspace ID number, the name of the
blobspace, the number of assigned chunks, and the mirroring status of the
blobspace. If an asterisk appears next to the Mirror field, one of the chunks
in this blobspace is down. Select the blobspace that you want to monitor.
The second screen display lists the following chunk information for each
dbspace:
■Chunk ID
■Chunk pathname and offset
■Mirror status flags
■Pages in the chunk
■Number of used disk pages in the chunk
If a chunk is mirrored, both the primary chunk and the mirror chunk shared
the same chunk ID number.
The chunk status flags are defined as follows:
Flag Description
- Chunk belongs to a dbspace.
B Chunk belongs to a blobspace.
D Chunk is down, no reads or writes can occur.
M Mirror chunk.
O Chunk is online.
(1 of 2)

3-64 IBM Informix OnLine Database Server Administrator’s Guide
Monitor Blobs in a Blobspace
From the Command Line
From the command line, execute tbstat -d to obtain information that is
similartothatdisplayedbytheDbspacesmenu,Infooption.However,where
DB-Monitor lists total pages and the number used, tbstat -d lists total pages
and, in the bpages field, the approximate number of free blobpages.
The tilde (~) that precedes the bpages value indicates that this number is
approximate because it is derived from the information stored in the disk
version of the chunk’s free-map page, not the version of the free-map page
stored in shared memory.
Another complication is that tbstat -d does not register a blobpage as
available until the logical log in which a blob deletion occurred is backed up
and the blobpage is freed. Therefore, if you delete 25 blobs and immediately
execute tbstat -d, the newly freed space does not appear in the tbstat output.
Refer to page 7-84 for further information about the tbstat -d display.
From the command line, you also can obtain an accurate picture of the
amount of available space in a blobspace, by executing tbcheck with the -pB
options. This utility gathers its data from the actual blob-storage statistics.
Execute tbcheck -pB with either a database name or a table name as a
parameter. The display reports the following statistics:
■Numberof blobpages usedby this table ordatabase in allblobspaces
■Blobpage fullness, by blob, for each blob in this table or database
P Primary chunk.
R Chunk is currently being recovered.
X Newmirrorchunkthat contains logicallogfiles; alevel-0archiveis
needed before the mirror can become active.
Flag Description
(2 of 2)

Operating OnLine 3-65
Monitor Blobs in a Dbspace
The number of free blobpages is derived from the information stored in the
shared-memory version of the chunk’s free-map page, not the disk version.
These statistics are the most current possible and might conflict with the
output of tbstat -d, which is derived from the disk version of the free-map
page.
Refer to page 5-5 for further information about how to interpret the display
and modify your blobspace blobpage size to improve performance.
From the command line, execute tbcheck with the -pe options for a detailed
listingofchunkusagefirstthedbspacesandthentheblobspaces.Thedisplay
provides the following blobspace usage information:
■Names of the tables that store blobs, by chunk
■Number of disk pages used, by table
■Number of free disk pages remaining, by chunk
■Number of overhead pages used, by chunk
Refer to page 7-43 for further information about the tbcheck -pe display.
Monitor Blobs in a Dbspace
You can learn the number of dbspace pages that are used by blobs, but little
else.
From the command line, execute tbcheck with the -pT options and either a
databasenameoratable name as a parameter.Foreachtableinthedatabase,
or for the specified table, OnLine displays a general tblspace report.
Following the general report is a detailed breakdown of page use in the
extent, by page type. Look for the blobpage type for blob information.
More than one blob can be stored on the same dbspace blobpage. Therefore,
you can count the number of pages used to store blobs in the tblspace, but
you cannot estimate the number of blobs in the table.
Refer to page 7-44 for further information about the tbcheck -pT utility
displays.

3-66 IBM Informix OnLine Database Server Administrator’s Guide
Monitor Buffers
Monitor Buffers
Use the tbstat -b,-X, and -B options to identify a specific user process that is
holding a resource that might be needed by another user process.
The tbstat -p option can help you assess performance as measured by the
percentage of cached reads and writes.
For monitoring information that describes the efficiency of the buffer pool,
refer to page 3-68 (buffer-pool activity).
tbstat -b
From the command line, execute tbstat -b to obtain the following buffer
statistics:
■General buffer statistics (total number, number modified)
■Address of each user process currently holding a buffer
■Page numbers for those pages in currently held buffers
■Address of the first user process waiting for each buffer
You can compare the addresses of the user processes to the addresses that
appear in the tbstat -u display to obtain the process ID number.
Refer to page 7-82 for further information about the tbstat -b output.
tbstat -X
Execute tbstat -X to obtain the same information as tbstat -b, along with the
complete list of all user processes that are waiting for buffers, not just thefirst
waiting process.
Refer to page 7-101 for further information about the tbstat -X output.

Operating OnLine 3-67
Monitor Buffers
tbstat -B
Execute tbstat -B to obtain the following buffer statistics:
■Address of every regular shared-memory buffer
■Page numbers for all pages remaining in shared memory
■Address of the first user process waiting for each buffer
Refer to page 7-84 for further information about the tbstat -B output.
tbstat -p
Execute tbstat -p to obtain statistics about cached reads and writes. The
caching statistics appear in four fields on the top row of the output display.
The first pair of statistics appears in the third and fourth positions:
The second pair of statistics appears in the seventh and eighth positions of
the top row of the display:
Note that the number of reads or writes can appear as a negative number if
the number of occurrences exceeds 232. To reset the profile counts, execute
tbstat -z.
Refer to page 7-92 for further information about the tbstat -p output.
Execute tbstat -P to obtain the tbstat -p display, with an additional field,
BIGreads, the number of big-buffer reads. Refer to page 2-55 for further
information about the big buffers.
bufreads is the number of reads from shared-memory buffers.
%cached is the percentage of reads cached.
bufwrits is the number of writes to shared memory.
%cached is the percentage of writes cached.

3-68 IBM Informix OnLine Database Server Administrator’s Guide
Monitor Buffer-Pool Activity
Monitor Buffer-Pool Activity
Monitor buffer-pool activity to determine the general availability of buffers
and to isolate the activity that is triggering buffer-pool flushing. (Refer also
to page 3-66 for general buffer statistics.)
Thetbstat -p output contains the following two statistics that describebuffer
availability:
Refer to page 7-92 for further information about the tbstat -p output.
tbstat -F
From the command line, execute tbstat -F to obtain a count of the writes
performed by write type. Refer to page 2-75 for a definition of each of the
following write types:
■Foreground write
■LRU write
■Idle write
■Chunk write
In addition, tbstat -F lists the following page-cleaner information:
■Page-cleaner number and shared-memory address
■Current state of the page cleaner
Details about the function and activities of the page-cleaner daemon
processes are described on page 2-34. Refer to page 7-87 for further infor-
mation about the tbstat -F output.
ovbuff lists the number of times that OnLine attempted to exceed the
maximum number of shared buffers, BUFFERS. (The ovbuff
field appears in the third row of output, fourth position.)
bufwaits lists the number of times processes waited for a buffer (any
buffer). (The bufwaits field appears in the fourth row of
output, first position.)

Operating OnLine 3-69
Monitor Checkpoints
tbstat -R
Execute tbstat -R to obtain information about the number of buffers in each
LRU queue and the number and percentage of the buffers that are modified.
Details about the function of the LRU queues are described on page 2-57.
Refer to page 7-95 for further information about the tbstat -R output.
tbstat -D
Execute tbstat -D to obtain, by chunk, the number of pages read and the
number of pages written.
Refer to page 7-86 for further information about the tbstat -D output.
Monitor Checkpoints
Monitor checkpoint activity to determine if your checkpoint interval
(specified as CKPTINTVL in the configuration file) is appropriate for your
processing environment.
From DB-Monitor
From DB-Monitor, select the Status menu, Profile option.
The Checkpoints field lists the number of checkpoints that have occurred
since OnLine was brought online.
The Check Waits field defines the number of times that a user process (any
user process) waits for a checkpoint to finish. A user process is prevented
from entering a critical section during a checkpoint. For further information
about critical sections, refer to page 2-28.
Refer to page 3-83 for a complete explanation of the Profile option.
From DB-Monitor, select the Force-Ckpt menu.
The display lists the time of the last checkpoint and the last time that OnLine
checked to determine if a checkpoint was needed.

3-70 IBM Informix OnLine Database Server Administrator’s Guide
Monitor Chunks
A checkpoint check is performed if the time specified by CKPTINTVL has
elapsed since the last checkpoint. If nothing is in the buffers waiting to be
written to disk at the time of the checkpoint check, no checkpoint is needed.
The time in the Last Checkpoint Done field is not changed until a check-
point occurs.
From the Command Line
From the command line, execute tbstat -m to view the last 20 entries of the
OnLine message log. If a checkpoint record does not appear in the last 20
entries, read the message log directly using a UNIX editor. Individual check-
point records are written to the log when the checkpoint ends. No record is
written when a checkpoint check occurs and no checkpoint occurs.
From the command line, execute tbcheck -pr to obtain further information
aboutthestateofOnLine atthetimeofthelastcheckpoint. Refertopage 2-97
for a detailed description of each field in the checkpoint reserved page.
From the command line, execute tbstat -p to obtain the same checkpoint
information as is available from the Status menu, Profile option (Check-
points and Check Waits fields). Refer to page 7-92 for more information
about the tbstat -p display.
Monitor Chunks
Monitor the OnLine chunks to check for fragmentation (tbcheck -pe) or to
check the availability of free space throughout allocated disk space (all
options).
From DB-Monitor
From DB-Monitor, select the Status menu, Spaces option.
The first screen display lists the blobspace or dbspace ID number, the name
of the blobspace or dbspace, the number of assigned chunks, and the
mirroring status of the blobspace or dbspace. If an asterisk appears next to
the Mirror field, one of the chunks in this dbspace or blobspace is down.
Select the dbspace or blobspace that you want to monitor.

Operating OnLine 3-71
Monitor Chunks
The second screen display lists the following chunk information for each
dbspace:
■Chunk ID
■Chunk pathname and offset
■Mirror status flags
■Pages in the chunk
■Number of used disk pages in the chunk
If a chunk is mirrored, both the primary chunk and the mirror chunk shared
the same chunk ID number.
The chunk status flags are defined as follows:
From the Command Line
From the command line, execute tbstat -d to obtain information that is
similar to the information available from the Dbspaces menu, Info option.
However, where DB-Monitor lists the number of used disk pages, tbstat -d
lists the number of free disk pages and, in the field bpages, the approximate
number of free blobpages. For further information about the bpages field,
refer to page 3-63.
Flag Description
- Chunk belongs to a dbspace.
B Chunk belongs to a blobspace.
D Chunk is down, no reads or writes can occur.
M Mirror chunk.
O Chunk is online.
P Primary chunk.
R Chunk is currently being recovered.
X Newmirrorchunkthat contains logicallogfiles; alevel-0archiveis
needed before the mirror can become active.

3-72 IBM Informix OnLine Database Server Administrator’s Guide
Monitor Chunks
Executetbcheck -pr to obtain thechunk information that isstoredinthe root
dbspace reserved page. Refer to page 2-100 for a detailed description of each
field in the chunk reserved page, PCHUNK.
Execute tbcheck -pe to obtain the physical layout of information in the
chunk.Thechunklayoutissequential,andthenumberofpagesdedicatedto
each table is shown. The following information displays:
■Dbspace name, owner, and number
■Number of chunks in the dbspace
This output is useful for determining the extent of chunk fragmentation. If
OnLineisunabletoallocateanextentinachunkdespiteanadequatenumber
of free pages, the chunk might be badly fragmented.
Refer to page 7-43 for further information about the tbcheck -pe output.
Depending on the specific circumstances, you might be able to eliminate
fragmentationby using the ALTER TABLE statement to rebuildthe tables. For
this tactic to work, the chunk must contain adequate contiguous space in
which to rebuild each table. In addition, the contiguous space in the chunk
must be the space that OnLine normally allocates to rebuild the table. (That
is, OnLine allocates space for the ALTER TABLE processing from the
beginning of the chunk, looking for blocks of free space that are greater than
or equal to the size specified for the NEXT EXTENT. If the contiguous space is
located near the end of the chunk, OnLine could rebuild the table using
blocks of space that are scattered throughout the chunk.)
Use the ALTER TABLE statement on every table in the chunk. Follow these
steps:
1. For each table, drop all the indexes except one.
2. Cluster the remaining index using the ALTER TABLE statement.
3. Re-create all the other indexes.
You eliminate the fragmentation in the second step, when you rebuild the
table by rearranging the rows. In the third step, you compact the indexes as
wellbecause the index valuesaresortedbeforetheyareaddedtothe B+ tree.
You do not need to drop any of the indexes beforeyou cluster one but, if you
do, the ALTER TABLE processing is faster and you gain the benefit of more
compact indexes.

Operating OnLine 3-73
Monitor Configuration Information
A second solution to chunk fragmentation is to unload and reload the tables
in the chunk.
To prevent the problem from recurring, consider increasing the size of the
tblspace extents.
Monitor Configuration Information
Configuration information is needed for documentation during OnLine
administration.
From DB-Monitor
From DB-Monitor, select the Status menu, Configuration option.
This option creates a copy of the current, effective configuration and stores it
in the directory and file you specify. If you have modified the configuration
parameters and have not yet reinitialized shared memory, the effective
parameters might be different than the parameters that appear in
$INFORMIXDIR/etc/$TBCONFIG.
If you specify only a filename, the file is stored in the current working
directory by default.
From the Command Line
Fromthecommandline,executetbstat -c to obtain a copy of the file specified
by the environment variable TBCONFIG.
If TBCONFIG is not specified, OnLine displays the contents of $INFOR-
MIXDIR/etc/tbconfig. Refer to page 1-13 for a complete listing of the
configuration file.
From the command line, execute tbcheck -pr to obtain the configuration
information that is stored in the root dbspace reserved page. The reserved
page contains a description of the current, effective configuration.
If you change the configuration parameters from the command line and run
tbcheck -pr before you reinitialize shared memory, tbcheck discovers that
values in the configuration file do not match the current values in the
reserved pages. A warning message is returned.

3-74 IBM Informix OnLine Database Server Administrator’s Guide
Monitor Databases
Referto page 2-97 foradetaileddescriptionof each fieldin the configuration
reserved page.
Monitor Databases
This section describes information that is available to you about OnLine
databases. Monitor databases to track disk space usage by database.
From DB-Monitor
From DB-Monitor, select the Status menu, Databases option.
ThisoptionlistsallOnLinedatabases(uptoalimitof100).Foreachdatabase,
DB-Monitor provides the following information:
■Database name
■Database owner (user who created the database)
■Dbspace location where the system catalog for this database resides
■Date that the database was created (or the time, if the database was
created today)
■Logging status flag of the database
Logging status is indicated with three flags: B for buffered logging, N for no
logging, and U for unbuffered logging. If an asterisk appears by the U, the
database is ANSI-compliant.
From the Command Line
From the command line, execute tbcheck -pc with a database name as a
parameter to obtain further information about every table in the database.
The table information is derived from the database system catalog and
includes the following data:
■Whether the table includes VARCHAR or blob columns
■Number of extents allocated
■First and next extent sizes
■Count of pages used and rows stored

Operating OnLine 3-75
Monitor Dbspaces
Because tbcheck -pc derives its information directly from the tblspace, you
do not need to run the UPDATE STATISTICS statement to ensure that the
output is current.
Refer to page 7-42 for further information about the tbcheck -pc display.
Monitor Dbspaces
Use these options to track available disk space. The Dbspaces menu, Info
option describes the mirror status of each dbspace chunk.
From DB-Monitor
From DB-Monitor, select the Status menu, Spaces option.
ThefirstscreendisplayliststhedbspaceIDnumber,thenameofthedbspace,
thenumberofassignedchunks,andthemirroringstatusofthedbspace.Ifan
asterisk appears next to the Mirror field, one of the chunks in this dbspace is
down. Select the dbspace that you want to monitor.
The second screen display lists the following chunk information for each
dbspace:
■Chunk ID
■Chunk pathname and offset
■Mirror status flags
■Pages in the chunk
■Number of used disk pages in the chunk
If a chunk is mirrored, both the primary chunk and the mirror chunk share
the same chunk ID number.

3-76 IBM Informix OnLine Database Server Administrator’s Guide
Monitor Dbspaces
The chunk status flags are defined as follows:
From the Command Line
From the command line, execute tbstat -d to obtain the information that is
similar to the information available from the Dbspaces menu, Info option.
However, where DB-Monitor lists the number of used disk pages, tbstat -d
lists the number of free disk pages and, in the bpages field, the approximate
number of free blobpages. For further information about the bpages field,
refer to page 3-63.
For further information about the tbstat -d display, refer to page 7-84.
From the command line, execute tbcheck -pr to obtain the dbspace infor-
mation that is stored in the root dbspace reserved page. The reserved page
contains the following dbspace information:
■dbspace name, owner, and number
■Flags indicating if the dbspace mirror status and if the dbspace is a
blobspace
■Number of chunks in the dbspace
For further information about the fields in the dbspaces reserved page, refer
to page 2-99.
Flag Description
- Chunk belongs to a dbspace.
B Chunk belongs to a blobspace.
D Chunk is down.
M Chunk is a mirror chunk.
P Chunk is a primary chunk.
R Chunk is in recovery mode.
X Mirroring has been requested but the chunk contains a logical log
file; a level-0 archive is needed before this mirror can begin
functioning.

Operating OnLine 3-77
Monitor Disk Pages
Monitor Disk Pages
Use these options to obtain the specific data row rowid or to view a specific
page in ASCII (and hexadecimal). Use the rowid to specify a disk page.
Fromthe commandline,executetbcheck-pDwitheither adatabasenameor
a table name as the parameter to obtain a listing of every row requested
(either in the database or in the table). If you specify a table name, you can
optionally specify a logical page number. (The logical page number is
contained in the most significant three bytes of the rowid, which displays as
part of this output.) Two examples of the syntax for tbcheck -pD follow:
tbcheck -pD database_name
tbcheck -pD table_name logical_page_number
For each row, the page type and rowid is provided. Note that the rowid is
expressed in hexadecimal, but without the usual 0x indicator. For further
information about tbcheck -pD syntax, refer to page 7-42.
The -pD option displays the data page contents in hexadecimal and ASCII.
For data rows that contain blob descriptions, the blob storage medium is
indicated. (Magnetic is specified with 0; optical is specified with 1.)
In summary, tbcheck -pD provides the following information:
■For every data row, the page type and rowid (expressed in
hexadecimal)
■Data page contents in hexadecimal and ASCII
For further information about tbcheck -pD output, refer to page 7-42.
The -pp options of tbcheck provide similar information to the -pD options
butincludeadetailedlistingoftheslot table forthedatapagerequested.You
request data pages using tbcheck -pp with the following parameters:
tbcheck -pp table_name row-ID
tbcheck -pp tblspace_number logical_page_number
To obtain a specific rowid, you can either write a SELECT statement with the
ROWID function or use the hexadecimal rowid output from tbcheck -pD. If
you use the rowid from tbcheck -pD, remember to prefix 0x to the rowid, as
shown in the following example:
tbcheck -pp stores2:bob.items 0x101

3-78 IBM Informix OnLine Database Server Administrator’s Guide
Monitor Extents
Ifyouprefertouseatblspacenumberandpagenumber,thetblspacenumber
is stored as a decimal in the partnum column of the systables table. Use the
HEX function to obtain the value as a hexadecimal:
SELECT HEX(partnum) FROM systables
WHERE tabname = tablename
You can calculate the page number from the hexadecimal value of the rowid
as follows:
■The two right-most digits of the hexadecimal rowid refer to the slot-
table entry number for this row.
■The remaining digits define the page number.
For further information about tbcheck -pp syntax, refer to page 7-38. For
further information about tbcheck -pp output, refer to page 7-43.
Monitor Extents
Monitor extents to check for chunk fragmentation (tbcheck -pe) or to
determine disk usage by table. Temporary tables are not monitored. Refer to
page 2-114 for further information about OnLine extents.
From the command line, execute tbcheck -pt with a database name or table
name parameter to obtain the following information for each table:
■Number of extents
■First extent size
■Next extent size
Refer to page 7-44 for further information about the tbcheck -pt output.
Execute tbcheck -pe to obtain the physical layout of information in the
chunk.Thechunklayoutissequential,andthenumberofpagesdedicatedto
each table is shown. The following information displays:
■Dbspace name, owner, and date created
■Usage of each chunk in the dbspace, by chunk number
If OnLine is unable to allocate an extent in a chunk despite an adequate
number of free pages, the chunk might be badly fragmented.

Operating OnLine 3-79
Monitor Index Information
Onesolutiontochunkfragmentationistoclusterthe index of all tables in the
chunk using the ALTER TABLE statement. Another solution is to unload and
load the tables in the chunk. (For further information about what to do if
fragmentation exists, refer to page 3-72.) Refer to page 7-43 for further infor-
mation about the tbcheck -pe output.
Execute tbstat -t to obtain general information about the limited set of active
tblspaces. The tbstat -t output includes the tblspace number and the
following four fields:
If a specific operation needs more pages than are available (npages minus
nused), a new extent is needed. If there is enough space in this chunk, the
extent is allocated here. If not, OnLine looks in other chunks for the space. If
none of the chunks contain adequate contiguous space, OnLine uses the
largestblockofcontiguousspaceitcanfindinthedbspace.Refertopage 7-98
for further information about the tbstat -t output.
Monitor Index Information
Monitor the indexes to verify index integrity or to monitor the number or
contents of key values in a specific index.
Refer to page 2-133 for a detailed discussion of index page structure. This
background information is needed to interpret most of the tbcheck -pk,-pl,
-pK, and -pL output.
When you check and print indexes with tbcheck, the uppercase options
includerowidchecks as part of theintegritychecking.Thelowercaseoptions
only verify the B+ tree structure. Refer to page 7-36 for further information
about using the tbcheck utility.
The tbcheck -pK or -pL options verify and repair indexes, check rowid
values, and display the index values. Either option performs an implicit
tbcheck -ci or -cI.
npages are the pages allocated to the tblspace.
nused are the pages used from this allocated pool.
nextns is the number of extents used.
npdata is the number of data pages used.
3-80 IBM Informix OnLine Database Server Administrator’s Guide
Monitor Logging Activity
Executethe-pkor-pKoptionsoftbchecktoobtainallpageinformation.(The
mnemonic -k option refers to “keep all” information.) Execute tbcheck -pk
with a database name or a table name parameter to obtain a listing of the
indexkeyvaluesandthecorrespondingrowidsforeachindexleafpage.Also
listed is the node page to which each leaf page is joined.
Execute the -pl or -pL options of tbcheck to obtain leaf node information.
Execute tbcheck -pl with a database name or a table name parameter to
obtainalistingoftheindexkeyvaluesandthecorrespondingrowidsforeach
index leaf node page. Figure 3-3 illustrates a simple index structure.
Executetbcheck -pc witha database name parametertoobtain the following
specific index information organized by table:
■Number of indexes
■Data record size
■Index record size
■Number of records
Monitor Logging Activity
Monitor logging activity to determine the amount of total available space in
the logical log files and the available space in the current log file.
If the total free space in the logical log files is less than half of a singlelog file,
OnLine does not create an archive.
Figure 3-3
A simple index
structure
B+ Tree Root node
Branch nodes
Leaf nodes
Pointer to data (rowids)

Operating OnLine 3-81
Monitor Logging Activity
Processing stops if OnLine attempts to switch to the next logical log file and
finds that the log file status is not free (F).
From DB-Monitor
From DB-Monitor, select the Status menu, Logs option.
The display contains three sections: physical log, logical log (general), and
the individual logical log files.
The first two sections contain buffer information. This information refers to
thecurrentphysicalandlogicallogbuffers.Thecurrentbufferisidentifiedas
either P1 or P2 (physical log buffer) or L1, L2, or L3 (logical log buffer). The
restofthe fields inthefirsttwosectionsarethe same fieldsthatdisplayifyou
execute the tbstat -l (lowercase L) option.
The third section of the display repeats for every logical log file that OnLine
manages. The status of the logical log file displays as a status flag. This
section contains an additional field, Dbspace, that does not appear in the
tbstat -l output. You might prefer the DB-Monitor display because Dbspace
clearly lists the dbspace in which each logical log file resides. This infor-
mation is not readily available from the command-line option.
Refer to page 7-89 for further information about the logging activity fields
that display in DB-Monitor. (The order of the fields in DB-Monitor varies
slightly from the tbstat -l output.)
From the Command Line
From the command line, execute tbstat -l to obtain nearly the same infor-
mation that is available from the Status menu, Logs option.
The tbstat -l output does not list the name of the current physical or logical
log buffers; instead, tbstat -l displays the address of the current buffer in
shared memory.
The tbstat utility provides the address of the log file descriptor for each
logical log file, but it does not provide the log file dbspace location.
(However,theleadingdigitofthebeginningaddressofthelogfiledescriptor
is the number of the dbspace in which the log file resides.) Status displays as
a flag. Refer to page 7-89 for a detailed explanation of the logging activity
fields.

3-82 IBM Informix OnLine Database Server Administrator’s Guide
Monitor the Message Log
Execute tbcheck -pr to obtain detailed logical log file information that is
stored in the root dbspace reserved page dedicated to checkpoint infor-
mation. Refer to page 2-97 for a description of each of the fields related to
logical logs (PAGE_CKPT).
Monitor the Message Log
Monitor the message log periodically to verify that OnLine operations are
proceeding normally and that events are being logged as expected. Use a
UNIX editor to read the complete message log. Refer to Chapter 8, “OnLine
Message Log,” for a complete listing of possible message log records and the
meaning of each one.
Monitorthe message log for size,as well. Edit the logas needed or back itup
to tape and delete it.
From DB-Monitor
From DB-Monitor, select the Status menu, Configuration option.
Use this option if you do not know the explicit pathname of the OnLine
message log. The pathname of the message log is specified as the value of
MSGPATH.
From the Command Line
From the command line, execute tbstat -m to obtain the name of the OnLine
message log and the 20 most-recent entries.

Operating OnLine 3-83
Monitor OnLine Profile
Monitor OnLine Profile
Monitor the OnLine profile to analyze performance over time. The Profile
screenmaintainscumulativestatistics.Usethetbstat-zoptionwheneveryou
wish to reset all statistics to 0.
From DB-Monitor
From DB-Monitor, select the Status menu, Profile option.
The screen display contains 28 separate statistics, as well as the current
OnLine operating mode, the boot time, and the current time.
ThefieldlabelsontheDB-Monitorprofilescreenarelesscrypticandarranged
in a slightly different order than the fields that display if you execute
tbstat -p. However, all DB-Monitor statistics are included in the tbstat -p
output. Refer to page 7-92 for a detailed explanation of every field that
displays with this option.
From the Command Line
Fromthecommand line, execute,tbstat -p todisplay 33 separate statisticson
OnLine activity. The tbstat -p output contains several fields that are not
included in the DB-Monitor display, including ovbuff, which is the number
of times that OnLine exceeded the maximum number of shared-memory
buffers. The ovbuff field is useful in performance tuning. The complete
display is defined on page 7-92.
Execute tbstat -P to obtain the same statistics as are available with tbstat -p,
plus BIGreads, the number of big-buffer reads.
Refer to page 2-55 for further information about the function of big buffers.

3-84 IBM Informix OnLine Database Server Administrator’s Guide
Monitor Shared Memory and Latches
Monitor Shared Memory and Latches
Monitor shared memory (tbstat -o) to capture a static snapshot of OnLine
shared memory that you can use for analysis and comparison.
Monitor latches to determine if a user process is holding a latch or if
contention of shared-memory resources exists.
From the command line, execute tbstat -o to save a copy of the shared-
memory segment. You can execute tbstat -o with a filename parameter to
specify the file to contain the output. Otherwise, the output is saved to
tbstat.out in the current directory. The shared-memory segment file is the
same size as the shared-memory segment. The size of shared memory is
displayed in the tbstat header. After you save a copy of shared memory to a
file, you can execute other tbstat options using the filename as a parameter.
Ifyoudo,thetbstat informationisderivedfromtheshared-memorysegment
stored in the specified file. Refer to page 7-91 for further information about
tbstat -o. Refer to page 7-80 for further information about tbstat filename
syntax and use.
Execute tbstat -p to obtain the value in the field lchwaits, which is the
number of times a user process (any process) was required to wait for a
shared-memory latch. A large number of latch waits typically results from a
high volume of processing activity in which most of the transactions are
being logged. (The number of latches is not configurable and cannot be
increased.) Refer to page 7-92 for a complete listing of all fields that display
when you execute tbstat -p.
Execute tbstat -s to obtain general latch information. The output lists the
addressofanyuserprocesswaitingforalatch.You can comparethisaddress
with the users’ addresses in the tbstat -u output to obtain the user process
identification number. Never kill a database server process that is holding a
latch.Ifyoudo, OnLine immediately initiates an abort.Refertopage 7-97for
a complete listing of all fields that display when you execute tbstat -s.

Operating OnLine 3-85
Monitor Tblspaces
Monitor Tblspaces
Monitor tblspaces to determine current space availability and allocation by
table.
Forfurtherinformationaboutmonitoringtblspaceextents,refertopage 3-78.
Fromthecommandline,executetbstat -ttoobtaingeneralinformationabout
the limited set of active (or open) tblspaces. The tbstat -t output includes the
tblspace number and the following four fields:
If a specific operation needs more pages than are available (npages minus
nused), a new extent is needed. If there is enough space in this chunk, the
extent is allocated here. If not, OnLine looks in other chunks for the space. If
none of the chunks contain adequate contiguous space, OnLine uses the
largestblockofcontiguousspaceitcanfindinthedbspace.Refertopage 7-98
for a complete listing of all fields that display when you execute tbstat -t.
Execute tbcheck -pT to obtain further information about pages, extents,
rows, and index specifics. The -pT options take either a database name or a
table name as a parameter. Refer to page 7-38 for further information about
the tbcheck -pT syntax and page 7-44 for further information about the
output.
npages are the pages allocated to the tblspace.
nused are the pages used from this allocated pool.
nextns is the number of extents used.
npdata is the number of data pages used.

3-86 IBM Informix OnLine Database Server Administrator’s Guide
Monitor Users and Transactions
Monitor Users and Transactions
Monitor users’ database server processes to determine the number and type
of server processes accessing OnLine, and the status of each one.
From DB-Monitor
From DB-Monitor, select the Status menu, User option.
The display provides an overview of database server process activity.
The first field, PID, is the user process identification number. The second
field,User,istheloginIDoftheuserthatcreatedthisdatabaseserverprocess.
The third field, Locks Held, is the number of locks held by the transaction
that is owned by the specified server process.
The fourth and fifth fields are the number of disk reads and write calls made
since the process started.
Thelastfield describes asetof user status flags.A complete description ofall
possible user flags is provided on page 7-99.
If a server process displays an X flag in the User Status field, the process is
in a critical section. No checkpoints can occur until the server process exits
that section of code. Never kill a database server process that is in a critical
section. If you do, OnLine immediately initiates an abort.
From the Command Line
From the command line, execute, tbstat -u to obtain user information that is
similar to that available from DB-Monitor. In addition, tbstat -u provides the
addressofeachlisteduserprocess,enablingyoutotracktheuserprocessthat
is holding a specific latch. Refer to page 7-99 for a complete listing of the
tbstat -u fields that refer to database server processes and their meanings.
The tbstat -u option also provides detailed transaction information in the
second section of the display. This information is relevant for administrators
whoareworkingina client/server environmentusingIBM InformixSTAR or
users who are working in an IBM Informix TP/XA distributed transaction-
processing environment. For detailed discussion of this transaction infor-
mation, refer to page 9-58.

Operating OnLine 3-87
Modify OnLine Configuration
If you execute tbstat -u while OnLine is performing fast recovery, several
database server processes might appear in the display. During fast recovery,
each transaction that is rolled forward or rolled back appears in the display.
Modify OnLine Configuration
Your OnLine configuration includes configuration parameters as well as the
number and status of OnLine structures such as blobspaces, dbspaces, and
chunks.
You can configure the areas of OnLine listed next. See the referenced section
and page for more information.
■Blobspaces
❑“Create a Blobspace” on page 3-88
❑“Drop a Blobspace” on page 3-91
■Buffers
❑“Change the Number of Buffers in the Pool” on page 3-92
❑“Change the Size of Either Log Buffer” on page 3-93
■Chunks
❑“Add a Chunk” on page 3-94
❑“Change the Maximum Number of Chunks” on page 3-96
■Dbspaces
❑“Create a Dbspace” on page 3-97
❑“Drop a Dbspace” on page 3-99
■Forced residency
❑“Enforce/Turn Off Residency for This Session” on page 3-100
❑“Enforce/Turn Off Residency” on page 3-100
■Mirroring
❑“Change the Status of a Mirrored Chunk” on page 3-101
❑“Enable Mirroring” on page 3-104
❑“Start/End Mirroring in a Blobspace or Dbspace” on page 3-105

3-88 IBM Informix OnLine Database Server Administrator’s Guide
Create a Blobspace
■Physical log
❑“Change Physical Log Location or Size” on page 3-107
■Shared-memory parameters
❑“Change the Checkpoint Interval” on page 3-109
❑“Change the Destination of Console Messages” on page 3-110
❑“Change the Maximum Number of Dbspaces” on page 3-111
❑“Change the Maximum Number of Locks” on page 3-112
❑“Change the Maximum Number of Tblspaces” on page 3-113
❑“Change the Maximum Number of Users” on page 3-114
❑“Change the Number of Page Cleaners” on page 3-115
Configuration issues that affect the logical logs and archiving are described
in the sections beginning on page 3-13 and page 3-43, respectively. Infor-
mation and guidelines for setting the value of shared-memory parameters
are provided in Chapter 1, “Installation and Initial Configuration.” Infor-
mation about performance tuning is provided in Chapter 5, “How to
Improve Performance.”
Create a Blobspace
Use a blobspace to store large volumes of BYTE and TEXT data types. Blobs
storedinablobspacearewrittendirectlytodisk. The blob datadoes not pass
through the shared-memory buffer pool. If it did, the volumes of data could
occupy so many of the buffer-pool pages that other data and index pages
would be forced out.
For the same reason, blobs stored in a blobspace are not written to either the
logical or physical log. The blobspace blobs are logged by writing the blobs
directly from disk to the logical log backup tapes, without ever passing
through the logical log files.
Refer to page 2-78 for further information about writing a blob directly to
disk. Refer to page 4-22 for further information about blobspace logging.

Operating OnLine 3-89
Create a Blobspace
Preliminary Considerations
Verifythatthe DBSPACES value in theconfiguration file will not be exceeded.
DBSPACES refer to the total number of blobspaces plus dbspaces.
When you create a blobspace, you specify the blobpage size as a multiple of
the machine-page size.
You specify an explicit pathname for the blobspace. Informix recommends
that you use a linked pathname. (Refer to page 1-22 for further information
about the benefits of using linked pathnames. Refer to page 2-93 for further
information about selecting a chunk pathname. Refer to page 1-43 for guide-
lines on how to determine where your chunks should be located on disk.)
If you are allocating a raw disk device for the blobspace, you might need to
specify an offset to preserve track-0 information used by your UNIX
operating system. (Refer to page 1-49 for further information about how to
determine if you need an offset.)
If you are allocating cooked disk space, the pathname is a file in a UNIX file
system.
You can mirror the blobspace when you create it if mirroring is enabled for
OnLine. Mirroring takes effect immediately. (Refer to page 4-14 for further
information about the benefits of chunk mirroring.)
Ifyou arelogged in asuser informix, youcan createa blobspace fromwithin
DB-Monitoror fromthe command line.If you areloggedinas root, youmust
use the command-line option.
You can create a blobspace while OnLine is in online mode.
Blobpage size can vary among blobspaces. Blobpage size is a multiple of
OnLine page size (specified as BUFFSIZE in the configuration file). You
specify blobpage size as some number of OnLine pages.
Aimto createablobpage size that isthe size ofthemost frequentlyoccurring
blob.Forexample,ifyou arestoring160blobsand you expect 120 blobs tobe
12 KB and 40 blobs to be 16 KB, a 12-kilobyte blobpage size would store the
blobs most efficiently. If speed is your primary concern, use a 16-kilobyte
blobpage so that every blob can be stored on a single blobpage.

3-90 IBM Informix OnLine Database Server Administrator’s Guide
Create a Blobspace
Tocontinuetheexample,assumeyourOnLinepagesizeis2KB.Ifyoudecide
on a 12-kilobyte blobpage size, specify the blobpage size parameter as 6. If
yourOnLinepagesizeis4KB,specifytheblobpagesizeparameteras3.(That
is,thesizeoftheblobroundeduptothenearestkilobyte,dividedbythepage
size, is equal to the blobpage size parameter.)
If a table has more than one blob column and the blobs are not close in size,
store the blobs in different blobspaces, each with an appropriately sized
blobpage.
A newly created blobspace is not immediately available for blob storage.
Blobspace logging and recovery require that the statement that creates a
blobspace and the statements that insert blobs into that blobspace appear in
separate logical log files. This requirement is true for all blobspaces,
regardless of the logging status of the database.
To accommodate this requirement, execute tbmode -l to switch to the next
logical log file after you create a blobspace.
From DB-Monitor
1. From within DB-Monitor, select the Dbspaces menu, BLOBSpace
option to create a blobspace.
2. Enter the name of the new blobspace in the BLOBSpace Name field.
3. If you want to create a mirror for the initial blobspace chunk, enter a
Y in the Mirror field. Otherwise, enter N.
4. Specify the blobpage size in the BLOBPage Size field.
5. Enter the complete pathname for the initial primary chunk of the
blobspace in the Full Pathname field of the primary chunk section.
6. Specify an offset in the Offset field if it is appropriate for your
device.
7. Enter the size of the chunk, in kilobytes, in the Size field.
8. If you are mirroring this blobspace, enter the mirror chunk full
pathname,size,andoptional offsetinthemirrorchunksectionofthe
screen.

Operating OnLine 3-91
Drop a Blobspace
From the Command Line
From the command line, execute the tbspaces utility with the following
options and parameters:
All options and parameters except -o and -m are required. The following
examplecreatesa mirroredblobspaceblobsp3 with a blobpagesizeof10KB,
where OnLine page size is 2 KB. An offset of 200 KB for the primary and
mirror chunks is specified.
tbspaces -c -b blobsp3 -g 5 -p /dev/rsd1f -o 200
-m /dev/rsd2a 200
Drop a Blobspace
The blobspace you intend to drop must be unused. (It is not sufficient for the
blobspace to be empty of blobs.) Execute tbcheck -pe to verify that no table
is currently storing data in the blobspace.
After you drop the blobspace, the newly freed chunks are available for
reassignment to other dbspaces or blobspaces.
Ifyoudropablobspacethatismirrored,youalsodroptheblobspacemirrors.
Ifyouwanttodroponlytheblobspacemirrors,turnoffmirroring.Thisdrops
the blobspace mirrors and frees the chunks for other uses.
-c creates a new blobspace.
-b blobspace specifies a blobspace name.
-g page_unit specifies the blobpage-size parameter (number of OnLine
pages).
-p pathname specifies the explicit pathname of a primary chunk: either a
raw device or a UNIX file.
-o offset specifies the raw device offset in kilobytes, if appropriate.
-m indicates blobspace mirroring and is followed by both
pathname and offset, if appropriate, for the blobspace mirror.

3-92 IBM Informix OnLine Database Server Administrator’s Guide
Change the Number of Buffers in the Pool
If you are logged in as user informix, you can drop a blobspace from within
DB-Monitoror fromthe command line.If you areloggedinas root, youmust
use the command-line option.
You can drop a blobspace while OnLine is in online mode.
From DB-Monitor
1. From within DB-Monitor, Select the Dbspaces menu, Drop option to
drop a blobspace.
2. Use the RETURN key or Arrow keys to scroll to the blobspace you
want to drop and press CTRL-B or F3. You are asked to confirm that
you want to drop the blobspace.
From the Command Line
From the command line, execute the tbspaces utility with the following
option and parameter:
The following example drops a blobspace blobsp3 and its mirrors:
tbspaces -d blobsp3
Change the Number of Buffers in the Pool
The number of regular page buffers in the shared-memory pool is specified
as BUFFERS in the configuration file.
YoucanmakethischangewhileOnLineisinonline mode, butitwillnottake
effect until you reinitialize shared memory (take OnLine offline and then to
quiescent or online mode).
The maximum number of buffers is 32,000. The minimum number is four
buffers per user process (USERS).
If you are logged in as user informix, you can make this change from within
DB-Monitoror fromthe command line.If you areloggedinas root, youmust
use the command-line option.
-d blobspace specifies the blobspace to be dropped.

Operating OnLine 3-93
Change the Size of Either Log Buffer
From DB-Monitor
1. From within DB-Monitor, select the Parameters menu, Shared-
Memory option to change the number of page buffers in the shared-
memory pool. Change the value in the field Max # of Buffers.
2. Reinitialize shared memory (take OnLine offline and then to
quiescent mode) for the change to take effect.
From the Command Line
1. To change the value of BUFFERS from the command line, use an
editor to edit the file specified by $INFORMIXDIR/etc/$TBCONFIG.
2. Change the value of BUFFERS. Reinitialize shared memory (take
OnLine offline and then to quiescent mode) for the change to take
effect.
Change the Size of Either Log Buffer
This section provides instructions for changing the size of either the three
logical log buffers or the two physical log buffers. Refer to page 2-63 for
further information about the physical log buffers. Refer to page 2-66 for
further information about the logical log buffers.
The size of each of the three logical log buffers is specified as LOGBUFF in the
configurationfile. The size of each of thetwo physical log buffers is specified
as PHYSBUFF.
The buffer size is expressed in kilobytes. The recommended value for both
parameters is 16 pages. The minimum value is one page, although small
buffers can create problems if you are storing records that are larger than the
size of the buffers (for example, blobs in dbspaces).
YoucanmakethischangewhileOnLineisinonline mode, butitwillnottake
effect until you reinitialize shared memory (take OnLine offline and then to
quiescent or online mode).
If you are logged in as user informix, you can make this change from within
DB-Monitoror fromthe command line.If you areloggedinas root, youmust
use the command-line option.

3-94 IBM Informix OnLine Database Server Administrator’s Guide
Add a Chunk
From DB-Monitor
1. From DB-Monitor, select the Parameters menu, Shared-Memory
option to change the size of either the logical log buffer or the
physical log buffer. Change the value in the appropriate field, either
Logical Log Buffer Size or Physical Log Buffer Size.
2. Reinitialize shared memory (take OnLine offline and then to
quiescent mode) for the change to take effect.
From the Command Line
1. To change the value of either LOGBUFF or PHYSBUFF from the
command line, use an editor to edit the file specified by
$INFORMIXDIR/etc/$TBCONFIG.
2. Change the value of either LOGBUFF or PHYSBUFF. Reinitialize
sharedmemory(takeOnLineofflineandthentoquiescentmode)for
the change to take effect.
Add a Chunk
Add a chunk when you need to increase the amount of disk space allocated
to a blobspace or dbspace.
Preliminary Considerations
Once you add a chunk, you cannot drop it unless you drop the entire
blobspace or dbspace.
Verify that you will not exceed the maximum number of chunks allowed in
your configuration, specified as CHUNKS.
If you are adding a chunk to a mirrored blobspace or dbspace, you must also
add a mirror chunk.
You specify an explicit pathname for the chunk. Informix recommends that
youusealinkedpathname.(Refer to page 1-22 for further information about
the benefits of using linked pathnames. Refer to page 2-93 for further infor-
mation about selecting a chunk pathname. Refer to page 1-43 for guidelines
on how to determine where your chunks should be located on disk.)

Operating OnLine 3-95
Add a Chunk
If you are allocating a raw disk device, you might need to specify an offset to
preserve track 0 information used by your UNIX operating system. Refer to
page 1-49 for further information about how to determine if you need an
offset.
If you are allocating cooked disk space, the pathname is a file in a UNIX file
system.
If you are logged in as user informix, you can make this change from within
DB-Monitoror fromthe command line.If you areloggedinas root, youmust
use the command-line option.
You can make this change while OnLine is in online mode. The newly added
chunk (and its associated mirror, if there is one) is available immediately.
From DB-Monitor
1. From within DB-Monitor, select the Dbspaces menu, Add_chunk
option to add a chunk.
2. Use the RETURN key or the arrow keys to select the blobspace or
dbspace that will receive the new chunk and press CTRL-B or F3.
The next screen that displays indicates whether the blobspace or
dbspace is mirrored. If it is, you must specify both a primary chunk
and mirror chunk.
3. EnterthecompletepathnameforthenewprimarychunkintheFull
Pathname field of the primary chunk section.
4. Specify an offset in the Offset field if it is appropriate for your
device.
5. Enter the size of the chunk, in kilobytes, in the Size field.
6. If you are mirroring this chunk, enter the mirror chunk full
pathname,size,andoptional offsetinthemirrorchunksectionofthe
screen.

3-96 IBM Informix OnLine Database Server Administrator’s Guide
Change the Maximum Number of Chunks
From the Command Line
From the command line, execute the tbspaces utility with the following
options and parameters:
All options and parameters except -o and -m are required. The following
example adds a mirrored chunk to blobsp3. An offset of 200 KB is specified.
tbspaces -a blobsp3 -p /dev/rsd0d -o 200 -s 100000
-m /dev/rsd8a 200
Change the Maximum Number of Chunks
This section provides instructions for changing the maximum number of
chunks that are permitted by OnLine. The maximum number of chunks is
specified as CHUNKS in the configuration file.
You can make this change while OnLineis in online mode but it willnot take
effect until you reinitialize shared memory (take OnLine offline and then to
quiescent or online mode).
The maximum number of chunks that can exist might be system-specific
sinceitdependsonthelengthofyourchunk namesorthemaximumnumber
of open files per process. (Refer to page 2-93 for further information about
this limit.)
If you are logged in as user informix, you can make this change from within
DB-Monitoror fromthe command line.If you areloggedinas root, youmust
use the command-line option.
-a space_name specifiesachunkistobeadded.The-aoptionisfollowed by
either a blobspace name or a dbspace name, indicating the
space to which the chunk is added.
-p pathname specifies the explicit pathname of a chunk, either a raw
device or a UNIX file.
-o offset specifies the raw device offset in kilobytes, if appropriate.
-s size specifies the chunk size, in kilobytes.
-m indicates chunk mirroring and is followed by both a
pathname and offset, if appropriate, for the mirror chunk.

Operating OnLine 3-97
Create a Dbspace
From DB-Monitor
1. From within DB-Monitor, select the Parameters menu, Shared-
Memory option to change the maximum number of chunks. Change
the value in the field, Max # of Chunks.
2. Reinitialize shared memory (take OnLine offline and then to
quiescent mode) for the change to take effect.
From the Command Line
1. To change the value of CHUNKS from the command line, use an
editor to edit the file specified by $INFORMIXDIR/etc/$TBCONFIG.
2. Change the value of CHUNKS. Reinitialize shared memory (take
OnLine offline and then to quiescent mode) for the change to take
effect.
Create a Dbspace
This section provides instructions for creating a dbspace.
Verify that you will not exceed the maximum number of blobspaces and
dbspaces allowed in your configuration, specified as DBSPACES.
You specify an explicit pathname for the initial chunk of the dbspace.
Informix recommends that you use a linked pathname. (Refer to page 1-22
for further information about the benefits of using linked pathnames. Refer
topage 2-93forfurtherinformationabout selectingachunkpathname.Refer
to page 1-43 for guidelines on how to determine where your chunks should
be located on disk.)
If you are allocating a raw disk device, you might need to specify an offset to
preserve track 0 information used by your UNIX operating system. (Refer to
page 1-49 for further information about how to determine if you need an
offset.)
If you are allocating cooked disk space, the pathname is a file in a UNIX file
system.
If you are logged in as user informix, you can create a dbspace within
DB-Monitoror fromthe command line.If you areloggedinas root, youmust
use the command-line option.

3-98 IBM Informix OnLine Database Server Administrator’s Guide
Create a Dbspace
You can create a dbspace while OnLine is in online mode. The newly added
dbspace (and its associated mirror, if there is one) is available immediately.
From DB-Monitor
1. FromwithinDB-Monitor, selecttheDbspacesmenu,Createoption to
create a dbspace.
2. Enter the name of the new dbspace in the field Dbspace Name.
3. If you want to create a mirror for the initial dbspace chunk, enter a Y
in the Mirror field. Otherwise, enter N.
4. Enter the complete pathname for the initial primary chunk of the
dbspace in the Full Pathname field of the primary chunk section.
5. Specify an offset in the Offset field if it is appropriate for your
device.
6. Enter the size of the chunk, in kilobytes, in the Size field.
7. If you are mirroring this dbspace, enter the mirror chunk full
pathname,size,andoptional offsetinthemirrorchunksectionofthe
screen.
From the Command Line
From the command line, execute the tbspaces utility with the following
options and parameters:
-c creates a new dbspace.
-d dbspace specifies a dbspace name.
-p pathname specifies the explicit pathname of the primary chunk, either a
raw device or a UNIX file.
-o offset specifies the raw device offset in kilobytes, if appropriate.
-m indicates dbspace mirroring and is followed by both pathname
and offset, if appropriate, for the dbspace mirror.

Operating OnLine 3-99
Drop a Dbspace
All options and parameters except -o and -m are required. The following
example creates a mirrored dbspace dbspce5. An offset of 5,000 KB is
specified.
tbspaces -c -d dbspce5 -p /dev/rsd1f -o 5000
-m /dev/rsd2a 5000
Drop a Dbspace
The dbspace you intend to drop must be unused. (It is not sufficient for the
dbspace to be empty of data.) Execute tbcheck -pe to verify that no tables or
logs are residing in the dbspace.
Preliminary Considerations
You cannot drop the root dbspace.
After you drop a dbspace, the newly freed chunks are available for
reassignment to other dbspaces or blobspaces.
If you drop a dbspace that is mirrored, you also drop the dbspace mirrors.
If you want to drop only the dbspace mirrors, turn off mirroring. This drops
the dbspace mirrors and frees the chunks for other uses.
If you are logged in as user informix, you can drop the dbspace from within
DB-Monitoror fromthe command line.If you areloggedinas root, youmust
use the command-line option.
You can drop a dbspace while OnLine is in online mode.
From DB-Monitor
1. From within DB-Monitor, select the Dbspaces menu, Drop option to
drop a dbspace.
2. Usethe RETURN key orarrowkeys to scrolltothedbspace you want
to drop and press CTRL-B or F3. You are asked to confirm that you
want to drop the dbspace.

3-100 IBM Informix OnLine Database Server Administrator’s Guide
Enforce/Turn Off Residency for This Session
From the Command Line
From the command line, execute the tbspaces utility with the following
option and parameter:
The following example drops a dbspace dbspce5 and its mirrors:
tbspaces -d dbspce5
Enforce/Turn Off Residency for This Session
Thischange takes effectimmediately,butitdoes not change thevalues in the
configuration file. If you want to change the configuration file, refer to
page 3-100.
If you are logged in as user informix or root, you can make this change from
the command line. This option is not available from within DB-Monitor.
You can make this change while OnLine is in online mode.
Toimmediatelyenforceresidencyofsharedmemory,execute tbmode -r.This
enforces shared-memory residency without affecting the value of the config-
uration file parameter RESIDENT.
To immediately end forced residency of shared memory, execute tbmode -n.
This ends residency without affecting the value of RESIDENT.
Enforce/Turn Off Residency
This change does not take effect until you reinitialize shared memory. If you
want the new setting to take effect immediately, refer to page 3-100.
The values that you specify for the RESIDENT parameter depend on whether
you are making the change through DB-Monitor or by editing the configu-
ration file.
YoucanmakethischangewhileOnLineisinonline mode, butitwillnottake
effect until you reinitialize shared memory (take OnLine offline and then to
quiescent or online mode).
-d dbspace specifies the dbspace to be dropped

Operating OnLine 3-101
Change the Status of a Mirrored Chunk
If you are logged in as user informix, you can create a dbspace within
DB-Monitoror fromthe command line.If you areloggedinas root, youmust
use the command-line option.
From DB-Monitor
1. From within DB-Monitor, select the Parameters menu, Shared-
Memory option to change the shared-memory residency setting. A
value of Y enforces shared memory, and a value of N permits all or
part of shared memory to be swapped to disk. Change the value in
the field, Forced Residency, to either Y or N.
2. Reinitialize shared memory (take OnLine offline and then to
quiescent mode) for the change to take effect.
From the Command Line
1. To change the value of RESIDENT from the command line, use an
editortoeditthefilespecifiedby$INFORMIXDIR/etc/$TBCONFIG.A
value of 1 enforces shared memory and a value of 0 permits all or
part of shared memory to be swapped to disk.
2. Change the value of RESIDENT to either 1 or 0. Reinitialize shared
memory (take OnLine offline and then to quiescent mode) for the
change to take effect.
Change the Status of a Mirrored Chunk
Two status changes are possible:
■Change a mirrored chunk from online to down
■Change a mirrored chunk from down to recovery
The status of a chunk is described by a combination of flags.
You can take down or restore a chunk only if it is part of a mirrored pair. You
can take down or restore either the primary chunk or the mirror chunk, as
long as the other chunk in the pair is online.

3-102 IBM Informix OnLine Database Server Administrator’s Guide
Change the Status of a Mirrored Chunk
When you initiate recovery for a “down” mirrored chunk, a daemon process
begins copying the contents of the primary chunk to the chunk being
recovered. OnLine brings the chunk online if the recovery is successful. The
recovery status (R) is transitional.
Ifyouareloggedinasuserinformix,youcanchangethestatusofamirrored
chunk from within DB-Monitor or from the command line. If you are logged
in as root, you must use the command-line options.
You can make this change while OnLine is in online mode.
The following table defines the eight OnLine chunk status flags:
Flag Description
-Chunk belongs to a dbspace.
BChunk belongs to a blobspace.
DChunk is down, no reads or writes can occur.
MMirror chunk.
OChunk is online.
PPrimary chunk.
RChunk is currently being recovered.
XNewmirrorchunkthat contains logicallogfiles; alevel-0archiveis
needed before the mirror can become active.

Operating OnLine 3-103
Change the Status of a Mirrored Chunk
From DB-Monitor
1. FromwithinDB-Monitor, select the Dbspaces menu,Status option to
change the status of a mirrored chunk.
2. Use the RETURN bar or the arrow keys to select the dbspace or
blobspace that contains the chunk whose status you wish to change.
Press CTRL-B or F3. The chunks screen displays all chunks assigned
to the selected blobspace or dbspace.
3. Use the RETURN key or the arrow keys to select the chunk whose
status you wish to change. If you select a chunk with online status,
OnLine takes the chunk down. If you select a chunk with down
status, OnLine initiates recovery. You are asked to confirm your
decision if you choose to bring down a chunk with online status.
From the Command Line
From the command line, execute the tbspaces utility with the following
options and parameters:
The -o option and parameter are optional. Specify either the -O or the -D
option but not both. If you select the -O option for a chunk that is already
online, or if you select the -D option for a chunk that is already down, the
command executes, but no change occurs.
The following example takes down a chunk that is part of the dbspace
db_acct:
tbspaces -s db_acct -p /dev/rsd1b -o 300 -D
-s space_name changesthestatusofachunk.The-soptionisfollowedbythe
nameoftheblobspace ordbspacetowhichthechunkbelongs.
-p pathname specifies the explicit pathname of the chunk: either a raw
device or a UNIX file.
-o offset specifies the raw device offset in kilobytes, if appropriate.
-O restores the specified down chunk and, after recovery, brings
the chunk online.
-D takes the specified online chunk down.

3-104 IBM Informix OnLine Database Server Administrator’s Guide
Enable Mirroring
Enable Mirroring
Mirroring activity does not begin until you define mirror chunks for a
dbspace or a blobspace and explicitly start mirroring. Do not enable
mirroring until you are ready to define the mirror chunks.
Mirroring is enabled when the value of the MIRROR shared-memory config-
uration parameter is set to 1.
You can change the value of MIRROR while OnLine is in online mode but it
will not take effect until you reinitialize shared memory (take OnLine offline
and then to quiescent or online mode).
If you are logged in as user informix, you can make this change from within
DB-Monitoror fromthe command line.If you areloggedinas root, youmust
use the command-line option.
IfyoumakethechangefromwithinDB-Monitor,youriskinadvertentlyreini-
tializing OnLine and destroying all data. This risk is present because you
accessthe MIRROR parameter throughtheInitializeoption of theParameters
menu.
From DB-Monitor
1. From within DB-Monitor, select the Parameters menu, Initialize
option to enable mirroring. In the field labelled Mirror, enter a Y.
Press ESC to record changes.
2. Whenthescreenofshared-memoryparametersappears,pressESCto
save the rest of your configuration without changes.
3. When the prompt appears to confirm that you want to save the
changes to your configuration, respond Y (yes).
4. Whenasecondpromptappearstoconfirmthatyouwanttocontinue
(to initialize OnLine disk space and destroy all existing data),
respond N (no).
5. Reinitialize shared memory (take OnLine offline and then to
quiescent mode) for the change to take effect.

Operating OnLine 3-105
Start/End Mirroring in a Blobspace or Dbspace
From the Command Line
1. Fromthecommand line, change the valueofMIRROR to 1. To dothis
from the command line, use an editor to edit the file specified by
$INFORMIXDIR/etc/$TBCONFIG.
2. Change the value of MIRROR to 1. Reinitialize shared memory (take
OnLine offline and then to quiescent mode) for the change to take
effect.
Start/End Mirroring in a Blobspace or Dbspace
This section provides instructions for the following topics:
■Starting mirroring in an existing blobspace or dbspace
■Ending mirroring in an OnLine blobspace or dbspace
Preliminary Considerations
Verify that the value of MIRROR is set to 1 to enable mirroring. If mirroring is
not enabled, you cannot access the DB-Monitor menu required for either of
these tasks.
You must use DB-Monitor to start or end mirroring. Only user informix can
initiate this action. You can make these changes while OnLine is in online
mode.
Start Mirroring
You can create a mirror chunk in either raw or cooked disk space. I/O writes
to mirrors created in cooked disk space exhibit the slowness that is a charac-
teristic of any cooked disk space.
UsetheUNIX linkcommand(ln)tolinktheactualdevicenames ofthemirror
chunks to linked pathnames. In the event of disk failure, you can link a new
device to the pathname. You eliminate the need to physically replace the
device that failed before the chunk is brought back online.
To start mirroring through DB-Monitor, you must provide a pathname for
each mirror chunk. Specify the linked pathnames, not the actual device
names.

3-106 IBM Informix OnLine Database Server Administrator’s Guide
Start/End Mirroring in a Blobspace or Dbspace
Create the mirror chunk on a separate device from the primary chunk.
Ideally, the mirror chunk device should be managed by a different controller
than the controller that manages the primary chunk.
Mirroring begins immediately unless the chunk contains a logical log file. If
this is the case, mirroring begins in this chunk as soon as you create a level-0
archive.
You cannot start mirroring in a dbspace that contains a logical log file while
a level-0 archive is in progress.
End Mirroring
When you end mirroring, all mirror chunks are released. These chunks are
immediately available for reassignment to other blobspaces or dbspaces.
You cannot end mirroring in a blobspace or dbspace that contains a primary
chunk that is down (status D).
Blobspaces and dbspaces can be described by their mirroring flags:
AmirroringflagforeveryOnLineblobspaceanddbspaceisdisplayedon the
first screen that appears when you select the Dbspaces menu, Mirror option.
An asterisk to the right of the Mirror field indicates that one or more chunks
in the blobspace or dbspace is down.
Flag Description
Y Blobspace or dbspace is mirrored.
N Blobspace or dbspace is not mirrored.
X Dbspacecontains alogicallog;mirroringtakeseffectas soonasyou
create a level-0 archive.

Operating OnLine 3-107
Change Physical Log Location or Size
To start or end mirroring
1. Select the Dbspaces menu, Mirror option.
Every OnLine blobspace and dbspace is listed. You can start mirror-
ing for spaces with a status of N. You can end mirroring for spaces
with a status of Y.
2. Use the RETURN key or the arrow keys to select a blobspace or
dbspace. Press CTRL-B or F3.
If the current status is Y,DB-Monitor ends mirroring and releases the
mirror chunks.
If the current status is N,DB-Monitor prompts you for the full path-
name location, offset, and size of each mirror chunk.
Informix recommends that you use a linked pathname. (Refer to
page 1-22 for further information about the benefits of using linked
pathnames. Refer to page 1-43 for guidelines on how to determine
where your chunks should be located on disk.)
3. Specify an offset in the Offset field if it is appropriate for your
device. (Refer to page 1-49 for further information about how to
determine if you need an offset.)
4. Enter the size of the chunk, in kilobytes, in the Size field.
Change Physical Log Location or Size
The size of the physical log is specified as PHYSFILE in the configuration file.
The dbspace location of the physical log is specified as PHYSDBS.
You can move the physical log file to try to improve performance. When
OnLine disk space is initialized, the disk pages allocated for the logical log
and the physical log are always located in the root dbspace. After OnLine is
initialized, you might be able to improve performance by physically
separatingthephysicallogand thelogicallogandplacingthemondisks that
are not shared by active tables.
The space allocated for the physical log must be contiguous. If you move the
log to a dbspace without adequate contiguous space or increase the log size
beyond the available contiguous space, a fatal shared-memory error occurs
when you attempt to reinitialize shared memory with the new values.
Specify the size of the physical log in kilobytes.

3-108 IBM Informix OnLine Database Server Administrator’s Guide
Change Physical Log Location or Size
Create a level-0 archive immediately after you reinitialize shared memory.
This archive is critical for OnLine recovery.
You can change the value of PHYSFILE orPHYSDBS while OnLine is in online
mode,butthechangesdonottakeeffectuntilyoureinitializesharedmemory
(take OnLine offline and then to quiescent or online mode). If you use the
command-line option, you reinitialize shared memory in the same step.
If you are logged in as user informix, you can change the size or location of
thephysicallogfromwithinDB-Monitororfromthecommandline.Ifyouare
logged in as root, you must use the command-line option.
From DB-Monitor
1. From within DB-Monitor, select the Parameters menu, Physical-Log
option to change the size or dbspace location, or both.
2. The Physical Log Size field displays the current size of the log.
Enterthe new size (in kilobytes)if you want to changethe size of the
log.
3. The Dbspace Name field displays the current location of the physical
log.Enterthenameofthenewdbspaceifyouwant to change the log
location.
4. You are prompted, first, to confirm the changes and, second, if you
want to shut down the system. This last message refers to reinitial-
izing shared memory. If you respond Y,DB-Monitor reinitializes
shared memory and any changes are implemented immediately. If
you respond N, the values are changed in the configuration file but
do not take effect until you reinitialize shared memory.
5. If you reinitialize shared memory, create a level-0 archive immedi-
ately to ensure that all recovery mechanisms are available.

Operating OnLine 3-109
Change the Checkpoint Interval
From the Command Line
From the command line, execute the tbparams utility with the following
options and parameters:
Only the -p option is required. The following example changes the size and
location of the physical log and reinitializes shared memory so the change
takes effect immediately:
tbparams -p -s 400 -d dbspace5 -y
If you reinitialize shared memory, create a level-0 archive to ensure that all
recovery mechanisms are available.
Change the Checkpoint Interval
This section provides instructions for changing the checkpoint interval. The
checkpoint interval is specified by CKPTINTVL in the configuration file.
The checkpoint interval is not necessarily the amount of time between check-
points. The interval describes the maximum amount of time that can elapse
before OnLine checks to determine if a checkpoint is needed. If no changes
have been made to OnLine data, the checkpoint check is recorded but the
checkpoint is not performed.
The value of CKPTINTVL is expressed in seconds. The default value is 300
seconds or five minutes.
You can make this change while OnLine is in online mode, but the changes
do not take effect until you reinitialize shared memory (take OnLine offline
and then to quiescent or online mode).
If you are logged in as user informix or root, you can make this change from
the command line. You cannot make this change from within DB-Monitor.
-p changes the physical log.
-s size specifies the size of the physical log in kilobytes.
-d dbspace specifies the dbspace where the physical log resides.
-y initializes shared memory immediately.

3-110 IBM Informix OnLine Database Server Administrator’s Guide
Change the Destination of Console Messages
To change the value of CKPTINTVL from the command line, use an editor to
edit the file specified by $INFORMIXDIR/etc/$TBCONFIG.
Change the value of CKPTINTVL. Reinitialize shared memory (take OnLine
offline and then to quiescent mode) for the change to take effect.
Change the Destination of Console Messages
The destination pathname is specified as CONSOLE in the configuration file.
You can make this change while OnLine is in online mode, but the changes
will not take effect until you reinitialize shared memory (take OnLine offline
and then to quiescent or online mode).
You specify an explicit pathname for the message destination. The default
destination is /dev/console.
If you are logged in as user informix, you can make this change from within
DB-Monitoror fromthe command line.If you areloggedinas root, youmust
use the command-line option.
IfyoumakethechangefromwithinDB-Monitor,youriskinadvertentlyreini-
tializing OnLine and destroying all data. This risk is present because the
CONSOLE parameter is accessed through the Initialize option of the Param-
eters menu.
From DB-Monitor
1. From within DB-Monitor, select the Parameters menu, Initialize
option to change the console message destination. In the field
labelled System Msgs., enter the pathname. Press ESC to record
changes.
2. Whenthescreenofshared-memoryparametersappears,pressESCto
save the rest of your configuration without changes.
3. When the prompt appears to confirm that you want to save the
changes to your configuration, respond Y (yes).

Operating OnLine 3-111
Change the Maximum Number of Dbspaces
4. Whenasecondpromptappearstoconfirmthatyouwanttocontinue
(to initialize OnLine disk space and destroy all existing data),
respond N (no).
5. Reinitialize shared memory (take OnLine offline and then to
quiescent mode) for the change to take effect.
From the Command Line
1. To change the value of CONSOLE from the command line, use an
editor to edit the file specified by $INFORMIXDIR/etc/$TBCONFIG.
2. Change the value of CONSOLE. Reinitialize shared memory (take
OnLine offline and then to quiescent mode) for the change to take
effect.
Change the Maximum Number of Dbspaces
The maximum number of blobspaces and dbspaces is specified as DBSPACES
in the configuration file.
You can make this change while OnLine is in online mode but the change
doesnottakeeffectuntilyoureinitializesharedmemory(takeOnLineoffline
and then to quiescent or online mode).
The maximum number of dbspaces depends on the maximum number of
chunks, CHUNKS, since every dbspace must be composed of at least one
chunk. Refer to page 2-93 for further information about this limit.
If you are logged in as user informix, you can make this change from within
DB-Monitoror fromthe command line.If you areloggedinas root, youmust
use the command-line option.
From DB-Monitor
1. From within DB-Monitor, select the Parameters menu, Shared-
Memory option to change the maximum number of dbspaces.
Change the value in the field, Max # of Dbspaces.
2. Reinitialize shared memory (take OnLine offline and then to
quiescent mode) for the change to take effect.

3-112 IBM Informix OnLine Database Server Administrator’s Guide
Change the Maximum Number of Locks
From the Command Line
1. To change the value of DBSPACES from the command line, use an
editor to edit the file specified by $INFORMIXDIR/etc/$TBCONFIG.
2. Change the value of DBSPACES. Reinitialize shared memory (take
OnLine offline and then to quiescent mode) for the change to take
effect.
Change the Maximum Number of Locks
The maximum number of available locks is specified as LOCKS in the config-
uration file.
You can make this change while OnLine is in online mode but the changes
will not take effect until you reinitialize shared memory (take OnLine offline
and then to quiescent or online mode).
The maximum number of locks is 256,000. The minimum is 20 locks per user
process (USERS).
If you are logged in as user informix, you can make this change from within
DB-Monitoror fromthe command line.If you areloggedinas root, youmust
use the command-line option.
From DB-Monitor
1. From within DB-Monitor, select the Parameters menu, Shared-
Memory option to change the maximum number of locks. Change
the value in the field, Max # of Locks.
2. Reinitialize shared memory (take OnLine offline and then to
quiescent mode) for the change to take effect.
From the Command Line
1. To change the value of LOCKS from the command line, use an editor
to edit the file specified by $INFORMIXDIR/etc/$TBCONFIG.
2. Change the value of LOCKS. Reinitialize shared memory (take
OnLine offline and then to quiescent mode) for the change to take
effect.

Operating OnLine 3-113
Change the Maximum Number of Tblspaces
Change the Maximum Number of Tblspaces
The maximum number of active tblspaces permitted by OnLine is specified
as TBLSPACES in the configuration file.
You can make this change while OnLine is in online mode but the change
doesnottakeeffectuntilyoureinitializesharedmemory(takeOnLineoffline
and then to quiescent or online mode).
The maximum number of tblspaces is 32,000. The minimum is 10 per user
process (USERS). This minimum also must be greater than the maximum
number of tables in any one database, including the system catalog tables,
plus 2. (This minimum is required to permit OnLine to execute a DROP
DATABASE statement.)
Refer to page 2-52 for further information about this limit.
If you are logged in as user informix, you can make this change from within
DB-Monitoror fromthe command line.If you areloggedinas root, youmust
use the command-line option.
From DB-Monitor
1. From within DB-Monitor, select the Parameters menu, Shared-
Memory option to change the maximum number of dbspaces.
Change the value in the field, Max # of Tblspaces.
2. Reinitialize shared memory (take OnLine offline and then to
quiescent mode) for the change to take effect.
From the Command Line
1. To change the value of TBLSPACES from the command line, use an
editor to edit the file specified by $INFORMIXDIR/etc/$TBCONFIG.
2. Change the value of TBLSPACES. Reinitialize shared memory (take
OnLine offline and then to quiescent mode) for the change to take
effect.

3-114 IBM Informix OnLine Database Server Administrator’s Guide
Change the Maximum Number of Users
Change the Maximum Number of Users
Users,inthiscontext,referstothemaximumnumberofprocessesthatattach
to shared memory. User processes include database server processes,
daemon processes, and utility processes. This value is specified as USERS in
the configuration file.
You can make this change while OnLine is in online mode but the change
doesnottakeeffectuntilyoureinitializesharedmemory(takeOnLineoffline
and then to quiescent or online mode).
The maximum number of user processes that can concurrently attach to
sharedmemoryis1,000.TheminimumvalueforUSERSisthenumberofpage
cleaners (specified as CLEANERS) plus 4, plus 1 if mirroring is enabled. The
four user processes that must be accommodated are tbinit, the master
daemon; tbundo, the undertaker daemon; tbmonitor, a utility process that
executes DB-Monitor; and one database server process to execute adminis-
trative tasks.
The minimum shared-memory values for LOCKS,BUFFERS, and TBLSPACES
all depend on the value of USERS. Ensure that the change you make to the
value of USER does not violate the minimum requirements for these three
values. If the value for LOCKS,BUFFERS, or TBLSPACES is less than the
acceptable minimum, you must change it as well.
If you are logged in as user informix, you can make this change from within
DB-Monitoror fromthe command line.If you areloggedinas root, youmust
use the command-line option.
From DB-Monitor
1. From within DB-Monitor, select the Parameters menu, Shared-
Memory option to change the maximum number of dbspaces.
Change the value in the field, Max # of Users.
2. Change the value of the LOCKS,BUFFERS, or TBLSPACES parameter
to match the new number of users, if required.
3. Reinitialize shared memory (take OnLine offline and then to
quiescent mode) for the change to take effect.

Operating OnLine 3-115
Change the Number of Page Cleaners
From the Command Line
1. To change the value of USERS from the command line, use an editor
to edit the file specified by $INFORMIXDIR/etc/$TBCONFIG.
2. Change the value of USERS. Change the value of the LOCKS,
BUFFERS, or TBLSPACES parameter to match the new number of
users, if required.
3. Reinitialize shared memory (take OnLine offline and then to
quiescent mode) for the change to take effect.
Change the Number of Page Cleaners
The number of page cleaners is specified as CLEANERS in the configuration
file.
You can make this change while OnLine is in online mode, but the changes
will not take effect until you reinitialize shared memory (take OnLine offline
and then to quiescent or online mode).
If you are logged in as user informix, you can make this change from within
DB-Monitoror fromthe command line.If you areloggedinas root, youmust
use the command-line option.
Refer to page 5-17 for guidelines for setting this value to improve
performance.
From DB-Monitor
1. From within DB-Monitor, select the Parameters menu, Shared-
Memory option to change the maximum number of page cleaners.
Change the value in the field, Number of Page Cleaners.
2. Reinitialize shared memory (take OnLine offline and then to
quiescent mode) for the change to take effect.

3-116 IBM Informix OnLine Database Server Administrator’s Guide
Things to Avoid
From the Command Line
1. To change the value of CLEANERS from the command line, use an
editor to edit the file specified by $INFORMIXDIR/etc/$TBCONFIG.
2. Change the value of CLEANERS. Reinitialize shared memory (take
OnLine offline and then to quiescent mode) for the change to take
effect.
Things to Avoid
Here are some ideas that might sound good in theory, but have unexpected
consequencesthatcouldadverselyaffectyourOnLineperformance.Belowis
a list of things to avoid:
■Never kill an OnLine database server process during database
activity.Checkthattheserverprocessisnotholdingalatchandisnot
in a critical section. Use tbmode -z to end a database server process.
Refer to page 2-32.
■Avoid transactions that span a significant percentage of available
logical log space.
■Do not define your archive tape device (TAPEDEV) as a named pipe.
■Donotrelyondbexport(autilitythatcreatesacopyofyourdatabase
for migrating) as an alternative to creating routine archives.
■Do not run utilities that send output to tape in background mode
(using the & operator).
■Do not switch the logical log tape device between a tape device and
/dev/null while the logical log files are in use.

4
Chapter
Data Consistency, Recovery,
and Migration
In This Chapter .................... 4-5
Consistency Checking.................. 4-6
Using the tbcheck Commands.............. 4-6
tbcheck -cr ................... 4-7
tbcheck -cc ................... 4-7
tbcheck -ce ................... 4-7
tbcheck -cI ................... 4-8
tbcheck -cD................... 4-8
Using the OnLine Message Log ............. 4-8
Setting Consistency-Checking Variables .......... 4-9
GCORE .................... 4-10
DUMPCORE .................. 4-11
DUMPSHMEM ................. 4-11
DUMPDIR ................... 4-12
Recovering from Corruption .............. 4-12
Mirroring ...................... 4-14
Beginning..................... 4-15
Processing .................... 4-16
Recovery ..................... 4-17
Ending...................... 4-17
OnLine Logging Overview ................ 4-18
Dbspace Logging .................. 4-19
Blobspace Logging ................. 4-22
Operations Logging ................ 4-24
Operations Rollback................ 4-24
Blob Restoration ................. 4-25

4-2 IBM Informix OnLine Database Server Administrator’s Guide
What Happens During Logical Log Backup .......... 4-26
Ready LTAPEDEV .................. 4-27
Locate the Next Logical Log .............. 4-27
Copy Blobpages .................. 4-27
Place Log Header on Tape ............... 4-28
Write Log Records to Tape ............... 4-29
Write Trailer Page .................. 4-30
What Happens During an Archive ............. 4-30
Read Archive History Information ............ 4-31
Mount a Tape on TAPEDEV .............. 4-31
Verify the Archive Level................ 4-32
Check Free Space in the Logical Log............ 4-32
Force a Checkpoint ................. 4-32
Purpose of Checkpoint Timestamp ........... 4-33
Purpose of Data Snapshot .............. 4-33
Synchronize tbtape and tbinit Activities .......... 4-33
Archive Disk Pages ................ 4-34
Archive blobpages ................ 4-35
Write Tape Header Page ................ 4-35
Archive Reserved Pages ................ 4-36
Determine Archive Criteria............... 4-37
Archive Disk Pages That Meet Criteria........... 4-38
Monitor and Archive Physical Log Pages .......... 4-38
Write a Trailer Page ................. 4-38
Update the Reserved Pages............... 4-38
Fast Recovery ..................... 4-39
How Does OnLine Initiate Fast Recovery? ......... 4-39
Fast Recovery and Logging............... 4-40
Step 1: Checkpoint Condition .............. 4-41
Step 2: Find Checkpoint Record in Logical Log ........ 4-41
Step 3: Roll Forward Log Records ............ 4-43
Step 4: Roll Back Incomplete Transactions.......... 4-44
Data Restore: When Should You Do It? ............ 4-45
Steps That Occur During a Data Restore .......... 4-45
Gather All Tapes Needed for Restore ........... 4-47
Verify OnLine Configuration .............. 4-48

Data Consistency, Recovery, and Migration 4-3
Initiate Data Restore from Offline Mode ...........4-49
Mount Level-0 Archive Tape ...............4-49
Verify Current Configuration ..............4-50
Prompt for Logical Log Backup ..............4-50
Write Each Archive Page to Disk .............4-51
Initialize Shared Memory ................4-51
Roll Forward Logical Logs ...............4-51
OnLine Is Quiescent..................4-52
Database and Table Migration................4-52
Description of Migration Methods .............4-54
UNLOAD/dbschema/LOAD .............4-54
UNLOAD/dbschema/dbload .............4-54
dbexport/dbimport ................4-55
tbunload/tbload .................4-55
Which Migration Method Is Best for You? ..........4-57
Using UNLOAD with LOAD or dbload ...........4-60
Create and Edit the Schema File First ..........4-61
Verify Adequate Disk Space for Data ..........4-61
Move Files....................4-61
Create the New Database or Tables ...........4-61
Use LOAD or dbload to Populate the Tables ........4-62
Using dbexport and dbimport ..............4-62
Using tbunload and tbload ...............4-63
tbunload ....................4-64
tbload .....................4-64
Migrating Data from OnLine to SE.............4-65
Migrating Data from SE to OnLine.............4-66

4-4 IBM Informix OnLine Database Server Administrator’s Guide

Data Consistency, Recovery, and Migration 4-5
In This Chapter
Several OnLine tasks that are critical to long-term operation are performed
automatically. As administrator, you might find it interesting and helpful to
understand what these tasks are and why they are important.
Consistency-checking code has been implemented throughout the OnLine
producttohelpalertadministratorstooccurrencesofdatainconsistency.The
function of the code is, at minimum, to write messages to the OnLine
messagelogifinconsistenciesaredetected.Administratorscanalsoaskusers
to set consistency-checking environment variables that will direct OnLine to
generate diagnostic output if inconsistencies are detected.
SeveralOnLinefeaturesprovidefordatarecovery.Thischapterexplainshow
each feature works, both independently and with other features, to preserve
and restore data in the event of operating system or media failure.
This chapter compares four migration methods to help you select the best
migration method for the task. Following the comparison of the migration
methods, each method is explained step-by-step.

4-6 IBM Informix OnLine Database Server Administrator’s Guide
Consistency Checking
Consistency Checking
OnLine 5 contains a page-level layer of checks that can detect data inconsis-
tencies that might be caused by hardware or operating system errors or by
unknown problems associated with OnLine operation. Associated with this
consistency checking are four environment variables that, if set, collect
diagnostic information that can be useful for IBM Informix technical support
staff. (Descriptions of the four environment variables start on page 4-9.)
Using the tbcheck Commands
To gain the maximum benefit from consistency checking and to ensure the
integrity of archives, periodically verify that all data and OnLine control
information is consistent. Because of the time needed for this check and the
possible contentions that the checks cause, schedule this check for times
when activity is at its lowest. Informix recommends that you perform this
check just prior to creating a level-0 archive.
The commands you should run as part of the check are listed here and
described in the paragraphs that follow:
■tbcheck -cr
■tbcheck -cc
■tbcheck -ce
■tbcheck -cI dbname
■tbcheck -cD dbname
You can run each of these commands while OnLine is in online mode. The
tbcheckcommandsthatincludeadatabaselockeachtableinthedatabasefor
thedurationofthecheck.Thetbcheck -cI and-cD commandslockeachtable
as the table is checked, denying access to all other database server processes.

Data Consistency, Recovery, and Migration 4-7
Using the tbcheck Commands
tbcheck -cr
Execute tbcheck -cr to validate the OnLine reserved pages that reside at the
beginning of the initial chunk of the root dbspace. These pages contain the
primary OnLine control information. If this command detects errors (not
warnings), perform a data restore from archive. (Refer to page 2-95 for more
details about the reserved pages.)
tbcheck -cc
Execute tbcheck -cc to validate the system catalog for each of the databases
that OnLine manages. Each database contains its own system catalog, which
contains information on the database tables, columns, indexes, views,
constraints, stored procedures, and privileges.
Ifawarningappears afteryouexecutetbcheck-cc,itsonlypurposeistoalert
you that no records of a specific type were found. These warnings do not
indicateanyproblemwithyourdata,yoursystemcatalog,orevenwithyour
database design. For example, the following warning might appear if you
execute tbcheck -cc on a database that has no synonym names defined for
any table:
WARNING: No syssyntable records found.
This message indicates only that no synonym exists for any table; that is, the
system catalog contains no syssyntable records.
However, if an error message is returned from tbcheck -cc, the situation is
quitedifferent.Tocorrectthesituation, you mustperformadatarestorefrom
archive.
tbcheck -ce
Execute tbcheck -ce to validate the extents in every OnLine database. It is
important that extents do not overlap. If this command detects errors,
perform a data restore from archive.

4-8 IBM Informix OnLine Database Server Administrator’s Guide
Using the OnLine Message Log
tbcheck -cI
Executetbcheck-cIforeachdatabasetovalidateindexesoneachofthetables
in the database. This command locks each table as the table is checked,
denyingaccesstoallotherdatabaseserverprocesses.Ifthiscommanddetects
errors, drop and re-create the affected index.
tbcheck -cD
Execute tbcheck -cD to validate the pages for each of the tables in the
database. This command locks each table as the table is checked, denying
access to all other database server processes. If this command detects errors,
try to unload the data from the specified table, drop the table, re-create the
table, and reload the data. If this does not succeed, perform a data restore
from archive.
After you perform the checks just described and you validate OnLine, create
a level-0 archive. Retain this archive and all subsequent logical log backup
tapes until you complete the next consistency check. Informix recommends
that you perform the consistency checks before every level-0 archive.
However, if you do not, at least keep all the tapes necessary to recover from
the archive that was created immediately after OnLine was verified to be
consistent.
Using the OnLine Message Log
If the consistency-checking code detects an inconsistency during OnLine
operation, messages are sent to the OnLine message log (specified as
MSGPATH in the configuration file; default value is $INFORMIXDIR/
online.log).
Many of the messages sent to the OnLine message log take the following
form:
Fail Consistency Check -- problem text pid=process# user=user#
us=address

Data Consistency, Recovery, and Migration 4-9
Setting Consistency-Checking Variables
The problem text briefly describes the type of consistency error. The process#
identifiestheOnLinedatabaseserverprocessidentificationnumber(pid)that
encountered the error. The user# is the user identification number as defined
in the UNIX /etc/passwd file. The addressis the address of the database server
process in shared memory. Locate the user login and try to discover the
operationbeingperformedat thetimeoftheerror.Thisinformationmightbe
valuable for diagnostic purposes.
Most of the general consistency-checking messages are followed by
additionalinformationthatusuallyincludesthetblspacewheretheerrorwas
detected. If this information is available, run tbcheck -cD on the database or
table. If this check verifies the inconsistency, unload the data from the table,
drop the table, re-create the table, and reload the data. Otherwise, no other
action is needed.
A message is also sent to the application process. The content of the message
depends on the operation in progress. However in all cases the following
ISAM error is returned:
-105 ISAM error: bad isam file format
Tip: Chapter 8, which describes the messages that might appear in the OnLine
message log, provides additional details about the objectives and contents of consis-
tency-checking messages.
Setting Consistency-Checking Variables
OnLinerecognizesfourvariablesintheuser’senvironment,which,whenset,
directOnLinetopreservediagnosticinformationwheneveraninconsistency
is detected or whenever OnLine enters into an abort sequence. To take effect,
the variables must be set at the time that the user’s OnLine database server
process is started.
You decide whether your users set these variables. Diagnostic output can
consume a large amount of disk space. (The exact content depends on the
environment variables set and your UNIX system.) The elements of the
output could include a copy of shared memory and/or a core dump of the
database server process.

4-10 IBM Informix OnLine Database Server Administrator’s Guide
Setting Consistency-Checking Variables
(Acoredumpisanimageofthedatabaseserverprocessinmemory atthetime
that the inconsistency was detected. Some core dumps include a copy of
shared memory. To determine the size of your OnLine shared memory, refer
to the kilobyte information listed in any tbstat header.)
Administratorswithdiskspaceconstraints might prefertowriteascriptthat
detects the presence of diagnostic output in a specified directory and sends
the output to tape. This approach preserves the diagnostic information and
minimizes the amount of disk space used.
GCORE
The GCORE environment variable is used with UNIX operating systems that
support the gcore utility. If GCORE is set, the OnLine database server process
calls gcore whenever the server process detects an inconsistency or initiates
an abort sequence. The gcore utility directs the server process to dump core
tothecurrentdirectory(orthedirectoryspecifiedbyDUMPDIR)andcontinue
processing.
The core dump output generated by gcore is saved to the file core.pid.cnt.
The pid value is the OnLine database server process identification number.
The cnt value is incremented each time this process encounters an inconsis-
tency. The cnt value can range from 1 to 4. After 4, separate core dumps are
savedto files, and no morefilesarecreated.Iftheserver processcontinues to
detect inconsistencies in this section of code, errors are reported to the
OnLine message log (and perhaps to the application), but no further
diagnostic information is saved.
IfyousetGCORE and your UNIX system does notsupportgcore,messages in
theOnLinemessagelogindicatethatanattemptwasmadetodumpcore,but
theexpectedfilewasnotfound.(IfyourUNIXsystemdoesnotsupportgcore,
set DUMPCORE instead.)
Set the GCORE environment variable at the system prompt or in your .login
or .cshrc (C shell) or your .profile (Bourne shell) file as follows:
C shell: setenv GCORE
Bourne shell: GCORE =
export GCORE

Data Consistency, Recovery, and Migration 4-11
Setting Consistency-Checking Variables
DUMPCORE
Set the DUMPCORE environmental variable as an alternative to GCORE for
systems that do not support the gcore utility. DUMPCORE directs each
OnLine database server process to dump core when it detects an inconsis-
tency or initiates an abort sequence. To accomplish this, the server process
sendsitselfasegmentationviolationsignal.Theresult,whichisaterminated
process that requires cleanup by an OnLine daemon process, is less elegant
than the GCORE option.
If you mistakenly set both GCORE and DUMPCORE, the server process first
callsgcore,dumpscore,thencontinuesuntiltheDUMPCORE variabledirects
the process to dump core again and send itself a segmentation violation
signal.
If DUMPCORE is set, you risk OnLine aborting whenever a user process
detects an inconsistency while it is in a critical section or holding a latch.
Set the DUMPCORE environment variable at the system prompt or in your
.login or .cshrc (C shell) or your .profile (Bourne shell) file as follows:
DUMPSHMEM
The DUMPSHMEM environment variable directs the OnLine database server
process to save a copy of shared memory to a file in the current directory or
the directory specified by DUMPDIR.
The filename takes the format shmem.pid.cnt. The pid value is the OnLine
database server process identification number. The cnt value is incremented
each time this process encounters an inconsistency. The cnt value can range
from 1 to 4. After 4 copies of shared memory are saved to separate files, no
morefilesarecreated.Iftheserverprocesscontinuestodetectinconsistencies
in this section of code, errors are reported to the OnLine message log (and
perhaps to the application), but no further diagnostic information is saved.
C shell: setenv DUMPCORE
Bourne shell: DUMPCORE =
export DUMPCORE

4-12 IBM Informix OnLine Database Server Administrator’s Guide
Recovering from Corruption
Set the DUMPSHMEM environment variable at the system prompt or in your
.login or .cshrc (C shell) or your .profile (Bourne shell) file as follows:
DUMPDIR
The DUMPDIR environment variable directs the OnLine database server
process to save the diagnostic output generated by GCORE or DUMPSHMEM
to the specified directory instead of to the current directory.
Set the DUMPDIR environment variable at the system prompt or in your
.login or .cshrc (C shell) or your .profile (Bourne shell) file as follows:
Recovering from Corruption
This section describes some of the symptoms of OnLine system corruption
and actions that OnLine or you, as administrator, can take to resolve the
problems. Corruption in an OnLine system can occur as a consequence of
problems caused by hardware or the operating system, or from some
unknownOnLineproblems.Corruptioncanaffecteitheruserprocessdataor
OnLine control information.
C shell: setenv DUMPSHMEM
Bourne shell: DUMPSHMEM =
export DUMPSHMEM
C shell: setenv DUMPDIR directory
Bourne shell: DUMPDIR=directory
export DUMPDIR

Data Consistency, Recovery, and Migration 4-13
Recovering from Corruption
OnLine alerts the user and administrator to possible corruption through the
following means:
■Errormessages reportedtotheapplication statethatpages,tables,or
databases cannot be found. The following message:
-105 ISAM error: bad isam file format
is always returned to the application if an operation has failed
because of an inconsistency in the underlying data or control
information.
■Consistency-checking messages are written to the OnLine message
log. The following message:
Fail Consistency Check
includes diagnostic information that can help you determine the
source of the problem.
■The tbcheck utility returns errors.
Corrective actions for tbcheck errors are described, by tbcheck
option, beginning on page 4-6.
At the first indication of corruption, run tbcheck -cI to determine if
corruptionexistsintheindex.Ifyouruntbcheck -cI inonlinemode,tbcheck
detects the corruption but does not prompt you for repairs. If corruption
exists, you can drop and re-create the indexes using SQL statements while
you are in online mode. If you run tbcheck -cI in quiescent mode and
corruption is detected, tbcheck prompts you to confirm whether the utility
should attempt to repair the corruption.
If tbcheck reports bad key information in an index, drop the index and re-
create it.
If tbcheck is unable to find or access the table or database, verify the UNIX
permissionsonthe device (chunk)wherethetableresides.Ifpermissionsare
not the source of the problem, the chunk might be down. (Refer to page 1-48
for more details about the proper device permissions.)
If an I/O error occurs during OnLine operation, the status of the chunk on
which the error occurred changes to down. If a chunk is down, the tbstat -d
display shows the chunk status as PD- for a primary chunk and MD- for a
mirror chunk. A message written to the OnLine message log contains the
UNIX error number that identifies the cause of the I/O error.

4-14 IBM Informix OnLine Database Server Administrator’s Guide
Mirroring
Ifthe downchunk is mirrored, OnLine continues to operate using themirror
chunk. Use UNIX utilities to determine what is wrong with the down chunk
and then to correct the problem and bring the chunk back to online mode.
Restore mirrored chunk data by following the procedure described on
page 3-101.
If the down chunk is not mirrored and contains logical log files, the physical
log, or the root dbspace, OnLine immediately initiates an abort. Otherwise,
OnLinecan continue to operate, butuser processes cannot writeto the down
chunk.YoumusttakestepsfirsttodeterminewhytheI/O erroroccurredand
then to correct the problem.
Important: If you take OnLine to offline mode when a chunk is marked as down
(“D”), you cannot reinitialize OnLine unless the down chunk is mirrored. The only
method for restoring the unmirrored chunk is to perform a data restore from archive.
Mirroring
When you mirror a chunk, OnLine maintains two copies of the chunk data.
Every write to a primary chunk is automatically followed by an identical
writetothemirrorchunk. If a failureoccursontheprimarychunk,mirroring
enablesyouto readfromandwriteto the mirrorchunk until you canrecover
the primary chunk, all without interrupting user access to data. This section
provides background information about OnLine mirroring operation and
administration.
As administrator, you enable mirroring through DB-Monitor as part of disk-
space initialization. You can also enable mirroring by editing the configu-
rationfileusingaUNIX editorand reinitializingsharedmemory.(Forspecific
instructions, refer to page 3-104.)
You can start or end mirroringatanytime.Mirroringisperformed by chunk,
but it must be requested for an entire blobspace or dbspace. You cannot
mirrorselectedchunkswithinablobspaceordbspace.Informixrecommends
that you create a level-0 archive after you change the mirroring status of
OnLine data. (For specific instructions on creating an archive, refer to
page 3-57.)

Data Consistency, Recovery, and Migration 4-15
Beginning
Recover a mirrored chunk through the DB-Monitor Dbspaces menu, Status
option or through the tbspaces utility (change the status of the failed chunk
from down, D, to online, O). When you initiate recovery, OnLine puts the
down chunk in recovery mode and copies the information from the online
chunk to the recovery chunk. When the recovery is complete, the chunk
automatically receives online status. You perform the same steps whether
you are recovering the primary chunk of a mirrored pair or recovering the
mirrorchunk.(Forinformationaboutmonitoringchunkstatuscodes,referto
page 3-70.)
Beginning
Mirroring begins immediately after you create the mirror chunk, in most
cases. (The one exception occurs when you start mirroring for a dbspace that
contains logical log files. This topic is addressed in the next section.)
Thenewmirrorchunkentersrecoverymodeautomatically.Amirror-recovery
process copies information from the primary chunk to the mirror chunk.
When the two chunks are considered equal, the mirror chunk automatically
receives online status (O). From this point on, the mirror chunk reports that it
has zero free pages.
Data from the online chunk is copied to the chunk in recovery in eight-page
increments. During the copy, these blocks of pages are frozen. Any modifica-
tions that affect those pages must wait until the copy to the recovery chunk
is complete.
Recovery time is almost instantaneous when the primary chunk and mirror
chunk are being created in the same operation. If you are adding a mirror
chunktoanexistingchunk,therecoverytimedependsontheamountofdata
in the chunk.
The recovery procedure that marks the beginning of mirroring is delayed if
you are starting to mirror a dbspace that contains a logical log. Mirroring for
this dbspace does not begin until you create a level-0 archive.

4-16 IBM Informix OnLine Database Server Administrator’s Guide
Processing
The reason for the delay is to ensure a proper restore. The level-0 archive
copies the updated OnLine configuration information (the newly created
mirror chunk) from the root dbspace reserved pages to the first block of the
archive tape. In the event of a data restore, the updated configuration infor-
mation at the beginning of the archive tape can direct OnLine to look for the
mirrored copies of the logical log files if the primary chunk becomes
unavailable.Ifyoudidnothavethenewarchiveinformationatthebeginning
of the tape, OnLine would be unable to take advantage of the mirrored log
files.
This is also the reason why you cannot mirror a dbspace that contains a
logical log while an archive is being created. The new information that must
appear in the first block of the archive tape cannot be copied there once the
archive has begun.
Processing
During OnLine processing, mirroring is performed by executing two writes
(one to the primary chunk and one to the mirror chunk) for each modified
page.
OnLine detects an I/O error by checking the return code when it first opens
a chunk and after any read or write. If OnLine detects that a primary chunk
devicefailedduringaread,OnLinechangesthechunkstatustodown(D)and
begins reading from the mirror chunk. OnLine continues to read from the
mirror chunk for as long as the primary chunk status remains down.
If OnLine detects that a primary chunk device failed during a write, writes
continue to the one chunk that remains online. This is also true if one of the
chunks is intentionally brought down by the administrator. Writes continue
on the other chunk.
Once the down chunk is recovered and returned to online status, reads are
again performed on the primary chunk and writes are made to both the
primary and mirror chunks.

Data Consistency, Recovery, and Migration 4-17
Recovery
Important: If OnLine detects an I/O error on a chunk that is not mirrored, OnLine
marks the chunk as down. If the down chunk contains logical log files, the physical
log, or the root dbspace, OnLine immediately initiates an abort. Otherwise, OnLine
can continue to operate but processes cannot write to the down chunk. The only
method for restoring an unmirrored chunk is to perform a data restore from archive.
If you take OnLine to offline mode when a chunk is marked as down, you cannot
reinitialize OnLine unless the down chunk is mirrored.
Recovery
When OnLine recovers a mirrored chunk, it performs the same recovery
procedure it uses when mirroring begins. A mirror-recovery process copies
the data from the existing online chunk onto the new, repaired chunk until
the two are considered equal.
Ending
When OnLine ends mirroring, it immediately frees the mirror chunks and
OnLine makes the space available for reallocation.
The action of ending mirroring takes only a few seconds. No other event
(such as a checkpoint) is triggered by the action of ending mirroring.
A level-0 archive created after you end mirroring ensures that this infor-
mationiscopiedtothearchivetape.Thispreventstherestoreprocedurefrom
assuming mirrored data is still available.

4-18 IBM Informix OnLine Database Server Administrator’s Guide
OnLine Logging Overview
OnLine Logging Overview
ThelogicallogfilesareatthecenterofallOnLinedata-recoverymechanisms.
The logical log files receive three types of records during processing, even if
no databases are created with transaction logging:
■SQL data definition statements (DDL) for all databases
■Changes to OnLine configuration (includes changes to chunks,
dbspaces, and blobspaces)
■Checkpoint events
The logical log files also receive one or more records of each SQL data
management statement (DML) that is executed in a database created with
logging. SELECT statements are not logged.
The logical log files serve three functions that affect all OnLine mechanisms
for data recovery and consistency:
■Ifadatabaseusestransactionsandatransactionmustberolledback,
OnLineuses the recordsin the logicallog files to reversethechanges
made on behalf of the transaction.
■If a data restore is needed, OnLine uses the records in the logical log
files to roll forward all work performed since the last archive.
■If OnLine has been shut down in an uncontrolled manner, OnLine
uses the records in the logical log files to implement fast recovery
andbring the systemback online ina consistent state without loss of
data.
The information that OnLine writes to the logical log differs, depending on
whether the operation involves dbspace data or blobspace data. When
OnLine logs operations involving dbspace data, the data rows (including
dbspace blobs) are included in the logical log records. This is not true for
blobspace data. Blobspace data is not copied to the logical log.
Blobspacedataispotentiallytoovoluminoustobeincludedinthelogicallog
files. If it were, the many kilobytes of data per blob would overwhelm the
space allocated for the log files. Instead of storing the blobspace data needed
for recovery in the logical log files, OnLine copies the blobspace pages from
disk directly to the logical log backup tapes when the log files are backed up,
without going through the logical log files.

Data Consistency, Recovery, and Migration 4-19
Dbspace Logging
Dbspace Logging
OnLine logs dbspace data operations in six steps, illustrated in Figure 4-1 on
page 4-20.
Following is an overview of steps in logging dbspace data:
1. Read the data page from disk to shared-memory page buffer.
2. Copy the unchanged page to the physical log buffer.
3. Write the new data into the page buffer; create a logical log record of
the transaction, if needed.
4. Flush physical log buffer to the physical log on disk.
5. Flush logical log buffer to a logical log file on disk.
6. Flush the page buffer and write it back to disk.
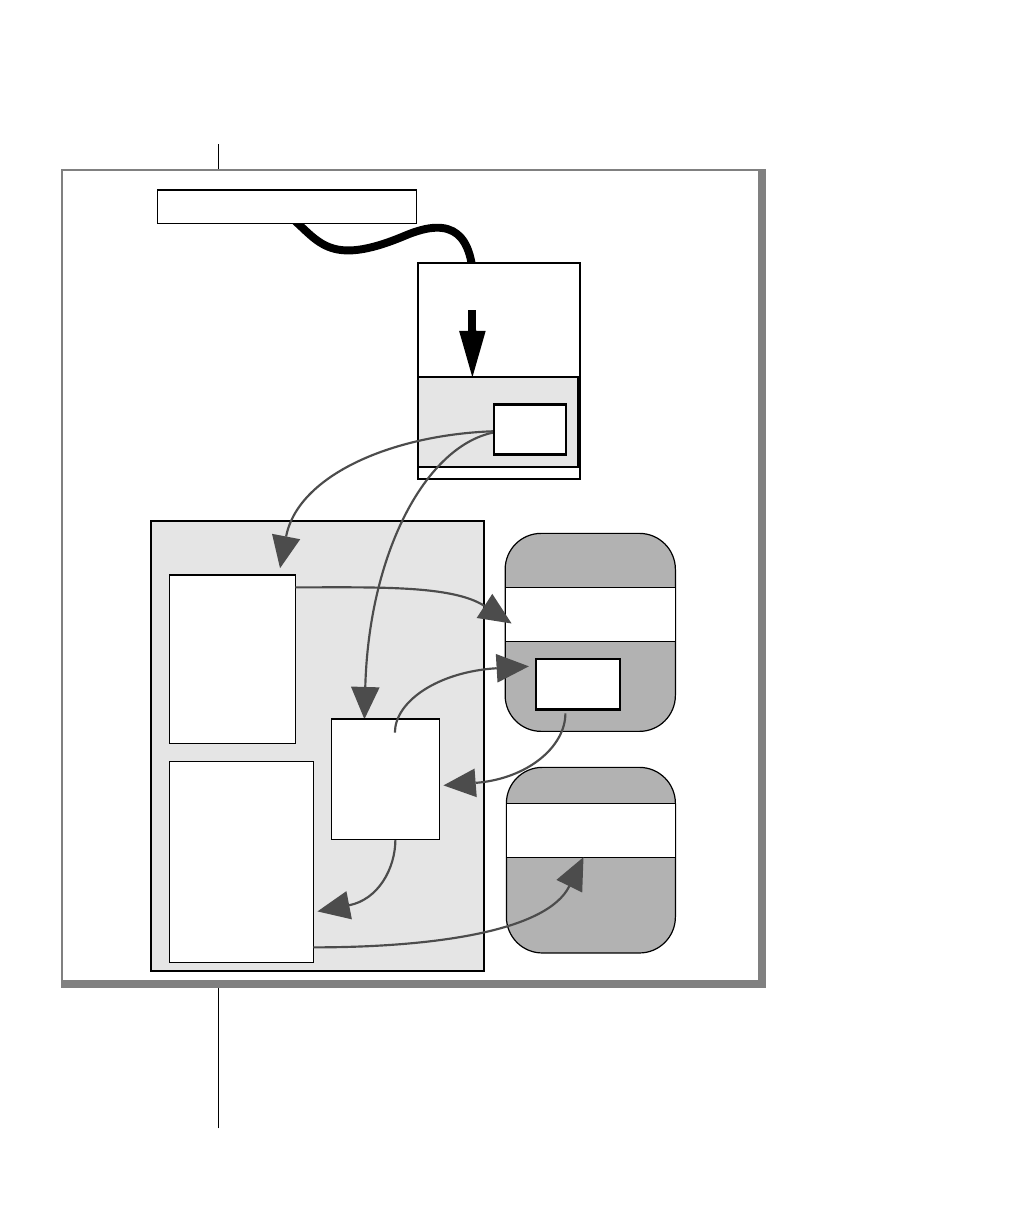
4-20 IBM Informix OnLine Database Server Administrator’s Guide
Dbspace Logging
Figure 4-1
OnLine logs
dbspace
operations in six
steps.
OnLine disk
1
24
3
35
6Data page
Logical log file
Physical log
Row data
Pipe Database server process
Logical log
buffer
Physical log buffer
Page
buffer
OnLine shared memory
Privatedataportion
of server’s virtual
address space
Application Process
OnLine disk

Data Consistency, Recovery, and Migration 4-21
Dbspace Logging
In general, an insert or an update begins when a database server process
requests a row. OnLine identifies the page on which the row resides and
attempts to locate the page in the OnLine shared-memory buffer pool. If the
page is not already in shared memory, it is read into shared memory from
disk.
Beforeadbspace data pageis first modified, a copy of theunchanged page is
stored in the physical log buffer. This copy of the “before-image” of the page
is eventually flushed from the physical log buffer to the physical log on disk.
The “before-image” of the page plays a critical role in fast recovery. (While
the data page is in shared memory, subsequent modifications do not require
another “before-image” to be stored in the physical log buffer.)
Data from the application tool process is passed to the database server
process. The data is stored in the private data portion of the virtual address
spaceof the process.After a copyof the unchanged data page is storedinthe
physical log buffer, the new data is written to the page buffer already
acquired by the database server process.
At the same time, all information needed to roll back or re-create this
operation is written to the logical log buffer in the form of a transaction
record.
The physical log buffer must flush before the data buffer flushes to ensure
that a copy of the unchanged page is available until the changed page is
copied to disk. The “before-image” of the page is no longer needed after a
checkpointoccurs.(Duringacheckpointallmodifiedpageinsharedmemory
are flushed to disk providing a consistent point from which to recover from
an uncontrolled shutdown. Refer to page 2-72 for a detailed discussion of
what happens during a checkpoint.)
After the physical log buffer is flushed, the shared-memory page buffer is
flushed and the data page is written to disk. (Refer to page 2-74 for more
details about the relationship between physical log buffer flushing and
shared-memory buffer pool flushing.)
When the logical log buffer is flushed, the logical log record is written to the
current logical log file on disk. A logical log file cannot become free (and
available for reuse) until all transactions represented in the log file are
completed and the log file is backed up to tape. This ensures that all open
transactions can be rolled back, if required. (Refer to page 2-66 for more
details about when the logical log buffer is flushed.)

4-22 IBM Informix OnLine Database Server Administrator’s Guide
Blobspace Logging
Blobspace Logging
OnLine logs blobspace data in three steps, illustrated in Figure 4-2 on
page 4-23. Blobspace data does not pass through shared memory or the
logical log files on disk.
Following is an overview of steps in logging blobspace data:
1. Blobspacedataflowsfromthepipe,throughtemporarybuffersinthe
database server process memory space, and is written directly to
disk. If the blob requires more than one blobpage, links and pointers
are created as needed.
2. A record of the operation (insert, update, or delete) is written to the
logical log buffer, if the database uses logging. The blob data is not
included in the record.
3. When a logical log backup begins, OnLine uses the logical log ID
number stored in the blobspace free-map page to determine which
blobpages to copy to tape.
Data Consistency, Recovery, and Migration 4-23
Blobspace Logging
Figure 4-2
OnLine logs
blobspace
operations in three
steps.
OnLine
shared
memory OnLine disk
Blobspace
Privateportion
of virtual
address space
Pipe
1
3
2
Application process
Temporary blob buffer
Temporary blob buffer
OnLine disk
OnLine logical log backup
Database server process

4-24 IBM Informix OnLine Database Server Administrator’s Guide
Blobspace Logging
Operations Logging
OnLine does not copy blobspace data to the logical log files. This is the
important difference between the way that OnLine logs blobspace data and
dbspace data.
Arecordof theblobspaceoperationiswrittentothelogicallogbuffer,butthe
logical log records do not include a copy of the blobspace data. The logical
log records only include images of the blobspace overhead pages: the free-
mappagesandthebit-mappages. (Refer topage 2-148forinformationabout
the blobspace overhead pages.) By logging these overhead pages, the logical
log file records track blobpage allocation and deallocation (when blobs are
deleted from blobpages).
Since the logical log records do not include blobspace blob data, the tbtape
process must somehow locate and copy to the logical log tape each blobpage
that was allocated while this logical log file was current.
How does tbtape know which blobpages to copy? It reads the information
from the entries in the blobspace free-map page.
When a blob is written to a blobspace, it is the function of the blobspace free-
mappageto allocate and tracktheblobpages that wereusedto storetheblob
data. Therefore, as part of blobpage allocation, an entry is placed in the free-
map page indicating the blobpages that are now allocated and contain blob
data.TheentryalsoincludesthelogicallogIDnumberthatwascurrentwhen
the blobpage was allocated. By reading this information, the tbtape process
can identify all blobpages that are associated with the insert, update, and
delete records contained in a specific logical log file. (Refer to page 4-26.)
Operations Rollback
How can a blobspace operation be rolled back if the logical log file does not
contain a copy of the data that was originally inserted?
The answer is that OnLine always has access to a copy of the blobspace data
until the transaction is committed. However, the accessible copy of the data
is maintained either in the blobspace on disk or on the logical log backup
tape, not in the logical log itself. The logical log is needed, because the log
contains the blobspace control pages, which track the location and status of
the blobpages.

Data Consistency, Recovery, and Migration 4-25
Blobspace Logging
OnLine allocates and deallocates blobpages via the blobspace free-map
pages. (Refer to page 2-148.) If a blobspace blob is deleted during a trans-
action,the entries in the free-mappagefor theblobpages storing the blob are
marked for deletion. The blob data is unchanged. If the transaction is
eventually rolled back, OnLine simply reverses the change to the blobpage
status in the free-map page entry. Even if the transaction is committed, the
blobpages remain protected until the logical log file in which the delete
occurredbecomesfree.Thatis,theblobpagesbecome“free”andavailablefor
reuse only after logical log file in which the deletion occurred is no longer
neededfor a data restore.One consequence of thisstrategy is thatyou do not
seetheeffectof deleting blobspaceblobstoincreaseavailablespaceuntilyou
free the logical log file in which the delete occurred.
Blob Restoration
Howcanablobspaceblob berestoredifthelogicallogrecordsdonotinclude
the data?
The answer is that even though blobspace blobpages never pass through the
logical log files, blobpages are copied directly to the logical log backup tape.
OnLine performs the copying as part of the logical log backup procedure.
When you request a logical log backup, you start the tbtape process. (If you
request the logical log backup through DB-Monitor, the monitor process
tbmonitor starts the tbtape process for you.) When the tbtape utility process
beginsalogicallogbackuptotape,itnotesthelogicallogfileID.Next,tbtape
checks the blobspace free-map pages for every blobspace, looking for
blobpages that were allocated during the time that this logical log file was
current. The current logical log ID number is stored in the blobspace free-
map page each time a blobpage is allocated.
The tbtape process copies each blobpage allocated when this logical log file
was current to the backup tape before any logical log record is copied. Then
tbtape continuesthe backup procedure,copying to tapethe recordsfromthe
logical log file. In this way, tbtape creates a permanent record of blobpage
data and associated logical log records without overburdening the capacity
of the logical log files.
For further information about what happens during the logical log backup
procedure, refer to page 4-26.

4-26 IBM Informix OnLine Database Server Administrator’s Guide
What Happens During Logical Log Backup
For further information about what happens during a data restore, refer to
page 4-45.
What Happens During Logical Log Backup
Logical log file backup can be initiated implicitly as part of continuous
loggingor explicitly by theOnLine administrator oroperator, either through
DB-Monitor or by executing tbtape. The backup is performed by the tbtape
process (even if requested through DB-Monitor).
The logical log backup achieves two objectives:
1. It stores the logical log records on tape so they can be rolled forward
if a data restore is needed.
2. It frees logical log file space to receive new logical log records.
Outlined below are the main steps in the logical log backup procedure.
1. Ready LTAPEDEV, the logical log backup tape device
2. Locate the next logical log file to be backed up
3. Check blobspaces for blobpages to be backed up
4. Write blobpages to tape
5. Write log header page and log pages to tape
6. Write trailer at end of backup session

Data Consistency, Recovery, and Migration 4-27
Ready LTAPEDEV
Ready LTAPEDEV
Whenyourequestalogicallog backup,youarepromptedtomountatapeon
the tape device specified as LTAPEDEV in the configuration file. The tbtape
process prompts you to verify that the tape device is ready.
If the tape is new, the tbtape utility process writes a tape header page to the
device. This tape header page contains the following information:
■The tape device block size (LTAPEBLK)
■The size of tape (LTAPESIZE)
■A flag that indicates the tape is for logical log backup
■A timestamp that indicates the date
Locate the Next Logical Log
The tbtape process locates the oldest logical log file that has been used but
not backed up (status U).
OnLinebacksupallfulllogicallogs. If morethanonetapeisneeded,OnLine
provides you with labelling information for the full tape andprompts you to
mount a new tape.
If Continuous-Logging is chosen, tbtape begins to back up all currently full
log files. The tbtape process then waits for the current log to become full. As
each log file becomes full, tbtape automatically initiates a back up.
Copy Blobpages
Thetbtape process begins by comparing the identification number of the log
file it is backing up with every entry on every blobspace free-map page. The
tbtape process is looking for blobpages that were allocated during the time
thislogicallogfilewasthecurrentlogfile.(Refertopage 2-148formoreinfor-
mation about the blobspace free-map page and its role in logical log file
backups.)

4-28 IBM Informix OnLine Database Server Administrator’s Guide
Place Log Header on Tape
Each blobpage that was allocated during the time that this log file was
current is copied to the tape device LTAPEDEV. This is required as part of
blobspace logging to ensure that blobspace blobs can be restored after a
DELETE statement, if required. (Refer to page 4-22 for a detailed explanation
of blobspace logging.)
Place Log Header on Tape
After all blobspace free-map pages have been checked and the required
blobpages have been copied to tape, tbtape writes a log header page to the
device.
The log header page is distinct from the tape header page. The log header
pagespecifiestheidentificationnumberofthelogicallogfileandthenumber
of pages from the logical log file that need to be copied.
Data Consistency, Recovery, and Migration 4-29
Write Log Records to Tape
Write Log Records to Tape
The tbtape process begins copying each page in the logical log file to tape.
Whenthelastpageinthelogfileiscopied,thebackupis complete.Figure 4-3
illustrates the order of information on the logical log backup tape.
Ifthebackupwasinitiated implicitlythroughcontinuouslogging,the logical
log backup session continues. The tbtape process waits until the next logical
log file becomes full.
Figure 4-3
Each logical log
backup begins with
blobpages, if any,
then the header
page, and then the
log records.
Order of information on the logical log backup tape
1
2
3
Logical log backup tape
Blobspace A
Blobspace B
Logical log
backupsession
header page
Logical log (status U-B)
Logical log (status U)
Logical log (status U-C)

4-30 IBM Informix OnLine Database Server Administrator’s Guide
Write Trailer Page
If the backup was initiated explicitly through tbtape -a or Auto-Backup,
tbtape looks for another log file with status U. If another log file requires
backup, the procedure is repeated. If tbtape cannot find another candidate
for logging, it prompts the operator to indicate if the current log file is to be
backed up. If so, the log files are switched and the backup procedure is
repeated for the formerly current log.
Write Trailer Page
When the entire procedure is complete, tbtape writes a trailer page that
indicates the end of the backup session.
Control is returned to the administrator.
If the tape mounted on LTAPEDEV becomes full before the end of the logical
log file, the operator is prompted for a new tape.
A tape header page is written to the new tape, along with a new log header
page. The page information in the log header contains the number of pages
that remain to be copied to complete the logical log file.
What Happens During an Archive
Archiving creates a complete record on tape of all used disk pages at a single
point in time. A level-0 archive contains all used disk pages. Level-1 and
level-2 archives are incremental, recording changes since the last archive.
With the information contained on the archive tapes and the logical log
backuptapes,youcanre-createthestateofOnLinedataatsomeknownpoint
in time.
OnLine creates an archive when the OnLine administrator or operator
requests one. Archives are not created automatically. Outlined below are the
main steps that are completed during an online archive.
1. tbtape reads archive information from reserved pages.
2. Operator readies TAPEDEV, the archive tape device.
3. tbtape verifies the archive level requested.
4. tbtape checks that adequate logical log space exists.

Data Consistency, Recovery, and Migration 4-31
Read Archive History Information
5. tbtape forces a checkpoint.
6. tbtape synchronizes activity with the tbinit process.
7. tbtape writes tape header page.
8. tbtapearchivesreservedpagesandlogicallogfilesthatcontainopen
transactions.
9. tbtape defines the archive criteria.
10. tbtape searches by chunk for disk pages that meet archive criteria
and archives those pages.
11. tbtape monitors pages written to the physical log and archives all
pages that meet archive criteria.
12. tbtape writes an end-of-archive trailer page.
13. tbtape updates archive information in the reserved pages.
Read Archive History Information
When the archive is first requested, the tbtape utility process begins assem-
bling the information it needs to create an archive. It reads the value of
TAPEDEV from the configuration file and reads archive history from the
activerootdbspacereservedpage.(Refertopage 2-102formoredetailsabout
PAGE_ARCH.)
The tbtape process uses the reserved-page information first to verify the
archive level (for example, a level-0 archive is required before a level-1
archive can be created). Later, tbtape uses the timestamp of the previous
archive to set the criteria for determining which pages must be archived.
Mount a Tape on TAPEDEV
When you request an archive, you are prompted to mount a tape on the
archive tape device and to verify that the tape device is ready. Do not store
more than one archive on the same tape; begin every archive with a different
tape. (It is likely that an archive will span more than one tape.)

4-32 IBM Informix OnLine Database Server Administrator’s Guide
Verify the Archive Level
Verify the Archive Level
As part of the archive request, you specify an archive level. The tbtape
process compares the specified archive level with the information that was
obtained from the PAGE_ARCH reserved page.
If tbtape cannot find a record of a previous archive on the reserved page, the
only valid archive level is a level-0 archive. Otherwise, any archive level is
valid.
(Alevel-0 archive to /dev/null registersasa valid archive.Therefore,OnLine
permits you to create a level-1 archive on a tape device if your only level-0
archive was created when the archive device was /dev/null. Because of the
problemsthiscouldcreateifadatarestorewereneeded,avoidthissituation.)
Check Free Space in the Logical Log
The tbtape process temporarily freezes the status of unreleased logical log
files and does not permit any log file to become free. The tbtape process
checks the total amount of free log space. If free space is less than half of one
log file, OnLine refuses the archive request and recommends that you back
up the logical logs.
Force a Checkpoint
After tbtape verifies that the archive can proceed, it forces a checkpoint.
During the checkpoint, tbtape gathers reference information that serves as a
snapshot of all OnLine data at this time.
The checkpoint marks the beginning of the archive. OnLine shared memory
and disk pages are brought to a consistent state. (Refer to page 2-70 for
further information about checkpoints.)
The address of the most-recently written record in the current logical log file
is noted. This record becomes the last record from the log that will be copied
as part of this OnLine archive.
Ifthisarchiveisanonlinearchive,allchangestoOnLinedatathatoccurafter
this point are considered beyond the range of the archive and are retained as
part of the logical log file records.

Data Consistency, Recovery, and Migration 4-33
Synchronize tbtape and tbinit Activities
(It is likely that some transactions are ongoing during an online archive
procedure. The restore procedure describes how transactions that span the
archive tape and the logical log file are rolled back during a data restore, if
necessary. Refer to page 4-45.)
Purpose of Checkpoint Timestamp
The checkpoint timestamp becomes the standard against which disk pages
are compared for archiving purposes. (Timestamps are not based on system
time. Refer to page 2-44 for further information about timestamps.)
For example, if the checkpoint occurs at 3401, then for a level-0 archive, all
pagescontainingtimestampslessthan3401mustbecopiedtotape.Astbtape
reads through disk pages during the archive, pages with timestamps greater
than3401areignored.OnLinereliesonthelogicallogfiles to contain records
of modifications that occur after 3401.
Purpose of Data Snapshot
During the checkpoint, tbtape also creates a snapshot of information that is
needed as reference to execute the archive procedure.
The snapshot information describes, for every OnLine chunk, the pages that
wereallocatedandthepagesthatwerefreeatthetimeofthecheckpoint.This
information is needed because the status of the pages might change during
an online archive. OnLine does not read pages that were considered free at
the time of the begin-archive checkpoint.
The snapshot also defines the pages that composed the logical log files and
the physical log files at the time of the checkpoint. This snapshot enables
tbtape to recognize and skip (not archive) pages that were allocated to logs
at the time of the checkpoint.
Synchronize tbtape and tbinit Activities
During an online archive, tbtape archives disk pages at the same time that
OnLine processing modifies disk pages. Assume that the archive-begin
checkpoint for a level-0 occurred at 3401. How does tbtape overcome the
problem of archiving every page at its 3401-state if OnLine processing is
constantly modifying pages?

4-34 IBM Informix OnLine Database Server Administrator’s Guide
Synchronize tbtape and tbinit Activities
The answer is that tbtape and tbinit synchronize their activities at the
beginning of the archive and continue to work in concert until the end ofthe
archive. The following paragraphs describe the consequences of this
cooperation.
Archive Disk Pages
The first task is to prevent any specific disk page from being modified until
tbtape has had a chance to archive that page in its archive-begin state. The
tbtape process neatly accomplishes this task without interrupting
processing.
During an archive, tbtape periodically scans the physical log looking for
“before-images”thatcontain timestamps that areless thanthe begin-archive
checkpoint timestamp. Each “before-image” page that meets this criterion is
copied to the archive tape.
OnLine cannot rely on scanning to obtain every required “before-image.”
The tbinit process must be blocked from flushing the physical log (by
completing a checkpoint) until tbtape can verify that it has copied all
required “before-images.” This is accomplished by ensuring that the tbtape
archive processing remains in critical-section code throughout the
procedure, effectively blocking a checkpoint from occurring. (Refer to
page 2-28 for more details about critical sections.)
When the need arises to flush the physical log, tbinit notifies tbtape. The
tbtape process scans the physical log to copy any required “before-images”
to the archive tape. (Periodic scanning prevents this final check and copy
from unduly prolonging the checkpoint.)
Copying done, tbtape temporarily exits from its critical section long enough
for tbinit to complete its checkpoint. When the checkpoint is complete,
tbtape reenters the critical section, again blocking tbinit from executing a
checkpoint.

Data Consistency, Recovery, and Migration 4-35
Write Tape Header Page
Archive blobpages
The second task facing tbtape is to prevent database server processes from
overwriting blobspace blobpages before they have been archived. Since
blobpages do not pass through shared memory, the strategy of archiving
from the physical log (described in the preceding section) is insufficient in
itself. In addition, tbtape must postpone all changes to blobpages until after
the blobpage is archived.
To accomplish this, tbtape blocks allocation of blobpages in each blobspace
chunkuntiltbtapehasreadandarchivedallused blobpagesinthechunk.As
soon as the chunk is archived, blobpage allocation in that chunk resumes.
One implication of this implementation is that during an online archive,
blobs cannot be inserted into a blobspace until the blobspace chunk has been
archived.Sincechunksarereadandarchivedbytbtape inorderofthechunk
identification numbers, you can minimize this inconvenience by creating
blobspaces early, ensuring a low chunk ID number.
Write Tape Header Page
After tbtape and tbinit have synchronized activities, tbtape writes a tape
header page to the archive device. The tape header page contains the
following information:
■The tape device block size (TAPEBLK)
■The size of tape (TAPESIZE)
■A flag that indicates the tape is for an archive
■A timestamp that indicates the date and time of the archive
■The archive level
■The ID number of the logical log file that contains the checkpoint
record that began the archive
■The physical location of that checkpoint record in the logical log file
Ifthearchivedevice(TAPEDEV)isdefinedas/dev/null,tbtapedoesnotwrite
apagetothedevice. Instead,tbtape updatestheactivePAGE_ARCH reserved
page with the same information that would have been written to the header
page. (Refer to the preceding list.) The checkpoint information is also copied
to the active PAGE_CKPT (checkpoint) reserved page.

4-36 IBM Informix OnLine Database Server Administrator’s Guide
Archive Reserved Pages
With this action, the root dbspace reserved pages receive acknowledgment
thatanarchivehasoccurred.ThiseventenablesOnLinetomakeuseofnewly
added or changed resources. (A level-0 archive to /dev/null registers as a
validarchive.OnLinepermitsyou to createa level-1 archiveon a tape device
even if your only level-0 archive was created when the archive device was
/dev/null. Because of the problems this could create if a data restore were
needed, avoid this situation.)
Having performed this function, tbtape considers the archive complete.
Synchronization with tbinit is ended. Control is returned to the
administrator.
Archive Reserved Pages
Aftertbtapewritesthetape headerpage,itbeginsreadingandwritingpages
to the archive tape in a specific order.
First, tbtape reads and archives each of the root dbspace reserved pages.
Second, tbtape reads and archives the contents of all logical log files that
contain records that are part of open transactions, up to the point of the
begin-archive checkpoint.
After selected logical log pages are archived, tbtape begins reading the
OnLine primary chunks in the order in which they are listed on the active
PAGE_PCHUNK page of the root dbspace reserved pages.
Mirrorchunks,whicharelistedontheactivePAGE_MCHUNK reservedpage,
are not explicitly read for archiving. Pages within a mirror chunk are
archived only if tbtape cannot read the page from the primary chunk.

Data Consistency, Recovery, and Migration 4-37
Determine Archive Criteria
Determine Archive Criteria
As tbtape reads each disk page, it applies a set of criteria that determines
which disk pages should be archived.
The tbtape process only archives pages that meet these criteria:
■The page has been allocated.
■The page is not part of a logical log file or the physical log.
■The page is needed for this archive level.
OnLine streamlines the archive procedure by ignoring disk pages that are
dedicated to OnLine but which were not yet allocated at the time of the
begin-archive checkpoint.
Before tbtape begins to read a chunk, it consults the snapshot of OnLine
activity to identify unallocated pages. (This information is contained in
entries on the dbspace chunk free-list pages. Refer to page 2-103.)
As tbtape reads a dbspace chunk, it recognizes the address of any unallo-
cated page that was, at the time that the archive began, the first page of a
contiguous block of free space. If a block of free space is found, tbtape skips
to the page that was, at the time, the end of that block of space.
Whentbtape beginsreadingablobspace chunk, it queriestheblobspace free-
map page and skips over any blobpage marked as free. Since blobspace
blobpage allocation was frozen at the time that the archive began, this infor-
mation is still current. (Refer to page 2-148 for further information about the
blobspace free-map page.)
The tbtape process checks the snapshot of reference information to identify
eachdbspacepagethatwaspartofalogicallogfileorpartofthephysicallog
at the time that the archive began. Whiletbtape reads each dbspace chunk, it
recognizes the address of the first page in the contiguous block that was the
physical log or was a logical log file at the time the archive began. When this
occurs, tbtape skips to the page that was, at the time, the end of the block.
Thearchivelevel affectsthearchivecriteria.Alevel-0archiverequirestbtape
to archive all used disk pages containing a timestamp less than the begin-
archive checkpoint timestamp.

4-38 IBM Informix OnLine Database Server Administrator’s Guide
Archive Disk Pages That Meet Criteria
A level-1 archive directs tbtape to consider a narrower range of used pages.
Thearchivecriteriabecomeall disk pagescontaining a timestampthatis less
thanthebegin-archivecheckpointtimestampbutgreaterthanthetimestamp
associated with the most recent level-0 archive. The tbtape process reads the
value of the most-recent level-0 archive timestamp from the active
PAGE_ARCH reserved page.
A level-2 archive also directs tbtape to consider a narrower range of used
pages.Thearchivecriteriabecomealldiskpagescontainingatimestampthat
is less than the begin-archive checkpoint timestamp but greater than the
timestamp associated with the most recent archive (any other level). Again,
tbtape reads the value of the most-recent archive timestamp from the active
PAGE_ARCH reserved page.
Archive Disk Pages That Meet Criteria
Afterthearchivecriteria areestablished,tbtapebeginstoreadthediskpages
in the chunk that is identified with chunk number 1. Each of the chunks is
readinorder.(OnLinechunksarelistedinorderintheactivePAGE_PCHUNK
reserved page.) Each page that meets the tbtape criteria for archiving is
copied to the archive tape.
Monitor and Archive Physical Log Pages
While tbtape reads disk pages, it periodically reads the pages stored in the
physical log, looking for pages that meet the archive timestamp criterion.
Each page that qualifies is copied to the archive tape. (Refer to page 4-34.)
Write a Trailer Page
Whentbtape reachesthelastpageofthelastchunk,thedisk-readingportion
ofthearchiveprocedureiscomplete.The tbtape processwritesatrailer page
to the tape, marking the end of the archive tape.
Update the Reserved Pages
Asthelast step in the archiveprocess,tbtape updatestheactive PAGE_ARCH
reserved page with the newest archive information.

Data Consistency, Recovery, and Migration 4-39
Fast Recovery
Fast Recovery
Fast recovery is an automatic, fault tolerance feature that OnLine executes
any time the operating mode changes from offline to quiescent mode. The
aim of fast recovery is to return OnLine to a state of physical and logical
consistency with minimal loss of work in the event of a system failure.
Fast recovery attains two goals:
■The physical log is used to return OnLine to the most-recent point of
known physical consistency, the most-recent checkpoint.
■The logical log files are used to return OnLine to logical consistency,
by rolling forward all committed transactions that have occurred
since the checkpoint and rolling back all transactions that were left
incomplete.
Fast recovery addresses situations like the following: OnLine is processing
tasks for more than 40 users. Dozens of transactions are ongoing. Without
warning, the operating system fails.
How does OnLine bring itself to a consistent state again? What happens to
ongoing transactions?
How Does OnLine Initiate Fast Recovery?
OnLine checks to see if fast recovery is needed every time that the adminis-
trator brings OnLine to quiescent mode from offline mode.
As part of shared-memory initialization, tbinit checks the contents of the
physical log. Normally, the physical log is empty when OnLine shuts down
under controlled circumstances. The move from online mode to quiescent
mode includes a checkpoint, which flushes the physical log. Therefore, if
tbinit finds pages in the physical log, it is clear OnLine went offline under
uncontrolled conditions, and fast recovery begins.

4-40 IBM Informix OnLine Database Server Administrator’s Guide
Fast Recovery and Logging
The aim of fast recovery is to return OnLine to a consistent state as part of
shared-memoryinitialization.TheactionsthatOnLinetakesasitimplements
fast recovery can be summarized in four steps:
1. Returnalldiskpagestotheirconditionat the time of the most-recent
checkpoint using the data in the physical log. (See Figure 4-4 on
page 4-41.)
2. Locate the most-recent checkpoint record in the logical log files. (See
Figure 4-5 on page 4-42.)
3. Roll forward all logical log records written after the most-recent
checkpoint record. (See Figure 4-6 on page 4-43.)
4. Roll back transactions that do not have an associated COMMIT
(commit work) record. (See Figure 4-7 on page 4-44.)
The result is that OnLine data is returned to a consistent state: all committed
transactions are restored and all uncommitted transactions are rolled back.
Fast Recovery and Logging
If a database uses buffered logging, some logical log records associated with
committed transactions might not be written to the logical log at the time of
thefailure.If this occurs, fast recoveryis unable to restorethosetransactions.
Fast recovery can only restore transactions with an associated COMMIT
(commit work) record stored in the logical log or on disk. (This is why
buffered logging represents a trade-off between performance and data
vulnerability.)
For databases that do not use logging, fast recovery restores the database to
its state at the time of the most-recent checkpoint. All changes made to the
database since the last checkpoint are lost.
Data Consistency, Recovery, and Migration 4-41
Step 1: Checkpoint Condition
Step 1: Checkpoint Condition
The first step, returning all disk pages to their condition at the time of the
most-recent checkpoint, is accomplished by writing the “before-images”
stored in the physical log back to disk. Each “before-image” in the physical
log contains the address of a page that was updated after the checkpoint. By
writingeach“before-image”page in thephysicallogbacktodisk,changesto
OnLine data since the time of the most-recent checkpoint are undone.
Figure 4-4 illustrates this step. (For more information about the contents and
function of the physical log, refer to page 2-152.)
Step 2: Find Checkpoint Record in Logical Log
The second step is to locate the address of the most-recent checkpoint record
in the logical log. The most-recent checkpoint record is guaranteed to be in
the logical log on disk.
All address information needed to locate the most-recent checkpoint record
in the logical log is contained in the active PAGE_CKPT page of the root
dbspace reserved pages.
Figure 4-4
Fast recovery,
step 1
Disk B
Fast Recovery: Step 1
Write“before-images”from the physicallogback todisk,returningthe datato
its state as of the most-recent checkpoint.
Disk A
Tblspace Physical log
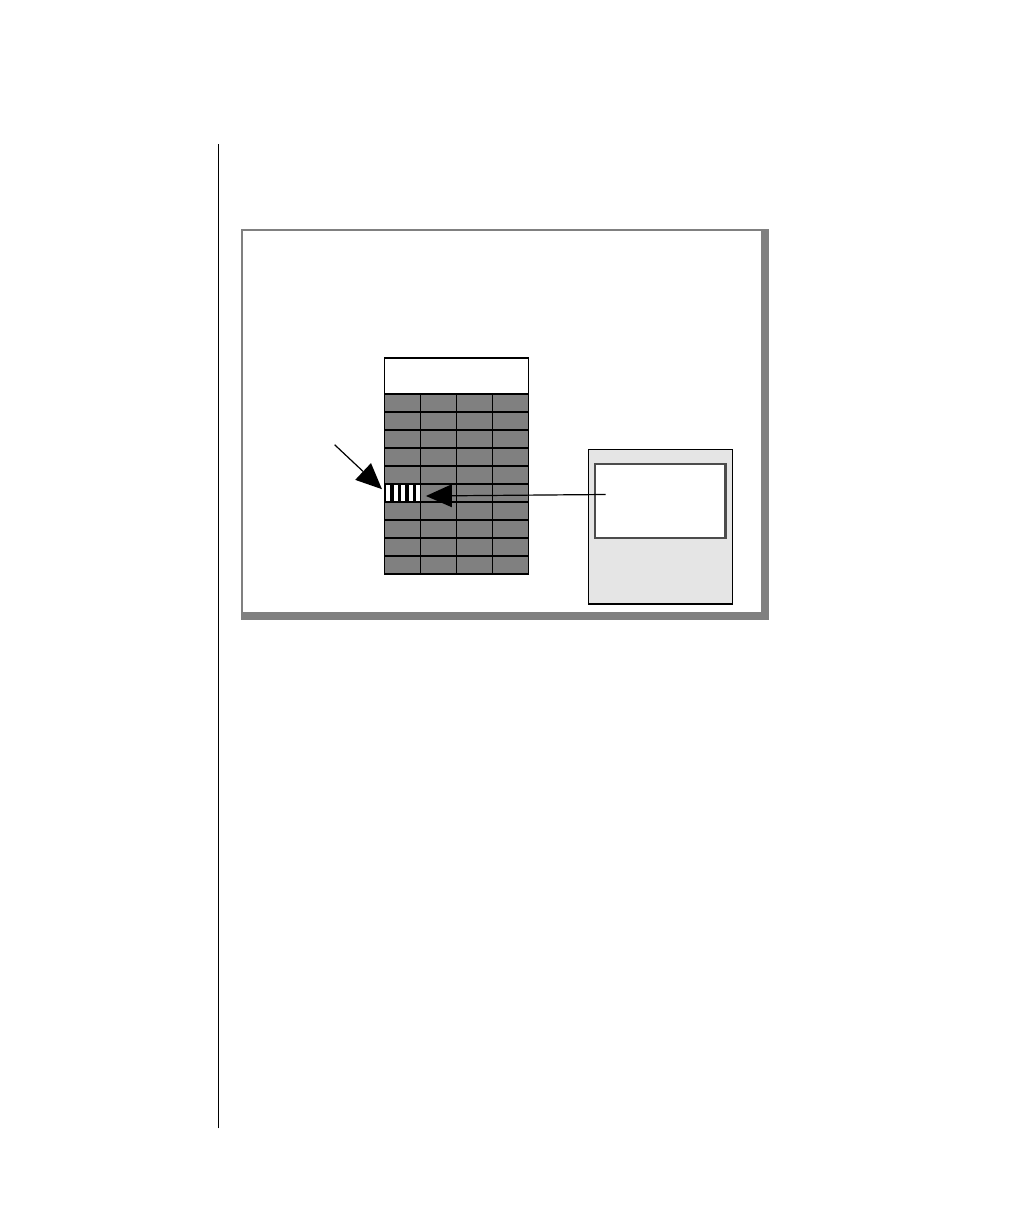
4-42 IBM Informix OnLine Database Server Administrator’s Guide
Step 2: Find Checkpoint Record in Logical Log
Once this information is read, it also identifies the location of all logical log
records written after the most-recent checkpoint. Figure 4-5 illustrates this
step.
Figure 4-5
Fast recovery,
step 2
Fast Recovery: Step 2
Thephysical addressof themost-recent checkpointrecord isstored inthe root
dbspace reserved page, PAGE_CKPT. The checkpoint record is located in the
logical log.
Checkpoint
record
address
Checkpoint record
Logical log
Reserved page
PAGE_CKPT
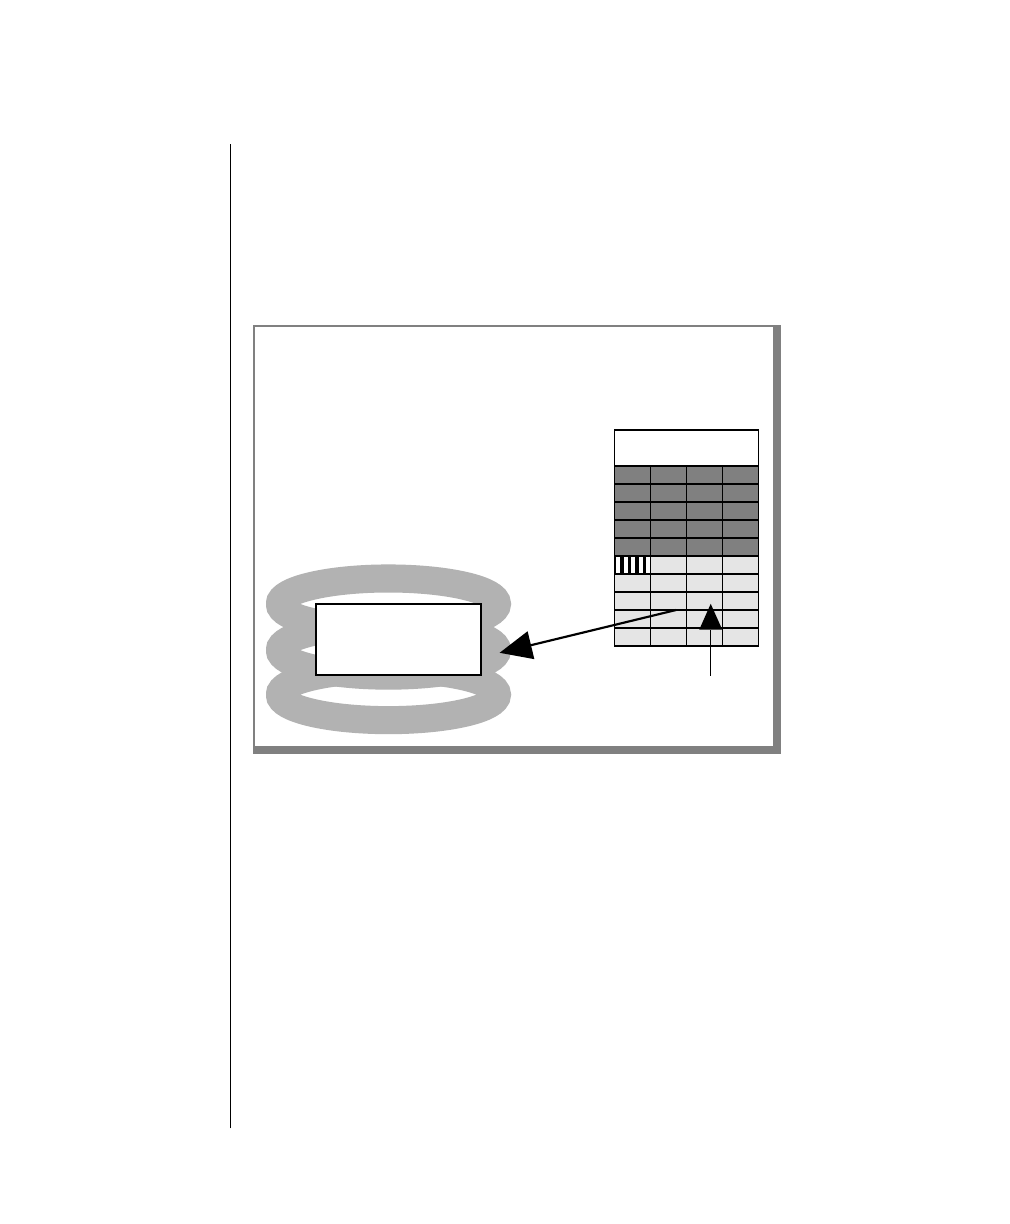
Data Consistency, Recovery, and Migration 4-43
Step 3: Roll Forward Log Records
Step 3: Roll Forward Log Records
The third step in fast recovery is to roll forward the logical log records that
werewrittenafter the most-recentcheckpointrecord. This action reproduces
all changes to the databases since the time of the last checkpoint, up to the
point where the uncontrolled shutdown occurred. Figure 4-6 illustrates this
step.
Figure 4-6
Fast recovery,
step 3
Fast Recovery: Step 3
OnLine rolls forward the logical log records written since the most-recent
checkpoint, reproducing the changes to the database since the checkpoint.
Records since the
checkpoint
Disk A
Logical log
Databasechangessince
the checkpoint rolled
forward
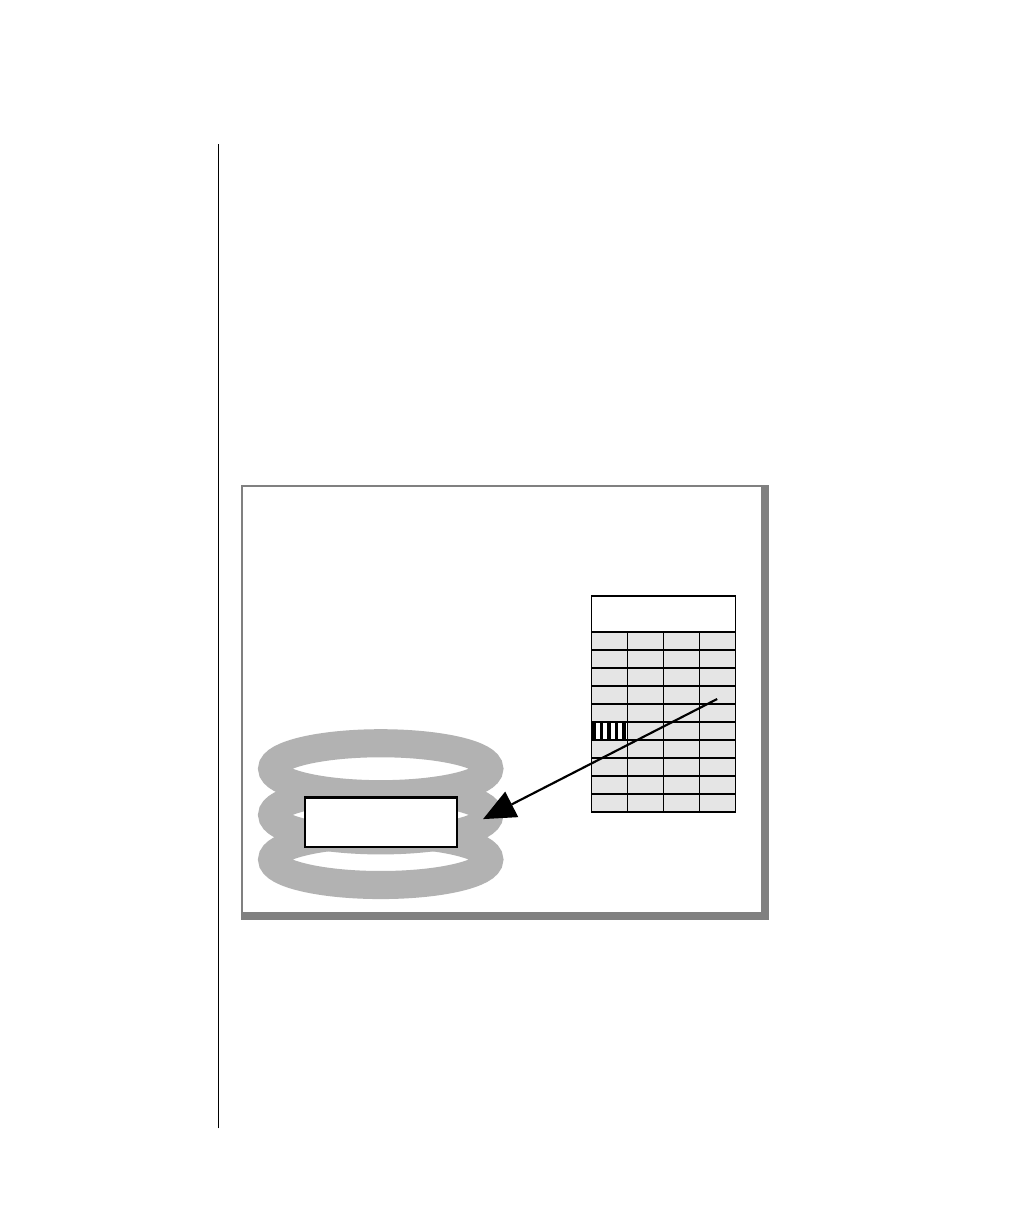
4-44 IBM Informix OnLine Database Server Administrator’s Guide
Step 4: Roll Back Incomplete Transactions
Step 4: Roll Back Incomplete Transactions
The final step in fast recovery is to roll back all logical log records that are
associated with transactions that were not committed (or were rolled back).
This rollback procedure ensures that all databases are left in a consistent
state.
Since it is possible that one or more transactions have spanned several check-
points without being committed, this rollback procedure might read
backwardthroughthelogicallog past the most-recentcheckpointrecord.All
logical log files that contain records for open transactions are available to
OnLinebecausealogis notfreeduntilalltransactions containedwithinitare
closed. Figure 4-7 illustrates the roll-back procedure. When fast recovery is
complete, OnLine goes to quiescent or online mode.
Figure 4-7
Fast recovery,
step 4
Fast Recovery: Step 4
OnLine rolls back all incomplete transactions, ensuring that all databases are
left in a consistent state. Records written earlier than the checkpoint might be
rolled back.
Disk A
Logical log
Uncommittedchanges
rolled back

Data Consistency, Recovery, and Migration 4-45
Data Restore: When Should You Do It?
Data Restore: When Should You Do It?
Three types of situations could occur in an OnLine environment that would
require you, as OnLine administrator, to perform a data restore:
■You want to replace one or more disks.
■Your disk experiences a media failure.
■Your OnLine data experiences extreme corruption.
A data restore re-creates the OnLine system that was in effect at the time of
your most-recent archive, plus any changes that have been backed up to a
logical log tape.
You cannot restore a selected table or database. Since you perform a data
restorefromthecompletesetofarchiveandlogicallogbackuptapes, OnLine
restores the complete contents of those tapes, which include all OnLine
databases.Refertopage 4-45foradescriptionofwhathappensduringadata
restore.
Outlinedbelowarethemainstepsthatarepartofthedatarestoreprocedure.
Following this list, each item is described in greater detail. If you press the
Interrupt key at any time during the restore, you must repeat the entire
procedure.
Steps That Occur During a Data Restore
1. Gather all archive and logical log backup tapes needed for the
restore.
2. Verify that your current shared-memory parameters are set to the
maximum value assigned since the last archive (any level).
3. Verify that your current device (and mirroring) configuration
matches the configuration that was in effect at the time of the last
archive (any level).
4. Verifythatallrawdevicesthathavebeeninusesincethelastarchive
are available.
5. Take OnLine to offline mode.
6. Select the DB-Monitor Archive menu, Restore option or execute
tbtape -r.

4-46 IBM Informix OnLine Database Server Administrator’s Guide
Steps That Occur During a Data Restore
7. Mount the first level-0 archive tape on TAPEDEV.
8. The tbtape process reads reserved page information from the tape
and verifies that the current configuration and the tape are
compatible.
9. Back up any logical log files remaining on the disk, if prompted by
tbtape. Mount tape on LTAPEDEV.
10. The tbtape process reads each page of data from the archive tape(s)
and writes the page to the address contained in header.
11. After the last archive tape is restored, the tbinit daemon process
clears the physical log to prevent fast recovery activity.
12. The tbinit process initializes shared memory.
13. The tbtape process prompts for the logical logs to be rolled forward.
14. Mount the correct tape (as prompted) on LTAPEDEV.
15. Thetbinit processrollsforwardthelogical logs, promptingformore
tapes as required.
16. Aftertherollforwardiscomplete,OnLineremainsinquiescentmode
and tbinit returns control to the administrator at the DB-Monitor
Archive menu.
Data Consistency, Recovery, and Migration 4-47
Gather All Tapes Needed for Restore
Gather All Tapes Needed for Restore
To restore OnLine, you need all archive tapes (level-0, and possibly level-1
and level-2) and the tapes containing the logical log backups since the last
archive. The tapes you need are listed for you when you select the
DB-Monitor Status menu, Archive option. Refer to Figure 4-8 if you are
uncertain about how to determine which archive tapes are needed for a data
restore.
Figure 4-8
How to determine
which archive tapes
are needed for a
data restore
Archive Day
Level-2 2 3 5 6 8 9 11
Level-1 4 7
Level-0 1 10
Incremental Archive Schedule
Day Tapes Needed
1 Tape 1
2 Tapes 1 and 2
3 Tapes 1 and 3
4 Tapes 1 and 4
5 Tapes 1, 4, and 5
6 Tapes 1, 4, and 6
7 Tapes 1 and 7
8 Tapes 1, 7, and 8
9 Tapes 1, 7, and 9
10 Tape 10
11 Tapes 10 and 11
Restore Requirements

4-48 IBM Informix OnLine Database Server Administrator’s Guide
Verify OnLine Configuration
Logicallogs files that remainondiskandwhich have notyet been backed up
can still be included in the restore. As part of the restore procedure, OnLine
prompts you to back up those logical log files to tape, so that they can be
rolled forward after the archive tapes have been restored. (This might not be
true if the disks containing the logs failed.)
Verify OnLine Configuration
During the restore, you cannot reinitialize shared memory, add chunks, or
changetapedevices.Thismeans that when you begin therestore,thecurrent
OnLine configuration must be compatible with, and accommodate, all
parameter values that have been assigned since the time of the most-recent
archive.
For guidance, use the copies of the configuration file that you create at the
time of each archive. However, do not blindly set all current parameters to
the same values as were recorded at the last archive. Pay attention to three
different groups of parameters:
■Shared-memory parameters
■Mirroring configuration parameters
■Device parameters
Verify that your current shared-memory parameters are set to the maximum
value assigned since the level-0 archive. For example, if you decreased the
value of USERS from 45 to 30 sometime since the level-0 archive, you must
begin the restore with USERS set at 45, and not at 30, even though the config-
uration file copy for the last archive might have the value of USERS set at 30.
(If you do not have a record of the maximum value of USERS since the level-
0 archive, set the value as high as you think necessary. You might need to
reassign values to BUFFERS,LOCKS, and TBLSPACES as well, since the
minimumvaluesforthesethreeparametersarebasedonthevalue of USERS.)
Verify that your current mirroring configuration matches the configuration
that was in effect at the time of the last level-0 archive. Since Informix recom-
mends that you create a level-0 archive after each change in your mirroring
configuration, this should not be a problem. The most critical parameters are
the mirroring parameters that appear in the OnLine configuration file,
MIRRORPATH and MIRROROFFSET.

Data Consistency, Recovery, and Migration 4-49
Initiate Data Restore from Offline Mode
Verify that all raw devices that have been in use since the level-0 archive are
available. For example, if you dropped a dbspace or mirroring for a dbspace
sinceyourlevel-0 archive,youmustensurethatthedbspaceor mirrorchunk
device is available to OnLine when you begin the restore. If the tbtape
process attempts to write pages to the chunk as it reads the level-0 archive
page, and cannot find the chunk, the restore will not complete. Similarly, if
you added a chunk since your last archive, you must ensure that the chunk
device is available to OnLine when it begins to roll forward the logical logs.
Initiate Data Restore from Offline Mode
You can only perform the data restore while OnLine is in offline mode.
To initiate a data restore from DB-Monitor, select the Archive menu, Restore
option.
To initiate a data restore from the command line, execute tbtape -r.
Mount Level-0 Archive Tape
Throughout the restore procedure, OnLine provides you with directions
through prompts that appear on the DB-Monitor screen or on the terminal, if
you executed tbtape -r.
The first prompt directs you to mount the level-0 archive tape.
Mount the tape and verify that the tape drive is online. OnLine prompts you
to press RETURN when you are ready to proceed.

4-50 IBM Informix OnLine Database Server Administrator’s Guide
Verify Current Configuration
Verify Current Configuration
As its first task, tbtape reads the root dbspace reserved pages from the first
blockofthetape.Thesepagescontainboththeconfigurationfilevaluesatthe
time of the level-0 archive and a complete listing of all dbspaces and chunks
that were defined at the time. The tbtape process verifies that the current
configurationiscompatible with the configurationinformationcontained on
the tape. As part of the verification, tbtape displays the list of chunks to the
screen. Press F3 or CTRL-B to continue.
The following message appears:
Verifying physical disk space, please wait.
If the two configurations are not compatible (for example, if the value of
USERS onthe tape is45 and thevalue of USERS inthe currentconfiguration is
30), the restore fails and error messages are returned to the user.
Prompt for Logical Log Backup
If tbtape confirms the configuration, it also determines if any logical log files
are available on disk. If so, tbtape prompts you if you want to back up these
logical log files.
You must back up the logical log files to tape to roll them forward after the
archiveportionoftherestoreiscomplete.Ifyou do not back upthefilesnow,
the restore procedure overwrites the log file pages and the data is lost.
Entera Yto indicate that you want to back upany logical log files and mount
a tape on the logical log backup tape device, LTAPEDEV. Verify that the tape
driveisonlineandpressRETURN.Ifnecessary,tbtapepromptsforadditional
tapes.
The tbtape process backs up each logical log file on disk, whether the log file
status is unreleased or backed up (U or U-B). Consequently, this backup
might provide you with an additional copy of a specific logical log file.
This redundancy is harmless and serves as a form of insurance. In any
rollforward, you must have all tapes available, in sequence. Thus, an extra
copy of the tapes gains you a fall-back in case of failure or loss and costs you
only the time of the backup.

Data Consistency, Recovery, and Migration 4-51
Write Each Archive Page to Disk
Write Each Archive Page to Disk
It might be that your configuration defines both TAPEDEV and LTAPEDEV as
the same device. Since this is possible, tbtape prompts for you to mount the
level-0archivetapeandtopressRETURN tocontinuetherestore.Ifyourtape
is already mounted on the archive device, simply press RETURN.
Astherestorebegins,tbtape readseach page ofdatafromthearchivetape(s)
and writes the page to the address contained in the page header.
The tbtape process prompts for additional tapes if the level-0 archive is
contained in more than one volume.
Afterthelevel-0archiveisrestored,tbtapepromptsforadditionallevels.You
must be aware of the archive levels required for your specific restore. If you
donothaveanyotherarchivelevelstorestore,or ifforsomereasonyouwish
to stop at a specific level, respond N to indicate no at the following prompt:
Do you have another level of tape to restore?
Initialize Shared Memory
After the last archive tape is restored, the tbinit process clears the physical
log to prevent fast recovery activity as it initializes shared memory. You will
see the following message:
Initializing, please wait ...
Roll Forward Logical Logs
The tbtape process automatically prompts you to indicate if you want to
restoreanylogicallogs.ThissameprompttellsyouthelogicallogIDnumber
at which the rollforward should begin:
Is there a logical log to restore? (y/n)
Roll forward should start with log number 28
You must relyonyour own tape-labelling system todirectyou to thespecific
tape that contains this logical log file. All logical log files must be rolled
forwardinsequence.Ifthistapeisnotavailable,youcannot rollforwardany
log files.
If you respond with a y, for yes, OnLine prompts you to mount the tape.

4-52 IBM Informix OnLine Database Server Administrator’s Guide
OnLine Is Quiescent
Mount the correct tape on LTAPEDEV. Verify that the tape drive is online and
press RETURN.
If you do not mount the correct tape, tbtape notifies you of the error and
prompts again for the correct tape.
The tbinit process rolls forward the records contained in the logical log
backup tapes.
The tbtape process prompts for new tapes as needed until all the log files are
processed.
OnLine Is Quiescent
After the rollforward is complete, tbinit returns controls at the DB-Monitor
Archive menu or tbtape exits gracefully and returns the system prompt.
OnLine is now in quiescent mode.
Database and Table Migration
The following situations might require you to move a database or selected
data:
■A move from a development environment to a production
environment
■A move to a different hardware platform
■A need to distribute an application to users
■A desire to reorganize the OnLine disk space configuration
■A need to switch to a different database server
OnLine utilities support four migration methods:
■UNLOAD statement /dbschema/LOAD statement
■UNLOAD statement /dbschema/dbload
■dbexport/dbimport
■tbunload/tbload

Data Consistency, Recovery, and Migration 4-53
Database and Table Migration
The correct method for you depends on your processing environment and
whatyouwanttomove(adatabase,selectedtables,orselectedcolumnsfrom
selected tables). The table displayed in Figure 4-9 compares the advantages
and different characteristics of each migration method. The sections that
follow describe and compare each migration method in detail. (Refer to
Chapter 7, “Utilities,” for a complete discussion of each OnLine utility. The
LOAD and UNLOAD statements are documented in the DB-Access User’s
Manual.)
Figure 4-9
Quick comparison of migration methods
UNLOAD/
LOAD UNLOAD/
dbload dbexport/
dbimport tbunload/
tbload
Performance Moderate Moderate Moderate Fast
Ease of use Input must
adhere to
format
You must
build input
file
No initial
requirements No initial
requirements
Flexibility
built into
options
No Yes Yes Yes
Ability to
modify data
schema
Modify the
ASCII file
created by
dbschema
Modify .sql
file No ability to
modify No ability to
modify
Granularity of
data Aportionofa
field up to a
complete
table
A portion of a
field up to a
complete table
Database only Table or
database
Output
destination Must have
enough disk
space for data
Must have
enough disk
space for data
Disk or Tape Tape only

4-54 IBM Informix OnLine Database Server Administrator’s Guide
Description of Migration Methods
Description of Migration Methods
This section provides an overview of how each data migration method
works. Figure 4-10 on page 4-56 illustrates the four migration methods. This
section does not attempt to compare the methods. Comparisons and
contrasts begin on page 4-57.
Refer to Chapter 7, “Utilities,” for a complete discussion of each OnLine
utility. The LOAD and UNLOAD statements are documented the DB-Access
User’s Manual.
UNLOAD/dbschema/LOAD
The DB-Access UNLOAD statement writes the rows retrieved in a SELECT
statement to a delimited ASCII file. A parameter in the UNLOAD statement
enables you to specify a field-delimiting character for the ASCII file. The
UNLOAD statement creates the ASCII input file of migration data.
The database server utility dbschema writes the SQL statements needed to
replicate the specified database or table to an ASCII file. The dbschema
output file can be modified with a system editor or run as is to create the
database or table that will receive the migration data.
The DB-Access LOAD statement inserts data from one or more of the
delimited ASCII input files created by UNLOAD into one or more tables
created from a dbschema output file.
UNLOAD/dbschema/dbload
TheUNLOAD statementanddbschema utilityperformthe same preparation
tasks in this method as described in the preceding paragraph. The database
server utility dbload takes one or more ASCII input files created by UNLOAD
and inserts the data into one or more specified tables created from a
dbschema output file. The dbload utility inserts the data as directed by a
command file that is created by the user. The user can specify additional
instructions at the command line when dbload is executed.

Data Consistency, Recovery, and Migration 4-55
Description of Migration Methods
dbexport/dbimport
The dbexport and dbimport utility pair operates only on databases, not on
tables.
The dbexport utility creates, on disk or on tape, a directory that contains an
ASCII file of data for each table in the specified database. Additionally,
dbexport creates on disk or on tape an ASCII file of SQL data definition
language (DDL) statements and accounting information necessary to re-
create the database on another Informix database server.
The dbimport utility takes input from a directory or from tape. It uses the
ASCII file of data definition statements (referred to as the .sql file) to create
the database. Specific database characteristics can be specified as part of the
dbimport command.
Afterthe database iscreated,dbimport populatesthe database withthe data
contained in the ASCII files stored within the specified directory or on the
tape.
tbunload/tbload
The tbunload utility writes to tape data from the specified database or table
in binary, disk-page units. The tbload utility takes as input a tape created by
the tbunload utility. With just the information contained on the tape, tbload
canre-createthedatabaseorthetable.Becausethedataiswritteninpage-size
units, migration requires that the two machines use the same page size
(specified as BUFFSIZE in the configuration file).
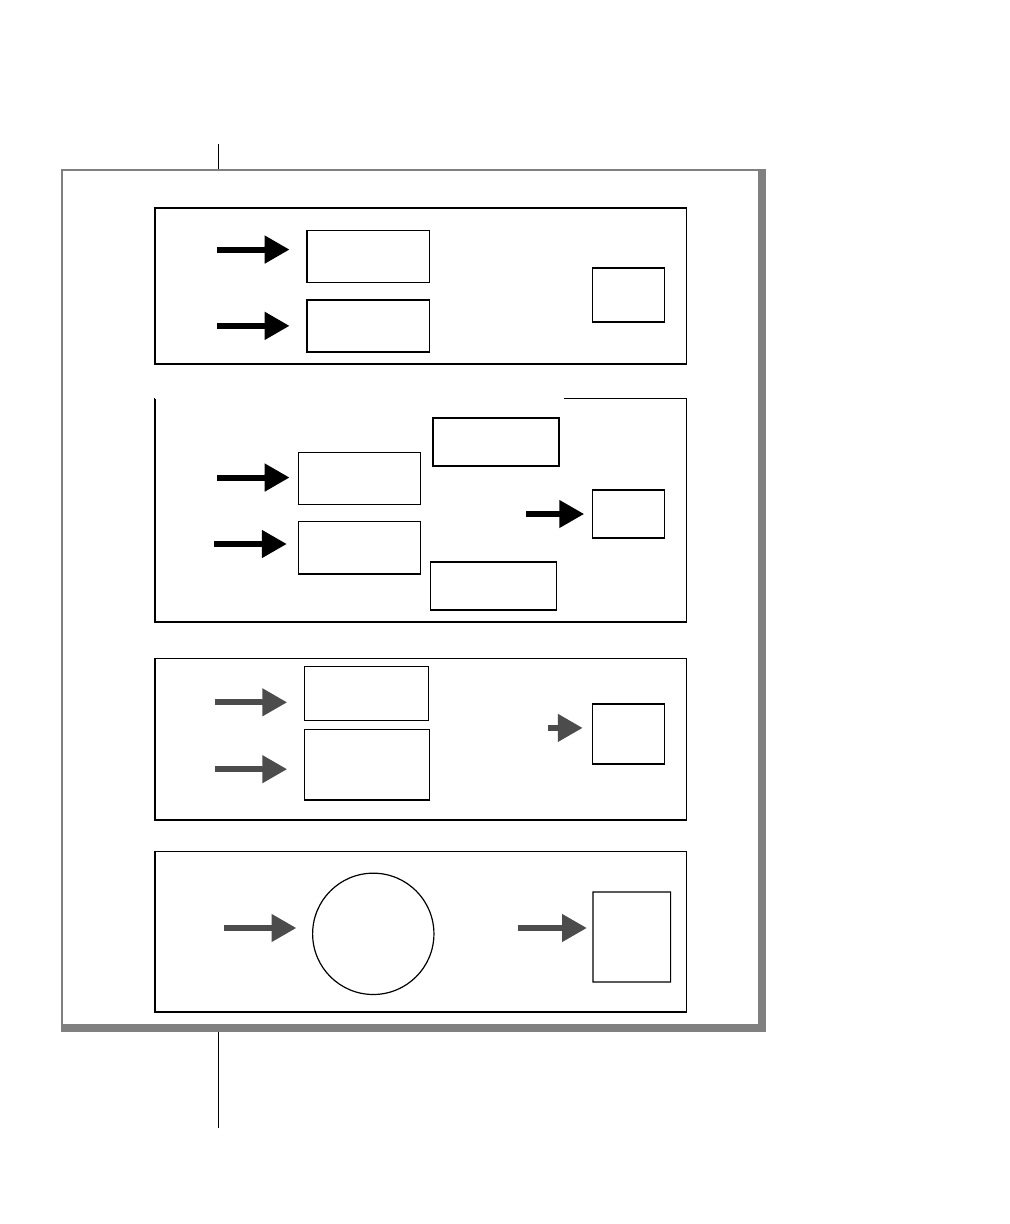
4-56 IBM Informix OnLine Database Server Administrator’s Guide
Description of Migration Methods
Figure 4-10
Description of
migration methods
}
}
}
}
}
}
UNLOAD/dbschema/LOAD
UNLOAD/dbschema/dbload
tbunload/tbload
dbexport/dbimport
.sql file of data
definition
statements
Binary page-
sized units on
tape
Table or
database
data
UNLOAD
dbschema
ASCII data
SQL statements LOAD Dataina
table
ASCII data
UNLOAD
dbschema SQL statements
Command-line
options
Command file
Data in a
table
dbexport ASCII data
dbimport Database
data
tbload
tbunload
dbload
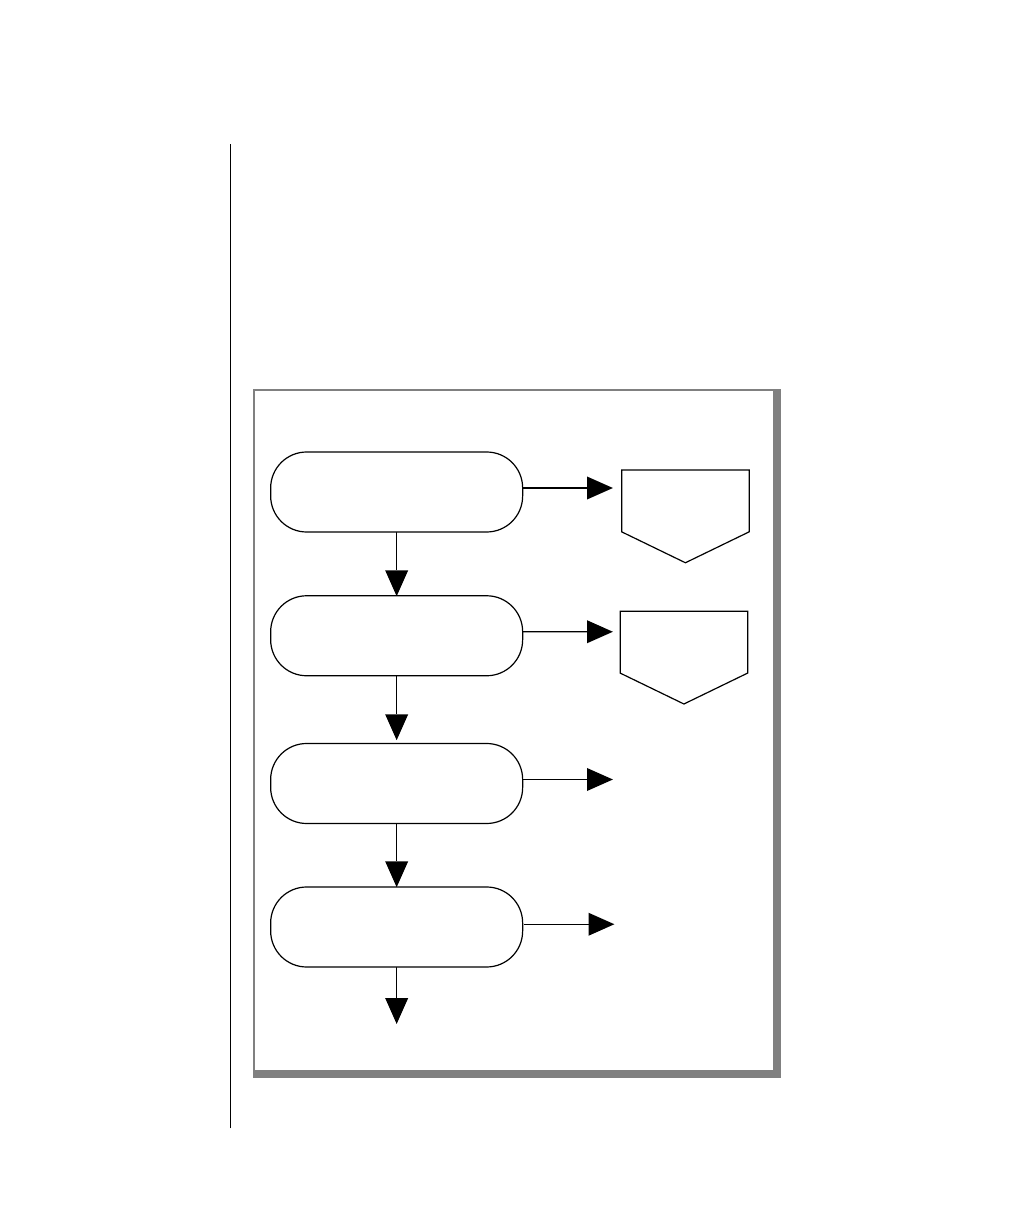
Data Consistency, Recovery, and Migration 4-57
Which Migration Method Is Best for You?
Which Migration Method Is Best for You?
Eachofthemigrationmethodsimposesconstraintsofoneformoranotheron
the user. The decision trees shown in Figure 4-11 through Figure 4-14
summarize the choices among the migration methods.
After you determine which method best suits your needs, refer to Chapter 7,
“Utilities,” for detailed instructions for using each utility. Refer to the
DB-Access User’s Manual for information about the LOAD and UNLOAD
statements.
Figure 4-11
First decision tree
summarizing the
choices among
OnLine migration
methods
Do you want to move data in
database units?
Do you want to keep the current
database schema? See Figure 4-13
Are you moving to another
OnLine? dbexport/ dbimport
Does the host machine have the
same page size?
tbunload/ tbload
See Figure 4-12
Which OnLine migration method is best for you?
dbexport/ dbimport
Yes
Yes
Yes
Yes
No
No
No
No

4-58 IBM Informix OnLine Database Server Administrator’s Guide
Which Migration Method Is Best for You?
Figure 4-12
Second
decision tree
summarizing the
choices among
OnLine migration
methods
You do not want to move data in database units.
Do you want to move the data in
table units?
Do you want to keep the current
table schema?
Use either LOAD
or dbload.
See Figure 4-14.
Use either LOAD
or dbload.
See Figure 4-14.
Are you moving to another OnLine
database server?
Use either LOAD
or dbload.
See Figure 4-14.
Does the host machine have the
same page size? Use either LOAD
or dbload.
See Figure 4-14.
tbunload/ tbload
Yes
Yes
Yes
Yes
No
No
No
No
Data Consistency, Recovery, and Migration 4-59
Which Migration Method Is Best for You?
InthechoicebetweenLOAD ordbload,thetrade-offisease-of-useandspeed
versus flexibility. The advantage of the dbload utility is flexibility. The price
of this flexibility is time spent learning about and creating the dbload
command file. Most users find that if they do not need the flexibility of
dbload, they prefer the LOAD statement for its simplicity. When you use the
LOAD statement to load data from an ASCII file into a table, all you do is run
it. LOAD tends to be much faster than dbload.
When you use the dbload utility, you must create the dbload command file.
The command file maps data from each ASCII input file into fields that are
insertedintospecifictablesinthedatabase.Thecommandfilecan drastically
reorder and rearrange input data as it is entered into the specified table.
In addition, dbload command-line options provide you with these
possibilities:
■Check the syntax of the command-file statements
■Suspend table locking during the insert
■Ignore the first x number of input records from the file
■Force a commit after every x number of records
■Terminate the load after x number of bad records
Figure 4-13
Third
decision tree
summarizing the
choices among
OnLine migration
methods
You want to modify the current database schema.
Do you want to write data directly
to tape? dbexport/dbimport
Use dbexport/dbimport, LOAD, or dbload. To choose between
LOAD and dbload, see Figure 4-14.
No
Yes
4-60 IBM Informix OnLine Database Server Administrator’s Guide
Using UNLOAD with LOAD or dbload
Using UNLOAD with LOAD or dbload
Thissection describes the steps you take when you migratedata using either
of these two methods:
■UNLOAD /dbschema /LOAD
■UNLOAD /dbschema /dbload
Refer to page 4-53 for an overview of each method. Refer to the DB-Access
User’s Manual for instructions and syntax for UNLOAD and LOAD. Refer to
page 7-32 for instructions and syntax for dbschema. Refer to page 7-15 for
instructions and syntax for dbload.
Figure 4-14
Fourth
decision tree
summarizing the
choices among
OnLine migration
methods
How to choose between LOAD and dbload
Do you need to commit any inserts
during the load?
UNLOAD/
dbschema/
LOAD
Is the ASCII input file format
acceptable to LOAD?
UNLOAD/
dbschema/
dbload
Can you use sed, awk, or an
editor to easily reformat the
ASCII input files?
UNLOAD/dbschema/dbload
UNLOAD/
dbschema/
LOAD
No
No
No
Yes
Yes
Yes

Data Consistency, Recovery, and Migration 4-61
Using UNLOAD with LOAD or dbload
Create and Edit the Schema File First
Use dbschema to create a schema file for the database or table that will
receive the data, if it does not yet exist.
After the schema file is created, you can edit the file with a system editor. By
editingtheschemafile,youcanchangeaccessprivileges,object(table,index,
orview)ownership,lockmode,orinitialandnextextentsizes.Otherwise,all
privileges and ownership remain unchanged.
Thedbschemautilitygivesall SERIAL fieldsincludedinCREATE TABLE state-
mentsastarting value of 1.Ifthis is not acceptable,youmust edit the schema
file.
Verify Adequate Disk Space for Data
UsetheUNLOAD statement to unload atableor specific columns inatable to
one or more ASCII files.
You specify the output filename for each ASCII file as part of the UNLOAD
statement syntax. Ensure that adequate disk space is available to store the
ASCII files. Otherwise, an error is returned.
Move Files
Move the ASCII input files and the schema file to the new host machine (or
to the new directory if you are exporting to an IBM Informix SE database
server).
Create the New Database or Tables
If the new database or table does not yet exist, create it.
To create a database, either run the schema file or execute the CREATE
DATABASE statement. To create a table, either run the schema file or execute
the CREATE TABLE statement.
Users might need to modify their DBPATH environment variable setting to
reflect the new database location.

4-62 IBM Informix OnLine Database Server Administrator’s Guide
Using dbexport and dbimport
Use LOAD or dbload to Populate the Tables
If you plan to use the LOAD statement to load data from an ASCII file into a
table, load the data now.
Ifyouplantousethedbloadutilitytoloaddata,refertopage 7-21forexplicit
instructions for creating the command file and loading the data.
Using dbexport and dbimport
This section describes the steps you take when you migrate data using the
dbexport and dbimport utilities.
Refer to page 4-53 for an overview of this method. Refer to page 7-5 for
instructions and syntax for dbexport. Refer to page 7-10 for instructions and
syntax for dbimport.
To run dbexport, you must be logged in as user informix or have DBA
privileges.
During the data export, OnLine attempts to lock the database in Exclusive
mode. If the lock can be obtained, users are unable to access data. If the lock
cannot be obtained, the program ends with a diagnostic message.
When you execute the dbexport command to export data from a database,
you specify the destination of the data and the .sql file of data definition
statements. You have the following options:
■Write both data files and .sql file on tape.
■Write both data files and .sql file on disk.
■Write data files on tape and .sql file on disk.
These options enable you to place the .sql file on disk where it can be easily
edited if you wish to modify the SQL data definition statements that define
the database.

Data Consistency, Recovery, and Migration 4-63
Using tbunload and tbload
The.sql filedoes not containalltable information available fromtheexisting
database. You can modify the .sql file to add the following information:
■Initial and next extent values for a table (the default value of eight
pages is used)
■Lockmodeforatable(thedefaultvalueofpage-levellockingisused)
■Dbspace where a table should reside
■Blobspace where a blob column should reside
If you export a database that stores blobs in a blobspace, you must edit the
.sql file to include the blobspace name in the CREATE TABLE statement.
Run dbimport when you are ready to re-create and populate the exported
databases. (During the import, page-level locking is used unless otherwise
specified in the .sql file.)
The dbimport command-line options enable you to do these things:
■Turn logging on for the imported database.
■Specify the new database to be created as ANSI-compliant.
■Specify the dbspace where the database is to be created.
Using tbunload and tbload
This section describes how you migrate data using the tbunload and tbload
utilities.
Refer to page 4-53 for an overview of this method. Refer to page 7-107 for
instructions and syntax for tbunload. Refer to page 7-47 for instructions and
syntax for tbload.
To run tbunload or tbload, you must be logged in as user informix or have
DBA privileges. You must run both utilities from the current host machine.

4-64 IBM Informix OnLine Database Server Administrator’s Guide
Using tbunload and tbload
tbunload
The tbunload utility can unload data more quickly than either dbexport or
theUNLOADcommandbecauseitcopiesthedatainbinaryandinpage-sized
units. However, this places some constraints on its use:
■tbunload writes data to tape only.
■You must load the tape written bytbunload ontoamachinewiththe
same page size as the original machine.
■You mustload the data on the tbunload tape into a databaseor table
managed by OnLine.
■When you unload a complete database, ownership of all database
objects (such as tables, indexes, and views) cannot be modified until
after the database is unloaded.
■tbunload unloads page images. If you load the pages to another
machinethatstoresnumericdatatypesdifferentlythanyourcurrent
machine (for example, with the most significant byte last instead of
first), the contents of the data page could be misinterpreted.
■tbunload does not carry over access privileges or synonyms that
were defined on the original tables.
tbload
The tbload utility performs faster than the dbimport,dbload, or LOAD
options. In exchange for this higher performance, the following five
constraints exist:
■tbload can only create a new database or table; you must drop or
renameanexistingdatabaseor table of thesame name beforetbload
is run. (tbload prompts you to rename blobspaces during execution,
if desired.)
■tbload locks the database or table exclusively during the load.
■When you load a complete database, the user executing tbload
becomes the owner of the database.

Data Consistency, Recovery, and Migration 4-65
Migrating Data from OnLine to SE
■tbload createsadatabase without logging;you must initiate logging
after the database is loaded, either through DB-Monitor or with the
tbtape utility.
■When you use tbload to load a table into a logged database, you
must turn logging off for the database during the operation.
Migrating Data from OnLine to SE
This section describes the information you need if you are migrating an
OnLine database to an IBM Informix SE database server.
Usethedbexportutilitytopreparethedata.Refertopage 7-5forinstructions
and syntax for dbexport. Refer to page 4-53 for an overview of the
dbexport/dbimport utility pair.
Use a system editor to remove the following OnLine specifics from CREATE
TABLE statements included in the .sql file created by dbexport:
■Initial and next extent sizes
■Dbspace and blobspace names
■Lock modes
■VARCHAR,BYTE, and TEXT columns
Refer to the IBM Informix SE Administrator’s Guide for detailed instructions
about using dbimport to migrate the prepared OnLine data. After you
successfully migrate the data to IBM Informix SE, ensure that the application
developers are aware of the differences between OnLine and IBM Informix
SE.
Three SQL statements contain syntax that only OnLine recognizes:
■SET CONSTRAINTS statement
■SET ISOLATION statement
■SET LOG statement
Three SQL statements contain extensions that only OnLine recognizes:
■ALTER TABLE
■CREATE DATABASE
■CREATE TABLE

4-66 IBM Informix OnLine Database Server Administrator’s Guide
Migrating Data from SE to OnLine
Formoreinformationaboutthedifferencesbetweenthetwodatabaseservers
and their interpretation of SQL, refer to IBM Informix Guide to SQL: Reference.
Migrating Data from SE to OnLine
This section describes the information you need if you are migrating an
IBM Informix SE database to an OnLine database server.
Use the IBM Informix SE dbexport utility to prepare the data and the OnLine
dbimport utility to load the data. Refer to the IBM Informix SE Administrator’s
Guide for further information about preparing the data for migration to
OnLine.Refertopage 4-53foranoverviewofthedbexport/dbimportutility
pair.
Before you execute dbimport, you might wish to edit the .sql file created by
dbexport to include OnLine information.
The .sql file does not contain the following table information that you might
wish to specify for your OnLine databases and tables:
■Database logging modes
■Initial and next extent values for a table (the default value of eight
pages is used)
■Lockmodeforatable(thedefaultvalueofpage-levellockingisused)
■Blobspace where TEXT or BYTE data types should reside
■Dbspace where the tables should reside
Run dbimport when you are ready to re-create and populate the exported
databases. (During the import, page-level locking is used unless otherwise
specified in the .sql file.)
The dbimport command-line options enable you to do these things:
■Turn logging on for the imported database.
■Specify the new database to be created as ANSI-compliant.
■Specify the dbspace where the database is to be created.
After you successfully migrate the database to OnLine, ensure that the appli-
cation developers are aware of the differences between OnLine and
IBM Informix SE.

Formoreinformationaboutthedifferencesbetweenthetwodatabaseservers
and their interpretation of SQL, refer to IBM Informix Guide to SQL: Reference.

4-68 IBM Informix OnLine Database Server Administrator’s Guide
Migrating Data from SE to OnLine

5
Chapter
How to Improve Performance
In This Chapter .................... 5-3
Disk Layout ..................... 5-4
Optimize Blobspace Blobpage Size ............. 5-5
tbcheck -pB and tbcheck -pe Utility Commands ....... 5-5
Blobpage Average Fullness............... 5-7
Apply Effective Criteria ................ 5-8
Eliminate User-Created Resource Bottlenecks.......... 5-8
When Is Tuning Needed?................. 5-10
% Cached Fields .................. 5-10
ovtbls, ovlock, ovuser, and ovbuff Fields .......... 5-11
Bufsize Pages/IO Fields................ 5-11
Shared-Memory Buffers ................. 5-13
When Is Tuning Necessary? .............. 5-13
How Is Tuning Done? ................ 5-13
Shared-Memory Resources ................ 5-14
When Is Tuning Necessary? .............. 5-14
How Is Tuning Done? ................ 5-15
Log Buffer Size .................... 5-15
Logging Status ................... 5-15
How Is Tuning Done? ................ 5-16
Page-Cleaner Parameters................. 5-17
Efficient Page Cleaning ................ 5-17
How Is Tuning Done? ................ 5-19

5-2 IBM Informix OnLine Database Server Administrator’s Guide
Checkpoint Frequency.................. 5-20
Performance Tradeoffs ................ 5-20
How Is Tuning Done?................. 5-21
Psort Parallel-Process Sorting Package ............ 5-22
How Psort Works .................. 5-22
Tuning Psort .................... 5-23
Psort and Shared Memory ............... 5-24
SPINCNT Configuration Parameter ............. 5-24

How to Improve Performance 5-3
In This Chapter
With each OnLine release, Informix engineers incorporate new code that
increases processing efficiency, reduces overhead, and improves perfor-
mance. This effort to tune the OnLine code has two consequences for you:
■The OnLine database server runs faster.
■OnLine administration requires less performance tuning.
The information in this chapter assumes that your application has been
writtenas efficientlyas possible. (Referto IBM Informix Guideto SQL: Tutorial.)
Performance gains from tuning are not dramatic, since code enhancements
have built performance gains directly into the IBM Informix OnLine product.
However, incremental benefits can be realized with careful adjustments
tailored to your specific environment.
InthisOnLinerelease,yougainthegreatestimprovementsinperformanceif
you focus your attention on managing disk space layout and eliminating
problems that are unintentionally created by users. The guidelines that you
should follow are clear-cut and easy to apply, regardless of your application
design. Three topics fall into this first tier of performance issues:
■Placing databases, tables, and logs on disk (page 5-4)
■Optimizing blobspace blobpage size (page 5-5)
■Eliminating user-created resource bottlenecks (page 5-8)
The second tier of performance improvements falls into the more abstract
category of performance tuning. Tuning guidelines vary, depending both on
your hardware and your application. Trade-offs arise that you alone can
evaluate, based on your environment. Informix can describe the reasons for
the trade-offs and the possible advantages of different tunings; however, it
remains your responsibility to consider the needs and desires of your users
and to select the correct approach.

5-4 IBM Informix OnLine Database Server Administrator’s Guide
Disk Layout
Performance-tuning issues are addressed as six topics in this chapter:
■When is tuning needed? (page 5-10)
■Shared-memory buffers (page 5-13)
■Shared-memory resources (page 5-14)
■Log buffer size (page 5-15)
■Page-cleaner parameters (page 5-17)
■Checkpoint frequency (page 5-20)
IfyouarerunningOnLineonamultiprocessormachine,twomultiprocessor-
specific features are available:
■Psort parallel-process sorting package (page 5-22)
■SPINCNT configuration parameter (page 5-24)
Disk Layout
PossiblythegreatestgainsinOnLine performance accrue fromstrategic disk
layout. It is not a simple matter to correct improper or poorly planned disk
layout after you have configured and initialized OnLine disk space. For this
reason, disk layout issues are addressed in Chapter 1 as part of your initial
configuration planning. Each time that you create a blobspace or dbspace,
you should review the basic principles described on page 1-43.
OnLine has an improved method of constructing indexes. Data is sorted
beforetheindexisbuilt.Thesortusesspacein/tmp(alltemporarytablesand
indexesarebuildinthe rootdbspace).The use of /tmp decreasesastheindex
is built so that, as the index grows, the need for sort space decreases.
You can improveperformancebystrategicplacement of the UNIX directories
thatOnLineusesforitsintermediate,sortwrites.Youcandefinethedirectory
that should be used for this purpose by defining the environment variable
DBTEMP. If DBTEMP is not set, OnLine uses the /tmp directory.

How to Improve Performance 5-5
Optimize Blobspace Blobpage Size
Optimize Blobspace Blobpage Size
Familiarize yourself with the OnLine approach to blobspace blob storage
before you begin this section. Refer to page 2-148 and page 2-149 for
background information.
When you are evaluating blobspace storage strategy, you can measure
efficiency by two criteria:
■Blobpage fullness
■Blobpages required per blob
Blobpage fullness refers to the amount of data within each blobpage. Blobs
stored in a blobspace cannot share blobpages. Therefore, if a single blob
requires only 20 percent of a blobpage, the remaining 80 percent of the page
isunavailableforuse.However,youwanttoavoidmakingtheblobpagestoo
small. When several blobpages are needed to store each blob, you can
increase the overhead cost of storage. For example, more locks are required
for updates since a lock must be acquired for each blobpage.
tbcheck -pB and tbcheck -pe Utility Commands
To help you determine theoptimalblobpagesizefor each blobspace, use two
OnLine utility commands: tbcheck -pB and tbcheck -pe.
The tbcheck -pB command lists the following statistics for each table (or
database):
■The number of blobpages used by the table (or database) in each
blobspace
■The average fullness of the blobpages used by each blob stored as
part of the table (or database)
The tbcheck -pe command can provide background information about the
blobs stored in a blobspace:
■Complete ownership information (displayed as database:owner.table)
for each table that has data stored in the blobspace chunk.
■The number of OnLine pages used by each table to store its
associated blob data.

5-6 IBM Informix OnLine Database Server Administrator’s Guide
tbcheck -pB and tbcheck -pe Utility Commands
Refer to page 7-38 for tbcheck -pB and tbcheck -pe syntax information.
The tbcheck -pB command displays statistics that describe the average
fullnessofblobpages.Thesestatisticsprovideameasureofstorageefficiency
for individual blobs in a database or table. If you find that the statistics for a
significantnumberofblobsshowalowpercentageoffullness,OnLinemight
benefit from resizing the blobpage in the blobspace.
The following example retrieves storage information for all blobs stored in
the table sriram.catalog in the stores5 database:
tbcheck -pB stores5:sriram.catalog
Figure 5-1 shows the output of this command.
Space Name is the name of the blobspace that contains one or more blobs
stored as part of the table (or database).
Page Number is the starting address in the blobspace of a specific blob.
Pages is the number of OnLine pages required to store this blob.
Percent Full is a measure of the average fullness of all the blobpages that
hold this blob.
Page Size is the size in bytes of the blobpage for this blobspace. (Blobpage
size is always a multiple of the OnLine page size.)
Figure 5-1
Blobspace
usage
report
from
tbcheck -pB
BLOBSpace Report for stores5:sriram.catalog
Total pages used by table 7
BLOBSpace usage:
Space Page Percent Full
Name Number Pages 0-25% 26-50% 51-75% 76-100%
------------------------------------------------------------------
blobPIC 0x300080 1 x
blobPIC 0x300082 2 x
------
Page Size is 6144 3
bspc1 0x2000b2 2 x
bspc1 0x2000b6 2 x
------
Page Size is 2048 4

How to Improve Performance 5-7
Blobpage Average Fullness
The example output indicates that four blobs are stored as part of the table
sriram.catalog. Two blobs are stored in the blobspace blobPIC in 6144-byte
blobpages. Two more blobs are stored in the blobspace bspc1 in 2048-byte
blobpages.
The summary information that appears at the top of the display, Total
pages used by table, is a simple total of the blobpages needed to store
blobs. The total says nothing about the size of the blobpages used, the
number of blobs stored, or the total number of bytes stored.
The efficiency information displayed under the Percent Full heading is
imprecise, but it can alert an administrator to trends in blob storage. To
understand how the fullness statistics can improve your blob storage
strategy, it is helpful to use the example in Figure 5-1 to explain the idea of
average fullness.
Blobpage Average Fullness
The first blob listed in Figure 5-1 is stored in blobPIC and requires one 6144-
byte blobpage. The blobpage is 51 to 75 percent full, meaning that the
minimum blob size must be greater than 50 percent of 6144 bytes, or 3072
bytes.Themaximumsize of this blob mustbelessthanor equal to 75 percent
of 6144 bytes, or 4508 bytes.
The second blob listed under blobspace blobPIC requires two 6144-byte
blobpages for storage, or a total of 12,288 bytes. The average fullness of all
allocated blobpages is 51 to 75 percent. Therefore, the minimum size of the
blob must be greater than 50 percent of 12,288 bytes, or 6144 bytes. The
maximum size of the blob must be less than or equal to 75 percent of 12,288
bytes, or 9216 bytes. Notice that average fullness does not mean that each
page is 51 to 75 percent full. A calculation would yield 51 to 75 percent
average fullness for two blobpages where the first blobpage is 100 percent
full and the second blobpage is 2 percent full.
Next, consider the two blobs in blobspace bspc1. These two blobs appear to
be nearly the same size. Both blobs require two 2048-byte blobpages and the
average fullness for each is 76 to 100 percent. The minimum size for these
blobs must be greater than 75 percent of the allocated blobpages, or 3072
bytes. The maximum size for each blob is slightly less than 4096 bytes
(allowing for overhead).

5-8 IBM Informix OnLine Database Server Administrator’s Guide
Apply Effective Criteria
Apply Effective Criteria
Looking at the efficiency information for blobspace bspc1 in Figure 5-1, an
administrator might decide that a better blob-storage strategy would be to
doubletheblobpagesizefrom2048bytesto4096bytes.(Recallthatblobpage
size is always a multiple of the OnLine page size.) If the administrator made
this change, the measure of page fullness would remain the same but the
number of locks needed during a blob update or modification would be
reduced by half.
The efficiency information for blobspace blobPIC reveals no obvious
suggestion for improvement. The two blobs in blobPIC differ greatly in size
and there is no optimal storage strategy. In general, blobs of similar size can
be stored more efficiently than blobs of different sizes.
Eliminate User-Created Resource Bottlenecks
OnLine manages limited resources such as locks, latches, buffers, and log
space. Users can adversely affect OnLine performance by inadvertently
creating resource bottlenecks in an otherwise efficiently tuned OnLine
system. (You can monitor the shared-memory resources being held by user
processes by executing tbstat -u. Refer to page 3-86 or page page 7-99.)
KnowledgeableusersareabletoavoidactivitiesthatcanslowOnLineperfor-
mancefor everyone. Asadministrator, you shouldencourage users to follow
these four guidelines:
■Do not leave a transaction open without committing or rolling back within
a reasonable period of time.
Ifauserleavesatransactionopen, theresourcesheldbythedatabase
serverprocessareunavailabletootherusers.Inaddition,ifthetrans-
action is left open for an extended period, this user action can
become responsible for a long transaction error.
■Do not stop a process using job control unless you are certain you can
terminate the job.
Astopped job does not releaseresourcesheld by thedatabase server
process. These resources might remain unavailable to other users. If
an application process is stopped while OnLine is engaged in data-
base activity on its behalf, serious concurrency delays can result.

How to Improve Performance 5-9
Eliminate User-Created Resource Bottlenecks
■Do not perform mass updates on frequently accessed tables.
During an update, the row must be locked. Mass updates to a table
are best performed with table-level locking to reduce locking over-
head.However,requestinganupdatewithtable-levellockingdenies
accesstothetabletoallusersexceptthoseusingDirtyReadisolation.
Users should balance their desire to perform a large transaction
against the effect their work has on concurrency. Mass updates
should always be timed for less active times. If the update must
occur while other users need access to the table, row-level locking is
appropriate.Table-levellockingis only appropriateifthetableisnot
needed by other users during the transaction.
■Consider the access problems that might result before you specify a
restrictive isolation level in an application.
Users should be aware that the isolation or locking level that they
select for their processing can affect other users. Isolation and lock-
ing levels should be selected to be consistent with the concurrency
needs of the complete OnLine environment.

5-10 IBM Informix OnLine Database Server Administrator’s Guide
When Is Tuning Needed?
When Is Tuning Needed?
As administrator, attempt to follow as closely as possible the guidelines for
disk layout, blobpage sizing, and user education. As part of your daily
routine, monitor OnLine activity to become familiar with what can be
considered normal operation. (Refer to page 3-83.) In the course of your
monitoring, pay particular attention to several fields that could indicate a
need for tuning. The field values that might indicate a need for tuning are
listed here, along with a cross-reference to direct you to the appropriate
tuning discussion in this chapter.
% Cached Fields
Use the fields that report read- and write-caching percentages to indicate a
possible need for tuning.
■The cached-read percentage refers to the number of reads done from
memory compared to the number of reads done from disk.
■The cached-write percentage refers to the percentage of writes that are
performed to the shared-memory buffer compared to the number of
writes to disk.
These caching percentages are reported by the DB-Monitor Status menu,
Profile option or as part of the tbstat -p or tbstat -P output: %cached is the
cached percentage. The %cached field appears twice in both the DB-Monitor
and tbstat display.
IfyouuseDB-Monitor,thecached-readpercentageisthethirdfieldonthetop
rowofstatistics.The cached-write percentageisthe left-most fieldon the top
row, which is also labelled %cached.
If you use tbstat -p or tbstat -P, the cached-read percentage is the first occur-
rence of the field %cached. The cached-write percentage is the second
occurrence of the field %cached.
If the cached-read percentage is less than 95 percent or the cached-write
percentage is less than 82 percent, you might want to consider retuning.
Refer to page 5-13 for more details about using these fields to adjust the
number of shared-memory buffers.

How to Improve Performance 5-11
ovtbls, ovlock, ovuser, and ovbuff Fields
Refer to page 5-17 for more details about using these fields to modify the
values of the page-cleaner parameters.
ovtbls, ovlock, ovuser, and ovbuff Fields
Usethefieldsthatreportunmet database server requestsforshared-memory
resources to indicate a possible need for tuning. The unmet requests are
reported by the DB-Monitor Status menu, Profile option or as part of the
tbstat -p or tbstat -P output:
The tbstat output contains a fourth field that reports on unmet requests:
If the value in the ovtbls,ovlock, or ovuser field is positive, refer to
page 5-14 for a discussion of tuning guidelines. If the value in the ovbuff
field is positive, refer to page 5-13.
Bufsize Pages/IO Fields
Use the fields that report the size of the physical and logical log buffers and
the fields that report the number of pages written from the buffer to disk to
indicate a possible need for tuning.
ovtbls is the number of times that an OnLine user process tried to
acquire an entry in the tblspaces table when none was
available. That is, the TBLSPACE limit defined in the configu-
ration file was reached.
ovlock is the number of times that an OnLine user process tried to
acquire an entry in the lock table when none was available.
That is, the LOCKS limit defined in the configuration file was
reached.
ovuser is the number of times that an OnLine user process tried to
acquire an entry in the users table when none was available.
That is, the USERS limit defined in the configuration file was
reached.
ovbuff is the number of times that an OnLine user process tried to
acquire a shared-memory buffer when none was available.

5-12 IBM Informix OnLine Database Server Administrator’s Guide
Bufsize Pages/IO Fields
Buffer size and the amount of I/O per write are reported by the DB-Monitor
Status menu, Logs option or as part of the tbstat -l or tbstat -p output:
If the physical log value of Pages/IO is less than 90 percent of the value of
Bufsize, you might be able to improve performance by adjusting the buffer
size. Refer to page 5-15 for more information.
Bufsize is the size of the physical or logical log buffer. The Bufsize
field appears twice in the display: once for the physical log
buffer and once for the logical log buffer.
Pages/IO is the number of pages, on average, that are written to disk
with each I/O operation. The Pages/IO field also appears
twice in the display: once for writes to the physical log and
once for writes to the logical log.

How to Improve Performance 5-13
Shared-Memory Buffers
Shared-Memory Buffers
In general, you want to allocate shared-memory buffers to OnLine until you
no longer see an improvement in performance. However, shared memory is
rarely an unlimited resource. You must always weigh the positive effect of
increasing OnLine shared memory against negative effects that might be
experienced by other applications running on your host machine.
When Is Tuning Necessary?
Look at the cached-read and cached-write percentages for OnLine. (Refer to
page 5-10.) Ideally, the cached-read percentage should be greater than 95
percent and the cached-write percentage should be greater than 82 percent.
The tbstat -p or tbstat -P display also includes a field labelled ovbuff, which
refers to “over buffers,” meaning the number of times that OnLine database
server processes tried to acquire a buffer when none was available. A low
positivenumberinthisfieldmight notnecessarilyindicateaneedfortuning.
A high value is more indicative of a need for more buffers. If the value of
ovbuff exceeds 50 or 60 within a 24-hour period, begin to monitor the field
over a fixed time interval. (Use tbstat -z to set all profile statistics to 0.) If it
appears that OnLine requests consistently exceed the BUFFERS value, you
should attempt to tune your configuration.
How Is Tuning Done?
You might be able to increase the cached percentages, up to a point, by
increasingthenumberofshared-memorybuffers,specifiedasBUFFERSinthe
configuration file. If OnLine was unable to defer writes to disk because of an
insufficientnumberofbuffers,youshouldseeanincreaseinthecached-write
percentage after you increase the number of buffers. If OnLine is forced to
readpagesfromdiskbecauseof an insufficientnumberofbuffers,increasing
the value of BUFFERS should improve the cached-read percentage.
If you do not see an increase in caching after you increase the value of
BUFFERS, or if the increase is nominal, then the number of buffers allocated
might be considered adequate for your application. There is no benefit from
overallocating shared-memory buffers.

5-14 IBM Informix OnLine Database Server Administrator’s Guide
Shared-Memory Resources
Important: Low caching percentages might reflect improperly tuned page-cleaning
parameters. If increasing the value of BUFFERS does not increase the caching
percentages, refer to page 5-17.
Refer to page 3-92 for more details about how to change the value of
BUFFERS.
Shared-Memory Resources
Ifdatabaseserverprocessesarewaitingforalimitednumbershared-memory
resources, you can improve performance by allocating more of the needed
resource. You can eliminate waiting for an entry in the locks, tblspaces, or
users table by increasing the value of TBLSPACES,LOCKS, or USERS in the
configuration file. However, each increase also increases the size of shared
memory, which is rarely an unlimited resource. You must always weigh the
positive effect of increasing OnLine shared memory against any negative
effectsthatmight be experiencedby other applications running on your host
machine.
When Is Tuning Necessary?
Look at the profile of OnLine activity. A low positive number in any one of
the three fields ovtbls,ovlock, or ovuser does not necessarily indicate a
need for tuning. A high value is more indicative of a need for more buffers.
If the value of ovbuff exceeds 50 or 60 within a 24-hour period, begin to
monitor the field over fixed time intervals. (Use tbstat -z to set all profile
statistics to 0.) If it appears that OnLine requests consistently exceed the
BUFFERS value, you should attempt to tune your configuration.

How to Improve Performance 5-15
How Is Tuning Done?
How Is Tuning Done?
You can increase the number of shared-memory resources by increasing the
valueofTBLSPACES,LOCKS,orUSERSintheconfigurationfile.Ifyouincrease
thevalue of USERS, you mightneed toalso increase the valueof TBLSPACES,
LOCKS, and BUFFERS, since the minimum values for all three of these param-
eters are based on the value of USERS. For further information about how to
change the value of these parameters, refer to the following pages:
TBLSPACES,page 3-113; LOCKS,page 3-112; and USERS,page 3-114.
Log Buffer Size
The optimal size for the physical and logical log buffers depends on your
environment. In general, the log buffers should be large enough to minimize
physical I/O writing to the logs on disk. However, the buffers should not be
so large that you have allocated shared-memory space that could be used
more efficiently for some other purpose.
Asecond consideration isthe amount ofdata that isheld in volatilememory.
This is a concern only if you are using buffered logging. The larger the log
buffer, the more log data that can be lost in the event of operating system
failure.Logdatathat is lost cannot beused during fast recovery.Therefore,if
several COMMIT records are left in the logical log buffer (database uses
buffered logging) and lost, you cannot recover these transactions after a
failure. Thus, if any of your OnLine databases use buffered logging, you
should weigh the benefits of increased buffer size against the disadvantages
of possible data loss in the event of operating system failure.
(The following paragraphs rely on information presented on page 5-11 that
explains the Bufsize and Pages/IO fields and how to interpret their values.)
Logging Status
An additional consideration in the decision to resize the logical log buffer is
the complication of the database logging status. The logging status of the
database affects the logical log Pages/IO value. If a database uses unbuf-
fered logging, the Pages/IO value is close to 1. If a database uses buffered
logging, the Pages/IO value should be very close to the value of Bufsize.

5-16 IBM Informix OnLine Database Server Administrator’s Guide
How Is Tuning Done?
How Is Tuning Done?
If the value of Pages/IO is 75 percent or more of Bufsize, each write to the
disk is, on average, deferred until the buffer is almost full. (Since the value of
Pages/IO is an average, some writes might be closer to 100 percent of the
buffer. The logging status affects this value; see the preceding paragraph.)
Inthiscase,you can try to furtherimprovebufferefficiencybyincreasingthe
size of the buffer to accommodate more data before each write.
If the value of Pages/IO is less than 75 percent of Bufsize, writes to the disk
occur,onaverage,long beforethebufferisfully used.Inthiscase,youcantry
to improve buffer efficiency by decreasing the size of the buffer to more
closely approximate the size of Pages/IO. Decreasing the size of the buffer
frees shared-memory space for other uses.
Refertopage 3-93forfurtherinformationabouthowtochangethesizeofthe
logical log or physical log buffer.

How to Improve Performance 5-17
Page-Cleaner Parameters
Page-Cleaner Parameters
In the discussion of page-cleaning tuning, it is especially true that your
hardware configuration and your application influence the values that are
best for your environment.
Familiarize yourself with the OnLine approach to page cleaning before you
begin this section. Refer to page 2-57 and page 2-58 for background infor-
mation about the LRU queues and their role in the page-cleaning process.
You can tune four page-cleaning parameters to affect performance:
Efficient Page Cleaning
Traditionally,theeffectivenessofpage-cleaneractivityhasbeenmeasuredby
the different types of writes performed. Idle writes occur when the page
cleanerswakebythemselvestoflushtheLRUqueues.Foregroundwritesoccur
ifthe databaseserver process must initiate page flushing. (Refer topage 2-75
for a description of the different types of writes that occur during OnLine
operation.) You can examine the types of writes that occur in your
environment by executing tbstat -F.
CLEANERS The number of page cleaners
LRUS The number of LRU queue pairs
LRU_MAX_DIRTY Thethresholdpercentageofmodifiedbuffersinthequeue,
which when reached initiates page-cleaning activity (as
idle writes)
LRU_MIN_DIRTY Thethresholdpercentageofmodifiedbuffersinthequeue,
which when reached indicates the point at which page-
cleaning activity can be suspended

5-18 IBM Informix OnLine Database Server Administrator’s Guide
Efficient Page Cleaning
You should still avoid foreground writes and LRU writes, displayed as Fg
Writes and LRU Writes in the tbstat -F output. (Refer to page page 7-87.)
However, the introduction of OnLine LRU queued pairs (composed of FLRU
and MLRU queues) significantly reduces the likelihood of these write types.
(Refer to page 2-57 for an explanation of the FLRU and MLRU queues.)
Monitoring tbstat -F might not alert you that you can affect performance by
tuning the page-cleaning parameters.
Instead, you should be concerned with the cached-read and cached-write
percentages. Refer to page 5-10 for a definition of these cache percentages.
In the OnLine environment, at least two events initiate a flush of the shared
memory-buffer pool:
■The value of LRU_MAX_DIRTY is reached.
■A checkpoint occurs.
Before you decide to increase the efficiency of the page cleaners, you should
consider the implied trade-off between idle writes and chunk writes. If you
increase the frequency of idle writes performed during normal operation,
you can reduce the frequency of checkpoints (since the idle writes can
maintain an adequate supply of clean buffers). This tuning is often
considered to be advantageous since checkpoints are perceived as contrib-
uting to decreased performance. (OnLine suspends database server
processingduringa checkpoint.) However, itisnotalwaystruethatless-frequent
checkpoints guarantee improved performance.
During a checkpoint, pages in the shared-memory buffer pool are written to
diskaschunkwrites.Thesesorted, chunkwritesarethemost efficientwayto
flush the buffer pool. (Refer to page 2-77.)
Peak performance results from flushing the buffer pool using chunk writes
that occur during a checkpoint instead of increasing the number of idle
writes initiated by the page cleaners. However, your users might experience
themorefrequentcheckpointsthatresultfromthisstrategy as morefrequent
periods of sluggishness. If idle writes clean the LRU queues more frequently,
overall performance might be lower, but users might be more content
because checkpoints can occur less often and might complete faster.

How to Improve Performance 5-19
How Is Tuning Done?
How Is Tuning Done?
If the cached-read percentage is lower than 95 percent, you might be able to
improve performance by lowering the values of LRU_MAX_DIRTY and
LRU_MIN_DIRTY to increase the number of free and/or unmodified pages
that are available in the shared-memory LRU queues.
If the cached-write percentage is lower than 82 percent, you might be able to
improve performance by increasing the LRU_MAX_DIRTY and
LRU_MIN_DIRTY values. This increases the number of modified buffers that
are able to accumulate in the MLRU queue and increases the likelihood that
pages will be reused before they are written to disk.
To change the value of either of these parameters, edit the configuration file
using an operating system editor.
The optimal value of CLEANERS depends on your specific hardware config-
uration. The maximum value of CLEANERS is 32. The minimum value is 0.
When CLEANERS is set to 0, the tbinit daemon assumes all responsibility for
page cleaning.
Youmightwanttoconfigureapagecleanerforeachseparatephysicaldevice.
However, if more than one disk shares a controller channel, you might find
that more than three page cleaners per controller overburdens the controller.
In most cases, the additional cleaners do not improve performance unless
you separate successive chunks from a blobspace or dbspace on the disk.
Ideally, you should try to assign successive chunks to separate disk devices.
(Referto page 1-43 formoredetails about disklayout. Refer topage 3-115for
more details about how to change the number of page cleaners.)
The default value of LRUS is the larger of USERS/2 or 8, where USERS is the
specified configuration file parameter. The minimum value of LRUS is 3 and
themaximumvalueis8.Theoptimal valueofLRUSdependsonyour specific
hardware configuration. Your best guide for selecting a value for LRUS is to
experiment with different values and monitor the performance benefits. You
might find that a larger value increases performance on machines with more
thantwo CPUs. To change the value of LRUS, edit the configuration file using
an operating system editor.

5-20 IBM Informix OnLine Database Server Administrator’s Guide
Checkpoint Frequency
Checkpoint Frequency
Familiarize yourself with the definition of a checkpoint, and with the events
that happen during a checkpoint, before you begin this section. Refer to
pages page 2-70 and page 2-72 for background information.
Performance Tradeoffs
ThefrequencyofcheckpointsandtheirdurationaffectsOnLineperformance.
Since OnLine restricts all database server processes from entering a critical
section during a checkpoint, frequent checkpoints might appear to lower
performance because user processing might be interrupted.
Your ability to tune the page-cleaning parameters means that you need not
rely solely on checkpoints to keep the shared-memory buffer pool clean. If
you wish, you can specify the page-cleaning parameters so that idle writes
maintain an adequate supply of free and/or unmodified page buffers, and
checkpoints are needed less frequently. (However, this might result in less-
than-peakperformance. Refer to page 5-18foran explanation ofwhyrelying
on checkpoints to flush the shared-memory buffer pool might result in the
greatest overall performance.)
The decision to configure OnLine for less-frequent checkpoints implies two
tradeoffs:
■You are liable to experience a longer fast-recovery time after an
operating system failure. The longer fast-recovery time is a conse-
quenceofthelargerphysicallogandtheincreasednumber of logical
log entries that are written between checkpoints.
■The larger physical log requires more space on disk.

How to Improve Performance 5-21
How Is Tuning Done?
How Is Tuning Done?
Thefirststepintuningisto determine the cause of frequentcheckpoints.Are
the checkpoints occurring because the physical log is becoming full too
rapidly or as a result of some other event?
To answer this question, examine the value of the Numpage field in the
physical log portion of the DB-Monitor Status menu, Logs option, or in the
tbstat-l(lowercase-L)output.ThephysicallogNumpage value is the number
of physical log pages used since the last checkpoint. If the value of Numpage
is close to 75 percent of the physical log size at the time that the checkpoint
begins, the checkpoint was probably initiated as a result of physical log
activity.
If this is the case, you can reduce the frequency of the checkpoint by
increasing the size of the physical log or increasing the specified value of
CKPTINTVL, the default checkpoint interval. If you wish to increase the
frequency of checkpoints, you can either reduce the size of the physical log
or reduce the specified value of CKPTINTVL, the default checkpoint interval.
(Refer to page 3-107 for more details about how to increase the size of the
physical log. Refer to page 3-109 for more details about how to change the
value of CKPTINTVL.)

5-22 IBM Informix OnLine Database Server Administrator’s Guide
Psort Parallel-Process Sorting Package
Psort Parallel-Process Sorting Package
Psortisasortingpackagethatimprovesperformancebytakingadvantageof
multiprocessors to start and synchronize multiple sort processes. This
parallel-process sorting package is transparent to end users. (If you are
working on a uniprocessor machine and you set any of the parallel-sort
parameters, OnLine ignores the parameters and proceeds with nonparallel
sorting.)
Psort becomes an option for OnLine under either of three conditions:
■Thedatabaseserverprocessisorderingqueryresults.(AnORDER BY
clause appears as part of a SELECT statement.)
■The database server process is eliminating duplicates. (The UNIQUE
or DISTINCT keyword appears in the SELECT statement.)
■The database server process is executing a sort-merge join, a new
multitablejoinmethodthatisusedwiththeolder “nested-loop” join
method.
How Psort Works
To enable Psort,set the PSORT_NPROCS environmentvariable, which defines
the upper limit for the number of processes used to sort a query. To disable
Psort, unset the PSORT_NPROCS environment variable. (Refer to the next
topic for guidelines for setting the value of PSORT_NPROCS.)
IfPsortisenabled, OnLine performs parallelsortingonlywhen performance
is likely to improve. OnLine does not employ parallel sorting for a small
number of input rows or if a table index supports the order requested in the
query.
If OnLine engages Psort, multiple sorted runs are made in memory, written
to disk, and then merged from disk into a single result stream. OnLine calcu-
lates the number of processes to use in the sort based on the size of the query
and the number of processors on the system. You can tune Psort by limiting
the maximum number of processes available to OnLine and by directing
OnLine to use directories on different disks for the intermediate writes.

How to Improve Performance 5-23
Tuning Psort
Tuning Psort
If PSORT_NPROCS is set to 0, Psort uses three as the default number of
processes for the sort.
When PSORT_NPROCS is set to some number greater than zero, the value is
themaximumnumberofprocessesavailable. OnLinecalculatesthenumber
of sort processes to use given that constraint.
You maximize the effectiveness of Psort if you set PSORT_NPROCS to the
number of available processors on the system. The maximum value for
PSORT_NPROCS is 10.
Each sort process must sort a minimum of 50 pages of data. That is, if you
specify five sort processes but only 125 pages of data require sorting, the
number of processes working on the sort is limited to two.
Set the PSORT_NPROCS environment variable as follows:
A second environment variable, PSORT_DBTEMP, lists the directories that
OnLine uses for its intermediate writes. OnLine writes into the directories
listedinPSORT_DBTEMPinround-robinfashion.Formaximumperformance,
specify directories that reside in file systems on different disks. Ideally, the
disks should not contain any other frequently accessed files.
If PSORT_DBTEMP is not set, OnLine uses the single directory named by the
environment variable DBTEMP. If DBTEMP is not set, OnLine uses the
directory /tmp.
When you specify more than one directory, separate the directory names
with a colon. Set the PSORT_DBTEMP environment variable as follows:
C shell: setenv PSORT_NPROCS num_of_processes
Bourne shell: PSORT_NPROCS=num_of_processes
export PSORT_NPROCS
C shell: setenv PSORT_DBTEMP directory:directory
Bourne shell: PSORT_DBTEMP=directory:directory
export PSORT_DBTEMP

5-24 IBM Informix OnLine Database Server Administrator’s Guide
Psort and Shared Memory
Psort and Shared Memory
Each parallel sort uses one UNIX shared-memory segment.
A front-end process is able to open an unlimited number of SELECT cursors
that contain an ORDER BY clause. However, the number of sorts that can be
executed in parallel is limited by the number of shared-memory segments
that each OnLine database server process can attach to. (For more details
about the UNIX parameter that specifies the maximum number of attached
shared-memorysegmentsperprocess,refertopage 2-18.)Allcursorsbeyond
the UNIX limit are executed using nonparallel sorts.
SPINCNT Configuration Parameter
Familiarize yourself with the function of a shared-memory latch before you
begin this section. Refer to page 2-41 for background information.
When an OnLine user process attempts to acquire a latch, it tests for avail-
ability.Ifthelatchisnotavailable,theuserprocesscaneitherwaitornotwait.
A third option is available on some multiprocessor UNIX operating systems:
spin and test again.
Inamultiprocessorenvironment,itispossiblefortwoOnLineuserprocesses
tobe residentin a CPU and forboth user processestoneedaccess to thesame
resource. Normally, one user process acquires the resource while the other
process waits. The waiting user process “sleeps,” meaning that the user
process is switched out of the CPU.
If a machine supports spin and test, the waiting user process does not sleep.
Instead, it “spins.” The “spinning” that the user process performs while it
waits is an assembly-level activity that varies among machines. The activity
itself does nothing.
The advantage of spinning and testing is that the waiting user process
remains in the CPU. This eliminates the overhead of context switching; that
is,theoverheadthatis incurredwhenthe user processis switched in andout
of the CPU. The spin-and-test approach is more efficient than sleeping.

How to Improve Performance 5-25
SPINCNT Configuration Parameter
The number of times that a user process spins and tests is specified by the
configuration parameter SPINCNT. The default value is 300. If you increase
the value of SPINCNT, you increase the period that the user process remains
in the CPU. If you decrease the value, you reduce the period.
You cannot directly affect the amount of time that the process spins between
tries.


6
Chapter
DB-Monitor Screens
In This Chapter .................... 6-3
Main Menu .................... 6-4
Status Menu .................... 6-5
Parameters Menu .................. 6-6
Dbspaces Menu................... 6-7
Mode Menu .................... 6-8
Force-Ckpt Option.................. 6-9
Archive Menu ................... 6-10
Logical-Logs Menu ................. 6-11

6-2 IBM Informix OnLine Database Server Administrator’s Guide

DB-Monitor Screens 6-3
In This Chapter
This chapter serves as a reference for the DB-Monitor screens. You can use it
to quickly determine the purpose and use of a specific screen or option.
To start the monitor, execute tbmonitor from the command line. If you are
logged in as user informix, the main menu appears. All users other than
informix have access only to the Status menu.
All menus and screens function in the same way. For menus, use arrow keys
or the SPACEBAR to scroll to the option you want to execute and press
RETURN, or you can press the first letter of the option. When you move from
one option to the next by pressing the SPACEBAR or an arrow key, the option
explanation (line 2 of the menu) changes.
If you want general instructions for a specific screen, press CTRL-W. If you
need help to determine what you should enter in a field on the screen, move
the highlight to the field (by using the Tab key) and press CTRL-F or F2.
Someofthemenus,includingthemainmenu,areringmenus.Ringmenusare
indicated with three dots (...) on the far right or left side. The dots indicate
thatyoucancontinuetomoveinthedirectionofthedotswiththearrowkeys
or the SPACEBAR to view other options.
The cross-references that appear next to each of the menu descriptions direct
you to pages in this manual that provide instructions and advice to help you
perform the task correctly.

6-4 IBM Informix OnLine Database Server Administrator’s Guide
Main Menu
Main Menu
Menu
Item Status Parameters Dbspaces Mode Force-
Ckpt Archive Logical-Logs Exit
Options Profile Initialize Create Startup Create Auto-
Backup
Users Shared-
Memory BLOBSpace On-Line Restore Continuous-
Backup
Spaces Add-Log Mirror Graceful-
Shutdown Tape-
Parameters Databases
Databases Drop-Log Drop Immediate-
Shutdown Exit Tape-
Parameters
Logs Physical-
Log Info Take-
Offline Exit
Archive Exit Add_chunk Exit
Output Status
Configu-
ration Exit
Exit

DB-Monitor Screens 6-5
Status Menu
Status Menu
Option Description See page...
Profile Use the Profile option to display OnLine perfor-
mance statistics. 3-83
Users Use the Users option to display the status of active
OnLine database server processes. 3-86
Spaces Use the Spaces option to display status information
about OnLine dbspaces, blobspaces, or each chunk
that is part of a dbspace or blobspace.
3-70
3-75
Databases Use the Databases option to display the name,
owner, and logging status of the first 100 databases. 3-74
Logs Use the Logs option to display status information
about the physical log buffer, the physical log, the
logical log buffer, and the logical log files.
3-80
Archive Use the Archive option to display a list of all archive
tapes and logical log files that would be needed if a
data restore were required now.
3-61
Output Use the Output option to store the output of any
other status information in a specified file.
Configuration Use the Configuration option to create a copy of the
current (effective) OnLine configuration to a
specified file.
3-73
Exit

6-6 IBM Informix OnLine Database Server Administrator’s Guide
Parameters Menu
Parameters Menu
Option Description See page...
Initialize Use the Initialize option to initialize OnLine disk
space or to modify OnLine disk space parameters. 1-52
Shared-
Memory Use the Shared-Memory option to initialize OnLine
shared memory or to modify OnLine shared-
memory parameters.
1-54
Add-Log UsetheAdd-Logoptionto adda logicallogfiletoan
OnLine dbspace. 3-28
Drop-Log Use the Drop-Log option to drop a logical log file
from an OnLine dbspace. 3-30
Physical-Log UsethePhysical-Logoptionto changethesizeorthe
location of the OnLine physical log. 3-107
Exit

DB-Monitor Screens 6-7
Dbspaces Menu
Dbspaces Menu
Option Description See page...
Create Use the Create option to create a dbspace. 3-97
BLOBSpace Use the BLOBSpace option to create a blobspace. 3-88
Mirror UsetheMirroroptiontoaddmirroringtoanexisting
blobspace or dbspace or to end mirroring for a
blobspace or dbspace.
3-105
Drop UsetheDropoptiontodropablobspaceoradbspace
from the OnLine configuration. 3-91
3-99
Info Use the Info option to see the identification number,
location, and fullness of each chunk assigned to a
blobspace or dbspace.
3-70
Add_chunk Use the Add_chunk option to add a chunk to a
blobspace or dbspace. 3-94
Status UsetheStatusoption to changethestatus of achunk
in a mirrored pair. 3-101
Exit

6-8 IBM Informix OnLine Database Server Administrator’s Guide
Mode Menu
Mode Menu
Option Description See page...
Startup Use the Startup option to initialize shared memory
and take OnLine to quiescent mode. 3-8
On-Line Use the On-Line option to take OnLine from
quiescent to online mode. 3-9
Graceful-
Shutdown Use the Graceful-Shutdown option to take OnLine
from on-line to quiescent mode. Users can complete
their work.
3-10
Immediate-
Shutdown UsetheImmediate-ShutdownoptiontotakeOnLine
from online to quiescent mode in 10 seconds. 3-11
Take-Offline Use the Take-Offline option to detach shared
memory and immediately take OnLine to offline
mode.
3-12
Exit


6-10 IBM Informix OnLine Database Server Administrator’s Guide
Archive Menu
Archive Menu
Option Description See page...
Create Use the Create option to create a level-0, level-1, or
level-2 archive. 3-57
Restore Use the Restore option to perform an OnLine data
restore. 4-45
Tape-
Parameters Use the Tape-Parameters option to modify the
parameters of the archive tape device. 3-52
through
3-56
Exit

DB-Monitor Screens 6-11
Logical-Logs Menu
Logical-Logs Menu
Option Description See page...
Auto-Backup UsetheAuto-BackupoptiontodirectOnLine toback
up all full logical log files and/or the current log file. 3-36
Continuous-
Backup Use the Continuous-Backup option to back up each
logical log file as it becomes full. 3-37
Databases Use the Databases option to modify the logging
status of an OnLine database. 3-33
Tape-
Parameters Use the Tape-Parameters option to modify the
parameters of the logical log backup tape device. 3-18
through
3-22
Exit


7
Chapter
Utilities
In This Chapter .................... 7-5
dbexport: Unload a Database and Schema File ......... 7-5
Syntax ...................... 7-6
Destination Options ................. 7-7
Contents of the Schema File .............. 7-9
dbimport: Create a Database ............... 7-10
Syntax ...................... 7-11
Input File Location Options .............. 7-12
Create Options ................... 7-14
dbload: Load Data from a Command File ........... 7-15
Syntax ...................... 7-16
Command-File Syntax Check .............. 7-18
Starting Line Number ................ 7-18
Batch Size..................... 7-19
Bad-Row Limits .................. 7-20
How to Create a Command File ............. 7-21
Delimiter Form FILE Statement ............ 7-22
Delimiter Form INSERT Statement........... 7-23
Delimiter Form Statement Examples .......... 7-24
Character-Position FILE Statement........... 7-26
Character-Position INSERT Statement ......... 7-28
Character-Position Statement Examples ......... 7-29
dbschema: Output SQL Statements ............. 7-32
Syntax ...................... 7-32
Include Synonyms.................. 7-33
Include Privileges .................. 7-34
Specify a Table, View, or Procedure ............ 7-35

7-2 IBM Informix OnLine Database Server Administrator’s Guide
tbcheck: Check, Repair, or Display.............. 7-36
Syntax ...................... 7-38
Option Descriptions ................. 7-39
No Options ................... 7-39
-cc Option ................... 7-39
-cd and -cD Options ................ 7-40
-ce Option ................... 7-40
-ci and -cI Options ................ 7-40
-cr Option ................... 7-41
-n Option ................... 7-41
-pB Option ................... 7-42
-pc Option ................... 7-42
-pd and -pD Options................ 7-42
-pe Option ................... 7-43
-pk and -pK, -pl and -pL Options ........... 7-43
-pp and -pP options ................ 7-43
-pr Option ................... 7-44
-pt and -pT Options ................ 7-44
-q Option.................... 7-45
-y Option.................... 7-45
tbinit: Initialize OnLine ................. 7-45
Syntax ...................... 7-46
No Options ................... 7-46
-i Option .................... 7-46
-p Option ................... 7-47
-s Option.................... 7-47
tbload: Create a Database or Table.............. 7-47
Syntax ...................... 7-48
Specify Tape Parameters................ 7-49
Create Options ................... 7-50
tblog: Display Logical Log Contents ............. 7-51
Syntax ...................... 7-51
Log-Record Read Filters ................ 7-52
-b Option.................... 7-52
-d Option ................... 7-53
-n Option ................... 7-53
Log-Record Display Filters ............... 7-54

Utilities 7-3
Interpreting tblog Output ................7-55
Record Types ...................7-56
Record Contents..................7-57
tbmode: Mode and Shared-Memory Changes ..........7-64
Syntax ......................7-65
Change OnLine Mode .................7-66
-k Option ....................7-66
-m Option ....................7-66
-s Option ....................7-67
-u Option ....................7-67
Force a Checkpoint ..................7-67
Change Shared-Memory Residency ............7-68
Switch the Logical Log File ...............7-68
Kill an OnLine Server Process ..............7-69
Kill an OnLine Transaction ...............7-69
tbparams: Modify Log Configuration Parameters .........7-70
Syntax ......................7-70
Add a Logical Log File .................7-70
Drop a Logical Log File.................7-71
Change Physical Log Parameters .............7-72
tbspaces: Modify Blobspaces or Dbspaces............7-73
Syntax ......................7-73
Create a Blobspace or Dbspace ..............7-74
Drop a Blobspace or Dbspace ..............7-75
Add a Chunk ....................7-76
Change Chunk Status .................7-77
tbstat: Monitor OnLine Operation ..............7-78
Syntax ......................7-80
Option Descriptions..................7-82
No Options ...................7-82
-- Option ....................7-82
-a Option ....................7-82
-b Option ....................7-82
-B Option ....................7-84
-c Option ....................7-84
-d Option ....................7-84
-D Option ....................7-86

7-4 IBM Informix OnLine Database Server Administrator’s Guide
-F Option.................... 7-87
-k Option.................... 7-88
-l Option .................... 7-89
-m Option ................... 7-91
-o Option.................... 7-91
-p Option ................... 7-92
-P Option ................... 7-95
-r Option.................... 7-95
-R option.................... 7-95
-s Option.................... 7-97
-t Option .................... 7-98
-u Option ................... 7-99
-X Option ...................7-101
-z Option....................7-102
tbtape: Logging, Archives, and Restore ............7-102
Syntax ......................7-103
Request a Logical Log Backup..............7-104
Start Continuous Backups ...............7-104
Create an Archive ..................7-105
Perform a Data Restore ................7-105
Change Database Logging Status.............7-106
tbunload: Transfer Binary Data in Page Units ..........7-107
Syntax ......................7-108
Specify Tape Parameters................7-109

Utilities 7-5
In This Chapter
This chapter describes the OnLine utilities that allow you to execute admin-
istrative tasks directly from the shell prompt.
dbexport: Unload a Database and Schema File
ThedbexportutilityunloadsadatabaseintoASCII files. The dbexport utility
creates an ASCII schema file that dbimport uses to re-create the database
schema in another Informix environment. You can edit the schema file to
modify the database that dbimport creates.
The dbexport utility supports the following three destination options:
■Unloading a database and its schema file to disk
■Unloading a database and its schema file to tape
■Unloading the schema file to disk, where it can be examined and
modified, and unloading the database data files to tape
You must either have DBA privilege or be logged in as user informix or root
to export a database.
The dbexport process locks the database in Exclusive mode during the
export.
If you export a database to disk, be sure that you have enough disk space
available to hold an ASCII dump of all data in the database. Otherwise, use
the tape option.
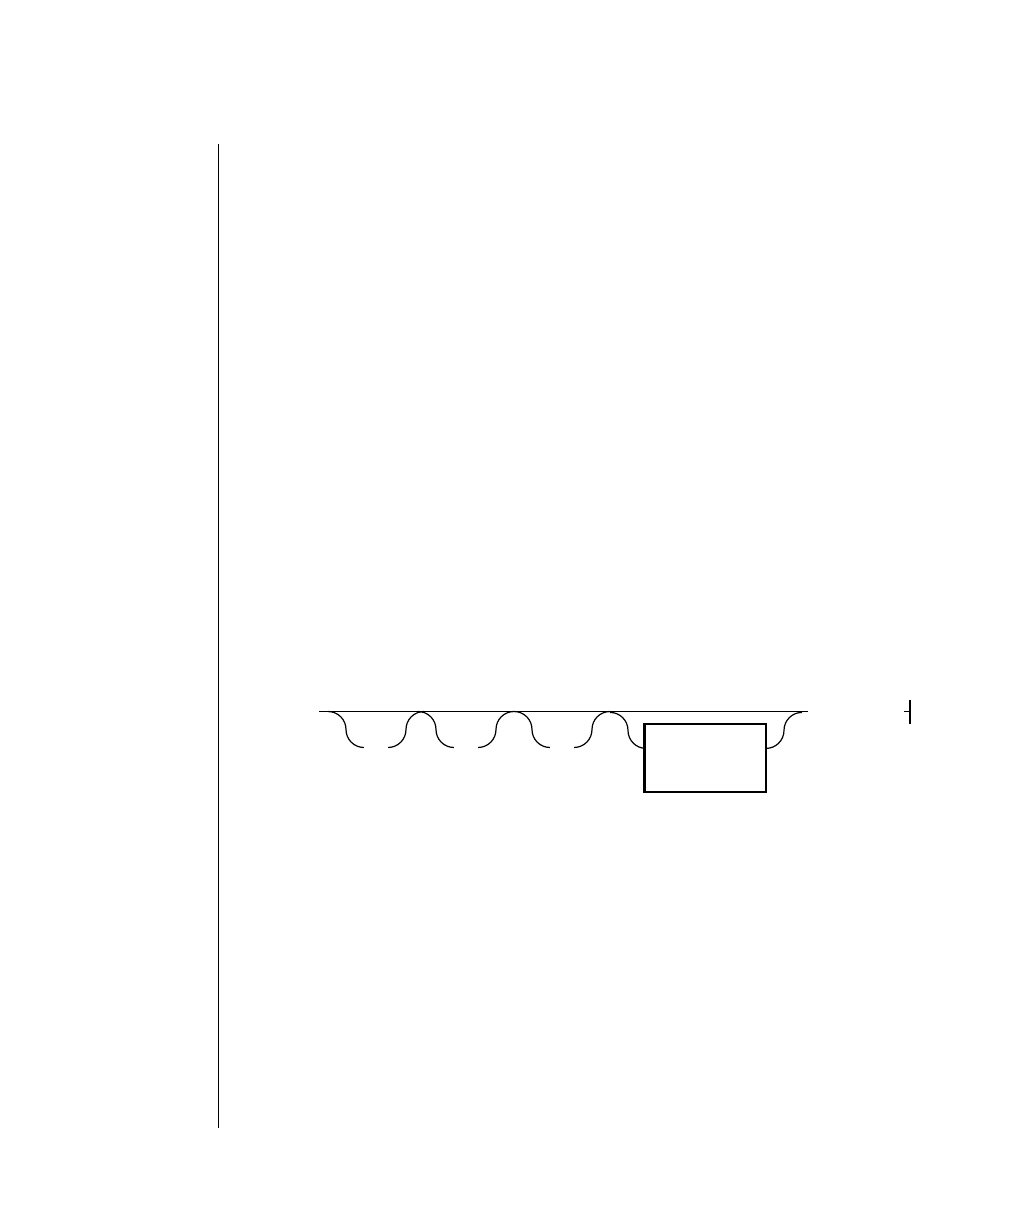
7-6 IBM Informix OnLine Database Server Administrator’s Guide
Syntax
The SQL statements contained in the dbexport schema file do not contain all
available information. The following information is omitted:
■Initial and next extent values
■Lock mode
■Dbspace where the table should reside
■Blobspace where a blob column should reside
■Logging mode of the database, if there is one
For this reason, you might want to unload the file to disk where you can edit
itbeforeyouimportthedatabase.Refertopage 7-9formoredetailsaboutthe
contents of the schema file.
You can use the dbexport/dbimport pair to convert databases from an
OnLine database server to an IBM Informix SE database server, or vice versa.
Syntax for the SE database server dbimport utility differs from OnLine
syntax. Refer to the IBM Informix SE Administrator’s Guide for more details
about dbimport syntax.
Syntax
The dbexport utility creates a file of messages called dbexport.out. This file
contains error messages and warnings, and it also contains a display of the
SQL data definition statements it is generating. The same material is also
written to the standard output unless you specify the -q option.
-c instructs dbexport to complete exporting unless fatal errors
occur.
-q suppressesdisplay(tothestandardoutput)oferrormessages,
warnings, and generated SQL data definition statements.
database specifies the name of the database you want to export.
-c -q
dbexport database
Destination
Options
p. 7-7
-d
Utilities 7-7
Destination Options
YoucanusetheOnLinesyntaxdatabase@dbservernametospecifythedatabase.
Specifying a database server name allows you to choose a database on
another server as your current database if you have installed IBM Informix
STAR.
During the export, the database is locked in exclusive mode. If dbexport
cannotobtainanexclusivelock,the programendswithadiagnostic message.
If you specify -c,dbexport does not interrupt processing unless one of the
following fatal errors occurs:
■Failure to open the tape device specified
■Bad writes to the tape or disk
■Invalid command parameters
■Inability to open the database specified
■Incorrect UNIX file or directory permissions
You can cancel dbexport at any time by pressing the Interrupt key. The
dbexport program asks for confirmation before terminating.
Destination Options
-b blocksize specifies in kilobytes the block size of the tape device.
-f pathname specifies the pathname on disk where you want to store the
schema file, if you are storing the data files on tape.
-o directory
-t device -b blocksize
-s tapesize
-f pathname
Destination
Options

7-8 IBM Informix OnLine Database Server Administrator’s Guide
Destination Options
Ifyoudonotspecifyadestinationforthedataandschemafiles,thedirectory
database.exp is placed in the current working directory. The schema file is
written to the file database.sql.
If you use the -f option, the schema file is written to the disk pathname
specified. Once on disk, you can examine and modify the schema file before
you use it with dbimport.
If you use the -o option, the directory specified as directory cannot exist. It is
created by dbexport and its directory group is informix. The schema file is
written to the file database.sql in the specified directory.
If you use the -s option, the tape size is limited to 2,097,151 KB. The limit is
required because of the way in which dbexport and dbimport track their
position into the tape.
The following command exports the stores5 database to tape with a block
size of 16 KB and a tape capacity of 24,000 KB. The schema file is written to
/tmp/stores5.imp.
dbexport -t /dev/rmt0 -b 16 -s 24000 -f /tmp/stores5.imp stores5
Thefollowingcommandexportsthestores5database to thedirectorynamed
/usr/informix/export/stores5.exp:
dbexport -o /usr/informix/export stores5
-o directory names the directory on disk where you want the ASCII data
files and the schema file stored.
-s tapesize specifies in kilobytes the amount of data that can be stored on
the tape.
-t device names the pathname of the tape device where you want the
ASCII data files and, possibly, the schema file stored.

Utilities 7-9
Contents of the Schema File
Contents of the Schema File
The .sql file contains the SQL statements needed to re-create the exported
database, as well as some additional ownership and privilege information.
The schema file does not retain all the information that might have been
included in the original statements used to create the database and tables.
The following information is omitted:
■Initial and next extent values
■Lock mode
■Dbspace where the table should reside
■Blobspace where a blob column should reside
■Logging mode of the database, if there is one
Initialornextextent sizesarenotretainedinthe .sql filestatements.Ifyoudo
not edit the .sql file CREATE TABLE statements before you run dbimport, the
tableswill be createdwiththe default extent sizes ofeight pages. If you want
to change the extent sizes after the database is imported, use the ALTER
TABLE statement.
Thelock mode ofthe table isnot retained in the.sql file statements. Ifyou do
not edit the .sql file CREATE TABLE statements before you run dbimport, the
table will be created with the default lock mode, which is page-level locking.
If you want to change the lock mode after the database is imported, use the
ALTER TABLE statement.
The logging mode is not retained in the .sql file. You can specify any one of
three options when you import the database using dbimport:
■ANSI-compliant database with unbuffered logging
■Unbuffered logging
■Buffered logging
If you want to change the logging mode of the database and do not specify a
logging option in the dbimport command line, you can make the change
from DB-Monitor after the database is imported. Refer to page 7-14 for more
details about starting logging from the dbimport command line.

7-10 IBM Informix OnLine Database Server Administrator’s Guide
dbimport: Create a Database
Thestatements in the ASCII schema file that createtables,views, and indexes
and grant privileges do so using the name of the person who originally
created the database. In this way, the original owner retains DBA privileges
for the database and is the owner of all the tables, indexes, and views. In
addition, whoever executes the dbimport command also has DBA privileges
for the database.
dbimport: Create a Database
The dbimport utility creates a database and loads it with data from input
ASCII filesgeneratedbydbexport.TheASCII filesconsistofaschemafilethat
isused to re-createthe database and data files that contain thedatabase data.
The dbimport utility can read the ASCII files from the following three
location options:
■All input files are located on disk.
■All input files are located on tape.
■The schema file is located on disk, and the data files are located on
tape.
Refer to page 7-9 for more details about the contents and use of the schema
file generated by dbexport.
The dbimport utility supports the following create options for the new
database:
■Create an ANSI-compliant database (includes unbuffered logging).
■Start transaction logging for a database (unbuffered or buffered
logging).
■Specify the dbspace where the database will reside.
The user who runs dbimport is granted DBA privilege on the newly created
database.
The dbimport process locks each table as it is being loaded and unlocks the
table when the loading is completed.
Utilities 7-11
Syntax
If you are loading a database from IBM Informix SE into an OnLine
environment, check that you set the SQLEXEC environment variable to
$INFORMIXDIR/lib/sqlturbo (to specify the OnLine database server).
You can display the software version number by executing dbimport -V.
Syntax
Afileofmessages calleddbimport.outiscreatedinthecurrentdirectory.The
dbimport.out file contains any error messages and warnings related to
dbimport processing. The same material is also written to the standard
output unless you specify the -q option.
YoucanusetheOnLinesyntaxdatabase@dbservernametospecifythedatabase.
Specifying a database server name allows you to choose a database on
another server as your current database if you have installed IBM Informix
STAR.
If you specify -c,dbimport does not interrupt processing unless one of the
following fatal errors occurs:
■Failure to open the tape device specified
■Bad writes to the tape or disk
■Invalid command parameters
■Inability to open the database specified
■Incorrect UNIX file or directory permissions
-c instructs dbimport to complete importing unless fatal errors
occur.
-q suppresses display (to the standard output) of error messages
and warnings.
database specifies the name of the database you intend to create.
database
dbimport Input File
Location
p. 7-12
Create
Options
p. 7-14
-c -q
7-12 IBM Informix OnLine Database Server Administrator’s Guide
Input File Location Options
You can cancel dbimport at any time by pressing the Interrupt key. The
dbimport program asks for confirmation before terminating.
Input File Location Options
If you do not specify an input file location, dbimport looks for the directory
database.exp under the current directory.
If you use the -i option, dbimport looks for the directory under the current
directoryunless acompletepathnameisprovided.Youcangivethedatabase
a new name if you use the -i option.
-b blocksize specifies in kilobytes the block size of the tape device.
-f pathname specifies the pathname on disk where dbimport will find the
schemafile to use as inputto createthedatabase (data filesare
read from tape).
-i directory names the directory on disk where dbimport will find the
input data files and schema files.
-s tapesize specifies in kilobytes the amount of data that can be stored on
the tape.
-t device names the pathname of the tape device where the tape
containing the input files is mounted.
-i directory
-t device -b blocksize -s tapesize
-f pathname
Input
File
Location

Utilities 7-13
Input File Location Options
You cannot use the -f option unless it was used when the schema file was
exported with the dbexport program. If you use -f, you typically use the
samecommandfilenamethatyouspecifiedinthedbexportcommand.Ifyou
specify only a filename, dbimport looks for the file in the .exp subdirectory
of either your current directory or the directory you specify with the -i
option.
If you are importing from tape, you must use the same block size and tape
size that you used to export the database.
The following command imports the stores5 database from a tape with a
block size of 16 KB and a capacity of 24,000 KB. The schema file is read from
/tmp/stores5.imp. The -c option directs dbimport to continue unless a fatal
error is detected.
dbimport -c -t /dev/rmt0 -b 16 -s 24000 -f /tmp/stores5.imp stores5
The following command imports the stores5 database from the stores5.exp
directory under the /usr/informix/port directory. The schema file is
assumed to be /usr/informix/port/stores5.exp/stores5.sql.
dbimport -c -i /usr/informix/port stores5
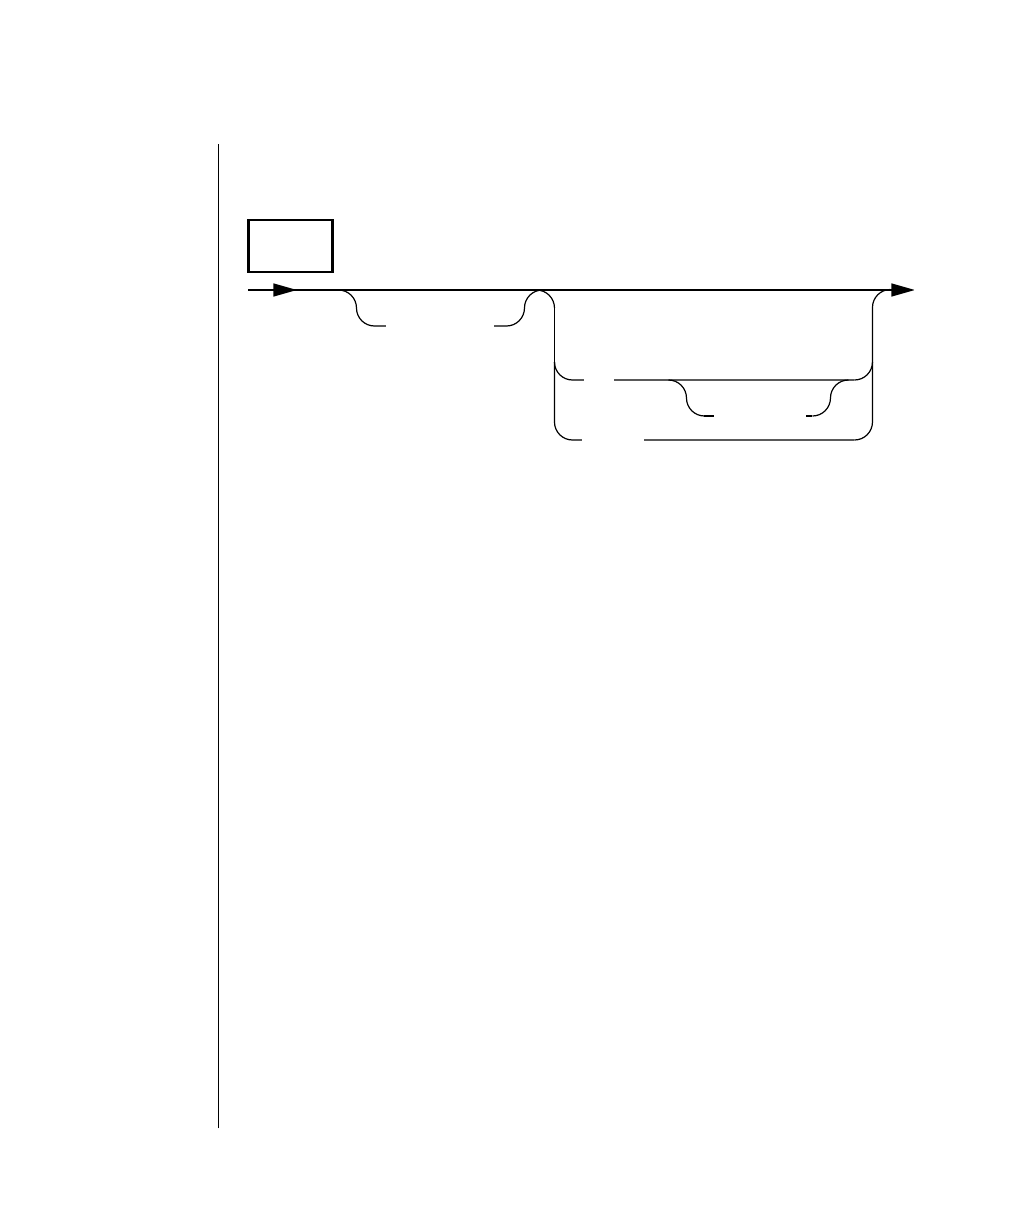
7-14 IBM Informix OnLine Database Server Administrator’s Guide
Create Options
Create Options
A database that is ANSI-compliant uses unbuffered logging. In addition, the
ANSI rules for transaction logging are enabled. For more information about
ANSI-compliant databases, see the CREATE DATABASE statement in
IBM Informix Guide to SQL: Reference.
If you do not specify a dbspace name, the database is created in the root
dbspace by default.
The-l option is equivalent to the WITH LOG clause of the CREATE DATABASE
statement.
The following command imports the stores5 database from the
/usr/informix/port/stores5.exp directory into the current directory. The new
database is ANSI-compliant, and the transaction log file is specified as
stores5.log in /usr/work.
dbimport -c stores5 -i /usr/informix/port -ansi /usr/work/stores5.log
-ansi creates an ANSI-compliant database.
-d dbspace namesthe OnLine dbspacewherethedatabase will becreated.
-l establishes unbuffered transaction logging for the imported
database.
-l buffered establishes buffered transaction logging for the imported
database.
Create
Options
-d dbspace
-l
-ansi buffered

Utilities 7-15
dbload: Load Data from a Command File
Thenextcommandimportsthestores5databasefromtapeintotheauckland
dbspace. The database is created with unbuffered logging. The command
suppresses the echo of the SQL statements and continues processing unless
fatal errors occur.
dbimport -cq -d auckland -l -t /dev/rmt0 -b 16 -s 24000 stores5
dbload: Load Data from a Command File
The dbload utility transfers data from one or more ASCII files into one or
more existing tables. The dbload utility offers four advantages over the
LOAD statement:
■You can create the data that dbload will load, unrestricted by the
format or the arrangement of data in an existing input file. The
dbload command file can accommodate data from entirely different
database management systems.
■You can specify a starting point in the load by directing dbload to
read but ignore x number of rows.
■You can specify a batch size so that after every xnumber of rows are
inserted, the insert is committed.
■You can limit the number of bad rows read, beyond which dbload
ends.
The cost of dbload flexibility is time and effort spent creating the dbload
command file, which is required for dbload operation. The ASCII input files
are not specified as part of the dbload command line. Neither are the tables
into which the data is inserted. This information is contained within the
command file.
The presence of indexes greatly affects the speed with which the dbload
utility loads data. For best performance, drop any indexes on the tables
receiving the data before you run dbload. You can create new indexes after
dbload has finished.

7-16 IBM Informix OnLine Database Server Administrator’s Guide
Syntax
The dbload syntax and use information begins in the next section. The
dbload command file structure and instructions for creating a command file
begin on page 7-21. After you create the command file, you can use the -s
option (see page 7-18) to check the syntax of the statements within the
command file.
You can display the software version number by executing dbload -V.
Syntax
YoucanusetheOnLinesyntaxdatabase@dbservernametospecifythedatabase.
Specifying a database server name allows you to choose a database on
another server as your current database if you have installed IBM Informix
STAR.
If you specify part (but not all) of the required information, dbload prompts
you for additional specifications. After you enter additional specifications or
press RETURN to accept the default values that appear in the prompts, the
screen is cleared and dbload begins execution.
-c command file specifies the filename or pathnameofadbload command
file.
-d database specifies the name of the database to receive the data.
-l error log file specifies the filename or pathname of an error log file.
-r instructsdbloadtoallowotheruserstomodifydatainthe
table during the load (do not lock the table during the
load).
Batch Size
p. 7-19 Bad-Row
Limits
p. 7-20
-r
dbload
Starting
Line No.
p. 7-18
Command-File
Syntax Check
p. 7-18
-d database -c command file -l error log file

Utilities 7-17
Syntax
Theerrorlogfilespecifiedbythe-lflagstoresanyinputfilerowsthatdbload
cannot insert into the database, as well as diagnostic information.
Tables specified in the command file are locked during loading, preventing
other users from modifying data in the table, unless you specify the -r flag.
Table locking reduces the number of locks needed during the load but at the
price of reduced concurrency. If you are planning to load a large number of
rows, use table locking and load during nonpeak hours.
If your database supports transactions, dbload commits a transaction after
every100rowsareinserted.Tomodifythisdefault value, specify a batch size
(see page 7-19).
The dbload default value for bad-row limit is 10. This means that after
dbload reads the eleventh bad row, it terminates. If dbload is loading data
rowsintoadatabasewithtransactionswhenthebad-rowlimitisreached,the
default condition is for dbload to commit all rows that have been inserted
since the last transaction. To modify the bad-row limit or to change the
default condition from “always commit” to “prompt for instructions,” refer
to page 7-20.
If your most recent dbload session ended prematurely, you can resume
loadingwiththe next recordinthefilebyspecifyingthe starting line number
in the command-line syntax (see page 7-18).
If you press the Interrupt key, dbload terminates and discards any new rows
thathavebeeninsertedbutnotyetcommittedtothedatabase(ifthedatabase
has transactions).
7-18 IBM Informix OnLine Database Server Administrator’s Guide
Command-File Syntax Check
Command-File Syntax Check
The -s option performs a syntax check on the FILE and INSERT statements in
the specified dbload command file. The screen displays the command file
with any errors marked where they are found.
You can redirect the -s output to a file with the redirect symbol (>).
Starting Line Number
-s instructs dbload to check the syntax of the statements in the
command file without inserting data.
>output file specifies the name ofthe file wheretheoutput from the syntax
check is stored.
-i number rows ignore instructs dbload to ignore the specified number
of NEWLINE characters.
-s
> output file
Command-File
Syntax Check
7-18
-i number rows ignore
Starting
Line
Number
Utilities 7-19
Batch Size
The -i option instructs dbload to read and ignore the specified number of
NEWLINE charactersintheinputfilebeforeitbeginsprocessing.(Thisoption
assumes that a NEWLINE character indicates the end of an individual data
row and header information.)
This option is useful if your most recent dbload session ended prematurely.
If, for example, dbload ended after inserting 240 lines of input, you can
resumeloadingat line 241 bysettingnumberrowsignoreequalto240.Itisalso
useful if header information in the input file precedes the data records.
Batch Size
If your database supports transactions, dbload commits a transaction after
every specified number of new rows are read and inserted. A message is
displayed after each commit.
If you do not specify the -n option, dbload commits a transaction after every
100 rows are inserted.
For information about transactions, see IBM Informix Guide to SQL: Tutorial.
-n number inserted rows instructs dbload to execute a commit after the
specified number of new rows are inserted.
-n number inserted rows
Batch
Size

7-20 IBM Informix OnLine Database Server Administrator’s Guide
Bad-Row Limits
Bad-Row Limits
Ifyouset-enumber errorsreadtoaninteger,dbloadterminateswhenitreads
(number errors read +1) bad rows. If you set the value of number errors read to
0,dbloadterminateswhenitreadsthefirstbadrow.Thereisnodefaultvalue
for number errors read.
If dbload exceeds the bad-row limit and the -p option is specified, dbload
prompts you for instructions before it terminates. The prompt asks you to
indicate whether you want to roll back or to commit all rows inserted since
the last transaction.
Ifdbloadexceedsthebad-rowlimitandthe-poptionisnotspecified,dbload
commits all rows inserted since the last transaction.
If you do not specify the -e option, the default is 10. This means that after
dbload reads the eleventh bad row, it terminates. In a database with transac-
tions,unlessyouspecifyotherwise,dbloadcommitsanynewrowsthathave
been inserted since the last transaction.
-e number errors read specifiesthenumberofbadrowsthatdbloadreads
before terminating.
-p promptsforinstructionsifthenumberofbadrows
exceeds the limit.
-e number errors read -p
Bad-Row
Limits

Utilities 7-21
How to Create a Command File
How to Create a Command File
Beforeyouuse dbload,youfirstcreateanASCII commandfile that namesthe
input data files and the tables that receive the data. The command file maps
fields from one or more input files into columns of one or more tables within
your database.
The command file contains only FILE and INSERT statements. Each FILE
statement names an input data file. The FILE statement also defines the data
fields from the input file that will be inserted into the table. Each INSERT
statementnames a table thatwill receivethe data. The INSERT statementalso
defines how dbload will place the data described in the FILE statement into
the columns of the table.
Within thecommand file, the FILE statementcan appear in thefollowing two
forms:
■Delimiter form
■Character-position form
Use the delimiter form of the FILE statement when every field in the input
data row uses the same delimiter and every row ends with a NEWLINE
character. This format is typical of data rows with variable-length fields. You
can also use the delimiter form of the FILE statement with fixed-length fields
as long as the data rows meet the delimiter and NEWLINE requirements. The
delimiterform of FILE andINSERT iseasiertouse than thecharacter-position
form.
Use the character-position form of the FILE statement when you cannot rely
on delimiters and you need to identify the input data fields by character
position within the input row. For example, you would use this form to
indicate that the first input data field begins at character position 1 and
continues until character position 20.
Another reason to use this second form is if you must translate a character
stringintothenullvalue. For example, if yourinputdatafileuses a sequence
of blanks to indicate a null value, you must use the second form if you want
to instruct dbload to substitute null at every occurrence of the blank-
character string.

7-22 IBM Informix OnLine Database Server Administrator’s Guide
How to Create a Command File
You can combine both forms of the FILE statement in a single command file.
For clarity, each statement type and form are described separately in the
sections that follow:
■Delimiter form FILE statement (page 7-22)
■Delimiter form INSERT statement (page 7-23)
■Character-position FILE statement (page 7-26)
■Character-position INSERT statement (page 7-28)
Delimiter Form FILE Statement
The syntax for the delimiter form of the FILE statement can be represented as
follows:
If the delimiter specified by c appears anywhere in the input file as a literal
character,itmustbeprecededwithabackslashintheinputfile.Forexample,
if the value of c were specified as [, you would need to place a backslash
beforeanyliteral[that appearedintheinputfile.Similarly,youmustprecede
any backslash that appears in the input file with an additional backslash.
The DELIMITER keyword causes dbload to internally assign the sequential
names f01,f02,f03, ... to fields in the input file. You cannot see these names,
but if you refer to these fields to specify a value list in an associated INSERT
statement, you must use the f01,f02,f03 format. Refer to page 7-24 to see an
example.
cdefinesthefielddelimiterfor thespecificinputfilespecifiedas
filename.
filename specifies the input file.
nfields is an integer that indicates the number of fields in each data
row contained in filename.
FILE filename DELIMITER “c”nfields ;

Utilities 7-23
How to Create a Command File
Two consecutive delimiters define a null field. As a precaution, you might
wish to place a delimiter immediately before the NEWLINE character that
marks the end of each data row. If you omit this delimiter, an error results
whenever the last field of a data row is empty. If you are certain that none of
the input data rows ends with an empty field, you can omit this step.
The following example command file illustrates a simple delimiter form of
the FILE and INSERT statements. The three input data files, stock.unl,
customer.unl,andmanufact.unl(fromstores5)werecreatedbytheUNLOAD
statement. (To see the .unl input data files, refer to the directory
$INFORMIXDIR/demo/product_name.)
FILE stock.unl DELIMITER "|" 6;
INSERT INTO stock;
FILE customer.unl DELIMITER "|" 10;
INSERT INTO customer;
FILE manufact.unl DELIMITER "|" 3;
INSERT INTO manufact;
Delimiter Form INSERT Statement
TheINSERTstatementwithindbloadcannotincorporateaSELECTstatement.
The user who executes dbload with this command file must have Insert
privilege on the named table. The syntax for the delimiter form of the
INSERT statement can be represented as follows:
Valid syntax for the dbload VALUES clause includes constants, literal
numbers, and functions as described in IBM Informix Guide to SQL: Reference.
You can also use the sequential field names automatically assigned by
dbload (f01,f02,f03, and so on) from the FILE statement.
column name is the column that receives the new data.
table name is the name of the table that receives the data. The table name
can include the owner name but cannot include a database
server name.
,
column
name
INSERT
INTO ;
( ) Restricted
Values Clause
table name

7-24 IBM Informix OnLine Database Server Administrator’s Guide
How to Create a Command File
The restrictions dbload imposes on the VALUES clause value list affect only
data types DATE,DATETIME, and INTERVAL. Values of type DATE must be in
mm/dd/yyyy format. (This is the case if the DBDATE environment variable is
set to its default value, MDY4/.) Data for DATETIME and INTERVAL columns
must be in character form, showing only field digits and delimiters (no type
or qualifiers).
Inserted data types correspond to the explicit or default column list. If the
data field width is different from its corresponding character column width,
the data is made to fit. That is, inserted values are padded with blanks if the
data is not wide enough for the column, or are truncated if the data is too
wide for the column.
If the number of columns named is fewer than the number of columns in the
table, dbload inserts the default value specified for the unnamed columns. If
no default is specified, dbload attempts to insert a null value. If the attempt
violatesa NOT NULL restrictionor a unique constraint, theinsert fails andan
error message is returned.
If the INSERT statement omits the column name(s), the default INSERT speci-
ficationiseverycolumninthenamedtable.IftheINSERTstatementomitsthe
VALUES clause, the defaultINSERT specificationiseveryfield of theprevious
FILE statement.
Anerrorresultsifthenumberofcolumnnameslisted(orimpliedbydefault)
does not match the number of values listed (or implied by default).
See the next section for examples of how to use the delimiter form of the
INSERT statement.
Delimiter Form Statement Examples
The first FILE and INSERT statement set in the example on page 7-22 is
repeated here:
FILE stock.unl DELIMITER "|" 6;
INSERT INTO stock;

Utilities 7-25
How to Create a Command File
The FILE statement describes the stock.unl data rows as composed of six
fields, each separated by a vertical bar (| = ASCII 124) as the delimiter.
Compare the FILE statement with the following data rows, which appear in
the input file stock.unl. (Since the last field is not followed by a delimiter, an
error results if any data row ends with an empty field.)
1|SMT|baseball gloves|450.00|case|10 gloves/case
2|HRO|baseball|126.00|case|24/case
3|SHK|baseball bat|240.00|case|12/case
TheexampleINSERTstatementcontainsonlytherequiredelements.Sincethe
column list is omitted, the INSERT statement implies that values are to be
inserted into every field in the stock table. Since the VALUES clause is
omitted, the INSERT statement implies that the input values for every field
are defined in the most-recent FILE statement.This INSERT statement is valid
because the stock table contains six fields, which is the same number of
values defined by the FILE statement.
The first data row inserted into stock from this INSERT statement is as
follows:
The following example FILE and INSERT statement set illustrates a more
complex INSERT statement syntax:
FILE stock.unl DELIMITER "|" 6;
INSERT INTO new_stock (col1, col2, col3, col5, col6)
VALUES (f01, f03, f02, f05, "autographed");
Column Value
stock_num 1
manu_code SMT
description baseball gloves
unit_price 450.00
unit case
unit_descr 10 gloves/case

7-26 IBM Informix OnLine Database Server Administrator’s Guide
How to Create a Command File
In this example, the VALUES clause uses the automatically assigned field
names assigned by dbload. You must reference the automatically assigned
fieldnameswiththeletterffollowedbyatwo-digitnumber:f01,f02,f10,and
so on. All other formats are incorrect.
The user has changed the column names, the order of the data, and the
meaningofcol6inthenewstocktable.Sincethefourthcolumninnew_stock
(col4)isnot named inthe column list, thenew data rowcontains a null inthe
col4 position (assuming that the column permits nulls).
The first data row inserted into new_stock from this INSERT statement is as
follows:
Character-Position FILE Statement
Five sample data rows are introduced here and used throughout the
character-position discussion to illustrate the FILE statement syntax and
function.
The examples in this section are based on an input data file, cust_loc_data,
that contains the last four fields (city,state,zipcode, and phone) of the
customer table.
Column Value
col1 1
col2 baseball gloves
col3 SMT
col4 null
col5 case
col6 autographed

Utilities 7-27
How to Create a Command File
Fields in the input file are padded with blanks (represented by + in the
following example) to create data rows in which the locations of data fields
andthenumberofcharactersarethesameacrossallrows.Thedefinitionsfor
these fields are CHAR(15), CHAR(2), CHAR(5), and CHAR(12), respectively.
For your reference, the character positions and five example data rows from
the cust_loc_data file are displayed:
1234567890123456789012345678901234
Sunnyvale++++++CA94086408-789-8075
Denver+++++++++CO80219303-936-7731
Blue Island++++NY60406312-944-5691
Brighton+++++++MA02135617-232-4159
Tempe++++++++++AZ85253xxx-xxx-xxxx
The following example of a dbload command file illustrates the character-
position form of the FILE and INSERT statements. The example includes two
new files, cust_address and cust_sort, to receive the data. For the purpose of
this example, cust_address contains four columns, the second of which is
omitted from the column list. The cust_sort table contains two columns.
FILE cust_loc_data
(city 1-15,
state 16-17,
area_cd 23-25 NULL = "xxx",
phone 23-34 NULL = "xxx-xxx-xxxx",
zip 18-22,
state_area 16-17 : 23-25);
INSERT INTO cust_address (col1, col3, col4)
VALUES (city, state, zip);
INSERT INTO cust_sort
VALUES (area_cd, zip);
The syntax for the character-position FILE statement can be represented as
follows:
: start -
end
);
FILE filename
,
fieldn start
NULL =
"null string"
(-
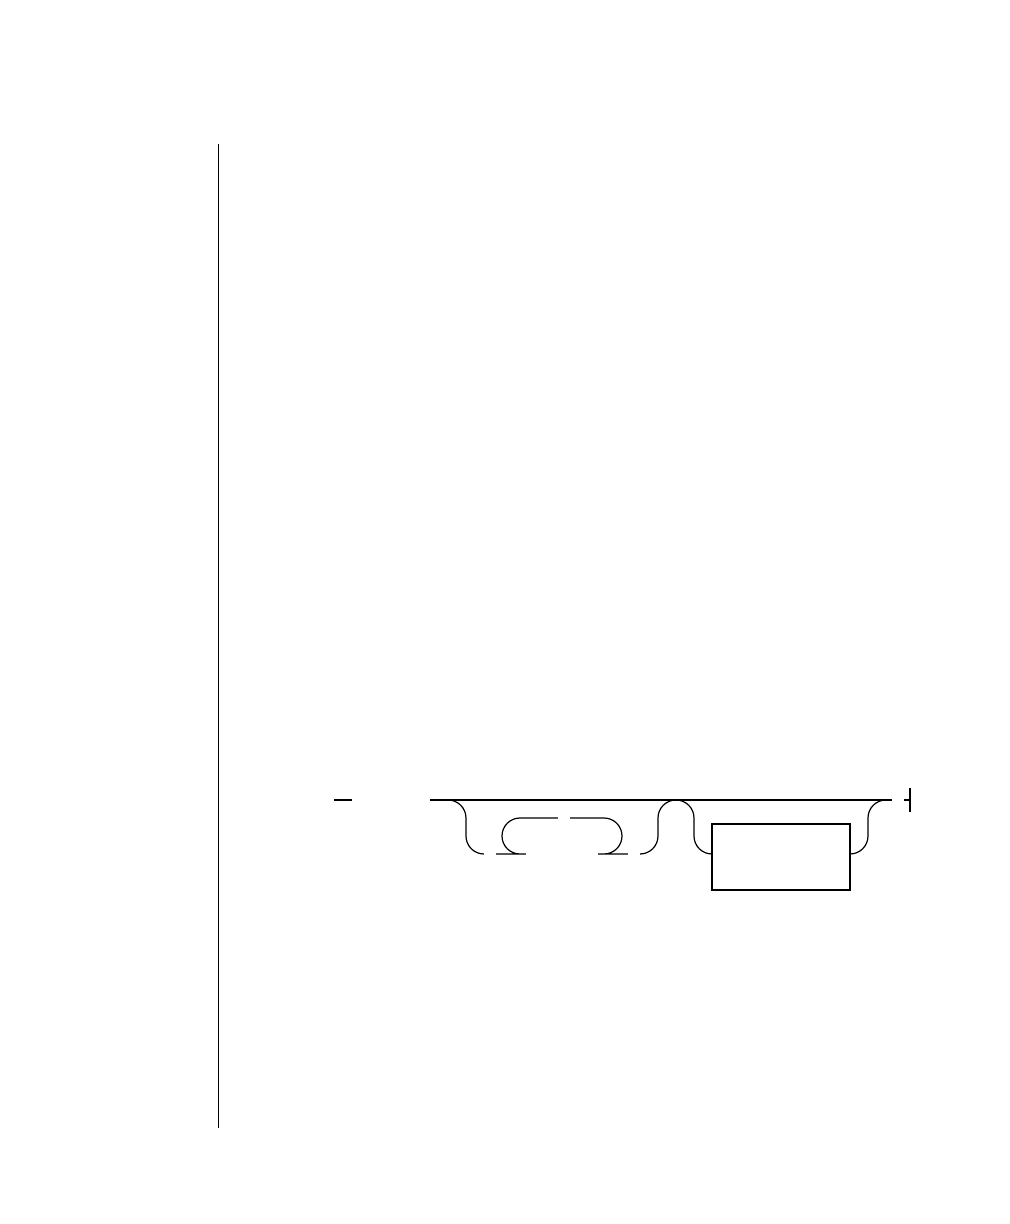
7-28 IBM Informix OnLine Database Server Administrator’s Guide
How to Create a Command File
The same character position can be repeated in a data field definition, or in
different fields.
The scope of reference of null string is the data field for which you define it,
but you can define the same null string for other fields.
Character-Position INSERT Statement
TheINSERTstatementwithindbloadcannotincorporateaSELECTstatement.
The user who executes dbload with this command file must have Insert
privilegeonthenamedtable.Arepresentationofthe syntax forthecharacter-
position INSERT statement follows:
Valid syntax for the dbload VALUES clause includes constants, literal
numbers, and functions as described in IBM Informix Guide to SQL: Reference.
- end is a hyphen followed by an integer that indicates the character
position within a data row that ends a range of character
positions.
fieldn is a name that you assign to a data field you are defining with
the range of character positions.
filename is the name of the input file.
null string is a quoted string that specifies the data value for which
dbload should substitute a null.
start isan integer that indicates the character positionwithin a data
row that starts a range of character positions.
column name is the column that receives the new data.
table name is the name of the table that receives the data. The table name
can include the owner name but cannot include a database
server name.
,
column
name Restricted
Values Clause
INSERT
INTO ;
( )
table name

Utilities 7-29
How to Create a Command File
The restrictions dbload imposes on the VALUES clause value list affect only
data types DATE,DATETIME, and INTERVAL. Values of type DATE must be in
mm/dd/yyyy format. (This is the case if the DBDATE environment variable is
set to its default value, MDY4/.) Data for DATETIME and INTERVAL columns
must be in character form, showing only field digits and delimiters (no type
or qualifiers).
Inserted data types correspond to the explicit or default column list. If the
data field width is different from its corresponding character column width,
the data is made to fit. That is, inserted values are padded with blanks if the
data is not wide enough for the column, or are truncated if the data is too
wide for the column.
If the number of columns named is fewer than the number of columns in the
table, dbload inserts the default value specified for the unnamed columns. If
no default is specified, dbload attempts to insert a null value. If the attempt
violatesa NOT NULL restrictionor a unique constraint, theinsert fails andan
error message is returned.
If the INSERT statement omits the column name(s), the default INSERT speci-
ficationiseverycolumninthenamedtable.IftheINSERTstatementomitsthe
VALUES clause, the defaultINSERT specificationiseveryfield of theprevious
FILE statement.
Anerrorresultsifthenumberofcolumnnameslisted(orimpliedbydefault)
does not match the number of values listed (or implied by default).
Character-Position Statement Examples
The first FILE and INSERT statement set in the character-position example on
page 7-26 is repeated here:
FILE cust_loc_data
(city 1-15,
state 16-17,
area_cd 23-25 NULL = "xxx",
phone 23-34 NULL = "xxx-xxx-xxxx",
zip 18-22,
state_area 16-17 : 23-25);
INSERT INTO cust_address (col1, col3, col4)
VALUES (city, state, zip);

7-30 IBM Informix OnLine Database Server Administrator’s Guide
How to Create a Command File
The FILE statement defines six data fields from the cust_loc_data table data
rows. The statement names the fields and defines the length of each field
using character positions. Compare the FILE statement in the preceding
example with the following example data rows:
1234567890123456789012345678901234
Sunnyvale++++++CA94086408-789-8075
Tempe++++++++++AZ85253xxx-xxx-xxxx
The FILE statement defines the following six data fields derived from these
data rows:
The null strings defined for the state and area_cd fields generate the null
values in those columns but do not affect the values stored in the state_area
column.
The INSERT statement uses the field names and values derived from the FILE
statement as the value-list input. Consider the first INSERT statement in the
character-position example:
INSERT INTO cust_address (col1, col3, col4)
VALUES (city, state, zip);
Column Values from Row 1 Values from Row 2
city Sunnyvale++++++ Tempe++++++++++
state CA AZ
area_cd 408 null
phone 408-789-8075 null
zip 94086 85253
state_area CA408 AZxxx

Utilities 7-31
How to Create a Command File
The following data rows would be inserted into the cust_address table:
Since the second column in cust_address (col2) is not named, the new data
row contains a null (assuming that the column permits nulls).
Consider the second INSERT statement in the character-position example:
INSERT INTO cust_sort
VALUES (area_cd, zip);
The following data rows would be inserted into the cust_sort table:
Since no column list is provided, dbload reads the names of all the columns
in cust_sort from the system catalog. Values to load into each column are
specified by field names from the previous FILE statement. You do not need
one FILE statement for each INSERT statement.
Column Values from Row 1 Values from Row 2
col1 Sunnyvale++++++ Tempe++++++++++
col2 null null
col3 CA AZ
col4 94086 85253
Column Values from Row 1 Values from Row 2
col1 408 null
col2 94086 85253
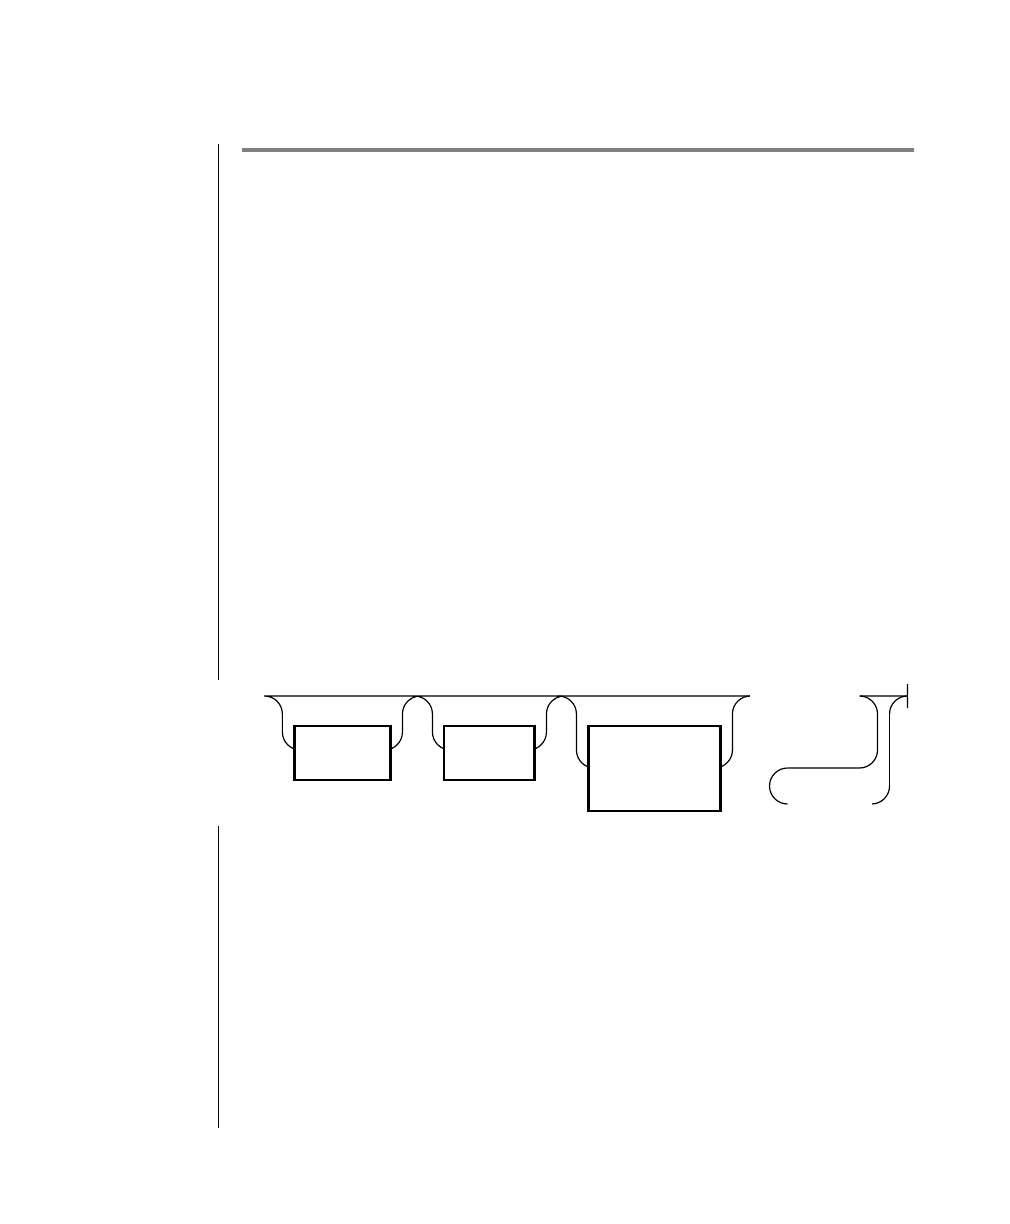
7-32 IBM Informix OnLine Database Server Administrator’s Guide
dbschema: Output SQL Statements
dbschema: Output SQL Statements
Use the dbschema utility to display the SQL statements required to replicate
a database or a specific table, view, or procedure. Options enable you to
perform the following activities:
■Display CREATE SYNONYM statements, by owner, for a database or
for a specific table.
■DisplayallGRANTprivilege statementsthataffectaspecifieduseror
that affect all users for a database or for a specific table.
■Save the output to a file.
You must be the DBA or have Connect or Resource privilege to the database
before you can run dbschema on it.
You can display the software version number by executing dbschema -V.
Syntax
If you do not supply a filename,dbschema sends output to the screen.
YoucanusetheOnLinesyntaxdatabase@dbservernametospecifythedatabase.
Specifying a database server name allows you to choose a database on
another server as your current database if you have installed IBM Informix
STAR.
Synonyms
p. 7-33 Privileges
p. 7-34
dbschema
filename
Tables,
Views, or
Procedures
p. 7-35
-d database
-d database specifies the database to which the schema applies.
filename specifies the filename that will contain the dbschema output.
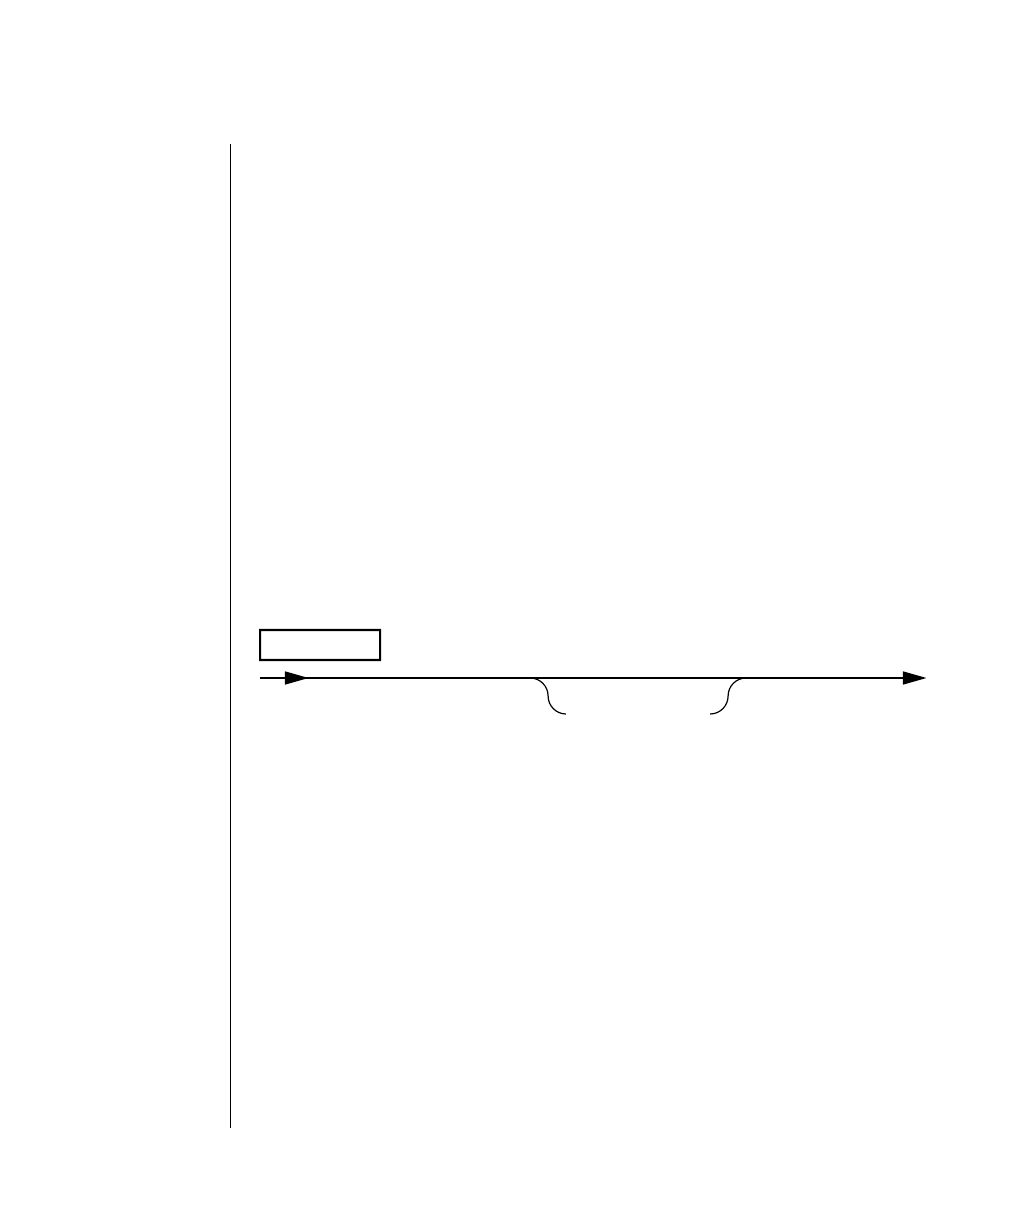
Utilities 7-33
Include Synonyms
All SERIAL fields included in CREATE TABLE statements displayed by
dbschema have a starting value of 1, regardless of their original starting
value.
The dbschema utility uses the owner.object convention when it generates any
CREATE TABLE,CREATE INDEX,CREATE SYNONYM,CREATE VIEW,CREATE
PROCEDURE, or GRANT statements, and when it reproduces any unique or
referential constraints. As a result, if you use the dbschema output to create
anew object (table, index,view, procedure,constraint,or synonym), thenew
objectis owned by the ownerof the original object. Ifyou want to change the
owner of the new object, you must edit the dbschema output before you run
it as an SQL script.
For more information about the CREATE TABLE,CREATE INDEX,CREATE
SYNONYM, CREATE PROCEDURE, GRANT, and CREATE VIEW statements, see
IBM Informix Guide to SQL: Reference.
Include Synonyms
If you specify all for ownername,dbschema displays all CREATE SYNONYM
statements for the database, table, or view specified.
Output from dbschema that is executed with the specified option -s alice
might appear as follows:
CREATE SYNONYM "alice".cust FOR "alice".customer
For more information about the CREATE SYNONYM statement, see
IBM Informix Guide to SQL: Reference.
-sownernamedirectsdbschematodisplaytheCREATESYNONYMstatements
owned by ownername.
Synonyms
-s ownername
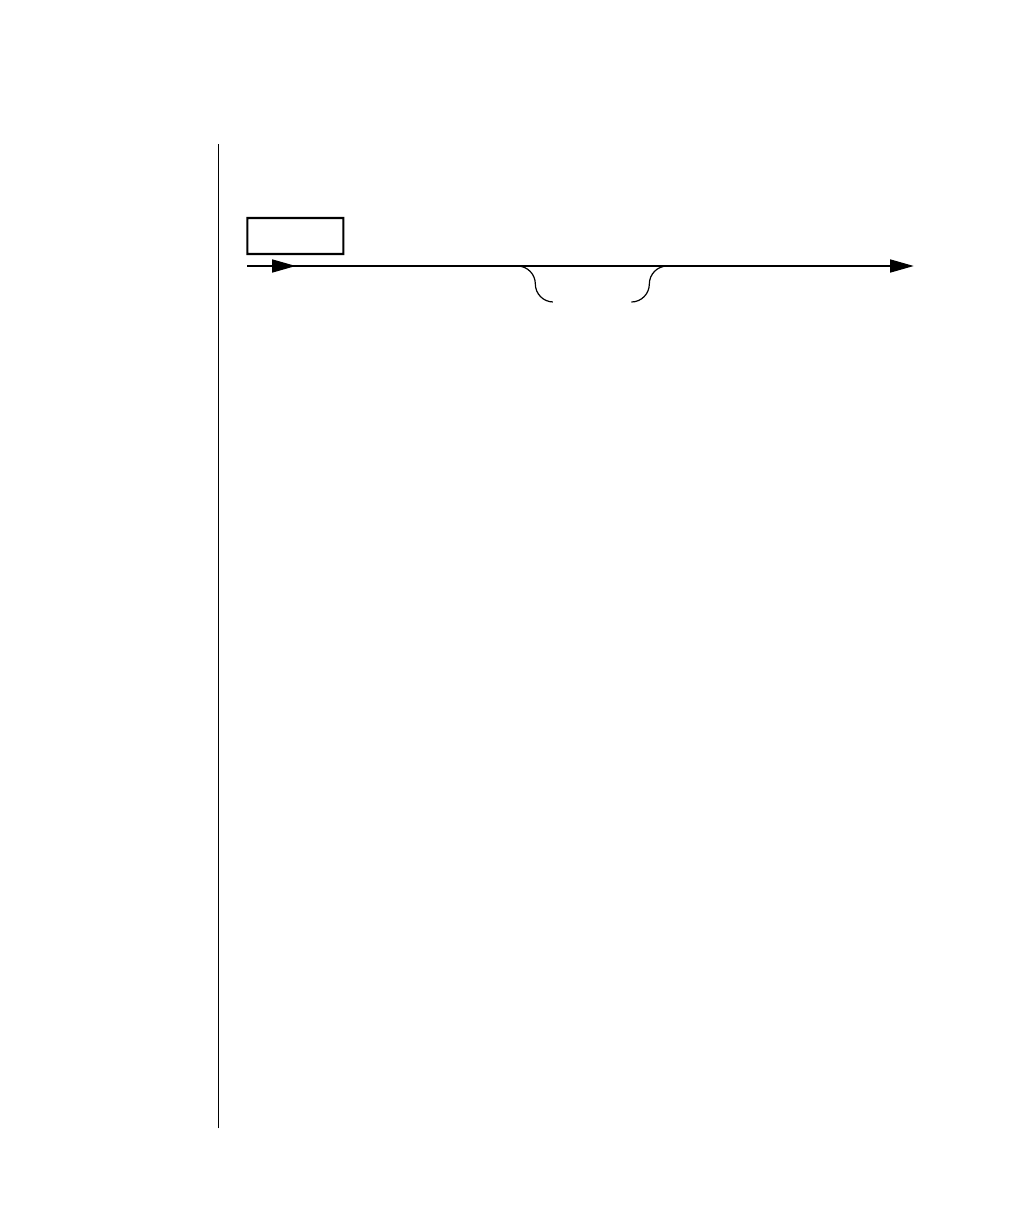
7-34 IBM Informix OnLine Database Server Administrator’s Guide
Include Privileges
Include Privileges
Ifyouspecifyall foruser,dbschema outputs GRANT statementsforallusers
for the database, table, or view specified.
In the dbschema output, the AS keyword indicates the grantor of a GRANT
statement. The following example output indicates that norma issued the
GRANT statement:
GRANT ALL ON "tom".customer TO "claire" AS "norma"
When the GRANT and AS keywords appear in the dbschema output, you
might need to grant privileges before you run the dbschema output as an
SQL script. Referring to the previous example output line, the following
conditions must be true before you can run the statement as part of a script:
■norma must have Connect privilege to the database.
■norma must have all privileges WITH GRANT OPTION for the table
tom.customer.
FormoreinformationabouttheGRANTstatement,refertoIBM InformixGuide
to SQL: Reference.
-p user directs dbschema to output the GRANT statements that grant
privileges to user.
Privileges
-p user
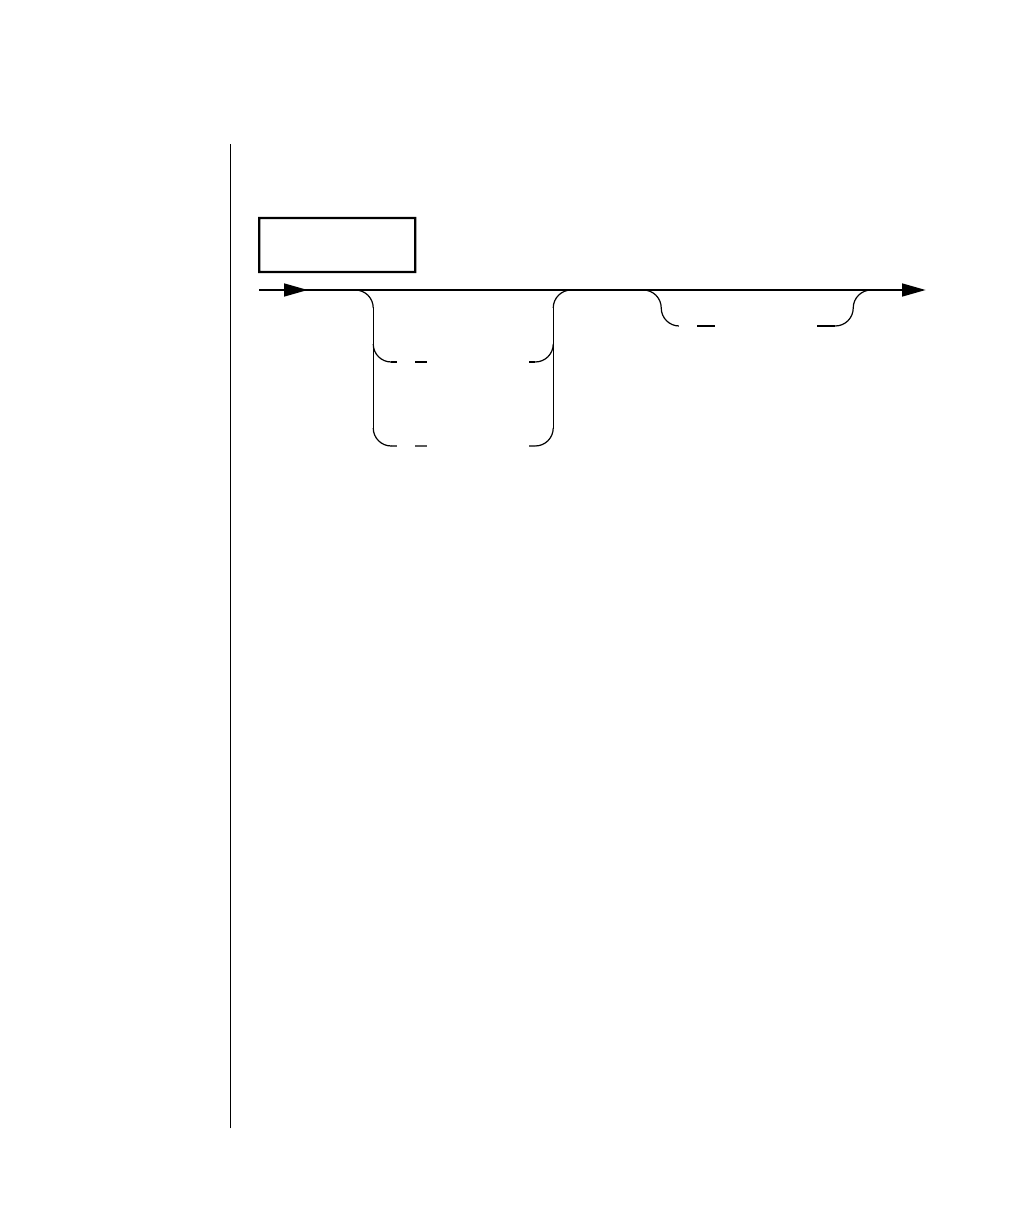
Utilities 7-35
Specify a Table, View, or Procedure
Specify a Table, View, or Procedure
If you specify all for the name of the procedure, dbschema displays all
CREATE PROCEDURE statements.
If you specify all for the table name (or view name), dbschema displays the
SQL statements for all database tables and views.
For more information about the CREATE PROCEDURE statement, see
IBM Informix Guide to SQL: Reference.
-f procedure specifies the name of the procedure for which you want
dbschema to output CREATE PROCEDURE statements.
-t view name directs dbschema to limit the SQL statement output to only
those statements needed to replicate the specified view.
-t table name directs dbschema to limit the SQL statement output to only
those statements needed to replicate the specified table.
Tables, Views, or
Procedures
-t
-t
-f
table name
view name
procedure

7-36 IBM Informix OnLine Database Server Administrator’s Guide
tbcheck: Check, Repair, or Display
tbcheck: Check, Repair, or Display
Depending on the options you choose, tbcheck can do the following things:
■Check specified structures for inconsistencies
■Repair index structures found to contain inconsistencies
■Display information about the structures
The only structures that tbcheck can repair are indexes. If tbcheck detects
inconsistencies in other structures, messages alert you to these inconsis-
tencies but tbcheck cannot resolve the problem. For more details about
OnLine consistency checking and dealing with corruption, refer to page 4-6.
Any user can execute the check options. Only user informix or root can
display database data or initiate index repairs. OnLine must be in quiescent
mode to repair indexes.
The display options of the tbcheck utility can be compared to the tbstat
utility, which also displays information about OnLine structures. The tbstat
utility reads the shared-memory segment and reports statistics that are
accurate for the instant during which the command executes. That is, tbstat
describes information that changes dynamically during processing, such as
buffers, locks, and users. The tbcheck utility tends to display configuration
and disk-usage information that is read directly from the disk and that
changes less frequently.
The list below associates tbcheck options with their function. Syntax is
providedon page 7-38.Somedisplayoptionsalsoperform checking.Referto
the descriptions that begin on page 7-39 for details.
Check Repair Display
Blobspace blobs -pB
Chunks and extents -ce -pe
Data rows, no blobs -cd -pd
Data rows, blob pages -cD -pD
Index (key values) -ci -ci -y, -pk -y -pk
(1 of 2)

Utilities 7-37
tbcheck: Check, Repair, or Display
Index (keys plus rowids) -cI -cI -y, -pK -y -pK
Index (leaf key values) -pl -y -pl
Index (leaf keys plus rowids) -pL -y -pL
Pages (by table) -pp
Pages (by chunk) -pP
Root reserved pages -cr -pr
Space usage (by table) -pt
Space usage (by table, with
indexes) -pT
System catalog tables cc -pc
Check Repair Display
(2 of 2)
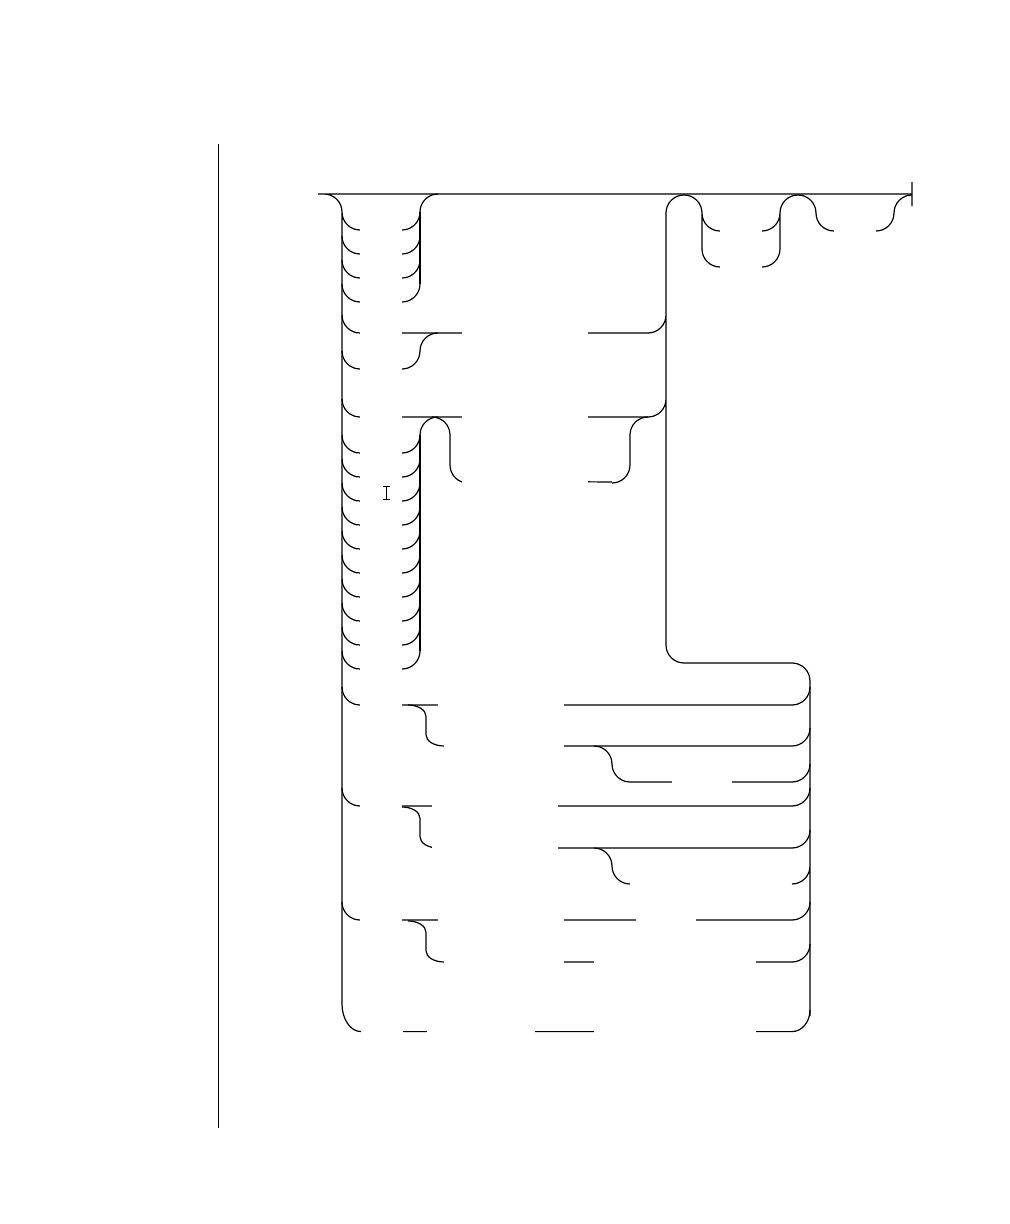
7-38 IBM Informix OnLine Database Server Administrator’s Guide
Syntax
Syntax
tbcheck
-ce
-cr
-pe
-pr
-pc
-cc
-cd
-cD
-ci
-c
-pB
-pk
-pK
-pl
-pL
-pt
-pT
-pd
rowid
-pp rowid
tblspace num logical page num
-pD
logical page num
-y
-n -q
database
database
database
table name
table name
database
table name
table name
-pP chunk num logical page num

Utilities 7-39
Option Descriptions
Option Descriptions
You cannot combine tbcheck option flags except as described in the
paragraphs that follow.
No Options
If you invoke tbcheck without any options, a summary of options displays.
-cc Option
The -cc option checks each of the system catalog tables for the specified
database.Ifthedatabaseis omitted,allsystemcatalogtablesforalldatabases
arechecked.Beforeyouexecute tbcheck, executethe SQL statement UPDATE
STATISTICS to ensure that an accurate check occurs.
chunk num is a decimal value that specifies a chunk. Execute the -pe
option to learn which chunk numbers are associated with
specific dbspaces or blobspaces.
database isthenameofthedatabase.Thedatabasenamecannotinclude
a database server name because tbcheck does not support a
client/server environment.
logical page
num is a decimal value that specifies a page in the tblspace. The
logical page number is contained in the most-significant three
bytes of the rowid. Rowid is displayed as part of tbcheck -pD
output.
rowid is a hexadecimal value that must include the 0x identifier.
Rowid is displayed as part of tbcheck -pD output.
table name is the name of the table. The table name cannot include a
database server name because tbcheck does not support a
client/server environment.
tblspace num is a hexadecimal value that identifies the tblspace. Refer to
page 2-104 for more details about obtaining the tblspace
number.

7-40 IBM Informix OnLine Database Server Administrator’s Guide
Option Descriptions
To check the tables, tbcheck compares each system catalog table to it corre-
sponding entry in the tblspace tblspace. The data in the tables are also
checked for consistency. Refer to page 2-104 for more details about the
tblspace tblspace. (The -pc option performs the same checks and also
displays the system catalog information as it checks it, including extent use
for each table.)
tbcheck -cc
tbcheck -cc stores5
-cd and -cD Options
The -cd option reads all non-blob pages from the tblspace for the specified
table and checks each page for consistency. The bit-map page is checked to
verify mapping. If a table is not specified, all tables in the database are
checked. (The -pd option displays a hexadecimal dump of specified pages
but does not check for consistency.)
The -cD option performs the same checks as -cd but includes dbspace blob
pages if any exist. To monitor blobspace blobpages, refer to tbcheck -pB.
tbcheck -cD stores5:catalog
-ce Option
The -ce option checks each chunk free list and corresponding free space and
each tblspace extent. The tbcheck process verifies that the extents on disk
correspond to the current control information describing them. Refer to
page 2-103formoredetailsaboutthechunkfree-listpage.Refertopage 2-114
for a definition of an extent, and to page 2-117 for more details about extent
allocation. (The -pe option performs the same checks and also displays the
chunk and tblspace extent information as it checks it.)
tbcheck -ce
-ci and -cI Options
The -ci option checks the key values for all indexes on the specified table.
(Refertopage 2-133formoredetailsaboutindexkeyvaluesandthestructure
of an index page.) If a table is not specified, all tables in the database are
checked.

Utilities 7-41
Option Descriptions
If inconsistencies are detected and OnLine is in quiescent mode, you are
prompted for confirmation to repair the problem index. If you specify the -y
(yes) option, indexes are automatically repaired. If you specify the -n (no)
option, only the problem is reported. No prompting occurs.
Index rebuilding can be time-consuming if you use tbcheck. Processing is
usuallyfasterifyouuse the DROP INDEX and CREATE INDEX SQL statements
to drop the index and re-create it.
The -cI option performs the same checks as -ci but extends the consistency
checking to include the rowids associated with the key values. The same -ci
repair options are available with -cI.
tbcheck -cI -n stores5:customer
-cr Option
The -cr option checks each of the root dbspace reserved pages as follows:
■It validates the contents of the $INFORMIXDIR/etc/$TBCONFIG file
with the PAGE_CONFIG reserved page.
■Itensuresthatall chunks canbe opened, thatchunks do notoverlap,
and that chunk sizes are correct.
■It checks all logical and physical log pages for consistency.
If you have changed the value of a configuration parameter (either through
DB-Monitor or by editing the configuration file) and you have not yet reini-
tialized shared memory, tbcheck -cr detects the inconsistency and returns an
error message.
Refertopage 2-95foracomplete listoftherootdbspace reservedpages.(The
-pr option performs the same checks and also displays the reserved-page
information as it checks the reserved pages.)
tbcheck -cr
-n Option
The-n option is used withthe index repairoptions(-ci,-cI,-pk,-pK,-pl,and
-pL) to indicate that no repair should be performed, even if errors are
detected.

7-42 IBM Informix OnLine Database Server Administrator’s Guide
Option Descriptions
-pB Option
The -pB option displays statistics that describe the average fullness of
blobspace blobpages in a specified table. These statistics provide a measure
ofstorageefficiencyforindividualblobsinadatabaseortable.Ifatableisnot
specified, statistics are displayed for the database. Refer to page 5-5 for more
details about interpreting tbcheck -pB output.
tbcheck -pB stores5:catalog
-pc Option
The -pc option performs the same checks as the -cc option. In addition, -pc
displays the system catalog information as it checks it, including extent use
for each table. Refer to the -cc discussion on page 7-39.
tbcheck -pc
-pd and -pD Options
The -pd option can take a database, a table, and a specific rowid or logical
pagenumberasinput.Ineverycase,-pdprintspageheaderinformationand
displays the specified rows in hexadecimal and ASCII format. No checks for
consistency are performed. If you specify a rowid (expressed as a
hexadecimal value), the page number contained in the rowid is printed.
(Refertopage 2-123formoredetails about the rowid.)Ifyouspecifyalogical
page number (expressed as a decimal), the contents of that page are printed
if the page is a home page. If you specify a table, all the rows in the table are
printed, with their rowids. If you specify a database, all the rows in the
database are printed. Blob descriptors stored in the data row are printed but
blob data itself is not.
The -pD option prints the same information as -pd. In addition, -pD prints
blobvaluesstoredin the tblspace orblobheaderinformationforblobsstored
in a blobspace blobpage. For more details about how to use this output to
monitor disk pages, refer to page 3-77.
tbcheck -pd stores5:systables
tbcheck -pd stores5:systables 5
tbcheck -pD stores5:customer 0x101

Utilities 7-43
Option Descriptions
-pe Option
The -pe option performs the same checks as the -ce option. In addition, -pe
displaysthechunkandtblspaceextentinformationasitchecksit.Refertothe
-ce discussion on page 7-40.
tbcheck -pe
-pk and -pK, -pl and -pL Options
The -pk option performs the same checks as the -ci option. In addition, -pk
displaysthekeyvaluesforallindexesonthespecifiedtableasitchecksthem.
The -pK option performs the same checks as the -cI option. The -pK option
displays the key values and rowids as it checks them.(Refer to the -ci and -cI
discussions on page 7-40.)
The -pl option performs the same checks as the -ci option and displays the
keyvalues, but onlyleaf-node index pagesarechecked. The root and branch-
node pages are ignored. (Refer to page 2-133 for more details about index-
root, branch-node, and leaf-node pages.)
The -pL option performs the same checks as the -cI option and displays the
key values and rowids, but only for leaf-node index pages. The root and
branch-node pages are ignored.
Repair options are available with all four flags.
tbcheck -pK -n stores5.customer
-pp and -pP options
The -pp option requires as input either of the following values:
■A table name and a rowid (expressed as a hexadecimal value)
■A tblspace number and logical page number
Use the -pp option to dump the contents of the logical page number
contained in the rowid. The page contents appear in ASCII format. The
display also includes the number of slot-table entries on the page.

7-44 IBM Informix OnLine Database Server Administrator’s Guide
Option Descriptions
Use the -pD option to obtain the rowid. Refer to page 2-104 for more details
about the tblspace number. Refer to page 2-124 for more details about the
logical page number. Refer to page 2-123 for more details about the rowid.
Refer to page 2-121 for more details about the slot table.
The -pP option provides the same information as the -pp option but requires
a chunk number and logical page number as input. For more details about
how to use this output to monitor disk pages, refer to page page 3-77.
tbcheck -pp stores5:customer 0x211
tbcheck 100000a 25
tbcheck -pP 3 15
-pr Option
The -pr option performs the same checks as the -cr option. In addition, -pr
displaysthereserved-pageinformationasitchecksthereservedpages.Refer
to page 2-95 for a complete listing of the root dbspace reserved pages.
tbcheck -pr
If you have changed the value of a configuration parameter (either through
DB-Monitor or by editing the configuration file) and you have not yet reini-
tialized shared memory, tbcheck -cr detects the inconsistency, prints both
values, and displays an error message.
-pt and -pT Options
The -pt option prints a tblspace report for the specified table. The report
containsgeneralallocationinformationincludingthemaximumrowsize,the
number of keys, the number of extents and their sizes, pages allocated and
used per extent, the current serial value, and the date the table was created.
If a table is not specified, this information is displayed for all tables in the
database.
The-pT optionprintsthesameinformation as the -pt option. In addition, the
-pT option displays index-specific information and page-allocation infor-
mation by page type (for dbspaces).

Utilities 7-45
tbinit: Initialize OnLine
Output for both -pt and -pT contains listings for “Number of pages used”
and “Number of data pages.” The values provided are never decremented;
that is, they always represent the maximum value that is valid for the
tblspace. For an accurate count of the number of pages currently used, refer
to the detailed information on usage (organized by page type) that the -pT
option provides.
tbcheck -pT stores5:customer
-q Option
The -q option suppresses all checking and validation messages. Only error
messages display if the -q option is invoked.
tbcheck -cc -q
-y Option
The-y optionisusedwiththe index-repairoptions(-ci,-cI,-pk,-pK,-pl,and
-pL) to indicate that tbcheck should repair any index where errors are
detected. OnLine must be in quiescent mode to repair indexes.
tbcheck -cI -y stores5:customer
tbinit: Initialize OnLine
Thetbinit processforksand the tbinit daemon processthatis spawned isthe
processthatsupervisesOnLine.ThetbinitdaemonprocessownstheOnLine
shared-memory segments and controls all other daemon processes
associated with OnLine. Executing tbinit from the command line initializes
OnLine. You must be logged in as root or user informix to execute tbinit.
Initializationcommands aredescribedin detail on page 2-8.For moredetails
about what happens during disk-space initialization and shared-memory
initialization, refer to page 2-14 and page 2-10, respectively.

7-46 IBM Informix OnLine Database Server Administrator’s Guide
Syntax
Syntax
No Options
If you execute tbinit without options, OnLine is left in online mode after
shared memory is initialized. For example, the following commands take
OnLine offline and then reinitialize shared memory:
tbmode -ky
tbinit
-i Option
If you use only the -i option, OnLine is left in online mode after initializing
disk space. If you use both the -i and -s options, OnLine is left in quiescent
mode. If you initialize disk space and overwrite an existing root dbspace, all data
associated with that OnLine system becomes inaccessible and lost.
-i specifies disk-space initialization. If you initialize disk space, all
existing data on the disk you are initializing is destroyed.
-p directs tbinit not to search for and delete temporary tables
during shared-memory initialization.
-s directs tbinit to leave OnLine in quiescent mode following
initialization. This option is equivalent to the DB-Monitor
Mode menu, Startup option.
-y automatically responds “yes” to all prompts.
-y
tbinit
-s-p
-i

Utilities 7-47
tbload: Create a Database or Table
-p Option
The -p option directs the tbinit daemon not to search for (and delete)
temporary tables left by database server processes that died without
performing cleanup. If you use this option, OnLine returns to online mode
morerapidlybutspaceusedbytemporarytablesleftondisk isnotreclaimed.
tbinit -p
-s Option
The -s option initializes shared memory and leaves OnLine in quiescent
mode. The following commands take OnLine offline, reinitialize shared
memory, and leave OnLine in quiescent mode:
tbmode -ky
tbinit -s
tbload: Create a Database or Table
Thetbload utilitycreatesadatabaseortableinaspecifieddbspaceandloads
it with data from an input tape created by the tbunload utility. During the
load, you can move blobs stored in a blobspace to another blobspace.
The tape that tbload reads contains binary data stored in disk-page-sized
units. For this reason, the machine receiving the data and the machine used
tocreatethetape must share the same pagesize (specified asBUFFSIZE in the
configuration file).
When tbload is used to create databases from a tbunload input tape, the
databases that result are not ANSI-compliant and do not use transaction
logging until you take further action. You can make a database ANSI-
complaint after it is loaded through the DB-Monitor Logical-Logs menu,
Databases option. You can add logging to a database either through
DB-Monitor (same option) or by executing tbtape.
Before you load a table into an existing, logged database, end logging for the
databaseorloadduringoff-peakhours.(Otherwise,youmightfillthelogical
logs or consume excessive shared-memory resources.) After the table is
loaded, create a level-0 archive before you resume database logging.

7-48 IBM Informix OnLine Database Server Administrator’s Guide
Syntax
If you are loading a table that contains blobs stored in a blobspace, a prompt
asks you if you want to move the blobs to another blobspace. If you respond
“yes,” the next prompt displays the blobspace name where the blobs were
stored when the tape was created. You are asked to enter the name of the
blobspacewhereyouwanttheblobsstored.Ifthenameyouenterisvalid,all
blob columns in the table are moved to the new blobspace during the load.
Otherwise, you are prompted again for a valid blobspace name.
When a new database is loaded, the user who runs tbload becomes the
owner. Ownership within the database (tables, views, and indexes) remains
the same as when the database was unloaded to tape with tbunload.
To load a table, you must have Resource privilege on the database. When a
newtableisloaded, the user who runs tbload becomes the ownerunlessyou
specify an owner in the table name. (To do so requires DBA privilege for the
database.)
Synonymsoraccessprivileges defined for atableatthe time it wasunloaded
to tape are not carried over to the new table. To obtain a listing of defined
synonymsor access privileges,use the dbschema utility.(Refer to page 7-32.)
During the load operation, the new database or table is locked exclusively.
Loading proceeds as a single transaction, and the new database or table is
dropped in case of error or system failure.
Syntax
database isthenameofthedatabase.Thedatabasenamecannotinclude
a database server name because tbload does not support a
client/server environment.
table name is the name of the table. The table name cannot include a
database server name because tbload does not support a
client/server environment.
Specify
Tape
Parameters
p. 7-49
Create
Options
p. 7-14
tbload database
table name
Utilities 7-49
Specify Tape Parameters
If you do not specify any tape parameter options, tbload uses the archive
tape parameters by default. The tape device to which data is sent is assumed
to be the device specified as TAPEDEV. The block size and tape size are
assumed to be the values specified as TAPEBLK and TAPESIZE, respectively.
To specify other parameter values, see the next section.
Specify Tape Parameters
You can use the -b,-s, and -t options individually to override the default
archive tape device parameters.
You can usethe -b,-s, and-t options with the-l option to overrideindividual
logical log device parameters.
To specify a remote tape device, use the following syntax:
host_machine_name:tape_device_pathname
-b blocksize specifies in kilobytes the block size of the tape device.
-l directs tbload to read the values for tape device, block size,
and tape size from the logical log backup device parameters
(LTAPEDEV,LTAPEBLK, and LTAPESIZE, respectively).
-s tapesize specifies in kilobytes the amount of data that can be stored on
the tape.
-t device namesthepathnameofthetapedevicewheretheinputtapeis
mounted.
Specify
Tape
Parameters
-b blocksize
1
-s tapesize
1
-t device
1
1-l
7-50 IBM Informix OnLine Database Server Administrator’s Guide
Create Options
The host machine where the tape device is attached must permit user
informix to run a UNIX shell from your machine without requiring a
password. If your machine does not appear in the hosts.equiv file of the
otherhost machine, it must appearin the .rhosts file in thehome directory of
the informix login. If you are executing tbload as root, the machine name
must appear in the .rhosts file for root on the other host machine.
Create Options
If you do not use the -d dbspace option to specify a dbspace, the database or
table is stored in the root dbspace by default.
Use the -i option to rename indexes during the load to avoid conflict with
existing index names. A table name must be specified in the command line
for the -i option to take effect.
-d dbspace specifies the dbspace where the database or table is to be
stored.
-i oldindex
newindex directs tbload to rename the table index when it is stored.
Create
Options
1-d dbspace
-i oldindex newindex
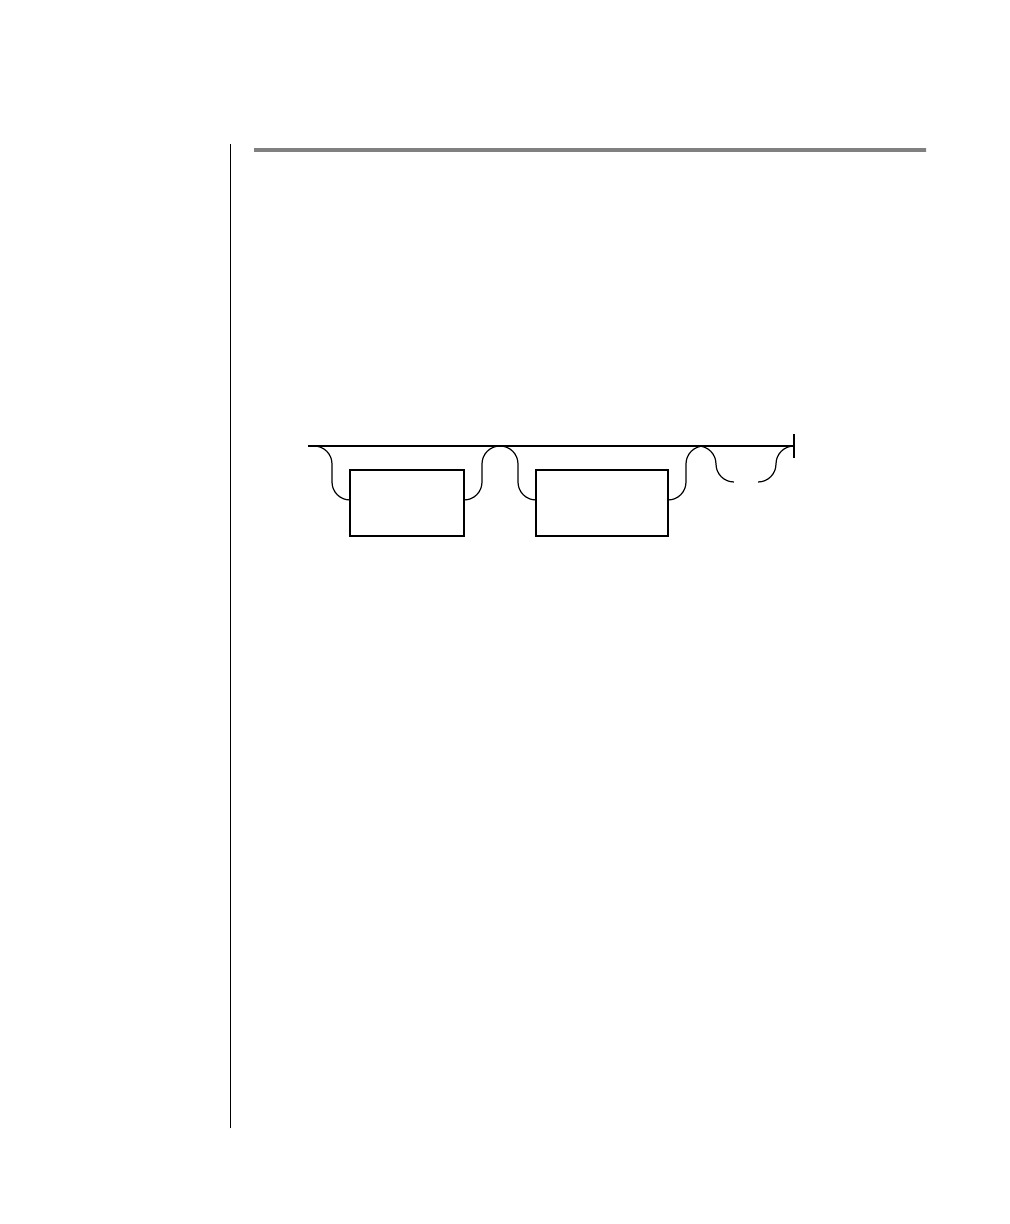
Utilities 7-51
tblog: Display Logical Log Contents
tblog: Display Logical Log Contents
ThetblogutilitydisplaysthecontentsofanOnLinelogicallogfile.Thetblog
output is most useful in debugging situations, when you want to be able to
track a specific transaction or to see what changes have been made to a
specific tblspace.
Syntax
Youdirecttblogtoreadthefollowingportionsofthelogical log asitsearches
for records to include in the output display:
■Records stored on disk
■Records stored on tape
■Records from the specified logical log file
You can display every logical log record header or you can specify output
based on the following criteria:
■Records associated with a specific table
■Records initiated by a specific user
■Records associated with a specific transaction
By default, tblog displays the logical log record header, which describes the
transaction number and the record type. The record type identifies the type
of operation performed.
-q directs tblog to suppress the one-line header that appears
every 18 records by default.
Log-Record
Read Filters
p. 7-52
-q
tblog
Log-Record
Display Filters
p. 7-54
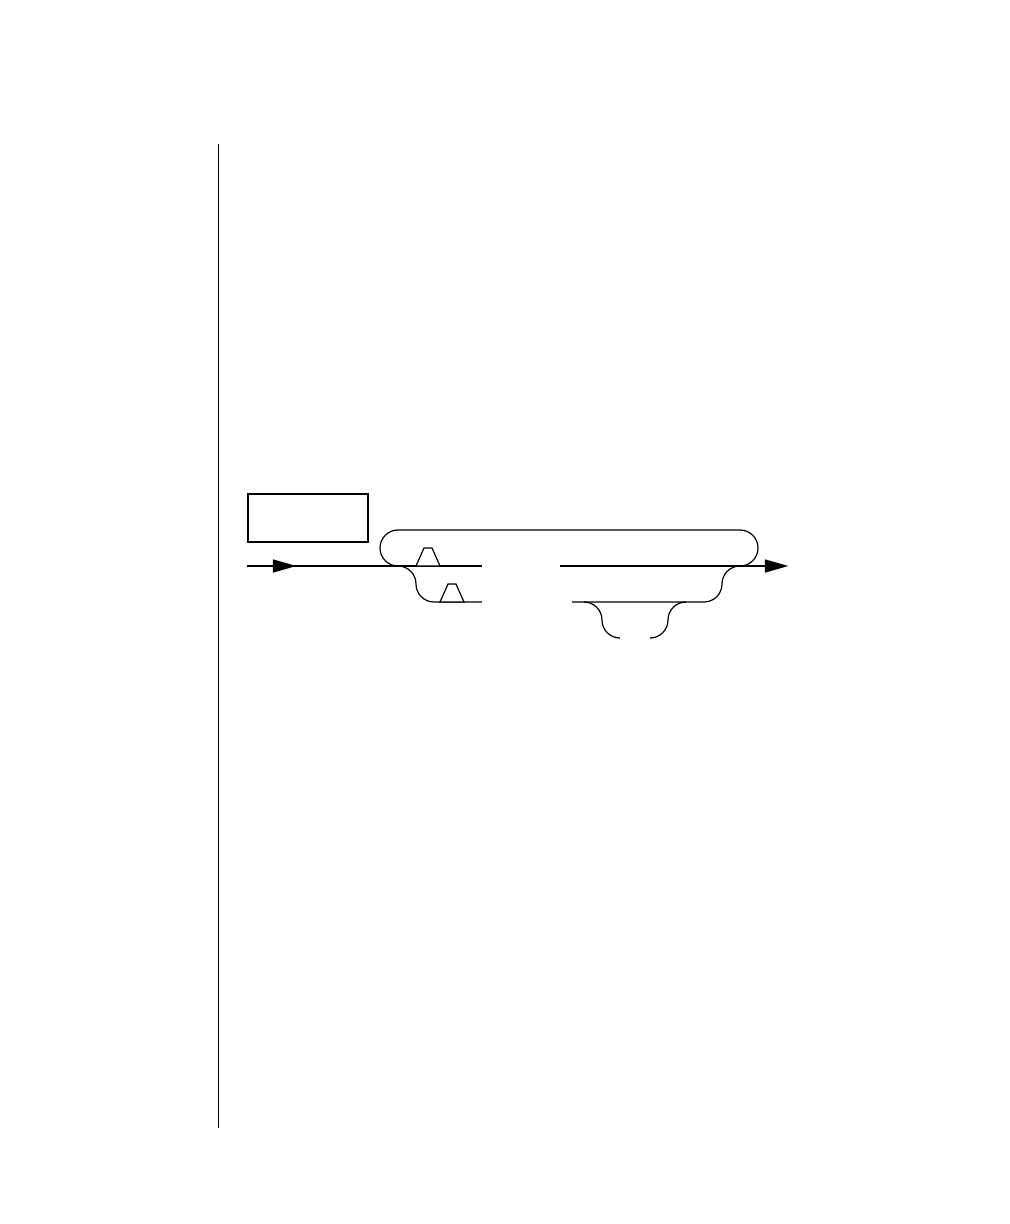
7-52 IBM Informix OnLine Database Server Administrator’s Guide
Log-Record Read Filters
In addition to the header, you can direct tblog to display the following
information:
■Copies of blobpages from blobspaces (copied from the logical log
backup tape only, not available from disk)
■Logical log record header and data (including copies of blobs stored
in a dbspace)
If tblog detects an error in the log file, such as an unrecognizable log type, it
displays the entire log page in hexadecimal format and terminates.
Log-Record Read Filters
-b Option
The -b option displays blobspace blobpages stored on the logical log backup
tape as part of blobspace logging. For more details about blobspace logging,
refer to page 4-22.
-b directs tblog to display blobspace blobpages stored on the logical log
backup tape.
-d device names the pathname of the tape device where the logical log
backup tape is mounted.
-n logid directs tblog to read only the logical log records contained in
the specified log.
Log-Record
Read Filters
-b
1-n logid
1-d device

Utilities 7-53
Log-Record Read Filters
-d Option
Ifyoudonotusethe-doption,tblogreadsthelogicallogfilesstoredondisk,
starting with the logical log file with the lowest logid number. The tblog
utilityusesthepathnamesstoredintherootdbspacereservedpagestolocate
thelogicallogfiles.IfOnLineisinofflinemodewhenyouexecutetblog,only
the files on disk are read. If OnLine is in quiescent or online mode, tblog also
reads the logical log records stored in the logical log buffers in shared
memory (after all records on disk have been read).
Whenyoureadthecurrentlogicallogondisk,readandwriteaccessisdenied
to all other user processes. For this reason, Informix recommends that you
wait to read the contents of the logical log files until after the files have been
backed up and then read the files from tape.
-n Option
If you do not use the -n option, tblog reads all logical log files available
(either on disk or on tape).
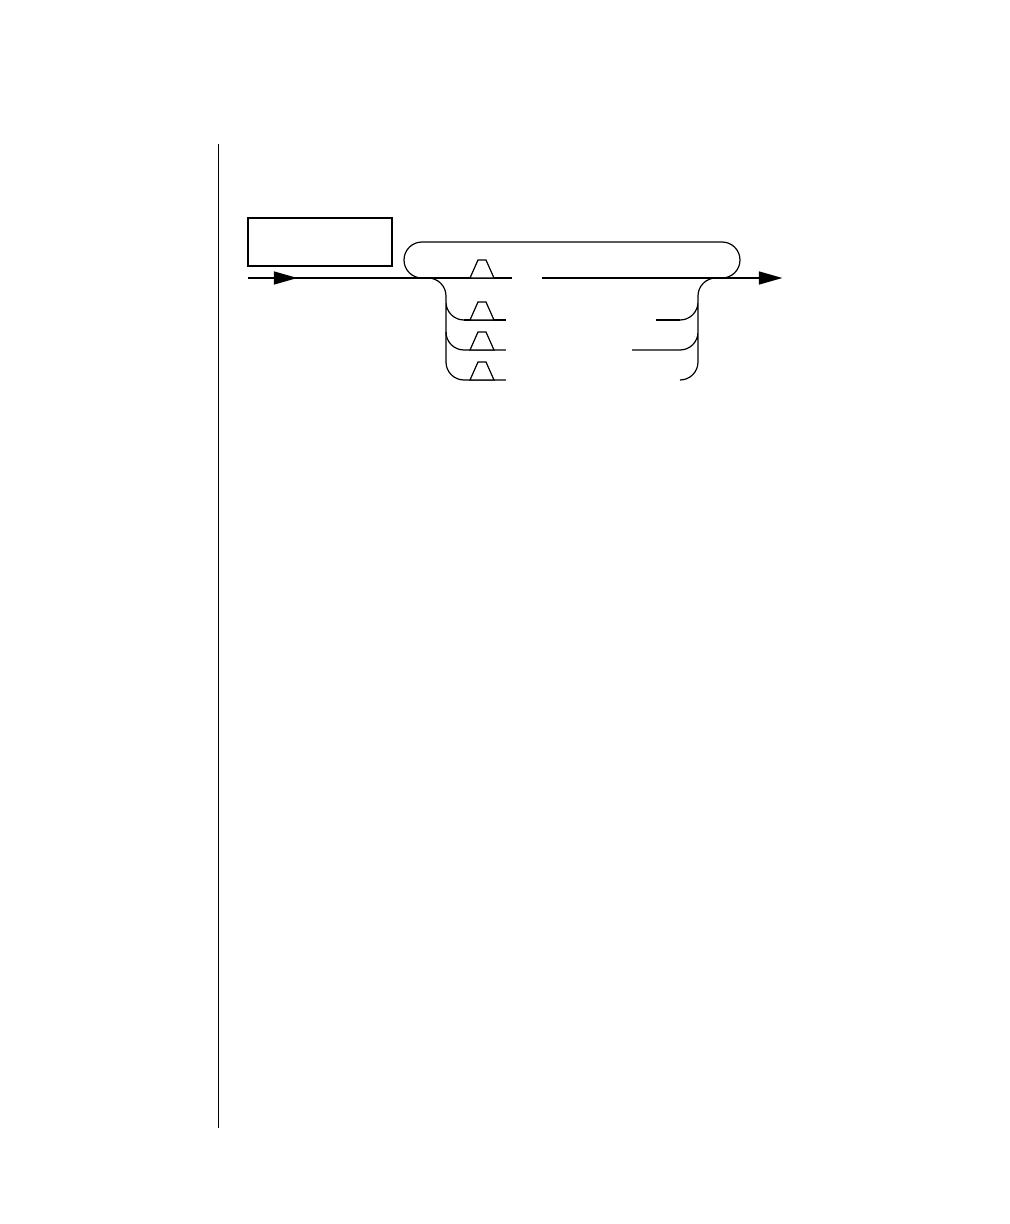
7-54 IBM Informix OnLine Database Server Administrator’s Guide
Log-Record Display Filters
Log-Record Display Filters
You can combine options with any other options to produce more selective
filters.
Forexample, if youuse both -u and-x options, only theactivities initiated by
username during the specified transaction are displayed.
Ifyouuseboththe-u and-t options, only the activities initiated by username
and associated with the specified tblspace are displayed.
-l directs tblog to display the long listing of the logical log
record, both heading and associated data.
-t tblspace
num directs tblog to display only records associated with the
specified tblspace. The tbspace number can be specified as
eitheradecimalorhexadecimal value. (If you donotusean0x
prefix, the value is interpreted as a decimal.)
-u username directs tblog to display only records associated with activity
initiated by the specified user.
-xtransaction
num directs tblog to display only records associated with the
specified transaction. The transaction number must be a
decimal value. (Refer to tbstat -u.)
Log-Record
Display Filters
-t tblspace num
1
-u username
1
-x transaction num
1
1-l

Utilities 7-55
Interpreting tblog Output
Interpreting tblog Output
Thetblogutilitydisplaystheheaderofeachlogicallogrecord.Dependingon
therecordtype,additionalcolumnsofinformation also appear intheoutput.
Displayedbelowisasampletblog outputthatillustratestheheader columns
that display for every logical log record.
This table defines the contents of each column.
addr en type xid id link
93338 56 DELITEM 2 0 93318
93370 32 DELITEM 2 0 93338
93390 16 PERASE 2 0 93370
933a0 12 BEGCOM 2 0 93390
933ac 16 ERASE 2 0 933a0
933bc 20 CHFREE 2 0 933ac
Header Field Contents Format
addr Log record address Hexadecimal
len Record length Decimal
type Record type name ASCII
xid Transaction number Decimal
id Logical log number Decimal
link Link to the previous record in the
transaction Hexadecimal

7-56 IBM Informix OnLine Database Server Administrator’s Guide
Interpreting tblog Output
Record Types
In addition to the six columns that display for every record, some record
types display additional columns of information. The information that is
displayed varies, depending on record type. A complete listing of record
types, alphabetized by type, is contained in the table on page 7-57. The
following paragraphs contain additional notes about specific record types or
processing conditions.
Transactions that involve dropping tables or dropping indexes generate a
PREPCOM log record when the commit begins. The ERASE,DINDEX, and
COMMIT records follow.
One record of type CLR (24 bytes in size) is generated for each record that is
rolled back as part of processing. If the phrase “includes next record” occurs
on a CLR record, the next log record printed is included within the CLR log
record as the compensating operation. Otherwise, assume that the compen-
sating operation is the logical undo of the log record pointed to by the CLR
record.
Ifthereareactivetransactionsatthetimeof a checkpoint, checkpoint records
include subentries that describe each of the active transactions using the
following columns:
■Log begin (decimal format)
■Transaction ID (decimal format)
■Unique log number (decimal format)
■Log position (hexadecimal format)
■Username
When a VARCHAR data type is included in an operation, three columns of
additionaloutputareaddedtothelogicallogrecordheadertoaccommodate
the tblspace number, the rowid, and the slot-table entry number. The eight
log record types represent the following operations:
■Home page insert
■Home page delete
■Home page update
■Remainder page insert
■Remainder page delete

Utilities 7-57
Interpreting tblog Output
■Remainder page update
■Before update record
■After update record
Record Contents
The table below lists tblog record types as they appear in the log. The
contentsofthelogrecordindicatethetypeofoperationthatgeneratedthelog
entry. The additional column and format information describes what is
displayed for each record type if you request the -l option (long listing).
Type Contents Additional Columns Format
ADDCHK add chunk chunk number
chunk name decimal
ASCII
ADDDBS add dbspace dbspace name ASCII
ADDITEM add item to index tblspace id
rowid
logical page
key number
key length
hexadecimal
hexadecimal
decimal
decimal
decimal
ADDLOG add log log number
log size (pages)
pageno
decimal
decimal
hexadecimal
BADIDX bad index tblspace id hexadecimal
BEGIN begin work date
time
PID
user
decimal
decimal
decimal
ASCII
BEGPREP begin a global
transaction flags
no. of participants decimal
decimal
(1 of 7)

7-58 IBM Informix OnLine Database Server Administrator’s Guide
Interpreting tblog Output
BFRMAP blob free map change tblspace id
bpageno
status
log id
prevpage
hexadecimal
hexadecimal
USED/FREE
decimal
hexadecimal
BLDCL build tblspace tblspace id
fextsize
nextsize
row size
ncolumns
hexadecimal
decimal
decimal
decimal
decimal
BSPADD add blobspace blobspace name ASCII
BTCPYBCK copyback child key to
parent tblspace id
parent logical page
child logical page
slot
rowoff
key number
hexadecimal
decimal
decimal
decimal
decimal
decimal
BTMERGE merge B+ tree nodes tblspace id
parent logical page
left logical page
right logical page
left slot
left rowoff
right slot
right rowoff
key number
hexadecimal
decimal
decimal
decimal
decimal
decimal
decimal
decimal
decimal
Type Contents Additional Columns Format
(2 of 7)

Utilities 7-59
Interpreting tblog Output
BTSHUFFL shuffle B+ tree nodes tblspace id
parent logical page
left logical page
right logical page
left slot
left rowoff
key number
flags
hexadecimal
decimal
decimal
decimal
decimal
decimal
decimal
hexadecimal
BTSPLIT split B+ tree node tblspace id
rowid
parent logical page
left logical page
right logical page
infinity logical page
rootleft logical page
midsplit
key number
key length
hexadecimal
hexadecimal
decimal
decimal
decimal
decimal
decimal
decimal
decimal
decimal
CHALLOC chunk extent
allocation pageno
size hexadecimal
hexadecimal
CHCOMBIN chunk extent
combine pageno hexadecimal
CHFREE chunk extent free pageno
size hexadecimal
hexadecimal
CHPHYLOG change physical
log location pageno
size in Kbytes
dbspace name
hexadecimal
hexadecimal
ASCII
CHSPLIT chunk extent split pageno hexadecimal
CINDEX create index tblspace id hexadecimal
Type Contents Additional Columns Format
(3 of 7)

7-60 IBM Informix OnLine Database Server Administrator’s Guide
Interpreting tblog Output
CKPOINT checkpoint max users
number of
active transactions
decimal
decimal
CLR compensation log
record; part of a roll
back
none
CLUSIDX create clustered index tblspace id hexadecimal
COLREPAI adjustment of BYTE,
TEXT, or VARCHAR
column
tblspace id
no. of columns that
were adjusted
hexadecimal
decimal
COMMIT commit work date
time decimal
decimal
DELETE delete before image tblspace id
rowid hexadecimal
hexadecimal
DELITEM delete item from index tblspace id
rowid
logical page
key number
key length
hexadecimal
hexadecimal
decimal
decimal
decimal
DINDEX drop index tblspace id hexadecimal
DRPBSP drop blobspace blobspace name ASCII
DRPCHK drop chunk chunk number
chunk name decimal
ASCII
DRPDBS drop dbspace dbspace name ASCII
DRPLOG drop log log number
log size (pages)
pageno
decimal
decimal
hexadecimal
ENDTRANS end the transaction none
Type Contents Additional Columns Format
(4 of 7)

Utilities 7-61
Interpreting tblog Output
ERASE drop tblspace tblspace id hexadecimal
HDELETE home row delete tblspace id
rowid
slotlen
hexadecimal
hexadecimal
decimal
HEURTX heuristic decision to
roll back transaction flag hexadecimal
HINSERT home row insert tblspace id
rowid
slotlen
hexadecimal
hexadecimal
decimal
HUPAFT home row update,
after image tblspace id
rowid
slotlen
hexadecimal
hexadecimal
decimal
HUPBEF home row update,
before image tblspace id
rowid
slotlen
hexadecimal
hexadecimal
decimal
IDXFLAGS index flags tblspace id
key number hexadecimal
hexadecimal
INSERT insert after image tblspace id
rowid hexadecimal
hexadecimal
LCKLVL locking mode tblspace id
old lockmode
new lockmode
hexadecimal
hexadecimal
hexadecimal
PBDELETE tblspace blob page
delete bpageno
status
unique id
hexadecimal
USED/FREE
decimal
Type Contents Additional Columns Format
(5 of 7)

7-62 IBM Informix OnLine Database Server Administrator’s Guide
Interpreting tblog Output
PBINSERT tblspace blob page
insert bpageno
tblspace id
rowid
slotlen
pbrowid
hexadecimal
hexadecimal
hexadecimal
decimal
hexadecimal
PDINDEX pre-drop index tblspace id hexadecimal
PERASE pre-erase old file tblspace id hexadecimal
PNSIZES set tblspace extent
sizes tblspace id
fextsize
nextsize
hexadecimal
decimal
decimal
PREPARE participant in two-
phase commit can
commit
coordinator’s
DBSERVERNAME ASCII
PTEXTEND partition extend tblspace id
last logical page
first physical page
hexadecimal
decimal
hexadecimal
RDELETE remainder page delete tblspace id
rowid
slotlen
hexadecimal
hexadecimal
decimal
RINSERT remainder page insert tblspace id
rowid
slotlen
hexadecimal
hexadecimal
decimal
ROLLBACK rollback work date
time decimal
decimal
RUPAFT remainder page
update, after image tblspace id
rowid
slotlen
hexadecimal
hexadecimal
decimal
Type Contents Additional Columns Format
(6 of 7)

Utilities 7-63
Interpreting tblog Output
RUPBEF remainder page
update, before image tblspace id
rowid
slotlen
hexadecimal
hexadecimal
decimal
TABLOCKS list of locked
tblspaces held by
transaction
no. of locks
tblspace number decimal
hexadecimal
UNDO header record to a
series of transactions
to be rolled back
count decimal
UNIQID logged when a new
serialvalueisassigned
to a row
tblspace id
unique id hexadecimal
decimal
UPDAFT update after image tblspace id
rowid hexadecimal
hexadecimal
UPDBEF update before image tblspace id
rowid hexadecimal
hexadecimal
XAPRECOM participant can
commit this XA
transaction
none
Type Contents Additional Columns Format
(7 of 7)

7-64 IBM Informix OnLine Database Server Administrator’s Guide
tbmode: Mode and Shared-Memory Changes
tbmode: Mode and Shared-Memory Changes
The flags that accompany tbmode determine which of the following opera-
tions is performed:
■Change OnLine operating mode
■Force a checkpoint
■Immediately change residency of OnLine shared memory for this
session
■Switch the logical log file
■Kill an OnLine database server process
■Kill an OnLine transaction
You must be logged in as root or user informix to execute tbmode.
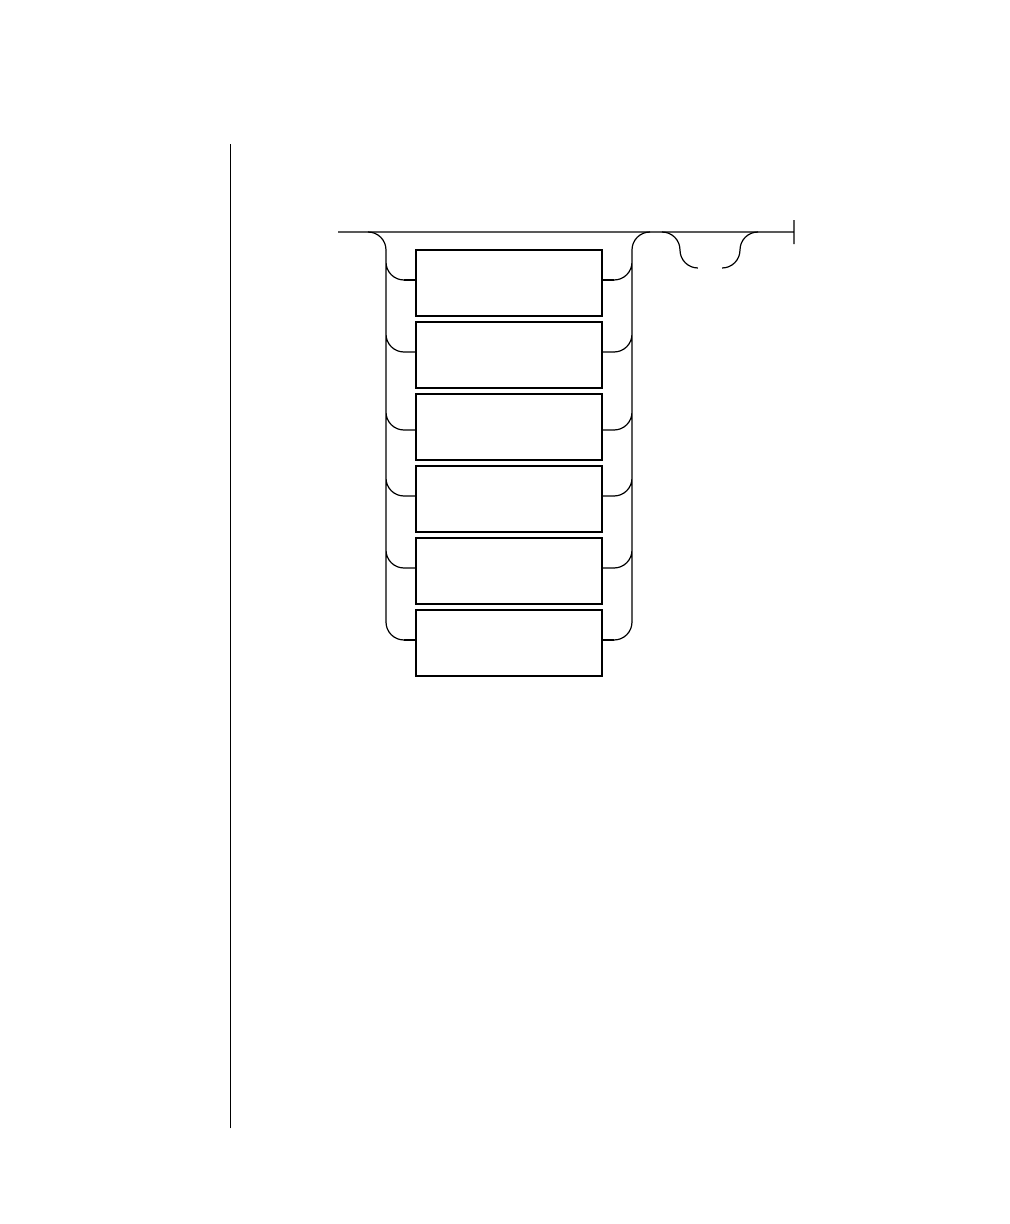
7-66 IBM Informix OnLine Database Server Administrator’s Guide
Change OnLine Mode
Change OnLine Mode
-k Option
The -k option is equivalent to the DB-Monitor Take-Offline option. Use the -k
option to take OnLine offline to reinitialize shared memory. Refer to
page 3-12 for more details about what happens when you execute this
command.
-m Option
The -m option is equivalent to the DB-Monitor On-Line option. It takes
OnLine from quiescent to online mode. Refer to page 3-9 for more details
about what happens when you execute this command.
-k removes OnLine shared memory and takes OnLine to offline
mode.
-m takes OnLine from quiescent to online mode.
-s restricts new access to OnLine but current processing can
finish. When all processing is finished, -s takes OnLine to
quiescent mode.
-u ends current processing and takes OnLine to quiescent mode.
The -u option leaves shared memory intact.
Change
OnLine Mode
-k
-m
-s
-u
Utilities 7-67
Force a Checkpoint
-s Option
The -s option is equivalent to the DB-Monitor Graceful-Shutdown option.
Onceyouexecutethe-s option,youcannotcanceltherequest.A promptasks
for confirmation. If you want to eliminate this prompt, execute the -y option
with the -s option. Refer to page 3-10 for more details about what happens
when you execute this command.
-u Option
The -u option is equivalent to the DB-Monitor Immediate-Shutdown option.
A prompt asks for confirmation. If you want to eliminate this prompt,
execute the -y option with the -u option. Refer to page 3-11 for more details
about what happens when you execute this command.
Force a Checkpoint
The -c option is equivalent to the DB-Monitor Force-Ckpt option. You might
usethe-c option to forceacheckpointifthe most-recentcheckpointrecordin
the logical log was preventing the logical log file from being freed (status
U-L). For more details about this situation, refer to page 3-39.
-c forces a checkpoint.
Force
a Checkpoint
-c
7-68 IBM Informix OnLine Database Server Administrator’s Guide
Change Shared-Memory Residency
Change Shared-Memory Residency
Any change you make using tbmode remains in effect until OnLine shared
memoryisreinitialized.Tochangetheforced-residencysettingintheOnLine
configuration file, you must either edit the $INFORMIXDIR/etc/$TBCONFIG
fileorusetheDB-MonitorParametersmenu,SharedMemoryoption.Refer to
page 3-100 for more information.
Switch the Logical Log File
The only way to switch the logical log file is with tbmode. There is no
DB-Monitor equivalent. Refer to page 3-39 for more information about the
conditions under which it is appropriate for you to switch logical log files.
-n immediatelyends forcedresidencyofOnLine sharedmemory
for this session without affecting the value of RESIDENT, the
forced-memory parameter in the configuration file.
-r immediately begins forced residency of OnLine shared mem-
ory for this session without affecting the value of RESIDENT,
the forced-memory parameter in the configuration file.
-l switches the current logical log file to the next logical log file.
Change Shared-
Memory Residency
-n
-r
Switch the
Logical Log File
-l
Utilities 7-69
Kill an OnLine Server Process
Kill an OnLine Server Process
Warning: Do not kill an OnLine database server process that is in a critical section
of code or is holding a latch. If you do, OnLine initiates an abort.
Refer to page 2-32 for instructions on how to determine if an OnLine
database server process is in a critical section of code or is holding a latch.
Kill an OnLine Transaction
Warning: If you have installed IBM Informix STAR and you kill an OnLine trans-
action,youcanleaveyourclient/serverdatabasesysteminaninconsistentstate.This
should be avoided if possible.
The tbmode -Z command is not valid until the amount of time specified by
the configuration parameter TXTIMEOUT has been exceeded. Refer to page
page 9-57.
The -Z option should rarely be used and only by an administrator of an
OnLine database server that is configured for use with IBM Informix STAR.
All discussion of tbmode -Z address is contained in Chapter 9, “Product
Environment.”
-zpid kills an OnLine database server process associated with the
process identification number pid.
-Z address kills an OnLine transaction associated with the shared-mem-
ory address address. The address is available from the Transac-
tion section of tbstat -u output.
-z pid
Kill an OnLine
Server Process
-Z address
Kill an OnLine
Transaction
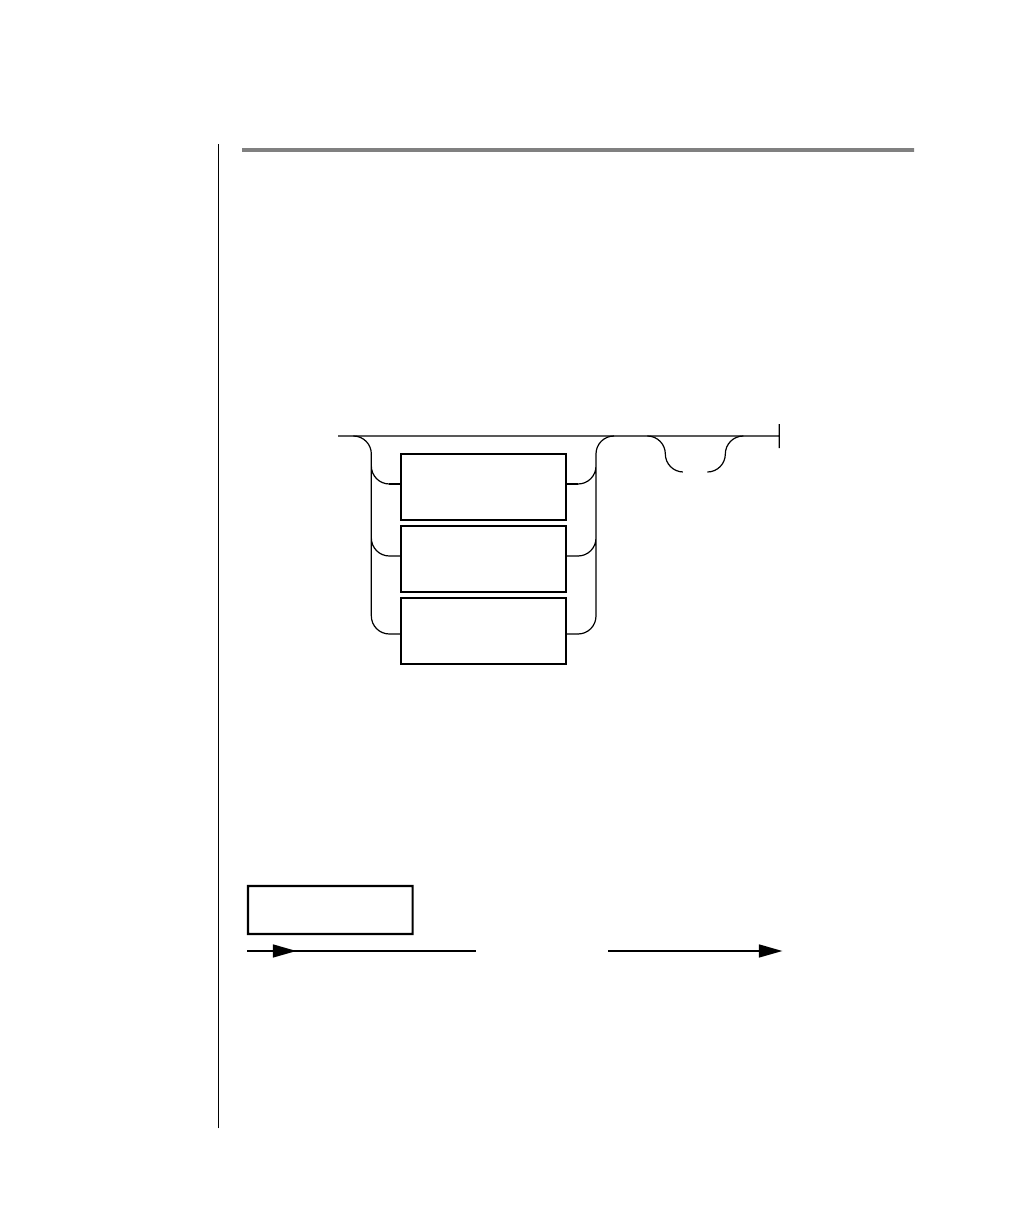
7-70 IBM Informix OnLine Database Server Administrator’s Guide
tbparams: Modify Log Configuration Parameters
tbparams: Modify Log Configuration Parameters
Use tbparams to add or drop a logical log or to change the size or location of
the physical log.
You must be logged in as root or user informix to execute tbparams.
Syntax
Any tbparams command will fail if an OnLine archive is in progress.
Add a Logical Log File
-y automatically responds “yes” to all prompts.
-a indicates that a logical log file is to be added to OnLine.
-d dbspace names the dbspace where the logical log file will reside.
tbparams
-y
Drop a Logical
Log File
p. 7-71
Change Physical
Log Parameters
p. 7-72
Add a Logical
Log File
p. 7-70
Add a Logical
Log File
-a -d dbspace
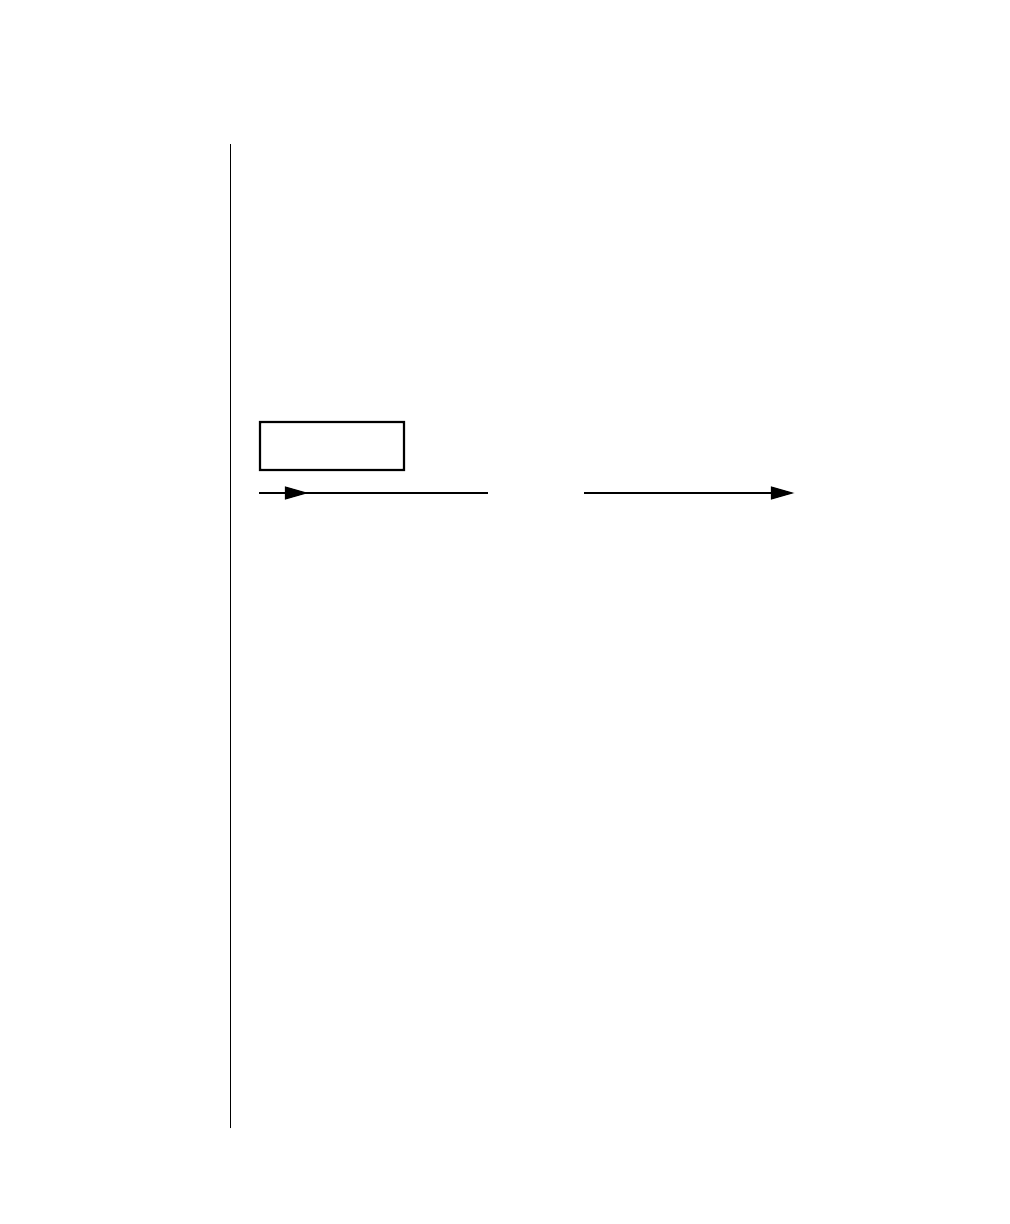
Utilities 7-71
Drop a Logical Log File
You cannot add a log file during an archive (quiescent or online). The newly
added log file or files retain a status of A and do not become available until
you create a level-0 archive.
The tbparams command to add a logical log file is but one step in a larger
procedure. Refer to page 3-28 for more details about the complete procedure
for adding a logical log file.
Drop a Logical Log File
OnLine requires a minimum of three logical log files at all times. You cannot
drop a log file if OnLine is configured for three logical log files.
You drop log files one at a time. After your configuration reflects the desired
number of log files, create a level-0 archive.
You can only drop a log file that has a status of Free (F) or newly Added (A).
The tbparams command to drop a logical log file is but one step in a larger
procedure. Refer to page 3-30 for more details about dropping a logical log
file.
-dindicates that a logical log file is to be dropped.
-l logid names the logical log file to be dropped.
Drop a Logical
Log File
-d -l logid
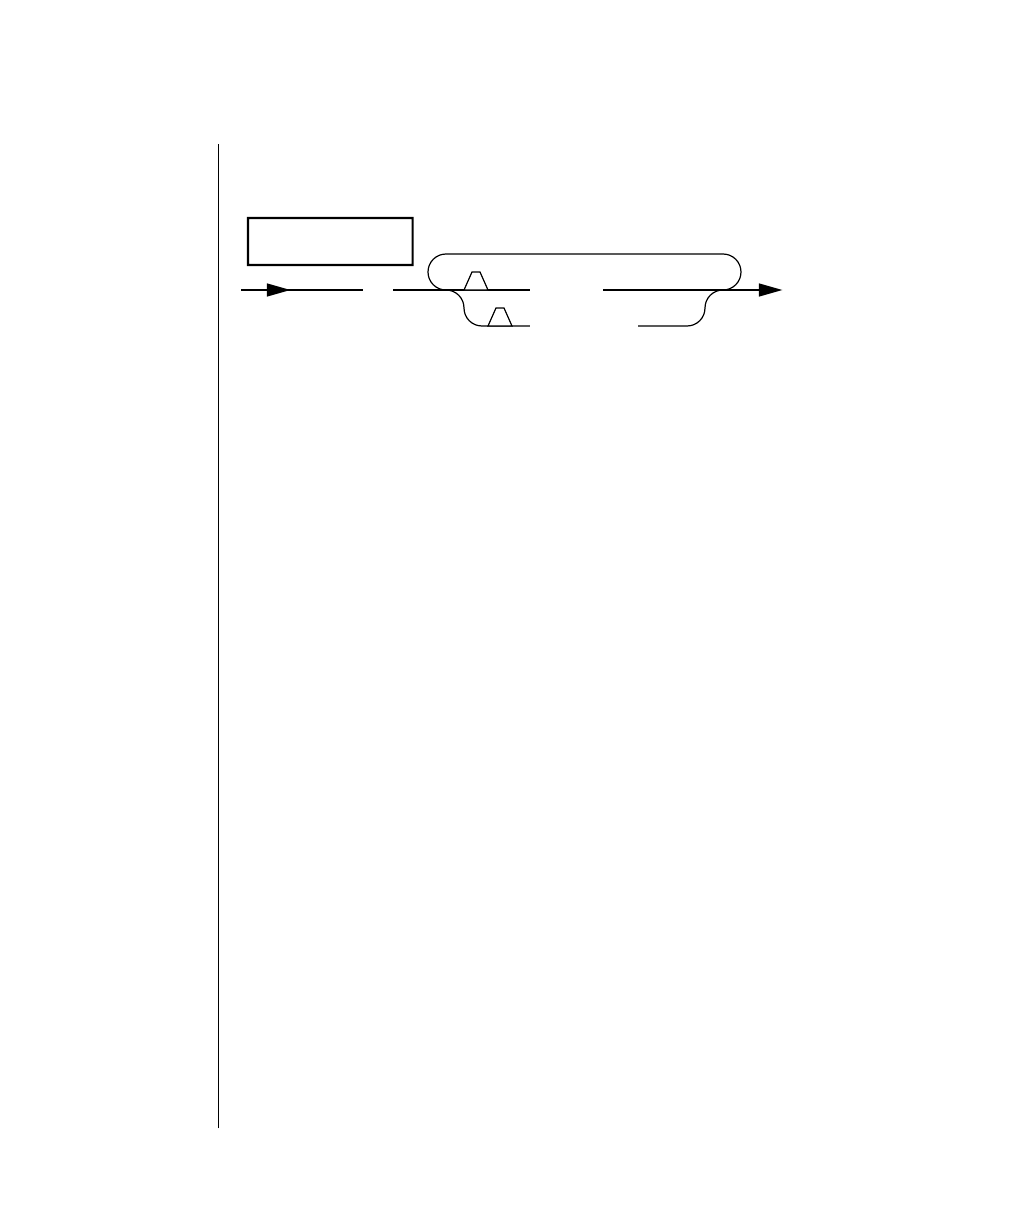
7-72 IBM Informix OnLine Database Server Administrator’s Guide
Change Physical Log Parameters
Change Physical Log Parameters
The space allocated for the physical log must be contiguous. If you move the
log to a dbspace without adequate contiguous space or increase the log size
beyond the available contiguous space, a fatal shared-memory error occurs
when you attempt to reinitialize shared memory with the new values.
Changes to the physical log do not take effect until you reinitialize shared
memory: that is, take OnLine offline and then back to quiescent or online
mode. To immediately reinitialize shared memory, execute the command
with the -y option.
Create a level-0 archive immediately after you reinitialize shared memory.
This archive is critical for proper OnLine recovery.
Refer to page 3-107 for more details about changing the physical log location
or size.
-p indicates a change to the physical log.
-d dbspace names the dbspace where the physical log will reside.
-s size indicates the size of the physical log, in kilobytes.
Change Physical
Log Parameters
1-s size
1-d dbspace
-p
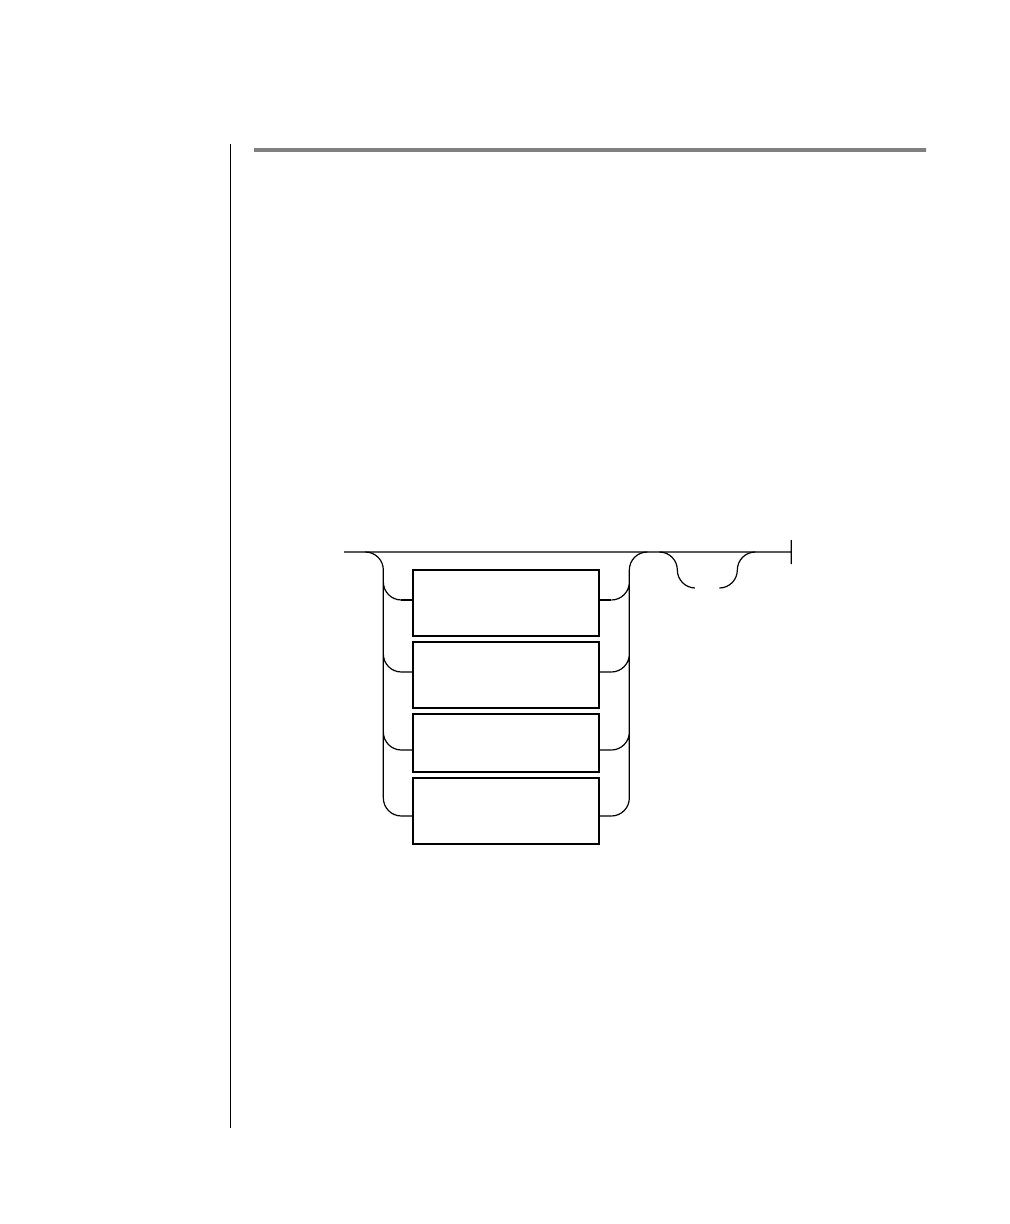
Utilities 7-73
tbspaces: Modify Blobspaces or Dbspaces
tbspaces: Modify Blobspaces or Dbspaces
Use tbspaces to perform the following modifications:
■Create a blobspace or dbspace
■Drop a blobspace or dbspace
■Add a chunk
■Change chunk status
You must be logged in as root or user informix to execute tbspaces.
Syntax
-y automatically responds “yes” to all prompts.
tbspaces
-y
Drop a Blobspace
or Dbspace
p. 7-75
Add a Chunk
p. 7-76
Change Chunk
Status
p. 7-77
Create a Blobspace
or Dbspace
p. 7-74
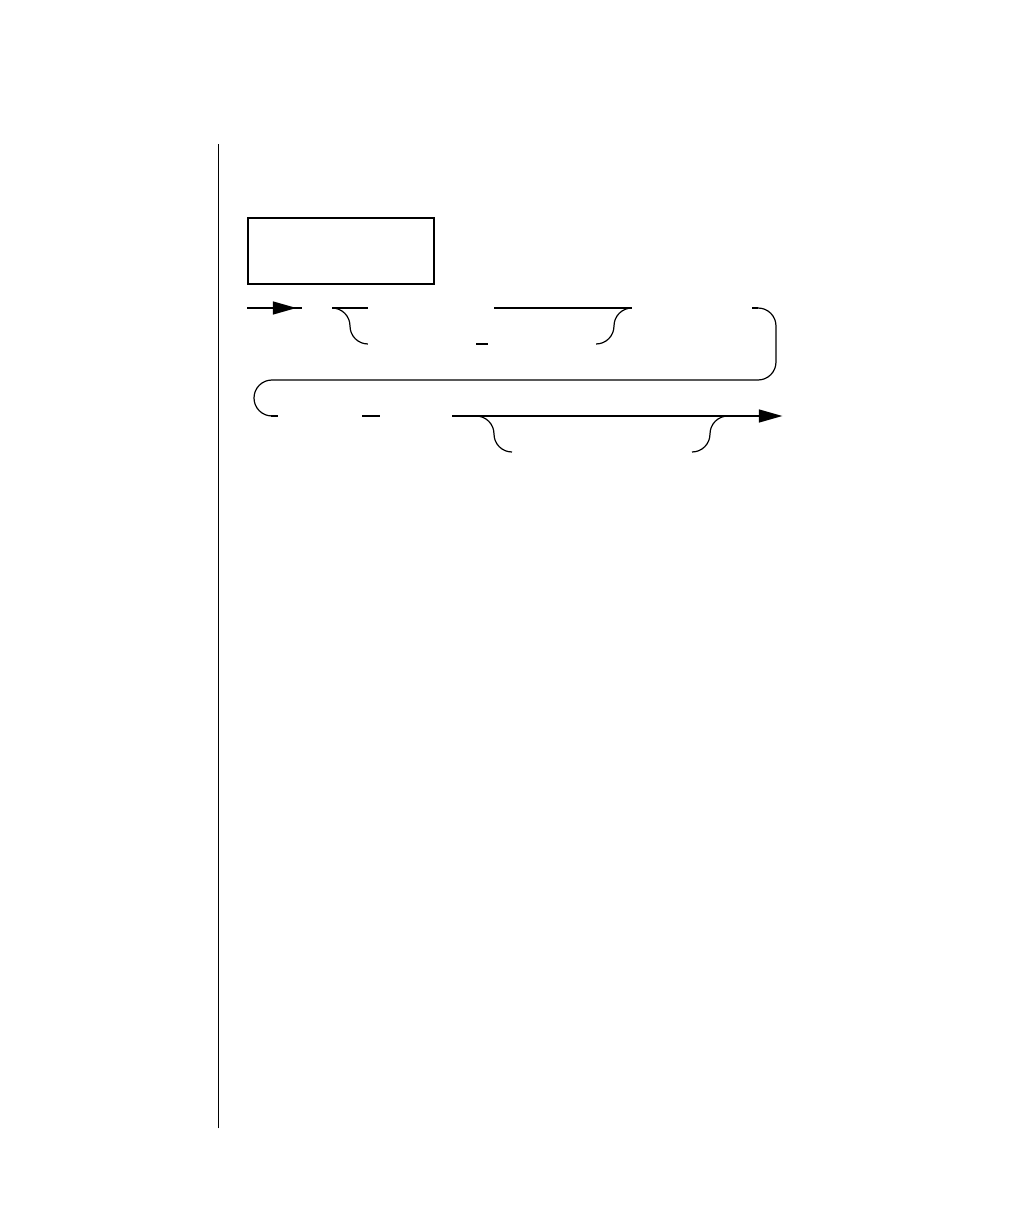
7-74 IBM Informix OnLine Database Server Administrator’s Guide
Create a Blobspace or Dbspace
Create a Blobspace or Dbspace
Refer to page 3-88 for more details to consider when you are creating a
blobspace. Refer to page 3-97 for more details to consider when you are
creating a dbspace.
-b blobspace names the blobspace to be created.
-c indicates that a blobspace or dbspace is to be created.
-d dbspace names the dbspace to be created.
-g page_unit specifies the blobspace blobpage size in terms of
page_unit, the number of disk pages per blobpage.
-m pathname
offset is an optional pathname and offset to the chunk that will
mirror the initial chunk of the new blobspace or dbspace.
-o offset indicates, in kilobytes, the offset into the disk partition or
into the device to reach the initial chunk of the new
blobspace or dbspace.
-p pathname indicatesthediskpartitionordeviceof theinitialchunkof
the new blobspace or dbspace. The chunk can be a raw
device or a file in a standard UNIX file system.
-s size indicates, in kilobytes, the size of the initial chunk of the
new blobspace or dbspace.
Create a Blobspace
or Dbspace
-b blobspace
-d dbspace -g pageunit
-o offset -s size
-m pathname offset
-c -p pathname
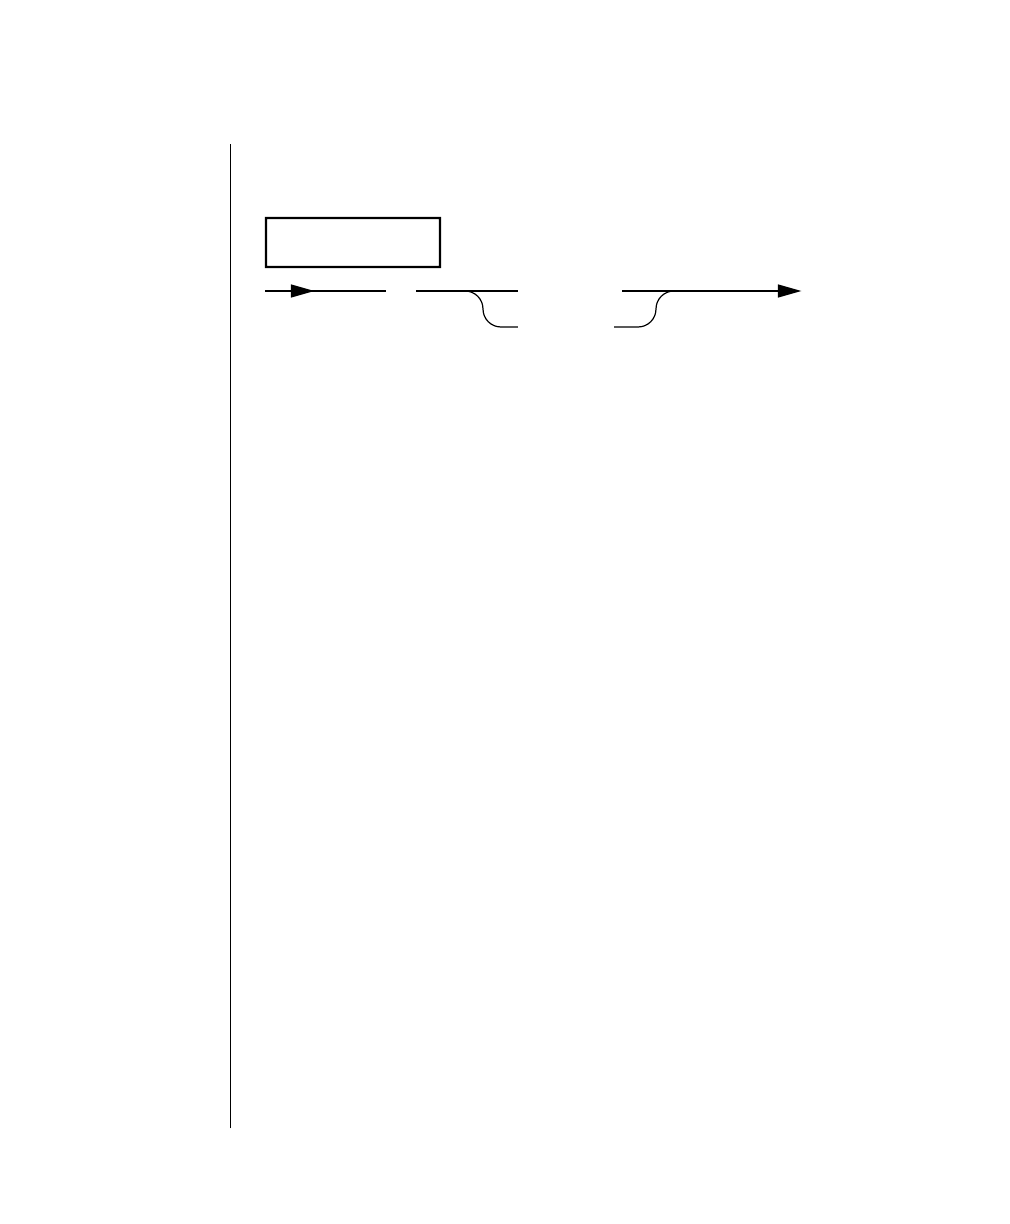
Utilities 7-75
Drop a Blobspace or Dbspace
Drop a Blobspace or Dbspace
The blobspace or dbspace you intend to drop must be unused. It is not suffi-
cient for the blobspace or dbspace to be empty. Execute tbcheck -pe to verify
that no table is currently storing data in the blobspace or dbspace.
Refer to page 3-91 for more details to consider when you are dropping a
blobspace. Refer to page 3-99 for more details to consider when you are
dropping a dbspace.
blobspace names the blobspace to be dropped.
-d indicates that either a blobspace or a dbspace is to be dropped.
dbspace names the dbspace to be dropped.
Drop a Blobspace
or Dbspace
blobspace
dbspace
-d
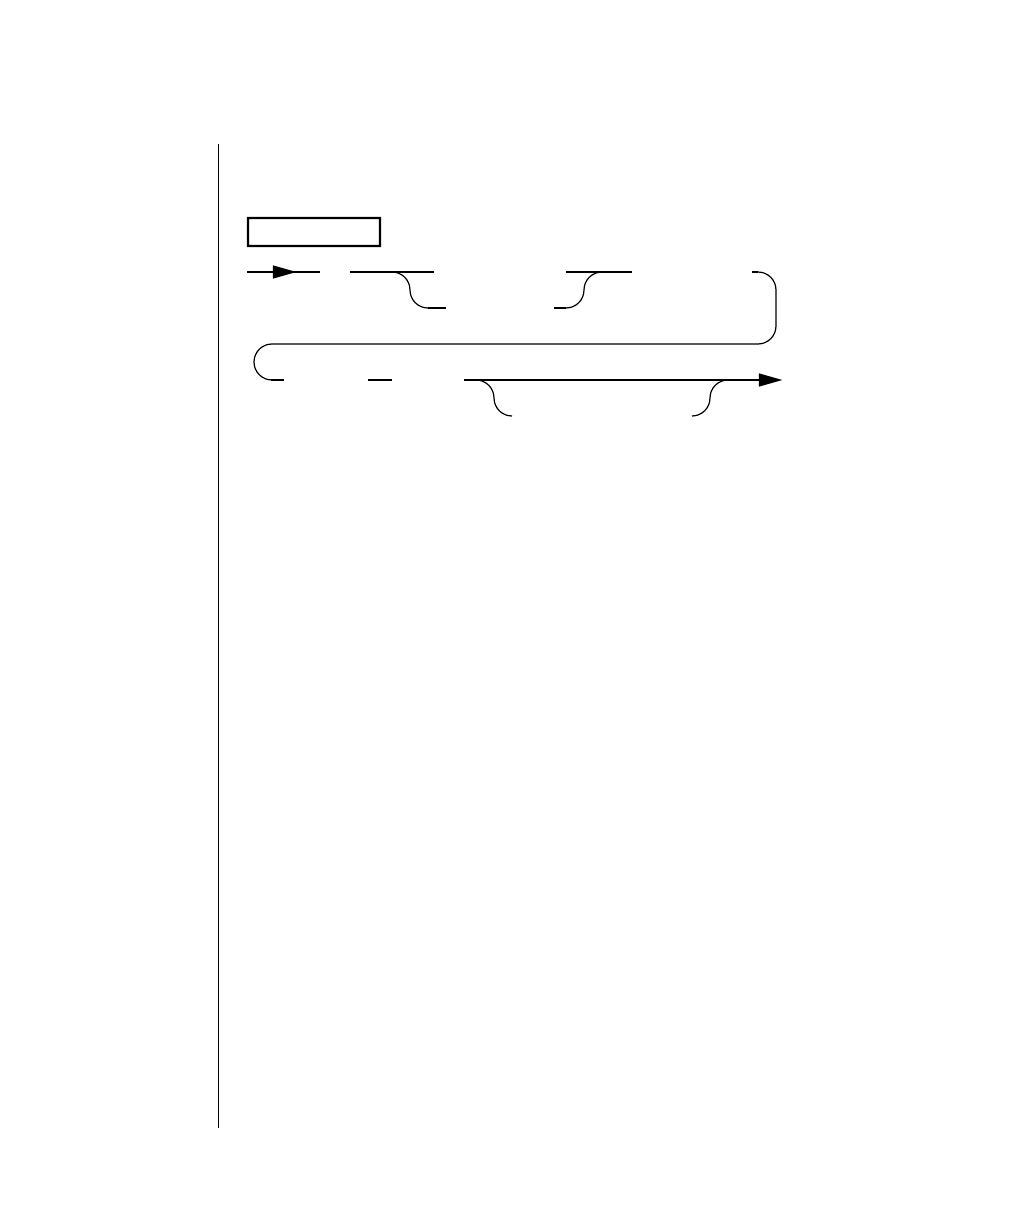
7-76 IBM Informix OnLine Database Server Administrator’s Guide
Add a Chunk
Add a Chunk
Refer to page 3-94 for more details to consider when you are adding a new
chunk to a blobspace or dbspace.
-a indicates that a chunk is to be added.
blobspace names the blobspace that will receive the new chunk.
dbspace names the dbspace that will receive the new chunk.
-g page_unit specifies the blobspace blobpage size in terms of
page_unit, the number of disk pages per blobpage.
-m pathname
offset is an optional pathname and offset to the chunk that will
mirror the new chunk.
-o offset indicates, in kilobytes, the offset into the disk partition or
into the device to reach the new chunk.
-p pathname indicates the disk partition or device of the new chunk.
The chunk can be a raw device or a file in a standard
UNIX file system.
-s size indicates, in kilobytes, the size of the new chunk.
Add a Chunk
blobspace
dbspace
-o offset -s size
-m pathname offset
-a -p pathname

Utilities 7-77
Change Chunk Status
Change Chunk Status
You can only change the status of a chunk in a mirrored pair. Refer to
page 3-101for more details to consider when you are taking down one of the
chunks in a mirrored pair or restoring it to online mode.
blobspace indicates that the chunk belongs to a blobspace.
-D takes the chunk down.
dbspace indicates that the chunk belongs to a dbspace.
-o offset indicates, in kilobytes, the offset into the disk partition or into
the device to reach the chunk.
-O restores the chunk and brings it online.
-p pathname indicates the disk partition or device of the chunk. The chunk
can be a raw device or a file in a standard UNIX file system.
-s indicates that you are changing the status of a chunk.
Change Chunk
Status
blobspace
dbspace
-o offset
-O
-s -p pathname
-D

7-78 IBM Informix OnLine Database Server Administrator’s Guide
tbstat: Monitor OnLine Operation
tbstat: Monitor OnLine Operation
Thetbstatutilityreadsshared-memorystructuresandprovidesstatisticsthat
areaccurate attheinstantthatthecommandexecutes.Thecontents ofshared
memory might change as the tbstat output displays. The tbstat utility does
not place any locks on shared memory so running the utility does not affect
performance. For information about disk usage and data storage, refer to the
tbcheck options described in the table in the section beginning on page 7-36.
The table below lists each tbstat option flag and its function.
Topic or Function Option Flag
All tbstat options --
Big buffer reads -P
Buffers in use -b
Buffers, all (in use or not) -B
Buffers, includes addresses of waiting processes -X
Configuration file information
($INFORMIXDIR/etc/$TBCONFIG)-c
Dbspace chunks, general information -d
Dbspace chunks, pages reads/writes -D
Latches -s
Locks held -k
Logging information (logical and physical logs, including page
addresses) -l
LRU queues -R
OnLine message log -m
OnLine profile of activity -p
Repeat this tbstat command periodically -r
(1 of 2)

Utilities 7-79
tbstat: Monitor OnLine Operation
Shared-memory segment (save it to a file) -o
Summary of user-oriented (lowercase) options -a
Tblspaces, active -t
User processes and transactions -u
Writetypestatistics (gatheredwhenpagesareflushed frombuffers) -F
Zero out all statistic counts -z
Topic or Function Option Flag
(2 of 2)
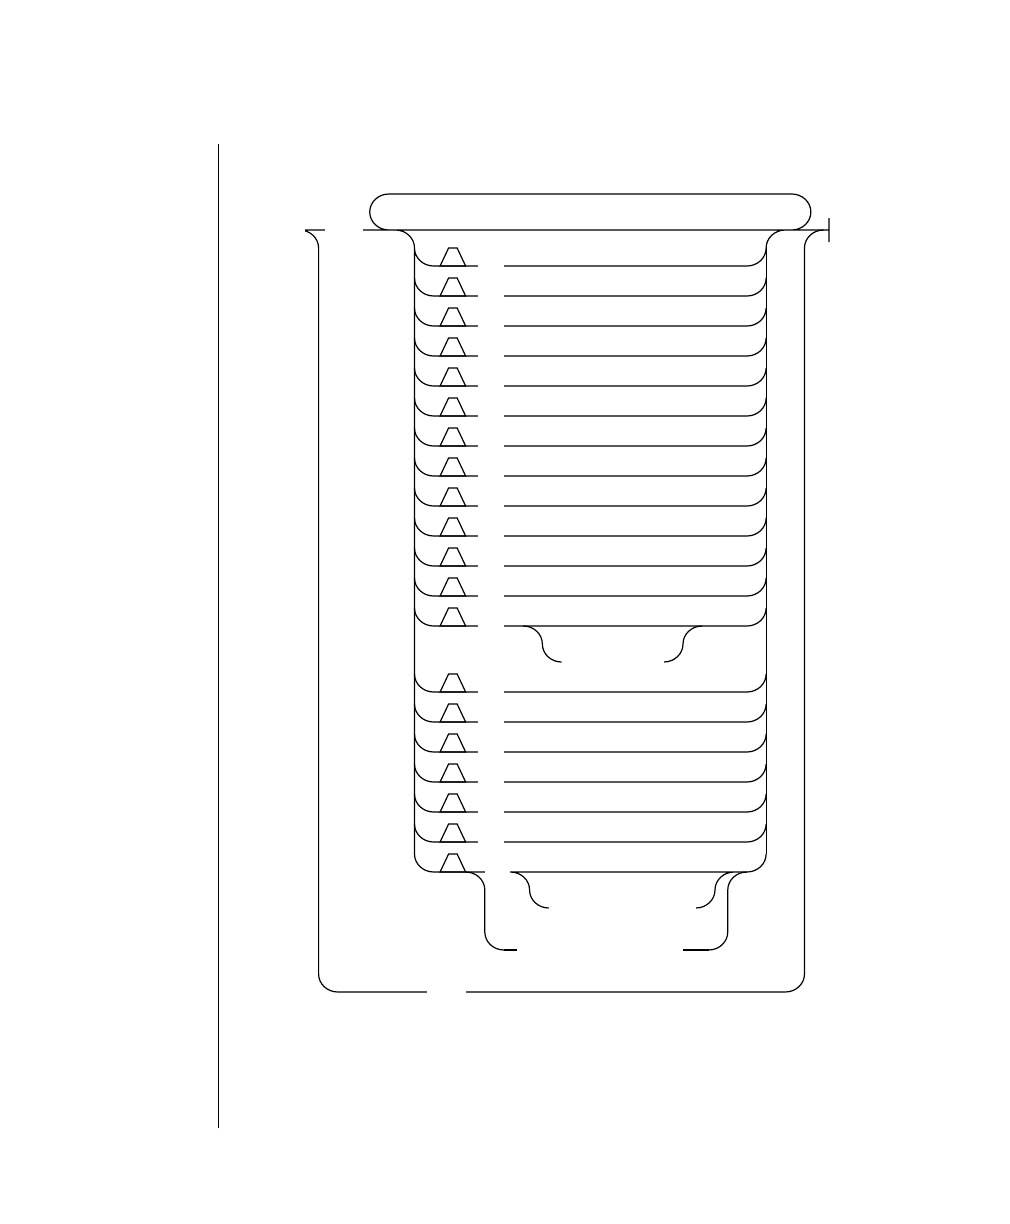
7-80 IBM Informix OnLine Database Server Administrator’s Guide
Syntax
Syntax
1
seconds
a
1b
1B
1c
1d
1D
1F
1k
1l
1m
1p
1P
1r
1R
1s
1t
1u
1X
1z
1
filename_dest
filename_source
o
-
- -
tbstat

Utilities 7-81
Syntax
Use the filename_source parameter with other option flags to derive the
requested tbstat statistics from the shared-memory segment contained in
filename_source. This assumes you have already used the tbstat -o option to
create a file that contains a shared-memory segment.
Use the seconds parameter with the -r option flag to cause all other flags to
execute repeatedly after waiting the specified seconds between each
execution.
All output includes a header. The header takes the following form:
Version--Mode--(Checkpnt)--Up Uptime--Shd_memory_size Kbytes
filename_dest isthedestinationfilethatwillcontainthecopy of the shared-
memory segment.
filename_sourceis the file that tbstat will read as source for the requested
information. This file must include a previously stored
shared-memory segment.
seconds is the number of seconds between each execution of this
tbstat command.
Version is the product version number.
Mode is the current operating mode. (Refer to page 3-6.)
(Checkpnt) is a checkpoint flag. If it is set, the header might display
twootherfieldsafterthemodeifthetimingisappropriate:
(CKPT REQ) indicates that some OnLine user process
has requested a checkpoint.
(CKPT INP) indicates that a checkpoint is in progress.
During the checkpoint, user access is lim-
ited to read only. Users cannot write or
update data until the checkpoint ends.
Uptime indicates how long the system has been running.
Shd_memory_size is the size of OnLine shared memory, expressed in kilo-
bytes.

7-82 IBM Informix OnLine Database Server Administrator’s Guide
Option Descriptions
An example header follows:
RSAM Version 5.0--On-Line--Up 15:11:41--368 KBytes
Option Descriptions
You can combine multiple tbstat option flags in a single command.
No Options
If you invoke tbstat without any options, the command is interpreted as
tbstat-pu.Foranexplanationofthe-pand-uoptions,refertotheparagraphs
that follow.
-- Option
The -- option displays a listing of all tbstat options and their functions. This
option is the only option flag that you cannot combine with any other flag.
-a Option
The -a option is interpreted as tbstat -cuskbtdlp (all lowercase option flags),
andoutputisdisplayedinthatorder.Foranexplanationofeachoption,refer
to the appropriate flag in the paragraphs that follow.
-b Option
The-b optiondisplays information about bufferscurrentlyinuse.(Seetbstat
-B for information about all buffers, not just those in use.) You can interpret
output from the -b option as follows:
address is the address of the buffer header in the buffer table.
user is the address of the most-recent user process to access the
buffer table. Many user processes might be reading the same
buffer concurrently.
flgs describes the buffer using the following flag bits:

Utilities 7-83
Option Descriptions
The number of modified buffers, the number of total buffers available, the
number of hash buckets available, and the size of the buffer in bytes are also
listed. The maximum number of buffers available is specified as BUFFERS in
the OnLine configuration file.
0x01
0x02
0x04
0x08
Modified data
Data
LRU
Error
pagenum is the physical page number on the disk.
memaddr is the buffer memory address.
nslots is the number of slot-table entries in the page. This indicates
thenumberofrows(orportionsofarow)thatarestoredonthe
page.
pgflags describesthe page typeusing the followingvalues, alone orin
combination:
1
2
4
8
10
40
80
100
800
data page
tblspace page
free-list page
chunk free-list page
B+-tree root node page
B+-tree branch node page
B+-tree leaf node page
logical log page
physical log
xflgs describes buffer access using the following flag bits:
0x0100
0x0200
0x0400
share lock
update lock
exclusive lock
owner is the user process that set the xflgs buffer flag.
waitlist isthe addressof the firstuser processwaiting for accessto this
buffer. For a complete list of all processes waiting for the
buffer, see tbstat -X.

7-84 IBM Informix OnLine Database Server Administrator’s Guide
Option Descriptions
-B Option
Use the -B option to obtain information about all OnLine buffers, not just
bufferscurrentlyinuse.The-Boutputdisplayfieldsarethesameasthefields
that appear in the -b output. See the -b option.
-c Option
Usethe-c optiontodisplaytheOnLineconfigurationfile.OnLinefirstchecks
to see if you have assigned a value to the system variable TBCONFIG. If so,
OnLine displays the contents of $INFORMIXDIR/etc/$TBCONFIG. If not, the
contents of $INFORMIXDIR/etc/tbconfig are displayed by default.
-d Option
Use the -d option to display information for the first 50 chunks in each
dbspace. You can interpret output from this option as follows. The first
section of the display describes the dbspaces.
address is the address of the dbspace in the shared-memory dbspace
table.
number is the unique ID number assigned at creation.
flags describes each dbspace using the following hexadecimal
values:
0x0001
0x0002
0x0004
0x0008
0x0010
No mirror
Mirror
Down
Newly mirrored
Blobspace
fchunk is the ID number of the first chunk.
nchunks is the number of chunks in the dbspace.
flags describes each dbspace using the following letter codes:

Utilities 7-85
Option Descriptions
The number of active blobspaces and dbspaces and the total number of
existing blobspaces and dbspaces are listed. The maximum number of
blobspaces and dbspaces is specified as DBSPACES in the OnLine configu-
ration file.
The second section of the tbstat -d output describes the chunks:
Position 1:
Position 2:
Position 3:
M – Mirror
N – Not Mirrored
X – Newly mirrored
B – Blobspace
owner is the owner of the dbspace.
name is the name of the dbspace.
address is the address of the chunk.
chk/dbs is the chunk number and the associated dbspace number.
offset is the offset into the device in pages.
size is the size of the chunk in pages.
free is the number of free pages in the chunk. (A tilde indicates an
approximate value for blobspaces.)
bpages is the number of free blobpages. Blobpages can be larger than
disk pages; therefore, the bpages value can be less than the
free value.
flags gives the chunk status information as follows:
Position 1:
Position 2:
Position 3:
P – Primary
M – Mirror
O – On-line
D – Down
R – Recovery
X – New mirror
B – Blobspace
- – Dbspace
pathname is the pathname of the physical device.

7-86 IBM Informix OnLine Database Server Administrator’s Guide
Option Descriptions
The number of active chunks and the number of existing chunks are listed.
The maximum number of chunks is specified as CHUNKS in the OnLine
configuration file.
Occasionally, the timing of the tbstat -d command can affect the utility
output. Timing becomes a factor in two cases. The first case occurs immedi-
ately after blobspace blobpages are allocated. The tbstat -d routine looks
directly at the disk to obtain blobpage statistics from the blobspace free-map
page.Ifblobpageswererecentlyallocated,itispossiblethattbstat-dwillnot
reflect the new allocation. This situation could arise if you execute tbstat -d
while the newest version of the blobspace free-map page remains in a
memory buffer and is not yet flushed to disk. (Refer to page 2-148 for more
details about the blobspace free-map page.)
The second case in which timing affects output occurs after blobspace
blobpages are freed. The tbstat -d output does not show a blobpage as free
untilthelogicalloginwhichthepageorpagesweredeallocatedisfreed.That
is, if you modify blobs, tbstat -d shows that the pages where the obsolete
blobs are stored are still in use until you back up and free the logical log that
contains the modifying statement.
Note that tbcheck -pB, which examines the disk pages, does not reflect this
timing nuance. If you delete a blob from a blobspace, tbcheck -pB output
reflects the freed space immediately. For this reason, output from tbstat -d
and tbcheck -pB could appear inconsistent.
For information about page reads and page writes, see tbstat -D.
-D Option
Use the -D option to display page read and page write information for the
first50chunks in each dbspace.Allbut two of the fieldsthatappear in the -D
output also appear in the tbstat -d output. You can interpret the two fields
that are unique to the -D output as follows:
page Rd is the number of pages read.
page Wr is the number of pages written.

Utilities 7-87
Option Descriptions
-F Option
Use the -F option to display account for each type of write performed when
a page was flushed to disk. You can interpret output from this option as
follows:
Fg Writes is the number of times a foreground write occurred. Refer to
page 2-77.
LRU Writes is the number of times an LRU write occurred. Refer to
page 2-77.
Idle Writes is the number of times an idle write occurred. Refer to
page 2-76.
Chunk Writes isthenumberoftimesa writeoccurredatacheckpoint. Refer
to page 2-77.
address is the address of the user structure assigned to this page-
cleaner process.
flusher is the page-cleaner number.
snooze is the page-cleaner sleep interval in seconds. The maximum
value is 60. The value varies with the amount of activity.

7-88 IBM Informix OnLine Database Server Administrator’s Guide
Option Descriptions
-k Option
Usethe-koptiontodisplayinformation about activelocks.You caninterpret
output from this option as follows:
state indicates the current page-cleaner activity using the
following codes:
C
E
I
L
chunk write
exit
cleaner is idle
LRU queue
The “exit” code indicates either that OnLine is in the process
of performing a shutdown or that a page cleaner did not
return from its write in a specific amount of time. This is also
known as a time-out condition. The tbinit daemon does not
knowwhathappenedtothecleaner,soitismarkedas“exit.”
In either case, the cleaner process eventually exits.
data provides additional information in concert with the state
field. If state is C,data is the chunk number to which the
page cleaner is writing buffers. If state is L,data is the LRU
queuefromwhichthepagecleaneriswriting.Thedata value
is displayed as a decimal, followed by an equal sign, and
repeated as a hexadecimal.
address istheaddressofthelockinthelocktable.Thisaddressappears
in the wait field of the tbstat -u (users) output for the user
process that is waiting for this lock.
wtlist is the first entry in the list of user processes waiting for the
lock, if there is one.
owner is the shared-memory address of the process holding the lock.
Thisaddresscorrespondstotheaddressintheaddress fieldof
tbstat -u (users) output. Ifthe value of owner is 0, the database
server process that owned the transaction is dead.
lklist is the next lock in a linked list of locks held by the owner just
listed.

Utilities 7-89
Option Descriptions
ThemaximumnumberoflocksavailableisspecifiedasLOCKS intheOnLine
configuration file.
-l Option
Use the -l option to display information about physical and logical logs. You
can interpret output from this option as follows. The first section of the
display describes the physical log configuration:
type indicates the type of lock using the following codes:
HDR
B
S
X
I
U
IX
IS
SIX
header
bytes lock
shared
exclusive
intent
update
intent-exclusive
intent-shared
shared, intent-exclusive
tblsnum is the tblspace number of the locked resource.
rowid is the row identification number. The rowid provides the
following lock information:
■If the rowid equals 0, the lock is a table lock.
■If the rowid ends in two 0s, the lock is a page lock.
■If the rowid is six digits or less and does not end in 0,
the lock is probably a row lock.
■Iftherowidismorethansixdigits,thelockisprobably
an index key value lock.
size is the number of bytes locked for a VARCHAR lock.
buffer is the address of the physical log buffer.
bufused is the number of pages of the buffer that are used.
bufsize is the size of each physical log buffer in pages.

7-90 IBM Informix OnLine Database Server Administrator’s Guide
Option Descriptions
The second section of the tbstat -l display describes the logical log
configuration.
numpages is the number of pages written to the logical log.
numwrits is the number of writes to disk.
pages/io is calculated as (numpages)/(numwrits). This value indicates
how effectively physical log writes are being buffered.
phybegin is the physical page number of the beginning of the log.
physize is the size of the physical log in pages.
phypos is the current position in the log where the next log record
write will occur.
phyused is the number of pages used in the log.
%used is the percent of pages used.
buffer is the address of the logical log buffer.
bufused is the number of pages used in the buffer.
bufsize is the size of each logical log buffer in pages.
numrecs is the number of records written.
numpages is the number of pages written.
numwrits is the number of writes to the logical logs.
recs/pages is calculated as (numrecs/numpages). You cannot affect this
value. Different types of operations generate different types
(and sizes) of records.
pages/io is calculated as (numpages/numwrits). You can affect this
value by changing the size of the logical log buffer (specified
as LOGBUFF in the configuration file) or by changing the
loggingmodeofthe database (frombufferedtounbuffered,or
vice versa).

Utilities 7-91
Option Descriptions
The following fields are repeated for each logical log file:
-m Option
Use the -m option to display the 20 most-recent lines of the system message
log.
Outputfromthisoptionliststhefullpathnameofthemessagelogfileandthe
20 file entries. A date and time header separates each day’s entries. A
timestamp prefaces single entries within each day. The name of the message
log is specified as MSGPATH in the OnLine configuration file.
-o Option
Usethe-o option to save acopy of the shared-memorysegmenttofilename.If
you omit a filename in the tbstat command, the copy of shared memory is
saved to tbstat.out in the current directory by default.
address is the address of the log file descriptor.
number is the logical log file logid number.
flags gives the status of each log as follows:
A
B
C
F
L
U
newly added
backed up
current logical log file
free, available for use
contains the most-recent checkpoint record
unreleased
uniqid is the unique ID number of the log.
begin is the beginning page of the log file.
size is the size of the log in pages.
used is the number of pages used.
%used is the percent of pages used.

7-92 IBM Informix OnLine Database Server Administrator’s Guide
Option Descriptions
-p Option
Use the -p option to display profile counts.
The first portion of the display describes reads and writes.
Reads and writes are tabulated in three categories: from disk, from buffers,
and number of pages (read or written).
The first %cached field is a measure of the number of reads from buffers
compared to reads from disk. The second %cached field is a measure of the
number of writes to buffers compared to writes to disk.
OnLine buffers information and writes to the disk in pages. For this reason,
the number of disk writes displayed as dskwrits is usually less than the
number of writes executed by an individual user.
dskreads is the number of actual reads from disk.
pagreads is the number of pages read.
bufreads is the number of reads from shared memory.
%cached is the percent of reads cached, calculated as
100 * (bufreads - dskreads)/bufreads.
dskwrits is the actual number of physical writes to disk.
pagwrits is the number of pages written.
bufwrits is the number of writes to shared memory.
%cached is the percent of writes cached, calculated as
100 * (bufwrits - dskwrits)/bufwrits.

Utilities 7-93
Option Descriptions
The next portion of the -p display tabulates the number of times different
ISAM callswereexecuted.Thecallsoccur at the lowestlevelof operation and
do not necessarily correspond one-to-one with SQL statement execution. A
singlequerymightgeneratemultipleISAMcalls.Thesestatisticsaregathered
across the OnLine system and cannot be used to monitor activity on a single
database unless only one database is active or only one database exists.
isamtot is the total number of calls.
open increments when a tblspace is opened.
start increments when positioning within an index.
read increments when the read function is called.
write increments with each write call.
rewrite increments when an update occurs.
delete increments when a row is deleted.
commit increments each time an iscommit() call is made. There is not
a one-to-one correspondence between this value and the
number of explicit COMMIT WORK statements that are
executed.
rollbk increments when a transaction is rolled back.

7-94 IBM Informix OnLine Database Server Administrator’s Guide
Option Descriptions
The third portion of the -p display tracks the number of times aresource was
requested when none was available. For example, if the value of TBLSPACES
is set to 200 in your configuration file and a user process attempted to open
the 201st table, the ovtbls field would be incremented by 1.
The last portion of the -p display contains miscellaneous information, as
follows:
ovtbls is the number of times that OnLine attempted to exceed the
maximum number of available tblspaces (specified as
TBLSPACES in the configuration file).
ovlock is the number of times that OnLine attempted to exceed the
maximum number of locks (specified as LOCKS in the configu-
ration file).
ovuser is the number of times that a user attempted to exceed the
maximum number of users (specified as USERS in the configu-
ration file).
ovbuff is the number of times that OnLine attempted to exceed the
maximum number of shared-memory buffers (specified as
BUFFERS in the configuration file).
usercpu isthetotaluserCPUtimeusedbyalluserprocesses,expressed
in seconds.
syscpu is the total system CPU time used by all user processes,
expressed in seconds.
numckpts is the number of checkpoints since the boot time.
flushes is the number of times that the buffer pool has been flushed to
the disk.
bufwaits increments each time a user process must wait for a buffer.
lokwaits increments each time a user process must wait for a lock.
lockreqs increments each time a lock is requested.
deadlks increments each time a potential deadlock is detected and
prevented.

Utilities 7-95
Option Descriptions
-P Option
Use the -P option to obtain a count of big buffer reads, in addition to the
standard profile counts. (Refer to page 2-55 for more details about big
buffers.)
The -P option displays the same information as the -p option, with the
addition of the BIGreads field, which appears as the first field in the output.
-r Option
Use the -r option to cause the accompanying tbstat option(s) to execute
repeatedly after waiting the specified seconds between each execution. The
default value of seconds is 5. To end execution, press the DEL key or CTRL-C.
-R option
Use the -R option to display detailed information about the LRU buffer
queues.
For each queue, the display lists the number of buffers in the queue and the
number and percentage of buffers that have been modified. The following
example shows the output format:
LRU 0: 10 (100.0%) modified of 10 total.
LRU 1: 1 (12.5%) modified of 8 total.
dltouts increments each time the distributed deadlock time-out value
is exceeded while a user process is waiting for a lock.
lchwaits increments when a process waits to gain access to a shared-
memory resource.
ckpwaits is the number of checkpoint waits.
compress increments each time a data page is compressed. (Refer to
page 2-133 for more details about how OnLine implements
page compression.)
BIGreads is the number of big buffer reads that have occurred.

7-96 IBM Informix OnLine Database Server Administrator’s Guide
Option Descriptions
Summary information follows the individual LRU queue information. You
can interpret the summary information as follows:
dirty is the total number of buffers that have been modified in all
LRU queues.
queued is the total number of buffers in LRU queues.
total is the total number of buffers.
hash buckets is the number of hash buckets.
buffer size is the size of each buffer.
start clean is the value of LRU_MAX_DIRTY. Refer to page 5-17 for more
details.
stop at is the value of LRU_MIN_DIRTY. Refer to page 5-17 for more
details.

Utilities 7-97
Option Descriptions
-s Option
Usethe -s option to display generallatch information. (Referto page 2-41 for
more details about latches.) You can interpret output from this option as
follows:
name identifies the resource the latch controls:
archive
bf
bh
chunks
ckpt
dbspace
flushctl
flushr
locks
loglog
LRU
physb1
physb2
physlog
pt
tblsps
users
archiving
buffers
hash buffers
chunk table
checkpoints
dbspace table
page flusher control
page cleaners
lock table
logical log
LRU queues
first physical log buffer
second physical log buffer
physical log
tblspace tblspace
tblspace table
user table
address is the address of the latch. This address appears in the -u
(users) output wait field if a process is waiting for the latch.
lock indicates if the latch is locked and set. The codes that indicate
the lock status (1 or 0) are machine-dependent.
wait indicates if any user process is waiting for the latch.
user is the shared-memory address of the owner of the latch. This
address identifies the user process in the -u (users) output.

7-98 IBM Informix OnLine Database Server Administrator’s Guide
Option Descriptions
-t Option
Usethe-toptiontodisplay tblspace informationforactivetblspaces.Youcan
interpret output from this option as follows:
The number of active tblspaces, the number of available tblspaces, and the
number of available hash buckets are also listed. The maximum number of
open tblspaces is specified as TBLSPACES in the OnLine configuration file.
n is a counter of open tblspaces.
address is the address of the tblspace in the shared-memory tblspace
table.
flgs describes the flag using the following flag bits:
0x01
0x02 Busy
Dirty
ucnt is the usage count, which indicates the number of user
processes currently accessing the tblspace.
tblnum is the tblspace number expressed as a hexadecimal value. The
integer equivalent appears as the partnum value in the
systables system catalog table.
physaddr is the physical address (on disk) of the tblspace.
npages is the number of pages allocated to the tblspace.
nused is the number of used pages in the tblspace.
npdata is the number of data pages used.
nrows is the number of data rows used.
nextns isthe number of(noncontiguous) extents allocated.This is not
the same as the number of times a next extent has been
allocated. (Refer to page 2-117.)

Utilities 7-99
Option Descriptions
-u Option
Use the -u option to print a profile of user activity. The output described in
this paragraph is provided for each user process.
Ataminimum,twouser processesalwaysappearin-u output:tbinit always
occupies the first entry and tbundo always occupies the second entry. If you
haveconfiguredOnLineforadditionalpagecleaners(specifiedasCLEANERS
in the configuration file), each page-cleaner daemon, tbpgcl, is listed as well.
You can interpret output from this option as follows:
address is the shared-memory address of the user process (in the user
table). Compare this address with the addresses displayed in
the -s output (latches), the -b,-B, and -X output (buffers), and
the -k output (locks) to learn what resources this process is
holding or waiting for.
flags gives the status of the user process. The flag codes for
position 1 indicate if the process is waiting for a resource:
B
C
G
L
S
X
T
waiting for a buffer
waiting for a checkpoint
waiting for the log buffer
waiting for a lock
waiting for a latch
waiting for a long transaction rollback
waiting for a transaction (refer to Chapter 9, “Product
Environment”)

7-100 IBM Informix OnLine Database Server Administrator’s Guide
Option Descriptions
The second section of the -u output describes transactions. This information
is required only for an X/Open environment or in some situations in which
OnLine is participating in queries managed by IBM Informix STAR. Refer to
page 9-58 for a detailed description of the transactions section.
Theflagcodesforposition2refertothestateofthetransaction
attached to this user process, or if the process is an archive
process:
A
B
C
H
P
R
T
X
archive process
transaction has been initiated
transaction is committed or is committing
transactionwasheuristically aborted or isinthe process
of doing so
prepare state; this transaction has been precommitted
in rollback mode; transaction was aborted or is aborting
inatransaction (work in progress);logginghasoccurred
transaction is XA-prepared or is in the process of doing
so
The flag codes for position 3 describe the user process activity
(if it is reading or writing):
R
Xreading
inside a write call, checkpoints prevented from
occurring
The flag codes for position 4 identify the user process type:
M
D
C
F
aDB-Monitor (monitor) process
a daemon process
terminated user process waiting for cleanup
a page-cleaner daemon (tbpgcl)
pid is the process identification number (derived from UNIX).
user is the user login name (derived from UNIX).
tty indicates the tty that the user is using (derived from UNIX).

Utilities 7-101
Option Descriptions
The number of active users and the maximum number of users allowed are
also indicated. The maximum number of concurrent user processes is
specified as USERS in the OnLine configuration file.
-X Option
Use the -X option to obtain precise information about the processes that are
sharing and waiting for buffers.
For each buffer in use, the -X option displays general buffer information that
is also available with either the -b or -B option. See tbstat -b for an expla-
nation of these fields.
Unique to the -X option are the sharers and waiters fields. More than one
process can share data in a buffer. For each buffer, the sharers field lists the
addresses of all user processes sharing that buffer. During an update
operation, a process places an exclusive lock on a buffer and no sharing
occurs. In this situation, the waiters field lists the addresses of all user
processes waiting for the buffer.
The tbstat -b and -B options contain a waitlist field that displays the
addressofthefirstuserprocesswaitingforthebuffer.The-Xoptionprovides
a complete list of addresses for all waiting processes.
The maximum number of shared buffers is specified as BUFFERS in the
OnLine configuration file.
wait if the user process is waiting for a specific latch or lock, this
field displays the address of the resource. Use this address to
map to information provided in the -s (latch) or -k (lock)
output.
tout is the lock time-out counter.
nlocks is the number of locks that the user process is holding. (The -k
output should include a listing for each lock held.)
nreads is the number of read calls that the user process has executed.
The reads could be either physical reads from disk or virtual
reads from the buffer cache.
nwrites is the number of write calls that the user process has executed.
All write calls are writes to the shared-memory buffer cache.

7-102 IBM Informix OnLine Database Server Administrator’s Guide
tbtape: Logging, Archives, and Restore
-z Option
Use the -z option to set the profile counts to 0.
If you use the -z option to reset and monitor the count of some fields, be
aware that profile counts are incremented for all activity that occurs in any
database that the OnLine database server manages. Any user can reset the
profile counts and thus interfere with monitoring that another user is
conducting.
tbtape: Logging, Archives, and Restore
Use the tbtape utility to perform any of the following tasks:
■Request a logical log backup
■Initiate continuous backup of logical log files
■Create an archive
■Perform a data restore
■Change database logging status
You must be logged in as root or user informix to execute tbtape.
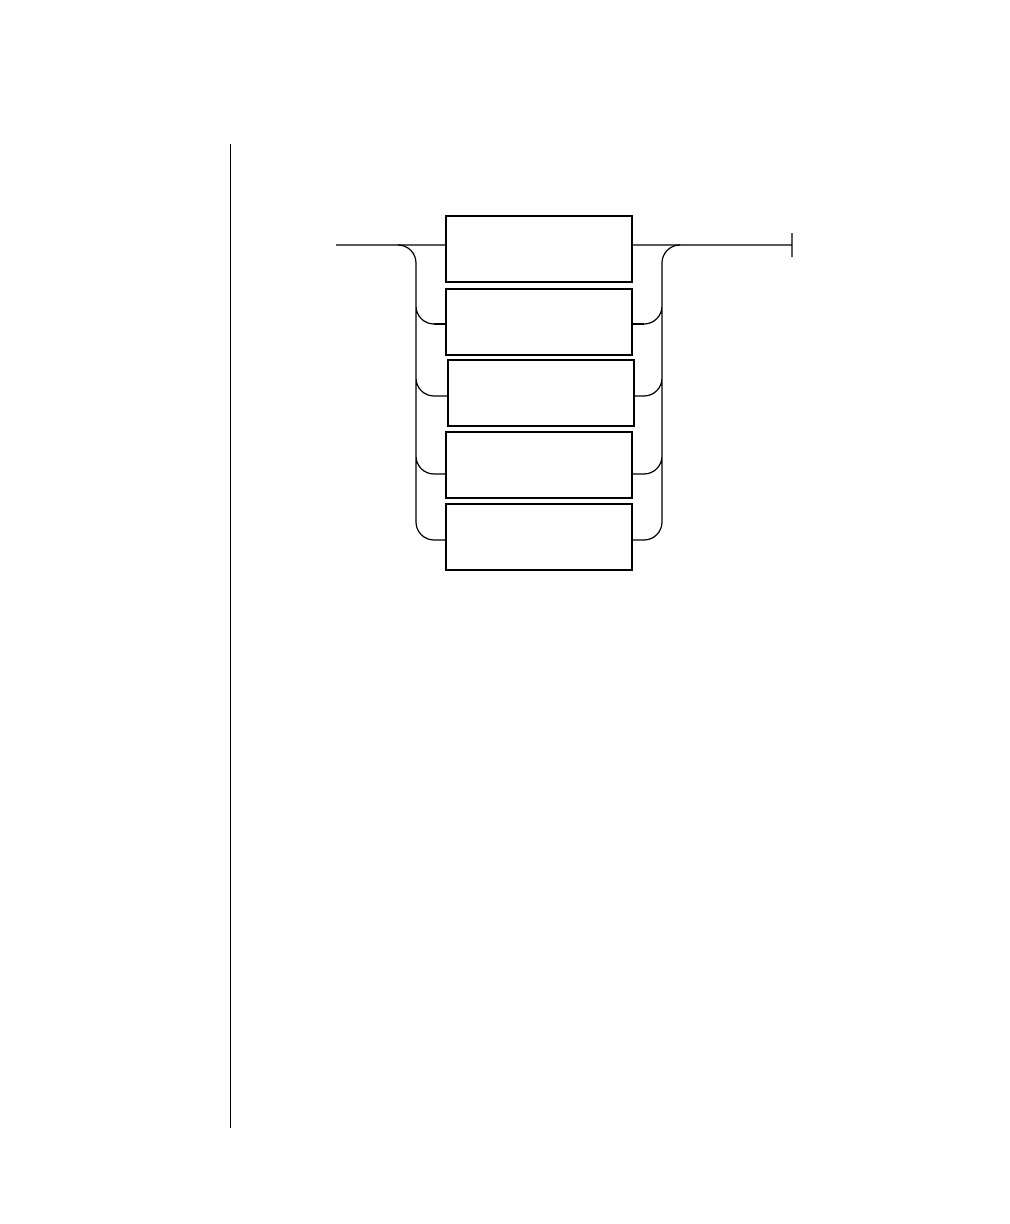
Utilities 7-103
Syntax
Syntax
If more than one tape is needed during the logical log backups or during an
archive, tbtape prompts for each additional tape. Do not run tbtape in
background mode (using the UNIX & operator) since you might need to
provide input from the terminal or window.
The tbtape utility has two exit codes:
0 indicates a normal exit from tbtape.
1 indicates an exceptional condition.
tbtape
Start Continuous
Backups
p. 7-104
Perform a
Data Restore
p. 7-105
Change Database
Logging Status
p. 7-106
Request a
Logical Log Backup
p. 7-104
Create an
Archive
p. 7-105
7-104 IBM Informix OnLine Database Server Administrator’s Guide
Request a Logical Log Backup
Request a Logical Log Backup
The -a option is the equivalent of the DB-Monitor Auto-Backup option from
the Logical-Logs menu.
OnLine backs up all full logical log files and prompts you with an option to
switch the log files and back up the formerly current log.
Refer to page 3-36 for more details to consider when you execute this
command.
Start Continuous Backups
The -c option is the equivalent of the DB-Monitor Continuous-Backup option
from the Logical-Logs menu.
This option initiates continuous logging. OnLine backs up each logical log
file as it becomes full. Continuous logging requires a dedicated terminal or
window.
Refer to page 3-37 for more details to consider when you execute this
command.
-a directs tbtape to back up all full logical log files.
-c directstbtape toinitiatecontinuousbackup of logicallog files.
Request a
Logical Log Backup
-a
Start Continuous
Backups
-c
Utilities 7-105
Create an Archive
Create an Archive
The -s option is the equivalent of the DB-Monitor Create option from the
Archive menu. You are prompted to supply the level archive (0, 1, or 2) that
you wish to create.
You can create an archive while OnLine is in quiescent or online mode.
Refer to page 3-57 for more details to consider when you execute this
command.
Perform a Data Restore
The -r option is the equivalent of the DB-Monitor Restore option from the
Archive menu.
Refer to page 4-45 for more details to consider when you execute this
command.
-s directs tbtape to create an archive.
-r directs tbtape to perform a data restore.
Create an
Archive
-s
Perform a
Data Restore
-r
7-106 IBM Informix OnLine Database Server Administrator’s Guide
Change Database Logging Status
Change Database Logging Status
These tbtape command options are similar to those available from the
DB-Monitor Archive menu, Database option.
The -s option is required if you are adding logging to a database. The -s
option is not required if you are ending logging or changing the logging
status from buffered to unbuffered or vice versa.
Refertopage 3-33formoredetailstoconsiderwhenyou execute anyofthese
commands.
-B directs tbtape to change the status of the specified database to
buffered logging.
database isthenameofthedatabase.Thedatabasenamecannotinclude
a database server name.
-N directs tbtape to end logging for the specified database.
-s initiates an archive.
-U directs tbtape to change the status of the specified database to
unbuffered logging.
Change Database
Logging Status
-s
-B database
-N
-U

Utilities 7-107
tbunload: Transfer Binary Data in Page Units
tbunload: Transfer Binary Data in Page Units
Thetbunload utility writes a database ortable totape. The programunloads
thedata in binary indisk-page units, makingit moreefficientthandbexport.
The tape created by tbunload is read using the tbload utility. The machine
receiving the data and the machine used to create the tape must share the
same page size (specified as BUFFSIZE in the configuration file).
The logging mode is not preserved when a database is unloaded with
tbunload.After you load thedatabase with tbload, youcan make a database
ANSI-complaint after it is loaded through the DB-Monitor Logical-Logs
menu, Databases option. You can add logging to a database either through
DB-Monitor (same option) or by executing tbtape.
To unload a database, you must have DBA privileges for the database. To
unload a table, you must either own the table or have DBA privileges for the
database in which the table resides.
If you unload a table, only the data and index pages that are associated with
thetableareunloaded.Accessprivileges defined for thetableand synonyms
or views associated with the table are not unloaded to tape.
The tbunload utility unloads page images. If you load the pages to another
machine that stores numeric data types differently than your current
machine (for example, with the most significant byte last instead of first), the
contents of the data page could be misinterpreted.
Duringtheunloadoperation,thenewdatabaseortableislockedexclusively.
An error is returned if an exclusive lock cannot be obtained.
7-108 IBM Informix OnLine Database Server Administrator’s Guide
Syntax
Syntax
If you do not specify any tape parameter options, tbunload uses the archive
tape parameters by default. The tape device to which data is sent is assumed
to be the device specified as TAPEDEV. The block size and tape size are
assumed to be the values specified as TAPEBLK and TAPESIZE, respectively.
To specify other parameter values, refer to the next section.
database isthenameofthedatabase.Thedatabasenamecannotinclude
a database server name because tbunload does not support a
client/server environment.
table name is the name of the table. The table name cannot include a
database server name because tbunload does not support a
client/server environment.
Specify
Tape
Parameters
p. 7-109
tbunload database
table name
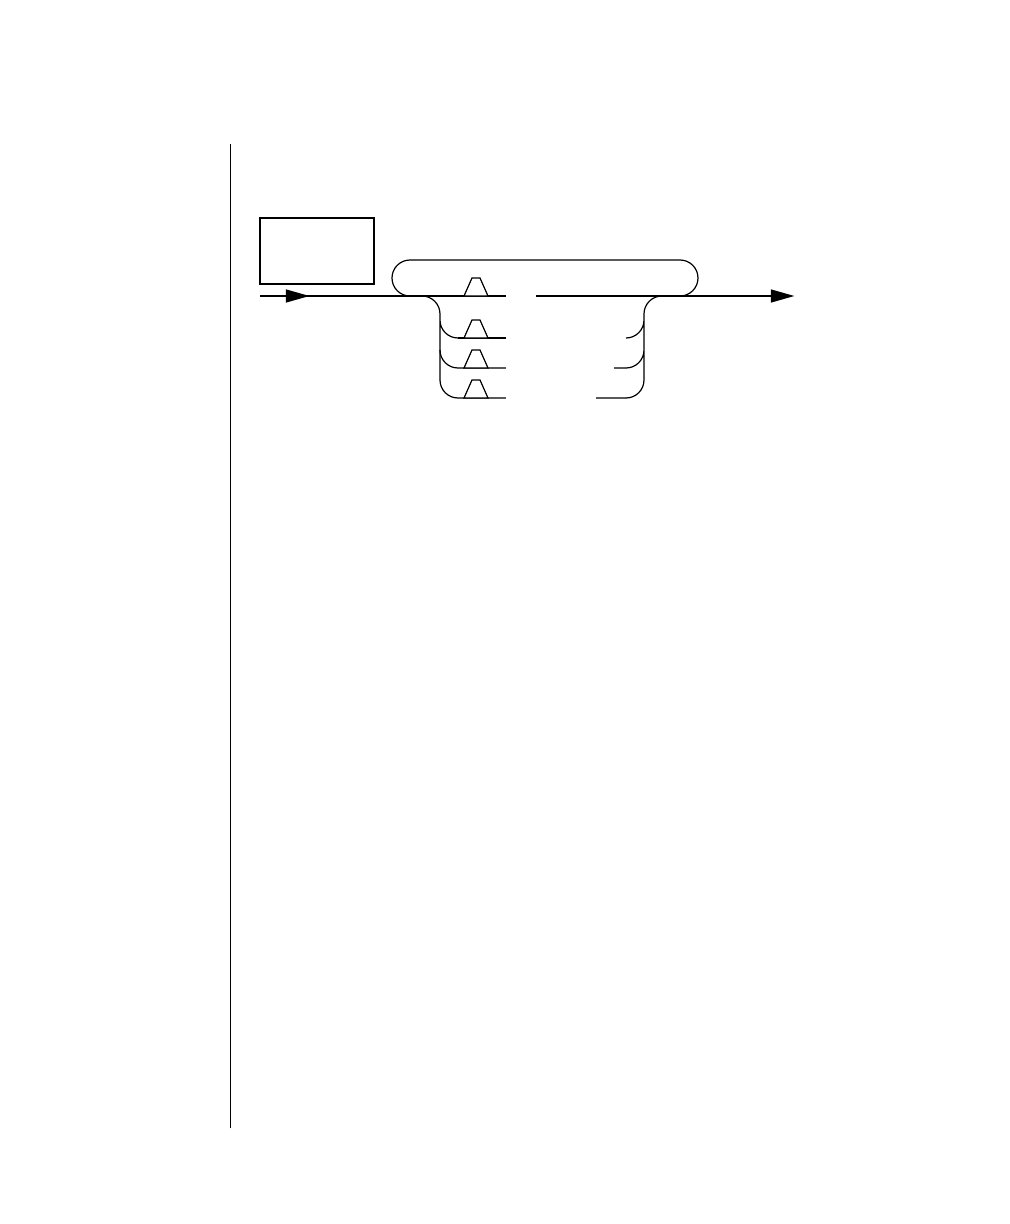
Utilities 7-109
Specify Tape Parameters
Specify Tape Parameters
You can use the -b,-s, and -t options individually to override the default
archive tape device parameters.
You can use the -b,-s, or -t option with the -l option to override individual
logical log device parameters.
To specify a remote tape device, use the following syntax:
host_machine_name:tape_device_pathname
The host machine where the tape device is attached must permit user
informix to run a UNIX shell from your machine without requiring a
password. If your machine does not appear in the hosts.equiv file of the
othermachine,then it must appear inthe.rhosts file in the homedirectoryof
the informix login. If you are executing tbunload as root, the machine name
must appear in the .rhosts file for root on the other host machine.
-b blocksize specifies in kilobytes the block size of the tape device.
-l directs tbunload to read the values for tape device, block size,
and tape size from the logical log backup device parameters
(LTAPEDEV,LTAPEBLK, and LTAPESIZE, respectively).
-s tapesize specifies in kilobytes the amount of data that can be stored on
the tape.
-t device namesthepathnameofthetapedevicewheretheinputtapeis
mounted.
Specify
Tape
Parameters
-b blocksize
1
-s tapesize
1
-t device
1
1-l


8-2 IBM Informix OnLine Database Server Administrator’s Guide

OnLine Message Log 8-3
In This Chapter
Thischapterintroducesthe OnLine MessageLog,aUNIX filespecifiedbythe
MSGPATH configuration file parameter.
OnLine Message Log
ThemessagescontainedintheOnLinemessagelograrelyrequireimmediate
action. (Situations that require your immediate attention are reported
through error messages or status messages sent to the system console.)
Fourgeneralcategoriesofmessagescanbedefined, althoughsomemessages
fall into more than one category:
■Routine information
■Consistency check reported (refer to page 4-6)
■Administrative action needed
■Fatal error detected
The messages reflect their traditional use by Informix technical staff to assist
in troubleshooting and diagnostics. The information they report often falls
into the category of “unexpected events” that might or might not develop
into problems caught by other error codes. Moreover, the messages are terse,
and often extremely technical and fragmented. That is, they report on one or
twoisolatedstatisticswithoutprovidingaclearpictureofwhatishappening.
When technical staff are investigating a problem, this information is useful
forsuggestingpossibleresearchpaths.Butoutofcontext,orwhenprocessing
is proceeding normally, the information might have little or no application
for an administrator.

8-4 IBM Informix OnLine Database Server Administrator’s Guide
OnLine Message Log
Informix recommends that you monitor the message log once or twice a day
to ensure that processing is proceeding normally. To that end, Informix has
documented the messages with the intent of providing you with as much
information about OnLine processing as possible. Of the approximately 150
messages included here, six might require you to contact Informix technical
support staff. These six messages are rarely, if ever, seen at customer
locations.
If OnLine experiences a failure, the message log serves as a paper trail for
retracing the events that later developed into an unanticipated problem.
Oftentheexact natureofthe problemandthe suggested correctiveactionare
provided in the message log.
If you wish, you can read the OnLine message log for a minute-by-minute
account of OnLine processing. It is possible that you could catch events
beforeaproblemdevelops.However,Informixdoesnotexpectorrelyonyou
to do this.
The OnLine message log messages are arranged here in alphabetical order.
The following guidelines were used to sort the messages:
■The timestamp that precedes each message is ignored.
■Letter case is ignored in alphabetization.
■Spaces are ignored.
■The word “the” is ignored if it is the first word in the message.
■Messages that begin with variables (such as a device pathname, a
dbspacename,oranumericvalue) arealphabetizedaccordingtothe
first standard word in the message text.
■Messages that begin with numbers or punctuation symbols appear
toward the end of the list.

OnLine Message Log 8-5
Alphabetized Messages
Alphabetized Messages
Aborting Long Transaction: tx 0xn
The logical log has filled beyond the long transaction high-water mark
(LTXHWM) and the offending long transaction is in the process of rolling
back.Noadditionalactionisneeded.Theaddressofthetransactionstructure
in shared memory is displayed as hexadecimal value.
allocpage: warning pagenum (nn) > npused (nn)
allocpage: partp (0xn), partnum (0xn)
allocrow: warning pagenum (nn) > npused (xx)
allocrow: partp (0xn), partnum (0xn)
allocvrow: warning pagenum (nn) > npused (xx)
allocvrow: partp (0xn), partnum (0xn)
Forallthreeofthesemessagesets, OnLine detected oneormoreinaccuracies
intheinternalinformationthatdescribesthesizeofthetblspaceindicatedby
the value of partnum (partnum is the tblspace number expressed as a
hexadecimal value). No action is needed. OnLine handles the situation
internally.
The value of pagenum is the logical page number within the tblspace, the
valueof npused is the number of used pages in thetblspace, and the value of
partp istheaddressofthetblspacetblspacein sharedmemory(expressedas
a hexadecimal value).
Attempt to write nn pages from a nn page buffer.
OnLine detected a logical log buffer overflow. No action is needed. OnLine
handles the situation internally.
Attempt to write nn pages from a nn page logfile.
OnLine detected a logical log file overflow. No action is needed. OnLine
handles the situation internally.

8-6 IBM Informix OnLine Database Server Administrator’s Guide
Alphabetized Messages
Attempt to write pages nn to a nn page buffer.
OnLine detected a page buffer overflow. No action is needed. OnLine
handles the situation internally.
Backup Mode
This message appears during a data restore. OnLine shared memory is in an
internalbackup mode whilethe blobspaces anddbspaces arebeing restored,
before OnLine changes to online mode.
bfcheck: bad page: what is invalid,process that encountered it
state = “pg_addr information”
state = “pg_stamp information”
state = “pg_flags information”
state = “pg_nslots information”
state = “pg_frptr information”
state = “slotcheck information”
state = “page->pg_frcnt information”
buffer header: information
page header: information
slot table and stamp: information
page header, slot table, and stamp: information
The first message in this series indicates that OnLine detected a consistency-
check failure. The additional messages identify the structure that is invalid
and provide diagnostic information. These messages have meaning to
Informix technical support personnel. Please contact Informix technical
support for additional assistance resolving this situation.
bfget(After wait) - bf_pagenum nn !=pagenum nn,
pb->_pagenum, pagenum
userp nn pid nn, USERP, USERP->us_pid
bp dump
bp->bf_page dump
This sequence of four messages accompanies a consistency-check failure
indicating that an unexpected event changed the contents of a buffer while a
database server process was waiting for the buffer to be unlocked. No action
is needed. OnLine handles the situation internally by attempting to obtain
the buffer again.

OnLine Message Log 8-7
Alphabetized Messages
The messages can be interpreted as follows:
■The first message indicates the inconsistency.
■The second message identifies the database server process affected.
■The third message is the header for the hexadecimal/ASCII dump of
the buffer header structure that follows.
■The fourth message is the headers for the hexadecimal/ASCII dump
of the page header structure that follows.
call to ptmap() from ptbld() failed
OnLine detected an error in an attempt to build a table. No action is needed.
OnLine handles the situation internally.
call to ptmap() from ptphyaddr() failed
OnLine detected an error in an attempt to translate a tblspace number to a
physical address within the tblspace tblspace. No action is needed. OnLine
handles the situation internally.
Cannot Allocate Physical Log File, nn wanted, nn available
OnLine attempted to initialize shared memory with a physical log size that
exceeds the amount of contiguous space available in the dbspace (specified
as PHYSDBS in the configuration file). Both quantities of space, wanted and
available, are expressed as kilobytes. You must either reduce the size of the
physical log (specified as PHYSFILE in the configuration file) or change the
location of the log to a dbspace that contains adequate contiguous space to
accommodate the log.
Cannot Commit Partially Complete Transactions
Within the fast recovery or data restore procedure, the logical log records are
first rolled forward. It is possible for an open transaction to fail during the
rollforward, leaving a transaction that should be committed in an incom-
plete, uncommitted state. This error does not prevent OnLine from moving
to quiescent or online mode, but it might indicate an inconsistent database.
Examine the logical log using the tblog utility to determine if any action is
needed.

8-8 IBM Informix OnLine Database Server Administrator’s Guide
Alphabetized Messages
Cannot execute gtrid_aaaa -- No TP monitor available.
(This message is only received by users of the IBM Informix TP/XA product.)
An OnLine database server process is making an XA function call within an
X/Open environment, but cannot detect the presence of a TP monitor. Refer
to the IBM Informix TP/XA User Manual.
Cannot Open Dbspace nnn
OnLine is unable to access the specified dbspace. This message indicates a
problem opening the tblspace tblspace or corruption in the initial chunk of
therootdbspace.Verifythattherootdbspacedeviceis running properlyand
has the correct UNIX permissions (rw-rw----). You might be required to
perform a data restore.
Cannot Open Logical Log
OnLine is unable to access the logical log files. Since OnLine cannot operate
without access to the logical log, you must resolve this problem. Verify that
the chunk device where the logical log files reside is running properly and
has the correct UNIX permissions (rw-rw----). You might be required to
perform a data restore.
Cannot Open Mirror Chunk pathname errorno = nn
Themirrorchunkof a mirroredpaircannot be opened.The chunk pathname
and the UNIX error are returned. Refer to your operating system documen-
tation for more information about corrective actions.
Cannot Open Primary Chunk pathname errorno = nnn
The primary chunk of a mirrored pair cannot be opened. The chunk
pathname and the UNIX error are returned. Refer to your operating system
documentation for more information about corrective actions.
Cannot Open Primary Chunk chunkname
The initial chunk of the dbspace cannot be opened. Verify that the chunk
deviceis runningproperlyandhas the correctUNIX permissions (rw-rw----).

OnLine Message Log 8-9
Alphabetized Messages
Cannot Perform Checkpoint
Arecoveryprocessthat isattemptingtorestoreamirrorchunkhasrequested
a checkpoint, but the checkpoint cannot be performed because the tbinit
daemon process has died.
Cannot Read Logical Log
Thelogicallogorthechunkcontainingthelogicalloghasbecomecorrupted.
OnLine cannot initialize. Perform a data restore from archive.
cannot recreate index -- partnum=0xn, keynum=nn,
iserrno=nn, errno=nn
OnLine detected an error during fast recovery or a data restore. After the
rollforward phase, all indexes that were built (according to the logical log
records) are physically created. However, a failure occurred and this index
was not properly created during the recovery. You should create the index
manuallyusingthe SQL statement CREATE INDEX. The index to becreatedis
described by partnum, which is the hexadecimal value of the tblspace
number that requires the index. Execute the command tbcheck -cI
0xpartnum to obtain the table name and index name. The iserrno is the
number of the ISAM error that is returned. The errno is the number of the
UNIXerrorthatis returned. Use these errornumbersfor further information
about the cause of the failure.
Cannot Restore to Checkpoint
OnLine is unable to recover the physical log and thus is unable to perform
fast recovery. If OnLine does not come online, perform a data restore from
archive.
Cannot Rollback Incomplete Transactions
Within the fast recovery or data restore procedure, the logical log records are
first rolled forward. Then, open transactions that have not committed are
rolled back. It is possible for an open transaction to fail during the rollback,
leaving some of the modifications from the open transaction in place. This
errordoesnotpreventOnLinefrommovingtoquiescentoronlinemode,but
it might indicate an inconsistent database. Examine the logical log using the
tblog utility to determine if any action is needed.

8-10 IBM Informix OnLine Database Server Administrator’s Guide
Alphabetized Messages
Cannot Rollforward from Checkpoint
OnLineisunabletorecoverthelogicallogandthusisunable tocompletefast
recovery. If OnLine does not come online, perform a data restore from
archive.
Can’t fork to create tbundo errno=nn
The tbinit process cannot start a tbundo daemon that is needed to perform
cleanup on a transaction on behalf of an aborted database server process.
OnLine initiates a shutdown. The errno nn refers to the UNIX error that
indicates the cause of the problem. Refer to your operating system
documentation.
Checkpoint Completed
A checkpoint completed successfully.
Checkpoint Page Write Error
OnLine detected an error in an attempt to write checkpoint information to
disk. Please contact Informix technical support for additional assistance
resolving this situation.
Checkpoint Record Not Found in Logical Log
Thelogicallogorthechunkcontainingthelogicalloghasbecomecorrupted.
OnLine cannot initialize. Perform a data restore from archive.
Chunk pathname will not fit in the space specified
OnLine attempted to initialize but the initial chunk of the root dbspace is too
large to fit into the device specified by the ROOTPATH configuration file
parameter. Change the location of the initial chunk of the root dbspace or its
size (specified as ROOTSIZE in the configuration file).
Chunk number nn pathname -- Offline
The indicated chunk in a mirrored pair has been marked with status “D” and
taken offline. The other chunk in the mirrored pair is operating successfully.
Take steps now to repair the chunk device and restore the chunk. The chunk
number and chunk device pathname are displayed.

OnLine Message Log 8-11
Alphabetized Messages
Chunk number nn pathname -- Online
The indicated chunk in a mirrored pair has been recovered and is online
(marked with status “O”). The chunk number and chunk device pathname
are displayed.
Chunk number nn pathname -- Recovery Aborted
Due to Signal
The indicated chunk could not be recovered from the other chunk in the
mirrored pair because of a signal that was received. The chunk number and
chunk device pathname are displayed.
Chunk number nn pathname -- Recovery Begins (pid)
An attempt is being made to recover the indicated chunk from the other
chunk in the mirrored pair. This could occur when mirroring is started for a
blobspaceor dbspace, when you areaddinga chunk to a mirroredblobspace
ordbspace,orwhenyouarechangingthestatusofthechunkfrom“D”to“O.”
Thechunk number, chunkdevicepathname, and therecoveryprocessIDare
displayed.
Chunk number nn pathname -- Recovery Complete (pid)
The indicated mirror chunk is online and operating successfully. The chunk
number,chunk device pathname, and therecoveryprocessIDaredisplayed.
Chunk number nn pathname -- Recovery Failed
The indicated chunk cannot be recovered from the other chunk in the
mirrored pair for some reason. The chunk number and chunk device
pathname are displayed.
Chunk number nn pathname -- Recovery Failed(pid)
The indicated chunk cannot be recovered from the other chunk in the
mirrored pair for some reason. The chunk number, chunk device pathname,
and the recovery process ID are displayed.

8-12 IBM Informix OnLine Database Server Administrator’s Guide
Alphabetized Messages
Chunk number nn pathname -- Recovery Failed - can’t fork
The indicated chunk cannot be mirrored or recovered from the other chunk
in the mirrored pair because the process that is needed to perform the
recovery cannot be spawned. The chunk number and chunk device
pathname are displayed. Refer to your operating system documentation for
more information about fork().
Continuing Long Transaction (for COMMIT): tx 0xn
The logical log has filled beyond the long transaction high-water mark
(LTXHWM), but the offending long transaction is in the process of
committing. In this case, the transaction is permitted to continue writing to
thelogical log and isnot rolledback. The addressofthetransaction structure
in shared memory is displayed as a hexadecimal value.
Core for nn in directory
The core of the database server process with process ID nn was moved to the
directory indicated. This action is usually taken in response to a consistency-
check failure when either the GCORE or DUMPCORE environment variable is
set.Refer to page 4-10for moreinformation about GCORE.Refer to page 4-11
for more information about DUMPCORE.
Dbspace dbspacename for Physical Log File not found
OnLine attempted to initialize shared memory but could not create the
physical log file in the named dbspace. OnLine cannot detect that the named
dbspace exists. Check the spelling of the value specified as PHYSDBS.
Dbspace dbspacename now has mirror
You have successfully added mirroring to the indicated dbspace.
Dbspace dbspacename now has no mirror
You have ended mirroring for the indicated dbspace.

OnLine Message Log 8-13
Alphabetized Messages
Dbspace dbspacename -- Recovery Begins (pid)
Dbspace recovery occurs when mirroring is turned on for a dbspace. An
attempt to recover this dbspace has begun. The process ID of the recovery
processis displayed.Thismessageisfollowedby messagesforeachchunkin
thedbspace indicating when chunk recovery begins andcompletes (or fails).
Dbspace dbspacename -- Recovery Complete (pid)
Mirroringhasbeensuccessfullyturnedonforthisdbspace.TheprocessIDof
the recovery process is displayed.
Dbspace dbspacename -- Recovery Failed (recovery pid)
Forsomereason,itwasnotpossibletoinitiatemirroringforthisdbspace.The
processIDof therecoveryprocessisdisplayed.Refertotheprecedingchunk-
level messages for more details.
Dbspace dbspacename -- Recovery Failed - can’t fork
The attempt to mirror this dbspace failed because of a problem affecting a
UNIX system call. Refer to your operating system documentation for more
information about fork().
delrecord: bad rowid 0xn partnum 0xn pid nn
OnLine detected that an attempt to delete the indicated rowid failed. The
rowid and tblspace number (partnum) are expressed as hexadecimal values.
The process ID of the user process is displayed.
Dropping temporary tblspace 0xn, recovering nn pages
During shared-memory initialization, OnLine routinely searches for
temporary tables that are left when a process dies without proper cleanup or
following an uncontrolled shutdown. If a temporary table is found, OnLine
drops the table and recovers the space. OnLine located the specified
temporary tblspace and dropped it. (The value 0xn is the hexadecimal repre-
sentation of the tblspace number.)

8-14 IBM Informix OnLine Database Server Administrator’s Guide
Alphabetized Messages
Empty B-tree node 0xn; Unable to do CopyBack
OnLine detected B+ tree corruption. Drop and re-create the index using the
SQL statements DROP INDEX and CREATE INDEX. An ISAM error number is
returned to the user. Node 0xn is the index node where the corruption was
detected, expressed as a hexadecimal value. To determine which index must
be re-created, run tbcheck -cI on the table.
ERROR - bfput (BF_MODIFY) not in Critical Section. us 0xn pid 0xn
OnLinedetectedaconsistency-checkfailureindicatingthatsomeunexpected
event permitted this user process to hold a modified buffer without flagging
that the process was in a critical section. The user ID and process ID of the
user process are displayed as hexadecimal values. Please contact Informix
technical support for additional assistance resolving this situation.
ERROR - flalloc: failed OPN_TST() userp 0xn partp 0xn
OnLine detected a situation in which a table that should have been open for
a user was not open. The hexadecimal value of userp is the address of the
user structure in shared memory; the hexadecimal value of partp is the
address of the tblspace structure in shared memory.
ERROR:logput() - type nn len nn.
OnLine detected an error while attempting to add a logical log record to the
current log file. This message is always accompanied by one of the following
messages:
“logput() not in critical section,” which indicates that an attempt to
add a record was made while the user process was not in a critical section.
“logput() not in transaction,” which indicates that a BEGIN log record
has not been written.
“logput() -logwrite() FAILED,” which indicates that an attempt to flush
the current logical log buffer failed.
“logput()-logsetup() FAILED,” which indicates that an attempt to set up
a log page to receive the new log record failed.
“logput()-unknown,” which indicates that the cause of the failure is
unknown.

OnLine Message Log 8-15
Alphabetized Messages
type is the log record type (refer to tblog); len is the length of the log record
in bytes.
ERROR: logread()- loguniq nn logpos 0xn
OnLine detected an error while attempting to read from the logical log. The
loguniq value is the logical log logid value; the logpos value is the logical
log position, expressed as a hexadecimal.
ERROR: logundo(n)- iserrno nn us 0xn pid nn tx 0xn loguniq nn
logpos 0xn
OnLine detected an error while attempting to roll back a logical log record.
The following information displays:
■logundo(n) is an internal definition of the type of the log record that
could not be rolled back.
■iserrno is the ISAM error number that indicates the reason for the
failure.
■us is the address of the user structure in shared memory
(hexadecimal).
■pid indicates the database server process that generated the error.
■tx is the address of the transaction structure in shared memory
(hexadecimal).
■loguniq is the logical log logid.
■logpos is the logical log position (hexadecimal).
ERROR:NO “waitfor” locks in Critical Section.
OnLine does not permit a database server process to own locks that might
have to wait while that server process is within a critical section. Any such
lock request is denied and an ISAM error message is returned to the user.
error on log write, buf 0xn, physaddr nn, npages nn
An error has occurred during an attempt to flush a logical log buffer to disk.
OnLine initiates a shutdown to preserve database integrity and consistency.
The buf value is the address of the logical log buffer in shared memory
(hexadecimal); the physaddr value is the physical address of the logical log
buffer; the npages value is the size of the logical log buffer.

8-16 IBM Informix OnLine Database Server Administrator’s Guide
Alphabetized Messages
ERROR: page cleaner nn has timed out.
A page-cleaner process could not complete its task within the allowed time
(two minutes). The cleaner process is disabled. Page cleaning continues with
the remaining page-cleaner processes and the tbinit daemon. The disabled
page cleaner is identified by its process ID,nn.
ERROR - pntorsfd: failed OPN_TST userp (0xn) partp (0xn)
ERROR - pntorsfd: fl_partnum (0xn) !=partnum (0xn)
ERROR - pntorsfd: partp is NULL openp (0xn) op_filep
OnLine detected a situation during a rollforward or a rollback in which a
table that should have been open for a process was not open. A consistency
error is generated. The hexadecimal value of userp is the address of the user
structure in shared memory; the hexadecimal value of partp is the address
ofthetblspace structureinsharedmemory.PleasecontactInformix technical
support for additional assistance resolving this situation.
ERROR: ptifree: failed OPN_TST() USERP 0xn partp 0xn
OnLine detected a situation in which a table that should have been open for
a user was not open. The hexadecimal value of USERP is the address of the
user structure in shared memory; the hexadecimal value of partp is the
address of the tblspace structure in shared memory.
Error writing shmem to file filename (error)
Unable to create output file filename errno=nn
Error writing filename errno=nn
OnLinedetectedanerrorinanattempt towritesharedmemory tofilename.
Thefirstmessageisfollowedbyoneofthe next two.Eithertheattemptfailed
because the output file could not be created or the because the contents of
sharedmemorycouldnotbewritten.Error referstotheerrorthatprompted
the attempt to write shared memory to a file. The value of errno is the UNIX
error. Refer to your operating system documentation.
Fail Consistency Check
This message is a header that is followed by different text messages that
attempt to identify the source of the consistency-check failure. Refer to
page 4-6formoreinformationaboutthecorrectactionstotakeinresponseto
consistency-check failures.

OnLine Message Log 8-17
Alphabetized Messages
Failed to stat chunk chunk_pathname, errno = nn
OnLine detected an error during an operating system stat() call. The UNIX
error number is returned. Refer to your operating system documentation.
fatal pgcompress error: pid = nn, uid = nn
OnLine detected an error in an attempt to compress a page. The process ID
and the user ID of the database server process that generated the error are
displayed.PleasecontactInformixtechnicalsupportforadditionalassistance
resolving this situation.
Fcntl failed in Async Chunk Initialization chunk_pathname, fd=nn
errno = nn
OnLinedetectedanerrorduringanoperatingsystemfcntl() call.TheUNIX
file descriptor number and error number are returned. Refer to your
operating system documentation.
gcore nn; mv core.nn core_filename
A user process detected an inconsistency or initiated an abort sequence and
calledthegcore operatingsystemutility.Theutilitydirectedtheuserprocess
to dump core to core_filename. This requires that either the GCORE or
DUMPCORE environment variable is set. Refer to page 4-10 for more infor-
mation about GCORE. Refer to page 4-11 for more information about
DUMPCORE.
INFORMIX-OnLine entering ABORT mode
OnLine is initiating a shutdown to preserve database integrity and consis-
tency. The most likely cause is the abnormal termination of a database server
process that is either in a critical section of code or holding a latch.
INFORMIX-OnLine Initialized - Complete Disk Initialized
OnLine disk space and shared memory have been initialized. Any databases
that existed on the disk before the initialization are now inaccessible.
INFORMIX-OnLine Initialized - Shared Memory Initialized
OnLine shared memory has been initialized.

8-18 IBM Informix OnLine Database Server Administrator’s Guide
Alphabetized Messages
INFORMIX-OnLine Must ABORT; Log error nn; us 0xn pid 0xn us_flags 0xn
This error can occur when OnLine detects logical log corruption of some
kind. Reinitialize OnLine shared memory. If this does not bring OnLine
online, perform a data restore from archive. The log error value refers to an
area in the code where the corruption was detected. The three hexadecimal
valuesaretheaddressofthe user structureinsharedmemory,theprocessID
oftheprocessthatgeneratedthismessage,andthevalueoftheuserstructure
flags.
INFORMIX-OnLine Must ABORT; Physical log flush write error; us 0xn
pid nn us_flags 0xn; information
This error can occur when OnLine attempts to write the physical log buffer
to disk and a failure occurs in the disk-write protocol. OnLine initiates a
shutdown to preserve database integrity and consistency. The hexadecimal
values are the address of the user structure in shared memory and the value
of the user structure flags. The process ID of the process that generated this
message also displays. The additional information has meaning to Informix
technical support but no application for the administrator.
INFORMIX-OnLine Must ABORT; Root chunk and root mirror down
Both the primary, initial chunk of the root dbspace and its mirror are down.
Possible causes could include the following:
■UNIX permission problems exist on the primary and mirror root
dbspace devices.
■The physical devices failed.
INFORMIX-OnLine Must ABORT; Root chunk down
If you are not mirroring the initial chunk of the root dbspace, OnLine must
abort when the chunk is marked as “down.” Repair the root dbspace chunk
device and perform a data restore (restore OnLine from archive).
INFORMIX-OnLine Stopped
OnLine has moved from quiescent mode to offline mode. OnLine is offline.

OnLine Message Log 8-19
Alphabetized Messages
Insufficient resources for index change rollback (partnum = nn, keynum
=nn)
Not enough disk space is available to complete the rollback of the index
changes made. OnLine marks this index as unusable. The index must be
dropped and re-created by the user using the SQL statements DROP INDEX
and CREATE INDEX. (partnum refers to the tblspace number of where the
indexislocated,expressedasaninteger. keynum referstoaninternaltblspace
descriptionpage.)Tolearnwhichindexmust bere-created,executetbcheck
-cI 0xpartnum. The table and index names are returned.
I/O function chunk nn, pagenum nn, pagecnt nn [errno nn]
An operating system error occurred during an attempt to access data from
OnLine disk space. The operating system function that failed is defined by
function.The chunk number and physical address of the page where the
error occurred are displayed as integers. pagecnt refers to the number of
pages that the user process was attempting to read. If an errno value is
displayed, it is the value of the UNIX error and might explain the failure. If
function is specified as “bad request,” some unexpected event caused the
I/O attempt on an invalid chunk or page.
Ifthechunkstatuschangesto“D,”ordown,restorethechunkfromitsmirror
or repair the chunk. Otherwise, perform a data restore.
I/O error ‘lseek’: expect nn actual nn addr 0xn errno nn
retries nn
The operating system lseek() call encountered an error. The operation is
retried three times to ensure that the error is not spurious. The values
reported are as follows:
■expect is the expected byte count.
■actual is the actual byte count.
■addr is the physical address (hexadecimal).
■errno is the UNIX error number.
■retries is the number of times this operation has been attempted.
I/O error, Mirror Chunk pathname -- Offline
OnLine detected an I/O error on a mirror chunk in a mirrored pair. In
response, the chunk was taken offline.

8-20 IBM Informix OnLine Database Server Administrator’s Guide
Alphabetized Messages
I/O error, Primary Chunk pathname -- Offline
OnLine detected an I/O error on a primary chunk in a mirrored pair. In
response, the chunk was taken offline.
I/O error ‘read’: expect nn actual nn addr 0xn errno nn retries nn
The operating system read() call encountered an error. The operation is
retried three times to ensure that the error is not spurious. The values
reported are as follows:
■expect is the expected byte count.
■actual is the actual byte count.
■addr is the physical address (hexadecimal).
■errno is the operating system error number.
■retries is the number of times this operation has been attempted.
I/O error ‘write’: expect nn actual nn addr 0xn errno nn retries nn
The operating system write() call encountered an error. The operation is
retried three times to ensure that the error is not spurious. The values
reported are as follows:
■expect is the expected byte count.
■actual is the actual byte count.
■addr is the physical address (hexadecimal).
■errno is the operating system error number.
■retries is the number of times this operation has been attempted.
I/O - retry successful; addr 0xn retries nn, io_retries
This message follows a retry of a previously detected I/O error and indicates
thattheretrywassuccessful. Refer to I/O error“lseek,”I/O error“read,”and
I/O error “write.”
Level n Archive Cancelled
The archive (of the indicated level) has been aborted for some reason. The
archive must be redone.

OnLine Message Log 8-21
Alphabetized Messages
Level n Archive Completed
The archive (of the indicated level) has ended.
Level n Archive Started
An archive (of the indicated level) is under way.
Lock table overflow - user id nn process id nn
A database server process attempted to acquire a lock when no locks were
available. The user ID and process ID of the requesting database server
process are displayed.
log buffer overflow
This message is preceded by a function name that requested a check for the
log buffer overflow condition.
Logical Log nn Backed Up
Backup of the logical log file identified by log ID number nn is complete.
Logical Log nn Complete
The logical log file identified by log ID number nn is full. OnLine automati-
cally switches to the next logical log file in the sequence.
Logical Log Files are Full -- Backup is Needed
OnLinehassuspendedprocessingandis waiting for the logical log files to be
backed up.
Logical Log File not found
The checkpoint record in the root dbspace reserved page has become
corrupted. Perform a data restore from archive.
Logical Recovery Complete; nn Committed, nn Rolled Back, nn Open, nn
Bad Locks
This summary message indicates the end of fast recovery. The following
statistics are provided:

8-22 IBM Informix OnLine Database Server Administrator’s Guide
Alphabetized Messages
■The number of transactions that were committed
■The number of transactions that were rolled back
■The number of transactions that were left open or unresolved (appli-
cable for users of IBM Informix STAR or IBM Informix TP/XA)
■Thenumberoftransactionsthatwereunabletoacquirelocksneeded
tocompletethetransaction(These transactionsareconsideredopen.)
Log Record: log = nn, pos = 0xn, type = nn, trans = nn
OnLine detected an error during the rollforward portion of fast recovery or
data restore. The log record that caused the error is identified as follows:
■log is the logical log logid where the record is stored.
■pos is the hexadecimal address position within the log.
■type is the logical log record type.
■trans is the transaction number that appears in the tblog output.
Memory Lock failed in Async Chunk Initialization pathname, errno = nn
OnLine detected an error during an operating system ioctl() call. The UNIX
error number is returned. Refer to your operating system documentation.
Mixed transaction result. (pid=nn user=userid)
(This message is only received by users of the IBM Informix STAR product.)
This message indicates that a database server process in the postdecision
phase of a two-phase commit transaction has been heuristically rolled back
and the global transaction has been implemented inconsistently. The pid
value is the user process identification number of the coordinator process.
The user value is the user ID associated with the coordinator process. Refer
to page 9-39.
newmode: Invalid page type of 0xn
OnLine detected that this page type is invalid for this tblspace. Most likely,
the page is uninitialized or corrupted in some way. The page type is a
hexadecimal value representing page flags from the page header. Please
contact Informix technical support for additional assistance resolving this
situation.

OnLine Message Log 8-23
Alphabetized Messages
Not enough Logical Logfiles, Increase “LOGFILES”
Duringadatarestore,thevalueoftheLOGFILES configurationfileparameter
must always be greater than or equal to the total number of logical log files.
At some point during the restore, the number of logical log file exceeded the
value of LOGFILES. Increase the value of LOGFILES.
Not enough main memory
OnLine detected an error in an attempt to acquire more memory space from
the operating system. Refer to your operating system documentation for
further information about malloc().
On-Line Mode
OnLine is in online mode. Users can access all databases.
Physical log file overflow
The physical log file (on disk) has filled since the last checkpoint. OnLine
initiates a shutdown. At this point, simply reinitialize OnLine. As OnLine
comes up, fast recovery occurs. The following message is written to the log:
Overflow OK if restore completes successfully.
If restore fails, do a full restore from backup.
If the fast recovery succeeds, you can ignore both messages. Increase the size
of the physical log immediately.
Ifthefastrecoverycannotcomplete,youmustperformadatarestore(restore
OnLine from archive).
Physical Recovery Aborted
Physicalrecoveryisthe first phasein OnLine fast recovery,duringwhich the
pages from the physical log are written back to the disk. If this phase is
aborted, fast recovery is aborted and OnLine does not initialize. Perform a
data restore from archive.

8-24 IBM Informix OnLine Database Server Administrator’s Guide
Alphabetized Messages
Physical Recovery Complete: nn Pages Restored
Physicalrecoveryisthe first phasein OnLine fast recovery,duringwhich the
pages from the physical log are written back to the disk. This phase is
completeandthesecondphase,logicalrecovery,isreadytobegin. Whenever
OnLine is shut down in a controlled manner, the physical log contains no
pages and zero pages are restored.
Physical Recovery Started
Physicalrecoveryisthe first phasein OnLine fast recovery,duringwhich the
pages from the physical log are written back to the disk. This message
indicates fast recovery is beginning.
Possible mixed transaction result.
(This message is only received by users of the IBM Informix STAR product.)
Thismessageindicatesthattheerror-716hasbeenreturned.Associatedwith
this message is a list of the OnLine database servers where the result of as
transaction is unknown. You might need to determine database consistency.
Refer to page 9-51.
Process Aborted Abnormally (commit): tx=0xn flags=0xn
A database server process that started a transaction aborted abnormally, but
since the process was already committing the work, the tbundo daemon
process was able to successfully complete the commit. The address of the
transaction structure and the value of the transaction flags are displayed,
expressed as hexadecimal values.
Process Aborted Abnormally (critical section): pid=nn user=nn
flags=0xn
A database server process was terminated while it was within a critical
section of code. OnLine initiates a shutdown to preserve database integrity
and consistency. The database server process ID, its user ID, and the value of
the user structure flags (expressed as hexadecimal values) are displayed.

OnLine Message Log 8-25
Alphabetized Messages
Process Aborted Abnormally (latch): pid=nn user=nn
flags=0xn
A database server process was terminated while it was holding a latch.
OnLine initiates a shutdown to preserve database integrity and consistency.
ThedatabaseserverprocessID,itsuserID,andthevalueoftheuserstructure
flags (expressed as hexadecimal values) are displayed.
Process Aborted Abnormally (rollback): tx=0xn flags=0xn
A database server process that started a transaction aborted abnormally, but
since the process was already rolling back the work, the tbundo daemon
process was able to successfully complete the rollback. The address of the
transaction structure and the value of the transaction flags are displayed,
expressed as hexadecimal values.
ptmap: bad extent number = nn - only nn pages
OnLine detected a request for an extent that is beyond the range of the
tblspace. extent number specifies the extent number that was requested;
only nn pages is the number of extents allocated to the tblspace.
ptmap: bad pagenum = nn - only nn pages
OnLinedetecteda requestforapage that is beyondtherangeof the tblspace.
pagenum nn referstothe logical page number that was requested;nn liststhe
number of pages allocated to the tblspace.
ptmap failure: userp = 0xn, pid = nn
OnLinedetecteda requestforapage that is beyondtherangeof the tblspace.
Userp refers to the address of the user structure in shared memory that
generated the request (hexadecimal). The process ID of the database server
process is also displayed.
Quiescent Mode
OnLine has entered quiescent mode from some other state. Only users
loggedinas informix or as root caninteract with OnLine. Nousercan access
a database.

8-26 IBM Informix OnLine Database Server Administrator’s Guide
Alphabetized Messages
read_record: deleted rowid = 0xn, partnum = 0xn
OnLine detected an error in an attempt to read a portion of a row. The page
and slot value indicated by the rowid is empty and appears to have been
deleted.The rowidshould be deleted by OnLine.The rowidof the portion of
the row is displayed as a hexadecimal value. partnum refers to the tblspace
number, expressed as a hexadecimal value.
read_record: invalid rowid = 0xn, partnum = 0xn
OnLine detected an error in an attempt to read a portion of a row. The page
and slot value indicated by the rowid is invalid. The rowid of the portion of
the row is displayed as a hexadecimal value. partnum refers to the tblspace
number, expressed as a hexadecimal value.
Remote tape error: cannot execute: <rcmd machine>
Thismessageindicatesaproblemwiththevalueoftheenvironmentvariable
DBREMOTECMD. Check the value of DBREMOTECMD and PATH. Try to
execute the command specified in DBREMOTECMD manually. The value of
DBREMOTECMD displays as rcmd. The name of the host machine where the
tape device is located displays as machine.
Remote tape error: command <rcmd> not in PATH
Thismessageindicatesaproblemwiththevalueoftheenvironmentvariable
DBREMOTECMD. Check the value of DBREMOTECMD and PATH. Try to
execute the command specified in DBREMOTECMD manually.
Remote tape error: no remote shell command available.
Thismessageindicatesaproblemwiththevalueoftheenvironmentvariable
DBREMOTECMD. Check the value of DBREMOTECMD and PATH. Try to
execute the command specified in DBREMOTECMD manually.

OnLine Message Log 8-27
Alphabetized Messages
Remote tape using alternate shell command: <rcmd machine>
Thismessageindicatesthataremotetapedevicehasbeen specified usingthe
environment variable DBREMOTECMD.DBREMOTECMD overrides the
default remote shell for your hardware platform. Set it using either a simple
command or the full pathname. When you use the full pathname, the
databaseserver searchesyour PATH for thespecified command. Thevalue of
DBREMOTECMD displays as rcmd. The name of the host machine where the
tape device is located displays as machine.
Rollforward of log record failed, iserrno = nn
The message appears if, during fast recovery or a data restore, a specific
logical log record cannot be rolled forward. OnLine might be able to change
to quiescent or online mode, but it is possible some inconsistency could
result. Refer to the message that immediately precedes this one for further
information. The iserrno value is the ISAM error number. Refer to the
Informix Error Messages manual.
shmem sent to filename.
A copy of shared memory has been written to the specified file as a conse-
quence of consistency checking.
Shutdown Mode
OnLine is in the process of moving from online mode to quiescent mode.
slotdelete: bad rowid = 0xn, partnum = 0xn
OnLine detected an error during an attempt to delete a rowid as part of a
rollforward or rollback operation. This error might have been caused by
logicallogcorruption.OnLinetakestherequiredaction,whichmightinclude
a shutdown to preserve database integrity and consistency. Both the rowid
and the tbspace number (partnum) are expressed as hexadecimal values.
Slot nn not free in page 0xn in partnum 0xn
OnLine detected that the internal space usage bitmap information for this
page was incorrect. The bitmap indicated that space was available, but it is
not. No action is needed. OnLine corrected the bitmap information. The slot
number nn is an integer; the logical page number and tbspace number
(partnum) are expressed as hexadecimal values.

8-28 IBM Informix OnLine Database Server Administrator’s Guide
Alphabetized Messages
Some dirty buffers not written. diskcnt=nn writes=nn
notflsh=nn
OnLine detected that some modified buffers destined for a specific chunk
were not written during this cleaning. These buffers will be written during
the next flushing of the buffer pool. The value of diskcnt is the number of
buffers that user processes attempted to write; writes is the number of
buffers that were written; and notflsh is the difference. All values are
integers.
sqlexec: information
(ThismessageisonlyreceivedbyusersoftheIBM InformixSTAR product.)A
database server process is being spawned to perform work on behalf of a
global transaction within the two-phase commit protocol. The following
additional information displays:
sqlexec informix 5.00 -t flags GTRID coordinator where:
■sqlexec is the value of SQLEXEC.
■informix is the owner of the process.
■5.00 is the OnLine version number.
■flags is either -g or -gr (used internally).
■GTRID is the global transaction ID in ASCII-encoded format.
■coordinator is the DBSERVERNAME of the coordinator OnLine.
Tbconfig parameter parameter modified from old_value to new_value
When OnLine shared memory is reinitialized, this message documents any
changes that have occurred since the last initialization.
TBLSpace table overflow - user id nn, process id nn
A database server process attempted to gain access to a tblspace when no
entries in the tblspace shared-memory table were available. The user ID and
process ID of the requesting database server process are displayed.
tbundo died pid=nn
Thetbundodaemonprocesswasstartedtoperformcleanupforatransaction
but the daemon died. A new daemon process will be started automatically.
The process ID of the tbundo daemon that died is displayed.

OnLine Message Log 8-29
Alphabetized Messages
Too Many Active Transactions, Increase “TRANSACTIONS”
During a data restore, the value of the TRANSACTIONS configuration file
parameter must always be greater than or equal to the total number of active
transactions. At some point during the restore, the number of active transac-
tions exceeded the value of TRANSACTIONS. Increase the value of
TRANSACTIONS.
Too Many Active Users, Increase “USERS”
During a data restore, the value of the USERS configuration file parameter
must always be greater than or equal to the total number of user processes.
At some point during the restore, the number of user processes exceeded the
value of USERS. Increase the value of USERS.
Transaction Completed Abnormally (endtx): tx=0xn flags =0xn User
user_name tty ttyid
(This message is only received by users of the IBM Informix STAR product.)
This message indicates that a database server process in the postdecision
phaseof a two-phasecommit transaction hasbeen heuristically ended.Refer
to page 9-40.tx refers to the address of the transaction in shared memory
(hexadecimal). flags refers to the value of the transaction flags obtained
from the transaction structure (hexadecimal). user_name is the name of the
user who executed tbmode -Z to end the transaction. ttyid is the terminal
identification of the user who ended the transaction.
Transaction Completed Abnormally (rollback): tx=0xn flags =0xn
(This message is only received by users of the IBM Informix STAR product.)
This message indicates that a database server process in the postdecision
phase of a two-phase commit transaction has been heuristically rolled back.
Refer to page 9-36.tx refers to the address of the transaction in shared
memory (hexadecimal). flags refers to the value of the transaction flags
obtained from the transaction structure (hexadecimal).
Transaction Not Found
Thelogicallogis corrupted.This can occur when a newtransactionisstarted
but the first logical log record for the transaction is not a BEGWORK record.

8-30 IBM Informix OnLine Database Server Administrator’s Guide
Alphabetized Messages
Transaction table overflow - user id nn, process id nn
A database server process attempted to gain access to the transaction table
when no entries in the shared-memory table were available. The user ID and
process ID of the requesting database server process are displayed.
tx_offwtlist() - userp 0xn not on wait list - txp 0xn
OnLine detected an error in the wait-list management for a transaction. No
actionis needed. OnLinehandles the situationinternally.A user processthat
was expected to be on a wait list for the specified transaction was not on the
list. The user process is identified by the hexadecimal value of the user
structurein sharedmemory.The transaction is identifiedbythe hexadecimal
value of the transaction structure in shared memory.
Unable to abort transaction: tx 0xn
OnLine neglected to send a signal to a database server process directing the
process to abort. The address of the transaction entry in the transaction
shared-memory table is displayed as a hexadecimal value. An administrator
should initiate an immediate shutdown to preserve database integrity and
consistency.
Unable to start SQL engine
OnLine was unable to start a database server process. Possible causes could
include the following:
■The user table is full.
■A long transaction has exclusive access to the logical log files.
■OnLine is in shutdown mode.
■All logical log files are full.
This message might also be received by administrators whose OnLine is
connected to a network using IBM Informix STAR. If this is the case,
additional causes could include improper settings for the environment
variables SQLEXEC or INFORMIXDIR.
Unexpected End of Logical Log
The logical log has become corrupted. OnLine cannot initialize. Perform a
data restore from archive.

OnLine Message Log 8-31
Alphabetized Messages
User table overflow - user id nn process id nn
Adatabase server processattemptedto attach to sharedmemory when there
were no available entries in the shared-memory user table. The user ID and
process ID of the requesting database server process are displayed.
Warning: Unable to open tblspace nn, iserrno = nn
OnLine cannot open the specified tbspace. (The value nn is the hexadecimal
representation of the tblspace number.) Refer to the ISAM error message
number nn, which should explain the reason why the tblspace cannot be
accessed. The error message is contained in the IBM Informix Error Messages
manual.
write failed, file system is full
This message is preceded by the name of the cooked file that was full. This
message is returned each time a write to the chunk is attempted and fails.


9
Chapter
Product Environment
In This Chapter .................... 9-3
The OnLine Environment ................ 9-3
OnLine Features .................. 9-3
High Performance ................ 9-4
Fault Tolerance and High Availability.......... 9-5
Multimedia Support................ 9-5
Distributed Data Queries .............. 9-6
Features Beyond the Scope of OnLine ........... 9-6
Bad-Sector Mapping................ 9-6
Blob Scanning or Compression ............ 9-7
What Is Multiple Residency? ............... 9-7
How Multiple Residency Works ............. 9-10
How to Set Up Multiple Residency ............ 9-11
Step 1: Create a New Configuration File ......... 9-11
Step 2: Edit the Configuration File for the New OnLine . . . 9-12
Step 3: Set Your TBCONFIG Environment Variable ..... 9-13
Step 4: Complete Tuning OnLine Configuration (Optional) . . 9-14
Step 5: Initialize New OnLine ............ 9-14
Step 6: Ensure That Users Correctly Define Their
TBCONFIG Variables............. 9-14
OnLine Administration with IBM Informix STAR ........ 9-15
Sharing Data by Using IBM Informix STAR ......... 9-15
Updating Multiple OnLine Servers .......... 9-17
Multiserver Modification Concepts .......... 9-18
IBM Informix STAR and Two-Phase Commit Protocol ..... 9-19
Protocol Components ............... 9-20
Example Transaction Commit ............ 9-21
Example Transaction Rollback ............ 9-22

9-2 IBM Informix OnLine Database Server Administrator’s Guide
Two-Phase Commit and Automatic Recovery ........ 9-23
Coordinator Recovery ............... 9-23
Participant Recovery................ 9-26
Presumed-Abort Optimization ............ 9-29
Independent Action and Manual Recovery ......... 9-29
Heuristic Decisions: What and Why............ 9-30
Heuristic Rollback .................. 9-36
Condition 1: Logical Log Fills to a High-Water Mark..... 9-36
Condition 2: You Execute tbmode -z .......... 9-37
When a Heuristic Rollback Occurs ........... 9-37
Heuristic End-Transaction ............... 9-40
Two-Phase Commit Protocol Errors ............ 9-43
Two-Phase Commit and Logical Log Records ........ 9-44
BEGPREP ................... 9-44
PREPARE ................... 9-44
TABLOCKS ................... 9-45
HEURTX.................... 9-45
ENDTRANS .................. 9-45
Transaction Commit Records ............. 9-46
Heuristic Rollback Records ............. 9-48
Heuristic End-Transaction Records........... 9-50
Determining Database Consistency ............ 9-51
Step 1: Determine Where a Heuristic Decision Occurred . . . 9-52
Step 2: Determine If the Networked Database Contains
Inconsistent Data .............. 9-53
Steps 3 and 4: Decide If Correction Is Needed ....... 9-54
Step 5: Use Logical Log Records............ 9-54
Example Manual Recovery ............. 9-55
IBM Informix STAR Configuration Parameters ........ 9-57
DEADLOCK TIMEOUT .............. 9-57
TXTIME-OUT .................. 9-58
Track a Transaction with tbstat Output........... 9-58
Tracking a Global Transaction ............ 9-59
Transaction address Field .............. 9-59
Transaction flag Field ............... 9-60
Transaction user Field ............... 9-61
Transaction locks Field ............... 9-61
Transaction log begin ............... 9-61
Transaction isolation Field.............. 9-62
Transaction retries Field .............. 9-62
Transaction coordinator Field............. 9-62

Product Environment 9-3
In This Chapter
This chapter describes three possible OnLine environments:
■A single OnLine database server operating on a host machine
■Two or more OnLine database servers operating independently on
the same host machine (referred to as multiple residency)
■Two or more OnLine database servers operating on a network
configured with the IBM Informix STAR client/server product
Read only the sections of this chapter that are of interest to you.
The OnLine Environment
The OnLine database server combines fault-tolerant, online transaction-
processing (OLTP) performance with multimedia capabilities. With OnLine,
userscanintegrateinformationobjectssuchasscannedanddigitizedimages,
voice,graphs,facsimiles,andword-processingdocumentsintoanSQL-based
relational database.
OnLine Features
This section summarizes OnLine features. Cross-references direct you to
more detailed information about each feature.

9-4 IBM Informix OnLine Database Server Administrator’s Guide
OnLine Features
High Performance
OnLine achieves high performance through two mechanisms:
■Raw disk management
■Shared-memory management
OnLine performs its own disk management using raw devices. By storing
tables on one or more raw devices instead of in a standard UNIX file system,
OnLinecanmanagethephysicalorganizationofdataandminimizediskI/O.
Doing so results in three advantages for the user:
■OnLineisnotrestrictedbyoperating-systemlimitsonthenumberof
tables that can be accessed concurrently.
■OnLine optimizes table access by storing rows contiguously.
■OnLine eliminates operating-system overhead by performing direct
data transfer between disk and shared memory.
If exceptional performance or reliability is not a primary concern, you can
also configure OnLine to use regular UNIX files to store data. In this case,
OnLine manages the file contents but the UNIX operating system manages
the I/O. For more details about OnLine use of raw disk or cooked files, refer
to page 1-40.
All applications that use OnLine share the same memory data space. After
one database server process reads data from a table, other processes can
access whatever data is already in memory. Disk access might not be
required.
OnLine shared memory contains both data from the database and control
information. Because all data that might be needed by all applications is
locatedinasingle, sharedportionofmemory,allcontrolinformationneeded
to manage access to that data can be located in the same place.
For more information about OnLine shared-memory management refer to
page 2-36.

Product Environment 9-5
OnLine Features
Fault Tolerance and High Availability
OnLine uses several logging and recovery mechanisms to protect data
integrity and consistency in the event of an operating-system or media
failure. The data needed to support these logging and recovery mechanisms
are stored in the OnLine physical and logical logs, on archive tape, and on
logical log backup tape.
OnLine fault-tolerant features are enhanced by associated high-availability
features. You can create the archive tapes and the logical log backup tapes
while users are accessing OnLine. You can also use online archiving to create
incrementalarchives.Incrementalarchivingenablesyoutoonlybackupdata
that has changed since the last archive, which reduces the amount of time
required for archiving.
For more information about archive administration, refer to page 3-43. For
more information about logical log administration, refer to page 3-13. For
more information about using archive tapes and logical log backup tapes to
restore your data, refer to page 4-45. For more information about automatic
fast recovery in the event of an uncontrolled shutdown, refer to page 4-39.
In addition, OnLine supports mirroring, which can eliminate data loss as a
result of media (hardware) crashes. If a primary OnLine chunk becomes
unavailableforanyreason,themirrorchunkisaccessedimmediatelyand,to
the user, transparently. For more information about OnLine mirroring, refer
to page 4-14.
Multimedia Support
OnLine supports two blob data types (TEXT and BYTE) with no practical
limit on the size of the data item stored. OnLine stores this blob data either
withotherdatabasedataorinspeciallydesignatedportionsofthediskcalled
blobspaces. All OnLine fault-tolerant and high-availability features support
blob data. For more information about how OnLine stores blobs, refer to
page 2-144.

9-6 IBM Informix OnLine Database Server Administrator’s Guide
Features Beyond the Scope of OnLine
Distributed Data Queries
TheIBM Informix STAR productenables an OnLine userto query andupdate
more than one database across multiple OnLine database servers within a
single transaction. The OnLine database servers can reside within a single
host machine or on the same network. Support is provided for TCP/IP
networks. For more information about IBM Informix STAR administration,
refer to page 9-15. For more information about using IBM Informix OnLine
within an X/Open environment, refer to the IBM Informix TP/XA User Manual.
Features Beyond the Scope of OnLine
As an OnLine administrator, you need to know the boundaries of OnLine
capabilities. This section describes the tasks that lie outside the scope of the
OnLine database server.
Bad-Sector Mapping
OnLine relies on the operating system of your host machine for bad-sector
mapping. OnLine learns of a bad sector or a bad track when it receives a
failure return code from a system call. When this happens, OnLine retries
severaltimestoensurethat the bad returnisaccurateandnotspurious.Ifthe
bad return is confirmed, OnLine marks as down the chunk where the read or
write was attempted. (Chunk status is D.)
OnLine cannot take any action to identify the bad cylinder, track, or sector
location because the only information available is the byte displacement
within the chunk where the I/O was attempted.
Important: If OnLine detects an I/O error on a chunk that is not mirrored, OnLine
marks the chunk as down. If the down chunk contains logical log files, the physical
log, or the root dbspace, OnLine immediately initiates an abort. Otherwise, OnLine
can continue to operate, but processes cannot write to the down chunk.

Product Environment 9-7
What Is Multiple Residency?
Blob Scanning or Compression
OnLine receives blob data into an existing table in any one of four ways:
■From the DB-Access LOAD statement
■From the OnLine dbload utility
■From INFORMIX-ESQL/C locator variables
■From INFORMIX-ESQL/C FILE host data types
OnLine does not contain any mechanisms for scanning blobs and inserting
the data into a file, or for blob compression, after the blob has been scanned.
What Is Multiple Residency?
Multiple OnLine database servers and separate collections of OnLine shared
memory and disk structures can coexist on a single host machine. During
processing, each OnLine database server process on the host machine reads
the TBCONFIG environment variable for the name of its configuration file.
Next, the database server process reads its configuration file to obtain the
valueofitsSERVERNUMparameter.TheSERVERNUMparameterispartofthe
calculation that defines the shared-memory segment to which this database
server process should attach. In this way, the TBCONFIG environment
variable maintains independent shared-memory segments. (Refer to
page 9-10.)
Yourabilitytocreateindependentdatabaseserverenvironmentsonthesame
host machine offers you the following options:
■Create separate but parallel OnLine production and OnLine devel-
opment environments.
If you separate production and development environments, users
can protect the production system from the unpredictable nature of
the development environment. Archiving, shared-memory utiliza-
tion, and tuning priorities can reflect the needs of each specific
environment.

9-8 IBM Informix OnLine Database Server Administrator’s Guide
What Is Multiple Residency?
■Create multiple configuration files and OnLine database server
environments that are precision-tuned for a specific use.
Because multiple OnLine database servers each have their own
shared-memory configurations and locations, you can create a con-
figuration file for each database server that reflects special tuning
requirements.EachapplicationcouldruninanOnLineenvironment
designed especially for it.
■Separately administer sensitive databases.
You might find it useful to isolate applications or databases that are
criticallyimportant,eitherforreasonsofsecurityortoaccommodate
more frequent archiving than is required for the majority of the
databases.
■Simulate and test distributed data transactions on a single host
computer (with IBM Informix STAR).
Ifyouaredevelopinganapplicationfor usewithIBM InformixSTAR,
you can perform your distributed data simulation and testing on a
single host machine for the sake of convenience. Later, when a net-
work of host machines is ready, you can install the application
without changes to application source code.
Product Environment 9-9
What Is Multiple Residency?
Figure 9-1
Conceptual
illustration of
multiple
residency
disk
disk
Application:
TBCONFIG
set to
tbconfig1
database server process
tbconfig1
Application:
TBCONFIG
set to
tbconfig2
database server process
Each OnLine
accesses a unique
area of the disk
shared-memory
segments
tbconfig2

9-10 IBM Informix OnLine Database Server Administrator’s Guide
How Multiple Residency Works
How Multiple Residency Works
Multiple residency is possible because separate shared-memory segments
can be maintained for each instance of OnLine. The link between each
OnLine instance and its associated shared-memory segments is the value of
SERVERNUM.
Under the UNIX operating system, each OnLine user process that wishes to
attach to shared memory passes to the operating system a shared-memory
key value. The key value is used to specify the shared-memory area that the
process might attach to.
OnLine incorporates the value of the configuration parameter SERVERNUM
into the calculation to arrive at the shared-memory key. Thus, before a user
process can attach to shared memory, it reads the value of the SERVERNUM
fromtheconfiguration file specifiedby the environmentvariableTBCONFIG,
and uses the value to calculate the shared-memory key. You maintain
separation between the OnLine systems by maintaining multiple configu-
ration files, each with a unique SERVERNUM value. (Refer to page 2-24 for
more details about how a user process attaches to shared memory. Refer to
page 1-55 for more details about the way in which TBCONFIG specifies the
OnLine configuration file for each user. )
It becomes your responsibility as administrator to ensure that each instance
of OnLine is associated with a unique SERVERNUM value, and that each user
with access to OnLine correctly sets his or her TBCONFIG environment
variable. You also must keep all disk space allocations separate by ensuring
that chunk pathnames are not duplicated among the separate OnLine
instances. In this way, multiple OnLine database servers execute concur-
rently and completely independently in different areas of shared memory
and disk space.
There is no change to OnLine administration under multiple residency.
However, recognize that you have to maintain logical logs for each OnLine
instance.IfyoucandedicateatapedrivetoeachOnLinedatabaseserver,you
can use the continuous logging option. Otherwise, you must plan your
logical log backup schedules and archive schedules carefully.

Product Environment 9-11
How to Set Up Multiple Residency
How to Set Up Multiple Residency
Thissectiondescribesthesix-stepinstallationprocedureformultipleOnLine
database servers on the same host machine. Before you perform this
procedure, you already should have installed one OnLine database server as
described in Chapter 1, “Installation and Initial Configuration.” Chapter 1
contains background information that is useful for understanding this
section.
To install multiple residency
1. Log in as user informix. Copy $INFORMIXDIR/etc/tbconfig.std to a
new configuration filename.
2. Edit the new configuration file with an operating-system editor and
modifythefourparameters that arecriticaltomultiple residency.Do
not use DB-Monitor.
3. Set your TBCONFIG environment variable to the new name of the
configuration file.
4. (Optional) Use DB-Monitor to finish tuning the configuration for the
new OnLine database server.
5. Access DB-Monitor and initialize disk space for this independent
OnLine database server.
6. Ensure that all OnLine users have set their TBCONFIG environment
variable to reflect the correct OnLine database server environment.
Step 1: Create a New Configuration File
Thetbconfig.stdfileisprovidedasatemplateforusein settingupadditional
OnLine database servers. (Refer to page 1-11 for more details about OnLine
configuration files.) The new file that you create must also reside in the
$INFORMIXDIR/etc directory. Name the file in such a way that it is easily
associated with the SERVERNUM value contained therein, as well as with its
function.Forexample,youmightselectthefilenametbconPROD3 toindicate
aproductionenvironmentconfigurationfilewiththeSERVERNUMvalueof3.

9-12 IBM Informix OnLine Database Server Administrator’s Guide
How to Set Up Multiple Residency
Step 2: Edit the Configuration File for the New OnLine
Use an operating-system editor to edit the parameters in the new configu-
ration file. Do not use DB-Monitor for this task. If you use DB-Monitor, you will
editthe values of the existing OnLine configuration file, andnot the new one
as you intend. (DB-Monitor accesses the OnLine configuration indicated by
TBCONFIG at the time.)
In the new configuration file, change the following four configuration
parameters:
■ROOTPATH
■SERVERNUM
■DBSERVERNAME
■MSGPATH
ROOTPATH
The ROOTPATH parameter specifies the location of the root dbspace for this
OnLine database server. The root dbspace location must be unique for every
OnLine configuration.
Important: YoucanusethesamevalueforROOTPATHifyouarenestingseveralroot
dbspaceswithin the ROOTPATH partition.That is, if thevalue of ROOTSIZE andthe
ROOTOFFSET define a unique portion of the partition, multiple OnLine database
servers can share the same ROOTPATH.
If the root dbspace is mirrored, you must also ensure that the location of the
root dbspace mirror, is unique. (The same situation exists if you are nesting
severalmirrorswithinthe same partition.MIRRORPATH need not beunique.)
Refer to page 1-21 for more general information about setting the value of
ROOTPATH and page 1-24 for more information about MIRRORPATH. Also
consider whether offsets to the root dbspace or its mirror are required. If
offsets are needed, specify them with the ROOTOFFSET and MIRROROFFSET
parameters.

Product Environment 9-13
How to Set Up Multiple Residency
SERVERNUM
The SERVERNUM parameter specifies the unique value associated with this
OnLine configuration. (Values need to be unique within a machine. OnLine
databaseserverswithinanetworkcanusethesameSERVERNUM value.)The
name of the configuration file should reflect the value you select for
SERVERNUM. The default value for SERVERNUM is zero. The value cannot
exceed 255. (Refer to page 2-24 for more details about the role that the
SERVERNUM value plays in determining the shared-memory key.)
DBSERVER-NAME
The DBSERVERNAME parameter specifies the name of this OnLine database
server and is the value that is returned when the SQL SITENAME or DBSERV-
ERNAME function is executed. This value must be unique throughout the
network on which the host machine is running. The value of DBSERV-
ERNAMEcannotexceed18characters.Validcharactersarerestrictedtodigits,
characters, and the underscore. The default value of DBSERVERNAME is
ONLINE.
MSGPATH
The MSGPATH parameter specifies the UNIX pathname of the OnLine
message file. OnLine messages do not include the DBSERVERNAME, which
means it would be impossible for you to sort the messages from the separate
OnLine environments if more than one OnLine database server shared the
same MSGPATH. (Refer to Chapter 8, “OnLine Message Log,” for a listing of
OnLine messages.)
The default value for MSGPATH is /usr/informix/online.log. Refer to
page 1-28 for more details about setting the value of MSGPATH.
Step 3: Set Your TBCONFIG Environment Variable
Set your TBCONFIG environment variable to the filename of the new config-
uration file. Specify only the filename, not the complete path. OnLine
assumes the file is located in the $INFORMIXDIR/etc directory. Make sure
thatthischangehastakeneffectbeforeyouproceedtothenextstep.(Referto
page 1-55 for more details about the role of the TBCONFIG environment
variable.)

9-14 IBM Informix OnLine Database Server Administrator’s Guide
How to Set Up Multiple Residency
Step 4: Complete Tuning OnLine Configuration (Optional)
AccessDB-Monitor or usean operating-system editorto modify othertuning
modifications to the configuration parameters if you wish. (If you execute
tbmonitor to use DB-Monitor, the configuration values that appear in
DB-Monitor are read from the configuration file specified by the TBCONFIG
environment variable.)
Step 5: Initialize New OnLine
When you initialize disk space for this OnLine database server, either
through DB-Monitor or by executing the tbinit process at the command line,
tbinit takes as input the values in $INFORMIXDIR/etc/$TBCONFIG.
As you create new blobspaces and/or dbspaces for this OnLine database
server,besurethateachchunkisassigned to a unique locationonthedevice.
OnLine does not allow you to assign more than one chunk to the same
location within a single OnLine environment, but it remains your responsi-
bility as administrator to make sure that chunks belonging to different
OnLine database servers do not overwrite each other.
Step 6: Ensure That Users Correctly Define Their TBCONFIG Variables
You might need to verify that your users understand the function of the
TBCONFIG environment variable. If a user’s environment supports two or
more OnLine database servers, the user must reset the TBCONFIG
environment variable each time he or she changes environments. Refer to
page 1-55 for more information about the role of TBCONFIG.

Product Environment 9-15
OnLine Administration with IBM Informix STAR
OnLine Administration with IBM Informix STAR
The IBM Informix STAR product enables a user to query and update more
than one database across multiple OnLine database servers within a single
transaction. The OnLine database servers can reside within a single host
machine or on the same network.
The information in this manual describes topics of concern to the adminis-
tratorwhosedatabaseserverusesIBM InformixSTAR tosharedatawithother
OnLine database servers.
(IBM InformixSTAR installationandconfigurationissuesareaddressedinthe
IBM Informix NET and IBM Informix STAR Installation and Configuration Guide.)
For background information about networks and distributed data, refer to
IBM Informix Guide to SQL: Tutorial. For detailed information about the correct
SQL syntax for specifying databases located on other OnLine database
servers, refer to specific SQL statement descriptions in IBM Informix Guide to
SQL: Reference.
Sharing Data by Using IBM Informix STAR
If your OnLine database server is configured with IBM Informix STAR, the
following situations can occur during processing:
■The current database might reside on another OnLine database
server.
■A query or update can refer to tables that are located in one or more
databases that reside on other OnLine database servers.

9-16 IBM Informix OnLine Database Server Administrator’s Guide
Sharing Data by Using IBM Informix STAR
Figure 9-2 illustrates a situation in which data is shared over a connection
created between two different OnLine database servers.
To execute the example code shown in Figure 9-2, the current server process
(on italy) contacts the france OnLine database server and requests it to
spawnadatabaseserver processthatcanexecutework on behalf of thetrans-
action. Waiting to receive this request at france is an IBM Informix STAR
sqlexecddaemonprocess.Thetaskofthesqlexecd daemonprocessistowait
for requests that arrive over the network and spawn database server
processes that perform work on behalf of the requesting processes. After a
database server process on france is spawned by sqlexecd, the connection
between the two OnLine database servers is maintained until the database is
closed. One sqlexecd process must be running on every OnLine database
server in the client/server environment. If your OnLine database server is
configured for IBM Informix STAR and you experience a failure, you must
restart the sqlexecd daemon when you reinitialize. (Refer to page 9-23.)
Figure 9-2
IBM Informix STAR
enables
OnLine to share
data across a
network.
Current OnLine
server: italy
OnLine server:
france
IBM Informix STAR
DATABASE stores5@italy
BEGIN WORK
INSERT INTO stores5@france:manufact
SELECT * FROM stores5@italy:manufact
COMMIT WORK
Product Environment 9-17
Sharing Data by Using IBM Informix STAR
Updating Multiple OnLine Servers
IBM InformixSTARensuresthattransactionsthatspanmorethanoneOnLine
database server meet all the requirements of transaction processing
(atomicity, consistency, isolation, and durability). Consider the single trans-
action(illustratedinFigure 9-3)inwhichoneupdate andtwoinsertsoccurat
three different OnLine database servers:
Figure 9-3
IBM Informix STAR
enables
multiserver updates
across a network.
Current OnLine server:
italy
OnLine server:
france
OnLine server:
australia
IBM Informix STAR
DATABASE stores5@italy
BEGIN WORK
UPDATE stores5:manufact
SET manu_code = "SHM"
WHERE manu_name = "Shimara"
INSERT INTO stores5@france:manufact
VALUES ("SHM", "Shimara", "30")
INSERT INTO stores5@australia:manufact
VALUES ("SHM", "Shimara", "30")
COMMIT WORK

9-18 IBM Informix OnLine Database Server Administrator’s Guide
Sharing Data by Using IBM Informix STAR
In the transaction shown in Figure 9-2,IBM Informix STAR must ensure that
all three OnLine database servers implement the same action, either to
commit the transaction or to roll back the transaction. This requirement of
atomicitymustbeenforcedevenifafailureoccursatanyhostmachine.Ifany
OnLine database server (italy,france, or australia) is unable to commit its
portion of the transaction, this inability must be communicated to a central
coordinator, and all OnLine servers participating in the transaction must be
prevented from committing their work. To manage this complex series of
communications, IBM Informix STAR uses a special protocol that coordinates
work performed at multiple database servers on behalf of a single trans-
action. The name of the protocol used to accomplish this is two-phase commit.
(The two-phase commit protocol is described in detail starting on page 9-19.)
Multiserver Modification Concepts
To execute the example code shown in Figure 9-2, the current server process
(on italy) contacts both the france OnLine database server and the australia
OnLine database server and requests that the sqlexecd daemon process
spawn a database server process.
In transactions that include multiserver modifications, the two-phase
commit protocol assigns the role of coordinator to the current OnLine server:
in this example, italy. As coordinator, italy routes the transaction work and
tracks it at each OnLine database server that is participating in the trans-
action. Within the two-phase commit protocol, the transaction that is under
the direction of the coordinator is called the global transaction.
The OnLine database servers that are doing work under the direction of the
coordinatorarereferredtoasparticipants.Inthisexample,theparticipantsare
france andaustralia. The work that each participant OnLine database server
performs is considered a piece of work associated with the global transaction.
In this example, the coordinator OnLine, italy, also functions as a participant
because it is also doing a piece of work, which is the update.

Product Environment 9-19
IBM Informix STAR and Two-Phase Commit Protocol
Within a client/server network, the identity of the coordinator OnLine is
dynamic.Inany transaction that includesmultiserver modifications, the role
of coordinator is assumed by the OnLine database server that is managing
the current database. Thus, if the first statement in the Figure 9-2 example
were changed to specify the current database as stores5@france, the two-
phase commit protocol would assign the role of coordinator to france.
However, the role of the coordinator cannot change during a single trans-
action. The coordinator for a transaction is displayed in the transaction
coordinator field of the tbstat -u output. (Refer to page 9-58.)
IBM Informix STAR and Two-Phase Commit Protocol
Transactions that include multiserver modifications use the two-phase
commit protocol to achieve two goals:
■Ensure that all participating OnLine database servers receive the
same instruction from the coordinator, either to commit or to roll
back a transaction
■EnsurethatallparticipatingOnLinedatabaseserversimplementthe
same action, regardless of local or network failures during the
protocol
The two-phase commit protocol occurs in three steps. First is the precommit
phase, in which the coordinator directs each participant database server to
prepare to commit the transaction.
The second step is the coordinator decision. After the coordinator directs the
participants to prepare to commit, it waits until it receives a response from
each participating OnLine server, indicating whether or not the participant
can commit the transaction. After all the responses are received, the coordi-
nator makes its decision whether or not to commit the transaction.
Ifeveryparticipantindicatesitcancommitthemodifications,thecoordinator
decides to commit the transaction. If any participant is unable to precommit
the modifications, the coordinator decides to roll back the transaction. The
decisionmarks the endof the second stepand the beginningof the thirdstep
of the protocol, the postdecision phase.

9-20 IBM Informix OnLine Database Server Administrator’s Guide
IBM Informix STAR and Two-Phase Commit Protocol
During the postdecision phase the coordinator directs each database server to
either commit the changes or roll back the transaction. If the coordinator
directsthe participantstocommitthetransaction,itwaitstoreceiveacknowl-
edgments from each before ending the global transaction. If the coordinator
directs the participants to roll back the transaction, no acknowledgments are
expected from the participants.
Informix has implemented the two-phase commit protocol with the
presumed-abort optimization, which allows faster processing because some of
thelogicallogrecordswrittenduringtheprotocolcanbebuffered.Theimpli-
cation of the optimization for automatic participant recovery is described as
part of the discussion of automatic recovery that begins on page 9-23. The
specific discussion of presumed-abort optimization begins on page 9-29.
Protocol Components
The two-phase commit protocol relies on two kinds of communication
messages and logical log records:
■Messages
Messagesmustpassbetweenthecoordinatorandeachparticipantto
ensure transaction atomicity (that is, all-or-nothing changes). Mes-
sages from the coordinator include a transaction identification
numberandinstructions(suchas“preparetocommit,”“commit,”or
“roll back”). Messages from each participant include the transaction
status and reports of action taken (such as “can commit,” “cannot
commit,” “committed,” or “rolled back”).
■Logical log records
Logicallog recordsofthetransactionarekeptonstable storage (disk
or tape) to ensure data integrity and consistency, even if a failure
occursataparticipatingOnLinedatabaseserver(participantorcoor-
dinator). For more details about automatic two-phase commit
recovery in the event of failure, refer to page 9-23. For more details
about the logical log records that are written during the two-phase
commit protocol, refer to page 9-44.
Product Environment 9-21
IBM Informix STAR and Two-Phase Commit Protocol
Example Transaction Commit
Figure 9-4 is a simple representation of a two-phase commit protocol that
results in a transaction being committed. Notice that the coordinator’s
decision to commit or roll back the transaction is stored on stable storage
before the decision is propagated to the participants. This is done to facilitate
recovery. Ifa failureoccurs during the operation, the recordof the decisionis
needed during recovery to indicate the status of the transaction. The
beginning of phase two is considered to be the instant at which the coordi-
nator records its decision—in this case, when the commit work logical log
record is written to disk.
Figure 9-4
Simple illustration
of a two-phase
commit protocol
that results in a
committed
transaction
All Participants:
Determine that the commit can occur. Record the fact that a commit
can occur. Return message: “can commit.”
Coordinator:
Waits to receive “committed” responses.
Records that the transaction is committed.
Removes transaction entry from shared-memory transaction table.
Releases shared-memory resources.
Coordinator:
Records decision to begin precommit phase. Sends a “prepare”
message to participants.
All Participants:
Commit the piece of work.
Remove transaction entry from shared-memory transaction table.
Release shared-memory resources.
Return confirmation message: “committed.”
Coordinator:
Waits to receive “can commit” responses.
Records decision to commit transaction.
Phase 2 Begins:
Sends a “commit” message to participants.
Start Protocol
End Protocol
C
PPP
C
C
PPP
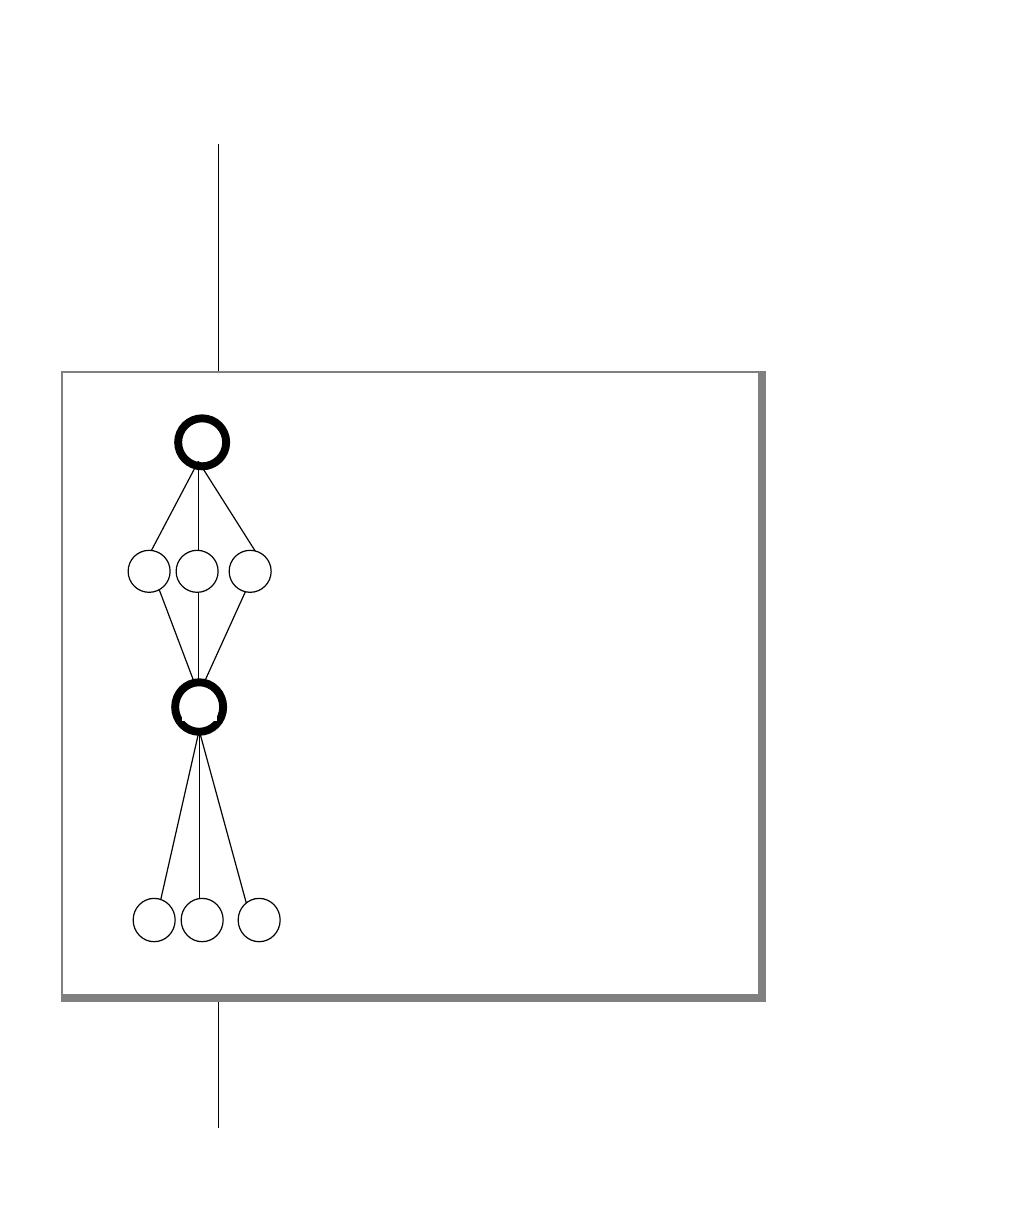
9-22 IBM Informix OnLine Database Server Administrator’s Guide
IBM Informix STAR and Two-Phase Commit Protocol
Example Transaction Rollback
Figure 9-5 is a simple representation of a two-phase commit protocol that
results in a transaction being rolled back. Notice that the participants do not
senda confirmation tothe coordinatorwhen the pieceof work isrolledback.
The coordinator does not keep a record that a transaction completed. The
beginning of phase two is considered to be the instant at which the coordi-
nator records its decision—in this case, when the roll back work logical log
record is written to disk.
Figure 9-5
Simple illustration
of a two-phase
commit protocol
that results in a
transaction being
rolled back
End Protocol
Start Protocol
C
P1 P2 P3
C
P1 P2 P3
P1 Participant:
Determines that the commit cannot occur.
Returns message: “cannot commit.”
P2 and P3 Participants:
Determine that the commit can occur.
Record the fact that a commit can occur.
Return message: “can commit.”
Coordinator:
Records decision to begin precommit phase. Sends a “prepare”
message to participants.
All Participants:
Roll back piece of work.
Remove transaction entry from shared-memory transaction table.
Release shared-memory resources.
Coordinator:
Receives “cannot commit” response.
Records decision to roll back the transaction.
Phase 2 Begins:
Rolls back work on behalf of transaction.
Removes transaction entry from shared-memory transaction table.
Releases shared-memory resources.
Sends a “roll back” message to participants.

Product Environment 9-23
Two-Phase Commit and Automatic Recovery
Two-Phase Commit and Automatic Recovery
The two-phase commit protocol includes automatic recovery in the event of
anuncontrolledshutdown(suchasanoperating-systemfailure)experienced
by either the coordinator or a participant OnLine database server. Two types
of recovery mechanics are included in the two-phase commit protocol:
If your OnLine database server is configured for IBM Informix STAR and you
experience a failure, you must restart the sqlexecd daemon when you reini-
tialize. To do this, log in as root and enter the following commands at the
system prompt when you are ready to reinitialize OnLine:
tbmode -ky ## Ensure all processes are terminated
## and shared memory has been detached.
tbinit ## Reinitialize shared memory and start
## OnLine in online mode. Use tbinit -s
## to start OnLine in quiescent mode.
sqlexecd ## Restart the INFORMIX-STAR daemon.
The sqlexecd command can take a servicename argument, although a default
is assumed. For more information about the servicename value for your
OnLine database server, refer to theIBM Informix NET and IBM Informix STAR
Installation and Configuration Guide. (The servicename value is stored in the
$INFORMIXDIR/etc/sqlhosts file.)
Coordinator Recovery
Coordinator recovery occurs automatically whenever a database server
process acting as coordinator completes the precommit phase and decides to
commit the transaction, but is terminated before the two-phase commit
protocol can be completed. During coordinator recovery, a new coordinator
database server process is spawned to complete the two-phase commit
protocol and ensure that the transaction is completed by every participating
OnLine database server. Figure 9-6 on page 9-25 illustrates coordinator
recovery.
Coordinator
recovery The coordinating database server process is terminated
prematurely.
Participant
recovery The database server process at a participating OnLine
database server is terminated prematurely.

9-24 IBM Informix OnLine Database Server Administrator’s Guide
Two-Phase Commit and Automatic Recovery
Coordinator recovery is not needed if the following occurs:
■The coordinator has not recorded a decision.
■The coordinator’s decision is to roll back the transaction.
Ifeitherone of these twoconditionsistrue,the situation is handledbypartic-
ipant recovery.
Coordinator failure can occur as a result of either a system failure or the
isolatedfailureof the coordinatordatabaseserver process.If a system failure
occurred, the administrator reinitializes shared memory and restarts the
sqlexecd process. (Refer to page 9-23.) Otherwise, coordinator recovery
begins as part of OnLine processing.
As part of its regular activity, the tbinit process at the coordinator OnLine
detects first that a two-phase commit protocol was underway; second, that
the coordinator had reached a decision to commit; and third, that the coordi-
nator was terminated prematurely. To complete the transaction, tbinit forks
a database server process. (The tbinit process reads the value of SQLEXEC to
fork a new database server process. If SQLEXEC is not set, tbinit uses the
pathname $INFORMIXDIR/lib/sqlturbo. The database server process is
owned by the user who started tbinit, either informix or root.)
Thisserverprocessactsasthenewcoordinator.Itforksanewdatabaseserver
process at each participant OnLine. (To do this, an sqlexecd process must be
running at each participant OnLine.)
Thenew coordinatorsends a message to each participant to obtainthe status
of its piece of work. If the participant received a commit message from the
coordinator before it failed, the participant would have committed the piece
of work, removed the entry from its transaction table, and would have no
knowledge of the transaction. Thus, if the new coordinator receives a
messagethatthetransactionstatusisunknown,it knows the piece of work is
committed.
If the new coordinator receives a message that the transaction status is “can
commit,”amessagetocommitissenttotheparticipant.Afterallparticipants
sendanacknowledgmentindicatingthattheirpiecesofworkcommitted,the
coordinator ends the transaction.
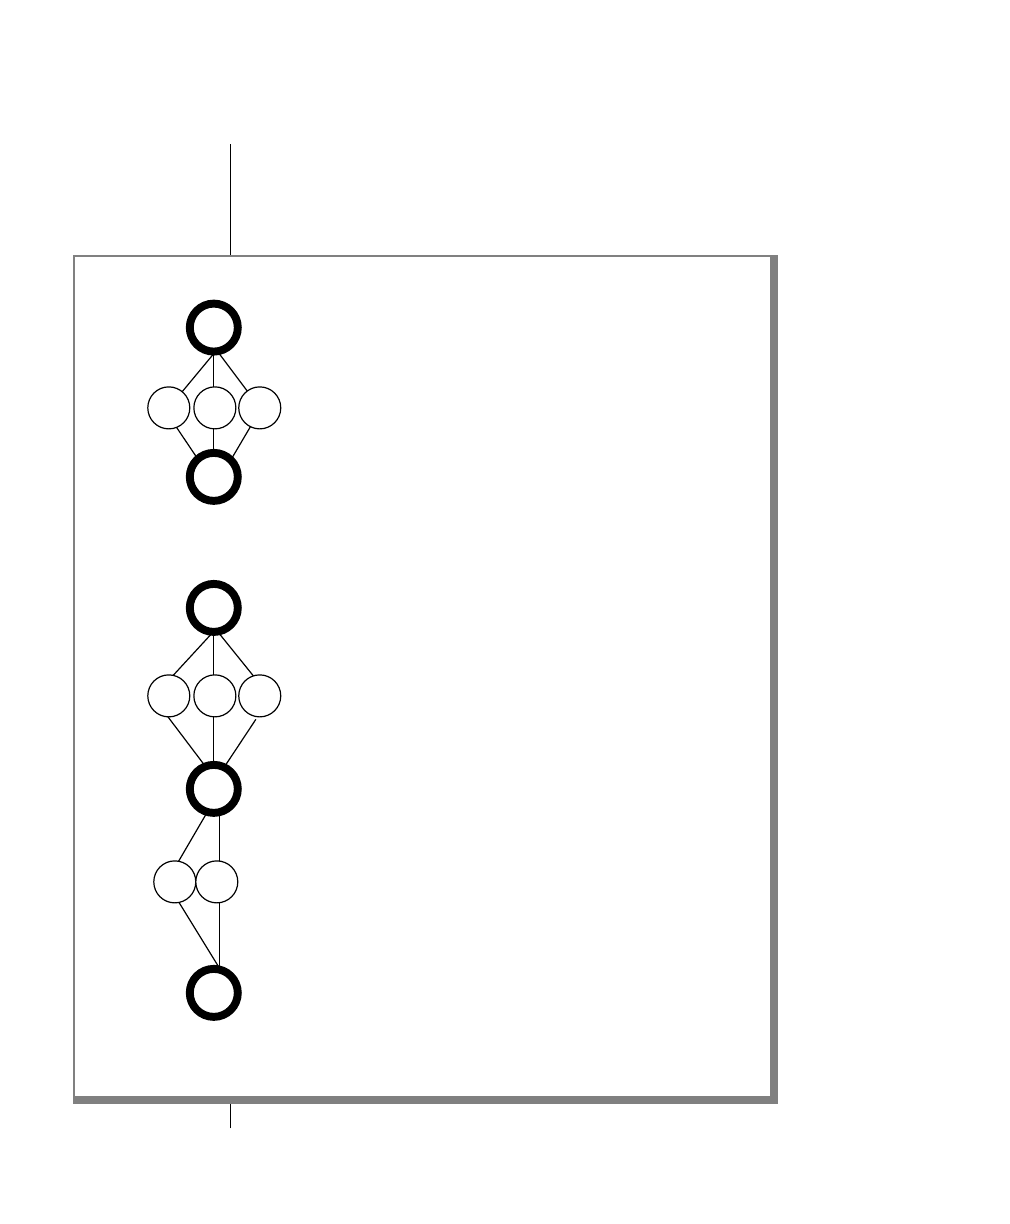
Product Environment 9-25
Two-Phase Commit and Automatic Recovery
If the coordinator is unable to contact one or more of the participants, or if
execution errors are detected, messages are recorded in the OnLine message
log. The coordinator continues its attempts to contact all participants and to
complete the protocol.
Figure 9-6
Simple
illustration of
automatic
coordinator
recovery. See text
on page 9-24.
All Participants:
Return message: “can commit.”
P3 Participant:
Reports status: “unknown status.”
Coordinator:
Sends a “prepare” message to participants.
P1 and P2 Participants:
Report status: “can commit.”
Coordinator:
Records decision to commit transaction.
Coordinator fails.
Start Protocol
End
Start Coordinator Recovery
AfterOnLinereturnsonline,tbinitforksanewcoordinatordatabaseserverprocess.
Coordinator:
Queries each participant for transaction status.
Coordinator:
Sends“commit”messagestoP1andP2.P3isassumedtohavecommitte
P1 and P2 Participants:
Commit the piece of work.
Remove transaction entry from shared-memory transaction table.
Release shared-memory resources.
Return confirmation message: “committed.”
Coordinator:
Waits to receive responses.
Records transaction committed.
Removes transaction entry from shared-memory transaction table.
Releases shared-memory resources.
C
P1 P2 P3
C
P1 P2 P3
C
C
P1 P2
C

9-26 IBM Informix OnLine Database Server Administrator’s Guide
Two-Phase Commit and Automatic Recovery
Participant Recovery
Participant recovery occurs whenever a database server process acting as
participant precommits a piece of work but is terminated before the two-
phase commit protocol can be completed. The goal of participant recovery is
to complete the two-phase commit protocol according to the decision
reached by the coordinating OnLine.
During participant recovery, the piece of work waits for direction that the
work should be committed. If the coordinator is able, it spawns (through
sqlexecd) a new participant database server process to replace the one that
was terminated. The intent is for the coordinator and the new participant
process to complete the two-phase commit protocol.
However, the piece of work only waits a limited amount of time for the
coordinator to reestablish the protocol. This waiting period is specified as
TXTIMEOUT. (Refer to page 9-57.)
If the waiting period elapses before the coordinator has been able to spawn a
new participant, the tbinit process at the participant OnLine spawns a new
participant database server process. It is the task of this tbinit-spawned
serverprocesstodeterminethetransactionstatusandcompletetheprotocol.
Figure 9-7 illustrates participant recovery.
Participant failure can occur as a result of either a system failure or the
isolated failure of the participant database server process. If a system failure
occurred, the administrator reinitializes shared memory and restarts the
sqlexecd process. (Refer to page 9-23.) Otherwise, participant recovery
occurs as part of OnLine processing.
As part of normal processing, the tbinit process at the participant OnLine
detects first that a two-phase commit protocol was underway, second that a
piece of work had been prepared to commit and third that the participant
database server process that owned the transaction was terminated
prematurely.
Nothing happens yet. The transaction waits to be contacted by the coordi-
nator. If the coordinator’s final decision is to commit the piece of work, the
coordinator attempts to contact the participant.

Product Environment 9-27
Two-Phase Commit and Automatic Recovery
If the participant does not receive contact from the coordinator by the time
specified as TXTIMEOUT (refer to page 9-57), the tbinit process at the partic-
ipant OnLine reads the value of SQLEXEC to fork a new database server
process. (If SQLEXEC is not set, tbinit uses the pathname $INFOR-
MIXDIR/lib/sqlturbo.The database server processisownedby the userwho
started tbinit, either informix or root.)
This server process acts as the new participant. It attempts to determine the
status of the transaction. To do this, it forks a new database server process at
thecoordinatingOnLine.(Todothis,ansqlexecdprocessmustbe runningat
the coordinator OnLine.)
A message is sent from the database server at the participant OnLine to the
database server at the coordinator OnLine. If the state of the transaction is
“unknown,” meaning no entry exists in the coordinator OnLine shared-
memory transaction table, the participant assumes that the transaction was
rolledback. (Thissituationisoneexampleofwhatismeant bypresumed-abort
optimization in the two-phase commit protocol.)
The database server process at the participant OnLine rolls back the piece of
work, frees shared-memory resources, and removes the transaction entry
fromitsshared-memorytransactiontable. When the database server process
exits, it also removes the database server process at the coordinator OnLine.
Iftheparticipantisunabletocontactthecoordinatororifexecutionerrorsare
detected, messages are recorded in the OnLine message log. The transaction
renewsits waitingforanotherperiodoftimespecifiedbyTXTIMEOUT. When
the specified time has again elapsed, tbinit spawns another database server
process and the procedure repeats.
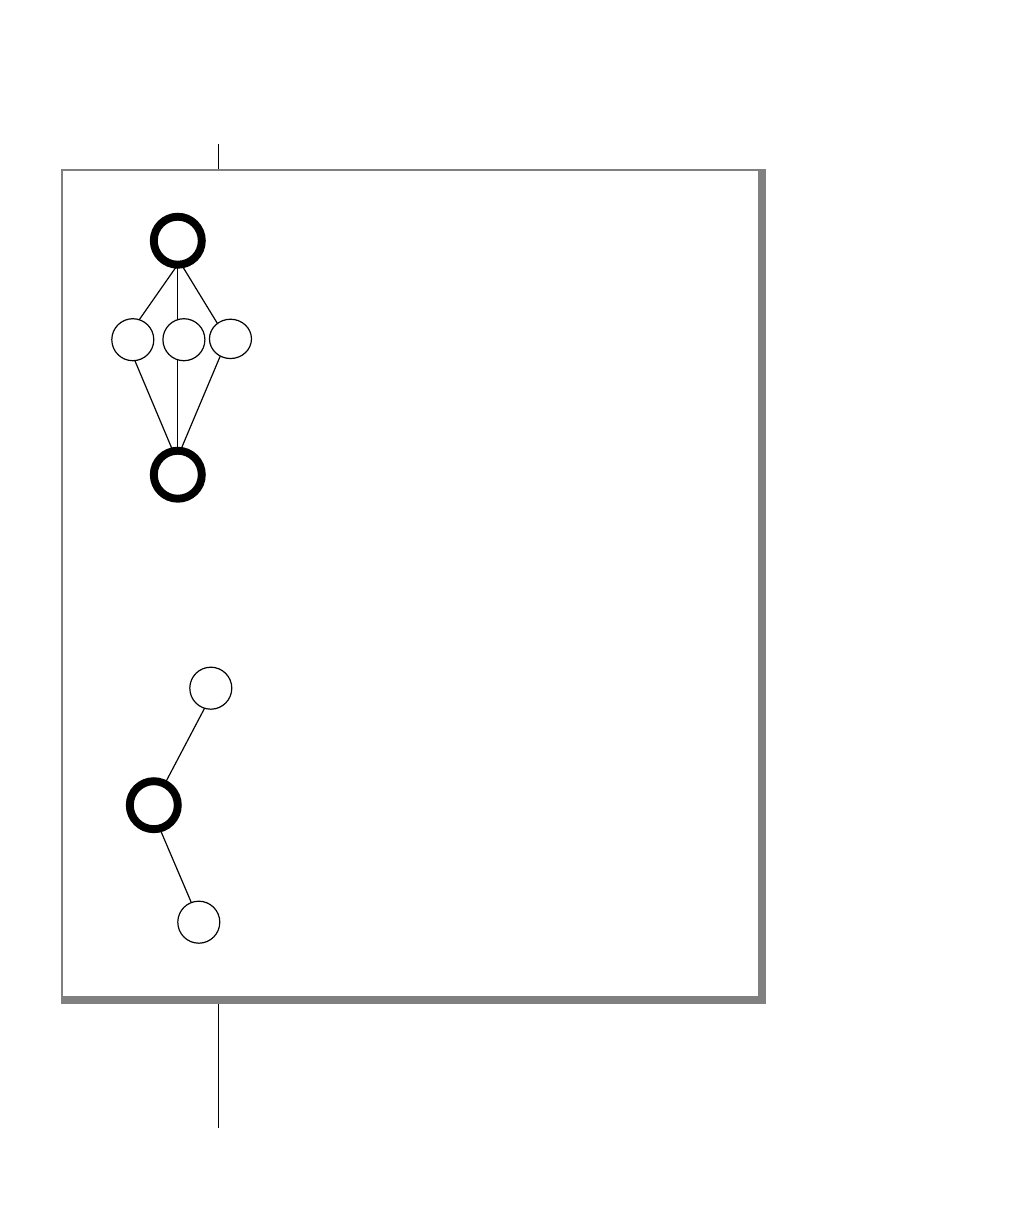
9-28 IBM Informix OnLine Database Server Administrator’s Guide
Two-Phase Commit and Automatic Recovery
Figure 9-7
Simple
illustration of
automatic
participant
recovery.
P1 Participant :
Returns message: “cannot commit.”
P3 Participant:
Queries coordinator about transaction status.
Coordinator:
Sends a “prepare” message to participants.
P3 Participant fails.
Start Protocol
End
Start Participant Recovery
AfterOnLinereturnsonline,transactionwaitsformessagefromcoordinatoruntilTXTIMEOUTelapses
tbinit forks database server process.
Coordinator:
Reports transaction status is unknown.
P3 Participant:
Interprets status as instruction to roll back.
Rolls back piece of work.
Removes transaction entry from shared-memory transaction table.
Releases shared-memory resources.
P2 and P3 Participants:
Return message: “can commit.”
Coordinator:
Receives “cannot commit” response.
Records decision to roll back.
C
P1 P2 P3
C
P3
C
P3

Product Environment 9-29
Independent Action and Manual Recovery
Presumed-Abort Optimization
If the coordinator database server process fails before it makes a decision or
after it decides to roll back a transaction, it is up to each participant OnLine
to initiate automatic recovery. This responsibility is part of the presumed-
abort optimization.
Optimization is realized because the coordinator is not required to flush the
logical log record (BEGPREP) that indicates a two-phase commit protocol has
begun.Thislogicallogcanbebuffered,whichrepresentsthemostsignificant
part of the streamlined processing. (Refer to page 9-44 for more information
about the logical log records written and flushed during the two-phase
commit protocol.)
Toalesserextent,messagetrafficisreducedbecausethecoordinatorreceives
acknowledgment only when a transaction commits. Participants do not
acknowledge rollbacks.
Independent Action and Manual Recovery
Manual two-phase commit recovery is needed whenever the protocol is
interrupted by an action that is independent of, and in opposition to, the
decision that the coordinator would reach. Manual recovery is an extremely
complicated administrative procedure and should be avoided.
Independent action during a two-phase commit protocol is rare, but it can
occur in four specific situations:
■The participant’s piece of work develops into a long-transaction
error and is rolled back by the executing database server process.
■An administrator kills a participant database server process during
the postdecision phase of the protocol using tbmode -z.
■An administrator kills a participant transaction (piece of work)
during the postdecision phase of the protocol using tbmode -Z.
■AnadministratorkillsaglobaltransactionatthecoordinatorOnLine
server using tbmode -z or tbmode -Z after the coordinator issued a
commit decision and became aware of a participant failure. (This
action always results in an error, specifically error -716. Refer to
page 9-43.)

9-30 IBM Informix OnLine Database Server Administrator’s Guide
Heuristic Decisions: What and Why
Independent action in and of itself does not create the need for manual
recovery. For example, if a piece of work at a participant database server is
rolled back because it developed into a long transaction and the coordinator
issues a decision to roll back the global transaction, the complete database
remains consistent and there is no problem.
However, within the context of two-phase commit protocol, some
independent actions can develop into heuristic decisions. (Refer to page 9-30.)
Independent actions create a problem only when both of two conditions are
true:
■The participant OnLine already sent a “can commit” message to the
coordinator.
■The coordinator’s decision is to commit the transaction.
When both conditions are true, the net result is a global transaction that is
inconsistently implemented (committed by one or more OnLine database
servers and rolled back by another). The database system becomes incon-
sistent. An inconsistent database system requires manual recovery, if you
decide that the best course of action is to return the database system to a
consistent state. This might not necessarily be the case. A description of how
to make this determination, and how to manually recover from an incon-
sistent global transaction, is provided on page 9-51.
Heuristic Decisions: What and Why
Within the two-phase commit protocol, two independent actions take on
special significance:
■Aheuristic rollback is an independent action taken by either tbinit or
the administrator to roll back a piece of work that has already sent a
“can commit” message.
■Aheuristic end-transaction is an independent action taken by the
administrator to roll back a piece of work and remove all information
about the transaction from the OnLine shared-memory transaction
table.

Product Environment 9-31
Heuristic Decisions: What and Why
The word heuristic refers to the independent nature of the action; that is, it
occurred at the participant OnLine independent of the two-phase commit
protocol,withoutthecoordinator’sinstructionorknowledge.Theonlyevent
that would cause tbinit to initiate a heuristic rollback is a long-transaction
condition. (Refer to page 2-159 for more details about a long-transaction
condition.)
If you, as administrator at the coordinator OnLine database server, execute
either tbmode -z (kill the coordinator process) or tbmode -Z (kill the global
transaction) after the coordinator issues its final “commit” decision, you are
removing all knowledge of the transaction from shared memory at the
coordinator OnLine server.
This action is not considered a heuristic decision; it is either acceptable or it
creates an error.
The action is acceptable any time that all participants are able to commit the
transaction without difficulty. In this case, your action to forcibly end the
transactionisactuallysuperfluous.Theindicationthatyouexecutedtbmode
-Z only reaches the coordinator at the point in time when it is preparing to
terminate.
In practice, you would probably only consider executing tbmode -z or
tbmode -Z at the coordinator OnLine if you were attempting to hasten the
conclusion of a global transaction that has remained open for an unusually
long period. In this scenario, the source of the problem is probably a failure
atsomeparticipantOnLineserver:thecoordinatorhasnotreceivedacknowl-
edgmentthattheparticipantcommitteditspieceofworkandthecoordinator
is attempting to establish communication with the participant to investigate.
If you execute either tbmode -z or tbmode -Z while the coordinator is
actively trying to reestablish communication, the coordinator database
server process obeys your instruction to die, but not before it writes an error
into the OnLine message log: error -716. The action is considered an error
because the two-phase commit protocol was forcibly broken, preventing the
coordinator from determining whether or not the database is consistent.
Important: The action of killing a global transaction at a coordinator OnLine is not
considered a heuristic decision but it can result in an inconsistent database. You are
strongly advised to avoid this action. (Refer to page 9-43 for an explanation of how
this action can lead to an inconsistent database.)

9-32 IBM Informix OnLine Database Server Administrator’s Guide
Heuristic Decisions: What and Why
Once a heuristic rollback or end-transaction occurs, you have started down
theroadtowardmanualrecovery,a complex and time-consumingprocess.It
isimportantforyoutofullyunderstandheuristicdecisions,asthatisthebest
means for avoiding them. You should always be wary of executing
tbmode -z or tbmode -Z within the context of two-phase commit.
Figure 9-8 on page 9-33 and Figure 9-9 on page 9-35 illustrate the key charac-
teristicsofaheuristicrollbackandaheuristicend-transaction,respectively.A
general discussion of a heuristic rollback begins on page 9-32. A more
detailed discussion, including why the rollback might occur and the
messages that are generated, begins on page 9-36. A general discussion of a
heuristic end-transaction begins on page 9-32. A more detailed discussion,
including why you might take this action and its consequences, begins on
page 9-40.
Two points about the heuristic rollback bear emphasis.
The first point is that a heuristic rollback does not end or close the trans-
action.Ifthepieceofworkiscreatingalong-transactioncondition,theaction
of rolling back the piece of work (whether done by tbinit or by you, the
administrator), does not solve the problem. This is a key difference between
thetwo-phasecommitprotocolandthestandardsituationinasingleOnLine
environment. The transaction remains open, and the logical log records
associatedwiththetransactionremainopen.Logicallogfilescannotbefreed.
The transaction ends only after the coordinator receives information about
the rollback from the participant, and, in response, directs the participant to
end the transaction. This additional instruction from the coordinator
removes the entry from the participant’s transaction table, ends the piece of
work,andenablesthelogicallogrecordsassociatedwiththe piece ofworkto
be closed.The complete protocol is illustrated in Figure 9-11 on page 9-49.
Thesecondpointisthataheuristicrollbackleavesthetransactionentryinthe
participant’sshared-memorytransactiontable. This is another way of saying
thatthetransactionremainsopenoractive.Eventually,whenthecoordinator
investigates why the participant OnLine did not acknowledge that the piece
of work committed, the entry in the transaction table is interpreted by the
coordinatorasevidenceofaheuristicrollback.Asmentionedintheprevious
paragraph,thecoordinatorrespondstotheheuristicrollbackbydirectingthe
participant to end the transaction.

Product Environment 9-33
Heuristic Decisions: What and Why
Whenever a heuristic rollback occurs, the possibility exists that manual
recovery might be required. If manual recovery is required, you are advised
by messages in the OnLine message log. This possibility is described
completely in the discussion that begins on page 9-36.
Figure 9-8
Characteristics of Heuristic Rollback
Figure 9-9 on page 9-35 illustrates the characteristics of a heuristic end-trans-
action. The most important point to remember about the heuristic end-
transactionisthatifyouexecutetbmode -Z ateither the coordinatororatthe
participant OnLine database server, you undermine the automatic recovery
and feedback mechanisms built into the two-phase commit protocol.
When it occurs: A heuristic rollback occurs after the participant OnLine
sends a “can commit” message for a piece of work.
Why it occurs: This piece of work initiated a long-transaction error, or
administrator executed tbmode -z process_id.
What occurs: This piece of work is rolled back at this OnLine,
independent of coordinator instructions.
Shared memory: Shared-memory resources are released. Transaction
entry remains in transaction table.
Logical log files: All files containing records associated with the piece of
work remain open. Long-transaction error is not
alleviated. It is possible for your logical log to fill.
Logical log: ROLLBACK and HEURTX logical log records are written.
Coordinator: Because a transaction entry exists in shared memory, the
coordinatorknowsthepieceofworkwasrolledbackand
needs to be ended.
OnLine messages: “Transaction completed abnormally (rollback)” is
written in the participant OnLine message log.

9-34 IBM Informix OnLine Database Server Administrator’s Guide
Heuristic Decisions: What and Why
In the first case, when you execute tbmode -Z to end a global transaction at
the coordinator OnLine database server, you interfere with participant recovery
in the following way. If a participating OnLine database server was down at
the time that the coordinator issued its decision to commit, participant
recovery eventually queries the coordinator for information. Because the
transaction entry has been removed from shared memory at the coordinator
OnLine server, the coordinator is unable to provide information about the
transaction. The participant interprets the lack of information as a evidence
that the coordinator issued a decision to rollback the transaction. The partic-
ipant rolls back its piece of work even though all other participating OnLine
servers committed theirs. This is one way in which an inconsistent database
can develop.
In the second case, when you execute tbmode -Z to end a piece of work that
is in progress at a participant OnLine database server, you interfere with the
protocol in the following way. If the coordinator issues a decision to commit,
it waits for acknowledgment from all participants that the commit occurred.
WhenthecoordinatorOnLinedoesnot receiveanacknowledgmentfromthe
participant OnLine server where the tbmode -Z occurred, it investigates the
situation. The coordinator queries the participant OnLine server, which no
longer has information about the transaction. The lack of a transaction table
entry at the participant OnLine server is taken as evidence that the trans-
action committed. The coordinator OnLine assumes that the
acknowledgment message was sent from the participant, but somehow it
wasnotreceived.Becausethecoordinatordoesnotknowthatthisparticipant’s
piece of work did not commit, it does not generate messages indicating that
the global transaction was inconsistently implemented. Only the adminis-
trator who executed the tbmode -Z command is aware of the inconsistent
implementation. (The complete protocol is illustrated in Figure 9-12 on
page 9-50.)
Thus, whenever you initiate a heuristic end-transaction by executing
tbmode -Z, you remove critical information required by OnLine to support
the two-phase commit protocol and its automatic recovery features. If you
execute tbmode -Z, it becomes your responsibility to determine whether
your networked database system is consistent. Refer to page 9-51 for more
details about how to determine database consistency.

Product Environment 9-35
Heuristic Decisions: What and Why
Figure 9-9
Characteristics of Heuristic “End-Transaction”
When it occurs: A heuristic end-transaction occurs after the participant
OnLine sends a “can commit” message for a piece of
work.
Why it occurs: Administrator executed.
tbmode -Z address, terminating the piece of work being
performed on behalf of the global transaction.
What occurs: This piece of work is rolled back and ended at this
OnLine database server, independent of coordinator
instructions.
Shared memory: Shared-memory resources are released. Transaction
entry is removed from the transaction table.
Logical log files: All records associated with the pieceof work are closed.
Files containing these records can be freed, if all other
conditions are met.
Logical log: ENDTRANS logical log recordiswritten.ROLLWORK log
record is written if it does not already exist.
Coordinator: The lack of a transaction entry in shared memory is
interpreted by the coordinator to mean that the piece of
work has committed.
OnLine messages: “Transaction completed abnormally (endtx)” is written
in the participant OnLine message log.

9-36 IBM Informix OnLine Database Server Administrator’s Guide
Heuristic Rollback
Heuristic Rollback
Two conditions might initiate a heuristic rollback:
■The logical log fills to the point defined by one of the long-trans-
action high-water marks (configuration file parameters LTXHWM or
LTXEHWM).Thesourceofthelong-transactionconditionisapieceof
work being performed on behalf of a global transaction.
■An administrator executes tbmode -z process_id to kill a database
server process that is executing a piece of work being performed on
behalf of a global transaction.
In either case, if the piece of work has already sent a “can commit” message
to its coordinator, the action is considered a heuristic decision. If the coordi-
nator later decides that the transaction should be committed, the
consequence of the heuristic decision is a heuristic rollback.
If you require a general introduction to the concept of a heuristic rollback
within the two-phase commit protocol, refer to page 9-30 for a summary
discussion. This section provides additional details. Turn to Figure 9-11 on
page 9-49 to see an illustration of the two-phase commit protocol for a piece
of work that is heuristically rolled back.
Condition 1: Logical Log Fills to a High-Water Mark
Under two-phase commit, a participant OnLine database server that is
waiting for instructions from the coordinator is blocked from completing its
transaction. During this time, the transaction remains open, the logical log
filescontainingrecordsassociatedwiththe open transaction cannot be freed,
and the logical log continues to fill.
If the logical log fills to the value of the long-transaction high-water mark
(LTXHWM) while the participant is waiting, tbinit directs all database server
processes that own long transaction to begin rolling them back. If a piece of
work that is precommitted is the offending long transaction, tbinit has
initiated a heuristic rollback. That is, this OnLine database server is rolling
back a precommitted piece of work without the instruction or knowledge of
the coordinator.

Product Environment 9-37
Heuristic Rollback
It is important to recognize that this rollback does not close the transaction as it
wouldinasingleOnLineenvironment.Undertwo-phasecommit,thelogicallog
files that contain records associated with the piece of work are considered
open until an ENDTRANS logical log record is written. (Refer to page 9-44for
more details about the logical log records during the two-phase commit
protocol.)
It is quite possible that the logical log will continue to fill until the exclusive
high-water mark is reached (LTXEHWM). If this happens, all database server
processes are suspended except those that are currently rolling back or
currently committing. In the two-phase commit scenario, the open trans-
actionpreventsyou frombacking up the logical log files andfreeingspace in
the logical log. Under these specific circumstances, the logical log can fill
completely.Ifthishappens,OnLineshutsdownandyoumustperformadata
restore.
Condition 2: You Execute tbmode -z
You, as administrator, can decide to initiate a heuristic rollback of a precom-
mitted piece of work by executing tbmode -z. You might make this decision
because you want to free the resources that are held by the piece of work. (If
youkillthedatabaseserverprocessbyexecutingtbmode-z,youfreealllocks
and shared-memory resources that are held by the database server process
even though you do not end the transaction.) The likely consequence of this
action is that the coordinator will eventually contact the participant, learn of
the heuristic rollback, and direct the participant to end the transaction
without an interruption in processing. However, you are strongly advised to
considertheother,lesslikelyconsequence(manualrecovery)beforeyoutake
this action.
When a Heuristic Rollback Occurs
When a heuristic rollback occurs at a participant OnLine, a record is placed
in the OnLine logical log (type HEURTX) where the rollback occurred. Locks
and resources held by the transaction are freed. The tbinit daemon writes a
message in the OnLine message log indicating that a long-transaction
condition and rollback occurred. (Refer to page 8-29 for a complete
description of the message.)
Transaction Completed Abnormally (rollback):
tx=address flags=0xnn

9-38 IBM Informix OnLine Database Server Administrator’s Guide
Heuristic Rollback
The next event in the scenario happens at the coordinator OnLine. The
coordinator issues second-phase instructions either to roll back the trans-
action or to commit the transaction.
If the coordinator decision is to roll back the global transaction, a database
server process at the participant OnLine writes an ENDTRANS record in the
logical log and the transaction associated with this piece of work is closed.
Logical log files containing records associated with this transaction are no
longerpreventedfrombeingfreedifallotherconditionsaremet.Inthiscase,
no error is returned and the heuristic decision is transparent to users.
If the coordinator decision is to commit the global transaction, a database
server process at the participant OnLine where the heuristic rollback
occurred returns to the coordinator error message -699:
-699 Transaction heuristically rolled back.
This error message is not returned to the application at this point; it is an
internal notification to the coordinator. The coordinator continues to wait
until all participants have responded to the commit instruction. The coordi-
nator does not make a determination of database consistency until all
participants have reported. The scenario continues in the paragraphs that
follow.
The coordinator gathers all responses from participants. If every participant
reports a heuristic rollback, the following events occur as a consequence:
1. The coordinator writes the following message to its own OnLine
message log:
Transaction heuristically rolled back.
2. The coordinator sends a message to all participants to end the
transaction.
3. EachparticipantwritesanENDTRANS recordinitslogicallogbuffer.
(The transaction entry is removed from the shared-memory trans-
action table.)
4. The coordinator writes an ENDTRANS record in its logical log buffer.
(The transaction entry is removed from the shared-memory trans-
action table.)
5. The coordinator returns error -699 to the application:
-699 Transaction heuristically rolled back.
In this situation, all databases remain consistent.

Product Environment 9-39
Heuristic Rollback
However,ifthecoordinatorgathersallresponsesfromparticipants, ifatleast
one participant reports a heuristic rollback, and at least one reports an
acknowledgment of a commit, the result is referred to as a mixed transaction
result. The following events occur as a consequence:
1. The coordinator writes the following message to its own OnLine
message log. (Refer to page 8-22 for a complete description of the
message.)
Mixed transaction result. (pid=nn user=userid)
The pid value is the user process identification number of the coor-
dinator process. The user value is the user ID associated with the
coordinator process. Associated with this message are additional
messages that list each of the participant OnLine database servers
that reported a heuristic rollback. The additional messages take the
following form:
Participant database server DBSERVERNAME heuristically
rolled back.
2. The coordinator sends a message to each participant that heuristi-
cally rolled back its piece of work, directing each one to end the
transaction.
3. Each participant writes an ENDTRANS message in its logical log
buffer. (The transaction entry is removed from the shared-memory
transaction table.)
4. The coordinator writes an ENDTRANS message in its logical log
buffer. (The transaction entry is removed from the shared-memory
transaction table.)
5. The coordinator returns error -698 to the application:
-698 Inconsistent transaction. Number and names of servers
rolled back.
Associated with this error message is the list of participant OnLine
database servers that reported a heuristic rollback. If a large number
ofOnLinedatabaseserversrolledbackthetransaction,thislistcould
betruncated.The completelistisalwaysincludedinthemessagelog
for the coordinator OnLine.
In this situation, use the tblog utility to access the logical log at each participant
OnLine and determine whether or not your database system is consistent. Refer to
page 9-51 for more details about how to determine if your database is
consistent and whether you must perform a manual recovery.

9-40 IBM Informix OnLine Database Server Administrator’s Guide
Heuristic End-Transaction
Heuristic End-Transaction
There is only one, rare situation in which it is reasonable for you to decide to
execute the tbmode -Z option to initiate a heuristic end-transaction: a piece of
work that has been heuristically rolled back remains open. This open transaction
prevents your logical log files from becoming free. As a result, the logical log is
dangerously close to full.
If you require a general introduction to the concept of a heuristic end-trans-
action within the two-phase commit protocol, refer to page 9-30 for a
summary discussion. This section provides additional details. Turn to
Figure 9-12 on page 9-50 to see an illustration of the two-phase commit
protocol for a piece of work that is heuristically ended.
In general, the coordinator issues its commit-or-rollback decision within a
reasonable period of time. However, if the coordinator fails and does not
return online to end a transaction that was heuristically rolled back at your
participant OnLine, you might find yourself facing a serious problem.
The problem scenario begins something like this:
1. The database server process executing a piece of work on behalf of a
global transaction has sent a “can commit” response to the
coordinator.
2. The piece of work is waiting for instructions from the coordinator.
3. While the piece of work is waiting, the logical log fills past the long-
transaction high-water mark.
4. The piece of work that is waiting for instructions is the source of the
long transaction. The tbinit daemon directs the executing database
server process to roll back the piece of work. This is a heuristic
rollback.
5. The participant continues to wait for the coordinator to direct it to
end the transaction. The transaction remains open. The logical log
continues to fill.
Ifthecoordinatorcontactstheparticipantanddirectsittoendthetransaction
in a reasonable period of time, no problem develops. The serious problem
occursiftheheuristicrollbackoccursataparticipantOnLineandthereafterthe
coordinatorfails,preventingthecoordinatorfromdirectingtheparticipantto
end the transaction.

Product Environment 9-41
Heuristic End-Transaction
As a consequence, the transaction remains open. The open transaction
preventsyou frombackinguplogicallogfilesand freeingspaceinthelogical
log. As the logical log continues to fill, it might reach the point specified by
the exclusive-access, long-transaction high-water mark, LTXEHWM. If this
occurs, normal processing is suspended. At some point after the LTXEHWM
high-water mark is reached, you must decide if the open transaction is
endangering your logical log. The danger is that if the logical log fills
completely, OnLine shuts down and you must perform a data restore.
You must decide if it is right for you to kill the transaction and protect your
system against the possibility of filling the logical log, despite all the
problemsassociatedwithexecutingtbmode -Z,orifitisrightforyoutowait
and see if communication with the coordinator can be reestablished in time
to end the transaction before the logical log fills.
The tbmode -Z address command is intended for use only if communication
between the coordinator and the participant is broken. To ensure that this is
the case, the tbmode -Z command does not execute unless the database
server process that was executing the piece of work has been dead for the
amount of time specified by TXTIMEOUT. (Refer to page 9-57 for a definition
of the TXTIMEOUT configuration parameter.)
The address parameter is obtained from tbstat -u output. Refer to page 9-58.
Refer to page 7-69 for additional tbmode -Z syntax information.
When you execute tbmode -Z, you direct the tbmode process to remove the
transaction entry that is located at the specified address from the transaction
table. Two records are written in the logical log to document the action. The
recordsaretypeROLLBACKandENDTRANS,orifthetransactionwasalready
heuristically rolled back, ENDTRANS only. The following message is written
to the participant OnLine message log: (refer to page 8-29 for a complete
description of the message)
(time) Transaction Completed Abnormally (endtx): tx=address
flags:0xnn user username tty ttyid
Your action to remove all transaction information from either the coordinator
or the participant OnLine shared memory breaks the two-phase commit
protocol.

9-42 IBM Informix OnLine Database Server Administrator’s Guide
Heuristic End-Transaction
In the first case, when you execute tbmode -Z to end a global transaction at
the coordinator OnLine database server, you interfere with participant recovery
in the following way. If a participating OnLine database server was down at
the time that the coordinator issued its decision to commit, participant
recovery eventually queries the coordinator for information. Because the
transaction entry has been removed from shared memory at the coordinator
OnLine server, the coordinator is unable to provide information about the
transaction. The participant interprets the lack of information as a evidence
that the coordinator issued a decision to rollback the transaction. The partic-
ipant rolls back its piece of work even though all other participating OnLine
servers committed theirs. This is one way in which an inconsistent database
can develop.
In the second case, when you execute tbmode -Z to end a piece of work that
is in progress at a participant OnLine database server, you interfere with the
protocol in the following way. If the coordinator issues a decision to commit,
it waits for acknowledgment from all participants that the commit occurred.
WhenthecoordinatorOnLinedoesnot receiveanacknowledgmentfromthe
participant OnLine server where the tbmode -Z occurred, it investigates the
situation. The coordinator queries the participant OnLine server, which no
longer has information about the transaction. The lack of a transaction table
entry at the participant OnLine server is taken as evidence that the trans-
action committed. The coordinator OnLine assumes that the
acknowledgment message was sent from the participant, but somehow it
wasnotreceived.Becausethecoordinatordoesnotknowthatthisparticipant’s
piece of work did not commit, it does not generate messages indicating that
the global transaction was inconsistently implemented.
Only the administrator who executed the tbmode -Z command is aware of
the inconsistent implementation. (The complete protocol is illustrated in
Figure 9-12 on page 9-50.)

Product Environment 9-43
Two-Phase Commit Protocol Errors
Two-Phase Commit Protocol Errors
Three two-phase commit protocol errors require special attention from the
administrator:
■-698 Inconsistent transaction ...
■-699 Transaction heuristically rolled back
■-716 Possible inconsistent transaction
If you receive either error -698 or -699, a heuristic rollback has occurred. If
you receive error -698, read the discussion pertaining to “Situation 2” on
page 9-39 for an explanation of how the inconsistent transaction developed
and to learn the options available to you. If you receive error -699, read the
discussion pertaining to “Situation 1” on page 9-38.
If you decide to kill a coordinator database server process after the coordi-
natorhas issued its final decisionto “commit,” error-716might be written to
the OnLine message log:
-716 Possible inconsistent transaction. Unknown servers are
<DBSERVERNAME> <DBSERVERNAME> ...
Youractioncreatesthefollowingproblem:ifaparticipatingOnLinedatabase
server does not receive the final decision from the coordinator (perhaps
because the participant is down), the participant begins to poll the coordi-
nator OnLine for instructions.
Ifthecoordinatordatabaseserverprocesshasbeenterminated,theinquiring
participantOnLinereceivesamessagestatingthatthetransactioninquestion
isunknown.Underthepresumed-abortoptimization,theparticipantOnLine
interprets this lack of information as an instruction to roll back its piece of
work.If,infact,thefinaldecisionwas“commit,”yourdatabasesystemcould
become inconsistent.
Warning: Any time that you end a transaction at the coordinator OnLine with
tbmode -z or tbmode -Z after the two-phase commit decision is made, it becomes
yourresponsibilitytodeterminewhetheryour database system is consistent.Youare
strongly advised to avoid this action.

9-44 IBM Informix OnLine Database Server Administrator’s Guide
Two-Phase Commit and Logical Log Records
Two-Phase Commit and Logical Log Records
Support of two-phase commit requires five additional logical log records.
These records can be used to detect heuristic decisions and, if required, to
help you perform a manual recovery in the event of an inconsistent database
system. The five records and their contents are described in this section. (For
more details about how to display and interpret the contents of the logical
log, refer to page 7-55.) The following illustrations of the two-phase commit
protocol are also included in this section:
BEGPREP
The BEGPREP logical log record is only written by the coordinator OnLine
database server to record the start of a global transaction.
Theoutputfromtblogcontainsthreefields:type,flags,and numberofpartic-
ipants. The value of the flags is always zero in the IBM Informix STAR
environment. The number of participants is expressed as an integer. The
output appears as follows:
BEGPREP 0 number_of_participants
PREPARE
The PREPARE logical log record is only written by a participant OnLine
database server to record the ability of the participant to commit the trans-
action, if so instructed.
Theoutputfromtblogcontainstwofields:typeandcoordinatorservername,
specified as the DBSERVERNAME. The output appears as follows:
PREPARE coordinator_DBSERVERNAME
Figure 9-10 on page 9-46 showsthelogicallogrecordsthatarewrittenwhen
a transaction is committed.
Figure 9-11 on page 9-49 showsthelogicallogrecordsthatarewrittenwhen
a piece of work is heuristically rolled back.
Figure 9-12 on page 9-50 showsthelogicallogrecordsthatarewrittenwhen
a piece of work is heuristically ended.

Product Environment 9-45
Two-Phase Commit and Logical Log Records
TABLOCKS
The TABLOCKS logical log record can be written by either a coordinator or a
participant OnLine database server. It is associated with either a BEGPREP or
aPREPARE record and contains a list of the locked tblspaces (by tblspace
number) held by the transaction. (Within the IBM Informix STAR
environment, transactions, not database server processes, are shown as the
owners of locks.)
Theoutputfromtblogcontainsthreefields:type;numberof locks,expressed
as an integer; and locked tblspace number, expressed as a hexadecimal. (If
youconvertthehexadecimalvaluetoaninteger,theresultisthevaluestored
as partnum in the systables system catalog table.) The output appears as
follows:
TABLOCKS number_of_locks hex_tblspace_number
HEURTX
The HEURTX logical log record is written by a participant OnLine database
server to record a heuristic decision to roll back the transaction. It should be
associated with a standard ROLLBACK record indicating that the transaction
was rolled back.
The output from tblog contains two fields: type and a heuristic flag,
expressed as a hexadecimal. The value of the flag is always one. The output
appears as follows:
HEURTX 0x01
ENDTRANS
The ENDTRANS logical log record is written by both the coordinator and
participant OnLine database servers to record the end of the transaction.
ENDTRANS instructsOnLineto removethe transaction entry fromitsshared-
memory transaction table and close the transaction.
In the coordinator logical log, each BEGPREP that results in a committed
transaction is paired with an ENDTRANS record. If the coordinator’s final
decision is to roll back the transaction, no ENDTRANS record is written.
In the participant logical log, each ENDTRANS record is paired with a corre-
sponding HEURTX record.
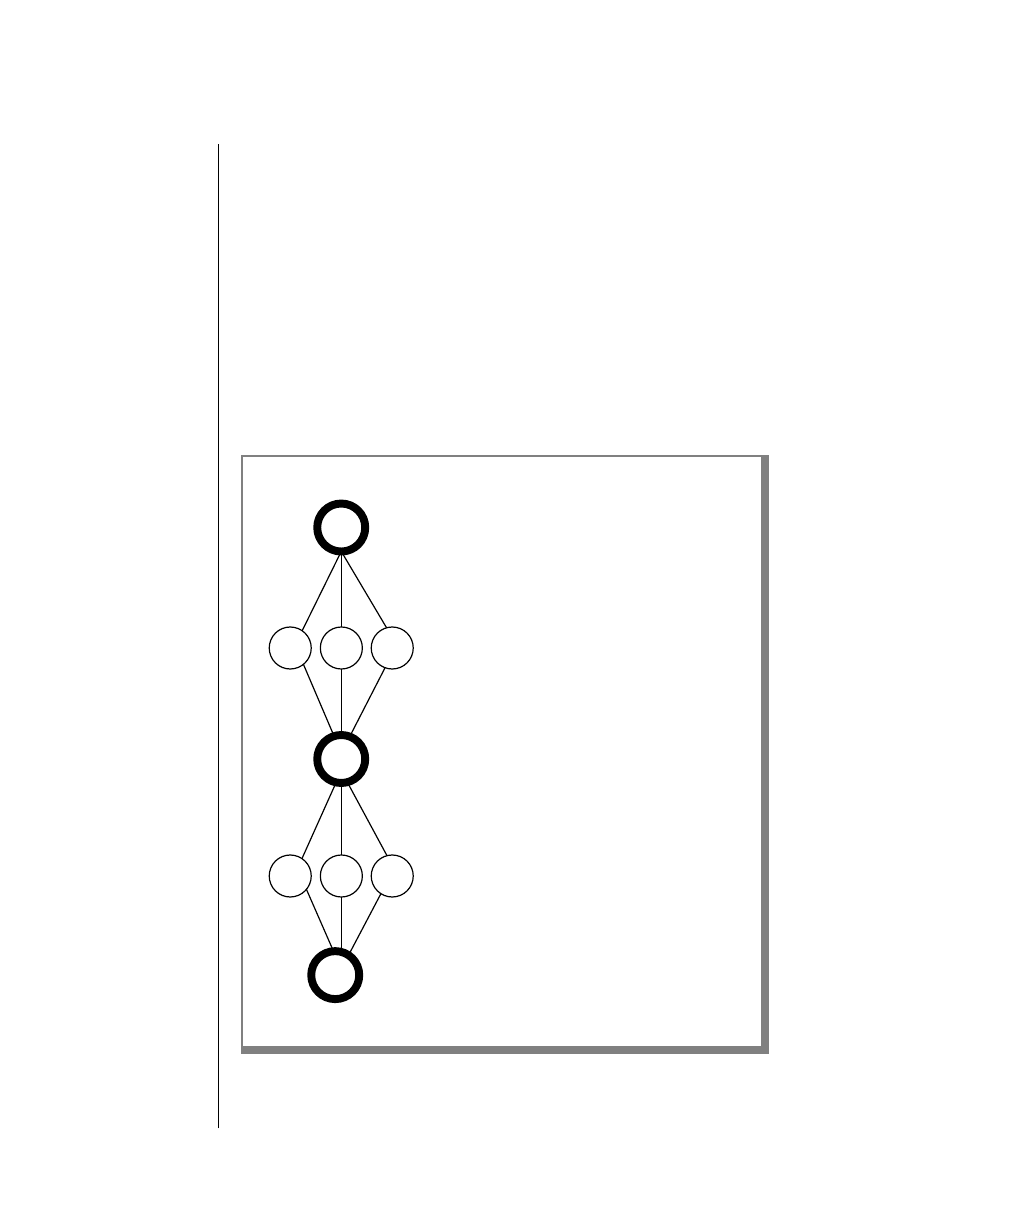
9-46 IBM Informix OnLine Database Server Administrator’s Guide
Two-Phase Commit and Logical Log Records
The output from tblog contains only the type field, as follows:
ENDTRANS
Transaction Commit Records
Figure 9-10 illustrates the writing sequence of the logical log records during
a successful two-phase commit protocol that results in a committed trans-
action. (Refer to page 9-22 for a more general discussion of this same
illustration.)
Some of the logical log records must be flushed immediately; for others,
flushing is not critical. The explanation of this difference follows the figure.
Figure 9-10
Logical log records
written during a
two-phase commit
protocol that
results in a
committed
transaction
All Participants:
Write log record: TABLOCKS.
Write and flush log record: PREPARE.
Send message: “can commit.”
Coordinator:
Writes log record: ENDTRANS.
Coordinator:
Writes log record: BEGPREP.
Sends message: “precommit.”
All Participants:
Write and flush log record: COMMIT.
Send message: “committed.”
Coordinator:
Writes and flushes log record: COMMIT.
Sends message: “commit.”
End Protocol
Start Protocol
P
C
C
P
C
P P
P P

Product Environment 9-47
Two-Phase Commit and Logical Log Records
The coordinator’s commit work record (COMMIT record) contains all infor-
mation needed to initiate the two-phase commit protocol and it serves as the
starting point for automatic recovery in the event of a failure on the coordi-
nator’s host machine. Because this record is critical to recovery, it is not
allowed to remain in the logical log buffer. The coordinator must immedi-
ately flush the COMMIT logical log record.
The participants in Figure 9-10 must immediately flush both the PREPARE
and the COMMIT logical log records. Flushing the PREPARE record ensures
that, if the participant’s host machine fails, fast recovery is able to determine
that this participant is part of a global transaction. As part of recovery, the
participant might query the coordinator to learn the final disposition of this
transaction.
Flushing the participant’s COMMIT record ensures that, if the participant’s
host machine fails, the participant has a record of what action it took
regarding the transaction. To understand why this is crucial, consider the
situation in which a participant crashes after the PREPARE record is written
but before the COMMIT record flushes. After fast recovery, the PREPARE
recordisrestoredbuttheCOMMITrecordislost(sinceitwasinthelogicallog
buffer at the time of the failure). The existence of the PREPARE record would
initiateaquerytothecoordinatoraboutthetransaction.However,thecoordi-
nator would know nothing of the transaction since it ended the transaction
afteritreceivedtheparticipant’s acknowledgment that the commit occurred.
In this situation, the participant would interpret the lack of information as a
final direction to roll back the transaction. The two-phase commit protocol
requirestheparticipantCOMMITrecordtobeflushedimmediatelytoprevent
this kind of misunderstanding.

9-48 IBM Informix OnLine Database Server Administrator’s Guide
Two-Phase Commit and Logical Log Records
Heuristic Rollback Records
Figure 9-11 illustrates the writing sequence of the logical log records during
a heuristic rollback. (Refer to page 9-36 for a description of a heuristic
rollback.) Since a heuristic rollback only occurs after the participant sends a
message that it can commit, and the coordinator sends a message to commit,
the first phase of this protocol is the same as that shown in Figure 9-10. In
Figure 9-11,the heuristic rollbackisassumed to be theconsequenceof a long-
transactionconditionthatoccursattheParticipantOne(P1)OnLinedatabase
server. Only the interactions between the coordinator and the P1 participant
are shown.
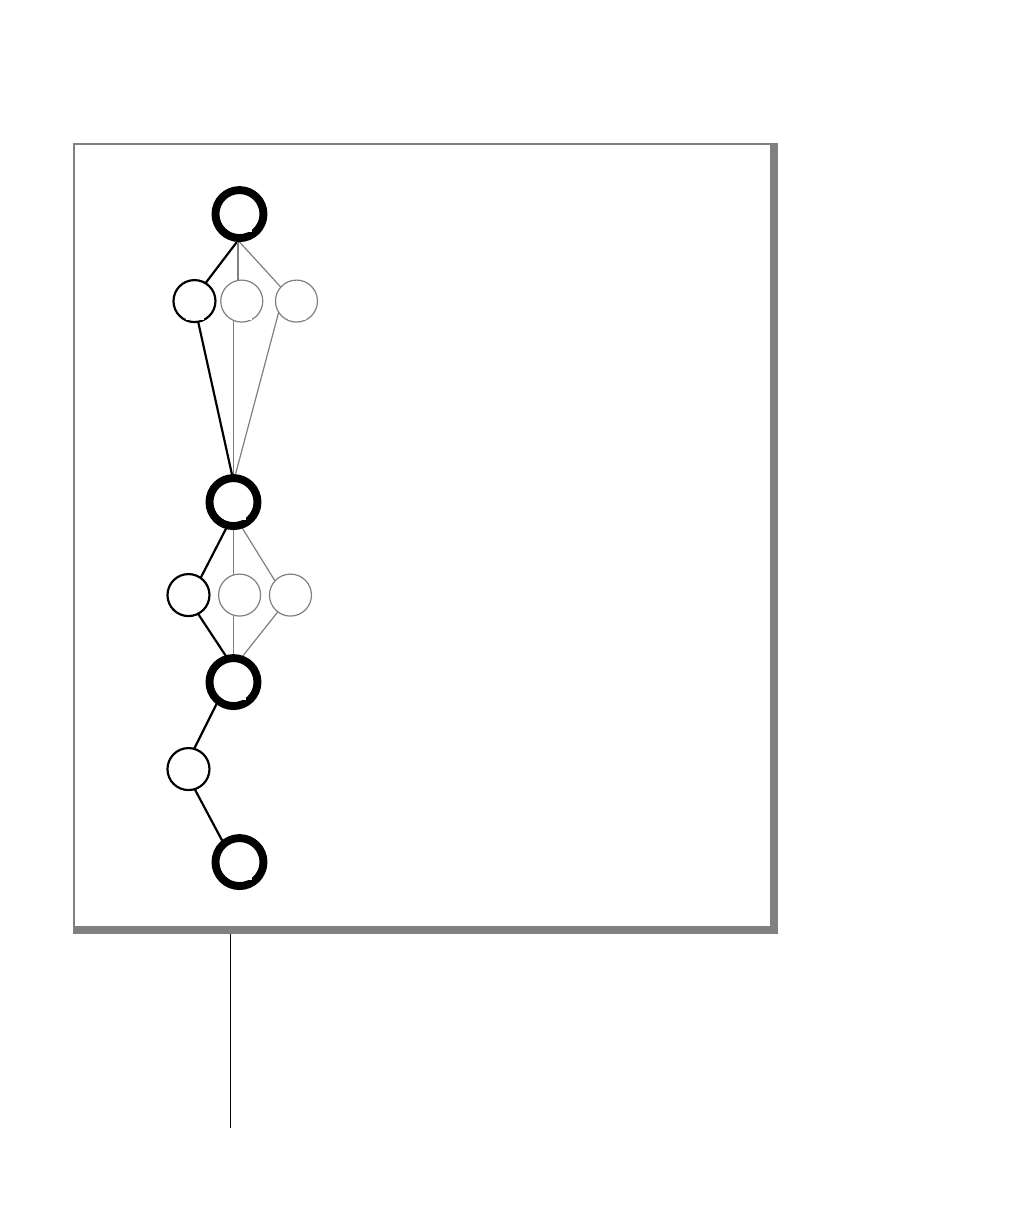
Product Environment 9-49
Two-Phase Commit and Logical Log Records
Figure 9-11
Writes of
logical log records
during a heuristic
rollback
All Participants:
Write log record: TABLOCKS.
Write and flush log record: PREPARE.
Send message: “commit ok.”
Coordinator:
Writes message in message log (-698).
Sends message to P1: “end-transaction.”
Coordinator:
Writes log record: BEGPREP.
Sends message: “precommit.”
P1 Participant:
Sends message: “Transaction heuristically rolled back.
Cannot commit.”
Coordinator:
Writes and flushes log record: COMMIT.
Sends message: “commit.”
Within P1 Participant’s Environment:
tbinit detects long-transaction condition rollback starts.
Writes log record: HEURTX.
Writes log record: ROLLBACK.
Message written in OnLine message log.
P1 Participant:
Writes log record: ENDTRANS.
Sends message: “transaction ended.”
Start
End Protocol
Coordinator:
Writes log record: ENDTRANS.
Returns error message to user: Error -698.
C
C
C
C
P1
P1
P2 P3
P1 P2 P3
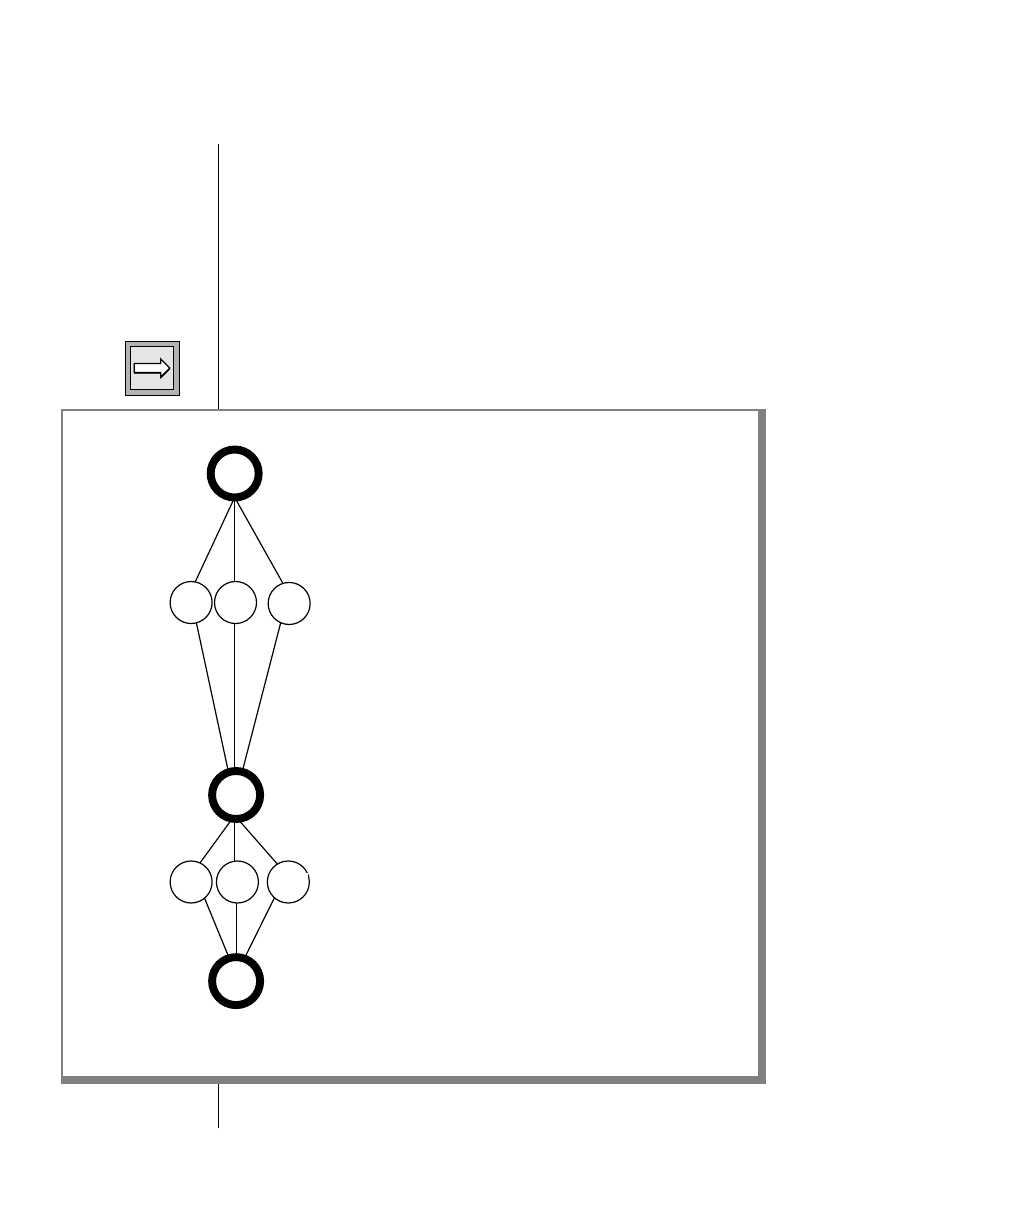
9-50 IBM Informix OnLine Database Server Administrator’s Guide
Two-Phase Commit and Logical Log Records
Heuristic End-Transaction Records
Figure 9-12 illustrates the writing sequence of the logical log records during
aheuristicend-transaction.Theeventisalwaystheresultofanadministrator
executing tbmode -Z at a participant OnLine database server after the partic-
ipant has sent a message: “can commit.” (Refer to page 9-40 for a description
ofaheuristicend-transaction.)InFigure 9-12,theheuristicend-transactionis
assumed to have occurred at the P1 participant.
Important: The transaction is inconsistently implemented.
Figure 9-12
Writes of
logical log records
during a heuristic
end-
transaction
All Participants:
Writes log record: TABLOCKS.
Writes and flushes log record: PREPARE.
Sends message: “commit ok.”
Coordinator:
Writes log record: BEGPREP.
Sends message: “precommit.”
P1 Participant:
Sends message: “Transaction status unknown.”
Coordinator:
Writes and flushes log record: COMMIT.
Sends message: “commit.”
Within P1 Participant’s Environment:
tbmode -Z is executed.
Writes log record: ROLLBACK.
Writes log record: ENDTRANS.
Message is written in OnLine message log.
Start Protocol
Transaction is
inconsistently implemented
Coordinator:
Assumes “unknown” status means “committed.”
Writes log record: ENDTRANS.
P2 and P3 Participants:
Send message: “committed.”
C
P1
C
P2 P3
P1 P2 P3
C

Product Environment 9-51
Determining Database Consistency
Determining Database Consistency
This section describes the administrative procedure that might be required if
a database server process or transaction is killed after it has entered the
second phase of the two-phase commit protocol. You must perform this
procedure if one of the following two scenarios has occurred:
■A heuristic decision to roll back occurred at a participant OnLine
after the coordinator received an acknowledgment from this partic-
ipant that it was able to commit and the coordinator later instructed
all participants to commit.
■You,asadministrator,executedthetbmode-Zoptionataparticipant
OnLine to initiate a heuristic end-transaction after this participant
sent an acknowledgment that it was able to commit.
Under normal processing, the need to perform this determination should
occur rarely, if at all.
Administrators are strongly advised to avoid this situation. Do not kill a
databaseserverprocessortransactionafterit has enteredthesecond phase of thetwo-
phase commit protocol unless it is absolutely necessary.
There are five steps to determine database consistency and correct the
situation, if required:
1. Determine which participating OnLine database servers committed
a heuristic decision.
2. Determine if the networked database system contains inconsistent
data.
3. Decide if action to correct the situation is required.
4. Decide if you need to roll back the transaction where it committed,
or recommit the transaction where it rolled back.
5. Implement the decision manually through inspection of the logical
logs at each affected OnLine.

9-52 IBM Informix OnLine Database Server Administrator’s Guide
Determining Database Consistency
Step 1: Determine Where a Heuristic Decision Occurred
There are a number of ways for you to determine the specific OnLine partic-
ipants affected by a heuristic decision to either roll back or end a transaction:
■Examine the return code from the COMMIT WORK statement.
■Examine the messages in the OnLine message log file for each
participant.
■Examine the tblog output for each participant.
Each of these options is addressed in the paragraphs that follow.
Two error messages indicate that database inconsistency is possible because
of a heuristic decision at a participating OnLine:
■-698 Inconsistent transaction. Number and names of
servers rolled back.
■-716 Possible inconsistent transaction. Unknown servers
are ...
If a database inconsistency is possible because of a heuristic decision at a
participating OnLine, one of the following messages appears in the OnLine
message log file:
■Mixed transaction result. (pid=nn
user=user_id)
Thismessageiswritten whenevererror-698isreturned.Associatedwiththis
message is a list of the OnLine database servers where the transaction was
rolled back. This is the complete list. The list that appears with the -698 error
message could be truncated if a large number of participants rolled back the
transaction.
■Possible mixed transaction result.
Thismessageiswritten whenevererror-716isreturned.Associatedwiththis
message is a list of the OnLine database servers where the result of the trans-
actionisunknown.(You mustdetermineifthe transaction was committedor
rolled back at each of these OnLine database servers. To do this, read the
logical log at each participant OnLine.)
If a database inconsistency is possible because of a heuristic decision at a
participatingOnLine,aHEURTX logrecordappearsin the OnLine logical log.

Product Environment 9-53
Determining Database Consistency
Step 2: Determine If the Networked Database Contains Inconsistent
Data
Suppose that you have determined that a transaction was inconsistently
implemented and that one or more participants committed the transaction
while one or more participants rolled it back. What does this mean to your
networked database system? When does this cause problems with data
integrity?
A transaction that is inconsistently implemented causes problems whenever
the piece of work rolled back by one participant is dependent on a piece of
workthatwasupdatedbyanotherparticipant.Itisimpossibletodefinethese
dependencies with SQL because distributed transactions do not support
constraints that reference data at multiple database servers. The pieces of
work are independent (no dependencies exist) only if the data could have
been updated in two independent transactions. Otherwise, the pieces of
work are considered to be dependent.
Beforeproceedingany further, considerthetransaction that causedthe error.
Are the pieces of data that were updated and rolled back dependent on one
another? Multiple updates might be included in a single transaction for
reasons other than maintaining data integrity. For example, here are three
possible reasons:
■Reduced transaction overhead
■Simplified coding
■Programmer preference
Verify also that every participant OnLine that is assumed to have committed
thetransaction actually modifieddata. It might bethat a read-onlyOnLineis
listed as a participant that committed a transaction.
Ifaninconsistenttransactiondoesnotleadtoaviolationofdataintegrity,you
can quit the procedure at this point.

9-54 IBM Informix OnLine Database Server Administrator’s Guide
Determining Database Consistency
Steps 3 and 4: Decide If Correction Is Needed
If an inconsistent transaction creates an inconsistent database, three options
are available to you:
■Leave the networked database in its inconsistent state.
■Remove the effects of the transaction wherever it was committed,
thereby rolling back the entire transaction.
■Reapply the effects of the transaction wherever it was rolled back,
thereby committing the transaction.
You might decide to leave the database in its inconsistent state if the trans-
action does not significantly affect database data. This is the situation if the
application can continue as it is and you decide that the price (in time and
effort) of returning the database to a consistent state by either removing the
effects or reapplying the transaction is too high.
You do nothaveto reachthis decision immediately. Youcan use themethods
described in the following paragraphs to determine what data the trans-
action was updating and which records are affected.
As you make your decision, consider that there is no automatic process or
utility that can perform a rollback of a committed transaction or that can
commit part of a transaction that has been rolled back. The following
paragraphs describe how to look through the OnLine message log and the
logical log to locate affected records. Without detailed knowledge of the
application, messages are not enough to determine what has happened. It
remains your responsibility, based on your knowledge of your application
and your system, to determine whether to roll back or to commit the trans-
action.Itisalsoyourresponsibilitytoprogramthecompensatingtransaction
that will perform the rollback or the commit.
Step 5: Use Logical Log Records
A participant OnLine logical log is the starting point for your information
search.ThetransactionthatrolledbackhasaHEURTX recordassociatedwith
it. The HEURTX record contains the local transaction identification number
(local xid). Use the local xid to locate all associated log records that rolled
back as part of this piece of work. Use these records and your knowledge of
the application to program a compensating transaction that will undo the
effects of the rollback.

Product Environment 9-55
Determining Database Consistency
You can also use the information in the HEURTX log record to locate all log
records (at all participating OnLine database servers) associated with the
global transaction of which this local transaction is just a piece. The steps
involved are as follows:
1. Obtain the local xid from the HEURTX log record at a participant
OnLine where the transaction rolled back.
2. LookforaPREPARE logrecordforthatlocalxidandobtaintheglobal
transaction number (GTRID) and the name of the coordinating
OnLine. (Refer to page 9-58 for more information about the GTRID.)
3. Examine the logical log maintained by the coordinator OnLine and
locate the BEGPREP record for this global transaction.
4. Read the BEGPREP log record and obtain the coordinator’s local xid
for the transaction.
5. ReadthelonglistingoftheBEGPREPrecordtoobtainalistofallother
participants.
6. At each participant OnLine, read the logical log to find the PREPARE
record that contains the GTRID associated with this transaction and
obtain the local xid for the piece of work performed by this
participant.
7. At each participant OnLine, use the local xid to locate all logical log
records associated with this transaction (committed or rolled back).
8. Use the records you find and your knowledge of the application to
help you construct a compensating transaction that either rolls back
the committed effects of the transaction or commits the pieces of
work that were rolled back.
Example Manual Recovery
This example is intended to illustrate the kind of work that is involved in
manualrecovery.ThefollowingSQLstatementswereexecutedbyuserpault.
Error -698 was returned.
<prompt> dbaccess
CREATE DATABASE tmp WITH LOG;
CREATE TABLE t ( a int);
CLOSE DATABASE;
CREATE DATABASE tmp@apex WITH LOG;
CREATE TABLE t ( a int);
CLOSE DATABASE;

9-56 IBM Informix OnLine Database Server Administrator’s Guide
Determining Database Consistency
DATABASE tmp;
BEGIN WORK;
INSERT INTO t VALUES (2);
INSERT INTO tmp@apex:t VALUES (2);
COMMIT WORK;
### return code -698
The following excerpt is taken from the logical log at the current database
server:
.....
17018 16 CKPOINT 0 0 13018 0
18018 20 BEGIN 2 1 0 08/27/91 10:56:57 3482 pault
1802c 32 HINSERT 2 0 18018 1000018 102 4
1804c 40 CKPOINT 0 0 17018 1
begin xid ID addr user
1 2 1 1802c pault
19018 72 BEGPREP 2 0 1802c 6d69 1
19060 16 COMMIT 2 0 19018 08/27/91 11:01:38
1a018 16 ENDTRANS 2 0 19060 580543
....
The following excerpt is taken from the logical log at the OnLine database
server apex:
16018 20 BEGIN 2 1 0 08/27/91 10:57:07 3483 pault
1602c 32 HINSERT 2 0 16018 1000018 102 4
1604c 68 PREPARE 2 0 1602c eh
17018 16 HEURTX 2 0 1604c 1
17028 12 CLR 2 0 1602c
17034 16 ROLLBACK 2 0 17018 08/27/91 11:01:22
17044 40 CKPOINT 0 0 15018 1
begin xid ID addr user
1 2 1 17034 --------
18018 16 ENDTRANS 2 0 17034 8806c3
....
First, you would try to match the transactions in the current database server
log with the transactions in the apex database server log as follows: The
BEGPREP and PREPARE log records each contain the global transaction
identifier(GTRID).You can extract theGTRID byusingtblog -l andlookingat
thefirst68bytesofthedataportionoftheBEGPREPandPREPARElogrecords.
This is the GTRID. A more simple, though less precise, approach is to look at
the time of the COMMIT or ROLLBACK records. The times should be close,
although there is a slight delay because of the time taken to transmit the
commit (or rollback) message from the coordinator to the participant. (This
second approach lacks precision because concurrent transactions could
commit at the same time, although the probability is low that concurrent
transactions from one coordinator would commit at the same time.)
To correct this example situation, you would take the following steps:

Product Environment 9-57
IBM Informix STAR Configuration Parameters
1. Find all records that were updated.
2. Identify their type (insert, delete, update) using the table on
page 7-57.
3. Use the tblog -l output for each record to obtain the local xid, the
tblspacenumber,andtherowid.(Refertopage 7-55foradescription
of the tblog -l header.)
4. Map the tblspace number to a table name by comparing the tblspace
number to the value in the partnum column of the systables system
catalog table.
5. Using your knowledge of the application, determine what action is
required to correct the situation.
In this example, it is possible to see that the timestamps on the COMMIT and
ROLLBACKrecordsinthedifferentlogsareclose.Nootheractivetransactions
introduce the possibility of another concurrent commit or rollback. In this
case, an insert (HINSERT) of assigned rowid 102 hexadecimal (258 decimal)
was committed on the current server. Therefore, the compensating trans-
action is as follows:
DELETE FROM t WHERE rowid = 258
IBM Informix STAR Configuration Parameters
Two configuration file parameters are specific to IBM Informix STAR:
■DEADLOCK_TIMEOUT
■TXTIMEOUT
Although both parameters specify time-out periods, the two are
independent.
DEADLOCK TIMEOUT
If a distributed transaction within an IBM Informix STAR environment is
forced to wait longer than the number of seconds specified by
DEADLOCK_TIMEOUT for a shared-memory resource, the database server
processthatownsthetransactionassumesthatamultiserverdeadlockexists.
The following error message is returned:
-154 ISAM error: deadlock timeout expired - Possible deadlock.

9-58 IBM Informix OnLine Database Server Administrator’s Guide
Track a Transaction with tbstat Output
The default value of DEADLOCK_TIMEOUT is 60 seconds. Adjust this value
carefully. If you set it too low, individual OnLine database servers abort
transactions that are not deadlocks. If you set it too high, multiserver
deadlocks could reduce concurrency.
TXTIME-OUT
The configuration TXTIMEOUT is specific to IBM Informix STAR two-phase
commit protocol. It is only used if communication between a transaction
coordinator and participant has been interrupted and needs to be
reestablished.
The function of TXTIMEOUT is to specify a period of time that a participant
OnLine waits to receive a commit instruction from a coordinator OnLine
during a distributed transaction. If the period of time specified by
TXTIMEOUT elapses, the participant OnLine checks the status of the trans-
action to determine if the participant should initiate automatic participant
recovery.
TXTIMEOUT is specified in seconds. The default value is 300 (five minutes).
The optimal value for this parameter varies, depending on your specific
environment and application. Before setting this parameter, read the
discussion that begins on page 9-23.
Track a Transaction with tbstat Output
The multiserver update capability supported by IBM Informix STAR requires
an enhanced tbstat -u output that can track both users and transactions. In
the IBM Informix STAR environment, relationships among users, transac-
tions, and locks (and other shared-memory resources) must be explicitly
described as follows:
■Locks are owned by transactions, not by database server processes.
■Transactions are usually owned by a database server process.
■A transaction can be orphaned and exist without being owned by a
database server process.
The transactions section of the tbstat -u output supports this level of
description. Each tbstat -u transactions field is explained in this section.

Product Environment 9-59
Track a Transaction with tbstat Output
Important: In tbstat -k output, the owner field still displays the address of the
database server process that owns the transaction. This address corresponds to the
addressdisplayedintheuser fieldofthetransactionssectionoftbstat-uoutputand
not to the transaction address field.
Tracking a Global Transaction
When a global transaction starts, it receives a unique identification number
called a GTRID (global transaction identification). Two pieces of information
are contained in the GTRID:
■The name of the coordinating OnLinedatabase server
(DBSERVERNAME)
■The number ID of the coordinating OnLine database server
(SERVERNUM)
When a participating OnLine database server receives its piece of work from
the coordinator, the associated GTRID is mapped to a transaction identifi-
cation number at the participating OnLine. The transaction identification
numberistheentry,orslot,ofthetransactionintheparticipant OnLine trans-
actiontable.(Thisnumberappearsasxid inthelogicallogrecordsassociated
with the transaction. Refer to page 7-55 for more information about the
logical log record contents.)
Transaction information is stored in the OnLine shared-memory transaction
table. Transaction-specific information is displayed in the second section of
tbstat -u outputaccordingtotheaddressofthe entry inthetransaction table.
As an administrator, you are usually concerned only with the shared-
memory address of the transaction. (You might be required to track infor-
mation by the GTRID or by the transaction identification number if you are
performing manual recovery. How to do this is explained in the discussion
that begins on page 9-51.)
Transaction address Field
The transaction address field displays the address of this transaction entry
intheOnLineshared-memorytransactiontable.Usethisaddresstointerpret
OnLine message log messages that include the transaction address. This
address is the required parameter to kill a transaction using tbmode -Z. (As
administrator, you should not require the transaction identification number
unless you must perform manual recovery.)

9-60 IBM Informix OnLine Database Server Administrator’s Guide
Track a Transaction with tbstat Output
Transaction flag Field
The transaction flag field describes the state of the transaction. Flags can
appear in the first, middle, and last position of the field as described in the
following table.
Position Flag Description
1 A Attached. This flag appears in the first position when a trans-
actionisownedby(attachedto)a databaseserverprocess.If this
flag does not appear, the transaction is orphaned
1 C Clean. This flag indicates that this transaction terminated
prematurely (probably because of a crash) and requires cleanup.
3 B Begin. Work has been logged for this transaction. This flag
appears when a writable operation is encountered within the
transaction. (A BEGIN WORK statement does not set this flag.)
3 C Commit. The transaction is being committed. If a failure occurs
while this flag is set, the OnLine recovery mechanism rolls
forward this transaction as if it were committed.
3 H Heuristic. The transaction is being heuristically rolled back. If a
failureoccurs while thisflagison, the recoverymechanism rolls
back this transaction as if it were aborted.
3 P Prepare. This transaction has been prepared to commit. Once a
transaction has reached this state, any decision to complete the
transaction independently of instructions from the coordinator
is considered a heuristic decision. If a failure occurs while this
flag is set, automatic recovery ensures that the transaction
completes correctly.
3 R Rollback. Thistransactionis beingrolledback.If afailureoccurs
whilethis flagis on,this transactionwill berolledbackaspart of
automatic recovery.
(1 of 2)

Product Environment 9-61
Track a Transaction with tbstat Output
Transaction user Field
The transaction user field displays the shared-memory address of the
database user process that currently owns the transaction. You can compare
this address with the list of database user process addresses displayed in the
first section of tbstat -u output. If this field is 0, the transaction has been
orphaned. An orphaned transaction is an incomplete transaction that is
created when its owning database server process is prematurely terminated.
Transaction locks Field
Thetransaction locks field displaysthe number oflocks owned by the trans-
action,whichisinturnownedbythedatabaseuserprocess.Todeterminethe
specific locks that are owned, compare the address displayed in the trans-
action user field (previous paragraph) with the address displayed in the
owner field of tbstat -k output.
Important: The tbstat -k output reports the owner of the lock as 0 if the database
server process that owned the transaction is dead.
Transaction log begin
The transaction log begin value is the identification number of the logical
log where this transaction began. This value is tracked to detect long
transactions.
5 C Coordinator. This transaction is an IBM Informix STAR
coordinator.
5 G Global. If this global transaction is owned by a database server
process, a second transaction should also appear in the table,
owned by the same database server process. The second trans-
action would be the piece of work that is performed by this
OnLine database server.
5 S Participant. This transaction is an IBM Informix STAR
participant.
Position Flag Description
(2 of 2)

9-62 IBM Informix OnLine Database Server Administrator’s Guide
Track a Transaction with tbstat Output
Transaction isolation Field
The isolation field describes the transaction isolation level. Four isolation
levels are valid under IBM Informix STAR:
■COMMIT (Committed Read)
■CURSOR (Cursor Stability)
■DIRTY (Dirty Read)
■REPEAT (Repeatable Read)
A fifth value, NO TRANS, might appear in this field. NO TRANS is reserved
for two situations:
■Database user processes (such as daemons) that perform work but
are not considered to be owners of a transaction
■Databases that do not use logging
For more details about isolation levels, refer to IBM Informix Guide to SQL:
Tutorial.
Transaction retries Field
The transaction retries field indicates the number of times that the period
specified by the TXTIMEOUT configuration parameter has expired (and this
participant transaction has attempted to contact its coordinator).
Transaction coordinator Field
The transaction coordinator field specifies the name of the coordinator of
this transaction. The name that appears is the DBSERVERNAME of the coordi-
nator OnLine.

A
Appendix
Notices
IBM may not offer the products, services, or features discussed
in this document in all countries. Consult your local IBM repre-
sentative for information on the products and services currently
available in your area. Any reference to an IBM product,
program, or service is not intended to state or imply that only
that IBM product, program, or service may be used. Any
functionally equivalent product, program, or service that does
not infringe any IBM intellectual property right may be used
instead. However, it is the user’s responsibility to evaluate and
verify the operation of any non-IBM product, program, or
service.
IBM may have patents or pending patent applications covering
subjectmatterdescribedinthisdocument.Thefurnishingofthis
documentdoesnotgiveyouanylicensetothesepatents.Youcan
send license inquiries, in writing, to:
IBM Director of Licensing
IBM Corporation
North Castle Drive
Armonk, NY 10504-1785
U.S.A.
Forlicenseinquiriesregardingdouble-byte(DBCS)information,
contact the IBM Intellectual Property Department in your
country or send inquiries, in writing, to:
IBM World Trade Asia Corporation
Licensing
2-31 Roppongi 3-chome, Minato-ku
Tokyo 106-0032, Japan

A-2 IBM Informix OnLine Database Server Administrator’s Guide
The following paragraph does not apply to the United Kingdom or any
other country where such provisions are inconsistent with local law:
INTERNATIONAL BUSINESS MACHINES CORPORATION PROVIDES THIS
PUBLICATION“ASIS”WITHOUTWARRANTYOFANY KIND,EITHER EXPRESS
ORIMPLIED,INCLUDING,BUT NOT LIMITED TO,THE IMPLIED WARRANTIES
OF NON-INFRINGEMENT, MERCHANTABILITY OR FITNESS FOR A
PARTICULAR PURPOSE. Some states do not allow disclaimer of express or
implied warranties in certain transactions, therefore, this statement may not
apply to you.
This information could include technical inaccuracies or typographical
errors. Changes are periodically made to the information herein; these
changes will be incorporated in new editions of the publication. IBM may
make improvements and/or changes in the product(s) and/or the
program(s) described in this publication at any time without notice.
Any references in this information to non-IBM Web sites are provided for
convenienceonlyanddonotinanymannerserveasanendorsementofthose
Web sites. The materials at those Web sites are not part of the materials for
this IBM product and use of those Web sites is at your own risk.
IBM may use or distribute any of the information you supply in any way it
believes appropriate without incurring any obligation to you.
Licensees of this program who wish to have information about it for the
purpose of enabling: (i) the exchange of information between independently
createdprogramsandotherprograms(includingthisone)and(ii)themutual
use of the information which has been exchanged, should contact:
IBM Corporation
J74/G4
555 Bailey Ave
P.O. Box 49023
San Jose, CA 95161-9023
U.S.A.
Such information may be available, subject to appropriate terms and condi-
tions, including in some cases, payment of a fee.
The licensed program described in this information and all licensed material
available for it are provided by IBM under terms of the IBM Customer
Agreement, IBM International Program License Agreement, or any equiv-
alent agreement between us.

Notices A-3
Any performance data contained herein was determined in a controlled
environment. Therefore, the results obtained in other operating environ-
ments may vary significantly. Some measurements may have been made on
development-level systems and there is no guarantee that these measure-
ments will be the same on generally available systems. Furthermore, some
measurements may have been estimated through extrapolation. Actual
resultsmayvary.Usersofthisdocumentshouldverifytheapplicabledatafor
their specific environment.
Information concerning non-IBM products was obtained from the suppliers
ofthoseproducts,theirpublishedannouncementsorotherpubliclyavailable
sources. IBM has not tested those products and cannot confirm the accuracy
of performance, compatibility or any other claims related to non-IBM
products. Questions on the capabilities of non-IBM products should be
addressed to the suppliers of those products.
All statements regarding IBM’s future direction or intent are subject to
change or withdrawal without notice, and represent goals and objectives
only.
This information contains examples of data and reports used in daily
business operations. To illustrate them as completely as possible, the
examples include the names of individuals, companies, brands, and
products. All of these names are fictitious and any similarity to the names
and addresses used by an actual business enterprise is entirely coincidental.
COPYRIGHT LICENSE:
This information contains sample application programs in source language,
which illustrate programming techniques on various operating platforms.
You may copy, modify, and distribute these sample programs in any form
without payment to IBM, for the purposes of developing, using, marketing
or distributing application programs conforming to the application
programming interface for the operating platform for which the sample
programs are written. These examples have not been thoroughly tested
under all conditions. IBM, therefore, cannot guarantee or imply reliability,
serviceability, or function of these programs. You may copy, modify, and
distribute these sample programs in any form without payment to IBM for
the purposes of developing, using, marketing, or distributing application
programs conforming to IBM’s application programming interfaces.

A-4 IBM Informix OnLine Database Server Administrator’s Guide
Trademarks
Each copy or any portion of these sample programs or any derivative work,
must include a copyright notice as follows:
© (your company name) (year). Portions of this code are derived
fromIBMCorp.SamplePrograms.©CopyrightIBMCorp.(enterthe
year or years). All rights reserved.
Ifyou areviewingthis information softcopy,thephotographs and color illus-
trations may not appear.
Trademarks
AIX; DB2; DB2 Universal Database; Distributed Relational Database
Architecture; NUMA-Q; OS/2, OS/390, and OS/400; IBM Informix;
C-ISAM; Foundation.2000TM; IBM Informix 4GL; IBM Informix
DataBlade Module; Client SDKTM; CloudscapeTM; CloudsyncTM;
IBM Informix Connect; IBM Informix Driver for JDBC; Dynamic
ConnectTM; IBM InformixDynamic Scalable ArchitectureTM (DSA);
IBM Informix Dynamic ServerTM; IBM Informix Enterprise Gateway
Manager (Enterprise Gateway Manager); IBM Informix Extended Parallel
ServerTM; i.Financial ServicesTM; J/FoundationTM; MaxConnectTM; Object
TranslatorTM; Red Brick Decision ServerTM; IBM InformixSE;
IBM InformixSQL; InformiXMLTM; RedBack; SystemBuilderTM; U2TM;
UniData; UniVerse; wintegratearetrademarks or registered trademarks
of International Business Machines Corporation.
Java and all Java-based trademarks and logos are trademarks or registered
trademarks of Sun Microsystems, Inc. in the United States and other
countries.
Windows, Windows NT, and Excel are either registered trademarks or trade-
marks of Microsoft Corporation in the United States and/or other countries.
UNIX is a registered trademark in the United States and other countries
licensed exclusively through X/Open Company Limited.
Other company, product, and service names used in this publication may be
trademarks or service marks of others.

@
Index
OQCAB DEFGHI JKLMN P RSTUVWXYZ
Index
A
Administration tasks
consistency and recovery 4-5
things to avoid 3-116
ANSI compliance
level Intro-19
Archive
administration topics 3-43
blobpage allocation blocked
during 2-159
configuration guidelines 3-50
creating 3-57
criteria for archiving disk
pages 4-37
criteria includes checkpoint
timestamp 4-33
estimating duration 3-46
if the archive is interrupted 3-60
if the device is /dev/null 4-35
if the logical log fills during an
archive 3-59
implicationsofsingle-tape-device
environment 3-52
incremental 3-45
labelling an archive tape 3-58
log space required to
proceed 4-32
monitoring archive history 3-61
online archiving synchronizes
tbtape, tbinit 4-33
relationship to data restore 3-47
reserved page information 2-102
scheduling 3-47
streamlined in 5.0 4-37
tapes required for data
restore 4-47
tasks that require a level-0
archive 3-47
types of archives 3-43
verifying archive level 4-32
what happens during an
archive 4-30
Archive tape device
changing block size 3-55
changing pathname 3-52
changing tape size 3-56
configuration guidelines 3-50
contents of tape header page 4-35
implicationsofsingle-tape-device
environment 3-52
initial configuration values 1-28
scheduling considerations 3-47
syntax to specify another
machine 3-54
B
Bad-sector mapping, absence of 9-6
BEGPREP logical log record 9-44
Big-buffer write 2-78
Big-remainder page 2-127
Bit-map page
2-bit and 4-bit in dbspace 2-143
2-bit values describing
fullness 2-144
4-bit values describing
fullness 2-144
blobspace 2-148
component of a tblspace 2-85
component of an extent 2-115
component of the tblspace
tblspace 2-106, 2-107

2IBM Informix OnLine Database Server Administrator’s Guide
OQCABDEFGHIJKLMNPRSTUVWXYZ@
description of 2-143
Blob
blobspace storage statistics 5-5
effect of Committed Read
isolation 2-46
effect of Dirty Read isolation 2-45
entering blob data 9-7
illustration of blobspace
storage 2-80
illustration of creating a blob in a
blobspace 2-80
modified by creating new
blob 2-146
monitoring in a blobspace 3-63
monitoring in a dbspace 3-65
restoring a blobspace blob 4-25
role of blob descriptor in
modifications 2-146
role of blob timestamps 2-44
scanningorcompression,absence
of 9-7
size limitations 2-146
storage on disk 2-145
writing to a blobspace 2-78
Blob descriptor
associated with blob
timestamp 2-44
created during blob storage 2-79
description of 2-123, 2-145
possibility of pointer becoming
obsolete 2-45
structure and function 2-145
Blobpage
allocation and rollbacks 4-25
allocation blocked during
archive 2-159, 4-35
buffers 2-79
components of page header 2-150
copied to backup tape
directly 4-28
description of 2-84
efficient blob storage and
blobpage size 5-5
fullness terminology
explained 5-7
reclaiming space requires logical
log backup 2-158, 4-25
size considerations 3-89
sizing for performance 5-5
storage statistics 5-5
structure 2-149
tbcheck-pB displayexplained 5-6
written bypassing shared
memory 2-78
Blobspace
adding a chunk 3-94
bit-map page 2-148
blob buffers 2-79
blob storage 2-145
blob timestamps 2-44
blobpage allocation blocked
during archive 2-159
blobpage structure 2-149
changing maximum
number 3-111
creating 3-88
creating during initial
configuration 1-59
description of 2-84
dropping 3-91
efficiency of storage 5-5
ending mirroring 3-105
free-map page
description of 2-148
location in blobspace 2-91
role during blob storage 2-80
role in blobpage logging 2-148,
4-24
role in blobspace logging 4-25
tracked by bit-map 2-148
illustration of writing a blob 2-80
logging, description of 4-22
logical log files and blobspace
activity 2-158
monitoring chunk status 3-63
monitoring free space 3-64
page types 2-148
reclaiming space requires logical
log backup 2-158
rollbacks and the logical log 4-24
starting to mirror 3-105
storage efficiency 5-5
structure 2-91
structure of mirror chunk 2-92
switching logical log file after
creating 2-159
writing data to a blobspace 2-78
Boldface type Intro-8
Buffer
access-level flag bits 7-83
acquiring a buffer 2-60
big buffers 2-56
blobpage buffer 2-79
changingnumber inthepool 3-92
exclusive mode 2-39
hash table 2-49
lock types 2-38
monitoring activity 3-66
page-type codes 7-83
regular buffers 2-56
share mode 2-38
shared-memory table 2-48
synchronizing buffer
flushing 2-74
tuning for performance 5-13
update mode 2-38
write types during flushing 2-75
Buffer pool
bypassed by blobspace data 2-78
changing number of buffers 3-92
description of 2-55
efficient cleaning affected by
checkpoints 5-18, 5-20
flushing 2-73
LRU queue management 2-58
monitoring 3-68
synchronizing buffer
flushing 2-74
BUFFERS parameter
changing 3-92
description of 1-13
initial configuration value 1-34
tuning for performance 5-13
BUFFSIZE parameter
description of 1-13
BYTE data type
Committed Read isolation 2-46
Dirty Read isolation 2-45
migrating from IBM Informix
OnLine 4-65
migrating from IBM Informix
SE 4-66
requires4-bit bit map 2-115,2-144
storage on disk 2-84
B+ tree structure 2-133

Index 3
OQCABDEFGHIJKLMNPRSTUVWXYZ@
C
Caching percentages
description of 5-10
mentioned 5-13, 5-17, 5-19
Cautions 3-116
Character-special file 1-41
Checkpoint
affected by online archiving 2-71
changing interval value 3-109
description of 2-70
forcing with tbmode -c 7-67
frequency trade-offs 5-20
initiating 2-70
maximumnumberoftransactions
on a checkpoint record 1-33
monitoring activity 3-69
page-cleaning parameters affect
frequency 5-18, 5-20
reserved page information 2-97
role in fast recovery 2-71, 4-40,
4-41
role of timestamp in archive 4-33
size of checkpoint record 2-157
step in shared-memory
initialization 2-13
updating the reserved pages 2-95
what happens during 2-72
Chunk
activity during mirror
recovery 4-17
adding 3-94
calculating maximum number of
chunks 2-93
changing mirror chunk
status 3-101
creating a link to the
pathname 1-48
description of 2-82
disk layout guidelines 1-43
fragmentation 3-72
free-list page 2-89, 2-90, 2-103
I/O errors during
processing 4-13
maximum number 3-96
mirror chunk reserved page
information 2-101
monitoring 3-70
naming guidelines 2-94
offsets for pathname 1-48
raw disk devices versus cooked
files 1-40
recovering a down chunk 3-101
reserved page information 2-100
shared-memory table 2-49
status flags defined 3-71, 3-102
structure
additional dbspace chunk 2-90
blobspace chunk 2-92
initial dbspace chunk 2-89
mirror chunk 2-92
using a link to the pathname 1-22
write type 2-77
Chunk write 2-77
CHUNKS parameter
calculating the maximum
value 2-93
changing 3-96
description of 1-13
initial configuration value 1-35
CKPTINTVL parameter
changing 3-109
description of 1-13
initial configuration value 1-37
tuning for performance 5-20
CLEANERS parameter
changing 3-115
description of 1-13
initial configuration value 1-36
tuning for performance 5-17
Code examples,
conventions Intro-12
Comment icons Intro-9
Committed Read isolation level
data-consistency checks 2-46
role of blob timestamps 2-45
Compliance
with industry standards Intro-19
Configuration file
changes for multiple
residency 9-11
changing parameter values 3-87
creating multiple files 1-12
description of 1-11
displaying contents of 1-12
entering values in DB-
Monitor 1-51
monitoring parameter
values 3-73
reserved page information 2-97
standard contents 1-13
Consistency-checking code
dealing with corruption 4-12
description of 4-6
environment variables 4-9
Console messages 3-110
CONSOLE parameter
changing 3-110
description of 1-13
initial configuration value 1-28
Contact information Intro-20
Conventions
command-line syntax Intro-9
example code Intro-12
railroad diagrams Intro-9
Cooked file space
description of 1-40
how to allocate 1-47
Coordinator database server
automatic recovery 9-23
description of 9-18
Core dump 4-10
Corruption
corrective actions 4-13
I/O errors from a chunk 4-13
recovery with data restore 4-45
symptoms of 4-13
CPU time tabulated 7-94
Critical section of code
access denied during
checkpoint 2-72
description of 2-28
how to determine for a
process 2-32
role in synchronizing
archive 4-34
Current database server
role in distributed-data
queries 9-16
role in two-phase commit
protocol 9-18

@
4IBM Informix OnLine Database Server Administrator’s Guide
OQCABDEFGHIJKLMNPRSTUVWXYZ
D
Daemon process
description of 2-33
user process type flag 2-30
Data consistency
blob timestamp and isolation
levels 2-44
consistency-checking code 4-6
fast recovery 4-39
role of timestamp pairs 2-44
Data restore
minimizing time needed 3-48
procedure 4-45
recovery after a long
transaction 2-161
tape requirements 4-47
tapes needed 3-61
what happens during a
restore 4-50 to 4-52
when is restore needed 4-45
Data row
big-remainder page 2-127
blob descriptor component 2-145
displaying row contents 3-77
forward pointer 2-125, 2-127
home page 2-123, 2-127
migration 4-52
obtaining the rowid 3-77
storage strategies 2-123
storing data on a page 2-125
Database
adding logging 3-33
creating, what happens on
disk 2-108
description of 2-85
ending logging 3-33
limits 2-110
logging, buffered and
unbuffered 3-33
making ANSI-compliant 3-33
migration 4-52
monitoring 3-74
stores5 demonstration
database Intro-5
unloading data using
dbexport 7-5
Database server process
cleanup performed by
tbundo 2-34
coordinator under two-phase
commit 9-18
description of 2-30
killing a process 2-31 to 2-32
killing with tbmode -z 7-69
monitoring 3-86
orphaned processes 2-31
participant under two-phase
commit 9-18
role of current server in
distributed-data queries 9-16
roleofcurrentserverintwo-phase
commit protocol 9-19
setting with SQLEXEC 1-55
specified as sqlturbo 2-30
SQLEXEC environment
parameter 2-30
tracked in shared-memory user
table 2-54
Database tblspace
location in root dbspace 2-87
relation to systable 2-109
structure and function 2-107
tblspace number 2-107
Data-recovery mechanisms
archiving 4-30
data restore 4-45
fast recovery 4-39
logging 4-18
mirroring 4-14
dbexport utility
contents of the schema file 7-9
description of 7-5
migrating with dbimport 4-62
overview of migration
methods 4-52
syntax 7-6
dbimport utility
create options 7-14
description of 7-10
input file location options 7-12
migrating with dbexport 4-62
overview of migration
methods 4-52
syntax 7-11
dbload utility
batch size 7-19
command file
character-position
examples 7-29
character-position FILE
statement 7-26
syntax check 7-18
comparison to LOAD
statement 4-59
description of 7-15
migrating with UNLOAD
statement 4-60
overview of migration
methods 4-52
starting line number 7-18
DB-Monitor
access and use 6-3
Archive menu and options 6-10
Dbspaces menu and options 6-7
Force-Ckpt option 6-9
how to access 1-10
Logical-Logs menu and
options 6-11
Main menu and options 6-4
Mode menu and options 6-8
Parametersmenu andoptions 6-6
Status menu and options 6-5
DBREMOTECMD environment
variable 8-27
dbschema utility
description of 7-32
including synonyms 7-33
specifying a table, view, or
procedure 7-35
DBSERVERNAME parameter
changes for multiple
residency 9-13
description of 1-13
initial configuration value 1-32
Dbspace
adding a chunk 3-94
bit-map page 2-143
blob page structure 2-146
blob storage 2-145
blob timestamps 2-44
changing maximum
number 3-111
creating 3-97

Index 5
OQCABDEFGHIJKLMNPRSTUVWXYZ@
creating during initial
configuration 1-59
description of 2-84
dropping 3-99
ending mirroring 3-105
identifying the dbspace for a
table 2-106
index page structure 2-133
logging activity 4-19
mirroring if logical log files
included 4-15
monitoring 3-75
monitoring blobs 3-65
page header 2-120
page types in an extent 2-115
reserved page information 2-99
shared-memory table 2-50
starting to mirror 3-105
structure 2-89, 2-90
structure of mirror chunk 2-92
tbcheck -pe links name to
table 3-78
DBSPACES parameter
changing 3-111
description of 1-14
initial configuration value 1-35
DEADLOCK_TIMEOUT parameter
description of 1-14, 9-57
initial configuration value 1-39
Demonstration database
copying Intro-6
installation script Intro-5
overview Intro-5
Dirty Read isolation level
data-consistency checks 2-45
role of blob timestamps 2-45
Disk layout for optimum
performance 1-43, 5-4
Disk page
before-images in physical
log 2-63
description of 2-82
function of timestamp pairs 2-44
logical page number 2-124
page compression 2-122, 2-133
physical page number 2-124
storing data on a page 2-125
structure
blobspace blobpage 2-115
dbspace page 2-120
types of pages in an extent 2-115
Disk space
allocating
cooked file space 1-47
overview 1-40
raw disk space 1-48
when a database is
created 2-109
when a table is created 2-111
chunk free-list page 2-103
creating a link to chunk
pathname 1-48
displaying usage by chunk 3-78
fragmentation 3-72
guidelines for layout 1-43
illustration of OnLine
concepts 2-83
initialization
commands 2-10
definition of 2-8
what happens during 2-14
list of structures 2-81
offsets for chunk pathnames 1-48
page compression 2-122, 2-133
raw devices versus cooked
files 1-40
reclaiming space in an empty
extent 2-118
requirements
for production
environment 1-43
for root dbspace 1-41
terms and definitions 2-81
tracking
available space in a
blobspace 2-148
available space in a chunk 2-103
free pages with bit-map
page 2-143
Documentation notes Intro-18
Documentation, types of
documentation notes Intro-18
error message files Intro-15
machine notes Intro-18
release notes Intro-18
DUMPCORE environment variable
description of 4-11
DUMPDIR environment variable
description of 4-12
DUMPSHMEM environment
variable
description of 4-11
DYNSHMSZ parameter
description of 1-14
initial configuration value 1-39
E
ENDTRANSlogical log record 9-45
Environment variable
DBREMOTECMD 8-27
DUMPCORE 4-11
DUMPDIR 4-12
DUMPSHMEM 4-11
GCORE 4-10
INFORMIXDIR 1-57
PATH 1-57
PSORT_DBTEMP 5-23
PSORT_NPROCS 5-22
setting values for initial
configuration 1-54
SQLEXEC 1-55
TBCONFIG 1-55
Environment variables Intro-8
Error message files Intro-15
Error messages
ASCII file location Intro-15
available as Postscript
files Intro-15, Intro-18
documentation for Intro-15
during initialization 1-59
finderr script displays
messages Intro-15
IBMInformixOnLineformat 1-60
rofferr script prints
messages Intro-15
two-phase commit protocol 9-43
UNIX format 1-60
Extent
description of 2-85
disk page types 2-115
displaying disk usage by
table 3-78
monitoring for
fragmentation 3-78

@
6IBM Informix OnLine Database Server Administrator’s Guide
OQCABDEFGHIJKLMNPRSTUVWXYZ
next extent allocation 2-117
reclaiming space in an empty
extent 2-118
size limitations 2-114
structure 2-114
tracking free pages using bit-map
page 2-143
F
Fast recovery
description of 4-39
effect of buffered logging 4-40
role of PAGE_CHKT reserved
page 4-41
step in shared-memory
initialization 2-13
FILE statement
dbload character-position
form 7-26
dbload delimiter form 7-23
finderr script, use and
syntax Intro-16
FLRU queue
description of 2-57
role in buffer acquisition 2-62
Forced residency
changing configuration
parameter 3-100
changing for this session 3-100
step in shared-memory
initialization 2-14
Foreground write 2-77
Forward pointer
description of 2-125
how blob pointers become
obsolete 2-45
role in a blobspace blob
storage 2-149
role in data storage 2-127
rolein dbspace blobstorage 2-145
unaffected by page
compression 2-122
Free-map page for blobspace 2-148
G
GCORE environment variable
description of 4-10
Global transaction identification
number 9-59
GTRID_CMP_SZ parameter
description of 1-14
initial configuration value 1-39
H
Hash table
description of 2-46
to buffer table 2-49
to lock table 2-52
to tblspace table 2-53
Hashing technique illustrated 2-47
Heuristic decision
definition of 9-30
develops from independent
action 9-30
Heuristic end-transaction
breaks two-phase commit
protocol 9-41
definition of 9-30
detailed description of 9-40
determining database
consistency 9-51
illustration including logical log
records 9-50
key points of understanding 9-33
messages returned 9-41
when is it necessary 9-40
Heuristic rollback
definition of 9-30
detailed description of 9-36
determining database
consistency 9-51
HEURTX logical log record 9-45
illustration including logical log
records 9-48
key points of understanding 9-32
messages returned 9-37
HEURTX logical log record 9-45
Home page 2-123, 2-127
I
IBM Informix OnLine database
server
bad-sector mapping, absence
of 9-6
blob compression, absence of 9-7
blob scanning, absence of 9-7
distributed-query support 9-6
error message format 1-60
fault-tolerant features 9-5
feature summary 9-3
multimedia support 9-5
multiple residency 9-7
possible environments 9-3
profile statistics 3-83
raw-disk management 9-4
shared-memory management 9-4
IBM Informix STAR
administration topics 9-15
configuration parameters 9-57
determining database
consistency 9-51
distributed-data queries 9-15
multiserver modifications in a
single transaction 9-17
recovery procedure 9-23
sqlexecd, role of 9-16
terminology for multiserver
modifications 9-18
tracking a transaction 9-58
two-phase commit protocol,
definition of 9-18
IBM Informix TP/XA
DYNSHMSZ parameter 1-39
GTRID_CMP_SZ parameter 1-39
Icons
Important Intro-9
Tip Intro-9
Warning Intro-9
Idle write 2-76
Important paragraphs, icon
for Intro-9
Incremental archive
description of 3-45
Index
branch node page 2-133
illustration of terminology 3-80
infinity slot 2-139

Index 7
OQCABDEFGHIJKLMNPRSTUVWXYZ@
key entries on root node
page 2-138
key value 2-134
leaf node page 2-133, 2-136
monitoring integrity 3-79
page structure 2-133
repairing structures with tbcheck
utility 7-36
root node page 2-133, 2-134
Industry standards, compliance
with Intro-19
Infinity slot 2-139
Informix products
application development
tools Intro-7
network products Intro-7
INFORMIXDIR environment
variable 1-57
$INFORMIXDIR/msg/errmsg.txt
ASCII file of error
messages Intro-15
Initial configuration
checklist 1-50
creating blobspaces and
dbspaces 1-59
default versus customized
values 1-20
defining parameter values 1-20
description of 1-5
disk layout
for learning environment 1-44
for production
environment 1-44
disk space requirements 1-41
entering values in DB-
Monitor 1-51
evaluating UNIX kernel
parameters 1-49
guidelines
archive tape device 1-28
logical log file 1-26
logical log tape device 1-29
machine-specific
parameters 1-39
message destination 1-28
mirroring 1-24
OnLine identifiers 1-31
physical log 1-25
product-specific
parameters 1-39
root dbspace 1-21
shared-memory resources 1-32
modifying UNIX scripts 1-56
raw disk devices versus cooked
files 1-40
tasks 1-5, 1-10
worksheet 1-21
Initialization
commands 2-8
configuration files 1-11
disk parameters screen 1-52
disk space and shared
memory 2-7
disk-space initialization 2-14
error messages 1-59
role of SQLEXEC 1-55
role of TBCONFIG 1-55
shared-memory
initialization 2-10
shared-memory parameters
screen 1-53
tbinit utility 7-45
INSERT statement
dbload character-position
form 7-28
dbload delimiter form 7-23
Installation
description of 1-5, 1-10
IBM Informix OnLine with IBM
Informix SE 1-6
items you need 1-5
multiple IBM Informix OnLine
systems 1-6
multiple residency 9-11
replacing an IBM Informix SE
database server 1-6
starting point 1-6
upgrading earlier versions 1-7
ISAM calls tabulated 7-93
Isolation level
Committed Read and blobs 2-45
Dirty Read and blobs 2-45
of a transaction 9-62
I/O errors during processing 4-13
L
Latch
acquisition 2-42
description of 2-41
determining if one is held 2-32
identifying the resource
controlled 7-97
monitoring 3-84
relationship of UNIX
semaphores 2-43
shared-memory table 2-51
spin-count latch acquisition 5-24
Level-0 archive
description of 3-44
tasks that require one 3-47
use in consistency checking 4-8
Level-1 archive
description of 3-45
Level-2 archive
description of 3-45
LOAD statement
comparison to dbload 4-59
migrating with UNLOAD
statement 4-60
overview of migration
methods 4-52
Locks
buffer lock types 2-38
buffer-access-level flag bits 7-83
byte lock 2-52
changing maximum
number 3-112
hash table 2-52
monitoring 7-88
shared-memory table 2-51
type codes 7-89
LOCKS parameter
changing 3-112
description of 1-14
initial configuration value 1-33
tuning for performance 5-15
LOGBUFF parameter
changing 3-93
description of 1-14
initial configuration value 1-36
LOGFILES parameter
description of 1-14
initial configuration value 1-27

@
8IBM Informix OnLine Database Server Administrator’s Guide
OQCABDEFGHIJKLMNPRSTUVWXYZ
Logging
blobspace data 4-22
buffered logging and fast
recovery 4-40
buffered versus unbuffered 3-34
comparison of blobspace to
dbspace 4-18
dbspace data 4-19
description of 4-18
monitoring activity 3-80
role of blobspace free-map
page 2-148, 4-22
transaction logging 1-26
Logical consistency
description of 4-39
Logical log buffer
changing size 3-93
description of 2-66
flushing 2-68
if it becomes full 2-69
role in dbspace logging 4-21
tuning size for performance 5-11,
5-15
Logical log file
access denied during long
transaction 2-160
adding 3-28
backing up a file 3-36
backup criteria for
blobpages 4-27
backups on another machine 3-19
changing database logging
status 3-33
changing size 3-24
configuration guidelines 3-14
contents 2-68, 2-156, 3-15
description of 1-26, 2-86
disk location 1-46
displaying contents 7-51
dropping 3-30
effect on blobspace activity 2-158
ending continuous backups 3-38
factors affecting the rate of
filling 2-157
filling in rotation 2-155, 2-160,
3-15, 3-27
freeing 3-39
function of 2-154, 4-18
identification numbers 3-27
if a backup is interrupted 3-42
if the files fill during an
archive 3-59
importance of backups 3-14
importanceoffreeing a file 2-155,
3-15
initial configuration values 1-26
limits on number and size 2-157
maximum number 3-23
mirroring a dbspace containing a
file 4-15
monitoring space, activity 3-80
moving to another dbspace 3-31
number and size 2-156
reading the log file 7-51
reserved page information 2-98
role in data consistency 4-18
role in fast recovery 4-40,
4-43 to 4-44
role in multiple residency 9-10
starting continuous backups 3-37
status 3-26
switching to activate new
blobspace 2-159
switching to the next file 3-39
triple buffering 2-66
what happens during
backup 4-26
Logical log record
BEGPREP for two-phase commit
protocol 9-44
blobspace blobs omitted 4-24
description of 2-154
displaying records in log 7-51
ENDTRANS for two-phase
commit protocol 9-45
factors that affect the number
written 2-157
flushingundertwo-phasecommit
protocol 9-47
HEURTX for two-phase commit
protocol 9-45
how to interpret record
displays 7-55
IBM Informix STAR-specific
records 9-44
needed for data consistency 4-18
PREPARE for two-phase commit
protocol 9-44
role in fast recovery 4-42,
4-43 to 4-44
size 2-157
span pages, not files 2-156
TABLOCKS for two-phase
commit protocol 9-45
types 7-56, 7-57
Logical log tape device
changing block size 3-21
changing pathname 3-18
changing tape size 3-22
implicationsofsingle-tape-device
environment 3-52
initial configuration
guidelines 1-29
Logical page number 2-124
LOGSIZE parameter
changing 3-24
description of 1-14
initial configuration value 1-27
LOGSMAX parameter
changing 3-23
description of 1-14
initial configuration value 1-36
Long transaction
description of 3-40
mentioned within two-phase
commit discussion 9-29, 9-33,
9-36, 9-37, 9-40, 9-48, 9-49
recovery requires data
restore 2-161
role played by high-water
marks 2-159
tracked by Log Begin field of
tbstat -u 9-61
LRU queue
description of 2-57
FLRU queue 2-57
MLRU queue 2-57
role in buffer pool
management 2-58
tuning parameters for
performance 5-17
LRU write 2-77
LRUS parameter
description of 1-15
initial configuration value 1-37
tuning for performance 5-17

Index 9
OQCABDEFGHIJKLMNPRSTUVWXYZ@
LRU_MAX_DIRTY parameter
description of 1-15
how to calculate value 2-59
initial configuration value 1-37
role in buffer pool
management 2-59
tuning for performance 5-17
LRU_MIN_DIRTY parameter
description of 1-15
how to calculate value 2-60
initial configuration value 1-38
role in buffer pool
management 2-59
tuning for performance 5-17
LTAPEBLK parameter
changing block size 3-21
description of 1-15
initial configuration value 1-30
LTAPEDEV parameter
changing pathname 3-18
description of 1-15
initial configuration value 1-30
separate device from
TAPEDEV 3-16
setting to /dev/null 3-17
syntax for remote device 3-19
LTAPESIZE parameter
changing tape size 3-22
description of 1-15
initial configuration value 1-31
LTXEHWM parameter
description of 1-15
initial configuration value 1-38
scenario of long transaction 2-160
LTXHWM parameter
description of 1-15
initial configuration value 1-38
scenario of long transaction 2-159
M
Machine notes Intro-18
Magic number 2-48
Message log
alphabetical listing of
messages 8-4
consistency-checking
messages 4-8
description of 8-3
initial configuration value 1-28
monitoring 3-82
Migration
choosing among methods 4-57
dbexport utility 7-5
dbimport utility 7-10
dbload utility 7-15
dbschema utility 7-32
IBMInformixOnLine data toIBM
Informix SE 4-65
IBM Informix SE data to IBM
Informix OnLine 4-66
illustration of four methods 4-56
overview of methods 4-52 to 4-56
tbload utility 7-47
tbunload utility 7-107
MIRROR parameter
changing 3-104
description of 1-16
initial configuration value 1-24
Mirroring
activity during processing 4-16
changing chunk status 3-101
description of 4-14
enabling 3-104
ending 3-105
flags defined 3-106
if the dbspace holds logical log
files 4-15
initial configuration
guidelines 1-24
recommended disk layout 1-46
recovering a down chunk 3-101
recovery activity 4-17
reserved page information 2-101
starting 3-105
structure of a mirror chunk 2-92
when mirroring begins 4-15
when mirroring ends 4-17
MIRROROFFSET parameter
description of 1-16
initial configuration value 1-25
when is it needed 1-48
MIRRORPATH parameter
description of 1-16
initial configuration value 1-24
specify a link pathname 1-24
MLRU queue
description of 2-57
role in buffer modification 2-63
Mode
description of 3-6
graceful shutdown 3-10
immediate shutdown 3-11
offline from any mode 3-12
offline to online 3-8
offline to quiescent 3-8
online to quiescent,
gracefully 3-10
online to quiescent,
immediately 3-11
quiescent to online 3-9
reinitializing shared memory 3-8
taking offline 3-12
Monitoring OnLine
archive history 3-61
blobs in blobspaces 3-63
blobs in dbspaces 3-65
blobspace storage efficiency 5-5
caching percentages 5-10
checkpoints 3-69
chunks 3-70
configuration parameter
values 3-73
data rows 3-77
databases 3-74
dbspaces 3-75
disk pages 3-77
extents 3-78
index information 3-79
latches 3-84
logical log files 3-80
message log 3-82
page-cleaning activity 5-17
pages written per I/O 5-11
profile of activity 3-83
rowid 3-77
shared-memory buffer-pool
activity 3-68
shared-memory buffers 3-66
shared-memory segments 3-84
tblspace number 3-78
tblspaces 3-85
transactions 3-86
user processes 3-86

@
10 IBM Informix OnLine Database Server Administrator’s Guide
OQCABDEFGHIJKLMNPRSTUVWXYZ
MSGPATH parameter
changes for multiple
residency 9-13
description of 1-16
initial configuration value 1-28
Multiple residency
benefits of 9-7
configuration and setup 9-11
description of 9-7, 9-10
Multiprocessor features
Psort sorting package 5-22
SPINCNT parameter 1-40
spin-count latch acquisition 2-42,
5-24
tuning for performance 5-4
O
Offline mode
description of 3-7
Online archive
description of 3-44
works by synchronizing
activity 4-33
Online files
provided with the
product Intro-18
Online mode
description of 3-7
Operating OnLine
consistency-checking code 4-6
logging overview 4-18
things to avoid 3-116
ovbuff field, performance
tuning 5-11
ovlock field, performance
tuning 5-11
ovtbls field, performance
tuning 5-11
ovuser field, performance
tuning 5-11
P
Page
bit-map page 2-148
blobspace blobpage 2-148
blobspace blobpage
structure 2-149
blobspace free-map page 2-148
components of dbspace
page 2-120
compression 2-133
dbspace blob page 2-146
dbspace page types 2-115
definition of full page 2-126
description of 2-82
free page, definition of 2-115
fullness 4-bit bit values 2-144
fullness bit values 2-144
header components 2-121
index page structure 2-133
logical page number 2-124
physical page number 2-124
Page compression 2-122, 2-124,
2-133
Page-cleaner process
changing number of 3-115
codes for activity state 7-88
description of 2-34
efficiency trade-offs 5-18
flushing buffer pool 2-73
monitoring activity 7-87
shared-memory table 2-52
snooze time 2-75, 7-87
tuning parameters for
performance 5-17
write types 2-75
PAGE_ARCH reserved page 2-102
PAGE_CKPT reserved page 2-97
PAGE_CONFIG reserved
page 2-97
PAGE_DBSP reserved page 2-99
PAGE_MCHUNK reserved
page 2-101
PAGE_PCHUNK reserved
page 2-100
PAGE_PZERO reserved page 2-97
Participant database server
automatic recovery 9-26
description of 9-18
Partnum field in systables 2-105
PATH environment variable 1-57
Performance tuning
blobspace blobpage size 5-5
checkpoint frequency 5-20
description of 5-3
log buffer sizes 5-15
page-cleaner parameters 5-17
parallel-process sorting 5-22
shared-memory buffers 5-13
shared-memory resources 5-14
specifying sorting directory 5-4
spin-count latch acquisition 5-24
user guidelines 5-8
when needed 5-10
PHYSBUFF parameter
changing 3-93
description of 1-16
initial configuration value 1-35
PHYSDBS parameter
changing 3-107
description of 1-16
initial configuration value 1-25
PHYSFILE parameter
changing 3-107
description of 1-16
initial configuration value 1-25
Physical consistency
description of 4-39
Physical log
before-image contents 2-152
changing size or location 3-107
configuration guidelines 1-25
description of 1-25, 2-86
disk location 1-46
emptied by a checkpoint 2-153
monitoring 3-81
role in fast recovery 4-40, 4-41
scenario that could fill the
log 2-153
structure and function 2-152
Physical log buffer
changing size 3-93
description of 2-63
double buffering 2-64
flushing 2-64
flushing synchronized during
archive 4-34
if it becomes full 2-65
role in dbspace logging 4-21
synchronizing buffer
flushing 2-74
tuning size for performance 5-11,
5-15

Index 11
OQCABDEFGHIJKLMNPRSTUVWXYZ@
Physical page number 2-124
PREPARE logical log record 9-44
Presumed-abort optimization
description of 9-20
implications of 9-29
Psort sorting package 5-22
PSORT_DBTEMP environment
variable 5-23
PSORT_NPROCS environment
variable 5-22
Q
Quiescent archive
description of 3-44
Quiescent mode
description of 3-7
R
Railroad diagrams
conventions used in Intro-9
example of syntax
conventions Intro-12
Raw disk space
description of 1-40
how to allocate 1-48
Recovery mode 3-7
Release notes Intro-18
Remainder page
description of 2-127
Remote archive
description of 3-44
syntax for specifying
TAPEDEV 3-54
Reserved pages
description of 2-95
location in a chunk 2-89
location in root dbspace 2-87
RESIDENT parameter
changing 3-100
description of 1-16
initial configuration value 1-32
rofferr script, use and
syntax Intro-17
Root dbspace
description of 1-21, 2-84
disk layout
for learning environment 1-44
for production
environment 1-44
disk space requirements 1-41
mirroring 1-24
structure 2-87
ROOTNAME parameter
description of 1-16
initial configuration value 1-21
ROOTOFFSET parameter
description of 1-16
initial configuration value 1-22
when is it needed 1-48
ROOTPATH parameter
changes for multiple
residency 9-12
description of 1-17
initial configuration value 1-22
specifying as a link 1-22
ROOTSIZE parameter
description of 1-17
initial configuration value 1-23
Rowid
component of index key
value 2-134
description of 2-123
functions as forward
pointer 2-125
locking information derived
from 7-89
obtaining for a data row 3-77
relation to slot table 2-122
role in buffer acquisition 2-61
stored in index pages 2-124, 2-133
unaffected by page
compression 2-124
S
Semaphore
relationship to latch
acquistion 2-43
UNIX parameters 2-20
SERVERNUM parameter
changes for multiple
residency 9-13
description of 1-17
initial configuration value 1-31
role in attaching to shared
memory 2-25
role in multiple residency 9-10
Shared memory
buffer pool 2-55
changing number of buffers 3-92
changing residency with
tbmode 7-68
components of 2-39
copying to a file 3-84
created during initialization 2-12
description of 2-22, 2-36
effect of UNIX kernel
parameters 2-18
eliminating resource
bottlenecks 5-8
header 2-47
how user processes attach to 2-24
initial configuration values 1-32
initialization commands 2-9
initialization, definition of 2-8
initialization, what happens
during 2-10
key used in attaching 2-25
latches 2-41
parameters screen in DB-
Monitor 1-53
process isolation and buffer
locks 2-38
resource management 2-40
resources, tuning for
performance 5-14
segment identifiers 2-24
size displayed by tbstat 7-81
tables 2-39, 2-48
unmet resource requests 5-11
SHMBASE parameter
description of 1-17, 2-26
effect of UNIX parameters 2-20
illustration of virtual address
space 2-23
initial configuration value 1-37
role in attaching to shared
memory 2-26
Shutdown
graceful 3-10
immediate 3-11
mode, description of 3-7

@
12 IBM Informix OnLine Database Server Administrator’s Guide
OQCABDEFGHIJKLMNPRSTUVWXYZ
taking offline 3-12
Slot table
description of 2-121
entry number 2-121
entry reflects changes in row
size 2-124, 2-129
location on a dbspace page 2-120
relation to rowid 2-122
Snooze time 2-75
Sorted write 2-76
Sorting space location
specifying directory 5-4
using Psort variables 5-22
SPINCNT parameter
description of 1-17
initial configuration value 1-40
tuning for performance 5-24
SQL statement
ALTER INDEX 2-118
CREATE SYNONYM statement
and dbschema 7-32
displaying with dbschema 7-32
FILE statement with dbload 7-21
GRANT statement and
dbschema 7-32
INSERT statement with
dbload 7-21
SQLEXEC environment variable
description of 1-55
how to set 1-55
sqlexecd
role in IBM Informix STAR
queries 9-16
stores5 demonstration database
copying Intro-6
creating on IBM Informix
OnLine Intro-6
overview Intro-5
Syntax conventions
example diagram Intro-11
Syntax diagrams, elements
in Intro-10
System architecture 2-7
System catalog tables
automatic updating 1-9
tracking a new database 2-109
tracking a new table 2-111
T
Table
creating, what happens on
disk 2-110
identifying its dbspace 2-106
migration 4-52
tbcheck -pe displays dbspace
name 3-78
temporary
cleanup during shared-memory
initialization 2-9, 2-13, 2-114
creating, what happens on
disk 2-113
message reporting cleanup 8-13
TABLOCKS logical log record 9-45
TAPEBLK parameter
changing 3-55
description of 1-17
initial configuration value 1-29
TAPEDEV parameter
changing pathname 3-52
description of 1-17
if the device is /dev/null 4-35
implications of pathname 3-51
initial configuration value 1-28
separate device from
LTAPEDEV 3-51
syntax to specify another
machine 3-54
TAPESIZE parameter
changing 3-56
description of 1-17
initial configuration value 1-29
tbcheck utility
corrective actions 4-6
options
-cc 7-39
-cd 7-40
-ce 7-40
-cI 7-41
-ci 7-40
-cr 7-41
-n 7-41
-pB 5-5, 7-42
-pc 7-42
-pD 7-42
-pd 7-42
-pe 7-43
-pK 7-43
-pk 7-43
-pL 7-43
-pl 7-43
-pP 7-44
-pp 7-43
-pr 7-44
-pT 7-44
-pt 7-44
-q 7-45
-y 7-45
use in consistency checking 4-6
TBCONFIG environment variable
changes for multiple
residency 9-13
description of 1-11
function during
initialization 1-55
how to set 1-55
relationship to tbconfig file 1-11
role in multiple residency 9-10
tbconfig file
description of 1-11
relationship to TBCONFIG 1-11
tbconfig.std file
contents of 1-13
description of 1-11
maintenance of the file 1-12
tbinit daemon process
description of 2-8, 2-33
role in
disk-space initialization 2-15
executing a checkpoint 2-72
long-transaction rollback 2-160
shared-memory
initialization 2-10
updating reserved pages 2-96
synchronized during online
archive 4-33
tbinit process
description of 2-8
initialization commands 2-10
role in
disk-space initialization 2-15
shared-memory
initialization 2-10
tbinit utility
description of 7-45

Index 13
OQCABDEFGHIJKLMNPRSTUVWXYZ@
tbload utility
description of 7-47
migrating with tbunload 4-63
overview of migration
methods 4-52
syntax 7-48
tblog utility
description of 7-51
filters for displaying logical log
records 7-54
filters for reading logical log
records 7-52
how to interpret tblog
output 7-55
Tblspace
changing maximum
number 3-113
description of 2-85
hash table 2-53
identifying its dbspace 2-106
monitoring 3-85
number 2-105
number displayed 7-98
shared-memory table 2-52
tbcheck -pe links table with
dbspace 3-78
Tblspace number
components of 2-106
description of 2-105
displaying with tbstat -t 7-98
includes dbspace number 2-105
obtaining 3-78
retrieving it from systables 2-105
Tblspace tblspace
bit-map page 2-107
description of 2-104
location in a chunk 2-89
location in root dbspace 2-87
size 2-106
structure and function 2-104
tracking new tables 2-111
TBLSPACES parameter
changing 3-113
description of 1-17
initial configuration value 1-34
tuning for performance 5-15
tbmode utility
change OnLine mode 7-66
changing shared-memory
residency 7-68
description of 7-64
forcing a checkpoint 7-67
killing a database server
process 7-69
killing a transaction 7-69
switching the logical log file 7-68
tbparams utility
adding a logical log file 7-70
change physical log size,
location 7-72
changing physical log dbspace
location 7-72
description of 7-70
dropping a logical log file 7-71
tbpgcl daemon process
description of 2-34
user process flag 2-30
tbspaces utility
adding a chunk 7-76
changing chunk status 7-77
creating a blobspace or
dbspace 7-74
description of 7-73
dropping a blobspace or
dbspace 7-75
recovering a down chunk 7-77
tbstat utility
description of 7-78
header 7-81
options
table of options and
functions 7-78
-a 7-82
-- 7-82
-B 7-84
-b 7-82
-c 7-84
-D 7-86
-d 7-84
-d output affected by
timing 7-86
-F 7-87
-k 7-88
-l 7-89
-m 7-91
(none) 7-82
-o 7-91
-P 7-95
-p 7-92
-R 7-95
-r 7-95
-s 7-97
-t 7-98
-u 7-99
-X 7-101
-z 7-102
syntax 7-80
tbtape process
role in creating an archive 4-30
role in logical log file backup 4-26
synchronized during online
archive 4-33
tbtape utility
changing database logging 7-106
creating an archive 7-105
description of 7-102
exit codes 7-103
logical log file backup 7-104
performing a data restore 7-105
starting continuous backup 7-104
tbundo daemon process
description of 2-34
machine-specific process id 2-54
tbunload utility
description of 7-107
migrating with tbload 4-63
overview of migration
methods 4-52
specifying tape parameters 7-109
syntax 7-108
TEXT data type
Dirty Read isolation 2-45
migrating from IBM Informix
OnLine 4-65
migrating from IBM Informix
SE 4-66
requires4-bit bit map 2-115,2-144
storage on disk 2-84
Timestamp
blob timestamp pair 2-44
blob timestamps on a
blobpage 2-151
description of 2-44
location
blobspace blobpage 2-149,
2-151

@
14 IBM Informix OnLine Database Server Administrator’s Guide
OQCABDEFGHIJKLMNPRSTUVWXYZ
dbspace blob page 2-146
dbspace page 2-120
page-header and page-ending
pair 2-44, 2-121
role in
data consistency 2-44
synchronizing buffer
flushing 2-74
role of checkpoint timestamp in
archive 4-33
Tip icons Intro-9
Transaction
address 9-59
atomicity in IBM Informix
STAR 9-18
flags 9-60
global transaction definition 9-18
global transaction identification
number, GTRID 9-59
isolation levels 9-62
killing with tbmode -Z 7-69
logging 1-26
maximum number on a
checkpoint record 1-33
monitoring 3-86
multiserver modifications under
IBM Informix STAR 9-17
piece of work, definition of 9-18
relationship to user
processes 2-29
rolling back blobspace
activity 4-24
shared-memory table 2-54
tracking status with tbstat -u 9-58
TRANSACTIONS parameter
description of 1-17
initial configuration value 1-33
Two-phase commit protocol
automatic recovery 9-23
coordinator definition 9-18
coordinator recovery 9-23
definition of 9-18
description of 9-19
determining database
consistency 9-51
errors and corrective actions 9-43
global transaction definition 9-18
global transaction identification
number 9-59
illustration
coordinator recovery 9-25
heuristic end-transaction 9-50
heuristic rollback 9-49
logical log records for
commit 9-46
participant recovery 9-28
simple protocol to commit 9-21
simpleprotocol to rollback 9-22
independent action, definition
of 9-29
logical log records 9-44
manual recovery procedure 9-51
manual recovery, definition
of 9-29
participant recovery 9-26
participant, definition of 9-18
phases defined 9-19
piece of work, definition of 9-18
presumed-abort
optimization 9-20
presumed-abort optimization,
implications of 9-29
requirements for flushing logical
log records 9-47
role of current server 9-18
terminology 9-18
TXTIMEOUT parameter
description of 1-17, 9-58
mentioned 9-27, 9-41
U
UNIX devices
creatinga linkto a pathname 1-48
ownership, permissions on
character-special 1-48
when are offsets needed 1-48
UNIX error message format 1-60
UNIX files
ownership, permissions on
cooked files 1-47
using for data storage 1-41
UNIX kernel parameters
description of 2-18
evaluating during initial
configuration 1-49
UNIX kill -9 command 2-32
UNIX link command 1-48
UNIX pipe 2-31
UNIX scripts to start up and shut
down IBM Informix
OnLine 1-56
UNLOAD statement
migrating with LOAD or
dbload 4-60
overview of migration
methods 4-52
User guidelines to improve
performance 5-8
User process
acquiring a buffer 2-60
attaching to shared memory 2-24
changing maximum
number 3-114
critical sections of code 2-28
description of 1-18, 2-22
example of virtual address
space 2-23
killing a process holding a
latch 2-43
mirror-recovery process 4-15
relationship to transactions 2-29
shared-memory table 2-54
status and state 2-29
status codes 7-99
type flags 2-30
virtual address space 2-22
user root, installation tasks 1-10
USERS parameter
changing 3-114
description of 1-18
initial configuration value 1-33
tuning for performance 5-15
Utilities
overview of all utilities 7-5
dbexport 7-5
dbimport 7-10
dbload 7-15
dbschema 7-32
tbinit 7-45
tbload 7-47
tblog 7-51
tbmode 7-64
tbparams 7-70
tbspaces 7-73
tbstat 7-78

Index 15
OQCABDEFGHIJKLMNPRSTUVWXYZ@
tbtape 7-102
tbunload 7-107
V
VARCHAR data type
byte locks 2-52
implications for data row
storage 2-125
indexing considerations 2-135
migrating from OnLine 4-65
requires4-bit bit map 2-115,2-144
storage considerations 2-123
Virtual address space
definition of 2-22
example illustration 2-23
W
Warning icons Intro-9
Warnings 3-116
Write types
big-buffer write 2-78
blobspace blobpages 2-79
chunk write 2-77
efficiency trade-off between idle
and chunk writes 5-18
foreground write 2-77
idle write 2-76
LRU write 2-77
sorted write 2-76
X
X/Open compliance level Intro-19
Symbols
-7-69

