IceRobotics ICE3DTR1 IceReader User Manual TABLE OF CONTENTS
IceRobotics Limited IceReader TABLE OF CONTENTS
UserManual.wiki
>
IceRobotics
>
ICE3DTR1 User Manual
Users Manual Revised
Navigation menu
Upload a User Manual
Namespaces
Wiki Guide
HTML
PDF
Info
Views
User Manual
Discussion / Help
Navigation

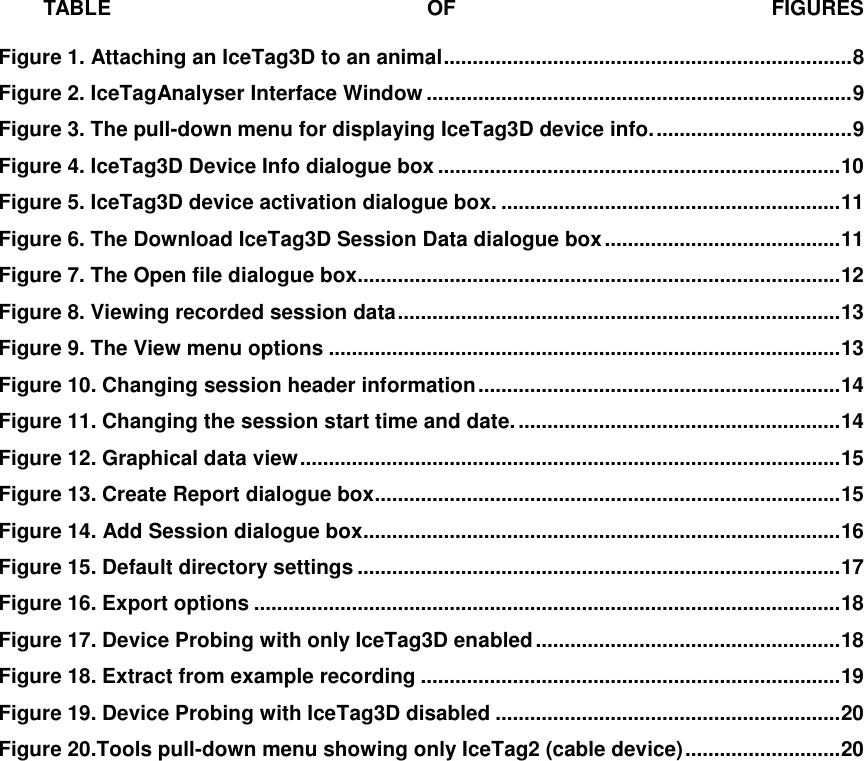

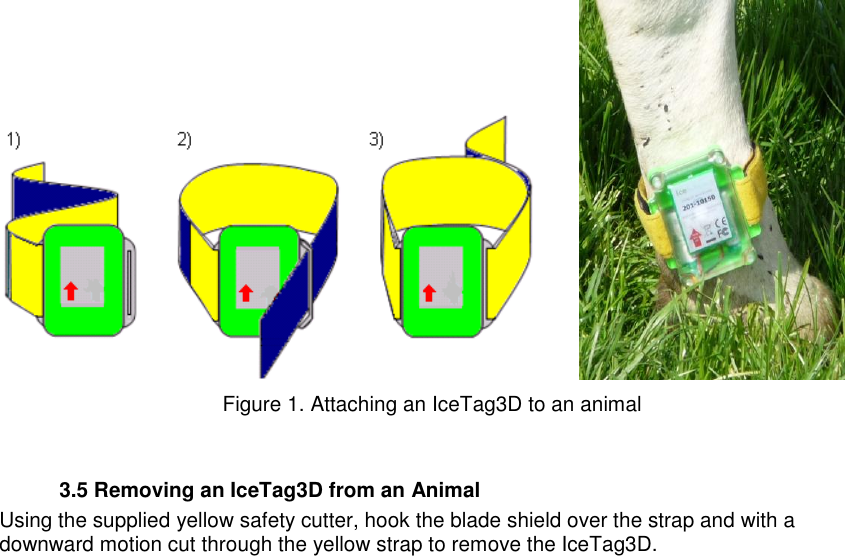

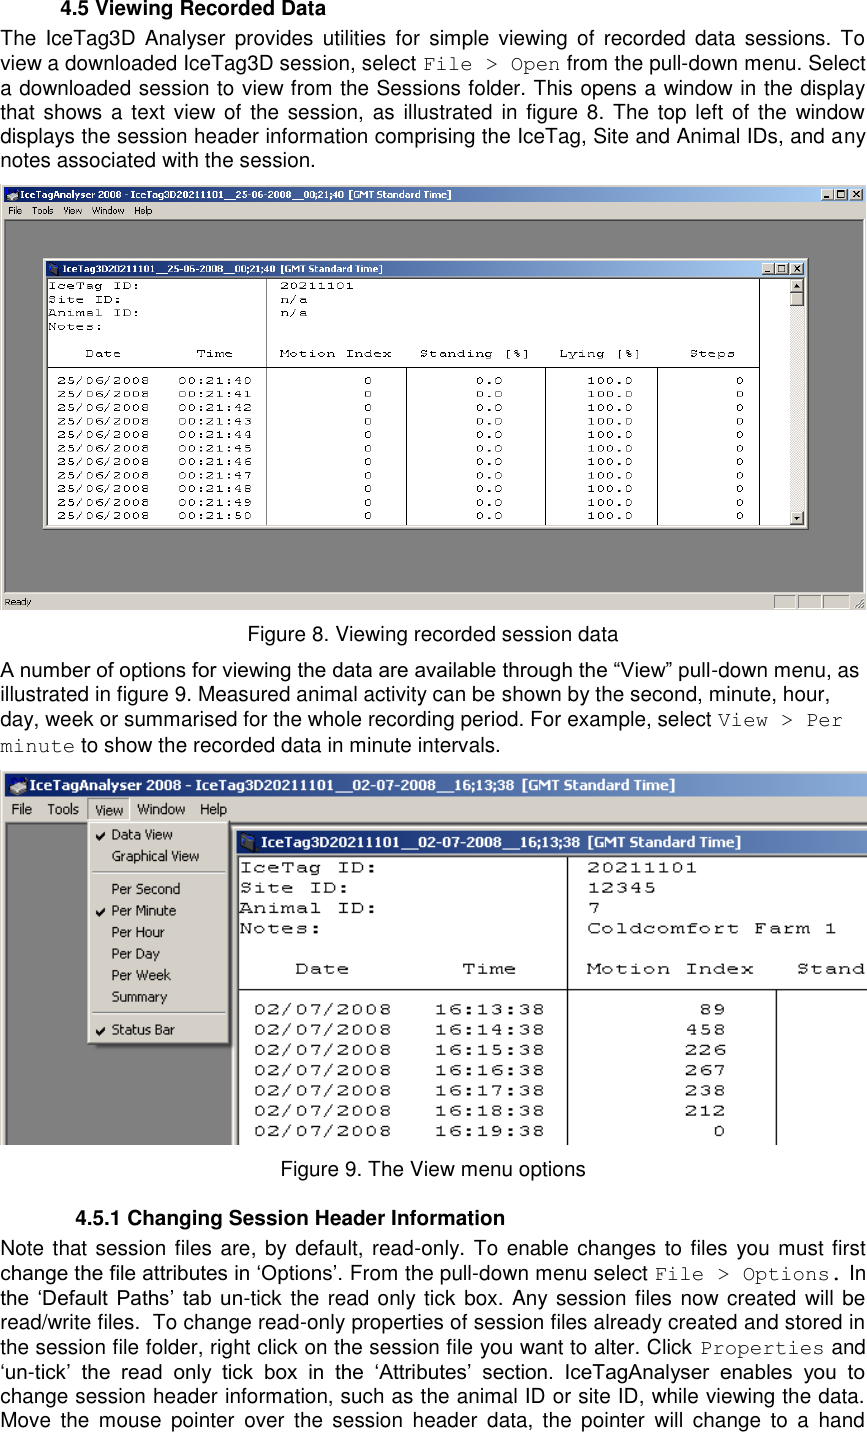
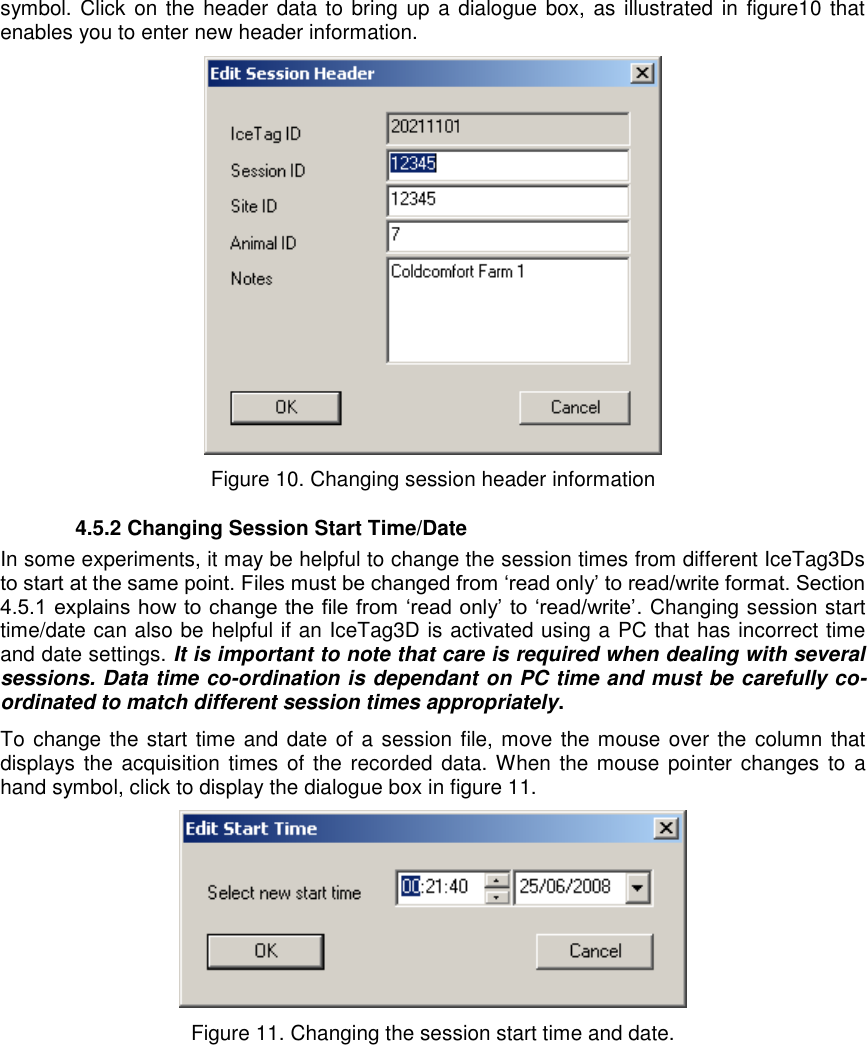
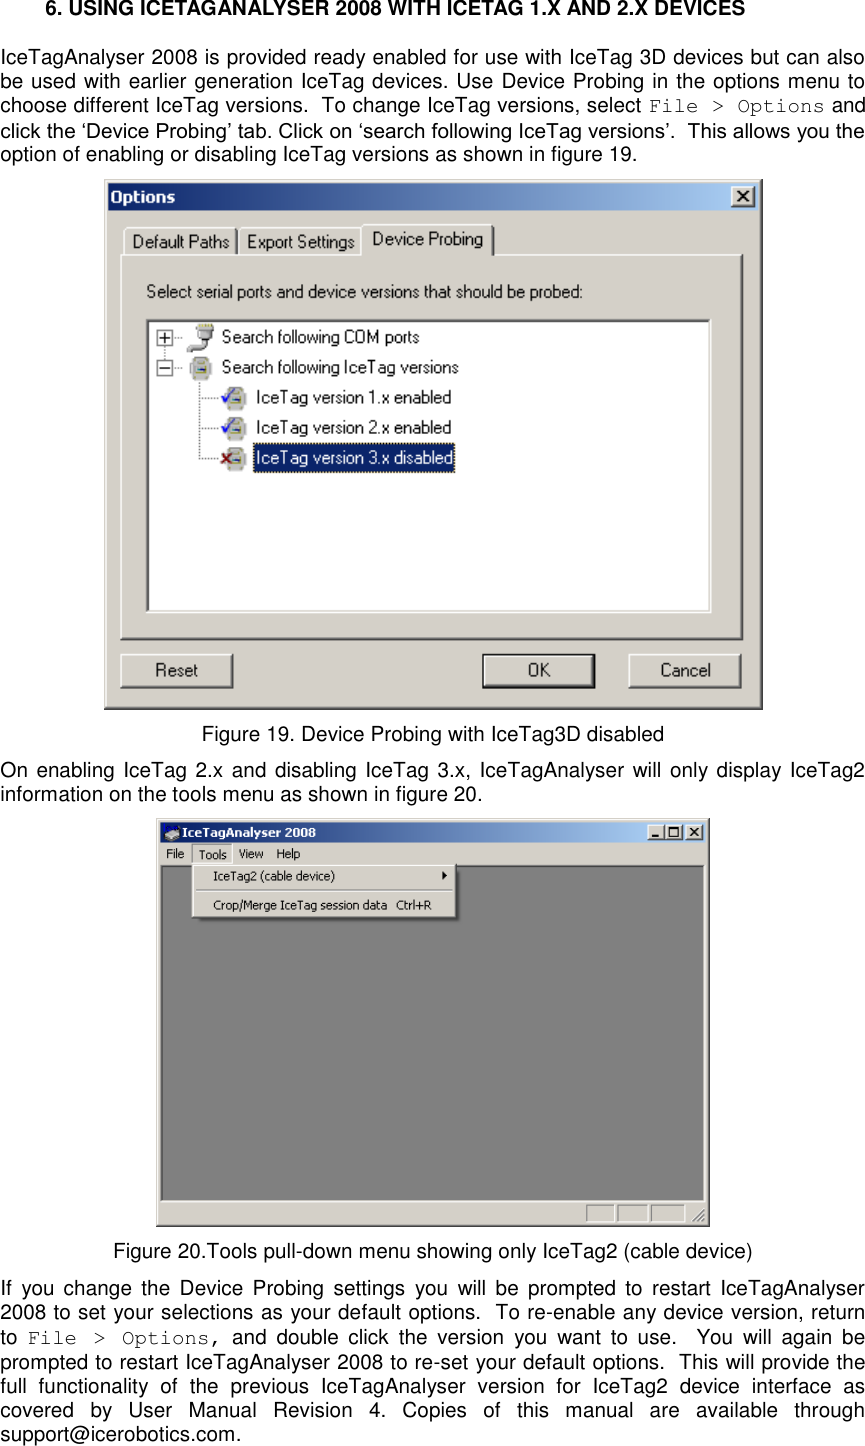
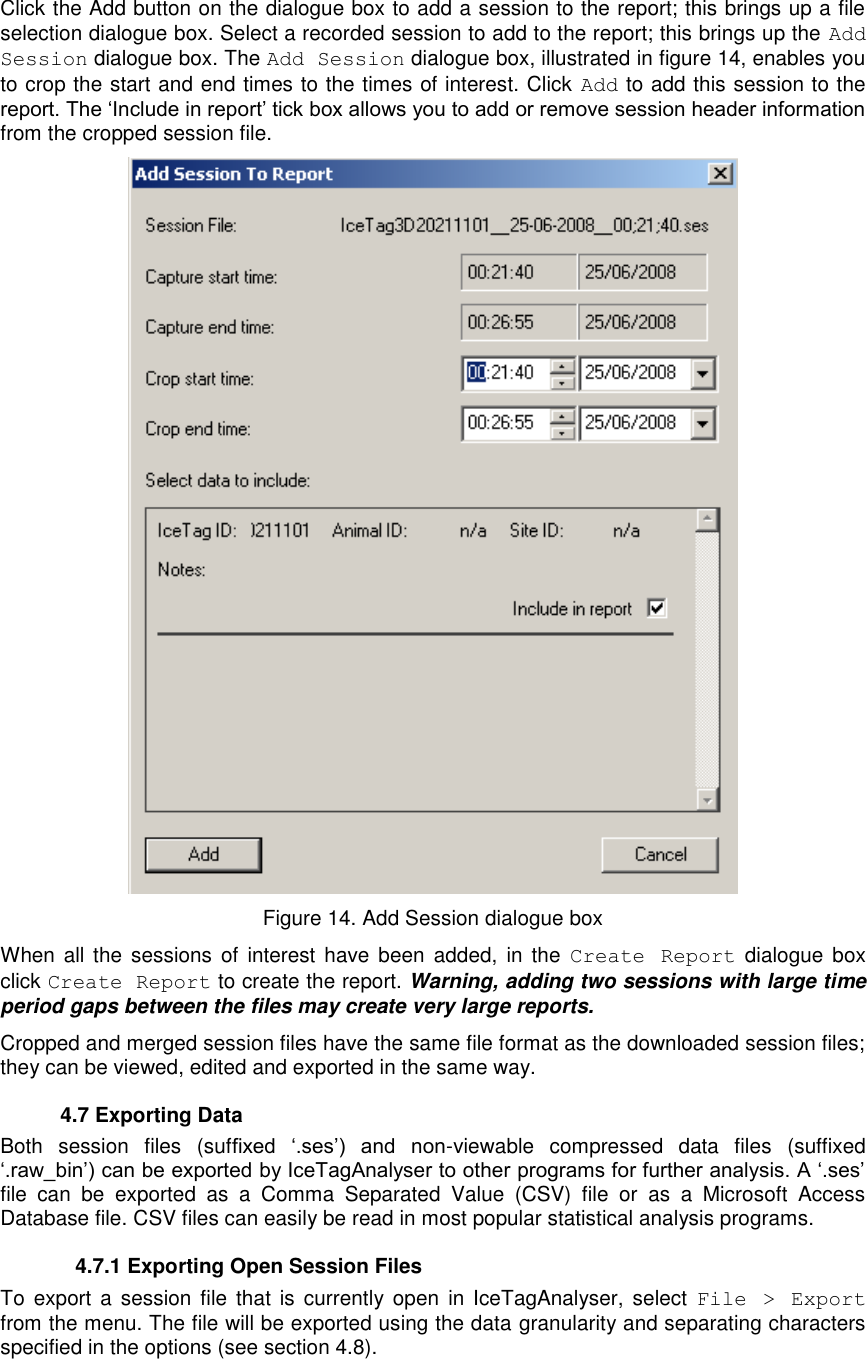
![4.5.3 Graphical View Select View > Graphical View from the pull-down menu to view the recorded data in a graphical format. As with the Data View, the activity can be shown by the second, minute, hour, day, week or as a total. Figure 12 shows a screen shot of data in graphical view. Figure 12. Graphical data view Move the mouse pointer over the “Standing [%]” in the left section of the window. The mouse pointer changes to a hand to show that this area of the screen is clickable. Click on “Standing [%]” to hide the standing information in the graphical view. Active and lying information can also be hidden in this way. This is a useful tool for finding times of interest in the recorded session. The motion index is represented on a logarithmic scale to improve visibility of motion. All other values are on a linear scale. 4.6 Creating Reports When an experiment requires that data be collected from multiple animals at the same time, it can be useful to collate the multiple session data into a single session. It may also be useful to truncate the recorded data to remove recordings before the IceTag3D was attached and after it was removed. The Create Report tool enables you to do this. Select Tools > Crop/Merge IceTag session data to open the Create Report dialogue box, illustrated in figure 13. Figure 13. Create Report dialogue box](https://usermanual.wiki/IceRobotics/ICE3DTR1/User-Guide-1358720-Page-15.png)
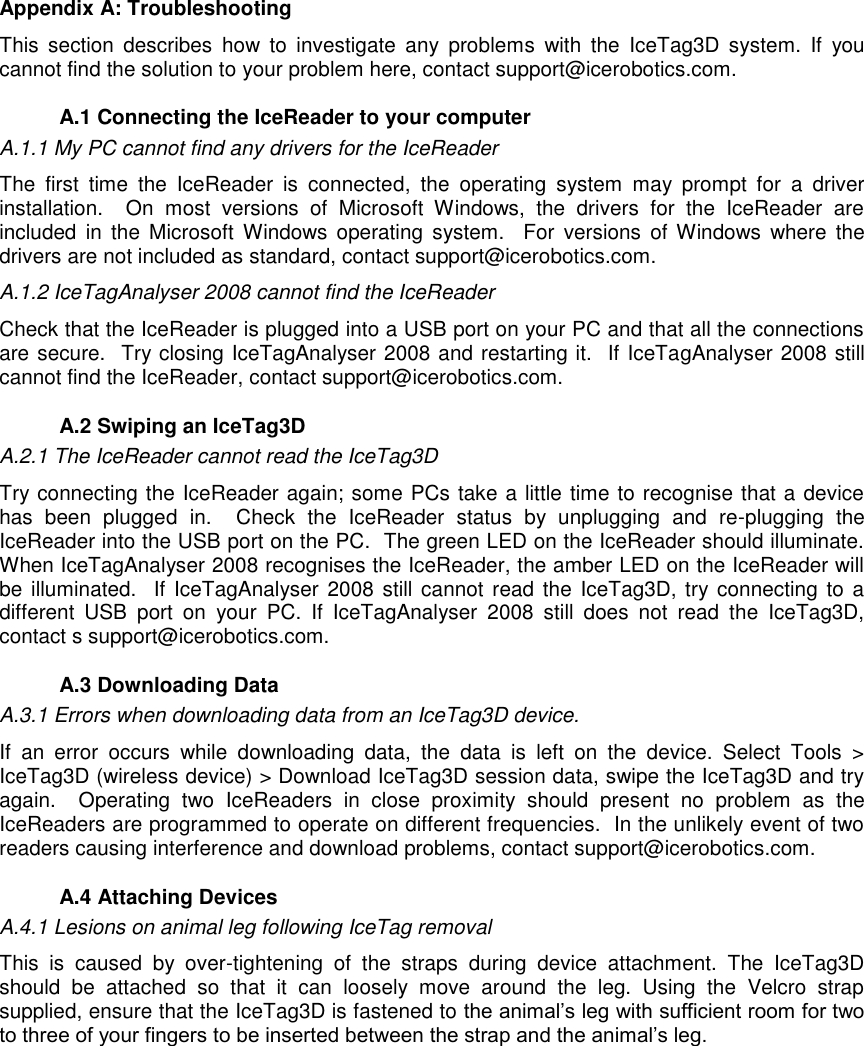
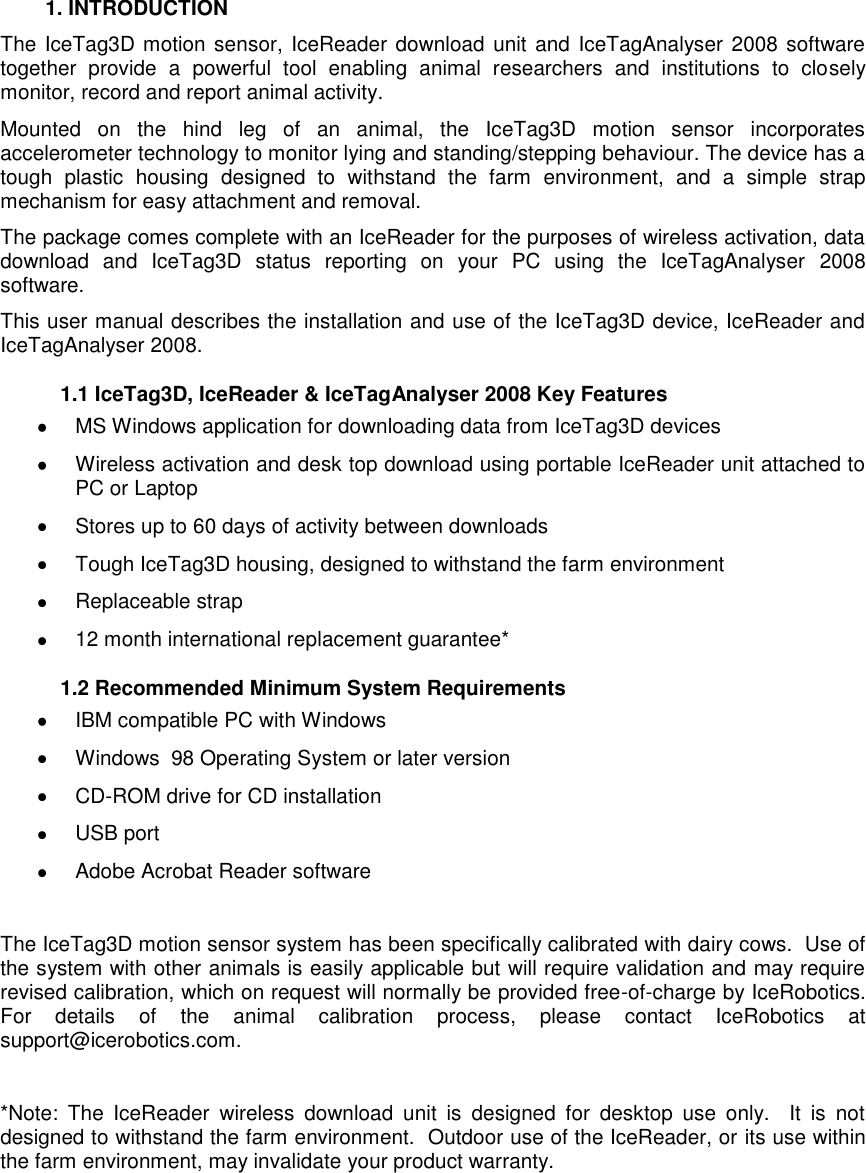
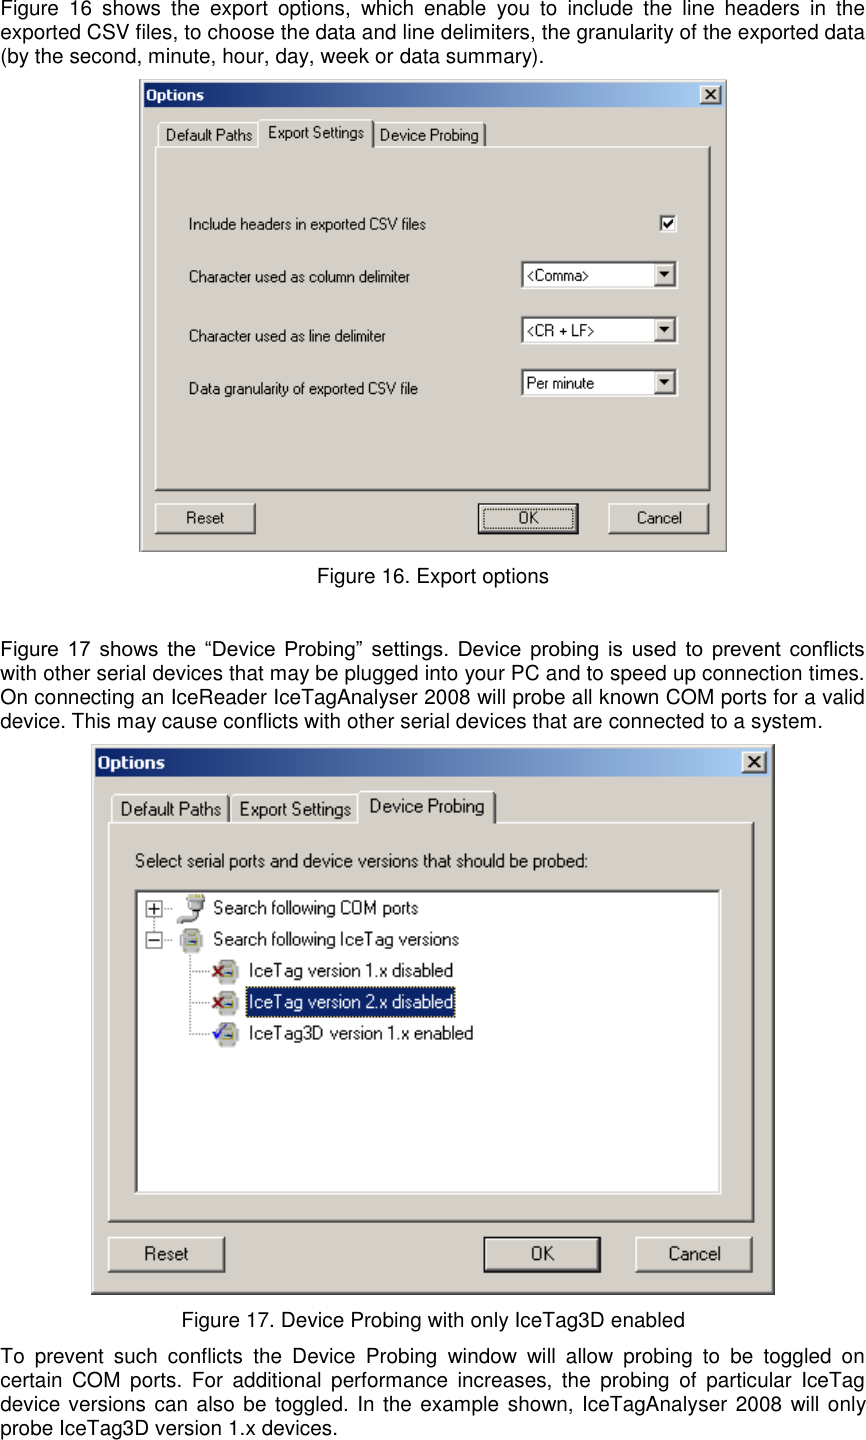
![4.7.2 Exporting multiple files with Explorer Both „.ses‟ files and „.raw_bin‟ files can be exported using Windows Explorer. In the Session file folder right click on the session file you want to export and select Export. The file will be exported using the data granularity and separating characters specified in the options (see section 4.8). NB: More than one session file can be selected at once. Exporting multiple files with Explorer also applies to „.raw_bin‟ files in the Raw file folder. 4.7.3 Exporting from a Command Prompt or a Batch File IceTagAnalyser 2008 supports a number of command line options that can be used to open or export session files. This can be useful, should scripted/batch file exporting be required. IceTagAnalyser 2008 supports the following command line options: IceTagAnalyser.exe [/exp [/format:csv/mdb] [/force]] <filename> where <filename> Full path and name of a .ses file /exp Option will export file to csv or mdb. If omitted, file will be opened in IceTagAnalyser. /format:csv Exports file as csv (output file name will not be prompted) /format:mdb Exports file as mdb (output file name will not be prompted) /force Export will overwrite existing files without prompting For command-line exports, the output path and output format (time granularity and delimiters) are taken from the current IceTagAnalyser settings. Appendix B contains some command-line examples. 4.8 Options Select File > Options from the pull-down menu to set the application options for the IceTagAnalyser 2008 software. The options that are configurable include the default path for Raw, Session, Report and Export file storage settings; export settings for the CSV files and Device Probing COM settings. Figure 15 shows the „default paths‟ tab. Downloaded session files are, by default, set as read-only. The „read only‟ tick boxes on the „default Paths‟ tab allow this safety feature to be overridden. Figure 15. Default directory settings](https://usermanual.wiki/IceRobotics/ICE3DTR1/User-Guide-1358720-Page-17.png)
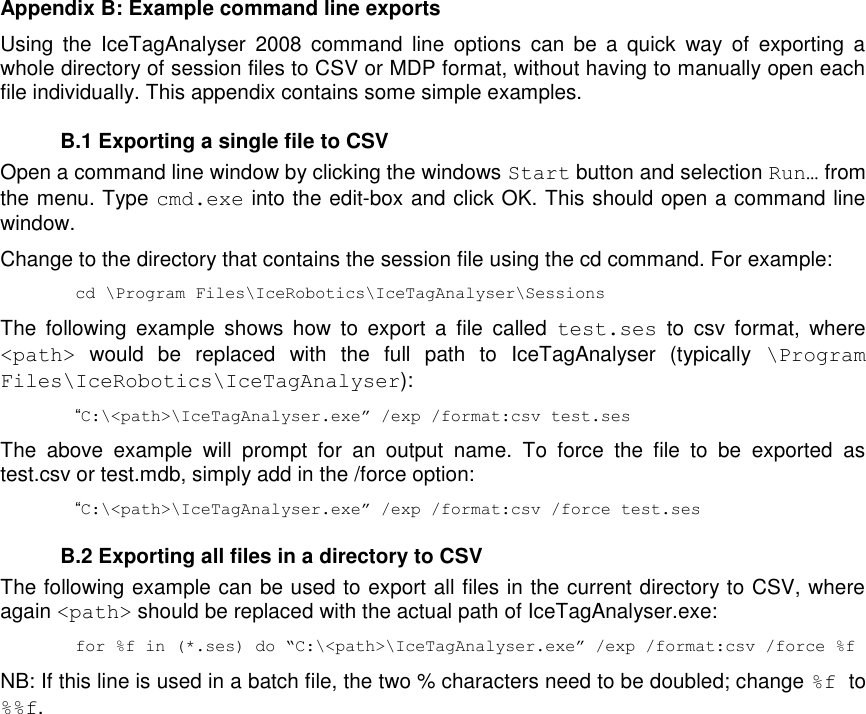
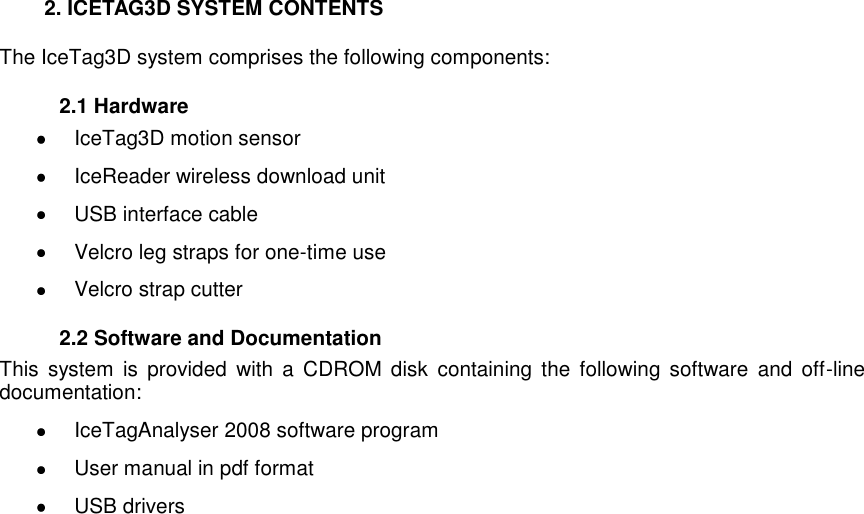
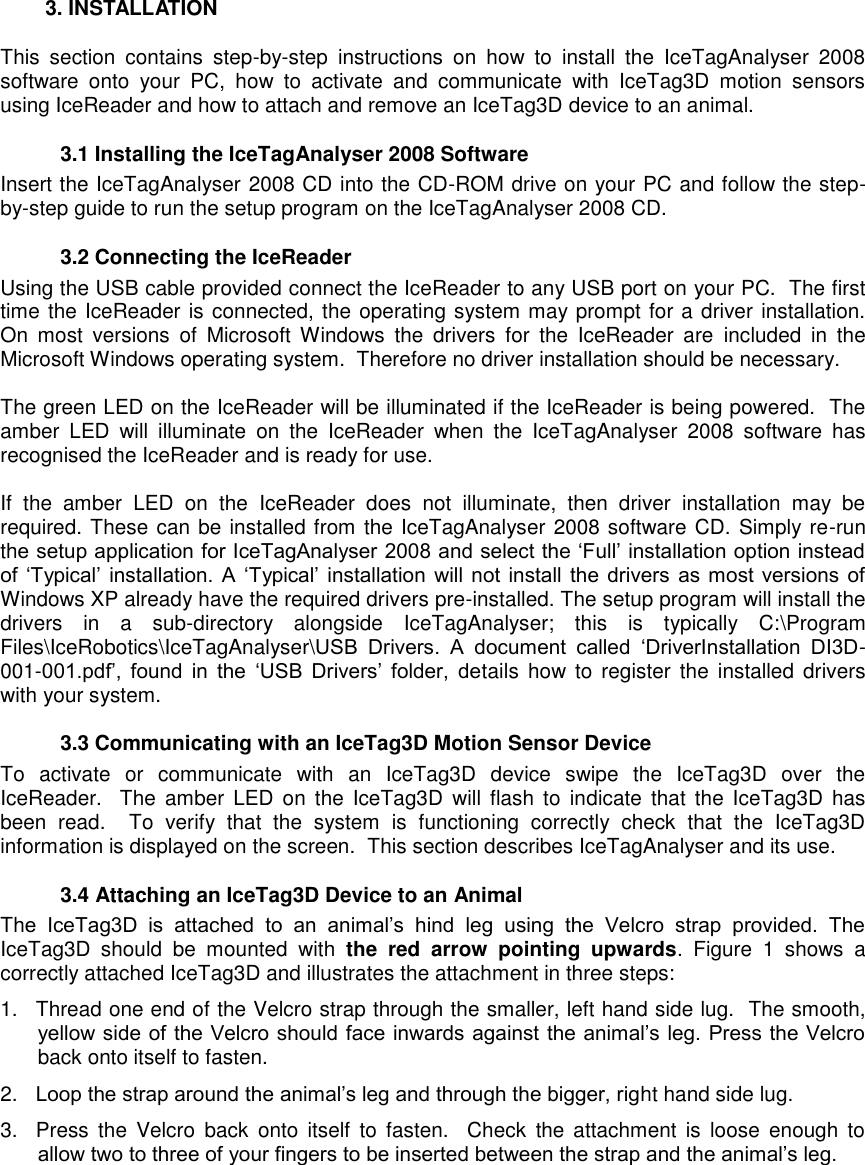
![5. INTERPRETING THE RECORDED DATA The IceTag3D analyses the movement of an animal‟s leg and defines standing, lying and step with a Motion Index. The Motion Index provides detail on how active the animal has been. For each second the Motion Index is typically a value between 0 and 30, with 0 indicating no movement and 30 indicating vigorous motion of the leg that second. Viewing the data per-minute, per-hour or per-day, the program sums the Motion Index for each second of the given time period. Where the animal is active, a step count indicates the number of steps taken by the animal during that time. The reported step count is the number of steps taken by the leg on which the IceTag3D is located. Figure 18 shows an extract of an exported CSV file from an IceTag3D which was recording the activity of an animal. The Export Options were set to report the activity minute by minute. The data shows the date and time interval and the percentage of time spent during that interval standing or lying, a step count and an indication of activity from the Motion Index. Tag ID: 155891 Site ID: Coldcomfort Animal ID: #218 Date Time Motion Index Standing [%] Lying [%] Steps 20/09/2008 16:41:24 20.4 79.6 0 9 20/09/2008 16:42:24 58.3 41.7 0 25 20/09/2008 16:43:24 61.3 38.7 0 26 20/09/2008 16:44:24 30.4 69.6 0 13 20/09/2008 16:45:24 33.5 66.5 0 13 20/09/2008 16:46:24 80.8 19.2 0 37 20/09/2008 16:47:24 45.2 54.8 0 19 20/09/2008 16:48:24 4.8 95.2 0 2 20/09/2008 16:49:24 5 95 0 2 20/09/2008 16:50:24 8.3 91.7 0 4 20/09/2008 16:51:24 9.2 90.8 0 3 20/09/2008 16:52:24 0 100 0 0 20/09/2008 16:53:24 0 100 0 0 20/09/2008 16:54:24 0 100 0 0 20/09/2008 16:55:24 2.7 97.3 0 1 20/09/2008 16:56:24 0 100 0 0 20/09/2008 16:57:24 0 100 0 0 20/09/2008 16:58:24 2.9 97.1 0 1 20/09/2008 16:59:24 0 100 0 0 20/09/2008 17:00:24 2.7 97.3 0 1 20/09/2008 17:01:24 0 100 0 0 20/09/2008 17:02:24 0 100 0 0 20/09/2008 17:03:24 2.3 97.7 0 1 20/09/2008 17:04:24 0 100 0 0 20/09/2008 17:05:24 3 97 0 0 20/09/2008 17:06:24 2.9 97.1 0 1 20/09/2008 17:07:24 13.1 86.9 0 6 20/09/2008 17:08:24 13.5 86.5 0 5 20/09/2008 17:09:24 1.7 98.3 0 1 20/09/2008 17:10:24 44.2 55.8 0 16 20/09/2008 17:11:24 21 79 0 8 Figure 18. Extract from example recording Note that an animal may be recorded as being active, but have taken no steps. This can occur, for example, when an animal is standing and shuffling its feet, but is not actually stepping; this can be a useful measure of restlessness. In figure 18, at 17:05 the animal is measured to be slightly active (3) but no steps have been measured, a manual observation taken at this time showed that the animal was standing at a food trough and shuffling its feet. A „Step‟ requires that the animal lift the tagged leg and move it forwards.](https://usermanual.wiki/IceRobotics/ICE3DTR1/User-Guide-1358720-Page-19.png)