Imagination Technologies 0050 Evoke Flow Spread Spectrum Transmitters User Manual LINCOLN Evoke Manualc
Imagination Technologies Ltd Evoke Flow Spread Spectrum Transmitters LINCOLN Evoke Manualc
User manual

Owner’s Manual
Version 1.0

Warranty information
Imagination Technologies Ltd. warrants to the end user that this product will be free from defects in materials and workmanship in the course
of normal use for a period of two years from the date of purchase. This guarantee covers breakdowns due to manufacturing or design faults;
it does not apply in cases such as accidental damage, however caused, wear and tear, negligence, adjustment, modification or repair not
authorised by us. Please visit www.pure.com/register to register your product with us. Should you have a problem with your unit please contact
your supplier or contact PURE Support at the address shown on the rear of this manual. If you need to return your product please use the
original packaging and include all parts and accessories. We reserve the right to refuse incomplete or badly packaged returns.
Disclaimer
Imagination Technologies Limited makes no representation or warranties with respect to the content of this document and specifically disclaims
any implied warranties of merchantability or fitness for any particular purpose. Further, Imagination Technologies Limited reserves the right to
revise this publication and to make changes in it from time to time without obligation of Imagination Technologies Limited to notify any person or
organization of such revisions or changes.
Acknowledgement of License Agreements
Portions of the code used in EVOKE Flow are subject to the following GPL and LPGL licenses and copyright:
GNU General Public License Version 2 (GPLv2). For the full text of the license agreement go to:
http://www.gnu.org/licenses/gpl-2.0.txt
GNU Lesser General Public License Version 2.1 (LGPLv2.1). For the full text of the license agreement go to:
http://www.gnu.org/licenses/lgpl-2.1.txt
Copyright
Copyright 2010 by Imagination Technologies Limited. All rights reserved. No part of this publication may be copied or distributed, transmitted,
transcribed, stored in a retrieval system, or translated into any human or computer language, in any form or by any means, electronic,
mechanical, magnetic, manual or otherwise, or disclosed to third parties without the express written permission of Imagination Technologies
Limited. Portions Copyright ©2004 Intel Corporation.
Trademarks
EVOKE Flow, the EVOKE Flow logo, PURE, the PURE logo, Imagination Technologies, and the Imagination Technologies logo are trademarks
or registered trademarks of Imagination Technologies Limited. The Wi-Fi CERTIFIED Logo is a certification mark of the Wi-Fi Alliance. All other
product names are trademarks of their respective companies. Version 1 February 2010.

IMPORTANT SAFETY INSTRUCTIONS
1. Read these instructions – All the safety and operating instructions should be read before this product is
operated.
2. Keep these instructions – The safety and operating instructions should be retained for future reference.
3. Heed all warnings – All warnings on the appliance and in the operating instructions should be adhered to.
4. Follow all instructions – All operating and use instructions should be followed.
5. Do not use this apparatus near water – The appliance should not be used near water or moisture – for
example, in a wet basement or near a swimming pool, and the like.
6. Clean only with dry cloth.
7. Do not block any ventilation openings. Install in accordance with the manufacturer’s instructions.
8. Do not install near any heat sources such as radiators, heat registers, stoves, or other apparatus (including
amplifiers) that produce heat.
9. Do not defeat the safety purpose of the polarized or grounding plug. A polarized plug has two blades with one
wider than the other. A grounding plug has two blades and a third grounding prong. The wide blade or the third
prong is provided for your safety. If the provided plug does not fit into your outlet, consult an electrician for
replacement of the obsolete outlet.
10. Only use attachments/accessories specified by the manufacturer.
11. Unplug the apparatus during lightning storms or when unused for long periods of time.
12. Refer all servicing to qualified personnel. Servicing is required when the apparatus has been damaged in any way,
such as power supply cord or plug is damaged, liquid has been spilled or objects have fallen into the apparatus has
been exposed to rain or moisture, does not operate normally, or has been dropped.
13. Do not install this equipment in a confined or building-in space such as a book case or similar unit. The
ventilation should not be impeded by covering the ventilation openings with items such as newspaper, tablecloths,
curtains etc.
14. WARNING: To reduce the risk of fire or electric shock, do not expose this apparatus to rain or moisture.
the apparatus shall not be exposed to dripping or splashing and that objects filled with liquids, such as vases, shall not
be placed on apparatus.
15. WARNING: The direct plug-in adapter is used as disconnect device, the disconnect device shall remain
readily operable.
16. WARNING: The battery (or batteries or battery pack) shall not be exposed to excessive heat such
as sunshine, fire or the like.
17. The lightning flash with arrowhead symbol within an equilateral triangle is intended to alert the user to the
presence of non-insulated “dangerous voltage” within the product’s enclosure that may be of sufficient
magnitude to constitute a risk of electric shock.
To reduce the risk of electric shock, do not remove cover (or back) as there are no user-serviceable parts
inside. Refer servicing to qualified personnel.
The exclamation point within an equilateral triangle is intended to alert the user to the presence of important
operating and maintenance instructions in the literature accompanying the appliance.
18. This equipment is a Class II or double insulated electrical appliance. It has been designed in such a
way that it does not require a safety connection to electrical earth.
19, Separation distance of at least 20cm must be maintained between the antenna of the product and all persons

FCC NOTICE TO A USER IN THE UNITED STATES
This equipment has been tested and found to comply with the limits for a Class B digital device,
pursuant to Part 15 of the FCC Rules. These limits are designed to provide reasonable protection
against harmful interference in a residential installation. This equipment generates, uses, and can
radiate radio frequency energy and, if not installed and used in accordance with the instructions,
may cause harmful interference to radio communications. However, there is no guarantee that
interference will not occur in a particular installation. If this equipment does cause harmful
interference to radio or television reception, which can be determined by turning the equipment
off and on, the user is encouraged to try to correct the interference by one or more of the
following measures:
· Reorient or relocate the receiving antenna.
· Increase the separation between the equipment and receiver.
· Connect the equipment into an outlet on a circuit different from that to which the receiver is connected.
· Consult the dealer or an experienced radio / TV technician for help.
Warning! Any modification or changes to this device, unless explicitly apporved by PURE, will invalidate the
authorisation of this device. Operation of an unathorised device is prohibited under Sectiopn 302
of the Communications Act of 1934, as amended, and Subpart 1 of Part 2 of Chapter 47 of the
Code of Federal Regulations
IC NOTICE TO A USER IN CANADA
Since digital circuitry may cause interference to other radio or television tuners nearby, switch this
unit off when not in use or move it away from the affected radio/television tuner.
NOTE: This digital apparatus does not exceed the Class B limits for radio noise emissions from
digital apparatus as set out in the Radio Interference Regulations of Industry Canada. These limits
are designed to provide reasonable protection against harmful interference in a residential
installation. This equipment generates, uses and can radiate radio frequency energy and, if not
installed and used in accordance with the instructions, may cause harmful interference to radio
communications. However, there is no guarantee that interference will not occur in a particular
installation. If this equipment does cause harmful interference to radio or television operation
(which can be determined by turning the equipment off), the user is encouraged to try to correct
the interference by one or more of the following measures:
· Reorient or relocate the receiving antenna.
· Increase the separation between the equipment and receiver.
· Connect the equipment into an outlet on a circuit different from that to which the receiver is connected.
· Consult the dealer or an experienced radio / TV technician for help.

You should be aware that listening to internet radio stations, podcasts and PURE sounds
will contribute towards any download limit on your broadband account set by your Internet
Service Provider (ISP). You can find out if you have a download limit on your broadband
account by checking the terms and conditions of your account or by contacting your
ISP. Please note that listening to FM, or streaming your own music files using the ‘Media
player’ source, will not contribute towards any download limit on your account.
Information about internet radio and broadband download limits
If you see the message ‘Time not available’ when the radio is in standby you need to select
‘The Lounge’ audio source and connect to acquire the current time. Providing you have a
connection, EVOKE Flow will keep the time up-to-date.
Help! I see ‘Time not available’

6Contents EVOKE Flow Owner’s Manual v1.0
Contents Contents
1 Discover EVOKE Flow 8
1.1 Here’s what you’ll need 8
1.2 Switching on EVOKE Flow for the first time 8
1.3 Key phrases used in this manual 9
1.4 Overview of controls and sensors 10
1.5 Quick guide to rear panel 11
1.6 Quick guide to the display 12
1.7 Quick Guide to common functions 12
1.9 About the PURE Lounge 13
2 Listening to Internet radio and more 14
2.1 Connecting EVOKE Flow to your wireless network for the first time 14
2.2 Listening to and searching for online audio content 17
2.3 Opening groups of items 20
2.4 Adding and viewing your Favorites 20
2.5 Pausing and seeking 21
2.6 Options available in The Lounge source 22
2.7 Wi-Fi settings 22
3.1 Setting up Media player for the first time 24
3 Listening to Media player 24
3.2 Playing albums, tracks and playlists 25
3.3 Skipping, pausing and seeking within tracks 26
3.4 Searching for an artist, track or album 27
3.5 Options available in Media player source 28
4 Listening to FM radio 29
4.1 Selecting the ‘FM radio’ audio source 29
4.2 Changing the station 29
4.3 Using presets 29
4.4 Options available in FM source 30

7Contents EVOKE Flow Owner’s Manual v1.0
5 Listening to an Auxiliary device 31
5.1 Connecting an Auxiliary device 31
5.2 Selecting the Auxiliary input source 31
6 Universal options 32
6.1 Setting the alarm and timers 32
6.2 Snoozing and cancelling the alarm 33
6.3 Changing the information shown on screen 34
6.4 Adjusting the screen brightness and duration 35
6.5 Upgrade your radio’s firmware 36
6.6 Factory reset 36
7 Help and advice 37
7.1 Steps to ensure successful connection to your wireless network 37
7.2 Steps to ensure successful listening to online audio content 37
7.3 Steps to ensure successful media streaming 37
7.4 Step to ensure successful FM listening 38
8 Technical specifications 39

8Discover EVOKE Flow EVOKE Flow Owner’s Manual v1.0
1 Discover EVOKE Flow
Welcome to EVOKE Flow, a connected radio with Flow technology. This chapter explains how to get
your new radio up and running, outlines the controls and explains some phrases used in this manual.
1.1 Here’s what you’ll need
To listen to online audio content (internet radio, listen again programmes, podcasts and PURE
sounds) and stream your music collection you’ll need the following:
A broadband internet connection (minimum speed 0.5 MB). If you already surf the web at
home, then your internet connection is active and working correctly.
A wireless router, also called a wireless access point.
If your network is secured, you’ll need the WEP, WPA or WPA2 key or password for your
network (for help see ‘What is a WEP key?’ p.16).
A registration code from the Lounge*. To get a registration code, visit
www.thelounge.com and click on ‘Join’ to create a lounge account. When you have an
account, click ‘My radios’ then ‘Connect my radio’, register your EVOKE Flow to receive a
registration code by e-mail. You’ll be asked to enter this code into your EVOKE Flow as part of
the setup process.
1.2 Switching on EVOKE Flow for the first time
1 Extend the aerial fully. You need to extend the aerial when listening to FM, but it’s not required
when listening to online audio content or streaming your music files.
2 Insert the connector of the supplied mains adapter into the 6V DC input on the rear of the radio.
4 Plug the power adapter into the power supply.
5 The EVOKE Flow screen is displayed for a short period.
6 The Select time zone region screen is displayed. Use the + and - buttons on your radio to
highlight your region, then press select to enter it. The next screen asks you to select time zone
location, use the same process to select the location closest to you.
7 The Source screen is displayed, which shows the 4 audio sources you can listen to on EVOKE
Flow. Each audio source is explained in a separate chapter of this manual.
8 To get started, push the Select button to select ‘FM radio’ and read the rest of this chapter for
an overview of how to operate the product.
Discover EVOKE Flow
* We recommend that you register with the PURE Lounge and connect your radio in order to save more than 10 favorites and
organise your favorites into separate folders.
Discover EVOKE Flow

9Discover EVOKE Flow EVOKE Flow Owner’s Manual v1.0
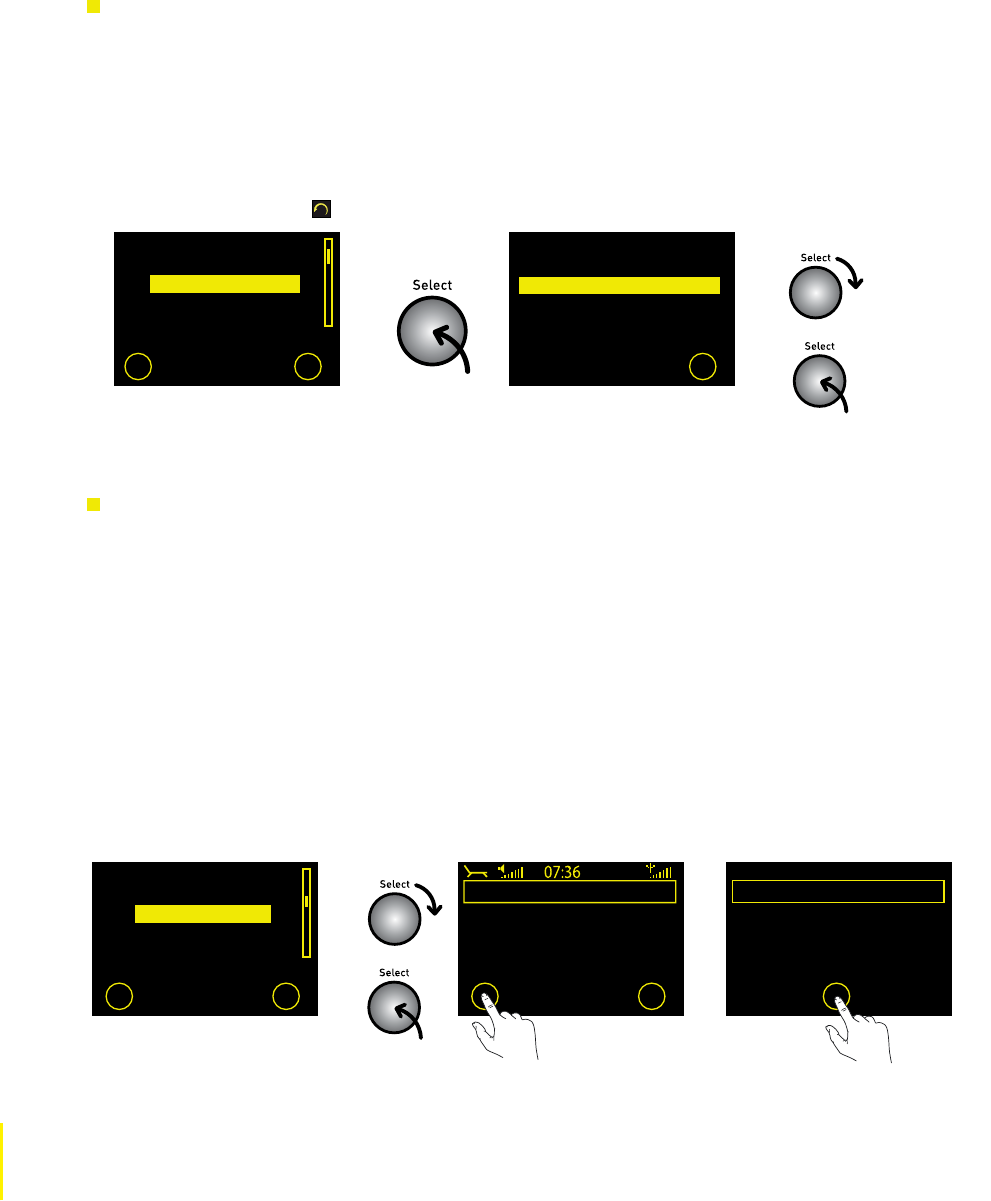
1.3 Key phrases used in this manual
The following key phrases and associated illustrations are used in this manual:
hold’
‘Select’ Push in the Select dial to select the desired item
‘Tap’ Tap the indicated button on your radio. Most often used in relation to
the context sensitive option buttons.
‘Highlight’ Rotate the Select dial until the desired item is highlighted
‘Press and Keep your finger on a button until the action is
complete. Most often used in relation to the context-sensitive
buttons.
BBC Radio 2
BBC Radio 3
BBC Radio 4
BBC Radio 5Live
BBC Radio 6Music
BBC Radio 4
Missed an item? You can
listen to the program again
via our website
Presets Options
BBC Radio 2
BBC Radio 3
BBC Radio 4
BBC Radio 5Live
BBC Radio 6Music
Sussex Breakfast: 20/08/08
Paused: 00:08.50
Options
10 Discover EVOKE Flow EVOKE Flow Owner’s Manual v1.0
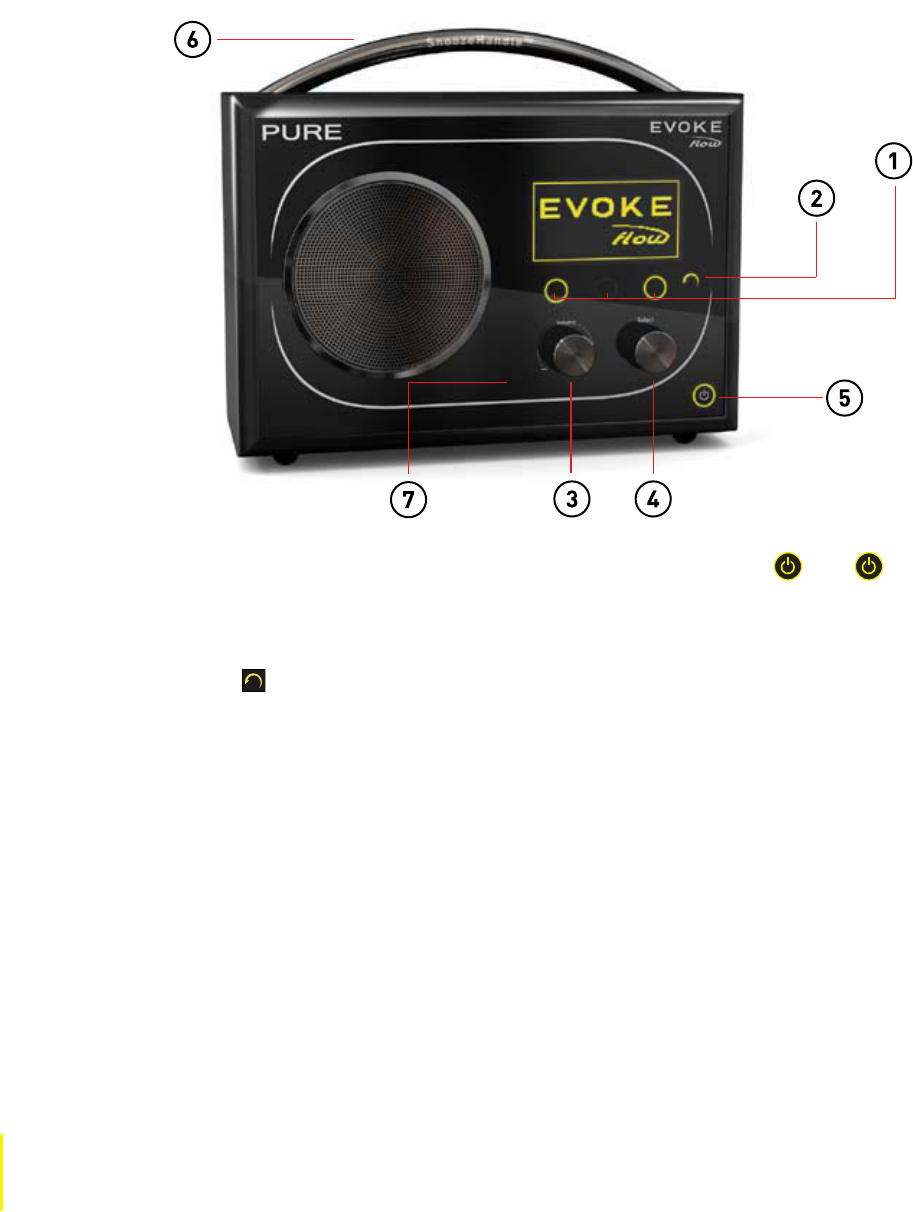
1.4 Overview of controls and sensors
1 Context-sensitive buttons. The function
is displayed on screen above the relevant
button and changes depending on the
current screen.
2 Back key ( ). Tap to display the Source
screen.Tap when browsing stations to
go back up to the previous list. Tap in
the Options menu to go back up to the
previous screen.
3 Volume/mute dial. Rotate right and left to
increase and decrease the volume. Push
to mute the audio and push again to un-
mute.
4 Select dial. Rotate to browse the current
list of items/options and push in to
select. Push in to pause a media track or
podcast.
5 Standby touch key ( ). Tap followed
by O Ok to switch the radio on; do this
again to switch the radio into standby (or
off if powered by a ChargePAK E1).
6 SnoozeHandle®. Tap to snooze the alarm
for 9 minutes. Grip and hold to brighten
the display to maximum brightness for 3
seconds (mains power only).
7 Light sensor. Adjusts the display
brightness according to the light levels in
your room (when the Brightness level is
set to ‘Automatic’). Make sure the sensor
is not covered or blocked.

11 Discover EVOKE Flow EVOKE Flow Owner’s Manual v1.0
1.5 Quick guide to rear panel
8 USB connector (mini-AB type) for
upgrading the radio’s firmware when
a wireless internet connection is not
available.
9 Input connection for the S-1 Flow auxiliary
speaker To purchase the S-1 Flow auxiliary
speaker, contact your local PURE dealer.
10 Output connection for headphones
(3.5mm).
11 Output connection to an external amplifier
using a suitable 3.5mm-to-RCA cable (not
supplied).
12 3.5mm Input connection for MP3/CD
players or PURE i-10 dock (contact your
local PURE dealer).
13 6VDC input connection for supplied mains
adapter.
15 Compartment for ChargePAK E1
rechargeable battery (sold separately).
17 Acoustically tuned bass reflex port (do not
cover).
18 Serial number location (needed for
registering your radio with the Lounge).
12 Discover EVOKE Flow EVOKE Flow Owner’s Manual v1.0
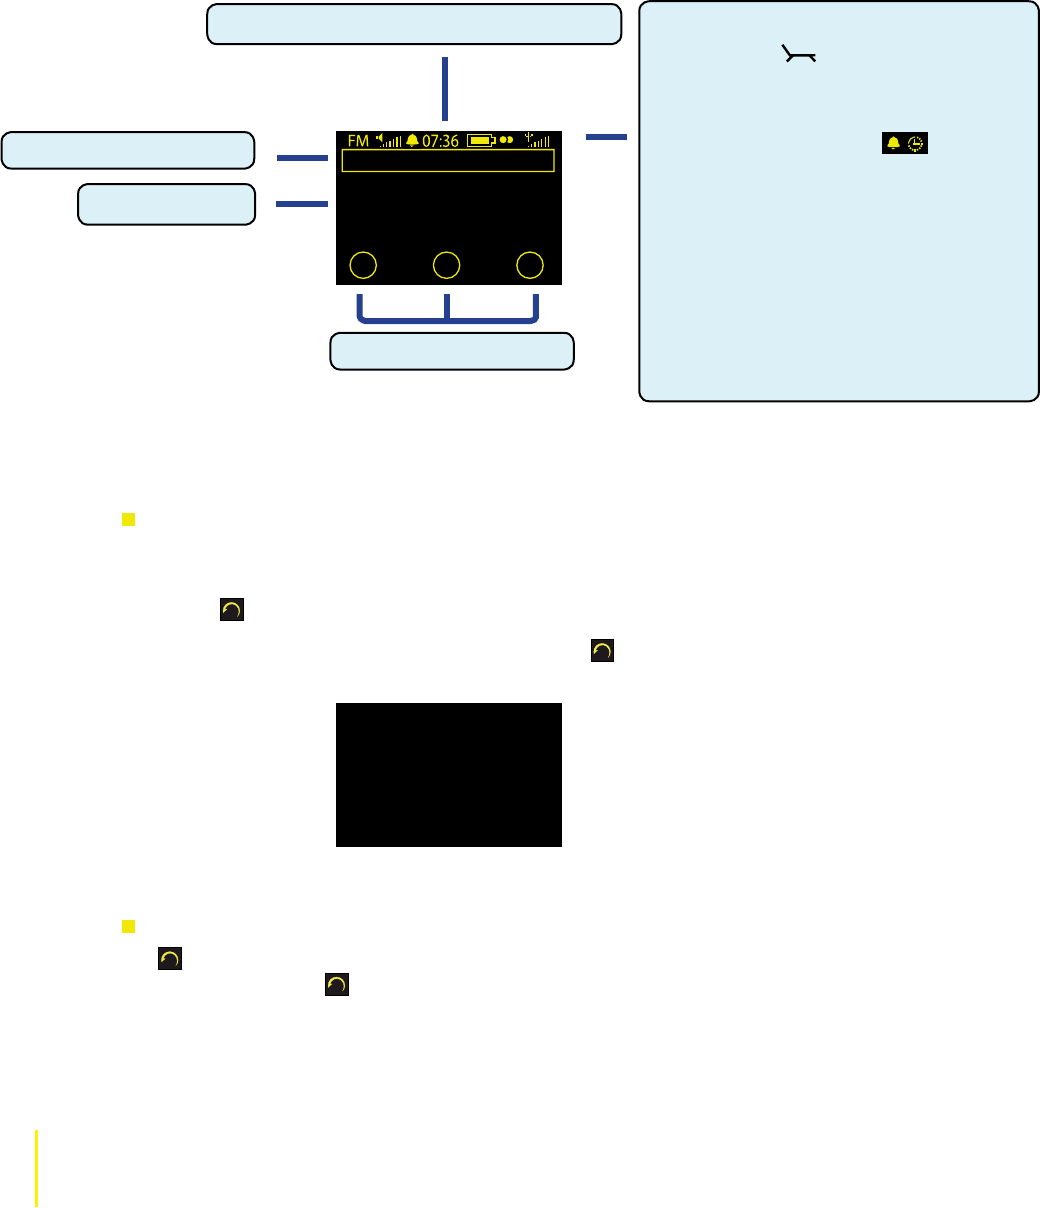
1.6 Quick guide to the display
1.7 Quick Guide to common functions
How to change the audio source
EVOKE Flow has 4 audio sources: The Lounge (online audio content), Media player, FM radio and
Auxiliary input. To change the audio source:
1 Tap
until the Source screen is displayed.
2 Highlight and select a new audio source, or tap to exit the Source screen.
Using the Back button to go back up to a previous menu
Tap when browsing stations and other content, or when in a menu, to go up to the previous
screen. Press and hold at any time to return to the ‘now playing’ screen for the currently selected
audio source.
The clock is automatically set and updated.
The Lounge
Media player
FM radio
Auxiliary input
102.7 KIIS FM
Missed an item? You can
listen to the program again
via our website
Context-sensitive buttons
The source screen
Icon bar (from left to right):
Audio source: (The Lounge), MP
(Media player), FM or AUX (Auxiliary input).
Volume level/ mute indicator
Alarm/timer set indicators
Clock
ChargePAK battery level
(animates when charging)
Stereo indicator
Signal strength bar: indicates reception
level in FM source and wireless network
strength in The Lounge and Media player
source.
Now Playing/menu name
Info display area

13 Discover EVOKE Flow EVOKE Flow Owner’s Manual v1.0
1.9 About the PURE Lounge
To get the most from EVOKE Flow connect your radio to the PURE Lounge (www.thelounge.com),
your online gateway to the world of online audio content.* The Lounge contains thousands of internet
radio stations, podcasts and listen again programmes available to listen to in the comfort of your living
room, bathroom, yard, garage − wherever you’re in range of your wireless network. Visit the Lounge
now to register your details and connect your radio to receive a registration code, which is required to
enjoy all the features of the Lounge and to save more than 10 favorite stations on your EVOKE Flow.
The Lounge
home page
* We recommend that you register with the PURE Lounge and connect your radio in order to save more than 10 favorites and
organise your favorites into separate folders.
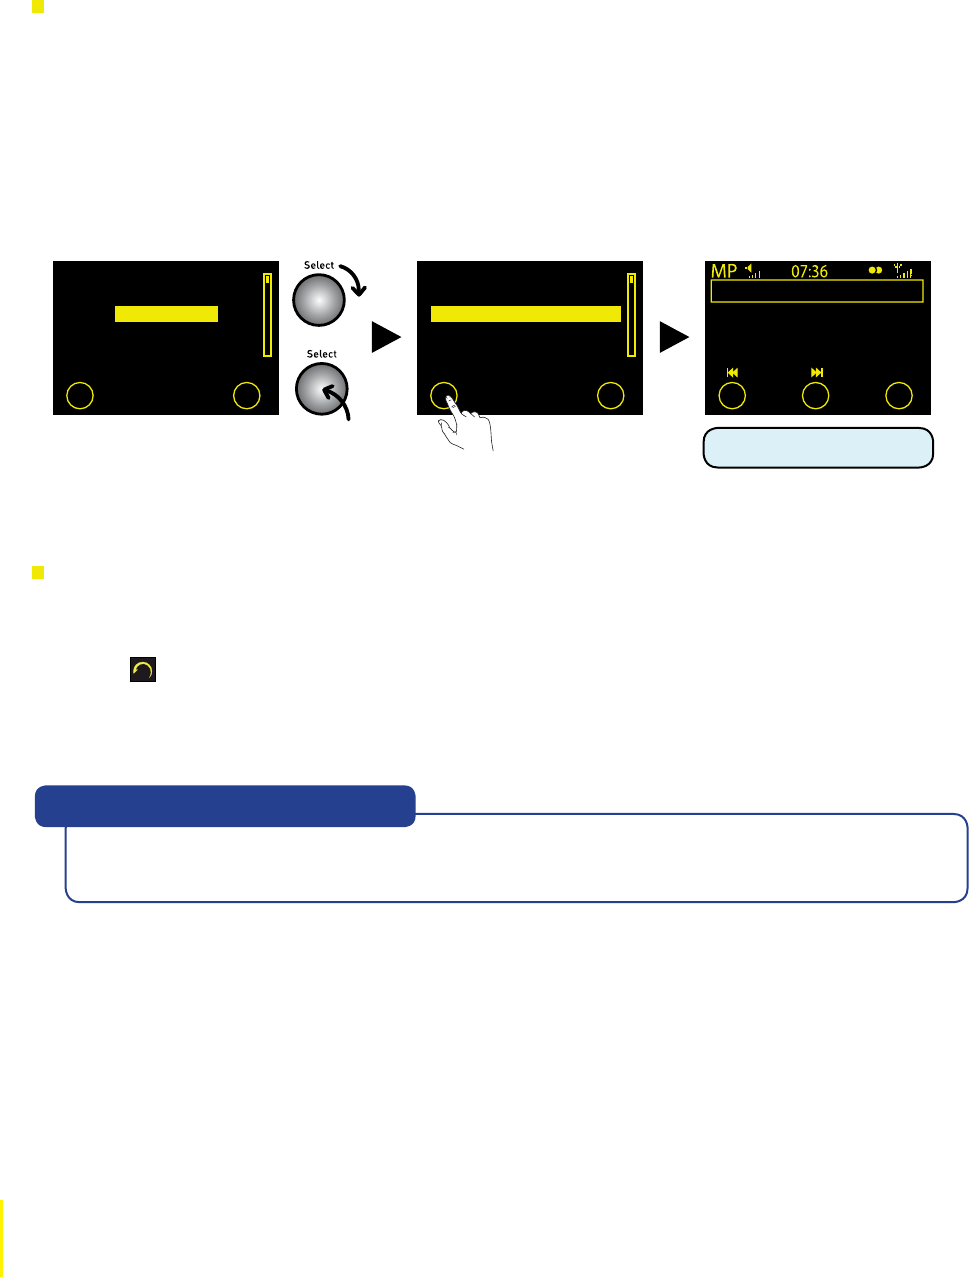
About the context-sensitive touch buttons
EVOKE Flow has 3 context-sensitive touch buttons. The function of each is displayed above the
button and changes depending on what you are listening to or which menu is active. If the yellow light
around a particular button is not lit, then it has no function in the current screen. For example:
Options Search
Play
All buttons illuminated, three
available functions
Middle button not illuminated, two
available functions
14 Listening to Internet Radio and more EVOKE Flow Owner’s Manual v1.0
2 Listening to Internet radio and more
Listening to Internet Radio and more
This chapter explains how to listen to EVOKE Flow in ‘The Lounge’ source. You can search for exciting
stations that match your interests, catch up with radio programmes you’ve missed, discover the world
of podcasting or listen to a selection of PURE sounds designed to stimulate, inspire and relax.
2.1 Connecting EVOKE Flow to your wireless network for the first time
Register at the PURE Lounge and connect your radio to receive your registration code
If you haven’t already done so, go to www.thelounge.com and and click on ‘Join’ to create a lounge
account. When you have an account, click ‘My radios’ then ‘Connect my radio’ to register at the
Lounge for a more personalised listening experience. Once the radio is connected to the Lounge,
you can add more than 10 Favorites, and log-in on your PC to organise your Favorites into separate
folders. As part of the registration process you will be e-mailed a registration code, which you enter
into your radio to connect it to the Lounge (see below).
Select ‘The Lounge’ audio source
1 Tap until the Source screen is displayed.
2 Highlight and select ‘The Lounge’.
Select your wireless network from the list
1 The first time you select the ‘The Lounge’ source EVOKE Flow will scan for all the visible
wireless networks in the surrounding area and display them in a list.
Note If you want to enter your wireless network details manually tap O Manual .
The strength of each wireless network is shown in brackets from 1 (weak) to 10 (strong).
2 Highlight and select the name of your wireless network from the list.
The Lounge
Media player
FM radio
Auxiliary input
Scanning...
Scan
–Top–
Cancel Manual
Scanning for
wireless networks
Selecting
The Lounge The Lounge
Media player
FM radio
Auxiliary input
(3)BT Home Hub A102
(9)SmithFamily
Select wireless network
- No network selected -
Manual
Selecting a
wireless network
15 Listening to Internet Radio and more EVOKE Flow Owner’s Manual v1.0
Enter your WEP or WPA/WPA2 key or password
1 If you see ‘Enter key or password’ enter the WEP, WPA or WPA2 key or the password for your
wireless network. Rotate the Select dial to highlight characters and push to enter; tap
O Delete to erase characters (press and hold to erase all); tap O More... to see lower-case
letters; and tap O Save to finish (O Save only appears when you’ve entered a compatible
number of characters).
ABCDEFGHIJKLM
NOPQRSTUVWXYZ
sp0123456789
Enter key or password
Delete Save More...
6
57
86
1
6D
7
06C
ABCDEFGHIJKLM
NOPQRSTUVWXYZ
sp0123456789
Enter key or password
More...
Key or password
entry screen
If you see the message ‘No networks found’ or ‘Wireless network error’ try moving your radio
nearer to the router and moving the router to a higher position (eg, on a shelf) away from metal
objects. Tap O Retry to re-scan for visible networks.
If networks are displayed but your wireless network is not listed try the above advice and then tap
and select ‘Connection wizard’ to re-scan for visible networks.
If your network is configured as invisible, you can enter the network settings manually by tapping
O Manual and following the steps.
Help! “I can’t find my wireless network”
2 Wait for EVOKE Flow to connect to your wireless network, which may take a minute or two.
Conf iguring IP...
A
Network Setup
Verifying key...
A
Setting up network
Please register at
www.thelounge.com
for a registration code.
Press Enter to enter code.
Skip Enter
My favourites
Stations
Listen again
Podcasts
PURE sounds
ABCDEFGHIJKLM
NOPQRSTUVWXYZ
sp0123456789
Enter registration code
Del Save More...
–YOUR CODE –
Entering a
registration
code
The Lounge home screen
Finally, enter your registration code for the Lounge*
1 When you see the Registration screen tap O Enter and enter your registration code, which was sent to your
e-mail address when you connected your radio to the Lounge. Rotate the Select dial to highlight characters
and push to select; tap O Delete to erase characters (press and hold to erase all); and tap O Save to finish.
2 Wait for a moment until you see the Lounge home screen. Well done! The world of internet radio is now at
your fingertips: read on to find out how to tune in.

16 Listening to Internet Radio and more EVOKE Flow Owner’s Manual v1.0
* We recommend that you register with the Lounge and connect your radio to save over 10 Favorites and organise your Favorites
into folders. However, if you’d rather connect to the Lounge without registering, tap ‘Skip’. You can always register later and then
select ‘Register with the Lounge’ from the Lounge options menu to enter your registration code.
If you see the message ‘Unable to connect’ highlight and select one of the following options:
Retry connection Attempts to reconnect to the selected network using the same
encryption key or password.
Select another network Re-scans and displays the list of visible wireless networks again. You
can select a new one if, for example, you’ve moved EVOKE Flow from
one location to another, eg, from home to the office.
Change key or password Allows you to enter a new WEP or WPA/WPA2 key or password if you
think you’ve made a mistake. Once you’ve done this, select ‘Retry
connection’ to try to connect with the new key/password.
Change encryption mode Change the encryption mode between ‘WEP’, ‘WPA (PSK)’, ‘WPA2
(PSK)’ or ‘None’. EVOKE Flow automatically detects the encryption
mode for your network, but you can change this option and then
select ‘Retry connection’ if you think the mode is specified incorrectly.
Change IP configuration Choose between ‘DHCP’ or ‘Static’
“Help! I see Unable to connect”
A WEP, WPA or WPA2 key is a sequence of letters and numbers that prevents unauthorized access
to a secured wireless network. Devices like EVOKE Flow need the encryption key in order to connect
to your wireless network. It is usually 26 or 64 characters long depending on how your wireless
network is configured and in some cases a shorter password can also be used instead of a full key.
You may have noted down the key or password when you set up your broadband account and/or
wireless network (or you could ask the person who set up your wireless network).
If you can’t find your key or password, don’t panic. See Chapter 7, Help and Advice, for more help
on finding this important information.
“Help! What is a WEP key?”
Note Depending on your wireless network configuration, entering only the password may not be sufficient
to connect. If this is the case, EVOKE Flow will try to connect to your network and then display the
‘Unable to connect’ menu. If this happens, highlight and select ‘Change key or password’ and try
entering the full WEP, WPA or WPA2 encryption key and tap O Save.

17 Listening to Internet Radio and more EVOKE Flow Owner’s Manual v1.0
2.2 Listening to and searching for online audio content
We’ve organised all the online audio content available at the Lounge into 5 content categories: My
favorites (empty until you start adding Favorites), Stations, Listen again, Podcasts and PURE sounds.
You can search each content category to find something that interests you. For example, let’s say
you’re learning Spanish and you like dance music. You can search our list of internet radio stations to
only display Spanish radio stations playing dance music.
Select a content category
1 When you enter ‘The Lounge’ source for the first time the Lounge home screen is displayed.
2 Highlight and select one of the content categories described in the table below:
3. Every station, listen again programme, podcast or PURE sound in the content category
is displayed. Tap O Search to enter some search terms and narrow down this list to find
something you like (see the next page).
Zuidoost Brabant
Zupanijski Radio Sibenik
+ Radio
+2 Radio
1 Click FM
Add Search
My favourites
Listen to your favorite stations, listen again programmes, podcasts or PURE
sounds. You can add items to your favorites when listening on EVOKE Flow
or when listening on your computer at the Lounge
Search radio stations from around the world broadcasting over the internet
Search archived radio programmes available to listen to (or ‘stream’) online
for a set or indefinite period of time after live broadcast
Search thousands of Podcasts. From the sublime to the ridiculous, these
are pre-recorded audio shows which can be posted online by virtually
anyone about virtually anything imaginable, but subjects might include
comedy, arts and technology
Listen to a hand picked selection of sounds to stimulate, inspire and relax.
the Lounge
home screen
Selecting
‘Stations’
My favourites
Stations
Listen again
Podcasts
PURE sounds
My favourites
Stations
Listen again
Podcasts
PURE sounds

18 Listening to Internet Radio and more EVOKE Flow Owner’s Manual v1.0
Search for a station, listen again programme or podcast
1 Tap
O Search from the content list to display the Search screen.
Displaying the
Search screen
Name [All]
Genre [All]
Country [All]
Language [All]
Quality [All]
Clear ClearGo Home
Zuidoost Brabant
Zupanijski Radio Sibenik
+ Radio
+2 Radio
1 Click FM
Add Search
Name [All]
Genre [All]
Country [Netherlands]
Language [All]
Quality [All]
Clear all ClearGo Lounge
Name [All]
Genre [All]
Country [Sp[All]
Language [All]
Quality [All]
Clear all ClearGo Lounge
Name [All]
Genre [Classical]
Country [Netherlands]
Language [All]
Quality [All]
Clear all ClearGo Lounge
Name [All]
Genre [All]
Country [Netherlands]
Language [All]
Quality [All]
Clear all ClearGo Lounge
The Search screen
Search
terms
Search
categories
2 Highlight and select a search category and then rotate the dial to browse the available search terms and
push to select. You can search by any combination of these search categories:
Name Search by all or part of the name of a station, podcast or programme.
Genre Choose to display only content from a certain genre, eg, Jazz.
Country Choose to display only content broadcasting from a particular country.
Language Choose to display only content broadcasting in a particular language.
Quality Choose to display only content that matches your desired audio quality. Quality ratings are
from 1 to 5, where 1 is low quality, 3 is medium and 5 is excellent.
For example, change the Country category to The Netherlands (highlight and select ‘Country’, rotate the
Select dial until ‘Netherlands’ is displayed and then push in to select ).
You can select and change as many search categories as you like before you search for matching content,
eg, you can also change the genre to ‘Classical’ (highlight and select ‘Genre’, rotate the Select dial until
‘Classical’ is displayed and then push in to Selectl).
3 When you’ve selected your chosen search terms, tap O Go to search for all the stations, listen again
programmes or podcasts that match your selections. If you want to reset the Search categories,
tap O Clear all.

19 Listening to Internet Radio and more EVOKE Flow Owner’s Manual v1.0
4 A list of stations, listen again programmes or podcasts that match your criteria is displayed.
Highlight and select an item from the list to begin playing.
abcdefghijklm
nopqrstuvwxyz
sp0123456789
Enter name
Delete OK Clear
kexp
KEXP 90.3FM
Search
Add
Entering a
station name
Radio Omproep Schouwe
Raudio Special 9 Beet
AVRO Klassiek 2
AVRO Klassiek 3
AVRO Klassiek 4 Search
Add
Now tuning...
Description not available
Add fav Options
AVRO Klassiek 2
For a broader picture
Options
Add
Name [kexp]
Genre [All]
Country [All]
Language [All]
Quality [All]
Clear all ClearGo Lounge
If you see the message ‘Station not available’ the radio station may be temporarily off air, or
you may be attempting to tune in to a station that has closed for the day or night depending
on the time in the country of broadcast.
If the ‘Station not available’ message persists with a particular station then it’s possible that
the station has closed down or there is a technical problem with the audio stream. Please
let us know by using the ‘Contact Us’ page at the Lounge and we’ll investigate the problem
and fix it if possible.
Help! I see ‘Station not available’
To select another station, programme or podcast
1 When listening to the station, programme or podcast, rotate the Select dial to display your most recent
search results, which are remembered until you perform a new search.
2 When your most recent search results are displayed, either highlight and select another item or do one of the
following:
To perform a new search within the same content category (eg, Stations) tap s O Search to display the Search
screen. Modify or clear your search terms and tap O Go to do a new search.
To Search within a different content category (either Stations, Listen again or Podcasts) tap s to go back to
the Lounge Home screen and highlight and select a new content category.
If you select ‘Name’ you can enter the name of a station, programme or podcast, which is handy if you
know exactly what you’re looking for. Just select ‘Name’, rotate and push the Select dial to enter all or
part of the name you’re looking for and tap O OK.
20 Listening to Internet Radio and more EVOKE Flow Owner’s Manual v1.0
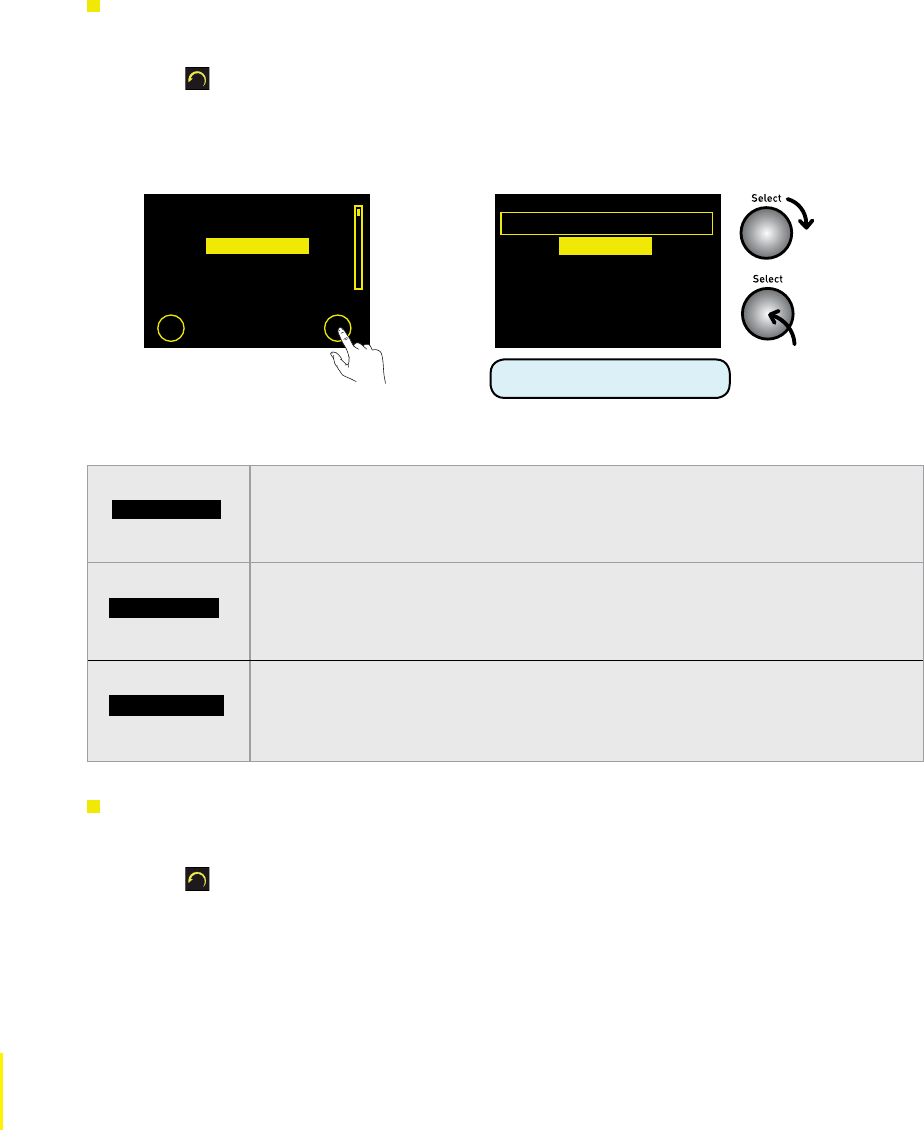
2.3 Opening groups of items
To open a group of programmes or podcast episodes
Groups of listen again programmes and podcasts (and Favorites Folders) are preceeded by a ‘+’
symbol. For example, all of the listen again programmes in a regular series, or a collection of podcast
episodes, may be grouped underneath the title of the series.
1 Highlight and select a group title, preceeded by a ‘+’ symbol, to view all of the programmes or
episodes in that group.
2 Highlight and select an individual programme or episode title to begin playback. To go back to
the group title, tap .
2.4 Adding and viewing your Favorites
To add a station, programme or podcast to your favorites
You can add stations, programmes and podcasts to ‘My favorites’ for quick and easy access.
Anything that you add to ‘My favorites’ will be listed under ‘My EVOKE Flow’ at the Lounge (as long
as you register and connect your radio to the website). You can log-in at the Lounge to organise
your Favorites into separate folders, eg, you could have a separate folder for each member of your
household, or separate folders for speech radio and music.
1 Perform a new search for content if desired (see Search for a station, 2.2.).
2 Highlight a station, listen again programme or podcast. If you want to listen before adding the
item to your favorites, push the Select dial to tune in, or go to step 3.
3 Tap
O Add♥ to add the service to ‘My favorites’.
4 The ‘Add Favorite’ confirmation screen appears. Tap O OK to return to confirm and return to
the previous screen.
+Best of The Boro
+Best of Today
+Between the lines
+Beyond belief
+Big Brother Podcasting
Search
Add
Armistead Maupin, author of
John Burnham Schwartz
Salman Rushdie, author of
Jennifer Finney Boylan
James McBride, author of
Search
Listening to an
item in a group
Clube 720 AM
Clube FM 100.5
Clyde 1 102.5FM
Crik FM classic rock
Cristal 1060 AM
Search
Add
Clyde 1 102.5FM
Clyde 1 102.5FM
Options
Add
Add favourite
Added to My favourites
Clyde 1 102.5FM
Add fav OK Menu
Adding a station
to My favorites

21 Listening to Internet Radio and more EVOKE Flow Owner’s Manual v1.0
To access your favorites
All the stations, programmes and podcasts that you add to your favorites can be viewed by selecting
the ‘My favorites’ content category.
1 Rotate the Select dial to display your most recent search results and tap until the Lounge
home screen is displayed. Alternatively, tap O Options and highlight and select ‘The Lounge’.
2 Select ‘My favorites’.
3 Highlight and select the name of your radio (‘My EVOKE Flow’ by default unless you’ve
changed this to something more personal; see Change radio name, p.22) or a Favorites Folder
that you’ve created at the Lounge.
4 Highlight and select the item you want to listen to.
Note To delete a favorite, log in to the Lounge and click on ‘My Favorites’.
2.5 Pausing and seeking
To pause and seek in a listen again programme or podcast
When you are listening to a listen again programme or podcast you can pause the audio stream and
seek backwards and forwards.
1 When a programme or podcast is playing, push the Select dial to pause the current audio and
display the seek screen.
2 Either push the Select dial to begin playing again or press and hold O or O to seek
backwards or forwards through the audio stream. The seek bar begins to move and a
percentage indicates your position in the audio stream.
3 Release your finger from the key to stop rewinding or fast-forwarding and begin playing from
the new position.
Note The ability to pause and seek depends on the properties of the audio stream and is not
always possible. It’s never possible to pause and seek a live internet radio station.
Sussex Breakfast: 20/08/08
Paused: 00:08.50
Options
The seek screen
Sussex Breakfast
The Best of Brighton and
Sussex Breakfast show. For
more information visit
Options
Add
Clube 720 AM
Clube FM 100.5
Clyde 1 102.5FM
Crik FM classic rock
Cristal 1060 AM
Search
Add
Sussex Breakfast: 20/08/08
55%
Pausing &
seeking
My favourites
Stations
Listen again
Podcasts
PURE sounds

22 Listening to Internet Radio and more EVOKE Flow Owner’s Manual v1.0
2.6 Options available in The Lounge source
When you are listening to a station, podcast or listen again programme, tap O Options and highlight
and select ‘The Lounge settings’ to display the following settings, which only apply in ‘The Lounge’
audio source. Other settings that apply to each audio source are detailed in Chapter 6, Universal
options.
Clear favorites
Select to delete all the favorites that have been stored on the radio. A warning message will appear:
tap O Yes to confirm deletion or O No to cancel.
Change radio name
Your radio is called ‘My EVOKE Flow’ by default the first time you connect to the Lounge, and will be
listed by this name in the ‘My Radios’ and ‘My Favorites’ pages . You can change this name to some-
thing more personal to you.
1 Highlight and select ‘Change radio name’.
2 The currently assigned radio name is displayed at the top of the screen.
3 Enter a new name for your radio and tap O Save (rotate the Select dial to highlight letters and
push to select; tap O More... to view upper-case characters and symbols).
4 Your radio will now appear at the Lounge and the My favorites screen under the new name.
Register with The Lounge
Select this option if you have not yet connected your radio to the Lounge (www.thelounge.com).
1 Highlight and select ‘Register with The Lounge’.
2 Enter your registration code, which is sent by e-mail when you register at the Lounge and
connect your radio , and tap O Save.
Note See 2.1, Connecting Evoke Flow..., wwto find out how to obtain your registration code.
2.7 Wi-Fi settings
Tap O Options in either ‘The Lounge’ or ‘Media player’ source and highlight and select ‘Network
settings’ to view the following list of options for configuring your wireless network.
Connection wizard
Select ‘Connection wizard’ to scan for all available wireless networks and select a new one if desired.
For help with connecting to a wireless network see 2.1 Connecting EVOKE Flow.

23 Listening to Internet Radio and more EVOKE Flow Owner’s Manual v1.0
View details
Select ‘View details’ to list the following technical information about the configuration of the network
that EVOKE Flow is connected to:
Network name The Network Name (SSID) is shown at the top of the screen.
Encryption The encryption method is listed (WEP, WPA or WPA2).
IP address The IP address of the radio.
Net mask The configured network mask.
DNS The DNS server IP address.
Router The gateway router IP address.
Radio Name The name of the radio (see Change radio name, p.22).
MAC address The MAC address of the radio (a fixed address that identifies your hardware).
Access point The MAC address of the router that the radio is connected to.
Manual setup
Select ‘Manual setup’ to manually configure your wireless network settings (for advanced users only).
Retry connection Attempts to reconnect to the selected network.
Network name Choose from ‘Scan for networks’ or ‘Enter SSID manually’ to specify a new SSID
for your wireless network.
Encryption mode Change the encryption mode between ‘WEP’, ‘WPA (PSK)’, ‘WPA2 (PSK)’ or
‘None’. EVOKE Flow automatically detects the encryption mode for your network.
Only change this setting if you think the encryption mode has been specified
incorrectly.
Key or password Enter a new encryption key or password.
IP address Choose between ‘DHCP’ or ‘Static’.
Clear network settings
Select ‘Clear network settings’ and EVOKE Flow will ‘forget’ all wireless networks and perform a
fresh re-scan for visible networks. Select ‘Connection wizard’ to re-scan for wireless networks. Note
that you will have to re-enter your WEP or WPA/WPA2 key or password. You have to confirm this
operation: tap O Yes to confirm or O No to cancel.

24 Listening to Media player EVOKE Flow Owner’s Manual v1.0
3 Listening to Media player
Listening to Media player
This chapter explains how to use EVOKE Flow in the ‘Media player’ source and enjoy the music stored
on your computer or NAS (network attached storage) box anywhere in your home. To use EVOKE
Flow in the Media player source you’ll need to connect the radio to your wireless network if you
haven’t done so already (see 2.1). You’ll also need to download the Flow Server software from www.
thelounge.com (you can also use another UPnP server such as Windows Media Player 11). Finally,
the music files stored on your PC or NAS box must be in a compatible file format (see Chapter 7,
Technical specifications, for a list of supported file formats).
3.1 Setting up Media player for the first time
First, install Flow Server on your PC or Mac
Flow Server is a UPnP media server that enables you to share all your music files with EVOKE Flow
and other UPnP-enabled devices throughout your home. It’s available as a free download when you
register at the Lounge.
1 If you haven’t done so already, visit the Lounge, click on ‘Connect my PURE radio’, register
your details and then follow the instructions in the Connection Guide to download and install
the Flow Server application on your system.*
2 During the installation process, follow the on-screen instructions to locate the music files stored
on your computer and share them over your wireless network.
3 Once the scan is complete, leave the Flow Server application running and leave your PC
switched on or in ‘hibernate’ mode.
Select the ‘Media player’ source and select your media server
1 Tap
until the Source screen is displayed.
2 Highlight and select ‘Media player’.
3 If you haven’t used ‘The Lounge’ or ‘Media player’ sources before, EVOKE Flow will scan
for available wireless networks. For full instructions on linking EVOKE Flow to your wireless
network, read Chapter 2.1
4 Wait a few moments for EVOKE Flow to find all the media servers available on your wireless
network.
5 A list of media servers will be displayed. Highlight and select the name of your media server,
usually ‘Flowserver’ unless you have changed the default settings.
Media Servers
Please wait...
searching for servers
Cancel
Music box
Flowserver
Media player
Media servers
–Select a server–
OK
DAB radio
The Lounge
Media player
FM radio
Auxiliary input
If you see the message ‘No servers found’ tap O OK. Make sure that your PC is switched
on and Flow Server or another UPnP software programme is open and running. Tap
O Servers to re-scan for UPnP servers. If you still cannot locate Flow Server, please
visit out support website at http://support.pure.com
“No servers found”
25 Listening to Media player EVOKE Flow Owner’s Manual v1.0
3.2 Playing albums, tracks and playlists
Your music files are grouped into folders organised by Flow Server or your UPnP media server, eg,
‘+Music’, ‘+All music’ or ‘+Albums’. You can browse through your music collection on EVOKE Flow’s
screen, and play tracks, albums and playlists..
To play an album, folder or track
1 Highlight a top-level category in the media directory, eg, ‘+Artists’ or ‘+Albums’. Albums and
folders, which contain tracks or other folders, are always displayed with ‘+’ before their name.
2 Tap O Play if you want to play all of the tracks in the highlighted album or folder or push the
Select dial to view all the tracks inside the album or folder.
3 Highlight the track you want to listen to and tap O Play.
+Abba Gold
+Abbey Road
+Accelerate
+American Idiot
+Appetite for Destruction
Play Search
Playing a track
in an album Supernatural Superserious
REM
Accelerate
Track 03
Options
1. Living Well Is The Best
2. Man Sized Wreath
3. Supernatural Superse
4. Hollow Man
5. Houston
Play Search
The track playing screen
Most UPnP media servers have a directory called ‘+ All tracks’ or ‘+All Music’ that lists every
track on your PC. Select this directory to access and play all your music.
“Help! How do I see all my tracks?”
To select a new album, folder or track
1. From the track playing screen, rotate the Select dial to display the contents of the current album, folder or
playlist, or your search results (see 3.4).
2. Tap to go up to the current album or folder title or tap repeatedly to go back to the media directory.
3. Highlight a new album, folder, playlist or track to play and tap O Play.
26 Listening to Media player EVOKE Flow Owner’s Manual v1.0
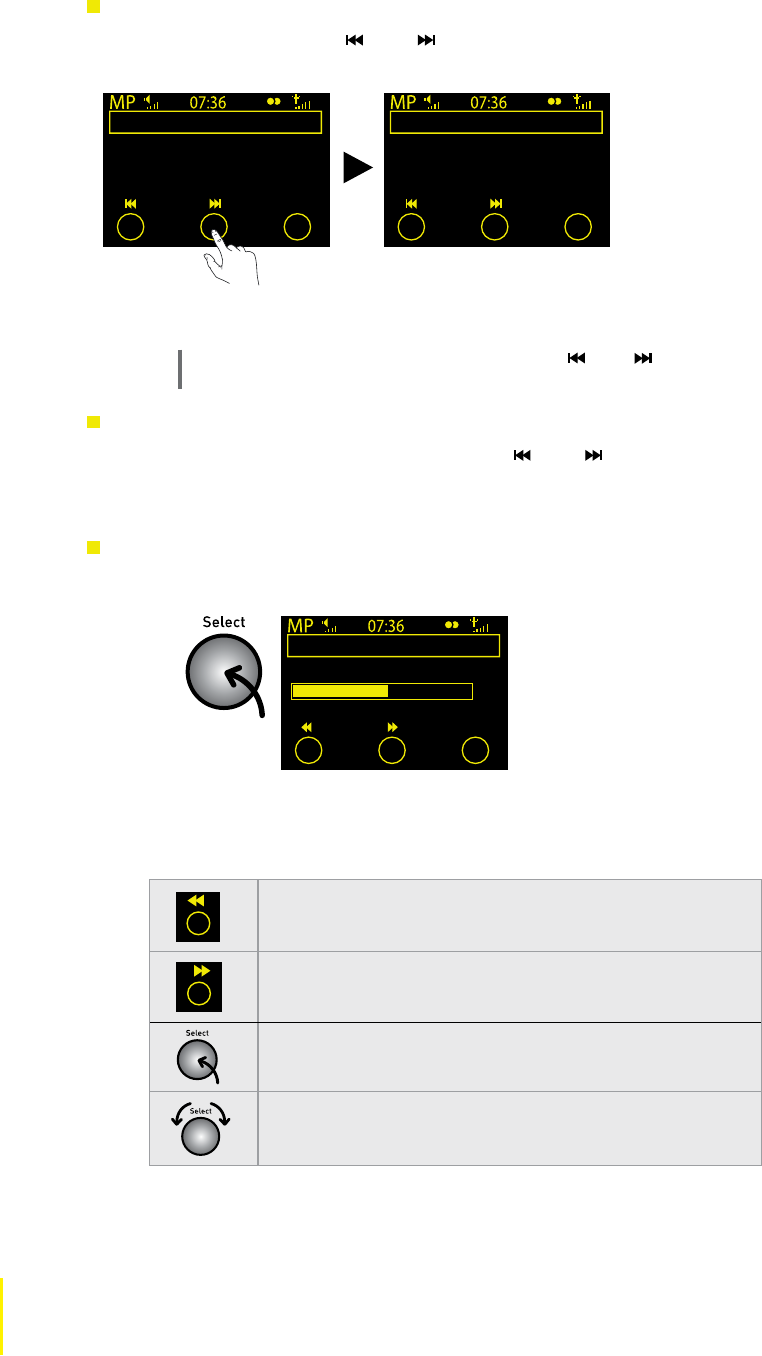
3.3 Skipping, pausing and seeking within tracks
To skip tracks
When a track is playing tap O or O to skip to the previous or next track in the album, folder or
playlist.
Note When Shuffle is set to ‘On’ (3.5), tapping or selects a random track from the
current album, folder or playlist.
To seek in a track
1 When a track is playing, press and hold O or O to seek through the current track.
2 Remove your finger or thumb to begin playing from the new position in the track.
To pause/play a track and seek
1 Push the Select dial to pause the currently playing track.
2 When the track is paused you can do the following:
Hollow Man
Paused: 00:01:02
Options
Press and hold to seek backwards through the track
and release to begin playing from the new position.
Press and hold to seek forwards through the track and
release to begin playing from the new position.
Push to begin playing the track again.
Rotate to browse the list of tracks and select a new
track if desired.
Supernatural Superserious
REM
Accelerate
Track 03
Options
Hollow Man
REM
Accelerate
Track 04
Options
Skipping a
track
O O
27 Listening to Media player EVOKE Flow Owner’s Manual v1.0
3.4 Searching for an artist, track or album
You can perform a context-sensitive search of a particular album or folder, or search your entire music
collection.
To display the Media Search screen
1 From the track playing screen, rotate the Select dial to display the track list.
2 Tap
if necessary and then highlight the folder, album, or playlist you want to search within
(if you want to search within all your music tracks, highlight the folder which contains all your
music – usually named ‘+All tracks’ or similar.
3 When the folder, album or playlist is highlighted tap O Search.
You can do the following:
To clear your search results
1 Rotate the Select dial to display your search results.
2 Tap
to go back to the directory list and play a track, album or playlist.
+Abba Gold
+Abbey Road
+Accelerate
+American Idiot
+Appetite for Destruction
Play Search
Accessing the
Media Search
screen
Action...
Menu item
Artist name
Select to search the highlighted folder or playlist for all tracks and albums
by a particular artist. Enter the artist name using the Select dial to highlight
and select letters and then tap O Go.
Track name
Select to search the highlighted folder or playlist for all tracks and albums
with a particular word or phrase in the track title. Enter the track name using
the Select dial to highlight and select letters and then tap O Go.
Album title
Select to search the highlighted folder or playlist for all tracks and albums
with a particular word or phrase in the album title. Enter the album name
using the Select dial to highlight and select letters and then tap O Go.
Artist name
Track name
Album title
Search by
OK
The Media Search screen

28 Listening to Media player EVOKE Flow Owner’s Manual v1.0
3.5 Options available in Media player source
When you are listening to a track (the track playing screen), tap O Options and highlight and select ‘Media player
settings’ to display the following settings. Rotate and push the Select dial to make selections and change values.
For details of the other options that appear in all of the audio sources, read chapter 7.
Repeat
Choose whether to repeat music or not. Highlight and select one of the following options:
Off (default) Tracks are played until the end of the current album, folder or playlist.
All EVOKE Flow continuously repeats the current album, folder, playlist, or your search results.
Track EVOKE Flow repeats the current track.
Shuffle
Choose if tracks are played in a random order or not. Highlight and select one of the following options:
Off (default) Tracks in the current album, folder, playlist or search results play in order.
On Tracks in the current album, folder, playlist or search results play in random order.
Note When Shuffle is set to ‘On’, tapping O or O selects a random track from the current album,
folder, playlist or search results.
Media server
Allows you to re-scan for new media servers or view technical details about the active media server. Two options
are available:
Current details Lists the following technical information about the active media server:
The name of your Media Servers
The name of the UPnP server programme you are currently connected to, eg, Flow s
Server.
The software version of the UPnP server programme you are currently connected to.s
The IP address and port of the current media server.s
A web address for further information or software updates for the UPnP server s
programme.
Scan for servers Scans for all available media servers.
Wi-Fi settings
The Wi-Fi settings menu, which allows you to configure your wireless network, is available in both ‘Media player’
and ‘The Lounge’ audio source. For details see ‘Wi-Fi settings’.

29 Listening to FM radio EVOKE Flow Owner’s Manual v1.0
EVOKE Flow is also a fully featured FM radio. This chapter explains how to operate EVOKE Flow in
the FM source, including seek and manual tuning and storing presets. You should extend the aerial for
optimum reception of FM broadcasts.
4.1 Selecting the ‘FM radio’ audio source
Select ‘FM radio’ source
1 Tap
until the Source screen is displayed.
2 Highlight and select ‘FM radio’ to enter the FM source.
4.2 Changing the station
Seek tuning (default)
1 Rotate the Select dial right or left to seek to the next or previous FM station that has a strong
signal.
2 RDBS information, if available, will scroll down the screen after a few minutes.
3 Rotate the Select dial again to seek for a new frequency.
Listening to FM radio
103.30
Seek tune
OKPresets Options
XFM
OKPresets Options
XFM
4 Listening to FM radio
Star 94 FM
Atlanta’s hit music station!
Presets Options
Empty 9
Empty 10
Empty 1
Empty 2
Empty 3
Store
Empty 9
Empty 10
Chiltern
Empty 2
Empty 3
Store Listen
4.3 Using presets
To store an FM station as a preset
1 Tune to the frequency you want to store as a preset and tap O Presets.
2 Rotate the Select dial to highlight a preset number between 1 and 10.
3 Tap
O Store to store the preset to that position on the preset list.

30 Listening to FM radio EVOKE Flow Owner’s Manual v1.0
To select an FM preset
1 When listening to an FM station, tap O Presets.
2 Rotate the Select dial to scroll through the list of preset stations. Presets are labelled with the
station name if a station has been stored or ‘Empty...’ if nothing has yet been stored.
3 Tap
O Listen to select the Preset.
4.4 Options available in FM source
When you are listening to FM, tap O Options and highlight and select ‘FM settings’ to access the
following options. For all other options, see chapter 7, Universal options.
FM Tuning
Switch between seek and manual tuning.
Seek tune When you rotate the Select dial EVOKE Flow tunes to the next station that has
a strong signal.
Manual tune When you rotate the Select dial EVOKE Flow tunes up or down in increments
of 0.5MHZ.
FM Stereo
Switch between broadcasting FM stations in ‘Mono’ (default) or ‘Stereo’. If listening on
headphones, or with an S-1 Flow auxiliary speaker, you may want to change this setting to Stereo.
Empty 9
Empty 10
Chiltern
Empty 2
Empty 3
Store Listen

31 Listening to FM radio EVOKE Flow Owner’s Manual v1.0
5 Listening to an Auxiliary device
You can use EVOKE Flow to amplify the music stored on a portable music player. All you need is a
3.5mm to 3.5mm auxiliary lead (not supplied) or an iPod docking cradle like the PURE i-10.
5.1 Connecting an Auxiliary device
To connect an Auxiliary device
1 Connect one end of the auxiliary lead into the Headphone or Line out connector on your iPod
or portable music player.
2 Connect the other end into the ‘Aux In’ connector on the rear of EVOKE Flow.
5.2 Selecting the Auxiliary input source
To play an auxiliary device
1 Press
until the Source screen appears.
2 Highlight and select ‘Auxiliary input’ to enter Auxiliary source.
3 Press Play and adjust the volume on the auxiliary device
08.15
Fri 3 Apr 2009
OK Options
AUX

32 Universal options EVOKE Flow Owner’s Manual v1.0
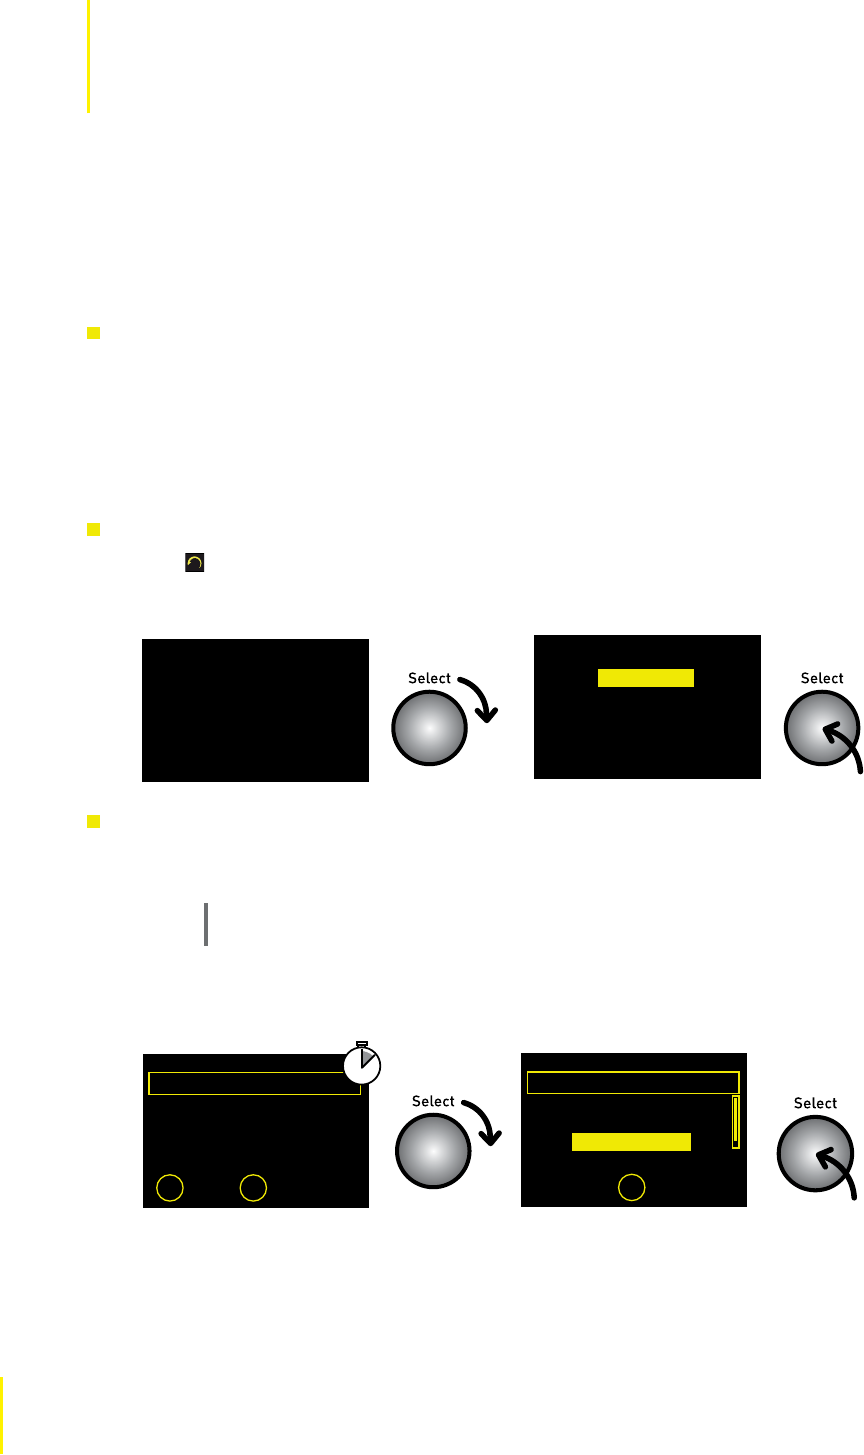
6.1 Setting the alarm and timers
Tap O Options, highlight and select ‘Alarm or timer’ and choose an
option:
To set the sleep timer
The sleep timer switches your radio into standby (or off if
powered by a ChargePAK) after a set number of minutes has
elapsed.
1 Highlight and select ‘Sleep timer’.
2 Rotate the Select dial to change the duration of the sleep
timer between 15 minutes and 1 and a half hours in
15 minute increments.
3 Tap
O Save to start the sleep timer and return to the station
playing screen. The icon appears in the icon bar.
To clear the sleep timer
1 Highlight and select ‘Sleep timer’.
2 Tap O Clear.
3 Tap
until you return to the now playing screen.
To set the kitchen timer
The kitchen timer sounds a beeping tone after a set time period
has elapsed.
1 Highlight and select ‘Kitchen timer’.
2 Rotate the Select dial to adjust the hours and push to
confirm.
3 Rotate the Select dial to adjust the minutes and push to
confirm or tap O Save. The icon appears in the icon bar.
00:15
Sleep timer (hh:mm)
OKClear Save Menu
00:45
Sleep Timer (hh:mm)
OKClear Save Menu
This chapter describes the options that are common across each of the audio sources, for example,
information display settings and setting the alarm and timers. Whichever audio source you’re listening
to, all of the following settings are accessed by tapping O Options and using the Select dial to select
and change settings.
1
2
6 Universal options
Universal options
00:45
Kitchen timer: set mins
Clear Save Hours

33 Universal options EVOKE Flow Owner’s Manual v1.0
To clear the kitchen timer
1 Highlight and select ‘Kitchen timer’.
2 Tap
O Clear.
3 Tap
to return to the now playing screen.
To set the alarm
1 Highlight and select ‘Alarm settings’.
2 Highlight and select ‘On’ to switch the alarm on or ‘Off’ to
switch the alarm off.
3 Rotate the Select dial to adjust the hours to your alarm time
and tap .
4 Rotate the Select dial to adjust the minutes to your preferred
wake up time and tap .
The icon appears when the alarm is set and there are no active
sleep or kitchen timers.
Note The alarm does not work when the radio is battery
On
O
Alarm Settings Menu
–Alarm o–
End
08:00
Alarm: set hours
07:00
End
08:30
Alarm: set minutes
–
08:30
–
End
2
3
4
powered
To set the clock
The clock will automatically set itself and also update for clock changes. However, if you cannot
receive a Wi-Fi or FM signal, the time and date can be manually set by selecting ‘Set Clock’.
6.2 Snoozing and cancelling the alarm
To snooze or cancel the alarm
When the alarm is sounding you can do one of the following:
1 Cancel the alarm by tapping or pushing the Select dial.
2 Snooze the alarm for 9 minutes by tapping the SnoozeHandle™ .
Note A sounding alarm will time-out and switch off after one hour.
To adjust the duration of the snooze timer
1 Tap
O Options and select ‘Alarm or timer’.
2 Highlight and select ‘Snooze time’.
3 Rotate the Select dial to adjust the duration of the snooze between 5 minutes and 1 hour and
push the Select dial to confirm.

34 Universal options EVOKE Flow Owner’s Manual v1.0
6.3 Changing the information shown on screen
Tap O Options and highlight and select ‘Display’ to choose between the following info display options:
Information (change the information shown on screen)
Select ‘Information’ to change what information is displayed when listening. The following tables
summarize the information display options available for each audio source:
Info display options available when listening to ‘The Lounge’
Information
Display Options
Description
Description Scrolling text information about the current station, programme,
podcast or PURE sound.
Location and
genre
Lists the location and genre of the current station, programme,
podcast or PURE sound, if available.
Time offset Displays your current position in the audio stream or ‘(live
stream)’ if you’re listening to a radio station.
Wi-Fi signal
strength
Displays a meter representing the strength of your Wi-Fi signal.
Station URL Displays the URL (web address) of the current audio stream.
Time and date Displays the time and date.
Media Player Info display options
Information
Display Options
Description
Track info Scrolls the Artist name, Album title and Track number vertically
down the display.
Time offset and
duration
Displays the track time elapsed and the total track time.
Wi-Fi signal
strength
Displays a meter representing the strength of your Wi-Fi signal.
Time and date Displays the time and date.

35 Universal options EVOKE Flow Owner’s Manual v1.0
FM Info display options
Information
Display Options
Description
Scrolling text Displays text information from the current station if RDS
information is available.
Reception info Displays the current frequency, Stereo/Mono indication, station
description and a meter representing signal strength.
Time and date Displays the time and date.
6.4 Adjusting the screen brightness and duration
You can adjust the brightness level of the screen and how long the screen lights up for when a button
is pressed (when switched on and when in standby).
To adjust how long the screen lights up for
1 Tap
O Options and highlight and select ‘Display’.
2 Highlight ‘Active operation’ to adjust the display settings that apply when the radio is switched
on or ‘Standby operation’ to adjust the display settings that apply in standby.
3 Highlight and select ‘Screen duration’.
4 Choose between the following screen duration options:
‘Always on’ (default) The display is always active (and is set to your chosen brightness level.
‘Off after 7 seconds’ The display switches off after 7 seconds of inactivity and lights up again
when you tap a touch key or the SnoozeHandle or push a dial.
To adjust the screen brightness
By default, the display brightness is set to ‘Automatic’ in active and standby, which means that the
brightness adjusts to suit the lighting level in your room. If you want to change this setting, follow the
instructions below:
1 Tap
O Options and highlight and select ‘Display’.
2 Highlight ‘Active operation’ to adjust the display settings that apply when the radio is switched
on or ‘Standby operation’ to adjust the display settings that apply in standby.
3 Highlight and select ‘Brightness’.
4 Rotate the Select dial to adjust the brightness from 1 (low) to 10 (high) and tap O OK to confirm.
Note You can toggle the brightness between O Automatic (light sensor) and O Manual.

36 Universal options EVOKE Flow Owner’s Manual v1.0
6.5 Upgrade your radio’s firmware
Firmware upgrades may be issued in the future to provide exciting new features. You can check if a
firmware upgrade is available and download the upgrade over your wireless network. Alternatively,
you can connect EVOKE Flow to your PC using a USB cable (A-to-mini-B type, not supplied) and
download the firmware upgrade manually from http://support.pure.com
To upgrade over your wireless network (recommended)
1 Tap
O Options; highlight and select ‘Additional settings’; select ‘Upgrade’; and select ‘Wi-Fi’.
2 EVOKE Flow will search for any available upgrades.
3 If an upgrade is available the message ‘New version available: v1.x’ will appear on screen. In
the event that older software upgrades, which have been superceded by the new upgrade, are
available tap O Show all to display all the available (legacy) upgrades.
4 Tap O OK to download and install the new firmware, which takes 3–4 minutes.
To upgrade using a USB cable (where a wireless network is not available)
1 Visit http://support.pure.com to check to see if an upgrade is available for EVOKE Flow.
2 If an upgrade is listed on the website, download the most recent upgrade to your PC.
3 Connect EVOKE Flow to your PC’s USB port. Follow the on-screen instructions provided with
the upgrade software.
6.6 Factory reset
Resetting your radio removes all FM presets (but not your internet Favorites), and resets all options to
defaults. All your wireless networks settings will be cleared.
1. Press and hold O Options for 3 seconds to display the ‘Factory reset’ menu.
2. Tap O Yes to confirm the reset or O No to cancel, or wait 7 seconds for the screen to time-out.
Note If you only want EVOKE Flow to forget all wireless networks, not your other settings, you
can select ‘Clear network settings’ in the ‘Wi-Fi settings’ menu.

37 Wireless networking help EVOKE Flow Owner’s Manual v1.0
7 Help and advice
Wireless networking help
7.1 Steps to ensure successful connection to your wireless network
Your wireless network needs to be visible, not ‘hidden’, and broadcasting an SSID (network name) s
in order for EVOKE Flow to detect it. If you’d like to enter your network settings manually and leave
your network configured as ‘hidden’, then follow the instructions on page 27, ‘Manual setup’.
EVOKE Flow cannot connect to wireless networks that are access controlled, such as certain s
office networks, without special permissions.
EVOKE Flow needs to be positioned within the range of your wireless network, which will be s
reduced if there are brick walls in between the router and the radio. Although EVOKE Flow is very
good at picking up wireless networks, the strength of the Wi-Fi signal will vary depending on your
router and surrounding environment. If EVOKE Flow fails to find your wireless network, or the
signal drops off, move closer to the router and select another station.
Unless your network is ‘open’ (this is generally not recommended due to the risk of unauthorised s
access), make sure you have your WEP, WPA or WPA2 key to hand. You can find this by logging in
to your router’s settings using a web address (found in the router’s instruction manual) and a user
name and password (sometimes found on the casing of the router itself or by contacting your ISP).
For more information and help go to www.thelounge.com and click ‘Help’
7.2 Steps to ensure successful listening to online audio content
If a station will not play, tell us about the problem at the ‘Talk to us’ page at The Lounge.s
To get the best user experience, register at The Lounge (www.thelounge.com), our online audio s
portal. This allows you to see recommended and popular stations and add more than 10 items to
your list of Favourites.
For more information and help go to www.thelounge.com and click ‘Help’
7.3 Steps to ensure successful media streaming
In order to share your music files with EVOKE Flow you need to download and install Flow Server s
from www.thelounge.com (available as a free download when you register) or install Windows
Media Player 11. These programmes share your media files over your wireless network using the
UPnP protocol.
Make sure your PC is switched on or in hibernation. If your media files are stored in a Network s
Attached Storage (NAS) device then your PC does not need to be switched on.
EVOKE Flow cannot play files which are restricted by Digital Rights Management (DRM).s

38 Wireless networking help EVOKE Flow Owner’s Manual v1.0
Make sure your music files are saved in a supported file format: MP2, MP3, WMA4, WMA7, s
WMA8, WMA9, AAC (including .m4a) or Real Audio. For more details see Chapter 8, Technical
specifications.
For more information and help go to www.thelounge.com and click ‘Help’
7.4 Step to ensure successful FM listening
When listening to FM, the aerial needs to be up and fully extended to ensure the best possible s
reception.
For more information and help go to www.thelounge.com and click ‘Help’
Need help?
We want you to get the most out of your EVOKE Flow
and enjoy all that the world of connected radio has to
offer. If you have any questions about the product after
reading this manual, please visit our support website
or contact a member of our support team by phone or
e-mail.
Returns & Repairs
If this product develops a fault within the warranty
period we’ll organise a repair or replace it if necessary.
Read the ‘Warranty information’ inside for information
about the warranty period, terms and conditions.
http://support,pure.com

39 Technical specifications EVOKE Flow Owner’s Manual v1.0
Description: Stereo radio (stereo output requires optional auxiliary speaker, headphones or
external amplifier) with full FM reception. Supports FM RDS and RadioText.
Wireless: 802.11b and 802.11g supported with WEP and WPA/WPA2 encryption. .
Frequency range: FM 89.7—107.9 MHz.
Supported codecs: MPEG: 8kbps–320kbps (includes MPEG-1-Layer-III, MPEG-2-Layer-III and MPEG
2.5-Layer-III). WMA: 64kbps–385kbps (WMA4, WMA7, WMA8 and WMA9,
including support for VBR & CBR). AAC: 16kbps–320kbps (including .m4a). Real
Audio: 8kbps–96.3kbps.
Media streaming: Media streaming requires UPnP media server or PC/MAC running UPnP server
software (Flow Server software supplied upon registration to www.thelounge.
com) or NAS box with UPnP support).
Speaker: Full-range 3” drive unit.
Audio power output: 7W RMS per channel (with additional speaker).
Input connectors: 6V DC power adapter socket (230V supplied). ChargePAK E1 connector. 3.5mm
Line-in for auxiliary devices. USB (mini-AB type) for firmware upgrades and PURE
Ethernet adapter
Output connectors: 3.5mm headphone, 3.5mm line out (analogue), 3.5mm auxiliary speaker
connection.
Controls: Touch-sensitive controls including 3 context-sensitive touch keys, back, standby
and SnoozeHandle. Rotary volume, rotary navigate/select.
Presets: 10 FM and unlimited internet radio favorites (maximum of 10 until user registration
at www.thelounge.com).
Display: Large high contrast yellow-on-black graphical 128 x 64 auto-dimming OLED
display.
Power: 100-240V, 50/60Hz. Output 6VDC 2.0A external power adapter for mains power.
Optional ChargePAK E1 for battery power (sold separately).
Approvals: CE marked. Compliant with the EMC and Low Voltage Directives (89/336/EEC and
73/23/EEC). IEEE 802.11b, IEEE 802.11g, WPA™ - Personal, WPA2™ - Personal.
Dimensions : 6.8" high x 8.2” wide x 4.3” deep.
Aerial: Captive telescopic aerial and internal Wi-Fi aerial.
Technical specifications
8 Technical specifications

www.pure.com
102BZ
PURE
Imagination
Technologies Ltd.
Home Park Estate
Kings Langley
Herts, WD4 8LZ
United Kingdom
+44 (0)845 148 9001 sales and support
+44 (0)845 148 9002 trade sales and support
+44 (0)845 148 9003 fax
http://support.pure.com
sales@pure.com
EcoPlus
EVOKE Flow is a member of the PURE EcoPlus™ product
family. All EcoPlus products are designed and manufactured
to minimise their environmental impact.
This manual is supplied as a PDF download to save paper.
The accompanying Quick Start Guide is printed on 100%
recycled paper using soya-based ink.
The retail carton protecting your product is printed on at
least 70% recycled card finished using a water-based
varnish and sized for maximum transport efficiency.
For more information please visit www.pure.com/ecoplus
100%
PURE North America
2269 Chestnut Street,
Suite 455
San Francisco CA
94123-2600
+1 (415) 566-38751 sales
www.pure.com/us
http://support.pure.com