Industrea Mining Technology AMTCASG1 UHF DATA TRANSCEIVER User Manual
Advanced Mining Technologies Pty Ltd UHF DATA TRANSCEIVER Users Manual
Users Manual

Document Number:
CAS-CAM_RF Operating Instructions.doc
Author: Craig Hoffmann
Issue: E Date: 18 June 2010
ADVANCED MINING TECHNOLOGIES PTY. LTD.
COLLISION AVOIDANCE SYSTEM
CAS-CAM/RF
®
Operating Instructions
18 June 2010
Issue E
© ADVANCED MINING TECHNOLOGIES PTY LTD
A.B.N. 76 060 418 859
All copyrights in this document and any accompanying drawings, data sheets or
other documents shall remain the exclusive property of ADVANCED MINING
TECHNOLOGIES PTY LTD and shall not be disclosed by the recipient to third
persons without the written consent of the company. The document is supplied
without liability for errors or omissions.

Collision Avoidance System: CAS-CAM/RF® Operating Instructions
Document Number: CAS-CAM_RF Operating Instructions (with FCC
precautions)_18June2010.doc Page 2 of 126
Issue: E
Dear Customer
Thank-you for purchasing the CAS-CAM/RF
®
system.
We strongly suggest that you note the listed Precautions and carefully study the Operating
Instructions before attempting to operate the CAS-CAM/RF
®
system.

Collision Avoidance System: CAS-CAM/RF® Operating Instructions
Document Number: CAS-CAM_RF Operating Instructions (with FCC
precautions)_18June2010.doc Page 3 of 126
Issue: E
Table of Contents
1 PRECAUTIONS...........................................................................................................11
1.1 Certifications .............................................................................................................11
1.2 Operation ...................................................................................................................11
1.3 Installation .................................................................................................................12
1.4 Repairs .......................................................................................................................12
2 SYSTEM OVERVIEW..................................................................................................13
2.1 Introduction ...............................................................................................................13
2.2 Performance Capabilities .........................................................................................14
2.3 Features and Benefits...............................................................................................15
3 BASIC SYSTEM OPERATION....................................................................................18
4 SYSTEM DESCRIPTION.............................................................................................19
4.1 Overview ....................................................................................................................19
4.2 Heavy Vehicle System...............................................................................................20
4.2.1 Camera Unit (PROD0118) ..................................................................................20
4.2.2 Display Unit (PROD0119) ...................................................................................21
4.2.3 Expansion Unit (PROD0161) ..............................................................................22
4.2.4 Front / Rear RF Unit (PROD0239 / PROD0169).................................................24
4.3 Light Vehicle (LV) System (with integral beacon) (PROD0246).............................26
4.4 Light Vehicle (LV) System (with external beacon option) (PROD0294) ................28
4.5 Stationary Object (SO) System (PROD0210)...........................................................30
4.6 Mobile Plant & Equipment (HV) System (PROD0225).............................................30
4.7 Personnel Tag (PT) Unit............................................................................................30
4.8 Test Station (TS) System (PROD0241).....................................................................32
5 SYSTEM OPERATION................................................................................................33
5.1 General.......................................................................................................................33
5.2 Programmable Detection Zones...............................................................................34
5.2.1 Heavy Vehicle Detection Zones..........................................................................34
5.2.2 Light Vehicle Detection Zone ..............................................................................35

Collision Avoidance System: CAS-CAM/RF® Operating Instructions
Document Number: CAS-CAM_RF Operating Instructions (with FCC
precautions)_18June2010.doc Page 4 of 126
Issue: E
5.2.3 Stationary Object / Mobile Plant & Equipment / Test Station Detection Zone .....36
6 COLLISION AVOIDANCE APPLICATIONS ...............................................................37
6.1 Heavy Vehicle (HV) to Heavy Vehicle (HV) collision avoidance ............................37
6.2 Heavy Vehicle (HV) to Light Vehicle (LV) collision avoidance ..............................37
6.3 Dragline / Shovel to Cleanup Dozer / Trailing Cable Handling Vehicle / Dump
Truck collision avoidance...............................................................................................38
6.4 Heavy Vehicle (HV) to Stationary Object (SO) collision avoidance (e.g. fixed plant
& equipment)....................................................................................................................38
6.5 Heavy Vehicle to Haul Road Crossing / Merging Collision Scenario....................38
6.6 Heavy Vehicle to other RF tagged Vehicles Collision Avoidance Due to Driver
Fatigue..............................................................................................................................39
6.7 Other Applications ....................................................................................................39
6.8 Additional Benefits from Camera Only installations (CAS-CAM
®
)........................40
7 TYPICAL COLLISION AVOIDANCE SCENARIOS ....................................................42
7.1 General.......................................................................................................................42
7.2 Collision Scenarios and Solutions...........................................................................42
8 APPLICATIONS ..........................................................................................................47
9 NAME AND FUNCTION OF PARTS...........................................................................48
9.1 Heavy Vehicle (HV) System ......................................................................................48
9.1.1 Display Unit (PROD0119) ...................................................................................48
9.1.2 Camera Unit (PROD0118) ..................................................................................50
9.1.3 Expansion Unit (PROD0161) ..............................................................................51
9.1.4 RF Unit – Front (PROD0239) or Rear (PROD0169) ...........................................52
9.2 Light Vehicle (LV) System (with integral beacon) (PROD0246).............................53
9.2.1 Light Vehicle Unit (PROD0209) ..........................................................................53
9.2.2 Dash Alarm Unit (PROD0211) ............................................................................54
9.3 Light Vehicle (LV) System (with external beacon option) (PROD0294) ................55
9.3.1 Light Vehicle RF Unit (with external beacon option) (PROD0295)......................55
9.3.2 Dash Alarm Unit (PROD0211) ............................................................................56
9.4 Stationary Object (SO) System (PROD0210)...........................................................57
9.4.1 Stationary Object Unit (PROD0212) ...................................................................57
9.4.2 Dash Alarm Unit (PROD0211) ............................................................................58
9.5 Mobile Plant & Equipment (HV) System (PROD0225).............................................59
9.5.1 Mobile Plant & Equipment Unit (PROD0250)......................................................59

Collision Avoidance System: CAS-CAM/RF® Operating Instructions
Document Number: CAS-CAM_RF Operating Instructions (with FCC
precautions)_18June2010.doc Page 5 of 126
Issue: E
9.5.2 Dash Alarm Unit (PROD0211) ............................................................................60
9.6 Test Station (TS) System (PROD0241).....................................................................61
9.6.1 Test Station Unit (PROD0251)............................................................................61
9.6.2 Dash Alarm Unit (PROD0211) ............................................................................62
9.7 Personnel Tag (PT) Unit............................................................................................63
10 BASIC FUNCTIONS.................................................................................................64
10.1 Heavy Vehicle Display Unit .................................................................................64
8.1.1 Screen Layout.....................................................................................................64
10.1.1 Power On/Off ...................................................................................................65
10.1.2 Keypad Functions ............................................................................................65
10.1.3 Switching Camera Channels............................................................................65
10.1.4 Changing Camera Settings..............................................................................66
10.1.5 Switching Cameras on Gearing .......................................................................66
10.1.6 Switching Cameras on RF Detections .............................................................66
10.1.7 Auto Cycling Camera Channels.......................................................................66
10.1.8 DIM Function....................................................................................................67
10.1.9 Display Reset Function....................................................................................67
10.1.10 Recording Video Signals (PAL format) .........................................................67
10.1.11 RF Detections and Alarms ............................................................................68
10.1.11.1 Alarm Display ............................................................................................68
10.1.11.2 RF Detection Ranges ................................................................................68
10.1.11.3 Alarm Process...........................................................................................68
10.1.11.4 Heavy Vehicle Reverse Mode ...................................................................69
10.1.11.5 Heavy Vehicle Forward Mode ...................................................................69
10.1.11.6 Heavy Vehicle Stationary (neutral) Mode ..................................................69
10.1.11.7 Operator Confirmation of Alarms...............................................................69
10.1.11.8 Alarm Specifications..................................................................................70
10.2 Light Vehicle (LV) System...................................................................................71
10.2.1 RF Detections and Alarms ...............................................................................71
10.2.1.1 Alarm Components......................................................................................71
10.2.1.2 RF Detection Zones and Ranges ................................................................71
10.2.1.3 Alarm Process.............................................................................................71
10.2.1.4 Alarm Specifications....................................................................................72
10.2.2 Power On/Off ...................................................................................................72
10.3 Stationary Object (SO) Unit.................................................................................73
10.3.1 RF Detections and Alarms ...............................................................................73
10.3.1.1 Alarm Components......................................................................................73
10.3.1.2 RF Detection Zones and Ranges ................................................................73
10.3.1.3 Alarm Process.............................................................................................73
10.3.1.4 Alarm Specifications....................................................................................73
10.3.2 Power On/Off ...................................................................................................73
10.4 Mobile Plant & Equipment (HV) Unit ..................................................................74
10.4.1 RF Detections and Alarms ...............................................................................74
10.4.1.1 Alarm Components......................................................................................74
10.4.1.2 RF Detection Zones and Ranges ................................................................74

Collision Avoidance System: CAS-CAM/RF® Operating Instructions
Document Number: CAS-CAM_RF Operating Instructions (with FCC
precautions)_18June2010.doc Page 6 of 126
Issue: E
10.4.1.3 Alarm Process.............................................................................................74
10.4.1.4 Alarm Specifications....................................................................................74
10.4.2 Power On/Off ...................................................................................................74
10.5 Test Station (TS) Unit ..........................................................................................75
10.5.1 RF Detections and Alarms ...............................................................................75
10.5.1.1 Alarm Components......................................................................................75
10.5.1.2 RF Detection Zones and Ranges ................................................................75
10.5.1.3 Alarm Process.............................................................................................75
10.5.1.4 Alarm Specifications....................................................................................75
10.5.2 Power On/Off ...................................................................................................75
10.6 Personnel Tag (PT) Unit ......................................................................................76
10.6.1 RF Detections and Alarms ...............................................................................76
10.6.1.1 Alarm Components......................................................................................76
10.6.1.2 RF Detection Zones and Ranges ................................................................76
10.6.1.3 Alarm Process.............................................................................................76
10.6.1.4 Alarm Specifications....................................................................................76
10.6.2 Power On/Off ...................................................................................................76
10.6.3 Battery Low......................................................................................................76
10.6.4 Battery Charging..............................................................................................77
11 HEAVY VEHICLE DISPLAY UNIT - MENU FUNCTIONS........................................78
11.1 Boot-Up Screen....................................................................................................78
11.2 Default Screen......................................................................................................78
11.3 Heavy Vehicle Display Unit – Diagnostic Menu.................................................79
12 OTHER FUNCTIONS ...............................................................................................80
12.1 Camera Titles (8 chars max) ...............................................................................80
12.2 Camera Brightness Settings...............................................................................80
12.3 Camera Colour Settings ......................................................................................80
12.4 Camera Mirror / Normal Mode.............................................................................80
12.5 Camera Enable.....................................................................................................80
12.6 Switching Settings...............................................................................................80
12.6.1 Forward Gear Switching ..................................................................................80
12.6.2 Forward Channel Selection..............................................................................80
12.6.3 Reverse Gear Switching ..................................................................................80
12.6.4 Reverse Channel Selection..............................................................................80
12.6.5 Sleep Time.......................................................................................................80
12.6.6 RF Switching....................................................................................................80
12.6.7 Wake on Forward Gear....................................................................................80
12.6.8 Wake on Reverse Gear ...................................................................................80
12.6.9 Central RF........................................................................................................80
12.6.10 Keypad Tone.................................................................................................80

Collision Avoidance System: CAS-CAM/RF® Operating Instructions
Document Number: CAS-CAM_RF Operating Instructions (with FCC
precautions)_18June2010.doc Page 7 of 126
Issue: E
12.6.11 Auto Cycle.....................................................................................................80
12.7 Front RF Unit Settings.........................................................................................80
12.8 Rear RF Unit Settings..........................................................................................80
12.9 Reversing Siren Disable on Heavy Vehicle .......................................................80
12.10 Heavy Vehicle Maintenance Mode...................................................................80
12.11 Heavy Vehicle Display Unit – Screen Power Down........................................81
12.11.1 Manual Mode ................................................................................................81
12.11.2 Automatic Mode............................................................................................81
12.12 Real Time Clocks ..............................................................................................81
12.13 Data Logging of Detections .............................................................................81
13 INSTALLER MODE SETTINGS ...............................................................................82
14 SYSTEM CALIBRATION & TESTING .....................................................................85
14.1 Calibration System (PROD0260).........................................................................85
14.2 Test Station System (TS) (PROD0251) ...............................................................85
15 CARE AND MAINTENANCE....................................................................................86
15.1 Heavy Vehicle (HV) System.................................................................................86
15.1.1 Operational Care..............................................................................................86
15.1.2 Pre-Operation Inspection .................................................................................86
15.1.3 Startup Inspection............................................................................................86
15.1.4 Operational Checks .........................................................................................87
15.1.5 Shutdown Inspection........................................................................................87
15.1.6 Maintenance Requirements .............................................................................87
15.2 Light Vehicle (LV) System...................................................................................88
15.2.1 Operational Care..............................................................................................88
15.2.2 Pre-Operation Inspection .................................................................................88
15.2.3 Startup Inspection............................................................................................88
15.2.4 Operational Checks .........................................................................................88
15.2.5 Maintenance Requirements .............................................................................88
15.3 Stationary Object (SO) Unit.................................................................................89
15.3.1 Operational Care..............................................................................................89
15.3.2 Maintenance Requirements .............................................................................89
15.4 Mobile Plant & Equipment (HV) System.............................................................89
15.4.1 Operational Care..............................................................................................89
15.4.2 Pre-Operation Inspection .................................................................................89
15.4.3 Startup Inspection............................................................................................89
15.4.4 Operational Checks .........................................................................................90
15.4.5 Maintenance Requirements .............................................................................90

Collision Avoidance System: CAS-CAM/RF® Operating Instructions
Document Number: CAS-CAM_RF Operating Instructions (with FCC
precautions)_18June2010.doc Page 8 of 126
Issue: E
15.5 Personnel Tag (PT) Unit ......................................................................................91
15.5.1 Operational Care..............................................................................................91
15.5.2 Pre-Operation Inspection .................................................................................91
15.5.3 Startup Inspection............................................................................................91
15.5.4 Operational Checks .........................................................................................91
15.5.5 Maintenance Requirements .............................................................................91
15.6 Test Station (TS) Unit ..........................................................................................91
15.6.1 Operational Care..............................................................................................91
15.6.2 Maintenance Requirements .............................................................................91
16 TROUBLESHOOTING .............................................................................................92
16.1 Overview...............................................................................................................92
16.2 Heavy Vehicle Display Unit Error Messages .....................................................92
16.3 Diagnostic Tables ................................................................................................94
16.3.1 Heavy Vehicle (HV) Diagnostic Table..............................................................94
16.3.2 Light Vehicle (LV) Diagnostic Table.................................................................97
16.3.3 Stationary Object (SO) Diagnostic Table .........................................................99
16.3.4 Mobile Plant & Equipment (MPE) Diagnostic Table.......................................100
16.3.5 Personnel Tag (PT) Diagnostic Table............................................................102
16.3.6 Test Station (TS) Diagnostic Table ................................................................103
17 FAULT REPORTING..............................................................................................104
18 ACCESSORIES......................................................................................................104
18.1 Heavy Vehicle Display Unit – Sun Visor (PROD0164).....................................104
19 CONFIGURATION OPTIONS ................................................................................105
20 PART NUMBERS...................................................................................................106
21 SPECIFICATIONS..................................................................................................107
21.1 Display Unit (PROD0119) ..................................................................................107
21.2 Camera Unit (PROD0118) ..................................................................................110
21.3 Expansion Unit (PROD0161) .............................................................................111
21.4 Heavy Vehicle Front RF Unit (PROD0239) & Rear RF Unit (PROD0169) .......112
21.5 Light Vehicle System (with integral beacon) (PROD0246) .............................113
21.6 Light Vehicle System (with external beacon option) (PROD0294).................114
21.7 Stationary Object System (PROD0210)............................................................115
21.8 Test Station System (PROD0241).....................................................................116

Collision Avoidance System: CAS-CAM/RF® Operating Instructions
Document Number: CAS-CAM_RF Operating Instructions (with FCC
precautions)_18June2010.doc Page 9 of 126
Issue: E
21.9 Mobile Plant & Equipment System (PROD0225) .............................................117
21.10 Personnel Tag .................................................................................................118
22 WARRANTY INFORMATION.................................................................................119
22.1 Warranty .............................................................................................................119
22.2 Maintenance and Repairs..................................................................................119
23 GLOSSARY OF TERMS ........................................................................................120
24 APPENDIX 1: AMT CAS-CAM/RF
®
FAULT REPORT RECORD ..........................125
25 APPENDIX 2: AMT CONTACT DETAILS..............................................................126
List of Figures
Figure 1: Typical Visibility Map for a Large Haul Truck (QMITAB 1998)...........................14
Figure 2: System Function Diagram .................................................................................19
Figure 3: Camera Unit (PROD0118).................................................................................20
Figure 4: Heavy Vehicle Display Unit (PROD0119)..........................................................21
Figure 5: Heavy Vehicle Expansion Unit (PROD0161) .....................................................22
Figure 6: Heavy Vehicle (HV) RF Unit (Front – PROD0239 / Rear – PROD0169) ...........24
Figure 7: Light Vehicle (LV) System – Light Vehicle Unit (PROD0209) ............................27
Figure 8: Light Vehicle (LV) System – Dash Alarm Unit (PROD0211)..............................27
Figure 9: Light Vehicle (LV) System – Light Vehicle RF Unit (with external beacon option)
(PROD0295)...............................................................................................................29
Figure 10: Light Vehicle (LV) System – Dash Alarm Unit (PROD0211)............................29
Figure 11 – Personnel Tag (PT) Unit (prototype version) ..................................................30
Figure 12 – Heavy Vehicle Front and Rear Detection Zones.............................................34
Figure 13 – Light Vehicle Object Detection Zone...............................................................35
Figure 14 – Stationary Object / Mobile Plant & Equipment / Test Station Detection Zone.36
Figure 15: Display Unit - Front Panel Layout ....................................................................48
Figure 16: Display Unit - Rear Panel Layout.....................................................................49
Figure 17: Camera Unit - Layout.......................................................................................50
Figure 18: Expansion Unit - Layout...................................................................................51
Figure 19: RF Unit - Layout...............................................................................................52
Figure 20: Light Vehicle Unit – Layout ..............................................................................53
Figure 21: Dash Alarm Unit – Front Panel Layout ............................................................54
Figure 22: Dash Alarm Unit – Rear Panel Layout.............................................................54
Figure 23: Light Vehicle Unit – Layout ..............................................................................55
Figure 24: Dash Alarm Unit – Front Panel Layout ............................................................56
Figure 25: Dash Alarm Unit – Rear Panel Layout.............................................................56
Figure 26: Stationary Object Unit – Layout .......................................................................57
Figure 22: Dash Alarm Unit – Front Panel Layout ............................................................58
Figure 23: Dash Alarm Unit – Rear Panel Layout.............................................................58
Figure 29: Mobile Plant & Equipment Unit – Layout .........................................................59
Figure 30: Dash Alarm Unit – Front Panel Layout ............................................................60
Figure 31: Dash Alarm Unit – Rear Panel Layout.............................................................60
Figure 32: Test Station Unit – Layout ...............................................................................61

Collision Avoidance System: CAS-CAM/RF® Operating Instructions
Document Number: CAS-CAM_RF Operating Instructions (with FCC
precautions)_18June2010.doc Page 10 of 126
Issue: E
Figure 33: Dash Alarm Unit – Front Panel Layout ............................................................62
Figure 34: Dash Alarm Unit – Rear Panel Layout.............................................................62
Figure 30: Display Unit – Default Screen Layout ..............................................................64
Figure 31: Display Unit – Summary of Keypad Functions.................................................65
List of Tables
Table 1: Heavy Vehicle Alarm Specifications....................................................................70
Table 2: Light Vehicle Alarm Specifications......................................................................72
Table 3: Stationary Object Alarm Specifications ...............................................................73
Table 4: Mobile Plant & Equipment Alarm Specifications .................................................74
Table 5: Test Station Alarm Specifications .......................................................................75
Table 6: Personnel Tag Alarm Specifications ...................................................................76
Table 7: CAS-CAM/RF
®
Configuration Options ..............................................................105

Collision Avoidance System: CAS-CAM/RF® Operating Instructions
Document Number: CAS-CAM_RF Operating Instructions (with FCC
precautions)_18June2010.doc Page 11 of 126
Issue: E
1 PRECAUTIONS
Please read these precautions carefully before you operate the CAS-CAM/RF
®
system.
1.1 Certifications
This equipment has been independently tested and found to comply with the following
standards:
• AS/NZS3548 ‘Electro-magnetic Compatibility for Information technology Equipment’
(CISPR22, EN55022), Class A, C-tick Mark Supplier Code Number N11443
• AS/NZS 4268.2 ‘Low Interference Potential Devices Class License’
• ACMA Radio Communications (Short Range Devices) Standard 2004
• ES60950-1: 2001 ‘Information Technology Equipment – Safety – Part 1: General
Requirements’
• ETSI EN 301 489-1 V1.8.1 (sections 9.2 and 9.6) ‘Electromagnetic compatibility and
Radio spectrum Matters (ERM); Electromagnetic Compatibility (EMC) standard for
radio equipment and services; Part 1: Common technical requirements.’
• ETSI EN 301 489-1 V1.8.1 (2008-04) and ETSI EN 301 489-3 V1.4.1 (2002-08)
• ETSI EN 300 220-1 v2.1.1 (2006-04)
1.2 Operation
• Warning – this product is not to be operated within 20 cm of people (FCC
requirement)
• Warning – this product is not to be modified from the Manufacturer’s standard
design as this will void manufacturer’s warranty and could impact Certifications.
• Warning – This is a Class A product. In a domestic environment this product may
cause radio interference in which case the user may be required to take adequate
measures.
• The CAS-CAM/RF
®
System is a safety aid in providing the drivers of Heavy
Vehicles, Light Vehicles and Personnel Tag users with additional information to
make informed decisions in order to reduce the incidence of collisions. The system
is not designed to be a stand-alone safety interlocking system that can give a false
sense of protection and security, but still requires that all vehicle drivers and
personnel still take every manual precaution to avoid the incidence of collisions.
The system is designed as an aid to supplement and enhance existing safe work
practices and procedures.
• In the event of equipment malfunction, check the Troubleshooting section for
remedial action. If not covered by this section, consult the AMT Service Agent.
• To prevent fire or shock hazard, do not expose the Heavy Vehicle Display Unit to
rain or moisture.
• To avoid electrical shock, do not open the electrical equipment enclosures. There
are no user serviceable parts located inside the equipment items. Refer servicing to
the AMT Service Agent.
• To maintain clear camera vision on the Heavy Vehicle Display Unit, the user is
recommended to regularly clean the build up of foreign material from the camera
unit window. Cleaning can best be conducted with a window cleaning spray and
cloth. Approved access methods must be used when cleaning cameras located at
heights.
• The audible alarms contained within the Heavy Vehicle Display Unit, Light Vehicle
Dash Alarm Unit and Mobile Plant & Equipment Dash Alarm Unit must not be
blocked with foreign objects in order to reduce alarm sound levels as this is the

Collision Avoidance System: CAS-CAM/RF® Operating Instructions
Document Number: CAS-CAM_RF Operating Instructions (with FCC
precautions)_18June2010.doc Page 12 of 126
Issue: E
primary means of notifying drivers of potential collisions. Consult the AMT Service
Agent if you wish to adjust the alarm sound levels to suit the ambient noise levels of
the particular installation. Additionally for the above reason, the Light Vehicle Dash
Alarm Unit and Mobile Plant & Equipment Dash Alarm Unit must not be
disconnected during normal operation.
• The visual alarms contained on the Heavy Vehicle Display Unit Screen, Light
Vehicle Dash Alarm Unit and Mobile Plant & Equipment Dash Alarm Unit should not
be covered over with foreign objects in order to reduce night vision glare, as this is
the secondary means of notifying drivers of potential collisions (the primary means
being the audible alarms). The brightness level can be switched to a low setting on
the Heavy Vehicle Display Unit Screen by activating ‘DIM’ mode (refer to section
10.1.8). The intensity of the Power On LED indicators on both equipment items and
the Light Vehicle Dash Alarm Unit and Mobile Plant & Equipment Dash Alarm Unit
‘alarm’ LED indicators have been set at low intensity levels suited for both day and
night visibility.
• This equipment generates random low power radio frequency emissions (license
exempt) for automatic object detection using RF tagging (CAS-RF
®
) and could
interfere with existing radio communication devices even though classified as a
‘Low Interference Potential Device’ (LIPD). If this is the case, contact the AMT
Service Agent for further investigation. Operating frequencies may need to be
changed to cater for existing radio communication spectrum usage for the particular
application. Similarly, the CAS-RF
®
equipment may not be immune to interference
by other higher power radio communication devices present on site.
1.3 Installation
• Only AMT Service Agents are to carry out installations. Non-approved installations
will automatically void the warranty conditions.
1.4 Repairs
• Only AMT Service Agents are to carry out repairs. Non-approved repairs will
automatically void the warranty conditions.
• Do not remove equipment item covers. There are no user serviceable parts located
inside the equipment items.

Collision Avoidance System: CAS-CAM/RF® Operating Instructions
Document Number: CAS-CAM_RF Operating Instructions (with FCC
precautions)_18June2010.doc Page 13 of 126
Issue: E
2 SYSTEM OVERVIEW
2.1 Introduction
Since the advent of large mining trucks there has been an ongoing problem with collisions
resulting from poor external vision and limited maneuverability. This has resulted in a very
high incidence of accidents where large mining trucks collide with other vehicles, items of
plant and occasionally people. Over the last 10 years in Australian open cut coal mines in
the states of New South Wales and Queensland, 147 collisions have been reported
involving large mining equipment. Of these, a large proportion has been the result of poor
visibility (see Figure 1). Remarkably there have been few fatalities but property damage
and lost productivity has been significant.
The only protection against collisions in the blind areas of a truck at the moment are
procedural or "soft" barriers, such as no-go zones for Light Vehicles, standard parking and
start-up procedures, and audible reversing alarms. Even with these procedural controls
and noisy reversing alarms in place, the problem of Heavy Vehicle collisions has not been
eliminated. In addition to the requirement for an improved collision avoidance system, the
noise from these smart reversing alarms have recently come under review in mines
operating in close proximity to residential areas.
Even if the Heavy Vehicle driver could be provided with 360 degree unlimited vision
around the Heavy Vehicle, this would still not be adequate because of the vehicle size.
The driver would only be able to ‘look’ in a limited number of directions at once with the
potential for also creating distractions from safe driving.
An improved approach is to provide enhanced driver vision supplemented by an automatic
detection system that looks in all high risk directions at once, identifies potential problems
and attracts the driver’s attention to those areas where potential collisions could occur. In
addition, a further level of effectiveness is to provide warning information to both the Heavy
Vehicle driver and the objects/personnel at risk, as any hazardous situation involving two
parties, in which one party does not have the ability to take action, is inherently unsafe.
As part of the ongoing commitment to improving safety and productivity through the
application of innovative technology, Advanced Mining Technologies (AMT) in conjunction
with CSIRO Exploration and Mining has developed such a Collision Avoidance System
(CAS) aimed at greatly improving Heavy Vehicle safety and eliminating the need for
audible reversing alarms.
The CAS technology utilises state of the art colour video cameras with an LCD video
Display Unit as a vision aid (CAS-CAM
®
) and Radio Frequency (RF) transmitters and
receivers for automatic object proximity detection and classification (CAS-RF
®
). The
combined video camera and RF technologies form the CAS-CAM/RF
®
System.

Collision Avoidance System: CAS-CAM/RF® Operating Instructions
Document Number: CAS-CAM_RF Operating Instructions (with FCC
precautions)_18June2010.doc Page 14 of 126
Issue: E
Figure 1: Typical Visibility Map for a Large Haul Truck (QMITAB 1998)
2.2 Performance Capabilities
The key performance capabilities of the CAS-CAM/RF
®
System are as follows:
• Warning to the driver of the Heavy Vehicle when a vehicle, personnel or stationary
object is in the Heavy Vehicle’s path (visual and audible warning when an object is
detected within a programmed detection range)
• Warning to the “AT-RISK” personnel / vehicles / equipment in the case of an imminent
collision when the Heavy Vehicle is detected within a programmed detection range
(visual and / or audible warning)
• Programmable detection ranges for different object types from 0 – 80 m (accuracy of
+/-20%). Option for long range operation (typically 200-300m) for haul road crossing
warning light activation by approaching Heavy Vehicle or Heavy Vehicle to Heavy
Vehicle haul road fatigue management ‘wake-up’ alarms.
• Improved vision for the driver (i.e. video cameras)
• Mechanism for driver acknowledgment of alarms
• Reversing Alarm activated when personnel / objects are within the programmed
detection range of the Heavy Vehicle when in the reverse direction (optional)
• Default to existing warning system by notifying the driver of the Heavy Vehicle when
the system is not working and automatically activates the traditional reversing alarm
• Rugged construction for reliability in mining environments
• Reliable operation in adverse environmental conditions (e.g. dust, fog, smoke, hot, cold
and darkness)
• System aids and doesn’t inhibit current mine operations
• Coded identification of objects within programmed detection range displayed at all
times (i.e. Heavy Vehicle (HV), Light Vehicle (LV), Stationary Object (SO) / Fixed Plant,
Personnel Tag (PT), Test Station (TS))
• Data logging capability on all Heavy Vehicles and Light Vehicles for monitoring /
recording system operational performance & logging all anti-collision detections as a
safety audit trail (optional).
• Easy integration with existing Mine Fleet Management Systems (e.g. Modular Mining,
Tritronics, WENCO etc) either via the Display Unit serial interface using MODBUS
protocol or via the Expansion Unit RS-485 or CAN interface. This allows the transfer of

Collision Avoidance System: CAS-CAM/RF® Operating Instructions
Document Number: CAS-CAM_RF Operating Instructions (with FCC
precautions)_18June2010.doc Page 15 of 126
Issue: E
vehicle detection data in ‘real-time’ back to the mine central monitoring station /
Dispatch as a safety-audit-trail for operator compliance monitoring.

Collision Avoidance System: CAS-CAM/RF® Operating Instructions
Document Number: CAS-CAM_RF Operating Instructions (with FCC
precautions)_18June2010.doc Page 16 of 126
Issue: E
2.3 Features and Benefits
Features Benefits
• Combined vision system (CAS-CAM
®
) &
automatic object detection (CAS-RF
®
)
technologies (CAS-CAM/RF
®
)
• Comprehensive Heavy Vehicle safety
package utilising both vision aids
(cameras) and automated object
proximity detection (using active RF
tags) for safe interactions between
Heavy Vehicles, Light Vehicles,
Personnel and Stationary Objects.
• Single compact video display / alarm unit
alerts Heavy Vehicle operator when
objects are in the vehicle’s path.
• Automatic alarming alleviates need to
monitor video display whilst driving thus
reducing distractions. Alarms attract the
driver’s attention to areas of potential
collisions.
• Improved driver vision using high-
resolution colour video cameras.
• Multiple levels of collision detection
redundancy (i.e. two-way RF tagging,
Video Cameras, reversing alarms and
side mirrors).
• Seamless integration of CAS-CAM
®
and
CAS-RF
®
components into CAS-
CAM/RF
®
.
• Two-way alarming • Heavy Vehicle driver receives alarm
when another Heavy Vehicle, Light
Vehicle, Personnel, Mobile and / or
Stationary Objects are in the vehicle’s
path and can take appropriate action.
Driver can also confirm presence of ‘AT-
RISK’ objects using unique object
Identification Codes for specific radio
confirmation and can also check location
using video cameras.
• Individual warning to the “AT-RISK”
personnel and / or mobile object of the
approaching Heavy Vehicle so that
appropriate action can be taken.
• Avoids the hazardous situation involving
two parties, in which one party does not
have the ability to take action, as this is
inherently unsafe.

Collision Avoidance System: CAS-CAM/RF® Operating Instructions
Document Number: CAS-CAM_RF Operating Instructions (with FCC
precautions)_18June2010.doc Page 17 of 126
Issue: E
Features Benefits
• Coded object classes and unique ID
codes (i.e. Heavy Vehicle (HV), Light
Vehicle (LV), Stationary Object (SO)
Personnel Tag (PT), Test Station (TS))
• Heavy Vehicle driver receives real time
indication of the number of objects in
each class and object identification
codes and can confirm the location of
the object(s) using video cameras.
• Alarms generated when object status
changes within the programmed
detection range(s).
• Multi-RF tag operation.
• RF tag could also be used for access
control purposes when integrated with a
security access control system.
• Programmable multiple detection ranges
from 0 – 80 m (accuracy of +/- 20%).
• Option for long range operation (typically
200-300m) for haul road crossing
warning light activation by approaching
Heavy Vehicle or Heavy Vehicle to
Heavy Vehicle ‘wake-up alarm’ for
managing driver fatigue on long haul
roads.
• Flexibility to adjust detection ranges to
suit specific applications.
• Programmable detection ranges
available on Heavy Vehicle for different
object types (e.g. HV, LV, SO, PT, TS),
HV detection location (i.e. front or rear or
sides), HV direction of travel (forward or
reverse) and speed.
• Single detection range on Personnel,
Light Vehicle, Stationary Object & Test
Station tags.
• Heavy Vehicle detection ranges can be
dynamically changed according to
vehicle speed for high speed and low
speed collision warning ranges.
• Cameras can be programmed to
automatically switch to front or rear or
side cameras either on gear changes
and / or automatic object detections
• Provides driver with visual confirmation
of the presence of new object (s) without
having to manually switch to the front or
rear camera.
• High performance Heavy Vehicle & RF
communications backbone • Allows flexibility for custom operation
and future expansion.
• Easy integration with other Heavy
Vehicle collision sensing technologies
(e.g. radar, ultra-sonics).
• Easy integration with existing mine data
telemetry networks (e.g. fleet
management systems).
• Heavy Vehicle and Light Vehicle data
logging capability for all detections
(optional)
• Able to monitor system performance and
all collision detections as a safety audit
trail.
• Data recoverable via laptop PC or in
real-time using Fleet Management
System.

Collision Avoidance System: CAS-CAM/RF® Operating Instructions
Document Number: CAS-CAM_RF Operating Instructions (with FCC
precautions)_18June2010.doc Page 18 of 126
Issue: E
Features Benefits
• Heavy Vehicle RF Unit eliminates the
need for noisy reversing sirens when
other ‘AT RISK’ objects are protected
with RF tags.
• Reduced noise emissions in particular
when operating near residential areas
(i.e. improves license to operate and
compliance with environmental noise
emission regulations).
• Reversing alarms can be activated when
either objects are detected within the
programmed detection zone (optional) or
when a system malfunction is detected.
• Localised System compared with
Distributed Wide Area Network • Not reliant on existing mine
infrastructure for reliable operation (i.e.
good risk management practice).
• High level of redundancy.
• Fast detection response time (typically
under 300 msec for 10 units operating
within the detection range).

Collision Avoidance System: CAS-CAM/RF® Operating Instructions
Document Number: CAS-CAM_RF Operating Instructions (with FCC
precautions)_18June2010.doc Page 19 of 126
Issue: E
3 BASIC SYSTEM OPERATION
The CAS technology offers significant benefits in the safety and productivity of both
surface and underground mining operations by eliminating Heavy Vehicle blind spots using
a combination of high-resolution colour cameras and automatic object detection using
active Radio Frequency (RF) tagging of ‘AT RISK’ objects / personnel. Objects types that
can be fitted with RF tags include Heavy Vehicles, Light Vehicles, Stationary Objects,
Mobile Plant & Equipment and Personnel (currently under development). Object detection
zones ('safety bubbles') can be programmed from 0 - 80m range (long range option for
200 - 300m range). Heavy Vehicles fitted with camera only systems can be seamlessly
upgraded to include the RF tagging capability. The colour video display in the Heavy
Vehicle also functions as an alarm panel which automatically alerts the driver to the
presence of the type and number of objects detected in either the front or rear or side
detection zones. Cameras can be programmed to automatically switch to front or rear
cameras either on gear changes and / or automatic object detections. Heavy Vehicle
reversing sirens can also be switched off when Heavy Vehicles and other 'AT RISK'
objects / personnel are protected with the RF tags. The system also provides 2-way
alarming between the Heavy Vehicle and the ‘AT RISK’ objects / personnel, as any
hazardous situation involving two parties, in which one party does not the ability to action,
is inherently unsafe. Only objects tagged as Heavy Vehicles generate alarms as they
create the greatest risk of collision with other objects due to size and blind spots.
Collision Avoidance System: CAS-CAM/RF® Operating Instructions
Document Number: CAS-CAM_RF Operating Instructions (with FCC
precautions)_18June2010.doc Page 20 of 126
Issue: E
4 SYSTEM DESCRIPTION
4.1 Overview
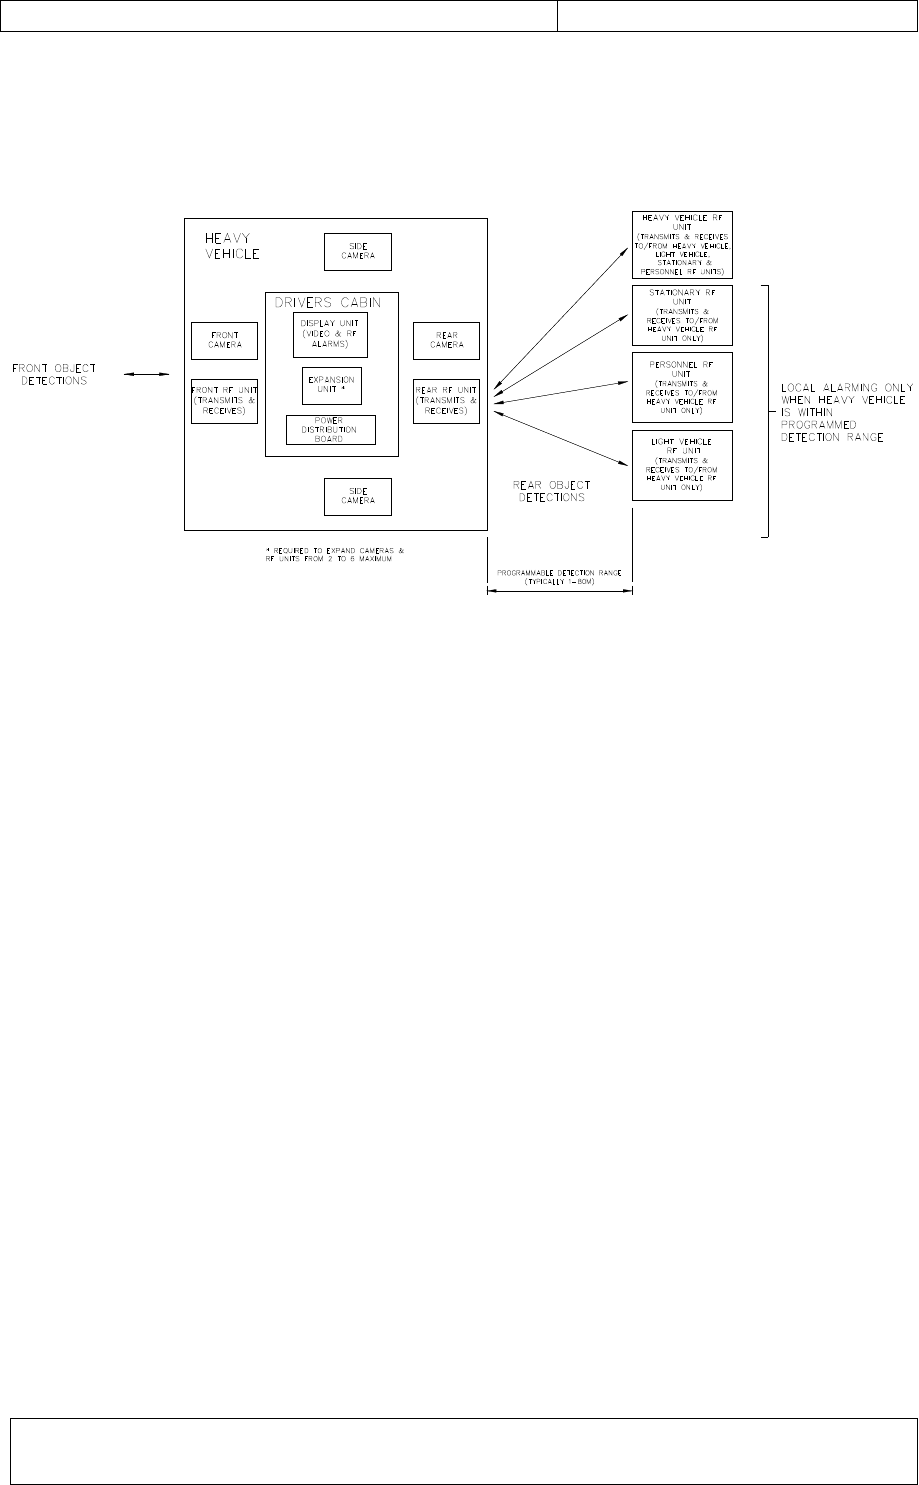
Figure 2: System Function Diagram
The CAS-CAM/RF
®
system consists of Radio Frequency (RF) Tags for each person, Light
Vehicle, Heavy Vehicle and other items of value. The Heavy Vehicle also has high quality
colour video cameras and a high definition colour LCD video Display Unit. The camera
video images and RF tagging alarms, in text format, are simultaneously displayed on the
Display Unit inside the Heavy Vehicle driver’s cabin.
The video camera is housed in a ruggedised enclosure and produces full colour vision
down to 0.03 lux illumination. Camera settings such as brightness and colour can be set
for each individual camera at the time of installation. Up to six (6) cameras can be
attached to the Display Unit (2 directly, 4 via an Expansion Unit). User programmable
camera functions include: DIM (brightness settings) and manual camera switching.
Additional programmable camera settings fixed at the time of installation include: Camera
titles (8 characters maximum), mirror / normal mode, auto switching to reverse / forward
camera when vehicle either engages reverse / forward gear or when RF detections are
recorded at the rear / front, camera cycling at variable rates. All settings are saved during
power down.
The Radio Frequency system transmits digitally coded data such as tag identification
number, tag type, vehicle status and tag status. This is crucial to the system’s ability to
discriminate when multiple tags are detected of various object classes.
A high quality, license exempt, digital RF link is used with full error control.
Personnel Tags (under development) are mounted on a safety vest and operate on
rechargeable batteries.
Collision Avoidance System: CAS-CAM/RF® Operating Instructions
Document Number: CAS-CAM_RF Operating Instructions (with FCC
precautions)_18June2010.doc Page 21 of 126
Issue: E
The system can be purchased with the following options:
• Video Only system for enhanced vision applications: CAS-CAM
®
• RF Only system for automatic object detection: CAS-RF
®
• Video & RF systems (vision & object detection): CAS-CAM/RF
®
A Video only system (CAS-CAM
®
) or RF only system (CAS-RF
®
) can be easily upgraded
for full Collision Avoidance System capability (CAS-CAM/RF
®
) as both technologies can
be seamlessly integrated with each other.
4.2 Heavy Vehicle System
The Heavy Vehicle System comprises of the following components:
• Camera Unit (up to 6 units)
• Display Unit
• Expansion Unit
• Front and / or Rear RF Unit and / or Side RF Units
Details on these components are as follows:
4.2.1 Camera Unit (PROD0118)
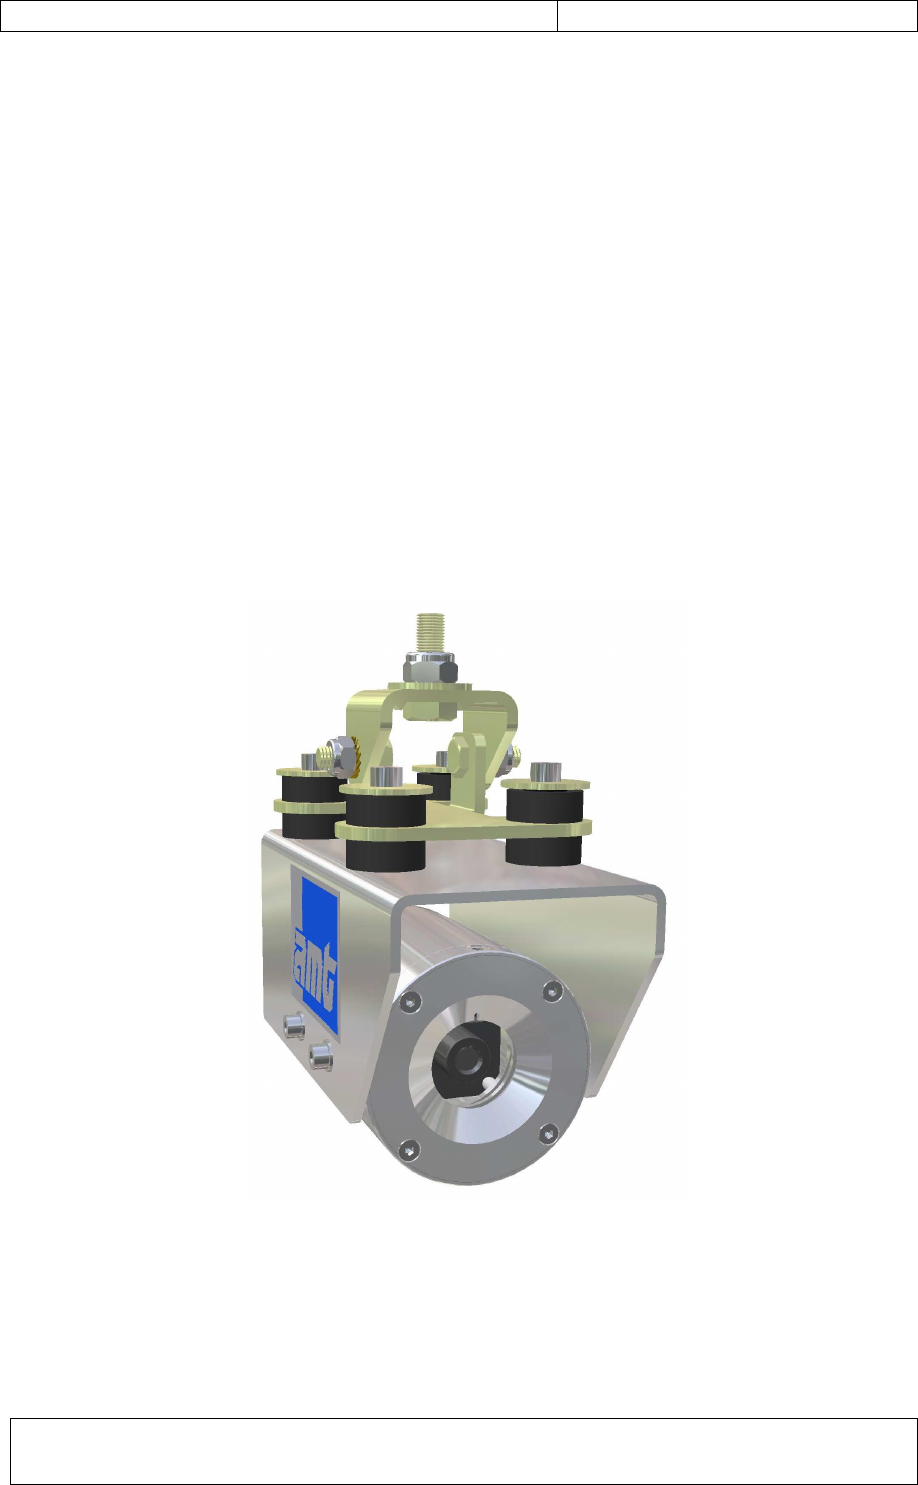
Figure 3: Camera Unit (PROD0118)
The Camera Units are water and dust resistant and designed to withstand the high-
pressure water sprays commonly used to clean Heavy Vehicles.
Features:
• IP 66 rated enclosure
• High resolution colour 1/3” CCD image sensor
Collision Avoidance System: CAS-CAM/RF® Operating Instructions
Document Number: CAS-CAM_RF Operating Instructions (with FCC
precautions)_18June2010.doc Page 22 of 126
Issue: E
• Resolution: 380 TV lines
• Viewing angle: 123 degrees horizontal and 91 degrees vertical (153 degrees diagonal)
(narrower viewing angles are available on request)
• Minimum illumination: 0.03 lux / F1.2 using day/night camera
• Waterproof connection system
• Small contemporary design
• Solid aluminium construction
• Highly adjustable mounting hardware
• Optional attachment for compressed air/water lens cleaning system (end user to
arrange)
4.2.2 Display Unit (PROD0119)
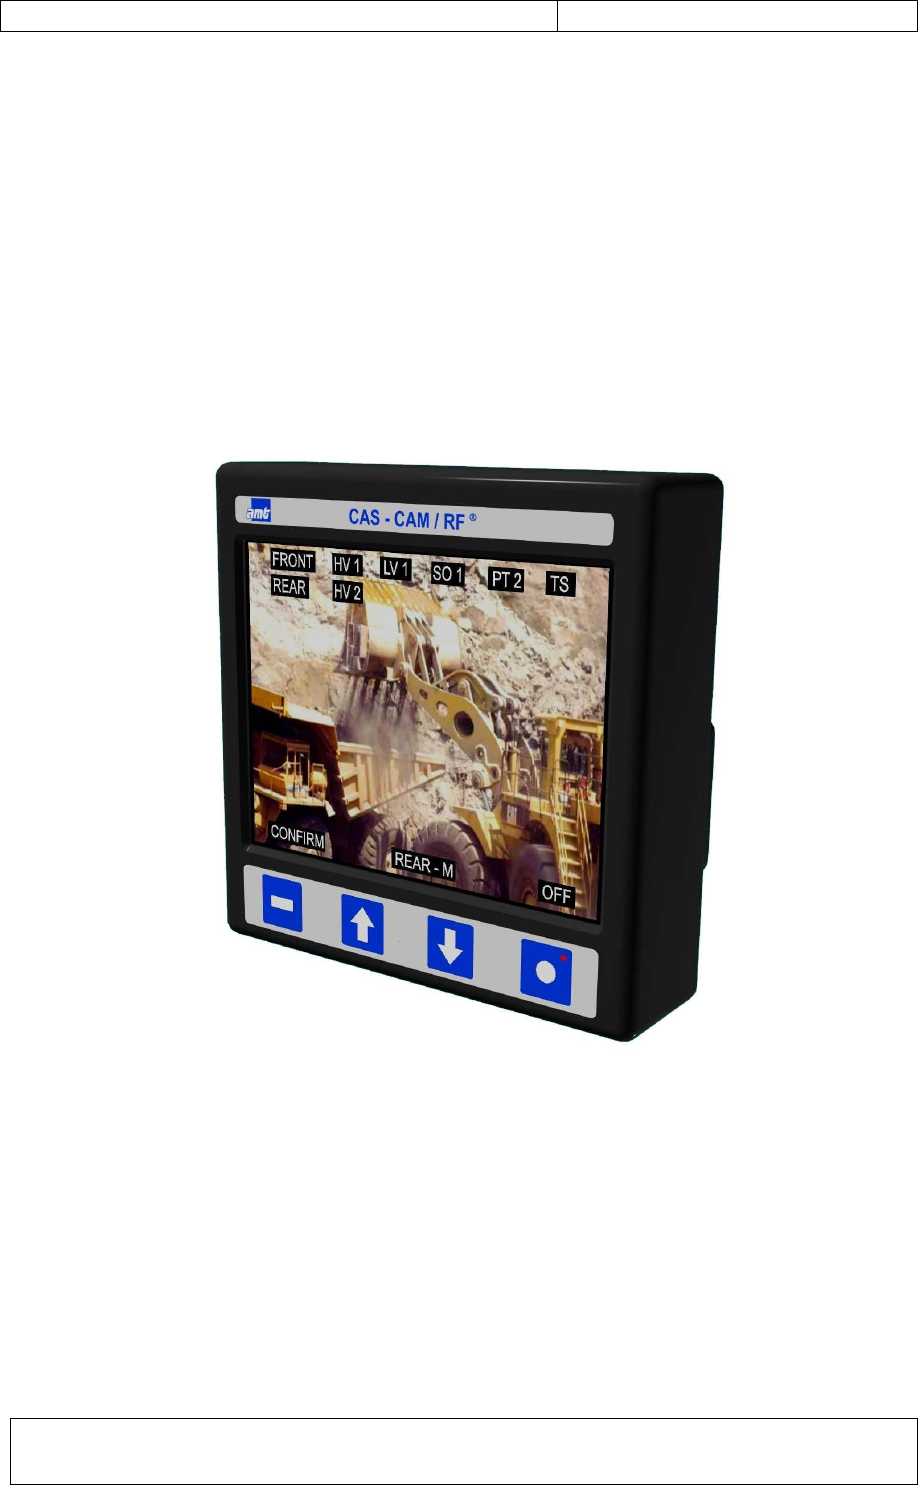
Figure 4: Heavy Vehicle Display Unit (PROD0119)
The Heavy Vehicle Display Unit consists of an active matrix 6.4” colour LCD screen. It
displays images from the cameras, text information received from the RF system, and
driver controls for camera selection adjustment and alarm acknowledgement. The Display
Unit also contains an RS-232 interface for system configuration and recovering logged
detection data via a laptop PC.
Features:
• IP 32 rated enclosure
• Full colour display (6.4” colour TFT LCD)
• High resolution (960W x 234H) anti-glare screen
Collision Avoidance System: CAS-CAM/RF® Operating Instructions
Document Number: CAS-CAM_RF Operating Instructions (with FCC
precautions)_18June2010.doc Page 23 of 126
Issue: E
• User programmable camera functions include: DIM (brightness)
• Installer mode functions programmable via a Laptop PC using RS-232 interface
include: Channel Settings (6 camera channels maximum), Camera Titles (8 characters
maximum), Camera Brightness (1-5), Camera Colour (1-5), Camera Mirror (on/off),
Camera enabled (yes/no), Camera Auto Cycling (off, 2s, 4s, 6s, 8s, 10s), Keypad Tone
(yes/no), Auto Switch to Reverse / Forward Camera on Reverse / Forward Gear
Selection and / or Rear / Front RF Unit detections, Display power down settings (sleep
time: off, 5mins, 10mins, 15mins, 20mins, 25mins, 30mins), Camera Wake Settings (on
forward gear and / or reverse gear), RF Detection Settings (programmable range,
visual & audible alarms for various object types and direction of travel), Clock Settings.
• Wide operating power supply range (10–30 VDC, 25W max)
(Note: The Display Unit, Expansion Unit, Camera Units and RF Units can be
permanently powered from the Heavy Vehicle battery with the Display Unit screen
powering down after a preset timeout period when the vehicle is not in forward or
reverse gear (if enabled). This function conserves battery life and enables the RF
tagging to still be active when the vehicle is unattended for the benefit of other vehicles.
Camera only installations (CAS-CAM
®
) are powered from the vehicle auxiliary / ignition
circuit.
• 4 function membrane keypad
• On-screen display function (text overlaid on video)
• Real time clock
• Audible alarm
• Menu settings saved during power down
• Two camera inputs (expandable up to 6 cameras using Expansion Unit) - can connect
RF Units to Camera inputs for upgrade to RF tagging capability (CAS-CAM/RF
®
)
• Video output – PAL (for connection to VCR)
• RS-232 & RS-485 interfaces
• Rugged aluminum construction
• Optional sun visor (PROD0164)
4.2.3 Expansion Unit (PROD0161)

Collision Avoidance System: CAS-CAM/RF® Operating Instructions
Document Number: CAS-CAM_RF Operating Instructions (with FCC
precautions)_18June2010.doc Page 24 of 126
Issue: E
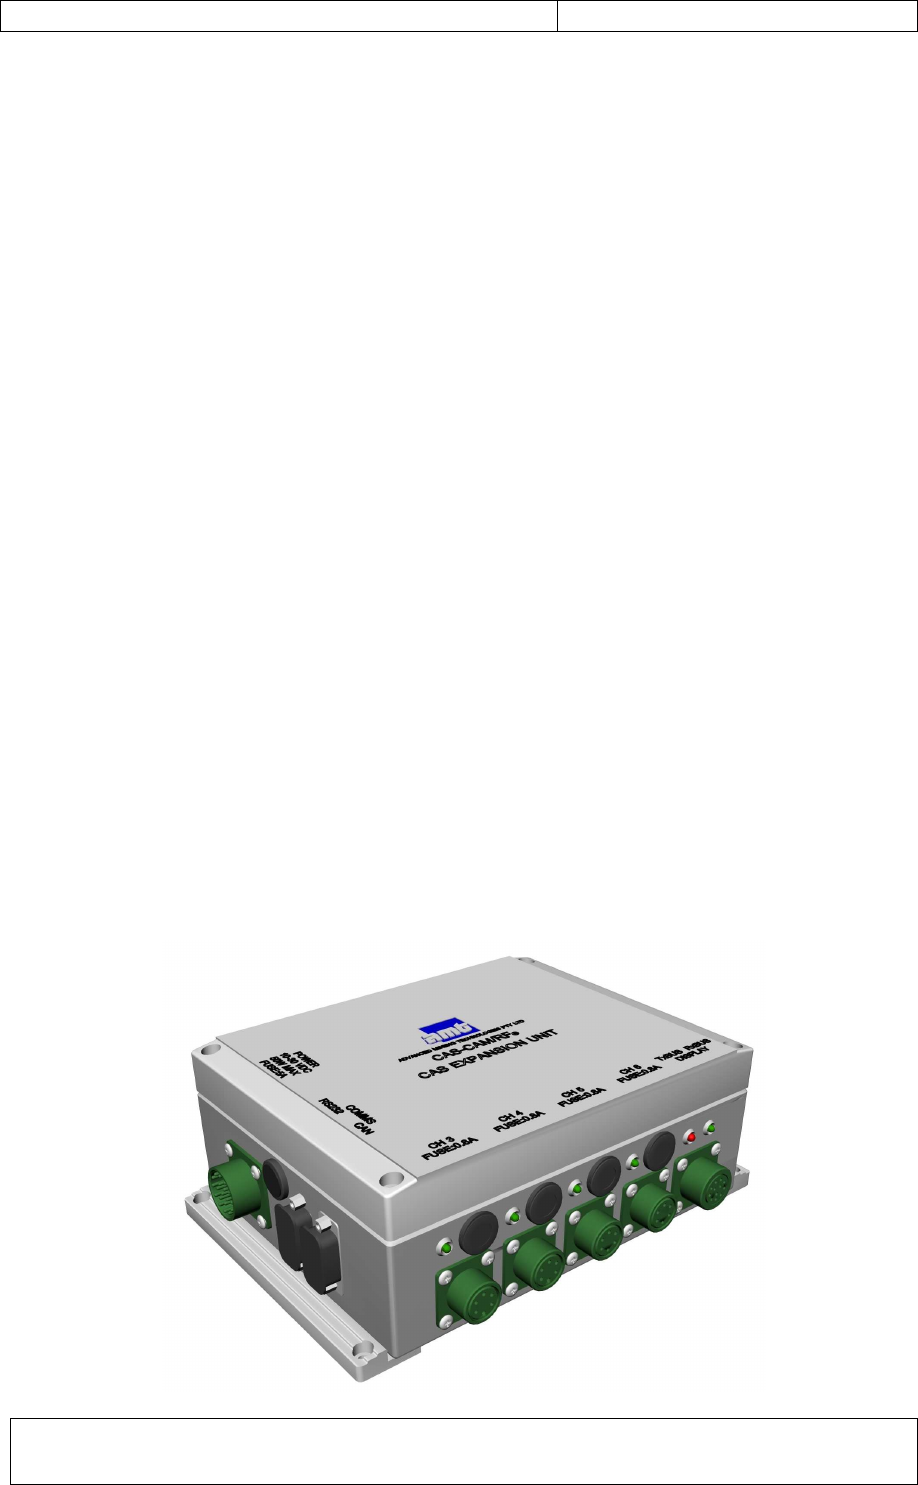
Figure 5: Heavy Vehicle Expansion Unit (PROD0161)
The Heavy Vehicle Expansion Unit provides the ability to easily expand the number of
cameras and RF Units from the standard 2 channels supported by the Display Unit up to a
maximum of 6 channels.
Features:
• IP 54 rated enclosure
• Provides Camera Unit & RF Unit expansion up to 6 units maximum with the Display
Unit
• 4 local camera inputs (in addition to 2 camera inputs on Display Unit) – can connect RF
Units to Camera inputs for upgrade to RF tagging capability (CAS-CAM/RF
®
)
• 4 auxiliary inputs (opto isolated) (e.g. reverse & forward signals)
• 2 switched contact outputs (voltage free) (e.g. reverse alarm circuit)
• RS-232, RS-485 & CAN interfaces
• Wide operating power supply range (10–30 VDC, 50W max) – also powers Display
Unit
(Note: The Display Unit, Expansion Unit, Camera Units and RF Units can be
permanently powered from the Heavy Vehicle battery with the Display Unit screen
powering down after a preset timeout period when the vehicle is not in forward or
reverse gear (if enabled). This function conserves battery life and enables the RF
tagging to still be active when the vehicle is unattended for the benefit of other vehicles.
Camera only installations (CAS-CAM
®
) are powered from the vehicle auxiliary / ignition
circuit.
• Input power provided from vehicle electrical distribution board (10–30 VDC, 50W max)
• Rugged aluminum construction
• Typically located within 10 metres of Display Unit
Collision Avoidance System: CAS-CAM/RF® Operating Instructions
Document Number: CAS-CAM_RF Operating Instructions (with FCC
precautions)_18June2010.doc Page 25 of 126
Issue: E
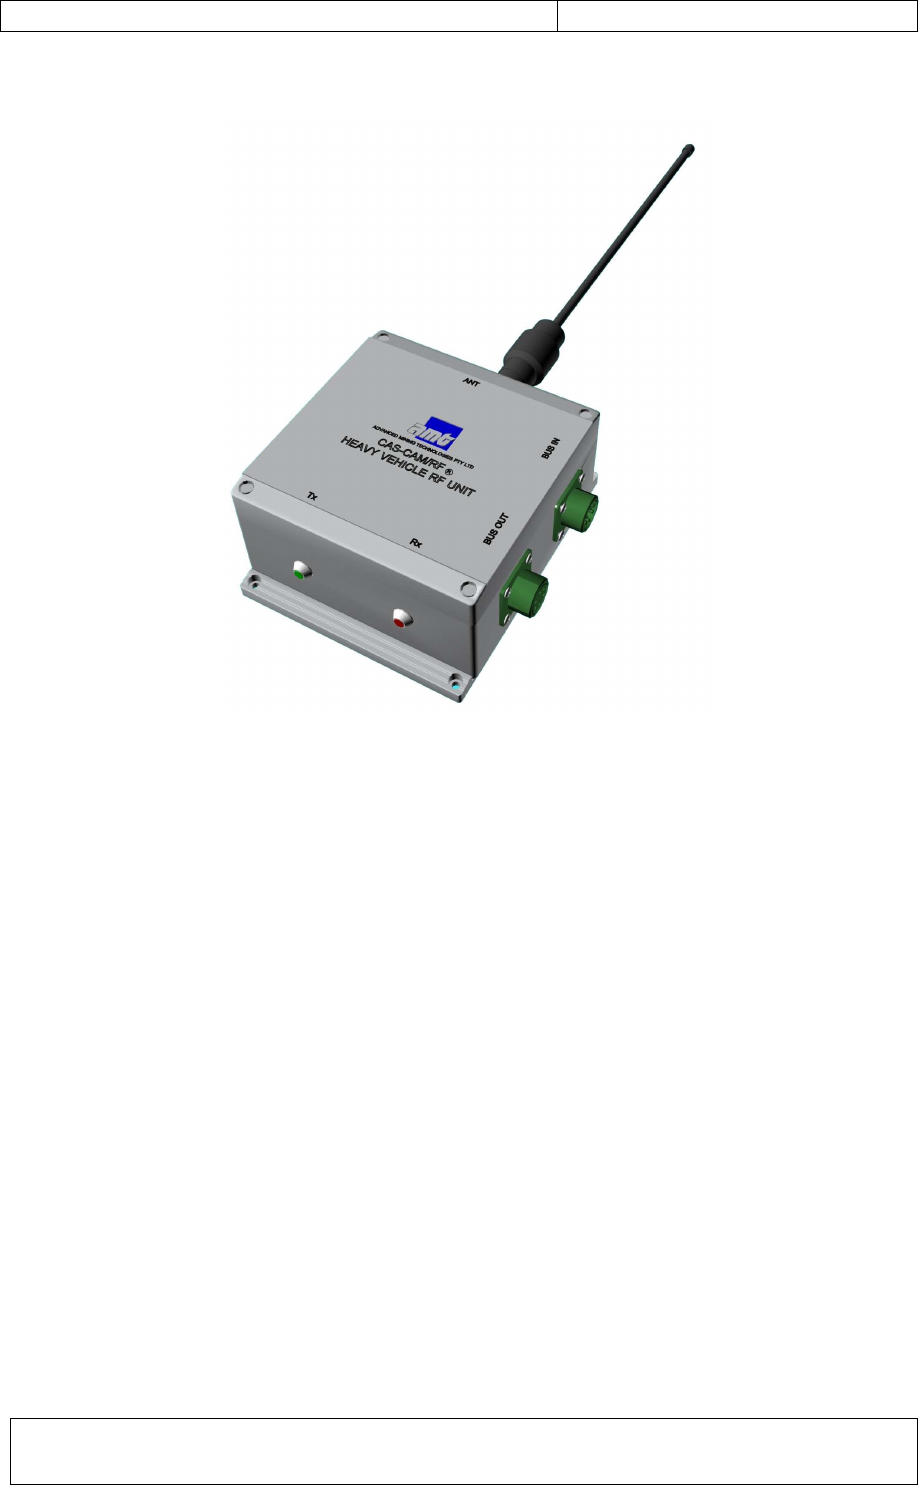
4.2.4 Front / Rear RF Unit (PROD0239 / PROD0169)
Figure 6: Heavy Vehicle (HV) RF Unit (Front – PROD0239 / Rear – PROD0169)
The Heavy Vehicle (HV) RF Unit is available in both Front and Rear models for mounting
at the front and rear of the vehicle respectively. Rear mounted versions are typically
located above the rear axle of large rear dump trucks; front mounted versions are typically
located in front of the grill on the driver access ladder. The unit receives the transmitted
signal from the other RF units and also continuously transmits a signal for triggering
alarms on the remote tags when located within the programmed detection range.
Optional Side RF Units (Left RF Unit, Right RF Unit) are available for effective 360 degree
close-range start-up object detection, whereas Front & Rear RF Units only provide partial
blind-spot object detection at the expense of long range detection directly in front or
behind.
Features:
• IP 56 rated enclosure
• Low power RF transceiver operates in LIPD class license for unlicensed bands
• Digital RF data transmission with full error control
• Detection angles typically in range 90 – 120 degrees at rear (including detection in rear
tyre path) and 180 degrees at front.
• Power supply 12VDC, 100mA maximum
(Note: The Display Unit, Expansion Unit, Camera Units and RF Units can be
permanently powered from the Heavy Vehicle battery with the Display Unit screen
powering down after a preset timeout period when the vehicle is not in forward or
reverse gear (if enabled). This function conserves battery life and enables the RF
tagging to still be active when the vehicle is unattended for the benefit of other vehicles.

Collision Avoidance System: CAS-CAM/RF® Operating Instructions
Document Number: CAS-CAM_RF Operating Instructions (with FCC
precautions)_18June2010.doc Page 26 of 126
Issue: E
• Input power provided from Display Unit or Expansion Unit
• Up to two units can be connected directly to Display Unit camera channels or additional
4 units connected via the Expansion Unit. Can multi-drop RF Units with camera
connected directly to RF Unit (e.g. Front + Left Side RF Units, Rear + Right Side RF
Units).
• External Tx and Rx activity indicators
• Rugged aluminum construction

Collision Avoidance System: CAS-CAM/RF® Operating Instructions
Document Number: CAS-CAM_RF Operating Instructions (with FCC
precautions)_18June2010.doc Page 27 of 126
Issue: E
4.3 Light Vehicle (LV) System (with integral beacon)
(PROD0246)
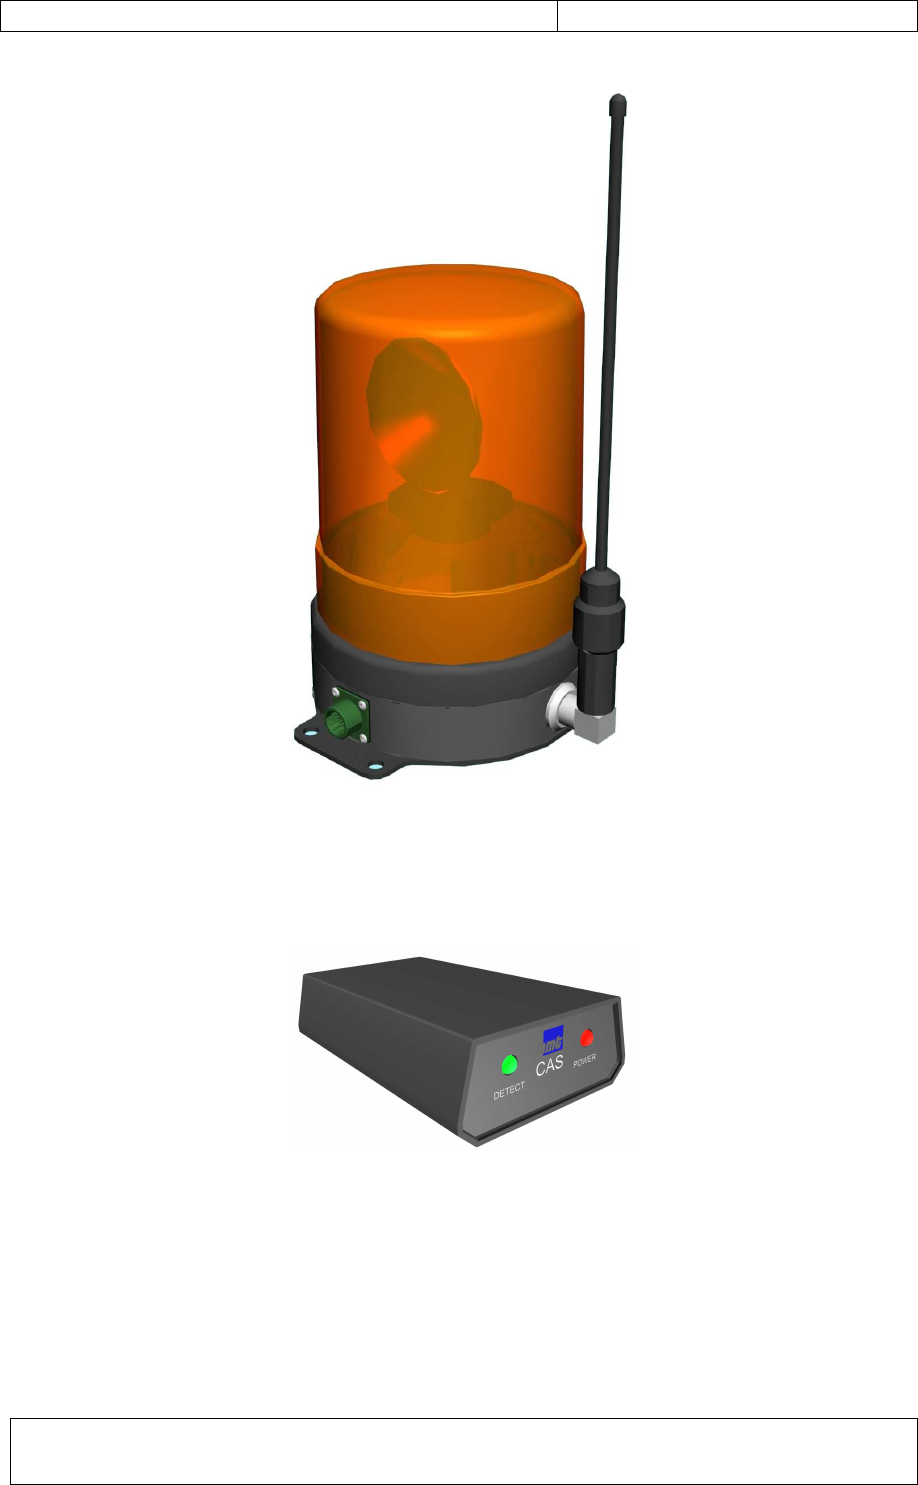
The Light Vehicle (LV) System (with integral beacon) comprises of an RF unit integrated
into a Light Vehicle Unit (Rotating Beacon) (Figure 7) as commonly used at open cut mine
sites, which is normally fitted to the roof of a Light Vehicle. A driver dash-mounted Alarm
Unit (Figure 8) is situated inside the vehicle cabin to provide both an audible and visual
warning to the driver when a Heavy Vehicle (HV) or Test Station (TS) is detected within
the programmed detection range. The Alarm Unit also contains a RS-232 interface for
system configuration and recovering logged detection data via a Laptop PC.
Features:
• IP 54 rated enclosure
• RF transceiver integrated into Rotating Beacon (12V, 55W)
• Dash mounted Alarm Unit containing audible alarm buzzer, flashing alarm indicator,
power indicator and RS-232 interface
• Rotating Beacon & dash mounted Alarm Unit activated when Heavy Vehicle (HV) (in
gear) or Test Station (TS) is detected within the pre-programmed range
• Low power RF transceiver operates in LIPD class license for unlicensed bands
• Digital RF data transmission with full error control
• Object detection angle of 360 degree
• Operating power supply: nominal 12VDC, 5A maximum
• Input power provided from vehicle electrical distribution board (via battery) for
permanent installation.
(Note: The Light Vehicle Unit is normally permanently powered from the vehicle battery
which enables the RF tagging to still be active when the vehicle is unattended for the
benefit of other vehicles. The Rotating Beacon on the roof will only be activated when
either a Heavy Vehicle (HV) (in gear) is detected or a Test Station (TS) is detected
within the programmed range.)
• Rugged construction
Collision Avoidance System: CAS-CAM/RF® Operating Instructions
Document Number: CAS-CAM_RF Operating Instructions (with FCC
precautions)_18June2010.doc Page 28 of 126
Issue: E
Figure 7: Light Vehicle (LV) System – Light Vehicle Unit (PROD0209)
Figure 8: Light Vehicle (LV) System – Dash Alarm Unit (PROD0211)

Collision Avoidance System: CAS-CAM/RF® Operating Instructions
Document Number: CAS-CAM_RF Operating Instructions (with FCC
precautions)_18June2010.doc Page 29 of 126
Issue: E
4.4 Light Vehicle (LV) System (with external beacon option)
(PROD0294)
The Light Vehicle (LV) System (with external beacon option) comprises of an RF unit
(Figure 9Figure 7) which is normally fitted to the roof of a Light Vehicle. A driver dash-
mounted Alarm Unit (Figure 10) is situated inside the vehicle cabin to provide both an
audible and visual warning to the driver when a Heavy Vehicle (HV) or Test Station (TS) is
detected within the programmed detection range. The Alarm Unit also contains a RS-232
interface for system configuration and recovering logged detection data via a Laptop PC.
Features:
• IP 54 rated enclosure
• RF transceiver
• Optional external beacon interface (12VDC@5A maximum)
• Dash mounted Alarm Unit containing audible alarm buzzer, flashing alarm indicator,
power indicator and RS-232 interface
• Optional External Beacon & dash mounted Alarm Unit activated when Heavy Vehicle
(HV) (in gear) or Test Station (TS) is detected within the pre-programmed range
• Low power RF transceiver operates in LIPD class license for unlicensed bands
• Digital RF data transmission with full error control
• Object detection angle of 360 degree
• Operating power supply: nominal 12VDC, 5A maximum (0.1A without external beacon)
• Input power provided from vehicle electrical distribution board (via battery) for
permanent installation.
(Note: The Light Vehicle Unit is normally permanently powered from the vehicle battery
which enables the RF tagging to still be active when the vehicle is unattended for the
benefit of other vehicles. The Rotating Beacon on the roof will only be activated when
either a Heavy Vehicle (HV) (in gear) is detected or a Test Station (TS) is detected
within the programmed range.)
• Rugged construction

Collision Avoidance System: CAS-CAM/RF® Operating Instructions
Document Number: CAS-CAM_RF Operating Instructions (with FCC
precautions)_18June2010.doc Page 30 of 126
Issue: E
Figure 9: Light Vehicle (LV) System – Light Vehicle RF Unit (with external beacon
option) (PROD0295)
Figure 10: Light Vehicle (LV) System – Dash Alarm Unit (PROD0211)
Collision Avoidance System: CAS-CAM/RF® Operating Instructions
Document Number: CAS-CAM_RF Operating Instructions (with FCC
precautions)_18June2010.doc Page 31 of 126
Issue: E
4.5 Stationary Object (SO) System (PROD0210)
The Stationary Object (SO) System is an identical design to the Light Vehicle (LV) System
(Figure 7), however, is coded as a Stationary Object (SO). The unit would normally be
mounted on fixed plant / equipment / obstacles that are prone to being damaged by Heavy
Vehicles. The unit can be powered by either battery packs with solar panel charging
capability or powered directly from mains powered 12VDC supply.
4.6 Mobile Plant & Equipment (HV) System (PROD0225)
The Mobile Plant & Equipment (MPE) System is an identical design to the Light Vehicle
(LV) System (Figure 7), however, is coded as a Heavy Vehicle (HV). The unit would
normally be mounted on Mobile Plant & Equipment that doesn’t require a Display and
Camera Unit(s).
The Mobile Plant & Equipment System comprises of an RF unit integrated into a Mobile
Plant & Equipment Unit (Rotating Beacon) (Figure 7) as commonly used at open cut mine
sites, which is fitted to the roof of mobile plant & equipment. A driver dash-mounted Alarm
Unit (Figure 8) is situated inside the vehicle cabin to provide both an audible and visual
warning to the driver when another Heavy Vehicle (HV), Light Vehicle (LV), Stationary
Object (SO) or Test Station (TS) is detected within the programmed detection range. The
Alarm Unit also contains a RS-232 interface for system configuration and recovering
logged detection data via a Laptop PC.
4.7 Personnel Tag (PT) Unit
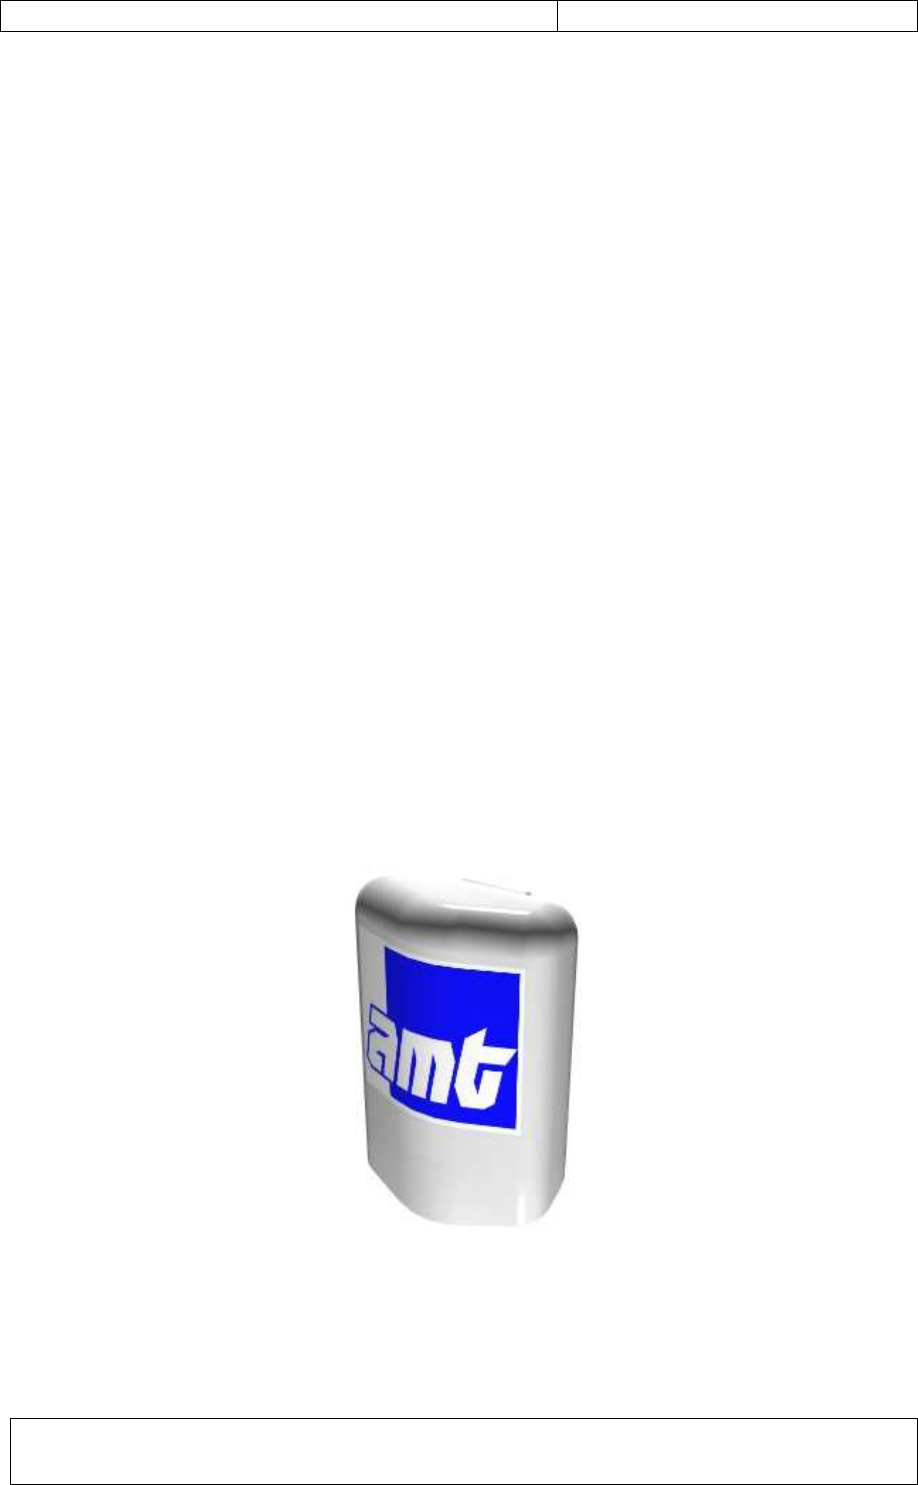
Figure 11 – Personnel Tag (PT) Unit (prototype version)
Personnel Tag (PT) Units (under development) can be provided in a safety vest version
and provides a warning to the user via a combination of audible and vibrating battery
alarms. The units operate on rechargeable batteries.

Collision Avoidance System: CAS-CAM/RF® Operating Instructions
Document Number: CAS-CAM_RF Operating Instructions (with FCC
precautions)_18June2010.doc Page 32 of 126
Issue: E
Features:
• RF Transceiver integrated into small, lightweight sealed enclosure
• Mounts onto safety vest and can be removed for battery charging
• audible alarm and vibration alarm when within the programmed detection range of
either a Heavy Vehicle (HV) (in-gear) or Test Station (TS)
• Powered from rechargeable batteries
• Low power RF transceiver operating in LIPD class license for unlicensed bands
• Digital RF data transmission with full error control
• Object detection angle of 360 degrees
• RF tag operational check performed during battery charging
• RF tag could also be used for access control purposes when integrated with security
access control system

Collision Avoidance System: CAS-CAM/RF® Operating Instructions
Document Number: CAS-CAM_RF Operating Instructions (with FCC
precautions)_18June2010.doc Page 33 of 126
Issue: E
4.8 Test Station (TS) System (PROD0241)
A Stationary Object (SO) Unit can be configured internally as a Test Station object type
(TS) for in-field testing of all mobile CAS tagged object types (e.g. Heavy Vehicle, Light
Vehicle, Stationary Object, Personnel Tags). Test Stations are designed to be alarmed by
and trigger alarms on all object types.
Test Stations would normally be installed in locations frequently passed by CAS RF
tagged objects (e.g. maintenance workshop, GO-LINE, refueling station etc) and serve to
provide regular functional two-way testing of all RF tagged objects. Solar power versions
are available for remote locations.
Test Stations (TS) are detected in the following manner by each CAS tagged object type:
• Heavy Vehicle (HV)
o TS object text displayed on Display Unit for front and rear detections
o Normal object detection audible and visual alarms generated with
‘CONFIRM’ button operation
o TS beacon activated when HV detected inside programmed detection zone.
TS beacon switches OFF 3 seconds after HV moves outside programmed
detection zone.
• Light Vehicle (LV)
o Distinct pulsed alarm (warble) on dash-mount Alarm Unit and Rotating
Beacon switched ON when TS detected inside programmed LV detection
zone. LV audible and visual alarms switch OFF 3 seconds after LV moves
outside TS programmed detection zone.
o TS beacon activated when LV detected inside programmed detection zone.
TS beacon switches OFF 3 seconds after LV moves outside programmed
detection zone.
• Mobile Plant & Equipment System (HV)
o Distinct pulsed alarm (warble) on dash-mount Alarm Unit and Rotating
Beacon switched ON when TS detected inside programmed HV detection
zone. HV audible and visual alarms switch OFF 3 seconds after HV moves
outside TS programmed detection zone.
o TS beacon activated when HV detected inside programmed detection zone.
TS beacon switches OFF 3 seconds after HV moves outside programmed
detection zone.
• Personnel Tag (PT)
o PT alarms when TS detected inside programmed PT detection zone. PT
alarm switches OFF 3 seconds after PT moves outside TS programmed
detection zone.
o TS beacon activated when PT detected inside programmed detection zone.
TS beacon switches off 3 seconds after LV moves outside programmed
detection zone.

Collision Avoidance System: CAS-CAM/RF® Operating Instructions
Document Number: CAS-CAM_RF Operating Instructions (with FCC
precautions)_18June2010.doc Page 34 of 126
Issue: E
5 SYSTEM OPERATION
5.1 General
The Heavy Vehicle will detect any tagged object within a pre-designated Detection Zone
that can be programmed at the time of installation. The RF tags transmit an identification
code that is deciphered by the Heavy Vehicle RF unit(s) and is classified into various
object classes, i.e. Light Vehicle (LV), Personnel Tag (PT), Stationary Object (SO), other
Heavy Vehicle (HV) or Test Station (TS).
The number of RF tags detected in each object class is displayed on the video monitor for
both front and rear detections (refer to Figure 35 for the screen layout). The Heavy Vehicle
unit also conducts initial and continuous self-checks to detect equipment malfunctions,
which are reported to the driver on the Display Unit. The reversing siren circuit can be
enabled as a fail-safe backup in the event of equipment failure or when an object is
detected at the rear within the programmed detection zone.
The Heavy Vehicle is continually receiving and transmitting signals that are detected by
the Personal Tags (PT), Light Vehicle (LV), Heavy Vehicle (HV), Stationary Object (SO) or
Test Station (TS) RF tags. When in the Heavy Vehicle Detection Zone (and HV in gear),
the Light Vehicle tags flash lights and sound an audible alarm in the cab. Tagged
Stationary Objects and Test Stations flash lights for driver identification.
The driver is provided with the number of each class of obstacle within the Heavy Vehicle’s
Detection Zone, on the Display Unit. Only when the Heavy Vehicle is in gear will the
audible alarm in the Display Unit sound when any objects have been detected within the
Heavy Vehicle Detection Zone. Heavy Vehicle visual and audible alarms are fully
programmable in the Display Unit for each object class (HV, LV, SO, PT, TS), based on
range, HV detection location (front / rear / sides), direction of travel (forward / park /
reverse) and speed.
All RF tags have a unique ID code that is logged when detected by either a Heavy Vehicle,
Light Vehicle, Stationary Object, Mobile Plant & Equipment, Test Station or Personnel
units. Collision detection data can be retrieved by either a Fleet Management System or
Laptop PC for safety audit trail purposes.
The system has been designed to enable the installation of the CAS in it’s entirety (CAS-
CAM/RF
®
) or the high-resolution colour video system (CAS-CAM
®
) as a stand-alone
product, with the necessary in-built smarts to install the RF interface (CAS-RF
®
) at a later
stage, should the user so desire.
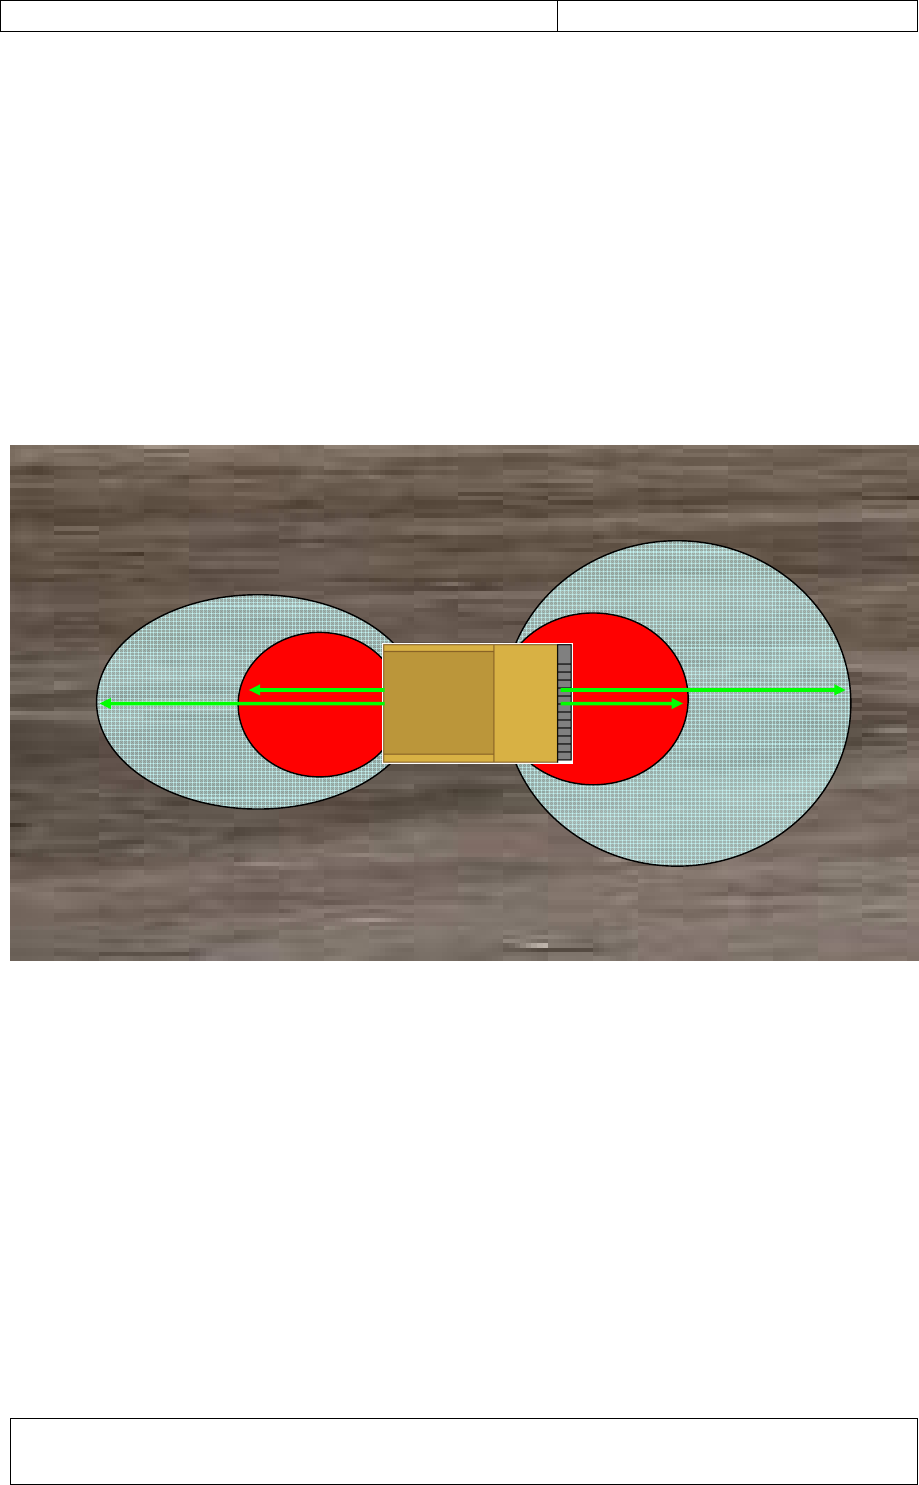
Collision Avoidance System: CAS-CAM/RF® Operating Instructions
Document Number: CAS-CAM_RF Operating Instructions (with FCC
precautions)_18June2010.doc Page 35 of 126
Issue: E
5.2 Programmable Detection Zones
Each RF tagged object has programmable Detection Zones as follows:
5.2.1 Heavy Vehicle Detection Zones
Fully programmable detection zones and audible alarms for different object types (e.g. HV,
LV, SO, PT, TS) based on range (0-80m), vehicle gear status (i.e. forward, reverse, park),
detection location (i.e. front or rear or sides) and vehicle speed.
Figure 12 – Heavy Vehicle Front and Rear Detection Zones
Rear Detection Zones Front Detection Zones
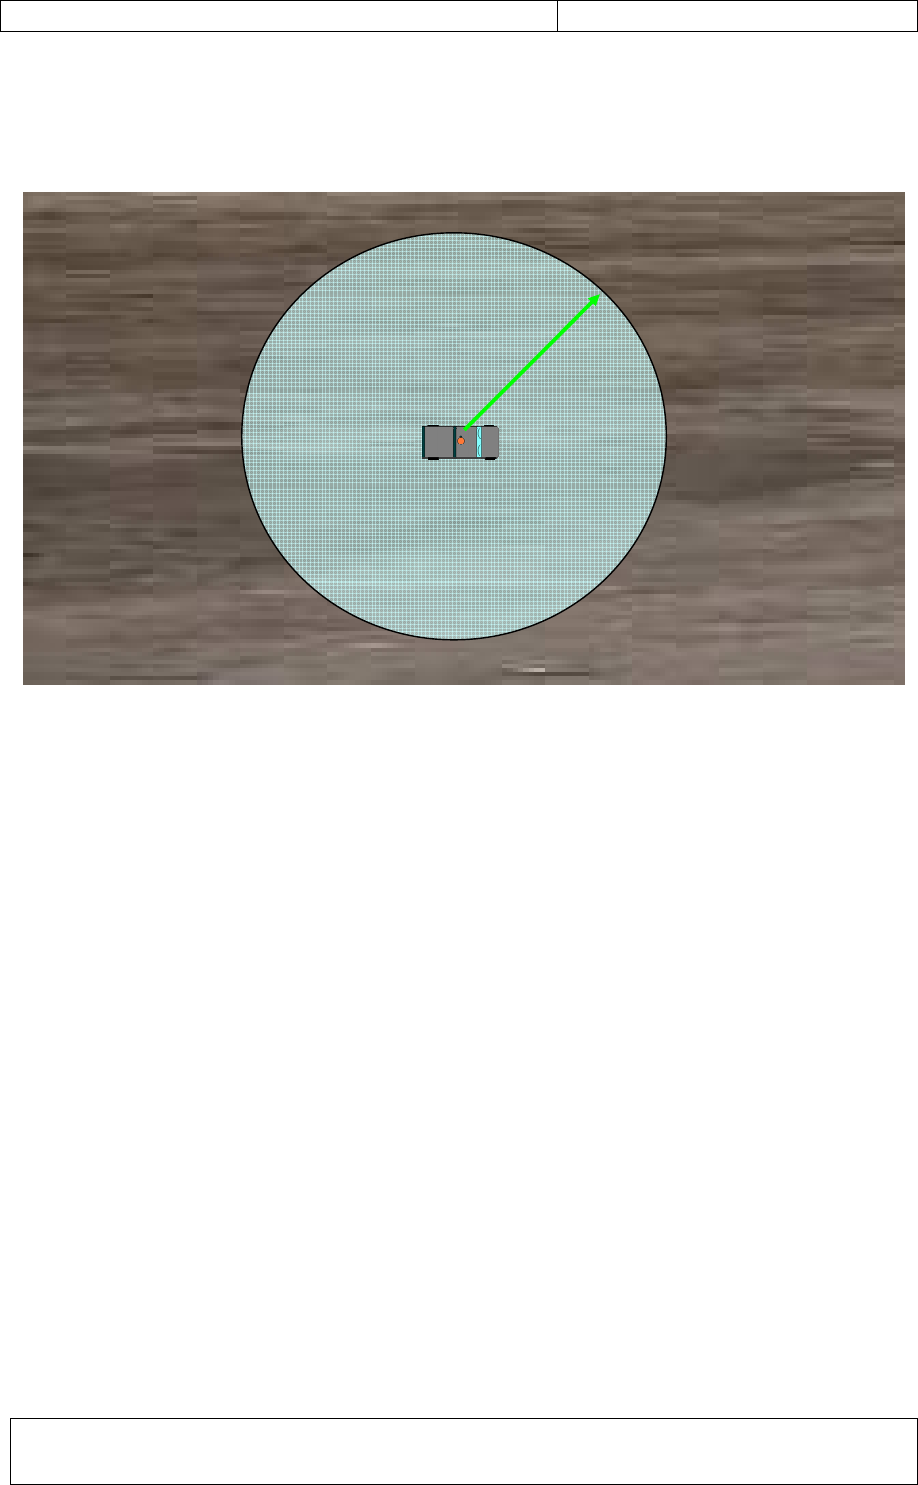
Collision Avoidance System: CAS-CAM/RF® Operating Instructions
Document Number: CAS-CAM_RF Operating Instructions (with FCC
precautions)_18June2010.doc Page 36 of 126
Issue: E
5.2.2 Light Vehicle Detection Zone
Single Programmable Detection Zone
Radius programmable from 0- 80 m
Figure 13 – Light Vehicle Object Detection Zone
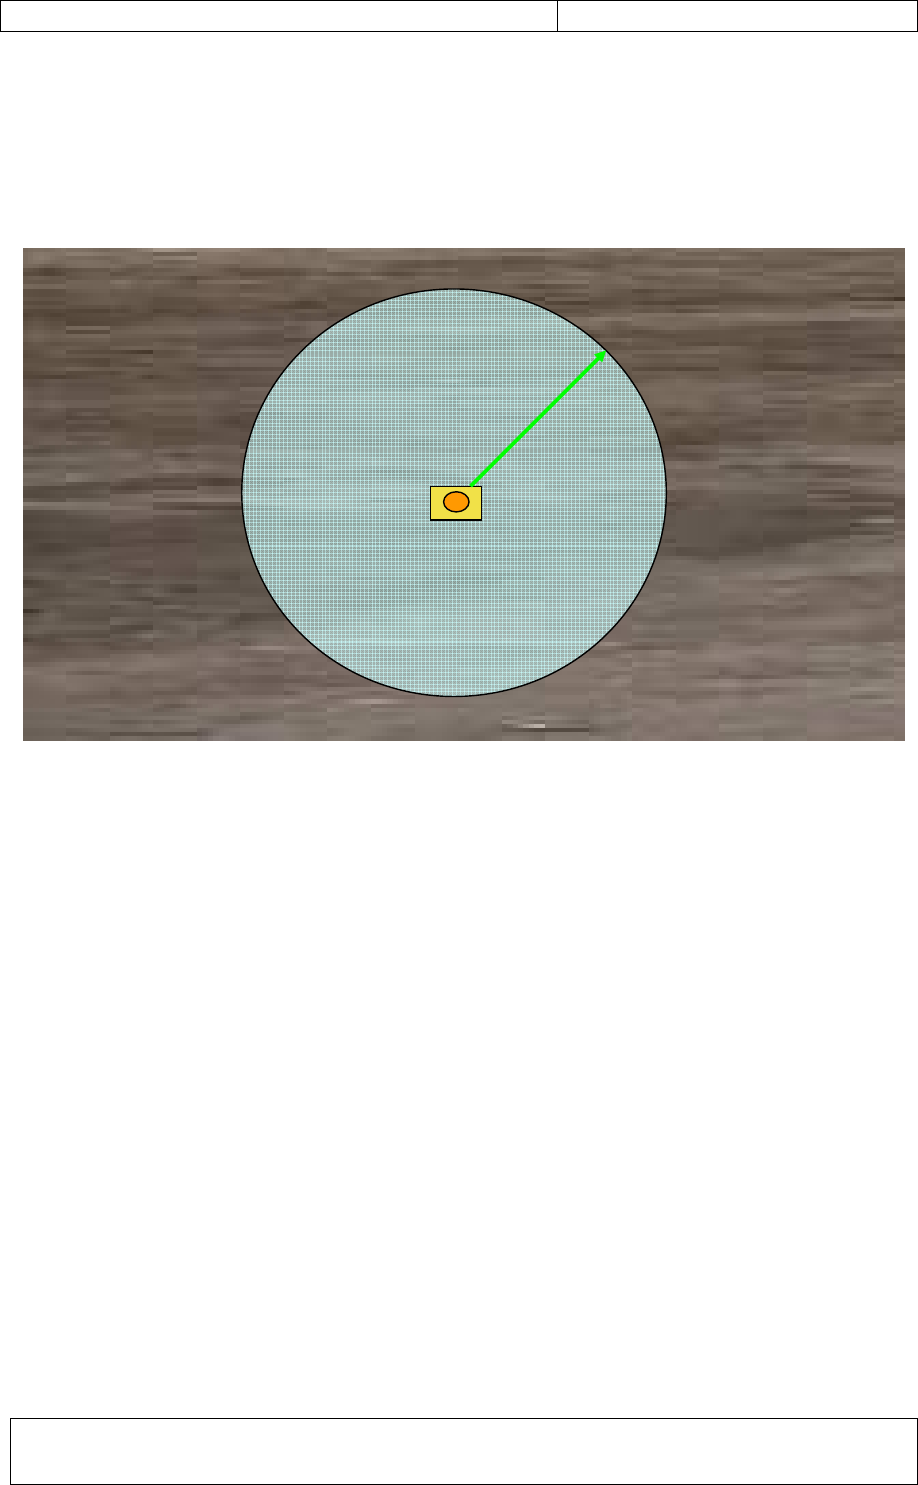
Collision Avoidance System: CAS-CAM/RF® Operating Instructions
Document Number: CAS-CAM_RF Operating Instructions (with FCC
precautions)_18June2010.doc Page 37 of 126
Issue: E
5.2.3 Stationary Object / Mobile Plant & Equipment / Test Station
Detection Zone
Single Programmable Detection Zone
Radius programmable from 0- 80 m
Figure 14 – Stationary Object / Mobile Plant & Equipment / Test Station Detection
Zone

Collision Avoidance System: CAS-CAM/RF® Operating Instructions
Document Number: CAS-CAM_RF Operating Instructions (with FCC
precautions)_18June2010.doc Page 38 of 126
Issue: E
6 COLLISION AVOIDANCE APPLICATIONS
Mine site collision avoidance applications for the CAS-CAM/RF
®
system are unlimited and
would typically cover:
6.1 Heavy Vehicle (HV) to Heavy Vehicle (HV) collision
avoidance
(e.g. Rear Dump Trucks, Loaders, Dozers, Graders, Shovels, Draglines, Excavators,
Water Trucks etc - covers forward, reverse and queuing scenarios)
HV to HV haul road queuing scenario: HV drives into rear of other HV either due to
fatigue or poor visibility. The AMT CAS-CAM/RF
®
system alerts both HV drivers to the
presence of both vehicles (within a programmed detection range) using both audible &
visual alarms. The front HV Display Unit also switches to the REAR camera for visual
confirmation and the rear HV Display Unit switches to the FRONT camera.
Heavy Vehicle (HV) to Heavy Vehicle (HV): stationary to reverse operation where the
reversing HV drives into the other HV due to blind spots. The AMT CAS-CAM/RF
®
system
alerts both HV drivers’ to the presence of both vehicles (within a programmed detection
range) using both audible & visual alarms. The Display Unit on the reversing HV also
switches to the REAR camera for visual confirmation.
6.2 Heavy Vehicle (HV) to Light Vehicle (LV) collision
avoidance
(covers forward, reverse and overtaking scenarios)
Heavy Vehicle (HV) to Light Vehicle (LV): stationary to forward operation where the HV
drives over the LV due to blind spots. The AMT CAS-CAM/RF
®
system alerts both the HV
driver and LV driver to the presence of both vehicles (within a programmed detection
range) using both audible & visual alarms. The HV Display Unit also switches to the
FRONT camera for visual confirmation.
Heavy Vehicle (HV) to Light Vehicle (LV): stationary to reverse operation where the HV
drives over the LV due to blind spots. The AMT CAS-CAM/RF
®
system alerts both the HV
driver and LV driver to the presence of both vehicles (within a programmed detection
range) using both audible & visual alarms. The HV Display Unit also switches to the REAR
camera for visual confirmation.
LV to HV overtaking scenario: LV overtakes HV without radio call-up and the HV turns
right driving over the LV with fatal consequences. The AMT CAS-CAM/RF
®
system alerts
both the HV driver and LV driver to the presence of both vehicles (within a programmed
detection range) using both audible & visual alarms. The HV Display Unit also switches to
the REAR / FRONT camera for visual confirmation as the LV moves from the HV Rear to
HV Front detection zone.

Collision Avoidance System: CAS-CAM/RF® Operating Instructions
Document Number: CAS-CAM_RF Operating Instructions (with FCC
precautions)_18June2010.doc Page 39 of 126
Issue: E
6.3 Dragline / Shovel to Cleanup Dozer / Trailing Cable
Handling Vehicle / Dump Truck collision avoidance
Vehicles remote to the Dragline / Shovel are damaged during swing cycles due to vehicles
being located in blind spots within the swing radius. The AMT CAS-CAM/RF
®
system
alerts all vehicle drivers to each other’s presence (within a programmed detection range =
swing radius + safety margin) using both audible & visual alarms. The Dragline / Shovel
operator should not commence a swing cycle if another vehicle is detected within the
programmed detection zone.
6.4 Heavy Vehicle (HV) to Stationary Object (SO) collision
avoidance (e.g. fixed plant & equipment)
e.g. Dozer reversing or traming forward drives into Stationary Object (e.g. lighting tower)
due to blind spots. The AMT CAS-CAM/RF
®
system alerts the HV driver to the presence of
the RF tagged light tower (within a programmed detection range) using both audible &
visual alarms. SO beacons are also activated when the Dozer is within the programmed
detection range for visual confirmation using the rear camera.
6.5 Heavy Vehicle to Haul Road Crossing / Merging Collision
Scenario
Haul Road Crossing / Merging Alarms activated by approaching Heavy Vehicles fitted with
RF tags.
HV to LV haul road crossing / merging scenario: HV approaching road crossing /
merger and collides with LV due to LV not being aware of approaching HV. The AMT CAS-
CAM/RF
®
system alerts both the HV driver and LV driver to the presence of both vehicles
(within a programmed detection range) using both audible & visual alarms. The HV unit
activates at longer range (200-300m) a set of road crossing lights warning LV’s of an
approaching HV.
HV to HV haul road crossing / merging scenario: HV approaching road crossing /
merger and collides with other HV due to HV not being aware of other approaching HV.
The AMT CAS-CAM/RF
®
system alerts both HV drivers to each others presence (within a
programmed detection range) using both audible & visual alarms. The HV units activate at
longer range (200-300m) a set of road crossing lights warning other HV’s / LV’s of an
approaching HV.

Collision Avoidance System: CAS-CAM/RF® Operating Instructions
Document Number: CAS-CAM_RF Operating Instructions (with FCC
precautions)_18June2010.doc Page 40 of 126
Issue: E
6.6 Heavy Vehicle to other RF tagged Vehicles Collision
Avoidance Due to Driver Fatigue
General fatigue management: the Heavy Vehicle Display Unit can be programmed as a
fatigue-monitoring unit where periodic alarms need to be actioned within a specified
response time. All fatigue alarms and operator reactions are data logged (along with RF
tag detections) for compliance monitoring & provides a safety audit trail in the event of an
incident (drivers are less likely to breach procedures knowing that vigilance methods are
being monitored). The CAS system RF tag audible alarms also act to combat fatigue.
HV to HV haul road collision due to driver fatigue: HV approaching another HV
traveling on opposite side of haul road collides with the oncoming HV due to driver fatigue
and driver not being aware of approaching HV and / or not maintaining adequate
clearance. The AMT CAS-CAM/RF
®
system alerts both HV drivers to each other’s
presence (within a programmed detection range up to 200-300m with long-range RF
option) using both audible & visual alarms.
A new extension to the CAS-CAM/RF
®
technology is a Guidance Laser System (CAS-
GLS
®
). The CAS-GLS
®
is a new remote sensing technology fitted to surface mining road
haulage equipment (e.g. Haul Trucks) that will automatically detect the presence of the
edge of the road (windrow), calculate the distance from the side of the Haul Truck to the
start of the windrow and report to the driver when the vehicle is operating within nominated
corridors (too close to edge – normal – warning - danger) using both visual and audible
indicators. Visual indication of whether an approaching Haul Truck is within or outside of
the nominated corridors is also provided for the benefit of oncoming Haul Trucks.
The GLS assists in managing driver fatigue by alerting both the vehicle driver and
oncoming vehicle when the vehicle is not operating within specified safe corridors for both
passing and normal driving operations. This is particularly important when mines upgrade
to larger payload capacity vehicles resulting in wider vehicles operating within reduced
safe operating corridors on existing haul roads.
The GLS can be operated either stand-alone or integrated with the CAS-CAM/RF
®
Display
Unit in the driver’s cabin to provide a fully integrated Collision Avoidance System using a
combination of high quality colour cameras and active RFID tags with programmable
detection zones for automatic object detection.
6.7 Other Applications
There are numerous other Collision Avoidance Applications involving Heavy Vehicles (with
blind spots) interacting with other Heavy Vehicles, Light Vehicles, Stationary Objects,
Personnel and other Mobile Plant & Equipment.
Refer to Section 7.6 for typical surface mining Collision Scenarios and CAS Solutions.

Collision Avoidance System: CAS-CAM/RF® Operating Instructions
Document Number: CAS-CAM_RF Operating Instructions (with FCC
precautions)_18June2010.doc Page 41 of 126
Issue: E
6.8 Additional Benefits from Camera Only installations (CAS-
CAM
®
)
Heavy Vehicle Reversing Operations – side view cameras provide a wider field of view
than existing side view mirrors, offering greatly improved visibility and awareness of
surroundings. Rear View camera eliminates known rear blind spots that have directly
attributed to fatalities in the surface mining industry.
Heavy Vehicle Forward Operations – front view camera eliminates known front blind
spots (typically out to 5-10m on larger rear dump trucks) that have directly attributed to
fatalities in the surface mining industry.
Dozer reversing operations – operator experiences neck & back strain due to repetitive
turning / twisting during reversing operations. Can be alleviated using rear view camera
system.
Load Placement - Rear Dump Truck leading tyre breaks through berm during reversing
operations for load dumping, placing vehicle at risk of flipping over edge when bed is
raised during dumping. Can be prevented using wide angle rear camera showing the
location of the rear tyres in relation to the berm in order to square the truck. The rear &
blind-side cameras are also helpful in lining up the truck with a Shovel during loading
operations.
Backing to Berms - Rear Dump Truck reverses over rock causing tyre and / or vehicle
damage. Can be prevented by using rear and blind side-view cameras to detect the
presence of rocks before reversing.
Confirming Load Completion – rear camera can be used to determine when the bed is
empty during dumping as the driver can see when the material stops falling from the bed
so they can determine when they can start off again. Without a rear view camera, drivers
would allow the bed to stay raised longer because they could not tell if the bed was
completely empty. Confirming Load Completion reduces turn-around time and increases
productivity as well as reducing the time the truck is backed up.
Keeping the Berm Intact – using the rear camera, the truck driver can partially raise the
bed of the truck during dumping so the bed doesn’t damage the berm.
Automatic Switching of Cameras on gearing – system automatically switches to front or
rear camera on gearing assisting the operator in assessing objects ‘at-risk’ before vehicle
motion. The system can also automatically switch to front or rear camera on RF tagged
object detections at either the front or rear of the vehicle. Where objects are detected at
both the front and rear, the camera switches to the direction of vehicle travel.
Note:
•
Elimination of Heavy Vehicle blind spots using camera systems (CAS-CAM
®
)
significantly reduces the risk of collision with other vehicles, mobile and fixed plant &
equipment, personnel and objects. However, the Heavy Vehicle operator cannot
always be watching the camera Display Unit whilst focusing on the task of machine

Collision Avoidance System: CAS-CAM/RF® Operating Instructions
Document Number: CAS-CAM_RF Operating Instructions (with FCC
precautions)_18June2010.doc Page 42 of 126
Issue: E
operation. Hence, the risk of collision is further reduced using the Automatic Object
Detection capability of the RF tagging (CAS-RF
®
), thereby offering a high level of
protection and redundancy in a complete standalone package.
•
The CAS-CAM/RF
®
System is a safety aid in providing the drivers of Heavy Vehicles,
Light Vehicles and Personnel Tag users with additional information to make informed
decisions in order to reduce the incidence of collisions. The system is not designed
to be a stand-alone safety interlocking system that can give a false sense of
protection and security, but still requires that all vehicle drivers and personnel still
take every manual precaution to avoid the incidence of collisions and to comply with
existing work place procedures. The system is designed as an aid to supplement and
enhance existing safe work practices and procedures.
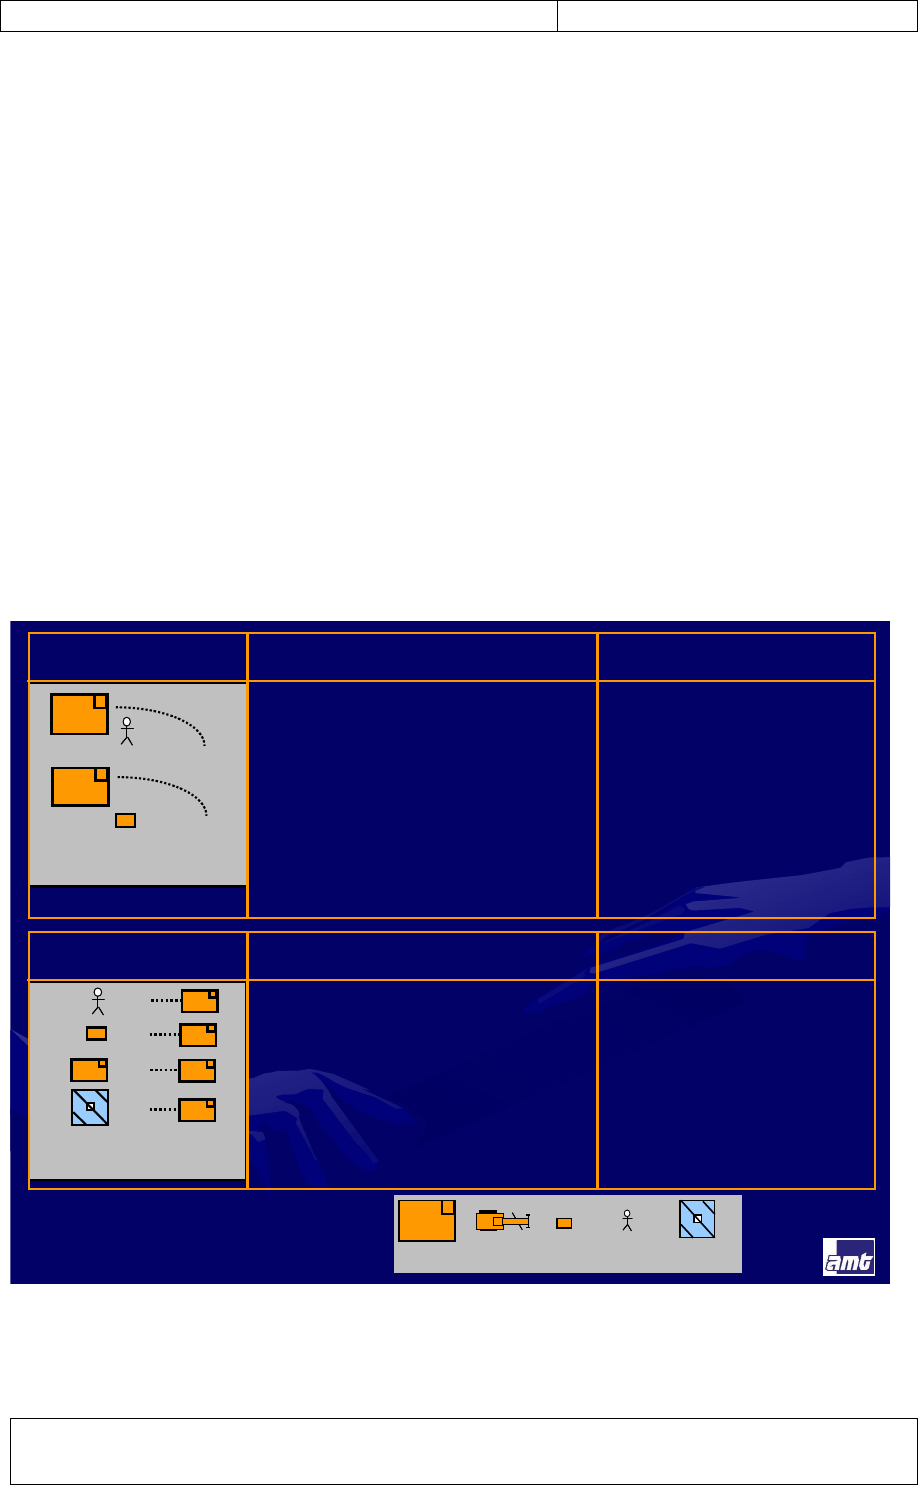
Collision Avoidance System: CAS-CAM/RF® Operating Instructions
Document Number: CAS-CAM_RF Operating Instructions (with FCC
precautions)_18June2010.doc Page 43 of 126
Issue: E
7 TYPICAL COLLISION AVOIDANCE SCENARIOS
7.1 General
Typical collision avoidance scenarios for an open-cut mine site include operation between
moving vehicles on haul roads, loading and dump sites, around high-wall and various
bench levels and around other mine site obstacles such as buildings, plant and equipment
etc.
A typical CAS-CAM/RF
®
system would be configured for front and rear and optional left &
right detection zones on all Heavy Vehicles, with fully programmable alarming for each
object type (based on distance, detection location, direction of travel and speed), and a
single detection zone on all Light Vehicles, Stationary Objects, Personnel Tags, Test
Stations and Mobile Plant & Equipment.
The system operation covers the following Heavy Vehicle – Light Vehicle and Heavy
Vehicle – Heavy Vehicle interaction scenarios (ranked from highest to lowest risk):
7.2 Collision Scenarios and Solutions
CAS Scenario Solutions 2005
Reversing HV
Parked
Reversing HV
Parked
Reversing HV receives audible & visual
alarm when within 'AT-RISK' object
programmed detection range. HV
automatically switches to Rear Camera for
blind spot vision on both reverse gear or
when 'AT-RISK' objects are detected at
the rear. 'AT-RISK' objects also receive
audible and visual alarms (no audible
alarm on parked HV).
HV to 'AT-RISK' objects alarming
is two-way. Different HV alarm
ranges possible for different 'AT-
RISK' object types (e.g. HV front,
HV rear, LV, SO, TS, PT) and HV
speed.
Scenario 2 AMT CAS Solutions Comments
Parked
or
Parked
or
HV driving forward receives audible &
visual alarm when within 'AT-RISK' object
programmed detection range. HV
automatically switches to Front Camera
for blind spot vision on both forward gear
or when 'AT-RISK' objects are detected at
the front. 'AT-RISK' objects also receive
audible and visual alarms when the HV is
in gear.
HV to 'AT-RISK' objects alarming
is two-way. Different alarm ranges
for different 'AT-RISK' object types
(e.g. HV front, HV rear, LV, SO,
TS, PT) and HV speed. HV RF
units located on front / rear / right
& left sides for close range start-
up object detection. Personnel
Tag (PT) proto-typed only and
subject to customer requirements.
Scenario 1 AMT CAS Solutions Comments
HV
Heavy Vehicle
LV
Light Vehicle
HV
Grader
PT
Personnel
SO
Stationary Object
HV
Heavy Vehicle
LV
Light Vehicle
HV
Grader
PT
Personnel
SO
Stationary Object
HV
Heavy Vehicle
LV
Light Vehicle
HV
Grader
PT
Personnel
SO
Stationary Object
SO
Stationary Object
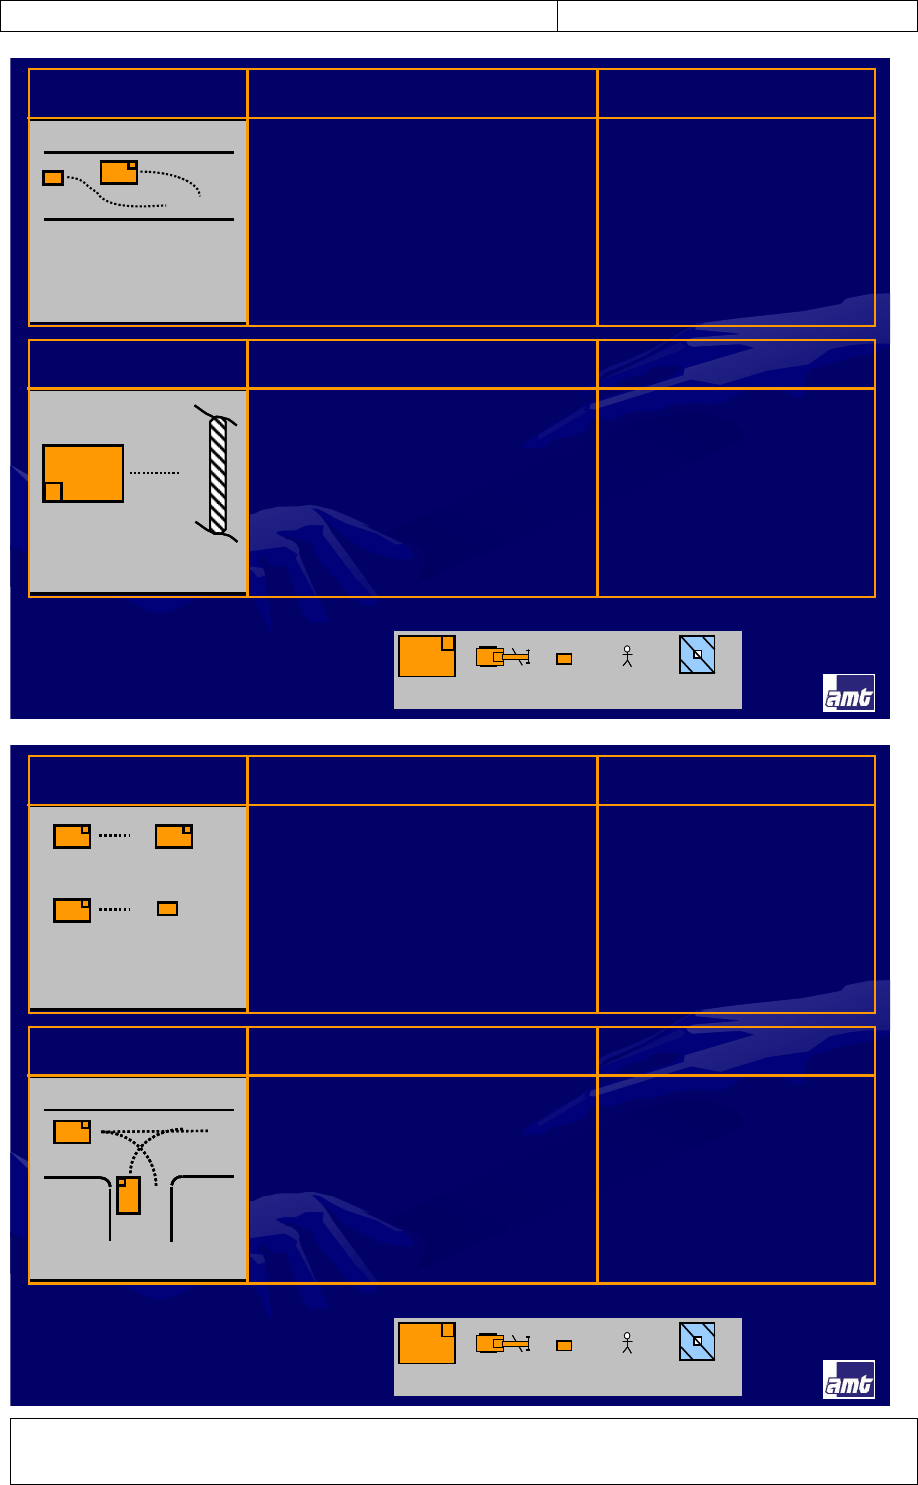
Collision Avoidance System: CAS-CAM/RF® Operating Instructions
Document Number: CAS-CAM_RF Operating Instructions (with FCC
precautions)_18June2010.doc Page 44 of 126
Issue: E
CAS Scenario Solutions 2005
Reversing HV into
dump
Reversing HV into
dump
Rear camera assists HV operator in: 1)
reversing square to berm, 2) avoid sharp
rocks that could result in tyre damage, 3)
verification of tray empty before driving
forward.
Scenario 4 AMT CAS Solutions Comments
LV Overtaking
HV
LV Overtaking
HV
Procedure for LV to call HV on radio for
permission to overtake. HV receives LV
Identification Code on Display Unit for
positive confirmation before granting
approval for LV to overtake.
Provides Positive Identification
(ID) for radio confirmation.
Scenario 3 AMT CAS Solutions Comments
HV
Heavy Vehicle
LV
Light Vehicle
HV
Grader
PT
Personnel
SO
Stationary Object
HV
Heavy Vehicle
LV
Light Vehicle
HV
Grader
PT
Personnel
SO
Stationary Object
HV
Heavy Vehicle
LV
Light Vehicle
HV
Grader
PT
Personnel
SO
Stationary Object
SO
Stationary Object
CAS Scenario Solutions 2005
IntersectionIntersection
HV on straight haul road approaching road
junction would trigger Haul Road Crossing
Warning lights at 200-300m distance prior
to road intersection. No HV - HV front
audible alarms enabled. Assume stop sign
is in place at entry to 'T' junction.
HV to HV alarming is two-way.
Different HV alarm ranges
possible for different object types
(e.g. HV front, HV rear, LV, SO,
TS, PT), HV location
(front/rear/sides) and HV speed.
Scenario 6 AMT CAS Solutions Comments
Approaching
parked vehicle
Parked or
Approaching
parked vehicle
Parked or
Approaching HV receives audible & visual
alarm when within programmed range of
another HV rear or approaching a LV
when in gear. LV only alarms when HV is
in gear and within programmed range. No
alarming on parked HV.
HV to LV alarming is two-way.
Different HV alarm ranges
possible for different object types
(e.g. HV front, HV rear, LV, SO,
TS, PT) and HV speed.
Scenario 5 AMT CAS Solutions Comments
HV
Heavy Vehicle LV
Light Vehicle
HV
Grader
PT
Personnel
SO
Stationary Object
HV
Heavy Vehicle LV
Light Vehicle
HV
Grader
PT
Personnel
SO
Stationary Object
HV
Heavy Vehicle LV
Light Vehicle
HV
Grader
PT
Personnel
SO
Stationary Object
SO
Stationary Object

Collision Avoidance System: CAS-CAM/RF® Operating Instructions
Document Number: CAS-CAM_RF Operating Instructions (with FCC
precautions)_18June2010.doc Page 45 of 126
Issue: E
CAS Scenario Solutions 2005
HV Approaching /
passing structure
HV Approaching /
passing structure
Approaching HV receives audible & visual
alarm when within programmed range of a
RF tagged Stationary Object (SO). SO
can provide visual alarm when HV is in
gear and within programmed range. No
alarming on parked HV.
HV to SO alarming is two-way.
Different HV alarm ranges
possible for different object types
(e.g. HV front, HV rear, LV, SO,
TS, PT), HV location
(front/rear/sides) and HV speed.
Scenario 8 AMT CAS Solutions Comments
HV approaching
roadwork
HV approaching
roadwork
Approaching HV receives audible & visual
alarm when within programmed range of
Grader in gear. Grader would receive
audible and visual alarm when
approaching HV in gear is detected within
the programmed detection range. Grader
automatically switches to Rear Camera for
blind spot vision when 'AT-RISK' objects
are detected within the programmed
detection range.
HV to HV alarming is two-way.
Different HV alarm ranges
possible for different object types
(e.g. HV front, HV rear, LV, SO,
TS, PT), HV location
(front/rear/sides) and HV speed.
Scenario 7 AMT CAS Solutions Comments
HV
Heavy Vehicle
LV
Light Vehicle
HV
Grader
PT
Personnel
SO
Stationary Object
HV
Heavy Vehicle
LV
Light Vehicle
HV
Grader
PT
Personnel
SO
Stationary Object
HV
Heavy Vehicle
LV
Light Vehicle
HV
Grader
PT
Personnel
SO
Stationary Object
SO
Stationary Object
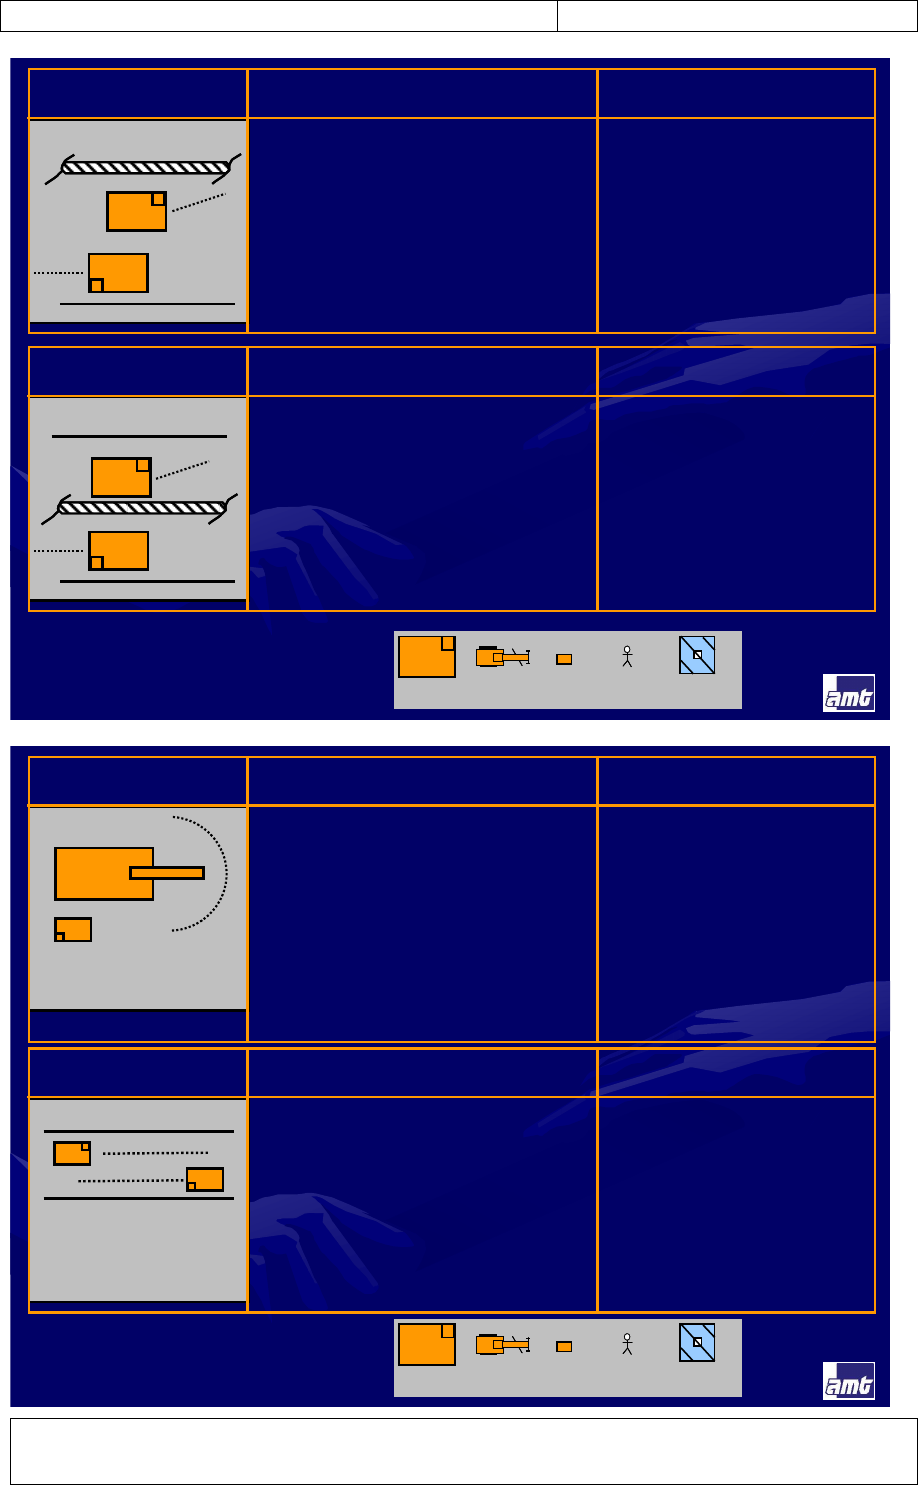
Collision Avoidance System: CAS-CAM/RF® Operating Instructions
Document Number: CAS-CAM_RF Operating Instructions (with FCC
precautions)_18June2010.doc Page 46 of 126
Issue: E
CAS Scenario Solutions 2005
Centre bermCentre berm
Guidance Laser System (GLS) used to
ensure HV's remain in programmed
corridors on haul road. Typical corridors
include: 1) Close to Edge, 2) Safe, 3)
Warning, 4) Danger. Voice & Visual
Alarms generated in Operator's Cabin
when moving outside 'Safe' corridor.
Green (safe) and Red (danger) Lights on
front of HV for visual warning to
approaching HV.
GLS doesn't require regular road
side guidance markers for
operation, but uses the road-
edge feature for guidance (e.g.
windrow, drain). GLS system
operation automatically controlled
using Signaling Barriers placed
at: 1) Start of Haul Road, 2) End
of Haul Road, 3) Road Junction.
Scenario 10 AMT CAS Solutions Comments
Outside bermOutside berm
Guidance Laser System (GLS) used to
ensure HV's remain in programmed
corridors on haul road. Typical corridors
include: 1) Close to Edge, 2) Safe, 3)
Warning, 4) Danger. Voice & Visual
Alarms generated in Operator's Cabin
when moving outside 'Safe' corridor.
Green (safe) and Red (danger) Lights on
front of HV for visual warning to
approaching HV.
GLS doesn't require regular road
side guidance markers for
operation, but uses the road-
edge feature for guidance (e.g.
windrow, drain). GLS system
operation automatically controlled
using Signaling Barriers placed
at: 1) Start of Haul Road, 2) End
of Haul Road, 3) Road Junction.
Scenario 9 AMT CAS Solutions Comments
HV
Heavy Vehicle
LV
Light Vehicle
HV
Grader
PT
Personnel
SO
Stationary Object
HV
Heavy Vehicle
LV
Light Vehicle
HV
Grader
PT
Personnel
SO
Stationary Object
HV
Heavy Vehicle
LV
Light Vehicle
HV
Grader
PT
Personnel
SO
Stationary Object
SO
Stationary Object
CAS Scenario Solutions 2005
Oncoming
Correct Lanes
Oncoming
Correct Lanes
Guidance Laser System (GLS) used to
ensure HV's remain in programmed
corridors on haul road. Typical corridors
include: 1) Close to Edge, 2) Safe, 3)
Warning, 4) Danger. Voice & Visual
Alarms generated in Operator's Cabin
when HV moves outside 'Safe' corridor.
Green (safe) and Red (danger) Lights on
front of HV for visual warning to
approaching HV.
GLS doesn't require regular road
side guidance markers for
operation, but uses the road-
edge feature for guidance (e.g.
windrow, drain). GLS system
operation automatically controlled
using Signaling Barriers placed
at: 1) Start of Haul Road, 2) End
of Haul Road, 3) Road Junction.
Scenario 12 AMT CAS Solutions Comments
Shovel rotating /
swinging
Shovel rotating /
swinging
HV blind side camera used to assist
operator in aligning with Shovel bucket.
Shovel blind spot cameras fitted with
automatic switching on swing direction.
Side RF units can be fitted to
Shovel for alarming HV when within
swing radius of Shovel Housing.
HV's normally programmed to
receive audible alarms from Shovel
typically include Clean-up Dozer
and Cable Handling Vehicle as
Rear Dump Trucks may receive a
high level of nuisance alarms when
reversing to Shovel at different
approach angles.
Scenario 11 AMT CAS Solutions Comments
HV
Heavy Vehicle LV
Light Vehicle
HV
Grader
PT
Personnel
SO
Stationary Object
HV
Heavy Vehicle LV
Light Vehicle
HV
Grader
PT
Personnel
SO
Stationary Object
HV
Heavy Vehicle LV
Light Vehicle
HV
Grader
PT
Personnel
SO
Stationary Object
SO
Stationary Object
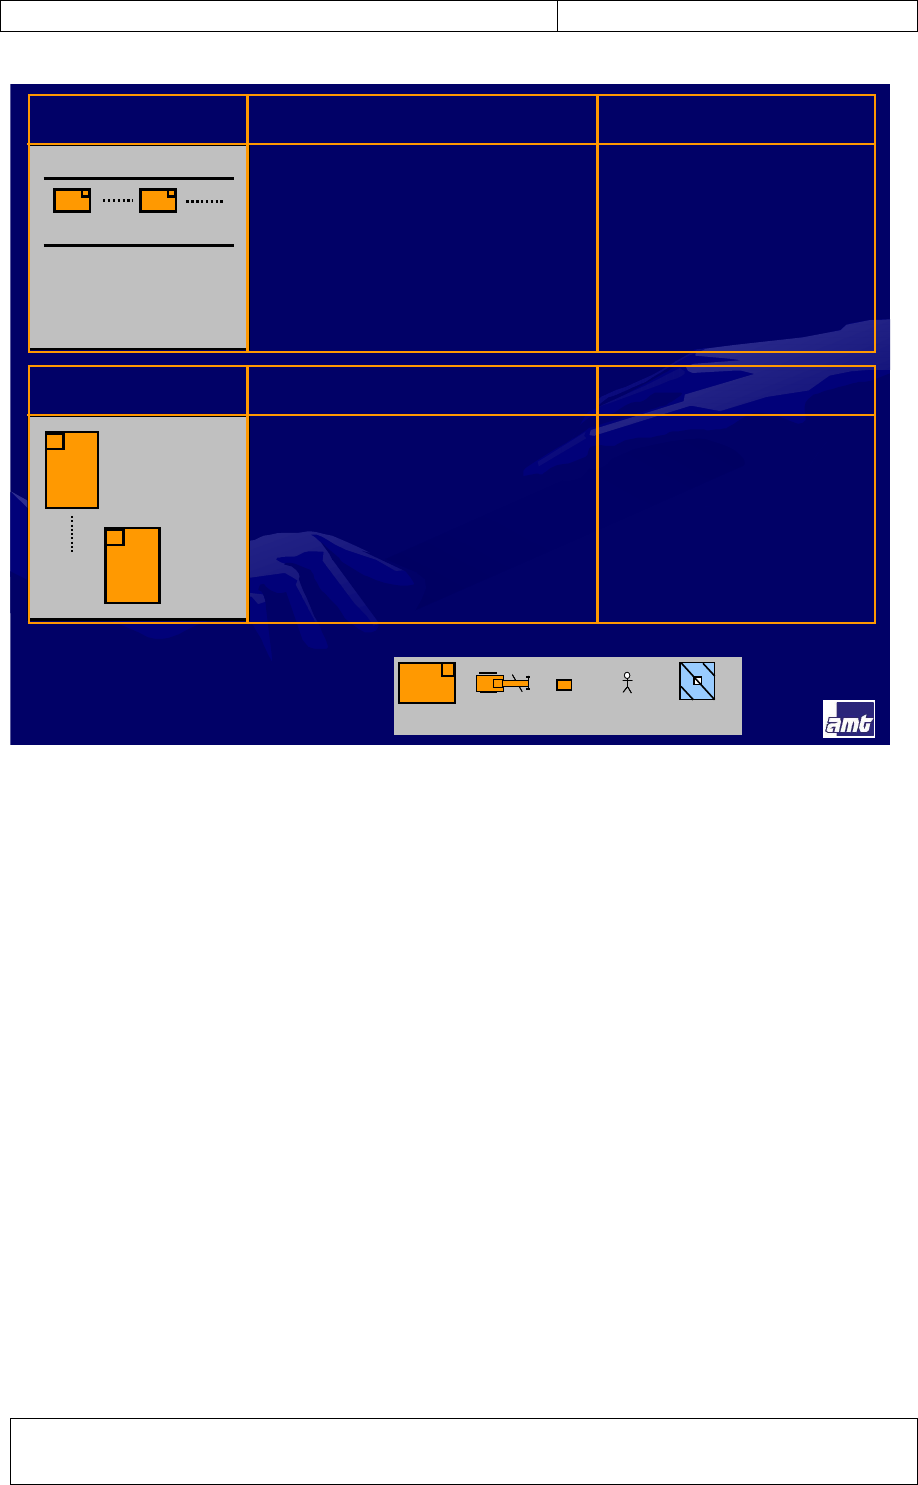
Collision Avoidance System: CAS-CAM/RF® Operating Instructions
Document Number: CAS-CAM_RF Operating Instructions (with FCC
precautions)_18June2010.doc Page 47 of 126
Issue: E
CAS Scenario Solutions 2005
Parked
Reversing
Parked
Reversing
Reversing HV receives audible & visual
alarm when within programmed detection
range of another HV. HV automatically
switches to Rear Camera for blind spot
vision on both reverse gear or when 'AT-
RISK' objects are detected at the rear. No
alarming on parked HV.
HV to HV alarming is two-way.
Different HV alarm ranges
possible for different object types
(e.g. HV front, HV rear, LV, SO,
TS, PT), HV location
(front/rear/sides) and HV speed.
Scenario 14 AMT CAS Solutions Comments
Following
Same lanes
Following
Same lanes
HV getting too close to HV in front would
receive an audible & visual alarm based
on distance and speed differential.
Different Alarms can be programmed
based on speed & distance to cover both
the 'Queuing' and 'Haul Road At Speed'
scenarios.
HV to HV alarming is two-way.
Different HV alarm ranges
possible for different object types
(e.g. HV front, HV rear, LV, SO,
TS, PT), HV location
(front/rear/sides) and HV speed.
Scenario 13 AMT CAS Solutions Comments
HV
Heavy Vehicle
LV
Light Vehicle
HV
Grader
PT
Personnel
SO
Stationary Object
HV
Heavy Vehicle
LV
Light Vehicle
HV
Grader
PT
Personnel
SO
Stationary Object
HV
Heavy Vehicle
LV
Light Vehicle
HV
Grader
PT
Personnel
SO
Stationary Object
SO
Stationary Object
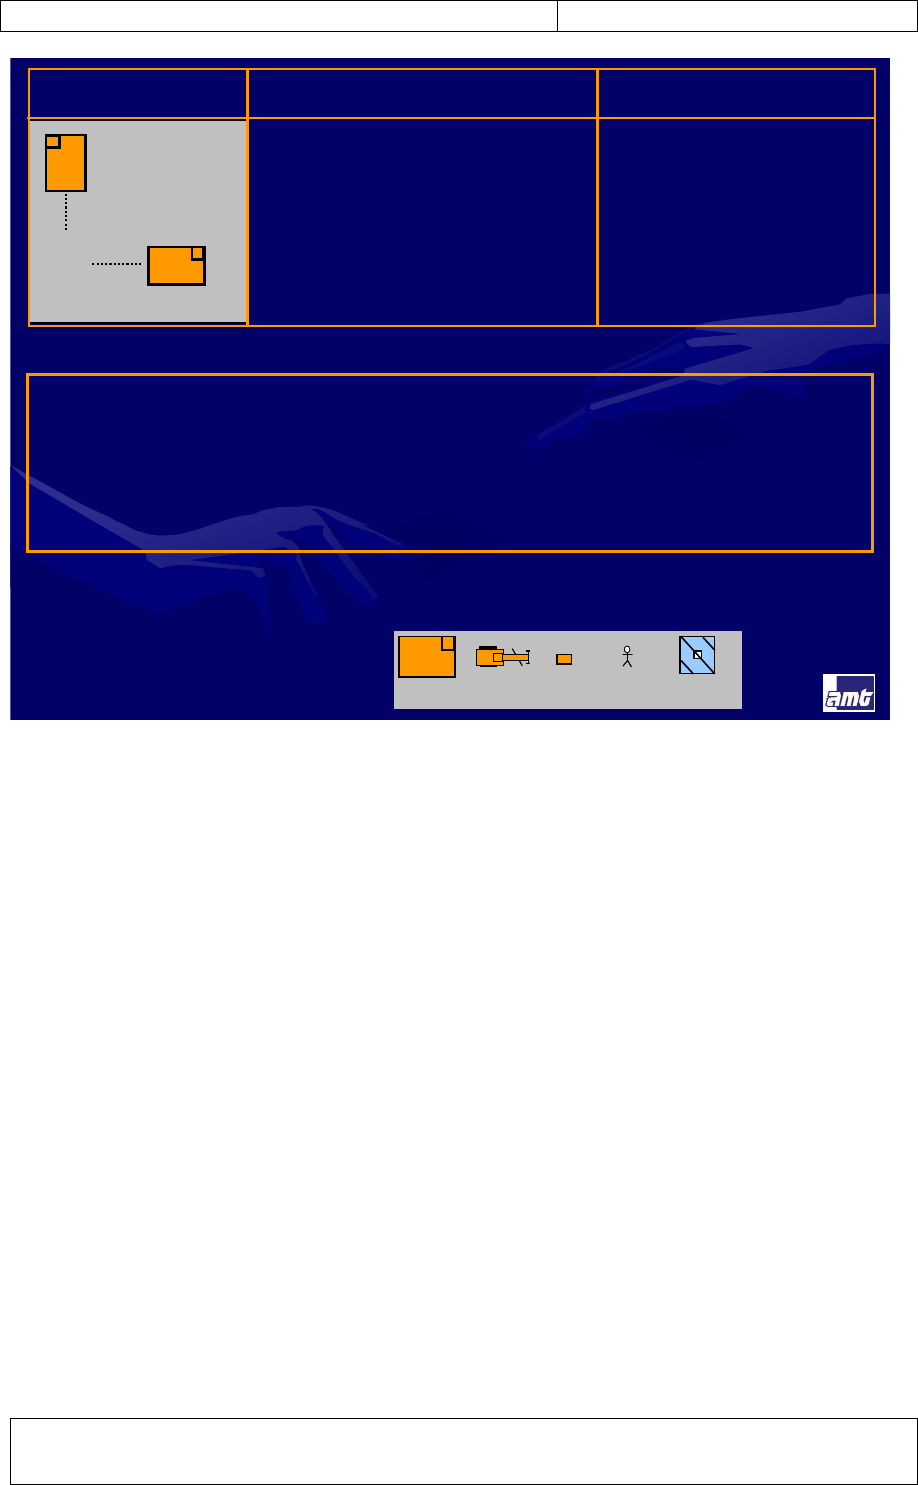
Collision Avoidance System: CAS-CAM/RF® Operating Instructions
Document Number: CAS-CAM_RF Operating Instructions (with FCC
precautions)_18June2010.doc Page 48 of 126
Issue: E
CAS Scenario Solutions 2005
Multiple
reversing
HV
Multiple
reversing
HV
Reversing HV's receive audible & visual
alarm when within programmed detection
range of another reversing or stationary
HV. HV's automatically switch to Rear
Camera for blind spot vision on both
reverse gear or when 'AT-RISK' objects
are detected at the rear.
HV to HV alarming is two-way.
Different HV alarm ranges
possible for different object types
(e.g. HV front, HV rear, LV, SO,
TS, PT), HV location
(front/rear/sides) and HV speed.
Scenario 15 AMT CAS Solutions Comments
HV
Heavy Vehicle
LV
Light Vehicle
HV
Grader
PT
Personnel
SO
Stationary Object
HV
Heavy Vehicle
LV
Light Vehicle
HV
Grader
PT
Personnel
SO
Stationary Object
HV
Heavy Vehicle
LV
Light Vehicle
HV
Grader
PT
Personnel
SO
Stationary Object
SO
Stationary Object
CAS settings shown are AMT suggested settings only.
All settings are fully programmable and final settings
are best decided upon completion of site Risk
Assessment.

Collision Avoidance System: CAS-CAM/RF® Operating Instructions
Document Number: CAS-CAM_RF Operating Instructions (with FCC
precautions)_18June2010.doc Page 49 of 126
Issue: E
8 APPLICATIONS
The superior quality video imaging, RF tagging capability and rugged construction make
the CAS-CAM/RF
®
system an ideal package in assisting the prevention of collisions with
plant, equipment or personnel for a variety of Heavy Vehicles.
Typical application areas include:
• Quarry, Mining and Construction Industry
• Refuse Industry
• Transport Industry (Road Haulage and Buses)
• Forklift / Handling / Storage
• Fire Fighting / Emergency Services Industry
• Agricultural Industry
• Recreational Vehicles
• Any other poor visibility application in hostile environments
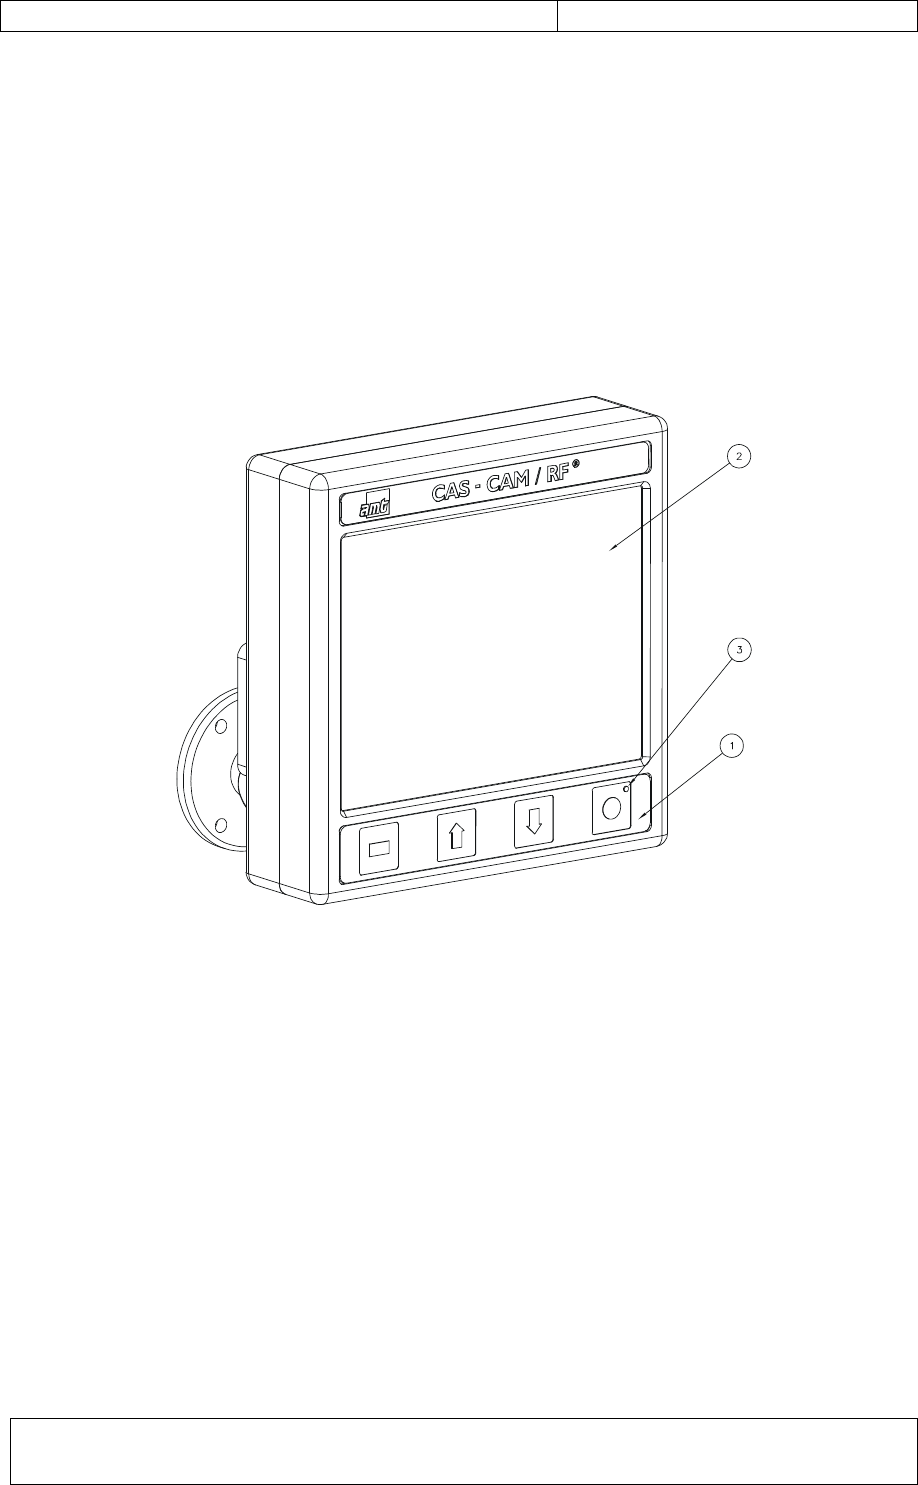
Collision Avoidance System: CAS-CAM/RF® Operating Instructions
Document Number: CAS-CAM_RF Operating Instructions (with FCC
precautions)_18June2010.doc Page 50 of 126
Issue: E
9 NAME AND FUNCTION OF PARTS
9.1 Heavy Vehicle (HV) System
9.1.1 Display Unit (PROD0119)
Front Panel Items
1. Keypad – controls screen power, switches camera channels and operator functions
2. Display - 6.4” colour TFT LCD monitor for displaying camera images, RF tagging
alarms and function text
3. Power Indicator – active when power is applied
Figure 15: Display Unit - Front Panel Layout
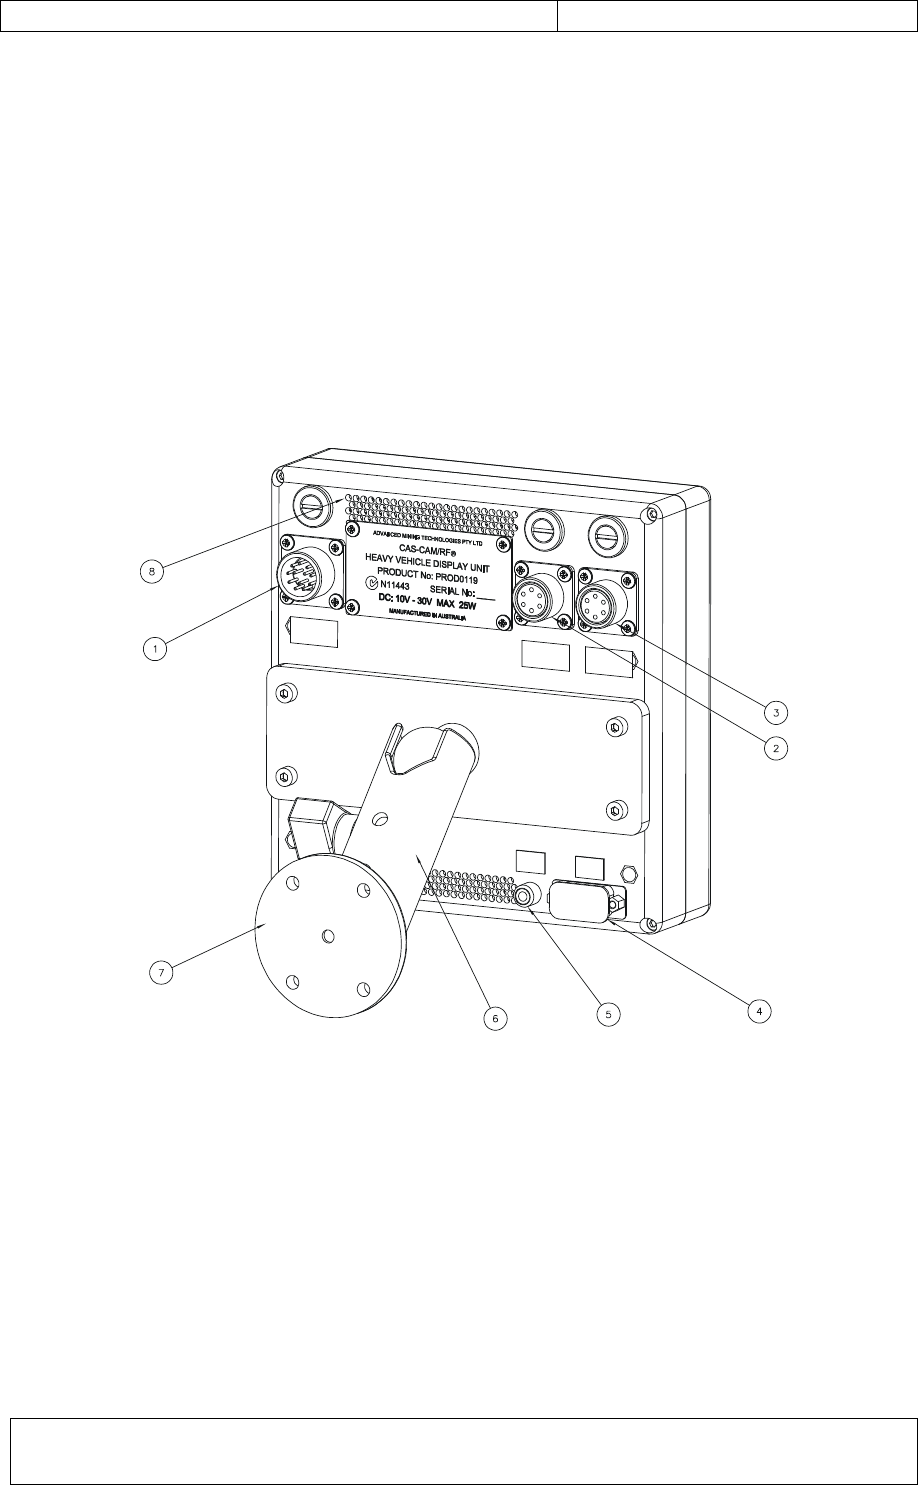
Collision Avoidance System: CAS-CAM/RF® Operating Instructions
Document Number: CAS-CAM_RF Operating Instructions (with FCC
precautions)_18June2010.doc Page 51 of 126
Issue: E
Rear Panel Items
1. EXT I/O – External Input/Output connector, including Power Input (12-way panel
plug) and Fuse (2A, 20mm x 5mm slow blow)
2. CH1 – Channel 1 connector (6-way panel socket) and Fuse (0.5A, 20mm x 5mm
slow blow)
3. CH2 – Channel 2 connector (6-way panel socket) and Fuse (0.5A, 20mm x 5mm
slow blow)
4. RS232 – serial communications port connector (DB-9 panel socket)
5. VIDEO OUT – Video output (PAL) connector (RCA panel socket)
6. Adjustable mounting bracket
7. Mounting base
8. Ventilation slots
Figure 16: Display Unit - Rear Panel Layout
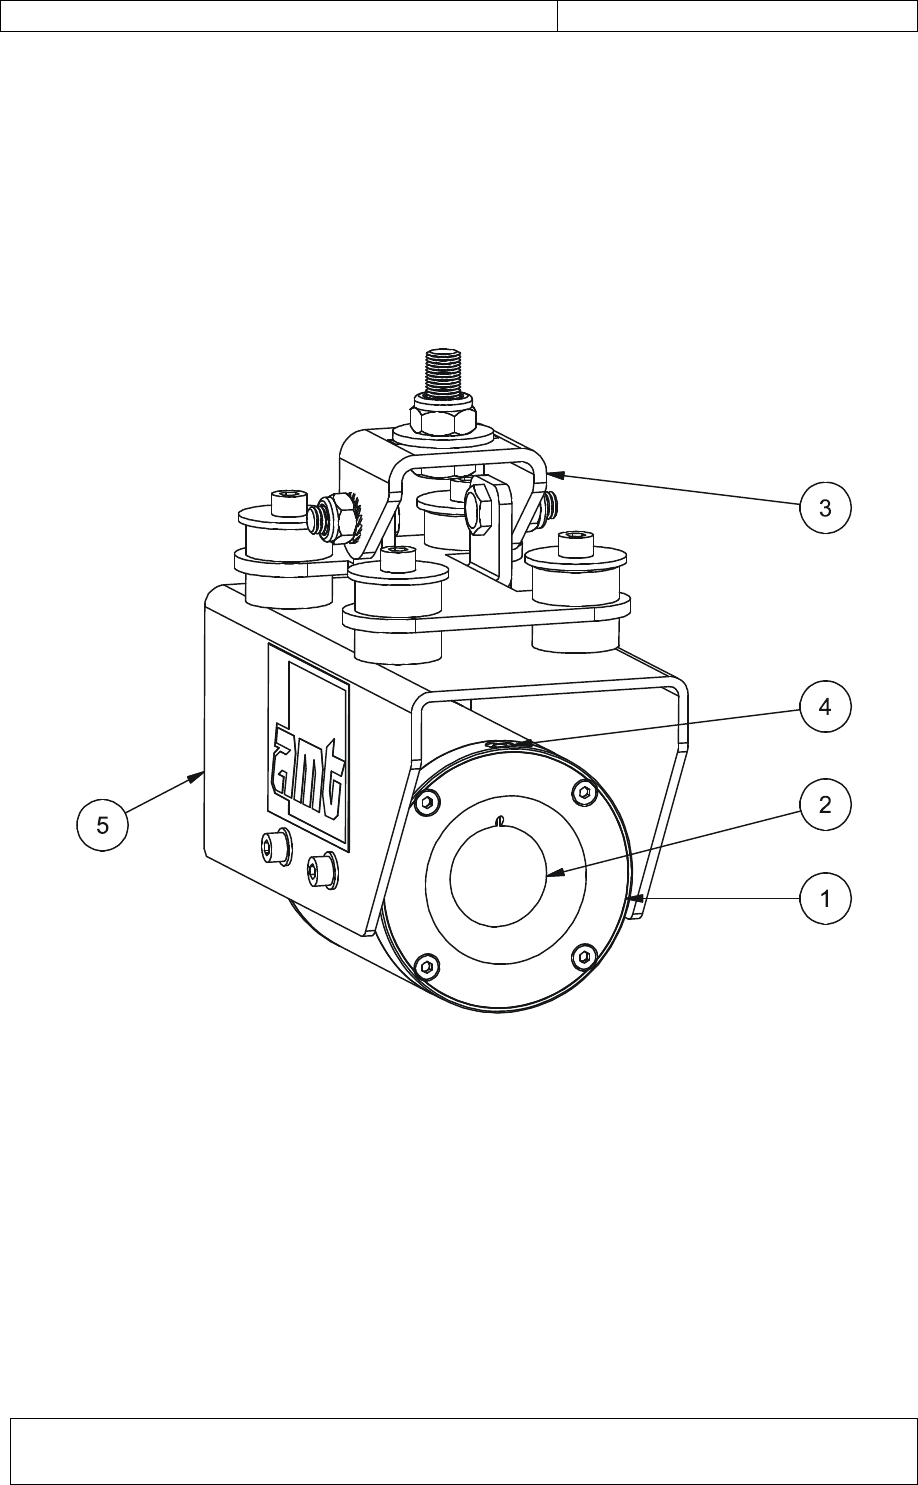
Collision Avoidance System: CAS-CAM/RF® Operating Instructions
Document Number: CAS-CAM_RF Operating Instructions (with FCC
precautions)_18June2010.doc Page 52 of 126
Issue: E
9.1.2 Camera Unit (PROD0118)
1. Weatherproof camera housing
2. Camera Window – requires manual cleaning for quality vision
3. Adjustable mounting bracket
4. Window air purge inlet (client option)
5. Electrical connector (6-way panel plug)
Figure 17: Camera Unit - Layout
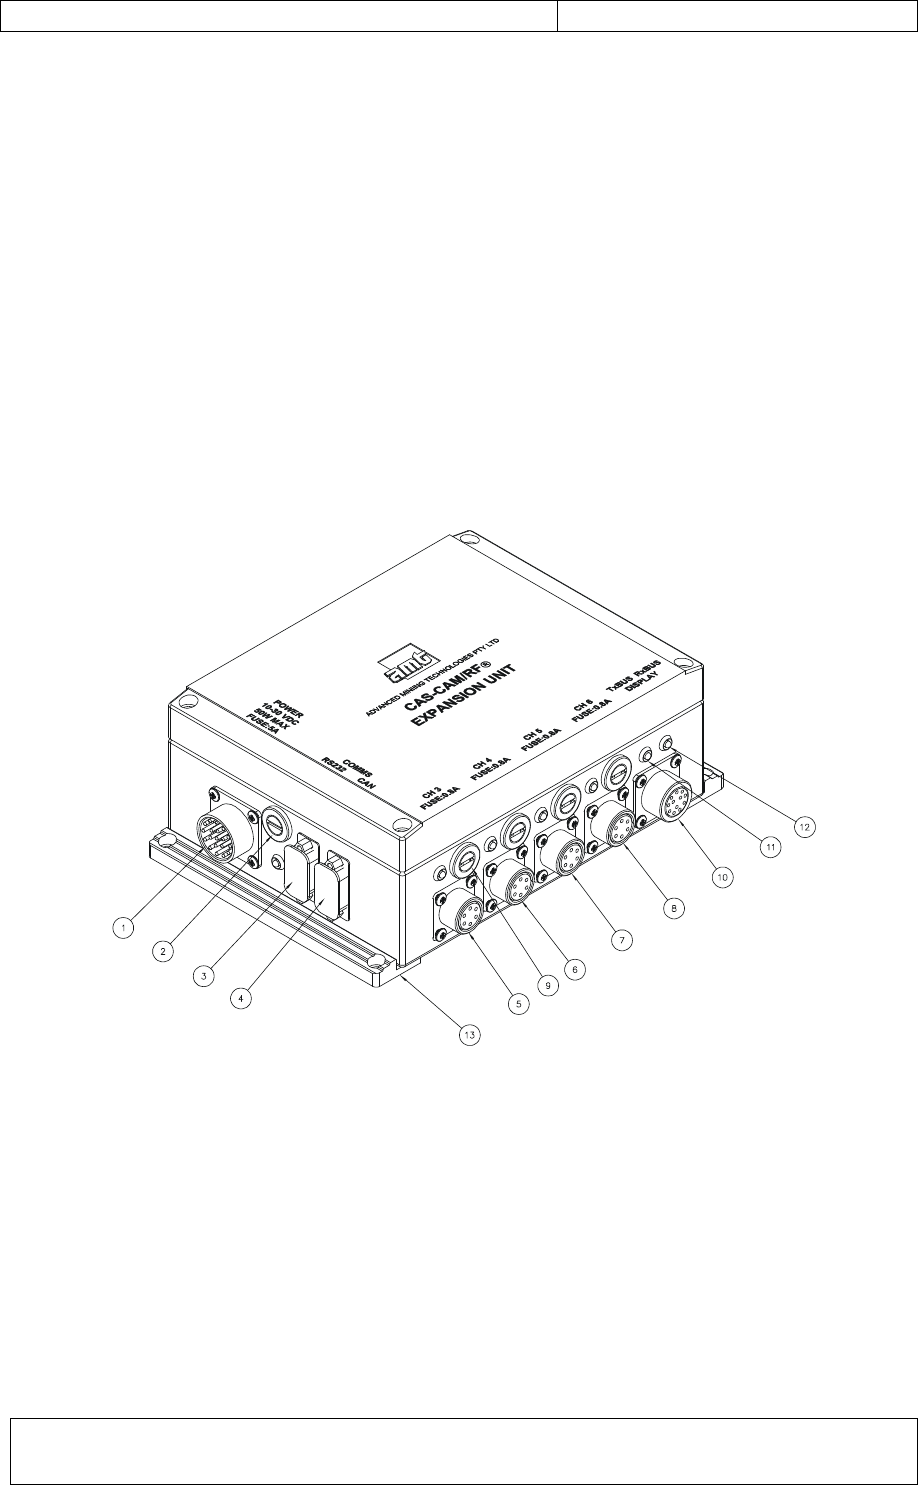
Collision Avoidance System: CAS-CAM/RF® Operating Instructions
Document Number: CAS-CAM_RF Operating Instructions (with FCC
precautions)_18June2010.doc Page 53 of 126
Issue: E
9.1.3 Expansion Unit (PROD0161)
1. POWER – Power Input (10-30VDC, 50W max.)
2. INPUT POWER FUSE (5A, 20mm x 5mm slow blow)
3. RS232 – serial communications port connector (DB-9 panel socket)
4. CAN – CAN Bus Interface (DB-9 panel socket)
5. CH3 – Channel 3 connector (6-way panel socket)
6. CH4 – Channel 4 connector (6-way panel socket)
7. CH5 – Channel 5 connector (6-way panel socket)
8. CH6 – Channel 6 connector (6-way panel socket)
9. Channel 3 – 6 Fuses (0.8A, 20mm x 5mm slow blow)
10. DISPLAY – Display Unit connector (12-way panel socket)
11. TX BUS – Communications Bus ‘Transmit’ Activity Indicator
12. RX BUS – Communications Bus ‘Receive’ Activity Indicator
13. Mounting base
Figure 18: Expansion Unit - Layout
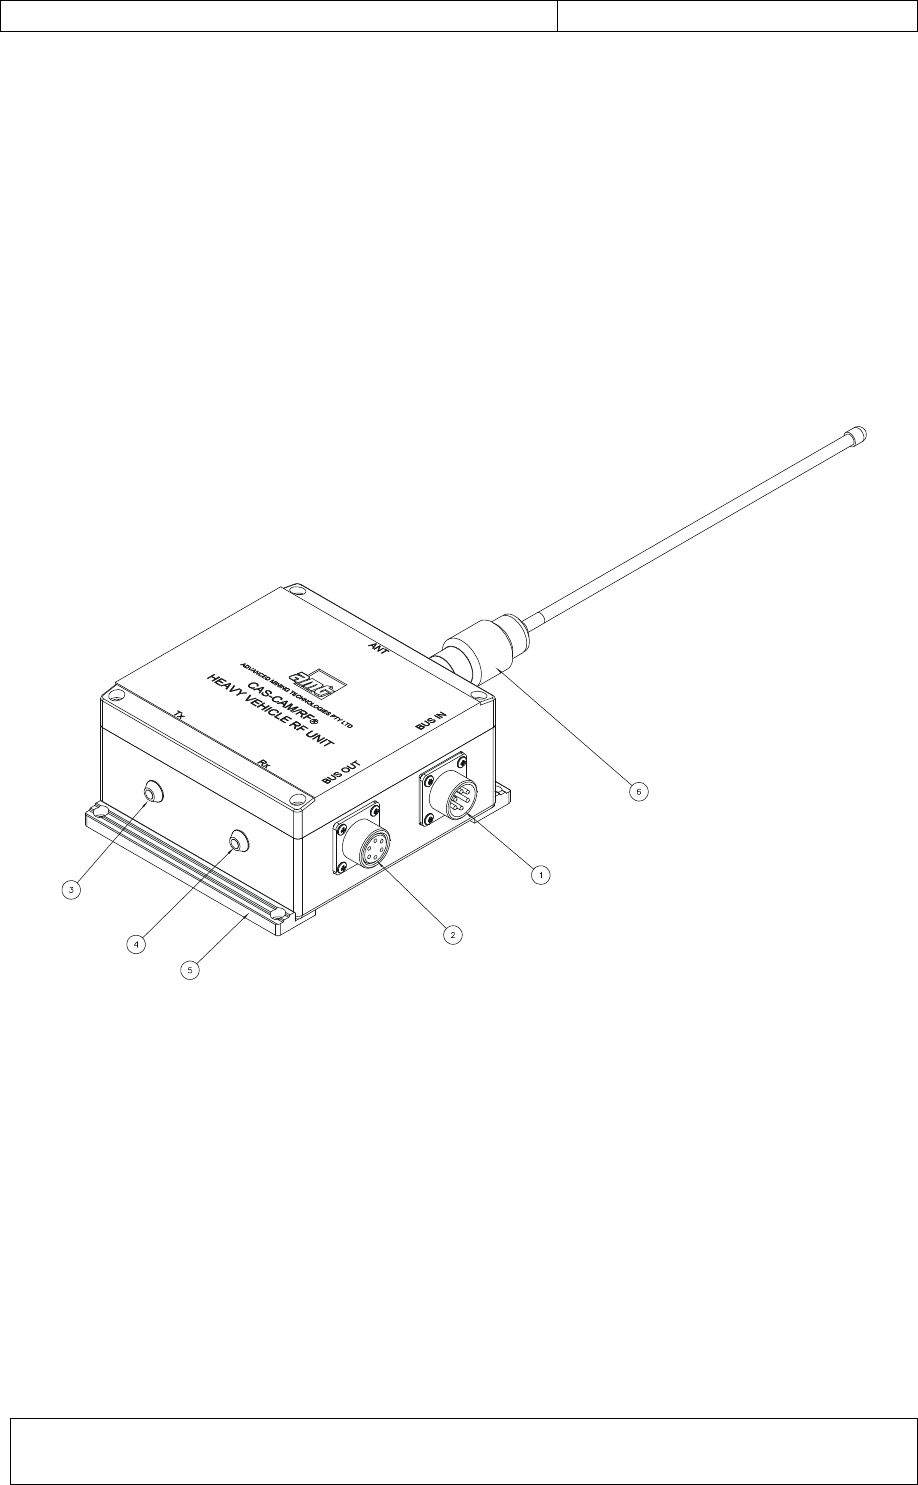
Collision Avoidance System: CAS-CAM/RF® Operating Instructions
Document Number: CAS-CAM_RF Operating Instructions (with FCC
precautions)_18June2010.doc Page 54 of 126
Issue: E
9.1.4 RF Unit – Front (PROD0239) or Rear (PROD0169)
1. BUS IN – Communications Bus Input (6-way panel plug)
2. BUS OUT – Communications Bus Input (6-way panel socket)
3. TX – Communications Bus ‘Transmit’ Activity Indicator (red)
4. RX – Communications Bus ‘Receive’ Activity Indicator (green)
5. Mounting base
6. ANT – Antenna connector
Note: optional Side RF Units (Left Side RF Unit, Right Side RF Unit) are identical in design
to the Front RF Unit and Rear RF Unit, however, are coded differently internally.
Figure 19: RF Unit - Layout
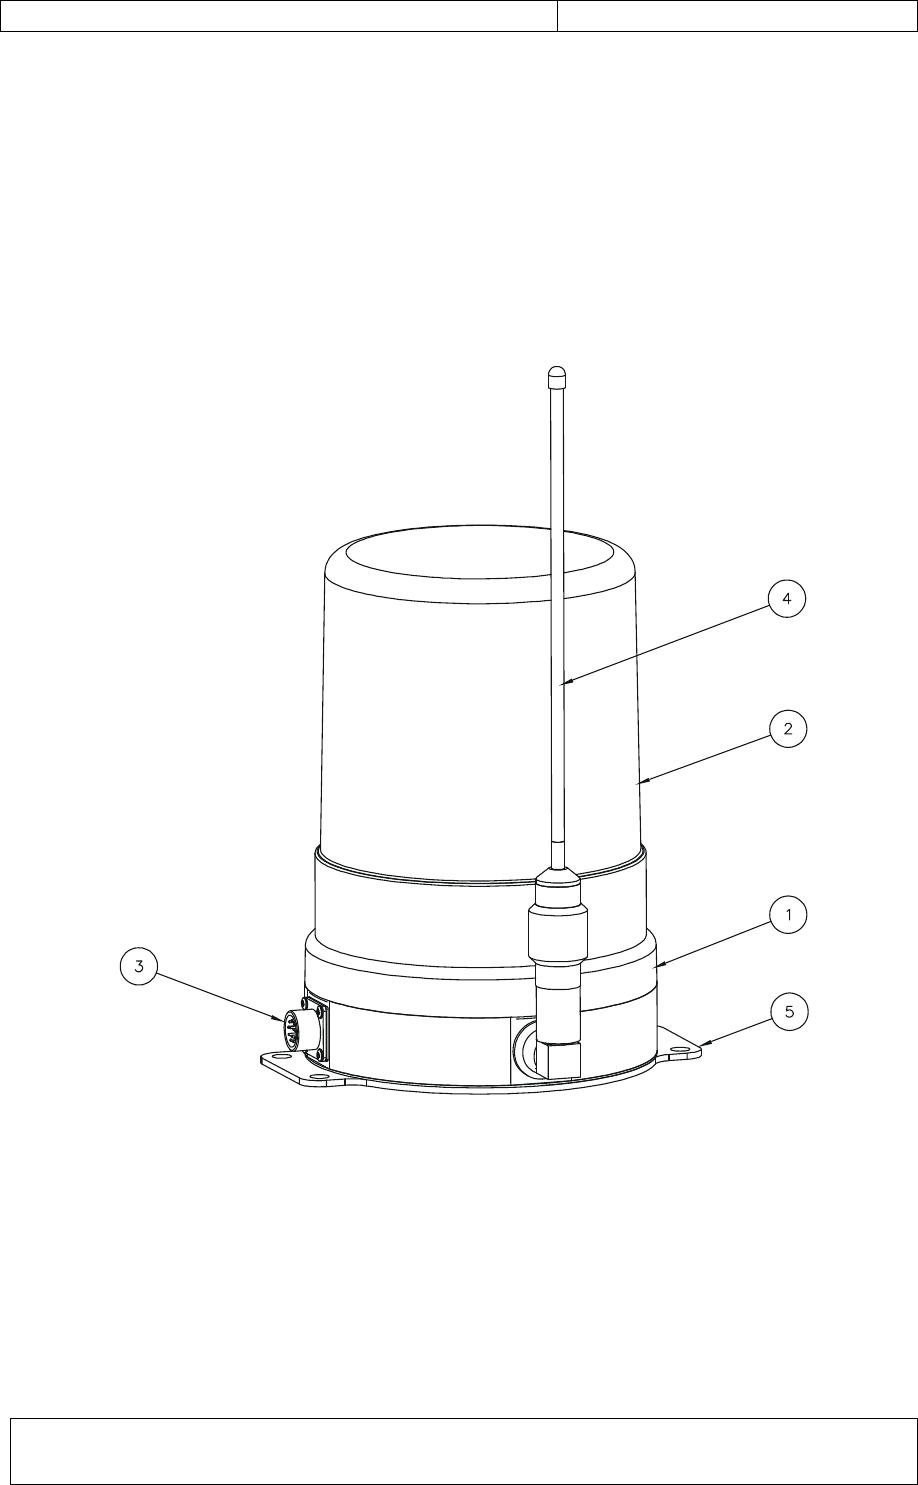
Collision Avoidance System: CAS-CAM/RF® Operating Instructions
Document Number: CAS-CAM_RF Operating Instructions (with FCC
precautions)_18June2010.doc Page 55 of 126
Issue: E
9.2 Light Vehicle (LV) System (with integral beacon)
(PROD0246)
9.2.1 Light Vehicle Unit (PROD0209)
1. Rotating Beacon
2. Beacon lens cover (optional colours)
3. External Input/Output connector, including Power Input (12-way panel plug)
4. Antenna
5. Mounting Base
Figure 20: Light Vehicle Unit – Layout
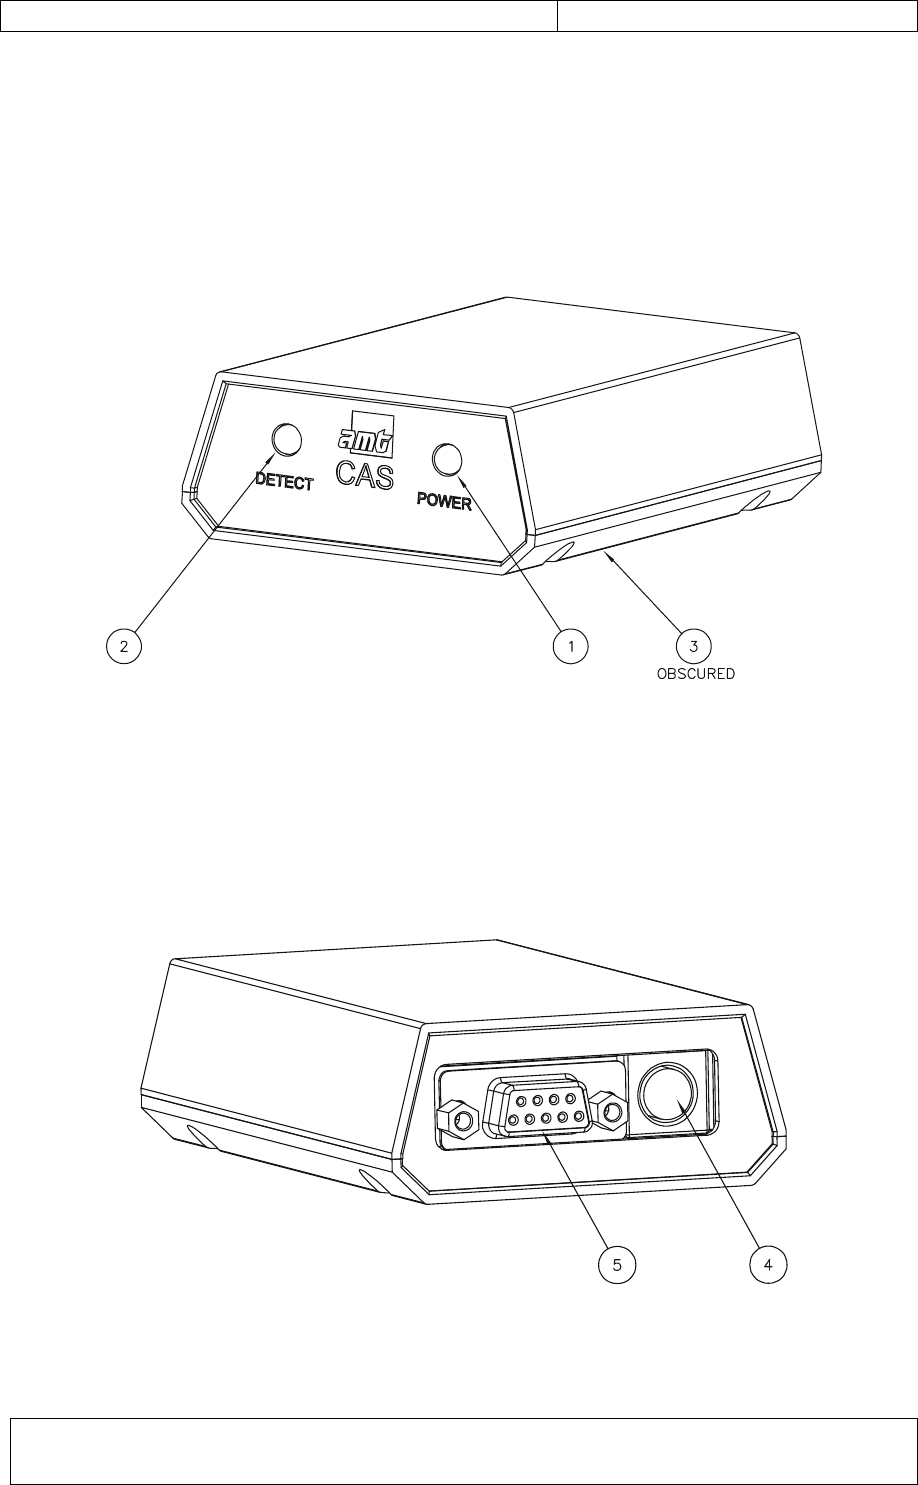
Collision Avoidance System: CAS-CAM/RF® Operating Instructions
Document Number: CAS-CAM_RF Operating Instructions (with FCC
precautions)_18June2010.doc Page 56 of 126
Issue: E
9.2.2 Dash Alarm Unit (PROD0211)
Front Panel Items
1. Power Indicator (green)
2. Alarm Indicator (red)
3. Audible Alarm
Figure 21: Dash Alarm Unit – Front Panel Layout
Rear Panel Items
4. External Input/Output connector, including Power Input (5-way panel subminiature
DIN socket)
5. RS-232 - serial communications port connector (DB-9 panel socket)
Figure 22: Dash Alarm Unit – Rear Panel Layout
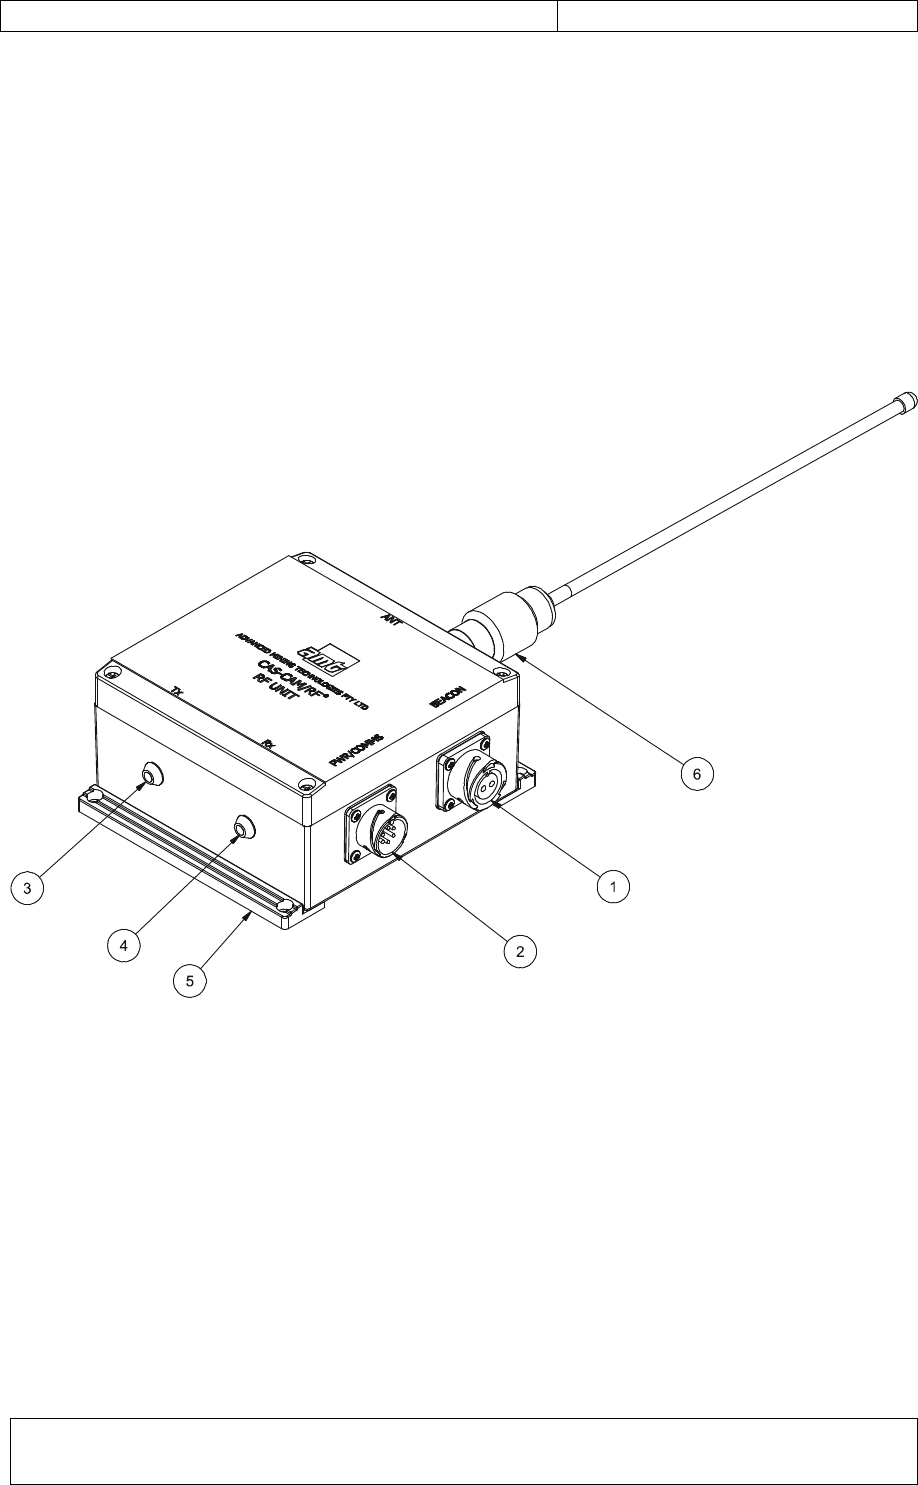
Collision Avoidance System: CAS-CAM/RF® Operating Instructions
Document Number: CAS-CAM_RF Operating Instructions (with FCC
precautions)_18June2010.doc Page 57 of 126
Issue: E
9.3 Light Vehicle (LV) System (with external beacon option)
(PROD0294)
9.3.1 Light Vehicle RF Unit (with external beacon option) (PROD0295)
1. BEACON – External Beacon Interface (2-way panel plug)
2. PWR/COMMS – Input Power & Communications (6-way panel socket)
3. TX – Communications Bus ‘Transmit’ Activity Indicator (red)
4. RX – Communications Bus ‘Receive’ Activity Indicator (green)
5. Mounting base
6. ANT – Antenna connector
Figure 23: Light Vehicle Unit – Layout
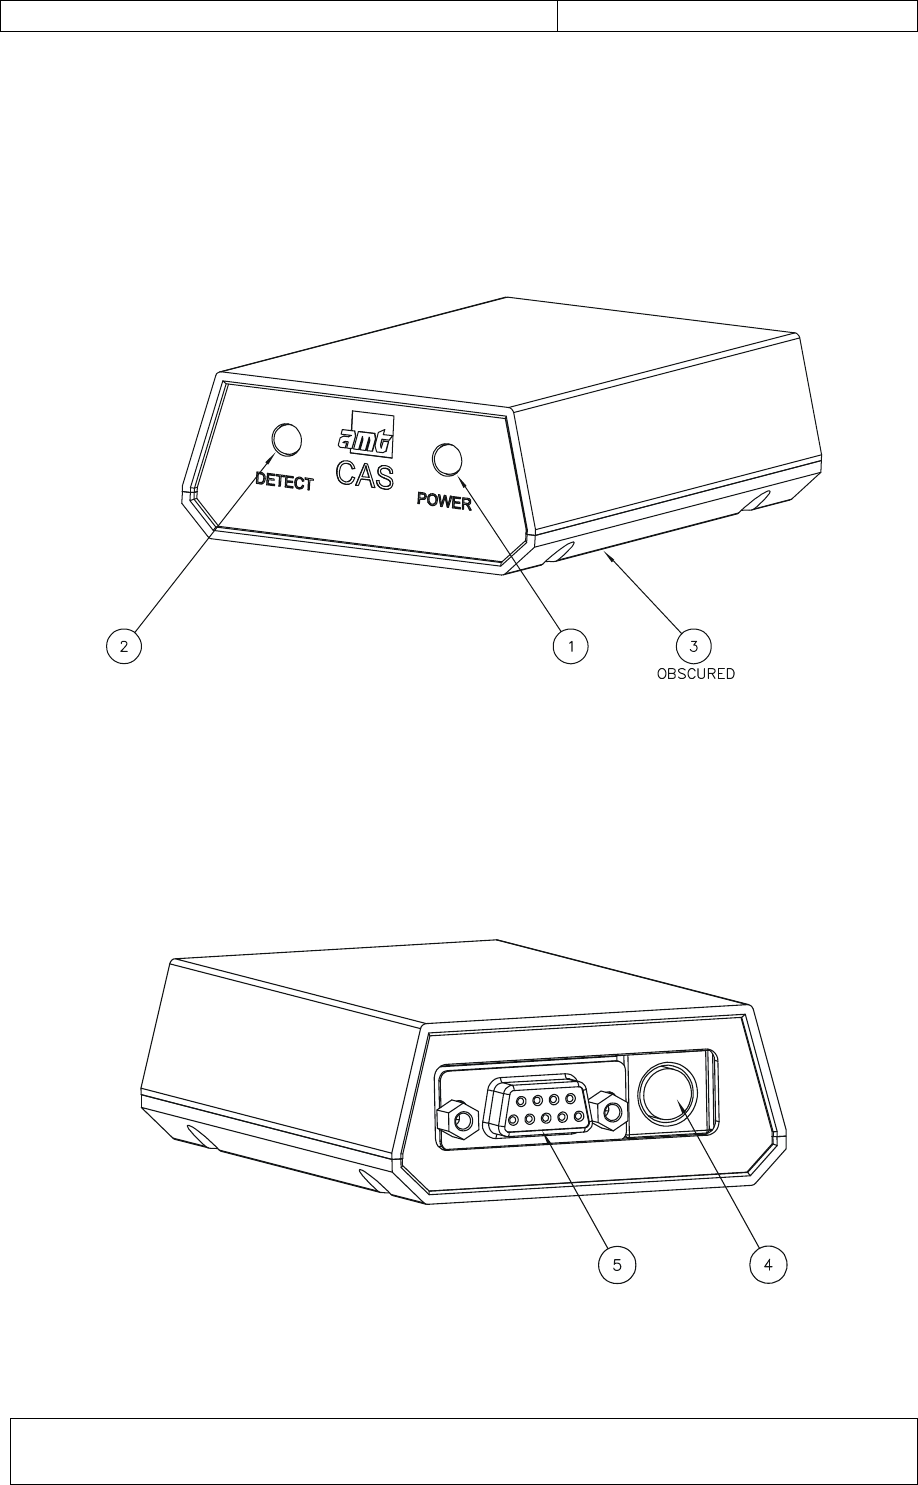
Collision Avoidance System: CAS-CAM/RF® Operating Instructions
Document Number: CAS-CAM_RF Operating Instructions (with FCC
precautions)_18June2010.doc Page 58 of 126
Issue: E
9.3.2 Dash Alarm Unit (PROD0211)
Front Panel Items
1. Power Indicator (green)
2. Alarm Indicator (red)
3. Audible Alarm
Figure 24: Dash Alarm Unit – Front Panel Layout
Rear Panel Items
4. External Input/Output connector, including Power Input (5-way panel subminiature
DIN socket)
5. RS-232 - serial communications port connector (DB-9 panel socket)
Figure 25: Dash Alarm Unit – Rear Panel Layout
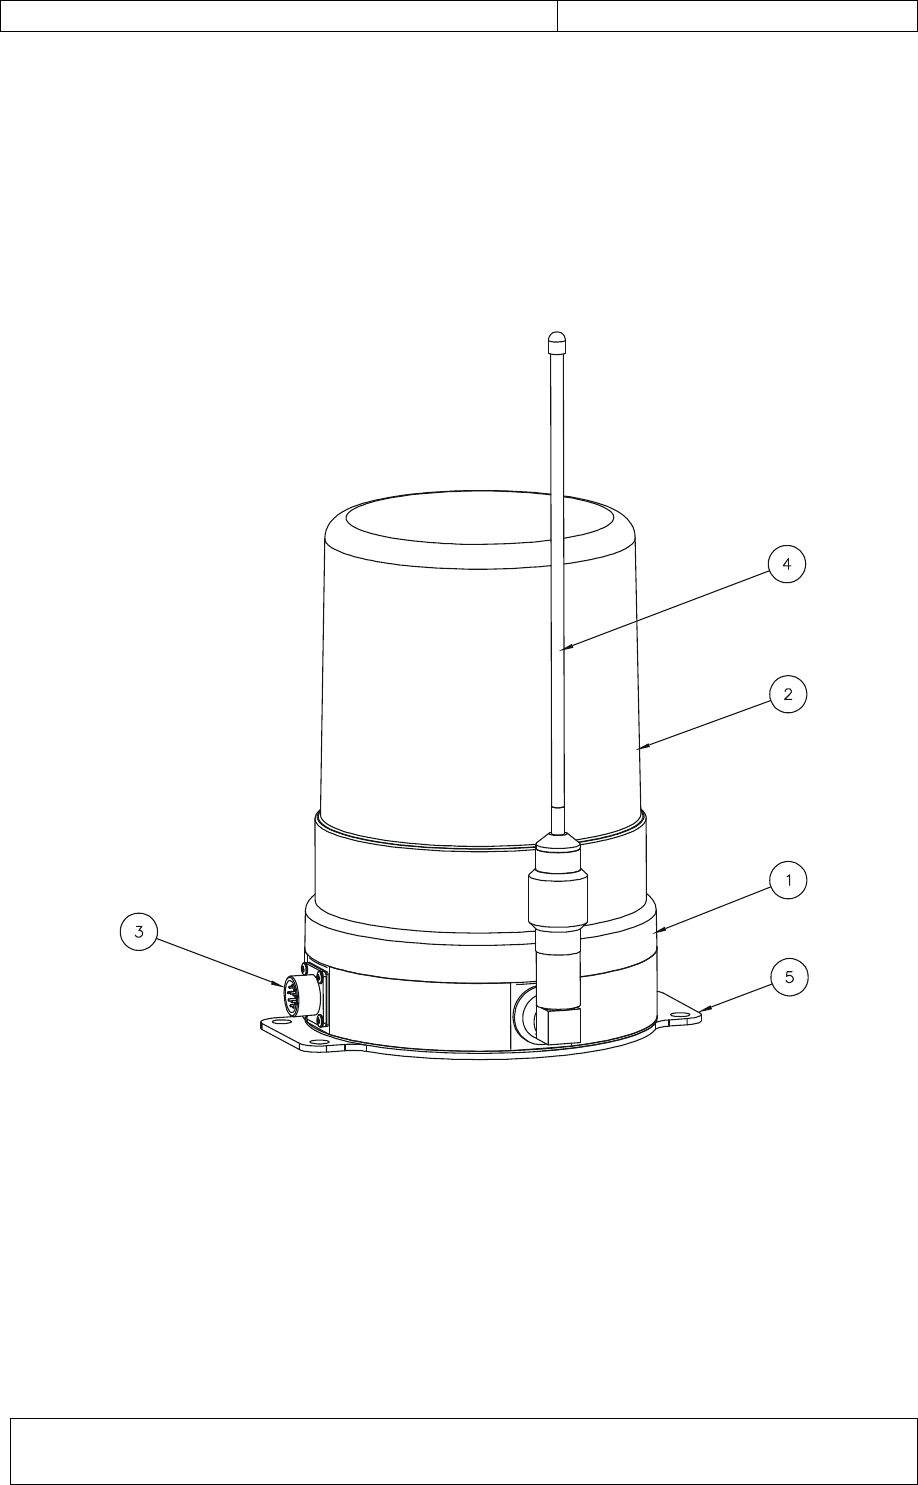
Collision Avoidance System: CAS-CAM/RF® Operating Instructions
Document Number: CAS-CAM_RF Operating Instructions (with FCC
precautions)_18June2010.doc Page 59 of 126
Issue: E
9.4 Stationary Object (SO) System (PROD0210)
9.4.1 Stationary Object Unit (PROD0212)
1. Rotating Beacon
2. Beacon lens cover (optional colours)
3. External Input/Output connector, including Power Input (12-way panel plug)
4. Antenna
5. Mounting Base
Figure 26: Stationary Object Unit – Layout
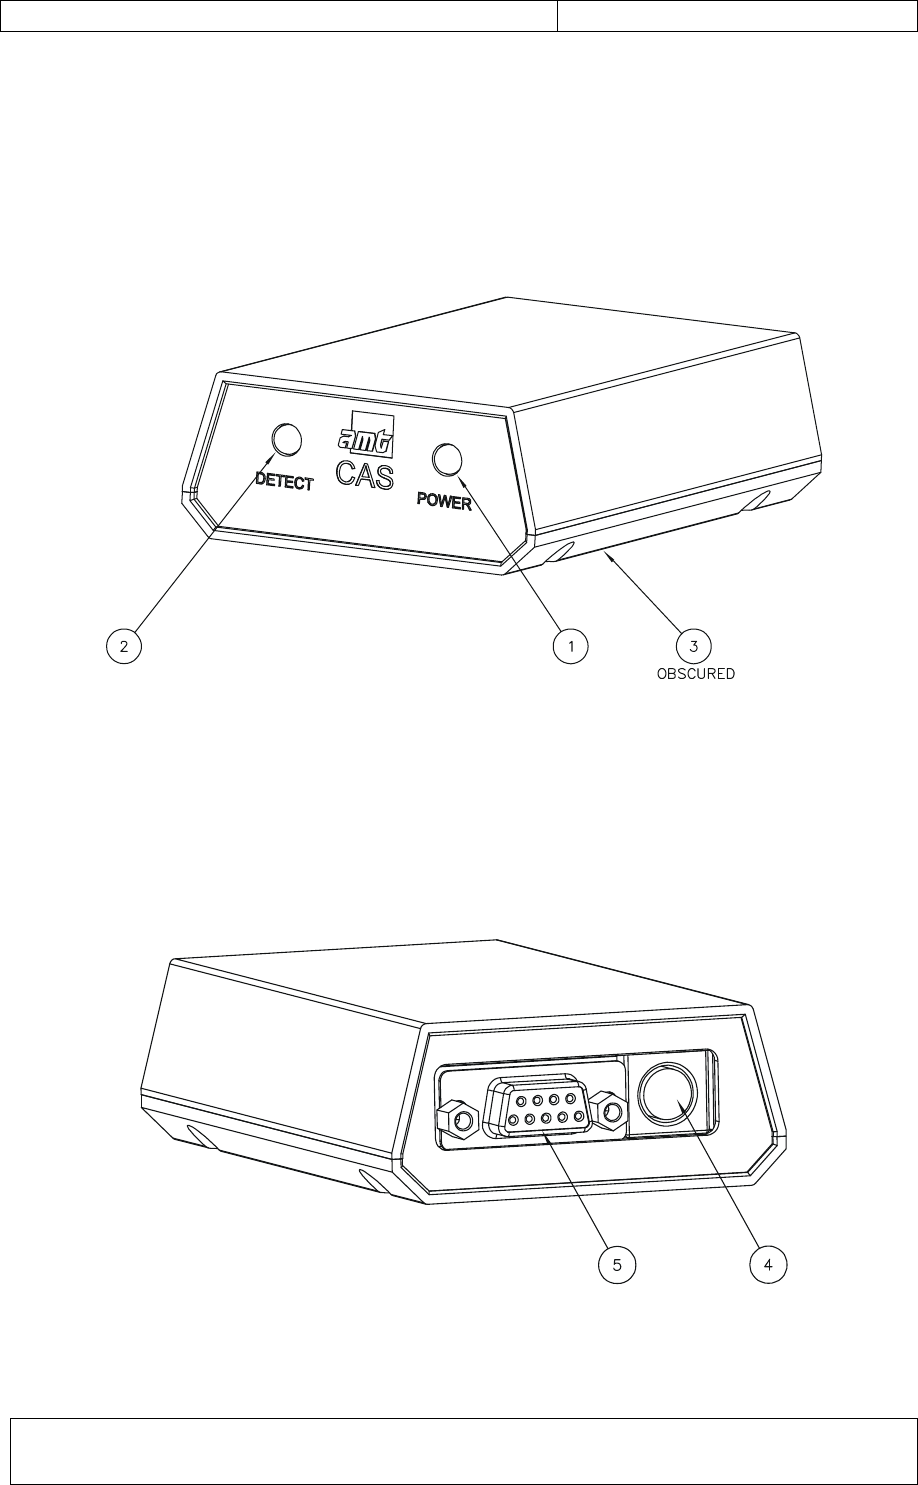
Collision Avoidance System: CAS-CAM/RF® Operating Instructions
Document Number: CAS-CAM_RF Operating Instructions (with FCC
precautions)_18June2010.doc Page 60 of 126
Issue: E
9.4.2 Dash Alarm Unit (PROD0211)
Front Panel Items
1. Power Indicator (green)
2. Alarm Indicator (red)
3. Audible Alarm
Figure 27: Dash Alarm Unit – Front Panel Layout
Rear Panel Items
4. External Input/Output connector, including Power Input (5-way panel subminiature
DIN socket)
5. RS-232 - serial communications port connector (DB-9 panel socket)
Figure 28: Dash Alarm Unit – Rear Panel Layout

Collision Avoidance System: CAS-CAM/RF® Operating Instructions
Document Number: CAS-CAM_RF Operating Instructions (with FCC
precautions)_18June2010.doc Page 61 of 126
Issue: E
9.5 Mobile Plant & Equipment (HV) System (PROD0225)
9.5.1 Mobile Plant & Equipment Unit (PROD0250)
1. Rotating Beacon
2. Beacon lens cover (optional colours)
3. External Input/Output connector, including Power Input (12-way panel plug)
4. Antenna
5. Mounting Base
Figure 29: Mobile Plant & Equipment Unit – Layout
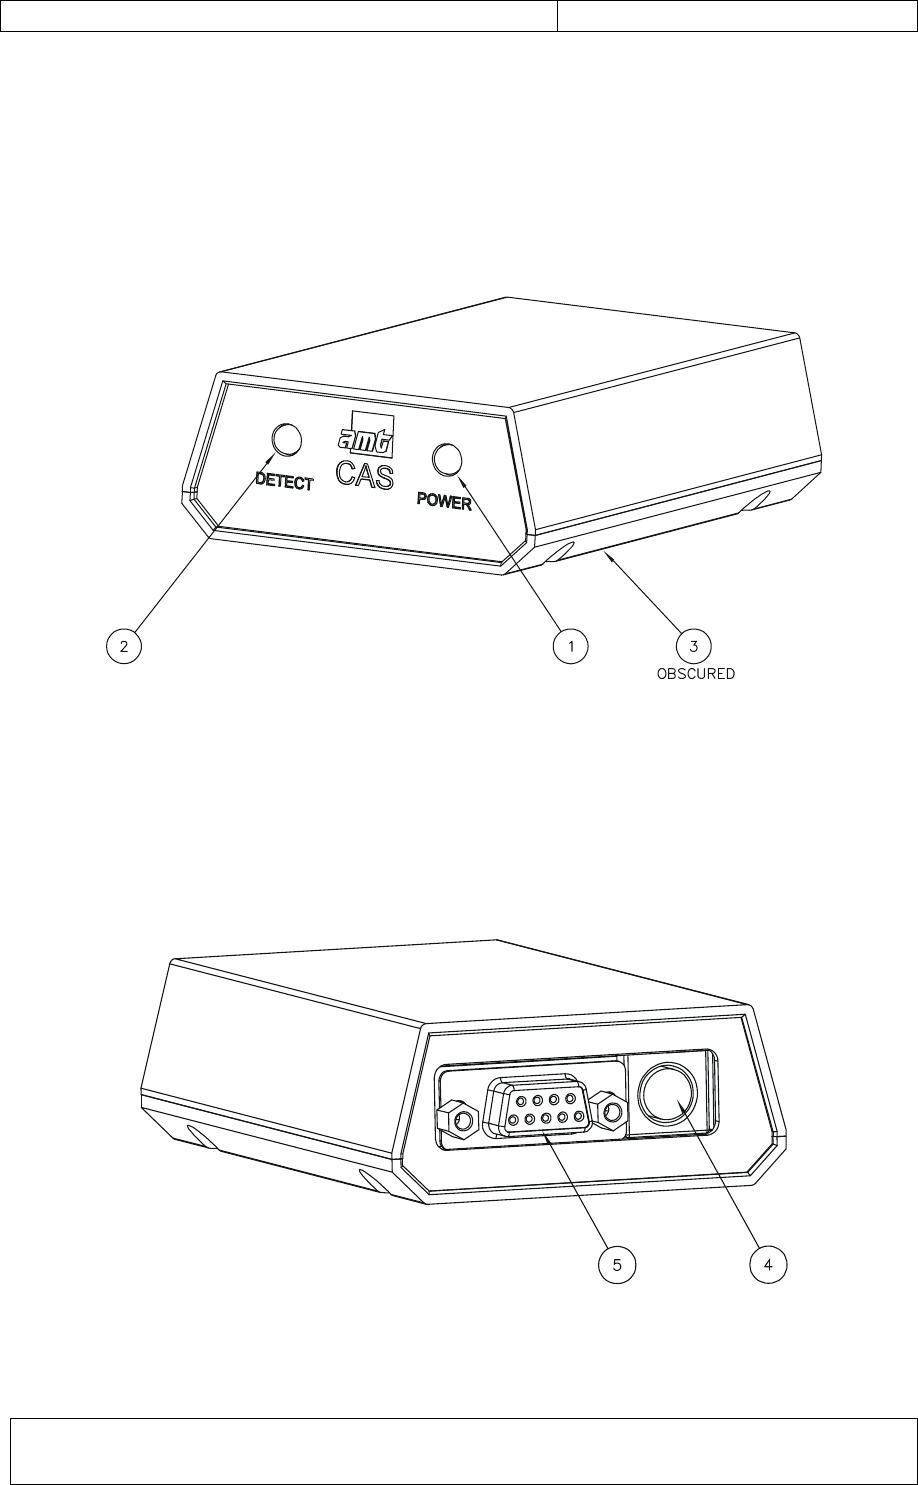
Collision Avoidance System: CAS-CAM/RF® Operating Instructions
Document Number: CAS-CAM_RF Operating Instructions (with FCC
precautions)_18June2010.doc Page 62 of 126
Issue: E
9.5.2 Dash Alarm Unit (PROD0211)
Front Panel Items
1. Power Indicator (green)
2. Alarm Indicator (red)
3. Audible Alarm
Figure 30: Dash Alarm Unit – Front Panel Layout
Rear Panel Items
4. External Input/Output connector, including Power Input (5-way panel subminiature
DIN socket)
5. RS-232 - serial communications port connector (DB-9 panel socket)
Figure 31: Dash Alarm Unit – Rear Panel Layout
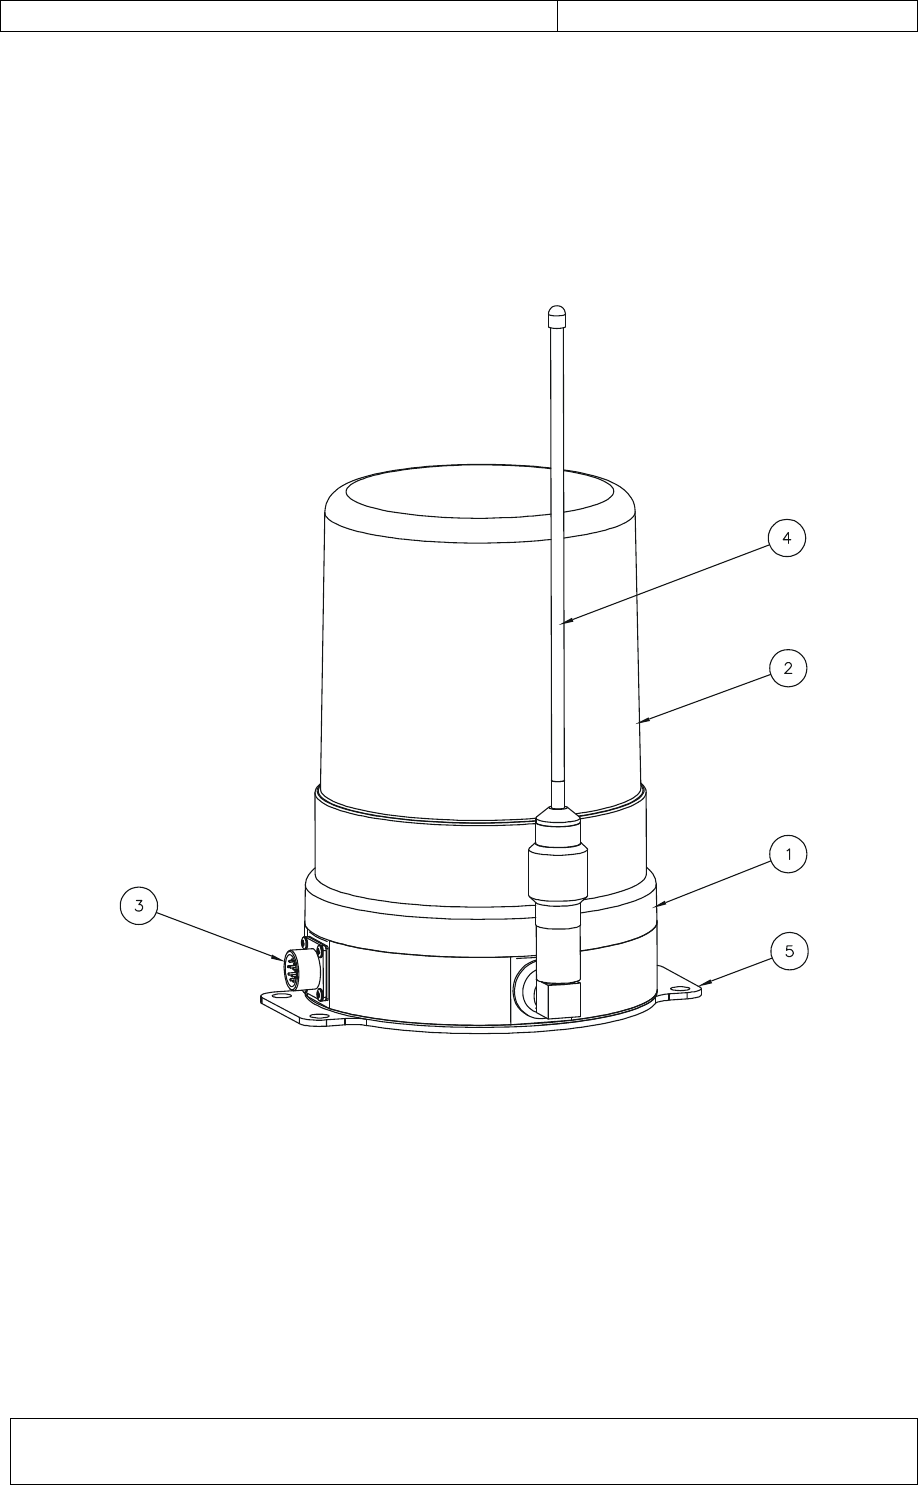
Collision Avoidance System: CAS-CAM/RF® Operating Instructions
Document Number: CAS-CAM_RF Operating Instructions (with FCC
precautions)_18June2010.doc Page 63 of 126
Issue: E
9.6 Test Station (TS) System (PROD0241)
9.6.1 Test Station Unit (PROD0251)
1. Rotating Beacon
2. Beacon lens cover (optional colours)
3. External Input/Output connector, including Power Input (12-way panel plug)
4. Antenna
5. Mounting Base
Figure 32: Test Station Unit – Layout
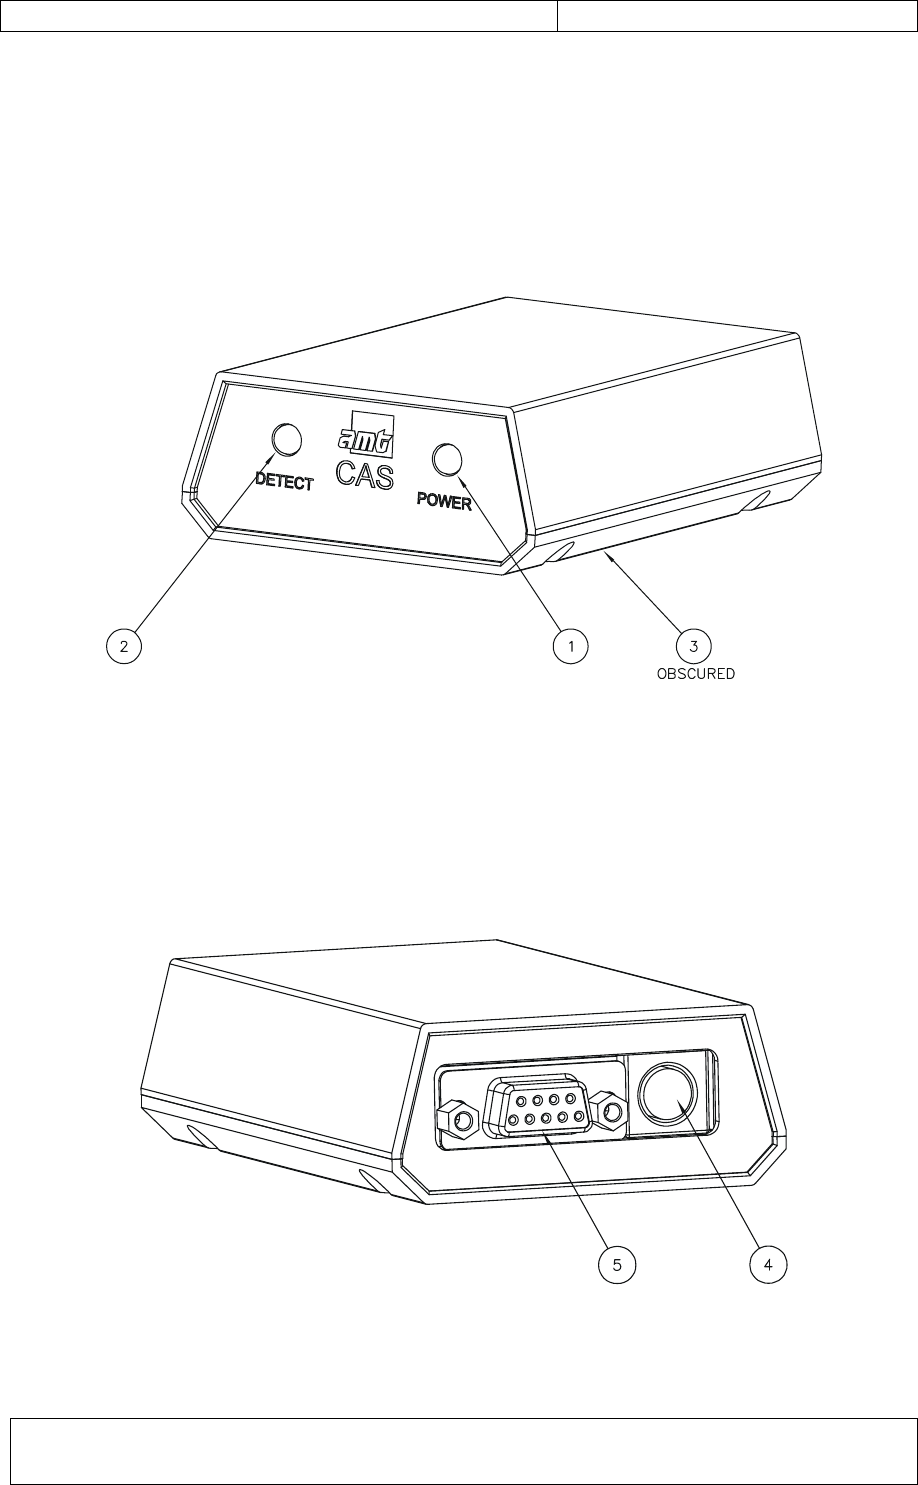
Collision Avoidance System: CAS-CAM/RF® Operating Instructions
Document Number: CAS-CAM_RF Operating Instructions (with FCC
precautions)_18June2010.doc Page 64 of 126
Issue: E
9.6.2 Dash Alarm Unit (PROD0211)
Front Panel Items
1. Power Indicator (green)
2. Alarm Indicator (red)
3. Audible Alarm
Figure 33: Dash Alarm Unit – Front Panel Layout
Rear Panel Items
4. External Input/Output connector, including Power Input (5-way panel subminiature
DIN socket)
5. RS-232 - serial communications port connector (DB-9 panel socket)
Figure 34: Dash Alarm Unit – Rear Panel Layout

Collision Avoidance System: CAS-CAM/RF® Operating Instructions
Document Number: CAS-CAM_RF Operating Instructions (with FCC
precautions)_18June2010.doc Page 65 of 126
Issue: E
9.7 Personnel Tag (PT) Unit
(under development)
Refer to section 4.7 for overview.
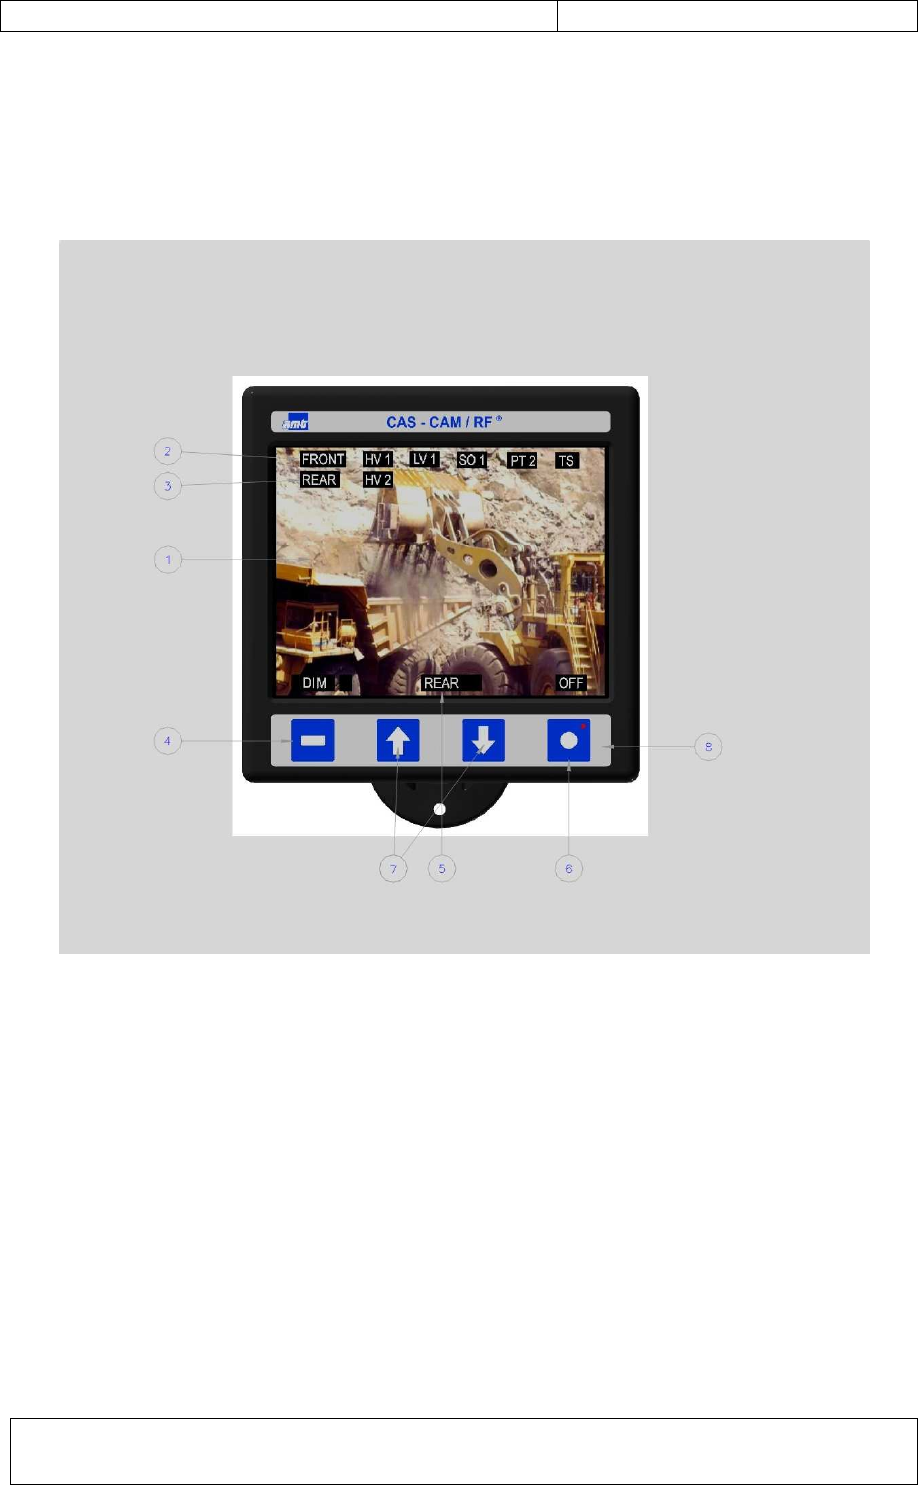
Collision Avoidance System: CAS-CAM/RF® Operating Instructions
Document Number: CAS-CAM_RF Operating Instructions (with FCC
precautions)_18June2010.doc Page 66 of 126
Issue: E
10 BASIC FUNCTIONS
10.1 Heavy Vehicle Display Unit
8.1.1 Screen Layout
The Default Screen layout is as follows:
Figure 35: Display Unit – Default Screen Layout
1. Video Display of current camera selected (6 cameras maximum)
2. Type and Number of FRONT Objects detected using RF tagging option (CAS-RF
®
)
(HV = Heavy Vehicle, LV = Light Vehicle, SO = Stationary Object, PT = Personnel Tag,
TS = Test Station)
3. Type and Number of REAR Objects detected using RF tagging option (CAS-RF
®
) (HV
= Heavy Vehicle, LV = Light Vehicle, SO = Stationary Object, PT = Personnel Tag, TS
= Test Station)
4. DIM key 5 levels of Brightness adjustment. Becomes the CONFIRM key when RF
alarming is enabled. Press the CONFIRM key to cancel the audible alarm.
5. CAMERA channel selected (custom title – 8 characters maximum)
6. OFF – switches video display OFF/ON (also functions as BACK and CYCLE continue
key)
7. Keys to manually select camera
8. 1 x 4 user keypad

Collision Avoidance System: CAS-CAM/RF® Operating Instructions
Document Number: CAS-CAM_RF Operating Instructions (with FCC
precautions)_18June2010.doc Page 67 of 126
Issue: E
10.1.1 Power On/Off
To switch ON the video screen, press the ‘
●
’
key. The Default screen will then appear.
To switch OFF the video screen, press the ‘
●
’
key again (OFF).
When CAS-CAM/RF
®
is fitted to a Heavy Vehicle, the power to the video screen can be
programmed to automatically switch OFF after a predetermined time period when the
vehicle is neither in forward or reverse gear (i.e. park / neutral) – this option is
programmed at the time of installation using Installer mode software and conserves
vehicle battery life when unattended as all equipment is permanently powered. Camera
only installations (CAS-CAM
®
) are powered from the vehicle auxiliary / ignition circuit.
The Display screen will switch ON again and sleep timer will reset under the following
conditions:
• On any key press
• On Forward or Reverse gearing
• Receiving PC commands from the Installer Mode software
10.1.2 Keypad Functions
A summary of the Keypad functions is as follows:
KEY SCREEN TEXT KEY FUNCTIONS
(above keypad)
DIM • 5 levels of Brightness adjustment
∎
CONFIRM • Confirms new object detection and cancels alarm
(CAS-RF
®
option)
⇧
Switch up to next camera channel
⇩
CAMERA TITLE Switch down to next camera channel
OFF • Switch display OFF
• Switch display ON
●
CYCLE Cycles cameras when ‘CYCLE’ mode selected in
SYSTEM menu
Note: Display Reset function - press keys
and
●
simultaneously
Figure 36: Display Unit – Summary of Keypad Functions
10.1.3 Switching Camera Channels
Use the
⇧
,
⇩
arrow keys to scroll through the Camera Channels. The camera channel title
(8 characters maximum) will be displayed above the arrow keys for the currently selected
channel.
Camera channels can be changed at any time except when RF detections have not been
confirmed by pressing the ‘CONFIRM’ key. Refer to section 10.1.11.7 ‘Operator
Confirmation of Alarms’ for details.

Collision Avoidance System: CAS-CAM/RF® Operating Instructions
Document Number: CAS-CAM_RF Operating Instructions (with FCC
precautions)_18June2010.doc Page 68 of 126
Issue: E
10.1.4 Changing Camera Settings
Programmable camera settings for each individual camera include: Colour, Mirror mode
and Camera Enable. These settings are not accessible by the operator and are
programmed at the time of installation using a laptop PC. These settings are saved during
power down and are automatically restored at power on.
10.1.5 Switching Cameras on Gearing
To configure the Display Unit to automatically switch to the FRONT or REAR camera when
engaging FORWARD or REVERSE gear, refer to section 13 as this function is only
programmable at the time of installation using a laptop PC.
At any time, other camera channels can be selected using the
⇧
,
⇩
arrow keys except
when RF detections have not been confirmed by pressing the “CONFIRM” key. Refer to
section 10.1.11.7 ‘Operator Confirmation of Alarms’ for details.
The Auto Cycle function is paused when camera switching is enabled on gear changes.
Press the ‘CYCLE’ key to resume Auto Cycling.
10.1.6 Switching Cameras on RF Detections
To configure the Display Unit to automatically switch to the FRONT or REAR camera on
FRONT or REAR RF detections, refer to section 13 as this function is only programmable
at the time of installation using a laptop PC.
At any time, other camera channels can be selected using the
⇧
,
⇩
arrow keys except
when RF detections have not been confirmed by pressing the “CONFIRM” key. Refer to
section 10.1.11.7 ‘Operator Confirmation of Alarms’ for details.
The Auto Cycle function is paused when camera switching is enabled on RF front / rear
detections. Press the ‘CYCLE’ key to resume Auto Cycling.
10.1.7 Auto Cycling Camera Channels
Enabling Auto Cycling
Camera Channels that are enabled can be cycled automatically at a nominated cycle time
(2s, 4s, 6s, 8s, 10s). This function is not programmable by the operator and is only
programmable at the time of installation using a laptop PC. This function setting is saved
during power down and is automatically restored at power on.
Pausing Auto Cycling to Study Camera View
1. When Auto Cycle is enabled and the active cameras are switching at the selected cycle
time, the Auto Cycle function can be paused at the current camera view by pressing
either of the
⇧
,
⇩
arrow keys.
2. Use the
⇧
,
⇩
arrow keys to switch between camera channels
Resuming Auto Cycling after Pausing

Collision Avoidance System: CAS-CAM/RF® Operating Instructions
Document Number: CAS-CAM_RF Operating Instructions (with FCC
precautions)_18June2010.doc Page 69 of 126
Issue: E
Auto Cycling is paused when either the operator manually selects a camera or automatic
camera switching is activated on gear changes or with RF front / rear detections. Press the
‘CYCLE’ key to resume Auto Cycling.
Disabling Auto Cycling
Disabling the Auto Cycle function is only programmable at the time of installation using a
laptop PC. This function setting is saved during power down and is automatically restored
at power on.
10.1.8 DIM Function
The DIM function provides 5 levels of global Brightness settings for all cameras.
Press the ‘DIM’ key to scroll thru 5 levels of Brightness settings from minimum to
maximum and then back to minimum.
10.1.9 Display Reset Function
Pressing simultaneously the keys
∎
and
●
will generate a Display Reset which causes
the Display to Reboot. When reset, the message RESETTING’ will be displayed on the
screen before switching to the Boot-Up screen (refer to section 11.1). This function should
only be used in the event of a screen or keypad lockup and should be reported to the AMT
Service Agent.
10.1.10 Recording Video Signals (PAL format)
A VCR unit with PAL format can be connected to the ‘VIDEO OUT’ connector on the rear
panel of the Display Unit for recording the video images along with text alarms and
messages.
The video signal can also be displayed on an external monitor if desired using the same
‘VIDEO OUT’ connector.
NOTE: for camera channels in mirror mode (horizontal flip), the text will appear mirrored
(i.e. backwards) on the ‘VIDEO OUT’ signal.

Collision Avoidance System: CAS-CAM/RF® Operating Instructions
Document Number: CAS-CAM_RF Operating Instructions (with FCC
precautions)_18June2010.doc Page 70 of 126
Issue: E
10.1.11 RF Detections and Alarms
10.1.11.1 Alarm Display
The top two lines of the Heavy Vehicle Display Unit are reserved as the alarm display for
both FRONT and REAR RF detections (refer to Figure 35). This relies on the Heavy
Vehicle being fitted with the CAS-RF
®
option where RF Units are fitted to either the REAR
only or FRONT and REAR of the vehicle for automatic object detection.
The objects detected are sorted into the following classes:
• Heavy Vehicle (HV) or Mobile Plant & Equipment (HV)
• Light Vehicle (LV)
• Stationary Object (SO)
• Personnel Tag (PT)
• Test Station (TS)
The number of objects detected in each class is also displayed.
A sample of the object detection alarm display for both a FRONT and REAR detection
CAS-RF system is as follows (refer to Figure 35 for screen layout):
FRONT: HV 1 LV 1 SO 1 PT 2 TS
REAR: HV2
The above alarm display indicates that the following object types and numbers were
detected within the Heavy Vehicle Front and Rear Detection Zones:
FRONT: detected 1 x Heavy Vehicle (HV), 1 x Light Vehicle (LV), 1 x Stationary Object
(SO), 2 x Personnel Tags (PT) and 1 x Test Station (TS)
REAR: detected 2 x Heavy Vehicles
10.1.11.2 RF Detection Ranges
The Heavy Vehicle FRONT and REAR RF Units can be field programmed for adjustable
RF Detection Ranges (typically 0 – 80 m +/- 20% accuracy). Front and Rear RF Detection
Ranges and alarm conditions based on direction of travel can be different for each object
types (e.g. HV, LV, SO, PT, TS) in order to suit the particular application.
The audible alarm (if enabled) is a pulsed alarm (typically 0.5Hz).
Refer to sections 5 & 7 for more details on Detection Zones and Alarm Scenarios.
10.1.11.3 Alarm Process
• new objects detected within the programmed RF Detection Range(s) can generate
alarms or existing objects previously detected will re-trigger alarms on a gear change
• object detections generate an audible alarm if programmed
• The number and class of objects detected are displayed on the top two lines of the
Display Unit screen for both FRONT and REAR RF units (where fitted)

Collision Avoidance System: CAS-CAM/RF® Operating Instructions
Document Number: CAS-CAM_RF Operating Instructions (with FCC
precautions)_18June2010.doc Page 71 of 126
Issue: E
• A new object detected is highlighted by blinking the text and enabling the audible
alarm (if programmed)
• The audible alarm will only silence when either the Operator presses the ‘CONFIRM’
key or when the object originally detected moves out of the Detection Range
• Only active detections are shown on the Display Unit screen (i.e. blank Display when
there are no detections)
• Alarms are generated on high risk changes only (i.e. new object moves into detection
zone or Heavy Vehicle changes gear)
• No alarm is generated when the object moves out of the Detection Range
10.1.11.4 Heavy Vehicle Reverse Mode
•
Fully programmable detection ranges and audible alarms for different object types (e.g.
HV, LV, SO, PT, TS) based on vehicle gear status (i.e. forward, reverse, park) and
detection location (i.e. front or rear)
Refer to section 7 for more details on HV Alarm Scenarios.
10.1.11.5 Heavy Vehicle Forward Mode
•
Fully programmable detection ranges and audible alarms for different object types (e.g.
HV, LV, SO, PT, TS) based on vehicle gear status (i.e. forward, reverse, park) and
detection location (i.e. front or rear)
Refer to section 7 for more details on HV Alarm Scenarios.
10.1.11.6 Heavy Vehicle Stationary (neutral) Mode
•
Fully programmable detection ranges and audible alarms for different object types (e.g.
HV, LV, SO, PT, TS) based on vehicle gear status (i.e. forward, reverse, park) and
detection location (i.e. front or rear)
Refer to section 7 for more details on HV Alarm Scenarios.
10.1.11.7 Operator Confirmation of Alarms
The Heavy Vehicle Operator is encouraged to acknowledge the presence of new objects
detected by visually confirming the object presence in the appropriate camera view and
then pressing the ‘CONFIRM’ key. This action cancels the audible alarm and is logged
along with all detections with time and date stamped into non-volatile memory.
To assist the Operator in the visual confirmation of new CAS-RF
®
alarms, the Display Unit
can be programmed at the time of installation to automatically switch to either the FRONT
or REAR camera depending on the source of the CAS-RF
®
alarm (e.g. REAR RF
detections will cause the Display Unit to automatically switch to the REAR camera and
similarly FRONT RF detections will cause the Display Unit to automatically switch to the
FRONT camera).
Camera switching is disabled until alarms are confirmed by pressing the ‘CONFIRM’ key.

Collision Avoidance System: CAS-CAM/RF® Operating Instructions
Document Number: CAS-CAM_RF Operating Instructions (with FCC
precautions)_18June2010.doc Page 72 of 126
Issue: E
10.1.11.8 Alarm Specifications
Alarm Conditions: 1. New object(s) move into HV Detection Zone(s)
2. Object(s) in HV Detection Zone when HV re-engages gear
Alarm Modes: 1. Reverse Gear
• Fully programmable Front & Rear & Side detection
ranges & audible alarms for different object types (e.g.
HV, LV, SO, PT, TS), location (front or rear or side) and
direction of travel with flashing object text
2. Forward Gear
• Fully programmable Front & Rear detection & Side
ranges & audible alarms for different object types (e.g.
HV, LV, SO, PT, TS), location (front or rear or side) and
direction of travel with flashing object text
3. Park / Neutral Gear
• Fully programmable Front & Rear & Side detection
ranges & audible alarms for different object types (e.g.
HV, LV, SO, PT, TS), location (front or rear or side) and
direction of travel with flashing object text
Alarm Zones: Programmable detection zones for different object types (e.g. HV,
LV, SO, PT, TS) with programmable ranges (0-80m).
Alarm Output: Audible alarm and flashing object text (detections) on Display for
both FRONT and REAR and SIDES. Fully programmable alarms
based on object type, range, location (front or rear or sides),
direction of travel and speed.
Alarm Tones: Pulsed audible alarm @ 0.5Hz
Alarm Cancellation: Driver presses ‘CONFIRM’ key or object moves out of Detection
Zone(s).
Table 37: Heavy Vehicle Alarm Specifications

Collision Avoidance System: CAS-CAM/RF® Operating Instructions
Document Number: CAS-CAM_RF Operating Instructions (with FCC
precautions)_18June2010.doc Page 73 of 126
Issue: E
10.2 Light Vehicle (LV) System
10.2.1 RF Detections and Alarms
10.2.1.1 Alarm Components
The Light Vehicle Unit comprises of the following alarm components:
Rotating Beacon Unit (optional)
• Mounted on roof of LV
• Activated (flashing) when HV detected (in gear) within the LV Detection Zone
• Provides HV driver with visual confirmation
Light Vehicle RF Unit (with external beacon option) (in lieu of Rotating Beacon Unit above)
• Mounted on roof of LV
• Optional external beacon / strobe activated (flashing) when HV detected (in gear)
within the LV Detection Zone
• Provides HV driver with visual confirmation
Light Vehicle Alarm Unit
• Dash mounted alarm unit
• Audible and visual alarms on HV detections
• Power indicator
10.2.1.2 RF Detection Zones and Ranges
The Light Vehicle Unit can be field programmed for a single Detection Zone with
programmable range / radius typically 0 – 80 m (+/- 20% accuracy).
Refer to sections 5 & 7 for more details on Detection Zones and Alarm Scenarios.
10.2.1.3 Alarm Process
1. Alarms are generated only when a HV (in gear) or TS is detected within the
programmed LV Detection Zone.
2. Only HV(s) (in gear) and TS(s) can generate LV alarms.
3. Alarm automatically cancels when the HV(s) or TS(s) move outside the LV Detection
Zone or HV out of gear.

Collision Avoidance System: CAS-CAM/RF® Operating Instructions
Document Number: CAS-CAM_RF Operating Instructions (with FCC
precautions)_18June2010.doc Page 74 of 126
Issue: E
10.2.1.4 Alarm Specifications
Alarm Conditions: HV (in gear) or TS detected within LV programmed Detection Zone
Alarm Zones: Single programmable Detection Zone
Alarm Output: Flashing beacon on roof (optional), dash-mount audible alarm and
flashing alarm indicator
Alarm Tones: High rate pulsed tone on initial HV (in gear) or TS detection,
changes after 3 seconds to low rate pulsed tone upon continuous
HV or TS detection.
Reverts back to high rate pulsed tone when either HV changes gear
or another HV or TS is detected.
Alarm Cancellation: HV or TS outside of LV Detection Zone (or HV out of gear)
Table 38: Light Vehicle Alarm Specifications
10.2.2 Power On/Off
The Light Vehicle Unit is permanently powered ON and will only generate alarms when a
HV (in gear) or TS is detected within the LV Detection Zone.

Collision Avoidance System: CAS-CAM/RF® Operating Instructions
Document Number: CAS-CAM_RF Operating Instructions (with FCC
precautions)_18June2010.doc Page 75 of 126
Issue: E
10.3 Stationary Object (SO) Unit
10.3.1 RF Detections and Alarms
10.3.1.1 Alarm Components
The Stationary Object Unit comprises of the following alarm components:
Rotating Beacon Unit
• Identical to LV Rotating Beacon Unit
• Mounted on Stationary Object requiring protection from Heavy Vehicles
• Activated (flashing) when HV (in gear) or TS is detected within the SO Detection
Zone
• Provides HV driver with visual confirmation
10.3.1.2 RF Detection Zones and Ranges
The Stationary Object Unit can be field programmed for a single detection zone with
programmable range / radius typically 0 – 80 m (+/- 20% accuracy).
Refer to sections 5 & 7 for more details on Detection Zones and Alarm Scenarios.
10.3.1.3 Alarm Process
1. Visual alarm is generated only when a HV (in gear) or TS is detected within the
programmed SO Detection Zone. Alarms can be programmed for HV(s) either in or out
of gear.
2. Only HV(s) (in gear) and TS(s) can generate SO alarms.
3. Alarm automatically cancels when the HV(s) move outside the SO Detection Zone or
HV out of gear.
10.3.1.4 Alarm Specifications
Alarm Conditions: HV (in gear) or TS detected within SO programmed Detection Zone
Alarm Zones: Single programmable Detection Zone
Alarm Output: Flashing beacon
Alarm Tones: Not Applicable
Alarm Cancellation: HV or TS moves outside of SO Detection Zone (or HV out of gear)
Table 39: Stationary Object Alarm Specifications
10.3.2 Power On/Off
The Stationary Object is permanently powered ON and will only generate visual alarms
when a HV (in gear) or TS is detected within the SO Detection Zone.
12VDC, 60W power can be supplied either from a permanent mains powered supply,
battery pack, or solar energy power supply for remote locations.

Collision Avoidance System: CAS-CAM/RF® Operating Instructions
Document Number: CAS-CAM_RF Operating Instructions (with FCC
precautions)_18June2010.doc Page 76 of 126
Issue: E
10.4 Mobile Plant & Equipment (HV) Unit
10.4.1 RF Detections and Alarms
10.4.1.1 Alarm Components
The Mobile Plant & Equipment Unit comprises of the following alarm components:
Rotating Beacon Unit
• Identical to LV Rotating Beacon Unit
• Mounted on Mobile Plant & Equipment Unit
• Activated (flashing) when either HV (in gear), LV or TS is detected within the
programmed Detection Zone
• Provides HV driver with visual confirmation
10.4.1.2 RF Detection Zones and Ranges
The Mobile Plant & Equipment Unit can be field programmed for a single detection zone
with programmable range / radius typically 0 – 80 m (+/- 20% accuracy).
Refer to sections 5 & 7 for more details on Detection Zones and Alarm Scenarios.
10.4.1.3 Alarm Process
1. Visual alarm is generated only when either a HV (in gear), LV or TS is detected within
the programmed Detection Zone.
2. Alarm automatically cancels when the HV, LV or TS moves outside the Detection Zone
or HV out of gear.
10.4.1.4 Alarm Specifications
Alarm Conditions: HV (in gear), LV or TS detected within programmed Detection Zone
Alarm Zones: Single programmable Detection Zone
Alarm Output: Flashing beacon
Alarm Tones: Not Applicable
Alarm Cancellation: HV, LV or TS moves outside of Detection Zone (or HV out of gear)
Table 40: Mobile Plant & Equipment Alarm Specifications
10.4.2 Power On/Off
The Mobile Plant & Equipment Unit is normally powered from the machine ignition and will
only generate visual alarms when either a HV (in gear) or TS is detected within the
Detection Zone.
12VDC, 60W power can be supplied from the machine battery via the ignition switch.

Collision Avoidance System: CAS-CAM/RF® Operating Instructions
Document Number: CAS-CAM_RF Operating Instructions (with FCC
precautions)_18June2010.doc Page 77 of 126
Issue: E
10.5 Test Station (TS) Unit
10.5.1 RF Detections and Alarms
10.5.1.1 Alarm Components
The Test Station Unit comprises of the following alarm components:
Rotating Beacon Unit
• Identical to LV Rotating Beacon Unit
• Mounted near vehicle traffic areas (e.g. maintenance workshop, GO-LINE, refueling
station etc) for regular functional testing of all RF tagged objects
• Activated (flashing) when either HV (in gear) , LV, SO or TS is detected within the
programmed Detection Zone
• Alarms all RF tagged objects within the programmed Detection Zone
• Is alarmed by all other RF tagged objects within the programmed Detection Zone
• Provides HV & LV driver with visual confirmation
10.5.1.2 RF Detection Zones and Ranges
The Test Station Unit can be field programmed for a single detection zone with
programmable range / radius typically 0 – 80 m (+/- 20% accuracy).
Refer to sections 5 & 7 for more details on Detection Zones and Alarm Scenarios.
10.5.1.3 Alarm Process
1. Visual alarm is generated only when either a HV (in gear), LV, SO or TS is detected
within the programmed Detection Zone.
2. Alarm automatically cancels when the HV, LV, SO or TS moves outside the Detection
Zone or HV out of gear.
10.5.1.4 Alarm Specifications
Alarm Conditions: HV (in gear), LV, SO or TS detected within programmed Detection
Zone
Alarm Zones: Single programmable Detection Zone
Alarm Output: Flashing beacon
Alarm Tones: Not Applicable
Alarm Cancellation: HV, LV, SO or TS moves outside of Detection Zone (or HV out of
gear)
Table 41: Test Station Alarm Specifications
10.5.2 Power On/Off
The Test Station is permanently powered ON and will only generate visual alarms when
either a HV (in gear), LV, SO or TS is detected within the TS Detection Zone.
12VDC, 60W power can be supplied either from a permanent mains powered supply,
battery pack, or solar energy power supply for remote locations.

Collision Avoidance System: CAS-CAM/RF® Operating Instructions
Document Number: CAS-CAM_RF Operating Instructions (with FCC
precautions)_18June2010.doc Page 78 of 126
Issue: E
10.6 Personnel Tag (PT) Unit
10.6.1 RF Detections and Alarms
10.6.1.1 Alarm Components
Note: The Personnel Tag Unit is under development and the following information is
preliminary only and subject to change.
The Personnel Tag Unit comprises of the following alarm components:
Safety Vest Version
• Audible & Vibrating battery alarm
• Alarm activated when HV (in gear) or TS detected within the PT Detection Zone
10.6.1.2 RF Detection Zones and Ranges
The Personnel Tag Unit can be field programmed for a single detection zone with
programmable range/radius typically 0 – 80 m (+/- 20% accuracy).
Refer to sections 5 & 7 for more details on Detection Zones and Alarm Scenarios.
10.6.1.3 Alarm Process
1. Alarm is generated only when a HV (in gear) or TS is detected within the programmed
PT Detection Zone.
2. Only HV(s) (in gear) or TS(s) can generate PT alarms.
3. Alarm automatically cancels when the HV(s) or TS(s) move outside the PT Detection
Zone or HV out of gear.
10.6.1.4 Alarm Specifications
Alarm Conditions: HV (in gear) or TS detected within PT programmed Detection Zone
Alarm Zones: Single programmable Detection Zone
Alarm Output: Audible / Vibrating Battery Alarm (Belt Version)
Alarm Tones: Not Applicable
Alarm Cancellation: HV or TS moves outside of PT Detection Zone (or HV out of gear)
Table 42: Personnel Tag Alarm Specifications
10.6.2 Power On/Off
The Personnel Tag is permanently powered ON and will only generate alarms when a HV
(in gear) or TS is detected within the PT Detection Zone.
Power is supplied by rechargeable batteries.

Collision Avoidance System: CAS-CAM/RF® Operating Instructions
Document Number: CAS-CAM_RF Operating Instructions (with FCC
precautions)_18June2010.doc Page 79 of 126
Issue: E
10.6.3 Battery Low
The battery voltage is monitored and when it falls to a ‘battery low’ condition, a battery low
alarm is generated warning the user to recharge the battery pack.
The battery low alarm is distinct to the CAS detection alarm and continues until the battery
reaches a flat condition or is recharged.
10.6.4 Battery Charging
Personnel Tag batteries are recharged using a smart charger unit designed to
automatically charge multiple battery packs. The charger provides status indication on
each battery being charged and provides a functional check when initiated by the user.

Collision Avoidance System: CAS-CAM/RF® Operating Instructions
Document Number: CAS-CAM_RF Operating Instructions (with FCC
precautions)_18June2010.doc Page 80 of 126
Issue: E
11 HEAVY VEHICLE DISPLAY UNIT - MENU
FUNCTIONS
11.1 Boot-Up Screen
The following boot-up screen will appear for approximately 5 seconds after initial power
ON or after performing a Display Reset function (refer to section 10.1.9):
ADVANCED MINING TECHNOLOGIES
COLLISION AVOIDANCE SYSTEM
CAS-CAM/RF
®
SOFTXXXX-Y
ID 10003
SOFTXXXX-Y = Software Part Number - Issue
ID = Display Unit Identification (ID) Number (5 digits)
11.2 Default Screen
After initial power ON, the above boot-up screen will appear for approximately 5 seconds
after which the following DEFAULT screen will appear:
FRONT: LV 1
REAR: HV 1 LV 1 SO 2 PT 1 TS
DIM CAMERA 1 OFF
The RF Detection Status for the FRONT and REAR RF units will only appear if either of
these units are fitted to the Heavy Vehicle (CAS-RF
®
option) and there are valid detections
within the programmed Detection Zone(s). Otherwise, the top two lines of the screen will
remain blank to maximise the video display area.

Collision Avoidance System: CAS-CAM/RF® Operating Instructions
Document Number: CAS-CAM_RF Operating Instructions (with FCC
precautions)_18June2010.doc Page 81 of 126
Issue: E
11.3 Heavy Vehicle Display Unit – Diagnostic Menu
The following basic Diagnostic Menu is available to the User for in-field monitoring of the
CAS-RF
®
tags under the direction of the AMT Service Agent:
RECORDS 1 PRK 1.00.047
ID LEVEL TYPE STAT DIR
21 1.41 2 0 1
BACK
To enter the DIAGNOSTICS MENU, press the
∎
and
⇩
keys simultaneously.
To exit the DIAGNOSTICS MENU, press the ‘BACK’ key to return to the ‘Default’ Menu.
The top line (3
rd
row) fields and descriptions are as follows:
RECORDS 1 PRK 1.00.047
RECORDS = Number of CAS-RF tags detected (details listed on remaining rows)
PRK = Gear Direction
PRK = Park
REV = Reverse
FWD = Forward
1.00.047 = Display Unit Bus I.D.
The second line (4
th
row) fields and descriptions are as follows:
ID = Object Identification Number (factory programmed & unique)
LEVEL = Detection Level (0.8 – 1.9 V)
TYPE = Object Type
0 = PT
1 = LV
2 = HV Front RF
3 = HV Rear RF
4 = SO
5 = TS
6,7 = Test Codes
STAT = Object Status
0 = RF O.K.
1 = low battery
2 = No RF Receive
3 = Fault

Collision Avoidance System: CAS-CAM/RF® Operating Instructions
Document Number: CAS-CAM_RF Operating Instructions (with FCC
precautions)_18June2010.doc Page 82 of 126
Issue: E
DIR = Gear Direction
0 = Reverse
1 = Forward
2 = Park / Neutral
12 OTHER FUNCTIONS
The following Functions are not accessible by the operator and need to be programmed by
the installer using a PC connected to the Display Unit RS-232 communications interface.
Refer to section 13 “Installer Mode Settings” for function settings and refer to the CAS-
CAM/RF
®
Installation Manual for detailed function descriptions and programming details.
Changes to installer Mode Settings only to be conducted by an AMT Service Agent.
12.1 Camera Titles (8 chars max)
12.2 Camera Brightness Settings
12.3 Camera Colour Settings
12.4 Camera Mirror / Normal Mode
12.5 Camera Enable
12.6 Switching Settings
12.6.1 Forward Gear Switching
12.6.2 Forward Channel Selection
12.6.3 Reverse Gear Switching
12.6.4 Reverse Channel Selection
12.6.5 Sleep Time
12.6.6 RF Switching
12.6.7 Wake on Forward Gear
12.6.8 Wake on Reverse Gear
12.6.9 Central RF
12.6.10 Keypad Tone
12.6.11 Auto Cycle
12.7 Front RF Unit Settings
12.8 Rear RF Unit Settings
12.9 Reversing Siren Disable on Heavy Vehicle

Collision Avoidance System: CAS-CAM/RF® Operating Instructions
Document Number: CAS-CAM_RF Operating Instructions (with FCC
precautions)_18June2010.doc Page 83 of 126
Issue: E
12.10 Heavy Vehicle Maintenance Mode
In order to disable alarms on all object types in the proximity of a Heavy Vehicle during
maintenance work, the Heavy Vehicle can be set to ‘Maintenance Mode’. This mode
disables all detections and alarms on both the Heavy Vehicle and all tagged objects within
the Heavy Vehicle Detection Zone(s). This mode is suited to a maintenance workshop
environment where normal CAS-RF
®
alarms may generate a high annoyance factor.
Refer to the CAS-CAM/RF
®
Installation Manual for programming details.
12.11 Heavy Vehicle Display Unit – Screen Power Down
12.11.1 Manual Mode
Refer to section 10.1.1 for details.
12.11.2 Automatic Mode
Refer to section 10.1.1 for details.
12.12 Real Time Clocks
The following CAS Units contain battery backed real time clocks, which can be used to
time & date stamp all RF detections and HV driver confirmation of alarms. This information
would be useful as a safety audit trail and is an optional feature.
• Heavy Vehicle Display Unit
• Light Vehicle Unit
• Stationary Object Unit
• Mobile Plant & Equipment Unit
• Test Station Unit
The programming of real-time clocks in all units is conducted at the time of installation
using laptop PC programming software. Refer to the CAS-CAM/RF
®
Installation Manual for
programming details.
12.13 Data Logging of Detections
All RF detections received by object types HV, LV, SO and TS can be logged to non-
volatile memory and are time and date stamped. This information would be useful as a
safety audit trail and is an optional feature.
Data is recovered via the RS-232 interface on the above mentioned objects using the
laptop Installer mode software. Refer to the CAS-CAM/RF
®
Installation Manual for
programming details.

Collision Avoidance System: CAS-CAM/RF® Operating Instructions
Document Number: CAS-CAM_RF Operating Instructions (with FCC
precautions)_18June2010.doc Page 84 of 126
Issue: E
13 INSTALLER MODE SETTINGS
The CAS-CAM/RF
®
equipment contains programmable system settings that can only be
configured at either the factory at the time of order or by an AMT Service Agent. These
system settings are not accessible by the user. Software setting changes require the use
of a laptop PC with RS-232 interface running the CAS-CAM/RF
®
Installer Mode Software.
Hardware setting changes require opening instrument enclosures and changing internally
configured jumper link settings.
The following settings are programmable by the Installer or can be factory preset at the
time of order:
Heavy Vehicle Display Unit Settings
CHANNEL Settings (6 camera channels)
• Channel Title (8 character title maximum)
• Brightness (1-5)
• Colour (1-5)
• Mirror (on, off)
• Enabled (yes, no)
SWITCHING Settings
• Forward Switching (yes, no)
• Forward Channel (1-6)
• Reverse Switching (yes, no)
• Reverse Channel (1–6)
• Sleep Time (off, 5, 10, 15, 20, 25, 30 mins)
• RF Switching (yes, no)
• Wake on Forward (yes, no)
• Wake on Reverse (yes, no)
• Central RF (yes, no)
• Keypad Tone (yes, no)
• Auto Cycle (off, 2s, 4s, 6s, 8s, 10s)
FRONT RF UNIT settings
• RF Unit Enable (yes, no)
• HVR (Reverse Gear) – audible (on, off), range (0-80m)
• HVF (Reverse Gear) – audible (on, off), range (0-80m)
• LV (Reverse Gear) – audible (on, off), range (0-80m)
• SO (Reverse Gear) – audible (on, off), range (0-80m)
• PT (Reverse Gear) – audible (on, off), range (0-80m)
• TS (Reverse Gear) – audible (on, off), range (0-80m)
• HVR (Park Gear) – audible (on, off), range (0-80m)
• HVF (Park Gear) – audible (on, off), range (0-80m)
• LV (Park Gear) – audible (on, off), range (0-80m)
• SO (Park Gear) – audible (on, off), range (0-80m)
• PT (Park Gear) – audible (on, off), range (0-80m)
• TS (Park Gear) – audible (on, off), range (0-80m)

Collision Avoidance System: CAS-CAM/RF® Operating Instructions
Document Number: CAS-CAM_RF Operating Instructions (with FCC
precautions)_18June2010.doc Page 85 of 126
Issue: E
• HVR (Forward Gear) – audible (on, off), range (0-80m)
• HVF (Forward Gear) – audible (on, off), range (0-80m)
• LV (Forward Gear) – audible (on, off), range (0-80m)
• SO (Forward Gear) – audible (on, off), range (0-80m)
• PT (Forward Gear) – audible (on, off), range (0-80m)
• TS (Forward Gear) – audible (on, off), range (0-80m)
REAR RF UNIT settings
• RF Unit Enable (yes, no)
• HVR (Reverse Gear) – audible (on, off), range (0-80m)
• HVF (Reverse Gear) – audible (on, off), range (0-80m)
• LV (Reverse Gear) – audible (on, off), range (0-80m)
• SO (Reverse Gear) – audible (on, off), range (0-80m)
• PT (Reverse Gear) – audible (on, off), range (0-80m)
• TS (Reverse Gear) – audible (on, off), range (0-80m)
• HVR (Park Gear) – audible (on, off), range (0-80m)
• HVF (Park Gear) – audible (on, off), range (0-80m)
• LV (Park Gear) – audible (on, off), range (0-80m)
• SO (Park Gear) – audible (on, off), range (0-80m)
• PT (Park Gear) – audible (on, off), range (0-80m)
• TS (Park Gear) – audible (on, off), range (0-80m)
• HVR (Forward Gear) – audible (on, off), range (0-80m)
• HVF (Forward Gear) – audible (on, off), range (0-80m)
• LV (Forward Gear) – audible (on, off), range (0-80m)
• SO (Forward Gear) – audible (on, off), range (0-80m)
• PT (Forward Gear) – audible (on, off), range (0-80m)
• TS (Forward Gear) – audible (on, off), range (0-80m)
• Reverse Alarm Relay (closed, RF closed, open)
MAINTENANCE MODE
• On / Off
Light Vehicle (LV) Settings
• Range (0 – 80m)
Stationary Object (SO) Settings
• Range (0 – 80m)
Mobile Plant & Equipment (HV) Settings
• Range (0 – 80m)
Personnel Tag (PT) Settings

Collision Avoidance System: CAS-CAM/RF® Operating Instructions
Document Number: CAS-CAM_RF Operating Instructions (with FCC
precautions)_18June2010.doc Page 86 of 126
Issue: E
• Range (0 – 80m)
Test Station (TS) Settings
• Range (0 – 80m)
Details on performing changes to installer Mode Settings are contained within the CAS-
CAM/RF
®
Installation Manual and are only to be conducted by an AMT Service Agent.

Collision Avoidance System: CAS-CAM/RF® Operating Instructions
Document Number: CAS-CAM_RF Operating Instructions (with FCC
precautions)_18June2010.doc Page 87 of 126
Issue: E
14 SYSTEM CALIBRATION & TESTING
The following equipment is required for the initial calibration and ongoing in-service testing
of the CAS-CAM/RF
®
Equipment. A brief overview is only given for general understanding
by the user.
14.1 Calibration System (PROD0260)
The CAS-CAM/RF
®
Calibration System (PROD0260) comprises of a Heavy Vehicle (HV)
RF Unit enclosure configured as a Calibration Unit (PROD0193) which is in effect a mobile
Test Station (TS) Unit. The unit is mounted on a portable tripod, battery powered and
interfaces via a RS-232 interface to a Portable Computer (laptop or Pocket PC / Palm
PDA) running the CAS-CAM/RF
®
Installer Mode software.
The Calibration System allows for programming the Detection Zones of all RF tagged
objects (i.e. Heavy Vehicle (HV), Light Vehicle (LV), Stationary Object (SO), Personnel
Tag (PT), Test Station (TS)).
An approved CAS-CAM/RF
®
System Installer can only conduct the Calibration Process
using the Installer Mode software. Refer to the CAS-CAM/RF
®
Installation Manual for
details.
14.2 Test Station System (TS) (PROD0251)
All CAS-CAM/RF
®
Equipment functionality can be tested on site using a Test Station (TS)
System (PROD0251).
Test Stations would normally be installed in locations frequently passed by CAS RF
tagged objects (e.g. maintenance workshop, GO-LINE, refueling station etc) and serve to
provide regular functional two-way testing of all RF tagged objects. Solar power versions
are available for remote locations.
Refer to section 4.8 for more details.

Collision Avoidance System: CAS-CAM/RF® Operating Instructions
Document Number: CAS-CAM_RF Operating Instructions (with FCC
precautions)_18June2010.doc Page 88 of 126
Issue: E
15 CARE AND MAINTENANCE
The following care and maintenance activities should be conducted to ensure the reliable
and safe operation of the CAS-CAM/RF
®
equipment. Note that there are no serviceable
parts located inside the equipment enclosures. Refer servicing to an AMT Service Agent.
15.1 Heavy Vehicle (HV) System
15.1.1 Operational Care
• To prevent fire or shock hazard, do not expose the Heavy Vehicle Display Unit to
rain or moisture.
• To avoid electrical shock, do not open the electrical equipment enclosures. There
are no user serviceable parts located inside the equipment items.
• Ensure that the Heavy Vehicle Display Unit rear panel ventilation holes are not
obstructed for efficient natural convection cooling.
• The audible alarm contained within the Heavy Vehicle Display Unit must not be
blocked with foreign objects in order to reduce alarm sound levels as this is the
primary means of notifying drivers of potential collisions. Consult the AMT Service
Agent if you wish to adjust the alarm sound levels to suit the ambient noise levels of
the particular installation.
• The visual alarms contained on the Heavy Vehicle Display Unit Screen should not
be covered over with foreign objects in order to reduce night vision glare as this is
the secondary means of notifying drivers of potential collisions (the primary means
being the audible alarms). The brightness level can be switched to the lowest
setting on the Heavy Vehicle Display Unit Screen by using the DIM function (refer to
section 10.1.8 for details). The intensity of the LED power indicators on both
equipment items and the Light Vehicle alarm LED indicator have been set at low
intensity levels suited for both day and night visibility.
15.1.2 Pre-Operation Inspection
External Checks
• Visually check that all cameras are clean and are orientated correctly. Clean and
adjust if necessary.
• Visually check that all equipment items and wiring harnesses are secure.
15.1.3 Startup Inspection
• Check the clarity of the Display Unit screen and where visibility is affected, clean
with a window cleaning spray and soft cloth. Ensure that the cleaning process
doesn’t scratch the screen cover or result in cleaning fluid entering the rear
ventilation holes.
• Inspect the clarity of vision from each camera on the Heavy Vehicle Display Unit
and where affected by the build up of foreign material, clean the camera unit
window with a window cleaning spray and cloth. Approved access methods must
only be used when cleaning cameras located at heights.
• Scroll thru all active camera channels to check operation
• Check that no error messages are displayed (refer to section 16.2 ‘System Error
Messages’ for details).
• When operating at daytime, check that DIM function has been set for maximum
brightness (refer to section 10.1.8 for details).

Collision Avoidance System: CAS-CAM/RF® Operating Instructions
Document Number: CAS-CAM_RF Operating Instructions (with FCC
precautions)_18June2010.doc Page 89 of 126
Issue: E
• When operating at night-time, check that the DIM function has set to minimum
brightness (refer to section 10.1.8 for details).
• Check automatic camera switching operation on gear selection (if programmed at
time of installation).
15.1.4 Operational Checks
• Drive past the Test Station (TS) and verify detection on the Heavy Vehicle Display
Unit (TS code) and the activation of the Test Station rotating beacon.
15.1.5 Shutdown Inspection
• Switch OFF the Heavy Vehicle Display Unit screen by pressing the
●
key when
unattended. This applies only when the RF tagging option has been fitted (CAS-
RF
®
) where all equipment is permanently powered from the vehicle battery. If
however this operation is not conducted, the Display Unit screen will automatically
switch OFF after a preset time period (if programmed during Installation - refer to
the CAS Installation manual for details) thereby conserving battery life. Camera only
installations (CAS-CAM
®
) are powered from the vehicle auxiliary circuit and the
equipment will automatically shutdown when the ignition is switched OFF.
15.1.6 Maintenance Requirements
Routine Checks
• Inspect the clarity of vision from each camera on the Heavy Vehicle Display Unit
and where affected by the build up of foreign material, clean the camera unit
window with a window cleaning spray and cloth. Approved access methods must
only be used when cleaning cameras located at heights.
• Where camera lenses have been scratched severely affecting image quality,
arrange for repair with the approved AMT Service Agent.
• Check that the antenna is securely screwed onto the RF Unit enclosure and located
in the upright position. Tighten and straighten by hand if necessary (secure using
Loctite 243).
• Check all equipment and cabling is secure. Re-secure if necessary.
Notes:
1. Damage to cables effecting signal connectivity will automatically be detected by the
Display Unit and reported as errors (refer to section 16.2 ‘System Error Messages’
for details).
2. To disable Heavy Vehicle & other tagged object alarms during workshop
Maintenance, refer to section 12.10 ‘Heavy Vehicle Maintenance Mode’.

Collision Avoidance System: CAS-CAM/RF® Operating Instructions
Document Number: CAS-CAM_RF Operating Instructions (with FCC
precautions)_18June2010.doc Page 90 of 126
Issue: E
15.2 Light Vehicle (LV) System
15.2.1 Operational Care
• To prevent fire or shock hazard, do not expose the Dash Alarm Unit to rain or
moisture.
• To avoid electrical shock, do not open the electrical equipment enclosures. There
are no user serviceable parts located inside the equipment items.
• The audible alarm contained within the Dash Alarm Unit must not be blocked with
foreign objects in order to reduce alarm sound levels as this is the primary means of
notifying drivers of potential collisions. Consult the AMT Service Agent if you wish to
adjust the alarm sound levels to suit the ambient noise levels of the particular
installation.
• The visual alarm contained on the Dash Alarm Unit should not be covered over with
foreign objects in order to reduce night vision glare as this is the secondary means
of notifying drivers of potential collisions (the primary means being the audible
alarms). The intensity of the led indicators (alarm and power) have been set at low
intensity levels suited for both day and night visibility.
15.2.2 Pre-Operation Inspection
External Checks
• Visually check that the roof mounted Rotating Beacon (if fitted) or RF Unit and
wiring harness are secure.
• Check that the antenna is securely screwed onto the Rotating Beacon enclosure
and located in the upright position. Tighten and straighten by hand if necessary
(secure using Loctite 243).
15.2.3 Startup Inspection
• Check that the dash alarm power indicator is ON
15.2.4 Operational Checks
• Drive past the Test Station (TS) and verify detection on the Light Vehicle dash
alarm unit (warble tone) and roof mounted Rotating Beacon (if fitted - verify beacon
operation using Test Station mirror). The Test Station rotating beacon should also
switch on when the Light Vehicle enters the programmed Detection Zone.
15.2.5 Maintenance Requirements
Routine Checks
• Check that the antenna is securely screwed onto the Rotating Beacon Unit
enclosure and located in the upright position. Tighten and straighten by hand if
necessary (secure using Loctite 243).
• Check the operation of rotating beacon (if fitted) and dash alarm at the Test Station
(TS).
• Check all equipment and cabling is secure. Re-secure if necessary.

Collision Avoidance System: CAS-CAM/RF® Operating Instructions
Document Number: CAS-CAM_RF Operating Instructions (with FCC
precautions)_18June2010.doc Page 91 of 126
Issue: E
15.3 Stationary Object (SO) Unit
15.3.1 Operational Care
• To avoid electrical shock, do not open the electrical equipment enclosures. There
are no user serviceable parts located inside the equipment items.
15.3.2 Maintenance Requirements
Monthly Checks
• Check that the antenna is securely screwed onto the Rotating Beacon Unit
enclosure and located in the upright position. Tighten and straighten by hand if
necessary (secure using Loctite 243).
• Check the operation of the Rotating Beacon by triggering a detection using a Heavy
Vehicle (in gear) or the Test Station (TS).
• Check all equipment and cabling is secure. Re-secure if necessary.
15.4 Mobile Plant & Equipment (HV) System
15.4.1 Operational Care
• To prevent fire or shock hazard, do not expose the Dash Alarm Unit to rain or
moisture.
• To avoid electrical shock, do not open the electrical equipment enclosures. There
are no user serviceable parts located inside the equipment items.
• The audible alarm contained within the Dash Alarm Unit must not be blocked with
foreign objects in order to reduce alarm sound levels as this is the primary means of
notifying drivers of potential collisions. Consult the AMT Service Agent if you wish to
adjust the alarm sound levels to suit the ambient noise levels of the particular
installation.
• The visual alarm contained on the Dash Alarm Unit should not be covered over with
foreign objects in order to reduce night vision glare as this is the secondary means
of notifying drivers of potential collisions (the primary means being the audible
alarms). The intensity of the led indicators (alarm and power) have been set at low
intensity levels suited for both day and night visibility.
15.4.2 Pre-Operation Inspection
External Checks
• Visually check that the roof mounted Rotating Beacon (if fitted) or RF Unit and
wiring harness are secure.
• Check that the antenna is securely screwed onto the Rotating Beacon enclosure
and located in the upright position. Tighten and straighten by hand if necessary
(secure using Loctite 243).
15.4.3 Startup Inspection
• Check that the dash alarm power indicator is ON

Collision Avoidance System: CAS-CAM/RF® Operating Instructions
Document Number: CAS-CAM_RF Operating Instructions (with FCC
precautions)_18June2010.doc Page 92 of 126
Issue: E
15.4.4 Operational Checks
• Drive past the Test Station (TS) and verify detection on the Dash Alarm unit (warble
tone) and roof mounted Rotating Beacon (if fitted - verify beacon operation using
Test Station mirror). The Test Station rotating beacon should also switch on when
the Mobile Plant & Equipment Unit enters the programmed Detection Zone.
15.4.5 Maintenance Requirements
Routine Checks
• Check that the antenna is securely screwed onto the Rotating Beacon Unit
enclosure and located in the upright position. Tighten and straighten by hand if
necessary (secure using Loctite 243).
• Check the operation of rotating beacon and dash alarm at the Test Station (TS).
• Check all equipment and cabling is secure. Re-secure if necessary.

Collision Avoidance System: CAS-CAM/RF® Operating Instructions
Document Number: CAS-CAM_RF Operating Instructions (with FCC
precautions)_18June2010.doc Page 93 of 126
Issue: E
15.5 Personnel Tag (PT) Unit
15.5.1 Operational Care
• The visual / audible alarm contained within the Personnel Tag Unit must not be
obstructed with foreign objects in order to reduce alarm output levels as this is the
primary means of notifying personnel of potential collisions with Heavy Vehicles.
• Charge or replace battery pack when ‘battery low’ alarm is ON.
15.5.2 Pre-Operation Inspection
• Check that the PT unit is correctly fitted with fully charged battery
15.5.3 Startup Inspection
• Check that the power indicator is ON
• Check that the ‘battery low’ alarm is OFF
15.5.4 Operational Checks
• Drive past the Test Station (TS) and verify detection. The Test Station rotating
beacon should also switch on when the Personnel Tag enters the programmed
Detection Zone.
15.5.5 Maintenance Requirements
Routine Checks
• Check PT unit operation at the Test Station (TS).
• Check operation of battery charger unit.
15.6 Test Station (TS) Unit
15.6.1 Operational Care
• To avoid electrical shock, do not open the electrical equipment enclosures. There
are no user serviceable parts located inside the equipment items.
15.6.2 Maintenance Requirements
Monthly Checks
• Check that the antenna is securely screwed onto the Rotating Beacon Unit
enclosure and located in the upright position. Tighten and straighten by hand if
necessary (secure using Loctite 243).
• Check the operation of the Rotating Beacon by triggering a detection using any
other tagged object. The tagged object should also alarm when within the TS
Detection Zone.
• Check all equipment and cabling is secure. Re-secure if necessary.
• For remote sites without permanent power, check the operation of the Solar Energy
system (where fitted).

Collision Avoidance System: CAS-CAM/RF® Operating Instructions
Document Number: CAS-CAM_RF Operating Instructions (with FCC
precautions)_18June2010.doc Page 94 of 126
Issue: E
16 TROUBLESHOOTING
16.1 Overview
If you have any questions or problems not covered below, please consult your nearest
AMT approved Installer or Service Agent.
16.2 Heavy Vehicle Display Unit Error Messages
Error Message Possible Cause Corrective Action
No camera connected Connect camera connection
Faulty camera Check camera operation
Replace with Spare Unit
Contact Service Agent for repair
Faulty cabling Check cabling
Faulty Expansion Unit Check equipment operation
Replace with Spare Unit
Contact Service Agent
NO SIGNAL
accompanied by Blue
Screen)
Blown fuse on Display
Unit / Expansion Unit
channel
Check & replace fuse
Investigate source of fuse failure –
Contact Service Agent
No Front RF Unit
connected Connect Front RF Unit
Check connectors
Faulty Front RF Unit Check equipment operation
Replace with Spare Unit
Contact Service Agent
Blown fuse on Display
Unit / Expansion Unit
channel
Check & replace fuse
Investigate source of fuse failure –
Contact Service Agent
HV Front Unit Not
Detected
Faulty cabling Check cabling
No Rear RF Unit
connected Connect Front RF Unit
Check connectors
Faulty Rear RF Unit Check equipment operation
Replace with Spare Unit
Contact Service Agent
Blown fuse on Display
Unit / Expansion Unit
channel
Check & replace fuse
Investigate source of fuse failure –
Contact Service Agent
HV Rear Unit Not
Detected
Faulty cabling Check cabling
No Expansion Unit
connected Connect Expansion Unit
Faulty Expansion Unit Check equipment operation
Replace with Spare Unit
Contact Service Agent
Faulty cabling Check cabling
Expansion Unit Not
Detected
Blown fuse on Expansion
Unit input power (note:
Display Unit won’t
operate either)
Check power indicator. If OFF
check fuse & replace if necessary.
Investigate source of fuse failure –
Contact Service Agent

Collision Avoidance System: CAS-CAM/RF® Operating Instructions
Document Number: CAS-CAM_RF Operating Instructions (with FCC
precautions)_18June2010.doc Page 95 of 126
Issue: E
Error Message Possible Cause Corrective Action
Hardware Defaults
Restored Flash memory problem –
User settings replaced
with hardware defaults
Replace with Spare Unit
Contact Service Agent
Saving Settings, Verify
Failure Flash memory problem Replace with Spare Unit
Contact Service Agent
User System Settings –
Restoring Backup
Defaults
Flash memory problem –
User System Settings
restored with Backup
Defaults
Replace with Spare Unit
Contact Service Agent
(unit still operational with same
settings)
Backup System
Settings – Restoring
Emergency Defaults
Flash memory problem –
Backup System Settings
restored with Emergency
Defaults
Replace with Spare Unit
Contact Service Agent
(unit still operational but may have
different settings)
User Switching Settings
– Restoring Backup
Defaults
Flash memory problem –
User Switching Settings
restored with Backup
Defaults
Replace with Spare Unit
Contact Service Agent
(unit still operational with same
settings)
Backup Switching
Settings – Restoring
Emergency Defaults
Flash memory problem –
Backup Switching
Settings restored with
Emergency Defaults
Replace with Spare Unit
Contact Service Agent
(unit still operational but may have
different settings)
User Front RF Settings
– Restoring Backup
Defaults
Flash memory problem –
User Front RF Settings
restored with Backup
Defaults
Replace with Spare Unit
Contact Service Agent
(unit still operational with same
settings)
Backup Front RF
Settings – Restoring
Emergency Defaults
Flash memory problem –
Backup Front RF Settings
restored with Emergency
Defaults
Replace with Spare Unit
Contact Service Agent
(unit still operational but may have
different settings)
User Rear RF Settings
– Restoring Backup
Defaults
Flash memory problem –
User Rear RF Settings
restored with Backup
Defaults
Replace with Spare Unit
Contact Service Agent
(unit still operational with same
settings)
Backup Rear RF
Settings – Restoring
Emergency Defaults
Flash memory problem –
Backup Rear RF Settings
restored with Emergency
Defaults
Replace with Spare Unit
Contact Service Agent
(unit still operational but may have
different settings)
User Channel Settings
– Restoring Backup
Defaults
Flash memory problem –
User Channel Settings
restored with Backup
Defaults
Replace with Spare Unit
Contact Service Agent
(unit still operational with same
settings)
Backup Channel
Settings – Restoring
Emergency Defaults
Flash memory problem –
Backup Channel Settings
restored with Emergency
Defaults
Replace with Spare Unit
Contact Service Agent
(unit still operational but may have
different settings)
Resetting User has pressed ∎ and
● keys simultaneously to
activate Display Reset
function.
No action required

Collision Avoidance System: CAS-CAM/RF® Operating Instructions
Document Number: CAS-CAM_RF Operating Instructions (with FCC
precautions)_18June2010.doc Page 96 of 126
Issue: E
16.3 Diagnostic Tables
16.3.1 Heavy Vehicle (HV) Diagnostic Table
Symptom Possible Cause Corrective Action
HEAVY VEHICLE (HV)
Unit
Dirty camera lens Clean lens
Camera lens scratched Replace camera
Contact Service Agent for repair
Dirty Display Unit screen Clean screen
Cable damaged Check cable
Poor connection Check connections
Poor quality video image
Internal Problem Replace with spare unit
Contact Service Agent
Loss of camera signal (NO
SIGNAL message with
Blue Screen)
Check connections & cables at
Camera and Display Unit /
Expansion Unit
Camera not enabled Enable with Installer Mode
software – contact Service
Agent
Faulty camera Replace camera
Contact Service Agent for repair
Camera Not Working
Blown fuse on Display Unit
/ Expansion Unit channel Check & replace fuse
Investigate source of fuse
failure – contact Service Agent
No power Check power LED indicator -
should be ON
Check fuse
Check power connector is
attached
Check battery condition
No text or video image on
screen
Display Shutdown or in
Sleep Mode Press any key to switch ON
Low brightness settings Increase brightness setting
(refer to section 10.1.4)
Low Level of Camera
Brightness Direct sun glare Fit sun visor option
(PROD0164)
Black & White camera
image Colour settings set too low Increase Colour setting (refer to
section 10.1.4)

Collision Avoidance System: CAS-CAM/RF® Operating Instructions
Document Number: CAS-CAM_RF Operating Instructions (with FCC
precautions)_18June2010.doc Page 97 of 126
Issue: E
Symptom Possible Cause Corrective Action
HEAVY VEHICLE (HV)
Unit
Function not programmed Enable with Installer Mode
software – contact Service
Agent
No automatic camera
switching on gearing
Faulty Gear Detection Check gearing signal detection
on Display Unit diagnostics
screen (refer to section 11.3).
Check gearing signal pickup at
electrical distribution board and
cable path to Display Unit.
Contact Service Agent
Poor quality camera image
at night Lighting level too low (<=
0.03 lux illumination) Camera limited to 0.03 lux
operation
No RF unit(s) fitted Check installation configuration
with Service Agent
RF units fitted but not
enabled Enable with Installer Mode
software – contact Service
Agent
Loss of communications
with RF unit (s) – Display
should show error
messages ‘HV Front Unit
Not Detected’ or ‘HV Rear
Unit Not Detected’ or
both
(refer to section 16.2 for
Troubleshooting details)
Refer to section 16.2 for
corrective actions
Loss of Detection Zone
settings Unit should still work with
factory default Detection Zone
settings (30 m range)
Contact Service Agent
Poor Antenna Connection Check antenna is firmly
attached & orientated upright.
Check for antenna damage &
replace if necessary – contact
Service Agent.
No CAS-RF
®
Detections
when HV is within the
Detection Zone of other
tagged objects (i.e. HV,
LV, SO, PT, TS)
Faulty Unit Replace with Spare Unit
Contact Service Agent for repair
No automatic camera
switching on Front / Rear
RF Detections & Alarms
Function not programmed Enable with Installer Mode
software – contact Service
Agent

Collision Avoidance System: CAS-CAM/RF® Operating Instructions
Document Number: CAS-CAM_RF Operating Instructions (with FCC
precautions)_18June2010.doc Page 98 of 126
Issue: E
Symptom Possible Cause Corrective Action
HEAVY VEHICLE (HV)
Unit
Pulsed Audible Alarm Normal operation –
indicates that a new object
has moved into the
programmed Detection
Zone (Front / Rear).
Object type text and
location (Front or Rear)
flashes on Display Unit
until the user presses the
‘CONFIRM’ key to verify
that the new object has
been visually confirmed
using the cameras and
cancels the alarm.
Normal operation
Tagged object has moved
out of Detection Zone and
re-entered (e.g. LV
approaching from rear
moving in & out HV
Detection Zone)
Normal Operation
New tagged object has
entered the HV Detection
Zone(s).
Normal Operation
Audible alarm re-triggers
after pressing ‘CONFIRM’
key
HV has changed gear and
all previously confirmed
objects are now
‘unconfirmed’.
Normal Operation
HV Alarms when in
Maintenance Workshop Detected other objects
within programmed
Detection Zone(s) – Front
& Rear.
Press ‘CONFIRM’ key to cancel
alarm. Will re-alarm on new
detections or HV gear changes.
Note: the HV is always active
for RF detections independent
of gearing status. To disable HV
alarm for Maintenance work
refer to section 12.10 ‘Heavy
Vehicle Maintenance Mode’

Collision Avoidance System: CAS-CAM/RF® Operating Instructions
Document Number: CAS-CAM_RF Operating Instructions (with FCC
precautions)_18June2010.doc Page 99 of 126
Issue: E
16.3.2 Light Vehicle (LV) Diagnostic Table
Symptom Possible Cause Corrective Action
LIGHT VEHICLE (LV)
Unit
Dash Alarm not connected Check rear panel connection
Rotating Beacon / RF Unit
not connected Check roof connection
Power indicator OFF
Loss of power Check in-line fuse
Check under-dash wiring /
connections
Check battery condition
Dash Alarm not connected Check rear panel connection
Rotating Beacon / RF Unit
not connected Check roof mounted unit
connection
Loss of power Check in-line fuse
Check under-dash wiring /
connections
Check battery condition
HV not in gear Check HV gear status
Poor Antenna Connection Check antenna is firmly
attached & orientated upright.
Check for antenna damage &
replace if necessary – contact
Service Agent.
No Dash Alarms when
within HV (in gear) or TS
Detection Zone
Faulty Unit Replace with Spare Unit
Contact Service Agent for repair
“All of above” “All of above”
Blown lamp Replace lamp (12V, 55W)
Warning: isolate power from the
beacon by disconnecting the
external connector before
removing the lamp cover in
order to replace a globe, as the
beacon may start revolving
without warning when a Heavy
Vehicle is within the Light
Vehicle Detection Zone.
No external Rotating
Beacon Alarm when within
HV (in gear) or TS
Detection Zone
Faulty Unit Replace with Spare Unit
Contact Service Agent for repair
External Beacon not
rotating but lamp is ON Faulty internal drive Replace with Spare Unit
Contact Service Agent for repair

Collision Avoidance System: CAS-CAM/RF® Operating Instructions
Document Number: CAS-CAM_RF Operating Instructions (with FCC
precautions)_18June2010.doc Page 100 of 126
Issue: E
Symptom Possible Cause Corrective Action
LIGHT VEHICLE (LV)
Unit
External Beacon rotating
but lamp is OFF Blown lamp Replace lamp (12V, 55W)
Warning: isolate power from the
beacon by disconnecting the
external connector before
removing the lamp cover in
order to replace a globe, as the
beacon may start revolving
without warning when a Heavy
Vehicle is within the Light
Vehicle Detection Zone.
Pulsed Dash Alarm (high
rate) when inside HV
Detection Zone
Normal operation on initial
HV detection (in gear) -
reverts to low rate alarm
after 3 seconds
Normal operation
Pulsed Dash Alarm (low
rate) when inside HV
Detection Zone
Normal operation after
detecting HV (in gear) for
longer than 3 seconds
Normal operation
Pulsed Dash Alarm (low
rate warble) when inside
TS Detection Zone
Normal operation Normal operation
Rotating Beacon always
ON when outside of HV or
TS Detection Zone
Faulty Unit Replace with Spare Unit
Contact Service Agent for repair
LV Alarms when in
Maintenance Workshop Detected HV or TS within
programmed Detection
Zone(s).
To disable LV alarm for
Maintenance work refer to
section 12.10 ‘Heavy Vehicle
Maintenance Mode’

Collision Avoidance System: CAS-CAM/RF® Operating Instructions
Document Number: CAS-CAM_RF Operating Instructions (with FCC
precautions)_18June2010.doc Page 101 of 126
Issue: E
16.3.3 Stationary Object (SO) Diagnostic Table
Symptom Possible Cause Corrective Action
STATIONARY OBJECT
(SO) Unit
Rotating Beacon not
connected Check connections
Loss of power Check power supply
(permanent, battery, solar etc)
Loss of Detection Zone
settings Unit should still work with
factory default Detection Zone
settings (30 m range)
Contact Service Agent
HV not in gear Check HV gear status
Poor Antenna Connection Check antenna is firmly
attached & orientated upright.
Check for antenna damage &
replace if necessary – contact
Service Agent.
Blown lamp Replace lamp (12V, 55W)
Warning: isolate power from the
beacon by disconnecting the
external connector before
removing the lamp cover in
order to replace a globe, as the
beacon may start revolving
without warning when a Heavy
Vehicle is within the SO
Detection Zone.
No external Rotating
Beacon Alarm when within
HV (in gear) or TS
Detection Zone.
Faulty internal drive Replace with Spare Unit
Contact Service Agent for repair
No SO Detections by HV
(in gear) or TS when within
the SO Detection Zone
Faulty Unit Replace with Spare Unit
Contact Service Agent for repair
External Beacon not
rotating but lamp is ON “All of above” “All of above”
External Beacon rotating
but lamp is OFF Faulty internal drive Replace with Spare Unit
Contact Service Agent for repair
Blown lamp Replace lamp (12V, 55W)
Warning: isolate power from the
beacon by disconnecting the
external connector before
removing the lamp cover in
order to replace a globe, as the
beacon may start revolving
without warning when a Heavy
Vehicle is within the SO
Detection Zone.

Collision Avoidance System: CAS-CAM/RF® Operating Instructions
Document Number: CAS-CAM_RF Operating Instructions (with FCC
precautions)_18June2010.doc Page 102 of 126
Issue: E
16.3.4 Mobile Plant & Equipment (MPE) Diagnostic Table
Symptom Possible Cause Corrective Action
Mobile Plant &
Equipment (MPE) Unit
Dash Alarm not connected Check rear panel connection
Rotating Beacon not
connected Check roof connection
Power indicator OFF
Loss of power Check in-line fuse
Check under-dash wiring /
connections
Check battery condition
Dash Alarm not connected Check rear panel connection
Rotating Beacon not
connected Check roof mounted unit
connection
Loss of power Check in-line fuse
Check under-dash wiring /
connections
Check battery condition
HV not in gear Check HV gear status
Poor Antenna Connection Check antenna is firmly
attached & orientated upright.
Check for antenna damage &
replace if necessary – contact
Service Agent.
No Dash Alarms when
within HV (in gear), LV or
TS Detection Zone
Faulty Unit Replace with Spare Unit
Contact Service Agent for repair
“All of above” “All of above”
Blown lamp Replace lamp (12V, 55W)
Warning: isolate power from the
beacon by disconnecting the
external connector before
removing the lamp cover in
order to replace a globe, as the
beacon may start revolving
without warning when a Heavy
Vehicle is within the Light
Vehicle Detection Zone.
No external Rotating
Beacon Alarm when within
HV (In gear), LV or TS
Detection Zone
Faulty Unit Replace with Spare Unit
Contact Service Agent for repair
External Beacon not
rotating but lamp is ON Faulty internal drive Replace with Spare Unit
Contact Service Agent for repair

Collision Avoidance System: CAS-CAM/RF® Operating Instructions
Document Number: CAS-CAM_RF Operating Instructions (with FCC
precautions)_18June2010.doc Page 103 of 126
Issue: E
Symptom Possible Cause Corrective Action
Mobile Plant &
Equipment (MPE) Unit
External Beacon rotating
but lamp is OFF Blown lamp Replace lamp (12V, 55W)
Warning: isolate power from the
beacon by disconnecting the
external connector before
removing the lamp cover in
order to replace a globe, as the
beacon may start revolving
without warning when a Heavy
Vehicle is within the Light
Vehicle Detection Zone.
Pulsed Dash Alarm (high
rate) when inside HV (in
gear), LV or TS Detection
Zone
Normal operation on initial
HV (in gear), LV or TS
detection - reverts to low
rate alarm after 3 seconds
Normal operation
Pulsed Dash Alarm (low
rate) when inside HV (in
gear) or LV Detection
Zone
Normal operation after
detecting HV (in gear) or
LV for longer than 3
seconds
Normal operation
Pulsed Dash Alarm (low
rate warble) when inside
TS Detection Zone
Normal operation Normal operation
Rotating Beacon always
ON when outside of HV,
LV or TS Detection Zone
Faulty Unit Replace with Spare Unit
Contact Service Agent for repair
MPE Alarms when in
Maintenance Workshop Detected HV (in gear), LV
or TS within programmed
Detection Zone(s).
To disable MPE alarm for
Maintenance work refer to
section 12.10 ‘Heavy Vehicle
Maintenance Mode’

Collision Avoidance System: CAS-CAM/RF® Operating Instructions
Document Number: CAS-CAM_RF Operating Instructions (with FCC
precautions)_18June2010.doc Page 104 of 126
Issue: E
16.3.5 Personnel Tag (PT) Diagnostic Table
Symptom Possible Cause Corrective Action
PERSONNEL TAG (PT)
Unit
Battery Flat Charge or replace battery pack
Loss of Detection Zone
settings Unit should still work with
factory default Detection Zone
settings (30 m range)
Contact Service Agent
HV not in gear Check HV gear status
No PT Alarm when within
HV (in gear) or TS
Detection Zone
Faulty Unit Replace with Spare Unit
Contact Service Agent for repair
No PT Detections by HV
(in gear) or TS when within
the PT Detection Zone
Faulty HV or TS tagged
object • HV (refer to Troubleshooting
section 16.3.1)
• TS (refer to Troubleshooting
section 16.3.6)
Pulsed alarm (high rate)
when inside HV (in gear)
Detection Zone
“All of above” “All of above”
Pulsed alarm (low rate)
when inside TS Detection
Zone
Normal operation Normal operation
Continuous alarm (pulsed)
outside of HV or TS
Detection Zone
Normal operation Normal operation
Battery Low Charge or replace battery pack

Collision Avoidance System: CAS-CAM/RF® Operating Instructions
Document Number: CAS-CAM_RF Operating Instructions (with FCC
precautions)_18June2010.doc Page 105 of 126
Issue: E
16.3.6 Test Station (TS) Diagnostic Table
Symptom Possible Cause Corrective Action
TEST STATION (TS)
Unit
Rotating Beacon not
connected Check connections
Loss of power Check power supply (permanent, battery,
solar etc)
HV Not in Gear Check HV gear status
Loss of Detection
Zone settings Unit should still work with factory default
Detection Zone settings (30 m range)
Contact Service Agent
Poor Antenna
Connection Check antenna is firmly attached &
orientated upright.
Check for antenna damage & replace if
necessary – contact Service Agent.
Blown lamp Replace lamp (12V, 55W)
Warning: isolate power from the beacon
by disconnecting the external connector
before removing the lamp cover in order
to replace a globe, as the beacon may
start revolving without warning when any
tagged object is within the TS Detection
Zone.
Faulty internal drive Replace with Spare Unit
Contact Service Agent for repair
No TS Rotating Beacon
Alarm when within the
Detection Zone of other
tagged objects (i.e. HV,
LV, SO, PT)
Faulty Tagged
Object • HV (refer to Troubleshooting section
16.3.1)
• LV (refer to Troubleshooting section
16.3.2)
• SO (refer to Troubleshooting section
16.3.3)
• PT (refer to Troubleshooting section
16.3.5)
No TS Detections by
tagged objects when
within the TS Detection
Zone
Faulty Unit Replace with Spare Unit
Contact Service Agent for repair
External Beacon not
rotating but lamp is ON “All of above” “All of above”
External Beacon
rotating but lamp is OFF
Faulty internal drive Replace with Spare Unit
Contact Service Agent for repair
Blown lamp Replace lamp (12V, 55W)
Warning: isolate power from the beacon
by disconnecting the external connector
before removing the lamp cover in order
to replace a globe, as the beacon may
start revolving without warning when any
tagged object is within the TS Detection
Zone.

Collision Avoidance System: CAS-CAM/RF® Operating Instructions
Document Number: CAS-CAM_RF Operating Instructions (with FCC
precautions)_18June2010.doc Page 106 of 126
Issue: E

Collision Avoidance System: CAS-CAM/RF® Operating Instructions
Document Number: CAS-CAM_RF Operating Instructions (with FCC
precautions)_18June2010.doc Page 107 of 126
Issue: E
17 FAULT REPORTING
On all occasions where a fault is observed on the equipment, the details and corrective
action taken should be reported on the “Fault Report Sheet” as detailed in Appendix 1.
The following details the recommended procedure for reporting faults:
1. For an observed fault, record the details on the Fault Report Sheet.
2. Attempt to rectify the fault as per the instructions in section 16 ‘Troubleshooting’ and
send a copy to AMT. If the fault cannot be rectified contact the approved AMT Service
Agent and give them a copy of the Fault Report Sheet.
3. Arrange with the AMT Service Agent to repair the fault and detail the cause and
remedy on the Fault Report Sheet.
4. The AMT Service Agent will then return the Fault Report Sheet to the originator of the
report and will send a copy to AMT.
18 ACCESSORIES
18.1 Heavy Vehicle Display Unit – Sun Visor (PROD0164)
An option exists to attach a Sun Visor over the Display Unit in order to reduce the level of
glare from the sun on the video display screen. This option is recommended as standard
for Display Units mounted at dashboard level.

Collision Avoidance System: CAS-CAM/RF® Operating Instructions
Document Number: CAS-CAM_RF Operating Instructions (with FCC
precautions)_18June2010.doc Page 108 of 126
Issue: E
19 CONFIGURATION OPTIONS
Option Benefits
Vehicle Identification
•
Positive confirmation of ‘AT-RISK’ objects being
detected. HV operator can make specific radio call
for confirmation before moving from start-up or
approving LV to overtake.
CAS Data Logging / Safety
Audit Trail
•
Time & date stamped safety audit trail
•
Track & manage HV-HV & HV-LV non-compliance
•
Data could be sent to Dispatch in real-time using
existing Fleet Management Systems
Non-Beacon Light Vehicle RF
Unit
•
Eliminates night vision glare from beacon (originally
required for positive confirmation of LV by HV
operator. No longer required with Vehicle I.D. being
displayed on camera monitor)
•
Option to add external beacon of clients selection
(12VDC @ 5A maximum)
Blind Side RF Units (LHS &
RHS)
•
Close range detection and full coverage of ‘AT-
RISK’ objects at HV sides (Front & Rear RF Units
only provide partial blind-side detection at the
expense of long range detection directly in front or
behind).
•
Required for effective 360 degree close-range
‘start-up’ object detection
Alarming based on Vehicle
Speed
•
Eliminates HV-LV & HV-HV nuisance alarms above
preset speed on haul roads
•
Fully programmable alarming based on object type,
range, location (front/rear/sides), HV direction of
travel (forward/reverse) and now speed.
Road Junction Warning System
•
Long range RF unit (300m) used to detect HV
approaching road junction / intersection for
triggering warning lights for other vehicles.
Table 43: CAS-CAM/RF
®
Configuration Options

Collision Avoidance System: CAS-CAM/RF® Operating Instructions
Document Number: CAS-CAM_RF Operating Instructions (with FCC
precautions)_18June2010.doc Page 109 of 126
Issue: E
20 PART NUMBERS
Refer to the AMT CAS-CAM/RF
®
System Supply Brochure and Spare Parts Catalogue.

Collision Avoidance System: CAS-CAM/RF® Operating Instructions
Document Number: CAS-CAM_RF Operating Instructions (with FCC
precautions)_18June2010.doc Page 110 of 126
Issue: E
21 SPECIFICATIONS
Note: All dimensions in mm
21.1 Display Unit (PROD0119)
Display 6.4” Colour TFT LCD
Resolution 960(W) x 234(H)
Active Area 129.6 mm (W) x 97.34 mm (H)
Dot Pitch 0.135 mm (W) x 0.416 mm(H)
Back Light CCFT
Composite video signal 1 Vp-p / 75 ohm
F
H
15.625 KHZ
F
V
50 Hz
Video Signal
F
C
4.43 MHz
Power Source DC 10V – 30V (ripple 0.5 Vp-p max.)
Power Consumption 25 W max.
Response Time Tr = 25ms (max. 50ms)
Tf = 30ms (max. 60ms)
Contrast Ratio Typ. 150
At optimal viewing angle
Brightness Typ. 300 cd/m
2
LCD Lamp Life 10,000 hr min (at Tamb = 25°C)
Viewing Angle Top
Bottom
Left / Right
40 deg
55 deg
60 deg
Operating Temperature 0°C - 60°C
Storage Temperature -30°C - 80°C
Operating Humidity 85 % RH max.
Storage Humidity 85 % RH max.
Protection Rating IP 32 rated enclosure
Overall Dimension 165 mm (W) x 165 mm (H) x 49 mm (D)
Weight 1.6 kg
Connectors • EXT. I/O (12-way MILSPEC panel plug)
• CH 1 (6-way MILSPEC panel socket) (1xCamera +
1xRF Unit max)
• CH 2 (6-way MILSPEC panel socket) (1xCamera +
1xRF Unit max)
• Video Out (RCA panel socket)
• RS-232 (DB-9 panel socket)
Sun Visor Optional (PROD0164)
Keypad Functions • (DIM / Confirm)
• (Channel scrolling)
• (Channel scrolling)
• (Power On-Off / Back / Cycle)

Collision Avoidance System: CAS-CAM/RF® Operating Instructions
Document Number: CAS-CAM_RF Operating Instructions (with FCC
precautions)_18June2010.doc Page 111 of 126
Issue: E
Menu Functions
(settings saved during power
down)
Note:
* Installation Functions –
configured at time of
installation using laptop PC
programming software. Not
User programmable.
• Channel settings (1-6):
• Camera Select (using ↑, ↓ keys)
• Channel Title (8 char max) *
• Brightness (5 settings) *
• Colour (5 settings) *
• Mirror (Off/On) *
• Enable (Yes/No) *
• Status (Detected / Not-Detected)
• Switching settings:
• Forward Switching (yes/no) *
• Forward Channel (1-6) *
• Reverse Switching (yes/no) *
• Reverse Channel (1-6) *
• Sleep Time (Off, 5, 10, 15, 20, 25, 30 mins) *
• RF Switching (yes/no) *
• Wake on Forward (yes/no) *
• Wake on Reverse (yes/no) *
• Central RF (yes/no)
• Keypad Tone (yes/no) *
• Auto Cycle (off, 2s, 4s, 6s, 8s, 10s) *
• Front RF Unit settings:
• Enabled (Yes, No) *
• Reverse Gear - alarm ranges & audible (on/off)
for all object types (HV, LV, SO, PT, TS) *
• Park Gear - alarm ranges & audible (on/off) for all
object types (HV, LV, SO, PT, TS) *
• Forward Gear - alarm ranges & audible (on/off)
for all object types (HV, LV, SO, PT, TS) *
• Rear RF Unit settings:
• Enabled (Yes, No) *
• Reverse Gear - alarm ranges & audible (on/off)
for all object types (HV, LV, SO, PT, TS) *
• Park Gear - alarm ranges & audible (on/off) for all
object types (HV, LV, SO, PT, TS) *
• Forward Gear - alarm ranges & audible (on/off)
for all object types (HV, LV, SO, PT, TS) *
• Reverse Alarm Relay (closed, RF closed, open) *
Input Signals • Vehicle Main Power (10-30 VDC, 25W max.)
• Vehicle Reverse sense signal (10-30 VDC, 20 mA
max, opto-isolated 3KV)
• Vehicle Forward sense signal (10-30 VDC, 20 mA
max, opto-isolated 3kV)
• Camera Unit video signal (differential 1Vp-p) – CH 1-
2
• Expansion Unit Video Mux Output (differential 1Vp-p)
– CH 3-6

Collision Avoidance System: CAS-CAM/RF® Operating Instructions
Document Number: CAS-CAM_RF Operating Instructions (with FCC
precautions)_18June2010.doc Page 112 of 126
Issue: E
Output Signals • Camera Unit power (12 VDC, 200mA ea.) – CH 1-2
• RS-485 comms bus (for connection to Expansion
Unit & Camera / RF Units)
• Vehicle Reverse Alarm circuit switched contact
(voltage free contact, N.O., 2A rating)
• Video Output (PAL, 1Vp-p / 75 ohm) – video + text
• RS-232 interface
• Audible Alarm
Fuses • Input Power (2A, 20 mm x 5 mm slow blow)
• 2 x Camera / RF Unit Power (500 mA, 20 mm x 5
mm slow blow)

Collision Avoidance System: CAS-CAM/RF® Operating Instructions
Document Number: CAS-CAM_RF Operating Instructions (with FCC
precautions)_18June2010.doc Page 113 of 126
Issue: E
21.2 Camera Unit (PROD0118)
Image Sensor 1/3” CCD Image Sensor
Chip Size 6.0 mm (W) x 4.96 mm (H)
CCD Total Pixels 500 (W) x 582 (H)
Scanning System 625 Lines (PAL)
50 fields/sec
Sync System Internal
Minimum Illumination 0.03 Lux at F1.2
Resolution 380 TV Lines
Field of View 123 degrees Horizontal & 91 degrees Vertical (153
degrees Diagonal). Narrower field of views available on
request.
Signal to Noise Ratio Better than 48dB (AGC OFF)
White Balance Auto
Auto Iris AES
Electronic Shutter Auto: Up to 1/100,000 sec continual
Video Output Signal 1.0V p-p composite video at 75 ohm & Υ/C output
Gamma Correction 0.45
Operating Temperature -10°C to 50°C
Storage Temperature -20°C - 60°C
Operating Humidity 85 % RH max.
Storage Humidity 85 % RH max.
Protection Rating IP 66 rated enclosure
Overall Dimension 130 mm (W) x 200 mm (H) x 180 mm (D)
Weight 1.3kg
Power Supply DC 12V (+/- 10%) @ 100mA (powered from Display Unit
for 2 camera system or from Expansion Unit for 6
camera system maximum)
Lens Mount On board Lens (f2.27mm)
Connector Input Power / Video / RS-485 comms (6-way MILSPEC
panel plug)
Input Signals • Camera Unit power (12 VDC, 800 mA max)
Output Signals • Camera Unit Video Signal (differential 1Vp-p / 75
ohm)
• RS-485 comms bus (connected to Display Unit & all
Camera / RF Units)

Collision Avoidance System: CAS-CAM/RF® Operating Instructions
Document Number: CAS-CAM_RF Operating Instructions (with FCC
precautions)_18June2010.doc Page 114 of 126
Issue: E
21.3 Expansion Unit (PROD0161)
Power Source DC 10V – 30V (ripple 0.5 Vp-p max.)
Power Consumption 50 W max.
Operating Temperature 0°C - 60°C
Storage Temperature -20°C - 60°C
Operating Humidity 85 % RH max.
Storage Humidity 85 % RH max.
Protection Rating IP 54 rated enclosure
Overall Dimension 204 mm (W) x 70 mm (H) x 150 mm (D)
Weight 1.2 kg
Connectors • POWER & I/O (19-way MILSPEC panel socket)
• DISPLAY (12-way MILSPEC panel socket)
• CH 3-6: Camera / RF Unit channels (6-way
MILSPEC panel sockets)
• RS-232 Interface (DB-9 panel socket)
• CAN Interface (DB-9 panel socket)
Input Signals • Vehicle Main Power (10-30 VDC, 50W max.)
• Vehicle Reverse sense signal (10-30 VDC, 20 mA
max, opto-isolated 3KV)
• Vehicle Forward sense signal (10-30 VDC, 20 mA
max, opto-isolated 3KV)
• 2 x spare input signals (10-30VDC, 20 mA max, opto
isolated 3KV)
• Camera Unit Video Signal (differential 1Vp-p)
Output Signals • CH3-CH6: 4 x Camera / RF Unit channels (12VDC,
0.8A max)
• Display Unit power (10-30 VDC, 25W max)
• Vehicle Reverse Alarm circuit switched contact
(voltage free contact, N.O., 2A rating)
• Spare switched contacts (voltage free contact,
N.O.+N.C., 2A rating)
• Video Mux Output (differential 1Vp-p)
• RS-485 comms bus (connected to Display Unit &
Camera / RF Units)
• RS-232 interface
• CAN interface
Fuses • Input Power (5A, 20 mm x 5 mm slow blow)
• CH3-CH6 (Camera / RF Unit Channels) (800 mA, 20
mm x 5 mm slow blow)

Collision Avoidance System: CAS-CAM/RF® Operating Instructions
Document Number: CAS-CAM_RF Operating Instructions (with FCC
precautions)_18June2010.doc Page 115 of 126
Issue: E
21.4 Heavy Vehicle Front RF Unit (PROD0239) & Rear RF Unit
(PROD0169)
Power Source DC 12V +/- 10% (powered from either the Heavy
Vehicle Display Unit or Expansion Unit)
Power Consumption 3W maximum
Operating Temperature 0°C - 60°C
Storage Temperature -20°C - 60°C
Operating Humidity 85 % RH max.
Storage Humidity 85 % RH max.
Protection Rating IP 56 rated enclosure
Overall Dimension 76 mm (W) x 65 mm (H) x 56 mm (D) – excluding
antenna (490 mm (H) with antenna connected)
Weight 1.2 kg (excluding antenna backing plate)
2.6 kg (including antenna backing plate)
Connectors • BUS IN (6-way MILSPEC panel plug)
• BUS OUT (6-way MILSPEC panel socket)
• Antenna (UHF panel socket)
Input / Output Signals CAS BUS (6 way interface)
• Input Power (12 VDC, 1.2W max.) – pins A(+ve), B
(gnd)
• Video Signal Out (differential 1Vp-p) – pins C(+), D(-)
• RS-485 data communications – pins E(+), F(-)

Collision Avoidance System: CAS-CAM/RF® Operating Instructions
Document Number: CAS-CAM_RF Operating Instructions (with FCC
precautions)_18June2010.doc Page 116 of 126
Issue: E
21.5 Light Vehicle System (with integral beacon) (PROD0246)
Power Source DC 12V +/- 10% (powered from Light Vehicle electrical
distribution board (via battery) with inline 7.5A fused
circuit)
Power Consumption 57W maximum
Operating Temperature 0°C - 60°C
Storage Temperature -20°C - 60°C
Operating Humidity 85 % RH max.
Storage Humidity 85 % RH max.
Protection Rating • Light Vehicle Unit - IP 54 rated enclosure
• Dash Alarm Unit – IP 32 rated enclosure
Overall Dimension • Light Vehicle Unit – 200mm (W) x 250mm(H) x
165mm (D) (excluding magnetic base)
• Dash Alarm Unit – 64 mm (W) x 25 mm (H) x 108
mm (D)
Weight • Light Vehicle Unit – 1.9 kg (excluding magnetic
base option)
• Dash Alarm Unit – 82 g
Connectors Light Vehicle Unit (PROD0209)
• Power & I/O (12-way MILSPEC panel plug)
• Antenna (UHF panel socket)
Dash Alarm Unit (PROD0211)
• Power & Inputs (5-way subminiature DIN)
• RS-232 Interface (DB-9 panel socket)
Input Signals Light Vehicle Unit
• Input Power (12 VDC, 55W max.)
• Antenna
Dash Alarm Unit
• Power (12VDC, 0.6W typical)
• RS-232 data communications
• Alarm signal
Output Signals Light Vehicle Unit
• Rotating Beacon Lamp (12V, 55W)
• RS-232 data communications
• Alarm Unit Power
• Alarm signal
Dash Alarm Unit
• Power indicator (POWER)
• Alarm indicator (DETECT) & buzzer (volume set by
internal jumper links)
• RS-232 data communications
Fuse Fuse to be installed in-line with vehicle power circuit
(7.5A, 20 mm x 5 mm slow blow)

Collision Avoidance System: CAS-CAM/RF® Operating Instructions
Document Number: CAS-CAM_RF Operating Instructions (with FCC
precautions)_18June2010.doc Page 117 of 126
Issue: E
21.6 Light Vehicle System (with external beacon option)
(PROD0294)
Power Source DC 12V +/- 10% (powered from Light Vehicle electrical
distribution board (via battery) with inline 7.5A fused
circuit)
Power Consumption 57W maximum
Operating Temperature 0°C - 60°C
Storage Temperature -20°C - 60°C
Operating Humidity 85 % RH max.
Storage Humidity 85 % RH max.
Protection Rating • Light Vehicle RF Unit - IP 56 rated enclosure
• Dash Alarm Unit – IP 32 rated enclosure
Overall Dimension • Light Vehicle Unit – 76 mm (W) x 65 mm (H) x 56
mm (D) – excluding antenna (490 mm (H) with
antenna connected)
• Dash Alarm Unit – 64 mm (W) x 25 mm (H) x 108
mm (D)
Weight • Light Vehicle Unit – 1.2 kg
• Dash Alarm Unit – 82 g
Connectors Light Vehicle RF Unit (PROD0295)
• Power & Comms (6-way MILSPEC panel plug)
• External Beacon (2-way MILSPEC panel plug)
• Antenna (UHF panel socket)
Dash Alarm Unit (PROD0211)
• Power & Inputs (5-way subminiature DIN)
• RS-232 Interface (DB-9 panel socket)
Input Signals Light Vehicle Unit
• Input Power (12 VDC@ 55W max. with external
beacon, 12VDC@ 1.2W without external beacon)
• Antenna
Dash Alarm Unit
• Power (12VDC, 0.6W typical)
• RS-232 data communications
• Alarm signal
Output Signals Light Vehicle RF Unit
• External Beacon (12V, 55W max.) (optional)
• RS-232 data communications
• Alarm Unit Power
• Alarm signal
Dash Alarm Unit
• Power indicator (POWER)
• Alarm indicator (DETECT) & buzzer (volume set by
internal jumper links)
• RS-232 data communications
Fuse Fuse to be installed in-line with vehicle power circuit
(7.5A, 20 mm x 5 mm slow blow)

Collision Avoidance System: CAS-CAM/RF® Operating Instructions
Document Number: CAS-CAM_RF Operating Instructions (with FCC
precautions)_18June2010.doc Page 118 of 126
Issue: E
21.7 Stationary Object System (PROD0210)
Power Source DC 12V +/- 10% (powered from suitable external 12VDC
power source via fused circuit – e.g. permanent power
supply, battery power supply, solar power supply with
battery backing)
Power Consumption 57W maximum
Operating Temperature 0°C - 60°C
Storage Temperature -20°C - 60°C
Operating Humidity 85 % RH max.
Storage Humidity 85 % RH max.
Protection Rating • Stationary Object Unit - IP 54 rated enclosure
• Dash Alarm Unit – IP 32 rated enclosure
Overall Dimension • Stationary Object Unit – 200mm (W) x 250mm(H)
x 165mm (D) (excluding magnetic base)
• Dash Alarm Unit – 64 mm (W) x 25 mm (H) x 108
mm (D)
Weight • Stationary Object Unit – 1.9 kg (excluding
magnetic base option)
• Dash Alarm Unit – 82 g
Connectors Stationary Object Unit (PROD0212)
• Power & I/O (12-way MILSPEC panel plug)
• Antenna (UHF panel socket)
Dash Alarm Unit (PROD0211)
• Power & Inputs (5-way subminiature DIN)
• RS-232 Interface (DB-9 panel socket)
Input Signals Stationary Object Unit
•
Input Power (12 VDC, 55W max.)
• Antenna
Dash Alarm Unit
• Power (12VDC, 0.6W typical)
• RS-232 data communications
• Alarm signal
Output Signals Stationary Object Unit
•
Rotating Beacon Lamp (12V, 55W)
• RS-232 data communications
• Alarm Unit Power
• Alarm signal
Dash Alarm Unit
• Power indicator (POWER)
• Alarm indicator (DETECT) & buzzer (volume set by
internal jumper links)
• RS-232 data communications
Fuse Fuse to be installed in-line with power supply circuit
(7.5A, 20 mm x 5 mm slow blow)
Mounting Options • Generic Mounting Base (standard)
• Magnetic base
• Solar System Pole Mount

Collision Avoidance System: CAS-CAM/RF® Operating Instructions
Document Number: CAS-CAM_RF Operating Instructions (with FCC
precautions)_18June2010.doc Page 119 of 126
Issue: E

Collision Avoidance System: CAS-CAM/RF® Operating Instructions
Document Number: CAS-CAM_RF Operating Instructions (with FCC
precautions)_18June2010.doc Page 120 of 126
Issue: E
21.8 Test Station System (PROD0241)
Power Source DC 12V +/- 10% (powered from suitable external 12VDC
power source via fused circuit – e.g. permanent power
supply, battery power supply, solar power supply with
battery backing)
Power Consumption 57W maximum
Operating Temperature 0°C - 60°C
Storage Temperature -20°C - 60°C
Operating Humidity 85 % RH max.
Storage Humidity 85 % RH max.
Protection Rating • Test Station Unit - IP 54 rated enclosure
• Dash Alarm Unit – IP 32 rated enclosure
Overall Dimension • Test Station Unit – 200mm (W) x 250mm(H) x
165mm (D) (excluding magnetic base)
• Dash Alarm Unit – 64 mm (W) x 25 mm (H) x 108
mm (D)
Weight • Test Station Unit – 1.9 kg (excluding magnetic
base option)
• Dash Alarm Unit – 82 g
Connectors Test Station Unit (PROD0251)
• Power & I/O (12-way MILSPEC panel plug)
• Antenna (UHF panel socket)
Dash Alarm Unit (PROD0211)
• Power & Inputs (5-way subminiature DIN)
• RS-232 Interface (DB-9 panel socket)
Input Signals Test Station Unit
• Input Power (12 VDC, 55W max.)
• Antenna
Dash Alarm Unit
• Power (12VDC, 0.6W typical)
• RS-232 data communications
• Alarm signal
Output Signals Test Station Unit
• Rotating Beacon Lamp (12V, 55W)
• RS-232 data communications
• Alarm Unit Power
• Alarm signal
Dash Alarm Unit
• Power indicator (POWER)
• Alarm indicator (DETECT) & buzzer (volume set by
internal jumper links)
• RS-232 data communications
Fuse Fuse to be installed in-line with power supply circuit
(7.5A, 20 mm x 5 mm slow blow)
Mounting Options • Generic Mounting Base (standard)
• Magnetic base
• Solar System Pole Mount

Collision Avoidance System: CAS-CAM/RF® Operating Instructions
Document Number: CAS-CAM_RF Operating Instructions (with FCC
precautions)_18June2010.doc Page 121 of 126
Issue: E
21.9 Mobile Plant & Equipment System (PROD0225)
Power Source DC 12V +/- 10% (powered from suitable external 12VDC
power source via fused circuit – e.g. permanent power
supply, battery power supply, solar power supply with
battery backing)
Power Consumption 57W maximum
Operating Temperature 0°C - 60°C
Storage Temperature -20°C - 60°C
Operating Humidity 85 % RH max.
Storage Humidity 85 % RH max.
Protection Rating • Mobile Plant & Equipment Unit - IP 54 rated
enclosure
• Dash Alarm Unit – IP 32 rated enclosure
Overall Dimension • Mobile Plant & Equipment Unit – 200mm (W) x
250mm(H) x 165mm (D) (excluding magnetic
base)
• Dash Alarm Unit – 64 mm (W) x 25 mm (H) x 108
mm (D)
Weight • Mobile Plant & Equipment Unit – 1.9 kg (excluding
magnetic base option)
• Dash Alarm Unit – 82 g
Connectors Mobile Plant & Equipment Unit (PROD0250)
• Power & I/O (12-way MILSPEC panel plug)
• Antenna (UHF panel socket)
Dash Alarm Unit (PROD0211)
• Power & Inputs (5-way subminiature DIN)
• RS-232 Interface (DB-9 panel socket)
Input Signals Mobile Plant & Equipment Unit
• Input Power (12 VDC, 55W max.)
• Antenna
Dash Alarm Unit
• Power (12VDC, 0.6W typical)
• RS-232 data communications
• Alarm signal
Output Signals Mobile Plant & Equipment Unit
• Rotating Beacon Lamp (12V, 55W)
• RS-232 data communications
• Alarm Unit Power
• Alarm signal
Dash Alarm Unit
• Power indicator (POWER)
• Alarm indicator (DETECT) & buzzer (volume set by
internal jumper links)
• RS-232 data communications
Fuse Fuse to be installed in-line with power supply circuit
(7.5A, 20 mm x 5 mm slow blow)

Collision Avoidance System: CAS-CAM/RF® Operating Instructions
Document Number: CAS-CAM_RF Operating Instructions (with FCC
precautions)_18June2010.doc Page 122 of 126
Issue: E
21.10 Personnel Tag
Under development.
Refer to section 4.7 for overview.

Collision Avoidance System: CAS-CAM/RF® Operating Instructions
Document Number: CAS-CAM_RF Operating Instructions (with FCC
precautions)_18June2010.doc Page 123 of 126
Issue: E
22 WARRANTY INFORMATION
22.1 Warranty
Subject to the AMT General Terms and Conditions, all new equipment supplied and
commissioned by AMT (or approved Service Agent) is warranted against defects for a
period of twelve (12) months from completion of commissioning.
The obligation of AMT is limited to the cost of making good the defect in the equipment
only and specifically excludes any consequential malfunction or loss, including loss of
profits or turnover.
This warranty does not apply to defects incurred through improper field installation, expiry
of consumable items, abnormal operating conditions, accidental damage, improper
handling, abuse or neglect or non-compliance with instructions provided by AMT.
The warranty is valid for the customer only and does not extend to third parties.
AMT will, at no charge to the customer, provide a replacement for any defective
component in the equipment supplied by AMT during the warranty period. However, labour
charges for dismantling and re-assembly shall be to the customer’s account.
AMT takes no responsibility for defects in the equipment, or part of the equipment, caused
in connection with the above-mentioned replacement work if performed by other than AMT
or their accredited representative(s).
Normal system testing and calibration may only be carried out by trained customer
technical personnel or accredited Service Agent(s) using the techniques provided by AMT.
22.2 Maintenance and Repairs
AMT will provide warranty coverage against equipment defects for a period of twelve (12)
months from completion of commissioning as outlined above.
If the customer is purchasing spares of each major equipment item, trained customer
technical personnel or accredited Service Agent(s) could replace defective equipment
items with working spare equipment items to immediately restore full equipment operation.
The defective equipment items would be returned via courier to AMT for immediate repair
and subsequent return to the customer. Refer to section 17 for the preferred ‘Fault
Reporting’ procedure.

Collision Avoidance System: CAS-CAM/RF® Operating Instructions
Document Number: CAS-CAM_RF Operating Instructions (with FCC
precautions)_18June2010.doc Page 124 of 126
Issue: E
23 GLOSSARY OF TERMS
Alarm The means of alerting the User to a new Object Detection.
Comprises of either an audible alarm or visual alarm or
both.
AMT Acronym for ‘Advanced Mining Technologies’, the
designers and manufacturers of the CAS-CAM/RF
®
system.
Audible Alarm Refers to sound emitting devices used as alarm indicators
(e.g. HV Display Unit & LV Dash Alarm Unit sounds a
buzzer for alarms).
Calibration The procedure by which the Detection Range of all CAS-
RF
®
tagged objects is programmed.
Calibration Unit Equipment used to conduct a calibration procedure.
Camera Apparatus used for taking real time photographs. Used to
provide high-resolution colour video images of blind spots
on the Heavy Vehicle Display Unit.
CAN Acronym for ‘Car Area Network’. International standard for
automotive vehicle networking. Used widely on current
model Heavy Vehicles for sensing and actuating functions
(e.g. brake and turning indicators, lighting control, engine
management etc).
CAS-CAM
®
Collision Avoidance System Camera only system.
Registered trademark of AMT.
CAS-CAM/RF
®
Integrated Collision Avoidance System with Camera & RF
tagging technologies. Registered trademark of AMT.
CAS-RF
®
Collision Avoidance System RF tagging only system.
Registered trademark of AMT.
Code Describes a software program as stored and run in a

Collision Avoidance System: CAS-CAM/RF® Operating Instructions
Document Number: CAS-CAM_RF Operating Instructions (with FCC
precautions)_18June2010.doc Page 125 of 126
Issue: E
computer.
Collision Avoidance
System (CAS) The classification of sensing technologies used to prevent
collisions between objects.
Command A user selectable task to be run by a computer.
Communications The system used to transfer data between computers and
other computers or hardware.
Confirm The operation of acknowledging the presence of a new
object detection on the Heavy Vehicle Display Unit.
Involves the User visually confirming the presence of a
new object using cameras and pressing the ‘CONFIRM’
key to cancel the alarm.
Day / Night Camera Low light level camera technology where the camera
automatically switches from Colour to Black & White at a
preset low light level enabling images to be viewed in
near dark conditions.
Detection The term used to describe the sensing of the presence of
an object.
Detection Range Refers to the distance over which an object can be
detected by the CAS-CAM/RF
®
system.
Detection Zone Refers to the area around which an object can be
detected by the CAS-CAM/RF
®
system.
Diagnostic A command or procedure used to find out about the
behaviour of a system, usually if a problem has occurred.
Flash Memory A storage medium that retains data when power is
removed. Used on all CAS-CAM/RF
®
equipment for
saving User or Installer programmed settings.
Hardware Electrical equipment used to perform functions the nature
of which are determined by the combination of the

Collision Avoidance System: CAS-CAM/RF® Operating Instructions
Document Number: CAS-CAM_RF Operating Instructions (with FCC
precautions)_18June2010.doc Page 126 of 126
Issue: E
hardware and software.

Collision Avoidance System: CAS-CAM/RF® Operating Instructions
Document Number: CAS-CAM_RF Operating Instructions (with FCC
precautions)_18June2010.doc Page 127 of 126
Issue: E
Heavy Vehicle (HV) Refers to the class of vehicle objects that poses the greatest
risk of collision with other objects due to their physical size
and poor visibility (blind spots). Heavy Vehicles typically
include: haulage truck, excavator, shovel, truck, loader,
dozer, grader, water truck, forklift, semi-trailer, bus. HV’s can
be fitted with camera only (CAS-CAM
®
), RF tag only (CAS-
RF
®
) or combined camera and RF tagging (CAS-CAM/RF
®
).
Installer The person(s) approved by AMT and the client to install,
calibrate, service and repair the CAS-CAM/RF
®
equipment.
Keypad A device used to input data into a computer or instrument.
The Heavy Vehicle Display Unit contains a 1 x 4 keypad for
User Operation.
LCD Acronym for ‘Liquid Crystal Display’. A low power display
used on many portable PC’s and instruments. Used on the
Heavy Vehicle Display Unit for displaying video images and
text.
LED Acronym for Light Emitting Diode. A semiconductor light
source that emits visible light or infra-red radiation. Used as
power, status and alarm indicators on the CAS-CAM/RF
®
equipment.
Light Vehicle (LV) Refers to the class of mobile vehicle objects fitted with CAS-
RF tags that are under threat of collision from Heavy
Vehicles. Light Vehicles typically include: 4WD, sedan,
wagon.
Lux Standard unit of illumination (brightness) equal to one lumen
per square metre.
Memory The part of a computer in which code and data are stored.
Menu A list of command functions and settings.

Collision Avoidance System: CAS-CAM/RF® Operating Instructions
Document Number: CAS-CAM_RF Operating Instructions (with FCC
precautions)_18June2010.doc Page 128 of 126
Issue: E
Mobile Plant &
Equipment (MPE) Refers to the class of Heavy Vehicle fitted with CAS-RF
®
tag
and Dash Alarm unit in lieu of Display Unit and Cameras.
Identical hardware to Light Vehicle System, except RF tag
coded as Heavy Vehicle (HV). MPE typically includes:
Dozer, Grader, Loader vehicle types if no blind spot cameras
are required.
Object Type Refers to the classification of objects fitted with CAS-RF
®
tags. Object Types include: Heavy Vehicle (HV), Light
Vehicle (LV), Stationary Object (SO), Personnel Tag (PT),
Test Station (TS).
PAL Acronym for Phase Alternating Lines. This is the television
standard used in Europe and Australia. The PAL standard is
25 frames per second within 625 lines.
Personnel Tag (PT) Refers to the CAS-RF tags worn by personnel for protection
from collision with Heavy Vehicles.
RF Acronym for ‘Radio Frequency’.
RF Tagged Object An object protected by a CAS-RF
®
tag.
RS-232 Interface between Data Terminal Equipment and Data
Communications Equipment, employing serial binary data
exchange. Available on the Heavy Vehicle Display Unit,
Expansion Unit and Light Vehicle Unit for in-field
programming of system settings using a PC.
RS-485 Interface standard used for multipoint digital communications
using drivers and receivers. Used on the Heavy Vehicle for
communications between Display Unit, Expansion Unit and
RF Units.
Service Agent The Company approved by AMT and the client to install,
calibrate, service and repair the CAS-CAM/RF
®
equipment.

Collision Avoidance System: CAS-CAM/RF® Operating Instructions
Document Number: CAS-CAM_RF Operating Instructions (with FCC
precautions)_18June2010.doc Page 129 of 126
Issue: E
Software The set of instructions that are to be run on a computer.
Specification A detailed description of the requirements, features and
performance capabilities of an instrument.
Stationary Object (SO) Refers to the class of fixed (stationary) objects fitted with
CAS-RF
®
tags that are under threat of collision from Heavy
Vehicles. Stationary Objects typically include: fixed plant and
equipment, buildings and structures.
Tag Refers to the physical placement of CAS-RF
®
units on
remote objects for collision avoidance detection and
alarming. Tags can be coded as different object types (e.g.
HV, LV, SO, PT, TS) with fully programmable alarming
configurations based on range. HV tags with Display Unit
can be coded with additional alarming configurations based
on HV gearing, detection location (i.e. front or rear) and
object type.
Test Station (TS) Refers to the class of Stationary Object fitted with CAS-RF
®
tag that is programmed to Test the operational functionality
of all other tagged objects (e.g. HV, LV, SO, PT).
TS unit is alarmed by all other object types and in turn
alarms all object types. Used for 2-way functional testing of
CAS-RF
®
tags.
Troubleshooting The process of trying to locate the source of a problem.
User The person operating the CAS-CAM/RF
®
system.
Video Electronic signals for producing television images.
Visual Alarm Refers to light emitting devices used as alarm indicators
(e.g. HV Display Unit flashes video text for alarms, LV Unit
flashes the roof mounted rotating beacon and Dash Alarm
Unit LED indicator).
Collision Avoidance System: CAS-CAM/RF® Operating Instructions
Document Number: CAS-CAM_RF Operating Instructions (with FCC
precautions)_18June2010.doc Page 130 of 126
Issue: E
24 APPENDIX 1: AMT CAS-CAM/RF
®
FAULT REPORT
RECORD
AMT: CAS-CAM/RF® Fault Report Record
No:
FRR-
Equipment:
Site:
Dept.
Serial No.:
Reported By:
To:
Date & Time:
Fault Report:
Equipment & Vehicle Conditions relative to Fault Report:
Actions Taken to Rectify Fault:
Service by:
Date & Time:
Arrive Time:
Depart Time:
Duration:
Recommendations/Comments:
Comment by:
Date & Time:
Follow Up Action:
Comment by:
Date & Time:
Fax to AMT on +61 2 4389 2355

Collision Avoidance System: CAS-CAM/RF® Operating Instructions
Document Number: CAS-CAM_RF Operating Instructions (with FCC
precautions)_18June2010.doc Page 131 of 126
Issue: E
25 APPENDIX 2: AMT CONTACT DETAILS
For Information or Technical Support on AMT’s Collision Avoidance System (CAS-
CAM/RF
®
), contact: sales@advminingtech.com.au
or visit our web site at: www.advminingtech.com.au
Advanced Mining Technologies Pty Ltd
A.B.N. 76 060 418 859
Head Office
3 Co-Wyn Close Fountaindale NSW 2258 Australia
PO Box 5107 Chittaway Bay NSW 2261 Australia
Phone: (+61) 2 4389 2344 Fax: (+61) 2 4389 2355
Queensland Office
QCAT Technology Transfer Centre Pullenvale QLD 4069 Australia
PO Box 883 Kenmore QLD 4069 Australia
Phone: (+61) 7 3720 1977 Fax: (+61) 7 3720 1966