Info Metropolitan Instructions User Manual
2017-08-03
User Manual: Info Metropolitan Instructions metropolitan_instructions ablefiles
Open the PDF directly: View PDF ![]() .
.
Page Count: 2

SF018 Rev. 2
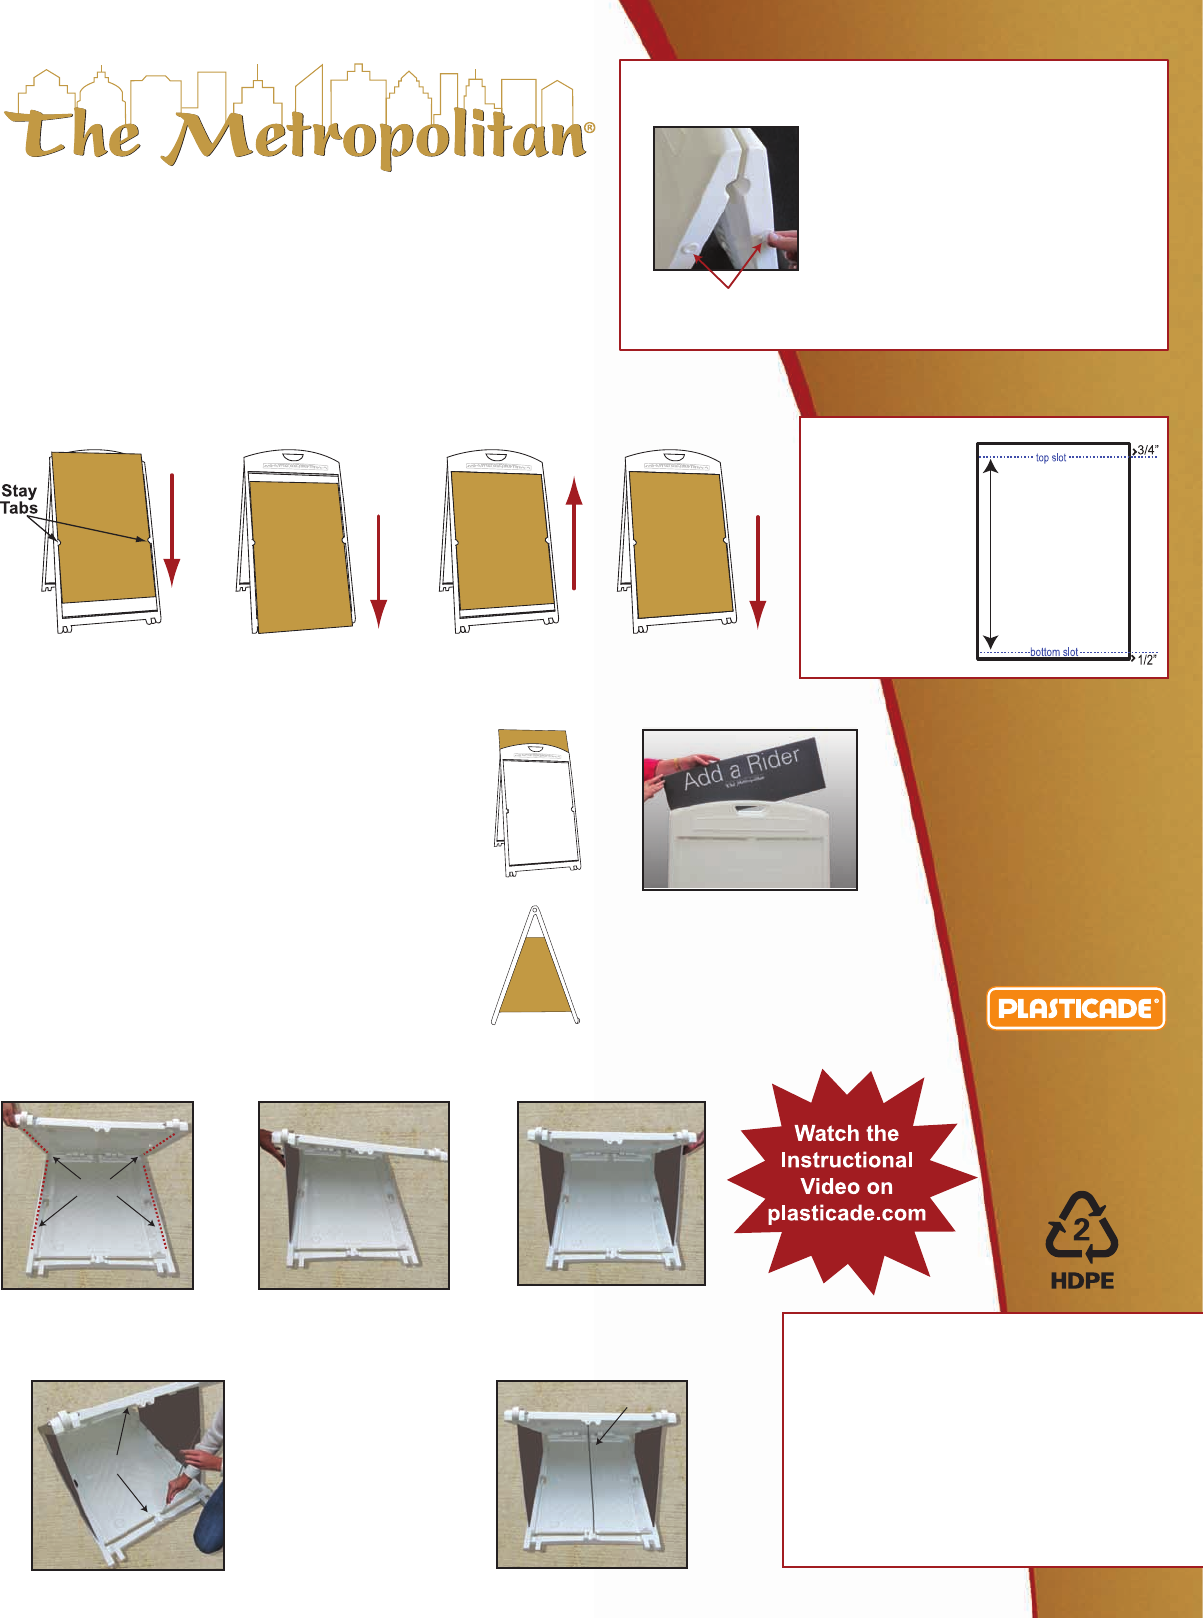
Patented slot design
- just slide in a sign
“Stay Tab”
Nameplate can be
Customized with
Your Name and Logo
Wheels
● Six Signs per Frame - Messaging
- two 24” x 36” signs
- two side signs
- two sided top rider
● Wheels for easy movement
● Quick-Change™ Feature
- change signs in seconds, slide in a sign
● Arched top design
- invisible hinges
● Customizable nameplate
● “Stay Tabs” hold main signs securely in place
● Internally weight with dry sand
● Available in white and black
7707 Austin Avenue
Skokie, IL 60077
phone (800) 772-0355
fax (847) 966-8074
Plasticade.com
OUTSIDE DIMENSIONS : 45.54”H X 26.72”W x 3.58”D
DIMENSIONS OF RECESSED AREA: 34.75”H x 24.25”W
WEIGHT: 24 lbs.
COLORS: White, Black, Custom Colors Available
6 SIGNS PER FRAME
MADE IN THE USA
US PATENTS
7,337,569 & 7,748,151
Main Signs Insertion Instructions:
2. ...until sign
rests on ground
1. Slide 24” x 36”
sign down through
the tabs
3. Push sign up
into slot 4. Slide sign down
into bottom slot
Side Signs Insertion Instructions:
A cutting template is available at plasticade.com.
Holds signs up to 1/4” thick.
If using corrugated plastic sheet for side signs, cut so flutes run horizontal to ground.
4 mm corrugated plastic sheet is recommended.
Insert Top Rider Before Inserting Side Signs
Stand the frame on the ground, spreading open
the sign faces only half way. Place the Sign Rider
in the opening at the top between the sign faces.
Now, move the sign faces apart until fully extended.
You may want to cut a hole in the rider to make the
handle accessible.
Top Rider Insertion Instructions:
Sand Fill Holes
Each sign frame has two fill holes.
Remove plugs from fill holes and fill
each hole with sand. After filling,
shake the frame to evenly distribute
the sand at the bottom. 5 lbs. of sand
per hole for a total of 10 lbs. per sign
frame is recommended.
Play sand is suggested for ease of
filling.
Sand Ballasting Instructions
Holds Signs
24”W x 36”H
(up to 3/16” thick)
Main Signs 24”
36”
Visual Area of
Sign
24” x 34.75”
1. Lay frame flat on the
ground. Lift up the
top sign face.
2. Slide first Side Sign
into top and bottom
channels on one
side of frame.
3. Slide second Side
Sign into top and
bottom channels on
other side of frame.
4. Insert Stabilizing Bar
into hole on bottom
and top. Lift up sign
frame by the handle
to stand upright.
Channels
Holes
Stabilizing Bar
