Ingenico I7770BT2 Point of Sale, Hand held Terminal User Manual 556719
Ingenico Point of Sale, Hand held Terminal 556719
Ingenico >
Contents
- 1. Installation Guide
- 2. Installation Guide 1
- 3. Installation Guide 2
- 4. installation guide
Installation Guide

3.5. Connections:
Turn the i7780 base off when connecting peripherals.
The power supply must be connected last, only after all
the other connections are made.
VERSATILE BASE
Ensure that the paper is protruding from UNDERNEATH
the roll:
4. Close the cover, press it until it snaps. Press the “Paper feed”
k
if h f d l
Recommended brands:
KANZAN .................... KF50 JUJO....................AF50KS-E
KOEHLER..........KT55HS01 MITSUBISHI..............P6402
Thermal paper should NOT be exposed to vinyl, plastics, adhesives,
shrink-wraps, wet-toner copies or certain carbon papers, office light
UV light, high humidity and temperature (above 65%, 25°C or 77°F)
for long periods of time.
7. If you experience problems:
Call one of the customer service centers listed below:
In Canada: In the USA:
TotalCARE Ingenico Inc.
6520 Gottardo Court TotalCARE
ii O i
1003 ll d
1. Ingenico 7780 description:
The i7780 is a portable (Bluetooth technology) point of
sale electronic payment terminal designed to process
debit, credit and smart card purchases. It is highly
secured, EMV level 1 and 2 certified.
The i7780 communicates with the acquirer through its
base via the telephone and/or Ethernet network. The
hand-held terminal and the base communicate through
the Bluetooth link, or via direct contact. A network can
be set up, with one base managing up to 7 terminals at the
same time. Various peripherals can be connected to the
base through its RS-232 ports.
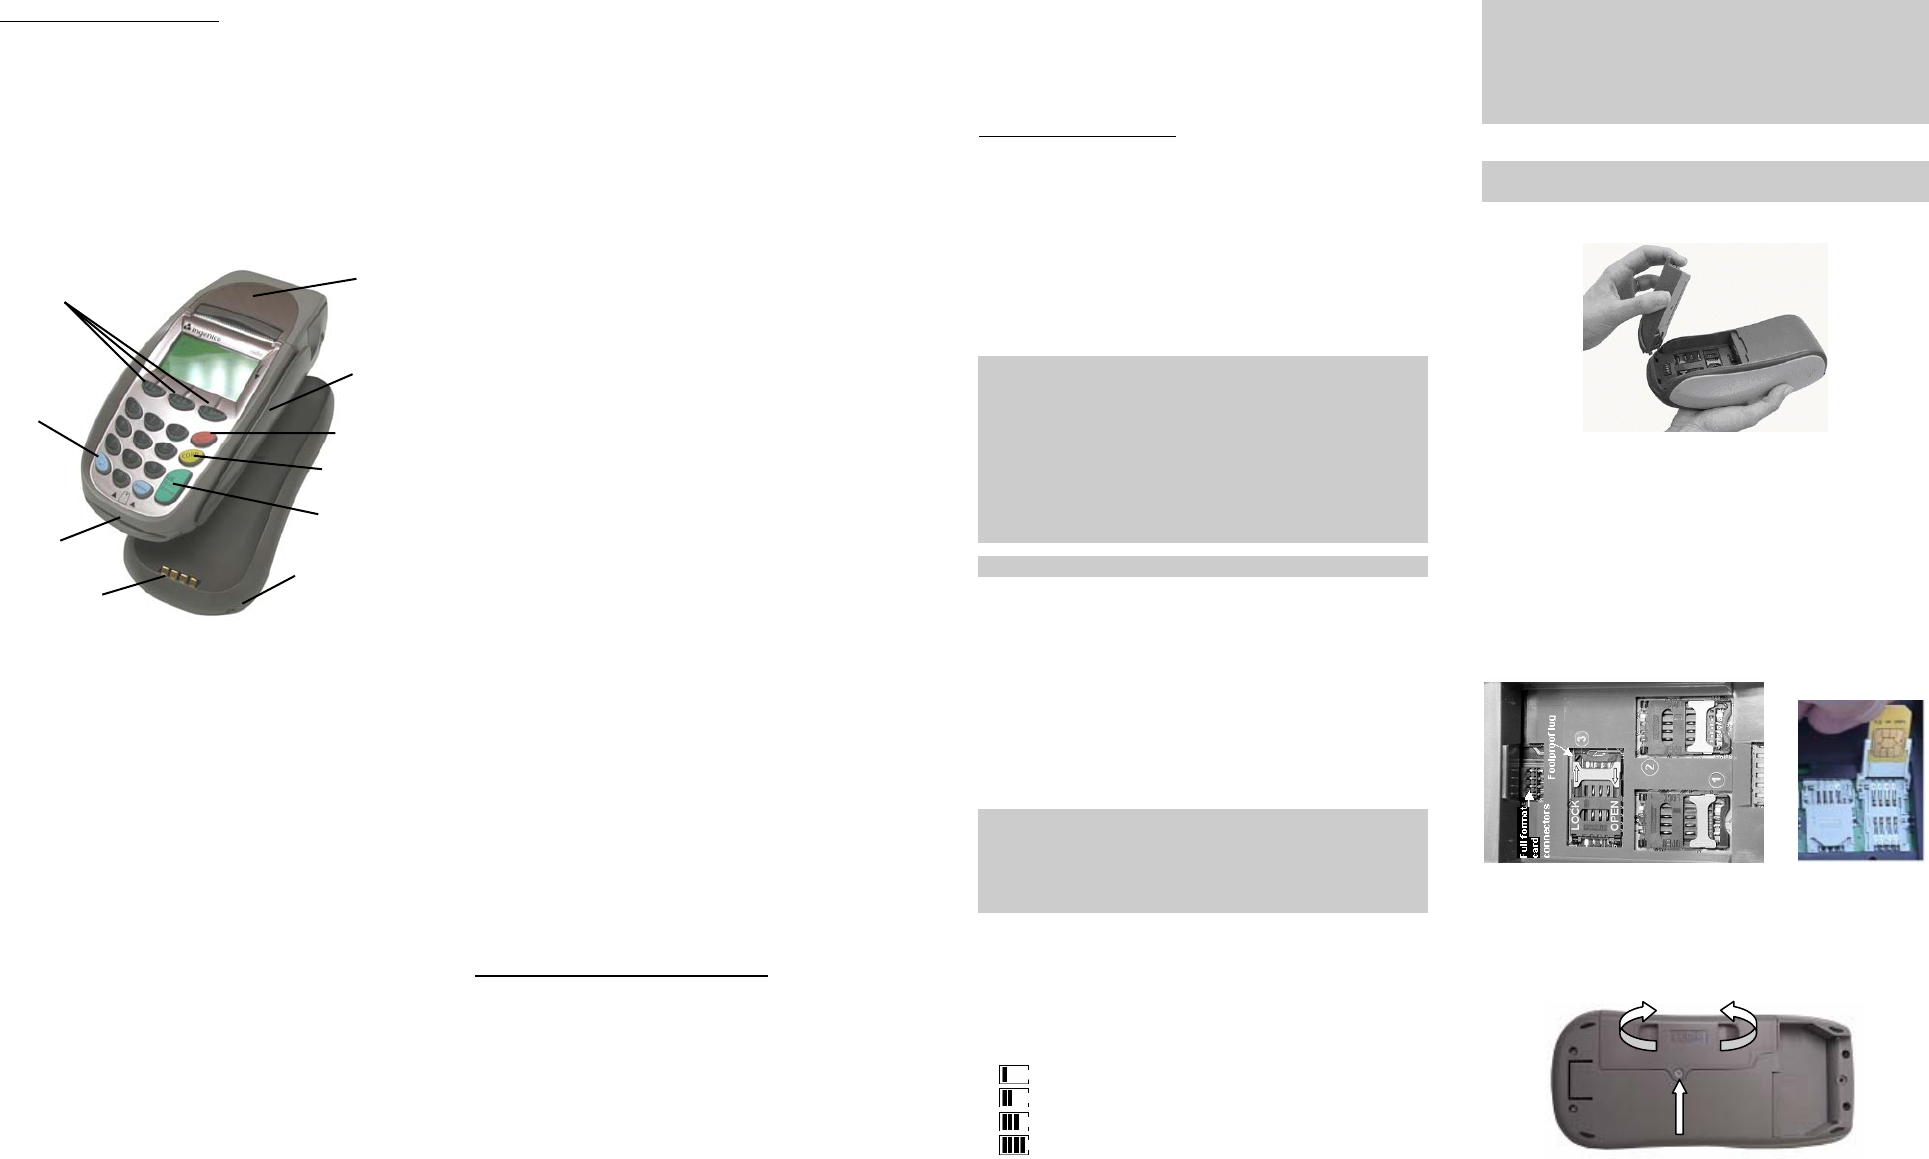
1.1. Display:
A 4 line x 16 character LCD graphic display, with a
back light.
1.2. Keypad:
18 keys, with a back light. The special function keys are:
• Programmable function keys <F1>, <F2> and <F3>
for navigation and access to various i7780 functions
and the system and application menus.
• Paper Feed key is used for a printer paper feed (20mm)
The green <ENTER> key confirms the data entered or
displayed. It also powers on the i7780.
• The red <CAN> key cancels the current function and
returns the terminal to the idle state. It also powers off
the i7780 if it is not docked on the base.
• The yellow <CORR> key corrects invalid data entry.
• The blue <ADMIN> key is used to access the terminal
administration function menu.
1.3. Magnetic Stripe Card Reader:
The i7780 features a bi-directional reader capable of
reading tracks 1 and 2 simultaneously. The reader is
located on the right-hand side. The card can be swiped
from the bottom to the top, or from the top to the bottom.
The magnetic stripe on the card has to face down and
point toward the keypad.
The card has to be swiped at uniform speed and pressure,
ensuring that the card remains in contact with the bottom of
the track throughout the entire swipe action.
1.4. Smart Card Reader:
Insert the smart card horizontally into the slot on the front of
the i7780, the microchip facing up, and leave it in the reader
throughout the transaction.
The i7780 has EMV level 1&2 approvals and complies
with the ISO 7816, Sync and Async T=1 & T=0.
1.5. Printer:
The i7780 integrates a quiet, high speed, “easy-load” style
thermal printer with graphics capability.
1.6. Battery:
Rechargeable and easily replaceable Ni-MH or Li-Ion battery
pack.
1.7. SAM Connectors:
Three SAM card connectors are located on the bottom of the
i7780. The SAM (Secure Access Module) supports
smart card chips necessary for applications such as
loyalty.
1.8. The Base
The i7780 communicates with its base via Bluetooth radio
link, or through the contacts (connect mode) which is useful
when loading large amounts of data, or when a Bluetooth
link is unavailable.
The i7780 works with either radio base or versatile base. The
versatile base has a Plug-It slot to add a Plug-It module with
additional communication port.
The base station recharges the battery pack and includes the
following communication ports:
- COM2 and COM1/3:
Two RS-232 serial communication links for customer
applications download and for the communication with
external peripherals (speed 300 to 115200 bps). The
COM1/3 provides power for external devices.
- DIAL LINE port:
A V34 / 33600 bps (asynch. and synchr.) modem that
supports fast connect and busy line detection.
- TELEPHONE port (on radio base only):
The telephone port allows sharing of the telephone line with
other devices such as a fax machine or telephone.
- ETHERNET port (on versatile base only):
The Ethernet port allows the i7780 to connect to a local
network.
2. Ingenico 7780 Packaging Content:
1. The i7780 hand held terminal.
2. The battery pack.
3. Thermal printer paper, one roll.
4. The base (optional versatile, radio or charging).
5. The plug-it module (optional, with the versatile base).
6. The power supply (optional, with the base only).
7. The phone cable (optional, with the radio or versatile
base only).
8. The Ethernet cable (optional, with Ethernet module only).
9. The cable securing plate and a screw (optional, with the
base only).
10. The holster (optional).
11. This installation guide.
3. Installation procedure:
Place the i7780 base on a clear, flat surface near an electrical
and telephone sockets. The ideal location is in the center of
the zone to be covered with a large open area around. The
antenna is inside, on the left side of the base.
The i7780 hand held and the base must be protected from
high temperature, vibrations, dust, dampness and
electromagnetic radiation (computer screen, microwave
oven, anti-theft barrier etc.). Equipment such as cordless and
cellular phones can emit harmonics that could disturb the
terminal at 2.45 GHz.
Do not place the base near a great vertical metal plane (doors
of refrigerator, large home appliances, vending machines).
Ensure the base or the terminal is more than 3 m (around 10
feet) from any microwave oven in use.
Do not place the hand held terminal on a metal surface.
Do not put your hand under the printer during
communication, as the range is greatly reduced.
If there are several radio bases installed, position them at
least 2 meters (around 6.5 feet) from each other.
Ensure that the terminal is seated securely on the base.
Operating temperature ................................+5°C to +40°C
Humidity ........................ 20% to 90% without condensation
Storage temperature ....................................-10°C to +60°C
3.1. Battery Set up and Charging:
The i7780 is supplied with a removable rechargeable NiMH
or Li-Ion battery. Only use the battery pack supplied with
your terminal.
The i7780 battery is built with circuitry for intelligent
battery management. To charge the battery, place the
handheld on the base (the base must be powered up).
Ensure that the terminal is seated securely on the base.
Use the power adapter supplied with the i7780. Many
adapters can appear similar and will plug into the i7780 base
but will not work properly causing erratic behavior, poor
charging or even damage to the unit.
Note that the battery will recharge only if necessary.
Furthermore, the battery has internal temperature control so
it never exceeds 50°C.
The i7780 with a fully charged battery can execute up to 200
transactions (depending on the ticket size and transaction
duration).
The battery status is updated on the handheld display:
1 bar represents 25 % of full capacity,
2 bars represent 50 % of full capacity,
3 bars represent 75 % of full capacity,
4 bars represent 100 % of full capacity
Always charge the battery at the room temperature.
Charge the battery for 3 hours when it is used the first time.
Full charging time after the first time is 2 hours. A new
battery will benefit from an initial "conditioning". The first 3
times the battery is used, allow the battery to fully discharge
and then charge it to its full capacity.
3.2. Installing the Battery:
Leave the i7780 handheld terminal off its base and wait until
it turns itself off before handling the battery pack.
Hold the battery with the connectors facing downwards, do
not touch the contacts on the battery or the i7780.
Insert the two plastic teeth in the gaps on the i7780 case,
place the battery in the cavity and press the handle until a
click is heard.
3.3. SAM Installation:
Wait till the i7780 turns off and remove its battery (do not
touch the contacts on the battery or the i7780). Unlock the
SAM connector by sliding the metallic latch in the direction
of the OPEN arrow. Lift the SAM cover upward and insert
the chip as shown on the picture below. Swing the cover
down and slide the latch into locked position (the LOCK
arrow). Put the battery back in the i7780 handheld.
3.4. Changing The Plug-It Module:
1. Turn off the versatile base.
2. Remove the cable from Plug-It module.
3. Remove the screw using Philips screwdriver.
4. Take the Plug-It module out.
5. Put in the new Plug-It module and secure it with a screw.
Navigation keys Paper
Compartment
CANCEL
Key
CORR Key
ENTER Key
Base Contacts
Paper
Feed Key
Magnetic
Stripe Card
Reader
Smart Card
Reader
Green Power
Indicator Light