Initial Dtv 171 Users Manual
DTV-171 to the manual 8caf21a2-982c-4f49-89dc-91b05a05bd48
2015-03-12
: Initial Initial-Dtv-171-Users-Manual-578195 initial-dtv-171-users-manual-578195 initial pdf
Open the PDF directly: View PDF ![]() .
.
Page Count: 49
17’’[16:9] AV/TV/PC MONITOR
MULTI-COLOR SYSTEM TV TUNER
DTV-171
Operation Manual
http://www.initialdvd.com
Please read carefully before use.

IMPORTANT INFORMATION
IMPORTANT SAFETY PRECAUTIONS
SUPPLIED ACCESSORIES
PREPARATION
INSERTING BATTERIES INTO THE REMOTE CONTROL
USING THE REMOTE CONTROL UNIT
CAUTIONS REGARDING REMOTE CONTROL UNIT
FUNCTIONAL OVERVIEW
FRONT VIEW
REAR VIEW
REMOTE CONTROL
CONNECTIONS
MAIN CONNECTION
ANTENNA CONNECTION
CONNECTING EXTERNAL EQUIPMENT
BASIC OPERATIONS
TURNING ON THE POWER
TURNING OFF THE POWER
TV/AV MODE SELECTION
WATCHING TV
TURNING ON THE POWER
TURNING OFF THE POWER
SIMPLE BUTTON OPERATIONS FOR CHANGING CHANNELS
USING LAST ON THE REMOTE UNIT
SIMPLE BUTTON OPERATION FOR CHANGING VOLUME/SOUND
MENU ADJUSTMENT
CHANNEL ADJUSTMENT
PICTURE ADJUSTMENT
AUDIO ADJUSTMENT
WINDOW ADJUSTMENT
OPTIONS ADJUSTMENT
TROUBLESHOOTING
SPECIFICATIONS
1
2-3
4
5
5
5
5
6-9
6
7
8-9
10-11
10
10
11
12
12
12
12
13-15
13
13
13
14
15
16-24
16-17
18
19-20
21-23
24
25
26
TABLE OF CONTENTS (FOR TV TUNER)
The lightning flash with arrowhead symbol, within an equilateral triangle,
is intended to alert the user to the presence of uninsulated ’’dangerous
voltage’’ within the product’s enclosure that may be of sufficient
magnitude to constitute a risk of electric shock to persons.
The exclamation point within a triangle is intended to alert the user to the
presence of important operation and maintenance (servicing) instructions
in the literature accompanying the product.
This equipment has been tested and found to comply with the limit for a Class B digital
device, pursuant to Part 15 of the FCC Rules. These limits are designed to provide
reasonable protection against harmful interference in a residential installation.
This equipment generates, uses and can radiate radio frequency energy and, if not
installed and used in accordance with the instructions, may cause harmful interference to
radio communications. However, there is no guarantee that interference will not occur in a
particular installation.
If this equipment does not cause harmful interference to radio or television reception which
can be determined by turning the equipment off and on, the user is encourage to try to
correct the interference by one or more of the following measure.
Reorient or relocate the receiving antenna.
Increase the separation between the equipment and receiver.
Correct the equipment into an outlet on a circuit different from that to which the receiver
is connected.
Consult the dealer or an experienced radio, TV technical for help.
Only shielded interface cable should be used.
FCC RF INTERFERENCE STATEMENT
NOTE:
RISKOFELECTRICSHOCK
DONOTOPEN
CAUTION
WARNING: TO REDUCE THE RISK OF FIRE OR ELECTRIC SHOCK, DO NOT EXPOSE
THIS PRODUCT TO RAIN OR MOISTURE.
IMPORTANT INFORMATION
page1

The present set has been designed and manufactured to assure personal safety. Improper use
can result in electric shock or fire hazard. The safeguards incorporated in the present unit will
protect you if you observe the following procedures in installing, using and servicing. The present
unit is fully transistorized and does not contain any element that can be repaired by the user.
1. Read these instructions - All operating instructions must be read and understood before the
product is operated.
2. Keep these instructions - These safely and operating instructions must be kept in a safe place
for future reference.
3. Heed all warnings - All warnings on the product and in the instructions must be observed closely.
4. Follow instructions - All operating instructions must be followed.
5. Attachment - Do not use attachments not recommended by the manufacturer. Use of inadequate
attachments can result in accidents.
6. Power source - This product must operate on a power source specified on the model label. If
you are not sure of the type of power supply used in your home, consult your dealer or local
power company.
7. AC cord protection - The AC cords must be routed properly to prevent people from stepping on
them or objects from resting on them. Check the cords at the plugs and product.
8. Overloading - Do not overload AC outlets or extension cords. Overloading can cause fire or
electric shock.
9. Entering of objects and liquids - Never insert an object into the product through vents or
openings. High voltage flows in the product, and inserting an object can cause electric shock
and/or short internal parts. For the same reason, do not spill water or liquid on the product.
10. Servicing - Do not attempt to service the product yourself. Removing covers can expose you
to high voltage and other dangerous conditions. Request a qualified service person to
perform servicing.
11. Repair - If any of the following conditions occurs, unplug the AC cord from the AC outlet, and
request a qualified service person to perform repairs.
a) When the AC cord or plug is damaged.
b) When a liquid was spilled on the product or when objects have fallen into the product.
c) When the product has been exposed to rain or water.
d) When the product does not operate properly as described in the operating instructions. Do
not touch the controls other than those described in the operating instructions. Improper
adjustment of controls not described in the instructions can cause damage, which often
requires extensive adjustment work by a qualified technician.
e) When the product has been dropped or damaged.
IMPORTANT SAFETY PRECAUTIONS
page2

f) When the product displays an abnormal condition. Any noticeable abnormality in the product
indicates that the product needs servicing.
12. Replacement parts - In case the product needs replacement parts, make sure that the service
person uses replacement parts specified by the manufacturer, or those with the same
characteristics and performance as the original parts. Use of unauthorized parts can result in
fire, electric shock and/or other danger.
13. Safety checks - Upon completion of service or repair work, request the service technician to
perform safety checks to ensure that the product is in proper operating condition.
14. Wall or ceiling mounting - When mounting the product on a wall or ceiling, be sure to install
the product according to the method recommended by the manufacturer.
15. Unplug the AC cord from the AC outlet before installing the speakers.
16. Cleaning - Unplug the AC cord from the AC outlet before cleaning the product. Use only with
a dry cloth to clean this apparatus. Do not use liquid or aerosol cleaners.
17. Water and moisture - Do not use this product near water such as bathtub, washbasin, kitchen
sink and laundry tub, swimming pool and in a wet basement. TV set shall not be exposed to
dripping or slashing and no objects filled with liquid, such as vases, shall be placed on the TV
set.
18. Stand - Do not place the product on an unstable cart, stand, tripod or table. Unstable installation
is likely to make the product fall resulting in serious injuries as well as material damage. Use
only the cart, stand, tripod, bracket, or table specified by the manufacturer, or sold with the
apparatus.
19. When a cart is used, use caution when moving the cart/apparatus combination to void injury
from tip-over.
20. Ventilation - The vents and other openings in the cabinet are designed for ventilation. Do not
cover or block them since insufficient ventilation can overheat and/or shorten the product¡fls
life span. Do not place the product on the bed, sofa, rug or other similar surfaces since they
can block ventilation openings. This product is not designed for built-in installation; do not
place the product in an enclosed place such as a bookcase or rack unless proper ventilation
is provided or the manufacturer’s instructions are followed.
21. The LCD panel used in this product is made of glass. Therefore, it can be broken when the
product is dropped or gets shock. Be careful not to be injured by glass pieces in case the
panel is broken.
22. Heat sources - Do not install near any heat sources such as radiators, heat registers, stoves,
or other apparatus (including amplifiers) that produce heat.
23. The LCD panel is a product of very high technology with 2,949,120 thin film transistors, giving
you fine picture details. Occasionally, a few non-active pixels may appear on the screen as a
fixed blue, green or red point. Please note that this does not affect your product’s performance.
IMPORTANT SAFETY PRECAUTIONS
page3
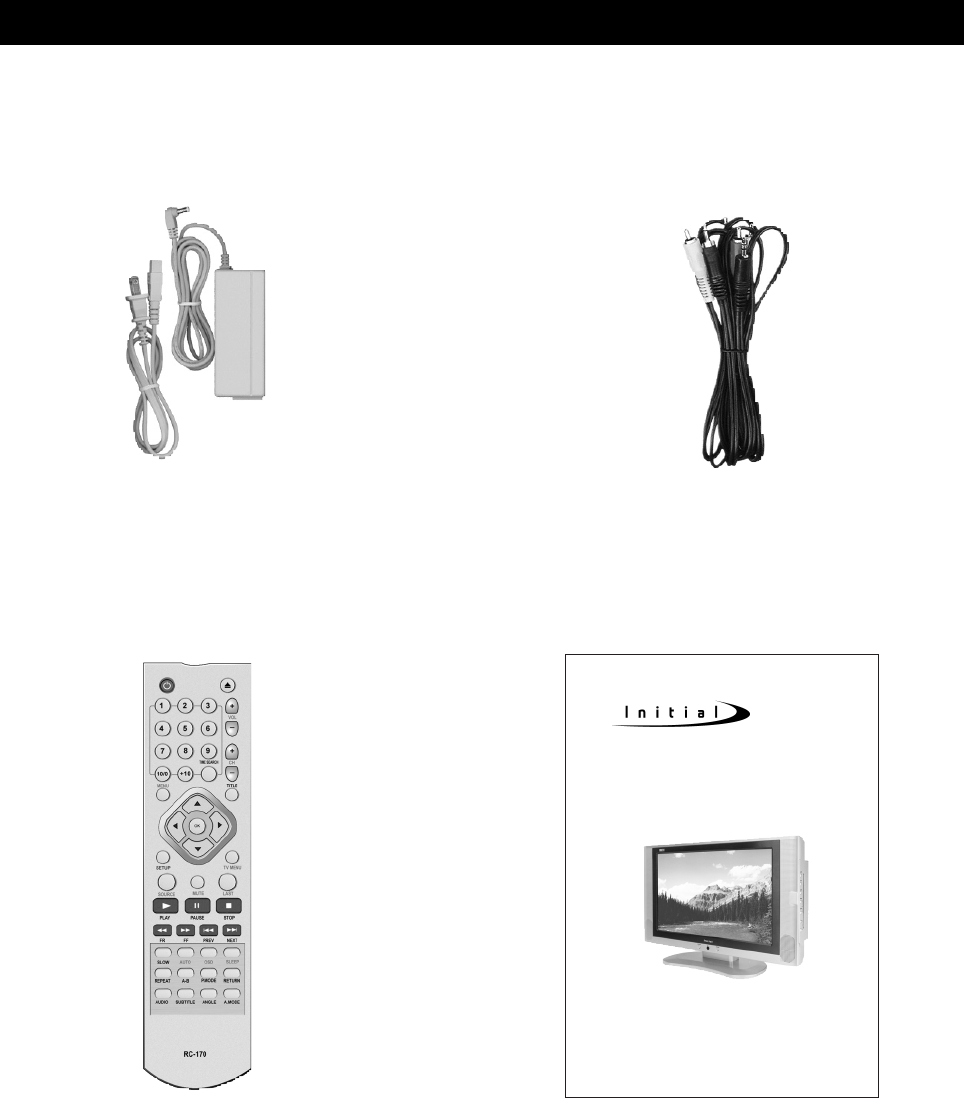
Make sure the following accessories are provided with the product.
SUPPLIED ACCESSORIES
page4
17 [16:9] AV/TV/PC MONITOR
MULTI-COLOR SYSTEM TV TUNER
DTV-171
Operation Manual
http://www.initialdvd.com
Please read carefully before use.
Power adapter AV cable
User guideRemote control
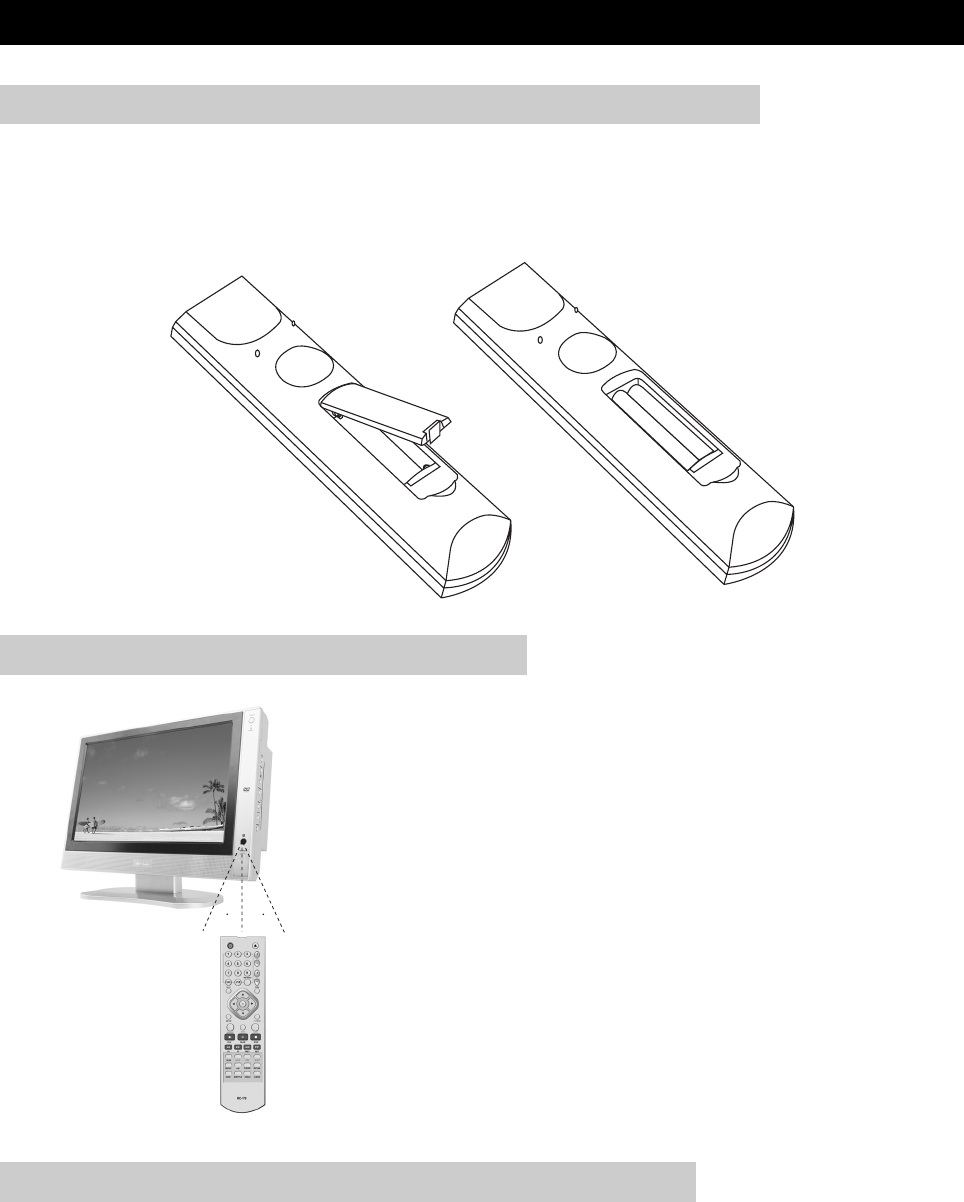
Insert supplied batteries via the battery compartment on the back of the remote control.
Make sure polarity matches the (+) and (-) marks inside the compartment.
PREPARATION
page5
INSERTING BATTERIES INTO THE REMOTE CONTROL
●Do not expose remote to liquids, direct sunlight or shock.
●The remote control unit may not work properly if the remote sensor window of the Display is
under direct sunlight or strong lighting. In such case, change the angle of the lighting or Display,
or operate the remote control unit closer to the remote sensor window.
CAUTIONS REGARDING REMOTE CONTROL UNIT
●Use the remote control by pointing it towards the remote
sensor on the TV. Objects between the remote control and
the sensor may disrupt operation.
●Effective range is 20 feet but is dependant on what your
viewing angle is.
●Range can also be affected by direct sunlight on the TV’s
sensor.
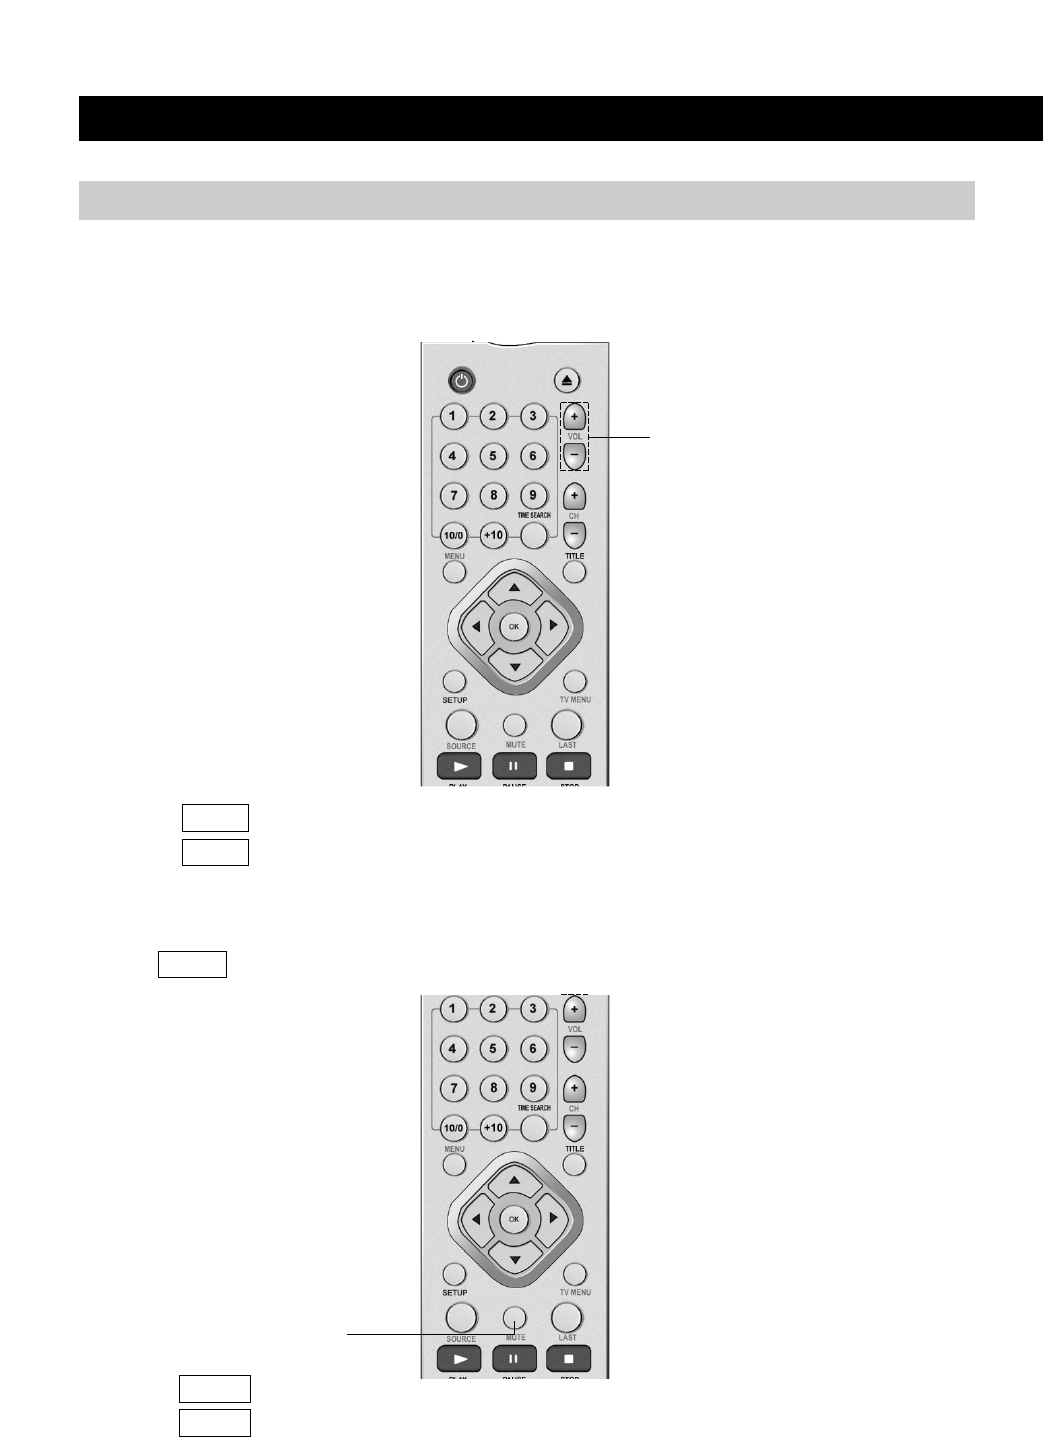
USING THE REMOTE CONTROL UNIT
30 30
+
-
+
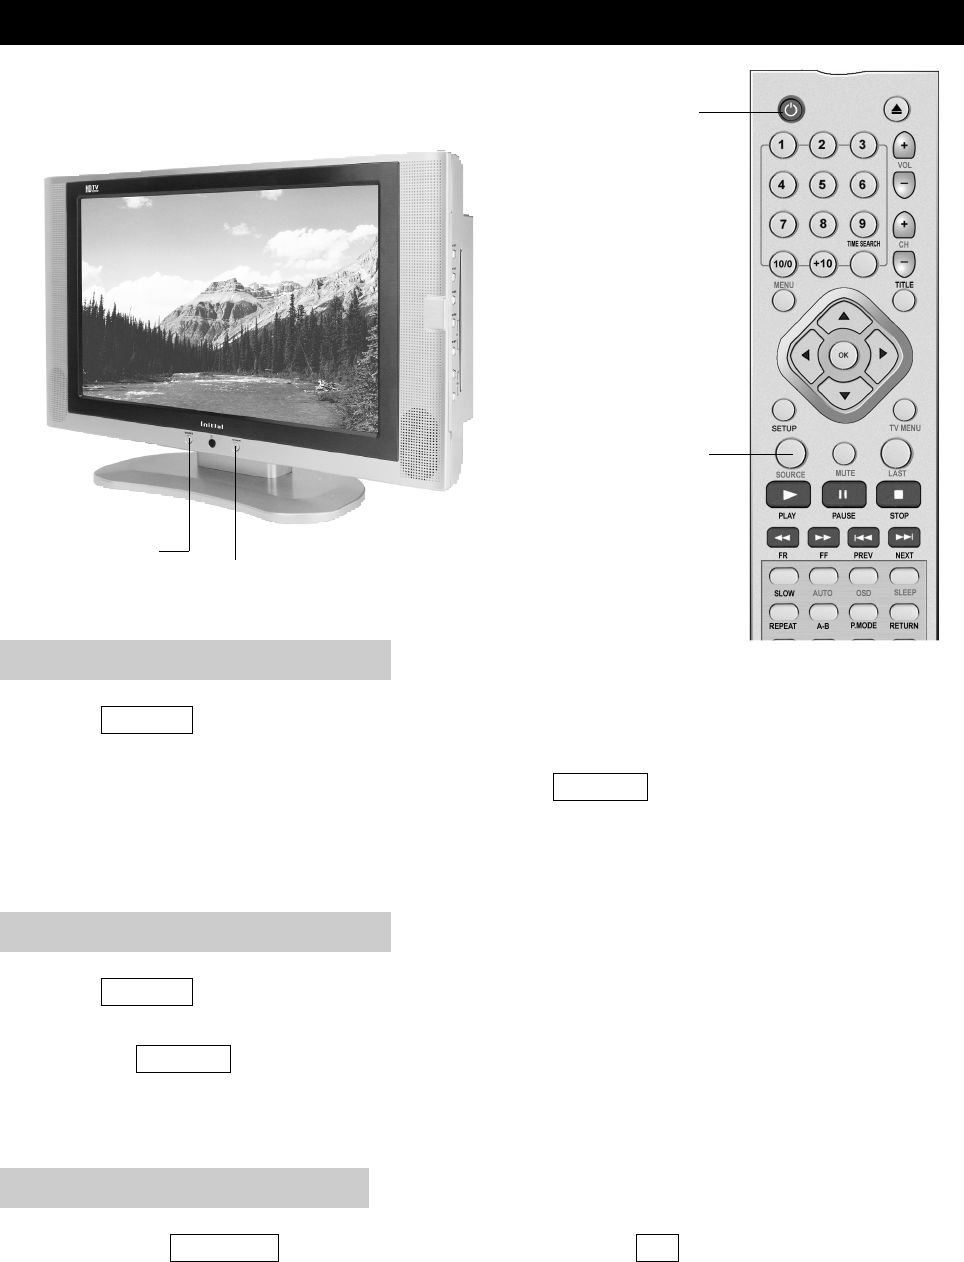
-
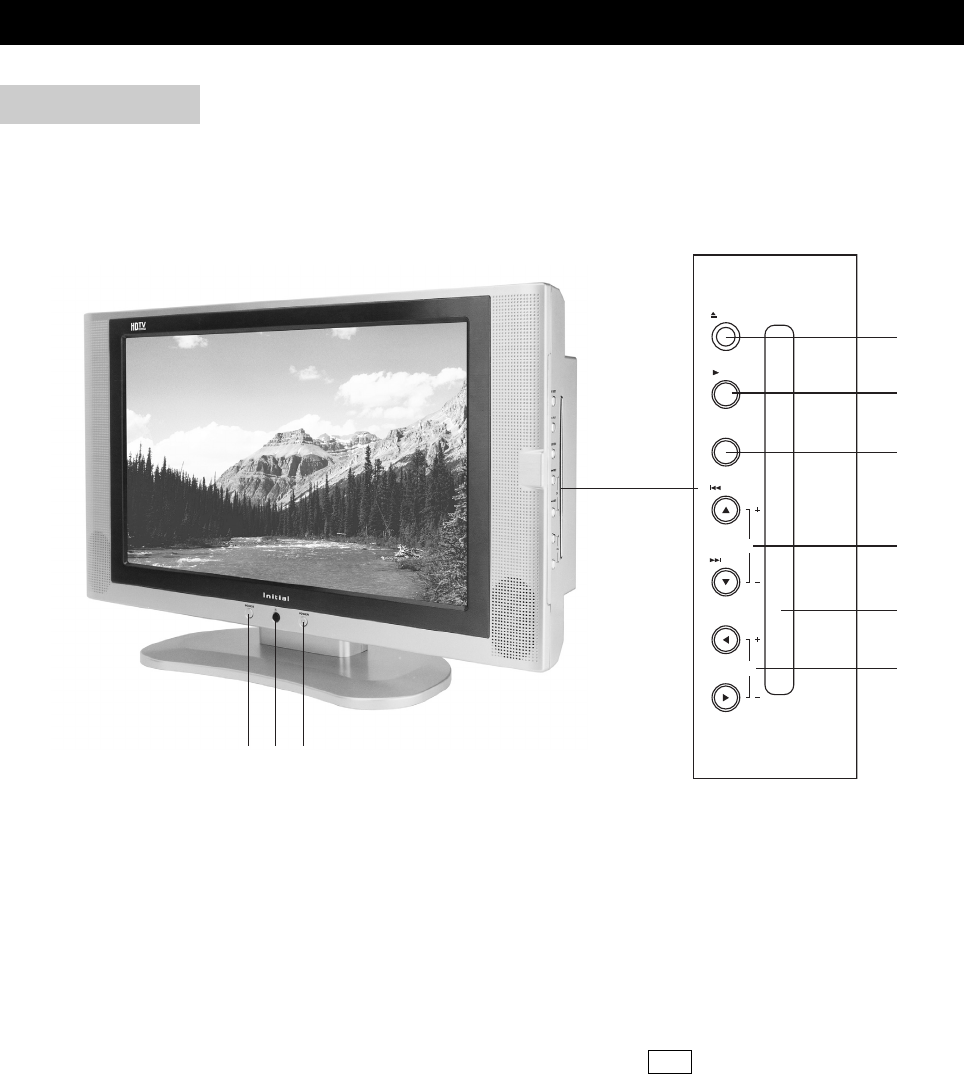
1) POWER BUTTON: Use to turn the unit on and off.
2) REMOTE SENSOR
3) SOURCE BUTTON: Use to select the AV signal source between: DVD, Analog RGB (PC input),
Composite Video, S-Video, TV, Component Video, and use the OK button to confirm.
4) EJECT BUTTON: Use to eject the disc being played in the disc slot.
5) PLAY BUTTON: Use to begin the DVD playback.
6) LCD MENU: Use to bring up the LCD adjustment menu; use the cursor buttons to select an
item and use the left or right button to adjust it.
7) PREV/NEXT (CH+/-): To skip to the previous/next chapter (previous/next channel).
8) DISC SLOT: Insert a DVD or CD disc to play under DVD status.
9) VOLUME+/-: Use to adjust the volume.
FUNCTIONAL OVERVIEW
page6
FRONT VIEW
LCD MENU
OK
VOL
CH
NEXT
PREV
PLAY
EJECT
1
2
3
4
5
6
7
8
9
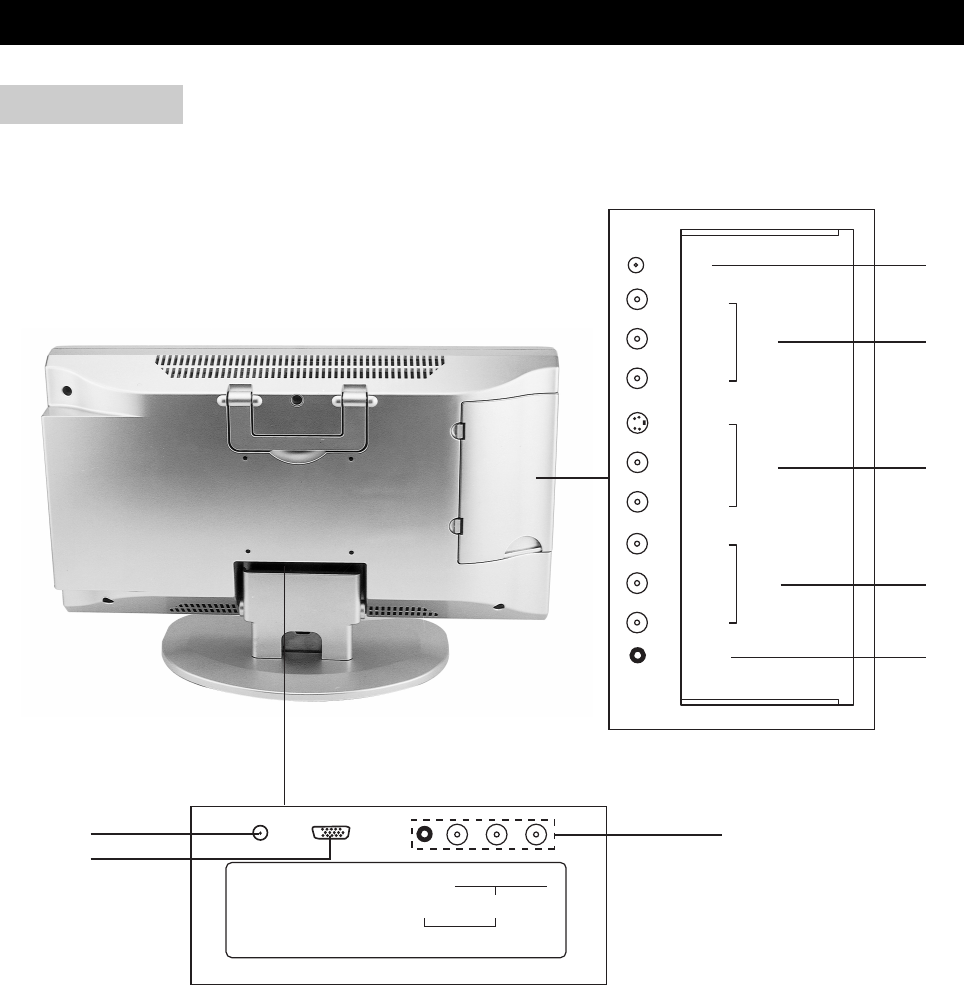
1) ANTENNA IN
2) AV1 IN (Composite Video and Audio In)
3) AV2 IN (S-Video and Audio In)
4) AV OUT (Composite Video and Audio Out)
5) PHONES
6) AV3 IN (Component Video and Audio In)
7) VGA (PC Input)
8) DC IN
FUNCTIONAL OVERVIEW
page7
REAR VIEW
PHONES
AV OUT
AV2 IN
AV1 IN
ANT
VIDEO
L
R
S-VIDEO
VIDEO
L
R
L
R
DC IN VGA Y
C
R /
P
R
C
B /
P
B
COMPONENT VIDEO /
PROGRESSIVE SCAN OUT
L/R
AV3 IN
2
1
5
6
8
7
3
4
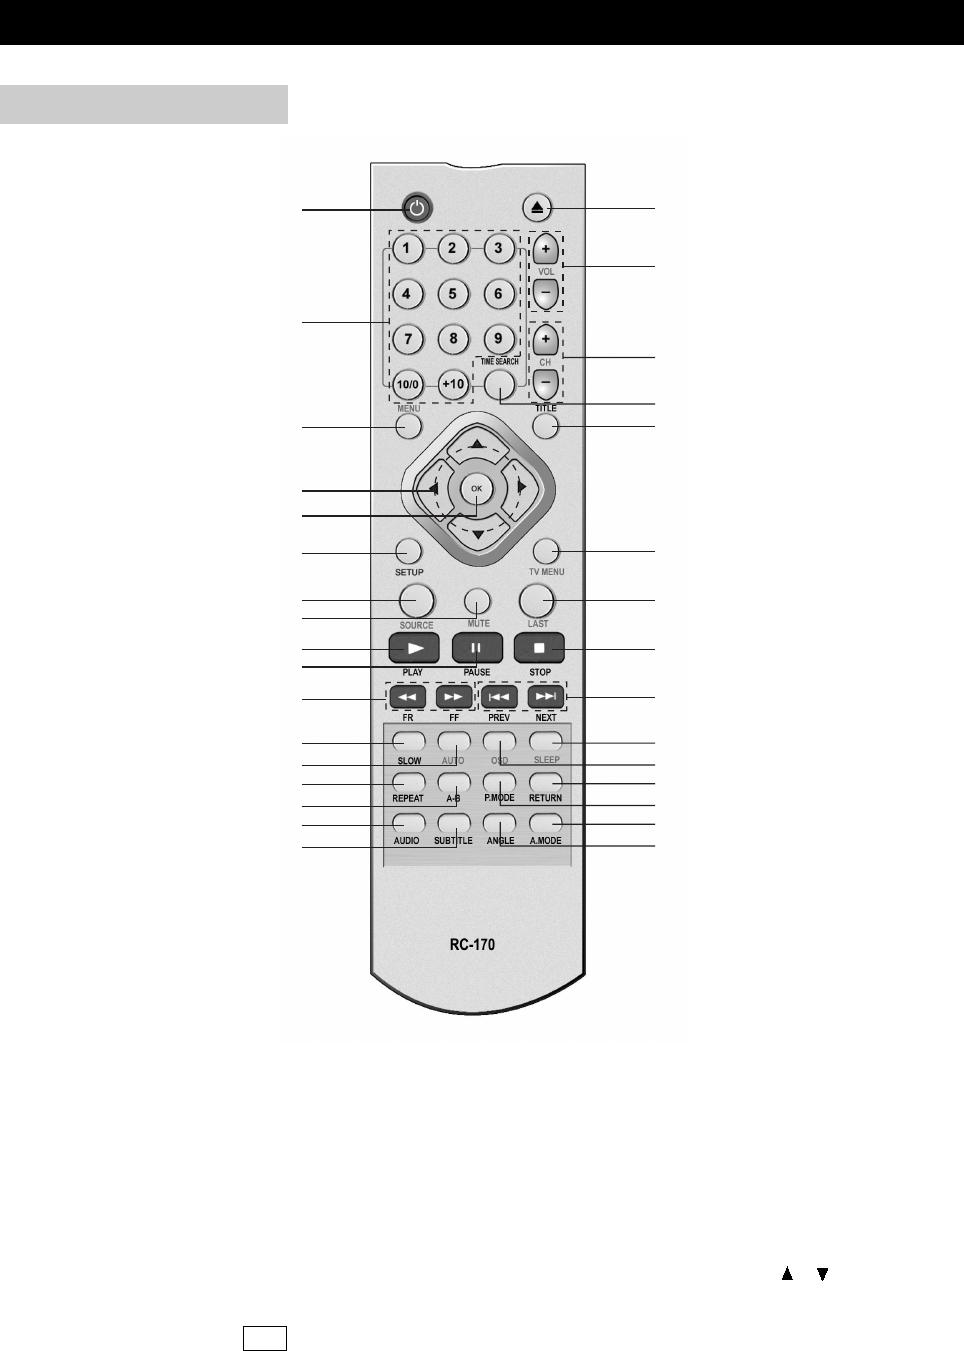
1) POWER: Use to turn the unit on and off.
2) Number Buttons: Use to set the channel and to enter DVD chapter numbers.
3) MENU: Use to bring up the DVD root menu.
4) Cursor Buttons: Use to select what you want.
5) OK: Use to confirm your selections.
6) SETUP: Use to bring up DVD setup menu.
7) SOURCE: Use to bring up the AV signal source selection screen and use the / buttons to
select between: DVD, Analog RGB (PC input), Composite Video, S-Video, TV, Component
Video, and press the OK button to confirm.
FUNCTIONAL OVERVIEW
page8
REMOTE CONTROL
1
2
3
4
6
5
7
8
9
11
10
12
13
14
15
16
17
19
18
21
20
23
25
27
28
26
24
22
30
29
31
32

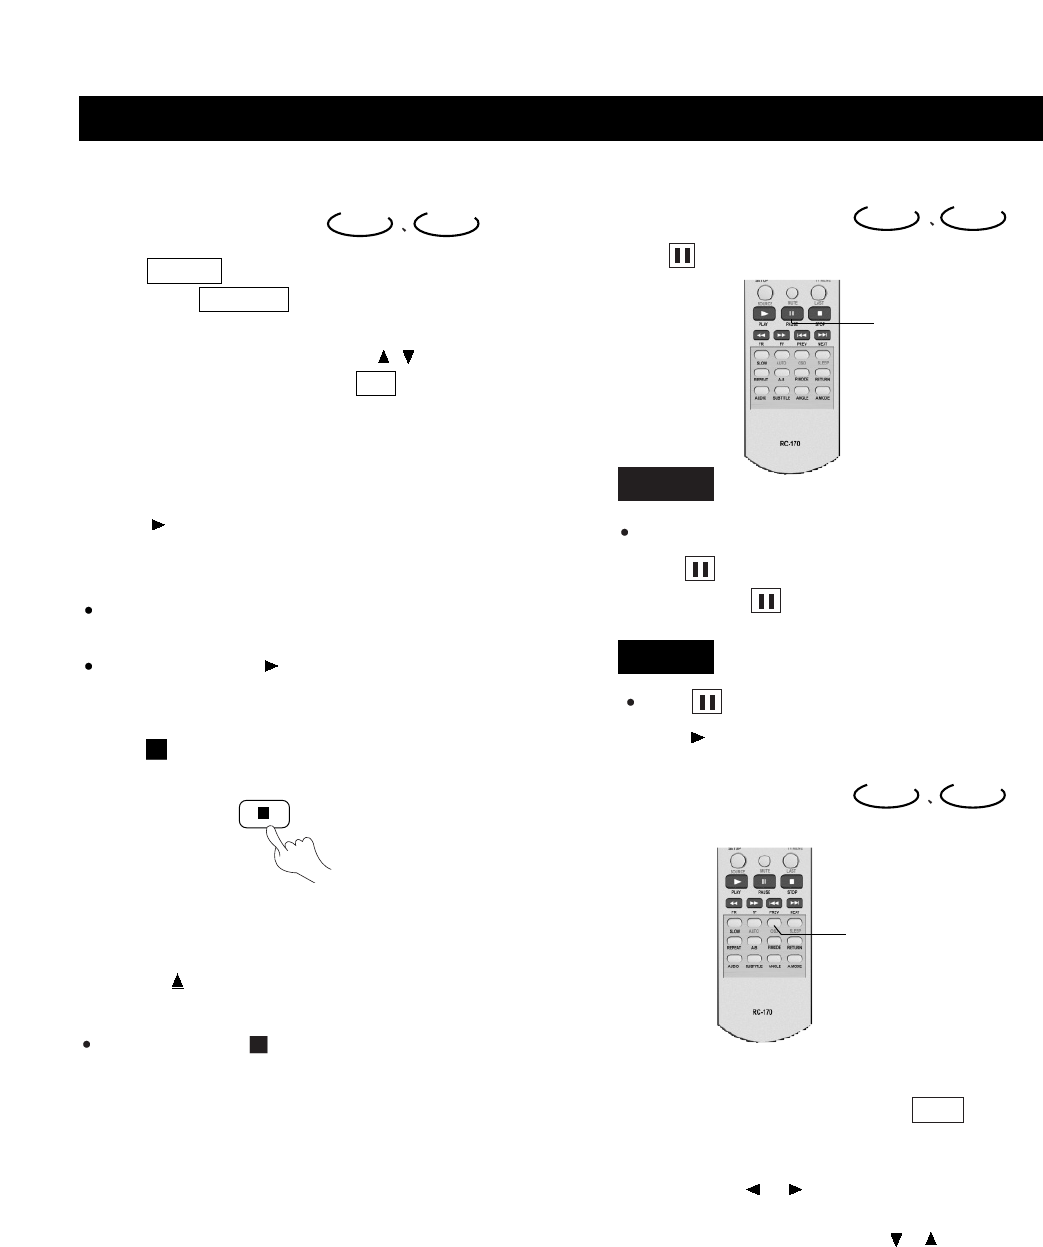
8) MUTE: Mute the sound.
9) PLAY:Use to begin the DVD playback.
10)PAUSE:Use to pause the DVD playback.
11) FF/FR: Use to play DVD fast forward/backward.
12) SLOW: Use to slow the DVD playback speed.
13) AUTO: Auto adjustment for PC signals.
14) REPEAT: Use to repeat the DVD playback.
15) A-B: Use to repeat play some part of DVD by setting begin point and ending point.
16) AUDIO: Use to shift DVD audio language.
17) SUBTITLE: Use to shift DVD subtitle language.
18) ANGLE: Use to shift DVD viewing angle.
19) A. MODE: Use to shift the DVD playback audio mode.
20) P. MODE: Use to shift DVD play mode.
21) RETURN: Return to the previous menu screen.
22) OSD: Use to bring up the DVD On-Screen-Display.
23) SLEEP: Set the sleep timer.
24) PREV/NEXT: Use to skip to the previous/next chapter.
25) STOP: Use to stop the DVD playback.
26) LAST: Press to return to the previous channel in normal viewing mode.
27) TV MENU: Use to bring up TV menu.
28) TITLE: Use to bring up the DVD title menu.
29) TIME SEARCH: Use to go to a special point of DVD by entering time number.
30) CH+/-:Use to skip to the previous/next channel.
31) VOLUME+/-: Use to adjust the volume.
32) EJECT( ):Use to eject the disc being played in the disc slot.
FUNCTIONAL OVERVIEW
page9
REMOTE CONTROL (CONTINUED)
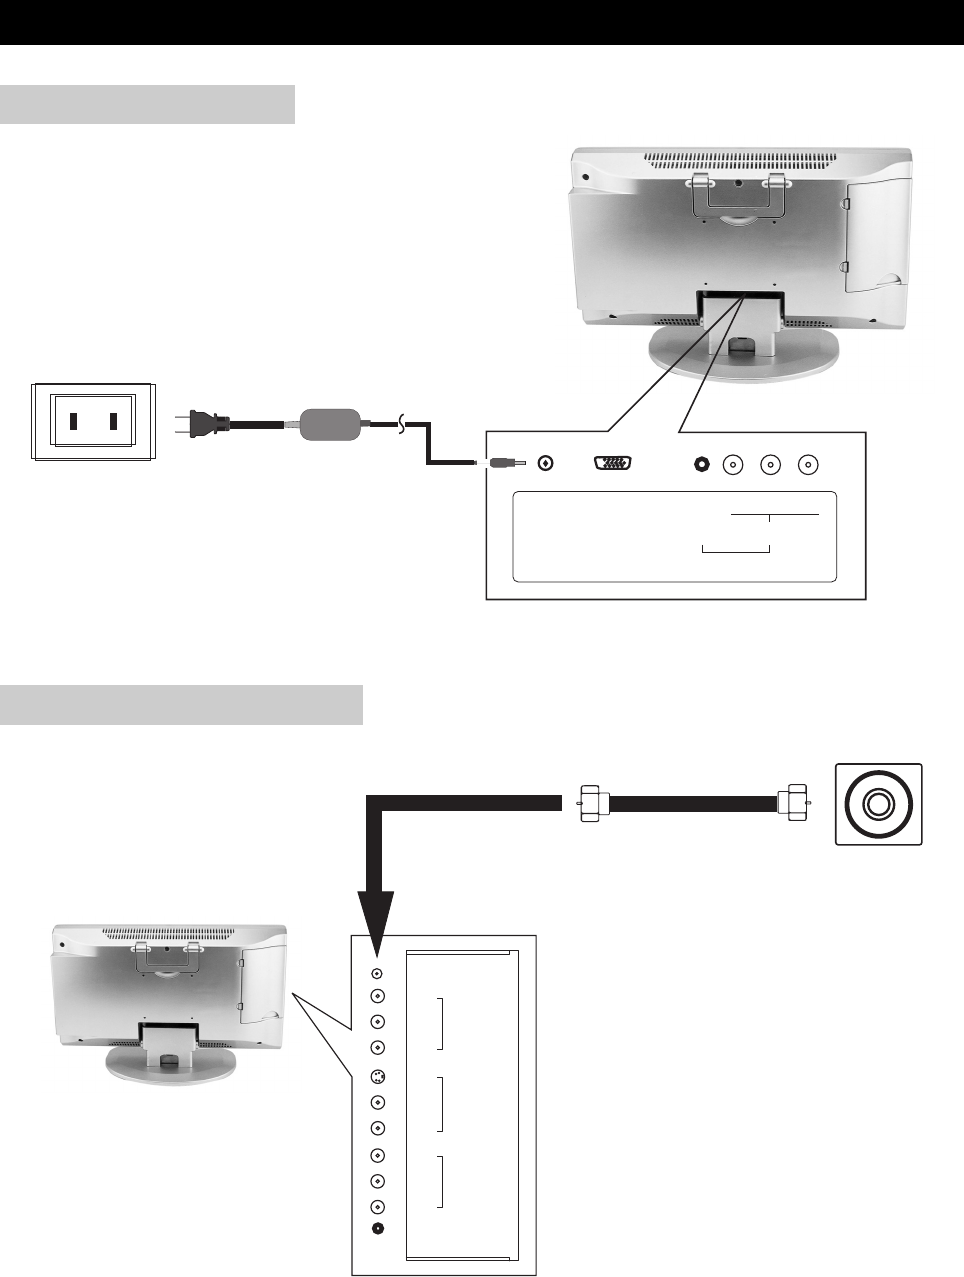
Plug the mains cable into the power socket with AC100V~240V, 50/60Hz.
Using the supplied antenna cable, connect the room antenna terminal to the antenna input
terminal on TV set.
CONNECTIONS
page10
MAIN CONNECTION
ANTENNA CONNECTION
DC IN VGA Y
C
R /
P
R
C
B /
P
B
COMPONENT VIDEO /
PROGRESSIVE SCAN OUT
L/R
AV3 IN
PHONES
AV OUT
AV2 IN
AV1 IN
ANT
VIDEO
L
R
S-VIDEO
VIDEO
L
R
L
R
ANTENNA CABLE
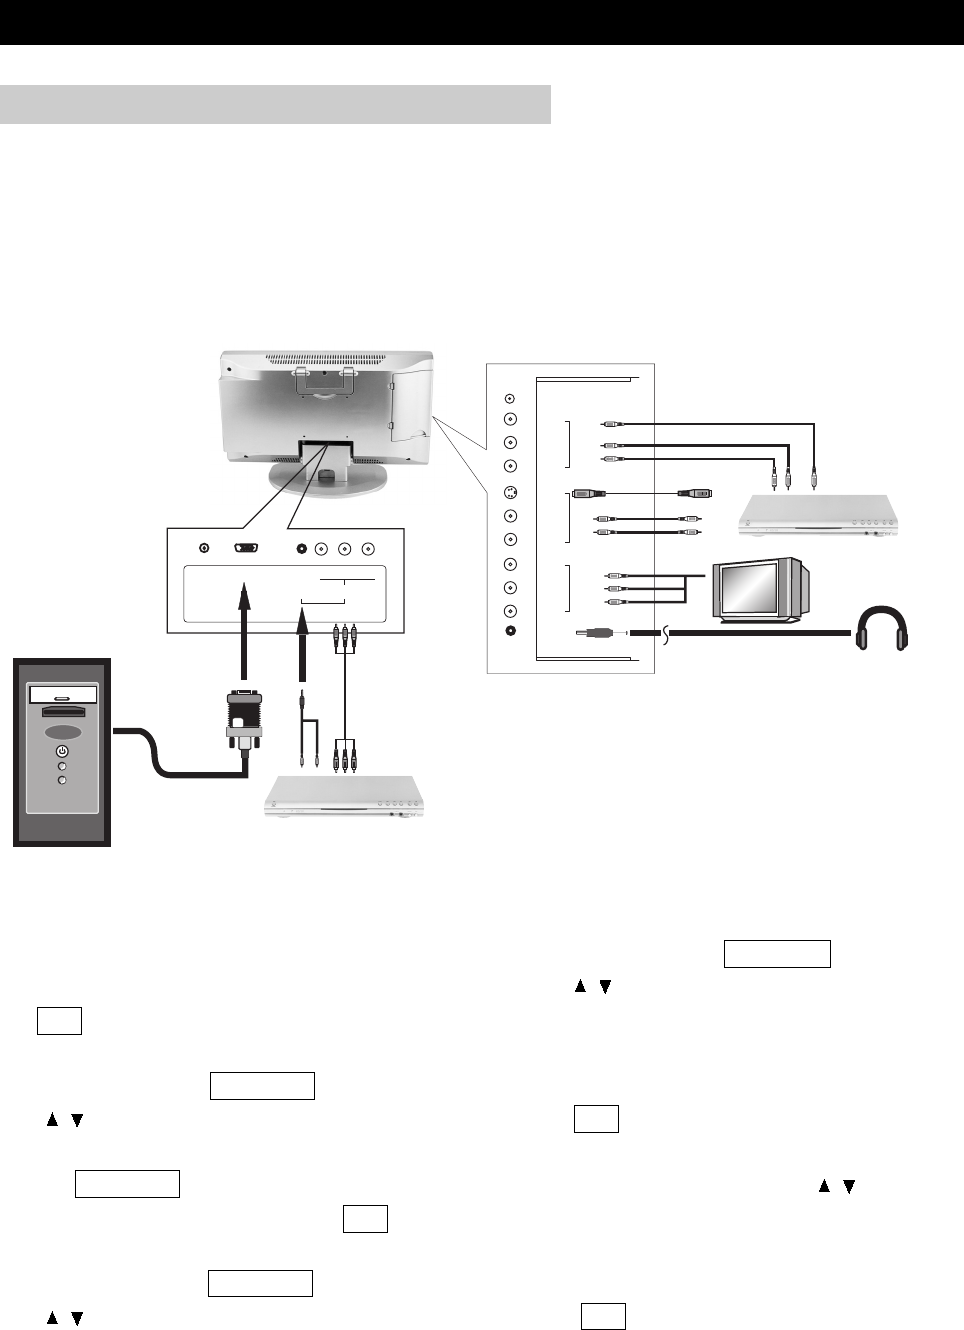
You can enjoy picture and sound by connecting VCR, DVD player and PC to the terminals located
on the back of TV set.
Before connecting an external device, turn the TV set off to avoid any possible damage.
1. Connect a PC computer to the LCD through the VGA socket, press the SOURCE button on
the remote to bring up Source selection screen, use the / buttons to select "PC" and press the
OK button to confirm.
2. Connect AV equipment to the LCD through the AV1 IN jacks (Composite Video and Audio In
jacks), press the SOURCE button on the remote to bring up Source selection screen, use the
/ buttons to select "Composite Video" and press the OK button to confirm.
3. Connect AV equipment to the LCD through the AV2 IN jacks (S-Video and Audio In jacks), press
the SOURCE button on the remote to bring up Source selection screen, use the / buttons to
select "S-Video" and press the OK button to confirm.
4. Connect AV equipment to the LCD through the AV3 IN jacks (Component Video and Audio In
jacks), press the SOURCE button on the remote to bring up Source selection screen, use the
/ buttons to select "Component Video" and press the OK button to confirm.
CONNECTIONS
page11
CONNECTING EXTERNAL EQUIPMENT
PHONES
AV OUT
VIDEO
AV2 IN
AV1 IN
ANT
VIDEO
L
R
S-VIDEO
VIDEO
L
R
L
R
DC IN VGA Y
C
R /
P
R
C
B /
P
B
COMPONENT VIDEO /
PROGRESSIVE SCAN OUT
L/R
AV3 IN
AUDIO
AUDIO
Y/PB/PR Cable
S-Video Cable
Audio Cable
Audio Cable
Video Cable
Personal Computer
DVD Player
Headphone
TV Monitor
AV Equipments (DVD, VCR...)
L
R
L
R
L
R
L
R
1. Press POWER button on the front panel to turn on the TV set. The STANDBY/ON indicator
lights up green.
2. If the STANDBY/ON indicator still lights up red, press POWER on the remote control to turn
the TV set on.
BASIC OPERATIONS
page12
TURNING ON THE POWER
1. Press POWER on the remote control, the image on the screen disappears and the
STANDBY/ON indicator changes from green to red.
2. Press the POWER button on the front panel to turn the TV set off.
NOTE: Weak electric power is still consumed even when the power is turned off.
TURNING OFF THE POWER
By pressing the SOURCE on the TV set and confirming by the OK button, you can change the
mode as follows:
DVD →Analog RGB (PC input) →Composite Video→S-Video→TV→Component Video→….
TV/AV MODE SELECTION
POWER
POWER
SOURCE
SOURCE
1. Press POWER button on the front panel to turn on the TV set. The STANDBY/ON indicator
lights up green.
2. If the STANDBY/ON indicator still lights up red, press POWER on the remote control to turn
the TV set on.
WATCHING TV
page13
TURNING ON THE POWER
1. Press POWER on the remote control, the image on the screen disappears and the
STANDBY/ON indicator changes from green to red.
2. Press the POWER button on the front panel to turn the TV set off.
NOTE: Weak electric power is still consumed even when the power is turned off.
TURNING OFF THE POWER
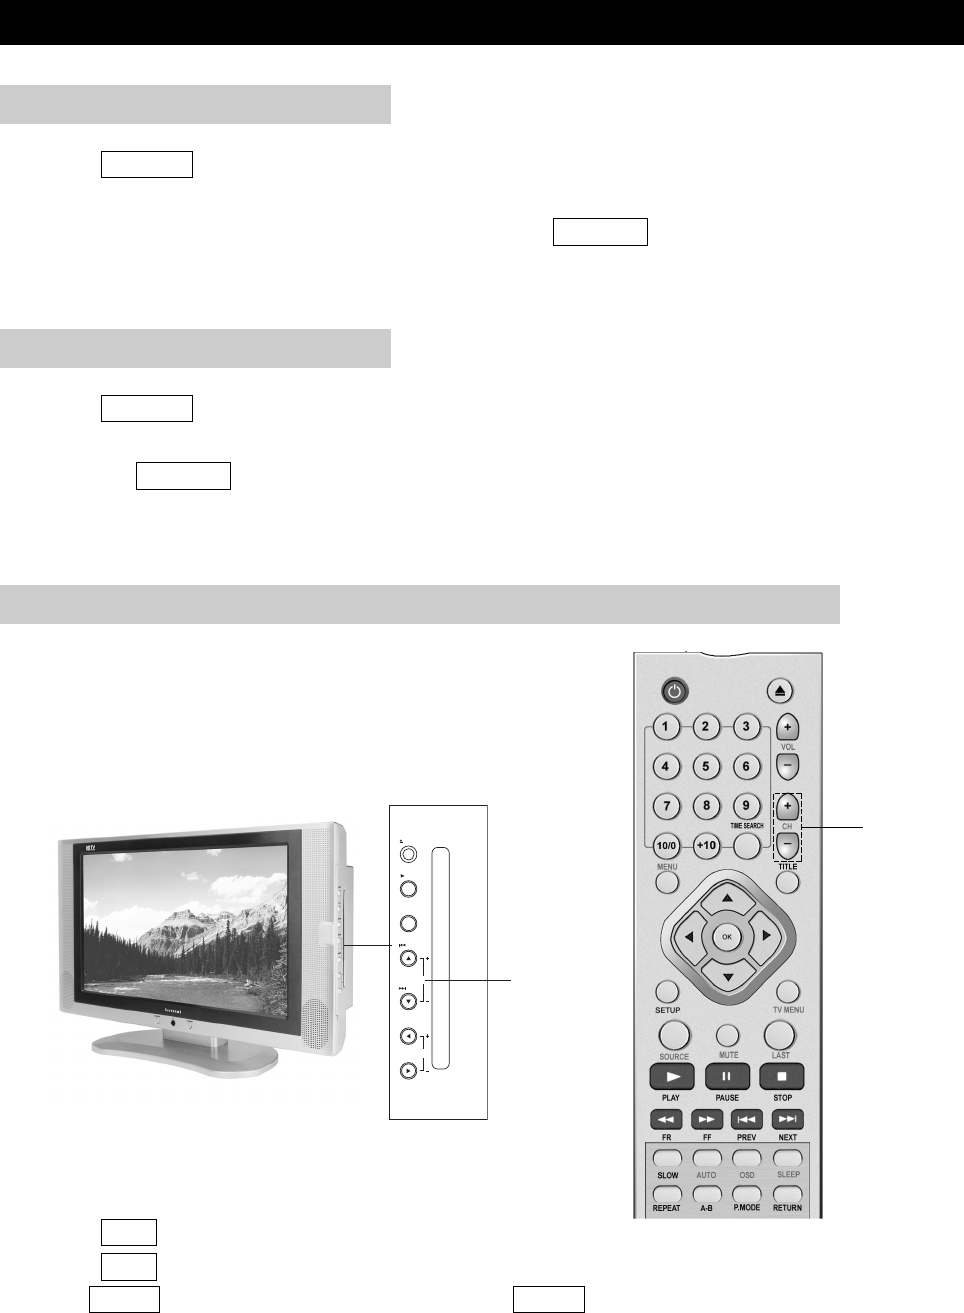
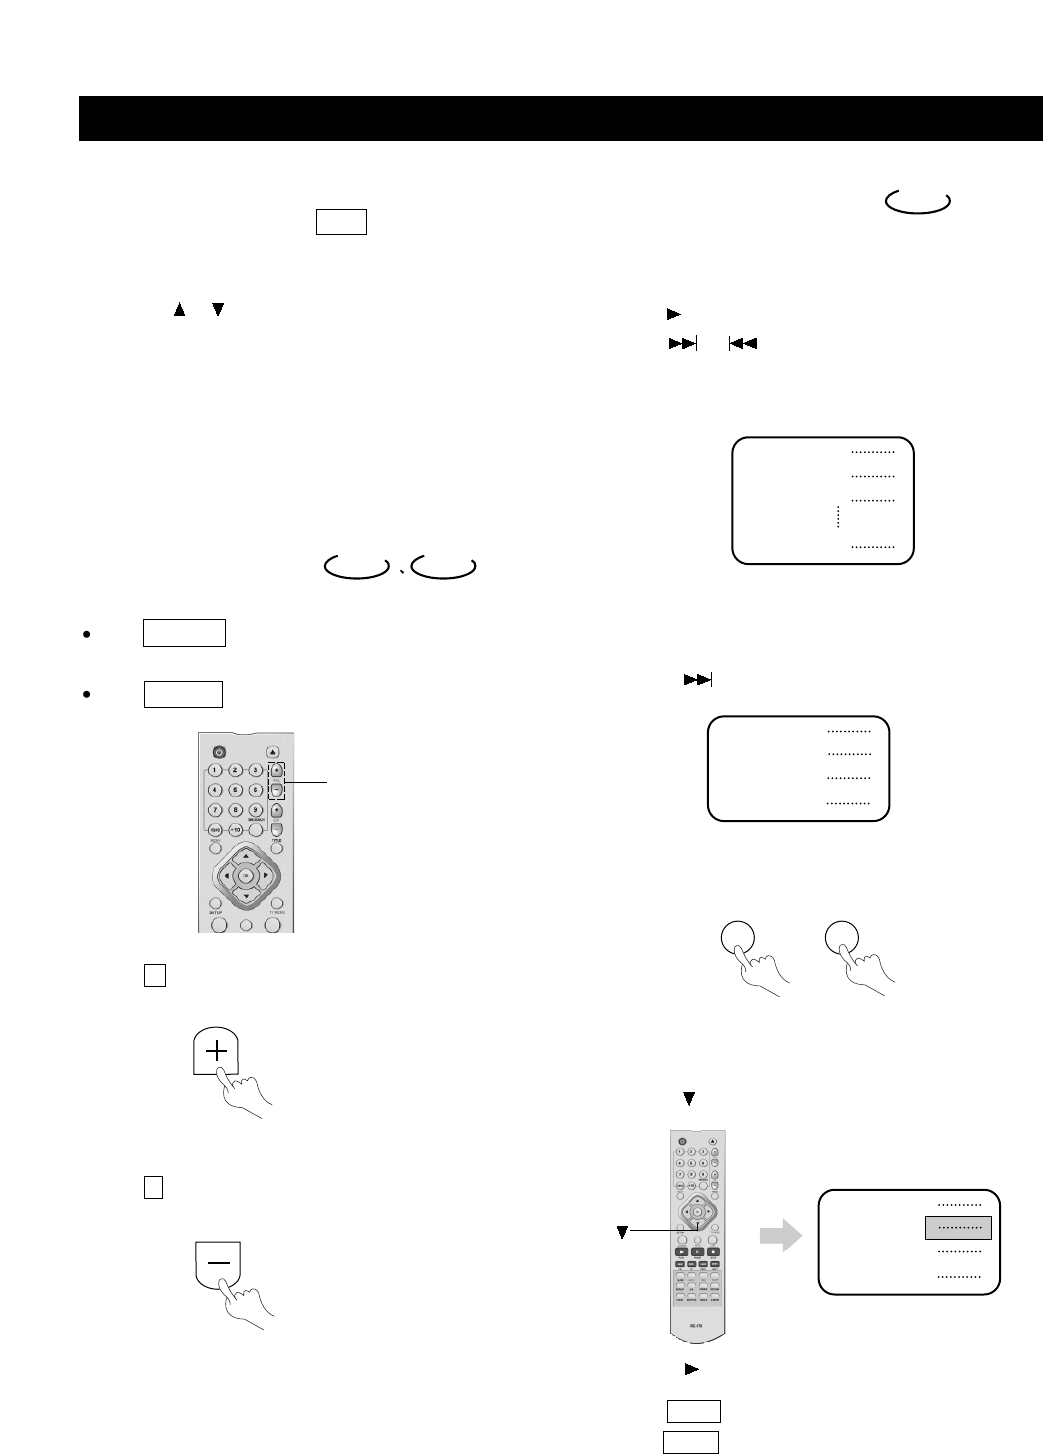
1. Press CH+ to increase channel number.
2. Press CH- to decrease channel number.
NOTE: CH+/- on the TV set operates the same as CH+/- on the remote unit.
CH+/-
You can change channels in several ways.
Using CH+/- on the remote unit
SIMPLE BUTTON OPERATIONS FOR CHANGING CHANNELS
LCD MENU
OK
VOL
CH
NEXT
PREV
PLAY
EJECT
CH+/-
CH+/-
Using number buttons on the remote unit
WATCHING TV
page14
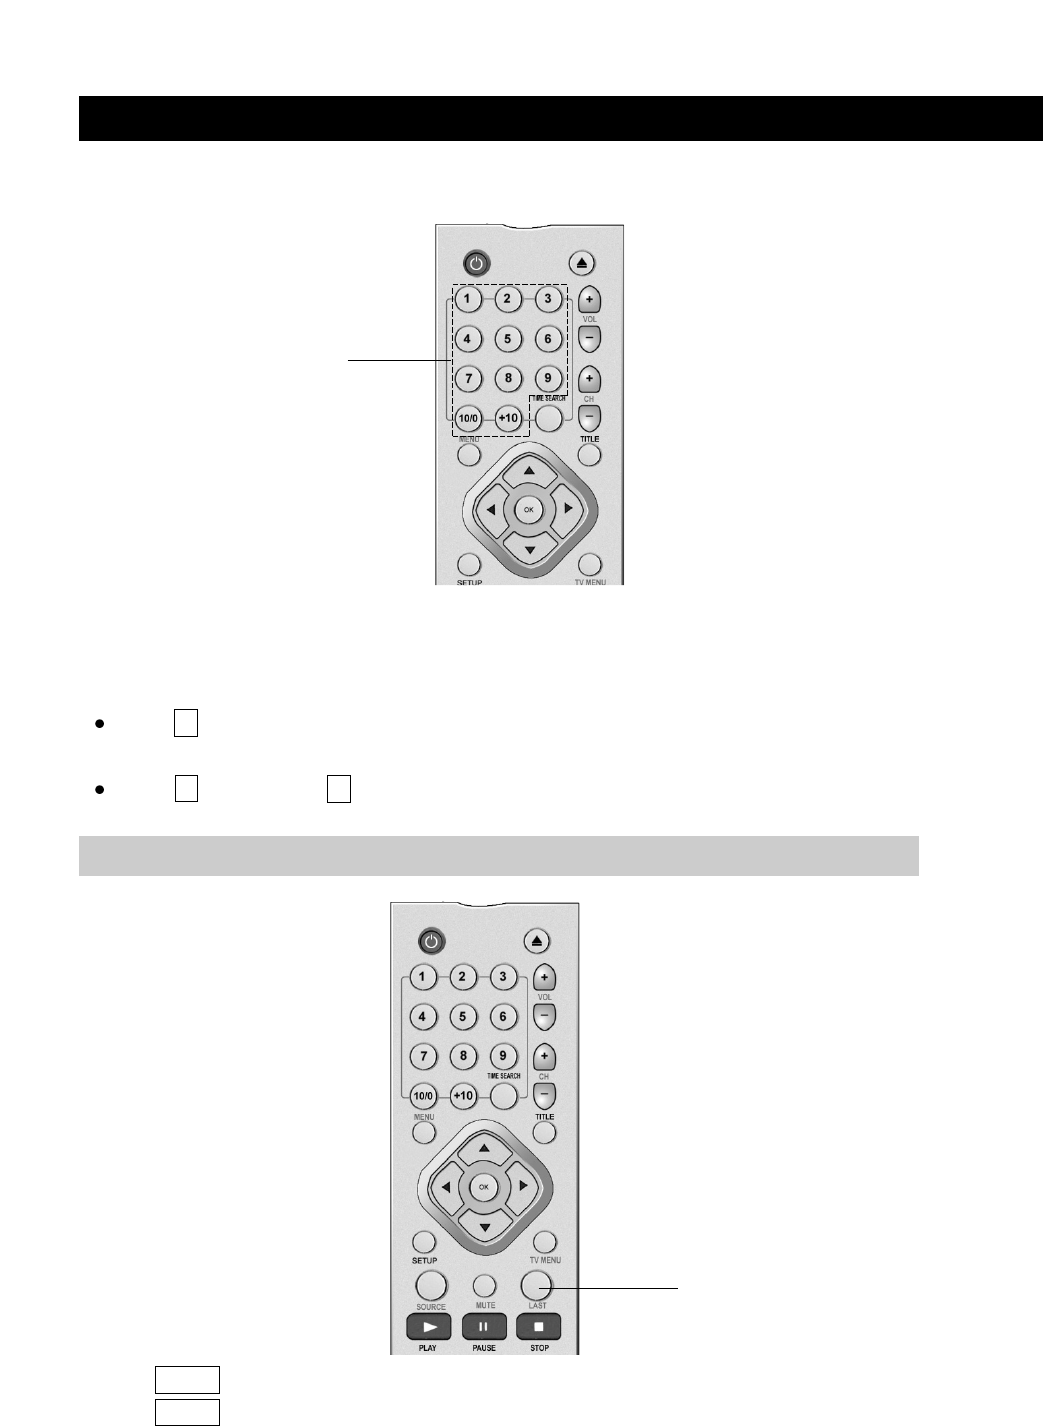
Press LAST to switch the currently tuned channel to the previous tuned channel.
Press LAST again to switch back to the currently tuned channel.
Select the channels directly by pressing the number buttons.
EXAMPLE:
To select a 1-digit channel (e.g. channel 2):
Press 2 .
To select a 2-digit channel (e.g. channel 12):
Press 1 ,followed by 2 .
USING LAST ON THE REMOTE UNIT
NUMBER BUTTONS
LAST
Changing the volume
You can change the volume on the front panel or on the remote control unit.
Using MUTE on the remote control
Press MUTE to mute the current sound output.
WATCHING TV
page15
1. Press MUTE . ’’MUTE’’ will display on the screen.
2. Press MUTE again to cancel the mute.
1. Press VOL+ to increase the volume.
2. Press VOL- to decrease the volume.
SIMPLE BUTTON OPERATION FOR CHANGING VOLUME/SOUND
VOLUME+/-
MUTE
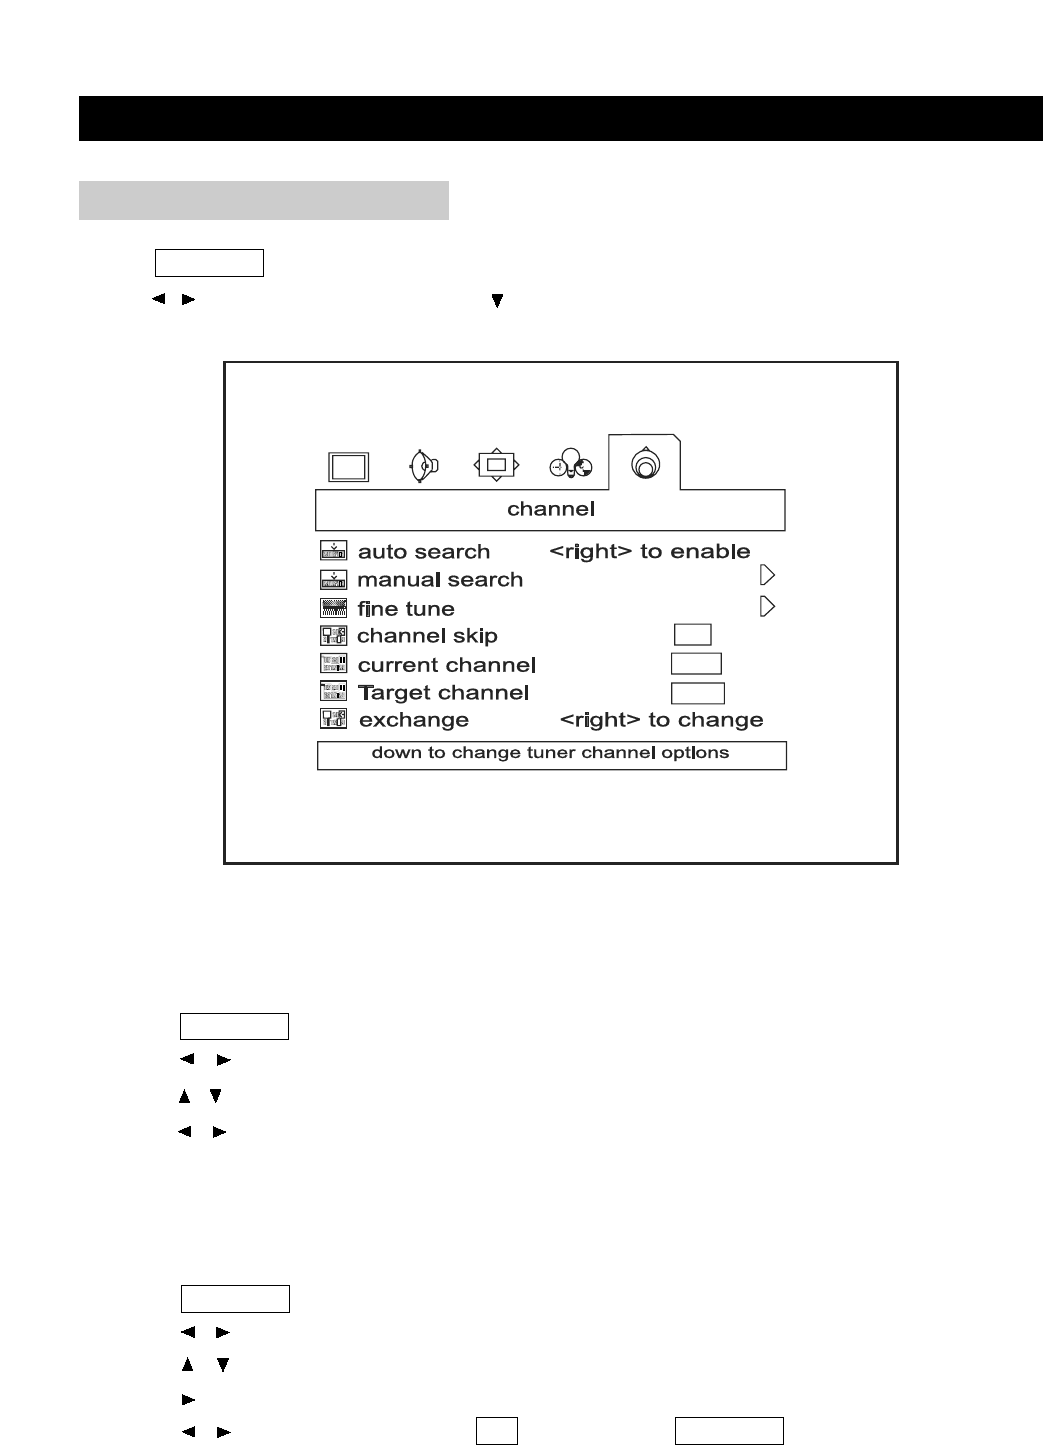
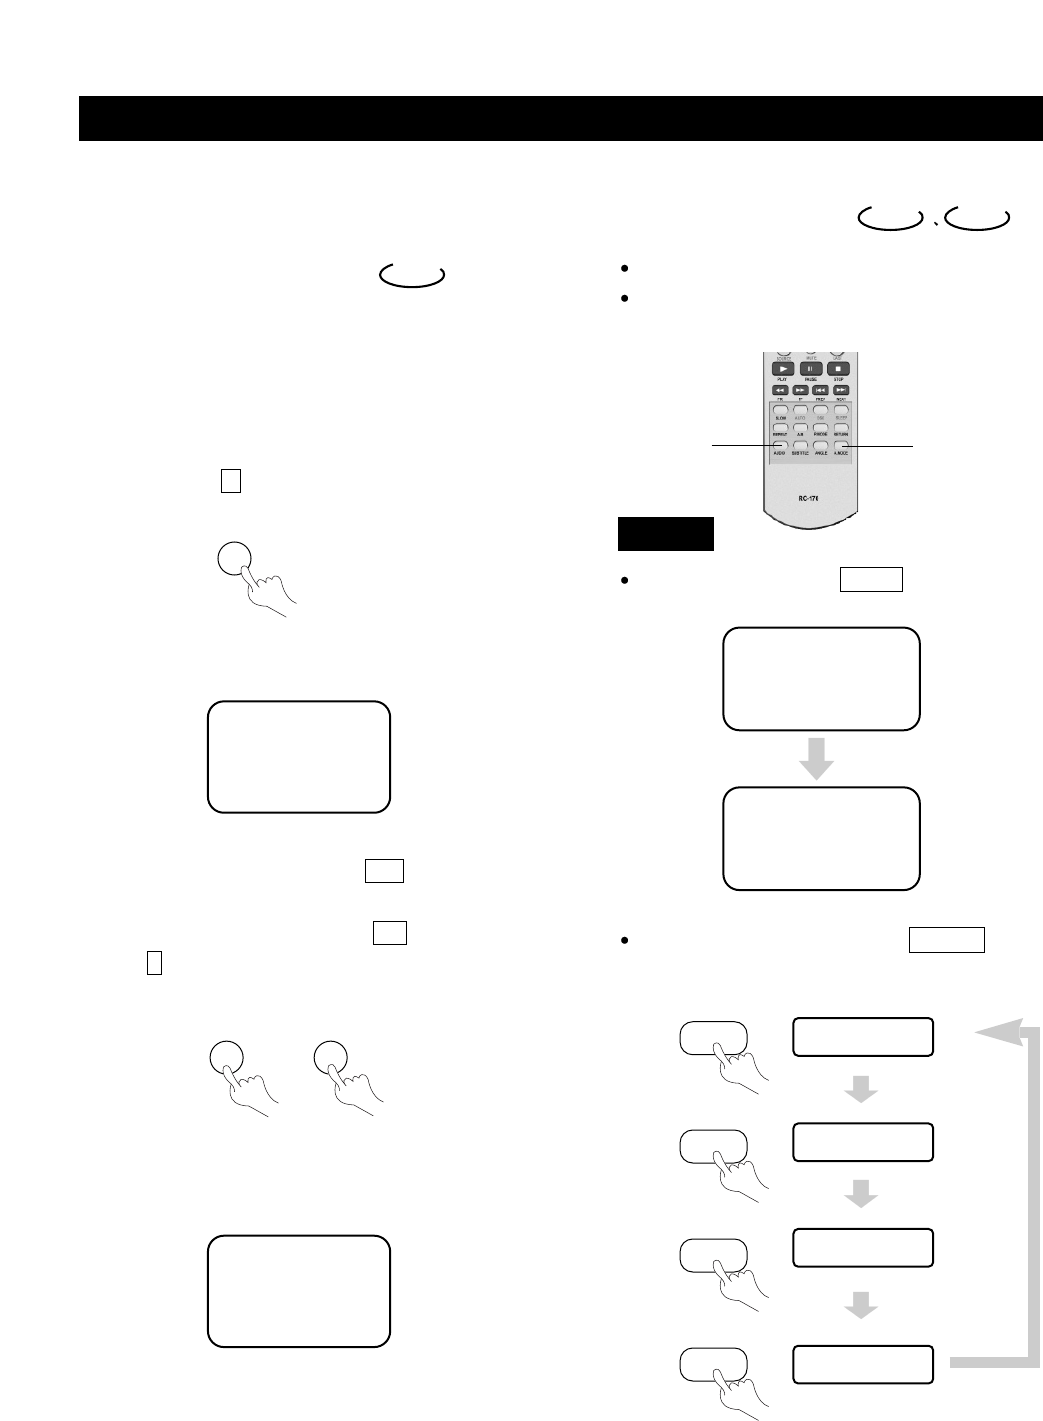
Press TV MENU to bring up the TV menu screen.
Press / to select "Channel" and press to enter into the items below ’’Channel’’.
MENU ADJUSTMENT
page16
CHANNEL ADJUSTMENT
Automatic channel search
Channel auto search finds and memorizes all channels viewable in your area. Select one
between AIR and CABLE before this operation.
1. Press TV MENU to bring up the TV menu screen.
2. Press / to select ’’Channel’’.
3. Press / to select ’’Auto Search’’.
4. Press / to begin the searching. Wait until the searching ends.
NOTE: The illustrations and on-screen displays in this manual are for explanation purposes and
may vary from the actual operations.
Manual Search
1. Press TV MENU to bring up the TV menu screen.
2. Press / to select ’’Channel’’.
3. Press / to move to "Manual Search".
4. Press to enter "Manual Search" screen.
5. Press / to enable search; press OK to return;press TV MENU to exit.
MENU ADJUSTMENT
page17
Current channel number selection
1. Press TV MENU to bring up the TV menu screen.
2. Press / to select ’’Channel’’.
3. Press / to select ’’Current Channel’’.
4. Press / to select a current channel number you want.
Fine tuning
If you are unable to get a good picture or sound because of a poor broadcast signal, you may
adjust the channel by Fine Tuning.
1. Press TV MENU to bring up the TV menu screen.
2. Press / to select ’’Channel’’.
3. Press / to select ’’Fine Tune’’.
4. Press to enter "Fine Tune" screen.
5. Press / to tune for a better picture and sound; press OK to return;press TV MENU to exit.
Target channel
1. Press TV MENU to bring up the TV menu screen.
2. Press / to select ’’Channel’’.
3. Press / to select ’’Target Channel’’ .
4. Press / to select a target channel number.
Channel skip
1. Press TV MENU to bring up the TV menu screen.
2. Press / to select ’’Channel’’.
3. Press / to move to "Channel Skip".
4. Press / to select between "On"and "Off ".
Exchange
1. Press TV MENU to bring up the TV menu screen.
2. Press / to select ’’Channel’’.
3. Press / to move to "Exchange".
4. Press / to change.
CHANNEL ADJUSTMENT (CONTINUED)

MENU ADJUSTMENT
page18
Contrast
1. Press TV MENU to bring up the TV menu screen.
2. Press / to select ’’Picture’’.
3. Press / to move to ’’Contrast’’.
4. Press / to adjust the picture contrast.
Brightness
1. Press TV MENU to bring up the TV menu screen.
2. Press / to select ’’Picture’’.
3. Press / to move to ’’Brightness’’.
4. Press / to adjust the picture brightness.
Color
1. Press TV MENU to bring up the TV menu screen.
2. Press / to select ’’Picture’’.
3. Press / to move to ’’Color’’.
4. Press / to adjust the picture color.
Sharpness
1. Press TV MENU to bring up the TV menu screen.
2. Press / to select ’’Picture’’.
3. Press / to move to ’’Sharpness’’.
4. Press / to adjust the picture sharpness.
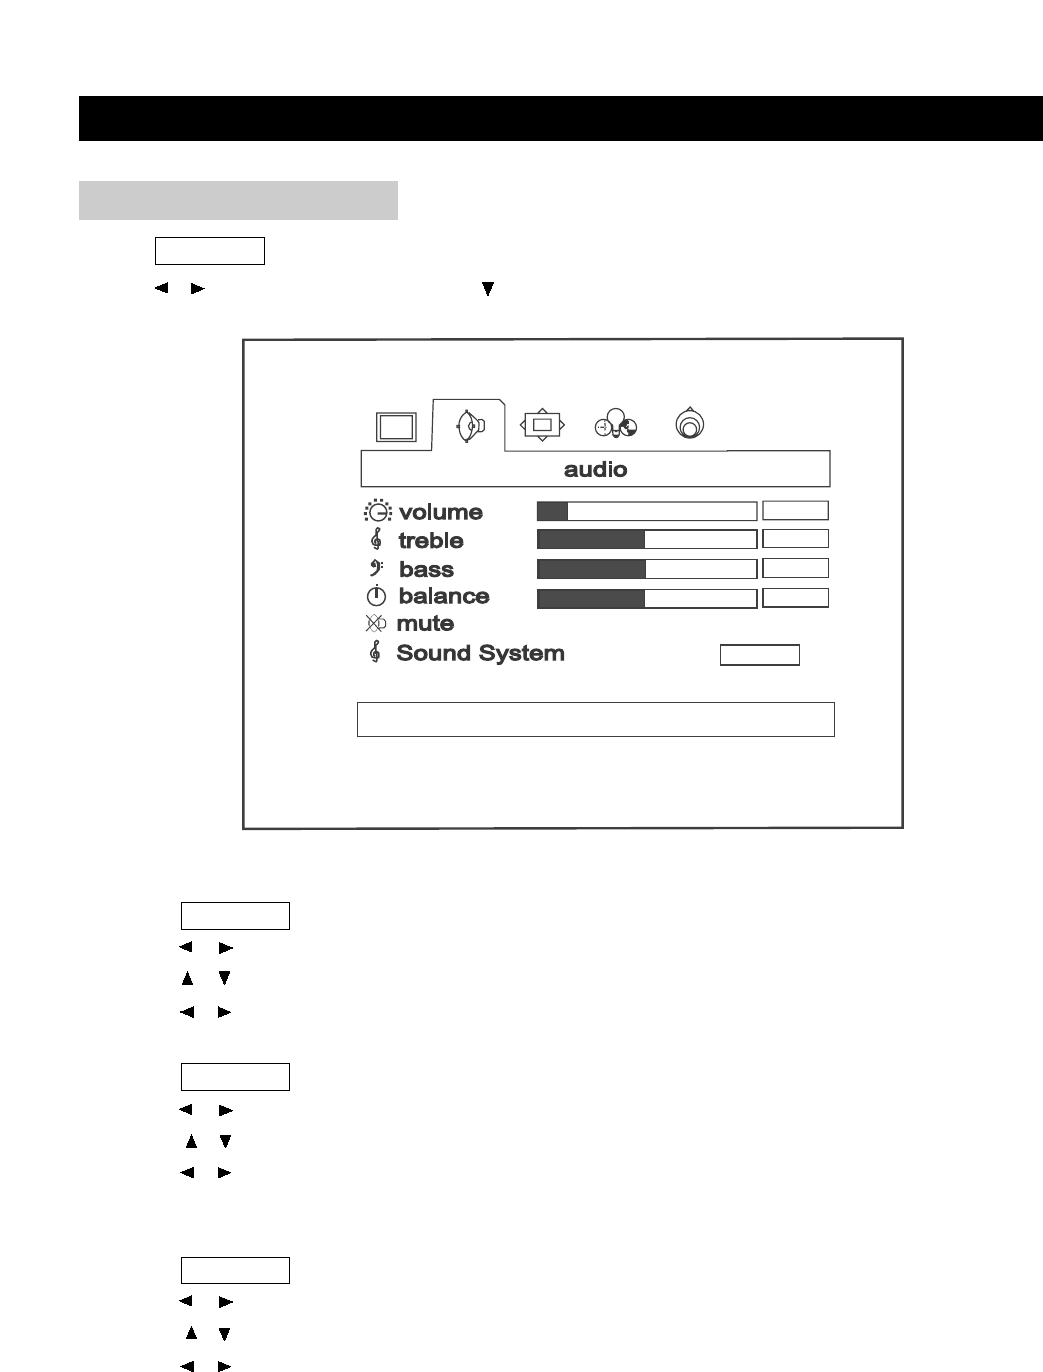
Press TV MENU to bring up the TV menu screen.
Press / to select ’’Picture’’ and press to enter into below items.
PICTURE ADJUSTMENT
MENU ADJUSTMENT
page19
Volume
1. Press TV MENU to bring up the TV menu screen.
2. Press / to select ’’Audio’’.
3. Press / to move to ’’Volume’’.
4. Press / to adjust the volume.
Bass
1. Press TV MENU to bring up the TV menu screen.
2. Press / to select ’’Audio’’.
3. Press / to move to ’’Bass’’.
4. Press / to adjust the bass weaker or stronger.
Treble
To stress high frequency sound
1. Press TV MENU to bring up the TV menu screen.
2. Press / to select ’’Audio’’.
3. Press / to move to ’’Treble’’.
4. Press / to adjust the treble weaker or stronger.
Press TV MENU to bring up the TV menu screen.
Press / to select ’’Audio’’ and press to enter into below items.
AUDIO ADJUSTMENT
down for audio settings
off
on

Balance
1. Press TV MENU to bring up the TV menu screen.
2. Press / to select ’’Audio’’.
3. Press / to move to ’’Balance’’.
4. Press / to adjust audio output between left and right speakers.
Mute
This function is to remove the sound.
1. Press TV MENU to bring up the TV menu screen.
2. Press / to select ’’Audio’’.
3. Press / to move to ’’Mute’’.
4. Press / to select ’’Off’’ or ’’On’’.
Sound System
This function is to select the sound appropriate to your TV program.
1. Press TV MENU to bring up the TV menu screen.
2. Press / to select ’’Audio’’.
3. Press / to move to ’’Sound System’’.
4. Press / to select among DK, I, Auto and BG.
MENU ADJUSTMENT
page20
AUDIO ADJUSTMENT (CONTINUED)
PC mode input format
In case of inputting the PC signal other than above signals, ’’OUT OF RANGE’’ will display.
Setup your PC software
Even if your actual display-setting screen looks different from the windows below, basic setup
methods will be applied in most of the case.
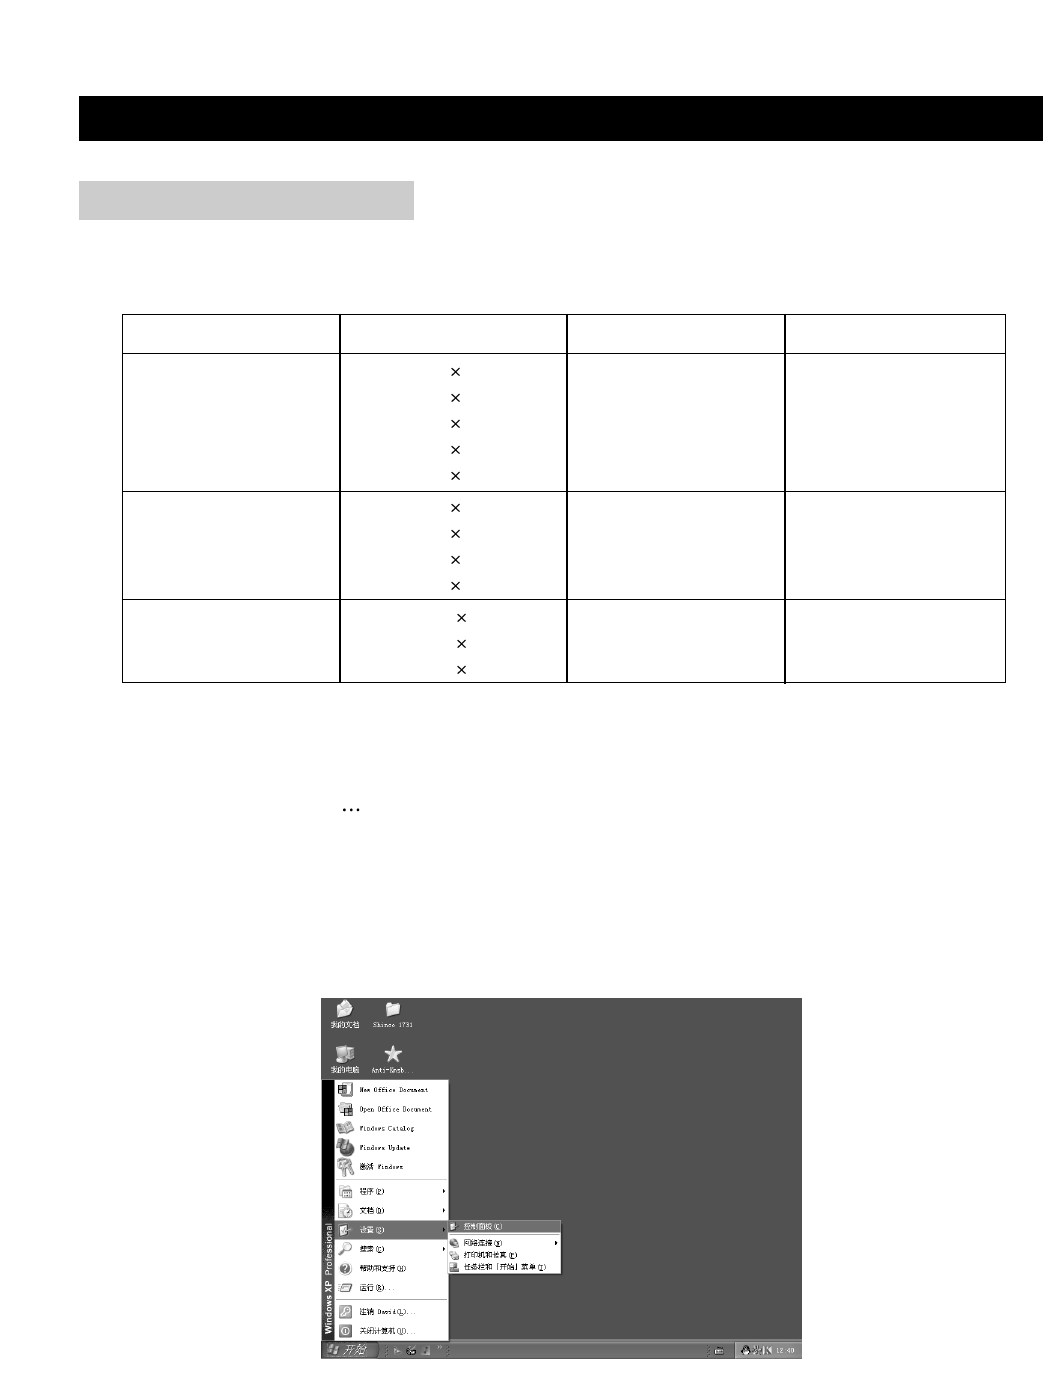
1. First, click on ’’Setting’’ on the Windows Start menu. While ’’Setting’’ is selected, move the cursor
to submenu ’’Control Panel’’.
MENU ADJUSTMENT
page21
WINDOW ADJUSTMENT
Resolution
VGA
SVGA
XGA
640 480
640 480
640 480
640 480
720 400
800 600
800 600
800 600
800 600
1024 768
1024 768
1024 768
60
70
75
48.4
56.5
60.2
60
75
85
72
37.9
46.9
53.7
48.1
60
72
75
85
70
31.5
37.9
37.5
43.3
31.5
V freq. (Hz) H freq. (KHz)
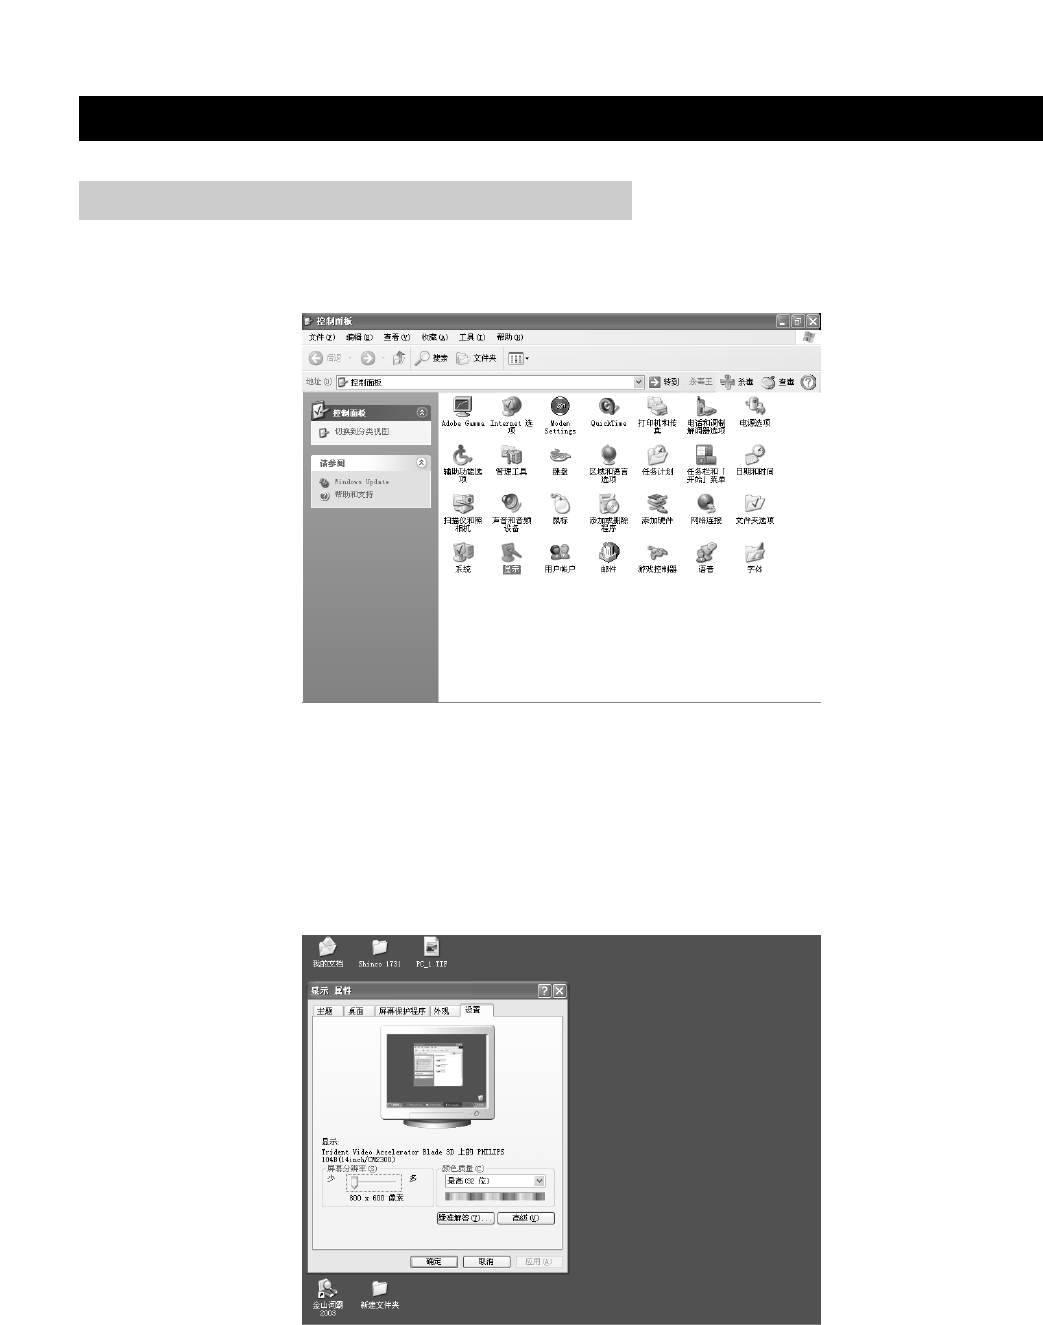
3. Navigate to the ’’Setting’’ tab on the display dialog box. The correct setting of size (resolution) is
’’1024 x 768 pixels’’.
Check the vertical frequency of your PC.
MENU ADJUSTMENT
page22
WINDOW ADJUSTMENT (CONTINUED)
2. When the control panel screen appears, click on ’’Display’’ and a display dialog box displays.
MENU ADJUSTMENT
page23
H-Position
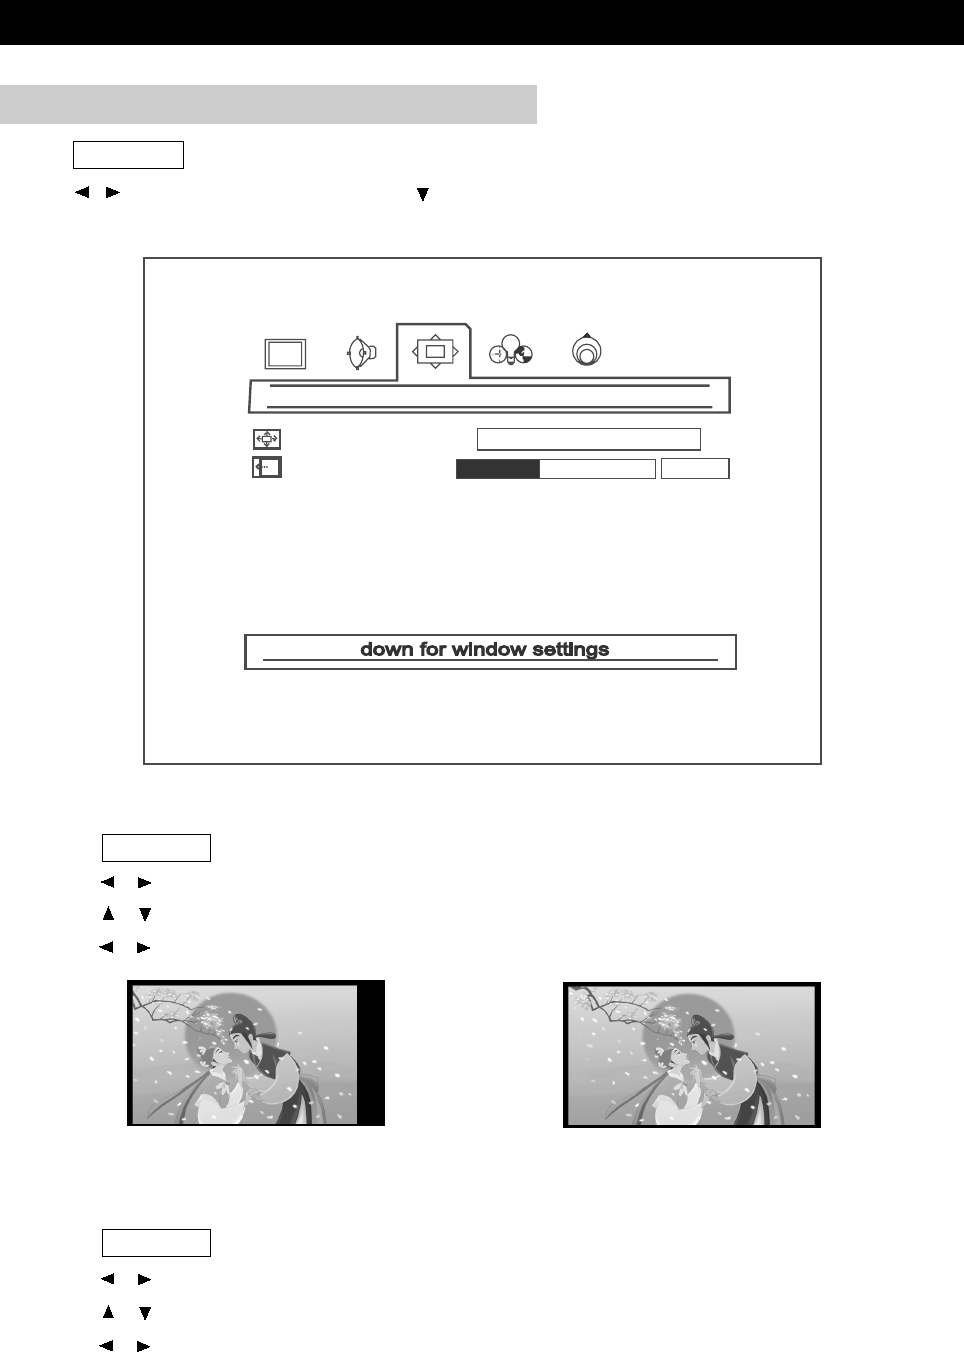
1. Press TV MENU to bring up the TV menu screen.
2. Press / to select ’’Window’’.
3. Press / to move to ’’H-Position’’.
4. Press / to adjust the horizontal position of displayed image.
Before adjustment After adjustment
WINDOW ADJUSTMENT (CONTINUED)
window
image size
h position
fill all
Image Size
1. Press TV MENU to bring up the TV menu screen.
2. Press / to select ’’Window’’.
3. Press / to move to ’’Image Size’’.
4. Press / to select an image size between:Fill All and Force 4:3.
Press TV MENU to bring up the TV menu screen.
Press / to select ’’Window’’ and press to enter into below items.
MENU ADJUSTMENT
page24
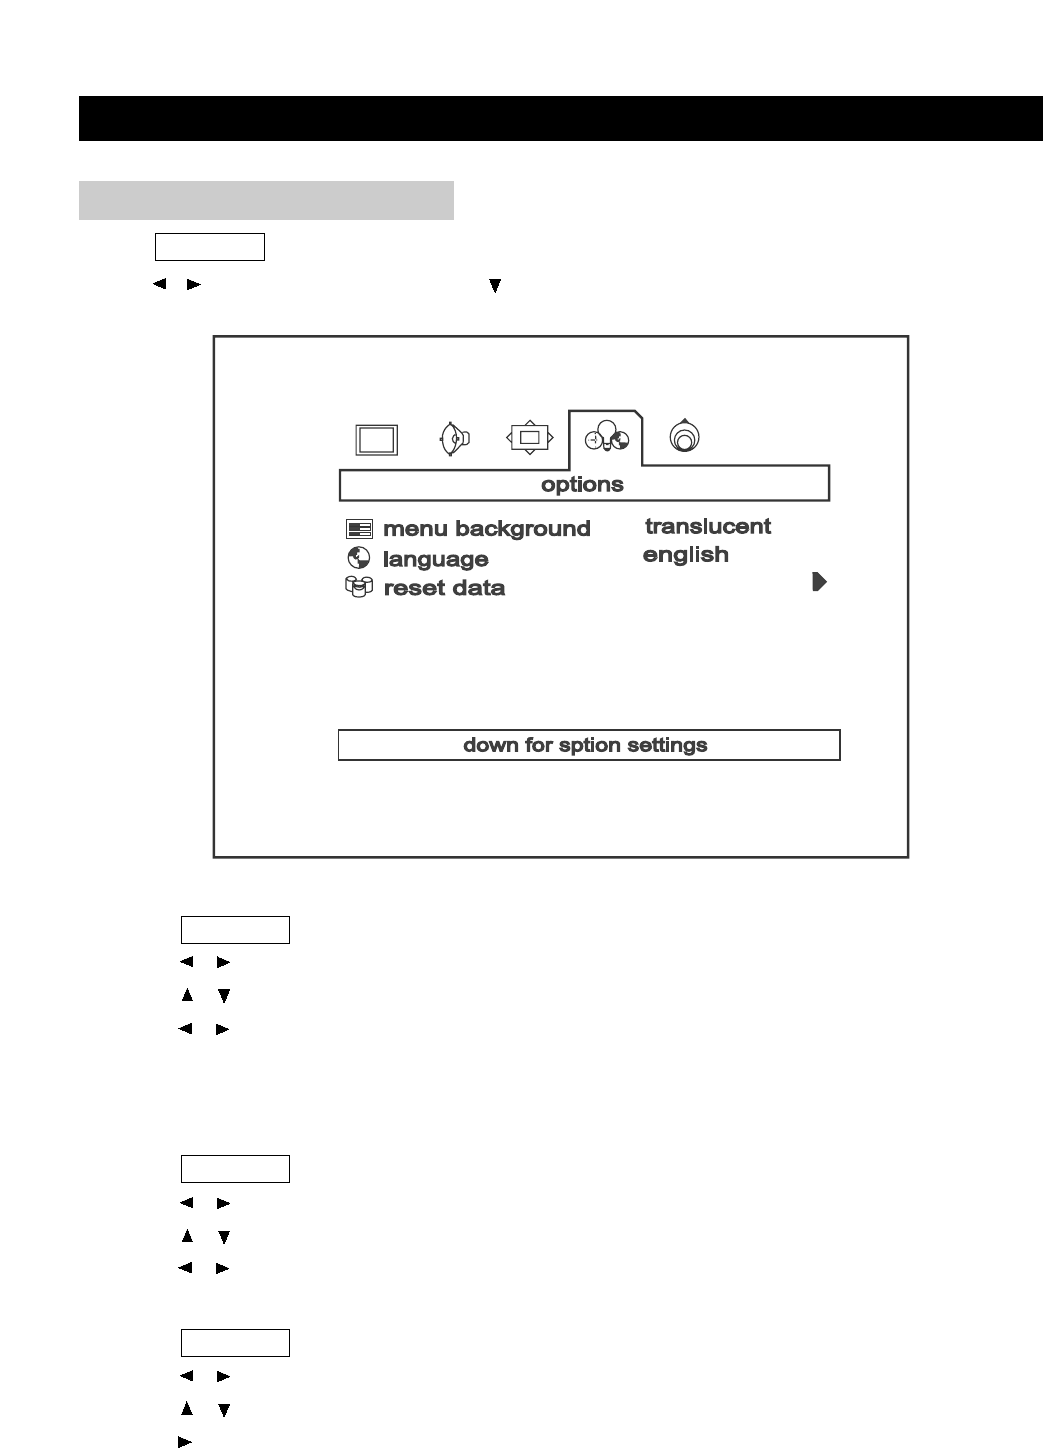
Press TV MENU to bring up the TV menu screen.
Press / to select ’’Options’’ and press to enter into below items.
OPTIONS ADJUSTMENT
Menu Background
1. Press TV MENU to bring up the TV menu screen.
2. Press / to select ’’Options’’.
3. Press / to move to ’’Menu Background’’.
4. Press / to select the menu background between:Translucent and Opaque.
Menu Language
You can select a language from Function menu as well. Select one between English and
Chinese.
1. Press TV MENU to bring up the TV menu screen.
2. Press / to select ’’Options’’.
3. Press / to move to ’’Language’’.
4. Press / to select the language between English and Chinese.
Reset Date
1. Press TV MENU to bring up the TV menu screen.
2. Press / to select ’’Options’’.
3. Press / to move to ’’Reset Data’’.
4. Press to reset all settings to factory setting.

TROUBLESHOOTING
page25
Please check the following items before asking for repair service.
Symptom
Neither picture nor
sound.
Picture is OK, but no
sound.
Sound is OK, but no
color.
The picture is
overlapped image.
Picture has ’’snow
noise ’’.
Stripes on picture.
Bad stereo or SAP
sound.
Remote control does
not work.
’’Out Of Range’’
appears on the
screen.
’’No Signal’’ appears
on the screen.
Image is not clear.
Image is not
centered.
Check Items
- Check the contact of sockets is all right.
- Check the TV main power is on.
- Check the volume control is set to minimum or mute.
- Check the color control and adjust it properly.
- Check the programme is in color or in black & white.
-Check the antenna is installed correctly and if not, adjust the antenna
toward the broadcasting station.
-Check the ’’FINE TUNE ’’is set up correctly and if not, adjust the fine
tuning properly.
- Check the antenna or its connection is correct and if not, correct the
antenna fault or connection cable fault.
- Check if car traffic or neon sign disturbs the sound effect.
- Check the susceptible interference by other electronic devices such
as radio and television and keep magnetic or electronic devices away
from the TV.
- Long distance from the station or other radio waves can generate bad
sound. Reception. If so, change the mode to Mono.
- Check if the batteries in the Remote control die.
- Check if any object between IR sensor of the TV and the Remote
control does not obstruct.
- Check the resolution and frequency of your PC. Then, adjust them to
optimum condition for LCD TV: 1024X768 and 60Hz.
- Refer to the table of PC mode input format indicated on page 21. (Not
being registered resolution and frequency on the table won’t be displayed.)
-Ensure that the signal cable is firmly connected to PC and TV.
-Adjust the PHASE control. (Refer to the PC ADJUSTMENT.)
- Adjust the H-POSITION, H-SIZE and V-POSITION Control. (Refer to
the PC ADJUSTMENT.)

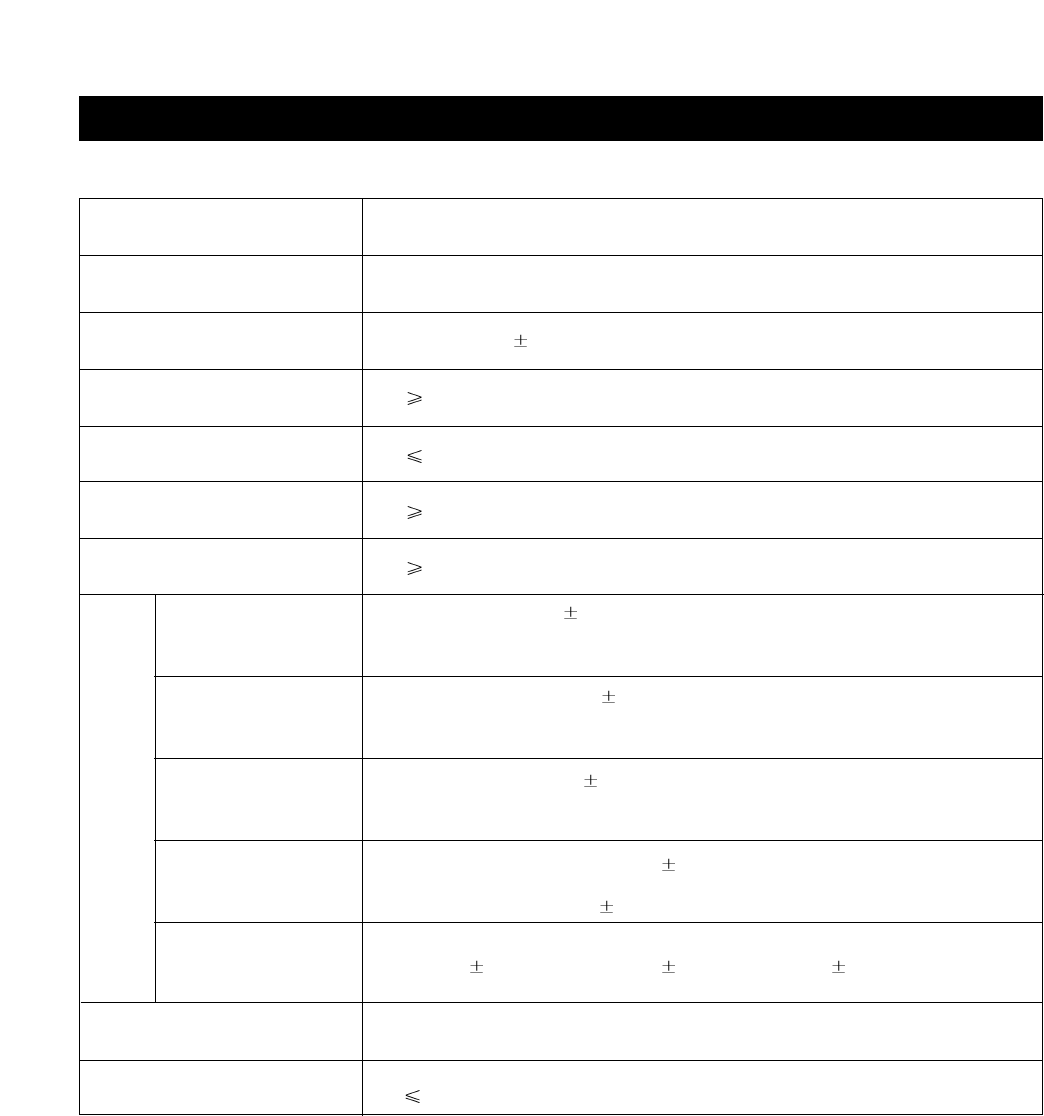
SPECIFICATIONS
page26
PANEL
RESOLUTION
ACTIVE AREA (mm)
VIEWING ANGLE (¡,U/D/L/R)
BRIGHTNESS (cd/m2)
WITH STAND (mm)
WITHOUT STAND (mm)
TV STANDARD
TUNING SYSTEM
STEREO
CATV
AV IN
COMPONENT
MONITOR OUT
HEADPHONE
PC IN
ANTENNA IN
LCD
DIMENSION
WEIGHT (WITHOUT ACCESSORIES)
TV-FUNCTION
TERMINALS
INPUT POWER
SOUND OUTPUT
POWER CONSUMPTION
17’’ WIDE TFT LCD
1280 X RGB X 768 (WXGA)
372.5 X 223.5
45/45/60/60
450
532 X 352 X 185
532 X 297 X 58
13.7lbs (6.6kg)
NTSC/PAL
ELECTRIC TUNING SYSTEM
MTS + SAP
125 CHANNELS
DC12V, AC100-240V~, 50/60Hz
2W + 2W
44W
VIDEO, S-VIDEO, AUDIO L&R
Y, Pb (Cb), Pr (Cr)
VIDEO OUT
3.5¿ STEREO MINI-JACK
D-SUB 15PIN RGB IN
F-TYPE

BASIC OPERATIONS
PLAY DISCS
PAUSE
OSD
VOLUME CONTROL
DVD MENU PLAY
SELECT WITH NUMBER BUTTONS
PLAY DISCS IN VARIOUS WAYS
AUDIO MODE
MUTE
FAST PLAY
SLOW PLAY
REPEAT PLAY
SELECT SUBTITLES
ANGLES SELECT
TIME SEARCH
PROGRAM PLAY
SHUFFLE (RANDOM) PLAY
MENU SETTING
GENERAL SETUP
AUDIO SETUP
VIDEO SETUP
PASSWORD SETUP
PREFERENCES
MP3 OPERATIONS
KODAK PICTURE CD PLAYBACK
TROUBLESHOOTING
TECHNICAL SPECIFICATIONS
27-31
27
27
27-30
30
30
31
31-37
31-32
32
32
33
33-34
34
35
35-36
36-37
37
38-43
39-40
40-42
42
42
43
43
44
45
46
TABLE OF CONTENTS (FOR DVD PLAYER)
DVD
1.PressPOWERtoturnonthe unit.
2.PresstheSOURCEbuttonontheremote
controltobringuptheAVsignalsource
selectionscreenandusethe/buttons
toselect"DVD",presstheOKbuttonto
confirm.
3.Insertadiscintothediscslot,withthe
labelsidefacingtoyourself.
4.Theunitbeginstoreadthedisc.
5.Press(PLAY)toplaythedisc.
AFTERSTEP4ISFINISHED:
IfplayingaDVD,theTVscreenshowsDVDmenuor
titlemenu.
IfplayingaCD,press(PLAY), andtheunitplays
thediscaccordingtothetracknumbers.
5.Stopplayback.
Press.
Play Discs CD
6.Pressthebuttonontheremotecontroltoremovethe
discandturnofftheunit.
Youhavetopush" "buttontwice tostopplayback
ofaDVDdisc.
Pause
Press
TopauseplaybackofaDVDwhileitisplaying,
press.Theunitentersstepplaystatus.Each
timeyoupress,thepictureadvancesoneframe.
Presstomakeplaybackpause.
Press(PLAY)toresumeplayback.
OSD
TheOn-ScreenDisplay(OSD)containsmanyplayback
features.ToseetheDisplay,presstheOSDbuttonon
theremotewhileadiscisplaying.TheDisplayappears
acrossthetopofthescreen.Eachfeatureisillustratedwith
anicon.Usetheor buttonsontheremotetomove
throughthedifferenticonsintheDisplay.
Whenaniconishighlighted,usetheorbutonsonthe
remotetoscrollthroughthechoicesdisplayedinthetext
boxundertheicons.
DVD CD
DVD CD
DVD
CD
PAUSE
OSD
page27
BASIC OPERATIONS

Remember,youcanonlyaccesstheDisplaywhenyou're
playingadisc.Also,theDisplayfeaturesareonly
availableifthediscwascreatedwiththatparticular
feature(i.e.,ifyouselecttheSubtitleicon,youwon'tbe
abletochangethesubtitlelanguageunlesstheauthorof
thedisccreatedthediscwithsubtitles).
Theinvalidsymbol""appearsonthescreenwhenyou
pressabuttonthatdoesn'thaveanyfunction.Ifoneof
theiconsis"grayedout",thatDisplayfeatureisn't
availableforthediscyou'replaying.TomaketheDisplay
disappearfromthescreen,pressOSDontheremote.
DVDdiscshavethefollowingplaybackfeatures:Title,
Chapter,Audio,Subtitle,AngleandRepeat.
Select a Title
Somediscscontainmorethanonetitle.Forexample,
theremightbefourmoviesononedisc(eachmoviemight
beconsideredatitle).
Eachtitleisdividedintochapters.Toselectatitle:
1.Whilethediscisplaying,pressOSDontheremote
tobringuptheDisplay.
2. IftheTitleiconontheDisplayisn'thighlighted,usethe
orbuttonstohighlightit.
3.Presstheorbuttonstogotothepreviousornext
title.
Note: Somediscsonlyhaveonetitle.
Select a Chapter
BecauseDVDdiscsusedigitaltechnology,atitlecanbe
dividedintoindividualchapters(similartotracksonaCD).
YoucanskiptoaspecificchapterbyusingtheChapter
featureintheDisplay.
1.Whilethediscisplaying,pressOSDontheremote
tobringuptheDisplay.
DVD
2.PresstheorbuttonstohighlighttheChaptericon.
3.Presstheorbuttonstogotothepreviousornext
chapter.
Notes: Thechapterfeaturewon'tworkifthediscisn't
formattedwithseparatechapters.
Youcanalsoadvancetothenextchapterbypressing
ontheremoteandgototheprecedingchapterby
pressingontheremote.
Changing the Audio Language
Ifthediscwascreatedwithdifferentlanguagetracks
(recordedindifferentlanguages),youcanusetheDisplay
totemporarilychangetheDVDplayer'sAudioLanguage
setting.
1.Whilethediscisplaying,pressOSDontheremote
tobringuptheDisplay.
2.PresstheorbuttonstohighlighttheAudioicon.
Thecurrentaudiolanguageappearsinthetextbox
belowtherowoficons.
3.Presstheorbuttonstoscrollthroughtheaudio
languagesthatareavailableonthediscuntiltheaudio
languageyouwanttouseappearsinthetextbox.
Audiowillbeplayedinthatlanguage.
4.TomaketheDisplaydisappear,presstheOSDbutton
ontheremote.
Note: Thelanguagefeatureonlyworksifthediscwas
createdwithmultipleaudiotracks.Whenyouchoosean
audiolanguagefromtheDisplay,youonlyoverridethe
audiolanguagesettingintheDVDplayer'smainmenu
temporarily.
Theaudiolanguagecanalsothechangedthroughthe
DVDplayermenu.
Selecting the Subtitle Language
Ifthediscwascreatedwithsubtitles,youcanusethe
DisplaytochangetheSubtitlelanguage.
page28
BASIC OPERATIONS

1.Whenthediscisplaying,pressOSDontheremote
tobringuptheDisplay.
2.PresstheorbuttonstohighlighttheSubtitleicon.
3.Presstheorbuttonstoscrollthroughthesubtitle
languagesthatareavailableonthediscuntilthe
subtitlelanguageyouwanttouseappearsinthetext
box.Thesubtitleswillbeshowninthatlanguage.
4.TomaketheDisplaydisappear,pressthe OSD button
ontheremote.
Notes: ChangingthesubtitlelanguagewiththeDisplay
willonlyaffectthedisccurrentlybeingplayed.Whenthe
discisremovedortheplayeristurnedoff,thesubtitle
languagewillreverttothelanguagesettingspecified
throughtheDVDplayermainmenu.
Thesubtitlelanguagecanalsobechangedthroughthe
DVDplayermenu.
Changing the Camera Angle
Somediscscontainmultipleanglesofaparticularscene
orsequence.Ifthedisconlyhasoneangle,thisfeature
won'twork.Whenmultipleanglesareavailable,to
changethecameraangle:
1. Whenadiscisplaying,pressOSDontheremoteto
bringuptheDisplay.
2.TheAngleiconwilldisplaythenumberofangles
available.Forexample,ifthereare3differentangles,
theiconwillread1of 3,Thismeansangle1is
currentlybeingplayed.
3.Presstheorbuttonstoscrollthroughtheangle
choices.Theanglenumberdisplayedinthetext
windowisautomaticallyshown.
4.TomaketheDisplaydisappear,pressthe OSD button
ontheremote.
Using the Repeat Feature
ThedefaultmodefortheRepeatfeatureisoff.Thereare
threeRepeatoptions:
All-repeatsthediscthatisplaying
Title-repeatsthetitlethatisplaying
Chapter-repeatsthechapterthatisplaying
To Use Repeat:
1.Whileadiscisplaying,pressOSDontheremoteto
bringuptheDisplay.
2.HighlighttheRepeaticon.
3.PresstheorbuttonstoscrollthroughtheRepeat
optionsuntiltheRepeatoptionyouwantisdisplayedin
thetextbox.
4.Theselectedrepeatoptionwilllooprepeatedlyuntil
youturnRepeatoff.
How to Cancel Repeat:
TherearethreewaystocancelRepeat:
PressSTOPtwice.
GotoRepeaticonintheDisplayandselectOff.
Ejectthedisc.
WHEN PLAYING CD
CDdiscshavethefollowingplaybackfeatures:Track,
L/R,andRepeat.
Select a Specific Track
1.Whilethediscisplaying,pressOSDontheremote
tobringuptheDisplay.
2.HighlighttheTrackicon.
3.Presstheorbuttonstoscrollthroughthetrack
numbers.
Changing the Audio Channel Output
IfyouareplayingaStereoCD,youcanchangethe
channeloutputfromtheplayer.
1.PressOSDontheremotetobringuptheDisplay.
2.HighlighttheL/RiconontheDisplay.
3.Theaudiochannelchoicesappearinthetextbox.
Presstheorbuttonstoscrollthroughthechoices:
LEFTMONO,RIGHTMONO,MIXEDMONOor
STEREO. Whateverchoiceisdisplayedbecomesthe
activechoice.
Using the Repeat Feature
ThedefaultmodefortheRepeatfeatureisoff.Thereare
twoRepeatoptionsforCDs:
All-repeatsthediscthatisplaying
Track-repeatsthetrackthatisplaying
CD
page29
BASIC OPERATIONS
To Use Repeat:
1.Whileadiscisplaying,pressOSDontheremote
tobringuptheDisplay.
2.HighlighttheRepeaticon.
3.Presstheorbuttonstoscrollthroughthe
RepeatoptionsuntiltheRepeatoptionyouwantis
displayedinthetextbox.
4.Theselectedrepeatoptionwilllooprepeatedlyuntil
youturnRepeatoff.
Volume Control
PressVOLUMEontheTVoramplifiertoadjustthe
volume.
PressVOLUMEontheremotecontrol.
1.Press+toraisethevolume.
2.Press-tolowerthevolume.
VOLUME+,-
DVD CD
DVD Menu Play
SomeDVDshavetitlemenusandchapter menus.
Press(PLAY),thescreenshowsthemenu.
Pressortoskiptothenextorpreviouspage.
Selectwithnumberbuttonsordirection buttons.
Example:selecttrack13.
1.Presstoenterthenextmenu.
2.Pressnumberbuttonstoselectdirectly.
Youcanalsoselectasfollows:
1.Presstoselecttrack13.
2.Press(PLAY)tostartplayingtrack13.
PressTITLEoncetoreturntothetitle menu.
PressMENUoncetoreturntotheroot menu.
12.
13.
14.
15.
12.
13.
14.
15.
1.
2.
Root
Menu
11.
Root
Menu
Root
Menu
DVD
+10 3
+
page30
BASIC OPERATIONS
Audio Mode
Youmayselectalanguagefrom amulti-languageDVD.
Youmayselecttherightchannel,leftchannel,orstereo
optionsfromamulti-channelCD.
Toselectalanguage,pressAUDIO.
Thescreenwillshowthefollowinginorder:
Differentdiscsmaydifferinlanguagesavailable.
Toselectaudiochanneloption,pressA.MODE,
thescreenshowsthefollowinginorder:
Loadadisc. Pressnumberbuttonstoselecttracksafter
theunit finishesreadingthedisc.
1.Ifthetracknumberisn'tover10,just
pushbuttons1-10.
Example:push8to selecttrack8.
Thescreenshows:
2.Ifthetracknumberisover10,press+10onceanda
buttonbetween1-10.
Example:ifyouselecttrack12,press+10onceand
button2.
Thescreenshows:
Select with Number
Buttons CD
TRACK08/20 00:00
TRACK12/20 00:00
AUDIO 1/2:AC-35.1CH
AUDIO2/2:AC-35.1CH
DVD CD
DVD
MONO LEFT
MONO RIGHT
MIXED MONO
STEREO
8
AUDIOA.MODE
A.MODE
page31
BASIC OPERATIONS
PLAY DISCS IN VARIOUS WAYS
+10 2
+
A.MODE
A.MODE
A.MODE

Youmayselectonemode.
Notes:
Differentdiscsdifferinlanguagesavailable.
Mute
Whenplayingadisc,thisfunctionremovesthesound.
1.TOREMOVESOUND
PressMUTE,thescreenshows"MUTE".
2.TORESUMESOUND
PressMUTEagain,thescreenshows"MUTEOFF".
ToselectaudiochanneloptionwhenforCDplayback,
pressA.MODE.Thescreenwillshowthefollowingin
order:
MUTE
MONO LEFT
MONO RIGHT
MIXED MONO
STEREO
DVD CD
CD
1.Whilediscisplaying,presstoplayinfast-forward
mode.Eachtimeyoupressthebutton,thescreenshows
thefollowinginorder:
2.Whilediscisplaying,presstoplayinfast-reverse
mode. Eachtimeyoupressthebutton,thescreenshows
thefollowinginorder:
3.Press(PLAY)toswitchtonormalplaywhileinfast-
forwardorfast-reverseplayingmode.
Fast Play
Whenplayingadisc,youcanplayitinfast-forwardor
fast-reversemodetofindwhatyouwanttoview.
DVD CD
DVD OR CD
2X
4X
8X
16X
32X
2X
4X
8X
16X
32X
MUTE
FR
FF
page32
PLAY DISCS IN VARIOUS WAYS
A.MODE
A.MODE
A.MODE
A.MODE
Slow Play
Enjoyslowmotionbythefollowingthestepsbelow.
1.PressSLOWtoplayinslowmotion.
Thescreenshowsthefollowinginorder:
DVD
2.Press(PLAY)toresumeplayatnormalspeed.
DVD
1/4 1/8
1/41/81/16
1/2 1/16
1/2
Repeat Play
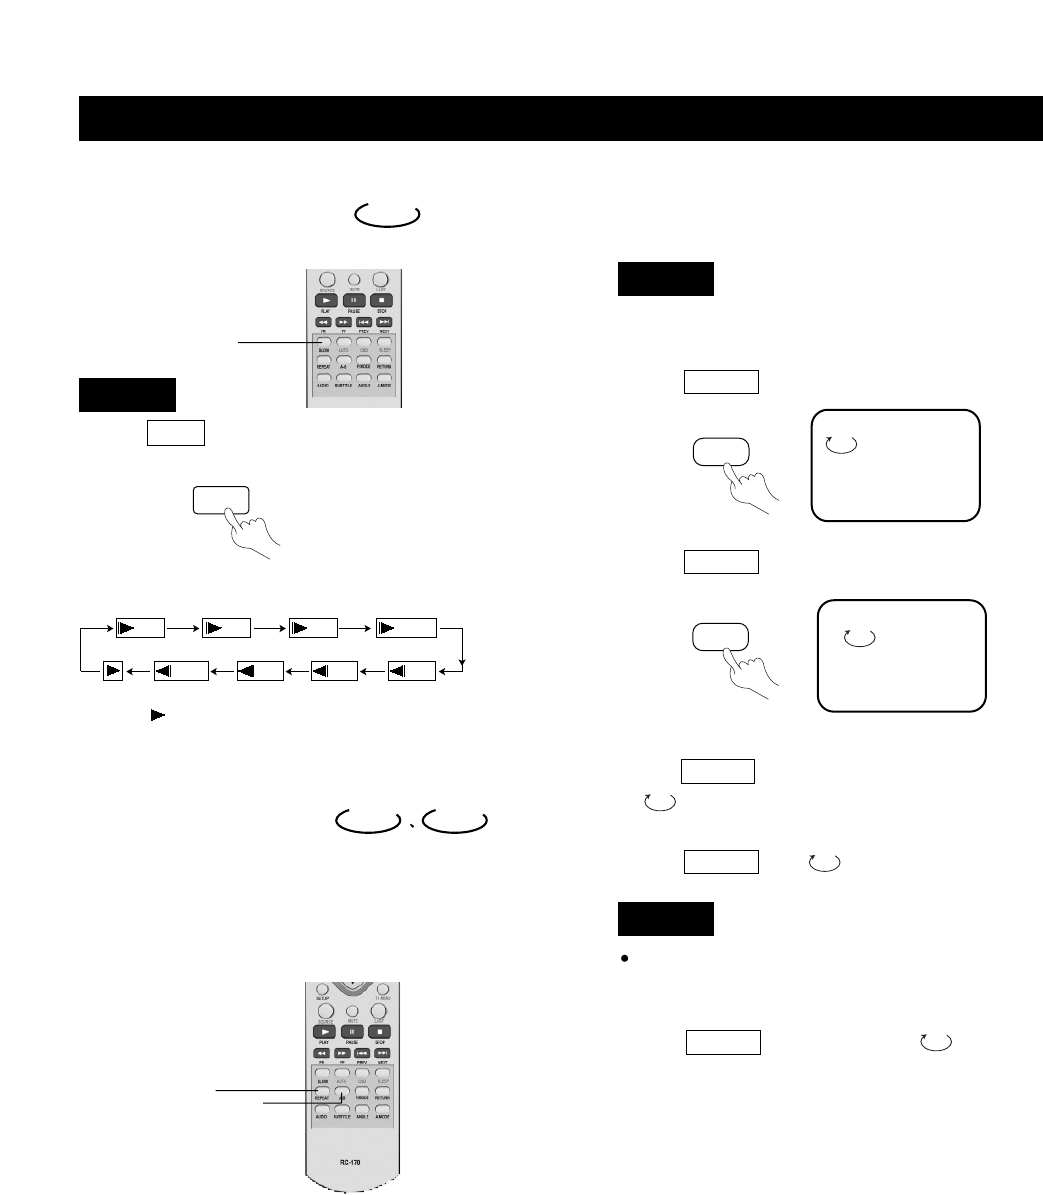
Thisfunctioncanbeusedtorepeatedlyplayatitle,
chapter,track, disc,orcertainpartsonadisc.
DVD CD
Playing A Disc Repeatedly
Youcanrepeatatitleorchapter.
1.Torepeatachapter:
PressREPEAT,thescreenwillshow:
2.Torepeatatitle:
PressREPEATtwice,thescreenwillshow:
3.Torepeatall:
PressREPEATthirdtime,thescreenshows
"ALL".
4.Toremove"REPEAT"function:
PressREPEATuntil"ALL"disappears.
Youmayrepeatatrackoranentirediscaccordingto
thefollowingsteps.
1.Torepeatatrack:
PressREPEAT,thescreenshows "TRACK".
Theunitplaysthecurrenttrack.
TITLE
CHAPTER
DVD
CD
SLOW
SLOW
REPEAT A-B
REPEAT
page33
PLAY DISCS IN VARIOUS WAYS
REPEAT
2.Torepeatadisc:
PressREPEAT,thescreenshows"ALL".
Theunitplaysallthetracksonthedisc.
3.Toremove"REPEAT"function:
PressREPEATtill" ALL"disappears.
Repeat Some Parts
Youcandesignatecertainportionsofdisctoplay
repeatedlybypressingA-Bwhenplayingadisc.
ALL
TRACK
1.TosetastartingpointA:pressA-Bwhereyouwish
tobegin.
Thescreenshows:
TheunitwillthenplayfromAtoB.
3.Toresumenormalplay,pressA-Bagainuntil"AB"
disappears.
A
2.TosetanendpointB:pressA-Bwhereyouwishto
end.
Thescreenshows:
AB
DVD OR CD
Select Subtitles
Thisoperationworksonlywithdiscswithmultiplesubtitle
languagesrecorded.
DVD
1.PressSUBTITLErepeatedlyuntilthedesired
languageisselected.
Thescreenshows:
2.Removethesubtitle.
PressSUBTITLEuntilthescreenshows"TURN
OFFSUBTITLE".
Notes:
Forsomediscs,subtitlescannotberemoved.
Differentdiscsdifferinthelanguageofsubtitles.
Ifthesubtitlesofdiscscannotbeselected,the
screenshows""whenyoupressSUBTITLE.
SUBTITLE01/03:ENGLISH
DVD
A-B
A-B
SUBTITLE
SUBTITLE
page34
PLAY DISCS IN VARIOUS WAYS
REPEAT
REPEAT
Angles Select
Somediscshaveimageswithdifferentviewingangles,
youmayselectamongthem.Forexample,whenyou
watcharunningtrain,youmaywatchitfromthefront,the
leftwindowortherightwindowwithoutstoppingit.
Example:
ADVDhasfourviewingangles atyouroption.
1.PressANGLEtoselectANGLE1.
2.PressANGLEtoselectotherangles,the
screenshowsrespectively:
3.Toresumenormalplayback,pressANGLEtoselect
originalangle.
2/4(selectANGLE2)
3/4(selectANGLE3)
4/4(selectANGLE4)
1/4
DVD
Time Search
Time Search
Youmaydirectlyenteratime,titleorchapternumberto
quicklysearchthedisc.Theunitwillplayfromthatpoint.
1.Searchatitleorachapter.
Example:Searchchapter2intitle6.
PressTIMESEARCH,thescreenshows:
Pressthedirectionbuttonandmove
thecursortoilluminatethetitlenumber.
Thescreenshows:
Pressbutton6toselecttitle6,thescreen
shows:
Repeatthestepsabove,selectchapter2
intitle6.
DVD CD
TITLE03/30 CHAPTER 01 /04
TITLE 03 /30 CHAPTER01/04
TITLE 06 /30 CHAPTER01/04
DVD
ANGLE
TIMESEARCH
page35
PLAY DISCS IN VARIOUS WAYS
2.TimeSearch.
PressTIMESEARCHuntilthescreen
shows:
Pressnumberbuttonstoenterhour,minute
andsecond.
Example:Enter1,0,2,3,8
Aftersetting,theunitwillplaythediscfrom1:02:38.
Tojumptoaspecifictime,use
TIMESEARCHtosetthetimeforthedesiredlocation.
Example:Playfrom00:01:38oftrack6.
1.Pressbutton6toselecttrack6.
Thescreenshows:
2.PressTIMESEARCH,thescreenshows:
3.Pressbutton0,1,3,8toenterthetime.Thescreen
shows:
Theunitplaysaccordingtoenteredtimeandtrack,for
examplefrom00:01:38oftrack6.
Press10/0toenter0.
Note:CDdiscshavethreeoptionsintimesearchfunction:
Youcanentertheelaspedtimeofadisctoplay.
Youcanentertheelaspedtimeofatracktoplay.
Youcangotoatrackyouwantplaybyenteringthe
tracknumber.(Similartotitleandchaptersearchfor
DVD.)
TIME : :
TRACK06/20 00:01
TRACK06/20 01:38
TRACK GO TO :
CD
page36
PLAY DISCS IN VARIOUS WAYS
Program Play
Tousetheprogramplaybackfeature,youmustenter
theorderinwhichyouwantthetitles(andchapters)on
theDVDorthetracksontheCDtoplaybycreatinga
program.
1.PressP.MODEunt
ilthescreenshows:
2.Usethenumberbuttonsontheremotetoenterthetitle
(andchapter)youwanttoplayfirst.Thetitle(and
chapter)numberyouenteredappearsinthebox.For
example:EnterChapter1inTitle8,thescreenshows:
3.Thecursorjumpstothenextspotintheprogramlist
section.Makesuretheboxishighlightedandenter
yournexttrack.
4.Continueaddingtitle(andchapter)untilyourprogram
iscomplete.Youcanplayyourprogrambyhighlighting
STARTandpressPLAY .
Note:Ifyouwanttoprogrammorethan10titles(and
chapters),highlightNEXTandpressPLAYto
gotothenextpage.Proceedtoprogram11-20 in
thesamewaytitles1-10wereprogrammed.
5.Toremoveprogramplayback,pressthe
STOPbutton
twiceduringtheprogramplay.
DVD CD
PROGRAM: TT(20)/CH (
--
)
01 TT:_ _ CH:_ _ 06 TT:_ _ CH:_ _
02 TT:_ _ CH:_ _ 07 TT:_ _ CH:_ _
03 TT:_ _ CH:_ _ 08 TT:_ _ CH:_ _
04 TT:_ _ CH:_ _ 09 TT:_ _ CH:_ _
05 TT:_ _ CH:_ _ 10 TT:_ _ CH:_ _
EXIT NEXT
PROGRAM: TT(20)/CH (
--
)
01 TT:0 8 CH:0 1 06 TT:_ _ CH:_ _
02 TT:_ _ CH:_ _ 07 TT:_ _ CH:_ _
03 TT:_ _ CH:_ _ 08 TT:_ _ CH:_ _
04 TT:_ _ CH:_ _ 09 TT:_ _ CH:_ _
05 TT:_ _ CH:_ _ 10 TT:_ _ CH:_ _
EXIT START NEXT
DVD
P.MODE
1.PressP.MODE
untilt
hescreenshows:
2.Usethenumberbuttonsontheremotetoenterthe
tracknumberyouwanttoplayfirst.Thetracknumber
enteredappearsinthebox.Theexample:Toprogram
track8ofaCDtoplayfirst,enter8,andthescreen
shows:
3.Thecursorjumpstothenextspotintheprogramlist
section.Makesuretheboxishighlightedandenter
yournexttrack.
4.Continueaddingtracksuntilyourprogramis
complete.Youcanplayyourprogrambyhighlighting
STARTandpressPLAY .
Note:Ifyouwanttoprogrammorethan10tracks,
highlightNEXTandpressPLAY togotonext
page.Program11-20inthesameway1-10were
programmed.
5.Toremoveprogramplayback,presstheSTOPbutton
duringtheprogramplay.
PROGRAM: TRACK (01
-
20)
01 _ _ 06 _ _
02 _ _ 07 _ _
03 _ _ 08 _ _
04 _ _ 09 _ _
05 _ _ 10 _ _
EXIT NEXT
PROGRAM: TRACK (01
-
20)
01 08 06 _ _
02 _ _ 07 _ _
03 _ _ 08 _ _
04 _ _ 09 _ _
05 _ _ 10 _ _
EXIT START NEXT
CD
page37
PLAY DISCS IN VARIOUS WAYS
1.PressP.MODEtoselectshuffleorrandomplay
modewhenadiscisplaying.
Thescreenshows:
2. Press(PLAY)to
startshuffleorrandomplay.
Theunitselectsatracktoplay.
3.Removeshuffleorrandomplay.
WhenplayingaDVDdisc,presstwice.
WhenplayingaCDdisc,presstwice.
Shuffle (Random) Play
TheunitcanplayDVDchaptersoraudiotracksin
randomorder.
Theorderisdifferenteachtime.
DVD CD
SHUFFLE RANDOMOR
P.MODE

SETUP
SETUP
page38
MENU SETTING
Accordingtotherecordedinformation andexternal
equipment,setthefollowing functionsfortheplayerto
obtainthebestplayingstatus.
1.PressSETUPtosetoptionsinthemainmenu.
2.Pressdirectionbuttons(or)toselectandpress
(PLAY)toconfirm.
Example:Select"AudioSetup"anddosomesetup.
Pressdirectionbuttontohighlight"AudioSetup",
press(PLAY)toenter"AudioSetupPage".
Themainmenuappearsonthescreen,withiconsacross
thetopofthescreen,illustratingGeneralSetup,Audio
Setup,VideoSetup,Preference,PasswordSetup,and
ExitSetup.
Thescreenshows:
--SetupMenu--Mainpage--
GeneralSetup
AudioSetup
VideoSetup
Preferences
PasswordSetup
ExitSetup
GoToGeneralSetupPage
Pressdirectionbuttons,toselect"LeftMono".
The screen shows:
Thescreenshows:
Pressdirectionbuttons(or)tohighlight"Dolby
DigitalSetup",andpress(PLAY)toenter"Dolby
DigitalSetup"Page.Thescreenshowsthesubmenu
foryourselection.
Thescreenshows:
--AudioSetupPage--
SpeakerSetup
DolbyDigitalSetup
ChannelEqualizer
3DProcessing
MainPage
GoToSpeakerSetupPage
--DolbyDigitalSetup--
DualMonoSTRStereo
LeftMono
RightMono
MixedMono
D.R.C
AudioSetup
--DolbyDigitalSetup--
DualMonoSTRStereo
LeftMono
RightMono
MixedMono
D.R.C
AudioSetup

page39
MENU SETTING
3.Exitsetupmenu.
Pressthedirectionbuttontoexitfrom"Dual
Mono".
Pressthedirectionbuttontoexitfrom"Dolby
DigitalSetup".
Pressthedirectionbuttontohighlight"MainPage"
andpress(PLAY).Thescreenshows:
Pressthedirectionbuttontohighlight"ExitSetup"
andpress(PLAY)toexitsetupmenucompletely.
NOTE:Youcanalsokeeppressingthedirectionbutton
untilthecursorismovedtothelasticonillustrating
Exit,thenpressthe(PLAY)buttontoexitsetup
menucompletely.
SetupPage--MainPage
GeneralSetup
AudioSetup
VideoSetup
Preferences
PasswordSetup
ExitSetup
GoToAudiosetupPage
--DolbyDigitalSetup--
DualMonoLStereo
LeftMono
RightMono
MixedMono
D.R.C
AudioSetup
Press(PLAY)toconfirmyourselection.Set"Dual
Mono"in"DolbyDigitalSetup"to"LeftMono".
Thesereenshows:
General Setup
Thesettingstructureis:
--GeneralSetupPage--
TVDisplayPS Normal/PS
Normal/LB
Wide
TVTypeNTSCPAL
Multi
NTSC
TVOutputSVideoYUV
SVideo
SPDIFOutput RAW Off
SPDIF/RAW
SPDIF/PCM
CaptionsOnOn
Off
ScreenSaveOnOn
Off
MainPage
TVDISPLAY
1.NORMAL/PS
Thisisselectedwhentheunitisconnected
toanormalTV.
Wide-screenimagesareshownonthe
screen,butwithsomepartscut
automatically.

page40
MENU SETTING
TV TYPE
YoumayselectaccordingtothecolorsystemoftheTVto
beconnected.
Select"MULTI"foramulti-systemTV.
Select"NTSC"foraNTSCTV.
Select"PAL"foraPALTV.
TV OUTPUT
1.YUV
SomeTVsormonitorsareequippedwithcomponent
videoinputs.Connectingtotheseinputsallowsyouto
enjoyhigherqualitypictureplayback.InsomeTVsor
monitors,thecolorlevelsoftheplaybackpicturemay
bereducedslightlyorthetintmaychange.Ifthis
happens,adjusttheTVormonitorforoptimum
performance.
2.S-VIDEO
Whenyouselectthis,youshouldconnectwithS-
VIDEO.
2.NORMAL/LB
Thisisselectedwhentheunitisconnected
toanormalTV.Wide-screenimagesare
shownonthescreenwithblackbarsonthe
topandbottomofthescreen.
3. WIDE
Thisisselectedwhentheunitisconnectedtoa
wide-screenTV.
SPDIF OUTPUT
SPDIFOFF:Nosignaloutputisfromdigitalport.
SPDIF/RAW:SelectthiswhentheDVDplayeris
connectedwithadigitalamplifierthroughdigitalport.
WhenaDolbyDigitaldiscorMPEGdiscareplayed,the
digitaloutputwillbeoptional.Thepoweramplifiertobe
connectedmusthaveDolbyDigitalandMPEG
decoding.
SPDIF/PCM:SelectthiswhentheDVDplayeris
connectedwitha2-channeldigitalstereoamplifier.When
aDolbyDigitalorMPEGdiscisplayed,thedigitalportwill
outputinPCM2-channelformat.
CAPTIONS
ON
Subtitlesareshown.
OFF
Subtitlesarehidden.
SCREEN SAVER
Thescreensaver imageappearswhenthe unitstopsor
theimageisfrozenforafewminutes.Thescreensaver
preventsdamagetotheTVscreen.
ON:Startthescreensaver.
OFF:Removethescreensaver.
Audio Setup
Thesettingstructureis:
--AudioSetupPage--
SpeakerSetup
DolbyDigitalSetup
ChannelEqualizer
3DProcessing
MainPage

page41
MENU SETTING
SPEAKER SETUP
Thesettingstructureis:
Lt/Rt
Adiscrecordedmultichannelsoundtrack,theoutput
signalwillbeincorportedtoleftandrightchannel.
STEREO
Adiscrecordedmultichannelsoundtrack,theoutput
signalwillbeincorportedtostereo.
DUALMONO
ThisistheoutputmodeoftheLandRsignalsofthe
setaudiooutput.Ifitissetto"MIXEDMONO",the
functiononlyworkswhentheDVDbeingplayedis5.1-
channel.
D.R.C
Thisisselectedtoadjustlinearcompressionrateto
obtainthedifferentcompressionresultsofthesignals.
DOLBY DIGITAL SETUP
Thesettingstructureis:
FULL
3/4
2/4
1/4
OFF
--SpeakerSetupPage--
DownmixSTRLt/Rt
Stereo
AudioSetup
--DolbyDigitalSetup--
DualMonoSTRStereo
LeftMono
RightMono
MixedMono
D.R.C
AudioSetup
EQUALIZER
Thiswillhelpyoutoselectgraphicequalizerpatterns
accordingtothegenreofthemusicbeingplayed,and
adjusttheequalizer.
Thesettingstructureis:
Youcanselectmusiccategorybypressingthedirection
buttonsandconfirmbypressingthePLAYbutton.
EQTYPE
--ChannelEqualizer--
EQTypeNoneNone
Rock
Pop
Live
Dance
Techno
Classic
Soft
AudioSetup
page42
MENU SETTING
3D PROCESSING
Thesettingstructureis:
--3DProcessingPage--
VSURROffOn
Off
ReverbModeOffOff
Concert
LivingRoom
Hall
Bathroom
Cave
Arena
Church
AudioSetup
VSURR
Usetoturntheabovefunctionoff.
REVERBMODE
UsetoselectaReverbModewhichyouwant.
Video Setup
Thesettingstructureis:
SHARPNESS
Usetoselectthesharpnesslevel.
HIGH
Thesharpnesslevelishighest.
--VideoSetupPage--
SharpnessHighHigh
Medium
Low
Brightness00
Contrast00
MainPage
MEDIUM
Thesharpnesslevelismedium.
LOW
Thesharpnesslevelislowest.
BRIGHTNESS
Youcanusetheorbuttontoadjustthebrightness.
CONTRAST
Youcanusetheorbuttontoadjustthecontrast.
Thesettingstructureis:
PASSWORD MODE
ON:Thepasswordfunctionisonand"PARENTAL"
isdimandcannotbeselected.
OFF:Thepasswordis locked,"PARENTAL"can
beselected.
PASSWORD CHANGE
Selectthistoadaptthecode,thescreenshows:
Password Setup
Enterapasswordaccordingtothescreen.
Note: The password is automatically factory set to
99999.
--PasswordSetupPage--
PWModeOffOn
Off
PasswordChange
MainPage
OldPassword
NewPassword
ConfirmPWD
OK
page43
MENU SETTING MP3 OPERATIONS
SELECT TRACKS WITH
NUMBER BUTTONS
1.Insertadisc,theunitwillsearchdisc information.
TheTVscreendisplaysmainmenu.
2.Pressdirectionkeytoselect song
folder.
Press(PLAY)toconfirm
selection. Example:
SelectMP3-02,the TVscreendisplays.
3.Pressdirectionbuttonstoselectasong.Press
(PLAY)buttontostartplayback.
4.Pressorbuttontoselectothertracks instop
mode.
5.Instopmode,selectthefoldericon(UPDIR1)on
theleft side,thenpress (PLAY) buttontoreturnto
themainmenu.
6.Pressortoplaypreviousornextsongs.
OTHER FUNCTIONS
DuringplaybackofMP3discs,theunitfeaturesmute,
volumecontrol,andrepeatplay.Operationsarethe
sameasCD.
00:0000:00
001/016FOLDER
..
wave-11
wave-12
wave-13
wave-14
wave-15
00:0000:00
001/012FOLDER
CD01
CD02
CD03
CD04
CD05
CD06
\CD02\
\
Thesettingstructureis:
Preferences
--PreferencePage--
AudioENGEnglish
French
Spanish
Chinese
Japanese
SubtitleENGEnglish
French
Spanish
Chinese
Japanese
Off
DiscMenuENGEnglish
French
Spanish
Chinese
Japanese
Parental081G
2
3PG
4PG13
5PGR
6R
7NC17
8ADULT
DefaultReset
MainPage
LANGUAGESELECTION
Ifalanguagementionedabove isrecordedonthedisc,
youcanselectsound,subtitlesordiscmenulanguages.If
not, thelanguagerecordedonthediscisshown.
PARENTALLOCK
Whenplayingadiscwithparentallockfunction,youmay
selectanagecontrolgradeaccordingtotheratingyour
desire.
Example:If"PG"isselected,youcannotplayDVDvideo
discsratedhigherthanthePGgrade.
DEFAULT>>RESET
Eachfunctionsettingreturnstotheinitialstatusinthe
factoryifyouselectthisoption.
Note:
"PREFERENCES"canonlybeselectedwhenpassword
isOFFwhentheunitisinstopmode.

Digest
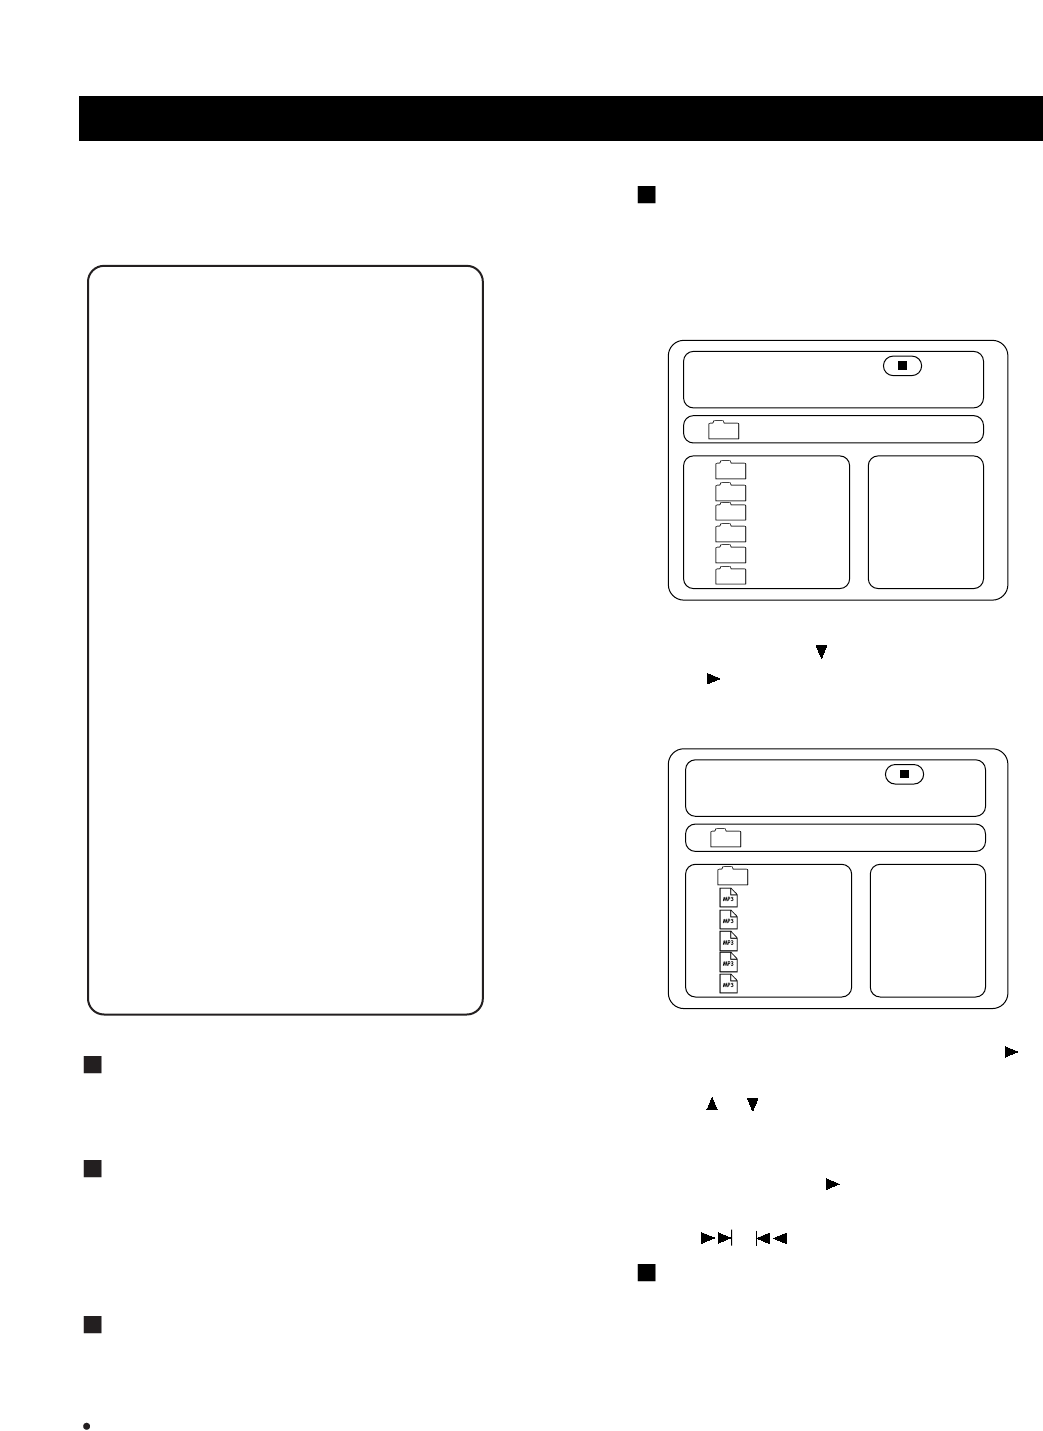
The "MENU" or "STOP" key is used to display thumbnail size pictures. After it is enabled, up to 12
scaled-down thumbnail pictures will be displayed on the screen. The "NEXT" and "PREV" keys can be
used to display the next/prev nine pictures in the the Kodak Picture CD.
You can select any of the nine displayed thumbnails by using the Arrow Keys and pressing the "PLAY"
key. The thumbnail will be enlarged to fit the TV screen and the slide show will statr. If you desire to
display an image indefinitely, press the PAUSE key. To view the Next or Previous picture press NEXT or
PREVIOUS keys. To resume the slideshow press the PLAY key.
IMPORTANT NOTE:
Quality of pictures displayed on the screen is highly dependent on the viewing device.
A Kodak Picture CD has the size and shape of a regular CD. You can order a KODAK Picture
CD simply by checking the box on the photofinishing envelope when you drop off a roll of film
(35 mm or Advanced Photo System (APS) color print film) at the time of processing in photo
processing outlet displaying "Kodak Picture CD"sign. When your order is returned, you receive
your prints, negatives, and your full roll of pictures safely stored on your KODAK Picture CD.
Each KODAK Picture CD brings you the tools to enhance, share and manage your pictures on
your computer.
Now, you can playback Kodak Picture CDs on XXX DVD players and view your pictures on
your TV in the comfort of your living room.
Playing back your Kodak Picture CD
The new feature enables the decoding of JPEG files from a Kodak Picture CD disk.
Playback modes
Normal
When a Kodak Picture CD is inserted on a player an automatic slide show is launched. Each picture in
the Kodak Picture CD will be displayed consecutively in a slide-show fashion and will be scaled to fit in
the TV screen. Twelve slideshow transition modes are provided, use "PLAY MODE" key to select.Select
transition mode prior to start of slideshow if one mode is desired for the entire show.
Customer can set transition effects for each picture in a slideshow by using the "PLAY MODE" functions
while viewing a slideshow.The last transition mode selected will be used in any future slideshows.
To display an image indefinitely, press the PAUSE key. To view the Next or Previous picture press
NEXT or PREVIOUS keys. To resume the slideshow press the PLAY key.
Image Rotation
There are four modes to rotate a picture:"Invert", "Mirror", "Left", and "Right". These operations are
allowed only when a picture is being displayed normally and will be cancelled automatically when a new
picture is displayed.The arrow key is used to select the diferent rotation modes:
Up
Down
Left
Right
-Invert/Normal
-Mirror/Normal
-Turn left
-Turn right
Mode 0: no special transition effect (by default)
Mode 1: wipe from top to bottom
Mode 2: wipe from bottom to top
Mode 3: wipe from left to right
Mode 4: wipe from right to left
Mode 5: wipe from left top to right bottom
Mode 6: wipe from right top to left bottom
Mode 7: wipe from left bottom to right top
Mode 8: wipe from right bottom to left top
Mode 9: wipe from center to top/bottom
Mode 10: wipe from center to left/right
Mode 11: wipe from top/bottom to center
Mode 12: wipe from left/right to center
Mode 13: horizontal blinds
Mode 14: vertical blind
Mode 15: wipe from edge to center
Mode 16: random
page44
KODAK PICTURE CD PLAYBACK

No sound
Checkifthe unitisconnectedsecurely.
MakesuretheTVoramplifierisworkingproperly.
MakesuretheamplifierissettoreceiveDVDsignal
output.
No image
Checkiftheunitisconnectedsecurely.
MakesuretheTVisworkingproperly.
Makesurethecolorsystemissetcorrectly.
Bad sound quality
Makesuretheaudiooutputmodeissetcorrectly.
Makesuretheaudioconnectionbetweentheunitand
amplifierisinplace.
Disc cannot be played
Thereisnodiscintheunit.
Putthedisconthedisctrayproperlywiththelabel
sideup.
Cleanthedisc.
Moisturehascondensedintheunit.Removethe
discandleavetheunitonforaboutanhour.
The unit doesn't operate normally
Disconnectthepowerplugandinsertitintothewall
outletagain.
Remote control does not work
Removebarriersbetweentheremotecontrolandthe
unit.
Pointtheremotecontrolattheremotecontrolsensor
oftheunit.
Replacethebatterieswithnewones.
Ifyouexperiencethefollowingproblemswhileusing the unit,thistroubleshootingguidecanhelpyou.
page45
TROUBLESHOOTING
Laser
Videosystem
Frequencyresponse
Signal/noiseratio
outputlevel:2V 10%
Loadimpedance:10KΩ
outputlevel:0.5Vp-p 20%
Loadimpedance:75Ω
outputlevel:1Vp-p 20%
Loadimpedance:75Ω, imbalance,negativepolarity
outputlevel:brightness(Y)1Vp-p20%
chromaticity(C)0.286Vp-p 20%Loadimpedance:75Ω
Y:700mv 20%Cb/Pb:535.5mv 20%Cr/Pr:535mv 20%
DC12V,AC100~240V,50/60Hz
20W
Thismanualisonlyforyourreference,anychangetothedesignandspecificationswillnotbeadvised.
Wavelength650nm
NTSC/MULTI/PAL
20Hz~20KHz 2.5dB
85dB
-80dB(1KHz)
85dB(1KHz)
85dB(1KHz)
Audiodistortion+noise
Channelseparation
Dynamicrange
Output
Audioout
(analogaudio)
Audioout
(digitalaudio)
Videoout
S-videoout
YUVout
PowerConsumption
Powersupply
page46
TECHNICAL SPECIFICATIONS
