Innovative Technology Electronics UOTUNE1 READY_CASSETTE_GO User Manual 1
INNOVATIVE TECHNOLOGY ELECTRONICS LLC READY_CASSETTE_GO 1
Users manual
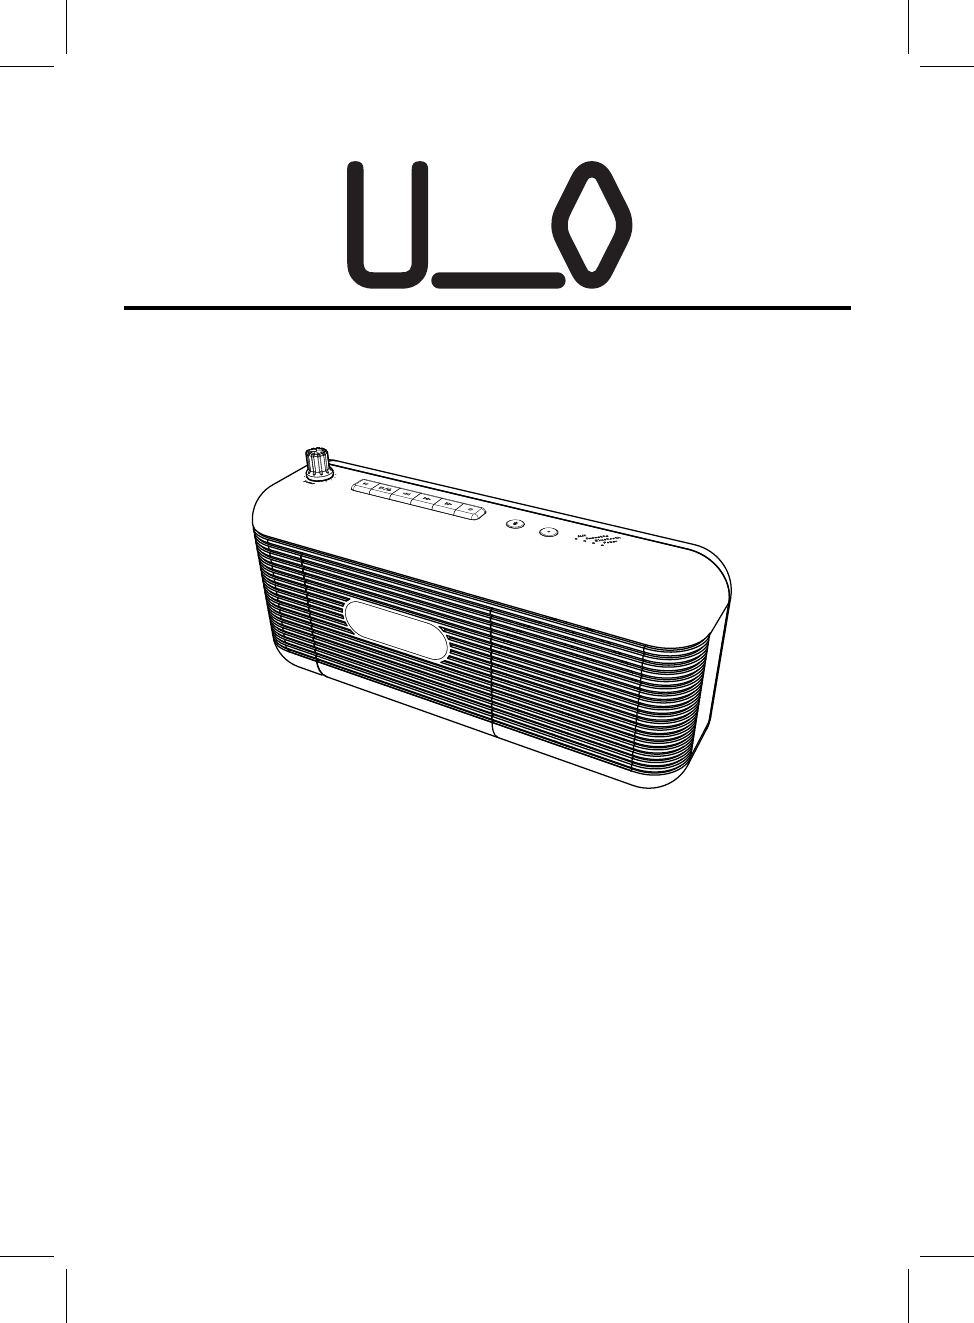
Bluetooth Speaker with Cassette
PLEASE READ CAREFULLY BEFORE OPERATING THIS EQUIPMENT
KEEP IT IN A SAFE PLACE FOR FUTURE REFERENCE
MODEL:CAB-D7050
Urban Outfitters
DANGEROUS VOLTAGE:The lighting flash with arrowhead symbol within
an equilateral triangle is intended to alert the user to the presence of
uninsulated “dangerous voltage” within the product’s enclosure that may
be of sufficient magnitude to constitute a risk of electric shock to persons.
ATTENTION:The exclamation point within an equilateral triangle is intended to
alert the user to the presence of important operating and maintenance
(servicing) instructions in the literature accompanying the appliance.
WARNING:TO PREVENT FIRE OR SHOCK HAZARD, DO NOT EXPOSE
THIS UNIT TO RAIN OR MOISTURE.
WARNING: USE UNDER SUPERVISION OF AN ADULT DUE TO LONG
CORD This unit has a long cord that can be easily tripped on or pulled on,
causing injury. Please make sure it is arranged so that it will not drape over a
tabletop, etc. Where it can be pulled on by children or tripped over accidentally.
FCC STATEMENT:
This device complies with part 15 of the FCC Rules. Operation is subject to the
following two conditions:
(1)This device may not cause harmful interference, and
(2)This device must accept any interference received, including interference
that may cause undesired operation.
CAUTION: TO REDUCE THE ELECTRIC SHOCK, DO NOT REMOVE THE
COVER (OR BACK). NO USER SERVICEABLE PART INSIDE, REFER
SERVICING TO QUALIFIED SERVICE PERSONNEL.
CAUTION
RISK OF ELECTRIC SHOCK
DO NOT OPEN
2
This equipment has been tested and found to comply with the limits for a Class
B digital device, pursuant to Part 15 of the FCC Rules. These limits are
designed to provide reasonable protection against harmful interference in a
residential installation. This equipment generates, uses and can radiate radio
frequency energy and, if not installed and used in accordance with the
instructions, may cause harmful interference to radio communications.
However, there is no guarantee that interference will not occur in a particular
installation. If this equipment does cause harmful interference to radio or
television reception, which can be determined by turning the equipment off and
on, the user is encouraged to try to correct the interference by one or more of
the following measures:
●Reorient or relocate the receiving antenna.
●Increase the separation between the equipment and receiver.
●Connect the equipment into an outlet on a circuit different from that to which
the receiver is connected.
●Consult the dealer or an experienced radio/TV technician for help.
FCC WARNING:
To assure continued operation, follow the attached installation instructions and
use only shield cables when connecting to other devices. Changes or
modifications not expressly approved by the party responsible for compliance
could void the user's authority to operate the equipment.
Before using the unit, be sure to read all operating instruction carefully, please
note that these are general precautions and may not pertain to your unit. For
example, this unit may not have the capability to be connected to an outdoor
antenna.
1. Read these instructions
All the safety and operating instructions should be read before the appliance is
operated.
2. Keep these instructions
The safety and operating instructions should be kept for future reference.
3. Heed all warnings
All warnings on the appliance and in the operating instructions should be
adhered to.
4. Follow all instructions
All operation and use instructions should be followed.
FCC NOTICE:
5. Do not use this apparatus near water
The appliance should not be used near water; for example, near a bath tub,
3
washbowl, kitchen sink, laundry tub, in a wet basement, or near a swimming
pool.
6. Clean only with dry cloth
The appliance should be cleaned only as recommended by the manufacturer.
7. Do not block any ventilation openings.Install in accordance with the
manufacturer’s instructions.
Slots and openings in the cabinet and in the back or bottom are provided for
ventilation, to ensure reliable operation of the product and to protect it from
overheating. These openings must not be blocked or covered. The openings
should never be blocked by placing the product on a bed, sofa, rug, or similar
surface. This product should never be placed near or over a radiator or heat
source. This product should not be placed in a built-in installation, such as a
bookcase or rack unless proper ventilation is provided or the manufacturer’s
instructions have been adhered to.
8. Do not install near any heat sources such as radiators, heat registers,
stoves, or other apparatus (including amplifiers) that produce heat.
9. Do not defeat the safety purpose of the polarized or grounding-type
plug. A polarized plug has two blades with one wider than the other. A
grounding type plug has two blades and a third grounding prong. The
wide or the third prong are provided for your safety. If the provided plug
does not fit into your outlet, consult an electrician for replacement of the
obsolete outlet.
10. Protect the power cord from being walked on or pinched particularly
at plugs, convenience receptacles, and the point where they exit from the
apparatus.
11. Only use attachments / accessories specified by the manufacturer.
12. Use only with a cart, stand, tripod, bracket, or table
specified by the manufacturer, or sold with the apparatus.
When a cart is used, use caution when moving the
cart/apparatus combination to avoid injury
from tip-over.
An appliance and cart combination should be moved with care. Quick stop,
excessive fore and uneven surfaces may cause the appliance and cart
combination to overturn.
13. Unplug this apparatus during lightning storms or when unused for
long periods of time.
To protect your product from a lightning storm, or when it is left unattended and
unused for long periods of time, unplug it from the wall outlet and disconnect
the antenna or cable system. This will prevent damage to the product due to
lightning and power-line surges.
14. Refer all servicing to qualified service personnel. Servicing is
required when the apparatus has been damaged in any way, such as
power-supply cord or plug is damaged, liquid has been spilled or objects
have fallen into the apparatus, the apparatus has been exposed to rain or
Portable Cart Warning
4
moisture, does not operate normally, or has been dropped.
15. Power source
This product should be operated only from the type of power source indicated
on the marking label. If you are not sure of the type of power supply to your
home, consult your appliance dealer or local power company. For products
intended to operate from battery power, or other source, refer to the operation
instructions.
16. Power lines
An outside antenna system should not be located in the vicinity of overhead
power lines or other electric light or power circuits, or where it can fall into such
power lines or circuits. When installing an outside antenna system, extreme
care should be taken to keep from touching such power lines or circuits as
contact with them might be fatal.
17. Overloading
Do not overload wall outlets and extension cords as this can result in a risk of
fire or electric shock.
18. Object and liquid entry
Never push objects of any kind into the product through openings as they may
touch dangerous voltage points or short out parts that could result in fire or
electric shock. Never spill or spray any type of liquid on the product.
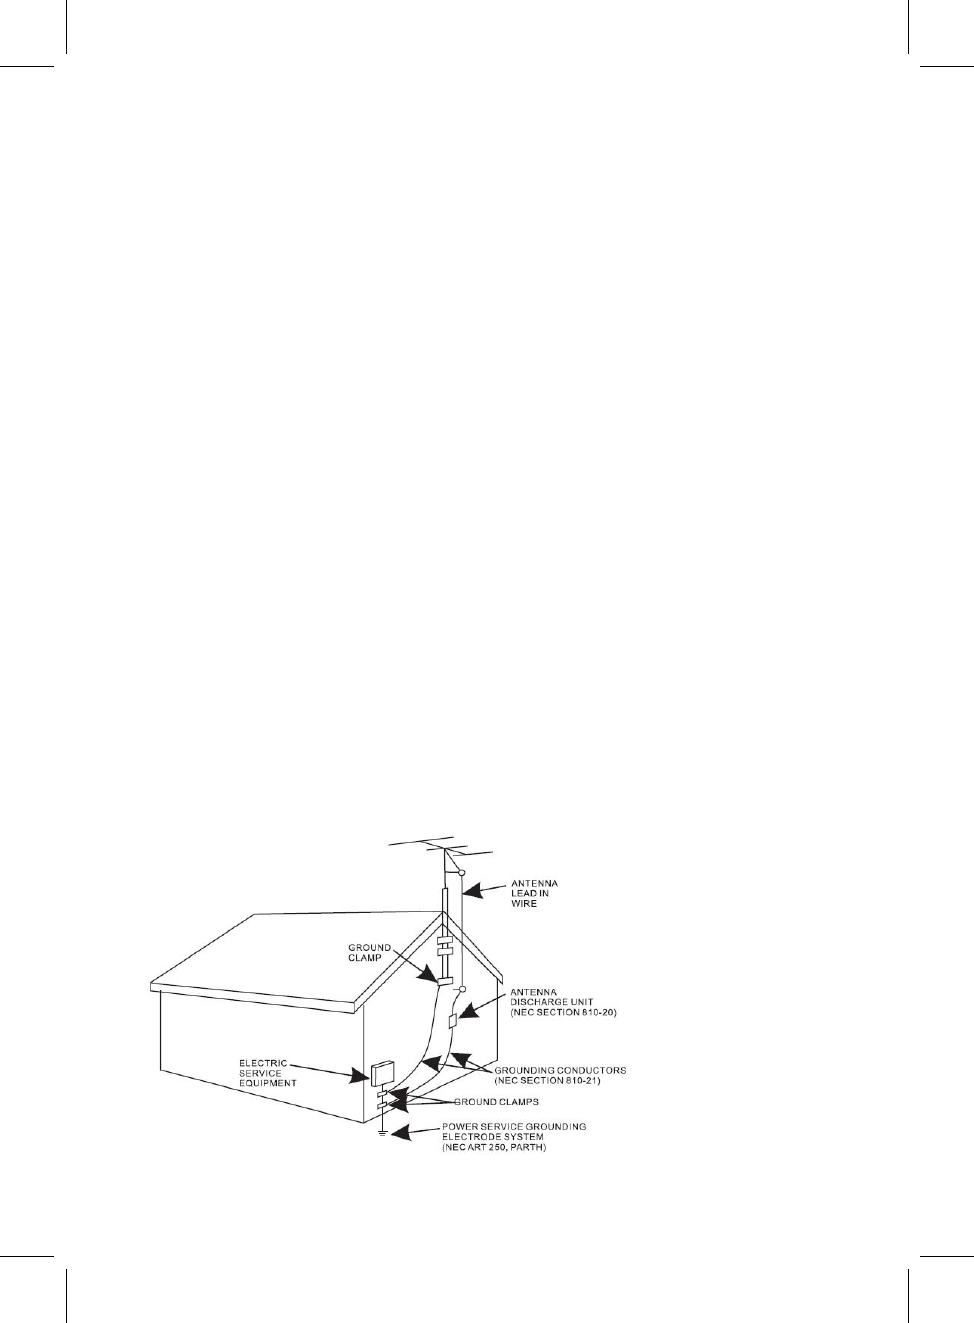
19. Outdoor antenna grounding
If an outside antenna is connected to the product, be sure the antenna system
is grounded so as to provide some protection against voltage surges and built
up static charges. Section 810 of the National Electric Code ANSI/ NFPA 70
provides information with respect to proper grounding of the mast and
supporting structure, grounding of the lead- in wire to an antenna discharge
product, size of grounding conductors, location of antenna- discharge product,
connection to grounding electrodes and requirements for the grounding
electrodes.
5

20. Service
Do not attempt to service this product yourself as opening or removing covers
may expose you to dangerous voltage or other hazards. Refer all servicing to
qualified service personnel.
b)If liquid has been spilled or objects have fallen into the product.
c)If the product has been exposed to rain or water.
d)If the product does not operate normally by following the operating
instructions. Adjust only those controls that are covered by the operating
instructions, as an adjustment of other controls may result in damage and will
require extensive work by a qualified technician to restore the product to its
normal operation.
e)If the product has been dropped or the cabinet has been damaged.
f)When the product exhibits a distinct change in performance- this indicates a
need for service.
25. Note to CATV system installer
This reminder is provided to call the CATV system installer' s attention to
Article 820- 40 of the NEC that provides guidelines for proper grounding and,
in particular, specifies that the cable ground shall be connected to the
grounding system of the building, as close to the point of cable entry as
practical.
NOTE: Refer all servicing to qualified service personnel. Servicing is
required when the unit has been damaged in any way such as the
following: the power-supply cord or plug has been damaged, liquid has
been spilled into unit, the unit has been exposed to rain or moisture, the
unit has been dropped or the unit does not operate normally.
21. Replacement parts
When replacement parts are required, be sure the service technician uses
replacement parts specified by the manufacturer or those that have the same
characteristics as the original parts. Unauthorized substitutions may result in
fire or electric shock or other hazards.
22. Safety check
Upon completion of any service or repairs to this product, ask the service
technician to perform safety checks to determine that the product is in proper
operating condition.
23. Wall or ceiling mounting
The product should be mounted to a wall or ceiling only as recommended by
the manufacturer.
24. Damage requiring service
Unplug this product from the wall outlet and refer service to qualified service
personnel under the following conditions.
a)When the power- supply cord or plug is damaged.
6
Metal and chrome (cobalt) tapes have identification holes.
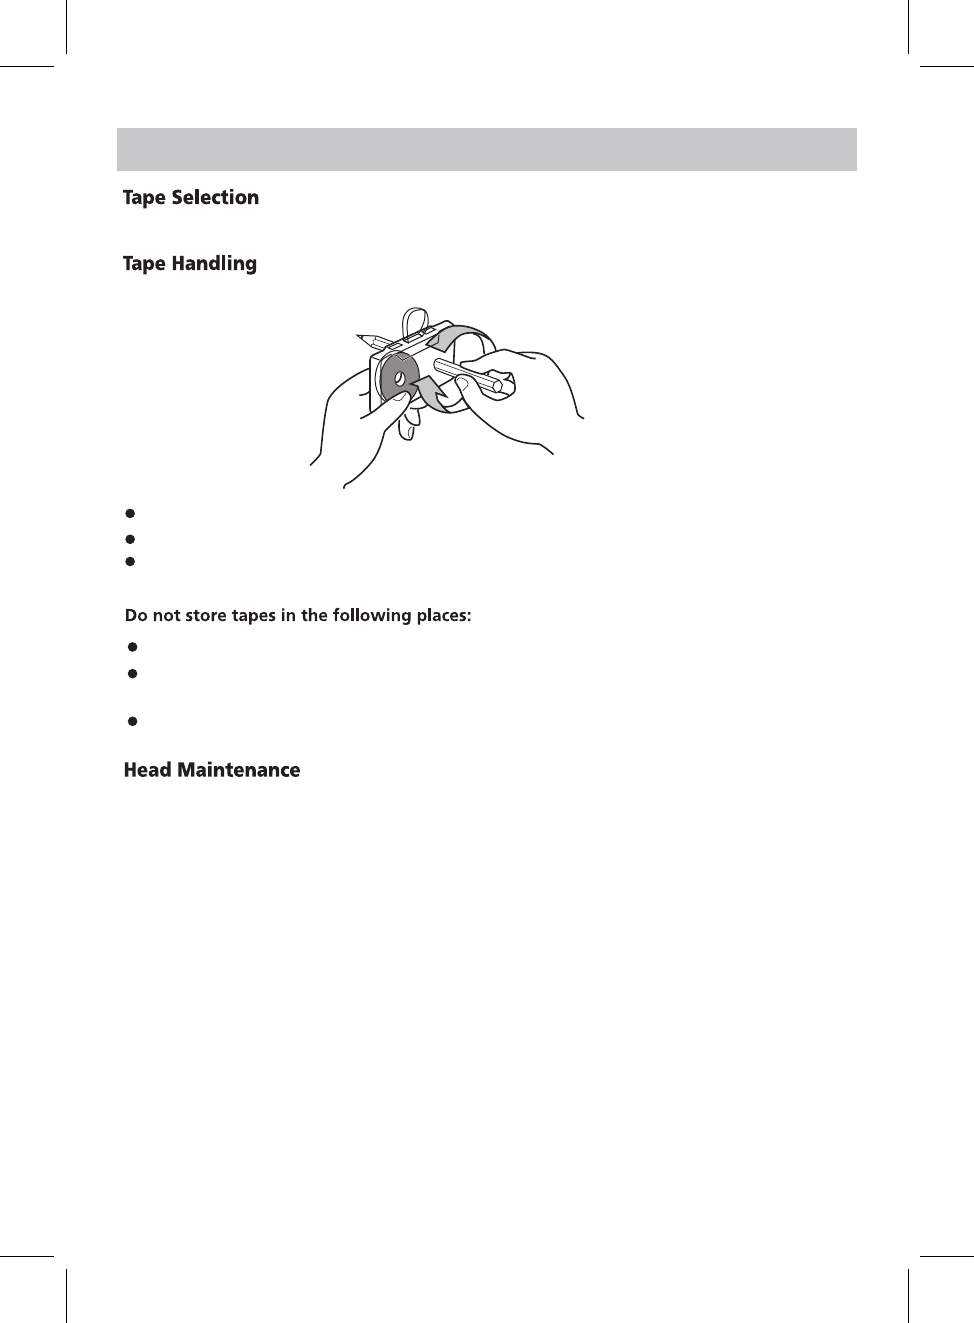
Use your finger or a pencil to turn the cassette's hub and take up any slack tape.
Avoid touching the tape. Fingerprints attract dust and dirt.
Avoid dropping or subjecting cassettes to excessive shocks.
As C-120 tapes are physically weak and could become
On top of heaters, exposed to direct sunlight or in any other places with high temperatures.
Near speakers, on TV sets or amplifiers or where they would
Where humidity is high and in dirty, dusty places.
The head and tape path should be cleaned and damagnetized
demanetizer. For specific details on the proper use of either item,
please read each item's instruction manual.
entangled in transport mechanism,
do not use them.
be exposed to strong magnetic
fields.
periodically. Please use a cassette
type head cleaning tape and
HANDLING CASSETTE
7
IC Caution:
RSS-Gen Issue 4 December 2014"&"CNR-Gen 4e Décembre 2014:
- English:
This device complies with Industry Canada licence-exempt RSS standard(s).
Operation is subject to the following two conditions: (1) This device may not cause interference,
and (2) This device must accept any interference, including interference that may cause undesired
operation of the device.
- French:
Le présentappareilestconforme aux CNR d'Industrie Canada applicables aux appareils radio
exempts de licence. L'exploitationestautorisée aux deux conditions suivantes:
(1) l'appareil ne doit pas produire de brouillage, et
(2) l'utilisateur de l'appareildoit accepter tout brouillageradioélectriquesubi, mêmesi le
brouillageest susceptible d'encompromettre le fonctionnement.
PRODUCT OVERVIEW
Front View
12
3
4
5678910
Rear View
Top View
11 12 13 14 15 16 17
1. Cassette Door
2. Speaker
3. AUX IN Jack
4. DC IN Jack
5. Power On/Off, Volume Knob
6. Play/Pause Button
7. Stop/Open Button
8. Fast Backward Button
9. Fast Forward Button
10. Play Button
11. Record Button
12. Play/Pause, Disconnect Button
13. Mode Button
14. AUX Indicator
15. Cassette Indicator
16. Bluetooth Indicator
17. Power Indicator
8
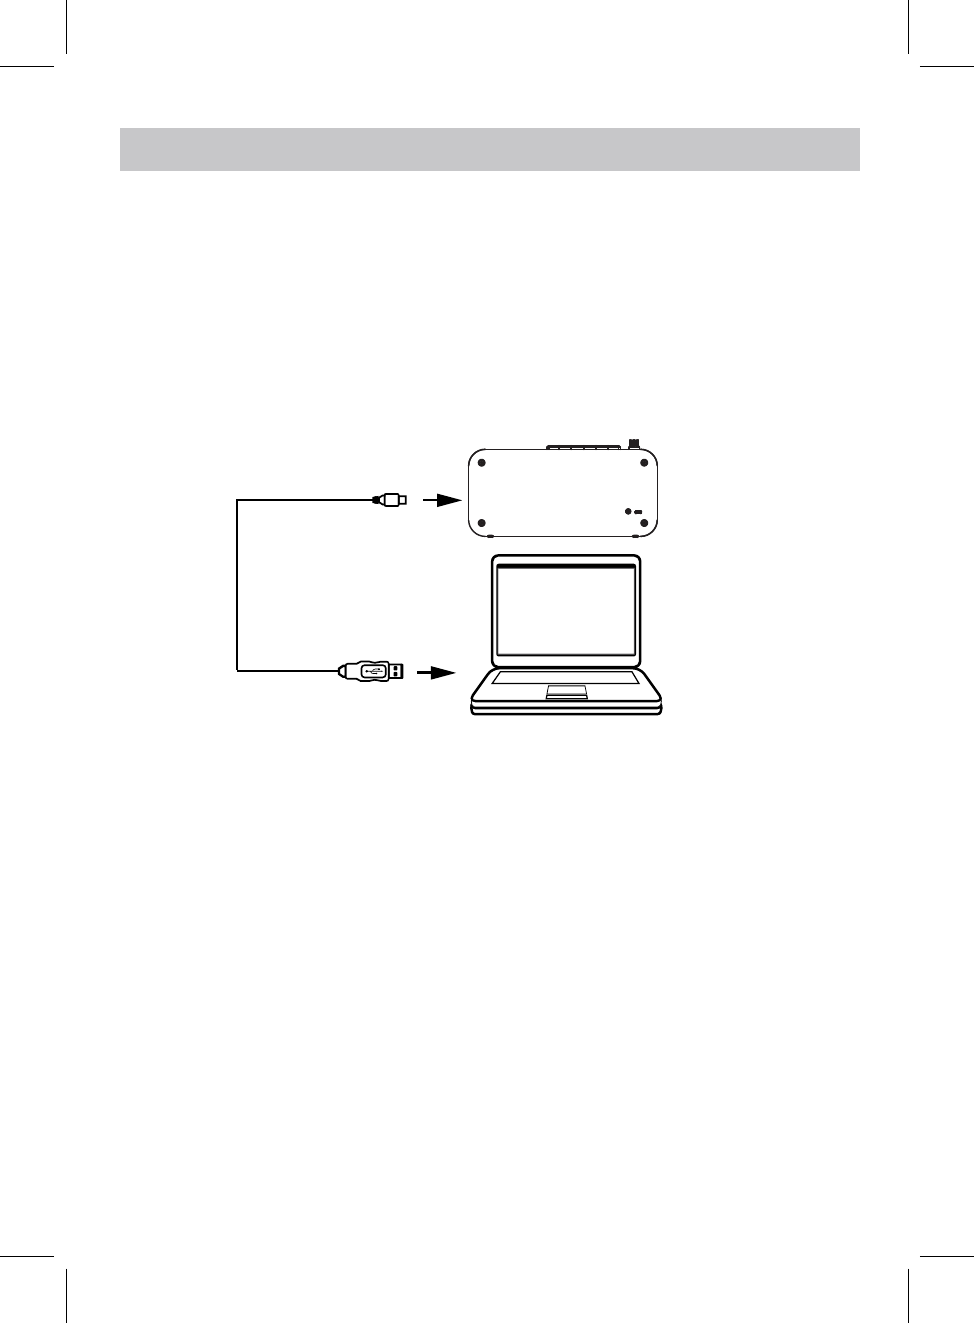
POWER SOURCE
The unit has a built in Li-ion rechargeable battery, recharge it before use or whenitisdrainedasfollows:
1.
Connect the Micro USB Plug from the supplied USB Connection Cable to
the Micro USB Port on the
rearofunit.
2.
Connect the full sized USB Plug from the supplied USB Connection Cable
to the USB Port on the
ComputerorUSBCharger.(ComputerandUSBCharger NOT supplied).
3.
NOTES:
Your battery will last longer if you're following these simple guidelines for caring and storing:
A.
Before first time use, charge it approximately 4hours until the unit is fully
charged.
B.
Recharge and store the unit within the temperature range of 5°C~35°C
(40°F~95°F).
C.
Do not charge longer than 24 hours. Excessive charging or running the
unit until battery fully drains
will damage battery. Battery life will be extended if you keep the battery fully charged.
D.
Battery life naturally shortens slowly over time.
E.
The rechargeable battery incorporated in this product is not user
replaceable.
PC
To Micro USB Port
USB Connection Cable
Main unit
To USB Port on PC or USB Charger
During charging in power on mode, the Power Indicator will flash Blue, after fully charged, the Power
Indicator will stay lit. (NOTE: Charging in power off mode, the power indicator will turn Red, after fully
9
charged, the power indicator will turn off.)
BOUETOOTH OPERATION
2. Press the (mode button) until the Bluetooth Indicator flashes White, the unit will send a tone.
3. Activate the bluetooth function on your external device, and try searching, the pairing name
will appear on the pairing name list.
4. Select it and register in your player.
5. After successful connection, the Bluetooth Indicator will stay lit.
6. Turn the volume knob to adjust the volume level.
Note:
1. Turn the Power On/Off/Volume Button clockwise until a sound of "click" heard to power on
the unit. The power indicator will light.
"UO_TUNE_IN_001"
During playing:
Press the button to pause, press it again to resume playing.
7. If you want to pair with another device, press and hold the button to disconnect the
current pairing and connection, and try to pair with another device by above pairing steps.
The unit can be automatically connected with the last paired device after first time pairing
when both of them are powered on and the Bluetooth is activated and in range.
AUX IN OPERATION
2. Press the (mode button) until the AUX Indicator turns White.
1. Turn the Power On/Off/Volume Button clockwise until a sound of "click" heard to power on
the unit. The power indicator will light.
3. Connect one end of the AUX IN Cable to the AUX IN jack on the rear of the unit.
4. Connect another end of the AUX IN Cable to the AUX OUT, Line Out or Headphone jack on the
external player like Mobilephone, MP3 Player etc..
5. Turn the volume knob to adjust the volume level.
10
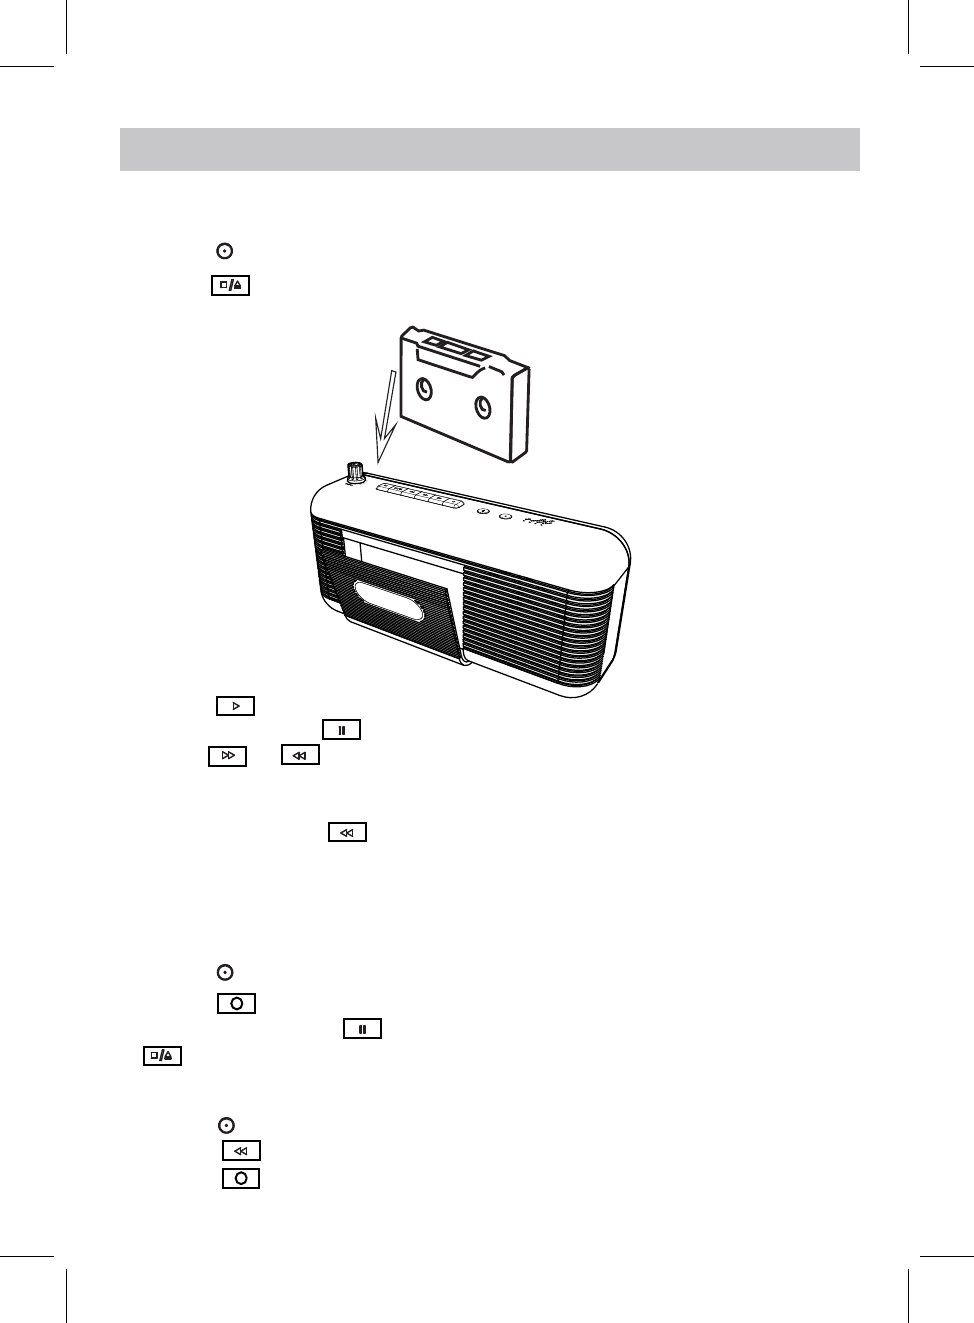
CASSETTE OPERATION
2. Press the (mode button) until the Cassette Indicator turns White.
1. Turn the Power On/Off/Volume Button clockwise until a sound of "click" heard to power on the unit.
The power indicator will light.
3. Press the button to open the Cassette door, put the cassettte tape into the cassette
compartment and close the door.
4. Press the button to start play the cassette tape.
5. During playing, press the button to pause, press it again to resume playing.
6. Turn the volume knob to adjust the volume.
7. After finish playing one side of the cassette tape, open the cassette door and take it out to play
another side. Or press the button to fast backward the tape.
Press the or button to fast forward or backward to the desired location.
1.Put an empty cassette tape into the cassette compartment.
2. Press the (mode button) to turn to Bluetooth mode or AUX mode and play through one of them.
3. Press the button to start recording.
4. During recording, press the button to pause, press it again to resume recording, or press the
button to stop recording.
11
1. Press the (mode button) repeatedly to return to cassette mode.
3. Press the button to start delete recording.
2. Press the button to fast backward to the desired location.
DELETE THE RECORDED CONTENT
TAPE RECORDING
NOTE:Under cassette mode, when finish the fast forward or skip the cassette tape, it cannot auto
resume all buttons and stop.
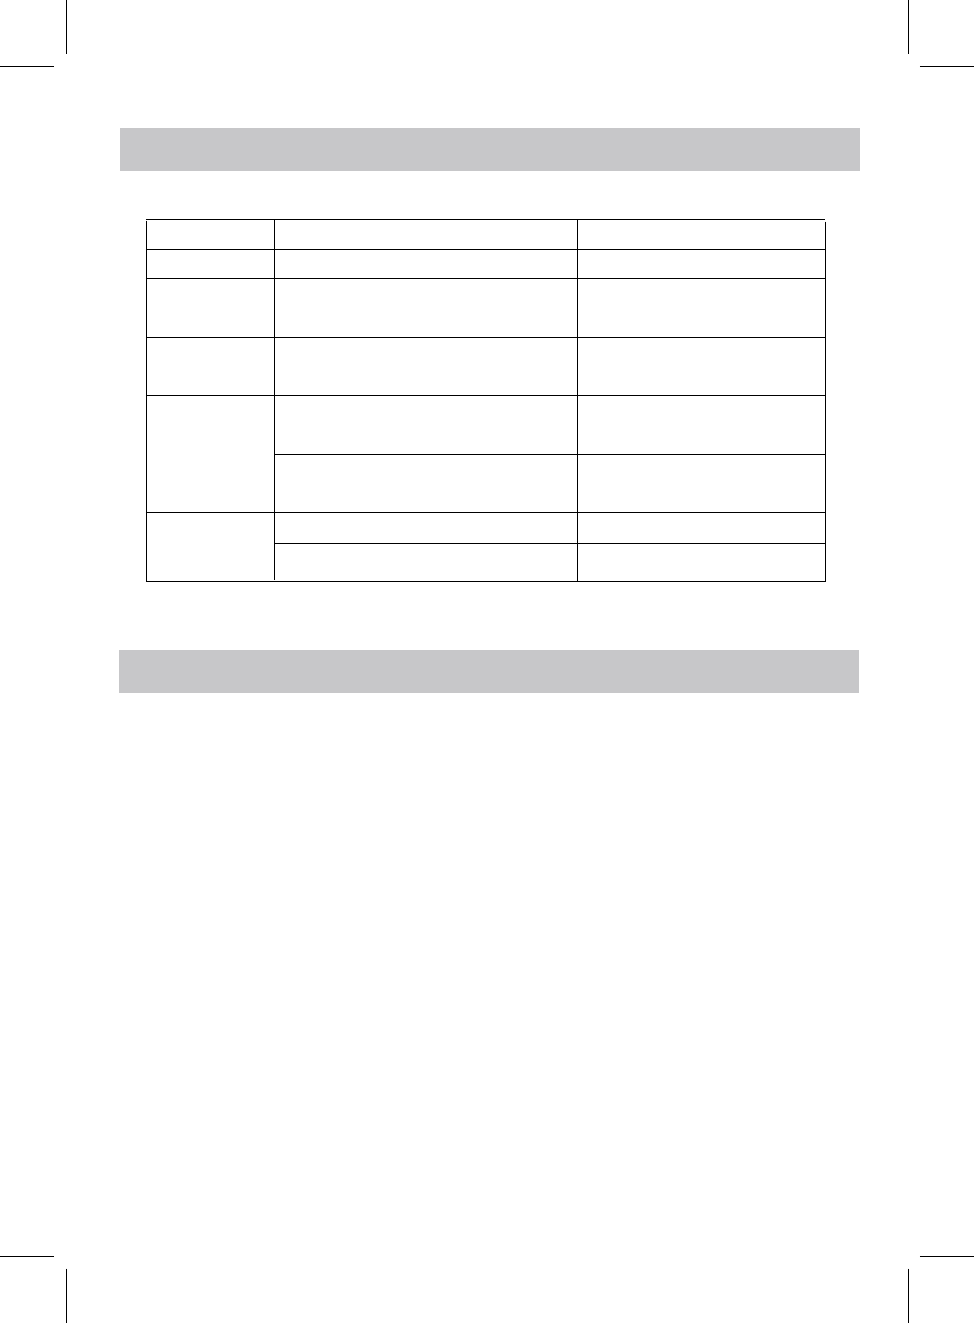
Check the following before requesting service:
SYMPTOM POSSIBLE CAUSE POSSIBLE SOLUTION
Can’t power on Built in battery drained Recharge the battery
Volume level of paired/connected device
is in low level
Rise the volume level of the
paired/connected device
Volume level of the connected/paired
devicetoohigh
Reduce the volume level of the
connected/paireddevice
The external BT device had NOT paired to
the unit
Pair the external BT device to the
unit
The external BT device too far from the
unit
Place the external BT device
close to the unit
Audio power: 1 x 5W (RMS)
BT Version: 4.1
BT Operation Distance: ≧32 Feet in open area
SPECIFICATIONS AND ACCESSORIES ARE SUBJECT TO CHANGE
WITHOUT NOTICE
No sound or
sound weak
Sound distortion
BT not
functioning
1 x User's Manual
1 x Micro USB Charging Cable
1 x Audio Connection Cables with 3.5mm Plugs
TROUBLESHOOTING
SPECIFICATIONS
ACCESSORIES:
Cassette tape
can not play
Bad tape
Insert a cassette tape correctly
Change another tape
Insert a cassette tape incorrectly
12