Innovative Technology Electronics VM100 ACRYLIC TURNTABLE W/TRUE WIRELESS 40W FLOATING SPEAKERS User Manual 1
INNOVATIVE TECHNOLOGY ELECTRONICS LLC ACRYLIC TURNTABLE W/TRUE WIRELESS 40W FLOATING SPEAKERS 1
Users Manual

MODEL:VM-100
ACRILIC TURNTABLE WITH WIRELESS SPEAKERS
PLEASE READ CAREFULLY BEFORE OPERATING THIS EQUIPMENT
KEEP IT IN A SAFE PLACE FOR FUTURE REFERENCE
2
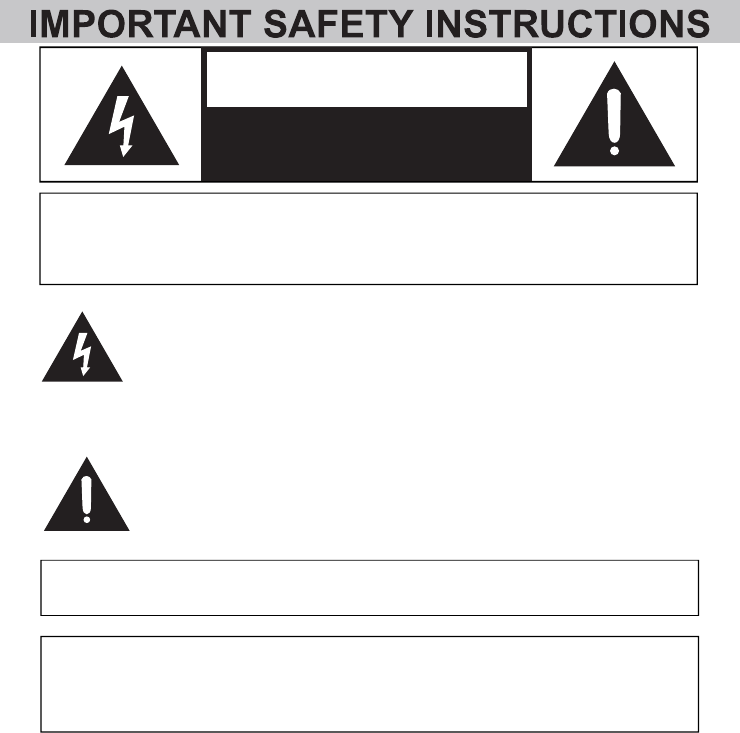
DANGEROUS VOLTAGE: The lighting flash with arrowhead symbol
within an equilateral triangle is intended to alert the user to the
presence of uninsulated “dangerous voltage” within the product’s
enclosure that may be of sufficient magnitude to constitute a risk of electric shock
to persons.
ATTENTION:
The exclamation point
within
an equilateral triangle is intended
to alert the
user
to the presence
of important operating and maintenance
(servicing) instructions in the literature accompanying the appliance.
WARNING:TO PREVENT FIRE OR SHOCK HAZARD, DO NOT EXPOSE
THIS UNIT TO RAIN OR MOISTURE.
WARNING: USE UNDER SUPERVISION OF AN ADULT DUE TO LONG
CORD This unit has a long cord that can be easily tripped on or pulled on,
causing injury.Please make sure it is arranged so that it will not drape over a
tabletop, etc. Where it can be pulled on by children or tripped over accidentally.
CAUTION: TO REDUCE THE ELECTRIC SHOCK, DO NOT REMOVE THE
COVER (OR BACK). NO USER SERVICEABLE PART INSIDE, REFER
SERVICING TO
Q
UALIFIED SERVICE PERSONNEL.
RISK OF ELECTRIC SHOCK
O NOT OPEN
CAUTION
D
FCC NOTICE:
This equipment has been tested and found to comply with the limits for a Class
B digital device, pursuant to Part 15 of the FCC Rules. These limits are
designed to provide reasonable protection against harmful interference in a
residential installation. This equipment generates, uses and can radiate radio
frequency energy and, if not installed and used in accordance with the
instructions, may cause harmful interference to radio communications.
However, there is no guarantee that interference will not occur in a particular
installation. If this equipment does cause harmful interference to radio or
television reception, which can be determined by turning the equipment off and
on, the user is encouraged to try to correct the interference by one or more of
the following measures:
Reorient or relocate the receiving antenna.
Increase the separation between the equipment and receiver.
Connect the equipment into an outlet on a circuit different from that to
which the receiver is connected.
Consult the dealer or an experienced radio/TV technician for help.
3
Before using the unit, be sure to read all operating instruction carefully, please
note that these are general precautions and may not pertain to your unit. For
example, this unit may not have the capability to be connected to an outdoor
antenna.
(1) Read these instructions
All the safety and operating instructions should be read before the
appliance is operated.
(2) Keep these instructions
The safety and operating instructions should be kept for future reference.
(3) Heed all warnings
All warnings on the appliance and in the operating instructions should be
adhered to.
(4) Follow all instructions
All operation and use instructions should be followed.
(5) Do not use this apparatus near water
The appliance should not be used near water; for example, near a bath
tub, washbowl, kitchen sink, laundry tub, in a wet basement, or near a
swimming pool.
FCC STATEMENT:
This device complies with part 15 of the FCC Rules. Operation is subject to the
following two conditions:
(1) This device may not cause harmful interference, and
(2) This device must accept any interference received, including interference
that maycause undesired operation.
FCC Radiation Exposure Statement:
This equipment complies with FCC radiation exposure limits set forth for an uncontrolled environment .
This transmitter must not be co-located or operating in conjunction with any other antenna or transmitter.
ISEDC Radiation Exposure Statement:
This equipment complies with ISEDC RF radiation exposure limits set forth for an uncontrolled environment.
This transmitter must not be co-located or operating in conjunction with any other antenna or transmitter.
Cet appareil est
conforme aux limitesd'exposition de rayonnement RF I
SEDC établiespour un environnement non contrôlé.
Cetémetteur ne doit pas être co-implanté oufonctionner
en conjonction avec toute aut
reantenne ou transmetteur
This device complies with ISEDC licence-exempt RSS standard(s). Operation is subject
to the following two conditions:
(1) this device may not cause interference, and
(2) this device must accept any interference, including interference that may cause
of the device.
undesired operation
FCC WARNING:
To assure continued operation, follow the attached installation instructions and
use only shield cables when connecting to other devices. Changes or
modifications not expressly approved by the party responsible for compliance
could void the user's authority to operate the equipment .

4
(6) Clean only with dry cloth
The appliance should be cleaned only as recommended by the
manufacturer.
(7) Do not block any ventilation openings.Install in accordance with the
manufacturer’s instructions.
Slots and openings in the cabinet and in the back or bottom are provided
for ventilation, to ensure reliable operation of the product and to protect it
from overheating. These openings must not be blocked or covered. The
openings should never be blocked by placing the product on a bed, sofa,
rug, or similar surface. This product should never be placed near or over a
radiator or heat source. This product should not be placed in a built-in
installation, such as a bookcase or rack unless proper ventilation is
provided or the manufacturer’s instructions have been adhered to.
(8) Do not install near any heat sources such as radiators, heat registers,
stoves, or other apparatus (including amplifiers) that produce heat.
(9) Do not defeat the safety purpose of the polarized or grounding-type
plug. A polarized plug has two blades with one wider than the other.
A grounding type plug has two blades and a third grounding prong.
The wide or the third prong is provided for your safety. If the
provided plug does not fit into your outlet, consult an electrician for
replacement of the obsolete outlet.
(10) Prod ct the power cord from being walked on or pinched particularly
at plugs, convenience receptacles, and the point where they exit
from the apparatus.
(11) Only use attachments / accessories specified by the manufacturer.
(12) Use only with a cart, stand, tripod, bracket, or tabl
specified by the manufacturer, or sold with th
apparatus. When a cart is used, use caution whe
n
e
e
moving the cart/apparatus combination to avoid injury from tip-over.
An appliance and cart combination should be moved with care. Quick stop,
excessive force and uneven surfaces may cause the appliance and cart
combination to overturn.
(13) Unplug this apparatus during lightning storms or when unused for
long periods of time.
To protect your product from a lightning storm, or when it is left unattended
and unused for long periods of time, unplug it from the wall outlet and
disconnect the antenna or cable system. This will prevent damage to the
product due to lightning and power-line surges.
(14) Refer all servicing to qualified service personnel. Servicing is
required when the apparatus has been damaged in any way, such as
power-supply cord or plug is damaged, liquid has been spilled or
objects have fallen into the apparatus, the apparatus has been
exposed to rain or moisture, does not operate normally, or has been
dropped.
te
5
(15) Power source
This product should be operated only from the type of power source
indicated on the marking label. If you are not sure of the type of power
supply to your home, consult your appliance dealer or local power
company. For products intended to operate from battery power, or other
source, refer to the operation instructions.
(16) Power lines
An outside antenna system should not be located in the vicinity of
overhead power lines or other electric light or power circuits, or where it
can fall into such power lines or circuits. When installing an outside
antenna system, extreme care should be taken to keep from touching
such power lines or circuits as contact with them might be fatal.
(17) Overloading
Do not overload wall outlets and extension cords as this can result in a
risk of fire or electric shock.
(18) Object and liquid entry
Never push objects of any kind into the product through openings as they
may touch dangerous voltage points or short out parts that could result in
fire or electric shock. Never spill or spray any type of liquid on the product.
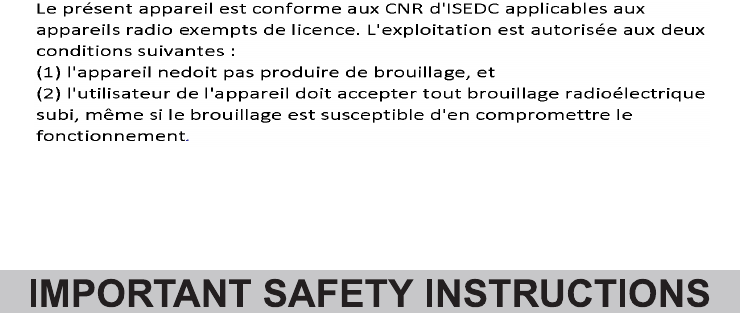
(19) Outdoor antenna grounding
If an outside antenna is connected to the product, be sure the antenna
system is grounded so as to provide some protection against voltage
surges and built up static charges. Section 810 of the National Electric
Code ANSI/ NFPA 70 provides information with respect to proper
grounding of the mast and supporting structure, grounding of the lead- in
wire to an antenna discharge product, size of grounding conductors,
location of antenna- discharge product, connection to grounding
electrodes and requirements for the grounding electrodes.
(20) Service
Do not attempt to service this product yourself as opening or removing
covers may expose you to dangerous voltage or other hazards. Refer all
servicing to qualified service personnel.
6
(21) Replacement parts
When replacement parts are required, be sure the service technician uses
replacement parts specified by the manufacturer or those that have the
same characteristics as the original parts. Unauthorized substitutions may
result in fire or electric shock or other hazards.
(22) Safety check
Upon completion of any service or repairs to this product, ask the service
technician to perform safety checks to determine that the product is in
proper operating condition.
(23) Wall or ceiling mounting
The product should be mounted to a wall or ceiling only as recommended
by the manufacturer.
(24) Damage requiring service
Unplug this product from the wall outlet and refer service to qualified
service personnel under the following conditions.
a) When the power- supply cord or plug is damaged.
b) If liquid has been spilled or objects have fallen into the product.
c) If the product has been exposed to rain or water.
d) If the product does not operate normally by following the operating
instructions. Adjust only those controls that are covered by the
operating instructions, as an adjustment of other controls may result in
damage and will require extensive work by a qualified technician to
restore the product to its normal operation.
e) If the product has been dropped or the cabinet has been damaged.
f ) When the product exhibits a distinct change in performance- this
indicates a need for service.
(25) Note to CATV system installer
This reminder is provided to call the CATV system installer' s attention to
Article 820- 40 of the NEC that provides guidelines for proper grounding
and, in particular, specifies that the cable ground shall be connected to the
grounding system of the building, as close to the point of cable entry as
practical.
NOTE: Refer all servicing to qualified service personnel. Servicing is
required when the unit has been damaged in any way such as the
following: the power-supply cord or plug has been damaged, liquid has
been spilled into unit, the unit has been exposed to rain or moisture, the
unit has been dropped or the unit does not operate normally.

7
BEFORE USING THE UNIT
As the unit may become warm during operation, always leave
The voltage supplied to the unit should match the voltage as printed on the rear panel.
If you are in any doubt regarding this matter, consult an electrician.
Choose the installation location of your unit carefully. Avoid placing it in direct sunlight or
close to a source of heat. Also avoid locations subject to vibrations and excessive dust, heat,
cold or moisture.
Do not place the unit on an amplifier/receiver.
Do not open the cabinet as this might result in damage to the circuitry or electrical shock. If a
foreign object should get into the unit, contact your dealer or service company.
When removing the power plug from the wall outlet, always
To keep the laser pickup clean, do not touch it, and always close the disc tray.
Do not attempt to clean the unit with chemical solvents as
Keep this manual in a safe place for future reference.
DO NOT MOVE THE UNIT DURING PLAYBACK
During playback, the disc rotates at high speed. Do NOT lift or move the unit during playback.
Doing so may damage thedisc or the unit.
WHEN MOVING THIS UNIT
When changing the unit’s location or packing the unit formoving, be sure to remove the
record or disc. Moving thisunit with the record or disc loaded may result in damage to this
unit. If the unit is to be packed and moved a greatdistance, it is also advisable to tighten
the turntable transport locking screw.
sufficient space around the unit
for ventilation.
pull directly on the plug, never
yank the cord.
this might damage the finish.
Use a clean, dry cloth.
8
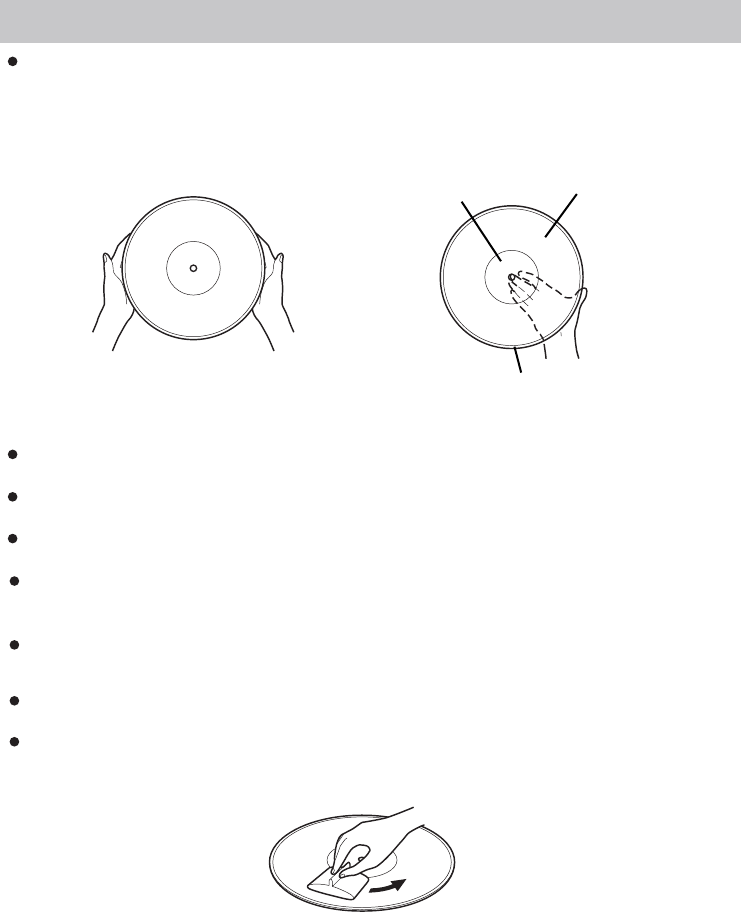
Do not expose records to direct sunlight or high humidity and
the record.
Do not store your records in the trunk of your car. The
Store records in an aera with a stable temperature and low humidity.
Should the record become dirty, gently wipe the surface in a
To avoid dust and scratches, keep records in their sleeves and jackets when not in use.
Store records upright on their edges. Records stored horizontally will eventually bend and warp.
Keep your records away from dust. Keep them in a cool, dry place.
Do not touch the record's grooves. Only handle records by the
from even clean hands can leave a residue on the record
surface that will gradually deteriorate the quality of your record.
temperature. Long exposure to
high temperatures will warp
temperature in a closed trunk can ruin
your collection.
circular motion, using a soft
anti-static cloth.
edges or the lable. Make sure
your hands are clean. Skin oils
edge
label groove
HANDLING RECORDS
9
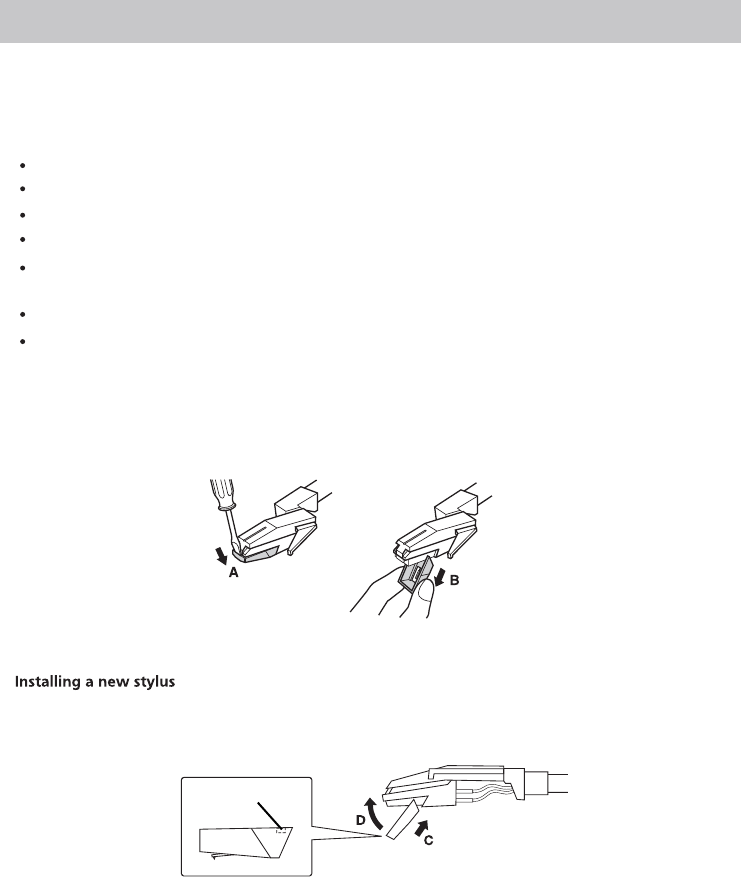
HOW TO REPLACE THE STYLUS
Guide Pins(inside)
The stylus should last about 50 hours under normal use. However, it is recommended that the
stylus be replaced as soon as you notive a change in sound quality.
Caution:
Do not remove or bend the sylus.
To avoid injury, do not touch the needle.
Turn off the unit's power before you replace the stylus.
Keep out of the reach of children.
record and cause the turntable stylus to malfunction.
Do not expose stylus to extreme heat.
Handle with care, as the stylus is delicate. Use of a bent or broken stylus may damage the
Contact a qualified repair company if you experience difficulty in changing the stylus.
1. Set a screwdriver at the tip of the stylus and push down to the direction "A".
2. Pull the stylus out toward direction "B".
1. Hold the tip of the stylus and insert the other edge by pressing toward direction "C".
2. Push the stylus up toward direction "D" until it locks at the tip.
Removing an old stylus:
10
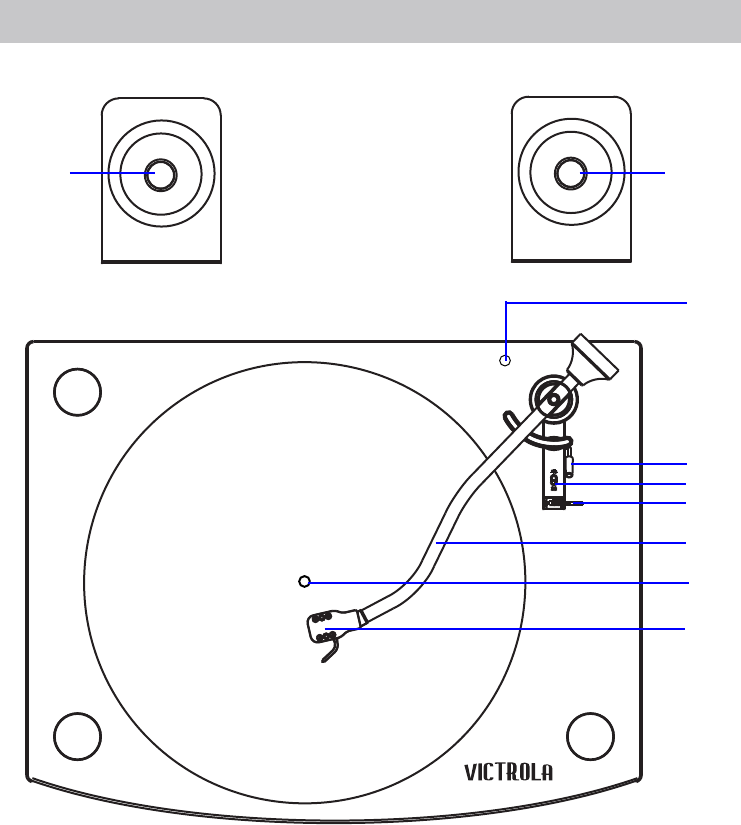
PRODUCT OVERVIEW
1
2
3
4
5
6
7
8
1
1. Speaker
2. Bluetooth Indicator
3. Cue Lever
4. Speed Selector
5. Tone Arm Holder and Clip
6. Tone Arm
7. Turntable
8. Stylus Cartridge
Speaker:
Turntable:
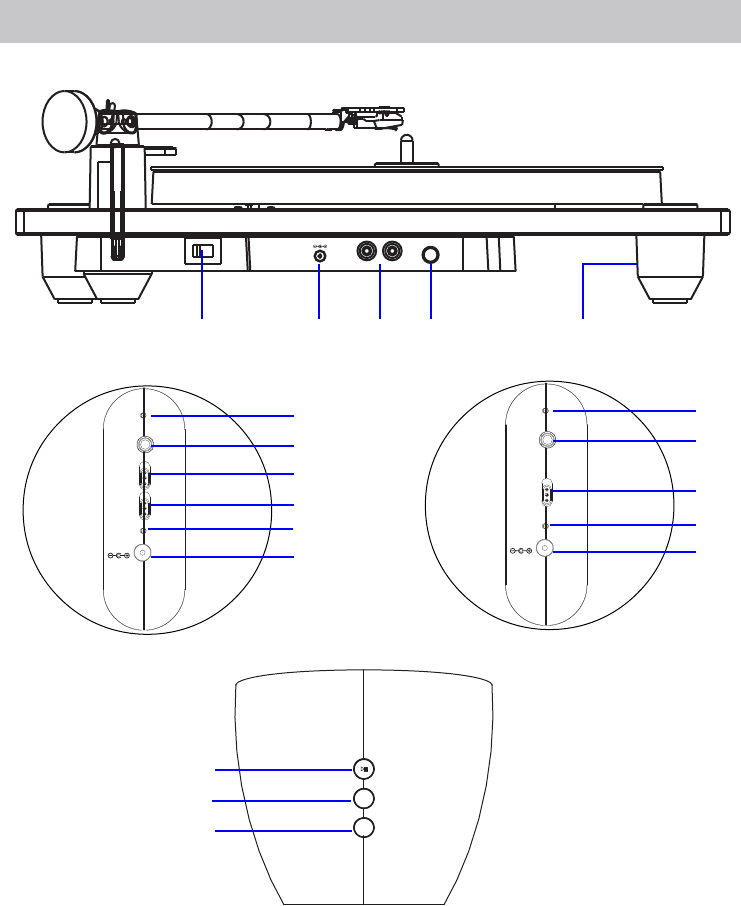
11
DC IN LIN E OUT
LRPAIR
ON O FF
LI NE I N
ON
DC I N
OF F
VOL -
VOL +
BT/
LINE IN
CHARGE
910 11 12 13
14
15
16
18
19
25
26
27
Rear View of Turntable:
PRODUCT OVERVIEW
Rear View of Main Speaker:
Top View of Main & Deputy Speaker:
9. Power ON/OFF Switch
10. DC IN Jack
11. LINE OUT Jacks
12. PAIR Button
13. Turntable feet
14. BT/LINE IN Indicator
15. LINE IN Jack
16. Power ON/OFF Switch
18. Charge Indicator
19. DC IN Jack 25. Play/Pause Button
26. Volume Up Button
27. Volume Down Button
LI NE I N
ON
DC I N
OF F
BT/
LINE IN
CHARGE
20
21
22
23
24
Rear View of Deputy Speaker:
BT
PHONO 17
20. BT/LINE IN Indicator
21. LINE IN Jack
22. Power ON/OFF Switch
23. Charge Indicator
24. DC IN Jack
17. BT/PHONO Switch
12
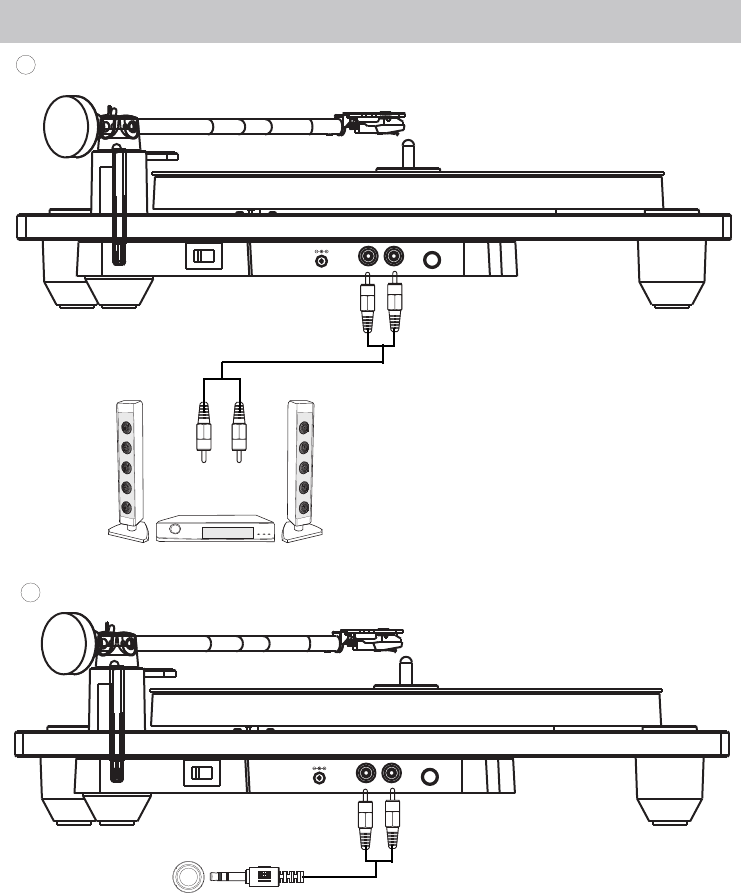
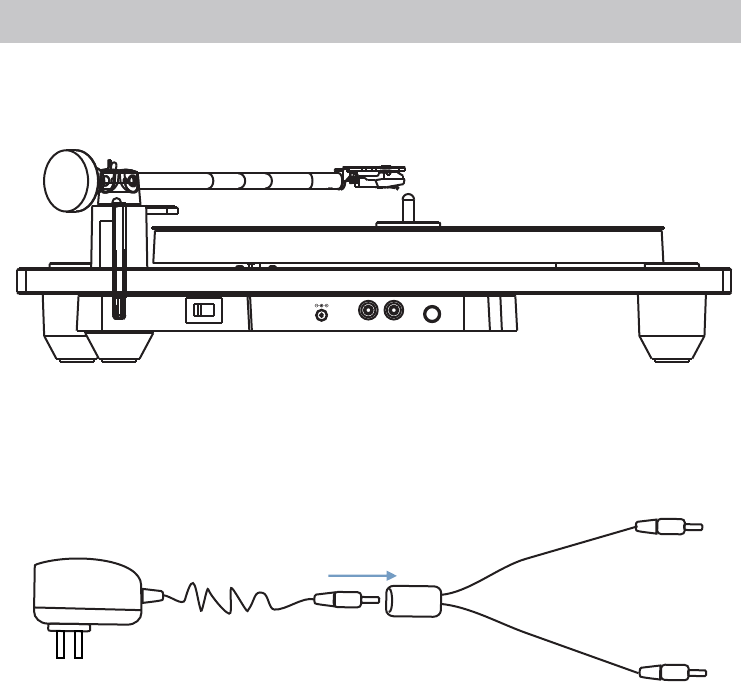
CONNECTIONS
1
DC IN LIN E OUT
LRPAIR
ON O FF
To the Line In/AUX In
jacks on the external
audio amplifier
RCA Audio Cable(not included)
Connect the Turntable through LINE OUT Jacks to the external amplifier
2Connect the Turntable through LINE OUT Jacks to the LINE IN jack of the speaker
DC IN LIN E OUT
LRPAIR
ON O FF
3.5mm plug RCA Audio Cable(not included)
LINE IN
White Red
White Red
of the Main & Deputy speaker
To the LINE IN Jack
on rear panel
13
CHARGING AND CONNECTIONS
DC IN LIN E OUT
LRPAIR
ON O FF
Method 2: Insert the AC/DC Adapter plug into the DC Cable Splitter, plug one end of DC Cable
Splitter into the DC IN Jack of the Turntable, then plug another end of the AC/DC Adapter
into the AC Walloutlet.
Recharging the Main & Deputy Speakers:
into the AC Walloutlet.
Insert the AC/DC Adapter plug into the DC Cable Splitter, plug each end of DC Cable Splitter into
the DC IN Jack of both speakers, then plug another end of the AC/DC Adapter
During recharging, the CHARGE Indicator will light up,
Powering the Turntable:
Method 1: Insert one end of the AC/DC adapter plug into the DC IN Jack of the Turntable, plug
another end of the AC/DC Adapter into the AC Walloutlet.
after fully charged, the CHARGE Indicator
will turn off.
AC/DC Adapter DC Cable Splitter
Inserted into the DC Cable Splitter

14
LINE IN AND LINE OUT
Mobile Phone
(Such like MP3 Player; cell phones;
iPod/iPad ... etc)
MP3
1. Connect one end of the audio connection cable to the Phones jack; Line out jack or AUX out jack
on the external audio player.
2. Connect the other end to the LINE IN jack of the Speaker as the illustrated below:
LINE IN:
3. Power on the speaker.
4. Plays the music on the connected external audio player as usual.
LINE OUT:
1. Connect one end of the RCA audio connection cable
to the Line IN jacks or LINE IN jacks on
2. Connect the other end of the cable to the LINE OUT
jacks on the rear of turntable as the illustrated on right.
To the Line In/AUX In
jacks on the external
audio amplifier
4. Power on the external audio amplifier and set it to
LINE IN mode to play the music.
3. Power on the unit and play music as usual.
LINE IN
Rear View of the Main or Deputy Speaker
LI N E OUT
LR
White Red
Line In Cable( included)
RCA Cable (not included)
the LINE IN Cable into the LINE IN Jack of the main unit, it will enter into LINE IN mode
automatically, the LINE IN Indictor will turn RED.
NOTE:
When both of the Main speaker and deputy speaker are paired with each other, only insert
the external
audio amplifier.
The Deputy speaker will enter line in mode if the LINE IN cable inserted during paired with the
Main Speaker .
LINE IN
15
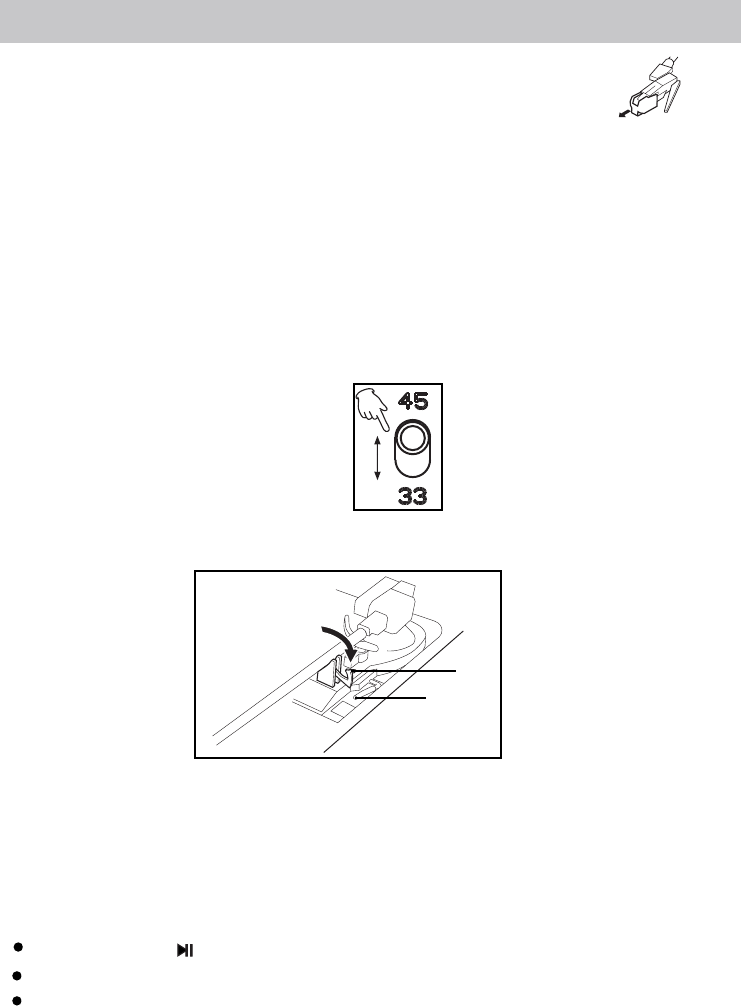
LISTENING TO A RECORD
Before operation, detach the stylus guard ( white plastic cover ) by
3. Slide the BT/PHONO switch to PHONO mode. Place a record on the center spindle.
Note: If you are playing a 45 RPM Single (small size record), place the 45 RPM adapter
to the center spindle then place the record on it.
5. Unlock the Tone Arm from the holder as the illustrated below:
Clip
6. Raise the Cue Lever to raising the Tone Arm then move it to the top of the desired location
7. When finished playing, move the Tone Arm back to Holder.
of the record. Release the Lever to put the Tone Arm onto the record. It will start playing.
Release the Cue Lever then lock the Tone Arm on the Holder.
Cue Lever
pulling it straight off the front of the cartridge.
NOTE:
Note:
Do not insert the LINE IN Cable into the LINE IN jack of the Main speaker.
NOTE: Press the PAIR button to pair with the two speakers if connection is unsuccessful.
1. Switch on the two speakers first, wait both speaker paird with each other, the Indicator on main
speaker will flash when connected.
turntable will be paired to the two speakers automatically, and the
bluetooth indicator on turntable will flash, after a few seconds, the
2. Switch on the turntable,
bluetooth indicator on turntable
will stay lit.
4. Slide the Speed selector to 33 or 45 to
match the play speed of the record.
with the turntable.
Press and hold the button on main speaker to disconnect the connection
Please restart both speakers and the Turntable if all of them are not responding.

16
LISTENING THROUGH BLUETOOTH
3. Activate the bluetooth function on your external device, and try searching, the pairing name
will appear on the pairing name list. Select it and register in your player.
4. After successful connection, the main speaker will send a tone.
5. Play the music as usual.
Note:
When the LINE IN Cable inserted in, it will be LIEN IN mode automatically.
During playing:
Press VOL+ or VOL - button to adjust the volume.
Press the button to switch between pause and playing.
"VM-100"
Press and hold the button on main speaker to disconnect the connection with external
OPERATION WITH TWO SPEAKERS
OPERATION WITH SINGLE SPEAKER
2. Activate the bluetooth function on your external device, and try searching, the pairing name
will appear on the pairing name list. Select it and register in your player.
3. After successful connection, the bluetooth indicator will stay lit.
4. Play the music as usual.
During playing:
Press VOL+ or VOL - button to adjust the volume.
Press the button to switch between pause and playing.
"VM-100"
5. Press and hold the button on speaker to disconnect the current connection with
external blutooth device.
Note:
When the LINE IN Cable inserted, it will be LIEN IN mode automatically.
The unit can be automatically connected with the last paired device after first time pairing.
bluetooth device.
1. Switch on the two speakers.
(the bluetooth indicator will stay lit on deputy speaker).
2. Slide the BT/PHONO switch to BT position, the bluetooth indicator will blink, they will paird with
each other automatically, the bluetooth indicator blinks on main speaker after successful
connection
1. Switch on main speaker or deputy speaker, (if using main speaker, slide the BT/PHONO
switch to BT position)the bluetooth indicator will blink.
6.
The main speaker will automatically connect with the last paired device after first time
pairing.
Please restart both speakers and the Turntable if all of them are not responding.

17
TROUBLESHOOTING
If you experience any problems with the unit, please take a moment to look through and see if you can
solve the problem yourself before calling for help.
NO POWER
Check the connection to AC power source. Check and make sure the AC power source is not a switched
outlet and if it is, the switch is turned on. Make sure there is power to the AC outlet by plugging another
item such as a lamp or fan.
NO SOUND
Adjust the volume.
NOISY SOUND
The unit is too close to a TV set or similar appliances. Relocate the unit further away from them, or turn the
other appliances off.
RECORD PLAYER (can not play)
●Detach the stylus guard.
(The stylus guard is a white plastic cover that protects the stylus during transportation.
Failing to remove this guard will not allow the needle to contact the grooves of the record and no sound
will be heard!)
●If the stylus is worn-out, change the stylus.
SOUND SKIPS
●Place the unit on a stable surface to avoid vibration and shock. Make sure the unit is level both front
to back and side to side.
●Clean the surface of the record.
●Don’t use scratched, damaged or warped records.
BEAWARE OF CONDENSATION
When the unit(or a record ) is moved from a cold to warm place, or used after a sudden temperature
change, there is the danger of condensation, vapor in the air could condense on the internal mechanism,
making correct operation erratic or impossible. To prevent this, or if this occurs, leave the unit turned on
for one or two hours. The unit will stabilize at the temperature of its surroundings.
MAI TAINENCE
Always keep the turntable clean.
If the surface of the unit gets dirty, wipe with a soft cloth or use a diluted mild liquid soap.
Be sure to remove any excess liquid completely. Do not use thinner, benzine or alcohol as they may damage
surface of the unit. Allow the surface of the unit. Allow the surface of the unit to dry completely before using.
N

Speaker built-in battery.............................................................................................7.4V, 2000mAh
Power requirement....................................................................................DC9V 2A
Speaker output power..................................................................................................2X10W(RMS)
Bluetooth working range..........................................................................................................32feet
Turntable speed.........................................................................................................33 rpm, 45rpm
1 X Instruction Manual
1 X AC/DC Adapter
Accessories:
Design and specifications are subject to change without notice.
1 X DC Cable Splitter
Speaker recharge time...............................................................................................about 2-3 hour
SPECIFICATIONS
Speaker running time...........................................................................about 4 hour(at 50%volume)
18
1 X Line In Cable