Innoview INV-30W LCD MONITOR & TV User Manual MANUAL
Innoview Co., Ltd. LCD MONITOR & TV MANUAL
Innoview >
MANUAL
HD Wide TFT LCD Television
User's MANUAL
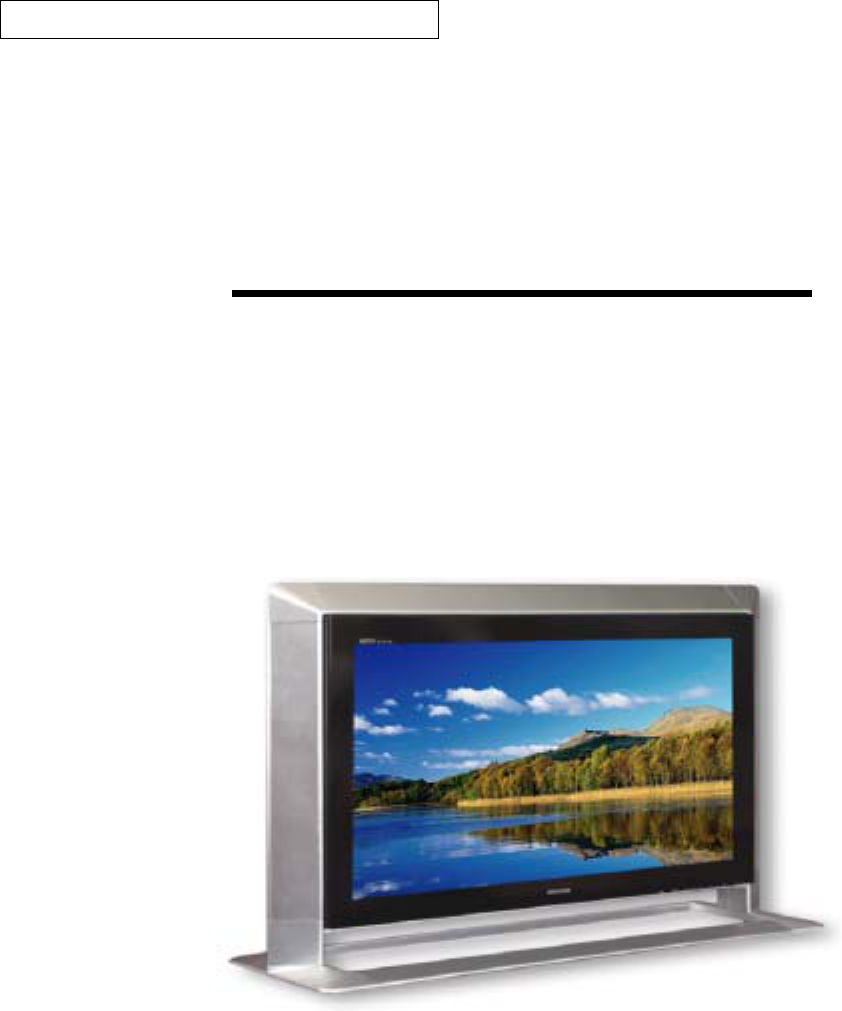
30inch TFT LCD Wide TV
Before operating this TV,
please read this manual thoroughly
and retain it for future reference

Safety Caution
Shock Hazard Marking and Associated Graphical Symbols
Explanation of Safety Related Symbols
"WARNING – To Reduce The Risk Of Fire Or Electric Shock, Do Not Expose This Apparatus To Rain Or
Moisture."
“Apparatus shall not be exposed to dripping or splashing and no objects filled with liquids, such as vases,
shall be placed on the apparatus.”
Important Safety Instructions
1) Read these instructions.
2) Keep these instructions.
3) Heed all warnings.
4) Follow all instructions.
5) Do not use this apparatus near water.
6) Clean only with a damp cloth.

7) Do not block any of the ventilation openings. Install in accordance with the
manufacturer's instructions.
8) Do not install near any heat sources such as radiators, heat registers, stoves, or
other apparatus (including amplifiers) that produce heat.
9)Do not defeat the safety purpose of the polarized or grounding type plug. A
polarized plug has two blades with one wider than the other. A grounding type plug
has two blades and a third grounding prong. The wide blade or the third prong is
provided for your safety. When the provided plug does not fit into your outlet,
consult an electrician for replacement of the obsolete outlet.
10) Protect the power cord from being walked on or pinched particularly at plugs,
convenience receptacles, and the point where they exit from the apparatus.
11) Only use the attachments/accessories specified by the manufacturer.
12) Use only with a cart, stand, tripod, bracket, or table specified by the
manufacturer, or sold with the apparatus. When a cart is used, use caution when
moving the cart/apparatus combination to avoid injury from tip-over.
13) Unplug this apparatus during lightning storms or when unused for long periods of
time.
14) Refer all servicing to qualified service personnel. Servicing is required when
the apparatus has been damaged in any way, such as power supply cord or plug is
damaged, liquid has been spilled or objects have fallen into the apparatus, the
apparatus has been exposed to rain or moisture, does not operate normally, or
has been dropped.

Service Instructions
"CAUTION – These servicing instructions are for use by qualified service
personnel only. To reduce the risk of electric shock, do not perform any
servicing other than that contained in the operating instructions unless you are
qualified to do so."
To ensure safety and many years of trouble-free operation of your product, please read
the Safety Precautions carefully before using this product.
Unplug the TV from the wall outlet when it is left unattended
and unused for long periods of time.
* Accumulated dust may cuase a fire or an electric shock from
deterioration or electric leakage.
Never touch the power plug with a wet hand.
* This may cause an electric shock.
During a lightning thunder, unplug the TV from the wall outlet and
don’t touch and antenna cable.
* This may cause damaged the TV or could give an electric shock.
In case of smoke or strange smell from the TV, switch it off, unplug
it from the wall outlet and contact your dealer or service center
* This may cause a fire or could give an electric shock.
Do not use the TV in damp place such as a bathroom or any place
where it is likely to get wet.
* This may cause a fire or could given an electric shock.

Do not place the TV in direct sunlight or near heat sources
such as heat registers, stove and so on.
* This may cause a fire.
Do not attempt to service the TV yourself. Contact your dealer
or service center.
* This may cause damaged the TV or could given an electric shock.
Do not place heavy objects and let child climb on the TV.
* This may cause serious injury to a child or adult
Do not place anything containing liquid on top of the TV.
* This may cause a fire or could give an electric shock.
Unplug this product from the wall outlet before cleaning.
Do not use liquid cleaners or aerosol cleaners.
* This may cause a fire or could give an electric shock.
Dispose of used batteries carefully to protect a child from
eating them.
* In case that it eats them, take it to see a doctor immediately.
There should be enough distance between an outside antenna
And power lines to keep the former from touching the latter
even when the antenna falls.
* This may cause an electric shock.
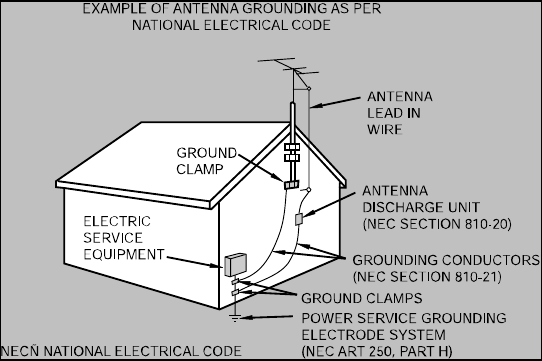
If an outside antenna is connected to the television equipment, be sure the antenna system is
grounded so as to provide some protection against voltage surges and built-up static charges.
Section 810 of the National Electrical Code provides information with respect to proper grounding
of the mast and supporting structure, grounding of the lead-in wire to an antenna discharge unit,
size of grounding conductors, Iocation of antenna-discharge unit, connection to grounding
electrodes, and requirements for the grounding electrode.
FCC NOTICE
Note: This equipment has been tested and found to comply with the limits for a Class B digital device, pursuant to part 15 of
the FCC Rules. These limits are designed to provide reasonable protection against harmful interference in a residential
installation. This equipment generates, uses and can radiate radio frequency energy and, if not installed and used in
accordance with the instructions, may cause harmful interference to radio communications. However, there is no guarantee
that interference will not occur in a particular installation. If this equipment does cause harmful interference to radio or
television reception, which can be determined by turning the equipment off and on, the user is encouraged to try to correct
the interference by one or more of the following measures:
• Reorient or relocate the receiving antenna.
• Increase the separation between the equipment and receiver.
• Connect the equipment into an outlet on a circuit different from that to which the receiver is connected.
• Consult the dealer or an experienced radio/TV technician for help.
Modifications not expressly approved by the manufacturer could void the user's authority to operated the equipment under
FCC rules.

Product Overview
The 30inch Wide (LG Philips LCD Division. Model:LC300W01) WXGA TFT LCD TV can support TV,
digital DVI signal & Video signals(VCD, DVD) from various video sources which are available in the market.
The LCD TV neither emits harmful rays nor requires much space. It conforms to VESA DPMS
(Display Power Management Signaling) requirement, therefore energy consumption is small.
The actual power consumption of LCD TV is less than 130watts during the operation.
The LCD Display has following attractive features:
• Eye Friendly : it does not cause an eye strain from starring at the LCD TV for long periods of time.
• Wide Screen : displays 16:9 screen sized output for cinematic display.
• Bottom Panel Control : allows access to the on screen display menus without a remote control.
• High brightness and contrast : very clear and definite screen with 450cd/㎡ and 350:1
• V-chip : (NTSC only) a tool for parents to prevent their children from watching on adult programs
by establishing rating limits.
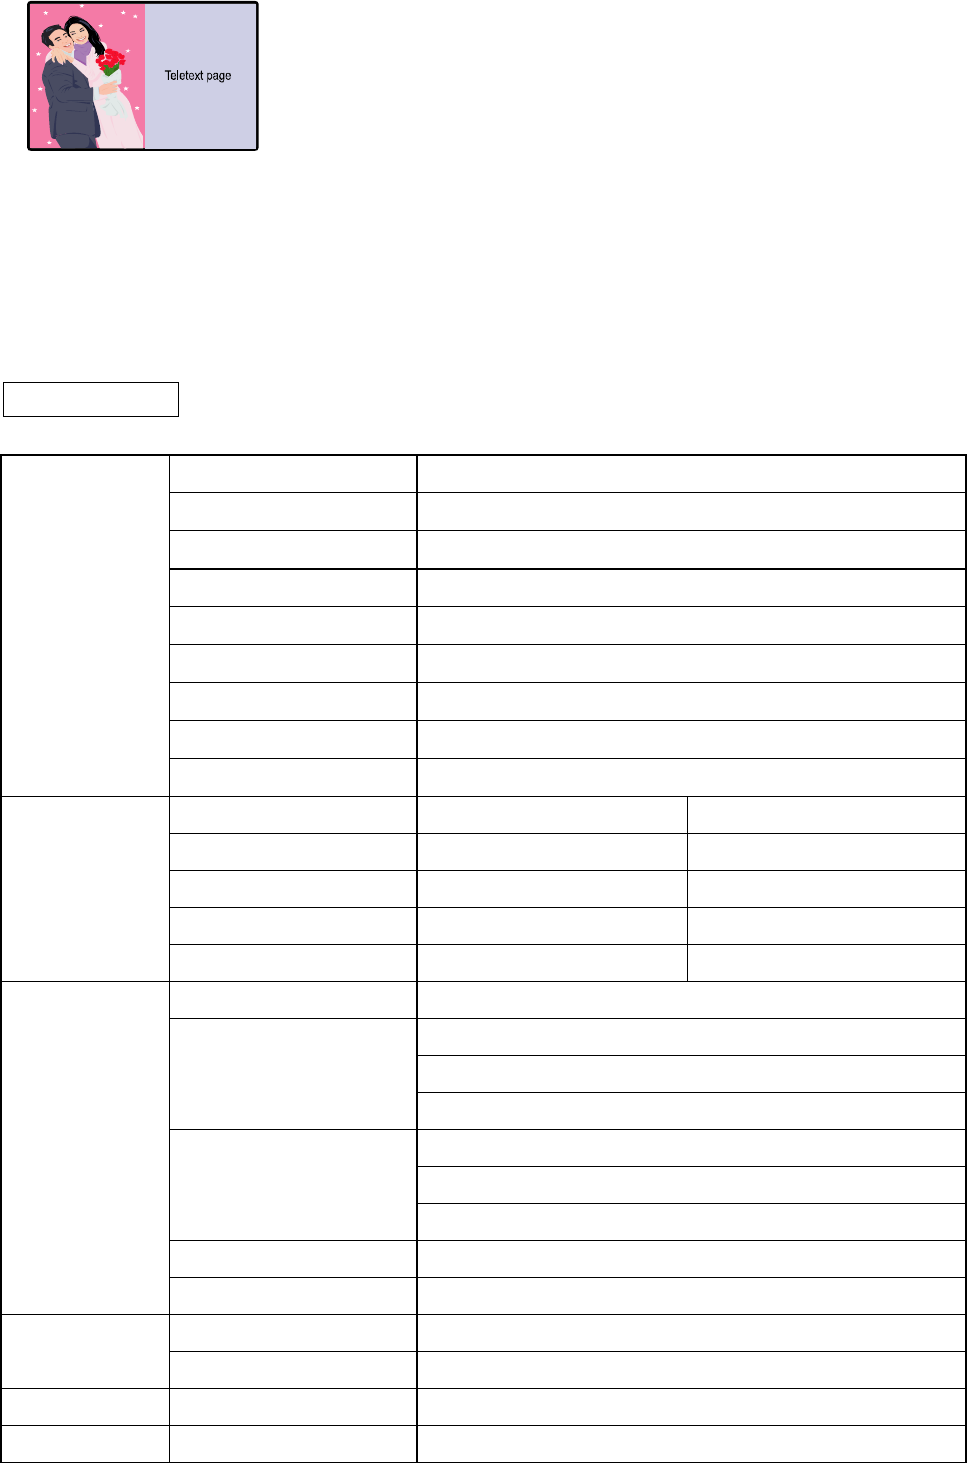
• Teletext : (PAL only) capable of displaying text information provided by the broadcast station.
• S-VIDEO : provides better quality picture than composite Video signal(CVBS)
• CVBS : provides good quality picture.
• SCART : Europe only and depends on the rear connector type.
• Component : provides superior quality of picture then the one of S-video.
• DVI : digital connection to PC for superior display.
• HD : 720p, 1080i quality at the HDTV level.
• PIP(Picture in picture) : User can use PC while watching TV or movie from VCR or DVD player.
The image sources can be swapped. The overlapped screen can shift the position
and can increase and decrease the size.
• PBP(Double Screen):Two independent screens in one display.
Possible to watch 2 TV programs at the same time(built in two TV tuners).
Teletext page in one screen and its image in the other screen.
• POP 3 (Picture of Picture 3 screens) : Watching main screen with checking up rotating three channels
every 3 seconds.
• POP 12 (Picture of Picture 3 screens) : Watching main screen with checking up rotating twelve channels
every 3 seconds.
• Grid Screen : Checking up nine rotating channels captured every three seconds.

Basic Accessories
Remote Controller(AAA batteries) AC / DC Adapter Power cord
Analog RGB User’s Manual
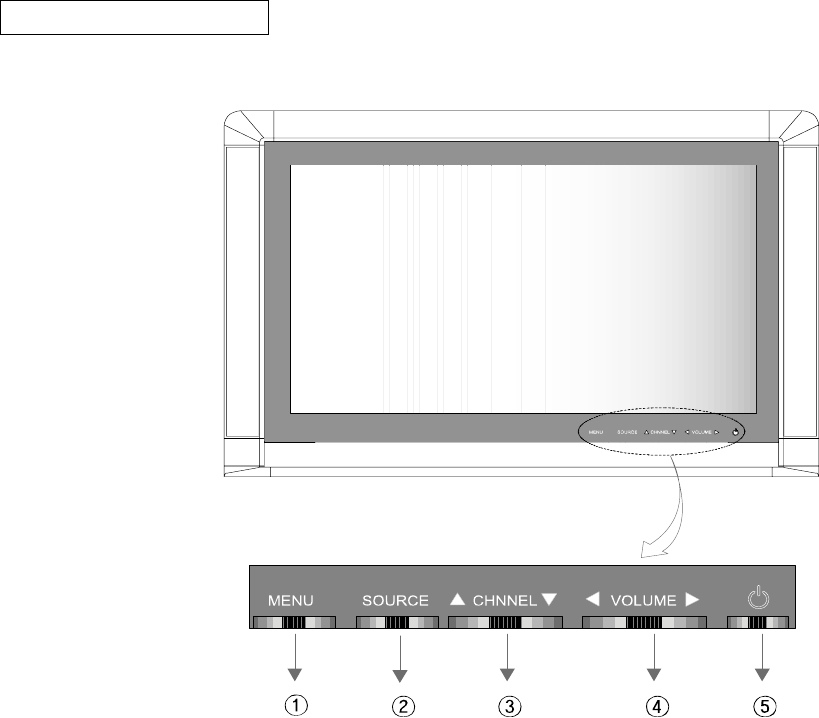
Front Panel Buttons
The buttons on the front panel controls your TV’s basic features, including the on-screen
menu. To use the more advanced features, you must use the remote control.
c MENU
Press to see an on-screen menu of your TV's features
d SOURCE
Changes different input source.
e CHNNEL
Press to change channels.
Also press to highlight various items on the on-screen menu.
(Without the Remote Control, You can turn on TV by using the Channel buttons.)
f VOLUME
Press to increase or derease the volume.
Also used to change the value of the selected items on the on-screen menu.
g POWER
Press to Turn the TV on and off.
Rear Panel Jacks
Use the rear panel jacks to connect an A/V component that will be connected
continuously, such as a VCR or a DVD player.
POWER / PC INPUT
cDC Power IN
○
2Aanog RGB In
○
3DVI In
○
12 PC Audio In
HD INPUT
○
4Audio In(L/R)
○
5HD Video Component(Y,Pb,Pr) In
AV1
○
6Scart In
○
7S-Video In
AV2
○
8Audio In(L/R)
○
9Video Component(Y,Cb,Cr) In
○
10 Video Composit In
○
11 S-Video In
AUDIO/VIDEO OUT
○
13 Audio Out(L/R)
○
14 Video Out(x2)
○
15 Head Phone Out(x2)
ANT(TV Tuner)
○
16 ANT In(x2)
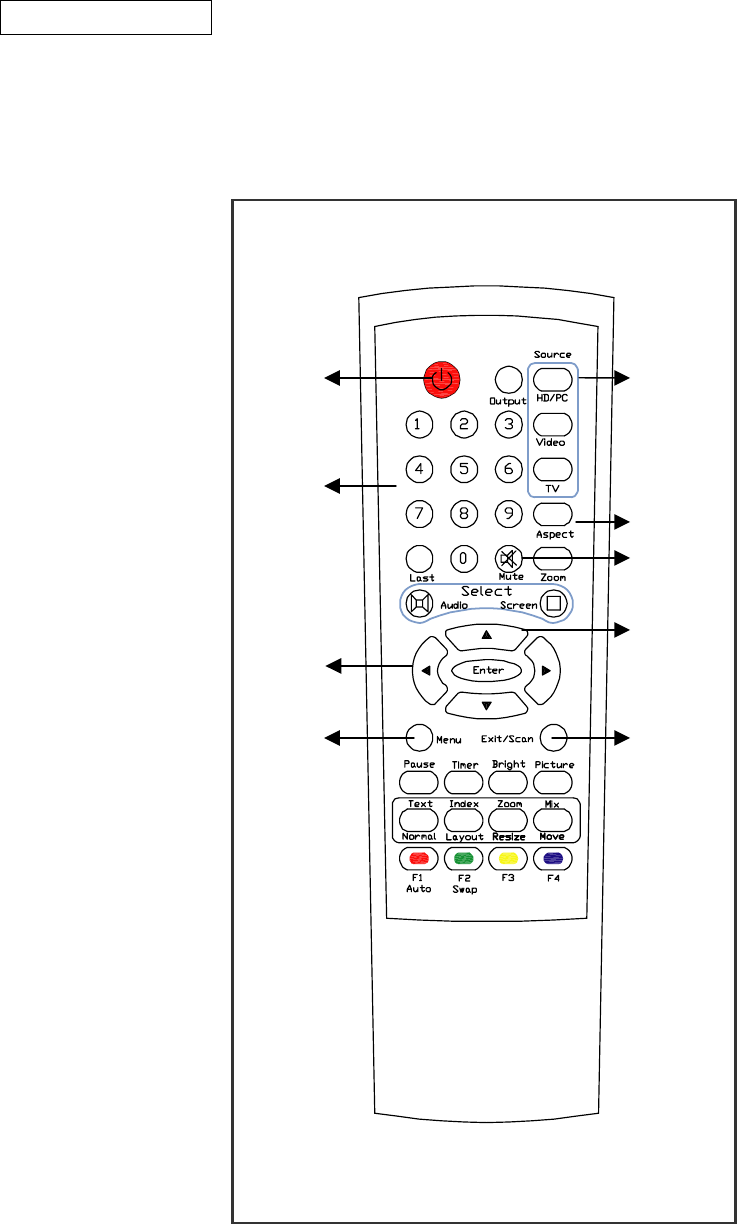
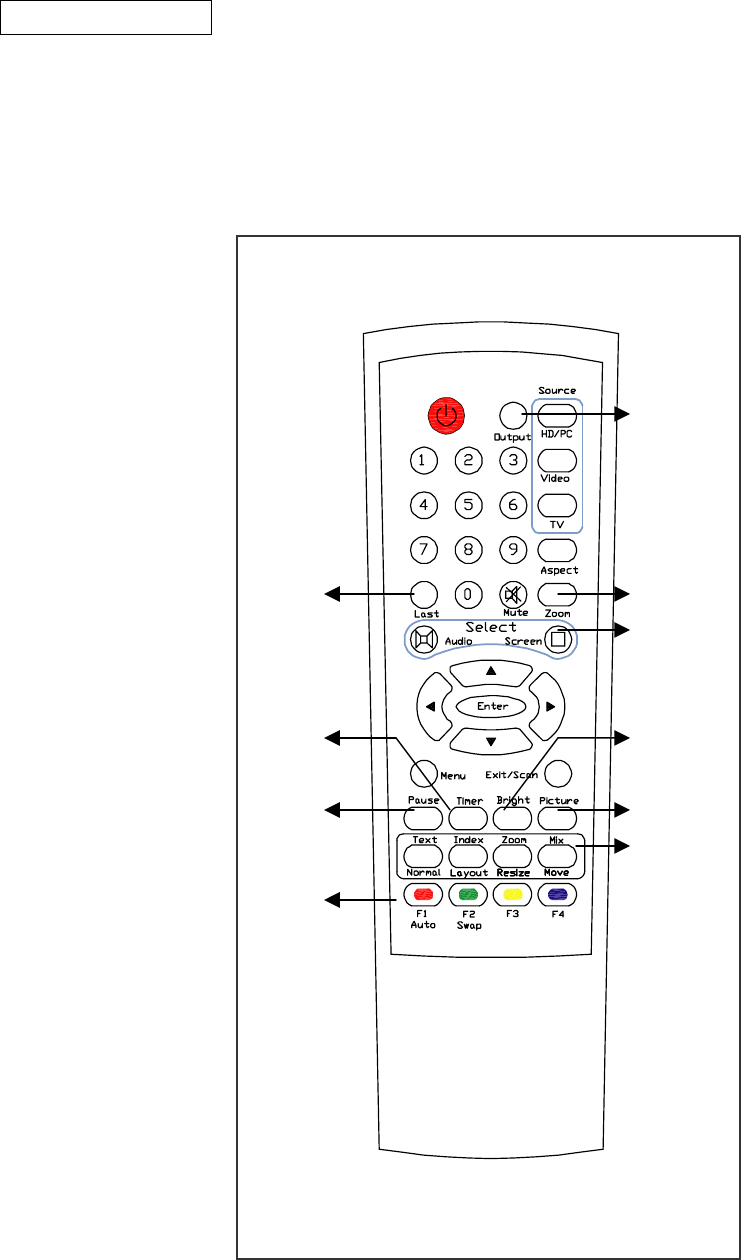
Remote Control
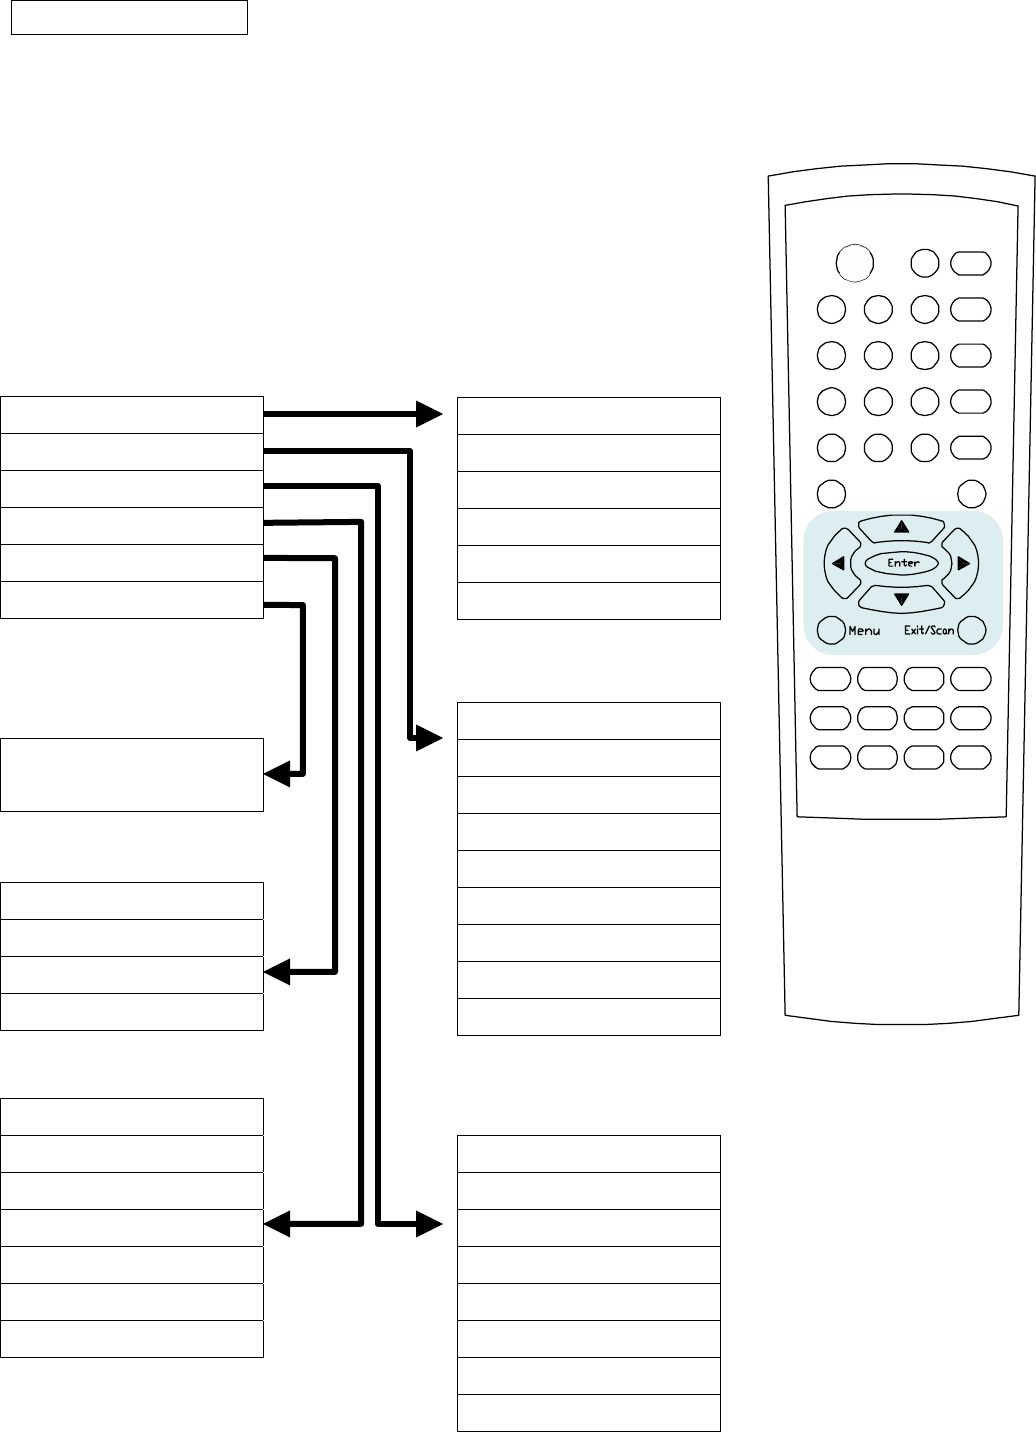
Frequently Used Buttons
You can use the remote control up to a distance of about 23 feet from the TV.
When using the remote, always point it directly at the TV.
n POWER r SOURCE
Turns the TV on Selects external
and off. input source
(TV, PC, DVD…)
n r
o Key Pad
-Changes Channels s ASPECT
by entering o Changes screen
numberical value. s size.
-In Teletext mode t t MUTE
(PAL), changes Temporary cuts off
pages by entering u the sound.
the Page No. p
u /
q v -Changes channel
p/ in TV mode
-Changes volume - Moves up / down
level Menu Key
-Selects the desired in OSD menu
the value of
function in OSD menu v EXIT
Exits from the OSD menu
q MENU
- Changes volume
level.
- Selects the desired
the value of
function in OSD menu.
n
o
p
q
r
s
t
u
v
w
r OUTPUT
Selects Video out sources
s ZOOM
Enlarges image on the screen
t SELECT
-AUTO :
-SCREEN :
u BRIGHT
Changes brightness of screen
v PICTURE
Changes picture setting of
screen(Normal, Movie…)
w TTX / MULTI-SCREEN
-TEXT / NORMAL(PAL Only) :
Switchs to Teletext(TTX) Mode
- INDEX(PAL Only) :
Displays Teletext pages
- ZOOM(PAL Only) :
Changes the text size in TTX
- MIX(Pal Only) :
Displays the teletext pages on
the TV picture
- LAYOUT : Display the Layout
menu to select Full, PIP, PBP,
POP3, POP12 or Grid function.
- RESIZE : Changes PIP screen
size
- RESIZE : Changes PIP screen
position
n LAST
Turns to the previous
channel.
o TIMER
Selects a time for the
TV to turn off
automatically
p PAUSE
Pauses current screen
q FUNCTION KEY
- AUTO : Adjusts picture
setting in PC mode
- SWAP : Swaps screen
in PIP, SPLIT and POP
- RED / GREEN /
YELLOW / BLUE :
Remote Control
Convenient Buttons
You can use the remote control up to a distance of about 23 feet from the TV.
When using the remote, always point it directly at the TV.
+30° -30°
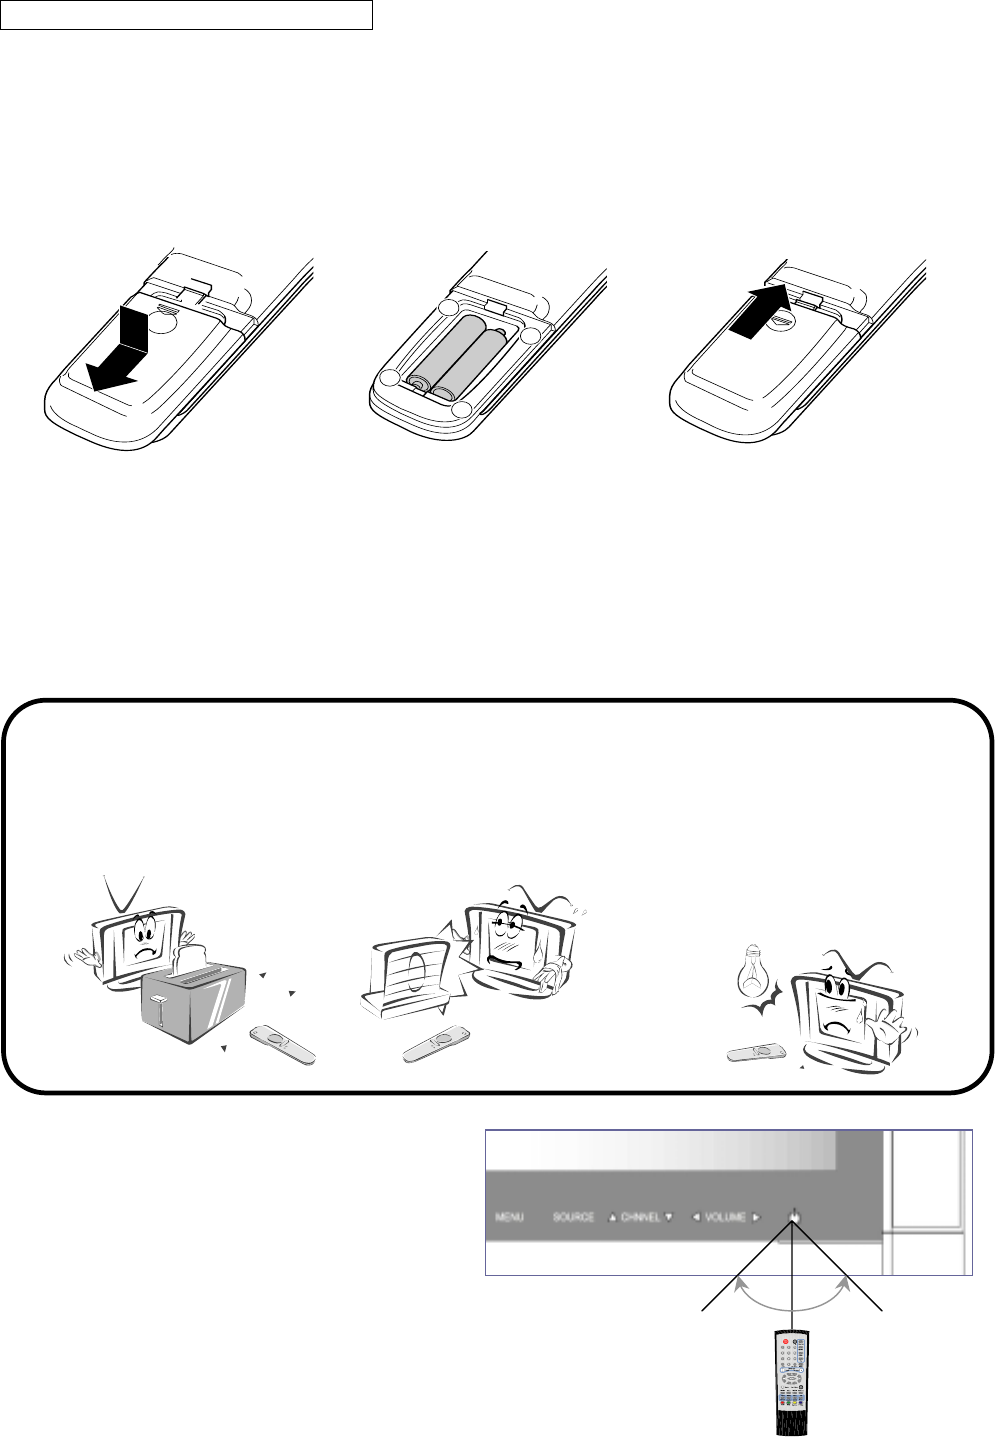
Batteries for the Remote Control
If the remote control fails to operate the LCD color TV functions, replace the batteries in the remote
control.
Notes for using the remote control
Operating with the Remote Control
Point the remote control at the remote sensor
and press the buttons.
Distance : About 23 ft (7 m) from the front
of the remote sensor.
Angle : About 30° in each direction
of the front of the remote sensor.
1. Open the battery
cover.
Slide the cover while
pressing down.
2. Insert batteries (1.5V “AAA ”)
size batteries, supplied with
product).
Place the batteries with their
terminals corresponding to the
(+) and (-) indications in the
battery compartment.
3. Close the battery
cover.
Make sure these are no
objects between the
remote control and its
sensor.
Don’t place the remote control
near a heater or damp place.
Strong impact on the remote
Control may cause operation failure.
Signal from the remote control
may be disturbed by sun light or
other strong light. In this case,
turn the set to other direction..
Within about 23ft (about 7m)
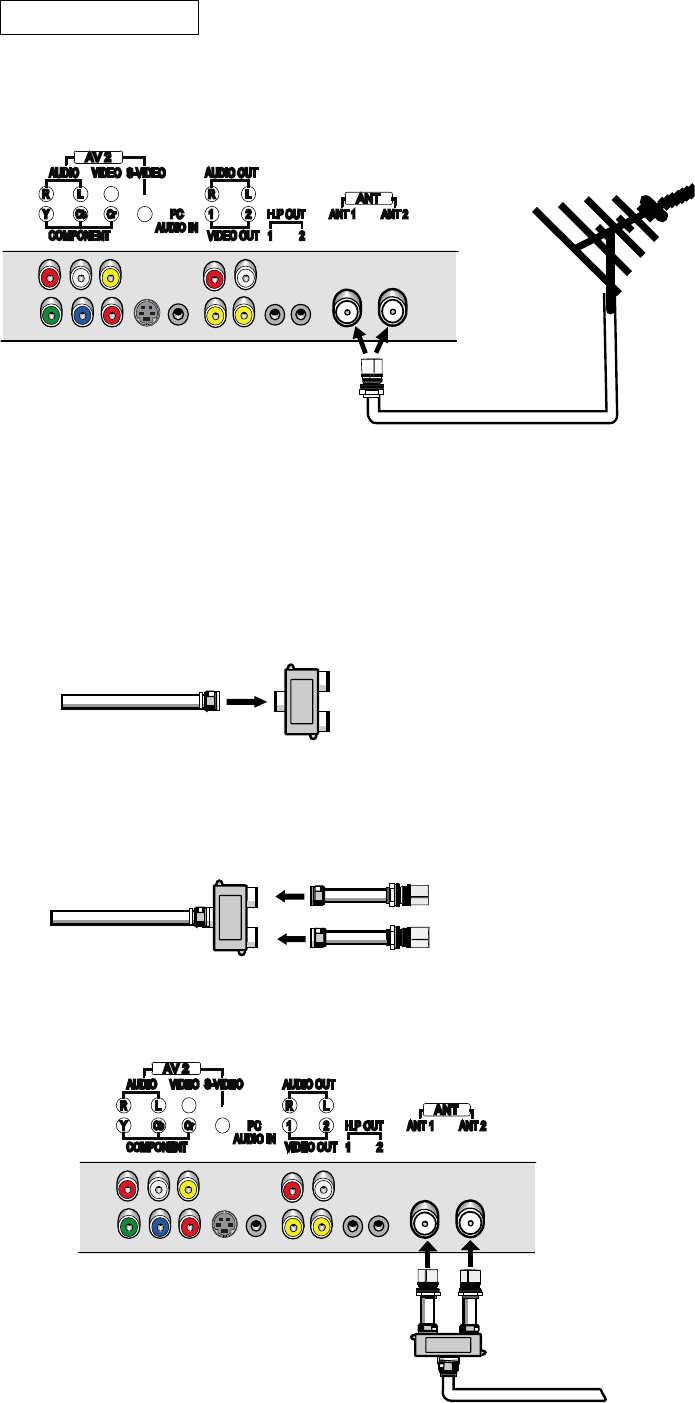
Connecting TV
1) Connect the RF cable into the ANT1 or ANT2 Jack on the TV.
<To watch VCR>
Press TV button on the remote control and select TV 1 or TV 2.
<To connect ANT 1 and ANT 2 through splitter>
Note : RF cable and Splitter are not supplied.
1) Connect the RF cable to the Splitter.
2) Connect the two cables(RF 1 and RF 2) to Splitter.
3) Connect the RF 1 and RF 2 cables to ANT 1 and ANT 2 on rear of the TV.
Splitter
RF Cable
RF Cable
Splitter
RF 2 Cable
RF 1 Cable
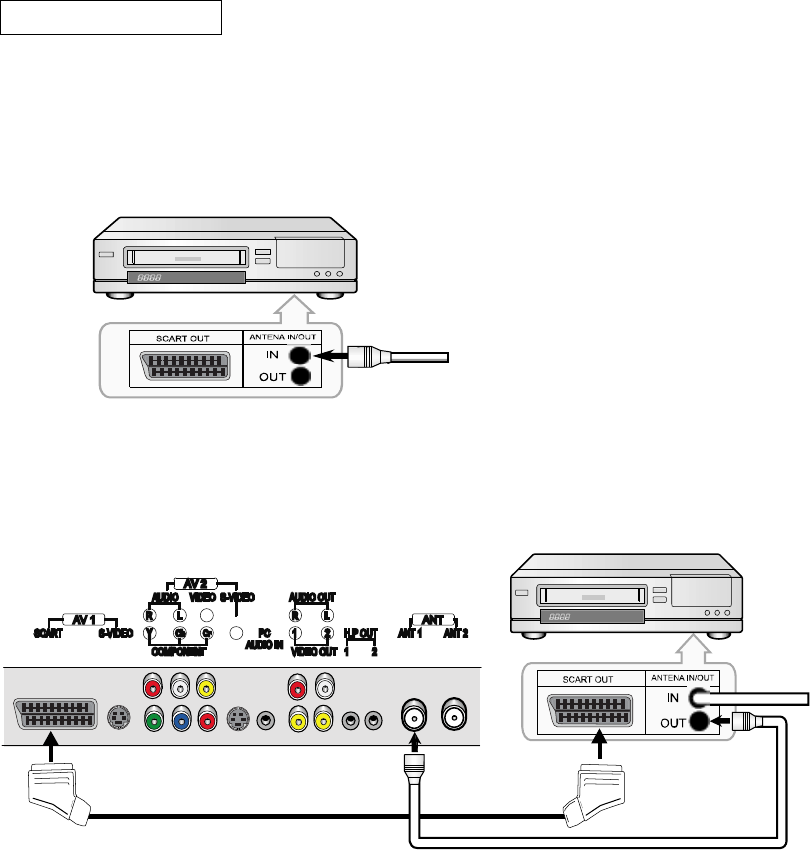
Connecting VCR
The actual connector-jack of the VCR may be different, depending on the model.
1. Connecting VCR with SCART Cable and RF cables
1) Connect the RF cables to the ANTENNA IN terminal on the back of the VCR.
Rear of the VCR
2) Connect RF cable between ANTENNA OUT terminal on the VCR and ANT 1 or ANT 2 on the TV.
3) Connect SCART cable between the SCART jack on the TV and the SCART jacks on the VCR player.
<To watch VCR>
Press VIDEO button on the remote control and select Composite1.
(When connecting with S-Video, Select the S-video1)
SCART Cable
RF Cable
Rear of TV
Rear of VCR
2. Connecting VCR with Video/Audio Cable
1) Connect a set of audio cables between the AUDIO(L/R) INPUT jacks on the TV and
the AUDIO OUT jacks on the VCR.
2) Connect a video cable between the VIDEO jacks on the TV and the VIDEO jacks on the VCR.
<To watch VCR>
Press VIDEO button on the remote control and select Composite2.
(When connecting with S-Video, Select the S-video2)
<To connect ANT 1 and ANT 2 through splitter>
Note : RF cable and Splitter are not supplied.
1) Connect the RF cable to the Splitter.
* Refer to Picture on pages11
2) Connect the two cables(RF 1 and RF 2) to Splitter.
* Refer to Picture on pages12
3) Connect the RF 1 and RF 2 cables to ANT 1 and ANT 2 on rear of the TV.
A
udio(R/L) Cable
RF Cable
Rear of TV
Rear of VCR
Video Cable
Splitter
RF Cable
RF 2 Cable
Connecting DVD Player
Note :The actual connector-jack of the DVD may be different, depending on the model.
1. Connecting to DVD with SCART Jack.
Connect SCART cable between the SCART jack on the TV and the SCART jacks on the DVD player.
<To watch DVD>
Press VIEO button on the remote control and select Component1.
(When connecting with S-Video, Select the S-video1)
2. Connecting to DVD with Component(Y, Pb, Pr) Jack
1) Connect a set of audio cables between the AUDIO(L/R) INPUT jacks on the TV and
the AUDIO OUT jacks on the DVD player.
2) Connect a video cable between the COMPONENT(Y, Pb, Pr) jacks on the TV and
the COMPONENT(Y, Pb, Pr) jacks on the DVD player.
<To watch DVD>
Press VIEO button on the remote control and select Component 2.
Rear of TV
Rear of DVD
Rear of TV
Rear of VCR
Rear of TV
Rear of VCR
SCART Cable
Audio Cable
Component Cable
(When connecting with S-Video, Select the S-video 2)
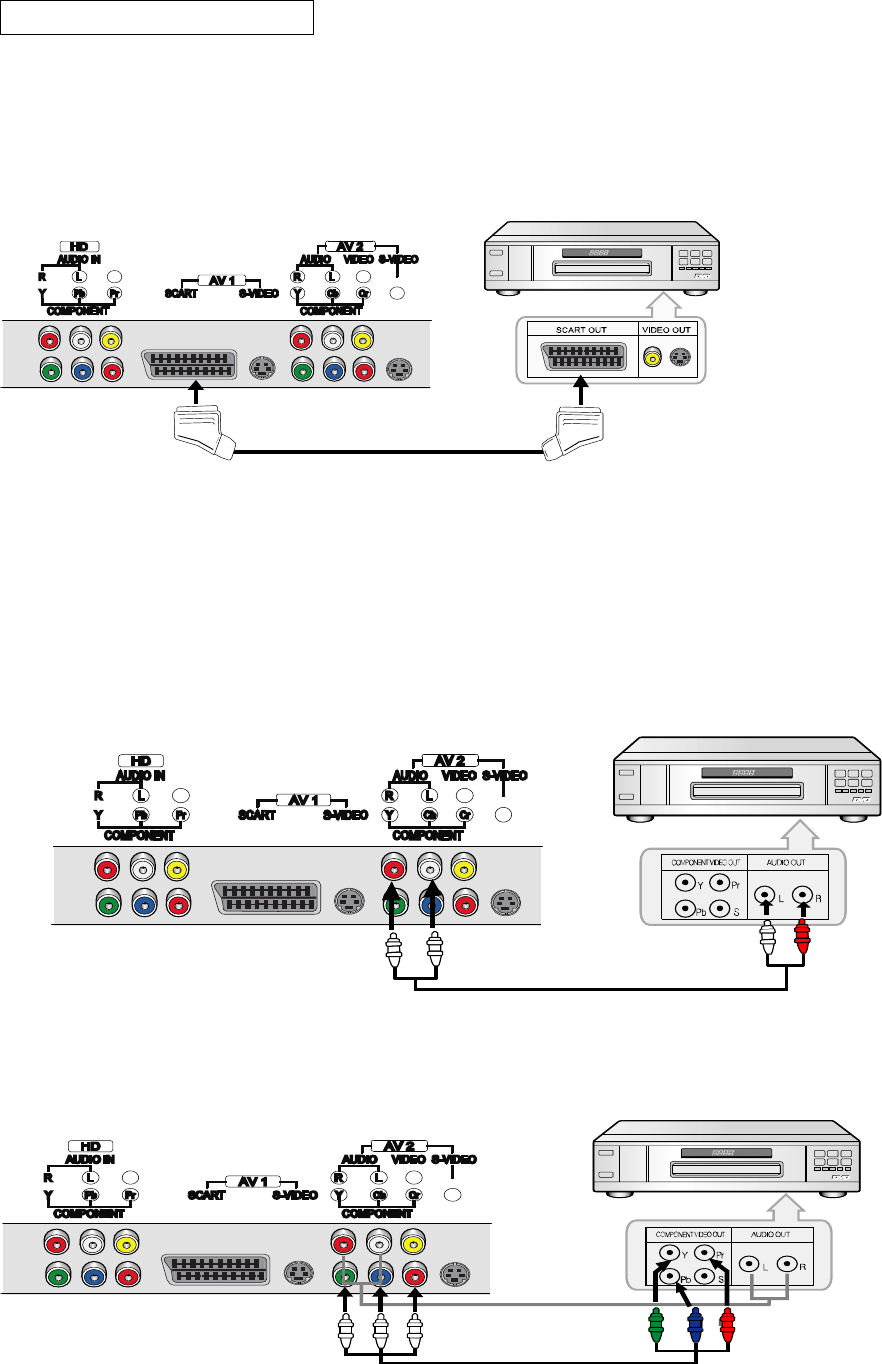
Connecting a PC
For sharp and superior image, connect the DVI.
Note : The actual connector-jack of the PC may be different, depending on the model.
The DVI cable is not supplied
1. Connecting PC with DVI cable
<To watch PC>
Press HD/PC button on the remote control and select Digital RGB.
2. Connecting PC with Analog RGB cable
<To watch PC>
Press HD/PC button on the remote control and select Analog RGB.
PC VIDEO CABLE
( DVI-D+DVI-D )
PC Audio CABLE
PC VIDEO CABLE
( Analog RGB cable)
PC Audio CABLE
Rear of TV
Rear of VCR
Rear of TV
Rear of VCR
Monitor Image Display Specifications
This display complies with the DDC plug and play standard, and automatically detects all the display information
when it is connected with a DVI cable.
Note :
Not all video graphics cards support 1280 x 768 wide aspect resolution.
Some devices may require updated driver
Please consult your video graphic manufacturer.
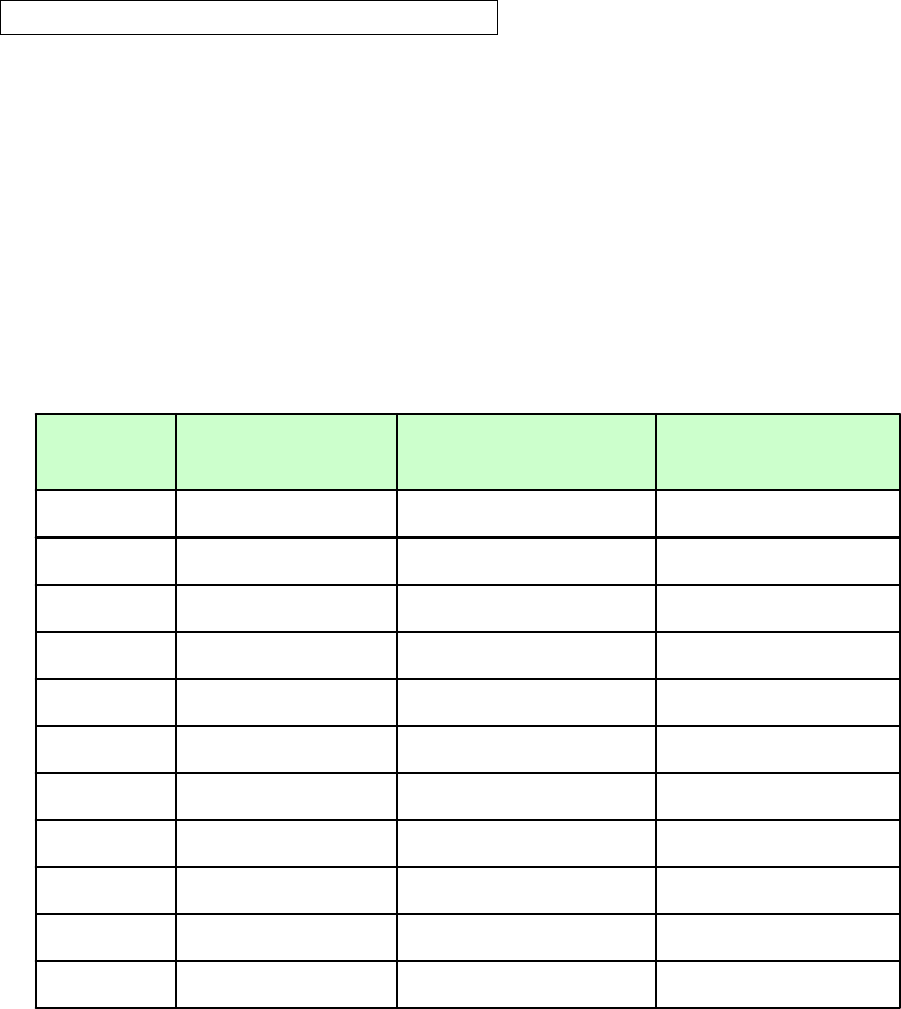
Preset PC Mode Timing Table
Recommended to set this display to 1280x768 at 60 Hz.
70 56.5 1024x768 7
60 37.9 800x600 4
75 37.5 640x480 3
60 47.7 1280x768 8
75 60 1024x768 7
60 48.4 1024x768 6
75 46.9 800x600 5
72 48.1 800x600 4
70 31.5 720x400 3
72 37.9 640x480 2
60 31.5 640x480 1
Vertical
Frequency (Hz)
Horizontal
Frequency (kHz)
Resolution
(Dots x lines)
No
On screen menus
The dialogue between you and your set takes place on screen with an operator menu.
The buttons required for the operating steps are also displayed.
Menu selection (with using remote control)
1. Press the MENU button and then S / Tbutton to display each menu.
2. Press the X button and then S / T button to select a menu item.
Press the W / X button to change the setting of selected item.
4. Press the EXIT button to exit the OSD menu.
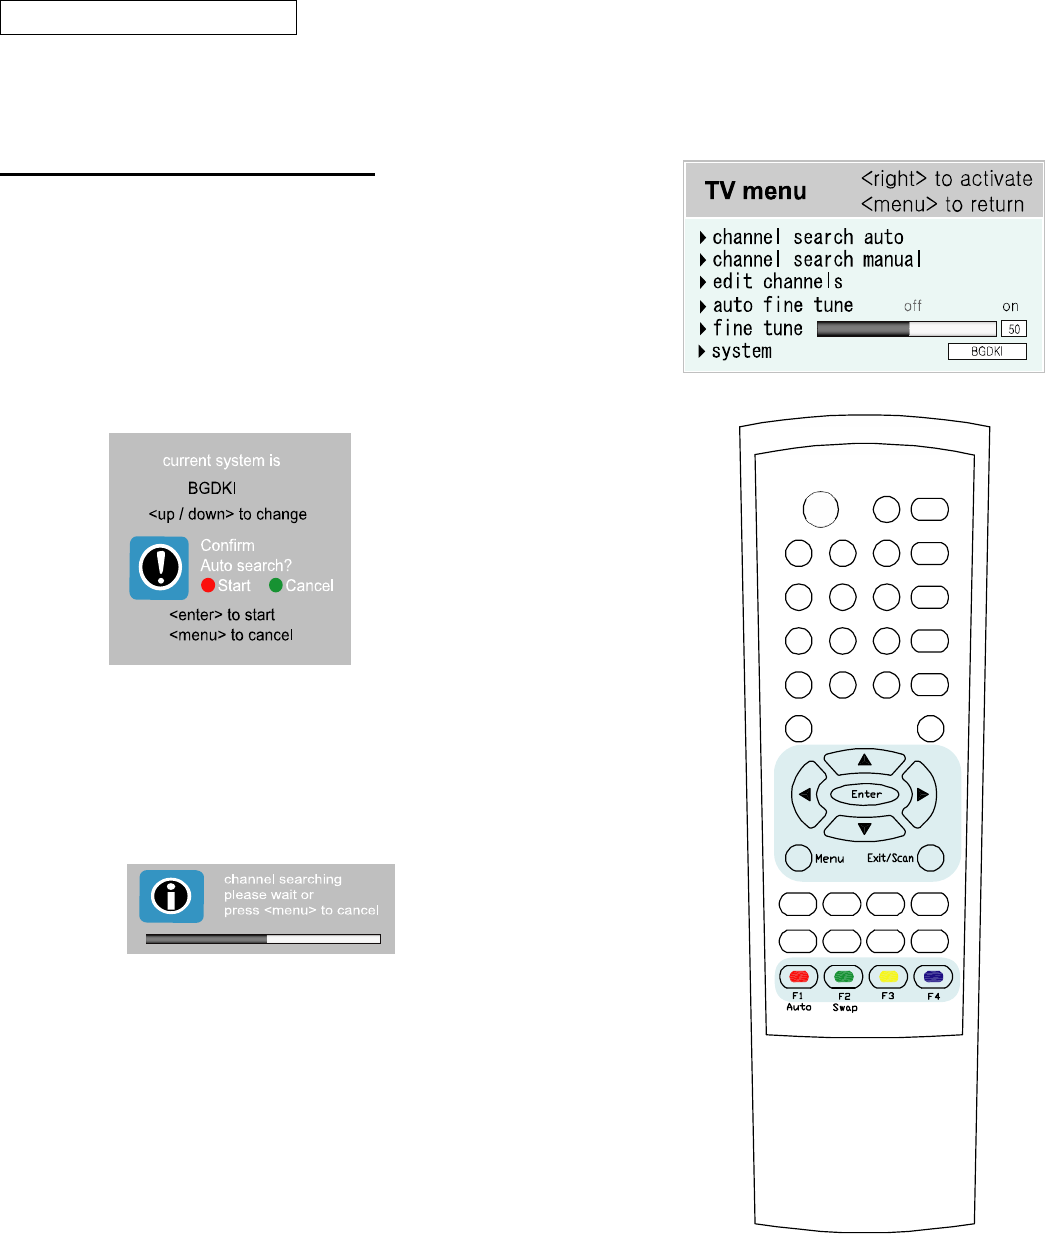
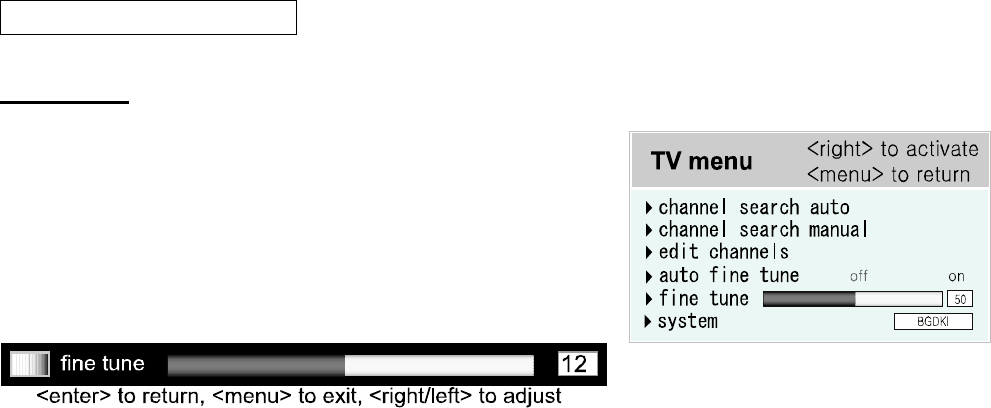
Main Menu TV menu
TV menu
picture
audio
option
output select
layout
Picture
Layout
Output
Option
Audio
Channel search auto
Channel search manual
Edit channels
Auto fine tune
Fine tune
system
brightness
contrast
tint
color
color temp.
user color temp.
sharpness
h position
v position
Full / PIP / Split screen /
POP 3 / POP 12
output 1 select
output 1 fixed, no action
output 2 select
output 2 video/tv selectable
mode
treble
bass
balance
auto volume
speaker out
Head P1 sound
Head P2 sound
source select
factory reset
menu background
room lighting
backlight
channel search mode
osd timeout
Setting up TV stations
Once you have preset the stations, you will be able to use the S / T or NUMBER buttons
to scan the stations you have programmed. Stations can be tuned using automatic or manual modes.
Channel searching automatically
All stations that can be received are stored by this method.
It is recommended that you use auto channel search during installation
of this set.
1. Press the MENU button and then S / T button to select the TV menu
2. Press the X button and then S / Tbutton to select the
channel search auto
3. Press the X button to display channel search auto menu.
4. Select a TV system with the S / Tbutton.
BGDKI : PAL P/G, SECAM B/G (Europe/East Europe)
PAL D/K, SECAM D/K(East Europe), PAL I/II (U.K./Ireland)
L : SECAM L/L(France: SECAM-L models only)
5. Press Red color button to start searching channels
Notes :
After finishing channel searching, Edit channel menu will be
Appeared. Please refer to the next page.
Setting up TV stations
Manual channel search
Manual channel search lets you manually tune and arrange the stations
in whatever order you desire. Also you can assign a station name with
characters to each program number.
1. Press the MENU button and then S / T button to select the
channel search manual.
2. Press the X button and then S / T button to select
the channel search manual.
3. Press the X button to display the channel search manual menu.
()O}{OOKOMENU
me
4. Select a TV system with the S / Tbutton.
BGDKI : PAL P/G, SECAM B/G (Europe/East Europe)
PAL D/K, SECAM D/K(East Europe), PAL I/II (U.K./Ireland)
L : SECAM L/L(France: SECAM-L models only)
5. Press RED button to start searching channels
Notes :
After finishing channel searching, Edit channel menu will be
Appeared. Please refer to the next page.

Setting up TV stations
Editing channel editing and assigning a station name
1. Press the MENU button and then S / T button to select the
edit channels.
2. Press the X button and then S / T button to select
the edit channels.
3. Press the X button to display the edit channels menu.
Deleting a channel
1. Select a channel to be deleted with the S / T or W / X button.
2. Press the RED button.
The selected channel is deleted, all the following channels
are shifted up one position.
Moving a channel
1. Select a channel to be moved with the S / T or W / X button.
2. Press the GREEN button.
3. Move the channel to the desired program number with
the S / T or W / X button.
4. Press the GREEN button again to release this function.
Renaming a program
1. Select a channel to be renamed with the S / T or W / X button.
2. Press the YELLOW button to assign name with alphabet character.
.
3. Press the GREEN or YELLOW button to move to the desired channel.
4. Press the arrow buttons(S / T or W / X) to assign a station name to the selected channel.
Setting up TV stations
Fine tuning
Normally fine tuning is only necessary if reception is poor.
1. Press the MENU button and then S / T button to select the
fine tune.
2. Press the X button and then S / T button to select
the fine tune.
3. Press the X button to display the fine tune menu.
4. Press right / left button(W / X) to fine tune for the best picture.
5. Repeatedly press the MENU button to return to normal TV viewing.
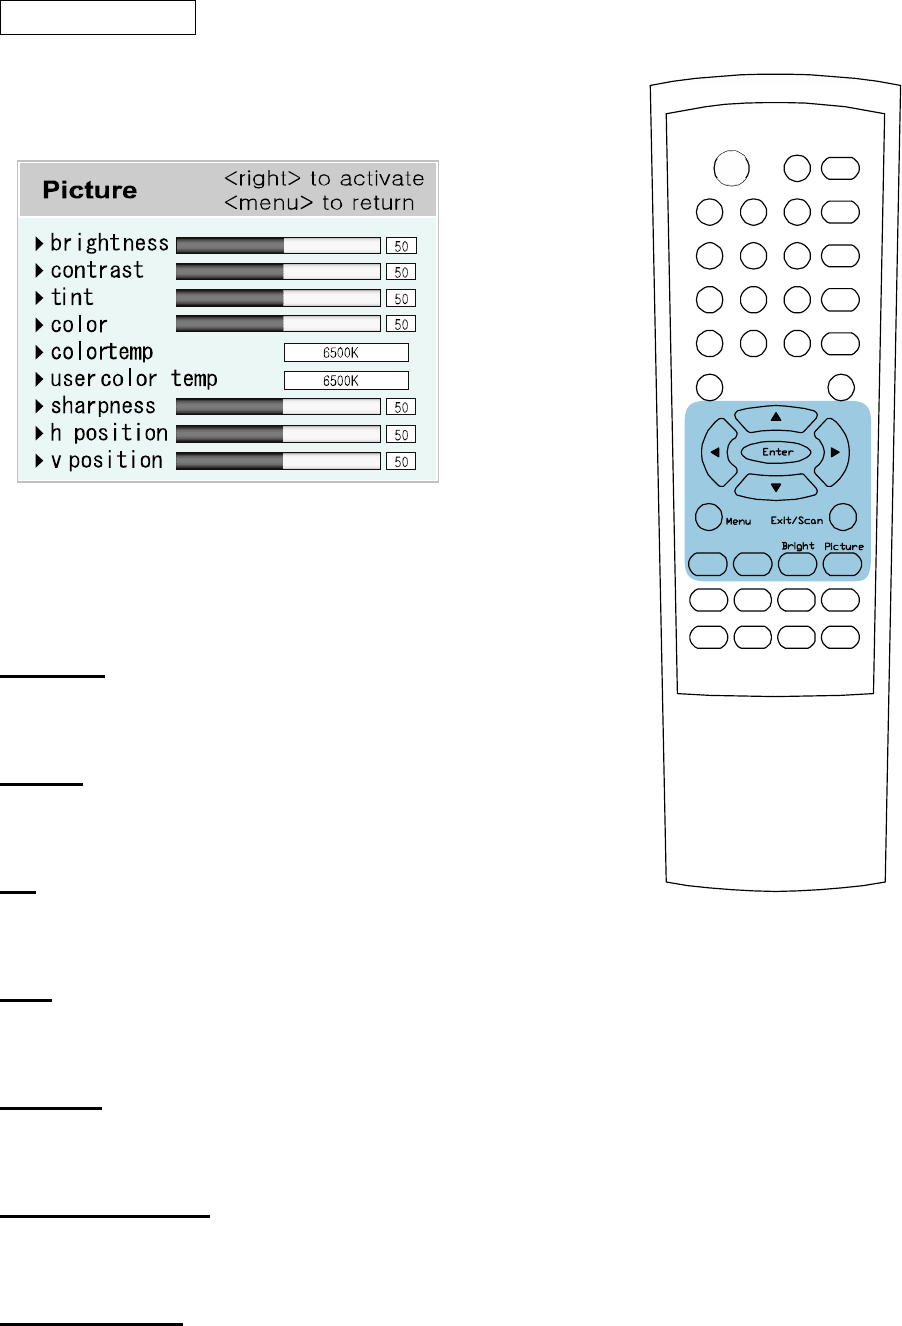
Picture setting
1. Press the Picture button and then S / T button to select
the desired item.
2. Press the W / X button to change the values of desired item.
3. Press the enter button to return.
4. Press the menu button to exit.
Brightness
Change the brightness of the LCD Display.
Contrast
Change the contrast of the LCD Display.
Tint
Changes the red tones in the LCD Display.
Color
Change the color saturation of the LCD Display
Sharpness
Adjust the clarity of the images.
H(Horizontal) Position
Change the horizontal Position
V(Vertical) Position
Change the vertical image position
Picture setting
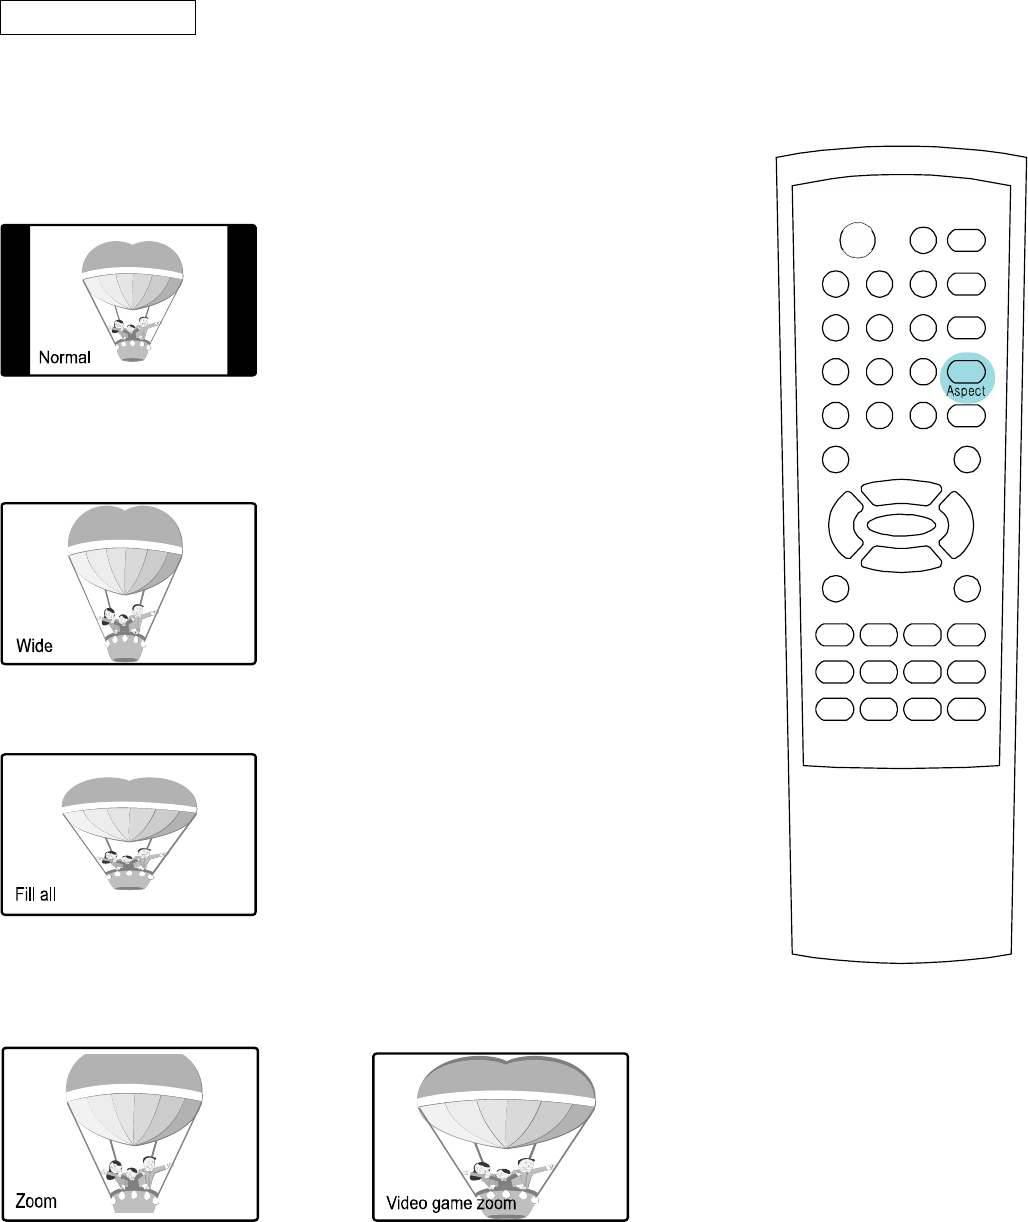
Aspect(Picture format)
You can watch TV in various picture formats : normal, wide, fill all, zoom, video game zoom.
1. Press the ASPECT button to select the formats.
Normal
This picture format is 4 to 3 of general TV.
Wide
You can enjoy the cinema (the picture format of 16:9) or general TV
through the 16:9 mode.
Fill all
The screen is magnified to the left / right side
Zoom
You can enjoy the cinema and video game zoom in a vast screen
through the Zoom mode. The bottom and top of the picture may be lost.
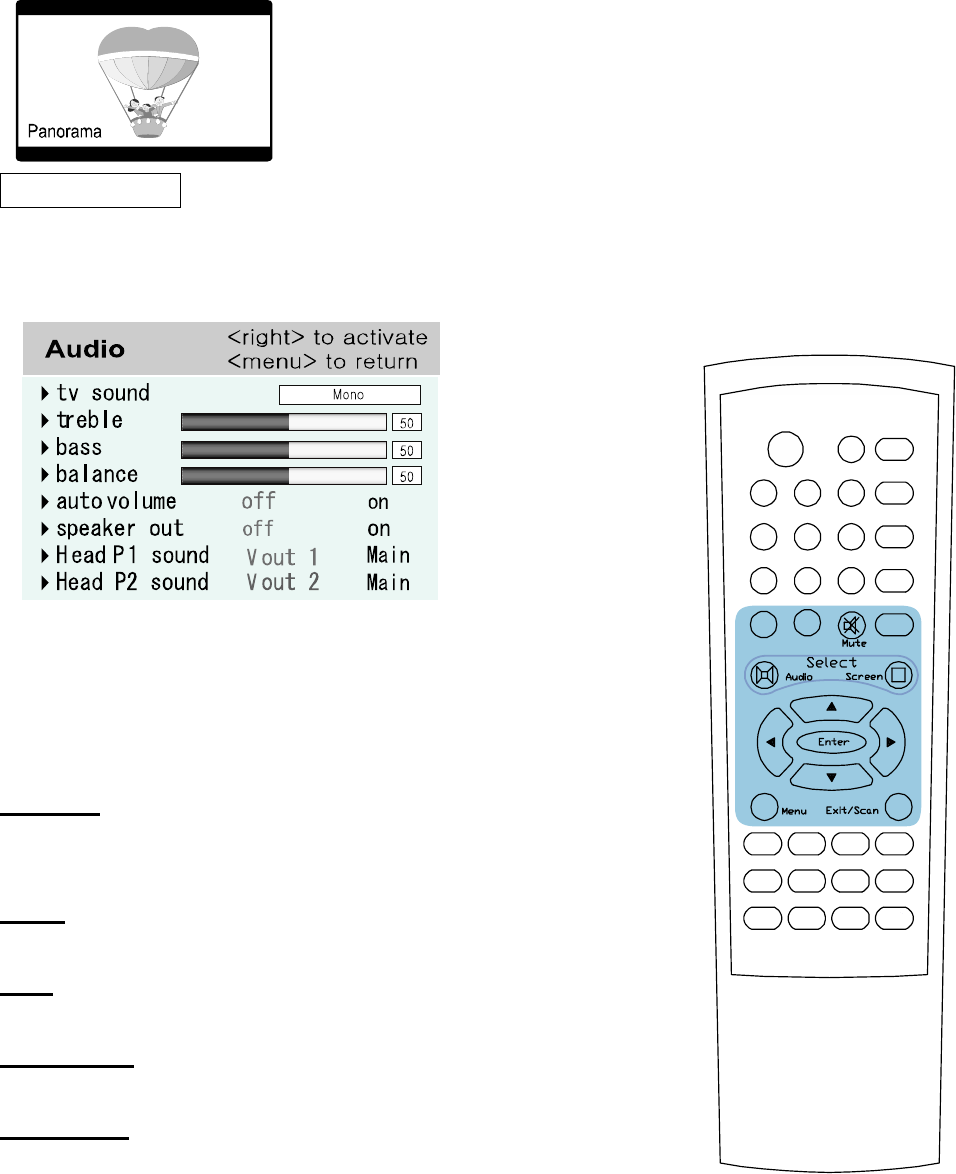
Panorama
Use this mode for the wide aspect ratio of a panoramic picture.
.
Audio setting
1. Press the Audio button and then S / T button to select
the desired item.
2. Press the X button to change the values of desired item.
3. Press the enter button to return.
4. Press the menu button to exit.
TV sound
When a program is selected, the sound information for the station
appears after the program number and station name disappear.
Treble
Changes the high pitched sound.
Bass
Changes the low pitched sound.
Auto Volume
Adjusts the sound level automatically.
Speaker Out
Options which sound out to additional extra speaker.
<Mute>
Turns off the sound in temporary
1. Press the Mute button to sound off in temporary
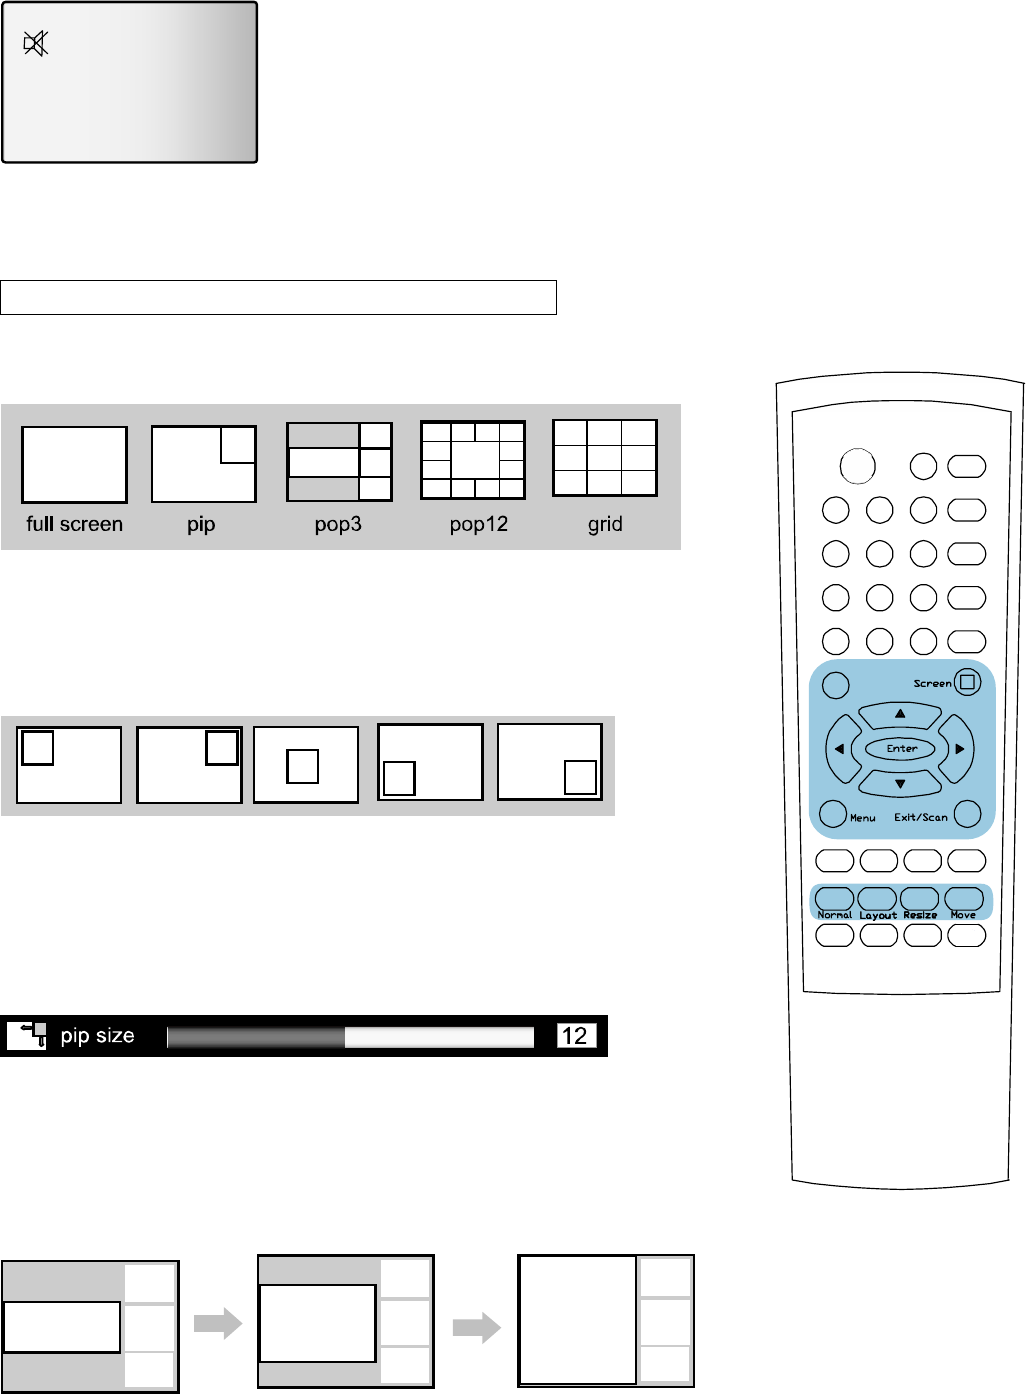
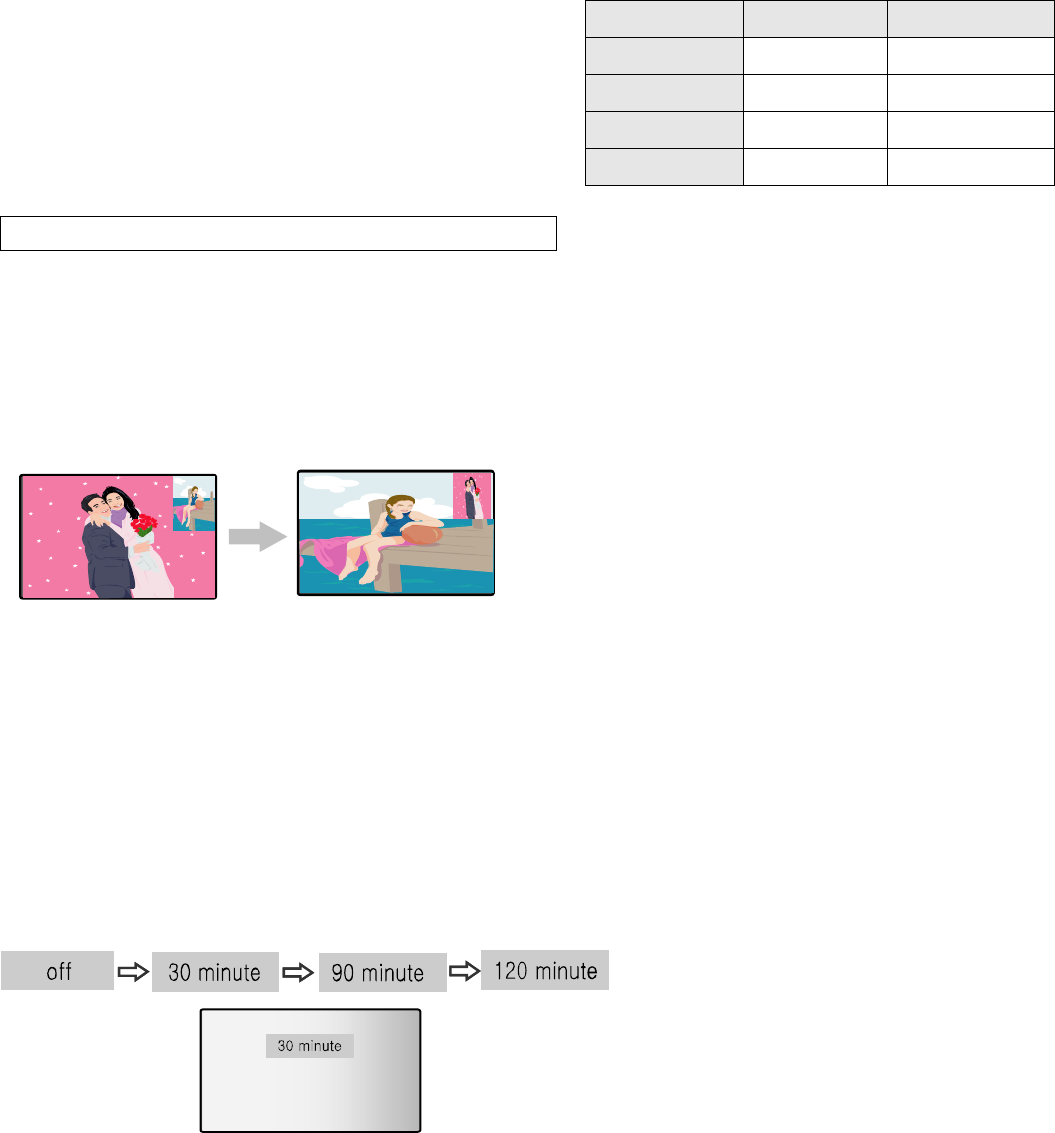
Multi-screen(PIP, Split screen, POP, GRID)
1. Press the layout button and then W / X button to select the layout..
2. Press the Enter button to display the selected layout.
<Changing PIP position >
1. Press the Move button to display the positions of the PIP screen in the PIP layout
2. Press the W / X button to change the position.
3. Press the menu button to exit
<Changing PIP size>
1. Press the Resize button to display the size of PIP screen in the PIP layout.
2. Press the W / X button to change the size.
3. Press the menu button to exit
<Changing POP3 size>
1. Press the Resize button to change main screen size in POP3 layout.
2. Press the S / T button to change the POP3 screen size.
3. Press the menu button to exit
<Changing input sources>
1. Press the Screen button to display the activated cursor
on the main or sub screen.
2. Press the Screen button again to move the cursor
to the desired screen.
3. Press the HD/PC, VIDEO or TV to change
Multi-screen(PIP, Split screen, POP, GRID)
<Changing the main picture and the sub picture>
Changes the main picture and the sub picture in the PIP, Split screen and POP layout
1. Press the Screen to select the desired sub picture to change with main picture.
2. Press the Swap button to change
Other Functions
<Sleep timer>
User need not to remember to switch the set off before you go to
bed. The sleep timer automatically switches the set to standby after
the preset time elapses.
1. Press the Timer button to select the number of minutes.
To release sleep time setting, press the SLEEP
button repeatedly to select the desired time.
2. Press the exit button to return to viewing screen.
<Pause>
User can freeze a current moving picture and watch the paused picture..
1. Press the Pause button to freeze a moving picture.
Input sources Main screen Sub screen
TV TV1 TV2
Composite Composite1 Composite2
Component Component1 Component2
HD/PC HD/PC -
2. Press again it to cancel.
<Last>
Turns to the previous channel on only TV mode.
1. Press the Pause button to freeze a moving picture.
2. Press again it to cancel.
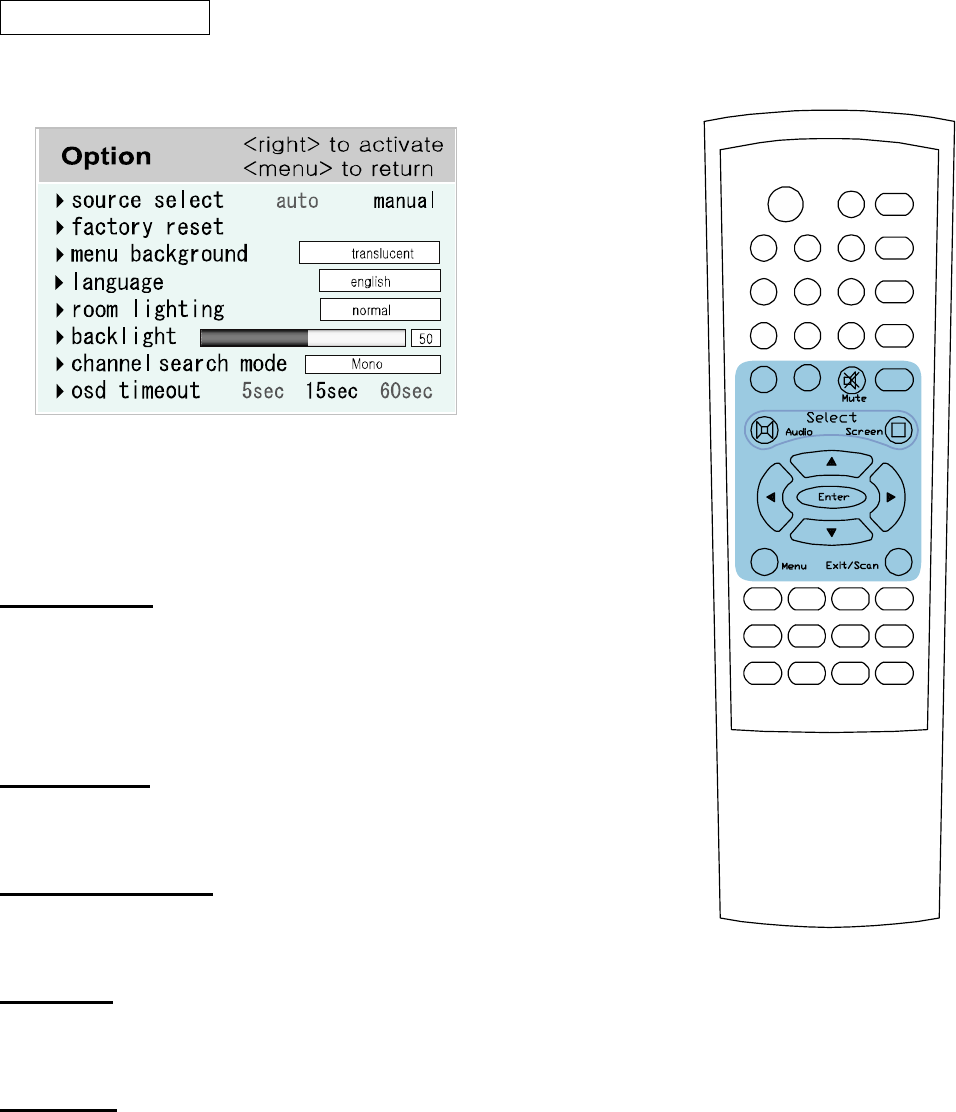
Setting Options
1. Press the Audio button and then S / T button to select
the desired item.
2. Press the W / X button to change the values of desired item.
3. Press the enter button to return.
4. Press the menu button to exit.
source select
Auto : automatic search of currently connected input sources
from external device.
Manual : user search of currently connected input sources
the sources from external device.
Factory reset
Reverts the Setting to Factory Default.
Menu back ground
Sets the Background color for On Screen Display Menu.
Language
Selects language of the OSD menus.
room light
Automatic settings of Brightness and Contrast in various Screen
modes i.e.Movie, Normal etc..
OSD time out
Time designated for when On Screen Display to disappear
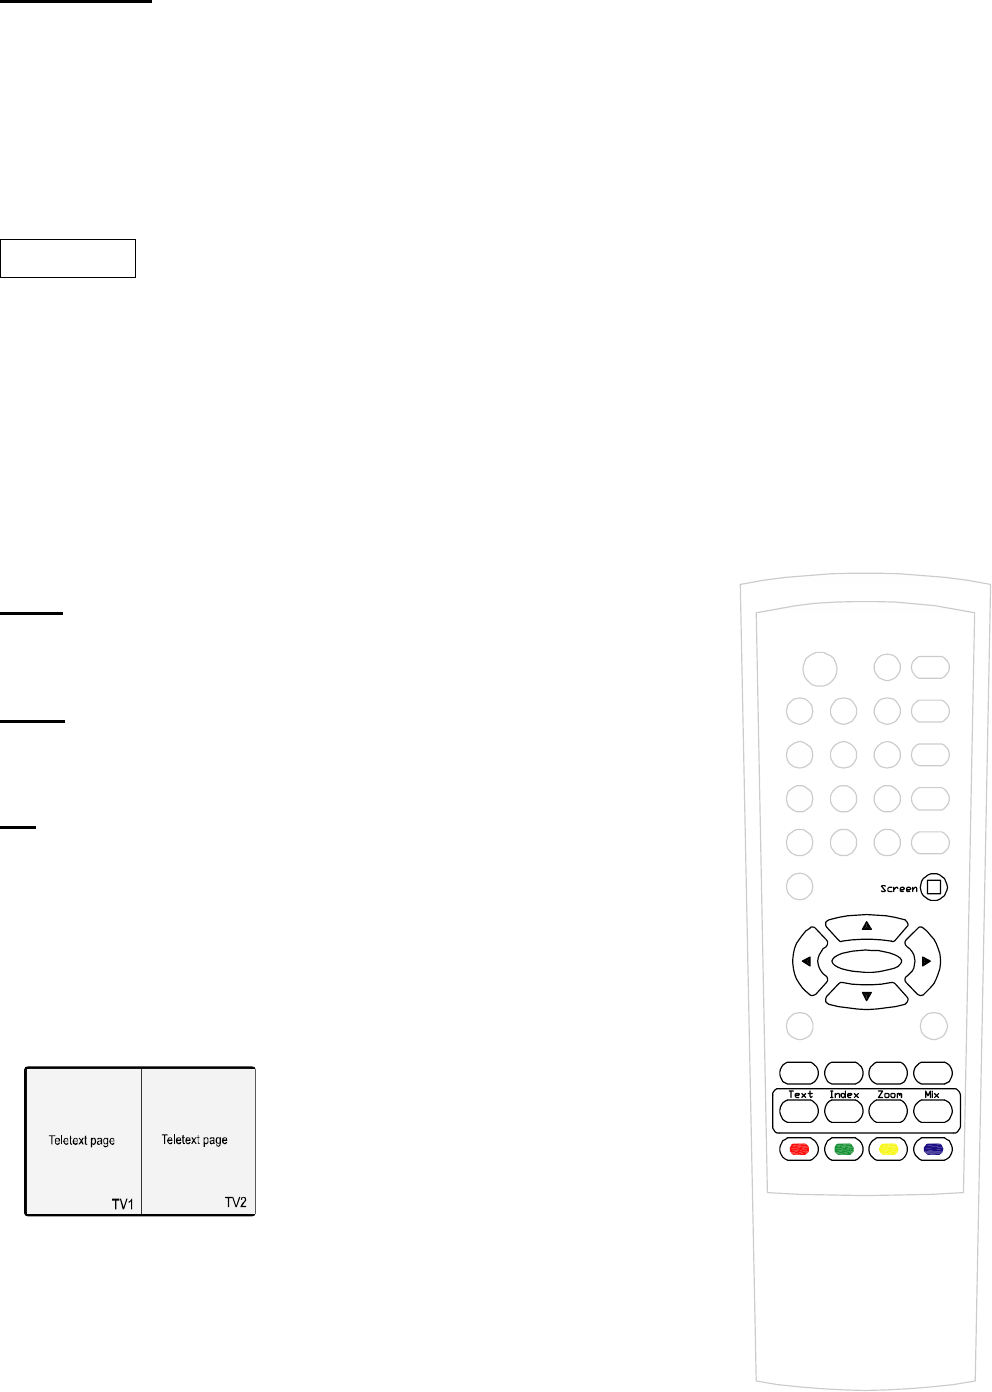
Teletext
Teletext is a free service broadcast by most TV stations which provide up to minute information on news,
weather, television programs as well as many other topics.
1. Press Text button on the remote to enable the Teletext services.
2. Press the W / X button(or Red color button/Green color button) to
move the page of teletext.
3. Press the same button to return to the TV mode.
Index
Displays the index page of the teletext.
Zoom
Enlarges the text size of the current page
MIX
Displays the teletext pages superimposed on the TV picture.
to switch the TV picture off press this button again.
<Watching the Teletext page in Split Screen>
1. Press the Layout button to change the screen into Split screen.
2. Press the Text button.
3. Press the screen button to select the desired screen.
4. Press the Picture button to watch TV picture in the selected screen.
Note: To return to Teletext page again, press the Mix button twice.
5. Press the Text button to exit the Teletext page in two screens.
Specification
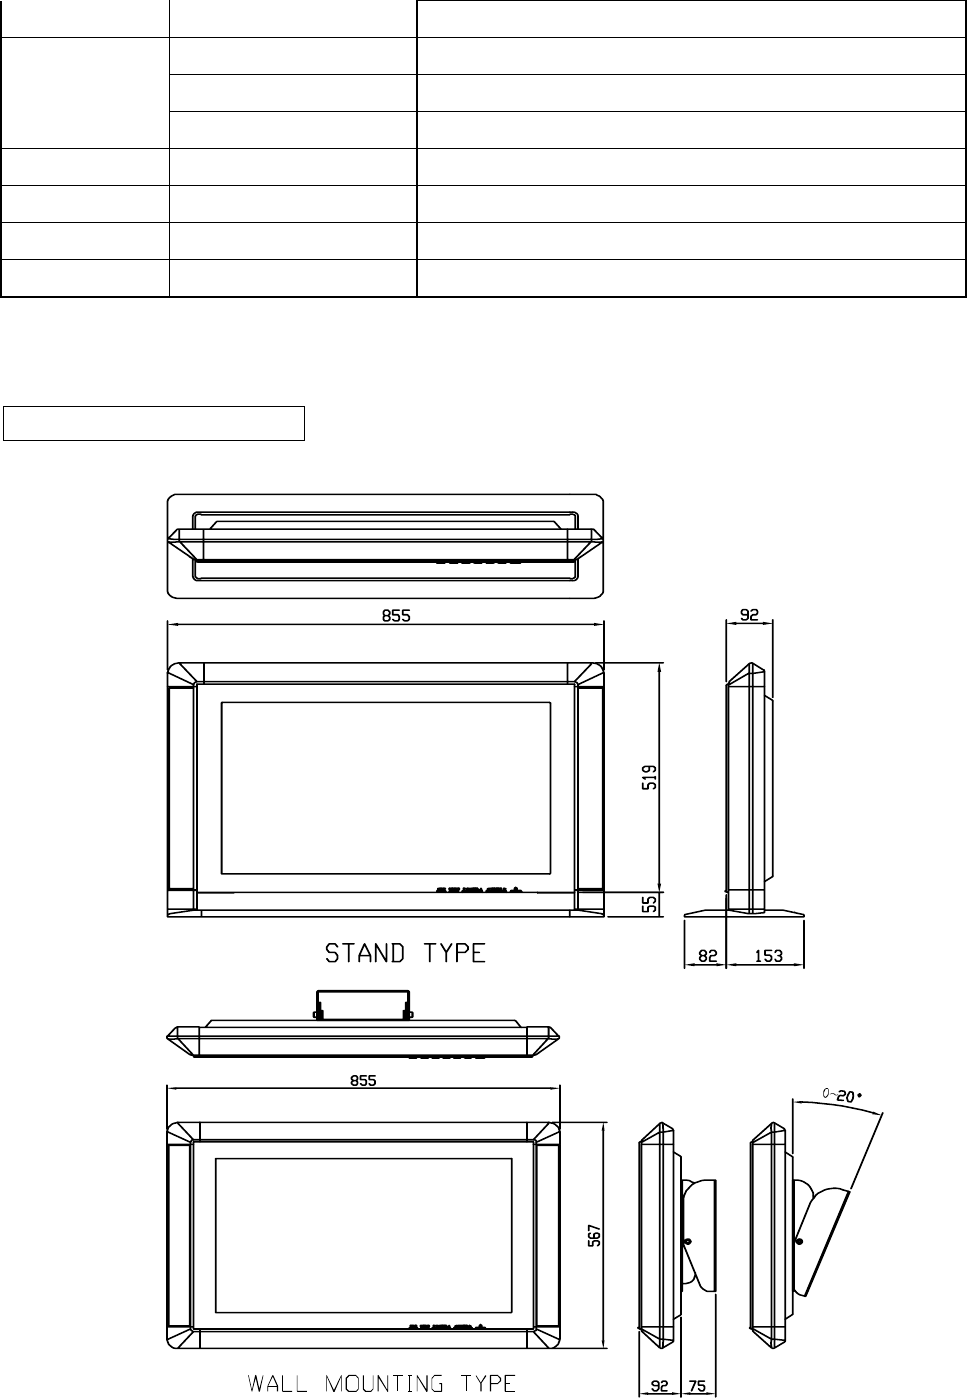
Display Size 30inches(750.062mm) diagonal
Display 697.8(H) x 431.8(V) x 50.9(D) mm(Typ.)
Response Time Rise Time : 25ms
Pixel pitch 0.5025mm x 0.1675mm
Resolution 1280 horiz by 768 vert. Pixels RGB stripe arrangement.
Color Depth 8bit 16,7M colors
Luminance 450cd/㎡
Contrast Ratio 350:1
LCD PANEL
View Angle R/L170(Typ), U/D 170(Typ)
TV system NTSC,PAL,SECAM PAL/SECAM
Sound system M B/G, D/K, I, L/L
Stereo A2, MTS NICAM,A2
TELETEXT Caption TELETEXT
TV
Parents Control Yes No
PC DVI, Analog RGB(15P D-SUB)
COMPOSITE ( BNC ) x 2
S-VIDEO (MINI DIN 4P) x 2
VIDEO
PLAYSTATION COMPONENT (YPbPr , BNC & HD Ready) x 3
PC audio (stereo jack)
COMPOSITE ( BNC)
Audio
COMPONENT (YPbPr , BNC & HD Ready)
Antenna 75 ohm coaxial x 2
Signal In
Euro A/V SCART (PAL only) x 1
Audio Head-phone x 2
Signal Out Speaker 3W x 8
Power power consumption Max. 120W Min. 3W
Adaptor IN 100~240V (50,60Hz)
OUT 24V * 6A
W 855mm
H 574mm
Dimension
D 235mm
Weight Packed Weight 20.5kg
COLOR COLOR silver
CERTIFICATION CERTIFICATION FCC, UL, CE, TUV, MIC, VCCI
FUNCTION FUNCTION PIP, Double Screen, POP3, POP12, Grid
The performance specification figures indicated are nominal values of
production units. There may be some deviations from these values in individual units.
Dimensional Drawings

Trouble Shooting
Before contacting service personnel, please perform the following simple checks.
No sound or picture.
Check that the mains lead has been connected to a wall socket.
Check that you have pressed the “ON/OFF” button.
Check the picture contrast and brightness conditions.
Check the volume.
Normal picture but no sound.
Check the volume.
Check whether the MUTE button has been pressed on the remote controller.
No picture or black and white picture.
Adjust the picture condition.
Check that the broadcast system selected is correct.
Sound and picture interference.
Try to identify the electrical appliance that is affecting the television and move it further away.
Plug your television into a different mains socket.
Blurred or snowy picture.
Check the direction, location and connections of your coaxial TV cable.
Remote control malfunctions.
Replace the remote controller batteries.
Clean the upper edge of the remote controller(transmission window).
Check the battery terminals.
The image is too light or too dark.
Adjust the Brightness and Contrast.
Horizontal bars appear to flicker, jitter or shimmer on the image.
Adjust the Fine function.
Vertical bars appear to flicker, jitter or shimmer on the image.
TV is suing its power management system.
Move the computer’s mouse or press a key on the keyboard.