Instant Care ANEL906FS Fall Sensor User Manual
Instant Care, Inc. Fall Sensor Users Manual
Users Manual

1
Fall Sensor (ANEL906-FS)
This fall sensor is designed to activate the Control Panel by manual button press or auto fall detection to
summon help in emergency condition.
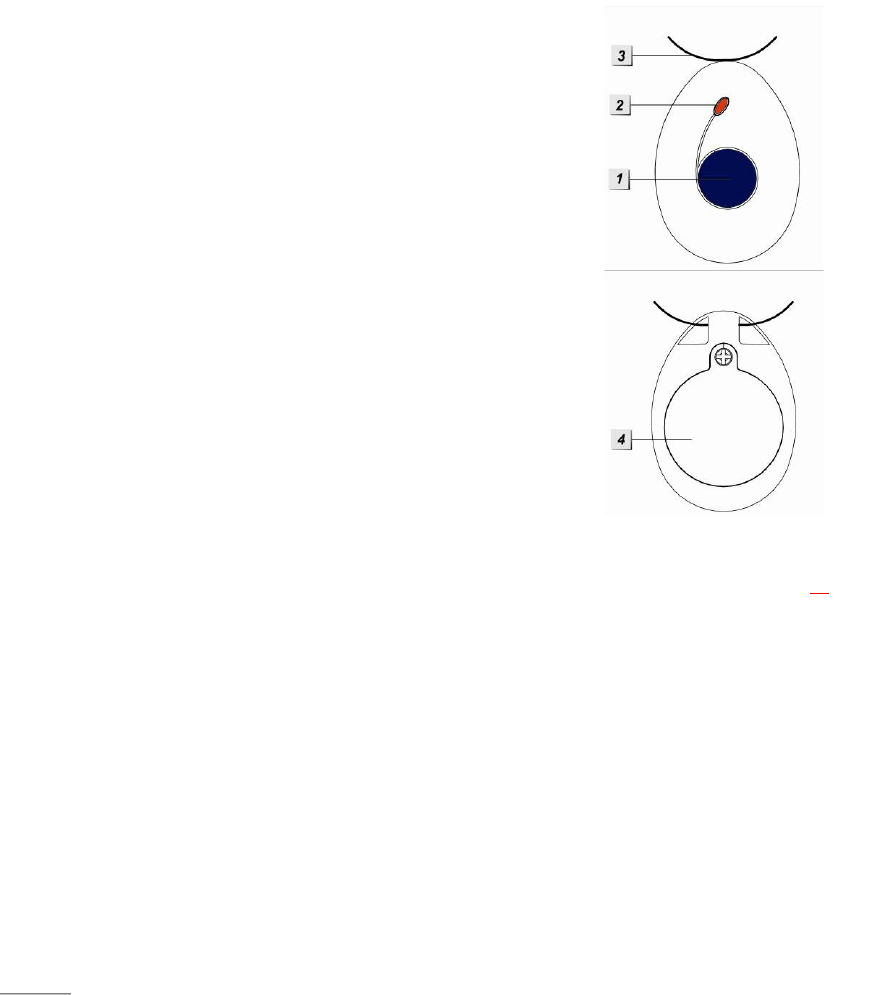
A. Identifying the Parts
1
1.
.
A
Ac
ct
ti
iv
ve
e/
/P
Pe
en
nd
da
an
nt
t
B
Bu
ut
tt
to
on
n
Press the Active Button to transmit signal
2
2.
.
R
Re
ed
d
L
LE
ED
D
LED OFF: In Standby Mode
LED ON: Transmitting signal
LED flashes: Transmitting signal when under low
battery
Quick flash for 5 seconds: Power on
3 flash: Low battery when powering on
3
3.
.
L
La
an
ny
ya
ar
rd
d
L
Lo
oo
op
p
4
4.
.
B
Ba
at
tt
te
er
ry
y
C
Co
om
mp
pa
ar
rt
tm
me
en
nt
t
C
Co
ov
ve
er
r
B. Low Battery Detection and Supervision
After the battery is inserted, Fall Sensor will automatically transmit a supervision signal every 2 70
hours. If the Main Unit has not received the signal, it will then notify the user accordingly (depend
on the Main Unit setting).
C. Learn In Fall Sensor
Step 1. Put the Main unit into Learning Mode. Please refer to the manual of the Main unit.
Step 2. Press the Pendant Button on Fall Sensor, a radio signal will be transmitted to the main unit.
Step 3. Please refer to the operation manual of your main unit to complete learning.
D. Battery
The Fall Sensor uses one coin type CR2477 3V lithium battery as its power source.
If the battery voltage is low, a Low Battery signal will be sent to the Main unit to notify the user. Moreover,
when the battery is low, the LED will flash during signal transmissions instead of turning on to remind the
user to replace the battery.
<
<N
NO
OT
TE
E>
>
It is prohibited to learn-in Fall Sensor to the Main unit when Fall Sensor is in low battery status.
2
E. Fall Detection and Sleep Mode
If a fall is detected, the sensor will activate the Main Unit (transmitting the same code as pressing
the Active Button).
If the fall sensor remains stationary for more than 3 hours, it will enter Sleep Mode. During Sleep
Mode, If movement is detected during sleep mode, the fall sensor will start a 1-minute countdown
to return to normal operation mode (you can return to normal operation instantly by pressing on
the Active Button once). Fall detection function is disabled during the 1-minute timer. After the
1-minute timer expires, The Fall Sensor will return to normal operation. This function is designed to
allow user to don the Fall Sensor after removing it for extended period without activating false
alarm.
F. Usage Recommendation
Please do not cover the fall sensor with clothes (wear it so it is visible to the eye)
Carefully place the fall sensor on a desk while not in use to avoid accidental alarm trigger.
G. Changing the Battery
Remove the battery compartment cover by unscrewing the screw using a Philips screwdriver.
Carefully remove the coin battery using a Philips screwdriver.
Press the Active Button twice to fully discharge.
Insert the coin battery taking care of polarity.
Replace the battery compartment cover and tighten the screw lightly.
F
Fe
ed
de
er
ra
al
l
C
Co
om
mm
mu
un
ni
ic
ca
at
ti
io
on
n
C
Co
om
mm
mi
is
ss
si
io
on
n
I
In
nt
te
er
rf
fe
er
re
en
nc
ce
e
S
St
ta
at
te
em
me
en
nt
t
This equipment has been tested and found to comply with the limits for a Class B digital device, pursuant
to Part 15 of the FCC Rules. These limits are designed to provide reasonable protection against harmful
interference in a residential installation.
This equipment generates, uses and can radiate radio frequency energy and, if not installed and used in
accordance with the instructions, may cause harmful interference to radio communications. However,
there is no guarantee that interference will not occur in a particular installation. If this equipment does
cause harmful interference to radio or television reception, which can be determined by turning the
equipment off and on, the user is encouraged to try to correct the interference by one of the following
measures:
. Reorient or relocate the receiving antenna.
. Increase the separation between the equipment and receiver.
. Connect the equipment into an outlet on a circuit different from that to which the receiver is connected.
. Consult the dealer or an experienced radio/TV technician for help.
FCC Caution: To assure continued compliance, any changes or modifications not expressly approved by
the party responsible for compliance could void the user's authority to operate this equipment. (Example
- use only shielded interface cables when connecting to computer or peripheral devices).
F
FC
CC
C
S
St
ta
at
te
em
me
en
nt
t
This device complies with Part 15 of the FCC Rules. Operation is subject to the following two conditions:
(1) This device may not cause harmful interference, and
(2) This device must accept any interference received, including interference that may cause undesired
operation.