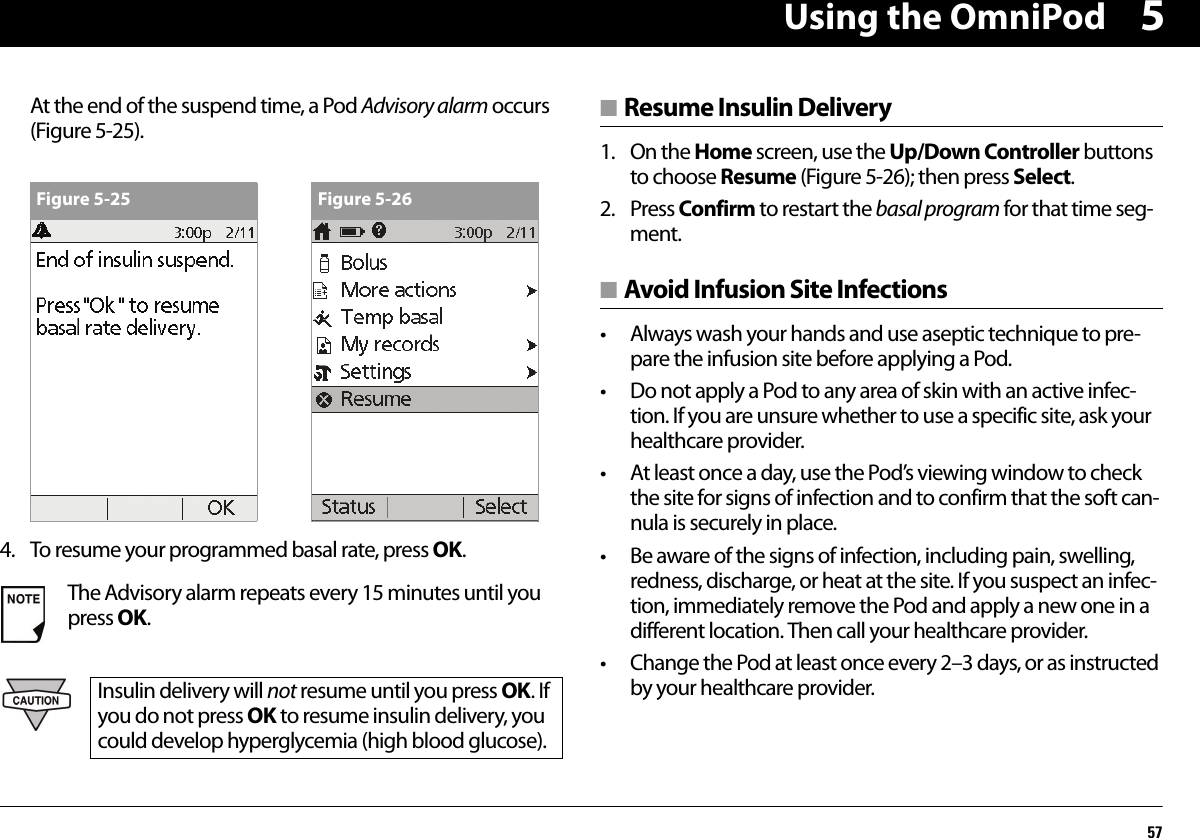
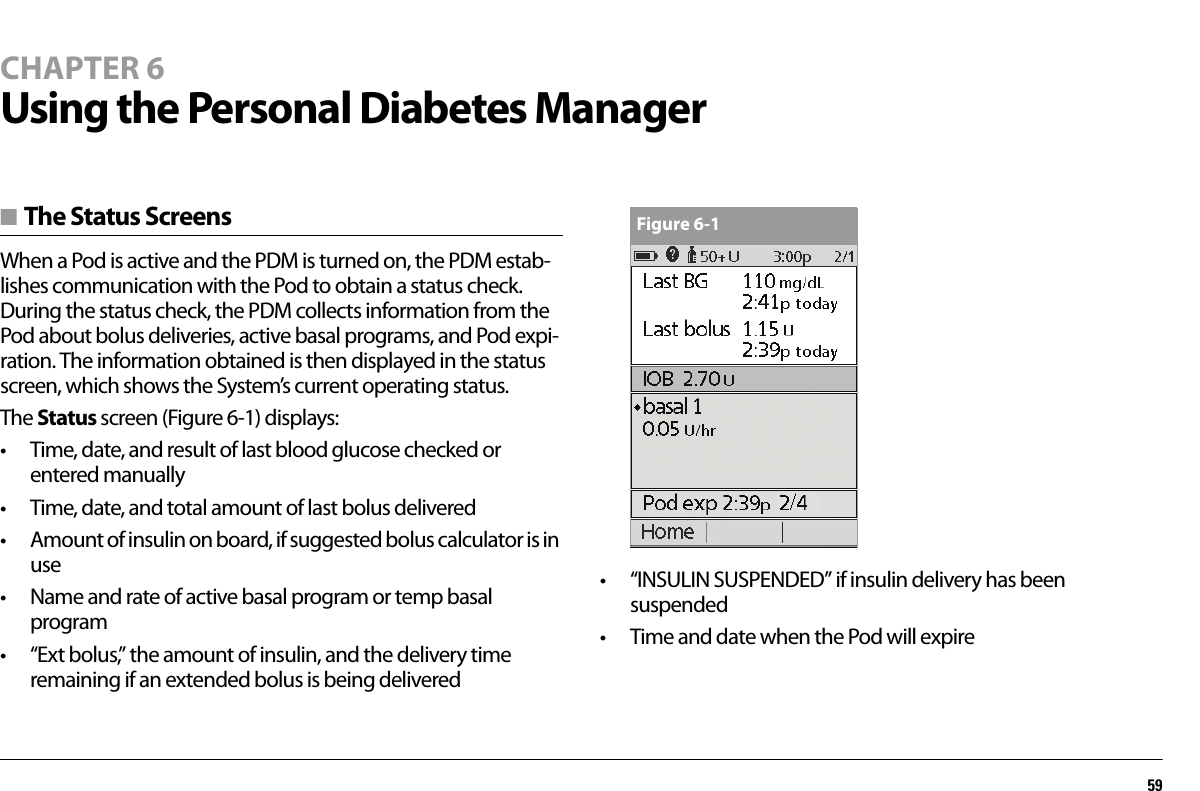
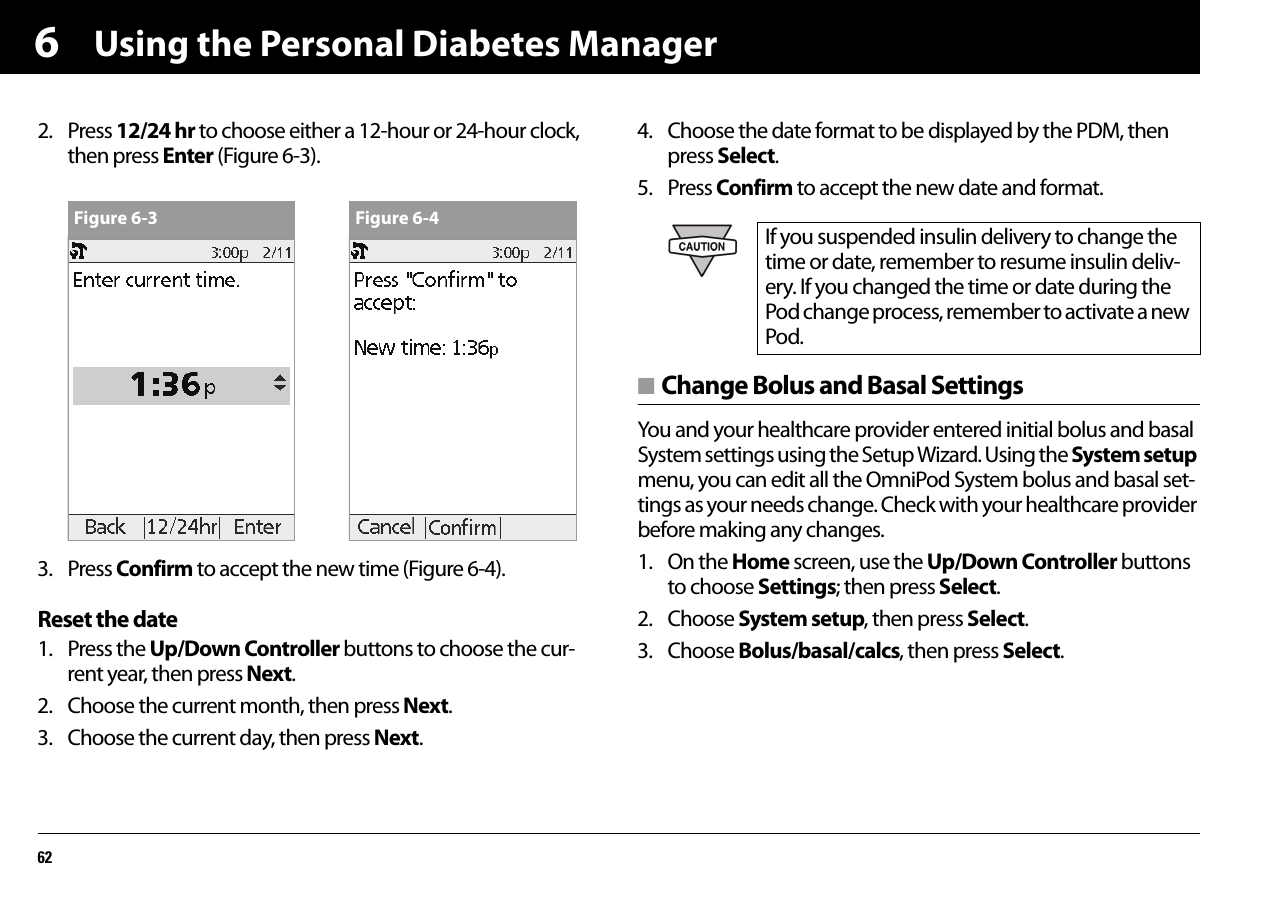
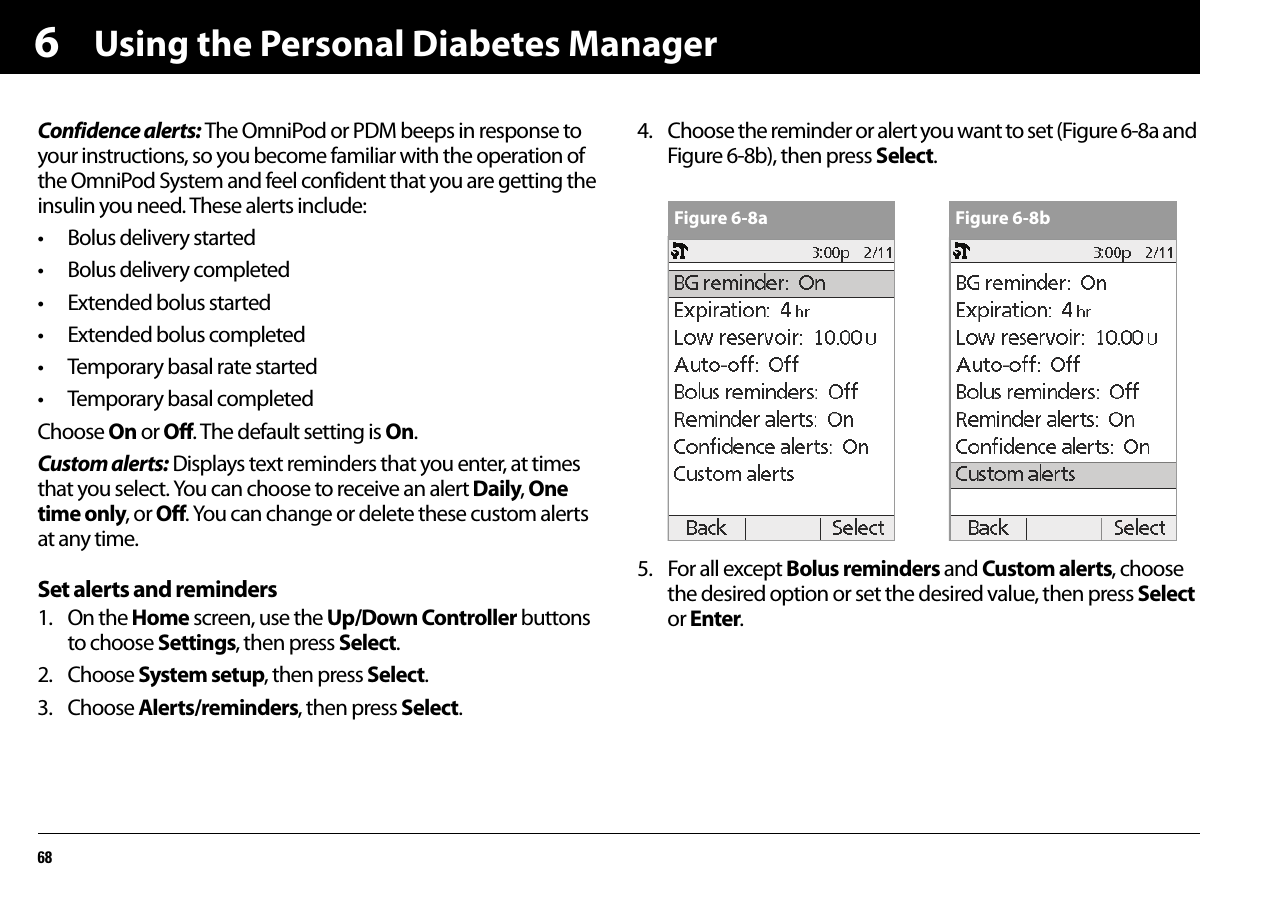
Insulet 010 PDM2 User Manual
Insulet Corporation PDM2
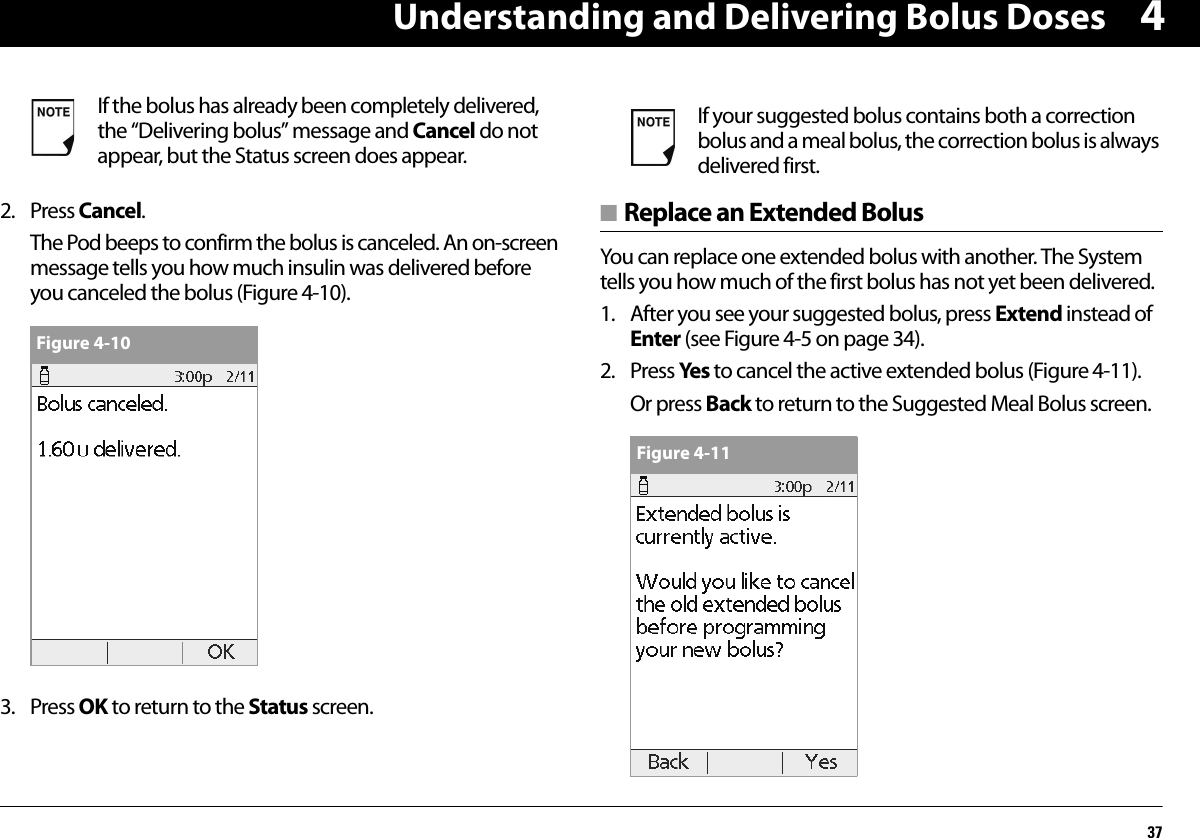
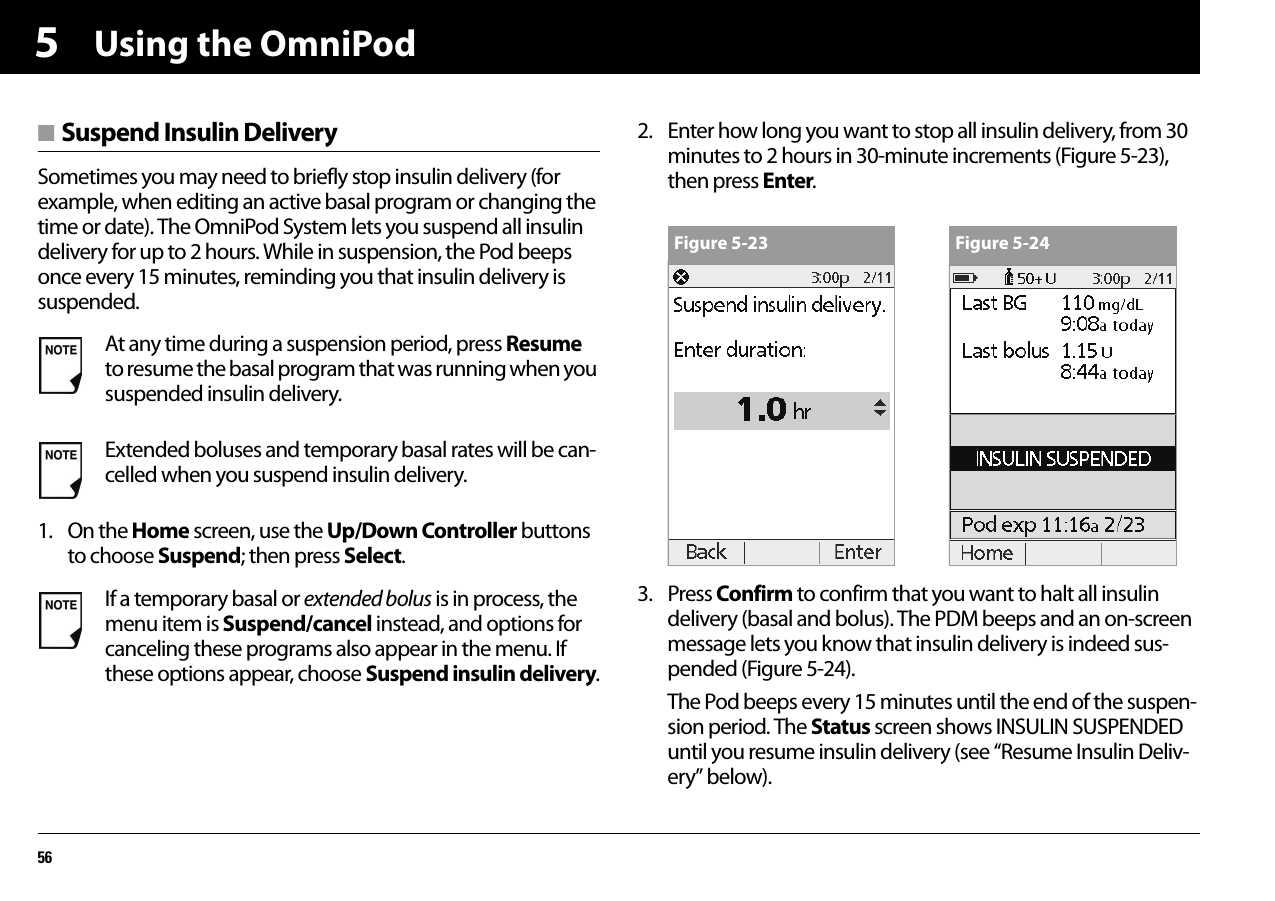
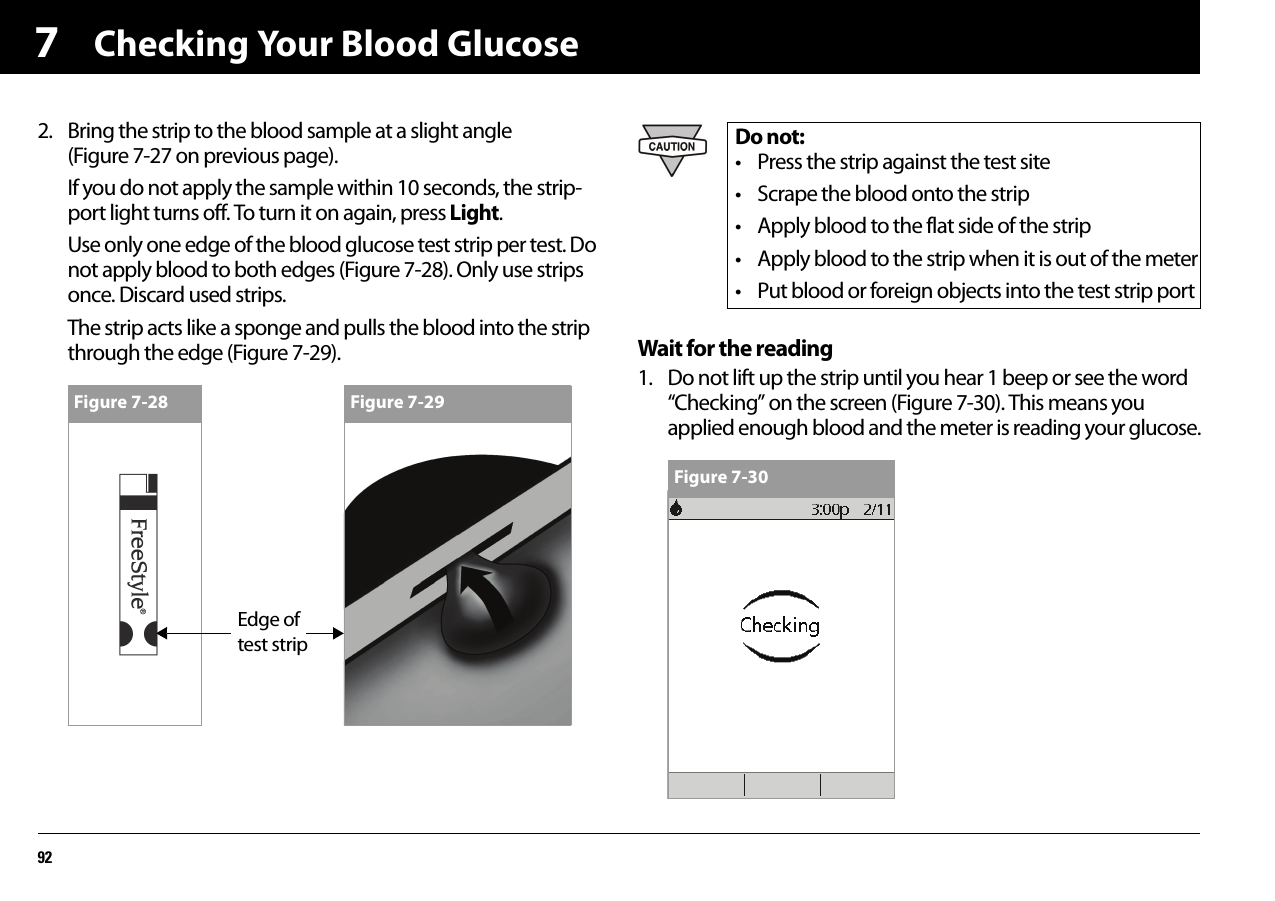
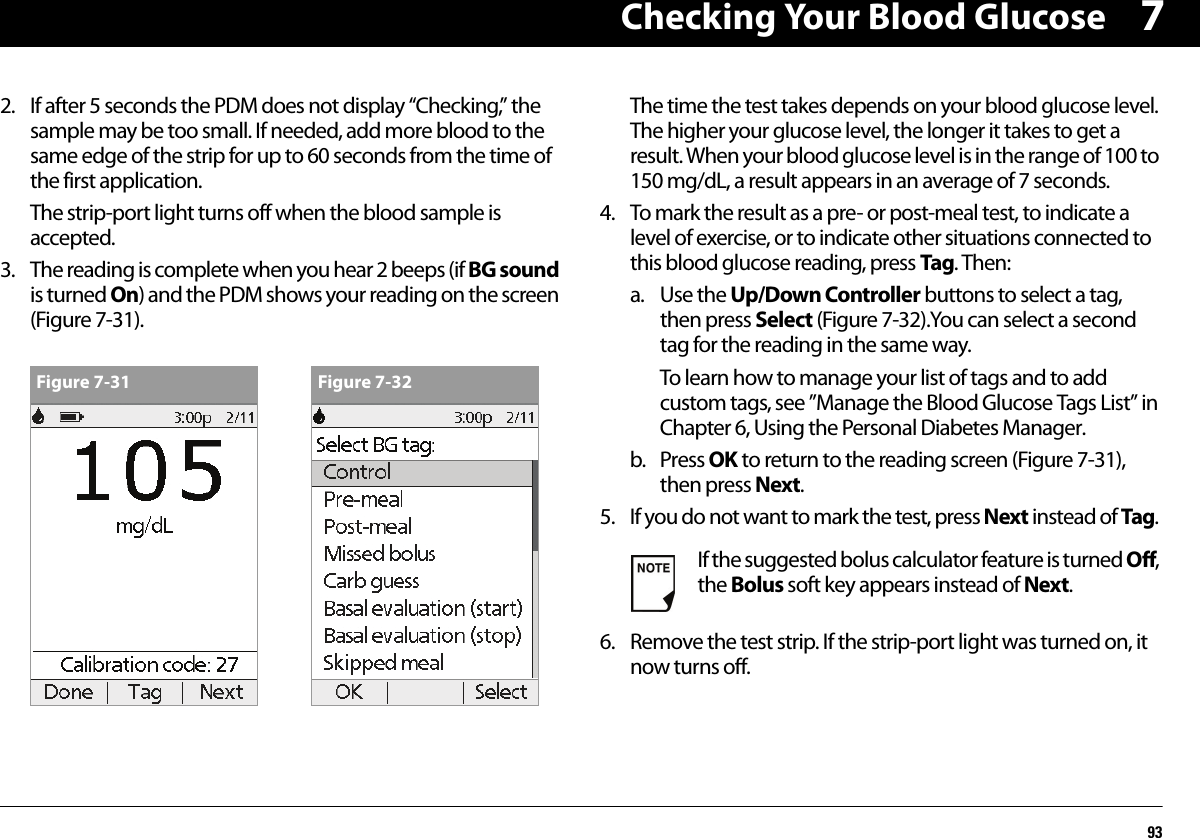
UserManual.wiki
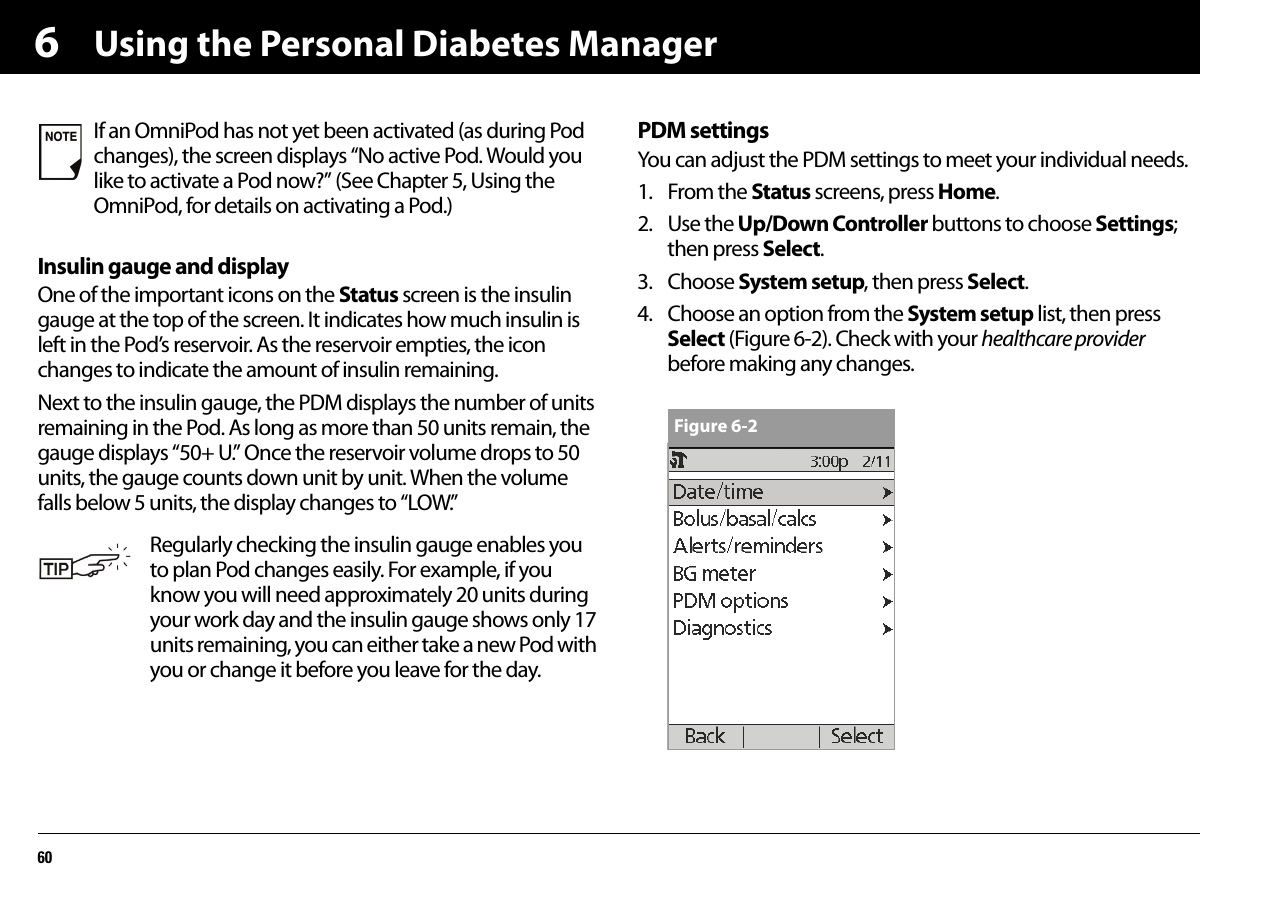
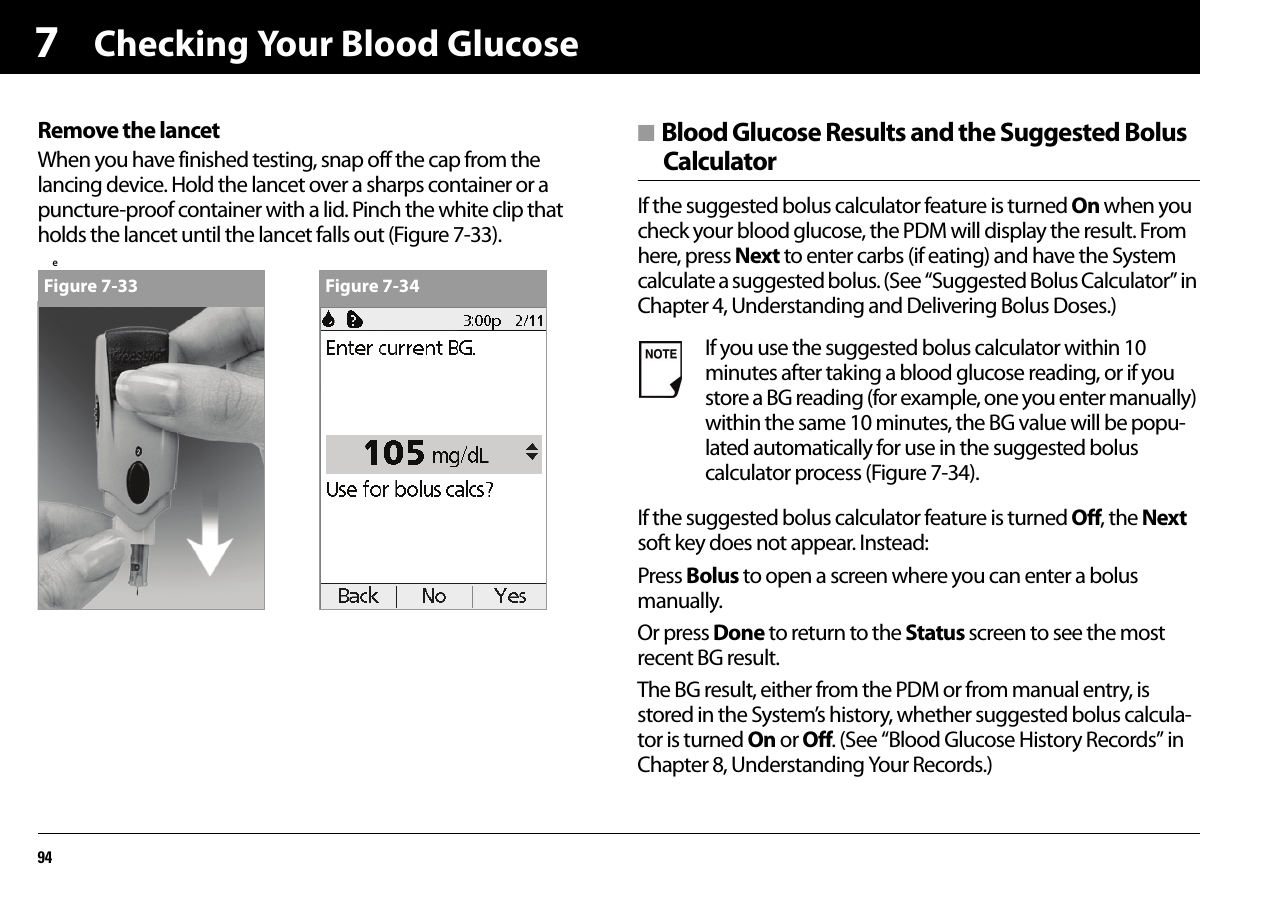
>
Insulet
>
010 User Manual
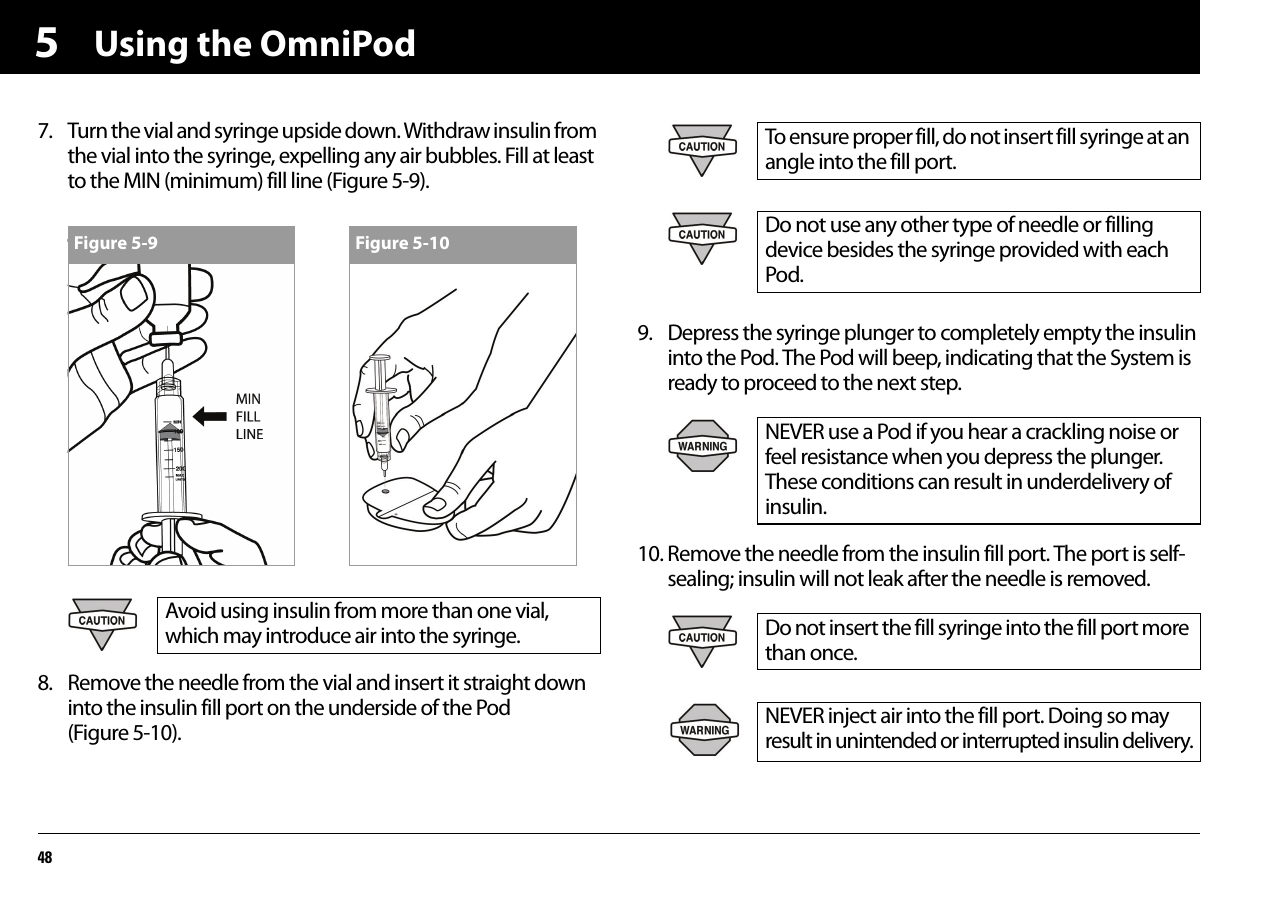
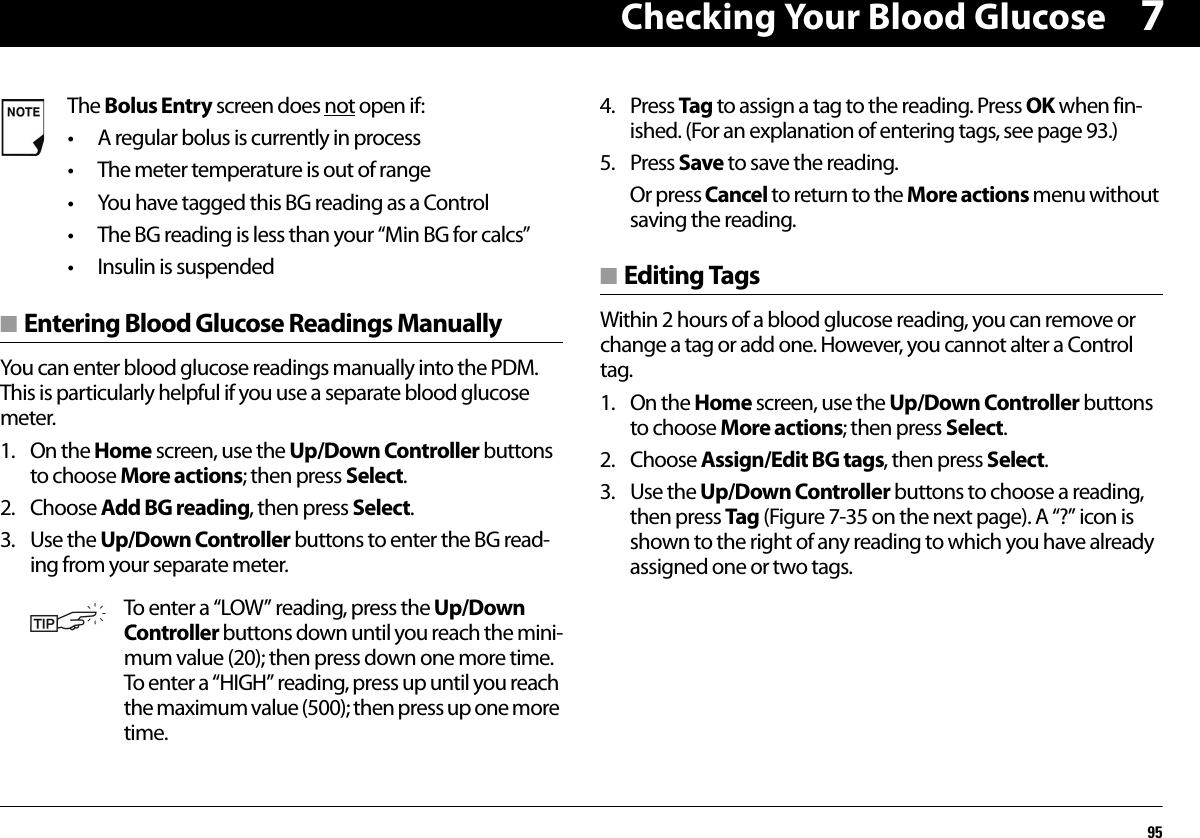
User Manual
Navigation menu
Upload a User Manual
Namespaces
Wiki Guide
HTML
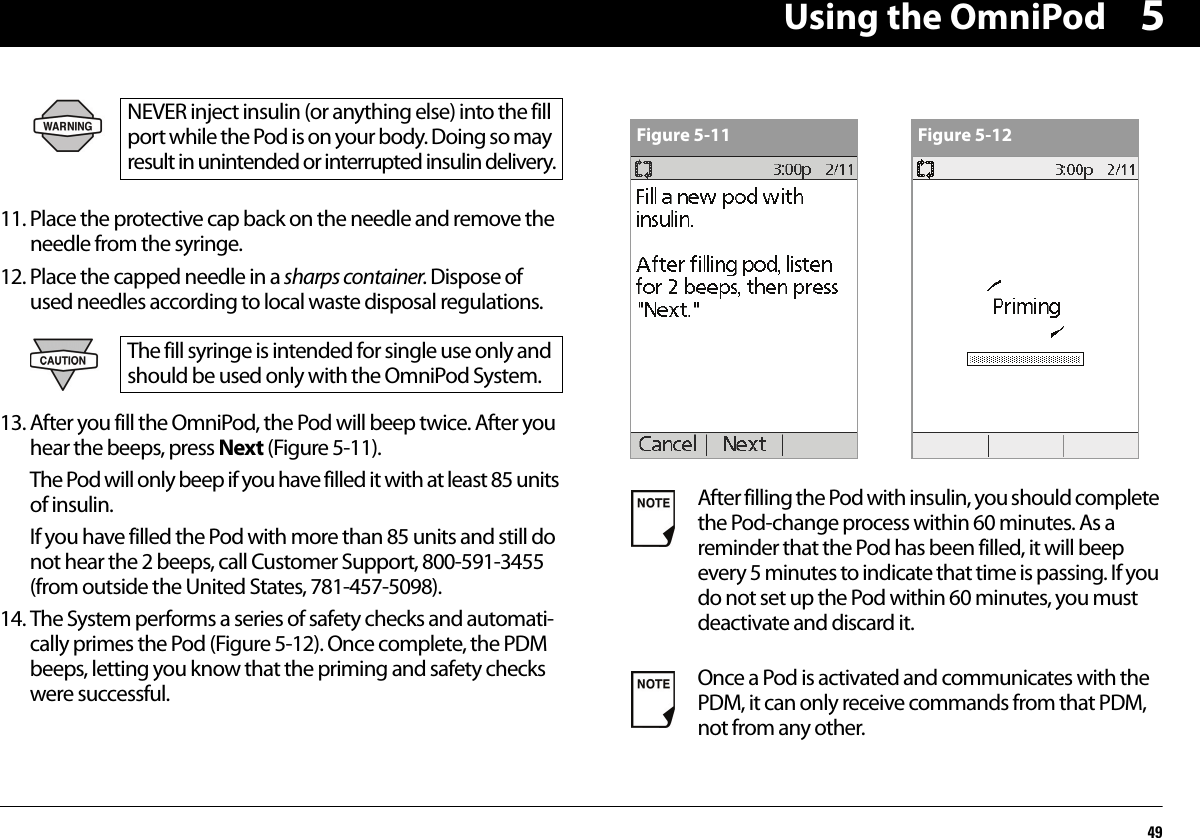
PDF
Info
Views
User Manual
Discussion / Help
Navigation


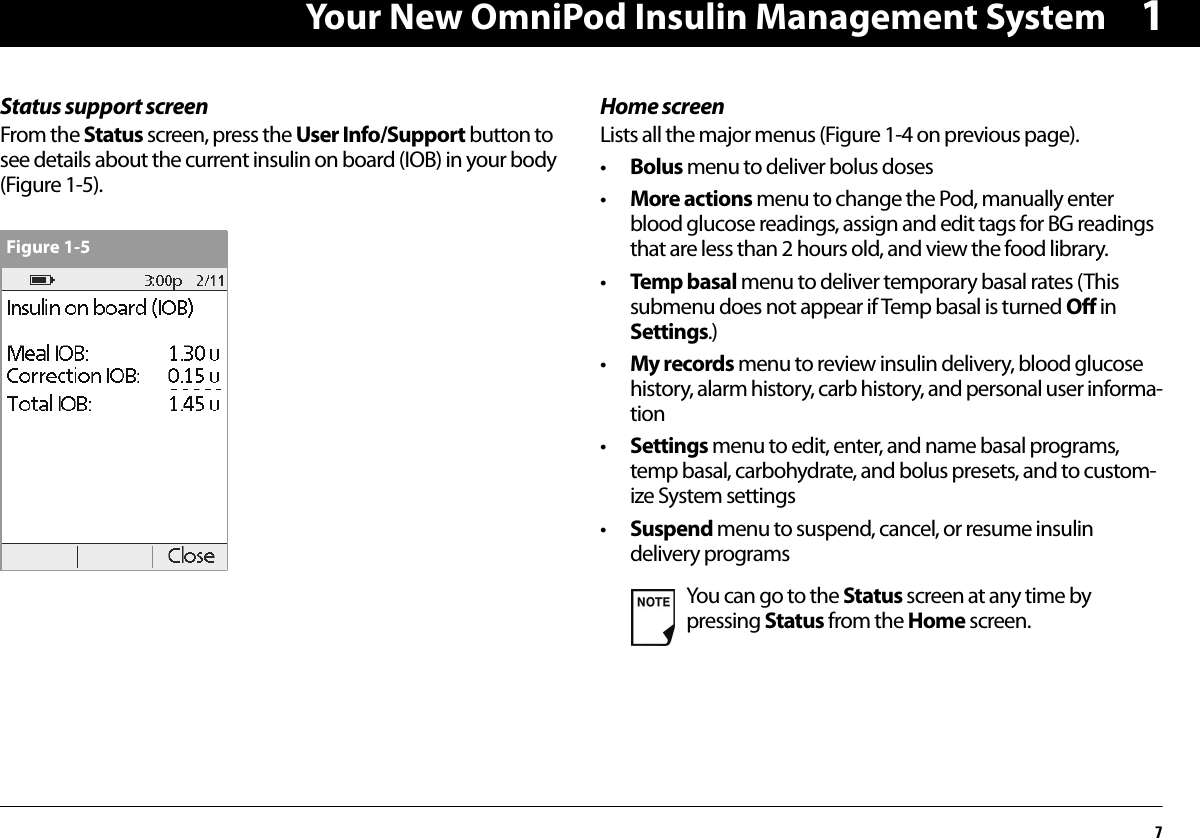

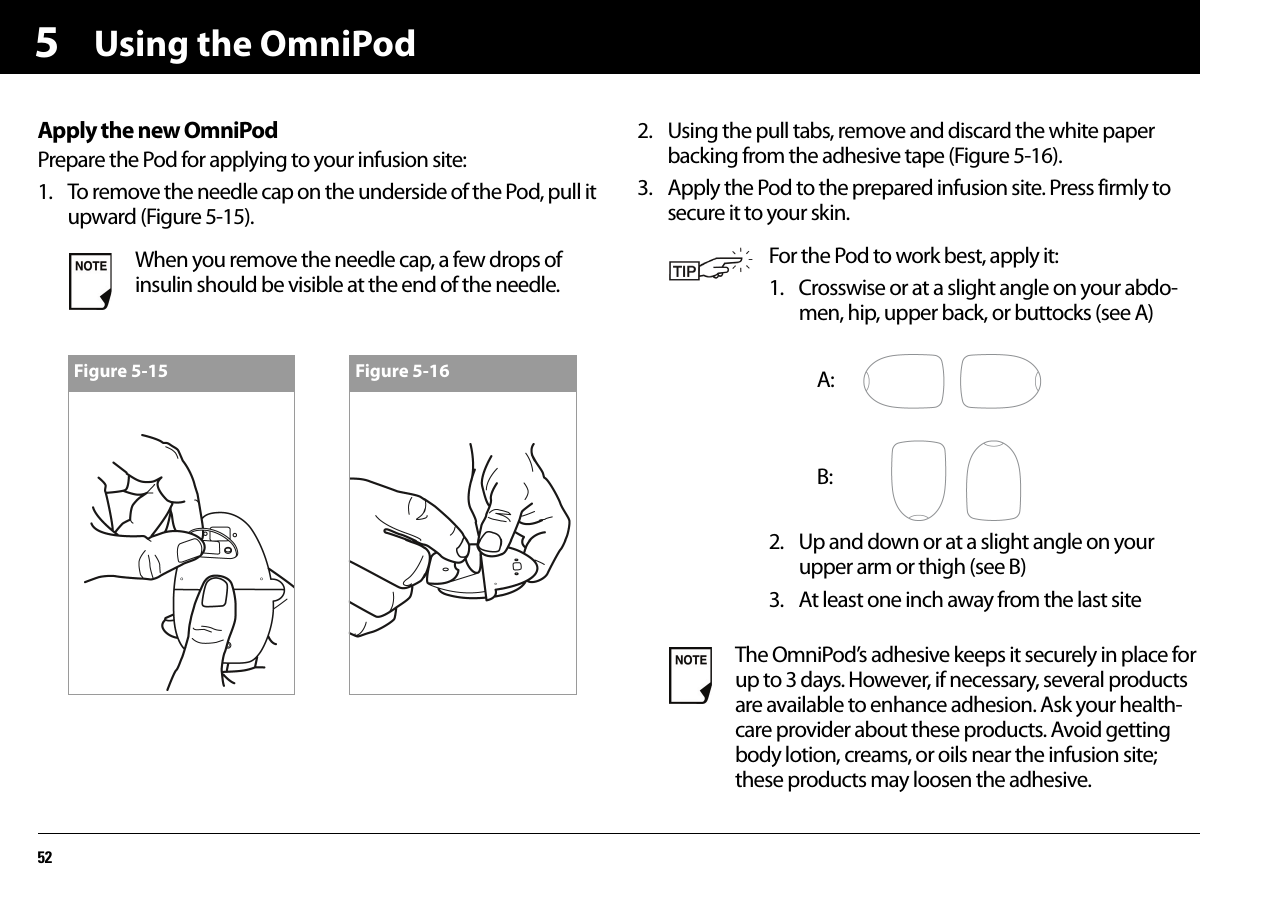
![Getting Started112■ The OmniPod Setup WizardThe first time you turn on the Personal Diabetes Manager, the Setup Wizard comes on automatically. Although setup is easy with the Wizard, if you are a first-time user, your healthcare pro-vider must guide you through the process. Setup takes only a few minutes and is easy to do:• Use the Up/Down Controller buttons to increase or decrease a number or to move up or down a list.• Press the soft key labeled Next, Select, Done, or Save to con-tinue to the next screen.• Press Back to return to the previous screen.The Wizard’s Welcome screen (Figure 2-3) gets you started. Press Next to begin setting up your PDM.Set date and time1. Use the Up/Down Controller buttons to increase or decrease the time. (If you prefer a 24-hour clock, press 12/24hr.) Then press Next.2. Enter the current year, then press Next.3. Choose the current month, then press Next.4. Enter the current day, then press Next.5. Choose the date format you prefer, then press Next. Initial settings are “---” [blank] for target blood glucose value, insulin-to-carbohydrate ratio, correction factor, and duration of insulin action.You can adjust these settings later as your needs change or you fine-tune your OmniPod System. See “OmniPod System Options and Settings” in the Appendices.Figure 2-3](https://usermanual.wiki/Insulet/010/User-Guide-1000784-Page-24.png)
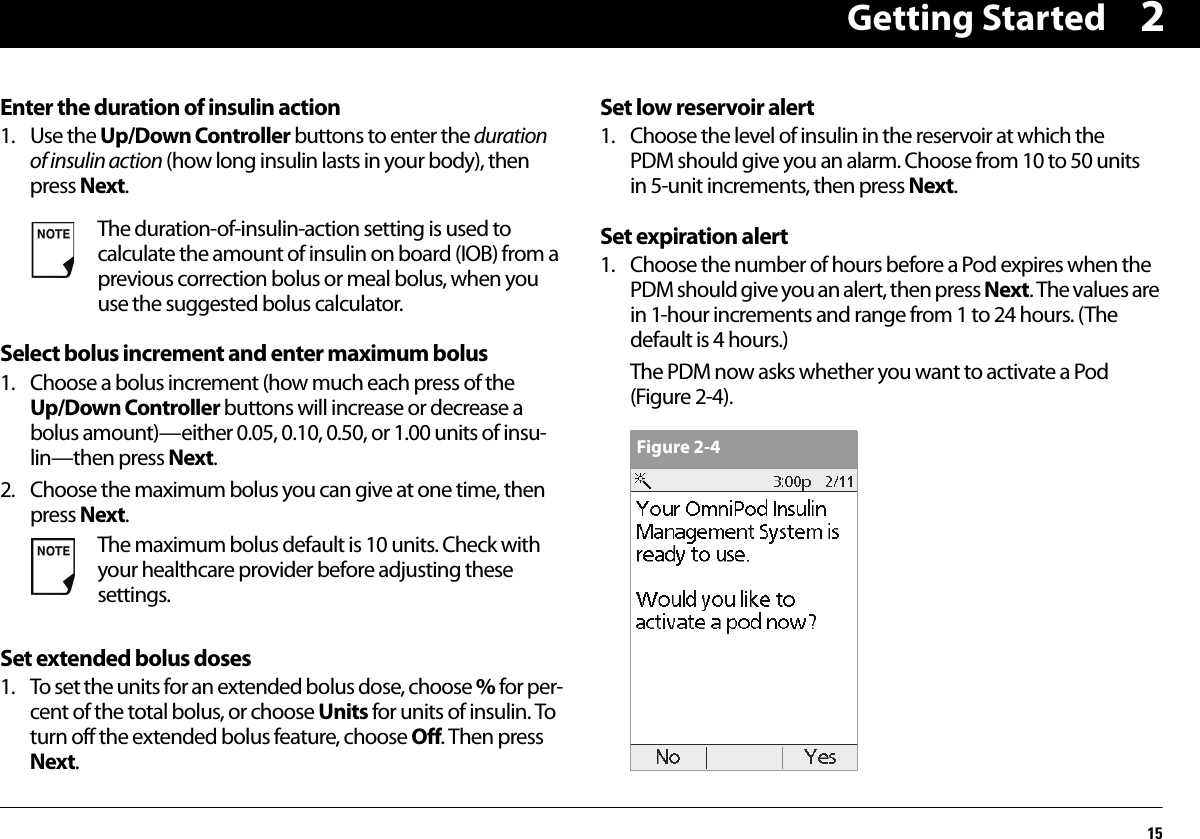
![Getting Started132Enter target blood glucose value1. Use the Up/Down Controller buttons to enter a target blood glucose (BG) value, then press Next.2. Use the Up/Down Controller buttons to enter the “correct above” value or correction threshold (the BG value above which you want the PDM to suggest a correction bolus), then press Next.3. To save the target BG value, press Done. To change these set-tings, select the segment you wish to change and press Edit.You can define up to 4 target BG time segments. To enter additional segments, choose [add new], then:a. Press New. b. Enter a start time for the target BG segment, then press Enter.c. Enter an end time for the target BG segment, then press Next.d. Enter a target blood glucose value, then press Next.e. Use the Up/Down Controller buttons to enter the “cor-rect above” value or correction threshold (the BG value above which you want the PDM to suggest a correction bolus), then press Next.f. When you have finished entering segments, press Done.4. To see the segments as a list, press List. To return to the graphic view, press Graph.5. Press Save to accept the target BG profile you have set.Enter minimum BG allowed for use in bolus calculation1. Use the Up/Down Controller buttons to enter a minimum blood glucose value, below which the System will not calcu-late a suggested bolus. The values are in 1 mg/dL increments and range from 50 to 70 mg/dL.2. Press Next.Enter insulin-to-carbohydrate ratio1. Use the Up/Down Controller buttons to enter your insulin-to-carbohydrate ratio, then press Next. (Insulin-to-carbohy-drate ratio is the number of carbs covered by 1 unit of insulin.)If the suggested bolus calculator is On, a correction bolus will be suggested only when your BG is above the value shown in brackets on the screen.](https://usermanual.wiki/Insulet/010/User-Guide-1000784-Page-26.png)
![Getting Started1422. To save the ratio, press Done. To change the ratio, select the segment you wish to change and press Edit.You can define up to 4 insulin-to-carbohydrate time seg-ments. To enter additional ratios, choose [add new], then:a. Press New.b. Enter a start time for the segment, then press Next.c. Enter an end time for the segment, then press Next.d. Enter the insulin-to-carb ratio for the new time segment, then press Next.e. To save the new ratio, press Done.3. To see the ratios as a list, press List. To return to the graphic view, press Graph.4. Press Save to accept the ratios you have set.Enter correction factor1. Use the Up/Down Controller buttons to enter how much one unit of insulin decreases your blood glucose, then press Next.2. To save the correction factor, press Done. To change the factor, select the segment you wish to change and press Edit.You can define correction factors for up to 4 time segments. To enter additional correction factors, choose [add new], then:a. Press New.b. Enter a start time for the segment, then press Next.c. Enter an end time for the segment, then press Next.d. Enter the correction factor, then press Next.e. To save the new correction factor segment, press Done.3. To see the factors as a list, press List. To return to the graphic view, press Graph.4. Press Save to accept the correction factors you have set.Set reverse correction1. To set reverse correction, use the Up/Down Controller buttons to choose On or Off, then press Next.If you enter carbs and reverse corrections are On, the System will subtract insulin from the suggested meal bolus to compensate for a low blood glucose (below the BG target you set). With reverse correction Off, the System will not subtract insulin from the sug-gested meal bolus dose due to a low BG. Follow your healthcare provider’s recommendation to set reverse correction On or Off.](https://usermanual.wiki/Insulet/010/User-Guide-1000784-Page-27.png)
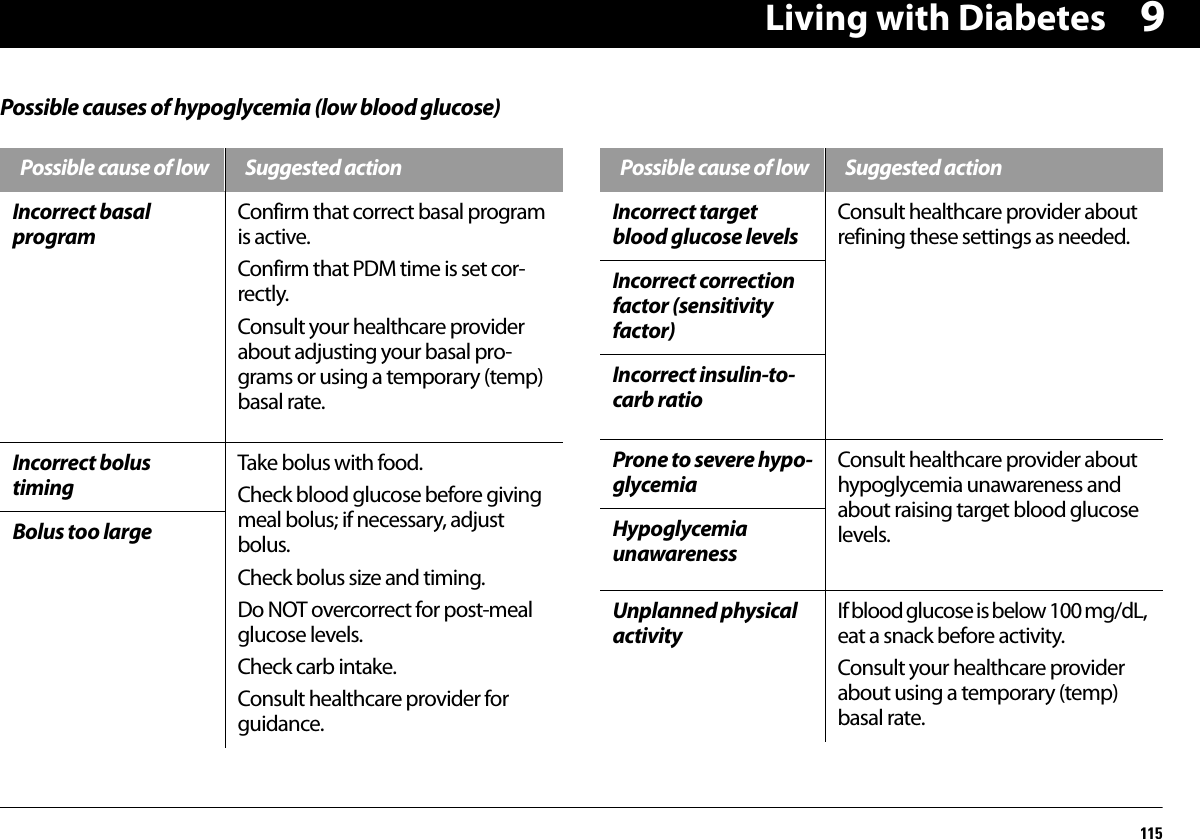
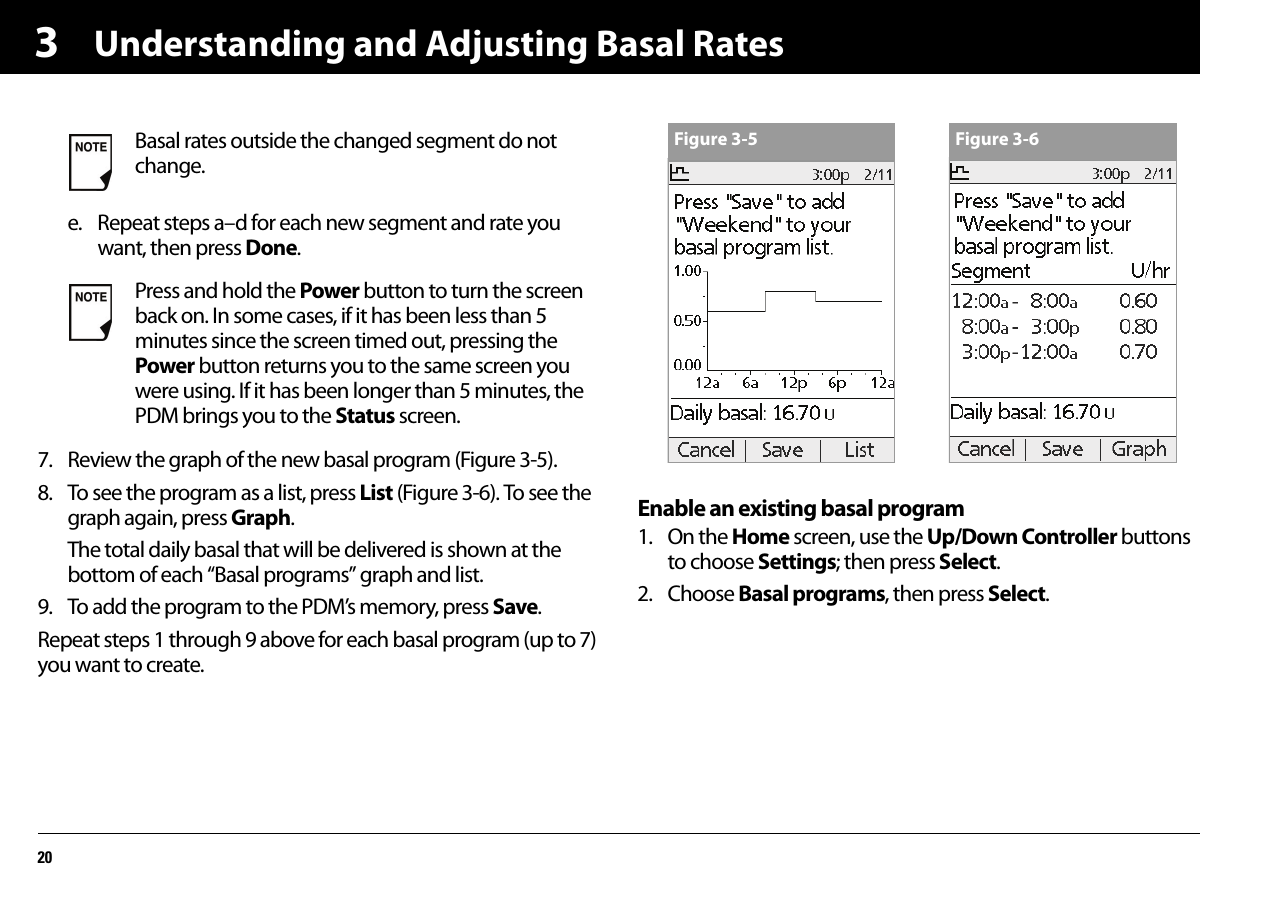
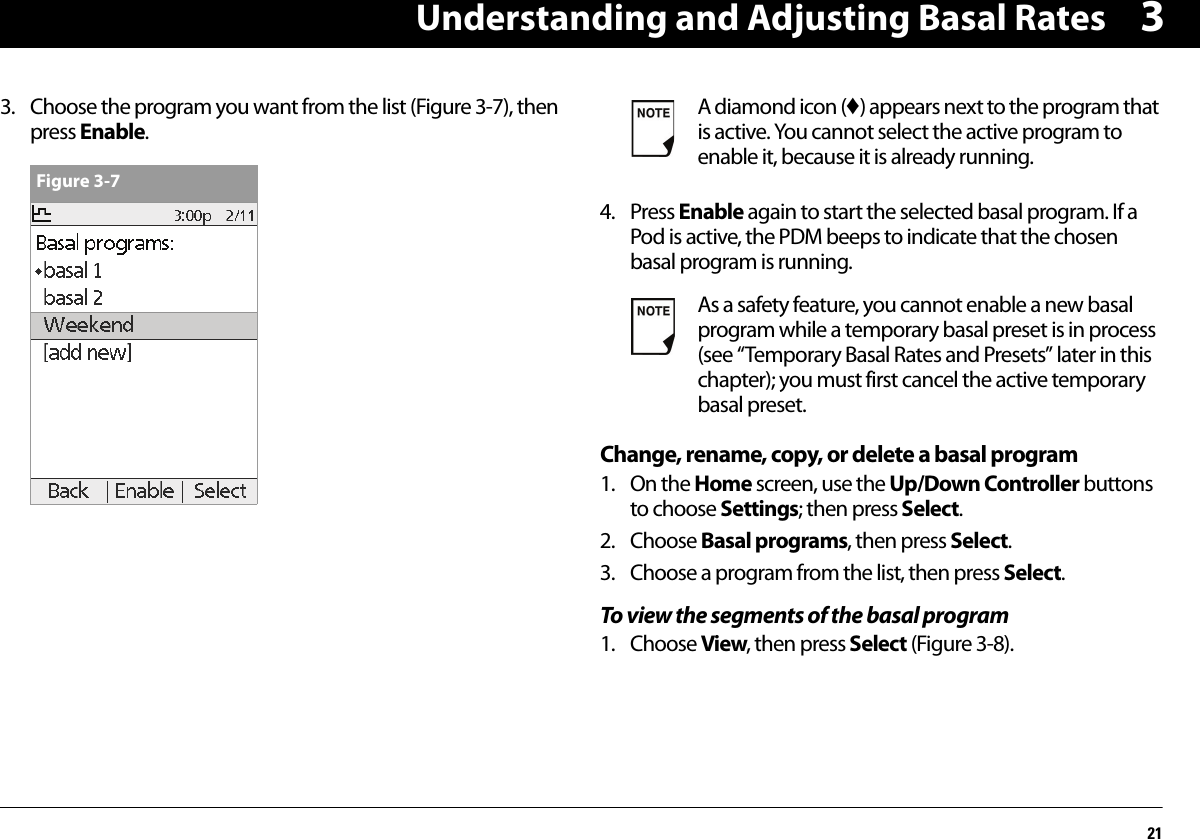
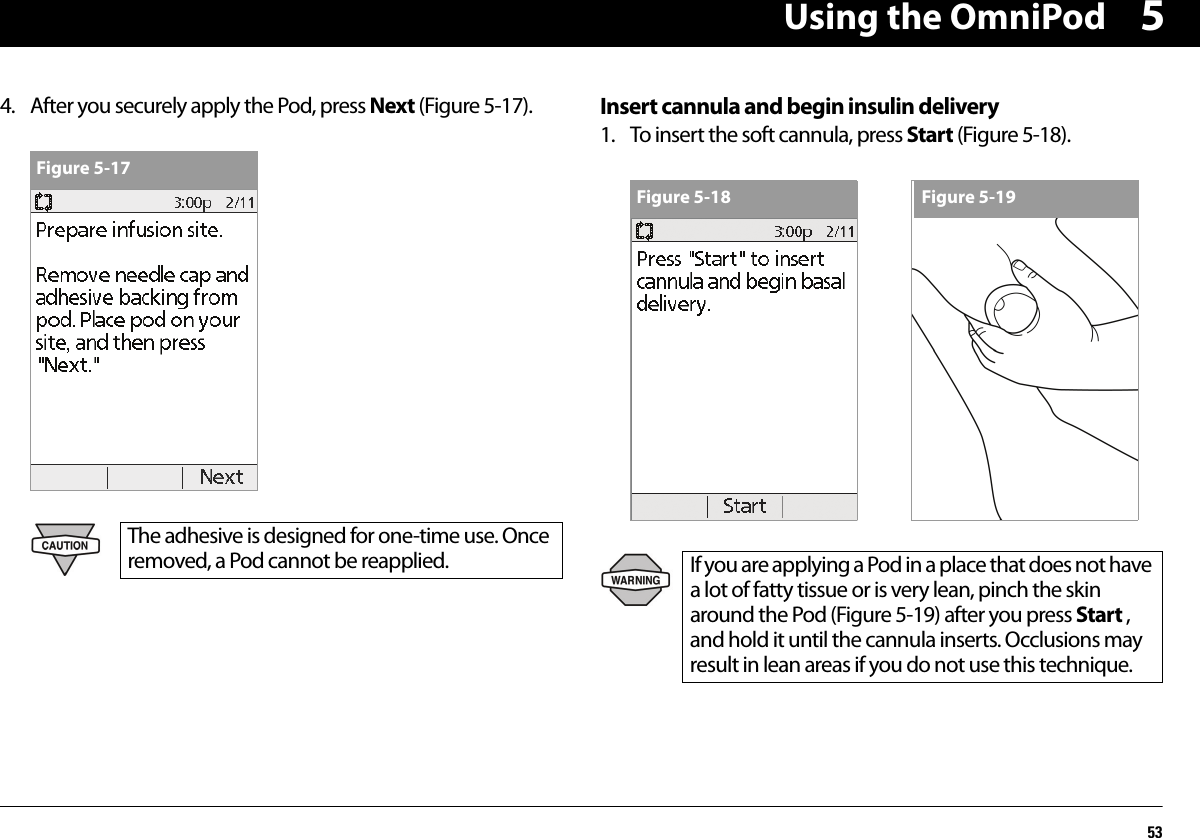
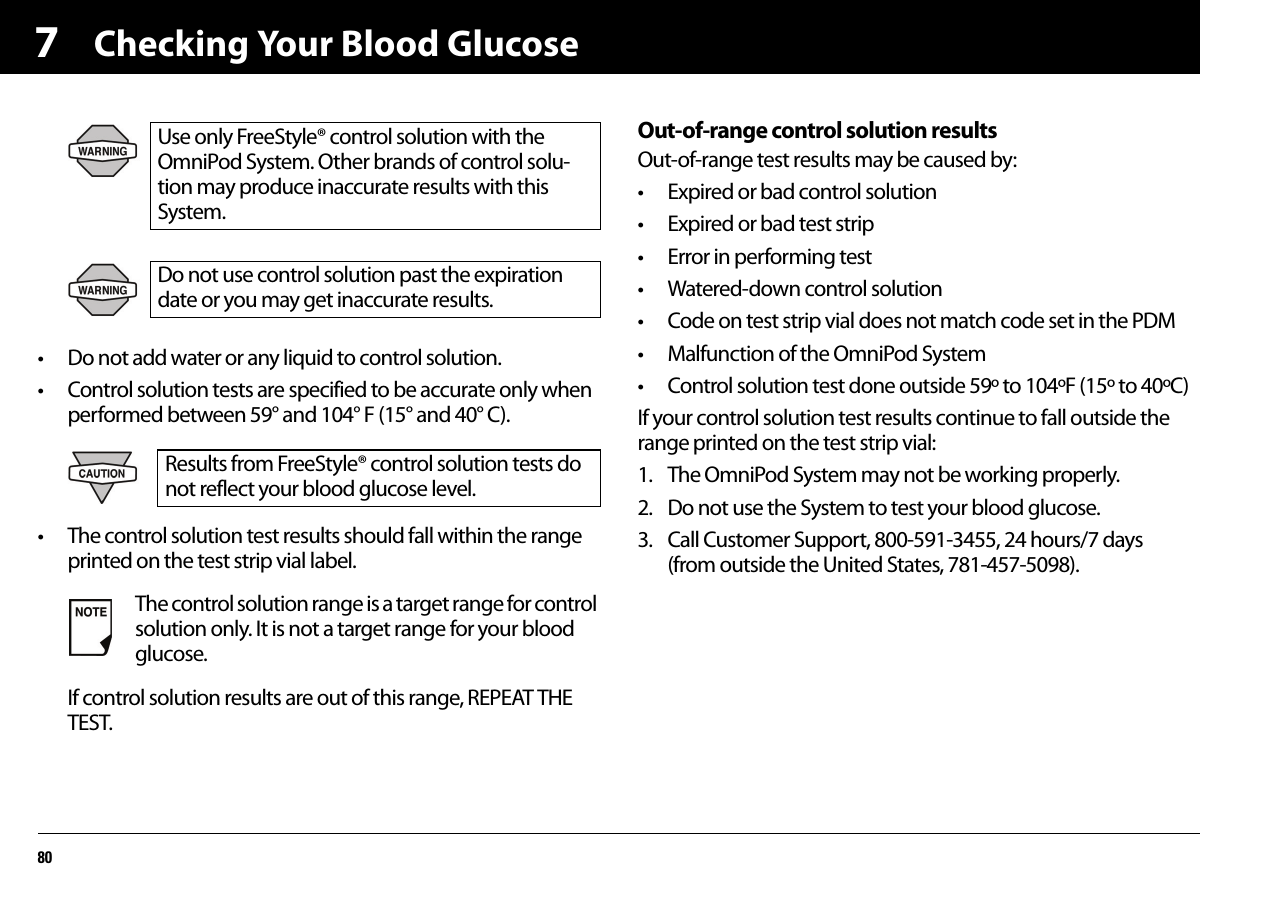
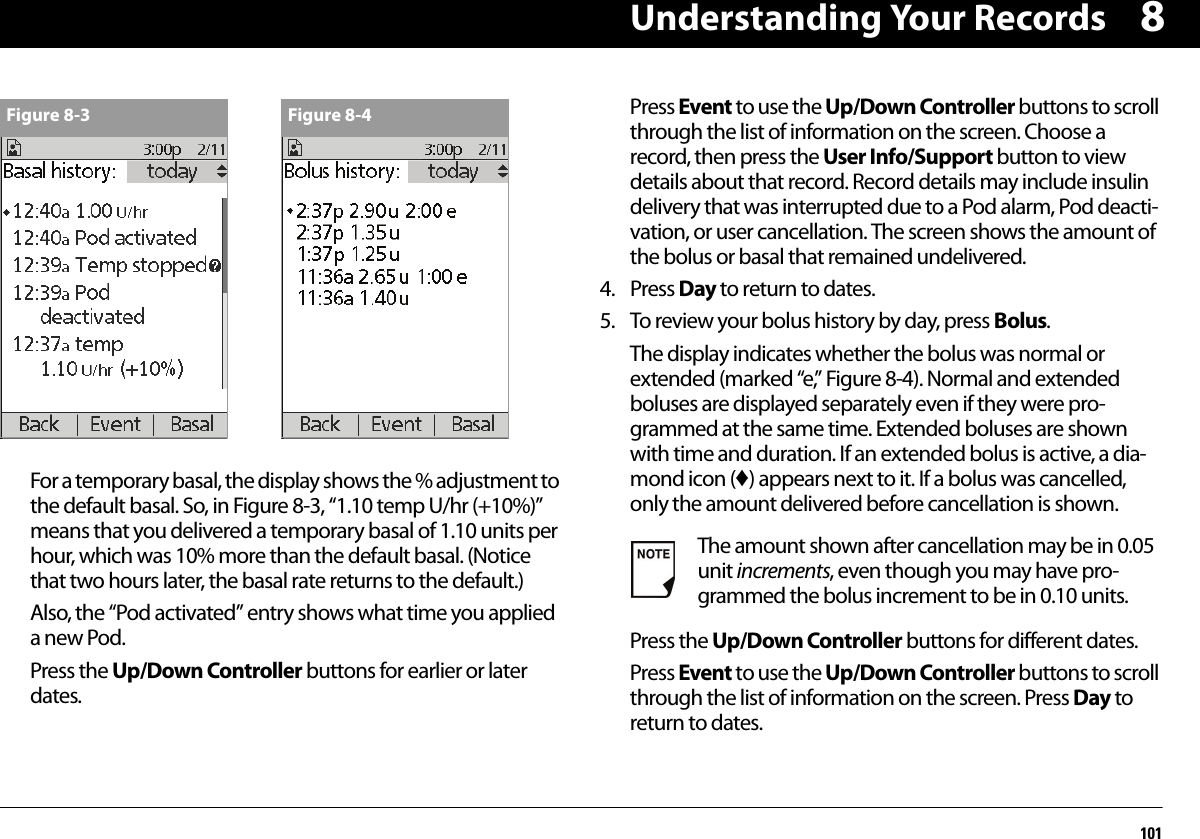
![Understanding and Adjusting Basal Rates183In addition to normal daily changes, insulin needs can vary with different routines or days of the week. For example, regular school or workday routines may differ from weekend routines, and insulin needs may differ, too. With your healthcare provider, you will decide on the basal rates that best match your lifestyle and insulin needs. You will enter at least one basal program (your Basal 1 program) into your PDM during the setup process (see Chapter 2, Getting Started). You can add other programs later as you fine-tune your System settings or when your needs change.You can also create temporary basal presets to use on occasions when you need to adjust your basal rate for a short period of time. See “Temporary Basal Rates and Presets” later in this chapter.Create a basal programThe Personal Diabetes Manager can store up to 7 different basal programs. Each program can contain 24 rates, programmed in half-hour increments. Once you enter a basal program into the PDM, you only need to press a few buttons to pick the program you want. The OmniPod continues to deliver insulin at those rates until you change that program or switch to another one.1. On the Home screen, use the Up/Down Controller buttons to choose Settings; then press Select.2. Choose Basal programs (Figure 3-1), then press Select. 3. Choose [add new] (Figure 3-2), then press New.4. To use the default naming system, simply press Next. The default naming system automatically assigns program names in numerical order, such as basal 1, basal 2, basal 3.If you want to give a different name to the program:a. Press the Up/Down Controller buttons to scroll through the list of characters. An up-and-down-arrow symbol on the screen indicates the character you are changing.Check with your healthcare provider before adjusting these settings.Figure 3-1 Figure 3-2](https://usermanual.wiki/Insulet/010/User-Guide-1000784-Page-31.png)
![Understanding and Adjusting Basal Rates193b. Press the middle soft key (labeled with the right arrow) to move the underscore to the next character. c. Enter each character one at a time. For example, if your weekend schedule is different from your weekday sched-ule, you might enter W, e, e, k, e, n, d (Figure 3-3). (A blank character or space is the first and last option in the scroll-ing menu.) d. Press Next.5. Enter the rate, in U/hr, for the first basal segment (from 0.05 to the maximum you entered during setup), then press Next.6. Review the list showing your new basal program.To use the same basal rate for the entire 24-hour program, press Done and continue with step 7.Or, to add basal segments and rates (for example, a higher basal rate between 8:00 am and 3:00 pm):a. Choose an existing basal segment, then press Edit.Or, choose [add new], then press New.b. Enter the start time (for example, 8:00 am), then press Next. Basal segments are in 30-minute increments.c. Enter the end time (for example, 3:00 pm), then press Next.d. Enter the rate for the new basal segment (for example, 0.80U/hr), then press Next.Figure 3-3 Figure 3-4As a safety feature, the words “Invalid basal program name” (Figure 3-4) appear if the name you entered does not have at least one character or if the name is being used for another basal program. Capitals and lowercase letters are considered the same. Press OK to return to the previous screen and enter a different name.](https://usermanual.wiki/Insulet/010/User-Guide-1000784-Page-32.png)
![Understanding and Adjusting Basal Rates223To edit or add a segment or rate in the basal program1. Choose Edit, then press Select.2. Choose the segment to change, then press Edit (Figure 3-9).Or, choose [add new], then press New.3. Enter a start time for the segment you want to change, then press Next.4. Enter an end time for this segment, then press Next.5. Enter a basal rate for the new segment, then press Enter.6. To save the newly entered segment into the basal program, press Save (Figure 3-10). If you want to make additional edits, repeat steps 2–5.7. To see the program as a list, press List. To see the graph again, press Graph.As a safety feature, you must suspend insulin delivery before editing an active basal program (see Chapter 5, Using the OmniPod.) Remember to resume deliv-ery after the edits are made.Figure 3-8 Figure 3-9Figure 3-10](https://usermanual.wiki/Insulet/010/User-Guide-1000784-Page-35.png)
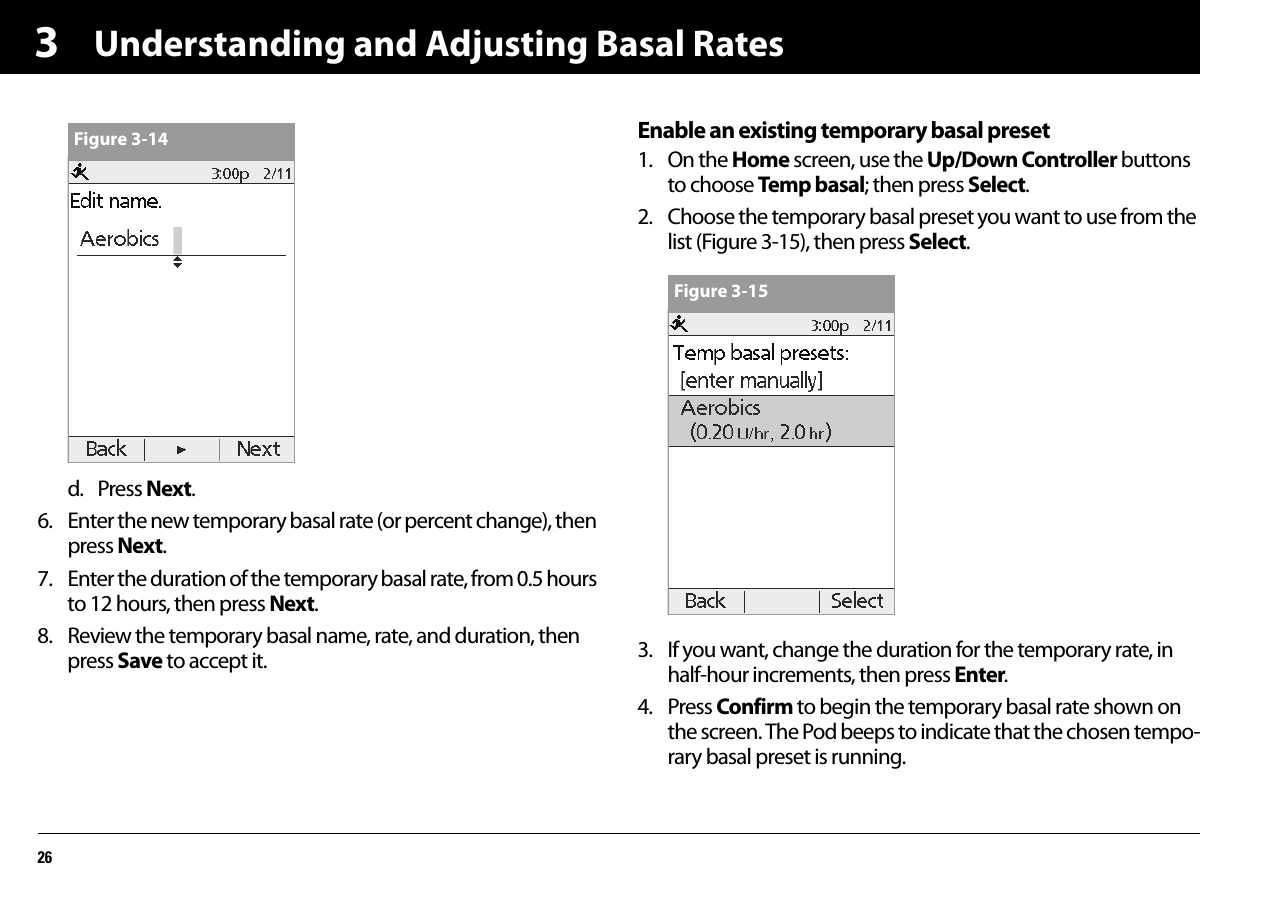
![Understanding and Adjusting Basal Rates243join a summer soccer league. For women, a monthly hormonal change that affects blood glucose is an example of predictable change. To easily handle predictable, short-term changes, you can “preset” a temporary basal rate, so it is ready whenever you need it. The PDM can remember up to 7 temporary basal presets.You can set a temporary basal rate for a duration of 30 minutes to 12 hours. Once the time limit is reached, the PDM returns to the active basal program.When using units per hour, the OmniPod System allows you to set temporary basal rates from 0.0 U/hr, up to your max basal rate. When using percent rate, you can set temporary basal rates from -100% to +95% of your active rate, as long as the temporary rate is less than or equal to your max basal rate.See the sections below on creating, enabling, canceling, and changing temporary basal presets.Enable a one-time temporary basal rate1. On the Home screen, use the Up/Down Controller buttons to choose Temp basal; then press Select.2. If you have created temp basal presets, choose [enter manu-ally] from the list, then press Select.If you have not created any temp basal presets, the PDM skips this step.3. Enter the temporary basal rate in either units per hour (Figure 3-11) or percent change (Figure 3-12), depending on how you chose to show the rates; then press Enter.4. Enter the duration for the temporary rate, then press Enter.5. Press Confirm to start the temporary basal rate shown on the screen. The Pod beeps to indicate that the temporary basal rate is running.During initial setup, you and your healthcare provider either turned Off temporary basal rates or chose to show the rates as % or U/hr. To change this setting, see Chapter 6, Using the Personal Diabetes Manager.Figure 3-11 Figure 3-12](https://usermanual.wiki/Insulet/010/User-Guide-1000784-Page-37.png)
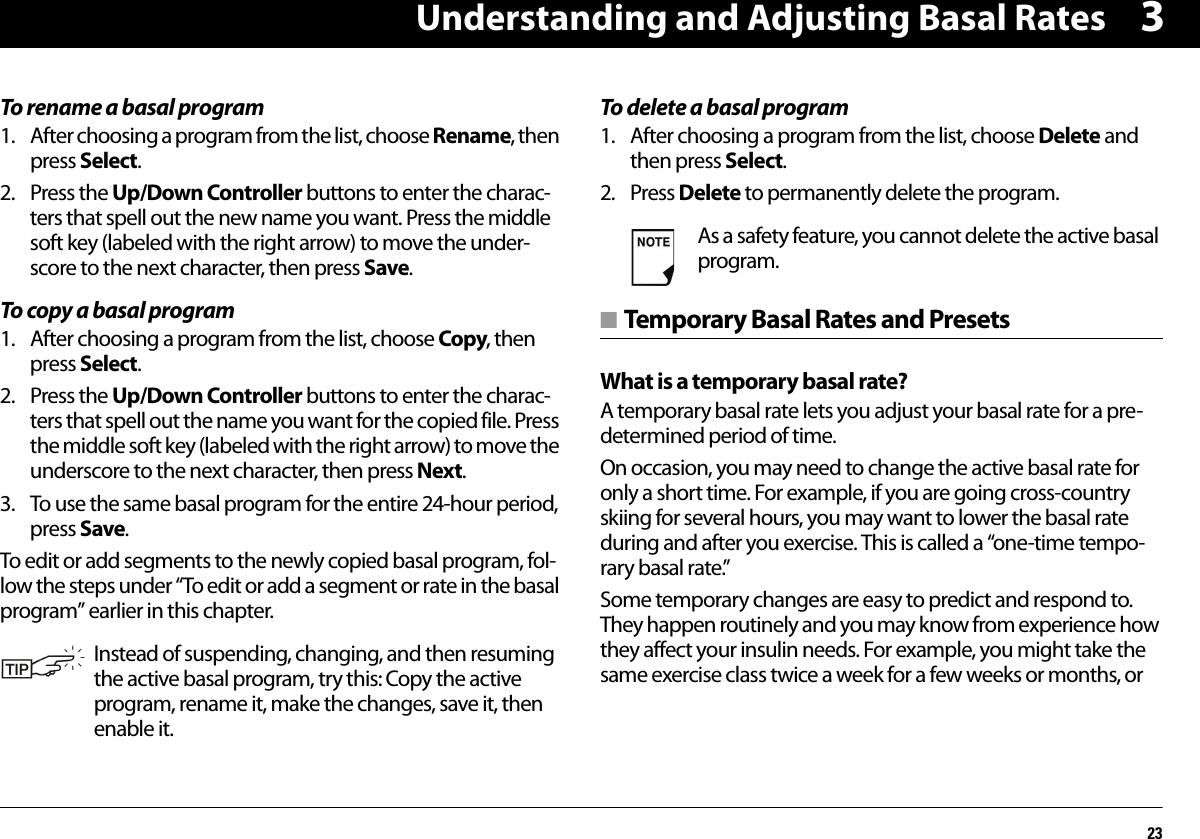
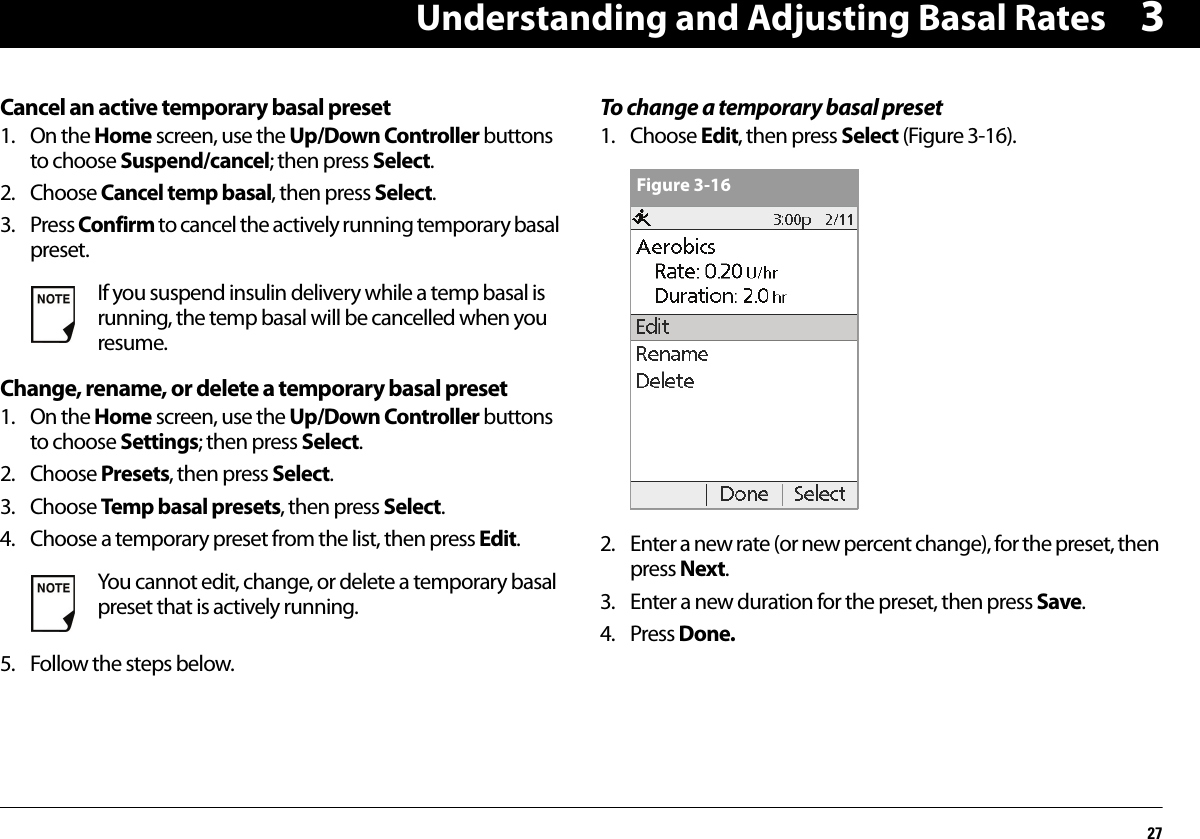
![Understanding and Adjusting Basal Rates253Cancel a one-time temporary basal rate1. On the Home screen, use the Up/Down Controller buttons to choose Suspend/cancel; then press Select.2. Choose Cancel temp basal (Figure 3-13), then press Select.3. Press Confirm to cancel the temporary basal shown on the screen.Create a temporary basal preset1. On the Home screen, use the Up/Down Controller buttons to choose Settings; then press Select.2. Choose Presets, then press Select.3. Choose Temp basal presets, then press Select.4. Choose [add new], then press New.5. To use the OmniPod System’s default naming system, simply press Next. The default naming system automatically assigns program names in numerical order, such as temp basal 1, temp basal 2, temp basal 3.Or, to give a different name to the program:a. Press the Up/Down Controller buttons to scroll through the list of characters. An up-and-down-arrow symbol on the screen indicates the character you are changing.b. Press the middle soft key to move the underscore to the next character.c. Enter each character one at a time. For example, if you take an aerobics class two nights a week, you might enter A, e, r, o, b, i, c, s (Figure 3-14). (A blank character or space is the first and last option in the scrolling menu.)Figure 3-13Capitals and lowercase letters are considered the same.](https://usermanual.wiki/Insulet/010/User-Guide-1000784-Page-38.png)
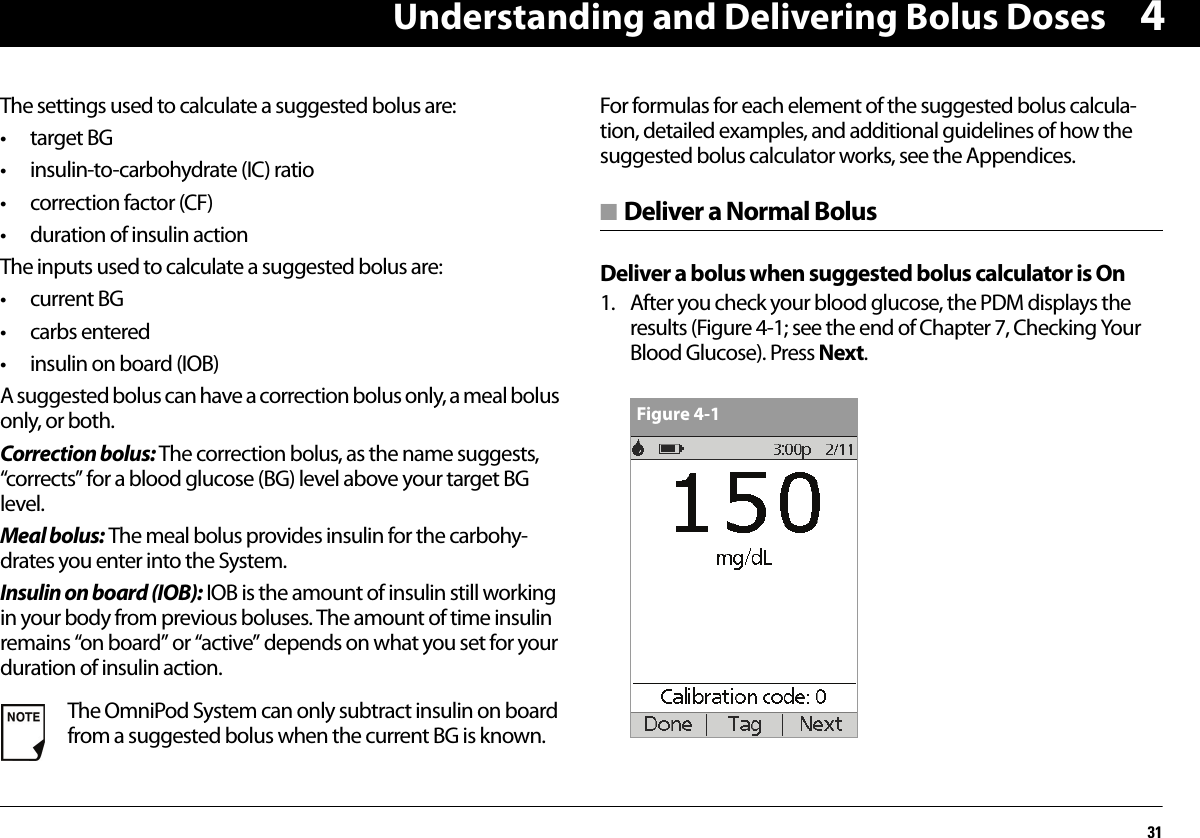
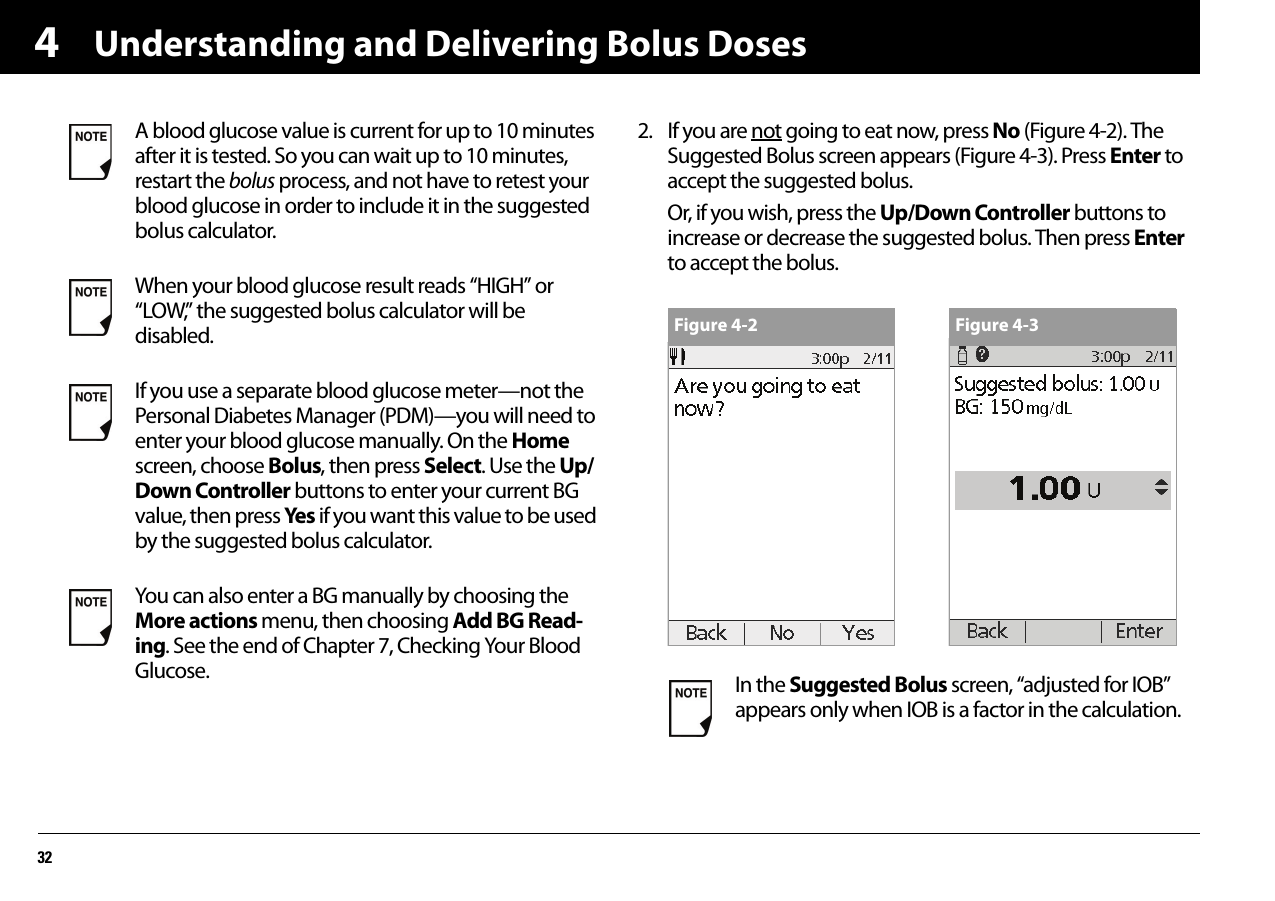
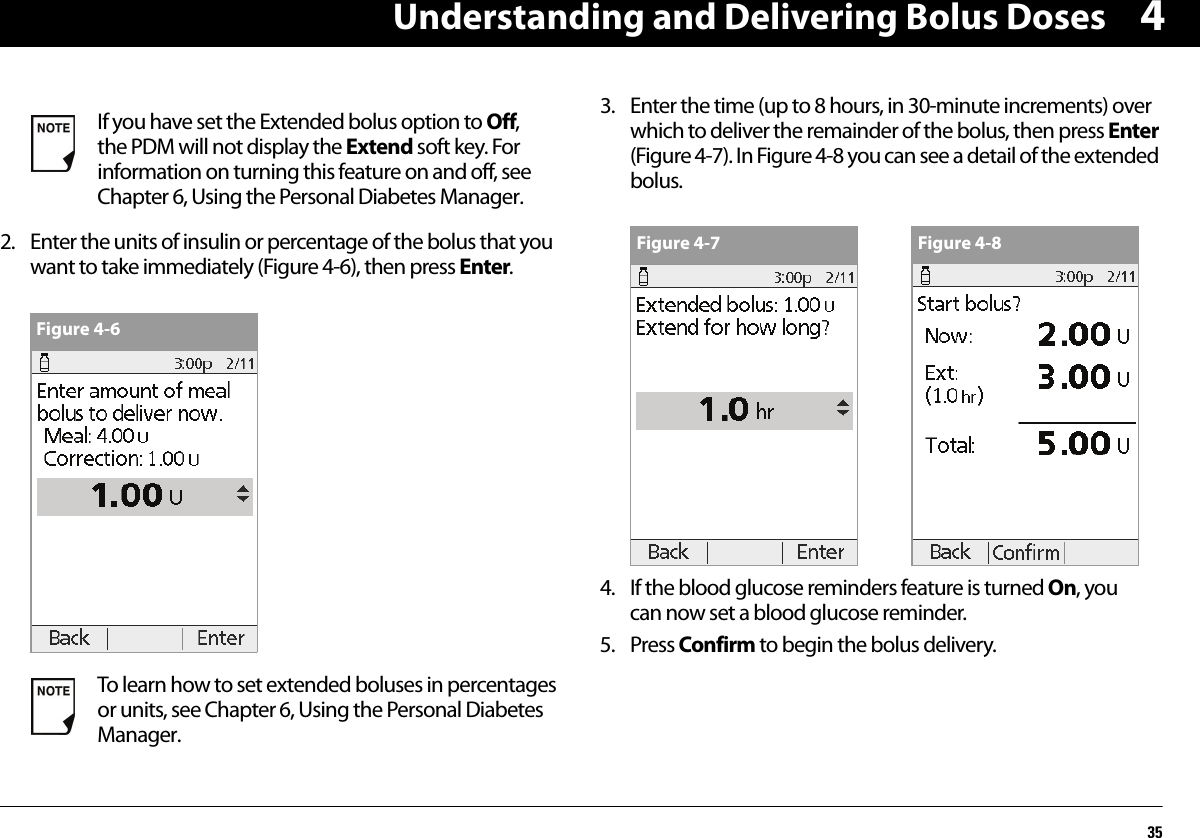
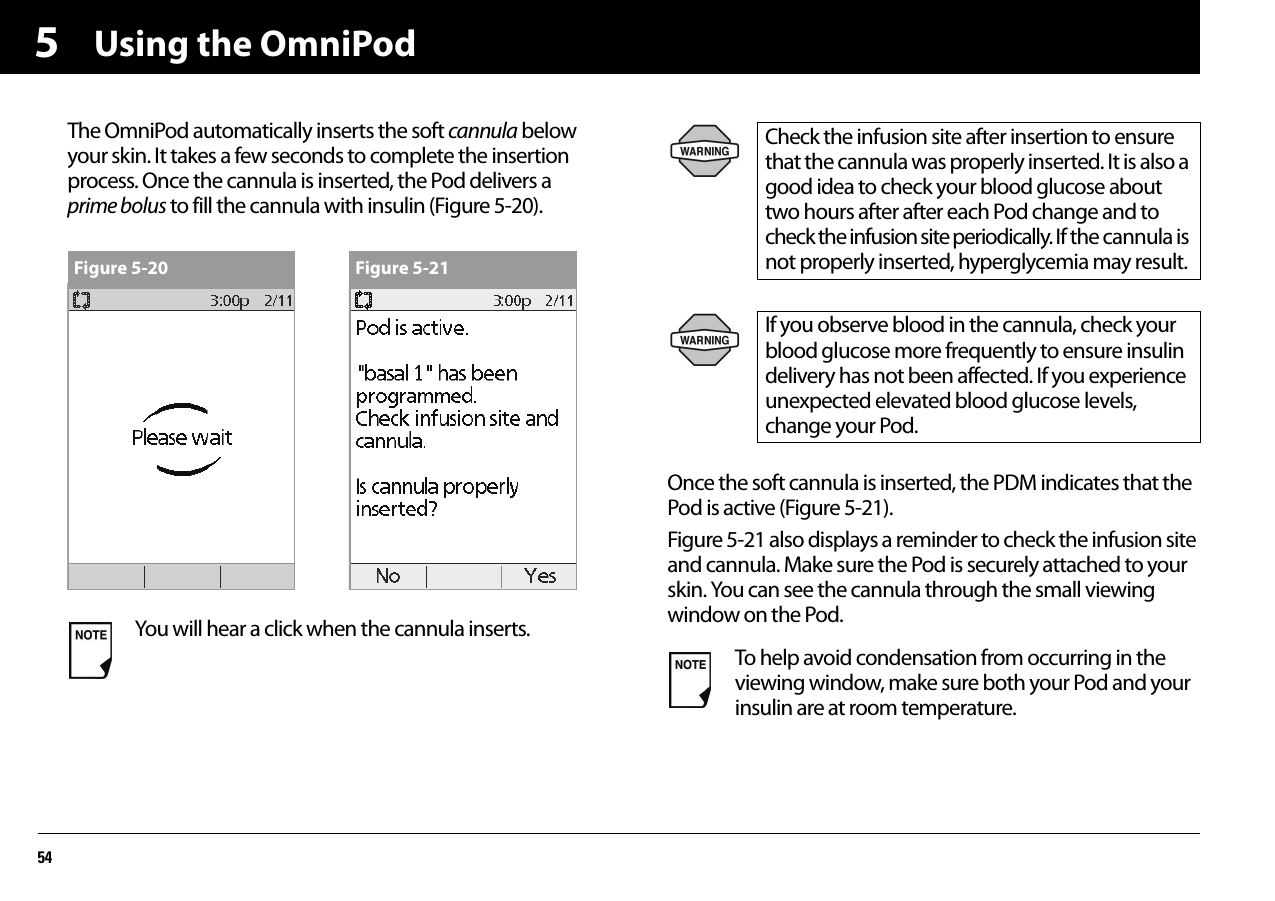
![Understanding and Delivering Bolus Doses3343. If you are going to eat now:a. Press Yes (Figure 4-2 on previous page), enter the number of carbohydrates you are about to eat, then press Enter.If you’ve previously entered a carb preset, then either:• Use the Up/Down Controller buttons to choose [enter manually], then press Select. Enter the num-ber of carbohydrates that you are going to eat, then press Enter.• Use the Up/Down Controller buttons to choose favorites, snacks, or meals. From there, select a carb preset you have previously entered (see “Carb Presets” later in this chapter), then press Select.b. Press Enter to accept the suggested bolus (Figure 4-4).Or press the User Info/Support button to view calculation information used for this suggested bolus. Press Close to return to the Suggested Bolus screen, then press Enter.To view detailed information about the calcula-tions used for this suggested bolus, press the User Info/Support button and scroll through the infor-mation screens. Press Close to return to the Suggested Bolus screen.The OmniPod System includes a reference food library. For more information, see “Reference Food Library” at the end of this chapter.If the reverse correction feature is turned On and if your blood glucose level is below your target, the System subtracts a correction amount from the meal portion of the bolus.If the reverse correction setting is turned Off, the System does not subtract anything for a blood glu-cose level below your target.Figure 4-4](https://usermanual.wiki/Insulet/010/User-Guide-1000784-Page-46.png)
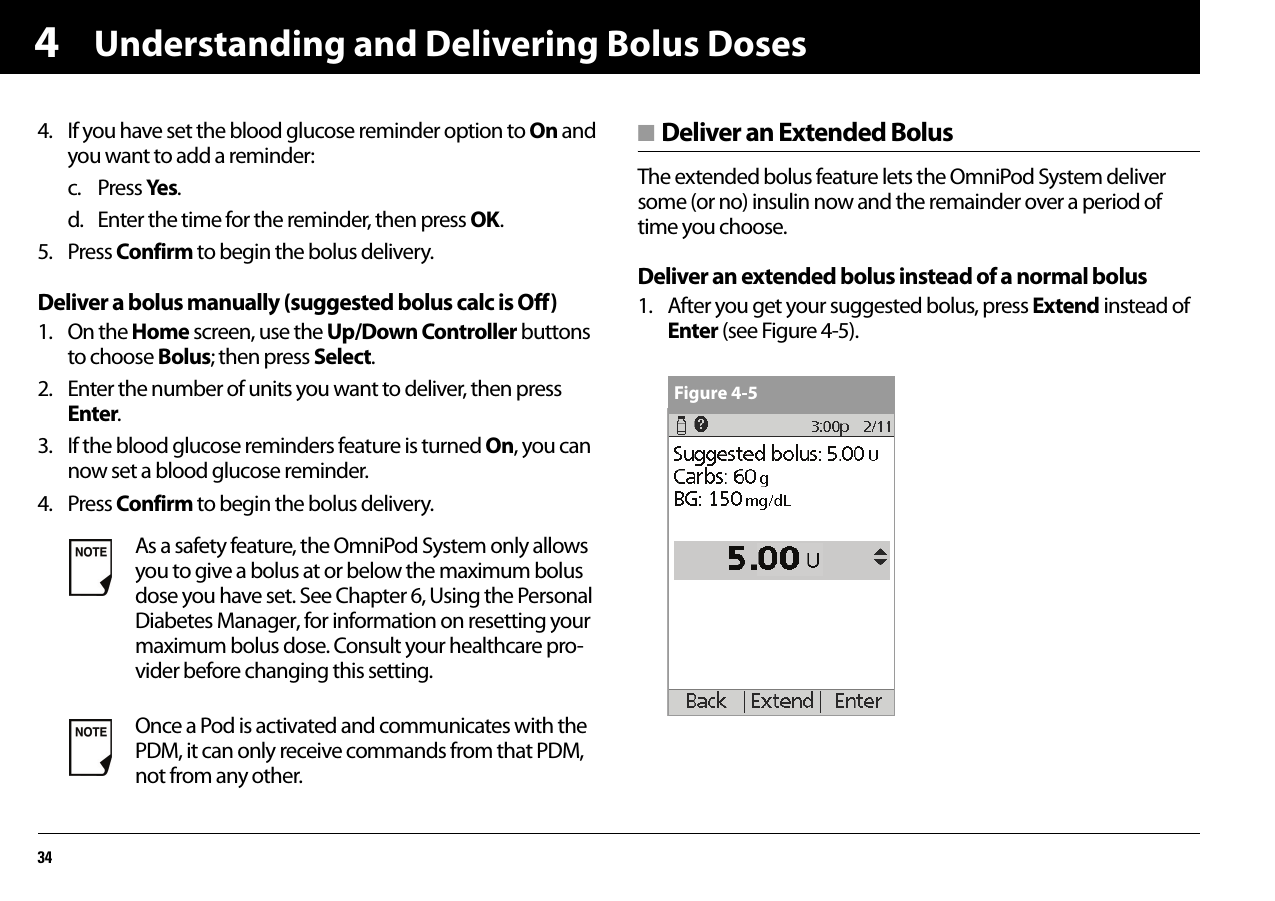
![Understanding and Delivering Bolus Doses3843. Press Confirm (Figure 4-12). 4. The screen displays the amount of the old extended bolus that remained to be delivered (Figure 4-13). Press Next to return to the Suggested Meal Bolus screen.■ Bolus PresetsBolus presets are bolus amounts that you program for frequent use. For example, if you often take the same bolus at lunchtime, you can create a bolus preset for that amount and name it “Lunch.”Create a bolus preset1. On the Home screen use the Up/Down Controller buttons to choose Settings; then press Select.2. Choose Presets, then press Select.3. Choose Bolus presets, then press Select.4. Choose [add new], then press New.5. To use the OmniPod System’s default naming system, simply press Next. The default naming system automatically assigns program names in numerical order, such as bolus 1, bolus 2, bolus 3.You can add what remained of the old extended bolus to the new one.Figure 4-12 Figure 4-13Bolus presets are available only when the suggested bolus calculator feature is turned Off. (If the suggested bolus calculator is turned On, you can still use carb pre-sets. See “Carb Presets” on page 40.)](https://usermanual.wiki/Insulet/010/User-Guide-1000784-Page-51.png)
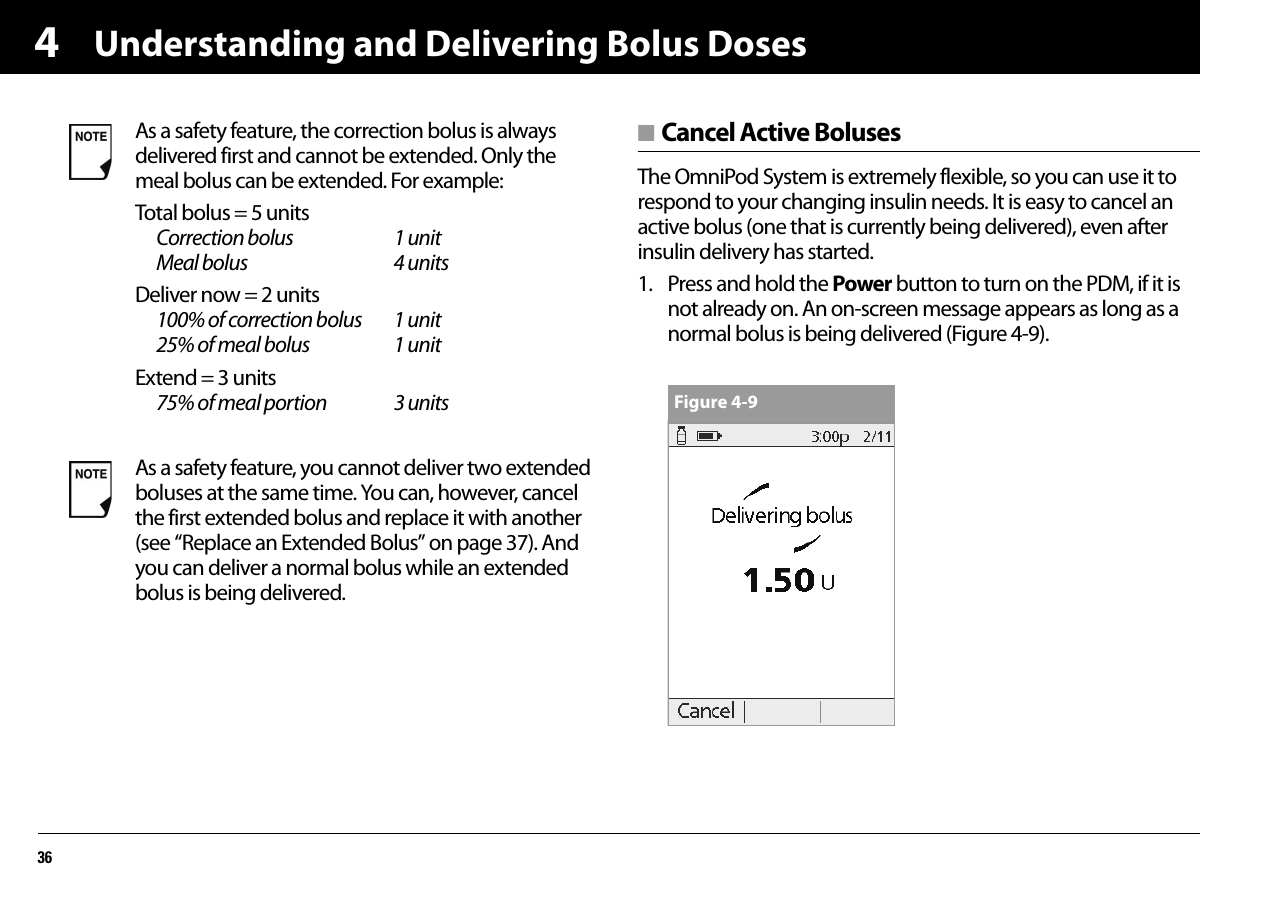
![Understanding and Delivering Bolus Doses404Rename a bolus preset1. Choose Rename, then press Select.2. Press the Up/Down Controller buttons to enter the charac-ters that spell out the name you want; then press Next.Delete a bolus preset1. Choose Delete and then press Select.2. Press Delete to permanently delete the preset.Cancel an active bolus preset1. Press and hold the Power button to turn on the PDM, if it is not already on. An on-screen message appears as long as a bolus is being delivered.2. Press Cancel.The Pod beeps to confirm the bolus is canceled. An on-screen message tells you how much insulin was delivered before you canceled the bolus.3. Press OK to return to the Status screen.For more details, see “Cancel Active Boluses” earlier in this chapter.■ Carb PresetsCarb presets are favorite food items, snacks, or meals that you eat frequently. After you enter these items, you can quickly select one when entering carbs during the suggested bolus calculator process.Create a carb preset1. On the Home screen, use the Up/Down Controller buttons to choose Settings; then press Select.2. Choose Presets, then press Select.3. Choose Carb presets, then press Select.4. Choose the category for this carb preset: Favorites, Snacks, or Meals, then press Select.5. Choose [add new], then press New.6. To use the OmniPod System’s default naming system, simply press Next. The default naming system automatically assigns program names in numerical order, such as carb preset 1, carb preset 2, carb preset 3.Or, to give a different name to the program:a. Press the Up/Down Controller buttons to enter the char-acters that spell the name you want. An up-and-down-arrow symbol on the screen indicates the character you are changing.](https://usermanual.wiki/Insulet/010/User-Guide-1000784-Page-53.png)
![Understanding and Delivering Bolus Doses414b. Press the middle soft key (the right arrow) to move the underscore to the next character.c. Enter each character one at a time. For example, if you frequently eat a breakfast of plain low-fat yogurt with blueberries, sweetener, and cinnamon, you might enter B, l, u, e, [space], Y, o, g, u, r, t (Figure 4-16).d. Press Next.7. Enter the grams of carbohydrate in the meal, then press Next.8. If you want, enter the grams of fiber, fat, and protein in the meal, and the total calories. Press Next after each entry.9. Press Save to add the preset to the category.Change or edit a carb preset1. On the Home screen, use the Up/Down Controller buttons to choose Settings; then press Select.2. Choose Presets, then press Select.3. Choose Carb presets, then press Select.4. Choose the category of the preset you want to change, then press Select (Figure 4-17).Figure 4-16 Figure 4-17These additional units are not required. If you prefer not to enter them, simply press Next repeatedly to step through the screens.If you do include grams of fiber in step 8 above, the suggested bolus calculator uses carbs minus fiber. Alter-natively, in step 7, you can enter the total of carbs minus fiber yourself. Your healthcare provider can best advise you how to make this entry.](https://usermanual.wiki/Insulet/010/User-Guide-1000784-Page-54.png)

![Using the Personal Diabetes Manager6364. Choose one of the options (Figure 6-5a and Figure 6-5b), then press Select. Each option is described below.Bolus calcsWhen the suggested bolus calculator is turned Off and you want to turn it On, press On and follow these steps:1. Target BG and correct-above value—You can edit existing time segments and add segments, up to a total of four.a. To edit an existing target BG time segment, choose the segment, then press Edit. Use the Up/Down Controller buttons to choose a new start time, end time, target BG value, and correct-above value (correction threshold). Press Next after each entry.b. To add a segment, choose [add new], then press New. Use the Up/Down Controller buttons to choose a start time, end time, target BG value, and correct-above value (correction threshold). Press Next after each entry.c. When you have completed all the time segments you want, press Done, then Save.2. Min BG for calcs (minimum blood glucose value allowed for calculating boluses)—Use the Up/Down Controller buttons to enter a new minimum BG, then press Next.Figure 6-5a Figure 6-5b](https://usermanual.wiki/Insulet/010/User-Guide-1000784-Page-76.png)
![Using the Personal Diabetes Manager6463. Insulin to carb (IC) ratio—You can edit existing time seg-ments and add segments, up to a total of four.a. To edit an existing IC ratio time segment, choose the seg-ment, then press Edit (Figure 6-6). Use the Up/Down Controller buttons to choose a new start time, end time, and IC ratio. Press Next after each entry.b. To add a segment, choose [add new], then press New. Use the Up/Down Controller buttons to choose a start time, end time, and IC ratio. Press Next after each entry.c. When you have completed all time segments, press Done, then Save.4. Correction factor—You can edit existing time segments and add segments, up to a total of four.a. To edit an existing correction factor time segment, choose the segment, then press Edit. Use the Up/Down Control-ler buttons to choose a new start time, end time, and cor-rection factor. Press Next after each entry b. To add a segment, choose [add new], then press New. Use the Up/Down Controller buttons to choose a start time, end time, and correction factor. Press Next after each entry.c. When you have completed all time segments, press Done, then Save.5. Reverse correction—Choose On or Off, then press Next.6. Insulin action (duration)—Use the Up/Down Controller buttons to choose a duration of insulin action, then press Done.7. Press OK.Figure 6-6](https://usermanual.wiki/Insulet/010/User-Guide-1000784-Page-77.png)
![Using the Personal Diabetes Manager656Ratios/factors/targetsWhen the suggested bolus calculator is turned On, you can view and change all the settings using the Ratios/factors/targets menu option. Choose Review all settings, then press Select (Figure 6-7a ). Or choose one setting from the menu, then press Select (Figure 6-7b). The steps are the same whether you choose all settings or individual ones.1. Target BG and correct-above value—You can edit existing segments and add segments, up to a total of four.a. To edit an existing target BG time segment, choose the segment, then press Edit. Use the Up/Down Controller buttons to choose a new start time, end time, target BG value, and correct-above value (correction threshold). Press Next after each entry.b. To add a segment, choose [add new], then press New. Use the Up/Down Controller buttons to choose a start time, end time, target BG value, and correct-above value (correction threshold). Press Next after each entry.c. When you have completed all the time segments you want, press Done, then Save.2. Min BG for calcs (minimum blood glucose value allowed for calculating boluses)—Use the Up/Down Controller buttons to enter a new minimum BG, then press Enter.3. Insulin to carb (IC) ratio—You can edit existing time seg-ments and add segments, up to a total of four.a. To edit an existing IC ratio time segment, choose the seg-ment, then press Edit. Use the Up/Down Controller but-tons to choose a new start time, end time, and IC ratio. Press Next after each entry.b. To add a segment, choose [add new], then press New. Use the Up/Down Controller buttons to choose a start time, end time, and IC ratio. Press Next after each entry.When the suggested bolus calculator is turned Off, the Ratios/factors/targets option does not appear in the Bolus/basal/calcs menu.Figure 6-7a Figure 6-7b](https://usermanual.wiki/Insulet/010/User-Guide-1000784-Page-78.png)
![Using the Personal Diabetes Manager666c. When you have completed all time segments, press Done, then Save.4. Correction factor—You can edit existing time segments and add segments, up to a total of four.a. To edit an existing correction factor time segment, choose the segment, then press Edit. Use the Up/Down Control-ler buttons to choose a new start time, end time, and cor-rection factor. Press Next after each entry.b. To add a segment, choose [add new], then press New. Use the Up/Down Controller buttons to choose a start time, end time, and correction factor. Press Next after each entry.c. When you have completed all time segments, press Done, then Save.5. Reverse correction—Choose On or Off, then press Select.6. Insulin action (duration)—Use the Up/Down Controller buttons to choose a duration of insulin action, then press Enter.Temp basalChoose %, U/hr , or Off to set the mode for temporary basal rates and presets, then press Select.ExtendedChoose %, Units, or Off to set the mode for extended boluses, then press Select.Bolus incrementChoose 0.05, 0.10, 0.50, or 1.00 units for bolus increments, then press Select.Max bolusUse the Up/Down Controller buttons to enter the maximum bolus dose you can take, then press Enter.Max basal rateUse the Up/Down Controller buttons to enter the maximum basal rate you can choose, then press Enter.Some settings have preset defaults, but all settings are changeable. See the Appendices for a list of Sys-tem specifications, including preset default settings.For additional details on bolus and basal settings, see Chapter 3, Understanding and Adjusting Basal Rates, and Chapter 4, Understanding and Deliver-ing Bolus Doses.](https://usermanual.wiki/Insulet/010/User-Guide-1000784-Page-79.png)
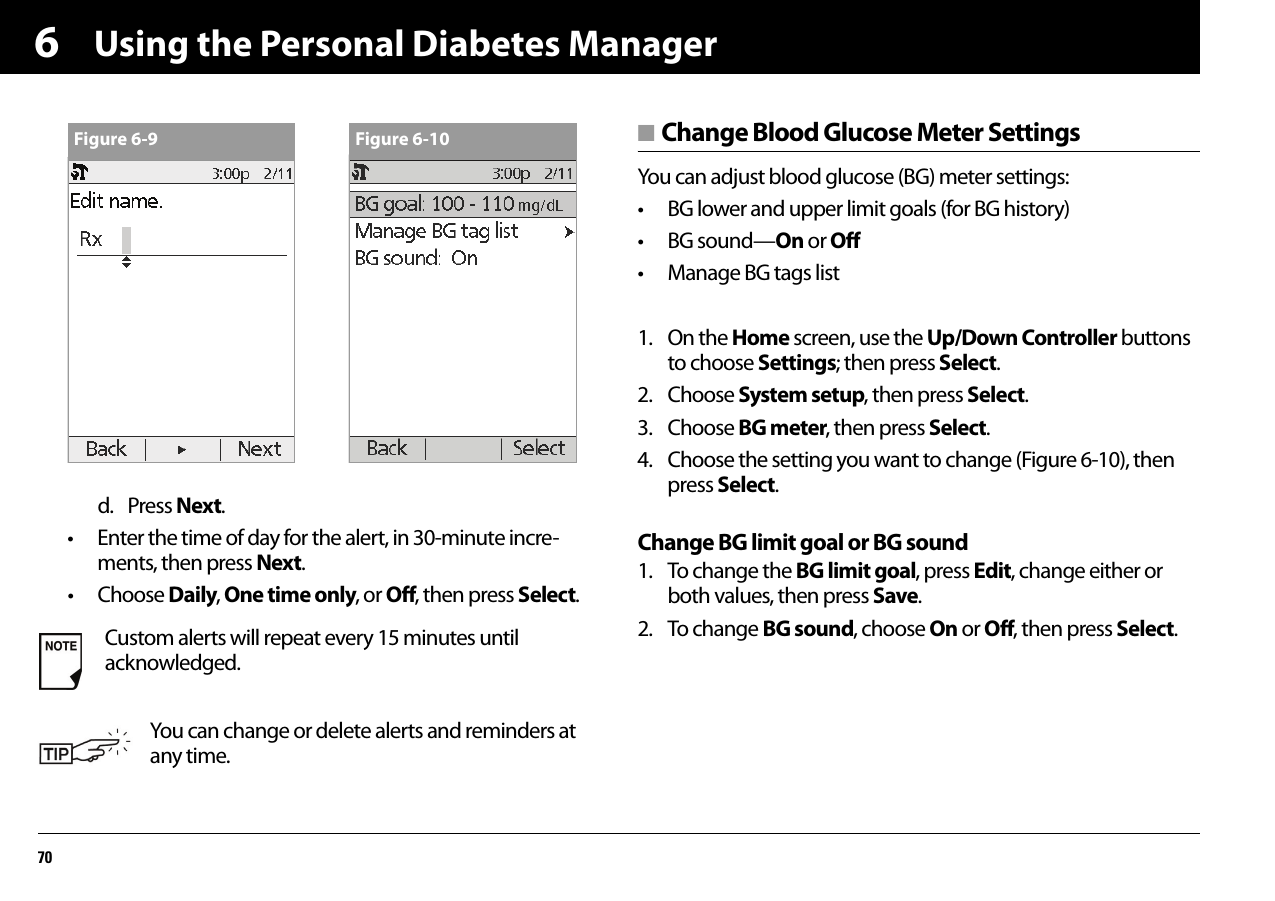
![Using the Personal Diabetes Manager6966. For Bolus reminders• Use the Up/Down Controller buttons to choose On or Off, then press Select.•If you chose On, you are taken to a new screen where you can add, edit or delete reminders:To add a Bolus remindera. Use the Up/Down Controller buttons to choose [add new], then press New.b. Choose a start time, then press Next.c. Choose an end time, then press Save.To edit a Bolus remindera. Choose the bolus reminder you wish to edit, then press Edit.b. Choose Edit, then press Select.c. Enter a new start time, then press Next.d. Enter a new end time, then press Save.To delete a Bolus remindera. Choose the bolus reminder you wish to delete, then press Edit.b. Choose Delete then press Select.c. Press Delete to remove the bolus reminder.7. For Custom alerts• Use the Up/Down Controller buttons to choose [add new], then press New.• To use the OmniPod System’s default naming system, sim-ply press Next. The default naming system automatically assigns alert names in numerical order, such as alert 1, alert 2, alert 3.If you want to give a different name to the custom alert:a. Use the Up/Down Controller buttons to scroll through the list of characters. An up-and-down-arrow symbol on the screen indicates the character you are changing.b. Press the middle soft key to move the underscore to the next character.c. Enter each character one at a time. For example, for a reminder to pick up a prescription, you might enter R, x (Figure 6-9 on next page). (A blank character or space is the first and last option in the scrolling menu.)](https://usermanual.wiki/Insulet/010/User-Guide-1000784-Page-82.png)
![Using the Personal Diabetes Manager716Manage the Blood Glucose Tags ListYou can create up to 15 custom blood glucose tags and hide any of the standard tags you do not plan to use. Standard BG tags are shown first on the screen (Figure 6-11a), followed by custom tags, then [add new] (Figure 6-11b). For more information about tagging BG readings, see Chapter 7, Checking Your Blood Glucose.1. To hide or show a standard BG tag, choose the tag, and press Show (if it is marked as hidden) or Hide.Tags you choose to show will be checkmarked; hidden ones will not be.2. To add a custom tag, choose [add new] at the end of the list of custom tags, then press New. In the Edit name screen, either:a. Press Save to save the new tag with the default name, custom tag1, custom tag2, and so on; orb. Use the Up/Down Controller key to choose letters and numbers for a name, followed by the middle soft key to move forward one space. Then press Save.3. To delete a custom tag, choose the tag, press Delete, then press Delete again. Or press Cancel to leave the tag unchanged.Figure 6-11a Figure 6-11b](https://usermanual.wiki/Insulet/010/User-Guide-1000784-Page-84.png)

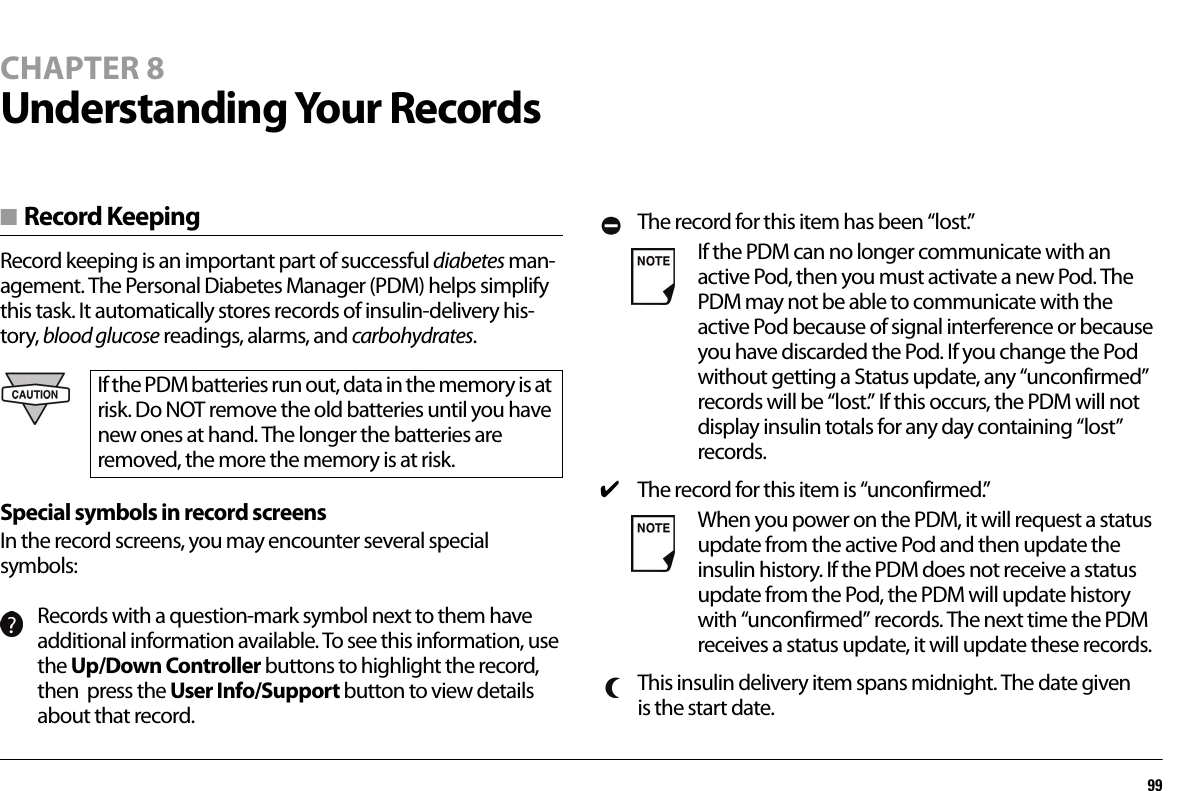

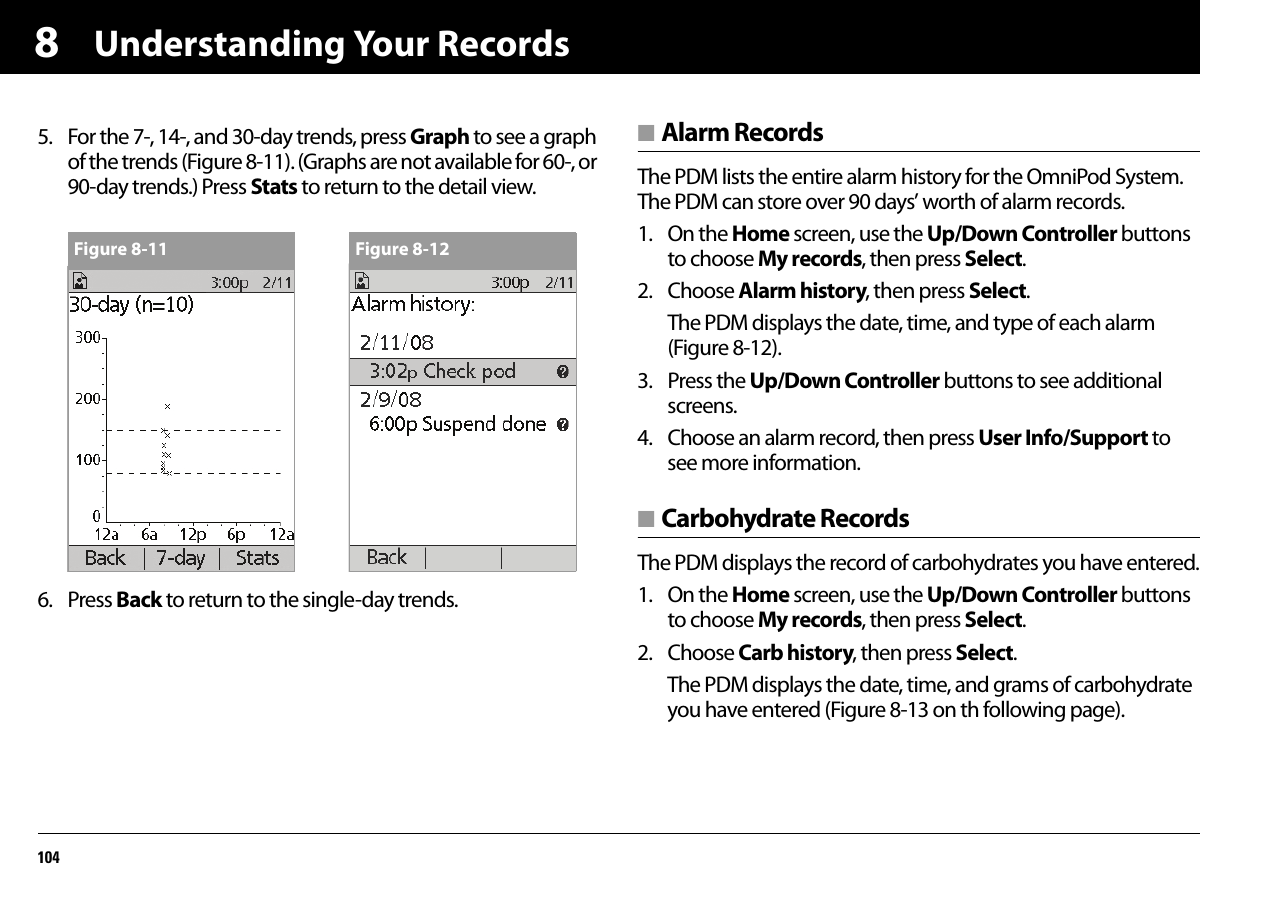
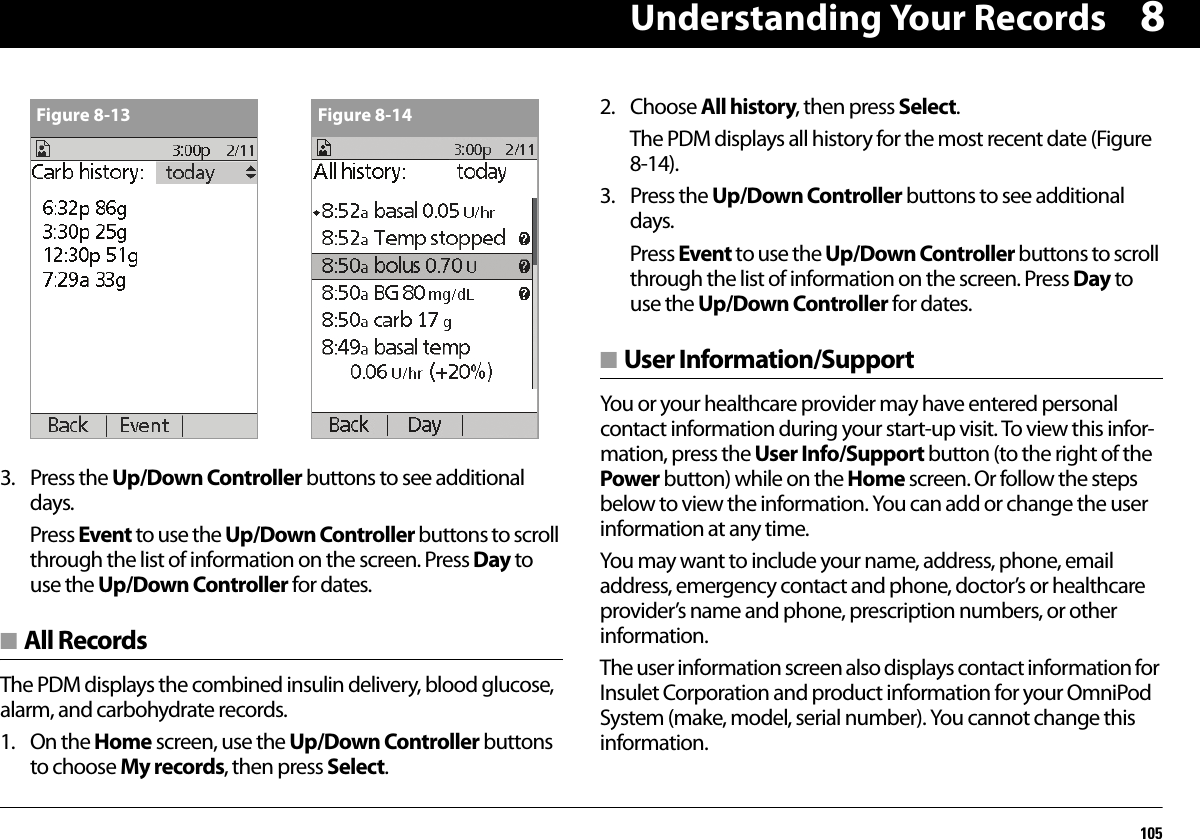
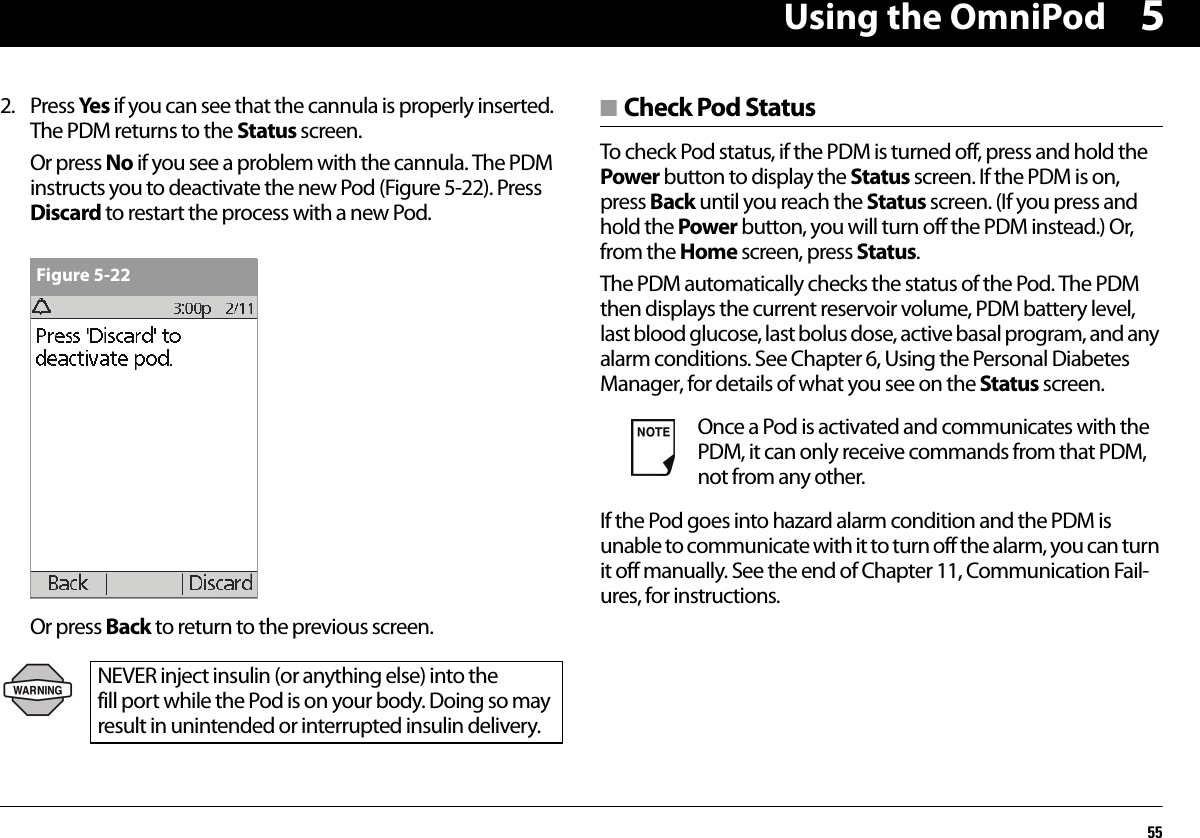
![Understanding Your Records1068Add or change user information1. On the Home screen, use the Up/Down Controller buttons to choose My records, then press Select.2. Choose My info, then press Select.3. Choose [My info] (Figure 8-15), then press Edit.4. Press the Up/Down Controller buttons to scroll through the list of characters. An up-and-down-arrow symbol ( ) on the screen indicates the character you are changing.5. Press the middle soft key to move the underscore to the next character.6. Enter each character one at a time. For example, if you want to enter your address, you might enter 5, 6, 5, [space], M, a, i, n, [space], S, t, [period]. (A blank character or space is the first and last option in the scrolling menu.)For your healthcare provider and local phone number, you might enter J, a, n, e, [space], S, m, i, t, h, [comma], [space], 5, 5, 5, [hyphen], 1, 2, 3, 4 (Figure 8-16).7. Press Save. 8. Repeat steps 3–7 for each line of personal information you want to enter or change. Twenty lines are available.The User Info/Support icon is also displayed on the suggested bolus screen. For information about the support information displayed on these screens, see Chapter 4, Understanding and Delivering Bolus Doses.Figure 8-15 Figure 8-16](https://usermanual.wiki/Insulet/010/User-Guide-1000784-Page-119.png)