Integrated Microwave Technologies 27VT2-L5-E1P5 Microwave Transmitter User Manual users manual
Integrated Microwave Technologies, LLC. Microwave Transmitter users manual
users manual
NEWSCASTER VT2
ENG/OB Microwave Transmitter
User Manual
M17-0002-00A (rev 1.0)
(software version D3.xx)
Nucomm Inc.
101 Bilby Road
Hackettstown, NJ 07840
Tel: 908-852-3700 Fax: 908-813-0399
www.nucomm.com

NewsCaster VT2
M17-0002-00A Rev 4 2 User Manual
Warranty
Equipment manufactured by Nucomm, Inc. is warranted to meet all customer
specifications and to be free from defects in material and workmanship within a period of
two years from date of shipment from Nucomm. The company’s liability under this
warranty is limited to:
• Servicing or adjusting equipment.
• Replacement of defective parts.
Any equipment returned to the factory shall have the freight paid for by the buyer.
Equipment showing damage by misuse, abnormal conditions of operation, or attempts to
repair by other than authorized service personal shall be excluded from this warranty.
Nucomm, Inc. shall in no event be responsible for incidental injury or property damage.
Since Nucomm, Inc. has no control over conditions of use, no warranty is made or
implied as to suitability for the customer’s intended use, beyond such performance
specifications as are made part of the purchase order. There are no warranties expressed
or implied, except as stated herein. This limitation on warranties shall not be modified by
verbal representations.
Proprietary & Disclaimer Notice
All information and graphic images herein contained within this manual are considered
the sole property of Nucomm, Inc. and is issued in the strictest of confidence. This
material may not be reproduced, stored, copied, or converted in any form, nor shall it be
disclosed to others or used for manufacturing or any other purpose without the written
permission of an authorized representative of Nucomm, Inc.
Nucomm, Inc. has made every effort to ensure the accuracy of this material at the time of
printing. However, as the specifications, equipment, and this manual are subject to
change without notice, Nucomm, Inc. assumes no responsibility or liability whatsoever
for any errors or inaccuracies that may appear in this manual, or for any decisions based
on its use. This manual is supplied for informational purposes only and should not be
construed as a commitment by Nucomm, Inc.
© Copyrighted 2005, Nucomm, Inc., Hackettstown, New Jersey 08740

NewsCaster VT2
M17-0002-00A Rev 4 3 User Manual
Customer Service Information
Equipment Returns
Customer Service technicians at Nucomm are available to extend technical assistance to
customers installing or operating Nucomm equipment. They will also assist customers
with equipment troubleshooting. If this cannot be successfully accomplished by
telephone, the equipment may be returned to the factory for repair. Loaner equipment is
often available until Nucomm is able to ship repaired units. The Nucomm Customer
Service telephone number is (908) 852-3700.
Do not return any Nucomm product to the factory until you have received a return
authorization (RA) number and shipping instructions from Nucomm. When returning
equipment to Nucomm, please enclose a letter containing the following:
• RA number.
• Model number.
• Serial number.
• Frequency operating range (in the case of modules).
• A detailed description of the problem.
• Name of an engineer or technician we may contact in regards to this problem.
• Include a “ship to” and “bill to” address.
Ship to:
Nucomm, Inc.
101 Bilby Road
Hackettstown, New Jersey 07840
For International orders
In the case of units being shipped from outside the United States, Nucomm recommends
the use of a courier such as Federal Express, UPS, etc, and that the goods be shipped
DOOR-TO-DOOR PRE-PAID. This will eliminate Customs costs, handling charges and
delays. Enclose all the information above, plus a statement that the equipment was
manufactured in the United States (the latter is needed to expedite customs processing).
Nucomm evaluates all returned units free of charge, and then confers with customers on
corrective action.
Telephone Consultation
Should there be a need for emergency telephone consultation, please have your model
number and serial number available for the Customer Service representative. Nucomm
Customer Service representatives are available to deal with all technical questions or
difficulties.

NewsCaster VT2
M17-0002-00A Rev 4 4 User Manual
Replacement Modules
Troubleshooting to the component level is often not cost-effective and frequently
impossible. Often the practical method of effecting field repairs is to substitute known
good spare modules for suspect units. Nucomm maintains an inventory of replacement
modules for its complete line of products.
Field Repair
Nucomm products are designed with easy access to components to facilitate service.
When troubleshooting the VT2 Transmitter, the user is cautioned to read all module
descriptions in this manual. Some Nucomm modules cannot be serviced in the field.
Warnings are included in the circuit descriptions and on certain modules themselves,
however the lack of a warning cannot be construed as a statement of safety. To prevent
voiding of the Nucomm warranty that protects the equipment, please contact Nucomm
before servicing or making any repairs.
Shipping Damage
Equipment shipped FOB Nucomm, Inc.; shall become the property of buyer upon
delivery to and receipt from carrier. Any damage in shipment should be handled by the
buyer directly with the carrier. Immediately request the carrier’s inspection upon
evidence of damage in shipment.
Do not return any Nucomm product to the factory until a return authorization (RA)
number has been given, along with shipping instructions, as discussed previously.
Contact Information
Nucomm Inc.
101 Bilby Road
Hackettstown, NJ 07840
Tel: 908-852-3700 Fax: 908-813-0399
www.Nucomm.com
For 24-hour emergency service, our Customer Service Manager can be contacted by
pager at (908) 515-3709.

NewsCaster VT2
M17-0002-00A Rev 4 5 User Manual
CAUTION!
RISK OF ELECTRICAL SHOCK. DO NOT REMOVE COVERS.
• Do not remove any covers.
• Refer servicing to qualified technicians only.
• Disconnect all power before servicing.
• Read and perform all instructions carefully. Failure to follow suggested
instructions and guidelines may void all warranties.
FCC STATEMENT
This equipment has been tested and found to comply with Part 74.637 (a) (2) of the FCC Rules
and Regulations. Any unauthorized changes or modifications not expressly approved by
Nucomm, Inc. could void the user’s authority to operate the equipment, and invalidate the
equipment’s warranty.

NewsCaster VT2
M17-0002-00A Rev 4 6 User Manual
Table of Contents
1. Description......................................................................................................11
2. Features...........................................................................................................13
3. SPECIFICATIONS AND Frequency Plans (USA)........................................19
3.1 Frequency Plans (USA) ..........................................................................23
4. Installation.......................................................................................................29
4.1 Unpacking & Inspection .........................................................................29
4.2 Pre-Installation Checkout........................................................................29
4.3 Cables and Connectors............................................................................29
4.4 Control Unit Mechanical Installation......................................................29
4.5 Control Unit Electrical Installation.........................................................31
4.6 RF Head Mechanical Install....................................................................34
4.7 Preparing the Interconnect Cables (including Nycoil)............................35
4.8 RF HEAD CONNECTORS....................................................................43
4.9 Control Unit / RF HEAD Interconnect ...................................................45
5. Operation.........................................................................................................49
5.1 Front Panel Operations ...........................................................................49
5.2 Controls and Indicators...........................................................................49
5.3 Menu System ..........................................................................................52
5.3.1 Main Menu......................................................................................52
5.3.2 Settings............................................................................................52
5.3.3 Monitoring/Alarms (Trouble Shooting)..........................................54
5.4 NEXTEL BAS RELOCATION SETTINGS..........................................56
5.4.1 Audio Sub-Carrier Frequency.........................................................56
5.4.2 Channel Bandwidth and Band Plan ................................................57
5.4.3 SWITCHOVER TO “POST-NEXTEL” SETTINGS.....................57

NewsCaster VT2
M17-0002-00A Rev 4 7 User Manual
Figures
Figure 1: NewsCaster VT2 System Diagram..........................................................11
Figure 2: NewsCaster VT2, Simple Block Diagram ..............................................13
Figure 3: Control Unit Block Diagram ...................................................................14
Figure 4: RF Head Block Diagram .........................................................................17
Figure 5: Control Unit Front Panel .........................................................................29
Figure 6: Control Unit Rear Panel (AC model)......................................................30
Figure 7: Control Unit, Audio Connector...............................................................31
Figure 8: Control Unit, RS-232 Connector.............................................................32
Figure 9: Control Unit, Joystick Connector............................................................32
Figure 10: Control Unit, 160v Pan/Tilt Pwr Connector..........................................33
Figure 11: Control Unit, 12v Pan/Tilt Pwr Connector............................................33
Figure 12: Mounting RF Head (and legacy HPA) using Mounting Plate...............34
Figure 13: Nycoil Block Diagram – Standard Coax (or Triax) Configuration.......35
Figure 14: Nycoil Block Diagram – Alternate Coax Configuration.......................35
Figure 15: Pan & Tilt Power (120VAC) Interconnect Diagram..............................37
Figure 16: Pan & Tilt Power (12VDC) Interconnect Diagram ...............................38
Figure 17: Pan & Tilt Motor Interconnect Cable....................................................39
Figure 18: NSI Quad Antenna Polarization Connections.......................................40
Figure 19: Radio Waves Quad Antenna Polarization Connections........................41
Figure 20: Cable, RF Head to optional High Power Amplifier ..............................42
Figure 21: RF Head, Front-Panel (shown w/Pan & Tilt option).............................43
Figure 22: RF Head AUX Power Connector ..........................................................44
Figure 23: RF Head, Rear Panel .............................................................................44
Figure 24: RF Head, Rear Panel (legacy extended power).....................................44
Figure 25: High Power Amp, or “HPA” (no longer produced) ..............................45
Figure 26: NCVT2 Interconnects, Standard Power ................................................47
Figure 27: NCVT2 Interconnects, Extended Power Option (legacy).....................47
Figure 28: Hole Pattern of RF Head (and legacy HPA) Base Plate........................48
Figure 29: NEWSCASTER VT2 Front Panel Controls and Indicators..................51
Figure 30: Menu Tree: “Monitoring & Alarms”.....................................................59
Figure 31: Menu Tree: “Settings”...........................................................................60

NewsCaster VT2
M17-0002-00A Rev 4 8 User Manual
Tables
Table 1: Frequency Plan (US), 2GHz 17MHz........................................................23
Table 2: Frequency Plan (US), 2GHz 12MHz........................................................24
Table 3: Frequency Plan (US), 7GHz .....................................................................25
Table 4: Frequency Plan (US), 12GHz ...................................................................26
Table 5: Frequency Plan (US), 13GHz ...................................................................27
Table 6: Recommended Nycoil cable lengths ........................................................35
Table 7: Typical IF cable configurations for the NewsCaster VT2........................36
Table 8: Summary of Nycoil cables and conductors needed..................................36
Table 9: AUX Power cable pinout..........................................................................36
Table 10: Pan & Tilt Power (120 VAC) Connector Pin-outs..................................37
Table 11: Pan & Tilt Power (12VDC) Connector Pin-outs.....................................38
Table 12: Quickset QPT90 12VDC/120VAC Pan & Tilt Connector Pin-out ........39
Table 13: NSI Quad Antenna Polarization Connector Pin Out ..............................40
Table 14: Radio Waves Quad Antenna Polarization Connector Pin Out ...............41
Table 15: NewsCaster VT2 Alarms........................................................................58

NewsCaster VT2
M17-0002-00A Rev 4 9 User Manual
Document Revision
Date Modified Revision Modified by Modification Detail
October 25, 2004 0.0 J Payne/M Hardy Preliminary Release
March 11, 2005
0.1 M Hardy Additional formatting.
June 3, 2005 0.2 R Risch Additional text, graphics and
formatting.
November 3,
2005
0.3
M Hardy
Additional Nycoil and related
information, as well as figure
numbering, references, Menu
Tree, and Frequency Stability.
April 6, 2006
1.0
M Hardy
Additional text, graphics and
formatting. Added Menu Tree,
BAS instructions and drawings.

NewsCaster VT2
M17-0002-00A Rev 4 10 User Manual
NewsCaster VT2 Description
M17-0002-00A Rev 4 11 User Manual
1. DESCRIPTION
Nucomm’s NewsCaster VT2 series is a two
box Digital and Analog ENG/OB Microwave
Transmitter System. The Mast Mounted
Microwave Transmitter is designed to operate
in any specified band in the 1.00 to 15.5 GHz
frequency range. Each unit is field
programmable and configurable to meet a
wide range of customer requirements.
The NewsCaster VT2 is a “split-box”
transmitter system utilizing a rack-mounted
Control Unit (19” x 1RU, sometimes referred
to as the “IDU”), and a Mast Mounted
transmitter RF Head (or “ODU”). The two are
connected with a single IF cable (RG-6 coax,
or optional Triax), which carries the 70 MHz
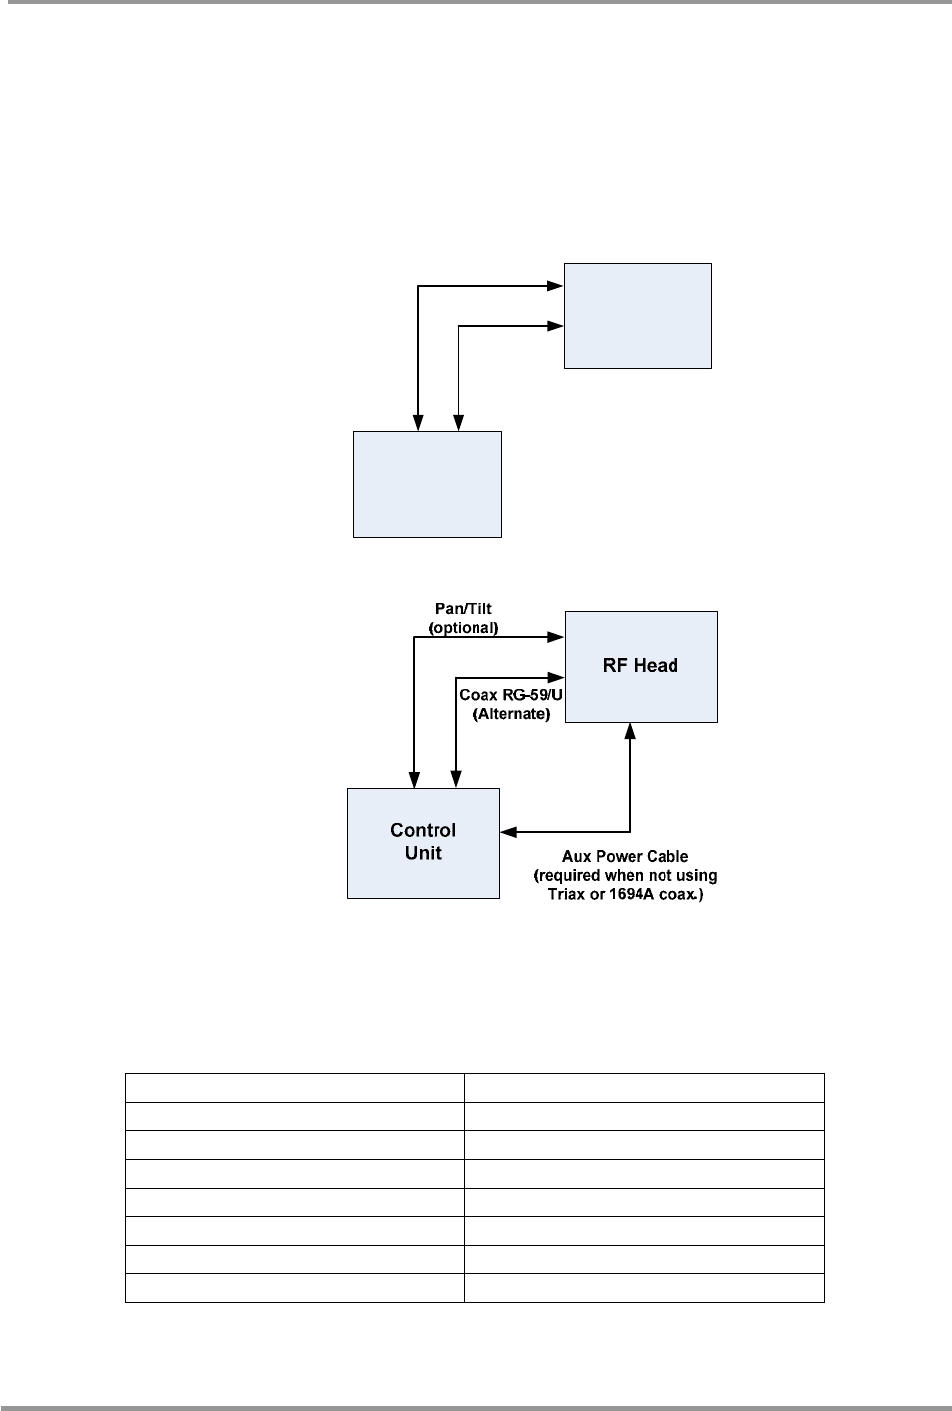
IF, Control Data, and DC power. For cases
where an existing IF cable in the Nycoil must
be used, and cannot support the diplexing of
the DC power, the NewsCaster VT2 can be
fitted with an AUX Power output to send the
power via separate conductors. (Refer to
Table 8.)
The NewsCaster VT2 is fully integrated with
an Analog FM modulator, compliant super-
low delay MPEG 2 Encoder and Multimode
Digital Modulator. Available modulations
include FM (NTSC / PAL), COFDM, optional
single carrier QAM, and optional VSB. As
additional digital modulation formats become
available, the VT2 can easily be software
updated. This makes the VT2 extremely
flexible while greatly reducing circuit
complexity.
Figure 1: NewsCaster VT2 System Diagram
Highlighted features include six “Quick-Key”
presets that allow single button operation,
integrated dynamic color bars, and HD
transport capability. Also, special menus have
been included to ease the BAS relocation
process.
Other available options for the NewsCaster
VT2 include Pan & Tilt control, a 10Watt
Digital High Power Amplifier, remote control
and monitoring functionality, multi-band
operation, etc.
This manual is written in a general form to
cover all configurations and options for the
NewsCaster VT2 within the 1.00 to
15.5 GHz frequency range.
The convention of this manual is to show non-
standard configuration options with shaded
text, as shown here.

NewsCaster VT2 Features
M17-0002-00A Rev 4 12 User Manual

NewsCaster VT2 Features
M17-0002-00A Rev 4 13 User Manual
2. FEATURES
Figure 2: NewsCaster VT2, Simple Block Diagram
Nucomm’s NewsCaster VT2 Series Digital-
Analog ENG/OB microwave transmitter was
designed with the 2GHz BAS Relocation in
mind, and is optimized for ENG/OB truck
applications. Nucomm has led the way in
creating the most comprehensive ENG/OB
transmitter available, with many state-of-the-
art features not found in any of the other
competing models.
Control Unit Features:
Fully integrated features of the Control Unit
(as shown in Figure 3) include:
• Smart LCD Display for system control
• Six Quick-Key presets that allow
single button configuration.
• Integrated dynamic color bars.
• Super low delay MPEG-2 using a
4:2:2 or 4:2:0 encoder.
• Multi-Mode modulator that includes
COFDM, Analog FM and optional
VSB, DVB-S or QAM modulation
• High data rate HD transport.
• Special menus to ease the BAS
relocation process.
• Antenna polarization selection, CW,
CCW, H, V.
• Omni/Directional antenna selection
(Optional).
• Control of four Form C relay closures
in the RF Head (Optional).
• Integrated Pan / Tilt Control (Optional)
• Joystick for Pan / Tilt (Optional)
Digital & Analog Input Signals:
The NEWSCASTER VT2 Control Unit
accepts multiple input formats. These include:
• Composite video (NTSC & PAL).
• Digital video as SDI, with audio de-
embedding.
• ASI.
• Two analog audio (optionally four).
• One digital AES/EBU audio
(optionally four).
• 70 MHz.
The audio’s can be combined with the video
via the MPEG-2 encoder or the FM sub-
carriers. A key feature of the Newscaster VT2
is that the SDI video can be converted
internally to composite video and transmitted
as FM analog modulation. The Audio and
Video signal flow is shown in Figure 3.
In Digital mode, the NewsCaster VT2 accepts
video as SDI, ASI, or Composite, along with
LINE, Embedded, or AES audio(s), and
digitally compresses the signals using 4:2:2 or
4:2:0 MPEG2 encoding. The encoded signal
is then internally modulated with one of the
user-selected formats: COFDM, or optional
QAM or VSB. (Refer to Figure 3).
For additional flexibility, an ASI Out port is
provided, enabling the NewsCaster VT2 to be
used as a standalone ASI Encoder
4:2:2
MPEG2
Encoder
Modulator
Analog
FM Mod DVB-S or
VSB or QAM
Control Unit with Dynamic Color Bar/ID
Up Converter and
Power Amplifier
RF Output
Coax Cable
SDI Video 4 x Audio
2 switchable
To Digital
ASI
70 MHz
Note: Optional Lower Cost 4:2:0 Encoder Available
RF Head
NewsCaster VT2 Features
M17-0002-00A Rev 4 14 User Manual
Figure 3: Control Unit Block Diagram
MPEG 2 Encoder
Multi
-format
Modulator
(COFDM,VSB,QAM
)
4 Analog Audio
2 AES /EBU Audio
SDI
Composite
ASI IN
Digital FM Modulator
Diplexer
Cable Transceiver
Communication to
RF Unit
Front Panel
PSU
(+12V, +45V)
+48V
10.7 MHz Data
70MHz
Auxiliary +48V DC
Power to RF Unit
Coax to
RF Unit
AC
(optional DC )
Pan and Tilt
Controller/ PSU
(optional )
Pan and Tilt Power
Future Encoder
Expansion
ASI OUT

NewsCaster VT2 Features
M17-0002-00A Rev 4 15 User Manual
In Analog mode, the NewsCaster VT2 accepts
SDI or Composite video, and LINE,
Embedded, or AES audio.
The NewsCaster VT2 can also accept
externally modulated signals via the 70 MHz
Input Port.
Audio Sub-carriers:
The two standard, or four optional,
synthesized audio sub-carriers are field
programmable and feature individual source
selection (OFF / LINE / TONE / AES) and
gain control via the menu system or audio
“Quick-Key”. The sub-carrier frequencies,
mode, and additional gain are front panel
adjustable using the menu system.
Prime Power:
The standard Control Unit input voltage is 90
to 240 volts AC (40 to 60 Hz). Optionally, the
system can be configured for DC ranging from
+11 to +32 VDC, or for both AC & DC
operation in the ranges listed above. In all
configurations, the system automatically
adapts to the input voltage without requiring
the user to change any jumpers, switches or
settings. Appropriate line cords are provided.
Standby Mode:
The Standby Mode is accessed from the front
panel under the grouping labeled “MODE”.
There are three options or functions that can
be selected: “Normal”, STANDBY” and
V.PRES.STBY”. In the “NORMAL” mode,
the NewsCaster VT2 amplifiers are powered
and transmitting. In the “STANDBY” mode,
the transmitter is powered on, but the RF
output is muted, enabling the transmitter to be
tuned safely without radiating off-frequency
emissions. The NewsCaster VT2 will remain
in “STANDBY” until on-frequency lock has
been obtained. Switching from “STANDBY”
to the “NORMAL” (operating) mode results
in instantaneous on-frequency transmission.
If the synthesizer has not attained lock when
the Standby switch is switched to
“NORMAL”, the unit will remain in
STANDBY” until on-frequency lock has been
obtained.
When the transmitter is in the Analog mode
there is an additional “STANDBY” mode
called “V.Pres. Sdtby” (Video Presence
Remote). When in this mode, the transmitter
will be in the “Normal” transmitting mode as
long as the video source is connected to the
Video or SDI input. When the video is
removed, the transmitter will go to
“STANDBY” in five seconds. Reapplying the
video will immediately turn the transmitter
back ON. The Video Presence Remote
Standby mode enables the camera operator to
remotely place the transmitter in standby or
turn it ON.
Dynamic Color Bar Generator:
To activate the Dynamic Color Bar Generator,
press the “TEST COL” button on the front
panel of the Control Unit. The LED above the
button will light. The color bar pattern is the
SMPTE color bar standard. In the middle of
the pattern is a 16 character ID that can be
programmed through the LCD display. The
first character in the ID will blink to indicate
that the microwave link is active. In a digital
system if the decoder stops decoding, the
picture will freeze and the operator would
have know way of knowing this. By causing
one of the ID characters to blink, one can
quickly tell that the link is operating properly.
In addition to numbers and characters, several
symbols are available for display in the ID.
These symbols include a helicopter, a Van, a
camera, etc.
When the Dynamic Color Bar Generator is
activated, a 1 kHz test tone is inputted to the
active audio channels. The left channel will be
a CW tone. The right channel will be a pulsed
tone.

NewsCaster VT2 Features
M17-0002-00A Rev 4 16 User Manual
Preset Keys:
Nucomm has designed six Preset Keys into
the front panel of the Newscaster VT2. These
keys are used to instantly recall previously
programmed configuration parameters such as
frequency, modulation format, analog or
digital, video and audio input type, etc. To
program a Preset Key, first set the Newscaster
VT2 to the desired operating configuration.
Then hold one of the six Preset Keys in until a
confirmation message is displayed (roughly 10
seconds).
To recall the Preset, simply press appropriate
key. The display will indicate the Newscaster
VT2 has been re-configured per the Preset.
Frequency Coverage:
Nucomm’s NewsCaster VT2 transmitters are
available in single-, dual-, and tri-band
configurations. This manual covers all the
models in the NewsCaster VT2 series.
The NewsCaster VT2 series radios provide full
coverage of the 2, 7 & 13GHz US frequency
bands, and/or other bands as required
internationally, from 1 to 15.5 GHz. The US
frequency bands are given in Table 1 through
Table 5. Band and channel selections are
made and clearly displayed via the front panel
LCD interface.
Antenna Operation:
The Newscaster VT2 can control a number of
antenna functions, including:
Polarization switching
Directional-Omni antenna switching
Selection between RWI or NSI Antennas
Coax Cable Requirements:
The NEWSCASTER VT2 Control Unit and
RF Head are typically connected with a single
Coax or Triax cable, which carries the 70MHz
IF and the Control Data signals, and in a
typical system, the power to the RF Head,
which is diplexed onto the center conductor of
the cable for coax, or through the inner shield
when Triax is used. The cable conductor must
carry 2 to 3 amps of current at +48 volts. .The
center conductor of Belden 1694A/RG 6U
coax (or equivalent), and the inner shield of
the Belden 8232A/RG59U triax are large
enough to carry this current with a minimum
of voltage drop.
When using video cable such as RG 58, or
Belden 1505/RG-59U, the voltage drop
through the center conductor is too great to
carry the diplexed +48volts. To support the
use of these cables which may be existing in
the Nycoil and must be used, Nucomm has
provided an auxiliary power (“AUX Power”)
connector that routes the power to external
wires. Refer to Section 4.7 for details.
The standard coax cable required between the
Control Unit and the RF Head must have an
impedance of 75 Ohms. The Newscaster will
on occasion, be used to replace systems that
use 50 Ohm RF or video type coax cable in an
existing Nycoil. On special request, Nucomm
can configure the Newscaster VT2 system to
operate using these 50 Ohm cables. Again,
depending on the type of coax cable used in
the pre-existing Nycoil, the power to the RF
Head may require the use of the AUX Power
option.
RF Head Features:
The rugged NewsCaster VT2 RF Head, as
shown in Figure 4, includes:
• IF to RF Up-Converter
• RF Power Amplifier
• Low Noise Frequency Synthesizer
• Diplexer that splits the +48 volts, the
70 MHz and the Control Data.
• DC to DC Converter
• Optional Pan & Tilt Controller
• Optional Omni/Directional Antenna
switch.
NewsCaster VT2 Features
M17-0002-00A Rev 4 17 User Manual
• Optional Four Form C Relay contacts
controlled from the Control Unit.
The RF Head components are housed in a
weatherproof enclosure that mounts on the
antenna pan and tilt housing, replacing the
conventional power amplifier. This setup
combines precise tuning of the transmitter
frequency with exceptional output power. The
RF unit is equipped with type “N” connectors
for the directional and optional omni-
directional antenna(s).
Other Standard Features:
• Digitally synthesized microwave oscillator
tuning.
• RS232/RS485 Remote.
• RF Power Output Adjustments.
• Field Programmable RF and ASC settings.
Other Options:
• Remote Control Software allowing the
NewsCaster VT2 to be fully monitored and
controlled from an IBM Compatible PC
through a RS232C/RS485 port.
• High Power Amplifier (20 Watt Analog,
10 Watt Digital).
• Mounting Adapter Plates enabling
mounting of the RF Head and High Power
Amplifier to the Pan and Tilt.
LPF
Amplifier
Module Detector Module
901-I058-02
IF to RF
Up-Converter
Diplexer
DC to DC
Power Supply Microprocessor
70 MHz
48 V Control Data
ALC
RF Output
Input from
Control Unit
Newscaster VT2 RF Head
Pan & Tilt
Controller
(Optional)
To Pan & Tilt
To Directional
Antenna
To Omni
Antenna
Four Form C
Relays
(Optional)
4 Relay
Closures
(Optional)
Figure 4: RF Head Block Diagram

NewsCaster VT2 Features
M17-0002-00A Rev 4 18 User Manual

NewsCaster VT2 Specifications & Frequency Plans
M17-0002-00A Rev 4 19 User Manual
3. SPECIFICATIONS AND FREQUENCY PLANS (USA)
RF PERFORMANCE
Frequency Bands (Front panel selectable)
Band 1: ..........................................................1.99 GHz – 2.50 GHz
Band 1 (optional): .........................................2.30 GHz – 2.70 GHz
Band 2: ..........................................................6.43 GHz – 7.12 GHz
Band 3:...........................................................12.706 GHz – 13.250 GHz
(other plans available per user requirements)
Tuning step size: ...........................................250 kHz (US), 100 kHz (International)
70 MHz input: ...............................................-10 to 0 dBm (75 Ohms)
Frequency stability: .......................................+/- 5ppm (.0005%)
Power Output:
2 GHz band:
Standard: ...........................................12W Analog; 4W Digital
Optional: ..........................................10W Digital**
6/7 GHz band:
Standard: ...........................................5W Analog; 2W Digital
Optional: ...........................................10W Analog, 4 W Digital
Optional: ...........................................10W Digital**
Dual Band 2 + 7GHz:
Standard: ............................................2GHz: 12W Analog, 4W Digital
Standard: ............................................7GHz: 5W Analog, 2.5W Digital
Optional: ...........................................10W Analog; 2.5W Digital;
Optional: ............................................10W Digital**
13GHz Band
Standard: ...........................................1W Analog, 0.25W Digital
Optional: ...........................................3W Analog, 1.75W Digital
**Analog adjustable to FCC maximum EIRP (max amp power 25W); A separate RF Head is
required for the 10 Watt digital configuration.
Standby mode:
Standby: ............................................No RF output
Normal: .............................................Instant on frequency transmission

NewsCaster VT2 Specifications & Frequency Plans
M17-0002-00A Rev 4 20 User Manual
NEWSCASTER VT2 Specifications (continued)
Modulation Modes
COFDM
Modulation Formats................................................COFDM; QPSK, 16QAM, 64 QAM
Code Rate: ..............................................................1/2, 2/3 3/4. 5/6, 7/8
Guard Interval: .......................................................1/32, 1/16, 1/8, 1/4
Bandwidth: .............................................................6, 7 and 8 MHz
Analog
Analog FM:.............................................................2 field tunable sub-carriers (optional 4)
Modulation Deviation (field selectable): ...............3 MHz/volt or 4 MHz/volt
VSB
Modulation Formats................................................2VSB, 4VSB, 8VSB, 8TVSB
Video & Digital Input Performance:
Analog Video Mode:
Video:.............................................................525/625 lines NTSC/PAL field selectable
1V p-p for +/- 4 MHz deviation
1 V p-p for +/- 3 MHz deviation
(Video input sensitivity switchable)
Pre-emphasis or Flat: .................................Field selectable
Pre-emphasis: ............................................NTSC/PAL-B,G or M (field selectable)
Video Low-Pass-Filter (field selectable): ..3.9, 4.5, 4.75, 5.0 and 6.0MHz
Frequency Response: ................................0.5 dB (10 Hz to video filter selected)
Base-Band Response: ................................1.0 dB (10 Hz to 10 MHz)
Signal-to-noise ratio: .................................69 dB typical (65 dB minimum)
Differential Phase: ....................................+/- 1.0 degrees
Differential Gain: ......................................+/- 1.0 %
Digital Video Mode:
Composite Video:
1V p-p Maximum input
Frequency Response: ................................0.5 dB (10 Hz to 20 kHz)
Base-Band Response: ................................1.0 dB (10 Hz to 10 MHz)
Signal-to-noise ratio:.................................. 69 dB typical (65 dB minimum)
Differential Phase: ....................................+/- 0.5 degrees
Differential Gain: ......................................+/- 0.5 %
SDI and ASI...................................................0.80 Volts p-p
Digital and Analog Modes:
Input impedance: ...........................................75 Ohms
Return loss: ...................................................-26 dB (10 Hz to 5 MHz)

NewsCaster VT2 Specifications & Frequency Plans
M17-0002-00A Rev 4 21 User Manual
NEWSCASTER VT2 Specifications (continued)
Audio Performance:
Analog Audio Mode
Two channels: ................................................2 Analog, or 1 AES/EBU, SDI De-embedded
Four optional .................................................4 Analog, or 2 AES/EBU, SDI De-embedded
Sub-Carriers: selectable and field tunable from front
panel; Tunable in 5 kHz steps 4.8 to 9.0 MHz
Digital Audio Mode
Two channels: ...............................................2 Analog, or 1 AES/EBU, SDI De-embedded
Four optional .................................................4 Analog, or 2 AES/EBU, SDI De-embedded
Frequency Response: .....................................30 Hz to 20 kHz: 0.5 dB
Digital & Analog Audio Line Input:
US: ...........................................................+8 dBm, 600 Ohms for 75 kHz deviation
International: ............................................+12 dBm, 600 Ohms for 100 kHz deviation
Frequency Response:
30 Hz to 10 kHz: .......................................0.5 dB
10 kHz to 15 kHz: .....................................1.0 dB
Signal-to-noise:
Line audio: ................................................65 dB
Deviation: ......................................................75 kHz peak at 1 kHz (100 kHz for PAL)
Pre-emphasis: ................................................75 µs & 50 µs LCD selectable
Harmonic distortion:
Line audio: .................................................0.5% maximum (typically 0.2 %)
Remote control: ..........................................RS-232 / RS-485
Power Requirements:
Input range: ...................................................100 to 260 VAC 50/60 Hz (Optional DC: +11 to +32)
Power consumption: ......................................80 W typical (12 watt version)
10 Watt all Digital..........................................120 Watts
Environmental:
Temperature range:
Full specification (RF Head): ....................-30° to +60°C
Full specification (Control Unit): ..............-10° to +50°C
Storage: ......................................................-40° to +80°C
Humidity: .......................................................0 to 95% non-condensing
Altitude:
Operating: ...............................................................20,000ft (6,000 m)
Storage: ...................................................................50,000ft (15,000 m)

NewsCaster VT2 Specifications & Frequency Plans
M17-0002-00A Rev 4 22 User Manual
NEWSCASTER VT2 Specifications (continued)
Physical Characteristics:
Size:
Control Unit: .................................................19” (48.26cm)W, 1.75”(4.45cm)H, 16"(40.64cm)D
RF Head (Standard Power): ..........................9.5” (24.13cm)W, 5”(12.7cm)H, 15”(38.1cm)L
RF Head (High Power): ................................TBD
Weight:
Control Unit: .................................................6 lbs (2.72kg)
RF Head (standard power): ...........................12 lbs (5.45kg)
RF Head (High Power): ................................TBD
Connectors:
Control Unit:
Video / SDI / DVB-ASI / 70MHz: ...............Type BNC-F
Audio: ...........................................................Removable Screw Terminal Strip
IF output to RF Head: ...................................TNC-F (optional Triax)
Optional AUX Power out: ............................Terminal Strip
Remote Control (RS232 / RS485): ...............9 Pin D, Female
Remote Control (Ethernet): ...........................RJ-45
Summary Alarm:............................................Form C on Terminal Strip
Pan / Tilt Power (to RF Head) ......................8 Pin military style connector (see Sec 4 for cabling)
RF Head:
Optional AUX Power in: ..............................MIL-C-26482, 12 Pin
RF Output: .....................................................Type “N” female
Polarization ....................................................
Pan / Tilt Power (from Control Unit).............12 Pin military style connector (see Sec 4 for cabling)
Pan / Tilt Control (to Pan / Tilt).....................17 Pin military style connector (see Sec 4 for cabling)

NewsCaster VT2 Specifications & Frequency Plans
M17-0002-00A Rev 4 23 User Manual
3.1 FREQUENCY PLANS (USA)
The standard US frequency plans apply to all units sold into markets covered by the FCC.
Frequency plans for all systems sold into non-US markets are individualized to meet specific
customer requirements and licensing restrictions, as specified at the time of purchase.
CHANNEL / FREQUENCY PLAN - CHART NO: 326
2 GHz (17 MHz)
(Frequency Range 1,994 MHz – 2,497 MHz)
Channel Offset Receive Frequency MHz
1 – 1,994.75
1 0 1,999.00
1 + 2,003.75
2 – 2,012.25
2 0 2,016.50
2 + 2,020.75
3 – 2,029.25
3 0 2,033.50
3 + 2,037.75
4 – 2,046. 25
4 0 2,050.50
4 + 2,054.75
5 – 2,063.25
5 0 2,067.50
5 + 2,071.75
6 – 2,080.25
6 0 2,084.50
6 + 2,088.75
7 – 2,097.25
7 0 2,101.50
7 + 2,105.75
8 – 2,454.25
8 0 2,458.50
8 + 2,462.75
9 – 2,471.25
9 0 2,475.50
9 + 2,479.75
10 – 2,488.25
10 0 2,492.50
10 + 2.496.75m
Table 1: Frequency Plan (US), 2GHz 17MHz

NewsCaster VT2 Specifications & Frequency Plans
M17-0002-00A Rev 4 24 User Manual
CHANNEL / FREQUENCY PLAN - CHART NO: 326
2 GHz (12 MHz)
(Frequency Range 2,025 MHz – 2,496 MHz)
Channel Offset Receive Frequency MHz
1 – 2,028.50
1 0 2,031.50
1 + 2,034.50
2 – 2,040.50
2 0 2,043.50
2 + 2,046.50
3 – 2,052.50
3 0 2,055.50
3 + 2,058.50
4 – 2,064.50
4 0 2,067.50
4 + 2,070.50
5 – 2,076.50
5 0 2,079.50
5 + 2,082.50
6 – 2,088.50
6 0 2,091.50
6 + 2,094.50
7 – 2,100.50
7 0 2,103.50
7 + 2,106.50
8 – 2,454.25
8 0 2,458.50
8 + 2,462.75
9 – 2,471.25
9 0 2,475.50
9 + 2,479.75
10 – 2,488.25
10 0 2,492.50
10 + 2,496.75
Table 2: Frequency Plan (US), 2GHz 12MHz

NewsCaster VT2 Specifications & Frequency Plans
M17-0002-00A Rev 4 25 User Manual
CHANNEL / FREQUENCY PLAN - CHART NO: 326
(Frequency Range 6,431 MHz – 7,119 MHz)
Channel Offset Receive Frequency MHz
1 – 6,881.25
1 0 6,887.50
1 + 6,893.75
2 – 6,906.25
2 0 6,912.50
2 + 6,918.75
3 – 6,931.25
3 0 6,937.50
3 + 6,943.75
4 – 6,956.25
4 0 6,962.50
4 + 6.993.75
5 – 6,981.25
5 0 6,987.50
5 + 6,993.75
6 – 7,006.25
6 0 7,012.50
6 + 7,018.75
7 – 7,031.25
7 0 7,037.50
7 + 7,043.75
8 – 7,056.25
8 0 7,062.50
8 + 7,068.75
9 – 7,081.25
9 0 7,087.50
9 + 7,093.75
10 – 7,106.25
10 0 7,112.50
10 + 7,118.75
11 – 6,431.25
11 0 6,437.50
11 + 6,443.75
12 – 6,456.25
12 0 6,462.50
12 + 6,468.75
13 – 6,481.25
13 0 6,487.50
13 + 6,493.75
14 – 6,506.25
14 0 6,512.50
14 + 6,518.75
Table 3: Frequency Plan (US), 7GHz

NewsCaster VT2 Specifications & Frequency Plans
M17-0002-00A Rev 4 26 User Manual
CHANNEL / FREQUENCY PLAN - CHART NO: 10
(Frequency Range 12,706MHz - 12,950MHz)
Channel Offset Receive Frequency MHz
1 - 12,706.25
1 0 12,712.50
1 + 12,718.75
1 ++ 12,725.00
2 - 12,731.25
2 0 12,737.50
2 + 12,743.75
2 ++ 12,750.00
3 - 12,756.25
3 0 12,762.50
3 + 12,768.75
3 ++ 12,775.00
4 - 12,781.25
4 0 12,787.50
4 + 12,793.75
4 ++ 12,800.00
5 - 12,806.25
5 0 12,812.50
5 + 12,818.75
5 ++ 12,825.00
6 - 12,831.25
6 0 12,837.50
6 + 12,843.75
6 ++ 12,850.00
7 - 12,856.25
7 0 12,862.50
7 + 12,868.75
7 ++ 12,875.00
8 - 12,881.25
8 0 12,887.50
8 + 12,893.75
8 ++ 12,900.00
9 - 12,906.25
9 0 12,912.50
9 + 12,918.75
9 ++ 12,925.00
10 - 12,931.25
10 0 12,937.50
10 + 12,943.75
10 ++ 12,950.00
Table 4: Frequency Plan (US), 12GHz

NewsCaster VT2 Specifications & Frequency Plans
M17-0002-00A Rev 4 27 User Manual
Table 5: Frequency Plan (US), 13GHz
CHANNEL / FREQUENCY PAN - CHART NO: 10
(Frequency Range 12,976MHz - 13,250MHz)
Channel Offset Receive Frequency MHz
1 - 12,956.25
1 0 12,962.50
1 + 12,968.75
1 ++ 12,975.00
2 - 12,981.25
2 0 12,987.50
2 + 12,993.75
2 ++ 13,000.00
3 - 13,006.25
3 0 13,012.50
3 + 13,018.75
3 ++ 13,025.00
4 - 13,031.25
4 0 13,037.50
4 + 13,043.75
4 ++ 13,050.00
5 - 13,056.25
5 0 13,062.50
5 + 13,068.75
5 ++ 13,075.00
6 - 13,081.25
6 0 13,087.50
6 + 13,093.75
6 ++ 13,100.00
7 - 13,106.25
7 0 13,112.50
7 + 13,118.75
7 ++ 13,125.00
8 - 13,131.25
8 0 13,137.50
8 + 13,143.75
8 ++ 13,150.00
9 - 13,156.25
9 0 13,162.50
9 + 13,168.75
9 ++ 13,175.00
10 - 13,181.25
10 0 13,187.50
10 + 13,193.75
10 ++ 13,200.00
11 - 13,206.25
11 0 13,212.50
11 + 13,218.75
11 ++ 13,225.00
12 - 13,231.25
12 0 13,237.50
12 + 13,243.75
12 ++ 13,250.00

NewsCaster VT2 Specifications & Frequency Plans
M17-0002-00A Rev 4 28 User Manual
NewsCaster VT2 Installation
M17-0002-00A Rev 4 29 User Manual
4. INSTALLATION
4.1 UNPACKING & INSPECTION
Unpack the NewsCaster VT2 and visually
inspect for possible damage to the LCD,
connectors, and surface areas. If damage is
found, a claim should be filed with the
transportation carrier. Save the shipping
container and packing material for re-
shipment, as needed.
4.2 PRE-INSTALLATION
CHECKOUT
Connect the NewsCaster VT2 IF output to the
RF Head via an appropriate IF cable (refer to
Table 7.) Connect the RF output of the RF
Head through a 30-watt, 30-dB attenuator to a
spectrum analyzer and observe the output
frequency on the analyzer display. Note that
the frequency and level correspond directly to
the LCD display on the front panel of the
VT2.
4.3 CABLES AND CONNECTORS
Detailed drawings and pinouts of the
NewsCaster VT2 cables and connectors are
shown throughout this section. Please contact
Nucomm Customer Service if additional detail
is required.
4.4 CONTROL UNIT
MECHANICAL INSTALLATION
The NewsCaster VT2 Control Unit is shipped
pre-assembled. Mount the Control Unit in a
standard 1RU E.I.A. rack space, using all 4
rack screws.
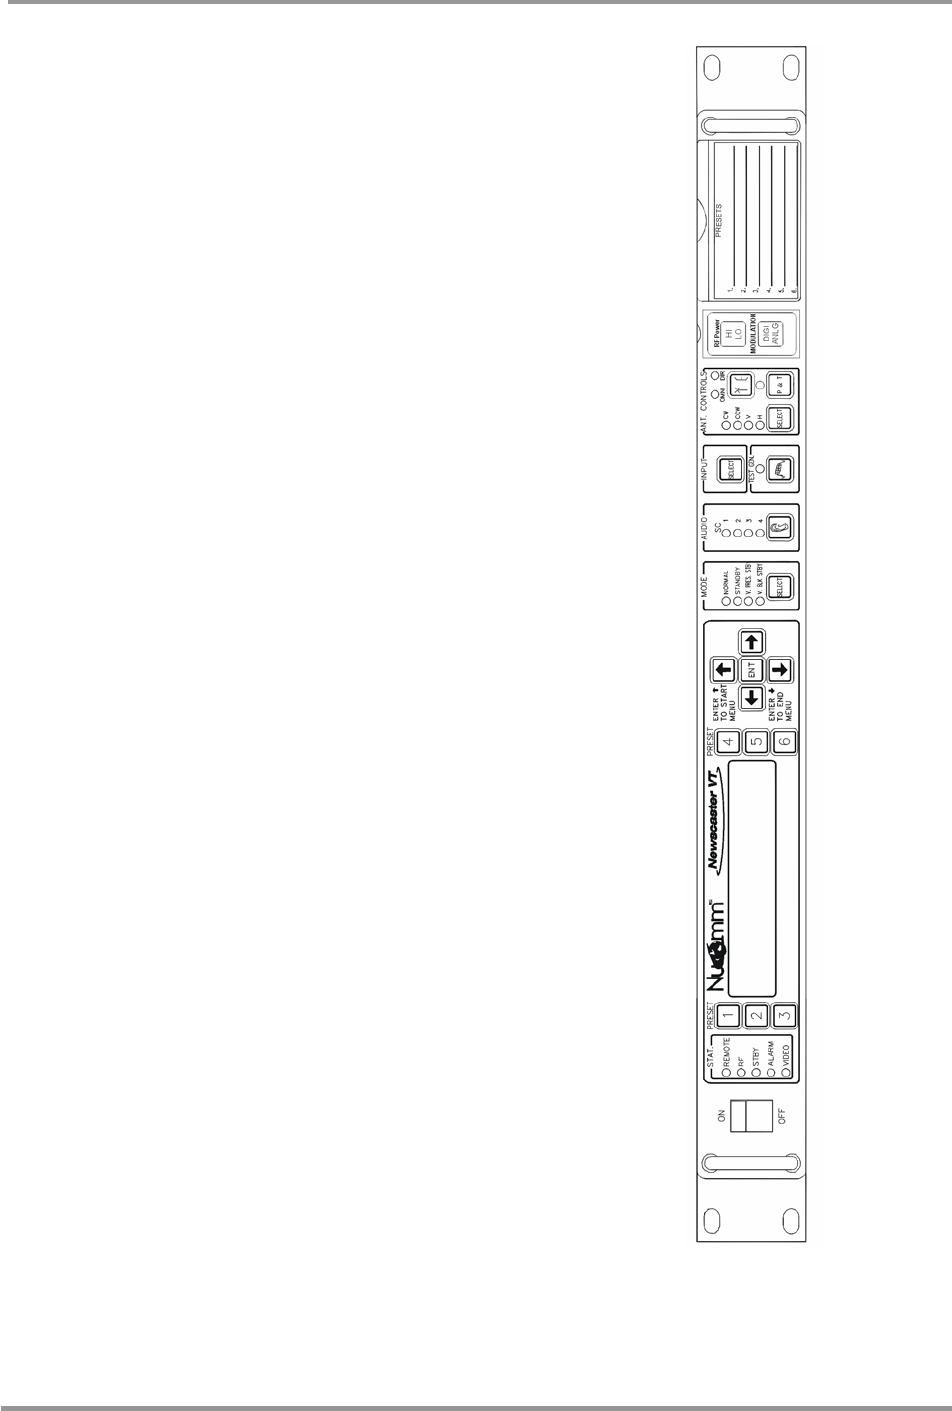
Figure 5: Control Unit Front Panel
NewsCaster VT2 Installation
M17-0002-00A Rev 4 30 User Manual
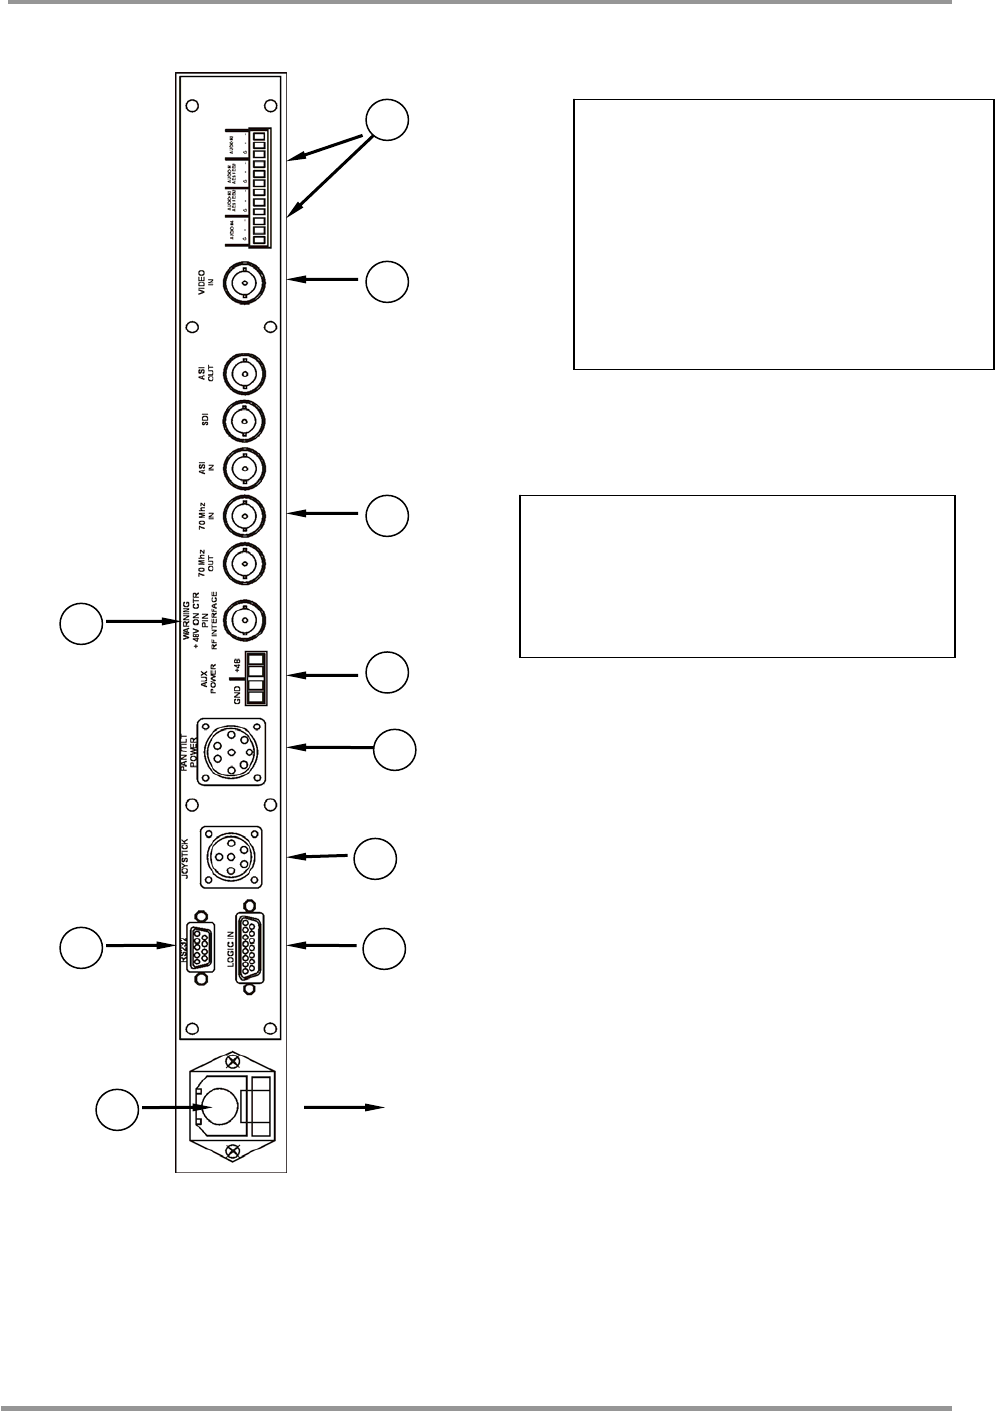
Figure 6: Control Unit Rear Panel (AC model)
8A
1
7
8
9
2
3
6
CAUTION – IF INTERFACE (7)
The IF Interface center conductor
carries +48V to power the RF Head. Do
not connect any instruments without
use of a special test cable.
10
NOTE:
For detailed views of connectors and
pin-outs, refer to Figures 10 thru 14.
Depending on the configuration
ordered, some units may not feature all
of the connectors pictured here.
2.5 Amp Fuse (120 VAC Units)
1.5 Amp Fuse (220-260 VAC Units)
5
NewsCaster VT2 Installation
M17-0002-00A Rev 4 31 User Manual
4.5 CONTROL UNIT ELECTRICAL
INSTALLATION
Input Power
AC Power: The NewsCaster VT2 is standard
configured to operate on AC power ranging
from 90 to 260 VAC at 40 to 60 Hz. Connect
the provided AC line cord to an appropriate
AC power source. (Refer to Figure 6, Detail
1.) Alternate line cord connector types are
available from Nucomm if needed.
DC Power: When configured for DC, the
system can operate on DC power ranging from
+11 to +32 VDC. Connect the provided DC
line cord between the lugs on the back of the
unit to an appropriate DC power source. (–)
for GND, and (+) for the +11 to +32VDC.
In all configurations, the system automatically
adapts to the input voltage without requiring
the user to change any jumpers, switches or
settings.
Video
All video inputs/outputs are made via clearly
marked 75 Ω BNC connectors. (Refer to
Figure 6, Detail 3 and Detail 4.) Simply
connect a 75 Ω coaxial cable between the
source and target equipment, and select the
appropriate input type via the front panel
interface. Refer to Section 5 for details.
Available video inputs and outputs are:
• SDI (input)
• ASI IN
• ASI OUT (from the internal encoder)
• Video (Input) – For use with
Composite and Baseband Video.
70 MHz Connectors
70 MHz input and output ports (75Ω BNC)
are provided.
The 70 MHz input port allows an externally
modulated signal to be inputted to the system
for RF transmission. To utilize this feature,
“External 70MHz” must be selected as an
input via the front panel interface. Refer to
Section 5 for details.
The 70 MHz output port can be connected to a
spectrum analyzer for monitoring, or to an
external transmitter. (see Figure 6, Detail 2).
Note: When “External 70 MHz” input is
selected, the 70 MHz out is a loopthrough
only.
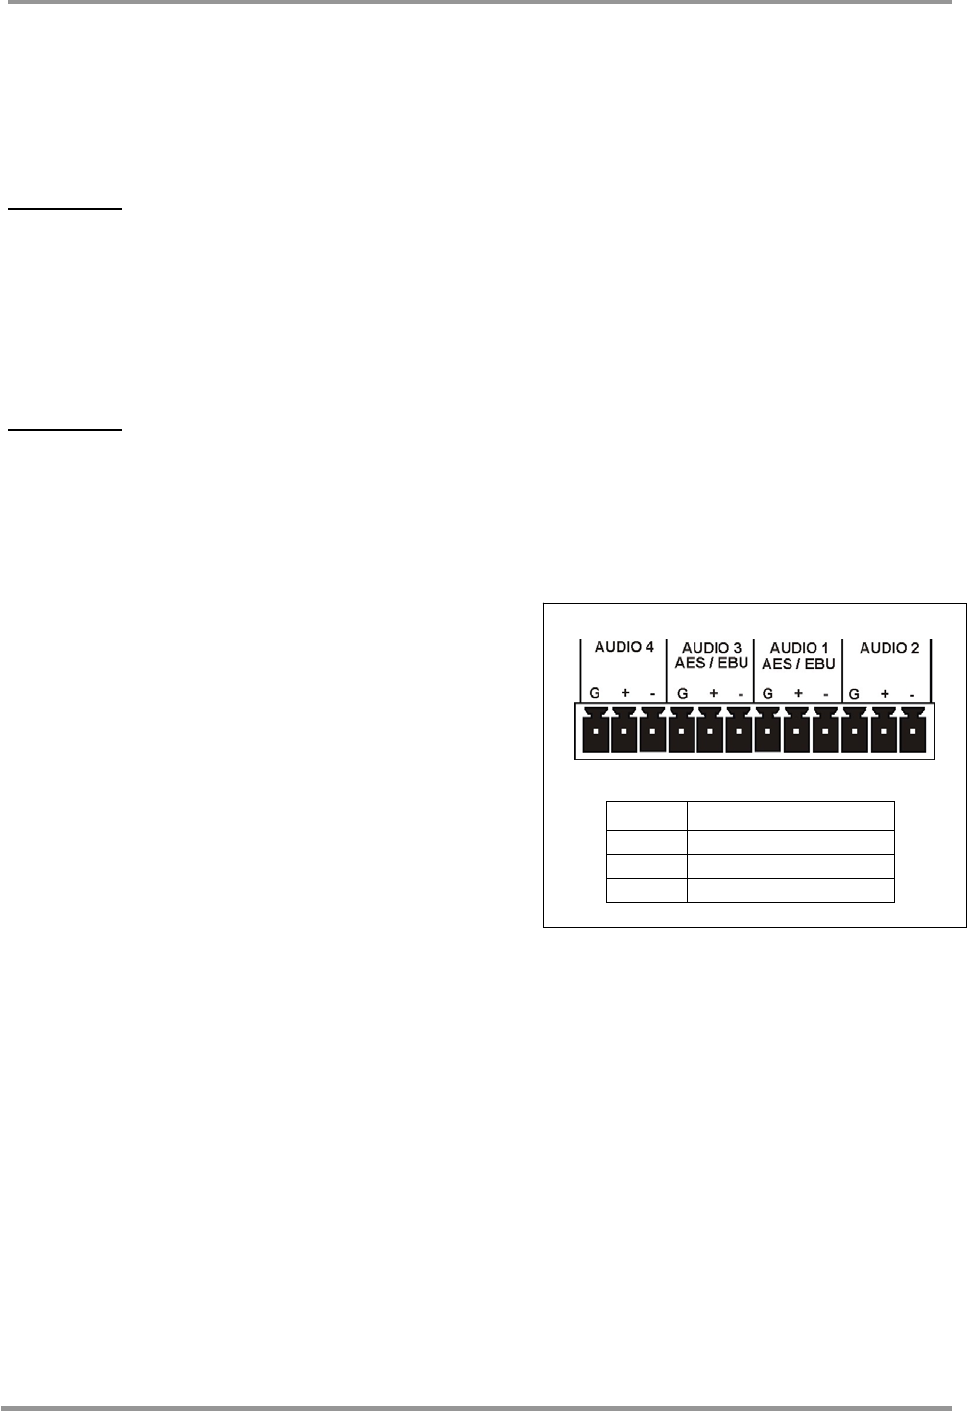
Figure 7: Control Unit, Audio Connector
Audio
The Analog and Digital audio inputs are made
via a strip terminal on the rear panel. (Refer
to Figure 6, Detail 6 for connector location.)
The terminal marked "G" is for the ground
lead, (-) is for the negative signal and (+) is
for the positive. (Refer to Figure 7 for the
connector detail.)
Pin # Function
G Ground
+ Positive
- Negative
NewsCaster VT2 Installation
M17-0002-00A Rev 4 32 User Manual
The Digital AES/EBU inputs are made via the
Audio 1 & Audio 3 terminals. As such, only
one Digital audio is available in the standard
“two audio” configuration.
IF Interface and AUX Power
When the IF Cable is suitable, a single TNC
(or optional Triax) connector (Figure 6, Detail
7) is used to output the three signals that must
pass between the Control Unit and the RF
Head:
(a) the modulated 70 MHz signal
(b) the inter-unit control data
(c) the +48VDC for the RF Head.
For cases when an existing non-conforming IF
cable that cannot handle +48VDC must be
used, the AUX Power option must be fitted
and will provide the +48V on a separate
connector (Figure 6, Detail 5) for transport to
the RF Head via dedicated conductors.
Table 7 lists conforming cables and details the
various configurations possible with and
without the AUX Power option.
NOTE: When AUX Power is configured, the
+48v still remains available at the IF
Interface port. This allows the user to
upgrade to a conforming IF cable without
requiring any changes to the unit.
Additional detailed information on the
interconnection between the Control Unit and
RF Head is found in Sections 4.7 through 4.9.
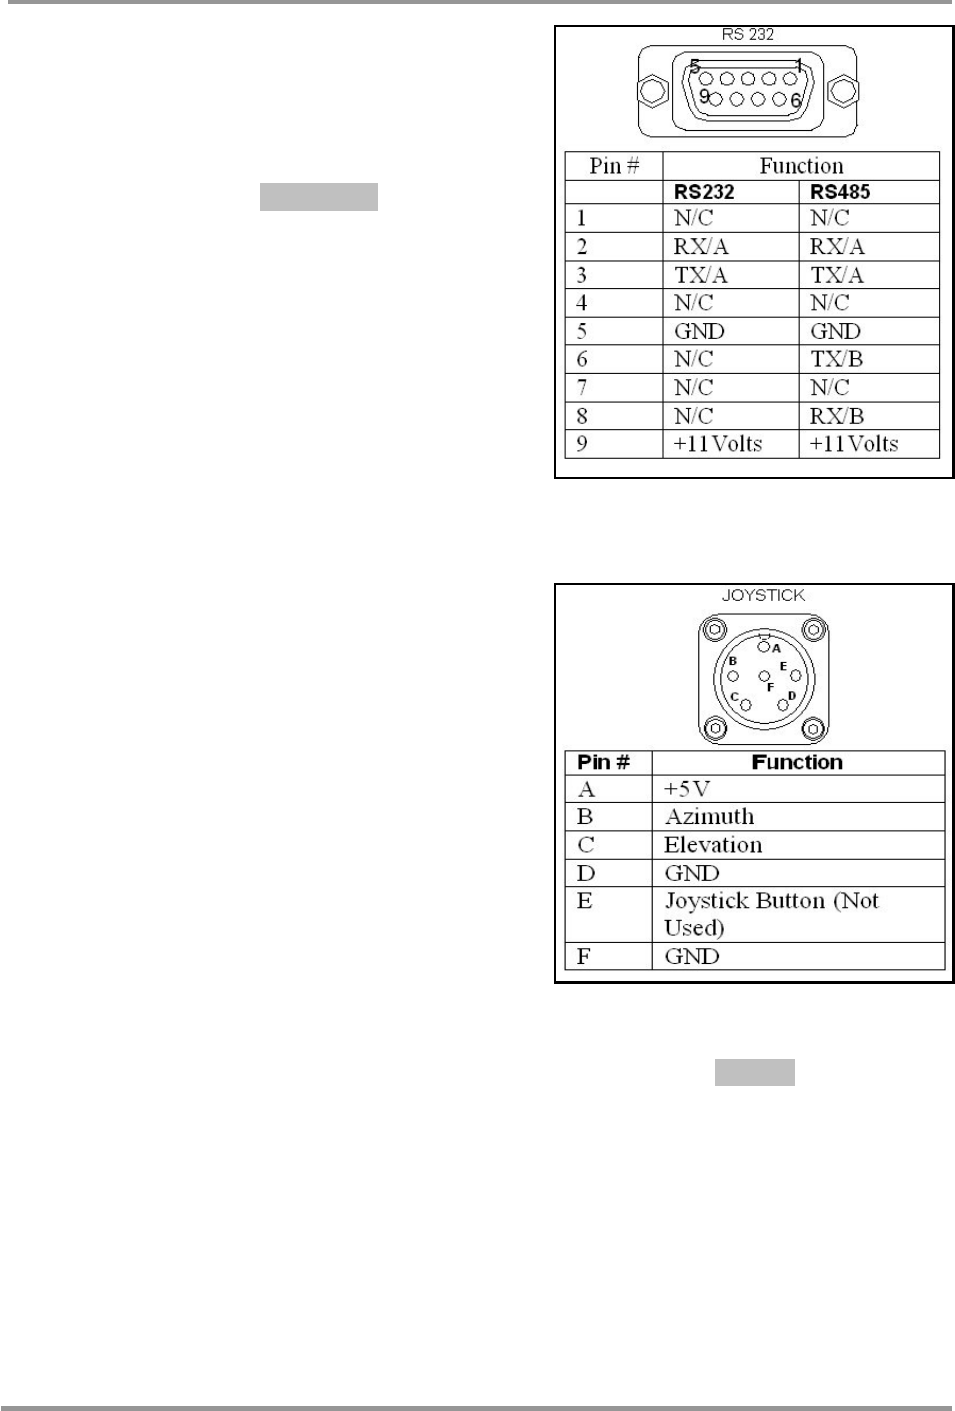
Remote
The remote control port (Figure 6, Detail 8)
allows for full control and monitoring of the
NewsCaster VT2. Both RS232 and RS485 are
supported. Refer to Section 5.3.2 for settings.
Refer to Figure 8 for pin-out.
Figure 8: Control Unit, RS-232 Connector
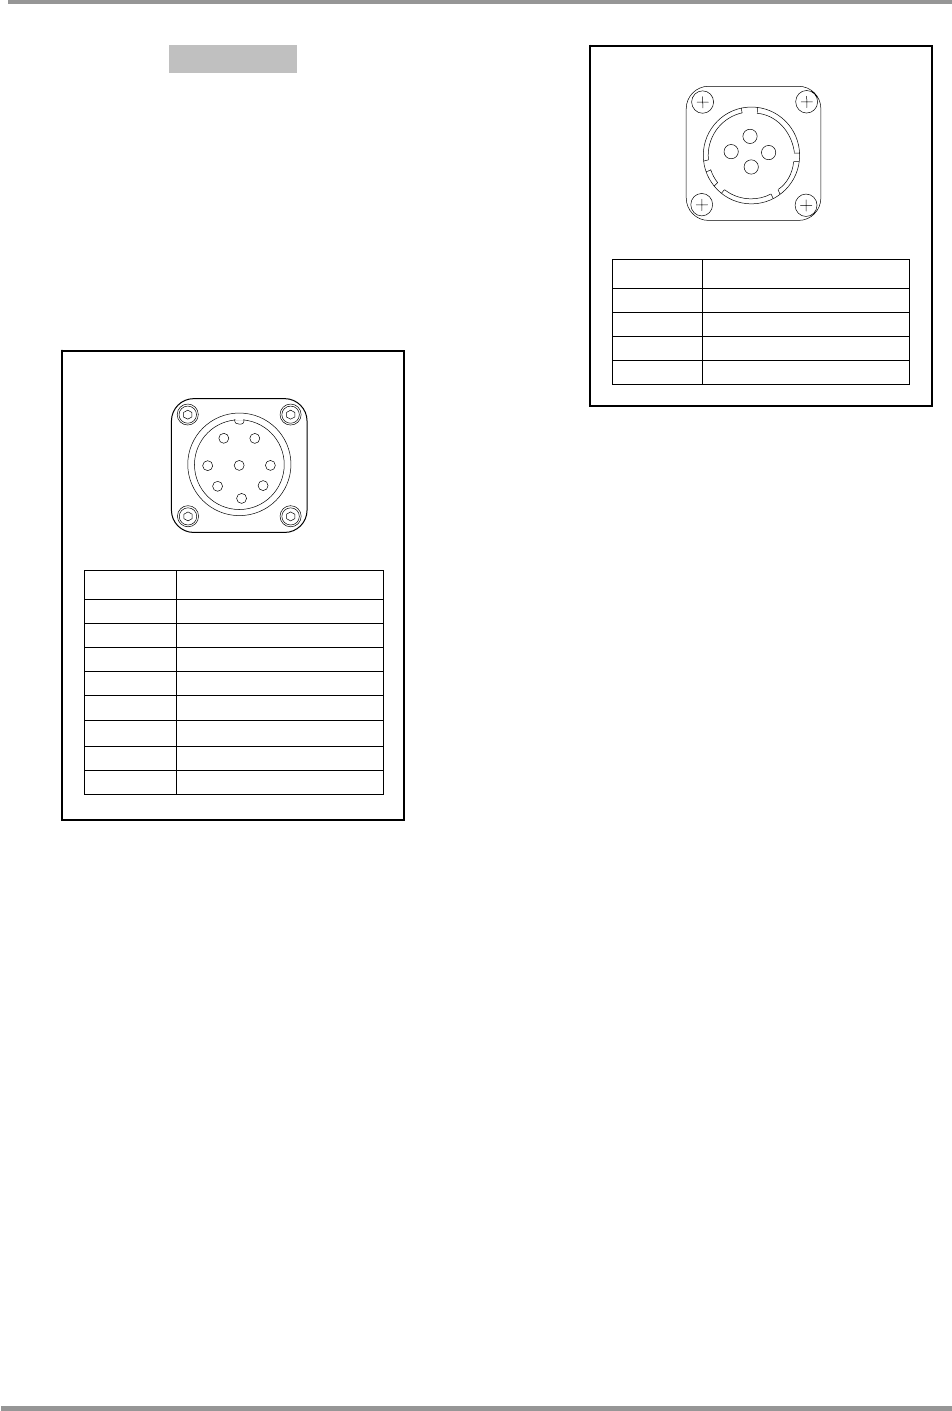
Figure 9: Control Unit, Joystick Connector
Joystick
This optional 6-pin connector (Figure 6,
Detail 9) connects the optional joystick for
Pan & Tilt Motor control. (Refer to Figure 9
for a detailed view and the pin-outs.)
NewsCaster VT2 Installation
M17-0002-00A Rev 4 33 User Manual
PAN / TILT
A
B
C
D
E
F
G
H
POWER
Pan/Tilt Pwr
This optional connector is used to provide
power to the Pan & Tilt Motor. See Figure 6,
Detail 10 for connector location on the
Control Unit. Detailed cabling info for
120VAC Pan & Tilt systems can be found in
Table 10 and Figure 15. Detailed cabling info
for 12VDC Pan & Tilt systems is found in
Table 11 and Figure 16.
Figure 10: Control Unit, 160v Pan/Tilt Pwr Connector
Figure 11: Control Unit, 12v Pan/Tilt Pwr Connector
Pin # Function
A +160V
B +160V
C NOT USED
D NOT USED
E −160V
F −160V
G GND
H NOT USED
PAN / TILT
POWER
A
B
C
D
Pin # Function
A +12V
B +12V
C GND
D GND
NewsCaster VT2 Installation
M17-0002-00A Rev 4 34 User Manual
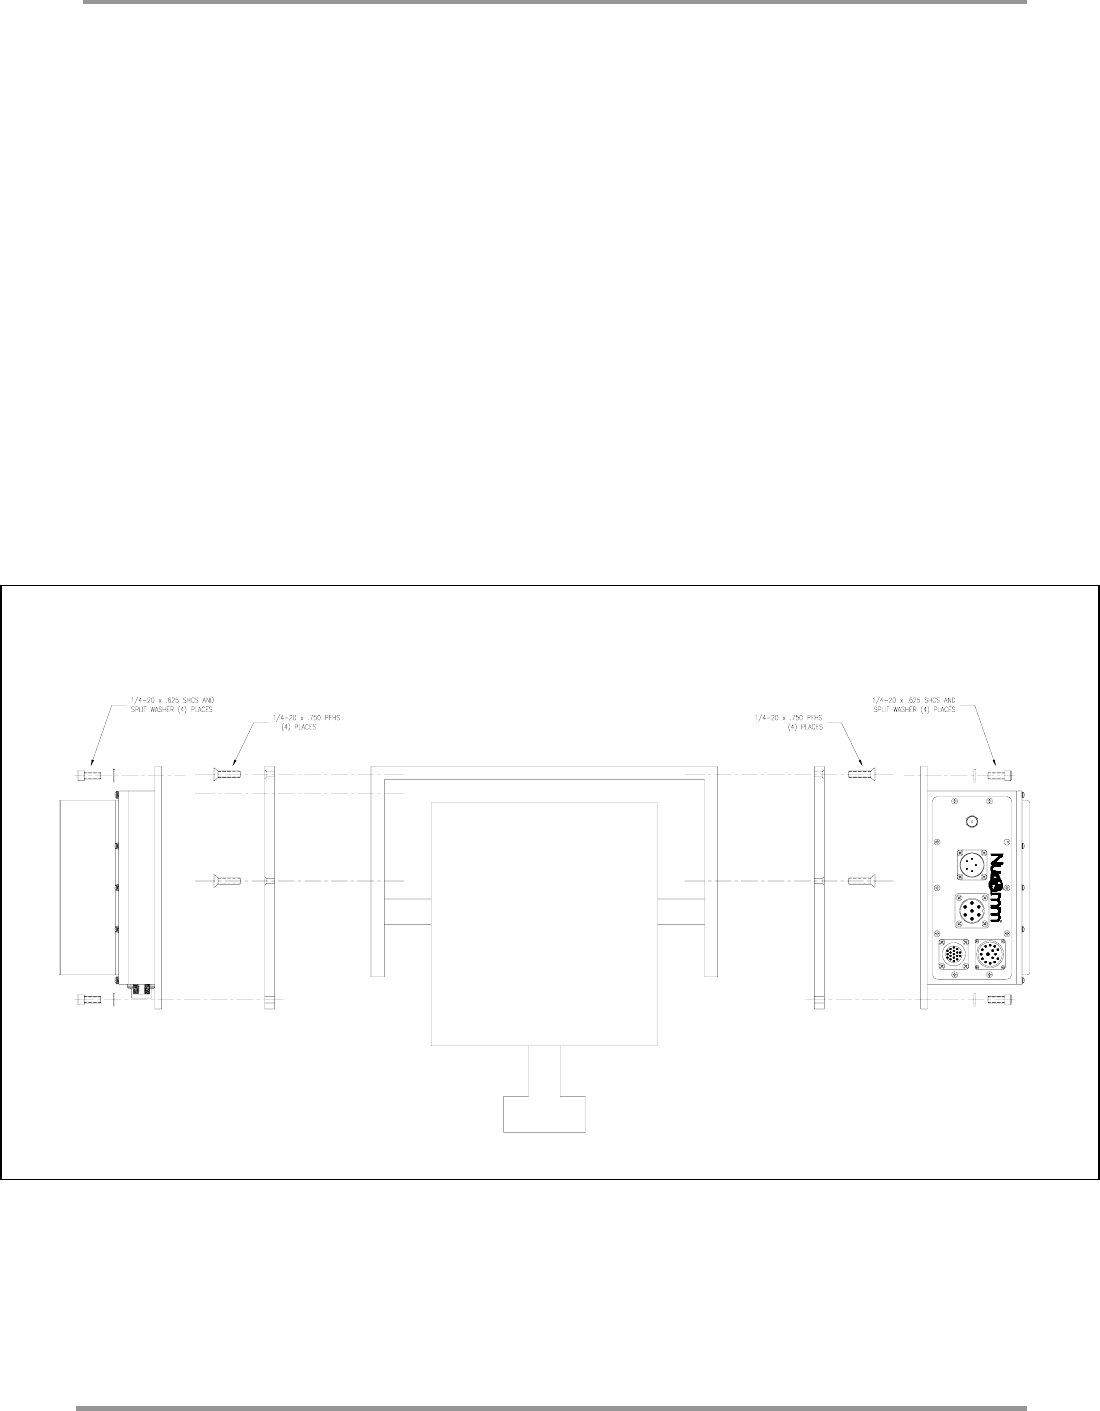
4.6 RF HEAD MECHANICAL
INSTALL
Nucomm’s mast mounted transmitter consists
of a single RF head (containing the up-
converter, P&T, PSU, Antenna Controls, and
amplifier). There is also a legacy “extended
power output” option which consisted of two
mast mounted units, the RF Head (containing
the up-converter, P&T, PSU and Antenna
Controls) and the High Power Amplifier (or
HPA). The legacy system is no longer
manufactured.
In a typical installation of Nucomm's
NewsCaster VT2, the RF Head (and HPA if
configured) are mounted on the Pan & Tilt
mechanism, which is attached to a pneumatic
mast atop an ENG/OB van. (See Figure 12
for a typical mounting setup.)
To ease the mounting of the RF Head (and
legacy HPA if configured) to the Pan & Tilt,
mounting adapter plates are available. The
plate is first mounted to the Pan & Tilt with
(4) 1/4-20x.750" flat head screws, then the RF
Head (and legacy HPA if configured) are
mounted to the adapter plate(s). For cases
when the mounting adapter plate is not used,
the hole pattern of the RF Head (and legacy
HPA) base plate has been provided (See
Figure 28).
Note: The RF Head(s) should be mounted so
that the heat sink fins are vertical during
operation.
Figure 12: Mounting RF Head (and legacy HPA) using Mounting Plate
N
ote: Attach Mounting Plate(s) to Pan & Tilt before attaching to RF Head (and/or legacy High Power Amplifier).
PAN / TILT. PWR
FROM CONTROL
TO PAN / TILT
POLARIZATION
ANTENNA
RF INTERFACE
Mounting Plate
(
713-K008-00B
)
RF Head
Mounting Plate High Power Amp
(no longer being
M
a
n
u
f
actu
r
ed)
Pan & Tilt
NewsCaster VT2 Installation
M17-0002-00A Rev 4 35 User Manual
4.7 PREPARING THE INTERCONNECT CABLES (INCLUDING NYCOIL)
The NewsCaster VT2 is flexibly designed to use multiple IF cable types. The STANDARD cable
types support diplexed +48VDC for transport to the RF Head. Belden 1694A (Coax) and Belden
8232A (Triax) are certified for this “one cable” configuration. Other common cables, such as
Belden 1505, may require the use of the AUX Power option. Refer to Table 7 for more details on
using the cables types mentioned. Table 9 details the AUX Power cable.
RF Head
Control
Unit
Coax RG-6/U
or
Triax RG-59/U
(Standard)
Pan/Tilt
(optional)
Figure 13: Nycoil Block Diagram – Standard Coax (or Triax) Configuration
Figure 14: Nycoil Block Diagram – Alternate Coax Configuration
Most broadcasters use a Nycoil cable conduit between the truck and the mast top. The required
length of the Nycoil cable is twice the difference between the extended and nested mast height.
MAST MODEL NYCOIL LENGTH
5-20 30'
6-27 40'
7-30 50'
7-34 60'
7-42 70'
8.5-52 100'
9-58 100'
Table 6: Recommended Nycoil cable lengths

NewsCaster VT2 Installation
M17-0002-00A Rev 4 36 User Manual
Config Type Control Unit Connector Cable Type Cable Use RF Head Connector
Standard
Coax
TNC Connector
Trompeter UPL40-41
Nucomm 511-F3003-000
Belden 1694A RG-6U
(recommended)
• 70MHz IF
• Inter-Unit Data
• +48VDC Power
TNC Connector
Trompeter UPL40-41
Nucomm 511-F3003-000
Standard
Triax
Triax Connector
Trompeter PL375-13A
Nucomm 511-F3002-000
Belden 8232A RG-59U
(recommended)
• 70MHz IF
• Inter-Unit Data
• +48VDC Power
Triax Connector
Trompeter PL375-13A
Nucomm 511-F3002-000
TNC Connector
Trompeter UPL40-41
Nucomm 511-F3003-000
Belden 1505(e.g.) RG-59U
• 70MHz IF
• Inter-Unit Data
TNC Connector
Trompeter UPL40-41
Nucomm 511-F3003-000
Alternate
Coax (requires
Aux Power
Option) Terminal Strip
Nucomm 514-E0003-04A #20AWG x 3 • +48VDC Power
15-pin connector
ITT Cannon: MS3116J14
Nucomm 512-F3012-015
Table 7: Typical IF cable configurations for the NewsCaster VT2
Table 8 is provided as a summary of the cables and conductors that are required for STANDARD
and ALTERNATE configurations, with and without Pan and Tilt Control.
System Configuration Cable Usage Wire Type / Size Number of
Conductors
Belden 1694A RG-6U (Coax)
or
Standard Coax or Triax
(no Pan & Tilt) Control to RF Head
Interconnect Belden 8232A RG-59U (Triax)
n/a
Control to RF Head
Interconnect Belden 1505(e.g.) RG-59U (Coax) n/a
A
lternate Coax
(no Pan & Tilt) Aux Power Cable #20 AWG 3
Belden 1694A RG-6U (Coax)
or
Control to RF Head
Interconnect Belden 8232A RG-59U (Triax)
n/a
S
tandard Coax or Triax
(with Pan & Tilt)
Pan & Tilt Control #18 AWG 4
Control to RF Head
Interconnect Belden 1505(e.g.) RG-59U (Coax) n/a
Aux Power Cable #20 AWG 3
Alternate Coax
(with Pan & Tilt)
Pan & Tilt Control #18 AWG 4
Table 8: Summary of Nycoil cables and conductors needed
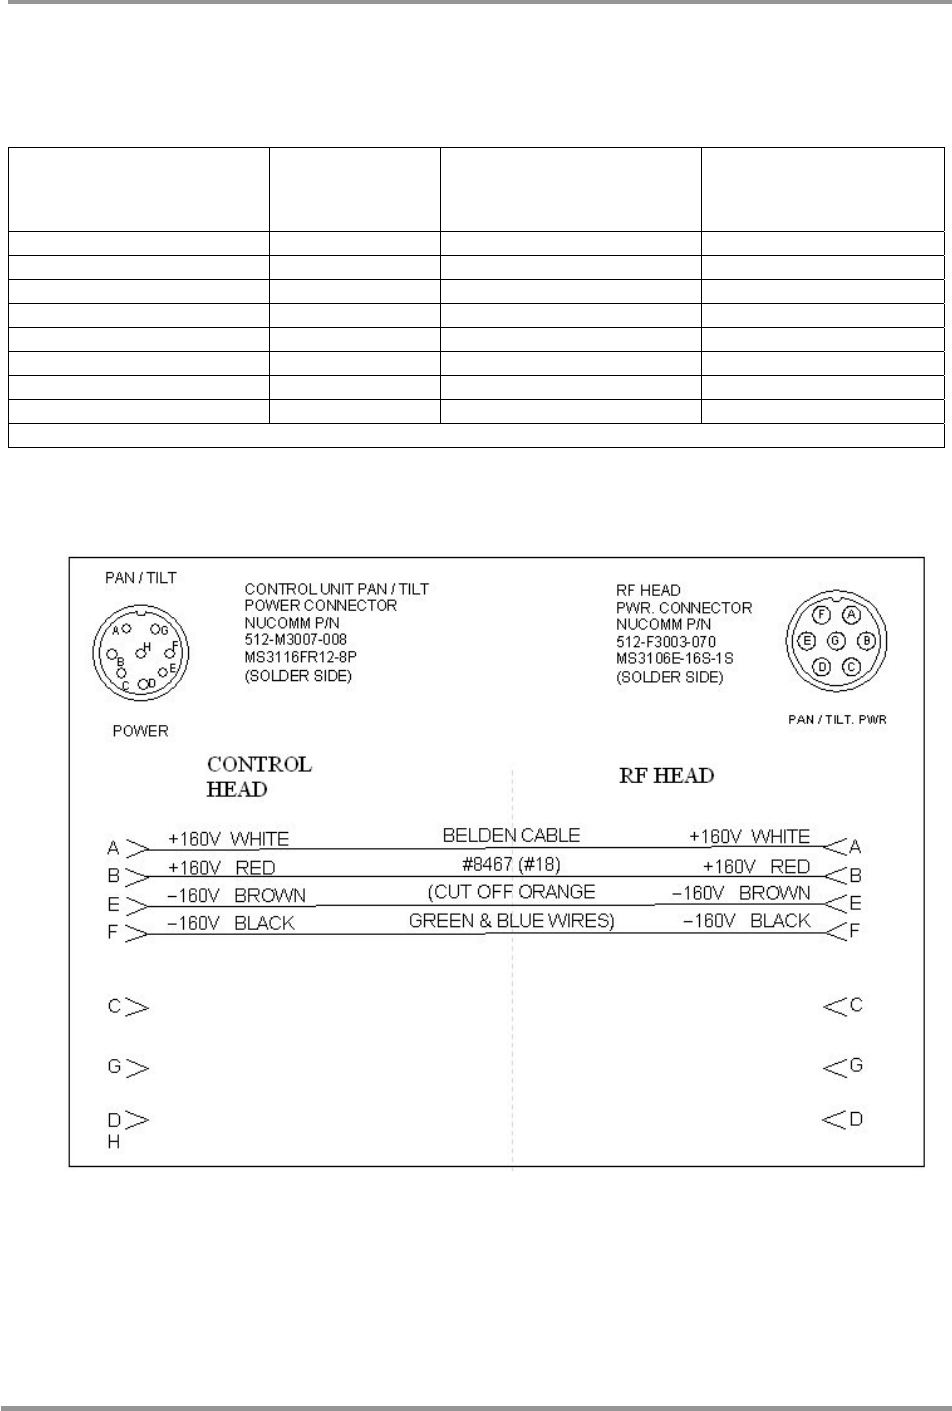
Control Unit
“AUX Power” Function Recommended
Wire Size RF Head
“AUX DC POWER”
1 +48VDC #18 Violet A
3 +48VDC #18 Violet B
2 Ground #18 Black G
Table 9: AUX Power cable pinout
NewsCaster VT2 Installation
M17-0002-00A Rev 4 37 User Manual
The following Tables and Figures are provided to assist in preparing the interconnect cables for the
optional Pan & Tilt control.
Control Unit
“PAN/TILT POWER” Function Recommended
Wire Size (AWG) RF Head
“PAN/TILT PWR
FROM CONTROL”
A +160VAC* #18 White A
B +160VAC* #18 Red B
C Not Used C
D Not Used D
E –160VAC* #18 Brown E
F –160VAC* #18 Black F
G Not Used G
H Not Used
*The motor for the 120VAC Pan and Tilt actually requires 160VAC.
Table 10: Pan & Tilt Power (120 VAC) Connector Pin-outs
Figure 15: Pan & Tilt Power (120VAC) Interconnect Diagram
NewsCaster VT2 Installation
M17-0002-00A Rev 4 38 User Manual
Control Unit
“PAN/TILT POWER” Function Recommended
Wire Size (AWG) RF Head
“PAN/TILT PWR
FROM CONTROL”
A +12VDC #18 YELLOW A
B +12VDC #18 YELLOW B
C GND #18 BLACK E
D GND #18 BLACK F
No Connection Not Used C
No Connection Not Used D
No Connection Not Used G
Table 11: Pan & Tilt Power (12VDC) Connector Pin-outs
Figure 16: Pan & Tilt Power (12VDC) Interconnect Diagram
NewsCaster VT2 Installation
M17-0002-00A Rev 4 39 User Manual
CABLE ASSY Lengths & P/N’s
LENGTH P/N
4FT. 922-B206-04B
5FT. 922-B206-05B
6FT. 922-B206-06B*
12FT. 922-B206-12B
*Standard
512-F3001-170 (FEMALE) 512-M3009-018 (MALE)
J2 J1
RF HEAD
“TO PAN/TILT”
(18 PIN)
FUNCTION RECOMMENDED
WIRE SIZE (AWG) PAN & TILT
MOTOR
(17 PIN)
A N/C #20 Green/Black A
B Position Pot-Ref B #20 Orange/Black B
C N/C #20 Blue/Black C
D Position Pot-Ref A #20 Black/White D
E AZ Left #20 Red/White E
F Elev. Pot Wiper #20 Green/White F
G Chassis Ground #20 Blue/White G
H Field “+” (120VAC Units Only) #20 Orange H
J Elev. Up #20 Blue J
K Elev. Down #20 White/Black K
L AZ Right #20 Red/Black L
M Stow SW Up #20 Red M
N Stow SW Down #20 Green N
P Field “-” (120VAC Units Only) #20 Black P
T AZ Pot Wiper #20 White T
U N/C N/A N/A
Table 12: Quickset QPT90 12VDC/120VAC Pan & Tilt Connector Pin-out
CONNECTORS: J2 AMPHENOL MS3116F14-18S Provided with Quickset Unit)
J1 AMPHENOL MS3106F20-29S
Cable: Belden # 9458, 15 Cond. #20
Figure 17: Pan & Tilt Motor Interconnect Cable

NewsCaster VT2 Installation
M17-0002-00A Rev 4 40 User Manual
NCVT2 - RF HEAD Function Recommended
Wire Size (AWG) NSI Antenna
N/C CW (Default) N/C N/C
E V #22 BROWN A
C H #22 RED B
D 2/7 GHz Band Select #22 GREEN L
F CCW #22 WHITE D
G Common Ground #22 BLACK E
K Earth Ground N/C N/C
N/C N/C N/C F
N/C N/C N/C H
N/C N/C N/C J
N/C N/C N/C K
N/C N/C N/C M
Table 13: NSI Quad Antenna Polarization Connector Pin Out
Figure 18: NSI Quad Antenna Polarization Connections
NewsCaster VT2 Installation
M17-0002-00A Rev 4 41 User Manual
NCVT2 - RF HEAD Function Recommended
Wire Size (AWG) Radio Waves
Antenna
N/C CW (Default) N/C N/C
E V #22 BROWN F
C H #22 RED B
D 2/7 GHz Band Select #22 GREEN G
F CCW #22 WHITE C
G Common +24V #22 BLACK K
N/C Shield GND N/C L
K DC GND #22 BLUE M
N/C N/C N/C A
N/C N/C N/C D
N/C N/C N/C E
N/C N/C N/C H
N/C N/C N/C J
Table 14: Radio Waves Quad Antenna Polarization Connector Pin Out
Figure 19: Radio Waves Quad Antenna Polarization Connections
NewsCaster VT2 Installation
M17-0002-00A Rev 4 42 User Manual
Figure 20: Cable, RF Head to optional High Power Amplifier
NewsCaster VT2 Installation
M17-0002-00A Rev 4 43 User Manual
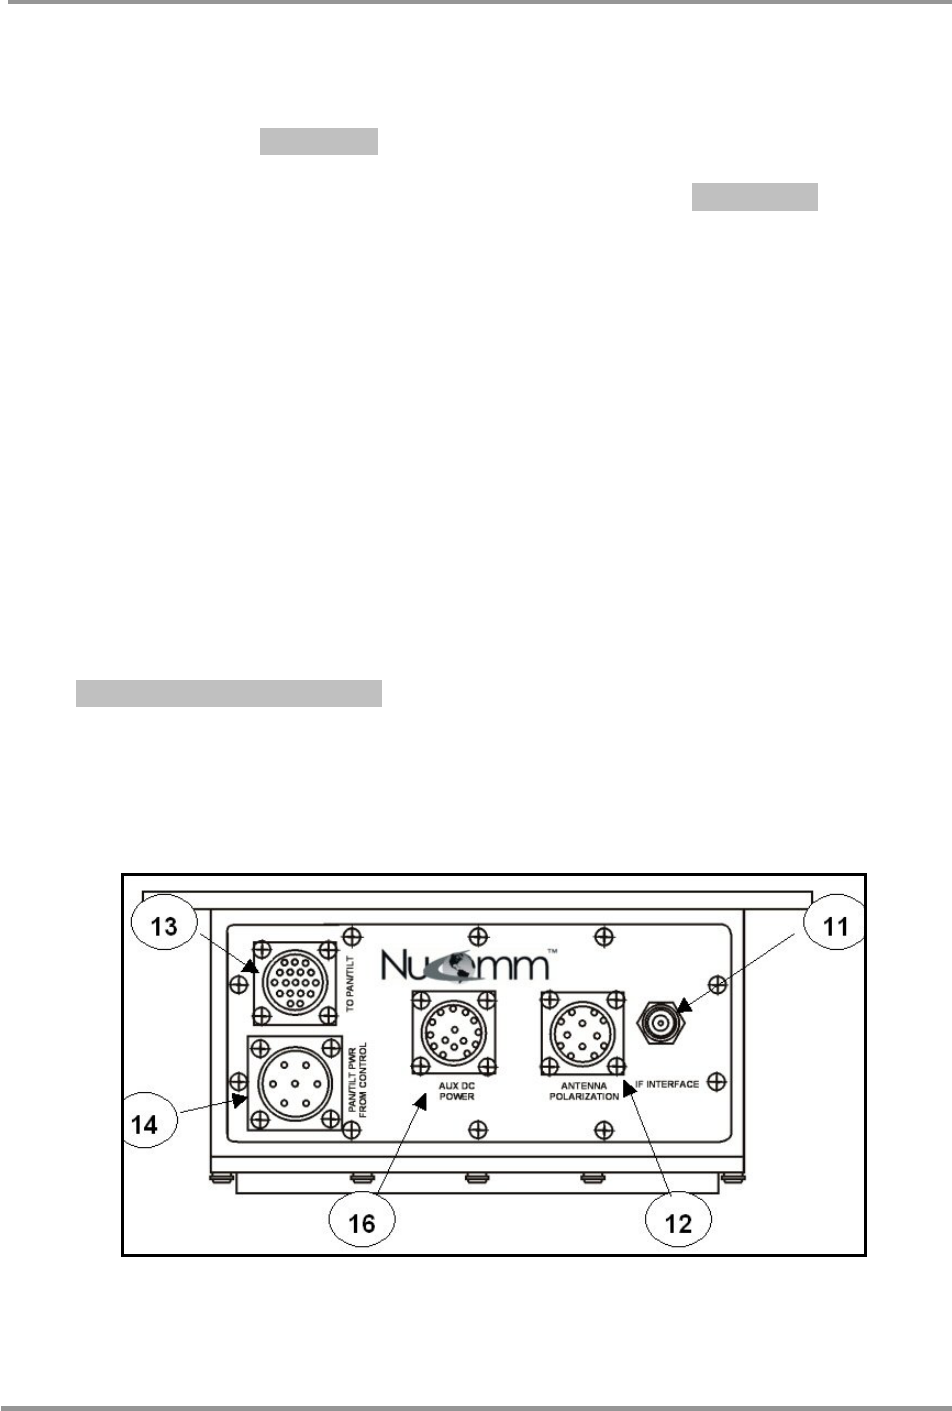
4.8 RF HEAD CONNECTORS
IF Interface and AUX Power
The TNC, or Triax, IF connector inputs the
diplexed 70 MHz, inter-unit control data, and
DC power for the RF Head when Belden
1694, or Triax, cable is used. If RG-59 is
used, then DC is input from the Aux Power
cable via the Aux DC Power input. (Refer
also to Figure 21, Detail 11.)
Antenna Polarization
This connector (if configured) receives the
antenna polarity control signals from the
Control Unit. Both NSI and Radio Waves
antennas are compatible, as well as others.
See Table 13 & Figure 18 for NSI details.
See Table 14 & Figure 19 for RWI details.
(Refer also to Figure 21, Detail 12.)
Pan / Tilt Power (from Control)
This connector (if configured) inputs power
from the Control Unit, which is then passed on
to the RF Head.
See Table 10 and Figure 15 for 120VAC P&T.
See Table 11 and Figure 16 for 12VDC P&T.
(Refer also to Figure 21, Detail 14.)
To Pan / Tilt
This connector (if configured) outputs signals
and power for the Pan & Tilt unit. Refer to
Table 12 and Figure 17 for cabling and pin-
outs. (Refer also to Figure 21, Detail 13.)
RF Output
The RF output is via a Type-N connector
located at the center rear of the NewsCaster
VT2 RF Head and carried, via a 50 Ω low-loss
coaxial cable, to the antenna. Turn the cable
connector clockwise while keeping it in line
with the transmitter connector. To avoid
unnecessary connector wear, do not allow the
cable to rotate while you connect it to the
transmitter. (Refer also to Figure 21,
Detail 15.)
Figure 21: RF Head, Front-Panel (shown w/Pan & Tilt option)
NewsCaster VT2 Installation
M17-0002-00A Rev 4 44 User Manual
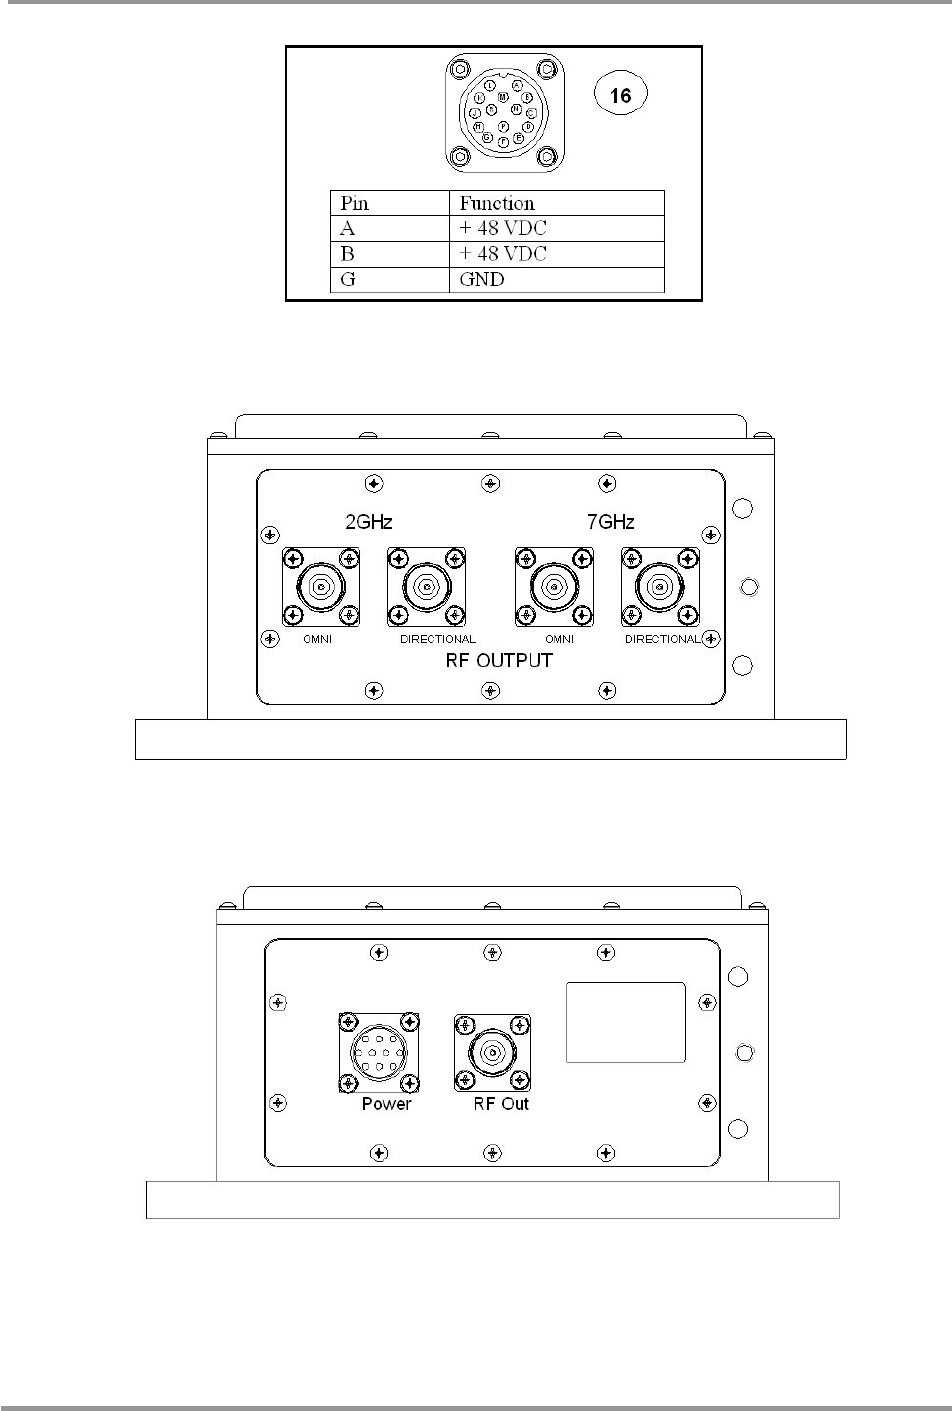
Figure 22: RF Head AUX Power Connector
Figure 23: RF Head, Rear Panel
(Dual Band shown, with optional Omni ports)
Figure 24: RF Head, Rear Panel (legacy extended power)
NewsCaster VT2 Installation
M17-0002-00A Rev 4 45 User Manual
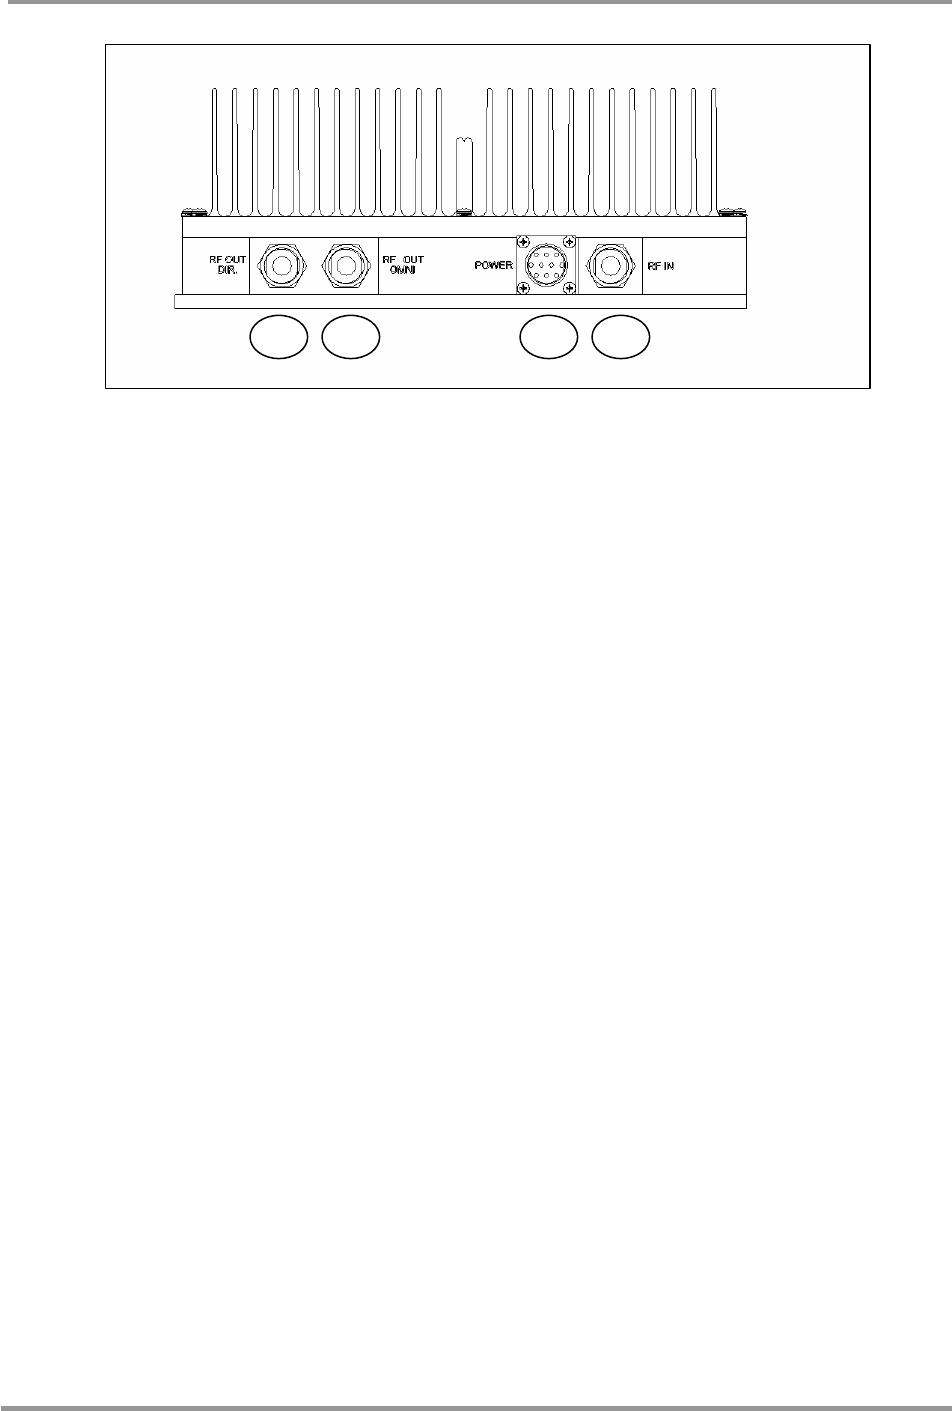
Figure 25: High Power Amp, or “HPA” (no longer produced)
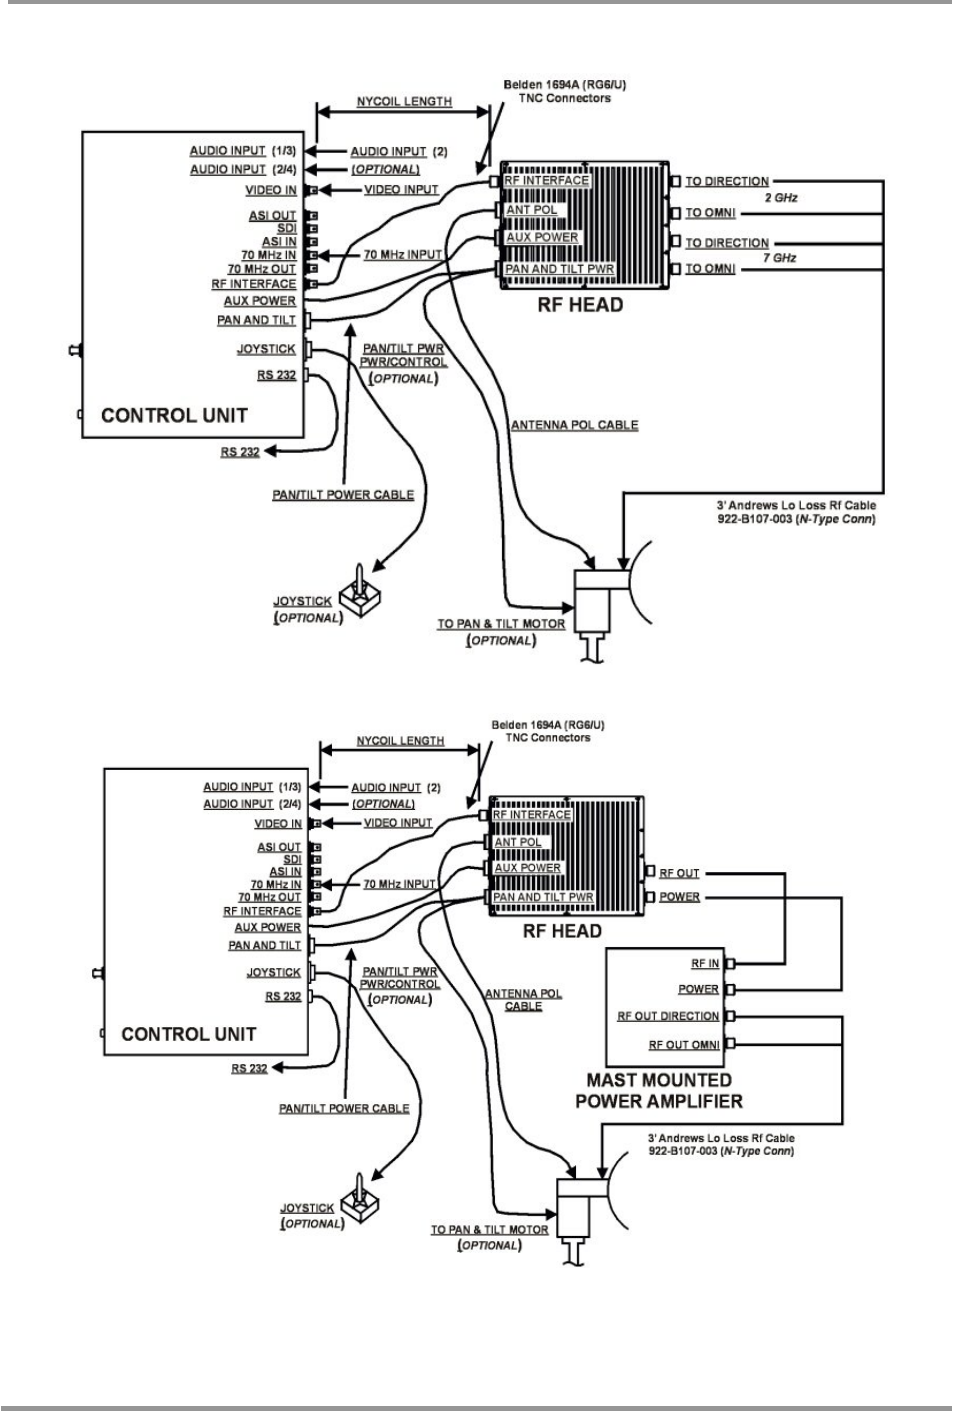
4.9 CONTROL UNIT / RF HEAD
INTERCONNECT
Figure 26 and Figure 27 show the
interconnects between the NewsCaster VT2
Control Unit and the mast mounted RF Unit
(and the legacy High Power Amplifier which
is no longer produced). To assist in preparing
the Control and Monitor cable, connector pin
assignments and recommended wire sizes are
provided. When Triax or Belden 1694 are
used, the only conductors required to pass
through the Nycoil for standard operation are
the coax (or Triax) cable (for power, data, and
70 MHz IF) and optional power conductors if
configured for Pan & Tilt. An auxiliary power
cable is required if using 75 Ω RG-59 (or
optional 50 Ω RG-58).
RF Head Connections
Perform the following for BOTH the Standard
and legacy Extended Power Output
configurations:
• Connect the RF cable to the RF Interface
jack. (Figure 21, Detail 11.)
• Connect the antenna polarization cable.
(Figure 21, Detail 12.)
If the Pan/Tilt option is configured:
• Connect the Pan/Tilt Power cable to the
RF Head (7-pin). (Refer to Figure 21,
Detail 14.)
• Connect P1 (18 pin, male) of the Pan &
Tilt Power/Control cable to J1 “TO
PAN/TILT” on the RF Head. Connect P2
(17 pin, female) of the Pan & Tilt
Power/control cable to the Pan & Tilt
motor assembly. Refer to Table 12 and
Figure 17 for cable pin-outs. (Refer also to
Figure 21, Detail 13.)
If the AUX Power option is configured:
• Connect the AUX Power cable to the
AUX DC POWER jack on the RF Head.
In addition to the above connections, the
following are specific to the power output
option chosen.
For Standard Power Output Only
Connect the antenna cable between your
antenna and the appropriate “RF OUTPUT”
port: 2GHz Omni; 2GHz Directional; 7GHz
Omni; or 7 GHz Directional. (Refer to Figure
23)
20 19 1821

NewsCaster VT2 Installation
M17-0002-00A Rev 4 46 User Manual
For (legacy) Extended Power Output Only
Connect the 10-pin Power/Control cable, and
the RF interconnect cable between the RF
Head and the High Power Amp. (Refer to
Figure 24 & Figure 25)
Connect the antenna cable between your
antenna and the appropriate “RF OUTPUT”
port on the High Power Amp: 2GHz Omni;
2GHz Directional; 7GHz Omni; or 7 GHz
Directional. (Refer to Figure 25)
NSI & Radio Waves Quad Antenna
Polarization Interconnection
Wiring diagrams are provided to assist in
preparing the polarization cable, including
connector pin assignments and recommended
wire sizes.
See Table 13 & Figure 18 for NSI details.
See Table 14 & Figure 19 for RWI details.
A software setting via the LCD interface is
used to select between the two antenna types,
and will be factory configured per the type
specified when the order is placed.
Quickset QPT90 Pan & Tilt Interconnection
The Pan & Tilt platform will handle a
maximum load of 90 lbs, with 0-355° of
rotation and +/− 90° of tilt. The unit features
adjustable "limit" switches for rotation and
tilt. The Pan & Tilt is controlled by an
optional joystick, which is connected to the
NEWSCASTER VT2 Control Unit. The
operator is able to set the platform position to
within 1 degree of the desired position. The
Control Unit displays the azimuth and degree
of rotation, as well as the tilt above and below
the horizon.
Nucomm supports two input voltage versions
of the Quickset QPT90, a 12v version and a
120v version. Table 12 and Figure 17 show
the interconnection between both QPT90
versions and the RF Head. The
interconnection between the Control Unit and
the RF head is different for each version.
QPT90 - 120VDC
See Table 10 and Figure 16 for details of the
interconnection between the Control Unit and
the RF Head for this Pan/Tilt Motor version.
QPT90 - 12VDC
See Table 11 and Figure 15 for details of the
interconnection between the Control Unit and
the RF Head for this Pan/Tilt Motor version.
NewsCaster VT2 Installation
M17-0002-00A Rev 4 47 User Manual
Figure 26: NCVT2 Interconnects, Standard Power
Figure 27: NCVT2 Interconnects, Extended Power Option (legacy)
NewsCaster VT2 Installation
M17-0002-00A Rev 4 48 User Manual
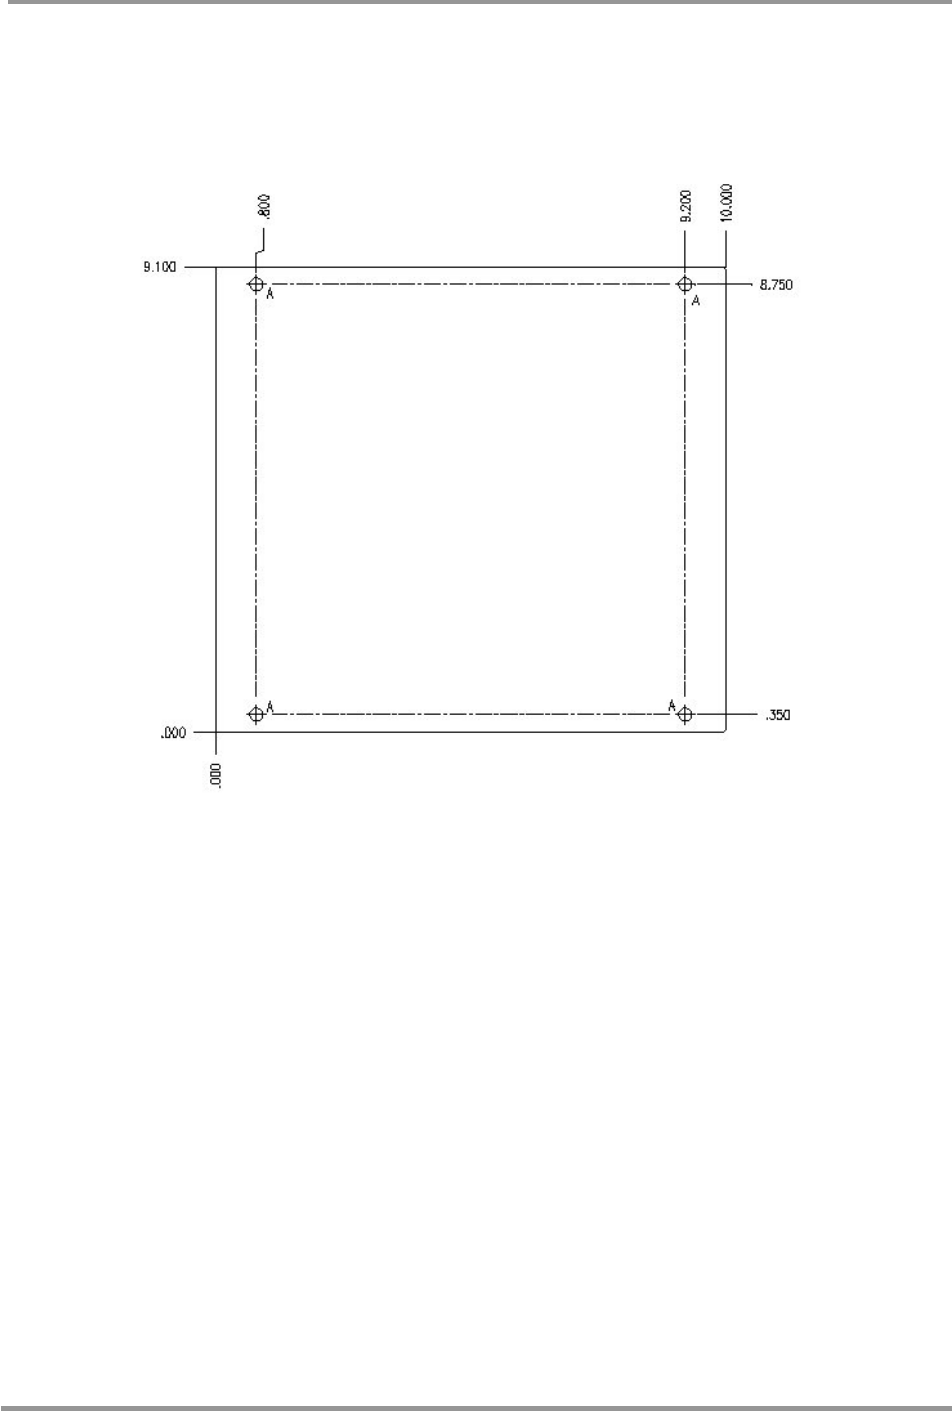
Figure 28: Hole Pattern of RF Head (and legacy HPA) Base Plate
Drill holes (A) are .250 Dia. (through drilled)
Material is ALUM 6061, ¼” thick.
Use four (4) size ¼-20 x .750” screws to mount the unit.

NewsCaster VT2 Operation
M17-0002-00A Rev 4 49 User Manual
5. OPERATION
5.1 FRONT PANEL OPERATIONS
On each screen, a cursor appears as an
underscore character, and is moved (Í) or
(Î) by the arrow keys. When the cursor is
under a desired item, select it by pressing ENT
and the underscore becomes a solid box. Use
(Ï) or (Ð) to scroll the available screens.
When the desired setting has been made, press
ENT to save the entry and put any change(s)
into effect. If ENT is not pressed, and the
keypad is left idle for 15 seconds, the changes
are discarded. In a multi-digit selection, as in
sub-carrier frequency, the boxed "Enter"
cursor can be moved left or right to select
other digits. Refer to Figure 30 and Figure 31
for graphics showing the Menu Tree’s.
Standard Screen:
The Standard Screen appears at power up, and
displays channel, band, frequency, and output
power. Note the cursor under the channel
number.
CH=1 6,887.500MHz
BAND=6-7G HIGH 0.0dBm D
Channel Selection:
Change channels on the Standard Screen by
underscoring the channel and pressing ENT to
select it. Use the up or down arrows to select
the new channel, then Press ENT to have the
new channel take affect. The unit will go to
standby as the synthesizer changes frequency.
Transmission will resume when the new
frequency is reached.
Power Adjustment:
The power mode of the NewsCaster VT2 is set
automatically to ANALOG or DIGITAL,
based on the Modulation (13) selected on the
front panel. This should not be confused with
the power output.
The user can select HI or LOW power output
(changes the output level 3 to 6dBm) by
pressing the HI/LO button (13). The power
will change when the arrow button is released.
The new value displayed is the current power.
CH=1 6,887.500MHz
BAND=6-7G LOW 0.0dBm D
Frequency Direct:
This is an optional operating mode allowing
the frequency to be changed without limitation
to channels. To use, move the cursor to
underline the frequency, and press the ENT
key. Use the left and right arrows to select the
digit(s) to edit, and the up and down arrows to
change the value(s). Continue this procedure
until the entire frequency has been set. When
complete, press ENT to have the new
frequency take effect. If the frequency
entered is outside the band of operation, the
entry will be discarded, and an error message
showing the valid region of operation will be
displayed. In this mode the channel number is
replaced with asterisks “****”. To return to
channel mode, select the channel with the
cursor and change it to the desired channel
number.
5.2 CONTROLS AND
INDICATORS
The NewsCaster VT2 operating controls and
indicators are shown in Figure 29. Location
numbers provide for cross-reference between
the figure and description.
ON/OFF (1) Power On/Off control
STAT. (2) The following show the
unit's status:
Remote: Unit is under remote control.

NewsCaster VT2 Operation
M17-0002-00A Rev 4 50 User Manual
RF (Green): RF present at output port.
STBY (Yellow): Indicates muted output
Alarm (Red): Indicates that there has been a
module failure. The exact reason for the
alarm can be determined from the Alarm
section of the Main Menu. (See Section 5.3)
Preset (3)
Six programmable preset keys are provided to
save and recall system configurations. To
store the current settings to a Preset, Hold the
desired Preset key until the confirmation
screen is displayed (about four seconds). The
following settings will be saved:
• Modulation Type.
• Input Type.
• Output Power.
• Channel Number.
• Audio Settings.
LCD Interface (4)
The LCD is the main interface to the unit.
The display shown in Figure 29 is the
Standard Screen.
Entry Keypad (5)
This keypad is used to navigate the LCD
menus. The ENT key is used to enter and exit
from edit mode, and to make menu selections.
Mode (6)
The MODE key is used to select from the
following four operating modes:
NORMAL
Transmitter is active, with or without a video
(or composite) input signal.
STANDBY
Transmitter is in STANDBY until switched to
another mode. Frequency synthesizer is
locked on frequency.
V. PRES. STBY
This mode is only selectable when input is set
to VIDEO. If no video is present, the
transmitter will switch to STANDBY after a
two-second delay (minimum). Use this mode
to remotely place the transmitter into STBY
when a video signal is removed. If the Test
Generator is installed, the user may set Color
Bars to be activated rather than have the unit
go into STBY. See
Section 5.4.
V-BLK STB
This mode is only selectable when input is set
to VIDEO. If the camera is capped, or black
video is present at the video input (no vertical
interval signals present) the NewsCaster VT2
will switch to Standby within 30 seconds. If
the black video or black burst is removed, the
unit will switch to Standby in 2 seconds.
When the video signal is reapplied, the unit
will return to Normal mode within 2 seconds.
If TEST GEN is installed, the user may select
Color Bars to be activated rather than having
the unit go into STBY.
AUDIO (7)
The AUDIO quick key is used for basic audio
sub-carrier mode (LINE/AES) selection and
gain changes.
Note: You can NOT change Audio Sub-
Carrier frequencies via this interface. Please
refer to section 5.3.2 “Audio Sub-Carrier
Frequency” in the “Nextel BAS Relocation
Settings” section.
SC1 Off/Line/AES 6.200MHz +2dB
SC2 Off/Line/AES 6.800MHz +2dB
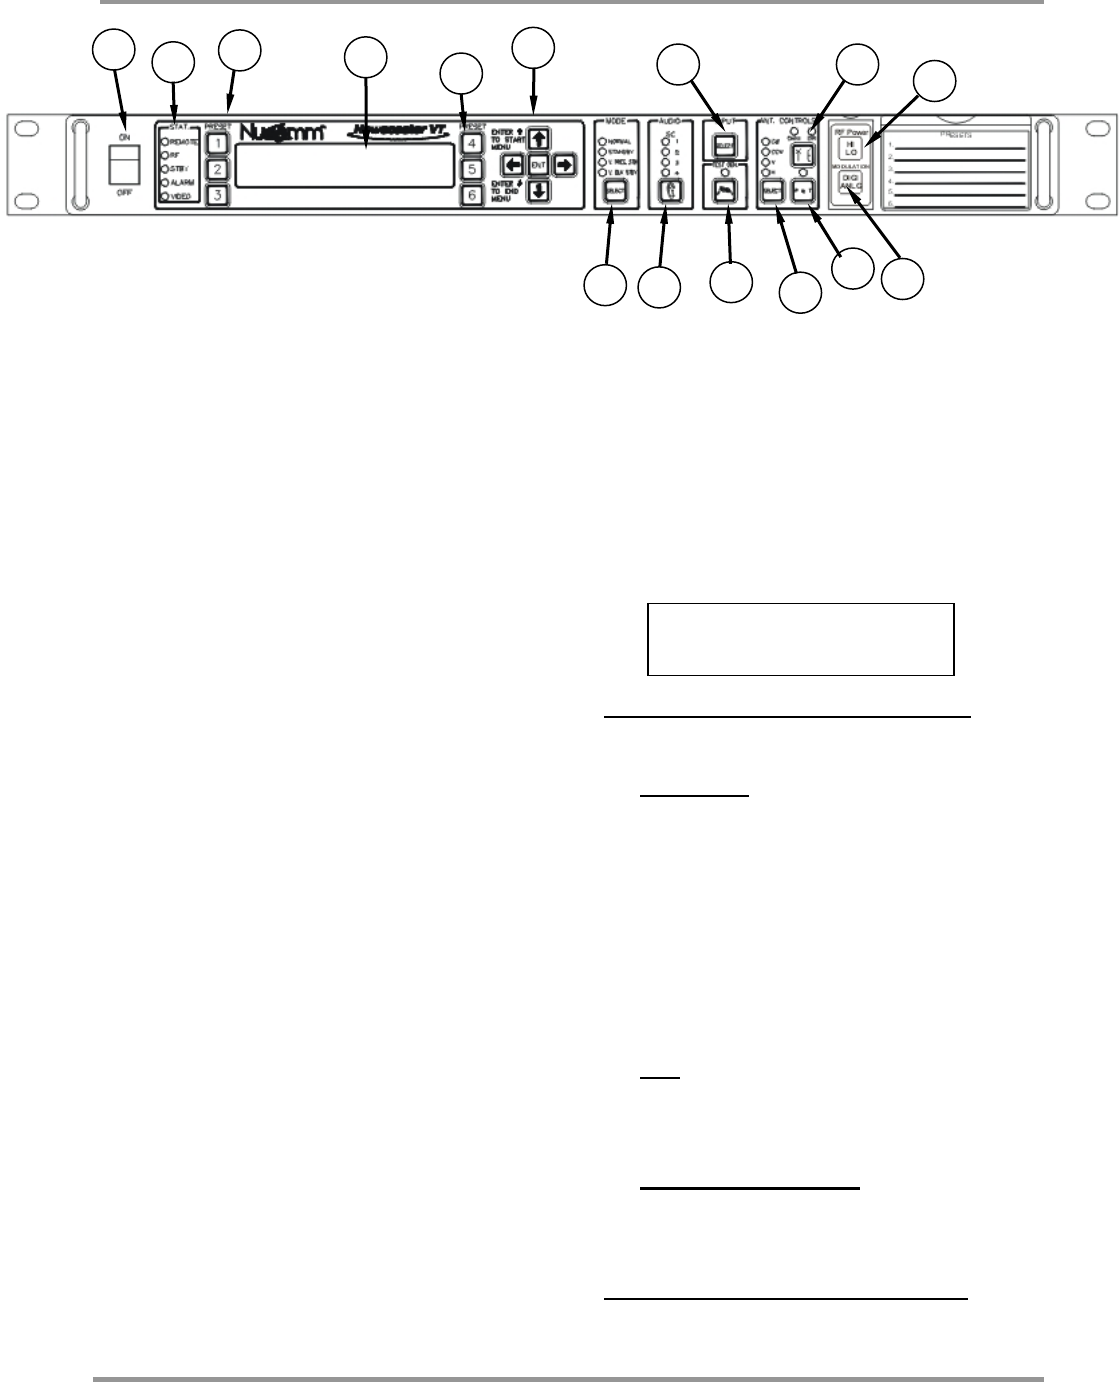
NewsCaster VT2 Operation
M17-0002-00A Rev 4 51 User Manual
Figure 29: NEWSCASTER VT2 Front Panel Controls and Indicators
The gain or mode selection is made using
the left or right arrow keys and edited using
the standard editing procedure. Additional
audio sub-carriers are selected with the up
and down arrows. To edit sub-carrier
frequency, refer to Settings in Section 5.4.
The gain adjustment allows for ±6 dB of
gain, and can be used to compensate for
variance in line levels. Audio levels will be
expressed in dBm when using analog
modulation, and in dBu when in digital, per
the following:
PdBm + Gain -18 = PdBu
0.0 dBm = -18 dBu
If LINE is selected, the unit accepts
balanced 600-Ohm inputs at +8 dBm
Analog (-10 dBu Digital). At 1 KHz input,
headroom is +18 dBm Analog (0.0 dBu
Digital).
If AES is selected, the unit accepts data
from the backplane AES port(s) and decodes
the Group 1 audio from the SDI stream. If
only two audio channels are configured,
they will be the first channel in Group 1.
Four LED’s indicate the status of the audio
channel:
GREEN: On and working - OK.
GREEN Flashing: Over modulation.
RED: Trouble indication.
OFF: Off, or not configured.
INPUT (8)
The INPUT key brings up the Input Screen
to select the mode of the input BNC
connector. Press ENT, then use the up and
down arrows to select the desired format.
Press ENT to confirm entry. To return to the
Standard Screen, press the Input key or wait
15 seconds.
When analog modulation is selected, the
input selections will be:
Composite - The signal applied at the
INPUT connector is routed through the
internal low pass filter to modulate the
output. Typically, this filter has a
bandwidth of about 4.0 MHz for NTSC
and 5.6 MHz for PAL. The NTSC filter
selectivity ensures the higher frequency
video components do not interfere with
the 4.83 MHz audio subcarrier.
SDI - SDI is converted to Composite via
an internal circuit and then processed as
a Composite signal.
External 70 MHz FM - The input
bypasses the modulator, and is routed
directly to the heterodyne up-converter.
When digital modulation is selected, the
input selections will be:
Input
Video
CH=**** 7,037.500MHz
BAND=6-7G LOW 0.0dBm A
1 4
2 3 5 8
3 12 13
11
10
9
7
6 14

NewsCaster VT2 Operation
M17-0002-00A Rev 4 52 User Manual
Í Mod/Enc Options PA
Fre
q
uenc
y
Plan Remote
Composite - In this mode the input
signal is passed through the MPEG
Encoder and converted to digital.
SDI - The Input is routed through the
MPEG Encoder.
External 70 MHz Digital - The input
bypasses the modulator, and routes to
the heterodyne up-converter.
ASI - Input bypasses the Encoder and
goes to the digital modulator. The ASI
rate must be at or below the maximum
digital modulation rate.
TEST GEN (9)
This key allows editing of the 16 character
ID, and selection of the waveform display.
This is only selected when the input type is
set to “VIDEO”.
When TEST GEN is enabled, the green LED
is lit and the LCD displays the current
pattern and ID. The menu will time-out
after 2 seconds. Pressing TEST GEN a
second time disable TEST GEN.
ANTENNA CONTROL (10)
The SELECT key is used to change the
antenna polarization.
PAN &TILT (11)
When Pan & Tilt is pressed, the Red
indicator LED is lit to indicate P/T power is
enabled. Any joystick movement will move
the antenna in that direction. A display for
P/T elevation and aximuth is available.
When operating the Pan & Tilt, the antenna
movement MUST also be physically
monitored to reduce the danger of hitting
power lines, etc. When the desired position
is reached, press Pan & Tilt again to disable
power to the motor and reduce the
possibility of unintentional antenna
movement.
ANTENNA SELECTION (12)
This key toggles between Omni or
Directional for antenna selection. If no
Omni is connected this function should be
disabled. (See Options in Section 5.4.)
HI/LOW RF POWER (13)
This key selects whether the unit will
operate in HI or LOW power mode.
MODULATION MODE (14)
This key selects whether the unit will
operate in Analog or Digital mode.
5.3 MENU SYSTEM
5.3.1 Main Menu
Refer to Figure 30 and Figure 31 for tree
diagrams of the menu system. To enter the
Main menu, hold (Ï) and press ENT. To
select a sub-menu, move the cursor to the
desired item, and press ENT. To move back
up a level, select (Í) at the upper left of the
screen and press ENT.
The Main Menu contains settings not
ordinarily required during standard
operation, such as the following:
• Modify the frequency plan.
• View trouble-shooting information.
• Changing sub-carrier frequencies.
• Changing video configurations.
• Setting up the remote interface.
• Configuring special unit options.
5.3.2 Settings
Selecting "Settings" accesses the system
settings menu.
Settings
Monitoring/Alarm

NewsCaster VT2 Operation
M17-0002-00A Rev 4 53 User Manual
• ANALOG
DIGITAL
• Video
Audio
• Video Level: 0
Video Emphasis:
NTSC/PAL/Flat
Í Vid-Blk Stby: Standby
Video Standby: Standby
Video Inverse: Invert/Normal
ANALOG
•
DIGITAL
Í Modulator
Encoder
Í Power: On Mod: QPSK
CR: 1/2 GI:1/32 BW:8MHz
Í Audio Video
Table GOP Rate
Mod/Enc (Modulator/Encoder)
Selecting Mod/Enc provides access to
parameters for video, audio, the MPEG-2
encoder and the digital/analog modulator.
First you must select whether you want to
modify Analog or Digital parameters.
Analog Video and Audio
Video Setup (FM modulation)
Video invert and emphasis are edited from
here. If the NewsCaster is used with
existing gear that inverts the video, it can be
pre-inverted at the transmitter to
compensate. The pre-emphasis network may
be bypassed, if desired.
Pressing the UP or DOWN arrow selects the
Video Standby screen where Video Black
Standby and Video Standby are set. STBY
can be changed to TEST GEN if that option
is installed.
Audio Setup (FM modulation)
This screen allows viewing and editing of
the analog audio configuration. Input mode,
emphasis or flat, sub-carrier frequency and
level may be selected. Pressing the UP or
DOWN arrows toggles between the audio
inputs.
Video Setup (Digital modulation)
When Digital is selected, you will see a
screen allowing access to Modulator and
Encoder settings.
Modulator Setup
You can view and/or edit the following:
• Power: On/Off.
• Modulation: QPSK, 64QAM,
16QAM.
• Code Rate: 1/2, 7/8, 5/6, 3/4, 2/3.
• Guard Interval: 1/32, 1/4, 1/8, 1/10.
• Bandwidth.
Encoder Screen:
By selecting "Audio" you can view the
sample rate.
By selecting "Video" you can view and/or
edit the following:
• Standard: PAL, NTSC.
• Profile: 4:2:2, 4:2:0.
• Aspect Ratio.
By selecting "Table" you can view and/or
edit the following:
• Service Name.
• Service Provider.
• PCR PID.
Í SC1 Freq:7.500MHz EMP
Mode:LINE Level:+2

NewsCaster VT2 Operation
M17-0002-00A Rev 4 54 User Manual
• Video PID.
• Audio 1 PID.
• Audio 2 PID.
By selecting "GOP" you can set the GOP
level from 0 (Super Low Delay) to 5
(Highest Quality Encoding).
By selecting "Rate" you can view the
"MPEG Only Rate".
Options:
Start in Standby: The unit can be forced to
startup in Standby regardless of the last
mode used. Caution: if the power to the unit
is interrupted for any reason the unit will not
return to transmit without user intervention.
Dir Antenna Only should be set to YES if an
Omni antenna is not connected to the RF
Head. This locks the Antenna Selection
Switch in DIR and prevents accidental
switching to the Omni circuit.
Antenna Type is selectable between
Nucomm and NSI. This will be factory set
per the configuration ordered.
Pan + Tilt Position Pot If the Pan and Tilt
control potentiometers are installed, then
this option should be set to YES.
Elevation Threshold can be used to halt the
Pan function when the selected elevation has
been exceeded, to avoid equipment damage.
PA
This is a Factory access point to the power
amplifier bias points, and should only be
used with factory consultation.
Frequency Plan
This menu allows viewing and editing of the
frequency plan.
Remote:
This menu allows remote configuration
through a PC. The type of interface (RS232
or RS485), BAUD rate, and address (1-255)
are selectable.
The Download Data function is for use by
factory personnel only.
5.3.3 Monitoring/Alarms
(Trouble Shooting)
(See Table 15 for Alarms and their Cause)
Selecting Monitoring/Alarm allows status to
be obtained on the Control and RF Units.
Notice the internal temperature of the units
may be monitored.
Visibility to the full range of alarms is
provided, with an indicator of which module
is failing.
Control Unit:
ÍFrequency Band
2GHz 7GHz 12/13GHz
ÍRemote Cfg
Download Data
Í Start in Standy: NO
DIR Antenna Onl
y
: NO
Í Antenna Type: Nucomm
P+T Position Pot: YES
Í Elevation Thd: 70
Í Control: OK 25ºC
RF Module: OK 63ºC
Í PSU:OK Audio:OK
Mod/Enc:OK Enc:N/A

NewsCaster VT2 Operation
M17-0002-00A Rev 4 55 User Manual
This first screen under "Control" provides an
overview of the Control Unit. To obtain
specific module status, move the cursor and
press ENT.
Power Supply Screen:
This screen displays the units PSU voltages.
The first display line toggles between the
two voltages present.
Modulator/Encoder:
This screen displays modulator/encoder
status. Version, Current Rate, and
Maximum Rate are displayed.
RF Unit:
This first screen under "RF Module"
provides an overview of the RF Unit. To
obtain specific module status, move the
cursor and press ENT.
P&T Screen:
Under this screen, the status of the pan and
tilt motor is displayed.
Synthesizer Screen:
Under this screen, the locked status and loop
voltage of synthesizer is displayed.
Controller Screen:
These screens provide status on the power
supply voltages, plus the firmware version
of the control board in the RF Head.
Í P&T:N/A Synth:OK
Controller:OK
Í P&T:WORKING OK
Í Encoder: WORKING OK
Ver: **.*
Í Encoder: WORKING OK
Current Rate: *.***mb
p
s
Í Encoder: WORKING OK
Max Rate: *.***mb
p
s
Í PSU:+12 Voltage OK
+12= +11.9V −12 = −12.0V
Í Synth:WORKING OK
Loop=+2.9V
Í Synth:WORKING OK
15.0= +14.5V 22.0= +23.2V
Í RF Router:WORKING OK
Ver:D2
Í RF Router:WORKING OK
+48v= +41 +11v= 10.7V
Í RF Router:WORKING OK
+5= +4.8V
−
5 = −4.7V
Í RF Router:WORKING OK
+24= 22V Var = −8.9V

NewsCaster VT2 Operation
M17-0002-00A Rev 4 56 User Manual
5.4 NEXTEL BAS RELOCATION SETTINGS
For our US clients, the ChannelMaster is designed so that, when properly configured per the
following guidelines, you will only need to change one setting, on one screen when it’s time to
switch over to the “post-Nextel” 2GHz band plan
To preset the unit to allow a “one setting” switchover, there are two groups of settings that must be
made in advance: “AUDIO SUB-CARRIER FREQUENCY” and “CHANNEL BANDWIDTH &
BAND PLAN”. These are described below.
5.4.1 Audio Sub-Carrier Frequency
In this section you set your “pre-Nextel” and “post-Nextel” Audio Sub-Carrier (ASC) frequencies,
so that when you make the switchover they will be ready to go.
Start the ASC set-up procedure by making the following menu selections:
SETTINGS>MODULATOR/ENCODER>ANALOG>AUDIO
This brings up a screen similar to the one at right, with the
settings and selections as described below:
NOTE: Press “Up” & “Down” to scroll through the ASC’s, and press “Left” & “Right” to scroll
through the available settings. The settings for all ASC’s are modified in the same fashion. ASC#1
is used as the example.
2(17)/7/13 This setting controls the frequency for the selected Sub-Carrier when
operating in the “pre-Nextel” 2GHz band (USA), and also for all the other
frequency bands (i.e. 7GHz or 13GHz). The possible range for this setting is
4.83MHz to 8.5MHz.
2(12) 1-7 This setting controls the frequency for the selected Sub-Carrier when
operating in the “post-Nextel” 2GHz band (USA) on channels 1 through 7.
The possible range for this setting is 4.83MHz to 5.8MHz
2(12) 8-10 This setting controls the frequency for the selected Sub-Carrier when
operating in the “post-Nextel” 2GHz band (USA) on channels 8 through 10.
The possible range for this setting is 4.83MHz to 8.5MHz
Nucomm’s default Audio Sub-carrier Frequencies
Bandplan ASC1 ASC2 ASC3* ASC4*
2(17)/7/13 4.83MHz 6.20MHz 6.80MHz 7.50MHz
2(12) 1-7 4.83MHz 5.80MHz 6.80MHz 7.50MHz
2(12) 8-10 4.83MHz 6.20MHz 6.80MHz 7.50MHz
*NOTE: Due to bandwidth limitations, only two ASC’s can be active on the “post-Nextel”
2GHz bandplan (US), regardless of how the unit is hardware configured.
Í SC1 Insertion: (-20 to -40dBc)
2(17)/7/13: 4.83 MHz
2(12) 1-7: 4.83 MHz
2
(
12
)
8-10: 4.83 MHz

NewsCaster VT2 Operation
M17-0002-00A Rev 4 57 User Manual
2GHz Freq Plan: 2G(17), 2G(12)
BW(2G(17)/7/13): 4MHz, 3MHz
BW
(
2G
(
12
)
8-10
)
: 4MHz, 3MHz
5.4.2 Channel Bandwidth and Band Plan
In this section you can set your “pre-Nextel” and “post-Nextel” Video Bandwidth Deviation, so
that when you make the switchover they will be ready to go.
Start this set-up procedure by making the following menu selections:
MENU>Settings>Options>Nextel
This brings up the screen at right, with the settings
and selections as described below:
2GHz Freq Plan This setting controls the 2GHz Frequency Plan which will be
used by the radio. Select the 17MHz “pre-Nextel” bandplan by
choosing “2G(17)”, or the 12MHz “post-Nextel” bandplan by
choosing “2G(12)”.
BW(2G(17)(7/13) This setting controls your Video Deviation bandwidth when
operating in the “pre-Nextel” 2GHz band (USA), and also for all
the other frequency bands (i.e. 7GHz or 13GHz). The possible
selections are 3MHz or 4MHz.
BW(2G(12) 8-10) This setting controls the Video Deviation bandwidth when
operating in the “post-Nextel” 2GHz band (USA) on channels 8
through 10. The possible selections are 3MHz or 4MHz.
NOTE: Due to bandwidth limitations of the “post-Nextel” 2GHz bandplan, in “2G(12)” mode, the
Video Deviation bandwidth of 2GHz channels 1 through 7 is locked at 3MHz..
5.4.3 SWITCHOVER TO “POST-NEXTEL” SETTINGS
For our US clients, when your DMA switchover date arrives, assuming you have already set the unit
per the preceding guidelines, you will only need to take the following steps to put the radio on the
new “post-Nextel” settings:
Step #1: Navigate to the following menu: Settings>Options>Nextel
Step #2: Change your “2GHz Freq Plan” setting from “2G(17)” to “2G(12)”
Step #3: Done!

NewsCaster VT2 Operation
M17-0002-00A Rev 4 58 User Manual
NewsCaster VT2 Alarms
Alarm Message Problem Probable Cause
“+11V Error” +11 VDC is out of tolerance. Problem in power supply or +11 VDC line
being loaded down.
“+5V Error” +5 VDC is out of tolerance. Problem in power supply or +5 VDC line being
loaded down.
“IFLO Unlock” IF Local Oscillator (Reference)
cannot frequency lock.
Reference Oscillator signal wrong or bad.
“RFLO Unlock” RF Local Oscillator (Reference)
cannot frequency lock.
Reference Oscillator signal wrong or bad.
“MOD: FPGA FAIL” FPGA failed software loading from
PROM.
Bad PROM.
“MOD: LOADING ERR” MOD microprocessor failed
loading data EPROM or EPROM
data not recognizable.
Bad EPROM or EPROM data corrupted.
“MOD: VIDEO ERROR” MPEG Video FIFO Read/Write
Error.
Bad MPEG Encoder Module.
“MOD: AUDIO ERROR” MPEG Audio FIFO Read/Write
Error.
Bad MPEG Encoder Module.
“MOD: ASI OVERFLOW” External ASI Data Rate Error Check devices for proper data rate setting.
Check external ASI signal for problems.
Possibly U1 (SDI Receiver) of COFDM MPEG
2 Encoder Board, its PLL circuit, or its clock is
bad.
“MOD: ASI UNLOCKED” External ASI Signal Lock Error Check external ASI signal for problems.
Possibly U1 (SDI Receiver) of COFDM MPEG
2 Encoder Board, its PLL circuit, or its clock is
bad.
“MOD: NO VIDEO INPUT” Video signal missing. Bad cable, bad connector, or COFDM MPEG 2
Encoder Board bad.
“MOD: NO AES AUDIO 1” No AES Audio 1 signal. Possibly U24 or U11 of COFDM MPEG 2
Encoder Board bad.
“MOD: NO EMD AUDIO 1” No Embedded Audio 1 signal. Possibly U1 (SDI Receiver) or U17
(Microprocessor) of COFDM MPEG 2
Encoder Board bad.
“MOD: EMB RATE 1” Embedded Audio 1 Data Rate
Error.
Check devices for proper data rate setting.
Check external SDI signal for problems.
Possibly COFDM MPEG 2 Encoder Board
bad.
“MOD: NO AES AUDIO 2 ” No AES Audio 2 signal. Possibly U22 or U7 of COFDM MPEG 2
Encoder Board bad.
“MOD: NO EMD AUDIO 2” No Embedded Audio 2 signal. Possibly U1 (SDI Receiver) or U17
(Microprocessor) of COFDM MPEG 2
Encoder Board bad.
“MOD: EMB RATE 2” Embedded Audio 2 Data Rate
Error.
Check devices for proper data rate setting.
Check external SDI signal for problems.
Possibly COFDM MPEG 2 Encoder Board
bad.
Table 15: NewsCaster VT2 Alarms

NewsCaster VT2 Operation
M17-0002-00A Rev 4 59 User Manual
Figure 30: Menu Tree: “Monitoring & Alarms”
Monitoring/Alarm
RF Module: OK / FAIL
Control Unit: OK / FAIL
Encoder
PSU: OK / FAIL
Pan & Tilt: WORKING OK/FAIL
+12 Voltage OK, +12V=xxV
Mod/Enc: OK / FAIL
Synth: OK/FAIL
Synth: Working OK / FAIL
RF Router:WORKING OK/FAIL
Ver: xxx
+45V=xxV, +12V=xx.xV
+5V=x.xV
+24V=xxV, +12V PA=xx.xV
Current Data Rate
Software Version
Maximum Data Rate
10.0v=+xx.xV 5.0v=+xx.xV
Loop=+x.xV
IF AGC = +0.0V
Controller: OK / FAIL
Ver: xxx
Date: xxx
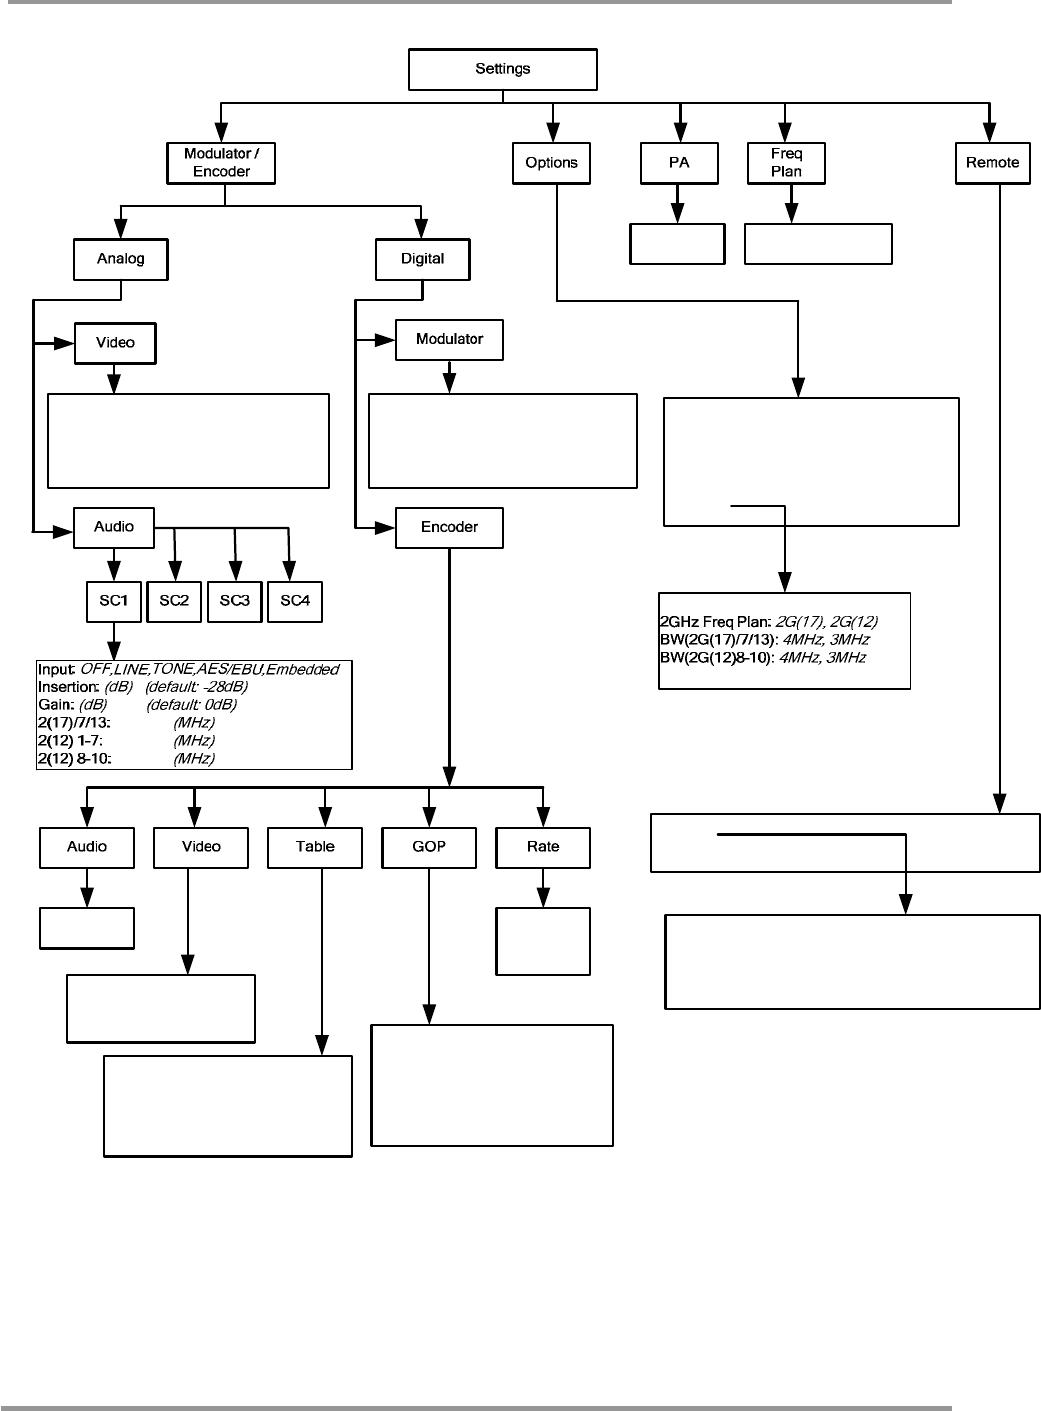
NewsCaster VT2 Operation
M17-0002-00A Rev 4 60 User Manual
Standard: NTSC / PAL
Emphasis: OFF / ON
Deviation: 0
Filter: Bypass / 3.9 / 4.5 / 4.75 / 5.6MHz
Inverse: YES / NO
Sample
Rate
Standard: (NTSC, PAL)
Profile: (4:2:0, 4:2:2)
Aspect Ratio: (4:3, 16:9)
Service Name: (NEWSCODER)
Service Provider: (NUCOMM, Inc.)
PCR PID: (0x1FFE)
Video PID: (0x0134)
Audio 1 PID: (0x0200)
GOP Level: 0 (Super Low Delay)
GOP Level: 1 (IP-15 Frame)
GOP Level: 2 (IP-45 Frame)
GOP Level: 3 (IPB-15 Frame)
GOP Level: 4 (IPB-45 Frame)
GOP Level: 5 (IPBB-16 Frame)
Remote
Download Data (Factory Use Only)
Power: ON, OFF
Modulation: QPSK, 16QAM, 64QAM
Code Rate: 1/2, 2/3, 3/4, 5/6, 7/8
Guard Interval: 1/32, 1/16, 1/8. 1/4
Bandwidth: 6MHz, 7MHz, 8MHz
MPEG Only
Rate
(View Only)
Start in Standby: (Yes / No)
Dir Antenna Only: (Yes / No)
Antenna Type: (Nucomm / NSI)
P+T Position Pot: (Yes / No)
Elevation Threshold: (0 - 90)
NEXTEL
Factory
Use Only
Band 1: (View/Edit)
Band 2: (View/Edit)
Control: (Local/Remote, Local Only, Remote Only)
Address: (1-255)
Interface: (RS232, RS485, RS232RECV, RS422)
Baud Rate: (4800, 9600, 19200)
Figure 31: Menu Tree: “Settings”