Intel 7265NGU Wireless Network Adapter User Manual 2
Intel Mobile Communications Wireless Network Adapter 2
Intel >
Contents
- 1. User Manual
- 2. User Manual 1
- 3. User Manual 2
User Manual 2

UserGuide
ThinkPadE450andE455

Note:Beforeusingthisinformationandtheproductitsupports,besuretoreadandunderstandthefollowing:
•Safety,Warranty,andSetupGuide
•RegulatoryNotice
•“Importantsafetyinformation”onpagevi
•AppendixE“Notices”onpage149
TheSafety,Warranty,andSetupGuideandtheRegulatoryNoticehavebeenuploadedtotheWebsite.To
refertothem,gotohttp://www.lenovo.com/ThinkPadUserGuidesandfollowtheinstructionsonthescreen.
FirstEdition(October2014)
©CopyrightLenovo2014.
LIMITEDANDRESTRICTEDRIGHTSNOTICE:IfdataorsoftwareisdeliveredpursuantaGeneralServicesAdministration
“GSA”contract,use,reproduction,ordisclosureissubjecttorestrictionssetforthinContractNo.GS-35F-05925.

Contents
Readthisfirst..............v
Importantsafetyinformation..........vi
Conditionsthatrequireimmediateaction..vii
Safetyguidelines............vii
Chapter1.Productoverview......1
Locatingcomputercontrols,connectors,and
indicators..................1
Frontview................1
Right-sideview..............3
Left-sideview..............4
Bottomview...............6
Statusindicators.............6
Locatinglabelsthatcontainimportantproduct
information.................8
Machinetypeandmodellabel........8
FCCIDandICCertificationnumberlabel...8
CertificateofAuthenticitylabel.......9
GenuineMicrosoftlabel.........10
Features.................10
Specifications...............11
Operatingenvironment...........12
Lenovoprograms.............12
AccessingLenovoprogramsontheWindows
7operatingsystem...........13
AccessingLenovoprogramsontheWindows
8.1operatingsystem..........14
AnintroductiontoLenovoprograms....14
Chapter2.Usingyourcomputer...17
Registeringyourcomputer..........17
Frequentlyaskedquestions.........17
Usingthemulti-touchscreen.........19
Specialkeys...............21
Functionkeysandkeycombinations....22
Windowskey.............23
ThinkPadpointingdevice..........23
UsingtheThinkPadpointingdevice....24
Usingthetrackpadtouchgestures.....25
CustomizingtheThinkPadpointingdevice..27
Replacingthecapofpointingstick.....27
Powermanagement............28
Checkingthebatterystatus........28
Usingtheacpower...........29
Chargingthebattery..........29
Maximizingthebatterylife........30
Managingthebatterypower.......30
Power-savingmodes..........30
Handlingthebattery...........31
Connectingtothenetwork..........33
Ethernetconnections..........33
Wirelessconnections..........33
Usinganexternaldisplay..........35
Connectinganexternaldisplay......36
Choosingadisplaymode........36
Changingdisplaysettings........37
Usingaudiofeatures............37
Usingthecamera.............37
Usingaflashmediacard...........38
Insertingaflashmediacard........38
Removingaflashmediacard.......39
Chapter3.Enhancingyour
computer...............41
FindingThinkPadoptions..........41
ThinkPadOneLinkDock...........41
ThinkPadOneLinkProDock.........42
Chapter4.Security..........45
Attachingamechanicallock.........45
Usingpasswords..............45
Typingpasswords...........45
Power-onpassword...........45
Supervisorpassword..........46
Harddiskpasswords..........48
Harddisksecurity.............50
Usingthefingerprintreader..........50
Noticeondeletingdatafromyourharddiskdrive,
hybriddrive,orsolid-statedrive........52
Usingfirewalls...............53
Protectingdataagainstviruses........53
Chapter5.Advancedconfiguration..55
Installinganewoperatingsystem.......55
InstallingtheWindows7operatingsystem..55
InstallingtheWindows8.1operatingsystem.56
Installingdevicedrivers...........57
UsingtheThinkPadSetupprogram......57
Mainmenu..............57
Configmenu..............58
DateandTimemenu..........62
Securitymenu.............62
Startupmenu.............66
Restartmenu.............68
©CopyrightLenovo2014i

UpdatingyoursystemUEFIBIOS.....68
Chapter6.Preventingproblems...69
Generaltipsforpreventingproblems......69
Makingsuredevicedriversarecurrent.....70
Takingcareofyourcomputer.........71
Cleaningthecoverofyourcomputer....72
Chapter7.Troubleshootingcomputer
problems...............75
Diagnosingproblems............75
Troubleshooting..............75
Computerstopsresponding.......75
Spillsonthekeyboard..........76
Errormessages............76
Errorswithoutmessages.........79
Beeperrors..............79
Memorymoduleproblems........80
Networkingproblems..........80
Problemswiththekeyboardandotherpointing
devices................82
Problemswiththedisplayandmultimedia
devices................83
Fingerprintreaderproblems........88
Batteryandpowerproblems.......88
Problemswithdrivesandotherstorage
devices................91
Asoftwareproblem...........91
Problemswithportsandconnectors....92
Chapter8.Recoveryoverview....93
RecoveryoverviewfortheWindows7operating
system..................93
Creatingandusingarecoverymedia....93
Performingbackupandrecoveryoperations.94
UsingtheRescueandRecoveryworkspace.95
Creatingandusingarescuemedium....96
Reinstallingpreinstalledprogramsanddevice
drivers................97
Solvingrecoveryproblems........98
RecoveryoverviewfortheWindows8.1operating
systems.................98
Refreshingyourcomputer........98
Resettingyourcomputertothefactorydefault
settings................99
Usingtheadvancedstartupoptions....99
RecoveringyouroperatingsystemifWindows
8.1failstostart.............99
Creatingandusingrecoverymedia.....99
Chapter9.Replacingdevices....101
Staticelectricityprevention..........101
Replacingthecoin-cellbattery........101
Replacingthestoragedrive.........104
Replacingthememorymodule........108
ReplacingawirelessLANcard........111
Replacingthekeyboard...........115
Chapter10.Gettingsupport....121
BeforeyoucontactLenovo..........121
Gettinghelpandservice...........121
Usingdiagnosticprograms........122
LenovoSupportWebsite.........122
CallingLenovo.............122
Purchasingadditionalservices........123
Chapter11.Youandyour
computer..............125
Accessibilityandcomfort..........125
Ergonomicinformation..........125
Comfort...............126
Accessibilityinformation.........126
Travelingwithyourcomputer.........130
Traveltips...............130
Travelaccessories...........130
AppendixA.Regulatory
information.............133
Wirelessrelatedinformation.........133
LocationoftheUltraConnectwireless
antennas...............134
Locatingwirelessregulatorynotices....134
Exportclassificationnotice..........135
Electronicemissionnotices..........135
FederalCommunicationsCommission
DeclarationofConformity........135
IndustryCanadaClassBemissioncompliance
statement...............135
EuropeanUnion-Compliancetothe
ElectromagneticCompatibilityDirective...136
GermanClassBcompliancestatement...136
KoreaClassBcompliancestatement....137
JapanVCCIClassBcompliancestatement..137
Japancompliancestatementforproducts
whichconnecttothepowermainswith
ratedcurrentlessthanorequalto20Aper
phase................137
Lenovoproductserviceinformationfor
Taiwan................137
Eurasiancompliancemark........137
Brazilregulatorynotice..........137
Mexicoregulatorynotice.........137
AppendixB.WEEEandrecycling
statements.............139
ImportantWEEEinformation.........139
iiUserGuide

Japanrecyclingstatements.........139
RecyclinginformationforBrazil........140
BatteryrecyclinginformationfortheEuropean
Union..................140
BatteryrecyclinginformationforTaiwan.....141
BatteryrecyclinginformationfortheUnitedStates
andCanada................141
RecyclinginformationforChina........141
AppendixC.RestrictionofHazardous
SubstancesDirective(RoHS)....143
EuropeanUnionRoHS...........143
ChinaRoHS................144
IndiaRoHS................144
TurkishRoHS...............145
UkraineRoHS...............145
AppendixD.ENERGYSTARmodel
information.............147
AppendixE.Notices.........149
Trademarks................150
©CopyrightLenovo2014iii

ivUserGuide
Readthisfirst
Besuretofollowtheimportanttipsgivenheretogetthemostuseandenjoymentoutofyourcomputer.
Failuretodosomightleadtodiscomfortorinjury,orcauseyourcomputertofail.
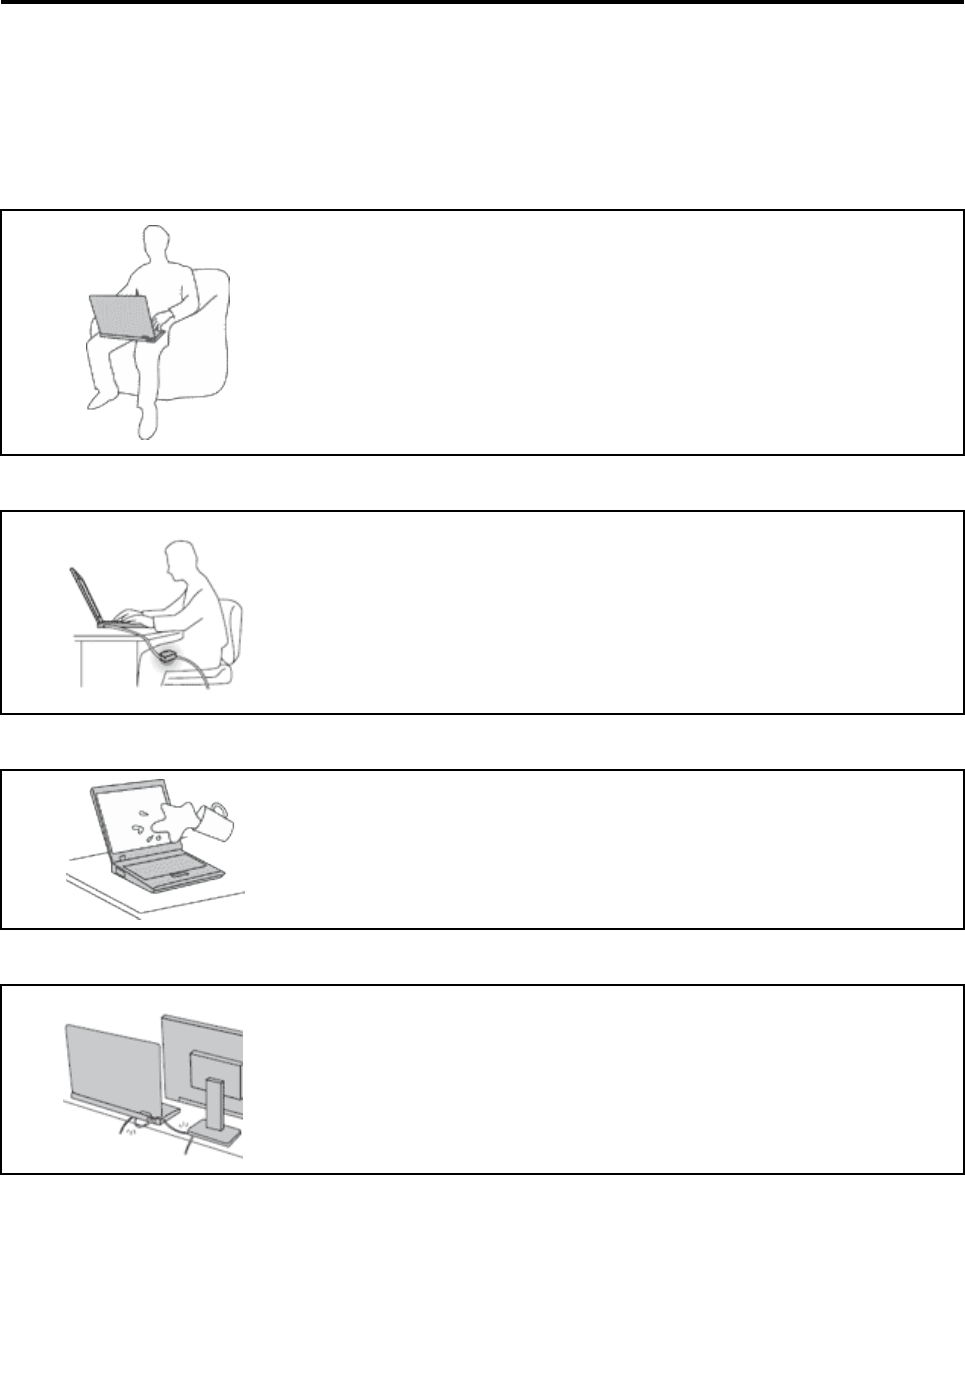
Protectyourselffromtheheatthatyourcomputergenerates.
Whenyourcomputeristurnedonorthebatteryischarging,thebase,thepalm
rest,andsomeotherpartsmaybecomehot.Thetemperaturetheyreach
dependsontheamountofsystemactivityandthelevelofchargeinthebattery.
Extendedcontactwithyourbody,eventhroughclothing,couldcause
discomfortorevenaskinburn.
•Avoidkeepingyourhands,yourlap,oranyotherpartofyourbodyin
contactwithahotsectionofthecomputerforanyextendedtime.
•Periodicallytakehandsfromusingthekeyboardbyliftingyourhandsfrom
thepalmrest.
Protectyourselffromtheheatgeneratedbytheacpoweradapter.
Whentheacpoweradapterisconnectedtoanelectricaloutletandyour
computer,itgeneratesheat.
Extendedcontactwithyourbody,eventhroughclothing,maycauseaskin
burn.
•Donotplacetheacpoweradapterincontactwithanypartofyourbody
whileitisinuse.
•Neveruseittowarmyourbody.
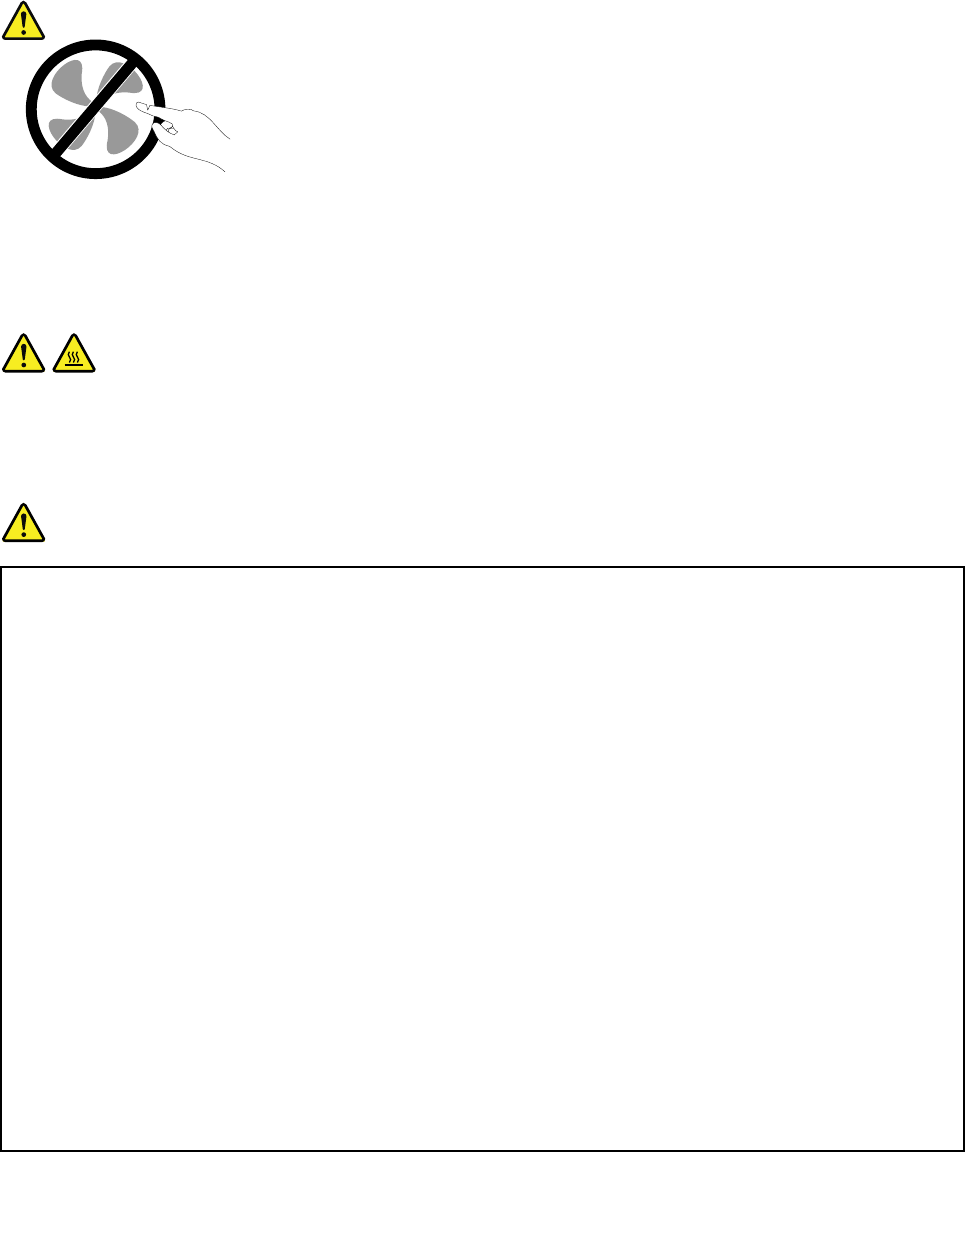
Preventyourcomputerfromgettingwet.
Toavoidspillsandthedangerofelectricalshock,keepliquidsawayfromyour
computer.
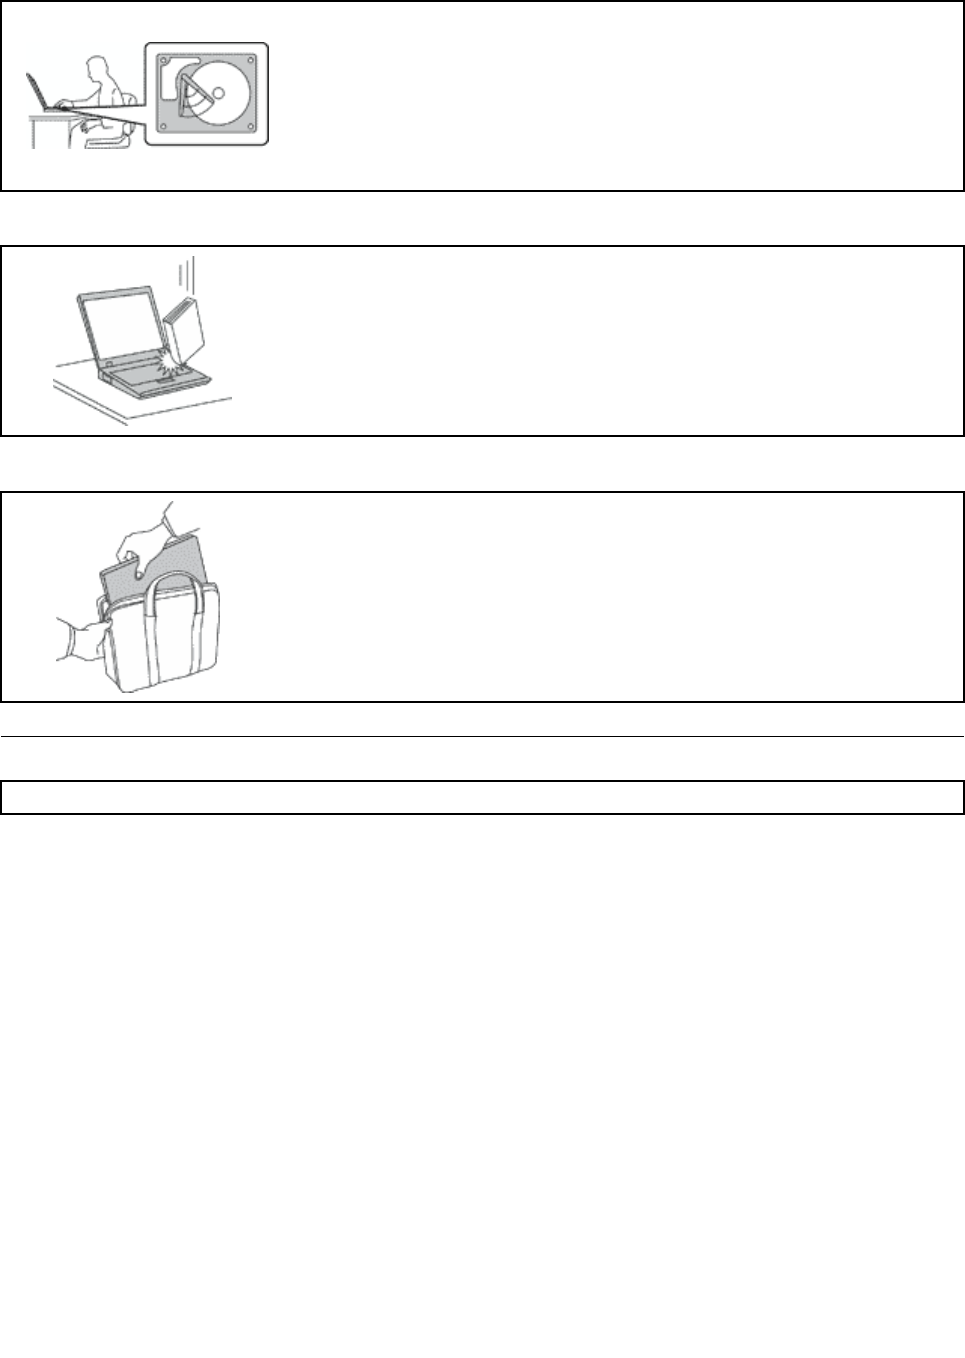
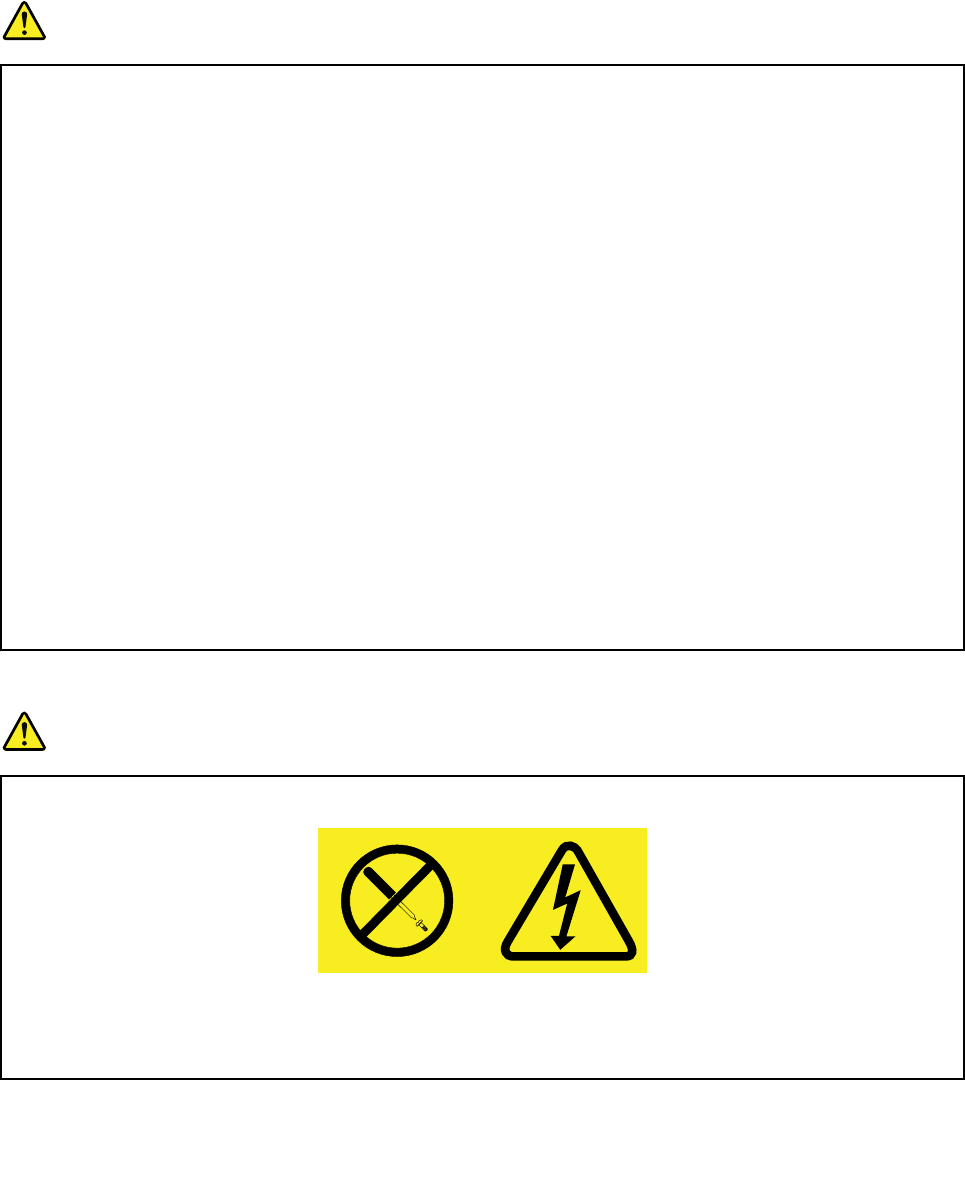
Protectthecablesfrombeingdamaged.
Applyingstrongforcetocablesmaydamageorbreakthem.
Routecommunicationlines,orthecablesofanacpoweradapter,amouse,a
keyboard,aprinter,oranyotherelectronicdevice,sothattheycannotbewalked
on,trippedover,pinchedbyyourcomputerorotherobjects,orinanyway
subjectedtotreatmentthatcouldinterferewiththeoperationofyourcomputer.
©CopyrightLenovo2014v
Protectyourcomputeranddatawhenmovingit.
Beforemovingacomputerequippedwithaharddiskdriveorhybriddrive,do
oneofthefollowing:
•Turnitoff.
•Putitinsleepmode.
•Putitinhibernationmode.
Thiswillhelptopreventdamagetothecomputer,andpossiblelossofdata.
Handleyourcomputergently.
Donotdrop,bump,scratch,twist,hit,vibrate,push,orplaceheavyobjectson
yourcomputer,display,orexternaldevices.
Carryyourcomputercarefully.
•Useaqualitycarryingcasethatprovidesadequatecushioningandprotection.
•Donotpackyourcomputerinatightlypackedsuitcaseorbag.
•Beforeputtingyourcomputerinacarryingcase,makesurethatitisoff,insleep
mode,orinhibernationmode.Donotputacomputerinacarryingcasewhileit
isturnedon.
Importantsafetyinformation
Note:Readtheimportantsafetyinformationfirst.
Thisinformationcanhelpyousafelyuseyournotebookcomputer.Followandretainallinformationincluded
withyourcomputer.Theinformationinthisdocumentdoesnotalterthetermsofyourpurchaseagreement
ortheLenovo®LimitedWarranty.Formoreinformation,see“WarrantyInformation”intheSafety,Warranty,
andSetupGuidethatcomeswithyourcomputer.
Customersafetyisimportant.Ourproductsaredevelopedtobesafeandeffective.However,personal
computersareelectronicdevices.Powercords,poweradapters,andotherfeaturescancreatepotential
safetyrisksthatcanresultinphysicalinjuryorpropertydamage,especiallyifmisused.Toreducethese
risks,followtheinstructionsincludedwithyourproduct,observeallwarningsontheproductandinthe
operatinginstructions,andreviewtheinformationincludedinthisdocumentcarefully.Bycarefullyfollowing
theinformationcontainedinthisdocumentandprovidedwithyourproduct,youcanhelpprotectyourself
fromhazardsandcreateasafercomputerworkenvironment.
Note:Thisinformationincludesreferencestopoweradaptersandbatteries.Inadditiontonotebook
computers,someproducts(suchasspeakersandmonitors)shipwithexternalpoweradapters.Ifyouhave
suchaproduct,thisinformationappliestoyourproduct.Inaddition,computerproductscontainacoin-cell
batterythatprovidespowertothesystemclockevenwhenthecomputerisunplugged,sothebattery
safetyinformationappliestoallcomputerproducts.
viUserGuide

Conditionsthatrequireimmediateaction
Productscanbecomedamagedduetomisuseorneglect.Someproductdamageisseriousenough
thattheproductshouldnotbeusedagainuntilithasbeeninspectedand,ifnecessary,repairedby
anauthorizedservicer.
Aswithanyelectronicdevice,paycloseattentiontotheproductwhenitisturnedon.Onveryrare
occasions,youmightnoticeanodororseeapuffofsmokeorsparksventfromyourproduct.Oryou
mighthearsoundslikepopping,crackingorhissing.Theseconditionsmightmerelymeanthatan
internalelectroniccomponenthasfailedinasafeandcontrolledmanner.Or,theymightindicate
apotentialsafetyissue.However,donottakerisksorattempttodiagnosethesituationyourself.
ContacttheCustomerSupportCenterforfurtherguidance.ForalistofServiceandSupportphone
numbers,seethefollowingWebsite:
http://www.lenovo.com/support/phone
Frequentlyinspectyourcomputeranditscomponentsfordamageorwearorsignsofdanger.
Ifyouhaveanyquestionabouttheconditionofacomponent,donotusetheproduct.Contact
theCustomerSupportCenterortheproductmanufacturerforinstructionsonhowtoinspectthe
productandhaveitrepaired,ifnecessary.
Intheunlikelyeventthatyounoticeanyofthefollowingconditions,orifyouhaveanysafety
concernswithyourproduct,stopusingtheproductandunplugitfromthepowersourceand
telecommunicationlinesuntilyoucanspeaktotheCustomerSupportCenterforfurtherguidance.
•Powercords,plugs,poweradapters,extensioncords,surgeprotectors,orpowersuppliesthatare
cracked,broken,ordamaged.
•Signsofoverheating,smoke,sparks,orfire.
•Damagetoabattery(suchascracks,dents,orcreases),dischargefromabattery,orabuildupofforeign
substancesonthebattery.
•Acracking,hissingorpoppingsound,orstrongodorthatcomesfromtheproduct.
•Signsthatliquidhasbeenspilledoranobjecthasfallenontothecomputerproduct,thepowercordor
poweradapter.
•Thecomputerproduct,powercord,orpoweradapterhasbeenexposedtowater.
•Theproducthasbeendroppedordamagedinanyway.
•Theproductdoesnotoperatenormallywhenyoufollowtheoperatinginstructions.
Note:Ifyounoticetheseconditionswithaproduct(suchasanextensioncord)thatisnotmanufacturedfor
orbyLenovo,stopusingthatproductuntilyoucancontacttheproductmanufacturerforfurtherinstructions,
oruntilyougetasuitablereplacement.
Safetyguidelines
Alwaysobservethefollowingprecautionstoreducetheriskofinjuryandpropertydamage.
Serviceandupgrades
DonotattempttoserviceaproductyourselfunlessinstructedtodosobytheCustomerSupportCenteror
yourdocumentation.OnlyuseaServiceProviderwhoisapprovedtorepairyourparticularproduct.
Note:Somecomputerpartscanbeupgradedorreplacedbythecustomer.Upgradestypicallyare
referredtoasoptions.ReplacementpartsapprovedforcustomerinstallationarereferredtoasCustomer
ReplaceableUnits,orCRUs.Lenovoprovidesdocumentationwithinstructionswhenitisappropriatefor
customerstoinstalloptionsorreplaceCRUs.Youmustcloselyfollowallinstructionswheninstallingor
replacingparts.TheOffstateofapowerindicatordoesnotnecessarilymeanthatvoltagelevelsinsidea
productarezero.Beforeyouremovethecoversfromaproductequippedwithapowercord,alwaysmake
©CopyrightLenovo2014vii
surethatthepoweristurnedoffandthattheproductisunpluggedfromanypowersource.Ifyouhave
anyquestionsorconcerns,contacttheCustomerSupportCenter.
Althoughtherearenomovingpartsinyourcomputerafterthepowercordhasbeendisconnected,the
followingwarningsarerequiredforyoursafety.
CAUTION:
Hazardousmovingparts.Keepfingersandotherbodypartsaway.
CAUTION:
Beforeyouopenthecomputercover,turnoffthecomputerandwaitseveralminutesuntilthe
computeriscool.
Powercordsandpoweradapters
DANGER
Useonlythepowercordsandpoweradapterssuppliedbytheproductmanufacturer.
Thepowercordsshallbesafetyapproved.ForGermany,itshallbeH05VV-F,3G,0.75mm2,or
better.Forothercountries,thesuitabletypesshallbeusedaccordingly.
Neverwrapapowercordaroundapoweradapterorotherobject.Doingsocanstressthecordin
waysthatcancausethecordtofray,crack,orcrimp.Thiscanpresentasafetyhazard.
Alwaysroutepowercordssothattheywillnotbewalkedon,trippedover,orpinchedbyobjects.
Protectpowercordsandpoweradaptersfromliquids.Forinstance,donotleaveyourpowercord
orpoweradapternearsinks,tubs,toilets,oronfloorsthatarecleanedwithliquidcleansers.
Liquidscancauseashortcircuit,particularlyifthepowercordorpoweradapterhasbeenstressed
bymisuse.Liquidsalsocancausegradualcorrosionofpowercordterminalsand/ortheconnector
terminalsonapoweradapter,whichcaneventuallyresultinoverheating.
Alwaysconnectpowercordsandsignalcablesinthecorrectorderandensurethatallpowercord
connectorsaresecurelyandcompletelypluggedintoreceptacles.
Donotuseanypoweradapterthatshowscorrosionattheacinputpinsorshowssignsof
overheating(suchasdeformedplastic)attheacinputpinsoranywhereonthepoweradapter.
Donotuseanypowercordswheretheelectricalcontactsoneitherendshowsignsofcorrosionor
overheatingorwherethepowercordappearstohavebeendamagedinanyway.
viiiUserGuide
Extensioncordsandrelateddevices
Ensurethatextensioncords,surgeprotectors,uninterruptiblepowersupplies,andpowerstripsthatyouuse
areratedtohandletheelectricalrequirementsoftheproduct.Neveroverloadthesedevices.Ifpowerstrips
areused,theloadshouldnotexceedthepowerstripinputrating.Consultanelectricianformoreinformation
ifyouhavequestionsaboutpowerloads,powerrequirements,andinputratings.
Plugsandoutlets
DANGER
Ifareceptacle(poweroutlet)thatyouintendtousewithyourcomputerequipmentappearstobe
damagedorcorroded,donotusetheoutletuntilitisreplacedbyaqualifiedelectrician.
Donotbendormodifytheplug.Iftheplugisdamaged,contactthemanufacturertoobtain
areplacement.
Donotshareanelectricaloutletwithotherhomeorcommercialappliancesthatdrawlargeamounts
ofelectricity;otherwise,unstablevoltagemightdamageyourcomputer,data,orattacheddevices.
Someproductsareequippedwithathree-prongedplug.Thisplugfitsonlyintoagrounded
electricaloutlet.Thisisasafetyfeature.Donotdefeatthissafetyfeaturebytryingtoinsertitinto
anon-groundedoutlet.Ifyoucannotinserttheplugintotheoutlet,contactanelectricianforan
approvedoutletadapterortoreplacetheoutletwithonethatenablesthissafetyfeature.Never
overloadanelectricaloutlet.Theoverallsystemloadshouldnotexceed80percentofthebranch
circuitrating.Consultanelectricianformoreinformationifyouhavequestionsaboutpowerloads
andbranchcircuitratings.
Besurethatthepoweroutletyouareusingisproperlywired,easilyaccessible,andlocatedclose
totheequipment.Donotfullyextendpowercordsinawaythatwillstressthecords.
Besurethatthepoweroutletprovidesthecorrectvoltageandcurrentfortheproductyouare
installing.
Carefullyconnectanddisconnecttheequipmentfromtheelectricaloutlet.
Powersupplystatement
DANGER
Neverremovethecoveronapowersupplyoranypartthathasthefollowinglabelattached.
Hazardousvoltage,current,andenergylevelsarepresentinsideanycomponentthathasthislabel
attached.Therearenoserviceablepartsinsidethesecomponents.Ifyoususpectaproblemwith
oneoftheseparts,contactaservicetechnician.
©CopyrightLenovo2014ix

Externaldevices
CAUTION:
DonotconnectordisconnectanyexternaldevicecablesotherthanUSBand1394cableswhilethe
computerpowerison;otherwise,youmightdamageyourcomputer.Toavoidpossibledamageto
attacheddevices,waitatleastfivesecondsafterthecomputerisshutdowntodisconnectexternal
devices.
Generalbatterynotice
DANGER
PersonalcomputersmanufacturedbyLenovocontainacoin-cellbatterytoprovidepowerto
thesystemclock.Inaddition,manymobileproducts,suchasnotebookcomputers,utilizea
rechargeablebatterytoprovidesystempowerwheninportablemode.Batteriessuppliedby
Lenovoforusewithyourproducthavebeentestedforcompatibilityandshouldonlybereplaced
withapprovedparts.
Neverattempttoopenorserviceanybattery.Donotcrush,puncture,orincineratebatteriesor
shortcircuitthemetalcontacts.Donotexposethebatterytowaterorotherliquids.Onlyrecharge
thebatterystrictlyaccordingtoinstructionsincludedintheproductdocumentation.
Batteryabuseormishandlingcancausethebatterytooverheat,whichcancausegassesorflame
to“vent”fromthebatteryorcoin-cellbattery.Ifyourbatteryisdamaged,orifyounoticeany
dischargefromyourbatteryorthebuildupofforeignmaterialsonthebatteryleads,stopusingthe
batteryandobtainareplacementfromthebatterymanufacturer.
Batteriescandegradewhentheyareleftunusedforlongperiodsoftime.Forsomerechargeable
batteries(particularlyLithiumIonbatteries),leavingabatteryunusedinadischargedstatecould
increasetheriskofabatteryshortcircuit,whichcouldshortenthelifeofthebatteryandalsocan
poseasafetyhazard.DonotletrechargeableLithium-Ionbatteriescompletelydischargeorstore
thesebatteriesinadischargedstate.
Lithiumcoin-cellbatterynotice
DANGER
Dangerofexplosionifbatteryisincorrectlyreplaced.
Whenreplacingthelithiumcoin-cellbattery,useonlythesameoranequivalenttypethatis
recommendedbythemanufacturer.Thebatterycontainslithiumandcanexplodeifnotproperly
used,handled,ordisposedof.
Donot:
•Throworimmerseintowater
•Heattomorethan100°C(212°F)
•Repairordisassemble
Disposeofthebatteryasrequiredbylocalordinancesorregulations.
ThefollowingstatementappliestousersinthestateofCalifornia,U.S.A.
CaliforniaPerchlorateInformation:
xUserGuide

Productscontainingmanganesedioxidelithiumcoin-cellbatteriesmaycontainperchlorate.
PerchlorateMaterial-specialhandlingmayapply,See
www.dtsc.ca.gov/hazardouswaste/perchlorate
Built-inrechargeablebatterynotice
DANGER
Donotattempttoreplacethebuilt-inrechargeablelithium-ionbatteries.ContactLenovoSupport
forfactoryreplacement.
Heatandproductventilation
DANGER
Computers,acpoweradapters,andmanyaccessoriescangenerateheatwhenturnedonandwhen
batteriesarecharging.Notebookcomputerscangenerateasignificantamountofheatduetotheir
compactsize.Alwaysfollowthesebasicprecautions:
•Whenyourcomputeristurnedonorthebatteryischarging,thebase,thepalmrest,andsome
otherpartsmaybecomehot.Avoidkeepingyourhands,yourlap,oranyotherpartofyour
bodyincontactwithahotsectionofthecomputerforanyextendedlengthoftime.Whenyou
usethekeyboard,avoidkeepingyourpalmsonthepalmrestforaprolongedperiodoftime.
Yourcomputergeneratessomeheatduringnormaloperation.Theamountofheatdependson
theamountofsystemactivityandthebatterychargelevel.Extendedcontactwithyourbody,
eventhroughclothing,couldcausediscomfortorevenaskinburn.Periodicallytakebreaks
fromusingthekeyboardbyliftingyourhandsfromthepalmrest;andbecarefulnottouse
thekeyboardforanyextendedlengthoftime.
•Donotoperateyourcomputerorchargethebatterynearflammablematerialsorinexplosive
environments.
•Ventilationslots,fansand/orheatsinksareprovidedwiththeproductforsafety,comfort,and
reliableoperation.Thesefeaturesmightinadvertentlybecomeblockedbyplacingtheproducton
abed,sofa,carpet,orotherflexiblesurface.Neverblock,cover,ordisablethesefeatures.
•Whentheacpoweradapterisconnectedtoanelectricaloutletandyourcomputer,itgenerates
heat.Donotplacetheadapterincontactwithanypartofyourbodywhileusingit.Neverusethe
acpoweradaptertowarmyourbody.Extendedcontactwithyourbody,eventhroughclothing,
maycauseaskinburn.
Foryoursafety,alwaysfollowthesebasicprecautionswithyourcomputer:
•Keepthecoverclosedwheneverthecomputerispluggedin.
•Regularlyinspecttheoutsideofthecomputerfordustaccumulation.
•Removedustfromventsandanyperforationsinthebezel.Morefrequentcleaningsmightbe
requiredforcomputersindustyorhigh-trafficareas.
•Donotrestrictorblockanyventilationopenings.
•Donotoperateyourcomputerinsidefurniture,asthismightincreasetheriskofoverheating.
•Airflowtemperaturesintothecomputershouldnotexceed35°C(95°F).
©CopyrightLenovo2014xi

Electricalcurrentsafetyinformation
DANGER
Electriccurrentfrompower,telephone,andcommunicationcablesishazardous.
Toavoidashockhazard:
•Donotuseyourcomputerduringalightningstorm.
•Donotconnectordisconnectanycablesorperforminstallation,maintenance,orreconfiguration
ofthisproductduringanelectricalstorm.
•Connectallpowercordstoaproperlywiredandgroundedelectricaloutlet.
•Connecttoproperlywiredoutletsanyequipmentthatwillbeattachedtothisproduct.
•Wheneverpossible,useonehandonlytoconnectordisconnectsignalcables.
•Neverturnonanyequipmentwhenthereisevidenceoffire,water,orstructuraldamage.
•Disconnecttheattachedpowercords,battery,andallthecablesbeforeyouopenthedevice
covers,unlessinstructedotherwiseintheinstallationandconfigurationprocedures.
•Donotuseyourcomputeruntilallinternalpartsenclosuresarefastenedintoplace.Neveruse
thecomputerwheninternalpartsandcircuitsareexposed.
DANGER
Connectanddisconnectcablesasdescribedinthefollowingprocedureswheninstalling,moving,
oropeningcoversonthisproductorattacheddevices.
Toconnect:
1.TurneverythingOFF.
2.First,attachallcablestodevices.
3.Attachsignalcablestoconnectors.
4.Attachpowercordstooutlets.
5.TurndevicesON.
Todisconnect:
1.TurneverythingOFF.
2.First,removepowercordsfromoutlets.
3.Removesignalcablesfromconnectors.
4.Removeallcablesfromdevices.
Thepowercordmustbedisconnectedfromthewalloutletorreceptaclebeforeinstallingallother
electricalcablesconnectedtothecomputer.
Thepowercordmaybereconnectedtothewalloutletorreceptacleonlyafterallotherelectrical
cableshavebeenconnectedtothecomputer.
DANGER
Duringelectricalstorms,donotperformanyreplacementanddonotconnectordisconnectthe
telephonecablefromthetelephoneoutletonthewall.
Liquidcrystaldisplay(LCD)notice
CAUTION:
TheLCDismadeofglass,androughhandlingordroppingthecomputercancausetheLCDtobreak.
IftheLCDbreaksandtheinternalfluidgetsintoyoureyesoronyourhands,immediatelywash
theaffectedareaswithwaterforatleast15minutes;ifanysymptomsarepresentafterwashing,
getmedicalcare.
xiiUserGuide

Note:Forproductswithmercury-containingfluorescentlamps(forexample,non-LED),thefluorescentlamp
intheliquidcrystaldisplay(LCD)containsmercury;disposeofaccordingtolocal,state,orfederallaws.
Usingheadphonesorearphones
CAUTION:
Excessivesoundpressurefromearphonesandheadphonescancausehearingloss.Adjustmentof
theequalizertomaximumincreasestheearphoneandheadphoneoutputvoltageandthesound
pressurelevel.Therefore,toprotectyourhearing,adjusttheequalizertoanappropriatelevel.
Excessiveuseofheadphonesorearphonesforalongperiodoftimeathighvolumecanbedangerousifthe
outputoftheheadphoneorearphoneconnectorsdonotcomplywithspecificationsofEN50332-2.The
headphoneoutputconnectorofyourcomputercomplieswithEN50332-2Subclause7.Thisspecification
limitsthecomputer’smaximumwidebandtrueRMSoutputvoltageto150mV.Tohelpprotectagainst
hearingloss,ensurethattheheadphonesorearphonesyouusealsocomplywithEN50332-2(Clause7
limits)forawidebandcharacteristicvoltageof75mV.UsingheadphonesthatdonotcomplywithEN
50332-2canbedangerousduetoexcessivesoundpressurelevels.
IfyourLenovocomputercamewithheadphonesorearphonesinthepackage,asaset,thecombinationof
theheadphonesorearphonesandthecomputeralreadycomplieswiththespecificationsofEN50332-1.
Ifdifferentheadphonesorearphonesareused,ensurethattheycomplywithEN50332-1(Clause6.5
LimitationValues).UsingheadphonesthatdonotcomplywithEN50332-1canbedangerousdueto
excessivesoundpressurelevels.
Additionalsafetyinformation
DANGER
Plasticbagscanbedangerous.Keepplasticbagsawayfrombabiesandchildrentoavoiddanger
ofsuffocation.
NoticeforusersintheU.S.A.
Manypersonalcomputerproductsandaccessoriescontaincords,cablesorwires,suchaspowercordsor
cordstoconnecttheaccessorytoapersonalcomputer.Ifthisproducthassuchacord,cableorwire,then
thefollowingwarningapplies:
WARNING:Handlingthecordonthisproductorcordsassociatedwithaccessoriessoldwiththisproduct
willexposeyoutolead,achemicalknowntotheStateofCaliforniatocausecancer,andbirthdefectsor
otherreproductiveharm.Washhandsafterhandling.
Savetheseinstructions.
©CopyrightLenovo2014xiii

xivUserGuide
Chapter1.Productoverview
Thischapterprovidesinformationaboutconnectorlocations,importantproductlabels,computerfeatures,
specifications,operatingenvironment,andpreinstalledprograms.
Thischaptercontainsthefollowingtopics:
•“Locatingcomputercontrols,connectors,andindicators”onpage1
•“Locatinglabelsthatcontainimportantproductinformation”onpage8
•“Features”onpage10
•“Specifications”onpage11
•“Operatingenvironment”onpage12
•“Lenovoprograms”onpage12
Locatingcomputercontrols,connectors,andindicators
Thissectionintroducesthecomputerhardwarefeaturestogiveyouthebasicinformationyouneedto
startusingthecomputer.
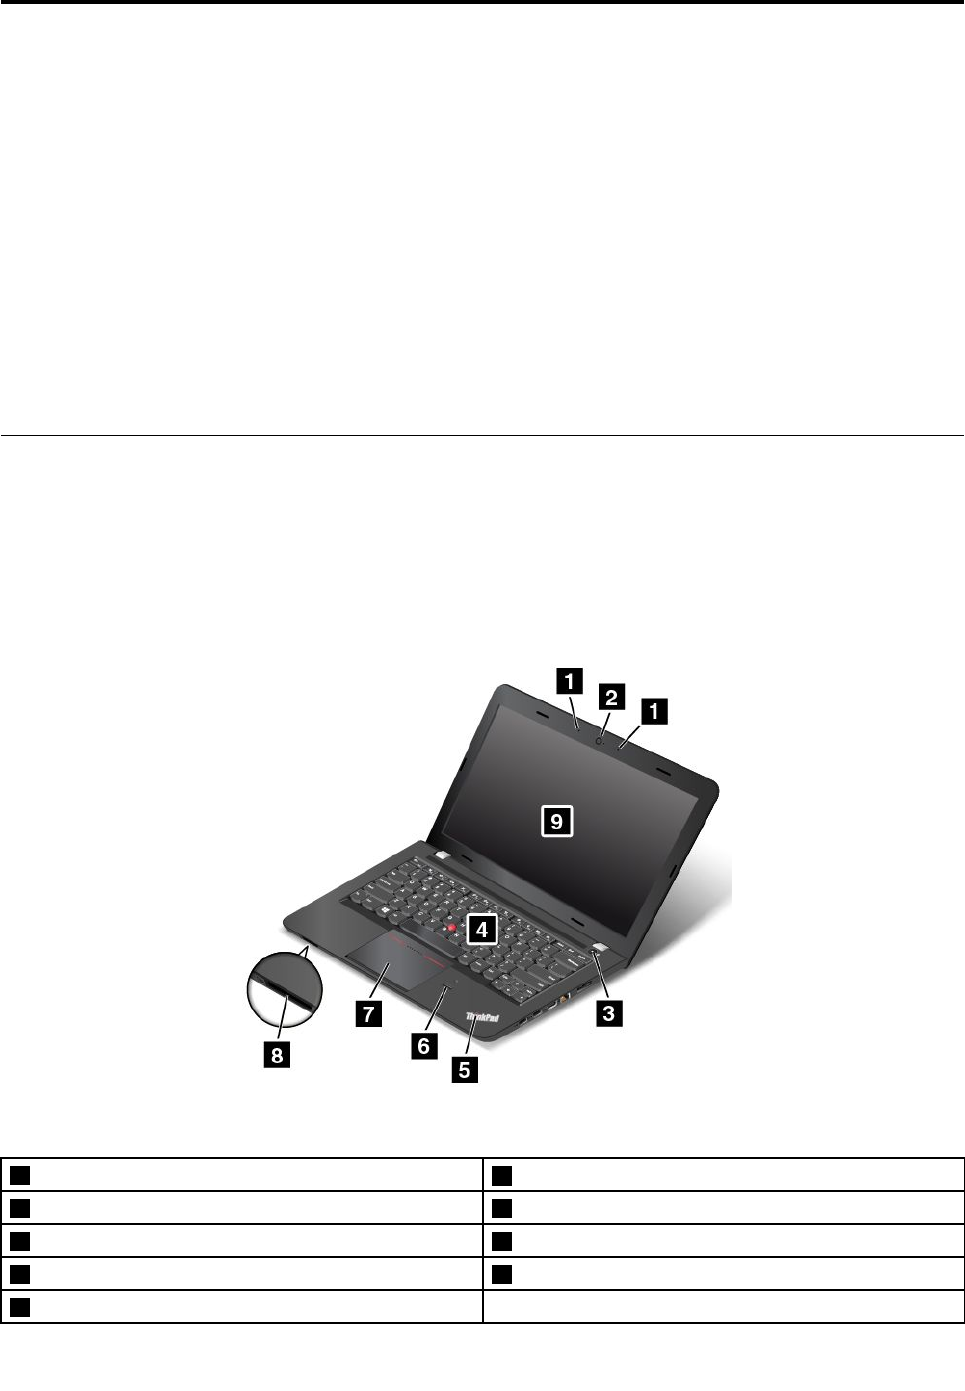
Frontview
Figure1.ThinkPadE450andE455frontview
1Microphones2Camera
3Powerbutton4TrackPoint®pointingstick
5System-statusindicator6Fingerprintreader(availableonsomemodels)
7ThinkPad®trackpad8Media-cardslot
9Screen(multi-touchscreenavailableonsomemodels)
©CopyrightLenovo20141

1Microphones
Thebuilt-inmicrophonescapturesoundandvoicewhenusedwithaprogramcapableofhandlingaudio.
Dependingonyourmodel,yourcomputermightcomewithonemicrophone.
2Camera
Somemodelshaveanintegratedcamera.Usethecameratotakepicturesorholdavideoconference.
Fordetails,see“Usingthecamera”onpage37.
3Powerbutton
Pressthepowerbuttontoturnonthecomputerorputthecomputerintosleepmode.Forhowtoturnoffthe
computer,see“Frequentlyaskedquestions”onpage17.
Ifyourcomputeriscompletelyunresponsive,youcanturnoffthecomputerbypressingandholdingthe
powerbuttonforfourormoreseconds.Ifthecomputercannotbeturnedoff,see“Computerstops
responding”onpage75formoreinformation.
Youalsocandefinewhatthepowerbuttondoes.Forexample,bypressingthepowerbutton,youcanturn
offthecomputerorputthecomputerintosleeporhibernationmode.Tochangewhatthepowerbutton
does,dothefollowing:
1.Fromthedesktop,clickthebattery-statusiconintheWindowsnotificationareaonthetaskbar.
2.ClickMorepoweroptions➙Choosewhatthepowerbuttonsdo.
3.Followtheinstructionsonthescreen.
Note:UseLenovoprogramsforadvancedpowersettings.
•ForWindows7:UsethePowerManagerprogram.
•ForWindows8.1:UsetheLenovoSettingsprogram.
Formoreinformation,see“Lenovoprograms”onpage12.
ThinkPadpointingdevice
4TrackPointpointingstick
7ThinkPadtrackpad
ThekeyboardcontainstheThinkPadpointingdevice.Pointing,selecting,anddraggingareallpartofasingle
processthatyoucanperformwithoutmovingyourfingersfromatypingposition.Formoreinformation,see
“ThinkPadpointingdevice”onpage23.
5System-statusindicator
TheilluminateddotintheThinkPadlogofunctionsasasystem-statusindicator.Forthedetailedinformation
abouttheindicator,see“Statusindicators”onpage6.
6Fingerprintreader(availableonsomemodels)
Somemodelshaveafingerprintreader.Fingerprintauthenticationtechnologyprovidesasimpleandsecure
useraccessbyassociatingyourfingerprintwithapassword.Formoreinformationaboutthefingerprint
reader,see“Usingthefingerprintreader”onpage50.
8Media-cardslot
Yourcomputerisequippedwithamediacardreader,whichprovidesamedia-cardslot.Insertyourflash
mediacardintothemedia-cardslottoreadthedataonthecard.Formoreinformationaboutthesupported
cards,see“Usingaflashmediacard”onpage38.
2UserGuide
9Screen(multi-touchscreenavailableonsomemodels)
Formoreinformation,see“Usingthemulti-touchscreen”onpage19.
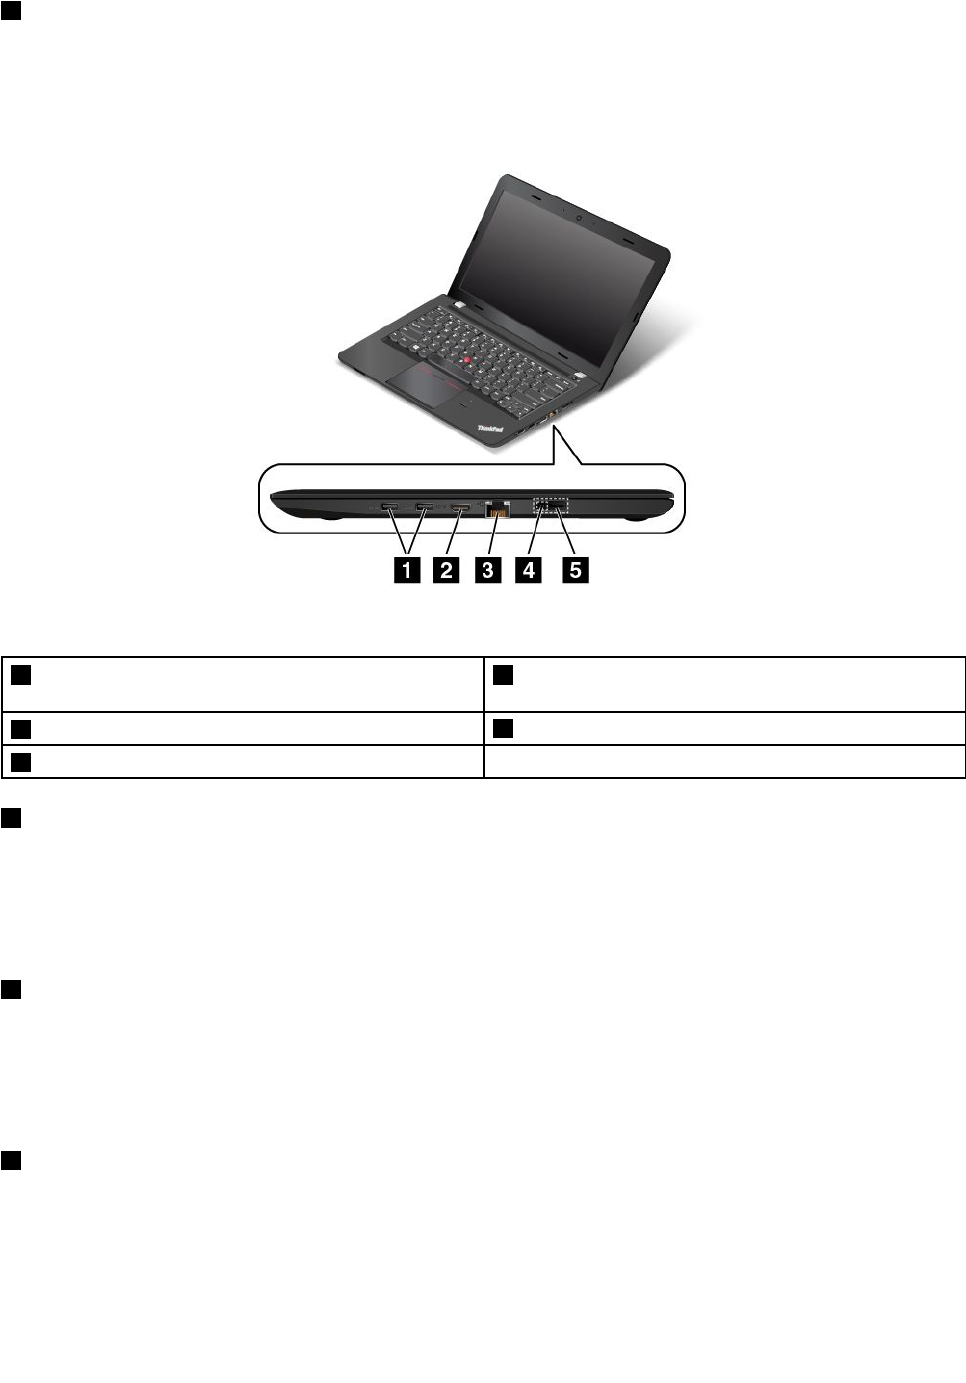
Right-sideview
Figure2.ThinkPadE450andE455right-sideview
1USB3.0connectors2High-DefinitionMultimediaInterface(HDMI™)
connector
3Ethernetconnector4acpowerconnector
5LenovoOneLinkconnector
1USB3.0connectors
TheUniversalSerialBus(USB)3.0connectorsareusedforconnectingUSB-compatibledevices,such
asaUSBkeyboardoraUSBmouse.
Note:WhenyouattachaUSBcabletothisUSBconnector,ensurethattheUSBmarkisfacingupward.
Otherwisetheconnectormightgetdamaged.
2HDMIconnector
Usethehigh-definitionmultimediainterface(HDMI)connectortoconnectthecomputertoan
HDMI-compatibleaudiodeviceorvideomonitor,suchasahigh-definitiontelevision(HDTV).
Note:IfyouconnectthecomputertoasupportedThinkPadOneLinkDock,usetheHMDIconnectoron
thedock,nottheoneonthecomputer.
3Ethernetconnector
Connectthecomputertoalocalareanetwork(LAN)withtheEthernetconnector.
Chapter1.Productoverview3
DANGER
Toavoidtheriskofelectricalshock,donotconnectthetelephonecabletotheEthernetconnector.
YoucanonlyconnectanEthernetcabletothisconnector.
TheEthernetconnectorhastwoindicatorsthatshowthestatusofthenetworkconnection.Whenthe
greenindicatorison,thecomputerisconnectedtoaLAN.Whentheyellowindicatorblinks,dataisbeing
transmitted.
Note:IfthecomputerisconnectedtotheThinkPadOneLinkDockorThinkPadOneLinkProDock,usethe
Ethernetconnectoronthedockingstationinsteadoftheoneonthecomputer.
4acpowerconnector
5LenovoOneLinkconnector
Whentheacpoweradapterisconnectedtotheacpowerconnector,itprovidespowertothecomputer
andchargesthebattery.WhenasupportedThinkPadOneLinkDockorThinkPadOneLinkProDockis
connectedtotheLenovoOneLinkconnector,itcannotonlyextendthecomputercapabilitiesbutalso
provideacpowertothecomputerandchargethebattery.
TousetheLenovoOneLinkconnector,youneedtoremovetheconnectorcoverfromtheLenovoOneLink
connectorfirst.
Note:Ensurethatyoukeeptheconnectorcover.ReattachittotheLenovoOneLinkconnectorwhen
youarenotusingtheLenovoOneLinkconnector.
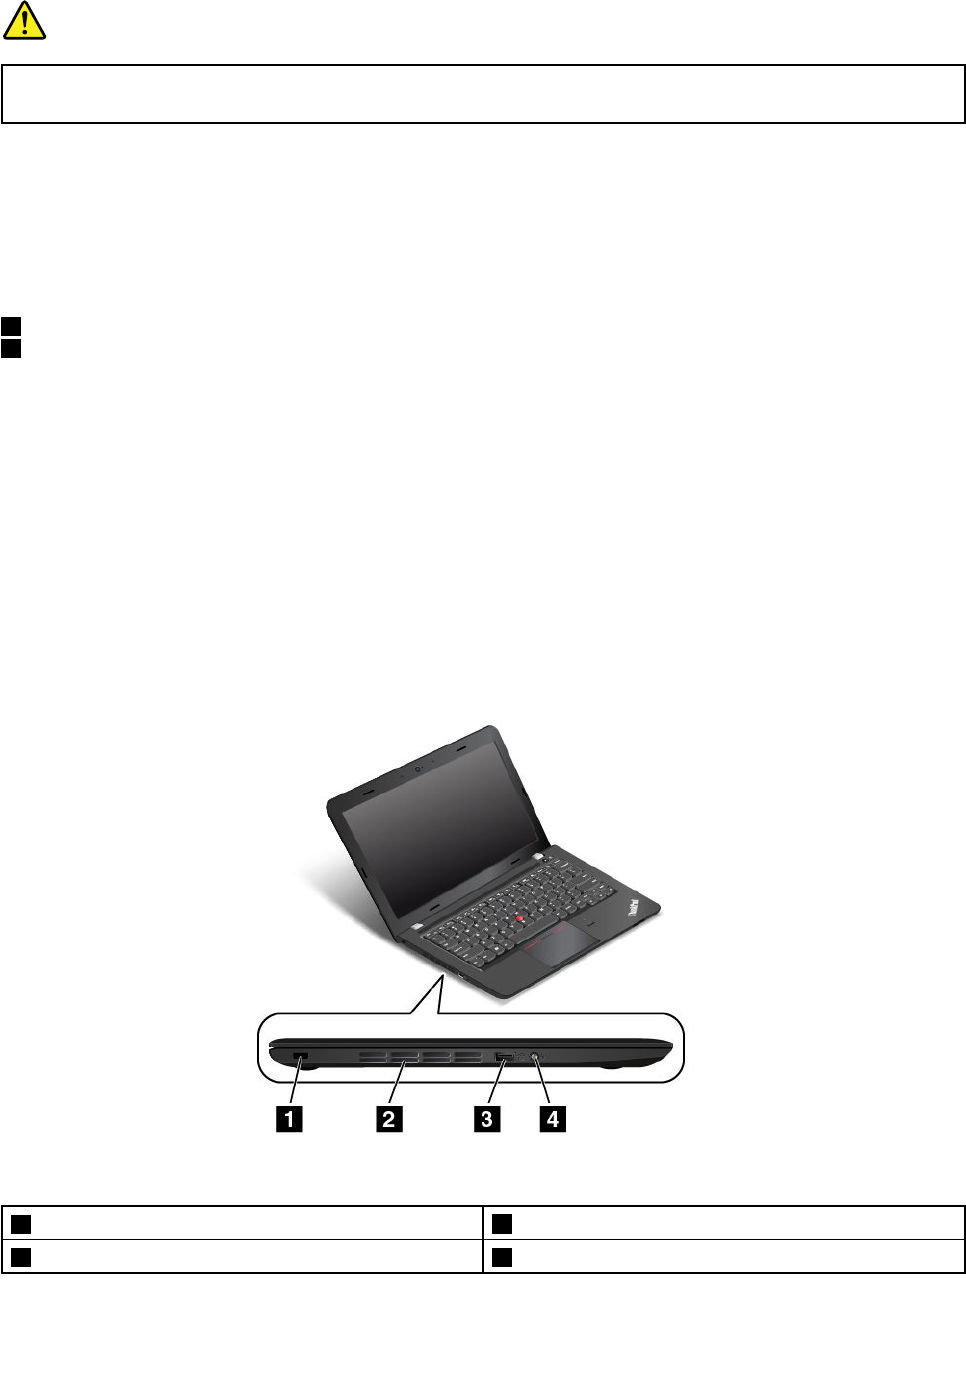
Left-sideview
Figure3.ThinkPadE450andE455left-sideview
1Security-lockslot2Fanlouvers
3AlwaysonUSBconnector4Comboaudioconnector
4UserGuide

1Security-lockslot
Toprotectyourcomputerfromtheft,purchaseasecuritycablelockthatfitsthissecurity-lockslottolock
yourcomputertoastationaryobject.
2Fanlouvers
Thefanlouversandtheinternalfanenableairtocirculateinthecomputertoensurepropercooling,
especiallythecoolingofthemicroprocessor.
Note:Toensureproperairflow,donotplaceanyobstacleinfrontofthefanlouvers.
3AlwaysonUSBconnector
Bydefault,theAlwaysOnUSBconnectorenablesyoutochargesomemobiledigitaldevicesand
smartphonesinthefollowingsituations:
•Whenyourcomputerisonorinsleepmode
•Whenyourcomputerisinhibernationmodeoristurnedoff,butconnectedtoacpower
Ifyouwanttochargethesedeviceswhenyourcomputerisinhibernationmodeoristurnedoff,andthe
computerisnotconnectedtoacpower,dothefollowing:
•ForWindows7:StartthePowerManagerprogramandclicktheGlobalPowerSettingstab.Then
selecttheEnableUSBchargefromthecomputerbatteryevenwhenthecomputerisoffcheck
box,andclickOKorApply.
•ForWindows8.1:PresstheWindowskeytogototheStartscreen.ClickLenovoSettings➙Power.In
thisarea,movetheswitchtotheOnpositionintheEnableAlwaysOnUSBareaandselectEnableeven
whenthecomputerisoff,andclickOKorApply.
Attention:WhenyouattachaUSBcabletothisUSBconnector,ensurethattheUSBmarkisfacingupward.
Otherwisetheconnectormightgetdamaged.
4Comboaudioconnector
Tolistentothesoundfromyourcomputer,connectheadphonesoraheadsetthathasa3.5mm,4-poleplug
tothecomboaudioconnector.
Notes:
•Ifyouareusingaheadsetwithafunctionswitch,donotpressthisswitchwhileusingtheheadset.If
youpressit,theheadsetmicrophonewillbedisabled,andtheintegratedmicrophonesonthecomputer
willbeenabledinstead.
•Thecomboaudioconnectordoesnotsupportaconventionalmicrophone.Formoreinformation,see
“Usingaudiofeatures”onpage37.
Chapter1.Productoverview5
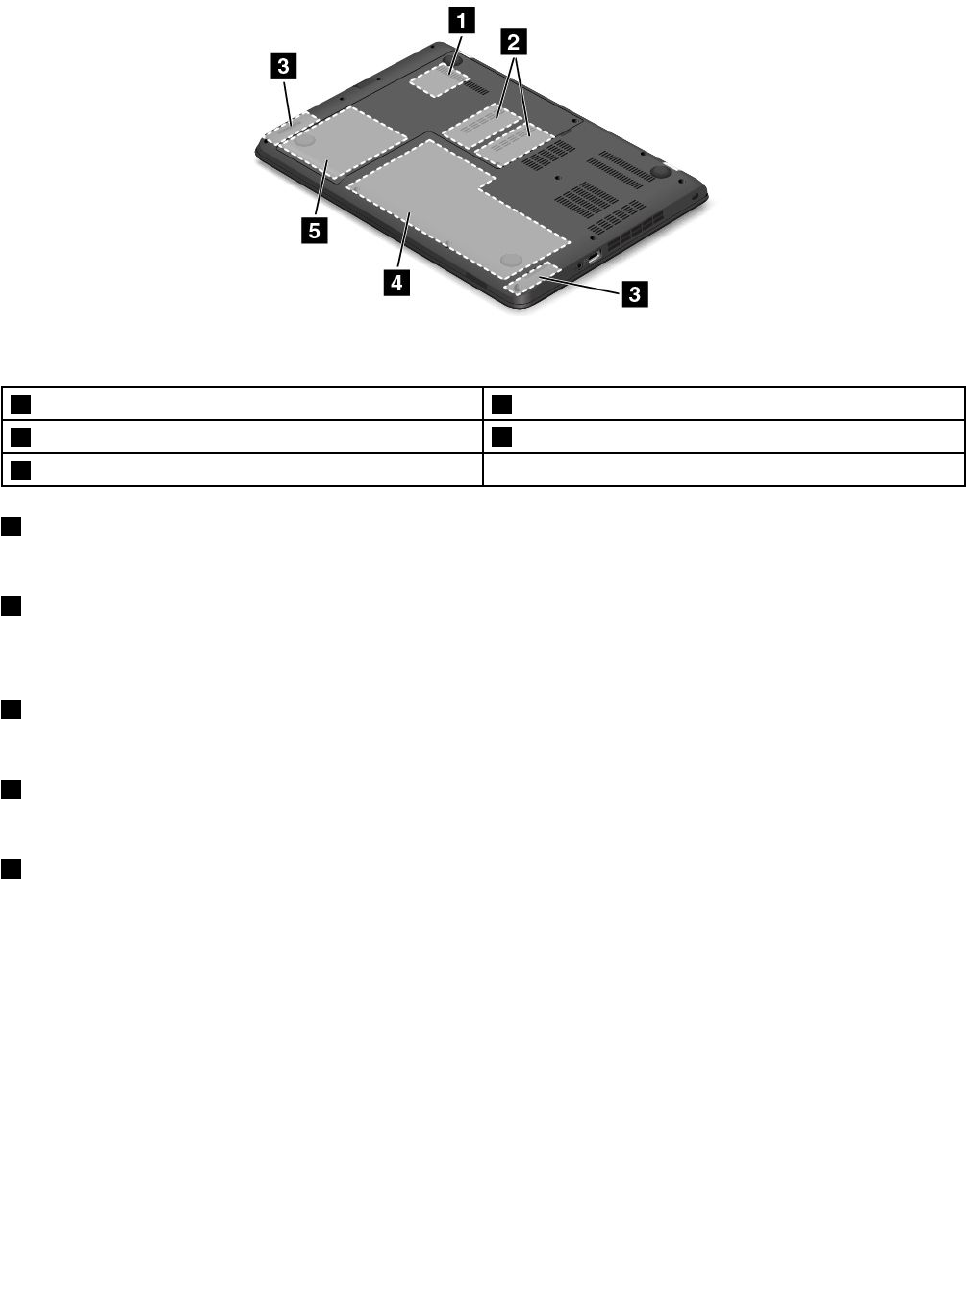
Bottomview
Figure4.ThinkPadE450andE455bottomview
1Wireless-LAN-cardslot2Memory-upgradeslots
3Speakers4Built-inbattery
5Storagedrive
1WirelessLANcardslot
YourcomputermighthaveawirelessLANcardinstalledforyoutoestablishwirelessLANconnections.
2Memory-upgradeslot
Youcanincreasetheamountofmemoryinyourcomputerbyinstallingamemorymoduleinthe
memory-upgradeslot.MemorymodulesareavailableasoptionsfromLenovo.
3Speakers
Yourcomputerisequippedwithapairofstereospeakers.
4Battery
Useyourcomputerwiththebatterypowerwheneveracpowerisunavailable.
5Storagedrive
Yourcomputerhasalarge-capacity,customer-upgradablestoragedriveinstalled.Dependingonthemodel,
thestoragedrivecanbeastoragedrivetomeetvariousstoragedemands.
Note:Thehiddenservicepartitionisthereasonwhythereislessfreespacethanexpectedonyourhard
diskdrive,hybriddrive,orsolid-statedrive.Thisreductionismorenoticeableonthesolid-statedrive
becauseofitssmallercapacity.
Statusindicators
Yourcomputerhasseveralstatusindicatorsshowingthestatusofyourcomputer.
Note:Yourcomputerkeyboardmightlookdifferentfromthefollowingillustration.
6UserGuide
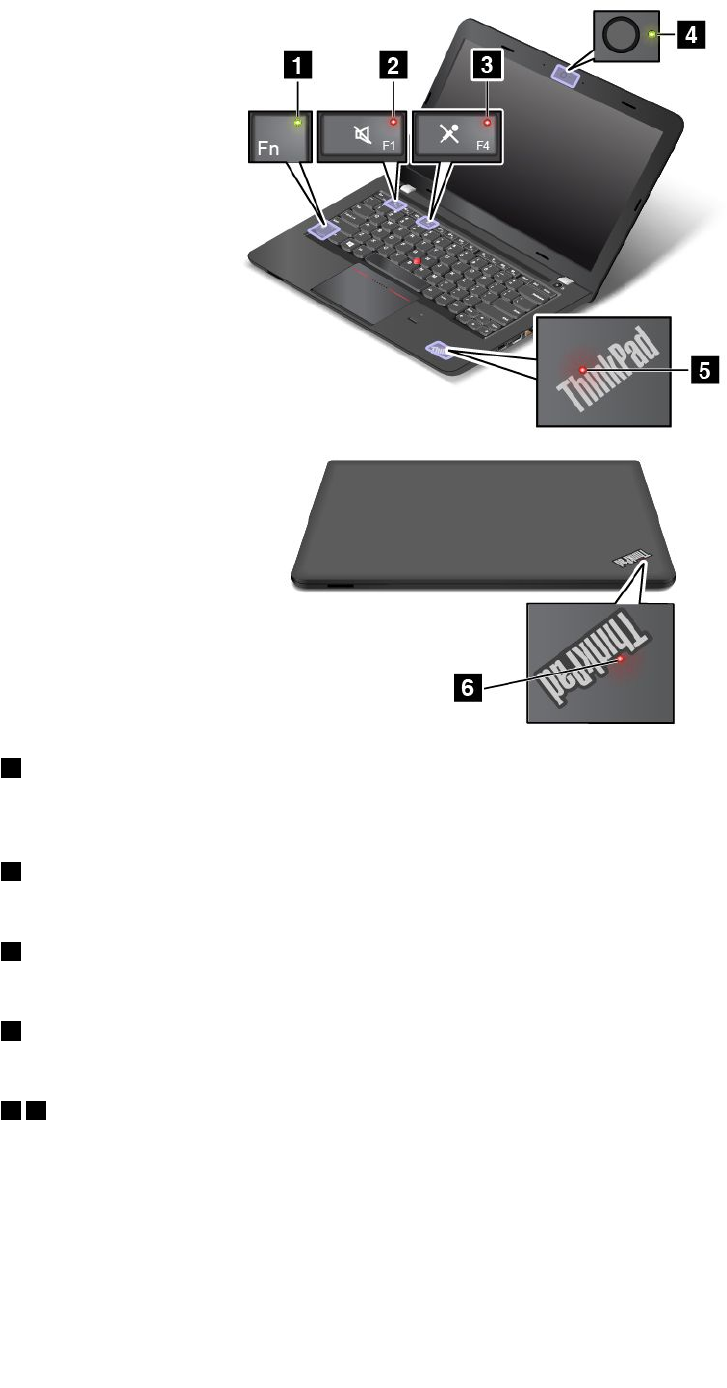
1FnLockindicator
TheFnLockindicatorshowsthestatusofFnLockfunction.Formoreinformation,see“Specialkeys”
onpage21.
2Speaker-muteindicator
Whenthespeaker-muteindicatorison,thespeakersaremuted.
3Microphone-muteindicator
Whenthemicrophone-muteindicatorison,themicrophonesaremuted.
4Camera-statusindicator
Whenthecamera-statusindicatorison,thecameraisinuse.
56System-statusindicators
TherearetwoThinkPadlogosonyourcomputer,oneonthepalmrestandtheotherontheouterlid.
TheilluminateddotineachThinkPadlogoworksasasystem-statusindicatorandhelpsyouidentifythe
statusofyourcomputer.
•Blinksforthreetimes:Thecomputerisinitiallyconnectedtothepower.
•Blinksfast:Thecomputerisenteringhibernationmode.
•Blinksslowly:Thecomputerisinsleepmode.
Chapter1.Productoverview7
•Off:Thecomputerisofforinhibernationmode.
•On:Thecomputerison(innormalmode).
Locatinglabelsthatcontainimportantproductinformation
Thissectionprovidesinformationtohelpyoulocatethefollowinglabelsthatcontainimportantproduct
information:
•“Machinetypeandmodellabel”onpage8
•“FCCIDandICCertificationnumberlabel”onpage8
•“CertificateofAuthenticitylabel”onpage9
•“GenuineMicrosoftlabel”onpage10
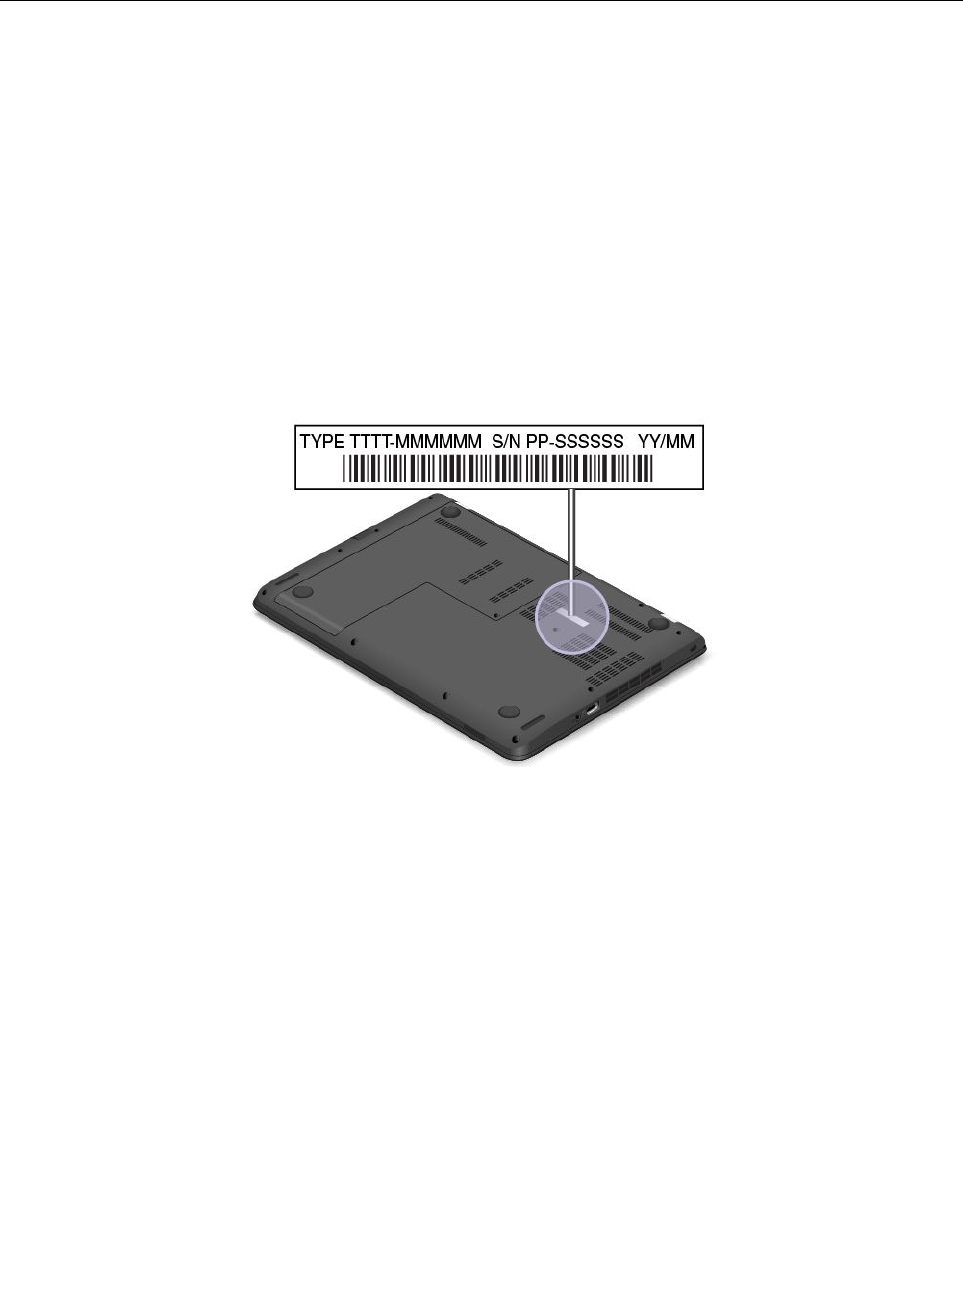
Machinetypeandmodellabel
Themachinetypeandmodellabelidentifiesyourcomputer.WhenyoucontactLenovoforhelp,themachine
typeandmodelinformationhelpssupporttechnicianstoidentifyyourcomputerandprovidefasterservice.
Thefollowingfigureshowsthelocationofthemachinetypeandmodelofyourcomputer:
FCCIDandICCertificationnumberlabel
TheFCCIDandICCertificationnumbersfortheinstalledwirelesscommunicationcardsarenotshownonthe
enclosureofyourcomputer.However,Lenovoprovidesinformationonthelabelattachedonthecomputer
bottomasshowntoinstructyouhowtolocatetheFCCIDandICCertificationnumbersinsideyourcomputer.
8UserGuide
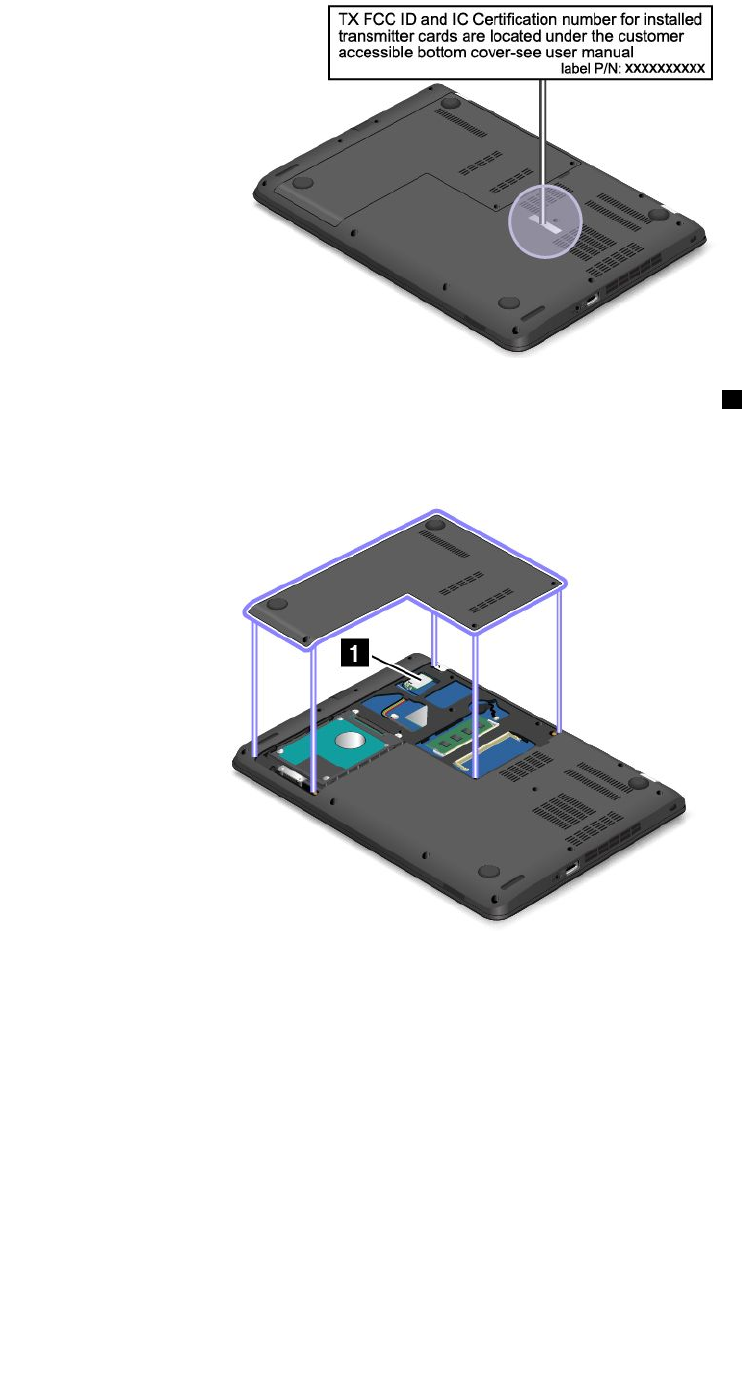
TheFCCIDandICCertificationnumberlabelisaffixedonthewirelessLANcard1installedinthewireless
communicationcardslotofthecomputer.
ThefollowingfigureshowsthelocationoftheFCCIDandICCertificationnumberlabelofyourcomputer.
ToremovethewirelessLANcardforrepairorreplacement,see“ReplacingawirelessLANcard”onpage111.
Note:UseonlyLenovo-authorizedwirelesscommunicationcardsforthecomputer.Ifyouinstallan
unauthorizedwirelesscommunicationcardthatisnotapprovedforuseinyourcomputer,anerrormessage
willbedisplayedandthecomputerwillbeepwhenyouturnonthecomputer.
CertificateofAuthenticitylabel
TheCertificateofAuthenticitylabelisprovidedonmodelsthatarelicensedtouseaWindows7
operatingsystem.ThelicensedWindowsversionandproductkeyassociatedwiththecomputerareprinted
onthislabel.Recordthisinformationandkeepitinasafeplace.Youmightneedthesenumberstostart
yourcomputerorreinstalltheWindows7operatingsystem.Dependingonthemodel,theCertificateof
Authenticitylabelcanbeonthecomputercover,underthebattery,oronthepoweradapter.
FormoreinformationabouttheCertificateofAuthenticitylabel,goto:
http://www.microsoft.com/en-us/howtotell/Hardware.aspx
Chapter1.Productoverview9

ThefollowingfigureshowsthelocationoftheCertificateofAuthenticitylabelonthebottomcover:
GenuineMicrosoftlabel
TheGenuineMicrosoftlabelisprovidedonmodelsthatarelicensedtouseaWindows8.1operatingsystem.
Theversionoftheoperatingsystemisprintedonthelabel.Ifyourcomputermodelislicensedtouse
theWindows8.1Prooperatingsystem,thatlicensealsopermitsyoutousetheWindows7Professional
operatingsysteminplaceoftheWindows8.1Prooperatingsystemifyouprefer.Lenovocomputersthat
arelicensedforusewithaWindows8.1operatingsystemareshippedwiththecorrespondinglicensekey
digitallyencodedintothecomputerhardware.Dependingonthecomputermodel,theGenuineMicrosoft
labelcanbeonthecomputercover,underthebattery,oronthepoweradapter.
FormoreinformationabouttheGenuineMicrosoftlabel,goto:
http://www.microsoft.com/en-us/howtotell/Hardware.aspx
ThefollowingfigureshowsthelocationoftheGenuineMicrosoftlabelonthecomputercover:
Features
Thistopicliststhefeaturesofyourcomputer.
Toviewthesystempropertiesofyourcomputer,dothefollowing:
•ForWindows7:ClickStartandright-clickComputer.ThenclickProperties.
•ForWindows8.1:Movethepointertothetop-rightorbottom-rightcornerofthescreentobringupthe
charms.ThenclickSettings➙PCinfo.
Memory
10UserGuide

•Doubledatarate3lowvoltagesynchronousdynamicrandomaccessmemorymodules(DDR3LVSDRAM)
Storagedevice
•2.5-inchformfactor,7-mmheightharddiskdrive
•2.5-inchformfactor,7-mmheightsolid-statedrive
•2.5-inchformfactor,7-mmheighthybriddrive
Display
ThecolordisplayusestheThinFilmTransistor(TFT)technology.
•Size:14.0inches(355.6mm)
•Resolution:
–LCD:Upto1366x768or1600x900,dependingonthemodel
–Externalmonitor:Upto2048x1536
•Brightnesscontrol
•Integratedcamera
•Microphones
Keyboard
•6-rowkeyboard
•ThinkPadpointingdevice
•Functionkeys
Interface
•Externalmonitorconnector(HDMIconnector)
•Comboaudioconnector
•TwoUSB3.0connectors
•OneAlwaysOnUSBconnector(USB2.0)
•RJ45Ethernetconnector
•4-in-1media-cardslot
•LenovoOneLinkconnector
•acpowerconnector
Wirelessfeatures
•IntegratedwirelessLAN
•IntegratedBluetooth
Securityfeatures
•Fingerprintreader(availableonsomemodels)
Specifications
Thissectionliststhephysicalspecificationsforyourcomputer.
Size
Chapter1.Productoverview11

•Width:339mm(13.35inches)
•Depth:239mm(9.41inches)
•Height:
–24.4mm(9.61inches)forthenon-touchmodel
–26.4mm(10.39inches)forthetouchmodel
Heatoutput
•45W(154Btu/hr)or65W(222Btu/hr)maximum(dependingonthemodel)
Powersource(acpoweradapter)
•Sine-waveinputat50to60Hz
•Inputratingoftheacpoweradapter:100to240Vac,50to60Hz
Operatingenvironment
Thissectionprovidesinformationabouttheoperatingenvironmentofyourcomputer.
Environment:
•Maximumaltitudewithoutpressurization:3048m(10000ft)
•Temperature
–Ataltitudesupto2438m(8000ft)
–Operating:5.0°Cto35.0°C(41°Fto95°F)
–Storage:5.0°Cto43.0°C(41°Fto109°F)
–Ataltitudesabove2438m(8000ft)
–Maximumtemperaturewhenoperatingundertheunpressurizedcondition:31.3°C(88°F)
Note:Whenyouchargethebattery,itstemperaturemustbeatleast10°C(50°F).
•Relativehumidity:
–Operating:8%to80%
–Storage:5%to95%
Ifpossible,placeyourcomputerinawell-ventilatedanddryareawithoutdirectexposuretosunshine.
Attention:
•Keepelectricalappliancessuchasanelectricfan,radio,airconditioner,andmicrowaveovenaway
fromthecomputer.Thestrongmagneticfieldsgeneratedbytheseappliancescandamagethemonitor
anddataontheharddiskdriveorhybriddrive.
•Donotplaceanybeveragesontopoforbesidethecomputerorotherattacheddevices.Ifliquidisspilled
onorinthecomputeroranattacheddevice,ashortcircuitorotherdamagemightoccur.
•Donoteatorsmokeoveryourkeyboard.Particlesthatfallintoyourkeyboardcancausedamage.
Lenovoprograms
YourcomputercomeswithLenovoprogramstohelpyouworkeasilyandsecurely.
Note:Theavailableprogramsaresubjecttochangewithoutnotice.
12UserGuide

TolearnmoreabouttheprogramsandothercomputingsolutionsofferedbyLenovo,goto:
http://www.lenovo.com/support
AccessingLenovoprogramsontheWindows7operatingsystem
YoucanaccessLenovoprogramsontheWindows7operatingsystemthroughWindowsSearchorfrom
ControlPanel.TheiconnamedisplayedinthesearchresultorControlPanelmightbedifferentfromthe
programname.YoucanfindtheprogrambyitsprogramnameoriconnameasshownintheLenovo
programsavailableontheWindows7operatingsystemtable.
Note:Ifyoudonotfindtheprogramyouneed,opentheLenovoThinkVantage®Toolsprogramtofindthe
dimmediconfortheprogram.Thendouble-clicktheicontoinstalltheprogram.
ToaccessLenovoprogramsthroughWindowsSearch,dothefollowing:
1.ClicktheStartbuttonandthentypetheprogramnameortheiconnameintothesearchbox.
2.Locatetheprogrambytheprogramnameortheiconnameandthenclicktheprogramtolaunchit.
ToaccessLenovoprogramsfromControlPanel,dothefollowing:
Note:SomeLenovoprogramsmightnotbedisplayedinControlPanel.Tofindtheseprograms,use
WindowsSearch.
1.ClickStart➙ControlPanel.ChangetheviewofControlPanelfromCategorytoLargeiconsorSmall
icons.
2.Locatetheprogrambytheiconnameandthenclicktheprogramtolaunchit.
Dependingonthemodel,yourcomputermightsupportthefollowingLenovoprograms:
Note:Theavailableprogramsaresubjecttochangewithoutnotice.
Table1.LenovoprogramsavailableontheWindows7operatingsystem
ProgramnameIconname
AccessConnections™Lenovo-InternetConnection
ActiveProtectionSystem™Lenovo-AirbagProtection
CommunicationsUtilityLenovo-WebConferencing
FingerprintManagerProorLenovoFingerprint
Manager
Lenovo-FingerprintManagerProorLenovo-Fingerprint
Manager
LenovoMicrophoneMuteLenovo-MicrophoneMute
LenovoQuickCastLenovoQuickCast
LenovoQuickControlLenovoQuickControl
LenovoQuickDisplayLenovoQuickDisplay
LenovoSolutionCenterLenovo-SystemHealthandDiagnostics
LenovoThinkVantageToolsLenovoThinkVantageTools
MessageCenterPlusMessagesfromLenovo
PasswordManagerLenovo-PasswordVault
PowerManagerLenovo-PowerControls
RecoveryMediaLenovo-FactoryRecoveryDisksorCreateRecoveryMedia
RescueandRecovery®Lenovo-EnhancedBackupandRestore
SystemUpdateLenovo-UpdateandDrivers
Chapter1.Productoverview13

AccessingLenovoprogramsontheWindows8.1operatingsystem
YoucanaccessLenovoprogramsontheWindows8.1operatingsystemfromtheStartscreenorthe
Appsscreen.
PresstheWindowskeytogototheStartscreen.ClickaLenovoprogramtolaunchit.Ifyoucannotfind
theprogramyouneed,clickthearrowicontogototheAppsscreen.Findthedesiredprograminthe
listorsearchfortheprograminthesearchbox.
Note:Ifyoudonotfindtheprogramyouneed,gotoLenovoPCExperience➙LenovoT ools.Thenyou
canfindtheprogramyouneed.
Dependingonthemodel,yourcomputermightsupportthefollowingLenovoprograms:
Note:Theavailableprogramsaresubjecttochangewithoutnotice.
•ActiveProtectionSystem
•FingerprintManagerPro
•LenovoCompanion
•LenovoMicrophoneMute
•LenovoQuickCast
•LenovoQuickControl
•LenovoSettings
•LenovoSolutionCenter
•LenovoSupport
•LenovoPCExperience
•PasswordManager
•SystemUpdate
AnintroductiontoLenovoprograms
ThistopicprovidesabriefintroductiontosomeLenovoprograms.
Note:Theavailableprogramsaresubjecttochangewithoutnotice.
•AccessConnections(Windows7)
TheAccessConnectionsprogramisaconnectivityassistantprogramforcreatingandmanaginglocation
profiles.EachlocationprofilestoresallthenetworkandInternetconfigurationsettingsneededfor
connectingtoanetworkinfrastructurefromaspecificlocationsuchasahomeoranoffice.
Byswitchingbetweenlocationprofilesasyoumoveyourcomputerfromplacetoplace,youcanquickly
andeasilyconnecttoanetworkwithnoneedtomanuallyreconfigureyoursettingsandrestartthe
computereachtime.
•CommunicationsUtility(Windows7)
TheCommunicationsUtilityprogramenablesyoutoconfiguresettingsfortheintegratedcameraand
audiodevices.
•LenovoQuickDisplay(Windows7)
TheLenovoQuickDisplayprogramenablesyoutoestablishaconnectionbetweenyourcomputeranda
Wi-Fidisplayprojector.Thisprovidesyouwithaquickandeasywaytomakepresentations.
14UserGuide

•LenovoThinkVantageT ools(Windows7)
TheLenovoThinkVantageToolsprogramhelpsyouworkmoreeasilyandsecurelybyprovidingeasy
accesstovariousprogram,suchasLenovoFingerprintManager,LenovoSolutionCenter,andsoon.
•MessageCenterPlus(Windows7)
TheMessageCenterPlusprogramautomaticallydisplaysmessagestoinformyouaboutimportantnotices
fromLenovo,suchasalertsonsystemupdatesandalertsonconditionsthatrequireyourattention.
•MobileBroadbandConnect(Windows7)
TheMobileBroadbandConnectprogramenablesyoutoconnectthecomputertothemobilebroadband
networkthroughasupportedwirelessWANcard.
•PowerManager(Windows7)
ThePowerManagerprogramprovidesconvenient,flexible,andcompletepowermanagementforthe
computer.Itenablesyoutoadjustyourcomputerpowersettingstoachievethebestbalancebetween
performanceandpowersaving.
•RecoveryMedia(Windows7)
TheRecoveryMediaprogramenablesyoutorestorethecontentsoftheharddiskdrive,solid-state
drive,orhybriddrivetothefactorydefaultsettings.
•RescueandRecovery(Windows7)
TheRescueandRecoveryprogramisaone-buttonrecoveryandrestoresolution.Itincludesasetof
self-recoverytoolstohelpyoudiagnosecomputerproblems,gethelp,andrecoverfromsystemcrashes,
evenifyoucannotstarttheWindowsoperatingsystem.
•LenovoCompanion(Windows8.1)
ThroughtheLenovoCompanionprogram,youcangettheinformationabouttheaccessoriesforyour
computer,viewblogsandarticlesaboutyourcomputer,andcheckforotherrecommendedprograms.
•LenovoSettings(Windows8.1)
TheLenovoSettingsprogramenablesyoutoenhanceyourcomputingexperiencebyturningyour
computerintoaportablehotspot,configuringcameraandaudiosettings,optimizingyourpowersettings,
andcreatingandmanagingmultiplenetworkprofiles.
•LenovoSupport(Windows8.1)
TheLenovoSupportprogramenablesyoutoregisteryourcomputerwithLenovo,downloadandview
usermanuals,getthewarrantyinformationofyourcomputer,andexplorehelpandsupportinformation.
•LenovoPCExperience(Windows8.1)
TheLenovoPCExperienceprogramhelpsyouworkmoreeasilyandsecurelybyprovidingeasyaccessto
variousprograms,suchasActiveProtectionSystem,UserGuide,andLenovoSolutionCenter.
•ActiveProtectionSystem(Windows7andWindows8.1)
TheActiveProtectionSystemprogramprotectsyourharddiskdrivewhentheshocksensorinsideyour
computerdetectsaconditionthatcoulddamagethedrive,suchassystemtilt,excessivevibration,or
shock.Theharddiskdriveislessvulnerabletodamagewhenitisnotoperating.Thisisbecausewhen
theharddiskdriveisnotoperating,thesystemstopsitfromspinning,andmightalsomovetheread
andwriteheadsofthedrivetoareasthatdonotcontaindata.Assoonastheshocksensorsenses
thattheenvironmentisstableagain(minimalchangeinsystemtilt,vibration,orshock),itturnsonthe
harddiskdrive.
•FingerprintManagerProorLenovoFingerprintManager(Windows7andWindows8.1)
Ifyourcomputercomeswithafingerprintreader,theFingerprintManagerProprogramorLenovo
FingerprintManagerprogramenablesyoutoenrollyourfingerprintandassociateitwithyourpasswords.
Asaresult,thefingerprintauthenticationcanreplaceyourpasswordandenablesimpleandsecure
useraccess.
Chapter1.Productoverview15

•LenovoMicrophoneMute(Windows7andWindows8.1)
TheLenovoMicrophoneMuteprogramenablesyoutosetwhichrecordingdeviceswillbecontrolledby
themicrophone-mutekeyonyourcomputer.Bypressingthemicrophone-mutekey,youcanmuteor
unmutetherecordingdevicesthatyouhaveselectedintheLenovoMicrophoneMuteprogram.
•LenovoQuickCast(Windows7andWindows8.1)
TheLenovoQuickCastprogramprovidesyouwithaquickandeasywaytosendfilesanduniform
resourcelocators(URLs)betweentwodevices.
•LenovoQuickControl(Windows7andWindows8.1)
TheLenovoQuickControlprogramenablesyoutocontrolyourcomputerremotelyfromyour
smartphone.Youcancontrolthemouse,entertext,controlmoviesandmusic,givepresentations,and
more.
•LenovoSolutionCenter(Windows7andWindows8.1)
TheLenovoSolutionCenterprogramenablesyoutotroubleshootandresolvecomputerproblems.It
combinesdiagnostictests,systeminformationcollection,securitystatus,andsupportinformation,along
withhintsandtipsforoptimalsystemperformance.
•PasswordManager(Windows7andWindows8.1)
ThePasswordManagerprogramautomaticallycapturesandfillsinauthenticationinformationfor
WindowsprogramsandWebsites.
•SystemUpdate(Windows7andWindows8.1)
TheSystemUpdateprogramenablesyoutokeepthesoftwareonthecomputerup-to-dateby
downloadingandinstallingsoftwarepackages,includingThinkVantageprograms,devicedrivers,Unified
ExtensibleFirmwareInterface(UEFI)basicinput/outputsystem(BIOS)updates,andotherthird-party
programs.
16UserGuide

Chapter2.Usingyourcomputer
Thischapterprovidesinformationonusingsomeofthecomputercomponents.
Thischaptercontainsthefollowingtopics:
•“Registeringyourcomputer”onpage17
•“Frequentlyaskedquestions”onpage17
•“Specialkeys”onpage21
•“ThinkPadpointingdevice”onpage23
•“Powermanagement”onpage28
•“Connectingtothenetwork”onpage33
•“Usinganexternaldisplay”onpage35
•“Usingaudiofeatures”onpage37
•“Usingthecamera”onpage37
•“Usingaflashmediacard”onpage38
Registeringyourcomputer
Whenyouregisteryourcomputer,informationisenteredintoadatabase,whichenablesLenovotocontact
youincaseofarecallorothersevereproblem.Inaddition,somelocationsofferextendedprivilegesand
servicestoregisteredusers.
WhenyouregisteryourcomputerwithLenovo,youalsowillreceivethefollowingbenefits:
•QuickerservicewhenyoucallLenovoforhelp
•Automaticnotificationoffreesoftwareandspecialpromotionaloffers
ToregisteryourcomputerwithLenovo,gotohttp://www.lenovo.com/registerandfollowtheinstructionson
thescreentoregisteryourcomputer.
IfyouareusingaWindows7operatingsystem,youalsocanregisteryourcomputerthroughthepreinstalled
LenovoProductRegistrationprogram.Theprogramlaunchesautomaticallyafteryouhaveusedyour
computerforaperiodoftime.Followtheinstructionsonthescreentoregisteryourcomputer.
Frequentlyaskedquestions
Thefollowingareafewtipsthatwillhelpyouoptimizetheuseofyourcomputer.
Toensurethatyoureceivethebestperformancefromyourcomputer,gotothefollowingWebpagetofind
informationsuchasaidsfortroubleshootingandanswerstofrequentlyaskedquestions:
http://www.lenovo.com/support/faq
CanIgetmyuserguideinanotherlanguage?
•Todownloadtheuserguideinanotherlanguage,gotohttp://www.lenovo.com/support.Thenfollow
theinstructionsonthescreen.
Howtoturnoffmycomputer?
©CopyrightLenovo201417

•ForWindows7:OpentheStartmenu,thenclickShutdown.
•ForWindows8.1:Dooneofthefollowing:
–GototheStartscreenbypressingtheWindowskey,clickthepowericoninthetop-rightcorner
ofthescreen,thenclickShutdown.
–Moveyourpointertothetop-rightorbottom-rightcornerofthescreentodisplaythecharms.Then
clickSettings➙Power➙Shutdown.
Note:YoualsocanopentheSettingscharmbypressingthesettingskey.
HowdoIusebatterypowermoreeffectivelywhenIamonthego?
•Toconservepower,ortosuspendoperationwithoutexitingprogramsorsavingfiles,see“Power-saving
modes”onpage30.
•Toachievethebestbalancebetweenperformanceandpowersaving,createandapplypowerplans.
See“Managingthebatterypower”onpage30
•Ifyourcomputerwillbeturnedoffforanextendedperiodoftime,youcanpreventbatterypower
fromdrainingbyremovingthebattery.Lookformoreinformationaboutusingthebatteryin“Power
management”onpage28.
HowdoIsecurelydisposeofdatastoredontheharddiskdrive,hybriddrive,orsolid-statedrive?
•StudyChapter4“Security”onpage45sectiontofindouthowyoucanprotectyourcomputerfrom
theftandunauthorizeduse.
•UsethePasswordManagerprogramtoprotectthedatastoredonyourcomputer.Fordetails,seethe
helpinformationsystemoftheprogram.
•Beforeyoudisposeofthedataontheharddiskdrive,hybriddrive,orsolid-statedrive,besuretoread
“Noticeondeletingdatafromyourharddiskdrive,hybriddrive,orsolid-statedrive”onpage52.
HowdoIgetconnectedindifferentlocations?
•Totroubleshootawirelessnetworkingissue,goto:
http://www.lenovo.com/support/faq
•TakeadvantageofthenetworkingfeaturesprovidedbytheAccessConnectionsprogram(onthe
Windows7operatingsystem)orLocationAwarenessprograminLenovoSettings(ontheWindows
8.1operatingsystem).
•Tolearnmoreaboutusingthewirelessfeaturesofyourcomputer,referto“Wirelessconnections”on
page33.
•Totravelmoreconfidently,besuretocheckthetipsin“Travelingwithyourcomputer”onpage130.
•PressF8toenableordisablethewirelessfeatures.
HowdoIgivepresentationsorattachanexternalmonitoroften?
•Ensurethatyoufollowtheprocedurefor“Usinganexternaldisplay”onpage35.
•WiththeExtenddesktopfunction,youcandisplayoutputonboththecomputerdisplayandanexternal
monitor.
HowdoIattachorreplaceadevice?
•SeeChapter9“Replacingdevices”onpage101formoreinformationaboutreplacingthedevicesof
yourcomputer.
Ihavebeenusingthecomputerforsometimealready,anditisgettingslower.WhatshouldIdo?
18UserGuide
•Followthe“Generaltipsforpreventingproblems”onpage69.
•Diagnoseproblemsyourselfbyusingthepreinstalleddiagnosticsoftware.
•CheckforrecoverysolutionsinChapter8“Recoveryoverview”onpage93.
Printthefollowingsectionsandkeepthemwithyourcomputerincaseyouareunabletoaccessthisonline
userguidewhennecessary.
•“Installinganewoperatingsystem”onpage55
•“Computerstopsresponding”onpage75
•“Powerproblems”onpage89
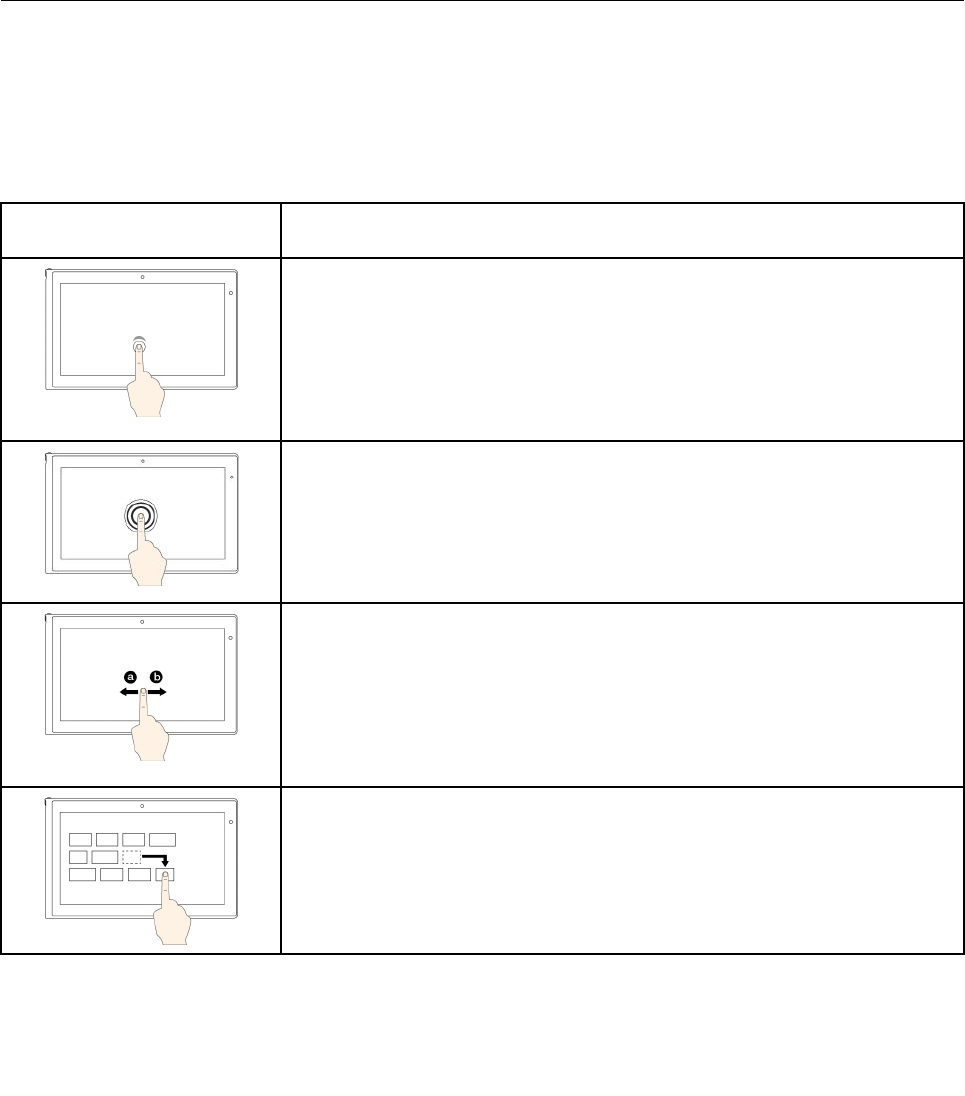
Usingthemulti-touchscreen
Thistopicprovidesinstructionsonhowtousethemulti-touchscreenthatisavailableonsomemodels.
Notes:
•Yourcomputerscreenmightlookdifferentfromthefollowingillustrations.
•Dependingontheappyouuse,somegesturesmightnotbeavailable.
Touchgesture(touchmodels
only)
Description
Touch:Tap.
Mouseaction:Click.
Function:Openanapporperformanactiononanopenapp,suchasCopy,
Save,andDelete,dependingontheapp.
Supportedoperatingsystems:Windows7andWindows8.1
Touch:Tapandhold.
Mouseaction:Right-click.
Function:Openamenuwithmultipleoptions.
Supportedoperatingsystems:Windows7andWindows8.1
Touch:Slide.
Mouseaction:Scrollthemousewheel,movethescrollbar,orclickthescroll
arrow.
Function:Scrollthroughitems,suchaslists,pages,andphotos.
Supportedoperatingsystems:Windows7andWindows8.1
Touch:Draganitemtothedesiredlocation.
Mouseaction:Click,hold,anddraganitem.
Function:Moveanobject.
Supportedoperatingsystems:Windows7andWindows8.1
Chapter2.Usingyourcomputer19
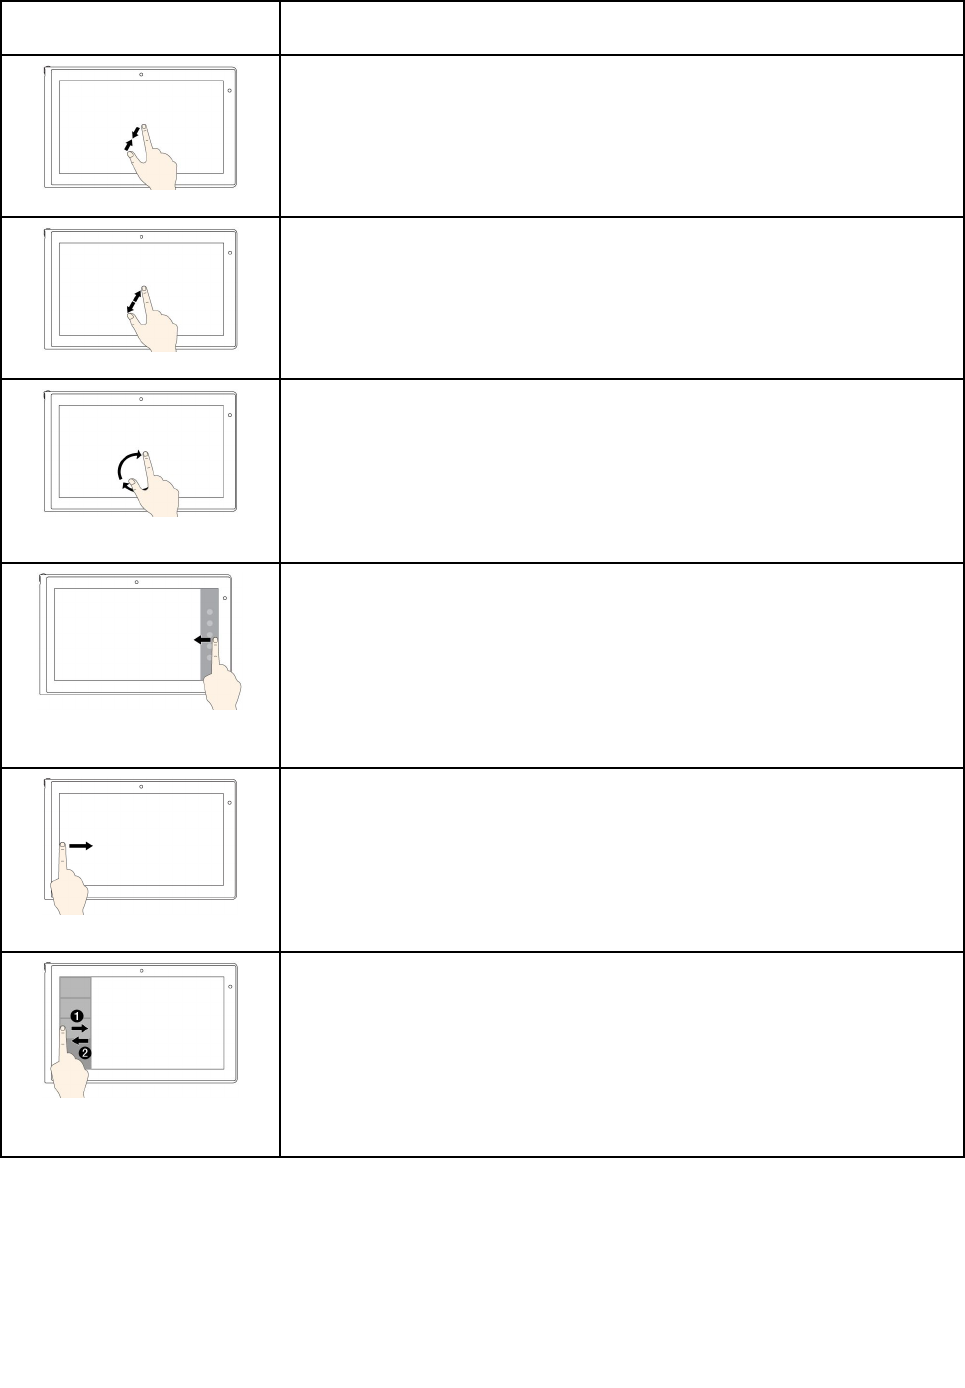
Touchgesture(touchmodels
only)
Description
Touch:Movetwofingersclosertogether.
Mouseaction:PresstheCtrlkeywhilescrollingthemousewheelbackward.
Function:Zoomout.
Supportedoperatingsystems:Windows7andWindows8.1
Touch:Movetwofingersfartherapart.
Mouseaction:PresstheCtrlkeywhilescrollingthemousewheelforward.
Function:Zoomin.
Supportedoperatingsystems:Windows7andWindows8.1
Touch:Puttwoormorefingersonanitemandthenrotateyourfingersclockwise
orcounterclockwise.
Mouseaction:Iftheappsupportsrotation,clicktherotationicon.
Function:Rotateanitem.
Supportedoperatingsystems:Windows7andWindows8.1
Touch:Swipeinfromtherightedge.
Mouseaction:Movethepointertothebottom-rightortop-rightcornerofyour
screen.
Function:Displaythecharmsthatcontainsystemcommands,suchasStart,
Settings,Search,Share,andDevices.
Supportedoperatingsystem:Windows8.1
Touch:Swipeinfromtheleftedge.
Mouseaction:Movethepointertothetop-leftcornerofyourscreen,andthen
click.Keepclickingtocyclethroughtheopenapps.
Function:Cyclethroughandswitchtoopenapps.
Supportedoperatingsystem:Windows8.1
Touch:Swipeinandoutontheleftedge.
Mouseaction:Movethepointertothetop-leftcornerofthescreen,andthen
movethepointerdownwardalongtheleftedge.Tomakeaselection,clickthe
desiredapp.
Function:Viewtherecentlyusedappsorselectanactiveappfromthelist.
Supportedoperatingsystem:Windows8.1
20UserGuide
Touchgesture(touchmodels
only)
Description
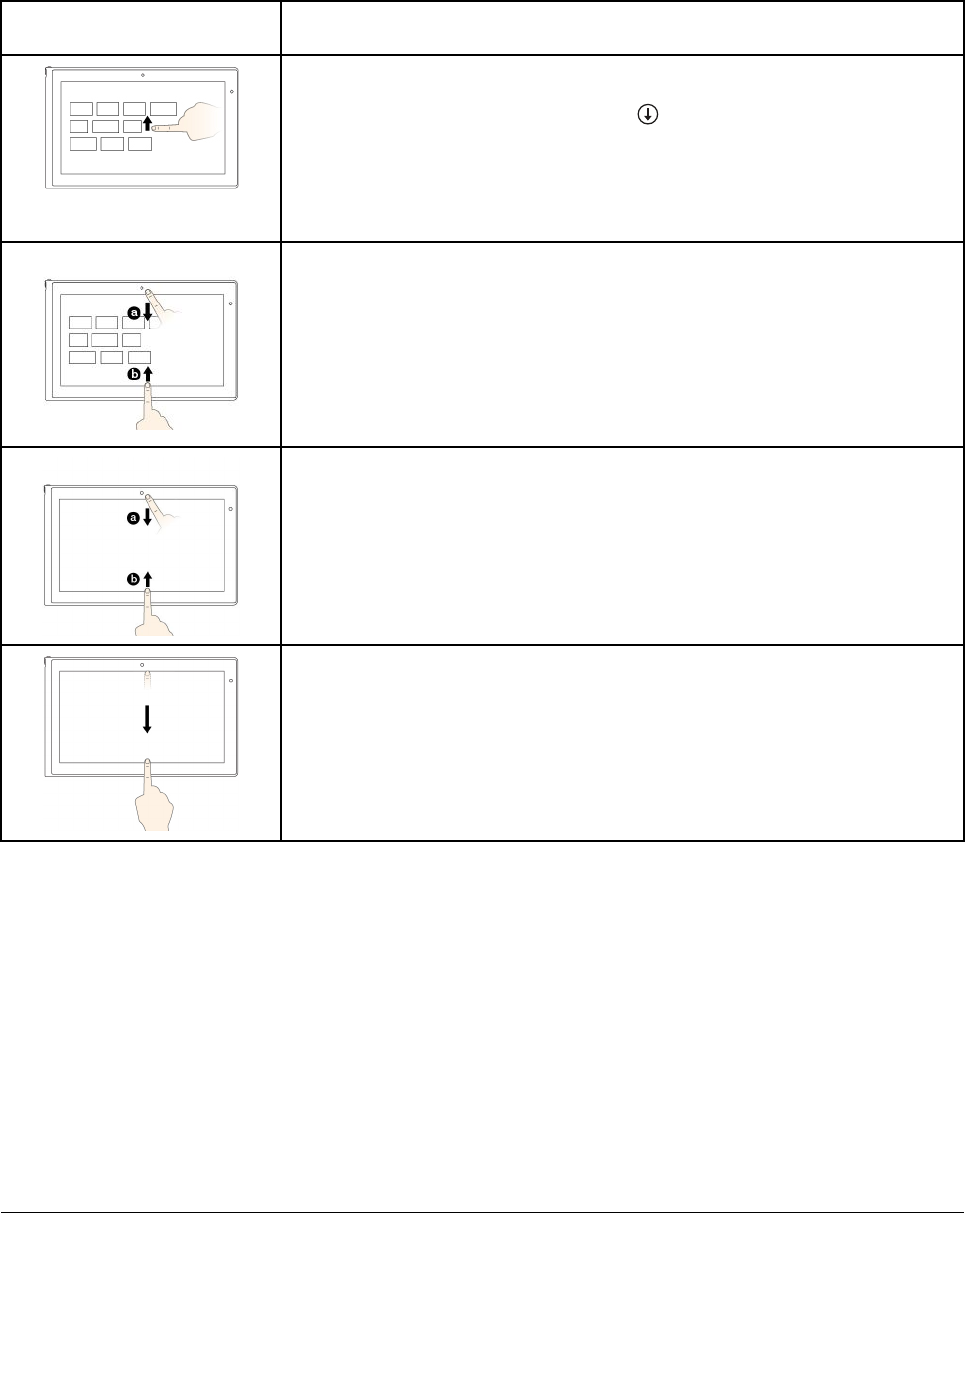
Touch:Swipeuptothetopedge.
Mouseaction:Clickthedownwardarrow()locatednearthebottom-leftcorner
oftheStartscreen.
Function:ViewallappsontheStartscreen.
Supportedoperatingsystem:Windows8.1
Touch:SwipeinfromthetoporbottomedgeoftheStartscreen,tapCustomize,
andthentapthedesiredicon.
Mouseaction:Right-clickablankareaontheStartscreen,clickCustomize,
andthenclickthedesiredicon.
Function:CustomizetilesontheStartscreen,oruninstallanapp.
Supportedoperatingsystem:Windows8.1
Touch:Swipeinfromthetoporbottomedgeofanopenapp.
Mouseaction:Right-clickanywhereonanopenapp.
Function:Viewtheappcommandsonanopenapp,suchasCopy,Save,and
Delete,dependingontheapp.
Supportedoperatingsystem:Windows8.1
Touch:Swipeinfromthetopedgetothebottomonanopenapp.
Mouseaction:Fromthetopedgeofthescreen,click,hold,andmovethepointer
tothebottomofthescreen.Then,releasethebutton.
Function:Closethecurrentapp.
Supportedoperatingsystem:Windows8.1
Tipsonusingthemulti-touchscreen
•Themulti-touchscreenisaglasspanelcoveredwithaplasticfilm.Donotapplypressureorplaceany
metallicobjectonthescreen,whichmightdamagethetouchpanelorcauseittomalfunction.
•Donotusefingernails,glovedfingers,orinanimateobjectsforinputonthescreen.
•Regularlycalibratetheaccuracyofthefingerinputtoavoidadiscrepancy.
Tipsoncleaningthemulti-touchscreen
•Turnoffthecomputerbeforecleaningthemulti-touchscreen.
•Useadry,soft,andlint-freeclothorapieceofabsorbentcottontoremovefingerprintsordustfromthe
multi-touchscreen.Donotapplysolventstothecloth.
•Gentlywipethescreenusingatop-downmotion.Donotapplyanypressureonthescreen.
Specialkeys
Yourcomputerhasseveralspecialkeystohelpyouworkmoreeasilyandeffectively.
Chapter2.Usingyourcomputer21

Functionkeysandkeycombinations
Thekeyboardhasseveralfunctionkeys,whichconsistoftheFnkey1andtheotherfunctionkeys2.
•+:PressFn+EsctoenableordisabletheFnLockfunction.
WhentheFnLockfunctionisdisabled:TheFnLockindicatorisoff(defaultmode).Toinitiatethe
specialfunctionofeachkey,pressthefunctionkeysdirectly.ToinputF1-F12,presstheFnkeyandthe
correspondingfunctionkey.
WhentheFnLockfunctionisenabled:TheFnLockindicatorturnson.ToinputF1-F12,pressthe
functionkeysdirectly.Toinitiatethespecialfunctionofeachkey,presstheFnkeyandthecorresponding
functionkey.
•:Mutesorunmutesthespeakers.Whenthespeakersaremuted,thespeakermuteindicatorturnson.
Ifyoumutethesoundandturnoffyourcomputer,thesoundwillremainmutedwhenyouturnonyour
computeragain.Toturnonthesound,pressF1,F2,orF3.
•:Decreasesthespeakervolume.
•:Increasesthespeakervolume.
•:Mutesorunmutesthemicrophones.Whenthemicrophonesaremuted,themicrophone-mute
indicatorturnson.
•:Darkensthedisplay.
•:Brightensthedisplay.
Youcantemporarilychangethecomputerdisplaybrightnessbypressingthetwokeys.Tochangethe
defaultbrightnesslevel,right-clickthebatterystatusiconintheWindowsnotificationarea.Thenclick
Adjustscreenbrightnessandmakechangesasdesired.
•:Switchesthedisplayoutputlocationbetweenthecomputerdisplayandanexternalmonitor.For
moreinformation,referto“Usinganexternaldisplay”onpage35.
Note:Toswitchbetweenthecomputerdisplayandanexternalmonitor,theWindows+Pkeycombination
alsoisavailable.
•:Enablesordisablesthebuilt-inwirelessnetworkingfeatures.Formoreinformationonthewireless
features,referto“Wirelessconnections”onpage33.
22UserGuide
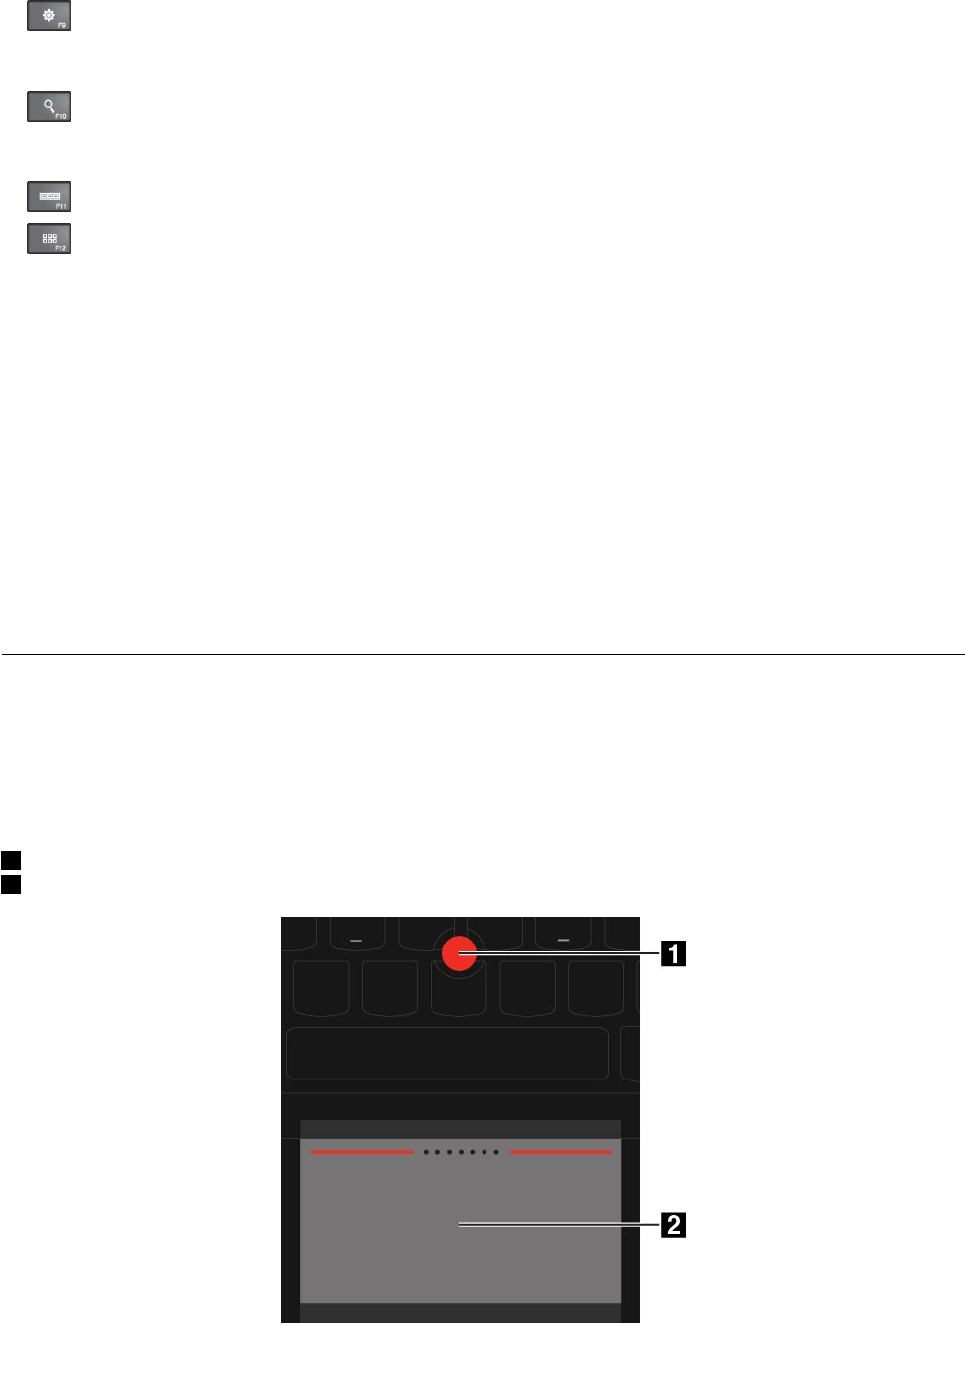
•:
ForWindows8.1:OpenstheSettingscharm.
ForWindows7:OpensControlPanel.
•:
ForWindows8.1:OpenstheSearchcharm.
ForWindows7:OpensWindowsSearch.
•:Viewstheprogramsthatyouhaveopened.
•:
ForWindows8.1:Viewsalltheprograms.
ForWindows7:OpensComputer.
•Fn+B:HasthesamefunctionastheBreakkey.
•Fn+P:HasthesamefunctionasthePausekey.
•Fn+S:HasthesamefunctionastheSysRqkey.
•Fn+K:HasthesamefunctionastheScrLKkey.
Windowskey
OntheWindows7operatingsystem,presstheWindowskeytoopentheStartmenu.OntheWindows8.1
operatingsystems,presstheWindowskeytoswitchbetweenthecurrentworkspaceandtheStartscreen.
ForinformationaboutusingtheWindowskeywithotherkeys,refertothehelpinformationsystemofthe
Windowsoperatingsystem.
ThinkPadpointingdevice
TheThinkPadpointingdeviceenablesyoutoperformallthefunctionsofatraditionalmouse,suchas
movingthepointer,left-clicking,right-clicking,andscrolling.WiththeThinkPadpointingdevice,youalso
canperformavarietyoftouchgestures,suchasrotatingandzoominginorout.
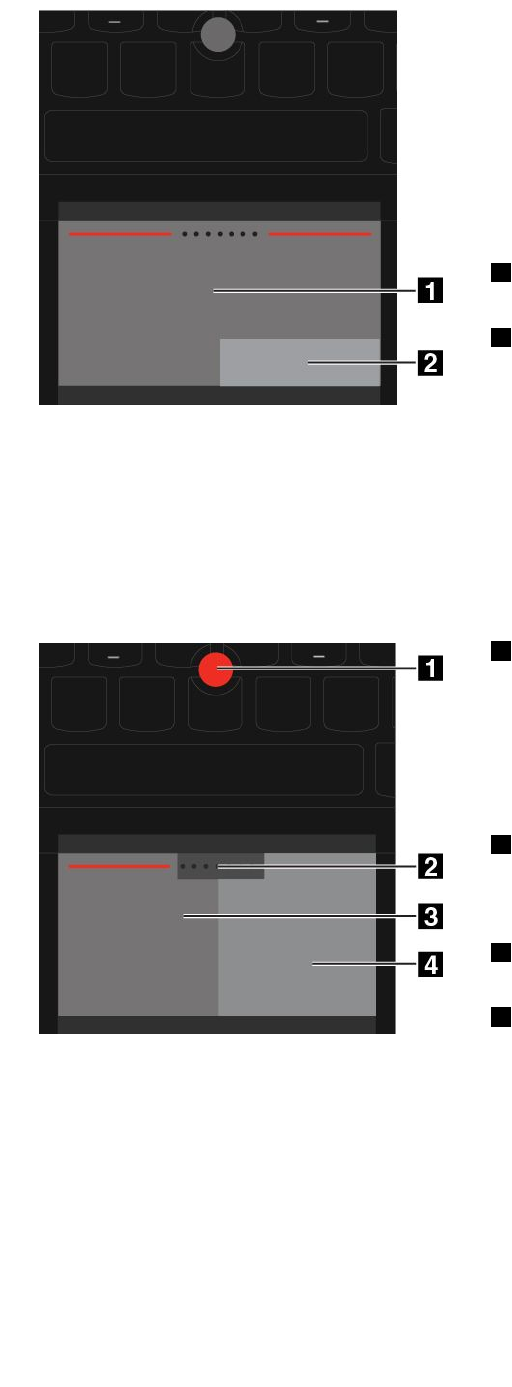
TheThinkPadpointingdeviceconsistsofthefollowingcomponents:
1Pointingstick
2Trackpad
Chapter2.Usingyourcomputer23

UsingtheThinkPadpointingdevice
Dependingonyourpreference,youcanusetheThinkPadpointingdeviceinoneofthefollowingmodes:
•TrackPointmode
•Trackpadmode
•ClassicTrackPointmode
TochangeamodefortheThinkPadpointingdevice,see“CustomizingtheThinkPadpointingdevice”
onpage27.
Note:Bydefault,TrackPointmodeandTrackpadmodearebothenabled.Youcanuseeitheroneofthem.
TrackPointmode
InTrackPointmode,usethepointingsticktomovethepointer,andusethetrackpadtoperformother
actionssuchasleft-clicking,right-clicking,andscrolling.Youalsocanusethetrackpadtoperforma
varietyoftouchgestures.
Forhowtousethetouchgestures,see“Usingthetrackpadtouchgestures”onpage25.
1Pointing
Usethepointingsticktomovethepointer.Tousethe
pointingstick,applypressuretothenonslipcaponthe
pointingstickinanydirectionparalleltothekeyboard.
Thepointermovesaccordinglybutthepointingstickitself
doesnotmove.Thespeedatwhichthepointermoves
dependsonthepressureyouapplytothepointingstick.
2Scrolling
Pressandholdthedottedscrollingbarwhilemovingthe
pointerintheverticalorhorizontaldirection.Thenyou
canscrollthroughthedocument,Website,orapps.
3Right-clicking
Presstheright-clickingzonetodisplayashortcutmenu.
4Left-clicking
Presstheleft-clickingzonetoselectoropenanitem.
Trackpadmode
InTrackpadmode,usethetrackpadtoperformalltheactions,suchasmovingthepointer,left-clicking,
right-clicking,andscrolling.Youalsocanusethetrackpadtoperformavarietyoftouchgestures.
Forhowtousethetouchgestures,see“Usingthetrackpadtouchgestures”onpage25.
24UserGuide
Pointing
Slideonefingeracrossthesurfaceofthetrackpadto
movethepointeraccordingly.
Scrolling
Puttwofingersonthetrackpadandmovetheminthe
verticalorhorizontaldirection.Thenyoucanscroll
throughthedocument,Website,orapps.Ensurethat
youputtwofingersslightlyapartfromeachother.
1Left-clicking
Presstheleft-clickingzonetoselectoropenanitem.
2Right-clicking
Presstheright-clickingzonetodisplayashortcutmenu.
ClassicTrackPointmode
InClassicTrackPointmode,usethepointingsticktomovethepointer,andusethetrackpadtoperform
otheractionssuchasleft-clicking,right-clicking,andscrolling.
Note:ComparedwithTrackPointmode,ClassicTrackPointmodeenlargestheright-clickingzonesothatthe
right-andleft-clickingzonesonthetrackpadaredividedequally.However,thetouchgesturesaredisabled
andcannotbeusedinClassicTrackPointmode.
1Pointing
Usethepointingsticktomovethepointer.Tousethe
pointingstick,applypressuretothenonslipcaponthe
pointingstickinanydirectionparalleltothekeyboard.
Thenyoucanmovethepointer.Butthepointingstick
itselfdoesnotmove.Thespeedatwhichthepointer
movesdependsonthepressureyouapplytothepointing
stick.
2Scrolling
Pressandholdthedottedscrollingbarwhilemovingthe
pointer.Thenyoucanscrollthroughthedocument,Web
site,orapps.
3Left-clicking
Presstheleft-clickingzonetoselectoropenanitem.
4Right-clicking
Presstheright-clickingzonetodisplayashortcutmenu.
Usingthetrackpadtouchgestures
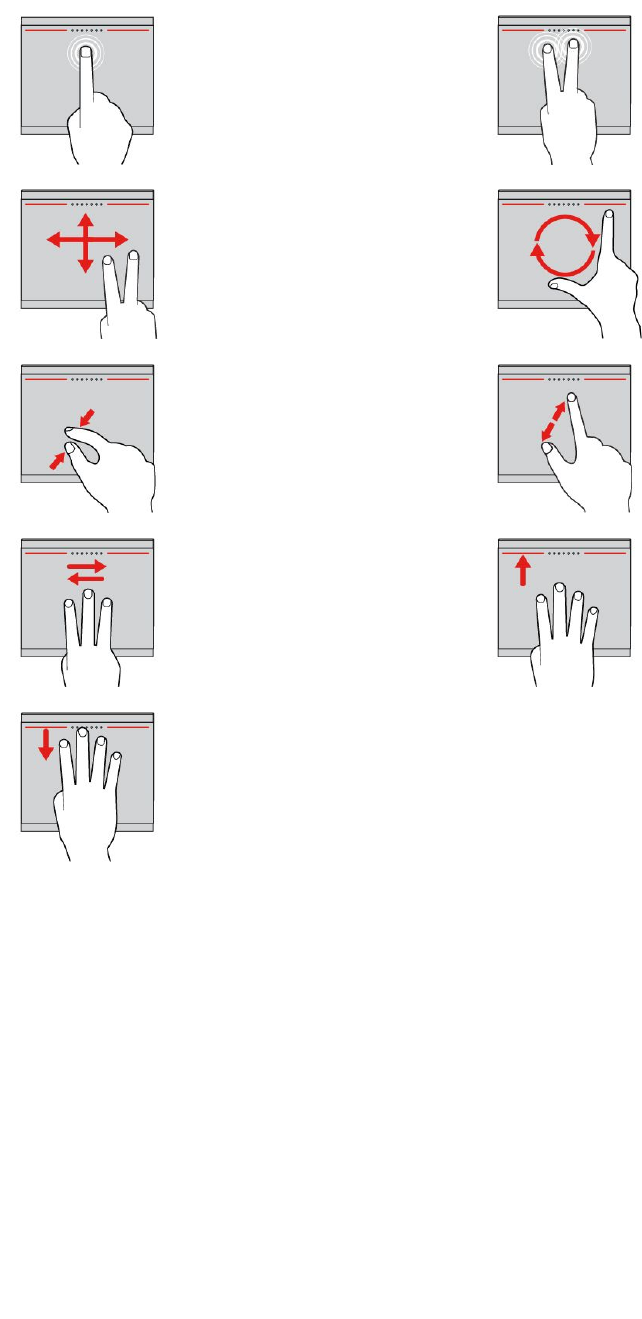
Thewholetrackpadisanactiveareasensitivetofingertouchandmovement.Youcanusethetrackpad
toperformpointingandclickingactionsasatraditionalmousedoes.Youalsocanusethetrackpad
toperformavarietyoftouchgestures.
Thistopicintroducesthefrequentlyusedtouchgesturessuchastapping,dragging,scrolling,androtating.
Formoregestures,seethehelpinformationsystemoftheThinkPadpointingdevice.
Notes:
Chapter2.Usingyourcomputer25
•SomegesturesareonlyavailableincertainappsandmodesoftheThinkPadpointingdevice.
•Whenusingtwoormorefingers,ensurethatyourfingersareslightlyapart.
Tapping
Tapanywhereonthetrackpad
withonefingertoselectoropen
anitem.
Two-fingertapping
Tapanywhereonthetrackpadwith
twofingerstodisplayashortcut
menu.
Two-fingerscrolling
Puttwofingersonthetrackpad
andmovethemintheverticalor
horizontaldirection.Thenyou
canscrollthroughthedocument,
Website,orapps.
Two-fingerrotating
Puttwofingersonthetrackpad
androtatethemclockwiseor
counterclockwisetorotateanitem.
Two-fingerpinching
Puttwofingersonthetrackpad
andmovethemclosertogether
tozoomout.
Two-fingerpinching
Puttwofingersonthetrackpadand
movethemfartheraparttozoomin.
Three-fingerswiping
Putthreefingersonthetrackpad
andmovethemleftwardto
showthenextitem.Movethem
rightwardtoshowtheprevious
item.
Four-fingerswiping
Putfourfingersonthetrackpad
andmovethemupwardtoviewand
choosefromopenedapps.
Four-fingerswiping
Putfourfingersonthetrackpad
andmovethemdownwardto
showthedesktop.
Note:ThefollowingtouchgesturesareavailableonlyontheWindows8.1operatingsystem.
26UserGuide
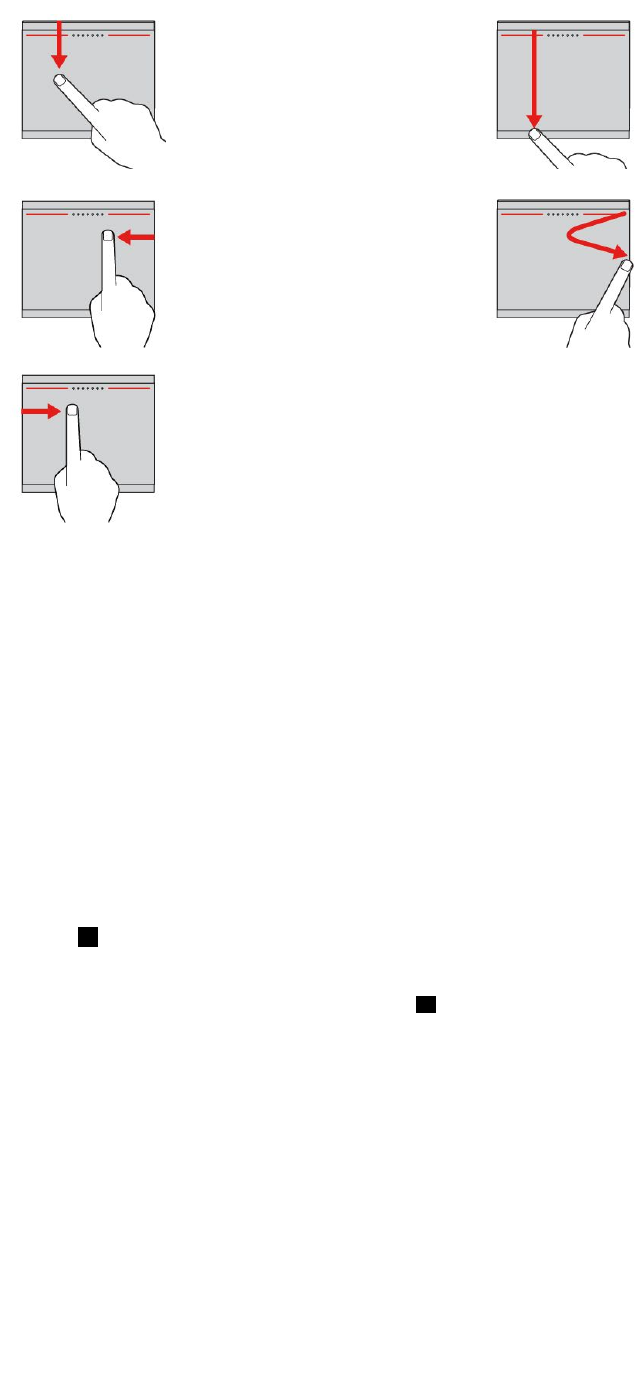
Swipingfromthetopedge
FromtheStartscreenorthe
currentapp,swipeinfrom
thetopedgeofthetrackpad
withonefingertodisplaythe
commandmenu.
Swipingfromthetoptothe
bottomedge
Swipefromthetoptothebottom
edgeofthetrackpadwithone
fingertoclosethecurrentapp.
Performingthisgestureonthe
desktopclosesthedesktopand
displaystheStartscreen.
Swipingfromtherightedge
Swipeinfromtherightedgeof
thetrackpadwithonefingerto
displaythecharms.
Swipinginandout
Swipeinandoutfromtheright
edgeofthetrackpadwithone
fingertohidethecharms.
Swipingfromtheleftedge
Swipeinfromtheleftedgeof
thetrackpadwithonefingerto
showthepreviouslyusedapp.
CustomizingtheThinkPadpointingdevice
YoucancustomizetheThinkPadpointingdevicesothatyoucanuseitmorecomfortablyandefficiently.For
example,youcanchooseyourpreferredmodetousetheThinkPadpointingdeviceandconfigurethetouch
gesturesinTrackPointmodeorTrackpadmode.
TocustomizetheThinkPadpointingdevice,dothefollowing:
1.GotoControlPanel.
2.ClickHardwareandSound➙Mouse.TheMousePropertieswindowisdisplayed.
3.IntheMousePropertieswindow,selecttheThinkPadtab.
4.Followtheinstructionsonthescreen.
Replacingthecapofpointingstick
Thecap1ontheendofthepointingstickisremovable.Afteryouusethecapforaperiodoftime,you
mightconsiderreplacingthecapwithanewone.
Note:Ensurethatyouuseacapwithgroovesaasshowninthefollowingillustration.
Chapter2.Usingyourcomputer27

Powermanagement
Whenyouuseyourcomputerawayfromelectricaloutlets,youdependonbatterypowertokeepyour
computerrunning.Differentcomputercomponentsconsumepoweratdifferentrates.Themoreyouusethe
power-intensivecomponents,thefasteryouconsumebatterypower.
SpendmoretimeunpluggedwithThinkPadbatteries.Mobilityhasrevolutionizedbusinessbyenabling
youtotakeyourworkwhereveryougo.WithThinkPadbatteries,youwillbeabletoworklongerwithout
beingtiedtoanelectricaloutlet.
Checkingthebatterystatus
ThebatterystatusiconintheWindowsnotificationareadisplaysthepercentageofbatterypowerremaining.
Therateatwhichyouusebatterypowerwilldeterminehowlongyoucanusethebatteryofyourcomputer
betweencharges.Becauseeachcomputeruserhasdifferenthabitsandneeds,itisdifficulttopredicthow
longabatterychargewilllast.Therearetwomainfactors:
•Howmuchenergyisstoredinthebatterywhenyoubegintowork.
•Thewayyouuseyourcomputer:
–Howoftenyouaccesstheharddiskdrive,hybriddrive,orsolid-statedrive.
–Howbrightyoumakethecomputerdisplay.
–Howoftenyouusethewirelessfeatures.
Tocheckfordetailedbatterystatusinformation,dothefollowing:
•ForWindows7:OpenthePowerManagerprogramandclicktheBatterytab.
•ForWindows8.1:OpentheLenovoSettingsprogramandclickPower.
EnablingthebatteryalarmontheWindows7operatingsystem
FortheWindows7operatingsystem,youcanprogramyourcomputersothatwhenthebatterypowerfalls
belowacertainlevel,threeeventsoccur:thealarmgoesoff,amessageisdisplayed,andtheLCDis
turnedoff.
Toenablethebatteryalarm,dothefollowing:
1.StartthePowerManagerprogram.
2.ClicktheGlobalPowerSettingstab.
28UserGuide

3.ForLowbatteryalarmorCriticallylowbatteryalarm,setthepercentageofthepowerlevelandset
theaction.
Note:Ifyourcomputerenterssleeporhibernationmodewhenthebatteryislow,butthealarmmessage
hasnotyetbeendisplayed,themessagewillbedisplayedwhenthecomputerresumes.Toresumenormal
operation,whenthemessageisdisplayed,clickOK.
Usingtheacpower
Thepowertorunyourcomputercancomeeitherfromthebatteryorfromacpower.Whileyouuseac
power,thebatterieschargeautomatically.
Yourcomputercomeswithanacpoweradapterandapowercord.
•acpoweradapter:Convertsacpowerfornotebookcomputeruse.
•Powercord:Connectstheacoutletandtheacpoweradapter.
Connectingtoacpower
Toconnectthecomputertoacpower,dothefollowing:
Attention:Usinganimproperpowercordmightcauseseveredamagetoyourcomputer.
Note:Ensurethatyouperformtheactionsintheorderinwhichtheyarelisted.
1.Connectthepowercordtotheacpoweradapter.
2.Connecttheacpoweradaptertothepowerconnectorofthecomputer.
3.Connectthepowercordintoanelectricaloutlet.
Tipsonusingtheacpoweradapter
•Whentheacpoweradapterisnotinuse,disconnectitfromtheelectricaloutlet.
•Donotbindthepowercordtightlyaroundtheacpoweradaptertransformerpackwhenitisconnectedto
thetransformer.
•Beforeyouchargethebattery,makesurethatitstemperatureisatleast10°C(50°F).
•Youcanchargethebatterywhentheacpoweradapterisconnectedtothecomputerandthebatteryis
installed.Youneedtochargethebatteryinanyofthefollowingconditions:
–Anewbatteryisinstalled.
–Thepercentageofpowerremainingislow.
–Thebatteryhasnotbeenusedforalongtime.
Chargingthebattery
Whenyoufindthatthepercentageofpowerremainingisloworwhenthepoweralarmalertsyouthatthe
remainingpowerislow,youneedtochargeyourbatteryorreplaceitwithachargedbattery.
Ifanacoutletisconvenient,plugtheacpoweradapterintoit,andtheninserttheconnectorintothe
computer.Thebatterywillbefullychargedinaboutthreetosixhours.Thisisaffectedbythebatterysize
andthephysicalenvironment.Youcancheckthebatterychargingstatusatanytimethroughthebattery
statusiconintheWindowsnotificationarea.
Note:Tomaximizethelifeofthebattery,thecomputerdoesnotstartrechargingthebatteryiftheremaining
powerisgreaterthan95%.
Chapter2.Usingyourcomputer29

Maximizingthebatterylife
Tomaximizethelifeofthebattery,dothefollowing:
•Usethebatteryuntilthechargeiscompletelydepleted.
•Rechargethebatterycompletelybeforeusingit.Youcanseewhetherthebatteryisfullychargedfromthe
batterystatusiconintheWindowsnotificationarea.
•Alwaysusepowermanagementfeaturessuchaspower-savingmodes.
Managingthebatterypower
Toachievethebestbalancebetweenperformanceandpowersaving,adjustyourpowerplansettings.To
achievethis,dothefollowing:
1.Fromthedesktop,clickthebattery-statusiconintheWindowsnotificationareaonthetaskbar.
2.ClickMorepoweroptions➙Changeplansettings.
3.Followtheinstructionsonthescreen.
Note:UseLenovoprogramsforadvancedpowersettings.
•ForWindows7:UsethePowerManagerprogram.
•ForWindows8.1:UsetheLenovoSettingsprogram.
Formoreinformation,see“Lenovoprograms”onpage12.
Power-savingmodes
Thereareseveralmodesthatyoucanuseatanytimetoconservepower.Thissectionintroduceseach
modeandgivestipsontheeffectiveuseofbatterypower.
•Screenblankmode(forWindows7only)
Thecomputerdisplayrequiresconsiderablebatterypower.Toturnoffthepowertothedisplayandmake
thecomputerenterscreenblankmode,right-clickthebatterygaugeiconintheWindowsnotificationarea
andselectPoweroffdisplay.
•Sleepmode
Insleepmode,yourworkissavedtomemory,andthentheharddiskdrive,hybriddrive,orsolid-state
driveandthecomputerdisplayareturnedoff.Whenyourcomputerwakesup,yourworkisrestored
withinseconds.
Dependingonthemodel,yourcomputermightsupportthe30DayStandbyfunction.Whenthisfunction
isenabled,thecomputerconsumesevenlesspowerinsleepmodeandtakesonlysecondstoresume
normaloperationwhenyoupressthepowerbutton.Formoreinformationaboutthe30DayStandby
function,dothefollowing:
–ForWindows7:RefertothehelpinformationsystemofthePowerManagerprogram.Forinstructions
onhowtostartthePowerManagerprogram,see“AccessingLenovoprogramsontheWindows7
operatingsystem”onpage13.
–ForWindows8.1:OpentheLenovoSettingsprogramandclickPower➙30DayStandby.
Toputyourcomputerintosleepmode,dothefollowing:
–ForWindows7:UsetheStartmenushutdownoption.
–ForWindows8.1:Movethepointertothetop-rightorbottom-rightcornerofthescreentobringupthe
charms.ThenclickSettings➙Power➙Sleep.
•Hibernationmode
Byusingthismode,youcanturnoffyourcomputercompletelywithoutsavingfilesorexitingany
30UserGuide

programsthatarerunning.Whenthecomputerentershibernationmode,allopenprograms,folders,and
filesaresavedtotheharddiskdrive,hybriddrive,orsolid-statedrive,andthenthecomputerturnsoff.
Toputthecomputerintohibernationmode,dothefollowing:
–ForWindows7:OpentheStartmenu,thenclickthearrownexttotheShutdownbutton.Click
Hibernatefromthemenudisplayed.
–ForWindows8.1:Definewhatthepowerbuttondoesfirst,thenpressthepowerbuttontoputthe
computerintohibernationmode.Formoreinformation,seeFrontview.
Ifyouputyourcomputerintohibernationmodewiththewake-upfunctiondisabled,thecomputerdoes
notconsumeanypower.Thewake-upfunctionisdisabledbydefault.Ifyouputyourcomputerinto
hibernationmodewiththewake-upfunctionenabled,thecomputerconsumesasmallamountofpower.
Toenablethewake-upfunction,dothefollowing:
1.GotoControlPanelandclickSystemandSecurity.
2.ClickAdministrativeTools.
3.ClickTaskScheduler.Ifyouarepromptedforanadministratorpasswordorconfirmation,typethe
passwordorprovideconfirmation.
4.Fromtheleftpane,selectthetaskfolderforwhichyouwanttoenablethewake-upfunction.The
scheduledtasksaredisplayed.
5.Clickascheduledtask,andthenclicktheConditionstab.
6.UnderPower,selectthecheckboxforWakethecomputertorunthistask.
Toputthecomputerintohibernationmode,changeyourpowerplansettingsbydoingthefollowing:
–ForWindows7:StartthePowerManagerprogramandthenclickthePowerPlantab.Thenfollow
theinstructionsonthescreen.ForinstructionsonhowtostartthePowerManagerprogram,see
“AccessingLenovoprogramsontheWindows7operatingsystem”onpage13.
–ForWindows8.1:Gotothedesktop.Right-clickthebatterystatusiconintheWindowsnotification
areaandclickPowerOptions,clickChangeplansettingsthatisnexttoyourpowerplan.Then
followtheinstructionsonthescreen.
•Wirelessoff
Whenyouarenotusingthewirelessfeatures,suchasBluetoothorwirelessLAN,turnthemoff.This
willhelpconservepower.Toturnoffthewirelessfeatures,pressF8.
Handlingthebattery
ThissystemsupportsonlybatteriesspeciallydesignedforthisspecificsystemandmanufacturedbyLenovo
oranauthorizedbuilder.Thesystemdoesnotsupportunauthorizedbatteriesorbatteriesdesignedforother
systems.Ifanunauthorizedbatteryorabatterydesignedforanothersystemisinstalled,thesystemwill
notcharge.
Attention:Lenovohasnoresponsibilityfortheperformanceorsafetyofunauthorizedbatteries,and
providesnowarrantiesforfailuresordamagearisingoutoftheiruse.
Note:Ifanunauthorizedbatteryisinstalled,thefollowingmessagewillbedisplayed:“Thebatteryinstalled
isnotsupportedbythissystemandwillnotcharge.PleasereplacethebatterywiththecorrectLenovo
batteryforthissystem.”
Chapter2.Usingyourcomputer31

DANGER
Donotattempttodisassembleormodifythebattery.
Attemptingtodosocancauseanexplosion,orliquidleakagefromthebattery.
AbatteryotherthantheonespecifiedbyLenovo,oradisassembledormodifiedbatteryisnot
coveredbythewarranty.
DANGER
Iftherechargeablebatteryisincorrectlyreplaced,thereisdangerofanexplosion.Thebattery
containsasmallamountofharmfulsubstances.Toavoidpossibleinjury:
•Replaceonlywithacoin-cellbatteryofthetyperecommendedbyLenovo.
•Keepthebatteryawayfromfire.
•Donotexposeittoexcessiveheat.
•Donotexposeittowaterorrain.
•Donotshort-circuitit.
•Storeitinacooldryplace.
•Keepitawayfromchildren.
Thebatteryisaconsumablesupply.Ifyourbatterybeginstodischargetooquickly,replacethebattery
withanewoneofthetyperecommendedbyLenovo.Formoreinformationaboutreplacingthebattery,
contactyourCustomerSupportCenter.
DANGER
Donotdrop,crush,orpuncturethebattery,ormakeitsubjecttostrongforces.Batteryabuseor
mishandlingcancausethebatterytooverheat,whichcancausegassesorflameto“vent”fromthe
batteryorcoin-cellbattery.Ifyourbatteryisdamaged,orifyounoticeanydischargefromyour
batteryorthebuildupofforeignmaterialsonthebatteryleads,stopusingthebatteryandobtaina
replacementfromthebatterymanufacturer.
DANGER
Onlyrechargethebatterystrictlyaccordingtoinstructionsincludedintheproductdocumentation.
DANGER
Donotputthebatteryintrashthatisdisposedofinlandfills.Whendisposingofthebattery,comply
withlocalordinancesorregulationsandyourcompany'ssafetystandards.
32UserGuide

DANGER
Thereisadangerofanexplosionifthecoin-cellbatteryisincorrectlyplaced.Thelithiumbattery
containslithiumandcanexplodeifitisnotproperlyhandled,ordisposedof.Replaceonlywitha
batteryofthesametype.Toavoidpossibleinjuryordeath,donot:(1)throworimmerseintowater,
(2)allowittoheattomorethan100°C(212°F),or(3)attempttorepairordisassembleit.Disposeof
itasrequiredbylocalordinancesorregulationsandyourcompany'ssafetystandards.
Connectingtothenetwork
YourcomputerhasoneormorenetworkcardsthatenableyoutoconnectyourcomputertotheInternet
andothernetworkconnections.
Ethernetconnections
Youcanconnectyourcomputertoalocalnetworkorabroadbandconnectionbyusingthebuilt-inEthernet
featureofthecomputer.
DANGER
YourcomputerhasanEthernetconnector.T oavoidtheriskofelectricalshock,donotconnect
thetelephonecabletotheEthernetconnector.
Wirelessconnections
Wirelessconnectionisthetransferofdatawithouttheuseofcablesbutbymeansofradiowavesonly.
Attention:
•Ifyouwanttousethewirelessfeaturesonanairplane,checkthewirelessserviceswiththeairlinebefore
boardingtheairplane.
•Iftherearerestrictionsontheuseofcomputerwirelessfeaturesonanairplane,youneedtodisablethe
wirelessfeaturesofyourcomputerbeforeboarding.
Dependingonthewirelessdevicesinstalledonyourcomputer,youmightbeabletousethefollowing
wirelessnetworks:
•WirelessLANconnection
•Bluetoothconnection
UsingthewirelessLANconnection
Awirelesslocalareanetwork(LAN)coversarelativelysmallgeographicarea,suchasanofficebuildingora
house.Devicesbasedonthe802.11standardscanconnecttothistypeofnetwork.
Yourcomputercomeswithabuilt-inwirelessnetworkcardandaconfigurationutilitytohelpyouestablish
wirelessconnectionsandmonitortheconnectionstatus.Thisenablesyoutostayconnectedtoyournetwork
whileyouareattheoffice,inameetingroom,orathome,withnoneedforawiredconnection.
ToestablishawirelessLANconnection,dothefollowing:
ForWindows7:
1.PressF8andfollowtheinstructionsonthescreentoenablethewirelessfeature.
Chapter2.Usingyourcomputer33

2.Clickthewireless-network-connection-statusiconintheWindowsnotificationarea.Alistofavailable
wirelessnetworksisdisplayed.
3.Double-clickanetworktoconnecttoit.Providerequiredinformationifneeded.
ForWindows8.1:
1.Gotothedesktopandclickthewireless-network-connection-statusiconintheWindowsnotification
area.Alistofavailablewirelessnetworksisdisplayed.
Note:Todisplaythelist,ensurethatairplanemode(flightmode)issettooff.
2.Double-clickanetworktoconnecttoit.Providerequiredinformationifneeded.
Ifyouneedtoconnecttodifferentwirelessnetworksindifferentlocations,usethefollowingsoftwareto
managemultiplenetworkprofilessothatthecomputerautomaticallyconnectstoanavailablenetworkwhen
thelocationchanges:
•ForWindows7:UsetheAccessConnectionsprogram.Formoreinformation,see“AccessingLenovo
programsontheWindows7operatingsystem”onpage13.
•ForWindows8.1:OpentheLenovoSettingsprogramandclickLocationAwareness.Formore
information,see“AccessingLenovoprogramsontheWindows8.1operatingsystem”onpage14.
TipsforusingthewirelessLANfeature
Toachievethebestconnection,usethefollowingguidelines:
•PlaceyourcomputersothatthereareasfewobstaclesaspossiblebetweenthewirelessLANaccess
pointandthecomputer.
•Openyourcomputerlidtoanangleofslightlymorethan90degrees.
•Ifyouusethewirelessfeature(the802.11standards)ofyourcomputersimultaneouslywithaBluetooth
option,thedatatransmissionspeedcanbedelayedandtheperformanceofthewirelessfeaturecanbe
degraded.
Checkingthewireless-LANconnectionstatus
Youcancheckthewireless-LANconnectionstatusthroughthewireless-network-connection-statusiconin
theWindowsnotificationarea.Themorebarsencompassed,thebetterthesignalis.
FortheWindows7operatingsystem,youalsocanchecktheAccessConnectionsgauge,theAccess
Connectionsstatusicon,ortheAccessConnectionswirelessstatusiconintheWindowsnotificationarea.
AccessConnectionsgauge:
•Powertothewirelessradioisoffornosignal.
•Powertothewirelessradioison.Thesignalstrengthofthewirelessconnectionispoor.To
improvesignalstrength,moveyourcomputerclosertothewirelessaccesspoint.
•Powertothewirelessradioison.Thesignalstrengthofthewirelessconnection
ismarginal.
•Powertothewirelessradioison.Thesignalstrengthofthewirelessconnection
isexcellent.
AccessConnectionsstatusicon:
•Nolocationprofileisactiveornoneexists.
•Currentlocationprofileisdisconnected.
34UserGuide

•Currentlocationprofileisconnected.
AccessConnectionswirelessstatusicon
•Powertothewirelessradioisoff.
•Powertothewirelessradioison.Noassociation.
•Powertothewirelessradioison.Nosignal.
•Powertothewirelessradioison.Thesignalstrengthofthewirelessconnectionisexcellent.
•Powertothewirelessradioison.Thesignalstrengthofthewirelessconnectionismarginal.
•Powertothewirelessradioison.Thesignalstrengthofthewirelessconnectionispoor.Toimprove
signalstrength,moveyourcomputerclosertothewirelessaccesspoint.
UsingBluetooth
Bluetoothcanconnectdevicesashortdistancefromoneanother,andiscommonlyusedforconnecting
peripheraldevicestoacomputer,transferringdatabetweenhand-helddevicesandapersonalcomputer,or
remotelycontrollingandcommunicatingwithdevicessuchasmobilephones.
Dependingonthemodel,yourcomputermightsupporttheBluetoothfeature.Totransferdatathrough
theBluetoothfeature,dothefollowing:
Note:Ifyouusethewirelessfeature(the802.11standards)ofyourcomputersimultaneouslywitha
Bluetoothoption,thedatatransmissionspeedcanbedelayedandtheperformanceofthewirelessfeature
canbedegraded.
•ForWindows7:
1.PressF8andthenfollowtheinstructionsonthescreentoenabletheBluetoothfeature.
2.Right-clickthedatathatyouwanttosend.
3.SelectSendTo➙BluetoothDevices.
4.SelectaBluetoothdevice,andthenfollowtheinstructionsonthescreen.
•ForWindows8.1:
1.Gotothedesktop,andthenright-clickthedatathatyouwanttosend.
2.SelectSendTo➙BluetoothDevices.
3.SelectaBluetoothdevice,andthenfollowtheinstructionsonthescreen.
Formoreinformation,refertotheWindowshelpinformationsystemandtheBluetoothhelpinformation
system.
Usinganexternaldisplay
Youcanuseanexternaldisplaysuchasaprojectororamonitortogivepresentationsortoexpandyour
workspace.Thistopicintroduceshowtoconnectanexternaldisplay,choosedisplaymodes,andchange
displaysettings.
Yourcomputersupportsthefollowingvideoresolution,providedthattheexternalmonitoralsosupportsthat
resolution.
•Upto1920x1200,withanexternaldisplayconnectedtotheVGAconnector
•Upto2560x1600,withanexternaldisplayconnectedtotheminiDisplayPortconnector
Formoreinformationabouttheexternaldisplay,refertothemanualsprovidedwithit.
Chapter2.Usingyourcomputer35

Connectinganexternaldisplay
Youcanuseeitherawireddisplayorawirelessdisplay.ThewireddisplaycanbeconnectedtotheHDMI,
VGA,orminiDisplayPortconnectorbyacable.ThewirelessdisplaycanbeaddedthroughtheWi-Dior
Miracastfunction.
•Connectingawireddisplay
Note:Whenyouconnectanexternalmonitor,avideointerfacecablewithaferritecoreisrequired.
1.Connecttheexternaldisplaytoanappropriatevideoconnectoronyourcomputer,suchastheVGA
connector,miniDisplayPortconnector,orHDMIconnector.
2.Connecttheexternaldisplaytoanelectricaloutlet.
3.Turnontheexternaldisplay.
Ifyourcomputercannotdetecttheexternaldisplay,right-clickonthedesktop,thenclickScreen
resolution➙Detect.
•Connectingawirelessdisplay
Note:Touseawirelessdisplay,ensurethatbothyourcomputerandtheexternaldisplaysupportthe
Wi-DiorMiracastfeature.
–ForWindows7
OpentheLenovoQuickDisplayprogramandfollowtheinstructionsonthescreen.Forhowtoaccess
theLenovoQuickDisplayprogram,see“Lenovoprograms”onpage12.
–ForWindows8.1
1.Moveyourpointertothetop-rightorbottom-rightcornerofthescreentodisplaythecharms.
2.ClickDevices➙Projector➙Addawirelessdisplay.
3.Selectthedesiredwirelessdisplayandfollowtheinstructionsonthescreen.
Formoreinformation,seethehelpinformationsystemsoftheLenovoQuickDisplayprogramandthe
Windows8.1operatingsystem.
Choosingadisplaymode
Youcandisplayyourdesktopandappsonthecomputerdisplay,theexternaldisplay,orboth.Tochoose
howtodisplaythevideooutput,pressthedisplay-modeswitchingkeyandthenselectadisplay
modeyouprefer.
Therearefourdisplaymodes:
•Disconnect:Displaysthevideooutputonlyonyourcomputerscreen.
Note:Dependingonthesituation,youmightseeDisconnect,PCscreenonly,Computeronly,or
Disconnectprojector.
•Duplicate:Displaysthesamevideooutputonbothyourcomputerscreenandanexternaldisplay.
•Extend:Extendsthevideooutputfromyourcomputerdisplaytoanexternaldisplay.Youcandragand
moveitemsbetweenthetwodisplays.
•Projectoronly:Showsthevideooutputonlyonanexternaldisplay.
Note:Dependingonthesituation,youmightseeProjectoronlyorSecondscreenonly.
Note:IfyoushowDOSorprogramsusingDirectDraworDirect3D®infull-screenmode,onlythemain
displayshowsthevideooutput.
36UserGuide

Changingdisplaysettings
Youcanchangethedisplaysettings,suchasthedisplayresolution,fontsize,andsoon.
Tochangethedisplaysettings,dothefollowing:
1.GotoControlPanelandclickAppearanceandPersonalization.
2.ClickDisplayforfurtherconfiguration.
3.ClickApply.Thechangewilltakeeffectafteryoulogoff.
Usingaudiofeatures
Yourcomputerisequippedwiththefollowingitems:
•Speakers
•Microphones
•Comboaudioconnector,3.5mm(0.14inch)indiameter
Yourcomputeralsohasanaudiochipthatenablesyoutoenjoyvariousmultimediaaudiofeatures,such
asthefollowing:
•CompliantwithIntelHighDefinitionAudio
•PlaybackofMusicalInstrumentDigitalInterface(MIDI)andMovingPictureExpertsGroupAudioLayer-3
(MP3)files
•Recordingandplaybackofpulse-codemodulation(PCM)andWaveformAudioFileFormat(WAV)files
•Recordingfromvarioussoundsources,suchasaheadsetattached
Thefollowingtableshowsthesupportedfunctionsoftheaudiodevicesattachedtothecomputer,the
ThinkPadOneLinkDock,orThinkPadOneLinkProDock.
Table2.Audiofeaturelist
ConnectorHeadsetwitha3.5–mm,
4-poleplug
ConventionalheadphoneConventionalmicrophone
ComboaudioconnectorHeadphoneand
microphonefunctions
supported
Headphonefunction
supported
Notsupported
Comboaudioconnector
ofthesupportedThinkPad
OneLinkDockorThinkPad
OneLinkProDock
Headphoneand
microphonefunctions
supported
Headphonefunction
supported
Notsupported
Configuringforsoundrecording
Toconfigurethemicrophoneforoptimalsoundrecording,usetheSmartAudioprogram.Tostartthe
program,gotoControlPanelandclickHardwareandSound➙SmartAudio.
Usingthecamera
Ifyourcomputerhasanintegratedcamera,youcanusethecameratopreviewyourvideoimageand
takeasnapshotofyourcurrentimage.
Tostartthecameraandconfigurethecamerasettings,dothefollowing:
•ForWindows7:OpentheCommunicationsUtilityprogram.
Chapter2.Usingyourcomputer37

•ForWindows8.1:ClickCamerafromtheStartscreen.
Whenthecameraisstarted,thegreencamera-in-useindicatorturnson.
Youalsocanusetheintegratedcamerawithotherprogramsthatprovidefeaturessuchasphotographing,
videocapturing,andvideoconferencing.Tousetheintegratedcamerawithotherprograms,openoneofthe
programsandstartthephotographing,videocapturing,orvideoconferencingfunction.Then,thecamera
willstartautomaticallyandthecamerastatusindicatorturnsongreen.Formoreinformationaboutusingthe
camerawithaprogram,refertothedocumentationthatcamewiththeprogram.
Configuringcamerasettings
Youcanconfigurethecamerasettingstomeetyourneeds,suchasadjustingthequalityofthevideooutput.
Toconfigurethecamerasettings,dothefollowing:
•ForWindows8.1,dooneofthefollowing:
–Configurethecamerasettingsdirectlyfromtheprogramthatisusingthecamera.Formoreinformation,
seethehelpinformationsystemoftheprogram.
–OpentheLenovoSettingsprogram.ThenclickCamera.Followtheinstructionsonthescreento
configurethecamerasettingsasdesired.
•ForWindows7:StarttheCommunicationsUtilityprogramandconfigurethecamerasettingsasdesired.
Usingaflashmediacard
Yourcomputerhasonemedia-cardslot.
Themedia-cardslotsupportsthefollowingfourtypesofcards:
•MultiMediaCard(MMC)
•SecureDigitaleXtended-Capacity(SDXC)card
•SecureDigital(SD)card
•SecureDigitalHigh-Capacity(SDHC)card
Note:YourcomputerdoesnotsupporttheCPRMfeaturefortheSDcard.
Attention:Whiletransferringdatatoorfromaflashmediacard,suchasanSDcard,donotputyour
computerintosleeporhibernationmodebeforethedatatransfercompletes;otherwise,yourdatacould
becomedamaged.
Insertingaflashmediacard
Attention:Beforeyoustartinstallingaflashmediacard,touchametaltableoragroundedmetalobject.
Thisactionreducesanystaticelectricityfromyourbody.
Toinsertaflashmediacard,dothefollowing:
1.Locatetheappropriatetypeofslotforyourcard.See“Locatingcomputercontrols,connectors,and
indicators”onpage1.
2.Ensurethatthemetalcontactsarefacingdownandpointingtowardtothecardslot.
3.Pressthecardfirmlyintothecardslot.
Iftheplug-and-playfeatureisnotenabled,dothefollowing:
1.GotoControlPanel.
38UserGuide

2.ClickHardwareandSound.
3.ClickDeviceManager.Ifyouarepromptedforanadministratorpasswordorconfirmation,typethe
passwordorprovideconfirmation.
4.FromtheActionmenu,selectAddlegacyhardware.TheAddHardwareWizardstarts.
5.Followtheinstructionsonthescreen.
Removingaflashmediacard
Attention:
•Stopalltheactivitiesinvolvingthecardbeforeremovingit.Otherwise,dataonthecardmightget
damagedorlost.
•Donotremoveacardwhilethecomputerisinsleepmodeorhibernationmode.Otherwise,thesystem
mightnotrespondwhenyoutrytoresumeoperation.
Toremoveaflashmediacard,dothefollowing:
1.ClickthetriangulariconintheWindowsnotificationareatoshowhiddenicons.
2.Right-clicktheSafelyRemoveHardwareandEjectMediaicon.
3.SelectthecorrespondingitemtoejectthecardfromtheWindowsoperatingsystem.
4.Pressthecardtoejectitfromyourcomputer.
5.Removethecardandstoreitsafelyforfutureuse.
Note:IfyoudonotremovethecardfromyourcomputerafteryouejectthecardfromtheWindowsoperating
system,thecardcannolongerbeaccessed.Toaccessthecard,youmustremoveitfirst,theninsertitagain.
Chapter2.Usingyourcomputer39

40UserGuide
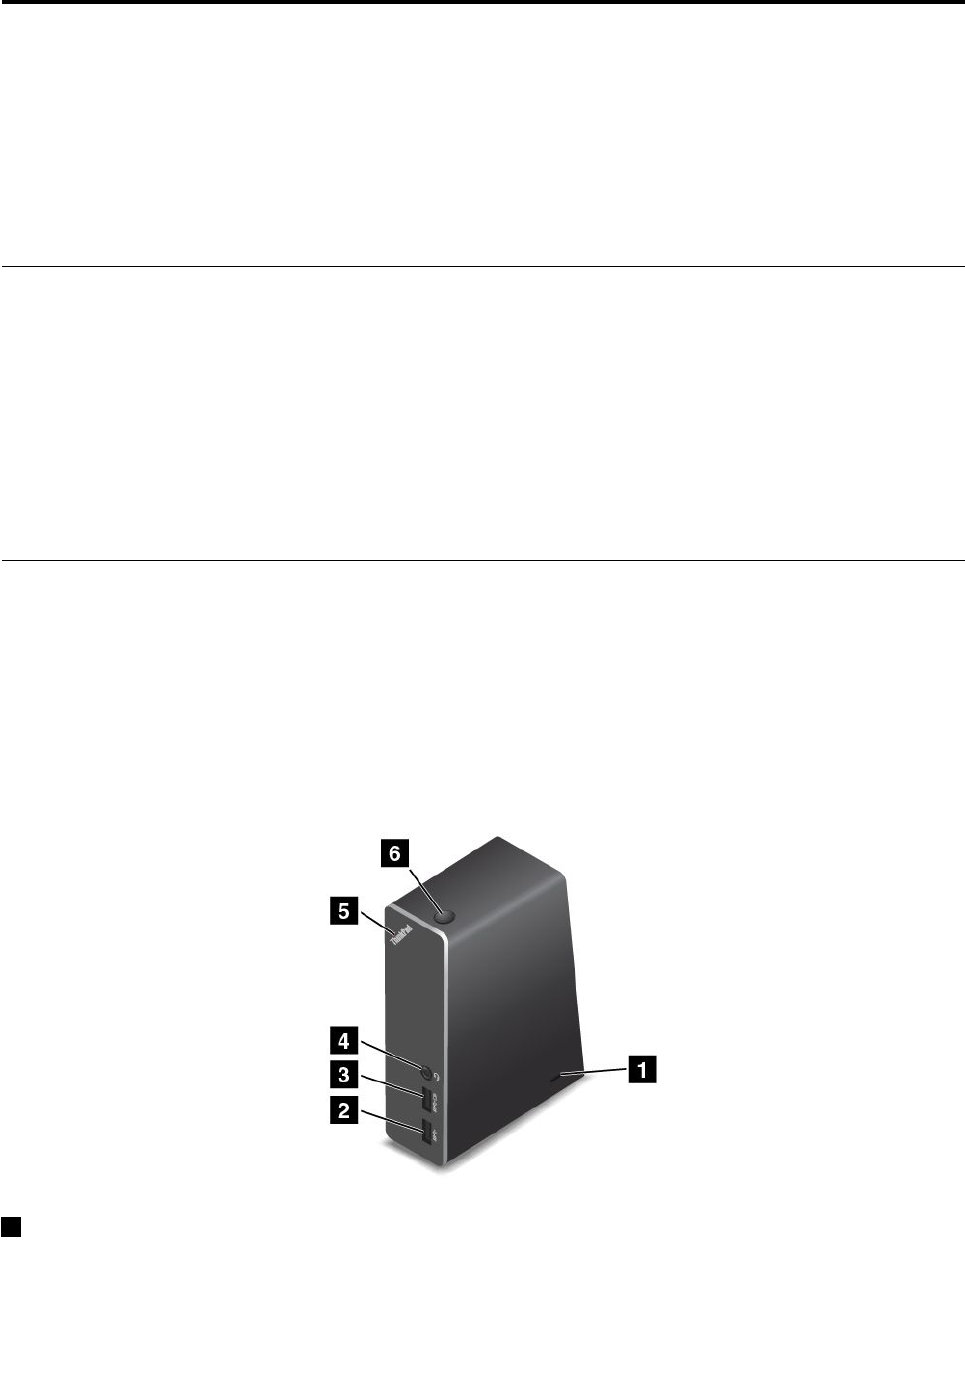
Chapter3.Enhancingyourcomputer
Thischapterprovidesinstructionsonhowtousehardwaredevicestoexpandyourcomputercapabilities.
•“FindingThinkPadoptions”onpage41
•“ThinkPadOneLinkDock”onpage41
•“ThinkPadOneLinkProDock”onpage42
FindingThinkPadoptions
Ifyouwanttoexpandthecapabilitiesofyourcomputer,Lenovohasanumberofhardwareaccessories
andupgradestomeetyourneeds.Optionsincludememorymodules,storagedevices,networkcards,port
replicators,batteries,poweradapters,printers,scanners,keyboards,mice,andmore.
YoucanshopatLenovo24hoursaday,7daysaweekdirectlyovertheWorldWideWeb.Allyouneedisan
Internetconnectionandacreditcard.
ToshopatLenovo,goto:
http://www.lenovo.com/accessories/services/index.html
ThinkPadOneLinkDock
Dependingonthemodel,yourcomputermightsupporttheThinkPadOneLinkDock(hereafterreferredtoas
thedock).Attachyourcomputertothedocktoexpandtheworkingcapability.
Thistopicprovidesbasicinformationaboutthedock.Fordetailedinformationaboutusingthedock,refer
tothedocumentationthatcomeswiththedock.
Note:Dependingonthemodel,yourdockmightlookslightlydifferentfromtheillustrationsinthistopic.
Frontview
1Security-lockslot:Toprotectyourdockfromtheft,youcanpurchaseasecuritycablelock,suchas
aKensington-stylecablelock,thatfitsthissecurity-lockslottolockyourdocktoadesk,table,orother
non-permanentfixture.
©CopyrightLenovo201441
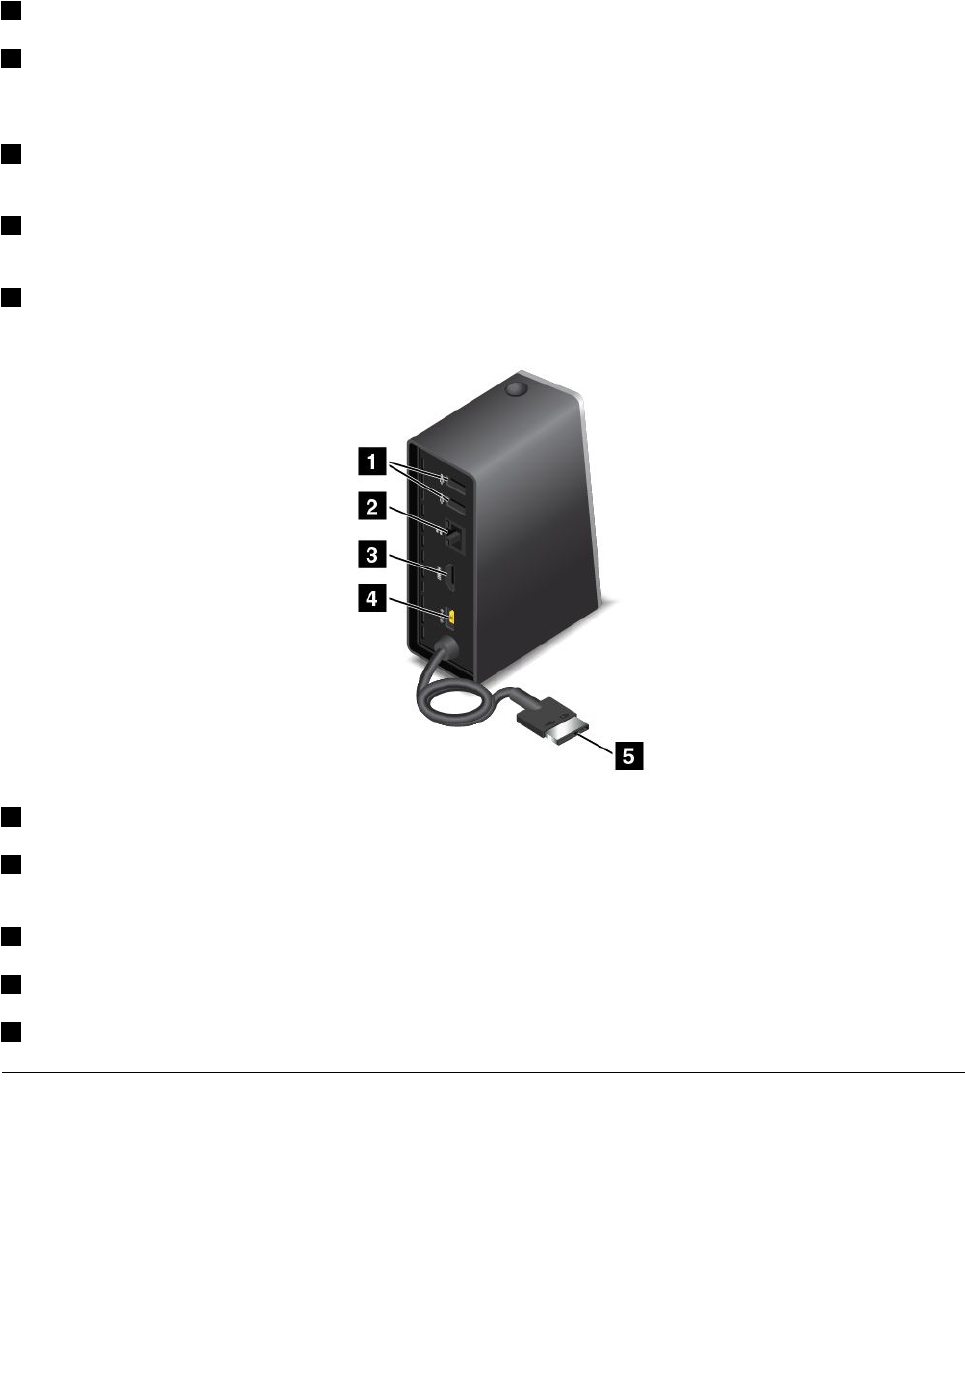
2USB3.0connector:UsedtoconnectdevicesthatarecompatiblewithUSB3.0andUSB2.0.
3AlwaysonUSBconnector:Bydefault,theAlwaysonUSBconnectorenablesyoutochargesome
mobiledigitaldevicesandsmartphonesnomatterwhenyourcomputerisinsleepmode,hibernationmode,
orisoff.Formoreinformation,refertothedocumentationthatcomeswiththedock.
4Comboaudioconnector:Usedtoconnectheadphonesoraheadsetthathasa3.5-mm(0.14-inch),
4-poleplug.
5System-statusindicator:TheindicatorontheilluminatedThinkPadlogofunctionsthesameastheones
onthecomputer.Fordetails,see“Statusindicators”onpage6.
6Powerbutton:Thepowerbuttononthedockfunctionsthesameastheoneonthecomputer.
Rearview
1USB2.0connector:UsedtoconnectdevicesthatarecompatiblewithUSB2.0.
2Ethernetconnector:UsedtoconnectthedocktoanEthernetLAN.Theindicatorsonthisconnector
havethesamefunctionastheonesonthecomputer.
3HDMIconnector:UsedtoconnectadigitalaudiodeviceorvideomonitorthatiscompatiblewithHDMI.
4Powerconnector:Usedtoconnecttheacpoweradapter.
5LenovoOneLinkconnector:ConnecttheLenovoOneLinkconnectortothecomputer.
ThinkPadOneLinkProDock
Dependingonthemodel,yourcomputermightsupporttheThinkPadOneLinkProDock(hereafterreferredto
asthedock).Attachyourcomputertothedocktoexpandtheworkingcapability.
Thistopicprovidesbasicinformationaboutthedock.Fordetailedinformationaboutusingthedock,refer
tothedocumentationthatcomeswiththedock.
Note:Dependingonthemodel,yourdockmightlookslightlydifferentfromtheillustrationsinthistopic.
42UserGuide
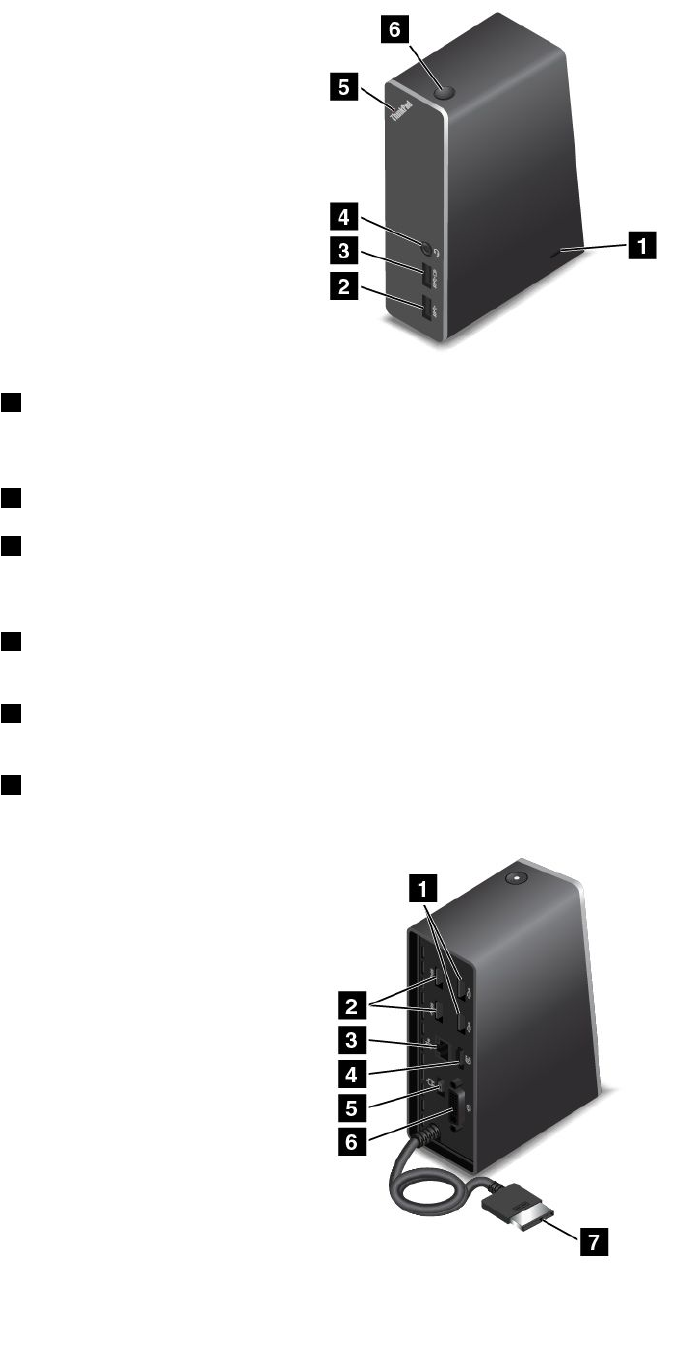
Frontview
1Security-lockslot:Toprotectyourdockfromtheft,youcanpurchaseasecuritycablelock,suchas
aKensington-stylecablelock,thatfitsthissecurity-lockslottolockyourdocktoadesk,table,orother
non-permanentfixture.
2USB3.0connector:UsedtoconnectdevicesthatarecompatiblewithUSB3.0andUSB2.0.
3AlwaysonUSBconnector:Bydefault,theAlwaysonUSBconnectorenablesyoutochargesome
mobiledigitaldevicesandsmartphonesnomatterwhenyourcomputerisinsleepmode,hibernationmode,
orisoff.Formoreinformation,refertothedocumentationthatcomeswiththedock.
4Comboaudioconnector:Usedtoconnectheadphonesoraheadsetthathasa3.5-mm(0.14-inch),
4-poleplug.
5System-statusindicator:TheindicatorontheilluminatedThinkPadlogofunctionsthesameastheones
onthecomputer.Fordetails,see“Statusindicators”onpage6.
6Powerbutton:Thepowerbuttononthedockfunctionsthesameastheoneonthecomputer.
Rearview
Chapter3.Enhancingyourcomputer43

1USB2.0connectors:UsedtoconnectdevicesthatarecompatiblewithUSB2.0.
2USB3.0connectors:UsedtoconnectdevicesthatarecompatiblewithUSB3.0andUSB2.0.
3Ethernetconnector:UsedtoconnectthedocktoanEthernetLAN.Theindicatorsonthisconnector
havethesamefunctionastheonesonthecomputer.
4DisplayPort®connector:Usedtoattachahigh-performancemonitor,adirect-drivemonitor,orother
devicesthatuseaDisplayPortconnector.
5Powerconnector:Usedtoconnecttheacpoweradapter.
6DVIconnector:UsedtoconnectamonitorthatsupportsDigitalVisualInterface(DVI)connection.
7LenovoOneLinkconnector:ConnecttheLenovoOneLinkconnectortothecomputer.
44UserGuide

Chapter4.Security
Thischapterprovidesinformationabouthowtoprotectyourcomputerfromtheftandunauthorizeduse.
•“Attachingamechanicallock”onpage45
•“Usingpasswords”onpage45
•“Harddisksecurity”onpage50
•“Usingthefingerprintreader”onpage50
•“Noticeondeletingdatafromyourharddiskdrive,hybriddrive,orsolid-statedrive”onpage52
•“Usingfirewalls”onpage53
•“Protectingdataagainstviruses”onpage53
Attachingamechanicallock
Youcanattachamechanicallocktoyourcomputer,tohelppreventitfrombeingremovedwithoutyour
permission.
Attachamechanicallocktothekeyholeofthecomputer;thensecurethechainonthelocktoastationary
object.Refertotheinstructionsshippedwiththemechanicallock.
Note:Youareresponsibleforevaluating,selecting,andimplementingthelockingdeviceandsecurity
feature.Lenovomakesnocomments,judgments,orwarrantiesaboutthefunction,quality,orperformance
ofthelockingdeviceandsecurityfeature.
Usingpasswords
Youcanhelppreventyourcomputerfromunauthorizedusebyusingpasswords.Onceyousetapassword,
apromptisdisplayedonthescreeneachtimeyouturnonthecomputer.Enteryourpasswordattheprompt.
Youcannotusethecomputerunlessyoutypethecorrectpassword.
Ifyouhavesetapower-onpassword,asupervisorpassword,oraharddiskpassword,itunlocks
automaticallywhenthecomputerresumesfromsleepmode.
Note:IfaWindowspasswordhasbeenset,youwillbepromptedtoenterit.
Typingpasswords
Whenthisiconisdisplayed,typeapower-onpasswordorasupervisorpassword.
Whenthisiconisdisplayed,typeauserharddiskpassword.Totypeamasterharddiskpassword,
pressF1.Whentheiconchangesto,typethemasterharddiskpassword
Note:Toreturntotheicon,pressF1again.
Power-onpassword
Youcansetapower-onpasswordtohelpprotectyourcomputeragainstunauthorizedaccess.
©CopyrightLenovo201445

Ifyousetapower-onpassword,thepasswordpromptisdisplayedonthescreenwheneveryouturnonthe
computer.Youmustenterthecorrectpasswordtostartusingthecomputer.
Setting,changing,orremovingapower-onpassword
Beforeyoustart,printtheseinstructions.
Toset,change,orremoveapower-onpassword,dothefollowing:
1.Turnoffyourcomputer.Waitforaboutfiveseconds,andthenturnonthecomputeragain.
2.Whenthelogoscreenisdisplayed,pressF1tostarttheThinkPadSetupprogram.
3.SelectSecurity➙Password➙Power-onPasswordbyusingthedirectionalkeys.
4.Dependingonyourneed,dooneofthefollowing:
•Tosetapassword,dothefollowing:
a.IntheEnterNewPasswordfield,typeadesiredpasswordandpressEnter.
b.IntheConfirmNewPasswordfield,retypethepasswordandpressEnter.
•Tochangeapassword,dothefollowing:
a.IntheEnterCurrentPasswordfield,typethecurrentpower-onpasswordandpressEnter.
b.IntheEnterNewPasswordfield,typethenewpower-onpasswordandpressEnter;thenretype
thepasswordintheConfirmNewPasswordfieldandPressEnter.
•Toremoveapassword,dothefollowing:
a.IntheEnterCurrentPasswordfield,typethecurrentpower-onpasswordandpressEnter.
b.LeavetheEnterNewPasswordandConfirmNewPasswordfieldsblank.PressEntertwice.
5.ASetupNoticewindowisdisplayed.PressEntertocontinue.
6.PressF10.ASetupConfirmationwindowisdisplayed.SelectYestosavetheconfigurationchanges
andexit.
Note:Youmightwanttorecordyourpasswordandstoreitinasafeplace.Otherwise,ifyouforgetthe
password,youhavetotakeyourcomputertoaLenovoreselleroramarketingrepresentativetohave
thepasswordcanceled.
Supervisorpassword
ThesupervisorpasswordprotectsthesysteminformationstoredintheThinkPadSetupprogram.Ifyouhave
setasupervisorpassword,noonecanchangetheconfigurationofthecomputerwithoutthepassword.It
providesthefollowingsecurityfeatures:
•Ifonlyasupervisorpasswordisset,apasswordpromptisdisplayedwhenyoutrytostarttheThinkPad
Setupprogram.UnauthorizeduserscannotaccesstheThinkPadSetupprogramwithoutthepassword.
•Thesystemadministratorcanusethesupervisorpasswordtoaccessacomputereveniftheuserofthat
computerhassetapower-onpassword.Thesupervisorpasswordoverridesthepower-onpassword.
•Ifbothasupervisorpasswordandapower-onpasswordareset,youcandothefollowingonlyifyou
havethesupervisorpassword:
–Changingordeletingthepower-onpassword
–Changingordeletingthesupervisorpassword
–Changingdateandtime
–Specifyingtheminimumlengthforpower-onpasswordandharddiskpassword
–Changingthesettingforthesecuritychip
–Erasingthefingerprintdata
46UserGuide

–Enablingordisablingthefollowingfeatures:
–WakeonLANandFlashoverLAN
–LockUEFIBIOSSettings
–Passwordatunattendedboot
–BootDeviceListF12Option
–BootOrderLock
–FlashBIOSUpdatingbyEnd-Users
–Internalnetworkdevice
–Internalwirelessdevice
–InternalBluetoothdevice
–InternalNetworkOptionROM
–Securitymode
–Fingerprintreaderpriority
Notes:
•ThesystemadministratorcansetthesamesupervisorpasswordonmanyThinkPadnotebookcomputers
tomakeadministrationeasier.
•WhenLockUEFIBIOSSettingsoptionisenabled,allBIOSsettingscannotbechanged.Tochange
thesettings,asupervisorpasswordisrequired.
Setting,changing,orremovingasupervisorpassword
Beforeyoustart,printtheseinstructions.
Onlyasystemadministratorcanset,change,orremoveasupervisorpassword.Toset,change,orremovea
supervisorpassword,dothefollowing:
1.Turnoffyourcomputer.Waitforaboutfiveseconds,andthenturnonthecomputeragain.
2.Whenthelogoscreenisdisplayed,pressF1tostarttheThinkPadSetupprogram.
3.SelectSecurity➙Password➙SupervisorPasswordbyusingthedirectionalkeys.
4.Dependingonyourneeds,dooneofthefollowing:
•Tosetapassword,dothefollowing:
a.IntheEnterNewPasswordfield,typeadesiredpasswordandpressEnter.
b.IntheConfirmNewPasswordfield,retypethepasswordandpressEnter.
•Tochangeapassword,dothefollowing:
a.IntheEnterCurrentPasswordfield,typethecurrentsupervisorpasswordandpressEnter.
b.IntheEnterNewPasswordfield,typethenewsupervisorpasswordandpressEnter;thenretype
thepasswordintheConfirmNewPasswordfieldandpressEnter.
•Toremoveapassword,dothefollowing:
a.IntheEnterCurrentPasswordfield,typethecurrentsupervisorpasswordandpressEnter.
b.LeavetheEnterNewPasswordandConfirmNewPasswordfieldsblank.PressEntertwice.
5.ASetupNoticewindowisdisplayed.PressEntertocontinue.
6.PressF10.ASetupConfirmationwindowisdisplayed.SelectYestosavetheconfigurationchanges
andexit.
Chapter4.Security47

Note:Youmightwanttorecordyourpasswordandstoreitinasafeplace.Thenexttimeyouopenthe
ThinkPadSetupprogram,youwillbepromptedtotypeyoursupervisorpasswordtoproceed.Ifyouforget
yoursupervisorpassword,Lenovocannotresetyourpassword.YoumusttakeyourcomputertoaLenovo
reselleroraLenovomarketingrepresentativetohavethesystemboardreplaced.Proofofpurchaseis
required,andafeewillbechargedforpartsandservice.
Harddiskpasswords
Thefollowingtwotypesofharddiskpasswordscanhelpprotecttheinformationstoredontheharddisk
drive,hybriddrive,orsolid-statedrive:
•Userharddiskpassword
Ifauserharddiskpasswordhasbeenset,butnomasterharddiskpasswordhasbeen,theusermust
entertheuserharddiskpasswordtoaccessfilesandapplicationsontheharddiskdrive,hybriddrive,or
solid-statedrive.
•Masterharddiskpassword
Themasterharddiskpasswordalsorequiresauserharddiskpassword.Themasterharddiskpassword
isusuallysetandusedbyasystemadministrator.Itenablestheadministratortoaccessanyharddisk
drive,hybriddrive,orsolid-statedriveinasystemlikeamasterkey.Theadministratorsetsthemaster
password;thenassignsauserpasswordforeachcomputerinthenetwork.Theusercanthenchangethe
userpasswordasdesired,buttheadministratorstillcangetaccessbyusingthemasterpassword.
Whenamasterharddiskpasswordisset,onlytheadministratorcanremovetheuserharddiskpassword.
Settingaharddiskpassword
Beforeyoustart,printtheseinstructions.
Tosetaharddiskpassword,dothefollowing:
1.Turnoffyourcomputer.Waitforaboutfiveseconds,andthenturnonthecomputeragain.
2.Whenthelogoscreenisdisplayed,pressF1tostarttheThinkPadSetupprogram.
3.SelectSecurity➙Password➙Harddisk1Passwordbyusingthedirectionalkeys.
4.Apasswordwindowisdisplayed.YouarepromptedtoselectUserorUser+Master.SelectUserif
youwanttosetonlyoneharddiskpassword.SelectUser+Masterifyouwanttosetauserharddisk
passwordandamasterharddiskpassword,forexampleifyouareanadministratororasupervisor.
•IfyouselectUser,dothefollowing:
a.Whenawindowfortypingthenewpasswordopens,typeyournewpasswordintheEnterNew
PasswordfieldandpressEnter.
b.IntheConfirmNewPasswordfield,retypethepasswordyoujustenteredandpressEnter.
•IfyouselectUser+Master,dothefollowing:
a.First,setauserharddiskpassword.Whenamessagewindowpromptsyoutosettheuserhard
diskpassword,pressEntertocontinue.TypeyournewuserharddiskpasswordintheEnter
NewPasswordfieldandpressEnter.RetypethepasswordintheConfirmNewPassword
fieldandpressEnter.
b.Then,setamasterharddiskpassword.Whenamessagewindowpromptsyoutosetthemaster
harddiskpassword.PressEntertocontinue.Typeyournewmasterharddiskpasswordinthe
EnterNewPasswordfieldandpressEnter.RetypethepasswordintheConfirmNewPassword
fieldandpressEnter.
5.ASetupNoticewindowisdisplayed.PressEntertocontinue.
6.PressF10.ASetupConfirmationwindowisdisplayed.SelectYestosavetheconfigurationchanges
andexit.
48UserGuide

Thenexttimeyouturnonyourcomputer,typetheuserormasterharddiskpasswordtostartyourcomputer
andaccesstheoperatingsystem.
Changingorremovingaharddiskpassword
Tochangeorremovetheharddiskpassword,dothefollowing:
•IfyouareinUser+Masterharddiskmode,youcanselecteitherUserHDPorMasterHDPtochange
thepassword,dependingonyourneeds.
–IfyouselectUserHDPmode,followthefollowingstepstochangetheuserharddiskpassword:
1.TypethecurrentuserharddiskpasswordintheEnterCurrentPasswordfieldandpressEnter.
2.TypethenewpasswordintheEnterNewPasswordfieldandpressEnter;thenretypethe
passwordintheConfirmNewPasswordfieldandpressEnter.
3.ASetupNoticewindowisdisplayed.PressEnteragaintocontinue.Theuserharddiskpassword
ischanged.
Note:TheharddiskpasswordcannotberemovedinUserHDPmode.
–IfyouselectMasterHDPmode,followthefollowingstepstochangethemasterharddiskpassword:
1.TypethecurrentmasterharddiskpasswordintheEnterCurrentPasswordfieldandpressEnter.
2.TypethenewmasterharddiskpasswordintheEnterNewPasswordfieldandpressEnter;then
retypethenewpasswordyoujustenteredintheConfirmNewPasswordfieldandpressEnter.
3.ASetupNoticewindowisdisplayed.PressEntertocontinue.Themasterharddiskpasswordis
changed.
Note:IfyouleavetheEnterNewPasswordandConfirmNewPasswordfieldsblankandpressEnter
twice,boththeuserandmasterharddiskpasswordsareremoved.
•IfyouareinUserharddiskmode,followthefollowingstepstochangetheuserharddiskpassword:
1.Followsteps1through7in“Settingaharddiskpassword”onpage48,typingyourpasswordtoget
accesstotheThinkPadSetupprogram.
2.TypethecurrentuserharddiskpasswordintheEnterCurrentPasswordfieldandpressEnter.
3.TypethenewpasswordintheEnterNewPasswordfieldandpressEnter;thenretypethenew
passwordintheConfirmNewPasswordfieldandpressEnter.
4.ASetupNoticewindowisdisplayed.PressEnteragaintocontinue.Theuserharddiskpasswordis
changed.
Note:IfyouleavetheEnterNewPasswordandConfirmNewPasswordfieldsblankandpressEnter
twice,theuserharddiskpasswordisremoved.
Tipsonusingtheharddiskpasswords
•YoucansettheminimumlengthofaharddiskpasswordthroughtheSecuritymenu.
•Ifyousetaharddiskpasswordofoversevencharacters,theharddiskdrive,hybriddrive,orsolid-state
drivecanbeusedonlywithacomputerthatcanrecognizeaharddiskpasswordofoversevencharacters.
Ifyoutheninstalltheharddiskdrive,hybriddrive,orsolid-statedriveinacomputerthatcannotrecognize
aharddiskpasswordthatcontainsmorethansevencharacters,youcannotaccessthedrive.
•Recordyourpasswordandstoreitinasafeplace.Ifyouforgettheuserharddiskpassword,orboth
userandmasterharddiskpasswords,Lenovocannotresetyourpasswordsorrecoverdatafromthe
harddiskdrive,hybriddrive,orsolid-statedrive.YoumusttakeyourcomputertoaLenovoresellerora
marketingrepresentativetohavetheharddiskdrive,hybriddrive,orsolid-statedrivereplaced.Proofof
purchaseisrequired,andafeewillbechargedforpartsandservice.
Chapter4.Security49

Harddisksecurity
Toprotectpasswordsfromunauthorizedsecurityattacks,refertothefollowingtipstomaximizesecurity:
•Setapower-onpasswordaswellasaharddiskpasswordforyourinternalharddiskdrive,hybriddrive,
orsolid-statedrive.Refertotheproceduresin“Power-onpassword”onpage45and“Harddisk
passwords”onpage48.Forsecurity,alongerpasswordisrecommended.
•IfaDiskEncryptionharddiskdrive,DiskEncryptionhybriddrive,oraDiskEncryptionsolid-statedriveis
installedinyourcomputer,besuretoprotectthecontentsofyourcomputermemoryfromunauthorized
accessbyuseofdriveencryptionsoftware.
•Beforeyoudisposeof,sell,orhandoveryourcomputer,deletethedatastoredonit.Formoreinformation,
referto“Noticeondeletingdatafromyourharddiskdrive,hybriddrive,orsolid-statedrive”onpage52.
Theharddiskdrive,hybriddrive,orsolid-statedrivebuiltintoyourcomputercanbeprotectedbyUEFIBIOS.
DiskEncryptionharddiskdrive,DiskEncryptionhybriddrive,andEncryptionsolid-statedrive
SomemodelscontaintheDiskEncryptionharddiskdrive,DiskEncryptionhybriddrive,orEncryption
solid-statedrive.Thisfeaturehelpstoprotectyourcomputeragainstsecurityattacksonmedia,NANDflash,
ordevicecontrollersbyuseofahardwareencryptionchip.Fortheefficientuseoftheencryptionfeature,set
aharddiskpasswordfortheinternalstoragedevice.
Usingthefingerprintreader
Dependingonthemodel,yourcomputermighthaveafingerprintreader.Fingerprintauthenticationcan
replaceyourWindowspassword.Inthisway,youcanlogontoyourcomputersimplyandsecurely.To
enablefingerprintauthentication,enrollyourfingerprintsfirst.
Enrollingyourfingerprint
Toenrollyourfingerprints,dothefollowing:
1.StarttheLenovoFingerprintManagerprogram.ForinstructionsonhowtostarttheFingerprintManager
Proprogram,see“Lenovoprograms”onpage12.
2.EntertheWindowspasswordasrequired.
3.Clicktheiconforthefingerthatyouwanttoenroll,andconstantlyswipeyourcorrespondingfinger
acrossthefingerprintreaderuntiltheenrollmentcompletes.Formoreinformation,see“Swipingyour
fingeroverthefingerprintreader”onpage50.
4.ClickFinish.Yourfingerprintisenrolledsuccessfully.
Note:Itisrecommendedthatyouenrollmorethanonefingerprintincaseofanyinjuriestoyourfingers.
Swipingyourfingeroverthefingerprintreader
Toswipeyourfingeroverthereader,dothefollowing:
50UserGuide
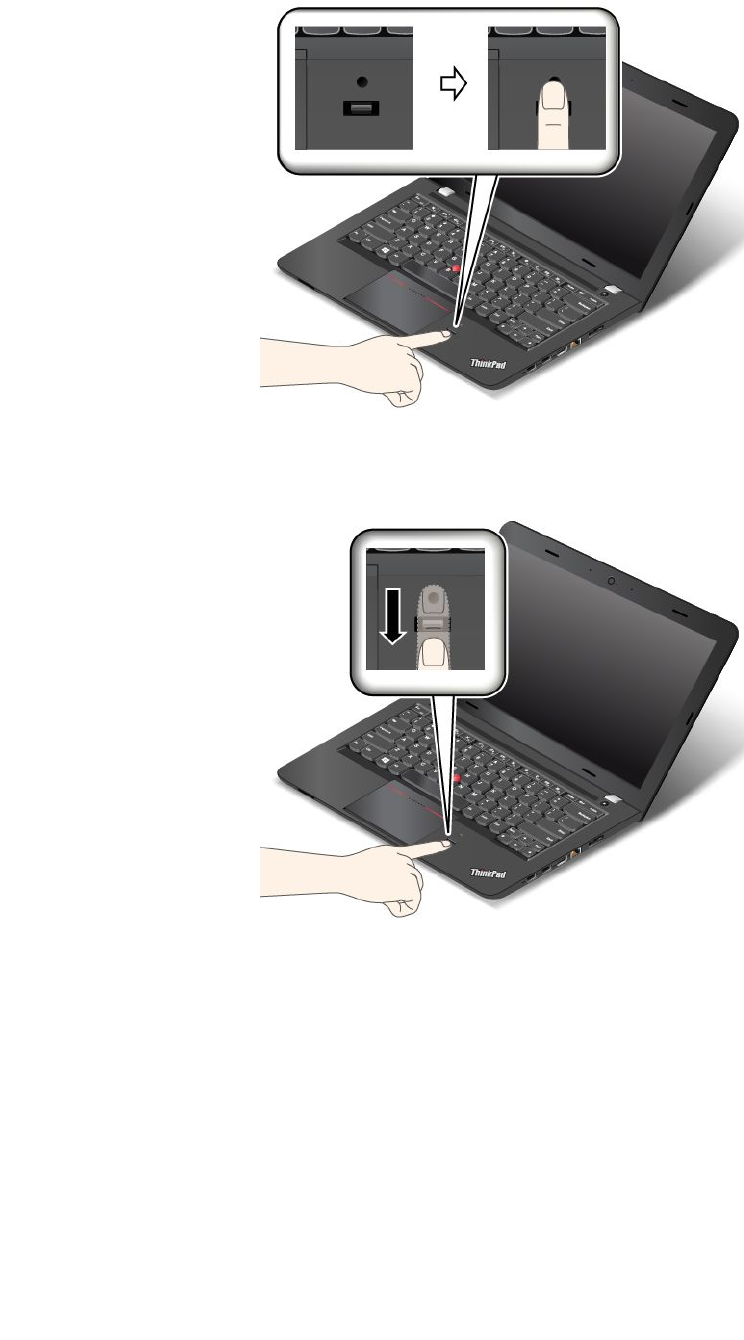
1.Placethetopjointofyourfingeronthesensor.
2.Applylightpressureandswipeyourfingertowardyouacrossthereaderinonesmoothmotion.Donot
liftyourfingerwhenyouareswipingit.
Maintainingthefingerprintreader
Thefollowingactionscoulddamagethefingerprintreaderorcauseitnottoworkproperly:
•Scratchingthesurfaceofthereaderwithahard,pointedobject.
•Scrapingthesurfaceofthereaderwithyourfingernailoranythinghard.
•Usingortouchingthereaderwithadirtyfinger.
Ifyounoticeanyofthefollowingconditions,gentlycleanthesurfaceofthereaderwithadry,soft,lint-free
cloth:
•Thesurfaceofthereaderisdirtyorstained.
•Thesurfaceofthereaderiswet.
Chapter4.Security51

•Thereaderoftenfailstoenrollorauthenticateyourfingerprint.
Ifyourfingerhasanyofthefollowingconditions,youmightnotbeabletoregisterorauthenticateit:
•Yourfingeriswrinkled.
•Yourfingerisrough,dry,orinjured.
•Yourfingerisstainedwithdirt,mud,oroil.
•Thesurfaceofyourfingerisdifferentfromwhenyouenrolledyourfingerprint.
•Yourfingeriswet.
•Afingerisusedthathasnotbeenenrolled.
Toimprovethesituation,trythefollowing:
•Cleanorwipeyourhandstoremoveanyexcessdirtormoisturefromthefingers.
•Enrollanduseadifferentfingerforauthentication.
•Ifyourhandsaredry,applylotiontothem.
Formoreinformationonhowtousethefingerprintreader,refertothehelpsystemoftheLenovoFingerprint
Managerprogram.
Noticeondeletingdatafromyourharddiskdrive,hybriddrive,or
solid-statedrive
Someofthedatastoredontheharddiskdrive,hybriddrive,orsolid-statedrivemightbesensitive.Handing
yourcomputerovertosomeoneelsewithoutdeletingtheloadedsoftware,suchasoperatingsystemsand
applicationsoftware,mightevenviolatelicenseagreements.Besuretodeletedatastoredontheharddisk
drive,hybriddrive,orsolid-statedrivebeforeyoudisposeof,sell,orhandoveryourcomputer.
Youcanusethefollowingmethodstodeletedatafromtheharddiskdrive,hybriddrive,orsolid-statedrive:
•MovethedatatotheRecycleBin,andthenemptytheRecycleBin.
•Deletethedata.
•Formatyourharddiskdrive,hybriddrive,orsolid-statedrive,usingthesoftwareforinitializingit.
•UsetherecoveryprogramprovidedbyLenovotobringtheharddiskdrive,hybriddrive,orsolid-state
drivebacktothefactorydefaultsettings.
Theseoperations,however,onlychangethefilelocationofthedata;theydonotdeletethedataitself.In
otherwords,thedataretrievalprocessingisdisabledunderanoperatingsystemsuchasWindows.The
dataisstillthere,eventhoughitseemstobelost.Thus,itissometimespossibletoreadthedatabyuseof
specialsoftwarefordatarecovery.Thereisariskthatpeopleofbadfaithmightreadandmisusethecritical
dataonharddiskdrives,hybriddrives,orsolid-statedrivesforunexpectedpurposes.
Topreventleakageofdata,itisimportantthatyoudeleteallthedatafromtheharddiskdriveorhybriddrive
whenyoudisposeof,sell,orhandoveryourcomputer.Youcandestroythedataphysicallybysmashingthe
harddiskdriveorhybriddrivewithahammer,ormagneticallybymeansofstrongmagneticpower,thus
makingthedataunreadable.Butitisrecommendedthatyouusethesoftware(payware)orservice(pay
service)developedforthatpurpose.Theprocessmighttakeseveralhours.
Fordisposingofdataonthesolid-statedrive,LenovoprovidestheDriveEraseUtilityforResettingthe
CryptographicKeyandErasingtheSolidStateDrivetool.Fordisposingofdataontheharddiskdrive,Lenovo
providestheSecureDataDisposal™tool.Gotohttp://www.lenovo.com/supporttodownloadthesetools.
52UserGuide

IfaDiskEncryptionharddiskdrive,aDiskEncryptionhybriddrive,oranEncryptionsolid-statedriveoris
supportedandinstalledinyourcomputer,youcanlogicallydisposeofallthedataonthedriveinashort
timebyerasingthecryptographickey.Thedataencryptedwiththeoldkeyisnotphysicallyerasedbut
remainsonthedrive;however,itcannotbedecryptedwithouttheoldkey.Thisfeatureisalsoavailablewith
theDriveEraseUtilityforResettingtheCryptographicKeyandErasingtheSolidStateDrivetool.
Usingfirewalls
Ifyoursystemispreinstalledwithafirewallprogram,itprotectsagainstcomputerInternetsecuritythreats,
unauthorizedaccess,intrusions,andInternetattacks.Italsoprotectsyourprivacy.
Formoreinformationabouthowtousethefirewallprogram,refertothehelpinformationsystemthat
comeswiththeprogram.
Protectingdataagainstviruses
Yourcomputerispreinstalledwithanantivirusprogramsoyoucandetectandeliminateviruses.The
antivirusprogramisdesignedtohelpyoudetectandeliminateviruses.
Lenovoprovidesafullversionofantivirussoftwareonyourcomputerwithafree30-daysubscription.After
30days,youmustrenewthelicensetocontinuereceivingtheantivirussoftwareupdates.
Formoreinformationabouthowtouseyourantivirussoftware,refertothehelpinformationsystemof
yourantivirussoftware.
Chapter4.Security53

54UserGuide

Chapter5.Advancedconfiguration
Thischapterprovidesthefollowinginformationtohelpyouconfigurethecomputer:
•“Installinganewoperatingsystem”onpage55
•“Installingdevicedrivers”onpage57
•“UsingtheThinkPadSetupprogram”onpage57
Installinganewoperatingsystem
Insomesituations,youmightneedtoinstallanewoperatingsystem.Thistopicprovidesinstructionson
howtoinstallanewoperatingsystem.
InstallingtheWindows7operatingsystem
Beforeyoustart,printtheseinstructions.
Attention:Theprocessofinstallinganewoperatingsystemdeletesallthedataonyourharddiskdrive,
hybriddrive,orsolid-statedrive,includingthedatathatwerestoredinahiddenfolder.
ToinstalltheWindows7operatingsystem,dothefollowing:
1.CopyallthesubdirectoriesandfilesintheC:\SWTOOLSdirectorytoaremovablestoragedevice.
•ThesupplementfilesfortheWindows7operatingsystemareintheC:\SWTOOLS\OSFIXESdirectory.
•ThedevicedriversareintheC:\SWTOOLS\DRIVERSdirectory.
•ThepreinstalledprogramsareintheC:\SWTOOLS\APPSdirectory.
2.StarttheThinkPadSetupprogram.See“UsingtheThinkPadSetupprogram”onpage57.
3.SelectStartup➙UEFI/LegacyBoot.Thendooneofthefollowing:
•ToinstalltheWindows7(32-bit)operatingsystem,selectLegacyOnlyorBoth.
•ToinstalltheWindows7(64-bit)operatingsysteminLegacymode,selectLegacyOnly.
•ToinstalltheWindows7(64-bit)operatingsysteminUEFImode,selectUEFIOnly.
4.PresstheF10keytoexittheThinkPadSetupprogram.
5.InserttheWindows7operatingsysteminstallationDVDintotheexternalopticaldrive,andrestartthe
computer.
6.RestoretheC:\SWTOOLSdirectorythatyoubackedupbeforeinstallingtheWindows7operatingsystem.
7.Installthedevicedrivers.See“Installingdevicedrivers”onpage57.
8.InstalltheWindows7fixmodules.YoucanfindtheWindows7fixmodulesintheC:\SWTOOLS\OSFIXES\
directory.Formoreinformation,gototheMicrosoftKnowledgeBasehomepageat:
http://support.microsoft.com/
9.Installtheregistrypatches,forexampletheEnablingWakeonLANfromStandbyforENERGYSTAR
patch.Todownloadandinstalltheregistrypatches,gototheLenovoSupportWebsiteat:
http://www.lenovo.com/support
Note:Afterinstallingtheoperatingsystem,donotchangetheinitialUEFI/LegacyBootsettinginthe
ThinkPadSetupprogram.Otherwisetheoperatingsystemwillnotstartcorrectly.
WhenyouinstalltheWindows7operatingsystem,youmightneedoneofthefollowingcountryorregion
codes:
©CopyrightLenovo201455

CountryorregionCodeCountryorregionCode
ChinaSCNetherlandsNL
DenmarkDKNorwayNO
FinlandFISpainSP
FranceFRSwedenSV
GermanyGRTaiwanandHongKongTC
ItalyITUnitedStatesUS
JapanJP
InstallingtheWindows8.1operatingsystem
Beforeyoustart,printtheseinstructions.
Attention:Theprocessofinstallinganewoperatingsystemdeletesallthedataonyourharddiskdrive,
hybriddrive,orsolid-statedrive,includingthedatathatwerestoredinahiddenfolder.
ToinstalltheWindows8.1operatingsystem,dothefollowing:
1.StarttheThinkPadSetupprogram.See“UsingtheThinkPadSetupprogram”onpage57.
2.SelectStartup➙BoottodisplaytheBootPriorityOrdersubmenu.
3.SelectthedrivethatcontainstheWindows8.1operatingsysteminstallationprogram,forexample
USBHDD.
4.PresstheF10keytoexittheThinkPadSetupprogram.
5.ConnectthedrivethatcontainstheWindows8.1operatingsysteminstallationprogramtothecomputer,
andrestartthecomputer.
6.InstalltheWindows8.1fixmodules.GototheMicrosoftKnowledgeBasehomepageat
http://support.microsoft.com/.Typethenumberofthefixmoduleinthesearchfield,thenclickSearch.
7.Installtheregistrypatches,forexampletheEnablingWakeonLANfromStandbyforENERGYSTAR
patch.Todownloadandinstalltheregistrypatches,gototheLenovoSupportWebsiteat:
http://www.lenovo.com/support
8.Installthedevicedrivers.See“Installingdevicedrivers”onpage57.
Note:Afterinstallingtheoperatingsystem,donotchangetheinitialUEFI/LegacyBootsettinginthe
ThinkPadSetupprogram.Otherwise,theoperatingsystemwillnotstartcorrectly.
WhenyouinstalltheWindows8.1operatingsystem,youmightneedoneofthefollowingcountryorregion
codes:
CountryorregionCodeCountryorregionCode
ChinaSCNetherlandsNL
DenmarkDKNorwayNO
FinlandFISpainSP
FranceFRSwedenSV
GermanyGRTaiwanandHongKongTC
ItalyITUnitedStatesUS
JapanJP
56UserGuide

Installingdevicedrivers
Devicedriveristheprogramthatoperatesaparticularhardwaredeviceofthecomputer.Ifadevicedoes
notperformwelloryouinstallanewdevice,youneedtoinstallorupdatethecorrespondingdevicedriver.
Forexample,ifyouusetheWindows7operatingsystem,tousetheUSB3.0connector,youneedto
downloadandinstalltheUSB3.0driver.
Todownloadthelatestdevicedrivers,dothefollowing:
1.Gotohttp://www.lenovo.com/ThinkPadDrivers.
2.Selectyourproductnametoviewallthedevicedriversforyourcomputer.
3.Selectthedevicedriversyouthatyouneed,andfollowtheinstructionsonthescreen.
Attention:DonotdownloadthedevicedriversfromtheWindowsUpdateWeb.Alwaysdownloadthedevice
driversfrom:
http://www.lenovo.com/ThinkPadDrivers
IfyouusetheWindows7operatingsystem,youalsocanfindthedevicedriversintheC:\SWTOOLS\DRIVERS
directoryonyourharddiskdriveorsolid-statedrive.Formoreinformation,see“Reinstallingpreinstalled
programsanddevicedrivers”onpage97.
UsingtheThinkPadSetupprogram
TheThinkPadSetupprogramenablesyoutoselectvarioussetupconfigurationsforyourcomputerthrough
configuringtheBIOS.
ToconfiguretheBIOSofyourcomputer,dothefollowing:
1.Turnonthecomputer.WhentheThinkPadlogoisdisplayed,pressF1.TheThinkPadSetupprogram
starts.
Ifyouarerequiredtoenterthesupervisorpassword,enterthecorrectpassword.Youalsocanpress
EntertoskipthepasswordpromptandstarttheThinkPadSetupprogram.Ifyoudonotenterthe
password,youcannotchangetheconfigurationsthatareprotectedbythesupervisorpassword.For
moreinformation,referto“Usingpasswords”onpage45.
2.Usethecursorkeystoselectatab;orusethecursorkeystolocateanitemandpressEntertoselectit.
Thenasubmenuisdisplayed.
Note:Somemenuitemsaredisplayedonlyifthecomputersupportsthecorrespondingfeatures.
3.Setthevalueofanitembydoingoneofthefollowing:
•PresstheF6keytochangetoahighervalue.
•PresstheF5keytochangetoalowervalue.
Note:Defaultvaluesareinboldface.
4.Tochangeotherconfigurations,presstheEsckeytoexitthesubmenuandreturntotheparentmenu.
5.Whenyoucompletetheconfiguration,presstheF10keytosaveandexit.Youalsocanselectthe
RestarttabintheThinkPadSetupmenu,andrestartyourcomputerwithoneoftheprovidedoptions.
Note:YoucanpresstheF9keytorestoretothedefaultsettings.
Mainmenu
WhenyouentertheThinkPadSetupprogram,youwillfirstseetheMainmenuasfollows:
•UEFIBIOSVersion
Chapter5.Advancedconfiguration57

•UEFIBIOSDate(Year-Month-Day)
•EmbeddedControllerVersion
•MEFirmwareVersion(availableonmodelswiththeIntelCPU)
•MachineTypeModel
•System-unitserialnumber
•Systemboardserialnumber
•AssetTag
•CPUType
•CPUSpeed
•Installedmemory
•UUID
•MACaddress(InternalLAN)
•PreinstalledOSLicense
•UEFISecureBoot
Configmenu
Tochangetheconfigurationofyourcomputer,selecttheConfigtabfromtheThinkPadSetupmenu.
ThefollowingtableliststheConfigmenuitems.
Attention:Thedefaultconfigurationsarealreadyoptimizedforyou.Improperchangeoftheconfigurations
mightcauseunexpectedresults.
Table3.Configmenuitems
MenuitemSubmenuitemSelectionComments
WakeOnLAN•Disabled
•ACOnly
•ACandBattery
Enablethecomputerto
poweronwhentheEthernet
controllerreceivesamagic
packet(aspecialnetwork
message).
IfyouselectACOnly,Wake
onLANisenabledonly
whentheacpoweradapter
isattached.
IfyouselectACand
Battery,WakeonLANis
enabledwithanypower
sources.
Notes:
•Themagicpackettype
WakeonLANrequires
acpower.
•TheWakeonLAN
functiondoesnot
workwhenaharddisk
passwordisset.
EthernetLANOptionROM•DisabledLoadstheEthernetLAN
OptionROMtoenable
Network
58UserGuide

Table3.Configmenuitems(continued)
MenuitemSubmenuitemSelectionComments
(forLegacyOnlyboot
modeorBothwithLegacy
first)
•Enabledstartupfromanintegrated
networkdevice.
UEFIIPv4NetworkStack
(forUEFIOnlybootmode
orBothwithUEFIfirst)
•Disabled
•Enabled
EnableordisableInternet
ProtocolVersion4(IPv4)
networkstackfortheUEFI
environment.
UEFIIPv6NetworkStack
(forUEFIOnlybootmode
orBothwithUEFIfirst)
•Disabled
•Enabled
EnableordisableInternet
ProtocolVersion6(IPv6)
networkstackforUEFI
environment.
UEFIPXEBootPriority
(forBothwithUEFIfirst
bootmode,andIPv6
andIPv4stacksareboth
enabled.)
•IPv6First
•IPv4First
Selectnetworkstack
priorityforUEFIPXEboot.
USBUEFIBIOSSupport•Disabled
•Enabled
Enablesordisablesboot
supportforUSBstorage
devices.
AlwaysOnUSB•Disabled
•Enabled
IfyouselectDisabled,
theexternalUSBdevices
cannotbechargedthrough
USBconnectors.
AlwaysOnUSBChargein
batterymode
•Disabled
•Enabled
IfyouselectEnabled,the
AlwaysOnUSBconnector
enablesyoutochargesome
mobiledigitaldevicesand
smartphoneswhenthe
computerispoweredoffor
inhibernationmodeonthe
conditionthattheacpower
adapterisconnected.
USB
USB3.0Mode•Disabled
•Enabled
•Auto
SettheUSB3.0controller
modefortheportsshared
betweenUSB2.0andUSB
3.0controllers.
IfyouselectAuto,itenables
youtoconnectandroute
appropriateUSB3.0or
USB2.0connectors.
IfyouselectEnabled,it
enablesUSB3.0mode
andallowsUSB3.0tobe
supportedintheoperating
system.
IfyouselectDisabled,it
disablesandhidestheUSB
3.0controller,andUSB3.0
Chapter5.Advancedconfiguration59

Table3.Configmenuitems(continued)
MenuitemSubmenuitemSelectionComments
connectorswillworkas
USB2.0connectors.
Keyboard/MouseFnandCtrlKeyswap•Disabled
•Enabled
IfyouselectEnabled,the
FnkeyworksastheCtrl
key,andtheCtrlkeyworks
astheFnkey.
Note:EvenwhenEnabled
isselected,youneedto
presstheFnkeytoresume
thecomputerfromsleep
modetonormaloperation.
BootDisplayDevice•ThinkPadLCD
•Analog(VGA)
•HDMI
•DisplayonDock
Selectthedisplaydevice
thatistobeactivatedat
boottime.Thisselection
iseffectiveforboottime,
passwordprompt,and
ThinkPadSetup.
Display
TotalGraphicsMemory•256MB
•512MB
Allocatetotalmemory
whichIntel®internal
graphicsdeviceshares.
Notes:
•Ifyouselect512MB,
themaximumusable
memorymaybereduced
onthe32-bitoperating
system.
•Thissub-menuis
availableonmodels
withanIntelCPU.
IntelSpeedStep®
technology
•Disabled
•Enabled
SelectthemodeofIntel
SpeedSteptechnologyat
runtime.
•Maximum
Performance:Always
highestspeed
•BatteryOptimized:
Alwayslowestspeed
•Disabled:Noruntime
support,lowestspeed
Note:Thissub-menuis
availableonmodelswithan
IntelCPU.
AdaptiveThermal
Management
SchemeforAC
•MaximizePerformance
•Balanced
SchemeforBattery
•MaximizePerformance
IfyouselectMaximize
Performance,itreduces
CPUthrottling.Ifyouselect
Balanced,itbalancesthe
fansound,thecomputer
temperature,andthe
computerperformance.
Power
60UserGuide

Table3.Configmenuitems(continued)
MenuitemSubmenuitemSelectionComments
•BalancedNote:Thissub-menuis
availableonmodelswithan
IntelCPU.
CPUPowerManagement•Disabled
•Enabled
Enableordisablethe
power-savingfeaturethat
stopsthemicroprocessor
clockautomaticallywhen
therearenocomputer
activities.Normally,itisnot
necessarytochangethe
setting.
Intel(R)RapidStart
Technology
•Disabled
•Enabled
Enterafter:
•Immediately
•1minute
•2minutes
•5minutes
•10minutes
•15minutes
•30minutes
•1hour
•2hours
•3hours
Tousethisfeature,aspecial
partitiononthesolid-state
driveisrequired.
Whenenabled,the
computerentersalower
powerstateafterthe
specifiedtimeinsleep
state.Andittakesonly
secondstoresumenormal
operation.
Note:Thissub-menuis
availableonmodelswithan
IntelCPU.
DisableBuilt-inBattery•Yes
•No
Temporarydisablebattery
forservicingthesystem.
Afterselectingthisitem,the
systemwillbeautomatically
poweredoff,thenready
tobeserviced.Note:the
batterywillbeautomatically
enabledwhentheAC
adapterisrecoonected.
PasswordBeep•Disabled
•Enabled
Enablethisoptiontohave
abeepsoundwhenthe
systemiswaitingfora
power-on,harddisk,or
supervisorpassword.
Differentbeepswillsound
whentheenteredpassword
matchesordoesnotmatch
theconfiguredpassword.
BeepandAlarm
KeyboardBeep•Disabled
•Enabled
Enablethisoptionto
haveabeepsound
whenunmanageablekey
combinationarepressed.
Chapter5.Advancedconfiguration61

DateandTimemenu
Tochangethedateortimeofyourcomputer,selecttheDate/TimetabfromtheThinkPadSetupmenu.
Thendothefollowing:
1.UsethecursorkeystoselectSystemDateorSystemTime.
2.Typeadateortime.
Securitymenu
Tochangethesecuritysettingsofyourcomputer,selecttheSecuritytabfromtheThinkPadSetupmenu.
ThefollowingtableliststheSecuritymenuitems.Defaultvaluesareinboldface.
Attention:Thedefaultconfigurationsarealreadyoptimizedforyou.Improperchangeoftheconfigurations
mightcauseunexpectedresults.
Table4.Securitymenuitems
MenuitemSubmenuitemSelectionComments
SupervisorPassword•Disabled
•Enabled
Referto“Supervisor
password”onpage46.
LockUEFIBIOSSettings•Disabled
•Enabled
Enableordisablethe
functionthatprotects
itemsinThinkPadSetup
frombeingchangedbya
userwhodoesnothave
thesupervisorpassword.
Bydefault,thisissetto
Disabled.Ifyousetthe
supervisorpasswordand
enablethisfunction,no
onebutyoucanchange
itemsintheThinkPadSetup
program.
PasswordatUnattended
Boot
•Disabled
•Enabled
Ifyouselectandenable
Passwordatunattended
boot,apasswordprompt
isdisplayedwhenthe
computeristurnedon,
fromeitherapower-off
stateorhibernationstate.
IfyouselectDisabled,
nopasswordpromptis
displayed;thecomputer
goesaheadandloads
theoperatingsystem.
Topreventunauthorized
access,settheuser
authenticationonthe
operatingsystem.
PasswordatRestart•Disabled
•Enabled
Ifyouselectandenable
Passwordatrestart,
apasswordpromptis
displayedwhenyourestart
thecomputer.Ifyouselect
Disabled,nopassword
promptisdisplayed;the
computergoesaheadand
Password
62UserGuide

Table4.Securitymenuitems(continued)
MenuitemSubmenuitemSelectionComments
loadstheoperatingsystem.
Topreventunauthorized
access,settheuser
authenticationonthe
operatingsystem.
PasswordatBootDevice
List
•Disabled
•Enabled
IftheSecuritypassword
isset,thisoptionisused
tospecifywhetherthe
Securitypasswordmust
beenteredtodisplaythe
F12bootdevicelist.Select
Enabledtopromptfor
theSecuritypassword.
SelectDisabledtoproceed
withoutanyuseraction
required.
PasswordCountExceeded
Error
•Disabled
•Enabled
SelectEnabledtoshow
thePOST0199errorand
promptfortheSecurity
password.SelectDisabled
tohidethePOST0199error
andproceedwithoutany
useractionrequired.
SetMinimumLength•Disabled
•Passwordlengthoptions
Specifyaminimumlength
forthepower-onpassword
andharddiskpassword.
Bydefault,thisissetto
Disabled.Ifyousetthe
supervisorpasswordand
specifyaminimumlength
forpasswords,noonebut
youcanchangethelength.
Power-OnPassword•Disabled
•Enabled
Referto“Power-on
password”onpage45.
HardDisk1Password•Disabled
•Enabled
Referto“Harddisk
passwords”onpage
48.
FlashBIOSUpdatingby
End-Users
•Disabled
•Enabled
IfyouselectEnabled,
alluserscanupdatethe
UEFIBIOS.Ifyouselect
Disabled,onlytheperson
whoknowsthesupervisor
passwordcanupdatethe
UEFIBIOS.
UEFIBIOSUpdateOption
SecureRollBackPrevention•Disabled
•Enabled
Disabledisthedefault
valuewhenOSOptimisezd
issettoDisabled.Enabled
isthedefaultvaluewhen
OSOptimisezdisset
toEnabled.
IfyouselectDisabled,you
canflashtheolderversion
UEFIBIOS.
Chapter5.Advancedconfiguration63

Table4.Securitymenuitems(continued)
MenuitemSubmenuitemSelectionComments
MemoryProtectionExecutionPrevention•Disabled
•Enabled
Somecomputerviruses
andwormscausememory
bufferstooverflowby
runningcodewhereonly
dataisallowed.Ifthe
DataExecutionPrevention
featurecanbeusedwith
youroperatingsystem,then
byselectingEnabledyou
canprotectyourcomputer
againstattacksbysuch
virusesandworms.Ifafter
choosingEnabledyoufind
thataprogramdoesnotrun
correctly,selectDisabled
andresetthesetting.
IntelVirtualization
Technology
•Disabled
•Enabled
IfyouselectEnabled,a
VirtualMachineMonitor
(VMM)canutilizethe
additionalhardware
capabilitiesprovidedby
VirtualizationTechnology.
Note:Thissub-menuis
availableonmodelswithan
IntelCPU.
IntelVT-dFeature•Disabled
•Enabled
IntelVT-disIntel
VirtualizationTechnology
forDirectedI/O.When
enabled,aVMMcanutilize
theplatforminfrastructure
forI/Ovirtualization.
Note:Thissub-menuis
availableonmodelswithan
IntelCPU.
Virtualization
AMD-V™Technology•Disabled
•Enabled
IfyouselectDisable,
aVMMcanutilizethe
additionalhardware
capabilitiesprovided
byAMDVirtualization
technology.
Note:Thissub-menuis
availableonmodelswithan
AMDCPU.
64UserGuide

Table4.Securitymenuitems(continued)
MenuitemSubmenuitemSelectionComments
EthernetLAN•Disabled
•Enabled
IfyouselectEnabled,you
canusetheEthernetLAN
device.
WirelessLAN•Disabled
•Enabled
IfyouselectEnabled,
youcanusewirelessLAN
devices.
Bluetooth•Disabled
•Enabled
IfyouselectEnabled,you
canuseBluetoothdevices.
USBPort•Disabled
•Enabled
IfyouselectEnabled,you
canuseUSBconnectors.
MemoryCardSlot•Disabled
•Enabled
IfyouselectEnabled,you
canusethememorycard
slots.
IntegratedCamera•Disabled
•Enabled
IfyouselectEnabled,you
canusetheintegrated
camera.
I/OPortAccess
Microphone•Disabled
•Enabled
IfyouselectEnabled,you
canusethemicrophones
(internal,external,or
line-in).
Anti-TheftComputraceModule
Activation
•Disabled
•Enabled
•PermanentlyDisabled
EnableordisabletheUEFI
BIOSinterfacetoactivate
thecomputracemodule.
Computraceisanoptional
monitoringservicefrom
AbsoluteSoftware.
Note:Ifyousetthe
Computracemodule
activationtoPermanently
Disabled,youwillbe
unabletoenablethis
settingagain.
SecureBoot•Disabled
•Enabled
Disabledisthedefault
valuewhenOSOptimisezd
issettoDisabled.Enabled
isthedefaultvaluewhen
OSOptimisezdisset
toEnabled.
Enableordisablethe
UEFISecureBootfeature.
SelectEnabletoprevent
unauthorizedoperating
systemsfromrunningat
boottime.SelectDisabled
toallowanyoperating
systemstorunatboottime.
Note:ToenableSecure
Boot,youneedtosetthe
startupsettingasUEFI
SecureBoot
Chapter5.Advancedconfiguration65

Table4.Securitymenuitems(continued)
MenuitemSubmenuitemSelectionComments
OnlyandsetCSMSupport
asNo.
PlatformMode•SetupMode
•UserMode
Specifythesystem
operatingmode.
SecureBootMode•StandardMode
•CustomMode
Specifythesystem
operatingmode.
ResettoSetupMode•Yes
•No
Thisoptionisusedtoclear
thecurrentplatformkey
andputthesysteminto
SetupMode.Youcan
installyourownplatform
keyandcustomizethe
SecureBootsignature
databasesinSetupMode.
SecureBootmodewillbe
settoCustomMode.
RestoreFactorykeys•Yes
•No
Thisoptionisusedto
restoreallkeysand
certificatesinSecure
Bootdatabasestofactory
defaults.Anycustomized
SecureBootsettings
willbeerased,andthe
defaultplatformkeywillbe
re-establishedalongwith
theoriginalsignature
databasesincluding
certificateforWindows
8.1operatingsystem.
ClearAllSecureBootKeys•Yes
•No
Thisoptionisusedtoclear
allkeysandcertificatesin
SecureBootdatabases.
Youcaninstallyourown
keysandcertificatesafter
selectingthisoption.
Startupmenu
Tochangethestartupsettingsofyourcomputer,selecttheStartuptabfromtheThinkPadSetupmenu.
Attention:
•Afteryouchangethestartupsequence,ensurethatyouselectacorrectdeviceduringacopy,asave,ora
formatoperation.Otherwiseyourdatamightbeerasedoroverwritten.
•IfyouareusingtheBitLocker™driveencryption,donotchangethestartupsequence.BitLockerdrive
encryptionlocksthecomputerfromstartingoncedetectsthechangeofstartupsequence.
Tochangethestartupsequencetemporarilysothatthecomputerstartsfromadesireddrive,dothefollowing:
1.Turnoffthecomputer.
2.Turnonthecomputer.WhentheThinkPadlogoisdisplayed,presstheF12key.
3.Selectthedevicethatyouwantthecomputertostartfrom.
66UserGuide

Note:TheBootmenuwillbedisplayedifthecomputercannotstartfromanydevicesortheoperating
systemcannotbefound.
ThefollowingtableliststheStartupmenuitems.Defaultvaluesareinboldface.
Note:Someitemsaredisplayedonthemenuonlyifthecomputersupportsthecorrespondingfeatures.
Table5.Startupmenuitems
MenuitemSelectionComments
BootSelectthebootdevicewhenyou
pressthepowerbuttontoturnonthe
computer.
NetworkBootSelectthebootdevicewhenthe
computerwakesfromLAN.IfWake
OnLANisenabled,anetwork
administratorcanturnonallofthe
computersinaLANremotelybyuse
ofnetworkmanagementsoftware.
UEFI/LegacyBoot•Both
•UEFIOnly
•LegacyOnly
UEFI/LegacyBootPriority
•UEFIFirst
•LegacyFirst
CSMSupport(forUEFIOnly)
•No
•Yes
Selectsystembootcapability.
•Both:Selectpriorityofboot
optionsbetweenUEFIandLegacy.
•UEFIOnly:Thecomputerwillstart
fromtheUEFI-enabledoperating
system.
•LegacyOnly:Thecomputerwill
bootfromanyoperatingsystem
otherthantheUEFI-enabledone.
Note:IfyouselectUEFIOnly,the
computercannotstartfromthe
bootabledevicesthatdonothavethe
UEFI-enabledoperatingsystem.
CompatibilitySupportModule(CSM)
isrequiredforstartingthelegacy
operatingsystem.IfyouselectUEFI
Only,CSMSupportisselectable.
ForBothorLegacyOnlymode,CSM
Supportisnotselectable.
BootMode•Quick
•Diagnostics
ScreenduringthePOST:
•Quick:TheThinkPadLogoscreen
isdisplayed.
•Diagnostics:Testmessagesare
displayed.
Note:YoucanalsoenterDiagnostic
modebypressingEscduringPOST.
OptionKeyDisplay•Disabled
•Enabled
IfyouselectDisabled,thenthe
message“Tointerruptnormalstartup,
pressEnter”isnotdisplayedduring
thePOST.
Chapter5.Advancedconfiguration67

Table5.Startupmenuitems(continued)
MenuitemSelectionComments
BootDeviceListF12Option•Disabled
•Enabled
IfyouselectEnabled,theF12key
isrecognizedandtheBootMenu
windowisdisplayed.
BootOrderLock•Disabled
•Enabled
IfyouselectDisabled,yourcomputer
willbootusingthedefaultpriority.If
youselectEnabled,yourcomputer
willbootusingthepriorityyouhave
customized.
Restartmenu
ToexittheThinkPadSetupprogramandrestartthecomputer,selectRestartfromtheThinkPadSetupmenu.
Thefollowingsubmenuitemsaredisplayed:
•ExitSavingChanges:Savethechangesandrestartthecomputer.
•ExitDiscardingChanges:Discardthechangesandrestartthecomputer.
•LoadSetupDefaults:Restoretothefactorydefaultsettings.
Note:EnableOSOptimizedDefaultstomeettheWindows8.1certificationrequirements.Whenyou
changethissetting,someothersettingsarechangedautomatically,suchasCSMSupport,UEFI/Legacy
Boot,SecureBoot,andSecureRollBackPrevention.
•DiscardChanges:Discardthechanges.
•SaveChanges:Savethechanges.
UpdatingyoursystemUEFIBIOS
TheUEFIBIOSisthefirstprogramthatthecomputerrunswhenthecomputeristurnedon.TheUEFIBIOS
initializesthehardwarecomponents,andloadstheoperatingsystemandotherprograms.
YoucanupdatetheUEFIBIOSbystartingyourcomputerfromaflashupdateopticaldiscoraflashupdate
programrunningintheWindowsenvironment.Whenyouinstallanewprogram,adevicedriver,orhardware,
youmightbeinformedtoupdatetheUEFIBIOS.
ForinstructionsonhowtoupdatetheUEFIBIOS,goto:
http://www.lenovo.com/ThinkPadDrivers
68UserGuide

Chapter6.Preventingproblems
AnimportantpartofowningaThinkPadnotebookcomputerismaintenance.Withpropercare,youcan
avoidcommonproblems.Thechapterprovidesinformationthatcanhelpyoukeepyourcomputerrunning
smoothly.
•“Generaltipsforpreventingproblems”onpage69
•“Makingsuredevicedriversarecurrent”onpage70
•“Takingcareofyourcomputer”onpage71
Generaltipsforpreventingproblems
•Checkthecapacityofyour,hybriddrive,orsolid-statedrivefromtimetotime.Ifthe,hybriddrive,or
solid-statedrivegetstoofull,theWindowsoperatingsystemwillslowdownandmightproduceerrors.
Tocheckthecapacityoftheharddiskdrive,hybriddrive,orsolid-statedrive,dothefollowing:
–ForWindows7:ClickStart➙Computer.
–ForWindows8.1:OpentheFileExplorer.
•Emptyyourrecyclebinonaregularbasis.
•Usediskdefragmenttoolregularlyonyourharddiskdrive,hybriddrive,orsolid-statedrivetoimprove
dataseekandreadtimes.
•Tofreeupdiskspace,uninstallunusedapplicationprograms.
Note:Youalsomightwanttolookforprogramduplicationoroverlappingversions.
•CleanoutyourInbox,Sent,andTrashfoldersfromyoure-mailclientprogram.
•Backupyourdataatleastonceaweek.Ifcriticaldataispresent,itisagoodideatoperformadaily
backupoperation.Lenovohasmanybackupoptionsavailableforyourcomputer.Rewritableexternal
opticaldrivesareavailableformostmachinesandareeasilyinstalled.
•Schedulesystemrestoreoperationstotakeasystemsnapshotperiodically.Formoreinformationabout
systemrestore,seeChapter8“Recoveryoverview”onpage93.
•UpdatedevicedriversandtheUEFIBIOSwhenneeded.
•Profileyourmachineathttp://www.lenovo.com/supporttokeepuptodatewithcurrentdriversand
revisions.
•Keepuptodatefordevicedriversonothernon-Lenovohardware.Youmightwanttoreadthedevice
driverinformationreleasenotespriortoupdatingforcompatibilityorknownissues.
•Keepalogbook.Entriesmightincludemajorhardwareorsoftwarechanges,driverupdates,minorissues
youhaveexperienced,andhowyouresolvedtheminorissues.
•Ifyoueverneedtorunarecoveryonyourcomputertoreturnthepreinstalledcontentsontothemachine,
thefollowingtipsmighthelpalongtheway:
–Removeallexternaldevicessuchastheprinter,keyboard,andsoon.
–Makesurethatyourbatteryischargedandyourcomputerhastheacpowerconnected.
–AccessThinkPadSetupandloadthedefaultsettings.
–Restartthecomputerandstarttherecoveryoperation.
–Ifyourcomputerusesdiscsastherecoverymedia,donotremovethediscfromthedriveuntil
promptedtodoso.
©CopyrightLenovo201469

•Forsuspectedharddiskdrive,hybriddrive,orsolid-statedriveissues,referto“Diagnosingproblems”
onpage75andrunadiagnostictestforthedrivebeforeyoucalltheCustomerSupportCenter.
Ifyourcomputerdoesnotstartup,downloadthefilestocreateabootableself-testmediumfrom
http://www.lenovo.com/hddtest.Runthetestandrecordanymessagesorerrorcodes.Ifthetestreturns
anyfailingerrorcodesormessages,calltheCustomerSupportCenterwiththecodesormessagesand
thecomputerinfrontofyou.Atechnicianwillassistyoufurther.
•Ifrequired,youcanfindthecontactinformationabouttheCustomerSupportCenterforyourcountry
orregionathttp://www.lenovo.com/support/phone.WhencallingtheCustomerSupportCenter,make
surethatyouhaveyourmachinemodeltype,serialnumber,andthecomputerinfrontofyou.Also,ifthe
computerisproducingerrorcodes,itishelpfultohavetheerrorscreenonorthemessageswrittendown.
Makingsuredevicedriversarecurrent
Devicedriversareprogramsthatcontaininstructionsfortheoperatingsystemabouthowtooperateor
“drive”acertainpieceofhardware.Eachhardwarecomponentonyourcomputerhasitsownspecificdriver.
Ifyouaddanewcomponent,theoperatingsystemneedstobeinstructedonhowtooperatethatpiece
ofhardware.Afteryouinstallthedriver,theoperatingsystemcanrecognizethehardwarecomponent
andunderstandhowtouseit.
Note:Becausedriversareprograms,likeanyotherfileonyourcomputer,theyaresusceptibletocorruption
andmightnotperformcorrectlyifcorruptionoccurs.
Itisnotalwaysnecessarytodownloadthelatestdrivers.However,youshoulddownloadthelatestdriver
foracomponentifyounoticepoorperformancefromthatcomponentorifyouaddedanewcomponent.
Thismighteliminatethedriverasthepotentialcauseofaproblem.
GettingthelatestdriversfromtheWebsite
YoucandownloadandinstallupdateddevicedriversfromtheLenovoWebsitebydoingthefollowing:
1.Gotohttp://www.lenovo.com/ThinkPadDrivers.
2.Selecttheentryforyourcomputerandthenfollowtheinstructionsonthescreentodownloadand
installnecessarysoftware.
GettingthelatestdriversusingSystemUpdate
TheSystemUpdateprogramhelpsyoukeepthesoftwareonyourcomputerup-to-date.Updatepackages
arestoredonLenovoserversandcanbedownloadedfromtheLenovoSupportWebsite.Updatepackages
cancontainapplications,devicedrivers,UEFIBIOSflashes,orsoftwareupdates.WhentheSystemUpdate
programconnectstotheLenovoSupportWebsite,theSystemUpdateprogramautomaticallyrecognizes
themachinetypeandmodelofyourcomputer,theinstalledoperatingsystem,andthelanguageofthe
operatingsystemtodeterminewhatupdatesareavailableforyourcomputer.TheSystemUpdateprogram
thendisplaysalistofupdatepackagesandcategorizeseachupdateascritical,recommended,oroptionalto
helpyouunderstandtheimportance.Youhavecompletecontrolofwhichupdatestodownloadandinstall.
Afteryouselecttheupdatepackagesyouwant,theSystemUpdateprogramautomaticallydownloadsand
installstheupdateswithoutanyfurtherinterventionfromyou.
TheSystemUpdateprogramispreinstalledonyourcomputerandisreadytorun.Theonlyprerequisiteis
anactiveInternetconnection.Youcanstarttheprogrammanually,oryoucanusetheschedulefeature
toenabletheprogramtosearchforupdatesautomaticallyatspecifiedintervals.Youalsocanpredefine
scheduledupdatestosearchbyseverity(criticalupdates,criticalandrecommendedupdates,orallupdates)
sothelistyouchoosefromcontainsonlythoseupdatetypesthatareofinteresttoyou.
FormoreinformationabouthowtousetheSystemUpdateprogram,refertothehelpinformationsystem
oftheprogram.
70UserGuide

Takingcareofyourcomputer
Althoughyourcomputerisdesignedtofunctionreliablyinnormalworkenvironments,youneedtouse
commonsenseinhandlingit.Byfollowingtheimportanttipsinthistopic,youwillgetthemostuseand
enjoymentoutofyourcomputer.
Becarefulaboutwhereandhowyouwork
•Storepackingmaterialssafelyoutofthereachofchildrentopreventtheriskofsuffocationfromplastic
bags.
•Keepyourcomputerawayfrommagnets,activatedcellularphones,electricalappliances,orspeakers
(morethan13cmor5inches).
•Avoidsubjectingyourcomputertoextremetemperatures(below5°C/41°Forabove35°C/95°F).
•Someappliances,suchascertainportabledesktopfansorairpurifiers,canproducenegativeions.Ifa
computerisclosetosuchanappliance,andisexposedforanextendedtimetoaircontainingnegative
ions,itmightbecomeelectrostaticallycharged.Suchachargemightbedischargedthroughyourhands
whenyoutouchthekeyboardorotherpartsofthecomputer,orthroughconnectorsonI/Odevices
connectedtoit.Eventhoughthiskindofelectrostaticdischarge(ESD)istheoppositeofadischargefrom
yourbodyorclothingtothecomputer,itposesthesameriskofacomputermalfunction.
Yourcomputerisdesignedandmanufacturedtominimizeanyeffectsofelectrostaticcharge.Anelectrostatic
chargeaboveacertainlimit,however,canincreasetheriskofESD.Therefore,whenusingthecomputer
closetoanappliancethatcanproducenegativeions,givespecialattentiontothefollowing:
•Avoiddirectlyexposingyourcomputertotheairfromanappliancethatcanproducenegativeions.
•Keepyourcomputerandperipheralsasfaraspossiblefromsuchanappliance.
•Whereverpossible,groundyourcomputertofacilitatesafeelectrostaticdischarge.
Note:Notallsuchappliancescauseasignificantelectrostaticcharge.
Begentlewithyourcomputer
•Avoidplacinganyobjects(includingpaper)betweenthedisplayandthekeyboardorthepalmrest.
•Yourcomputerdisplayisdesignedtobeopenedandusedatanangleslightlygreaterthan90degrees.
Donotopenthedisplaybeyond135degrees,asthismightdamagethecomputerhinge.
•Donotturnyourcomputeroverwhiletheacpoweradapterispluggedin.Thiscouldbreaktheadapter
plug.
Carryyourcomputerproperly
•Beforemovingyourcomputer,besuretoremoveanymedia,turnoffattacheddevices,anddisconnect
cordsandcables.
•Whenpickingupyouropencomputer,holditbythebottom.Donotpickuporholdyourcomputerby
thedisplay.
Handlestoragemediaanddrivesproperly
•Wheninstallingtheharddiskdrive,hybriddrive,orsolid-statedrive,followtheinstructionsshippedwith
yourhardware,andapplypressureonlywhereneededonthedevice.
•Afteryoureplacetheprimaryharddiskdrive,hybriddrive,orsolid-statedrive,reattachthecoverofthe
driveslot.
•Whenreplacingtheharddiskdrive,hybriddrive,orsolid-statedrivereattachthecoverofthedriveslot.
•Storeyourexternalandremovableharddiskdrive,hybriddrive,orsolid-statedriveintheappropriate
containersorpackagingwhentheyarenotbeingused.
Chapter6.Preventingproblems71

•Beforeyouinstallanyofthefollowingdevices,touchametaltableoragroundedmetalobject.Thisaction
reducesanystaticelectricityfromyourbody.Thestaticelectricitycoulddamagethedevice.
Note:Notalllisteddevicesareincludedinyourcomputer.
–Memorymodule
–Mini-PCIcard
–Memorycard,suchasanSDcard,SDHCcard,SDXCcard,andaMultiMediaCard
Thisactionreducesanystaticelectricityfromyourbody.Thestaticelectricitycoulddamagethedevice.
•Whentransferringdatatoorfromaflashmediacard,suchasanSDcard,donotputyourcomputerin
sleeporhibernationmodebeforethedatatransferiscomplete.Todosomightcausedamagetoyour
data.
Takingcarewhensettingpasswords
•Rememberyourpasswords.Ifyouforgetasupervisororharddiskpassword,Lenovowillnotresetit,and
youmighthavetoreplaceyoursystemboard,harddiskdrive,hybriddrive,orsolid-statedrive.
Takingcareofthefingerprintreader
Thefollowingactionscoulddamagethefingerprintreaderorcauseitnottoworkproperly:
•Scratchingthesurfaceofthefingerprintreaderwithahard,pointedobject.
•Scrapingthesurfaceofthefingerprintreaderwithyourfingernailoranythinghard.
•Usingortouchingthefingerprintreaderwithadirtyfinger.
Ifyounoticeanyofthefollowingconditions,gentlycleanthesurfaceofthefingerprintreaderwithadry,
soft,lint-freecloth:
•Thesurfaceofthefingerprintreaderisdirtyorstained.
•Thesurfaceofthefingerprintreaderiswet.
•Thefingerprintreaderoftenfailstoenrollorauthenticateyourfingerprint.
Registeringyourcomputer
•RegisteryourThinkPadcomputerwithLenovoathttp://www.lenovo.com/register.Formoreinformation,
see“Registeringyourcomputer”onpage17.
Besurenottomodifyyourcomputer
•OnlyanauthorizedThinkPadrepairtechnicianshoulddisassembleandrepairyourcomputer.
•Donotmodifyortapethelatchestokeepthedisplayopenorclosed.
Cleaningthecoverofyourcomputer
Occasionallycleanyourcomputerbydoingthefollowing:
1.Prepareamixtureofagentlekitchen-usedetergent.Thedetergentmustnotcontainabrasivepowderor
strongchemicalssuchasacidoralkaline.Usefivepartswatertoonepartdetergent.
2.Absorbthediluteddetergentintoasponge.
3.Squeezeexcessliquidfromthesponge.
4.Wipethecoverwiththesponge,usingacircularmotionandtakingcarenottoletanyexcessliquiddrip.
5.Wipethesurfacetoremovethedetergent.
6.Rinsethespongewithcleanrunningwater.
7.Wipethecoverwiththecleansponge.
72UserGuide

8.Wipethesurfaceagainwithadry,soft,lint-freecloth.
9.Waitforthesurfacetodrycompletelyandremoveanyfibersfromthecloth.
Cleaningyourcomputerkeyboard
Tocleanthecomputerkeyboard,dothefollowing:
1.Applysomeisopropylrubbingalcoholtoasoft,dust-freecloth.
Note:Avoidsprayingcleanerdirectlyontothekeyboard.
2.Wipeeachkeytopsurfacewiththecloth.Wipethekeysonebyone;ifyouwipeseveralkeysatatime,
theclothmighthookontoanadjacentkeyandpossiblydamageit.Makesurethatnoliquiddripsonto
orbetweenthekeys.
3.Allowtodry.
4.Toremoveanycrumbsordustfrombeneaththekeys,youcanuseacamerablowerwithabrush
orcoolairfromahairdryer.
Cleaningyourcomputerdisplay
Tocleanthecomputerdisplay,dothefollowing:
1.Gentlywipethedisplaywithadry,softlint-freecloth.Ifyouseeascratchlikemarkonyourdisplay,it
mightbeastaintransferredfromthekeyboardortheTrackPointpointingstickwhenthecoverwas
pressedfromtheoutside.
2.Wipeordustthestaingentlywithasoft,drycloth.
3.Ifthestainremains,moistenasoft,lint-freeclothwithwaterora50-50mixtureofisopropylalcoholand
waterthatdoesnotcontainimpurities.
Note:Avoidsprayingcleanerdirectlyontothekeyboard.
4.Wringoutasmuchoftheliquidasyoucan.
5.Wipethedisplayagain;donotletanyliquiddripintothecomputer.
6.Besuretodrythedisplaybeforeclosingit.
Chapter6.Preventingproblems73

74UserGuide

Chapter7.Troubleshootingcomputerproblems
Thischapterprovidesinformationonwhattodoifyouexperienceaproblemwithyourcomputer.
•“Diagnosingproblems”onpage75
•“Troubleshooting”onpage75
Diagnosingproblems
Ifyouexperienceproblemswithyourcomputer,usetheLenovoSolutionCenterprogramasastarting
pointforsolvingthem.
TheLenovoSolutionCenterprogramenablesyoutotroubleshootandresolvecomputerproblems.It
combinesdiagnostictests,systeminformationcollection,securitystatus,andsupportinformation,along
withhintsandtipsforoptimalsystemperformance.
Notes:
•TheLenovoSolutionCenterprogramalsoisavailablefordownloadedat:
http://www.lenovo.com/diags
•IfyouareusingotherWindowsoperatingsystemratherthanWindows7orWindows8.1,youcanfindthe
latestinformationaboutdiagnosticsforyourcomputerat:
http://www.lenovo.com/diagnose
IfyourcomputerisinstalledwiththeWindows7operatingsystem,whenyouaresettingupyourcomputer,
theLenovoSolutionCenterprogrampromptsyoutocreaterecoverymedia.Youcanusetherecovery
mediatorestoretheharddiskdrive,hybriddrive,orsolid-statedrivetothefactorydefaultstate.Formore
information,see“Creatingandusingarecoverymedia”onpage93.
ToruntheLenovoSolutionCenterprogram,see“AccessingLenovoprogramsontheWindows7operating
system”onpage13.
Foradditionalinformation,refertotheLenovoSolutionCenterhelpsystem.
Note:IfyouareunabletoisolateandrepairtheproblemyourselfafterrunningLenovoSolutionCenter
program,saveandprintthelogfilescreatedbytheprogram.Youwillneedthelogfileswhenyouspeaktoa
Lenovotechnicalsupportrepresentative.
Troubleshooting
Ifyourcomputerhasanerror,ittypicallydisplaysamessageoranerrorcode,ormakesabeepwhen
youturniton.Whenyouexperienceaproblem,refertothecorrespondingsectionsinthistopictotryto
solvetheproblembyyourself.
Computerstopsresponding
Printtheseinstructionsnowandkeepitwithyourcomputerforreferencelater.
Ifyourcomputeriscompletelyunresponsive(youcannotusetheThinkPadpointingdeviceorthekeyboard),
dothefollowing:
©CopyrightLenovo201475

1.PressandholdthepowerbuttoneitheryourcomputerortheconnectedThinkPadOneLinkDockor
ThinkPadOneLinkProDock(hereinaftercalledthedock)untilthecomputerturnsoff.Afterthecomputer
isturnedoff,restartbypressingthepowerbutton.Ifthecomputerdoesnotturnon,continuewithstep2.
Note:Donotremovethebatteryconnectorandtheacpoweradapterorthebatteryconnectorandthe
docktoresetthecomputer.
2.Whilethecomputeristurnedoff,removeallpowersourcesfromthecomputer(batteryconnectorand
theacpoweradapterorbatteryconnectorandthedock).Holddownthepowerbuttonfor10seconds.
Plugintheacpoweradapterorthedockwhilekeepingthebatteryoutofthecomputer.Ifthecomputer
doesnotturnbackon,continuewithstep3.
Note:OncethecomputerstartsupandenterstheWindowsenvironment,usethepropershutdown
proceduretoturnthecomputeroff.Oncethecomputerisoff,reattachthebatteryandrestartthe
computer.Ifthecomputerdoesnotstartwiththebatteryreattached,removethebatteryandagain
startwithstep2.Ifthecomputerstartswithacpowerbutdoesnotstartwhenthebatteryisattached,
calltheCustomerSupportCenterforsupport.
3.Whilethecomputerisoff,removeallsourcesofpower(batteryandtheacpoweradapter).Removeall
externaldevicesthatareattachedtoyourcomputer(keyboard,mouse,printer,scanner,andsoon).
Repeatstep2.Ifstep2isunsuccessful,continuewithstep4.
Note:Thefollowingstepsinvolveremovingstaticsensitivecomponentsfromyourcomputer.Makesure
thatyouareproperlygroundedandremoveallsourcesofpowerattachedtothecomputer.Ifyouare
uncomfortableorunsureaboutremovingcomponents,calltheCustomerSupportCenterforassistance.
4.Whilethecomputerisoff,removeallsourcesofpowerandexternalhardware.Removeanynon-original
memorymoduleaddedtoyourcomputer.Afterremovingtheextramemorymoduleandreinstallingthe
originalmemorymodule,repeatstep2.Ifthecomputerstilldoesnotturnon,consulttheusermanual
forothercustomer-replaceablecomponentsthatareattachedtoyourcomputer.
Ifthecomputerstilldoesnotstartup,calltheCustomerSupportCenterandaCustomerSupportSpecialist
willassistyou.
Spillsonthekeyboard
Withamobilecomputer,thereareincreasedchancesofspillingliquidsonthekeyboard.Becausemost
liquidsconductelectricity,liquidspilledonthekeyboardcouldcreatenumerousshortcircuits,potentially
causingirreparabledamagetoyourcomputer.
Ifyouspillsomethingonyourcomputer:
Attention:Besurethatnoliquidcreatesashortcircuitbetweenyouandtheacpoweradapter(ifinuse).
Althoughyoumightlosesomedataorworkbyturningoffthecomputerimmediately,leavingthecomputer
onmightmakeyourcomputerunusable.
1.Carefullyunplugtheacpoweradapterimmediately.
2.Turnoffthecomputerimmediately.Ifthecomputerdoesnotturnoff,removethebattery.Themore
quicklyyoustopthecurrentfrompassingthroughthecomputerthemorelikelyyouwillreducedamage
fromshortcircuits.
3.Waituntilyouarecertainthatalltheliquidisdrybeforeturningonyourcomputer.
Note:Ifyouwanttoreplaceyourkeyboard,youcanpurchaseanewone.
Errormessages
•Message:0177:BadSVPdata,stopPOSTtask.
76UserGuide

Solution:ChecksumofthesupervisorpasswordintheEEPROMisnotcorrect.Thesystemboard
shouldbereplaced.Havethecomputerserviced.
•Message:0183:BadCRCofSecuritySettingsinEFIVariable.EnterThinkPadSetup.
Solution:ChecksumoftheSecuritysettingsintheEFIVariableisnotcorrect.EnterThinkPadSetup
tochecksecuritysettings,PressF10andthenpressEntertorestartthesystem.Ifyoustillhavea
problem,havethecomputerserviced.
•Message:0187:EAIAdataaccesserror.
Solution:TheaccesstoEEPROMisfailed.Havethecomputerserviced.
•Message:0188:InvalidRFIDSerializationInformationArea.
Solution:TheEEPROMchecksumisnotcorrect(block#0and1).Thesystemboardshouldbereplaced,
andtheboxserialnumberneedstobereinstalled.Havethecomputerserviced.
•Message:0189:InvalidRFIDconfigurationinformationarea.
Solution:TheEEPROMchecksumisnotcorrect(block#4and5).Thesystemboardshouldbereplaced,
andtheUUIDneedstobereinstalled.Havethecomputerserviced.
•Message:0190:Criticallow-batteryerror.
Solution:Thecomputerturnsoff,becausethebatteryislow.Connecttheacpoweradaptertothe
computerandchargethebattery,orreplacethebatterywithafullychargedone.
•Message:0191:SystemSecurity-Invalidremotechangerequested.
Solution:Thesystemconfigurationchangehasfailed.Confirmtheoperationandtryagain.Toclearthe
error,entertheThinkPadSetupprogram.
•Message:0199:SystemSecurity-Securitypasswordretrycountexceeded.
Solution:Thismessageisdisplayedifyouenterawrongsupervisorpasswordmorethanthreetimes.
Confirmthesupervisorpasswordandtryagain.Tocleartheerror,entertheThinkPadSetupprogram.
•Message:0251:SystemCMOSchecksumbad.
Solution:ThesystemCMOSmighthavebeencorruptedbyaprogram.Thecomputerusesthedefault
settings.RunThinkPadSetuptoreconfigurethesettings.Ifyoustillseethesameerrorcode,have
thecomputerserviced.
•Message:0253:EFIVariableBlockDatawasdestroyed.
Solution:ThesystemEFIVariableBlockDatamighthavebeencorrupted.Thecomputerusesthe
defaultsettings.RunThinkPadSetuptoreconfigurethesettings.Ifyoustillseethesameerrorcode,
havethecomputerserviced.
•Message:0271:Realtimeclockerror.
Solution:Havethecomputerserviced.
•Message:1802:Unauthorizednetworkcardispluggedin.
Solution:Thenetworkcardisnotsupportedonthiscomputer.Removeit.
•Message:1820:Morethanoneexternalfingerprintreadersareattached.
Solution:Poweroffandremoveallbutthereaderthatyousetupwithinyourmainoperatingsystem.
•Message:2000:ThinkVantageActiveProtectionsensordiagnosticsfailed.
Chapter7.Troubleshootingcomputerproblems77

Solution:ThinkVantageActiveProtectionsensorisnotworkingcorrectly.Havethecomputerserviced.
•Message:2100:DetectionerroronHDD0(MainHDD).
Solution:Theharddiskdriveorhybriddriveisnotworking.Havetheharddiskdriveorhybriddrive
serviced.
•Message:2101:DetectionerroronHDD1(UltrabayHDD)).
Solution:Theharddiskdriveorhybriddriveisnotworking.Havetheharddiskdriveorhybriddrive
serviced.
•Message:2102:DetectionerroronHDD2(MiniSATA).
Solution:TheMiniSATAdeviceisnotworking.HavetheMiniSATAdeviceserviced.
•Message:2110:ReaderroronHDD0(MainHDD).
Solution:Theharddiskdriveorhybriddriveisnotworking.Havetheharddiskdriveorhybriddrive
serviced.
•Message:2111:ReaderroronHDD1(UltrabayHDD)
Solution:Theharddiskdriveorhybriddriveisnotworking.Havetheharddiskdriveorhybriddrive
serviced.
•Message:2112:ReaderroronHDD2(MiniSATA)
Solution:TheMiniSATAdeviceisnotworking.HavetheMiniSATAdeviceserviced.
•Message:2200:MachineTypeandSerialNumberareinvalid.
Solution:MachineTypeandSerialNumberareinvalid.Havethecomputerserviced.
•Message:2201:MachineUUIDisinvalid.
Solution:MachineUUIDisinvalid.Havethecomputerserviced.
•Message:Fanerror
Solution:Coolingfanhasfailed.Shutdownthecomputerimmediatelyandhavethecomputerserviced.
•Message:Thermalsensingerror
Solution:Thethermalsensorisnotfunctioningcorrectly.Shutdownthecomputerimmediatelyand
havethecomputerserviced.
•Message:ThissystemdoesnotsupportbatteriesthatarenotgenuineLenovo-madeorauthorized.The
systemwillcontinuetoboot,butmaynotchargeunauthorizedbatteries.PresstheESCkeytocontinue.
Attention:Lenovohasnoresponsibilityfortheperformanceorsafetyofunauthorizedbatteries,and
providesnowarrantiesforfailuresordamagearisingoutoftheiruse.
Solution:ReplacethebatterywiththecorrectLenovobatteryforthiscomputer.Ifyoustillseethesame
errormessage,contactLenovoservicetohavethecomputerserviced.
•Message:Thebatteryinstalledisnotsupportedbythissystemandwillnotcharge.Pleasereplacethe
batterywiththecorrectLenovobatteryforthissystem.PresstheESCkeytocontinue.
Solution:ReplacethebatterywiththecorrectLenovobatteryforthiscomputer.Ifyoustillseethesame
errormessage,contactLenovoservicetohavethecomputerserviced.
78UserGuide

Errorswithoutmessages
•Problem:MyscreenkeepsblankingwhenIdonotwantitto.
Solution:IfyoucomputerispreinstalledwiththeWindows7operatingsystem,youcandisableany
systemtimers,suchastheLCDturn-offtimerortheblanktimerbydoingthefollowing:
1.StartPowerManager.
2.ClickthePowerplantab,andthenselectMaximumPerformancefromthepredefinedpowerplans.
•Problem:WhenIturnonthecomputer,nothingisdisplayedonthescreenandthecomputerdoesnot
beepwhilestartingup.
Note:Ifyouarenotsurewhetheryouheardanybeeps,turnoffthecomputerbypressingandholdingthe
powerbuttonforfoursecondsormore.Thenturnonthecomputerandlistenagain.
Solution:Makesurethat:
–Thebatteryisinstalledcorrectly.
–Theacpoweradapterisconnectedtothecomputerandthepowercordispluggedintoaworking
electricaloutlet.
–Thecomputeristurnedon.(Pressthepowerbuttonagainforconfirmation.)
–Thebrightnesslevelofthescreenisappropriatelyset.
Ifapower-onpasswordisset,pressanykeytodisplaythepromptforthepower-onpasswordand
thentypethecorrectpasswordandpressEnter.
Iftheseitemsarecorrectlyset,andthescreenremainsblank,havethecomputerserviced.
•Problem:WhenIturnonthecomputer,onlyawhitecursorisdisplayedonablankscreen.
Solution:Ifyouhavemodifiedapartitiononyourharddiskdrive,hybriddrive,orsolid-statedrivebyusing
partitionsoftware,informationaboutthatpartition,orthemasterbootrecordmighthavebeendestroyed.
1.Turnoffthecomputer,andthenturnitonagain.
2.Ifyoustillseeonlythecursoronthescreen,dothefollowing:
–Ifyouhaveusedthepartitionsoftware,examinethepartitionontheharddiskdrive,hybriddrive,
orsolid-statedrivebyusingthesoftware,andrecoverthepartitionifrequired.
–Usetherecoverysolutionstorestorethesystemtothefactorydefaultstate.
Iftheproblempersists,havethecomputerserviced.
•Problem:Myscreengoesblankwhilethecomputerison.
Solution:Yourscreensaverorpowermanagementmighthavebeenenabled.Doeitherofthefollowing:
–TouchtheTrackPointpointingdeviceortheThinkPadtrackpad,orpressakeytoexitthescreensaver.
–Pressthepowerbuttontoresumethecomputerfromsleeporhibernationmode.
Beeperrors
Table6.Beeperrors
ProblemSolution
Oneshortbeep,pause,threeshortbeeps,pause,three
moreshortbeeps,andoneshortbeep
Makesurethatmemorymodulesareinstalledcorrectly.If
theyare,andyoustillhearthebeeps,havethecomputer
serviced.
Chapter7.Troubleshootingcomputerproblems79

Table6.Beeperrors(continued)
Threeshortbeeps,pause,oneshortbeep,pause,one
moreshortbeep,andthreeshortbeeps
PCIresourceallocationfailure.Poweroffthecomputer
andremovethedevicefromtheExpressCardSlot.Ifthe
beepspersist,havethecomputerserviced.
Fiveshortbeeps,pause,Fiveshortbeeps,pauseTheSecurityChiphasaproblem.Havethecomputer
serviced.
FourcyclesoffourshortbeepsTheSecurityChiphasaproblem.Havethecomputer
serviced.
OnelongandtwoshortbeepsThevideofunctionhasaproblem.Havethecomputer
serviced.
FiveshortbeepsThesystemboardhasaproblem.Havethecomputer
serviced.
Memorymoduleproblems
Printtheseinstructionsnowandkeepitwithyourcomputerforreferencelater.
Ifyourmemorymoduleisnotoperatingproperly,checkthefollowingitems:
1.Verifythatthememorymoduleisinstalledandseatedcorrectlyinyourcomputer.
Itmightbenecessarytoremovealladdedmemorymodulestotestthecomputerwithonlythe
factory-installedmemorymodules,andthenreinstallthememorymoduleoneatatimetoensure
aproperconnection.
2.Checkforerrormessagesduringstartup.
Followtheappropriatecorrectiveactionsforpower-onself-test(POST)errormessages.
3.VerifythatthelatestUEFIBIOSforyourmodelhasbeeninstalled.
4.Verifythepropermemoryconfigurationandcompatibilityincludingthemaximummemorysizeandthe
memoryspeed.
5.Rundiagnosticprograms.See“Diagnosingproblems”onpage75.
Networkingproblems
Thefollowingarethemostcommonnetworkingproblems:
Ethernetproblems
•Problem:Yourcomputercannotconnecttothenetwork.
Solution:Makesurethat:
–Thecableisinstalledcorrectly.
ThenetworkcablemustbesecurelyconnectedbothtotheEthernetconnectorofyourcomputerand
totheRJ45connectorofthehub.Themaximumallowabledistancefromthecomputertohubis
100meters.Ifthecableisconnectedandthedistanceiswithinacceptablelimitsbuttheproblem
persists,tryadifferentcable.
–Youareusingthecorrectdevicedriver.Toinstallthecorrectdriver,dothefollowing:
1.GotoControlPanelandclickHardwareandSound➙DeviceManager.Ifyouarepromptedfor
anadministratorpasswordorconfirmation,typethepasswordorprovideconfirmation.
2.Iftheexclamationmark!isdisplayednexttotheadapternameunderNetworkadapters,you
mightnotbeusingthecorrectdriverorthedrivermighthavebeendisabled.Toupdatethedriver,
right-clickthehighlightedadapter.
3.ClickUpdateDriverSoftware,andthenfollowtheinstructionsonthescreen.
80UserGuide

–Theswitchportandtheadapterhavethesameduplexsetting.
Ifyouconfiguredtheadapterforfullduplex,makesurethattheswitchportalsoisconfiguredforfull
duplex.Settingwrongduplexmodecandegradeperformance,causedataloss,orresultinlost
connections.
–Youhaveinstalledallnetworkingsoftwarethatisnecessaryforyournetworkenvironment.
CheckwithyourLANadministratorforthenecessarynetworkingsoftware.
•Problem:Theadapterstopsworkingfornoapparentreason.
Solution:Thenetworkdriverfilesmightbecorruptormissing.Updatethedriverbyreferringtotheabove
solutionfortheproceduretomakesurethatthecorrectdevicedriverisinstalled.
•Problem:IfyourcomputerisaGigabitEthernetmodelandyouuseaspeedof1000Mbps,the
connectionfailsorerrorsoccur.
Solution:
–UseCategory5wiringandmakesurethatthenetworkcableissecurelyconnected.
–Connecttoa1000BASE-Thub/switch(not1000BASE-X).
•Problem:TheWakeonLANfeatureisnotworking.
Solution:
–MakesurethatWakeonLANisenabledinThinkPadSetup.
–Ifitis,checkwithyourLANadministratorforthenecessarysettings.
•Problem:IfyourcomputerisaGigabitEthernetmodel,itcannotconnecttothenetworkat1000Mbps.
Instead,itconnectsat100Mbps.
Solution:
–Tryanothercable.
–Makesurethatthelinkpartnerissettoauto-negotiate.
–Makesurethattheswitchis802.3ab-compliant(gigabitovercopper).
AwirelessLANproblem
Problem:Icannotconnecttothenetworkusingthebuilt-inwirelessnetworkcard.
Solution:Makesurethat:
•YourwirelessLANdriveristhelatestversion.
•Yourcomputeriswithinrangeofawirelessaccesspoint.
•Thewirelessradioisenabled.
Note:IfyouareusingtheWindows7operatingsystem,clickShowhiddeniconsontheWindows
notificationarea.TheAccessConnectionsiconisdisplayed.Formoreinformationabouttheicon,referto
theAccessConnectionshelpinformationsystem.
FortheWindows7operatingsystem,checktheNetworkName(SSID)andyourencryptioninformation.Use
theAccessConnectionsprogramtoverifythiscase-sensitiveinformation.
Bluetoothproblems
Note:CheckyourconnectionanytimeandmakesurethatnootherBluetooth-enableddeviceissearchingfor
thedevicetowhichyouwanttoconnect.SimultaneoussearchingisnotallowedintheBluetoothconnection.
Chapter7.Troubleshootingcomputerproblems81

•Problem:SounddoesnotcomefromtheBluetoothheadset/headphonebutcomesfromthelocal
speakereventhoughtheBluetoothheadset/headphoneisconnectedusingaHeadsetprofileorAVprofile.
Solution:Dothefollowing:
1.Exittheapplicationthatusesthesounddevice(forexample,WindowsMediaPlayer).
2.GotoControlPanelandclickHardwareandSound➙Sound➙Playback.
3.IfyouareusingaHeadsetprofile,selectBluetoothHands-freeAudioandclicktheSetDefault
button.IfyouareusinganAVprofile,selectStereoAudioandclicktheSetDefaultbutton.
4.ClickOKtoclosetheSoundwindow.
•Problem:PIMitemssentfromtheWindows7operatingsystemscannotbereceivedcorrectlyintothe
addressbookofanyotherBluetooth-enableddevice.
Solution:TheWindows7operatingsystemsendsPIMitemsinXMLformat,butmostBluetooth-enabled
deviceshandlePIMitemsinvCardformat.IfanotherBluetooth-enableddevicecanreceiveafilethrough
Bluetooth,aPIMitemsentfromtheWindows7mightbesavedasafilewiththeextension.contact.
Problemswiththekeyboardandotherpointingdevices
Thefollowingarethemostcommonproblemswithkeyboardsandotherpointingdevices.
ThinkPadpointingdeviceproblems
•Problem:Thepointerdriftswhenthecomputeristurnedonorafteritresumesnormaloperation.
Solution:ThepointermightdriftwhenyouarenotusingtheTrackPointpointingdeviceduringnormal
operation.ThisisanormalcharacteristicoftheTrackPointpointingdeviceandisnotadefect.Pointer
driftingmightoccurforseveralsecondsunderthefollowingconditions:
–Whenthecomputeristurnedon
–Whenthecomputerresumesnormaloperation
–WhentheTrackPointpointingdeviceiskeptpressedforalongtime
–Whenthetemperaturechanges
•Problem:TheTrackPointpointingdeviceorThinkPadtrackpaddoesnotwork.
Solution:MakesurethattheTrackPointpointingdeviceorThinkPadtrackpadisenabledintheThinkPad
pointingdevicesettingwindow.
Note:ToopentheThinkPadpointingdevicewindow,gotoControlPanelandclickHardwareand
Sound➙Mouse,andthenclicktheThinkPadtab.
Keyboardproblems
•Problem:Allorsomekeysonthekeyboarddonotwork.
Solution:Ifanexternalnumerickeypadisconnected:
1.Turnoffthecomputer.
2.Removetheexternalnumerickeypad.
3.Turnonthecomputerandtryusingthekeyboardagain.
Ifthekeyboardproblemisresolved,carefullyreconnecttheexternalnumerickeypadandtheexternal
keyboard.Makesurethatyouhaveseatedtheconnectorscorrectly.
Iftheproblempersists,makesurethatthecorrectdevicedriverisinstalledbydoingthefollowing:
1.OpenControlPanel.ChangetheviewofControlPanelfromCategorytoLargeiconsorSmallicons.
2.ClickKeyboard.
82UserGuide

3.SelecttheHardwaretab.IntheDevicePropertiespane,makesurethatyouseethismessage:
DeviceStatus:Thisdeviceisworkingproperly.
Ifkeysonthekeyboardstilldonotwork,havethecomputerserviced.
•Problem:Anumberisdisplayedwhenyoutypealetter.
Solution:Thenumericlockfunctionison.Todisableit,pressFn+NumLock.
•Problem:Allorsomekeysontheexternalnumerickeypaddonotwork.
Solution:Makesurethattheexternalnumerickeypadiscorrectlyconnectedtothecomputer.
Problemswiththedisplayandmultimediadevices
Thistopicincludesthemostcommonproblemswithdisplaysandmultimediadevices,includingthe
computerdisplay,theexternalmonitor,andaudiodevices.
Computerscreenproblems
•Problem:Thescreenisblank.
Solution:Dothefollowing:
–PressF7tobringuptheimage.
–Ifyouareusingtheacpoweradapter,orusingthebatteryandthebatterygaugeshowsthatthebattery
isnotdepleted,pressF6tomakethescreenbrighter.
–Ifyourcomputerisinsleepmode,pressFntoresumefromthesleepmode.
–Iftheproblempersists,followthesolutionforthefollowingproblem.
•Problem:Thescreenisunreadableordistorted.
Solution:Makesurethat:
–Thedisplaydevicedriverisinstalledcorrectly.
–Thescreenresolutionandcolorqualityarecorrectlyset.
–Themonitortypeiscorrect.
Tocheckthesesettings,dothefollowing:
1.Connecttheexternalmonitortoyourcomputer,andthenconnectthemonitortoanelectricaloutlet.
2.Turnontheexternalmonitor.
3.Right-clickonthedesktop,andclickScreenresolution.
Note:Ifyourcomputercannotdetecttheexternalmonitor,clicktheDetectbutton.
4.SelecttheexternalmonitorandsetResolution.
5.ClickAdvancedSettings.
6.ClicktheMonitortab.Checkthemonitorinformationtomakesurethatthemonitortypeiscorrect.
Ifthemonitortypeiscorrect,clickOKtoclosethewindow;otherwiseproceedwiththefollowingsteps.
1.Ifmorethantwomonitortypesaredisplayed,selectGenericPnPMonitororGenericNon-PnP
Monitor.
2.ClickProperties.Ifyouarepromptedforanadministratorpasswordorconfirmation,typethepassword
orprovideconfirmation.
3.ClicktheDrivertab.
4.ClickUpdateDriver.
Chapter7.Troubleshootingcomputerproblems83

5.ClickBrowsemycomputerfordriversoftware,andthenclickLetmepickfromalistofdevice
driversonmycomputer.
6.CleartheShowcompatiblehardwarecheckbox.
7.Selectthecorrectmanufacturerandmodelfortheexternalmonitor.Ifyoucannotfindyourmonitoron
thelist,stoptheinstallationofthisdriverandusethedrivershippedwithyourmonitor.
8.Afterupdatingthedriver,clickClose.
9.FortheWindows7operatingsystem,tochangethecolorsettings,right-clickonthedesktop,andclick
Screenresolution.ClickAdvancedSettings,selecttheMonitortab,thensetColors.
10.ClickOK.
•Problem:Incorrectcharactersaredisplayedonthescreen.
Solution:Didyouinstalltheoperatingsystemorprogramcorrectly?Iftheyareinstalledandconfigured
correctly,havethecomputerserviced.
•Problem:Thescreenstaysonevenafteryouturnoffyourcomputer.
Solution:Pressandholdthepowerbuttonforfoursecondsormoretoturnoffyourcomputer;then
turnitonagain.
•Problem:Missing,discolored,orbrightdotsappearonthescreeneverytimeyouturnonyourcomputer.
Solution:ThisisanintrinsiccharacteristicoftheTFTtechnology.Yourcomputerdisplaycontains
multiplethin-filmtransistors(TFTs).Asmallnumberofmissing,discolored,orbrightdotsonthescreen
mightexistallthetime.
Externalmonitorproblems
•Problem:Theexternalmonitorisblank.
Solution:Tobringuptheimage,pressF7andselectthedesiredmonitor.Iftheproblempersists,do
thefollowing:
1.Connecttheexternalmonitortoanothercomputertomakesurethatitworks.
2.Reconnecttheexternalmonitortoyourcomputer.
3.Refertothemanualshippedwiththeexternalmonitortochecktheresolutionsandrefreshratesthat
aresupported.
–Iftheexternalmonitorsupportsthesameresolutionasthecomputerdisplayorahigherresolution,
viewoutputontheexternalmonitororonboththeexternalmonitorandthecomputerdisplay.
–Iftheexternalmonitorsupportsalowerresolutionthanthecomputerdisplay,viewoutputonthe
externalmonitoronly.(Ifyouviewoutputonboththecomputerdisplayandtheexternalmonitor,
theexternalmonitorscreenwillbeblankordistorted.)
•Problem:Youcannotsetahigherresolutionthanthepresentoneonyourexternalmonitor.
Solution:Makesurethatthemonitorinformationiscorrect.Dothefollowing:
1.Right-clickonthedesktop,andclickScreenresolution.
Note:Ifyourcomputercannotdetecttheexternalmonitor,clicktheDetectbutton.
2.Clicktheiconforthedesiredmonitor(theMonitor-2iconisfortheexternalmonitor).
3.ClickAdvancedSettings.
4.ClicktheAdaptertab.
5.Makesurethatthecorrectdevicedrivernameisshownintheadapterinformationwindow.
Note:Thedevicedrivernamedependsonthevideochipthathasbeeninstalledonyourcomputer.
84UserGuide

6.ClickOK.
Iftheinformationisincorrect,reinstallthedevicedriver.
–Checkthemonitortypeand,ifnecessary,updatethedriverbydoingthefollowing:
1.Connecttheexternalmonitortothemonitorconnector,andthenconnectthemonitortoan
electricaloutlet.
2.Turnontheexternalmonitorandthecomputer.
3.Right-clickonthedesktop,andclickScreenresolution.
Note:Ifyourcomputercannotdetecttheexternalmonitor,clicktheDetectbutton.
4.Clicktheiconforthedesiredmonitor(theMonitor-2iconisfortheexternalmonitor).
5.ClickAdvancedSettings.
6.ClicktheMonitortab.Checkthemonitorinformationwindowtomakesurethatthemonitortype
iscorrect.Ifitis,clickOKtoclosethewindow;otherwisedothefollowing.
7.Ifmorethanonemonitortypeisdisplayed,selectGenericPnPMonitororGenericNon-PnP
Monitor.
8.ClickProperties.Ifyouarepromptedforanadministratorpasswordorconfirmation,typethe
passwordorprovideconfirmation.
9.ClicktheDrivertab.
10.ClickUpdateDriver.
11.ClickBrowsemycomputerfordriversoftware,andthenclickLetmepickfromalistof
devicedriversonmycomputer.
12.CleartheShowcompatiblehardwarecheckbox.
13.Selectyourmonitormanufacturerandmodel.
14.Afterupdatingthedriver,clickClose.
15.SetResolution.
Note:Tochangethecolorsettings,selecttheMonitortab,thensetColors.
16.ClickOK.
•Problem:Thescreenisunreadableordistorted.
Solution:Makesurethat:
–Themonitorinformationiscorrectandtheappropriatemonitortypeisselected.Refertothesolution
totheaboveproblem.
–Makesurethatanappropriaterefreshrateisselectedbydoingthefollowing:
1.Connecttheexternalmonitortothemonitorconnector,andthenconnectthemonitortoan
electricaloutlet.
2.Turnontheexternalmonitorandthecomputer.
3.Right-clickonthedesktop,andclickScreenresolution.
Note:Ifyourcomputercannotdetecttheexternalmonitor,clicktheDetectbutton.
4.Clicktheiconforthedesiredmonitor(theMonitor-2iconisfortheexternalmonitor).
5.ClickAdvancedSettings.
6.ClicktheMonitortab.
7.Selectthecorrectscreenrefreshrate.
Chapter7.Troubleshootingcomputerproblems85

•Problem:Wrongcharactersaredisplayedonthescreen.
Solution:Didyoufollowthecorrectprocedurewheninstallingtheoperatingsystemorprogram?Ifyou
did,havetheexternalmonitorserviced.
•Problem:TheExtenddesktopfunctiondoesnotwork.
Solution:EnabletheExtenddesktopfunctionbydoingthefollowing:
1.Connecttheexternalmonitortothemonitorconnector,andthenconnectthemonitortoanelectrical
outlet.
2.Turnontheexternalmonitorandthecomputer.
3.Right-clickonthedesktop,andclickScreenresolution.
4.ClicktheMonitor-2icon.
5.SelectExtendthesedisplaysformultipledisplays.
6.ClicktheMonitor-1icon(fortheprimarydisplay,thecomputerdisplay).
7.Settheresolutionfortheprimarydisplay.
8.ClicktheMonitor-2icon(fortheexternalmonitor).
9.Setthescreenresolutionforthesecondarydisplay.
10.Settherelativepositionofeachmonitorbydraggingitsicon.Youcansetthemonitorsinanyrelative
position,buttheiconsmusttoucheachother.
11.ClickOKtoapplythechanges.
Note:Tochangethecolorsettings,right-clickonthedesktop,andclickScreenresolution.Click
AdvancedSettings,selecttheMonitortab,thensetColors.
•Problem:IfyouusetheExtenddesktopfunction,youcannotsetahigherresolutionorhigherrefresh
rateonthesecondarydisplay.
Solution:Changetheresolutionandthecolordepthtolowersettingsfortheprimarydisplay.Refer
tothesolutiontotheaboveproblem.
•Problem:Displayswitchingdoesnotwork.
Solution:IfyouusetheExtenddesktopfunction,disableit,andchangethedisplayoutputlocation.If
aDVDmovieoravideoclipisplaying,stoptheplayback,closetheprogram,andthenchangethe
displayoutputlocation.
•Problem:Thescreenpositionontheexternalmonitorisincorrectwhenthatmonitorissetforahigh
resolution.
Solution:Sometimes,whenyouuseahighresolutionsuchas1600x1200,theimageisshiftedtoleftor
rightonthescreen.Tocorrectthis,firstmakesurethatyourexternalmonitorsupportsthedisplaymode
(theresolutionandtherefreshrate)thatyouhaveset.Ifitdoesnot,setadisplaymodethatthemonitor
supports.Ifitdoessupportthedisplaymodeyouhaveset,gotothesetupmenuforthemonitoritself
andadjustthesettingsthere.Usuallytheexternalmonitorhasbuttonsforaccesstothesetupmenu.For
details,seethedocumentationthatcomeswiththemonitor.
Audioproblems
•Problem:WaveorMIDIsounddoesnotplaycorrectly.
Solution:Makesurethatthebuilt-inaudiodeviceisconfiguredcorrectly.
1.OpenControlPanel.
2.ClickHardwareandSound.
86UserGuide

3.ClickDeviceManager.Ifyouarepromptedforanadministratorpasswordorconfirmation,typethe
passwordorprovideconfirmation.
4.Double-clickSound,videoandgamecontrollers.
5.Makesurethatthefollowingdeviceisenabledandconfiguredcorrectly:
–ConexantCX20672SmartAudioHD
•Problem:Recordingsmadeusingthemicrophoneinputarenotloudenough.
Solution:MakesurethattheMicrophoneBoostfunctionisturnedonandsetbydoingthefollowing:
1.OpenControlPanel.
2.ClickHardwareandSound.
3.ClickSound.
4.ClicktheRecordingtabintheSoundwindow.
5.SelectMicrophone,andclickthePropertiesbutton.
6.ClicktheLevelstab,andmovetheMicrophoneBoostsliderupwards.
7.ClickOK.
Note:Fordetailsaboutcontrollingvolume,refertoyourWindowsonlinehelp.
•Problem:Avolumeorbalanceslidercannotbemoved.
Solution:Theslidermightbegrayedout.Thismeansthatitspositionisfixedbythehardwareand
cannotbechanged.
•Problem:Thevolumeslidersdonotstayinplacewhensomeaudioprogramsareused.
Solution:Itisnormalforthesliderstochangepositionwhencertainsoundapplicationsareused.The
applicationsareawareofthesettingsintheVolumeMixerwindowandareallowedtochangethesettings
themselves.AnexampleistheWindowsMediaPlayer.Usuallytheprogramhasslidersavailableto
controlthesoundfromwithintheprogram.
•Problem:Thebalanceslidercannotcompletelymuteonechannel.
Solution:Thecontrolisdesignedtocompensateforminordifferencesinbalanceanddoesnot
completelymuteeitherchannel.
•Problem:ThereisnovolumecontrolforMIDIsoundintheVolumeMixerwindow.
Solution:Usethehardwarevolumecontrol.Thisisbecausethebuilt-insynthesizersoftwaredoes
notsupportthecontrol.
•Problem:ThesoundcannotbeturnedoffevenifyousettheMastervolumecontrolatminimum.
Solution:YoustillcanhearsomesoundeventhoughyouhavesettheMastervolumecontrolatminimum.
Toturnoffthesoundcompletely,gototheMastervolumecontrolandselectMutespeakers.
•Problem:Whenyouconnectaheadphonetoyourcomputerwhileplayingsound,aspeakerdoesnot
producesound.
Solution:Oncetheheadphoneisattached,thestreamingisautomaticallyredirectedtoit.Ifyouwant
tolistentosoundfromthespeakersagain,besuretosetthosespeakersasthedefaultdevice.The
procedureisasfollows:
1.OpenControlPanel.
2.ClickAllControlPanelItems.
3.ClicktheSmartAudioicon.TheSmartAudiowindowopens.
Chapter7.Troubleshootingcomputerproblems87

4.Lookattheplaybackdevices.Ifyouhaveattachedaheadphone,theheadphonewillbeautomatically
setasthedefaultdevice,andtheiconforthatheadphonewillbechecked.
5.Tosetadifferentdeviceasthedefault,double-clicktheiconforthosespeakers.Thaticonwill
nowhaveacheckmark.
6.PlayanysoundbyuseofamusicprogramsuchasWindowsMediaPlayer.Makesurethatsound
comesfromthespeakers.
Fordetails,refertothehelpinformationsystemforSmartAudio.
Fingerprintreaderproblems
•Problem:Thesurfaceofthereaderisdirty,stained,orwet.
Solution:Gentlycleanthesurfaceofthereaderwithadry,soft,lint-freecloth.
•Problem:Thereaderoftenfailstoenrollorauthenticateyourfingerprint.
Solution:Ifthesurfaceofthereaderisdirty,stained,orwet,gentlycleanthesurfaceofthereader
withadry,soft,lint-freecloth.
Fortipsonhowtomaintainthefingerprintreader,refertoMaintainingthefingerprintreader.
Batteryandpowerproblems
Thistopiccontainsinstructionsontroubleshootingbatteryandpowerproblems.
Batteryproblems
•Problem:Thebatterycannotbefullychargedinthestandardchargetimewhenthecomputerispowered
off.
Solution:Thebatterymightbeover-discharged.Dothefollowing:
1.Turnoffthecomputer.
2.Makesurethattheover-dischargedbatteryisinthecomputer.
3.Connecttheacpoweradaptertothecomputerandletitcharge.
Ifaquickchargerisavailable,useittochargetheover-dischargedbattery.
Ifthebatterycannotbefullychargedin24hours,useanewbattery.
•Problem:YourcomputershutsdownbeforethebatterystatusiconintheWindowsnotificationarea
showsempty,oryourcomputeroperatesafterthebatterystatusiconintheWindowsnotificationarea
showsempty.
Solution:Dischargeandrechargethebattery.
•Problem:Theoperatingtimeforafullychargedbatteryisshort.
Solution:Dischargeandrechargethebattery.Ifyourbatteryoperatingtimeisstillshort,useanewbattery.
•Problem:Thecomputerdoesnotoperatewithafullychargedbattery.
Solution:Thesurgeprotectorinthebatterymightbeactive.Turnoffthecomputerforoneminutetoreset
theprotector;thenturnonthecomputeragain.
•Problem:Thebatterycannotbecharged.
Solution:Youcannotchargethebatterywhenitistoohot.Ifthebatteryfeelshot,removeitfromthe
computerandallowittocooltoroomtemperature.Afteritcools,reinstallitandrechargethebattery.Ifit
stillcannotbecharged,haveitserviced.
88UserGuide

Anacpoweradapterproblem
Problem:Theacpoweradapterisconnectedtothecomputerandtheworkingelectricaloutlet,butthe
poweradapter(powerplug)iconisnotdisplayedintheWindowsnotificationarea.
Solution:Dothefollowing:
1.Makesurethattheconnectionoftheacpoweradapteriscorrect.Forinstructionsonconnectingtheac
poweradapter,seeSafety,Warranty,andSetupGuidethatcomeswithyourcomputer.
2.Iftheconnectionoftheacpoweradapteriscorrect,turnoffthecomputer,thendisconnecttheacpower
adapterandremovethemainbattery.
3.Reinstallthebatteryandreconnecttheacpoweradapter,thenturnonthecomputer.
4.IfthepoweradaptericonstillisnotdisplayedintheWindowsnotificationareaandthesystem-status
indicatordoesnotblinkthreetimeswhenanacpowersourceisconnected,havetheacpoweradapter
andyourcomputerserviced.
Note:IfyouareusingtheWindows7operatingsystem,todisplaythepoweradapter(powerplug)icon,click
ShowhiddeniconsintheWindowsnotificationarea.
Powerproblems
Printtheseinstructionsnowandkeepitwithyourcomputerforreferencelater.
Ifyourcomputerisgettingnopoweratall,checkthefollowingitems:
1.Verifythepowerbutton.Thepowerbuttonislitwheneverthecomputerison.
2.Checkallpowerconnections.Removeanypowerstripsandsurgeprotectorstoconnecttheacpower
adapterdirectlytotheacpoweroutlet.
3.Inspecttheacpoweradapter.Checkforanyphysicaldamage,andmakesurethatthepowercableis
firmlyattachedtotheadapterbrickandthecomputer.
4.Verifytheacpowersourceisworkingbyattachinganotherdevicetotheoutlet.
5.Removealldevicesandthentestforsystempowerwithminimaldevicesattached.
a.Disconnecttheacpoweradapterandallcablesfromthecomputer.
b.Closethecomputerdisplayandturnthecomputerover.
c.Removethebottomcoveranddisconnectthebatterycable.Referto“Replacingthestorage
drive”onpage104.
d.Removethememorymodule.Referto“Replacingthememorymodule”onpage108.
e.RemovetheWirelessLANcard.Referto“ReplacingawirelessLANcard”onpage111.
f.Removetheharddiskdrive,hybriddrive,orsolid-statedrive.Referto“Replacingthestorage
drive”onpage104.
g.Waitfor30seconds,andthenreinstallthememorymoduleandtheknowngoodbatteryortheac
poweradaptertotestthecomputerwithminimaldevicesattachedfirst.
h.Reinstalleachdeviceoneatatimethatyouhaveremovedintheearliersteps.
Ifyourcomputerdoesnotrunonbatterypower,disconnectandreconnectthebatterycable.Referto
“Replacingthestoragedrive”onpage104
Apowerbuttonproblem
Problem:Thesystemdoesnotrespond,andyoucannotturnoffthecomputer.
Solution:Turnoffthecomputerbypressingandholdingthepowerbuttonfor4secondsormore.Ifthe
systemisstillnotreset,removetheacpoweradapterandthebattery.
Chapter7.Troubleshootingcomputerproblems89

Bootproblems
Printtheseinstructionsnowandkeepthemwithyourcomputerforreferencelater.
Ifyoureceiveanerrormessagebeforetheoperatingsystemloads,followtheappropriatecorrectiveactions
forPOSTerrormessages.
Ifyoureceiveanerrormessagewhiletheoperatingsystemisloadingthedesktopconfigurationafterthe
POSTiscompleted,checkthefollowingitems:
1.GototheLenovoSupportWebsiteathttp://www.lenovo.com/supportandsearchfortheerrormessage.
2.GototheMicrosoftKnowledgeBasehomepageathttp://support.microsoft.com/andsearchforthe
errormessage.
Sleepandhibernationproblems
•Problem:Thecomputerenterssleepmodeunexpectedly.
Solution:Ifthemicroprocessoroverheats,thecomputerautomaticallyenterssleepmodetoallowthe
computertocoolandtoprotectthemicroprocessorandotherinternalcomponents.Checkthesettings
forsleepmode.
•Problem:Thecomputerenterssleepmode(thesystem-statusindicatorblinksslowlyimmediatelyafter
thepower-onself-test.
Solution:Makesurethat:
–Thebatteryischarged.
–Theoperatingtemperatureiswithintheacceptablerange.Referto“Operatingenvironment”onpage
12.
Ifthebatteryischargedandthetemperatureiswithinrange,havethecomputerserviced.
•Problem:Acriticallow-batteryerroroccurs,andthecomputerimmediatelyturnsoff.
Solution:Thebatterypowerisgettinglow.Connecttheacpoweradaptertothecomputerandplugit
intoanelectricaloutlet,orreplacethebatterywithachargedone.
•Problem:ThecomputerdisplayremainsblankafteryoupressFntoreturnfromsleepmode.
Solution:Checkwhetheranexternalmonitorwasdisconnectedorturnedoffwhilethecomputerwas
insleepmode.Ifyoudisconnectedorturnedofftheexternalmonitor,connectitorturnitonbefore
resumingthecomputerfromthesleepmode.Whenresumingthecomputerfromthesleepmode
withoutattachingtheexternalmonitororturningiton,andthecomputerdisplayremainsblank,press
F7tobringupthecomputerdisplay.
•Problem:Thecomputerdoesnotreturnfromsleepmode,orthesystem-statusindicatorblinksslowly
andthecomputerdoesnotwork.
Solution:Ifthesystemdoesnotreturnfromsleepmode,itmighthaveenteredsleeporhibernationmode
automaticallybecausethebatteryisdepleted.Checkthesystem-statusindicator.
–Ifthesystem-statusindicatorblinksslowly,yourcomputerisinsleepmode.Connecttheacpower
adaptertothecomputer;thenpressFn.
–Ifthesystem-statusindicatorisoff,yourcomputerisinpower-offstateorhibernationmode.Connect
theacpoweradaptertothecomputer;thenpressthepowerbuttontoresumeoperation.
Ifthesystemstilldoesnotreturnfromsleepmode,yoursystemmightstoprespondingandyoumightnot
beabletoturnoffthecomputer.Inthiscase,youneedtoresetthecomputer.Ifyouhavenotsavedyour
data,itmightbelost.Toresetthecomputer,pressandholdthepowerbuttonfor4secondsormore.If
thesystemisstillnotreset,removetheacpoweradapterandthebattery.
90UserGuide

•Problem:Yourcomputerdoesnotentersleeporhibernationmode.
Solution:Checkwhetheranyoptionhasbeenselectedtodisableyourcomputerfromenteringsleep
orhibernationmode.
Ifyourcomputertriestoentersleepmodebuttherequestisrejected,thedeviceattachedtotheUSB
connectormighthavebeendisabled.Ifthisoccurs,doahot-unplug-and-plugoperationfortheUSB
device.
•Problem:Thebatterydischargesslightlywhilethecomputerisinhibernationmode.
Solution:Ifthewakeupfunctionisenabled,thecomputerconsumesasmallamountofpower.Thisisnot
adefect.Fordetails,referto“Power-savingmodes”onpage30.
Problemswithdrivesandotherstoragedevices
Thissectionincludesharddiskdriveproblems,hybriddriveproblems,solid-statedriveproblems.
Harddiskdriveandhybriddriveproblems
•Problem:Theharddiskdriveorhybriddrivemakesarattlingnoiseintermittently.
Solution:Therattlingnoisemightbeheard:
–Whentheharddiskdriveorhybriddrivebeginsorfinishesgettingaccesstodata.
–Whenyoucarrytheharddiskdriveorhybriddrive.
–Whenyoucarryyourcomputer.
Thisisanormalcharacteristicofaharddiskdriveorhybriddriveandisnotadefect.
•Problem:Theharddiskdriveorhybriddrivedoesnotwork.
Solution:OntheBootmenuofThinkPadSetup,makesurethattheharddiskdriveorhybriddriveison
theBootpriorityorderlist.IfitisontheExcludedfrombootorderlist,itisdisabled.Selecttheentry
foritonthelistandpresstheShift+1key.ThismovestheentrytotheBootpriorityorderlist.
•Problem:Aftersettingaharddiskpasswordontheharddiskdriveorhybriddriveofthecomputer,you
movedthedrivetoanothercomputer.Nowyoucannotunlocktheharddiskpassword.
Solution:Yourcomputersupportsanenhancedpasswordalgorithm.Computersolderthanyoursmight
notsupportsuchasecurityfunction.
Asolid-statedriveproblem
Problem:WhenyoucompressfilesorfoldersbyuseofthedatacompressionfunctioninWindows,and
thendecompressthem,theprocessofwritingtoorreadingfromthefilesorfoldersisslow.
Solution:ApplythediskdefragmentationtoolinWindowsforfasteraccesstothedata.
Asoftwareproblem
Problem:Aapplicationdoesnotruncorrectly.
Solution:Makesurethattheproblemisnotbeingcausedbytheapplication.
Checkthatyourcomputerhastheminimumrequiredmemorytoruntheapplication.Refertothemanuals
suppliedwiththeapplication.
Checkthefollowing:
•Theapplicationisdesignedtooperatewithyouroperatingsystem.
Chapter7.Troubleshootingcomputerproblems91

•Otherapplicationsruncorrectlyonyourcomputer.
•Thenecessarydevicedriversareinstalled.
•Theapplicationworkswhenitisrunonsomeothercomputer.
Ifanerrormessageisdisplayedwhileyouareusingtheapplication,refertothemanualssuppliedwiththe
application.
Iftheapplicationstilldoesnotruncorrectly,contactyourplaceofpurchaseoraservicerepresentative
forhelp.
Problemswithportsandconnectors
Thefollowingarethemostcommonproblemswithportsandconnectors.
AUSBproblem
Problem:AdeviceconnectedtotheUSBconnectordoesnotwork.
Solution:OpentheDeviceManagerwindow.MakesurethattheUSBdevicesetupiscorrect,andthatthe
assignmentofcomputerresourceandtheinstallationofthedevicedriverarecorrect.ToopentheDevice
Managerwindow,gotoControlPanelandclickHardwareandSound➙DeviceManager.Ifyouare
promptedforanadministratorpasswordorconfirmation,typethepasswordorprovideconfirmation.
Adockproblem
Problem:Thecomputerdoesnotstartwhenyoutrytoturniton,anddoesnotrespondwhenyoutryto
resumeoperation.
Solution:Makesurethat:
•TheThinkPadOneLinkDockorThinkPadOneLinkProDockisconnectedtopower.
•ThecomputeriscorrectlyconnectedtotheThinkPadOneLinkDockorThinkPadOneLinkProDock.
92UserGuide

Chapter8.Recoveryoverview
ThischapterprovidesinformationabouttherecoverysolutionsprovidedbyLenovo.
•“RecoveryoverviewfortheWindows7operatingsystem”onpage93
•“RecoveryoverviewfortheWindows8.1operatingsystems”onpage98
RecoveryoverviewfortheWindows7operatingsystem
ThissectionprovidesinformationabouttherecoverysolutionsprovidedbyLenovoontheWindows7
operatingsystem.
Notes:
•Thereareavarietyofmethodstochoosefromwhenconsideringhowtorecoverintheeventofasoftware-
orhardware-relatedproblem.Somemethodsvarydependingonthetypeofyouroperatingsystem.
•Theproductontherecoverymediamightbeusedonlyforthefollowingpurposes:
–Restoretheproductpreinstalledonyourcomputer
–Reinstalltheproduct
–ModifytheproductusingtheAdditionalFiles
Topreventpotentialperformancerisksorunexpectedbehaviorthatmightbecausedbythenewharddisk
drivetechnology,itisrecommendedthatyouuseoneofthefollowingsoftwareprogramsforbackup:
•ThinkVantageRescueandRecovery4.52orlater
•SymantecNortonGhostversion15orlater
TostarttheSymantecNortonGhostprogram,dothefollowing:
1.ClickStart➙Run.TheRunwindowopens.
2.Typecmdinthefield.ThenclickOK.
3.Typeghost-align=1mbandpressEnter.
•AcronisTrueImage2010orlater
•ParagonBackup&Recovery10Suitorlater,ParagonBackup&Recovery10Homeorlater
Creatingandusingarecoverymedia
Youcanuserecoverymediatorestoretheharddiskdrive,hybriddrive,orsolid-statedrivetothefactory
defaultsettings.Recoverymediaareusefulifyoutransferthecomputertoanotherarea,sellthecomputer,
recyclethecomputer,orputthecomputerinanoperationalstateafterallothermethodsofrecoveryhave
failed.Asaprecautionarymeasure,itisimportanttocreaterecoverymediaasearlyaspossible.
Note:Therecoveryoperationsyoucanperformusingrecoverymediavarydependingontheoperating
systemfromwhichtherecoverymediawerecreated.Therecoverymediamightcontainabootmedium
andadatamedium.YourMicrosoftWindowslicensepermitsyoutocreateonlyonedatamedium,soitis
importantthatyoustoretherecoverymediainasafeplaceafteryouhavemadethem.
Creatingrecoverymedia
Thissectionprovidesinstructionsonhowtocreaterecoverymedia.
Note:YoucancreaterecoverymediausingdiscsorexternalUSBstoragedevices.
©CopyrightLenovo201493

Tocreaterecoverymedia,clickStart➙AllPrograms➙LenovoThinkVantageTools➙FactoryRecovery
Disks.Then,followtheinstructionsonthescreen.
Usingrecoverymedia
Thissectionprovidesinstructionsonhowtouserecoverymediaondifferentoperatingsystems.
•Youcanuserecoverymediatorestorethecomputertothefactorydefaultsettingsonly.Youcanuse
recoverymediatoputthecomputerinanoperationalstateafterallothermethodsofrecoveryhavefailed.
Attention:Whenyouuserecoverymediatorestorethecomputertothefactorydefaultsettings,allthe
filescurrentlyontheharddiskdrive,hybriddrive,orsolid-statedrivewillbedeletedandreplacedby
thefactorydefaultsettings.
Touserecoverymedia,dothefollowing:
1.Dependingonthetypeofyourrecoverymedia,connectthebootmedium(memorykeyorotherUSB
storagedevice)tothecomputer,orinsertthebootdiscintotheexternalopticaldrive.
2.RepeatedlypressandreleasetheF12keywhenturningonthecomputer.WhentheBootMenu
windowopens,releasetheF12key.
3.SelectthedesiredstartupdeviceandpressEnter.Therestoreprocessbegins.
4.Followtheinstructionsonthescreentocompletetheoperation.
Notes:
1.Afterrestoringyourcomputertothefactorydefaultsettings,youmighthavetoreinstalldevicedrivers
forsomedevices.See“Reinstallingpreinstalledprogramsanddevicedrivers”onpage97.
2.SomecomputerscomewithMicrosoftOfficeorMicrosoftWorkspreinstalled.Ifyouneedtorecover
orreinstallyourMicrosoftOfficeorMicrosoftWorksprograms,youmustusetheMicrosoftOfficeCD
orMicrosoftWorksCD.ThesediscsareprovidedonlywithcomputerspreinstalledwithMicrosoft
OfficeorMicrosoftWorks.
Performingbackupandrecoveryoperations
TheRescueandRecoveryprogramenablesyoutobackupallyourharddiskdrive,hybriddrive,or
solid-statedrivecontentsincludingtheoperatingsystem,datafiles,softwareprograms,andpersonal
settings.YoucandesignatewheretheRescueandRecoveryprogramstoresthebackup:
•Inaprotectedareaofyourharddiskdrive,hybriddrive,orsolid-statedrive
•Onthesecondaryharddiskdrive,hybriddrive,orsolid-statedriveifasecondaryharddiskdrive,hybrid
drive,orsolid-statedriveisinstalledinyourcomputer
•OnanattachedexternalUSBharddiskdriveorsolid-statedrive
•Onanetworkdrive
•Onrecordablediscs(arecordableexternalopticaldriveisrequiredforthisoption)
Afteryouhavebackedupthecontentsontheharddiskdrive,youcanrestorethecompletecontentsof
theharddiskdrive,hybriddrive,orsolid-statedriverestoreonlytheselectedfiles,orrestoreonlythe
Windowsoperatingsystemandapplications.
Performingabackupoperation
ThissectionprovidesinstructionsonhowtoperformabackupoperationusingtheRescueandRecovery
program.
1.FromtheWindowsdesktop,clickStart➙AllPrograms➙LenovoThinkVantageTools➙Enhanced
BackupandRestore.TheRescueandRecoveryprogramopens.
2.IntheRescueandRecoverymainwindow,clicktheLaunchadvancedRescueandRecoveryarrow.
94UserGuide

3.ClickBackupyourharddriveandselectbackupoperationoptions.Then,followtheinstructionson
thescreentocompletethebackupoperation.
Performingarecoveryoperation
ThissectionprovidesinstructionsonhowtoperformarecoveryoperationusingtheRescueandRecovery
program.
1.FromtheWindowsdesktop,clickStart➙AllPrograms➙LenovoThinkVantageTools➙Enhanced
BackupandRestore.TheRescueandRecoveryprogramopens.
2.IntheRescueandRecoveryprogrammainwindow,clicktheLaunchadvancedRescueandRecovery
arrow.
3.ClicktheRestoreyoursystemfromabackupicon.
4.Followtheinstructionsonthescreentocompletetherecoveryoperation.
FormoreinformationaboutperformingarecoveryoperationfromtheRescueandRecoveryworkspace,see
“UsingtheRescueandRecoveryworkspace”onpage95.
UsingtheRescueandRecoveryworkspace
TheRescueandRecoveryworkspaceresidesinaprotected,hiddenareaofyourharddiskdrive,hybrid
drive,orsolid-statedrivethatoperatesindependentlyfromtheWindowsoperatingsystem.Thisenablesyou
toperformrecoveryoperationsevenifyoucannotstarttheWindowsoperatingsystem.Youcanperformthe
followingrecoveryoperationsfromtheRescueandRecoveryworkspace:
•Rescuefilesfromyourharddiskdriveorfromabackup
TheRescueandRecoveryworkspaceenablesyoutolocatefilesonyourharddiskdrive,hybriddrive,or
solid-statedriveandtransferthemtoanetworkdriveorotherrecordablemedia,suchasaUSBdeviceor
adisc.Thissolutionisavailableevenifyoudidnotbackupyourfilesorifchangesweremadetothe
filessinceyourlastbackupoperation.YoualsocanrescueindividualfilesfromaRescueandRecovery
backuplocatedonyourlocalharddiskdrive,aUSBdevice,oranetworkdrive.
•RestoreyourharddiskdrivefromaRescueandRecoverybackup
Ifyouhavebackedupyourharddiskdrive,hybriddrive,orsolid-statedriveusingtheRescueand
Recoveryprogram,youcanrestoretheharddiskdrive,hybriddrive,orsolid-statedrivefromaRescue
andRecoverybackup,evenifyoucannotstarttheWindowsoperatingsystem.
•Restoreyourharddiskdrivetothefactorydefaultsettings
TheRescueandRecoveryworkspaceenablesyoutorestorethecompletecontentsofyourharddisk
drive,hybriddrive,orsolid-statedrivetothefactorydefaultsettings.Ifyouhavemultiplepartitionson
yourharddiskdrive,hybriddrive,orsolid-statedriveyouhavetheoptiontorestorethefactorydefault
settingstotheC:partitionandleavetheotherpartitionsintact.BecausetheRescueandRecovery
workspaceoperatesindependentlyfromtheWindowsoperatingsystem,youcanrestorethefactory
defaultsettingsevenifyoucannotstarttheWindowsoperatingsystem.
Attention:Ifyourestoretheharddiskdrive,hybriddrive,orsolid-statedrivefromaRescueandRecovery
backuporrestoretheharddiskdrive,hybriddrive,orsolid-statedrivetothefactorydefaultsettings,all
filesontheprimaryharddiskdrivepartition(usuallydriveC:)willbedeletedintherecoveryprocess.If
possible,makecopiesofimportantfiles.IfyouareunabletostarttheWindowsoperatingsystem,youcan
usetherescuefilesfeatureoftheRescueandRecoveryworkspacetocopyfilesfromyourharddiskdrive,
hybriddrive,orsolid-statedrivetoothermedia.
TostarttheRescueandRecoveryworkspace,dothefollowing:
1.Makesurethatthecomputeristurnedoff.
2.RepeatedlypressandreleasetheF11keywhenturningonthecomputer.Whenyouhearbeepsor
seealogoscreen,releasetheF11key.
Chapter8.Recoveryoverview95

3.IfyouhavesetaRescueandRecoverypassword,typeyourpasswordwhenprompted.TheRescue
andRecoveryworkspaceopensafterashortdelay.
Note:IftheRescueandRecoveryworkspacefailstoopen,see“Solvingrecoveryproblems”onpage98.
4.Dooneofthefollowing:
•Torescuefilesfromyourharddiskdrive,hybriddrive,orsolid-statedriveorfromabackup,click
Rescuefilesandfollowtheinstructionsonthescreen.
•Torestoreyourharddiskdrive,hybriddrive,orsolid-statedrivefromaRescueandRecoverybackup
ortorestoreyourharddiskdrive,hybriddrive,orsolid-statedrivetothefactorydefaultsettings,click
Restoreyoursystemandfollowtheinstructionsonthescreen.
FormoreinformationaboutthefeaturesoftheRescueandRecoveryworkspace,clickHelp.
Notes:
1.Afterrestoringyourharddiskdrive,hybriddrive,orsolid-statedrivetothefactorydefaultsettings,you
mighthavetoreinstalldevicedriversforsomedevices.See“Reinstallingpreinstalledprogramsand
devicedrivers”onpage97.
2.SomecomputerscomewithMicrosoftOfficeorMicrosoftWorkspreinstalled.Ifyouneedtorecover
orreinstallyourMicrosoftOfficeorMicrosoftWorksprograms,youmustusetheMicrosoftOfficeCD
orMicrosoftWorksCD.ThesediscsareprovidedonlywithcomputerspreinstalledwithMicrosoft
OfficeorMicrosoftWorks.
Creatingandusingarescuemedium
Witharescuemedium,suchasadiscoraUSBharddiskdrive,youcanrecoverthecomputerfrom
failuresthatpreventyoufromgainingaccesstotheRescueandRecoveryworkspaceonyourharddisk
drive,hybriddrive,orsolid-statedrive.
Notes:
1.Therecoveryoperationsyoucanperformusingarescuemediumvarydependingontheoperating
system.
2.Therescuedisccanbestartedinalltypesofopticaldrives.
Creatingarescuemedium
Thissectionprovidesinstructionsonhowtocreatearescuemedium.
1.FromtheWindowsdesktop,clickStart➙AllPrograms➙LenovoThinkVantageTools➙Enhanced
BackupandRestore.TheRescueandRecoveryprogramopens.
2.IntheRescueandRecoverymainwindow,clicktheLaunchadvancedRescueandRecoveryarrow.
3.ClicktheCreateRescueMediaicon.TheCreateRescueandRecoveryMediawindowopens.
4.IntheRescueMediaarea,selectthetypeoftherescuemediumyouwanttocreate.Youcancreatea
rescuemediumusingadisc,aUSBharddiskdrive,orasecondaryinternalharddiskdrive.
5.ClickOKandfollowtheinstructionsonthescreentocreatearescuemedium.
Usingarescuemedium
Thissectionprovidesinstructionsonhowtousetherescuemediumyouhavecreated.
•Ifyouhavecreatedarescuemediumusingadisc,usethefollowinginstructionstousetherescuemedium:
1.Turnoffyourcomputer.
2.RepeatedlypressandreleasetheF12keywhenturningonthecomputer.WhentheBootMenu
windowopens,releasetheF12key.
96UserGuide

3.IntheBootMenuwindow,selectthedesiredexternalopticaldriveasthefirstbootdevice.Then,
inserttherescuediscintotheexternalopticaldriveandpressEnter.Therescuemediumstarts.
•IfyouhavecreatedarescuemediumusingaUSBharddiskdrive,usethefollowinginstructionsto
usetherescuemedium:
1.AttachtheUSBharddiskdrivetooneoftheUSBconnectorsonyourcomputer.
2.RepeatedlypressandreleasetheF12keywhenturningonthecomputer.WhentheBootMenu
windowopens,releasetheF12key.
3.IntheBootMenuwindow,selecttheUSBharddiskdriveasthefirstbootdeviceandpressEnter.
Therescuemediumstarts.
Whentherescuemediumstarts,theRescueandRecoveryworkspaceopens.Thehelpinformationfor
eachfeatureisavailablefromtheRescueandRecoveryworkspace.Followtheinstructionstocomplete
therecoveryprocess.
Reinstallingpreinstalledprogramsanddevicedrivers
Yourcomputerhasprovisionsthatenableyoutoreinstallselectedfactory-installedprogramsanddevice
drivers.
Reinstallingpreinstalledprograms
Toreinstallsomepreinstalledapplicationprograms,dothefollowing:
1.Turnonyourcomputer.
2.GototheC:\SWTOOLSdirectory.
3.OpentheAPPSfolder.Thefoldercontainsseveralsubfoldersnamedforthevariouspreinstalled
applications.
4.Openthesubfolderfortheapplicationyouwanttoreinstall.
5.Double-clickSetup,andthenfollowtheon-screenstepstoreinstalltheapplication.
Reinstallingpreinstalleddevicedrivers
Attention:Whenyoureinstalldevicedrivers,youarechangingthecurrentconfigurationofyourcomputer.
Reinstalldevicedriversonlywhenitisnecessarytocorrectaproblemwithyourcomputer.
Toreinstalladevicedriverforafactory-installeddevice,dothefollowing:
1.Turnonyourcomputer.
2.GototheC:\SWTOOLSdirectory.
3.OpentheDRIVERSfolder.Thefoldercontainsseveralsubfoldersnamedforthevariousdevices
installedinyourcomputer(forexample,AUDIOandVIDEO).
4.Openthesubfolderforthedevice.
5.Reinstallthedevicedriverbyoneofthefollowingmethods:
•Inthesubfolderforthedevice,lookforatextfile(afilewiththeextension.txt).Thetextfilecontains
informationonhowtoreinstallthatdevicedriver.
•Ifthesubfolderforthedevicecontainsafileofsetupinformation(afilewiththeextension.inf),you
canusetheAddNewHardwareprogram(intheWindowsControlPanel)toreinstallthedevicedriver.
Notalldevicedriverscanbereinstalledbyuseofthisprogram.IntheAddNewHardwareprogram,
whenpromptedforthedevicedriveryouwanttoinstall,clickHaveDiskandBrowse.Thenselect
thedevicedriverfilefromthedevicesubfolder.
•Inthesubfolderforthedevice,lookfortheexecutablefile(afilewiththeextension.exe).Double-click
thefile,andfollowtheinstructionsonthescreen.
Chapter8.Recoveryoverview97

Attention:Ifyouneedupdateddevicedriversforyourcomputer,donotdownloadthemfromtheWindows
UpdateWebsite.ObtainthemfromLenovo.Formoreinformation,see“Makingsuredevicedriversare
current”onpage70.
Solvingrecoveryproblems
IfyouareunabletoaccesstheRescueandRecoveryworkspaceortheWindowsenvironment,doone
ofthefollowing:
•UsearescuemediumtostarttheRescueandRecoveryworkspace.See“Creatingandusingarescue
medium”onpage96.
•Userecoverymediaifallothermethodsofrecoveryhavefailedandyouneedtorestorethehard
diskdrive,hybriddrive,orsolid-statedrivetothefactorydefaultsettings.See“Creatingandusinga
recoverymedia”onpage93.
Note:IfyouareunabletoaccesstheRescueandRecoveryworkspaceortheWindowsenvironment
fromarescuemediumorrecoverymedia,youmightnothavetherescuedevice(aninternalharddisk
drive,adisc,aUSBharddiskdrive,orotherexternaldevices)setasthefirstbootdeviceinthestartup
devicesequence.Youmustfirstmakesurethatyourrescuedeviceissetasthefirstbootdeviceinthe
startupdevicesequenceintheThinkPadSetupprogram.Fordetailedinformationonhowtotemporarilyor
permanentlychangethestartupdevicesequence,see“Startupmenu”onpage66.
Itisimportanttocreatearescuemediumandasetofrecoverymediaasearlyaspossibleandstorethem
inasafeplaceforfutureuse.
RecoveryoverviewfortheWindows8.1operatingsystems
ThissectionprovidesinformationabouttherecoverysolutionsfortheWindows8.1operatingsystems.
AWindowsrecoveryimageispreinstalledintherecoverypartitiononyourcomputer.TheWindowsrecovery
imageenablesyoutorefreshyourcomputer,orresetyourcomputertothefactorydefaultsettings.
YoucancreaterecoverymediaasbackupsorreplacementfortheWindowsrecoveryimage.Withthe
recoverymedia,youcantroubleshootandfixtheproblemsonyourcomputerevenifyoucannotstartthe
Windows8.1operatingsystem.Itisrecommendedthatyoucreaterecoverymediaasearlyaspossible.For
moreinformation,see“Creatingandusingrecoverymedia”onpage99.
Refreshingyourcomputer
Ifyourcomputerdoesnotperformwellandtheproblemmightbecausedbyarecentlyinstalledprogram,
youcanrefreshyourcomputerwithoutlosingyourpersonalfilesorchangingyoursettings.
Attention:Ifyourefreshyourcomputer,theprogramsthatcamewithyourcomputerandtheprogramsthat
youinstalledfromWindowsStorewillbereinstalled,butallotherprogramswillberemoved.
Torefreshyourcomputer,dothefollowing:
1.Moveyourpointertothetop-rightorbottom-rightcornerofthescreentodisplaythecharms.Click
Settings➙ChangePCsettings➙Updateandrecovery➙Recovery.
2.IntheRefreshyourPCwithoutaffectingyourfilessection,clickGetstarted.
3.Followtheinstructionsonthescreentorefreshyourcomputer.
98UserGuide

Resettingyourcomputertothefactorydefaultsettings
Ifyouwanttorecycleyourcomputerorjuststartover,youcanresetyourcomputertothefactorydefault
settings.Resettingthecomputerwillreinstalltheoperatingsystem,reinstallalltheprogramsthatcamewith
yourcomputer,andresetallthesettingstothefactorydefaultsettings.
Attention:Ifyouresetthecomputertothefactorydefaultsettings,allyourpersonalfilesandsettingswillbe
deleted.Toavoiddataloss,makeabackupcopyofallthedatathatyouwanttokeep.
Toresetyourcomputertothefactorydefaultsettings,dothefollowing:
1.Moveyourpointertothetop-rightorbottom-rightcornerofthescreentodisplaythecharms.Click
Settings➙ChangePCsettings➙Updateandrecovery➙Recovery.
2.IntheRemoveeverythingandreinstallWindowssection,clickGetstarted.ThenclickNextto
confirmtheoperation.
3.Dependingonyourneeds,dooneofthefollowing:
•Toperformaquickformat,clickJustremovemyfilestostarttheprocess.Theprocesswilltake
severalminutes.
•Toperformacompleteformat,clickFullycleanthedrivetostarttheprocess.Theprocesswill
takeseveralhours.
4.Followtheinstructionsonthescreentoresetyourcomputertothefactorydefaultsettings.
Usingtheadvancedstartupoptions
Withtheadvancedstartupoptions,youcanchangethefirmwaresettingsofthecomputer,changethe
startupsettingsoftheWindowsoperatingsystem,startthecomputerfromanexternaldevice,orrestorethe
Windowsoperatingsystemfromasystemimage.
Tousetheadvancedstartupoptions,dothefollowing:
1.Moveyourpointertothetop-rightorbottom-rightcornerofthescreentodisplaythecharms.Click
Settings➙ChangePCsettings➙Updateandrecovery➙Recovery.
2.IntheAdvancedstartupsection,clickRestartnow➙Troubleshoot➙Advancedoptions.
3.Selectadesiredstartupoption,thenfollowtheinstructionsonthescreen.
RecoveringyouroperatingsystemifWindows8.1failstostart
TheWindowsrecoveryenvironmentonyourcomputeriscapableofoperatingindependentlyfromthe
Windows8.1operatingsystem.Thisenablesyoutorecoverorrepairtheoperatingsystemevenifthe
Windows8.1operatingsystemfailstostart.
Aftertwoconsecutivefailedbootattempts,theWindowsrecoveryenvironmentstartsautomatically.Then
youcanchooserepairandrecoveryoptionsbyfollowingtheinstructionsonthescreen.
Note:Ensurethatyourcomputerisconnectedtoacpowerduringtherecoveryprocess.
Creatingandusingrecoverymedia
YoucancreaterecoverymediaasbackupsfortheWindowsrecoveryenvironmentandtheWindows
recoveryimage.Ifyoucannotstartthecomputer,youcanuserecoverymediatotroubleshootandfixthe
problemsonyourcomputer.
Itisrecommendedthatyoucreaterecoverymediaasearlyaspossible.Onceyoucreaterecoverymedia,
keeptheminasafeplaceanddonotusethemtostoreotherdata.
Chapter8.Recoveryoverview99

Creatingrecoverymedia
Tocreaterecoverymedia,youneedaUSBdrivewithatleast8GBofstorage.TherequiredUSBcapacity
dependsonthesizeoftherecoveryimage.
Attention:CreatingrecoverymediawilldeleteanythingstoredontheUSBdrive.Toavoiddataloss,makea
backupcopyofallthedatathatyouwanttokeep.
Tocreaterecoverymedia,dothefollowing:
Note:Ensurethatyourcomputerisconnectedtoacpower.
1.Moveyourpointertothetop-rightorbottom-rightcornerofthescreentodisplaythecharms,and
clickSearch.
2.TyperecoveryintheSearchfieldandclicktheSearchbutton.ThenclickCreatearecoverydrive.
3.ClickYesintheUserAccountControlwindowtoallowtheRecoveryMediaCreatorprogramtostart.
4.EnsurethatyouselecttheCopytherecoverypartitionfromthePCtotherecoverydrive.option.
ThenclickNext.
Important:IfyoucleartheCopytherecoverypartitionfromthePCtotherecoverydrive.option,
youwillcreaterecoverymediawithouttherecoverypartitioncontent.Youstillcanstartthecomputer
fromtherecoverymedia,butyoumightbeunabletorecoveryourcomputeriftherecoverypartitionon
yourcomputerisdamaged.
5.ConnectaproperUSBdrivethenclickNext.
6.ClickCreateintheRecoveryDrivewindow.Thecreationoftherecoverymediastarts.
7.Whenthecreationoftherecoverymediafinishes,dooneofthefollowing:
•Tokeeptherecoverypartitiononyourcomputer,clickFinish.
•Todeletetherecoverypartitiononyourcomputer,clickDeletetherecoverypartition.
Attention:Ifyoudeletetherecoverypartitiononyourcomputer,dokeeptherecoverymediaina
safeplace.TheWindowsrecoveryimagewillnotbestoredinyourcomputeranymore,andyouwill
needtherecoverymediatorefreshorresetyourcomputer.
8.RemovetheUSBdrive.Therecoverymediaarecreatedsuccessfully.
Usingrecoverymedia
Ifyoucannotstartyourcomputer,orifyoucannotstarttheWindowsrecoveryimageonyourcomputer,use
recoverymediatorecoveryourcomputer.
Touserecoverymedia,dothefollowing:
Note:Ensurethatyourcomputerisconnectedtoacpower.
1.Turnonorrestartthecomputer.BeforetheWindowsoperatingsystemstarts,repeatedlypresstheF12
key.TheBootMenuwindowopens.
2.Selecttherecoverydriveasthebootdevice.
3.Selectapreferredlanguageandthenselectapreferredkeyboardlayout.
4.ClickTroubleshoottodisplaytheoptionalrecoverysolutions.
5.Selectacorrespondingrecoverysolutionaccordingtoyoursituation.Forexample,selectResetyour
PCifyouwanttoresetyourcomputertothefactorydefaultsettings.
FormoreinformationabouttherecoverysolutionsprovidedbytheWindows8.1operatingsystem,goto:
http://go.microsoft.com/fwlink/?LinkID=263800
100UserGuide

Chapter9.Replacingdevices
Thischapterprovidesinstructionsonhowtoinstallorreplacehardwareforyourcomputer.
•“Staticelectricityprevention”onpage101
•“Replacingthecoin-cellbattery”onpage101
•“Replacingthestoragedrive”onpage104
•“Replacingthememorymodule”onpage108
•“ReplacingawirelessLANcard”onpage111
•“Replacingthekeyboard”onpage115
Staticelectricityprevention
Staticelectricity,althoughharmlesstoyou,canseriouslydamagecomputercomponentsandoptions.
Improperhandlingofstatic-sensitivepartscancausedamagetothepart.Whenyouunpackanoptionor
aCRU,donotopenthestatic-protectivepackagethatcontainsthepartuntiltheinstructionsdirectyou
toinstallthepart.
WhenyouhandleoptionsorCRUs,orperformanyworkinsidethecomputer,takethefollowingprecautions
toavoidstatic-electricitydamage:
•Limityourmovement.Movementcancausestaticelectricitytobuilduparoundyou.
•Alwayshandlecomponentscarefully.Handleadapters,memorymodules,andothercircuitboardsbythe
edges.Nevertouchexposedcircuitry.
•Preventothersfromtouchingcomponents.
•Whenyouinstallastatic-sensitiveoptionorCRU,touchthestatic-protectivepackagethatcontainsthe
parttoametalexpansion-slotcoverorotherunpaintedmetalsurfaceonthecomputerforatleasttwo
seconds.Thisreducesstaticelectricityinthepackageandyourbody.
•Whenpossible,removethestatic-sensitivepartfromthestatic-protectivepackageandinstallthepart
withoutsettingitdown.Whenthisisnotpossible,placethestatic-protectivepackageonasmooth,
levelsurfaceandplacethepartonthepackage.
•Donotplacethepartonthecomputercoverorothermetalsurface.
Replacingthecoin-cellbattery
Beforeyoustart,printtheseinstructionsandread“Importantsafetyinformation”onpagevi.
DANGER
Ifthecoin-cellbatteryisincorrectlyreplaced,thereisdangerofanexplosion.Thecoin-cellbattery
containsasmallamountofharmfulsubstances.Toavoidpossibleinjury:
•ReplaceonlywithabatteryofthetyperecommendedbyLenovo.
•Keepthebatteryawayfromfire.
•Donotexposeittoexcessiveheat.
•Donotexposeittowaterorrain.
•Donotshort-circuitit.
©CopyrightLenovo2014101
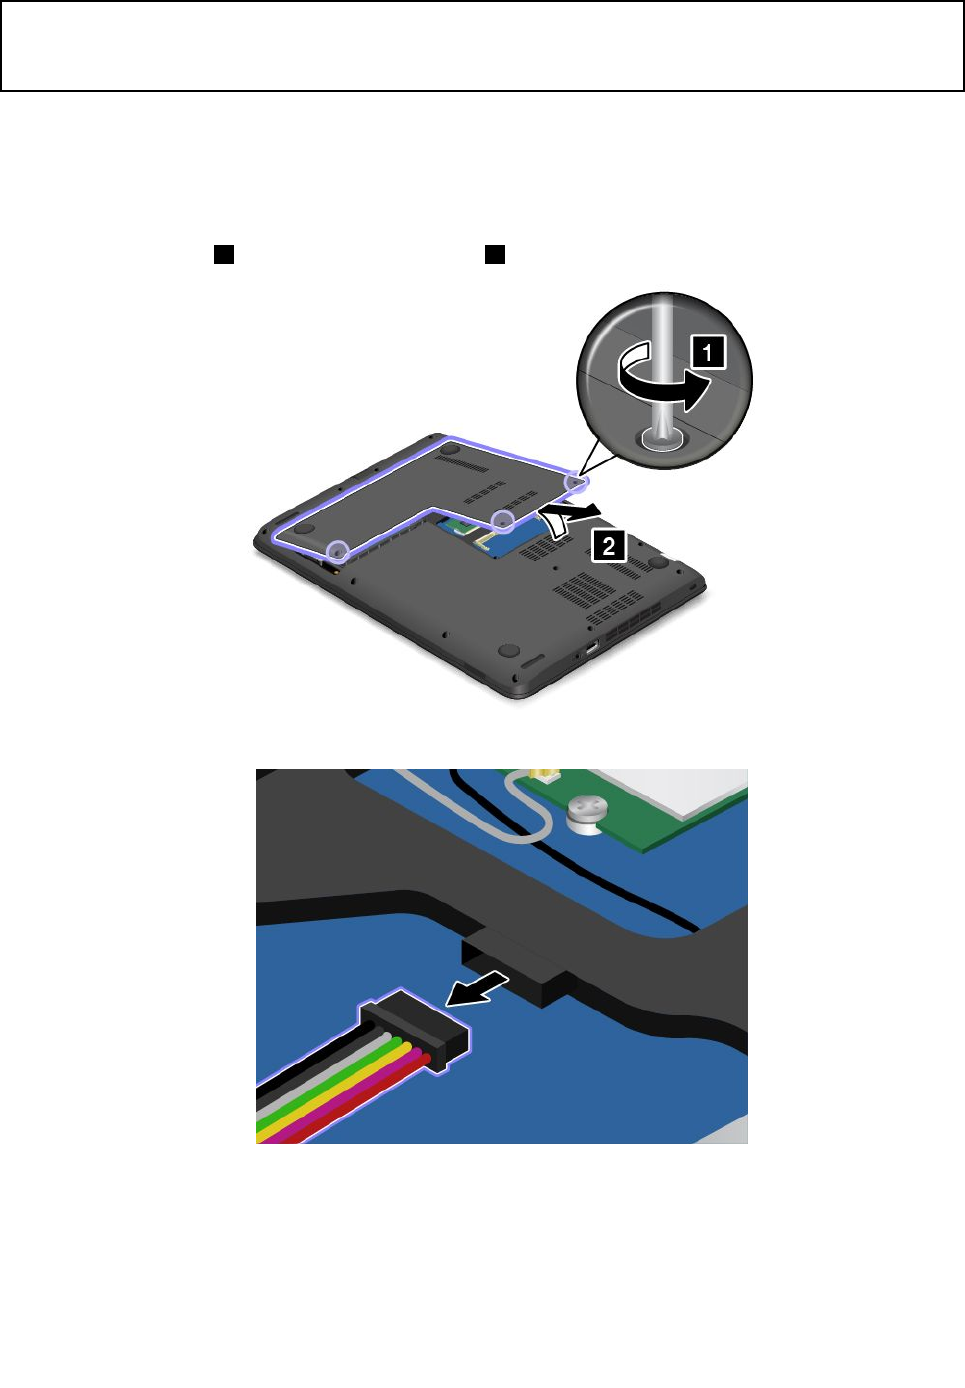
•Donotdrop,crush,orpuncturethebattery,ormakeitsubjecttostrongforces.Batteryabuse
ormishandlingcancausethebatterytooverheat,whichcancausegassesorflameto“vent”
fromthebatteryorcoin-cellbattery.
Toreplacethecoin-cellbattery,dothefollowing:
1.Turnoffthecomputer;thendisconnecttheacpoweradapterandallcablesfromthecomputer.Wait
severalminutestoletthecomputercool.
2.Closethecomputerdisplayandturnthecomputerover.
3.Loosenthescrews1andthenremovethecover2.
4.Disconnectthemainbatteryconnector.
102UserGuide
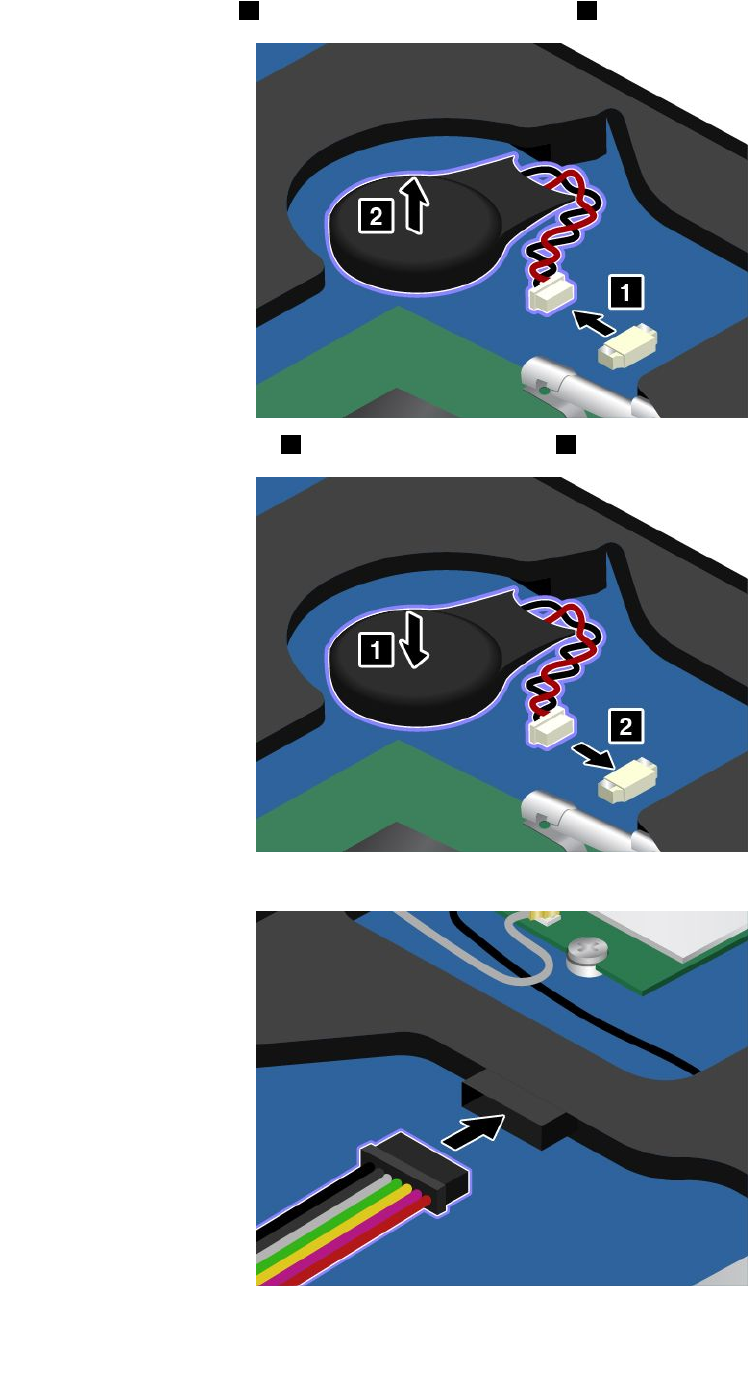

8.Attachthecover1andpivotitdownwards2.Thentightenthescrews3.
9.Turnthecomputeroveragain.Connecttheacpoweradapterandallcables.
Replacingthestoragedrive
Beforeyoustart,printtheseinstructionsandread“Importantsafetyinformation”onpagevi.
Attention:Theharddiskdrive,hybriddrive,orsolid-statedriveisverysensitive.Incorrecthandlingcan
causedamageandpermanentlossofdata.Observethefollowingguidelines:
•Replacetheharddiskdrive,hybriddrive,orsolid-statedriveonlyifyouupgradeitorhaveitrepaired.
Theconnectorsandslotoftheharddiskdrive,hybriddrive,orsolid-statedrivearenotdesignedfor
frequentchangesordriveswapping.
•Donotdropthedriveorsubjectittophysicalshocks.Putthedriveonamaterial,suchassoftcloth,that
absorbsanyphysicalshocks.
•Donotapplypressuretothecoverofthedrive.
•Donottouchtheconnector.
•Beforeremovingtheharddiskdrive,hybriddrive,orsolid-statedrive,makeabackupcopyofallthe
informationonitandthenturnoffthecomputer.
•Neverremovethedrivewhilethecomputerisoperating,insleepmode,orinhibernationmode.
Toreplacetheharddiskdrive,hybriddrive,orsolid-statedrive,dothefollowing:
1.Turnoffthecomputer.Thendisconnecttheacpoweradapterandallcablesfromthecomputer.Wait
severalminutestoletthecomputercool.
2.Closethecomputerdisplayandturnthecomputerover.
104UserGuide

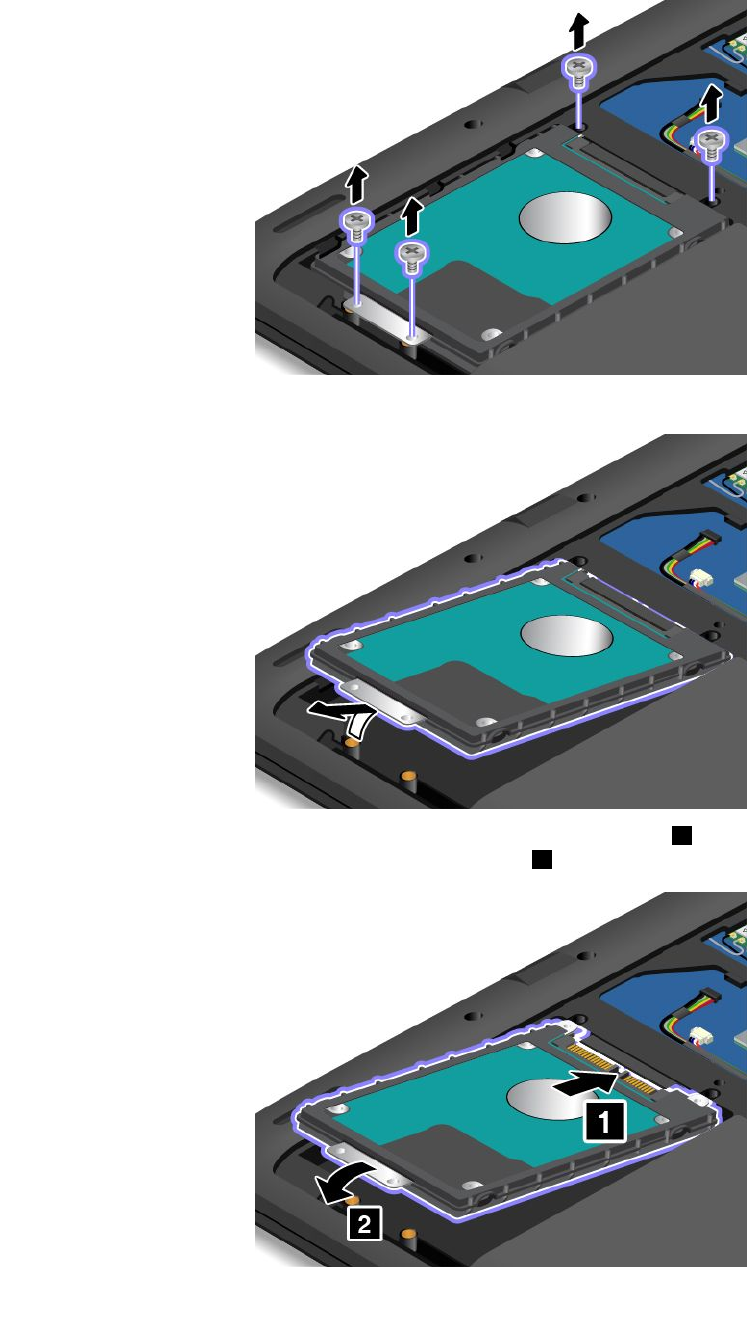
5.Removethescrewsthatsecuretheharddiskdrive,hybriddrive,orsolid-statedrive.
6.Liftthetabandremovetheharddiskdrive,hybriddrive,orsolid-statedrive.
7.Inserttheharddiskdrive,hybriddrive,orsolid-statedriveintotheslot1andpositiontheharddisk
drive,hybriddrive,orsolid-statedrivefirmlyintoplace2.
106UserGuide
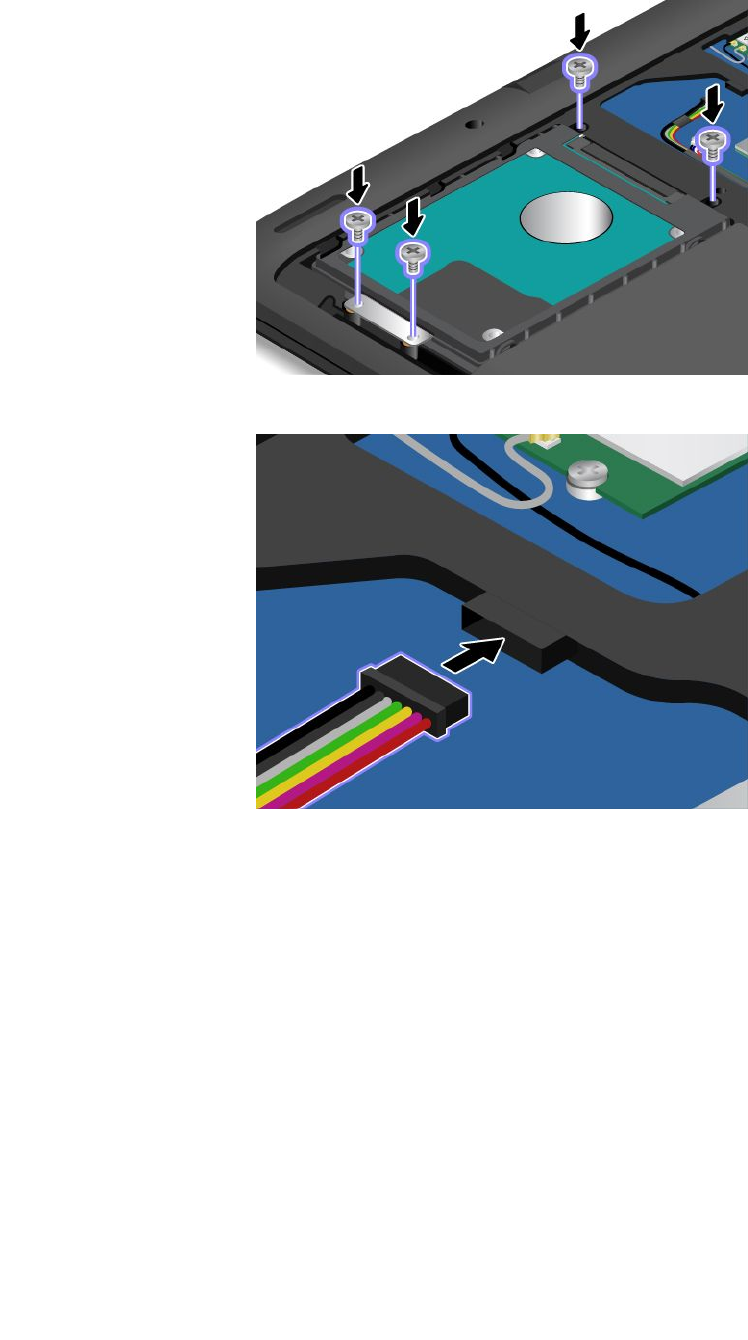
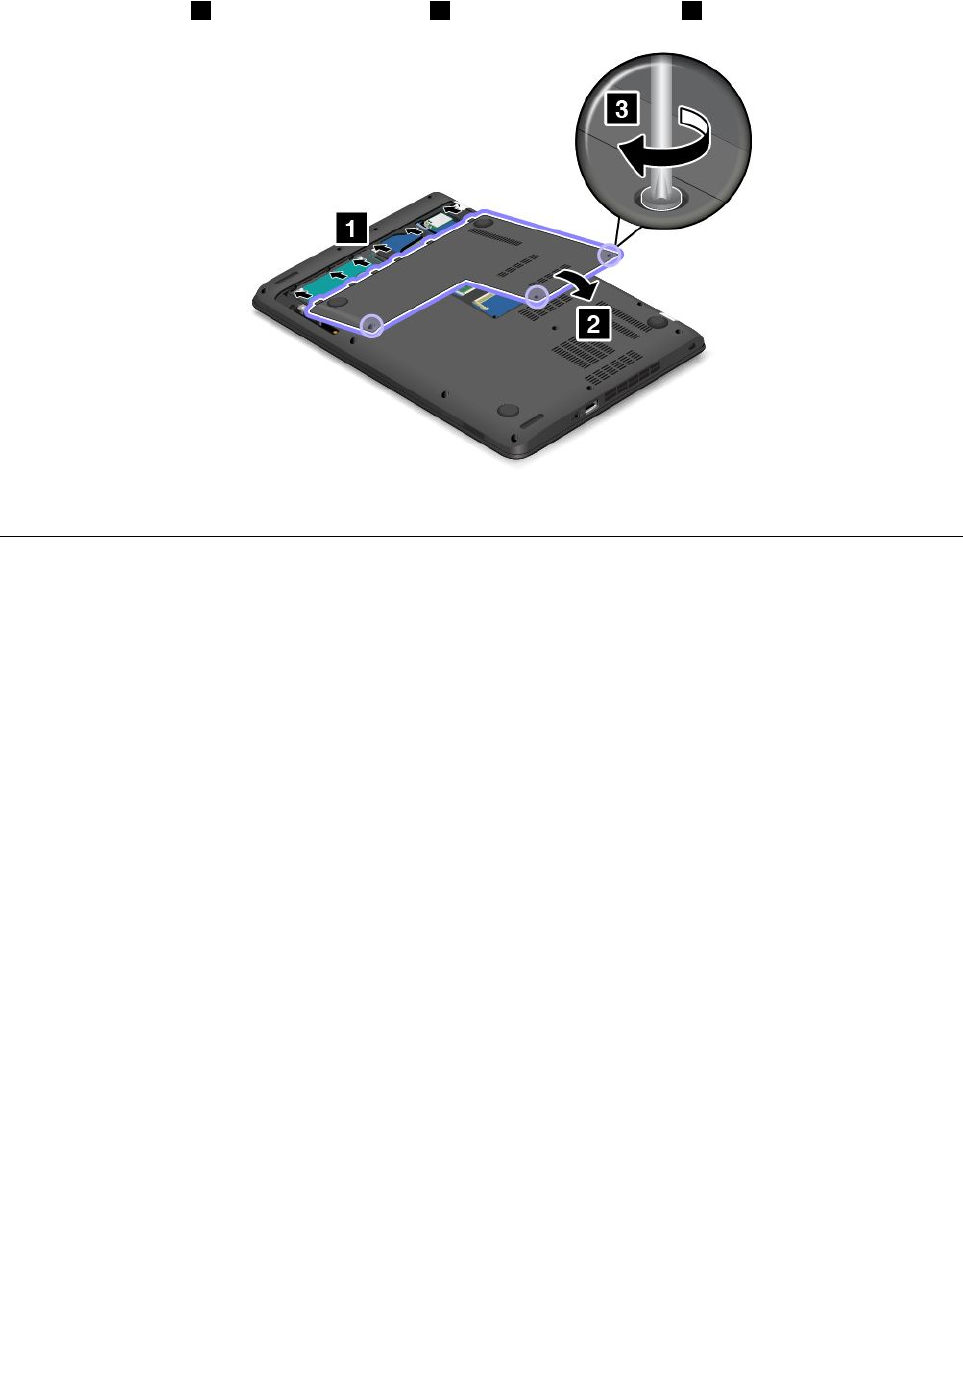
10.Attachthecover1andpivotitdownwards2.Thentightenthescrews3.
11.Turnthecomputerover.Connecttheacpoweradapterandallcables.
Replacingthememorymodule
Beforeyoustart,printtheseinstructionsandread“Importantsafetyinformation”onpagevi.
Increasingmemorycapacityisaneffectivewaytomakeprogramsrunfaster.
Note:Theoperatingspeedofthememorymodulehasdependencyonthesystemconfiguration.Insome
conditions,thememorymoduleinyourcomputermightnotbeabletooperateatthemaximumspeed.
Attention:Beforeyoustartinstallingamemorymodule,touchametaltableoragroundedmetalobject.This
actionreducesanystaticelectricityfromyourbody.Thestaticelectricitycoulddamagethememorymodule.
Toreplacethememorymodule,dothefollowing:
1.Turnoffthecomputer.Thendisconnecttheacpoweradapterandallcablesfromthecomputer.Wait
severalminutestoletthecomputercool.
2.Closethecomputerdisplayandturnitover.
108UserGuide
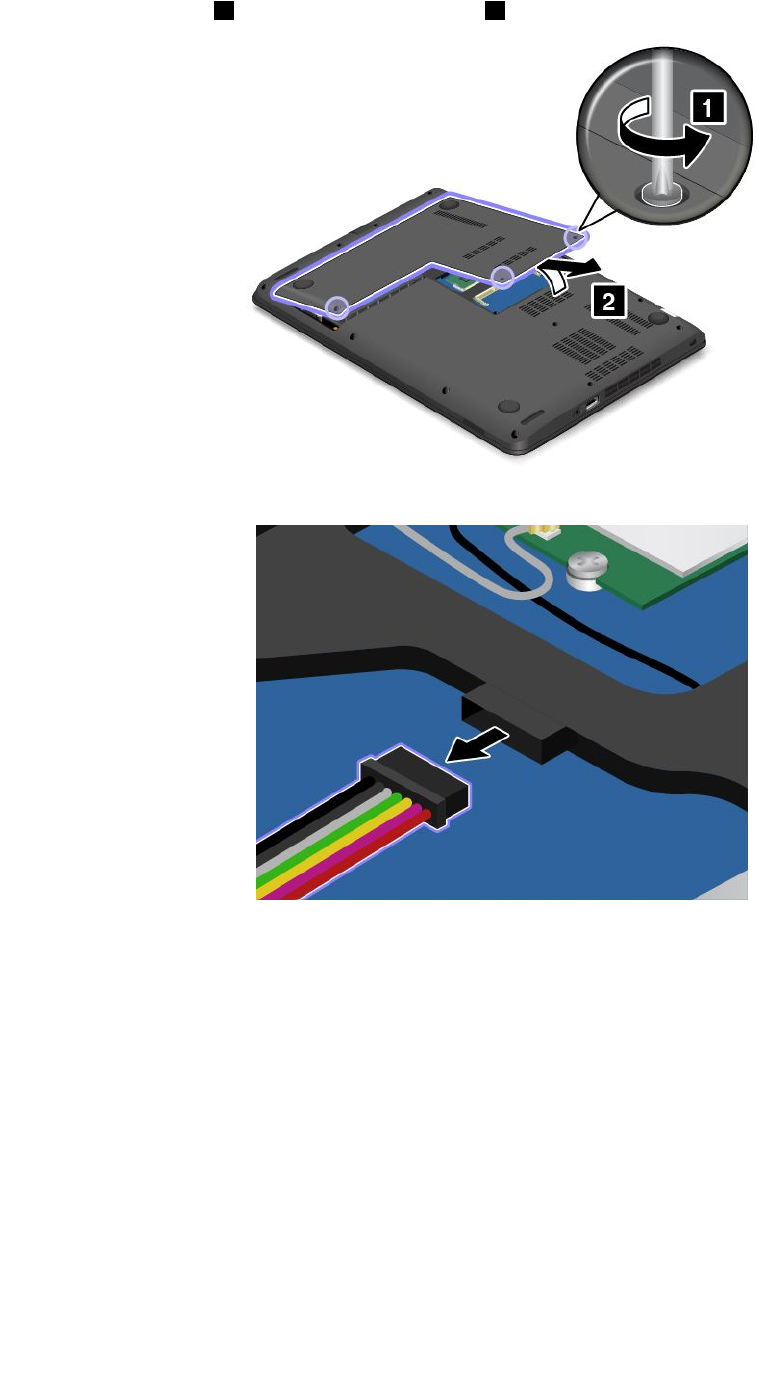
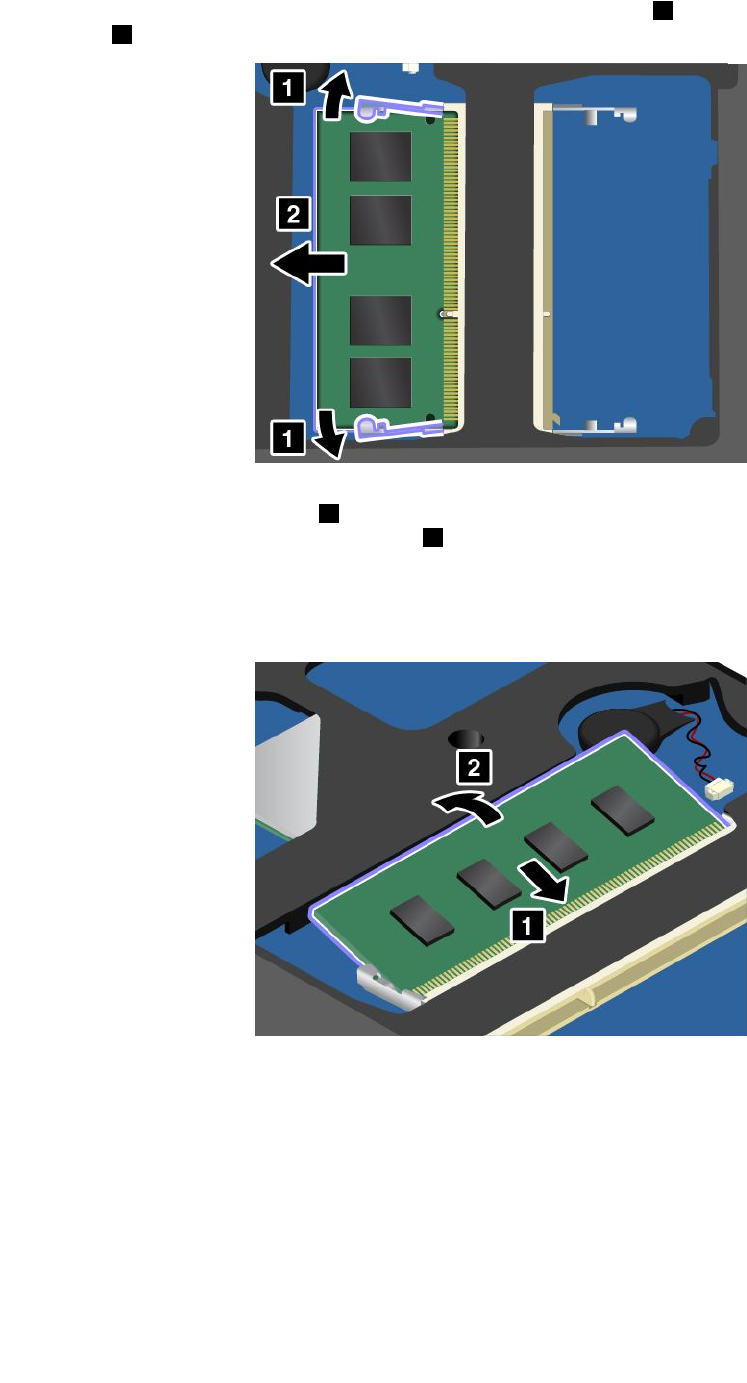
5.Openthelatchesonbothsidesofthememoryslotatthesametime1andthenremovethememory
module2.
6.Placethenotchedendofthenewmemorymoduletowardthecontactedgesideofthememoryslot,
andinsertthememorymodule1intotheslotatanangleofabout20degrees.Pivotthememory
moduledownwarduntilitsnapsintoplace2.Ensurethatthememorymoduleisfirmlyinstalledin
theslotandcannotbemovedeasily.
Attention:Donottouchthecontactedgeofthememorymodule.Otherwisethememorymodule
mightgetdamaged.
110UserGuide
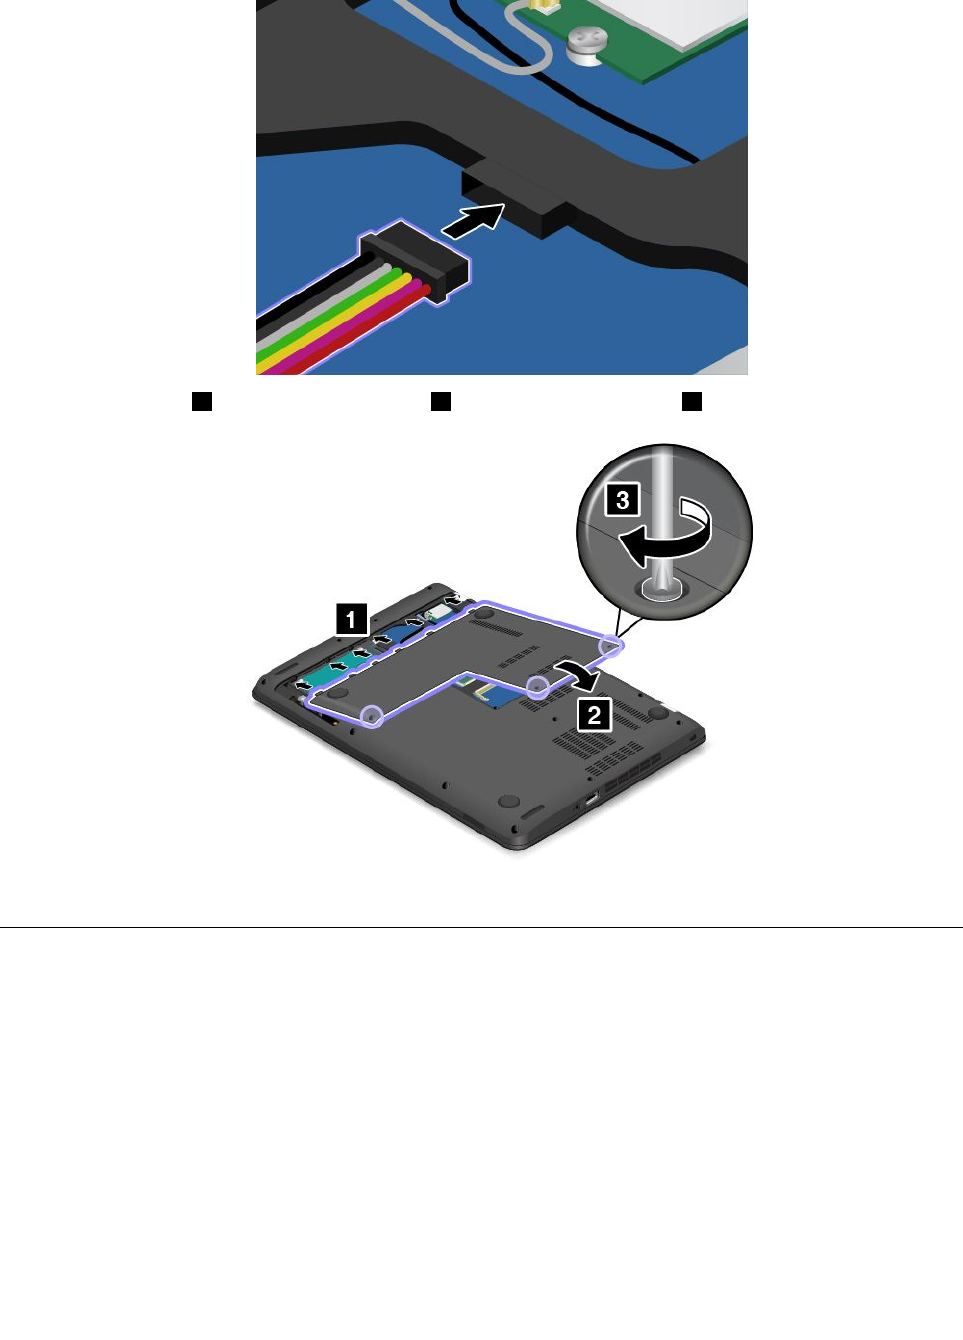
7.Connectthebatterycable.
8.Attachthecover1andpivotitdownwards2.Thentightenthescrews3.
9.Turnthecomputerover.Connecttheacpoweradapterandallcables.
ReplacingawirelessLANcard
Beforeyoustart,printtheseinstructionsandread“Importantsafetyinformation”onpagevi.
Attention:BeforeyoustartinstallingawirelessLANcard,touchametaltableoragroundedmetalobject.
Thisactionreducesanystaticelectricityfromyourbody.Thestaticelectricitycoulddamagethecard.
ToreplacethewirelessLANcard,dothefollowing:
1.Turnoffthecomputer.Thendisconnecttheacpoweradapterandallcablesfromthecomputer.Wait
severalminutestoletthecomputercool.
2.Closethecomputerdisplayandturnthecomputerover.
Chapter9.Replacingdevices111
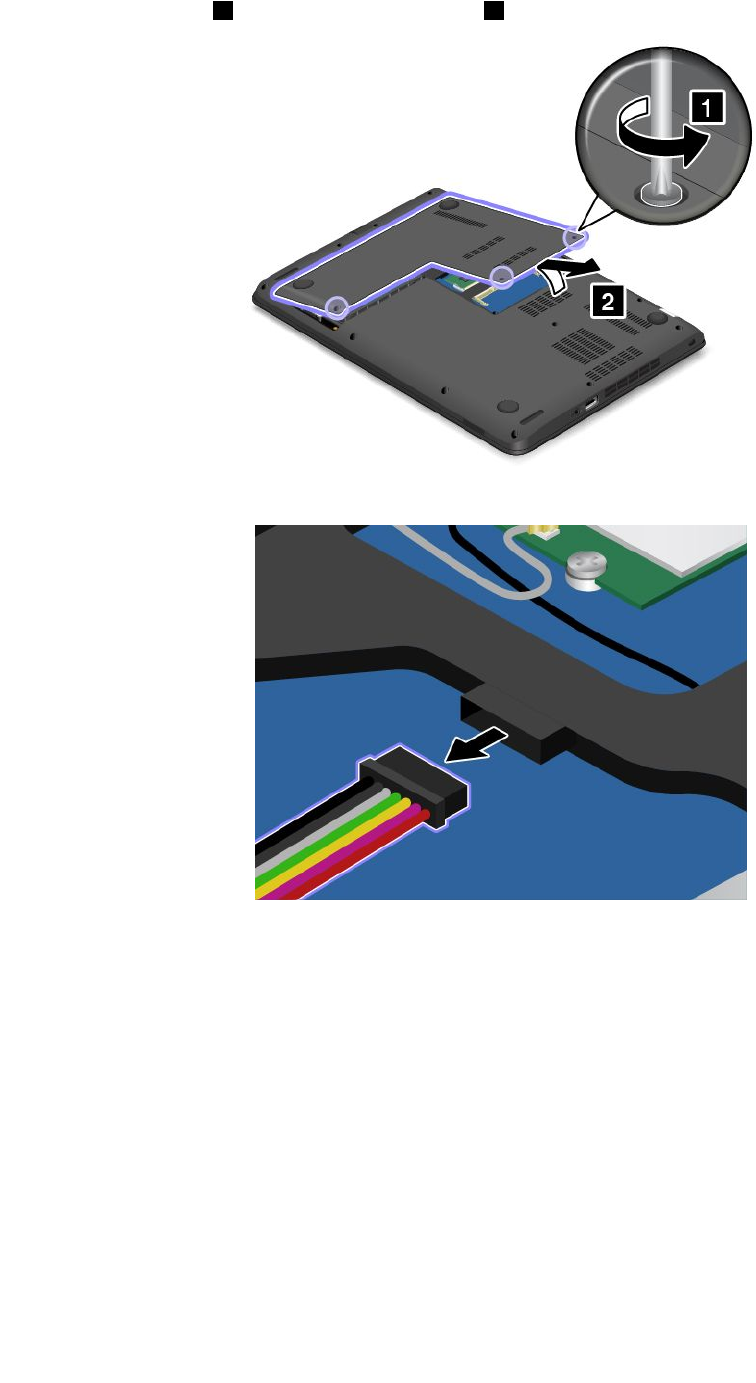
3.Loosenthescrews1andthenremovethecover2.
4.Disconnectthebatteryconnector.
112UserGuide
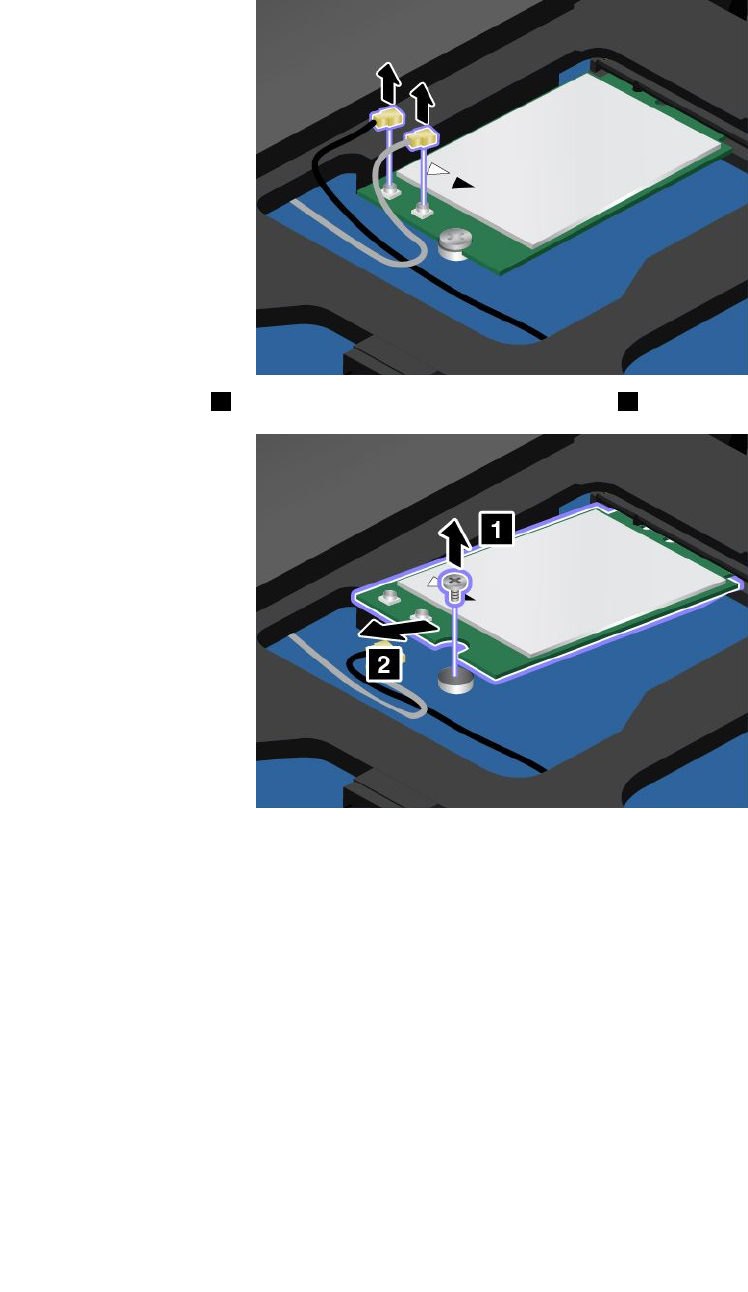
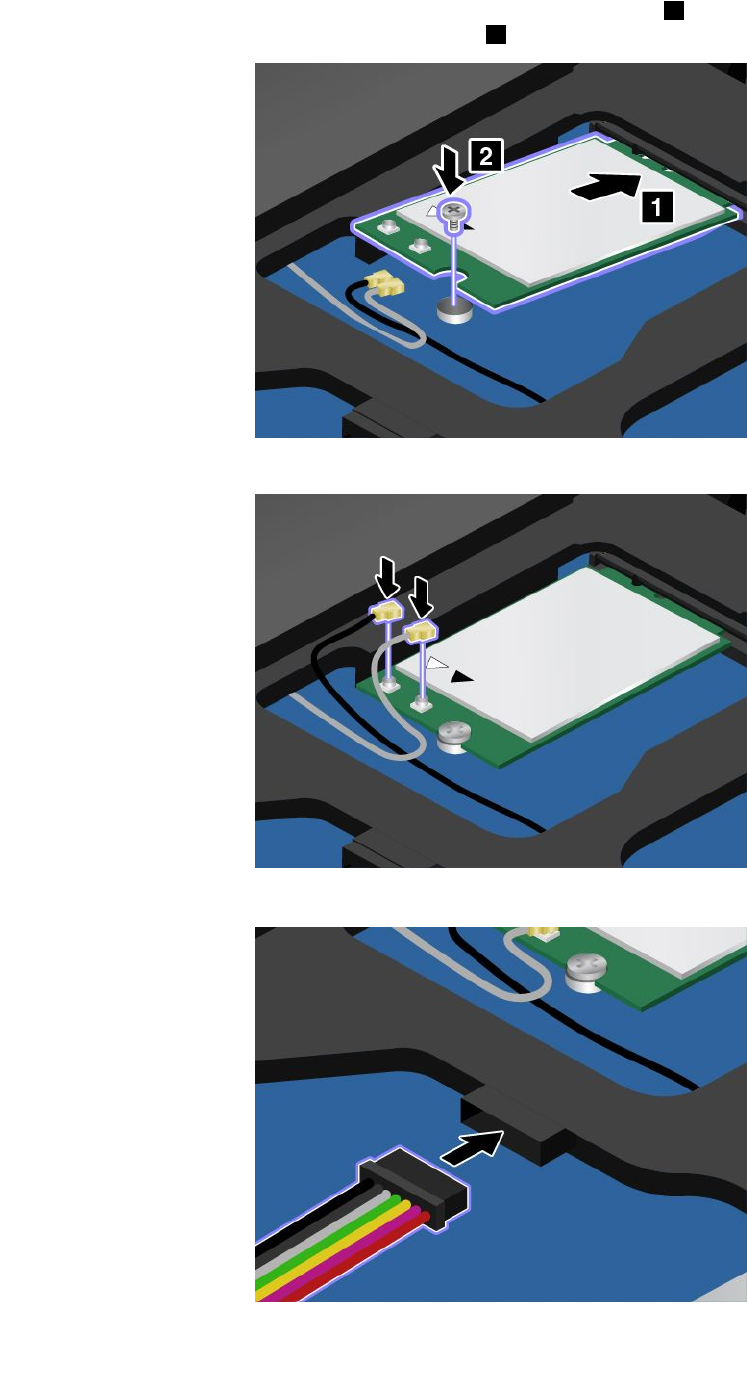
7.Alignthecontactedgeofthenewcardwiththecorrespondingsocket1.Pivotthenewcarddownward
andtheninstallthescrewtosecurethenewcard2.
8.Connecttheantennacablestothenewcardasshown.
9.Connectthebatterycable.
114UserGuide
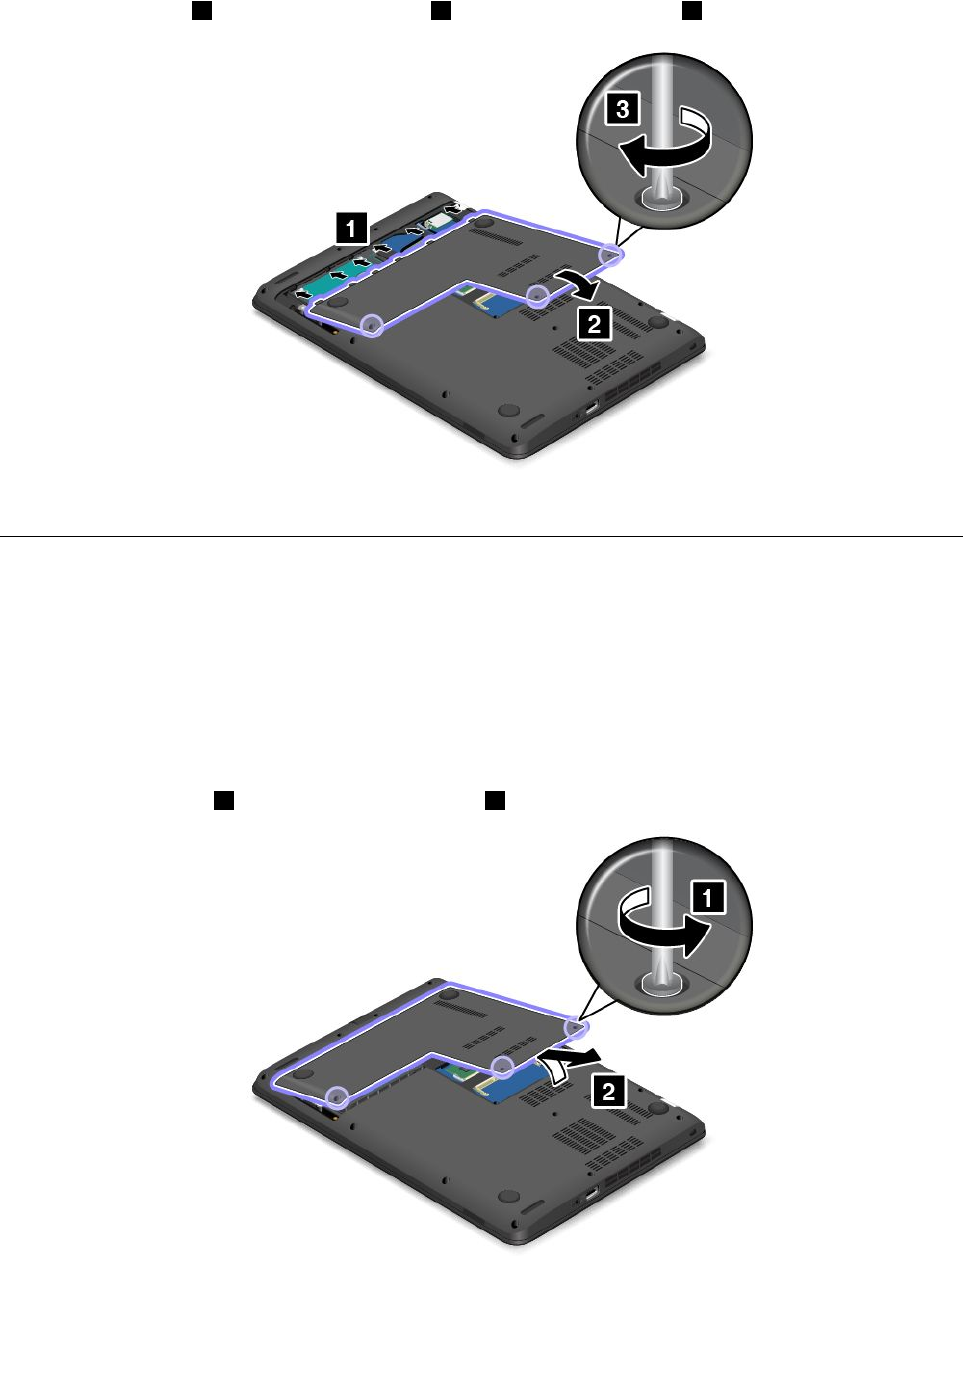
10.Attachthecover1andpivotitdownwards2.Thentightenthescrews3.
11.Turnthecomputerover.Connecttheacpoweradapterandallcables.
Replacingthekeyboard
Beforeyoustart,printtheseinstructionsandread“Importantsafetyinformation”onpagevi.
Removingthekeyboard
Toremovethekeyboard,dothefollowing:
1.Turnoffthecomputer.Thendisconnecttheacpoweradapterandallcablesfromthecomputer.Wait
severalminutestoletthecomputercool.
2.Closethecomputerdisplayandturnthecomputerover.
3.Loosenthescrews1andthenremovethecover2.
Chapter9.Replacingdevices115
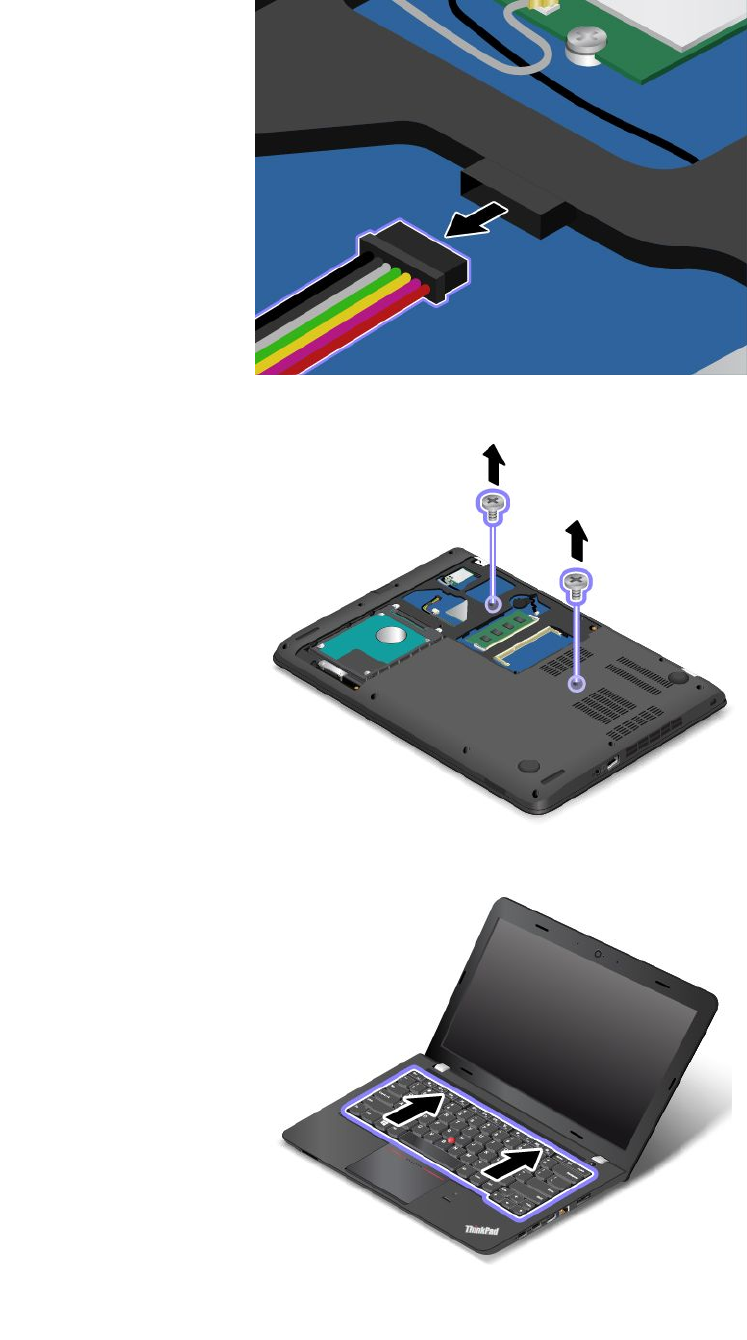
4.Disconnectthebatteryconnector.
5.Removethescrewsthatsecurethekeyboard.
6.Pushhardinthedirectionshowntounlatchthekeyboard.
116UserGuide
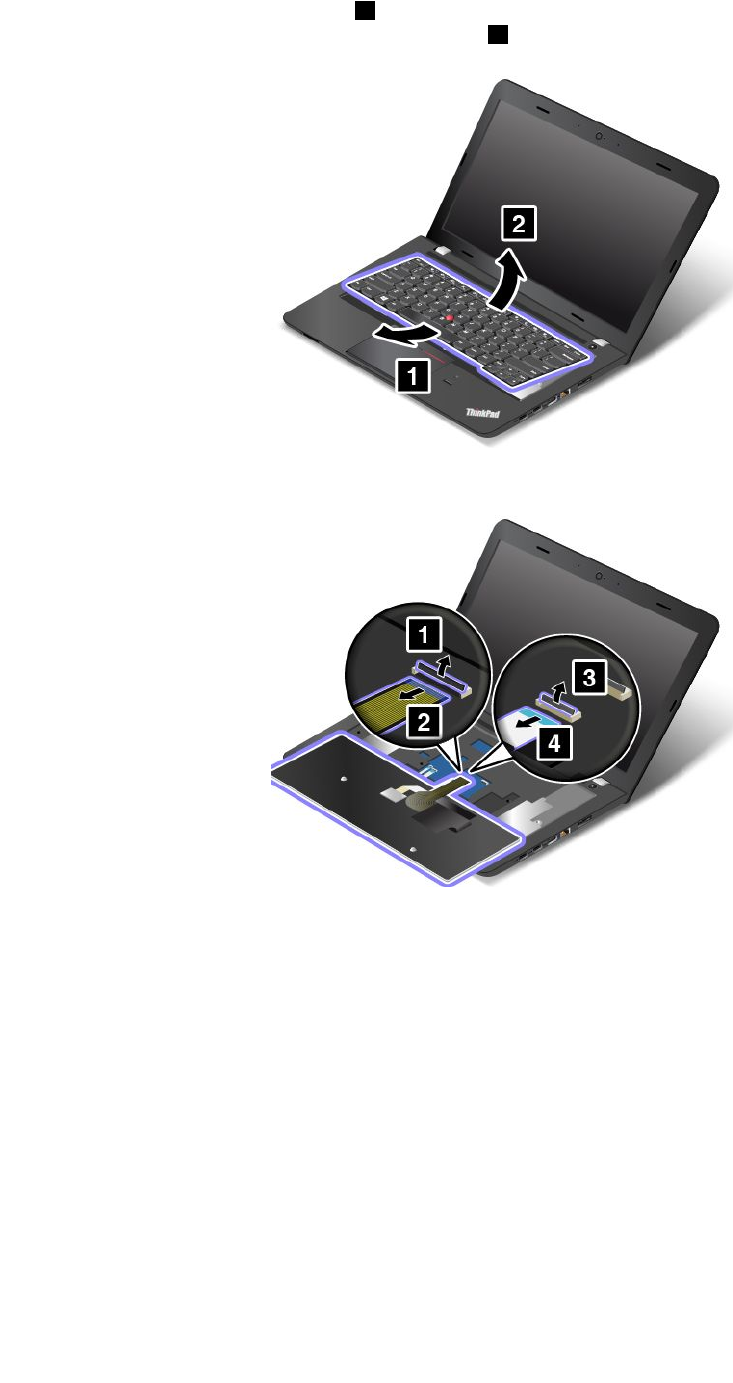
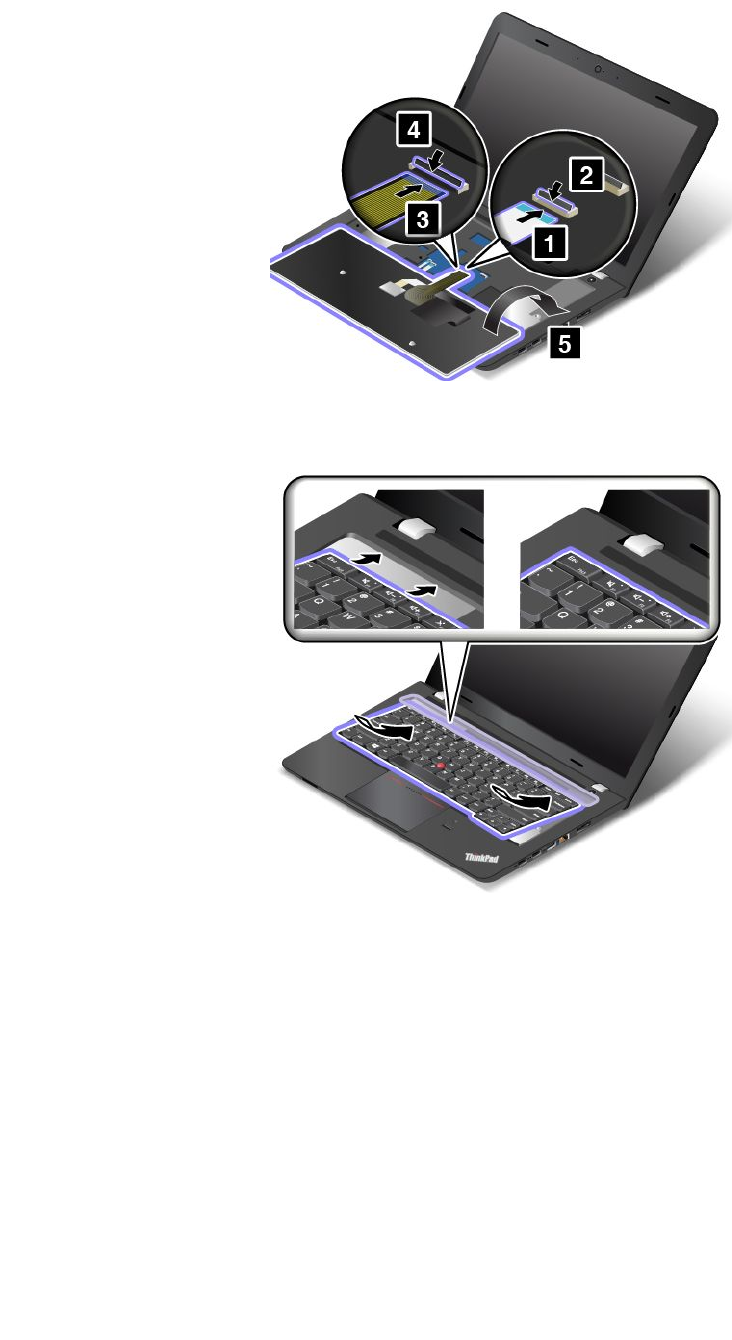
1.Attachtheconnectorsandthenturnoverthekeyboard.
2.Insertthekeyboardintothespaceunderthekeyboard-bezelframeasshown.Ensurethattheedgeof
thekeyboardisunderthekeyboard-bezelframeasshown.
118UserGuide
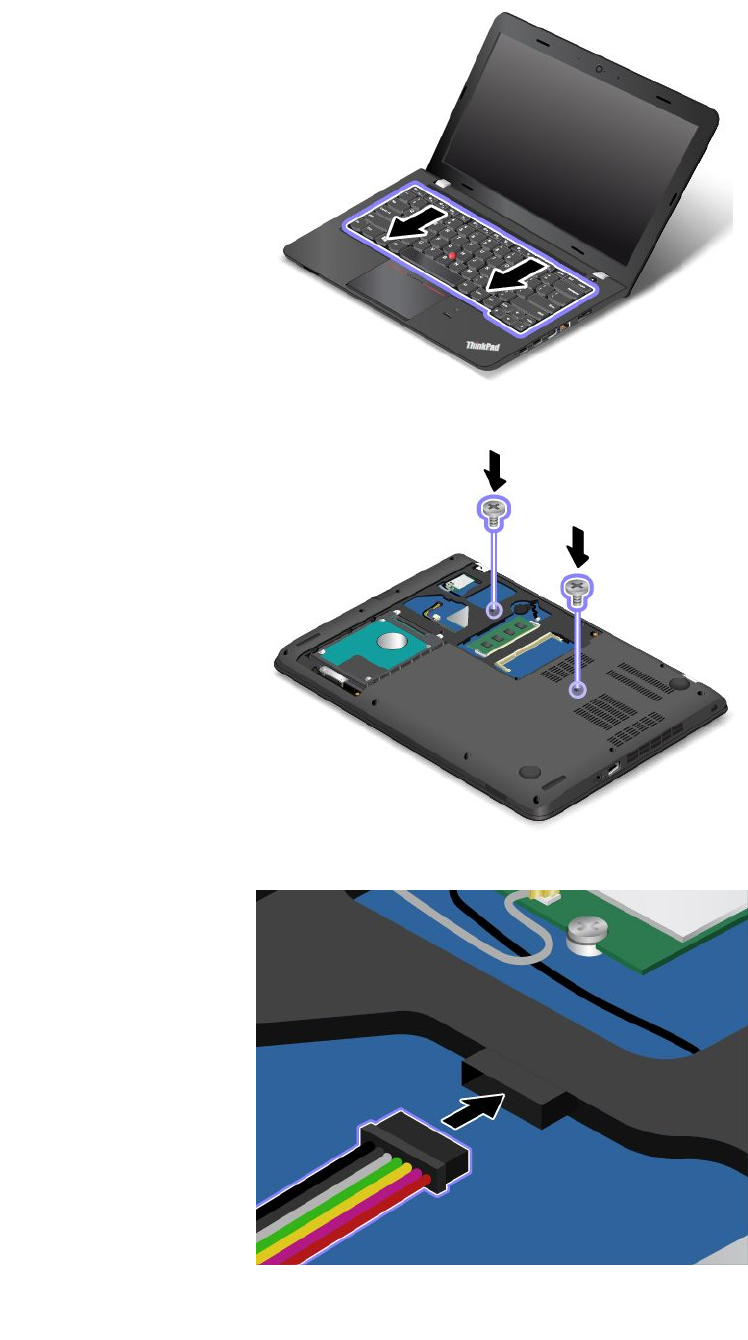
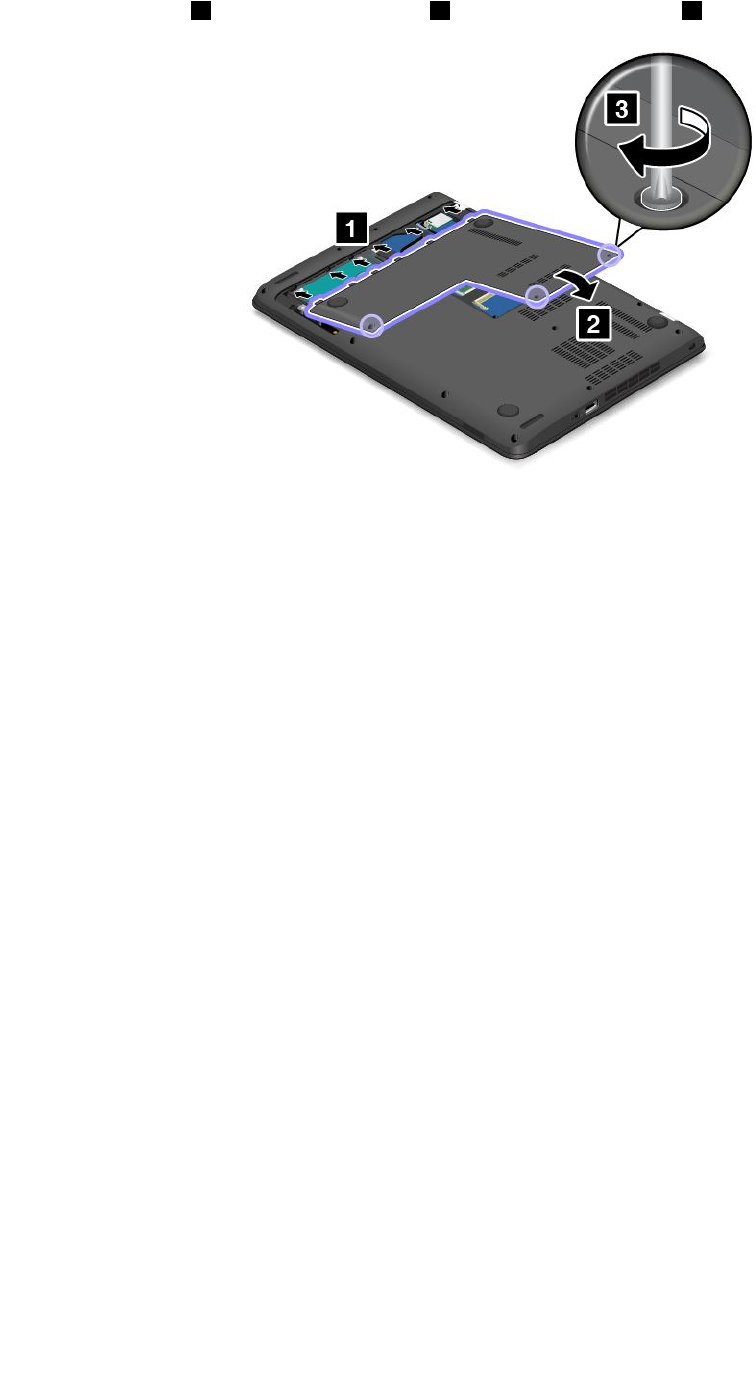
6.Attachthecover1andpivotitdownwards2.Thentightenthescrews3.
7.Turnthecomputerover.Connecttheacpoweradapterandallcables.
120UserGuide

Chapter10.Gettingsupport
ThischapterprovidesinformationaboutgettinghelpandsupportfromLenovo.
•“BeforeyoucontactLenovo”onpage121
•“Gettinghelpandservice”onpage121
•“Purchasingadditionalservices”onpage123
BeforeyoucontactLenovo
Often,youcansolveyourcomputerproblemsbyreferringtotheinformationintheexplanationsoferror
codes,runningdiagnosticprograms,orbyconsultingtheLenovoWebsite.
Registeringyourcomputer
RegisteryourcomputerwithLenovo.Formoreinformation,see“Registeringyourcomputer”onpage17.
Downloadingsystemupdates
Downloadingupdatedsoftwaremightresolveproblemsyouexperiencewithyourcomputer.
Todownloadupdatedsoftware,gotothefollowingWebsiteandfollowtheinstructionsonthescreen:
http://www.lenovo.com/support
Recordinginformation
BeforeyoutalktoaLenovorepresentative,recordthefollowingimportantinformationaboutyourcomputer.
Recordingproblemsymptomsanddetails
Collecttheanswerstothequestionsbelowbeforeyoucallforhelp.Then,youwillbeabletogethelp
asquicklyaspossible.
•Whatistheproblem?Isitcontinuousorintermittent?
•Isthereanerrormessage?Whatistheerrorcode,ifany?
•Whatoperatingsystemareyouusing?Whichversion?
•Whichsoftwareprogramswererunningatthetimeoftheproblem?
•Cantheproblembereproduced?Ifso,how?
Recordingsysteminformation
Theserialnumberlabelisonthebottomofyourcomputer.Recordthemachinetypeandtheserialnumber.
•WhatisthenameofyourLenovoproduct?
•Whatisthemachinetype?
•Whatistheserialnumber?
Gettinghelpandservice
Ifyouneedhelp,service,technicalassistance,orjustwantmoreinformationaboutLenovoproducts,you
willfindawidevarietyofsourcesavailablefromLenovotoassistyou.Thissectioncontainsinformation
aboutwheretogoforadditionalinformationaboutLenovoandourproducts,whattodoifyouexperiencea
problemwithyourcomputer,andwhomtocallforserviceshoulditbenecessary.
©CopyrightLenovo2014121

Informationaboutyourcomputerandpreinstalledsoftware,ifany,isavailableinthedocumentationthat
comeswithyourcomputer.Thedocumentationincludesprintedbooks,onlinebooks,readmefiles,andhelp
files.Inaddition,informationaboutLenovoproductsisavailableontheWorldWideWeb.
MicrosoftServicePacksarethelatestsoftwaresourceforWindowsproductupdates.Theyareavailable
throughWebdownload(connectionchargesmightapply)orthroughdisc.Formorespecificinformationand
links,gotohttp://www.microsoft.com.Lenovoofferstechnicalassistancewithinstallationof,orquestions
relatedto,ServicePacksforyourLenovo-preinstalledMicrosoftWindowsproduct.Forinformation,contact
theCustomerSupportCenter.
Usingdiagnosticprograms
Manycomputerproblemscanbesolvedwithoutoutsideassistance.Ifyouexperienceaproblemwithyour
computer,thefirstplacetostartisthetroubleshootinginformationinyourcomputerdocumentation.Ifyou
suspectasoftwareproblem,seethedocumentation,includingreadmefilesandhelpinformationsystems,
thatcomeswiththeoperatingsystemorapplicationprogram.
ThinkPadnotebookcomputerscomewithasetofdiagnosticprogramsthatyoucanusetohelpyouidentify
hardwareproblems.See“Diagnosingproblems”onpage75forinstructionsonhowtousethediagnostic
programs.
Thetroubleshootinginformationorthediagnosticprogramsmighttellyouthatyouneedadditionalor
updateddevicedriversorothersoftware.Youcangetthelatesttechnicalinformationanddownloaddevice
driversandupdatesfromtheLenovoWebsiteathttp://www.lenovo.com/support.
LenovoSupportWebsite
TechnicalsupportinformationisavailableontheLenovoSupportWebsiteat:
http://www.lenovo.com/support
ThisWebsiteisupdatedwiththelatestsupportinformationsuchasthefollowing:
•Driversandsoftware
•Diagnosticsolutions
•Productandservicewarranty
•Productandpartsdetails
•Userguidesandmanuals
•Knowledgebaseandfrequentlyaskedquestions
CallingLenovo
Ifyouhavetriedtocorrecttheproblemyourselfandstillneedhelp,duringthewarrantyperiod,youcan
gethelpandinformationbytelephonethroughtheCustomerSupportCenter.Thefollowingservicesare
availableduringthewarrantyperiod:
•Problemdetermination-Trainedpersonnelareavailabletoassistyouwithdeterminingifyouhavea
hardwareproblemanddecidingwhatactionisnecessarytofixtheproblem.
•Lenovohardwarerepair-IftheproblemisdeterminedtobecausedbyLenovohardwareunderwarranty,
trainedservicepersonnelareavailabletoprovidetheapplicablelevelofservice.
•Engineeringchangemanagement-Occasionally,theremightbechangesthatarerequiredafteraproduct
hasbeensold.Lenovooryourreseller,ifauthorizedbyLenovo,willmakeselectedEngineeringChanges
(ECs)thatapplytoyourhardwareavailable.
Thefollowingitemsarenotcovered:
122UserGuide

•ReplacementoruseofpartsnotmanufacturedfororbyLenovoornonwarrantedparts
Note:Allwarrantedpartscontaina7-characteror10-characteridentificationintheformatFRUXXXXXXX
orFRUXXXXXXXXXX.
•Identificationofsoftwareproblemsources
•ConfigurationofUEFIBIOSaspartofaninstallationorupgrade
•Changes,modifications,orupgradestodevicedrivers
•Installationandmaintenanceofnetworkoperatingsystems(NOS)
•Installationandmaintenanceofapplicationprograms
ForthetermsandconditionsoftheLenovoLimitedWarrantythatappliestoyourLenovohardwareproduct,
see“Warrantyinformation”intheSafety,Warranty,andSetupGuidethatcomeswithyourcomputer.
Ifpossible,benearyourcomputerwhenyoumakeyourcallincasethetechnicalassistancerepresentative
needstohelpyouresolveacomputerproblem.Ensurethatyouhavedownloadedthemostcurrentdrivers
andsystemupdates,rundiagnostics,andrecordedinformationbeforeyoucall.Whencallingfortechnical
assistance,havethefollowinginformationavailable:
•Machinetypeandmodel
•Serialnumbersofyourcomputer,monitor,andothercomponents,oryourproofofpurchase
•Descriptionoftheproblem
•Exactwordingofanyerrormessages
•Hardwareandsoftwareconfigurationinformationforyoursystem
Telephonenumbers
ForalistoftheLenovoSupportphonenumbersforyourcountryorregion,goto
http://www.lenovo.com/support/phoneorrefertotheSafety,Warranty,andSetupGuidethatcomeswith
yourcomputer.
Note:Phonenumbersaresubjecttochangewithoutnotice.Thelatestphonenumbersareavailableat
http://www.lenovo.com/support/phone.Ifthenumberforyourcountryorregionisnotprovided,contact
yourLenovoresellerorLenovomarketingrepresentative.
Purchasingadditionalservices
Duringandafterthewarrantyperiod,youcanpurchaseadditionalservices,suchassupportforLenovo
andnon-Lenovohardware,operatingsystems,andapplicationprograms;networksetupandconfiguration
services;upgradedorextendedhardwarerepairservices;andcustominstallationsservices.Service
availabilityandservicenamemightvarybycountry.
Formoreinformationabouttheseservices,goto:
http://www.lenovo.com/accessories/services/index.html
Chapter10.Gettingsupport123

124UserGuide
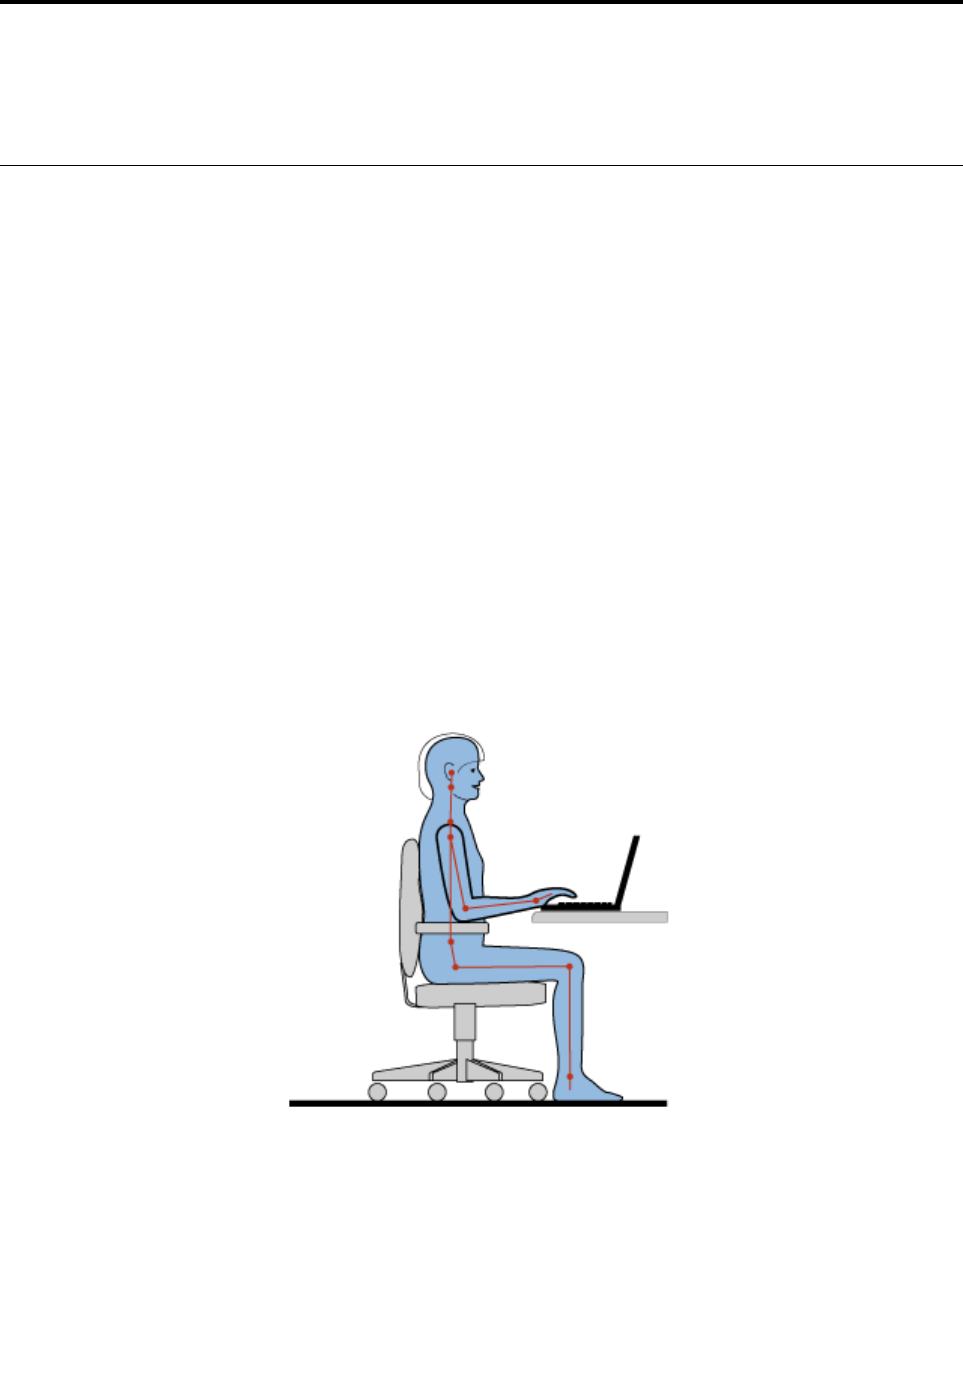
Chapter11.Youandyourcomputer
Thischapterprovidesinformationaboutaccessibility,comfort,andtravellingwithyourcomputer.
Accessibilityandcomfort
Goodergonomicpracticeisimportanttogetthemostfromyourpersonalcomputerandtoavoiddiscomfort.
Arrangeyourworkplaceandtheequipmentyouusetosuityourindividualneedsandthekindofwork
thatyouperform.Inaddition,usehealthyworkhabitstomaximizeyourperformanceandcomfortwhile
usingyourcomputer.
Thefollowingtopicsprovideinformationaboutarrangingyourworkarea,settingupyourcomputer
equipment,andestablishinghealthyworkhabits.
Lenovoiscommittedtoprovidingthelatestinformationandtechnologytoourcustomerswithdisabilities.
Refertotheaccessibilityinformationthatoutlinesoureffortsinthisarea.See“Accessibilityinformation”on
page126.
Ergonomicinformation
Workinginthevirtualofficemightmeanadaptingtofrequentchangesinyourenvironment.Forexample,
adaptingtothesurroundinglightingsources,properseating,andtheplacementofyourcomputerhardware,
canhelpyouimproveyourperformanceandachievegreatercomfort.
Thefollowingexampleshowssomeoneinaconventionalsetting.Evenwhennotinsuchasetting,youcan
followmanyofthesetips.Developgoodhabits,andtheywillserveyouwell.
Generalposture:Makeminormodificationsinyourworkingposturetodetertheonsetofdiscomfort
causedbylongperiodsofworkinginthesameposition.Frequent,shortbreaksfromyourworkalsohelp
topreventminordiscomfortassociatedwithyourworkingposture.
Display:Positionthedisplaytomaintainacomfortableviewingdistanceof510-760mm(20-30inches).
Avoidglareorreflectionsonthedisplayfromoverheadlightingoroutsidesourcesoflight.Keepthedisplay
screencleanandsetthebrightnesstolevelsthatenableyoutoseethescreenclearly.
©CopyrightLenovo2014125

Headposition:Keepyourheadandneckinacomfortableandneutral(vertical,orupright)position.
Chair:Useachairthatgivesyougoodbacksupportandseatheightadjustment.Usechairadjustmentsto
bestsuityourdesiredposture.
Armandhandposition:Keepyourforearms,wrists,andhandsinarelaxedandneutral(horizontal)position.
Typewithasofttouchwithoutpoundingthekeys.
Legposition:Keepyourthighsparalleltothefloorandyourfeetflatonthefloororonafootrest.
Whatifyouaretraveling?
Itmightnotbepossibletoobservethebestergonomicpracticeswhenyouareusingyourcomputer
whileonthemoveorinacasualsetting.Regardlessofthesetting,trytoobserveasmanyofthetipsas
possible.Sittingproperlyandusingadequatelighting,forexample,willhelpyoumaintaindesirablelevels
ofcomfortandperformance.
Questionsaboutvision?
ThevisualdisplayscreensofThinkPadnotebookcomputersaredesignedtomeetthehigheststandards
andtoprovideyouwithclear,crispimagesandlarge,brightdisplaysthatareeasytosee,yeteasyonthe
eyes.Ofcourse,anyconcentratedandsustainedvisualactivitycanbetiring.Ifyouhavequestionsoneye
fatigueorvisualdiscomfort,consultavision-carespecialistforadvice.
Comfort
Observethefollowingguidelinestoachievegreatercomfortandimproveperformance.
Activesittingandrestbreaks:Thelongeryousitandworkwithyourcomputer,themoreimportantitisto
observeyourworkingposture.Follow“Ergonomicinformation”onpage125andpractice“activesitting”to
avoiddiscomfortassociatedwithyourworkingpostures.Makingminorvoluntaryposturalchangesand
takingshortfrequentworkbreaksarethekeyingredientsforhealthycomputing.Yourcomputerislightand
mobile;youcaneasilyrepositionyourworkingsurfacetoaccommodatemanyposturemodifications.
Workareasetupoptions:Familiarizeyourselfwithallofyourofficefurnituresothatyouknowhowtoadjust
yourworksurface,seat,andotherworktoolstoaccommodateyourpreferencesforcomfort.Ifyourwork
areaisnotinanofficesetting,besuretotakespecialnoteofemployingactivesittingandtakingwork
breaks.ManyThinkPadproductsolutionsareavailabletohelpyoumodifyandexpandyourcomputerto
bestsuityourneeds.Youcanfindsomeoftheseoptionsathttp://www.lenovo.com/essentials.Exploreyour
optionsfordockingsolutionsandexternalproductsthatprovidetheadjustabilityandfeaturesthatyouwant.
Accessibilityinformation
Lenovoiscommittedtoprovidingpeoplewithdisabilitiesgreateraccesstoinformationandtechnology.
Sometechnologiesarealreadyprovidedinyouroperatingsystem.Otherscanbepurchasedthrough
vendors.
UsersalsocanusetheEaseofAccessCenterprovidedintheWindowsoperatingsystemtoconfiguretheir
computerstosuittheirphysicalandcognitiveneeds.TheEaseofAccessCenterisacentrallocation
thatyoucanusetoconfiguretheaccessibilitysettingsandprogramsavailableintheMicrosoftWindows
operatingsystem.TousetheEaseofAccessCenter,openControlPanelandclickEaseofAccess
➙EaseofAccessCenter.
Thefollowinginformationprovideswaystohelpuserswhohavehearing,vision,andmobilitylimitationsget
themostoutoftheircomputerexperience.
126UserGuide

On-screennotification
On-screennotificationhelpshearing-impairedpeoplebeawareofthestatusoftheircomputer.On-screen
notificationreplacessoundswithvisualcuesortextcaptionstoindicatethatactivityishappeningonthe
computer.Asaresult,systemalertsarenoticeableevenwhentheyarenotheard.Forexample,whenyou
selectoneobjectwithyourkeyboard,theobjectishighlighted.Whenyoumovethepointertooneobject
withyourmouse,theintroductorytextoftheobjectisdisplayed.
Touseon-screennotification,openControlPanel,clickEaseofAccess➙EaseofAccessCenter,and
thenclickUsetextorvisualalternativeforsounds.
Audionotification
Audionotificationhelpsvisuallyimpairedpeopleorpeoplewithweaksightbeawareofthestatusoftheir
computer.
Touseaudionotification,openControlPanel,clickEaseofAccess➙EaseofAccessCenter➙Usethe
computerwithoutadisplay,andthenselectTurnonAudioDescription.
Narrator
Narratorisascreenreaderthatreadswhatisdisplayedonthescreenaloudanddescribeseventslike
errormessages.
ToopenNarrator,dothefollowing:
•ForWindows7:ClicktheStartbutton.Then,typeNarratorintothesearchfield.Inthelistofresults,
clickNarrator.
•ForWindows8.1:ClicktheSearchicononthetop-rightcorneroftheStartscreenandthentypeNarrator
intothedisplayedsearchbox.Ifyouareusingakeyboard,youcanjuststarttypingontheStartscreenand
thenthesearchboxandsearchresultsaredisplayedautomatically.Inthelistofresults,clickNarrator.
FormoreinformationabouthowtouseandconfigureNarrator,seetheWindowsHelpandSupport
informationsystem.
Screen-readertechnologies
Screen-readertechnologiesareprimarilyfocusedonsoftwareprograminterfaces,helpinformationsystems,
andavarietyofonlinedocuments.Foradditionalinformationaboutscreenreaders,seethefollowing:
•UsingPDFswithscreenreaders:
http://www.adobe.com/accessibility.html?promoid=DJGVE
•UsingtheJAWSscreenreader:
http://www.freedomscientific.com/jaws-hq.asp
•UsingtheNVDAscreenreader:
http://www.nvaccess.org/
SpeechRecognition
SpeechRecognitionenablesyoutocontrolyourcomputerbyvoice.
Usingonlyyourvoice,youcanstartprograms,openmenus,clickbuttonsandotherobjectsonthescreen,
dictatetextintodocuments,andwriteandsende-mails.Everythingyoudowiththekeyboardandmouse
canbedonewithonlyyourvoice.
ToopenSpeechRecognition,dothefollowing:
•ForWindows7:ClicktheStartbutton.Then,typeSpeechRecognitionintothesearchfield.Inthelist
ofresults,clickSpeechRecognition.
Chapter11.Youandyourcomputer127

•ForWindows8.1:ClicktheSearchicononthetop-rightcorneroftheStartscreenandthentypeSpeech
Recognitionintothedisplayedsearchbox.Ifyouareusingakeyboard,youcanjuststarttypingonthe
Startscreenandthenthesearchboxandsearchresultsaredisplayedautomatically.Inthelistofresults,
clickSpeechRecognition.
FormoreinformationabouthowtouseandconfigureSpeechRecognition,seetheWindowsHelpand
Supportinformationsystem.
Customizabletextsize
Dependingonyourpreference,youcanchangeonlythetextsizeinsteadofchangingthesizeofeverything
onthedesktop.Tochangethetextsize,openControlPanelandclickAppearancesandPersonalization➙
Display.Then,gotoChangeonlythetextsizeandsetatextsizethatmeetsyourneeds.
Magnifier
YourcomputerisequippedwiththeMicrosoftMagnifiertohelpvisuallyimpairedpeopleusethecomputer
morecomfortably.Magnifierisausefulutilitythatenlargespartorallofyourscreensothatyoucanseethe
wordsandimagesbetter.MagnifierispartoftheEaseofAccessCenter.
ToopenMagnifier,dothefollowing:
•ForWindows7:ClicktheStartbutton,clickAllPrograms➙Accessories➙EaseofAccess,and
thenclickMagnifier.
•ForWindows8.1:ClicktheSearchicononthetop-rightcorneroftheStartscreenandthentypeMagnier
intothedisplayedsearchbox.Ifyouareusingakeyboard,youcanjuststarttypingontheStartscreenand
thenthesearchboxandsearchresultsaredisplayedautomatically.Inthelistofresults,clickMagnifier.
FormoreinformationabouthowtouseandconfigureMagnifier,seetheWindowsHelpandSupport
informationsystem.
Note:Fortouch-screencomputermodels,youalsocanzoominandzoomoutbyusingtouchgestures
insteadofthekeyboard.See“Zoom”onpage128.
Zoom
Youcanusethezoomfeaturetoenlargeorreducethesizeoftext,pictures,maps,orotherobjects.
•Fromthekeyboard:
–Zoomin:PresstheWindowslogokey+theplus-signkey(+)toenlargethesizeoftext,pictures,
maps,orotherobjects.
–Zoomout:PresstheWindowslogokey+theminus-sign(-)keytoreducethesizeoftext,pictures,
maps,orotherobjects.
•Fromthetouchscreen:
–Zoomin:Movetwofingersfartherapartonthetouchscreentoenlargethesizeoftext,pictures,
maps,orotherobjects.
–Zoomout:Movetwofingersclosertogetheronthetouchscreentoreducethesizeoftext,pictures,
maps,orotherobjects.
Screenresolution
Youcanmakeyourdocumentseasiertoreadbyadjustingthescreenresolutionofyourcomputer.Toadjust
thescreenresolution,rightclickanywhereonthedesktop,clickScreenresolution,andthenadjustthe
settingsasyouprefer.
Note:Settingtoolowofaresolutionmightpreventsomeitemsfromfittingonthescreen.
128UserGuide

Foralternativesonincreasingthesizeoftextandotherobjects,seethefollowing:
•“Customizabletextsize”onpage128
•“Magnifier”onpage128
•“Zoom”onpage128
EaseofAccesskeyboardshortcuts
Keyboardshortcutsarecombinationsoftwoormorekeysthatyoucanusetoperformataskthatwould
typicallyrequireamouseorotherpointingdevices.Keyboardshortcutsprovideaneasieralternativeto
interactwithyourcomputerasyouworkwiththeWindowsoperatingsystemandmostapplications.
Thefollowingtablecontainskeyboardshortcutsthatcanhelpmakeyourcomputereasiertouse.
KeyboardshortcutFunction
Windowslogokey+UOpentheEaseofAccessCenter
RightShiftforeightsecondsTurnFilterKeysonoroff
ShiftfivetimesTurnStickyKeysonoroff
NumLockforfivesecondsTurnToggleKeysonoroff
LeftAlt+LeftShift+NumLockTurnMouseKeysonoroff
LeftAlt+LeftShift+PrtScn(orPrtSc)TurnHighContrastonoroff
Formoreinformation,gotohttp://windows.microsoft.com/,andthentypeanyofthefollowingkeywordsfor
searching:keyboardshortcuts,accesskeys,keycombinations,shortcutkeys.
On-ScreenKeyboard
Ifyouprefertotypeorenterdataintoyourcomputerwithoutusingaphysicalkeyboard,youcanuse
On-ScreenKeyboard.On-ScreenKeyboarddisplaysavisualkeyboardwithallthestandardkeys.Youcan
selectkeysusingthemouseoranotherpointingdevice,oryoucantaptoselectthekeysifyourcomputer
supportsmulti-touchscreen.
ToopenOn-ScreenKeyboard,dothefollowing:
•ForWindows7:ClicktheStartbutton.Then,typeOn-ScreenKeyboardintothesearchfield.Inthelistof
results,clickOn-ScreenKeyboard.
•ForWindows8.1:ClicktheSearchicononthetop-rightcorneroftheStartscreenandthentype
On-ScreenKeyboardintothedisplayedsearchbox.Ifyouareusingakeyboard,youcanjuststarttyping
ontheStartscreenandthenthesearchboxandsearchresultsaredisplayedautomatically.Inthelistof
results,clickOn-ScreenKeyboard.
FormoreinformationabouthowtouseandconfigureOn-ScreenKeyboard,seetheWindowsHelpand
Supportinformationsystem.
Personalizedkeyboard
Thetactilebumpsonthekeyboardprovideareferencepointfromwhichyoucaneasilylocateallkeyson
thekeyboardwithoutvisualassistance.
Toadjustyourkeyboardsettings,openControlPanel,clickEaseofAccess➙EaseofAccessCenter,
andthenclickMakethekeyboardeasiertouse.
Chapter11.Youandyourcomputer129

Industry-standardconnectors
Yourcomputerprovidesindustry-standardconnectorsthatenableyoutoconnectassistivedevices,
ifneeded.
Formoreinformationonthelocationandfunctionofeachconnector,see“Locatingcomputercontrols,
connectors,andindicators”onpage1.
Smartlatches
ThesmartlatchesonsomeThinkPadnotebookcomputerlidandtheremovablebatteryenableyouto
openyourcomputerlidandremovetheremovablebatteryusingonlyonehandwithphysicalstrengthof
lessthan22.2N.
Documentationinaccessibleformats
Lenovoprovideselectronicdocumentationinaccessibleformats.Lenovoelectronicdocumentation,suchas
properlytaggedPDFfilesorHyperTextMarkupLanguage(HTML)files,isdevelopedtoensurethatvisually
impaireduserscanreadthedocumentationthroughascreenreader.Eachimageinthedocumentationalso
includesadequatealternativetexttoexplaintheimagesothatvisuallyimpaireduserscanunderstandthe
imagewhentheyuseascreenreader.
Travelingwithyourcomputer
Thistopicprovidesinformationtohelpyouworkwithyourcomputerwhenyouaretravelling.
Traveltips
Usethefollowingtraveltipstotravelmoreconfidentlyandefficientlywithyourcomputer.
•Althoughitissafetoallowyourcomputertogothroughthex-raymachinesatairportsecuritystations,it
isimportanttokeepyoureyesonthecomputeratalltimestopreventtheft.
•Considerbringinganelectricaladapterforuseinanairplaneorautomobile.
•Ifyoucarryanacpoweradapter,detachtheaccordfromittoavoiddamagingthecord.
Traveltipsonairplanes
Ifyoucarryyourcomputerintoanairplane,takenoteofthefollowingtips:
•Ifyouintendtouseyourcomputerorwirelessservices(suchasInternetandBluetooth),checkwiththe
airlineforrestrictionsandavailabilityofservicesbeforeboardingtheairplane.Iftherearerestrictions
ontheuseofcomputerswithwirelessfeaturesontheairplane,youmustabidebythoserestrictions.If
necessary,disablewirelessfeaturesbeforeboarding.
•Becarefulabouttheseatinfrontofyouonairplanes.Angleyourcomputerdisplaysothatitdoesnotget
caughtwhenthepersoninfrontofyouleansback.
•Whentakingoff,remembertoturnoffyourcomputerorputitintohibernatemode.
Travelaccessories
Thefollowingisachecklistofitemstoconsiderpackingwhenyouaregoingtotravel:
•ThinkPadacpoweradapter
•ThinkPadAC/DCComboAdapter
•Externalmouse,ifyouareaccustomedtousingone
•Ethernetcable
•Extrabattery,charged
130UserGuide

•Aqualitycarryingcasethatprovidesadequatecushionandprotection
•Externalstoragedevice
Ifyouaretravelingtoanothercountry,youmightalsowanttoconsiderthefollowingitems:
•Anacpoweradapterforthecountrytowhichyouaretravelling
•Anadaptertoconnecttoaphonelineinthatcountry(formodelsequippedwithamodem)
Topurchasetravelaccessories,gotohttp://www.lenovo.com/essentials.
Chapter11.Youandyourcomputer131

132UserGuide

AppendixA.Regulatoryinformation
Wirelessrelatedinformation
Wirelessinteroperability
WirelessLANCardisdesignedtobeinteroperablewithanywirelessLANproductthatisbasedonDirect
SequenceSpreadSpectrum(DSSS),ComplementaryCodeKeying(CCK),and/orOrthogonalFrequency
DivisionMultiplexing(OFDM)radiotechnology,andiscompliantto:
•The802.11b/gStandard,802.11a/b/g,802.11n,or802.11aconWirelessLANs,asdefinedandapproved
bytheInstituteofElectricalandElectronicsEngineers.
•TheWirelessFidelity(WiFi)certificationasdefinedbytheWi-FiAlliance.
ABluetoothdeviceisdesignedtobeinteroperablewithanyBluetoothproductsthatarecompliantto
BluetoothSpecificationSpecification4.0asdefinedbytheBluetoothSIG.Thefollowingprofilesare
supportedbyBluetoothdevices:
•AdvancedAudioDistributionProfile(A2DP)
•Audio/VideoControlTransportProtocol(AVCTP)
•Audio/VideoDistributionTransportProtocol(AVDTP)
•A/VRemoteControlProfile(AVRCP)
•BasicImagingProfile(BIP)
•BasicPrintingProfile(BPP)
•Dial-UpNetworkingProfile(DUN)
•FileTransferProfile(FTP)
•GenericAccessProfile(GAP)
•GenericA/VDistributionProfile(GAVDP)
•HardcopyCableReplacementProfile(HCRP)
•HeadsetProfile(HSP)
•Hands-FreeProfile(HFP)
•HumanInterfaceDeviceProfile(HID)
•MessageAccessProfile(MAP)
•ObjectExchangeProtocol(OBEX)
•ObjectPushProfile(OPP)
•PersonalAreaNetworkingProfile(PAN)
•PhoneBookAccessProfile(PBAP)
•ServiceDiscoveryProtocol(SDP)
•SynchronizationProfile(SYNC)
•VideoDistributionProfile(VDP)
•GenericAttributeProfile(GATT)
•ProximityProfile
•FindMeProfile
©CopyrightLenovo2014133
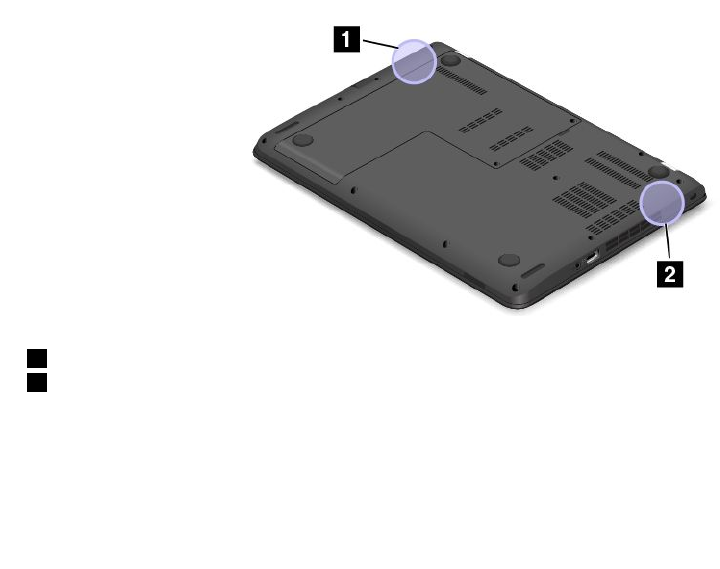
•ImmediateAlertProfile
•BatteryStatusProfile
Usageenvironmentandyourhealth
Integratedwirelesscardsemitradiofrequencyelectromagneticenergylikeotherradiodevices.However,the
levelofenergyemittedisfarmuchlessthantheelectromagneticenergyemittedbywirelessdeviceslike
forexamplemobilephones.
Duetothefactthatintegratedwirelesscardsoperatewithintheguidelinesfoundinradiofrequencysafety
standardsandrecommendations,Lenovobelievestheyaresafeforusebyconsumers.Thesestandardsand
recommendationsreflecttheconsensusofthescientificcommunityandresultfromdeliberationsofpanels
andcommitteesofscientistswhocontinuallyreviewandinterprettheextensiveresearchliterature.
Insomesituationorenvironment,theuseofintegratedwirelesscardsmightberestrictedbytheproprietor
ofthebuildingorresponsiblerepresentativesoftheorganization.Thesesituationsandareasmightfor
exampleinclude:
•Usingtheintegratedwirelesscardsonboardofairplanes,inhospitalsornearpetrolstations,blasting
areas(withelectro-explosivedevices),medicalimplantsorbody-wornelectronicmedicaldevices,such
aspacemakers.
•Inanyotherenvironmentwheretheriskofinterferencetootherdevicesorservicesisperceivedor
identifiedasharmful.
Ifyouareuncertainofthepolicythatappliestotheuseofwirelessdevicesinaspecificorganization(suchas
airportorhospital),youareencouragedtoaskforauthorizationtouseintegratedwirelesscardspriorto
turningonthecomputer.
LocationoftheUltraConnectwirelessantennas
ThinkPadnotebookcomputersfeatureanintegratedUltraConnect™wirelessantennasystembuiltintothe
displayforoptimalreception,enablingwirelesscommunicationwhereveryouare.
Antennalocation
1WirelessLANantenna
2WirelessLANantenna
Locatingwirelessregulatorynotices
Formoreinformationaboutthewirelessregulatorynotices,refertotheRegulatoryNoticeshippedwithyour
computer.
134UserGuide

IfyourcomputerisshippedwithouttheRegulatoryNotice,youcanfinditontheWebsiteat:
http://www.lenovo.com/UserManual
Exportclassificationnotice
ThisproductissubjecttotheUnitedStatesExportAdministrationRegulations(EAR)andhasanExport
ClassificationControlNumber(ECCN)of4A994.b.Itcanbere-exportedexcepttoanyoftheembargoed
countriesintheEARE1countrylist.
Electronicemissionnotices
FederalCommunicationsCommissionDeclarationofConformity
ThefollowinginformationreferstotheThinkPadE450,machinetype20DC(Tx)and20DD(Rx);ThinkPad
E455,machinetype20DE.
ThisequipmenthasbeentestedandfoundtocomplywiththelimitsforaClassBdigitaldevice,pursuant
toPart15oftheFCCRules.Theselimitsaredesignedtoprovidereasonableprotectionagainstharmful
interferenceinaresidentialinstallation.Thisequipmentgenerates,uses,andcanradiateradiofrequency
energyand,ifnotinstalledandusedinaccordancewiththeinstructions,maycauseharmfulinterference
toradiocommunications.However,thereisnoguaranteethatinterferencewillnotoccurinaparticular
installation.Ifthisequipmentdoescauseharmfulinterferencetoradioortelevisionreception,whichcanbe
determinedbyturningtheequipmentoffandon,theuserisencouragedtotrytocorrecttheinterferenceby
oneormoreofthefollowingmeasures:
•Reorientorrelocatethereceivingantenna.
•Increasetheseparationbetweentheequipmentandreceiver.
•Connecttheequipmentintoanoutletonacircuitdifferentfromthattowhichthereceiverisconnected.
•Consultanauthorizeddealerorservicerepresentativeforhelp.
Lenovoisnotresponsibleforanyradioortelevisioninterferencecausedbyusingotherthanspecifiedor
recommendedcablesandconnectorsorbyunauthorizedchangesormodificationstothisequipment.
Unauthorizedchangesormodificationscouldvoidtheuser'sauthoritytooperatetheequipment.
ThisdevicecomplieswithPart15oftheFCCRules.Operationissubjecttothefollowingtwoconditions:(1)
thisdevicemaynotcauseharmfulinterference,and(2)thisdevicemustacceptanyinterferencereceived,
includinginterferencethatmaycauseundesiredoperation.
ResponsibleParty:
Lenovo(UnitedStates)Incorporated
1009ThinkPlace-BuildingOne
Morrisville,NC27560
PhoneNumber:919-294-5900
IndustryCanadaClassBemissioncompliancestatement
ThisClassBdigitalapparatuscomplieswithCanadianICES-003.
CetappareilnumériquedelaclasseBestconformeàlanormeNMB-003duCanada.
AppendixA.Regulatoryinformation135

EuropeanUnion-CompliancetotheElectromagneticCompatibility
Directive
ThisproductisinconformitywiththeprotectionrequirementsofEUCouncilDirective2004/108/EConthe
approximationofthelawsoftheMemberStatesrelatingtoelectromagneticcompatibility.Lenovocannot
acceptresponsibilityforanyfailuretosatisfytheprotectionrequirementsresultingfromanon-recommended
modificationoftheproduct,includingtheinstallationofoptioncardsfromothermanufacturers.
ThisproducthasbeentestedandfoundtocomplywiththelimitsforClassBInformationTechnology
EquipmentaccordingtoEuropeanStandardEN55022.ThelimitsforClassBequipmentwerederived
fortypicalresidentialenvironmentstoprovidereasonableprotectionagainstinterferencewithlicensed
communicationdevices.
EUcontact:Lenovo,Einsteinova21,85101Bratislava,Slovakia
GermanClassBcompliancestatement
DeutschsprachigerEUHinweis:
HinweisfürGerätederKlasseBEU-RichtliniezurElektromagnetischenVerträglichkeit
DiesesProduktentsprichtdenSchutzanforderungenderEU-Richtlinie2004/108/EG(früher89/336/EWG)zur
AngleichungderRechtsvorschriftenüberdieelektromagnetischeVerträglichkeitindenEU-Mitgliedsstaaten
undhältdieGrenzwertederEN55022KlasseBein.
Umdiesessicherzustellen,sinddieGerätewieindenHandbüchernbeschriebenzuinstallierenundzu
betreiben.DesWeiterendürfenauchnurvonderLenovoempfohleneKabelangeschlossenwerden.
LenovoübernimmtkeineVerantwortungfürdieEinhaltungderSchutzanforderungen,wenndasProdukt
ohneZustimmungderLenovoverändertbzw.wennErweiterungskomponentenvonFremdherstellernohne
EmpfehlungderLenovogesteckt/eingebautwerden.
Deutschland:
EinhaltungdesGesetzesüberdieelektromagnetischeVerträglichkeitvonBetriebsmitteln
DiesesProduktentsprichtdem„GesetzüberdieelektromagnetischeVerträglichkeitvonBetriebsmitteln“
EMVG(früher„GesetzüberdieelektromagnetischeVerträglichkeitvonGeräten“).DiesistdieUmsetzungder
EU-Richtlinie2004/108/EG(früher89/336/EWG)inderBundesrepublikDeutschland.
ZulassungsbescheinigunglautdemDeutschenGesetzüberdieelektromagnetischeVerträglichkeit
vonBetriebsmitteln,EMVGvom20.Juli2007(früherGesetzüberdieelektromagnetische
VerträglichkeitvonGeräten),bzw.derEMVEGRichtlinie2004/108/EC(früher89/336/EWG),für
GerätederKlasseB.
DiesesGerätistberechtigt,inÜbereinstimmungmitdemDeutschenEMVGdasEG-Konformitätszeichen
-CE-zuführen.VerantwortlichfürdieKonformitätserklärungnachParagraf5desEMVGistdieLenovo
(Deutschland)GmbH,Gropiusplatz10,D-70563Stuttgart.
InformationeninHinsichtEMVGParagraf4Abs.(1)4:
DasGeräterfülltdieSchutzanforderungennachEN55024undEN55022KlasseB.
136UserGuide

KoreaClassBcompliancestatement
JapanVCCIClassBcompliancestatement
Japancompliancestatementforproductswhichconnecttothepower
mainswithratedcurrentlessthanorequalto20Aperphase
LenovoproductserviceinformationforTaiwan
Eurasiancompliancemark
Brazilregulatorynotice
Ouvirsonscommaisde85decibéisporlongosperíodospodeprovocardanosaosistemaauditivo.
Mexicoregulatorynotice
Advertencia:EnMexicolaoperacióndeesteequipoestásujetaalassiguientesdoscondiciones:(1)es
posiblequeesteequipoodispositivonocauseinterferenciaperjudicialy(2)esteequipoodispositivodebe
aceptarcualquierinterferencia,incluyendolaquepuedacausarsuoperaciónnodeseada.
AppendixA.Regulatoryinformation137

138UserGuide

AppendixB.WEEEandrecyclingstatements
Lenovoencouragesownersofinformationtechnologyequipmenttoresponsiblyrecycletheirequipment
whenitisnolongerneeded.Lenovooffersavarietyofprogramsandservicestoassistequipmentownersin
recyclingtheirITproducts.InformationonproductrecyclingofferingscanbefoundonLenovo'sInternetsite
athttp://www.lenovo.com/social_responsibility/us/en/.
ImportantWEEEinformation
TheWEEEmarkingonLenovoproductsappliestocountrieswithWEEEande-wasteregulations(forexample,
EuropeanDirective2002/96/EC,IndiaE-WasteManagement&HandlingRules,2011).Appliancesare
labeledinaccordancewithlocalregulationsconcerningwasteelectricalandelectronicequipment(WEEE).
Theseregulationsdeterminetheframeworkforthereturnandrecyclingofusedappliancesasapplicable
withineachgeography.Thislabelisappliedtovariousproductstoindicatethattheproductisnottobe
thrownaway,butratherputintheestablishedcollectionsystemsforreclaimingtheseendoflifeproducts.
Usersofelectricalandelectronicequipment(EEE)withtheWEEEmarkingmustnotdisposeofendoflife
EEEasunsortedmunicipalwaste,butusethecollectionframeworkavailabletothemforthereturn,recycle,
andrecoveryofWEEEandtominimizeanypotentialeffectsofEEEontheenvironmentandhumanhealth
duetothepresenceofhazardoussubstances.ForadditionalWEEEinformationgoto:
http://www.lenovo.com/recycling
Japanrecyclingstatements
CollectingandrecyclingadisusedLenovocomputerormonitor
IfyouareacompanyemployeeandneedtodisposeofaLenovocomputerormonitorthatistheproperty
ofthecompany,youmustdosoinaccordancewiththeLawforPromotionofEffectiveUtilizationof
Resources.Computersandmonitorsarecategorizedasindustrialwasteandshouldbeproperlydisposed
ofbyanindustrialwastedisposalcontractorcertifiedbyalocalgovernment.InaccordancewiththeLaw
forPromotionofEffectiveUtilizationofResources,LenovoJapanprovides,throughitsPCCollectingand
RecyclingServices,forthecollecting,reuse,andrecyclingofdisusedcomputersandmonitors.Fordetails,
visittheLenovoWebsiteathttp://www.lenovo.com/recycling/japan.
PursuanttotheLawforPromotionofEffectiveUtilizationofResources,thecollectingandrecyclingof
home-usedcomputersandmonitorsbythemanufacturerwasbegunonOctober1,2003.Thisservice
isprovidedfreeofchargeforhome-usedcomputerssoldafterOctober1,2003.Fordetails,goto
http://www.lenovo.com/recycling/japan.
©CopyrightLenovo2014139
DisposingofLenovocomputercomponents
SomeLenovocomputerproductssoldinJapanmayhavecomponentsthatcontainheavymetalsorother
environmentalsensitivesubstances.Toproperlydisposeofdisusedcomponents,suchasaprintedcircuit
boardordrive,usethemethodsdescribedaboveforcollectingandrecyclingadisusedcomputerormonitor.
DisposingofdisusedlithiumbatteriesfromLenovocomputers
Abutton-shapedlithiumbatteryisinstalledinsideyourLenovocomputertoprovidepowertothecomputer
clockwhilethecomputerisoffordisconnectedfromthemainpowersource.Ifyouneedtoreplaceitwitha
newone,contactyourplaceofpurchaseorcontactLenovoforservice.Ifyouneedtodisposeofadisused
lithiumbattery,insulateitwithvinyltape,contactyourplaceofpurchaseoranindustrial-waste-disposal
operator,andfollowtheirinstructions.
Disposalofalithiumbatterymustcomplywithlocalordinancesandregulations.
DisposingofadisusedbatteryfromLenovonotebookcomputers
YourLenovonotebookcomputerhasalithiumionbatteryoranickelmetalhydridebattery.Ifyouarea
companyemployeewhousesaLenovonotebookcomputerandneedtodisposeofabattery,contactthe
properpersoninLenovosales,service,ormarketing,andfollowthatperson'sinstructions.Youalsocan
refertotheinstructionsathttp://www.lenovo.com/jp/ja/environment/recycle/battery/.
IfyouuseaLenovonotebookcomputerathomeandneedtodisposeofabattery,you
mustcomplywithlocalordinancesandregulations.Youalsocanrefertotheinstructionsat
http://www.lenovo.com/jp/ja/environment/recycle/battery/.
RecyclinginformationforBrazil
DeclaraçõesdeReciclagemnoBrasil
DescartedeumProdutoLenovoForadeUso
Equipamentoselétricoseeletrônicosnãodevemserdescartadosemlixocomum,masenviadosàpontosde
coleta,autorizadospelofabricantedoprodutoparaquesejamencaminhadoseprocessadosporempresas
especializadasnomanuseioderesíduosindustriais,devidamentecertificadaspelosorgãosambientais,de
acordocomalegislaçãolocal.
ALenovopossuiumcanalespecíficoparaauxiliá-lonodescartedessesprodutos.Casovocêpossua
umprodutoLenovoemsituaçãodedescarte,ligueparaonossoSACouencaminheume-mailpara:
reciclar@lenovo.com,informandoomodelo,númerodesérieecidade,afimdeenviarmosasinstruções
paraocorretodescartedoseuprodutoLenovo.
BatteryrecyclinginformationfortheEuropeanUnion
140UserGuide

Notice:ThismarkappliesonlytocountrieswithintheEuropeanUnion(EU).
BatteriesorpackagingforbatteriesarelabeledinaccordancewithEuropeanDirective2006/66/EC
concerningbatteriesandaccumulatorsandwastebatteriesandaccumulators.TheDirectivedeterminesthe
frameworkforthereturnandrecyclingofusedbatteriesandaccumulatorsasapplicablethroughoutthe
EuropeanUnion.Thislabelisappliedtovariousbatteriestoindicatethatthebatteryisnottobethrown
away,butratherreclaimeduponendoflifeperthisDirective.
InaccordancewiththeEuropeanDirective2006/66/EC,batteriesandaccumulatorsarelabeledtoindicate
thattheyaretobecollectedseparatelyandrecycledatendoflife.Thelabelonthebatterymayalso
includeachemicalsymbolforthemetalconcernedinthebattery(Pbforlead,Hgformercury,andCdfor
cadmium).Usersofbatteriesandaccumulatorsmustnotdisposeofbatteriesandaccumulatorsasunsorted
municipalwaste,butusethecollectionframeworkavailabletocustomersforthereturn,recycling,and
treatmentofbatteriesandaccumulators.Customerparticipationisimportanttominimizeanypotential
effectsofbatteriesandaccumulatorsontheenvironmentandhumanhealthduetothepotentialpresenceof
hazardoussubstances.Forpropercollectionandtreatment,goto:
http://www.lenovo.com/lenovo/environment
BatteryrecyclinginformationforTaiwan
BatteryrecyclinginformationfortheUnitedStatesandCanada
RecyclinginformationforChina
http://support.lenovo.com.cn/activity/551.htm
AppendixB.WEEEandrecyclingstatements141

142UserGuide

AppendixC.RestrictionofHazardousSubstancesDirective
(RoHS)
EuropeanUnionRoHS
LenovoproductssoldintheEuropeanUnion,onorafter3January2013meettherequirementsofDirective
2011/65/EUontherestrictionoftheuseofcertainhazardoussubstancesinelectricalandelectronic
equipment(“RoHSrecast”or“RoHS2”).
FormoreinformationaboutLenovoprogressonRoHS,goto:
http://www.lenovo.com/social_responsibility/us/en/RoHS_Communication.pdf
©CopyrightLenovo2014143
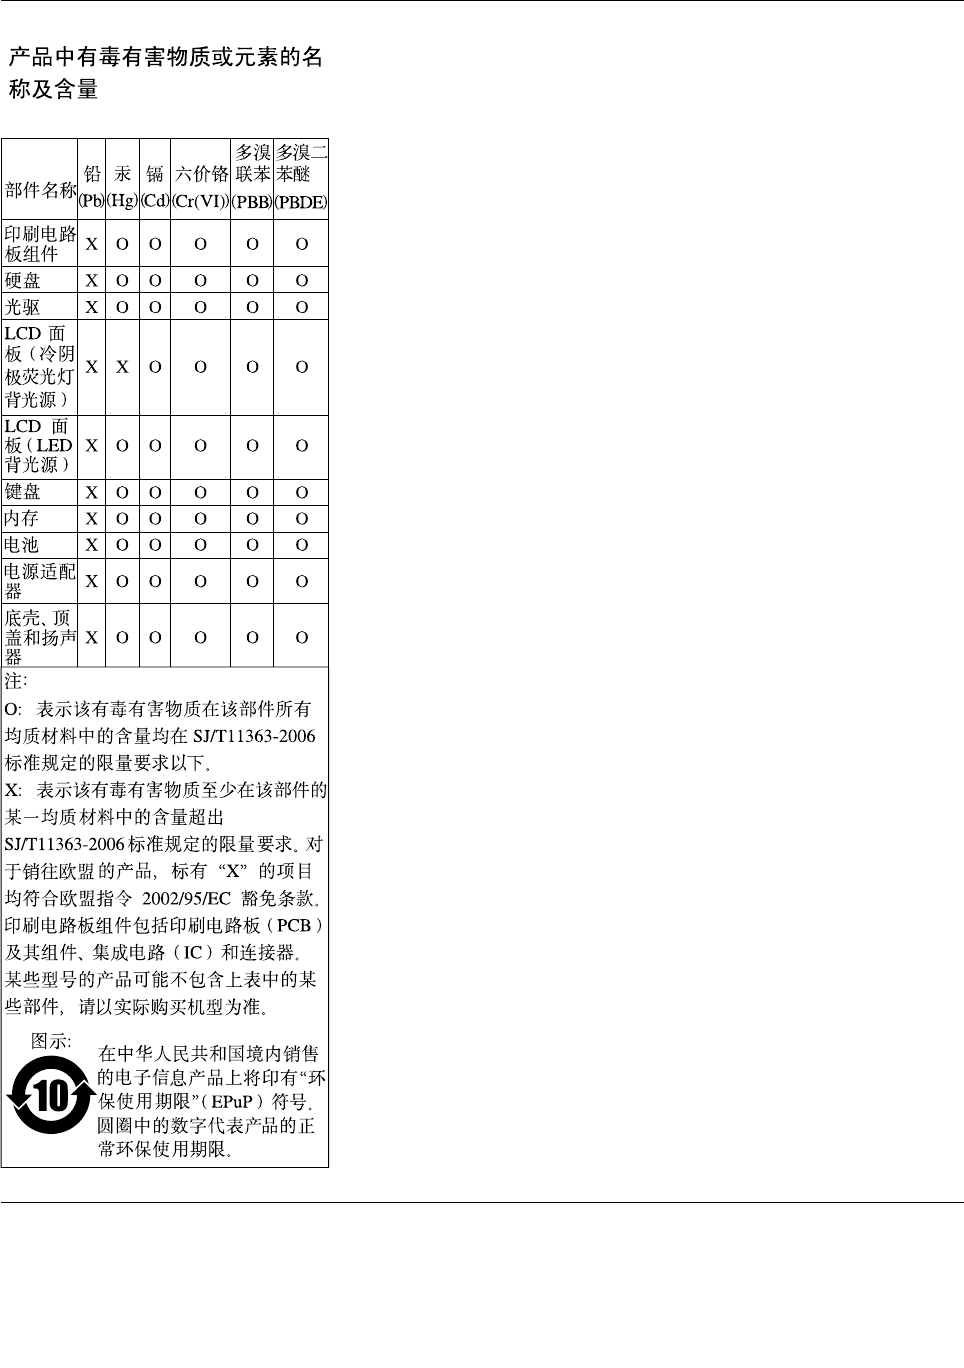
ChinaRoHS
IndiaRoHS
RoHScompliantasperE-Waste(Management&Handling)Rules,2011.
144UserGuide


146UserGuide

AppendixD.ENERGYSTARmodelinformation
ENERGYSTAR®isajointprogramoftheU.S.EnvironmentalProtectionAgencyandtheU.S.Department
ofEnergyaimedatsavingmoneyandprotectingtheenvironmentthroughenergyefficientproductsand
practices.
LenovoisproudtoofferourcustomersproductswiththeENERGYSTARqualifieddesignation.Lenovo
computersofthefollowingmachinetypes,iftheENERGYSTARmarkisaffixed,havebeendesignedand
testedtoconformtotheENERGYSTARprogramrequirementsforcomputers.
20DC(Tx),20DD(Rx),and20DE
ByusingENERGYSTARqualifiedproductsandtakingadvantageofthepower-managementfeatures
ofyourcomputer,youcanhelpreducetheconsumptionofelectricity.Reducedelectricalconsumption
cancontributetopotentialfinancialsavings,acleanerenvironment,andthereductionofgreenhousegas
emissions.
FormoreinformationaboutENERGYSTAR,goto:
http://www.energystar.gov
Lenovoencouragesyoutomakeefficientuseofenergyanintegralpartofyourday-to-dayoperations.To
helpinthisendeavor,Lenovohaspresetthefollowingpower-managementfeaturestotakeeffectwhenyour
computerhasbeeninactiveforaspecifiedlengthoftime:
ByusingENERGYSTARqualifiedproductsandtakingadvantageofthepower-managementfeatures
ofthecomputer,youcanhelpreducetheconsumptionofelectricity.Reducedelectricalconsumption
cancontributetopotentialfinancialsavings,acleanerenvironment,andthereductionofgreenhousegas
emissions.
FormoreinformationaboutENERGYSTAR,goto:
http://www.energystar.gov
Lenovoencouragesyoutomakeefficientuseofenergyanintegralpartofyourday-to-dayoperations.To
helpinthisendeavor,Lenovohaspresetthefollowingpower-managementfeaturestotakeeffectwhenthe
computerhasbeeninactiveforaspecifiedlengthoftime:
Powerplan:EnergySaver(settingswhenpluggedintoacpower)
•Turnoffthedisplay:After10minutes
•Putthecomputerintosleep:After20minutes
•Advancedpowersettings:
–Turnoffharddisks:After15minutes
–Hibernate:Never
©CopyrightLenovo2014147

Toawakenthecomputerfromsleepmode,presstheFnkeyonyourkeyboard.Formoreinformationabout
thesesettings,seetheWindowsHelpandSupportinformationonthecomputer.
TheWakeonLANfunctionisenabledwhenyourLenovocomputerisshippedfromthefactory,andthe
settingremainsvalidevenwhenthecomputerisinsleepmode.IfyoudonotneedtohaveWakeonLAN
enabledwhilethecomputerisinsleepmode,youcanreducethepowerconsumptionandprolongthetime
insleepmode,bydisablingthesettingofWakeonLANforsleepmode.
TodisablethesettingofWakeonLANforsleepmode,dothefollowing:
1.ClickStart➙Controlpanel.
2.ClickHardwareandSound➙DeviceManager.
3.IntheDeviceManagerwindow,expandNetworkadapters.
4.Right-clickyournetworkadapterdevice,andclickProperties.
5.ClickthePowerManagementtab.
6.CleartheAllowthisdevicetowakethecomputercheckbox.
7.ClickOK.
148UserGuide

AppendixE.Notices
Lenovomaynotoffertheproducts,services,orfeaturesdiscussedinthisdocumentinallcountries.Consult
yourlocalLenovorepresentativeforinformationontheproductsandservicescurrentlyavailableinyour
area.AnyreferencetoaLenovoproduct,program,orserviceisnotintendedtostateorimplythatonlythat
Lenovoproduct,program,orservicemaybeused.Anyfunctionallyequivalentproduct,program,orservice
thatdoesnotinfringeanyLenovointellectualpropertyrightmaybeusedinstead.However,itistheuser's
responsibilitytoevaluateandverifytheoperationofanyotherproduct,program,orservice.
Lenovomayhavepatentsorpendingpatentprogramscoveringsubjectmatterdescribedinthisdocument.
Thefurnishingofthisdocumentdoesnotgiveyouanylicensetothesepatents.Youcansendlicense
inquiries,inwriting,to:
Lenovo(UnitedStates),Inc.
1009ThinkPlace-BuildingOne
Morrisville,NC27560
U.S.A.
Attention:LenovoDirectorofLicensing
LENOVOPROVIDESTHISPUBLICATION“ASIS”WITHOUTWARRANTYOFANYKIND,EITHEREXPRESS
ORIMPLIED,INCLUDING,BUTNOTLIMITEDTO,THEIMPLIEDWARRANTIESOFNON-INFRINGEMENT,
MERCHANTABILITYORFITNESSFORAPARTICULARPURPOSE.Somejurisdictionsdonotallow
disclaimerofexpressorimpliedwarrantiesincertaintransactions,therefore,thisstatementmaynotapply
toyou.
Thisinformationcouldincludetechnicalinaccuraciesortypographicalerrors.Changesareperiodically
madetotheinformationherein;thesechangeswillbeincorporatedinneweditionsofthepublication.
Lenovomaymakeimprovementsand/orchangesintheproduct(s)and/ortheapplication(s)describedinthis
publicationatanytimewithoutnotice.
Theproductsdescribedinthisdocumentarenotintendedforuseinimplantationorotherlifesupport
applicationswheremalfunctionmayresultininjuryordeathtopersons.Theinformationcontainedinthis
documentdoesnotaffectorchangeLenovoproductspecificationsorwarranties.Nothinginthisdocument
shalloperateasanexpressorimpliedlicenseorindemnityundertheintellectualpropertyrightsofLenovo
orthirdparties.Allinformationcontainedinthisdocumentwasobtainedinspecificenvironmentsandis
presentedasanillustration.Theresultobtainedinotheroperatingenvironmentsmayvary.
Lenovomayuseordistributeanyoftheinformationyousupplyinanywayitbelievesappropriatewithout
incurringanyobligationtoyou.
Anyreferencesinthispublicationtonon-LenovoWebsitesareprovidedforconvenienceonlyanddonotin
anymannerserveasanendorsementofthoseWebsites.ThematerialsatthoseWebsitesarenotpartof
thematerialsforthisLenovoproduct,anduseofthoseWebsitesisatyourownrisk.
Anyperformancedatacontainedhereinwasdeterminedinacontrolledenvironment.Therefore,theresult
obtainedinotheroperatingenvironmentsmayvarysignificantly.Somemeasurementsmayhavebeen
madeondevelopment-levelsystemsandthereisnoguaranteethatthesemeasurementswillbethesame
ongenerallyavailablesystems.Furthermore,somemeasurementsmayhavebeenestimatedthrough
extrapolation.Actualresultsmayvary.Usersofthisdocumentshouldverifytheapplicabledatafortheir
specificenvironment.
©CopyrightLenovo2014149

Trademarks
ThefollowingtermsaretrademarksofLenovointheUnitedStates,othercountries,orboth:
Lenovo
AccessConnections
ActiveProtectionSystem
SecureDataDisposal
ThinkPad
ThinkPadlogo
ThinkVantage
TrackPoint
UltraConnect
IntelandIntelSpeedSteparetrademarksorregisteredtrademarksofIntelCorporationoritssubsidiariesin
theUnitedStatesandothercountries.
Microsoft,Windows,Direct3D,andBitLockeraretrademarksoftheMicrosoftgroupofcompanies.
AMDandAMD-VaretrademarksorregisteredtrademarkofAdvancedMicroDevices,Inc.
DisplayPortisaTrademarkoftheVideoElectronicsStandardsAssociation.
ThetermsHDMIandHDMIHigh-DefinitionMultimediaInterfacearetrademarksorregisteredtrademarksof
HDMILicensingLLCintheUnitedStatesandothercountries.
Othercompany,product,andservicenamesmaybetrademarksorservicemarksofothers.
150UserGuide