Intel CZ120 HSPA+ Smartphone User Manual user guide
Intel Corporation HSPA+ Smartphone user guide
Intel >
user guide

User Guide
Intel Smartphone: CZ120

PAGE : 2
CONTENTS
1 Getting Started ............................................................................................. 3
1.1 Your Phone .................................................................................3
1.2 Phone Buttons ............................................................................4
1.3 Phone Slots, Ports & Jacks ........................................................... 4
1.4 Charge the Battery.......................................................................5
1.4.1 Battery Tips .............................................................................................. 5
1.5 Insert Micro-SIM Card .................................................................5
1.6 Using the Headset ....................................................................... 6
1.7 Turn on the Phone .......................................................................6
1.8 Sleep & Wake ............................................................................7
1.9 Touchscreen ...............................................................................7
1.10 Tips on Using the Touchscreen ...................................................7
2 Home Screen & Basic Features ..................................................................... 8
2.1 Customizing Your Home Screen ....................................................9
2.2 Status & Notification Icons .........................................................10
2.2.1 Status Icons ........................................................................................... 10
2.2.2 Notification Icons .................................................................................... 11
2.3 Search .....................................................................................11
2.3.1 Search Settings ...................................................................................... 12
2.4 Securing your Phone ..................................................................12
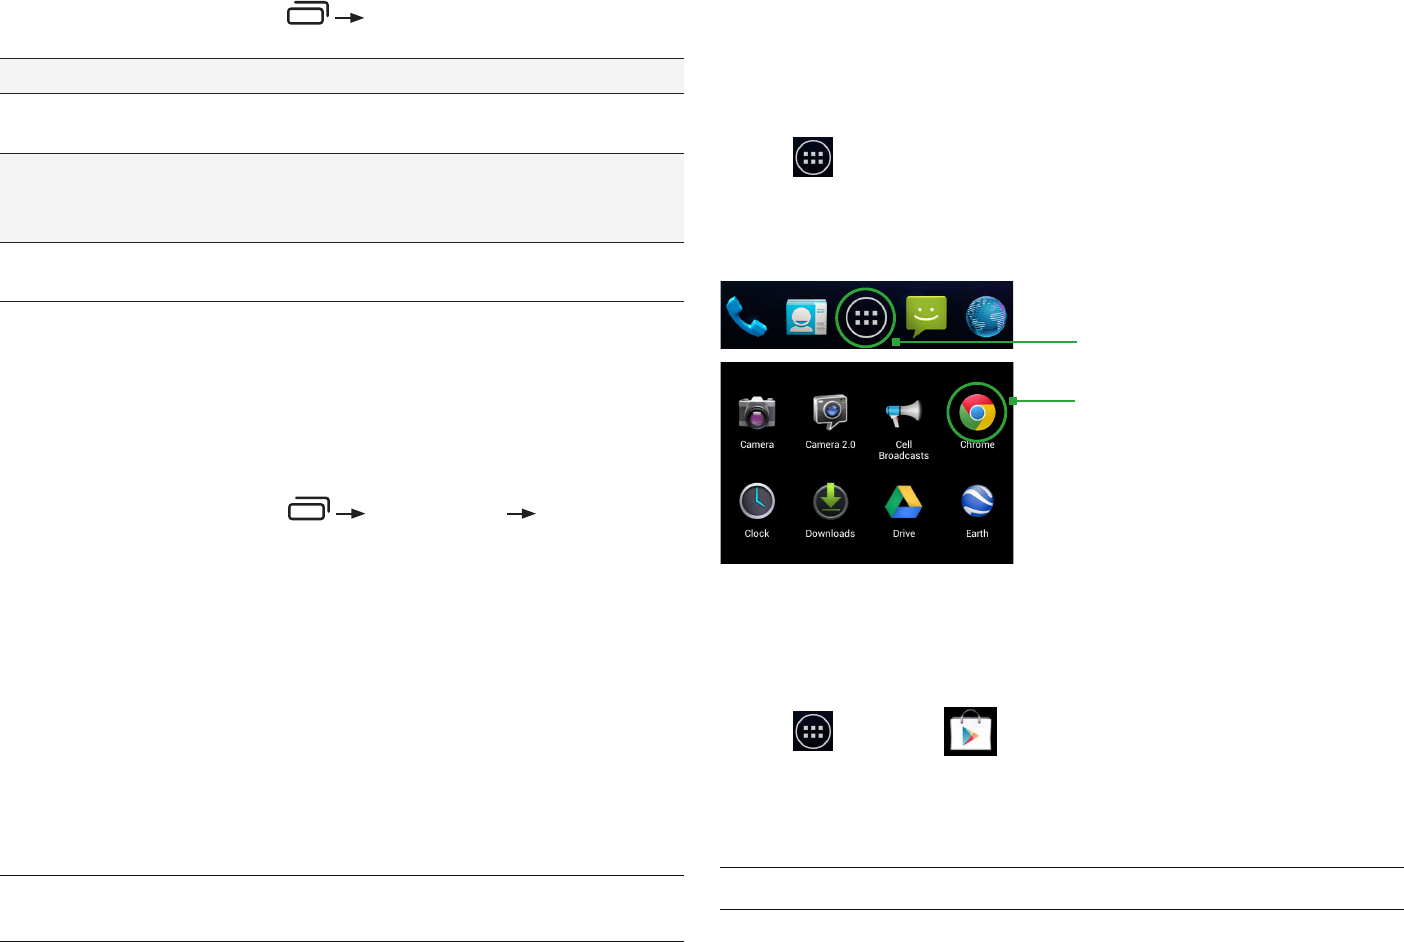
2.5 Using the App Launcher ............................................................12
2.6 Using the Play Store ..................................................................12
3 Making & Answering Calls ......................................................................... 13
3.1 Using the Phone Tab .................................................................13
3.1.1 Call Waiting ............................................................................................ 14
3.1.2 Call Forwarding ....................................................................................... 14
3.1.3 Working with Multiple Calls ...................................................................... 15
3.1.4 Voicemail ............................................................................................... 15
3.2 Answering & Rejecting Calls .......................................................16
3.3 Using the Call Log Tab ............................................................... 16
3.4 Using the Contacts Tab ..............................................................17
3.4.1 Contact Synchronization .......................................................................... 17
4 Sending & Receiving Messages .................................................................. 19
4.1 Sending messages .....................................................................19
4.2 Managing Messages ...................................................................20
4.3 Message Settings ......................................................................20
4.4 Additional Messaging Features ...................................................21
5 Taking Photos & Videos ............................................................................. 22
3.1 View Your Pictures & Video .........................................................23
6 Connections .............................................................................................. 24
6.1 Using Wi-Fi .............................................................................24
6.2 Wireless Bluetooth® Connection ..................................................24
6.2.1 Share Files via Wireless Bluetooth® Connection .......................................... 25
6.3 Transferring Files between your Phone & Computer ....................... 25
6.4 Connecting to Virtual Private Networks ........................................25
6.5 Sharing Your Phone’s Data Connection ........................................25
6.5.1 Share your Phone’s Data Connection via USB Tethering .............................. 25
6.5.2 Share your Phone’s Data Connection as a Wi-Fi Hotspot ............................. 26
6.6 Connecting to a Wireless Display (WiDi) ....................................... 26
6.7 Control Your Phone from a PC .....................................................26
7 Accounts ................................................................................................... 27
8 Changing Phone Settings ............................................................................ 28
8.1 Wireless & Networks ..................................................................28
8.2 Device ...................................................................................... 29
8.3 Personal ...................................................................................29
8.4 System ..................................................................................... 30
9 Safety, Regulatory & Legal ......................................................................... 31
PAGE : 3
1.1 YOUR PHONE
1 GETTING STARTED
Congratulations on your new phone purchase.
This guide will help you quickly come up to speed on the important features
of your phone.
Keep in mind your phone has:
• Fast Processor: Featuring the Intel® Atom™ processor that enables fast
web browsing, super-responsive apps, and effortless multi-tasking, so that
enjoying the things you love to do has never been easier.
• Intelligent Camera: Featuring an advanced 5MP HD camera that lets you
capture images quickly - up to 7 photos a second - so you’ll never miss the
best shot, even in challenging environments.
• Great Entertainment: Easily create and share true HD-quality video, and
with super-smooth playback, your phone becomes a personal theatre you
can take with you anywhere.
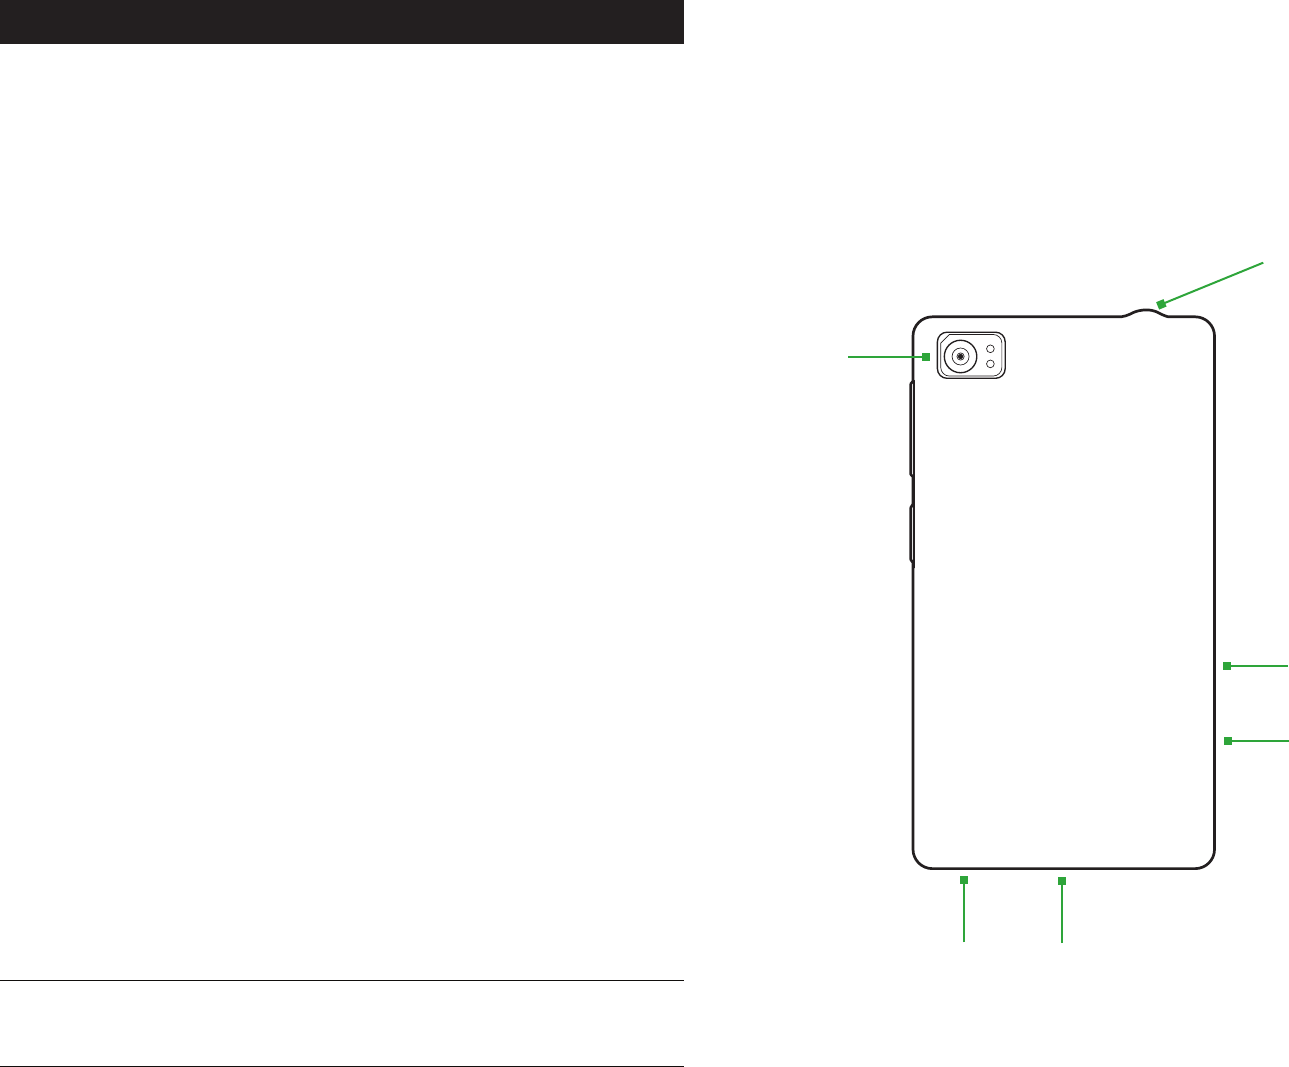
USB/Power Port
5.0MP
Rear-Facing
Camera
3.5mm
Audio Jack
Speaker
1.0 GETTING STARTED
NOTE: Screen images and icons are simulated for the purpose of this guide. Actual
displays may vary. Instructions in this guide may change depending on the software
version on your device.
HDMI Port
Micro-SIM
Card Tray
PAGE : 4
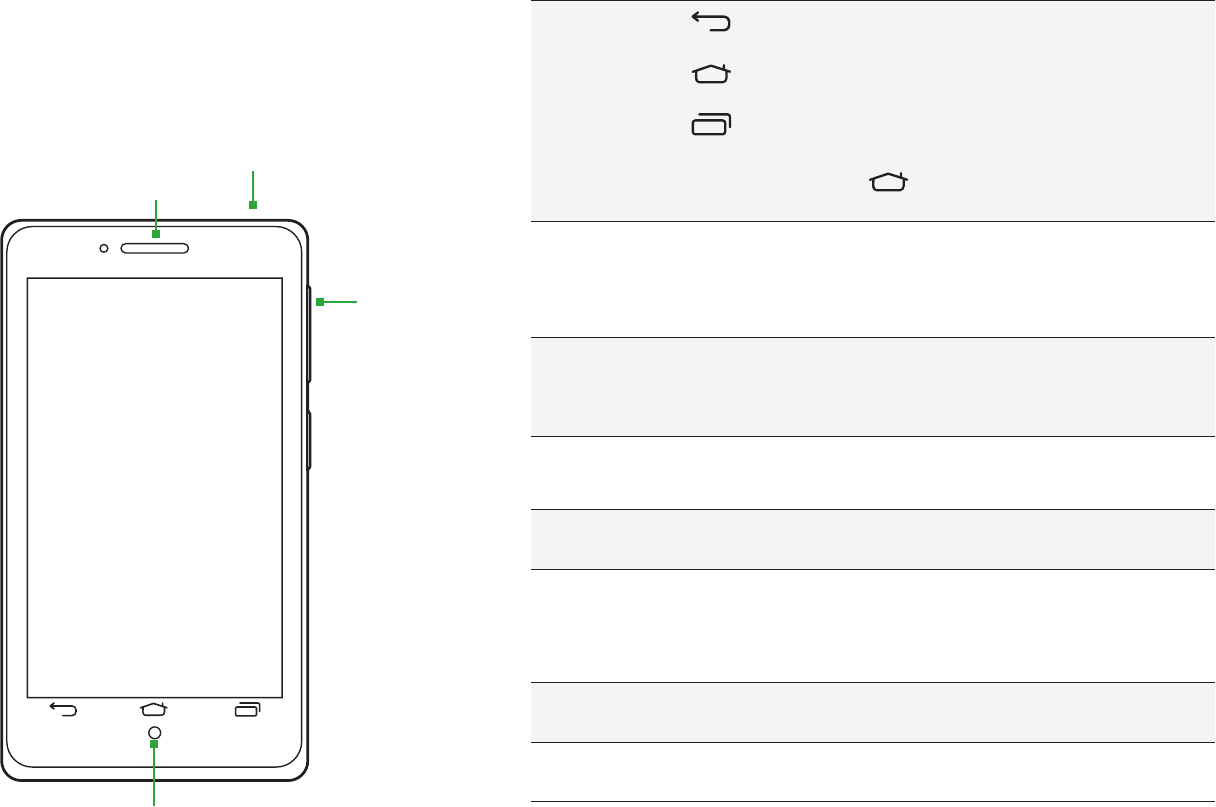
1.2 PHONE BUTTONS
Buttons Press to go back to the previous screen or to close a
menu or dialog box.
Press to return to the center panel of the Home
screen.
Press to display actions and settings specific to the
current screen.
TIP: Press and hold to display shortcuts to the most
recently used apps.
Power button Press and hold to turn your phone on. To turn the phone
off, press and hold then follow the instructions onscreen.
When your phone is on, press to wake your phone or put it
into sleep mode.
Volume Press on the top to increase the volume or on the bottom
to decrease the volume.
TIP: Press either top or bottom to silence an incoming call.
1.3 PHONE SLOTS, PORTS & JACKS
3.5 mm
audio jack
Plug in headphones or other audio device.
USB/Power port Connect USB cord to phone and power adapter to charge
the phone.
NOTE: You can plug the USB cord to phone and connect
to your PC.
Micro-SIM
card tray
Remove or replace micro-SIM card, using the provided
SIM eject tool to open the tray.
HDMI port Plug in HDMI cable and connect to TV or other electronics
to transmit HD images.
Earpiece
Power Button
Volume
1.0 GETTING STARTED
Microphone
PAGE : 5
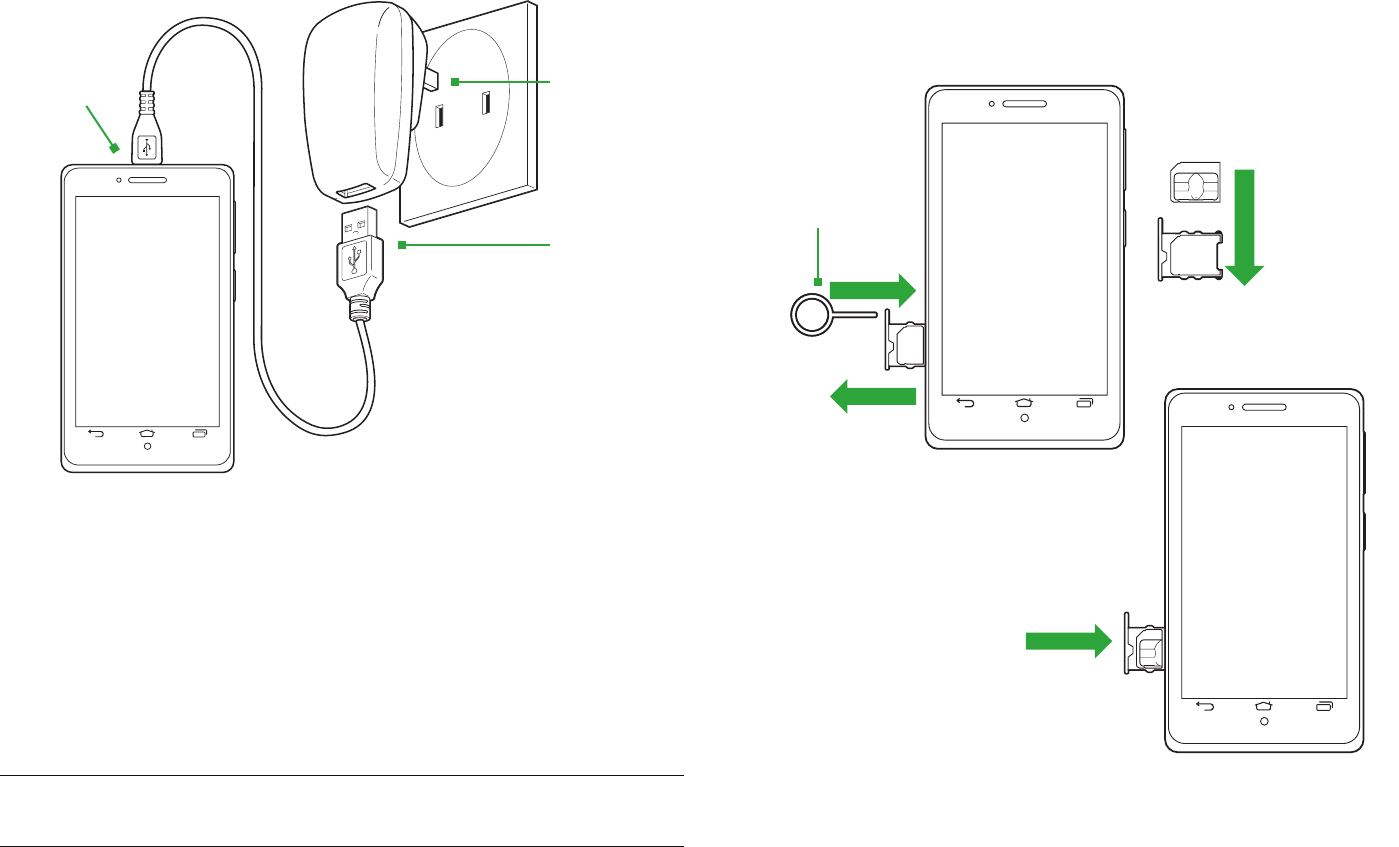
1.5 INSERT MICRO-SIM CARD
If your micro-SIM card is not already installed in your phone, follow these
procedures to insert a micro-SIM card.
To insert the micro-SIM card:
1. Open the micro-SIM card tray with the included SIM eject tool.
2. Insert the micro-SIM card into the tray, making sure that it matches the
illustration on the tray.
3. Push the tray back into the phone.
1.4 CHARGE THE BATTERY
Before using your phone for the first time, charge the phone for three hours.
To charge the battery:
1. Attach one end of the USB cord to the phone’s micro-USB port and the
other end to the plug.
2. Plug the phone into the wall.
1.4.1 BATTERY TIPS
For the best battery life, let your battery drain down until the battery very low
icon appears in the status bar (usually below 15% charge ) before recharging,
and do not leave your phone plugged in after it is fully charged.
To make your charge last as long as possible:
• Change the screen timeout rate and display brightness
(see Display Settings).
• Disable Wi-Fi when not in use (see Wireless & Networks Settings).
NOTE: For optimal charging, please use the USB cable and charger provided
with the phone.
1.0 GETTING STARTED
Connect this
end to phone’s
USB port. Plug into wall.
Connect this
end to plug.
2. Insert Micro-SIM card
into tray.
1. Insert SIM eject tool
into hole to open tray.
3. Push tray back
into phone.
SIM eject tool
PAGE : 6
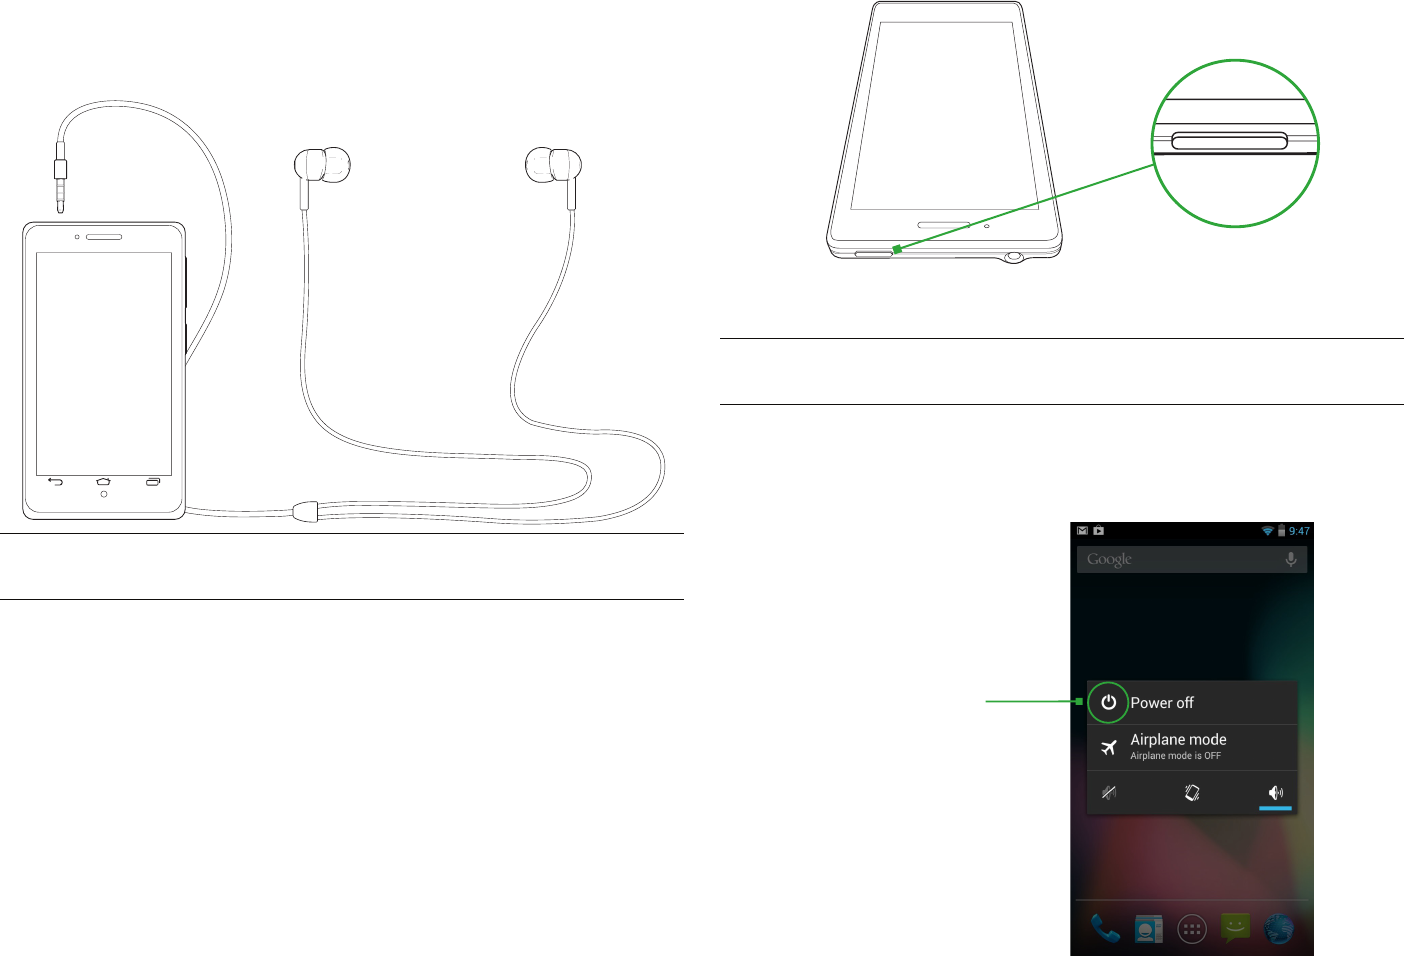
1.6 USING THE HEADSET
You can use your headset to listen to music or make phone calls.
To use the headset:
1. Plug the headset into the audio jack on your phone.
2. Place the earbuds in your ears and position the microphone so that it picks
up your voice (if you are making a call).
TIP: Use the button near the right earbud to mute and unmute the
microphone.
1.7 TURN ON THE PHONE
To turn on the phone:
• Hold down the power button to turn the phone on.
Hold down the power button to turn the phone on.
TIP: One press puts your phone into Sleep mode. Pressing and holding allows
you to choose Restart, Airplane mode, Silent mode, or Vibrate.
To turn the phone off:
• Hold down the power button and touch Power Off.
1.0 GETTING STARTED
Hold down the power button,
then touch Power off to turn
the phone off.
RL

PAGE : 7
1.9 TOUCHSCREEN
Use your fingers on the touchscreen to perform actions, open objects, slide
the screen, and more.
Below are the different ways of interacting with your touchscreen.
• Drag: Touch and hold an object then drag the object to a new location. For
example, drag any icon on the Home screen to a new location.
• Double-tap: Quickly touch the screen twice to zoom in when using the
Gallery or on zoomed-out Browser pages. For example, double-touch a news
site to zoom in on the text.
• Pinch: When using Gallery or zoomed-out Browser pages, place two fingers
on the screen at once, then move your fingers together to zoom out or move
them apart to zoom in. For example, pinch your fingers apart to zoom out of
a news site in the Browser.
• Slide: Quickly move your finger from one edge of the screen to the opposite
edge to scroll the display up, down, left or right. For example, quickly move
your finger from the left side of the Home screen to the right to scroll the
Home screen to a different panel.
• Touch: Touch an object on the screen to select or open it. For example,
touch on the Home screen to open the Phone app.
• Touch and hold: Touch an object on the screen and continue to hold it to
reveal other options. For example, touch and hold an empty spot on the
Home screen to reveal options for adding items to the screen.
1.10 TIPS ON USING THE TOUCHSCREEN
• Do not use sharp tools, such as pens or a stylus, on the touchscreen—these
might scratch the screen.
• Do not allow the touchscreen to come in contact with other electrical
devices. Electrostatic discharges can cause the touchscreen to malfunction.
• Do not allow the touchscreen to get wet. The touchscreen may malfunction
in humidity or when exposed to water.
• For the best performance, remove the screen protection film before using
the device and tap the screen with your fingertip.
1.8 SLEEP & WAKE
When your phone is on, you can put the phone in sleep mode and lock your
phone. Your phone will go into sleep mode if left idle, to save battery life.
You can wake and unlock your phone when you’re ready to use it.
To put the phone in sleep mode:
• Briefly press the power button.
Your phone goes into sleep mode, without disrupting any running
application, download, or phone call.
NOTE: If you press the power button for too long, you will see the power off
menu.
To wake the phone:
1. Press the Power button.
2. Place your finger on and slide it all the way to the right.
3. Your phone’s screen will resume display.
NOTE: If your phone is secured, you must enter your password, pin, or pattern
to wake it. See Securing Your Phone for more details.
TIP: You can go directly to the Camera app by sliding the lock to on the
left after waking your phone.
When the phone is
in sleep mode and
you want to wake the
phone, press the power
button and then drag
the lock to the right.
1.0 GETTING STARTED
PAGE : 8
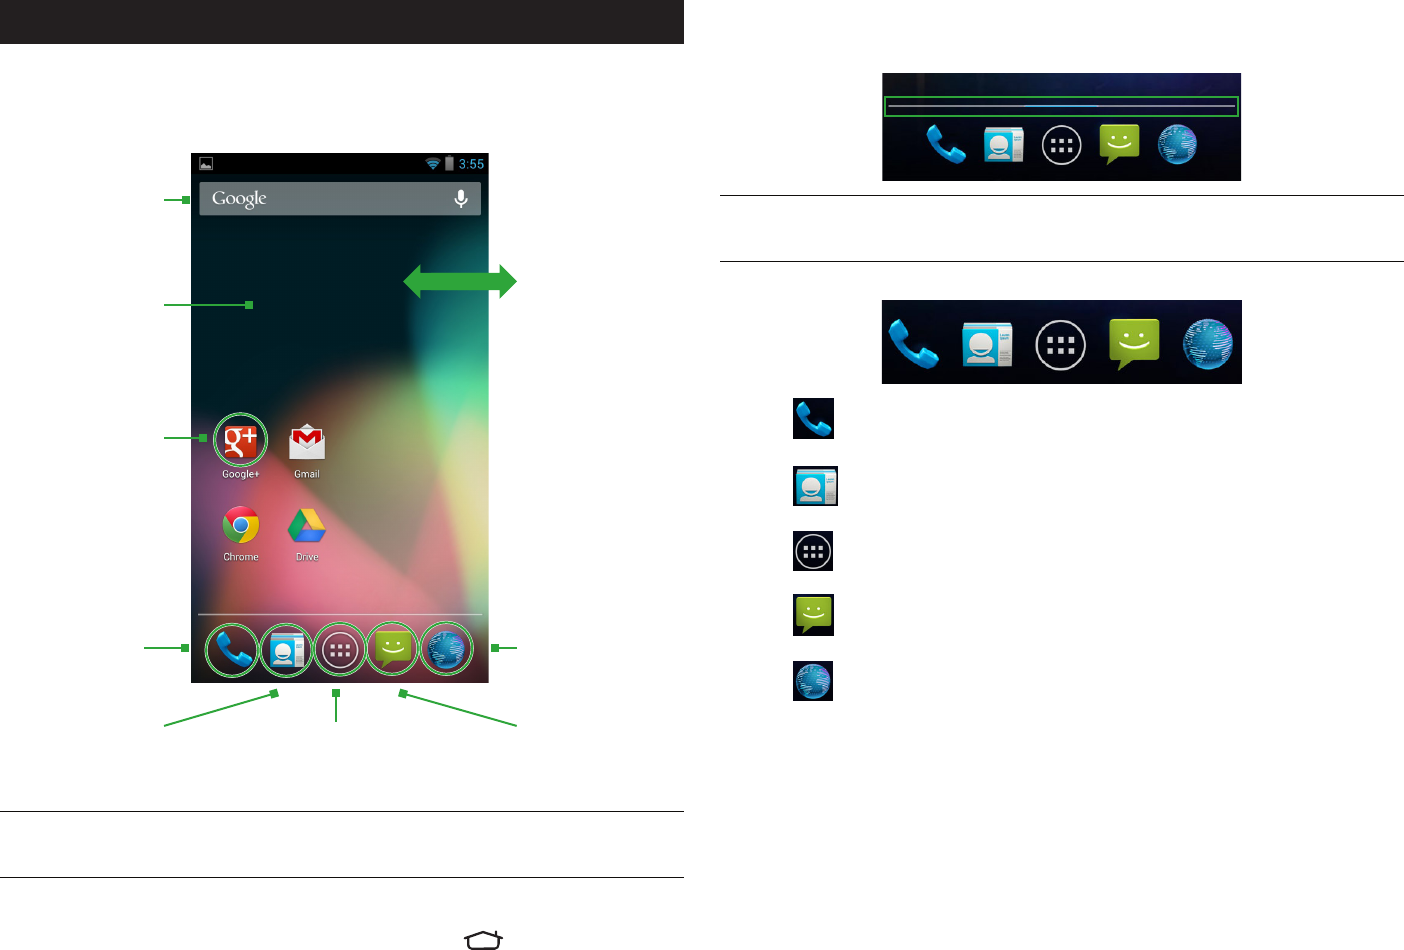
2 HOME SCREEN & BASIC FEATURES
The Home screen is a gateway to all of your phone’s applications and
features, and displays whenever you turn on your phone.
TIP: To move an icon, touch and hold the icon, then drag it to a
new location.
To open the Home screen:
• Open the Home screen at any time by pressing the button.
The Home screen is split into five panels, with the center panel displayed
when the Home screen opens.
2.0 HOME SCREEN & BASIC FEATURES
To scroll the Home screen:
• Slide the screen to the left or right.
TIP: The bar at the bottom of the screen indicates which one of the five
panels is displayed.
To quickly access your phone’s main functions:
• Touch to make a call. For more information on calling, see Making and
Answering Calls.
• Touch to see your contacts. For more information on contacts, see
Make and Answer Calls.
• Touch to choose an app from the App Launcher. For more information
on apps and the App Launcher, see Manage Applications.
• Touch to send a message. For more information on Messaging, see
Send and Receive Messages.
• Touch to browse the web. For more information on the Browser app,
see Browse the Web.
Touch to view all
apps.
Touch to make
a call.
Touch to browse
the web.
Swipe left or
right to see more
panels.
Touch Google to
search the web via
text input tray.
Touch and hold
to change the
wallpaper.
Touch an app to
open it.
Touch to send a
text message.
Touch to view
contacts.
PAGE : 9
2.0 HOME SCREEN & BASIC FEATURES
TIP: Rearrange items on your screen by touching and holding them and then
dragging them to a new location. You can also delete them by touching and
holding and then dragging them to the trash.
You can perform the following actions with folders.
To open a folder Touch the folder. To make a new folder, stack
apps on top of each other in the home screen.
To add items to a folder Drag an item on your Home screen into the
folder.
NOTE: You cannot put shortcuts in a
contact folder.
To remove items from a
folder
Touch and hold an item in the folder,
then release it on the Home screen or on
the trash icon.
To rename a folder Open a folder, then touch and hold the title bar
and enter a new folder name.
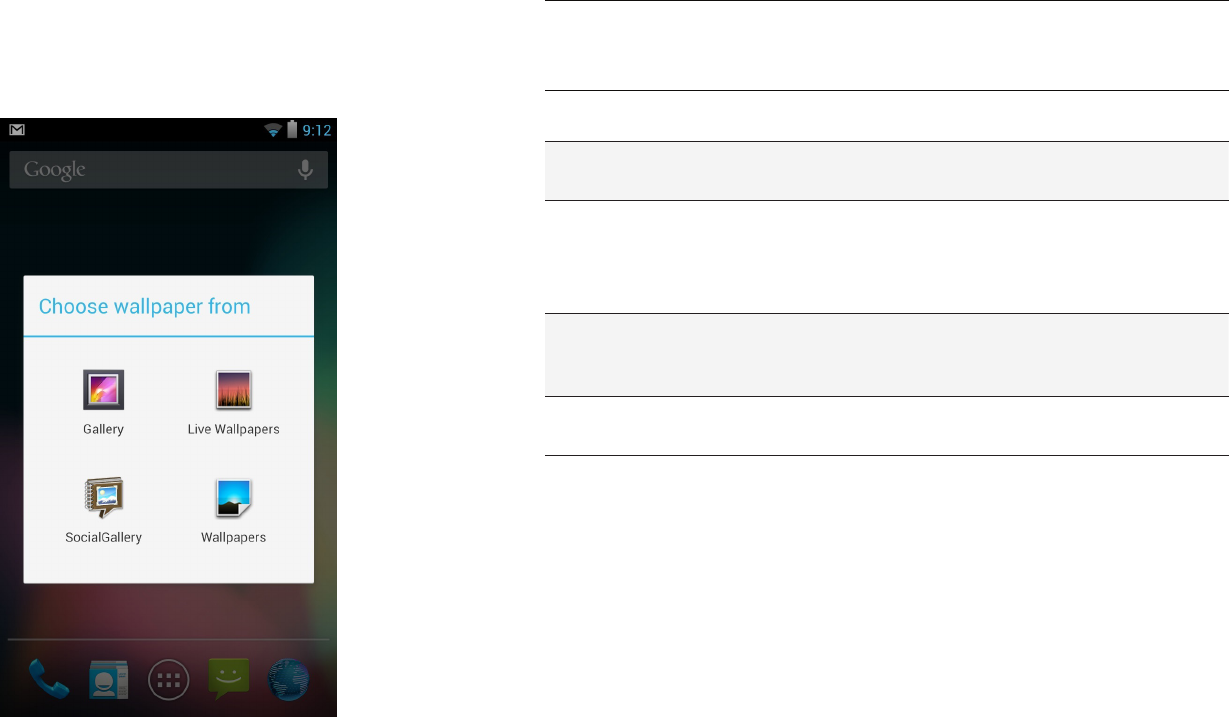
2.1 CUSTOMIZING YOUR HOME SCREEN
You can easily customize your Home screen by changing the background
picture (or wallpaper).
To customize your Home screen:
• Touch and hold an empty space on the Home screen, then touch the type of
item you want to add and follow the prompts.
The following types of items are available:
• Gallery allows you to choose photos on your phone to set as the background
image for your screen.
• Social Gallery also allows you to choose photos on your phone.
• Live Wallpapers are animated background images for your screen.
• Wallpapers are static background images for your screen.
PAGE : 10
2.0 HOME SCREEN & BASIC FEATURES
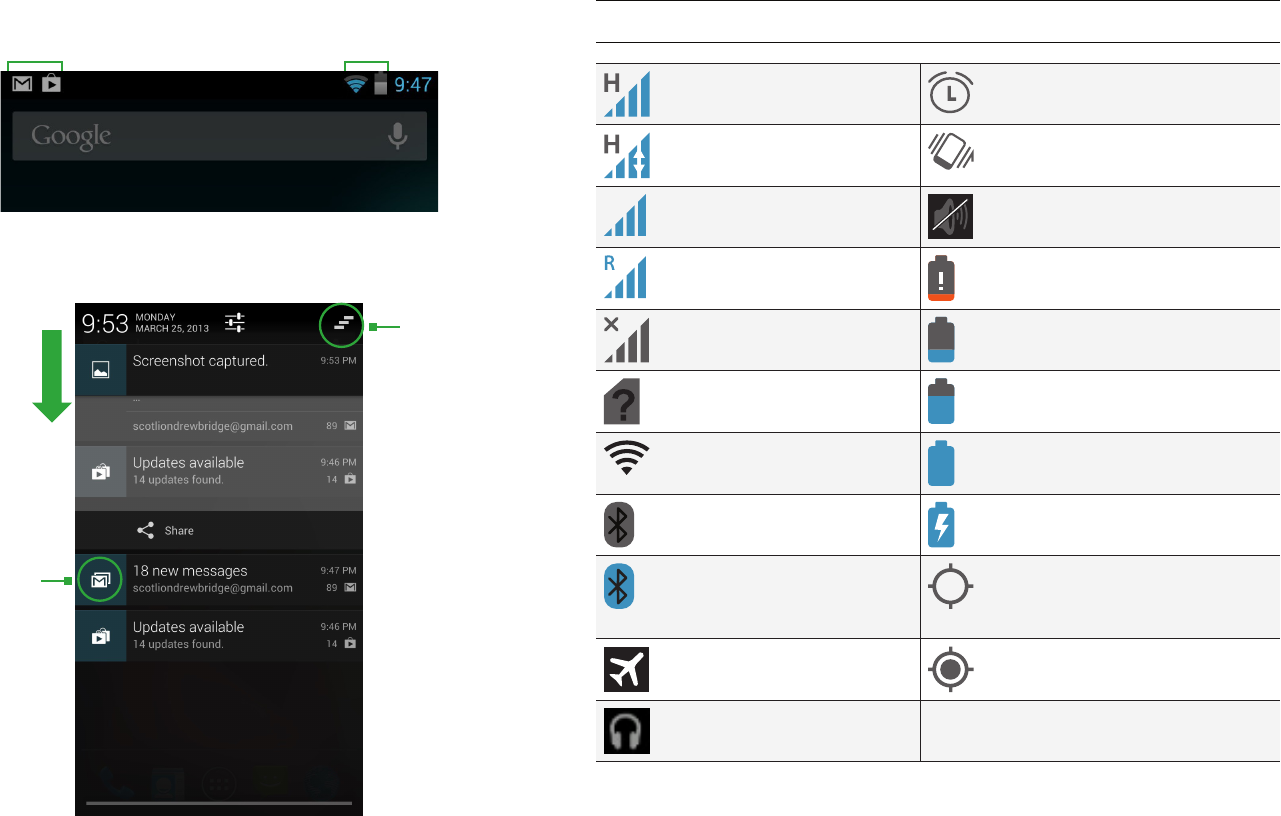
2.2.1 STATUS ICONS
Below are the status and notification icons you can expect to see.
NOTE: Installed apps may use their own unique notification icons.
Connected to mobile
network Alarm set
Mobile network in use Vibrate mode
Mobile network strength Ringer silenced
Roaming Battery very low
No signal Battery low
No SIM card installed Battery partially drained
Connected to Wi-Fi network Battery full
Bluetooth wireless
technology on Battery charging
Connected to wireless
product featuring
Bluetooth technology
GPS on
Airplane mode Receiving location data from
GPS
Headset plugged in
2.2 STATUS & NOTIFICATION ICONS
The status bar at the top of the screen displays important information about
your phone.
To open the notifications panel:
• Drag the status bar to the bottom of the screen.
To respond to a notification:
• Touch a notification in the panel to open its application. For example,
touching a new email notification opens the Email app’s inbox.
To close the notifications panel:
• Drag the status bar back to the top of the screen.
Touch a
notification to
respond.
Touch to clear
notifications.
Drag down
to display
notifications.
Notification icons Status icons
PAGE : 11
2.0 HOME SCREEN & BASIC FEATURES
2.3 SEARCH
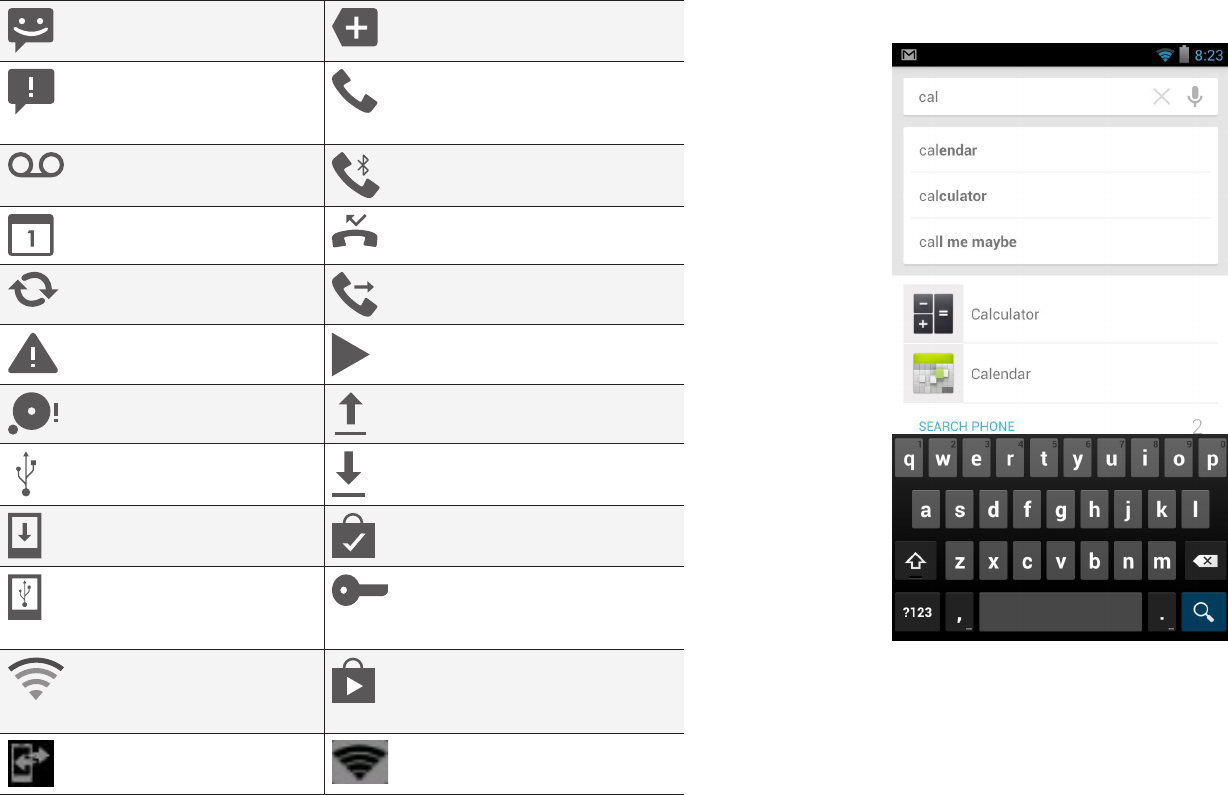
Search on your phone and on the web with the built-in Search function.
To run a search:
1. Touch the Google search box at the top of the Home screen.
2. Type a search term. As you type, Search displays matching results.
3. Touch a matching result to open it.
2.2.2 NOTIFICATION ICONS
New text or
multimedia message
More notifications
Problem with text
or multimedia
message delivery
Call in progress
New voicemail Call in progress using a
Bluetooth headset
Upcoming event Missed call
Data syncing Call forwarding on
Problem with sign-in or
sync
Song playing
USB storage full Uploading data
Phone connected via
USB cable
Downloading data
System update available Download finished
Phone sharing its
data connection via
USB tethering
Connected to or disconnected
from virtual private network
(VPN)
Phone sharing its data
connection as a Wi-Fi
hotspot
Application update available
Connected to Wireless
Display (WiDi)
Wi-Fi direct on
PAGE : 12
2.0 HOME SCREEN & BASIC FEATURES
2.5 USING THE APP LAUNCHER
Apps are small programs that add features to your phone. Many apps come
preinstalled, and additional apps can be purchased in the Play Store.
Widgets are apps that run directly on your Home screen, such as a music
player, newspaper, or clock.
You can use the App launcher to easily access all of your installed apps.
To use the app launcher:
• Touch , then touch an app to open it.
To add an app shortcut to the Home screen:
• Touch and hold an app. Once the Home screen displays, drop the app
onto an empty spot on the Home screen.
2.6 USING THE PLAY STORE
Almost any app you can imagine is available for purchase (and often for free)
in the Play Store.
To use the Play Store:
• Touch , then touch .
Search or browse for apps. You will be able to confirm that you want to
purchase an app and see the permissions it requires before installing it on
your phone.
TIP: Google™ Play Store can be used only when Google account is activated.
2.3.1 SEARCH SETTINGS
You can change the default Search settings.
To change Search settings:
• From the Search screen, press Settings.
Google Now Toggle Google Now On or Off.
Voice Display options for setting language, SafeSearch, and
blocking offensive words.
Phone Search Select which applications to search by default.
NOTE: Only the selected applications will display and be
searched within the Search application.
Privacy and
accounts
Set your location and manage your Google search history.
2.4 SECURING YOUR PHONE
You can configure your phone to require a password, PIN, or pattern in order
to turn it on or wake it up. Securing your phone can help keep its contents
private.
To secure your phone:
1. From the Home screen, press System settings Security.
2. Touch Screen lock to change the current security lock.
3. Select one of the following settings:
• None disables screen locking.
• Slide lets you drag an icon across the screen to unlock your phone.
• Face Unlock lets you use facial recognition to unlock your phone.
• Pattern lets you draw a custom pattern to unlock your phone.
• PIN lets you use a 4- to 16-digit number combination to unlock
your phone.
• Password lets you use a 4- to 16-character password to unlock your
phone. (Password must contain at least one letter.)
NOTE: Once you have selected a lock for your phone, you will need to enter
this lock each time you turn on or wake up your phone.
2. Touch an app to open it.
1. Touch to open the App tray.
PAGE : 13
3.0 MAKING & ANSWERING CALLS
The following actions are available while you are on a call:
To hold a call Touch to hold or resume the current call.
To mute a call Touch to mute or unmute the call.
To use speakerphone Touch to turn speakerphone on or off.
Warning! To avoid damage to your hearing, do not
hold the phone against your ear when speakerphone
is turned on.
To use a Bluetooth
headset
Touch to automatically transfer your calls
to a connected Bluetooth headset. See Wireless
Bluetooth Connection for more information.
To end a call Touch .
3 MAKING & ANSWERING CALLS
The Phone app allows you to make calls and easily store and find
your contacts.
You can move between the phone dialer, call history, contacts, and
favorites by touching the tabs at the top of the Phone app.
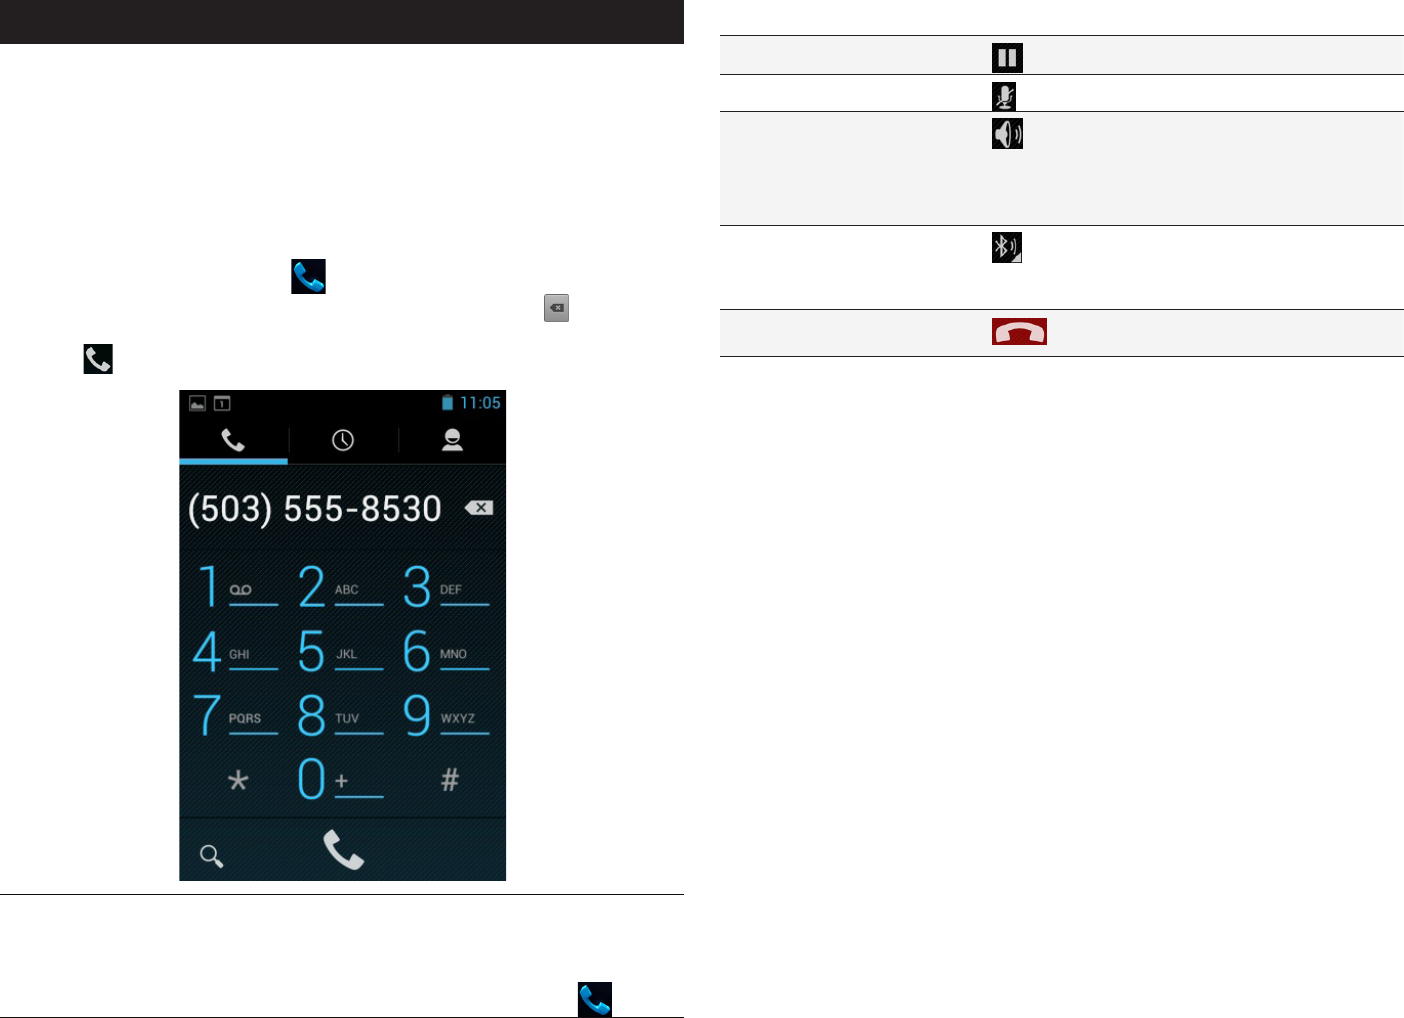
3.1 USING THE PHONE TAB
To make a call:
1. From the Home screen, touch .
2. Touch the numbers on the dial pad to dial a number, using to make
corrections.
3. Touch to dial the number.
NOTE: For international calls, first touch and hold 0 to enter + and then dial
the number.
NOTE: You can switch to any application without ending the call. Return to
the phone screen by expanding the notifications bar and touching .

PAGE : 14
3.0 MAKING & ANSWERING CALLS
3.1.2 CALL FORWARDING
You can set the forwarding behavior of your phone when receiving calls.
To set up incoming call forwarding:
1. From the Phone app, press Settings Call forwarding settings.
2. Touch Always forward to enable or disable.
3. Touch the following options to input a phone number to which each type of
call will be forwarded:
• Always forward
• Forward when busy
• Forward when unanswered
• Forward when unreachable
NOTE: Once set, Call Forward conditional is active will appear on-screen.
3.1.1 CALL WAITING
The Call Waiting feature will notifiy you if the person you are calling is already
on another call.
Outgoing call waiting:
When you call someone who has Call Waiting activated on their phone,
and that person is already on the line in another call, you will see a “Call
waiting...” notification on the screen.
PAGE : 15
3.0 MAKING & ANSWERING CALLS
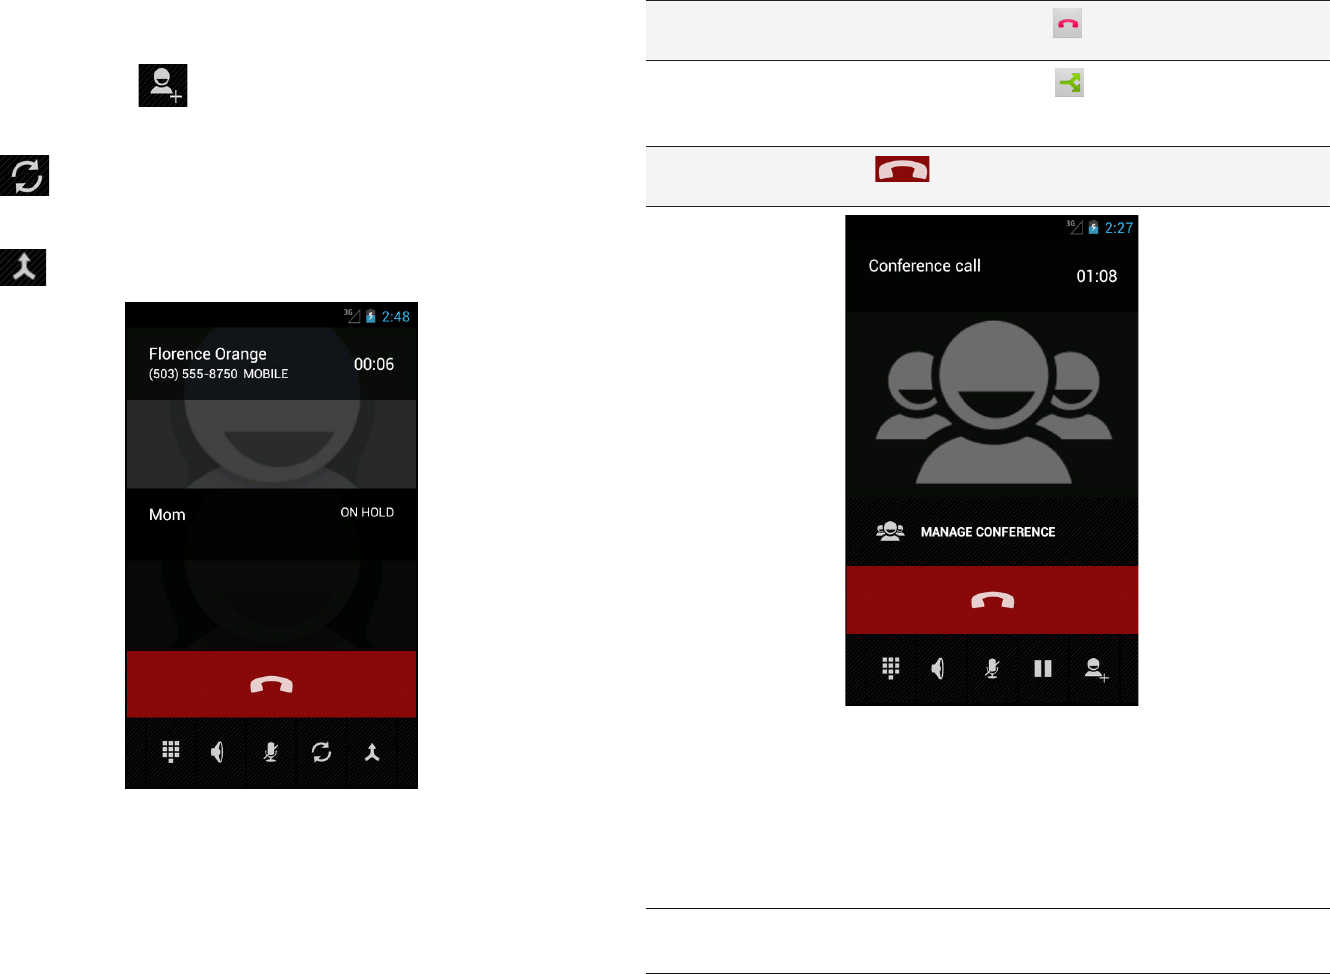
The following options are available when on a conference call:
To drop a
participant
Touch Manage, then touch .
To talk privately
to a participant
Touch Manage, then touch . When you are done
talking privately, touch Merge Calls to add the participant
back to the conference call.
To end the call Touch to end the conference call and disconnect
all callers.
3.1.4 VOICEMAIL
When you receive voicemail, the message notification icon appears in the
notifications panel.
To check voicemail:
• Within the Phone app, press and hold the 1 key. (May vary by carrier.)
TIP: You can also open the notifications panel and touch the
message notification.
3.1.3 WORKING WITH MULTIPLE CALLS
You can make another call while on a call.
To add a call:
• While on a call, touch and dial another number.
To move between calls:
• Touch to move between calls.
• To merge calls into a conference call:
• Touch to join two or more calls together into a single conference call.
PAGE : 16
3.0 MAKING & ANSWERING CALLS
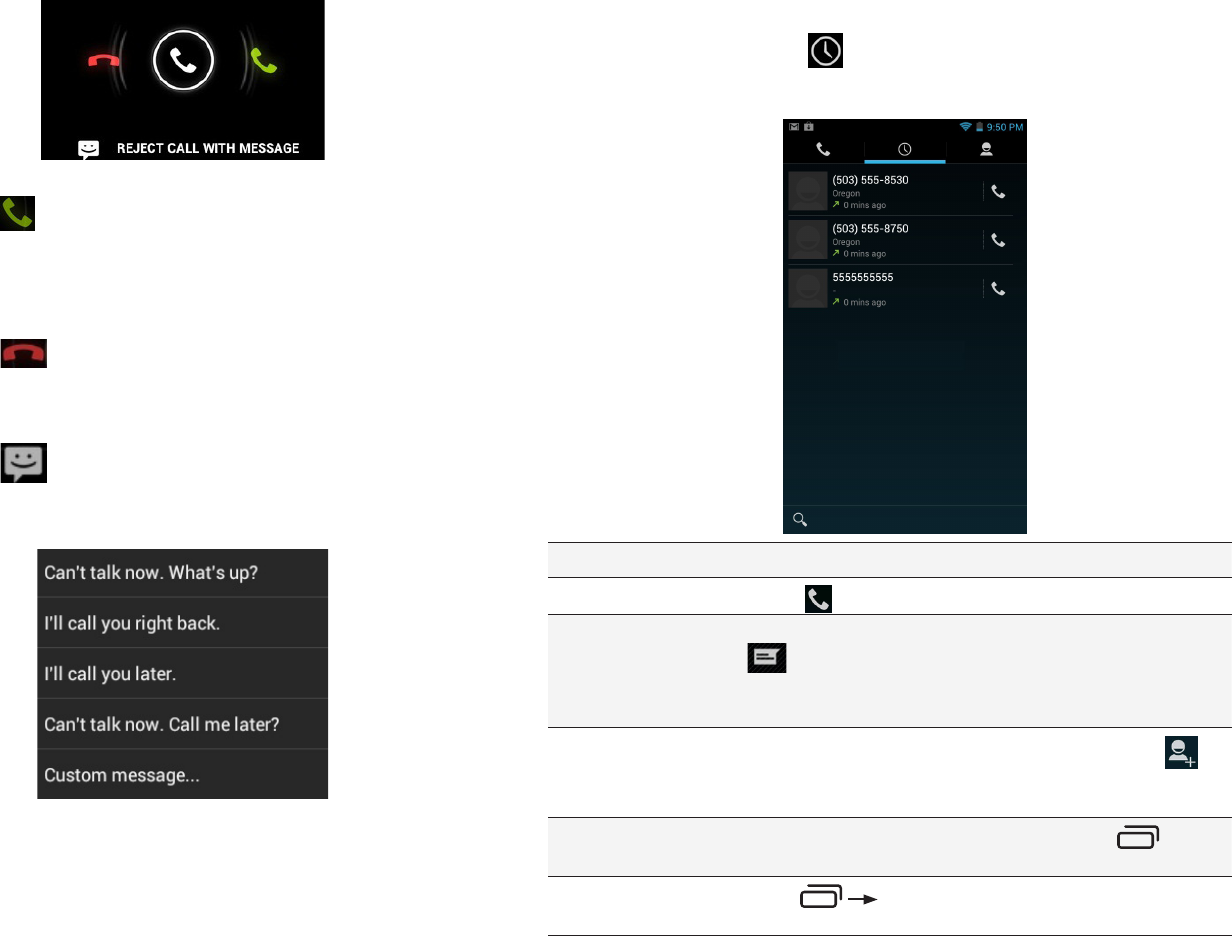
3.3 USING THE CALL LOG TAB
The call log lists calls you have made, missed, and received. You can also call
entries, send messages, and add caller information to contacts.
To use the call log:
• From the Phone app, touch .
The following options are available from the call log.
To see more details Touch an entry.
To call the entry Touch .
To send a text
message
Touch the entry to see more details, then touch
.
For more information on messaging, see Sending &
Receiving Messages.
To add to contacts Touch the entry to see more details, then touch .
For more information on adding contacts, see Using
the Contacts Tab.
To remove an entry
from the call log
Touch the entry to see more details, press , then
touch Remove from call log.
To remove all entries
from the call log
Press Clear Call Log.
3.2 ANSWERING & REJECTING CALLS
When receiving a call, you will see the following at the bottom of the screen:
To accept a call:
• Drag the circle to .
If you are already in a call, that call will be placed on hold while you answer
the new call.
To reject a call:
• Drag the circle to .
The rejected call will automatically be directed to your voicemail.
To reject a call with a text message:
• Drag the circle to .
The call will be rejected, and the caller will recieve the automated text
message reply of your choice:
PAGE : 17
3.0 MAKING & ANSWERING CALLS
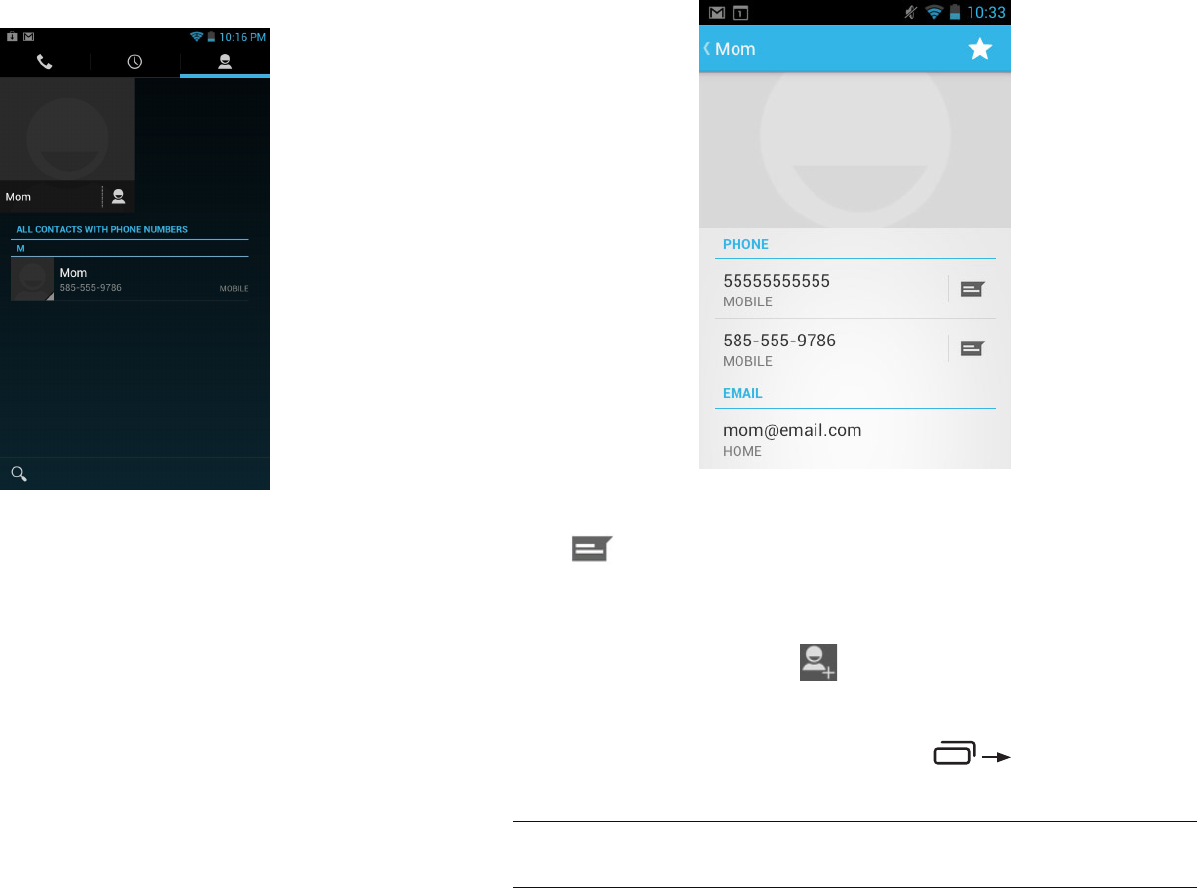
To communicate with contacts:
• Touch the contact, then touch one of the following icons:
Touch the phone number to call a contact.
Touch to send a text message.
Touch the email address to send an email.
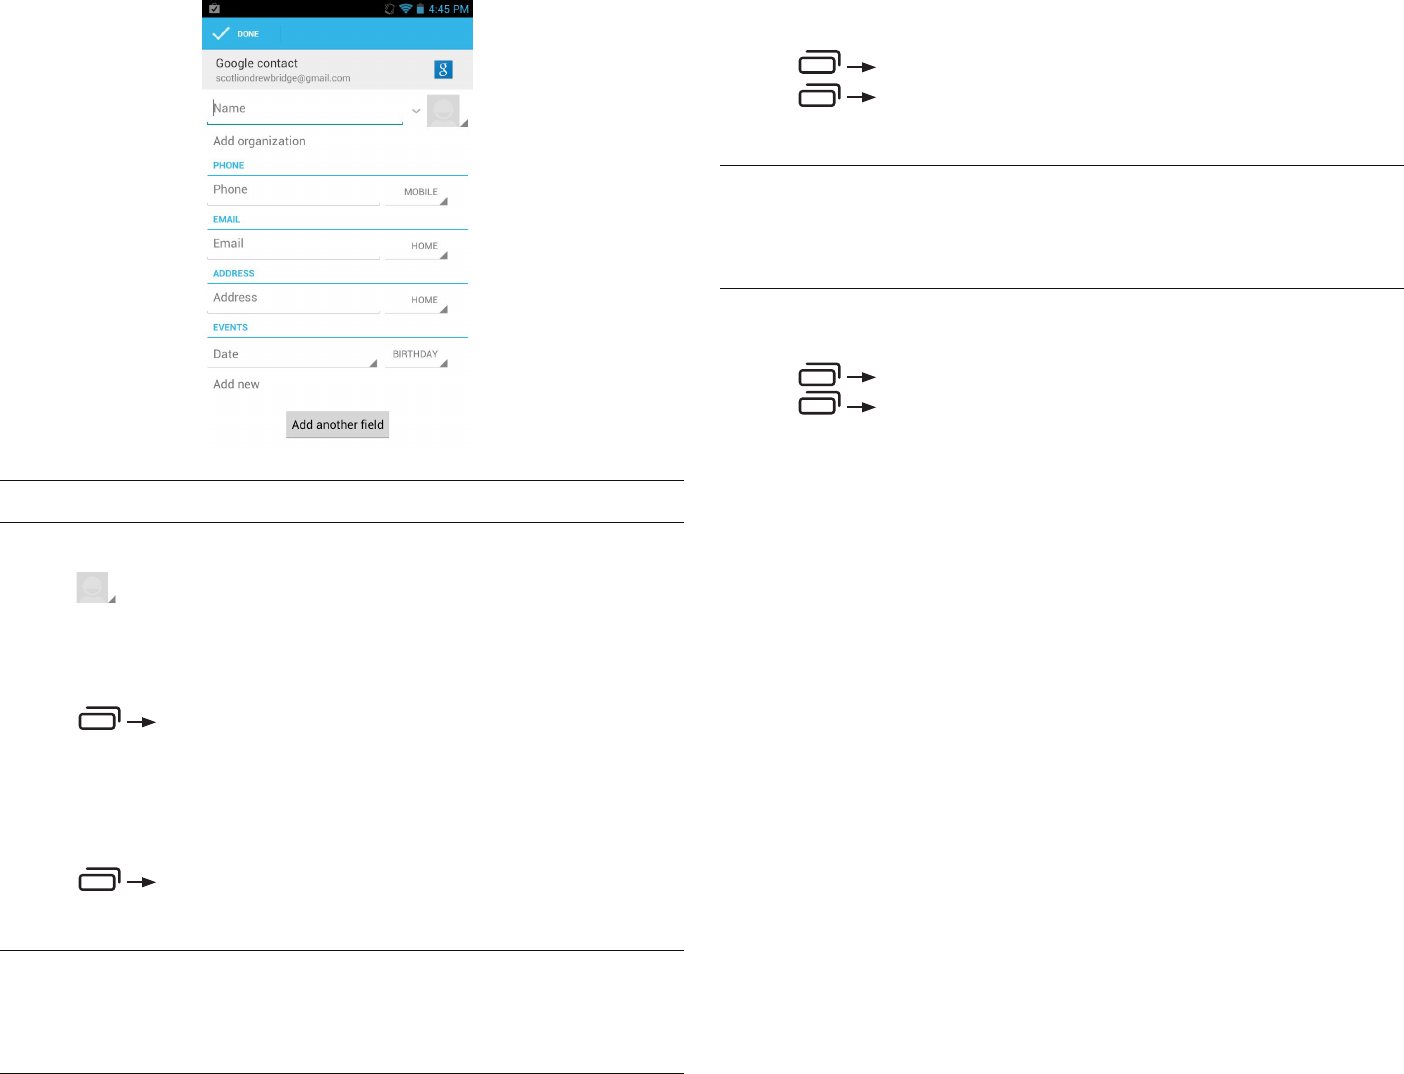
To add a contact:
1. From the Contacts tab, touch .
2. Enter contact information, filling in as many or as few of the fields
as desired.
3. Touch Done to create a new contact, or press Discard to discard
the new contact without saving.
NOTE: If you have multiple accounts, select the account to which you want to
add the new contact.
3.4 USING THE CONTACTS TAB
The Contacts tab displays the contacts from your accounts along with any
contacts you have added.
3.4.1 CONTACT SYNCHRONIZATION
By default, contacts in your accounts and on your phone will be synchronized,
so that any changes to the contacts on your phone will be matched in your
accounts, and vice versa. See Accounts for more information.
Depending on your account settings, information you add or remove from your
phone will be synchronized with your external accounts. See Accounts for
more information.
To find a contact:
1. From the Phone app, touch the Contacts tab.
2. Scroll up and down to view all contacts.
3. Touch a name to call that contact.
PAGE : 18
3.0 MAKING & ANSWERING CALLS
To join contacts:
1. From the Home screen, touch the Contacts icon and then touch a contact.
Press Edit.
2. Press Join.
3. Touch a contact to join with.
TIP: The name and picture of the contact you select first will be used for the
resulting joined contact.
NOTE: Contacts with the same name from two different accounts are
automatically joined.
To separate contacts:
1. From the Home screen, touch the Contacts icon and then touch a contact.
Press Edit.
2. Press Separate.
TIP: Use the following controls to add information about the contact:
• Touch the arrow at the end of the name field to view more name fields.
• Touch and follow the prompts to choose or take a photo for your
contact’s icon.
To edit a contact:
1. From the homescreen, touch the Contacts icon and then touch a contact.
Press Edit.
2. Modify the contact information, as described above.
3. Touch Done.
To delete a contact:
1. From the homescreen, touch the Contacts icon and then touch a contact.
Press Delete.
2. Touch OK to confirm.
TIP: Log into your Google account to manage your contacts online. Add, edit,
or remove contacts, and they will automatically sync to your phone.
NOTE: Read-only contact information—such as that from an external app—
will only be hidden, not deleted.
PAGE : 19
4.1 SENDING MESSAGES
To send a message:
1. From the Message app, touch .
2. Enter a recipient in the To field or touch .
Matching numbers and contacts appear as you type.
3. Touch a matching contact or number to select it or enter a new number to
message a new contact.
4. Touch the Type message field and enter a message.
5. Touch to send your message.
TIP: You can add smileys, subject headings, and more. See Message Options
below for more information.
TIP: You can send messages to groups.
4.0 SENDING & RECEIVING MESSAGES
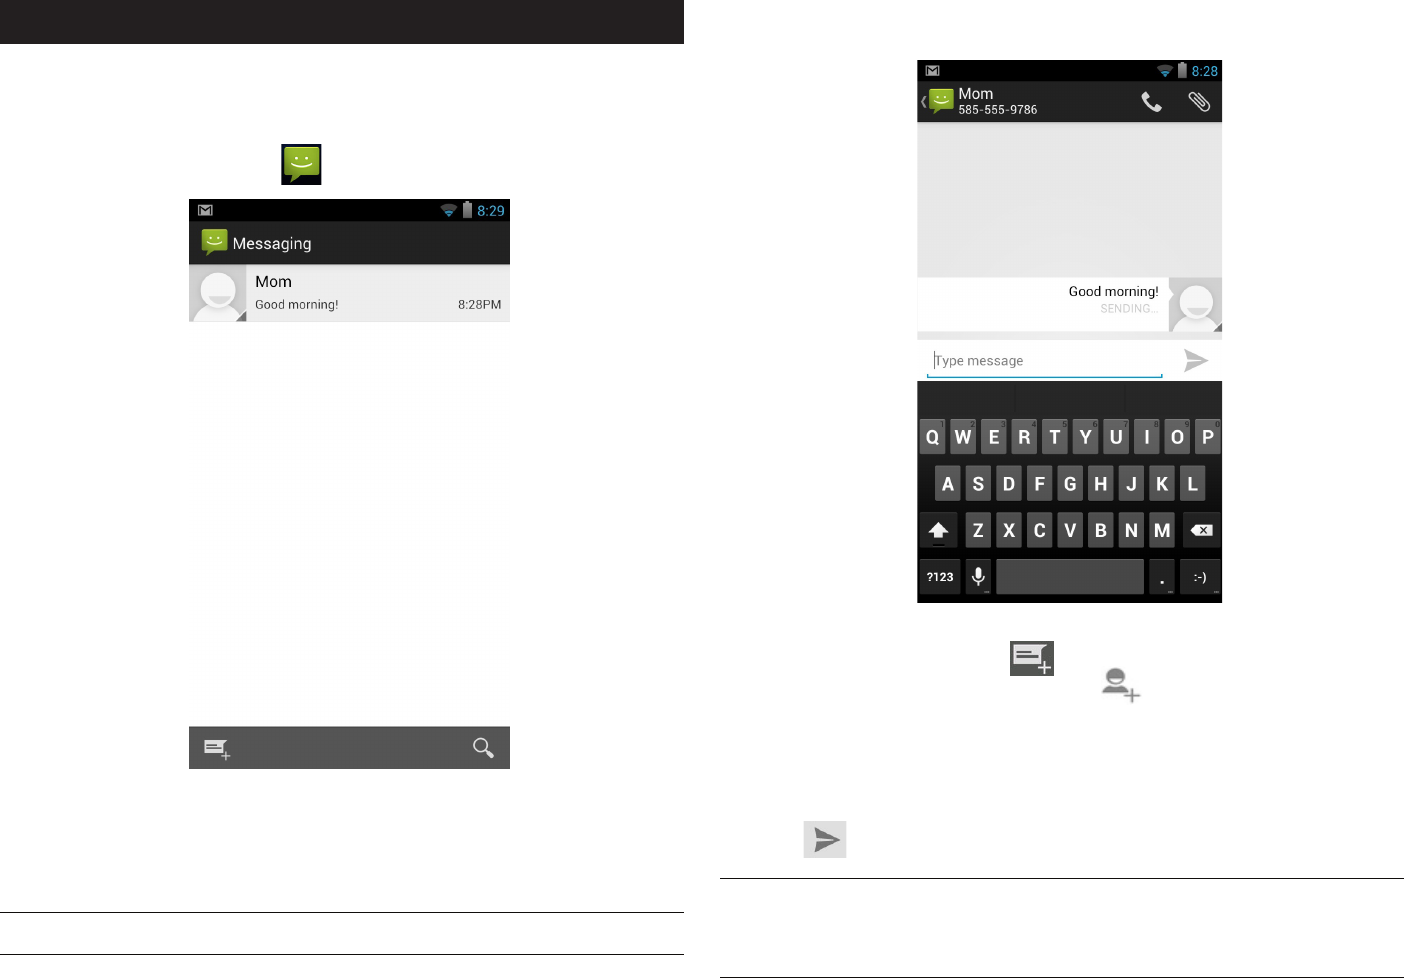
4 SENDING & RECEIVING MESSAGES
The Message app allows you to send and receive text and multimedia
messaging threads (groups of sent and received messages).
To open the messaging app:
• From the Home screen, touch .
To view a message:
• Within the Message app, touch a messaging thread.
The messages inside the thread will be displayed, with the newest message
at the top of the screen.
TIP: Threads with new messages are displayed in bold.
To view a multimedia attachment:
• If the message has a multimedia attachment, touch the attachment to
view it.
PAGE : 20
4.0 SENDING & RECEIVING MESSAGES
To attach multimedia to a message:
1. Press Attach.
2. Select the desired type of attachment (for example, a music file or a
captured picture), then follow the prompts to send the message.
MESSAGE OPTIONS
The following actions are available while composing a message:
Save message as a draft Press .
ALTERNATE: Exiting the Message app will also
save any draft messages.
Resume working on a draft Touch the message thread you were composing
and resume entering your message.
Discard a draft Clear the message text.
Enter a smiley Press Insert Smiley and touch the
smiley you want to insert.
ALTERNATE: Touch and hold :-) on the onscreen
keyboard and select a smiley.
ALTERNATE: Enter the characters that make up
the smiley.
Add a subject heading to
your message
Press Add subject and enter the
subject heading.
4.2 MANAGING MESSAGES
To delete a messaging thread:
• Open the messaging window, touch and hold a messaging thread,
then touch .
To forward a message:
1. Open the messaging window and touch a messaging thread.
2. Press Forward.
3. Enter a recipient and then touch Send to forward the message.
To delete all messaging threads:
1. Open the messaging window, then touch and hold a messaging thread.
2. Touch all other messaging threads to select them.
3. Touch .
4.3 MESSAGE SETTINGS
To specify message settings:
• From the main Messaging window, press Settings.
The following settings are available:
TEXT (SMS) MESSAGES
Delivery reports Request a delivery report whenever you send a
text message.
Manage SIM card
messages
Open a window where you can work with
messages stored on a SIM card.
NOTE: This option can be useful for retrieving
messages from a previous phone’s SIM card.
MULTIMEDIA (MMS) MESSAGES
Delivery reports Request a delivery report whenever you send a
multimedia message.
Read reports Request reports when your multimedia messages
are read or deleted.
Auto-retrieve Automatically download attachments from
incoming multimedia messages.
Roaming auto-retrieve Turn on auto-retrieve even when on another
carrier’s network.
NOTE: Turning this option off prevents data
roaming costs.
Creation mode Select an MMS creation mode for composing
messages.
NOTIFICATION SETTINGS
Notifications Set to show message content, to only show
sender, or to not show notification.
Message alert Choose a ringtone to play whenever a new
message is received.

PAGE : 21
4.0 SENDING & RECEIVING MESSAGES
4.4 ADDITIONAL MESSAGING FEATURES
While using the Messaging app, you can take advantage of several features
that make advanced tasks even easier.
The following features are available:
Zoom in/out While reading a message, pinch your fingers to
zoom in or out on the message text.
Select multiple messages
to delete or forward
1. Touch and hold an individual message.
2. Touch other messages to select them.
3. Touch to delete selected messages
Or
Touch to forward selected messages.
Select multiple contacts 1. From the Message app, touch .
2. Touch .
3. Touch the contacts to whom you wish to
send your message. (Touch to select all
contacts.)
4. Touch .
Select group contacts 1. From the Message app, touch .
2. Touch .
3. Select Groups by touching .
4. Touch the contacts in that group to whom you
wish to send your message or simply touch
to select all contacts in that group.
5. Touch .
The difference between Multiple Contacts and Groups:
Sending to multiple contacts means you are starting several conversations,
one conversation with each recipient. Sending to a group means you are
starting one conversation with everyone in that group.
NOTE: Messages addressed to groups will be sent to the first contact source
identified in each group member’s contact info. For example: If a contact has
a listing for Email, Mobile, and Home in contact info, the group message will
be sent to the Email address (because it is listed first). You must manually set
a default contact method (most likely the Mobile number) for contacts.

PAGE : 22
To take a picture:
1. Frame your subject in the display.
2. Touch the Shutter button to take your picture and save the image to the
Social Gallery.
NOTE: This is the default Camera Single mode.
To shoot a video:
1. From the Camera 2.0 app, touch the Mode button, and then select .
2. Touch the Shutter button to begin recording. When done, press the Shutter
button again to stop recording and save the video to the Social Gallery.
Use Camera HDR mode:
Select High Dynamic Range mode to give you pictures the most vivid colors
and richest details.
Use Camera SmileCam mode:
In this mode, the camera will automatically snap a photo as soon as it detects
that all subjects are smiling. (The shutter button is effectively disabled.)
Use Multi Burst mode:
When the camera is set to Burst mode, each shutter press will capture a
series of five images and save them to the Social Gallery.
Use Multi Continuous mode:
Select the Continuous mode to sweep across a scene (horizontally or
vertically) and capture multiple images that will be automatically stitched
together into a single panoramic image. During Continuous capture, several
on-screen elements assist in capturing and aligning images:
• The arrow indicates the direction to move the camera for the next shot.
• Touch the red stop button to finish capturing multiple images.
• The counter displays the number of images that have been collected for this
panorama.
• A semi-transparent overlay of the previous image assists in aligning the next
image in the sequence. Simply move the camera until key details on the
two images are aligned, and the next image is automatically captured.
NOTE: When using Continuous Mode, you must pan far enough to take at
least two pictures. If you do not touch the red stop button, the camera will
stop taking pictures when it reaches the maximum number of shots.
5.0 TAKING PHOTOS & VIDEOS
5 TAKING PHOTOS & VIDEOS
The Camera 2.0 app lets you take and share pictures and videos.
To start the Camera 2.0 app:
• In the App Launcher, touch .
Camera buttons and icons
Once opened, the Camera 2.0 app displays the following icons and buttons:
Touch to switch mode: Camera, Video Multi and Panorama.
SmileCam mode will be available only in Photo mode. Selecting
a new mode changes the icon on the shutter button to match the
current mode.
Use the Shutter button to take a picture or shoot a video.
Touch to switch between rear-facing and front-facing cameras.
Touch to toggle Face Detection on/off.
Touch to adjust Flash settings.
Touch to access Picture Size, Geo Location, and Hints.
TIP: To zoom in or out, pinch in the view window to bring up the zoom slider.
Slide the dot up to zoom in (+); slide the dot down to zoom out (-)
PAGE : 23
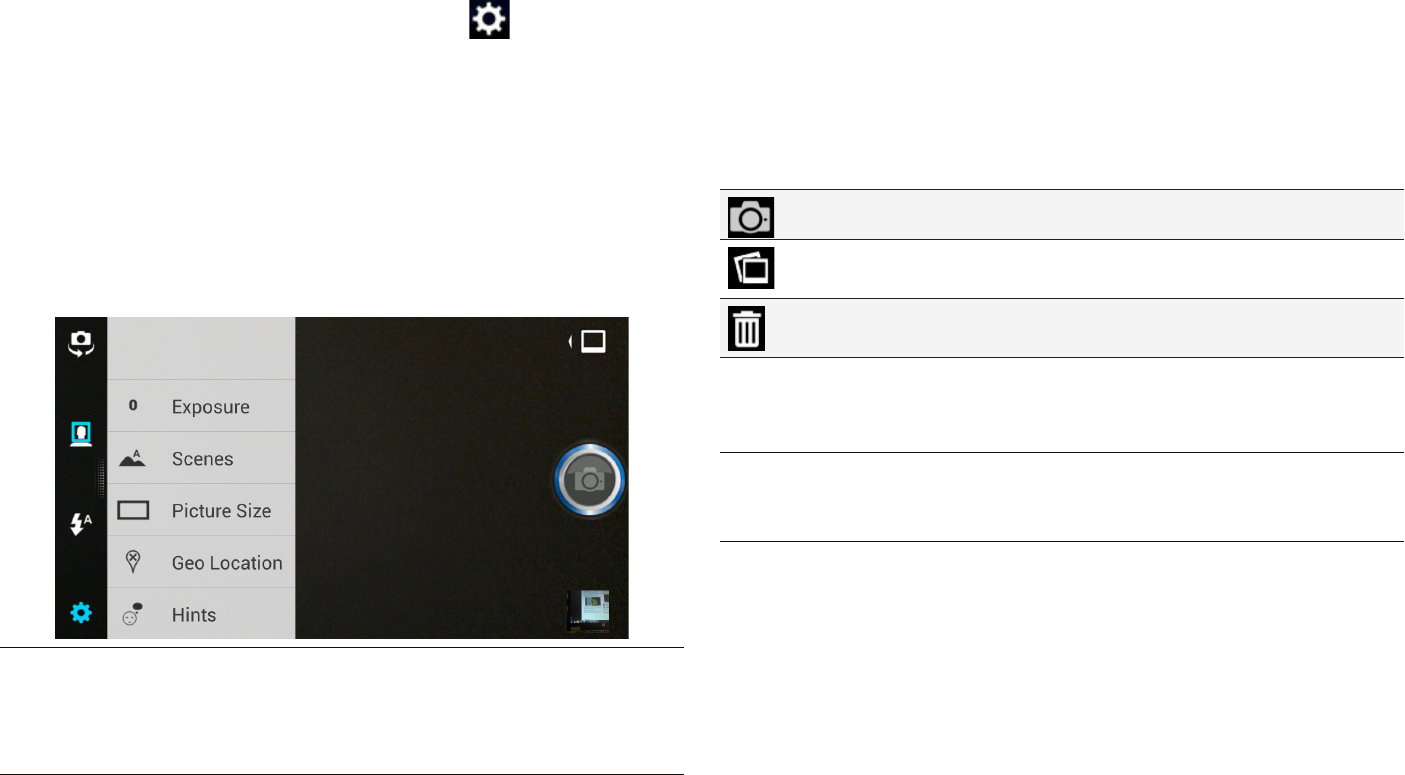
To change advanced settings:
Camera settings are available at any time by pressing .
Exposure: Touch to adjust exposure (brightness) settings.
Scenes: Touch to choose an appropriate shooting scene.
Picture Size: Two picture sizes are available: 1MP widescreen image or a 2MP
image that is in standard 4:3 format and appears centered on the screen.
Two different video sizes are available: 720p HD or 480p SD.
Geo Location: Touch to toggle on/off. When on, location information will be
captured and stored with your photos.
TIP: Set the camera to Camera Mode to change Picture Size. Set the camera
to Video Mode to change Video Size settings.
NOTE: Using the 2MP Picture Size and the HD Video Size settings will result
in larger file sizes, which will use significantly more memory space.
5.0 TAKING PHOTOS & VIDEOS
3.1 VIEW YOUR PICTURES & VIDEO
Pictures and videos taken with the Camera 2.0 app are stored in the Social
Gallery app, but they can be viewed and shared from within the main camera
screen also. To view a picture, touch the small thumbnail image in the lower
right of the screen. You will see the following screen:
While viewing a picture, the following actions are available:
Touch to return to the Camera 2.0 app to take more pictures.
Touch to launch a gallery app (choose between standard Gallery
and Social Gallery) to see all the pictures on your tablet.
Touch to delete the picture you are currently viewing.
The “filmstrip” of thumbnail images across the bottom of the screen contains
your most recently captured pictures. Simply touch a picture to view it.
NOTE: The Social Gallery app displays the pictures and videos you have taken
on your tablet, downloaded from the web, or (where available) uploaded to a
synchronized Picasa account (Google’s web-based photo storage).
To share pictures:
Sharing a picture is as quick and easy as viewing it. While viewing a picture, a
list of sharing methods appears along the left side of the screen. Simply touch
your preferred method of sharing (Google Drive, Gmail, Google+, wireless
Bluetooth technology-enabled device, Picasa web album, text message, etc.).
PAGE : 24
6.0 CONNECTIONS
6 CONNECTIONS
Your phone can connect to Wi-Fi networks, Bluetooth wireless technology-
enabled products (such as headsets), and your computer. You can also
connect to virtual private networks (or VPNs) and use your phone as a hotspot.
6.1 USING WI-FI
Connect to Wi-Fi networks to browse the internet, check your email, and more.
TIP: Use a Wi-Fi connection to help save on data costs.
To connect to a wireless network:
1. From the Home screen, press System settings Wi-Fi.
2. If Wi-Fi is not enabled, touch Wi-Fi to turn it on.
3. The available networks will be displayed.
4. Touch a network, then touch Connect.
NOTE: For secured networks, enter the requested security information, then
touch Connect.
TIP: Quickly toggle Wi-Fi on/off from the Home screen by dragging down the
notification panel and touching the Wi-Fi icon.
To add a network:
1. From the Home screen, press System settings Wi-Fi.
2. Scroll to the bottom of the list of available networks and touch
Add network.
3. Enter the network’s SSID (the name of the network).
4. Touch Save. Your phone saves the information you entered and uses it to
connect to the network whenever it is available.
NOTE: If the network is secured, enter the security information by touching
None (under Security) and selecting the type of network security that
the network uses (for example, WEP or WPA/WPA2 PSK). Then enter the
requested security information, such as a password.
To remove or modify a saved network:
1. From the Home screen, press System settings Wi-Fi.
2. Touch and hold the network, then touch Forget network or Modify network.
6.2 WIRELESS BLUETOOTH® CONNECTION
To connect to a Bluetooth wireless technology-enabled product for the
first time, you must pair it with your phone. Once paired, your phone will
automatically connect to paired products. You can use your phone to connect
to wireless products featuring Bluetooth technology up to eight meters away.
To pair phone with Bluetooth wireless technology-enabled product:
1. From the Home screen, press System settings.
2. If Bluetooth is OFF, touch OFF to toggle it on.
3. Touch Bluetooth. The available Bluetooth wireless technology-enabled
products will be displayed.
4. Select the product you wish to pair.
5. Confirm the product number and touch Pair to pair the product. Once
paired, your phone will automatically connect with the product.
NOTE: If the product requires a pass code before pairing, try entering 0000 or
1234 or check the product’s documentation. If your phone does not display
the Bluetooth wireless technology-enabled product, touch Search for devices
to rescan. See the documentation that came with your product to learn how to
configure it to be discoverable by phone.
To disconnect a Bluetooth wireless technology-enabled product:
1. From the Home screen, press System settings Bluetooth.
2. Touch a connected product, then touch OK to disconnect.
To reconnect a paired Bluetooth wireless technology-enabled product:
1. From the Home screen, press System settings Bluetooth.
2. Touch a paired product that you want to connect.
To unpair Bluetooth wireless technology-enabled product:
1. From the Home screen, press System settings Bluetooth.
2. Touch next to a paired but disconnected product, then touch Unpair.

PAGE : 25
6.0 CONNECTIONS
6.2.1 SHARE FILES VIA WIRELESS BLUETOOTH® CONNECTION
To share files via wireless Bluetooth connection:
1. From the App Launcher, touch and select files to share.
2. Touch and then select Bluetooth from the pop-up list.
3. Select a paired device from the Bluetooth device picker list, and the file
will be shared via wireless Bluetooth connection.
NOTE: Instructions for sharing pictures and videos stored on your phone can
be found in 6.2 Share Your Pictures & Video.
6.3 TRANSFERRING FILES BETWEEN YOUR PHONE & COMPUTER
Transfer files between your phone and computer by connecting your phone to
your computer’s USB port.
To transfer files between your phone and your computer:
1. Use the USB cable that came with your phone (the “cord” of your phone’s
power cord) to connect your phone to your computer’s USB port.
Warning! Follow any instructions that appear on your computer when
connecting to the USB port. Failure to follow these instructions may result
in damage to your files.
2. Once connected, drag down the notification panel and touch Connected
as a mass storage to change connection type: Mass Storage, Media device
(MTP), and Camera (PTP).
6.4 CONNECTING TO VIRTUAL PRIVATE NETWORKS
Virtual private networks (VPNs) allow you to connect to a secured local
network from outside the network. VPNs are commonly deployed by schools,
corporations, and other institutions that rely primarily on an on-location
network but allow secure access from the outside.
To connect to a VPN for the first time, add that VPN to your phone. You can
then connect to it automatically at any time.
To add a VPN to your phone:
1. From the Home screen, press System settings More... (under
the Wireless & Networks section) VPN Add VPN network.
2. Select the type of VPN, based on instructions from your VPN administrator,
and then follow your network administrator’s instructions to configure each
component of the VPN’s settings.
3. When you are done configuring the VPN, touch Save.
Your phone saves the VPN’s configuration and connects.
To connect to a previously-added VPN:
1. From the Home screen, press System settings More... (under
the Wireless & Networks section) VPN.
The VPNs you have added are listed at the top of the screen.
2. Touch the desired VPN. Enter any requested information.
3. Touch Connect.
To disconnect from a VPN:
• Open the notifications panel, touch the active VPN notification, and touch
Disconnect.
TIP: You must set a lock screen PIN or password before using connecting to a
Virtual Private Network.
6.5 SHARING YOUR PHONE’S DATA CONNECTION
You can share your phone’s data connection with a computer, allowing that
computer to access the internet by using your phone’s data stream. You can
share your phone’s data connection with a single computer by using USB
tethering or with up to eight computers at a time by enabling the Portable
Wi-Fi hotspot setting.
NOTE: Not all carriers support sharing your phone’s data connection. Please
check with your carrier to find out more.
6.5.1 SHARE YOUR PHONE’S DATA CONNECTION VIA USB TETHERING
You can share your phone’s data connection with a single computer via the
USB port; however, you can do this only when you are not currently using the
USB port to share files.
NOTE: Some operating systems, such as Windows XP, require you to prepare
your computer before enabling USB tethering. Visit www.android.com/tether
for more information.
PAGE : 26
6.0 CONNECTIONS
To tether your phone:
1. Use the USB cable that came with your phone to connect your phone to
your computer’s USB port.
2. From the Home screen, press System settings More... (under
the Wireless & Networks section) Tethering & portable hotspot.
3. Touch USB tethering to enable tethering.
Your phone will begin sharing its data connection with your computer. For
help with setting up USB tethering on your computer, please use the Help
available on the Tethering & portable hotspot settings page on your phone.
4. When you are finished, uncheck USB tethering or simply disconnect the
USB cable.
Go to http://software.intel.com/en-us/articles/intel-usb-driver-for-android-devices
for the latest drivers.
6.5.2 SHARE YOUR PHONE’S DATA CONNECTION AS A WI-FI HOTSPOT
You can turn your phone into a Wi-Fi hotspot to let other computers and
devices use your phone’s data connection as a wireless network.
To turn your phone into a Wi-Fi hotspot:
1. From the Home screen, press System settings More... (under
the Wireless & Networks section) Tethering & portable hotspot.
2. Touch Portable Wi-Fi hotspot to enable it.
Your phone will broadcast its Wi-Fi SSID and can be connected to like
any other wireless network.
Uncheck the Portable Wi-Fi hotspot setting to stop sharing your phone’s
data connection.
SECURE YOUR PORTABLE WI-FI HOTSPOT
You can secure your phone’s Wi-Fi connection, so that other devices and
computers can only use it as a Wi-Fi hotspot after entering the required
security information.
To secure your phone’s portable Wi-Fi hotspot:
1. From the Home screen, press System settings More... (under
the Wireless & Networks section) Tethering & portable hotspot.
2. Ensure that Portable Wi-Fi hotspot is checked, then touch
Configure Wi-Fi hotspot.
3. Change any desired security settings, then touch Save.
6.6 CONNECTING TO A WIRELESS DISPLAY (WIDI)
You can enjoy all of your personal and online content on your big screen—by
wirelessly connecting your phone to your TV.
To set up Wireless Display:
1. From the Home screen, touch .
2. Touch the checkbox to the right of Wireless Display to turn WiDi on.
3. Determine Video Extend Mode preference. (Unchecked: phone and TV
display same content at max resolution of phone’s LCD screen. Checked:
video displays only on TV (phone may still be used as remote control), but
video will be displayed at TV’s max resolution.)
4. When scanning completes, touch an adapter name to connect to it.
5. Enter the 8-digit pin code shown on the TV screen and touch OK.
NOTE: Once connected, the icon next to the adapter name will change
to .
To disconnect Wireless Display:
1. From the Home screen, touch .
2. Touch the name of the adapter you are currently using.
3. Touch Disconnect.
TIP: Follow the first two steps above and then choose Rename to give this
adapter a custom name, such as Living Room, My Place, etc.
6.7 CONTROL YOUR PHONE FROM A PC
MOBILedit! allows you to control your phone from a PC. Download MOBILedit!
to any computer and connect your phone via cable, wireless Bluetooth
connection, or IrDA. You will be able to view the contents of your phone, as
well as synchronize, add, edit, or delete items.
Go to www.mobiledit.com/oem and enter the code intel-001303 to register and
then download the MOBILedit! software.
PAGE : 27
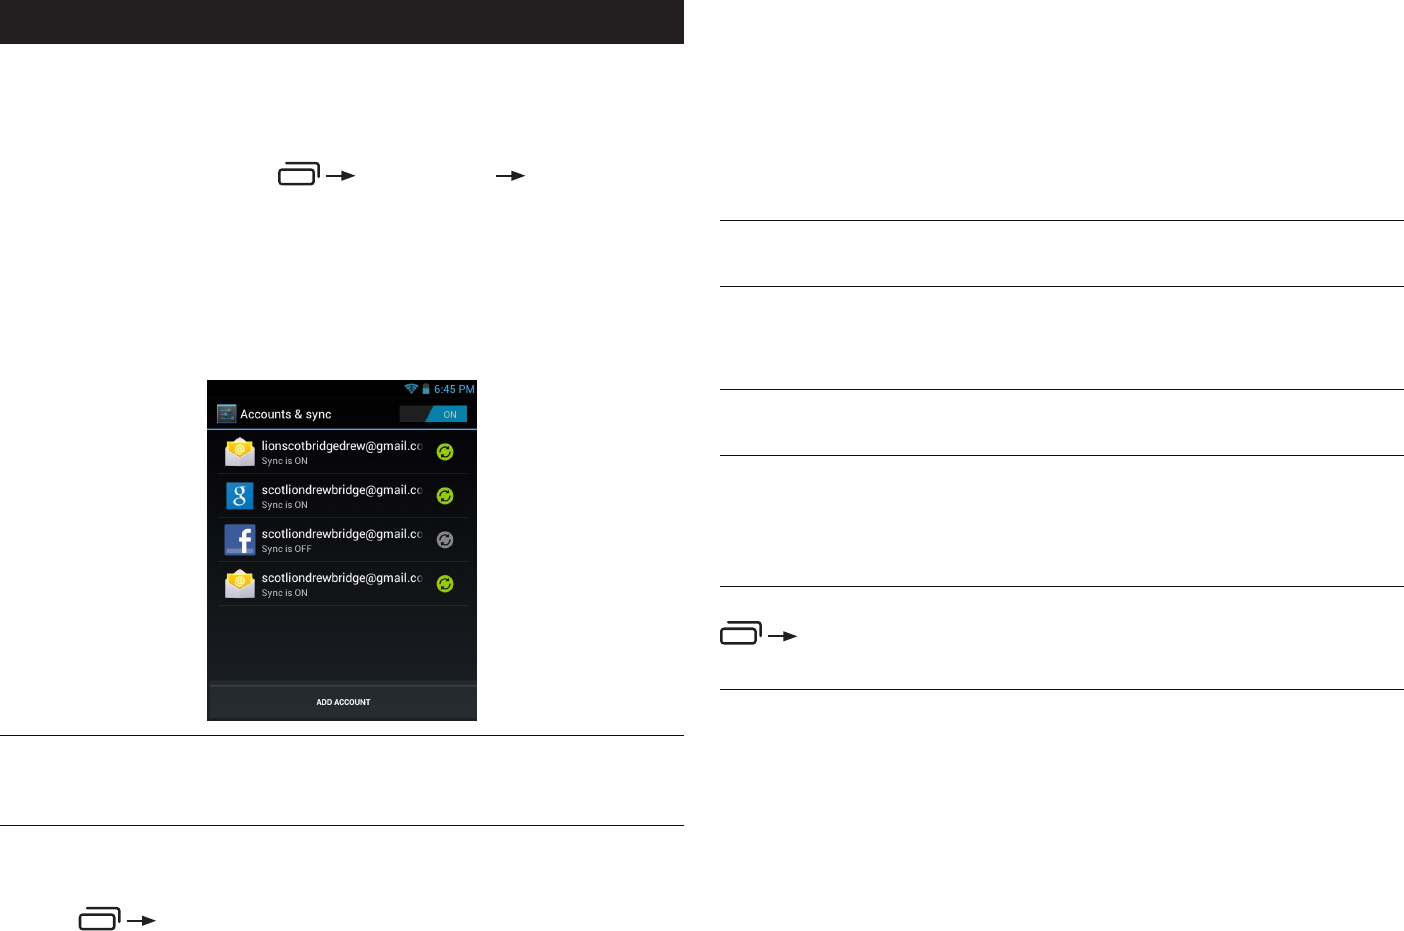
7.0 ACCOUNTS
7 ACCOUNTS
You can keep your phone synchronized with your Google, email, and corporate
accounts, as well as synchronizing contacts with other applications.
To open the Accounts screen:
• From the Home screen, press System settings Accounts & sync.
To add an account to your phone:
1. From the Accounts screen, touch Add Account.
2. Select the type of account to add, such as a corporate account
(using Microsoft Exchange) or a Google account.
3. Follow the on-screen instructions for configuring your account
(or configure your account manually).
NOTE: The first time you open an app using accounts (such as Email,
Calendar, or Gmail) you will be prompted to add an account. The process for
adding an account within these apps is identical to that described above.
To remove an account from your phone:
1. From Accounts & sync, touch the account to remove.
2. Press Remove account.
3. Touch Remove account to confirm deletion.
To change an account’s synchronization settings:
1. From Accounts & sync, touch the account synchronization setting you want
to change.
2. In the next screen, check or uncheck the type of information you want
synchronized. For example, your Google account lets you enable or disable
synchronization of your Browser, Contacts, Calendar, Google Photos, Picasa
Web Albums (where available), and Gmail.
NOTE: Previously synchronized data remains on your phone until you
manually delete it.
To turn automatic synchronization on or off:
• From Accounts & sync, select OFF/ON in the top-right corner of the screen.
NOTE: If this option is turned off, accounts and applications must be
synchronized manually.
To manually synchronize an account:
1. From Accounts & sync, touch the account to sync.
2. Touch the type of data to sync.
TIP: You can sync all types of data for the account by pressing
Sync now.
NOTE: Data charges may be incurred during the synchronization process.
PAGE : 28
8.0 CHANGING PHONE SETTINGS
8 CHANGING PHONE SETTINGS
The settings window displays all of the settings that affect how your phone
looks and works.
To open the settings window:
• From the Home screen, press System settings.
8.1 WIRELESS & NETWORKS
The Wireless & networks section configures your phone’s connections, such as
Wi-Fi, Bluetooth wireless technology, VPN, Wi-Fi Direct, and more.
Wi-Fi Turn on Wi-Fi and configure any desired settings
under Advanced Wi-Fi.
For information on using Wi-Fi, see Using Wi-Fi.
Advanced
Wi-Fi
From Settings, touch Wi-Fi press Advanced.
• Network notification: Receive a notification when an open
Wi-Fi network becomes available.
• Keep Wi-Fi on during sleep: Choose when to keep Wi-Fi
turned on.
• MAC address: Displays your current MAC address.
• IP address: Displays your current IP address.
Bluetooth Turn on Bluetooth wireless technology. To see available
devices, touch Bluetooth. From this Bluetooth screen, press
for options: Rename phone, Visibility timeout, and Show
received files.
For more information on pairing your phone with a Bluetooth
wireless technology-enabled product, see Wireless Bluetooth
Connection.
Data usage Turn Mobile data on to see your phone’s data
usage. You can also turn on Set mobile data limit.
Touch More... to access the following options:
Airplane
mode
Disable all wireless connections, including Bluetooth wireless
technology and 3G.
Activating airplane mode greys out some other settings.
VPN Configure your Virtual Private Network.
Tethering
& portable
hotspot
Configure your phone for tethering or for use as a portable
hotspot with the following settings:
• USB tethering: Share your phone’s mobile data network
connection with your computer via a USB connection.
• Portable Wi-Fi hotspot: Share your phone’s mobile data
network connection as a portable Wi-Fi hotspot.
• Bluetooth tethering: Share your phone’s mobile data
network connection via a Bluetooth connection.
Wi-Fi direct Touch the box to turn on Wi-Fi direct and connect directly
to nearby peer devices over Wi-Fi for more reliable, higher-
speed communication. (No internet connection or tethering
is needed.) Through third-party apps, you can connect to
compatible devices to take advantage of new features such
as instant sharing of files, photos, or other media; streaming
video or audio from another device; or connecting to
compatible printers or other devices.
Mobile
networks
Configure your mobile data network using the following
settings:
• Data enabled: Clear this checkbox to prevent your phone
from transmitting data on any mobile network. This is
useful when you are traveling and wish to avoid charges
for data use on a local carrier’s network, and it also can
decrease the battery usage.
Disabling data does not prevent your phone from
transmitting data on other networks, such as Wi-Fi or
Bluetooth wireless technology-enabled products.
• Data roaming: Clear this checkbox to prevent your phone
from using other carrier’s mobile networks when your own
is unavailable.
• Access Point Names: Select from the available access
points.
• Use only 2G networks: Touch to use only 2G networks.
• Network operators: Scan for and select a network operator.

PAGE : 29
8.0 CHANGING PHONE SETTINGS
8.2 DEVICE
Sound settings let you configure your phone’s sounds.
Volumes Set the volume for each sound made by your phone, such
as media or incoming calls.
Silent mode Set your phone sounds to Off, Vibrate, or Mute.
Phone ringtone Select the ringtone for a phone call.
You can also select a song as a ringtone through the Music
App. See Playing Music for more information.
Default
notification
Select the notification ringtone.
Vibrate and
ring
Turn on to make the phone vibrate when it rings.
Dial pad touch
tones
Turn on to hear key presses when you dial numbers.
Touch sounds Turn on to hear sounds when you touch items.
Screen lock
sound
Turn on to hear a sound when you lock/unlock the screen.
Vibrate on
touch
Turn on to make the phone vibrate when you touch items.
Display settings configure your phone’s screen, such as its brightness or
rotation.
Brightness Adjust the screen’s brightness automatically or select the
desired brightness.
For the longest battery life, use the lowest comfortable
brightness.
Wallpaper Select an image on your phone to display as your phone’s
wallpaper.
Auto-rotate
screen
Check to automatically rotate the orientation of the screen
as you turn the phone sideways or upright.
Sleep Set how long a phone will idle before the phone enters
sleep mode.
For the longest battery life, use the shortest timeout.
Font size Change the size of the text displayed on your phone.
Storage displays the usage of internal storage and USB storage.
Battery displays the battery’s current charge, along with the battery usage of
applications.
Apps launches Manage apps.
8.3 PERSONAL
Accounts &
sync
Add, remove, and manage your accounts (including Google
and Microsoft Exchange accounts.) For more information
on working with accounts and synchronizing data, see
Accounts.
Location
services
Toggle on/off GPS and search features that use your current
location.
Security Secure your phone with a Slide, Pattern, PIN, or Password.
See Securing your phone for more information.
• Encrypt phone: Require a numerical PIN or password to
decrypt your phone each time that you turn it on.
• Set up SIM card lock: Require a PIN each time it is
powered on.
• Make passwords visible: Turn on to briefly display each
character of your password.
Asterisks are displayed by default.
• Device administrators: View or deactivate device
administrators.
• Uknown sources: Allow installation of non-Market apps.
• Trusted credentials: Display trusted CA certificates.
• Install from SD card: Install certificates from SD card.
• Clear credentials: Remove all certificates.

PAGE : 30
8.0 CHANGING PHONE SETTINGS
Language &
input
Touch Language to choose a new language from the
menu.
• Spelling correction: Toggle off/on.
• Personal dictionary: Display the user dictionary used to
identify words you type.
Touch the red X next to a word to delete it. Touch a word
to edit it. Touch the plus sign to add a new word.
• Keyboard & Input Methods: Display the onscreen
keyboards available on your phone. Touch the sliders on
the right to configure a keyboard.
For more information, see Onscreen Keyboard Basics.
• Keyboard Layout: Choose QWERTY or AZERTY layout.
• Voice Search: Display options for setting language,
SafeSearch, and blocking offensive words.
• Text-to-speech output: Change the text-to-speech engine,
adjust the speed at which text is spoken, and listen to an
example.
• Pointer speed: Adjust the speed of any mouse or track
pad that is connected to or controlled by your phone.
Backup & reset Use this setting to manage your personal information.
• Back up my data: Back up certain personal data to Google
servers. If you replace your phone, you can restore the
data you have backed up.
The following data can be backed up and restored:
Browser bookmarks. Some third-party applications may
also take advantage of this feature.
Unchecking this option stops data back-up and deletes
any existing backups.
• Backup account: Set an account as your backup account.
• Automatic restore: Restore your settings and other data
when you reinstall an application using your current
Google account.
• Factory data reset: Erase all of your personal data from
internal phone storage. Resetting the phone does not
erase any software updates you have downloaded.
You can also erase data downloaded to USB storage.
After resetting your phone, you will be returned to the
Google wizard when you next restart your phone.
8.4 SYSTEM
Date & time The Date & time settings screen configures how the date
and time are displayed on your phone. You can also use
this screen to manually enter the date and time, rather than
obtaining the current time from the mobile network.
• Automatic date & time: Uncheck to set the date and time
on the phone manually, rather than obtaining the current
time from the mobile network.
• Automatic time zone: Uncheck to set the time zone on the
phone manually, rather than obtaining the current time
zone from the mobile network.
• Set date/Set time/Select time zone: Manually set the
phone’s date, time zone, and time. This setting is only
available if the Automatic setting, above, is unchecked.
• Use 24-hour format: Display the time using 24-hour time
format—for example, 13:00 rather than 1:00 PM.
• Select date format: Select the date format.
Accessibility Toggle large text off/on, using the power button to end calls,
and screen auto-rotate. Configure the length of the touch
and hold delay and install web scripts from Google that
make web content more accessible.
Sensor
calibration
Use to calibrate your compass.
Developer
options
Advanced options for developers.
About phone Display information about your phone.
• System updates: Check for Android system software
updates.
• Update from USB storage: Check for updates on your
USB storage.
• Update from OTA: Check for updates over the air.
• Status: Touch to open the Status screen.
• Legal information: Display legal information about the
software included with your phone.

PAGE : 31
9.0 SAFETY, REGULATORY & LEGAL
9 SAFETY, REGULATORY & LEGAL
SAFETY AND OPERATIONAL GUIDELINES
IMPORTANT: Review and adhere to these guidelines. Failure to do so may
be dangerous or illegal. All statements, information, and recommendations
contained herein do not constitute a warranty of any kind, either expressed
or implied. The information contained herein is subject to change without
notice. Read the complete user guide for further information.
• Always comply with all local legal requirements or restrictions when using the phone, for
example, in airplanes, gas or petrol stations, in hospitals, or while driving.
• Elements of the phone are made of glass and may break or become scratched if dropped or
used improperly. You may be able to reduce the chances of any such harm by utilizing a case.
• As with any electronic device, please keep your phone away from any water including, for
example, rain, wash basins or toilets.
• Do not attempt to repair or modify your phone yourself. This includes any access to or
attempted replacement of the battery. Any attempt to do so will invalidate your warranty and
regulatory approvals.
• Your mobile phone may be equipped with Global Positioning System (GPS) or Assisted GPS
(AGPS) technology, which may be used to determine the approximate location of the mobile
phone. When connected to a wireless network, the phone may transmit location-based
information, including to third-party application providers. Please read your using manual and
check the settings of any installed applications to ensure that you manage these location based
services in accordance with your privacy preferences.
• Mobile phones can interfere with the functioning of medical devices such as hearing aids or
pacemakers. Keep at least 20 cm (9 inches) between the phone and pacemaker. When using
the mobile phone hold it to the ear which is furthest away from the pacemaker. For more
information, consult your doctor.
• Always keep the phone and accessories out of reach of small children. Small parts such as the
SIM card can be dismantled and swallowed by small children.
• Keep the phone away from electromagnetic data carriers such as credit cards, disk drives, etc.
Information stored on them could be lost.
• Permanent hearing loss may occur if you use earphones or headphones at high volume. You
can adapt over time to a higher volume, which may sound normal but can be damaging to your
hearing. Set your volume to a safe level. If you experience discomfort or buzzing in your ears,
reduce the volume or discontinue use of your earphones or headphones.
• Ring tones, info tones, and hands-free talking are reproduced through the loudspeaker. Do not
hold the phone to the ear when it rings or when you have switched on the handsfree function.
Otherwise you risk serious permanent damage to your hearing.
• Please use only the power supply that was supplied with your phone. Failure to do so may
damage the phone. The power supply must be plugged into an easily accessible AC mains
power socket when charging the battery. The only way to turn off the charging device after
charging the battery is to unplug it.
• The phone may cause interference in the vicinity of television sets, radios, computers and other
electronic components.
• Dispose of unwanted batteries and phones in accordance with local law.
• Improper use of the device will invalidate the warranty! These safety instructions also apply to
original accessories.
• Do not store the phone or any of its accessories on or near an automotive air bag, or air bag
deployment area.
• Some people may be susceptible to blackouts, seizures or debilitating headaches when exposed
to bright, flashing light such as, for example, when playing video games or watching other
video content on the device. If you have experienced such medical issues in the past, please
consult your physician before engaging in such activity on this device.
• Please take care not to use your device in potentially explosive environments such as, for
example, fueling stations, fueling areas, fuel or chemical storage facilities, or areas where the
air may contain chemical or dust particles such as grain particles or metal powders.
• The repetitive motion of certain actions, such as pressing keys or other repetitive finger
motions, may cause discomfort in your hands, wrists, arms, shoulders, neck and other parts of
your body. If you experience any such discomfort, please discontinue such actions until you
have had an opportunity to consult with your physician.
• This phone includes a radio transmitter and receiver to transmit and receive, respectively,
electromagnetic energy operating at various radio frequencies (RF energy). The device is
designed to operate within local regulatory requirements concerning the exposure of this RF
energy to human beings. Nonetheless, however you use your phone, you should keep the phone
15 mm away from your body to limit your exposure to RF energy.
• Connect only to USB interfaces with USB 2.0 version or higher.
NOTE: The operating temperature for this device is 0C to 45C; ensure the
operating temperature for the adapter is not higher than 35C.
PAGE : 32
9.0 SAFETY, REGULATORY & LEGAL
In-Box Contents:
• Handset
• AC Adapter
• USB Cable
• Headset
Additional Warnings and DoC Information
FCC Statements
This device complies with Part 15 of the FCC Rules. Operation is subject to
the following conditions:
1. This device may not cause harmful interference.
2. This device must accept any interference received, including interference
that may cause undesired operation.
Changes or modifications not expressly approved by the party responsible for
compliance could void the user‘s authority to operate the equipment.
This equipment has been tested and found to comply with the limits for a
Class B digital device, pursuant to part 15 of the FCC Rules. These limits
are designed to provide reasonable protection against harmful interference
in a residential installation. This equipment generates, uses and can radiate
radio frequency energy and, if not installed and used in accordance with
the instructions, may cause harmful interference to radio communications.
However, there is no guarantee that interference will not occur in a particular
installation. If this equipment does cause harmful interference to radio or
television reception, which can be determined by turning the equipment off
and on, the user is encouraged to try to correct the interference by one or
more of the following measures:
• Reorient or relocate the receiving antenna.
• Increase the separation between the equipment and receiver.
• Connect the equipment into an outlet on a circuit different from that to
which the receiver is connected.
• Consult the dealer or an experienced radio/TV technician for help.
This device is restricted to indoor use while Wi-Fi connectivity is operating
in the 5.15 to 5.25 GHz frequency range to reduce the potential for harmful
interference to co-channel Mobile Satellite systems. High power radars are
allocated as primary users of the 5.25 to 5.35 GHz and 5.65 to 5.85 GHz
bands. These radar stations can cause interference with and /or damage this
device.
RF Exposure Information (SAR)
This mobile phone meets the government’s requirements for exposure to radio
waves.
This phone is designed and manufactured not to exceed the emission
limits for exposure to radio frequency (RF) energy set by the Federal
Communications Commission of the U.S. Government, Industry Canada, and
other national regulatory agencies.
The exposure standard for wireless mobile phones employs a unit of
measurement known as the Specific Absorption Rate, or SAR. The SAR limit
set by the FCC is 1.6W/kg. *Tests for SAR are conducted using standard
operating positions accepted by the FCC with the phone transmitting at its
highest certified power level in all tested frequency bands. Although the SAR
is determined at the highest certified power level, the actual SAR level of the
phone while operating can be well below the maximum value. This is because
the phone is designed to operate at multiple power levels so as to use only
the power required to reach the network. In general, the closer you are to a
wireless base station antenna, the lower the power output.
While there may be differences between the SAR levels of various phones and
at various positions, they all meet the government requirement. Equipment
Authorization has been granted to this model with all reported SAR levels
evaluated as in compliance with the FCC RF exposure guidelines. SAR
information on this model phone is on file with the FCC and can be found
under the Display Grant section of www.fcc.gov/oet/ea/fccid after searching on
FCC ID: O2Z-CZ120.
For body worn operation, this phone has been tested and meets the FCC RF
exposure guidelines for use with an accessory that contains no metal and
which keeps a distance of at least 1cm between the phone and the body.
Use of other accessories may not ensure compliance with FCC RF exposure
guidelines. If you do not use a body-worn accessory and are not holding the
phone at the ear, position the handset a minimum of 1cm from your body
when the phone is switched on.
PAGE : 33
9.0 SAFETY, REGULATORY & LEGAL
Industry Canada Statements
This device complies with Industry Canada licence-exempt RSS standard(s).
Operation is subject to the following two conditions: (1) this device may
not cause interference, and (2) this device must accept any interference,
including interference that may cause undesired operation of the device.
Le présent appareil est conforme aux CNR d’Industrie Canada applicables
aux appareils radio exempts de licence. L’exploitation est autorisée aux deux
conditions suivantes : (1) l’appareil ne doit pas produire de brouillage, et (2)
l’utilisateur de l’appareil doit accepter tout brouillage radioélectrique subi,
même si le brouillage est susceptible d’en compromettre le fonctionnement.
Notice
The information contained herein is subject to change without notice. All
statements, information and recommendations contained herein do not
constitute a warranty of any kind, either expressed or implied. Please review
this product guide thoroughly, with particular attention paid to any safety
sections, to make sure that you use your phone safely.
Copyright © 2011-2012 Intel Corporation. All rights reserved.
This publication is protected by copyright. No part of the publication may be
used, reproduced, or translated, in any form, without the prior written consent
of Intel Corporation.
Intel, the Intel logo, Intel Atom, Intel Inside, and the Intel Inside logo, are
trademarks of Intel Corporation in the U.S. and/or other countries.
Google, Gmail, Google Maps, YouTube, Google Calendar, Android, and Android
Market are trademarks of Google, Inc. Use of these trademarks is subject to
Google’s permission.
*Other names and brands may be claimed as the property of others.