User Manual

Harris beach User Guide
(Model: HSBUB-SDS)
Jan 2013
Revision 0.6
Intel Confidential

2
Revision History
Revision
Number Description Revision Date
0.5 Initial release Jan.2013
0.6 Add caution about battery Jan.2013
3
Safety precautions
i. Please only use the power adapter in the accessories box to charge the internal
battery of the system.
ii. Battery is not User-serviceable, do not attempt to remove battery.
iii. Do NOT remove, disassemble, puncture, drop, crush the internal battery pack or
expose to fire or temperatures above 100℃. Do NOT drop the system to water.
iv. Excessive sound pressure from earphones and headphones can cause hearing loss.
v. DO NOT place the ultra-book on an uneven or unstable work surfaces. This may
cause the unit to fall, hence, damaged.
vi. Risk of explosion if battery is replaced by an incorrect type.
vii. Dispose of used batteries according to the instructions.
viii. The 5150-5250MHz is limited to used indoor only.

4
Contents
1Hardware setup.................................................................................................................. 5
1.1Top View...........................................................................................................................5
1.2Bottom View .....................................................................................................................6
1.3Right side..........................................................................................................................7
1.4Left Side............................................................................................................................8
2Using your Notebook PC................................................................................................. 9
2.1Getting started...................................................................................................................9
2.2Gestures for the touch screen............................................................................................9
2.3Using the keyboard .........................................................................................................11
2.4Turn your Notebook PC off ............................................................................................11
3Trouble shooting.............................................................................................................. 12
4Appendices......................................................................................................................... 13
5
1 Hardware setup
Getting to know the model: HSBUB-SDS
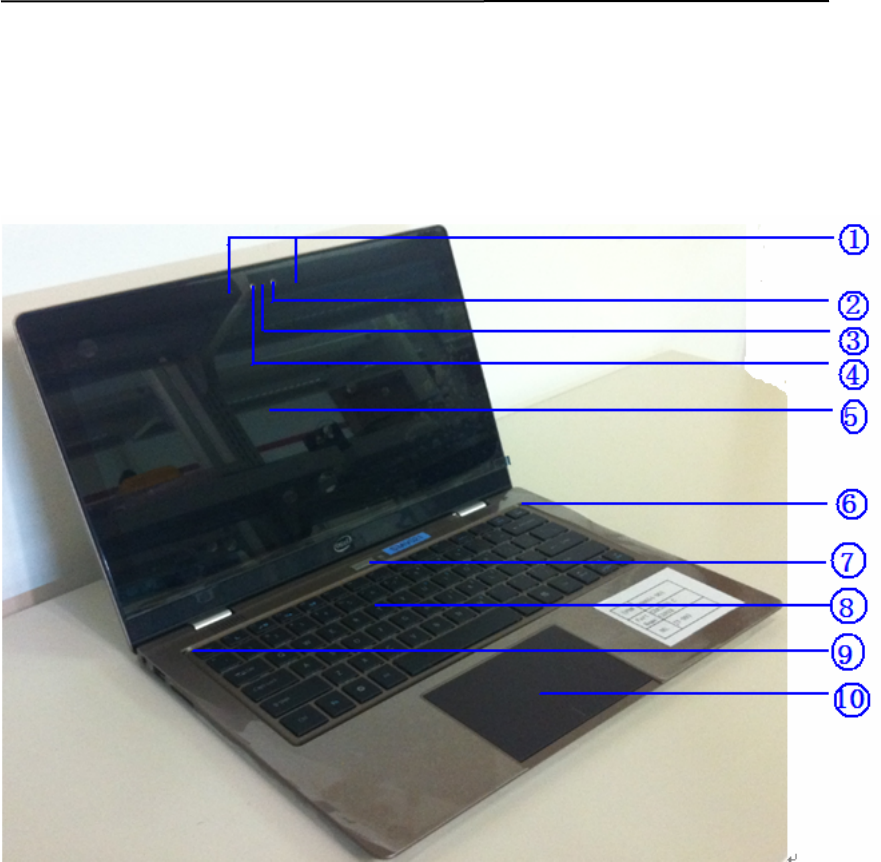
1.1 Top View
1) Microphone
The built-in microphone can be used for video conferencing, voice narrations,
or simple audio recording.
2) Camera indicator
The camera indicator lights up when the built-in camera is in use.
3) Camera
The built-in camera allows you to take pictures or record videos.
4) ALS (Ambient light sensor)
The ALS allows the system to change the display backlight automatically according
the ambient light.
5) Display panel
This high-definition display panel provides excellent viewing features for
6
Photos, videos, and other multimedia files.
Note: HSBUB-SDS is equipped with touch-enabled panel, allowing you to
operate using touch gestures.
6) Number Lock indicator
This indicator lights up when the number lock function is activated.
7) Power button (with power LED indicator)
Press the power button can turn on/off Notebook PC. You can also use it to put your
PC into sleep or hibernate mode and wake it up from sleep or hibernate mode.
The power LED lights up when the Notebook PC is turned on.
8) Keyboard
The keyboard provides full size keys for typing, it also enables you to use
the function keys, allows quick access to Windows.
9) Capital lock indicator
This indicator lights up when the capital lock function is activated
10) Touchpad
The touchpad allows the use of multi-gestures to navigate onscreen. It also simulates
the functions of a regular mouse.
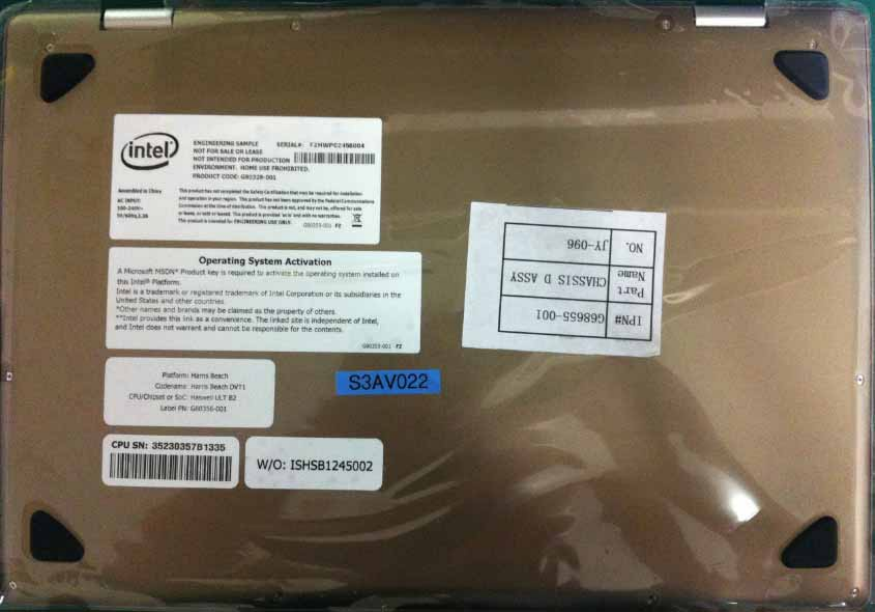
1.2 Bottom View
7
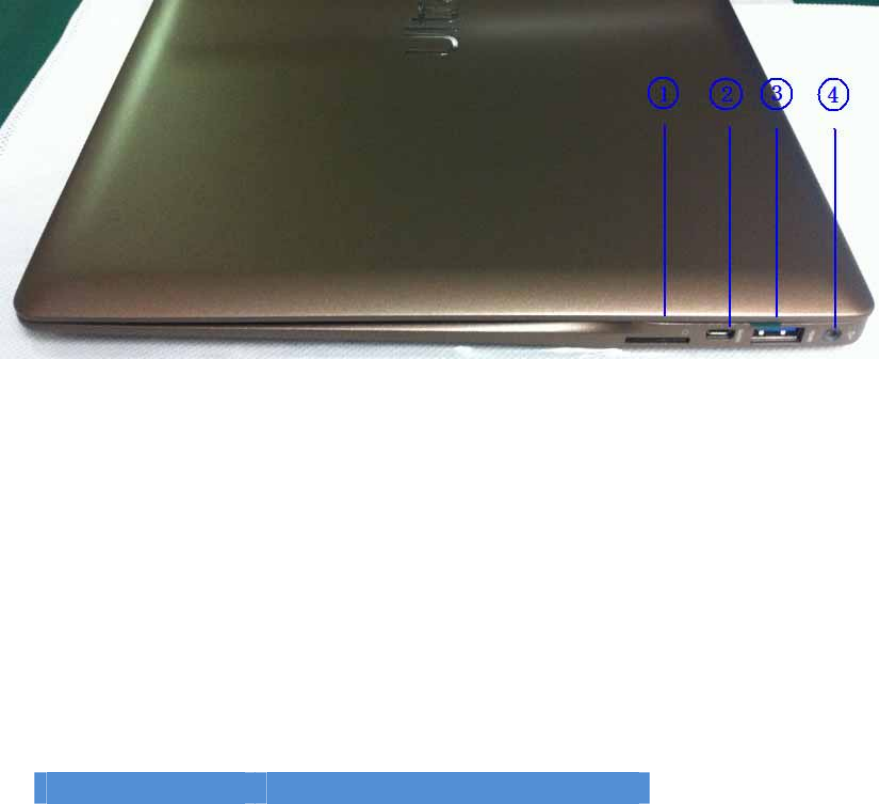
1.3 Right side
1) SIM Card port
The standard SIM card can be plugged into this port for the built-in 3G
module.
2) Mini HDMI port
This port is for a High-Defnition Multimedia Interface (HDMI) connector.
3) USB3.0 port
This Universal Serial Bus 3.0 (USB 3.0) port provides a transfer rate of up to 5 Gbit/s
and is backward compatible to USB 2.0
4) Power (DC) input port with two color battery charge indicator
Insert the bundled power adapter into this port to charge the battery pack and supply
power to your Notebook PC.
The two-color LED provides a visual indication of the battery’s charge status. Refer to
the following table for details:
Color Status
Solid Green The Notebook PC is plugged to a power
source and the battery power is
between 95% and 100%.
Solid Orange The Notebook PC is running on
battery mode and the battery power
is less than 95%.
Blinking Orange The Notebook PC is running on
battery mode and the battery power
is less than 10%.
Lights off The Notebook PC is running on
battery mode and the battery power
is between 10% to 100%.
IMPORTANT! Use only the bundled power adapter to charge the battery pack
and supply power to your Notebook PC.
8
Power adapter information:
Chicony A12-045N2A
- Input : 100~240V /1.3A , 50~60Hz
- output: 19V / 2.37A, 45W
Delta ADP-45BE AA
- Input : 100~240V /1.3A , 50~60Hz
- output: 20V / 2.25A, 45W
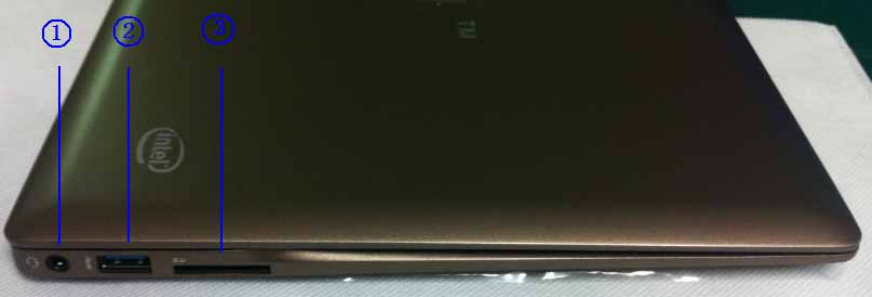
1.4 Left Side
1) Headphone/microphone combo jack port
This port allows you to connect your Notebook PC’ to amplified speakers or
headphones. You can also use this port to connect your Notebook PC to an
external microphone.
2) USB3.0 port
This Universal Serial Bus 3.0 (USB 3.0) port provides a transfer rate of up to
5 Gbit/s and is backward compatible to USB 2.0
3) SD card reader port
This Notebook PC has a single built-in memory card reader slot that support SD
card formats.
9
2 Using your Notebook PC
2.1 Getting started
1) Connect the AC power cord to the AC/DC adapter, Plug the AC power adapter into a
100V~240V power source. Connect the DC power connector into your Notebook PC’s
power (DC) input.
2) Lift to open the display panel.
3) Press the power button.
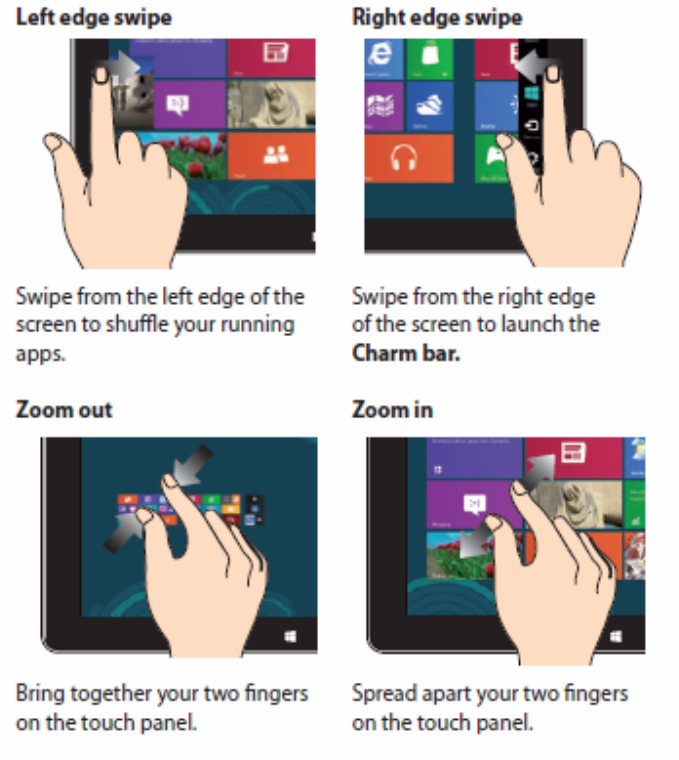
2.2 Gestures for the touch screen

10

11
2.3 Using the keyboard
The function keys on your Notebook PC’s keyboard can trigger the following commands:
FunctionkeysExpectation
Fn+F1PutstheNotebookPCintoSleepmode
Fn+F2Displayswitch
Fn+F3DisplaybrightnessIncrease
Fn+F4DisplaybrightnessDecrease
Fn+F5TurnsWidion/off
Fn+F6Turnsthevolumemute
Fn+F7Turnsthevolumedown
Fn+F8Turnsthevolumeup
Fn+F9KeyboardbrightnessDecrease
Fn+F10KeyboardbrightnessIncrease
Fn+F11NumberLock
Fn+InsertPrintscreen
Fn+DelPause
Fn+LeftHome
Fn+RightEnd
Fn+UpPageUp
Fn+DownPageDown
2.4 Turn your Notebook PC off
There are three ways to turn off the Notebook PC
1) Tap from the Charm bar, then tap and select Shut down to do a
normal shut down.
2) From the log-in screen , tap and select Shut down to do a normal shut down.
3) Launch the desktop then press alt+f4 to launch the shut down window, select shut down from the
drop-down list.

12
3 Trouble shooting
1. The Notebook PC hangs up, can’t shut down.
Answer: press the power button for more than 4s to force the system shut down.
2. How to update BIOS in Windows8 ?
Answer:
a. Get the tool “WinFlashInstaller” from
http://clientdownload.intel.com/SitePages/Sharkbay%20ULT.aspx
The file should contain: WinFlash_Installer.exe, please install it on your
Notebook PC.
b. Get the BIOS “HSB_BIOS_xxxx” from :
http://clientdownload.intel.com/SitePages/Sharkbay%20ULT.aspx.
c. Open Winflash, and load the BIOS file “HSB_BIOS_xxxx.bin”
d. Click “SPIFULL” on the left side, then click “Batch” to update the BIOS.
e. After successfully update the BIOS, reboot the system.

13
4 Appendices
FEDERAL COMMUNICATIONS COMMISSION
INTERFERENCE STATEMENT
This equipment has been tested and found to comply with the limits for a
Class B digital device, pursuant to Part 15 of the FCC Rules. These limits are
designed to provide reasonable protection against harmful interference in a
residential installation. This equipment generates, uses and can radiate radio
frequency energy and, if not installed and used in accordance with the
instructions, may cause harmful interference to radio communications.
However, there is no guarantee that interference will not occur in a particular
installation. If this equipment does cause harmful interference to radio or
television reception, which can be determined by turning the equipment off
and on, the user is encouraged to try to correct the interference by one or
more of the following measures:
-- Reorient or relocate the receiving antenna.
-- Increase the separation between the equipment and receiver.
-- Connect the equipment into an outlet on a circuit different from that to
which the receiver is connected.
-- Consult the dealer or an experienced radio/TV technician for help.
CAUTION:
To assure continued FCC compliance:
1. Any changes or modifications not expressly approved by the grantee of this
device could void the user's authority to operate the equipment.
2. This equipment complies with FCC radiation exposure limits set forth for an
uncontrolled environment. This equipment should be installed and operated
with minimum distance 20cm between the radiator & your body.
IC
This device complies with Industry Canada license-exempt RSS standard(s).
Operation is subject to the following two conditions: (1) this device may not
cause interference, and (2) this device must accept any interference, including
interference that may cause undesired operation of the device.

14
This equipment complies with IC radiation exposure limits set forth for an
uncontrolled environment. This equipment should be installed and operated
with minimum distance 20cm between the radiator and your body.
French:
Cet appareil radio est conforme au CNR-210 d’Industrie Canada. L’utilisation
de ce dispositif est autorisée seulement aux deux conditions suivantes : (1) il
ne doit pas produire de brouillage, et (2) l’utilisateur du dispositif doit être prêt
à accepter tout brouillage radioélectrique reçu, même si ce brouillage est
susceptible de compromettre le fonctionnement du dispositif.
Cet équipement est conforme aux limites d’exposition aux rayonnements IC
établies pour un environnement non contrôlé. Cet équipement doit être
installé et utilisé avec un minimum de 20 cm de distance entre la source de
rayonnement et votre corps.
CE
This device can be operated in EU without restrictions indoor.
Hereby declares that this Notebook is in compliance with the essential
Requirements and other relevant provisions and Directive 1995/5/EC, 2006/95/EC
and 2004/108/EC.
Test Standards for complying are following:
ETSI EN 301 489-1 ETSI EN 301 489-3
ETSI EN 301 489-7 ETSI EN 301 489-17
ETSI EN 301489-24
ETSI EN 300 328 ETSI EN 301 893
ETSI EN 301 511 ETSI EN 301 908-1
ETSI EN 302 291-1 1 ETSI 302 291-2
EN 62311
EN 60950-1
EN 55022 EN 55024