Intel LEN4965AGN Intel Wireless WiFi Link 4965AGN User Manual
Intel Mobile Communications Intel Wireless WiFi Link 4965AGN Users Manual
Intel >
Contents
- 1. Users Manual
- 2. User Manual
- 3. Manual
Manual
Lenovo(Japan), Ltd., Date: April 10, 2007
Document Number: UY610-03-0038-45
User’s Manual
The attachments are parts of the user’s manual of the specific Lenovo host device (ThinkPad X60
Tablet Series) that indicate the regulatory notices concerning the FCC Part 2/15/22/24 and IC RSS-
102/132/133/210.
The regulatory notice consists of the following separate parts.
1. WLAN/ Bluetooth/ UWB, and Modem features
2. WWAN feature (Model MC5725 and MC8775)
z MC5725 adapter (US)
z MC5725 adapter (Canada)
z MC8775 adapter (US)
And the following electronic contents referred in the above notices are also provided
associated with host devices and indicated on each LCD screen
3. Electronic Users Manual
z WLAN, WWAN & Bluetooth antenna locations
z FCC ID, IC Certification Number indication
z Location of WLAN & WWAN mini-PCI e card slots
z Installation Instruction of WLAN & WWAN adapters
z Operation Instruction of wireless features
z Operation Instruction of Digitizer feature
1. Regulatory Notice for WLAN/ Bluetooth/ UWB, and Modem features

Part Number: 42X3527
ThinkPad® X61 Tablet Regulatory Notice
Read first — regulatory information
Please read this document before you use the ThinkPad computer.
ThinkPad computer complies with the radio frequency and safety standards
of any country or region in which it has been approved for wireless use. You
must install and use your computer in strict accordance with the instructions
as described hereafter.
If your ThinkPad computer contains a Wireless WAN adapter, be sure to also
read ThinkPad Regulatory Notice for Wireless WAN adapter, included with your
computer.
Note: You cannot use the Wireless WAN Adapter and the Wireless LAN
adapter (Models: AR5BXB6, AR5BXB63-L, AR5BXB72, WM3945ABG,
4965AG, or 4965AGN) simultaneously. If one of the adapters has
established the connection to the network, the other will be
disconnected automatically. To confirm the status of the network
connection, check the power status indicators of your computer. For
more information about the power status indicators, see the “Power
status indicators” section in Access Help.
Veuillez lire ce document avant d’utiliser l’ordinateur ThinkPad.
L’ordinateur ThinkPad est conforme aux normes de sécurité et de
radiofréquence du pays ou de la région où son utilisation sans fil est agréée.
Vous devez installer et utiliser votre ordinateur en respectant scrupuleusement
les instructions décrites ci-après.
Si votre ordinateur ThinkPad contient une carte de réseau étendu (WAN) sans
fil, veillez à lire également la consigne réglementaire ThinkPad Regulatory
Notice for Wireless WAN adapter, fournie avec votre ordinateur.
Remarque: Vous ne pouvez pas utiliser simultanément la carte de réseau
étendu sans fil et la carte de réseau local sans fil (Modèles:
AR5BXB6, AR5BXB63-L, AR5BXB72, WM3945ABG, 4965AG, ou
4965AGN). Si l’une de ces cartes a établi la connexion avec le
réseau, l’autre carte sera automatiquement déconnectée. Pour
confirmer l’état de la connexion réseau, contrôlez les voyants
© Copyright Lenovo 2007 1
d’état d’alimentation. Pour plus d’informations, reportez-vous à la
section “Voyants d’état de l’alimentation” dans l’aide Access.
USA — Federal Communications Commission (FCC)
I. RF safety compliance
The antennas used for wireless LAN Mini PCI Express Cards (Model:
AR5BXB6, AR5BXB63-L, WM3945ABG, 4965AG, 4965AGN, and AR5BXB72) in
this notebook computer are located on the upper side of the LCD screen, and
the antenna used for Bluetooth card (Model: J07H081) is located on the
keyboard bezel under the palm rest to the right.
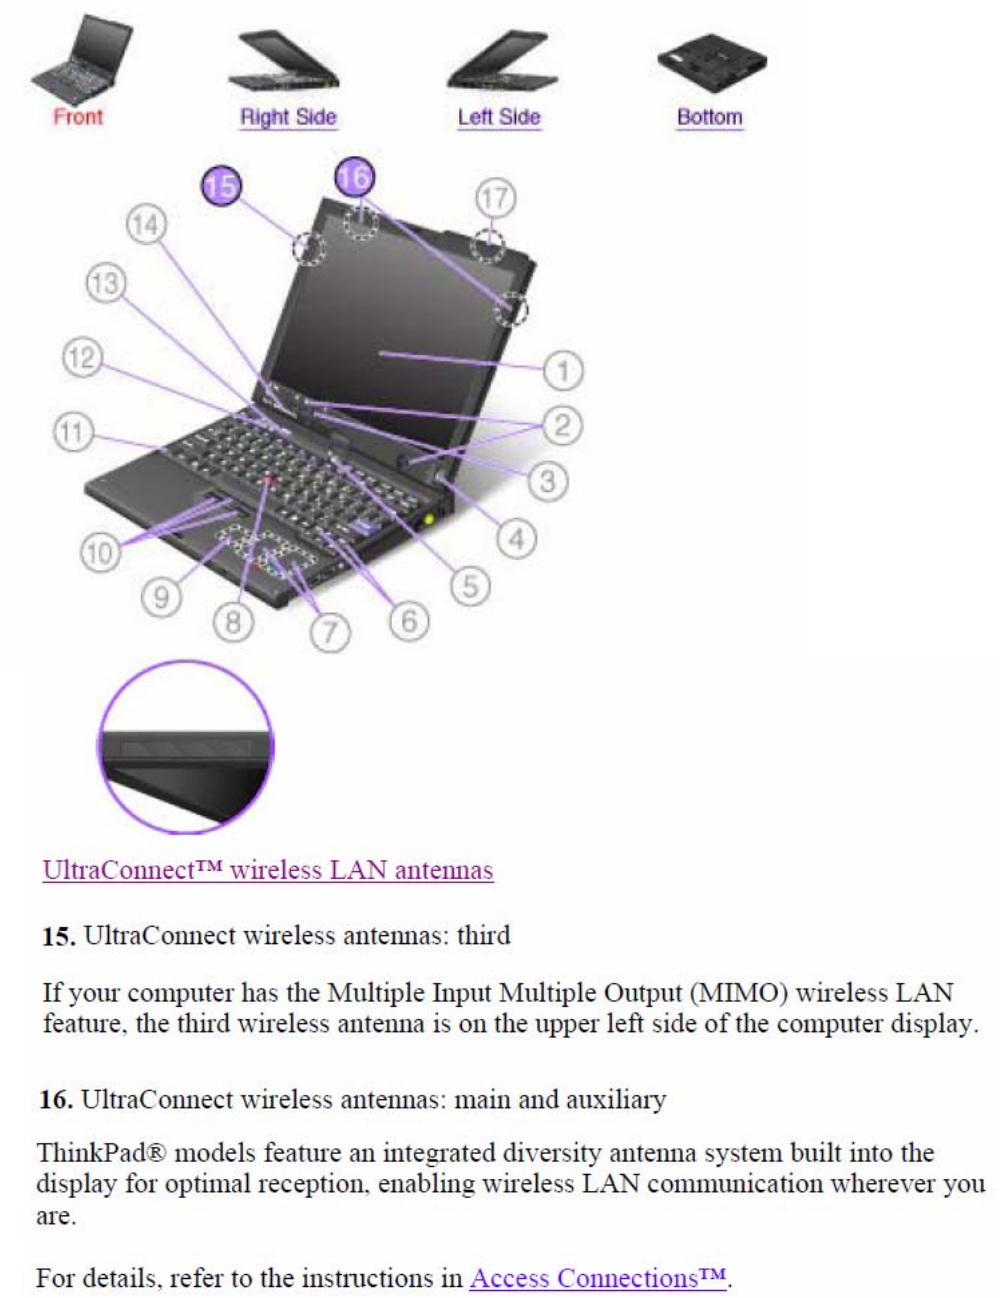
For the illustrations of each antenna location, see the “UltraConnect™ wireless
LAN antennas” and “Bluetooth antenna” sections in Access Help.
Note: The transmission diversity function is implemented for this product.
For WLAN cards (Models: AR5BXB6, AR5BXB63-L, WM3945ABG,
4965AG, and 4965AGN) using Main and Auxiliary antennas for
transmission in the IEEE 802.11 a/b/g transmission mode, radio
frequency energy is not emitted simultaneously from both Main and
Auxiliary antennas. One of the antennas is selected automatically or
manually (by users) to have good quality of radiocommunication
(transmission diversity function).
For the WLAN card (Model: 4965AGN) using MIMO (Multiple In
Multiple Out), multiple antennas (Main and Auxiliary) can transmit
radio frequency energy simultaneously.
For the WLAN card (Model: AR5BXB72) using either MIMO or IEEE
802.11 a/b/g transmission mode, multiple antennas (Main and
Auxiliary) can transmit radio frequency energy simultaneously.
Third antenna is also used with the Models: 4965AGN and AR5BXB72
on some models, and functions as Receive Only. It does not emit any
radio frequency energy.
The total radiated energy from the Main and Auxiliary antennas connected to
one of the wireless LAN Mini PCI Express Cards and Bluetooth card (with its
built-in antenna on the card) conforms to the FCC limit of SAR (Specific
Absorption Rate) requirement regarding CFR Part 2 section 1093. The
maximum SAR values measured for the ThinkPad X61 Tablet computer are
less than the limit (1.6W/Kg), when the computer was used in the
conventional settings.
II. User installable Wireless LAN module
Mini PCI Express Cards:
v FCC ID: PPD-AR5BXB6 (Model: AR5BXB6)
v FCC ID: PPD-AR5BXB63-L (Model: AR5BXB63-L)
v FCC ID: PPD-AR5BXB72-L (Model: AR5BXB72)
2
v FCC ID: PD9LEN3945ABG (Model: WM3945ABG)
v FCC ID: PD9LEN4965AG (Model: 4965AG)
v FCC ID: PD9LEN4965AGN (Model: 4965AGN)
Wireless LAN Mini PCI Express Cards marketed in the USA and Canada do
not support nor function in the extended channels (12ch, 13ch).
i) FCC ID of wireless module: There is no FCC ID for Mini PCI Express
Card shown on the enclosure of your ThinkPad computer. Instead you will
find an indicator pointing to the location of the FCC ID on the bottom side of
your ThinkPad computer. For the location of the FCC ID indicator, see the
“Location of the FCC ID and IC Certification number label” section in Access
Help. The FCC ID is affixed on the approved module installed in the Mini
PCI Express Card slot. For the location of the slot, see the “PCI Express Mini
Card slots” section in Access Help.
ii) Installation of approved wireless module: If no integrated wireless LAN
Mini PCI Express Card has been preinstalled in your ThinkPad computer, you
can install one, provided by Lenovo as an option. Plug the wireless card
option into the Mini PCI Express Card slot. For the installation procedure, see
the "Installing and replacing the PCI Express Mini Card for wireless LAN
connection" section in Access Help.
Attention: The ThinkPad computers contain an authentication mechanism.
If you install an unauthorized wireless LAN Mini PCI Express Card that is
not approved for use in your computer, the computer will not start, but only
displays an error message and emits beeps.
iii) Radio Frequency interference requirements:
v The devices have been tested and found to comply with the limits for a
Class B digital device pursuant to FCC Part 15 Subpart B. The models
AR5BXB6, AR5BXB63-L, and AR5BXB72 were subject to DoC. Refer to
“Electronic emission notices” on page 8.
The models WM3945ABG, 4965AG, and 4965AGN underwent the
certification process, thus FCC ID PD9LEN3945ABG for model
WM3945ABG, FCC ID PD9LEN4965AG for model 4965AG , and FCC ID
PD9LEN4965AGN for model 4965AGN include all compliances of Part 15
Subpart B, C, and E.
v Each device is restricted to indoor use due to its operation in the 5.15 to
5.25 GHz frequency range. FCC requires these products to be used indoors
for the frequency range 5.15 to 5.25 GHz to reduce the potential for harmful
interference to co-channel Mobile Satellite systems.
v High power radar are allocated as primary users of the 5.25 to 5.35 GHz
and 5.65 to 5.85 GHz bands. These radar stations can cause interference
with and/or damage this device.
3
III. Preinstalled integrated Bluetooth module
v FCC ID: MCLJ07H081 (Model: J07H081)
i) FCC ID and installation of the module: If you find the FCC ID
“MCLJ07H081” on the label at the bottom side of your computer, your
computer integrates the Bluetooth transmitter module (Model: J07H081). The
Bluetooth module is preinstalled by Lenovo, and is not removable by users. If
your card requires replacement via the proper steps shown in "Getting help
and service" of the Service and Troubleshooting Guide, shipped with your
computer, Lenovo will request you to send your computer with the card to
Lenovo so that Lenovo will repair it.
ii) The FCC RF safety requirement: The radiated output power of the
Bluetooth module is far below the FCC radio frequency exposure limits.
Therefore, a 20 cm of separation between the Bluetooth antenna and human
body is not required.
For the location of the Bluetooth module “J07H081” and its built-in antenna,
see the "About your computer" section in Access Help.
iii) Radio Frequency interference requirements: The device has been tested
and found to comply with the limits for both a Class B digital device
regarding FCC Part 15 Subpart B and an intentional radiator regarding FCC
Part 15 Subpart C; then it underwent the certification processes for both rules.
Thus the FCC ID MCLJ07H081 of this device includes both certifications of
Part 15 Subpart B and C.
IV. Digitizer function in LCD screen
The ThinkPad X61 Tablet computer employs a digitizer function in LCD
screen which is able to sense the Tablet Digitizer Pen shipped associated with
your computer. The digitizer emits extra low power radio frequency and
complies with the FCC Part 15, Subpart C. The FCC ID: PU5-X61T is indicated
on the label at the bottom side of your ThinkPad computer.
V. Simultaneous use of RF transmitters
Your ThinkPad computer is approved for simultaneous use of the transmitters
listed below:
v Wireless LAN adapter (FCC ID: PPD-AR5BXB6, PPD-AR5BXB63-L,
PPD-AR5BXB72-L, PD9LEN3945ABG, PD9LEN4965AG, or
PD9LEN4965AGN)
v Bluetooth module (FCC ID: MCLJ07H081)
Please make sure of the following conditions on use of these wireless features:
1. When you use any other RF option device, you are requested to confirm
that the device conforms to the SAR requirement and is approved to use
for ThinkPad X61 Tablet computer.
4
2. When you use any other RF option device, all other wireless features
including the above integrated devices in your ThinkPad computer are
required to be turned off.
3. Users must follow the RF Safety instructions on wireless option devices
that are included in the RF option device’s user’s manual.
Canada — Industry Canada (IC)
IC Certification number
I) User installable Wireless LAN modules:
v IC: 4104A-AR5BXB6 (Model: AR5BXB6)
v IC: 4104A-ARBXB63L (Model: AR5BXB63-L)
v IC: 4104A-ARBXB72L (Model: AR5BXB72)
v IC: 1000M-LEN3945 (Model: WM3945ABG)
v IC: 1000M-L4965AG (Model: 4965AG)
v IC: 1000M-L4965AGN (Model: 4965AGN)
Wireless LAN Mini PCI Express Cards marketed in the USA and Canada do
not support nor function in the extended channels (12ch, 13ch).
There is no certification number of Industry Canada for Mini PCI Express
Card shown on the enclosure of your ThinkPad computer. Instead you will
find an indicator pointing to the location of the IC Certification number on the
bottom side of your ThinkPad computer. For the location of the IC
Certification number indicator, see the “Location of the FCC ID and IC
Certification number label” section in Access Help. The IC certification
number is affixed on the approved module installed in the Mini PCI Express
Card slot. For the location of the slot, see the “PCI Express Mini Card slots”
section in Access Help.
Attention: The ThinkPad computer contains an authentication mechanism
You can install or remove each wireless feature by yourself. If you install an
unauthorized wireless adapter that is not approved for use in the ThinkPad
computer, the computer will not start, but only displays an error message and
emits beeps.
II) Digitizer function in LCD screen: The ThinkPad X61 Tablet computers
employ a digitizer function in LCD screen which is able to sense the Tablet
Digitizer Pen shipped associated with your computer. The digitizer emits
extra low power radio frequency and complies with the standard (RSS-210).
The IC certification number IC: 4182A-X61T is indicated on the label at the
bottom side of your ThinkPad computer.
III) Preinstalled integrated Bluetooth module:
v IC: 2878D-J07H081 (Model: J07H081)
5
If you find an indication “Contains Transmitter Module: Canada IC:
2878D-J07H081” on the label at the bottom side of your computer, your
computer integrates the Bluetooth transmitter module. The Bluetooth module is
preinstalled by Lenovo, and is not removable by users. If your card requires
replacement via the proper steps shown in "Getting help and service" of the
Service and Troubleshooting Guide, Lenovo will request you to send your
computer with the card to Lenovo so that Lenovo will repair it.
Low power license-exempt radiocommunication devices (RSS-210):
Operation is subject to the following two conditions:
1. This device may not cause interference, and
2. this device must accept any interference, including interference that may
cause undesired operation of the device.
The transmitter devices have been designed to operate with the antennas
integrated in ThinkPad computer, and having a maximum gain of within 3
dBi.
The maximum antenna gain permitted for devices in the 5250-5350 MHz and
5725-5825 MHz bands complies with the e.i.r.p. limit in section A9.2 of
RSS-210.
When you use the model AR5BXB6, AR5BXB72, WM3945ABG, 4965AG, or
4965AGN:
v The devices for the band 5150–5250 MHz are only for indoor usage to
reduce potential for harmful interference to co-channel Mobile Satellite
systems.
v High power radars are allocated as primary users (meaning they have
priority) of 5250–5350 MHz and 5650–5850 MHz and these radars could
cause interference and/or damage to LELAN (Licence-Exempt Local Area
Network) devices.
Exposure of humans to RF fields (RSS-102): ThinkPad computers employ
low gain integral antennas that do not emit RF field in excess of Health
Canada limits for the general population; consult Safety Code 6, obtainable
from Health Canada’s Web site at www.hc-sc.gc.ca/rpb
Numéro d’homologation IC
I) Module sans fil installable par l’utilisateur: Les cartes Express mini-PCI
de réseau local sans fil:
v IC: 4104A-AR5BXB6 (Model: AR5BXB6)
v IC: 4104A-ARBXB63L (Model: AR5BXB63-L)
v IC: 4104A-ARBXB72L (Model: AR5BXB72)
v IC: 1000M-LEN3945 (Model: WM3945ABG)
v IC: 1000M-L4965AG (Model: 4965AG)
6
v IC: 1000M-L4965AGN (Model: 4965AGN)
Les cartes de réseau local sans fil Express mini-PCI commercialisées aux
Etats-Unis et au Canada ne prennent pas en charge les canaux étendus (12ch,
13ch) et ne fonctionnent donc pas sur de tels canaux.
Le boîtier de votre ordinateur ThinkPad ne comporte pas de numéro
d’homologation IC (Industry Canada) pour la carte mini-PCI Express ; mais
sous votre ThinkPad, vous trouverez un indicateur pointant vers
l’emplacement du numéro d’homologation IC. Pour connaître l’emplacement
du numéro d’homologation IC, consultez la section correspondante dans l’aide
Access. Le numéro d’homologation IC est apposé sur le module installé dans
le logement pour carte mini-PCI Express. Pour connaître l’emplacement de ce
logement, consultez la section correspondante dans l’aide Access.
Attention: L’ordinateur ThinkPad contient un mécanisme d’authentification.
Vous pouvez installer ou désinstaller tout dispositif sans fil. Si vous installez
une carte sans fil qui n’est pas homologuée pour l’ordinateur ThinkPad,
l’ordinateur ne démarrera pas; un message d’erreur sera affiché et des bips
sonores seront émis.
II) Fonction de numérisation sur écran LCD: Les ordinateurs ThinkPad X61
Tablet utilisent une fonction de numérisation sur écran LCD capable de
détecter le stylo numériseur de la tablette graphique qui est associé à votre
ordinateur. Le numériseur émet une fréquence radio extrêmement basse et il
est conforme à la norme CNR-210. Le numéro de certification IC: 4182A-X61T
figure sur l’étiquette apposée au bas de votre ordinateur ThinkPad.
III) Module Bluetooth intégré préinstallé:
v IC : 2878D-J07H081 (Modèle : J07H081)
Si la mention “Contains Transmitter Module: Canada IC: 2878D-J07H081”
figure sur l’étiquette située au bas de votre ordinateur, cela signifie que ce
dernier intègre le module de transmission Bluetooth. Le module Bluetooth est
préinstallé par Lenovo et ne peut pas être retiré par les utilisateurs. Si votre
carte doit être remplacée conformément aux étapes du Chapitre relatif à l’aide
et la maintenance dans le manuel Guide de maintenance et d’identification des
incidents, Lenovo vous demandera de lui envoyer votre ordinateur
accompagné de la carte pour réparation.
Remarque relative aux appareils de communication radio de faible
puissance sans licence (CNR-210): Le fonctionnement de ce type d’appareil
est soumis aux deux conditions suivantes:
1. Cet appareil ne doit pas perturber les communications radio, et
2. cet appareil doit supporter toute perturbation, y compris les perturbations
qui pourraient provoquer son dysfonctionnement.
7
Les périphériques d’émission sont conçus pour fonctionner avec des antennes
intégrées aux ThinkPad et ayant un gain maximal de moins de 3 dBi.
Le gain d’antenne maximal pour les périphériques dans les bandes de
fréquence 5250-5350 MHz et 5725-5825 MHz est conforme à la limite p.i.r.e
énoncée dans la section A9.2 de la CNR-210.
Lorsque vous utilisez le modèle AR5BXB6, AR5BXB72, WM3945ABG, 4965AG,
ou 4965AGN :
v Tout appareil destiné à la bande 5150-5250 MHz devra être exclusivement
utilisé en intérieur afin de réduire les risques de perturbations
électromagnétiques gênantes sur les systèmes de satellite mobile dans un
même canal.
v Les radars à forte puissance sont désignés comme les utilisateurs
principaux (c’est-à-dire qu’ils sont prioritaires) des bandes 5250-5350 MHz
et 5650-5850 MHz. Ils peuvent provoquer des perturbations
électromagnétiques sur les appareils de type LELAN (réseau de
communication local sans licence) ou les endommager.
Exposition des êtres humains aux champs radioélectriques (RF) (CNR-102):
L’ordinateur ThinkPad utilise des antennes intégrales à faible gain qui
n’émettent pas un champ électromagnétique supérieur aux normes imposées
par le Ministére de la santé canadien pour la population. Consultez le Safety
Code 6 sur le site Web du Ministére de la santé canadien à l’adresse
“www.hc-sc.gc.ca/rpb”.
Electronic emission notices
Federal Communications Commission (FCC) Statement
v Model: AR5BXB6
v Model: AR5BXB63-L
v Model: AR5BXB72
v Model: ThinkPad X61 Tablet (Machine Type: 7762, 7763, 7764, 7767, 7768
and 7769)
Note: The compliances of the FCC Part 15 Subpart B for models
WM3945ABG, 4965AG, 4965AGN, and J07H081 were proceeded by
certification under each respective FCC ID: PD9LEN3945ABG,
PD9LEN4965AG, PD9LEN4965AGN, and MCLJ07H081.
This equipment has been tested and found to comply with the limits for a
Class B digital device, pursuant to Part 15 of the FCC Rules. These limits are
designed to provide reasonable protection against harmful interference in a
residential installation. This equipment generates, uses, and can radiate radio
frequency energy and, if not installed and used in accordance with the
instructions, may cause harmful interference to radio communications.
8

However, there is no guarantee that interference will not occur in a particular
installation. If this equipment does cause harmful interference to radio or
television reception, which can be determined by turning the equipment off
and on, the user is encouraged to try to correct the interference by one or
more of the following measures:
v Reorient or relocate the receiving antenna.
v Increase the separation between the equipment and receiver.
v Connect the equipment into an outlet on a circuit different from that to
which the receiver is connected.
v Consult an authorized dealer or service representative for help.
Lenovo is not responsible for any radio or television interference caused by
unauthorized changes or modifications to this equipment. Unauthorized
changes or modifications could void the user’s authority to operate the
equipment.
This device complies with Part 15 of the FCC Rules. Operation is subject to
the following two conditions: (1) this device may not cause harmful
interference, and (2) this device must accept any interference received,
including interference that may cause undesired operation.
Responsible Party:
Lenovo (United States) Incorporated
5241 Paramount Parkway
Morrisville, NC 27650
Telephone: (919) 254-0532
Tested To Comply
With FCC Standards
FOR HOME OR OFFICE USE
Industry Canada Class B Emission Compliance Statement
This Class B digital apparatus complies with Canadian ICES-003.
Avis de conformité à la réglementation d’Industrie Canada
Cet appareil numérique de la classe B est conforme à la norme NMB-003 du
Canada.
Telecommunication notices
Federal Communications Commission (FCC) and Telephone Company
Requirements (Part 68 of the FCC Rules)
1. The Telephone Consumer Protection Act of 1991 makes it unlawful for
any person to use a computer or other electronic device to send any
message via a telephone fax machine unless such message clearly
contains in a margin at the top or bottom of each transmitted page or on
9
the first page of the transmission, the date and time it is sent, and an
identification of the business or other entity, or other individual sending
the message and the telephone number of the sending machine or such
business, other entity, or individual.
In order to program this information into your computer, you should be
sure to follow the installation instructions for your fax software package.
2. This equipment complies with Part 68 of the FCC rules and the
requirements adopted by the ACTA. On this equipment is a label that
contains, among other information, a product identifier in the format
US:AAAEQ##TXXXX. If requested, this number must be provided to the
telephone company.
3. The REN is used to determine the number of devices that may be
connected to a telephone line. Excessive RENs on a telephone line may
result in the devices not ringing in response to an incoming call. In most
but not all areas, the sum of RENs should not exceed five (5.0). To be
certain of the number of devices that may be connected to a line, as
determined by the total RENs, contact the local telephone company. The
REN for this product is part of the product identifier that has the format
US:AAAEQ##TXXXX. The digits represented by ## are the REN without
a decimal point (e.g., 03 is a REN of 0.3).
4. If the built-in modem causes harm to the telephone network, the
telephone company may discontinue your service temporarily. If possible,
they will notify you in advance. But, if advance notice isn’t practical, you
will be notified as soon as possible. You will be advised of your right to
file a complaint with the FCC.
5. Your telephone company may make changes in its facilities, equipment,
operations, or procedures that could affect the proper operation of your
equipment. If they do, you will be given advance notice so as to give you
an opportunity to maintain uninterrupted service.
6. No customer repairs are possible to the modem. If you experience trouble
with this built-in modem, contact your Lenovo Authorized Seller, or the
Customer Support Center. For the most current phone numbers, go to
http://www.lenovo.com/think/support and click Support phone list.
The telephone company may ask you to disconnect this equipment from
the network until the problem has been corrected, or until you are sure
the equipment is not malfunctioning.
7. The modem may not be used on coin service provided by the telephone
company. Connection to party lines is subject to state tariffs. Contact your
state public utility commission or corporation commission for
information.
8. When ordering network interface (NI) service from the Local Exchange
Carrier, specify service arrangement USOC RJ11C.
9. A plug and jack used to connect this equipment to the premises wiring
and telephone network must comply with the applicable FCC Part 68
rules and requirements adopted by the ACTA. A compliant telephone
10
cord and modular plug is provided with this product. It is designed to be
connected to a compatible modular jack that is also compliant. See
installation instructions for details.
10. If your home has specially wired alarm equipment connected to the
telephone line, ensure the installation of this Data/Fax Modem does not
disable your alarm equipment. If you have questions about what will
disable alarm equipment, consult your telephone company or a qualified
installer.
Industry Canada requirements
Notice
This equipment meets the applicable Industry Canada Terminal Equipment
Technical Specifications. This is confirmed by the registration number. The
abbreviation, IC, before the registration number signifies that registration was
performed based on a Declaration of Conformity indicating that Industry
Canada technical specifications were met. It does not imply that Industry
Canada approved the equipment.
Before installing this equipment, users should ensure that it is permissible to
be connected to the facilities of the local telecommunications company. The
equipment must also be installed using an acceptable method of
communication. In some cases, the company’s inside wiring associated with a
single line individual service may be extended by means of a certified
connector assembly (telephone extension cord). The customer should be aware
that compliance with the above conditions may not prevent degradation of
service in some situations.
Repairs to certified equipment should be made by an authorized Canadian
maintenance facility designated by the supplier. Any repairs of alterations
made by the user to this equipment, or equipment malfunctions, may give the
telecommunications company cause to request the user to disconnect the
equipment.
Users should ensure for their own protection that the electrical ground
connections of the power utility, telephone lines and internal metallic water
pipe system, if present, are connected together. This precaution may be
particularly important in rural areas.
Caution
Users should not attempt to make such connections themselves, but should
contact the appropriate electric inspection authority, or electrician, as
appropriate.
The Ringer Equivalence Number (REN) for the terminal equipment
RD02-D110 is 0.1. The REN assigned to each terminal equipment provides an
indication of the maximum number of terminals allowed to be connected to a
11
telephone interface. The termination on an interface may consist of any
combination of devices subject only to the requirement that the sum of the
Ringer Equivalence Numbers of all the devices does not exceed five.
Avis
Le présent matériel est conforme aux spécifications techniques d’Industrie
Canada applicables au matériel terminal. Cette conformité est confirmée par le
numéro d’enregistrement. Le sigle IC, placé devant le numéro
d’enregistrement, signifie que l’enregistrement s’est effectué conformément à
une déclaration de conformité et indique que les spécifications techniques
d’Industrie Canada ont été respectées. Il n’implique pas qu’Industrie Canada a
approuvé le matériel.
Avant d’installer ce matériel, l’utilisateur doit s’assurer qu’il est permis de le
raccorder aux installations de l’entreprise locale de télécommunication. Le
matériel doit également être installé en suivant une méthode acceptée de
raccordement. Dans certains cas, les fils intérieurs de l’entreprise utilisés pour
un service individuel à ligne unique peuvent être prolongés au moyen d’un
dispositif homologué de raccordement (cordon prolongateur téléphonique
interne). L’abonné ne doit pas oublier qu’il est possible que la conformité aux
conditions énoncées ci-dessus n’empechent pas la dégradation du service dans
certaines situations. Actuellement, les entreprises de télécommunication ne
permettent pas que l’on raccorde leur matériel à des jacks d’abonné, sauf dans
les cas précis prévus par les tarifs paticuliers de ces entreprises.
Les réparations de matériel homologué doivent être effectuées par un centre
d’entretien canadien autorisé désigné par le fournisseur. La compagnie de
télécommunications peut demander à l’utilisateur de débrancher un appareil à
la suite de réparations ou de modifications effectuées par l’utilisateur ou à
cause de mauvais fonctionnement.
Pour sa propre protection, l’utilisateur doit s’assurer que tous les fils de mise
à la terre de la source d’énergie électrique, des lignes téléphoniques et des
canalisations d’eau métalliques, s’il y en a, sont raccordés ensemble. Cette
précaution est particulièrement importante dans les régions rurales.
Avertissement
L’utilisateur ne doit pas tenter de faire ces raccordements lui-même; il doit
avoir recours à un service d’inspection des installations électriques, ou à
électricien, selon le cas.
L’indice d’équivalence de la sonnerie (IES) du présent matériel RD02-D110 est
de 0.1. L’IES assigné à chaque dispositif terminal indique le nombre maximal
de terminaux qui peuvent être raccordés à une interface téléphonique. La
terminaison d’une interface peut consister en une combinaison quelconque de
12
dispositifs, à la seule condition que la somme d’indices d’équivalence de la
sonnerie de tous les dispositifs n’excède pas 5.
Trademarks
The following terms are trademarks of Lenovo in the United States, other
countries, or both:
Lenovo
ThinkPad
Other company, product, and service names may be trademarks or service
marks of others.
13
2. Regulatory Notice for WWAN feature (Model MC5725 and MC8775)

Part Number: 42X3528
ThinkPad® Regulatory Notice for Wireless WAN adapter
Read first — regulatory information
Please read this document before you use the ThinkPad computer. Be sure to
also read ThinkPad Regulatory Notice, included with your computer.
ThinkPad computer complies with the radio frequency and safety standards
of any country or region in which it has been approved for wireless use. You
must install and use your computer in strict accordance with the instructions
as described hereafter.
You cannot use the Wireless WAN Adapter Model: MC5725 and a Wireless
LAN adapter simultaneously. If one of the adapters has established the
connection to the network, the other will be disconnected automatically. To
confirm the status of the network connection, check the power status
indicators of your computer. For more information about the power status
indicators, see the “Power status indicators” section in Access Help.
USA — Federal Communications Commission (FCC)
If your computer integrates the Wireless WAN adapter Model: MC5725, you
may connect it to the radiocommunication Public Network in the USA.
I. FCC ID of the wireless module
The Wireless WAN adapter (Model: MC5725) was certified under the FCC ID:
N7N-MC5725-L, but there is no FCC ID for the card shown on the enclosure
of your ThinkPad computer. Instead you will find an indicator pointing to the
location of the FCC ID on the bottom side of your ThinkPad computer. For
the location of the FCC ID indicator, see the "Location of the FCC ID and IC
Certification number label" in Access Help. The FCC ID is affixed on the
approved module installed in the Mini PCI Express Card slot.
For the location of the slot, see the "PCI Express Mini Card slots" section in
Access Help.
II. Installation of the approved wireless module
If no integrated wireless WAN Mini PCI Express Card has been preinstalled in
your ThinkPad computer, you can install one, provided by Lenovo as an
option. Plug the wireless card option into the Mini PCI Express Card slot.
For the installation procedure, see the "Replacing the PCI Express Mini Card
for wireless WAN connection" section in Access Help.
© Copyright Lenovo 2007 1
Attention: The ThinkPad computers contain an authentication mechanism.
If you install an unauthorized wireless WAN Mini PCI Express Card that is
not approved for use in your ThinkPad computer, the computer will not start,
but only displays an error message and emits beeps.
III. RF safety compliance
The total radiated energy from the antenna connected to the Wireless WAN
adapter (Model: MC5725), the Bluetooth module with its built-in antenna on
card (Model: J07H081), and the Wireless USB Card (Model: T60H990)
conforms to the FCC limit of the SAR (Specific Absorption Rate) requirement
regarding 47 CFR Part 2 section 1093. The maximum SAR values measured
for your ThinkPad computer were less than the FCC limit 1.6W/Kg, when the
ThinkPad computer was operated in a conventional setting.
For the location of the antenna, see the "About your computer" section in
Access Help.
IV. Emergency Calls
The Wireless WAN adapters embedded in the ThinkPad computer do not
support voice calls, hence their use for essential communication is not
possible, including emergency calls regarding the E911 rule.
V. Simultaneous use of RF transmitters
If your ThinkPad computer contains the Bluetooth module (Model: J07H081,
FCC ID: MCLJ07H081) or the Wireless USB Card (Model: T60H990, FCC ID:
MCLT60H990), the Wireless WAN module Model: MC5725 is approved for
simultaneous use with these radio devices.
Please make sure of the following conditions on use of these wireless features:
1. When you use any other RF option device, all other wireless features
including the above integrated devices in your ThinkPad computer are
required to be turned off.
2. Users must follow the RF Safety instructions on wireless option devices
that are included in the RF option device’s user’s manual.
Electronic emission notices
Federal Communications Commission (FCC) Statement
v Model: MC5725
This equipment has been tested and found to comply with the limits for a
Class B digital device, pursuant to Part 15 of the FCC Rules. These limits are
designed to provide reasonable protection against harmful interference in a
residential installation. This equipment generates, uses, and can radiate radio
frequency energy and, if not installed and used in accordance with the
instructions, may cause harmful interference to radio communications.
However, there is no guarantee that interference will not occur in a particular
installation. If this equipment does cause harmful interference to radio or
2

television reception, which can be determined by turning the equipment off
and on, the user is encouraged to try to correct the interference by one or
more of the following measures:
v Reorient or relocate the receiving antenna.
v Increase the separation between the equipment and receiver.
v Connect the equipment into an outlet on a circuit different from that to
which the receiver is connected.
v Consult an authorized dealer or service representative for help.
Lenovo is not responsible for any radio or television interference caused by
unauthorized changes or modifications to this equipment. Unauthorized
changes or modifications could void the user’s authority to operate the
equipment.
This device complies with Part 15 of the FCC Rules. Operation is subject to
the following two conditions: (1) this device may not cause harmful
interference, and (2) this device must accept any interference received,
including interference that may cause undesired operation.
Responsible Party:
Lenovo (United States) Inc.
5241 Paramount Parkway
Morrisville, NC 27650
Telephone: (919) 254-0532
Tested To Comply
With FCC Standards
FOR HOME OR OFFICE USE
Trademarks
The following terms are trademarks of Lenovo in the United States, other
countries, or both:
Lenovo
ThinkPad
Other company, product, and service names may be trademarks or service
marks of others.
3

Part Number: 42X3544
ThinkPad® Regulatory Notice for Wireless WAN adapter
Canada — Industry Canada (IC)
IC Certification number
User installable Wireless WAN module:
v IC: 2417C-MC5725 (Model: MC5725)
There is no certification number of Industry Canada for Mini PCI Express
Card shown on the enclosure of your ThinkPad computer. Instead you will
find an indicator pointing to the location of the certification number on the
bottom side of your ThinkPad computer. For the location of the certification
number indicator, see the “Location of the FCC ID and IC certification number
label” section in Access Help. The certification number of Industry Canada is
affixed on the approved module installed in the Mini PCI Express Card slot.
For the location of the slot, see the “PCI Express Mini Card slots” section in
Access Help.
Attention: The ThinkPad computer contains an authentication mechanism.
You can install or remove each wireless feature by yourself. If you install an
unauthorized wireless adapter that is not approved for use in the ThinkPad
computer, the computer will not start, but only displays an error message and
emits beeps.
Exposure of humans to RF fields (RSS-102)
ThinkPad computers employ low gain integral antennas that do not emit RF
field in excess of Health Canada limits for the general population; consult
Safety Code 6, obtainable from Health Canada’s Web site at
www.hc-sc.gc.ca/rpb
Industry Canada Class B Emission Compliance Statement
This Class B digital apparatus complies with Canadian ICES-003.
Operation is subject to the following two conditions: (1) this device may not
cause interference, and (2) this device must accept any interference, including
interference that may cause undesired operation of the device.
© Copyright Lenovo 2006 1
Numéro d’homologation IC
Module sans fil installable par l’utilisateur:
v IC: 2417C-MC5725 (Modèle: MC5725)
Le numéro d’homologation d’Industrie Canada pour le carte sans fil Express
mini-PCI homologuée est indiqué sur le module installé dans l’emplacement
réservé à la carte Express mini-PCI. Pour plus d'informations sur
l’emplacement réservé à la carte Express mini-PCI reportez-vous à la rubrique
"ThinkPad - Présentation" dans Access Help.
Attention: L’ordinateur ThinkPad contient un mécanisme d’authentification.
Vous pouvez installer ou désinstaller tout dispositif sans fil. Si vous installez
une carte sans fil qui n’est pas homologuée pour l’ordinateur ThinkPad,
l’ordinateur ne démarrera pas; un message d’erreur sera affiché et des bips
sonores seront émis.
Exposition des êtres humains aux champs radioélectriques (RF)
(CNR-102)
L’ordinateur ThinkPad utilise des antennes intégrales à faible gain qui
n’émettent pas un champ électromagnétique supérieur aux normes imposées
par le Ministére de la santé canadien pour la population. Consultez le Safety
Code 6 sur le site Web du Ministére de la santé canadien à l’adresse
www.hc-sc.gc.ca/rpb.
Avis de conformité à la réglementation d’Industrie Canada
Cet appareil numérique de la classe B est conforme à la norme NMB-003 du
Canada.
Le fonctionnement de ce type d’appareil est soumis aux deux conditions
suivantes: (1) Cet appareil ne doit pas perturber les communications radio, et
(2) cet appareil doit supporter toute perturbation, y compris les perturbations
qui pourraient provoquer son dysfonctionnement.
2

Part Number: 42X3541
ThinkPad® Regulatory Notice for Wireless WAN adapter
Read first — regulatory information
Please read this document before you use the ThinkPad computer. Be sure to
also read ThinkPad Regulatory Notice, included with your computer.
ThinkPad computer complies with the radio frequency and safety standards
of any country or region in which it has been approved for wireless use. You
must install and use your computer in strict accordance with the instructions
as described hereafter.
You cannot use the Wireless WAN Adapter Model: MC8775 and a Wireless
LAN adapter simultaneously. If one of the adapters has established the
connection to the network, the other will be disconnected automatically. To
confirm the status of the network connection, check the power status
indicators of your computer. For more information about the power status
indicators, see the “Power status indicators” section in Access Help.
USA — Federal Communications Commission (FCC)
If your computer integrates the Wireless WAN adapter Model: MC8775, you
may connect it to the radiocommunication Public Network in the USA. This
WWAN Module is only certified with the FCC.
I. FCC ID of the wireless module
The Wireless WAN adapter (Model: MC8775) was certified under the FCC ID:
N7NMC8775-L, but there is no FCC ID for the card shown on the enclosure of
your ThinkPad computer. Instead you will find an indicator pointing to the
location of the FCC ID on the bottom side of your ThinkPad computer. For
the location of the FCC ID indicator, see the "Location of the FCC ID and IC
Certification number label" in Access Help. The FCC ID is affixed on the
approved module installed in the Mini PCI Express Card slot.
For the location of the slot, see the "PCI Express Mini Card slots" section in
Access Help.
II. Installation of the approved wireless module
If no integrated wireless WAN Mini PCI Express Card has been preinstalled in
your ThinkPad computer, you can install one, provided by Lenovo as an
option. Plug the wireless card option into the Mini PCI Express Card slot.
© Copyright Lenovo 2007 1
For the installation procedure, see the "Replacing the PCI Express Mini Card
for wireless WAN connection" section in Access Help.
Attention: The ThinkPad computers contain an authentication mechanism.
If you install an unauthorized wireless WAN Mini PCI Express Card that is
not approved for use in your ThinkPad computer, the computer will not start,
but only displays an error message and emits beeps.
III. RF safety compliance
The total radiated energy from the antenna connected to the Wireless WAN
adapter (Model: MC8775), the Bluetooth module with its built-in antenna on
card (Model: J07H081), and the Wireless USB Card (Model: T60H990)
conforms to the FCC limit of the SAR (Specific Absorption Rate) requirement
regarding 47 CFR Part 2 section 1093. The maximum SAR values measured
for your ThinkPad computer were less than the FCC limit 1.6W/Kg, when the
ThinkPad computer was operated in a conventional setting.
For the location of the antenna, see the "About your computer" section in
Access Help.
IV. Emergency Calls
The Wireless WAN adapters embedded in the ThinkPad computer do not
support voice calls, hence their use for essential communication is not
possible, including emergency calls regarding the E911 rule.
V. Simultaneous use of RF transmitters
If your ThinkPad computer contains the Bluetooth module (Model: J07H081,
FCC ID: MCLJ07H081) or the Wireless USB Card (Model: T60H990, FCC ID:
MCLT60H990), the Wireless WAN module Model: MC8775 is approved for
simultaneous use with these radio devices.
Please make sure of the following conditions on use of these wireless features:
1. When you use any other RF option device, all other wireless features
including the above integrated devices in your ThinkPad computer are
required to be turned off.
2. Users must follow the RF Safety instructions on wireless option devices
that are included in the RF option device’s user’s manual.
Electronic emission notices
Federal Communications Commission (FCC) Statement
v Model: MC8775
This equipment has been tested and found to comply with the limits for a
Class B digital device, pursuant to Part 15 of the FCC Rules. These limits are
designed to provide reasonable protection against harmful interference in a
residential installation. This equipment generates, uses, and can radiate radio
frequency energy and, if not installed and used in accordance with the
2

instructions, may cause harmful interference to radio communications.
However, there is no guarantee that interference will not occur in a particular
installation. If this equipment does cause harmful interference to radio or
television reception, which can be determined by turning the equipment off
and on, the user is encouraged to try to correct the interference by one or
more of the following measures:
v Reorient or relocate the receiving antenna.
v Increase the separation between the equipment and receiver.
v Connect the equipment into an outlet on a circuit different from that to
which the receiver is connected.
v Consult an authorized dealer or service representative for help.
Lenovo is not responsible for any radio or television interference caused by
unauthorized changes or modifications to this equipment. Unauthorized
changes or modifications could void the user’s authority to operate the
equipment.
This device complies with Part 15 of the FCC Rules. Operation is subject to
the following two conditions: (1) this device may not cause harmful
interference, and (2) this device must accept any interference received,
including interference that may cause undesired operation.
Responsible Party:
Lenovo (United States) Inc.
5241 Paramount Parkway
Morrisville, NC 27650
Telephone: (919) 254-0532
Tested To Comply
With FCC Standards
FOR HOME OR OFFICE USE
Trademarks
The following terms are trademarks of Lenovo in the United States, other
countries, or both:
Lenovo
ThinkPad
Other company, product, and service names may be trademarks or service
marks of others.
3
3. Electronic Users Manual
10. Bluetooth antenna
Some ThinkPa
d
® models have Inte
g
rated
B
luetooth features.
Right-side view
1/2 ページLocation: Bluetooth antenna
2007/03/19file://C:\TamaTemp\LCBLUE.HTM\LCBLUE.HTM
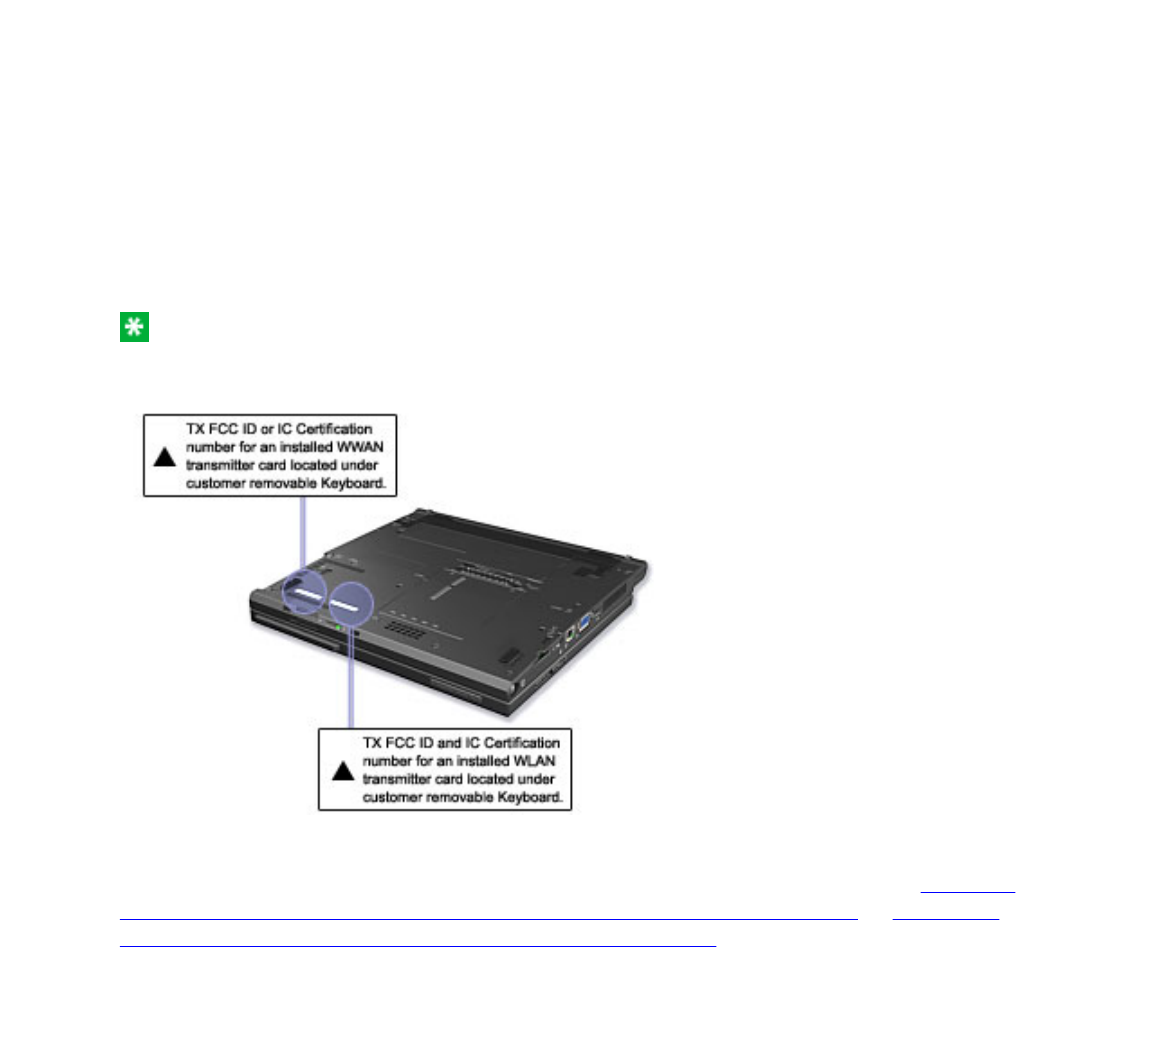
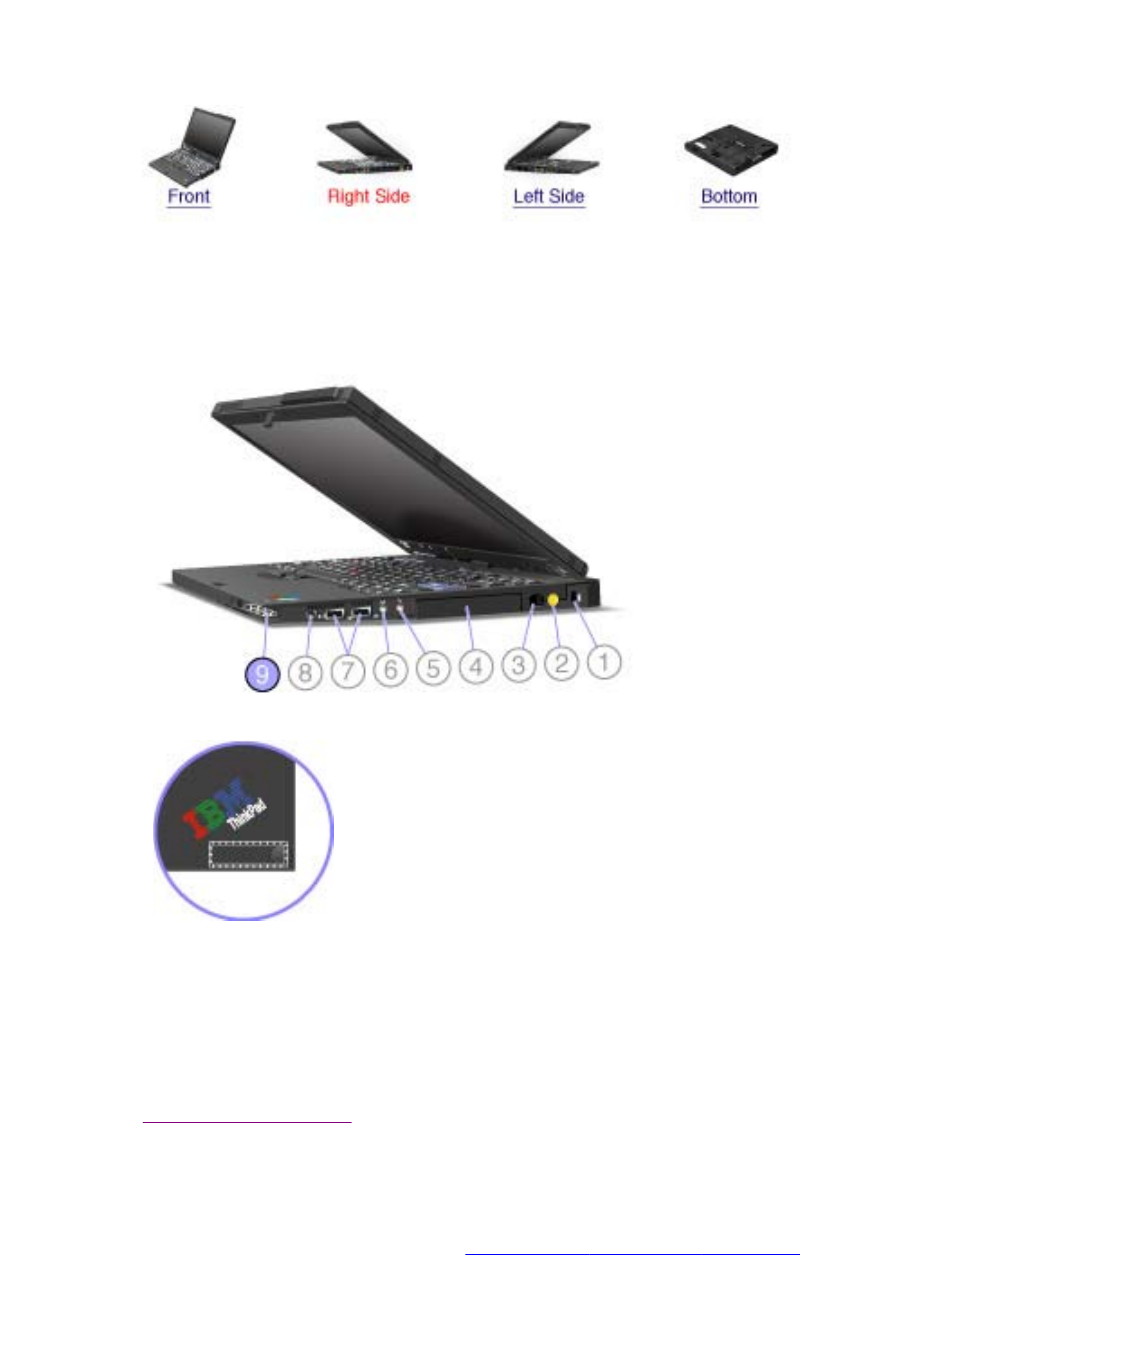
There is no FCC ID or IC Certification number for the PCI Express Mini Card shown
on the enclosure of your ThinkPad® computer. Instead you will find an indicator
pointing to the location of the FCC ID and the IC Certification number for the
installed transmitter card on the bottom side of your ThinkPad as shown below. The
FCC ID and IC Certification number label is affixed on the card installed in the Mini
PCI Express Card slot of your ThinkPad computer.
Note: The wording of the label may vary depending on the model.
If no integrated wireless PCI Express Mini Card has been preinstalled in your
ThinkPad computer, you can install one. To do this, follow the procedure in Installing
and replacing the PCI Express Mini Card for wireless LAN connection or Replacing
the PCI Express Mini Card for wireless WAN connection.
Location of the FCC ID and IC Certification number label
1/1 ページLocation of the FCC ID and IC Certification number label
2007/03/19file://C:\TamaTemp\fccidlbl.htm\fccidlbl.htm
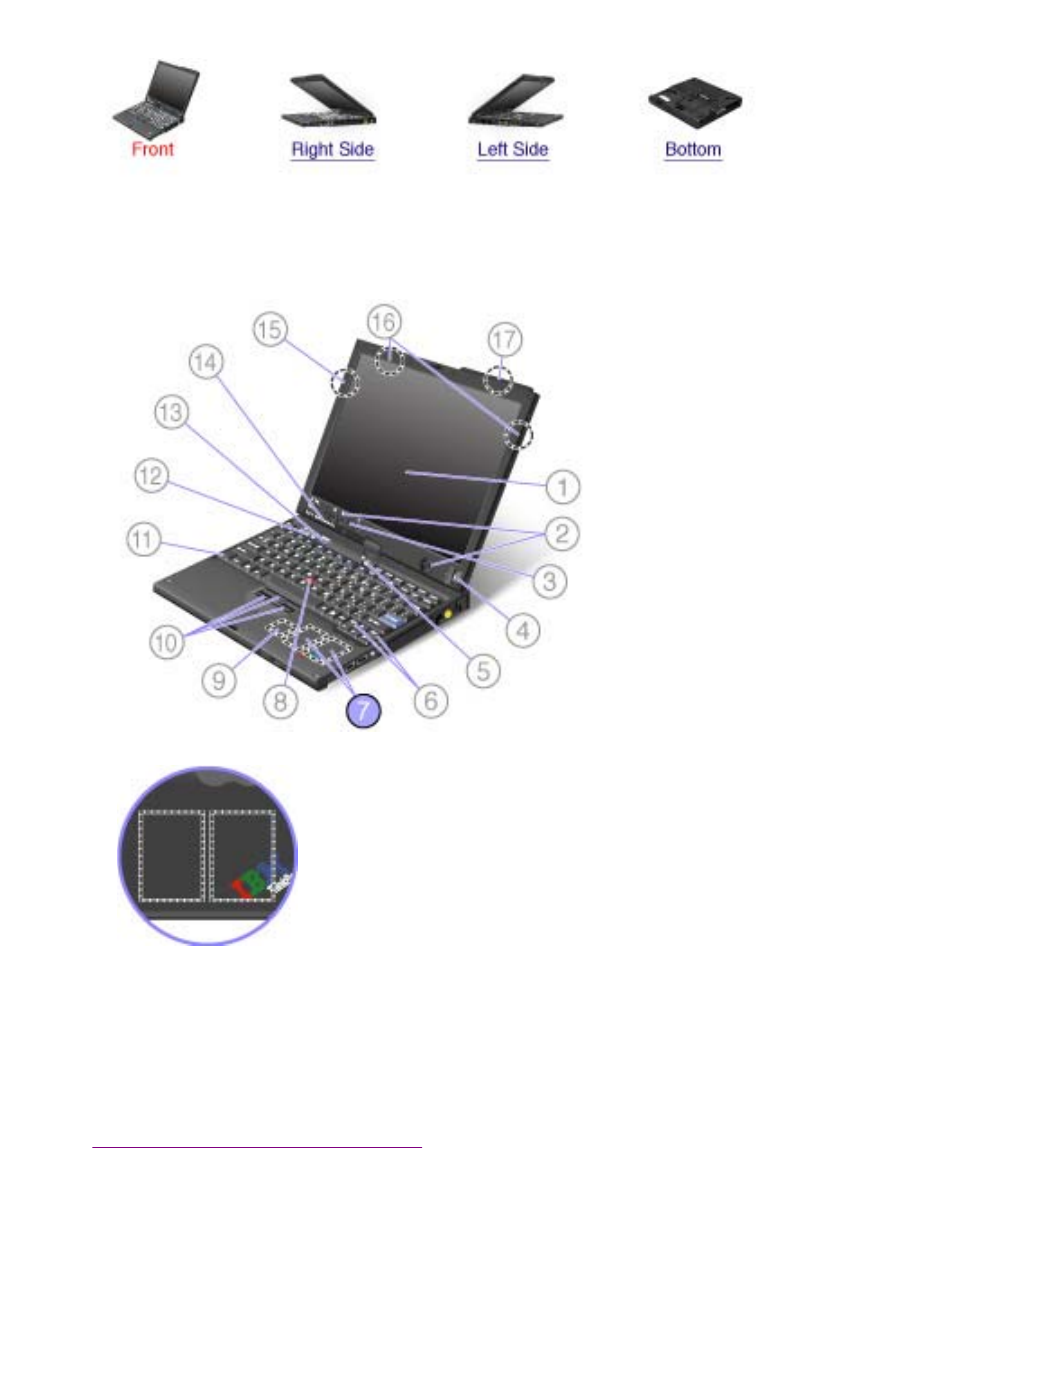
7. PCI Express Mini Card slots
Your computer might include PCI Express Mini Cards in the PCI Express Mini
Card slots which enable wireless LAN and WAN communications.
Front view
1/1 ページLocation: PCI Express Mini Card slot
2007/03/19file://C:\TamaTemp\LCMPCI.HTM\LCMPCI.HTM

Before you start, print these instructions.
To replace the PCI Express Mini Card or the Modem Daughter Card, you need to remove the keyboard and
then the palm rest.
Danger: During electrical storms, do not connect the cable to or disconnect it from the telephone
outlet on the wall.
Danger: Electric current from power, telephone, and communication cables is hazardous. To avoid
shock hazard, disconnect the cables before opening the cover of this slot.
To remove the palm rest, do as follows:
1. Turn off the computer; then disconnect the ac adapter and all cables from the computer. Wait for a few
minutes, till the inside of the computer cools, before you start the following procedures.
2. Remove the battery.
3. Remove the Tablet Digitizer Pen.
4. Remove the keyboard.
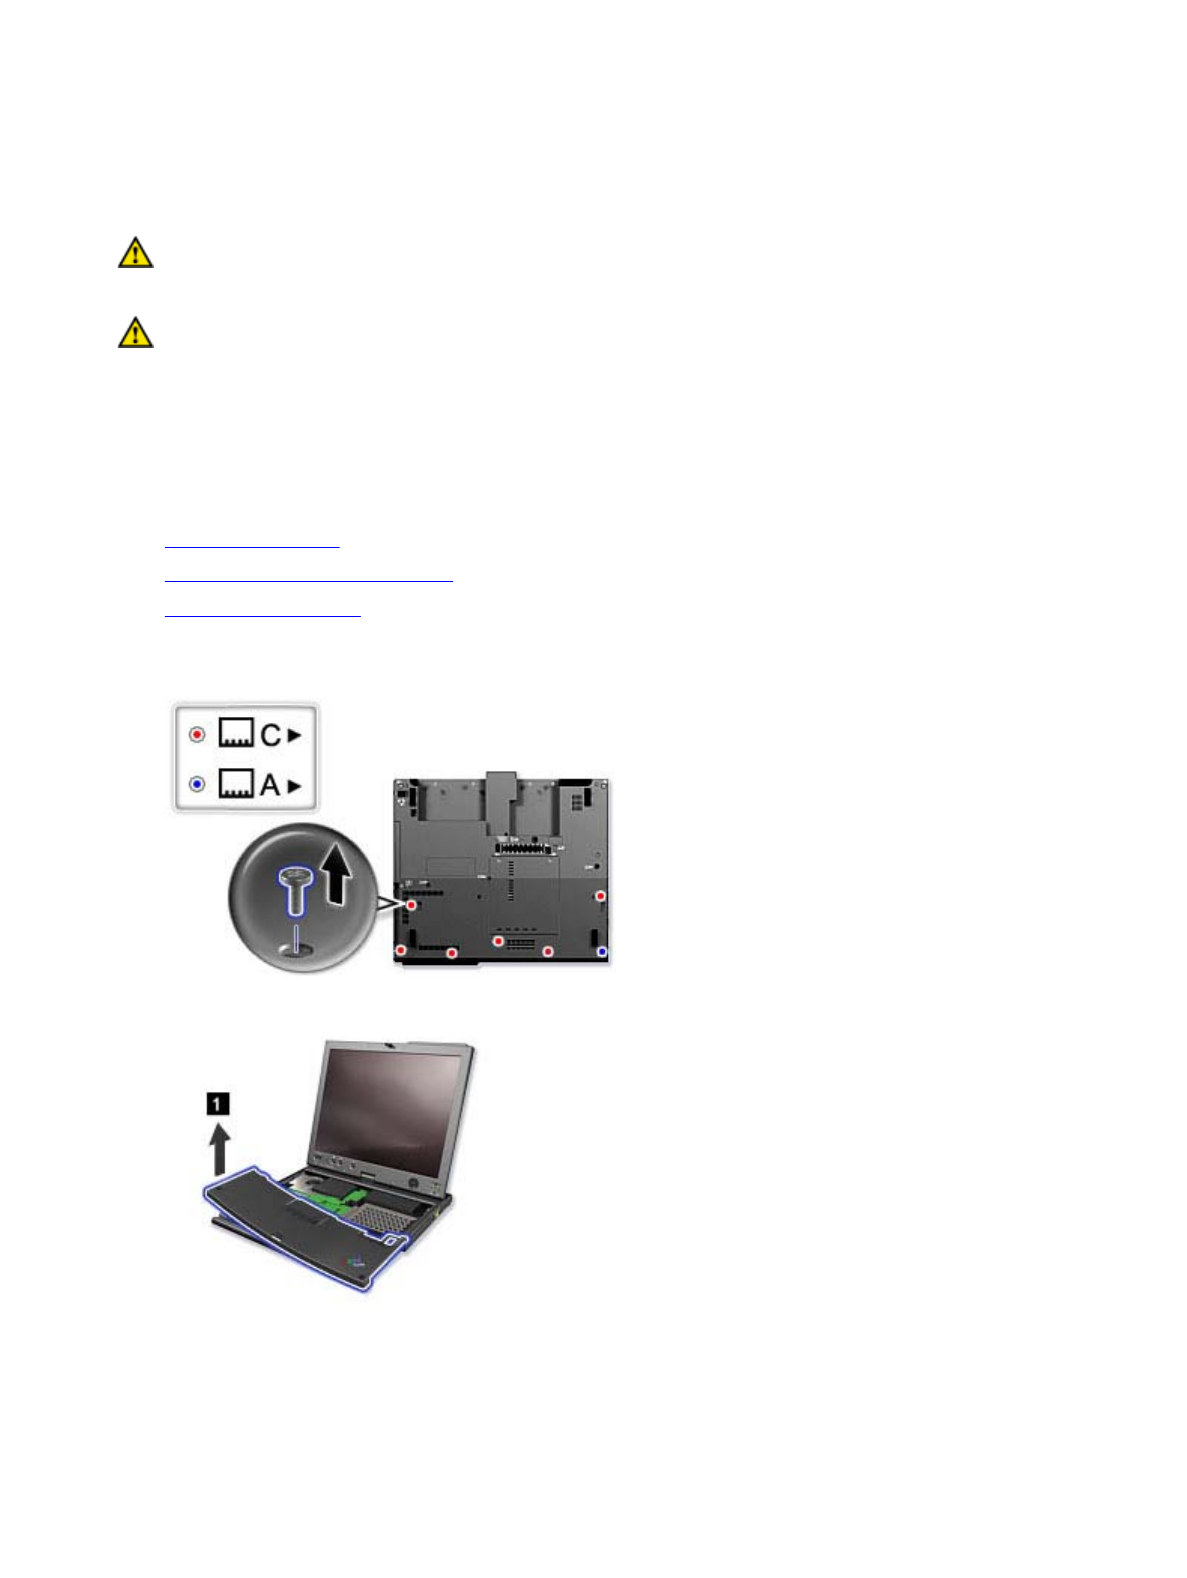
5. Close the computer display, and turn the computer over.
6. First remove the short screw marked (A), and then remove the six screws marked (C).
7. Turn the computer over and open the display. Lift up to release the left edge of the palm rest (1).
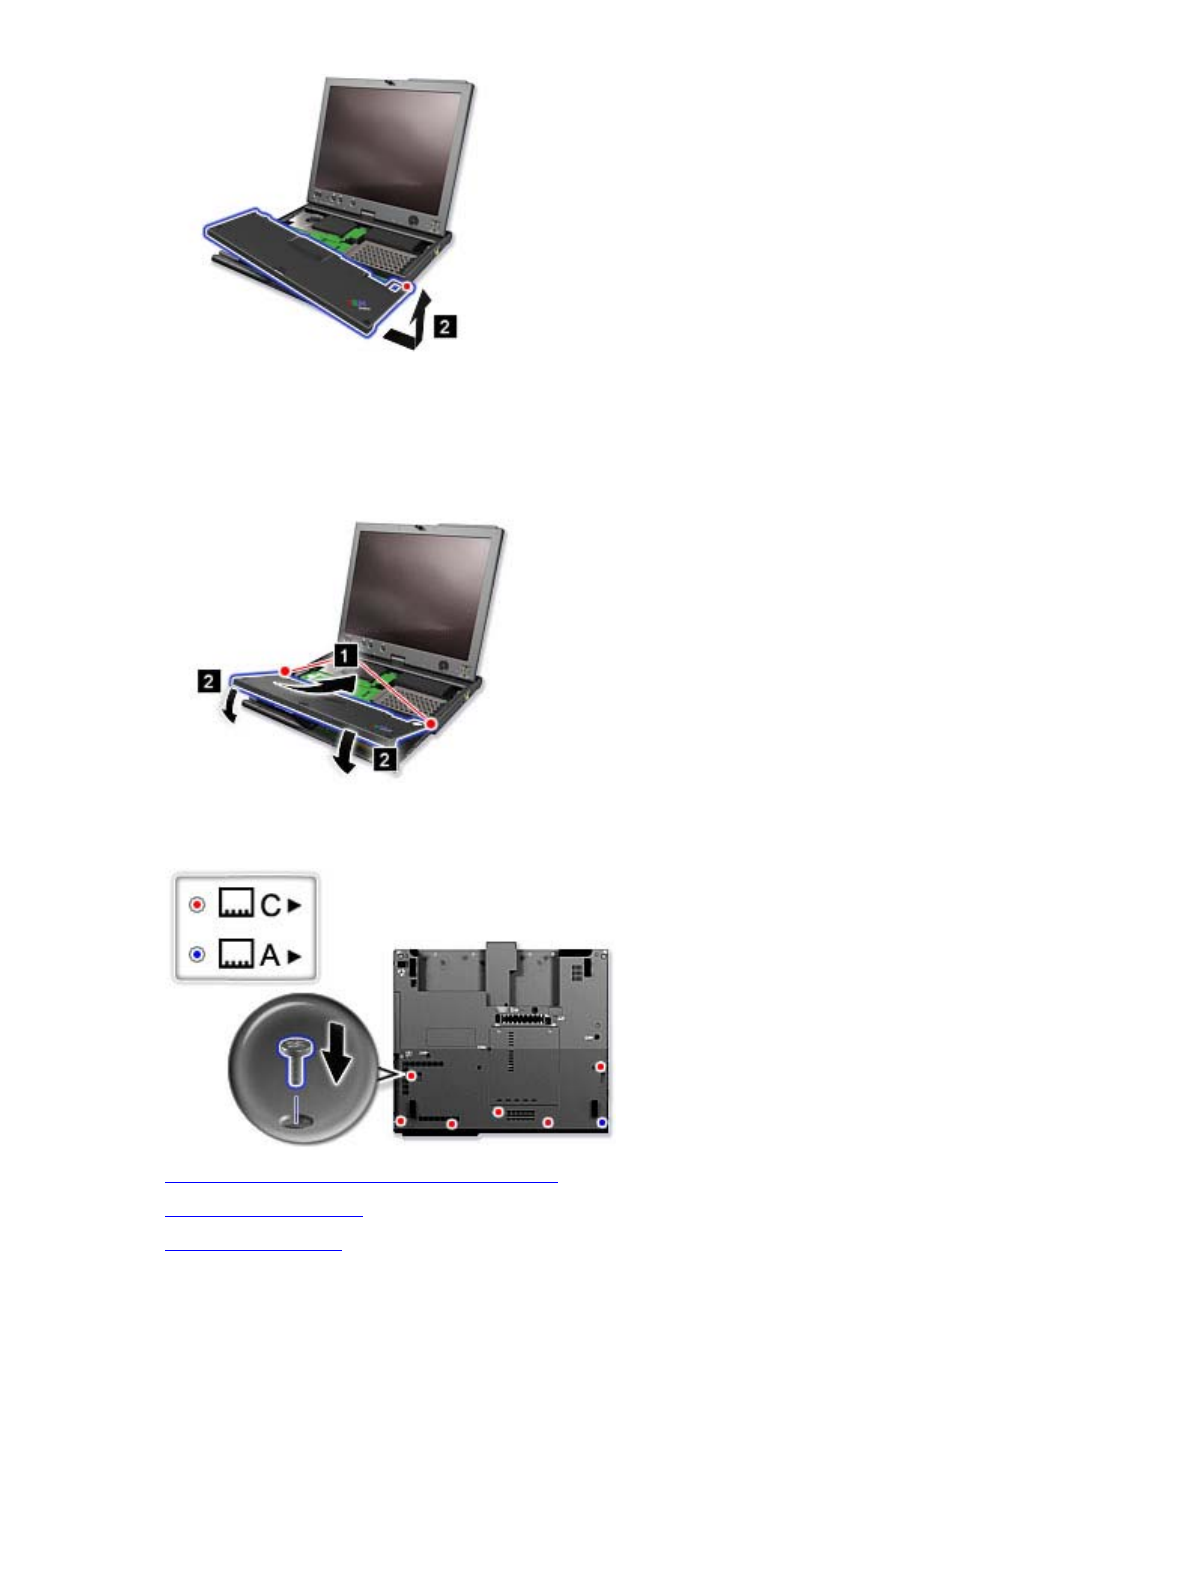
8. Gently lift the right front side of the palm rest (2) to release the latch on the right top edge, and then
release the palm rest from the computer.
Replacing the palm rest
1/2 ページReplacing the palm rest
2007/03/19file://C:\TamaTemp\replpalm.htm\replpalm.htm
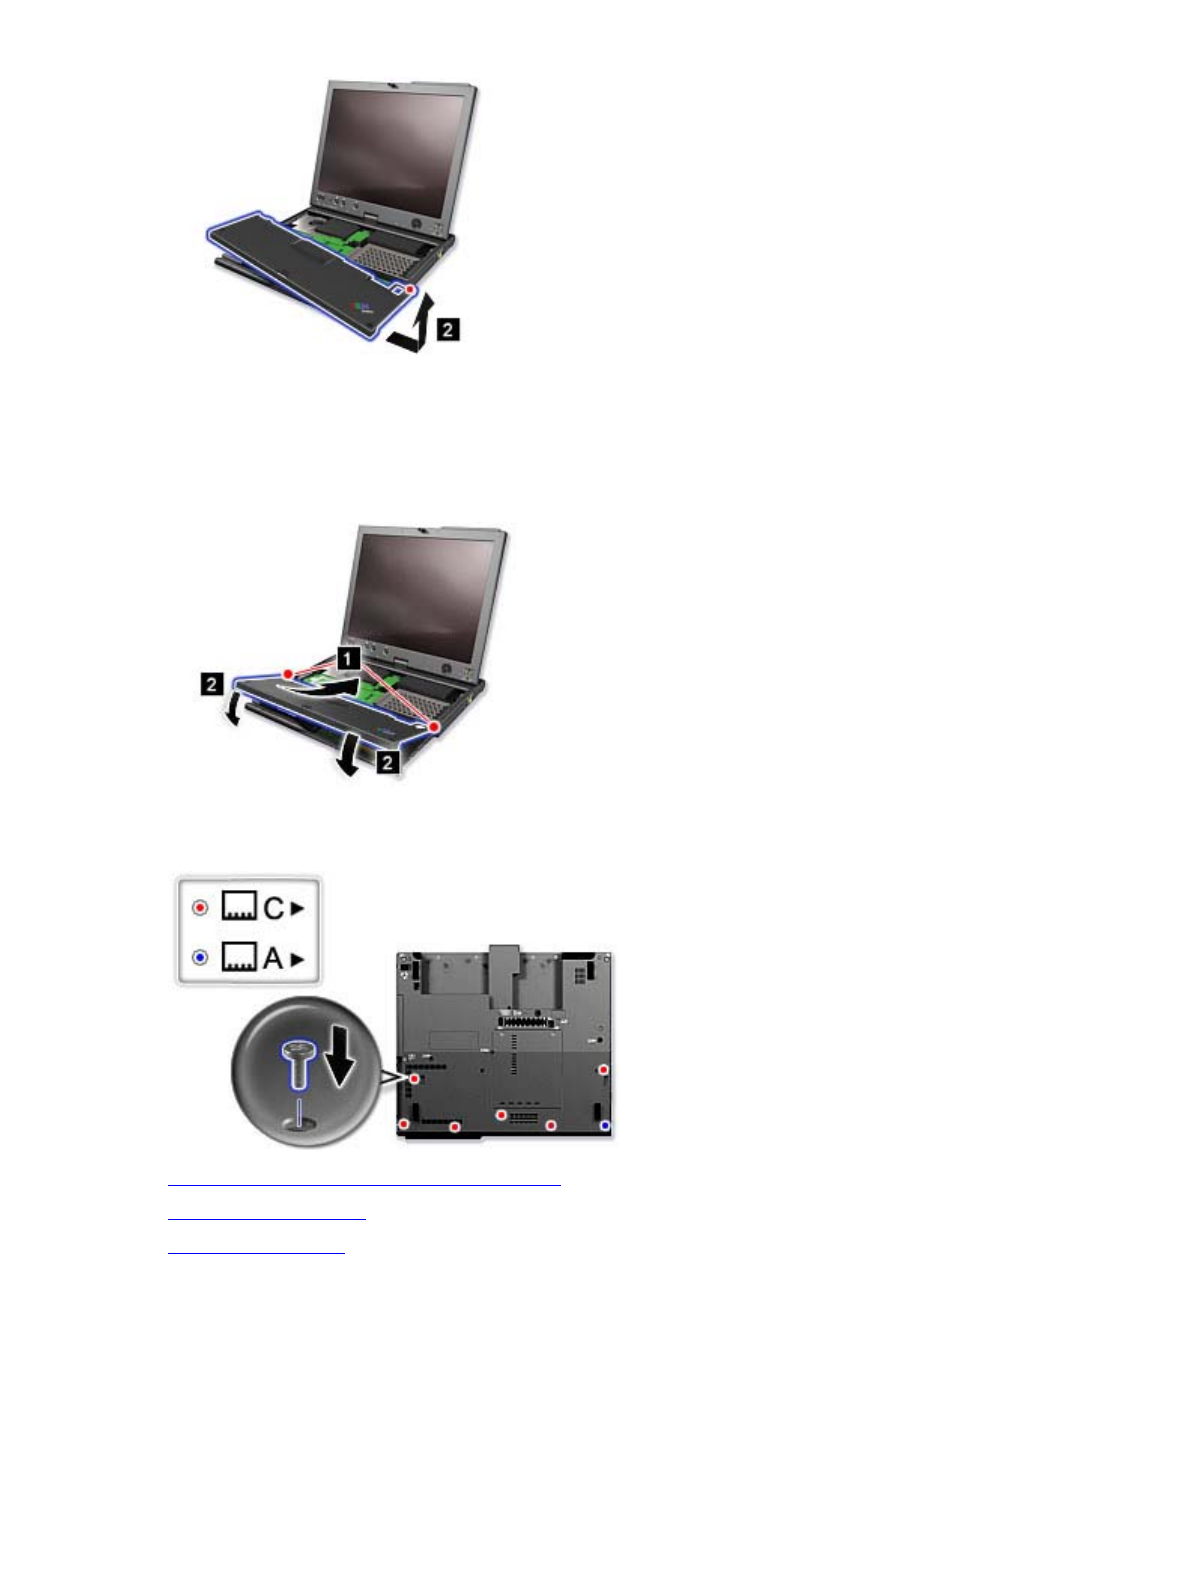
To reinstall the palm rest, do as follows:
1. Reinstall the palm rest by aligning the latches (1), and pushing down on the front and sides (where the
latches are) (2) of the palm rest.
2. Close the computer display, and turn the computer over.
3. First reinstall the short screw marked (A), and then reinstall six screws marked (C).
4. Store the Tablet Digitizer Pen back in its slot.
5. Reinstall the keyboard.
6. Reinstall the battery.
7. Turn the computer over again. Connect the ac adapter and cables to the computer; then turn it on.
2/2 ページReplacing the palm rest
2007/03/19file://C:\TamaTemp\replpalm.htm\replpalm.htm

Before you start, print these instructions.
Installation of the PCI Express Mini Card for wireless LAN
If no integrated wireless LAN Mini-PCI express card module has been preinstalled in your ThinkPad
computer, you can install one. To do this, follow the procedure in the Replacement of the PCI Express Mini
Card for wireless LAN section below.
Replacement of the PCI Express Mini Card for wireless LAN
If your computer has a PCI Express Mini Card for wireless LAN, you can replace it with a new one. To do
this, follow the procedure below.
To find the position of the PCI Express Mini Card for wireless LAN connection in your computer, click here.
Danger: During electrical storms, do not connect the cable to or disconnect it from the telephone
outlet on the wall.
Danger: Electric current from power, telephone, and communication cables is hazardous. To avoid
shock hazard, disconnect the cables before opening the cover of this slot.
Attention: Before you start installing a module, touch a metal table or a grounded metal object. This
action reduces any static electricity from your body. The static electricity could damage the PCI Express
Mini Card.
Note: Use the PCI Express Mini Card provided by Lenovo.
Note: If your computer is a wireless upgradeable model, you can install a wireless PCI Express Mini
Card, available as an option.
To replace the PCI Express Mini Card with two connectors, click here.
To replace the PCI Express Mini Card with three connectors, click here.
To replace the PCI Express Mini Card with two connectors, do as follows:
1. Turn off the computer; then disconnect the ac adapter and all cables from the computer. Wait for a few
minutes, till the inside of the computer cools, before you start the following procedures.
2. Close the computer display, and turn the computer over.
3. Remove the battery.
4. Remove the Tablet Digitizer Pen.
5. Remove the keyboard.
6. Remove the palm rest.
7. If a tool for removing connectors is included in the package with the new card, use it to disconnect the
cables from the card. If no such tool is included, disconnect the cables from the card by picking up the
connectors with your fingers and gently unplugging them.
Installing and replacing the PCI Express Mini Card for wireless LAN connection
1/4 ページInstalling and replacing the PCI Express Mini Card for wireless LAN connection
2007/03/19file://C:\TamaTemp\replpci.htm\replpci.htm
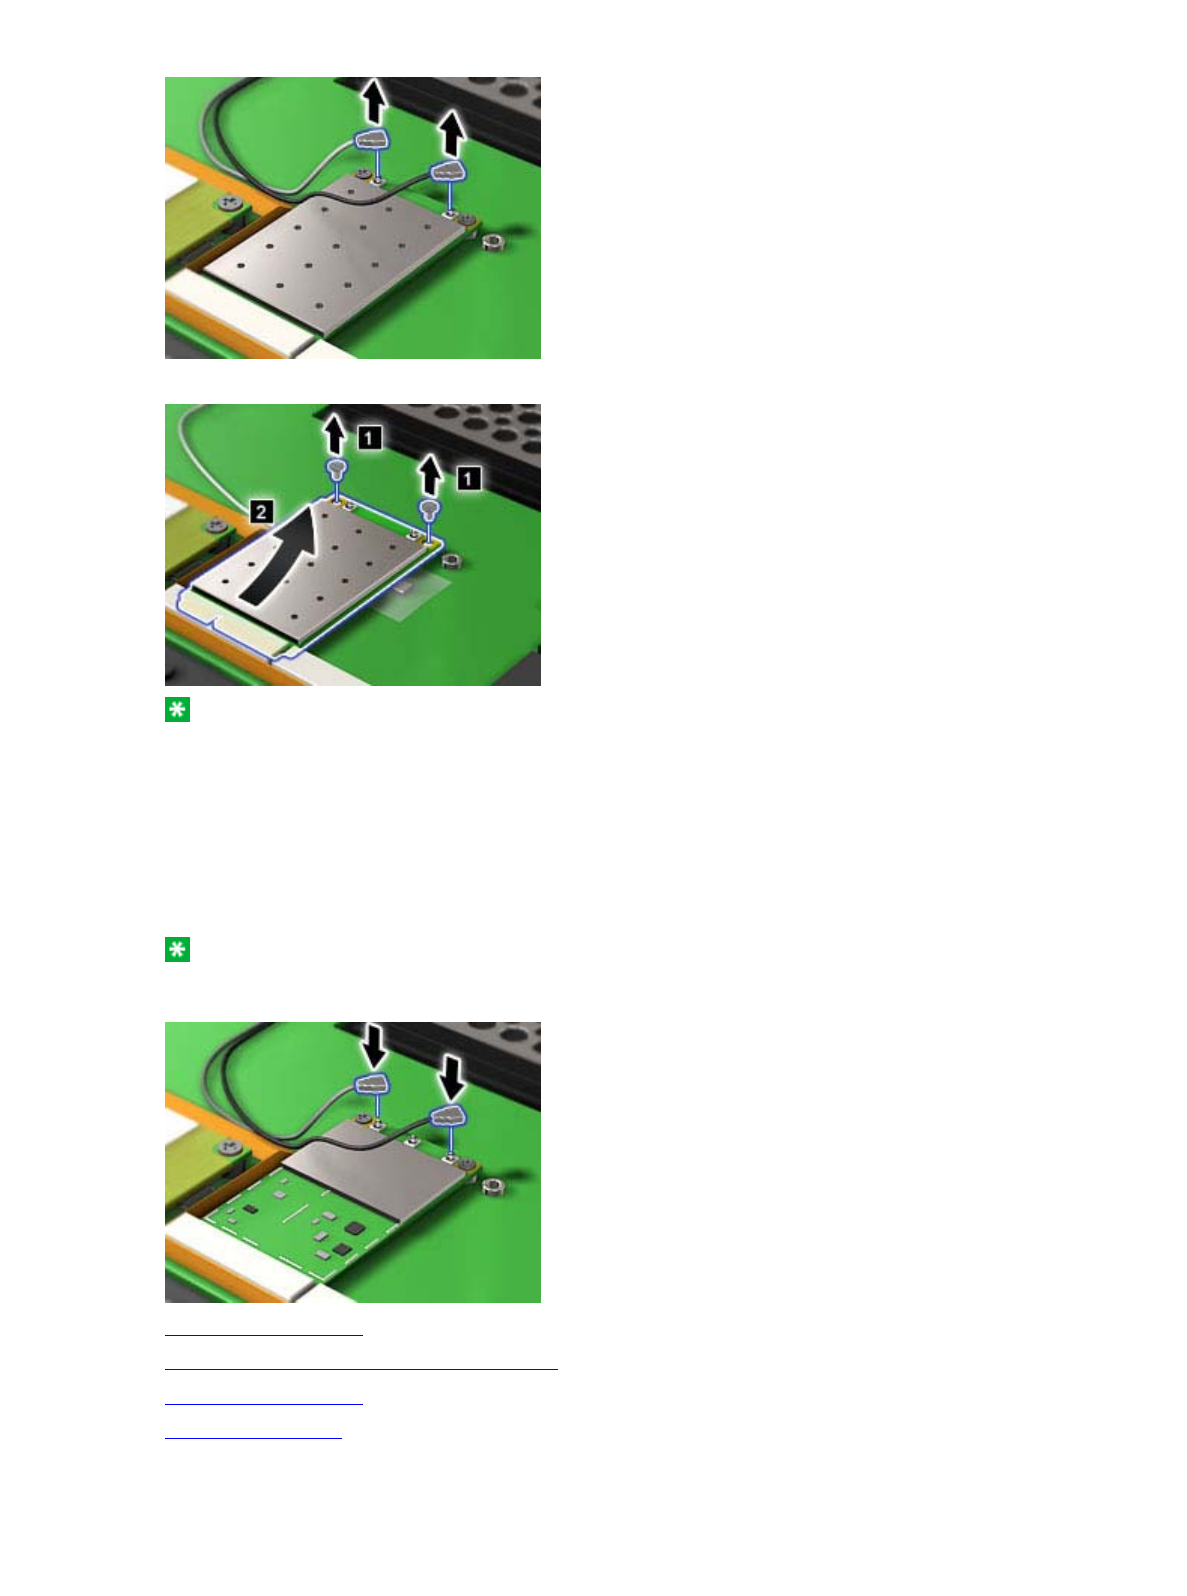
8. Remove the screws (1). The card pops up (2). Remove the card.
Note: If there is a spacer under the screw, remove it before installing a new card.
9. Align the contact edge of the PCI Express Mini Card with the corresponding socket contact of the
computer.
10. Pivot the card until you can snap it into place by pressing the upper side of the connectors; then secure
the card with the two screws.
Make sure that the card is firmly fixed in the slot and does not move easily.
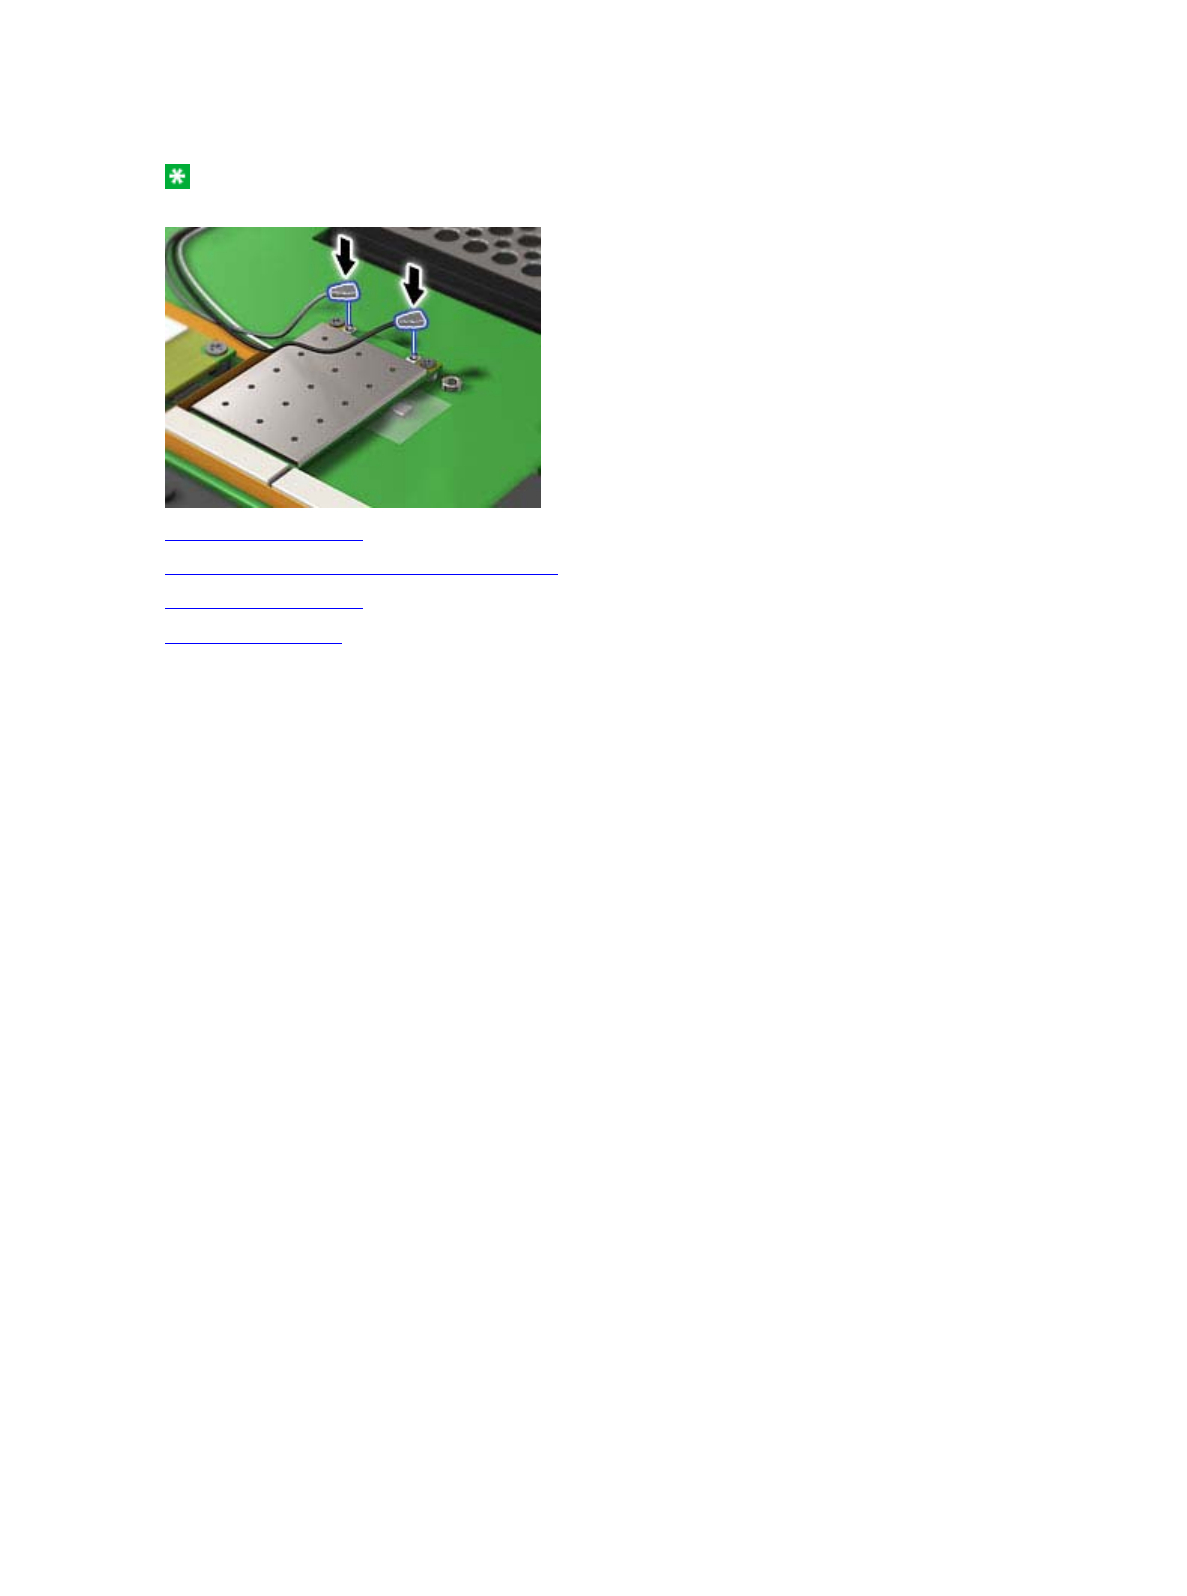
11. Connect the cables to the new PCI Express Mini Card.
Note: If the new PCI Express Mini Card has three connectors, as in the next drawing, you must
attach the cables to the right and left connectors. If you attach either cable to the center connector, the
connection speed will be lower.
12. Reinstall the palm rest.
13. Store the Tablet Digitizer Pen back in its slot.
14. Reinstall the keyboard.
15. Reinstall the battery.
16. Turn the computer over again. Connect the ac adapter and cables to the computer; then turn it on.
2/4 ページInstalling and replacing the PCI Express Mini Card for wireless LAN connection
2007/03/19file://C:\TamaTemp\replpci.htm\replpci.htm
connec
t
ors comes w
ith
th
e compu
t
er.
T
o rep
l
ace
th
e car
d
f
or
th
e
MIMO
f
ea
t
ure,
d
o as
f
o
ll
ows:
1. Turn off the computer; then disconnect the ac adapter and all cables from the computer. Wait for a few
minutes, till the inside of the computer cools, before you start the following procedures.
2. Close the computer display, and turn the computer over.
3. Remove the battery.
4. Remove the Tablet Digitizer Pen.
5. Remove the keyboard.
6. Remove the palm rest.
7. If a tool for removing connectors is included in the package with the new card, use it to disconnect the
cables from the card. If no such tool is included, disconnect the cables from the card by picking up the
connectors with your fingers and gently unplugging them.
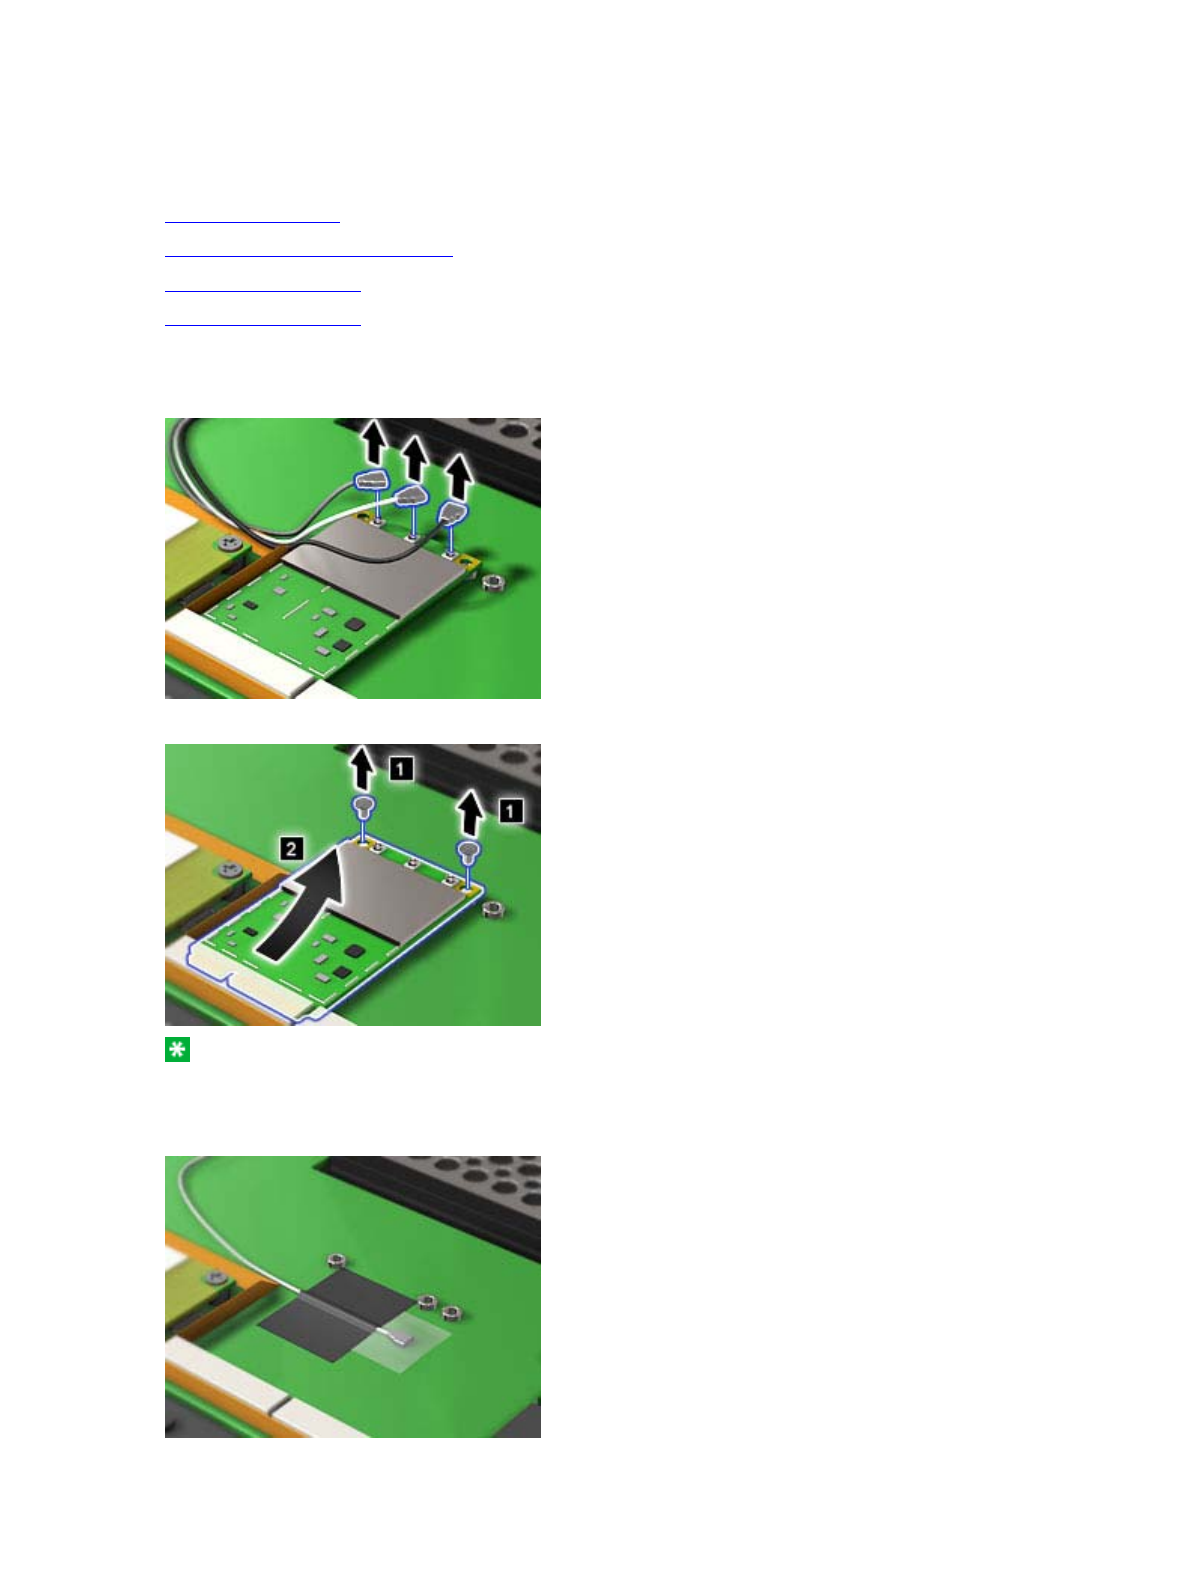
8. Remove the screws (1). The card pops up (2). Remove the card.
Note: If there is a spacer under the screw, remove it before installing a new card.
9. If the new PCI Express Mini Card has three connectors, skip this step. If the new PCI Express Mini
Card has two connectors, first insert the connector end of the white cable in the plastic cable bag and
affix the cable to the mainboard with tape.
10. Align the contact edge of the new card with the corresponding socket contact of the computer.
11. Pivot the card until you can snap it into place by pressing the upper side of the connectors; then secure
the card with the two screws.
3/4 ページInstalling and replacing the PCI Express Mini Card for wireless LAN connection
2007/03/19file://C:\TamaTemp\replpci.htm\replpci.htm
Make sure that the card is firmly fixed in the slot and does not move easily.
12. Connect the cables to the new card.
Note: If the new PCI Express Mini Card has two connectors, as in the next drawing, you must
attach the gray cable to the left connector and the black cable to the right connector.
13. Reinstall the palm rest.
14. Store the Tablet Digitizer Pen back in its slot.
15. Reinstall the keyboard.
16. Reinstall the battery.
17. Turn the computer over again. Connect the ac adapter and cables to the computer; then turn it on.
4/4 ページInstalling and replacing the PCI Express Mini Card for wireless LAN connection
2007/03/19file://C:\TamaTemp\replpci.htm\replpci.htm
Before you start, print these instructions.
To replace the PCI Express Mini Card or the Modem Daughter Card, you need to remove the keyboard and
then the palm rest.
Danger: During electrical storms, do not connect the cable to or disconnect it from the telephone
outlet on the wall.
Danger: Electric current from power, telephone, and communication cables is hazardous. To avoid
shock hazard, disconnect the cables before opening the cover of this slot.
To remove the palm rest, do as follows:
1. Turn off the computer; then disconnect the ac adapter and all cables from the computer. Wait for a few
minutes, till the inside of the computer cools, before you start the following procedures.
2. Remove the battery.
3. Remove the Tablet Digitizer Pen.
4. Remove the keyboard.
5. Close the computer display, and turn the computer over.
6. First remove the short screw marked (A), and then remove the six screws marked (C).
7. Turn the computer over and open the display. Lift up to release the left edge of the palm rest (1).
8. Gently lift the right front side of the palm rest (2) to release the latch on the right top edge, and then
release the palm rest from the computer.
Replacing the palm rest
1/2 ページReplacing the palm rest
2007/03/19file://C:\TamaTemp\replpalm.htm\replpalm.htm
To reinstall the palm rest, do as follows:
1. Reinstall the palm rest by aligning the latches (1), and pushing down on the front and sides (where the
latches are) (2) of the palm rest.
2. Close the computer display, and turn the computer over.
3. First reinstall the short screw marked (A), and then reinstall six screws marked (C).
4. Store the Tablet Digitizer Pen back in its slot.
5. Reinstall the keyboard.
6. Reinstall the battery.
7. Turn the computer over again. Connect the ac adapter and cables to the computer; then turn it on.
2/2 ページReplacing the palm rest
2007/03/19file://C:\TamaTemp\replpalm.htm\replpalm.htm
Before you start, print these instructions.
Some ThinkPad® models have a PCI Express Mini Card slot for wireless WAN connection. To replace the
PCI Express Mini Card with a new one, follow the procedure below.
To find the position of the PCI Express Mini Card for wireless WAN connection in your computer, click
here .
Danger: During electrical storms, do not connect the cable to or disconnect it from the telephone
outlet on the wall.
Danger: Electric current from power, telephone, and communication cables is hazardous. To avoid
shock hazard, disconnect the cables before opening the cover of this slot.
Attention: Before you start installing a PCI Express Mini Card, touch a metal table or a grounded
metal object. This action reduces any static electricity from your body. The static electricity could damage
the card.
To replace the PCI Express Mini Card, do as follows:
1. Turn off the computer; then disconnect the ac adapter and all cables from the computer. Wait for a few
minutes, till the inside of the computer cools, before you start the following procedures.
2. Close the computer display, and turn the computer over.
3. Remove the battery.
4. Remove the Tablet Digitizer Pen.
5. Remove the keyboard.
6. Remove the palm rest.
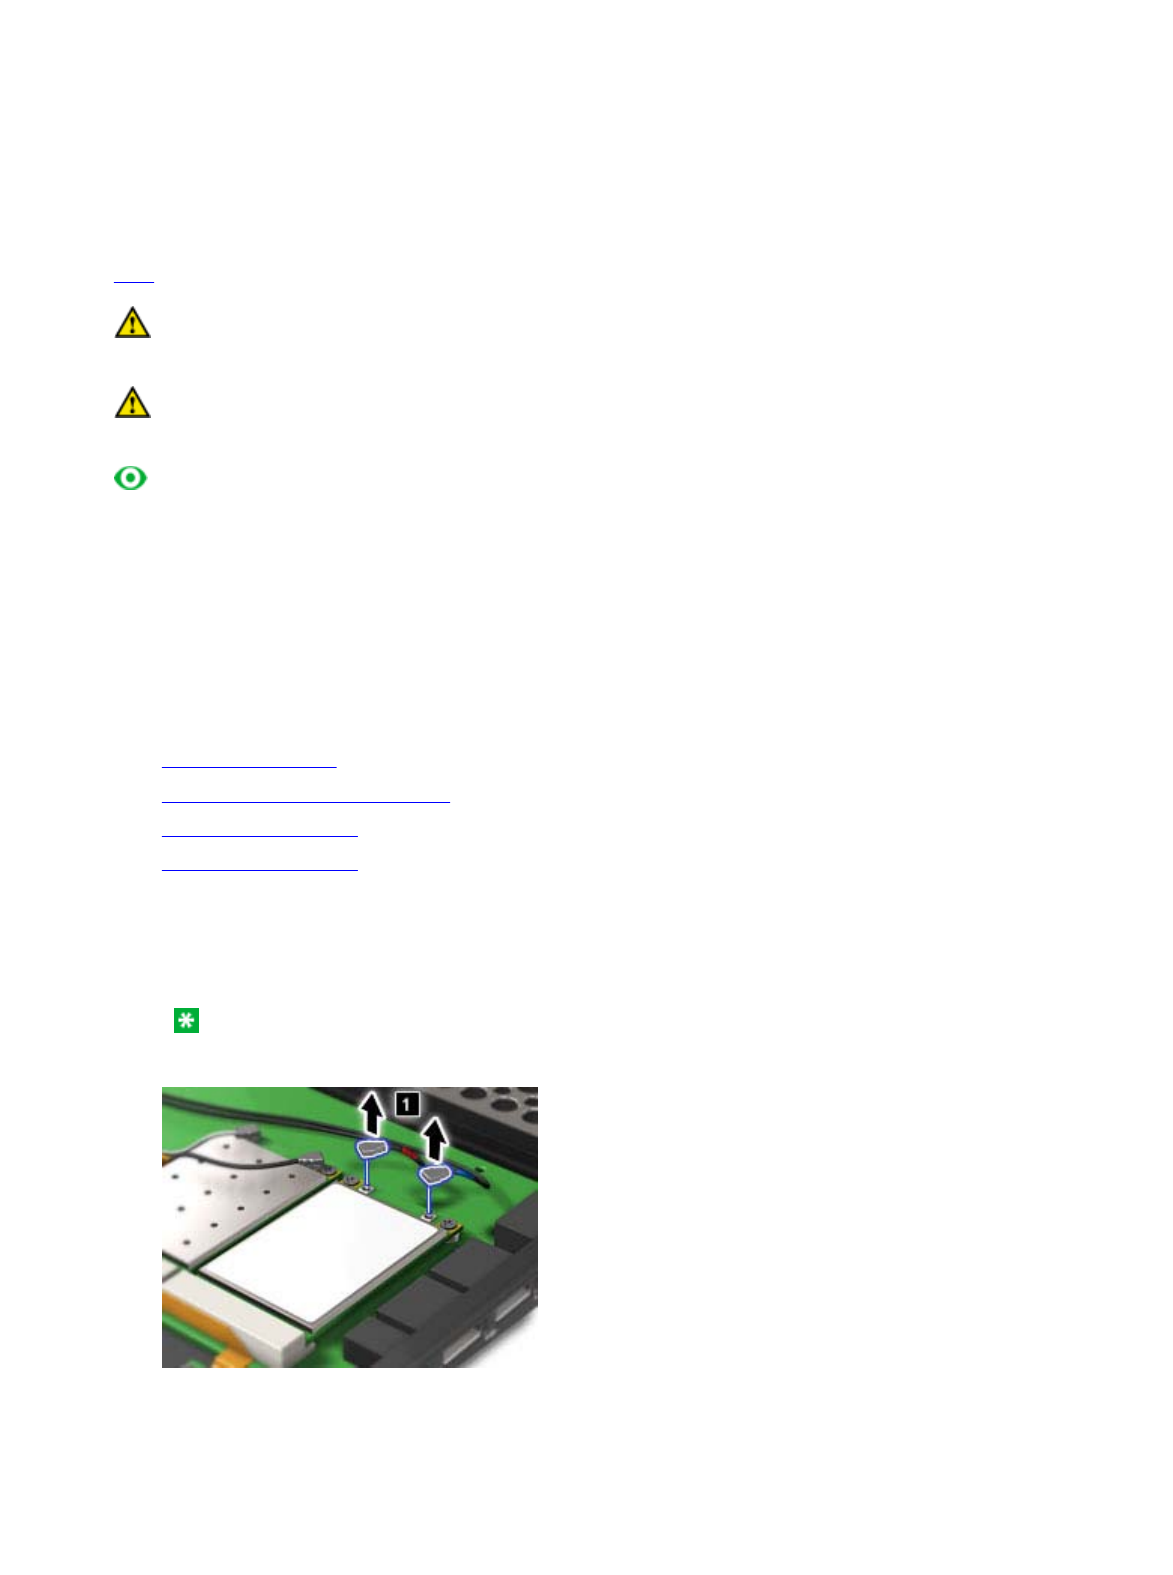
7. If a tool for removing connectors is included in the package with the new card, use it to disconnect the
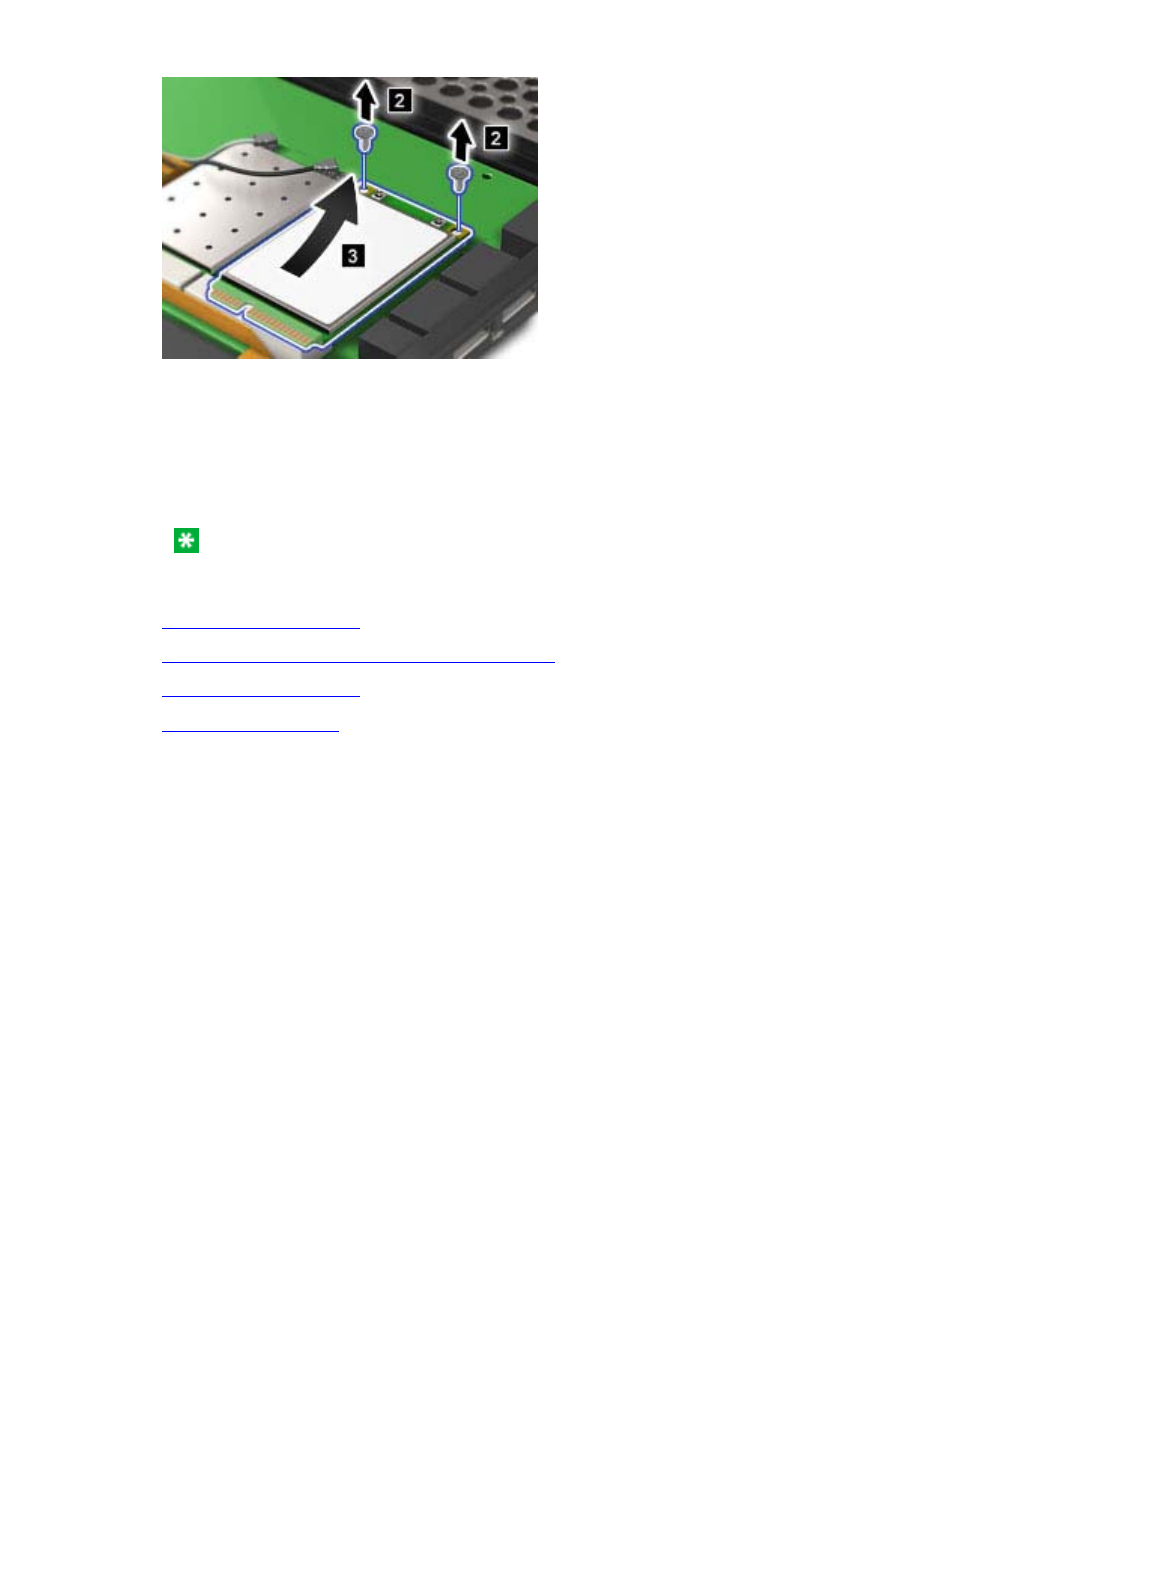
cables from the card (1). If no such tool is included, disconnect the cables from the card (1) by picking
up the connectors with your fingers and gently unplugging them. Then peel off the antenna if it is
present.
Note: Depending on the system configuration of your computer, the card may have only one
connector.
8. Remove the screws
(
3
)
. The card pops up
(
4
)
. Remove the card
(
3
)
.
Replacing the PCI Express Mini Card for wireless WAN connection
1/2 ページReplacing the PCI Express Mini Card for wireless WAN connection
2007/03/19file://C:\TamaTemp\replwan.htm\replwan.htm
9. Align the contact edge of the new Wireless WAN Card with the corresponding socket contact of the
computer.
10. Pivot the card until you can snap it into place by pressing the upper side of the connectors; then secure
the card with the two screws. Reattach the antenna if it is present, and connect the cables to the new
card.
Note: Depending on the system configuration of your computer, the card may have only one
connector.
11. Reinstall the palm rest.
12. Store the Tablet Digitizer Pen back in its slot.
13. Reinstall the keyboard.
14. Reinstall the battery.
15. Turn the computer over again. Connect the ac adapter and cables to the computer; then turn it on.
2/2 ページReplacing the PCI Express Mini Card for wireless WAN connection
2007/03/19file://C:\TamaTemp\replwan.htm\replwan.htm
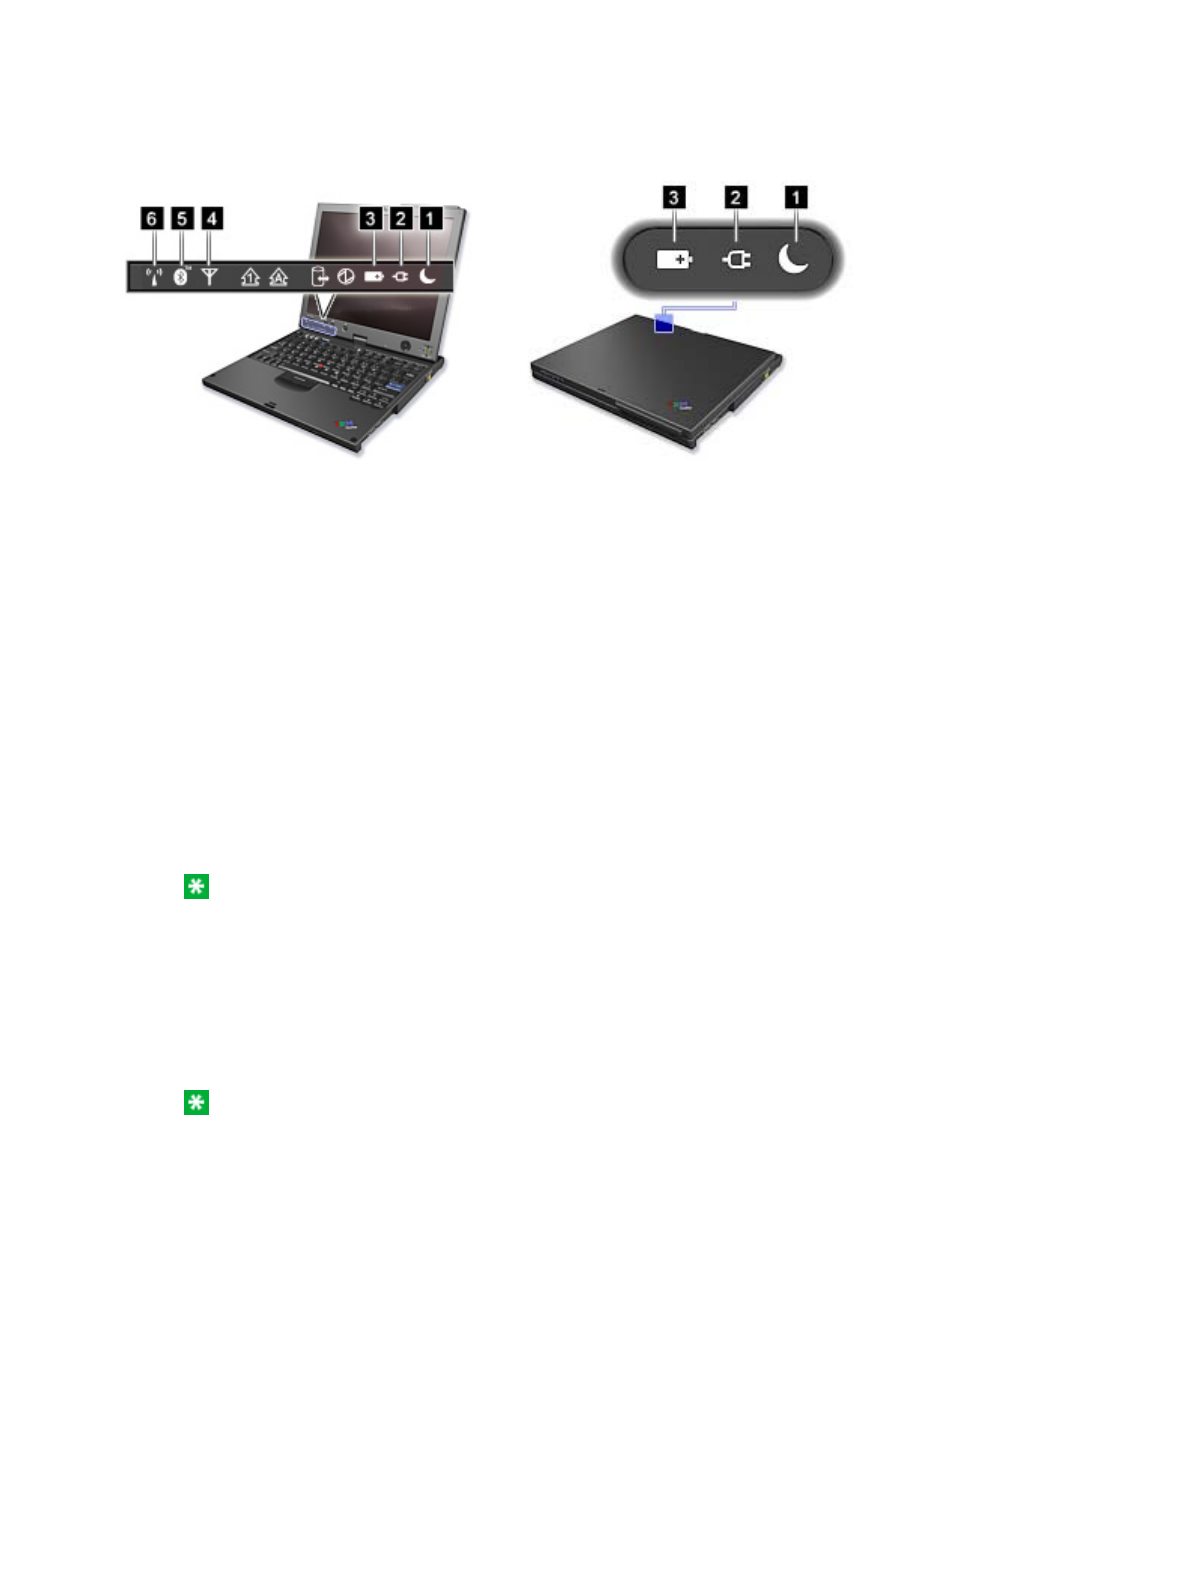
The computer has status indicators that show the mode (standby, hibernation, or normal), AC power status,
and the status of the battery. The following shows the location and the meaning of the indicators:
1. Standby status
zGreen: The computer is in standby mode.
zBlinking green: The computer is entering standby or hibernation mode, or is resuming normal
operation.
2. AC power status
zGreen: The ac adapter is connected and the computer is operating on ac power. If a battery is
installed in the computer, it is charged when this indicator is green.
zOff: The computer is operating on battery power.
3. Battery status
zGreen: The battery has more than 20% charge.
zOrange: The battery has between 5% and 20% charge.
zFast blinking orange: The battery has less than 5% charge.
Note: The battery may be charging.
zSlow blinking orange: The battery is being charged. When it reaches 20%, the blinking color
changes to green.
zSlow blinking green: The battery has between 20% and 80% charge, and charging is
continuing. When the battery reaches 80% charge, blinking stops, but the charging may continue
until the battery is 100% charged.
Note: If the computer is operating on battery power, the Battery status indicator does not work
while the computer is turned off or it is in standby mode or hibernation mode.
If your computer is shipped with a wireless feature and a Bluetooth feature, you can use the following
indicators:
4. Wireless WAN status
zGreen: The wireless WAN feature is on, and the radio link is ready for use.
zBlinking green: Data is being transmitted.
5. Bluetooth status
zGreen: The Bluetooth feature is on, and the radio link is ready for use.
zBlinking green: Data is being transmitted.
6. Wireless LAN status
zGreen: The wireless feature (the IEEE 802.11 standard) is on, and the radio link is ready for use.
zBlinking green: Data is being transmitted.
Power-status indicators
1/2 ページPower-status indicators
2006/10/05mk:@MSITStore:C:\Documents%20and%20Settings\KNAKA\My%20Documents\DA...

You can connect to the Internet without connecting a wire to your computer by setting up a wireless access
point or residential gateway. A wireless access point does not connect you to the Internet directly. Instead,
it connects to a wired connection such as a cable modem, a DSL modem, or a phone line.
Certain types of wireless connections, such as wireless LAN (the IEEE 802.11 standard), are being used to
connect to an access point.
To connect to an access point, you will need several pieces of information. You will need to know the
network name (obtain this from your administrator), and your MAC address (which should have come with
your computer or wireless networking card). You may also need to set up encryption. Contact your
administrator for your network name and encryption settings. You may need to register your MAC address
with your network administrator before connecting to your company network. A residential gateway is the
consumer version of an access point. Consult your residential gateway instructions for setup.
Be careful to disable the wireless function when you are not using it because it uses power even when you
are not connected to the network. Some models have an integrated Wireless LAN antenna and hardware.
If your computer did not come with integrated wireless, you can purchase a PC Card as an option. Wireless
LAN gives you a high-speed connection to an access point.
If your computer comes with the built-in wireless LAN or wireless WAN card, refer to Making wireless LAN
connections and Using wireless WAN connections for more information. If your computer has the
Integrated Bluetooth features and/or is equipped with the Certified Wireless USB, refer to Using Bluetooth
and Using Certified Wireless USB for more information.
Wireless connections
1/1 ページWireless connections
2007/02/13file://C:\TamaTemp\Wireless.htm\Wireless.htm

Wireless Wide Area Network (wireless WAN) enables you to establish wireless connections over remote public or private networks. These
connections can be maintained over a large geographical area, such a city or an entire country, by use of multiple antenna sites or
satellite systems maintained by wireless service providers.
Some ThinkPad® computers come with a built-in wireless WAN card integrating some wireless WAN technologies, such as 1xEV-DO or
HSDPA. You can connect to the Internet or your company network with the built-in wireless WAN card and the configuration utility to make
a wireless WAN connection and monitor its status.
Note: Wireless WAN service is provided by authorized service providers in some countries.
Note: When the wireless WAN connection is enabled, you cannot set the screen orientation of your computer to Secondary
Landscape.
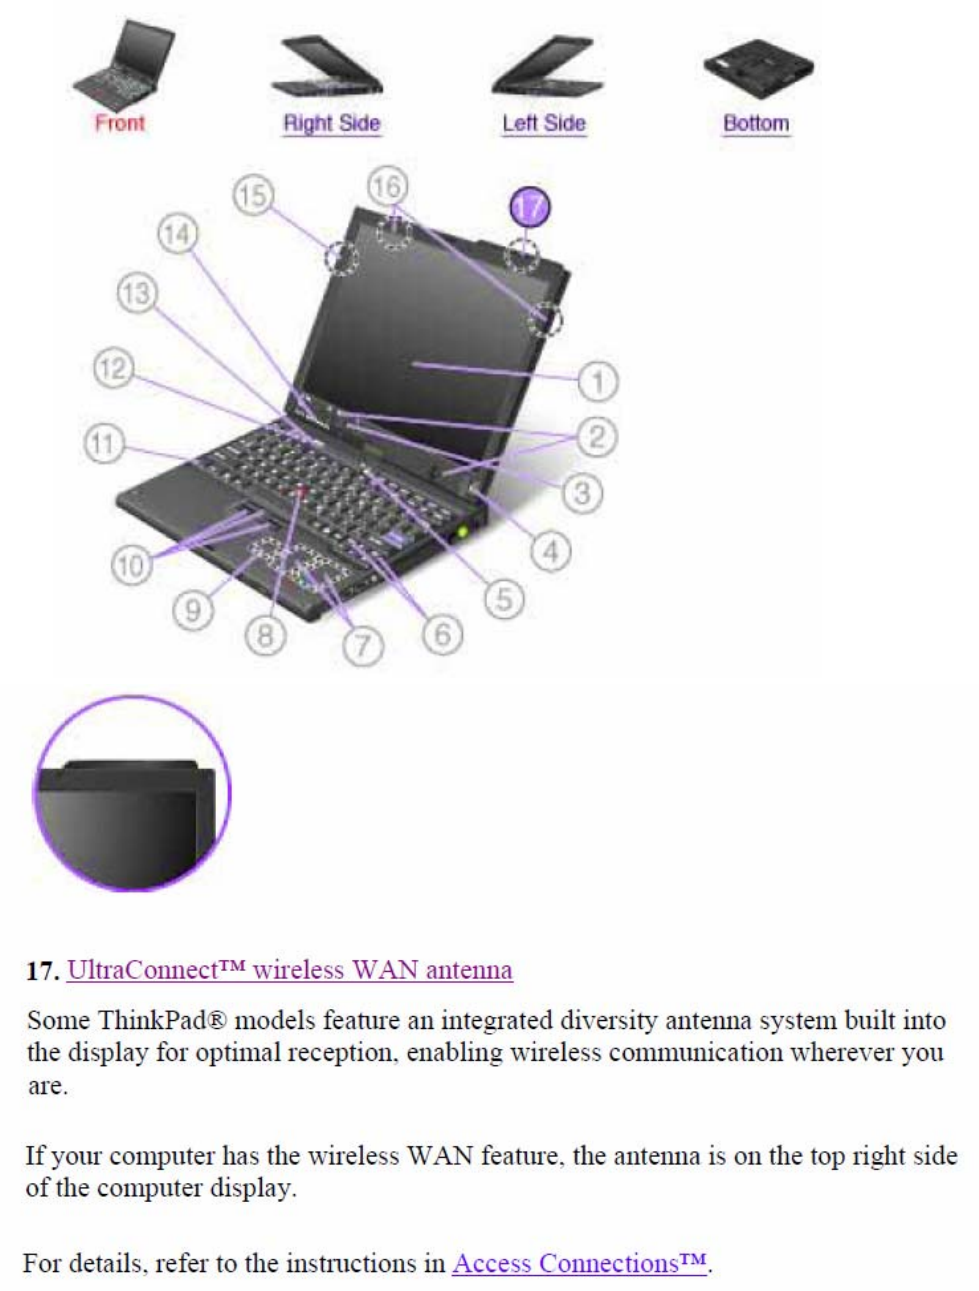
If the antenna for wireless WAN connections is on the top right side of your computer display (1), you can use the wireless WAN feature.
To use a wireless WAN connection with built-in wireless WAN features, start Access Connections™.
To start the Access Connections wizard, click Start --> All Programs --> ThinkVantage --> Access Connections, and follow the
instructions on the screen.
Using wireless WAN connections
1/2 ページUsing wireless WAN connections
2007/03/19file://C:\TamaTemp\usewan.htm\usewan.htm

You can stay connected to your network while you are in the office, in a meeting room, or at home, with no
need for a wired connection. Some ThinkPad® models come with a built-in wireless networking card and a
configuration utility to help you make wireless connections and monitor the status of your connection.
Attention: If you carry your ThinkPad computer with the wireless LAN feature into an airplane, you
need to disable it before boarding. To disable it, refer to the instructions in Enabling or disabling the
wireless feature.
Wireless networking setup
Wireless security features
Checking wireless connection status
Enabling or disabling the wireless feature
Wireless upgradeable ThinkPad models
Note: Some models come with a wireless networking card and a wireless LAN configuration utility built
in. If your computer does not come with these features, you can purchase the wireless networking card as
an option. For more information, refer to Finding ThinkPad options.
Note: If you use the wireless LAN feature, place your computer so that there are as few obstacles as
possible between the wireless LAN access point and the computer. Also for the best connection of the
wireless LAN feature, open your computer display to an angle of slightly more than 90 degrees.
Making wireless LAN connections
1/1 ページMaking wireless LAN connections
2007/02/13file://C:\TamaTemp\Wireconn.htm\Wireconn.htm

To use the built-in wireless networking card (the IEEE 802.11 standard) to communicate, start Access
Connections™
To start the Access Connections wizard, click Start --> All Programs (in Windows® 2000, Programs) -->
ThinkVantage --> Access Connections, and follow the instructions on the screen.
Note: Before you start setting up wireless networking connections by using Access Connections, obtain
a Network Name (SSID) and your encryption information from your network administrator.
Access Connections, a connectivity assistant program, can easily enable one network adapter and disable
the other adapters on demand. After setting up your wireless networking connection, you can use the
program to quickly switch the network settings.
Wireless networking setup
1/1 ページWireless networking setup
2007/02/13file://C:\TamaTemp\wireset.htm\wireset.htm

Advances in wireless technology require that we manage your security more reliably than ever. Therefore,
Lenovo has extended its Embedded Security Subsystem to encompass virtually all of our ThinkPad® and
desktop computer lines. This security subsystem helps protect data, hardware, network access and
communications - both wired and wireless - on select ThinkPad and desktop PCs.
The Embedded Security Subsystem provides hardware-based protection of critical security information,
including passwords, encryption keys, and electronic credentials. It also helps identify computer users
involved in transactions, and helps establish that data transmissions are authentic, confidential and intact.
Security and Privacy Services for wireless risk assessment and wireless solution design can help you
assess the risks based on your business needs, identify your information risk position, and integrate
security strategies, policies, and architectures to help you achieve your wireless e-business objectives. To
effectively manage risk on an ongoing basis, organizations must have a sound security strategy. By
understanding threats and vulnerabilities at an early stage, we can help define the necessary scope and
features of your wireless e-business security infrastructure.
For more information on wireless security offerings, click the following link:
http://www.pc.ibm.com/us/think/thinkvantagetech/security.html
Wireless security features
1/1 ページWireless security features
2007/02/13file://C:\TamaTemp\wiresec.HTM\wiresec.HTM

You can check the signal strength and status of your wireless connection either by opening Access
Connections™, or by double-clicking the Access Connections wireless status icon in the system tray.
The Access Connections wireless status icon displays the signal strength and status of your wireless
connection as follows:
No link or a very poor one
Usable but weak link
Strong link
Wireless radio is disabled
Note: If you have trouble in making a connection, try moving your computer closer to your wireless
access point.
Checking wireless connection status
1/1 ページChecking wireless connection status
2007/02/13file://C:\TamaTemp\wirestat.htm\wirestat.htm

To enable or disable the wireless feature, press Fn+F5. A list of wireless features is displayed. You can
turn the feature on and off with a single click.
You can also enable or disable the feature by the following procedures.
To enable the wireless feature, do as follows:
1. Click the Access Connections wireless icon in the system tray.
2. Click Power On Wireless Radio.
To disable the wireless feature, do as follows:
1. Click the Access Connections wireless icon in the system tray.
2. Click Power Off Wireless Radio.
Note: To enable the wireless radio, do as follows:
1. Select Enabled for the Internal Wireless Device in the BIOS Setup Utility.
2. Select the On position of the wireless radio switch on the computer.
3. Click the Access Connections wireless icon in the system tray and select Turn Wireless Radio
On. Or press Fn+F5, and then turn the feature on.
Note: You can use the wireless radio switch to disable the wireless radio of all the wireless devices on
your computer.
Enabling or disabling the wireless feature
1/1 ページEnabling or disabling the wireless feature
2007/02/13file://C:\TamaTemp\Wlenab.htm\Wlenab.htm

Depending on the model, your ThinkPad® computer might be wireless upgradeable. This means that your
computer has an antenna that can support wireless LAN access when wireless LAN access points are
available. Wireless devices are available from Lenovo: Finding ThinkPad options.
8 Wireless upgradeable ThinkPad models
1/1 ページWireless upgradeable ThinkPad models
2007/02/13file://C:\TamaTemp\wireread.htm\wireread.htm
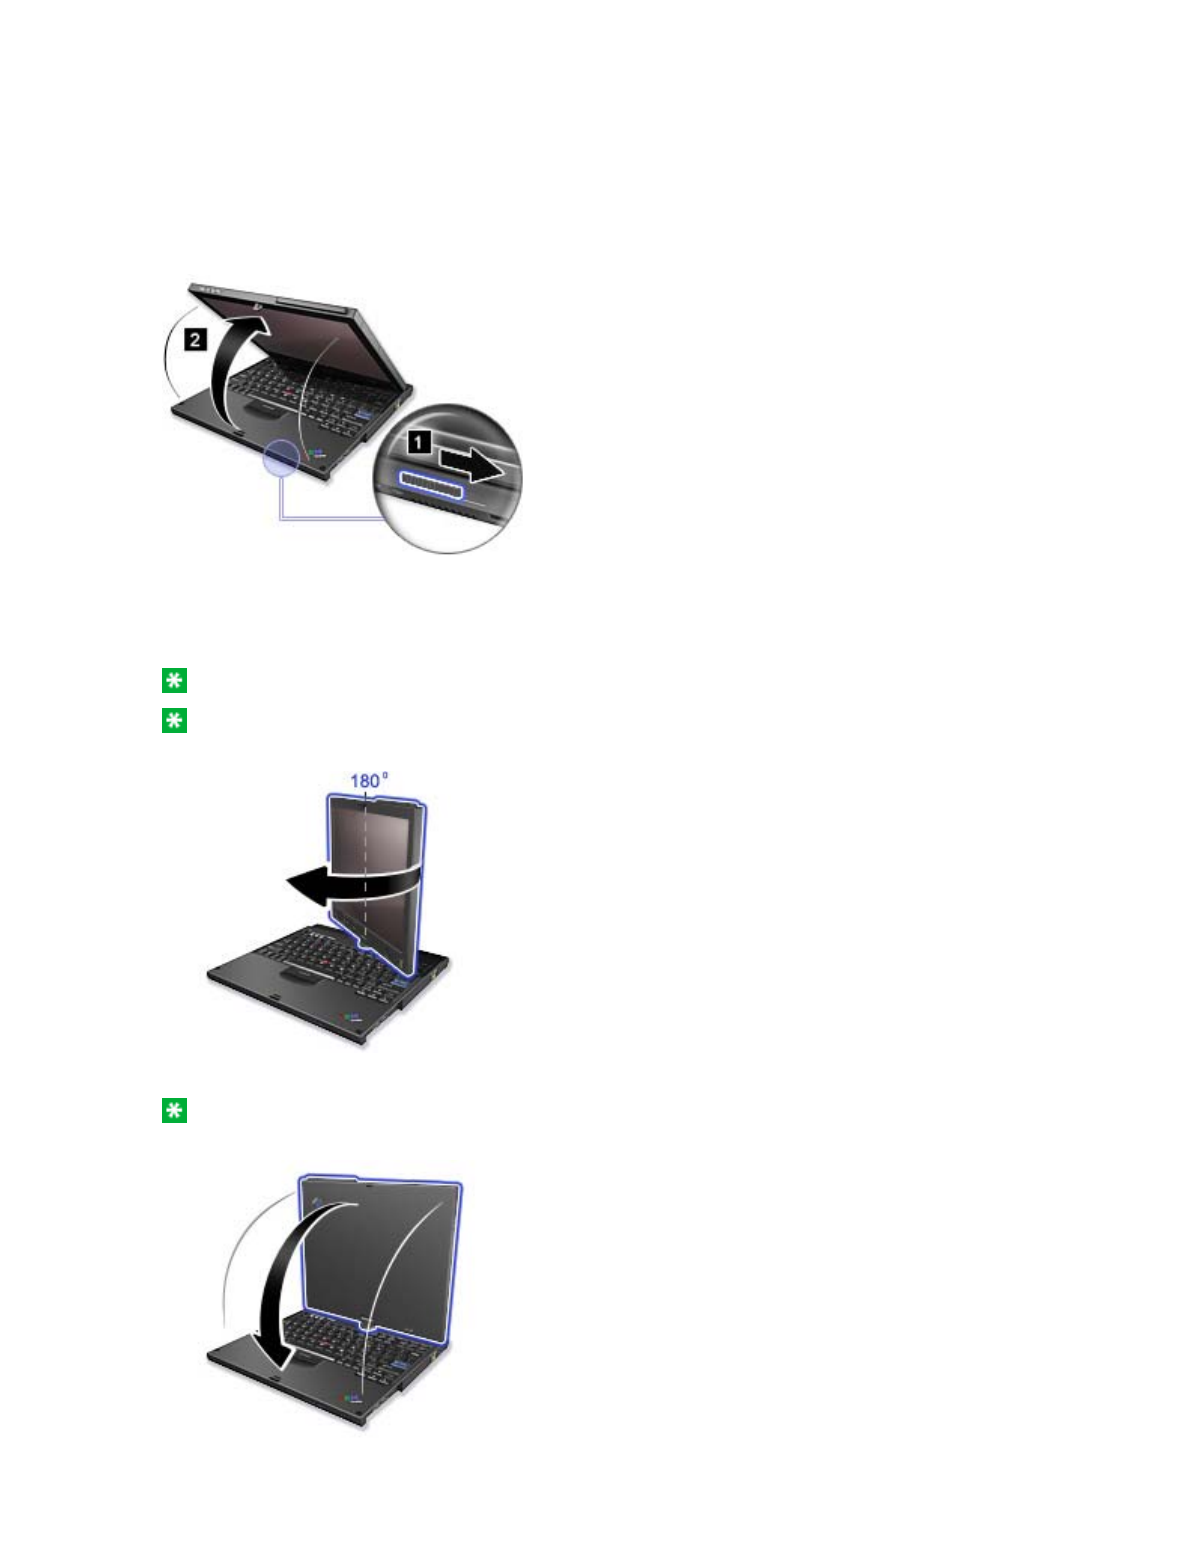
In the tablet mode, you can use your ThinkPad(R) computer in a creative and intuitive way by jotting down
notes and illustrations with the Tablet Digitizer Pen and then storing them digitally.
To use your ThinkPad(R) computer in the tablet mode, do as follows:
1. Unlock the display latch (1) and open the computer display (2) slowly, holding the upper left and right
sides of the display with both hands. Your computer is now in the notebook mode.
2. Open the display by at least 45 degrees, preferably by 90 degrees. Grasp the center of one side of the
computer display with one hand while holding the keyboard bezel with the other hand; then rotate the
display slowly clockwise until the back of the display is facing the keyboard. Your computer is now in
the picture frame mode.
Note: While rotating the display, do not press the upper edge of either side of the display.
Note: In the notebook mode, you can rotate the computer display only clockwise. In the tablet
mode, you can rotate it only counterclockwise. Do not force it to rotate in the wrong direction.
3. Close the computer display slowly, holding the upper left and right sides with both hands.
Note: Make sure that the display is rotated at 180 degrees, so that the back of the display faces the
keyboard.
4. Press the center latch down to lock the display.
Using the tablet mode
1/2 ページUsing the tablet mode
2006/10/16file://C:\TamaTemp\usetab.HTM\usetab.HTM
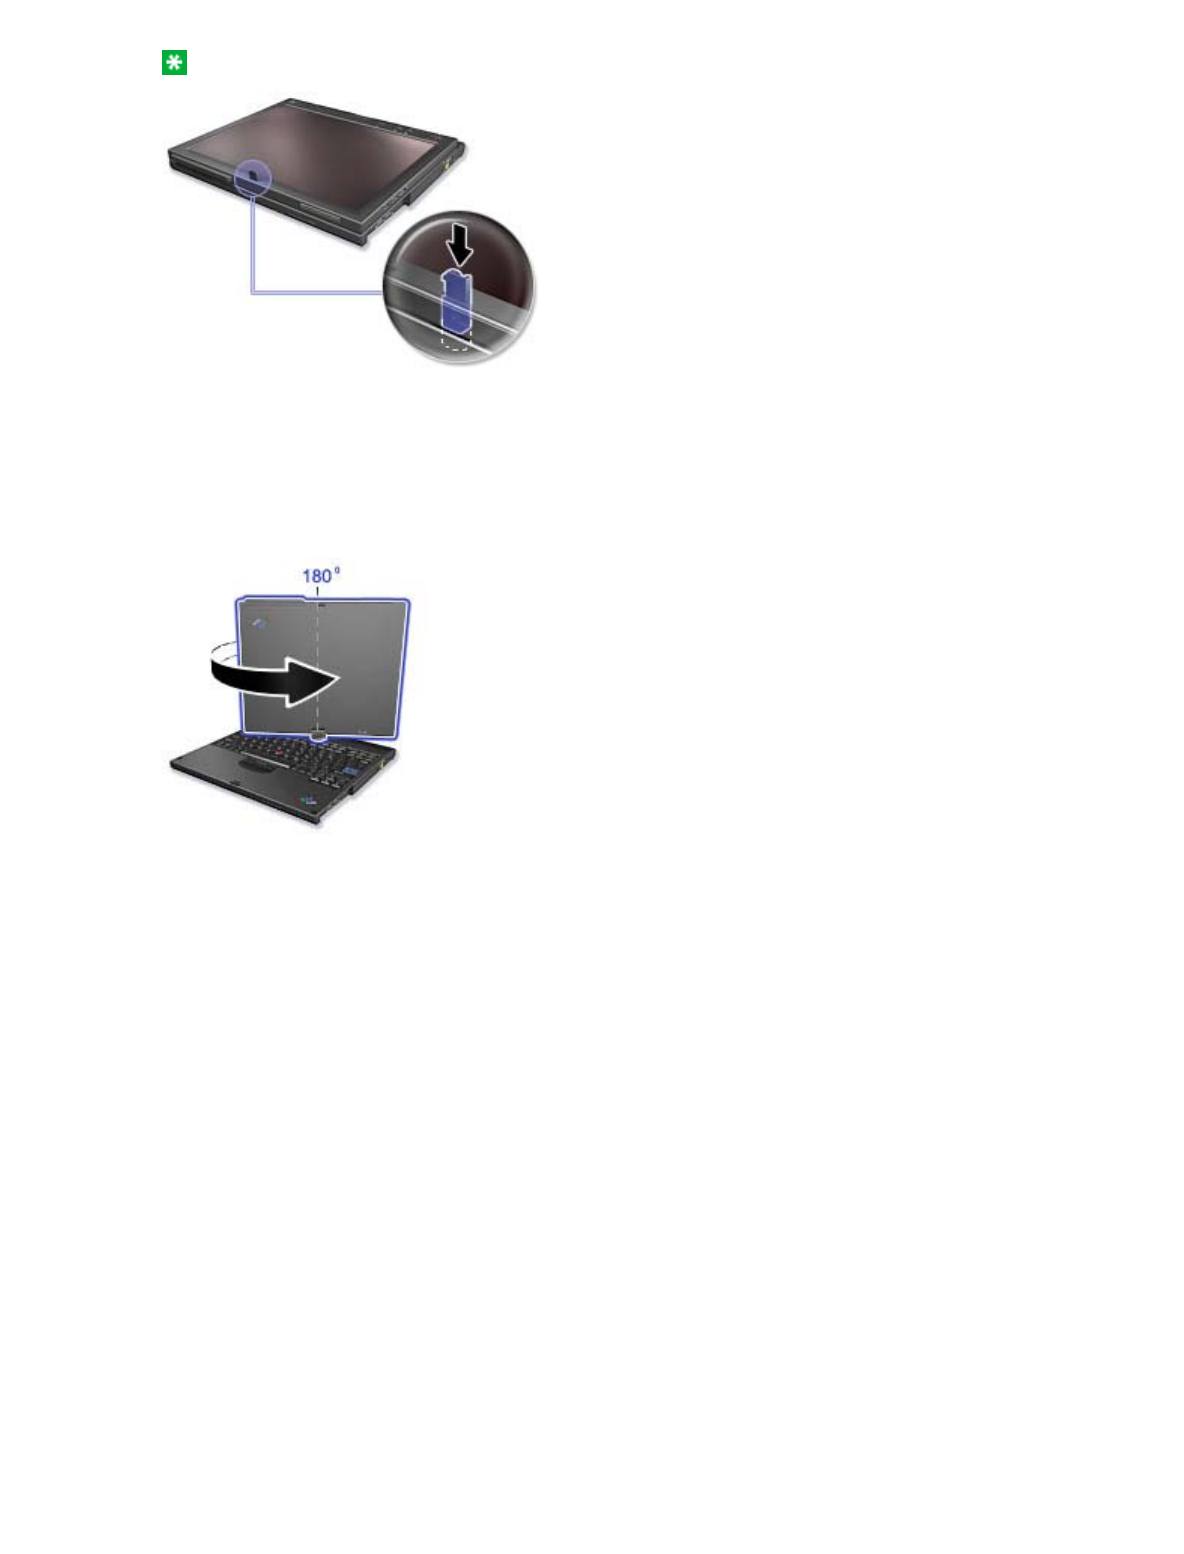
Note: Do not rotate, twist, or bend the center latch of the display.
Your computer is now in the tablet mode.
To return your ThinkPad computer to the notebook mode, do as follows:
Unlatch the display latch and open the display by at least 45 degrees, preferably by 90 degrees. Then
rotate the display slowly counter-clockwise until the front of the display is facing the keyboard.
Your computer is now in the notebook mode.
Tips on using your computer in the tablet mode
zTo close the computer display, first make sure that the display either faces the keyboard or is
positioned at 180 degrees to the keyboard, so that the back of the display faces the keyboard.
zDo not pick up or hold the computer by the display only.
zDo not hit, vibrate, or bump the computer display.
zTo allow free ventilation, do not place any obstacle, such as a thick-piled carpet or a soft cushion,
in front of the fan.
zWhen you use the computer in the picture frame mode, hold the display with one hand and use
the Tablet Digitizer Pen.
zIf you hold the computer with one hand while using it in the tablet mode, do not expose it to
excessive vibration, shock, or rotation.
zDo not use the computer outdoors. Do not expose it to rain.
zIf you put your computer in a carrying case, put it into notebook mode and close the display.
2/2 ページUsing the tablet mode
2006/10/16file://C:\TamaTemp\usetab.HTM\usetab.HTM
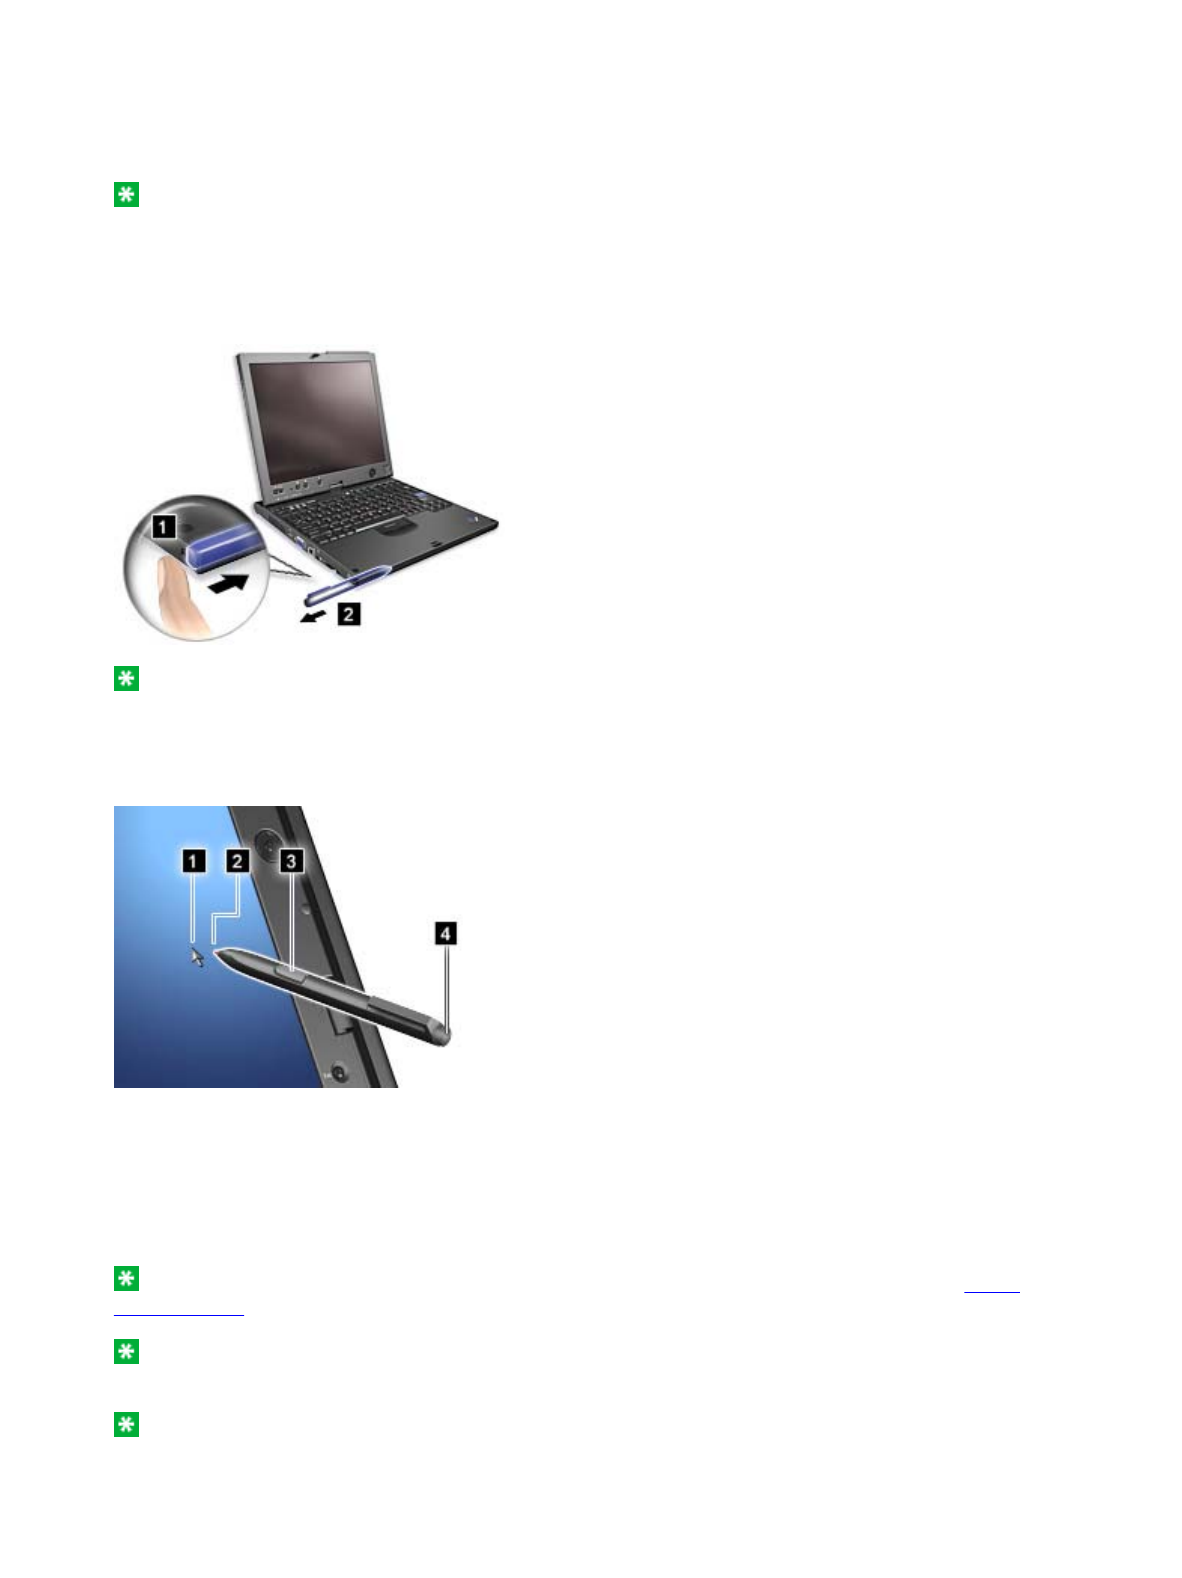
The Tablet Digitizer Pen and its accessories are shipped in a separate box within the ThinkPad(R) shipping
box. You can use the pen to control your computer just as you would with a mouse or keyboard.
Note: This pen is not waterproof. Take care not to soak it or dip it in water.
You can store the pen in the slot on the left side of the ThinkPad computer. Press it gently into the slot until
you hear a click.
To remove the pen from its slot, press it gently into the slot (1) to release it; then pull it out (2).
Note: The pen contains pressure sensors. Do not push the tip of the pen for an extended period of time.
Do not subject the pen to shock or vibration.
The Tablet Digitizer Pen consists of a tip (2), a click button (3), and an eraser tip (4). Hold the pen and point
the tip at the display to move the cursor (1).
To make a selection (single click), tap the display once with the pen. To double-click, tap twice without
pausing. To do a right-click, tap the display once and then hold the tip of the pen on the display; the right-
click icon appears.
Pressing the click button (3) is the same as a right-click. The eraser tip (4) functions like an eraser in
applications that support this function.
Note: You can enable or disable the pen buttons in the Tablet and Pen Settings panel of the Tablet
Shortcut Menu.
Note: The Digitizer Pen shipped with the ThinkPad X60 Tablet computer is for use with that computer
only. Do not insert it into the pen slot of the ThinkPad X41 Tablet computer.
Note: The Digitizer Pen shipped with the ThinkPad X41 Tablet computer is for use with that computer
only. Do not insert it into the pen slot of the ThinkPad X60 Tablet computer.
Using the Tablet Digitizer Pen and the touch panel feature
1/3 ページUsing the Tablet Digitizer Pen and the touch panel feature
2006/10/16file://C:\TamaTemp\tabpen.HTM\tabpen.HTM
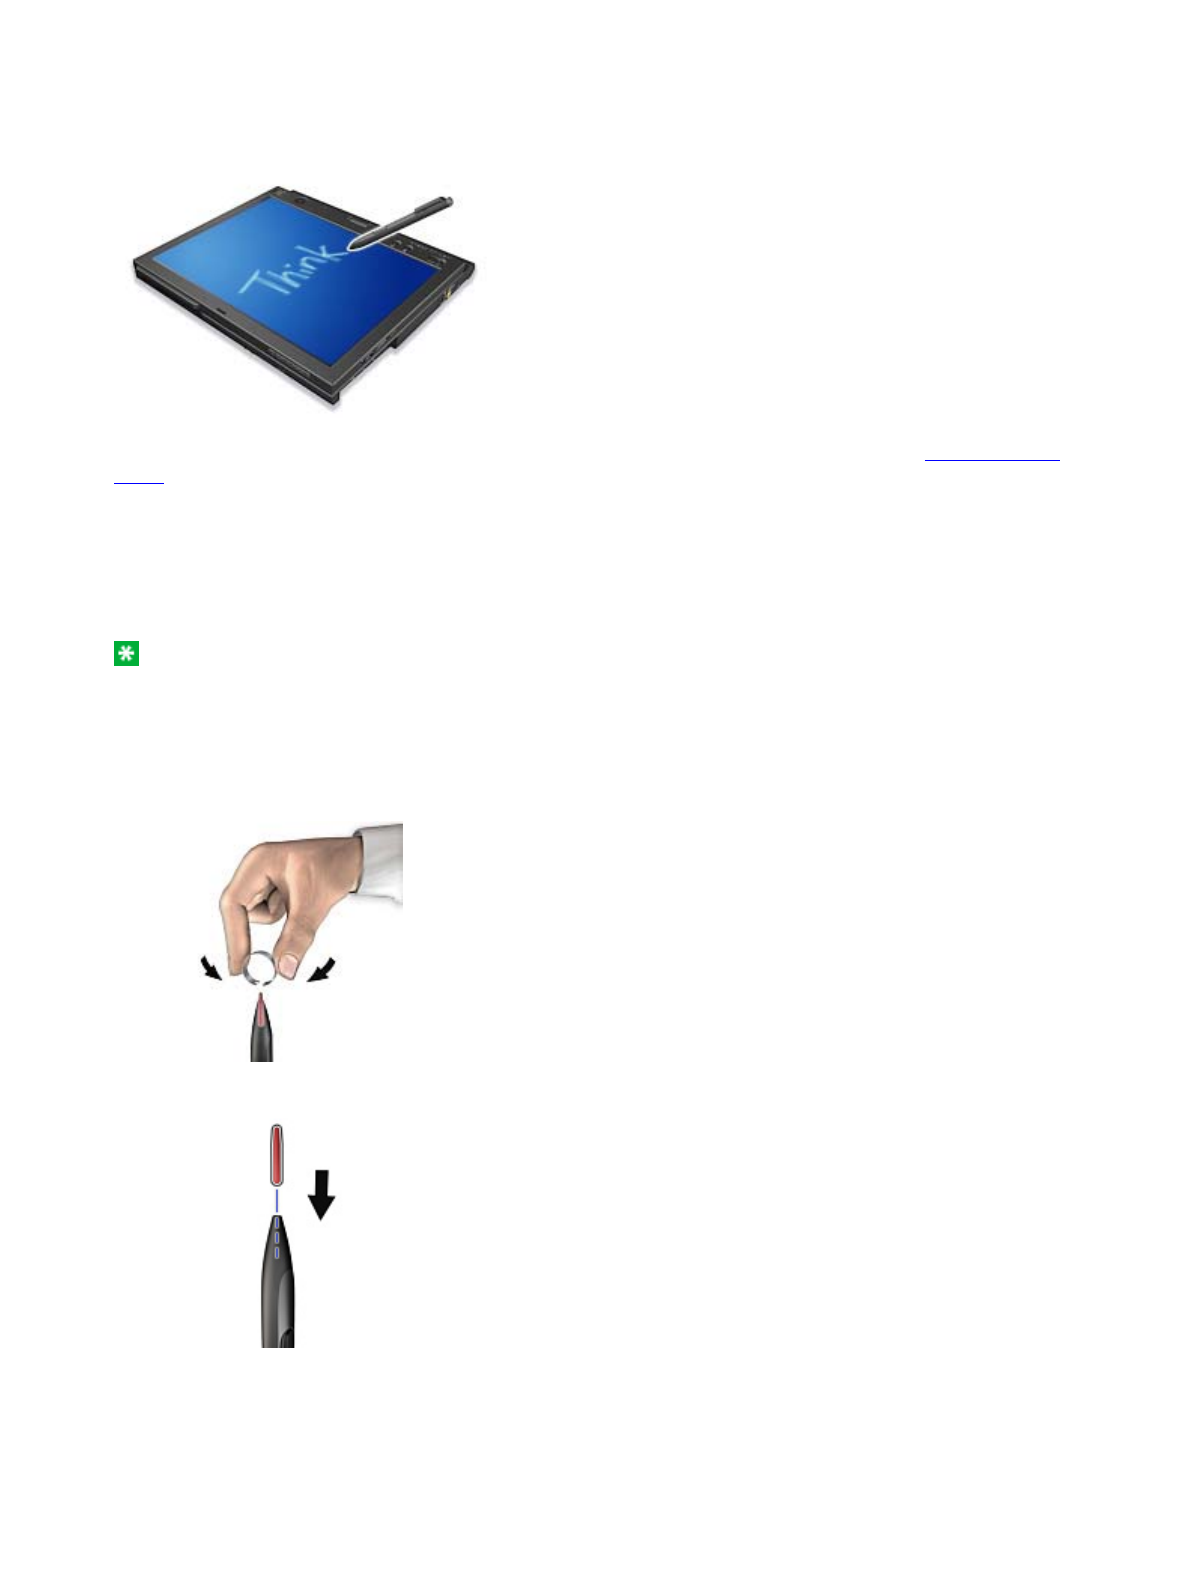
Besides functioning as a basic selection tool, the Tablet Digitizer Pen also enables you to write text or draw
on the screen, as you would with a pen on paper. Different methods of input can be chosen from the Tablet
PC Input Panel on the Windows taskbar.
To configure the Tablet Digitizer Pen settings, use the Tablet and Pen Settings panel of the Tablet Shortcut
Menu.
Replacing the Tablet Digitizer Pen tip
The tip of the Tablet Digitizer Pen may wear out. Replacement tips and a tip removal tool are included in
the pen box shipped with your computer.
Note: Your computer is shipped with five replacement tips for the Digitizer Pen. Be sure to store the pen
tips in a secure place for future use. The pen tips will not be covered under the warranty for the digitizer
pen or the computer.
To replace a pen tip, do as follows:
1. Grip the pen tip with the tip removal tool, and pull it out.
2. Insert a replacement pen tip fully into the Tablet Digitizer Pen.
Using the touch panel
Some modes have the touch panel feature. The touch panel feature makes the interaction with your
ThinkPad computer even more natural, because you can use your finger instead of a pen for navigation on
the go.
2/3 ページUsing the Tablet Digitizer Pen and the touch panel feature
2006/10/16file://C:\TamaTemp\tabpen.HTM\tabpen.HTM

T
o ma
k
e a se
l
ec
ti
on
(
s
i
ng
l
e c
li
c
k)
,
t
ap
th
e
di
sp
l
ay once w
ith
your
fi
nger.
T
o
d
ou
bl
e-c
li
c
k
,
t
ap
t
w
i
ce w
ith
ou
t
pausing. To do a right-click, tap the display once and then hold your finger on the display until the right-
click icon appears.
Tips on using the touch panel
zThe touch panel is a glass panel covered with a plastic film. For input you can use either your
finger of the Tablet Digitizer Pen shipped with your computer. Do not use any pen other than the
specified one, or any metallic object, because to do so might damage the touch panel or cause it
to malfunction.
zIf you put your computer in a carrying case, put it into notebook mode and close the display. Do
not carry your computer in tablet mode.
zIf you use both your finger and the Tablet Digitizer Pen simultaneously for input to the screen,
only data entered by use of the Digitizer Pen will be processed.
zIf you use your finger to input to the touch panel, touch only one point at a time. If you touch
several points simulatneously, the input will not be processed correctly.
zWith the touch panel, gradually a discrepancy may start to appear between the point you touched
with your finger during the finger point, and its actual position on the screen. To avoid this,
regularly correct the accuracy of the finger input by use of the touch panel Settings Utility.
Cleaning the touch panel display
1. To remove fingerprints, etc., from the touch panel display, use a dry, soft, lint-free cloth. (A piece
of absorbent cotton will also serve the purpose.) Do not apply solvents to the cloth.
2. Gently wipe foreign particles and dust from the touch panel with one side of the cloth.
3. Wipe smudges or fingerprints with the other side of the cloth, or with a clean cloth.
4. After using the cloth, wash it with a neutral detergent.
3/3 ページUsing the Tablet Digitizer Pen and the touch panel feature
2006/10/16file://C:\TamaTemp\tabpen.HTM\tabpen.HTM