Intel ND1 802.11 a/b/g/n, BLE and BT Module User Manual User Guide2x
Intel Corporation 802.11 a/b/g/n, BLE and BT Module User Guide2x
Intel >
Contents
- 1. Regulatory flyer
- 2. Regulatory Flyer
- 3. Installation Manual Revised
Installation Manual Revised

Document Number: EQSG-ww29
Intel® Edison
Quick Start Guide
September 2014
Revision ww29
Intel Confidential

Intel® Edison
Quick Start Guide September 2014
2 Intel Confidential Document Number: EQSG-ww29
Notice: This document contains information on products in the design phase of development. The information here is subject to change without notice.
Do not finalize a design with this information.
INFORMATION IN THIS DOCUMENT IS PROVIDED IN CONNECTION WITH INTEL PRODUCTS. NO LICENSE, EXPRESS OR IMPLIED, BY
ESTOPPEL OR OTHERWISE, TO ANY INTELLECTUAL PROPERTY RIGHTS IS GRANTED BY THIS DOCUMENT. EXCEPT AS PROVIDED IN
INTEL’S TERMS AND CONDITIONS OF SALE FOR SUCH PRODUCTS, INTEL ASSUMES NO LIABILITY WHATSOEVER AND INTEL DISCLAIMS
ANY EXPRESS OR IMPLIED WARRANTY, RELATING TO SALE AND/OR USE OF INTEL PRODUCTS INCLUDING LIABILITY OR WARRANTIES
RELATING TO FITNESS FOR A PARTICULAR PURPOSE, MERCHANTABILITY, OR INFRINGEMENT OF ANY PATENT, COPYRIGHT OR OTHER
INTELLECTUAL PROPERTY RIGHT.
A “Mission Critical Application” is any application in which failure of the Intel Product could result, directly or indirectly, in personal injury or death.
SHOULD YOU PURCHASE OR USE INTEL’S PRODUCTS FOR ANY SUCH MISSION CRITICAL APPLICATION, YOU SHALL INDEMNIFY AND
HOLD INTEL AND ITS SUBSIDIARIES, SUBCONTRACTORS AND AFFILIATES, AND THE DIRECTORS, OFFICERS, AND EMPLOYEES OF EACH,
HARMLESS AGAINST ALL CLAIMS COSTS, DAMAGES, AND EXPENSES AND REASONABLE ATTORNEYS' FEES ARISING OUT OF, DIRECTLY
OR INDIRECTLY, ANY CLAIM OF PRODUCT LIABILITY, PERSONAL INJURY, OR DEATH ARISING IN ANY WAY OUT OF SUCH MISSION
CRITICAL APPLICATION, WHETHER OR NOT INTEL OR ITS SUBCONTRACTOR WAS NEGLIGENT IN THE DESIGN, MANUFACTURE, OR
WARNING OF THE INTEL PRODUCT OR ANY OF ITS PARTS.
Intel may make changes to specifications and product descriptions at any time, without notice. Designers must not rely on the absence or
characteristics of any features or instructions marked “reserved” or “undefined.” Intel reserves these for future definition and shall have no responsibility
whatsoever for conflicts or incompatibilities arising from future changes to them. The information here is subject to change without notice. Do not
finalize a design with this information.
Intel software products are copyrighted by and shall remain the property of Intel Corporation. Use, duplication, or disclosure is subject to restrictions
stated in Intel’s Software License Agreement, or in the case of software delivered to the government, in accordance with the software license
agreement as defined in FAR 52.227-7013.
The products described in this document may contain design defects or errors known as errata which may cause the product to deviate from published
specifications. Current characterized errata are available on request.
The code names presented in this document are only for use by Intel to identify products, technologies, or services in development that have not been
made commercially available to the public, i.e., announced, launched, or shipped. They are not "commercial" names for products or services and are
not intended to function as trademarks.
Contact your local Intel sales office or your distributor to obtain the latest specifications and before placing your product order.
Copies of documents which have an order number and are referenced in this document, or other Intel literature may be obtained by calling
1-800-548-4725 or by visiting Intel’s website at http://www.intel.com/design/literature.htm.
Intel processor numbers are not a measure of performance. Processor numbers differentiate features within each processor family, not across different
processor families. See http://www.intel.com/products/processor_number for details.
Intel, the Intel logo, and Edison are trademarks of Intel Corporation in the US and other countries.
* Other brands and names may be claimed as the property of others.
Copyright © 2014 Intel Corporation. All rights reserved.

Intel® Edison
September 2014 Quick Start Guide
Document Number: EQSG-ww29 Intel Confidential 3
Contents
1!Introduction ......................................................................................................................................................... 6!
1.1!References ............................................................................................................................................. 6!
1.2!Terminology ............................................................................................................................................ 6!
1.3!Typographic conventions ....................................................................................................................... 6!
2!Overview .............................................................................................................................................................. 7!
2.1!Before you begin .................................................................................................................................... 8!
3!Windows Configuration ..................................................................................................................................... 9!
3.1!Connect to Edison through USB/UART serial ........................................................................................ 9!
!Downloads ........................................................................................................................ 9!3.1.1
!Initial setup ........................................................................................................................ 9!3.1.2
!Connecting to Edison ....................................................................................................... 9!3.1.3
3.2!Connect through RNDIS ...................................................................................................................... 10!
!Downloads ...................................................................................................................... 10!3.2.1
!Initial setup ...................................................................................................................... 10!3.2.2
!Connecting to Edison ..................................................................................................... 10!3.2.3
3.3!Flashing an image onto the Edison ...................................................................................................... 10!
!Downloads ...................................................................................................................... 10!3.3.1
!Initial setup ...................................................................................................................... 11!3.3.2
!Flashing an image .......................................................................................................... 12!3.3.3
3.4!Cross-compile “hello world” .................................................................................................................. 13!
4!Linux Configuration .......................................................................................................................................... 14!
4.1!Connect through USB/UART ............................................................................................................... 14!
!Initial setup ...................................................................................................................... 14!4.1.1
!Connecting to Edison ..................................................................................................... 14!4.1.2
4.2!Connect through RNDIS ...................................................................................................................... 14!
!Initial setup ...................................................................................................................... 14!4.2.1
!Connecting to Edison ..................................................................................................... 16!4.2.2
4.3!Flash an image onto the Edison ........................................................................................................... 17!
!Downloads ...................................................................................................................... 17!4.3.1
!Initial setup ...................................................................................................................... 17!4.3.2
!Flashing an image .......................................................................................................... 17!4.3.3
4.4!Cross-compile “hello world” .................................................................................................................. 18!
5!Mac OS X Configuration ................................................................................................................................... 19!
5.1!Connect through USB/UART ............................................................................................................... 19!
5.2!Connect through RNDIS ...................................................................................................................... 19!
6!Connecting to the Intel® Edison Board .......................................................................................................... 21!
6.1!Wi-Fi ..................................................................................................................................................... 21!
6.2!Bluetooth .............................................................................................................................................. 21!
6.3!Changing an Edison board’s static IP address .................................................................................... 22!
7 7.1 Regulatory Statements………………………………………………………………………………..……… 23,24

Intel® Edison
Quick Start Guide September 2014
4 Intel Confidential Document Number: EQSG-ww29
Figures
Figure 1!What’s included in the box ................................................................................................................. 7!
Figure 2!PuTTY configuration .......................................................................................................................... 9!
Figure 3!Zadig setup ...................................................................................................................................... 11!
Figure 4!Verifying dfu-util installation ............................................................................................................. 12!
Figure 5!Windows Device Manager — USB devices ..................................................................................... 12!
Figure 6!Intel® Edison board ......................................................................................................................... 13!
Figure 7!Linux > Edit connections .................................................................................................................. 15!
Figure 8!Linux > Network connections ........................................................................................................... 15!
Figure 9!Linux > Editing wired connection ..................................................................................................... 16!
Figure 10!Intel® Edison board ......................................................................................................................... 18!
Figure 11!Mac system preferences ................................................................................................................. 19!
Figure 12!Configure RNDIS driver ................................................................................................................... 20!

Intel® Edison
September 2014 Quick Start Guide
Document Number: EQSG-ww29 Intel Confidential 5
Revision History
Revision
Description
Date
ww27
Initial release
July 9, 2014
ww29
Overhaul to align documentation with OOBE, follow a linear process, and fix errors.
July 22, 2014
§

Introduction
Intel® Edison
Quick Start Guide September 2014
6 Intel Confidential Document Number: EQSG-ww29
1 Introduction
This document provides the necessary steps to install the Intel® Edison software and make the initial configurations
in the supported environments.
1.1 References
Reference
Name
Number/location
[QSG]
Intel® Edison Quick Start Guide
(This document)
[UG]
Intel® Edison Board Support Package User Guide
[RN]
Intel® Edison Board Support Package Release Notes
[HDG]
Intel® Edison Hardware Design Guide
[GSG]
Intel® Edison Getting Started Guide
[SDG]
Intel® Edison Software Developer Guide
[YPQSG]
Yocto Project Quick Start Guide
http://www.yoctoproject.org/docs/current/yocto-
project-qs/yocto-project-qs.html
[YDM]
Yocto Developer Manual
http://www.yoctoproject.org/docs/current/dev-
manual/dev-manual.html
[YKDM]
Yocto Kernel Developer Manual
http://www.yoctoproject.org/docs/latest/kernel-
dev/kernel-dev.html
1.2 Terminology
Term
Definition
SSH
Secure shell host
RNDIS
Remote Network Driver Interface Specification (Microsoft Proprietary protocol used on top of USB)
UART
Universal Asynchronous Receiver/Transmitter
SCP
Secure Copy Command
SFTP
Secure File Transfer Protocol
USB CDC
Universal Serial Bus Communication Device Class
1.3 Typographic conventions
The following conventions are used in this document:
• Emphasis - graphical user interface entries and buttons, filenames, directory paths, etc.
• Courier font - code examples, command line entries.
Linux terminal inputs follow bold ## symbols and outputs follow a single # symbol as shown below.
##echo “a line sample of terminal input and output”
#a line sample of terminal input and output
§
Overview
Intel® Edison
September 2014 Quick Start Guide
Document Number: EQSG-ww29 Intel Confidential 7
2 Overview
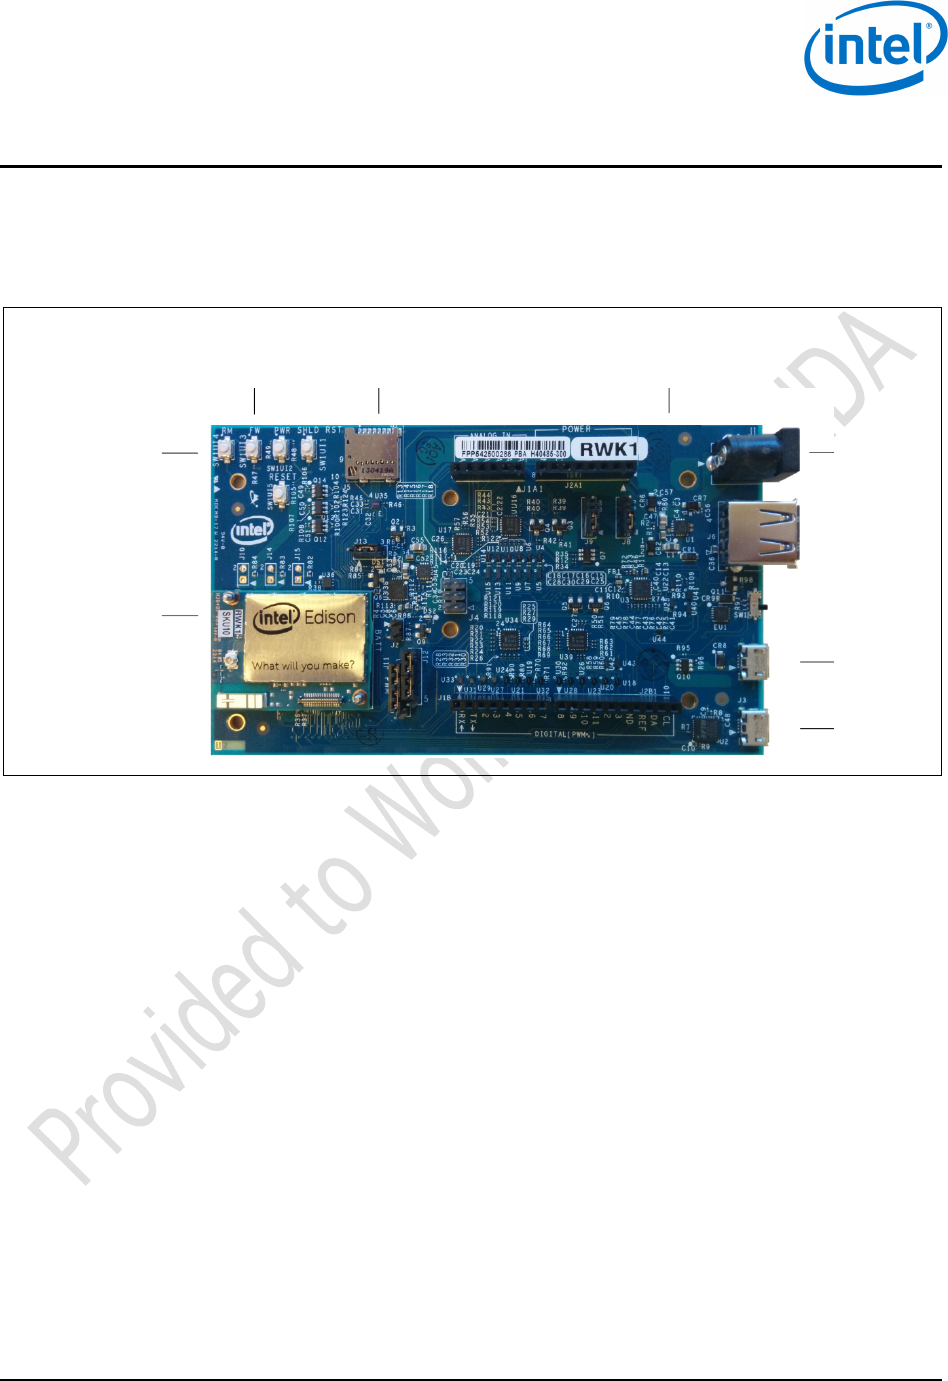
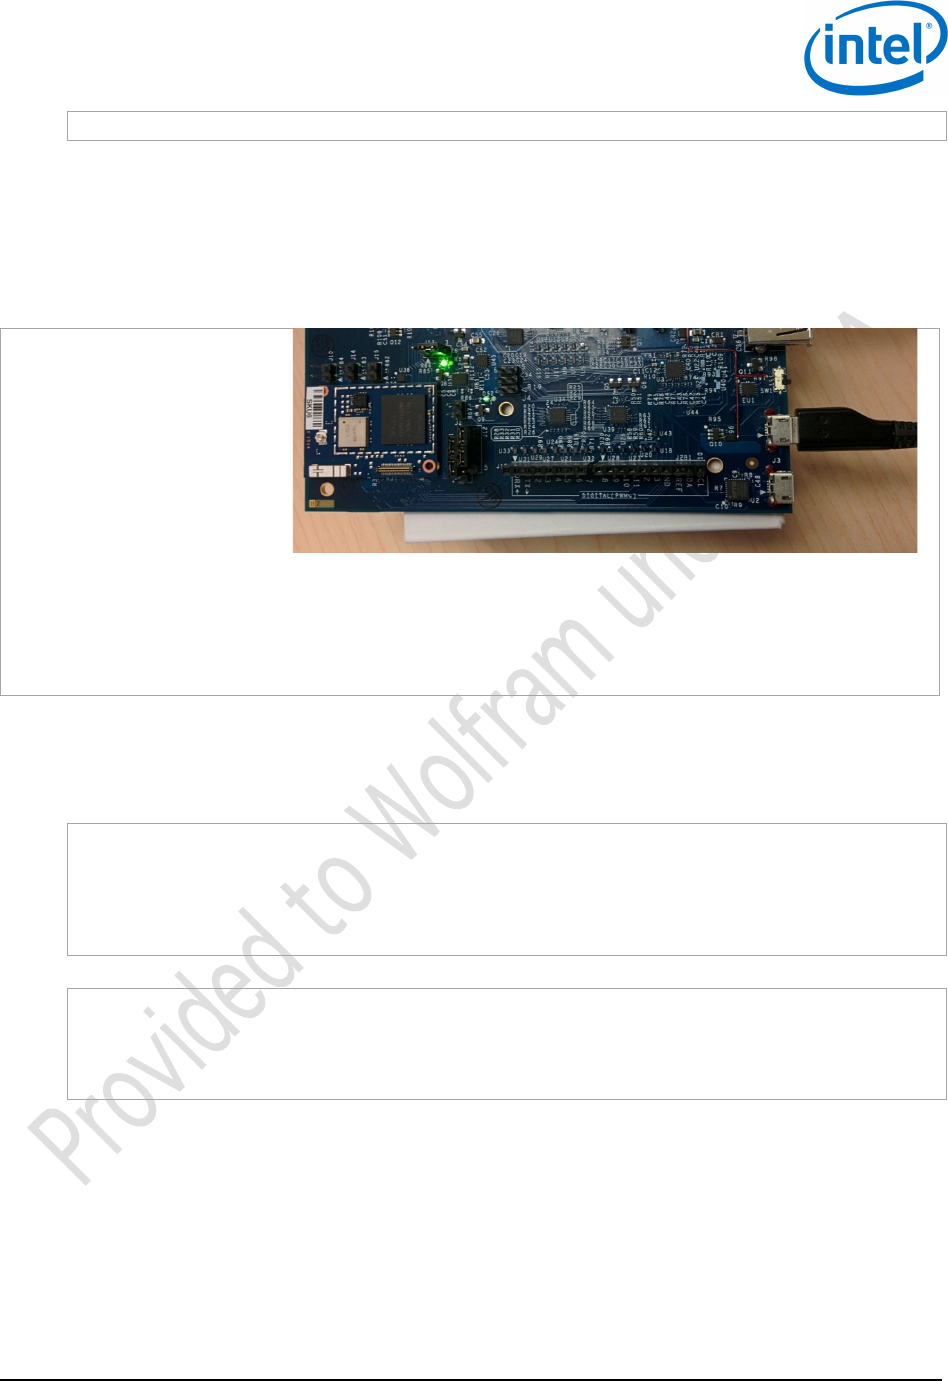
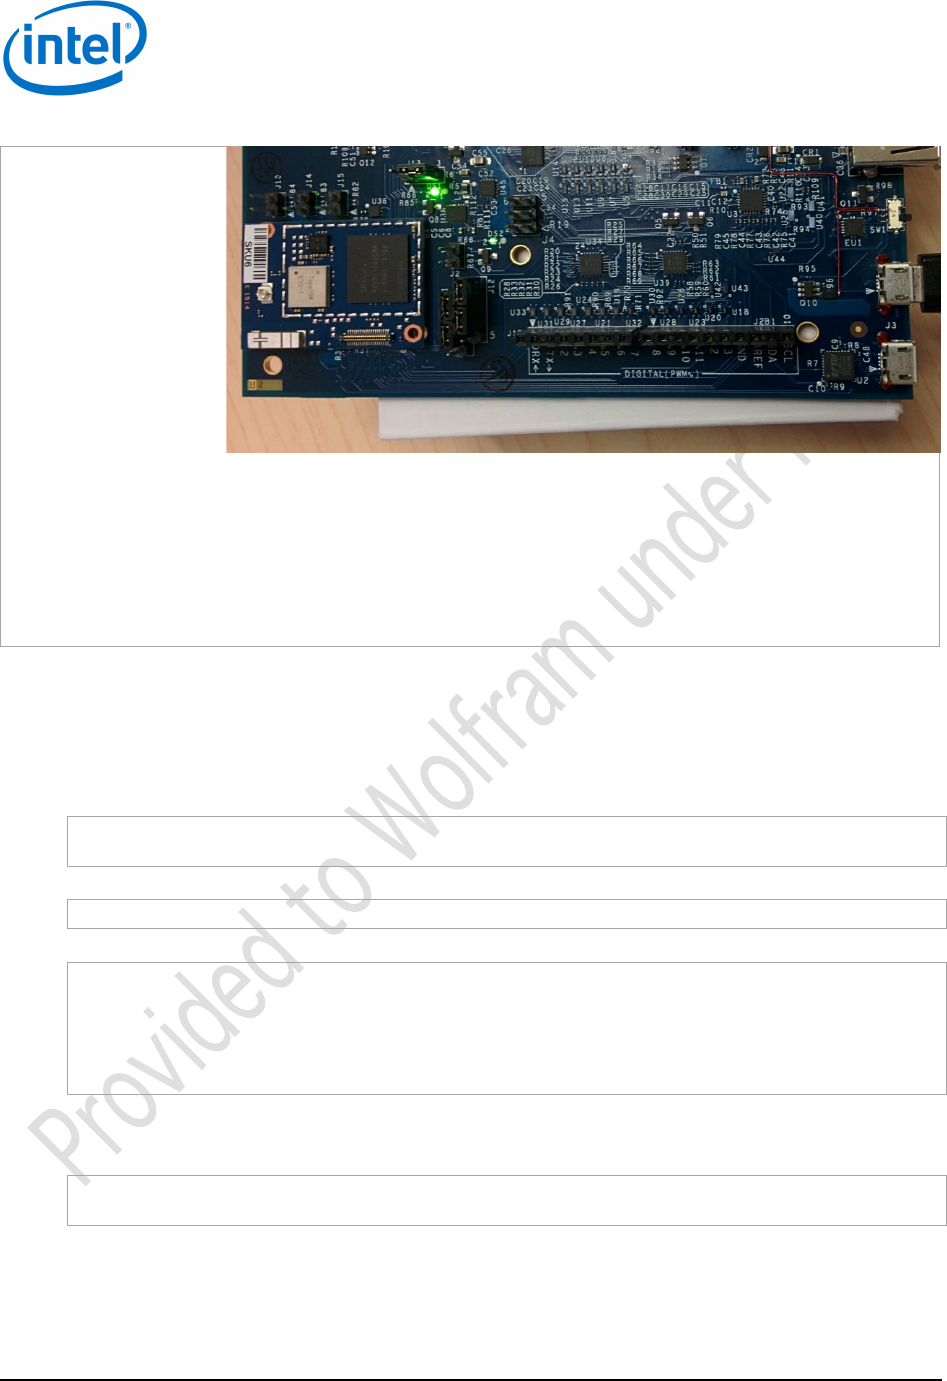
Thank you for participating in the Intel® Edison development program. Your development pacakge includes an Intel®
Edison development (daughter) board and an Arduino expansion board (Figure 1). This figure also shows some of
the key components on the Intel® Edison development board that you might need to access for the purposes of this
document.
Figure 1 What’s included in the box
FW - Firmware
recover (connected
to pin #63)
Micro SD card slot
Arduino expansion board
RM button
(Recovery
Mode;
connected to
pin #30)
Power
Intel® Edison
board
Micro
USB port
(for
flashing)
Serial port
You will also need the following (not included):
• One microUSB cable (two, if you want to use both microUSB ports simultaneously)
• One power supply, with a 2.1 mm center-positive jack, that provides voltage between 7 and 15 V.
The Intel® Edison development board can be powered over USB (max 0.5 A) through the USB multigadget port and
by an external power supply that provides between 7 and 15 V.
The UART port is the debug port and provides a serial connection to the Edison board.
The multigadget port is a USB CDC device that does multiple things on the same connection:
• Can power the Edison board.
• Provides a network interface through remote network driver interface specification (RNDIS).
• Provides a serial connection and access for Arduino IDE through ACM serial.
• Grants the host computer access to an 800 MB Edison partition as a USB drive.
• Allows users to flash the Edison device.
The USB 2.0 Host port allows USB devices, such as cameras, to connect to the Edison. This port cannot be used at
the same time as the multigadget port; you must use the micro switch to enable one or the other.

Overview
Intel® Edison
Quick Start Guide September 2014
8 Intel Confidential Document Number: EQSG-ww29
2.1 Before you begin
Release contents are available at file://aceslab/SLC/NDG-Edison/Software/Release. To follow this document,
download the following:
• Flash image: Edison-image-ww29-14.zip
• Cross-compilation SDK installers (to compile your applications). Download the file for your host OS:
− Win32: edison-sdk-win32-weekly-19.zip
− WIn64: edison-sdk-win64-weekly-19.zip
− Linux32: edison-sdk-linux32-weekly-19.zip
− Linux64: edison-sdk-linux64-weekly-19.zip
− Mac OS X: edison-sdk-macosx-weekly-19.zip
§
Windows Configuration
Intel® Edison
September 2014 Quick Start Guide
Document Number: EQSG-ww29 Intel Confidential 9
3 Windows Configuration
Complete these one-time instructions to configure your Intel® Edison board for Windows.
3.1 Connect to Edison through USB/UART serial
The easiest way to connect to Edison is to use a terminal emulator through the USB/UART serial debug interface.
Downloads 3.1.1
To connect to the Edison through UART, you need an FTDI UART driver and a terminal emulator such as PuTTY that
can connect to a UART interface.
• FTDI Driver: http://www.ftdichip.com/Drivers/CDM/CDM%20v2.10.00%20WHQL%20Certified.exe
• PuTTY (or another COM port terminal emulator): http://the.earth.li/~sgtatham/putty/latest/x86/putty.exe
Initial setup 3.1.2
If you have not installed a UART USB driver before, install the FTDI UART driver. To make sure the device has been
installed correctly, power on the Edison and connect it to your computer. Then, go to Device Manager and locate the
“USB Serial Port” device under Ports. If the device exists, setup succeeded. Afterwards, make sure you have
downloaded a terminal emulator, such as PuTTY.
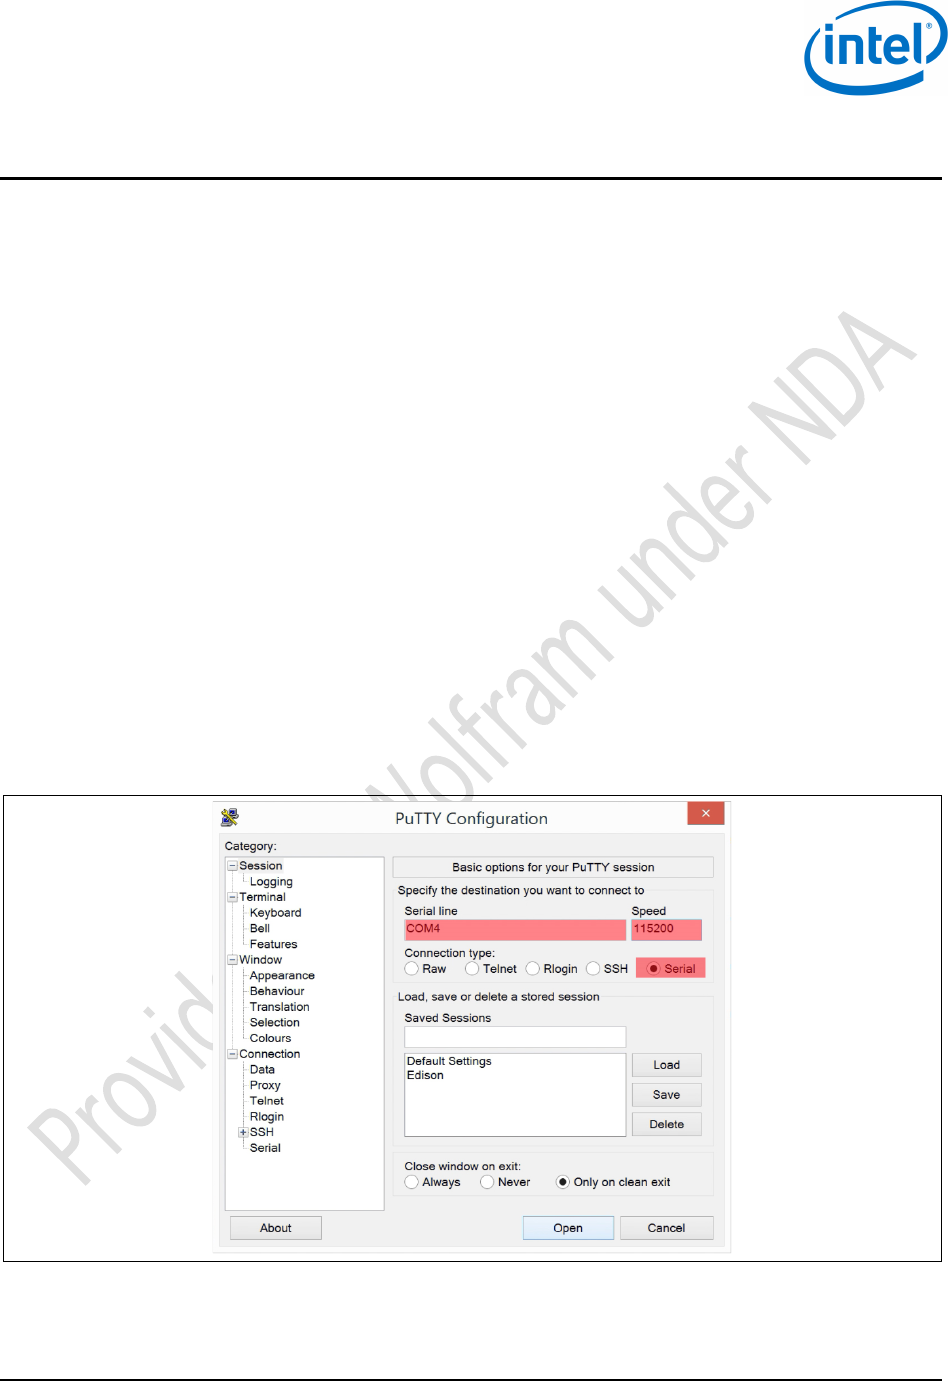
Connecting to Edison 3.1.3
To connect to the USB UART interface, go to Device Manager and make note of the COM port assigned to the USB
Serial Port device. Using your terminal emulator, connect to that serial COM port with a baud rate of 115200.
If you are using PuTTY, select Serial and enter the COM port and a speed of 115200 (Figure 2).
Figure 2 PuTTY configuration
When the serial console is not used for 5 seconds, it goes to idle. The first character you enter when it is in Note:
this state will be lost. This is a hardware issue; there is currently no software workaround.

Windows Configuration
Intel® Edison
Quick Start Guide September 2014
10 Intel Confidential Document Number: EQSG-ww29
3.2 Connect through RNDIS
Setting up RNDIS will allow you to access Edison using an Ethernet over USB connection. This allows SSH, SCP,
and SFTP to all occur over a USB cable. This method does not require a driver to be installed.
Downloads 3.2.1
In this case, you’ll need to install something with a SSH client such as Cygwin, Git for Windows, or Putty. In our
examples, we’ll be using Putty.
• PuTTY (or another COM Port terminal emulator): http://the.earth.li/~sgtatham/putty/latest/x86/putty.exe
Initial setup 3.2.2
Set up RNDIS/Ethernet gadget
1. Launch the Device Manager (Start > Control Panel > Hardware and Sound and select the Device Manager
under Devices and Printers) and look under Network adapters for RNDIS/Ethernet Gadget. If it is not there,
right-click RNDIS/Ethernet Gadget and select Update Driver Software.
2. Choose Browse my computer for driver software and Let me pick from a list of device drivers on my
computer. Select Network adapters as the device type and click Next.
3. Select network adapters from the dropdown list of manufacturers, select Microsoft Corporation and Remote
NDIS Compatible Device.
4. Click Next and click through the update driver warning. The device should be installed correctly in the
network adapters list.
Set the IP address
To set the IP address, do the following:
1. Open Control Panel > Network Internet > Network Connections.
2. Open the properties of the local area network USB Ethernet/RNDIS Gadget.
3. Click Internet Protocol Version 4 (TCP/IPv4) in the list of items then click Properties and change the
following:
a. IP address: 192.168.2.1
b. Subnet mask: 255.255.255.0
4. Save the settings and exit. This will allow you to connect to the board, which will have the IP address
192.168.2.15.
Connecting to Edison 3.2.3
To connect to the Edison, SSH to 192.168.2.15 with root as the username. If a terminal environment such as Git
Bash has SSH, this would create the connection:
ssh root@192.168.2.15
For Putty, the configuration would be to select the SSH radio button and enter root @ 192.168.2.15 as the hostname.
Because this IP address is statically set on the Edison, it will not be possible to have two Edisons connected over
RNDIS without changing the static IP on one of the two devices.
3.3 Flashing an image onto the Edison
Follow these instructions to use a prebuilt Edison image that Intel has distributed.
Downloads 3.3.1
Before starting the process, download the following dependencies:
Windows Configuration
Intel® Edison
September 2014 Quick Start Guide
Document Number: EQSG-ww29 Intel Confidential 11
• Phone Flash Tool: https://wiki.ith.intel.com/display/DRD/Phone+Flash+Tool
• dfu-util: http://dfu-util.gnumonks.org/releases/dfu-util-0.7-binaries.7z
• Zadig: http://zadig.akeo.ie/downloads/zadig_2.1.0.exe
Also, go to file://aceslab/SLC/NDG-Edison/Software/Release and download the latest Edison image zip file (edison-
image-wwXX-XX.zip, where “XX-XX” is the workweek and year), and extract a prebuilt Edison image archive to flash.
Initial setup 3.3.2
For the phone flash tool to work on Windows, the Intel SOC drivers and the Intel Android USB drivers are required.
These drivers are included in the Phone Flash Tool package, and they will be installed or updated during PFT
installation. Install Phone Flash Tools. After doing so, extract the dfu-util archive, and store it in a location where it
will not be inadvertently disturbed, such as C:\Program Files (x86).
You must add the dfu-util directory to the path manually. Do the following:
1. Right-click on the Computer icon and select Properties.
2. Choose Advanced system settings in the left pane.
3. Click Environment Variables at the bottom of the Advanced tab.
4. Edit the Path variable in the system variables list (the lower list). Assuming that dfu-util was extracted to
C:\Program Files (x86), insert a semicolon and add C:\Program Files (x86)\dfu-util-0.7-binaries\win32-
mingw32 to the path.
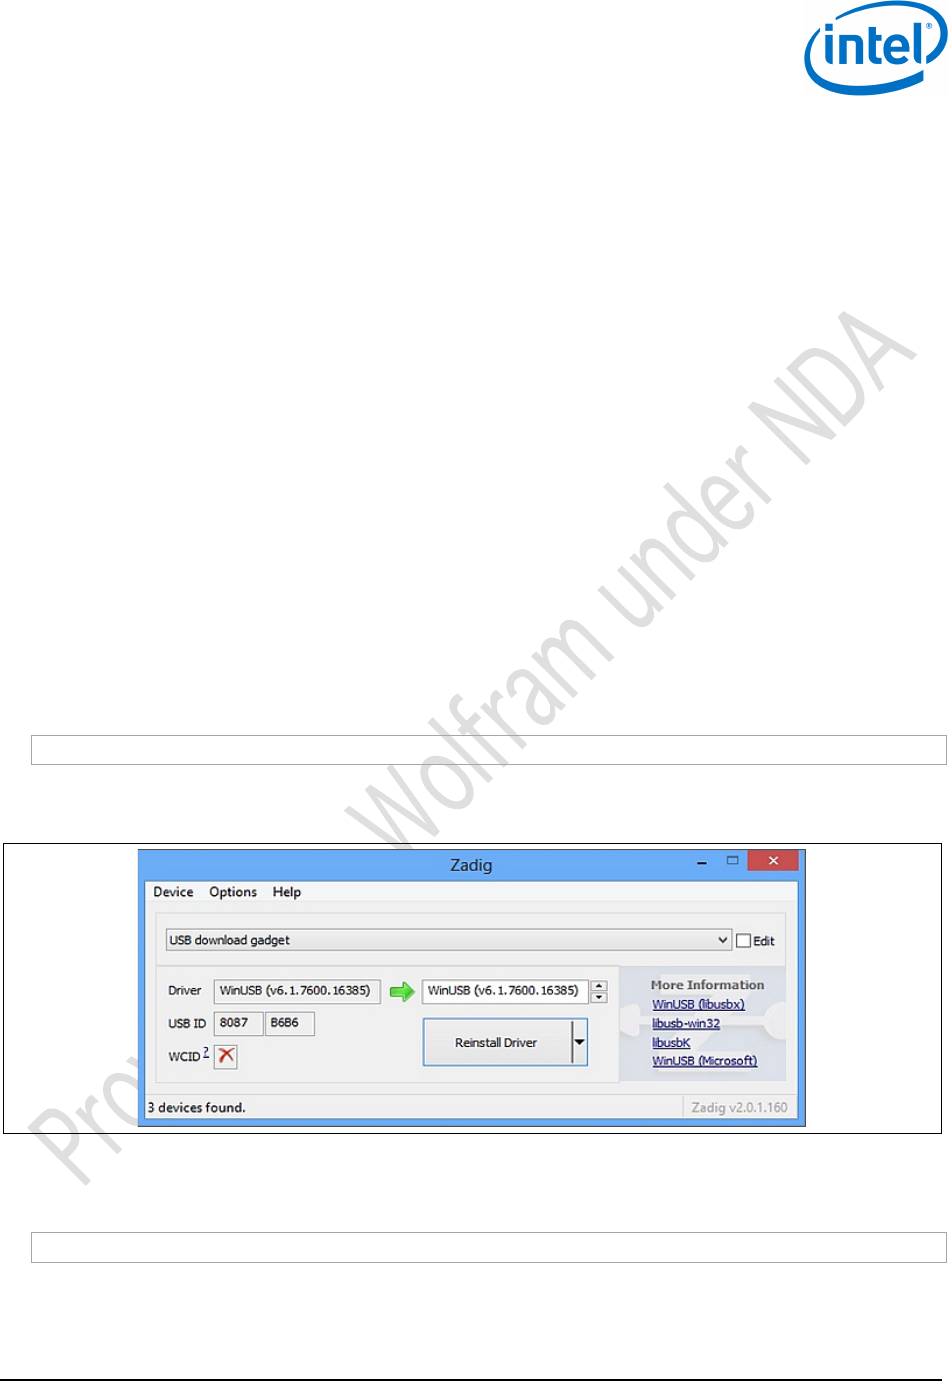
You will also need the Zadig program to make dfu-util work on Windows. Zadig is a utility that aids in installing
drivers.
The first time the board is plugged into the PC, you need to install its driver by launching Zadig.exe.
If you don’t see USB download gadget in the dropdown for Zadig after waiting for about a minute, open a Note:
terminal in the extracted folder of the Edison image – which should have a file named flashall.bat – and run the
following command:
flashall.bat -i
After the process is completed, the USB download gadget should show up in Zadig (Figure 3).
Figure 3 Zadig setup
Select USB download gadget and install the WinUSB driver, then click OK when the verification message states the
installation is successful and restart your computer.
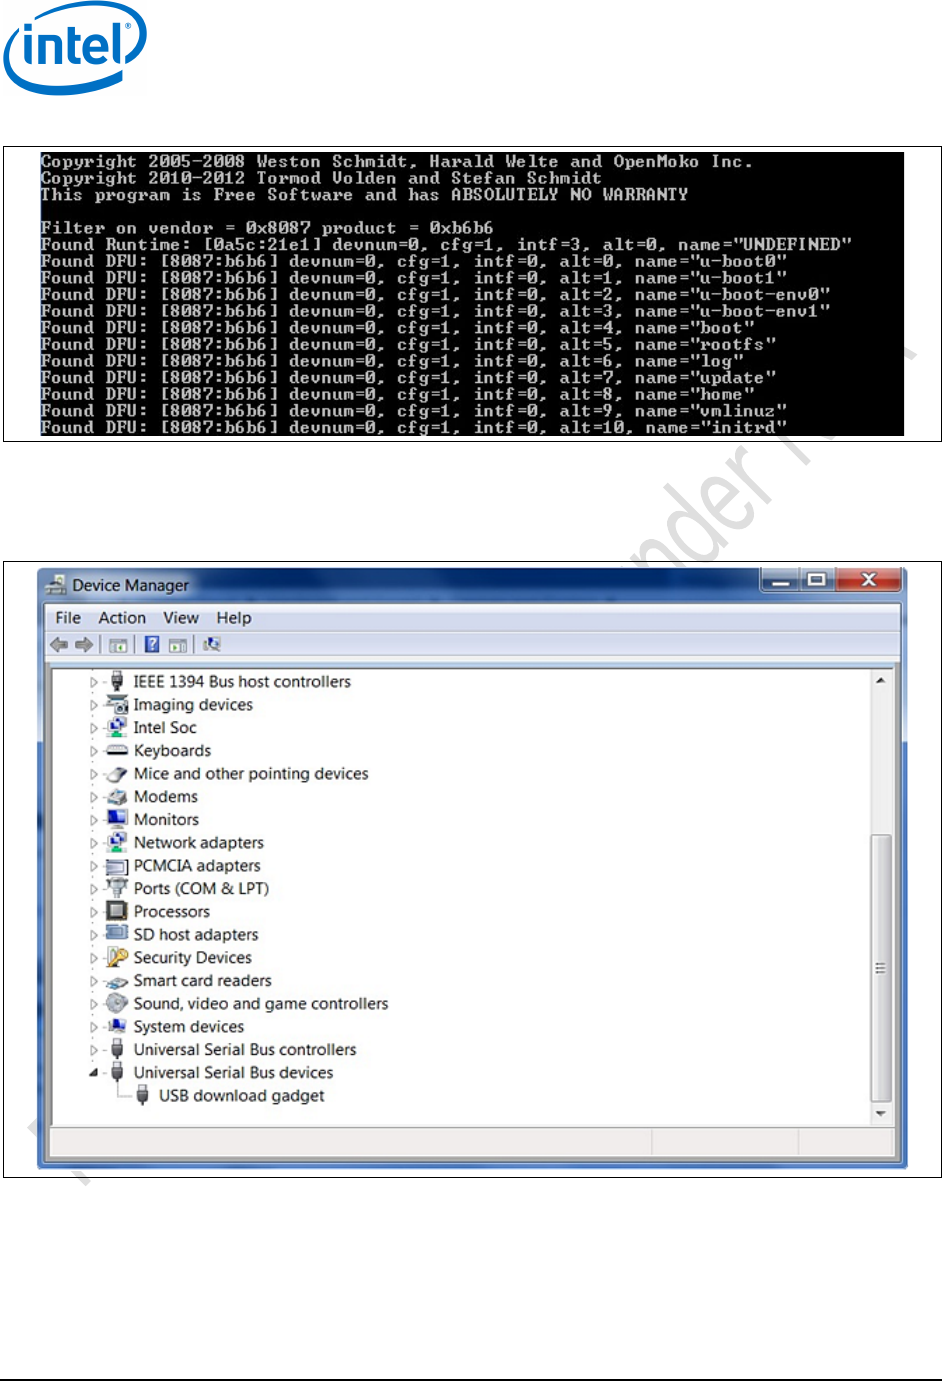
To verify dfu-utils installation, open a terminal and issue the command:
dfu-util –v –l –d 8087:b6b6
You should see output similar to Figure 4.
Windows Configuration
Intel® Edison
Quick Start Guide September 2014
12 Intel Confidential Document Number: EQSG-ww29
Figure 4 Verifying dfu-util installation
You can also verify the availability of the USB download gadget by launching the Device Manager Go to Start >
Control Panel > Hardware and Sound and select the Device Manager under Devices and Printers. Then look under
Universal Serial Bus devices (at the bottom of Figure 5).
Figure 5 Windows Device Manager — USB devices
Flashing an image 3.3.3
Use a USB 2.0 port for all flashing operations on the Intel® Edison board.
1. Keep the Micro USB cable and the power supply unplugged. Make sure that the position of the tiny switch
SW1 is on the side closer to the Micro USB connector.
2. Unzip the prebuilt edison_image-wwXX-XX.zip file into a directory of your choice. Then open a Windows
command shell, navigate to the directory where you saved the zip files, and enter the following command:
Windows Configuration
Intel® Edison
September 2014 Quick Start Guide
Document Number: EQSG-ww29 Intel Confidential 13
.\flashall.bat –b
3. When the script starts to search for the Edison, connect the micro USB cable to the inner Micro USB port as
shown in Figure 6, and connect the power supply afterwards. If the flashing does not start, unplug both
cables, reinsert the microUSB cable, and then reconnect the power supply.
4. After the flashing starts, allow the script to completely run and do not interrupt.
5. After flashing, the board will reboot a couple of times and partition the file system. Do not interrupt this
operation, it should last approximately 30 seconds or so.
Figure 6 Intel® Edison board
3.4 Cross-compile “hello world”
To build a native application in a Windows environment, do the following:
1. Unzip the edison-sdk-win32-weekly-14.zip file to a directory of your choice.
/* Hello World program */
#include<stdio.h>
main()
{
printf("Hello World\n");
}
2. If you extracted the zip archive to the C:\ drive, the command to build helloworld.c would be this:
C:\edison-sdk-win32-weekly-14\poky-edison-eglibc-i686-edison-image-core2-32-
toolchain-1.6\sysroots\i686-pokysdk-mingw32\usr\bin\i586-poky-linux\i586-poky-
linux-gcc.exe --sysroot=C:\edison-sdk-win32-weekly-14\poky-edison-eglibc-i686-
edison-image-core2-32-toolchain-1.6\sysroots\core2-32-poky-linux
c:\test\helloworld.c -o c:\test\helloworld
§

Linux Configuration
Intel® Edison
Quick Start Guide September 2014
14 Intel Confidential Document Number: EQSG-ww29
4 Linux Configuration
Complete these one-time instructions to configure your Intel® Edison board forLinux.
4.1 Connect through USB/UART
Initial setup 4.1.1
If you do not have a terminal program that can connect to a UART interface such as PuTTY, minicom, teraterm, or
screen, you will need to install one. For the sake of simplicity, we will be using screen in this guide.
Ubuntu:
sudo apt-get install screen
Connecting to Edison 4.1.2
Connect a USB cable from your host computer to the Intel® Edison board’s micro USB receptacle (J3), in the lower
right corner of the board (as shown in Figure 6).
Using a terminal program (such as PuTTY, minicom, teraterm, screen, etc.), enter a command to connect to the
board. If multiple UART devices are not connected, the Edison UART interface will be enumerated as /dev/ttyUSB0.
Baudrate should be set at 115200.
For example, with screen.
sudo screen /dev/ttyUSB0 115200
4.2 Connect through RNDIS
Initial setup 4.2.1
Add the following lines to /etc/network/interfaces
allow-hotplug usb0
auto usb0
iface usb0 inet static
address 192.168.2.1
netmask 255.255.255.0
Restart networking service using: /etc/init.d/networking restart
Modifying this file will have a side-effect that usb0 network interface will be configured each time for the next Note:
PC reboot. If the board is up and running, the USB interface will be found; if the board is not running, it won't.
Sometimes this will cause the system to hang for a while as Ubuntu boots, trying to configure the network. After
a successful boot, eth0 might fail to be configured. If this happens, a workaround is to manually start network
manager from terminal:
$ sudo service network-manager start
If this process does not work, there is an alternative (and perhaps easier) method on Ubuntu, using the GUI to edit
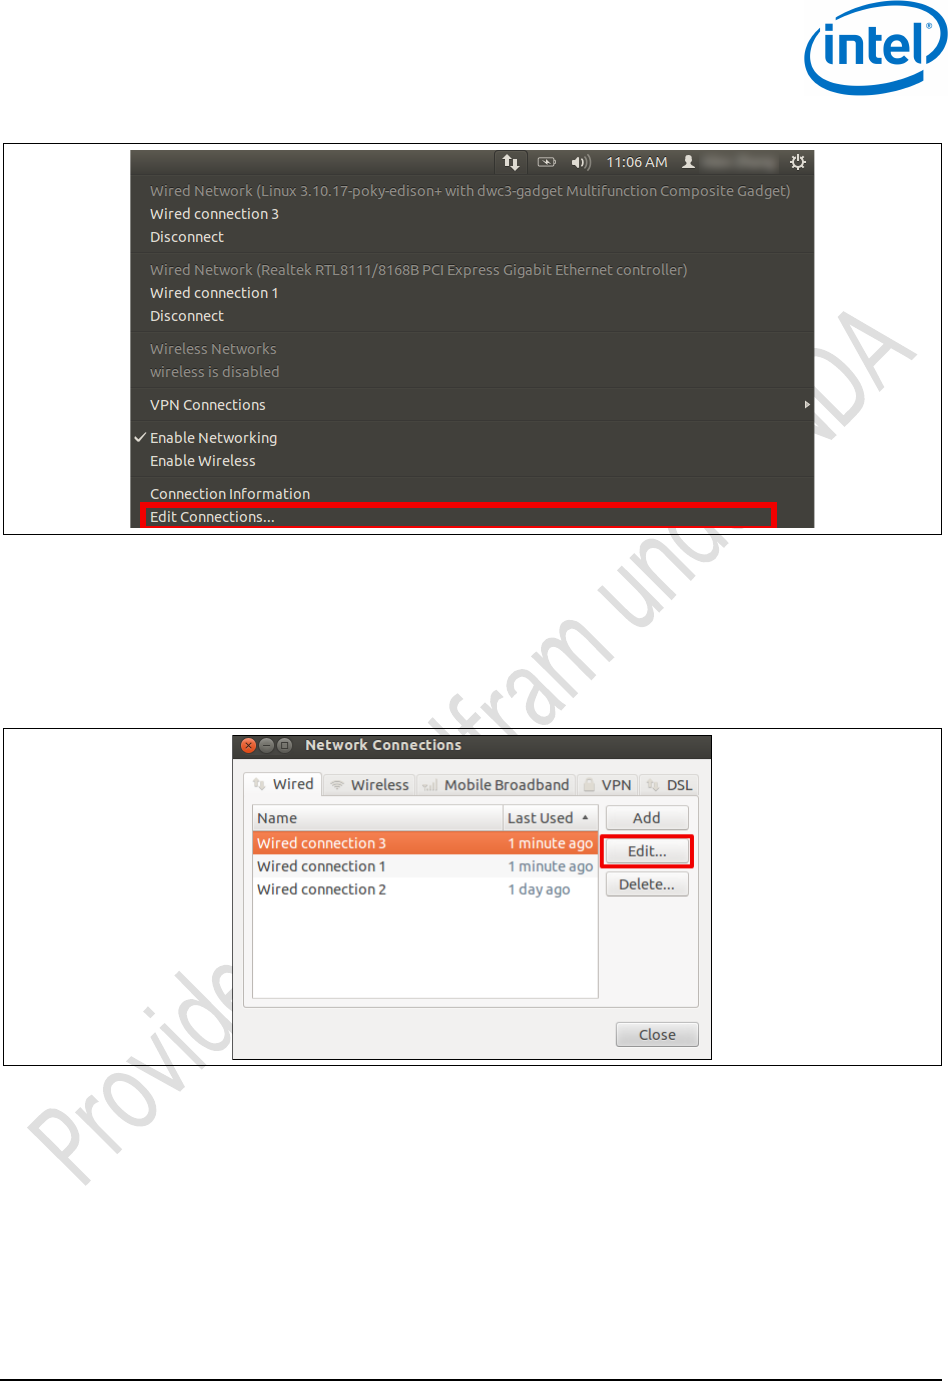
the network connections. After flashing the device, Ubuntu will automatically register a new wired connection.
Network connections can be viewed in the top right of the status bar. Click Edit Connections from the dropdown
menu, as shown in Figure 7.
Linux Configuration
Intel® Edison
September 2014 Quick Start Guide
Document Number: EQSG-ww29 Intel Confidential 15
Figure 7 Linux > Edit connections
Depending on how many wired connections you have, the wired connection to the Intel® Edison board will usually be
the most recently created one, with the highest identifier. In this case, it is Wired Connection 3. You can verify which
wired connection is the correct one by going to the dropdown menu shown above, and seeing which connection has
“edison” in the name.
After determining which wired connection the Intel® Edison board is connected to, highlight it and click Edit
(Figure 8).
Figure 8 Linux > Network connections
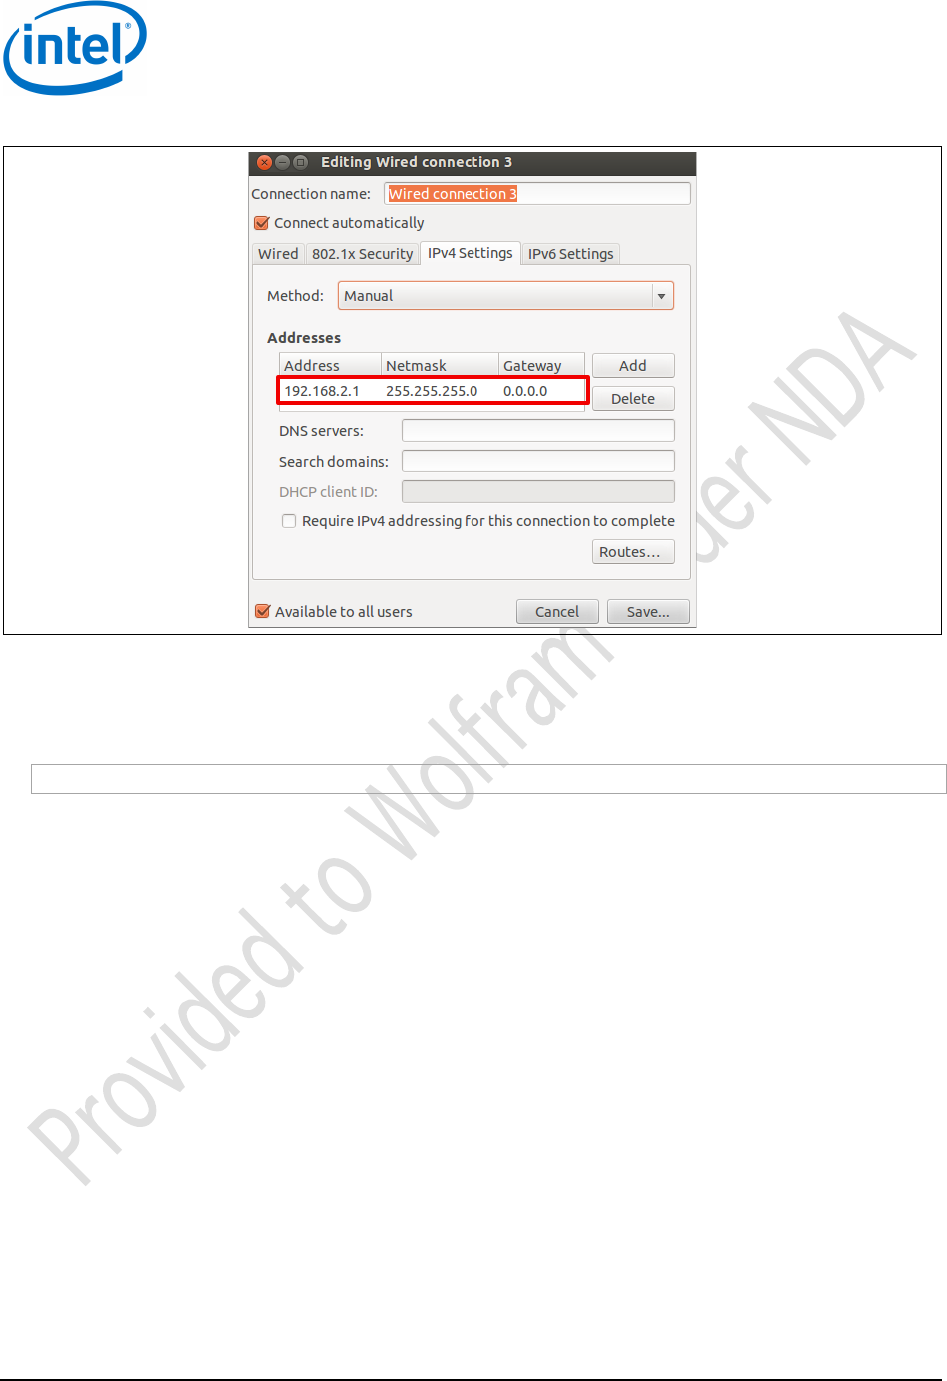
Go to the IPv4 Settings tab and click Add (Figure 9). Enter the following information:
• IP Address: 192.168.2.1
• Netmask: 255.255.255.0
• Gateway: 0.0.0.0
Linux Configuration
Intel® Edison
Quick Start Guide September 2014
16 Intel Confidential Document Number: EQSG-ww29
Figure 9 Linux > Editing wired connection
Click Save. You should now be able to network with and connect to the Intel® Edison board without issue.
Connecting to Edison 4.2.2
To connect to the Edison, SSH to 192.168.2.15 with root as the username. For example, from the terminal;
ssh root@192.168.2.15
Because this IP address is statically set on the Edison, it will not be possible to have two Edisons connected over
RNDIS without changing the static IP on one of the two devices.
Linux Configuration
Intel® Edison
September 2014 Quick Start Guide
Document Number: EQSG-ww29 Intel Confidential 17
4.3 Flash an image onto the Edison
Downloads 4.3.1
Before starting the process, download the following dependencies:
• Phone Flash Tool: https://wiki.ith.intel.com/display/DRD/Phone+Flash+Tool
Also, go to file://aceslab/SLC/NDG-Edison/Software/Release and download the latest Edison image zip file (edison-
image-wwXX-XX.zip, where “XX-XX” is the workweek and year), and extract a prebuilt Edison image archive to flash.
Initial setup 4.3.2
For Ubuntu 12.04 environments, do the following:
1. Install Phone Flash Tool (including the SOC and USB drivers):
sudo apt-get install gdebi ia32-libs
2. Enter the following:
sudo gdebi ~/<download_directory>/PhoneFlashTool_4.4.4.0_linux_x86_64.deb
3. Enter the following:
sudo apt-get install dfu-util
Gnome users: You must configure the device before connecting it to your computer, to prevent the network Note:
manager desktop plugin from creating a profile for the device. If you do not, you will have to remove this profile to
avoid losing static IP configuration.
Flashing an image 4.3.3
Use a USB 2.0 port for all flashing operations on the Intel® Edison board. Note:
1. Keep the Micro USB cable and the power supply unplugged. Make sure that the position of the tiny switch
SW1 is on the side closer to the Micro USB connector.
2. Unzip the prebuilt edison_image-wwXX-XX.zip file. Then open a command shell, navigate to the directory
listed below, and enter the following command:
./flashall.sh –b
3. When the script starts to search for the Edison, connect the micro USB cable to the inner Micro USB port as
shown in Figure 6, and connect the power supply afterwards. If the flashing does not start, unplug both
cables, reinsert the microUSB cable, and then reconnect the power supply.
4. After the flashing starts, allow the script to completely run and do not interrupt.
5. After flashing, the board will reboot a couple of times and partition the file system. Do not interrupt this
operation, it should last approximately 30 seconds or so.
If you have errors flashing, open a UART interface serial connection in order to see what is happening on Note:
the Edison.
Linux Configuration
Intel® Edison
Quick Start Guide September 2014
18 Intel Confidential Document Number: EQSG-ww29
Figure 10 Intel® Edison board
4.4 Cross-compile “hello world”
To build a native application for the target using the cross-compilation toolchain, do the following:
1. Extract the script from the zip, which should be in the format Edison-sdk-linux-weekly-51.zip. Run the script
with sudo, which should prompt for a target install directory. Install the cross-compiler in a directory of your
choice, which by default is /opt/poky-edison/1.6.
sudo ./poky-edison-eglibc-x86_64-edison-image-core2-32-toolchain-1.6.sh
Enter target directory for SDK (default: /opt/poky-edison/1.6):
2. Initialize the environment to use the proper cross-compiler:
source /opt/poky-edison/1.6/environment-setup-core2-32-poky-linux
3. Build a “helloworld” C program:
/* Hello World program */
#include<stdio.h>
main()
{
printf("Hello World\n");
}
4. Save it as helloworld.c.
5. Compile the helloworld.c program and deploy it on the device. This is an example of how to do so over
RNDIS.
$CC -o helloworld helloworld.c
scp helloworld root@192.168.2.15:/home/root
§
Mac OS X Configuration
Intel® Edison
September 2014 Quick Start Guide
Document Number: EQSG-ww29 Intel Confidential 19
5 Mac OS X Configuration
5.1 Connect through USB/UART
Open up a terminal and use the screen command to connect to the UART USB interface. The following command will
do so as long as there is only one UART interface connected to the Mac.
sudo screen /dev/tty.usbserial* 115200
5.2 Connect through RNDIS
MacOS X does not come with the needed Remote Network Driver Interface Specification (RNDIS) driver preinstalled.
A possible solution is the open-source HoRNDIS driver. (Visit www.joshuawise.com/horndis.)
The easiest way to install the necessary software is by using homebrew. If you do not have homebrew, you can
install it by entering the following on a command line:
ruby -e "$(curl -fsSL https://raw.github.com/Homebrew/homebrew/go/install)"
Once you have homebrew installed, use it to install the HoRNDIS driver:
brew install horndis
If this command fails, install the downloaded horndis file using the Mac package installer.
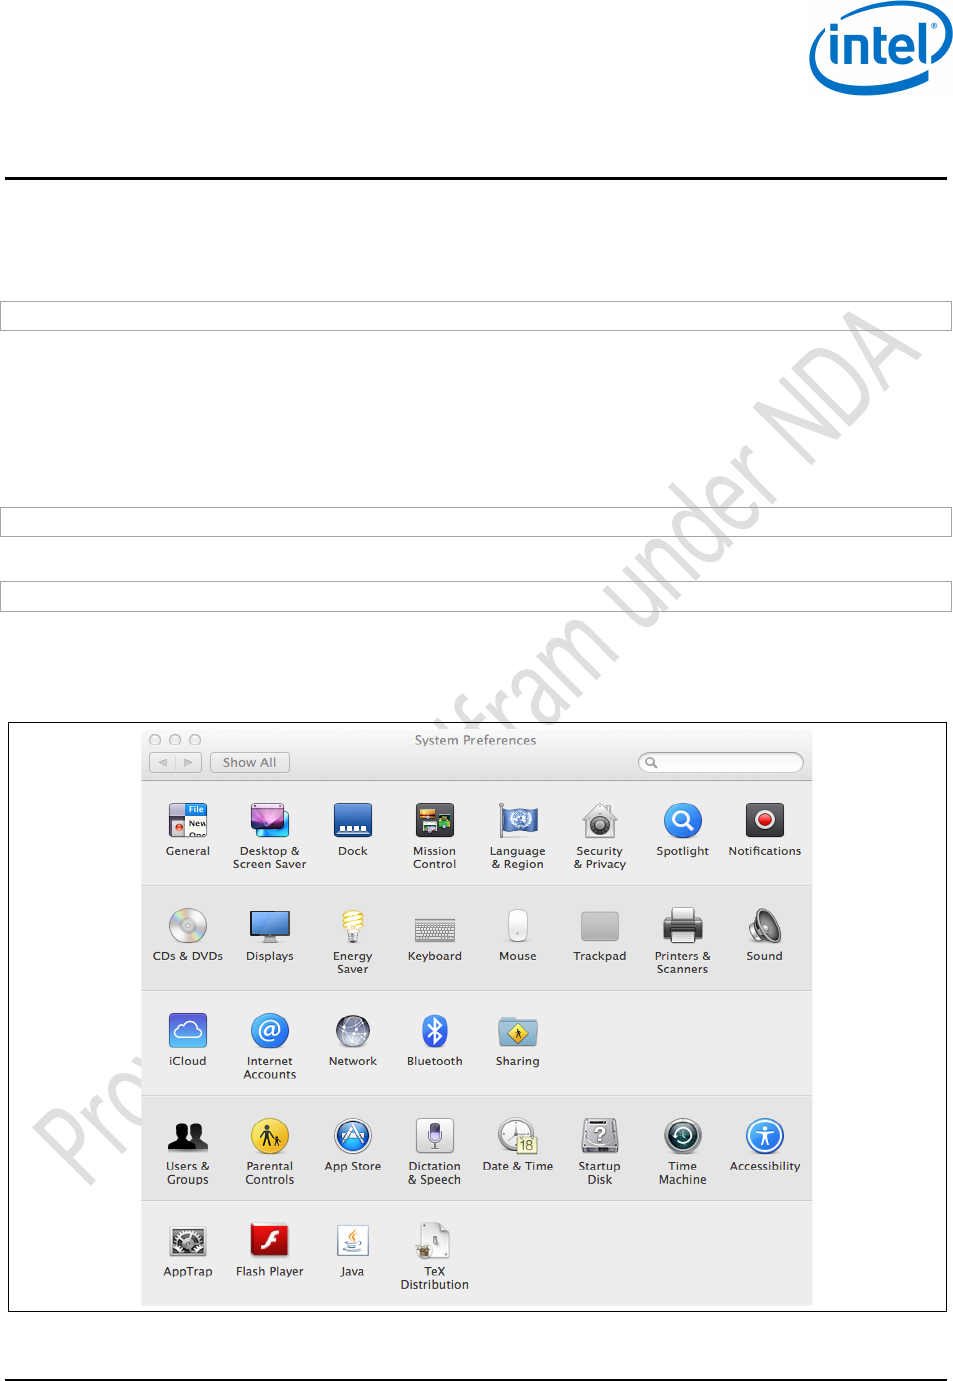
Configure the RNDIS driver by opening the system preferences and selecting Network (Figure 11).
Figure 11 Mac system preferences
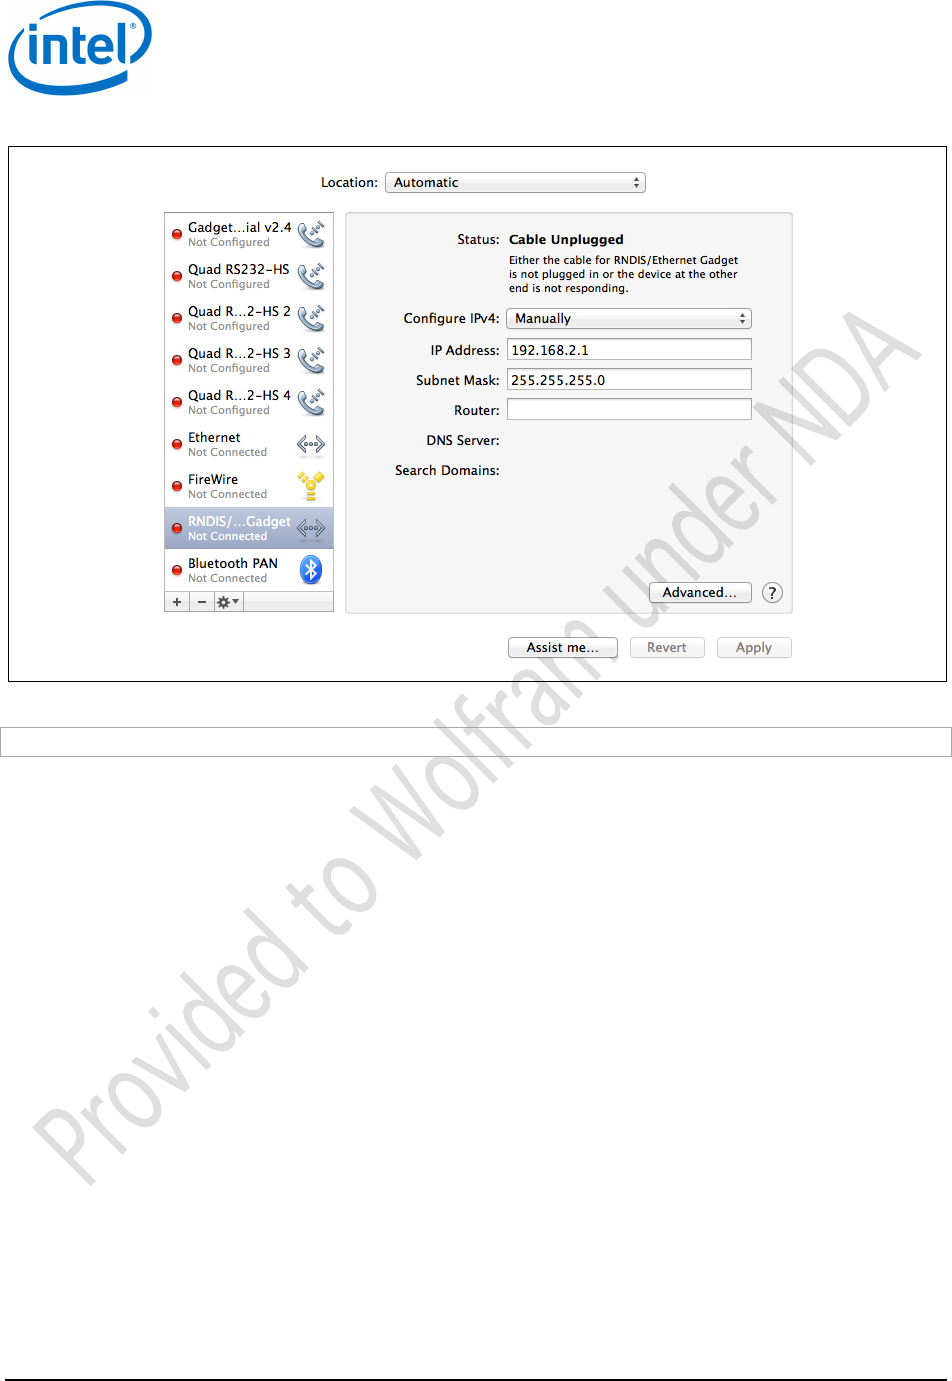
In the network window (Figure 12), select RNDIS driver from the left column, then set the RNDIS driver to configure
IPv4 manually, with an IP address of 192.168.2.1 and a subnet mask of 255.255.255.0. Then click Apply.
Mac OS X Configuration
Intel® Edison
Quick Start Guide September 2014
20 Intel Confidential Document Number: EQSG-ww29
Figure 12 Configure RNDIS driver
To connect to the Edison, SSH to 192.168.2.15 with root as the username. For example, from the terminal:
ssh root@192.168.2.15
Because this IP address is statically set on the Edison board, it will not be possible to have two Edison Note:
boards connected over RNDIS without changing the static IP on at least one of the two devices.
§

Connecting to the Intel® Edison Board
Intel® Edison
September 2014 Quick Start Guide
Document Number: EQSG-ww29 Intel Confidential 21
6 Connecting to the Intel® Edison Board
Make sure your host computer (Linux, Windows, or Mac) has been set up following the steps in the preceding
chapters, then connect to the Intel® Edison module using one of the following methods.
6.1 Wi-Fi
To connect your Intel® Edison board to Wi-Fi devices, enter the following on a command line:
systemctl start wpa_supplicant
wpa_cli
> add_network
> set_network 0 key_mgmt WPA-PSK
> set_network 0 ssid "Guest"
> set_network 0 psk "xxxxx"
> enable_network 0
> quit
Usage example:
ping www.intel.com
iperf –c 192.168.2.2 –u –b 20M –I 2 –t 60
6.2 Bluetooth
To connect your Intel® Edison board to Bluetooth devices, enter the following on a command line:
root@edison:~# rfkill unblock bluetooth
turning Bluetooth ON
Done setting line discipline
root@edison:~#
Now you can verify all RF interface via rfkill
root@edison:~# rfkill list
0: phy0: wlan
Soft blocked: no
Hard blocked: no
1: brcmfmac-wifi: wlan
Soft blocked: no
Hard blocked: no
2: bcm43xx Bluetooth: bluetooth
Soft blocked: no
Hard blocked: no
3: hci0: bluetooth
Soft blocked: no
Hard blocked: no
You have done, bluetooth is enabled !!
A basic test is to perform a scan:
root@edison:~# hcitool scan
Scanning ...
CC:52:AF:03:33:B4 OJABBARX-MOBL2
70:F3:95:7D:48:EF MONTEILX-MOBL
70:F3:95:7D:88:41 n/a
E0:2A:82:CB:62:9B FGANAPAX-MOBL
F4:B7:E2:F7:14:FD AZOUAOUI-MOBL
70:F3:95:C7:C7:2D SCOLLEUX-MOBL
root@edison:~#

Connecting to the Intel® Edison Board
Intel® Edison
Quick Start Guide September 2014
22 Intel Confidential Document Number: EQSG-ww29
6.3 Changing an Edison board’s static IP address
If you more than one Intel® Edison device, you will need to change the static IP address of each additional board in
the same host via SSH. To change an Edison’s IP address, do the following:
1. Log on to the Edison board via SSH.
2. Edit the /lib/systemd/system/network-gadget-init.service file and change the default IP address listed in
following two lines:
ExecStart=-/bin/sh –c “ ifconfig usb0 192.168.2.15”
ExecReload=-/bin/sh –c “ ifconfig usb0 192.168.2.15”
3. Next time you og on to this Edison device via SSH, the static IP address will be changed.
§

Regulatory Statements
Intel® Edison
September 2014 Quick Start Guide
Document Number: EQSG-ww29 Intel Confidential 23
7 Regulatory+Statements+
Model:!Edison!
FCC!Statement:!
This!device!complies!with!Part!15!of!the!FCC!Rules.!Operation!is!subject!to!the!following!two!conditions:!
•!This!device!may!not!cause!harmful!interference!
•!This!device!must!accept!any!interference!received!including!interference!that!may!cause!undesired!
operation.!
This!equipment!has!been!tested!and!found!to!comply!with!the!limits!for!a!Class!B!digital!device,!
pursuant!to!part!15!of!the!FCC!Rules.!These!limits!are!designed!to!provide!reasonable!protection!against!
harmful!interference!in!a!residential!installation.!This!equipment!generates,!uses!and!can!radiate!radio!
frequency!energy!and,!if!not!installed!and!used!in!accordance!with!the!instructions,!may!cause!harmful!
interference!to!radio!communications.!However,!there!is!no!guarantee!that!interference!will!not!occur!
in!a!particular!installation.!If!this!equipment!does!cause!harmful!interference!to!radio!or!television!
reception,!which!can!be!determined!by!turning!the!equipment!off!and!on,!the!user!is!encouraged!to!try!
to!correct!the!interference!by!one!or!more!of!the!following!measures:!
•!Reorient!or!relocate!the!receiving!antenna!
!•!Increase!the!separation!between!the!equipment!and!receiver.!!
•!Connect!the!equipment!into!an!outlet!on!a!circuit!different!from!that!
to!which!the!receiver!is!connected.!
!•!Consult!the!dealer!or!an!experienced!radio/TV!technician!for!help.!
WARNING!+Exposure!to!Radio!Frequency!Radiation!The!radiated!output!power!of!this!device!is!
below!the!FCC!and!Industry!Canada!radio!frequency!exposure!limits.!
To!ensure!compliance!with!FCC,!IC!and!CE!SAR!limits!use!in!portable!hosts!is!subject!to!the!
following!limitations:!
!
This!module,!when!configured!at!the!low!power!setting!described!in!this!filing,!is!approved!for!use!in!
portable!devices!operating!at!a!minimum!separation!distance!of!5mm!from!the!body.!This!module!is!
approved!for!use!at!the!maximum!power!setting!in!portable!host!devices!where!the!smallest!distance!
between!the!outer!surface!of!the!device!and!the!user!is!17mm!or!the!antenna!is!located!at!a!distance!
where!the!SAR!characteristics!for!the!host!are!not!influenced!by!the!user.!The!highest!reported!SAR!
value!is!0.40!W/Kg!for!the!5mm!separation!and!0.37!W/Kg!for!the!17mm!separation!distances.!
!
!

Regulatory Statements
Intel® Edison
Quick Start Guide September 2014
24 Intel Confidential Document Number: EQSG-ww29
The!modular!certification!for!this!device!covers!installation!of!the!device!using!only!an!integral!antenna!
for!the!configurations!described!in!the!installation!instructions.!!Use!of!an!external!antenna!requires!
host!device!certification,!which!OEM!may!obtain!on!their!own.!!!!
FCC!requires!the!user!to!be!notified!that!any!changes!or!modifications!made!to!this!device!that!are!not!
expressly!approved!by!Intel,!may!void!the!user’s!authority!to!use!the!device.!
CAUTION:!When!using!IEEE!802.11a!wireless!LAN,!this!product!is!restricted!to!indoor!use,!due!to!its!
operation!in!the!5.15[!to!5.25[GHz!frequency!range.!The!FCC!requires!this!product!to!be!used!indoors!for!
the!frequency!range!of!5.15!GHz!to!5.25!GHz!to!reduce!the!potential!for!harmful!interference!to!co[
channel!mobile!satellite!systems.!High[power!radar!is!allocated!as!the!primary!user!of!the!5.25[!to!5.35[
GHz!and!5.65[!to!5.85[GHz!bands.!These!radar!stations!can!cause!interference!with!and/or!damage!to!
this!device.!
Canada!IC:!!
This!digital!apparatus!does!not!exceed!the!Class!B!limits!for!radio!noise!emissions!from!digital!apparatus!
set!out!in!the!interfer[!ence[causing!equipment!standard!entitled:!“Digital!Apparatus,”!ICES[003!of!the!
Canadian!Department!of!Communications.!
Cet!appareil!numérique!respecte!les!limites!bruits!radioélectriques!applicables!aux!appareils!numériques!
de!Classe!Bprescrites!dans!la!norme!sur!le!matériel!brouilleur:!"Appareils!Numériques",!NMB[003!
édictee!par!le!Ministre!Canadian!des!Communications.!
This!device!complies!with!Industry!Canada!licence[exempt!RSS!standard(s).!Operation!is!subject!to!the!
following!two!conditions:!(1)!this!device!may!not!cause!interference,!and!(2)!this!device!must!accept!any!
interference,!including!interference!that!may!cause!undesired!operation!of!the!device.!
Le!présent!appareil!est!conforme!aux!CNR!d’Industrie!Canada!applicables!aux!appareils!radio!exempts!
de!licence.!L’exploitation!est!autorisée!aux!deux!conditions!suivantes!:!(1)!l’appareil!ne!doit!pas!produire!
de!brouillage,!et!(2)!l’utilisateur!de!l’appareil!doit!accepter!tout!brouillage!radioélectrique!subi,!même!si!
le!brouillage!est!susceptible!d’en!compromettre!le!fonctionnement.!
!
Europe!(CE!Declaration!of!Conformity)!
This!product!complies!with!the!Low!Voltage!Directive!2006/95/EC;!EMC!Directive!2004/108/EC,!EU!
Directive!R&TTE!Directive!1999/5/EC,!and!RoHS!Directive!2011/65/EU.!Point!of!contact:!Intel!
Corporation,!Attn:!Corporate!Quality,!200!Mission!College!Blvd.,!Santa!Clara,!CA!05054!USA!!
!
!