User Manual
Red Ridge
User
Guide

ii
Table of Contents
Chapter 1: Getting Started.................................................................... 1
1.1 Your Device.................................................................................................. 1
Front ........................................................................................................................ 1
Back
......................................................................................................................... 1
Top........................................................................................................................... 2
Bottom
..................................................................................................................... 2
Side
.......................................................................................................................... 2
1.2 Installing Memory Card............................................................................... 3
1.3 Charging the Battery ................................................................................... 3
1.4 Turning the Device On or Off ..................................................................... 4
1.5 Unlocking the Screen.................................................................................. 5
Chapter 2: The Basics........................................................................... 6
2.1 Home Screen ............................................................................................... 6
Extended Home
screen
............................................................................................ 6
Status Bar
Ic
ons ....................................................................................................... 7
Shortcut menu.......................................................................................................... 8
Using
widgets
.......................................................................................................... 9
Applications........................................................................................................... 10
Setting
wallpaper
................................................................................................... 10
2.2 Adjusting Volume ...................................................................................... 13
2.3 Setting up Wi-Fi ......................................................................................... 14
2.4 People......................................................................................................... 17
Adding
contacts
..................................................................................................... 17
Importing
contact
s ................................................................................................. 18
Backing up contacts............................................................................................... 18
Favorite contacts.................................................................................................... 19
Chapter 3:
Email
.................................................................................. 20
3.1 Email Accounts ......................................................................................... 20
Setting up an Internet email account ..................................................................... 20
Viewing email accounts ........................................................................................ 21
Chapter 4: Using Internet ................................................................... 22
4.1 Browsing Web Pages ................................................................................ 22
Managing web
pages
............................................................................................. 23
Chapter 5: Using Bluetooth................................................................ 24
5.1 Connecting to Bluetooth Devices ............................................................ 24
Chapter 6: Multimedia
Applications
.................................................. 25
6.1 Photos and Videos .................................................................................... 25
Taking a
photo
....................................................................................................... 25
Recording a
video
.................................................................................................. 26
Taking a panorama shot......................................................................................... 27
Reviewing a p
hoto
................................................................................................. 29
Reviewing a
video
................................................................................................. 29

0
Reviewing a panorama shot................................................................................... 30
Configuring camera
settings
.................................................................................. 30
6.2 Viewing Photos & Videos ......................................................................... 32
Viewing photos...................................................................................................... 32
Playing videos ....................................................................................................... 33
6.3 Using Music Player ................................................................................... 34
Music
screen
.......................................................................................................... 34
Chapter 7:
Applications
...................................................................... 35
7.1 Books ......................................................................................................... 35
7.2 Browser ...................................................................................................... 35
7.3 Calculator ................................................................................................... 36
7.4 Calendar ..................................................................................................... 36
7.5 Clock........................................................................................................... 37
7.6 Downloads ................................................................................................. 38
Managing
file
s ....................................................................................................... 38
7.7 ES File Explorer ......................................................................................... 39
Managing files and
folders
.................................................................................... 39
7.8 DoubanFM .................................................................................................. 39
7.9 Gallery ........................................................................................................ 40
Chapter 8: Managing Your
Device
..................................................... 41
8.1 Device Settings.......................................................................................... 41
WIRELESS & NETWORKS ................................................................................ 41
DEVICE ................................................................................................................ 42
PERSONAL .......................................................................................................... 43
SYSTEM ............................................................................................................... 44
8.2 Changing Basic Settings .......................................................................... 46
Date and time settings ........................................................................................... 46
Alarms
settings
...................................................................................................... 47
Display settings ..................................................................................................... 47
Ringtone
settings
................................................................................................... 48
8.3 Using Wireless & networks ...................................................................... 49
8.4 Protecting Your Device ............................................................................. 49
Screen lock protection
settin
gs .............................................................................. 49
8.5 Resetting the Device ................................................................................. 49
Safety Information .................................................................................................. 50
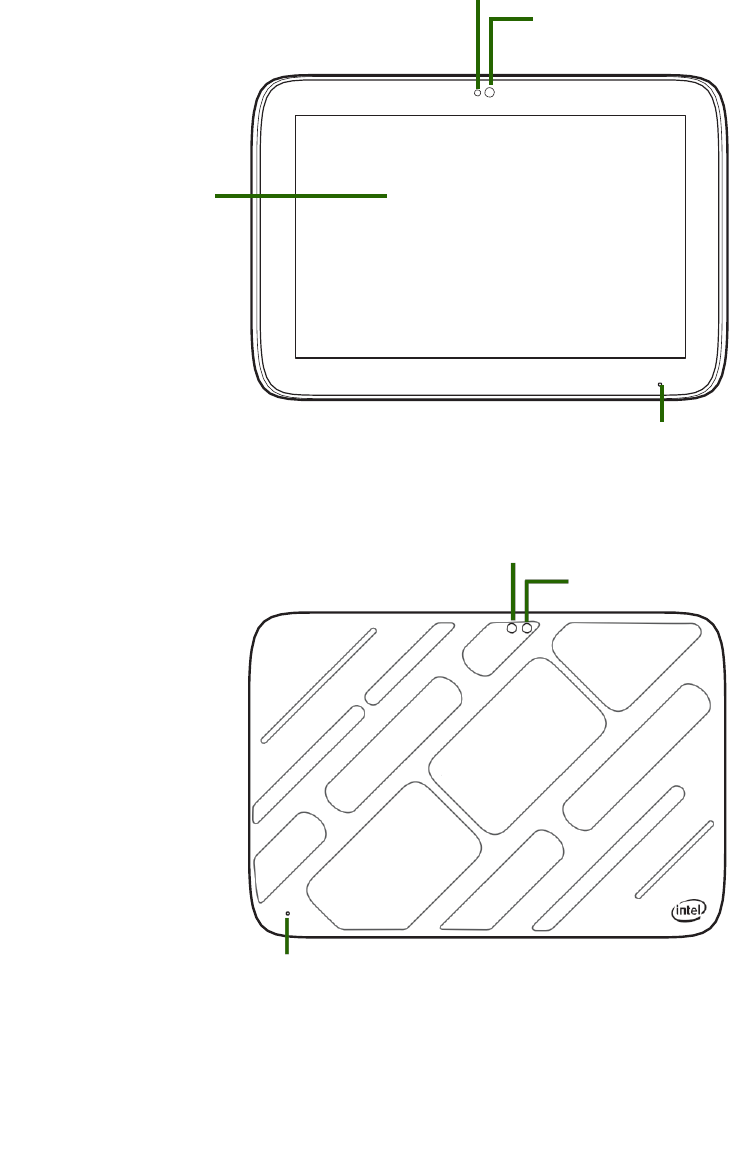
1
Chapter 1: Getting
Started
1.1 Your Device
Front
Light sensor
Front camera
Touch screen
Microphone
Back
Flash light
Rear camera
®
Microphone

2
Chapter 1: Getting Started
Top
Bottom
Power button Volume +/- button
Power jack
Micro USB connector
Side
Micro HDMI connector
Headset jack Speaker Speaker
MicroSD slot
3
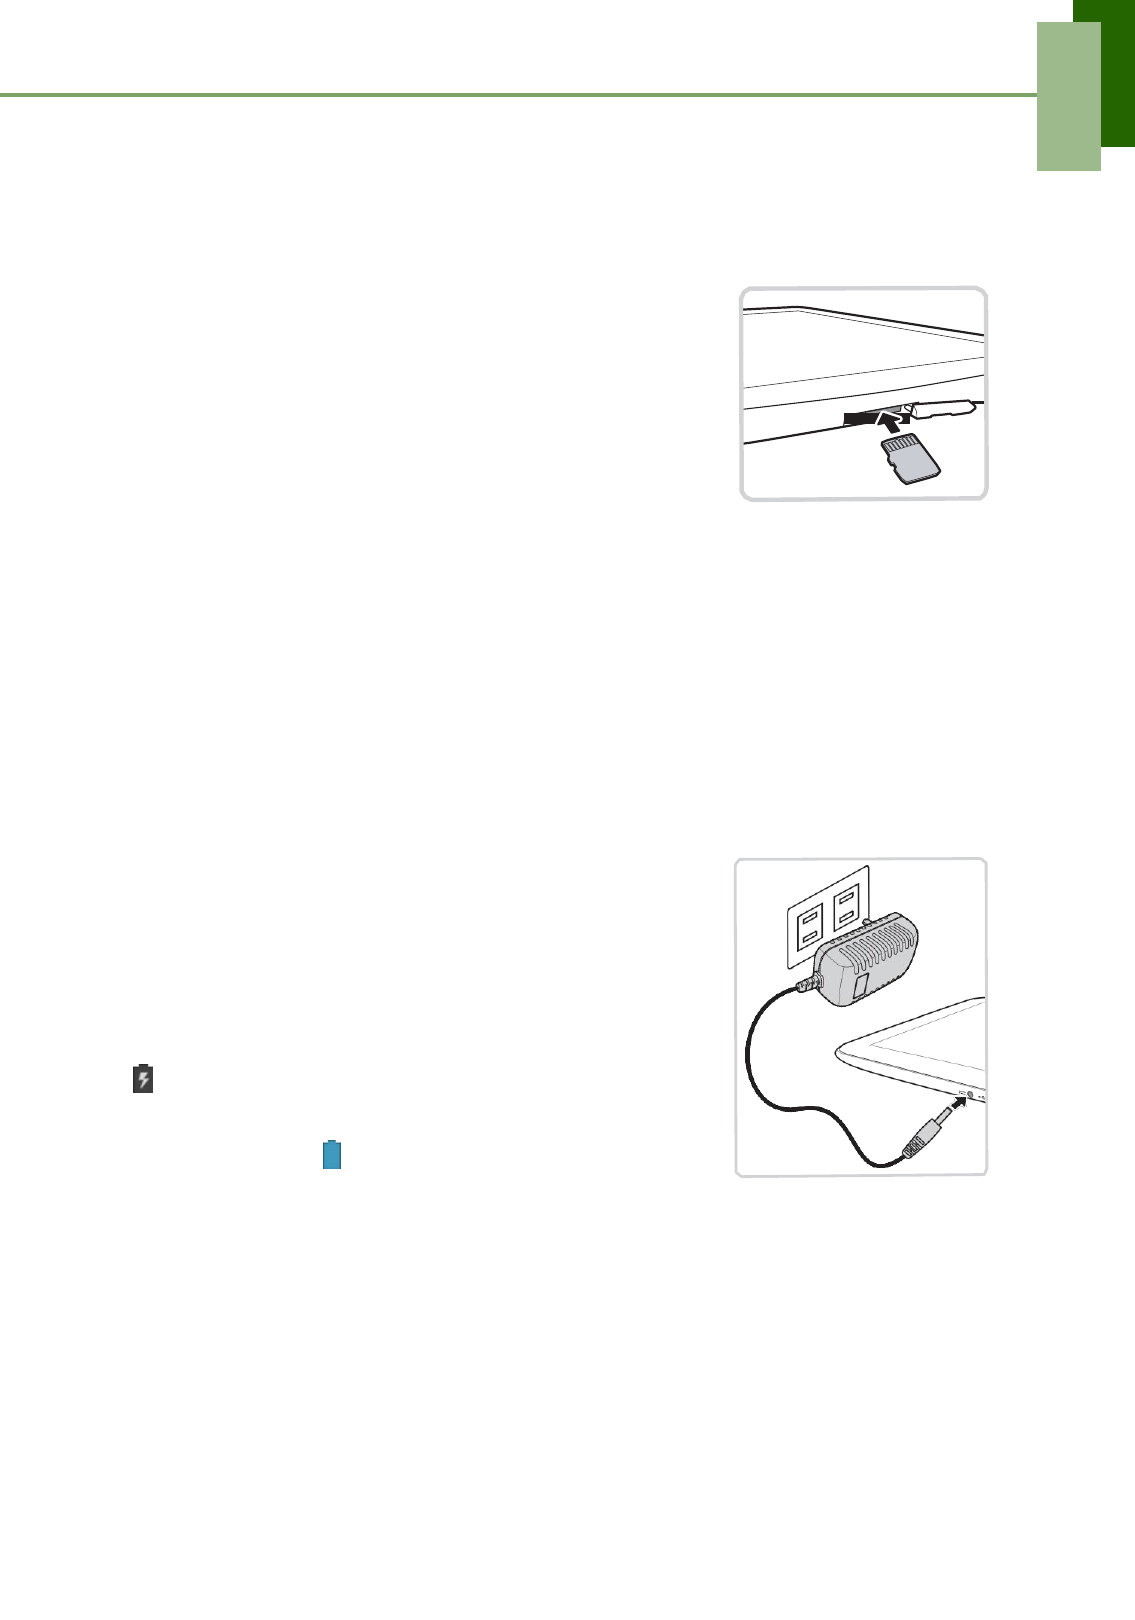
Chapter 1: Getting Started
1.2 Installing Memory Card
You need a microSD® card to store photos, music, videos, and other data.
To install the memory card
1. Open the card cover.
2. Insert the microSD card as shown. Make sure the gold
contacts are facing up.
To remove the memory card
1. Open the card cover.
2. Push to eject the microSD card from the slot.
NOTE: Do not remove the memory card while the device is turned on. Sudden
removal of the memory card may cause data loss or unpredictable system hangs.
1.3 Charging the Battery
The battery is only partially charged. To fully charge the battery, charge it for 5 hours.
Charge the battery
1. Connect one end of the AC adapter to the Power jack
of the device.
2. Plug the other end of the AC adapter to the wall outlet
to start charging.
When the battery is charging and the device is turned on,
the icon is displayed on the status bar. When the
battery is fully charged and the AC adapter is removed
from the device, the icon is displayed on the status bar.
NOTE:
• Battery cannot be charged when the device is connected to a computer using the
micro USB cable.
• Users have to use the connection to USB interfaces with USB 2.0 version or higher.
4
Chapter 1: Getting Started
1.4 Turning the Device On or Off
After installing the memory card and charging the battery, the device is ready to be
turned on.
To turn on your device
Press and hold the Power button until the device is turned on.
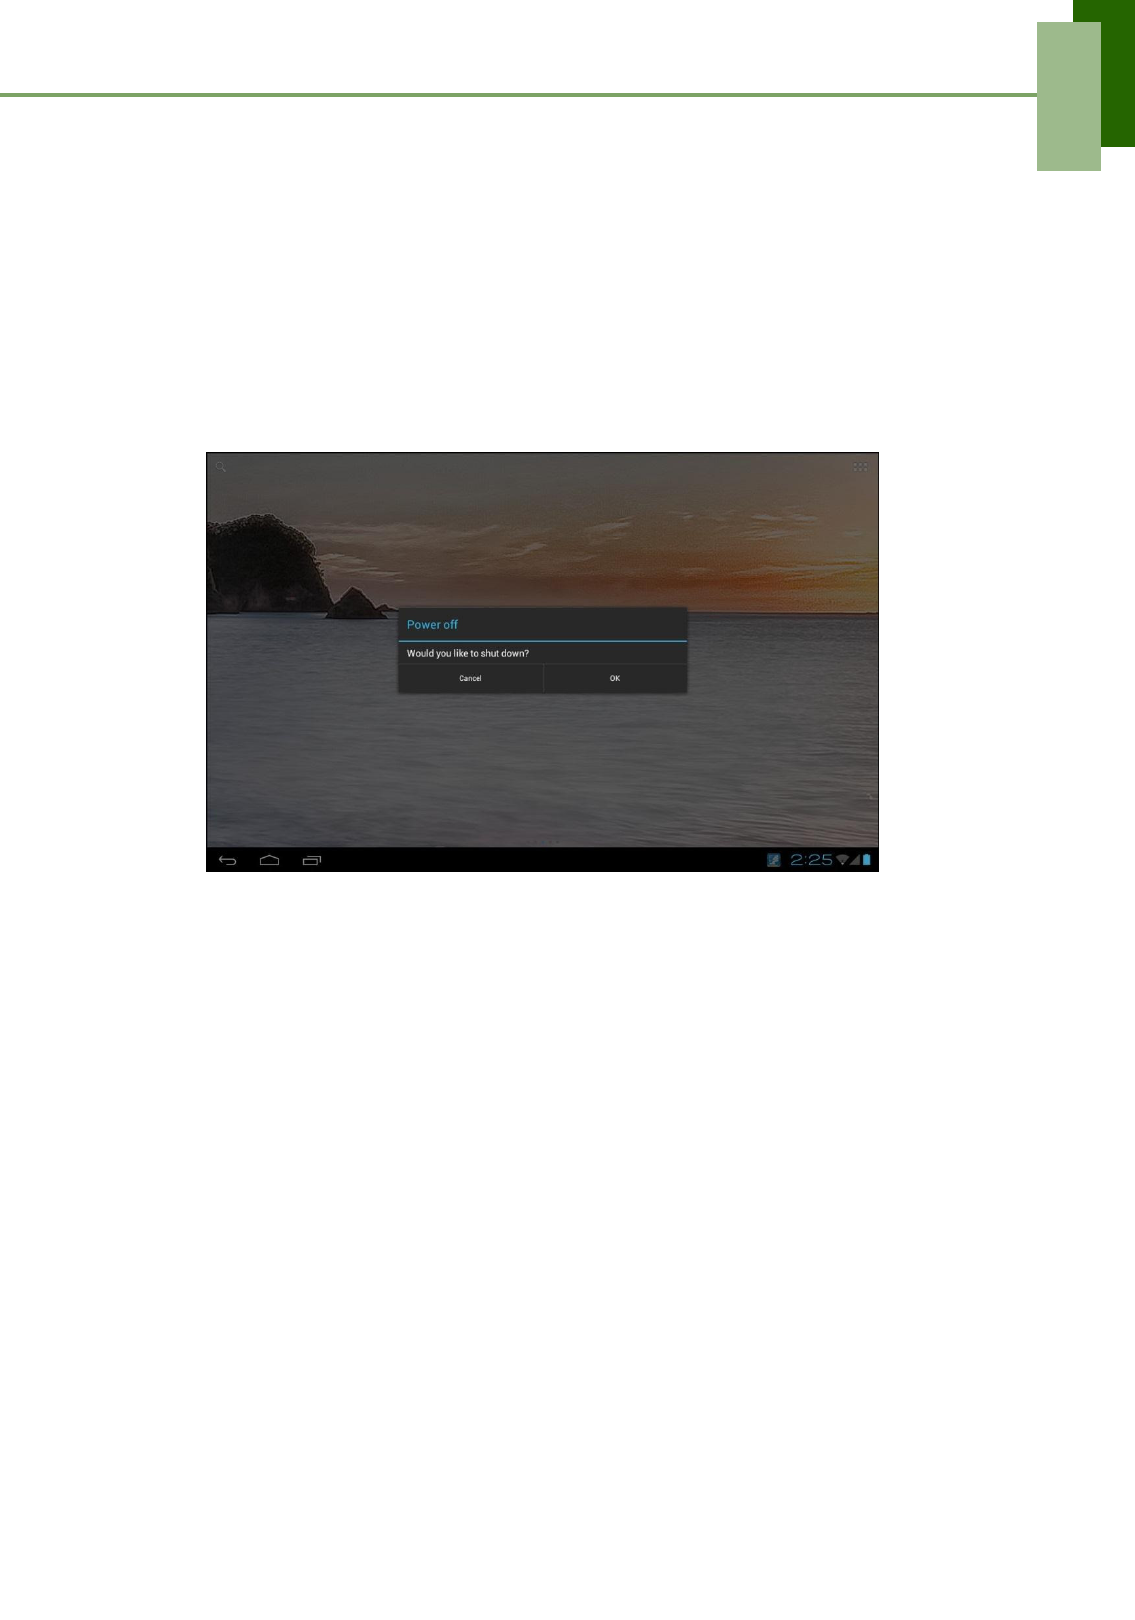
To turn off your device
1. Press and hold the Power button for 1 second.
2. A pop-up window will appear, tap OK to confirm.
To put your device in Sleep mode
To put your device in Sleep mode, press the Power button. This will turn the display
off.
To turn the display on, press the Power button again.
5
Chapter 2: The Basics
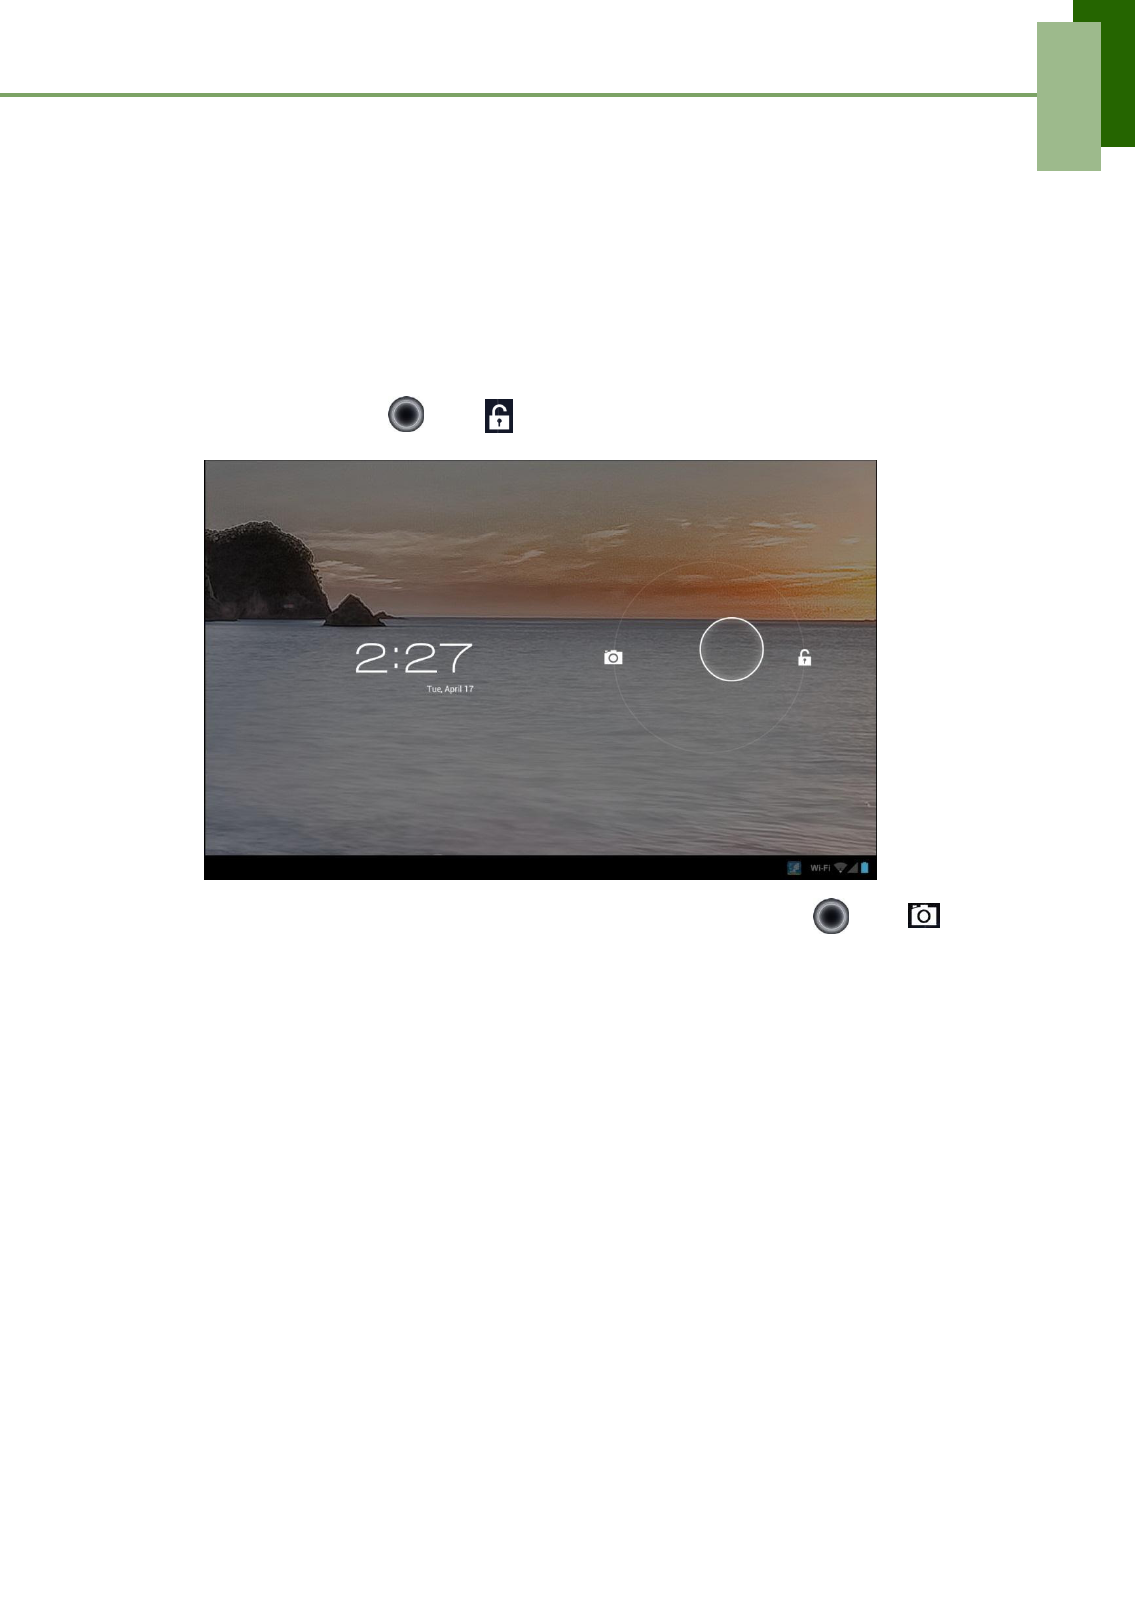
1.5 Unlocking the Screen
By default, the screen automatically locks after a period of inactivity. You can set the
length of time until the screen locks, see “To turn off backlight when the device is idle”
on page 50.
To unlock the screen
1. Press the Power button to turn on the display from Sleep mode.
2. Drag the middle circle ( ) to to unlock the screen.
NOTE: To use the camera function directly, drag the middle circle ( ) to .
6
Chapter 2: The Basics
Chapter 2: The
Basics
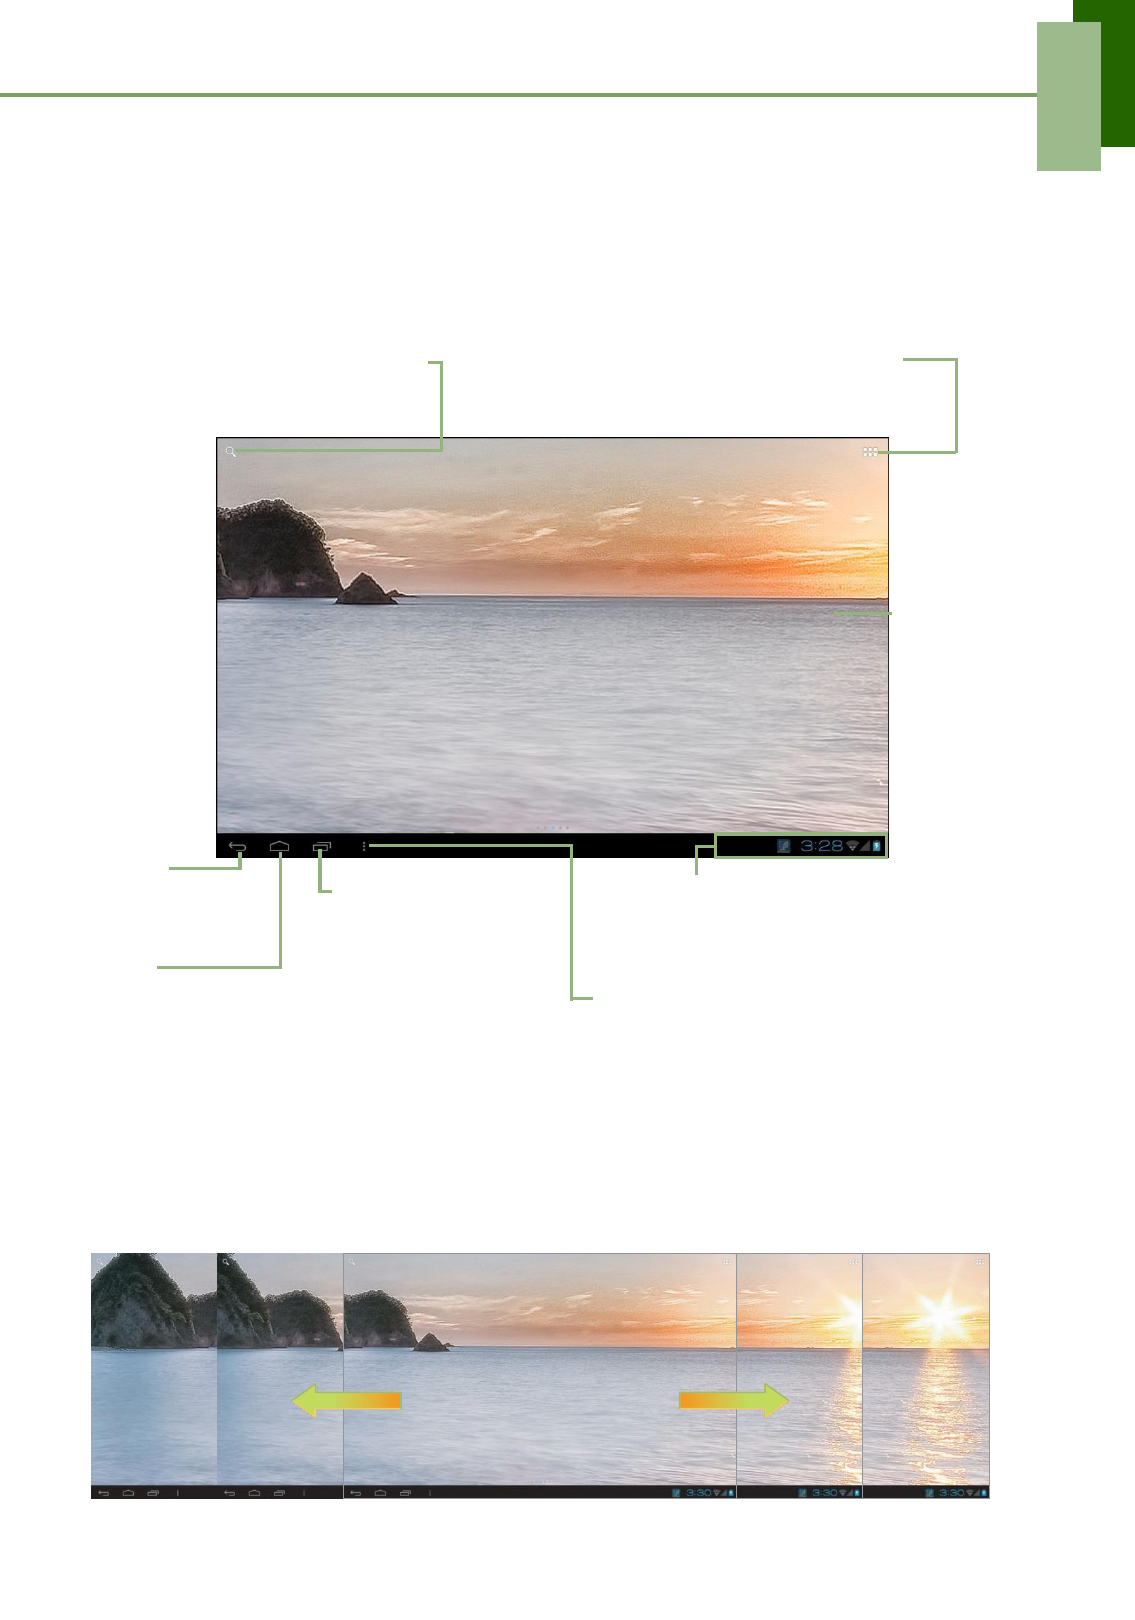
2.1 Home Screen
From the Home screen, you can quickly access common features and view
notifications of received messages, battery and connection status.
Search icon
Tap to enter the text you want
to search.
Launcher icon
Tap to view the applications
and settings of the device.
Swipe
left/right
to view
the
extended
Home
screen.
Return
Tap to return to the
previous screen.
Home
Tap to return to Home.
Recent Apps Tap
to view the recent
applications.
Status bar
Displays status and
notification icons.
Tap to set the wallpaper, manage
applications, and system settings.
Extended Home screen
Swipe your finger to the left or right across the Home screen.
The two extensions to the left and to the right of the Home screen provide more space
for icons, widgets, shortcuts, and other items.
7
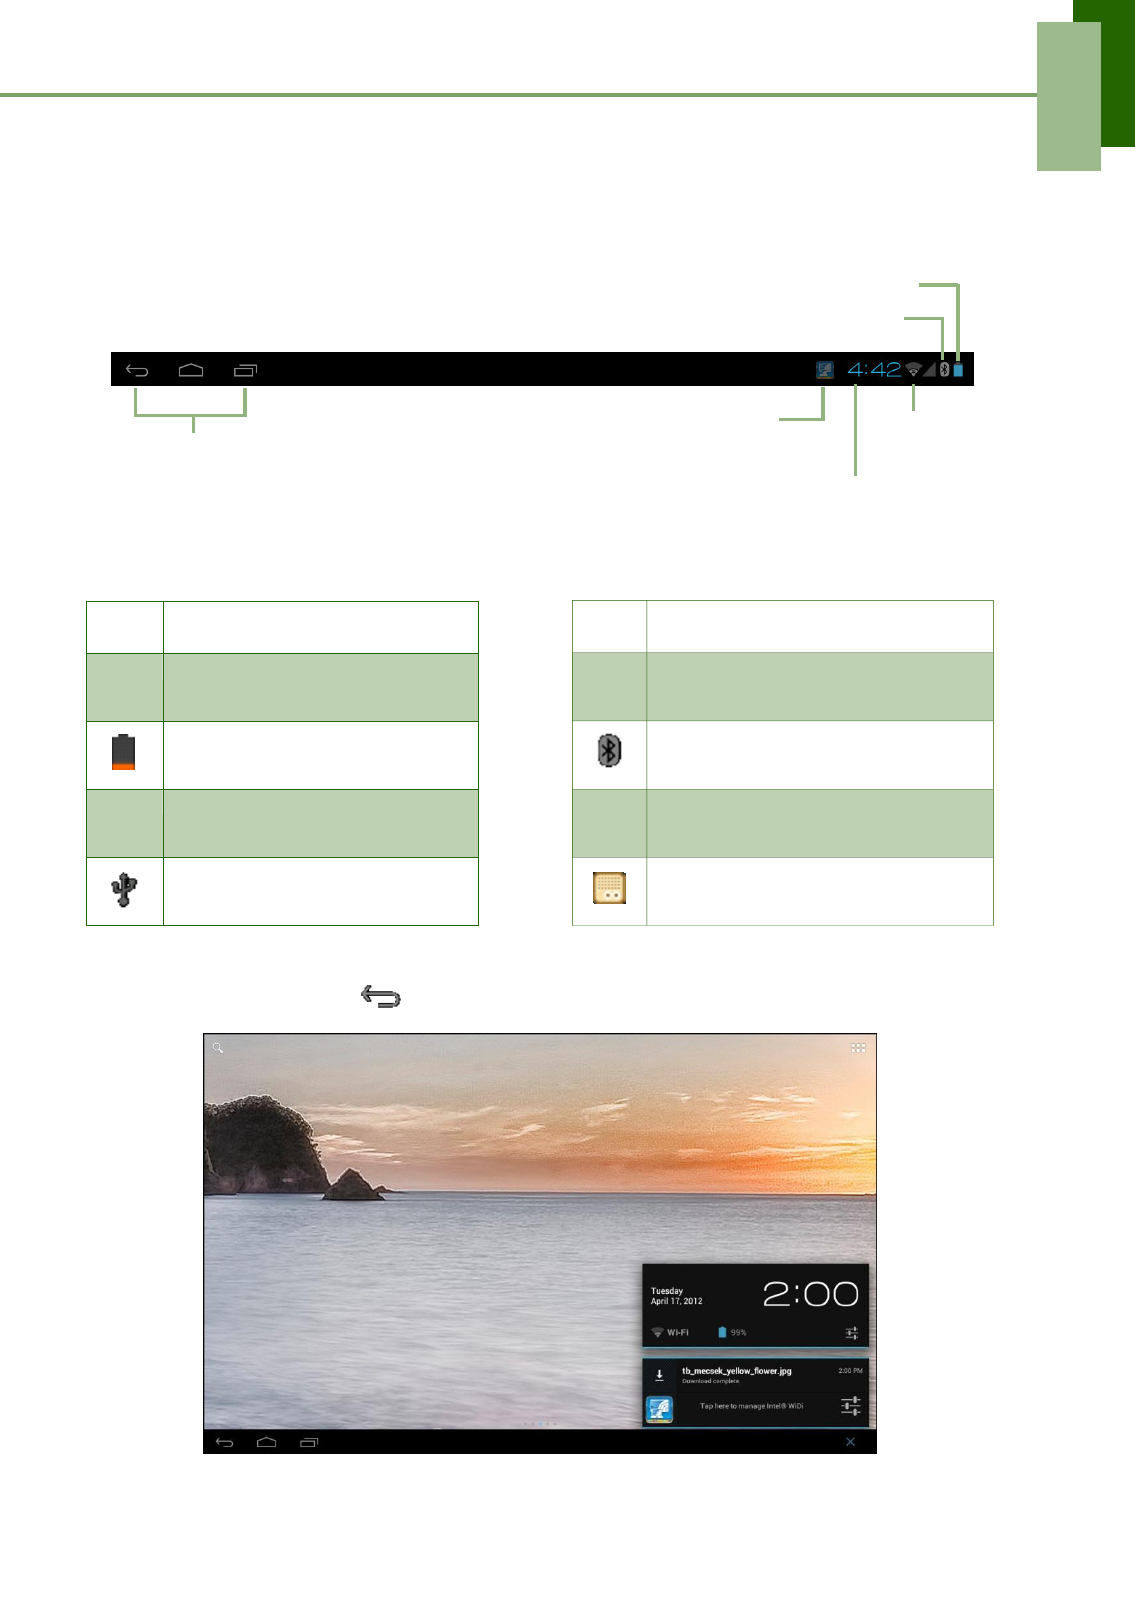
Chapter 2: The Basics
Icon
Description
Wi-Fi is connected
Bluetooth connection active
File download in progress
DoubanFM on
Status bar icons indicate different types of information.
The icons on the status bar indicate the following information:
Battery icon
Bluetooth icon
Operation icons
(Return/Home/History)
See “Home Screen” on page 6.
Intel® WiDi icon
Tap to manage Intel® WiDi.
Network
icon
Current time
Icon
Description
Battery full
Battery low
Battery charging
Device is connected to PC via
USB connection
Tap the status bar and scroll up to view notifications or view system information easily.
To close the window, tap .
8
Chapter 2: The Basics
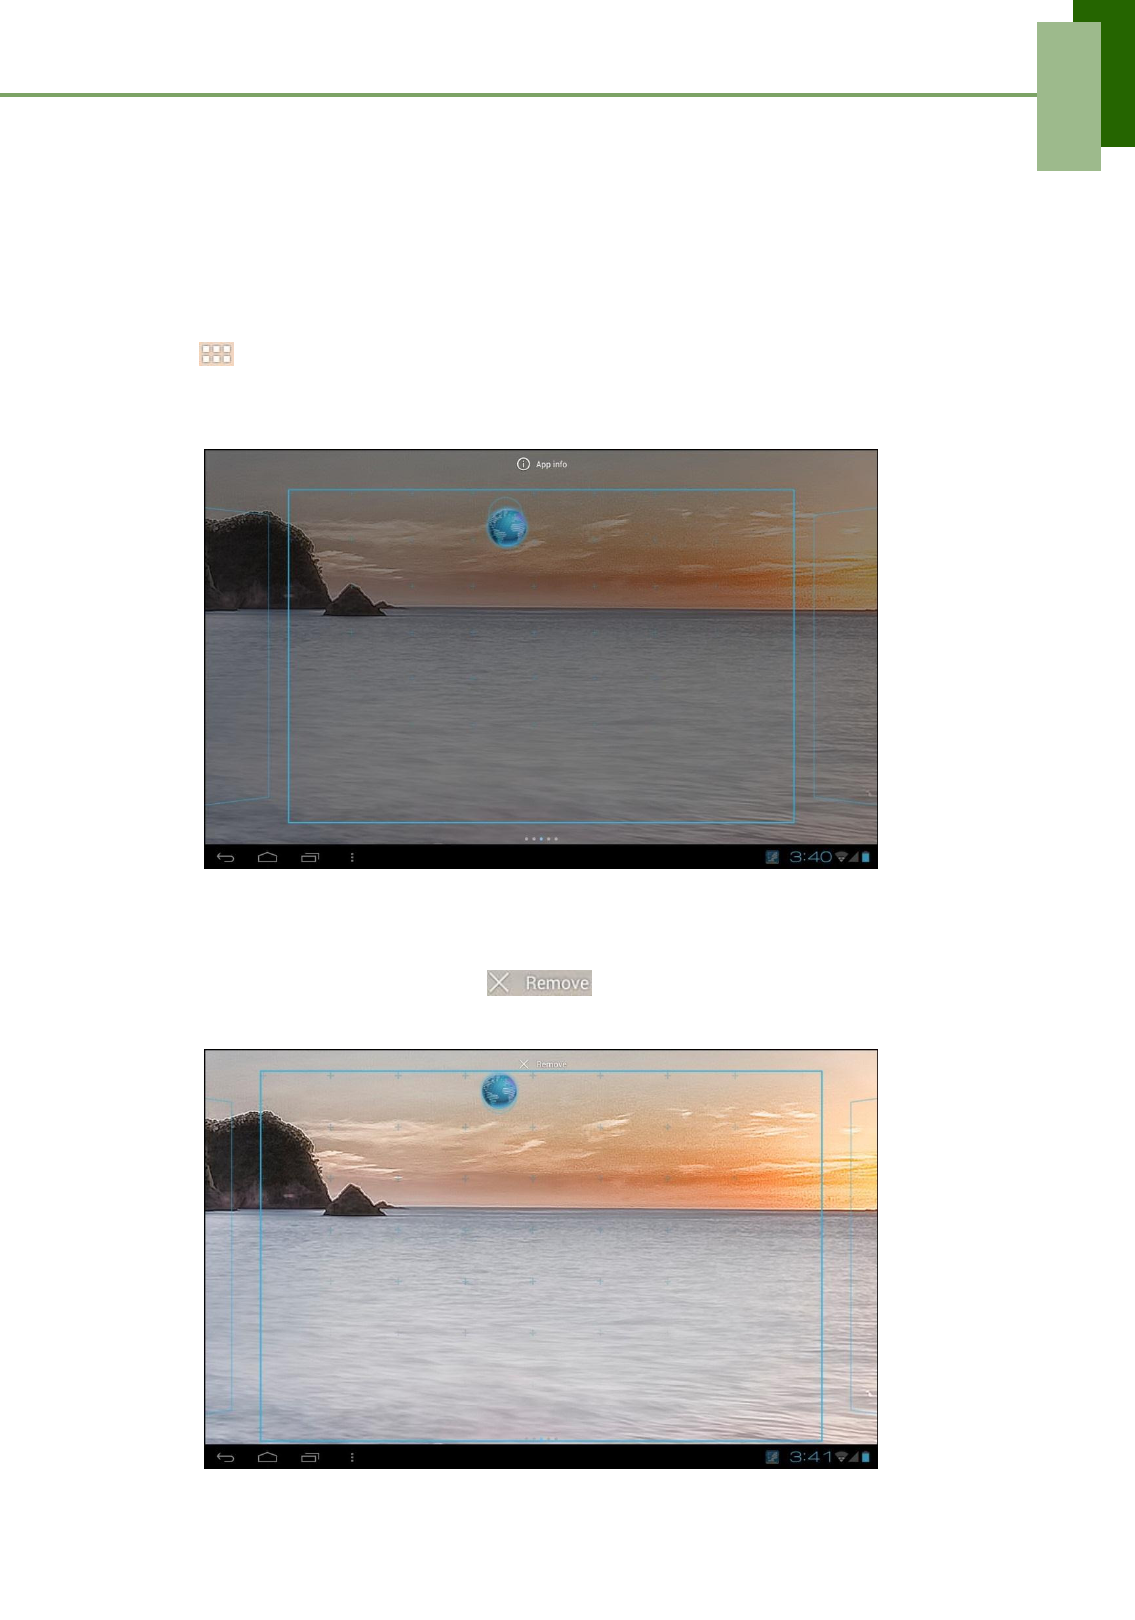
Shortcut menu
The shortcut menu allows you to easily access an application from the Home screen.
To open an application, tap an icon.
Customizing shortcut menu
To add a shortcut:
1. Tap .
2. Tap APPS to display the applications.
3. To add an item, drag the application icon to the specific Home screen.
To remove shortcut:
1. Tap and hold an application icon.
2. Drag the application icon to to delete. The application icon is
removed from the Home screen.
9
Chapter 2: The Basics
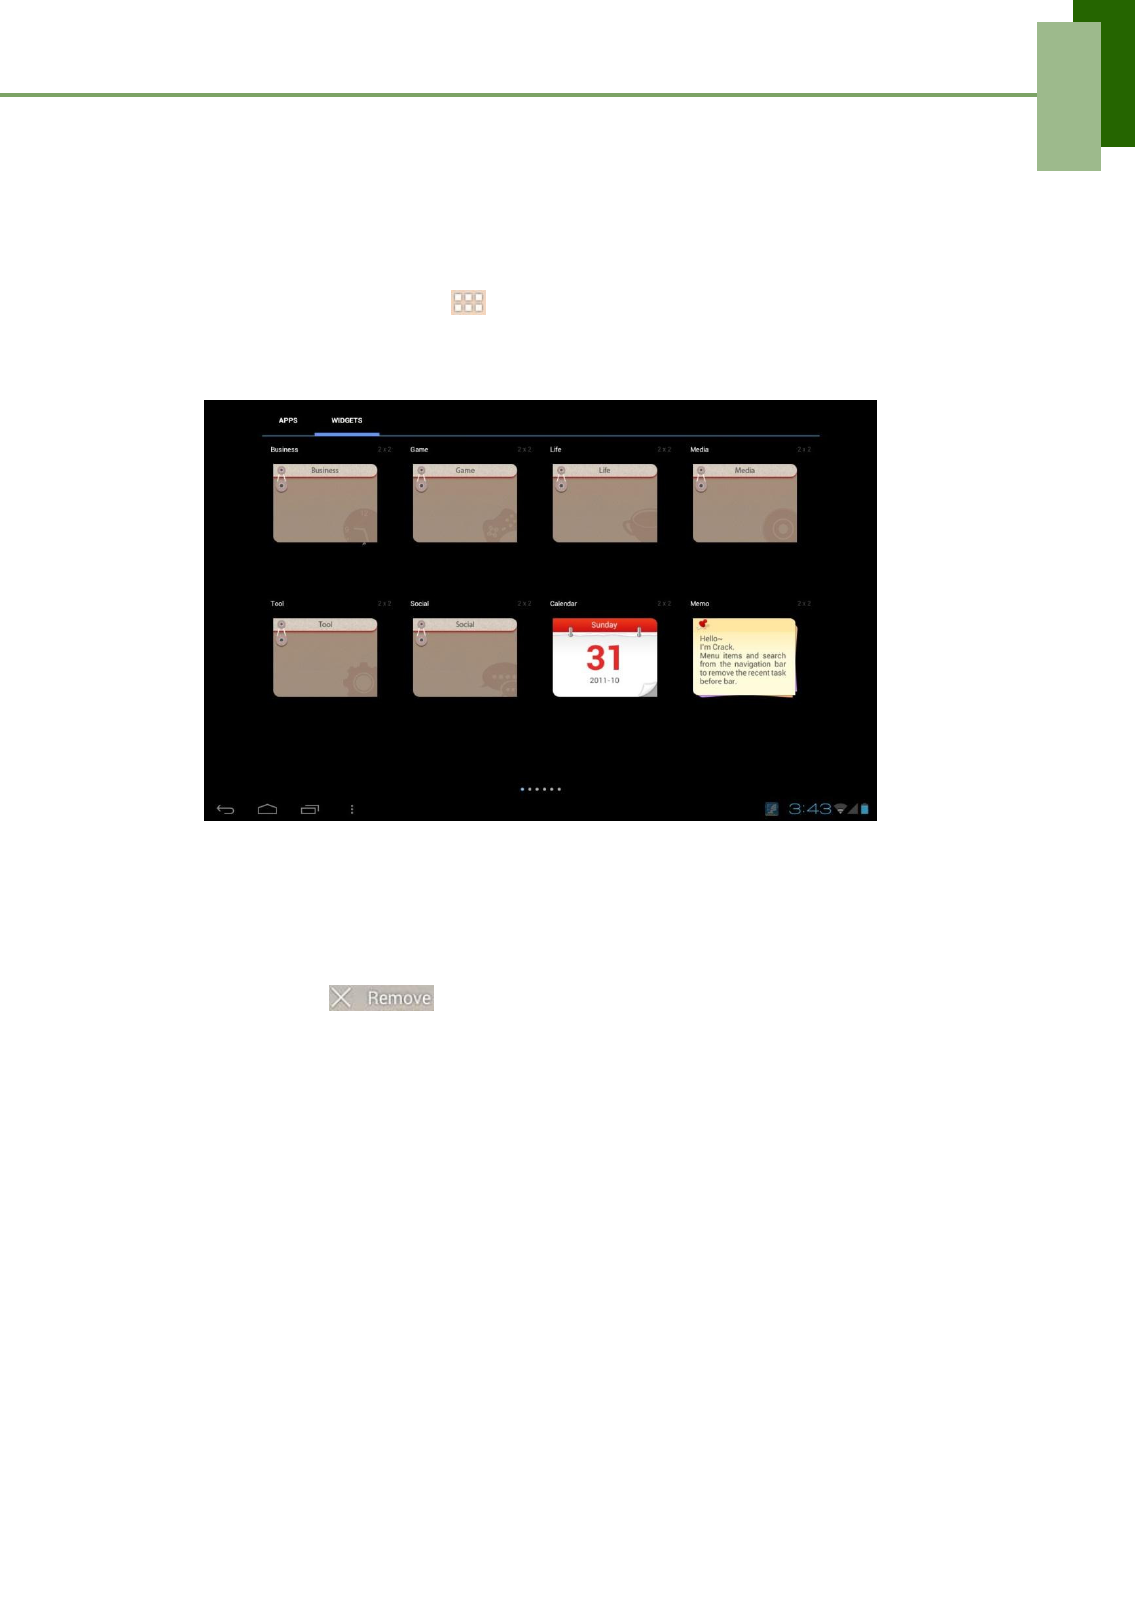
Save time with live updates right on the Home screen and get all your personalized
updates in one place.
You may add and customize the Widgets on the Home screen as you like.
1. From the Home screen, tap .
2. Tap WIDGETS to display applications.
All available widgets are displayed.
3. To add a widget, drag the widget icon to the specific Home screen.
To remove widgets:
1. From the Home screen, tap and hold the desired widget.
2. Drag the widget to to delete it from the Home screen.
10
Chapter 2: The Basics
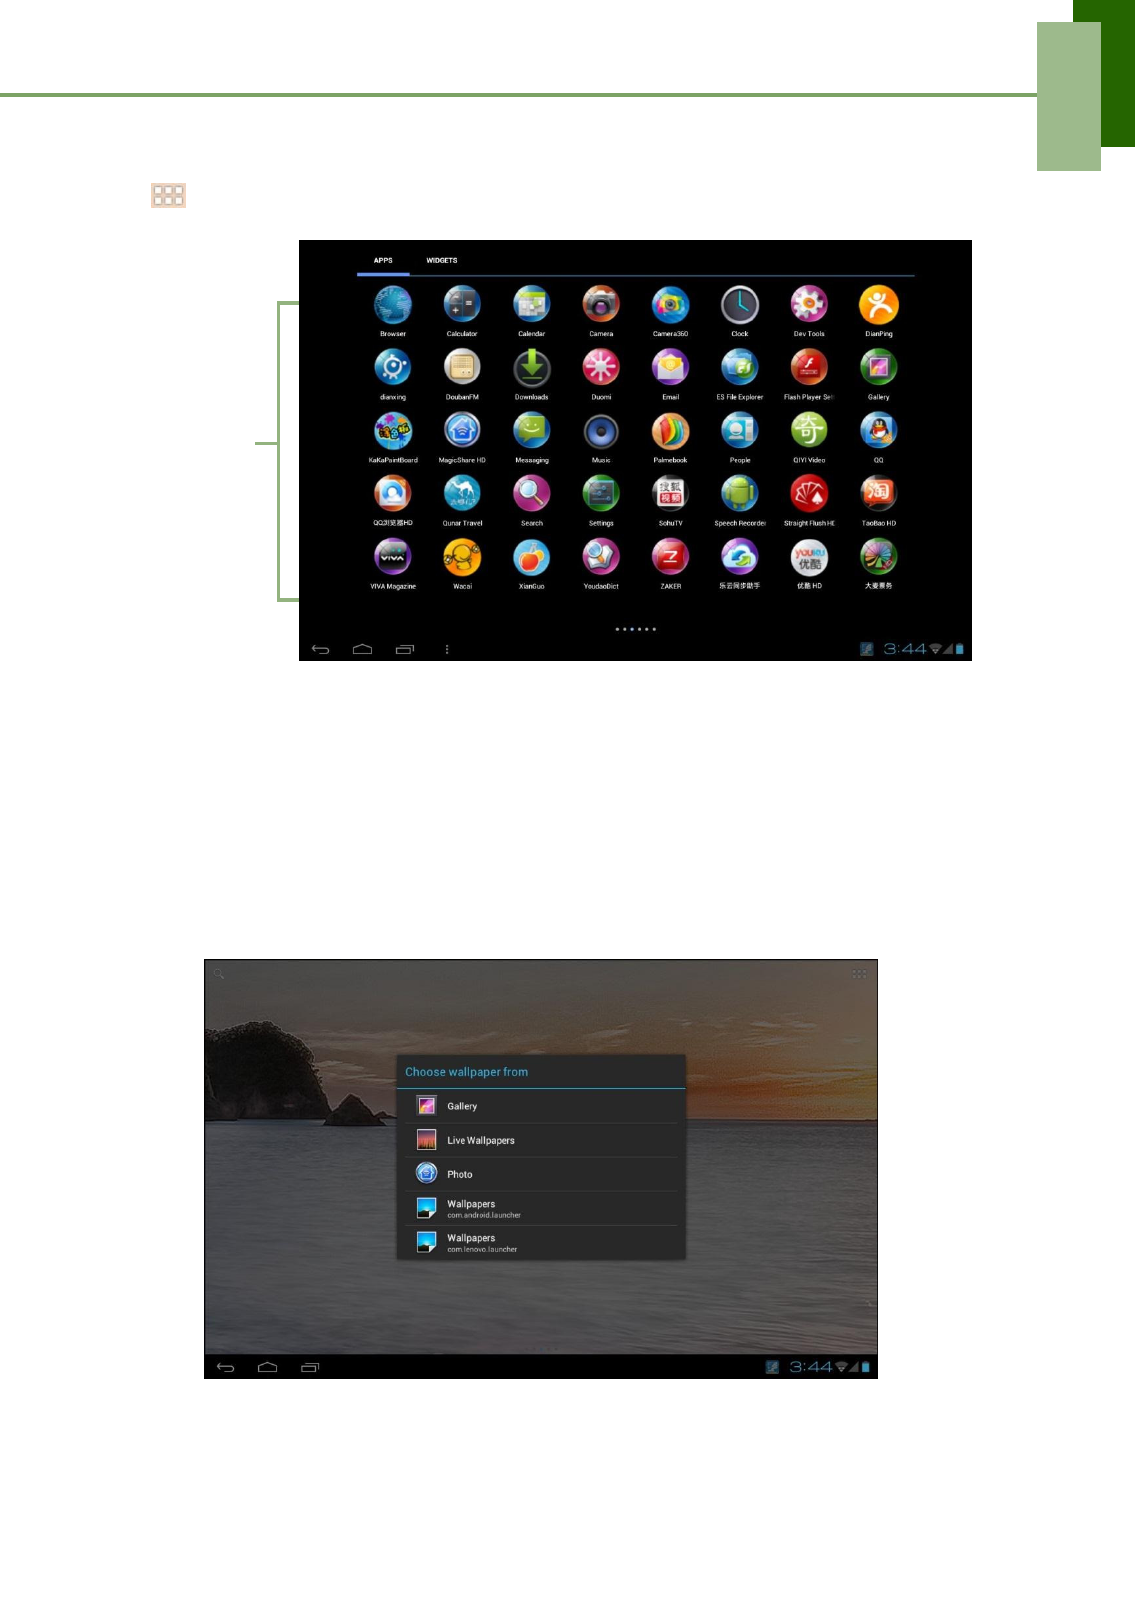
Applications
Tap to view applications and device settings.
Tap an icon
to access the
application.
Setting wallpaper
You can customize the wallpaper of your Home screen with a default wallpaper or with
pictures taken with your device.
Set wallpaper from My Gallery
1. From the Home screen, tap and hold the screen.
2. Tap Gallery.
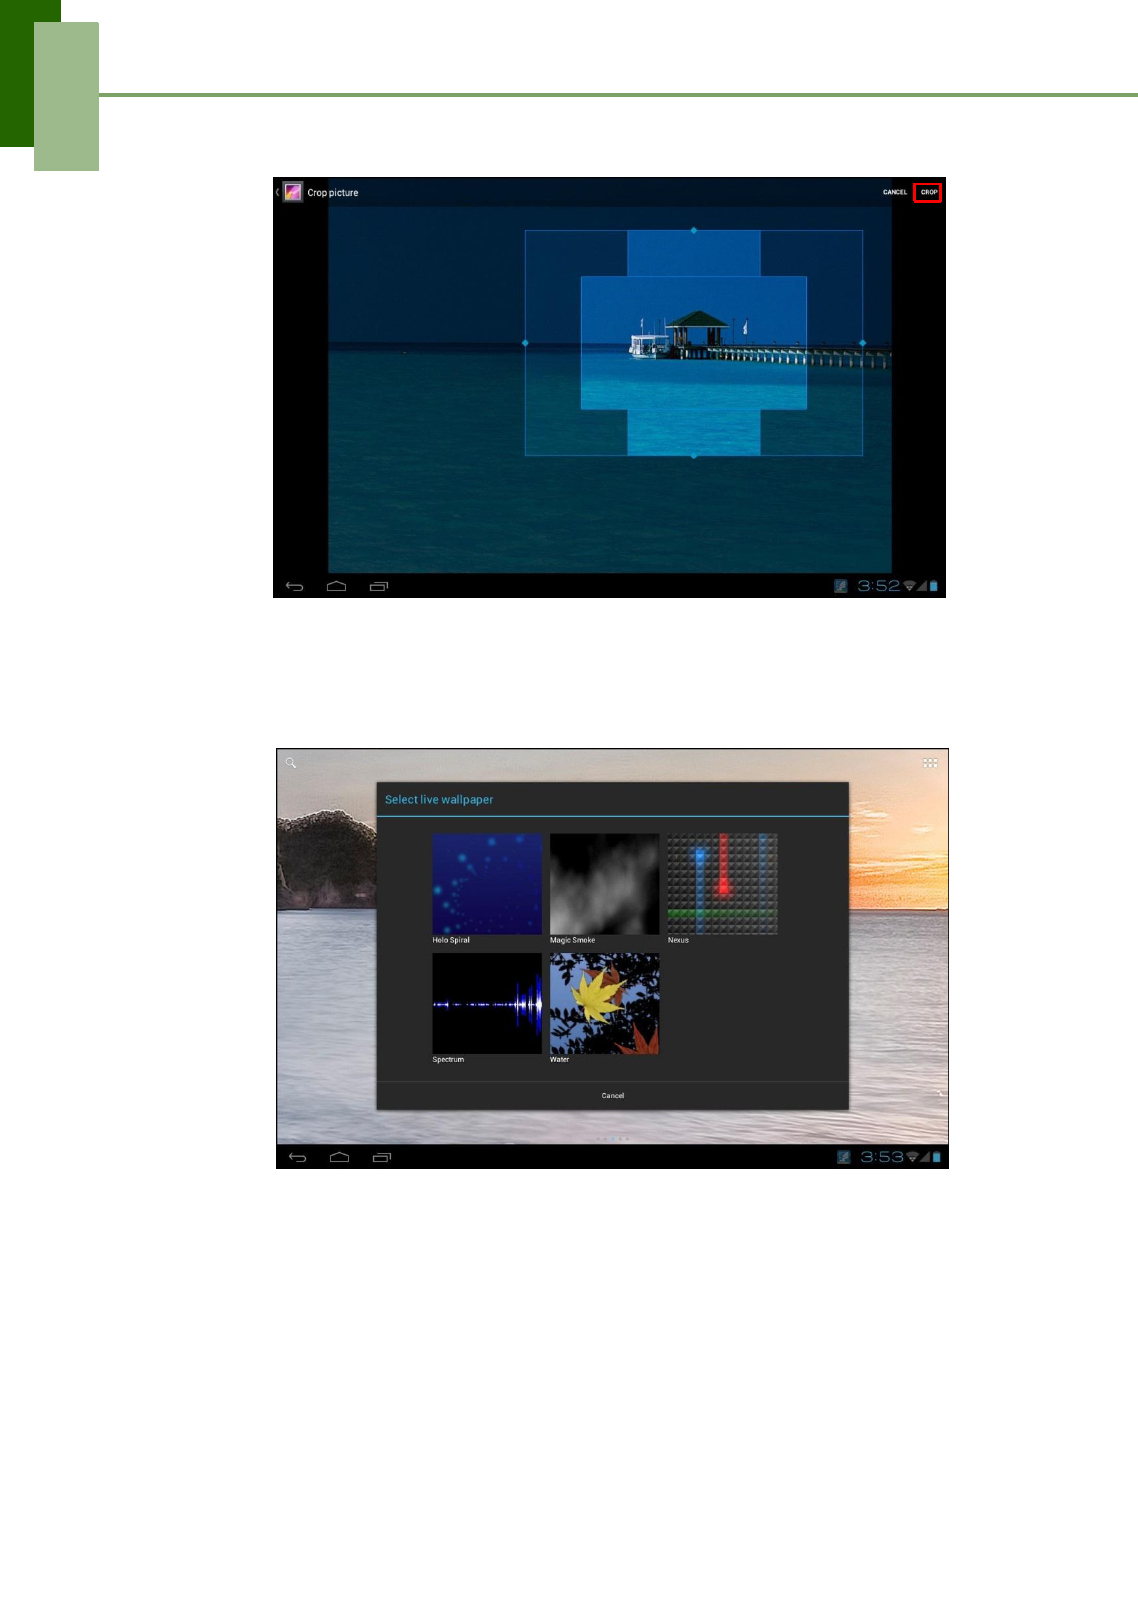
3. Browse the files. Tap to select the picture you want to use as wallpaper.
4. Drag your finger to select the crop area.
11
Chapter 2: The Basics
5. Tap CROP to set the cropped photo as wallpaper.
Set wallpaper from Live Wallpaper gallery
1. From the Home screen, tap and hold the screen.
2. Tap Live Wallpapers.
3. Tap to browse the desired live wallpaper.
4. Tap Set wallpaper to set the desired live wallpaper to set as Home screen
wallpaper.
12
Chapter 2: The Basics
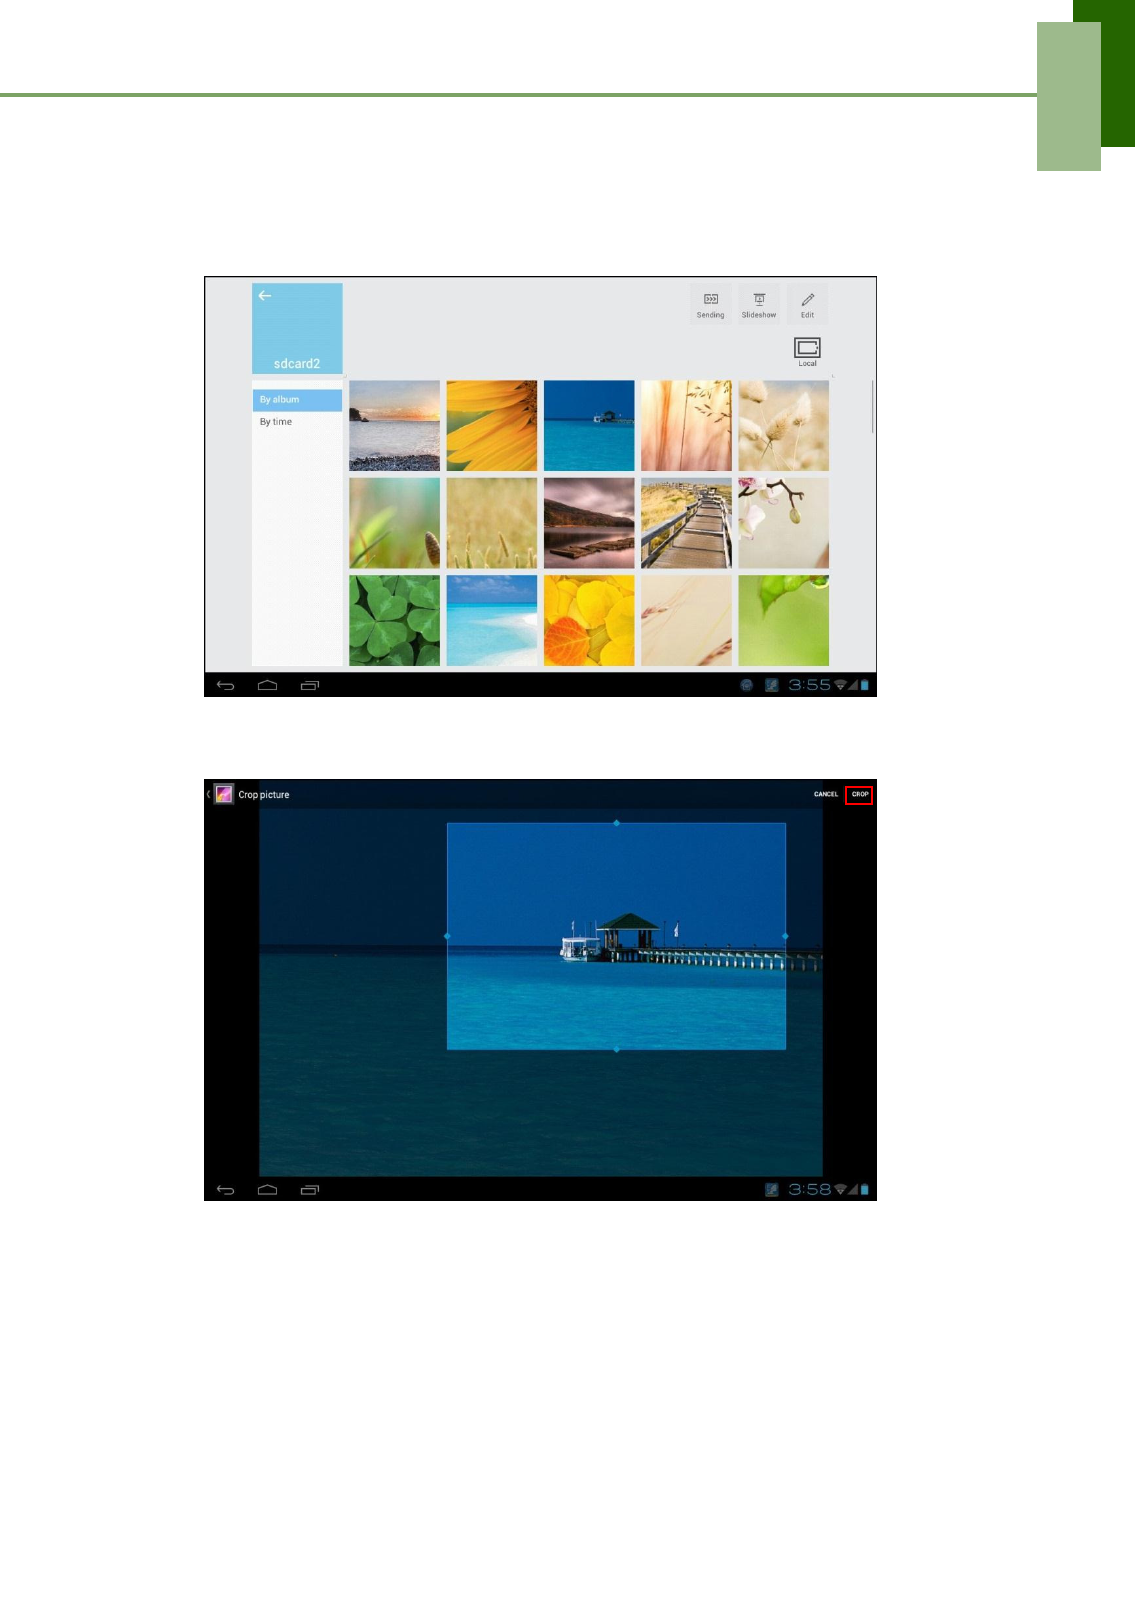
Set wallpaper from Photo
1. From the Home screen, tap and hold the screen.
2. Tap Photo.
3. Browse the files. Tap to select the picture you want to use as wallpaper.
4. Drag your finger to select the crop area.
5. Tap CROP to set the cropped photo as wallpaper.
Set wallpaper from Wallpaper gallery
1. From the Home screen, tap and hold the screen.
2. Tap Wallpapers.
3. Browse the available wallpapers.
4. Tap Set wallpaper to set the desired wallpaper as the Home screen wallpaper.
13
Chapter 2: The Basics
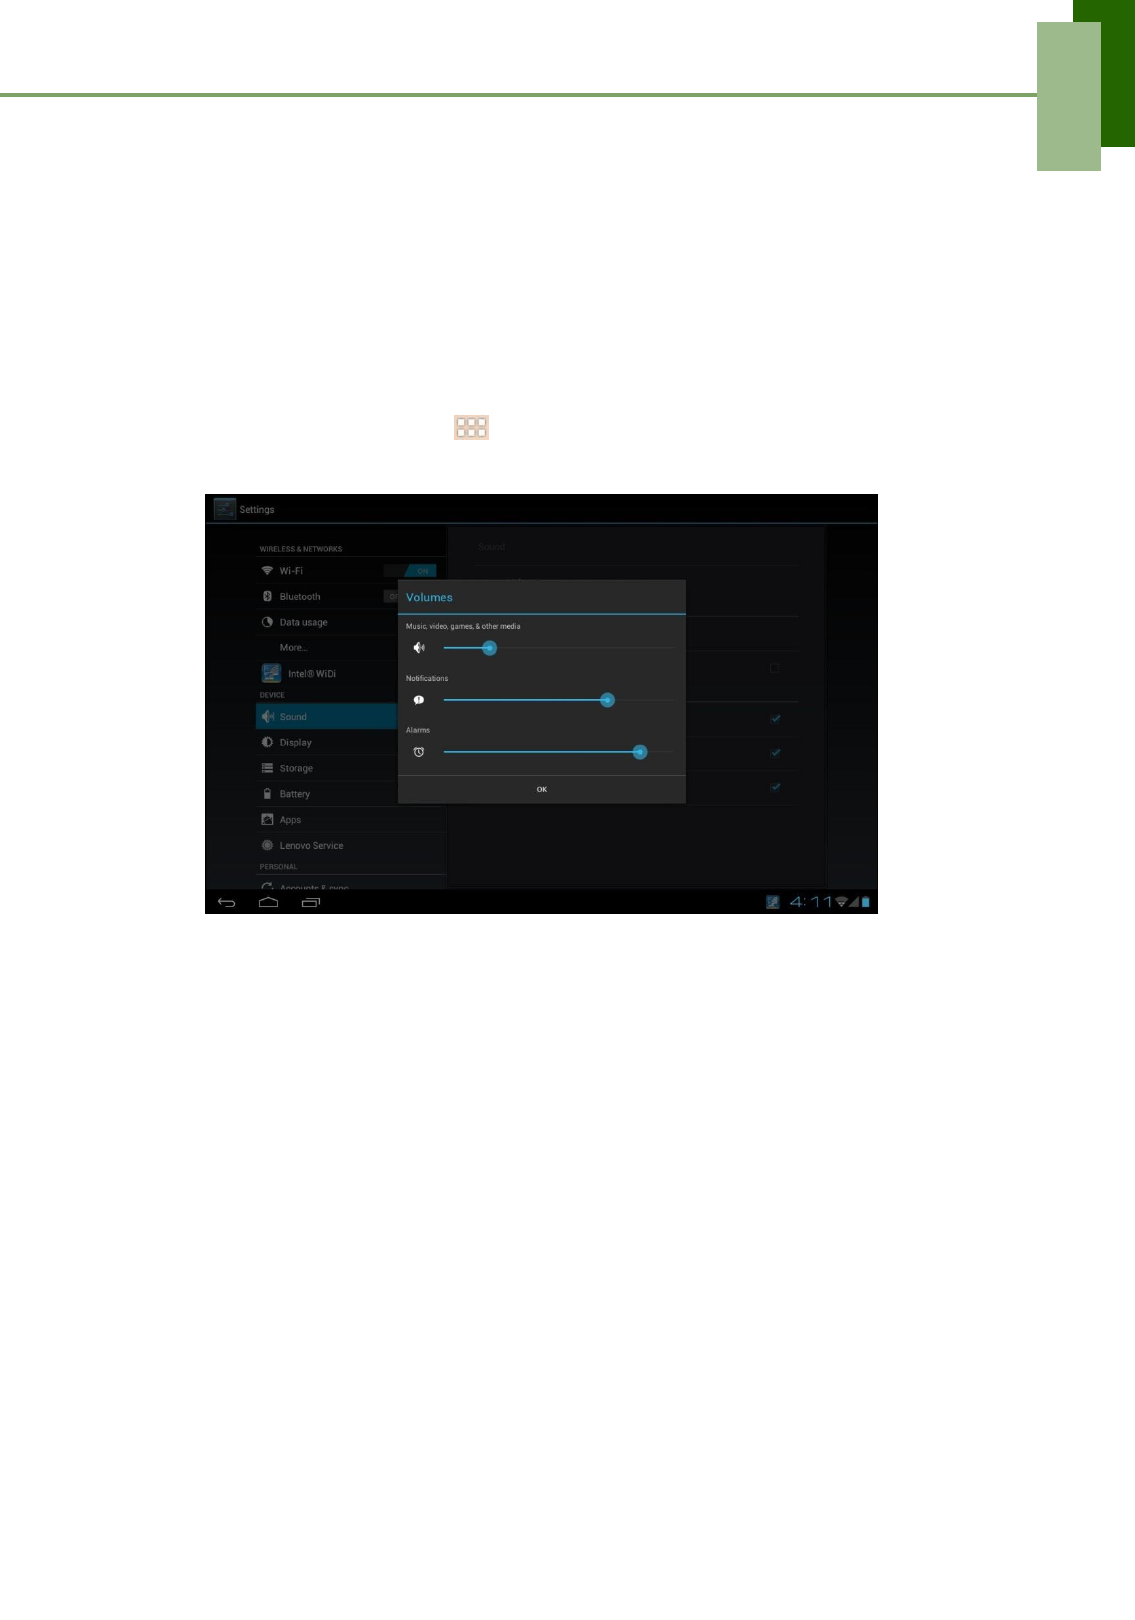
2.2 Adjusting Volume
This device features three types of volume which can be adjusted separately:
• Media volume: Set the volume for music, videos, games and other media.
• Notification volume: Set the volume for notifications.
• Alarm volume: Set the volume for alarms.
To adjust the volume
1. From the Home screen, tap > Settings.
2. In DEVICE, tap Sound > Volumes.
3. To adjust the volume, drag the respective volume slider to adjust the volume.
4. Tap OK to save your settings.
14
Chapter 2: The Basics
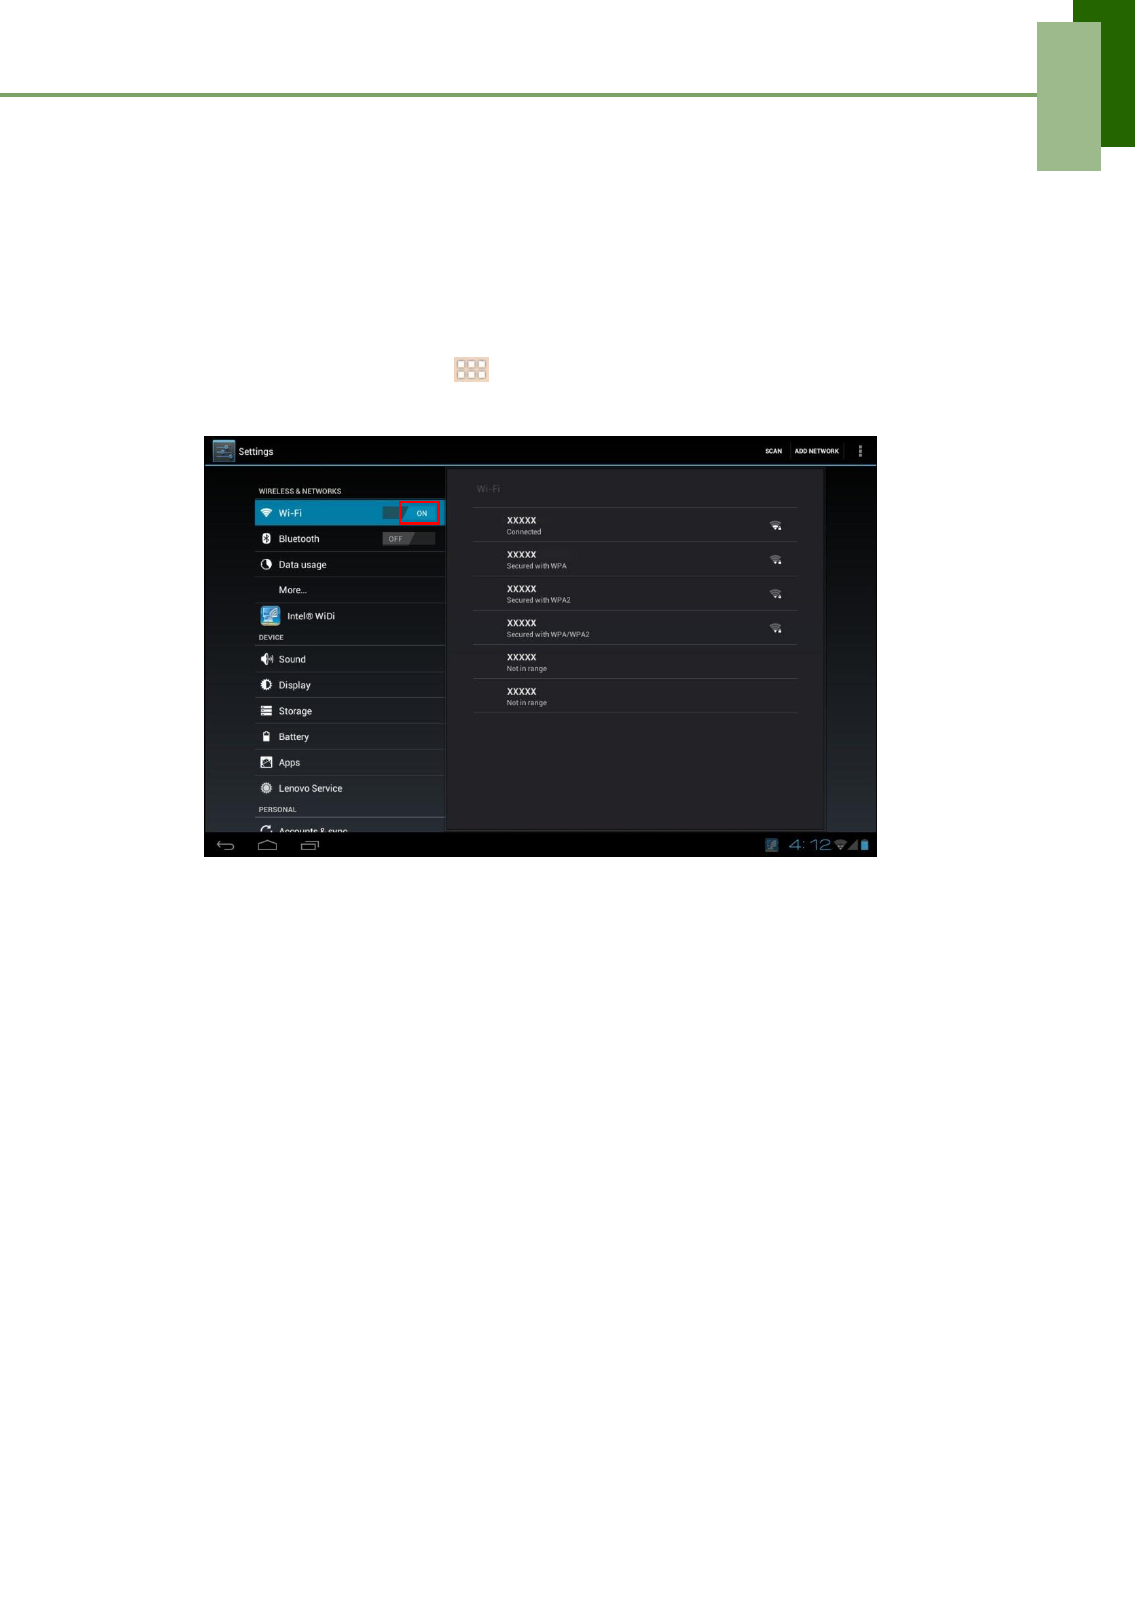
2.3 Setting up Wi-Fi
This device only supports Wi-Fi connections to access the Internet. You need to
connect to a wireless network before surfing the Internet or using the related
applications that require Internet connection.
To turn Wi-Fi on
1. From the Home screen, tap > Settings.
2. In WIRELESS & NETWORKS, tap Wi-Fi and set it to ON.
To connect to a Wi-Fi network
1. Turn Wi-Fi on.
2. The available networks are listed. Tap a network to connect to.
NOTE: You can also tap ADD NETWORK to manually add a connection.
See “To add a Wi-Fi network” on page 15.
3. If you select an unsecured network, the connection is automatically established.
Otherwise, proceed to the next step.
15
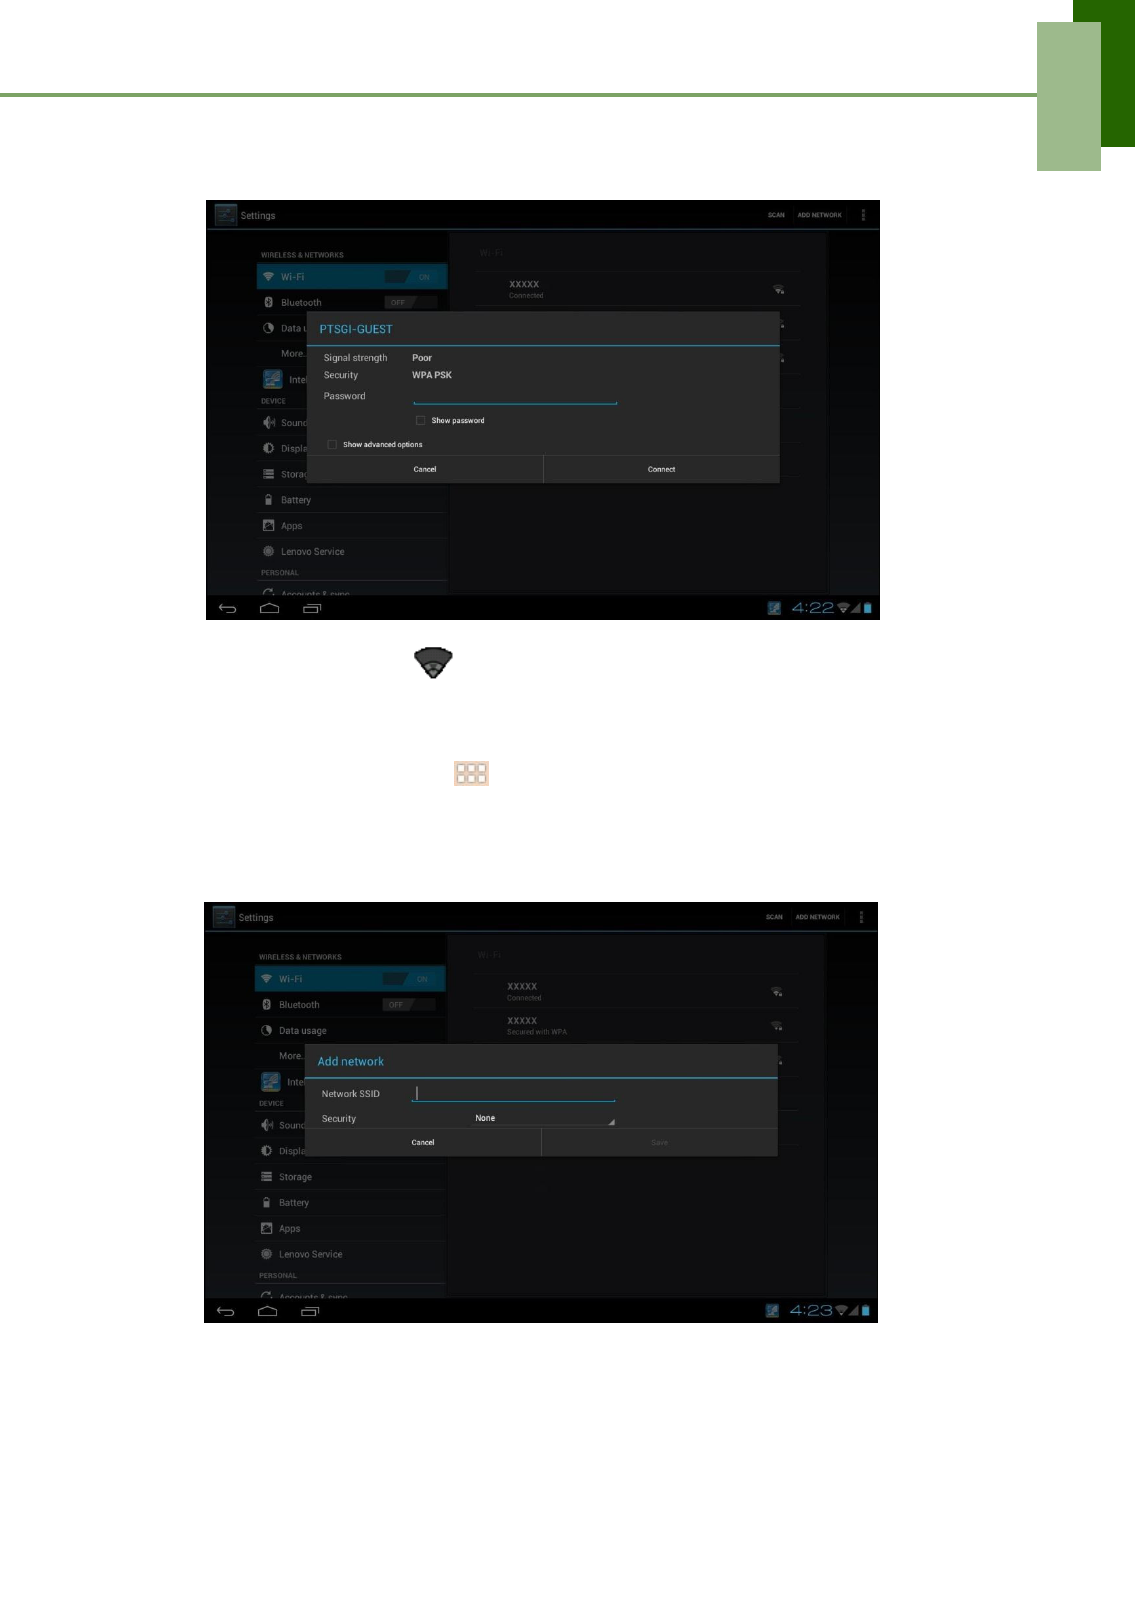
Chapter 2: The Basics
4. When connecting to a secured network, you will be prompted for the password.
Enter the password, then tap Connect.
When Wi-Fi is connected, the connection icon is displayed on the status bar.
To add a Wi-Fi network
1. From the Home screen, tap > Settings.
2. In Wi-Fi networks, tap ADD NETWORK. A new window is displayed.
3. Follow the on-screen instructions and enter the necessary information, then tap
Save to save the settings.
16
Chapter 2: The Basics
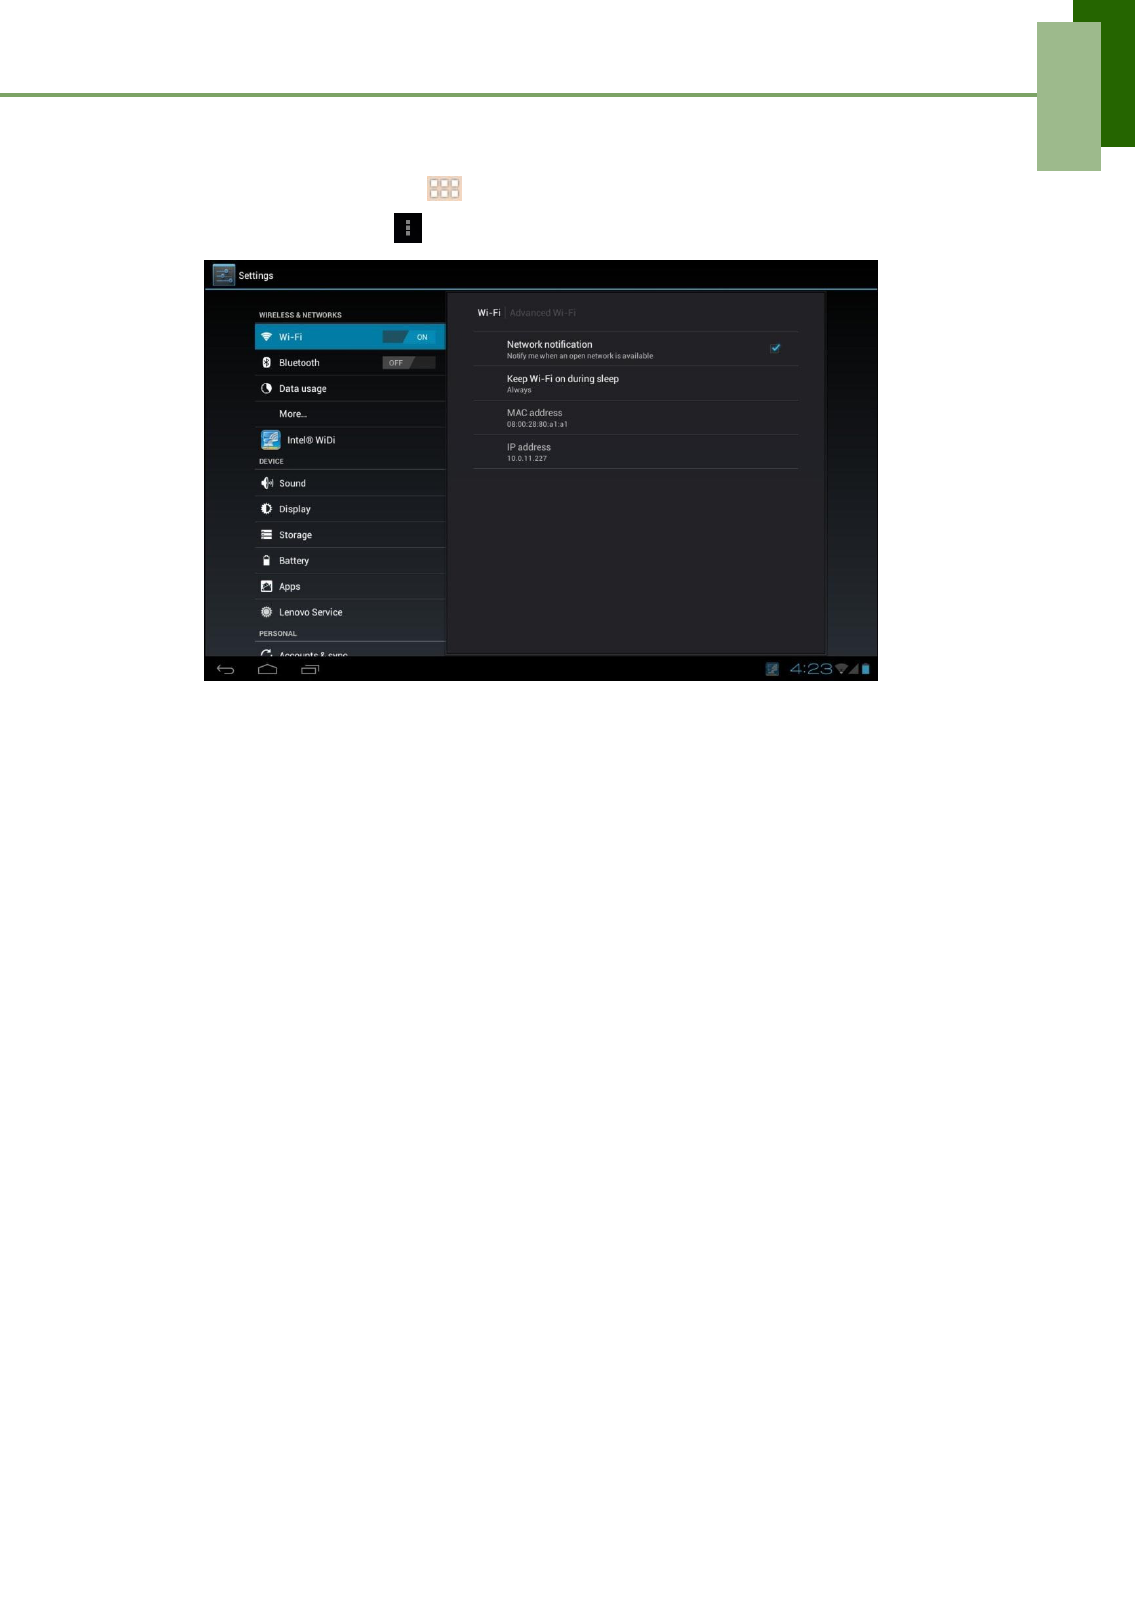
To view Wi-Fi settings
1. From the Home screen, tap > Settings.
2. In Wi-Fi networks, tap > Advanced.
Network information appears on the screen.
17
Chapter 2: The Basics
2.4 People
People lets you store names, phone numbers, email addresses, and other
information. You can also add frequently used contacts to the Favorites list. See
“Favorite contacts” on page 19.
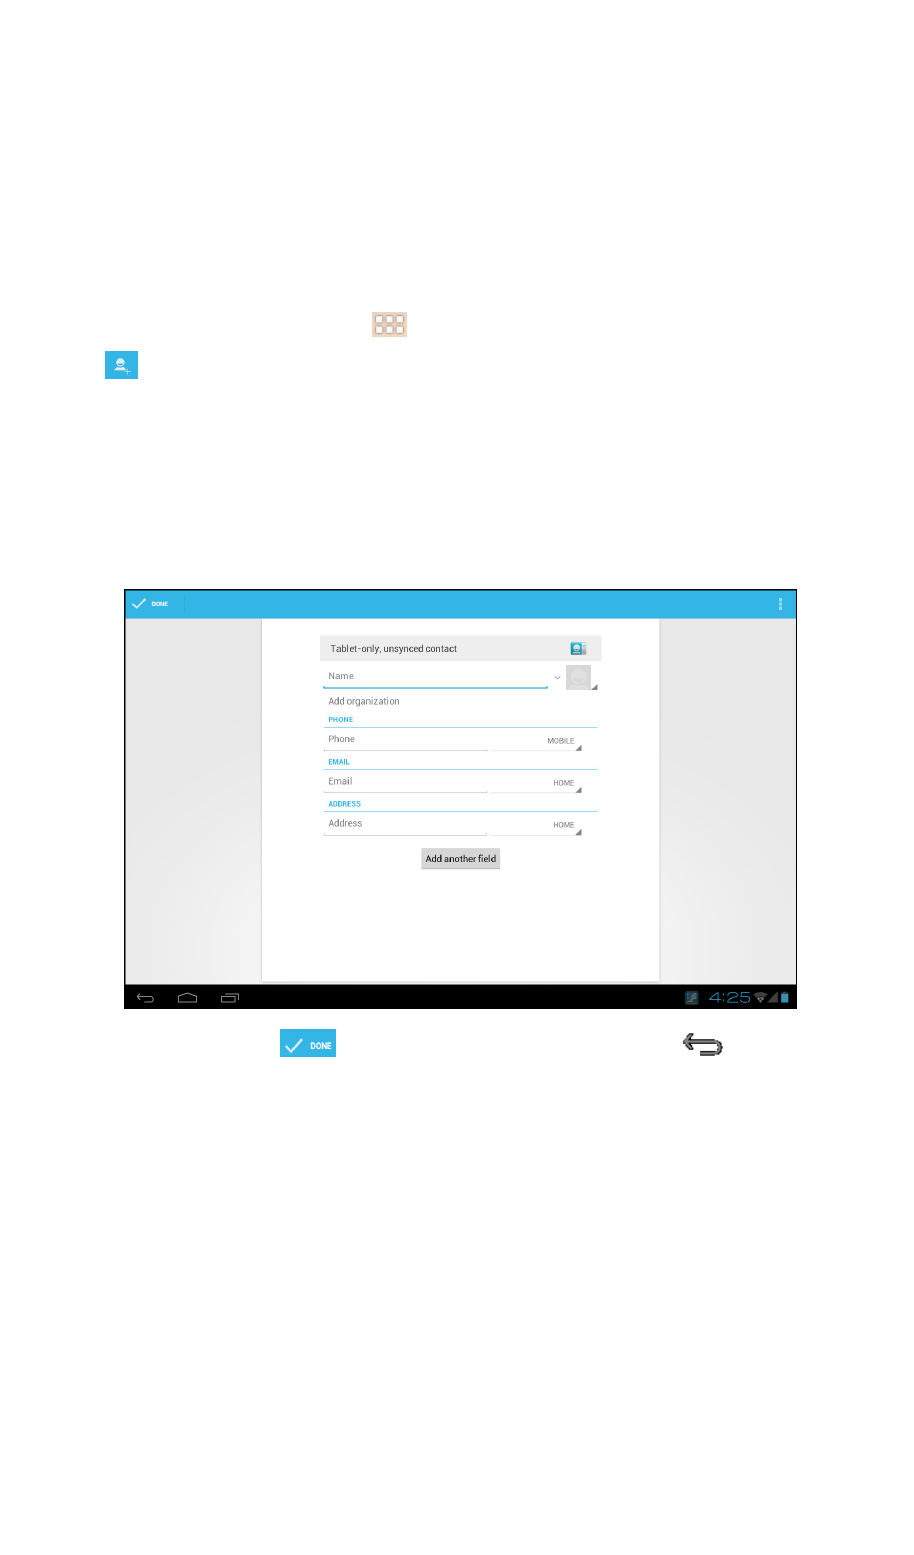
Adding contacts
1. From the Home screen, tap > People.
2. Tap to add a contact.
NOTE: If the contact list is empty, tap one of the following:
• Create a new contact: to save the contact to the device memory.
• Sign in to an account: to retrieve the contacts stored on a corporate or
other account.
• Import/export contacts: to import/export contacts from/to the storage.
3. Enter contact information such as name, phone number, email address, etc.
4. When finished, tap to save the contact or tap to exit without
saving any changes.
18
Chapter 2: The Basics
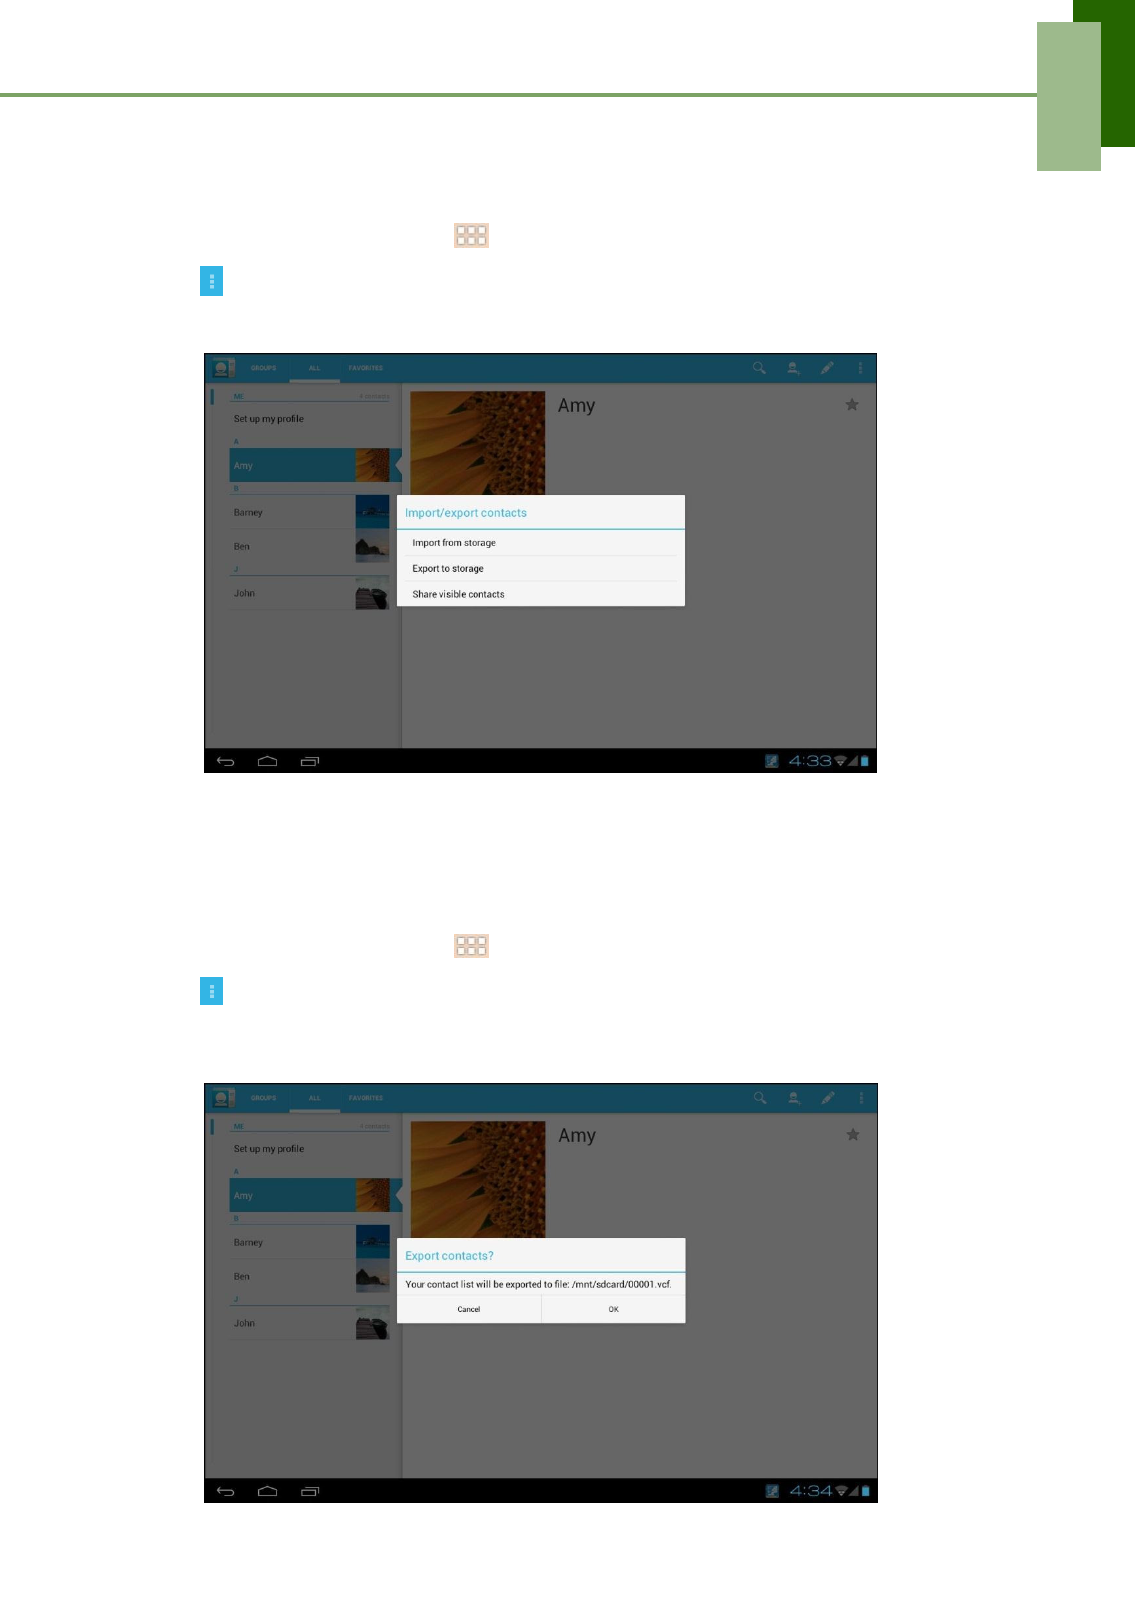
Importing contacts
You can import contacts from the memory card to your device.
1. From the Home screen, tap > People.
2. Tap > Import/export.
3. Select Import from storage.
4. Select the vCard files to import and tap OK.
Backing up contacts
You can copy contacts to the memory card to back up your contacts information.
1. From the Home screen, tap > People.
2. Tap > Import/export > Export to storage.
3. A warning message pops up, tap OK to proceed. All contacts are copied to the
memory card.
19
Chapter 2: The Basics
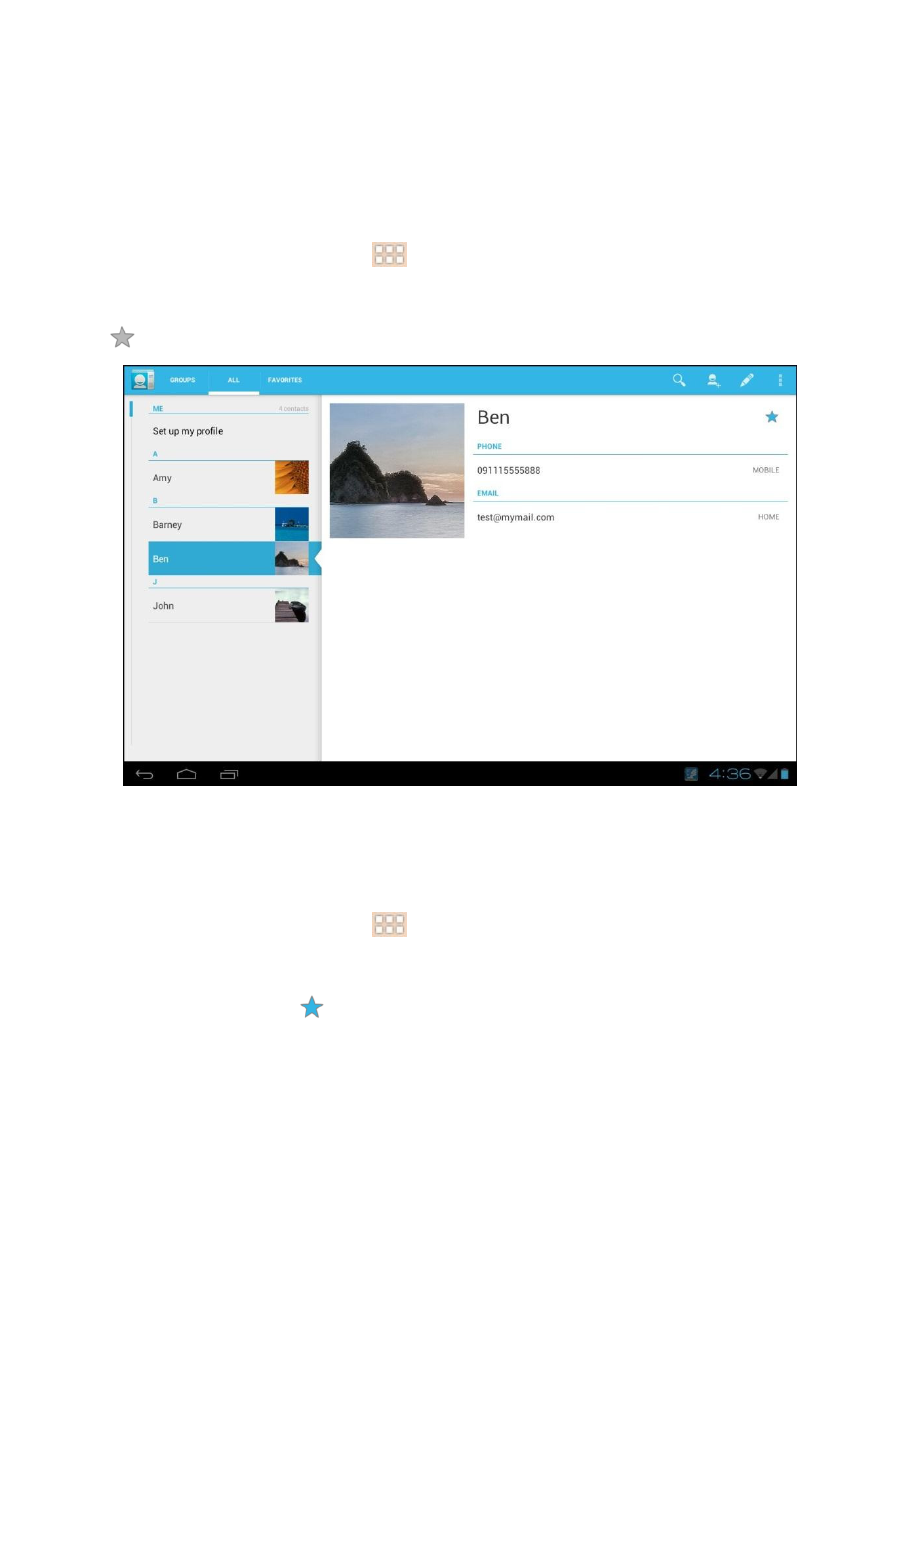
Favorite contacts
Add the most frequently called contacts to the FAVORITES list to help you access
contacts quickly and easily.
Add to Favorites List
1. From the Home screen, tap > People.
2. Tap ALL tab and select a contact.
3. Tap and the icon turns blue.
The contact is now displayed in the FAVORITES list.
Remove from Favorites List
1. From the Home screen, tap > People.
2. Tap ALL tab and select a contact.
3. Tap a contact and tap .
The contact is removed from the FAVORITES list.
20
Chapter 3: Email
Chapter 3:
Email
Use Email to send and receive email messages via your internet email accounts.
3.1 Email Accounts
Your device can send and receive emails just as you do with a computer. Your device
supports email accounts provided by an Internet Service Provider (ISP) or web-based
email, such as Hotmail, Yahoo! Mail, etc.
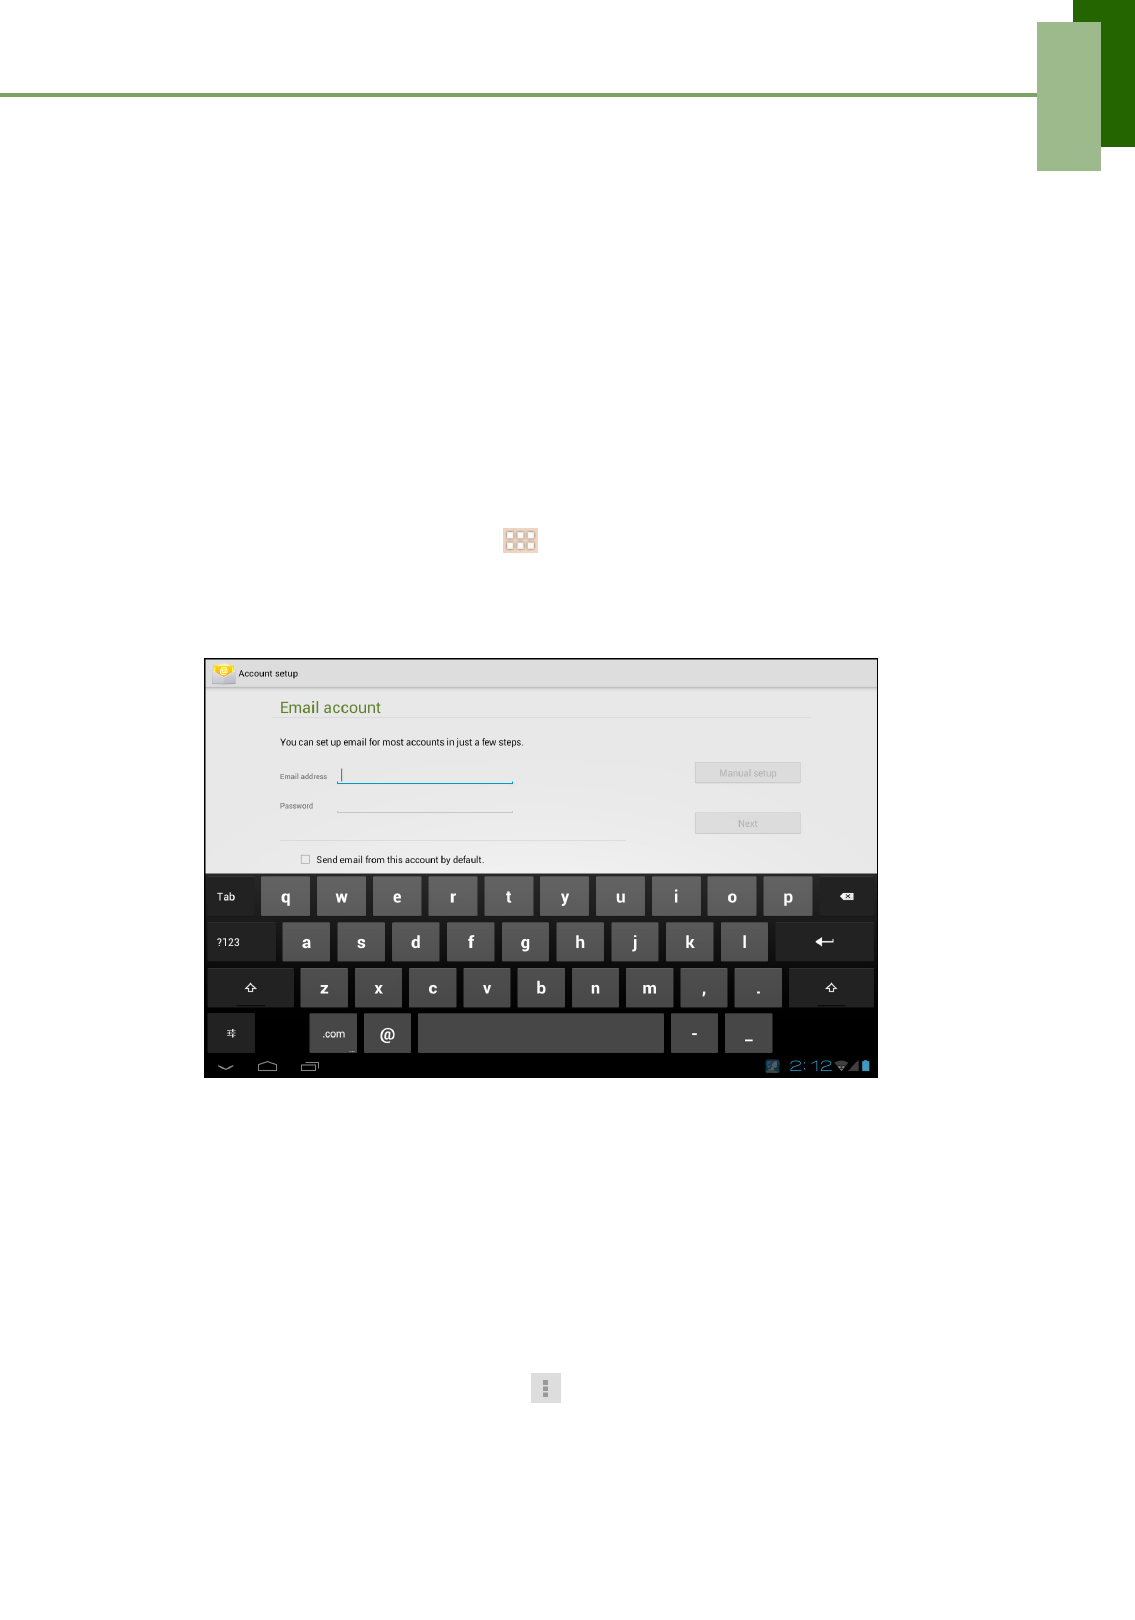
Setting up an Internet email account
1. From the Home screen, tap >
Email.
2. Enter your Email address and
Password.
3. Tap Next. The device will automatically retrieve the email settings.
4. Set your account options and tap
Next.
5. Enter Your Name and Account display
name.
NOTE: The Account display name is the name shown to the recipients of your
emails.
6. Tap Next. Once the account set up is completed, the device will automatically
retrieve your emails.
• To add another email account, tap > Settings > ADD ACCOUNT.
21
Chapter 3: Email
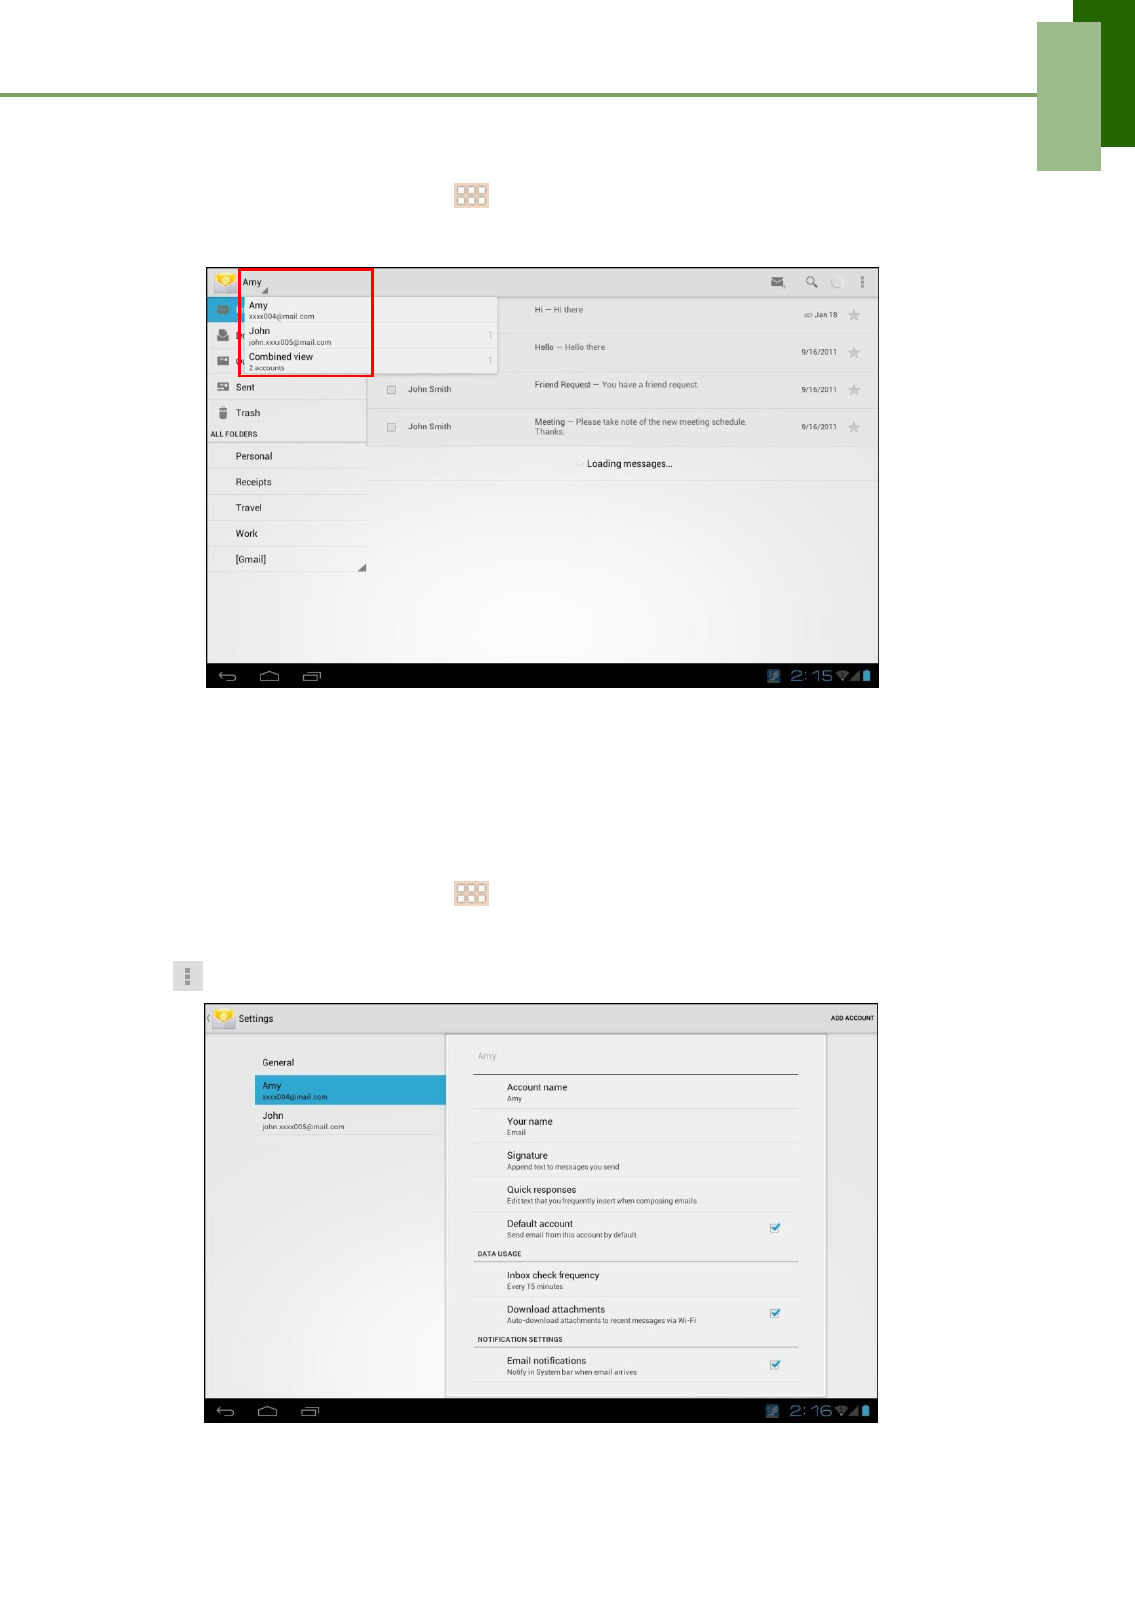
Viewing email accounts
1. From the Home screen, tap > Email.
2. Tap the account selection box at the top left of the screen.
3. Tap the account you want to access from the available email accounts.
Customizing email settings
Configure message settings using the Account settings menu.
1. From the Home screen, tap > Email.
2. Tap the account you want to access.
3. Tap > Settings to open the email setting menu.
22
Chapter 4 : Using Internet
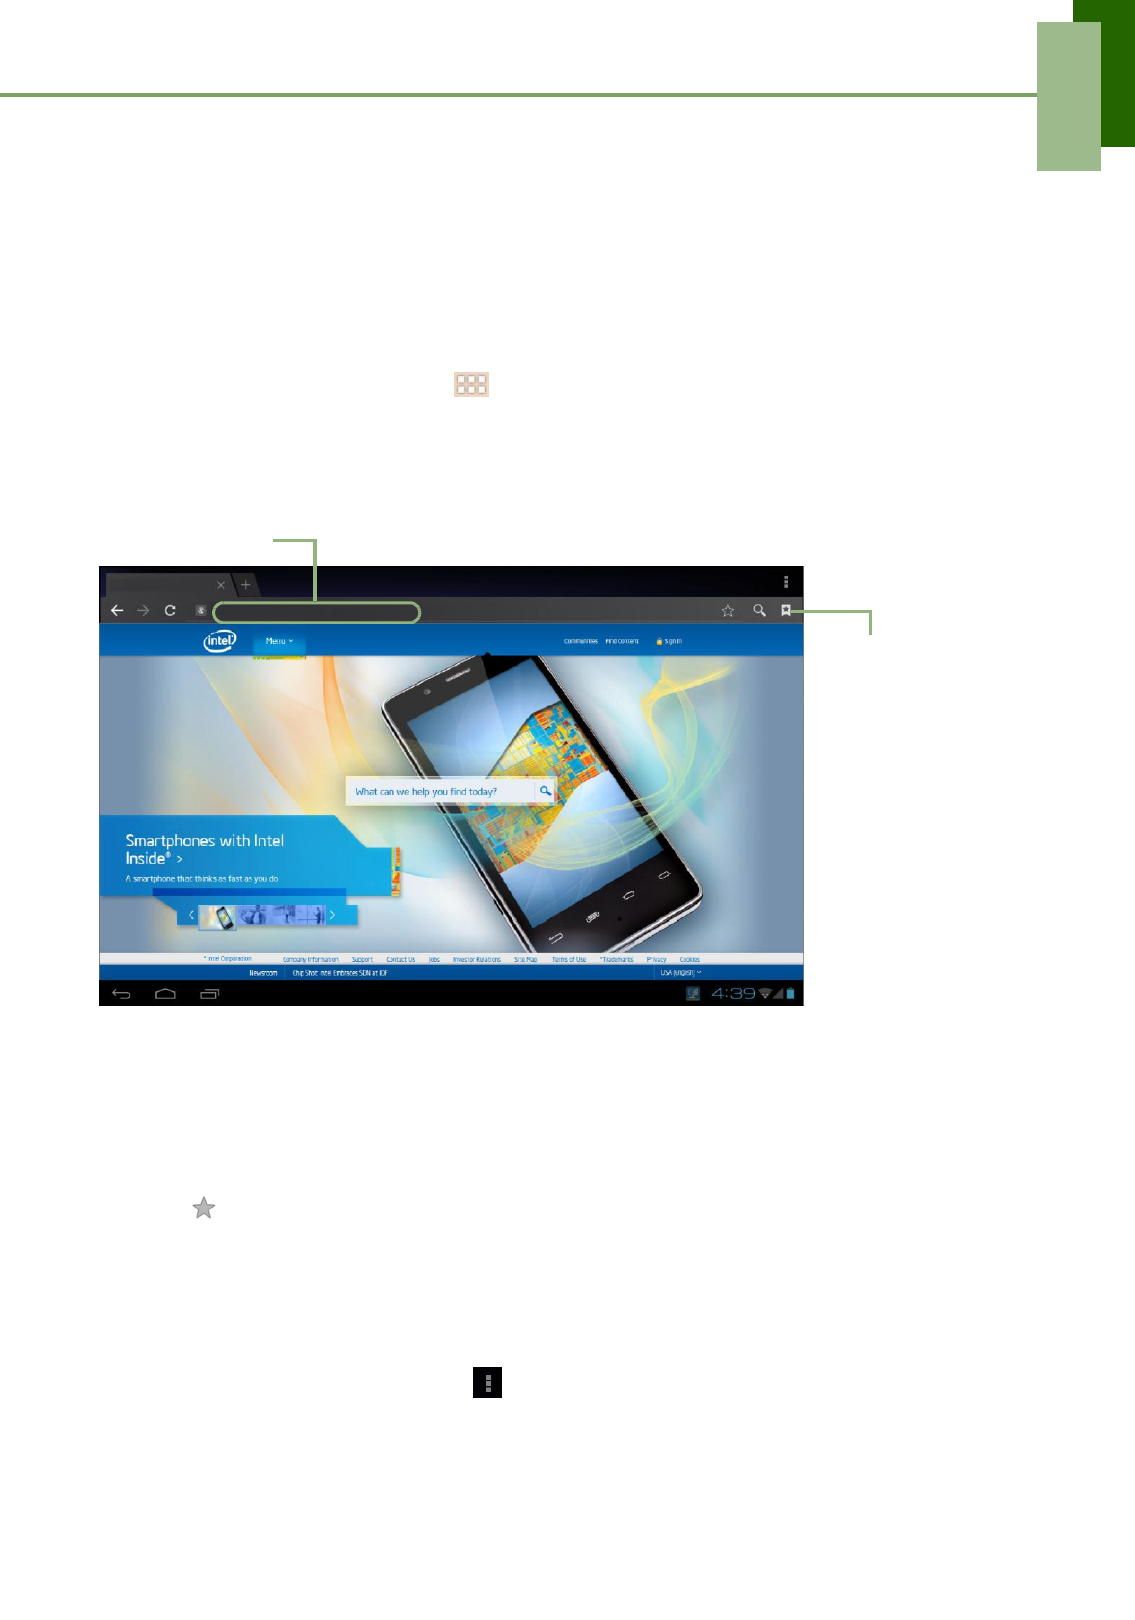
4.1 Browsing Web Pages
1. From the Home screen, tap > Browser.
2. Tap the address bar.
3. Type the URL. As you type, a list of URL suggestions will appear on the screen.
4. Tap an item in the list.
Address bar
Tap to browse
bookmarks,
history, and
saved pages.
To navigate a page
To scroll up or down, swipe your finger down or up. To scroll left or right, tap and
swipe your finger to the right or left.
To bookmark the page
1. Tap .
2. Enter the label and change other default settings (if necessary).
3. Tap OK to save your settings.
To set the Home page
1. While viewing a web page, tap > Settings > Set homepage.
2. Select the page that you want to set as the home page.
• Tap OK to save your settings.
• If “Other” is selected, enter the URL of the page that you want to set as the
home page
http://www.intel.com
Intel - Home
23
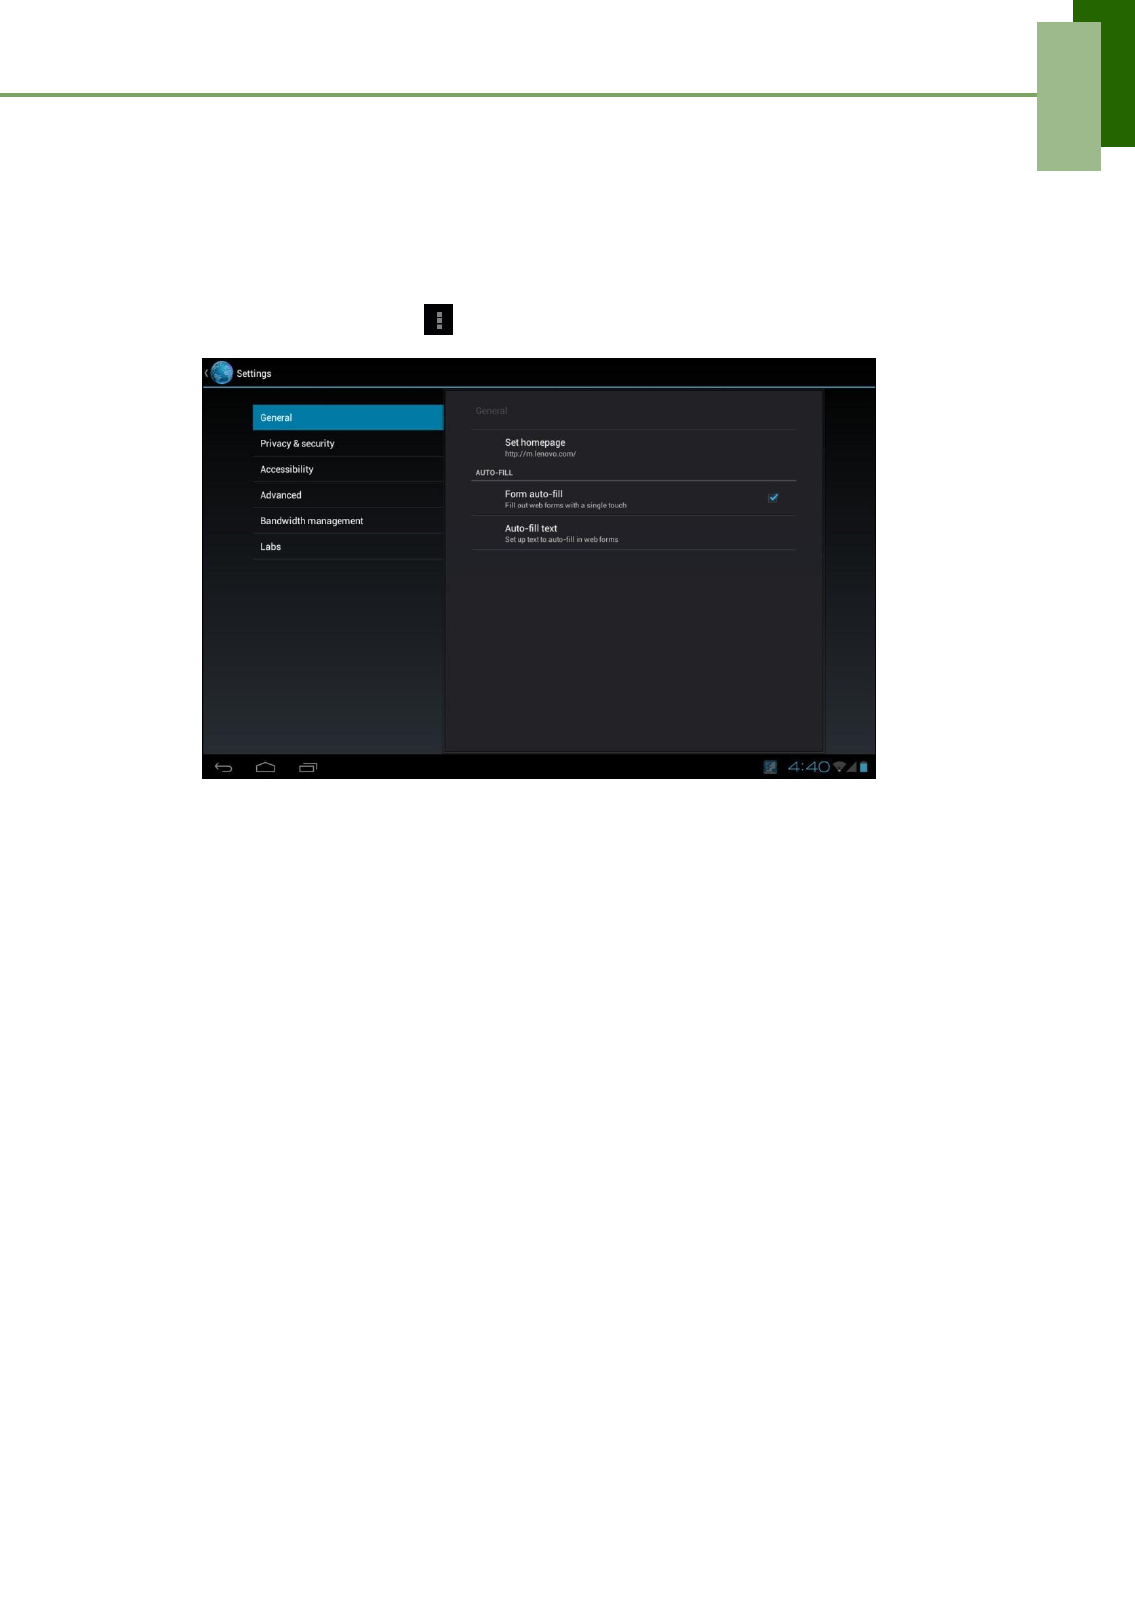
Managing web pages
While viewing a web page, tap to configure the browser settings:
• General: Select to set home page, and configure sync data and autofill settings.
• Privacy & security: Select to configure privacy and security settings including
cache, history, cookies, form data, location, and password.
• Accessibility: Select to configure text size, zoom, and inverted screen rendering
settings.
• Advanced: Select to set search engine, open in background, enable JavaScript,
enable plug-ins, advanced settings for individual website, page content settings,
and reset all settings to the factory default.
• Bandwidth management: Select to allow browser to preload high confidence
search results in the background and display images on the web pages.
• Labs: Select to set quick control access.
24
Chapter 5: Using Bluetooth
Chapter 5: Using
Bluetooth
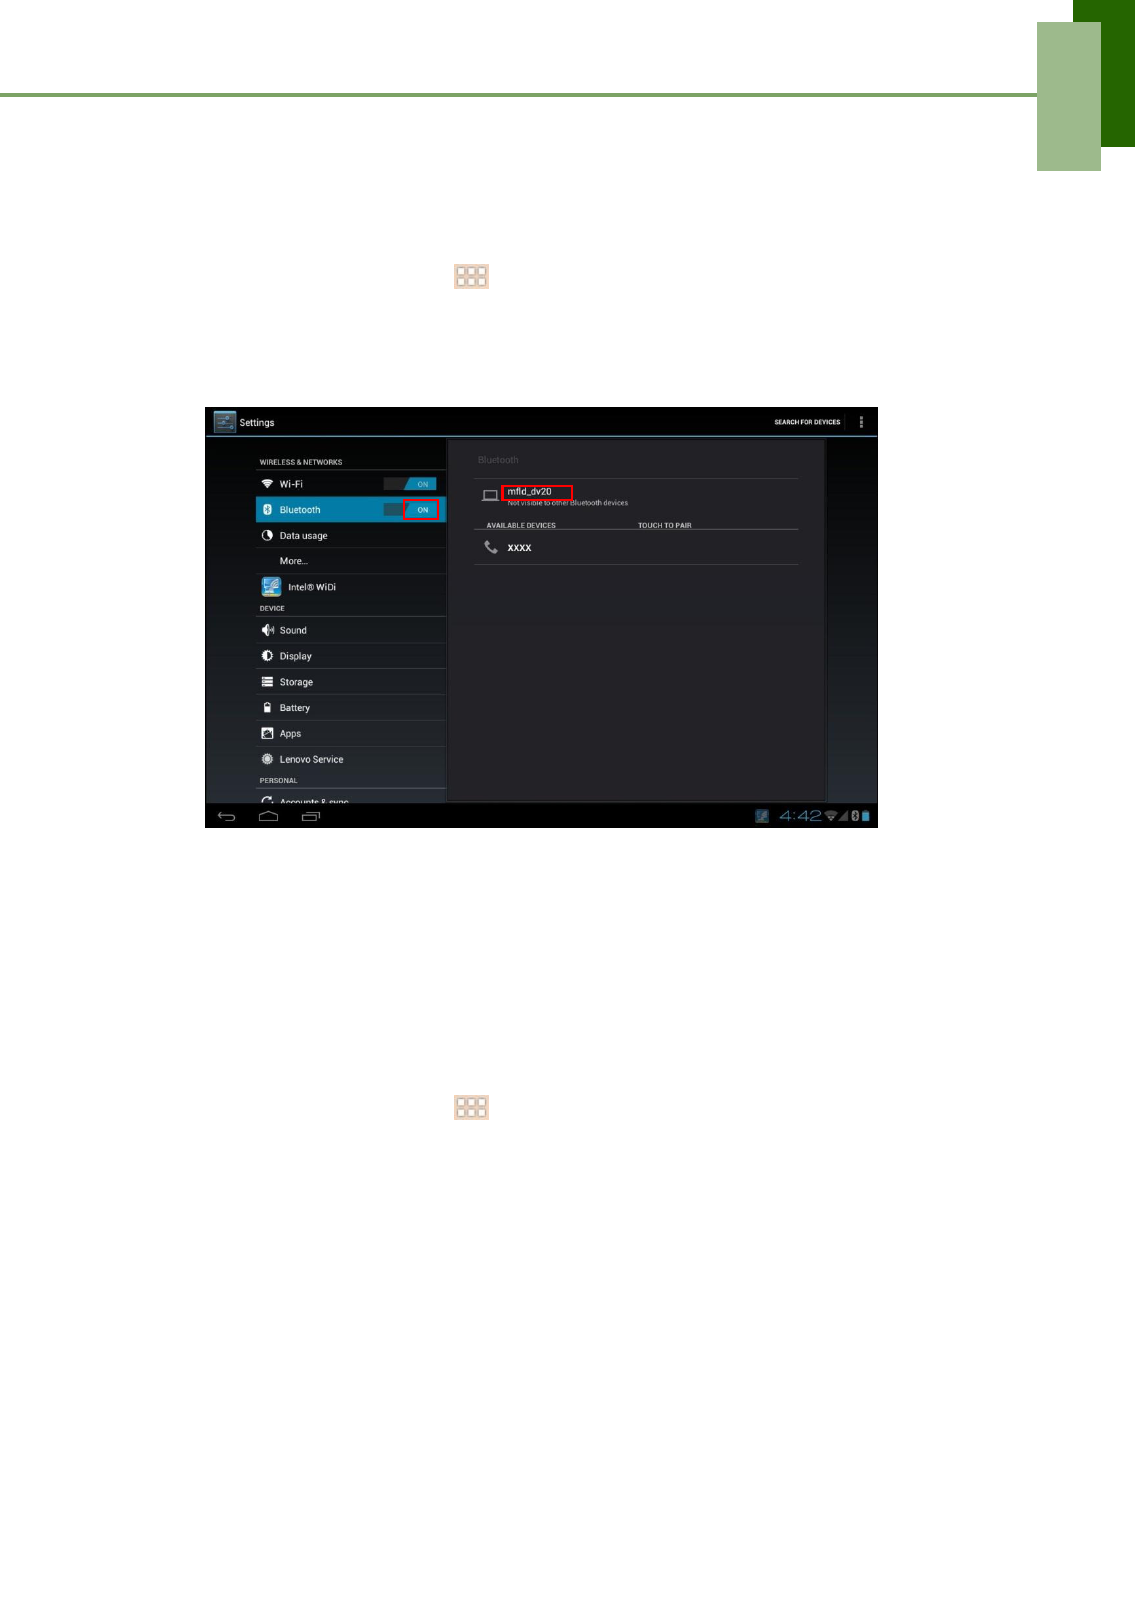
To turn Bluetooth on
1. From the Home screen, tap > Settings.
2. In WIRELESS & NETWORKS, tap Bluetooth and set it to ON.
NOTE: When the Bluetooth is turned on, your device detects other Bluetooth
devices, but your device is not visible to others.
3. To make your device visible to others, tap mfld_dv20 once to make this device
visible to other devices.
5.1 Connecting to Bluetooth Devices
A connection to a Bluetooth device is called a partnership. You need to pair and
create a partnership with a Bluetooth device to exchange information.
1. From the Home screen, tap > Settings.
2. In WIRELESS & NETWORKS, tap Bluetooth and set it to ON.
3. To search for a new device, tap SEARCH FOR DEVICES.
4. Tap a detected device.
5. To start pairing, enter the PIN and tap OK.
NOTE:
• The PIN of the device must be the same PIN on the other bluetooth device.
• On some devices, tap Pair to start pairing.
6. The paired bluetooth device name is displayed.
NOTE: Once a partnership has been created, connecting to that device again will
no longer require entering the PIN.
25
Chapter 5: Using Bluetooth
Chapter
6:
Multimedia Applications
6.1 Photos and Videos
This device is equipped with rear and front cameras to take photos and videos. By
default, your device uses the rear camera to take photos or record videos.
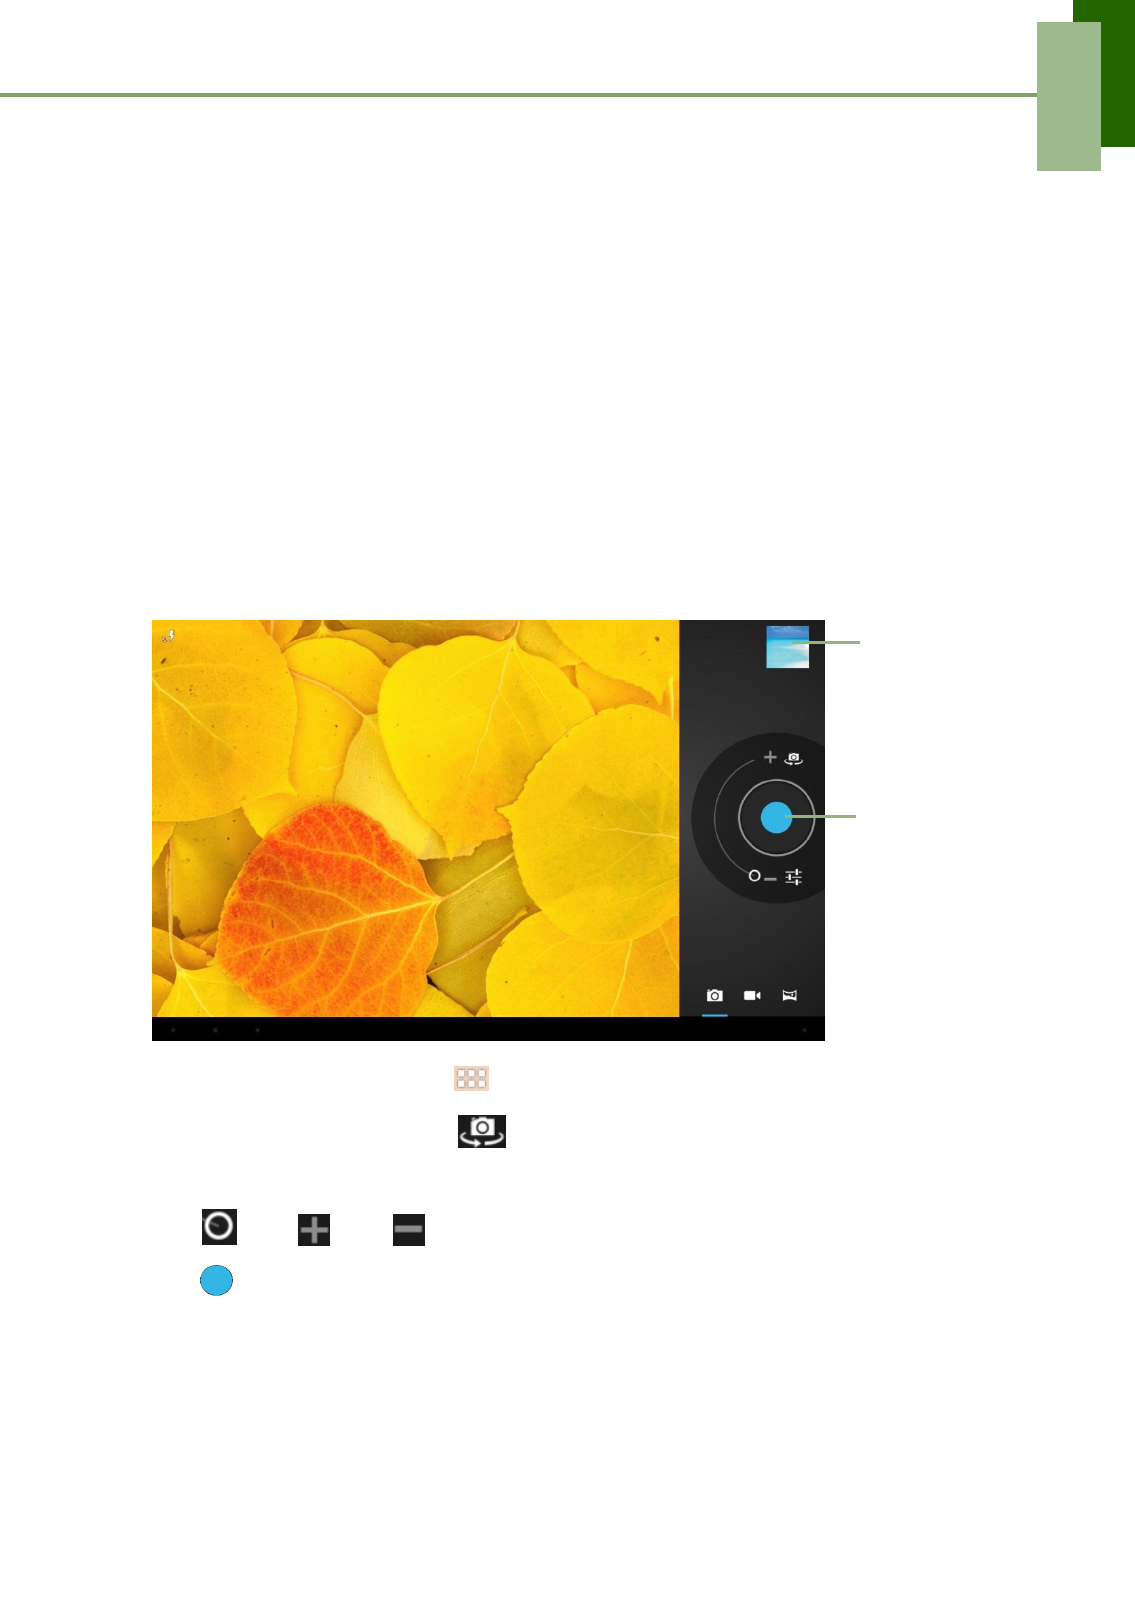
Taking a photo
Tap to
preview the
latest
recorded
file.
Tap to take a
photo.
1. From the Home screen, tap > Camera.
To switch to front camera, tap .
2. Aim the device at the subject.
Slide to or to zoom in/out on the subject.
3. Tap to take the shot.
The latest photo will be displayed on the top right of the screen. Tap the thumbnail
to view it in full screen.
26
Chapter 6: Multimedia Applications
Recording a video
Tap to preview
the latest
recorded file.
Tap to record
video.
1. From the Home screen, tap > Camera.
2. Tap to switch to Camcorder mode.
To switch to front camera, tap .
3. Aim the device at the subject.
4. To start recording, tap .
To stop recording, tap .
27
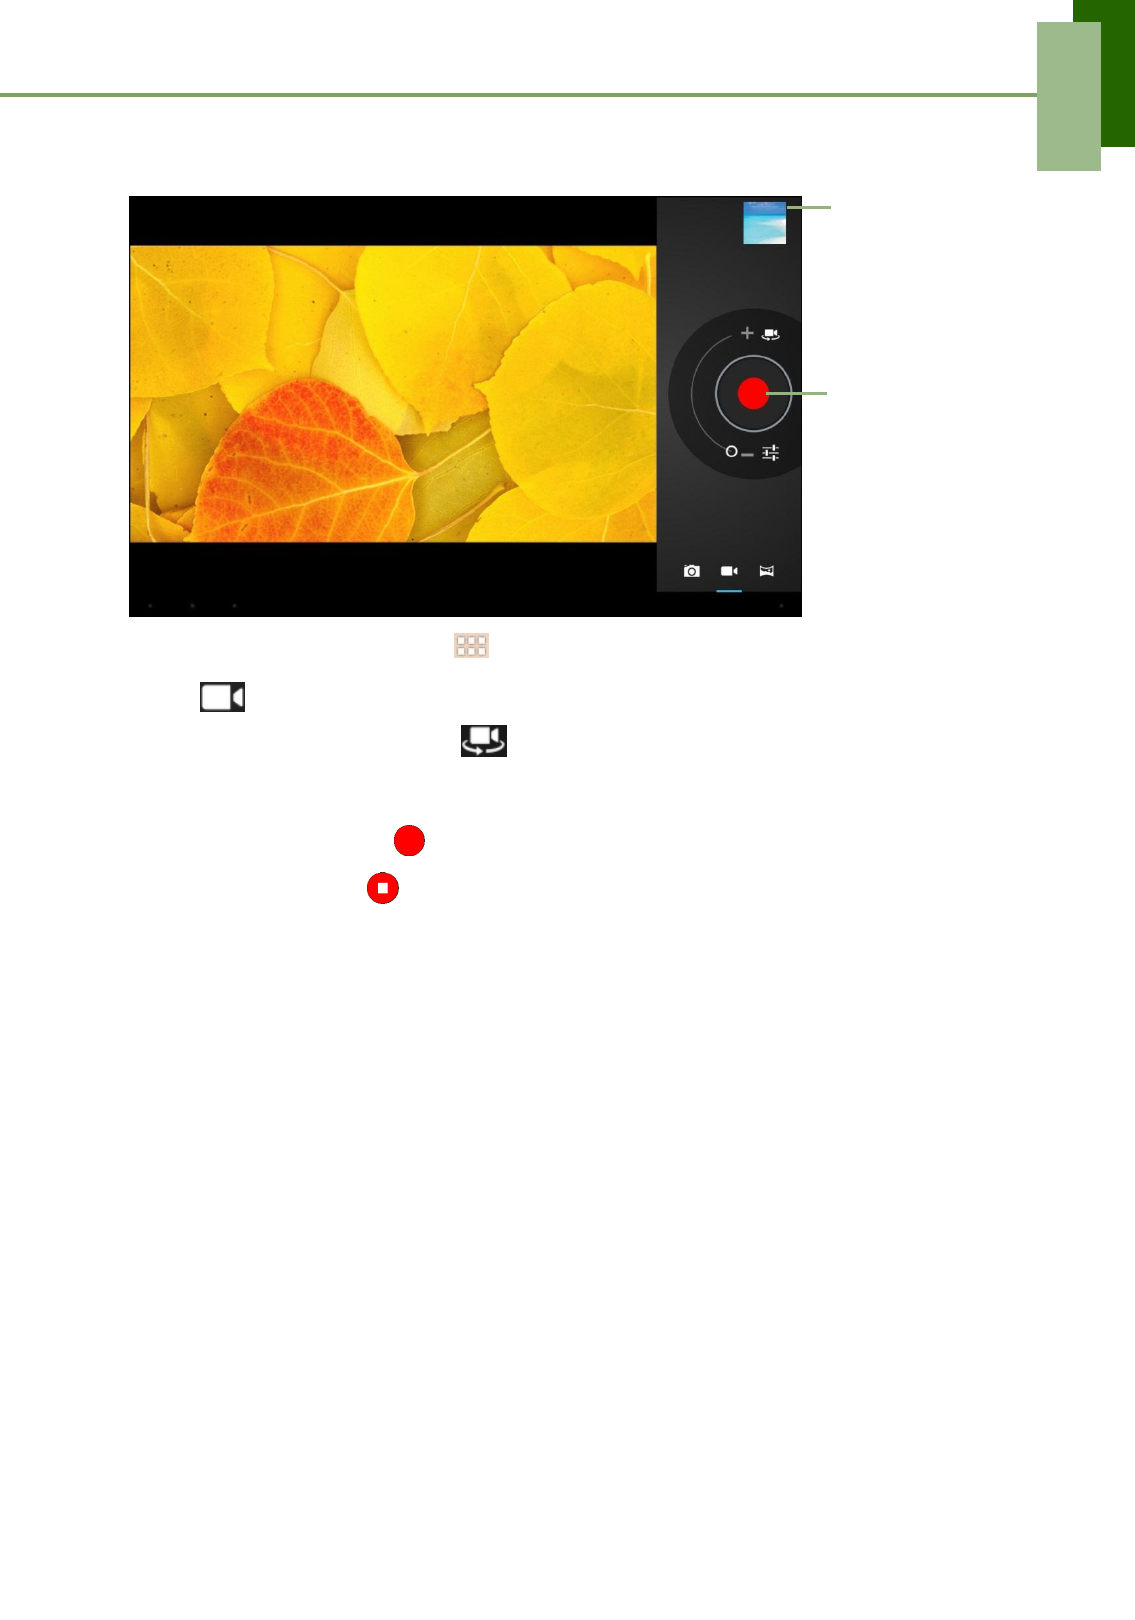
Chapter 6: Multimedia Applications
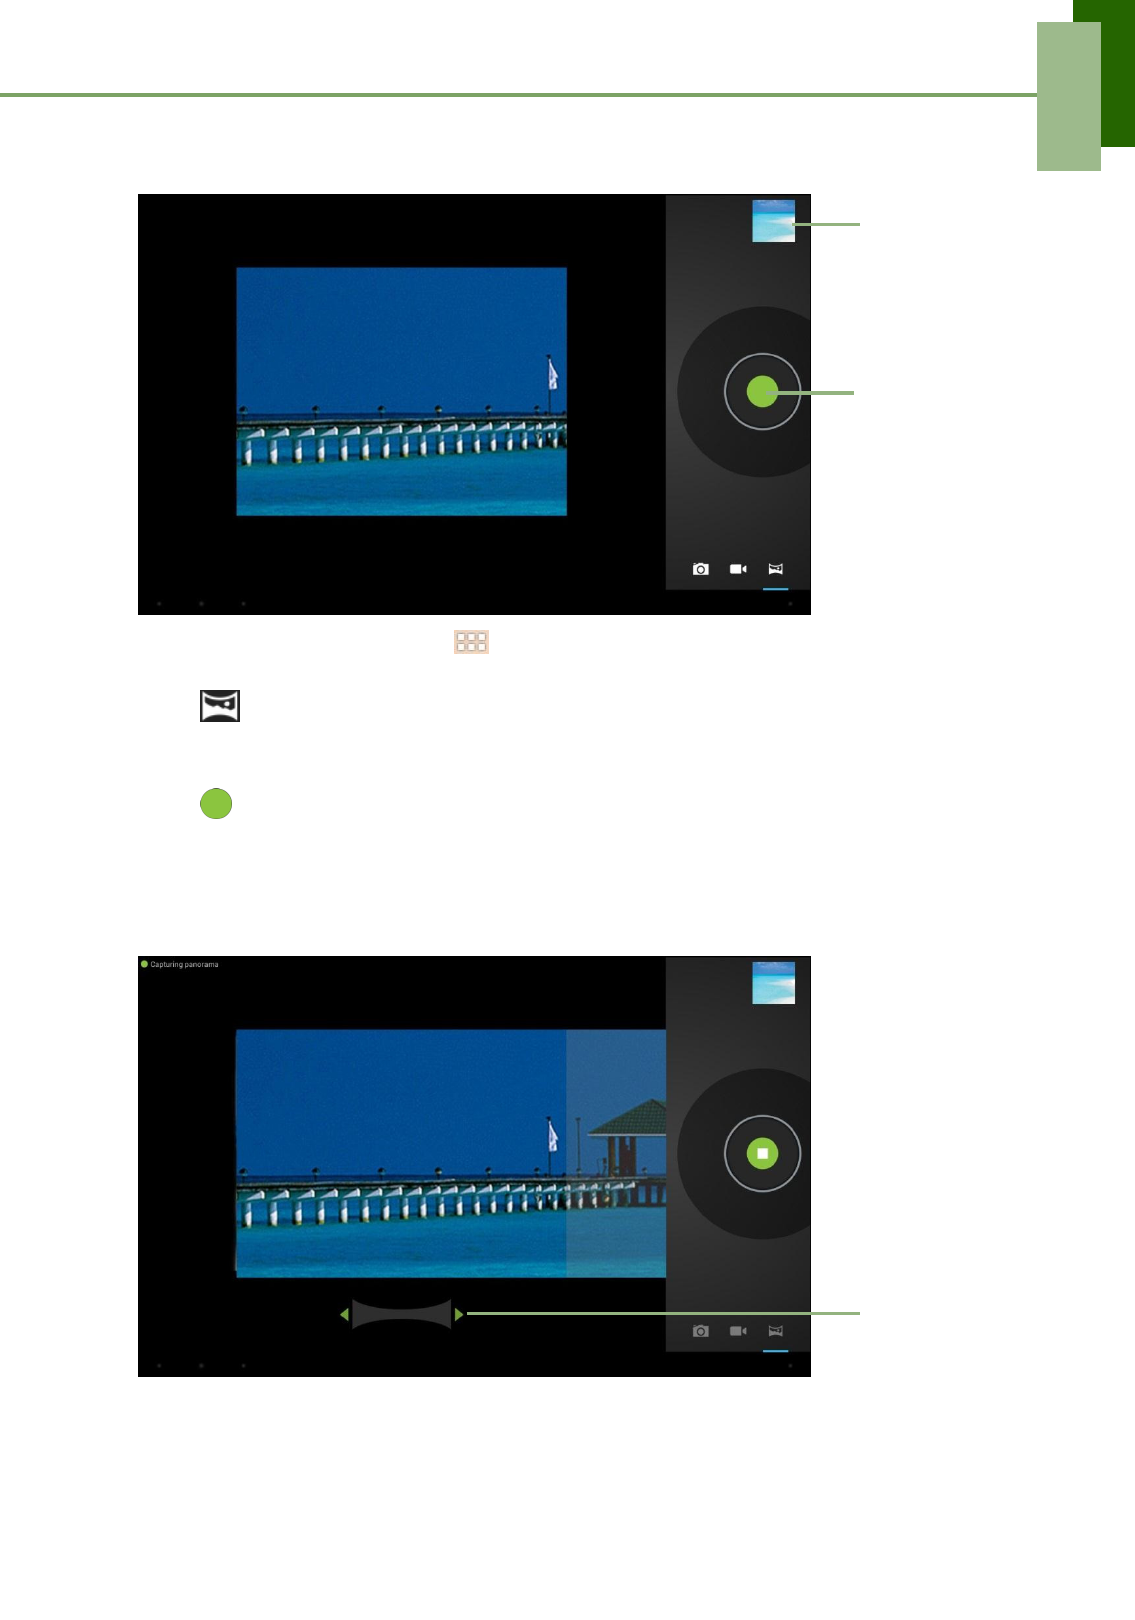
Taking a panorama shot
Tap to
preview the
latest
recorded
file.
Tap to take
the shot.
1. From the Home screen, tap > Camera.
2. Tap to switch to Panorama mode.
3. Aim the device at the subject.
4. Tap to take the shot.
5. Move the device slowly towards the desired shooting direction.The
device automatically starts shooting when it detects the panorama
direction.
Shooting
direction (left/
right).
28
Chapter 6: Multimedia Applications
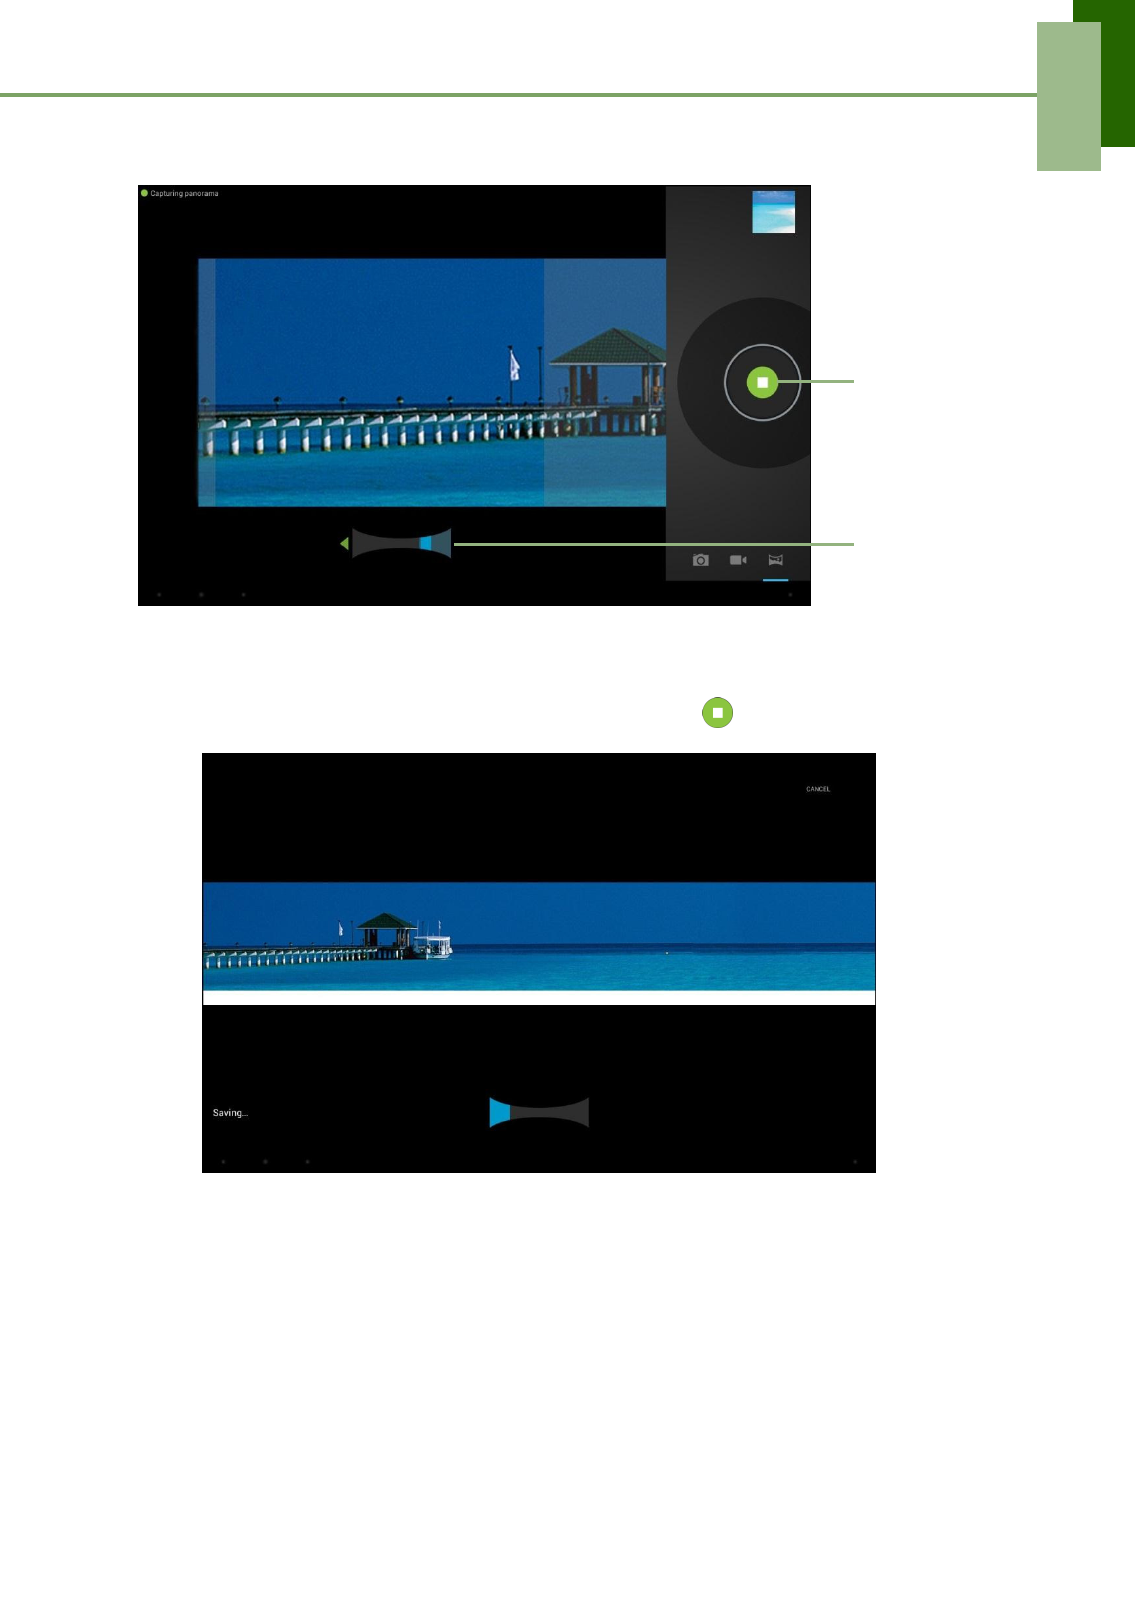
6. Pan the device horizontally and follow the shooting direction shown on the screen.
Tap to stop
the shooting.
Shooting
guide
7. When the shooting guide reaches the end of the shooting point, the panorama
shooting ends.
You can also manually stop the recording by tapping .
The latest panorama shot will be displayed on the top right of the screen. Tap the
thumbnail to view it in full screen.
29
Chapter 6: Multimedia Applications
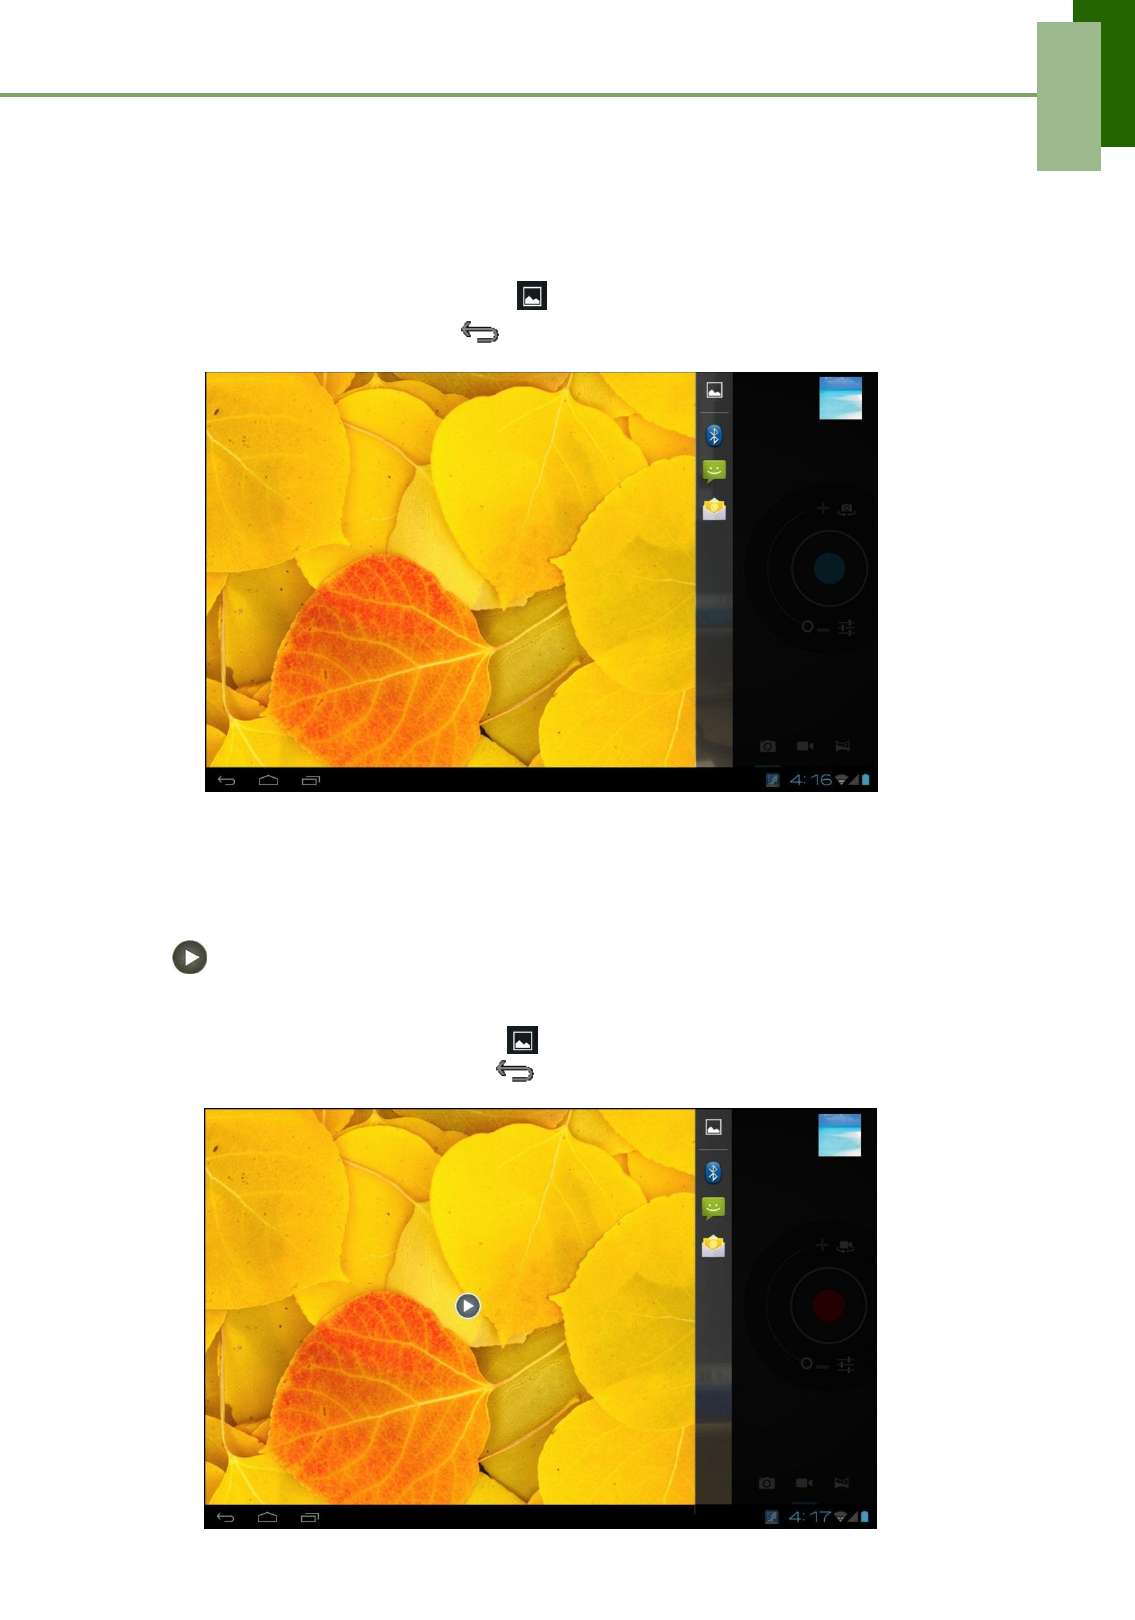
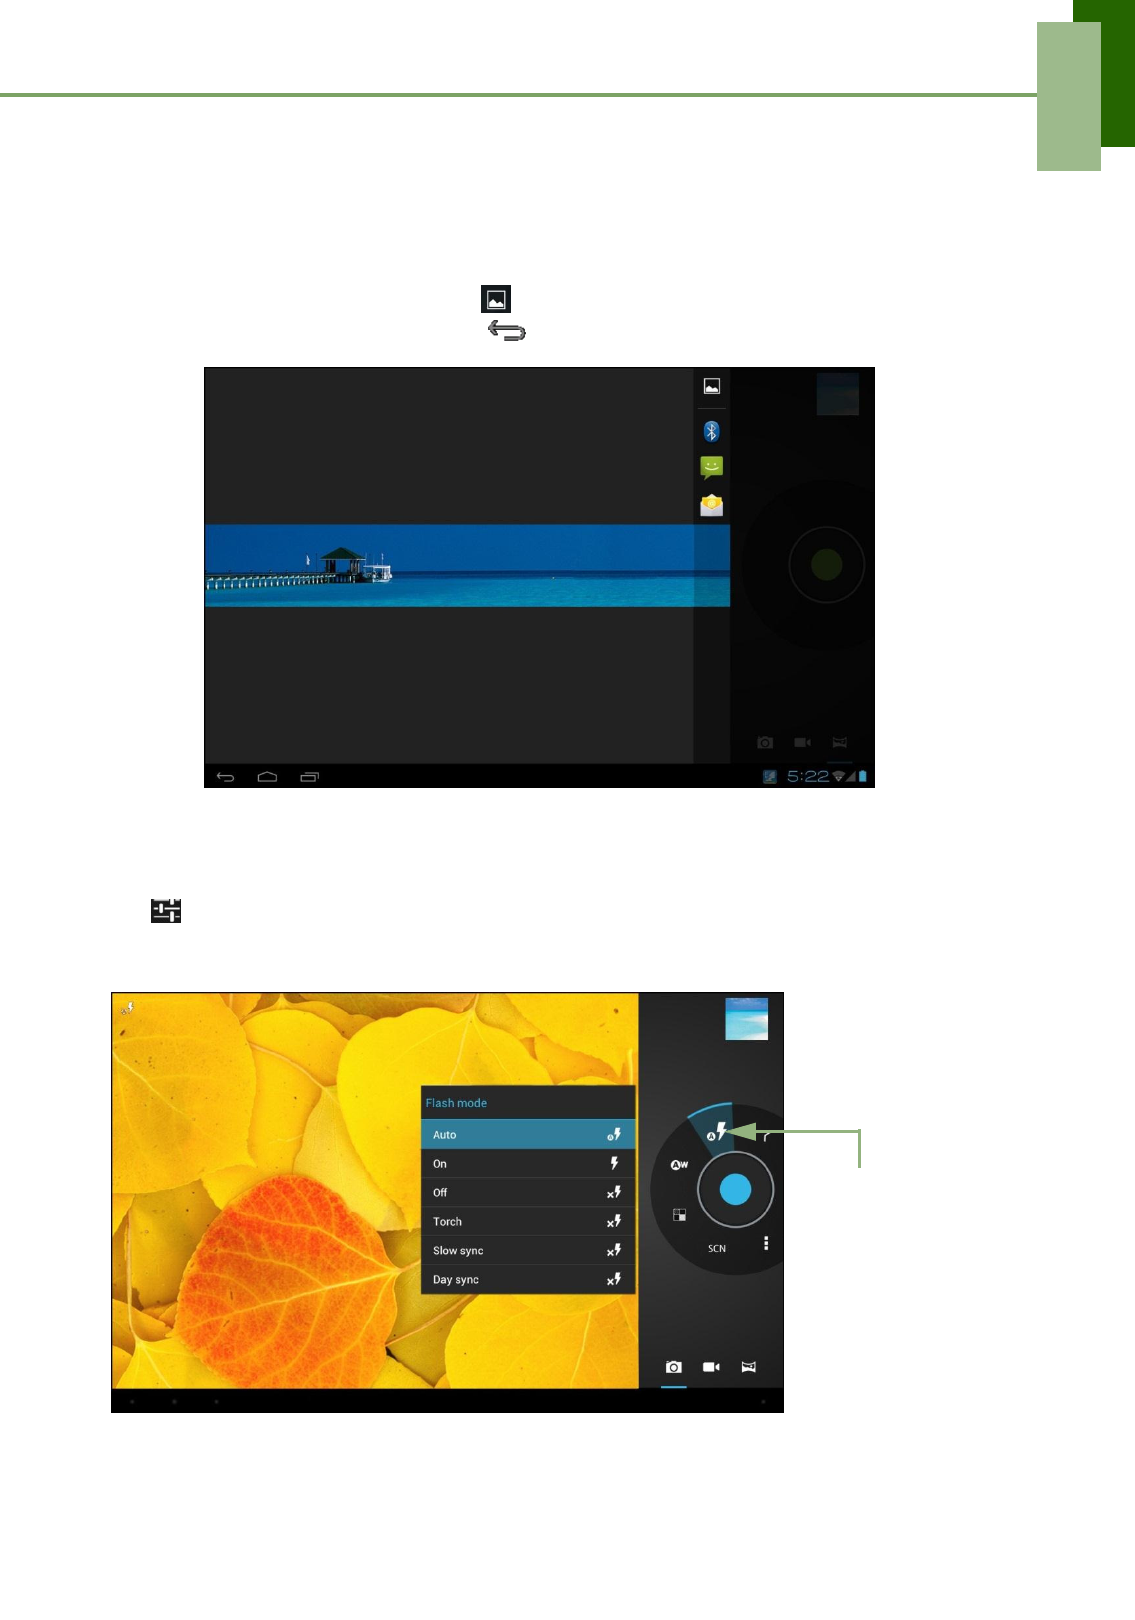
Reviewing a photo
After taking a photo, tap the window located at top right corner to preview the latest
captured photo on the screen.
• To share the photo, tap an application for sharing.
• To view other photos in Gallery, tap .
• To return to Camera mode, tap .
Reviewing a video
After recording a video, tap the window located at top right corner to preview the latest
recorded video on the screen.
• Tap to play the video.
• To share the video, tap an application for sharing.
• To view other videos in Gallery, tap .
• To return to Camcorder mode, tap .
30
Chapter 6: Multimedia Applications
Reviewing a panorama shot
After recording a panorama shot, tap the window located at top right corner to preview
the latest recorded shot on the screen.
• To share the shot, tap an application for sharing.
• To view other files in Gallery, tap .
• To return to Panorama mode, tap .
Configuring camera settings
Tap to access the camera/camcorder menu. Tap the menu item icon to open the
respective menu and select the desired setting.
Tap an option to
configure camera
settings.
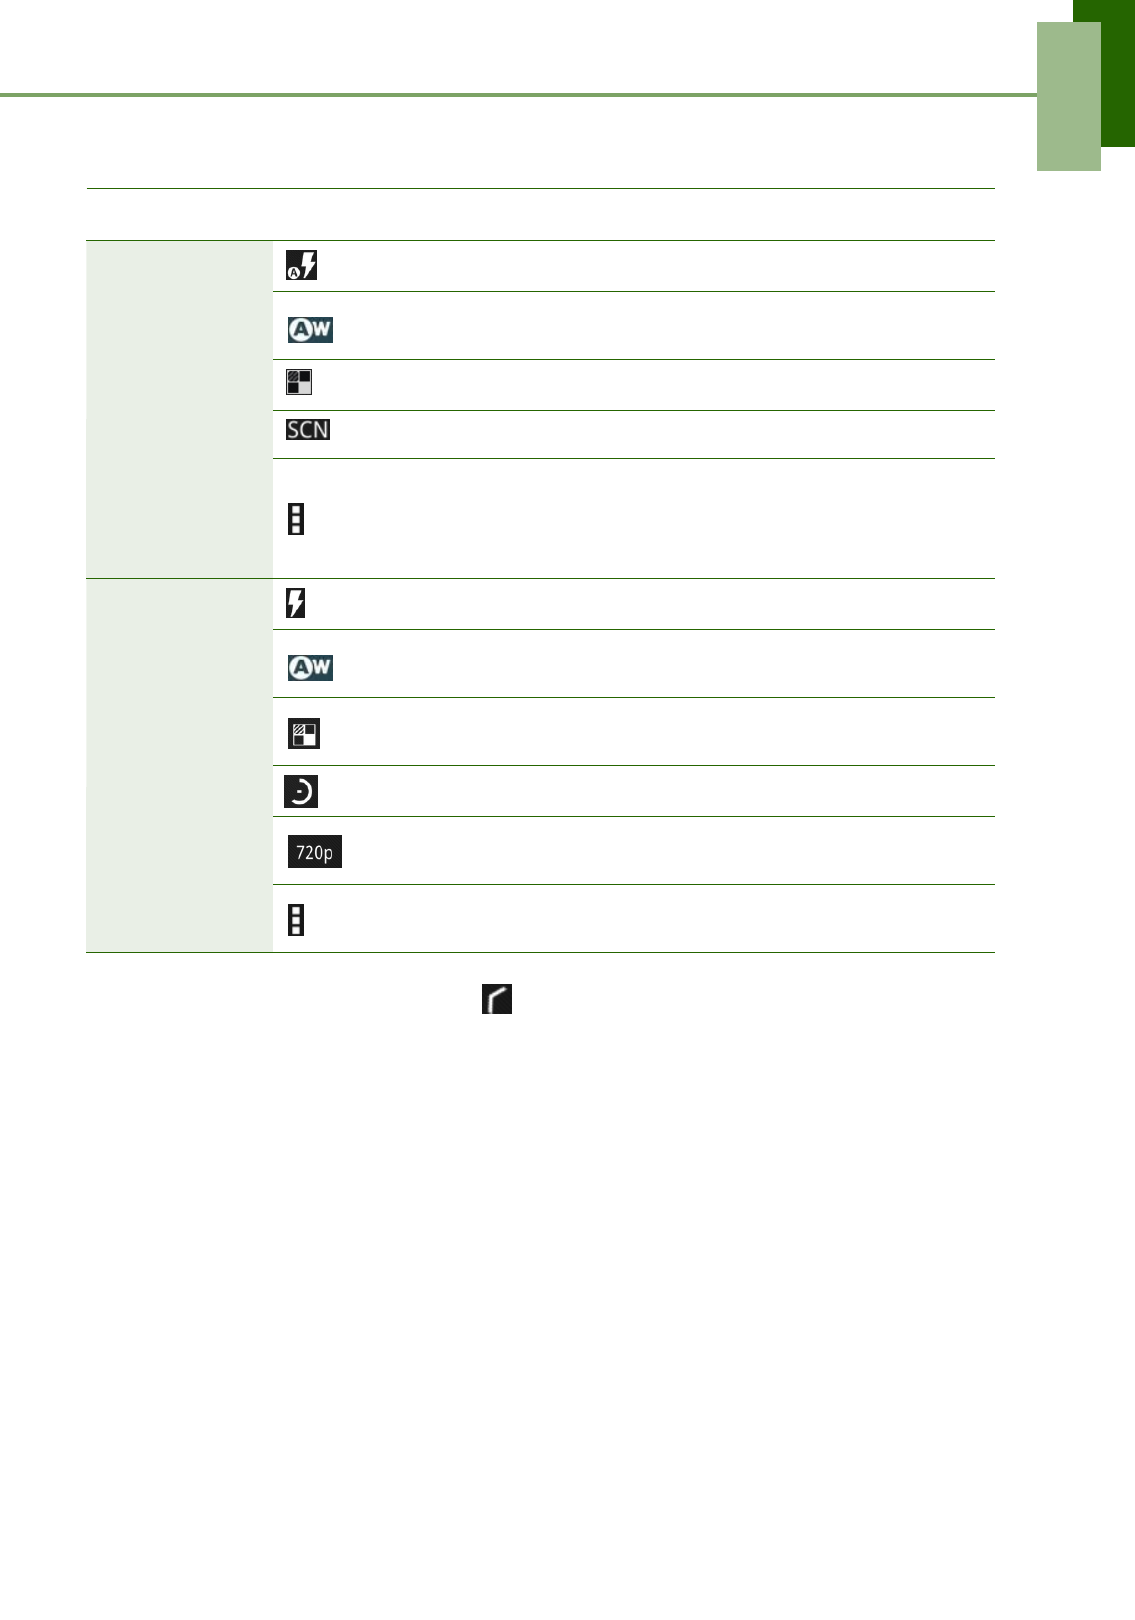
31
Chapter 6: Multimedia Applications
Tap to view and adjust the general settings of your camera:
Mode Setting Available options
Camera mode
(Flash mode) Auto, On, Off, Torch, Slow sync, Day sync
Auto, Incandescent, Daylight, Fluorescent,
(White balance) Cloudy
(Color effect) None, Mono, Sepia, Negative
(Scene mode) Auto, Portrait, Landscape, Night, Fireworks
Store location (On, Off), Picture size (8M
pixels, 5M pixels, 3M pixels, 2M pixels,1.1M
(Camera settings) pixels,1M pixels, VGA, QVGA), Restore
defaults (OK, Cancel)
Camcorder
mode
(Flash mode) On, Off
Auto, Incandescent, Daylight, Fluorescent,
(White balance) Cloudy
BACKGROUND (In space, Sunset, Disco,
(Effect) Choose your own)
(Time lapse interval) Off, 1s, 1.5s, 2s, 2.5s, 3s, 5s, 10s
HD (1080p), HD (720p), SD (480p), QVGA
(Video quality) (Low)
Store location (On, Off), Restore defaults
(Camera settings) (OK, Cancel)
NOTE: To exit the menu mode, tap .
32
Chapter 6: Multimedia Applications
6.2 Viewing Photos & Videos
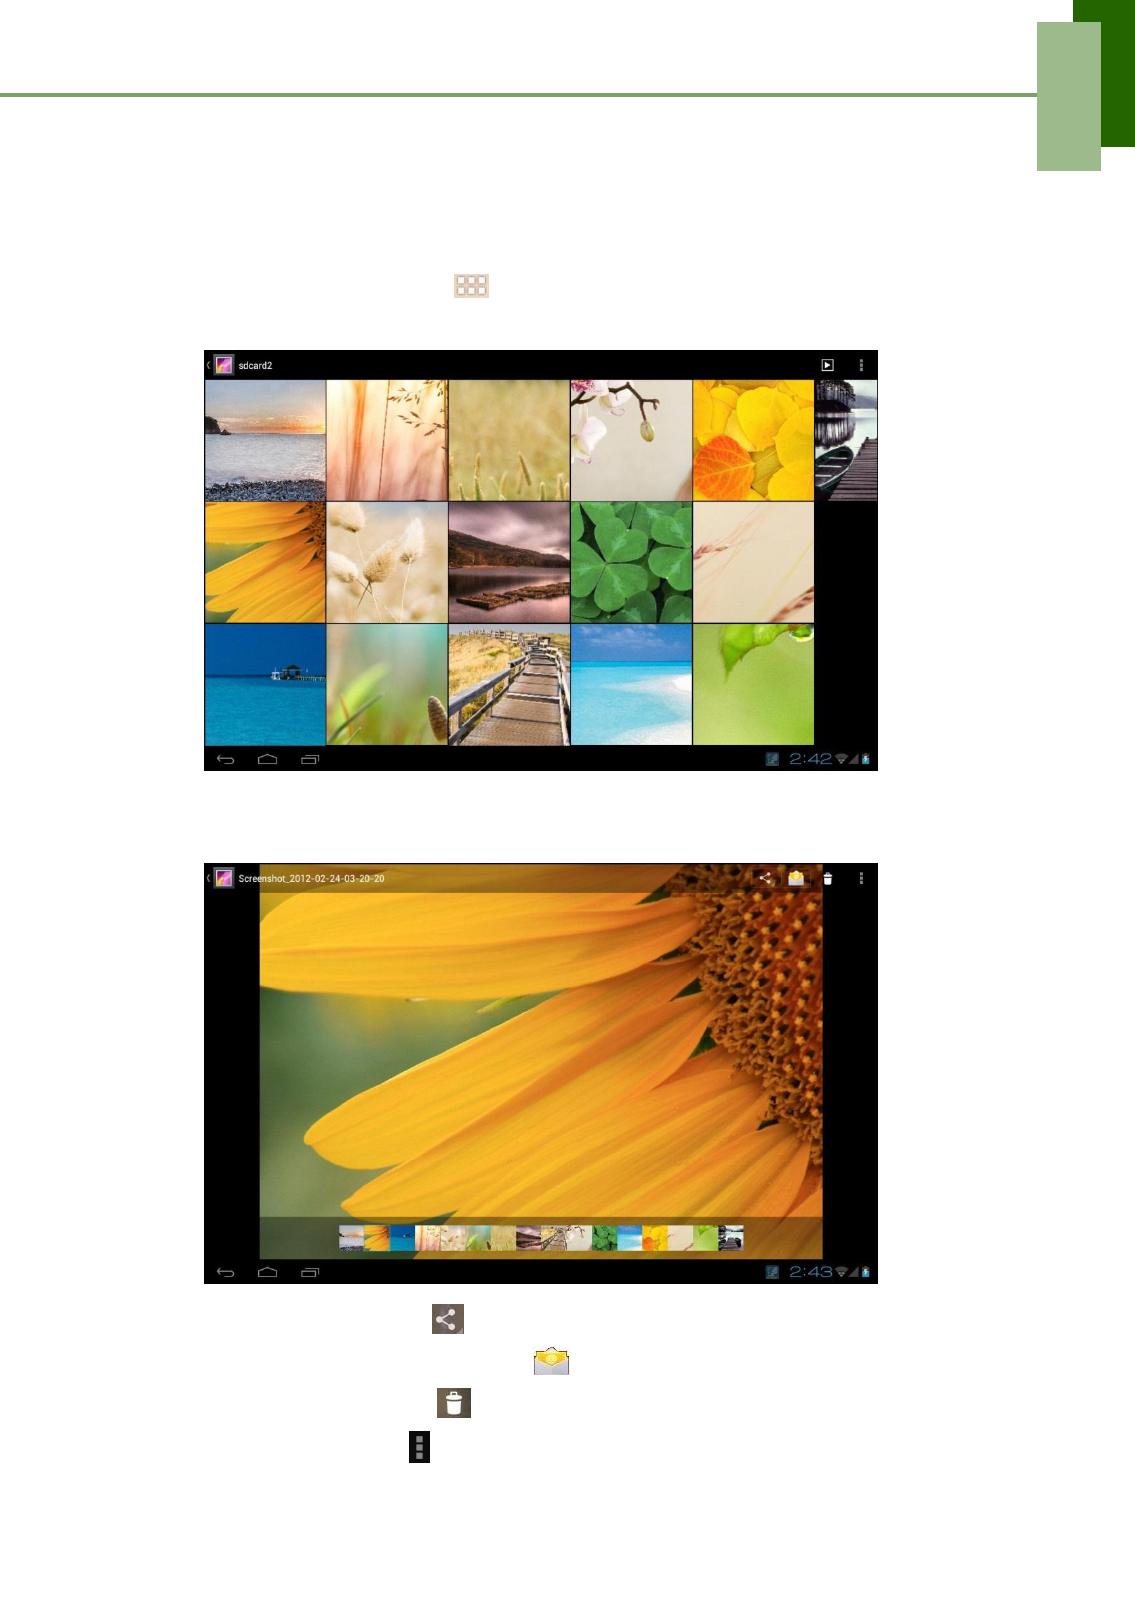
Viewing photos
1. From the Home screen, tap > Gallery.
2. Tap the desired folder to view the images in thumbnails.
3. Tap an image to view.
4. Swipe your finger to the left/right to view the previous/next image.
• To share the photo, tap , then tap an application for sharing.
• To share the photo via email, tap , then compose your email.
• To delete the photo, tap . Then, tap Delete to confirm file deletion.
• To edit the photo, tap to show more options.
33
Chapter 6: Multimedia Applications
Playing videos
1. From the Home screen, tap > Gallery.
2. Tap the desired folder to view the videos in thumbnails.
3. Tap the video to playback.
34
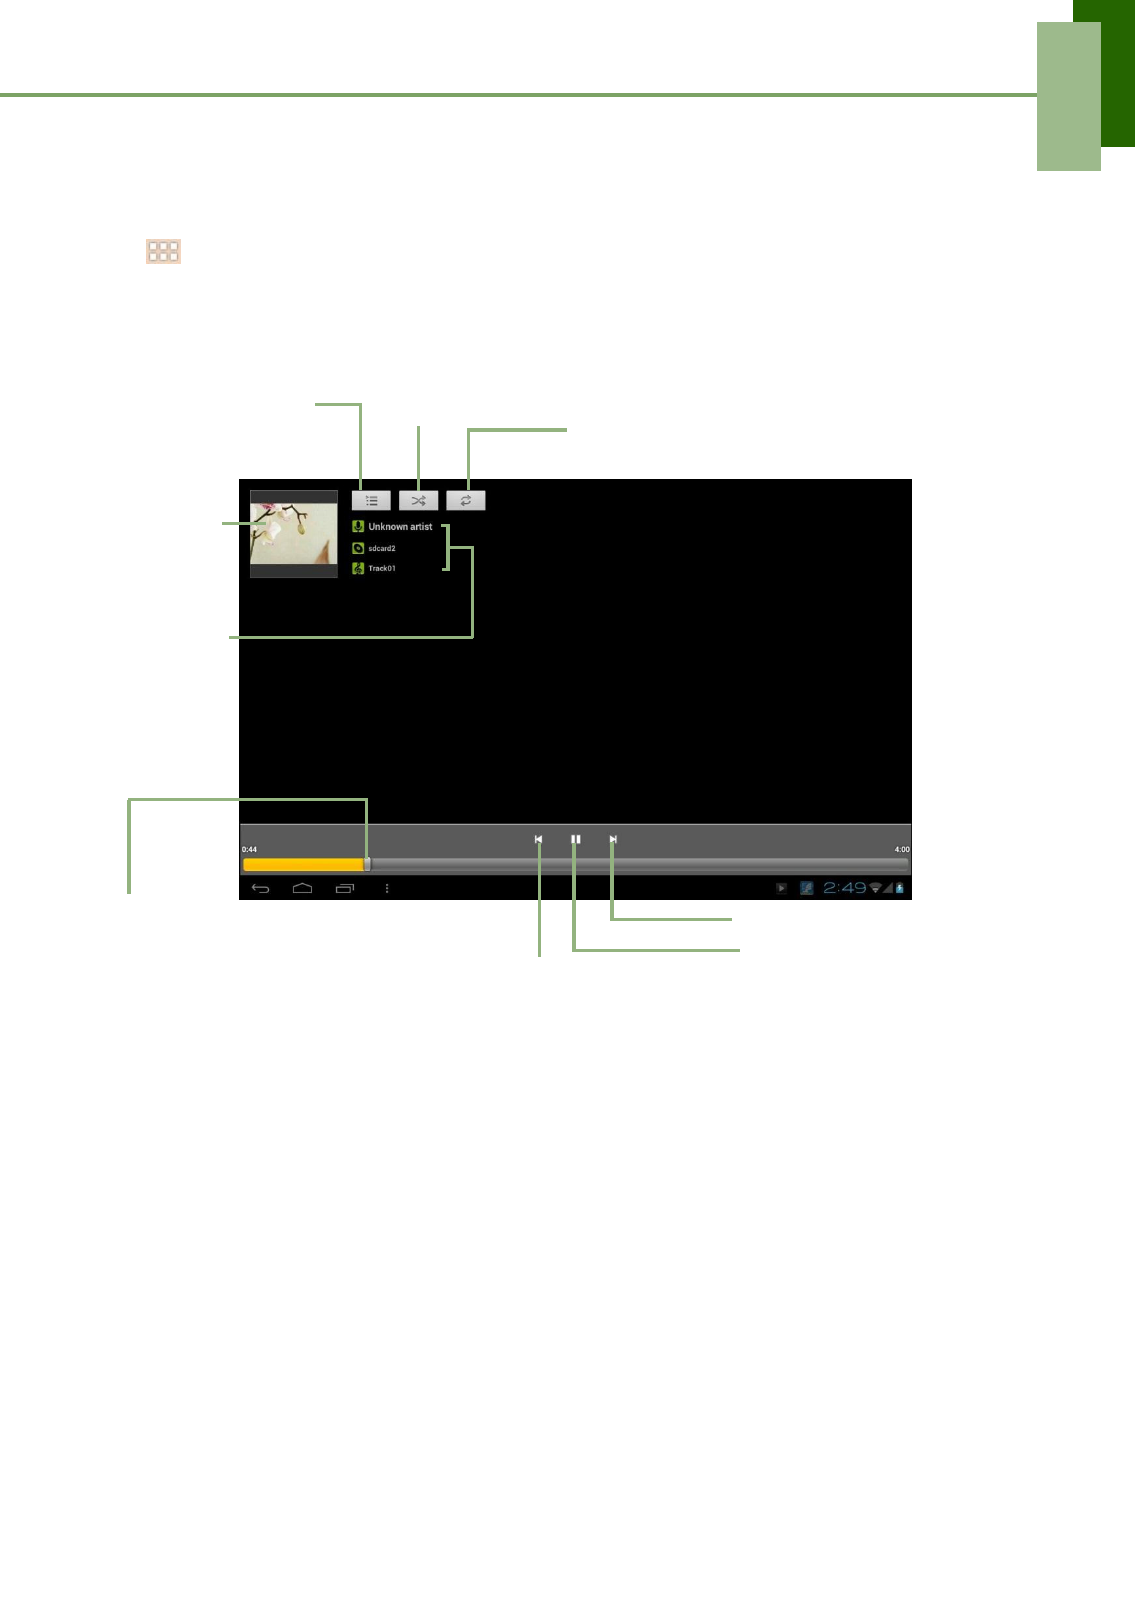
Chapter 6: Multimedia Applications
6.3 Using Music Player
You can transfer music to the device from the computer. From the Home screen,
tap > Music.
Music screen
• Playback screen: Displays the playback area with the playback controls.
Tap to go
to
Now
Playing
screen
Tap to shuffle
Tap to enable or disable
the repeat function.
Album
art
picture
or
animation.
Audio
information
display
area.
Drag the
slider left/right to go forward
Go to next song.
or backward. Play or pause the song.
Go to previous
song.
35
Chapter 7: Applications
Chapter 7:
Applications
Your device comes with the following pre-installed applications.
7.1 Browser
Open Browser to view web pages. See “Browsing Web Pages” on page 22.
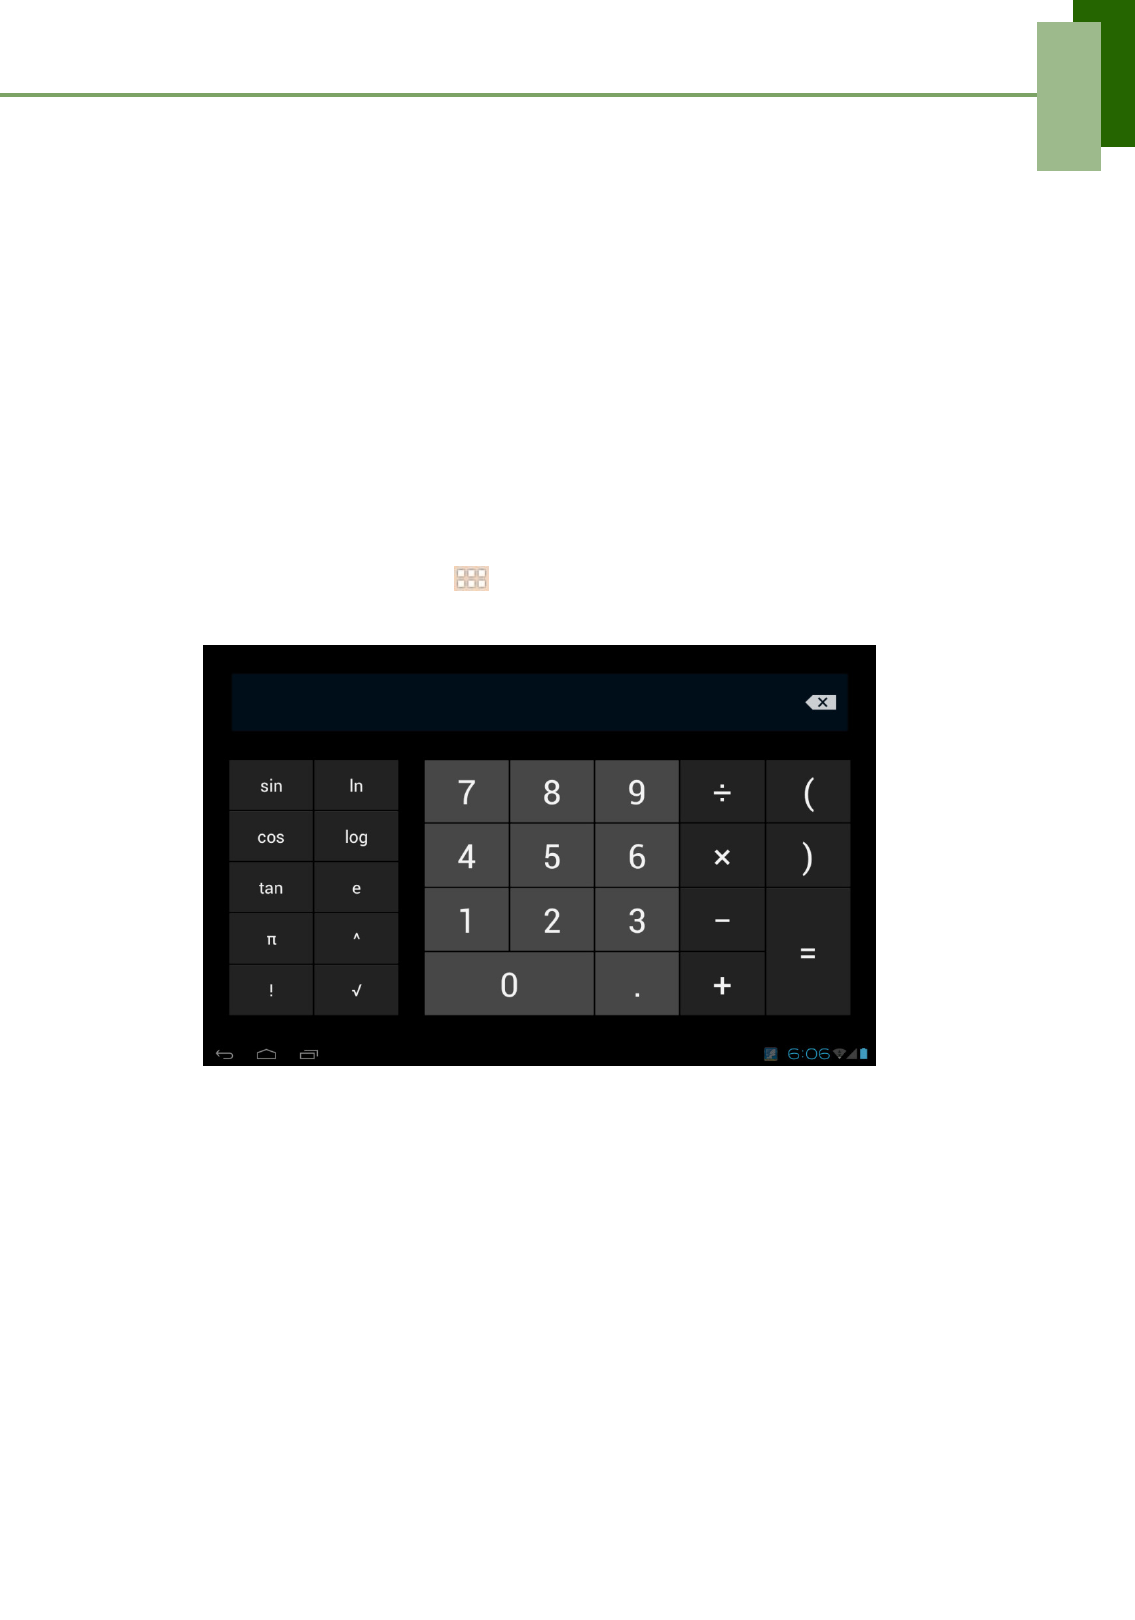
7.2 Calculator
With Calculator, you can perform basic arithmetic functions on your device.
1. From the Home screen, tap > Calculator.
2. Use the on-screen calculator keypad to perform arithmetic calculation.

36
Chapter 7: Applications
7.3 Calendar
The Calendar lets you schedule and sound alarms for appointments, meetings and
other events. Scheduled appointments for the day can be displayed on the Home
screen.
To schedule an event
1. From the Home screen, tap > Calendar.
2. Tap .
3. Enter the event details.
4. Select the date and time for From and To fields.
NOTE: For an all-day event, check All day
.
5. To set repetition, select the repetition from the list.
6. To set a reminder, select the time from the list.
7. When finished, tap .
TIP: From the Calendar screen, tap and hold a day or a time slot then set a new
appointment on the selected date or time.
7.4 Clock
Set alarms with this device. See “Alarms settings” on page 50.
37
Chapter 7: Applications
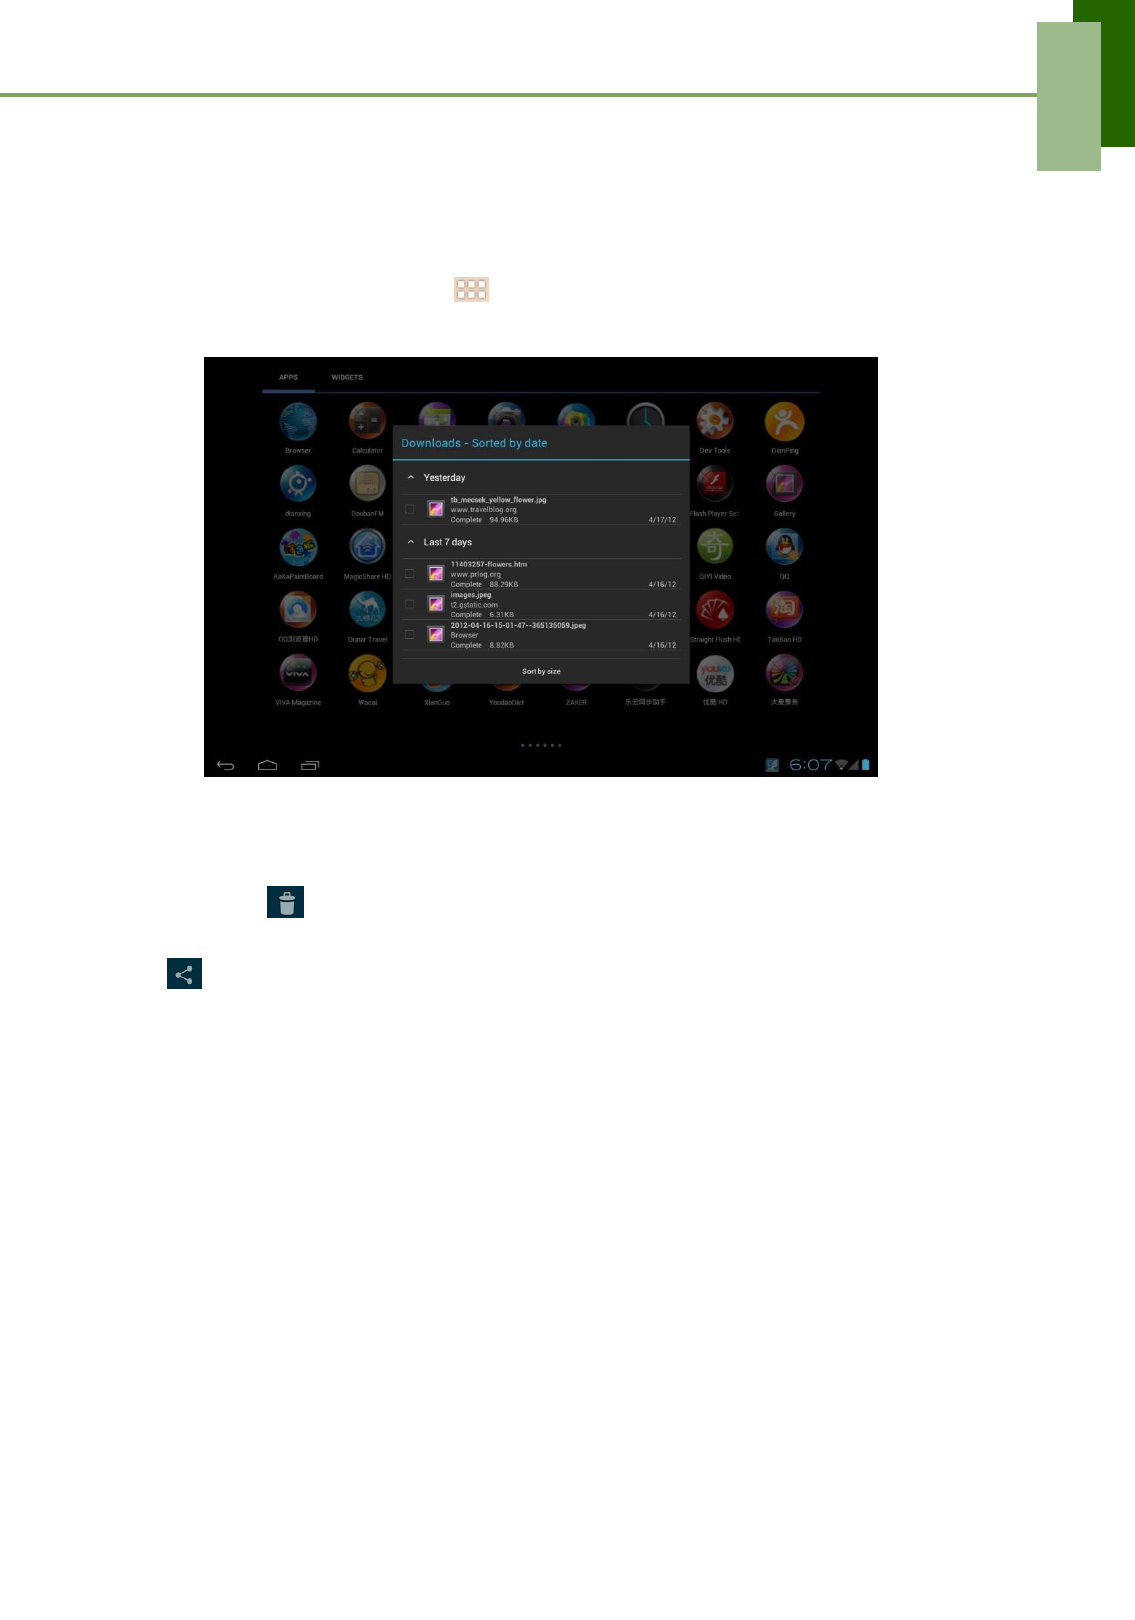
7.5 Downloads
Use Downloads to view or delete what you have downloaded in Browser.
NOTE: The downloaded files are stored in the “Download” folder in your memory card.
1. From the Home screen, tap > Downloads.
2. Tap an item to view.
Managing files
• To delete a file, tap the check box on the left side of the image. A blue tick
appears, tap .
• To share a file, tap the check box on the left side of the image. A blue tick appears,
tap .
• To sort the file by size, tap Sort by size.
• To sort the file by time, tap Sort by date.
• To view files that have been downloaded earlier, tap the headings.
38
Chapter 7: Applications
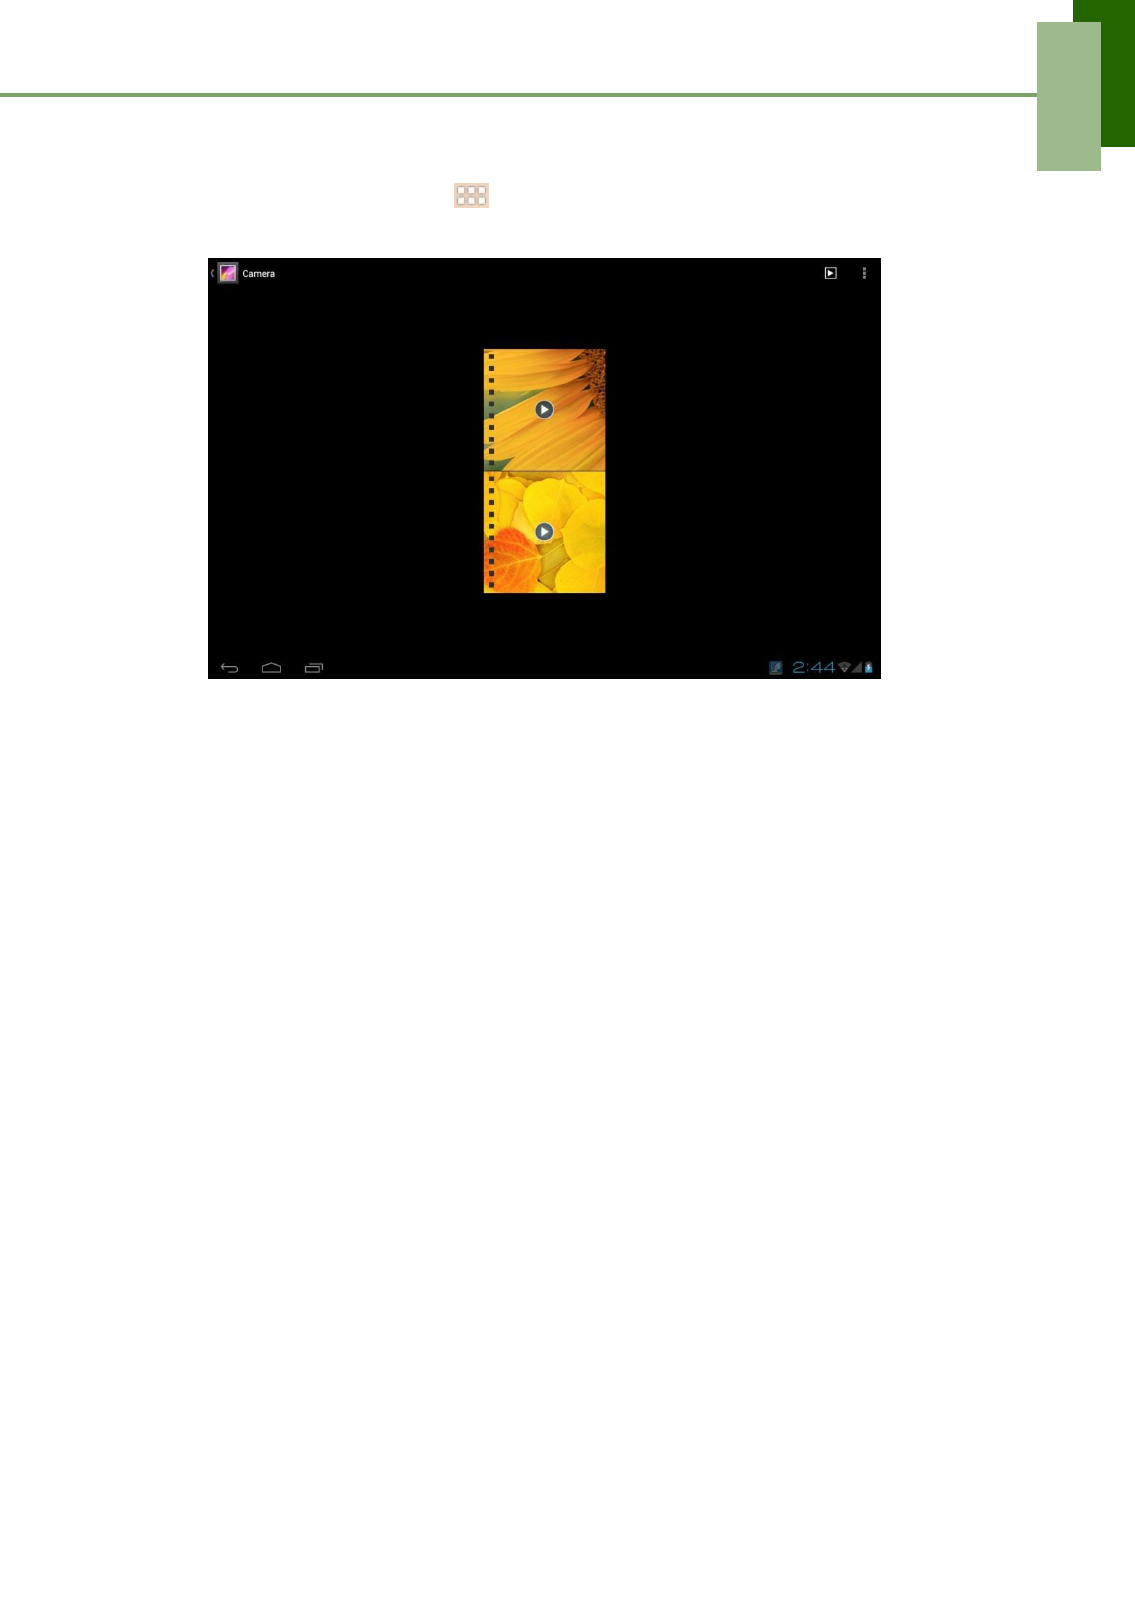
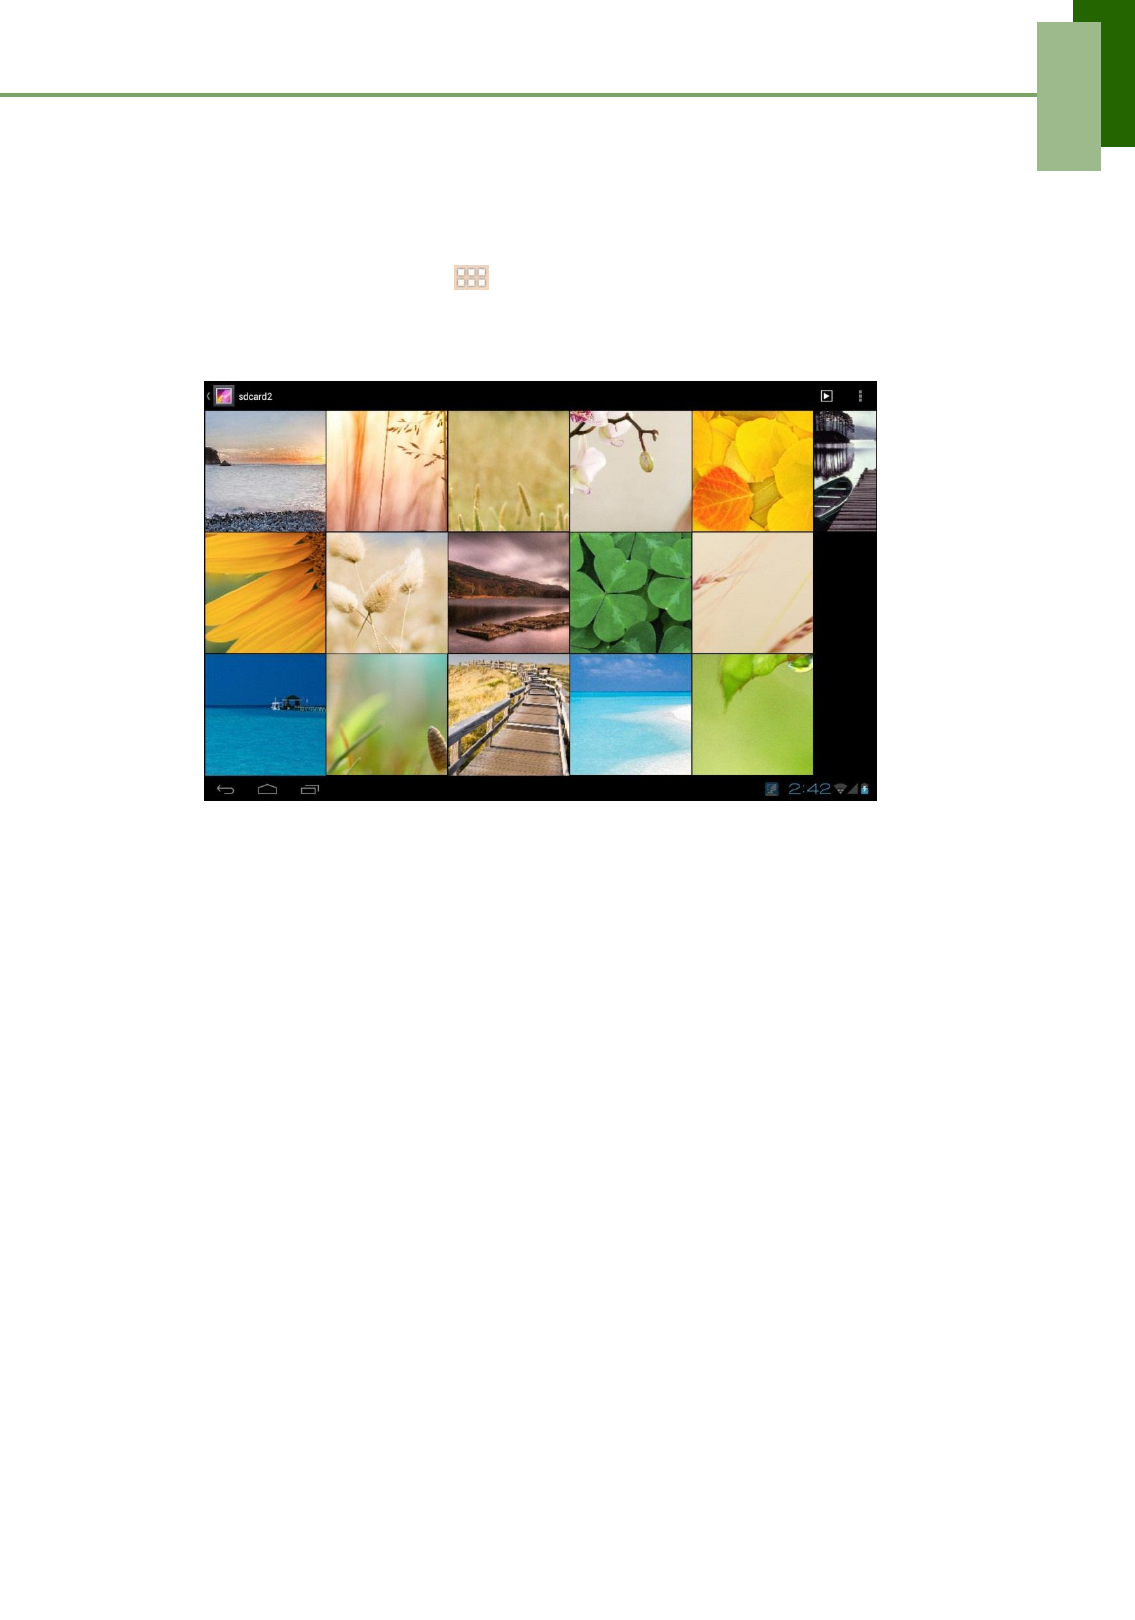
7.6 Gallery
You can view your captured images, recorded video clips, and downloaded images in
Gallery.
1. From the Home screen, tap > Gallery.
2. Tap the desired folder to view the camera pictures or camera videos.
3. The images or videos are displayed in thumbnails.
4. To view photos or videos, see “Viewing Photos & Videos” on page 32.

39
Chapter 7: Applications
7.7 Search
From the Home Screen, you can search information on your device and on the web
with Search right away.
Searching information by entering text
1. From the Home screen, tap > Search.
2. Enter the text you are searching in the search box.
3. As you type, matching items on your device and suggestions from web search
are added to the list of previously chosen search results.
Tap a match item in the list.
4. If what you are searching is not in the list, tap . The Browser opens,
displaying results of a search on the web.
7.8 Settings
In the Settings menu, you can view and make adjustments for wireless & network
settings and the general and security settings of your device. See “Device Settings”
on page 44.
40
Chapter 7: Applications
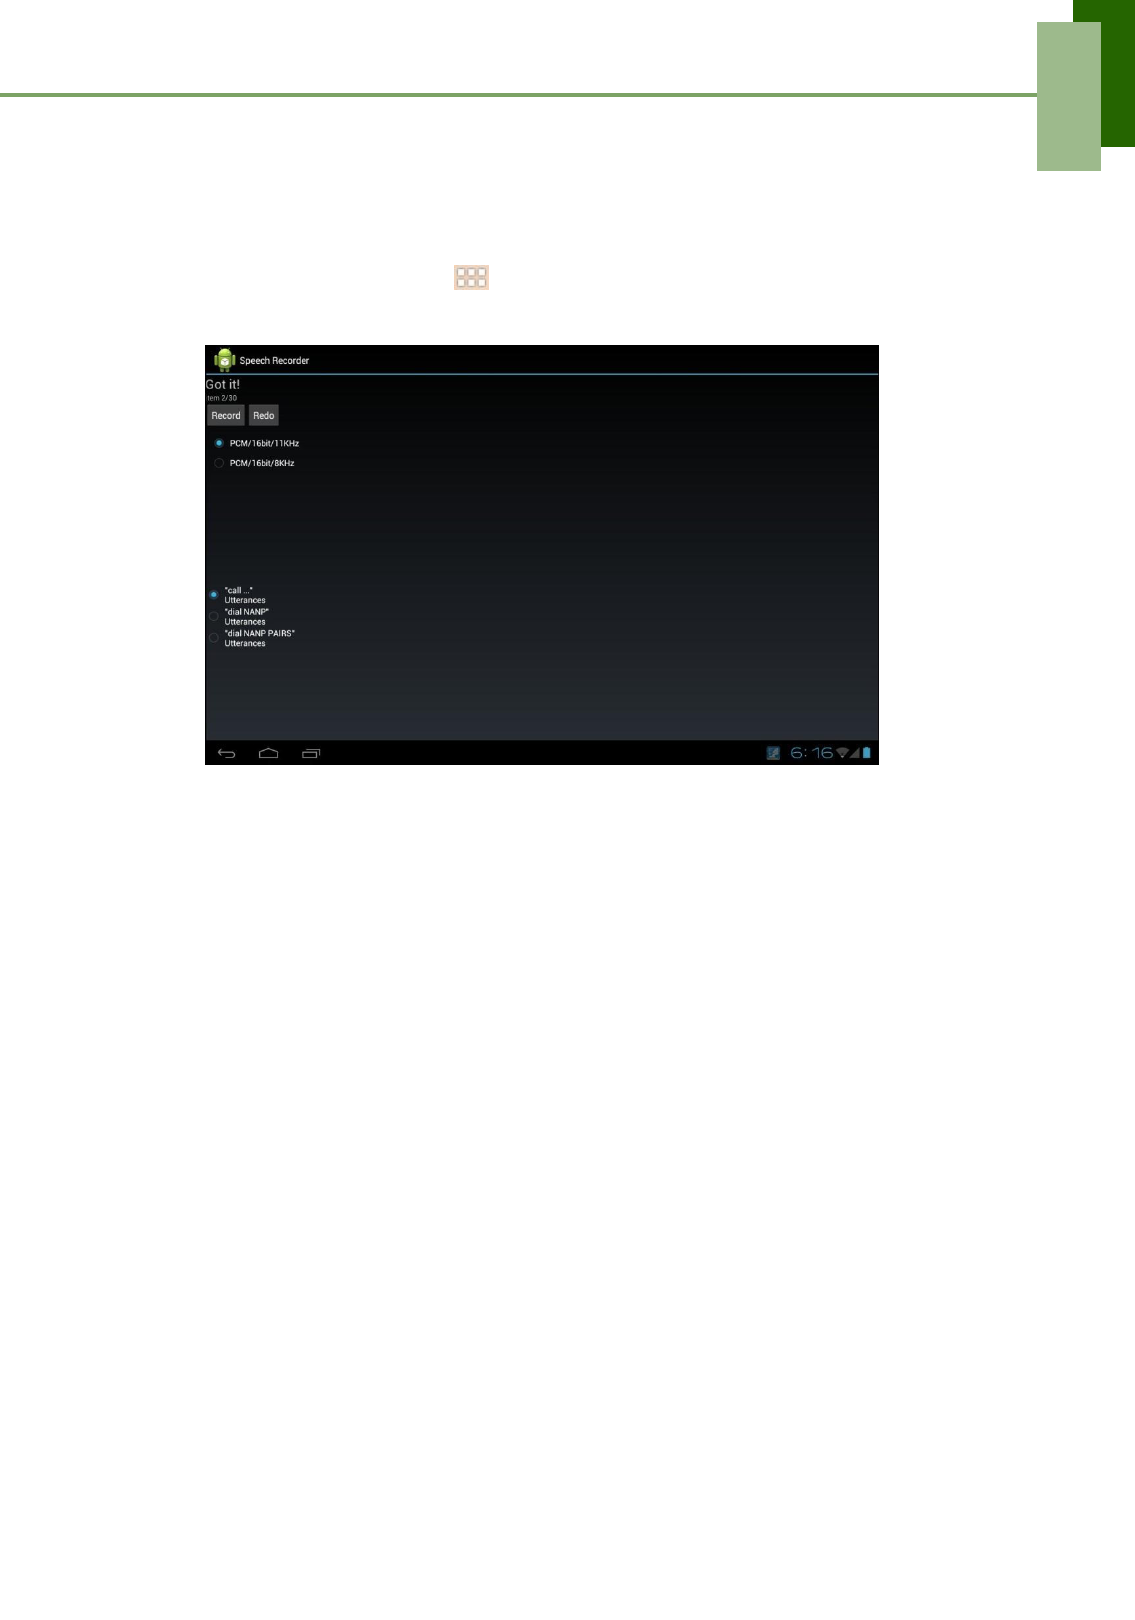
7.9 Speech Recorder
With Speech Recorder, you can record predefined texts to be recognized and used
by this device for voice dialing, finding a contact, and others.
1. From the Home screen, tap > Speech Recorder.
The recording screen is displayed.
2. Tap Record.
To record again, tap Redo.
41
Chapter 8: Managing Your Device
Chapter 8: Managing Yo
ur
Device
8.1 Device Settings
From the Home screen, tap > Settings to view and adjust the settings of
your device. Settings menu is categorized into: WIRELESS & NETWORKS,
DEVICE, PERSONAL, and SYSTEM.
WIRELESS & NETWORKS
Application
Description
Wi-Fi
Manage Wi-Fi connections, scan and connect to available Wi-Fi
networks.
Bluetooth
Manage Bluetooth connections, set device name, and
discoverability of the device.
NFC
Manage NFC (Near Field Communication) connections
Data usage
View data usage used by the applications.
Airplane mode
Disable all wireless connections.
VPN
Set up and manage Virtual Private Networks (VPNs).
Tethering &
portable hotspot
Share your tablet’s data connection via USB or Bluetooth.
Wi-Fi direct
Allow several Wi-Fi enabled devices to exchange data without an
Internet connection or a wireless router.
Intel® WiDi
Manage Intel Wireless Display (WiDi) connections, scan and
connect to available WiDi adapters.

42
Chapter 8: Managing Your Device
Item
Description
Sound
Volumes
Adjust the volume for media, notification, and
alarms.
Default notification
Set your default notification ringtone.
Vibrate and ring
Device vibrates for new notifications.
Touch sounds
Enable/disable
sound when selecting items on
the screen.
Screen lock sound
Play sounds when locking or unlocking the
screen.
Vibrate on touch
Enable/disable vibration when selecting items on
the screen.
Display
Brightness
Adjust the brightness of the screen.
Wallpaper
Customize the device wallpaper.
Auto-rotate screen
Switch orientation automatically when rotating
the device.
Sleep
Adjust delay before the screen automatically
goes off.
Font size
Set the font size.
Storage
INTERNAL
STORAGE
Show total space, currently used by
applications, and remaining device storage.
SD CARD
Show total and available memory card storage
and unmount the SD card to safely
remove the
card.
USB STORAGE
Mount USB storage or erase all data on the
internal USB storage.
Battery
View the battery usage on currently running applications and battery
charging status.
Apps
View and control downloaded and currently running services.

43
Chapter 8: Managing Your Device
PERSONAL
Application
Description
Accounts & sync
Tap ADD ACCOUNT to add an account to configure synchronization
settings for Email.
Location services
Google’s location
service
Allow location to be determined by Wi-Fi.
GPS satellites
Allow applications to use GPS to locate your
location.
Security
Screen lock
Set the lock screen by sliding the screen or
with a pattern, PIN, or password.
Owner info
Show owner information on the lock screen.
Encrypt tablet
Require a numeric PIN or password to decrypt
your tablet each time you power on the device.
Make passwords
visible
Show passwords as you type.
Device
administrators
View or deactivate device administrators.
Unknown sources
Allow installation of non-Market applications.
Trusted credentials
Display trusted CA certificates.
Install from SD card
Install encrypted certificates from SD card.
Clear credentials
Clear credential storage of all contents and
reset its password.
Language & input
Language
Set the on-screen display language for your
device.
Spelling correction
Enable/disable spell check function.
Personal dictionary
Add or edit user preset words to the dictionary.
Default
Set the default keyboard input method.
Android keyboard
Configure on-screen keyboard settings.
Text-to-speech
output
Set the text-to-speech settings.
Pointer speed
Configure pointer speed.
Backup & reset
Factory data reset
Delete all data on the device and restore to
factory default settings.
44
Chapter 8: Managing Your Device
SYSTEM
Application
Description
Date & time
Automatic date &
time
Check to use network provided time.
Automatic time
zone
Check to use network provided time zone.
Set date
Set the date.
Set time
Set the time.
Select time zone
Select the time zone of your current location.
Use 24-hour format
Set the clock to 24-hour format.
Select date format
Set the preferred date format.
Accessibility
Large text
Change to a larger font size.
Auto-rotate screen
Switch orientation automatically when rotating
the device.
Speak passwords
Read aloud passwords as you type.
Touch & hold delay
Set the delay until a touch is interpreted as a
touch & hold.
Install web scripts
Allow applications to install scripts that make
their web content more accessible.
Developer options
USB debugging
Enable/disable debug mode when a USB is
connected.
Development
device ID
View development device ID.
Stay awake
Set the screen to never sleep while charging.
Allow mock
locations
Allow mock location.
HDCP checking
Use HDCP checking for DRM content only.
Desktop backup
password
Set desktop backup password.
Strict mode
enabled
Screen flashes when applications do long
operations on main thread.
Pointer location
Screen overlays to show the current touch
data.
Show touches
Show visual feedback for touches.
Show screen
updates
The updated screen flashes when it is being
updated.
Show CPU usage
Screen overlays to show the current CPU
usage.
45
Chapter 8: Managing Your Device
Application
Description
Developer options
Force GPU
rendering
Use 2D hardware acceleration in applications.
Window animation
scale
Set the window animation scale ratio.
Transition
animation scale
Set the transition animation scale ratio.
Don’t keep
activities
Destroy every activity as soon as the user
leaves it idle.
Background
process limit
Set the background process limit.
Show all ANRs
Show all applications which are not
responding to background applications.
Sensor calibration
Gyroscope
calibration
Place the device on a table. Then tap
Calibrate to do the calibration.
Compass
calibration
Tap Calibrate and wave the device in a figure
8 about 10 seconds.
About tablet
Status
View the status of battery, network, and other
information.
Legal information
View Open source licenses and legal
information.
Model number
View the device model number.
Android version
View Android version.
Baseband version
View Baseband version.
Kernel number
View Kernel version.
Build number
View Build number.
46
Chapter 8: Managing Your Device
8.2 Changing Basic Settings
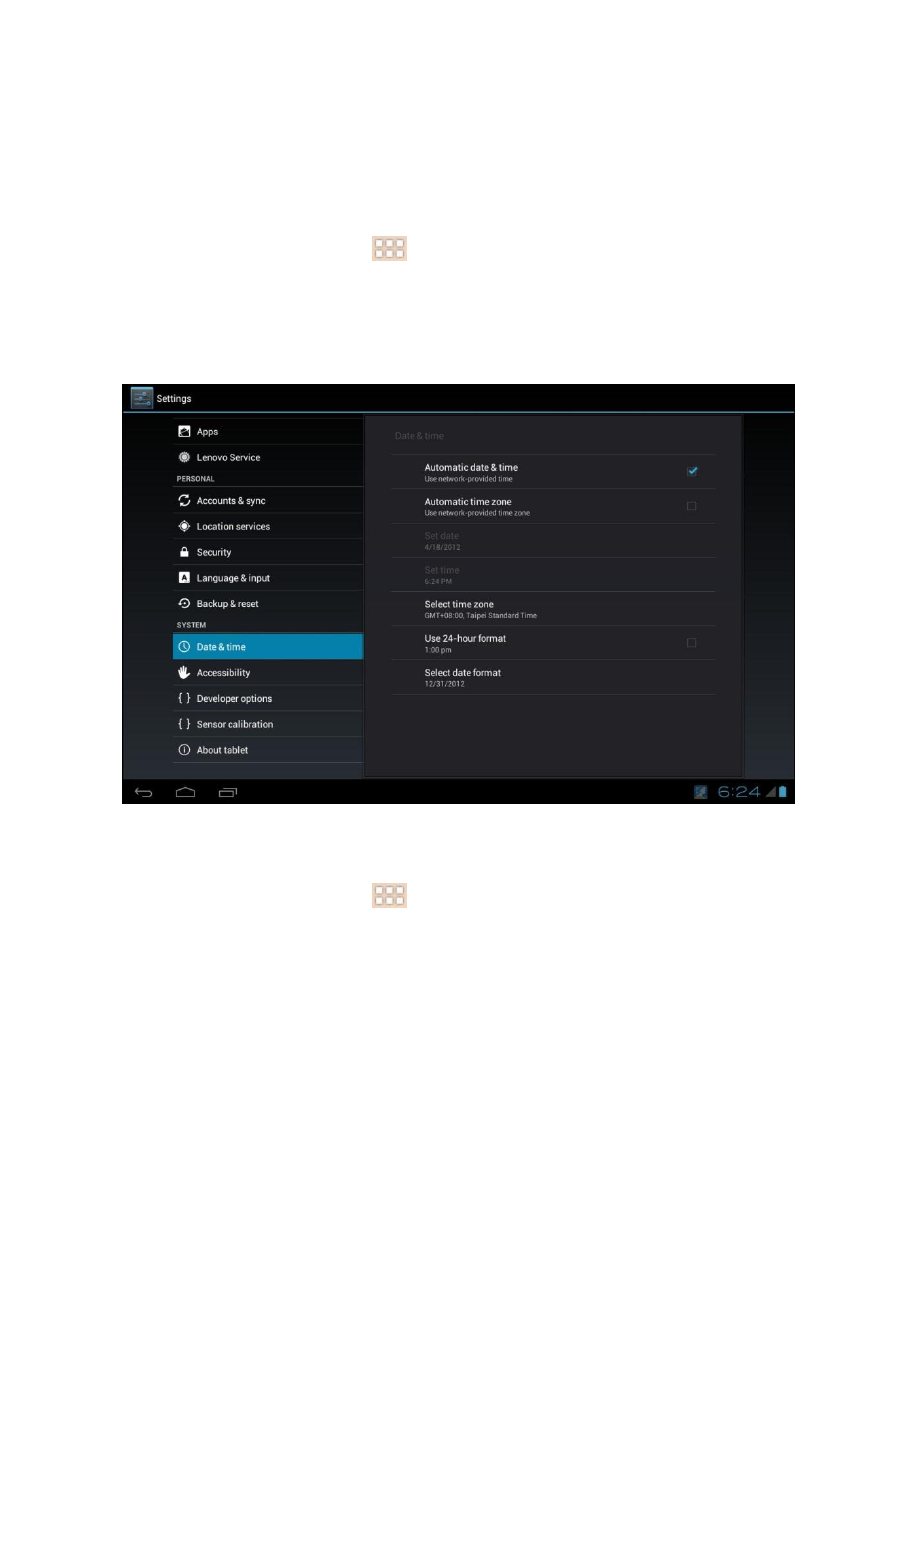
Date and time settings
To automatically set the date and time
1. From the Home screen, tap > Settings.
2. In SYSTEM, tap Date & time.
3. Tap Automatic date & time to automatically set the date and time according to
the network.
To manually set the date and time
1. From the Home screen, tap > Settings.
2. In SYSTEM, tap Date & time.
3. Tap Set date to set the date.
• To adjust the date, tap the month, day, or year field, and tap
S
or
T
to increase
or decrease the value. Tap Set to apply the values.
• To change the date format, tap Select date format, and select the date format
from the list.
4. Tap Select time zone to select the time zone from the list.
5. Tap Set time to set the time.
• To adjust the time, tap the hour, minute, second or AM/PM field, and tap
S
or
T
to increase or decrease the value. Tap Set to apply the values.
• To use a 24-hour format, tap Use 24-hour format
.
47
Chapter 8: Managing Your Device
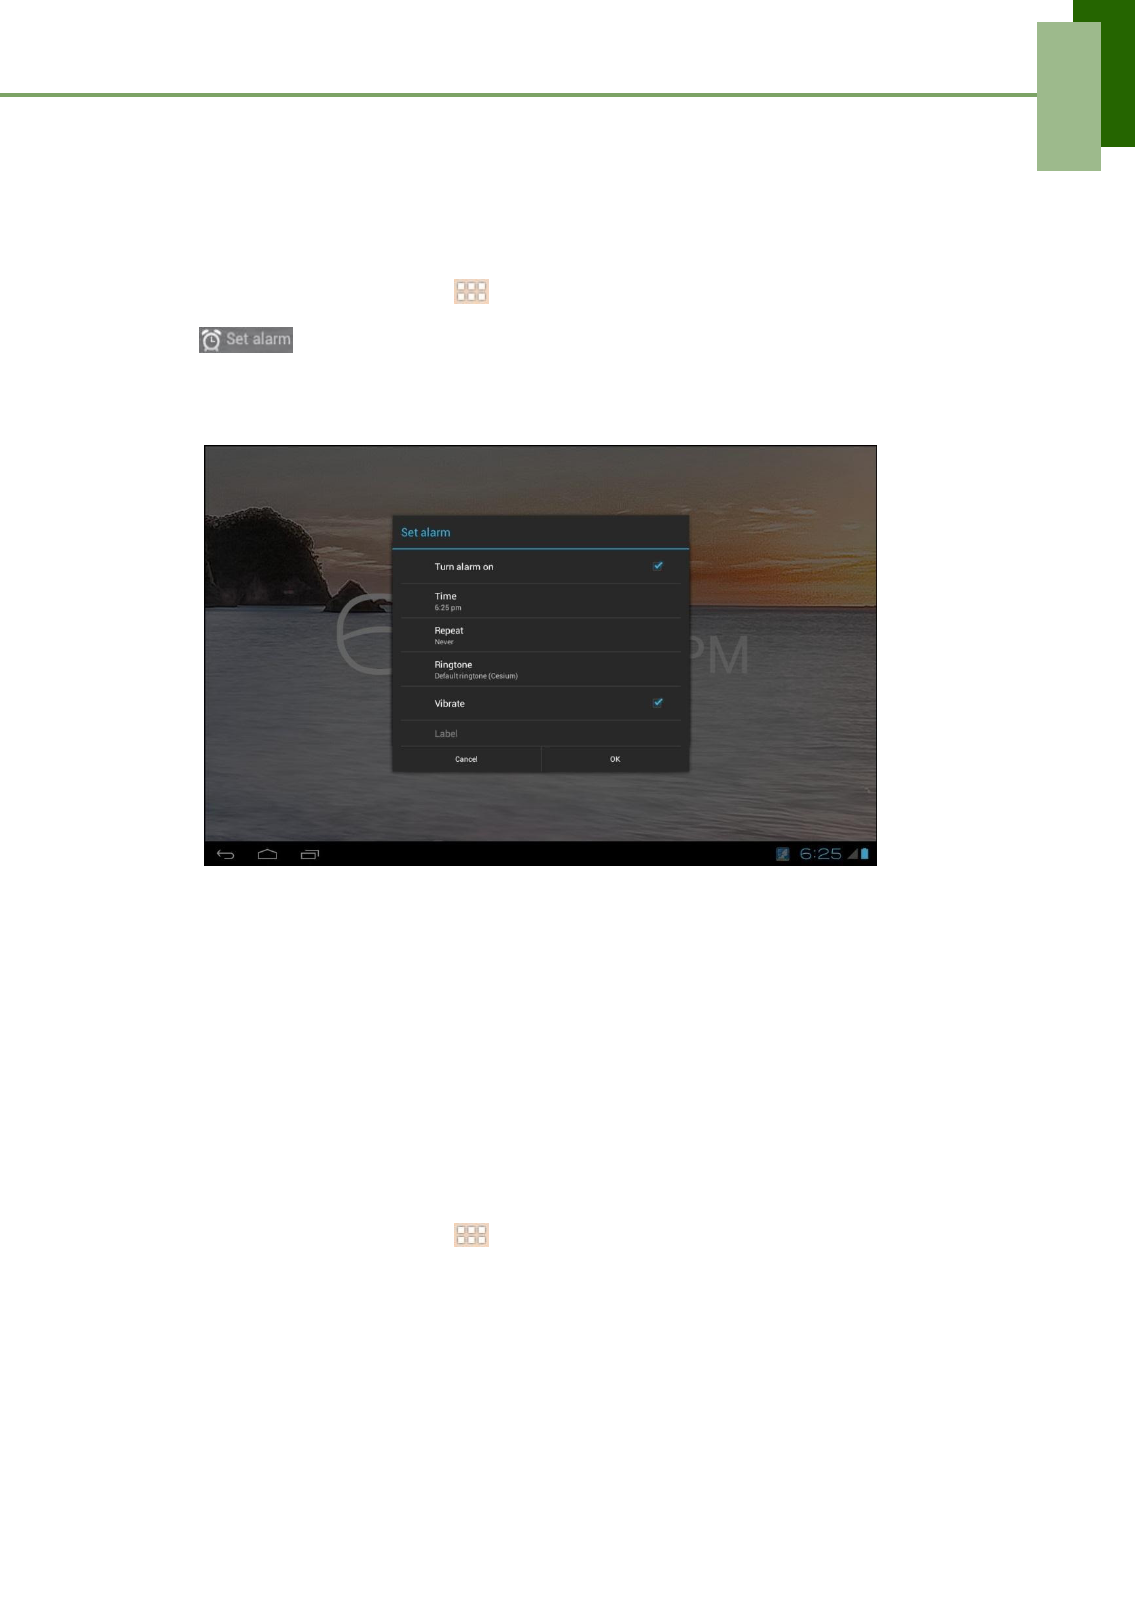
Alarms settings
You can set up alarms on this device.
To set the alarm
1. From the Home screen, tap > Clock.
2. Tap .
3. To add an alarm, tap Add alarm.
4. Tap the
S
or
T
to set the alarm time, and tap Set.
5. To set repeat mode, tap Repeat. Tap one or more options, then tap OK.
6. To set the ringtone, tap Ringtone. Tap an option, then tap OK.
7. To vibrate when alarm sounds, check Vibrate.
8. To add an alarm label, tap Label.
9. After all settings are complete, tap OK.
Display settings
The display settings of this device affect the battery and external power level.
To turn off backlight when the device is idle
1. From the Home screen, tap > Settings.
2. In DEVICE, tap Display.
3. Tap Sleep.
4. Select the desired length of time.
Your setting is automatically saved.

48
Chapter 8: Managing Your Device
To adjust brightness
1. From the Home screen, tap > Settings.
2. In DEVICE, tap Display.
3. Tap Brightness.
4. Drag the Brightness slider to adjust brightness settings.
5. Tap OK when finished.
To change the screen orientation
1. From the Home screen, tap > Settings.
2. In DEVICE, tap Display.
3. Tap Auto-rotate screen to automatically switch the screen orientation when
rotating the device.
Ringtone settings
You can assign a default ringtone whenever a new notification is received.
To change the notification ringtone
1. From the Home screen, tap > Settings.
2. In DEVICE, tap Sound.
3. Tap Default notification.
4. Tap the preferred ringtone from the list.
5. Tap OK to confirm.

49
Chapter 8: Managing Your Device
8.3 Using Wireless & networks
Wireless & networks allows you to manage Wi-Fi, Bluetooth, Tethering, and Virtual
Private Networks (VPNs).
1. From the Home screen, tap >
Settings.
2. In WIRELESS & NETWORKS, do any of the following (if necessary):
• To enable/disable or configure Wi-Fi settings, tap Wi-Fi.
• To enable/disable or configure Bluetooth settings, tap Bluetooth.
• To enable/disable Airplane mode, tap More > Airplane mode.
• To set up and manage Virtual Private Networks (VPNs), tap More > VPN.
• To share your device mobile data connection via USB or Bluetooth,
tap More > Tethering & portable hotspot.
8.4 Protecting Your Device
You can protect your device from unauthorized users by requiring the PIN code or
entering a password.
Screen lock protection settings
You can increase your device's security by creating a screen unlock pattern (disabled
by default). When enabled, you must trace the correct unlock pattern on the screen to
unlock and regain access to the device.
1. From the Home screen, tap > Settings.
2. In PERSONAL, tap Security.
3. Tap Screen lock.
4. Tap Pattern to trace the pattern to unlock the screen.
5. Follow the on-screen instructions to trace your own personal unlock pattern and
tap Continue.
6. Retrace your unlock pattern again and tap Confirm.
8.5 Resetting the Device
You can reset your device to its factory defaults.
1. From the Home screen, tap > Settings.
2. In PERSONAL, tap Backup & reset.
3. Tap Factory data reset.
4. Tap Reset tablet to reset.

50
Chapter 8: Managing Your Device
Safety
Information
Please read before
proceeding
• Following all precautions and instructions will increase the life of device.
• Use only the battery and the power adapter provided by the manufacturer. Use of
unauthorized accessories may void your warranty.
• Avoid using the device near electromagnetic sources such as TVs, radios, and
microwave ovens.
• Unplug the power adapter from the wall outlet during lightning storms to avoid
electric shock or fire.
• Do not expose the device or the battery to direct sunlight.
• Do not store your device in temperatures higher than 55ºC.
• Do not use harsh chemicals or detergents to clean your device.
• Do not handle the device with wet hands while it is being charged. This may cause
an electric shock or serious damage to the device.
• The operating temperature for this device is from -10ºC to 55ºC.
SAFETY PRECAUTIONS FOR BATTERY USE
• The battery is not removable.
• End users shall not remove the embedded battery by themselves.
• Use only approved battery.
• Keep the battery dry and away from any liquid since this may cause a short circuit.
• Keep the battery away from metal objects since this may cause a short circuit.
• Do not use damaged or deformed batteries.
• If the battery emits a foul odor, discontinue use.
• Keep the battery away from babies and small children.
If the battery leaks:
• Do not allow the leaking fluid to come in contact with your skin, eyes or clothing. If
already in contact, rinse with clean water immediately and seek medical advice.
• Keep the battery away from fire since this may cause the battery to explode.
• Do not attempt to open or service the battery yourself.
• Do not dispose battery in fire or water.
• Recycle or dispose used batteries according to the local regulations.
ROAD AND ENVIRONMENTAL SAFE
TY
• Turn off the device in areas with a potentially explosive atmosphere or where
flammable objects exist such as gas stations, fuel depots, and chemical plants
among others. Sparks from these areas could cause explosion or fire and result in
injury or even death.
• Do not use device while driving a vehicle.

51
Safety Information
SAFETY IN AIRCRAFT
Do not use the device on board an aircraft. The device’s network signals may
cause interference to the navigation system. As a safety measurement, it is against
the law in most countries to use the device on board an aircraft.
Copyright
©
2012. All Rights
Reserved.
Android is a trademark of Google Inc. Use of this trademark is subject to Google
Permissions.
This product has an Android™ platform based on Linux, which can be expanded by a
variety of JME-based application SW.
All products use in this device and trademarks mentioned herein are trademarks or
registered trademarks of their respective owners.
Google™, the Google logo, Android™, the Android logo and Gmail™ are trademarks
of Google Inc. Use of this trademark is subject to Google Permissions.
Wi-Fi and the Wi-Fi CERTIFIED logo are registered trademarks of the Wireless
Fidelity Alliance.
microSD™ is a trademark of SD Card Association.
Bluetooth and the Bluetooth logo are trademarks owned by Bluetooth SIG, Inc.
Java, JME and all other Java-based marks are trademarks or registered trademarks
of Sun Microsystems, Inc. in the United States and other countries.
The prediction engine of the input method is TOUCHPAL, provided by COOTEK.

52
Safety Information
FCC
Regulations
This device complies with Part 15 of the FCC Rules. Operation is subject to the
following two conditions: (1) This device may not cause harmful interference, and (2)
this device must accept any interference received, including interference that may
cause undesired operation.
Operation on the 5.15-5.25GHz frequency band is restricted to indoor use only. The
FCC requires indoor use for the 5.15-5.25GHz band to reduce the potential for
harmful interference to co-channel Mobile Satellite Systems.
This device has been tested and found to comply with the limits for a Class B digital
device, pursuant to Part 15 of the FCC Rules. These limits are designed to provide
reasonable protection against harmful interference in a residential installation. This
equipment generates, and uses radio frequency energy. If not installed and used in
accordance with the instructions, it may cause harmful interference to radio
communications. However, there is no guarantee that interference will not occur in a
particular installation. If this equipment does cause harmful interference to radio or
television reception, which can be determined by turning the equipment off and on,
the user is encouraged to try to correct the interference by one or more of the
following measures:
- Reorient or relocate the receiving antenna.
- Increase the separation between the equipment and receiver.
- Connect the equipment into an outlet on a circuit different from that to which the
receiver connected.
- Consult the dealer or an experienced radio/TV technician for help.
Changes or modifications not expressly approved by the party responsible for
compliance could void the user‘s authority to operate the equipment.
RF Exposure
Information (SAR)
This device is compliant with SAR requirement for general population / uncontrolled
exposure limits in ANSI/IEEE C95.1-1999 and has been tested in accordance with
the measurement methods and procedures specified in FCC OET Bulletin 65
Supplement C.
This equipment complies with the FCC RF exposure limits set forth for uncontrolled
environment. This device was tested during operations with the edges and backside
of the device directly in contact with the human body. To maintain compliance with
FCC RF exposure requirements, avoid direct contact to the antenna elements while
the device is transmitting. The highest measured SAR value for the device reported
to the FCC when placed next to the body, as described in this user guide is 1.342
W/kg.

Safety Information
53
RoHS
Compliance
This product is in compliance with Directive 2002/95/EC of the European Parliament
and of the Council of 27 January 2003, on the restriction of the use of certain
hazardous substances in electrical and electronic equipment (RoHS) and its
amendments.
Intellectual
Property Right
Information
Right to all technologies and products that comprise this device are the property of
their respective owners:
This product has an Android™ platform based on Linux, which can be expanded by a
variety of Java-Script-based application SW.
Google™, the Google logo, Android™, the Android logo and Gmail™ are trademarks
of Google Inc.
Bluetooth and the Bluetooth logo are trademarks owned by Bluetooth SIG, Inc.
Java, JME and all other Java-based marks are trademarks or registered trademarks
of Sun Microsystems, Inc. in the United States and other countries.
microSD™ is a trademark of SD Card Association.
The prediction engine of the input method is TOUCHPAL, provided by COOTEK.