MobileView 3000 Navigator User Manual 1072546B Mobile View
2015-09-28
: InterLogix 1072546B Mobileview 3000 Navigator User Manual 1072546B MobileView 3000 Navigator User Manual mobileview-training resources
Open the PDF directly: View PDF ![]() .
.
Page Count: 93
- Client Software Requirements
- Installation
- Upgrade to MobileView Navigator 1.1
- Initial Login
- Getting to know MobileView Navigator 1.1
- Basic Operations
- Initial UI Startup
- Vehicle Selector
- Import/Export Address Book
- Add Folder to Vehicle Selector
- Add Device to Vehicle Selector
- Search for Device in Vehicle Selector
- Device Discovery
- Work Station
- Caddy Discovery
- Device Connection
- Video Tile Layout Manager
- Alarm Search
- Track Vehicle on Map
- Video Download Manager
- Download "Alternate Video Stream"
- Manage Users
- Vehicle Management
- Settings
- Diagnostics
- Disk Analysis
- Open Live
- Open Playback
- Close
- Upload Configuration File
- Download Configuration
- Upload Firmware
- Configure Device
- Get HDD Log
- Get Log File
- Reboot Device
- Retire Device
- Properties

MobileView 3000
Navigator User Manual
P/N 1072546 • REV B • ISS 31OCT13

Copyright © 2013 United Technologies Corporation
Interlogix is part of UTC Climate Controls & Security, a unit of United
Technologies Corporation. All rights reserved.
Trademarks and
patents The MobileView 3000 Navigator name and logo are trademarks of
United Technologies Corporation.
Other trade names used in this document may be trademarks or
registered trademarks of the manufacturers or vendors of the
respective products.
Version This document applies to MobileView 3000 Navigator.
Certification N0000
Software license
agreement Important: This end-user license agreement (“Agreement”) is a legal
agreement between UTC and You. By downloading, installing,
copying or otherwise using this software, you agree to be bound by
the terms of this Agreement. If you do not agree to the terms of this
Agreement, you may not download, install, copy or use the software,
and you may return the software within thirty days (30) days and
request a refund of the license fee.
1. Definitions. The following definitions apply to this document:
“UTC”, means United Technologies Corporation, a Delaware
corporation.
“You” means the natural person or the entity that is agreeing to be
bound by this Agreement, their employees and third party
contractors that provide services to you.
“Software” means the software products that are licensed to You
under this Agreement and any upgrades, modified versions, updates,
additions, and copies of the Software furnished to You during the
term of the license granted herein.
“Customer” means the person or organization, or parent or
subsidiary thereof, who uses the Software for its intended purposes,
and excludes distributors, authorized resellers, value added resellers
and original equipment manufacturers. Customer may be referred to
as You or Your, whether an individual or a business entity of any
kind.
“Machine” means the computer, workstation, terminal, or other
hardware product on which the Software is installed.
2. License. The Software is licensed, not sold. UTC shall retain all
rights to and in the Licensed Product, including, but not limited to, all
copyrights, patents, trademarks, and trade secrets incorporated in
the Licensed Products.
UTC hereby grants You a non-exclusive, non-transferable license,
without right to sublicense, to install and use the object code version
of the Software to the extent permitted by your payment of the
license fee (if applicable) and only in the country in which the
Software was acquired. Unless multiple copies are licensed, you
may not install more than one copy of the Software onto more than
one Machine.
UTC hereby grants You a non-exclusive, non-transferable license, to
make a single machine-readable copy of the Software solely for
backup or archival purposes.
You agree not to:
a. transfer or distribute the Software, in electronic format or
otherwise;
b. store the Software on a server for use by more than one terminal;
c. sell, rent, lease, or sublicense the Software;
d. copy or modify the Software for any purpose.
3. Term. This Agreement is effective until terminated. You may
terminate this Agreement by uninstalling all components of the
Software from all Machines and returning the Software to UTC. UTC
may terminate this Agreement if You breach any of these terms and
conditions. Upon termination of this Agreement for any reason, You
agree to immediately uninstall all components of the Software and
return the Software to UTC. All provisions of this Agreement relating
to (i) disclaimer of warranties; (ii) limitations on liability, remedies,
and damages; and (iii) UTC’s proprietary rights, shall survive
termination of this Agreement.
4. Reverse Engineer. The Software is delivered in object code only.
You may not alter, merge, modify, adapt, translate, decompile,
disassemble, reverse-engineer, or otherwise reduce the Software to
a human-perceivable form.

5. Limited warranty. UTC warrants that for one (1) year from the
date of delivery of the Licensed Product (Software Warranty Period),
the functions contained in the Software will be fit for their intended
purpose as described in the accompanying documentation, and will
conform in all material respects to the specifications stated in such
documentation. UTC does not warrant that the operation of the
Software will be uninterrupted or error-free. Your exclusive remedy
under this limited warranty for nonconforming Software shall be
repair or replacement of the Software, at the sole discretion of UTC.
To obtain a repair or replacement of nonconforming Software,
contact your Interlogix reseller directly or contact us online at
www.interlogix.com/customer-support during the Software Warranty.
EXCEPT FOR THE PRECEDING EXPRESS LIMITED WARRANTY,
TO THE MAXIMUM EXTENT PERMITTED BY APPLICABLE LAW,
UTC PROVIDES THE SOFTWARE WITHOUT ANY WARRANTIES
OF ANY KIN, EXPRESS, IMPLIED, OR STATUTORY. UTC
SPECIFICALLY DISCLAIMS ANY IMPLIED WARRANTIES OF
MERCHANTABILITY, FITNESS FOR A PARTICULAR PURPOSE,
AND NON-INFRINGEMENT.
6. Limitation of liability. UTC’s sole obligation or liability under this
agreement is the repair or replacement of nonconforming software
and/or defective media according to the limited warranty above. TO
THE MAXIMUM EXTENT PERMITTED BY APPLICABLE LAW, IN
NO EVENT WILL UTC BE LIABLE FOR ANY LOST PROFITS OR
BUSINESS OPPORTUNITIES, LOSS OF USE, BUSINESS
INTERRUPTION, LOSS OF DATA, OR ANY OTHER INDIRECT,
SPECIAL, INCIDENTAL, OR CONSEQUENTIAL DAMAGES
UNDER ANY THEORY OF LIABILITY, WHETHER BASED IN
CONTRACT, TORT, NEGLIGENCE, PRODUCT LIABILITY, OR
OTHERWISE. BECAUSE SOME JURISDICTIONS DO NOT
ALLOW THE EXCLUSION OR LIMITATION OF LIABILITY FOR
CONSEQUENTIAL OR INCIDENTAL DAMAGES THE PRECEDING
LIMITAITON MAY NOT APPLY TO YOU. IN ANY EVENT, UTC’S
LIABILITY WILL NOT EXCEED THE LICENSE FEE, IF ANY, PAID
BY YOU FOR THE SOFTWARE LICENSED HEREUNDER. THE
FORGOING LIMITATION WILL APPLY TO THE MAXIMUM
EXTENT PERMITTED BY APPLICABLE LAW, REGARDLESS OF
WHETHER UTC HAS BEEN ADVISED OF THE POSSIBILITY OF
SUCH DAMAGES AND REGARDLESS OF WHETHER ANY
REMEDY FAILS OF ITS ESSENTIAL PURPOSE.

7. General. The material provided to You, including the Software,
shall not be exported or reexported in violation of any export
provisions of the USA or any other applicable jurisdiction. Any
attempt to sublicense, assign, or transfer any of the rights, duties, or
obligations hereunder shall be void. This Agreement shall be
governed by and interpreted under the laws of the State of California,
United States of America, without regard to conflicts of law
provisions. You hereby consent to the exclusive jurisdiction of the
state and federal courts covering Costa Mesa, California to resolve
any disputes arising under or in connection with this Agreement
.
8. Restricted rights legend. The Licensed Product is provided with
RESTRICTED RIGHTS. In the event the United States Government
or an agency thereof is granted a license, the following additional
terms apply: Restricted Computer Software, as defined in the
Commercial Computer Software– Restricted Rights clause at
Federal Acquisition Regulations 52.227-19, and the restrictions as
provided in subparagraphs (c)(1) and (c)(2) thereof; and as
applicable, the Government’s rights to use, modify, reproduce,
release, perform, display, or disclose the Software also are restricted
as provided by paragraphs (b)(2) and (b)(3) of the Rights in
Noncommercial Technical Data and Computer Software– Small
Business Innovative Research (SBIR) Program clause at DFARS
252.227-7018.
9. Acknowledgment. You acknowledge that You have read and
understand this agreement and agree to be bound by its terms. You
further agree that this agreement is the complete and exclusive
statement of the agreement between You and UTC, and supersedes
any proposal or prior agreement, oral or written, and any other
communication relating to the subject matter of this agreement.
Intended use Use this product only for the purpose it was designed
for; refer to the data sheet and user documentation.
For the latest product information, visit us online at
www.interlogix.com/mobileview .
MobileView 3000 Navigator User Manual i
Content
Chapter 1 Overview 1
Client Software Requirements 4
Chapter 2 Installation 5
Installation 5
Upgrade to MobileView Navigator 1.1 8
Initial Login 11
Chapter 3 Operation 13
Getting to know MobileView Navigator 1.1 13
Chapter 4 Basic Operations 19
Basic Operations 19
Chapter 5 Detailed Operations 29
Initial UI Startup 29
Vehicle Selector 30
Import/Export Address Book 33
Add Folder to Vehicle Selector 34
Add Device to Vehicle Selector 35
Search for Device in Vehicle Selector 35
Device Discovery 36
Work Station 37
Caddy Discovery 37
Device Connection 38
Video Tile Layout Manager 39
Alarm Search 40
Track Vehicle on Map 43
Video Download Manger 44
Download "Alternate Video Stream" 47
Manage Users 49
Vehicle Management 51
Settings 52
Diagnostics 57
Disk Analysis 58
Open Live 59
Open Playback 60
Close 61
Upload Configuration File 61
MobileView 3000 Navigator User Manual 1
Chapter 1
Overview
MobileView Navigator is video management software that enables security-
related personnel to easily and remotely gather video evidence, monitor live
situations, and configure and maintain a mobile video surveillance system that
consists of UTC digital video recorders (DVRs) and analog video cameras.
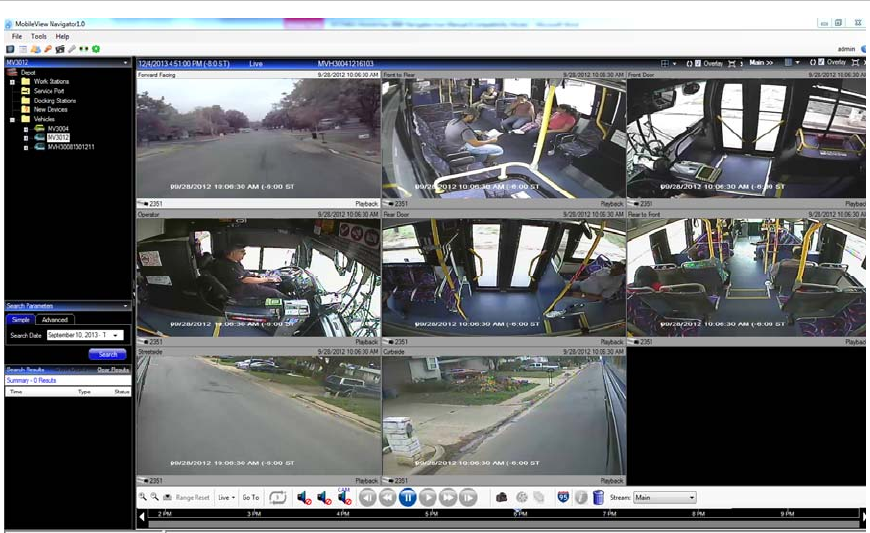
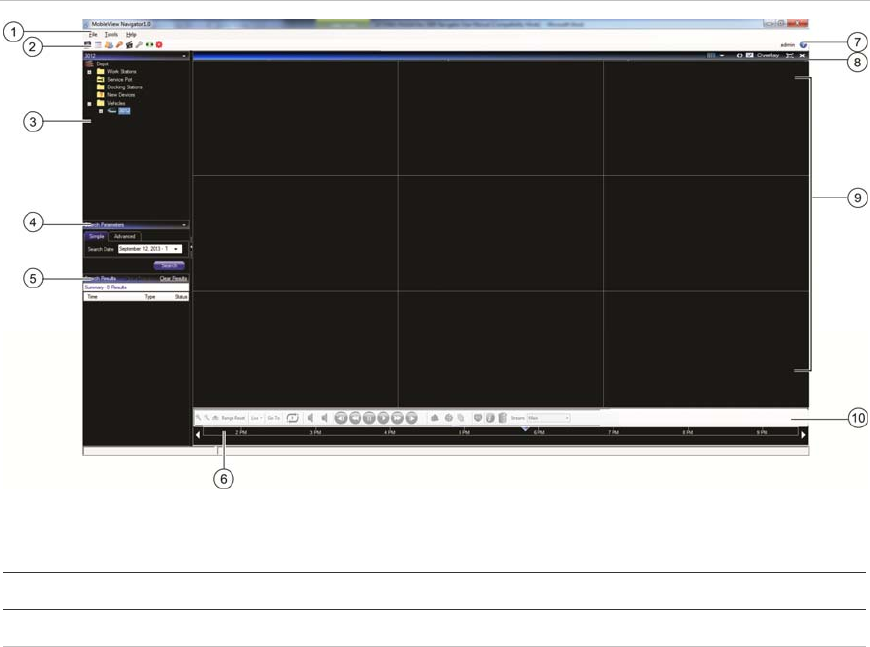
MobileView Navigator provides a more intuitive way to find and provide relevant
video content. Figure 1 shows the MobileView Navigator main screen with a
typical configuration.
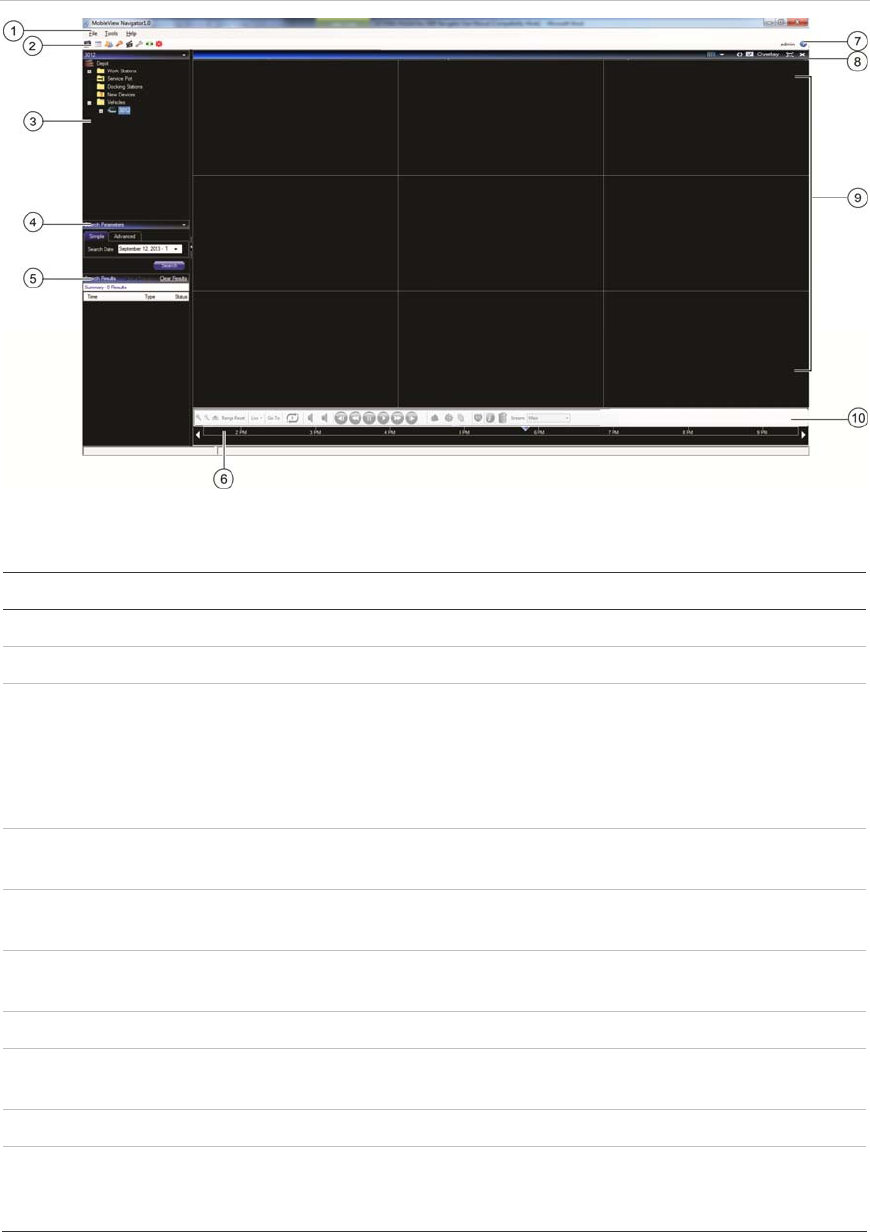
Figure 1: MobileView Navigator Main Screen
Chapter 1: Overview
2 MobileView 3000 Navigator User Manual
Figure 2: MobileView Navigator Main Screen overview
Table 1: MobileView Main Screen Overview
Item Name Description
1 File Menu Contains the following drop-down menus: File, Tools, and Help
2 Toolbar Contains shortcuts to Common Operations
3 Vehicle Selector
Panel All the folders and respective devices in folders are loaded into the
Vehicle Selector tree. The state of devices loaded is represented on
the tree. (Reachable/Not reachable)
If any Caddies are discovered they are added under Docking
Stations node.
4 Search
Parameters Panel Tabs for Simple and Advanced Searching
5 Search Results
Panel Displays the Search results
6 Disk Analysis When a video tile is selected the disk analysis for that camera is
displayed under the timeline bar.
7 Help icon Launches User Manual
8 Video Layout
Manager Contains commands related to the Video layout: Stream Modes,
Display Modes, Overlay, Maximize/Restore, and Close
9 Video Display Displays Live or Playback Video
10 Timeline Bar While playing video all cameras play in time synch. The video time
will be displayed on the viewer and the time line pointer will move as
the video proceeds.
Chapter 1: Overview
MobileView 3000 Navigator User Manual 3
MobileView Navigator consists of 6 panels and several major dialogs as listed
above. Panels are resizable by dragging the vertical left or right splitter bars.
Arrow icons next to panel names signify the ability to hide/unhide the panel. This
provides custom application layout styles depending on the activities that you
want to perform.
The Vehicle Selector panel is the central administration area in the software and
allows you to quickly search and access any device or camera in your system.
The Vehicle Selector panel features double-click or drag n’ drop capability to
view cameras or devices as a whole. By right-clicking on any object in the
Vehicle Selector panel, you will be exposed to a number of operations that can
be performed on the object. These include health diagnostics, device
configuration, disk analysis, properties, search, firmware uploads, and more.
This panel is permission-based, so if you do not have rights to perform certain
actions, you will not see the options.
The Video Display panel allows you to view both live and recorded video from
any video source in the system to verify and act on the content. It contains live or
previous recorded videos that can be launched from the Search, Vehicle
Selector, or Disk Analysis panels.
Users have several tile layouts to choose from when arranging the video
sources. Standard tile layouts include 1×1, 2×2, 3×3, 4×4, and 5×5. We also
support a Custom Tile Layout with 1 large tile and 7 smaller surrounding tiles for
additional flexibility. Double-clicking in any single tile will bring that video to full
screen. Double-clicking the video again will restore the video to the previous tile
layout.
The Timeline toolbar allows you to manage video once it is loaded in the Video
Display panel. The Timeline toolbar features a toolbar, a timeline, playback
controls, and stream switching capabilities.
The Timeline toolbar allows you to select all video tiles in the viewer, zoom in and
out on the timeline, center the timeline, perform a Go To search, and put video in
live or playback. The Snapshot button allows you to take a snapshot of the
current play time of a selected video tile and send it to the Hard Drive for export.
The Video button allows you to send a desired video segment (of the time range
you specified with the green and red indicators) to the Collector for export.
The Disk Analysis panel allows users to seek for video at specific points in time.
Double-clicking anywhere on the timeline will automatically playback the selected
video at that specific date and time. Use the current live/playback cursor
(appears as a blue seek triangle icon) to seek and play the video anywhere along
the timeline. Use the green and red triangle icons to mark the beginning and end
of a desired video segment. Use the playback controls beneath the timeline to
further manipulate playback video.

Chapter 1: Overview
4 MobileView 3000 Navigator User Manual
The Search Parameters panel allows users to perform both simple and
advanced searches using various parameters. Filter parameters include Alarm,
Start Time, End Time, and Cameras. Searches can also run from the Search
History and Search Device commands.
Search results are displayed in the Search Results panel. User can double click
on the Start time column link from search results to view the video in video panel
starting from that time. If playback video is currently playing, all the cameras will
seek to the new time. If video is not playing, application will open streams for all
cameras at the alarm time.
User can also export the video from search results by performing right clicking on
any of the search results and select export video.
Client Software Requirements
MobileView Navigator supports all of the following Operating Systems and other
software components.
Table 2: Client software requirements
Component Version
Operating System Microsoft Windows 7 32-bit
Microsoft Windows 7 64-bit
Microsoft Windows XP SP3 32-bit
Other Microsoft .NET Framework 4.0
MobileView 3000 Navigator User Manual 5
Chapter 2
Installation
Installation
To install a new standalone instance of MobileView Navigator on your computer
do the following:
Download the MobileView Navigator setup.exe program to the desktop of the PC.
Double-click the MobileView Navigator setup.exe to begin the installation.
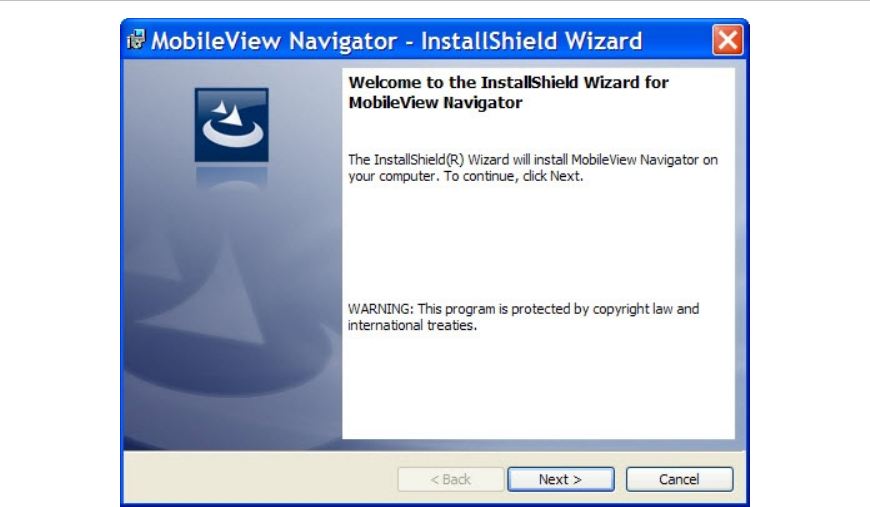
The Welcome window displays.
Figure 3: InstallShield Wizard window
Chapter 2: Installation
6 MobileView 3000 Navigator User Manual
Click Next.
The Setup Type window displays.
Figure 4: Setup Type window
Select New UTC Installation and click Next.
The Installation Complete screen displays.

Chapter 2: Installation
MobileView 3000 Navigator User Manual 7
Figure 5: The Installation Complete window
Figure 6: InstallShield Wizard window
Click Next.
Select the Yes, I want to restart my computer now option and click the Finish
button.
A MobileView Navigator icon will be placed on your desktop and in your Start
Menu to access the application.
Installation is complete.
Chapter 2: Installation
8 MobileView 3000 Navigator User Manual
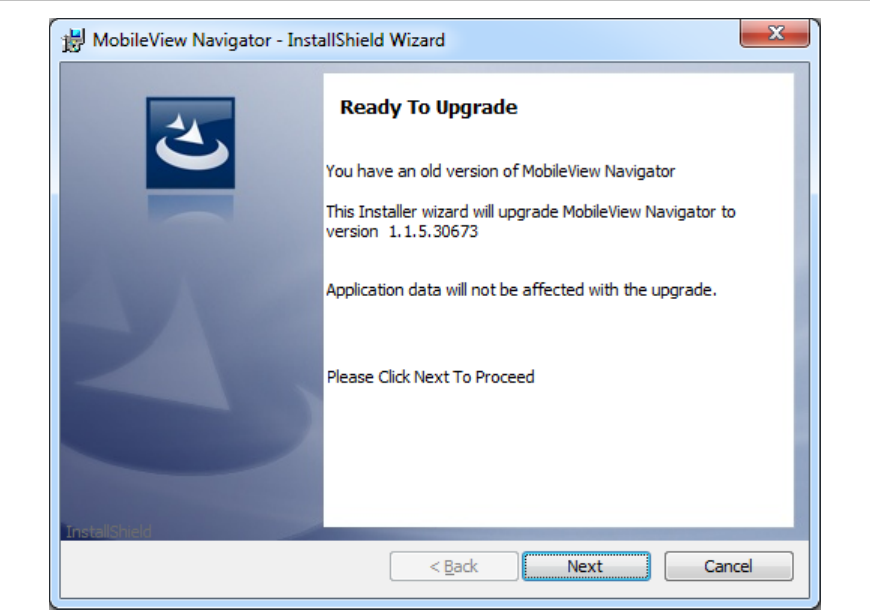
Upgrade to MobileView Navigator 1.1
To install a Mobile\View Navigator service pack on a standalone instance of
MobileView Navigator on your computer, please do the following steps:
Place the MobileView Navigator service pack setup.exe on the desktop of the
PC.
Double-click the MobileView Navigator setup.exe to begin the installation.
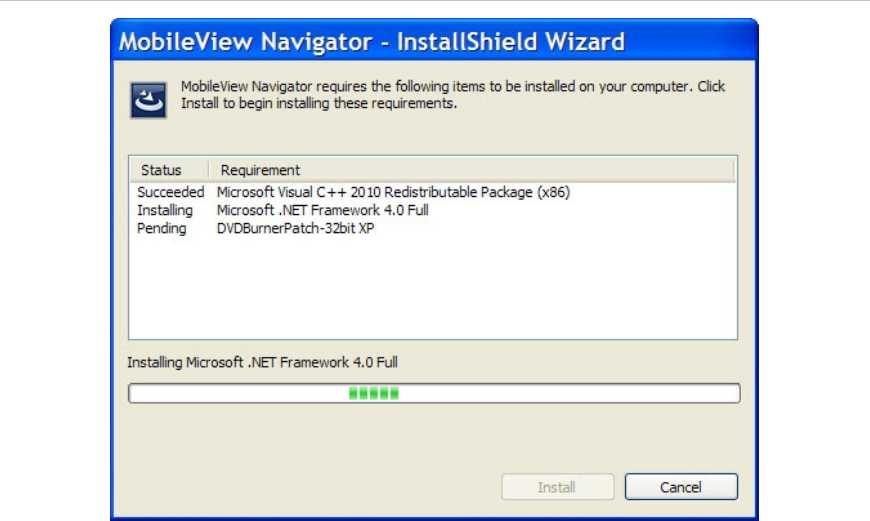
The Upgrade window displays.
Figure 7: Install Shield Wizard window
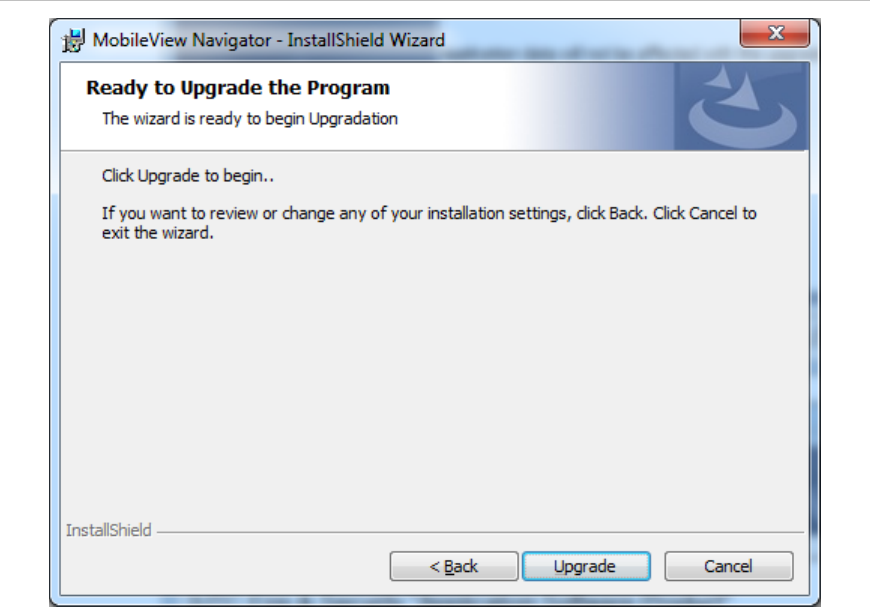
Click Next.
The Upgrade Setup window displays.
Chapter 2: Installation
MobileView 3000 Navigator User Manual 9
Figure 8: Upgrade Setup window
Select Upgrade and click next.
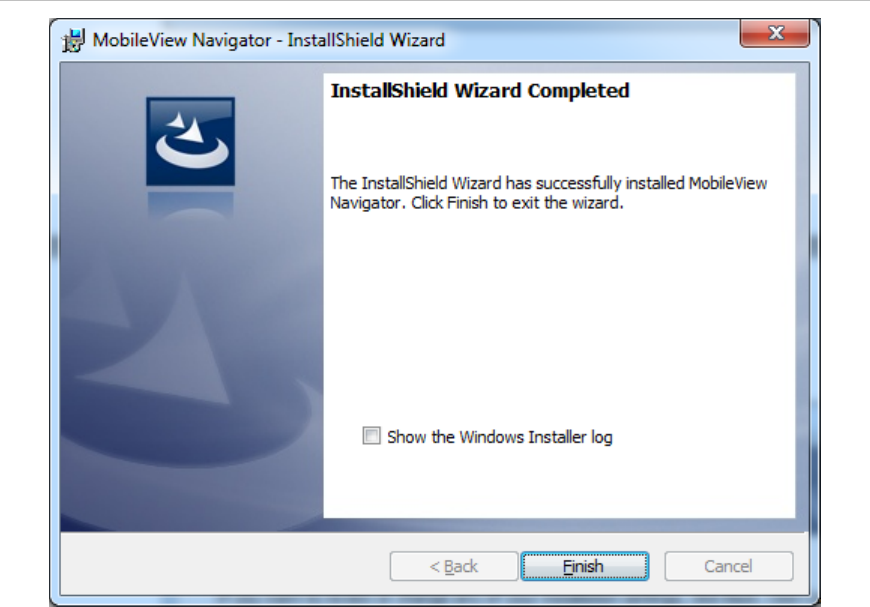
The Installation Complete screen displays.
Chapter 2: Installation
10 MobileView 3000 Navigator User Manual
Figure 9: The Installation Complete window
Click the Finish button.
A MobileView Navigator icon will be placed on your desktop and in your Start
Menu to access the application.
Installation is complete.
Chapter 2: Installation
MobileView 3000 Navigator User Manual 11
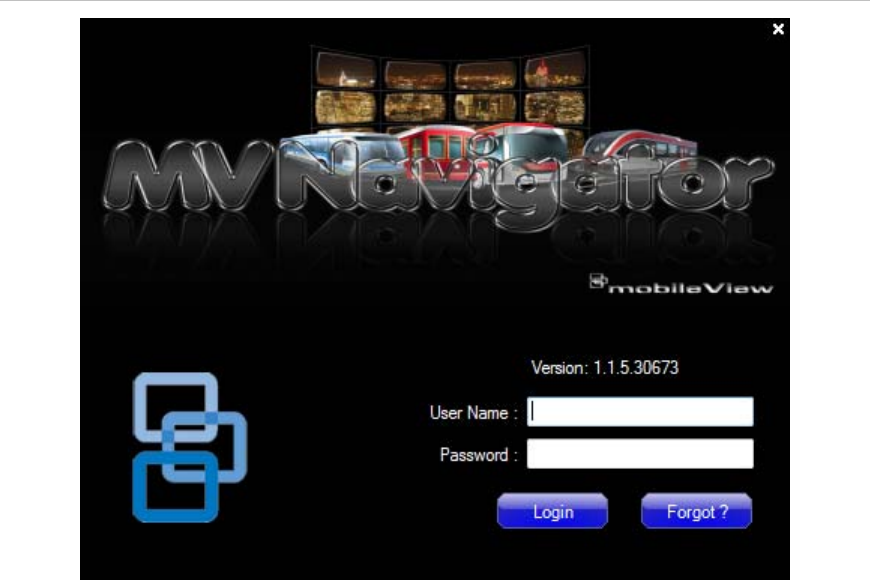
Initial Login
After a successful installation, launch MobileView Navigator using one of the
following methods:
• Double-clicking on the MobileView Navigator icon on your desktop.
• Access the Start menu, All Programs, MobileView Navigator.
When MobileView Navigator launches, a login window displays. Log in as the
default Administrator using the following default credentials:
Username - admin
Password - admin
Figure 10: Login window
Chapter 2: Installation
12 MobileView 3000 Navigator User Manual
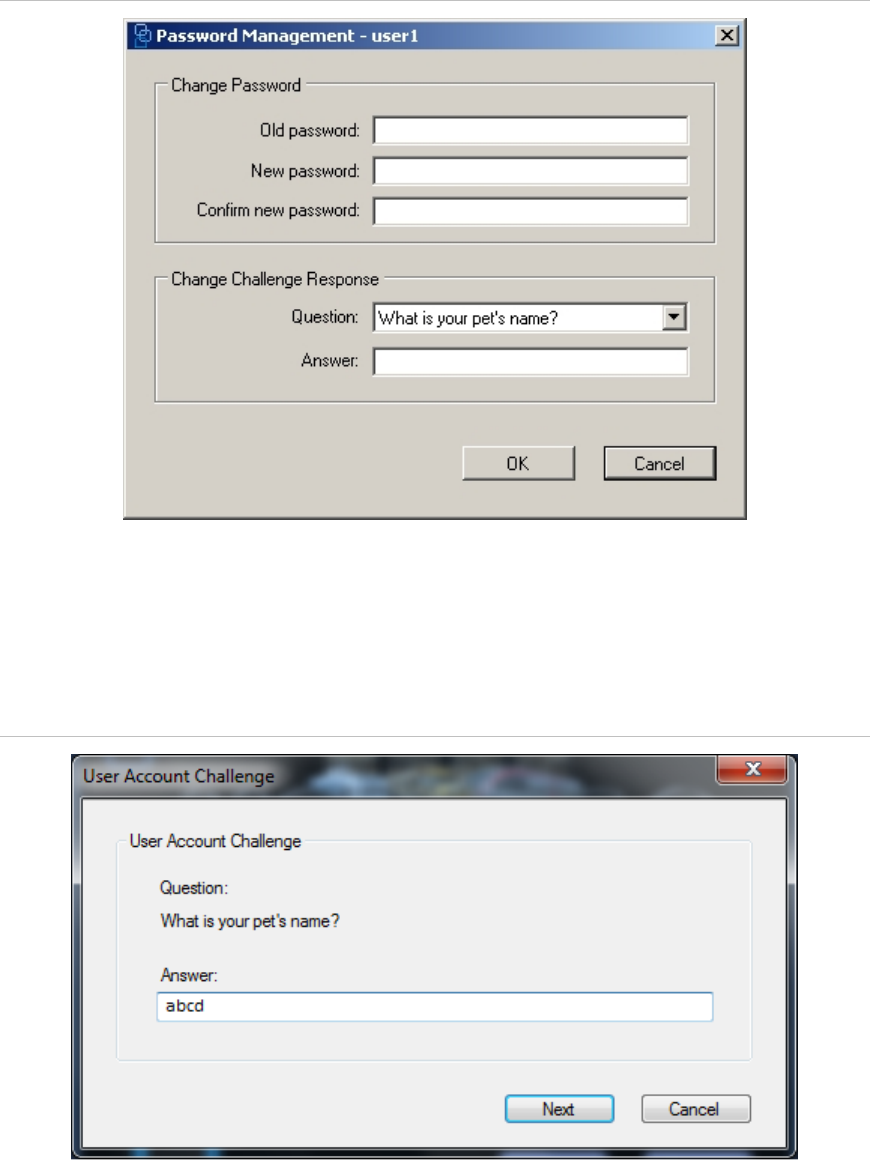
If as a user (non-admin) you login for the first time you are forced to change your
default password.
Figure 11: Change Password
If you ever forget your password, simply click on the Forgot ? button on the
Login dialog. This will allow you to answer your challenge question, and if
successful, change your password and re-enter the application without calling for
any assistance.
Figure 12: User Account Challenge Dialog
MobileView 3000 Navigator User Manual 13
Chapter 3
Operation
Getting to know MobileView Navigator 1.1
The next several figures explain the layout and controls in MobileView Navigator.
Figure 13: The Main Screen Overview
Table 2: MobileView Main Screen Overview
Item Name Description
1 File Menu Contains the following drop-down menus: File, Tools, and Help
2 Toolbar Contains shortcuts to Common Operations
Chapter 3: Operation
14 MobileView 3000 Navigator User Manual
Item Name Description
3 Vehicle Selector
Panel All the folders and respective devices in folders are loaded into the
Vehicle Selector tree. The state of devices loaded is represented on
the tree. (Reachable/Not reachable)
If any Caddies are discovered they are added under Docking
Stations node.
4 Search
Parameters Panel Tabs for Simple and Advanced Searching
5 Search Results
Panel Displays the Search results
6 Disk Analysis When a video tile is selected the disk analysis for that camera is
displayed under the timeline bar.
7 Help icon Launches the user manual
8 Video Layout
Manager Contains commands related to the Video layout: Stream Modes,
Display Modes, Overlay, Maximize/Restore, and Close
9 Video Display Displays Live or Playback Video
10 Timeline Bar While playing video all cameras play in time synch. The video time
will be displayed on the viewer and the time line pointer will move as
the video proceeds.
Timeline Bar
Timeline and video controls are enabled only while viewing video.
Figure 14: The Timeline bar
Table 3: Timeline Bar Overview
Item Name Description
1 Zoom In Click to Zoom into the timeline bar to expand the disk analysis more
clearly one step at a time.
2 Zoom Out Click to Zoom out on the timeline bar to view the disk analysis at a
higher level one step at a time
3 Center Timeline Click the Center Timeline icon on the timeline bar will center the
timeline pointer of currently playing video to the center of the
timeline.

Chapter 3: Operation
MobileView 3000 Navigator User Manual 15
Item Name Description
4 Playback/Live
Toggle The Playback/Live button is a toggle button that changes from Play
Live to Play Playback and Vice Versa. When Live video is playing
the button will display Live.
5 Go To The Go To option will open dialog to choose a specific Date and
Time. Video will be fetched from the selected Date and Time from
the Device.
6 Loop Video Plays video between the selected range of time in a loop.
7 Audio Channel
Selector User selects an audio channel to enable audio for the channel
available.
8 Camera Audio
Selector For MV3012 device a camera audio icon gets loaded which can be
used to select audio channel on each individual camera.
9 Video Playback
Controls Contains commands related to the Video control. See the Video
Playback Controls section.
10 Snapshot User can take snapshot of currently playing video stream. This
operation can be achieved by clicking on Snapshot icon on toolbar.
A dialog box opens which will contain the list of all the cameras.
User can select cameras of his choice and click on OK button.
11 Export Video Clip When user clicks on Export video toolbar button, a dialog will open
that will allow the user to select Cameras. Video for all the selected
cameras is exported into a single file (multiplexed video).
12 Image Log Clicking on Image Log icon on the timeline toolbar will open a dialog
window. User has to select an exported video file from MobileView
3000 Device/Docking Station.
13 Show Map User is playing Live or Playback video and clicks on map control for
tracking the Vehicle on the Map. The map control dialog opens with
map displayed at zoom level 8 on the given route. User has the
option of 16 zoom levels.
14 Local File
Information User can click on the Local File Information icon on timeline toolbar
to view the local file information at any time while video is playing.
15 Delete Deletes the currently selected video range from the device.
16 Visual Timeline When cameras start streaming video, the time of video is tracked on
the timeline with a current play position indicator.
17 Timeline Pointer When play back video is streaming the timeline pointer (track bar)
will indicate the current date time point where the video is playing.
18 Range Reset This will allow users to reset the selected video range on timeline
bar.
19 Stream This will allow users to set Primary Stream or Alternate Stream for
videos
Chapter 3: Operation
16 MobileView 3000 Navigator User Manual
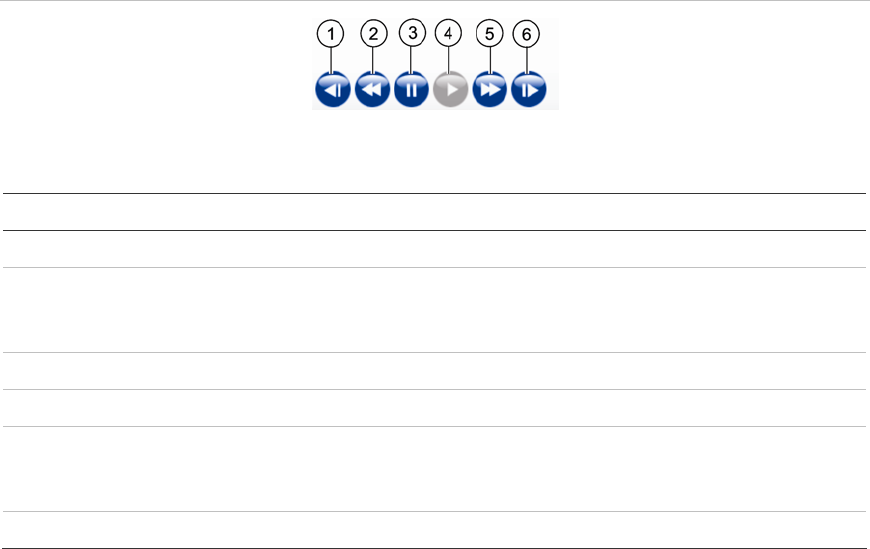
Playback Controls
The Playback Controls buttons are used to control how the video is displayed.
Figure 15: Playback Controls
Table 4: Playback Controls Overview
Item Name Description
1 Step Reverse Allows user to view next frame in reverse direction
2 Play Reverse Allows user to play current video in reverse mode at normal speed.
On clicking the icon again the speed is increased by x speed
amount. The speed management is device dependent
3 Pause When user presses the Pause control, video is paused
4 Play Plays the selected video at normal speed
5 Fast Forward Allows user to play current video x times faster in forward direction.
On clicking the icon again the speed is increased by x amount. The
speed management is device dependent
6 Step Forward Allows user to view next frame in forward direction
Chapter 3: Operation
MobileView 3000 Navigator User Manual 17
Application Toolbars
The available options on the Application Toolbars vary by Account Type.
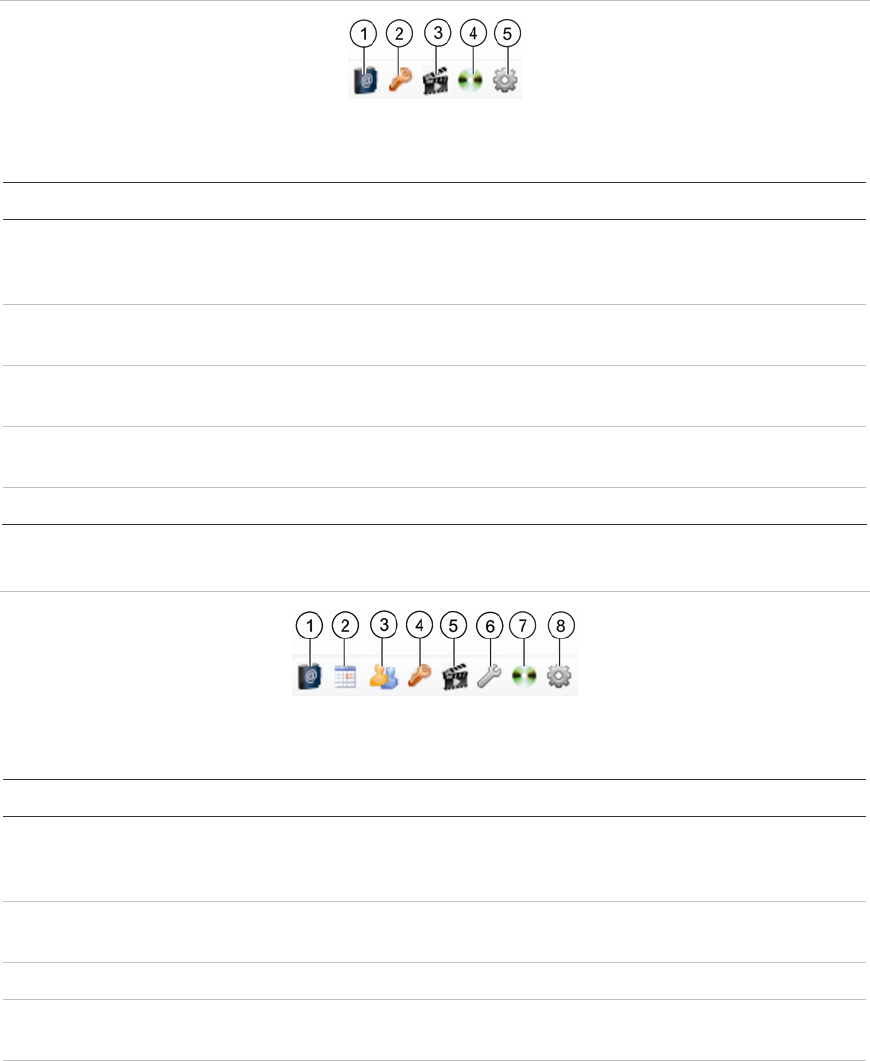
Figure 16: Application Toolbar for Normal User
Table 5: Normal Application Toolbar Controls Overview
Item Name Description
1 Manage Vehicle
List Opens the Vehicle Management Dialog Window. Double click on a
device row to open the Device Properties Dialog Window. User can
modify the details of the device.
2 Password
Management Click to launch Password Management Windows
3 Local File
Playback Select a video file from local disk or network share. On selecting the
File, application plays the video file.
4 Burn Video File to
Media Click to launch the CD/DVD burner or USB dialog window with
options to select files for burning to a CD / DVD or to write to USB.
5 Services Shows details about the current Mobile Services
Figure 17: Application Toolbar for Administrator
Table 6: Administrator Application Toolbar Controls Overview
Item Name Description
1 Manage Vehicle
List Opens the Vehicle Management Dialog Window. Double click on a
device row to open the Device Properties Dialog Window. User can
modify the details of the device.
2 Task Scheduling Scheduler dialog provides snapshot of current tasks and provides
facility to modify pending tasks to download video from device.
3 Manage Users Click to launch the Manage Users Dialog Window
4 Password
Management Click to launch Password Management Windows
5 Local File
Playback Select a video file from local disk or network share. On selecting the
File, application plays the video file.
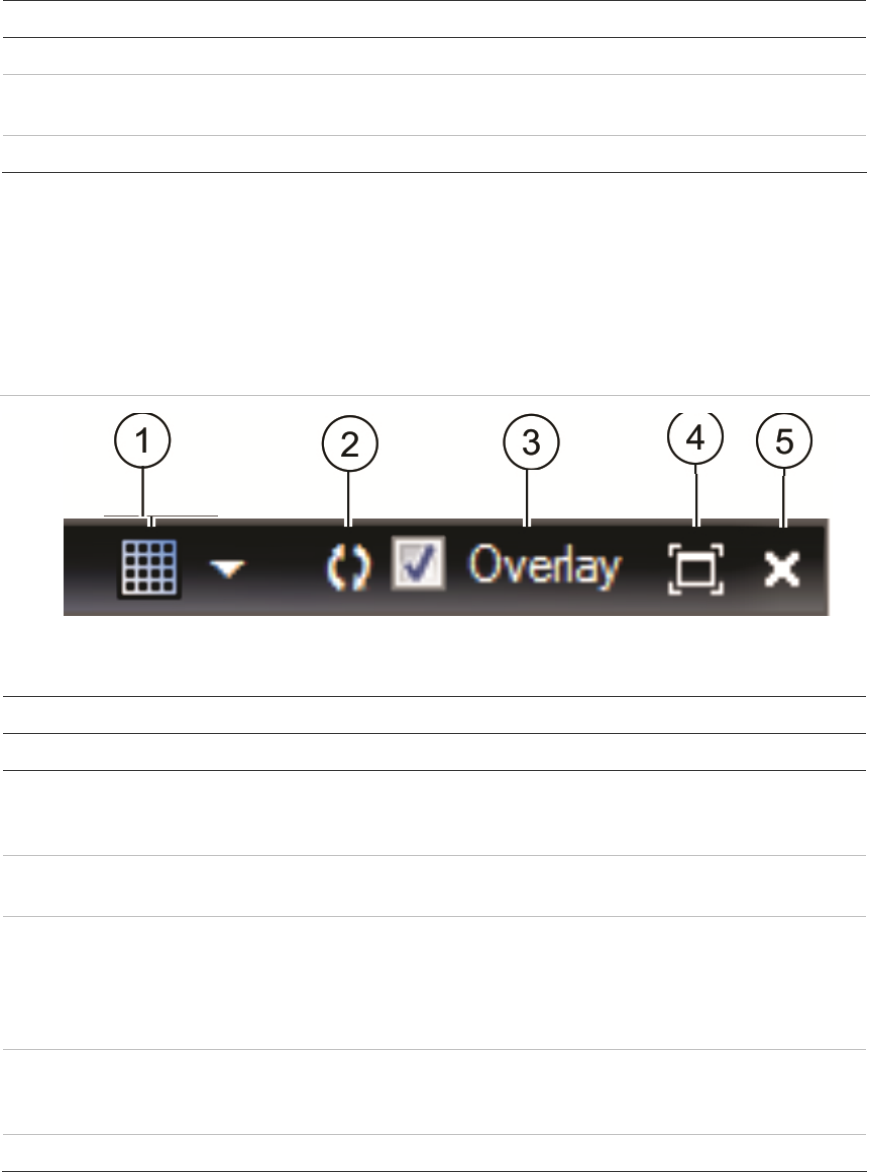
: Operation
18 MobileView 3000 Navigator User Manual
Item Name Description
6 Settings Click to launch the Settings Dialog Window
7 Burn Video File to
Media Click to launch the CD/DVD burner or USB dialog window with
options to select files for burning to a CD / DVD or to write to USB.
8 Services Shows details about the current Mobile Services
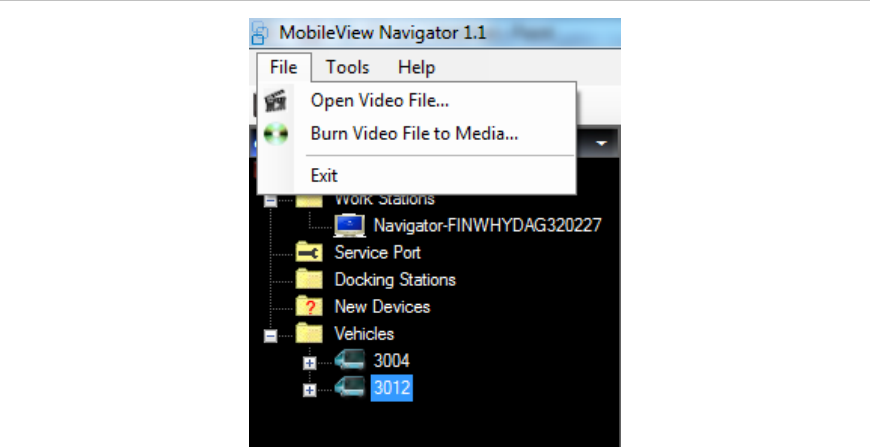
Video Layout Manager
The Video Layout Manager controls how the videos are displayed within the
program.
Figure 18: Video Layout Manager
Table 7: Video Layout Manager Controls Overview
Item Name Description
1 Layout Selector Change the video tile layout from the layout selector. The Layout
selector will show all available layouts. Application will allow user to
select any layout and display only those number of cameras
2 Camera Display
Order Changes the Camera Display Order.
3 Overlay By selecting the overlay option user can view the video player
header and footer on the video tiles which have video streaming in
the viewer .On video tile header the details of camera title, date and
time will be displayed. On the video tile footer the details of device
name, type of video streaming (live/playback) will be displayed.
4 Maximize Restore
layout Maximize the current layout by clicking the Maximize/restore Viewer
beside the layout selector. The current layout is maximized to full
screen mode
5 Close Closes all the videos streaming in the current layout tiles
MobileView 3000 Navigator User Manual 19
Chapter 4
Basic Operations
Basic Operations
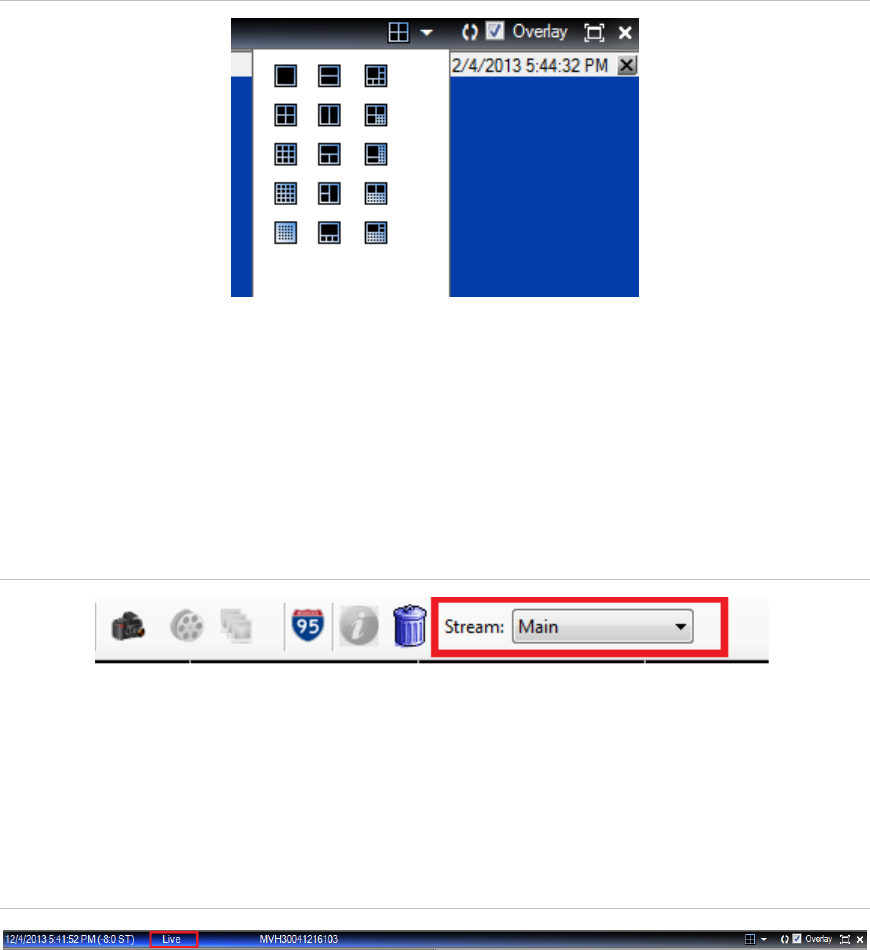
Opening a Video File
Click on the File menu and select Open Video File. The Open Video File menu
allows user to select a video file from local disk or network share. On selecting
the File, MvNav plays the video file.
Figure 19: The Open Video File Dialog Window
Select the Display Mode with the Video Layout Manager
1. Click on the Layout Selector icon to display all the display mode options.
Chapter 4: Basic Operations
20 MobileView 3000 Navigator User Manual
2. Click to select a desired display mode.
Figure 20: The Layout Selector Menu
Streaming Mode
In-order to distinguish device video streaming is happening in ‘Main’ or ‘Sub’
(Alternate) stream. This can be observed in the figure below
Figure 21: Streaming Mode
Live/Playback Mode
At the top of the Viewer caption bar user can check whether the video is a Live or
Playback video.
Figure 22: Live/Playback Indicator
Device Time Zone
In the Main screen, at the top of the Viewer caption bar, device time zone
information is displayed.
Chapter 4: Basic Operations
MobileView 3000 Navigator User Manual 21
Figure 23: Time Zone
Search Video
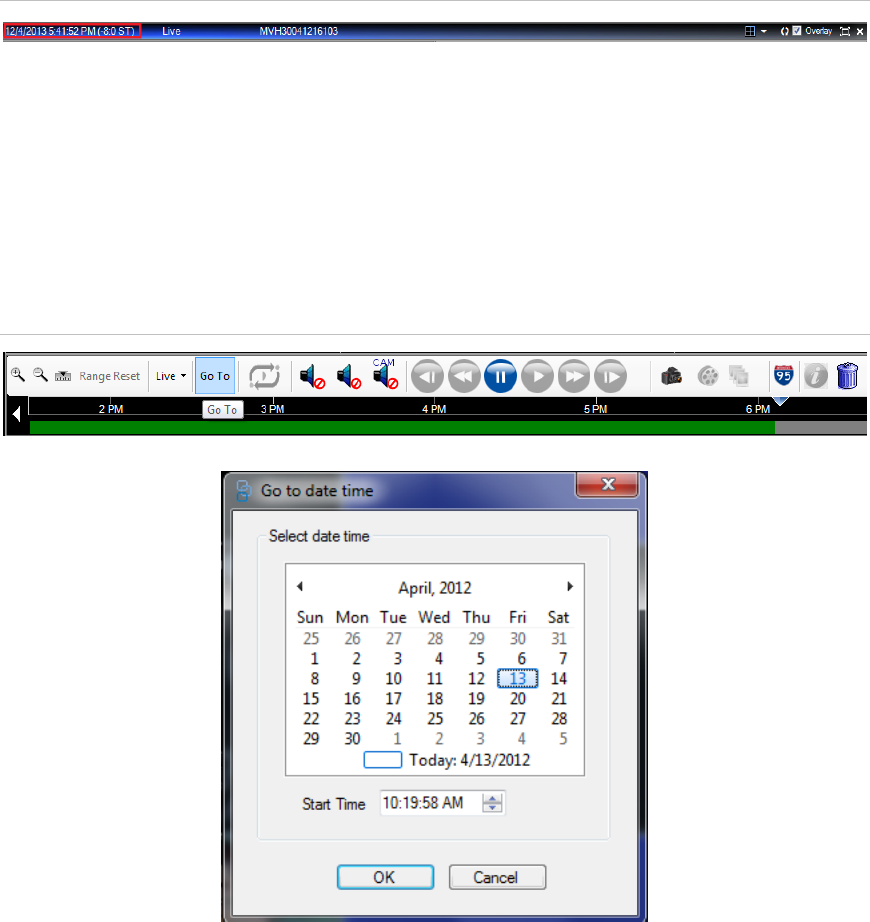
Search by Date/Time
Click on the Go To button to launch the Go to Date Time Dialog Window. Select
the desired Date/Time. Click on the OK button to start the search.
Figure 24: The GoTo Date Time command and Dialog Window
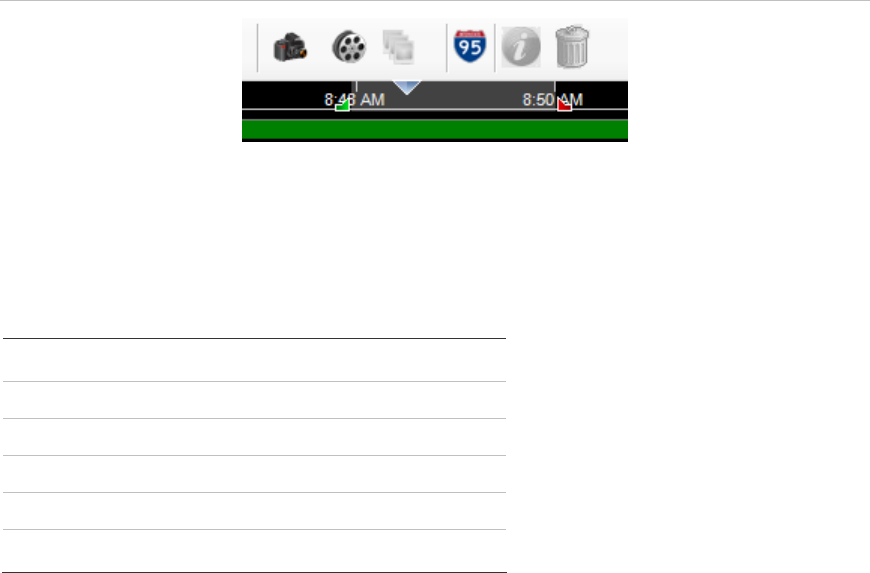
Search by Timeline Bar
Hover the mouse over the Timeline Bar where the cursor is located. When the Range
Selection indicators appear you can move (slide) the Selection Start Time indicator and
the Selection End Time indicator to select the time range.
Chapter 4: Basic Operations
22 MobileView 3000 Navigator User Manual
Figure 25: Range Selection Indicators
Click the Zoom In icon to magnify the time frame. Click the Zoom Out icon to reduce
the time frame. Event types are represented by different colors. Please refer to the
following chart for the meaning of events.
Table 8: Event type color code
Color Event Type
Gray Untagged
Blue Video Loss
Red Alarm
Green Normal Video
Yellow Other event
Snapshot and Archive
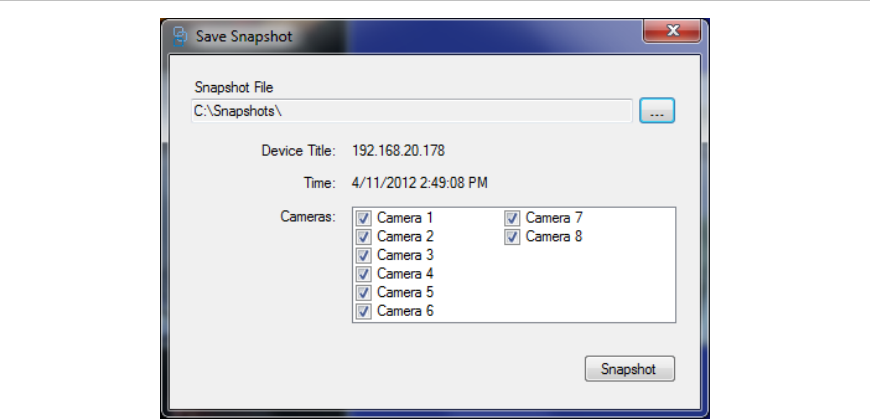
Export Snapshot
You can take snapshot of the playing video stream. This operation can be
achieved by clicking on the Snapshot icon on the toolbar. A dialog box opens
which will contain a list of all the cameras. Select the cameras and click on the
OK button. The destination folder for the Snapshot files is written to the System
Settings snapshot folder. You can select a location for the files by clicking on the
… (Browse) button.
Chapter 4: Basic Operations
MobileView 3000 Navigator User Manual 23
Figure 26: The Save Snapshot Dialog Window
While the snapshots are generated in the background if there is any delay in
generating the snapshots, the snapshot icon will be disabled until it completes
generating the snapshots and then gets enabled. Mean while use can perform
other operations. The result of generating the snapshot is displayed on the status
bar as message.
Save Video to Media
Click on the Burn Video File to Media button to display a file dialog to select a
file or files to be written to the CD/DVD or USB.
Select CD/DVD Writer tab to burn files to CD/DVD.
Select USB Writer tab to write files to USB.

Chapter 4: Basic Operations
24 MobileView 3000 Navigator User Manual
Select the CD/DVD or USB drive from Disc Drives/USB Drives dropdown
All the files selected are added to a listbox. You can choose to include the player
by checking the Include Player checkbox.
User can select to add files from a list box or click on the Remove button to
remove selected files.
Click the Burn button (in CD/DVD Writer tab) to write all selected files to the
CD/DVD or Write button (in USB Writer tab) to write files to USB. Do not cancel
the burn (process) operation. If you try to close the Disc Burner dialog in the
middle of writing process, a message box is displayed stating “Busy with disc
operation. Please wait...”
You can format the CD/DVD and erase the data on a rewritable CD/DVD by
clicking on the Erase button. All data on the CD/DVD will be lost.
Progress will be shown for the operation on the Progress bar.
Chapter 4: Basic Operations
MobileView 3000 Navigator User Manual 25
View Video Information
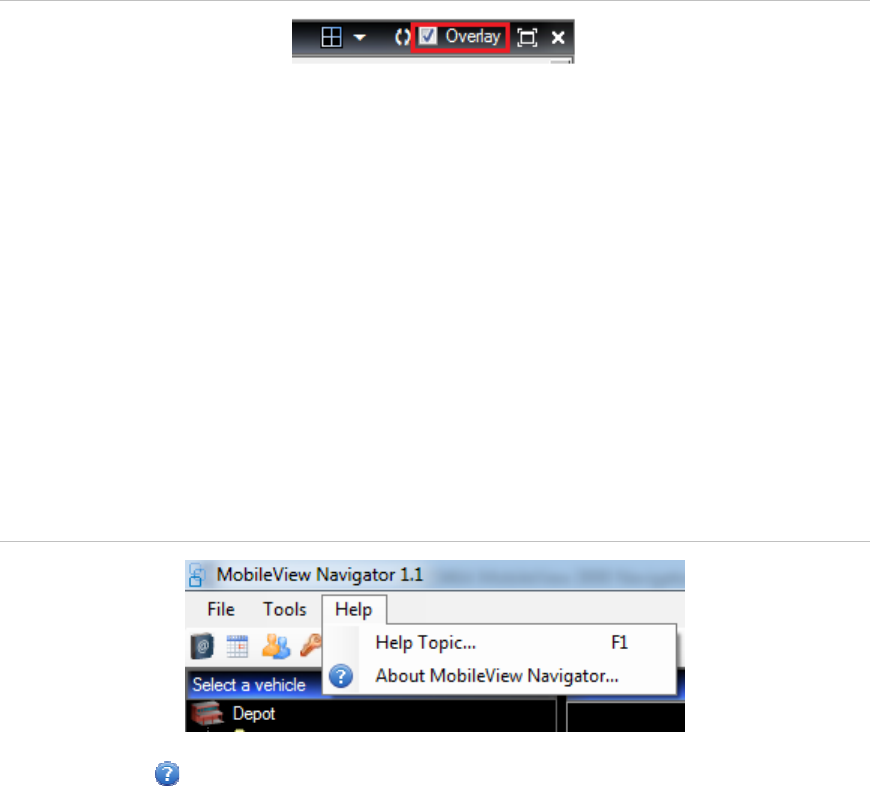
Displays the header and footer data for the selected video tile. Click the Overlay
check box on the Video Layout Manager Toolbar to enable.
Figure 27: The Overlay check box
The following information is displayed on the header and footer of the video tile:
• Camera title
• Video play time
• Device name
• Video stream state
• Close video tile
Help
If you need to get any assistance, select the Help Menu and select Help Topic
to get help information.
Figure 28: The Help Menu
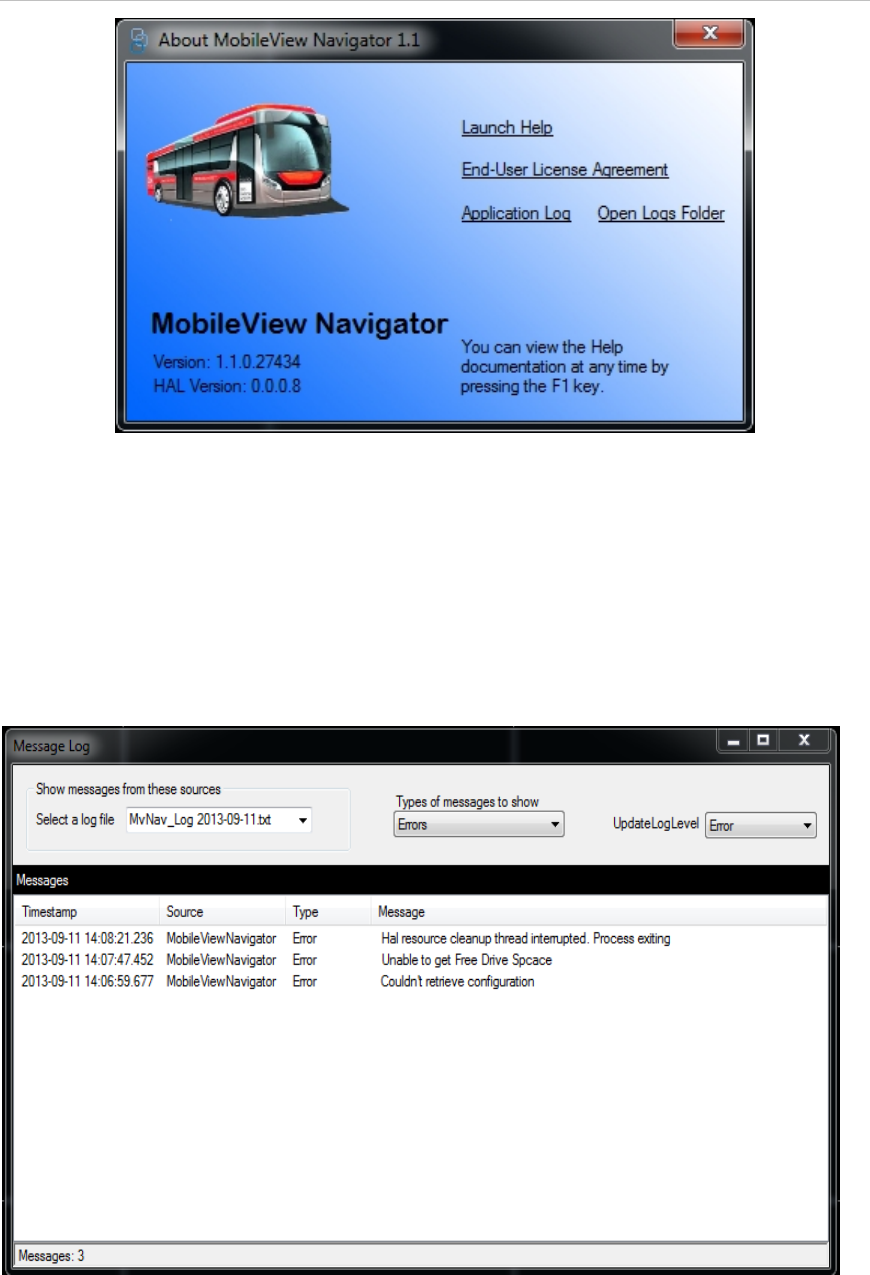
Selecting the icon opens the screen displaying the MobileView Navigator
version.
Chapter 4: Basic Operations
26 MobileView 3000 Navigator User Manual
Figure 29: The About Window
Selecting the ”Application Log” link opens the Message Log window ,where user
can view different types of log messages; user can filter the types of messages
by selecting the appropriate type in “Types of messages to show” drop down.
User can also update the Log Level as desired by select the appropriate log type
in “UpdateLogLevel” dropdown.
Chapter 4: Basic Operations
MobileView 3000 Navigator User Manual 27
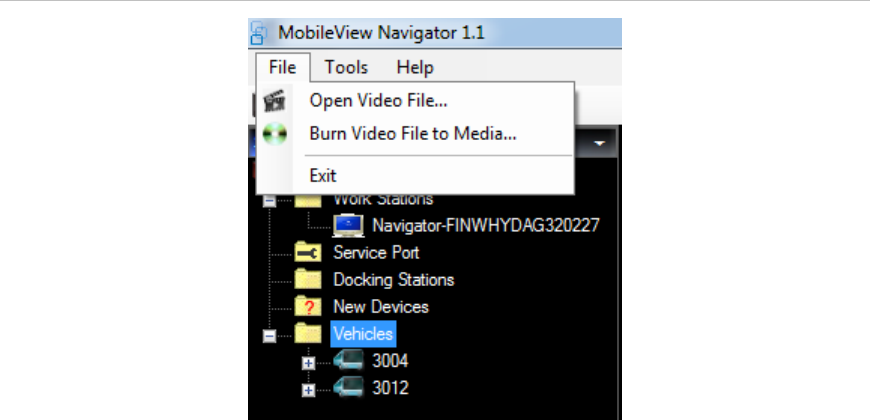
Exit
To exit from MobileView Navigator 1.1, select the File Menu and select Exit.
Figure 30: The File Menu

Chapter 5: Detailed Opeations
29 MobileView 3000 Navigator User Manual
Chapter 5
Detailed Operations
Initial UI Startup
Application will launch the main UI based on user permissions. The Vehicle
selector tree will be populated with folders and devices from the database. Each
device in the tree will be highlighted according to the reachability status. Devices
that cannot be reached will be in italic font and devices that can be reached will
be in normal font.
Main UI toolbar will have following items enabled based on user permissions –
Admin user: Address Book, Task Scheduling, Manage Users, Password
Management, local file Playback, Settings, CD Burning, Service Information,
Image Log, Erase Video data on Hdd.
Non Admin user: Address Book, Password Management, local file Playback, CD
Burning, Service Information, Image Log.
Note - If service is running on the machine the service information icon will be in green otherwise it will be
red in color.
- Service Active - Service Inactive
Main UI will have the following items disabled on launch – Alarm Search, Main
Timeline and associate controls, Video Controls and Disk Analysis on timeline.
Chapter 5: Detailed Operations
30 MobileView 3000 Navigator User Manual
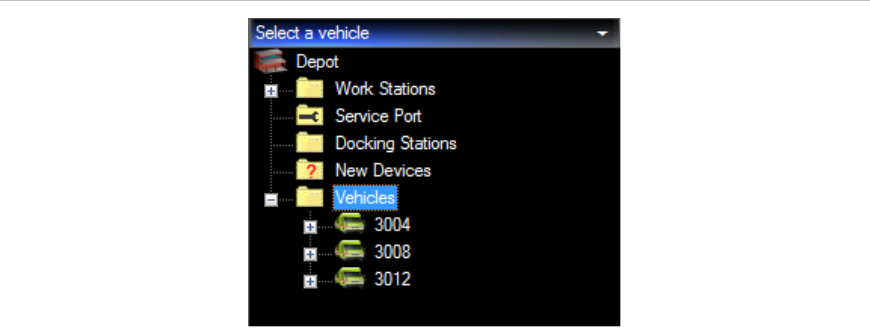
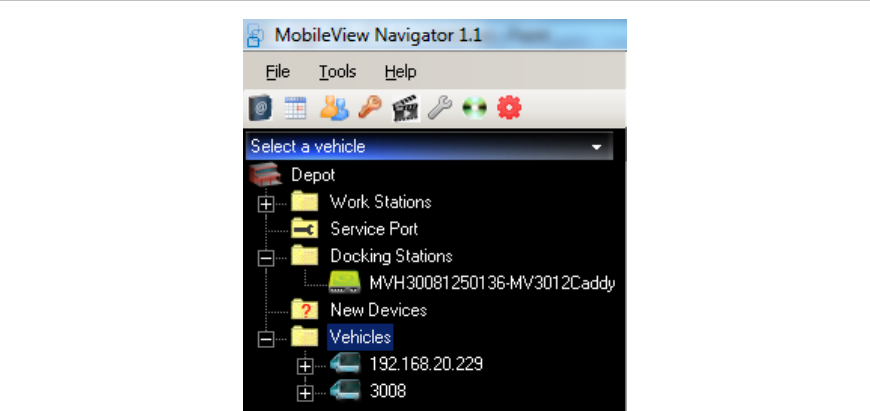
Vehicle Selector
On user login, Main UI is displayed to the user. Application will check the Folder/
Device list available in its database. All the folders and respective devices in
folders are loaded into the Vehicle Selector tree.
The state of devices loaded is represented on the tree. (Reachable/Not
reachable)
Devices that cannot be reached will be in italic font and devices that can be
reached will be in normal font
If any Caddies are discovered they are added under Docking Stations. If any new
devices are discovered they are added under New Vehicles node.
Figure 31: Vehicle Selector Tree
Import More than One Vehicle
In order to import more than one vehicle that are present in ‘New Devices’ folder
to ‘Vehicles’ folder, press ‘Ctrl’ button from the keyboard and with the help of the
mouse select the devices present under the ‘New Devices’ folder, release the
‘Ctrl’ button from the keyboard and with the help of the mouse drag them from
‘New Devices’ folder to ‘Vehicles’ folder.
Chapter 5: Detailed Operations
31 MobileView 3000 Navigator User Manual
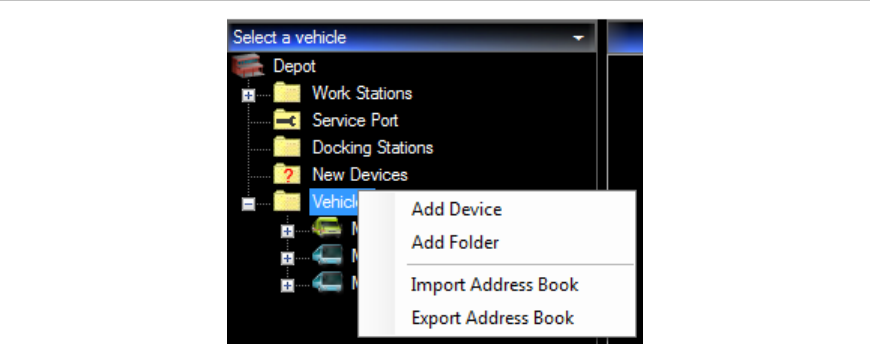
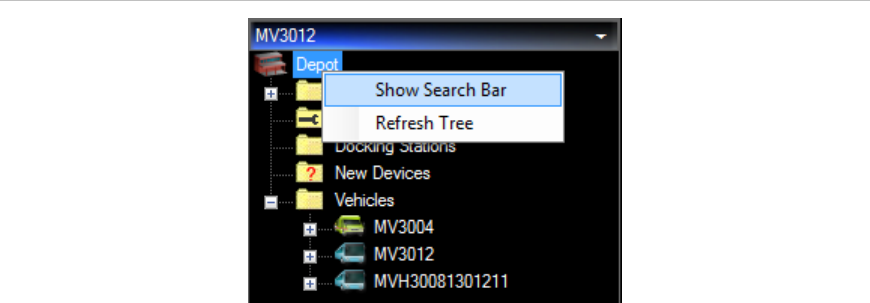
Context Menu
When user performs right click on a Tree node in Vehicle selector following
options will be provided to the user based on the type of the Node.
Below list represents complete right click options.
Depot Node
• Show Search Bar
• Refresh Tree
Work Stations – No OptionsWork Station discovered
• Open File
Service Port
• MVIII
• MV 3004
• MV 3008
• MV 3012
Service Port(Device Added)
• Device - Reachable
• Run Health Diagnostics
• Disk Analysis
• Open Live
• Open Playback
• Last 15Minutes
• Last 30Minutes
• Last 1 Hour
• Last 24 Hours
• From Beginning of Disk
• Start Playback at Time
• Close
• Upload Configuration File
• Download Configuration File
• Upload Firmware
• Configure Device
• Get HDD Log
• Get Log File
• Reboot Device
• Properties
Chapter 5: Detailed Operations
32 MobileView 3000 Navigator User Manual
Docking Stations – No Options
Mv3008 Caddy-1 (Caddy discovered)
• Disk Analysis
• Open Playback Video
• Last 15Minutes
• Last 30Minutes
• Last 1 Hour
• Last 24 Hours
• From Beginning of Disk
• Start Playback at Time
• Close Videos
• System Log
• Properties
• Get HDD log
•
New Devices Node – No Options
Vehicles Node
• Add Device
• Add Folder
• Import Address Book
• Export Address Book
Chapter 5: Detailed Operations
33 MobileView 3000 Navigator User Manual
Folder
• Add Device
• Add Folder
• Delete Folder
Device - Reachable
• Run Health Diagnostics
• Disk Analysis
• Open Live
• Open Playback
• Last 15Minutes
• Last 30Minutes
• Last 1 Hour
• Last 24 Hours
• From Beginning of Disk
• Start Playback at Time
• Close
• Upload Configuration File
• Download Configuration File
• Upload Firmware
• Configure Device
• Get HDD Log
• Get Log File
• Reboot Device
• Retire Device
• Properties
Device - Not Reachable
• Delete
• Properties
Import/Export Address Book
User selects Import Address Book option from context menu. This will open a file
dialog to choose .csv or WaveReader file for import. On selection of Address
Book by the user, application will load the Address Book file, parse the contents
and populate the Vehicle Selector tree under folder named with current datetime.
All imported devices/folder are added to the application database.
Chapter 5: Detailed Operations
34 MobileView 3000 Navigator User Manual
Figure 32: Import Address Book menu
If Export Address Book is selected from the context menu of the Vehicles node, a
file save dialog will be opened to choose where the exported file has to be saved.
All the Devices in the Vehicles Selector tree will be exported. HDD Caddy
information from the tree will not be exported.
The exported file will be in .csv format. The name of the file will include the
mobile s/w version from which the file has been exported. The exported file
includes the device information along with Camera information with all the
headers.
Note: The address book will not contain any hard drive caddy information as the
hard drives are not configured in the vehicle selector and are automatically
populated when a caddy with HDD is plugged to USB port of the PC.
Add Folder to Vehicle Selector
User chooses Add Folder from Vehicles context menu. This will add new folder s
“New Folder 1” (by default) under Vehicles folder. The title of the folder will be in
edit state and user can enter his/her preferred name.
Note: Feature is similar to the New Folder addition in windows explorer.
Chapter 5: Detailed Operations
35 MobileView 3000 Navigator User Manual
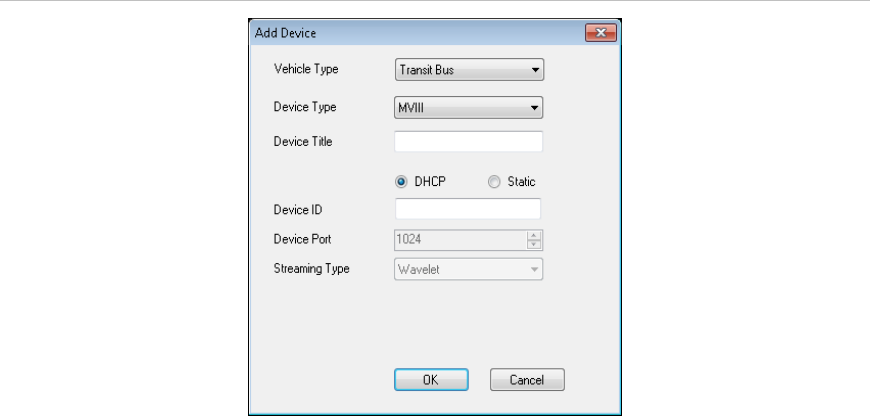
Add Device to Vehicle Selector
User chooses Add Device from Vehicles context menu. This will open Add
Device dialog. The Dialog will accept several parameters related to the Device
such as Device Title, Device Type, Device ID, Device Port, and Streaming Type.
Figure 33: Add Device Dialog window
After providing the required information and click OK, Device is added to the
Vehicle Selector under selected folder.
Initially Device is added in a not reachable state. Once the device is discovered,
the reachability of the device is updated in the tree.
If Device is reachable at the time of adding the device, the reachability status will
be updated.
Search for Device in Vehicle Selector
User selects the search option from the root node context menu. This will open a
search text box above the root node with a search icon. It is a toggle control with
a text box and a search icon. User enters the name of the Device /Folder and
clicks on search icon.
Chapter 5: Detailed Operations
36 MobileView 3000 Navigator User Manual
Figure 34: Show Search Bar command
The selected device or folder gets highlighted with background color. Scroll bar
automatically scrolls to the item selected when the Vehicle list is large. The next
device/folder that meets search criteria can be reached by clicking on the search
icon again. If the selection reaches the end of vehicle selector then all search
results will be highlighted and cursor will reach the first item.
Device Discovery
Application will automatically look for devices that are reachable and will update
their status in vehicle selector.
When new device is discovered, application places the device in “New Vehicles”
folder. Thereafter user can
• Either Ignore the device or
• Drag & drop the device in “Vehicles” Folder indicating that, he wants to
monitor and exercise all the options available in MvNav on that device.
Typical states of Devices in Vehicle Selector apply to both “Vehicles” and “New
Devices” folder:
• Device not reachable (Grayed Out and Italicized)
• Connected/Reachable (Normal Font)
While dragging the device from “New Devices” folder to “Vehicles” folder, If the
Device is reachable, Cameras will be auto populated. After the cameras are
populated, user can start accessing the video Live/Playback from the Device.
Chapter 5: Detailed Operations
37 MobileView 3000 Navigator User Manual
Work Station
User can view local files to play by selecting the file from Open file dialog. It
Contains history of all the local files played in the navigator.
To clear a file, user can select release option from file’s context menu.
Caddy Discovery
Application will automatically look for hard drives that are added to the
computer/Network and will update vehicle selector by adding newly found
caddies under Docking Stations node. If a caddy is removed from the Computer
after it is discovered that caddy will disappear from the Docking Stations node.
Once a caddy is added to the tree user can perform the following video
operations:
• Play video from disk beginning.
• GoTo option on timeline bar can be used to view video from any date and
time.
• Use timeline controls to perform video operations like Fast Forward, Fast
Reverse, Frame Next and Previous Frame.
• User can click on Map icon to view the vehicle moving on the map.
The disk analysis for the first camera is displayed by default on timeline bar. The
disk analysis for selected camera is displayed on timeline bar.
.
User can access log files on caddy by clicking on “Get HDD Log” operation from
the Caddy context menu.User is allowed to select timelines within the range of
video recorded i.e. within
“From” and “To” times of the recorded video.
Chapter 5: Detailed Operations
38 MobileView 3000 Navigator User Manual
Figure 35: Caddy added to Vehicle Selector Tree
Device Connection
Application allows only one Device to be connected and accessed at a time. User
can choose any Device in the tree. The application context switches to the
currently selected Device.
The selected device Title is displayed in the Vehicle Selector caption bar.
Vehicles in the “New vehicles” folder will not be accessible until they are dragged
into the “Vehicles” folder.
When user selects a Device, if the connection is successful, following updates
are made to the Main UI:
• Once connected device will have all the available cameras populated and
expanded
• Timeline and video controls will be in disabled state. They are enabled
only while viewing video.
• Application will allow only one device or caddy to be connected at a time.
When user connects to a new device, the currently streamed videos will
be closed.
• User can access any feature available on the Device through context
menu.
• Current selected Device Title is displayed in the Vehicle Selector caption
panel.
Chapter 5: Detailed Operations
39 MobileView 3000 Navigator User Manual
Connected Device goes out of Network
When device goes out of network while user is performing some operations, user
will be provided with a status message indicating the Device has gone out of
network.
The Vehicle selector Icon will be updated to indicate Device not reachable status.
Further, if Live or Playback video is playing for the Device, all the Tiles will be
closed and Layout will be brought to the initial state.
All objects related to the Device state will be cleared.
Video Tile Layout Manager
User can change the video tile layout from layout selector. Layout selector will
show all available layouts. Application will allow user to select any layout and
display only those number of cameras. Rest of the cameras will be closed
Opening and closing of an individual camera stream is supported in the
application.
When user selects a new layout, all the existing video streams and controls will
be moved to the new layout.
Layout is supported for Live, playback and Local File Playback.
Figure 36: Changing Layout

Chapter 5: Detailed Operations
40 MobileView 3000 Navigator User Manual
Alarm Search
Simple Search
Default simple search is selected. The default selection is 1 day before the
current date. Simple search consists of Months calendar, in which default current
date is selected.
When user selects Device on the vehicle selector, click on Search button. User
can click on Clear button only after the search result message displayed in status
and clears the search result panel.
Search filters supported by simple search are for single day selection.
The results will be displayed in a grid display below the search parameters area
and separately in Search result Form clickable at right corner of search Results
panel as Show Details.
The clear button will clear the results found from search.
Figure 37: Simple Search tab
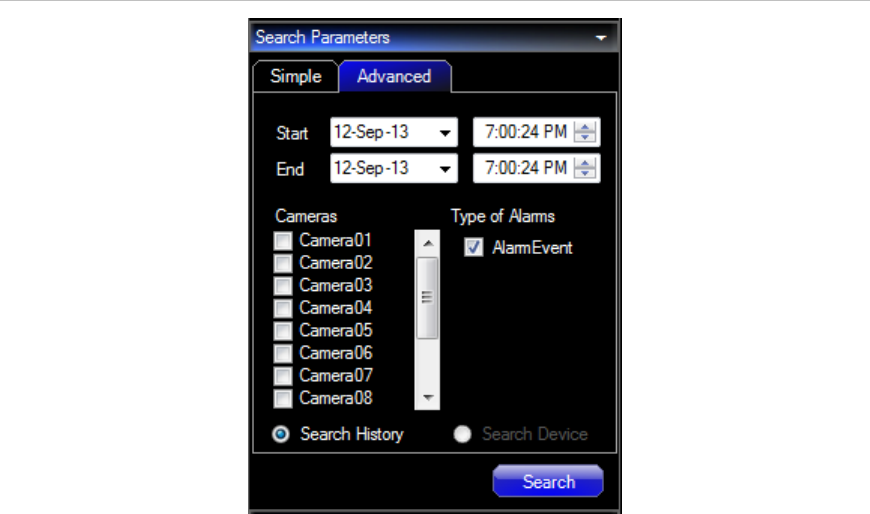
Advanced Search
User selects Advance search by selecting the advanced tab.
Based on the device selected, Device cameras are populated in the checkbox
list. Types of Alarms with check boxes are dynamically displayed by capabilities
of currently selected device.
Chapter 5: Detailed Operations
41 MobileView 3000 Navigator User Manual
Figure 38: Advanced Search tab
The following filters for alarm search will be supported.
• Alarm Event
• Start time
• End time
• Cameras
User can select to perform search from Search History or Search Device.
After selecting the filters, user clicks on Search button. Search button will be
disabled. User can click on Clear button only after the search result message
displayed in status and clears the search result panel.
The results will be displayed in a grid display below the search parameters area
and separately in Search result Form clickable at right corner of search Results
panel as Show Details.
The clear button will clear the results found from search.
Search Results
User can double click on the Time column link from search results to view the
video in video panel starting from that time. If playback video is currently playing,
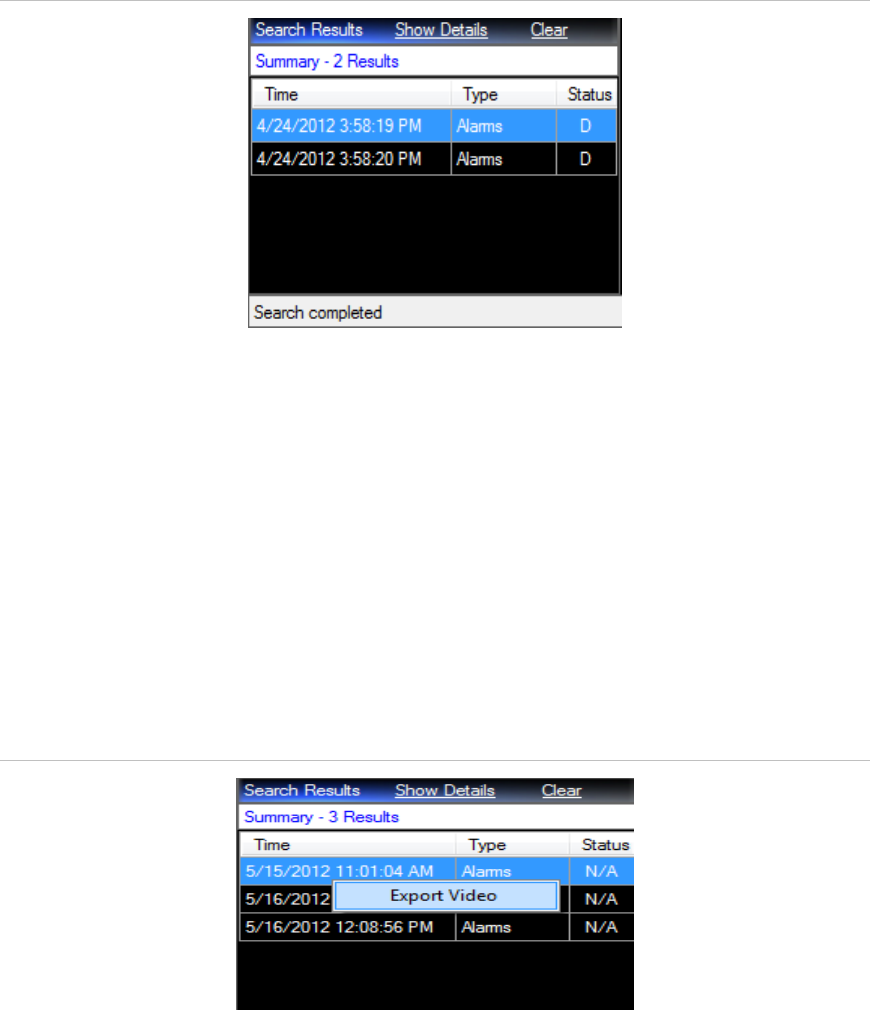
Chapter 5: Detailed Operations
42 MobileView 3000 Navigator User Manual
all the cameras will seek to the new time. If video is not playing, application will
open streams for all cameras at the alarm time.
Figure 39: Search Results screen
User can double click on the Start time column link from search results to view
the video in video panel starting from that time. If playback video is currently
playing, all the cameras will seek to the new time. If video is not playing,
application will open streams for all cameras at the alarm time.
User can also export the video from search results by performing right click on
any of the search results and select export video.
If auto download is enable for the device and status is changed to “C”, if user
double clicks on the Start time column link from search results, downloaded clip
is played as local file playback.
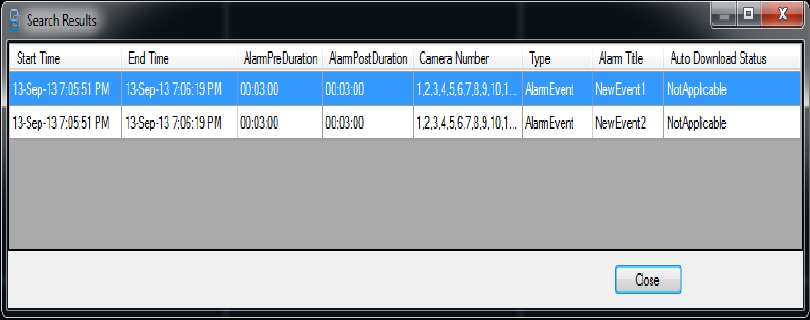
Clicking on Show Details will open separate window showing complete details.
Figure 40: Search results
Chapter 5: Detailed Operations
43 MobileView 3000 Navigator User Manual
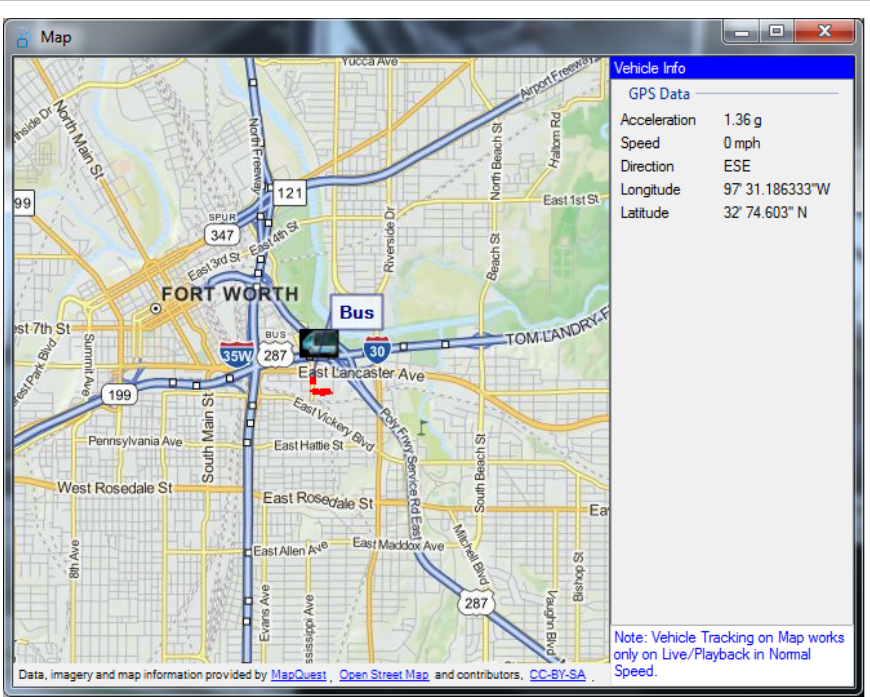
Track Vehicle on Map
User is playing Live or Playback video and clicks on map control for tracking the
Vehicle on the Map. The map control dialog opens with map displayed at zoom
level 8 on the given route. User has option of 16 zoom levels.
The Vehicle will be tracked as the video is played through a bus Icon on the map.
The Icon moves along the route with a track being drawn along the path that the
Vehicle has traveled.
User can perform Pan on the map in all directions in the selected zoom level.
Chapter 5: Detailed Operations
44 MobileView 3000 Navigator User Manual
Figure 41: Map Screen
Video Download Manager
Scheduler dialog provides snapshot of current tasks and provides facility to
modify pending tasks to download video from device.
User can schedule to download video from a device. The Download Manager will
take care to download video in sequential order if device is currently connected.
There are six types of task status filters that displays the tasks in the scheduler
accordingly
Completed
• Displays all the completed tasks
Pending
• Displays all the pending tasks

Chapter 5: Detailed Operations
45 MobileView 3000 Navigator User Manual
In-Progress
• Displays all the In-Progress tasks
Cancel Requested
• Displays all the Cancel Requested tasks
Canceled
• Displays all the Canceled tasks
Failed
• Displays all the failed tasks
There are three types of task
User Created Video Download Tasks
• These tasks are created by user
Automatic Video Download of Alarm Video
• Tasks created by application basing on alarms in device
Automatic Search tasks
• Task created to search the device for alarms for the duration it was offline
Device Filter: Filters the tasks as per the device selected.
Task Name Filter: Filters the tasks as per the task name.
Scheduler dialog will display the following information to the user:
• Title - Name of the Task
• Type - Indicates whether task is Search Task, Video Download Task or
System Download Task
• Priority- Indicates Priority
• Scheduled Time - Indicated time at which the task is scheduled
• Status - Can be any of the following:
Pending Video Download Task Yet to Start
InProgress Video Download Task is in progress
Completed Downloaded video has been saved to desired location by user
Failed Video Download has failed
CancelRequested User has decided to cancel the task
Canceled Task has been canceled
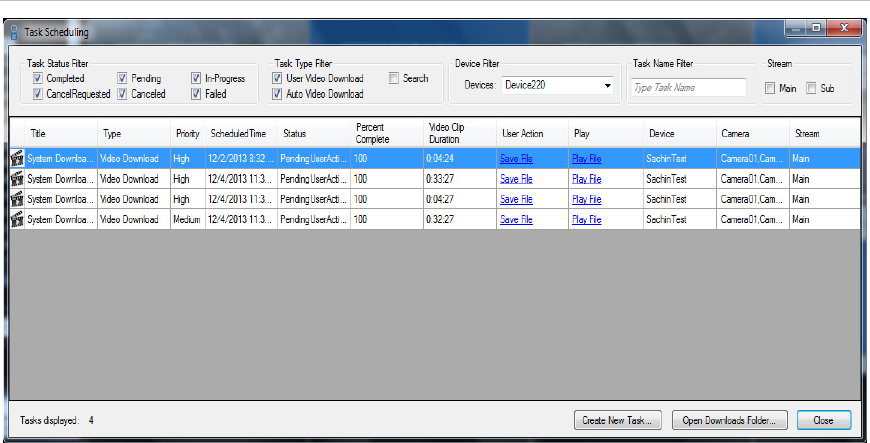
Chapter 5: Detailed Operations
46 MobileView 3000 Navigator User Manual
• Percent Complete Percent of Video Download completed
• Video Clip Duration Duration of the clip
• User Action User Actions
• Device Device used for download
• Camera Cameras from which the videos were downloaded
• Open Downloads Folder Button which shows location where videos were
originally
Downloaded (Always points to Video Download
Location in System Setting)
If there is an alarm notification from a device the application will automatically
schedule video download for the alarm.
On completion of download, video is saved to application created task specific
folder that user can view by click on Open Downloads Folder button.
Priority of Video download in Task Scheduling is same as the Event priority set in
the device event configuration menu for that device.
Figure 42: Task Scheduling Window

Chapter 5: Detailed Operations
47 MobileView 3000 Navigator User Manual
Download "Alternate Video Stream"
• Video streaming can be downloaded in two streams, Primary and Alternate.
• Video download facility is available only in playback mode or when playing local
file, but selection of Primary or Alternate is not available while playing local file,
only in device playback mode (Last 15 Mins/30 Mins ...) we have the facility to
choose either Primary or Alternate.
• Video download facility is disabled when in Live streaming
• In order to download video, playback video in Last 15 mins/30 mins/1 hr … then
select duration of video to export, video export button will be enabled.
• Click on the video export button once enabled which open a popup screen to
save the video
Figure 43: Video Export
• By default Primary stream is enabled, if you want to download Alternate Stream
chose the appropriate option and say start
A notification is provided for user to check free space.
User can schedule task to scheduler service
If space is not available in the video repository, then user will be provided with
warning message
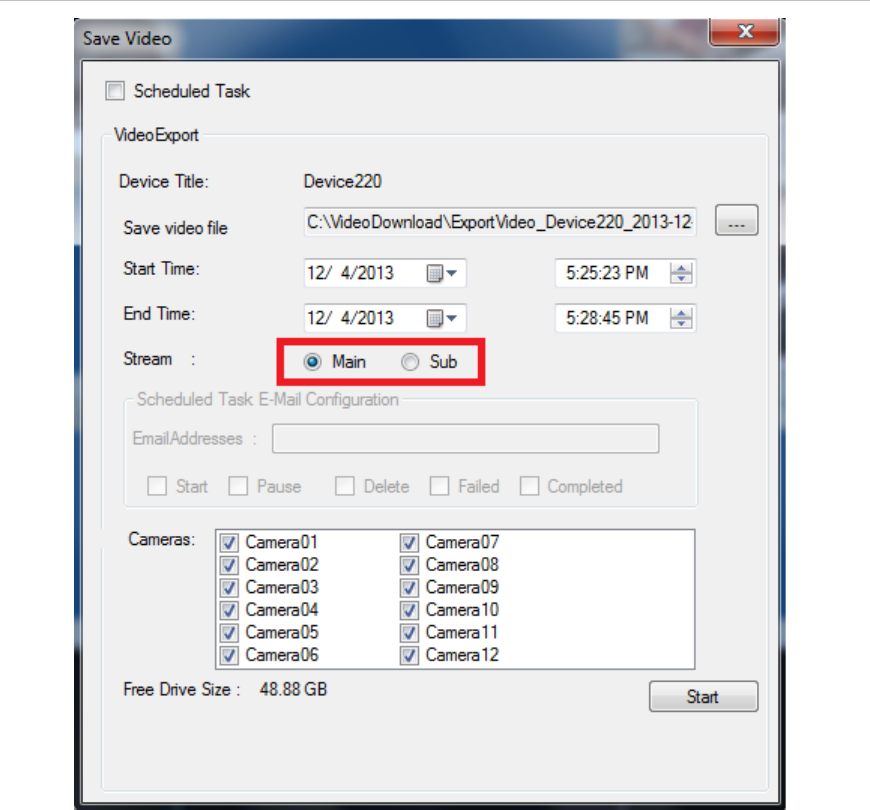
Chapter 5: Detailed Operations
48 MobileView 3000 Navigator User Manual
Figure 44: Save Video
Chapter 5: Detailed Operations
49 MobileView 3000 Navigator User Manual
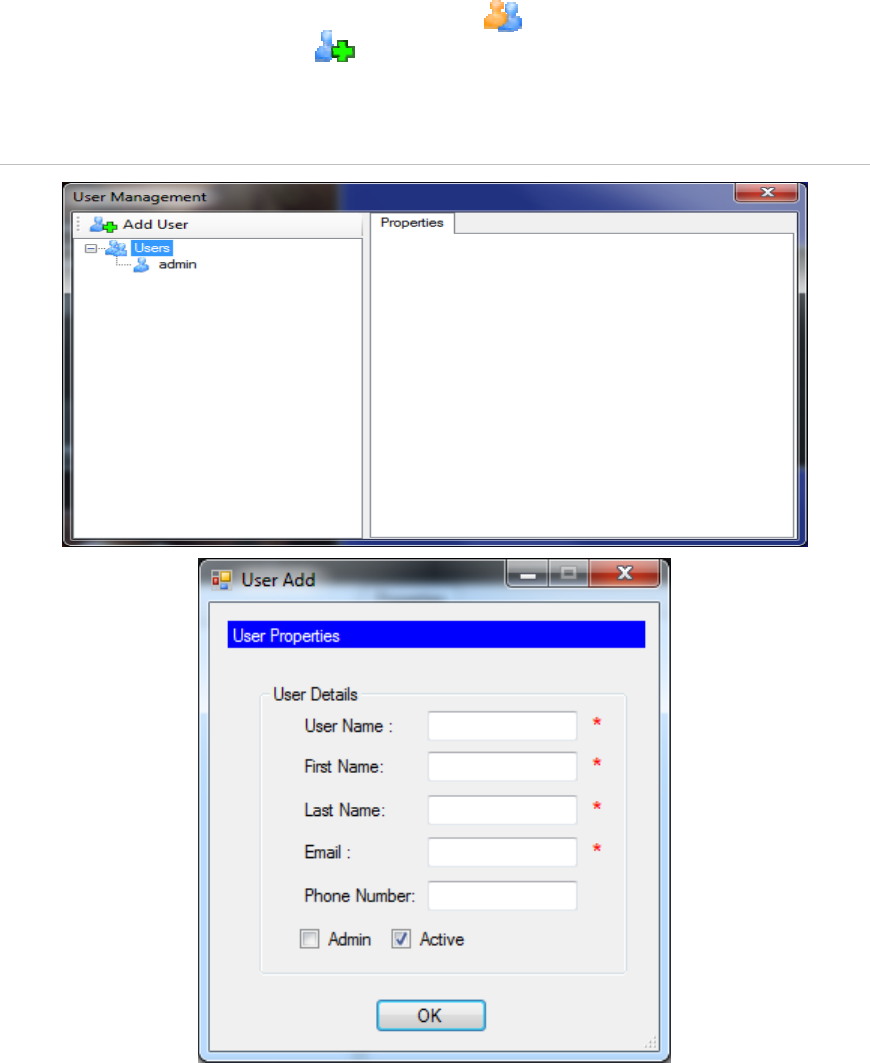
Manage Users
Admin user can access “User Management” toolbar button to Add or Modify
user. Clicking on “Add User” opens the User Add window where admin can
provide the necessary information to create a new user.
Figure 45: User Management Screen
After successfully added, a dialog box is displayed saying user is added
successfully. A system generated password is mailed to the email-id provided.
When the newly created user logs in for the first time he/she is forced to modify
the default password.
Chapter 5: Detailed Operations
50 MobileView 3000 Navigator User Manual
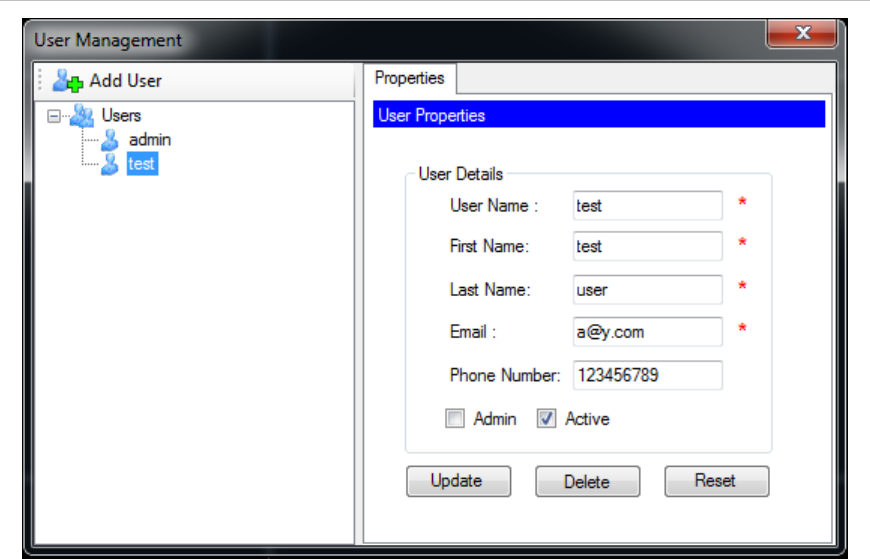
Update User Information
Admin user can also update the user information like first name, last name,
email, phone number, set user as admin by checking the checkbox against
Admin, set user status as Active by checking the checkbox against Active for
user (By default user is active and checkbox against Active is checked). After
updating the information Logged in user has to click on Update Account button to
save the new information.
Admin user can also reset the user password by clicking on reset button, which
will send a default password to the email-id provided.
Figure 46: User Properties
User Permissions
A normal user can perform all the operations available in the application except
Managing users, Task Scheduling and managing system settings.
Application Permissions:
Admin User
• Manage Vehicle List
• Task Scheduling
• Manage Users
Chapter 5: Detailed Operations
51 MobileView 3000 Navigator User Manual
• Password Management
• Local File Playback
• Settings
• Burn Video File to Media
• Services
• Erase Disk
Normal User
• Manage Vehicle List
• Password Management
• Local File Playback
• Burn Video File to Media
• Services
Vehicle Management
User opens the vehicle management dialog and double clicks on a row. The
selected device properties are opened in a device properties dialog. User can
modify the details of the device.
User clicks on the Add vehicle toolbar button on the mange vehicle list Form. Add
device dialog opens add new device dialog. The new device added is updated on
vehicle selector.
User selects a device row on mange vehicle list and clicks on the Remove
Vehicle button on toolbar. The selected device in the grid gets deleted from the
list. The device list gets updated on vehicle selector.
User can Export the vehicle list into .csv format file by clicking on the Export List
toolbar button.
User can import vehicles from address book (exported) files. User clicks on
Import List toolbar button. An open file dialog opens for user to choose a .csv file
(Mobile/Wave Reader) file. On selecting a valid file the vehicles list is imported
and displayed in the vehicle management grid and the same is updated in
vehicle selector.
Chapter 5: Detailed Operations
52 MobileView 3000 Navigator User Manual
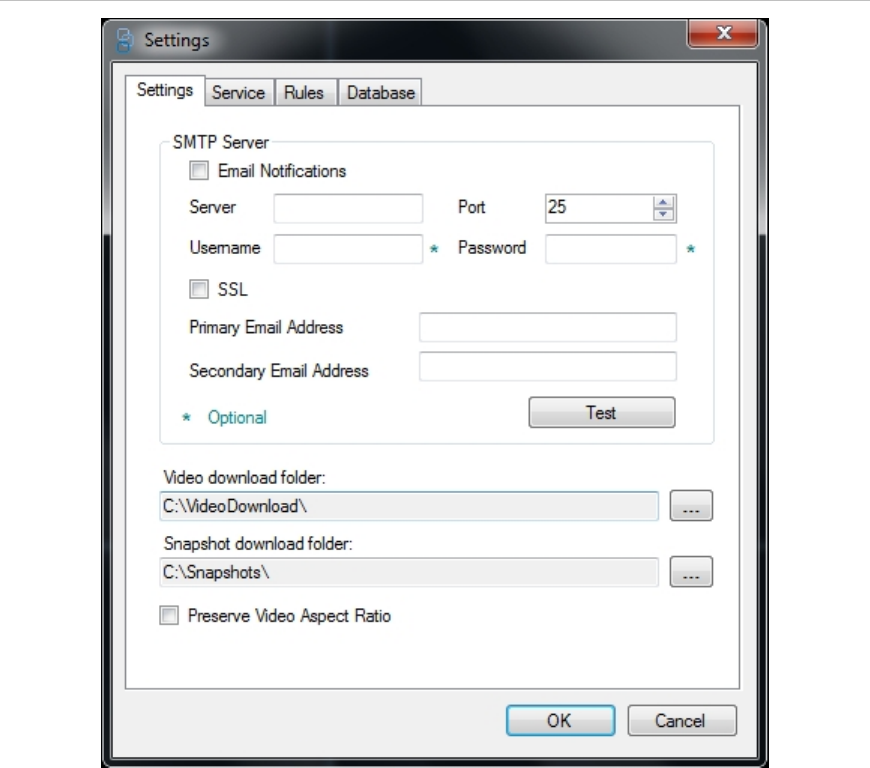
Settings
When user selects settings menu from the toolbar, a dialog will open that will
allow configuration of following parameters:
Potential configuration parameters:
Settings
SMTP Server (SMTP Server details)
Server
• Port
• Username
• Password
• SSL
• Email Notifications
• Primary Email Address
• Secondary Email Address
• Test Button (To test the connection)
Video Download folder (Default path where service will download the video
from the device)
Snapshot Download Folder (Default path where application downloads the
snapshots from the device)
Preserve Video Aspect Ratio.
Chapter 5: Detailed Operations
53 MobileView 3000 Navigator User Manual
Figure 47: Settings Dialog Window
Service (Shows details about Mobile Service)
Installed
Status (user can start/stop the service)
Running Since
Tasks
• Task Scheduling
• Maximum Concurrent Tasks
• Last Activity (Date when service performed last Task Scheduling)
Auto Download Settings (User can select the devices that are required to
perform auto download)
• Auto Download
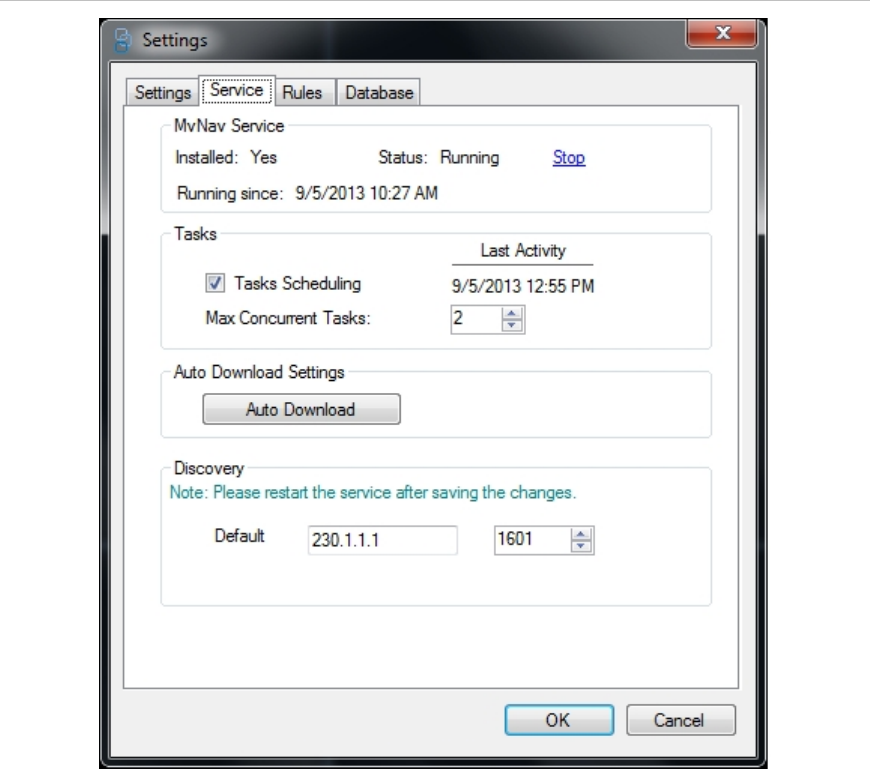
Chapter 5: Detailed Operations
54 MobileView 3000 Navigator User Manual
Device Discovery (Shows the IP address of the computer that devices alert
when they join the network)
• Default
Figure 48: Settings Service Tab

Chapter 5: Detailed Operations
55 MobileView 3000 Navigator User Manual
Rules
• Data Retention Policy (Specifies the time period task and downloaded data
will be maintained in application)
• Keep Search results for
• Keep task status for
• Keep Downloaded video for
Check repository status (displays all the files that would be deleted in
10days).
• Notifications (Allow user to set the capacity to notify the user when disk
space is below that capacity).
• Device management if enabled allows user to delete new devices after
certain period of configured time.
Figure 49: Settings Rules Tab
Chapter 5: Detailed Operations
56 MobileView 3000 Navigator User Manual
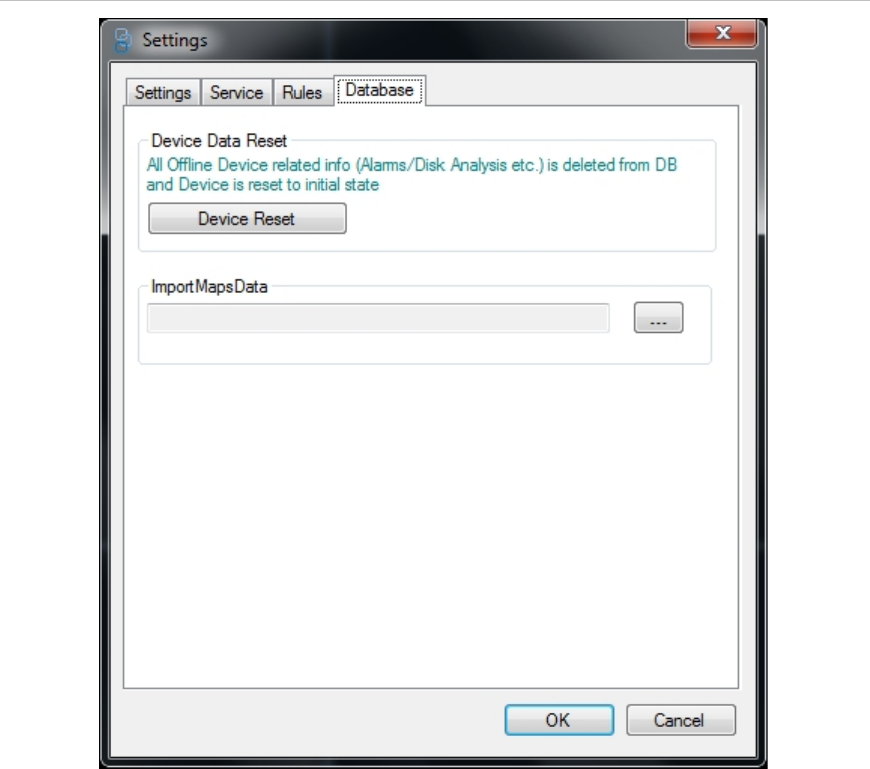
Database
Device Reset (Resets the device and deletes all the information related to offline
device from the database).
Application will use the setting where ever required.
Import Maps Data allows user to import Offline maps to the application.
Figure 50: Settings Database Tab
Chapter 5: Detailed Operations
57 MobileView 3000 Navigator User Manual
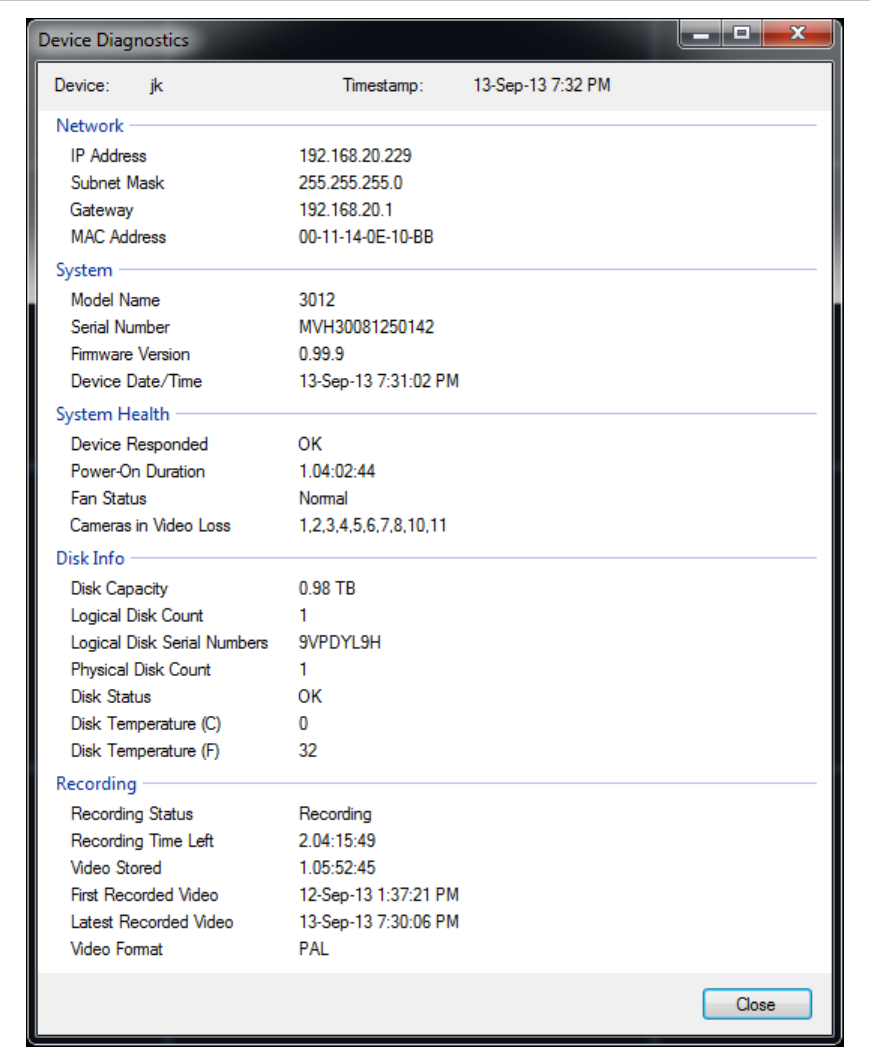
Diagnostics
User chooses Run Health Diagnostics from the Device context menu.
Figure 51: Diagnostics Screen
Chapter 5: Detailed Operations
58 MobileView 3000 Navigator User Manual
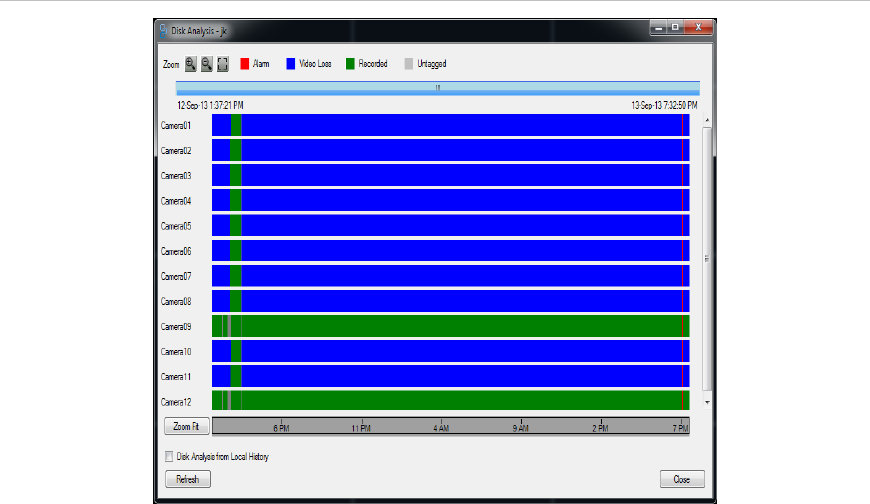
Disk Analysis
User chooses Disk Analysis from the Device context menu or Toolbar Icon. Disk
Analysis is retrieved and displayed in graphic format. Such dialog is generated by
HAL. The dialog will clearly show the video data available on the disk. It will show
the video type (Alarm, Video Loss, and No Video) for each camera through color
coding. Refresh can be done to get retrieve the latest disk analysis.
User can use mouse roller to zoom in and zoom out without holding the Ctrl key.
User can also zoom in to specific area of timeline within the specified right and
left marker boundaries.
By default, Disk analysis displays information to the earliest reported time on the
device media.
User can choose ZoomFit to fit the Disk Analysis to default layout.
Figure 52: Disk Analysis Screen
Chapter 5: Detailed Operations
59 MobileView 3000 Navigator User Manual
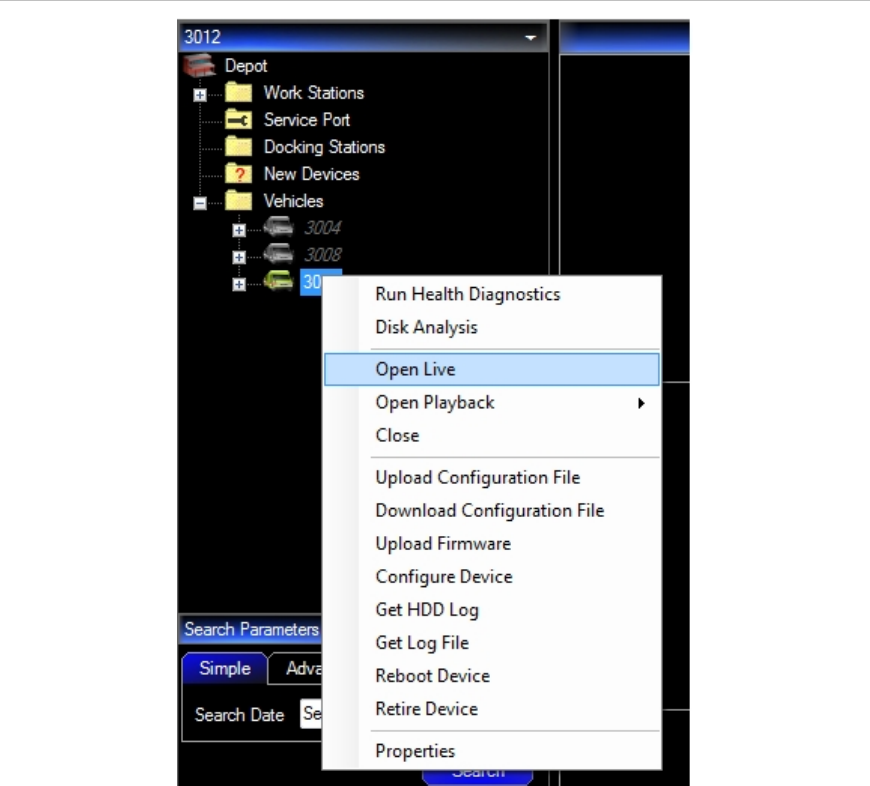
Open Live
User can choose “Open Live” from Device context menu to view live videos of a
device which is in 'Reachable' state.
Figure 53: Open Live Command
Chapter 5: Detailed Operations
60 MobileView 3000 Navigator User Manual
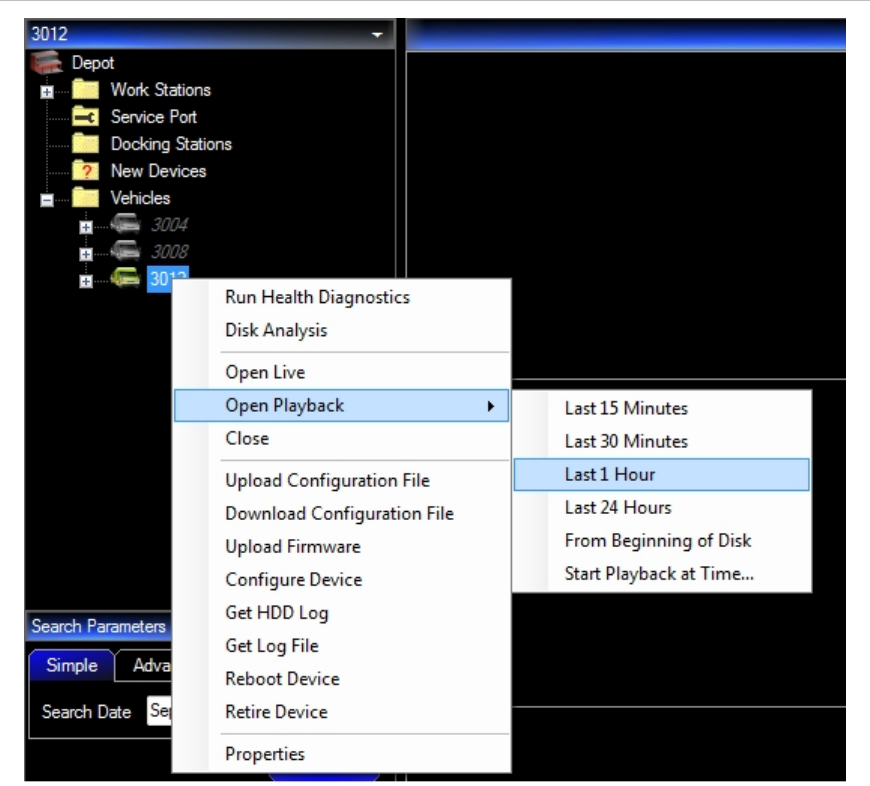
Open Playback
User chooses “Open Playback” from Device context menu to view playback
videos on device, user can select playback Last 15 Minutes or 30 Minutes … so
on.
Figure 54: Open Playback
Chapter 5: Detailed Operations
61 MobileView 3000 Navigator User Manual
Close
User chooses “Close” from Device context menu; this will close the video
streams playing in viewer pane.
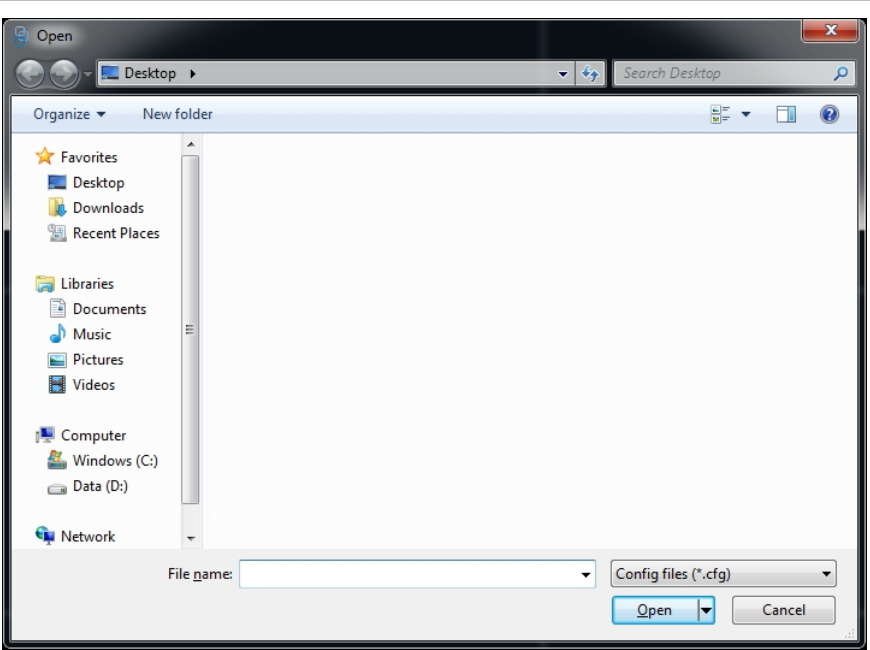
Upload Configuration File
User chooses Upload configuration from device context menu.
This opens the file dialog to select the Configuration file in “.cfg.” file format.
Figure 55: Open File Dialog
Chapter 5: Detailed Operations
62 MobileView 3000 Navigator User Manual
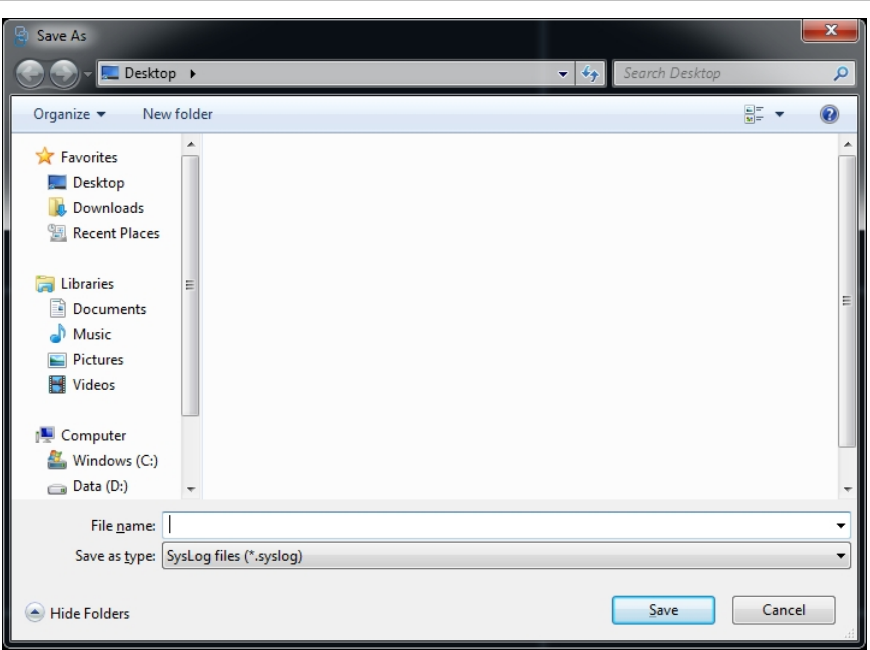
Download Configuration
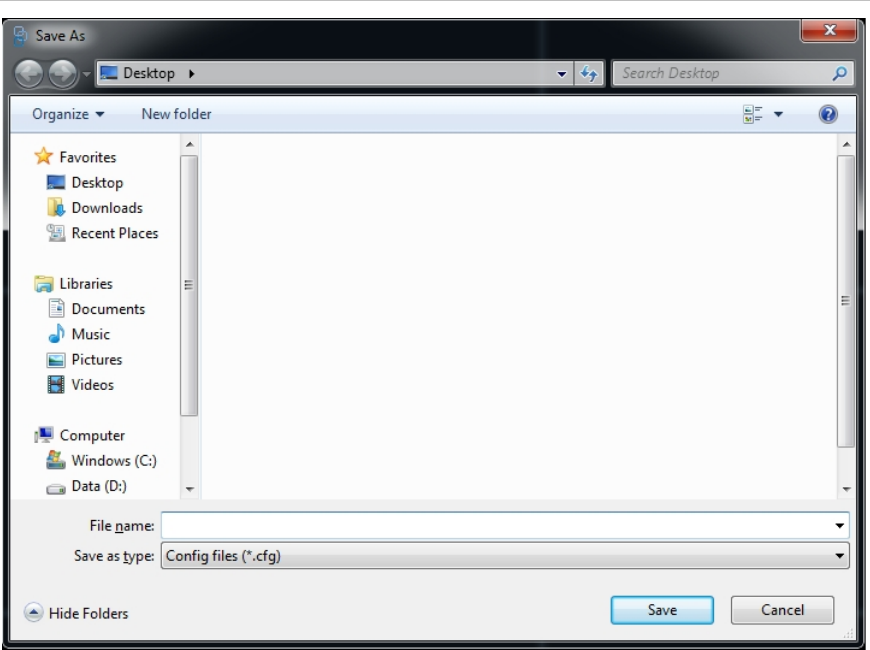
User chooses Download configuration from device context menu.
This opens “save as” file dialog, user can locate where to save the configuration
of device in “.cfg.” file format.
Figure 56: Save As Dialog
Chapter 5: Detailed Operations
63 MobileView 3000 Navigator User Manual
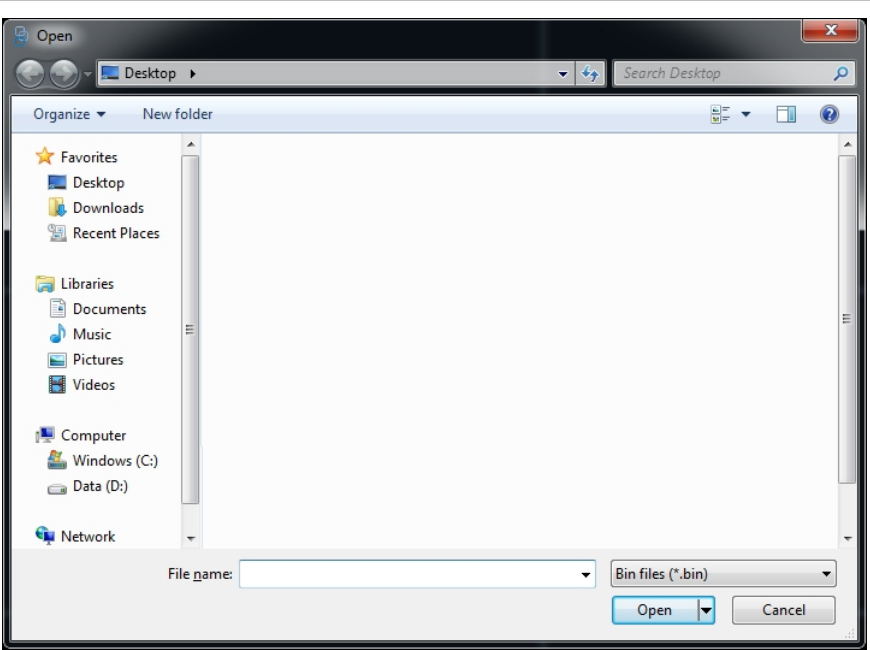
Upload Firmware
User chooses “Upload Firmware” from Device context menu .This will open a
dialog to browse the firmware for the device (.bin).You can select the appropriate
firmware and upload to the device.
Figure 57: Open File Dialog
Chapter 5: Detailed Operations
64 MobileView 3000 Navigator User Manual
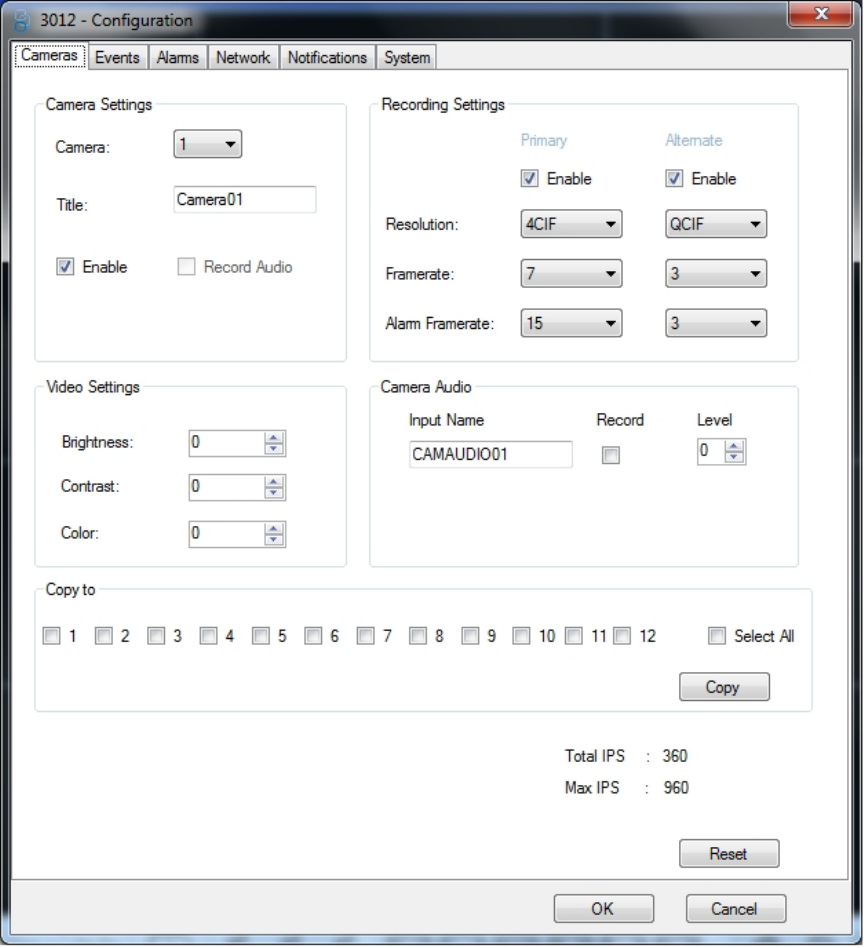
Configure Device
User chooses “Configure Device” from device context menu. This will open the
device configuration properties window in different tabs.
Reload option is provided in each tab to reload the default values for the
configuration.
Cameras:
Information related to device cameras is displayed in cameras tab.
Figure 58: Cameras Tab
Chapter 5: Detailed Operations
65 MobileView 3000 Navigator User Manual
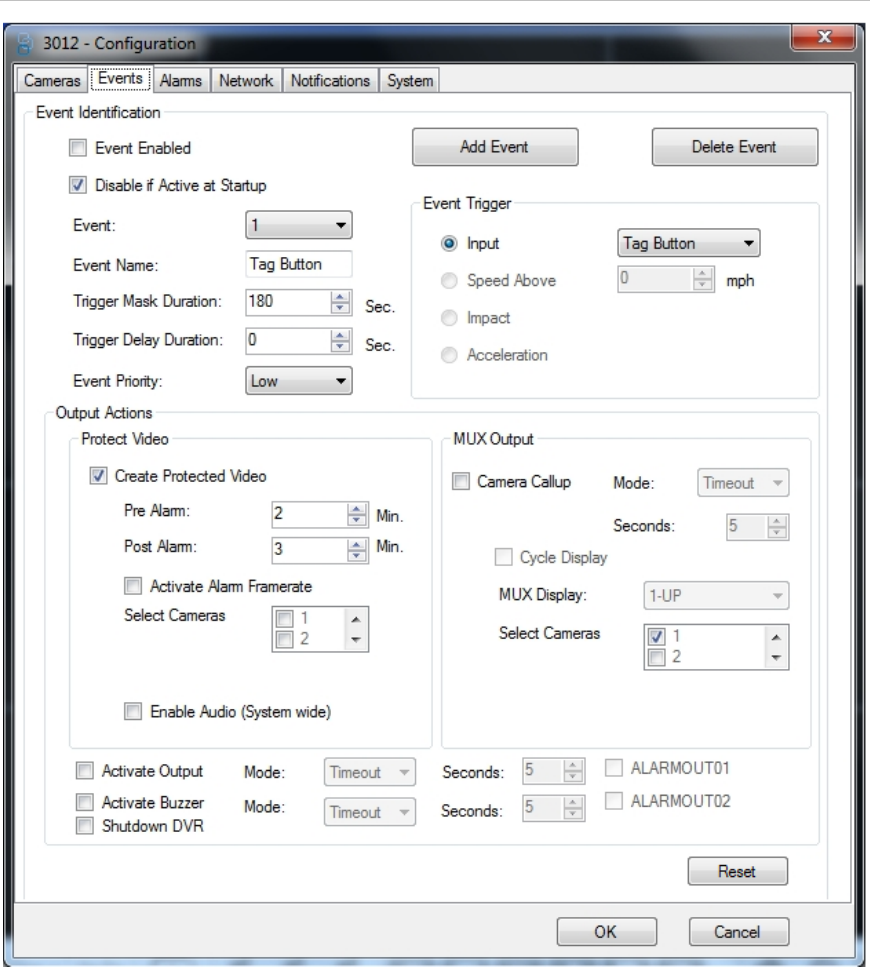
Events:
Information related to events is displayed in events tab.
Figure 59: Events Tab

Chapter 5: Detailed Operations
66 MobileView 3000 Navigator User Manual
Alarms:
Information related to alarms is displayed in alarms tab.
Figure 60: Alarm Tab
Chapter 5: Detailed Operations
67 MobileView 3000 Navigator User Manual
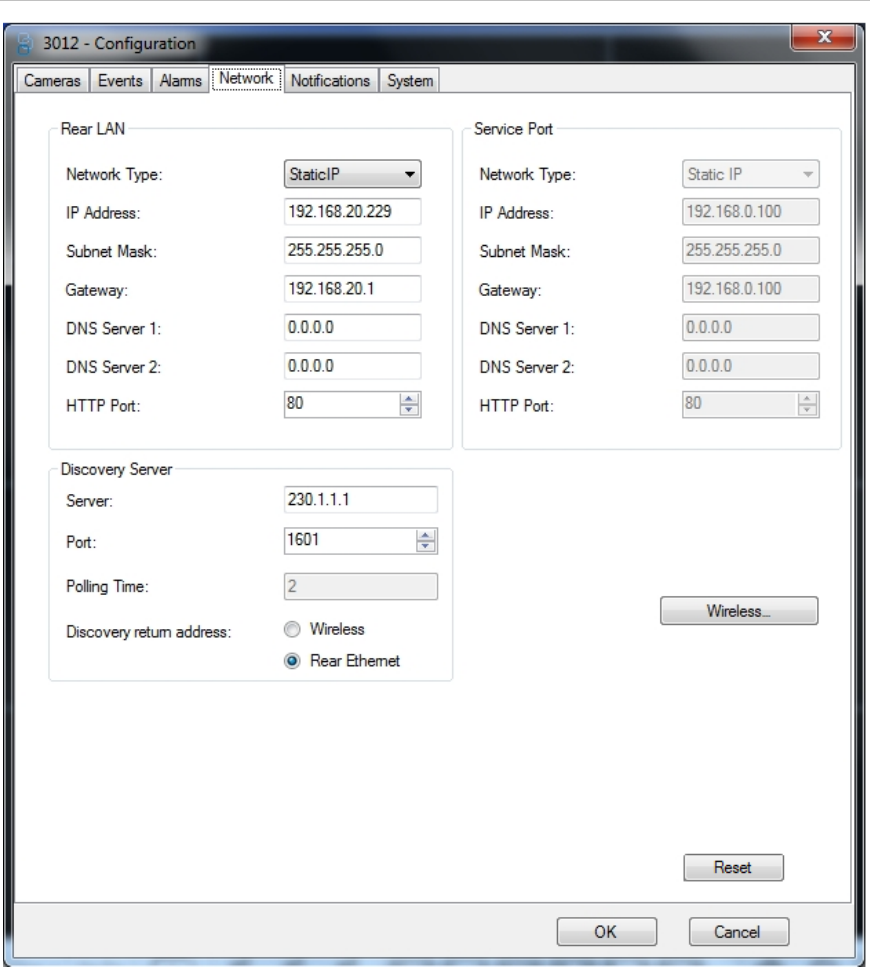
Network:
Information related to Network is displayed in network tab.
Figure 61: Network Tab
Chapter 5: Detailed Operations
68 MobileView 3000 Navigator User Manual
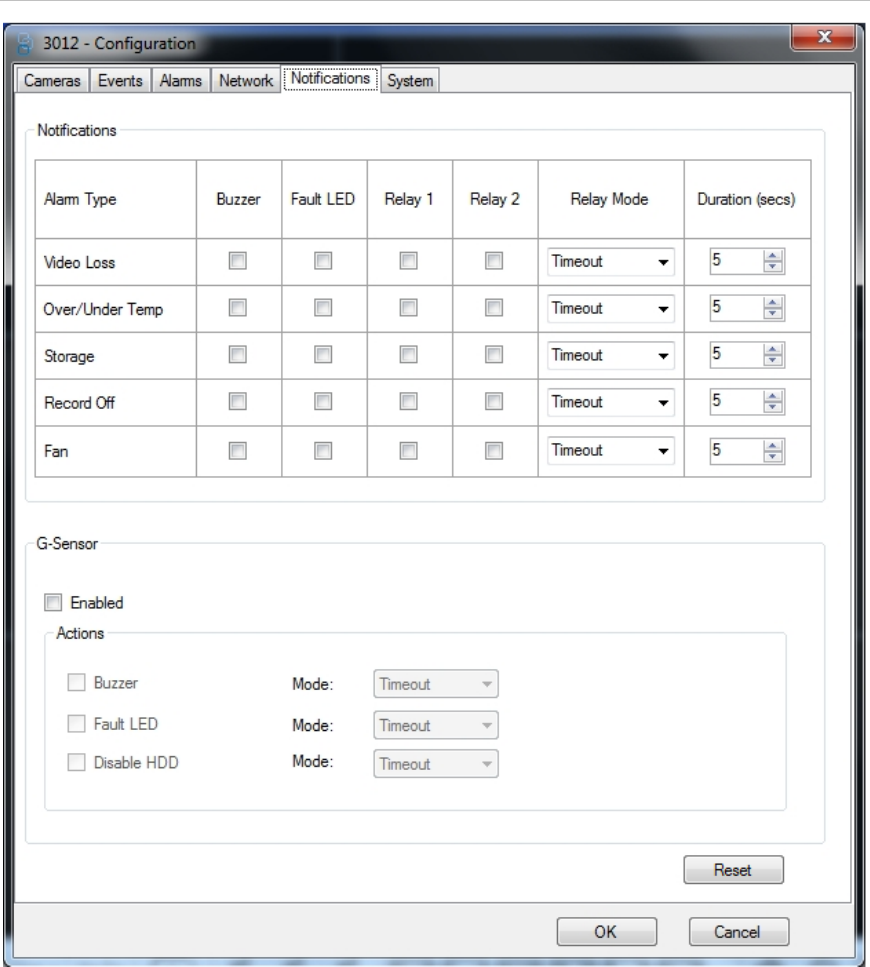
Notifications:
Information related to Notifications is displayed in Notifications tab.
Figure 62: Notifications Tab
Chapter 5: Detailed Operations
69 MobileView 3000 Navigator User Manual
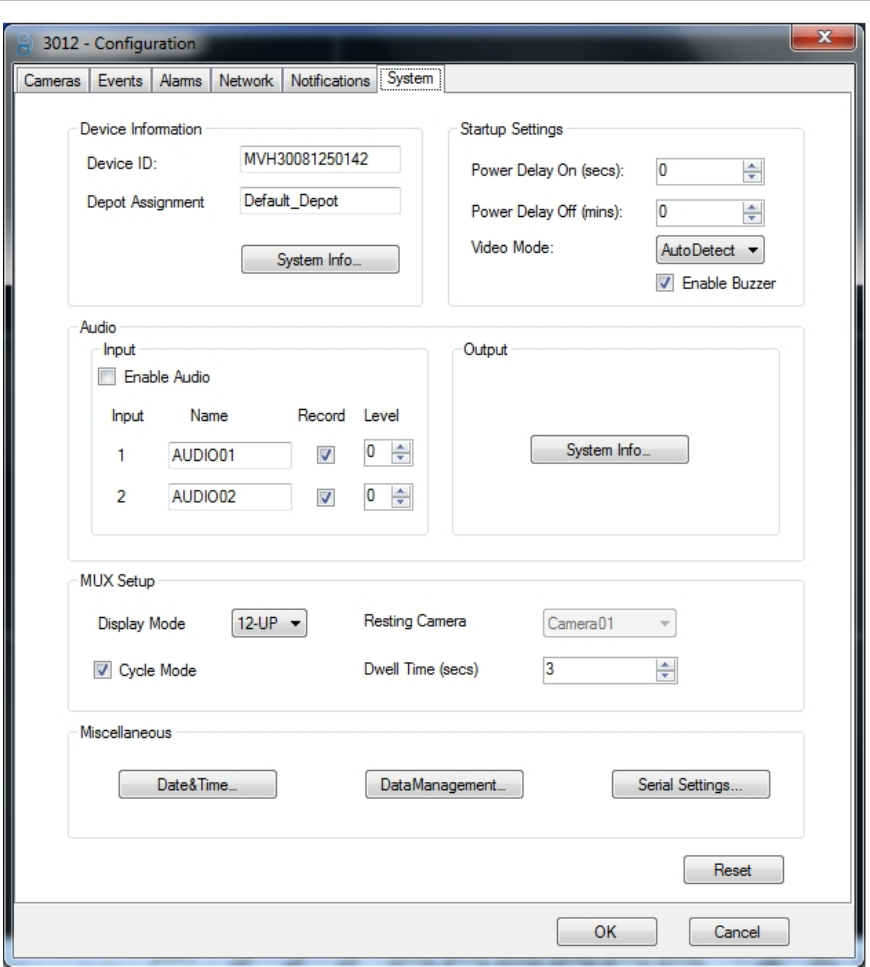
System:
Device related Information is displayed in system tab.
Figure 63: Systems Tab

Chapter 5: Detailed Operations
70 MobileView 3000 Navigator User Manual
Get HDD Log
User chooses “GetHDDLog” from device context menu. This will open a dialog to
save the log file in .hddlog format.
Figure 64: Open Dialog
Chapter 5: Detailed Operations
71 MobileView 3000 Navigator User Manual
Get Log File
User chooses “Get Log File” from device context menu. This will open a dialog to
save the log file in .syslog format.
Figure 65: Open Dialog
Chapter 5: Detailed Operations
72 MobileView 3000 Navigator User Manual
Reboot Device
User chooses “Reboot Device” from device context menu. This will reboot the
device.
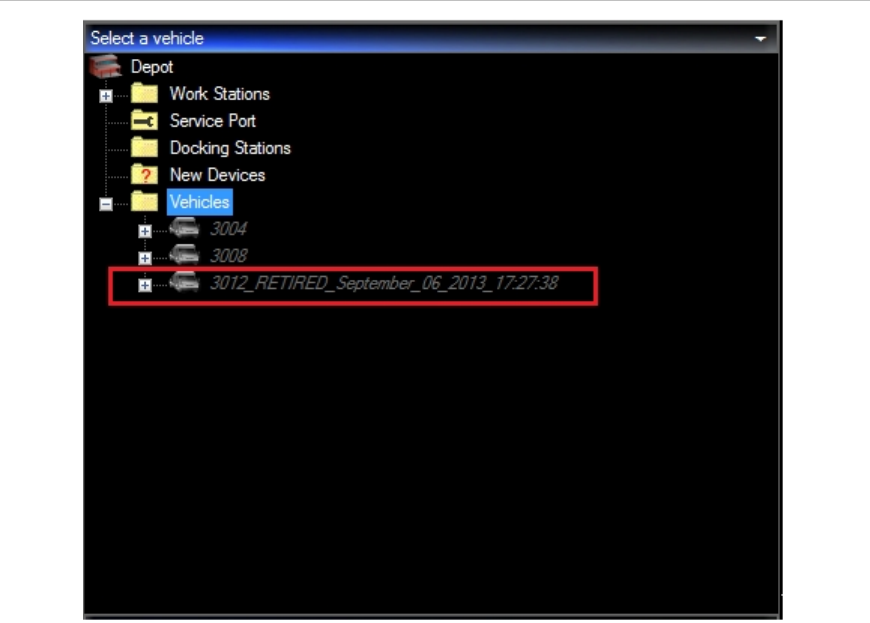
Retire Device
User chooses “Retire Device” from reachable device context menu. This will ask
a confirmation dialog whether to continue or not, once confirmed the device will
retire. The purpose of retiring a device is, if a device is in Reachable state, it
cannot be deleted directly, first it has to be retired which will free the resources it
is bound to and then finally deleted if required.
Figure 66: Select a Vehicle Dialog
Chapter 5: Detailed Operations
73 MobileView 3000 Navigator User Manual
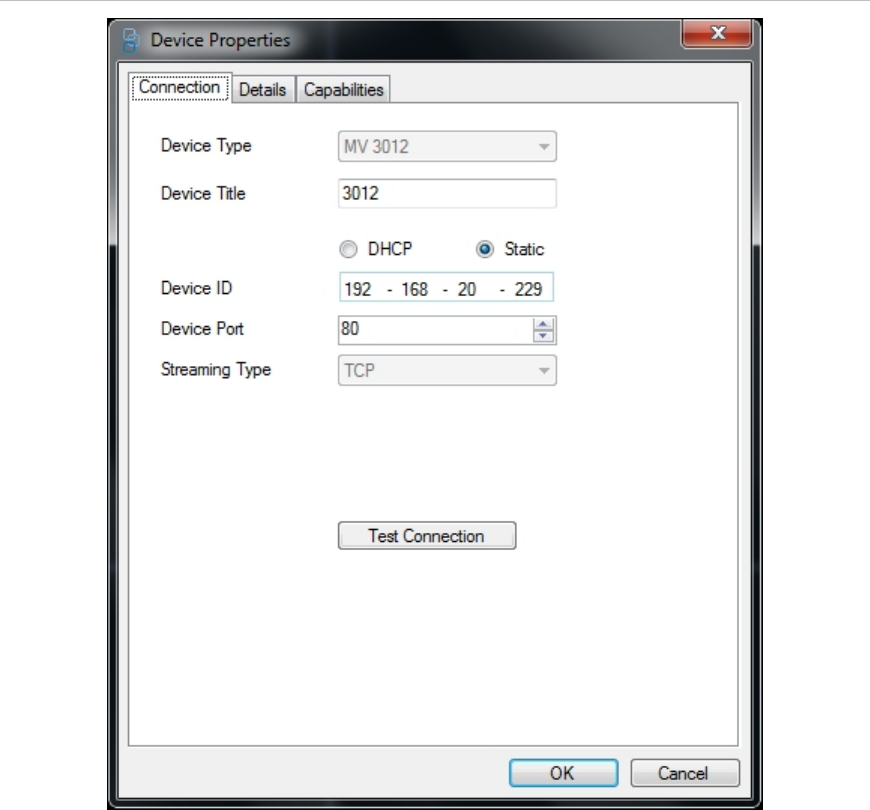
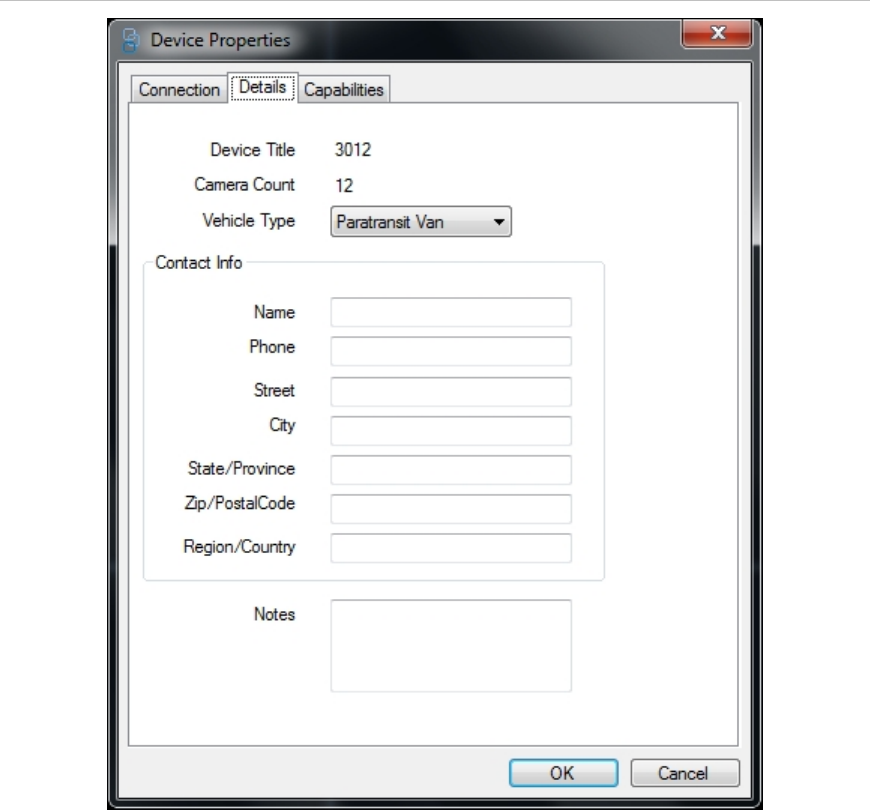
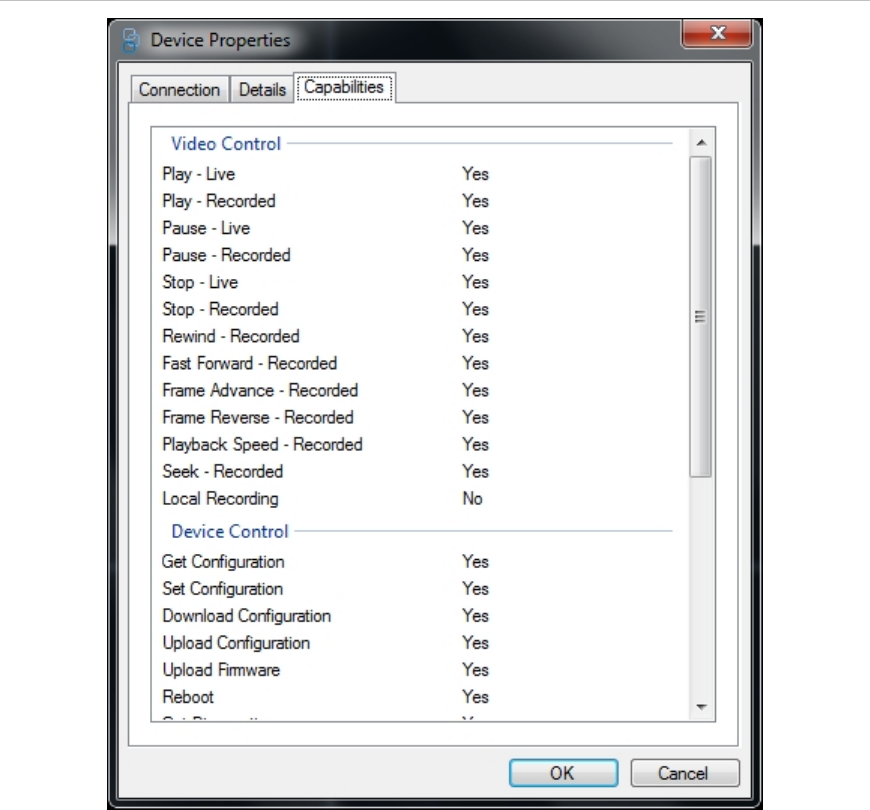
Properties
User chooses to Properties from device context menu, this will open the device
properties in different tabs.
Connection:
Device connection Information is displayed in Connection tab.
Figure 67: Connection Tab
Chapter 5: Detailed Operations
74 MobileView 3000 Navigator User Manual
Details:
Device details are displayed in Details tab.
Figure 68: Details Tab
Chapter 5: Detailed Operations
75 MobileView 3000 Navigator User Manual
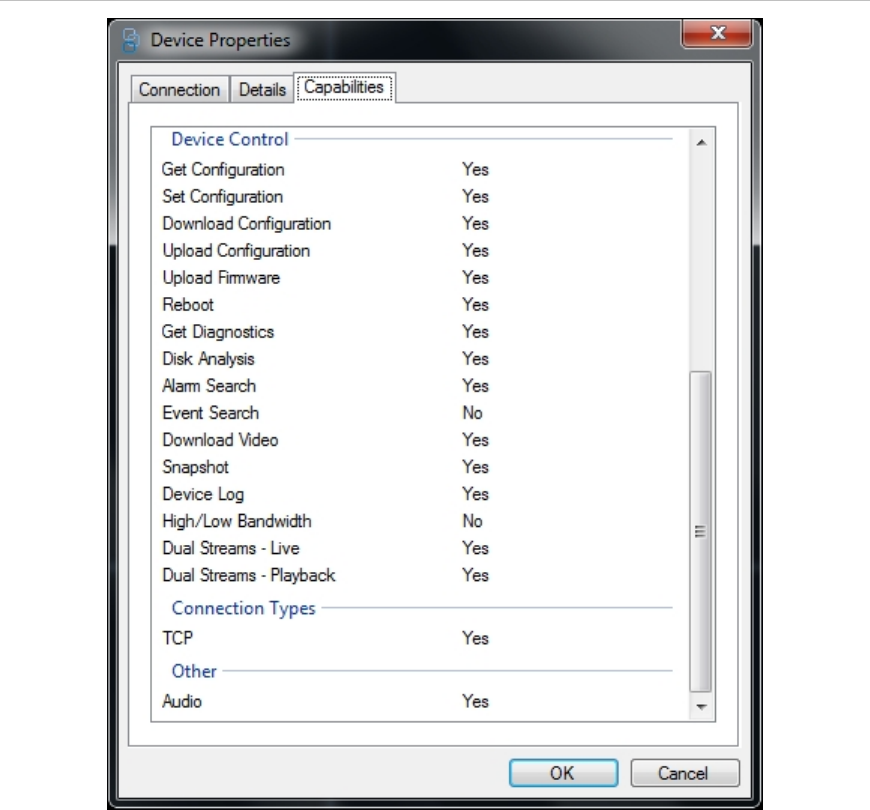
Capabilities:
Device capabilities are displayed in Capabilities tab.
Figure 69: Capabilities Tab/Video Control
Chapter 5: Detailed Operations
76 MobileView 3000 Navigator User Manual
Figure 70: Capabilities Tab/Device Control
77 MobileView 3000 Navigator User Manual
Appendix A:
Windows Firewall
Steps to follow to add a port or program when Windows
Firewall is ON
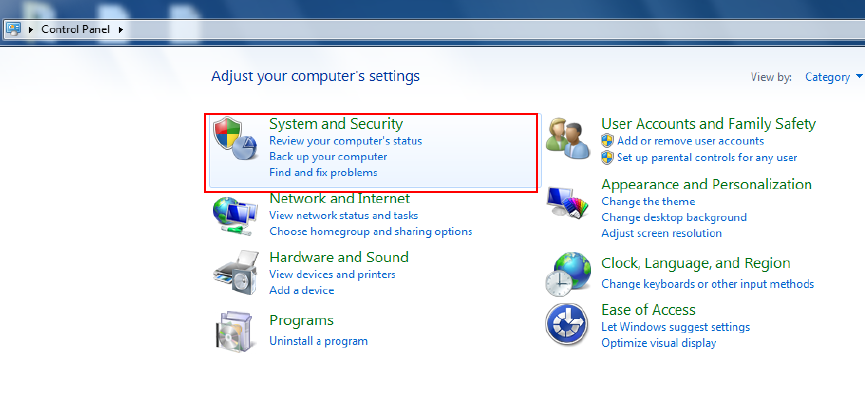
1) Goto Control Panel and select “System & Security”.
Appendix A: Windows Firewall
78 MobileView 3000 Navigator User Manual
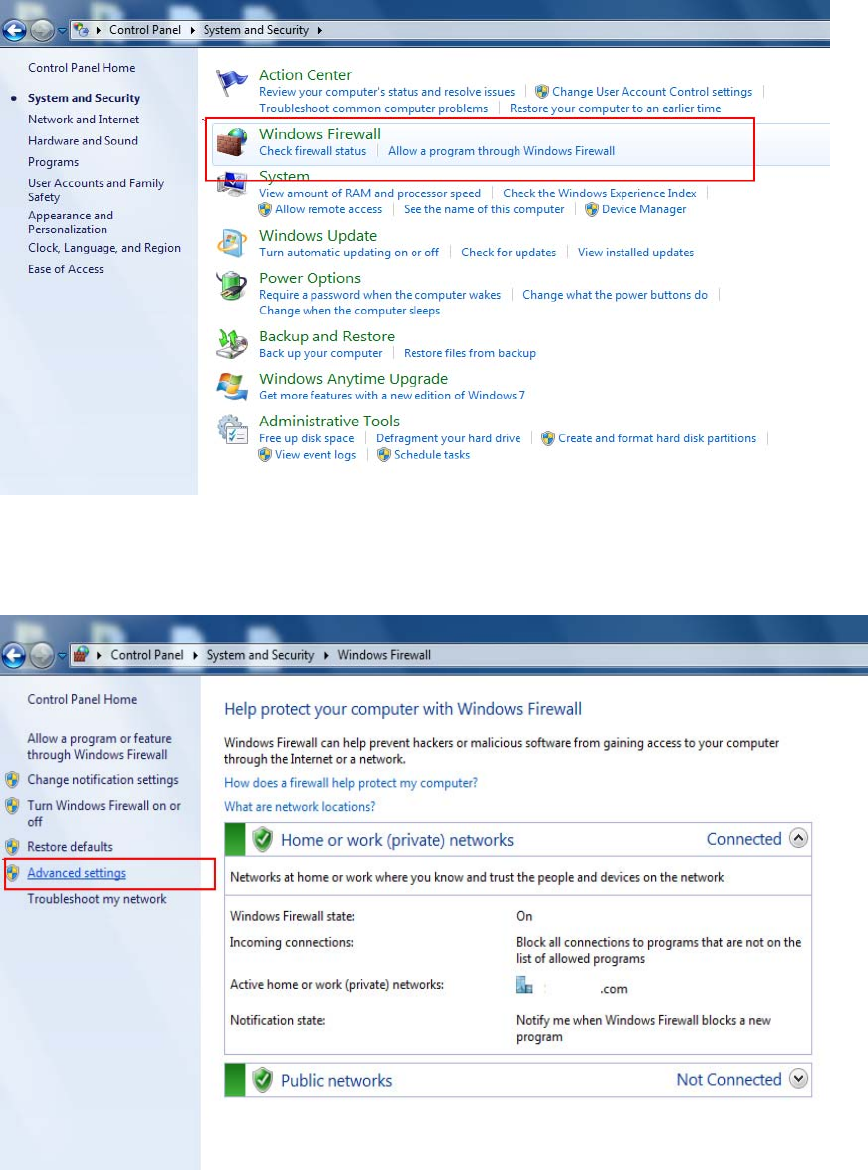
2) Click on “Windows Firewall”.
3) Now Click on “Advanced Settings”.
Appendix A: Windows Firewall
79 MobileView 3000 Navigator User Manual
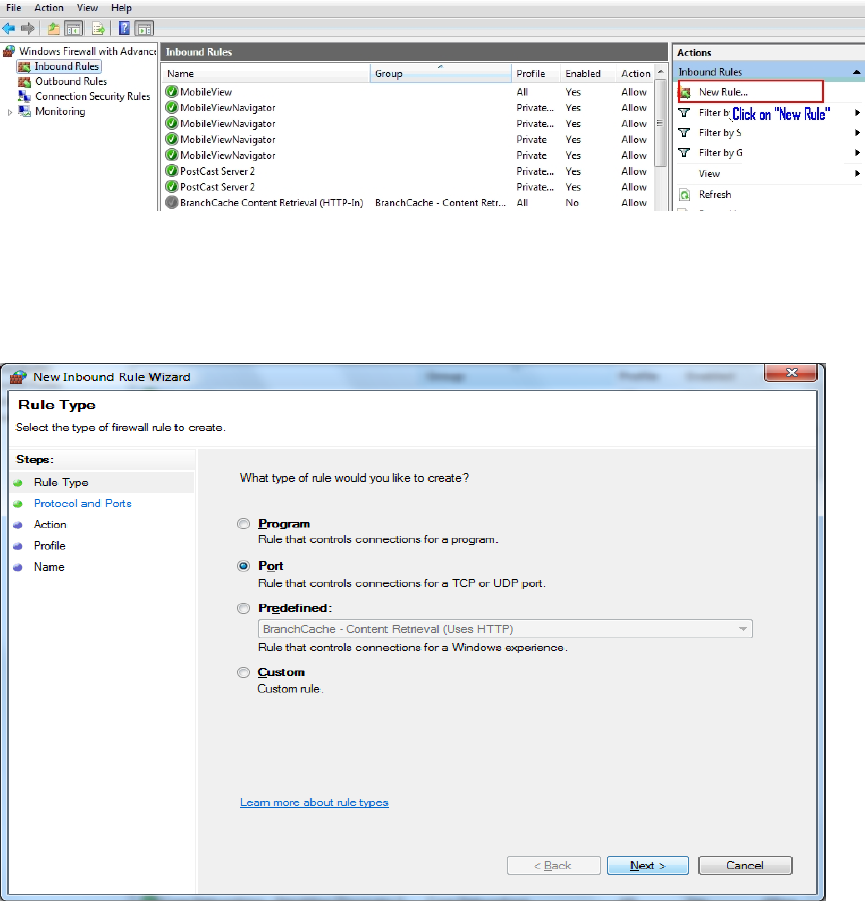
4) From “Advanced Settings”, select “Inbound Rules” & click on “New Rule”.
5) Select the type of firewall rule to create. A program or port can be selected
and then click on “Next”.
Appendix A: Windows Firewall
80 MobileView 3000 Navigator User Manual
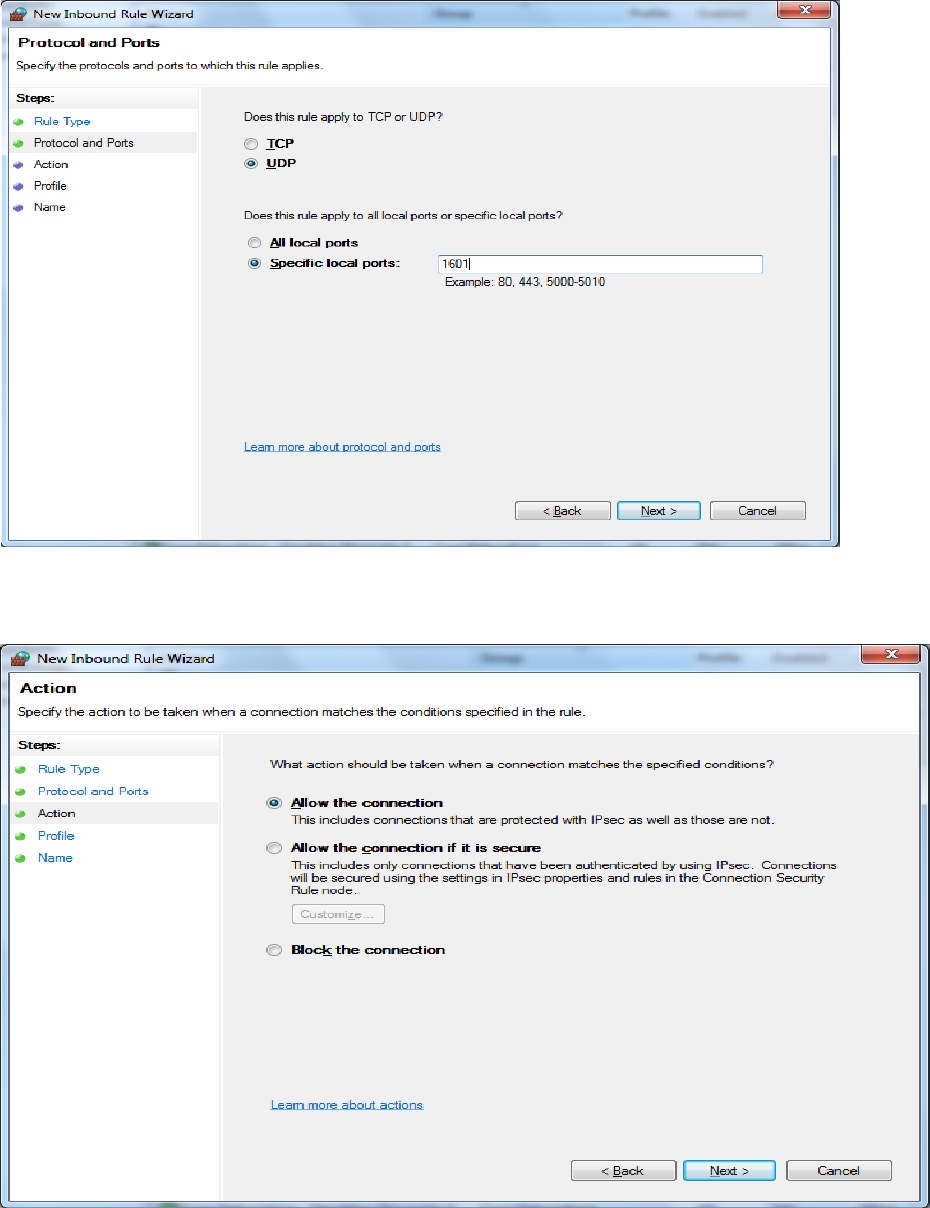
6) Specify the protocols and ports to which the rule applies (Ex: 1601 or input
required port number).
7) Click on “Allow the connection”.
Appendix A: Windows Firewall
81 MobileView 3000 Navigator User Manual
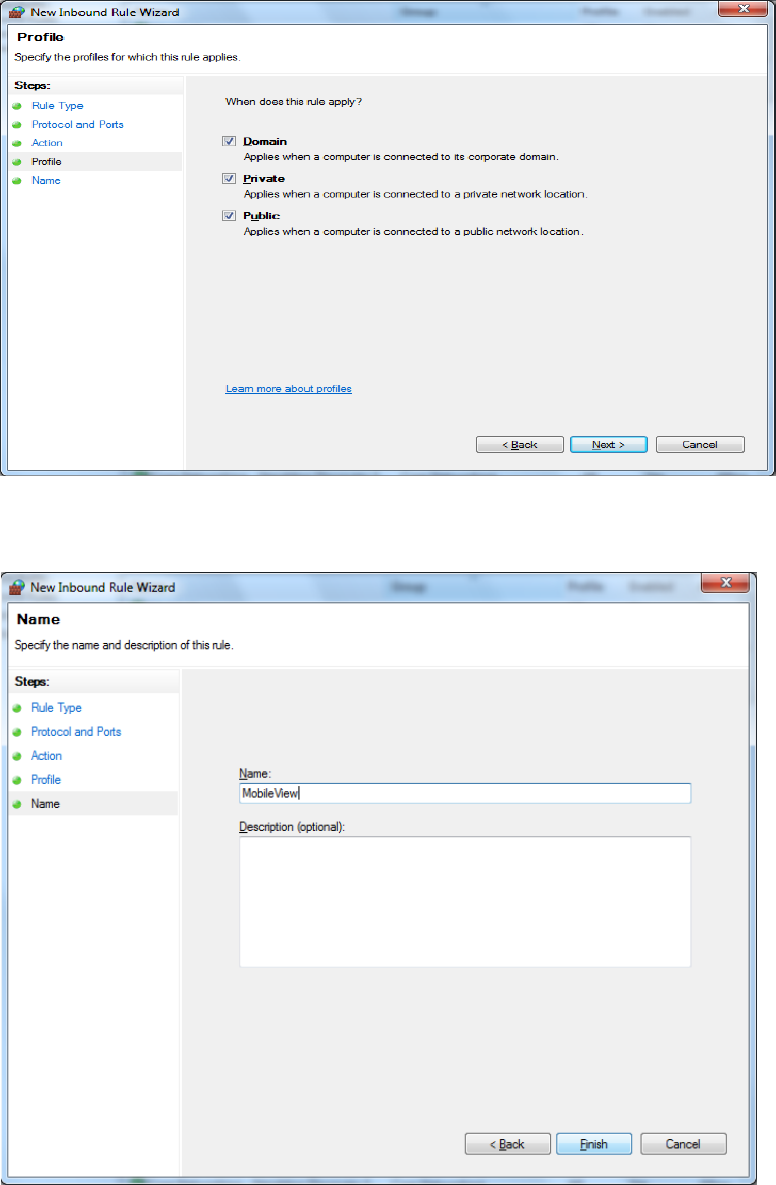
8) Specify the profiles for which the rule applies.
9) Specify the name and description of the rule and click on “Finish”.

83 MobileView 3000 Navigator User Manual
Appendix B:
Open Source Libraries
MobileView Navigator 1.1 uses following open source libraries:
• OpenStreetMaps
• Sqlite
Each of the above products is governed by following license terms.
OpenStreetMap
Copyright and License
OpenStreetMap is open data, licensed under the Open Data Commons Open Database License
(ODbL).
You are free to copy, distribute, transmit and adapt our data, as long as you credit
OpenStreetMap and its contributors. If you alter or build upon our data, you may distribute the
result only under the same license. The full legal code explains your rights and responsibilities.
The cartography in our map tiles, and our documentation, are licensed under the Creative
Commons Attribution-ShareAlike 2.0 license (CC-BY-SA).
How to credit OpenStreetMap
We require that you use the credit “© OpenStreetMap contributors”.
You must also make it clear that the data is available under the Open Database License, and if
using our map tiles, that the cartography is licensed as CC-BY-SA. You may do this by linking to
this copyright page. Alternatively, and as a requirement if you are distributing OSM in a data form,
you can name and link directly to the license(s). In media where links are not possible (e.g.
printed works), we suggest you direct your readers to openstreetmap.org (perhaps by expanding

Appendix B: Open Source Libraries
84 MobileView 3000 Navigator User Manual
'OpenStreetMap' to this full address), to opendatacommons.org, and if relevant, to
creativecommons.org.
For a browsable electronic map, the credit should appear in the corner of the map. For example:
Finding out more
Read more about using our data, and how to credit us, at the Legal FAQ.
Although OpenStreetMap is open data, we cannot provide a free-of-charge map API for third-
party developers. See our API Usage Policy, Tile Usage Policy and Nominatim Usage Policy.
Our contributors
Our contributors are thousands of individuals. We also include openly-licensed data from national
mapping agencies and other sources, among them:
• Austria: Contains data from Stadt Wien (under CC BY), Land Vorarlberg and Land Tirol
(under CC-BY AT with amendments).
• Canada: Contains data from GeoBase®, GeoGratis (© Department of Natural Resources
Canada), CanVec (© Department of Natural Resources Canada), and StatCan
(Geography Division, Statistics Canada).
• France: Contains data sourced from Direction Générale des Impôts.
• Netherlands: Contains © AND data, 2007 (www.and.com)
• New Zealand: Contains data sourced from Land Information New Zealand. Crown
Copyright reserved.
• South Africa: Contains data sourced from Chief Directorate: National Geo-Spatial
Information, State copyright reserved.
• United Kingdom: Contains Ordnance Survey data © Crown copyright and database right
2010-12.
For further details of these, and other sources that have been used to help improve
OpenStreetMap, please see the Contributors page on the OpenStreetMap Wiki.
Inclusion of data in OpenStreetMap does not imply that the original data provider endorses
OpenStreetMap, provides any warranty, or accepts any liability.
Copyright infringement
OSM contributors are reminded never to add data from any copyrighted sources (e.g. Google
Maps or printed maps) without explicit permission from the copyright holders.
If you believe that copyrighted material has been inappropriately added to the OpenStreetMap
database or this site, please refer to our takedown procedure or file directly at our on-line filing
page.

Appendix B: Open Source Libraries
85 MobileView 3000 Navigator User Manual
SQLite Copyright
All of the deliverable code in SQLite has been
dedicated to the public domain by the authors. All
code authors, and representatives of the companies
they work for, have signed affidavits dedicating their
contributions to the public domain and originals of
those signed affidavits are stored in a firesafe at the
main offices of Hwaci. Anyone is free to copy,
modify, publish, use, compile, sell, or distribute the
original SQLite code, either in source code form or
as a compiled binary, for any purpose, commercial
or non-commercial, and by any means.
The previous paragraph applies to the deliverable
code in SQLite - those parts of the SQLite library that you actually bundle and
ship with a larger application. Portions of the documentation and some code
used as part of the build process might fall under other licenses. The details here
are unclear. We do not worry about the licensing of the documentation and build
code so much because none of these things are part of the core deliverable
SQLite library.
All of the deliverable code in SQLite has been written from scratch. No code has
been taken from other projects or from the open internet. Every line of code can
be traced back to its original author, and all of those authors have public domain
dedications on file. So the SQLite code base is clean and is uncontaminated with
licensed code from other projects.
SQLite is in the
Public Domain
