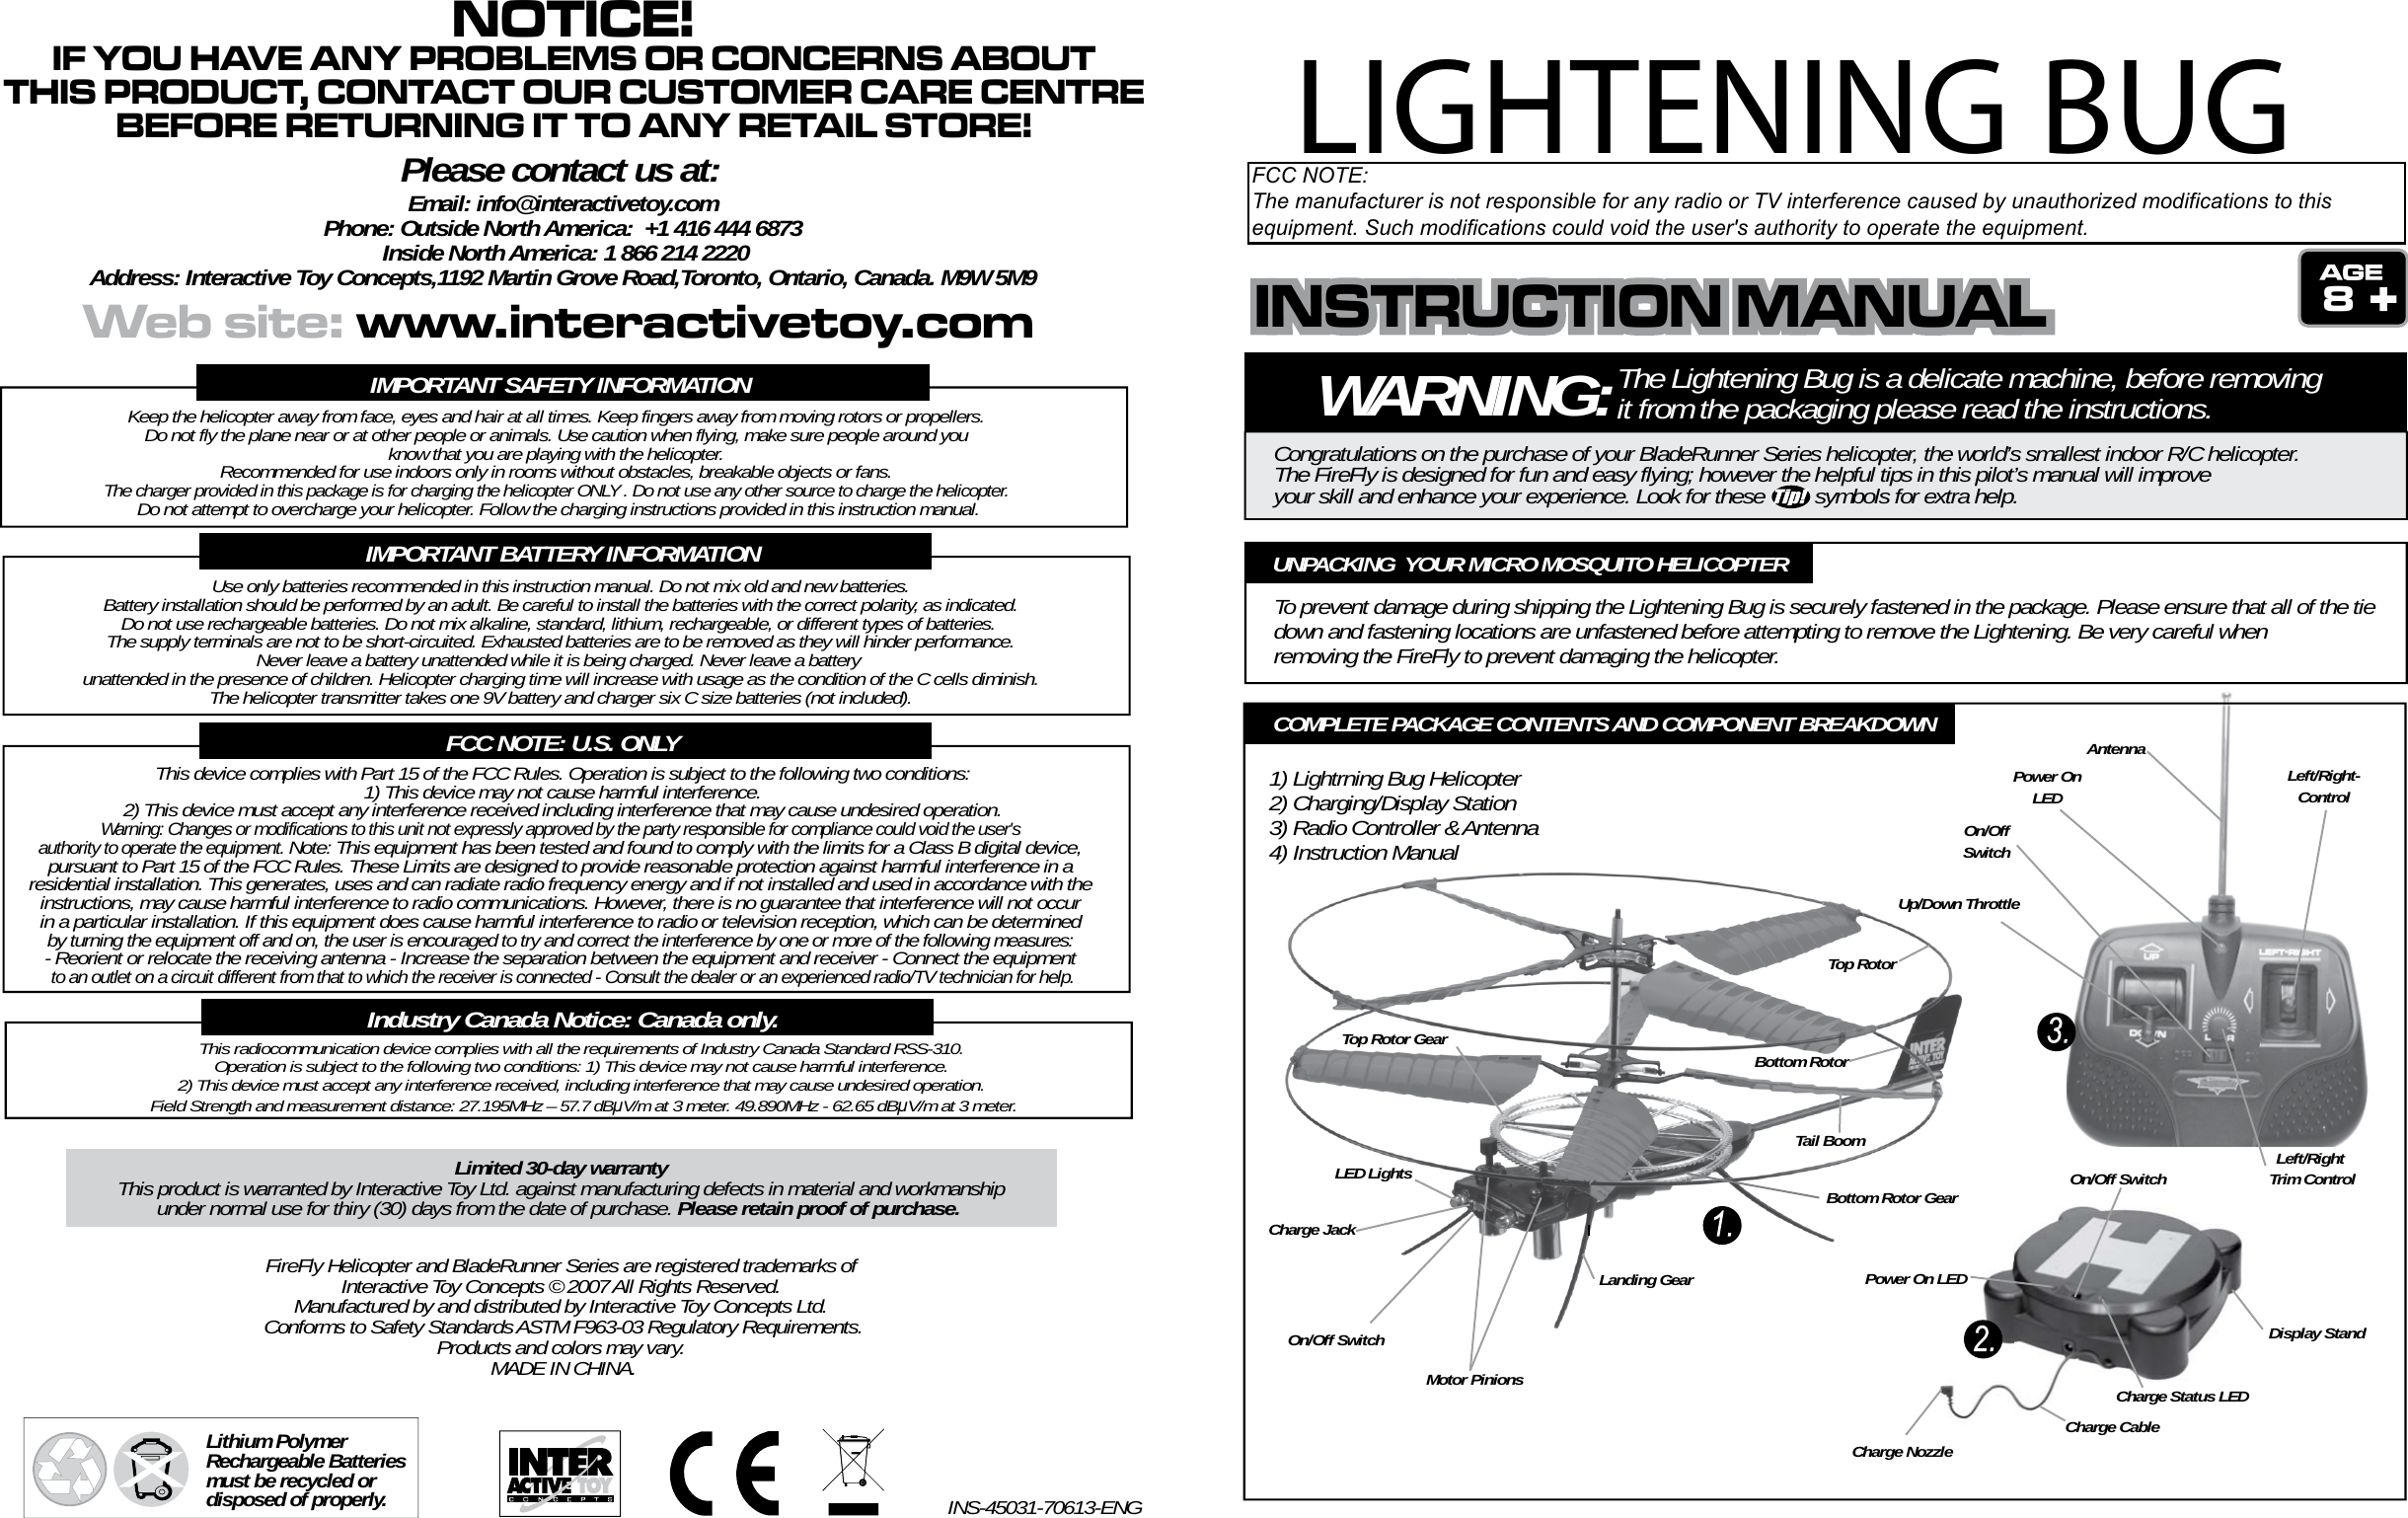
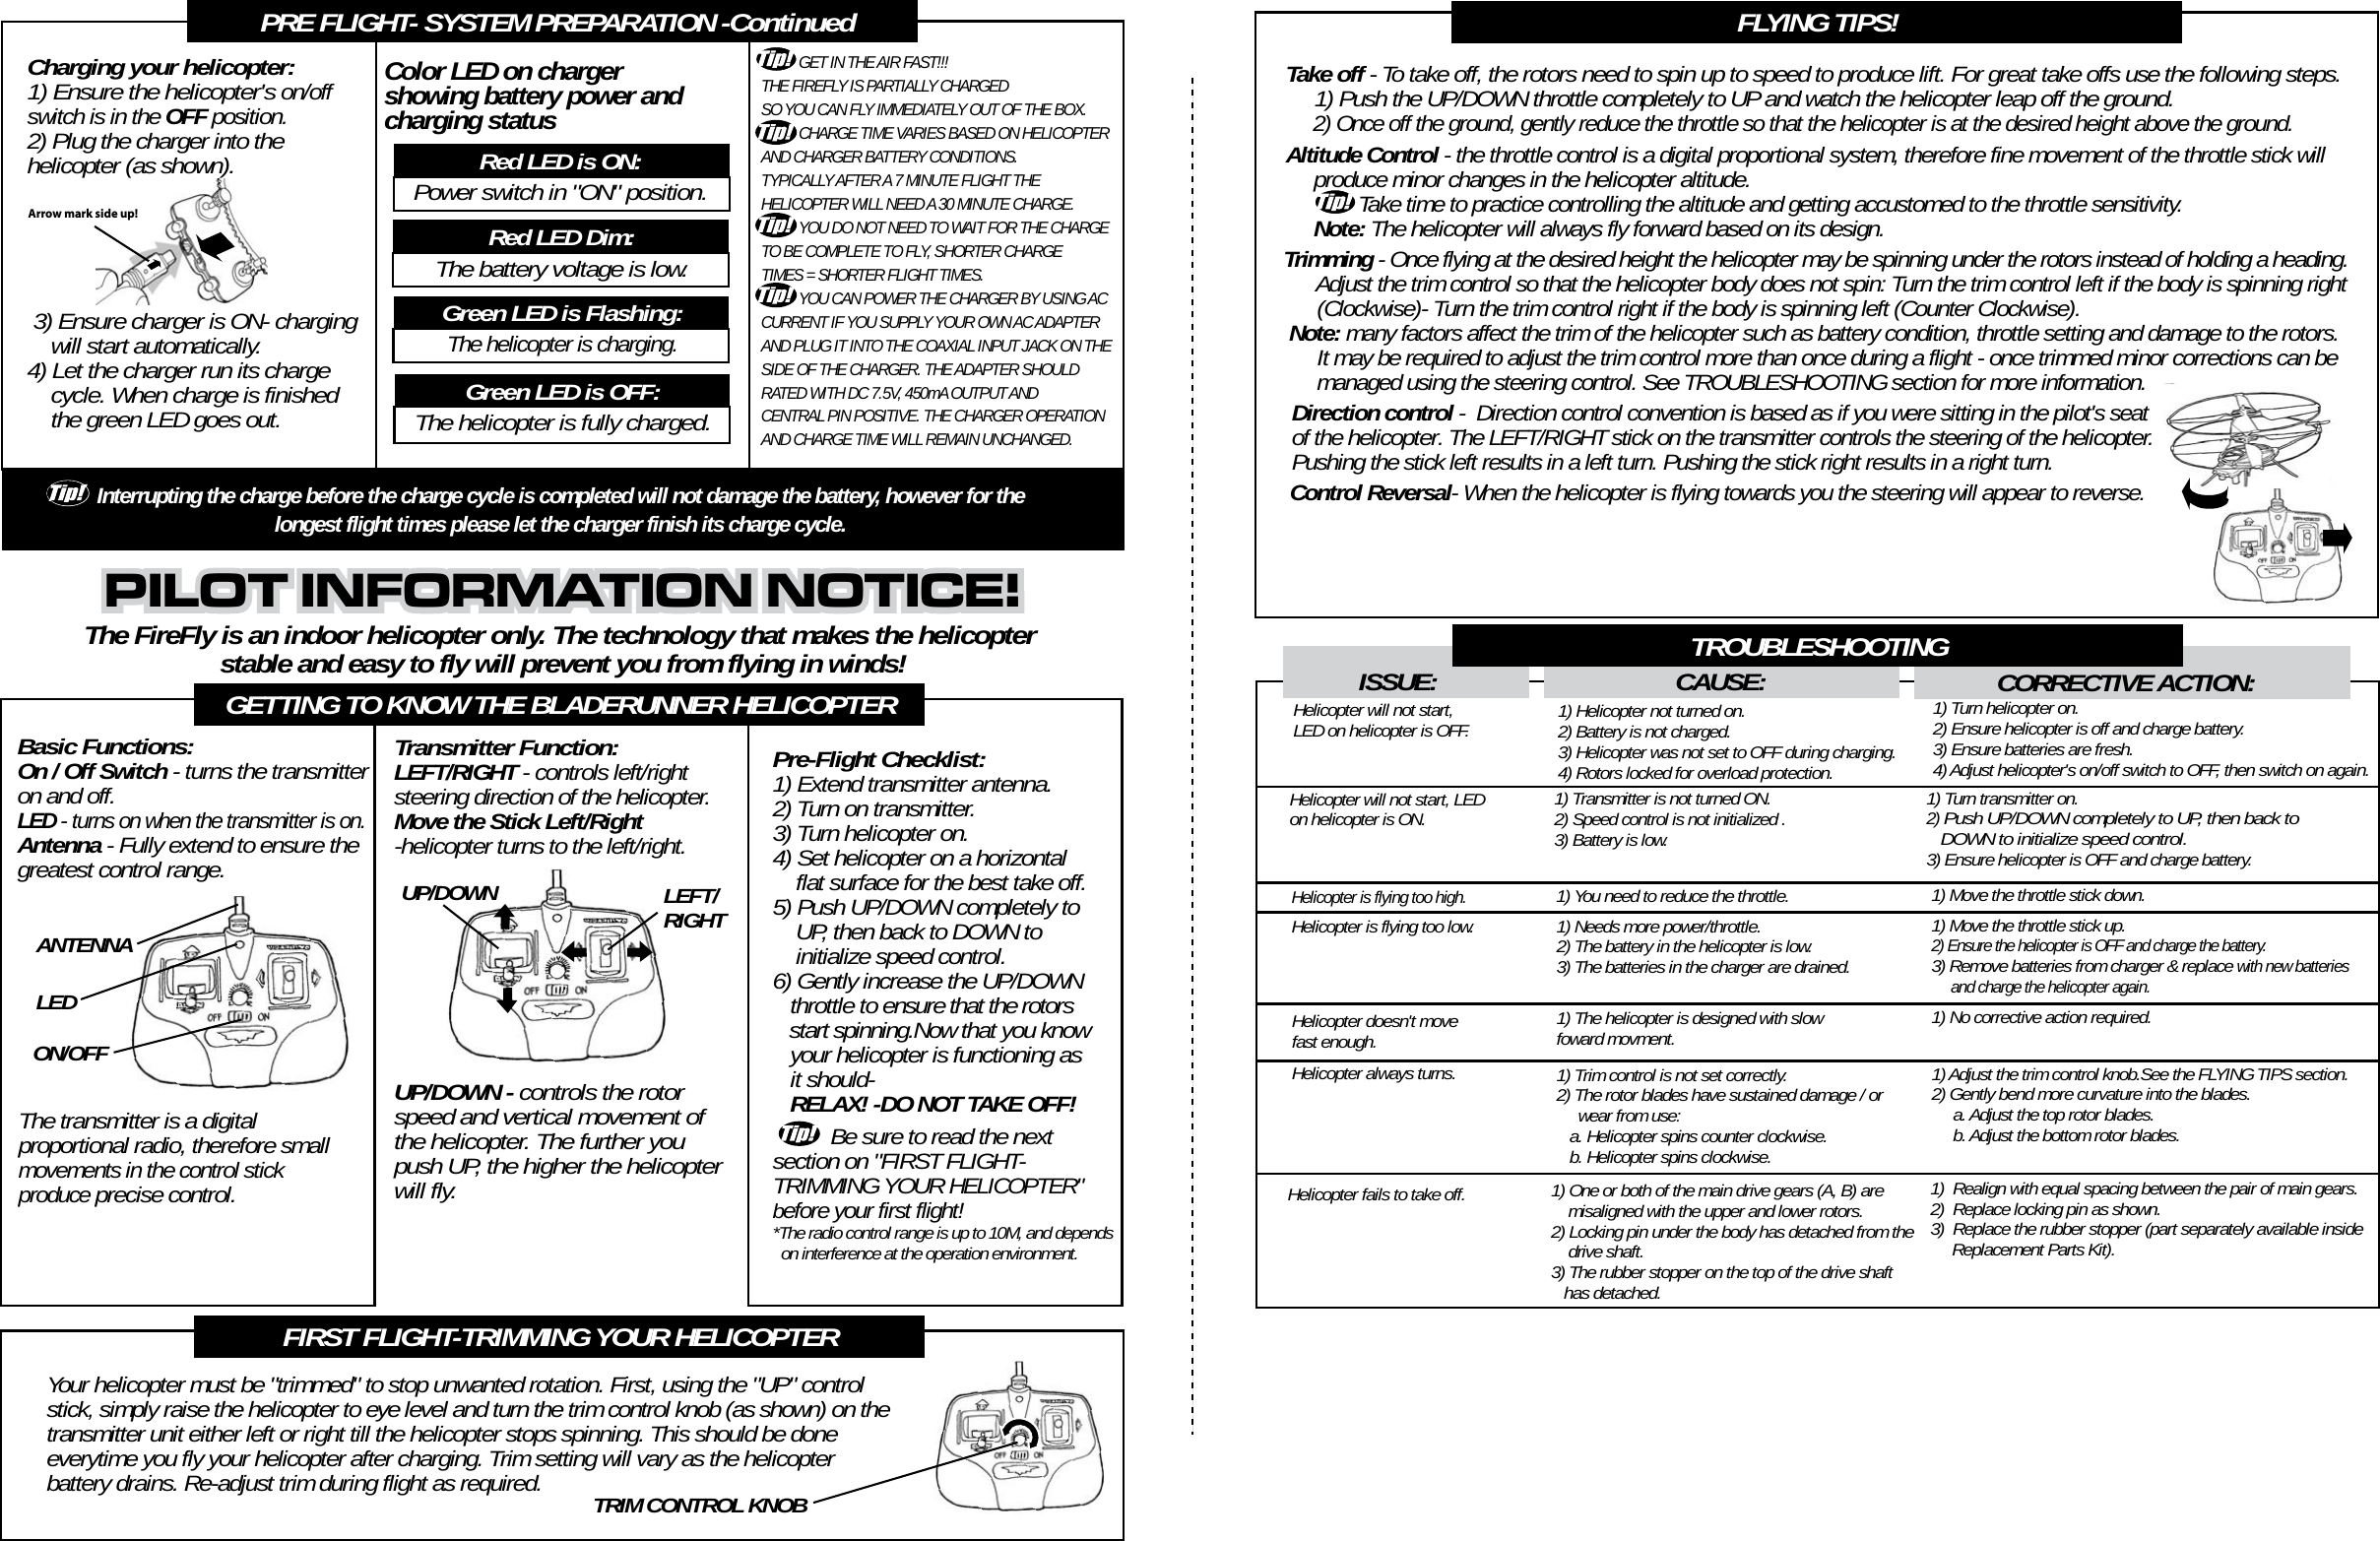
Interactive Toy Concepts 45071TX49 R/C Helicopter User Manual INS 45031 70613 ENG cover back ai

Interactive Toy Concepts Limited R/C Helicopter INS 45031 70613 ENG cover back ai

users manual

WARNING:The Lightening Bug is a delicate machine, before removing it from the packaging please read the instructions.Congratulations on the purchase of your BladeRunner Series helicopter, the world’s smallest indoor R/C helicopter. The FireFly is designed for fun and easy flying; however the helpful tips in this pilot’s manual will improveyour skill and enhance your experience. Look for these         symbols for extra help.8To prevent damage during shipping the Lightening Bug is securely fastened in the package. Please ensure that all of the tie down and fastening locations are unfastened before attempting to remove the Lightening. Be very careful when removing the FireFly to prevent damaging the helicopter.UNPACKING  YOUR MICRO MOSQUITO HELICOPTERTop RotorBottom RotorTop Rotor GearBottom Rotor GearMotor PinionsLED LightsCharge JackOn/Off SwitchLanding GearTail BoomUp/Down ThrottleLeft/Right-ControlLeft/Right Trim ControlOn/OffSwitchPower OnLEDAntennaDisplay StandOn/Off SwitchPower On LEDCharge Status LEDCharge CableCharge NozzleCOMPLETE PACKAGE CONTENTS AND COMPONENT BREAKDOWN1) Lightrning Bug Helicopter2) Charging/Display Station3) Radio Controller & Antenna4) Instruction ManualIMPORTANT SAFETY INFORMATIONKeep the helicopter away from face, eyes and hair at all times. Keep fingers away from moving rotors or propellers. Do not fly the plane near or at other people or animals. Use caution when flying, make sure people around you know that you are playing with the helicopter. Recommended for use indoors only in rooms without obstacles, breakable objects or fans. The charger provided in this package is for charging the helicopter ONLY . Do not use any other source to charge the helicopter. Do not attempt to overcharge your helicopter. Follow the charging instructions provided in this instruction manual.IMPORTANT BATTERY INFORMATIONUse only batteries recommended in this instruction manual. Do not mix old and new batteries.Battery installation should be performed by an adult. Be careful to install the batteries with the correct polarity, as indicated.Do not use rechargeable batteries. Do not mix alkaline, standard, lithium, rechargeable, or different types of batteries.  The supply terminals are not to be short-circuited. Exhausted batteries are to be removed as they will hinder performance. Never leave a battery unattended while it is being charged. Never leave a battery unattended in the presence of children. Helicopter charging time will increase with usage as the condition of the C cells diminish.The helicopter transmitter takes one 9V battery and charger six C size batteries (not included).FCC NOTE: U.S. ONLYThis device complies with Part 15 of the FCC Rules. Operation is subject to the following two conditions:1) This device may not cause harmful interference.2) This device must accept any interference received including interference that may cause undesired operation.Warning: Changes or modifications to this unit not expressly approved by the party responsible for compliance could void the user's authority to operate the equipment. Note: This equipment has been tested and found to comply with the limits for a Class B digital device, pursuant to Part 15 of the FCC Rules. These Limits are designed to provide reasonable protection against harmful interference in a residential installation. This generates, uses and can radiate radio frequency energy and if not installed and used in accordance with the instructions, may cause harmful interference to radio communications. However, there is no guarantee that interference will not occur in a particular installation. If this equipment does cause harmful interference to radio or television reception, which can be determined by turning the equipment off and on, the user is encouraged to try and correct the interference by one or more of the following measures: - Reorient or relocate the receiving antenna - Increase the separation between the equipment and receiver - Connect the equipment to an outlet on a circuit different from that to which the receiver is connected - Consult the dealer or an experienced radio/TV technician for help.Lithium Polymer Rechargeable Batteries must be recycled or disposed of properly.FireFly Helicopter and BladeRunner Series are registered trademarks of Interactive Toy Concepts © 2007 All Rights Reserved. Manufactured by and distributed by Interactive Toy Concepts Ltd. Conforms to Safety Standards ASTM F963-03 Regulatory Requirements.Products and colors may vary. MADE IN CHINA.INS-45031-70613-ENGLimited 30-day warrantyThis product is warranted by Interactive Toy Ltd. against manufacturing defects in material and workmanshipunder normal use for thiry (30) days from the date of purchase. Please retain proof of purchase. This radiocommunication device complies with all the requirements of Industry Canada Standard RSS-310. Operation is subject to the following two conditions: 1) This device may not cause harmful interference. 2) This device must accept any interference received, including interference that may cause undesired operation. Field Strength and measurement distance: 27.195MHz – 57.7 dBμV/m at 3 meter. 49.890MHz - 62.65 dBμV/m at 3 meter.Industry Canada Notice: Canada only.INSTRUCTION MANUALINSTRUCTION MANUALINSTRUCTION MANUALWeb site: www.interactivetoy.comNOTICE!IF YOU HAVE ANY PROBLEMS OR CONCERNS ABOUTTHIS PRODUCT, CONTACT OUR CUSTOMER CARE CENTREBEFORE RETURNING IT TO ANY RETAIL STORE!Please contact us at:Email: info@interactivetoy.comPhone: Outside North America:  +1 416 444 6873 Inside North America: 1 866 214 2220Address: Interactive Toy Concepts,1192 Martin Grove Road,Toronto, Ontario, Canada. M9W 5M9LIGHTENING BUGFCC NOTE:The manufacturer is not responsible for any radio or TV interference caused by unauthorized modifications to thisequipment. Such modifications could void the user's authority to operate the equipment.
Take off - To take off, the rotors need to spin up to speed to produce lift. For great take offs use the following steps.     1) Push the UP/DOWN throttle completely to UP and watch the helicopter leap off the ground.     2) Once off the ground, gently reduce the throttle so that the helicopter is at the desired height above the ground.        Altitude Control - the throttle control is a digital proportional system, therefore fine movement of the throttle stick will      produce minor changes in the helicopter altitude.              Take time to practice controlling the altitude and getting accustomed to the throttle sensitivity.       Note: The helicopter will always fly forward based on its design.CORRECTIVE ACTION:CAUSE:PRE FLIGHT- SYSTEM PREPARATION -ContinuedCharging your helicopter:1) Ensure the helicopter's on/off switch is in the OFF position.2) Plug the charger into the helicopter (as shown). 3) Ensure charger is ON- charging     will start automatically.4) Let the charger run its charge     cycle. When charge is finished     the green LED goes out.Red LED is ON:Power switch in "ON" position.Green LED is OFF:The helicopter is fully charged.Red LED Dim:The battery voltage is low.Green LED is Flashing:The helicopter is charging.          GET IN THE AIR FAST!!! THE FIREFLY IS PARTIALLY CHARGED SO YOU CAN FLY IMMEDIATELY OUT OF THE BOX.           CHARGE TIME VARIES BASED ON HELICOPTER AND CHARGER BATTERY CONDITIONS. TYPICALLY AFTER A 7 MINUTE FLIGHT THE HELICOPTER WILL NEED A 30 MINUTE CHARGE.          YOU DO NOT NEED TO WAIT FOR THE CHARGE TO BE COMPLETE TO FLY, SHORTER CHARGE TIMES = SHORTER FLIGHT TIMES.          YOU CAN POWER THE CHARGER BY USING AC CURRENT IF YOU SUPPLY YOUR OWN AC ADAPTER AND PLUG IT INTO THE COAXIAL INPUT JACK ON THESIDE OF THE CHARGER. THE ADAPTER SHOULD RATED WITH DC 7.5V, 450mA OUTPUT AND CENTRAL PIN POSITIVE. THE CHARGER OPERATION AND CHARGE TIME WILL REMAIN UNCHANGED. Interrupting the charge before the charge cycle is completed will not damage the battery, however for the longest flight times please let the charger finish its charge cycle.PILOT INFORMATION NOTICE!PILOT INFORMATION NOTICE!PILOT INFORMATION NOTICE!The FireFly is an indoor helicopter only. The technology that makes the helicopter stable and easy to fly will prevent you from flying in winds!GETTING TO KNOW THE BLADERUNNER HELICOPTERPre-Flight Checklist:1) Extend transmitter antenna.2) Turn on transmitter.3) Turn helicopter on.4) Set helicopter on a horizontal     flat surface for the best take off.5) Push UP/DOWN completely to     UP, then back to DOWN to     initialize speed control.6) Gently increase the UP/DOWN    throttle to ensure that the rotors    start spinning.Now that you know    your helicopter is functioning as    it should-    RELAX! -DO NOT TAKE OFF!            Be sure to read the next section on "FIRST FLIGHT- TRIMMING YOUR HELICOPTER" before your first flight!*The radio control range is up to 10M, and depends   on interference at the operation environment.FLYING TIPS!TROUBLESHOOTINGISSUE:Helicopter will not start, LED on helicopter is OFF. 1) Helicopter not turned on.2) Battery is not charged.3) Helicopter was not set to OFF during charging.4) Rotors locked for overload protection.  1) Turn helicopter on.2) Ensure helicopter is off and charge battery.3) Ensure batteries are fresh.4) Adjust helicopter's on/off switch to OFF, then switch on again. Helicopter will not start, LED on helicopter is ON. 1) Transmitter is not turned ON.2) Speed control is not initialized .3) Battery is low.1) Turn transmitter on.2) Push UP/DOWN completely to UP, then back to    DOWN to initialize speed control.3) Ensure helicopter is OFF and charge battery.Helicopter is flying too high.1) You need to reduce the throttle. 1) Move the throttle stick down.Helicopter is flying too low. 1) Needs more power/throttle.2) The battery in the helicopter is low.3) The batteries in the charger are drained.1) Move the throttle stick up.2) Ensure the helicopter is OFF and charge the battery.3) Remove batteries from charger & replace with new batteries      and charge the helicopter again.Helicopter doesn't move fast enough. 1) The helicopter is designed with slow foward movment.    1) No corrective action required.Helicopter always turns. 1) Trim control is not set correctly.2) The rotor blades have sustained damage / or      wear from use:   a. Helicopter spins counter clockwise.   b. Helicopter spins clockwise.1) Adjust the trim control knob.See the FLYING TIPS section.2) Gently bend more curvature into the blades.     a. Adjust the top rotor blades.     b. Adjust the bottom rotor blades.Trimming - Once flying at the desired height the helicopter may be spinning under the rotors instead of holding a heading.       Adjust the trim control so that the helicopter body does not spin: Turn the trim control left if the body is spinning right       (Clockwise)- Turn the trim control right if the body is spinning left (Counter Clockwise). Note: many factors affect the trim of the helicopter such as battery condition, throttle setting and damage to the rotors.       It may be required to adjust the trim control more than once during a flight - once trimmed minor corrections can be       managed using the steering control. See TROUBLESHOOTING section for more information.Direction control -  Direction control convention is based as if you were sitting in the pilot's seat of the helicopter. The LEFT/RIGHT stick on the transmitter controls the steering of the helicopter.  Pushing the stick left results in a left turn. Pushing the stick right results in a right turn.  Basic Functions:On / Off Switch - turns the transmitter on and off.LED - turns on when the transmitter is on.   Antenna - Fully extend to ensure the greatest control range. FIRST FLIGHT-TRIMMING YOUR HELICOPTERTRIM CONTROL KNOBYour helicopter must be "trimmed" to stop unwanted rotation. First, using the "UP" control stick, simply raise the helicopter to eye level and turn the trim control knob (as shown) on the transmitter unit either left or right till the helicopter stops spinning. This should be done everytime you fly your helicopter after charging. Trim setting will vary as the helicopter battery drains. Re-adjust trim during flight as required.Transmitter Function:LEFT/RIGHT - controls left/right steering direction of the helicopter. Move the Stick Left/Right -helicopter turns to the left/right. UP/DOWN - controls the rotor speed and vertical movement of the helicopter. The further you push UP, the higher the helicopter will fly. The transmitter is a digital proportional radio, therefore small movements in the control stick produce precise control.Color LED on charger showing battery power and charging status               Control Reversal- When the helicopter is flying towards you the steering will appear to reverse. Arrow mark side up!Helicopter fails to take off. 1) One or both of the main drive gears (A, B) are     misaligned with the upper and lower rotors.2) Locking pin under the body has detached from the     drive shaft.3) The rubber stopper on the top of the drive shaft    has detached.    1)  Realign with equal spacing between the pair of main gears. 2)  Replace locking pin as shown.3)  Replace the rubber stopper (part separately available inside      Replacement Parts Kit).    ON/OFFANTENNAUP/DOWN LEFT/RIGHTLED

Navigation menu