Intermec Technologies 02CN4 Handheld PDA-type device CDMA User Manual 935 029
Intermec Technologies Corporation Handheld PDA-type device CDMA 935 029
UserManual.wiki
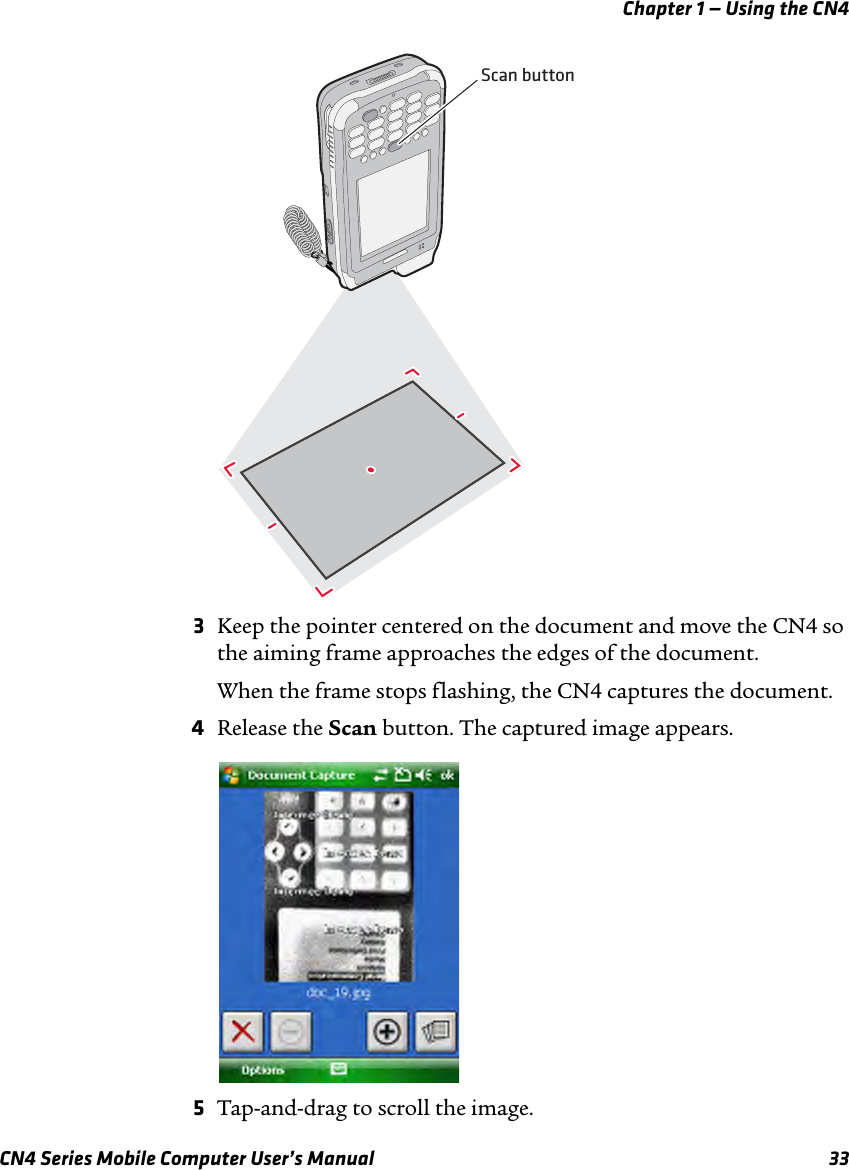
>
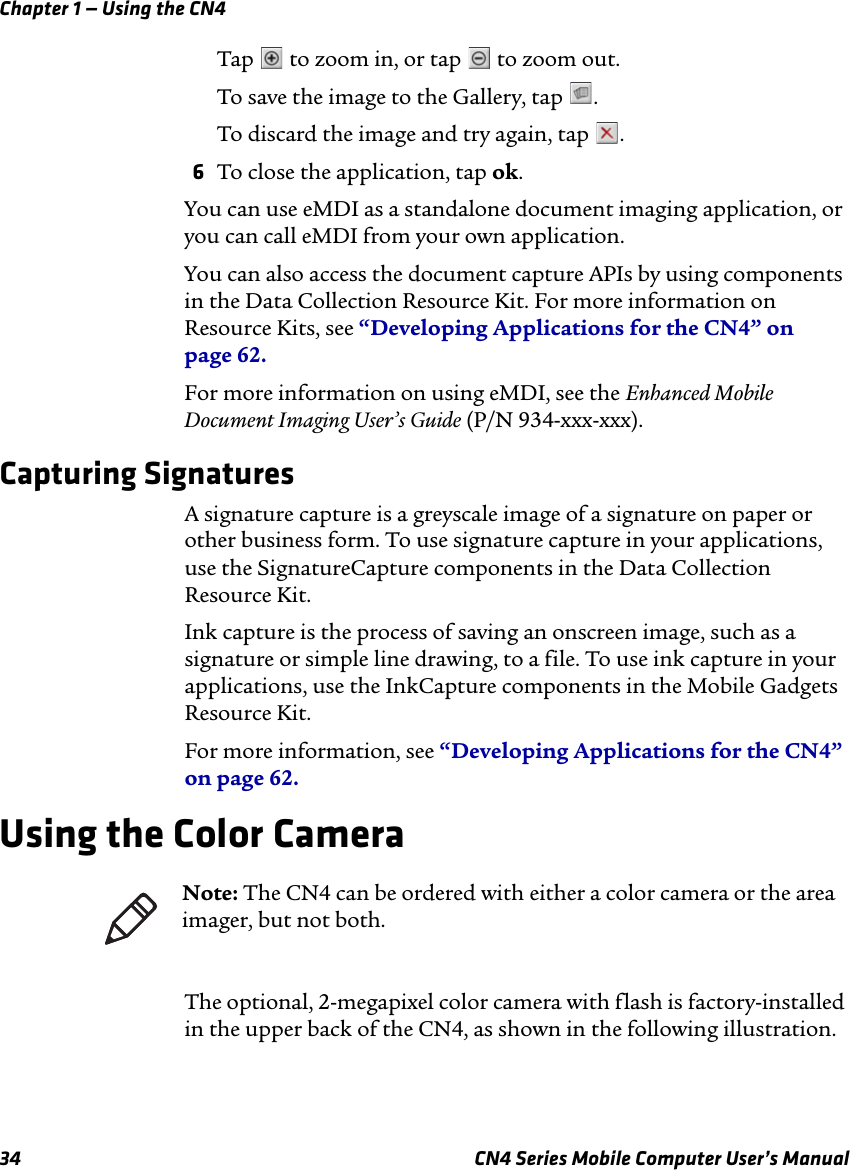
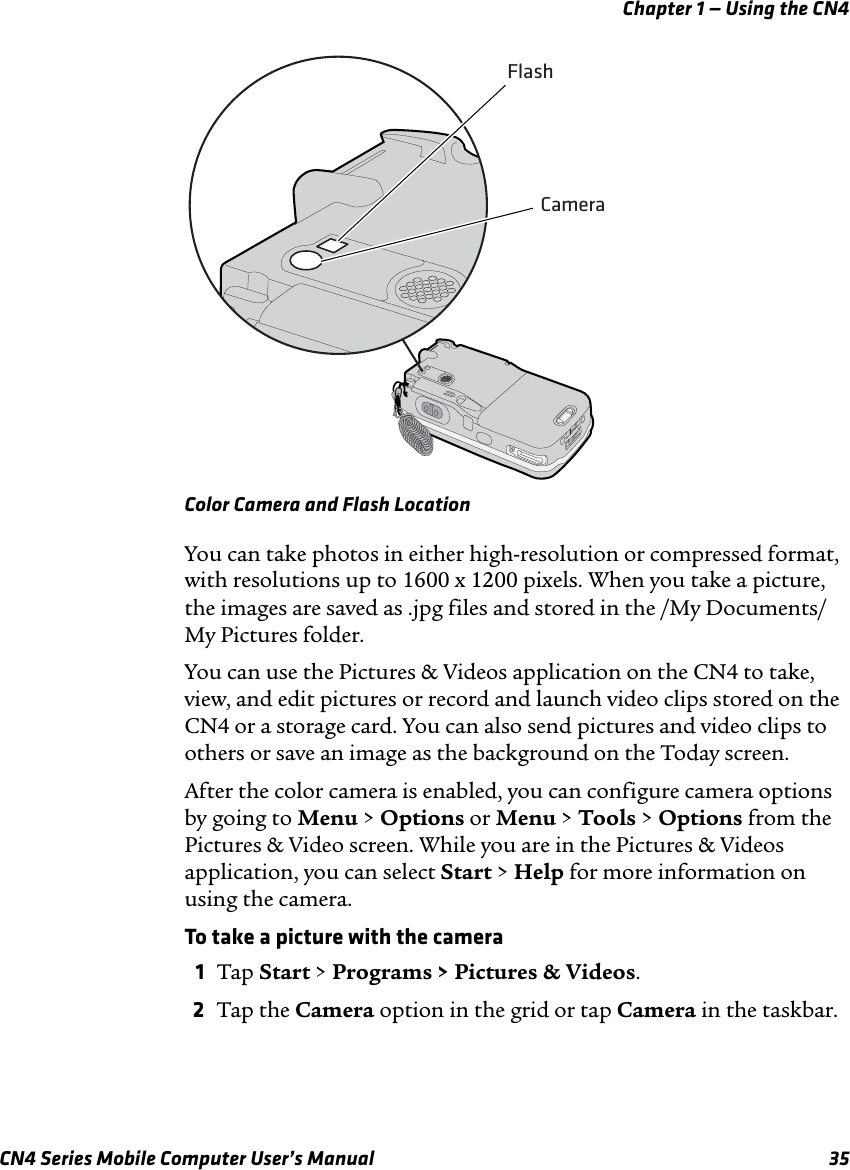
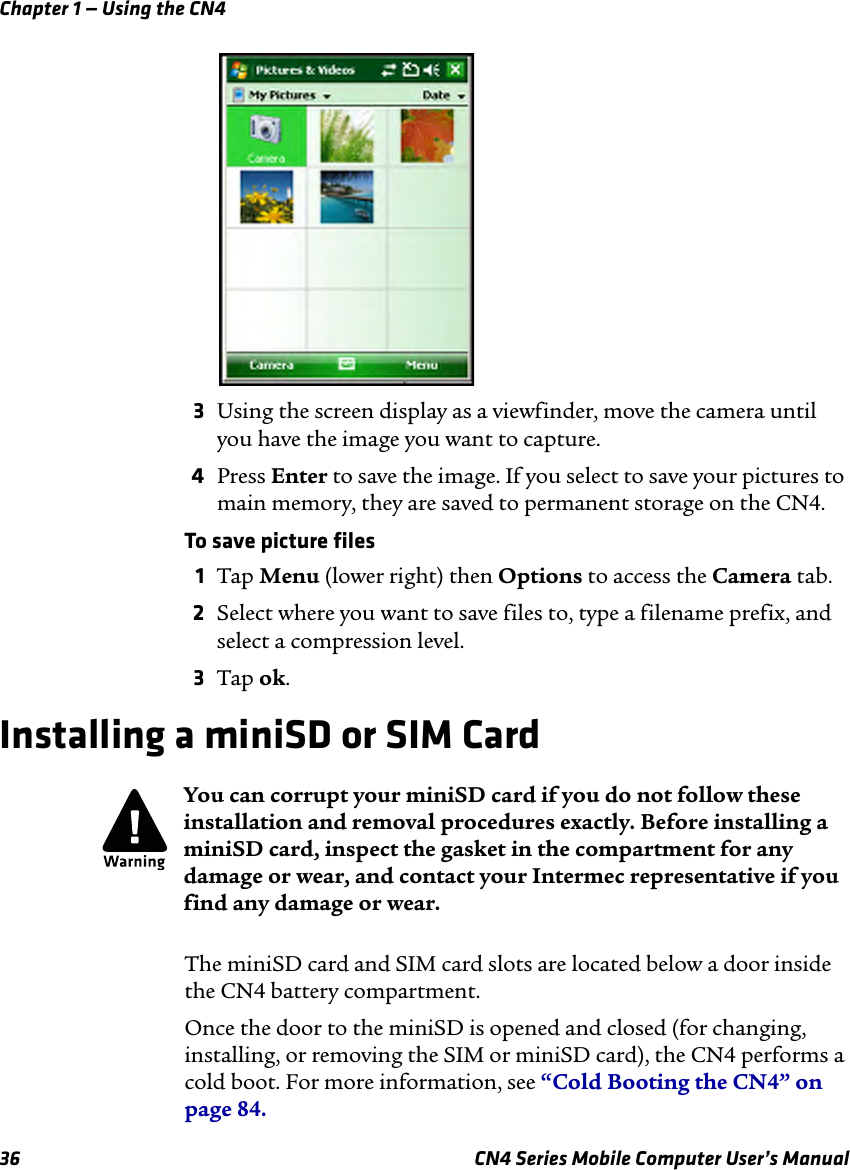
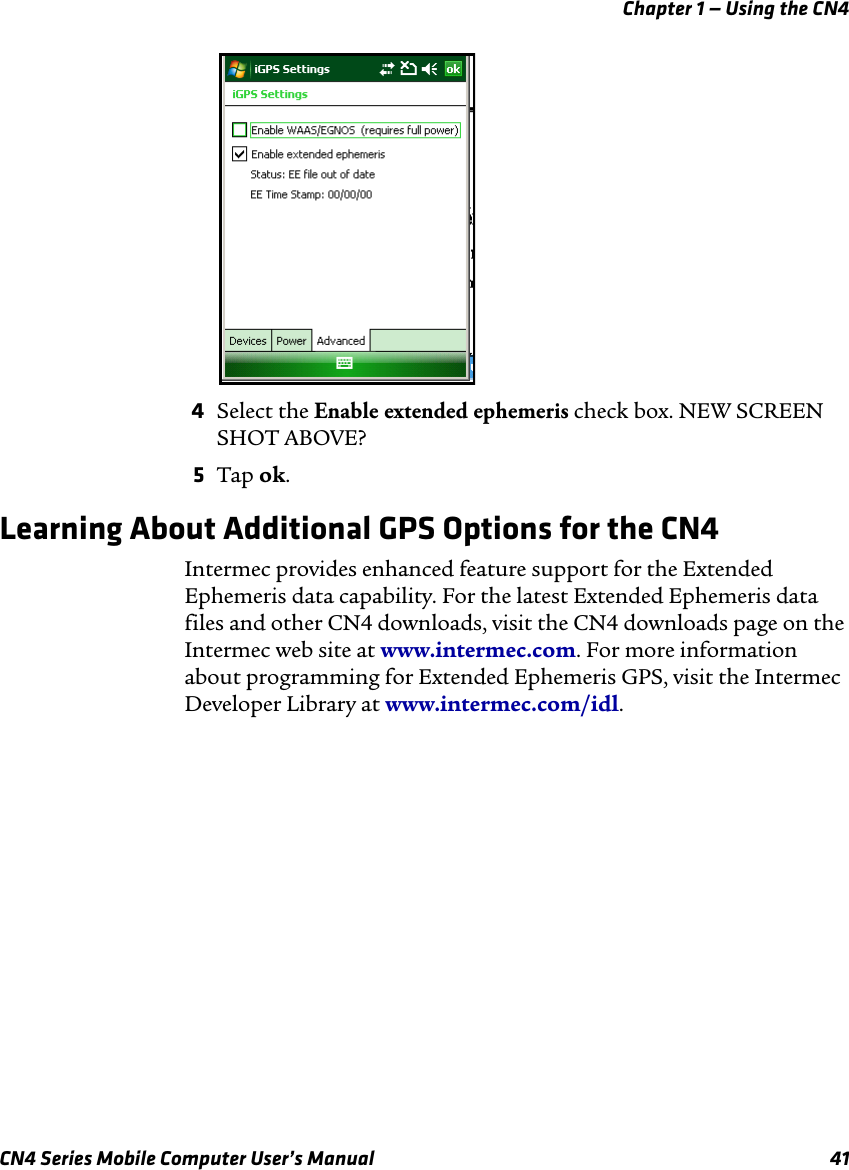
Intermec Technologies
>
02CN4 User Manual
>
Users Manual
Contents
1.
Users Manual
2.
Compliance Insert
Users Manual
Navigation menu
Upload a User Manual
Namespaces
Wiki Guide
HTML
PDF
Info
Views
User Manual
Discussion / Help
Navigation

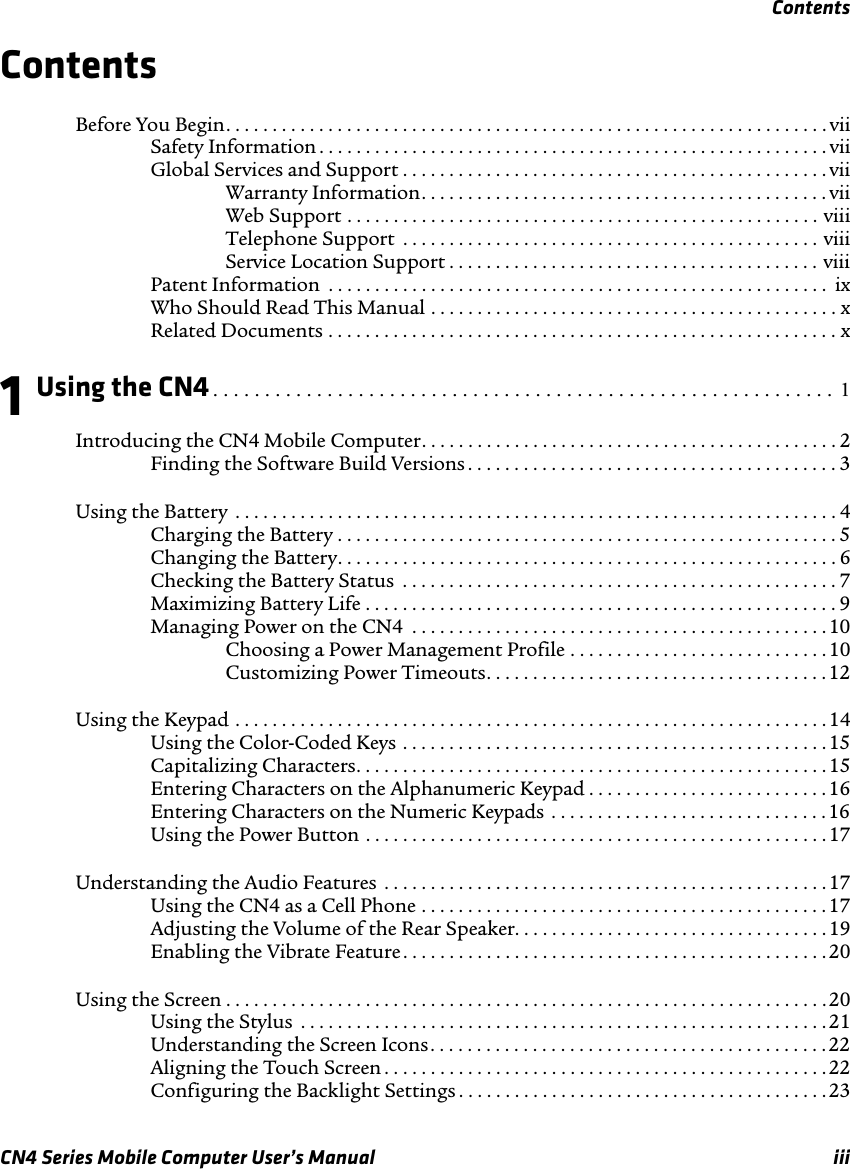


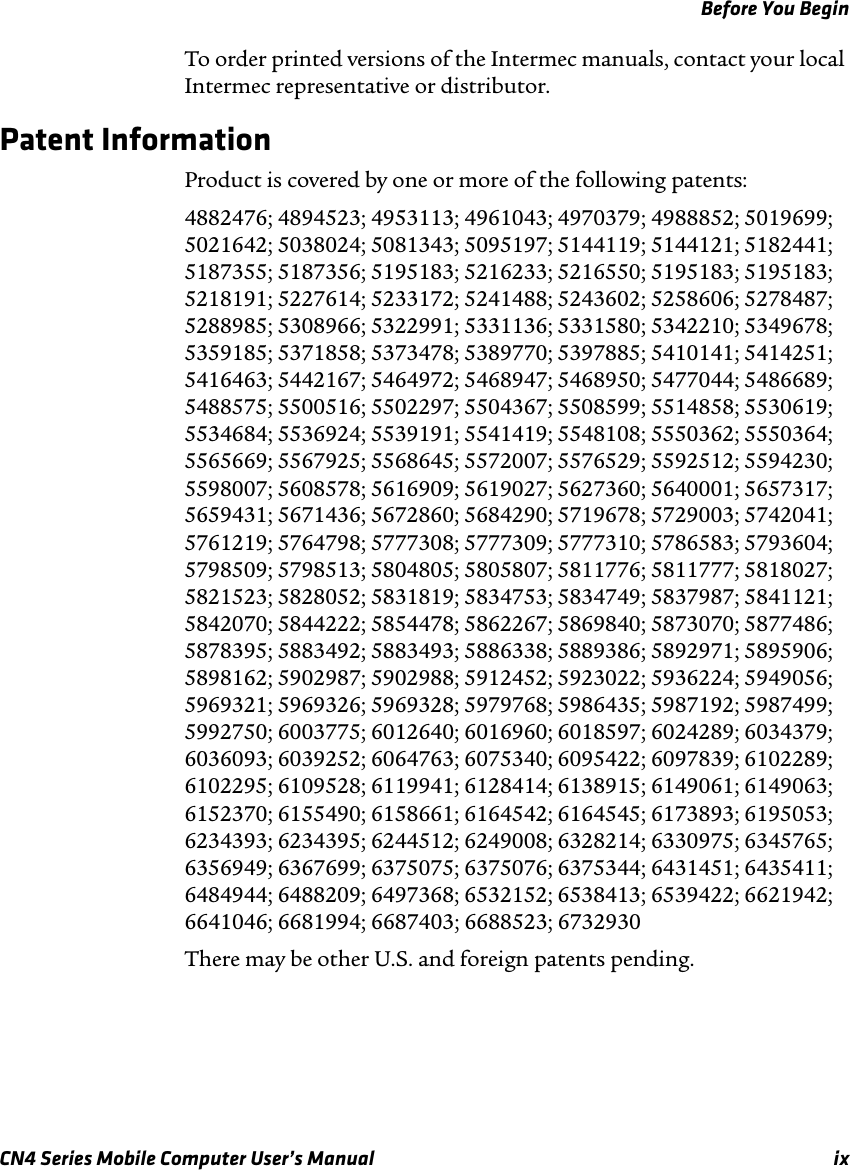
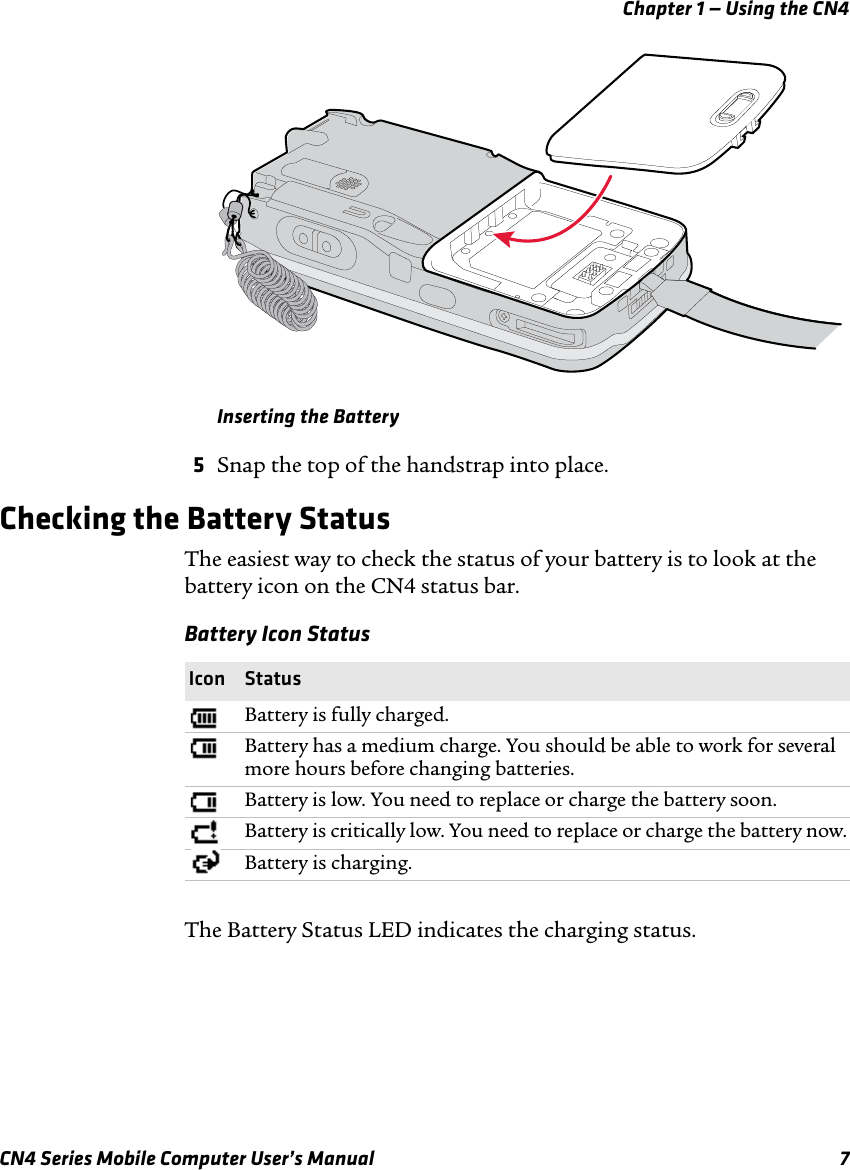
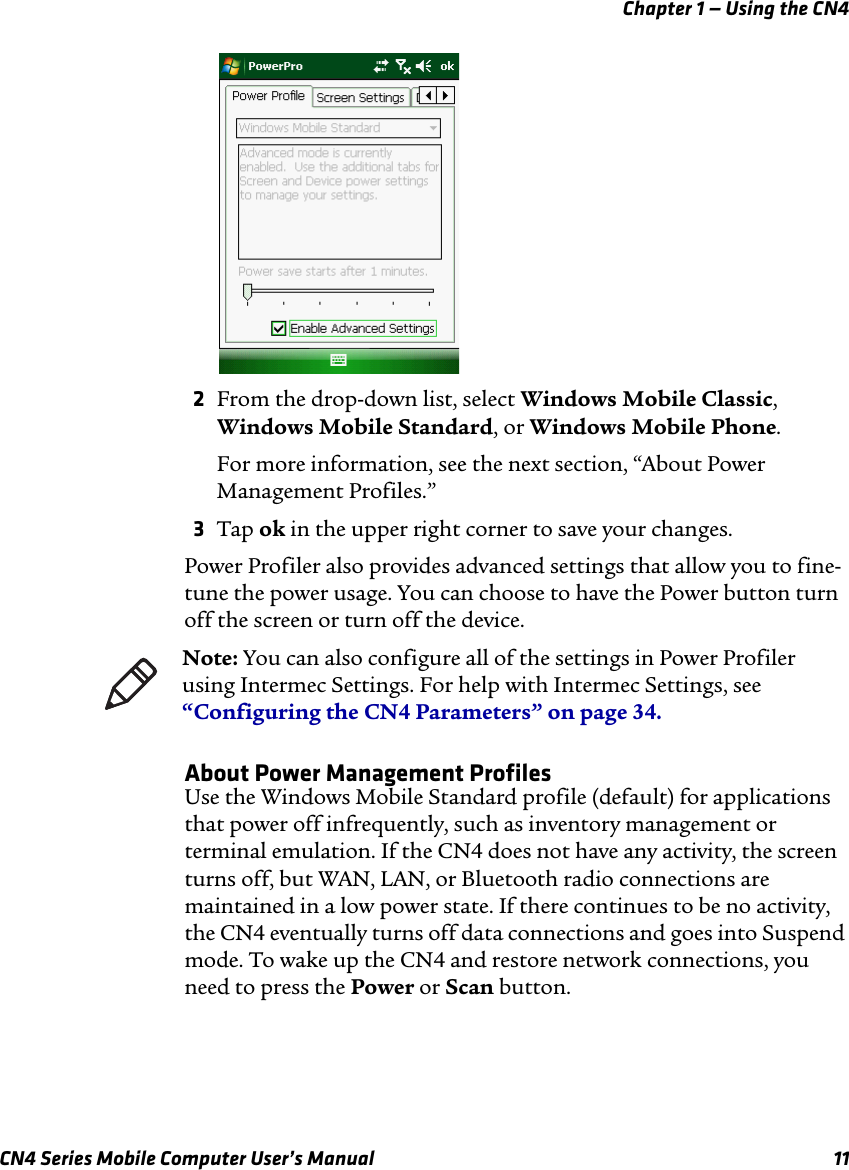

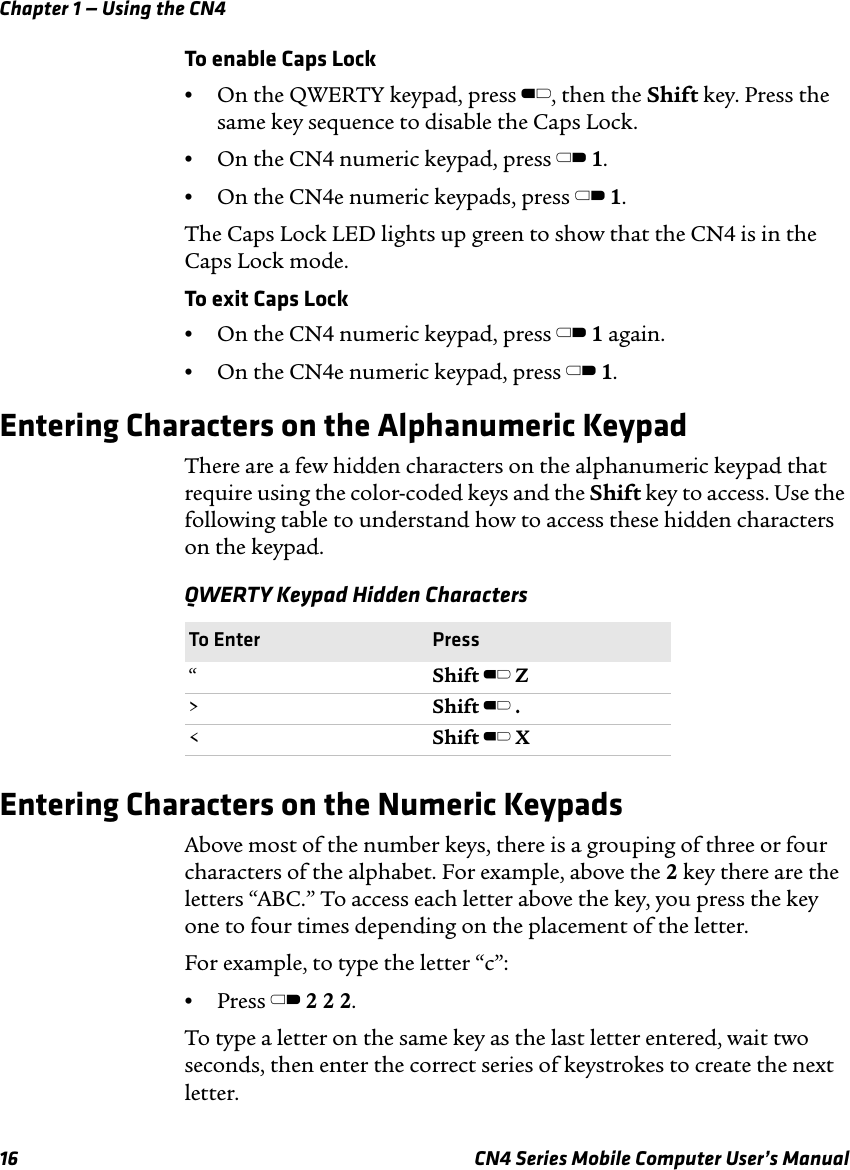
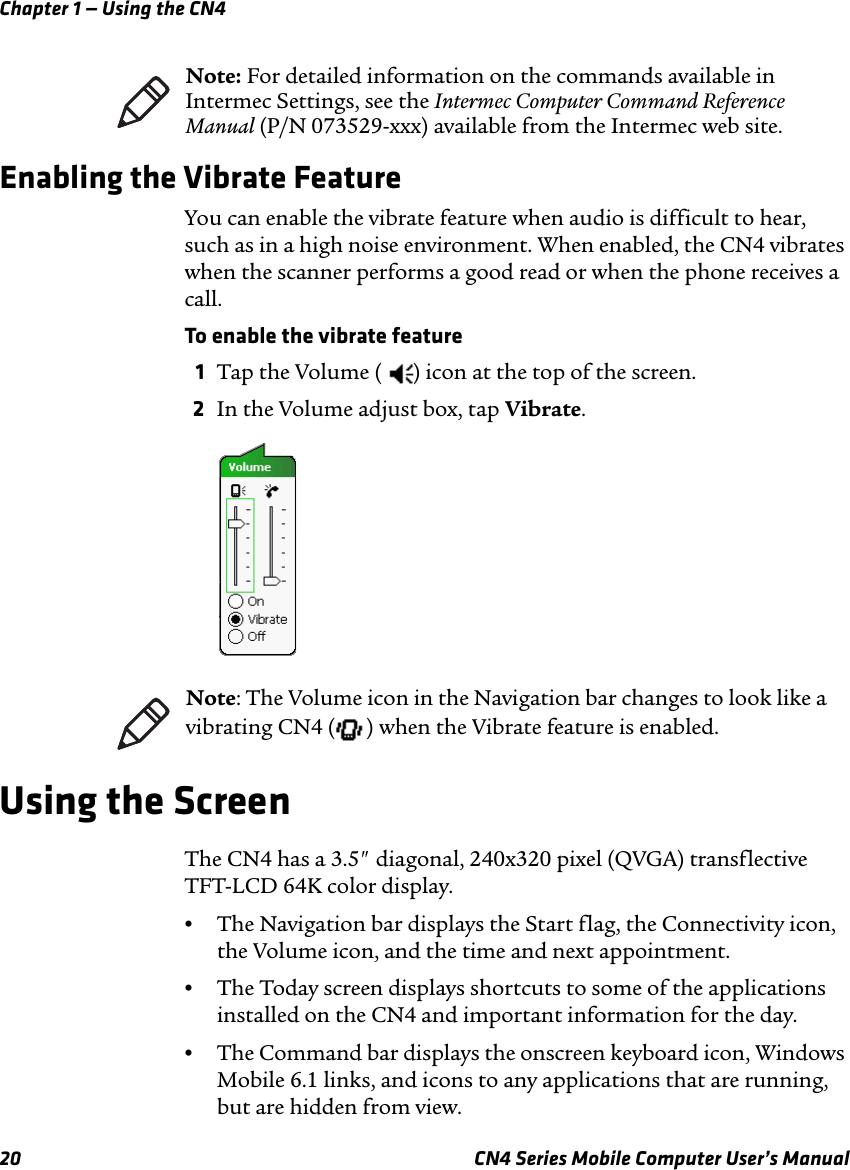

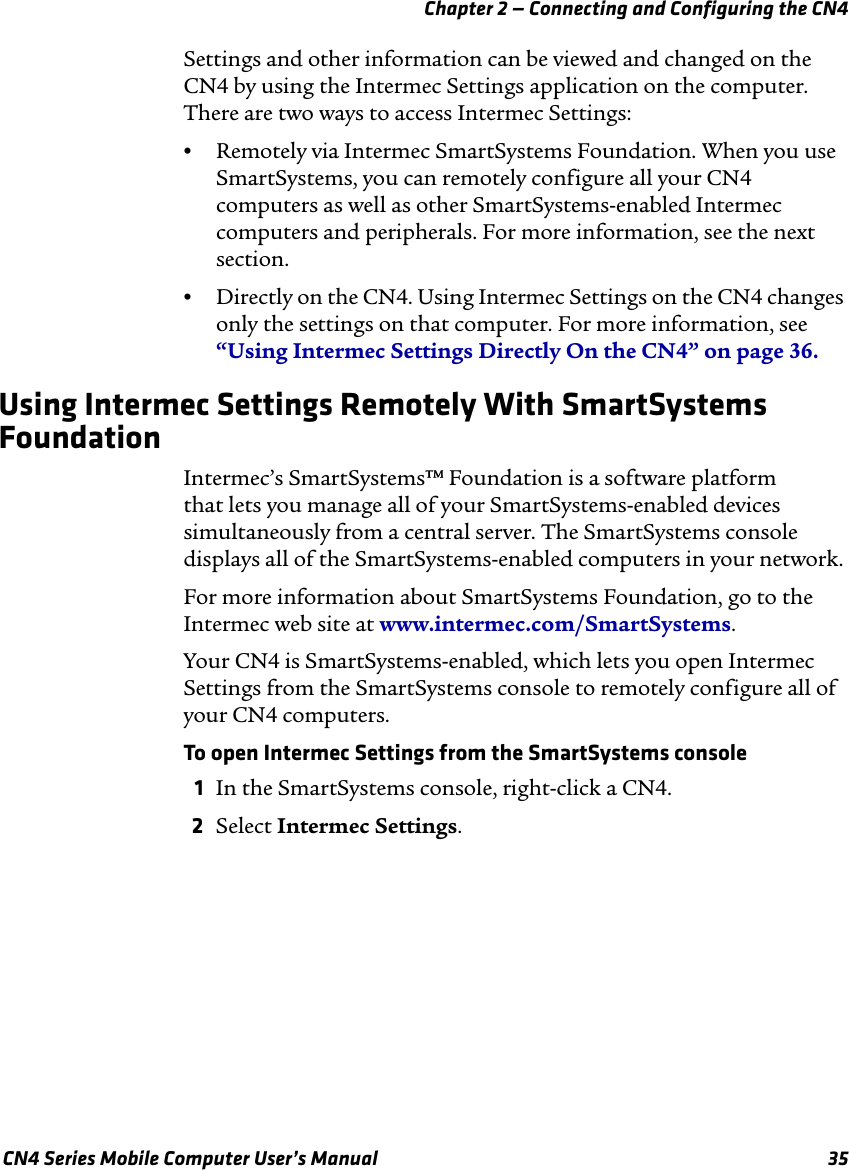
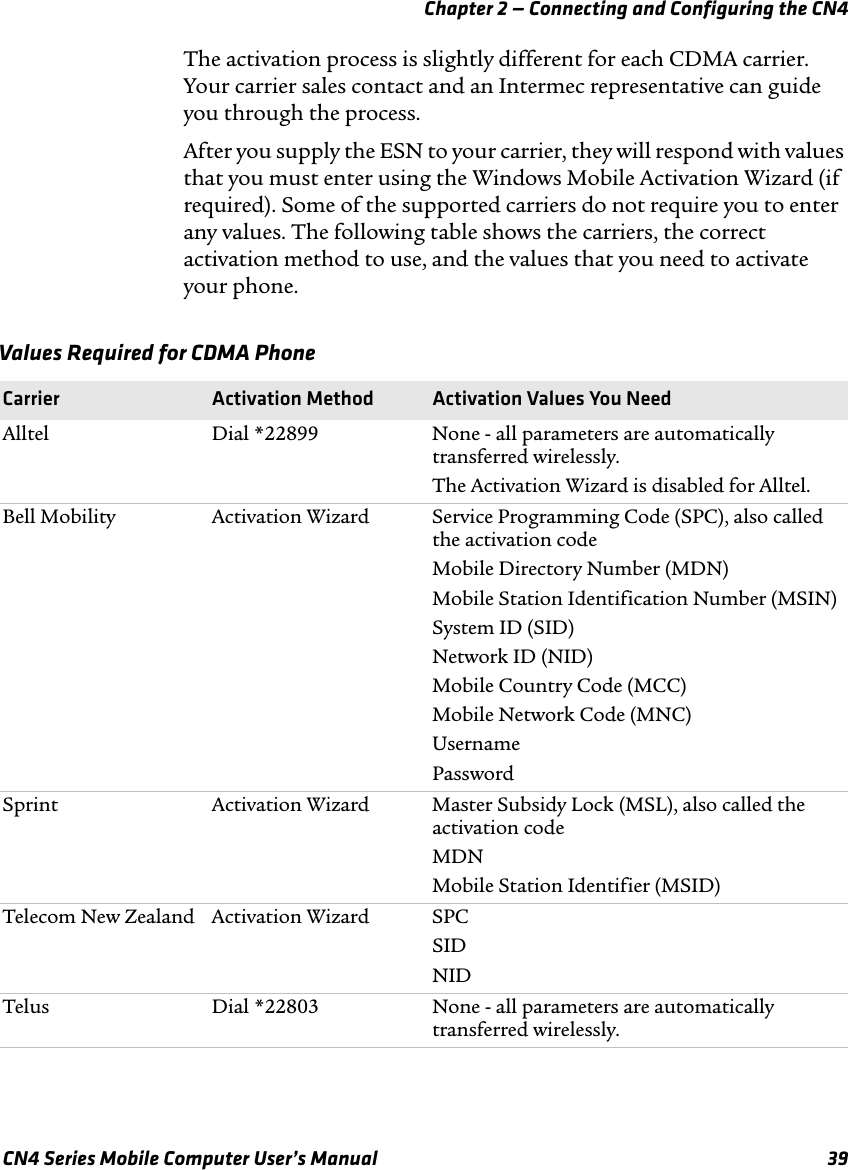
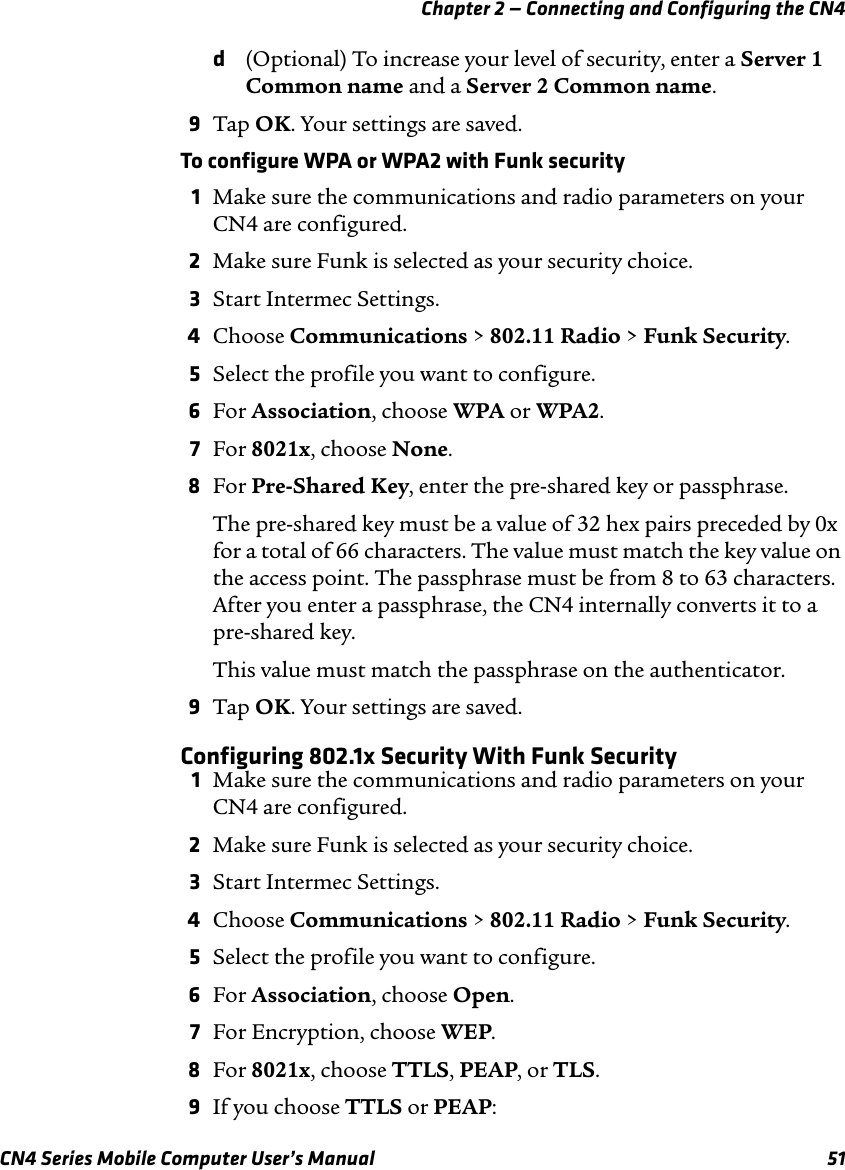
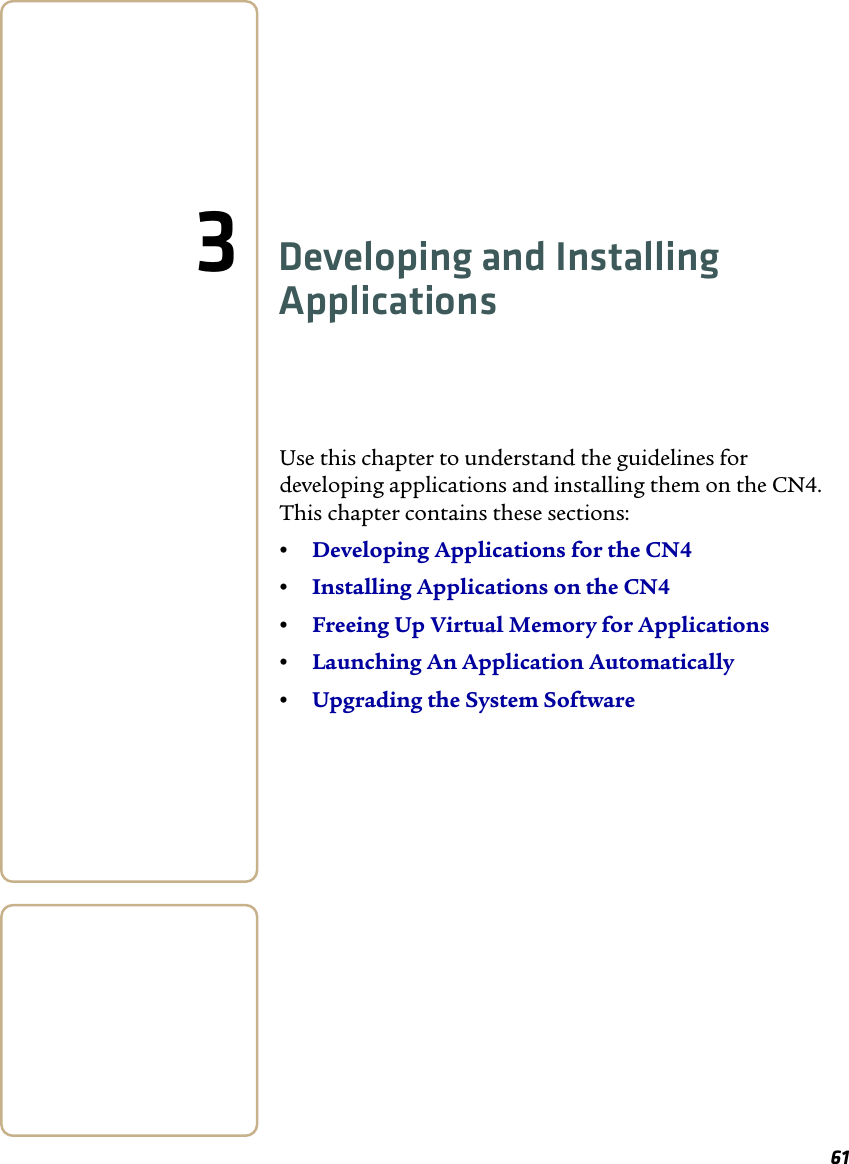
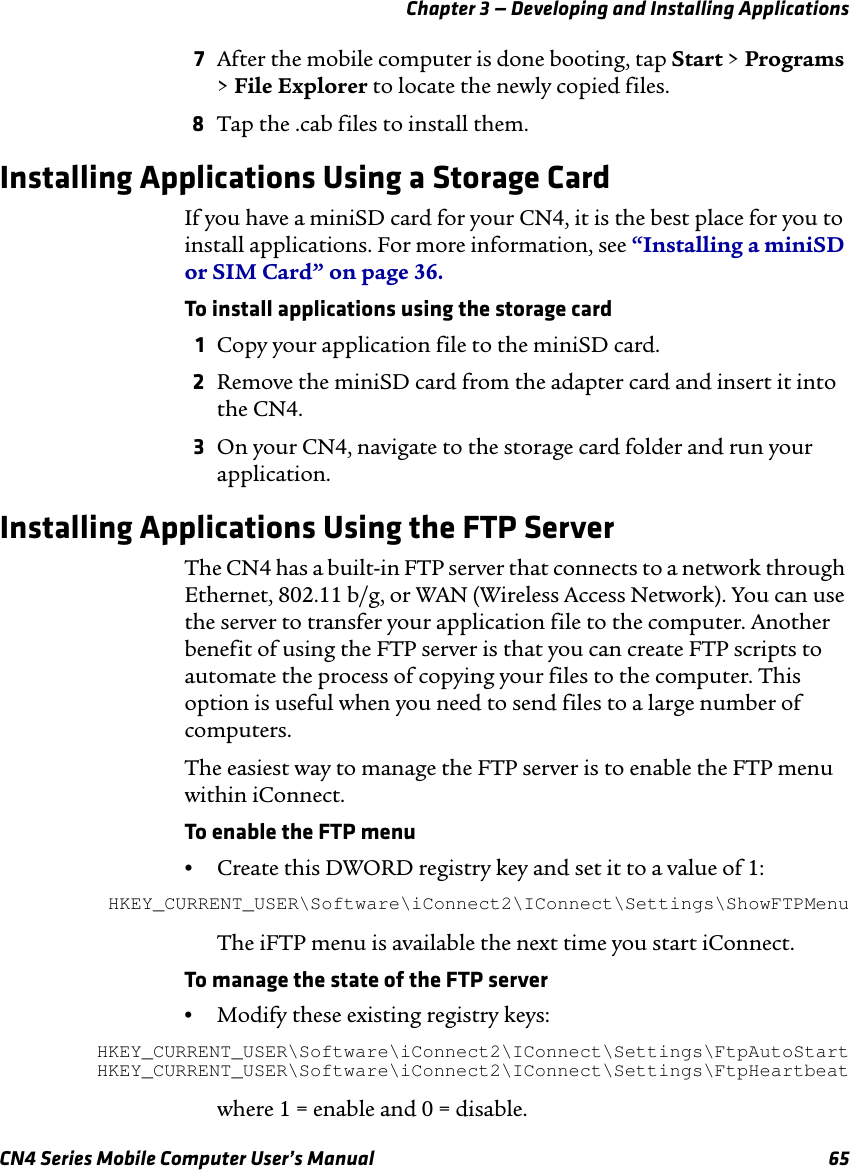
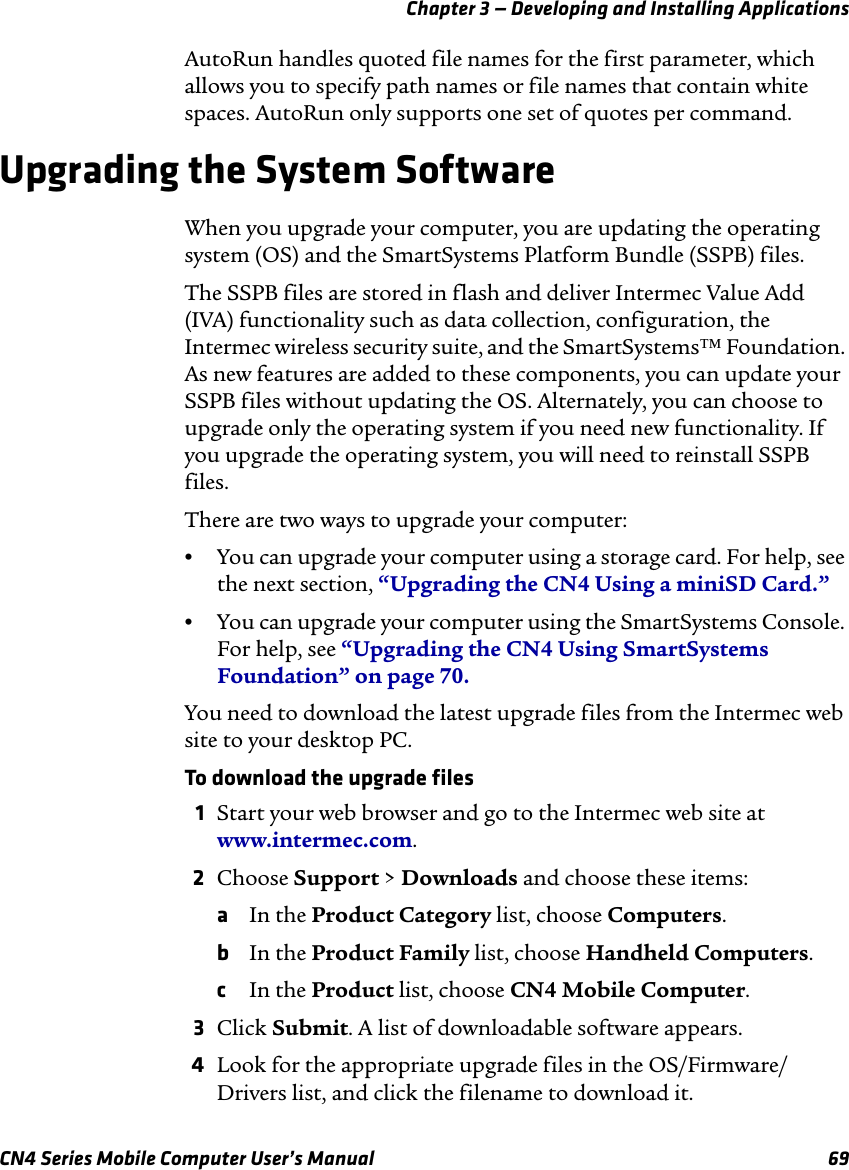

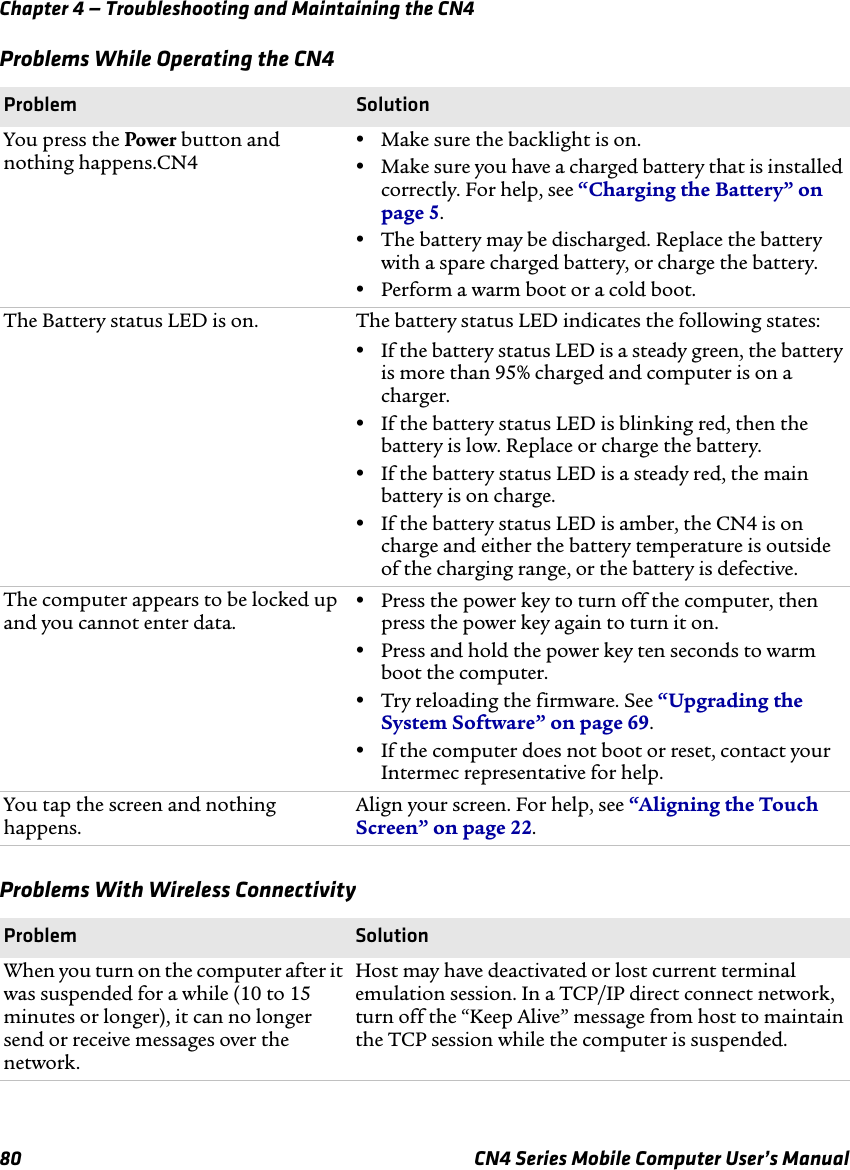

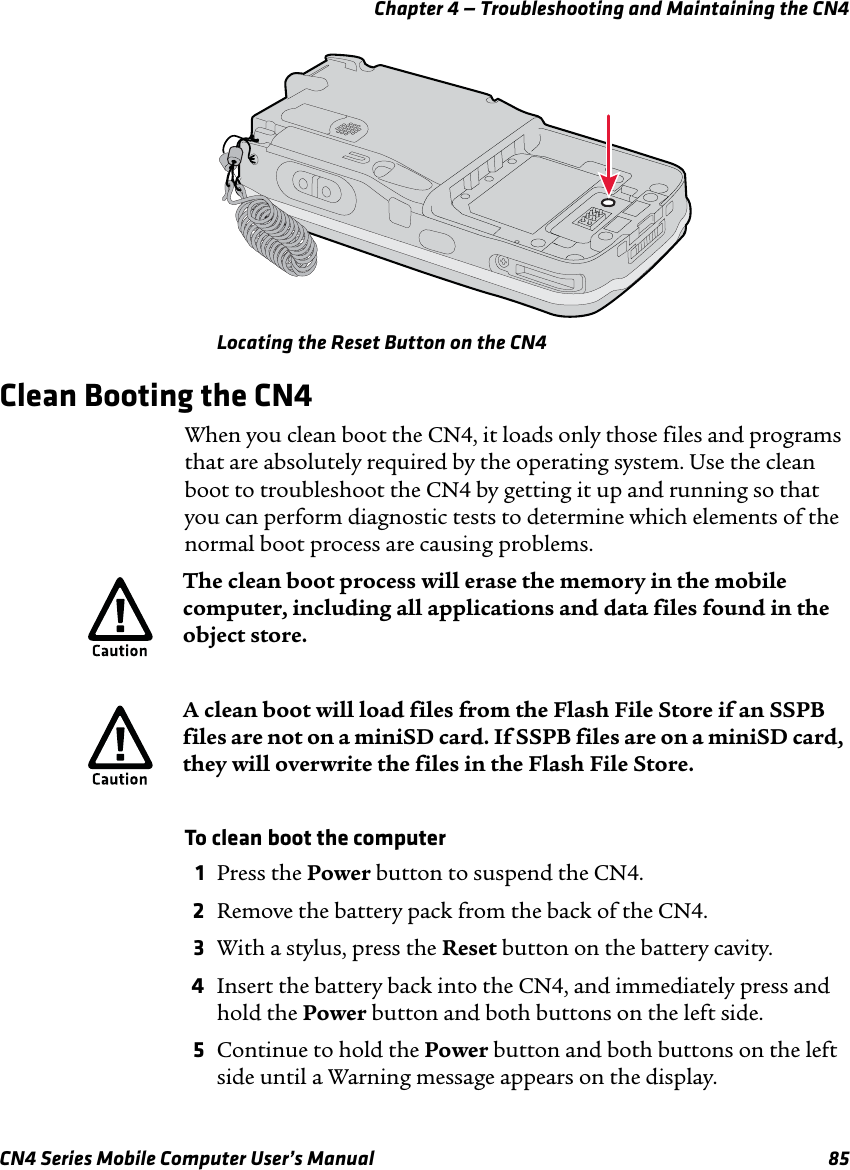

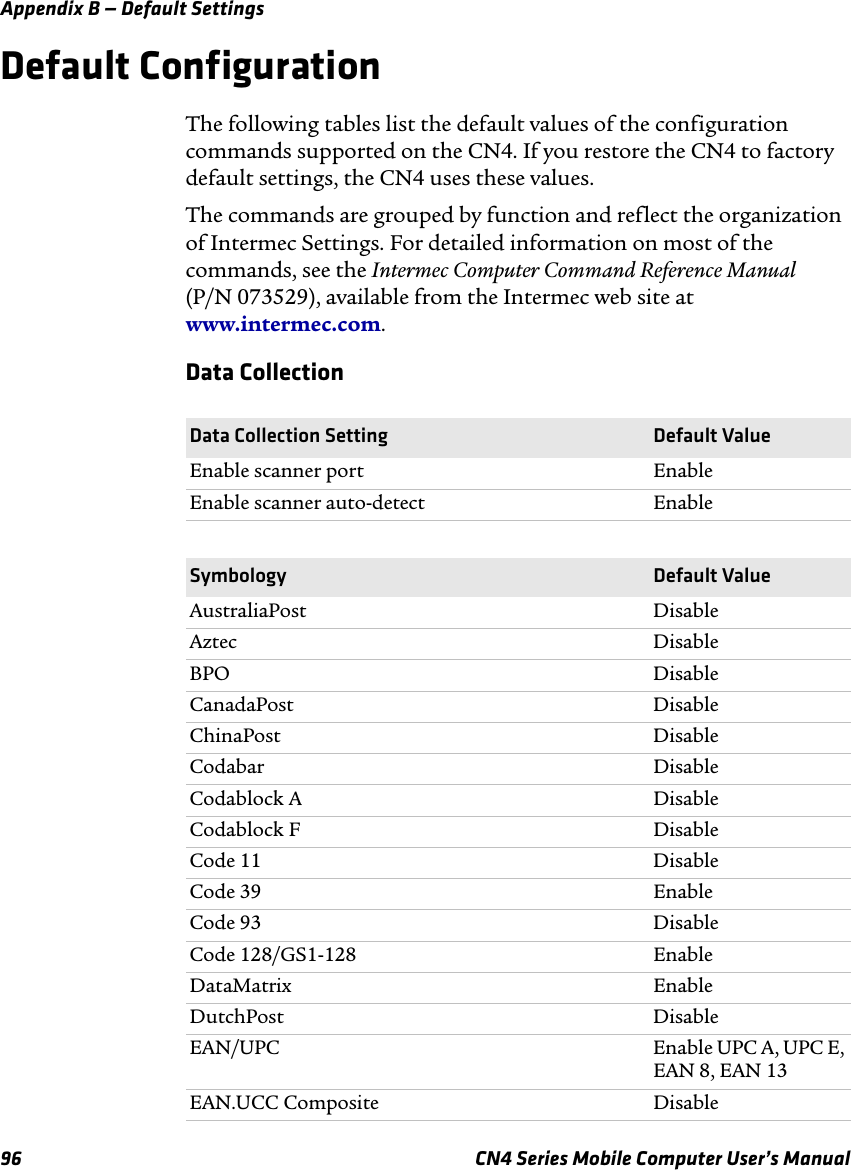
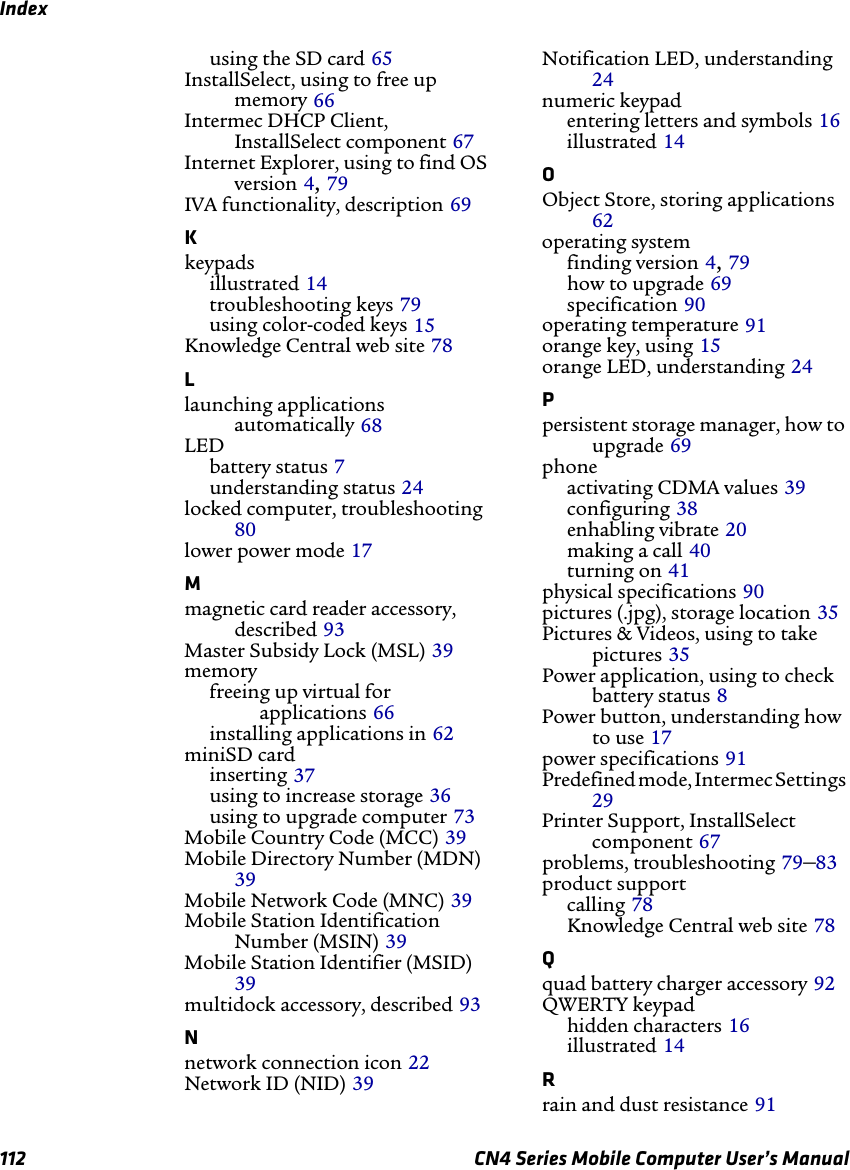
![Appendix C — Keypads and Keystrokes104 CN4 Mobile Computer User’s ManualStandard CharactersUse the following tables to learn how to enter standard and other available characters and functions with the keypad. If there is no sequence of keystrokes for a particular character or function, it is only available through the soft input panel (SIP), which can be accessed by tapping the keyboard icon on the touch screen.Alphanumeric CharactersCharacter Numeric Keypad Alphanumeric KeypadaC [2] [A]bC [2] [2] [B]cC [2] [2] [2] [C]dC [3] [D]eC [3] [3] [E]fC [3] [3] [3] [F]gC [4] [G]hC [4] [4] [H]iC [4] [4] [4] [I]jC [5] [J]kC [5] [5] [K]lC [5] [5] [5] [L]mC [6] [M]nC [6] [6] [N]oC [6] [6] [6] [O]pC [7] [P]qC [7] [7] [Q]rC [7] [7] [7] [R]sC [7] [7] [7] [7] [S]tC [8] [T]uC [8] [8] [U]vC [8] [8] [8] [V]wC [9] [W]xC [9] [9] [X]](https://usermanual.wiki/Intermec-Technologies/02CN4.Users-Manual/User-Guide-1150682-Page-118.png)
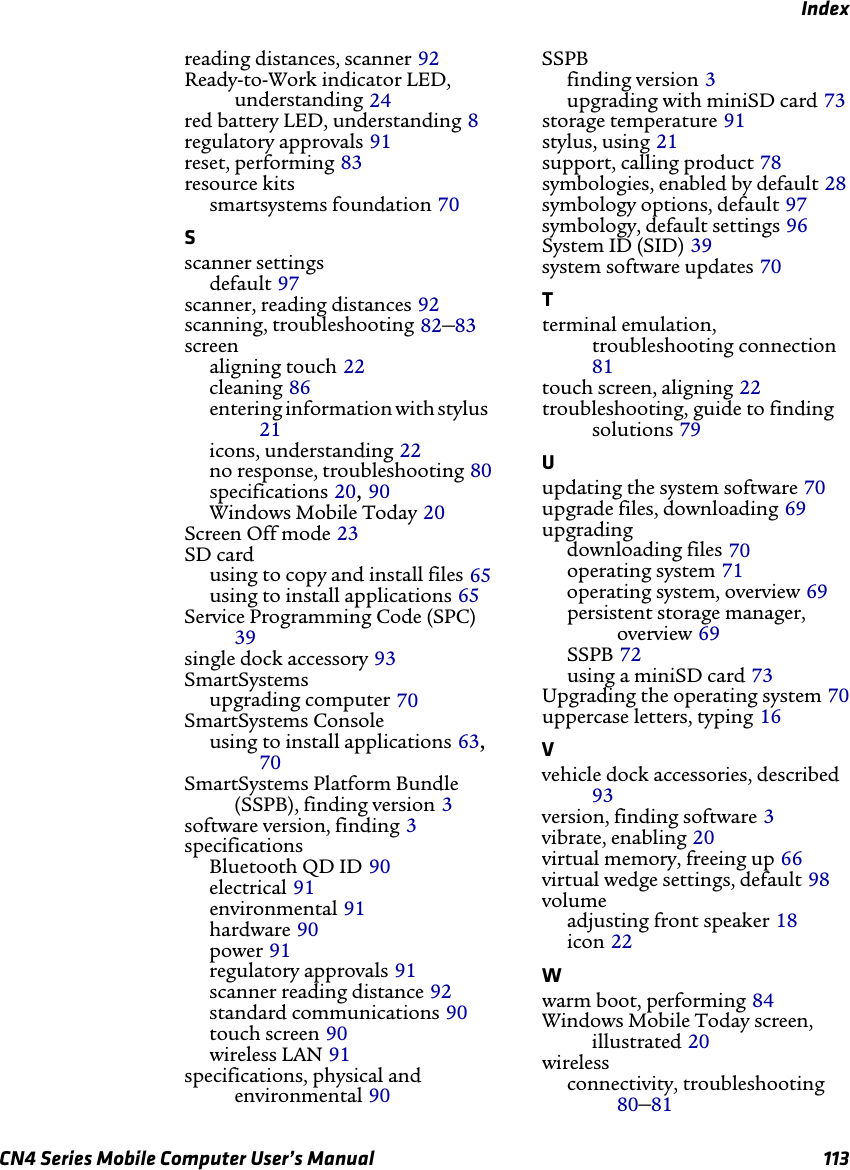
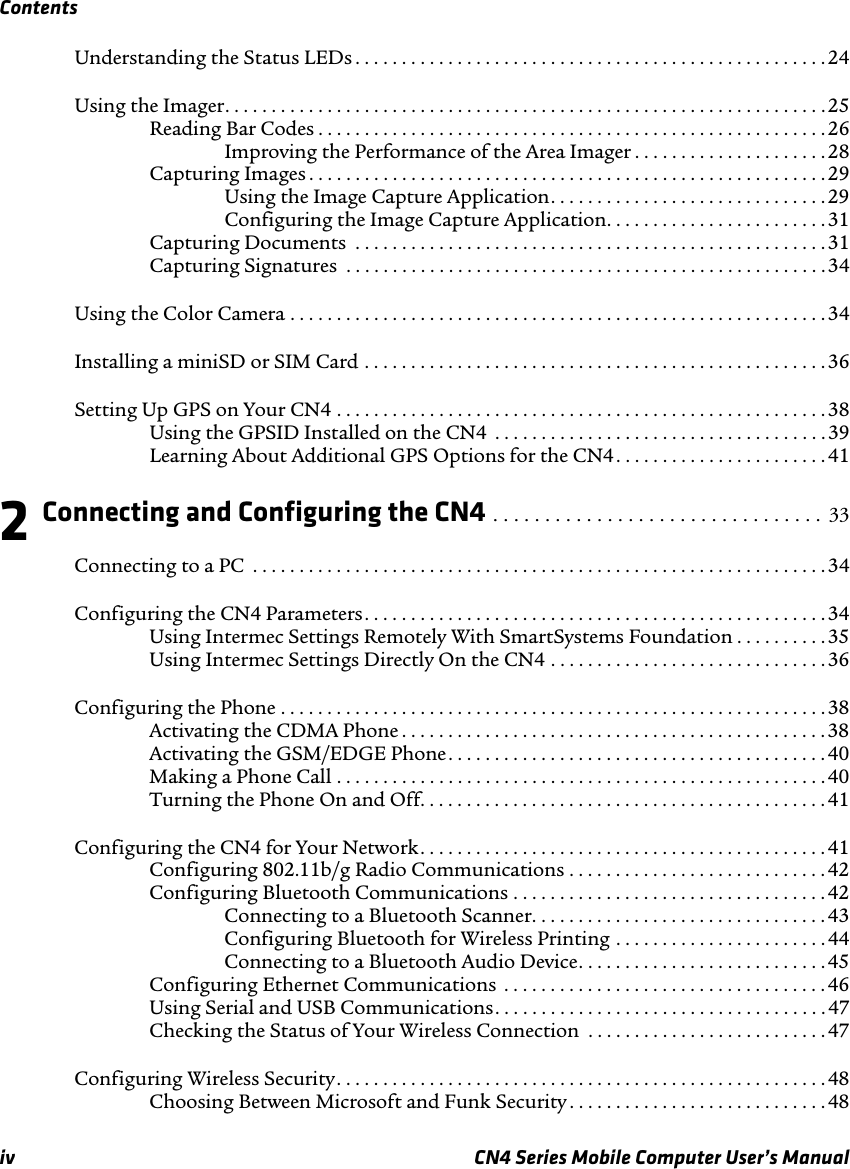
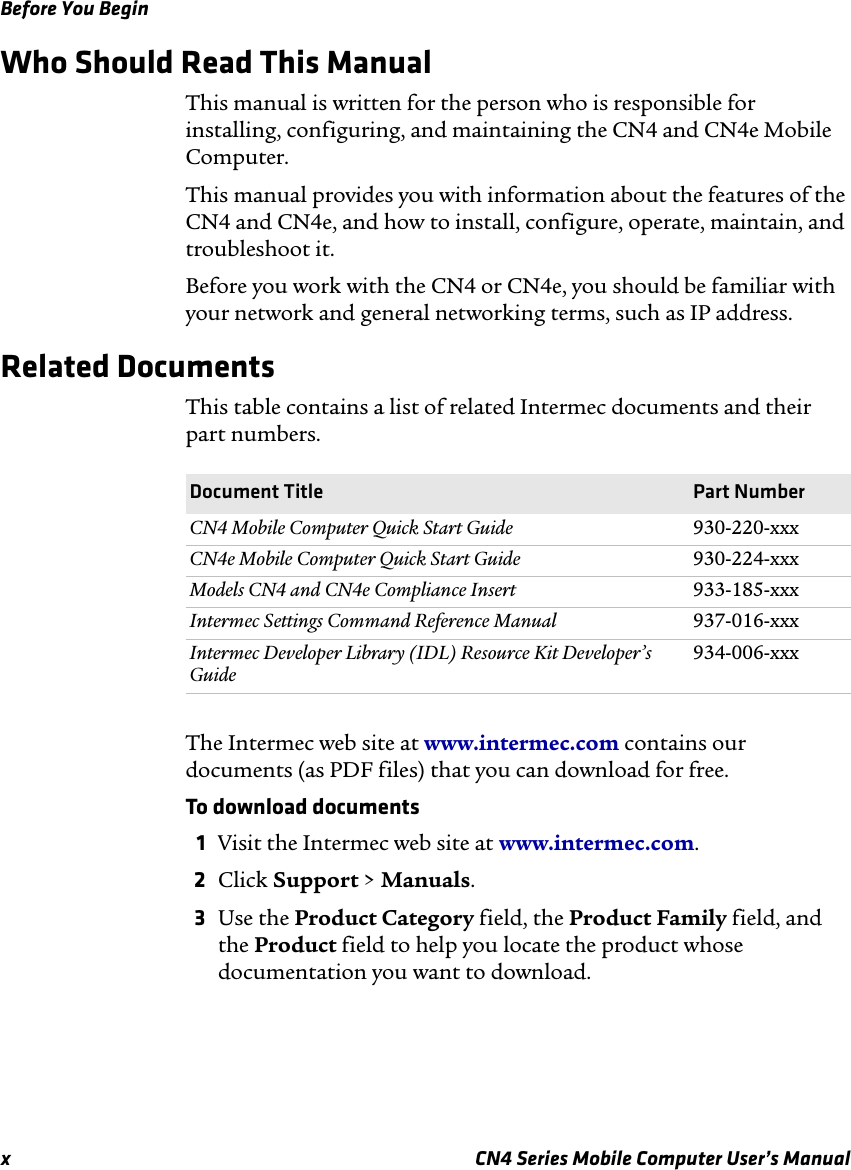
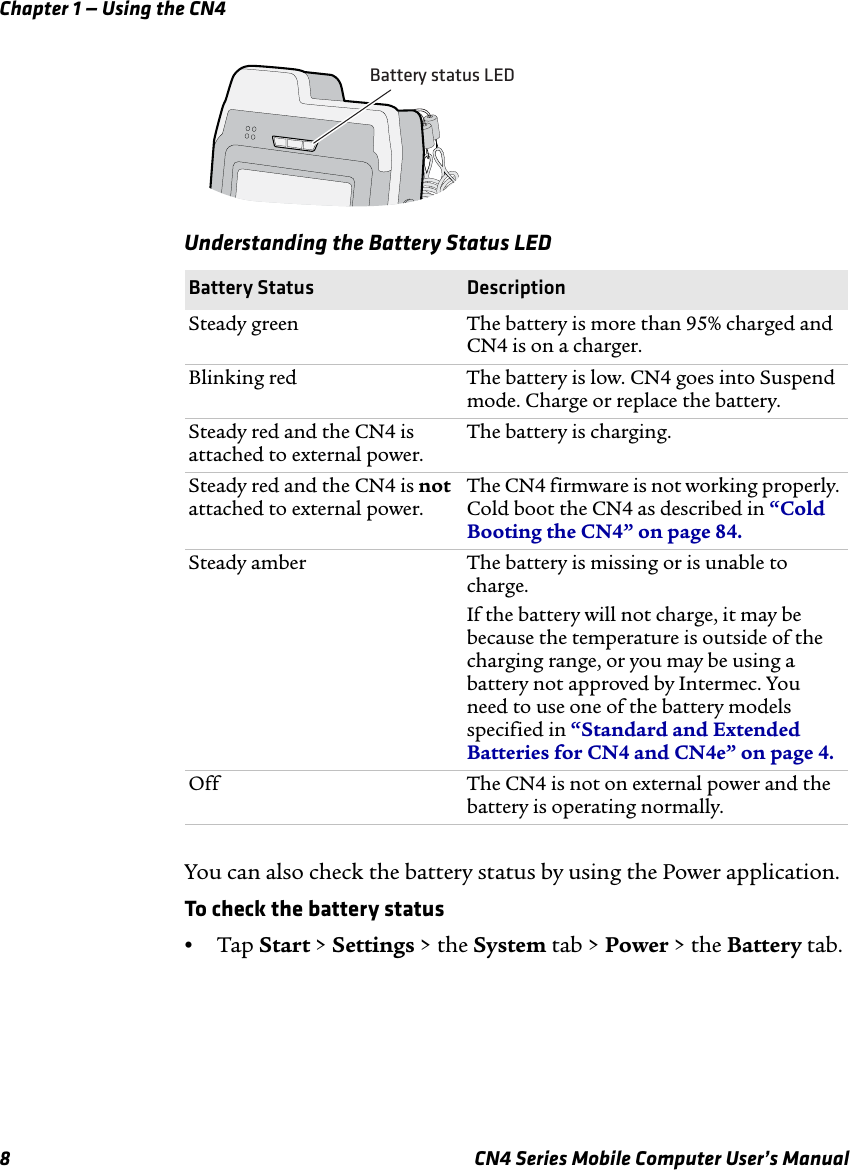
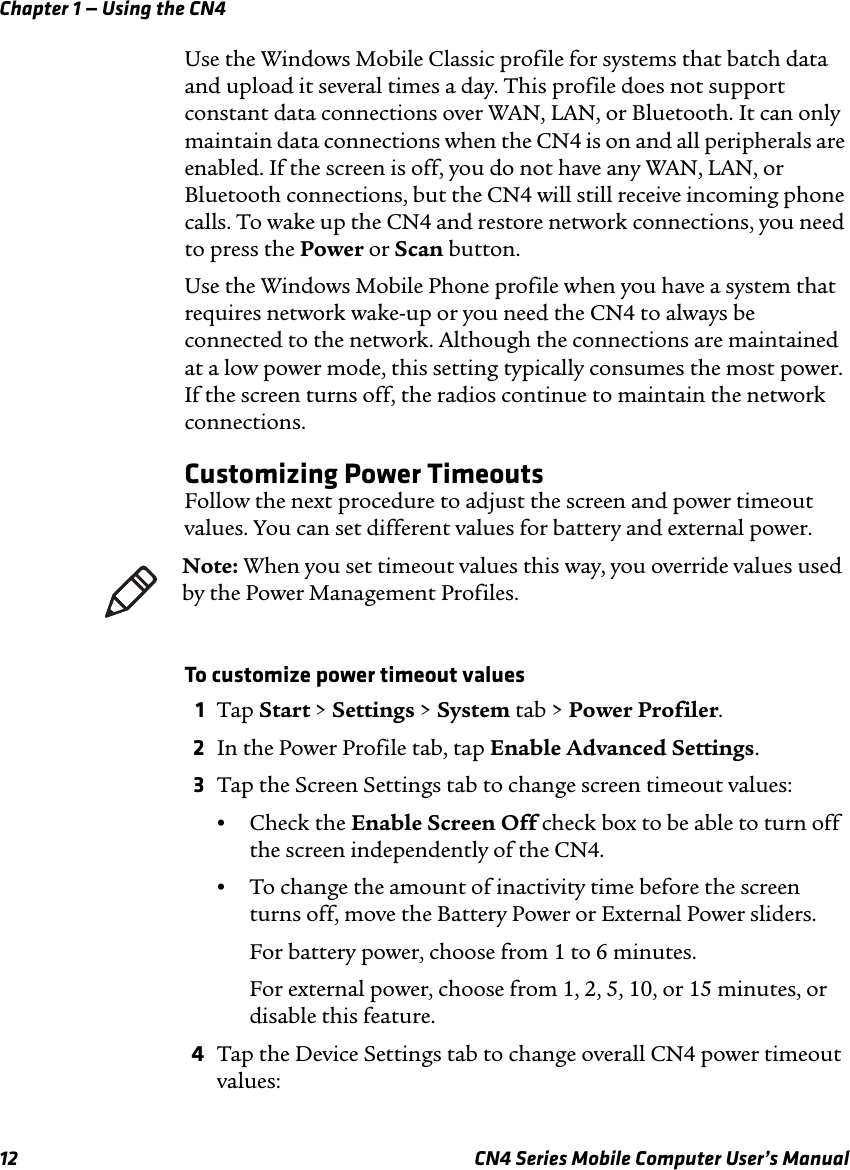
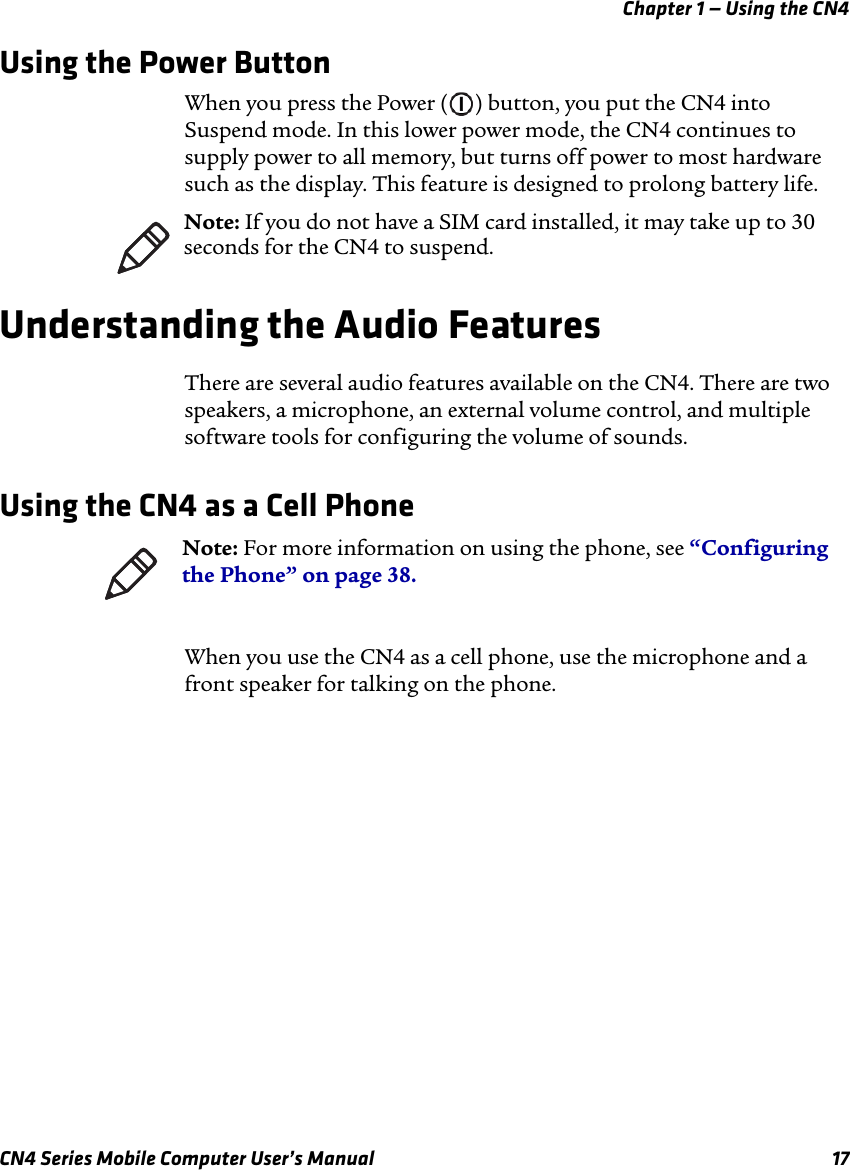
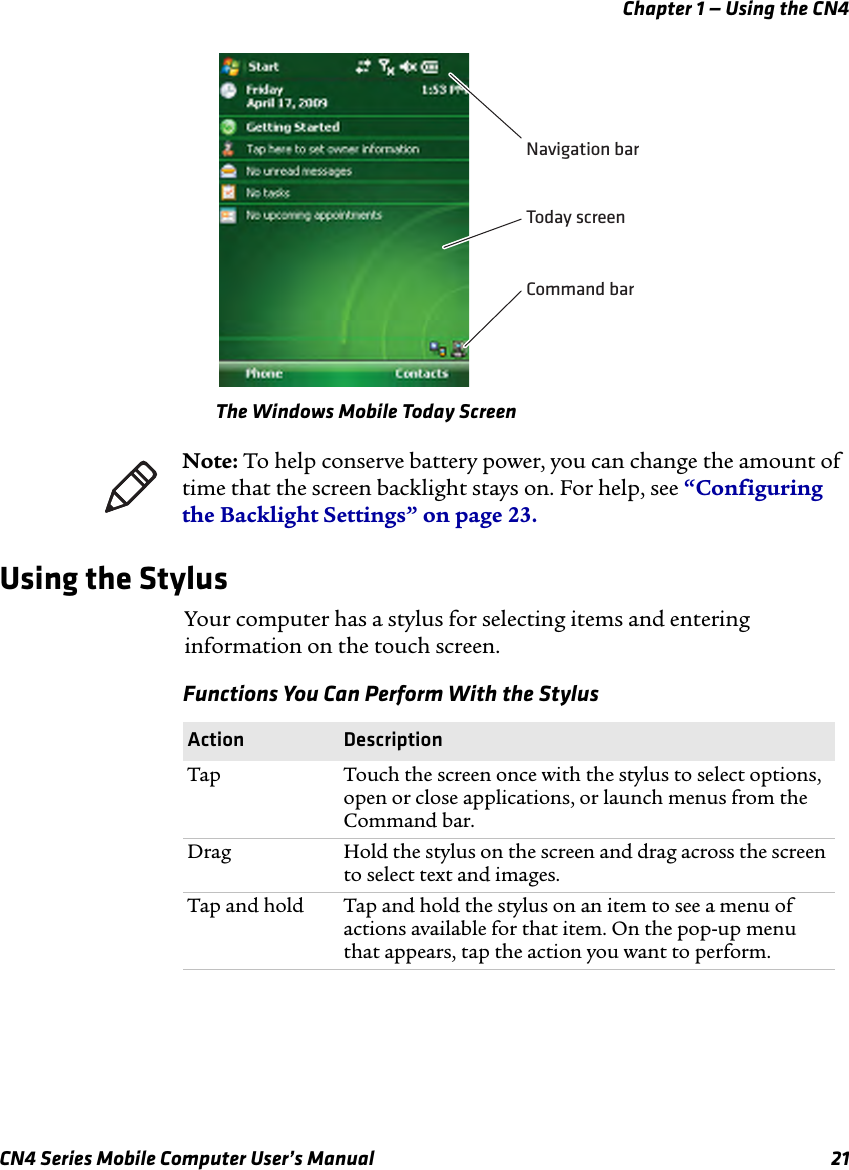
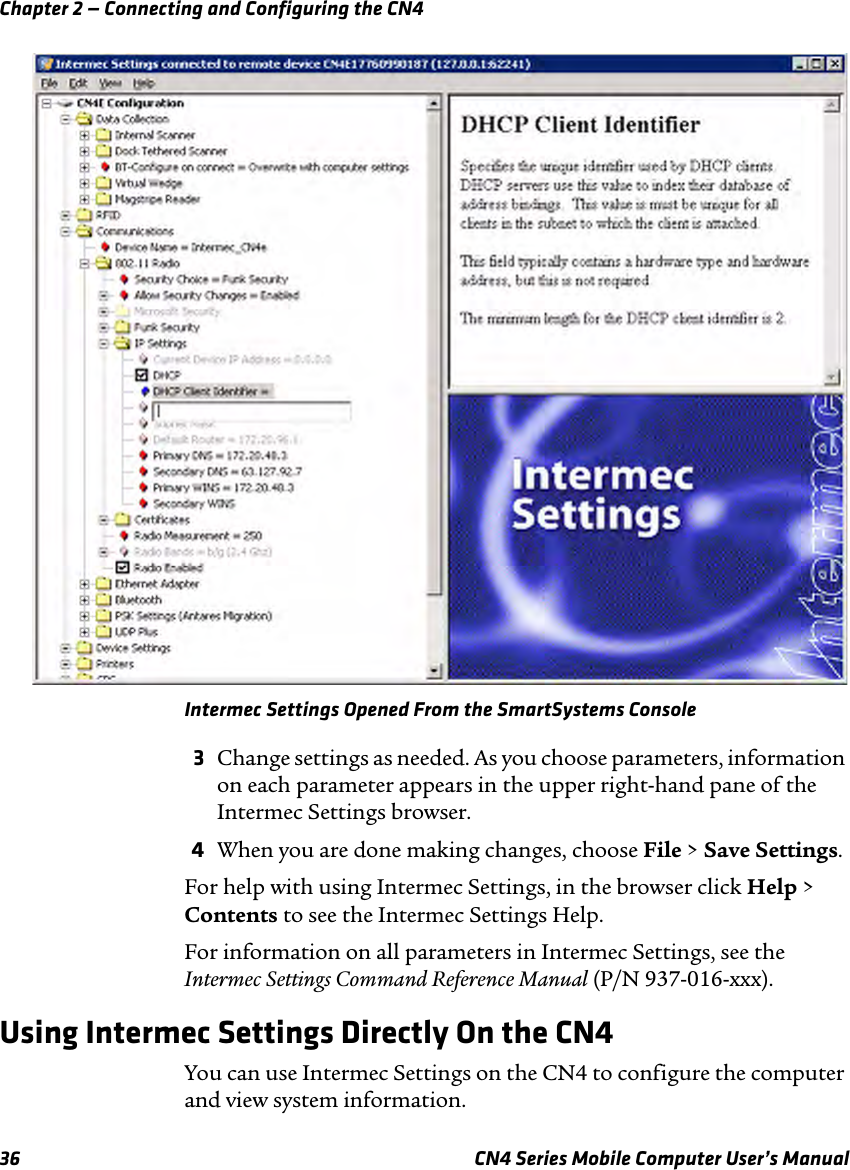
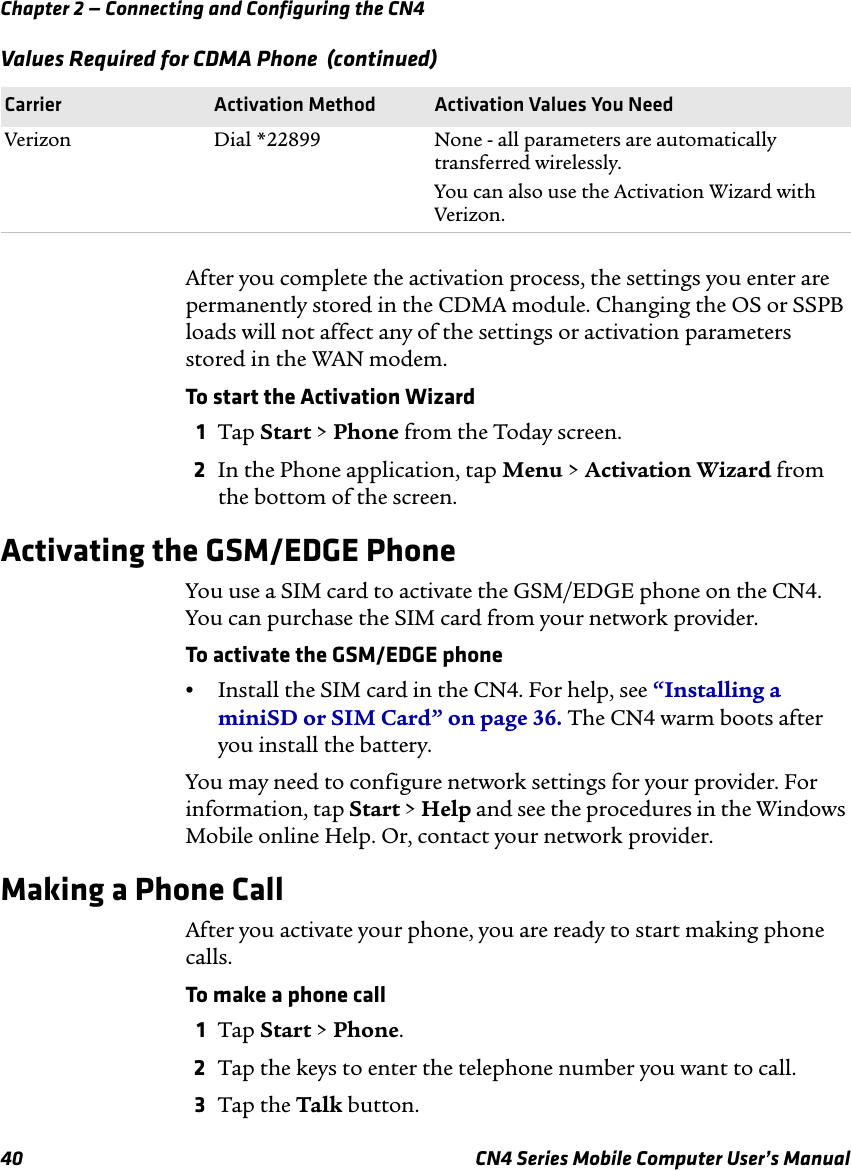
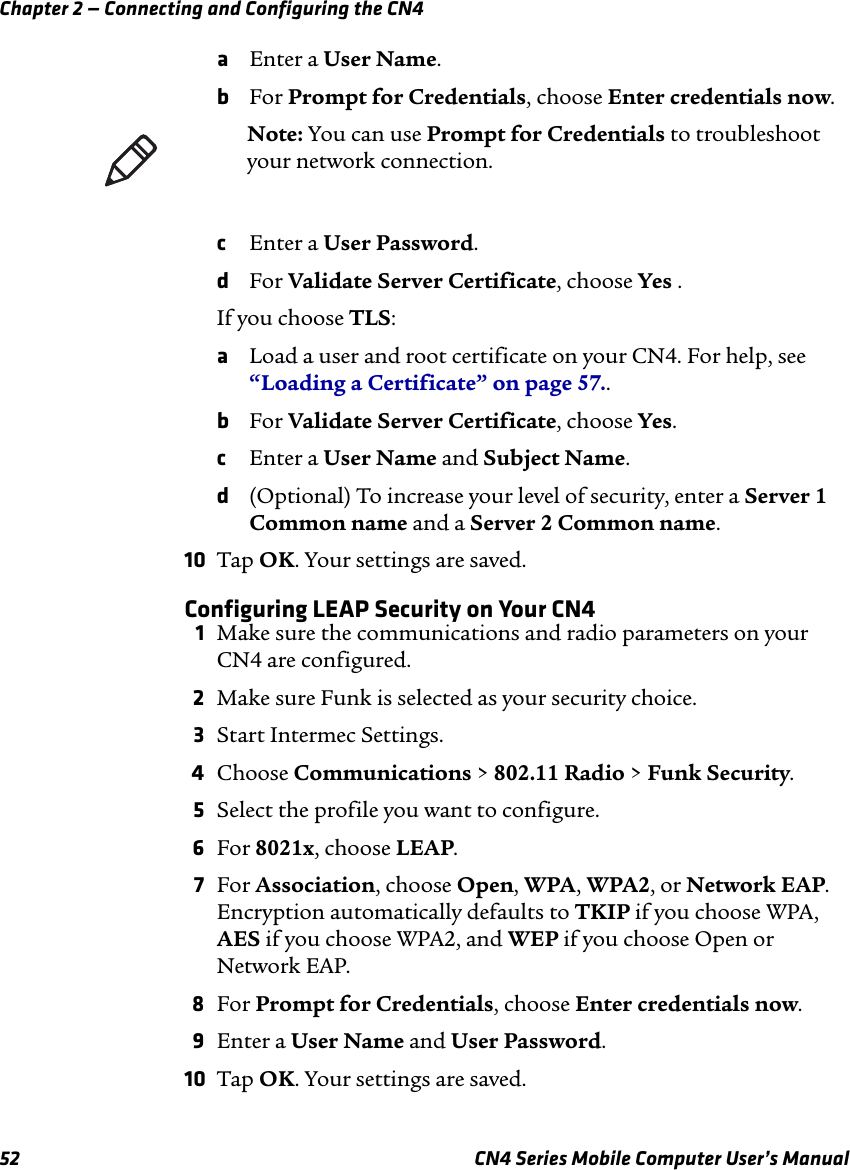
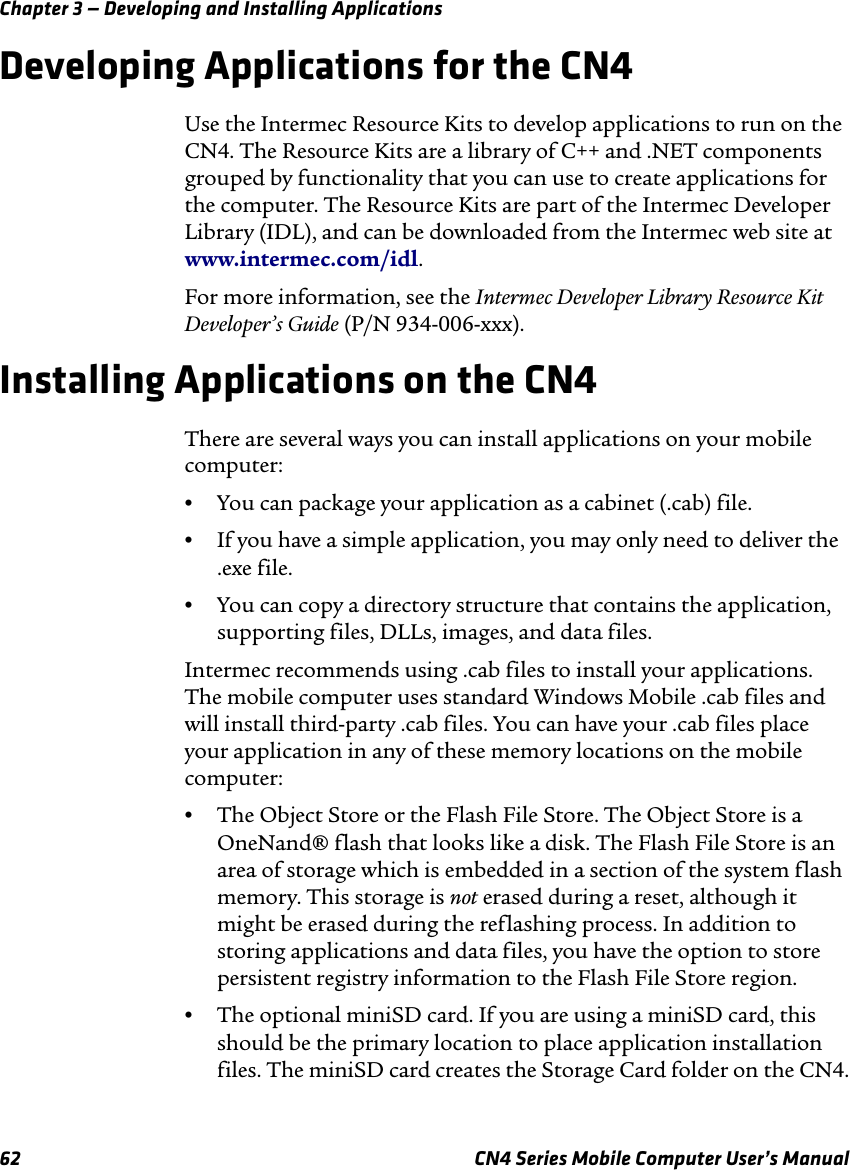
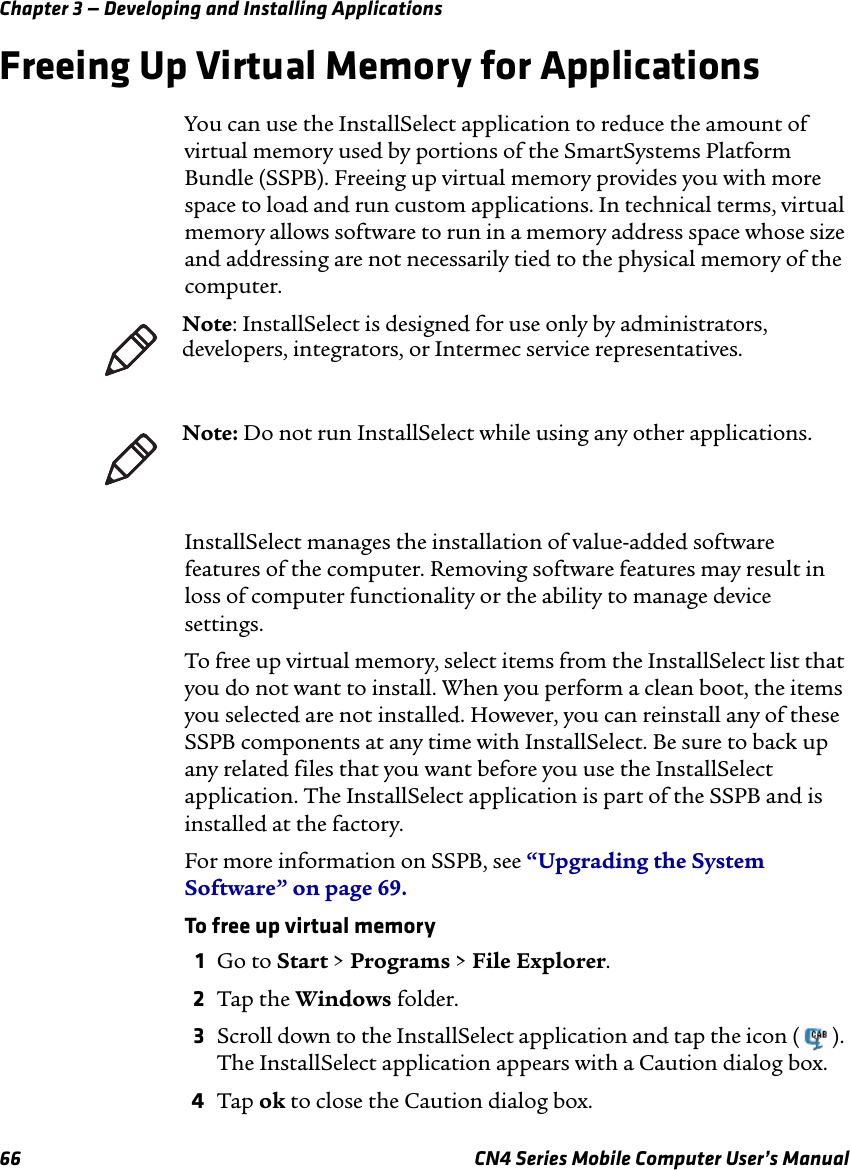
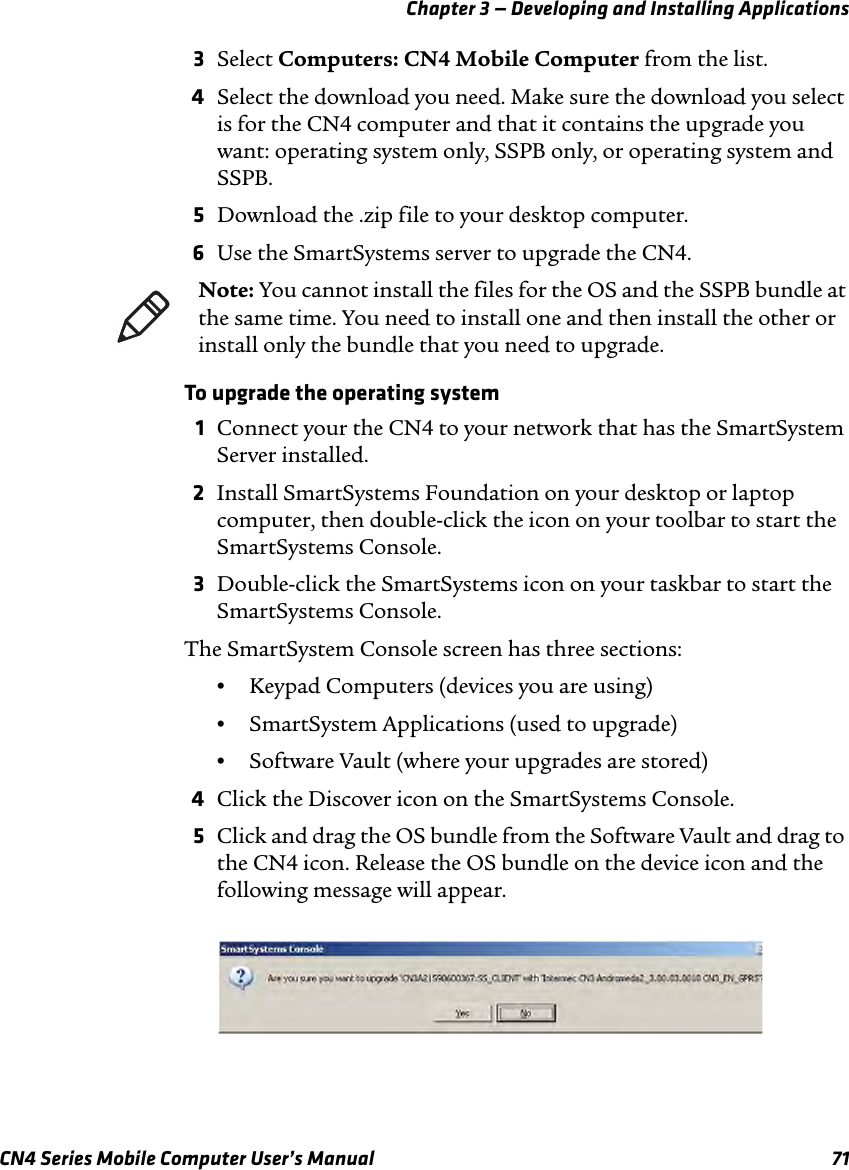
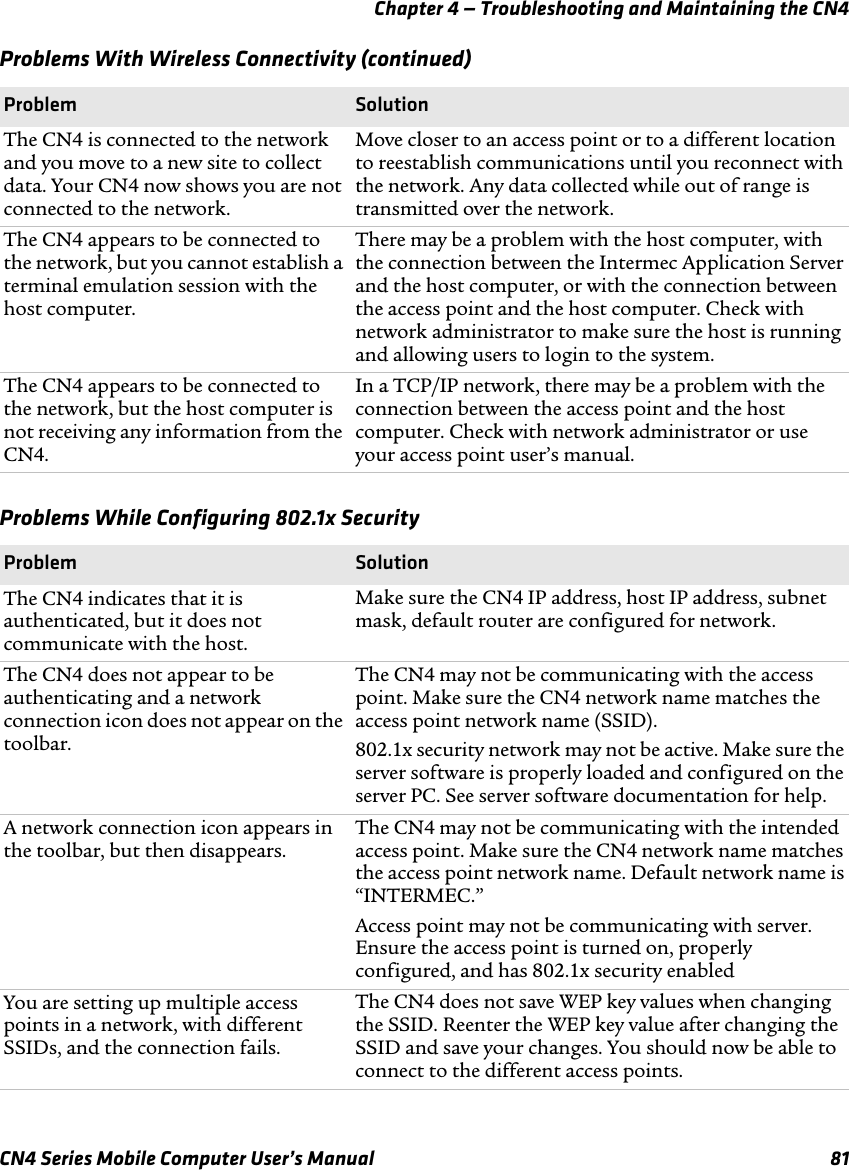
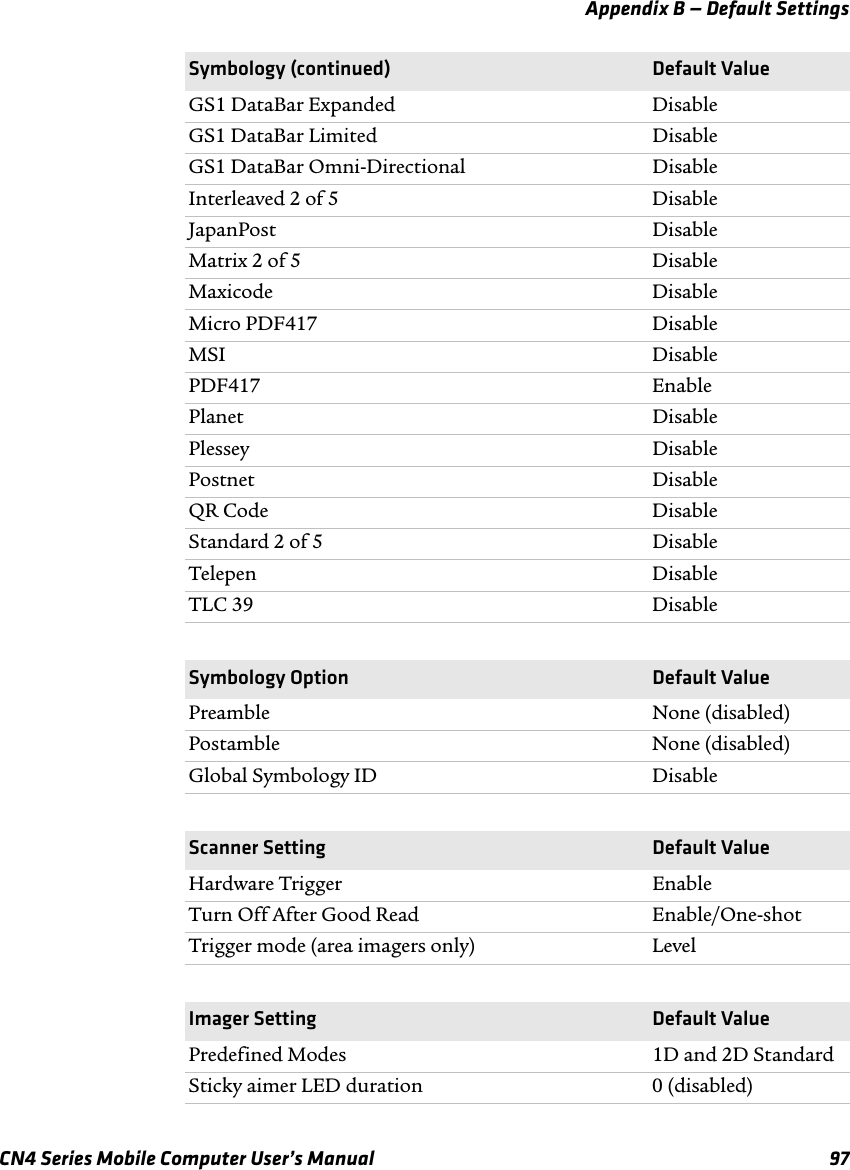
![Appendix C — Keypads and KeystrokesCN4 Mobile Computer User’s Manual 105yC [9] [9] [9] [Y]zC [9] [9] [9] [9] [Z]AC [1] [2] [Shift] [A]BC [1] [2] [2] [Shift] [B]CC [1] [2] [2] [2] [Shift] [C]DC [1] [3] [Shift] [D]EC [1] [3] [3] [Shift] [E]FC [1] [3] [3] [3] [Shift] [F]GC [1] [4] [Shift] [G]HC [1] [4] [4] [Shift] [H]IC [1] [4] [4] [4] [Shift] [I]JC [1] [5] [Shift] [J]KC [1] [5] [5] [Shift] [K]LC [1] [5] [5] [5] [Shift] [L]MC [1] [6] [Shift] [M]NC [1] [6] [6] [Shift] [N]OC [1] [6] [6] [6] [Shift] [O]PC [1] [7] [Shift] [P]QC [1] [7] [7] [Shift] [Q]RC [1] [7] [7] [7] [Shift] [R]SC [1] [7] [7] [7] [7] [Shift] [S]TC [1] [8] [Shift] [T]UC [1] [8] [8] [Shift] [U]VC [1] [8] [8] [8] [Shift] [V]WC [1] [9] [Shift] [W]XC [1] [9] [9] [Shift] [X]YC [1] [9] [9] [9] [Shift] [Y]ZC [1] [9] [9] [9] [9] [Shift] [Z]0[0] B [backlight]1[1] B [Y]2[2] B [U]3[3[ B [I]Alphanumeric Characters (continued)Character Numeric Keypad Alphanumeric Keypad](https://usermanual.wiki/Intermec-Technologies/02CN4.Users-Manual/User-Guide-1150682-Page-119.png)
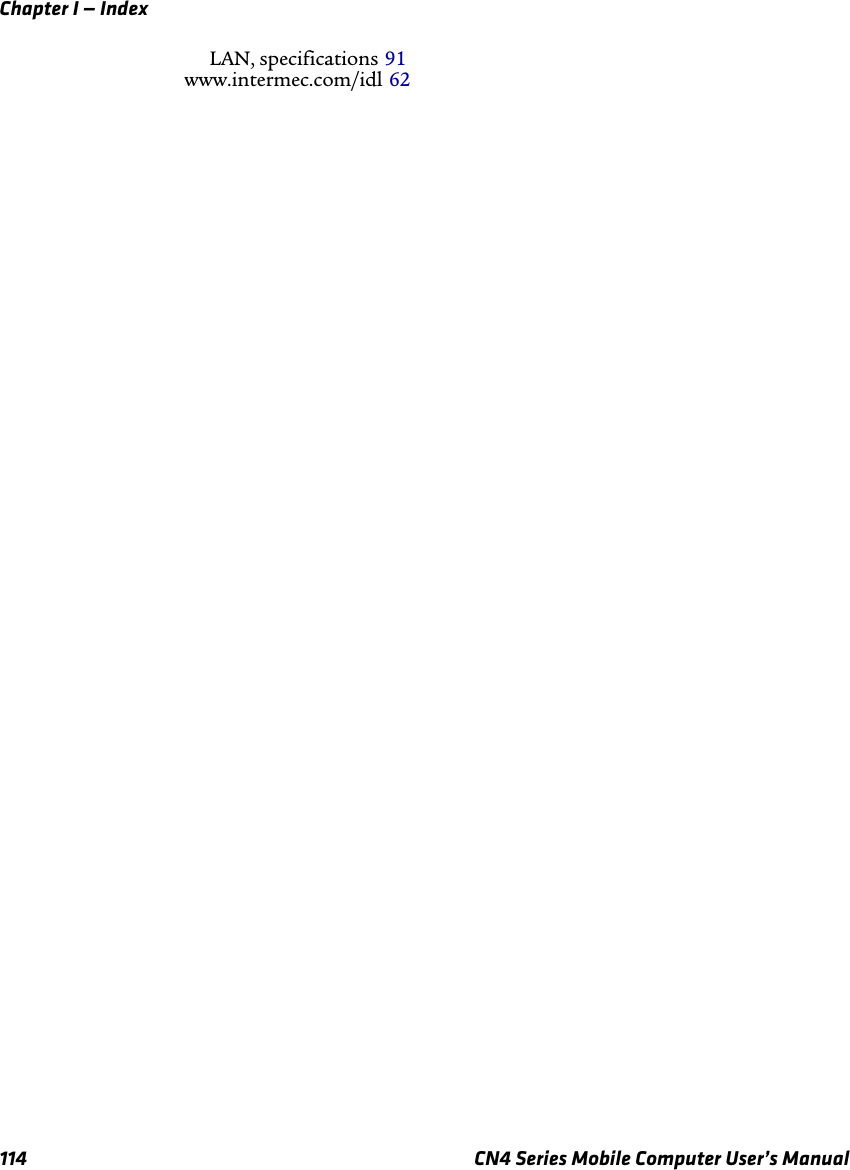
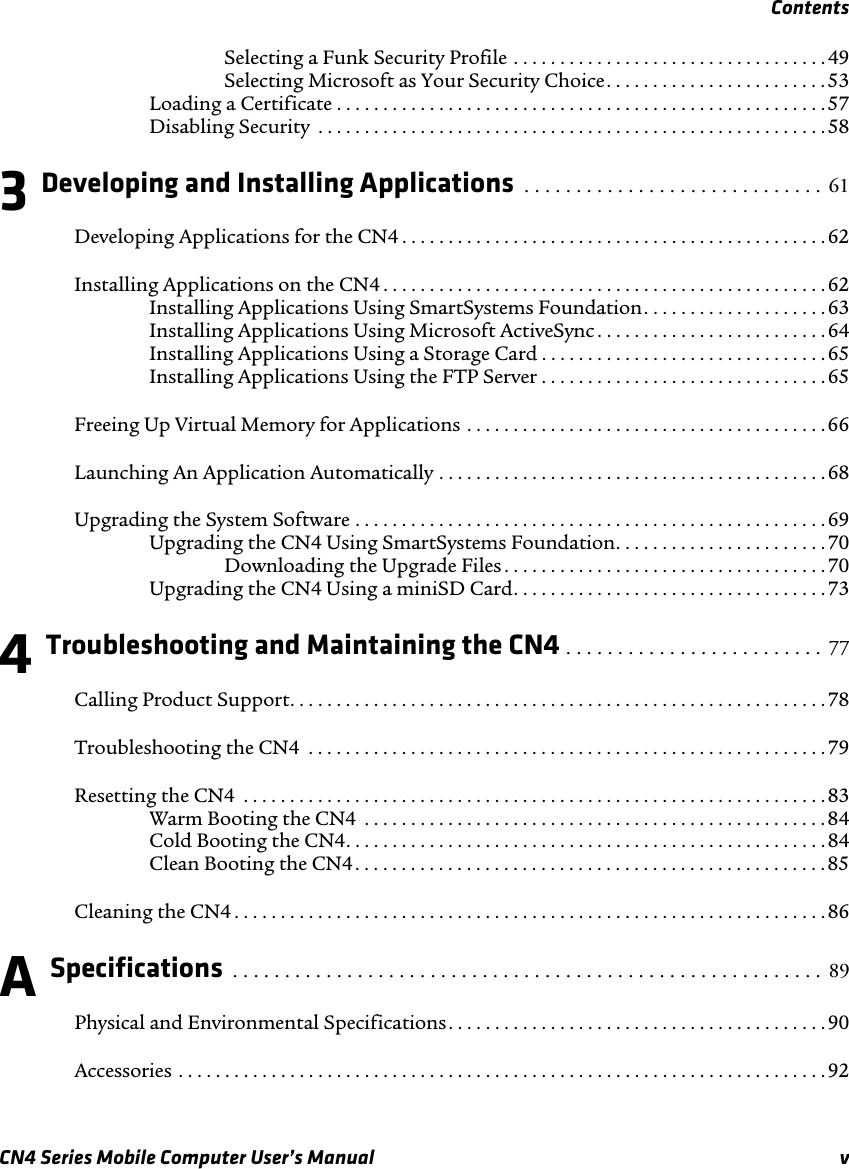
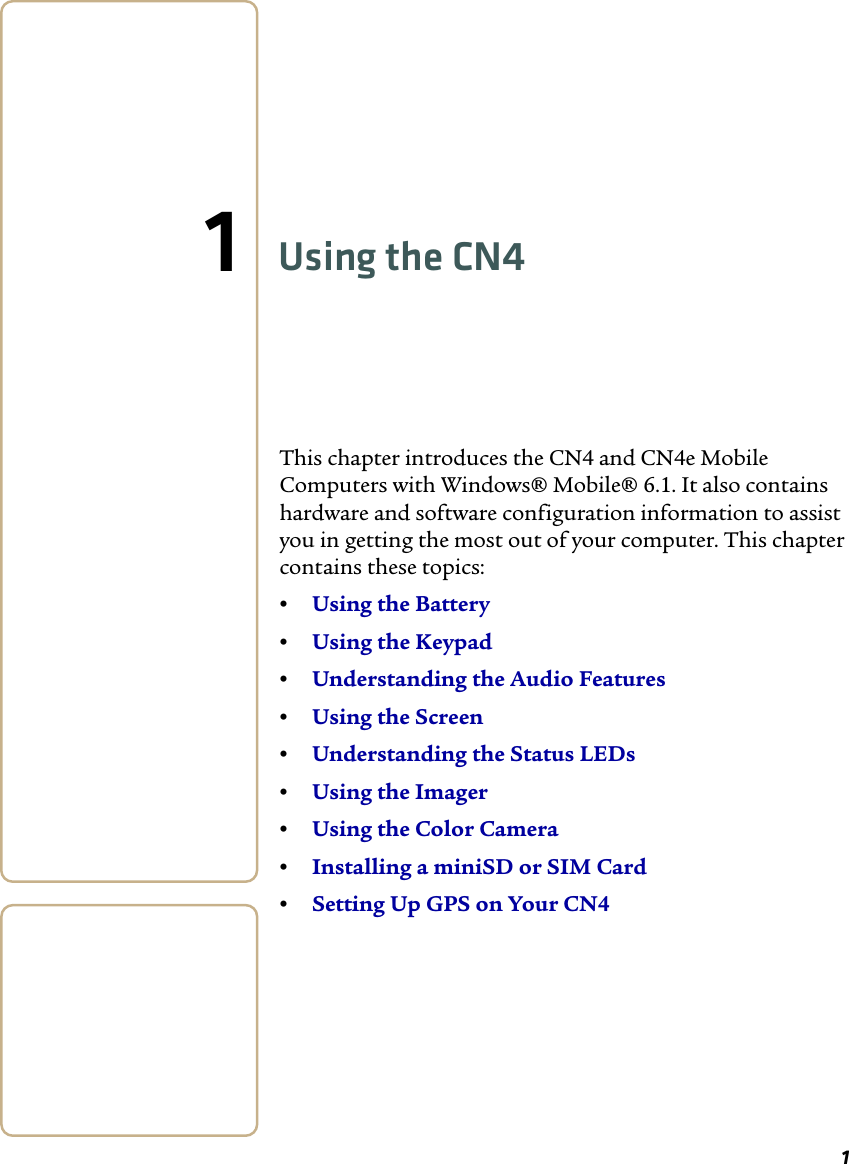
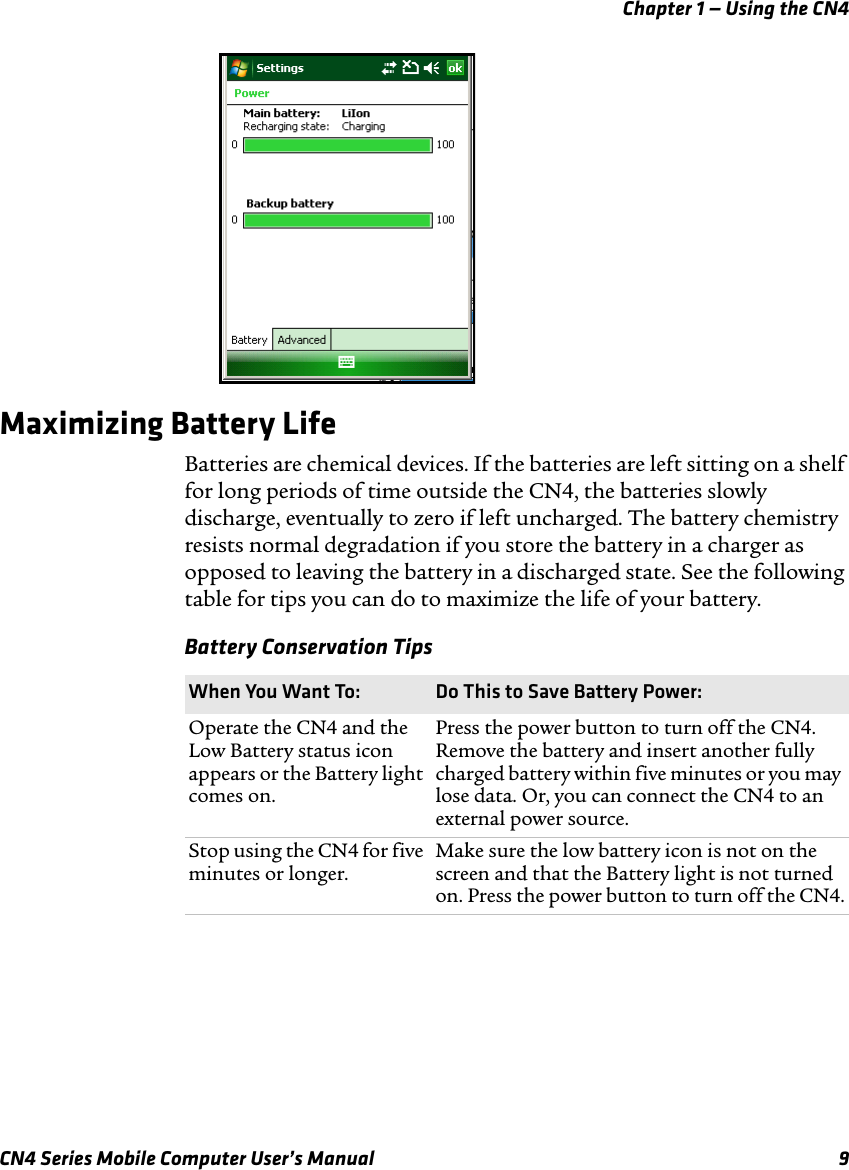
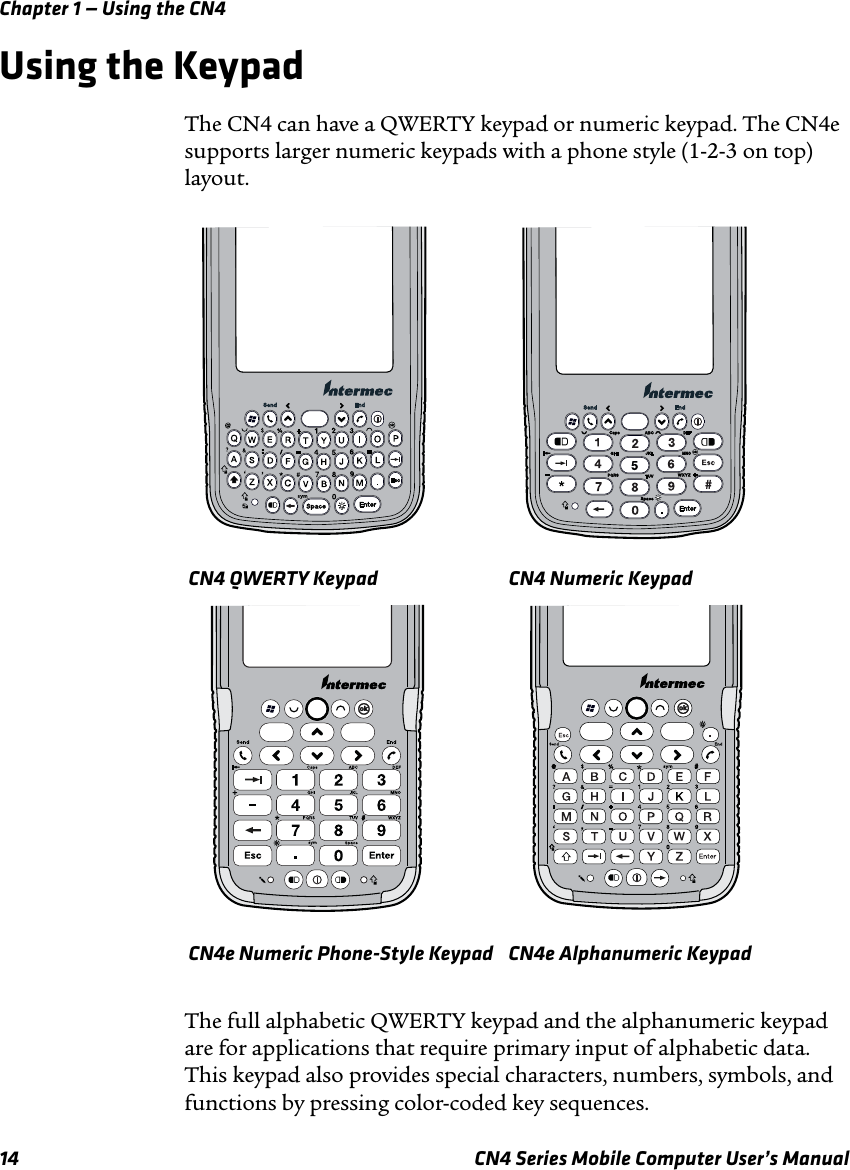
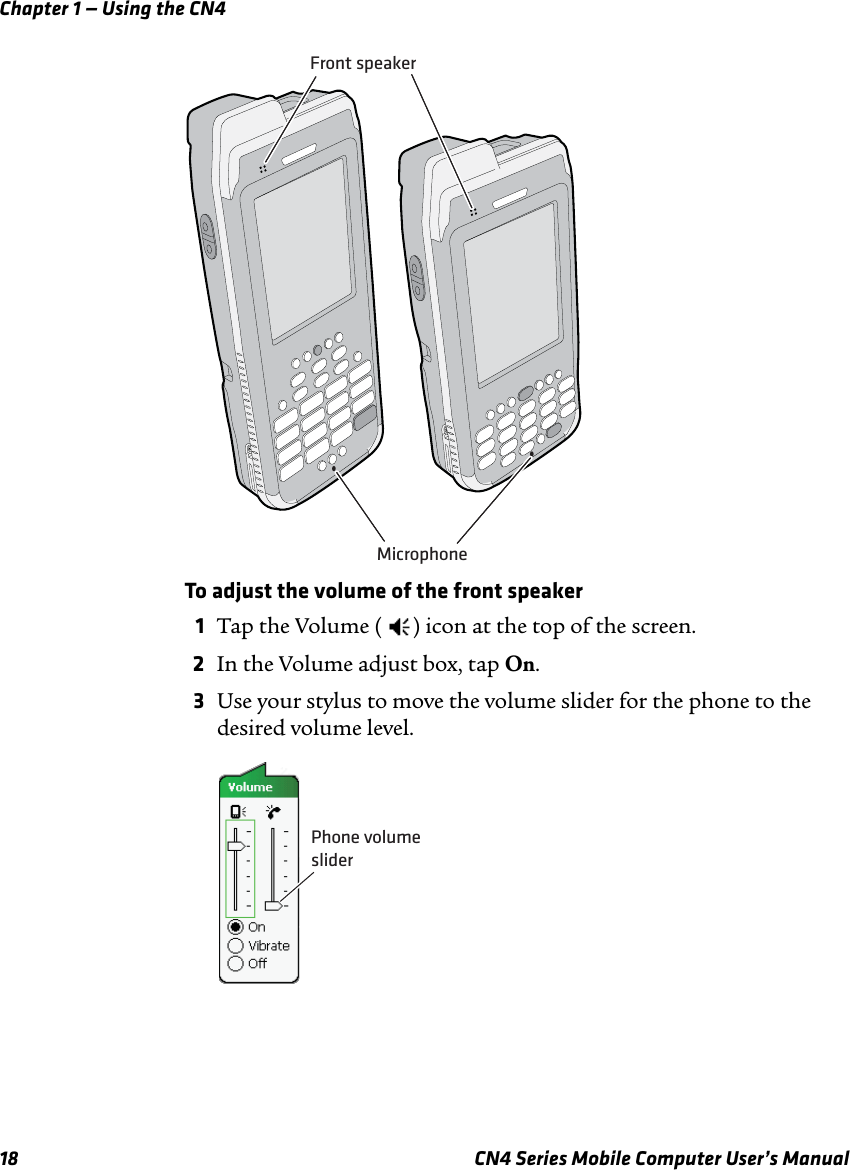
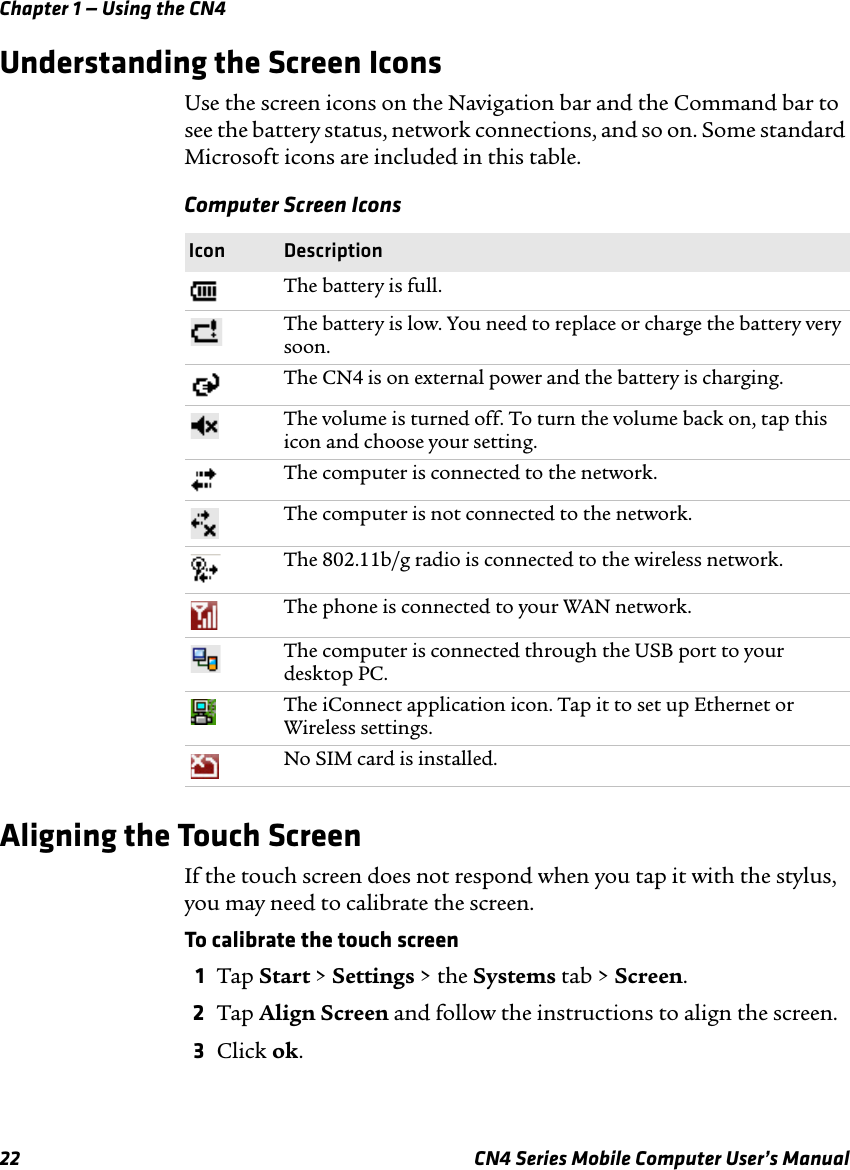
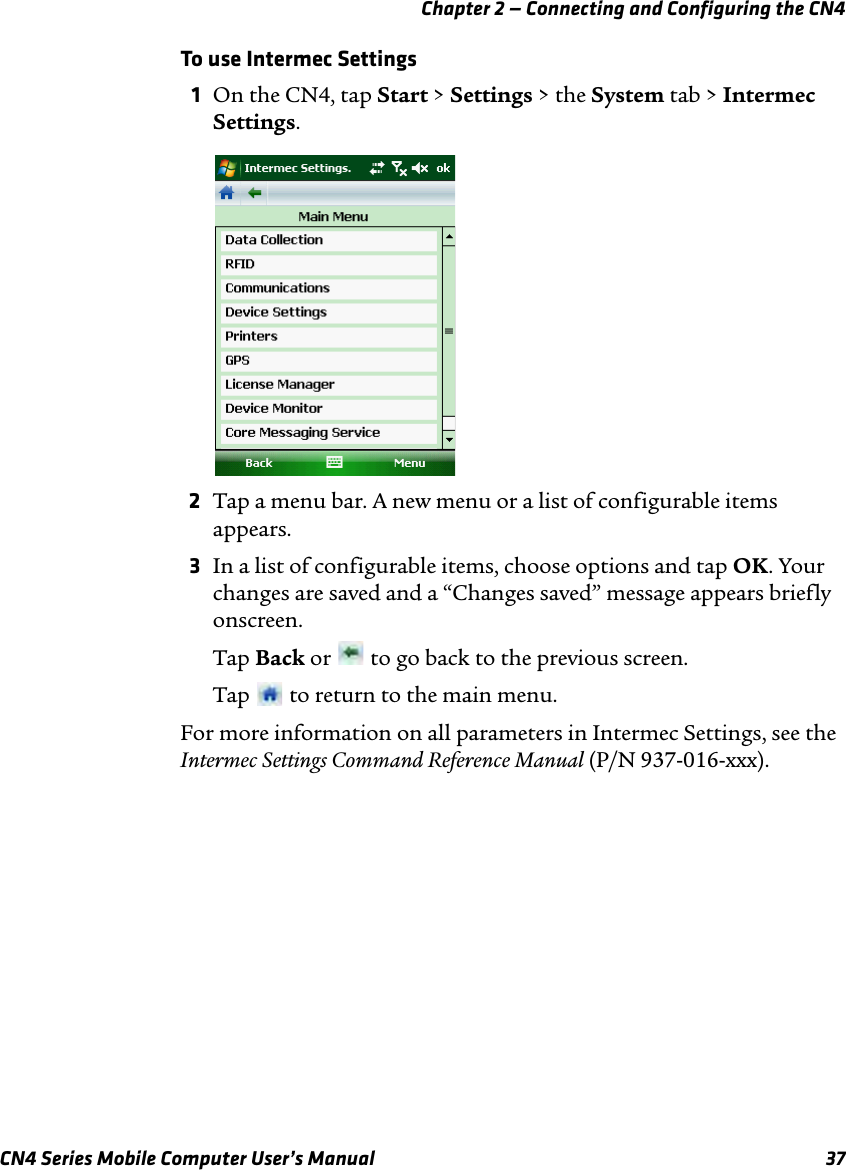
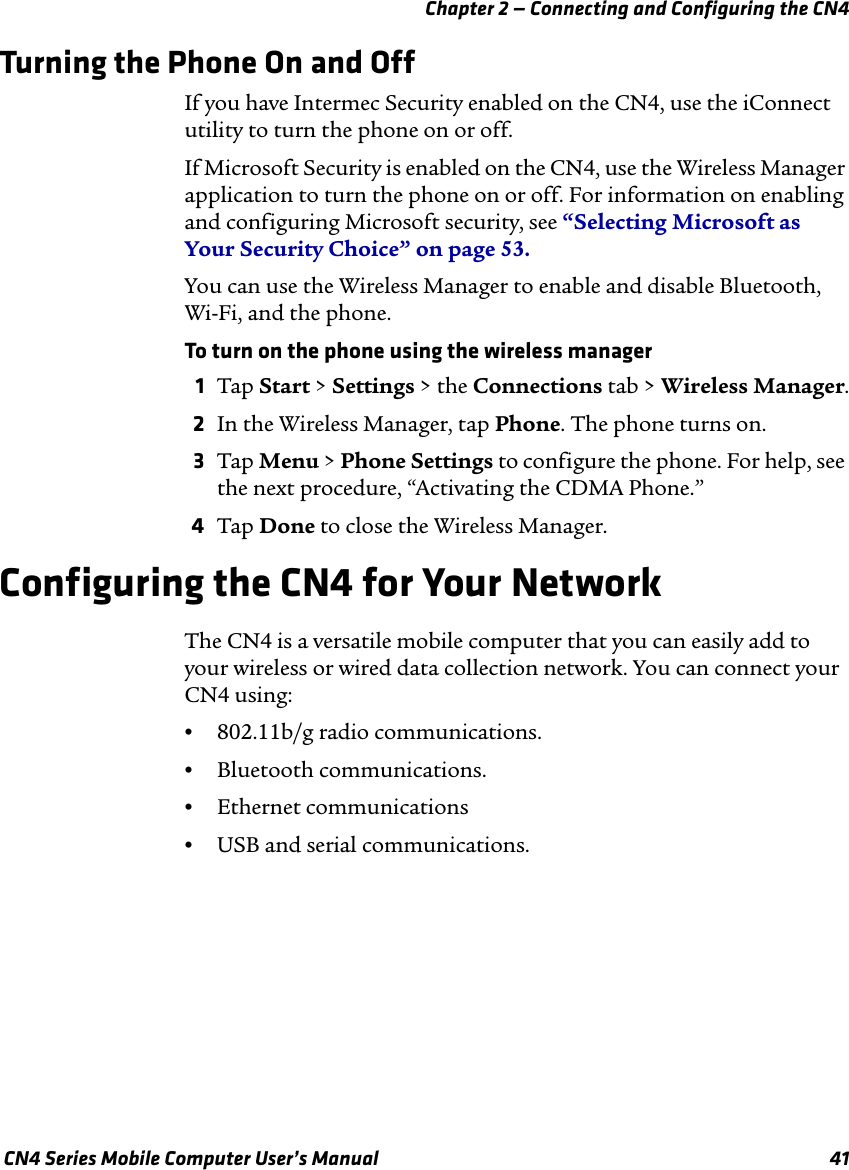
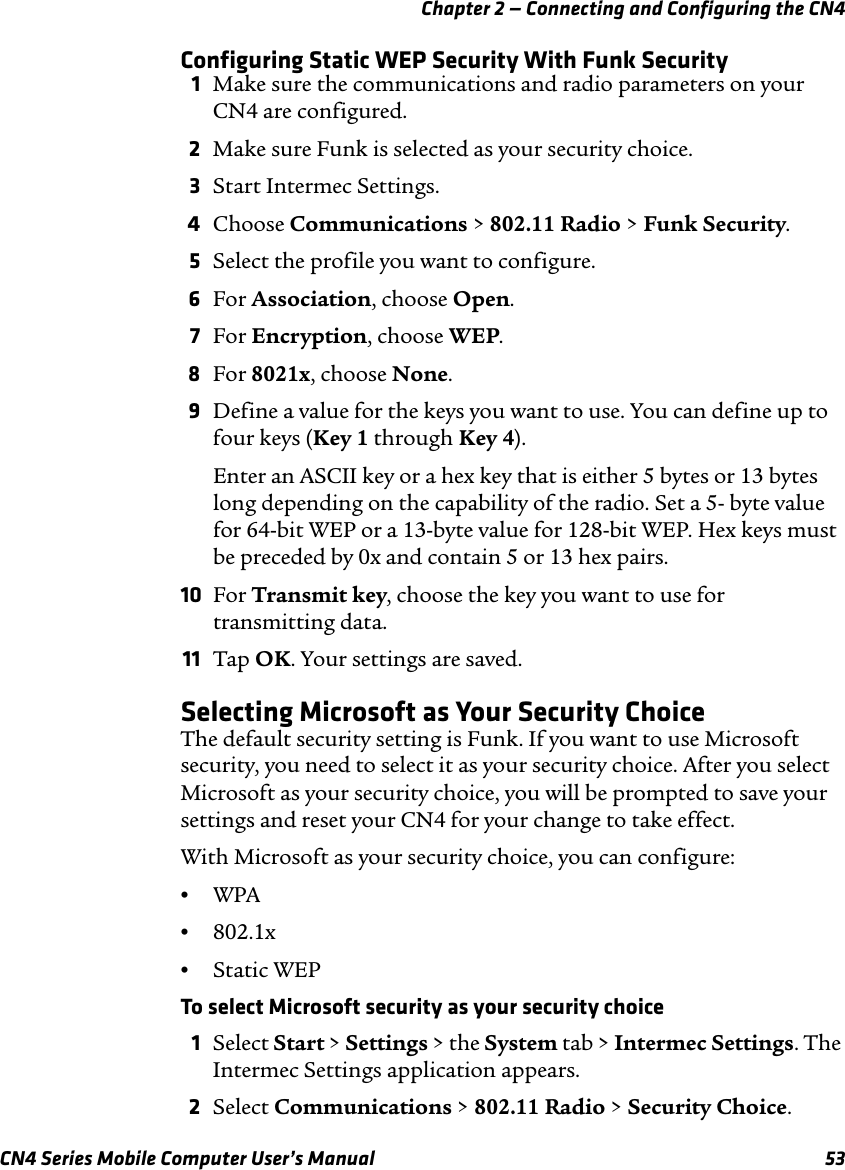
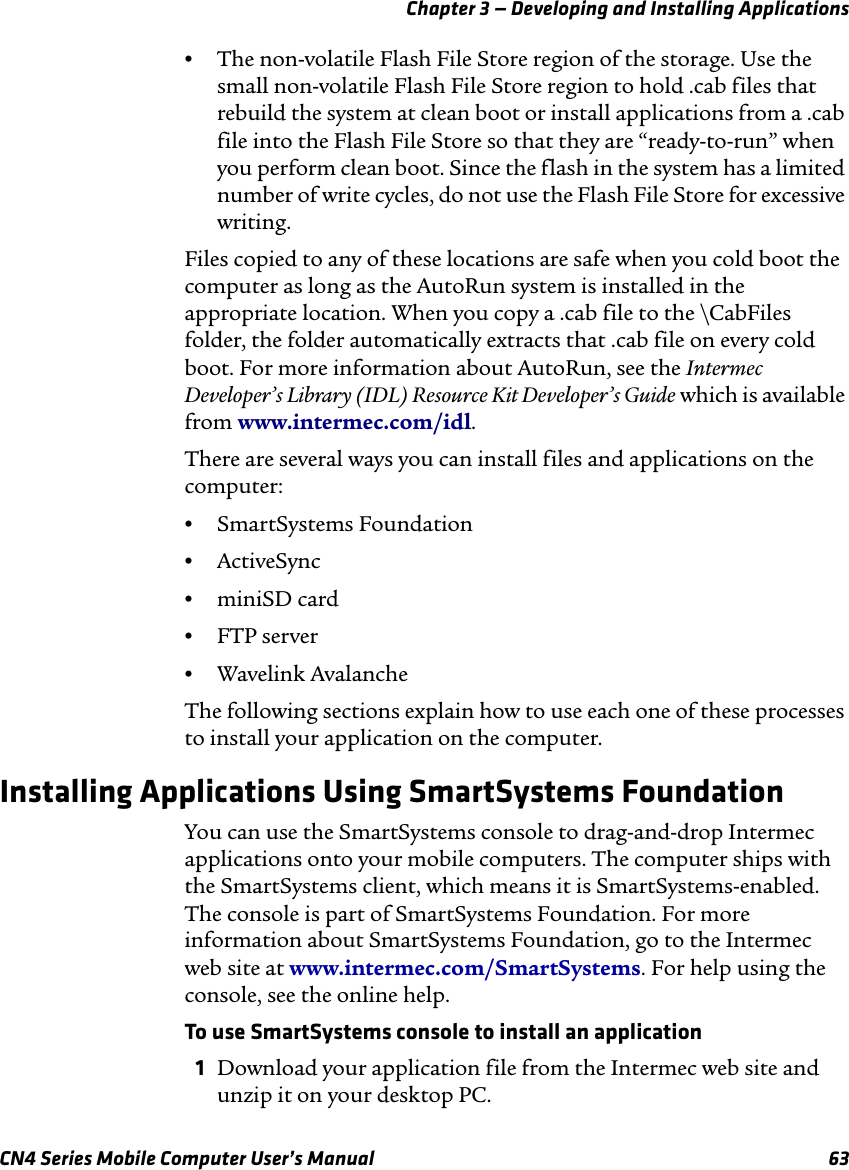
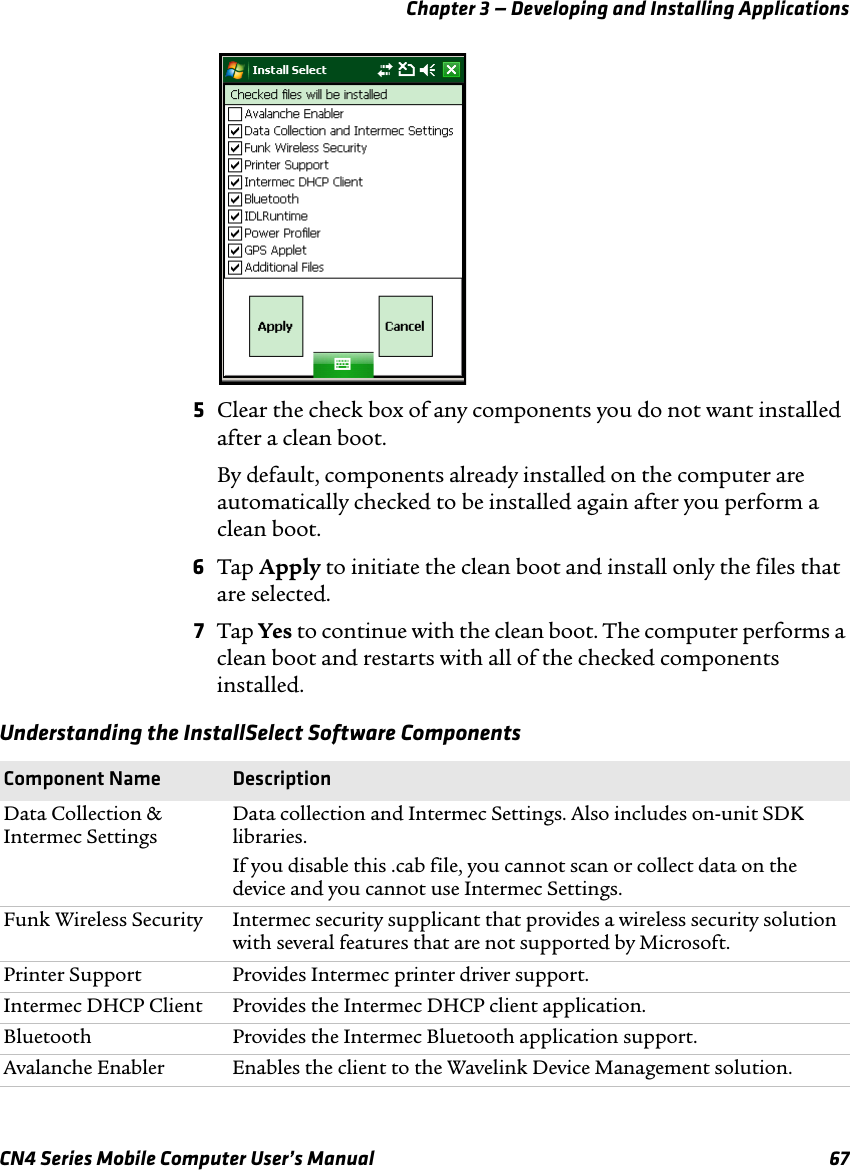
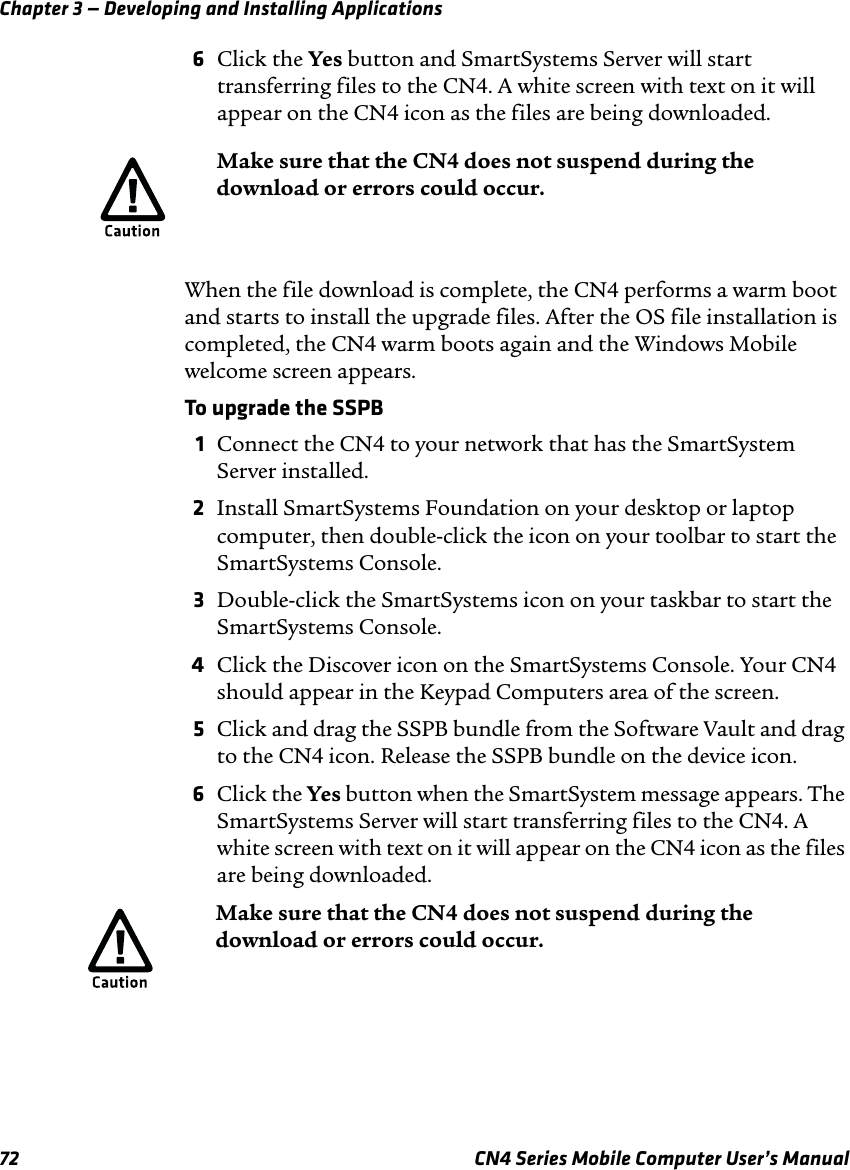
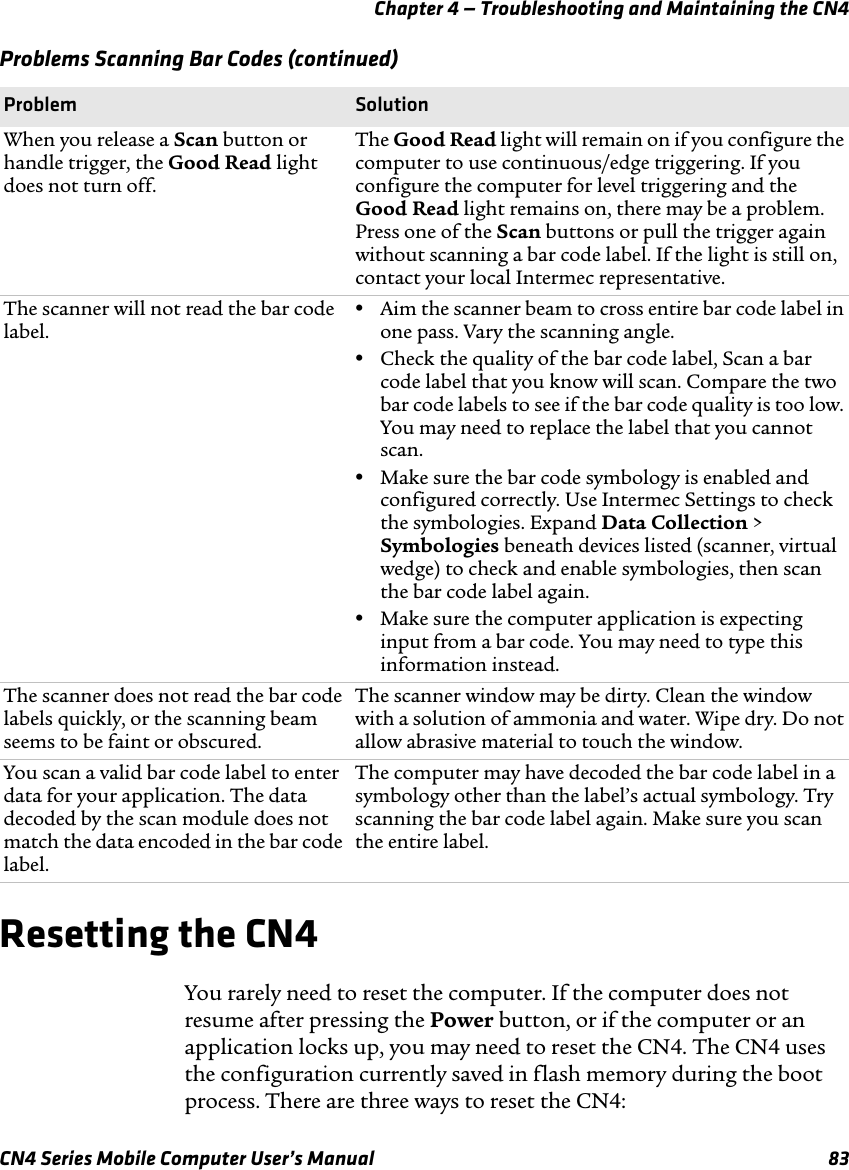
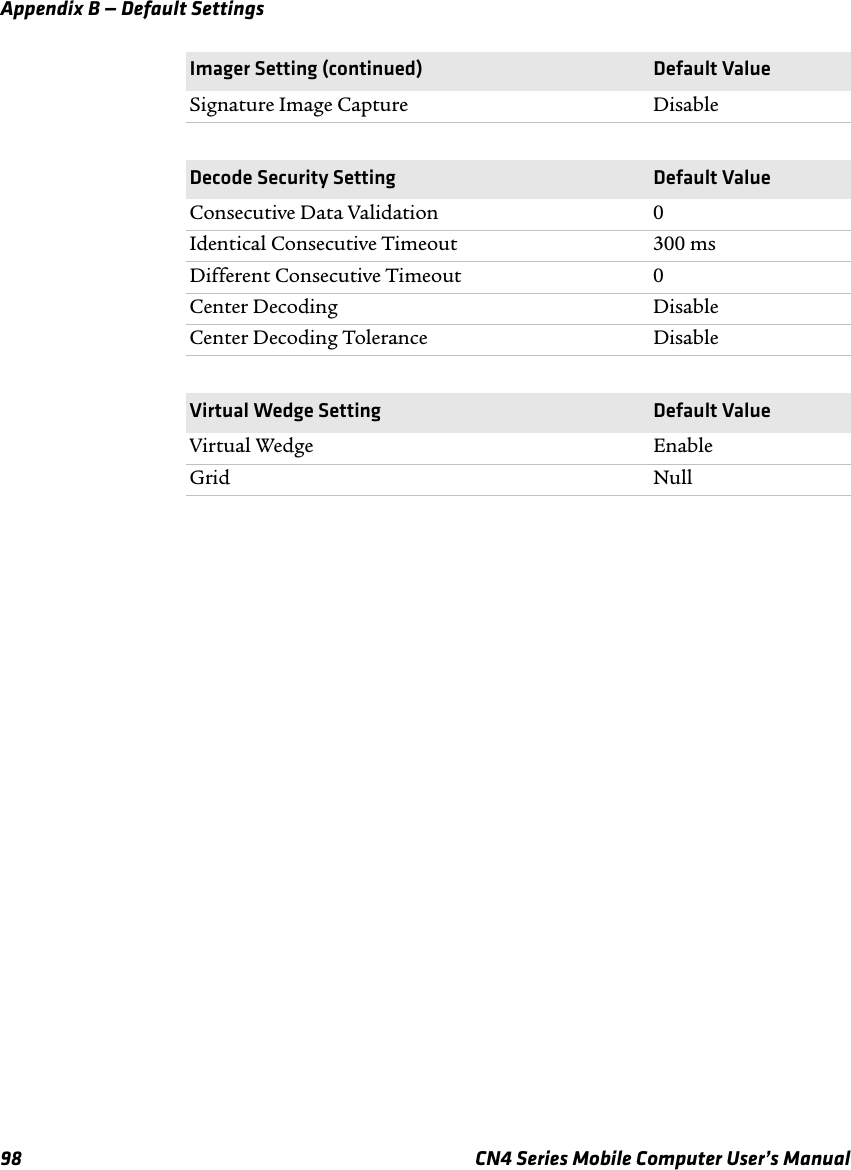
![Appendix C — Keypads and Keystrokes106 CN4 Mobile Computer User’s Manual 4[4] B [H]5[5] B [J]6[6] B [K]7[7] B [B]8[8] B [N]9[9] B [M]Symbols Symbol key, or S plus corresponding key.Other Available Characters and FunctionsTo Enter Numeric Keypad QWERTY Keypad^ (accent) N/A N/A@ (ampersand) N/A B [Q]& (and) N/A B [S]* (asterisk) N/A B [C]: (colon) N/A B [D] , (comma) N/A B [X]$ (dollar) N/A B [E]" (double quote) N/A N/A! (exclamation) N/A N/A` (grave accent) N/A B [Z]> (greater than) N/A N/A- (hyphen) B [*] B [G][ (left bracket) N/A N/A{ (left curly bracket) N/A N/A( (left parentheses) N/A N/A< (less than) N/A N/A% (percent) N/A B [R] . (period) [.] [.]+ (plus) B [#] B [T]Alphanumeric Characters (continued)Character Numeric Keypad Alphanumeric Keypad](https://usermanual.wiki/Intermec-Technologies/02CN4.Users-Manual/User-Guide-1150682-Page-120.png)
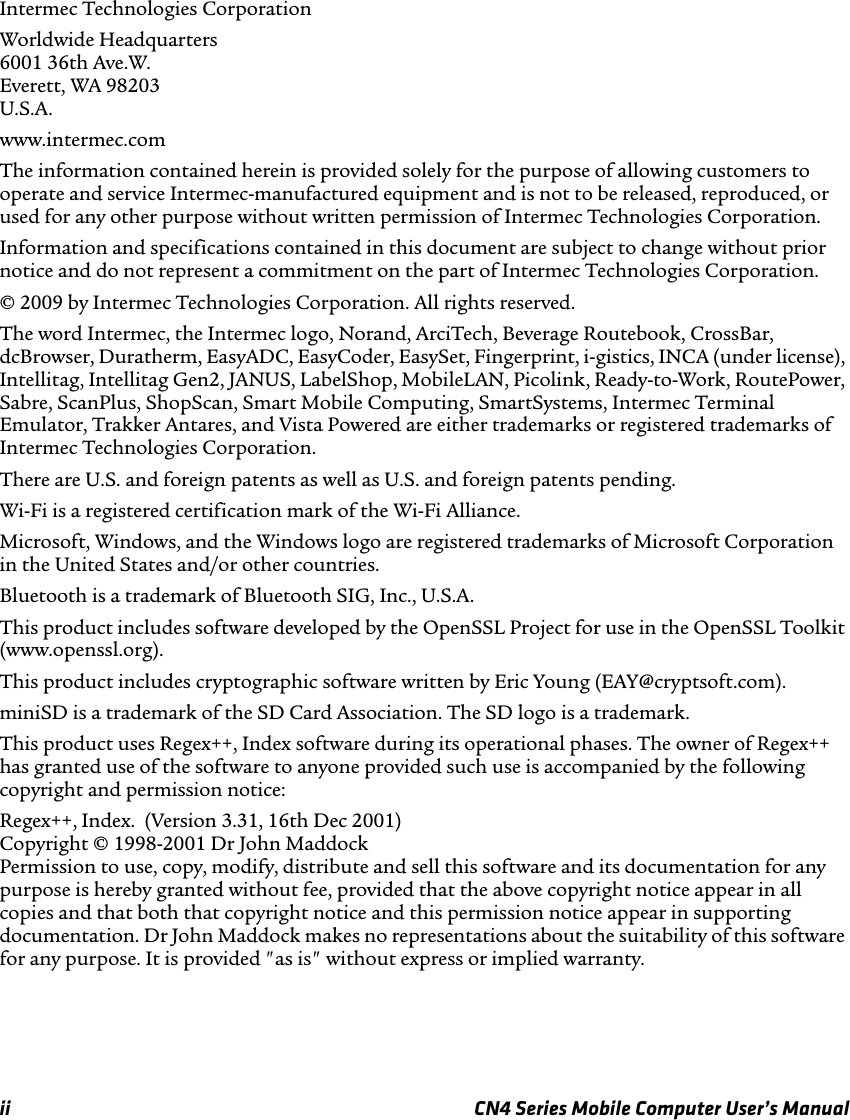
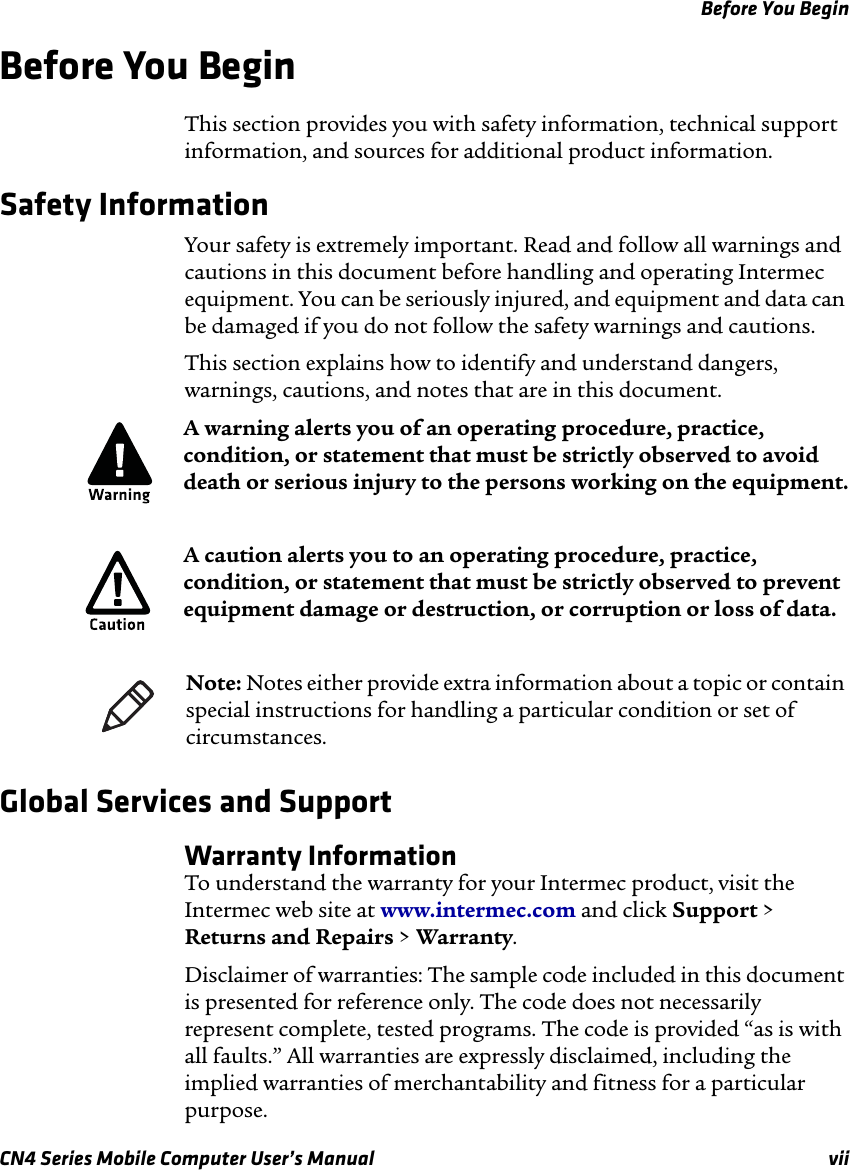
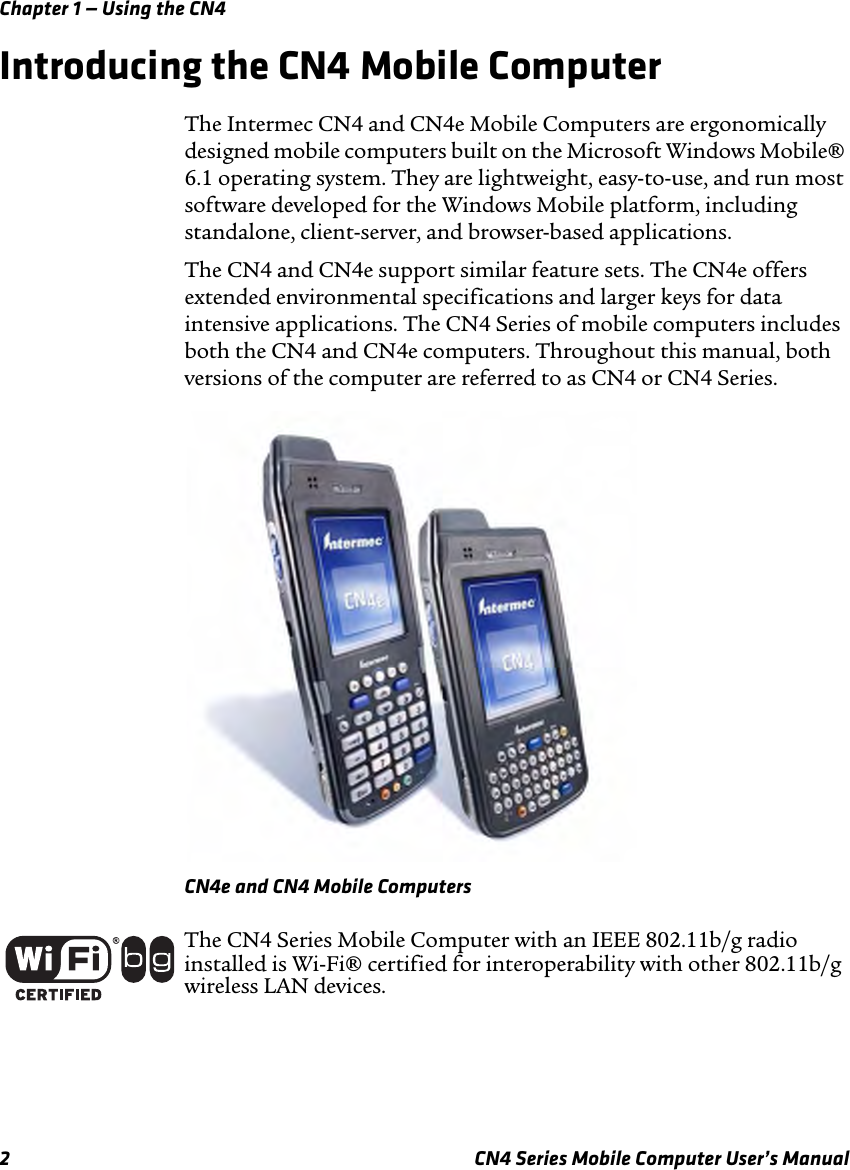
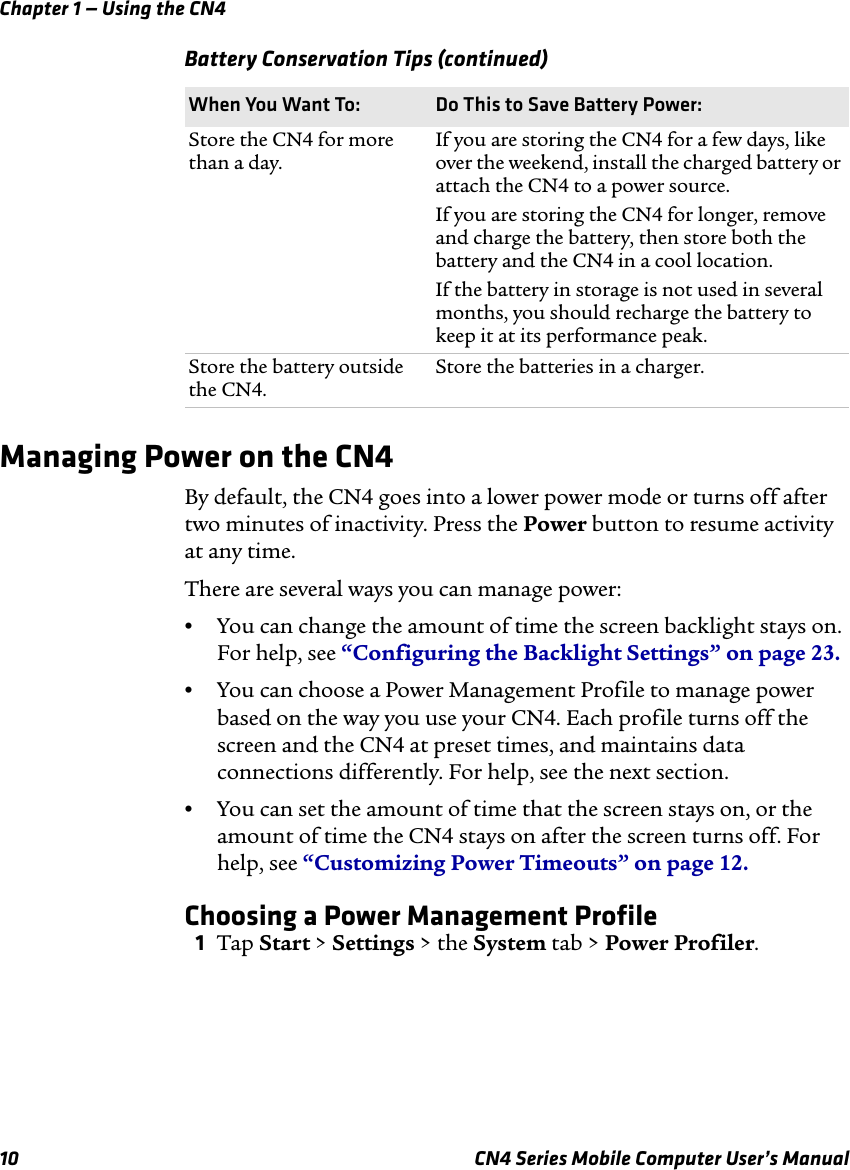
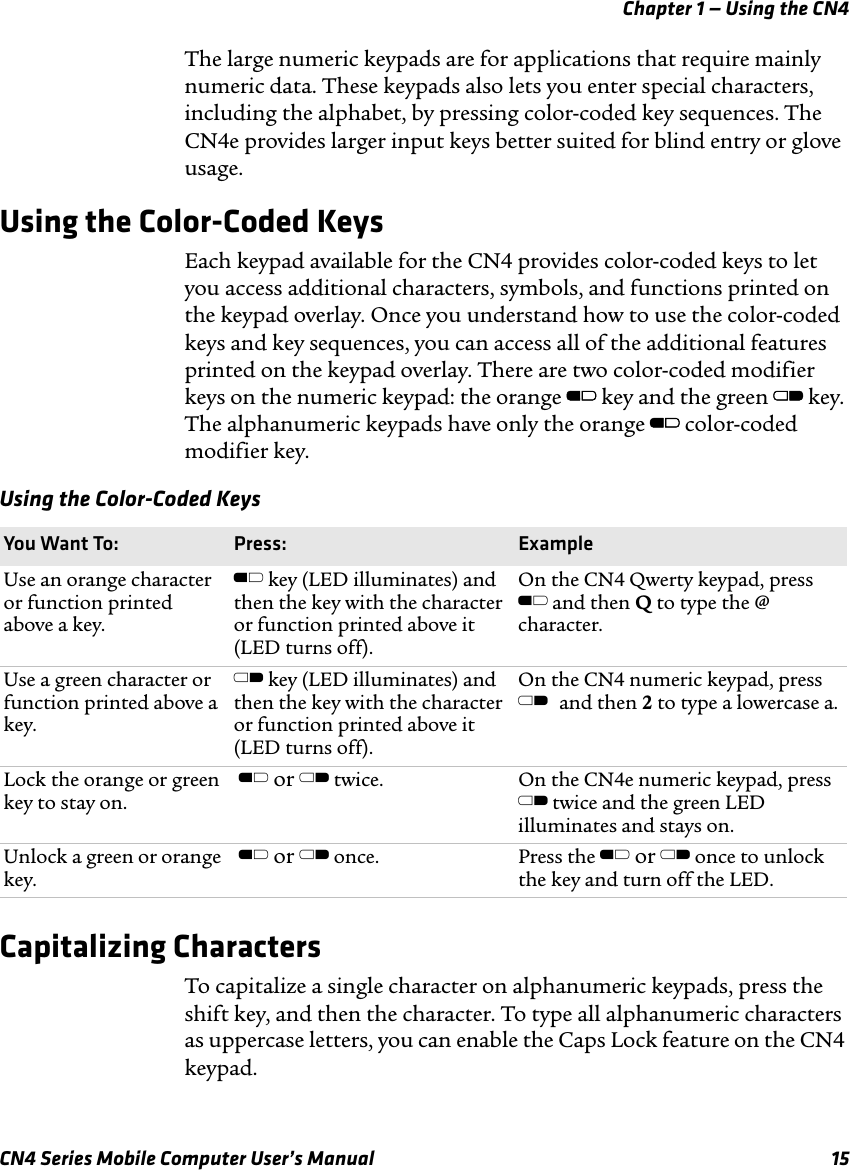
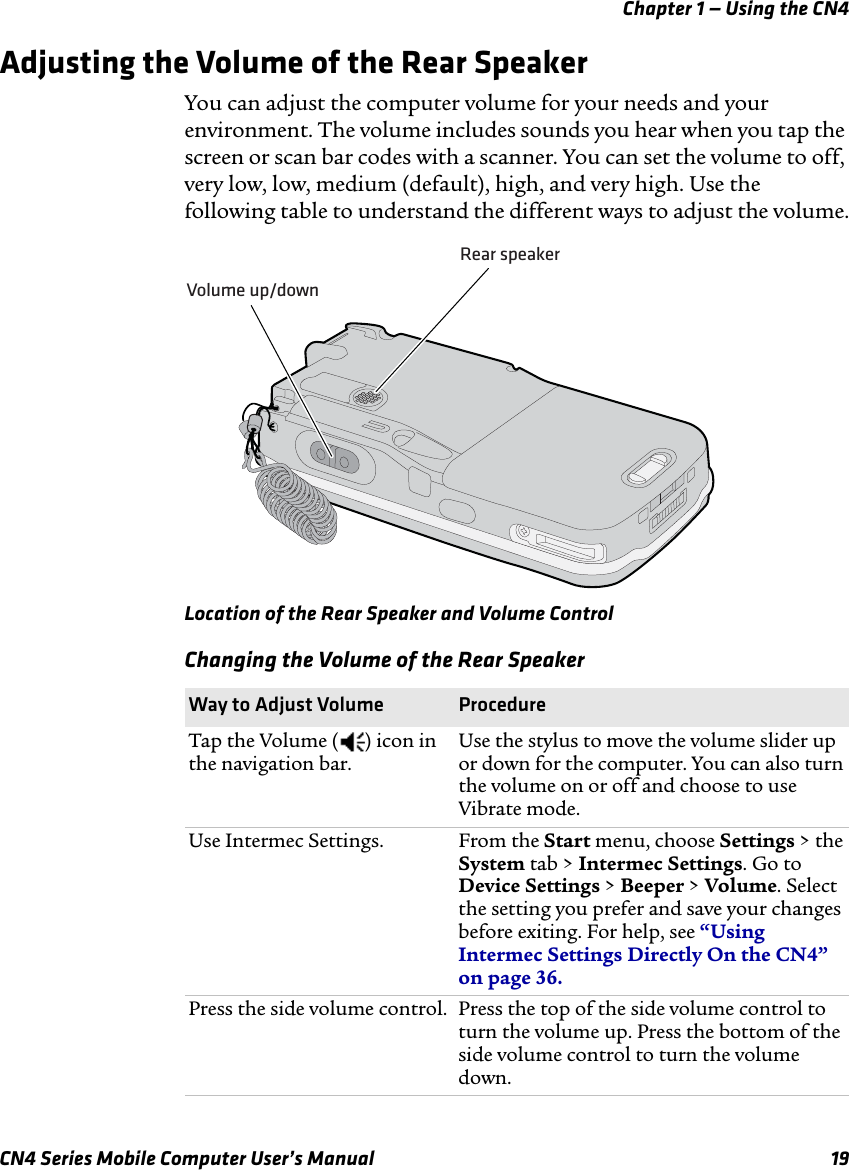
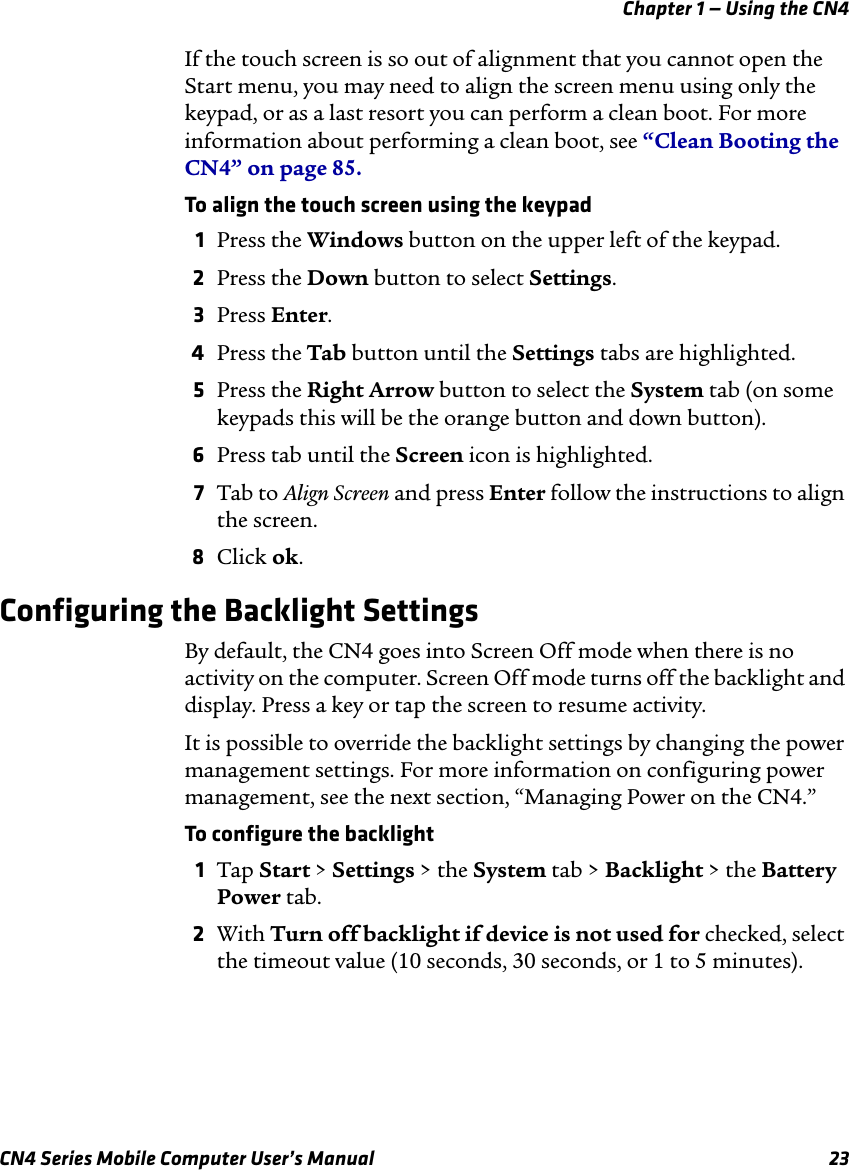
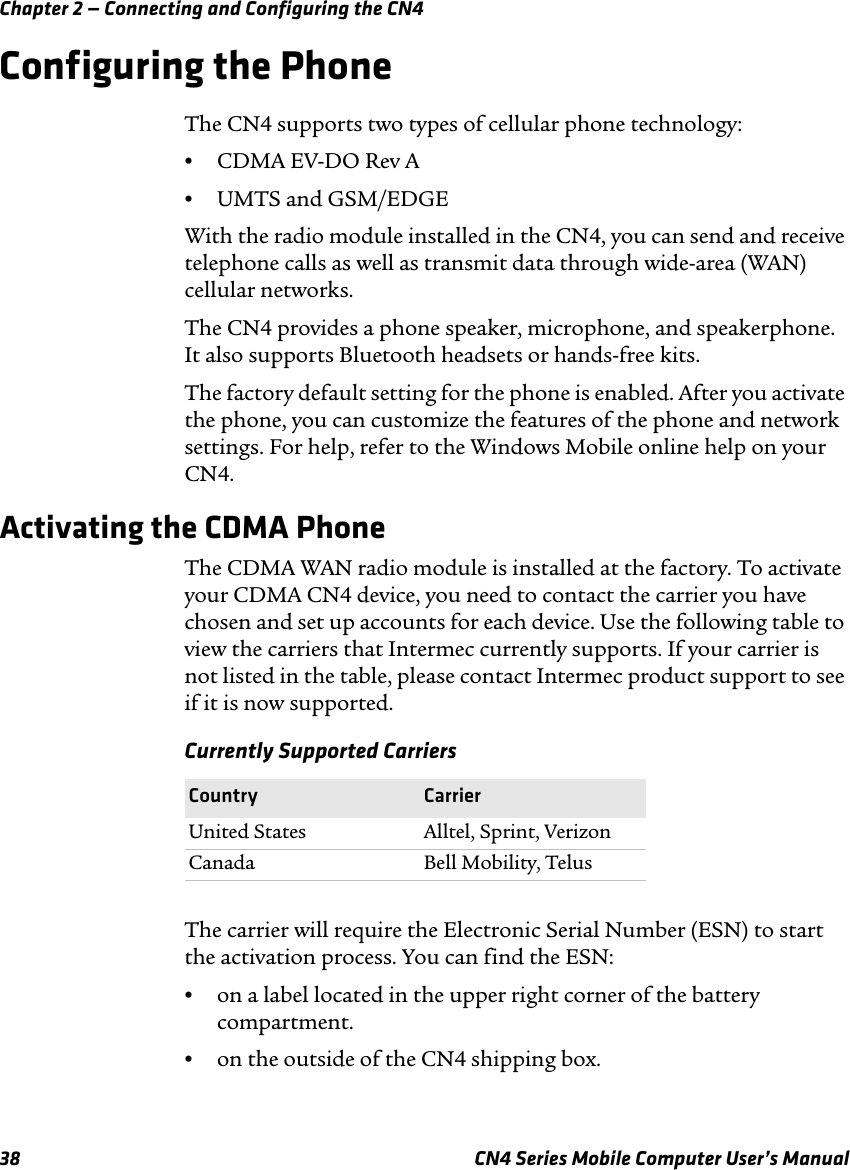
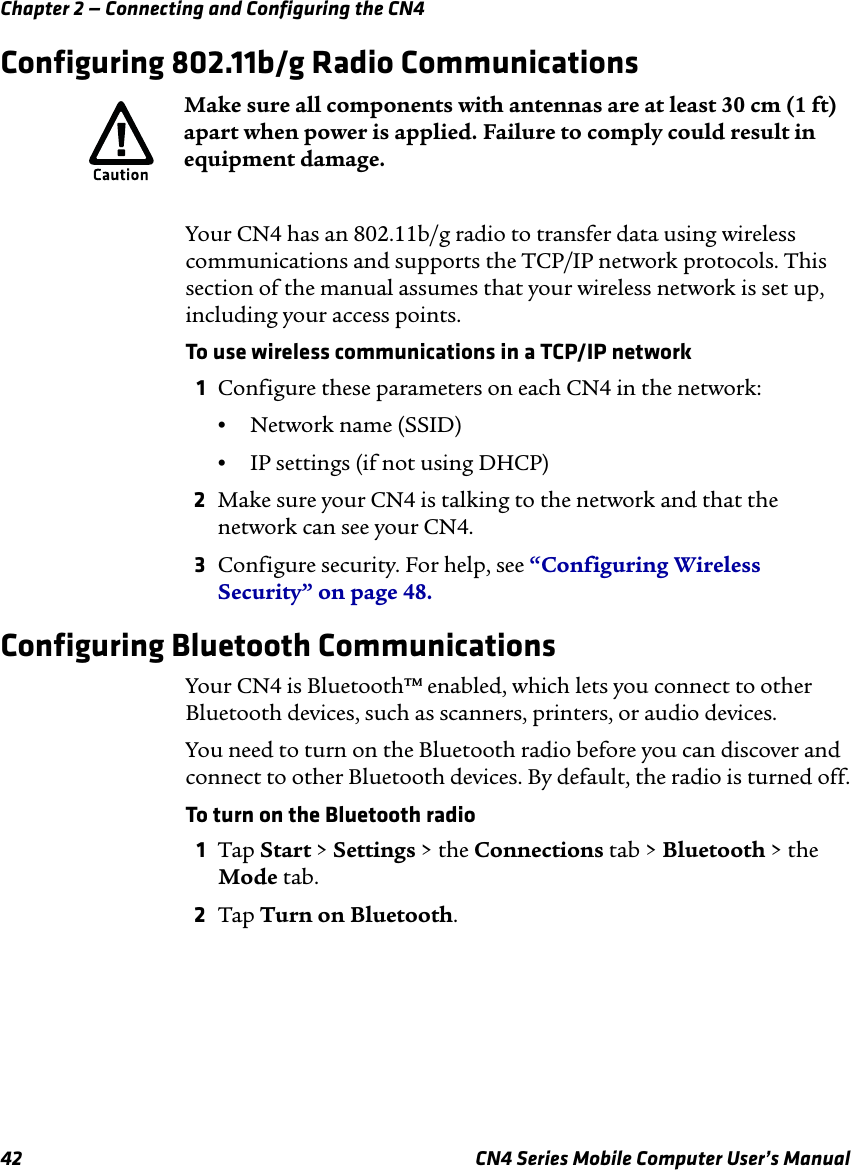
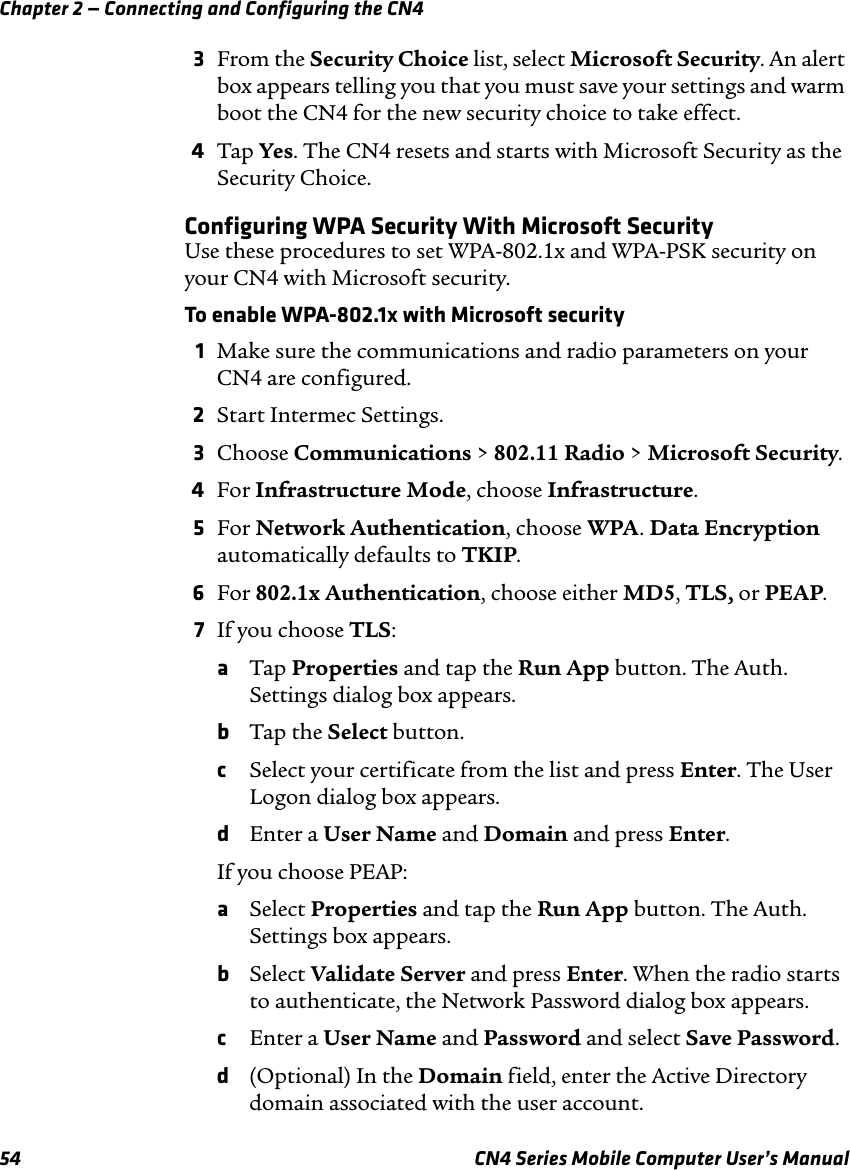
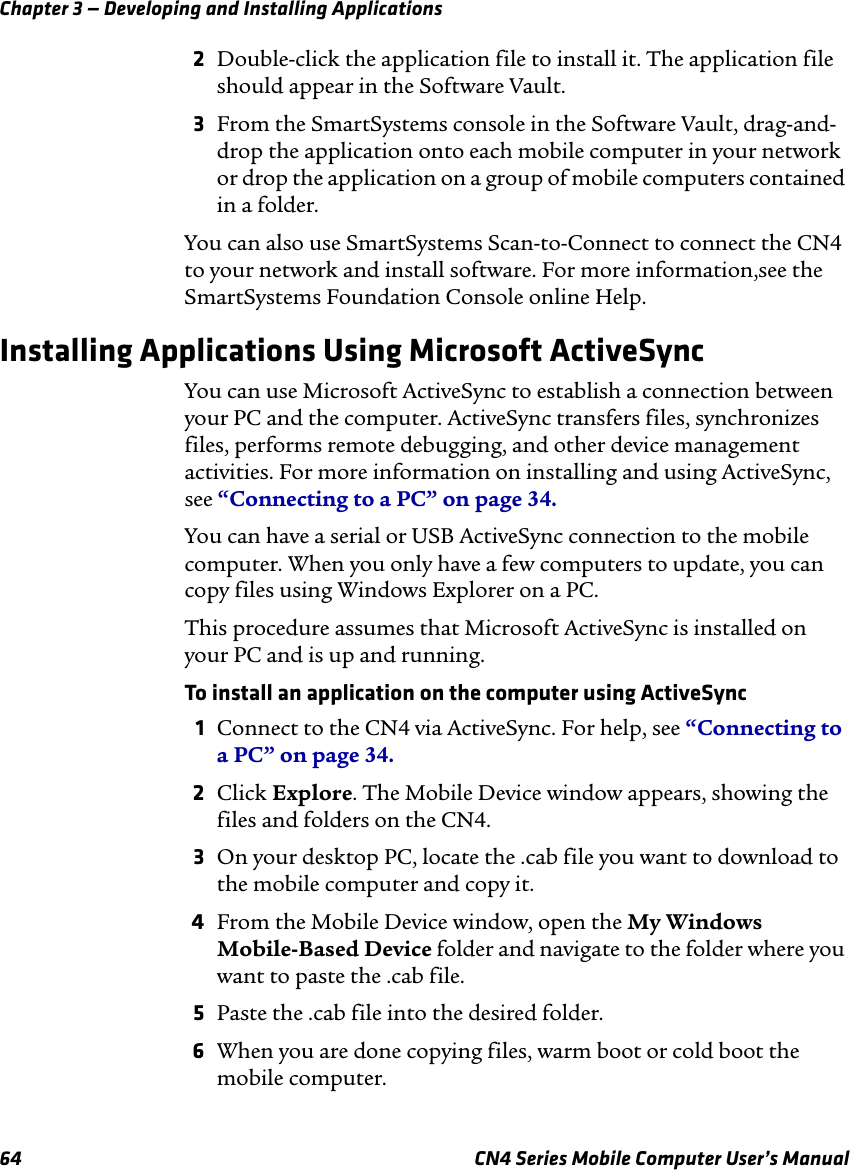
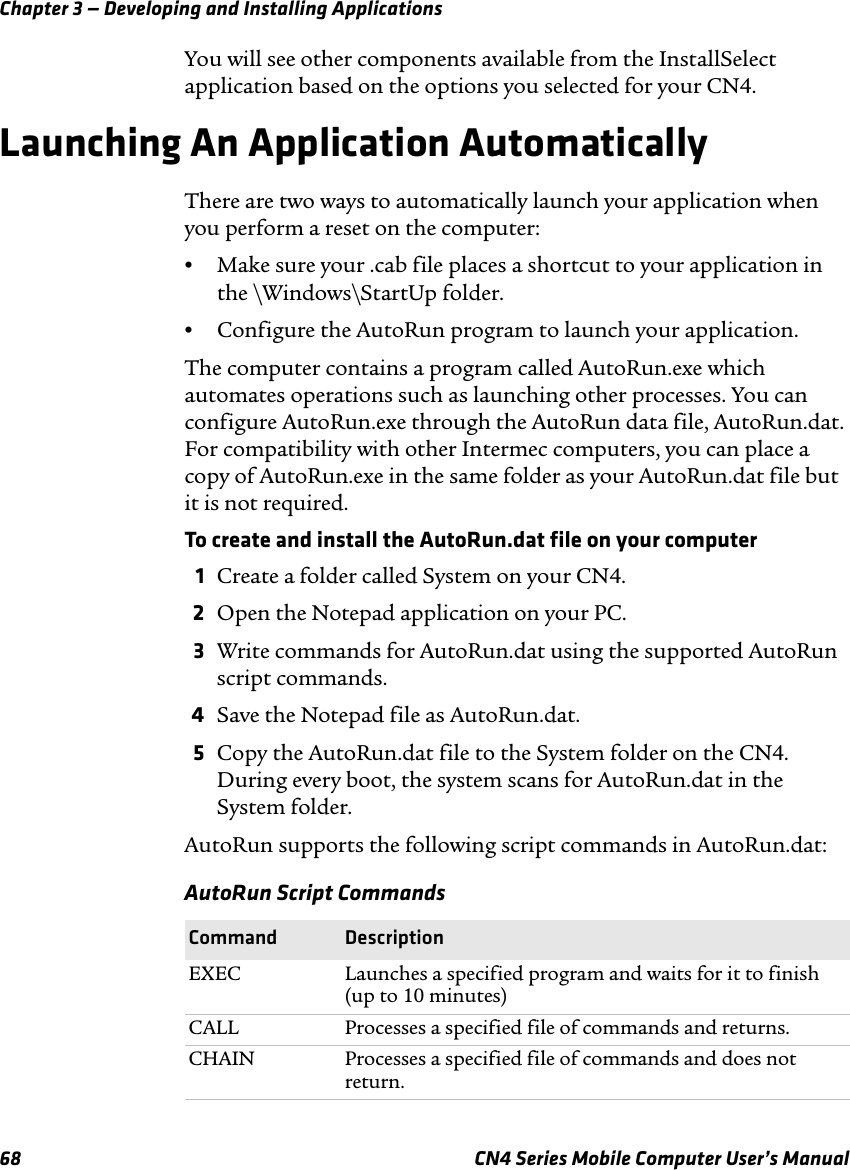
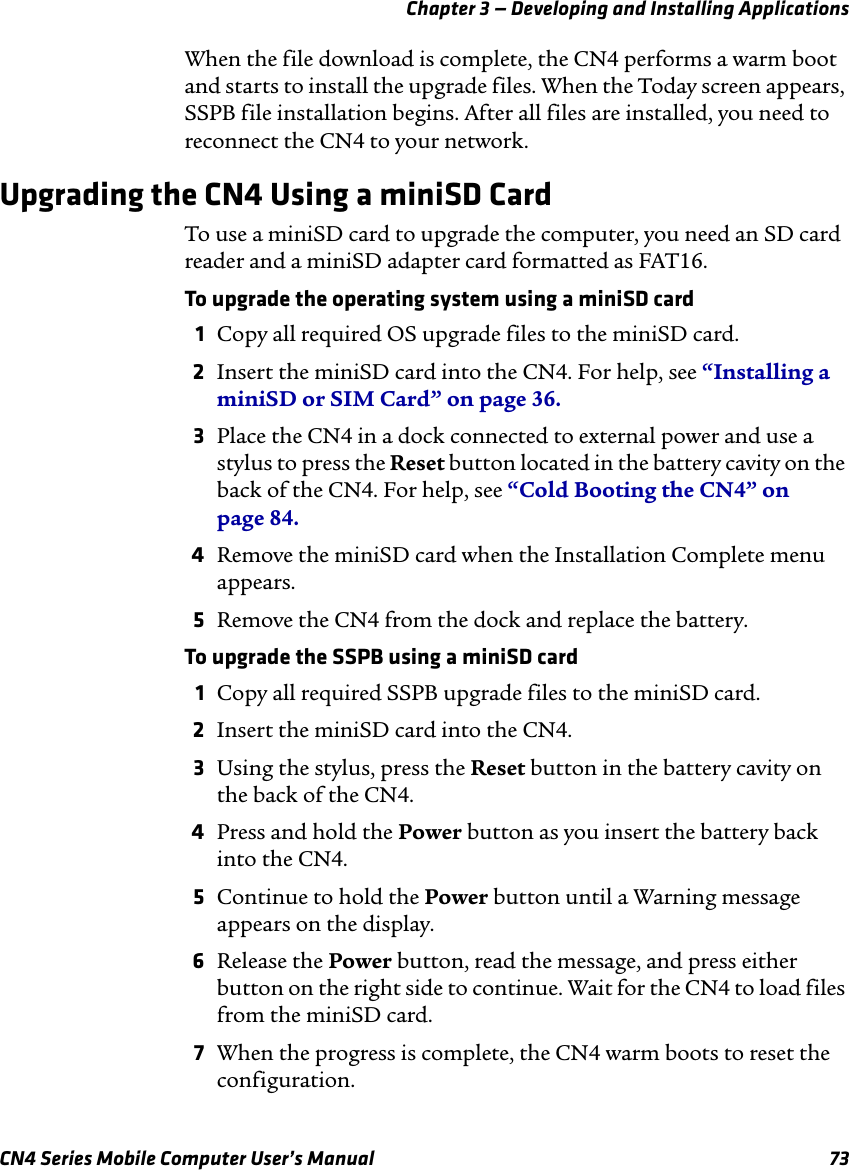
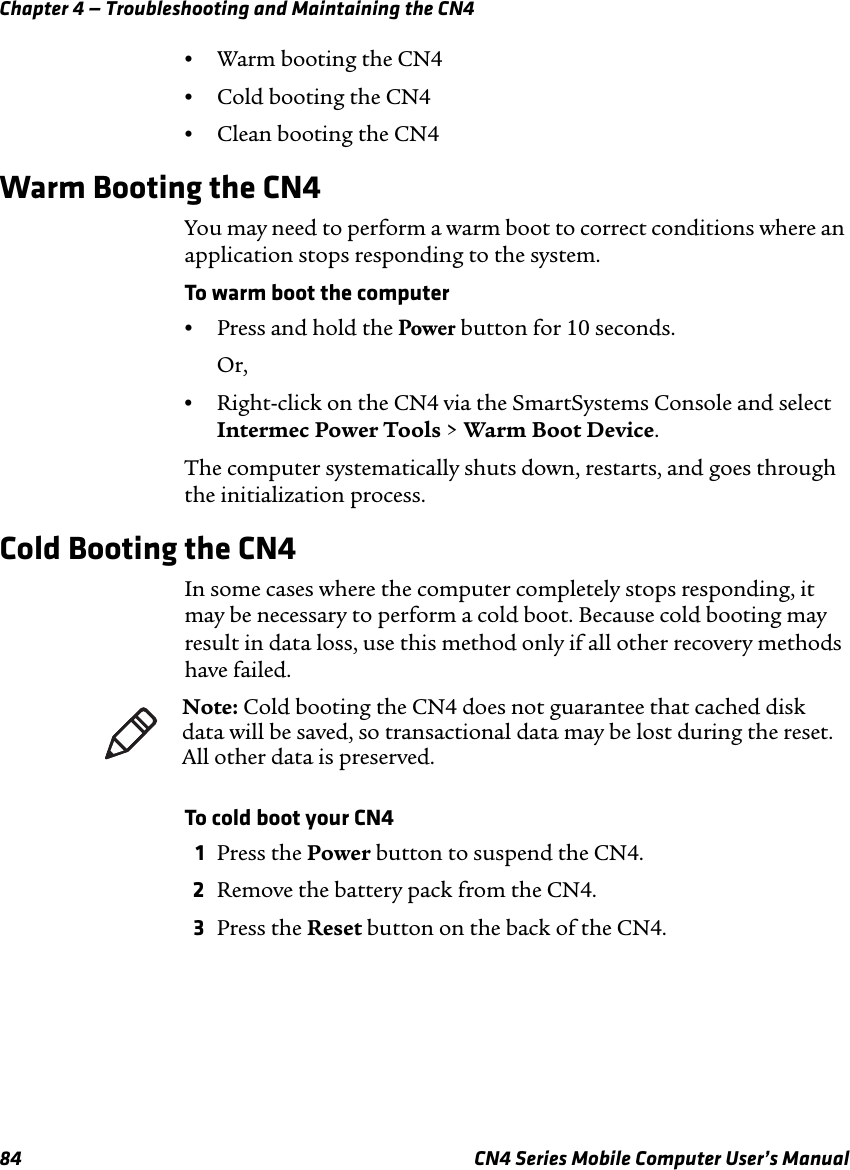
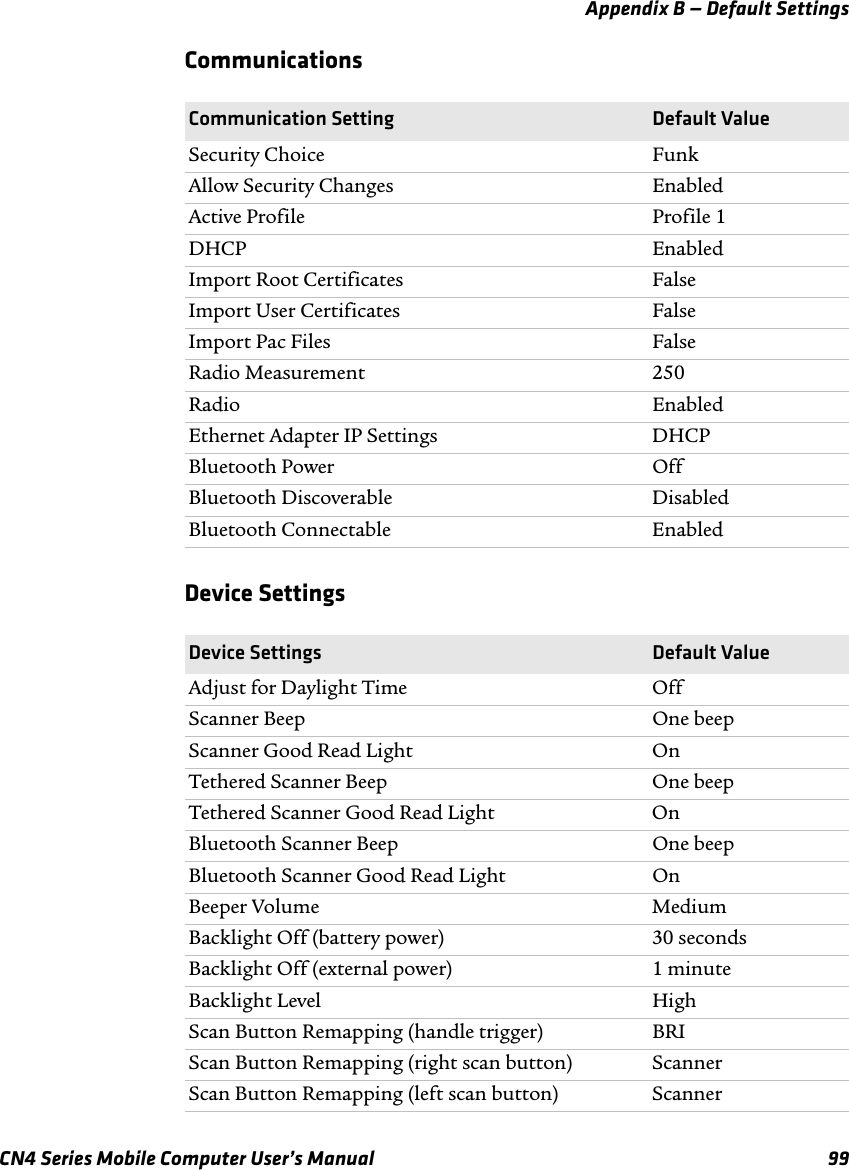
![Appendix C — Keypads and KeystrokesCN4 Mobile Computer User’s Manual 107# (pound) N/A B [V]? (question mark) N/A B [A]] (right bracket) N/A N/A} (right curly bracket) N/A N/A) (right parentheses) N/A N/A; (semicolon) N/A N/A` (single quote) N/A B [Z]~ (tilde) N/A N/A_ (underscore) N/A N/ABackTab B [→| ] B [→| ]CapsLock C [1] B [Shift]Enter [Enter] [Enter]frown B [3] B [O]ok B [Esc] B [P]Shift C [Shift]smiley B [1] B [W]Space C [0] [Space]Other Available Characters and Functions (continued)To Enter Numeric Keypad QWERTY Keypad](https://usermanual.wiki/Intermec-Technologies/02CN4.Users-Manual/User-Guide-1150682-Page-121.png)