Intermec Technologies 08CN3 CN3 with DHIB and MC75 User Manual CN3UserManual
Intermec Technologies Corporation CN3 with DHIB and MC75 CN3UserManual
Contents
- 1. User Manual compliance insert
- 2. User manual part 1 of 6
- 3. User Manual 2 of 6
- 4. User Manual 3 of 6
- 5. User Manual 4 of 6
- 6. User Manual part 5 of 6
- 7. User Manual par6 of 6
- 8. User Manual Compliance Insert
- 9. Users Manual part 1 of 6
- 10. Users Manual 2 of 6
- 11. Users Manual 3 of 6
- 12. Users Manual 4 of 6
- 13. Users Manual 5 of 6
- 14. Users Manual 6 of 6
- 15. Manual
- 16. Radio Info
- 17. Compliance Insert
- 18. User Manual part 1
- 19. User Manual part 2
- 20. User Manual part 3
- 21. User Manual part 4
User Manual 4 of 6

CN3 Mobile Computer User’s Manual 99
4Maintaining the Computer
Use this chapter to solve problems you may encounter and perform routine
maintenance on your CN3 Mobile Computer.
Chapter 4 — Maintaining the Computer
100 CN3 Mobile Computer User’s Manual
Upgrading the Operating System on your Computer
You can use the SmartSystems™ Foundation application from Intermec to
perform upgrades on your CN3, versions 3.0 or later. Contact your
Intermec representative for more information about the SmartSystems
Foundation software.
When you upgrade the operating system, you erase the current
configuration and replace it with the new default configuration. You will
need to reset the network parameters on the CN3 to reestablish
communications with other devices in the network. In other words, if you
upgrade the operating system and the default registry from the operating
system has changed, the registry is rolled back to the new default.
When you upgrade your CN3, you are updating the operating system (OS)
and the SmartSystems Platform Bundle (SSPB) files.
The SSPB files are stored on the DiskOnChip, and deliver Intermec value-
added functionality such as data collection, unit configuration and
diagnostics, and Intermec’s wireless security suite. As new features are added
to these components, you can upgrade your SSPB files without needing to
upgrade the operating system image. Similarly, features added to the
operating system images do not affect the functionality of the SSPB, and
you can choose to upgrade only the operating system image.
There are two ways to upgrade the CN3:
• You can use a miniSD card to upgrade the CN3. For help, see the next
page.
• You can use the SmartSystems Console to upgrade the CN3. For help,
see “Using the SmartSystems Console to Upgrade the Computer” on
page 98.
You need to download the latest upgrade files from the Intermec web site to
your desktop or laptop computer, then determine if you want to upgrade
both the operating system and SSPB files, just the operating system files, or
just the SSPB files.
To download the latest upgrade files
1Start your web browser and go to the Intermec web site at
www.intermec.com.
2Go to Service & Support > Downloads.
3Select Computers: CN3 Mobile Computer from the drop-down list.
4Select which download you need. Make sure the download you select is
for the CN3.
5Look at the description (or the ReadMe file) to determine if this
download will upgrade both the operating system and SSPB files, just the
operating system, or just the SSPB. You will need this information later.
Chapter 4 — Maintaining the Computer
CN3 Mobile Computer User’s Manual 101
6Close the link and download the .zip file to your desktop computer or
your laptop computer.
7If you are using the SmartSystems Console to upgrade the CN3, go to
page 102, otherwise go to the next paragraph.
Using a Storage Card to Upgrade the Computer
To use a miniSD storage card to upgrade the CN3, you need a Secure
Digital card reader and a miniSD storage card formatted as FAT16.
Upgrading Both Operating System and SSPB Files
1Extract the upgrade files to a folder on your desktop or laptop computer.
Make sure to select the option to use folder names when extracting files.
2Place all individual root files onto your miniSD card, this will update
your operating system only. Ignore the SSPB files at that point.
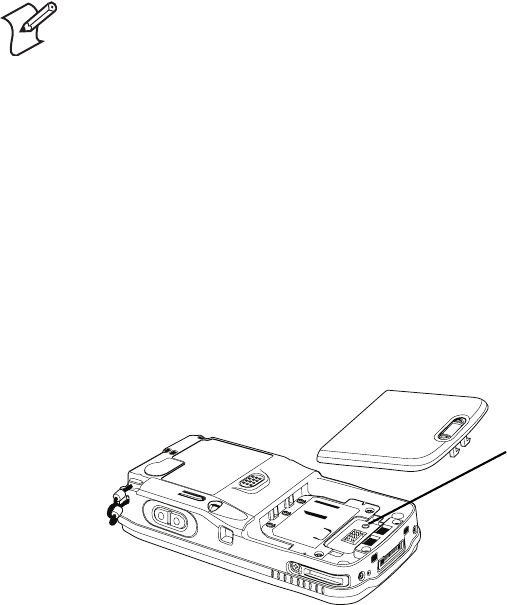
3Insert the miniSD card in the CN3.
4Remove the battery pack from the CN3 and place the CN3 in a dock
connected to external power. With a stylus, press the reset button in the
battery cavity in the back.
5When the Installation Complete menu appears, remove the miniSD
card. Remove the existing files from the miniSD card and place all of the
files from the SSPB folder into your miniSD card. The number of files
will vary from version to version.
6Insert the miniSD card in the CN3. With a stylus, press the reset button
in the battery cavity in the back, and press and hold the power switch as
you put the battery back in the CN3.
7Continue to hold the power switch until a Warning message appears on
the display, release the power switch, then read the message. Press either
right-side button to continue with the clean-boot.
8Perform the pen calibration, then wait for the CN3 to load files from the
miniSD card. This progress is shown via the orange banner near the Start
menu in the display.
Note: Intermec offers miniSD cards for sale which have been tested and
certified to work with the CN3. Intermec cannot guarantee that other
miniSD cards will work with CN3s.
Reset button

Chapter 4 — Maintaining the Computer
102 CN3 Mobile Computer User’s Manual
9When progress is complete, the CN3 performs a warm-boot to reset its
configuration. Remove the miniSD card and delete its files. Set the date,
time, and network communication parameters to reestablish
communications with the other devices in the wireless network.
Upgrading the SSPB Files
1Extract the SSPB upgrade files to a miniSD card.
2Insert the miniSD card in the CN3, then press the reset button in the
battery cavity in the back to wipe the current SSPB and load the new
SSPB over the old in the persistent storage.
3Do the pen calibration, then wait for the CN3 to load files from the
miniSD card. This progress is shown via the orange banner near the Start
menu in the display.
4When the progress is complete, remove the miniSD card, delete its files.
5When progress is complete, the CN3 performs a warm-boot to reset its
configuration. Remove the miniSD card and delete its files.
6Set the date, time, and network communication parameters to reestablish
communications with the other devices in the wireless network.
Using the SmartSystems Console to Upgrade the Computer
Use the SmartSystems Console to upgrade the CN3 operating system. The
console is part of SmartSystems Foundation and is available from the
Intermec web site via the IDL. Before upgrading the CN3, you need:
• the SmartSystems Foundation. To download SmartSystems Foundation,
go to www.intermec.com/idl and open the Device Management page.
• the device upgrade .exe file, which is available from the Intermec web site
at www.intermec.com. Go to Service & Support > Downloads.
To use the SmartSystems Console to Upgrade the CN3
1Install SmartSystems Foundation on your desktop or laptop computer,
then open the SmartSystems Console.
2Make sure the SmartSystems Console can communicate with the CN3.
See the SmartSystems online manual for more information.
3Make sure your CN3s are either in a communications dock or charging
dock, or that power management is disabled to prevent the CN3 from
suspending during an upgrade.
4Download the device upgrade .exe file to your desktop or laptop
computer, then double-click the file to start the InstallShield application.
5From the SmartSystems Console, locate the device upgrade to install.
Note: Do not change the default location where InstallShield extracts the
files. The SmartSystems Console requires files to be in this location.

Chapter 4 — Maintaining the Computer
CN3 Mobile Computer User’s Manual 103
6Drag-and-drop the device upgrade onto each CN3 icon.
Troubleshooting Your Computer
Before sending the CN3 in for service, save its data and configuration.
Once the upgrade is done downloading to your CN3, your CN3 replaces
the operating system, then performs a warm-boot. The SmartSystems
Console shows your CN3 as offline (via a red stop sign) until the device
reboots and reconnects to the system.
Problems While Operating the Computer
Problem Solution
You press the power switch to
turn on the CN3 and nothing
happens.
Make sure the backlight is on by pressing E.
Make sure you have a charged CN3 Battery installed correctly. For help, see
“Using the Batteries” on page 9.
The battery may be discharged. Replace the battery with a spare charged battery,
or charge the battery.
Perform a warm-boot or press the reset button in the battery cavity.
The Battery status LED is on. If the battery status LED is a steady green, the battery is more than 95% charged
and CN3 is on a charger.
If the battery status LED is blinking red, then the battery is low.
If the battery status LED is a steady red, the main battery is on charge.
The CN3 appears to be locked up
and you cannot enter data.
Press the power switch to turn off the CN3, then press the power switch again to
turn on the CN3.
Press and hold the power switch ten seconds to warm-boot the CN3.
Try reloading the firmware. See “Upgrading the Operating System on your
Computer” on page 100.
If the CN3 does not boot or reset, contact your local Intermec representative for
help.
Problems While Configuring the Computer
Problem Solution
You scan a configuration
command, such as Beeper
Volume, and you hear three low
beeps.
If you are working in Intermec Settings, you cannot scan configuration
commands. Exit Intermec Settings to scan configuration commands.
You scan or enter an option for
the Scanner Model configuration
command and you hear three low
beeps.
You may have scanned or entered a Scanner Model command that does not apply
to the type of scanner that you have installed. Try scanning or entering the
Scanner Model command again and select an option for the type of device you
are using.
You cannot type a character on
the keypad or you can only type
uppercase or lowercase letters.
You may have locked a modifier key on the keypad. Check the CN3 toolbar to
see if it contains an icon with a locked symbol. Press the necessary key sequence
to unlock the key. See “Using the Keypad” on page 16.

Chapter 4 — Maintaining the Computer
104 CN3 Mobile Computer User’s Manual
Problems While Configuring 802.1x Security
If you have trouble configuring the computer for 802.1x security, check
these problems and possible solutions.
Problems with Wireless Connectivity
Problem Solution
When you turn on the CN3 after
it was suspended for a while (10-
15 minutes or longer), it can no
longer send or receive messages
over the network.
Host may have deactivated or lost current terminal emulation session. In a
TCP/IP direct connect network, turn off the “KeepAlive” message from host to
maintain the TCP session while a CN3 is suspended.
The No Network Connection
icon appears on the toolbar. The
CN3 is not communicating with
the access point.
The CN3 is not connected to access point. Ensure access point is turned on and
operating. Move closer to access point to reestablish communications. Ensure the
CN3 is configured correctly for network. CN3 radio parameters must match all
access point values.
If you have an 802.11b/g radio and its radio initialization process failed, reset the
CN3 (see page 5).
If No Network Connection icon still appears, you may have a defective radio
card. For help, contact your local Intermec representative.
The CN3 is connected to the
Intermec Application Server or
host computer and you move to a
new site to collect data. The
Network Connection icon was
visible, but is now replaced with
the No Network Connection
icon.
Move closer to an access point or to a different location to reestablish
communications until the Network Connection icon appears. Any data you
collected while out of range is transmitted over the network.
The Network Connection icon is
in the toolbar, but you cannot
establish a terminal emulation
session with the host computer.
There may be a problem with the host computer, with the connection between
the Intermec Application Server and the host computer, or with the connection
between the access point and the host computer. Check with network
administrator to make sure the host is running and allowing users to login to the
system.
The Network Connection icon is
in the toolbar, but the host
computer is not receiving any data
from the CN3.
In a UDP Plus network, there may be a problem with the connection between
the Intermec Application Server and the host computer. Check with network
administrator or see the user’s manual for the Intermec Application Server.
In a TCP/IP network, there may be a problem with the connection between the
access point and the host computer. Check with network administrator or use
your access point user’s manual.
Problems While Configuring 802.1x Security
Problem Solution
The CN3 indicates that it is
authenticated, but it does not
communicate with the host.
Make sure the CN3 IP address, host IP address, subnet mask, default router are
configured for network.
The CN3 does not appear to be
authenticating and a network
connection icon does not appear
on the toolbar.
The CN3 may not be communicating with access point. Make sure the CN3
network name matches access point network name (SSID).
802.1x security network may not be active. Ensure the server software is properly
loaded and configured on server PC. See server software documentation for help.

Chapter 4 — Maintaining the Computer
CN3 Mobile Computer User’s Manual 105
A network connection icon
appears in the toolbar, but then
disappears.
The CN3 may not be communicating with the intended access point. Make sure
the CN3 network name matches the access point network name. Default
network name is “INTERMEC.”
Access point may not be communicating with server. Ensure the access point is
turned on, properly configured, and has 802.1x security enabled.
The CN3 indicates it is not
authenticated.
User Name and Password parameters on the CN3 must match the user name and
password on authentication server. You may need to reenter the password on
both the CN3, authentication server.
On your authentication server, the user and group are allowed and the group
policy is allowed to log into the server. For help, see the documentation that
shipped with your authentication server software.
IP address and secret key for access point must match the IP address and secret
key on authentication server. You may need to reenter the IP address and secret
key on both your access point and authentication server.
Authentication server software is running on server PC
You are setting up multiple access
points in a network, with different
SSIDs, and the connection fails.
CN3 does not save WEP key values when changing the SSID. Reenter the WEP
key value after changing the SSID, select Apply Network Settings from the
802.11 Radio menu. You should now be able to connect to the different access
points.
You receive a message saying “The
server certificate has expired or
your system date is incorrect” after
you perform a clean-boot on the
CN3.
Date and time are not saved when a clean-boot is performed. Reenter the date
and time, then select Apply Network Settings from the 802.11 Radio menu.
Problems While Scanning Bar Codes
Problem Solution
You cannot see a red beam of light
from the scanner when you press
the Scan button and aim the
scanner at a bar code label.
You may be too far away from the bar code label. Try moving closer to the bar
code label and scan it again.
You may be scanning the bar code label “straight on.” Change the scanning angle
and try again.
Move within 2 feet of a wall to test the effective scan of the scanner. For help
scanning bar codes, see page 15.
When you release the Scan button
or handle trigger, the Good Read
light does not turn off.
The Good Read light will remain on if you configure the CN3 to use
continuous/edge triggering. If you configure the CN3 for level triggering and the
Good Read light remains on, there may be a problem. Press the Scan button or
pull the trigger again without scanning a bar code label. If the light is still on,
contact your local Intermec representative.
Problems While Configuring 802.1x Security (continued)
Problem Solution

Chapter 4 — Maintaining the Computer
106 CN3 Mobile Computer User’s Manual
Cleaning the Scanner and Camera Windows and Screen
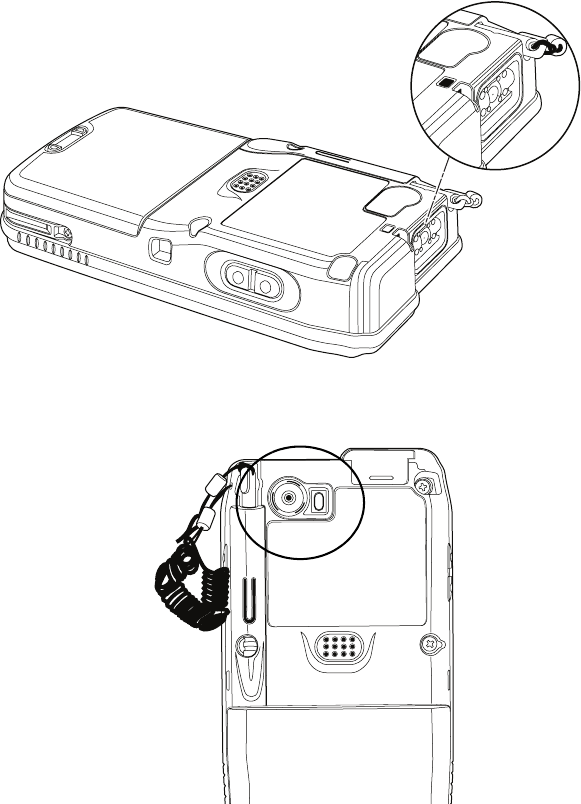
To keep the CN3 in good working order, you may need to clean the EA11
scanner and color camera windows and the screen.
Clean the scanner and camera windows and screen as often as needed for
the environment in which you are using the CN3. To clean the CN3, use a
solution of ammonia and water.
The input device attached to the
CN3 does not work well or read
bar code labels very quickly.
Set the Scanner Model command to the specific attached input device. Check
enabled bar code symbologies and enable only the symbologies being used.
The scanner will not read the bar
code label.
Aim the scanner beam to cross entire bar code label in one pass. Vary the
scanning angle.
Check the quality of the bar code label, Scan a bar code label that you know will
scan. Compare the two bar code labels to see if the bar code quality is too low.
You may need to replace the label that you cannot scan.
Ensure the bar code symbology is enabled. Use Intermec Settings to check the
symbologies. Expand Data Collection > Symbologies beneath devices listed
(scanner, virtual wedge) to check and enable symbologies, then scan the bar code
label again.
Ensure the CN3 application is expecting input from a bar code. You may need to
type this information instead.
The scanner does not read the bar
code labels quickly, or the
scanning beam seems to be faint
or obscured.
The scanner window may be dirty. Clean the window with a solution of
ammonia and water. Wipe dry. Do not allow abrasive material to touch the
window.
You scan a valid bar code label to
enter data for your application.
The data decoded by the scan
module does not match the data
encoded in the bar code label.
The CN3 may have decoded the bar code label in a symbology other than the
label’s actual symbology. Try scanning the bar code label again. Make sure you
scan the entire label.
There are no user-serviceable parts in the CN3. Opening the CN3 will
void the warranty and may cause damage to the internal components.
Problems While Scanning Bar Codes (continued)
Problem Solution
Chapter 4 — Maintaining the Computer
CN3 Mobile Computer User’s Manual 107
Press the power switch to turn off the CN3. Dip a clean cloth towel in the
ammonia solution and wring out the excess. Wipe off the scanner window
and camera lens and flash area. Do not allow any abrasive material to touch
these surfaces. Wipe dry.
CN3 with EA11 Scanner
CN3 with Color Camera
Chapter 4 — Maintaining the Computer
108 CN3 Mobile Computer User’s Manual