Intermec Technologies EASYLAN EASYLAN User Manual Exhibit A
Intermec Technologies Corporation EASYLAN Exhibit A
Contents
- 1. User Manual
- 2. User Manual 2
User Manual
Exhibit A: User Manual
FCC ID: HN2EASYLAN

EasyLAN Wireless
User's Manual

Intermec Technologies Corporation
6001 36th Avenue West
Everett, WA 98203-9280
U.S. service and technical support: 1-800-755-5505
U.S. media supplies ordering information: 1-800-227-9947
Canadian service and technical support: 1-800-668-7043
Canadian media supplies ordering information: 1-800-268-6936
Outside U.S.A. and Canada: Contact your local Intermec service supplier.
The information contained herein is proprietary and is provided solely for the purpose of allowing customers
to operate and/or service Intermec manufactured equipment and is not to be released, reproduced, or used for
any other purpose without written permission of Intermec.
Information and specifications in this manual are subject to change without notice.
2002 by Intermec Technologies Corporation
All Rights Reserved
The word Intermec, the Intermec logo, INCA (under license), MobileLAN, JANUS, IRL, Trakker Antares,
EZBuilder, TE 2000, Data Collection Browser, dcBrowser, Universal Access Point, UAP, Duratherm,
EasyCoder, Precision Print, PrintSet, Virtual Wedge, and CrossBar are either trademarks or registered
trademarks of Intermec.
Throughout this manual, trademarked names may be used. Rather than put a trademark ( or ) symbol in
every occurrence of a trademarked name, we state that we are using the names only in an editorial fashion, and
to the benefit of the trademark owner, with no intention of infringement.
There are U.S. and foreign patents pending.
blank

Contents
iii
Contents
Before You Begin vii
Warranty Information vii
Safety Summary vii
Warnings, Cautions, and Notes viii
About This Manual ix
Other Intermec Manuals xi
Installing the EasyLAN Wireless
Introducing the EasyLAN Wireless 1-3
System Requirements 1-3
Supported Operating Systems and Network Protocols 1-4
Understanding the EasyLAN Wireless 1-5
Installing the EasyLAN Wireless 1-6
Attaching the Antenna 1-6
Starting and Testing the EasyLAN Wireless 1-7
Connecting the EasyLAN Wireless to an RS-232 Serial Port 1-7
Setting Radio and Network Communications 1-8
Configuring the EasyLAN Wireless
Before You Begin 2-3
Configuring the TCP/IP Parameters 2-4
Using the Web Browser Interface 2-4
Using the EasyLAN Wireless Admin Utility 2-8
Configuring the Radio Parameters 2-12
Using the Web Browser Interface 2-13
Using the EasyLAN Wireless Admin Utility 2-14
Configuring the Access and Update Passwords 2-16
Configuring the Ports 2-18
Configuring the Port Services 2-20
Configuring for the NetWare Network 2-24
Configuring the NetWare Parameters 2-25
Configuring Additional Queues 2-26
Configuring for NetBIOS 2-26
1
2

EasyLAN Wireless User’s Manual
iv
Configuring the DLC Parameters 2-28
Configuring for UNIX 2-29
Configuring for a Berkeley UNIX Host 2-29
Configuring for Sun Solaris 2-30
Configuring for HP/UX 2-31
Configuring for IBM AIX 2-32
Configuring for Other Systems 2-33
Managing the EasyLAN Wireless
Rebooting the EasyLAN Wireless 3-3
Using the Web Browser Interface 3-3
Using the EasyLAN Wireless Admin Utility 3-6
Setting the EasyLAN Wireless to Factory Defaults 3-9
Using the Web Browser Interface 3-9
Using the EasyLAN Wireless Admin Utility 3-10
Printing a Test Label 3-10
Using the Web Browser Interface 3-10
Using the EasyLAN Wireless Admin Utility 3-11
Reloading Firmware 3-11
Viewing Ethernet Statistics 3-13
Other EasyLAN Wireless Admin Utility Functions 3-14
Configuring IP Subnets 3-14
Adding an EasyLAN Wireless 3-15
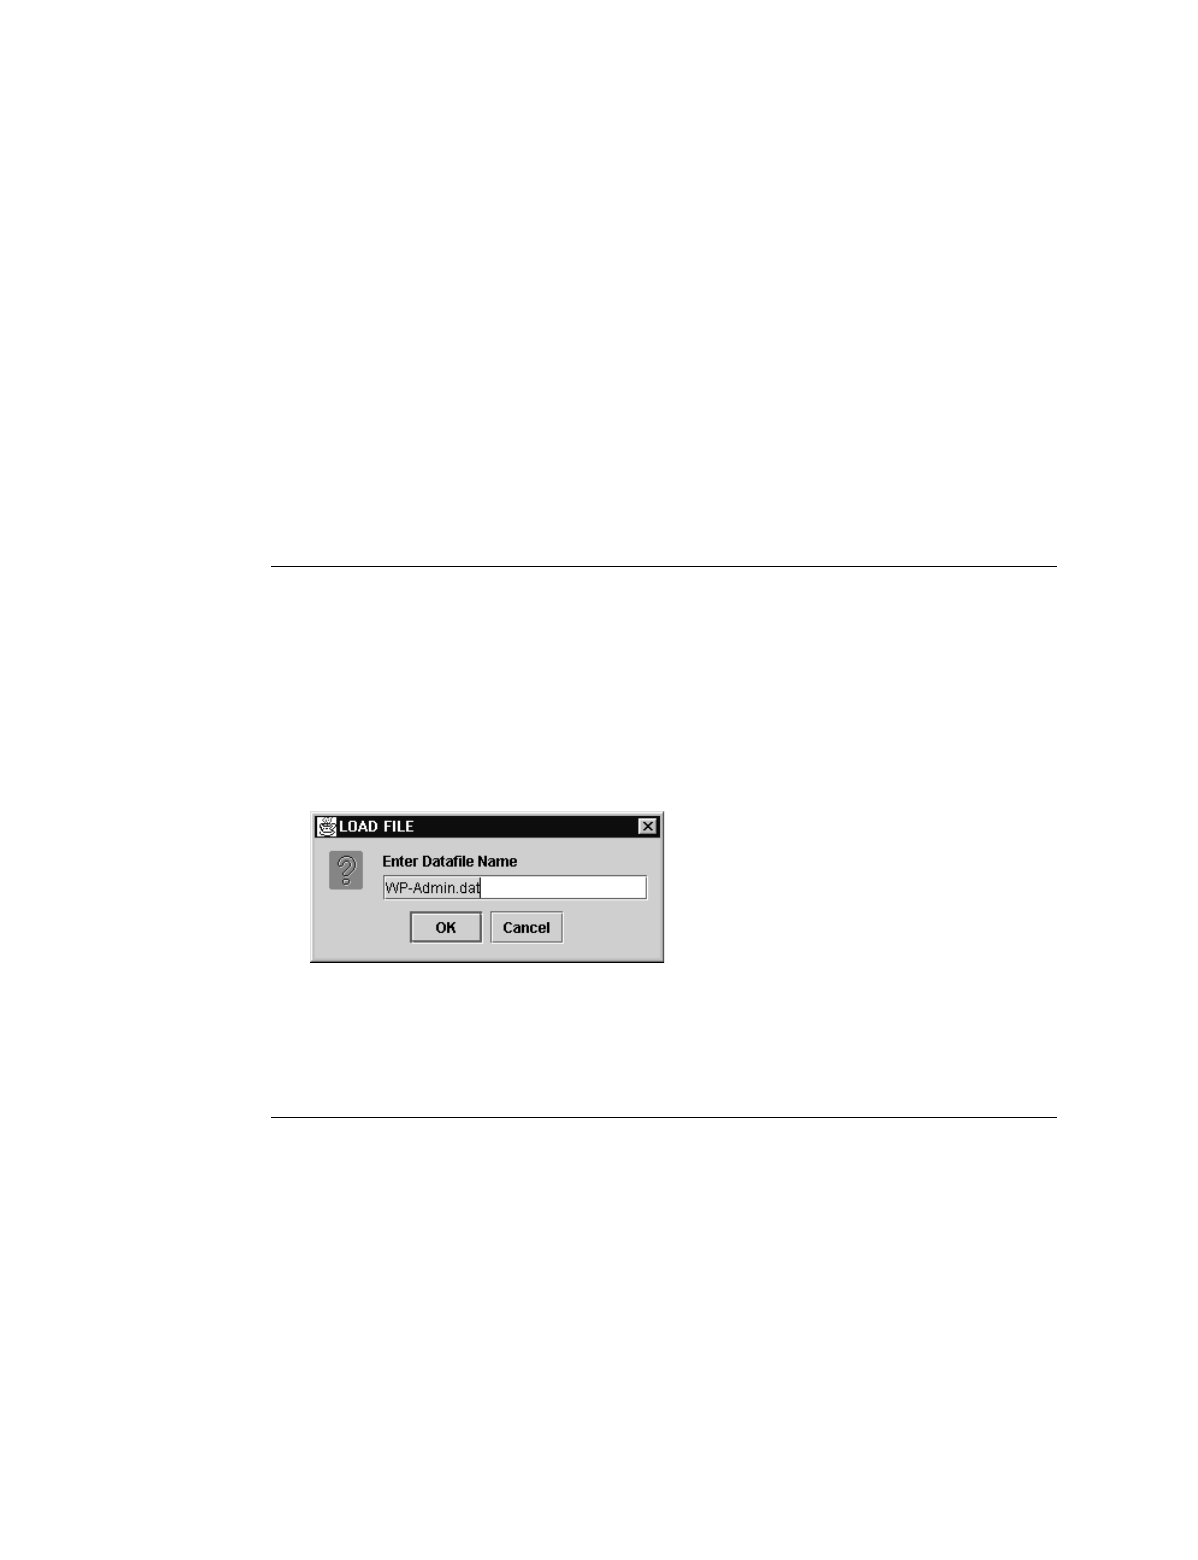
Loading Files 3-16
Saving Files 3-16
Using the Port Monitor
Installing the Port Monitor 4-3
Troubleshooting the EasyLAN Wireless
Troubleshooting Printing Problems 5-3
Troubleshooting Wireless Configuration Problems 5-3
Troubleshooting Network Configuration 5-4
3
4
5

Contents
v
Console Commands
Sending the Console Commands A-3
General Commands A-5
TCP/IP Commands A-7
NetWare Commands A-8
Radio Commands A-9
A

blank

C39
Before You Begin
vii
Before You Begin
This section introduces you to standard warranty provisions, safety precautions,
warnings and cautions, document formatting conventions, and sources of additional
product information. A documentation roadmap is also provided to guide you in finding
the appropriate information.
Warranty Information
To receive a copy of the standard warranty provision for this product, contact your local
Intermec support services organization. In the U.S. call 1-800-755-5505, and in Canada
call 1-800-668-7043. If you live outside of the U.S. or Canada, you can find your local
Intermec support services organization on the Intermec Web site at www.intermec.com.
Safety Summary
Your safety is extremely important. Read and follow all warnings and cautions in this
book before handling and operating Intermec equipment. You can be seriously injured,
and equipment and data can be damaged if you do not follow the safety warnings and
cautions.
Do not repair or adjust alone Do not repair or adjust energized equipment alone
under any circumstances. Someone capable of providing first aid must always be
present for your safety.
First aid Always obtain first aid or medical attention immediately after an injury.
Never neglect an injury, no matter how slight it seems.
Resuscitation Begin resuscitation immediately if someone is injured and stops
breathing. Any delay could result in death. To work on or near high voltage, you should
be familiar with approved industrial first aid methods.
Energized equipment Never work on energized equipment unless authorized by a
responsible authority. Energized electrical equipment is dangerous. Electrical shock
from energized equipment can cause death. If you must perform authorized emergency
work on energized equipment, be sure that you comply strictly with approved safety
regulations.
EasyLAN Wireless User’s Manual
viii
Warnings, Cautions, and Notes
The warnings, cautions, and notes in this manual use this format.
Warning
A warning alerts you of an operating procedure, practice, condition, or statement
that must be strictly observed to avoid death or serious injury to the persons working
on the equipment.
Avertissement
Un avertissement vous avertit d’une procédure de fonctionnement, d’une méthode,
d’un état ou d’un rapport qui doit être strictement respecté pour éviter l’occurrence
de mort ou de blessures graves aux personnes manupulant l’équipement.
Caution
A caution alerts you to an operating procedure, practice, condition, or statement that
must be strictly observed to prevent equipment damage or destruction, or corruption
or loss of data.
Conseil
Une précaution vous avertit d’une procédure de fonctionnement, d’une méthode,
d’un état ou d’un rapport qui doit être strictement respecté pour empêcher
l’endommagement ou la destruction de l’équipement, ou l’altération ou la perte de
données.
Note: Notes are statements that either provide extra information about a topic or
contain special instructions for handling a particular condition or set of circumstances.

C39
Before You Begin
ix
About This Manual
This manual contains all of the information necessary to install, configure, operate,
maintain, and troubleshoot the EasyLAN Wireless.
This manual was written for users who want to know more about the EasyLAN
Wireless. It was also written for installers, applications analysts, systems engineers, and
programmers who will install, operate, program, and troubleshoot the EasyLAN
Wireless in a network. A basic understanding of data communications and networks is
necessary.
What You Will Find in This Manual
This table summarizes the information in each chapter of this manual:
For Information On Refer To
Installing the EasyLAN
Wireless
Chapter 1, “Installing the EasyLAN Wireless.” Tells you how to
install the EasyLAN Wireless in your network.
Configuring the
EasyLAN Wireless
Chapter 2, “Configuring the EasyLAN Wireless.” Explains how to
configure the EasyLAN Wireless.
Managing the EasyLAN
Wireless
Chapter 3, “Managing the EasyLAN Wireless.” Explains how to
reboot, set to factory defaults, and load firmware the EasyLAN
Wireless.
Using the port monitor Chapter 4, “Using the Port Monitor.” Explains how to install and
use the port monitor.
Troubleshooting the
EasyLAN Wireless
Chapter 5, “Troubleshooting the EasyLAN Wireless.” Provides
general troubleshooting information.
Console commands Appendix A, “Console Commands.” Explains how to send console
commands to the EasyLAN Wireless, and lists the commands.

EasyLAN Wireless User’s Manual
x
Terminology
You should be aware of how these terms are being used in this manual:
Term Description
EasyLAN Wireless The wireless server for Intermec printers.
3400 The EasyCoder 3400 printer.
4420/4440 The EasyCoder 4420/4440 printer.
EasyLAN Wireless
software utility
The free utility for configuring the EasyLAN Wireless.
Web browser
interface
The HTML pages that you can use to configure and manage the
EasyLAN Wireless.
Format Conventions for Input From a Keyboard or Keypad
This table describes the formatting conventions for input from PC or host computer
keyboards and device keypads:
Convention Description
Special text Shows the command as you should enter it into the device. See
“Format Conventions for Commands” later in this chapter.
Italic text Indicates that you must replace the parameter with a value. See
“Format Conventions for Commands” later in this chapter.
Bold text Indicates the keys you must press on a PC or host computer
keyboard. For example, “press Enter” means you press the key
labeled “Enter” on the PC or host computer keyboard.
Format Conventions for Commands
This manual includes sample commands that are shown exactly as you should type
them on your device. The manual also describes the syntax for many commands,
defining each parameter in the command. This example illustrates the format
conventions used for commands:
From the command line in HyperTerminal, type:
set en wep keyval
value
where value is the hexadecimal value of the WEP encryption (10 hexadecimal values
for 64-bit encryption or 26 hexadecimal values for 128-bit encryption)
This table defines the conventions used in this manual:
Convention Description
Special font Commands appear in this font. You enter the command exactly as it
is shown.
Italic text Italics indicate a variable, which you must replace with a real value,
such as a number, filename, or keyword.

C39
Before You Begin
xi
Command Conventions (continued)
Convention Description
[ ] Brackets enclose a parameter that you may omit from the command.
Do not include the brackets in the command.
Required
parameters
If a parameter is not enclosed in brackets [ ], the parameter is
required. You must include the parameter in the command;
otherwise, the command will not execute correctly.
where This word introduces a list of the command’s parameters and
explains the values you can specify for them.
Other Intermec Manuals
You may need additional information when working with the EasyLAN Wireless with
various printers in a data collection system. Please visit our Web site at
www.intermec.com to download many of our current manuals in PDF format. To order
printed versions of the Intermec manuals, contact your local Intermec representative or
distributor.

blank

Installing the EasyLAN Wireless
1

blank
Installing the EasyLAN Wireless
1-3
1
This chapter provides an overview of the EasyLAN Wireless and explains how to install
it in your network.
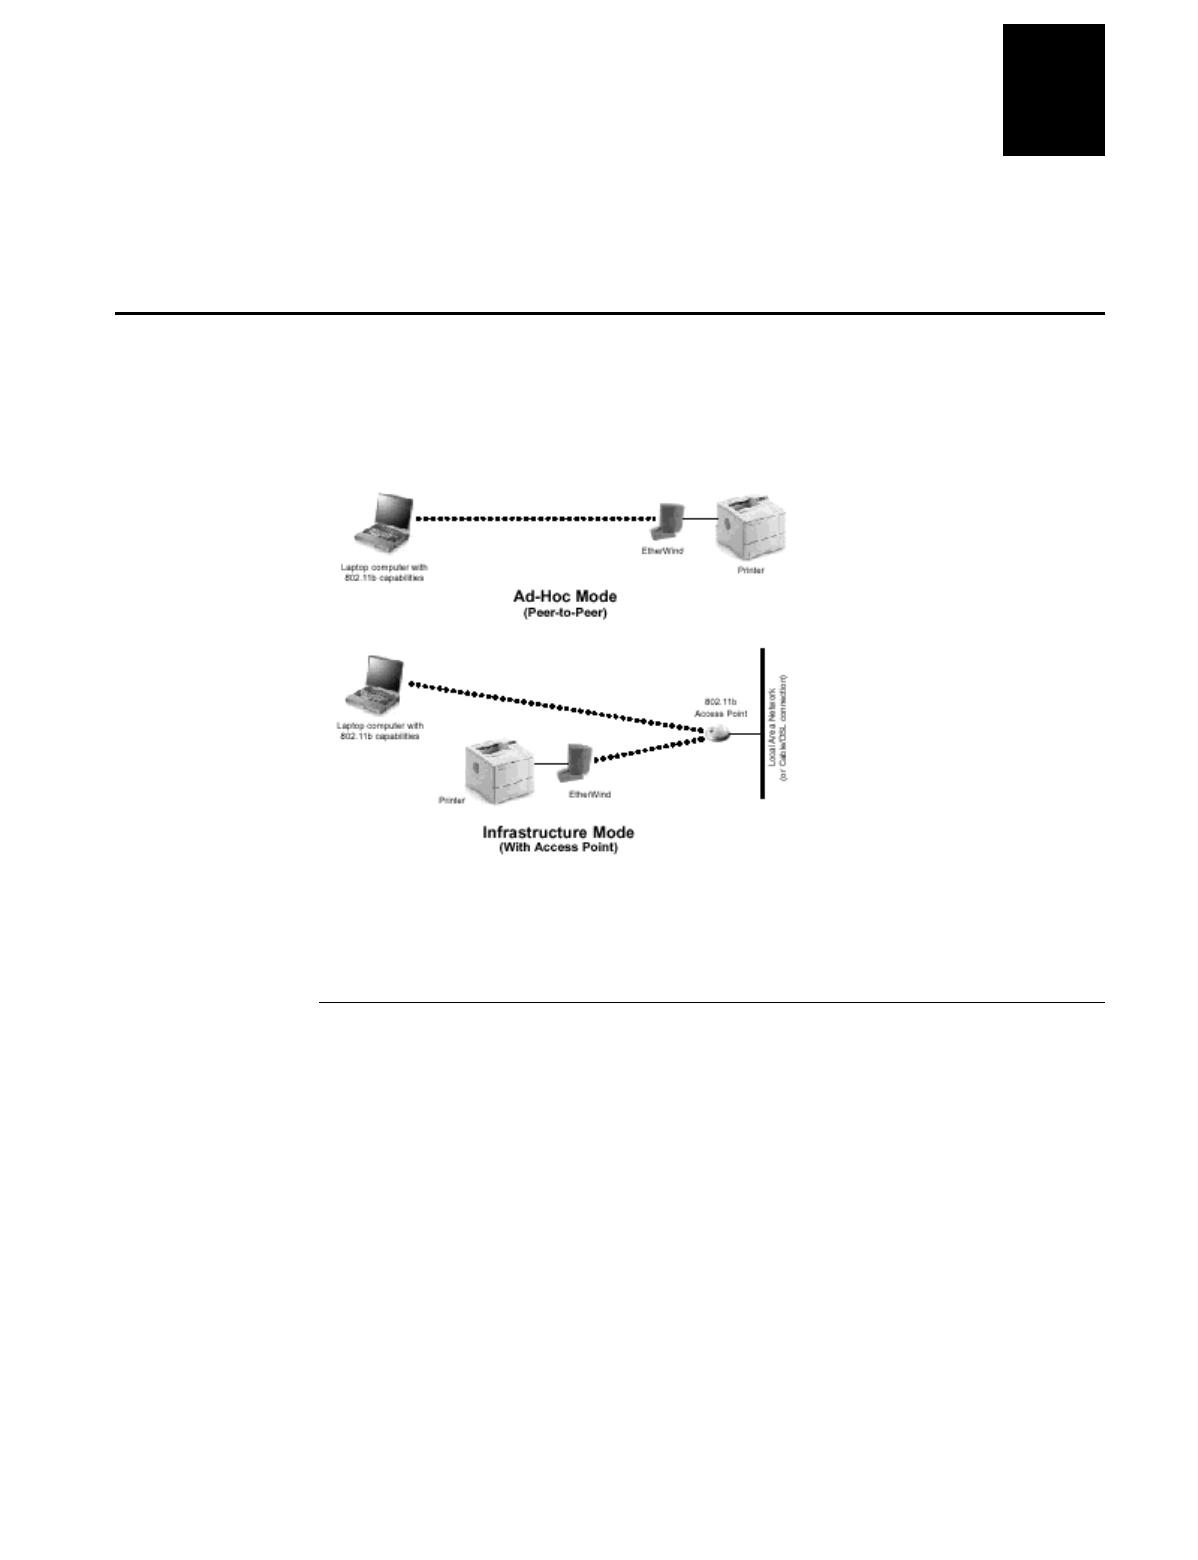
Introducing the EasyLAN Wireless
The Intermec 802.11b EasyLAN Wireless lets you communicate with 3400e, 4420, and
4440 printers from anywhere on an 802.11b wireless network. You can use the
EasyLAN Wireless in ad-hoc (peer-to-peer) or infrastructure (access point) mode, as
shown below.
The wireless communication operates at speeds of up to 11 Mbps on any IEEE 802.11b
wireless compatible network.
System Requirements
To print to the EasyLAN Wireless, you need an 802.11b wireless network. The wireless
network must consist of one of the following:
•An 802.11b wireless enabled device printing straight to the printer (ad-hoc mode).
•An 802.11b wireless access point allowing wireless and wired Ethernet enabled
devices to print to the printer.
To configure and print to the EasyLAN Wireless, you need the following information:
•The MAC address of the EasyLAN Wireless (for example, 004017023F96).
•The following information from your network administrator:
•Wireless mode (infrastructure or ad-hoc)
•The SSID (service set identifier) for your wireless network

EasyLAN Wireless User’s Manual
1-4
•The radio frequency channel of the wireless network
•If you are using TCP/IP (recommended for Windows networks) and are not
connected to a dynamic host configuration protocol (DHCP) server, you need a
unique IP address for the EasyLAN Wireless (for example, 192. 168.1.14). If
the EasyLAN Wireless is not on the same IP subnet as the devices you are
printing from, you also need a subnet mask and a router (default gateway)
address.
Supported Operating Systems and Network Protocols
•Windows 95, 98, ME, NT 4, 2000, XP
•TCP/IP
•LPD/LPR
•Raw TCP/IP (port 9100)
•NetBIOS over IP (with SMB)
•Multiple configurable TCP port numbers
•TELNET
•WINS
•DHCP
•IPX/SPX
•NetWare RPrinter Bindery mode
•NetWare PServer Bindery mode
•NetWare NPrinter NDS mode with NDPS support
•NetWare PServer NDS mode
•Ethernet II, 802.3, 802.2, 802.2 SNAP Frame types
•Compatible with PCONSOLE, NWADMIN, PRINTCON, and other Novell
utilities
•NetBEUI
•Unix

Installing the EasyLAN Wireless
1-5
1
Understanding the EasyLAN Wireless
Before you install the EasyLAN Wireless, you should identify the following
components on the back of your printer:
picture of the back of the printer with the following components called out
Component Description
Antenna
connector
Attach the antenna to this connector.
Press down this switch for less than 5 seconds to print a test label on the
printer. The test label shows the current wireless and network settings of the
EasyLAN Wireless. Press the switch down for more than 5 seconds to reset the
EasyLAN Wireless to its factory default parameters. If you hold the test switch
down upon powering up, the wireless print option powers up in ad-hoc mode
on RF channel 11 with the SSID of printer.
Test switch
Note: If you press the test switch for more than 5 seconds, only the
EasyLAN Wireless is reset to the factory defaults. The rest of the
printer settings remain unchanged.
LEDs The green LED comes on when the wireless print option is powered on and
then goes out. The yellow LED comes on solid when a wireless network link is
established. The green LED blinks during wireless network activity.
Serial port
(DB9)
Use this port for connecting a serial device. You can also use this port to access
the command line console of the EasyLAN Wireless for configuration and
diagnostics.

EasyLAN Wireless User’s Manual
1-6
Installing the EasyLAN Wireless
Before you install the EasyLAN Wireless, make sure that you have properly installed
the 802.11b wireless equipment and software you are using to communicate to the
printer as described in the documentation that came with that equipment. Also make
sure that you have loaded media and ribbon into the printer. For help, see the quick start
guide for your printer.
Attaching the Antenna
•Screw the antenna onto the antenna connector, and bend the antenna so that it points
up.
illustration of antenna being attached
For best performance, position the printer and antenna so that the antenna has a line-of-
sight exposure to the access point or wireless device that it communicates with.
The following antennas and extension cable are also available:
illustration of antenna 2.4GHz 5dBi dual flat patch, recommended for office
corridors, hospital halls, and retail establishments. Part
No. 067262
illustration of antenna 2.4GHz 5dBi omnidirectional, recommended for open
areas, warehouses, and industrial sites. Designed for
outdoor use. Part No. 063363
illustration of extension
cable
12-foot long cable with magnetic base at the antenna
connector. Use with the antenna that came with the
EasyLAN Wireless. Part No. 060749

Installing the EasyLAN Wireless
1-7
1
Starting and Testing the EasyLAN Wireless
When the EasyLAN Wireless is powered on, the option goes through the following
startup sequence:
•The EasyLAN Wireless runs through a set of power-up diagnostics for a few
seconds. If the EasyLAN Wireless is operating properly, the yellow and green
LEDS blink momentarily and then go out. If the green LED blinks continuously in a
regular pattern, there is a problem. Try unplugging the power to the printer and then
plugging it in again. If the problem persists, contact your local Intermec
representative.
•When a successful connection is made to the EasyLAN Wireless from another
802.11b wireless device like an access point or PC, the yellow LED stays lit. The
green LED blinks whenever there is wireless networking activity.
After the green and yellow LEDs go out, print a test label to make sure that the wireless
print option is working. The test label shows the current wireless and network settings
of the EasyLAN Wireless.
To print a test label
•Press and release the test switch. For help finding the test switch, see
“Understanding the EasyLAN Wireless” earlier in this chapter.
If you cannot print a test page, see Chapter 5, “Troubleshooting.”
Connecting the EasyLAN Wireless to an RS-232 Serial Port
To initially configure the EasyLAN Wireless, you must connect it to your PC using the
RS-232 serial port. The EasyLAN Wireless has one standard serial port. The serial port
uses PC-compatible 9-pin male D-connectors. Note that the standard off-the-shelf 9-pin
female to 25-pin male PC cables require a null modem in order to connect to most
printers or terminals. The following illustration and table show the pin-outs for the serial
port.

EasyLAN Wireless User’s Manual
1-8
Pin-Out for Serial Port
DB9 Pin Input Signal Output Signal DTE Pin DCE Pin
1 Not used Not used - -
2 Receive Data Transmit Data 2 3
3 Transmit Data Receive Data 3 2
4DTR out DSR in 620
5 Signal Ground Signal Ground 7 7
6 DSR in STR out 20 7
7 RTS out CTS in 5 4
8CTS in RTS out 45
9 Not used Not used - -
Basically, the cable must connect input signals (such as Receive Data) on the EasyLAN
Wireless to the equivalent output signals (such as Transmit Data) on the PC and vice-
versa.
You can set the serial port to operate in console mode to allow you to configure and
diagnose the EasyLAN Wireless via a PC running HyperTerminal. To enable the
console mode manually, unplug the power supply from the EasyLAN Wireless, hold
down the test switch, and simultaneously plug in the power supply.
The port remains in console mode until you power off the EasyLAN Wireless.
You may also enable console mode by connecting remotely to the EasyLAN Wireless
via the Web browser interface, TELNET, NCP, or XConfig. For more information
about using console mode, see Chapter 2, “Configuring the EasyLAN Wireless.”
Setting Radio and Network Communications
Before you can set radio and network communications, you need to get the following
information from your network administrator:
•Radio SSID
•Radio boot method (ad-hoc or infrastructure)
•Radio WEP (64-bit, 128-bit, or disabled)
•Radio WEP key number
•Radio WEP encryption value
•Static IP address for the printer
•Subnet mask
•Router

Installing the EasyLAN Wireless
1-9
1
To set radio and network communications
1. Make sure that your PC’s serial port is set to
•115200 baud.
•8 data bits.
•No parity.
•1 stop bit.
2. Connect the serial port on the EasyLAN Wireless to the serial port of your PC.
3. Open a HyperTerminal session, and press Enter to get the Local> prompt.
4. To set the radio SSID, type set en ssid
mynetwork
where mynetwork is the
SSID for the EasyLAN Wireless, and press Enter.
5. To set the radio boot method to ad-hoc or infrastructure, type set en mo
mode
where mode is ad for ad-hoc, ps for pseudo ad-hoc, or in for infrastructure, and
press Enter.
6. To enable WEP 64 bit, type set en wep 64, and press Enter.
Or to enable WEP 128 bit, type set en wep 128, and press Enter.
7. To set the radio WEP key, type set en key#
n
where n is a number from 1 to 4,
and press Enter.
8. To set the radio WEP encryption value, type set en wep keyval
value
where
value is the hexadecimal value of the WEP encryption (10 hexadecimal values for
64-bit encryption or 26 hexadecimal values for 128-bit encryption), and press
Enter.
9. To set the static IP address, type set ip ad to
n.n.n.n
where n is a number
from 0 to 255, and press Enter.
10. To set the subnet mask, type set ip su
n.n.n.n
where n is a number from 0 to
255, and press Enter.
11. To set the router, type set ip ro
n.n.n.n
where n is a number from 0 to 255,
and press Enter.
12. To set the boot method to static instead of DHCP, type set ip me static, and
press Enter. If you are using a printer other than the 601XP, skip to Step 15.
13. (601XP only) To set the communications parameters to 57600 baud, type set
port s1 sp 57600, and press Enter.
14. (601XP only) To disable console mode, type set port s1 co dis, and press
Enter.
15. To save the changes, type save, press Enter, type ini, and press Enter.
16. Type exit and press Enter.

EasyLAN Wireless User’s Manual
1-10
You can now use the Web browser interface or the EasyLAN Wireless Admin utility to
configure and manage the EasyLAN Wireless. For help, see Chapter 2, “Configuring
the EasyLAN Wireless,” and Chapter 3, “Managing the EasyLAN Wireless.”

Configuring the EasyLAN Wireless
2

blank

Configuring and Managing the EasyLAN Wireless
2-3
2
This chapter explains how to configure the EasyLAN Wireless for radio and network
communications.
Before You Begin
This chapter explains how to configure the EasyLAN Wireless using the Web browser
interface, EasyLAN Wireless Admin utility, and network specific utilities, such as
Novell NWAdmin utility. For information on using console commands with
HyperTerminal to configure the EasyLAN Wireless, see Appendix A, “Console
Commands.”
Before you configure the EasyLAN Wireless, you need to:
•Make sure that you have properly configured your PC for communication on a
wireless network. If you are connecting to the printer though an access point, make
sure your PC is in infrastructure mode and that it is associated with the access point.
If you are printing directly to the printer without an access point, you should be in
ad-hoc mode. See the documentation for your PC’s wireless adapter for instructions.
Note: If your PC’s wireless adapter includes an option for 802.11 ad-hoc, you must
select it if you want to use the printer in ad-hoc mode. If it does not include this
option, select Ad-hoc Computer-to-Computer or whatever mode your adapter uses
to communicate on a wireless network without an access point.
•If you are using WEP encryption on your wireless network, temporarily disable
WEP on your PC in order to configure the EasyLAN Wireless using the EasyLAN
Wireless Admin utility. If you are using an access point with WEP enabled and it
does not allow non-WEP clients to communicate with other non-WEP clients, then
you also need to temporarily change the wireless mode of your PC to ad-hoc.
Note: If no PCs on your network can be set to ad-hoc mode, you need to
temporarily disable WEP on your access point. When you are done configuring the
EasyLAN Wireless, you can re-enable WEP on your access point and change the
wireless mode back if necessary.
•If you are using TCP/IP, note your PC’s IP address. The EasyLAN Wireless needs
to be on the same IP segment as the other nodes on your network in order to
communicate.
•If you are using infrastructure mode, make sure you have a good signal between
your computer and the access point. Most wireless adapters have a utility that shows
the wireless signal strength. See your PC’s wireless adapter’s documentation for
details.
•If you are using a home gateway or router, configure the EasyLAN Wireless from a
PC on the same network segment that you want the EasyLAN Wireless to be on.

EasyLAN Wireless User’s Manual
2-4
Configuring the TCP/IP Parameters
You can use the Web browser interface or the EasyLAN Wireless Admin utility to
configure the following TCP/IP parameters:
•Enable or disable TCP/IP
•Enable port services
•IP address
•Subnet mask
•Gateway or router IP address
•Boot method
Note: If you are using DHCP on your network, the EasyLAN Wireless may have
automatically acquired valid IP settings, and no further configuration is necessary.
Using DHCP may work well if your DHCP server allows the EasyLAN Wireless to
keep its IP address permanently, but in most cases, you want to use a static IP address
outside the range reserved for DHCP (see your DHCP server manual for details). You
want a static IP address for when you configure your printer port and to use the Web
browser interface.
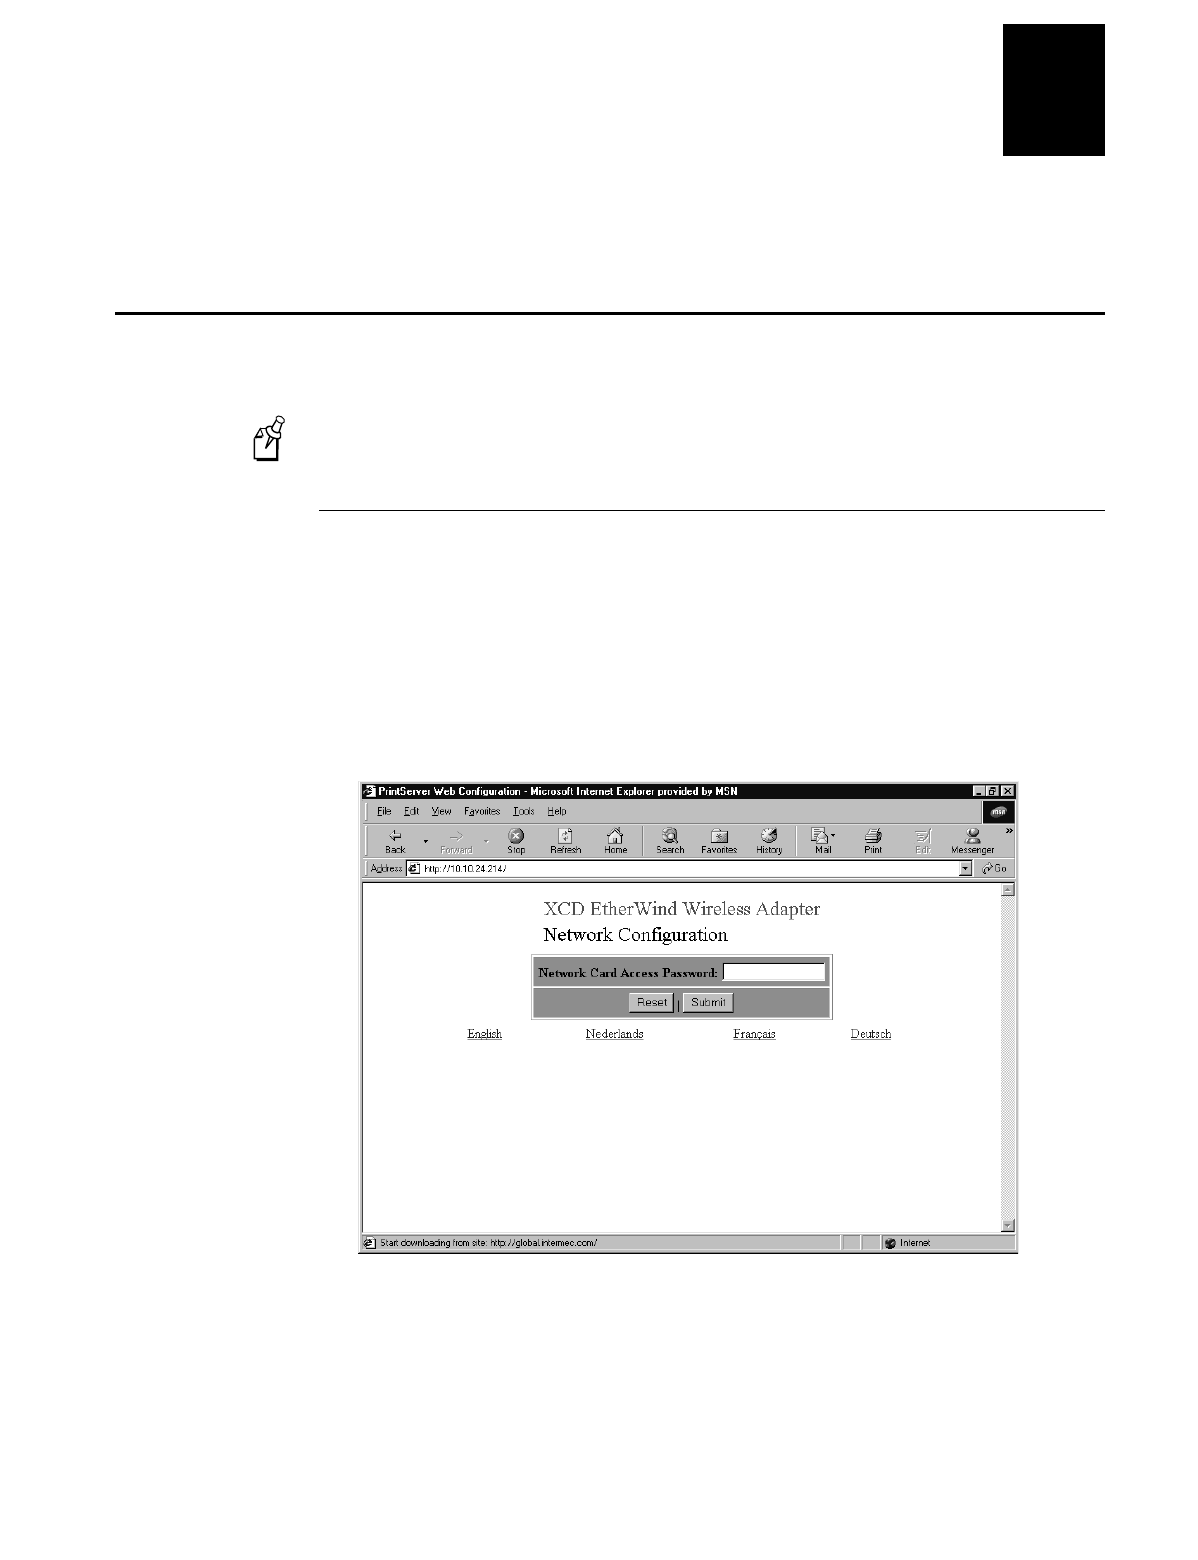
Using the Web Browser Interface
Before you can use the Web browser interface, you need to open it.
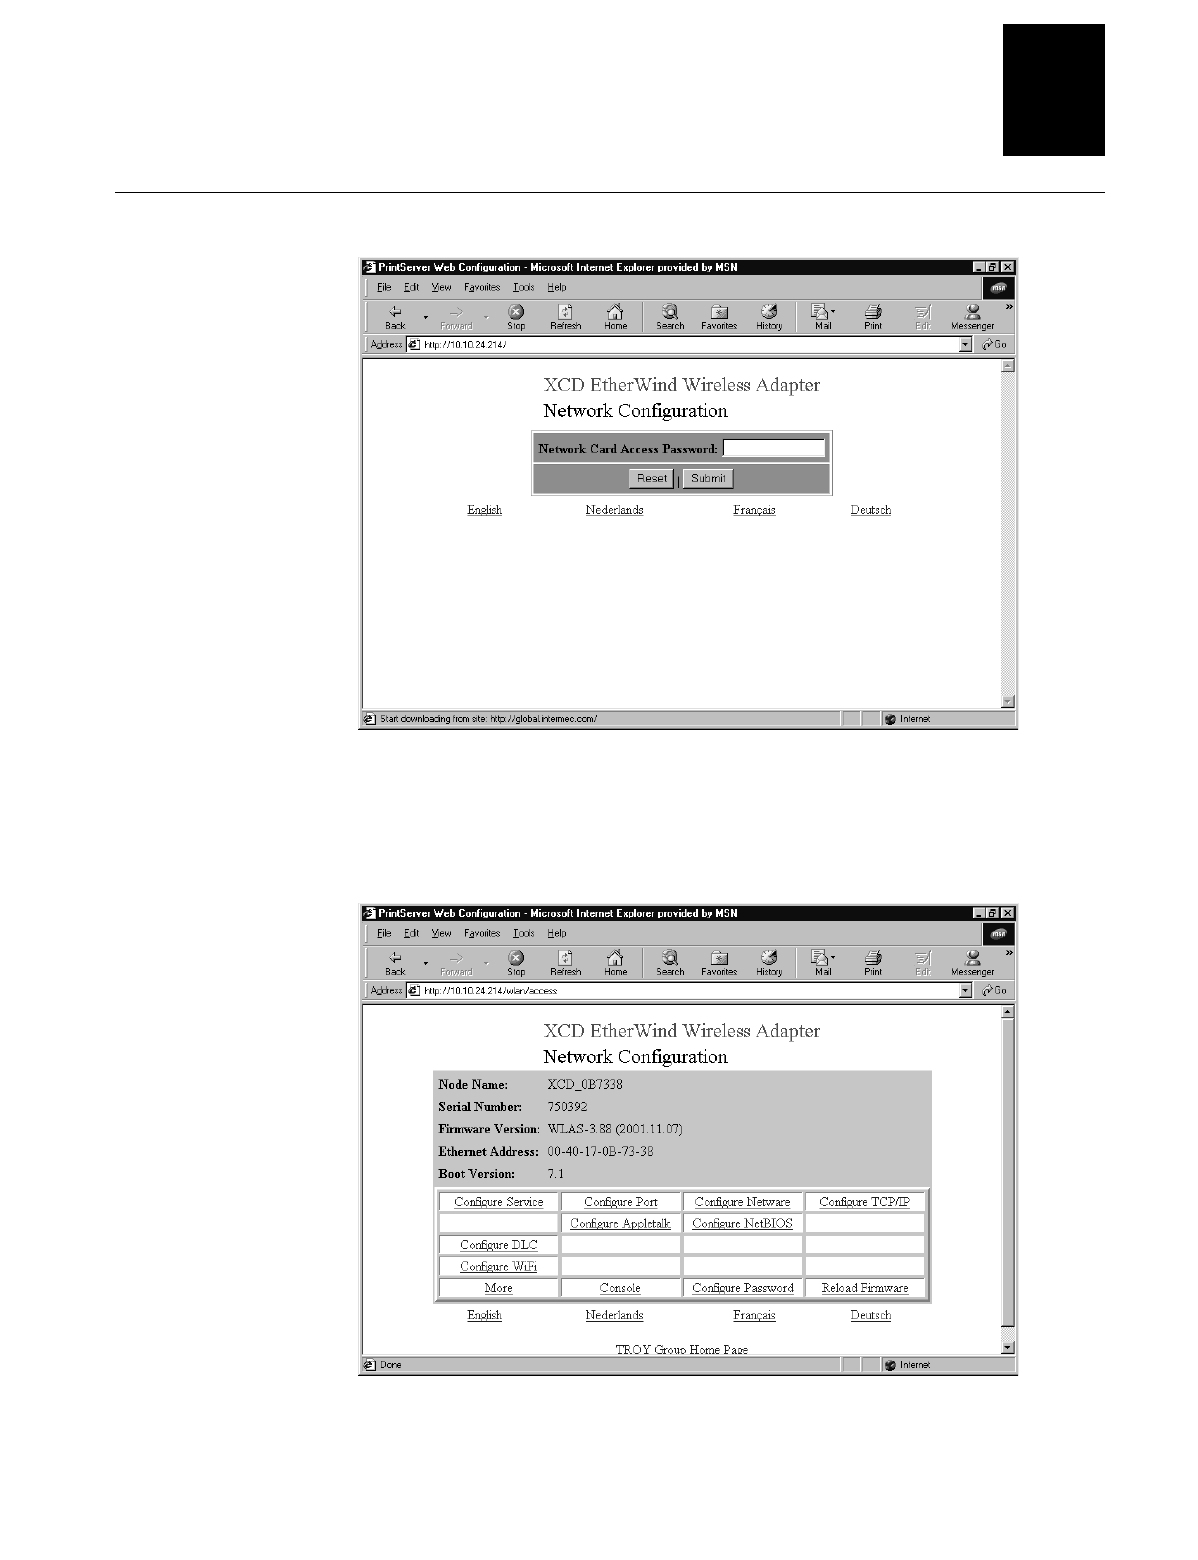
To open the Web browser interface
1. Start your Web browser.
2. In the Address (Internet Explorer) or Go to (Netscape) line, enter the IP address for
the EasyLAN Wireless, and press Enter. The following page appears.
Configuring and Managing the EasyLAN Wireless
2-5
2
Access Password Page
3. In the Print Server Access Password field, enter the password. The default password
is access.
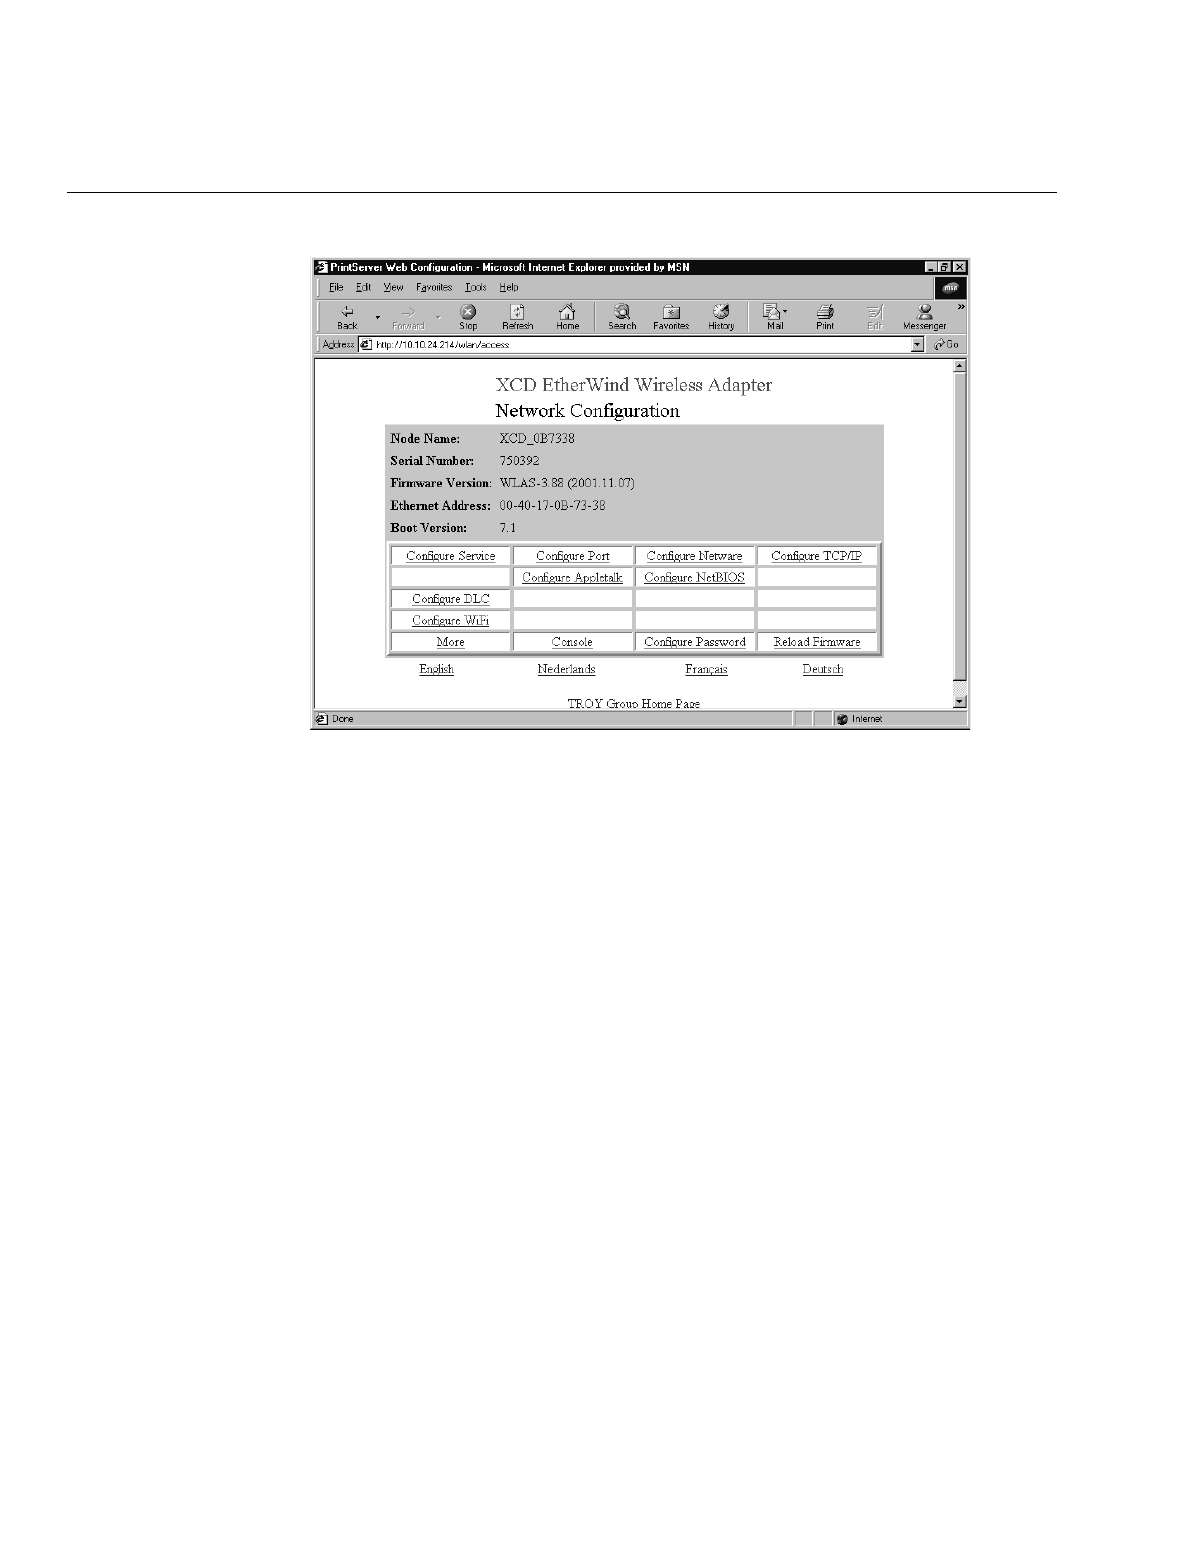
4. Click Submit. The Configuration and Management page appears.
EasyLAN Wireless User’s Manual
2-6
You are now ready to configure the TCP/IP parameters.
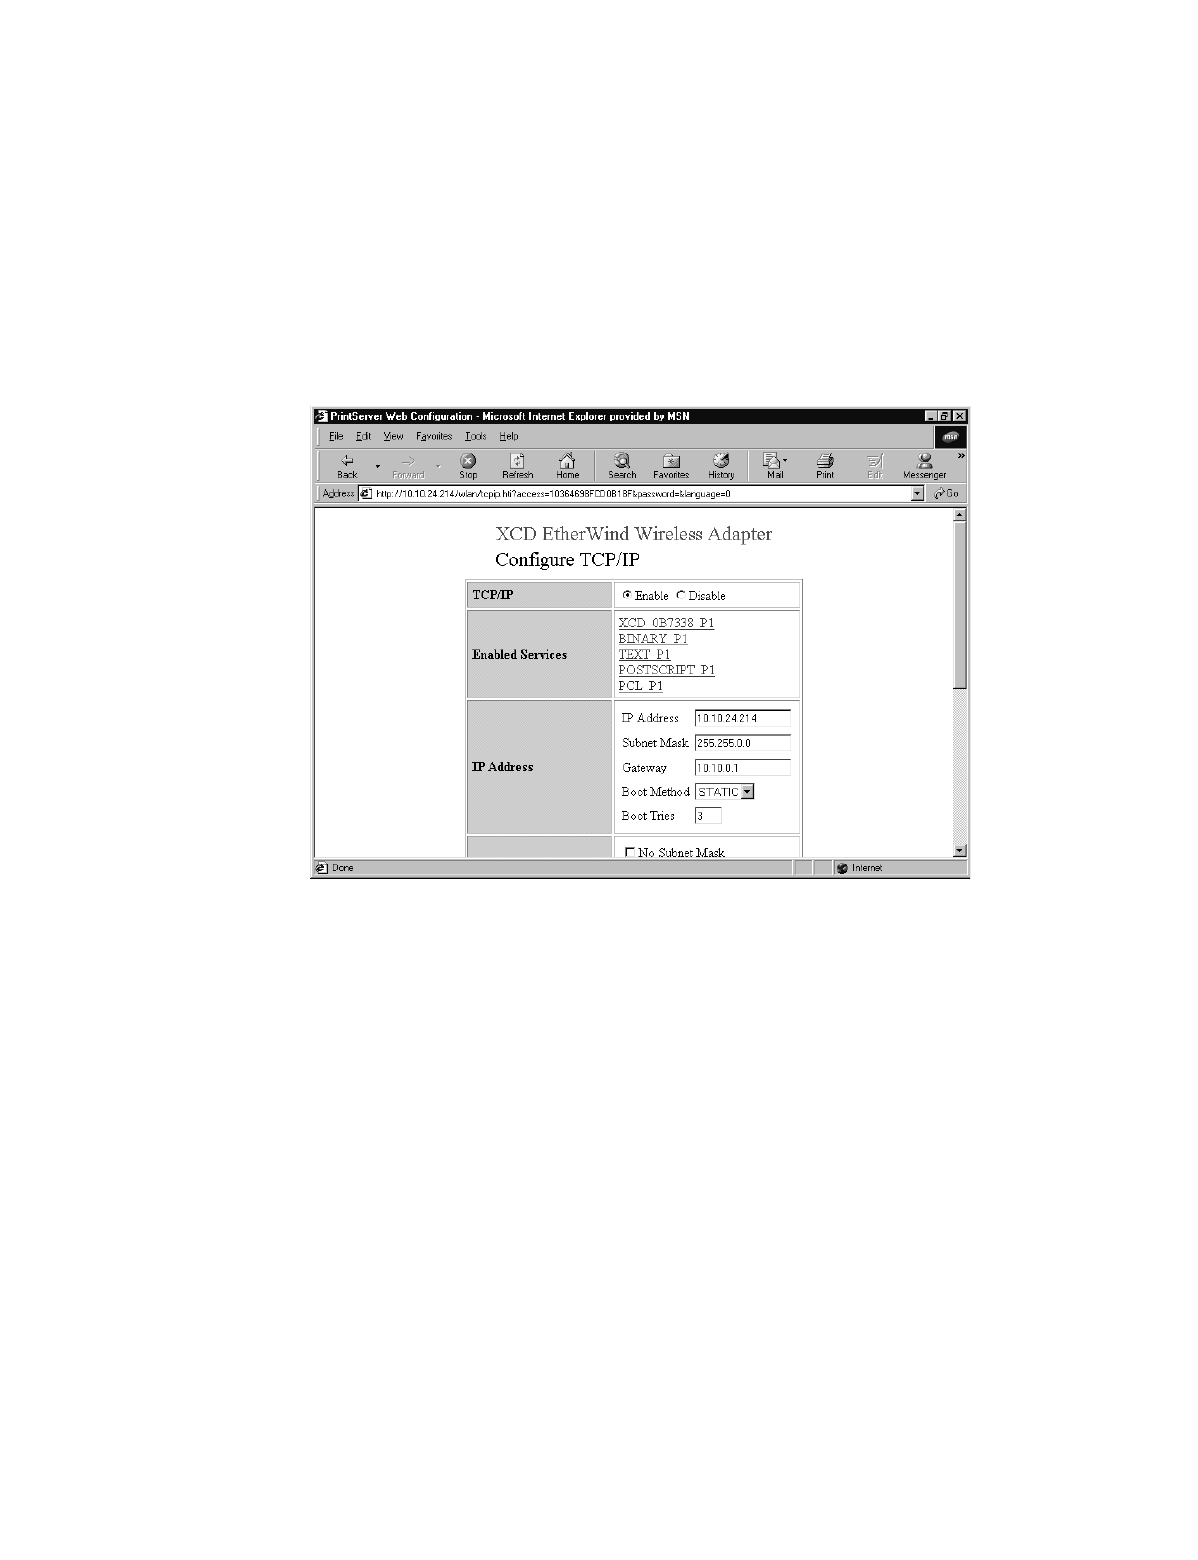
To configure the TCP/IP parameters using the Web browser interface
1. From the Configuration and Management page, click Configure TCP/IP. The
Configure TCP/IP page appears. For help opening the Configuration and
Management page, see “To open the Web browser interface” earlier in this section.
2. In the TCP/IP row, select Enable or Disable.
3. In the Enabled Services row, click the port you want to configure services for. For
help, see “Configuring Port Services” later in this chapter.
4. In the IP Address field in the IP Address row, enter the IP address for the EasyLAN
Wireless using the form n.n.n.n where n is from 0 to 255. After you click Submit,
you will have to enter the new IP address in the Address/Go to line of your browser
to get the Web browser interface back.
5. In the Subnet Mask field in the IP Address row, enter the subnet mask that the
printer is communicating in using the form n.n.n.n where n is from 0 to 255.
6. In the Gateway field in the IP Address row, enter the IP address of the gateway or
router your EasyLAN Wireless communicates with.

Configuring and Managing the EasyLAN Wireless
2-7
2
7. In the Boot Method dropdown list in the IP Address row, select the method for
finding the EasyLAN Wireless IP address, subnet mask, and gateway address when
the EasyLAN Wireless powers on or is reset:
•Auto sets the EasyLAN Wireless to try to get an IP address using DHCP,
BOOTP, and RARP. If it cannot get an IP address using these methods, Auto
changes to Static.
•DHCP sets the EasyLAN Wireless to use the dynamic host configuration
protocol to get an IP address.
•BOOTP sets the EasyLAN Wireless to use boot protocol to get an IP address.
•RARP sets the EasyLAN Wireless to use reverse address resolution protocol to
get an IP address.
•Static sets the EasyLAN Wireless to use the IP address set in the IP Address
field whenever it boots.
8. In the Boot Tries field in the IP Address row, enter the number of times the boot
method tries to set the IP address, subnet mask, and gateway address before using
the available values. This field is only used if the boot method is set to Auto,
DHCP, BOOTP, or RARP. What is the range of valid values for this field?
9. In the RARP Boot Settings row, select whether RARP sets the subnet mask based
on the EayLAN Wireless IP address and sets the gateway IP address. To use these
settings, set the boot method to RARP or Auto.
10. In the TCP Window row, enter the maximum TCP window for TCP
communications. Normally this value is set automatically, but you may want to
change it to optimize network performance. What is the range of valid values for
this field?
11. In the TCP Timeout row, enter how many minutes or seconds a TCP job can be idle
before the job is terminated. If you set the timeout to zero, the TCP job can be idle
indefinitely. What is the range of valid values for this field?
12. In the LPD Banner Enable check box in the LPD Settings row, check the check box
to have the EasyLAN Wireless print the banner page in an LPD control file.
13. In the LPD Retry Enable check box in the LPD Settings row, check the check box
to have the EayLAN Wireless wait for an LPD job that has been terminated before
it was completed to be resent. If the LPD job is resent, the EasyLAN Wireless
continues printing the job where it had stopped.
14. In the Keepalive Timer row, enter how often in minutes the EasyLAN Wireless
sends an IP ping packet to the router to keep the router aware of the EasyLAN
Wireless. Enter zero to disable this feature.
15. In the Probe Idle Connections row, select Enable to have the EasyLAN Wireless
send a probe packet on TCP connections with no data traffic. If the EasyLAN
Wireless does not receive an acknowledgement, it closes the connection.
EasyLAN Wireless User’s Manual
2-8
16. In the TCP Receive Checksum row, select Enable to compute the TCP checksum on
received packets. Disabling this feature can enhance performance, but data
corruption will not be checked.
17. Click Submit. A page appears letting you know that your changes were successful.
18. Click OK to return to the Configuration and Management page.
Using the EasyLAN Wireless Admin Utility
Before you can use the WPAdmin utility, you need to install it and then search for the
EasyLAN Wireless.
To install the WPAdmin utility
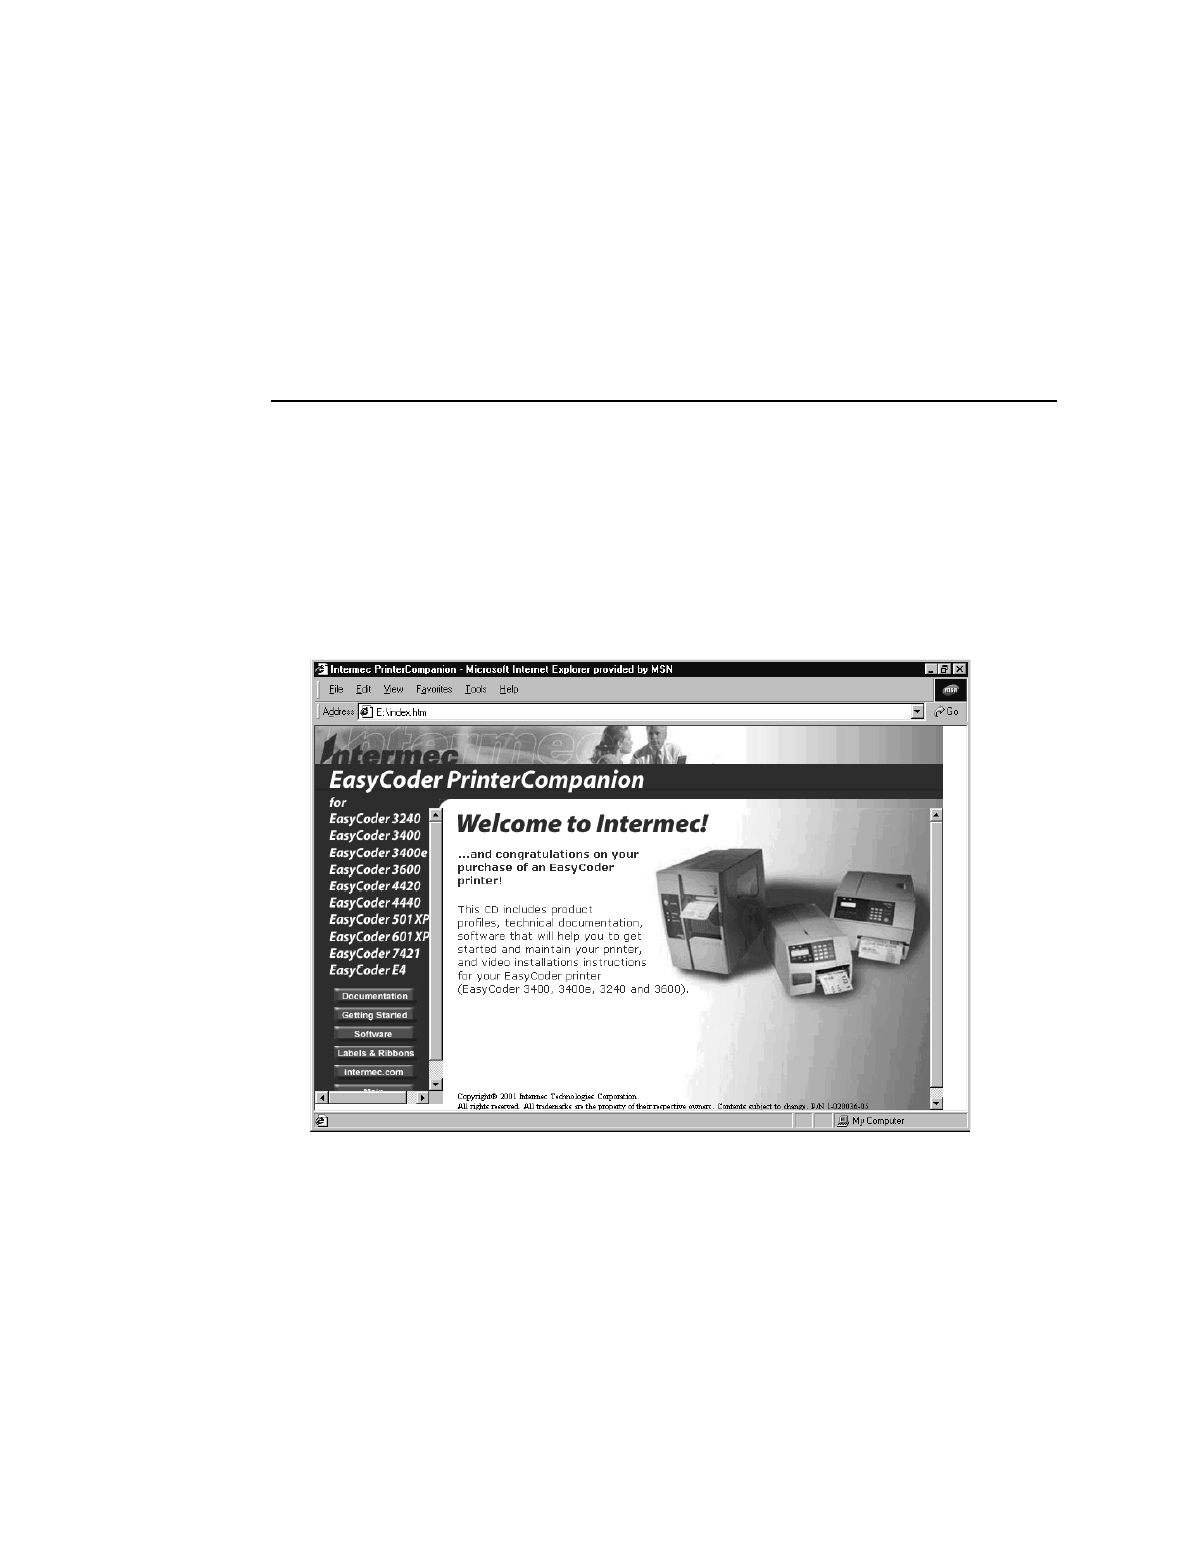
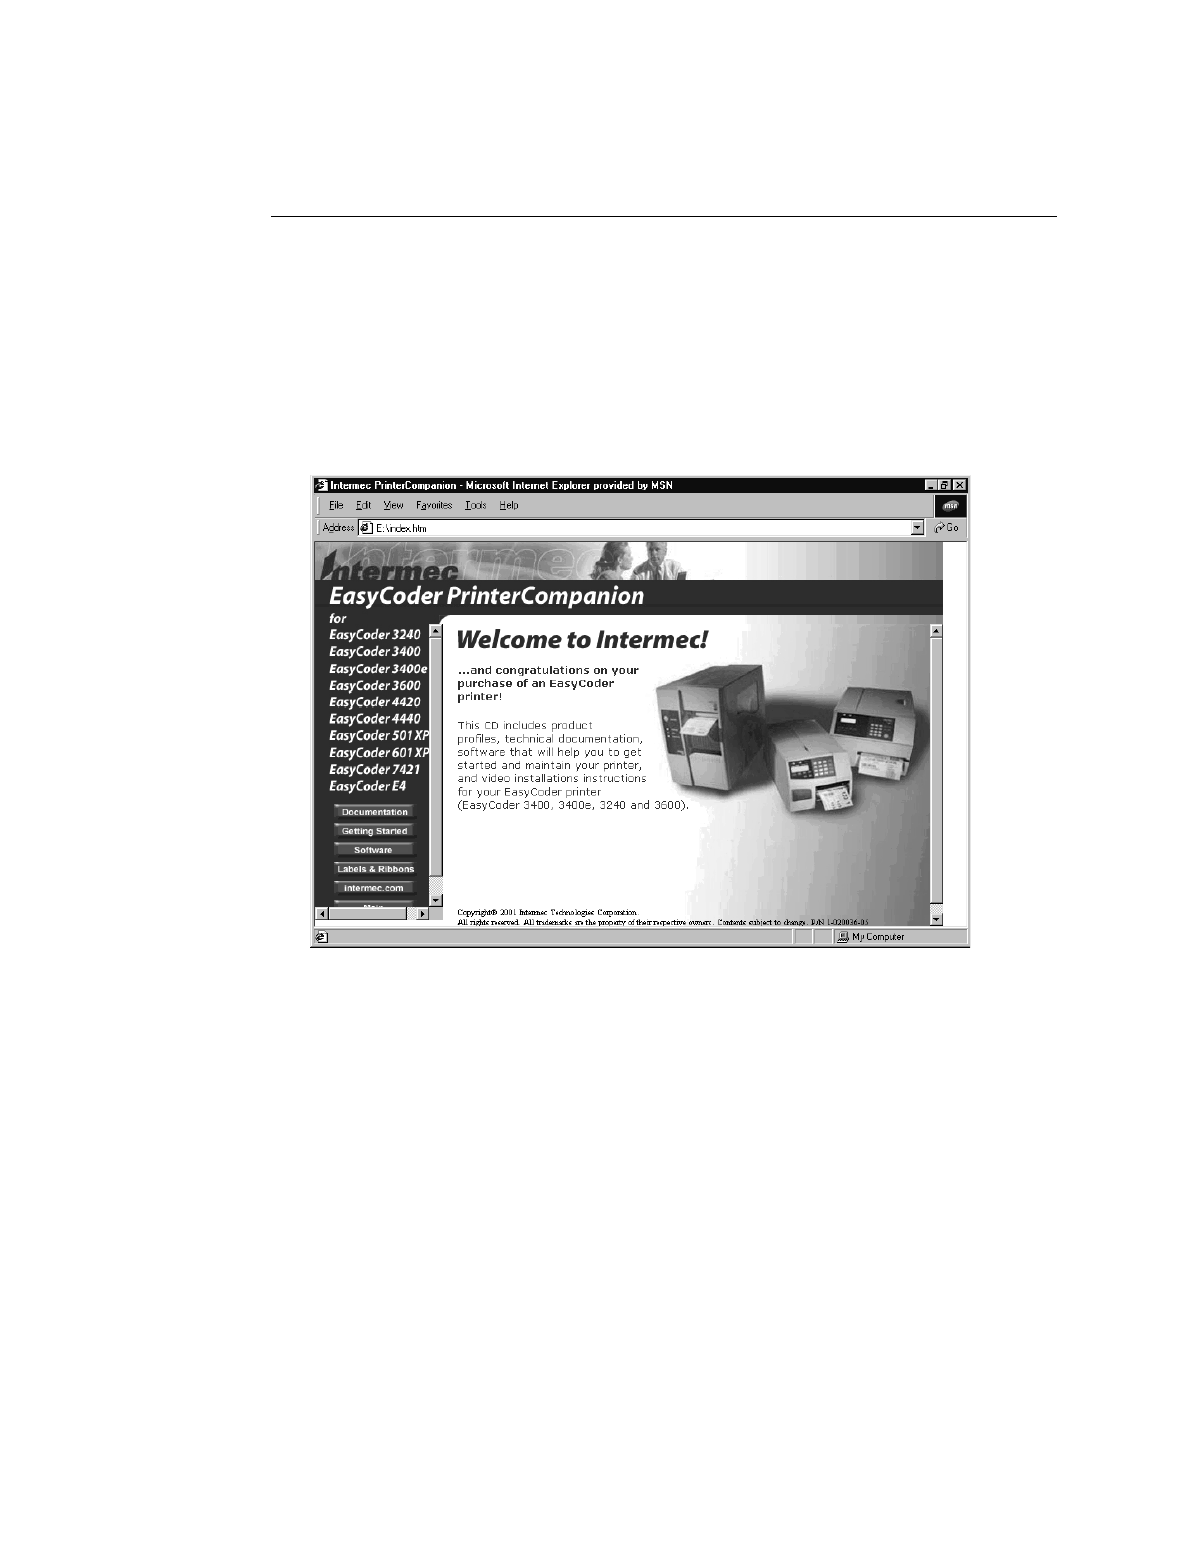
1. Place the printer CD-ROM in your PC’s CD-ROM drive. The following screen
appears.
2. Click Software in the left frame. The Software page appears.

Configuring and Managing the EasyLAN Wireless
2-9
2
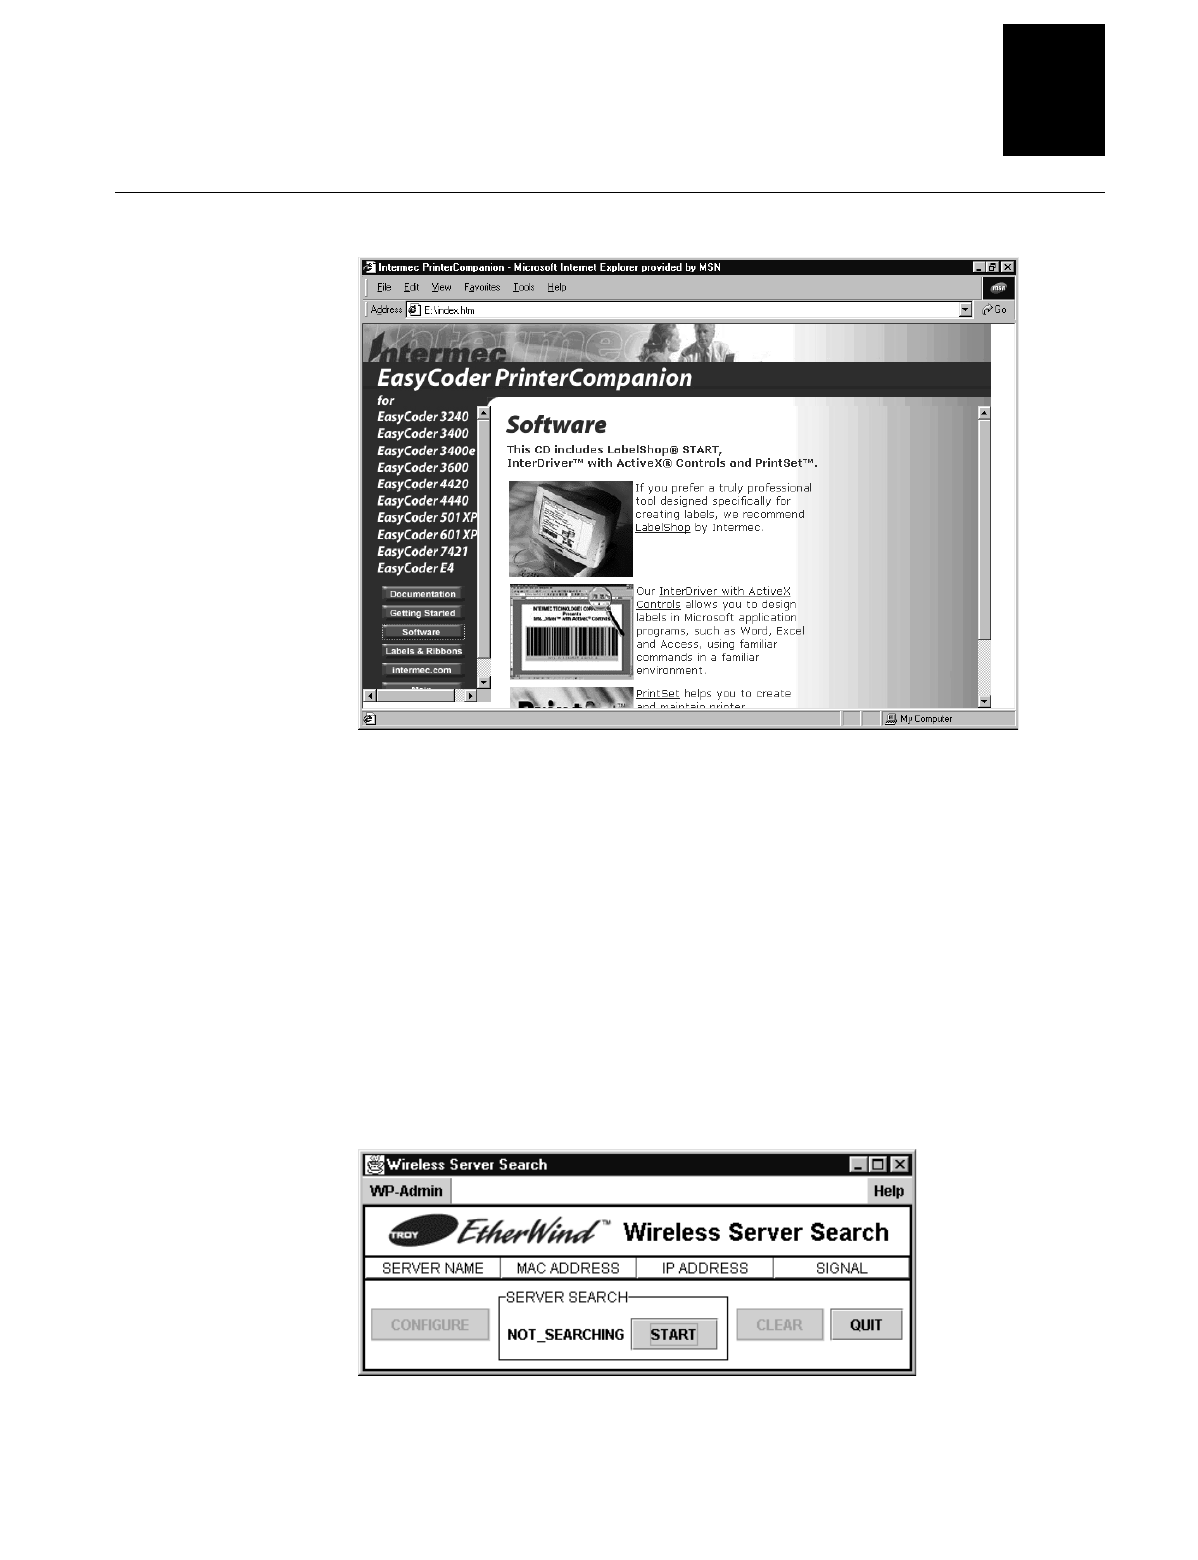
Printer Companion CD Software Page
3. Scroll down to EasyLAN Wireless Admin utility, and then click the picture or the
link for the EasyLAN Wireless Admin utility page.
4. Click Install EasyLAN Wireless Admin utility.
5. Follow the instructions for installing the EasyLAN Wireless Admin utility.
6. When the installation is complete, close the CD-ROM screen.
To search for the EasyLAN Wireless
1. Open the WPAdmin utility by selecting it from the Start menu (under Programs,
Intermec then WPAdmin) or by double-clicking a short cut on your desktop. The
Search dialog box appears.
EasyLAN Wireless User’s Manual
2-10
2. In the Server Search box, click Start. The name of the EasyLAN Wireless, MAC
address, IP address, and signal appear for all of the EasyLAN Wireless found.
If the WPAdmin utility does not find your EasyLAN Wireless right away, click
Stop and make sure that the EasyLAN Wireless is on and configured properly. For
help with initially configuring the EasyLAN Wireless, see “Setting Radio and
Network Communications” in Chapter 1.
Note: If the wireless signal is less than 50% on the Search screen, printing performance
could be affected. To improve the signal strength, try moving the EasyLAN Wireless
closer to the computer or access point and away from other radio devices, such as
Bluetooth wireless devices, microwave ovens, or cordless phones.
You are now ready to configure the EasyLAN Wireless.
To configure the TCP/IP parameters using the EasyLAN Wireless Admin utility
1. Open the WPAdmin utility and search for the EasyLAN Wireless on your network.
For help, see the previous procedure, “To search for the EasyLAN Wireless.”
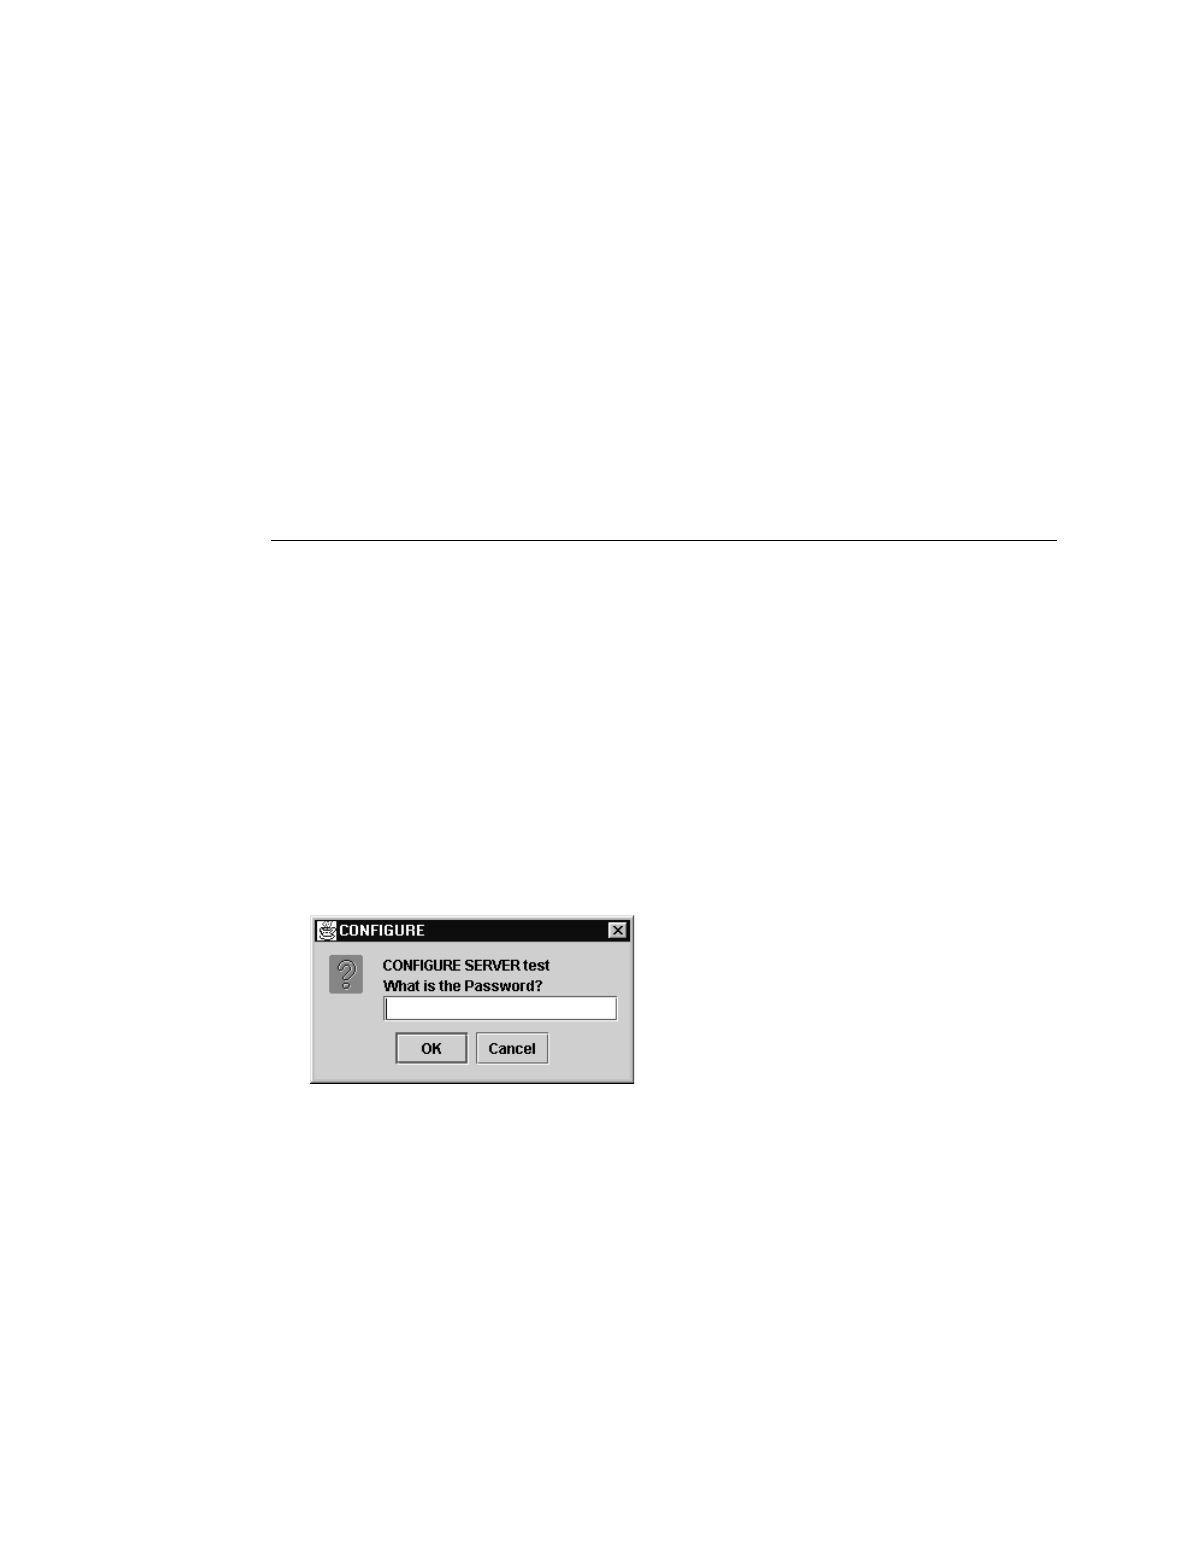
2. Select an EasyLAN Wireless and click Configure. The Configure Password dialog
box appears.
3. Enter the password for the EasyLAN Wireless. The default password is access. The
Configuration dialog box appears.
Configuring and Managing the EasyLAN Wireless
2-11
2
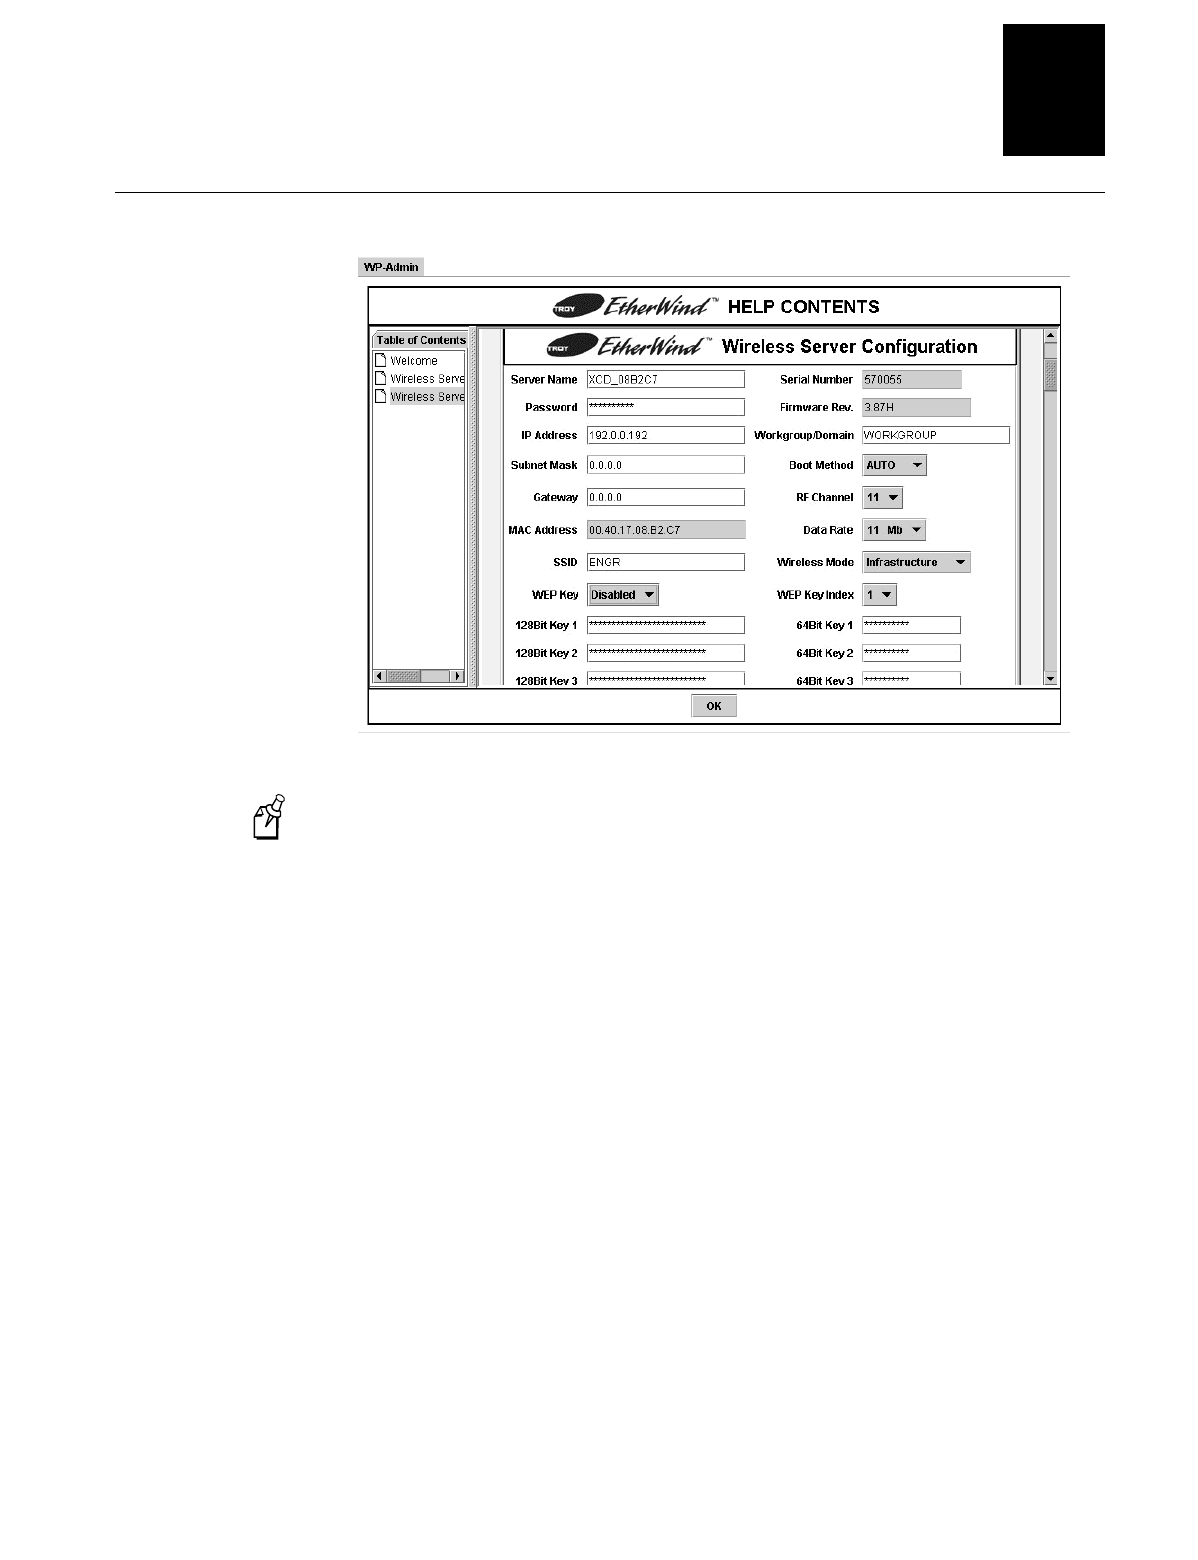
Configuration Dialog Box
Note: The Serial Number field, Firmware Rev. field, and MAC Address field are
read only fields. You cannot change the values of these fields.
4. In the Server Name field, enter the name for the EasyLAN Wireless. The default
name is XCD_xxxxxx where xxxxxx is the last six digits of the MAC address.
5. In the Password field, enter the password that you use to access this Configuration
dialog box.
6. In the IP Address field, enter the IP address for the EasyLAN Wireless in the form
n.n.n.n where n is a number from 0 to 255.
7. In the Workgroup/Domain field, enter the Microsoft Workgroup or Domain that
prints to this printer. If your network uses NetBIOS or NetBEUI, enter the name of
the PC that prints to this printer.
8. In the Subnet Mask field, enter the subnet mask that the EasyLAN Wireless
communicates in using the form n.n.n.n where n is a number from 0 to 255.
9. From the Boot Method dropdown list, select one of the following options:
•Auto sets the EasyLAN Wireless to try to get an IP address using DHCP,
BOOTP, and RARP. If it cannot get an IP address using these methods, Auto
changes to Static.
•DHCP sets the EasyLAN Wireless to use the dynamic host configuration
protocol to get an IP address.

EasyLAN Wireless User’s Manual
2-12
•BOOTP sets the EasyLAN Wireless to use boot protocol to get an IP address.
•RARP sets the EasyLAN Wireless to use reverse address resolution protocol to
get an IP address.
•Static sets the EasyLAN Wireless to use the IP address set in the IP Address
field whenever it boots.
10. In the Gateway field, enter the address for the gateway or router that the EasyLAN
Wireless communicates through to other subnets using the form n.n.n.n where n is a
number from 0 to 255.
11. From the Data Rate dropdown list, select the throughput speed for the Ethernet
connection (1, 2, 5.5, or 11 Mbps).
12. Click OK to accept your changes and return to the Search screen.
Click Cancel to reject your changes and return to the Search screen.
Note: If you are having trouble configuring an EasyLAN Wireless, click Cancel in the
Configuration screen. In the Search screen, click Clear to clear the list of print servers,
and start a new search. For help searching for the EasyLAN Wireless, see “To search
for the EasyLAN Wireless” earlier in this chapter.
For configuring the rest of the parameters in the Configuration screen, see “Using the
EasyLAN Wireless Admin Utility” in the next section.
Configuring the Radio Parameters
You can use the Web browser interface or the EasyLAN Wireless Admin utility to
configure the following radio parameters:
•Channel
•SSID
•Mode
•Speed
•WEP
Configuring and Managing the EasyLAN Wireless
2-13
2
Using the Web Browser Interface
You need to open the Web browser interface before you can use it. For help, see “To
open the Web browser interface” earlier in this chapter.
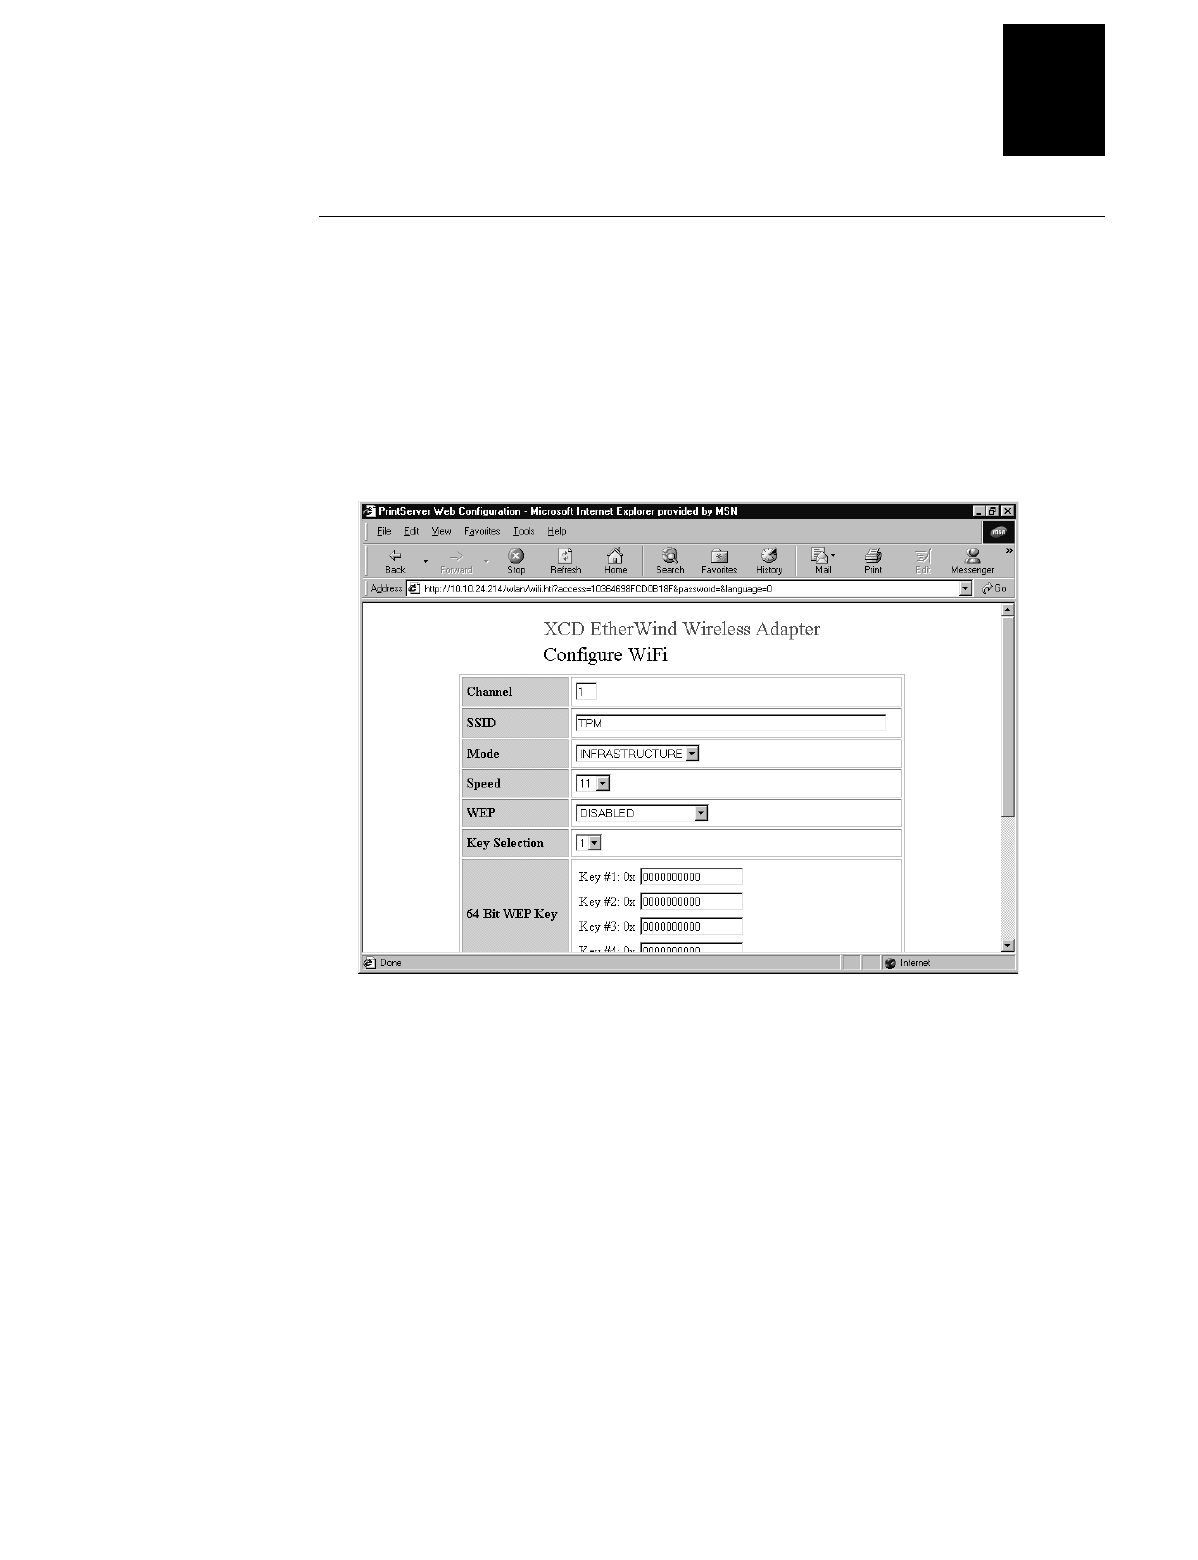
To configure the radio parameters using the Web browser interface
1. From the Configuration and Management page, click Configure Radio. The
Configure Radio page appears. For help opening the Configuration and
Management page, see “To open the Web browser interface” earlier in this chapter.
2. In the Channel field, enter a channel number from 1 to 11, or enter 0 to have the
system automatically select the proper channel.
3. In the SSID field, enter the SSID for the EasyLAN Wireless.
4. In the Mode field, select the mode your network is using to communicate:
•Choose Auto mode to have the EasyLAN Wireless select the appropriate mode
based on what network activity is happening at the time.
•Choose Pseudo Ad-hoc mode when your network has some stations without
access points.
•Choose Ad-hoc (802.11) mode when all of the stations on the network are IEEE
802.11 compliant.
•Choose Infrastructure mode when all data is being passed through a central
access point.
EasyLAN Wireless User’s Manual
2-14
5. In the Speed field, select the speed of your network: 1, 2, 5.5, or 11 Mbps.
6. In the WEP field, select the WEP security your network is using: disabled, 64-bit
encryption, or 128-bit encryption.
7. In the Key Selection field, select the WEP key your network is using: 1, 2, 3, or 4.
8. In the 64 Bit WEP Key fields or the 128 Bit WEP Key fields, enter the hexadecimal
digits for each key: 10 digits for 64-bit encryption and 26 digits for 128-bit
encryption.
9. Click Submit. A page appears letting you know that your changes were successful.
10. Click OK to return to the Configuration and Management page.
Using the EasyLAN Wireless Admin Utility
Before you can configure the radio parameters using the EasyLAN Wireless Admin
utility, you need to install the utility and search for the EasyLAN Wireless. For help, see
“To install the EasyLAN Wireless Admin Utility” and “To search for the EasyLAN
Wireless” earlier in this chapter.
To configure the radio parameters using the EasyLAN Wireless Admin utility
1. Open the WPAdmin utility and search for the EasyLAN Wireless on your network.
For help, see “To search for the EasyLAN Wireless” earlier in this chapter.
2. Select an EasyLAN Wireless and click Configure. The Configure Server Password
dialog box appears.
3. Enter the password for the EasyLAN Wireless. The default password is access. The
Configuration dialog box appears.

Configuring and Managing the EasyLAN Wireless
2-15
2
Configuration Dialog Box
Note: The Serial Number field, Firmware Rev. field, and MAC Address field are
read only fields. You cannot change the values of these fields.
4. In the Server Name field, enter the name for the EasyLAN Wireless. The default
name is XCD_xxxxxx where xxxxxx is the last six digits of the MAC address.
5. In the Password field, enter the password that you use to access this Configuration
dialog box.
6. From the RF Channel dropdown list, select the wireless channel (0 to 11) the
EasyLAN Wireless uses to communicate.
7. In the SSID field, enter the service set identifier for the subnetwork.
8. From the Wireless Mode dropdown list, select one of the following options:
•Auto. Select this mode to have the EasyLAN Wireless select the appropriate
mode based on what network activity is happening at the time.
•Pseudo Ad-hoc. Select this mode when your network has some stations without
access points.
•Ad-hoc. Select this mode when all of the stations on the network are IEEE
802.11 compliant.
•Infrastructure. Select this mode when all data is being passed through a central
access point.

EasyLAN Wireless User’s Manual
2-16
9. From the WEP Key dropdown list, select either disabled, 64-bit, or 128-bit wired
equivalent privacy. If you selected disabled, skip to Step 12.
10. From the WEP Key Index dropdown list, select the 64-bit or 128-bit key you are
using.
11. In the 64 Bit Key fields or the 128 Bit Key fields, enter the hexadecimal digits for
each key: 10 digits for 64-bit encryption and 26 digits for 128-bit encryption.
12. Click OK to accept your changes and return to the Search screen.
Click Cancel to reject your changes and return to the Search screen.
Note: If you are having trouble configuring an EasyLAN Wireless, click Cancel in the
Configuration screen. In the Search screen, click Clear to clear the list of print servers,
and start a new search. For help searching for the EasyLAN Wireless, see “To search
for the EasyLAN Wireless” earlier in this chapter.
To configure the other parameters in the Configuration screen, see “Using the EasyLAN
Wireless Admin Utility” in the previous section.
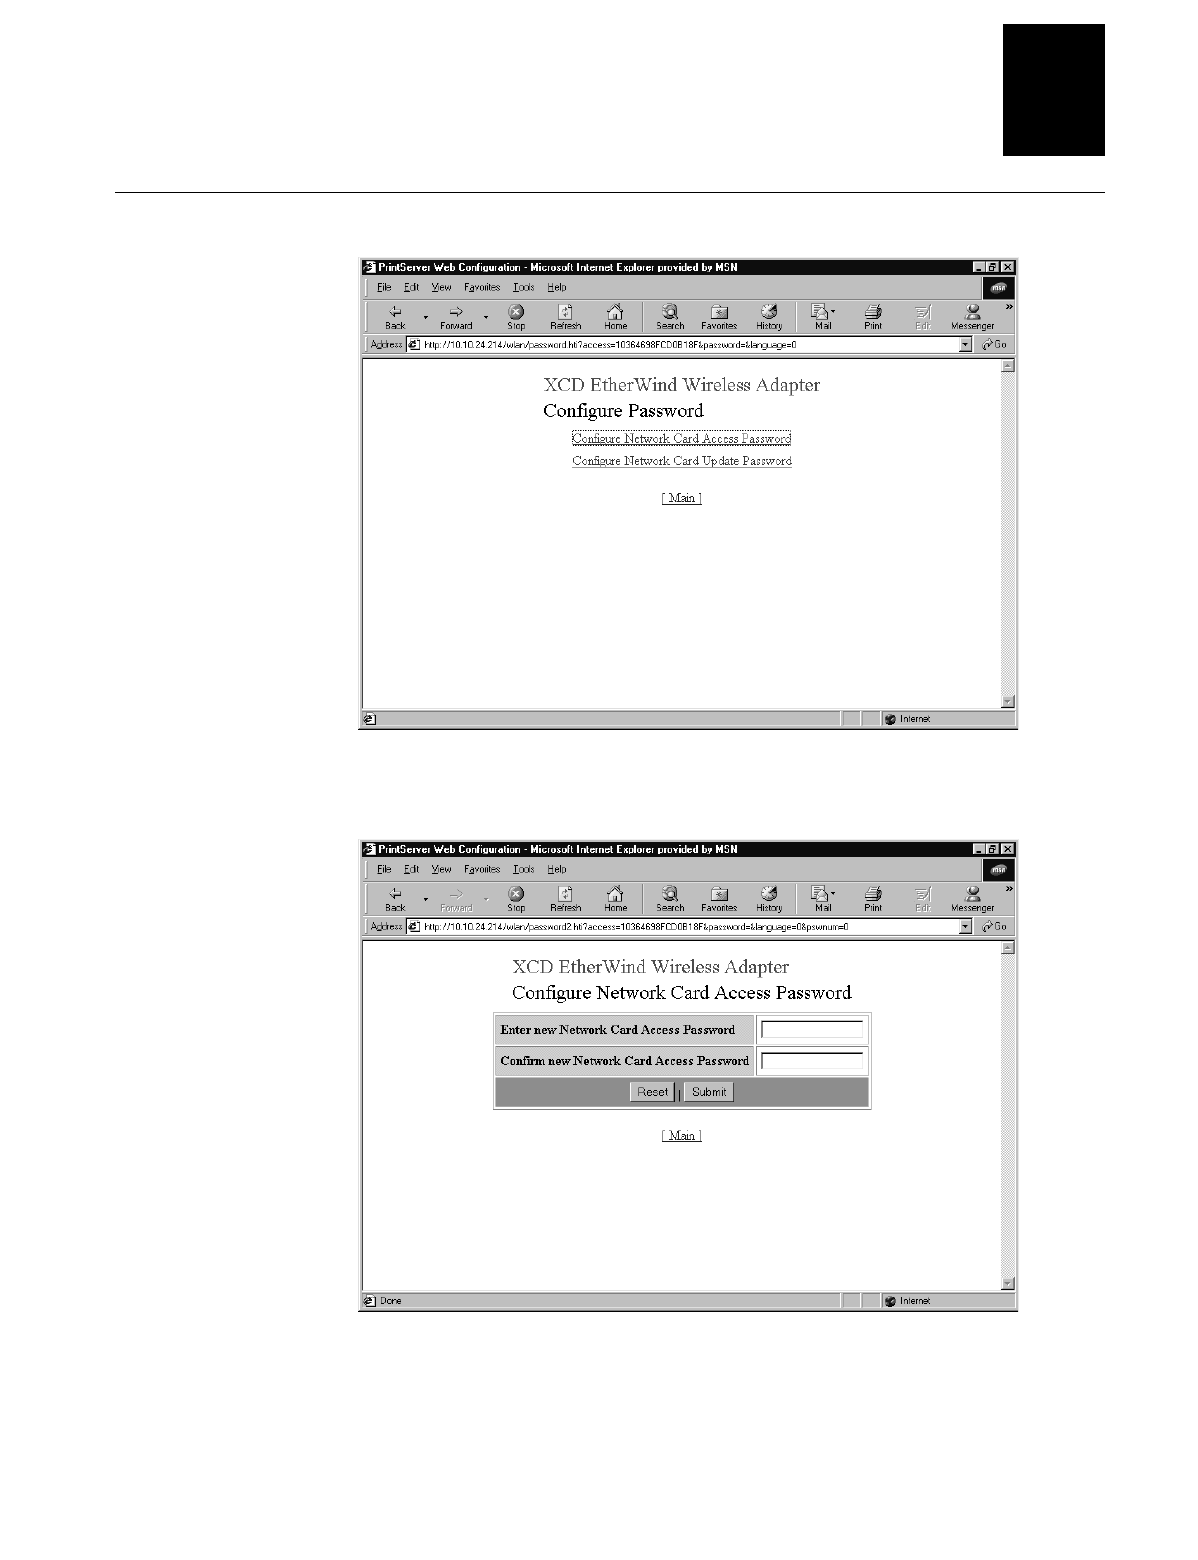
Configuring the Access and Update Passwords
Use the Web browser interface to configure the access and update passwords. The
default passwords are access. The access password is the password you use to get to the
Configuration page of the Web browser interface. The update password is the password
you use to reload the firmware.
To configure the access and update passwords
1. From the Configuration and Management page, click Configure Password. The
Configure Password page appears. For help opening the Configuration and
Management page, see “To open the Web browser interface” earlier in this chapter.
Configuring and Managing the EasyLAN Wireless
2-17
2
Configure Password Page
2. Click Configure Access Password. The Configure Access Password page appears.
3. Enter the access password in both fields.
EasyLAN Wireless User’s Manual
2-18
4. Click Submit. A page appears letting you know that your changes were successful.
5. Click OK to return to the Configuration and Management page.
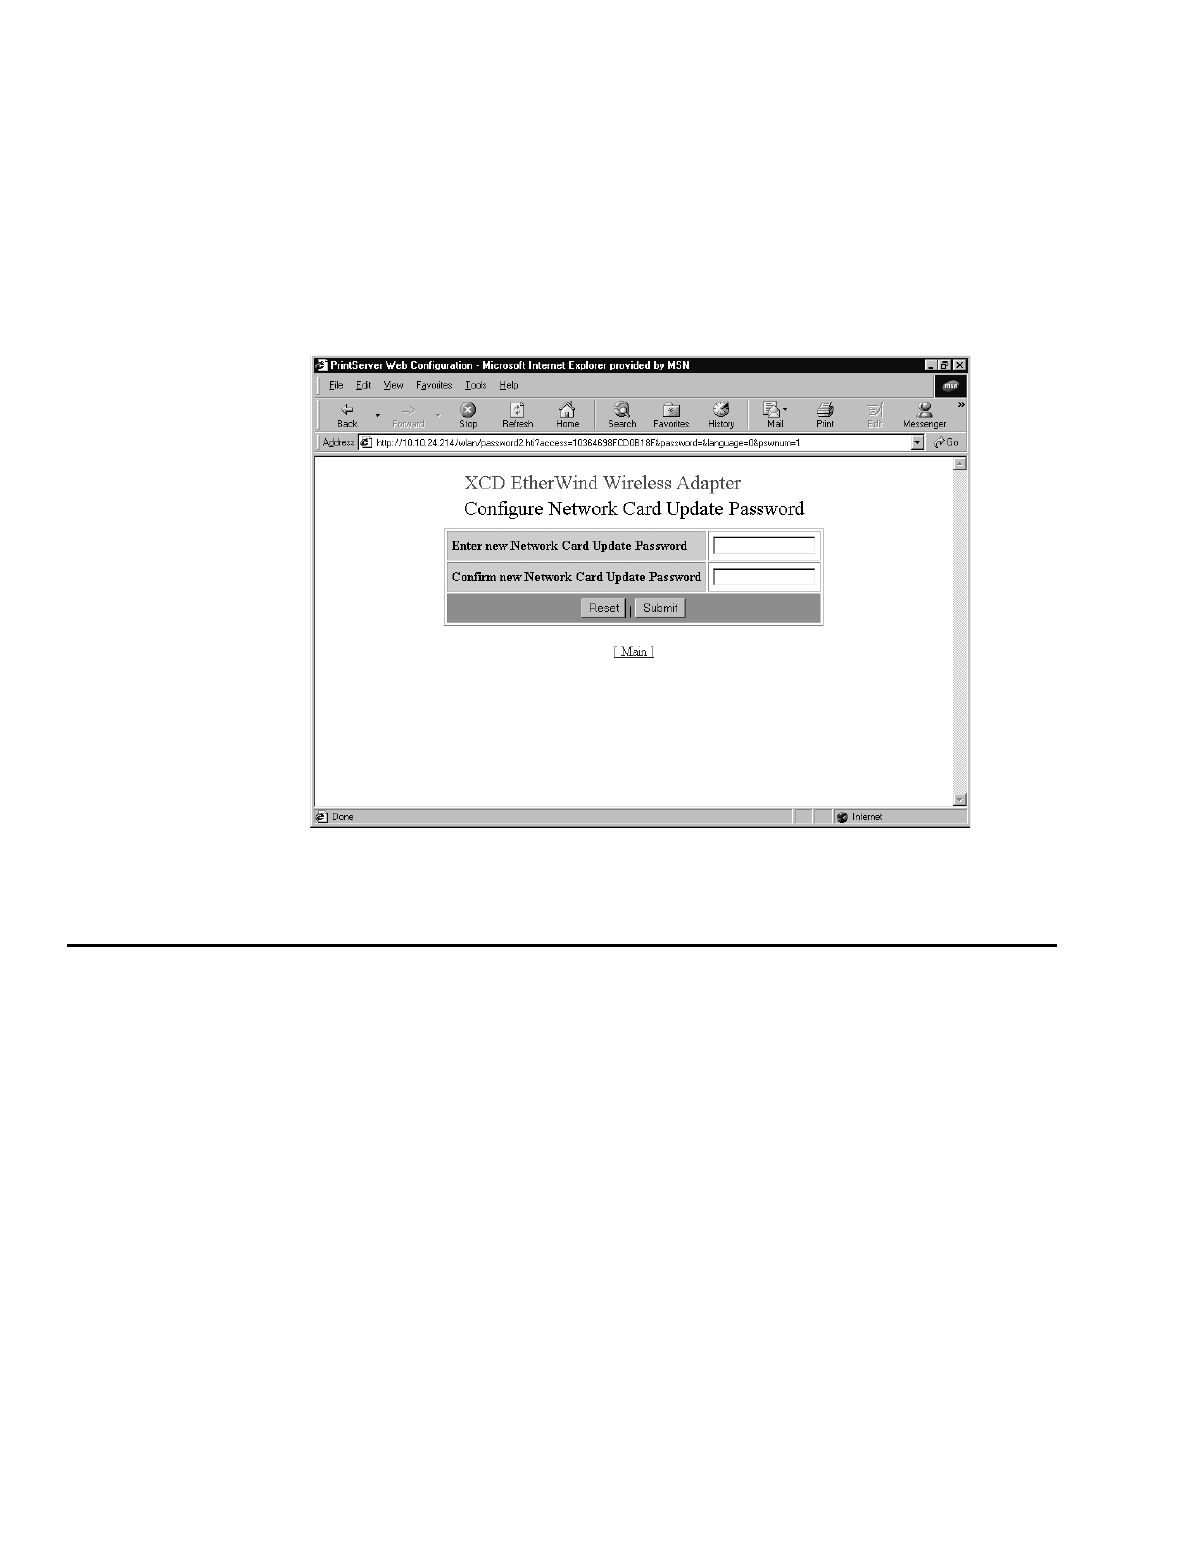
6. Repeat Steps 1 through 5 for the update password. The Configure Update Password
page is shown next.
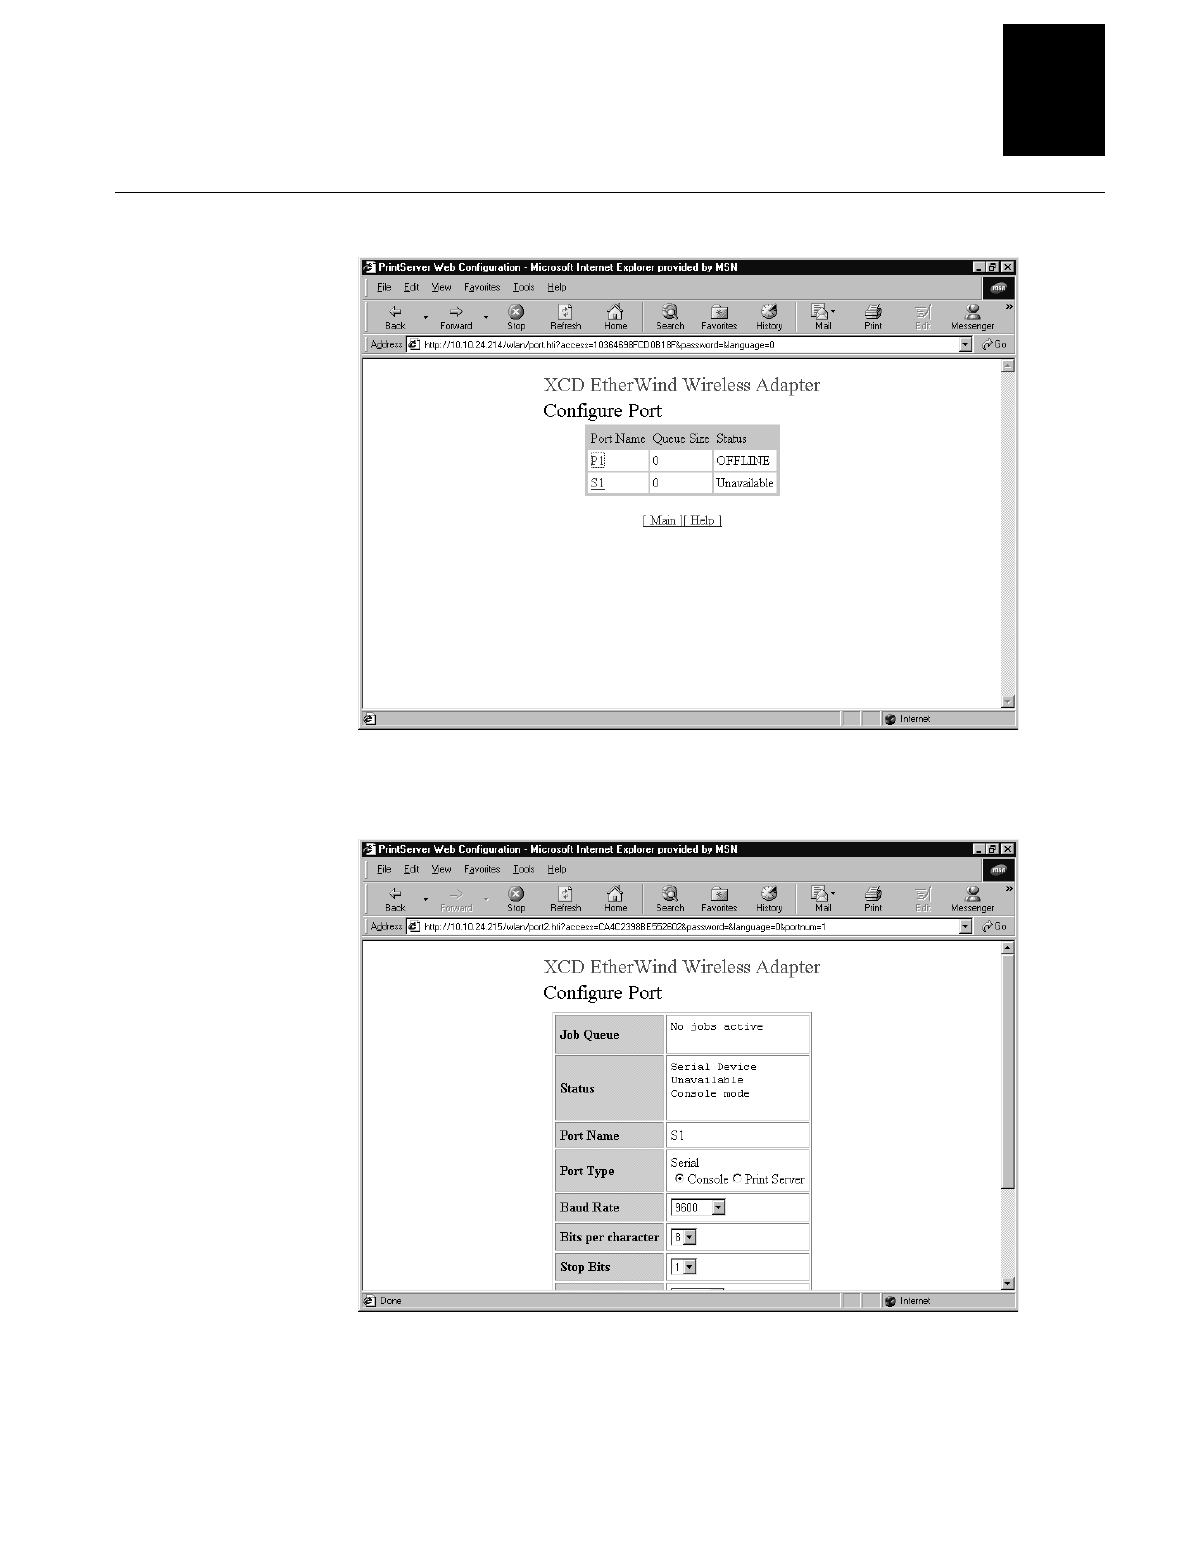
Configuring the Ports
Use the Web browser interface to configure the following port parameters:
•Output mode
•Bidirectional communication
•ECP
•Software I/O
To configure the ports
1. From the Configuration and Management page, click Configure Port. The
Configure Port page appears. For help opening the Configuration and Management
page, see “To open the Web browser interface” earlier in this chapter.
Configuring and Managing the EasyLAN Wireless
2-19
2
Configure Port Page
2. Click the port name for the port you want to configure. The following page appears.
3. Read the first three rows to find out what jobs are in the port, the status of the port,
and the port name.

EasyLAN Wireless User’s Manual
2-20
4. In the Port Type row, select Console to send console commands to the EasyLAN
Wireless through the serial port, or select Print Server to print to the EasyLAN
Wireless.
5. In the Baud Rate row, select the baud rate for the port.
6. In the Bits per character row, select 7 or 8 bits.
7. In the Stop Bits row, select 1 or 2 stop bits.
8. In the Parity row, select None, Odd, Even, Mark, or Space.
9. In the Flow Control row, select None, XON/XOFF, or RTS/CTS.
10. Click Submit. A page appears letting you know that your changes were successful.
11. Click OK to return to the Configuration and Management page.
Configuring the Port Services
Use the Web browser interface to configure port services.
If you clicked on a service name in a network parameter page, such as Configure
Netware, go to Step 3.
To configure the port services
1. From the Configuration and Management page, click Configure Services. The
Configure Service screen appears. For help opening the Configuration and
Management page, see “To open the Web browser interface” earlier in this chapter.
Configuring and Managing the EasyLAN Wireless
2-21
2
2. Click the service name for the service you want to configure. The following page
appears.
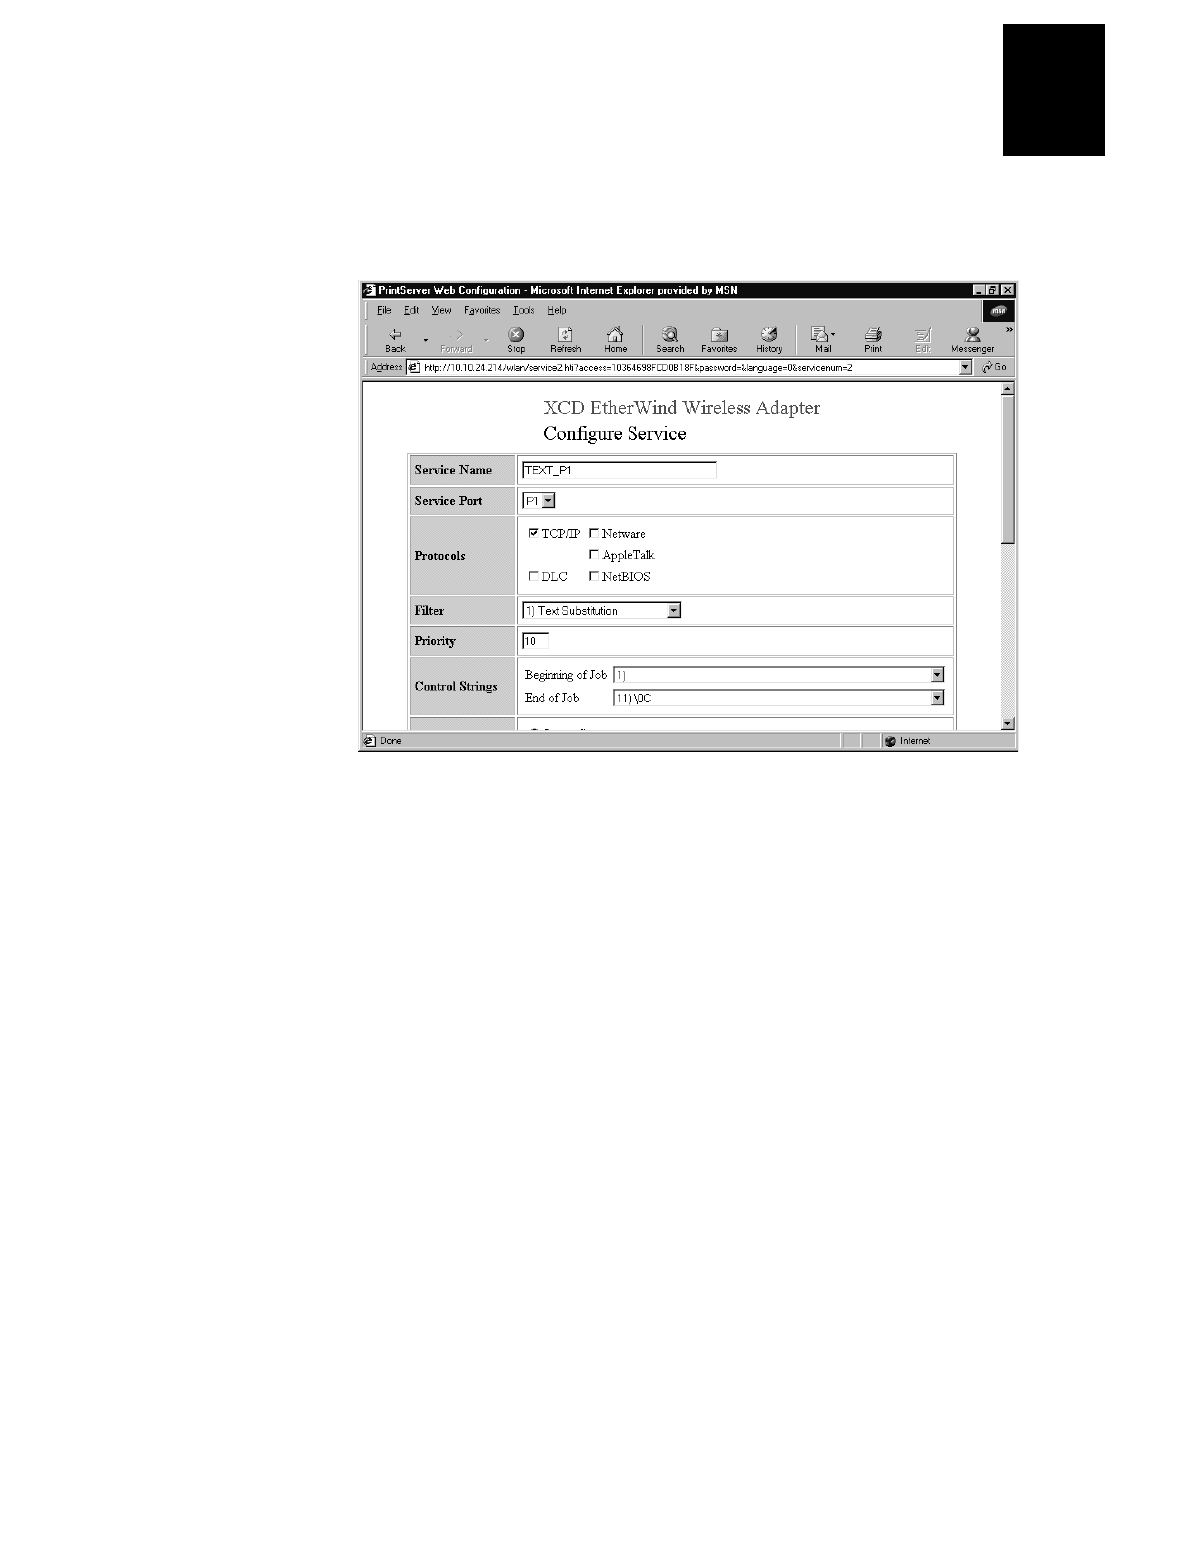
3. In the Service Name row, enter the name for the service.
4. In the Service Port row, select the port the service runs on.
5. In the Protocols row, choose the protocols the service uses to communicate.
6. In the Filter row, select the data filter the service uses:
•0, no filter: data passes unmodified
•1, text substitution: default is CRLF for LF
•2, not used
•3, converts normal text to PostScript
•4, converts output data to PostScript Tagged Binary
7. In the Priority row, enter the priority. What is the range of valid values for this
field?
8. In the Control Strings row, select the data strings for the beginning of a job and end
of a job.
9. In the NetWare row, check the Queue Server radio button to configure the
EasyLAN Wireless to fetch print jobs directly from the Netware print queues

EasyLAN Wireless User’s Manual
2-22
10. In the NetWare row in the NDS Tree field, enter the name of the organizational tree
and enter the context for your NetWare network. To configure the EasyLAN
Wireless for Netware Directory Services, check the Queue Server radio button and
enter an NDS tree name and context for the EasyLAN Wireless. To disable NDS
support, leave the NDS Tree field and the NDS Context field blank.
11. In the NetWare row in the NDS Context field, enter the organizational unit(s) that
you configured for the EasyLAN Wireless using NWAdmin or PCONSOLE. To
disable NDS support, leave the NDS Tree field and the NDS Context field blank.
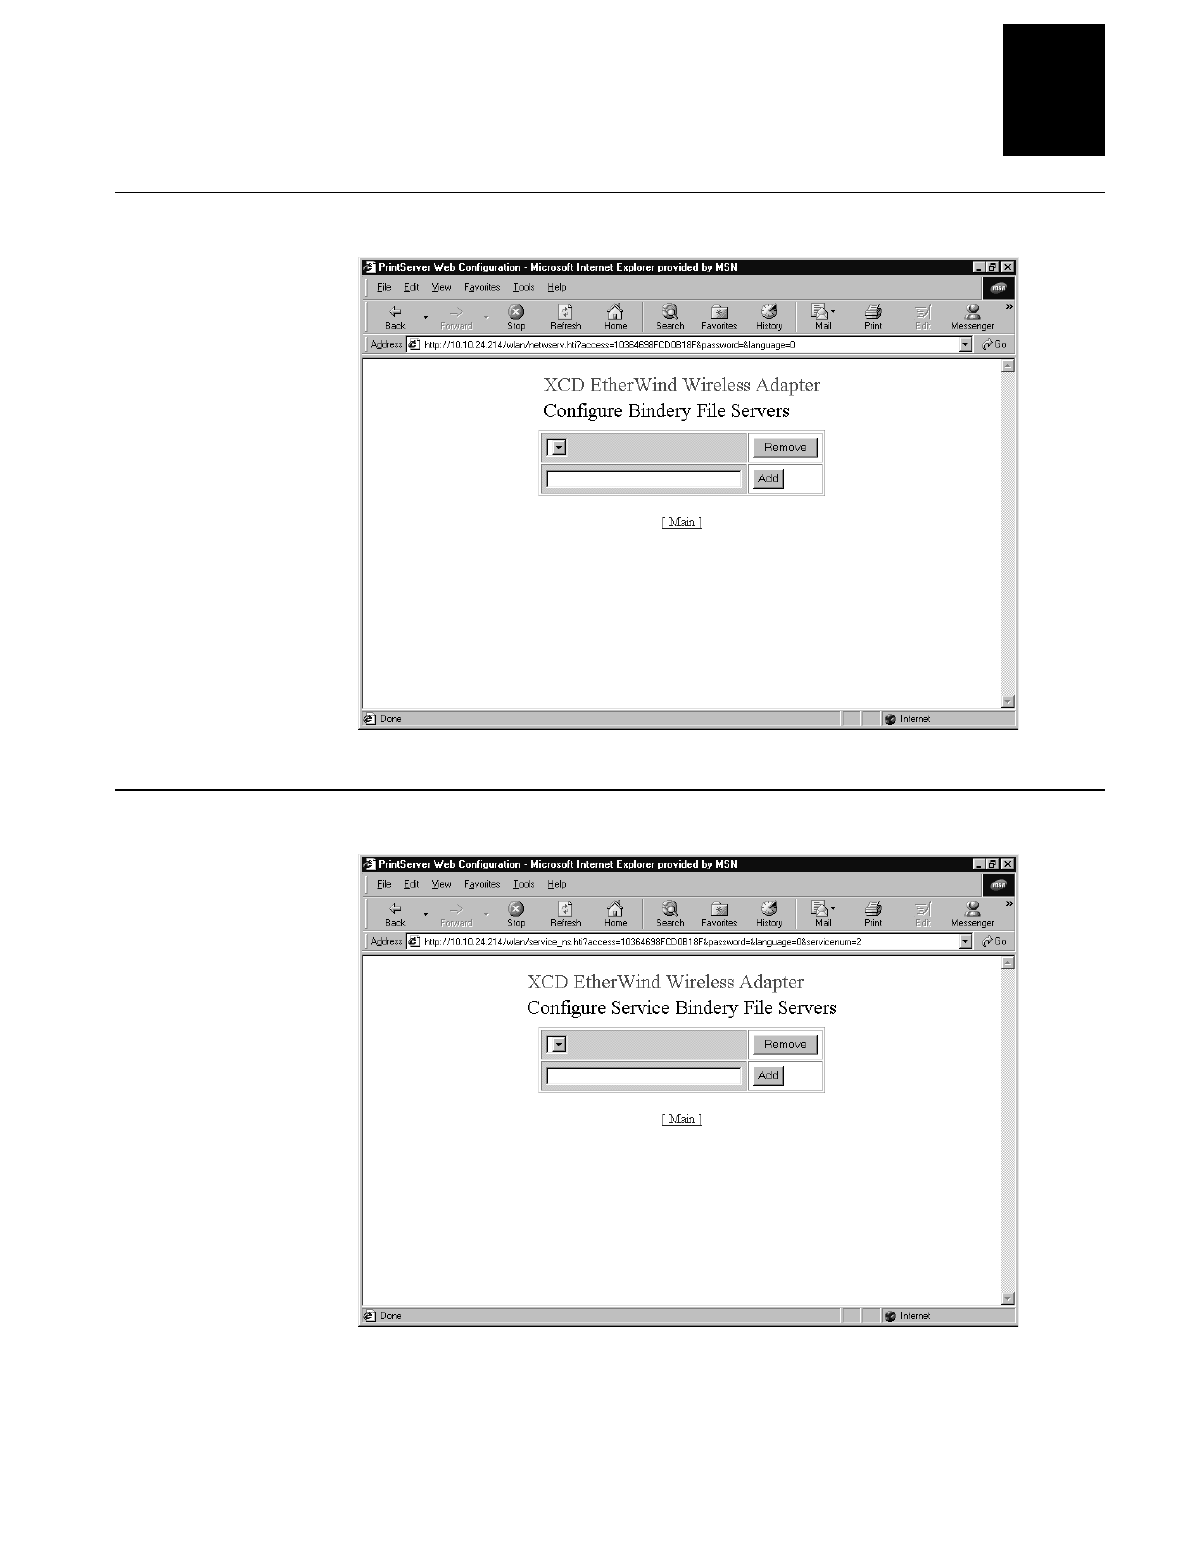
12. To configure either bindery file servers or service bindery file servers, click either
Configure Bindery File Servers or Configure Service Bindery File Servers. For
help, see the next procedure, “To configure bindery file servers and service bindery
file servers.”
13. In the NetWare row, check the Remote Printer radio button if you have a NetWare
print server loaded on the file server or workstation.
14. In the NetWare row in the Printer Number field, enter the number for the printer.
What is the range of valid values for this field? And what does this number
mean?
15. In the NetWare row in the Printer Server field, enter the name of the NetWare print
server. Do you need to add path information or other context?
16. In the Raw TCP Port row, enter the TCP port to be used with this service. What is
the range of valid values for this field?
17. In the Service Options row, check the Bi-Directional radio button to have the
service send data back from the printer to the network. Normally you should not
need to change this.
18. In the Service Options row, check the Queued (TCP) radio button with the Raw
TCP Port defined to have the EasyLAN Wireless queue jobs sent to that port. If not
checked, the EasyLAN Wireless rejects jobs if the EasyLAN Wireless is currently
busy with another job
19. Click Submit. A page appears letting you know that your changes were successful.
20. Click OK to return to the Configuration and Management page.
To configure bindery file servers service bindery file servers
1. In the Active Servers and Queues row of the Configure NetWare page or the
NetWare row of the Configure Services page, click Configure Bindery File Servers
or click Configure Service Bindery File Servers. The Configure Bindery File
Servers page or Configure Service Bindery File Servers page appears.
Configuring and Managing the EasyLAN Wireless
2-23
2
Configure Bindery File Servers Page
Configure Service Bindery File Servers Page

EasyLAN Wireless User’s Manual
2-24
2. If you want to remove a server, select a server from the dropdown list and click
Remove.
3. If you want to add a server, enter a server number in the field and click Add.
4. Click Back in your browser toolbar to return to the previous page.
Or click Main to return to the Configuration and Management page.
Configuring for the NetWare Network
This section explains how to use the Web browser interface to configure NetWare
parameters and how to configure additional queues using the Novell NWAdmin utility.
Note: Intermec recommends you use the Novell 32-bit client on your Windows PC
instead of the Microsoft NetWare client because it allows direct configuration of print
queues without the need for a Novell utility like NWAdmin or PCONSOLE.
The EasyLAN Wireless automatically makes itself known on a NetWare network. The
default NetWare Print Server name is XCD_xxxxxx_P1 where xxxxxx is the last six
digits of the MAC address. Note that the NetWare Print Server name is used for either
NDS or bindery mode configuration.
If you are configuring the first port with the Web browser interface, the NDS Printer
Name for this port is automatically assigned as XCD_xxxxxx_P1 where xxxxxx is the
last six digits of the MAC address. If you are using an alternate configuration method
like NWAdmin, you may assign any unique name for the printer. For help configuring
the first port, see “Configuring the Ports” earlier in this chapter.
You extensively use the Print Server and Printer names while configuring. Note that
these names are actually the names of the EasyLAN Wireless NetWare services. If
desired, you can change the default names using the Web browser interface. For help,
see “Configuring the Port Services” earlier in this chapter.
Configuring and Managing the EasyLAN Wireless
2-25
2
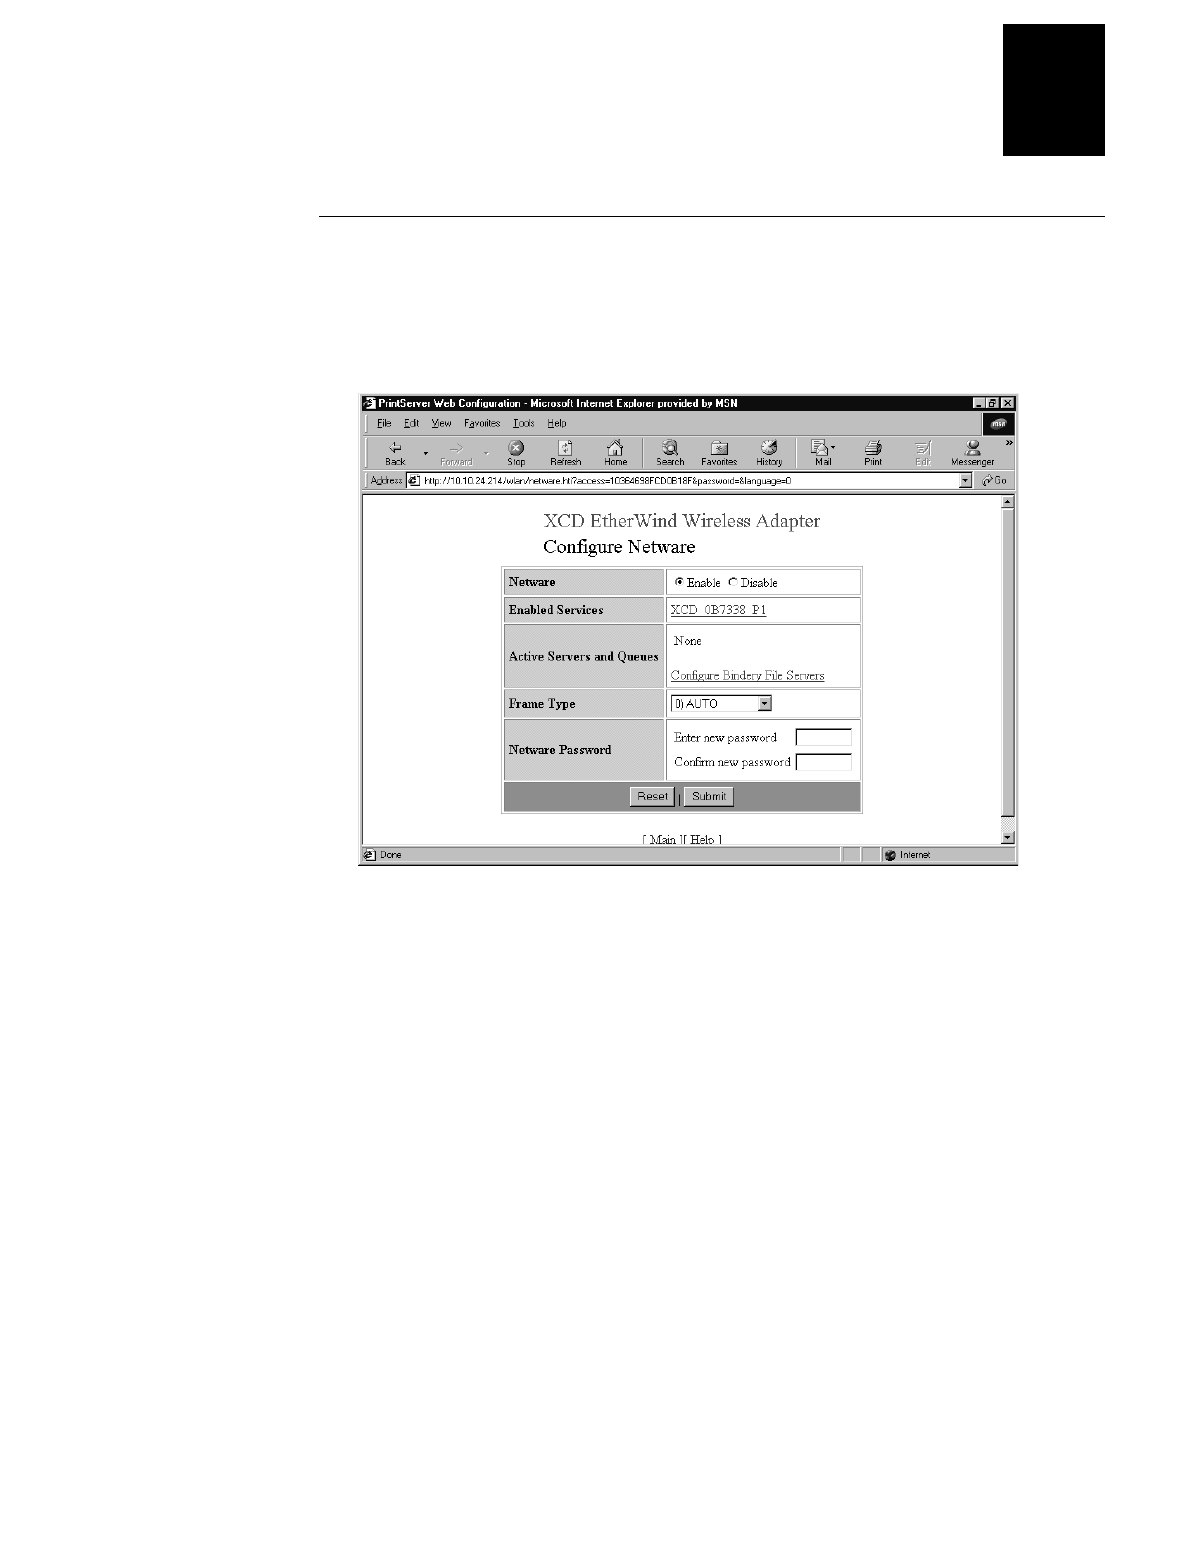
Configuring the NetWare Parameters
1. From the Configuration and Management page, click Configure NetWare. The
Configure NetWare screen appears. For help opening the Configuration and
Management page, see “To open the Web browser interface” earlier in this section.
2. In the Netware row, select Enable or Disable.
3. To configure services for the port shown in the Enabled Services row, click the link
for the port. For help, see “Configuring Port Services” later in this chapter.
4. Read the information in the Active Servers and Queues row to find out what servers
and queues are enabled.
5. To configure bindery file servers, click Configure Bindery File Servers. For help,
see “To configure bindery file servers and service bindery file servers” in the
previous section.
6. In the Frame Type field, select the frame type: Auto, 802.3, Ethernet II, 802.2, or
SNAP.
7. In the Netware Password row, enter the password the EasyLAN Wireless uses to
communicate with the file server in the Enter new password field and Confirm new
password field. To disable the password, enter a single space.
8. Click Submit. A page appears letting you know that your changes were successful.
9. Click OK to return to the Configuration and Management page.

EasyLAN Wireless User’s Manual
2-26
Configuring Additional Queues
If you want to configure additional queues, you must use the Novell NWAdmin utility
(this program is usually found in the Public directory on the NetWare file server).
To configure additional queues and ports
1. Start the NWAdmin utility and make sure you are in the right context. (If not, select
NDS Browser from the Tools menu and then browse for the desired context.)
2. Select the container where you want the print queue to reside.
3. From the Tools menu, select Print Services Quick Setup.
4. Browse for the NetWare Print Server by clicking on the button next to the Print
Server Name window.
5. Enter the name of the NDS Printer for the desired port in the Name box (for
example, XCD_04ECBA_P1).
6. Leave the Type box at the default Parallel setting.
7. Select the desired banner type.
8. Enter any desired name for the print queue.
9. If necessary, browse for the volume.
10. Click Create to create the print queue. You are now ready to use the queue from a
NetWare workstation.
Configuring for NetBIOS
Use the Web browser interface to configure for NetBIOS.
To configure for NetBIOS
1. From the Configuration and Management page, click Configure NetBIOS. The
Configure NetBIOS page appears. For help opening the Configuration and
Management page, see “To open the Web browser interface” earlier in this chapter.
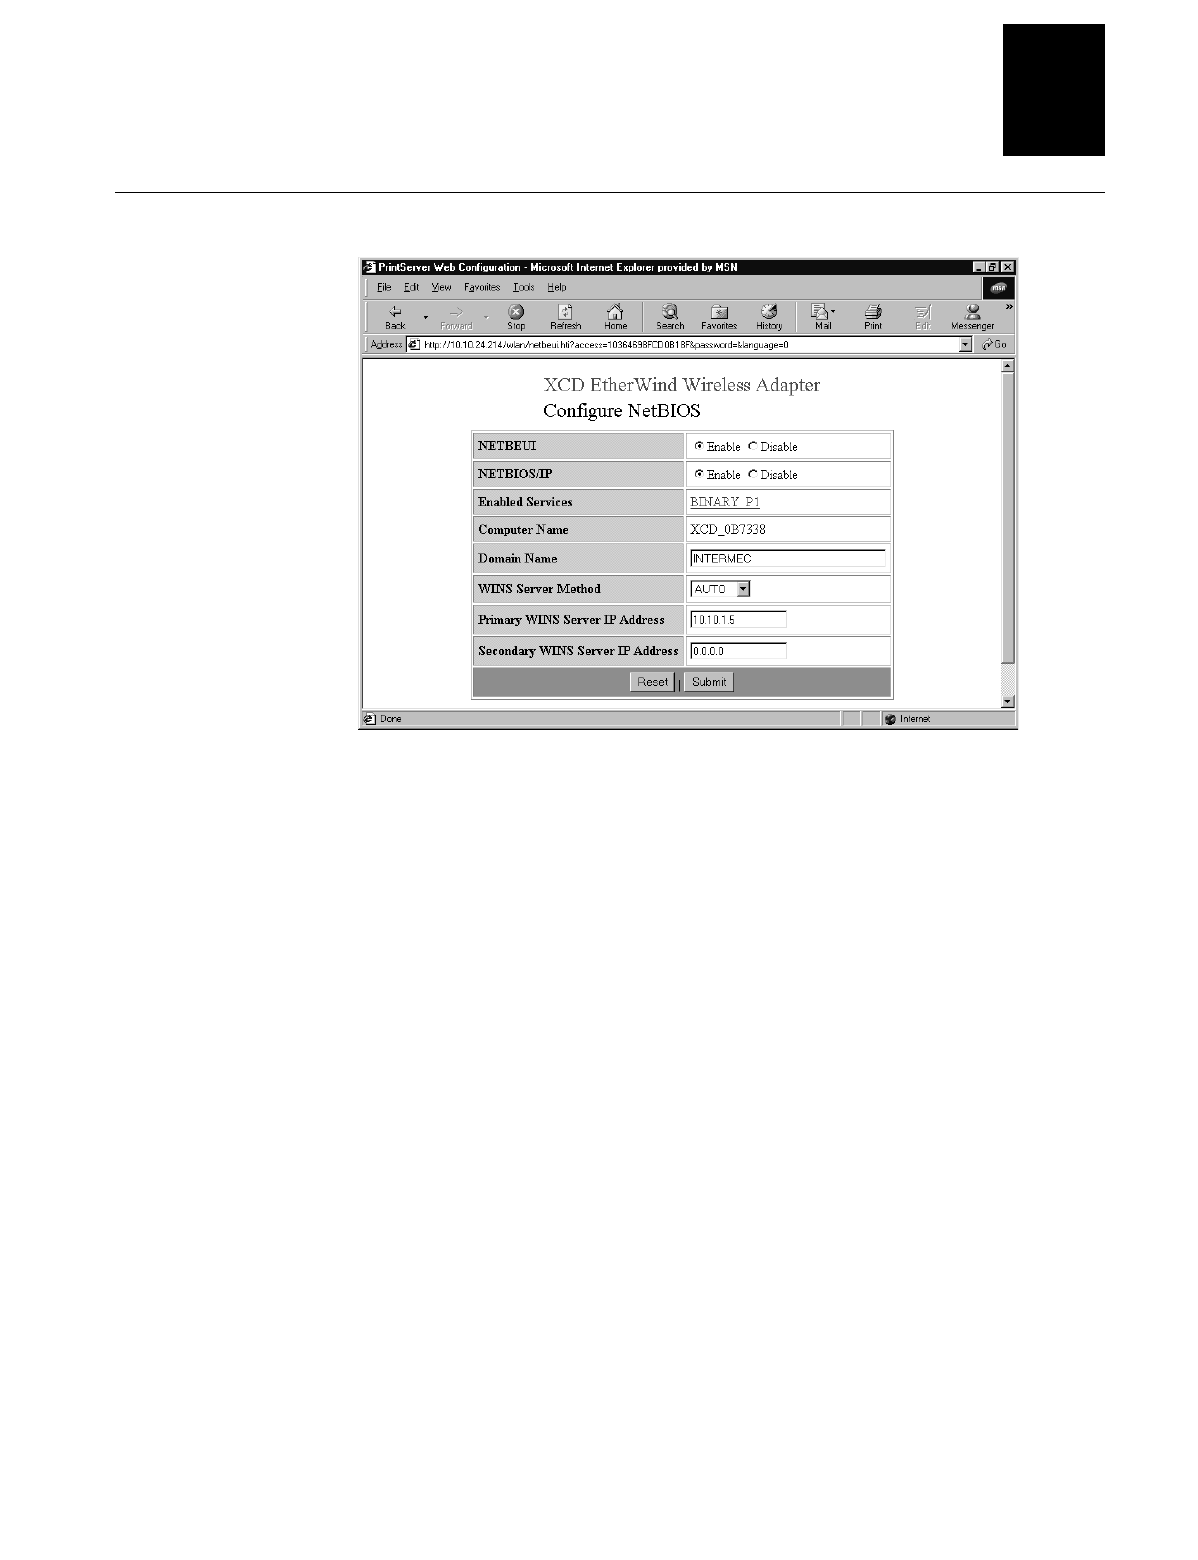
Configuring and Managing the EasyLAN Wireless
2-27
2
Configure NetBIOS Page
2. In the NETBEUI row, select Enable to enable communication over the LLC
protocol.
3. In the NETBIOS/IP row, select Enable to enable communication over the Internet
protocol.
4. In the Enabled Services row, click the displayed port to configure the services for
that port. For help, see “Configuring Port Services” later in this chapter.
5. Read the name of the EasyLAN Wireless from the Computer Name row.
6. In the Domain Name row, enter the name of the domain that contains the PCs that
will print to this printer.
7. In the WINS Server Method row, select the server method:
•Set to Auto to use DHCP to set the primary and secondary WINS server IP
addresses. To use DHCP, you must set the boot method in the Configure
TCP/IP page to either Auto or DHCP.
•Set to Static to always use the values you enter in the Primary WINS Server IP
Address row and Secondary WINS Server IP Address row. To disable WINS
registration, select Static and set the primary and secondary WINS server IP
addresses to 0.0.0.0.
8. In the Primary WINS Server IP Address row, enter the IP address for the primary
WINS server.
EasyLAN Wireless User’s Manual
2-28
9. In the Secondary WINS Server IP Address row, enter the IP address for the optional
secondary WINS server.
10. Click Submit. A page appears letting you know that your changes were successful.
11. Click OK to return to the Configuration and Management page.
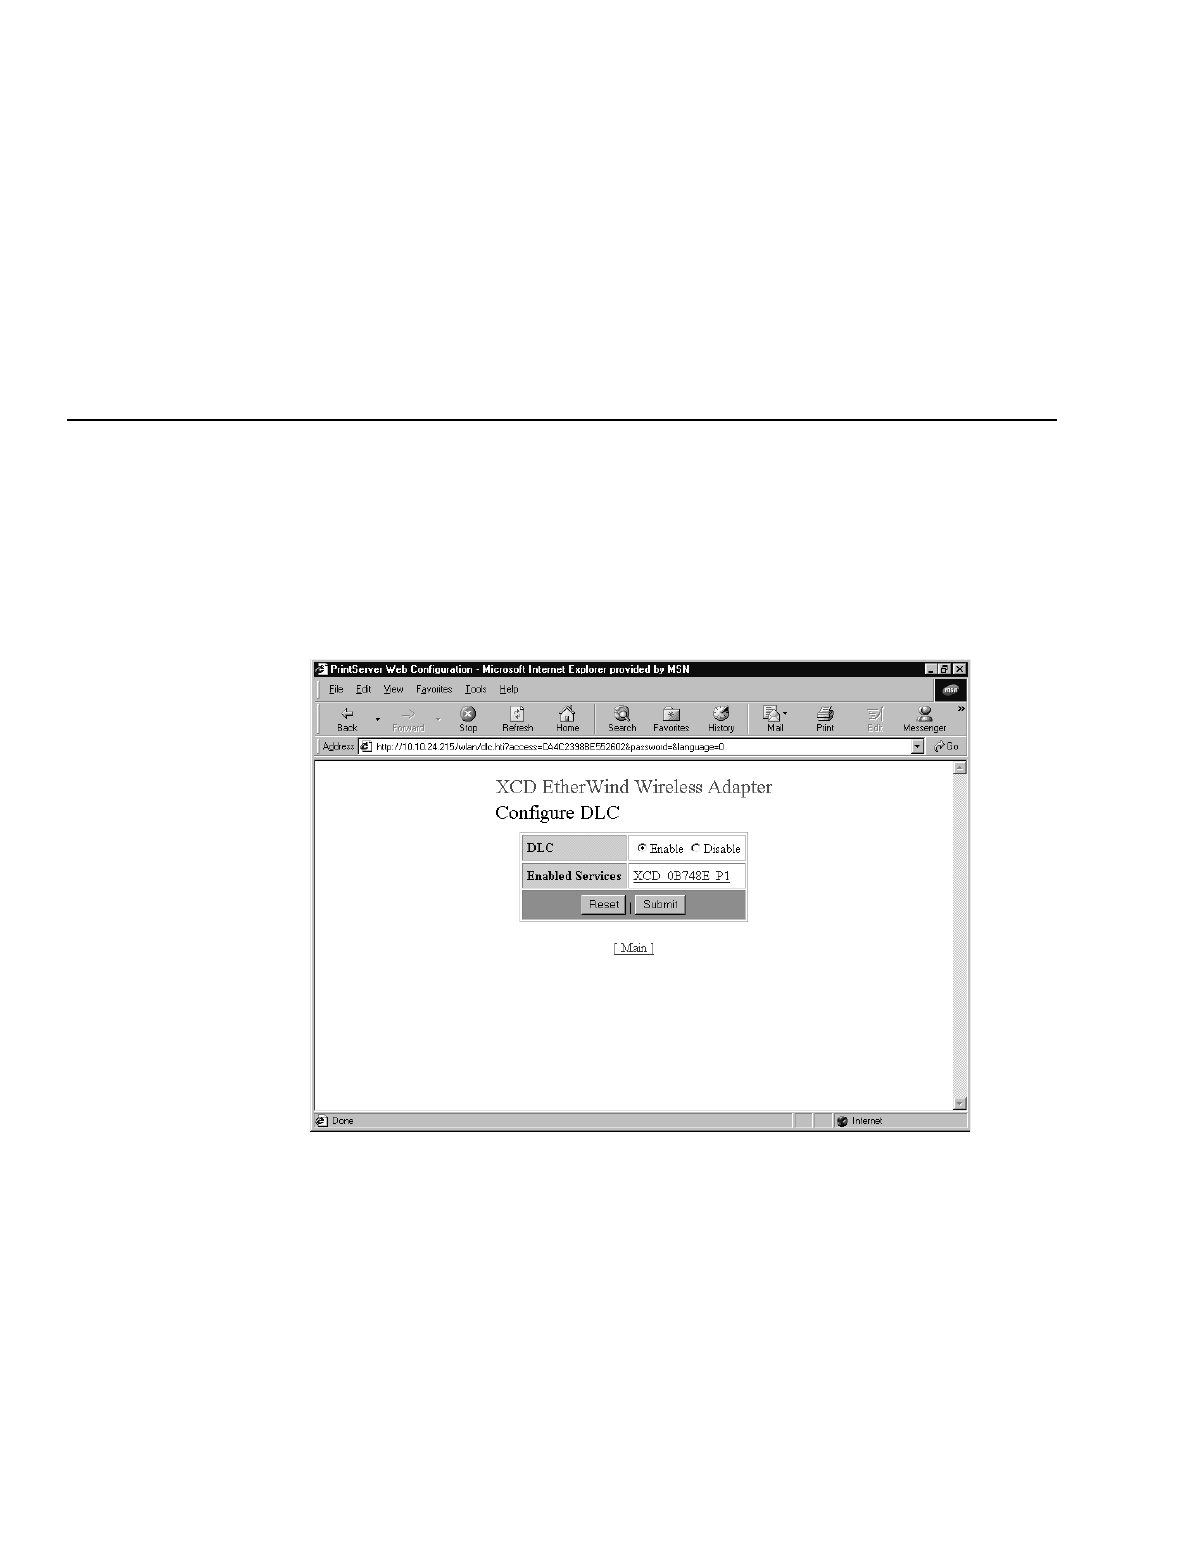
Configuring the DLC Parameters
Use the Web browser interface to configure the DLC parameters.
To configure the DLC parameters
1. From the Configuration and Management page, click Configure DLC. The
Configure DLC page appears. For help opening the Configuration and Management
page, see “To open the Web browser interface” earlier in this chapter.
2. In the DLC row, select Enable or Disable.
3. In the Enabled Services row, click the port you want to configure services for. For
help, see “Configuring Port Services” earlier in this chapter.
4. Click Submit. A page appears letting you know that your changes were successful.
5. Click OK to return to the Configuration and Management page.

Configuring and Managing the EasyLAN Wireless
2-29
2
Configuring for UNIX
The EasyLAN Wireless appears to the network as a UNIX host computer with a unique
IP address running the line printer daemon (lpd) protocol. As a result, any host
computer that supports the Berkeley remote-LPR command can spool jobs to the
EasyLAN Wireless without the need for any special software on the host computer.
Note: Before you configure a UNIX print queue, the EasyLAN Wireless must have a
valid IP address.
Configuring for a Berkeley UNIX Host
Berkeley UNIX host computers include Linux, Digital Equipment Corporation Digital
UNIX, OSF/1, and ULTRIX; Compaq Tru64 UNIX; SunOS (not Solaris), SCO UNIX;
and many others. Sun Solaris, HP/UX, and IBM AIX users should skip to the
appropriate sections later in this chapter.
Note: Do not use the Linux X-Windows graphical user interface printer configuration
utility because it does not work with the EasyLAN Wireless. Instead, Linux users
should follow the configuration steps listed in this section.
Note: SCO UNIX users should use the ripconf command to create a printer and
automatically configure the /etc/printcap file (you still need to edit the /etc/hosts file).
Enter the EasyLAN Wireless service name (XCD_xxxxxx_P1 where xxxxxx is the last
six digits of the MAC address) as the name of the printer (refer to the EasyLAN
Wireless test label for the exact name of this service), and enter the name of the
EasyLAN Wireless that you assigned that you assigned in the /etc/hosts file as the
remote host name. Note the because this name must be unique for each printer, we
recommend using the XCD_xxxxxx_P1 service instead of the normal BINARY_P1
service.
To configure for a Berkeley UNIX host
1. Edit the /etc/hosts file (or equivalent local host table). For example:
192.189.207.33 xcdprinter
2. Edit the printcap file. For example:
LabelPrinter
:\
:lp=:\
: rm=
XCD
:\
:rp=
BINARY_P1
:\
:
sd
=/usr/spool/
LabelPrinter
:

EasyLAN Wireless User’s Manual
2-30
where:
LabelPrinter is the queue name.
XCD matches the name in the hosts file.
BINARY_P1 is the EasyLAN Wireless service name. Use TEXT_P1
instead of BINARY_P1 for text files.
sd is the spool directory.
3. Create the spool directory. The lpd spool directory is usually located in the
/usr/spool directory. To create a new spool directory, use the mkdir command. For
example:
mkdir /usr/spool/lpd/LabelPrinter
4. Print using the standard lpr command:
lpr –PLabelPrinter
filename
5. For AT&T based UNIX systems, such as SCO, use the standard lp command:
lp –dLabelPrinter
filename
Configuring for Sun Solaris
To use an EasyLAN Wireless with Sun Solaris, first use the Host Manager in the
Admintool utility to add the EasyLAN Wireless IP address and name to the /etc/hosts
file.
To use the Host Manager to add the EasyLAN Wireless IP address
1. Open Host Manager in the Admintool utility. For help, see the documentation for
your Sun Solaris system.
2. Click None – Use /etc files on host.
3. Click Apply.
4. Click Edit, and then click Add Host.
5. Enter the EasyLAN Wireless name as the Host Name (this name is anything you
want, but should not have an underscore (_) character in it).
6. Enter the IP address and MAC address of the EasyLAN Wireless (the MAC address
has the format aa:bb:cc:dd:ee:ff).
7. Click Add.
8. Close the Host Manager windows. Now you are ready to use the Printer Manager in
the Admintool utility.

Configuring and Managing the EasyLAN Wireless
2-31
2
To use the Printer Manager
1. Open the Printer Manager under Open Windows in the Admintool utility. For help,
see the documentation for your Sun Solaris system.
2. Select Edit.
3. Select Add.
4. Select Add Access to Remote Printer.
5. At the PrinterName prompt, type any desired name for the print queue.
6. At the Printer Server prompt, type
name
\!
servicename
where:
name matches the EasyLAN Wireless name as entered in the hosts table.
servicename is the print service name. For binary graphics files, use the service
BINARY_P1; for text files, use the service TEXT_P1.
7. Make sure that the Print Server OS is set to BSD (this is the default setting).
8. Select Add.
9. To print, use the standard lp command:
lp –dLabelPrinter
filename
Note: We recommend using the /etc/hosts file for the printer name rather than NIS or
other name services.
Due to a bug in the Sun lpd implementation on Solaris 2.4 and earlier releases, you may
encounter problems printing very long print jobs. The workaround is to configure the
EasyLAN Wireless as an HP JetDirect card using the HP JetAdmin for UNIX software.
Solaris print queues can also be configured from the UNIX shell using the lpadmin
command.
Configuring for HP/UX
1. For HP/UX 10.x, open the sam program to configure the EasyLAN Wireless.
2. When you get a list of options, select Printers and Plotters.
3. Select LP Spooler.
4. Select Printers and Plotters.
5. Select Actions, and then select Add Remote Printer/Plotter.
6. Enter any name as the Printer Name (the Printer Name is the name of the print
queue).

EasyLAN Wireless User’s Manual
2-32
7. Enter the IP address of the EasyLAN Wireless as the Remote System Name.
8. Enter the desired EasyLAN Wireless service name (BINARY_P1 for binary files or
TEXT_P1 for text files) as the Remote Printer Name.
9. Check the box next to Remote Printer is on BSD System.
10. If you choose to, accept the default values for the remaining items.
11. Click OK to configure the printer.
12. Print using the lp –d command with the EasyLAN Wireless name.
Note: The configuration for HP Distributed Print Services and for earlier versions of
HP/UX is slightly different.
You can also configure the EasyLAN Wireless as a JetDirect card using HP/UX. To do
this, you need the HP UNIX Host Printing Software (part of HP’s JetAdmin for UNIX).
Configuring for IBM AIX
1. Using the SMIT program, enter smit and select Devices.
2. Select Printer/plotter.
3. Select Manage remote printer subsystem.
4. Select Client services.
5. Select Remote printer queues.
6. Select Add a remote queue.
7. Enter the following remote queue settings:
•Name of queue to add (user selectable)
•Activate the queue (Yes)
•Destination host (EayLAN Wireless IP address; or if you have configured the
/etc/hosts file, use the name of the EasyLAN Wireless that you specified in that
file)
•Name of queue on remote printer (BINARY_P1 for binary files or TEXT_P1
for text files)
•Name of device to add (user selectable; for example, lp0)
8. Print using the lp –d command.

Configuring and Managing the EasyLAN Wireless
2-33
2
Note: The configuration for earlier versions of AIX is slightly different.
You can also configure the EasyLAN Wireless as a JetDirect card using AIX. To do
this, refer to your AIX documentation.
Configuring for Other Systems
You can use the EasyLAN Wireless with any computer system that supports either the
lpr/lpd protocol or the HP JetDirect card (the EasyLAN Wireless parallel port is port
9100 while the serial port is port 9101). Refer to your system’s documentation for
information on configuring lpr/lpd or JetDirect print queues.

blank

Managing the EasyLAN Wireless
3

blank
Managing the EasyLAN Wireless
3-3
3
This chapter explains how to manage the EasyLAN Wireless using the Web browser
interface and EasyLAN Wireless Admin utility.
Rebooting the EasyLAN Wireless
Use either the Web browser interface or the EasyLAN Wireless Admin utility to reboot
the EasyLAN Wireless.
Note: Only the EasyLAN Wireless reboots, not the entire printer.
Using the Web Browser Interface
Before you can use the Web browser interface, you need to open it.
To open the Web browser interface
1. Start your Web browser.
2. In the Address (Internet Explorer) or Go to (Netscape) line, enter the IP address for
the EasyLAN Wireless, and press Enter. The following page appears.
3. In the Print Server Access Password field, enter the password. The default password
is access.
4. Click Submit. The Configuration and Management page appears.
EasyLAN Wireless User’s Manual
3-4
Configuration and Management Page
You are now ready to manage the EasyLAN Wireless.
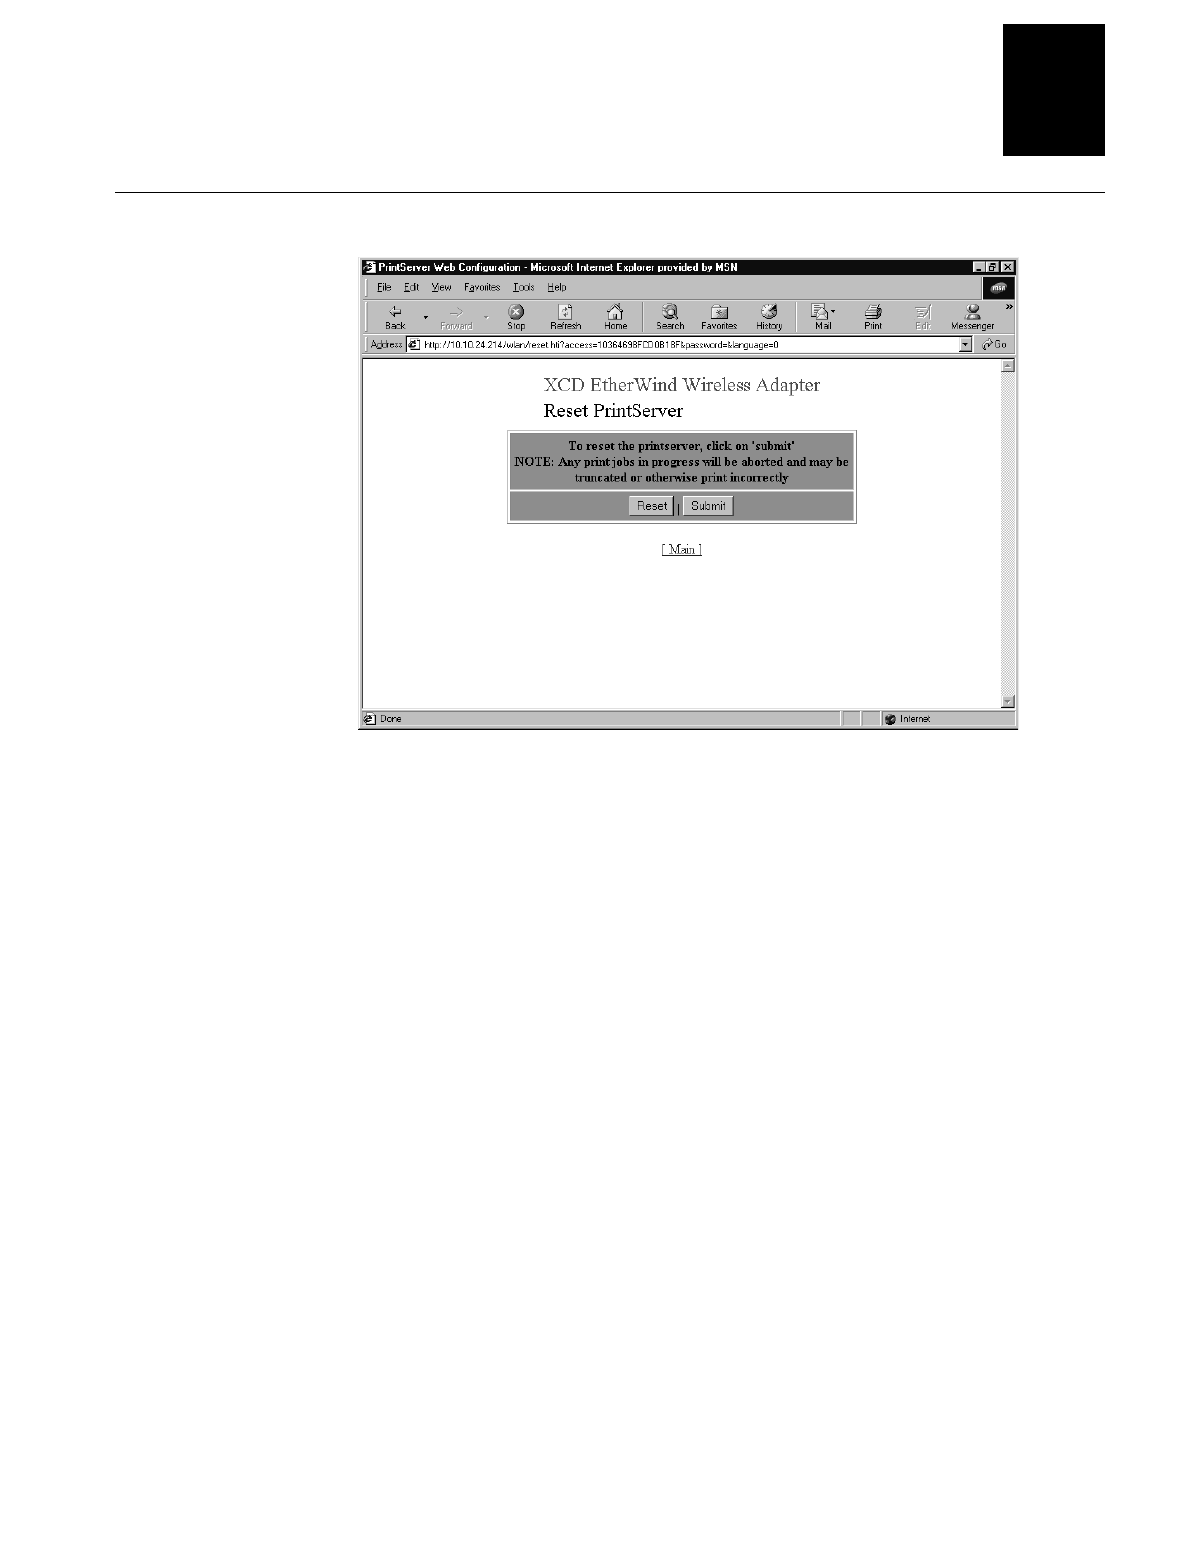
To reboot the EasyLAN Wireless
1. From the Configuration and Management page, click Reset Server. The Reset
Server page appears. For help opening the Configuration and Management page, see
“To open the Web browser interface” earlier in this section.
Managing the EasyLAN Wireless
3-5
3
Reset Server Page
2. Click Submit. A screen appears telling you that the EasyLAN Wireless has been
reset.
3. Click OK to return to the Configuration and Management screen.
EasyLAN Wireless User’s Manual
3-6
Using the EasyLAN Wireless Admin Utility
Before you can use the EasyLAN Wireless Admin utility, you need to install it and then
search for the EasyLAN Wireless.
To install the WPAdmin utility
1. Place the printer CD-ROM in your PC’s CD-ROM drive. The following page
appears.
2. Click Software in the left frame. The Software page appears.
Managing the EasyLAN Wireless
3-7
3
Printer Companion CD Software Page
3. Scroll down to EasyLAN Wireless Admin utility, and then click the picture or the
link for the EasyLAN Wireless Admin utility page.
4. Click Install EasyLAN Wireless Admin utility.
5. Follow the instructions for installing the EasyLAN Wireless Admin utility.
6. When the installation is complete, close the CD-ROM screen.
To search for the EasyLAN Wireless
1. Open the EasyLAN Wireless Admin utility by selecting it from the Start menu
(under Programs, Intermec then EasyLAN Wireless Admin) or by double-clicking a
short cut on your desktop. The Search dialog box appears.

EasyLAN Wireless User’s Manual
3-8
2. In the Server Search box, click Start. The name of the EasyLAN Wireless, MAC
address, IP address, and signal appear for all of the EasyLAN Wireless found.
If the EasyLAN Wireless Admin utility does not find your EasyLAN Wireless right
away, click Stop and make sure that the EasyLAN Wireless is on and configured
properly. For help with initially configuring the EasyLAN Wireless, see “Setting
Radio and Network Communications” in Chapter 1.
Note: If the wireless signal is less than 50% on the Search screen, printing performance
could be affected. To improve the signal strength, try moving the EasyLAN Wireless
closer to the computer or access point and away from other radio devices, such as
Bluetooth wireless devices, microwave ovens, or cordless phones.
You are now ready to manage the EasyLAN Wireless.
To reboot the EasyLAN Wireless
1. Open the EasyLAN Wireless Admin utility and search for the EasyLAN Wireless
on your network. For help, see the previous section, “Searching for EasyLAN
Wireless on Your Network.”
2. Select an EasyLAN Wireless, open the Set Up menu, and select Reboot. The
Reboot Server Password dialog box appears.
3. Enter the password for the EasyLAN Wireless and click OK. A message box
appears telling you that the EasyLAN Wireless is rebooting. When the EasyLAN
Wireless has finished rebooting, the Search screen appears. Is any information lost
or settings changed when option reboots?
Managing the EasyLAN Wireless
3-9
3
Setting the EasyLAN Wireless to Factory Defaults
Use the Web browser interface, the EasyLAN Wireless Admin utility, or the test switch
to set the EasyLAN Wireless to factory defaults. This section explains how to use the
Web browser interface and the EasyLAN Wireless Admin utility. For help using the test
switch, see “Understanding the EasyLAN Wireless” in Chapter 1.
Note: Only the EasyLAN Wireless is set to factory defaults, not the entire printer.
Using the Web Browser Interface
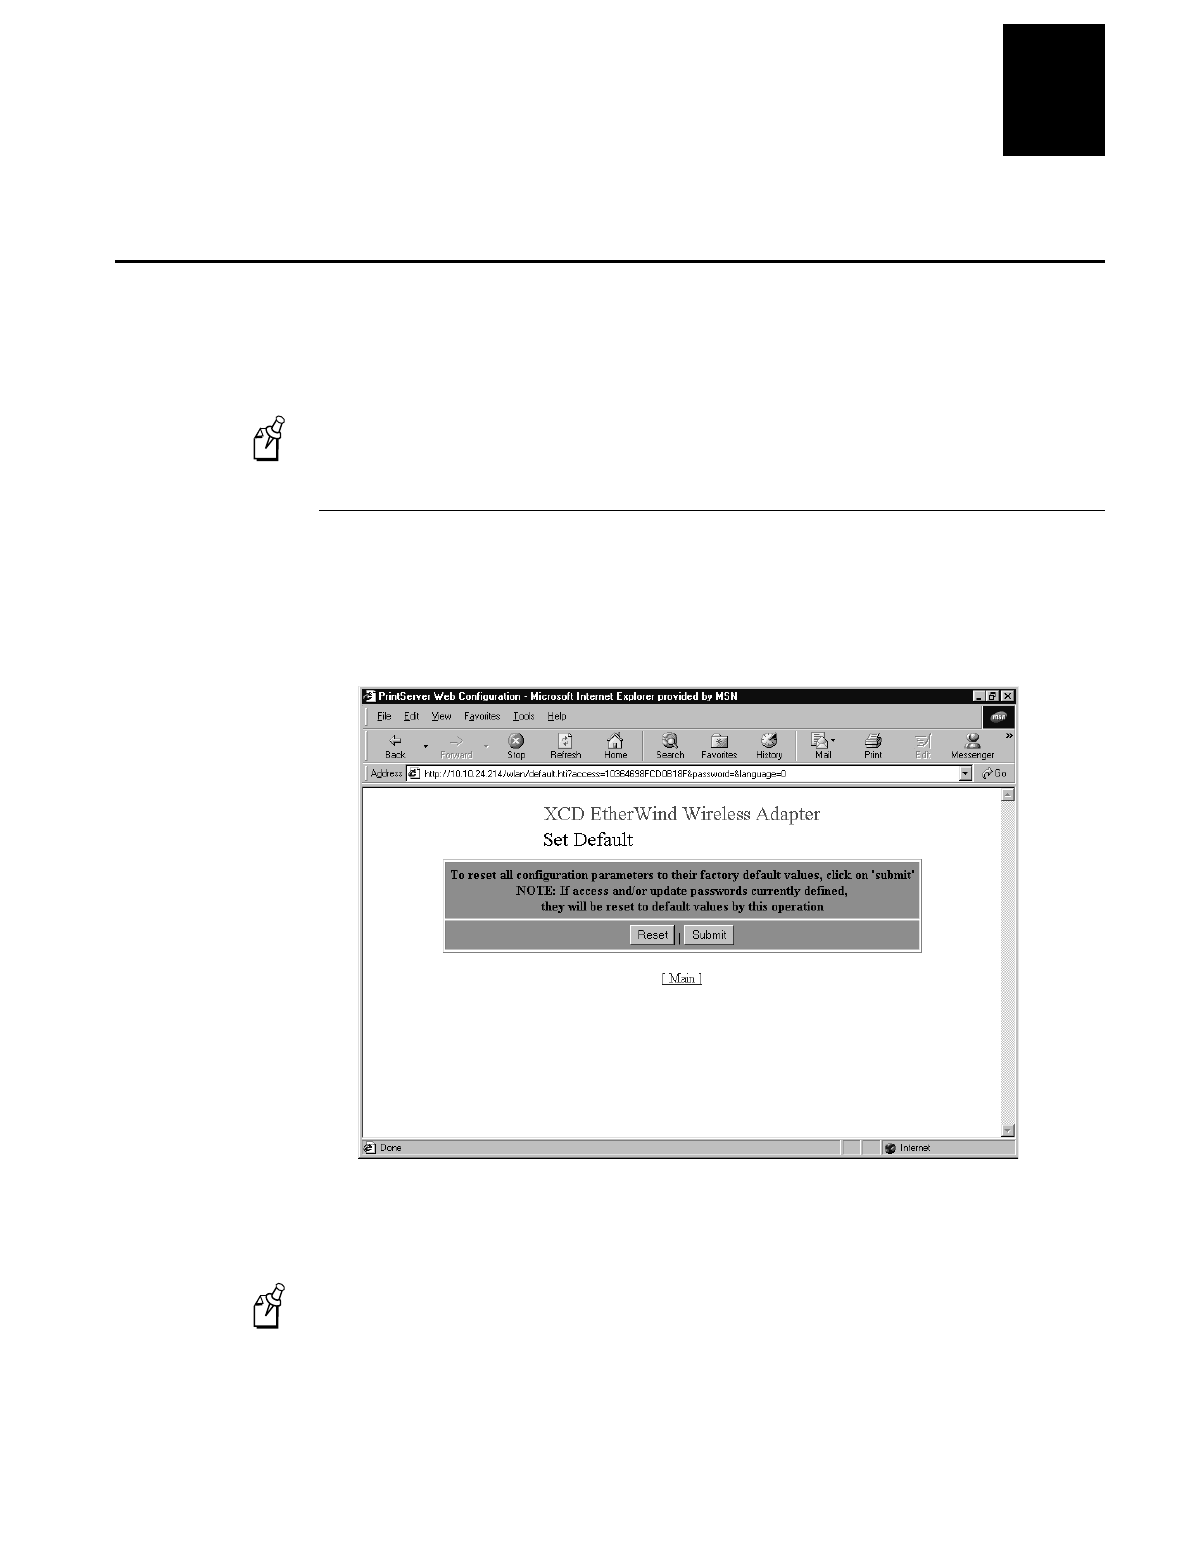
1. From the Configuration and Management page, click Set Default. The Set Default
page appears. For help opening the Configuration and Management page, see “To
open the Web browser interface” earlier in this chapter.
2. Click Submit. A screen appears telling you that the EasyLAN Wireless is set to
factory defaults.
Note: The access and update passwords have been set to the factory default of
access.
3. Click Main to return to the Configuration and Management screen.

EasyLAN Wireless User’s Manual
3-10
Using the EasyLAN Wireless Admin Utility
Note: The password for the EasyLAN Wireless is set to access when the EasyLAN
Wireless is set to factory defaults.
1. Open the EasyLAN Wireless Admin utility and search for the EasyLAN Wireless
on your network. For help, see “To search for the EasyLAN Wireless” earlier in this
chapter.
2. Select an EasyLAN Wireless, open the Set Up menu, and select Reset. The Reset
Defaults Password dialog box appears.
3. Enter the password for the EasyLAN Wireless and click OK. A message box
appears telling you that the EasyLAN Wireless is being set to factory defaults.
When the EasyLAN Wireless is set to factory defaults, the Search screen appears.
Printing a Test Label
Use the Web browser interface, the EasyLAN Wireless Admin utility, or the test switch
to print a test label. This section explains how to use the Web browser interface and the
EasyLAN Wireless Admin utility. For help using the test switch, see “Understanding
the EasyLAN Wireless” in Chapter 1.
Using the Web Browser Interface
Note: The test label is sent to the printer when you click Print Test Label.
1. From the Configuration and Management page, click Print Test Label. A screen
appears telling you that the test label has been sent to the printer. For help opening
the Configuration and Management page, see “To open the Web browser interface”
earlier in this chapter.
2. Click Main to return to the Configuration and Management screen.
Managing the EasyLAN Wireless
3-11
3
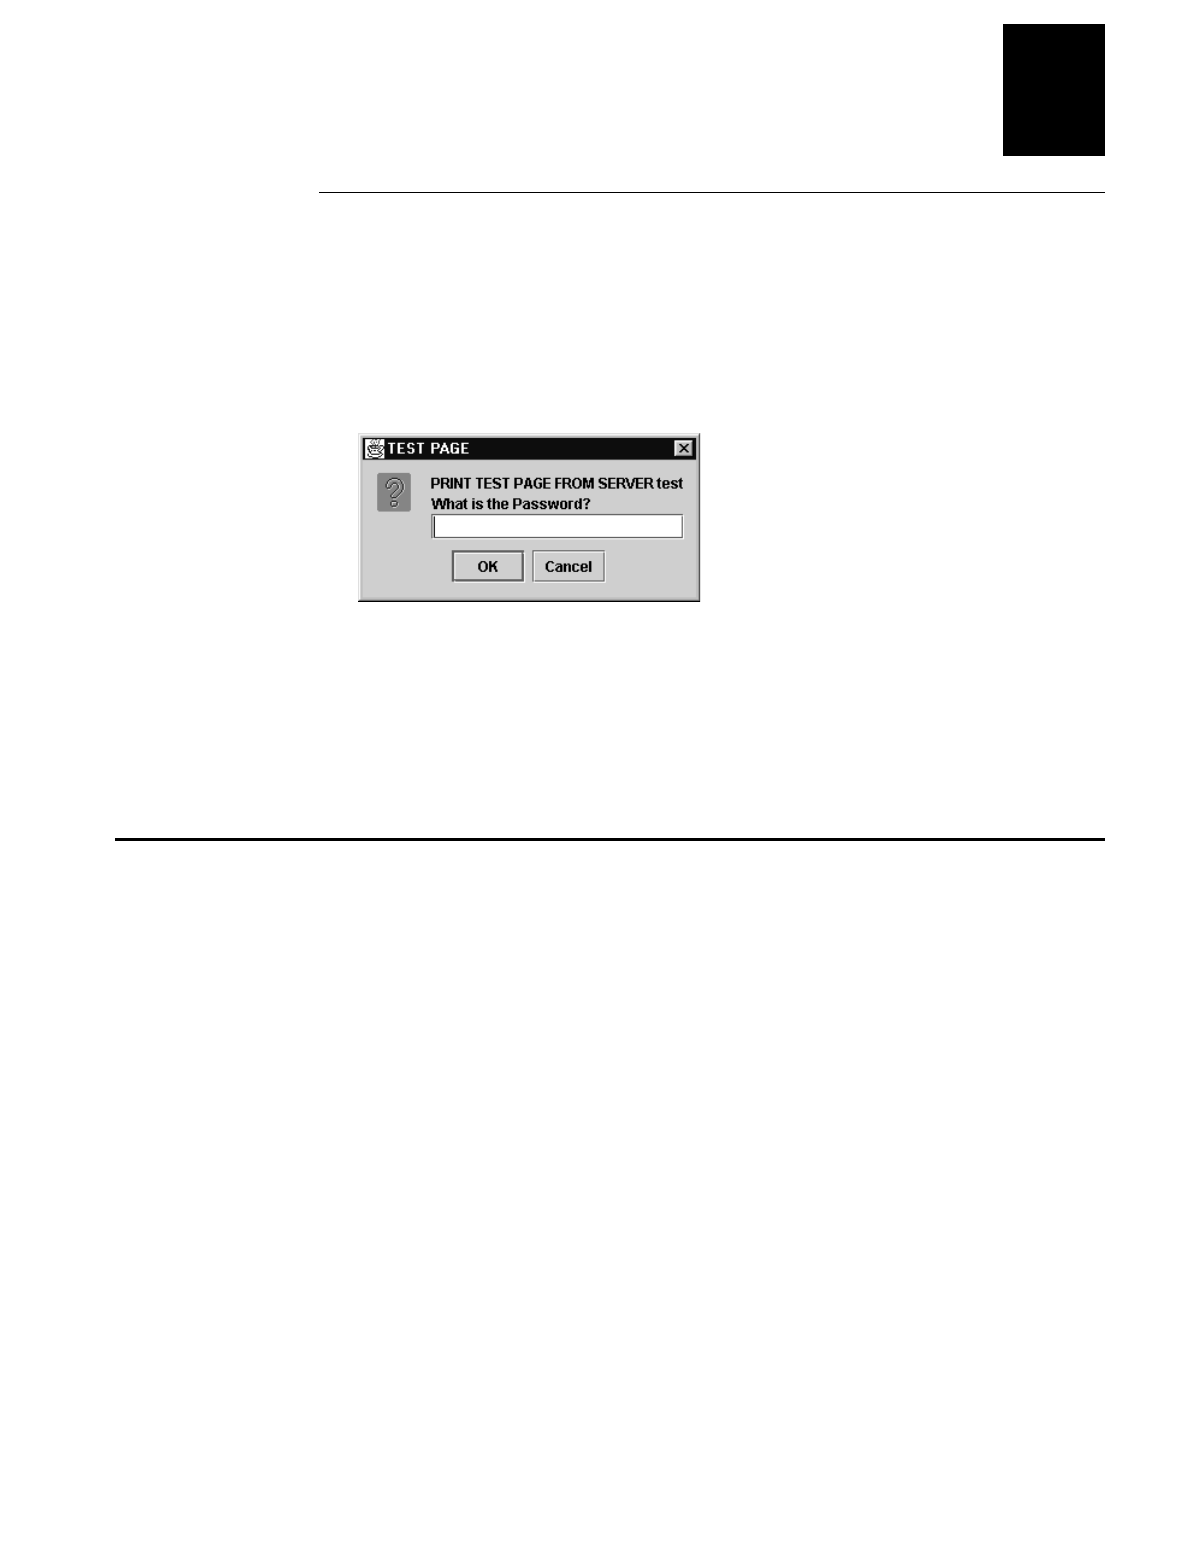
Using the EasyLAN Wireless Admin Utility
1. Open the EasyLAN Wireless Admin utility and search for the EasyLAN Wireless
on your network. For help, see “To search for the EasyLAN Wireless” earlier in this
chapter.
2. Select an EasyLAN Wireless, open the Set Up menu, and select Test Page. The
Print Test Page Password dialog box appears.
3. Enter the password for the EasyLAN Wireless and click OK. A message box
appears telling you that the test label has been printed.
4. Click OK. The Search screen appears.
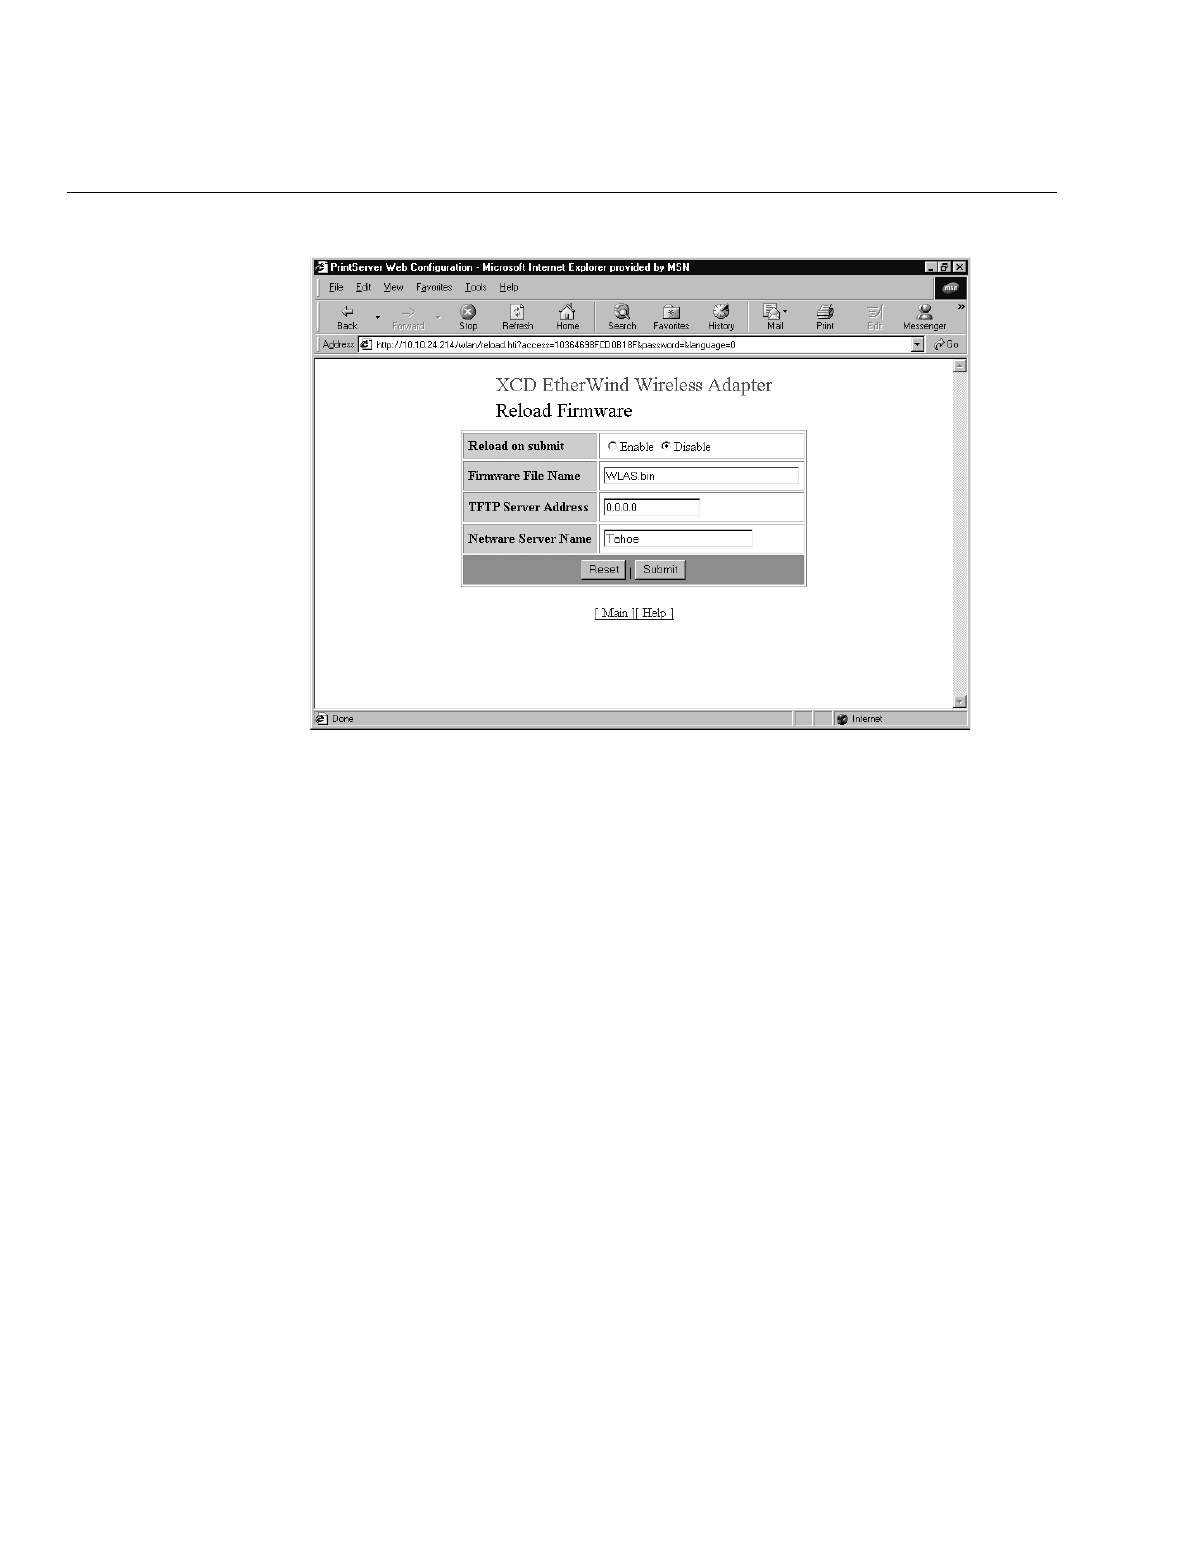
Reloading Firmware
Use the Web browser interface to reload firmware.
To reload firmware
1. From the Configuration and Management page, click Reload Firmware. The Reload
Firmware page appears. For help opening the Configuration and Management page,
see “To open the Web browser interface” earlier in this chapter.
EasyLAN Wireless User’s Manual
3-12
Reload Firmware Page
2. In the Reload on submit row, choose Enable to reload the firmware when you click
submit. If you choose Disable, the firmware is reloaded when you reboot the
EasyLAN Wireless (Guess on my part). For help, see “Rebooting the EasyLAN
Wireless” earlier in this chapter.
3. In the Firmware File Name row, enter the file name for the firmware. Do you need
to enter path information?
4. In the TFTP Server Address row, enter the IP address for the TFTP server in the
form n.n.n.n where n is from 0 to 255. Is the firmware supposed to be on the
TFTP server?
5. In the Netware Server Name row, enter the name of the Netware server. Why is this
information needed?
6. Click Submit. If you enabled reload on submit, the firmware is sent to the EasyLAN
Wireless, and a message page appears letting you know the reload was successful.
If you disabled reload on submit, a message page appears letting you know that the
firmware is ready to load.
7. Click OK to return to the Configuration and Management page. If you need to reset
the EasyLAN Wireless, see “Resetting the EasyLAN Wireless” later in this chapter.
Managing the EasyLAN Wireless
3-13
3
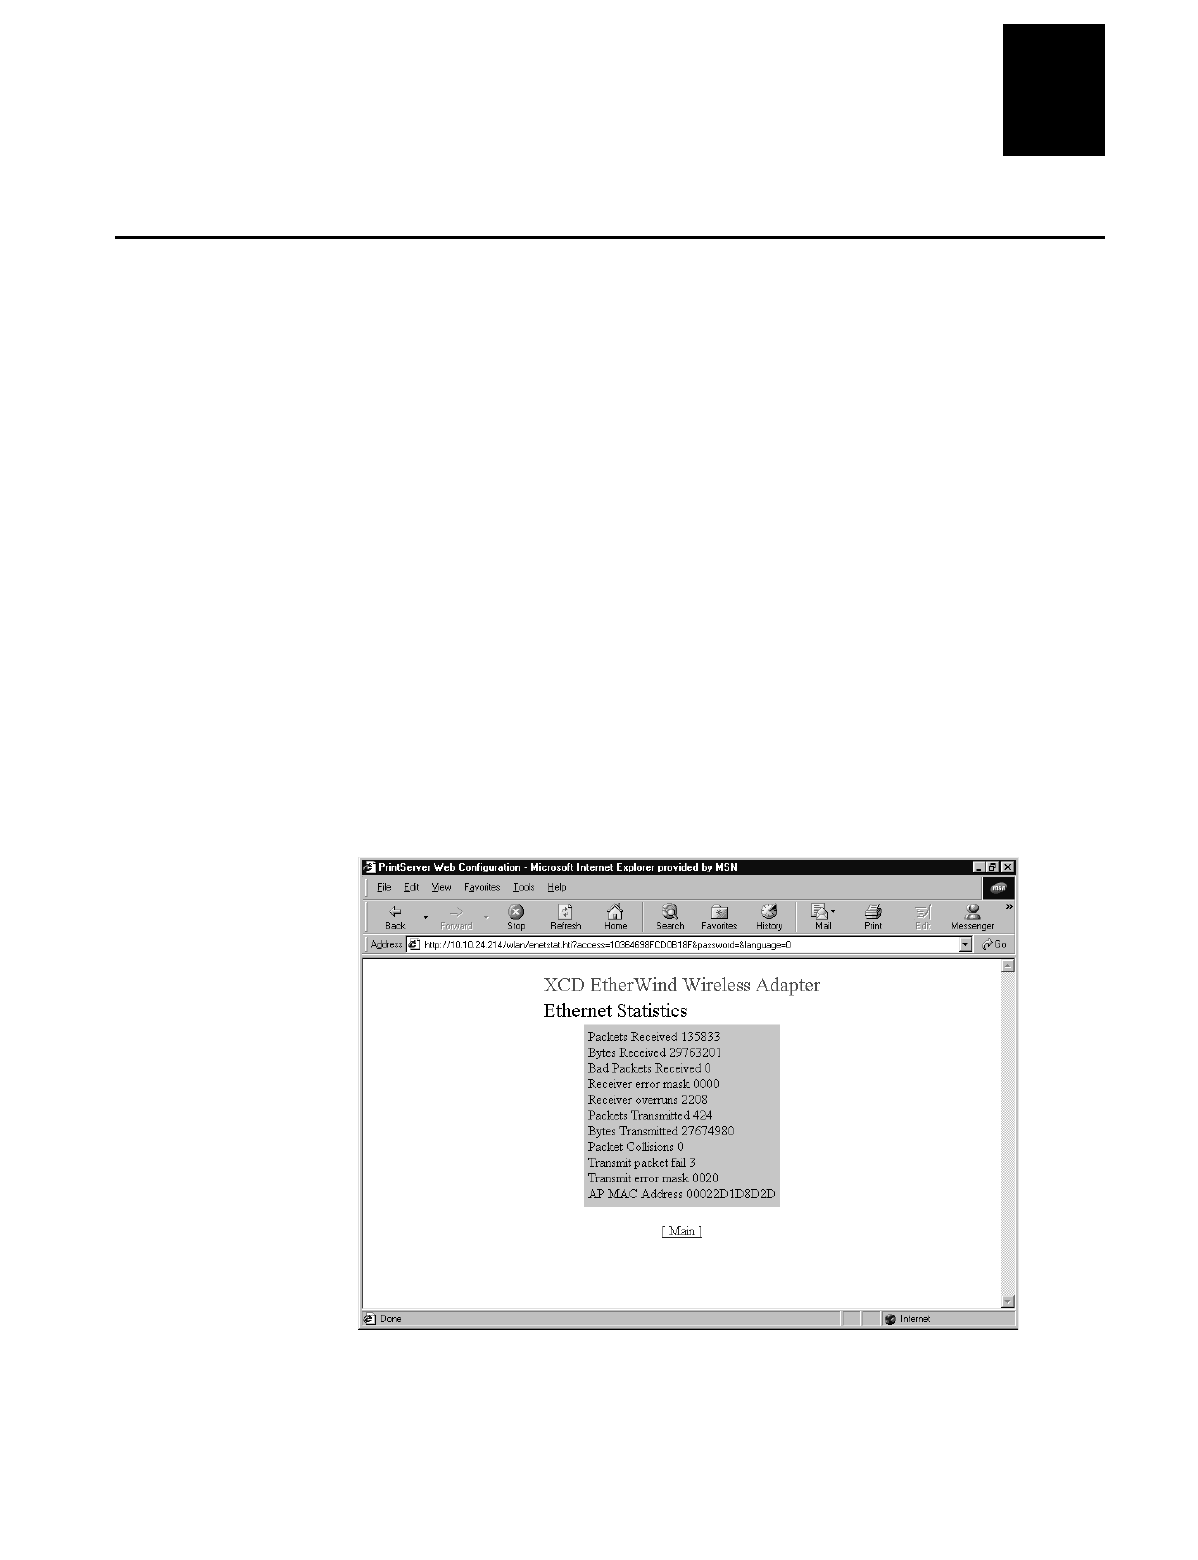
Viewing Ethernet Statistics
This Web browser interface page provides the following information:
•Packets received
•Bytes received
•Bad Packets received
•Receiver overruns
•Packets transmitted
•Bytes transmitted
•Packet collisions
•Transmit packet fail
•Transmit error mask
•AP MAC address
To view Ethernet statistics
1. From the Configuration and Management page, click Ethernet Statistics. The
Ethernet Statistics page appears. For help opening the Configuration and
Management page, see “To open the Web browser interface” earlier in this chapter.
2. Click Main to return to the Configuration and Management screen.
EasyLAN Wireless User’s Manual
3-14
Other EasyLAN Wireless Admin Utility Functions
You can also use the EasyLAN Wireless Admin tool to
•configure IP subnets.
•add servers.
•load files.
•save files.
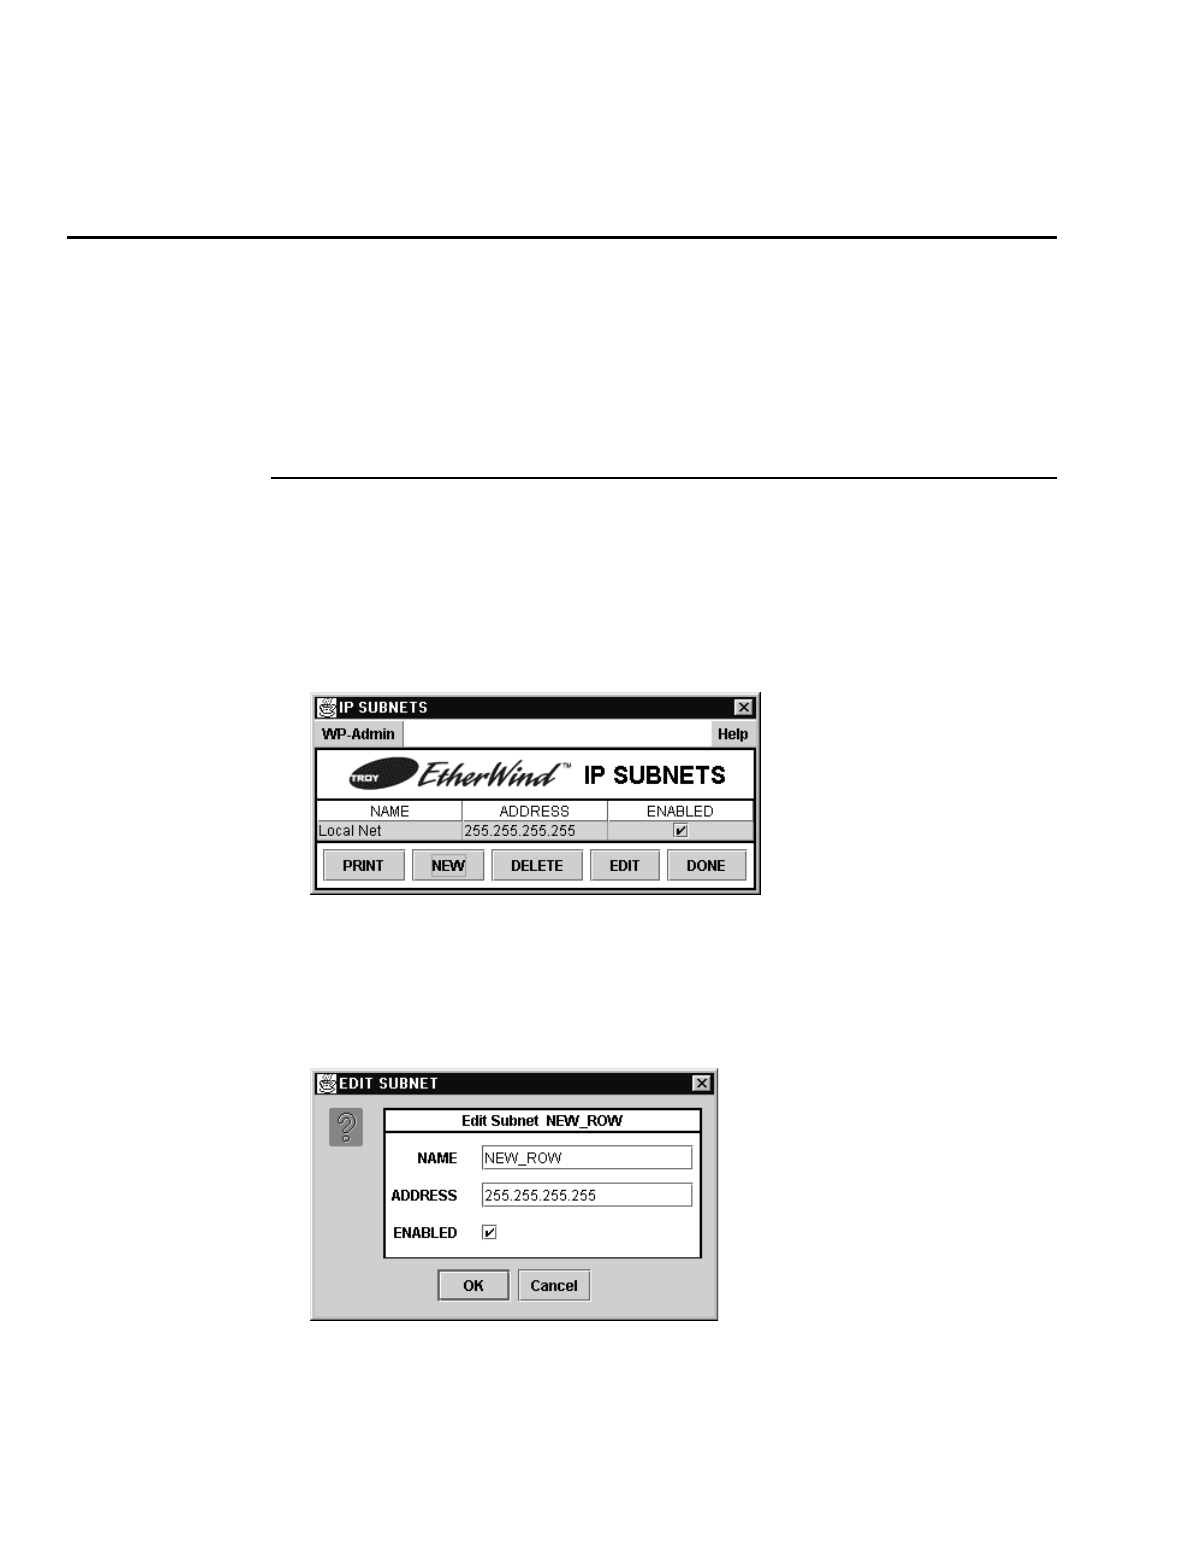
Configuring IP Subnets
1. Open the EasyLAN Wireless Admin utility and search for the EasyLAN Wireless
on your network. For help, see “To search for the EasyLAN Wireless” earlier in this
chapter.
2. Open the Set Up menu and select IP Subnet. The IP Subnets dialog box appears.
3. To change a subnet, select the subnet and click Edit. The Edit Subnet dialog box
appears.
To add a subnet, click New. The Edit Subnet dialog box appears.
4. In the Name field, enter the name of the subnet.
Managing the EasyLAN Wireless
3-15
3
5. In the Address field, enter the IP address of the subnet in the form n.n.n.n where n is
from 0 to 255.
6. Check or clear the Enabled check box.
7. Click OK to accept your changes and return to the IP Subnet dialog box. Or click
Cancel to reject your changes and return to the IP Subnet dialog box.
8. To delete a subnet, select the subnet and click Delete. The subnet disappears from
the IP Subnet dialog box.
9. To print a list of subnets, click Print, select the print options you want, and click
OK.
10. When you have finished configuring the subnets, click Done. The Search screen
appears.
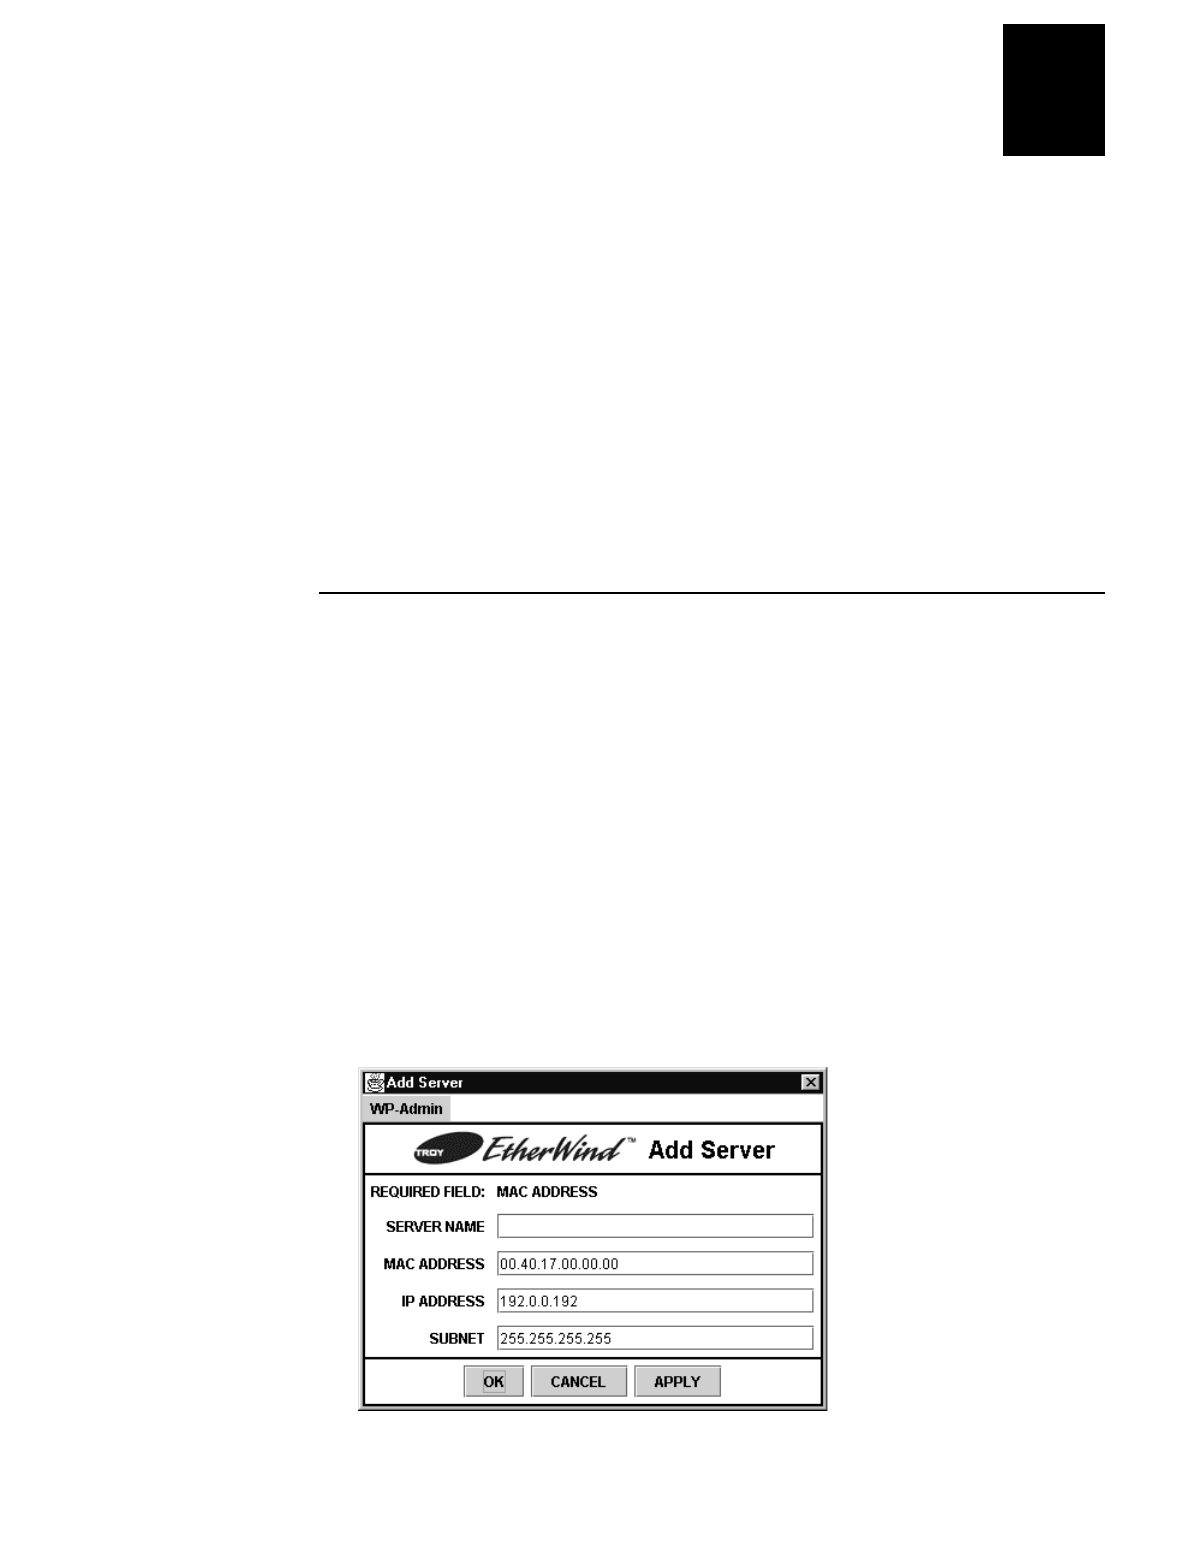
Adding an EasyLAN Wireless
If you know you will be bringing an EasyLAN Wireless online, you may want to add it
to the EasyLAN Wireless Admin utility to help the utility find it when it comes online.
You need the following information to add an EasyLAN Wireless:
•The name of the EasyLAN Wireless. The default name is XCD_xxxxxx where
xxxxxx is the last six digits of the MAC address.
•The MAC address of the EasyLAN Wireless.
•The IP address of the EasyLAN Wireless.
•The subnet that the EasyLAN Wireless communicates in.
To add an EasyLAN Wireless to the EasyLAN Wireless Admin utility
1. Open the EasyLAN Wireless Admin utility.
2. Open the Set Up menu and select Add. The Add Server dialog box appears.
EasyLAN Wireless User’s Manual
3-16
3. In the Server Name field, enter the name of the EasyLAN Wireless.
4. In the MAC Address field, enter the MAC address of the EasyLAN Wireless in the
form of six hexadecimal values separated by periods.
5. In the IP Address field, enter the IP address of the EasyLAN Wireless in the form
n.n.n.n where n is from 0 to 255.
6. In the Subnet field, enter the subnet that the EasyLAN Wireless communicates in.
7. Click OK to accept your changes and return to the Search screen. The EasyLAN
Wireless information appears in the Search screen.
Click Cancel to reject your changes, not add a server, and return to the Search
screen.
Loading Files
You can load DAT files to somewhere for some reason that isn’t clear to me.
To load files
1. Open the EasyLAN Wireless Admin utility.
2. Open the Set Up menu and select Load. The Load File dialog box appears.
3. Enter the name of the file you want to load and click OK. When the file is finished
loading, the Search screen appears. Do you need to put in path information?
Saving Files
You can save DAT files for some reason that isn’t clear to me.
To save files
1. Open the EasyLAN Wireless Admin utility.
2. Open the Set Up menu and select Save. The Save File dialog box appears.
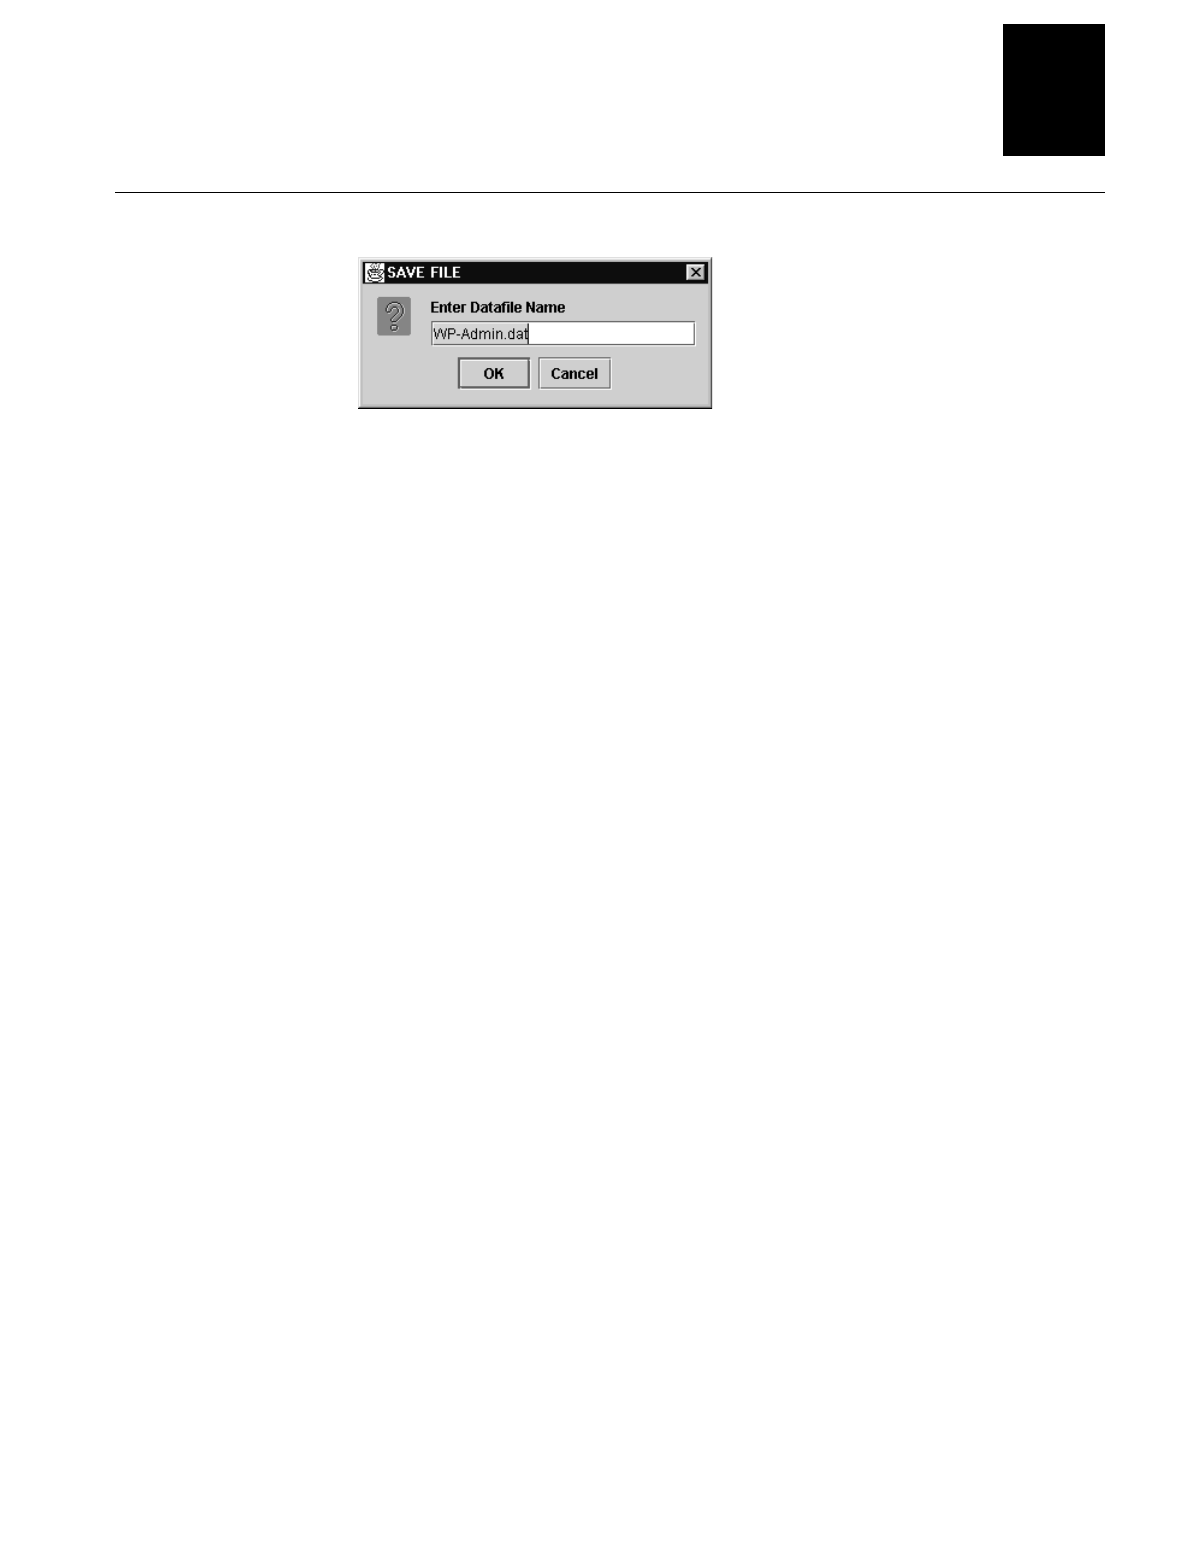
Managing the EasyLAN Wireless
3-17
3
Save File Dialog Box
3. Enter the name of the file you want to save and click OK. When the file is finished
saving, the Search screen appears. Do you need to put in path information?

blank

Using the Port Monitor
4

blank

Using the Port Monitor
4-3
4
This chapter explains how to use the XXX port monitor with the EasyLAN Wireless.
Installing the Port Monitor
The port monitor monitors Windows OS ports ….
Waiting for information from Lars Enoksson and Göran Reineholm. Sent them email
the morning of 3/22/02.

EasyLAN Wireless User’s Manual
4-4

Troubleshooting the EasyLAN Wireless
5

blank

Troubleshooting the EasyLAN Wireless
5-3
5
This chapter describes how to troubleshoot the EasyLAN Wireless.
Troubleshooting Printing Problems
First, check the printer to make sure it is online and has media and ribbon.
If the printer is working fine, test the connection between the printer and the EasyLAN
Wireless by pushing the test switch on the back of the printer for less than 5 seconds.
Note: Remember, if a test label does not print, the printer may still be able to print
through the EasyLAN Wireless. Set up the printer as you normally would and try
printing from an application.
If the test label does not print, try resetting the EasyLAN Wireless to factory defaults by
holding the test switch for more than 5 seconds.
Troubleshooting Wireless Configuration Problems
Make sure your computer’s wireless adapter or access point is configured properly and
note the settings paying special attention to the wireless mode, SSID or network name,
WEP or security, and IP address settings so you can configure your EasyLAN Wireless
to the same wireless settings.
Make sure you have a good wireless signal from your PC and from the EasyLAN
Wireless. Make sure that the EasyLAN Wireless is within range (90 meters or 300 feet),
and that it is away from metal objects and other devices with radio signals (such as
Bluetooth radios, cordless phones, and microwave ovens).
Make sure your computer is set to infrastructure mode if you are connecting through an
access point or ad-hoc (802.11) if you are connecting to the EasyLAN Wireless without
an access point. See the documentation for your wireless adapter for details.
If you are using WEP (Wired Equivalent Privacy) encryption or security on your
wireless network, you need to temporarily disable WEP on your PC in order to
configure the EasyLAN Wireless. If you are using an access point with WEP enabled
and it does not allow non-WEP clients to communicate with other non-WEP clients,
then you need to temporarily change the wireless mode of your computer to ad-hoc
(802.11) mode.
Note: If no computers on your network can be set to ad-hoc mode, you need to
temporarily disable WEP on your access point. When you are done configuring the
EasyLAN Wireless, you can re-enable WEP on your computer and change the wireless
mode back if necessary.

EasyLAN Wireless User’s Manual
5-4
If you want to use WEP encryption or password protect your wireless network, and your
wireless adapter or access point normally uses a password or passphrase instead of
WEP, it should allow you to enter 0x followed by a 10 digit (for 40-bit or 64-bit WEP)
or 26 digit (for 128-bit WEP) key in hexadecimal format (0 to 9 or A to F).
If you are experiencing slow performance or are having intermittent problems
connecting, try changing the RF channel of your wireless network. For help configuring
the RF channel using the Web browser interface or the EasyLAN Wireless Admin
utility, see Chapter 2, “Configuring the EasyLAN Wireless.” For help changing the RF
channel on your wireless adapter or access point, see the documentation for those
products. You should change it to at least three channels lower or higher than any other
wireless networks within range.
Troubleshooting Network Configuration
If you are using TCP/IP, make sure that your computer and the EasyLAN Wireless are
on the same IP segment or can reach each other with a PING command from the host.
The IP address you assign to the EasyLAN Wireless must be on the same logical
network as your host computers (for example, if your computer has an IP address of
192.189.207.3, the EasyLAN Wireless should have an IP address of 192.189.207.x
where x is an integer between 1 and 254), or you must properly configure your router
address to work with the EasyLAN Wireless.
If your EasyLAN Wireless is set to Auto or DHCP for obtaining an IP address, it is
possible the EasyLAN Wireless IP address can change. Either configure your DHCP
server to give the EasyLAN Wireless a permanent lease or configure the EasyLAN
Wireless to be on a Static address outside the scope of DHCP addresses.

Console Commands
A

blank
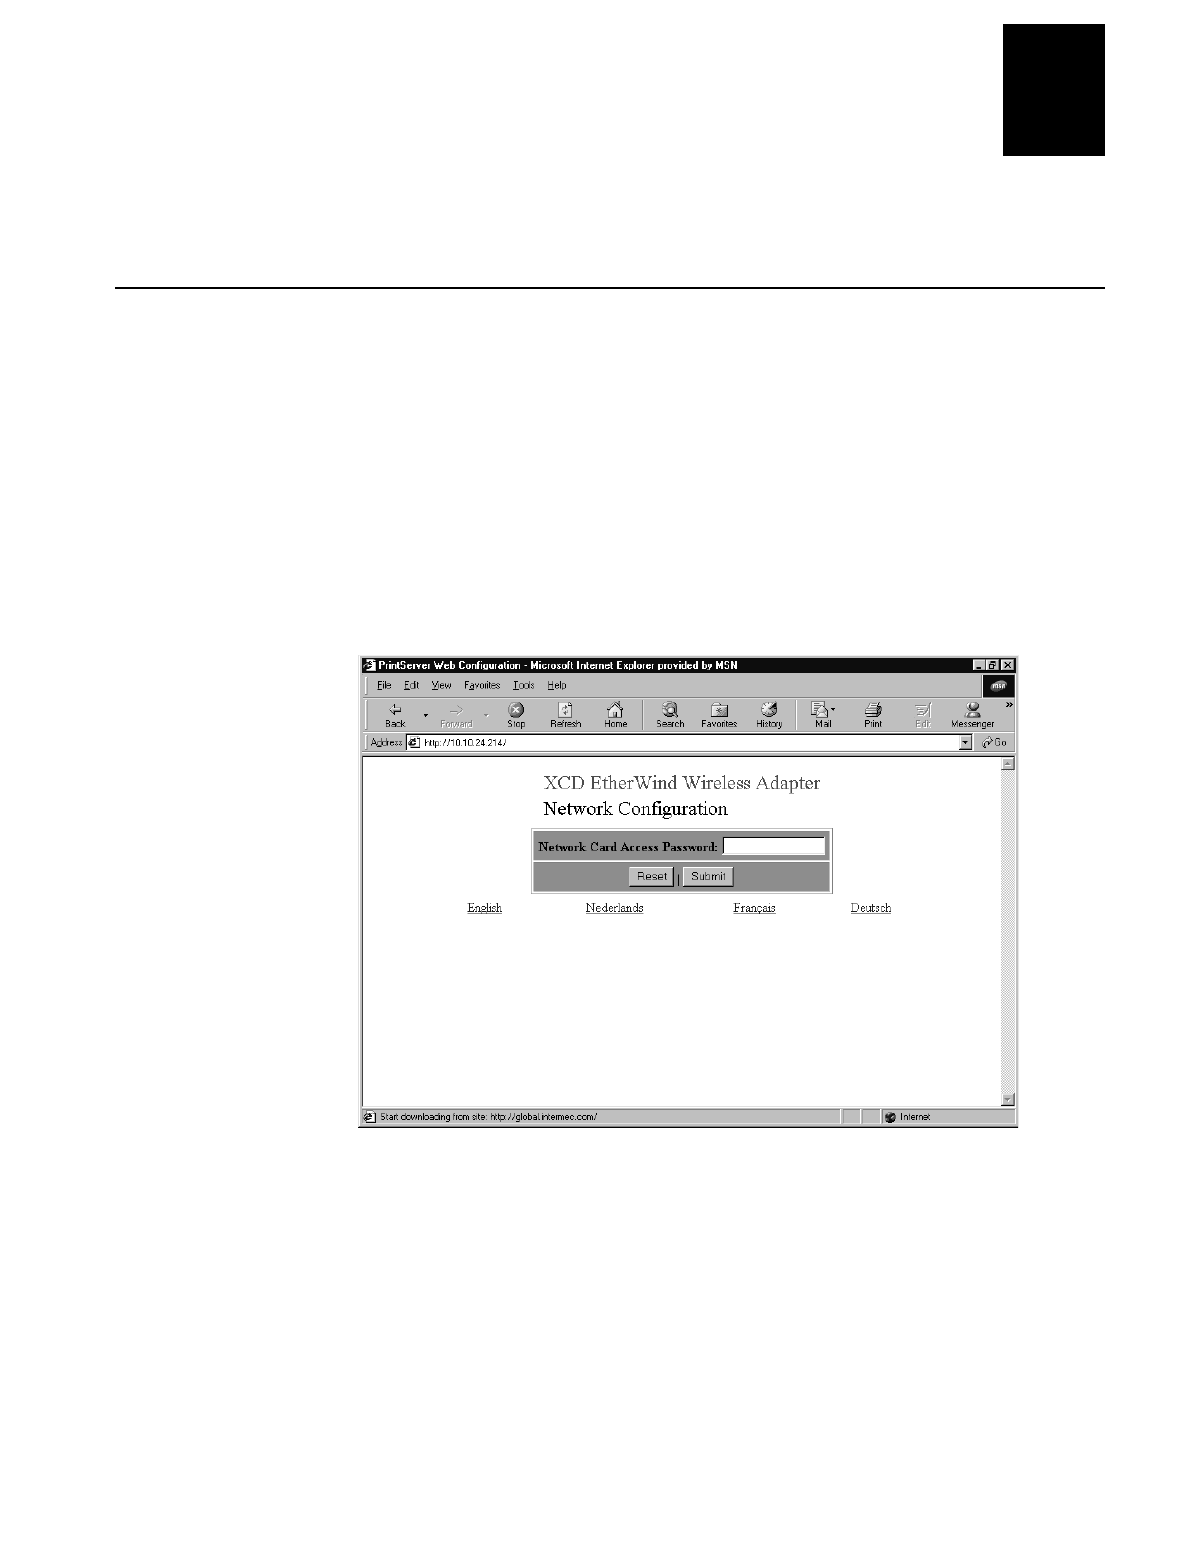
Console Commands
A-3
A
This appendix explains how to send the console commands and list the commands.
Sending the Console Commands
Use either HyperTerminal or the Web browser interface to send the console commands
to the EasyLAN Wireless. The following procedure explains how to use the Web
browser interface. For help using HyperTerminal, see the documentation for
HyperTerminal.
Before you can use the Web browser interface, you must open it.
To open the Web browser interface
1. Start your Web browser.
2. In the Address (Internet Explorer) or Go to (Netscape) line, enter the IP address for
the EasyLAN Wireless, and press Enter. The following page appears.
3. In the Print Server Access Password field, enter the password. The default password
is access.
4. Click Submit. The Configuration and Management page appears.

EasyLAN Wireless User’s Manual
A-4
Configuration and Management Page
You are now ready to send console commands.
To send the console commands
1. Make sure port S1 is set to Console mode:
a. From the Configuration and Management page, click Configure Port. The
Configure Port page appears. For help opening the Configuration and
Management page, see “To open the Web browser interface” earlier in this
section.
b. In the Mode row, select Console.
c. Click Submit.
d. Return to the Configuration and Management page.
2. From the Configuration and Management page, click Console. The Console page
appears.

Console Commands
A-5
A
Console Page
3. Enter the commands you want to send in the field, and then click Enter.
4. How do you get out of this screen?
General Commands
This table lists general commands for configuring and managing the EasyLAN
Wireless.
Command Description
cl serve st stringnumber Removes the specified string number.
cl fa Deletes the fatal error log.
cl po p1 job Clears the current entry in the EasyLAN Wireless internal
queue for the parallel port.
exit/^d Exits EasyLAN Wireless console.
he Provides information on available commands
in Resets the EasyLAN Wireless.
set default Sets the EasyLAN Wireless parameters to factory defaults.
set port s1 co dis Disables console mode on port S1.
set load dis Disables the firmware reload after exit.

EasyLAN Wireless User’s Manual
A-6
General Commands (continued)
Command Description
set load en Enables the firmware reload after exit.
set load ho name Sets the node name of the boot host for NetWare firmware
load.
set load ip n.n.n.n Sets the IP address of the load host (TCP/IP firmware load).
set load so filename Sets the host filename of the firmware to load.
set pa password Sets the console password. The default password is access.
set port p1 ackh status Enables or disables pACKH on parallel port (for older
printers). Where status equals en for enabled or dis for
disabled.
set port p1 bid status Enables or disables bidirectional mode on the parallel port.
Where status equals en for enabled or dis for disabled.
set port p1 dvid status Enables or disables 1284 device ID queries on the parallel
port. Where status equals en for enabled or dis for disabled.
set port p1 ecp status Enables or disables 1284 ECP mode on the parallel port.
Where status equals en for enabled or dis for disabled.
set port p1 fstb status Enables or disables fast strobe mode on the parallel port.
Where status equals en for enabled or dis for disabled.
set port p1 nbuf status Enables or disables no buffering on parallel port. Where status
equals en for enabled or dis for disabled.
set pro password Sets the console protection password to prevent access to set
commands. (Use unprotect command to access set commands.)
set serve de Sets the node description string displayed with the show server
command.
set serve str n “…” Defines the EasyLAN Wireless BOT/EOT string.
set servi servicname protocol
status
Enables or disables specified protocol on the specified service.
Where status equals en for enabled or dis for disabled.
set servi servicename bot nn Sets the service BOT string to nn.
set servi servicename eot nn Sets the service EOT string to nn.
set servi servicename fi nn Sets the service filter to nn.
set servi servicename fms
matchnumber
Sets the service with the specified match string number.
set servi servicename frs
replacenumber
Sets the service with the specified replacement string number.
set servi ip servicename status Enables or disables IP jobs. Where servicename equals the
name of the service and status equals en for enabled or dis for
disabled.

Console Commands
A-7
A
General Commands (continued)
Command Description
set servi servicename na
newname
Changes the service name.
set servi servicename rec status Enables or disable receive only mode on the specified service.
Where servicename equals the name of the service and status
equals en for enabled or dis for disabled.
sh fa Shows the fatal error log.
sh fr Shows the memory available.
sh loa Shows the firmware update parameters.
sh po Shows the port parameters.
sh po p1 sta Shows the current port status.
sh serve co Shows the EasyLAN Wireless statistics.
sh servi Shows the service parameters.
sh te Prints the test label.
sh ve Shows the EasyLAN Wireless firmware version.
unpro Allows the system manager to temporarily access set
commands when the remote console is in protected mode. The
set default command can be used to permanently disable the
protected mode.
ze Zeroes statistical counts.
TCP/IP Commands
Use these commands to configure and manage TCP/IP parameters.
Command Description
set ip ac status n.n.n.n Enables or disables specified IP address from accessing the
EasyLAN Wireless. Where status equals en for enabled, dis
for disabled, or all for enabling all IP addresses and n.n.n.n
equals the specific IP address.
set ip ad n.n.n.n Sets the IP address of the EasyLAN Wireless.
set ip bo n Sets the number of BOOTP/RARP tries.
set ip status Enables or disables IP processing. Where status equals en for
enabled or dis for disabled.
set ip meth stat Sets IP to static address so that the EasyLAN Wireless will not
look for a DHCP address.

EasyLAN Wireless User’s Manual
A-8
TCP/IP Commands (continued)
Command Description
set ip ra nn Sets the procedure used by the EasyLAN Wireless when
obtaining its IP address. By default the IP address is set along
with a default subnet mask and a router address that is the
same as the address of the load host. By setting nn to 1, the
subnet mask is not set. If nn is set to 2, the router address is not
set. If nn is set to 3, neither the subnet mask nor the router
address is set.
set ip ro n.n.n.n Sets the default router address.
set ip su n.n.n.n Sets the subnet mask.
set ip ti n Sets the inactivity timeout in minutes.
set servi servicename ip status Enables or disables TCP/IP jobs on specified EasyLAN
Wireless. Where servicename equals the name of the service
and status equals en for enabled or dis for disabled.
set servi servicename tcp nn Sets the TCP port number (>1023) on the specified service.
sh ip Shows LPD/TCP/TELNET parameters.
sh ip ac Shows IP addresses that are allowed to access the EasyLAN
Wireless.
NetWare Commands
Use these commands to configure and manage NetWare parameters.
Command Description
cl netw se server Removes the specified NetWare file server from the EasyLAN
Wireless access list.
set netw ad nSets the advertising frequency of the EasyLAN Wireless.
set netw status Enables or disables the NetWare protocol on the EasyLAN
Wireless. Where status equals en for enabled or dis for
disabled.
set netw fr type Sets the NetWare frame type. Where type equals 802.2, 802.3,
eth for Ethernet II, al for all, au for auto, or sna for SNAP.
set netw ne n Sets the NetWare internal network number.
set netw np pserver n on
service
Set NPrinter mode on the specified service.
set netw pa password Sets the EasyLAN Wireless login password for the file server.
set netw po n Sets the queue polling time in seconds.

Console Commands
A-9
A
NetWare Commands (continued)
Command Description
set netw qs fileserver on
service
Sets queue server mode on the specified service.
set netw re Rescans the file servers for new queues.
set netw name se status Enables or disables the file server. Where name equals the
name of the file server and status equals en for enabled or dis
for disabled.
set servi servicename net status Enables or disables NetWare jobs on the specified service.
Where servicename equals the name of the service and status
equals en for enabled or dis for disabled.
sh netw Shows the NetWare parameters.
set servi servicename con
string
Sets NDS context.
set servi servicename tree
string
Sets NDS TREE.
Radio Commands
Use these commands to configure and manage radio parameters.
Command Description
set en mo mode Sets the 802.11b wireless mode. Where mode equals in for
infrastructure, ad for ad-hoc, or ps for pseudo ad-hoc.
set en ssid mynetwork Sets the 802.11b wireless SSID, sometimes referred to as
network name. Use double-quotes if you are using a space
character in the SSID.
set en wep encryption Sets the wired equivalent privacy encryption level. Where
encryption equals dis for disabled, 64 for 64-bit encryption, or
128 for 128-bit encryption.
set en key# number Sets which WEP key number is to be used. Where number is a
value from 1 to 4. The default value is 1.
set en keyval wepkey Set the 10-digit (for 64-bit encryption) or 26-digit (for 128-bit
encryption) WEP key value. This key must be hexadecimal
values.
set en ch nn Sets the 802.11b wireless channel to be used.
set en sp speed Sets the 802.11b wireless speed in Mbps. Where speed equals
1, 2, 5 for 5.5, or 11.

blank