Invacare Electric Portable Patient Lift Rpa600 1E Users Manual 1078988
Electric Portable Patient Lift RPA600-1E 1078988
RPA600-1E to the manual 59ea6ead-c565-478c-a518-6c5c9ffddb34
2015-02-02
: Invacare Invacare-Electric-Portable-Patient-Lift-Rpa600-1E-Users-Manual-433022 invacare-electric-portable-patient-lift-rpa600-1e-users-manual-433022 invacare pdf
Open the PDF directly: View PDF ![]() .
.
Page Count: 40
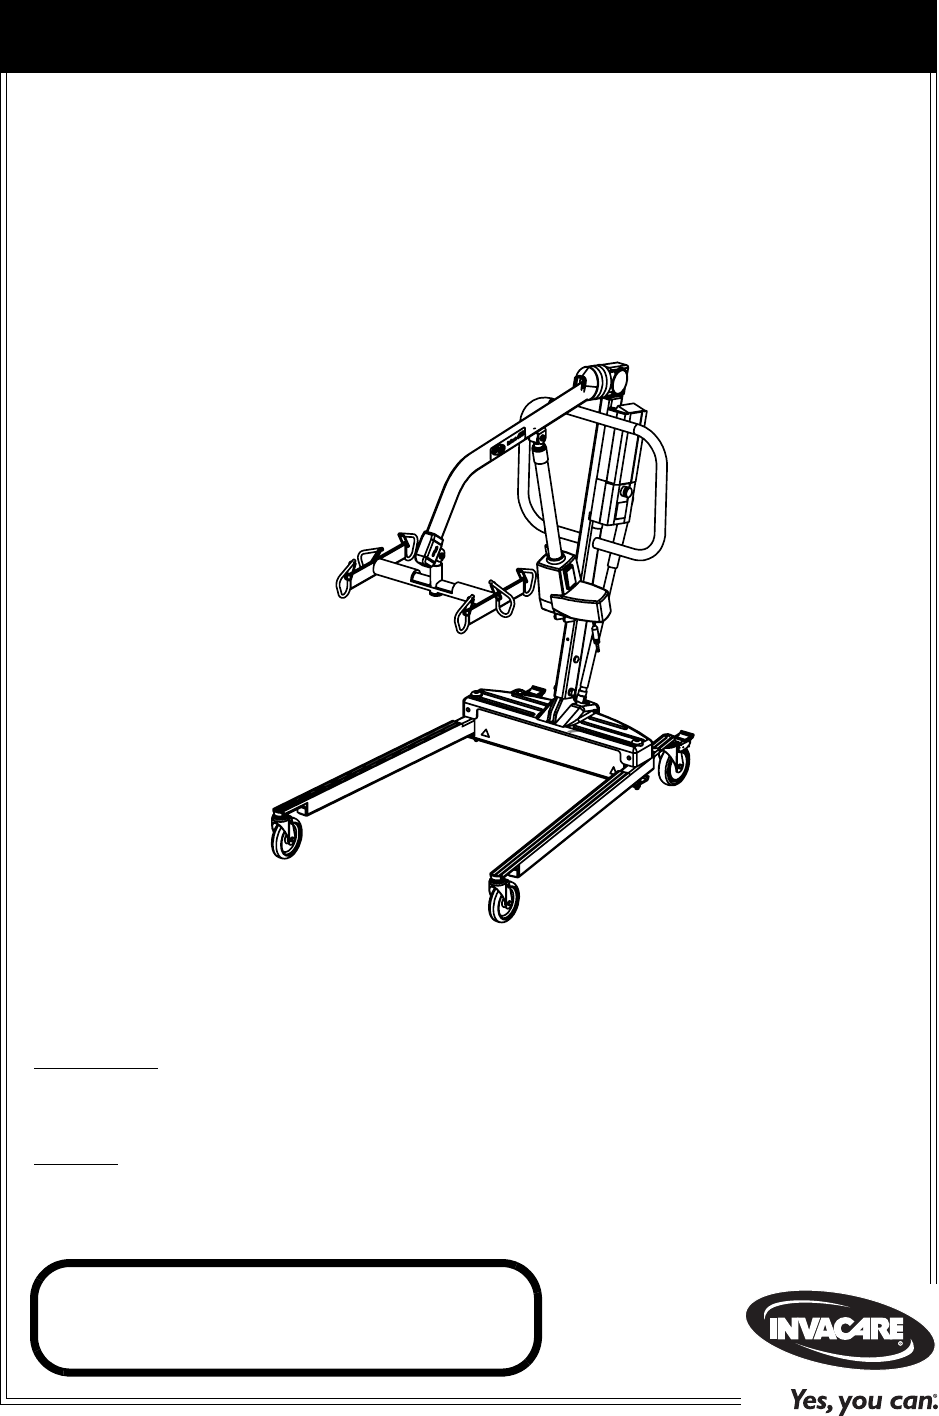
Owner’s Operator and Maintenance Manual
DEALER: This manual MUST be given to
the user of the patient lift.
USER: BEFORE using this patient lift, read
this manual and save for future reference.
For more information regarding
Invacare products, parts, and services,
please visit www.invacare.com
Electric Portable
Patient Lift - RPA600-1E
SYMBOL LEGEND
Electric Portable Patient Lift - RPA600-1E 2Part No 1078988
WARNING
DO NOT USE THIS PRODUCT OR ANY AVAILABLE OPTIONAL
EQUIPMENT WITHOUT FIRST COMPLETELY READING AND
UNDERSTANDING THESE INSTRUCTIONS AND ANY
ADDITIONAL INSTRUCTIONAL MATERIAL SUCH AS OWNER’S
MANUALS, SERVICE MANUALS OR INSTRUCTION SHEETS
SUPPLIED WITH THIS PRODUCT OR OPTIONAL EQUIPMENT. IF
YOU ARE UNABLE TO UNDERSTAND THE WARNINGS,
CAUTIONS OR INSTRUCTIONS, CONTACT A HEALTHCARE
PROFESSIONAL, DEALER OR TECHNICAL PERSONNEL BEFORE
ATTEMPTING TO USE THIS EQUIPMENT - OTHERWISE, INJURY
OR DAMAGE MAY OCCUR.
ACCESSORIES WARNING
Invacare products are specifically designed and manufactured for use in
conjunction with Invacare accessories. Accessories designed by other
manufacturers have not been tested by Invacare and are not
recommended for use with Invacare products.
SYMBOL LEGEND
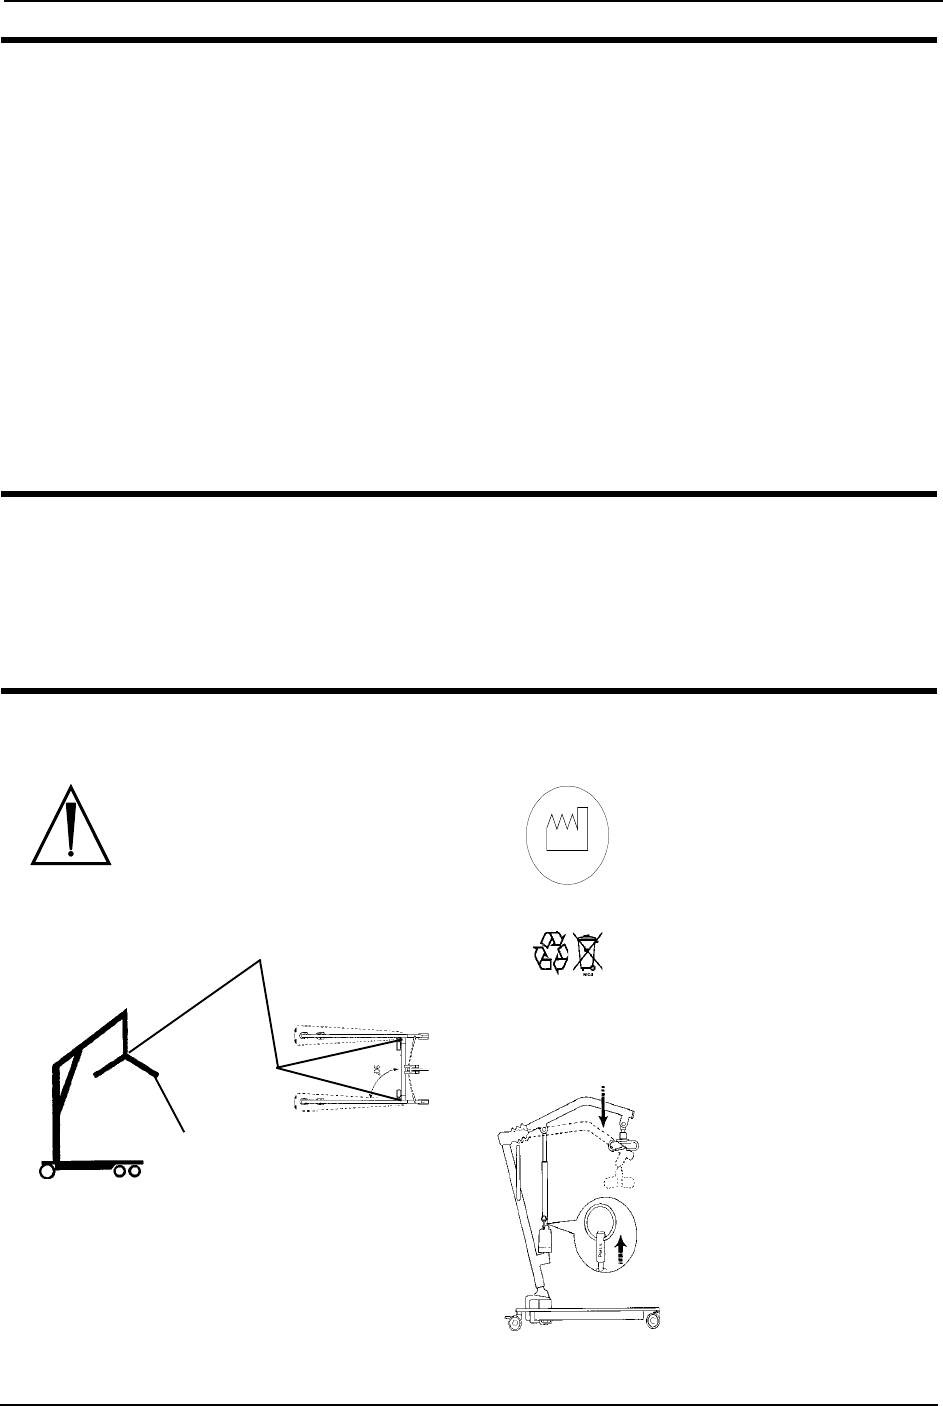
"ATTENTION, see
instructions for use".
CAUTION - Pinch Points, fingers
could be pinched.
Between Boom and
Swivel Bar Base of Lift
WARNING - When
positioning Lift, be
aware of the position of
the Swivel Bar and the
patient. Injury could
occur.
2008
"Date of Manufacture"
Device contains Lead Acid
batteries. DO NOT dispose
of batteries in normal
household waste. They
MUST be taken to a proper
disposal site. Contact your
local waste management
company for information.
EMERGENCY
Mechanical Lowering -
Pull UP on
EMERGENCY Ring.
Push DOWN on Boom.
NOTE:Updatedversionsofthismanualareavailableonwww.invacare.com.

TABLE OF CONTENTS
Part No 1078988 3Electric Portable Patient Lift - RPA6001E
TABLE OF CONTENTS
SYMBOL LEGEND .............................................................................. 2
SPECIAL NOTES ................................................................................ 5
LABEL LOCATION ............................................................................ 6
PRODUCT PARAMETERS .................................................................. 7
Patient Lift RPA600-1E..............................................................................................................................7
Reliant Scale RLS6 ......................................................................................................................................7
SECTION 1—GENERAL GUIDELINES ................................................... 8
Weight Limitation.......................................................................................................................................8
Assembling the Lift.....................................................................................................................................8
Using the Sling .............................................................................................................................................8
Operating the Lift .......................................................................................................................................9
Lifting the Patient........................................................................................................................................9
Transferring the Patient ..........................................................................................................................10
Performing Maintenance .........................................................................................................................10
SECTION 2— ASSEMBLY .................................................................. 11
Assembling the Patient Lift.....................................................................................................................11
Assembling the Mast to the Base .....................................................................................................11
Assembling the Electric Actuator to the Boom............................................................................12
Installing the Shifter Handle ...................................................................................................................13
Attaching the Battery Charger Mounting Bracket to the Wall .....................................................13
SECTION 3—OPERATION ................................................................ 14
Introduction...............................................................................................................................................14
Operating the Patient Lift.......................................................................................................................14
Locking/Unlocking the Rear Casters...............................................................................................14
Raising/Lowering the Patient Lift......................................................................................................14
Using the Emergency Stop.................................................................................................................14
Closing/Opening the Legs ..................................................................................................................16
Closing the Legs .............................................................................................................................16
Opening the Legs ...........................................................................................................................16
Activating a Mechanical Emergency Release..................................................................................17
Primary Emergency Release .........................................................................................................17
Secondary Emergency Release ....................................................................................................17
Charging the Battery................................................................................................................................18

TABLE OF CONTENTS
Electric Portable Patient Lift - RPA6001E 4Part No 1078988
TABLE OF CONTENTS
SECTION 4—LIFTING THE PATIENT ................................................. 19
Preparing the Lift for Use .......................................................................................................................19
Positioning the Lift...............................................................................................................................19
Attaching a Sling to the Swivel Bar ..................................................................................................20
Lifting/Moving the Patient .......................................................................................................................20
SECTION 5—TRANSFERRING THE PATIENT .................................... 22
Introduction...............................................................................................................................................22
Transferring to a Commode Chair ......................................................................................................23
Transferring to a Standard Commode ................................................................................................24
Transferring to a Wheelchair ................................................................................................................24
SECTION 6— TROUBLESHOOTING ................................................... 26
SECTION 7— MAINTENANCE .......................................................... 27
Maintenance Safety Inspection Checklist ............................................................................................27
Lubricating the Lift ...................................................................................................................................28
Detecting Wear and Damage ................................................................................................................29
Cleaning the Sling and the Lift ...............................................................................................................29
Replacing the Electric Actuator.............................................................................................................29
Checking and Tightening Mast Pivot Bolt ...........................................................................................30
Replacing the Swivel Bar .........................................................................................................................30
SECTION 8— ACCESSORIES ............................................................. 32
Reliant Scale RLS6 ....................................................................................................................................32
Removing the Swivel Bar....................................................................................................................32
Installing the Reliant Scale ..................................................................................................................33
Operating the Scale..................................................................................................................................34
Keypad Functions.................................................................................................................................34
Weighing the Patient................................................................................................................................35
Replacing the Battery...............................................................................................................................36
Calibrating the Reliant Scale..............................................................................................................36
Troubleshooting........................................................................................................................................37
Display Codes.......................................................................................................................................37
LIMITED WARRANTY ..................................................................... 39

SPECIAL NOTES
Part No 1078988 5Electric Portable Patient Lift - RPA6001E
SPECIAL NOTES
Signalwordsareusedinthismanualandapplytohazardsorunsafepracticeswhich
couldresultinpersonalinjuryorpropertydamage.Refertothetablebelowfor
definitionsofthesignalwords.
NOTICE
THE INFORMATION CONTAINED IN THIS DOCUMENT IS SUBJECT TO
CHANGE WITHOUT NOTICE.
RADIO FREQUENCY INTERFERENCE
Most electronic equipment is influenced by Radio Frequency Interference (RFI).
CAUTION should be exercised with regard to the use of portable communication
equipment in the area around such equipment. If RFI causes erratic behavior, PUSH
the RED Emergency Stop Button IMMEDIATELY. DO NOT turn the Red
Emergency Stop Button OFF while transmission is in progress.
MAINTENANCE
Maintenance MUST be performed ONLY by qualified personnel.
SIGNAL WORD MEANING
DANGER Danger indicates an imminently hazardous situation which, if not avoided, will result in
death or serious injury.
WARNING Warning indicates a potentially hazardous situation which, if not avoided, could result in
death or serious injury.
CAUTION Caution indicates a potentially hazardous situation which, if not avoided, may result in
property damage or minor injury or both.
LABEL LOCATION
Electric Portable Patient Lift - RPA600-1E 6Part No 1078988
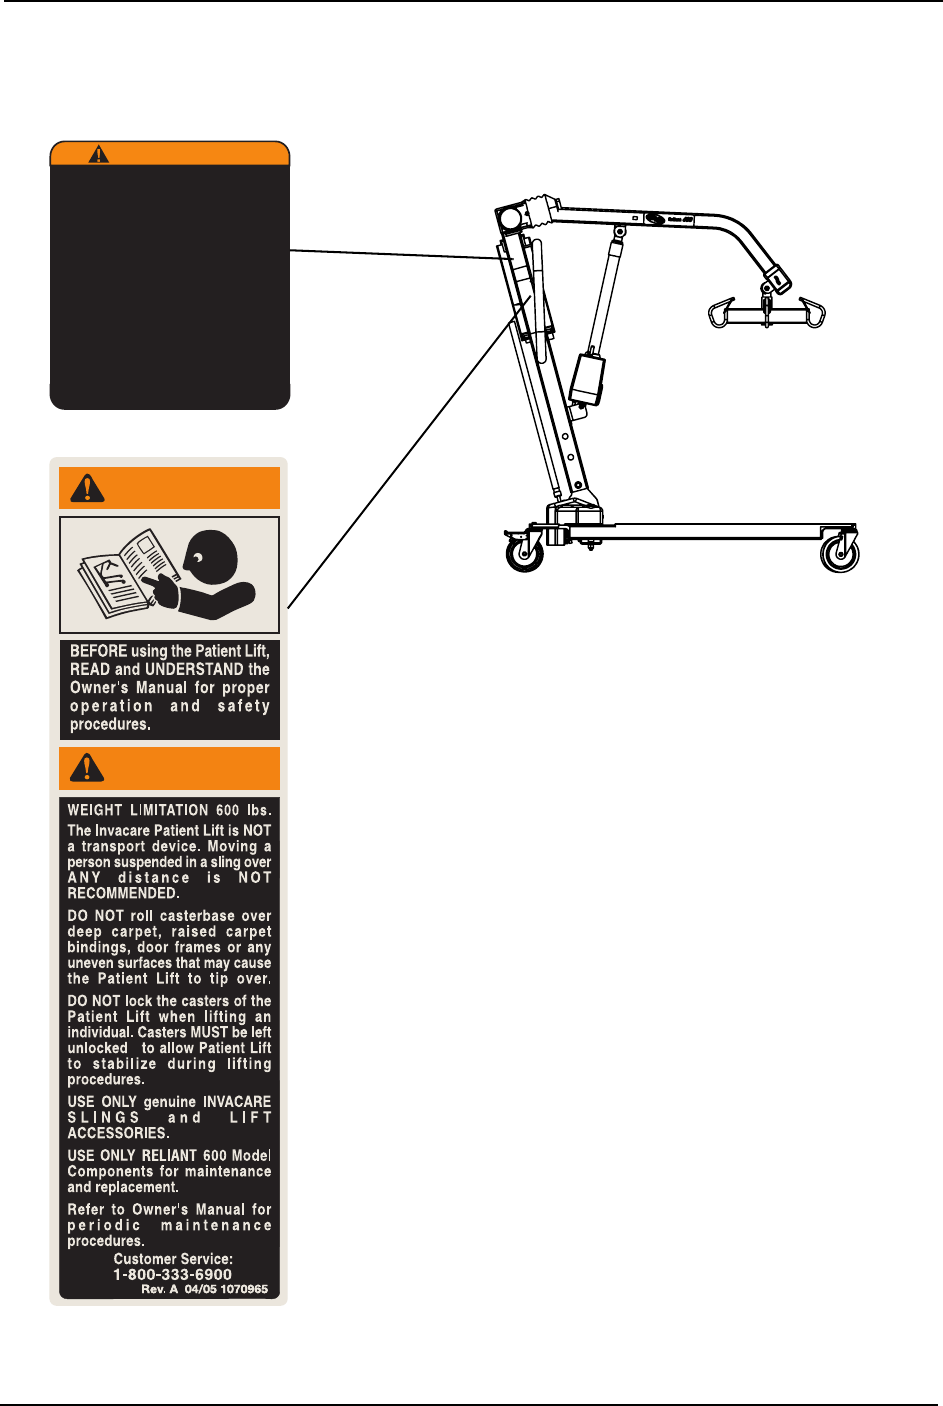
LABEL LOCATION
WARNING
Mast pivot
MUST be
tight to
ensure safe use
of your
patient lift. Bolt
MUST be
checked at
least every six
(6) months
in conjunction
with periodic
maintenance.
See Owner's Manual.
P/N 1130200 Rev. B
WARNING
WARNING

PRODUCT PARAMETERS
Part No 1078988 7Electric Portable Patient Lift - RPA6001E
PRODUCT PARAMETERS
Patient Lift RPA600-1E
*NOTE:Variesdependinguponloadandstroke.
Reliant Scale RLS6
204.5 kg Electric
Low- Profile
204.5 Electric
Standard
272.7 kg Electric
Heavy-duty
Height at Sling Hook-up - MAX.: 188 cm 193 cm 177.8 cm
Height at Sling Hook-up - MIN.: 61 cm 66 cm 76.2 cm
Base Width OPEN: 104 cm 104,1 cm 104,1 cm
Base Width CLOSED: 67,3 cm 67,3 cm 67,3 cm
Base Height (Clearance): 11,4 cm 17,3 cm 17,3 cm
Base Length: 121,9 cm 121,9 cm 121,9 cm
Caster Size (FRONT/REAR): 7,6/12,7 cm 12,7 cm 12,7 cm
Weight Capacity: 204,5 kg 204,5 kg 272,7 kg
Weight Out of Carton: 48,2 kg 48,2 kg 50,9 kg
Battery: 24V DC
(RECHARGEABLE)
24V DC
(RECHARGEABLE)
24V DC
(RECHARGEABLE)
Charger Input: 100-240V AC 100-240V AC 100-240V AC
Charger Output/Charging Time: 29,5V DC Max 6 hrs 29,5V DC Max 6 hrs 29,5V DC Max 6 hrs
Audio Low Battery Alarm: Yes Yes Yes
Motor Safety Devices: Anti-Entrapment Anti-Entrapment Anti-Entrapment
*Approx. Lifts per Charge: *100-200 Cycles
per charge
*100-200 Cycles
per charge
*100-200 Cycles
per charge
Warranty Lift/Electronics: 3 Years/1 Year 3 Years/1 Year 3 Years/1 Year
Emergency Stop Button: Yes Yes Yes
Weight Range: Up to 600 Lbs. (272.7 Kg)
Resolution: +/- 0.2 Lbs (.1 Kg)
Display: Liquid Crystal Digital
Automatic Power Down: Two (2) minutes
Size: 5-3/4 L X 3-5/8 W X 4 H
Weight: .55 Lbs
Power: Nine (9) Volt Alkaline battery (included)
Battery Life: Approximately 1500 readings
Temperature Range: 50° To 104°F (10° To 40°C)

SECTION 1—GENERAL GUIDELINES
Electric Portable Patient Lift - RPA6001E 8Part No 1078988
SECTION 1—GENERAL GUIDELINES
WARNING
SECTION 1 - GENERAL GUIDELINES contains important information for the safe
operation and use of this product.
Checkallpartsforshippingdamagebeforeusing.Incaseofdamage,DONOTusethe
equipment.ContacttheDealerforfurtherinstructions.
TheInvacarepatientliftisNOTatransportdevice.Itisintendedtotransferanindividual
fromonerestingsurfacetoanother(suchasabedtoawheelchair).Movingaperson
suspendedinaslingoverANYdistanceisNOTrecommended.
DONOTattemptanytransferwithoutapprovalofthepatient’sphysician,nurseor
medicalassistant.ThoroughlyreadtheinstructionsinthisOwner’sManual,observea
trainedteamofexpertsperformtheliftingproceduresandthenperformtheentirelift
procedureseveraltimeswithpropersupervisionandacapableindividualactingasa
patient.
InvacareStandAssistandTransferslingsarespecificallydesignedtobeusedin
conjunctionwithInvacarepatientlifts.Slingsandaccessoriesdesignedbyother
manufacturersarenottobeutilizedasacomponentofInvacare’spatientliftsystem.Use
oftheseproductsisprohibitedandwillvoidthelift’swarranty.Usetheslingthatis
recommendedbytheindividual’sdoctor,nurseormedicalassistantforthecomfortand
safetyoftheindividualthatisbeinglifted.
Weight Limitation
DONOTexceedmaximumweightlimitationofthepatientlift.Theweightlimitationfor
theElectricPortablePatientLiftis600lbs.
Assembling the Lift
DONOTovertightenmountinghardware.Thiswilldamagemountingbrackets.
Using the Sling
IndividualsthatusetheStandAssistSlingMUSTbeabletosupportthemajorityoftheir
ownweight,otherwiseinjurymayoccur.
StandAssistSlings:DONOTusethestandassistslingincombinationwiththepatientlift
asatransportdevice.Itisintendedtotransferanindividualfromonerestingsurfaceto
another(suchasabedtoawheelchair).Movingapersonusingthestandassistslingin
combinationwiththepatientliftoverANYdistanceisNOTrecommended.

SECTION 1—GENERAL GUIDELINES
Part No 1078988 9Electric Portable Patient Lift - RPA6001E
StandAssistSlings:Beforeliftingthepatient,makesurethebottomedgeofthestand
assistslingispositionedonthelowerbackofthepatientandthepatient’sarmsare
outsidethestandassistsling.
StandAssistSlings:ThebeltMUSTbesnug,butcomfortableonthepatient,otherwisethe
patientcanslideoutoftheslingduringtransfer,possiblycausinginjury.
TransferSlings:Beforeliftingthepatient,makesurethebottomedgeofthetransfersling
isatthebaseofthespineandthepatient’sarmsareoutsidethetransfersling.
TransferSlings:DONOTraisethepatienttoafullstandingpositionwhileusingthe
transfersling,otherwiseinjurymayoccur.
DONOTuseanykindofplasticbackincontinencepadorseatingcushionbetween
patientandslingmaterialthatmaycausethepatienttoslideoutoftheslingduring
transfer.
Aftereachlaundering(inaccordancewithinstructionsonthesling),inspectsling(s)forwear,
tears,andloosestitching.
Bleached,torn,cut,frayed,orbrokenslingsareunsafeandcouldresultininjury.Discard
immediately.
DONOTalterslings.
Besuretochecktheslingattachmentseachtimetheslingisremovedandreplaced,toensure
thatitisproperlyattachedbeforethepatientisremovedfromastationaryobject(bed,chair
orcommode).
Ifthepatientisinawheelchair,securethewheellocksinplacetopreventthechairfrom
movingforwardsorbackwards.
Whenconnectingslingsequippedwithcolorcodedstrapstothepatientlift,theshortestofthe
strapsMUSTbeatthebackofpatientforsupport.Usinglongsectionwillleavelittleorno
supportforpatientʹsback.Theloopsoftheslingarecolorcodedandcanbeusedtoplace
patientinvariouspositions.Thecolorsmakeiteasytoconnectbothsidesoftheslingequally.
Makesurethatthereissufficientheadsupportwhenliftingapatient.
Operating the Lift
Makesurethereisanaudibleclickwhenmountingbatteryonthebatterychargerto
confirmpropermounting.Otherwise,injuryordamagemayoccur.
Usethehandlestopushorpullthepatientlift.
Lifting the Patient
Beforepositioningthelegsofthestandupliftaroundthepatient,makesurethatthepatient’s
feetareoutofthewayofthefootplate,otherwiseinjurymayoccur.
Adjustmentsforsafetyandcomfortshouldbemadebeforemovingthepatient.Patientʹsarms
shouldbeoutsideoftheslingstraps.

SECTION 1—GENERAL GUIDELINES
Electric Portable Patient Lift - RPA6001E 10 Part No 1078988
Beforeliftingapatientfromastationaryobject(wheelchair,commodeorbed),slightlyraise
thepatientoffthestationaryobjectandcheckthatallslingattachmentsaresecure.Ifany
attachmentisnotcorrect,lowerthepatientandcorrecttheproblem,thenraisethepatientand
checkagain.
Duringtransfer,withthepatientsuspendedinaslingattachedtothelift,DONOTrollcaster
baseoverobjectssuchascarpet,raisedcarpetbindings,doorframes,oranyunevensurfaces
orobstaclesthatwouldcreateanimbalanceofthepatientliftandcouldcausethepatientlift
totipover.UsesteeringhandleonthemastatALLtimestopushorpullthepatientlift.
InvacarerecommendslockingtherearswivelcastersONLYwhenpositioningorremoving
thesling(standassistortransfer)fromaroundthepatient.
InvacaredoesNOTrecommendlockingoftherearcastersofthepatientliftwhenliftingan
individual.Doingsocouldcausethelifttotipandendangerthepatientandassistants.
InvacareDOESrecommendthattherearcastersbeleftunlockedduringliftingproceduresto
allowthepatientlifttostabilizeitselfwhenthepatientisinitiallyliftedfromachair,bedor
anystationaryobject.
Transferring the Patient
Beforetransferring,checkthattheproduct’sweightcapacitycanwithstandthepatientʹs
weight.
WheelchairwheellocksMUSTbeinalockedpositionbeforeloweringthepatientintothe
wheelchairfortransport.
Performing Maintenance
Regularmaintenanceofpatientliftsandaccessoriesisnecessarytoassureproperoperation.
Afterthefirst12monthsofoperation,inspectallpivotpointsandfastenersforwear.Ifthe
metalisworn,thepartsMUSTbereplaced.Performthisinspectioneverysixmonths
thereafter.
DONOTovertightenmountinghardware.Thiswilldamagemountingbrackets.
Castersandaxleboltsrequireinspectionseverysixmonthstocheckfortightnessandwear.
SECTION 2—ASSEMBLY
Part No 1078988 11 Electric Portable Patient Lift - RPA600-1E
SECTION 2—ASSEMBLY
Assembling the Patient Lift
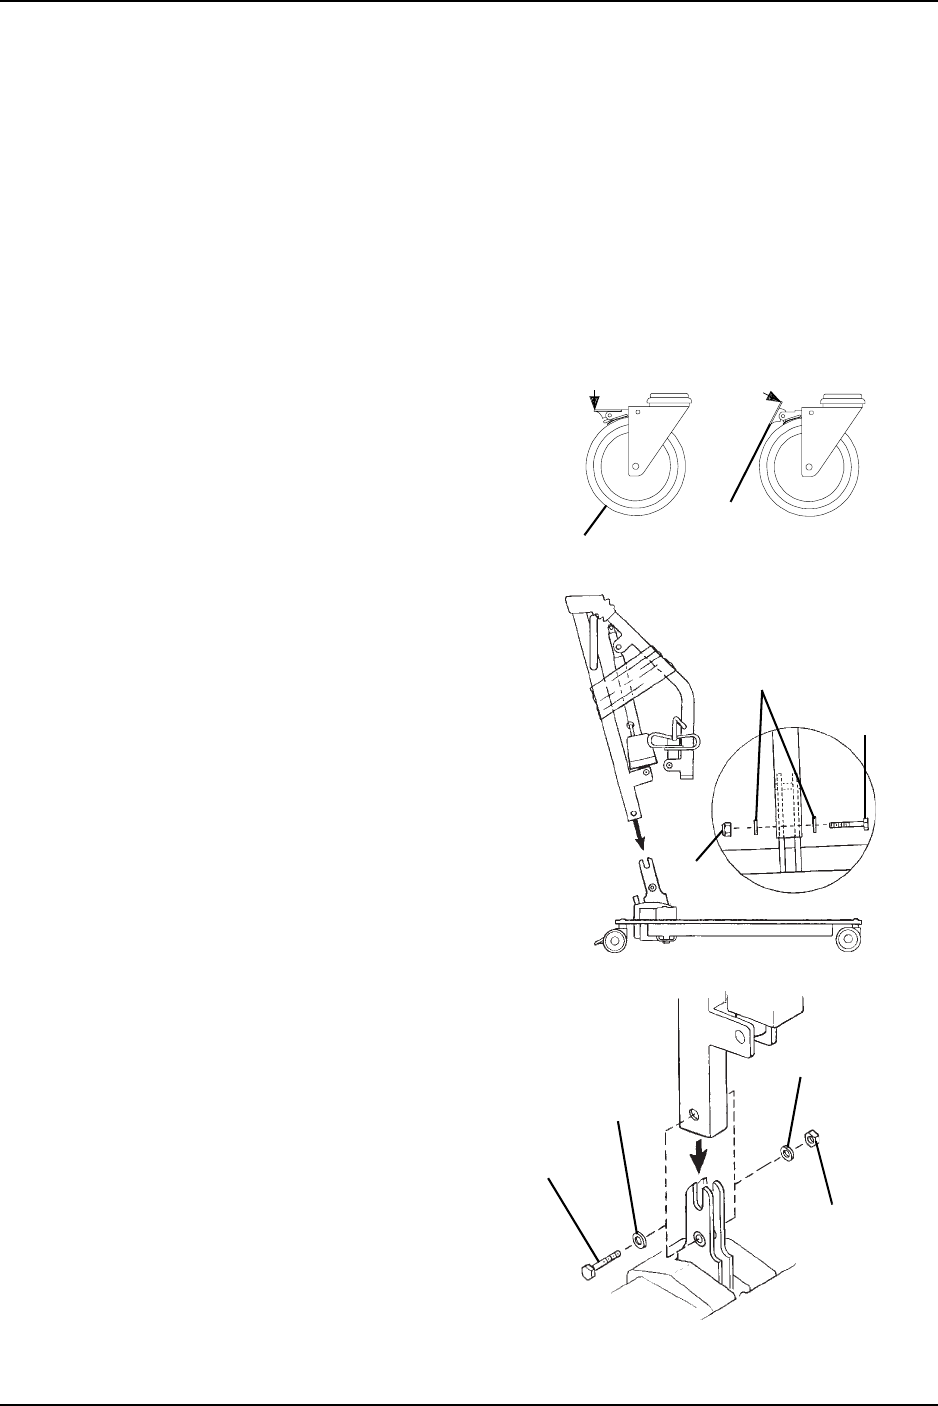
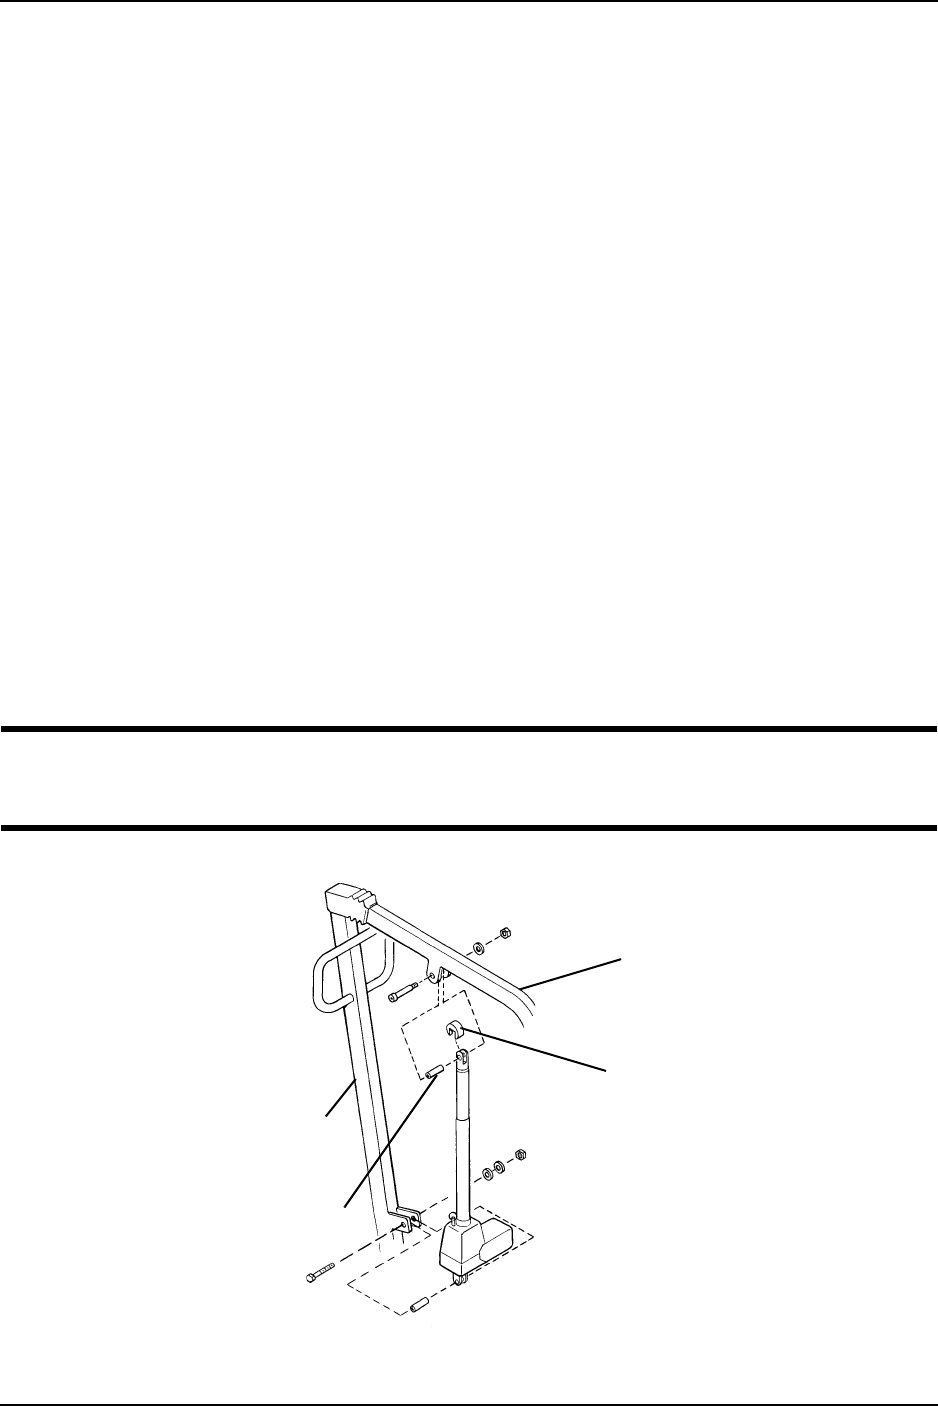
Assembling the Mast to the Base
NOTE:Themastassemblymayberemovedfrom
thebaseforstorageortransporting.Themast
assemblyMUSTbeproperlysecuredtothebase
assemblybeforeuse.
NOTE:Forthisprocedure,referto
FIGURE 2.1.
1. Putthebaseonalevelsurfacesoall
castersmakecontactwiththefloor.
2. Locktherearcasters(Detail“A ” ) .
3. Removetheshoulderbolt,nutand
washer,thatsecuresthemasttothebase.
4. PutthemastintotheU‐shapedcut‐outin
thebase.
5. Whilesupportingthemast,insertthe
shoulderboltthroughthebase,mastand
washers.
6. Securethemastinplacewithanut.
FIGURE 2.1 Assembling the Mast to the Base
Washers Shoulder
Bolt
Nut
Step Here
to Lock
Locking
Lever
DETAIL “A” -
LOCKING/UNLOCKING REAR CASTERS
Caster
Washer
Shoulder
Bolt
Nut
Step Here to
Unlock
Washer
SECTION 2—ASSEMBLY
Electric Portable Patient Lift - RPA600-1E 12 Part No 1078988
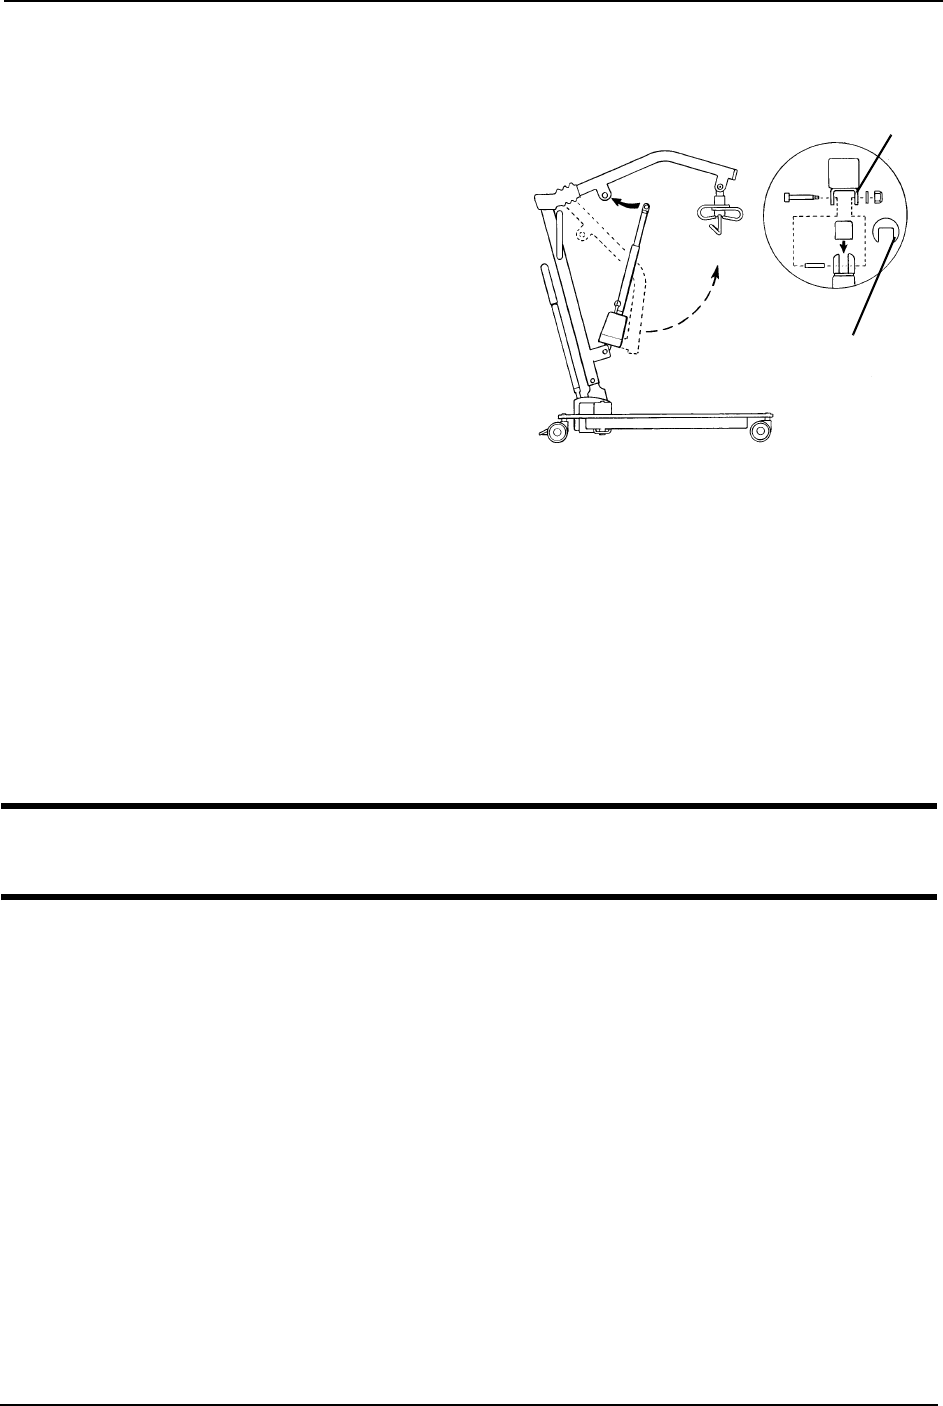
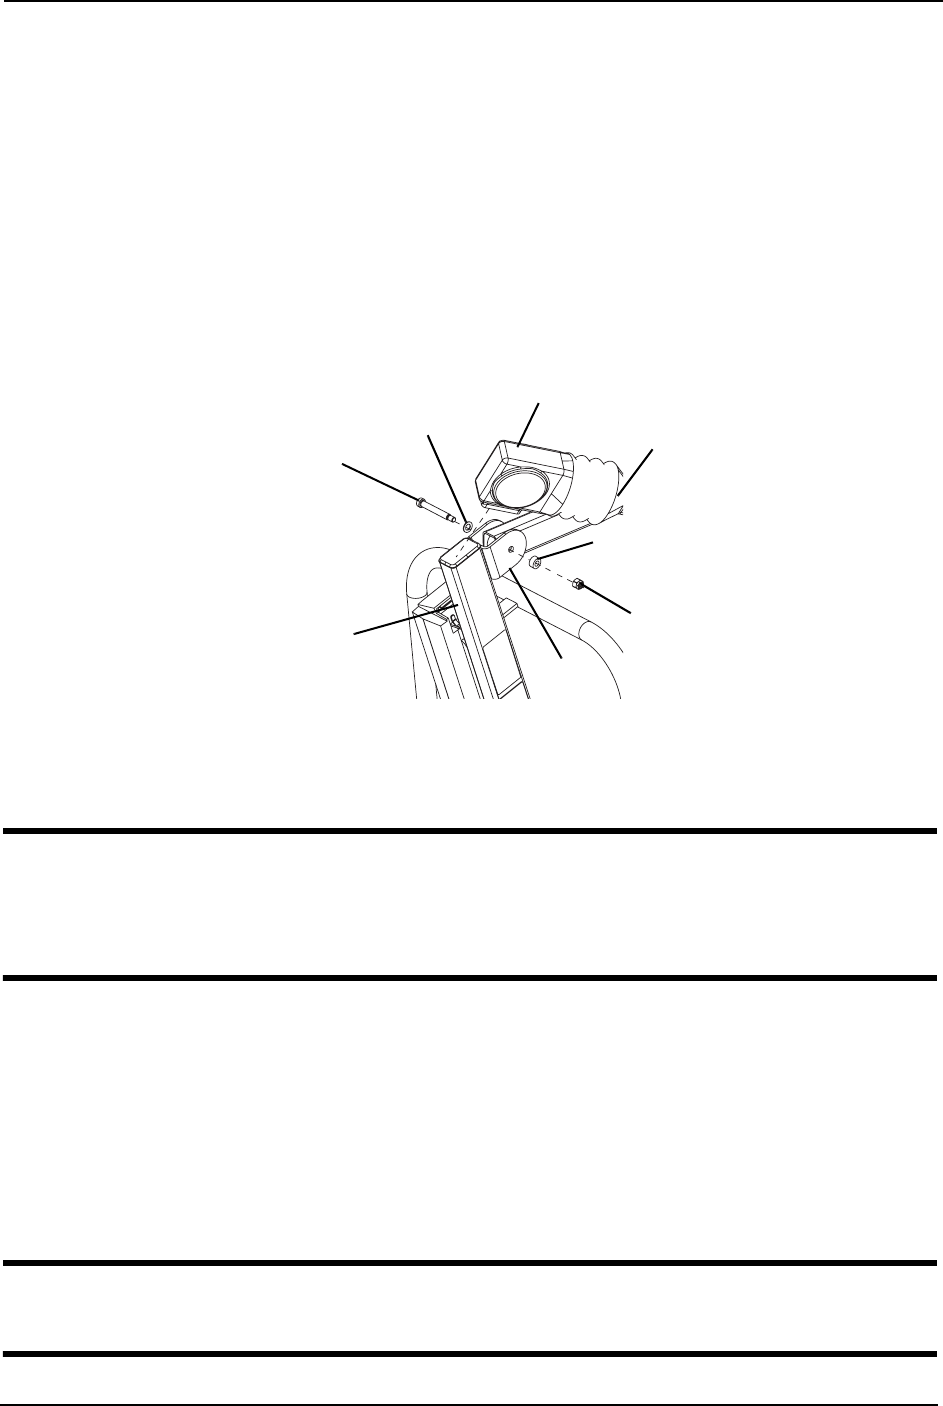
Assembling the Electric Actuator to the Boom
NOTE:Forthisprocedure,refertoFIGURE 2.2.
1. Removetheshoulderbolt,washerand
nutfromthemountingbracketonthe
boomassembly.
2. Unpackthepinchguardfromthepatient
liftcarton.
NOTE:Thebottomoftheelectricactuator
assemblywillalreadybeassembledtothemast
mountingbracket.
3. Cuttheplastic‐wrapthatsecuresthe
boomandmasttogether.
4. Lift‐upontheboomandplaceitonyour
leftshoulder.FIGURE 2.2 Assembling the Electric Actuator
to the Boom
5. Lettheactuatorrestonyourright‐sideofyourchestandrotatetheshaftextensionofthe
actuatorassemblyuntilitlines‐upwiththemountingholesintheboomassembly.
6. Placethepinchguardovertheshaftextensionoftheactuator.
7. Aligntheholesoftheboomassemblymountingbracketwiththoseoftheactuatorand
insertthebolt.Securewithnut.
NOTE:Besurethattheboltiscompletelythroughtheholesoftheboomassemblymountingbracketand
theactuatorassembly.Theboomassemblywillpivoteasilyifthemountinghardwareisalignedproperly
whentheboomassemblyissecuredtothemast.
CAUTION
DO NOT overtighten the nut and bolt. This damages the mounting bracket.
8. Plugintheelectricalconnectorsfromtheelectricactuatortothebottomofthebattery
assembly.
9. Plugthependantcontrolintothebottomofthebatteryassembly.
NOTE:Thebottomoftheactuatorassemblywillalreadybeassembledtothemastmountingbracket.
Pinch Guard
NOTE: Turn 90°
Mounting Bracket
SECTION 2—ASSEMBLY
Part No 1078988 13 Electric Portable Patient Lift - RPA600-1E
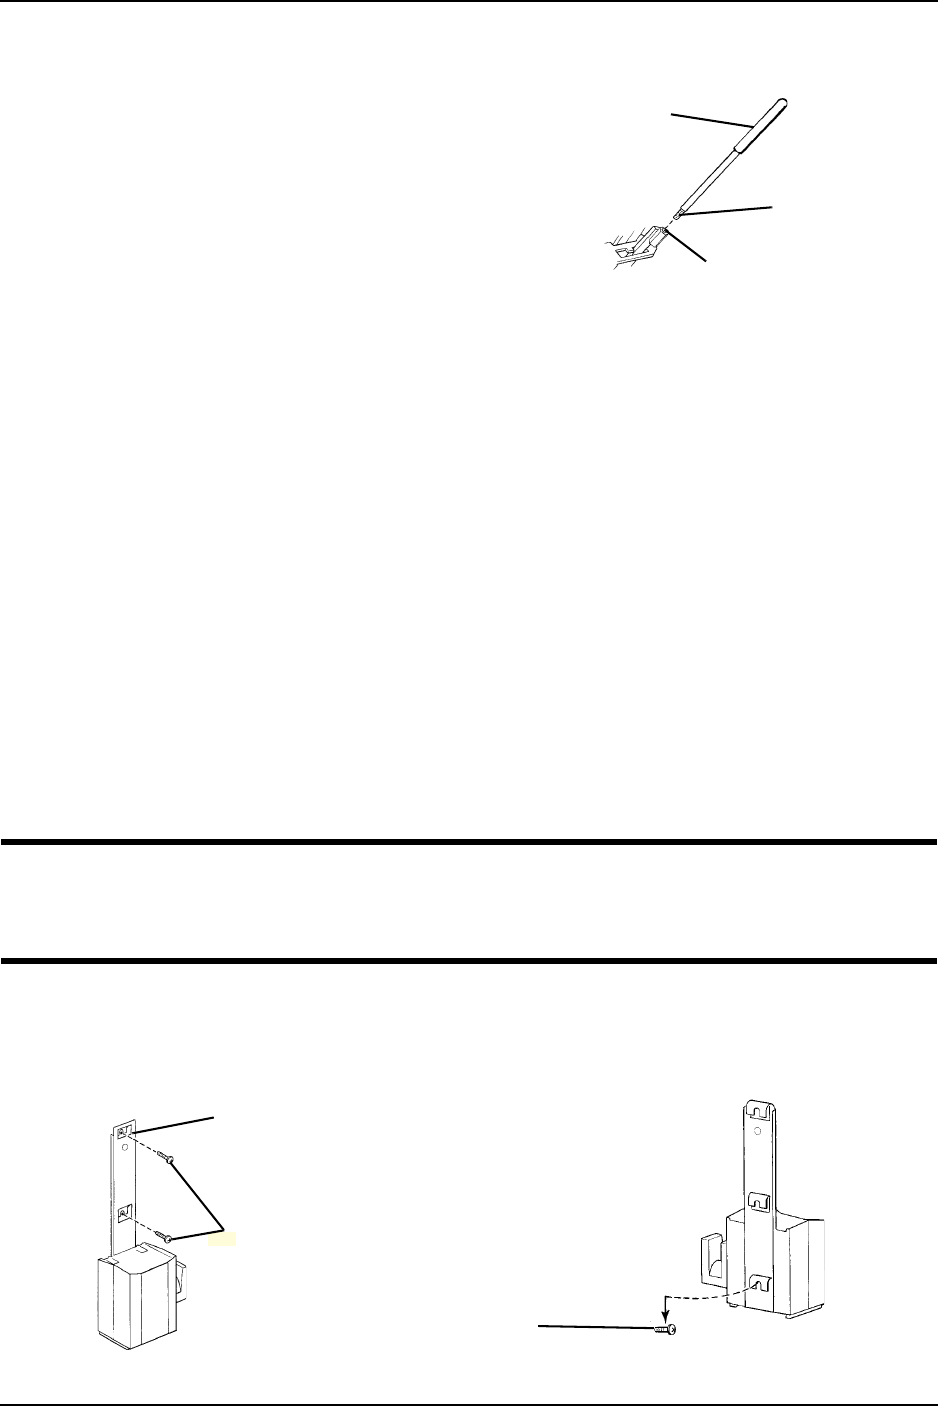
Installing the Shifter Handle
NOTE:Forthisprocedure,referto
FIGURE 2.3.
1. Line‐uptheshifterhandlethreadswith
threadedopeninginthebase.
2. Turntheshifterhandleclockwiseand
securelytightenintothebase.
FIGURE 2.3 Installing the Shifter Handle
Attaching the Battery Charger Mounting Bracket to the
Wall
NOTE:Forthisprocedure,refertoFIGURE 2.4.
1. Placethebatterychargermountingbracketonthewallatthedesiredposition.
2. Withapencil,markthemiddleholeposition.
3. Measuredown6½inchesfromthepencilmarkanddrillonemountinghole.
4. Installthebottommountingscrewuntilthereisanapproximate1/8‐inchgapbetweenthe
screwheadandthewall.
5. Putthebatterychargermountingbracketontothebottommountingscrew.
6. Drilltheothertwomountingholes.
7. Screwthemountingscrewsthroughthebatterychargermountingbracketandintothe
wall.Tightensecurely.
CAUTION
Make sure there is an audible click when mounting battery on the battery charger to
confirm proper mounting. Otherwise, injury or damage may occur.
8. Putthebatterychargerinplaceonthemountingbracket.
9. Plugthebatterychargerintoanelectricaloutlet.
NOTE:AnLEDwillilluminatewhenpowerisappliedtobatterycharger.
FIGURE 2.4 Attaching the Battery Charger Mounting Bracket to the Wall
Shifter Handle
Threads
Opening in Base
Mounting Bracket
Mounting
Screws
Bottom Mounting Screw

SECTION 3—OPERATION
Electric Portable Patient Lift - RPA600-1E 14 Part No 1078988
SECTION 3—OPERATION
Introduction
WARNING
DO NOT attempt to transfer a patient without approval of the patient’s physician,
nurse, or medical assistant. Thoroughly read the instructions in this owner’s manual,
observe a trained team of experts performing the lifting procedures and then perform
the entire lift procedure several times with proper supervision and a capable individual
acting as a patient.
The legs of the patient lift MUST be in the maximum open position for optimum stabil-
ity and safety. If it is necessary to close the legs to maneuver the patient lift under a bed,
close the legs only as long as it takes to position the patient lift over the patient and lift
the patient off of the bed surface. When the legs of the patient lift are no longer under
the bed, return the legs to the maximum open position.
NOTE:Invacarerecommendsthattwoassistantsbeusedforallliftingpreparationandtransferringto/
fromprocedures;however,thepatientliftcanbeoperatedbyoneassistant.Theuseofthepatientliftby
oneassistantshouldbebasedontheevaluationofthehealthcareprofessionalforeachindividualcase.
Operating the Patient Lift
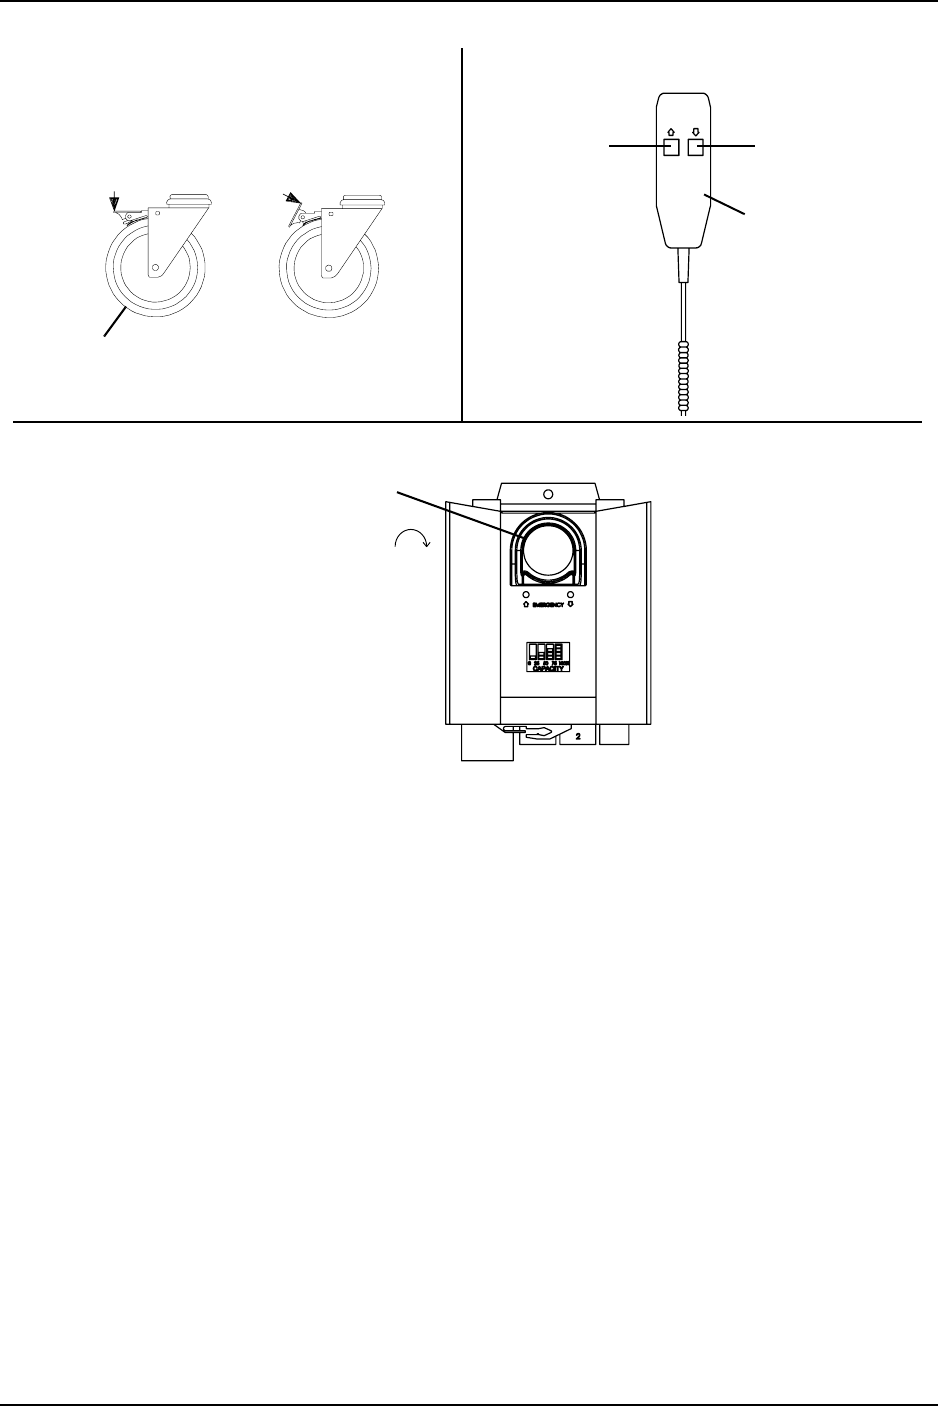
Locking/Unlocking the Rear Casters
NOTE:Forthisprocedure,refertoDetailAofFIGURE 3.1.
•ToLocktheCaster:Pushtabdown.
•ToUnlocktheCaster:Pushtabup.
Raising/Lowering the Patient Lift
NOTE:Forthisprocedure,refertoDetailBofFIGURE 3.1.
•ToRaisethePatientLift:Presstheup(Ï) buttononthehandcontrol.
NOTE:Ifthepatientliftisraisedtothehighestlevel,itmaybenecessarytopulldowngentlyonthelift
armsbeforethemastwillbegintolower.Pulldowngentlyonbotharmsatthesametimetoavoid
makingtheliftunstable.
•ToLowerthePatientLift:Pressthedownbutton(Ð) onthehandcontrol.
Using the Emergency Stop
NOTE:Forthisprocedure,refertoDetailCofFIGURE 3.1.
•PushtheREDemergencybuttonintostoptheliftarmsfromraisingorlowering.
•Toreset,rotatetheemergencybuttonclockwise.
SECTION 3—OPERATION
Part No 1078988 15 Electric Portable Patient Lift - RPA600-1E
FIGURE 3.1 Operating the Patient Lift
DETAIL “B” - HAND CONTROL DETAILS
DETAIL “C” - EMERGENCY STOP
Down Button
Up Button
Hand Control
Emergency Button
Push in to stop,
turn clockwise
to reset.
Step Here
to Lock
Locking
Lever
DETAIL “A” -
LOCKING/UNLOCKING REAR CASTERS
Caster
Step Here to
Unlock

SECTION 3—OPERATION
Electric Portable Patient Lift - RPA600-1E 16 Part No 1078988
Closing/Opening the Legs
NOTE:Forthisprocedure,refertoFIGURE 3.2.
WARNING
If the shifter handle is NOT positioned completely into its mounting slot, DO NOT use
the patient lift until the shifter handle is properly seated and the legs of the patient lift
are locked in place. Otherwise, injury and/or damage may occur.
WARNING
The legs of the lift must be in the maximum open position and the shifter handle locked
in place for optimum stability and safety. If it is necessary to close the legs of the lift to
maneuver the lift under a bed, close the legs of the lift only as long as it takes to position
the lift over the patient and lift the patient off the surface of the bed. When the legs of
the lift are no longer under the bed, return the legs of the lift to the maximum open
position and lock the shifter handle immediately.
Closing the Legs
1. Standattherearofthepatientliftandgrasptheshifterhandlewithonehandand
placetheoppositehandonthesteeringhandleofthemastforbalance.
NOTE:TheshifterhandleMUSTlockintoitsmountingslottolockthelegsinthefullclosed
position.
2. Pulltheshifterhandleawayfromthepatientliftandthentoyourleftuntilitlocksin
thenotchofthebracket(Detail“A”).
Opening the Legs
1. Standattherearofthepatientliftandgrasptheshifterhandlewithonehandand
placetheoppositehandonthesteeringhandleofthemastforbalance.
NOTE:TheshifterhandleMUSTlockintoitsmountingslottolockthelegsinthefullopen
position.
2. Pulltheshifterhandleawayfromthepatientliftandthentoyourright(Detail“B”).
FIGURE 3.2 Closing/Opening the Legs
DETAIL “A” - CLOSING THE LEGS DETAIL “B” - OPENING THE LEGS
SECTION 3—OPERATION
Part No 1078988 17 Electric Portable Patient Lift - RPA600-1E
Activating a Mechanical Emergency Release
Primary Emergency Release
NOTE:Forthisprocedure,refertoFIGURE 3.3.
NOTE:Thisprocedurewillbringtheboomdownorliftitupifthehandcontrolisnotfunctioning
properly.
Toactivatetheprimaryemergencyrelease,insertapenintotheholelabeledEmergency
UporEmergencyDownonthecontrolbox.
FIGURE 3.3 Primary Emergency Release
Secondary Emergency Release
NOTE:Forthisprocedure,refertoFIGURE 3.4.
NOTE:Allpatientliftactuatorsareequippedwithamechanicalemergencyrelease.The
mechanicalreleasewillenabletheactuatortoretractwithoutpower.
NOTE:Usetheprimaryemergencyreleasefirstbeforeusingthesecondaryemergencyrelease
procedure.Thisprocedureshouldonlybeusediftheprimaryemergencyreleaseprocedureisnot
functioningorisunreachable.
NOTE:TheliftMUSTbeunderaloadforthemechanicalreleasetofunction.
Toactivatethesecondaryrelease,pullupontheEMERGENCYringandpushdownon
theboomatthesametime.
FIGURE 3.4 Secondary Emergency Release
EMERGENCY
Emergency
Release
Hole
Control
Box
Pull UP on
EMERGENCY
Ring.
Push DOWN
on Boom
SECTION 3—OPERATION
Electric Portable Patient Lift - RPA600-1E 18 Part No 1078988
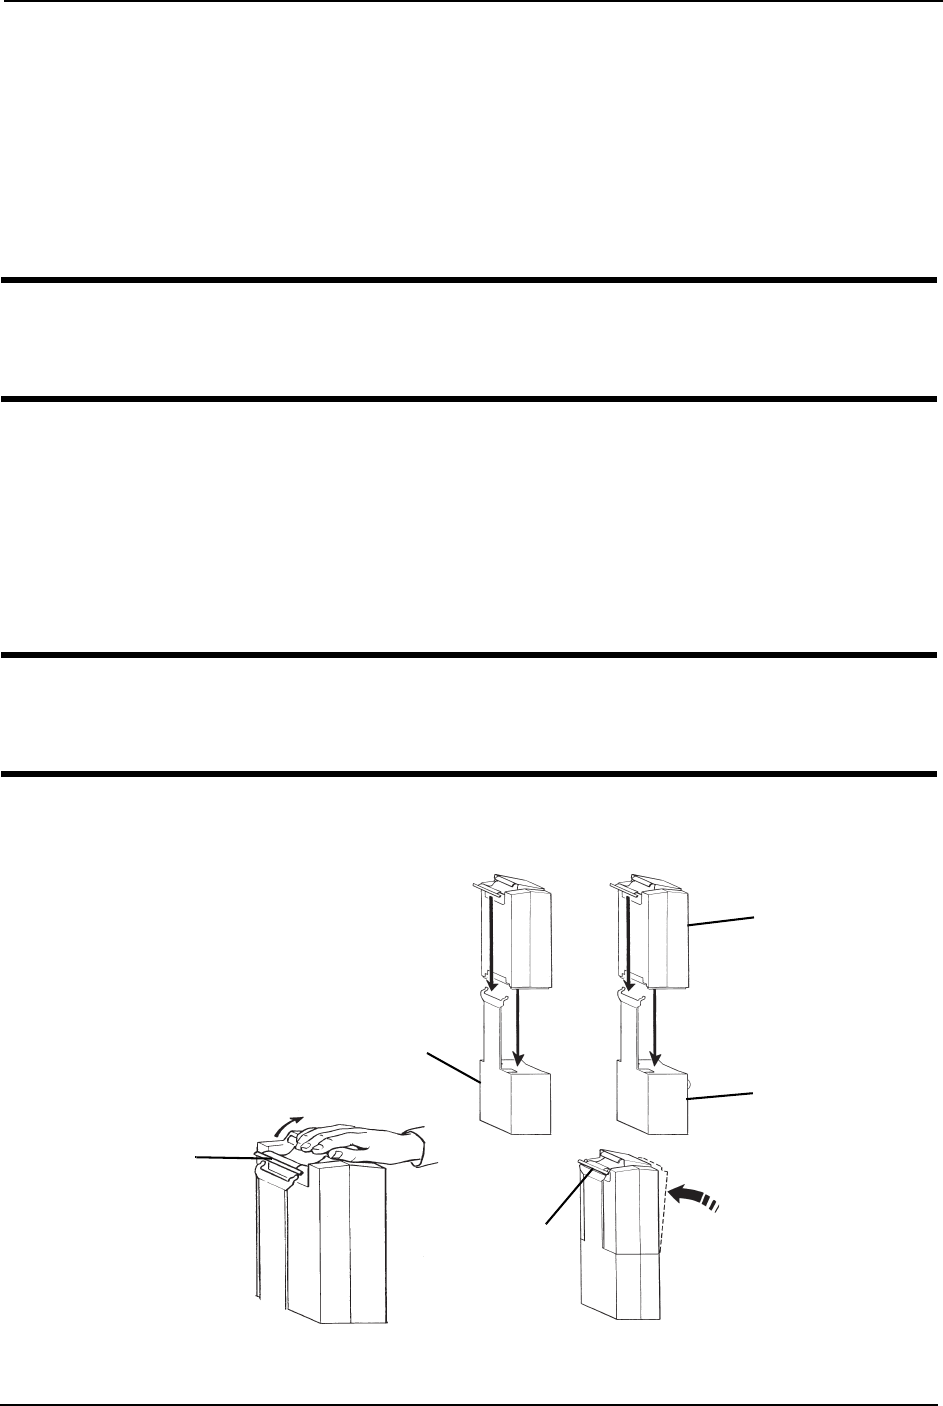
Charging the Battery
NOTE:Forthisprocedure,refertoFIGURE 3.5.
NOTE:Invacarerecommendsthebatteryberechargeddailytoprolongbatterylife.
NOTE:Anaudiblealarmwillsoundwhenbatteryislow.
1. Liftuponthehandleonthebackofthebattery.
2. Liftthebatteryupandawayfromthecontrolbox.
CAUTION
Make sure there is an audible click when mounting battery on the battery charger to
ensure proper mounting. Otherwise, injury or damage may occur.
3. Placethebatteryonthebatterycharger.Pushthetopofthebatteryagainstthemounting
bracketuntilthereisanaudibleclick.
NOTE:ThechargeLEDwillilluminate.Whencharged,theLEDwillstopilluminating.
NOTE:Itwilltakeapproximatelyfourhourstochargeabatterythatrequiresafullcharge.
4. Liftuponthehandleonthebackofthebattery.
5. Liftthebatteryupandawayfromthebatterycharger.
CAUTION
Make sure there is an audible click when mounting battery onto the control box to
ensure proper mounting. Otherwise, injury or damage may occur.
6. Placethebatteryonthecontrolbox.Pushthetopofthebatteryagainstthemounting
bracketuntilthereisanaudibleclick.
FIGURE 3.5 Charging the Battery
Battery
Charger
(STEP 3) Control Box
(STEP 6)
Audible click
when properly
installed
(STEPS 3 and 6)
Handle
(STEPS 1, 2, 4 and 5)
Battery

SECTION 4—LIFTING THE PATIENT
Part No 1078988 19 Electric Portable Patient Lift - RPA6001E
SECTION 4—LIFTING THE PATIENT
Preparing the Lift for Use
NOTE:AlthoughInvacarerecommendsthattwoassistantsbeusedforallliftingpreparation,
transferringfromandtransferringtoprocedures,ourequipmentwillpermitproperoperationby
oneassistant.Theuseofoneassistantisbasedontheevaluationofthehealthcareprofessionalfor
eachindividualcase.
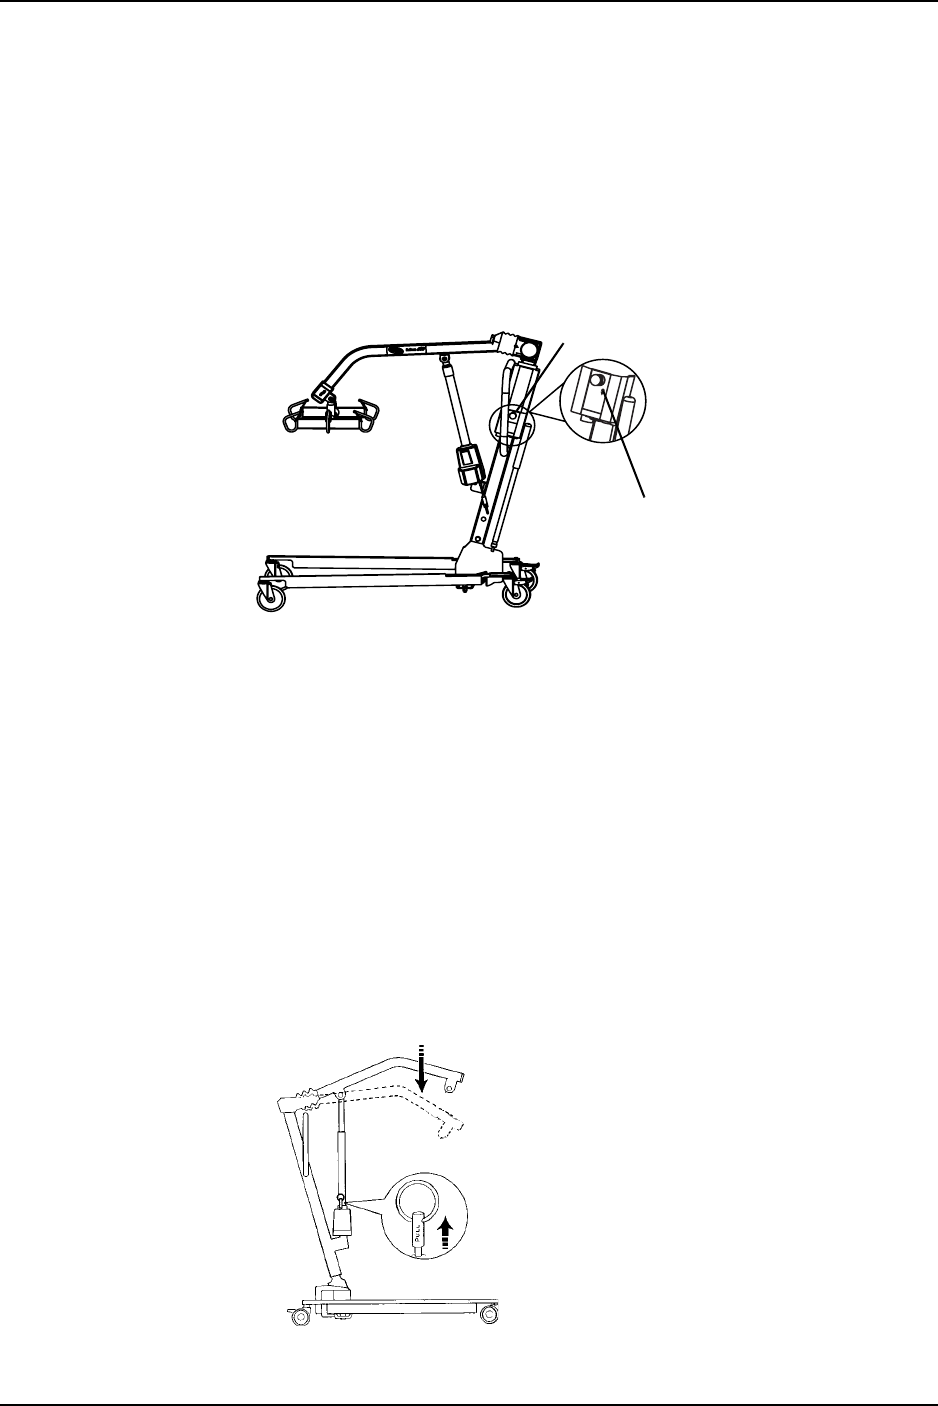
Positioning the Lift
NOTE:Forthisprocedure,refertoFIGURE 4.1.
NOTE:RefertoGeneralGuidelinesonpage 9inthismanualbeforeproceedingfurtherandobserve
allwarningsindicated.
NOTE:Beforepositioningthelegsofthepatientliftunderabed,makesurethattheareaisclear
ofanyobstructions.
WARNING
The legs of the lift must be in the maximum open position and the shifter handle
locked in place for optimum stability and safety. If it is necessary to close the legs of
the lift to maneuver the lift under a bed, close the legs of the lift only as long as it
takes to position the lift over the patient and lift the patient off the surface of the
bed. When the legs of the lift are no longer under the bed, return the legs of the lift
to the maximum open position and lock the shifter handle immediately.
1. Withthelegsofthebaseopenandlocked,usethesteeringhandletopushthepatient
liftintoposition.
2. Lowerthepatientliftforeasyattachmentofthesling.
FIGURE 4.1 Positioning the Lift

SECTION 4—LIFTING THE PATIENT
Electric Portable Patient Lift - RPA6001E 20 Part No 1078988
Attaching a Sling to the Swivel Bar
WARNING
The maximum weight capacity of the RPA600-1E patient lift is 600 lbs. DO NOT
exceed the maximum weight capacity of the patient lift otherwise, injury or damage
may occur.
Before using the sling, read and understand all operating instructions provided in
the sling owner’s manual.
Bleached, torn, cut, frayed or broken slings are unsafe and could result in injury.
Discard IMMEDIATELY. DO NOT alter slings in any way.
Invacare slings are made specifically for use with Invacare Patient Lifts. For the
safety of the patient, DO NOT use slings and patient lifts of different manufacturers.
1. Placethestrapsoftheslingoverhooksoftheswivelbar.
2. Matchthecorrespondingcolorsoneachsideoftheslingforanevenliftofthepatient.
NOTE:TheInvacareSwivelBarshavethreehookuppointsperside.
WARNING
The patient lift MUST be moved with the push handles on the mast assembly -
otherwise, injury or damage may occur.
DO NOT move the patient outside the center of gravity achieved after the patient
is suspended in the sling and the patient lift adjusts.
3. Liftthepatient.RefertoLifting/MovingthePatient.
Lifting/Moving the Patient
WARNING
DO NOT lock the rear casters of the lift when lifting an individual. Locking the rear
casters could cause the lift to tip and endanger the patient and assistants.
DO NOT move the patient if the sling is not properly connected to the hooks of the
swivel bar. When the sling is elevated a few inches off the surface of the bed and before
moving the patient, check again to make sure that the sling is properly connected to the
hooks of the swivel bar. If any attachments are NOT properly in place, lower the
patient back onto the stationary surface and correct this problem - otherwise, injury or
damage may occur.
Adjustments for safety and comfort should be made before moving the patient.
Patient's arms should be inside of the straps.
DO NOT use slings and patient lifts of different manufacturers. Invacare slings are
made specifically for use with Invacare patient lifts. Injury or damage may occur.
SECTION 4—LIFTING THE PATIENT
Part No 1078988 21 Electric Portable Patient Lift - RPA6001E
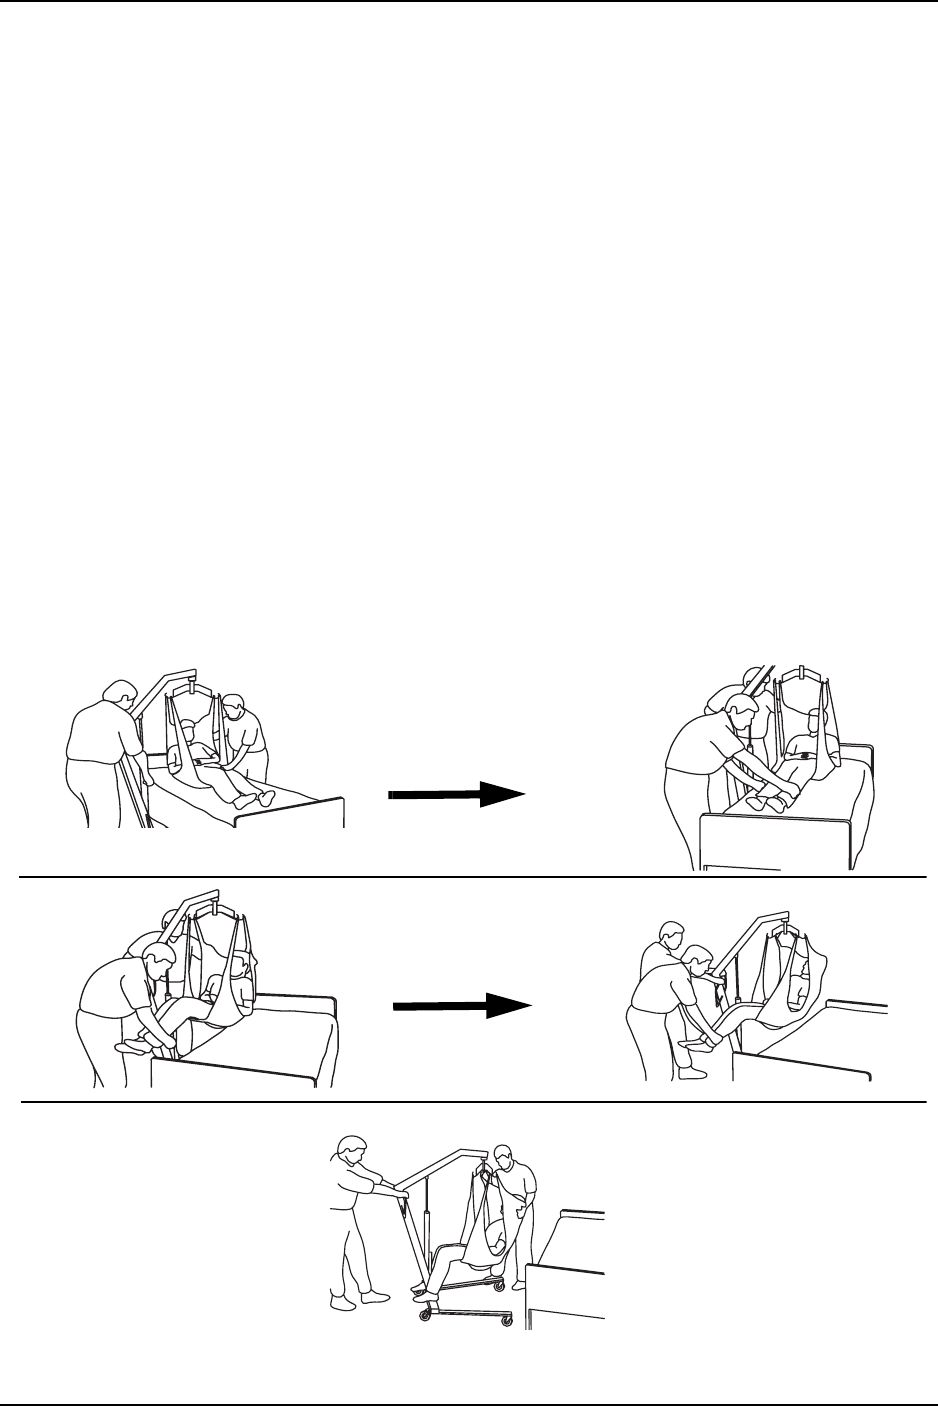
NOTE:Forthisprocedure,refertoFIGURE 4.2.
NOTE:Whenthepatientisliftedfromthebedorthefloor(withthepatient’sheadsupportedbythesling
and/oranassistant),he/shewillberaisedtoasittingposition(Detail“A”ofFIGURE 4.2).
1. Presstheupbuttononthehandcontroltoraisethepatienthighenoughtoclearthebed
surface.Thepatient’sfullbodyweightwillbesupportedbythelift.
NOTE:Theboomwillstayinthispositionuntiltheupordownbuttonsarepushedonthehandcontrol.
2. Placethepatient’sarmsinsideofthesling.
3. Whenthepatientisclearofthebedsurface,swingtheirfeetoffthebed(Detail“B”of
FIGURE 4.2).
4. Usingthehandle,movethepatientliftawayfromthebed.
5. Turnthepatientsothathe/shefacesassistantoperatingthepatientlift(Detail“C”of
FIGURE 4.2).
6. Pressthedownbuttontolowerthepatientsothathis/herfeetrestonthebaseofthelift,
straddlingthemast.
NOTE:Thelowercenterofgravityprovidesstabilitymakingthepatientfeelmoresecureandthelift
easiertomove.
7. Pushtheliftwithbothhandsfirmlyonthesteeringhandle.
FIGURE 4.2 Lifting/Moving the Patient
DETAIL “A” - LIFTING THE PATIENT
DETAIL “B” - MOVING THE PATIENT
DETAIL “C” - MOVING THE PATIENT LIFT AWAY FROM THE BED

SECTION 5—TRANSFERRING THE PATIENT
Electric Portable Patient Lift - RPA6001E 22 Part No 1078988
SECTION 5—TRANSFERRING THE
PATIENT
Introduction
WARNING
DO NOT attempt any transfer of a patient without approval of the patient's
physician, nurse, or medical assistant.
DO NOT move the patient if the sling is not properly connected to the hooks of the
swivel bar. When the sling is a few inches off the surface of the bed and before
moving the patient, check to make sure that the sling is properly connected to the
hooks of the swivel bar. If any attachments are NOT properly in place, lower the
patient back onto the stationary surface and correct this problem - otherwise, injury
or damage may occur.
Adjustments for safety and comfort should be made before moving the patient. The
patient's arms should be inside the straps.
DO NOT use slings and patient lifts of different manufacturers. Invacare slings are
made specifically for use with Invacare patient lifts. Otherwise, injury or damage
may occur.
DO NOT lock the rear casters of the patient lift when lifting an individual. Locking
the rear casters could cause the patient lift to tip and endanger the patient and
assistants.
The legs of the patient lift MUST be in the maximum open position for optimum
stability and safety. If it is necessary to close the legs to maneuver the patient lift
under a bed, close the legs only as long as it takes to position the patient lift over the
patient and lift the patient off the surface of the bed. When the legs of the patient
lift are no longer under the bed, return the legs to the maximum open position.
Be sure to check the sling attachments each time the sling is removed and replaced to
ensure that it is properly attached before the patient is removed from a bed or chair.
Theslingswithcommodeopeningsaredesignedtobeusedwitheitheracommodechair
orstandardcommode.
NOTE:Invacarerecommendsthattheslingremainconnectedtotheswivelbarhooksduringthe
patient’suseofeitherthecommodechairorstandardcommode.
NOTE:Invacarerecommendsthattwoassistantsbeusedforallliftingpreparationand
transferringto/fromprocedures;however,ourequipmentwillpermitproperoperationbyone
assistant.Theuseofoneassistantisbasedontheevaluationofthehealthcareprofessionalforeach
individualcase.
SECTION 5—TRANSFERRING THE PATIENT
Part No 1078988 23 Electric Portable Patient Lift - RPA6001E
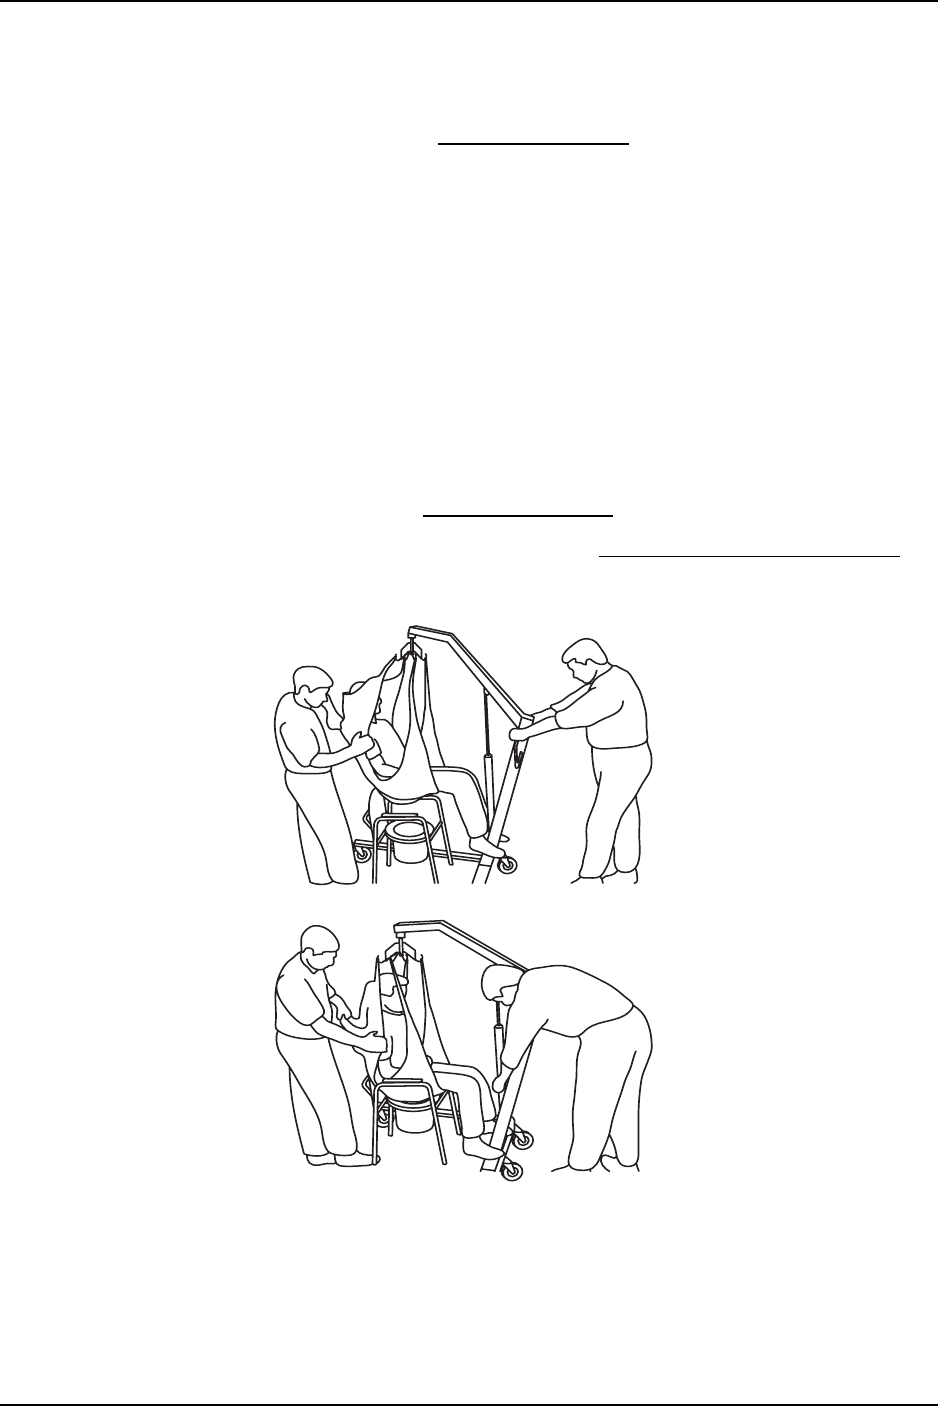
Transferring to a Commode Chair
NOTE:Forthisprocedure,refertoFIGURE 5.1.
1. Liftthepatientfromthebed.RefertoLiftingthePatientonpage 19.
2. PresstheUPbuttononthehandcontroltoelevatethepatienthighenoughtoclearthe
armsofthecommodechair.Theirweightwillbesupportedbythepatientlift.
3. Guidethepatientontothecommodechair.Thismayrequiretwoassistants.
4. PresstheDOWNbuttononthehandcontroltolowerthepatientontothecommode
chairleavingtheslingattachedtotheswivelbarhooks.
5. Whencomplete,rechecktheslingforcorrectattachments.
6. PresstheUPbuttononthehandcontroltoraisethepatientoffthecommodechair.
7. Whenthepatientisclearofthecommodesurface(usingthesteeringhandles),move
thepatientliftawayfromthecommodechair.
8. Toreturnthepatienttobed,reverseLiftingthePatientonpage 19.
9. Toreturnorplacethepatientinawheelchair,refertoTransferringtoaWheelchairon
page 24.
FIGURE 5.1 Transferring to a Commode Chair

SECTION 5—TRANSFERRING THE PATIENT
Electric Portable Patient Lift - RPA6001E 24 Part No 1078988
Transferring to a Standard Commode
NOTE:TheInvacarepatientliftisNOTintendedasatransportdevice.Movingaperson
suspendedinaslingoveranydistanceisNOTrecommended.Ifthebathroomfacilitiesarenotnear
thebedorifthepatientliftcannotbeeasilymaneuveredtowardsthecommode,thenthepatient
MUSTbetransferredtoawheelchairandtransportedtothebathroomfacilitiesbeforeusingthe
patientliftagaintopositionthepatientonastandardcommode.RefertoTransferringtoa
Wheelchair.
1. Useanemptypatientlifttocheckifthepatientliftcanmaneuveraroundthe
commode.
2. Ifthepatientliftcanmaneuveraroundthecommode,liftthepatientfromthebed.
RefertoLiftingthePatientonpage 19.
3. Transportthepatienttothebathroomfacility.
4. PresstheUP/DOWNbuttonsonthehandcontroltoelevatethepatienthighenough
toclearthecommode.Theirweightwillbesupportedbythepatientlift.
5. Guidethepatientontothecommode.Thismayrequiretwoassistants.
6. PresstheDOWNbuttononthehandcontroltolowerthepatientontothestandard
commodeleavingtheslingattachedtotheswivelbarhooks.
7. Whencomplete,rechecktheslingforcorrectattachments.
8. PresstheUPbuttononthehandcontroltoraisethepatientoffthecommode.
9. Whenpatientisclearofthecommodesurface(usingthesteeringhandle),movethe
liftawayfromthecommode.
10. Toreturnthepatienttobed,reverseLiftingthePatientonpage 19.
11. Toreturnorplacepatientinawheelchair,refertoTransferringtoaWheelchair.
Transferring to a Wheelchair
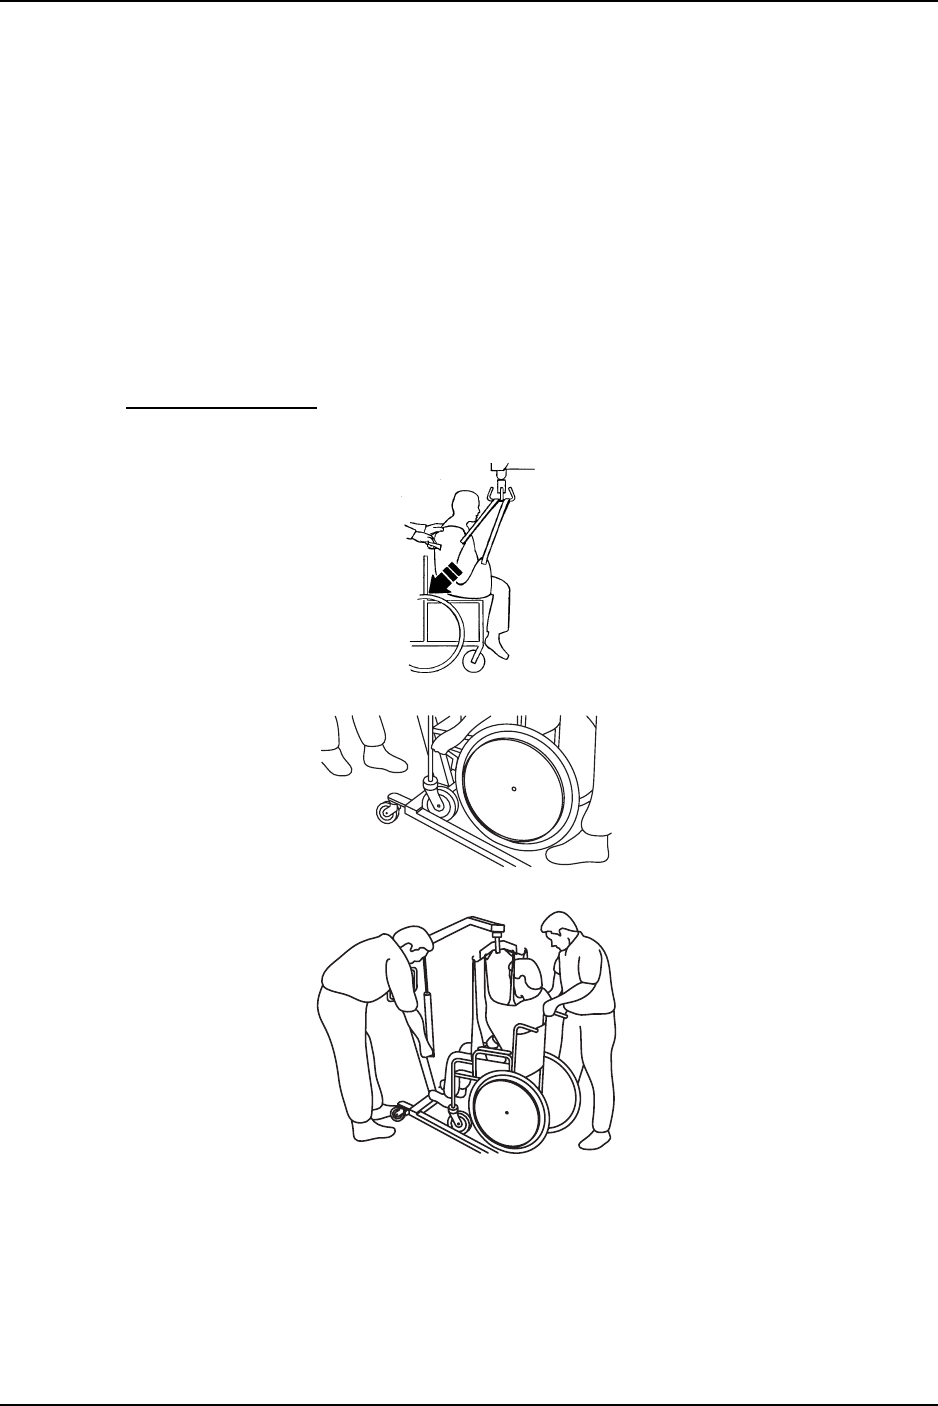
NOTE:Forthisprocedure,refertoFIGURE 5.2.
1. Liftthepatientfromthebed.RefertoLiftingthePatientonpage 19.
2. Ensurethelegsoftheliftwithpatientintheslingareintheopenposition.Pressthe
legsopenbuttonuntilinmaximumopenposition.
3. Movethewheelchairintoposition.
4. Engagethewheellocksofthewheelchairtopreventmovementofthechair.
WARNING
DO NOT place the patient in the wheelchair if the locks are not engaged. The
wheelchair wheel locks MUST be in a locked position before lowering the patient
into the wheelchair for transport. Otherwise, injury may result.
SECTION 5—TRANSFERRING THE PATIENT
Part No 1078988 25 Electric Portable Patient Lift - RPA6001E
5. Usethestrapsorhandlesonthesideandthebackoftheslingtoguidethepatient’s
hipsasfarbackaspossibleintotheseatforproperpositioning.
6. Positionthepatientovertheseatwiththeirbackagainstthebackofthechair.
7. BegintolowerthepatientpressingtheDOWNbuttononthehandcontrol.
8. Usetwoassistants‐Oneassistantstandsbehindthechairandtheotheroperatesthe
patientlift.Theassistantbehindthechairpullsbackonthegrabhandle(onselect
models)orsidesoftheslingtoseatthepatientwellintothebackofthechair.
NOTE:Thiswillmaintainagoodcenterofbalanceandpreventthechairfromtippingforward.
9. Leavetheslinginplaceunlessadividedlegslingwasused.Removeadividedleg
sling.
10. ReverseLiftingthePatientonpage 19toreturntotheseatingsurfaceofthe
wheelchair.
FIGURE 5.2 Transferring to a Wheelchair

SECTION 6—TROUBLESHOOTING
Electric Portable Patient Lift - RPA6001E 26 Part No 1078988
SECTION 6—TROUBLESHOOTING
NOTE:Ifproblemsarenotremediedbythesuggestedmeans,pleasecontactyourdealeror
Invacare.
SYMPTOMS FAULTS SOLUTION
Patient Lift feels loose. Mast/Base joint loose.
Tie - Rods are loose.
Refer to Assembly on page 11.
Noisy or dry sound
from pivots.
Needs lubrication. Refer to Lubricating the Lift on page 28.
Electric actuator fails to
lift when button is
pressed.
Hand-control or actuator con-
nector loose.
Battery low.
RED emergency stop button
pressed IN.
Battery not connected prop-
erly to control box.
The connecting terminals are
damaged.
Electric actuator in need of ser-
vice or load is too high.
Charge batteries. Refer to Charging the Battery
on page 18.
Rotate RED emergency stop button CLOCK-
WISE until it pops out.
Reconnect the battery to the control box. Refer
to Charging the Battery on page 18.
Replace the battery pack. Refer to Charging the
Battery on page 18.
Refer to Replacing the Electric Actuator on
page 29. Contact your Dealer.
Unusual noise from
actuator.
Actuator is worn or damaged
or spindle is bent.
Refer to Replacing the Electric Actuator on
page 29. Contact your Dealer.
Lift arms will not lower
in uppermost position.
Lift arms require a minimum
weight load to lower from the
uppermost position.
Pull down slightly on the lift arms.
Lift arms will not lower
during a power retrac-
tion.
Shoulder bolt at the junction of
the boom and mast may not be
properly installed.
Refer to Checking and Tightening Mast Pivot Bolt
on page 30.

SECTION 7—MAINTENANCE
Part No 1078988 27 Electric Portable Patient Lift - RPA600-1E
SECTION 7— MAINTENANCE
Maintenance Safety Inspection Checklist
*NOTE:Forindividualhomeuse,afullinspectionisrequiredpriortoeachnewuser.
**NOTE:Regularcleaningwillreveallooseorwornparts,enhancesmoothoperationandextend
thelifeexpectancyofthelift.
NOTE:Followthemaintenanceproceduresdescribedinthismanualtokeepyourpatientliftin
continuousservice.
ITEM INITIALLY
INSTITUTIONAL
INSPECT/ADJUST
MONTHLY
IN-HOME
INSPECT EVERY
SIX (6) MONTHS
THE CASTER BASE
Inspect for missing hardware.
Base opens/closes with ease.
Inspect casters and axle bolts for tightness.
Inspect casters for smooth swivel and roll.
Inspect and clear wheels of debris.
X
X
X
X
X
X
X
X
X
X
X
X
X
X
X
SHIFTER HANDLE
Operates smoothly.
Locks adjustable base whenever engaged.
X
X
X
X
X
X
THE MAST
Mast MUST be securely assembled to boom.
Inspect for bends or deflections.
X
X
X
X
X
X
THE BOOM
Check all hardware and swivel bar supports.
Inspect for bends or deflections.
Inspect bolted joints of boom for wear.
Inspect to ensure that the boom is centered
between the base legs.
Check the mast pivot bolt under the rubber
boot. Ensure that the bolt is tightly secured.
X
X
X
X
X
X
X
X
X
X
X
X
X
X
X
THE SWIVEL BAR
Check the bolt / hooks for wear or damage.
Check sling hooks for wear or deflection.
X
X
X
X
X
X
ELECTRIC ACTUATOR ASSEMBLY
Check for leakage.
Inspect hardware on mast and boom.
Check for wear or deterioration.
(IF DAMAGED, RETURN TO FACTORY).
Cycle to ensure smooth quiet operation.
X
X
X
X
X
X
X
X
X
X
X
X
THE PUMP HANDLE
Check for smooth operation. XX X
CLEANING
Whenever necessary. XX X
SLINGS AND HARDWARE
CHECK ALL SLING ATTACHMENTS each
time it is used to ensure proper connection and
patient safety.
Inspect sling material for wear.
Inspect straps for wear.
X
X
X
X
X
X
X
X
X

SECTION 7—MAINTENANCE
Electric Portable Patient Lift - RPA600-1E 28 Part No 1078988
TheInvacarePatientLiftisdesignedtoprovideamaximumofsafe,efficientand
satisfactoryservicewithminimumcareandmaintenance.
AllpartsoftheInvacareLiftaremadeofthebestgradesofsteel,butmetaltometal
contactwillwearafterconsiderableuse.
Thereisnoadjustmentormaintenanceofeitherthecastersorbrakes,otherthancleaning,
lubricationandcheckingaxleandswivelboltsfortightness.Removealldebris,etc.from
thewheelandswivelbearings.Ifanypartsareworn,replacethesepartsimmediately.
Ifyouquestionthesafetyofanypartofthelift,contactyourDealerimmediatelyand
advisehim/herofyourproblem.
Lubricating the Lift
NOTE:Forthisprocedure,refertoFIGURE 7.1.
TheInvacareliftisdesignedforminimummaintenance.However,asixmonthcheckand
lubricationshouldensurecontinuedsafetyandreliability.
Keepliftandslingscleanandingoodworkingorder.Anydefectshouldbenotedand
reportedtoyourdealerassoonaspossible.
ThecastersMUSTswivelandrollsmoothly.Alightgrease(waterproofautolubricant)
maybeappliedtotheballbearingswivelofthecastersonceayear.Applymore
frequentlyifthecastersareexposedtoextrememoistconditions.
RefertoFIGURE 7.1forlubricationpoints.Lubricateallpivotpoints.Wipeallexcess
lubricantfromliftsurface.
1. SwivelBar
2. BoomMountingBracket
3. Boom/MastMount
4. MastMountingBracket
FIGURE 7.1 Lubricating the Lift
1
2
3
4
SECTION 7—MAINTENANCE
Part No 1078988 29 Electric Portable Patient Lift - RPA600-1E
Detecting Wear and Damage
Itisimportanttoinspectallstressedparts,suchasslings,spreaderbarandanypivotfor
slingsforsignsofcracking,fraying,deformationordeterioration.Replaceanydefective
partsimmediatelyandensurethattheliftisnotuseduntilrepairsaremade.
Cleaning the Sling and the Lift
Theslingshouldbewashedregularlyinwatertemperatureof180°F(82°C)andabiological
solution.Asoftcloth,dampenedwithwaterandasmallamountofmilddetergent,isallthat
isneededtocleanthepatientlift.Theliftcanbecleanedwithnon‐abrasivecleaners.
Replacing the Electric Actuator
NOTE:Forthisprocedure,refertoFIGURE 7.2.
1. Removethenut,washerandshoulderboltthatsecuretheelectricactuatortothemast
mountingbracket.
2. Resttheboomonyourshoulderandremovethenut,bolt,plasticbushingandpinch
guardfromtheboommountingbracket.
3. Removetheelectricactuatorassembly.
4. Reversestepsforinstallation.
CAUTION
DO NOT overtighten the nut and bolt. This damages the mounting bracket.
FIGURE 7.2 Replacing the Electric Actuator
Boom
Pinch Guard
Bushing
Mast
SECTION 7—MAINTENANCE
Electric Portable Patient Lift - RPA600-1E 30 Part No 1078988
Checking and Tightening Mast Pivot Bolt
NOTE:Forthisprocedure,refertoFIGURE 7.3.
1. Liftupthebackoftherubberbootandslideitoffthemastalongtheboom.
2. Checkthattheboltisthroughthebracketandthelocknutistightandsecure.
3. Ifneeded,dooneormoreofthefollowing:
•tightenlocknutandback‐offthelocknut1/8ofaturn.
•replacethelocknut.
4. Repositiontherubberboot.
FIGURE 7.3 Checking and Tightening Mast Pivot Bolt
Replacing the Swivel Bar
WARNING
After the first year of use, the hooks of the swivel bar and mounting brackets of the
boom should be inspected every six months to determine the extent of wear. If
these parts become worn, replacement must be made.
NOTE:Forthisprocedure,refertoFIGURE 7.4.
1. Theswivelbarcomesattachedtotheboomwithbolt,nut,washers,andpinchguard.
NOTE:Washersshouldbeplacedagainstbothsidesoftheboommountingbrackettoeliminate
damage.
NOTE:Theswivelbarhasthreehooksonbothendstoattachtheslingthatsupportsthepatient
duringlift.
2. Removeexistinghardwareandreplacetheswivelbar.
CAUTION
DO NOT overtighten the nut and bolt. This damages the mounting bracket.
Mast
Spacer
(if equipped)
Locknut
Boom
Bolt
Washer
Rubber Boot
Bracket
SECTION 8—ACCESSORIES
Electric Portable Patient Lift - RPA6001E 32 Part No 1078988
SECTION 8—ACCESSORIES
Reliant Scale RLS6
TheReliantScaleisacompactprecisionscalesystemdesignedspecificallyforthe
InvacarePatientLiftSystem.
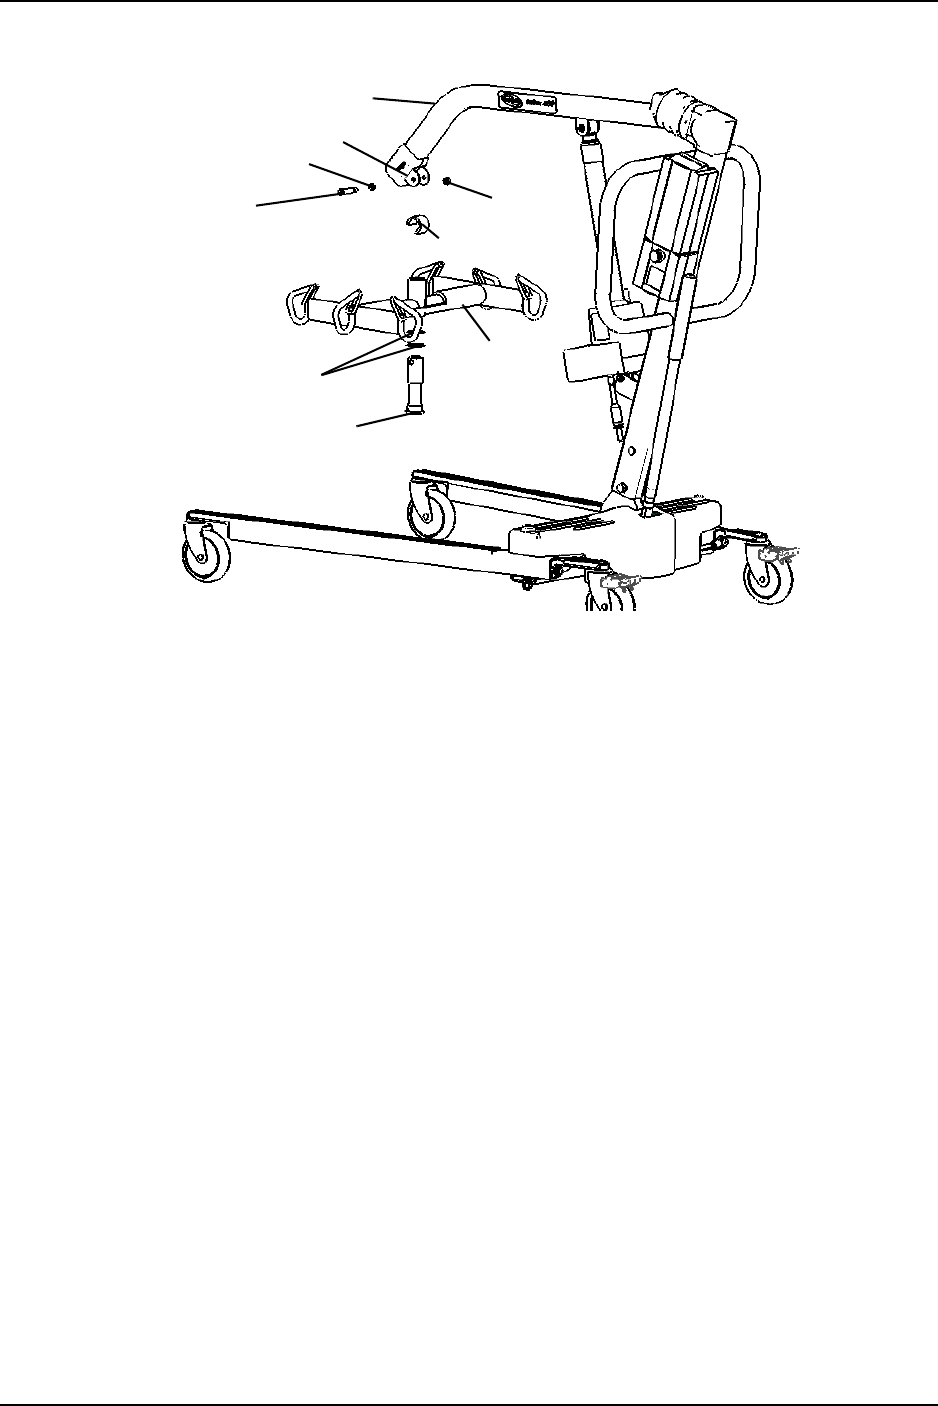
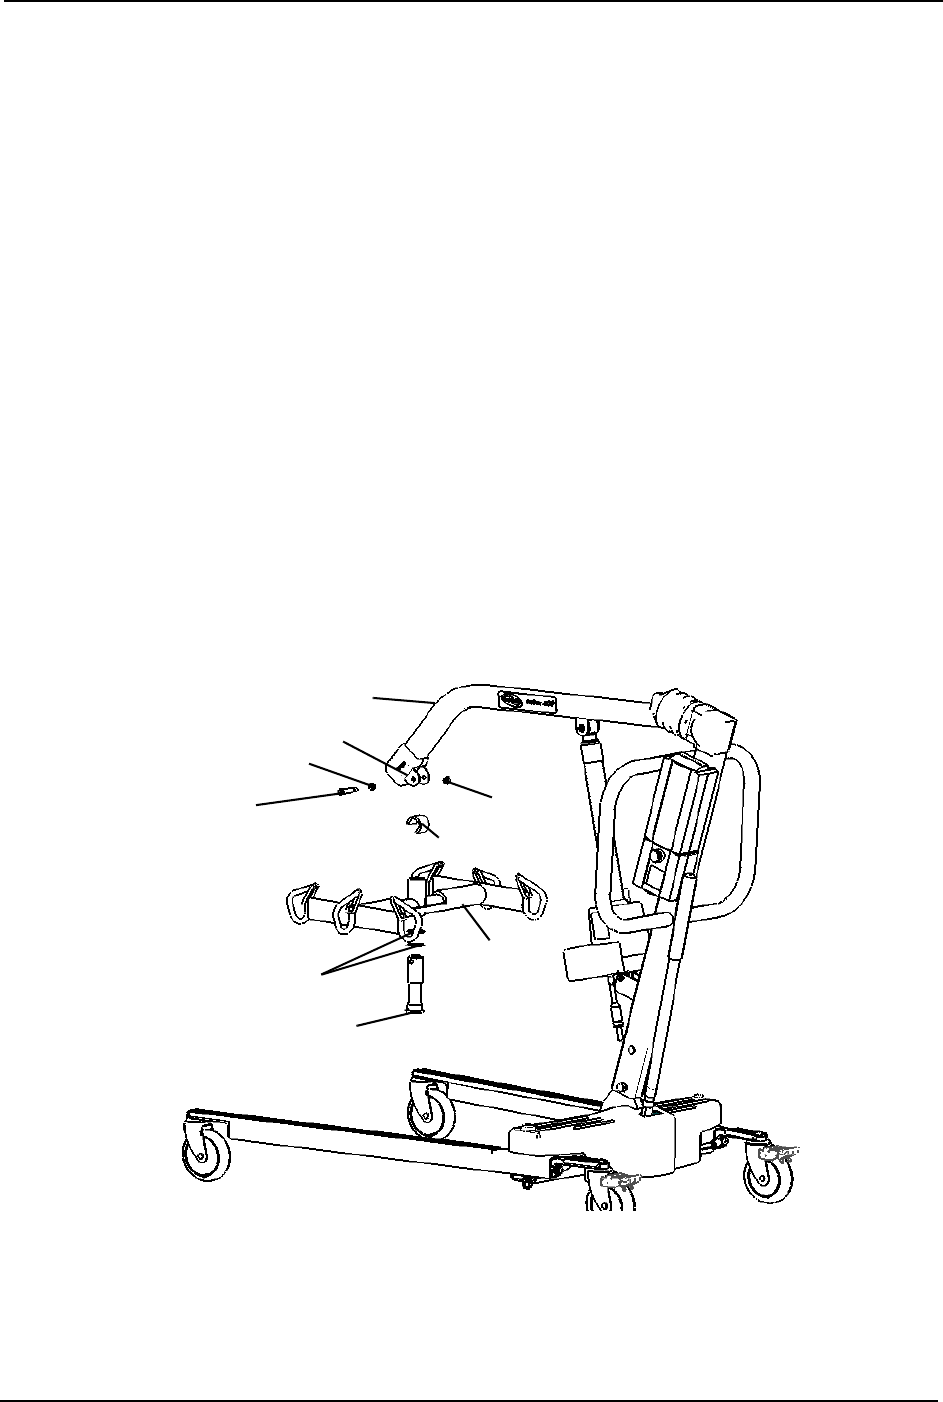
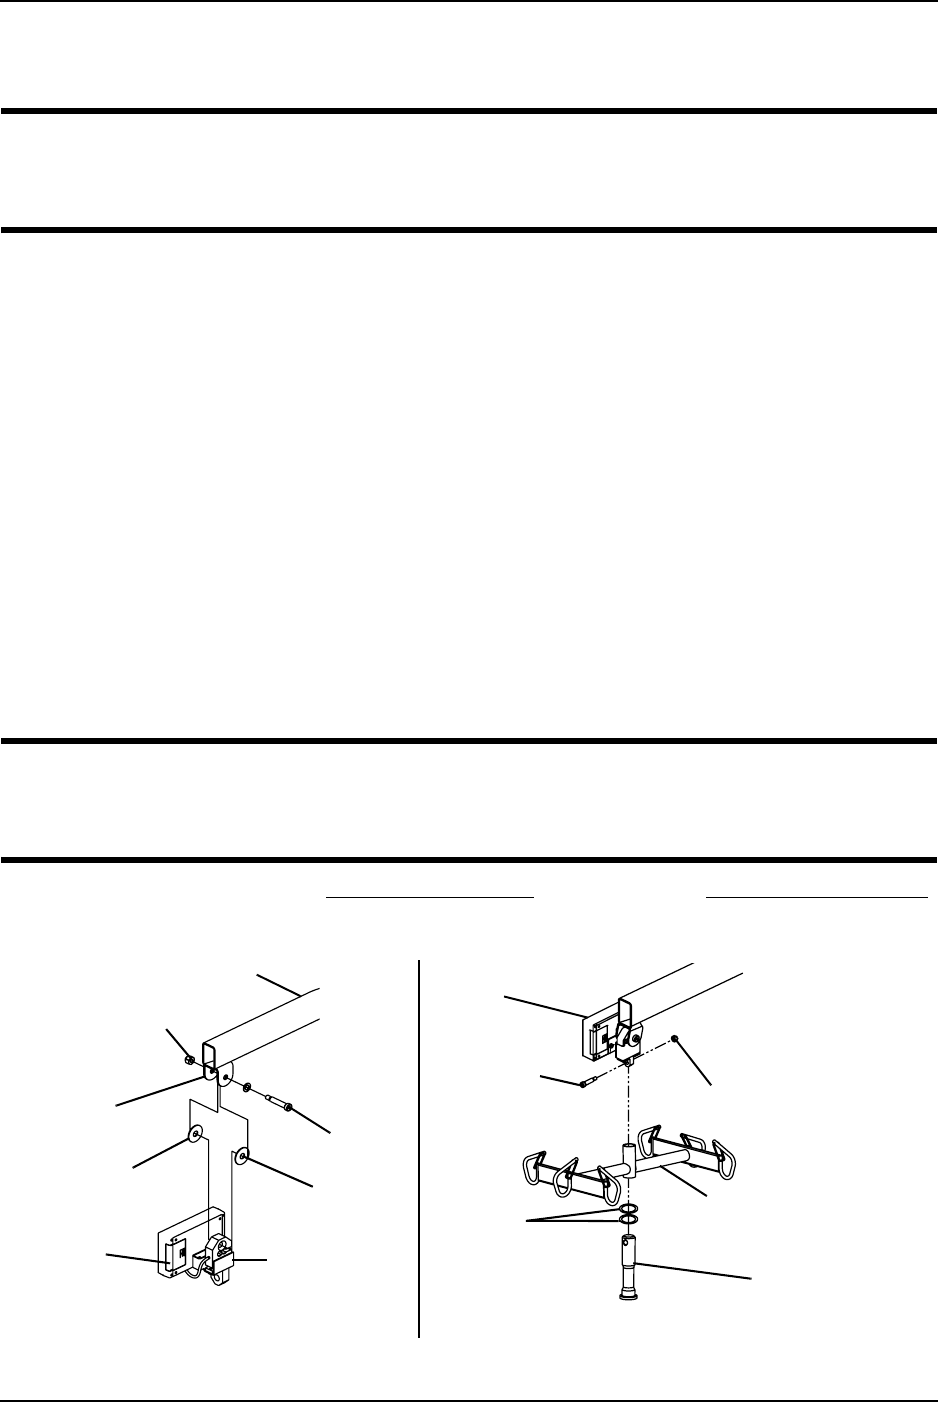
Removing the Swivel Bar
NOTE:Forthisprocedure,refertoFIGURE 8.1.
1. Removetheshoulderbolt,locknut,pinchguardandwasherwhichsecuretheswivel
bartotheboommountingbracket.
NOTE:SavetheshoulderboltandlocknuttosecuretheReliantScaletotheboom.Thepinchguard
willnotbeusedwhenthescaleisinstalled.Savethepinchguardforfutureuseoftheswivelbar
withoutscale.
NOTE:Removingtheswivelbarhardwarewillreleasetheswivelbar,twonylonwashersandthe
swivelbarpin.Savetheswivelbarpinandthetwonylonwashersforfutureuseoftheswivelbar
withoutthescale.
FIGURE 8.1 Removing the Swivel Bar
Boom
Boom Mounting Bracket
Washer
Shoulder Bolt Locknut
Swivel Bar
Swivel Bar Pin
Nylon Washers
Pinch Guard
SECTION 8—ACCESSORIES
Part No 1078988 33 Electric Portable Patient Lift - RPA6001E
Installing the Reliant Scale
NOTE:Forthisprocedure,refertoFIGURE 8.2.
WARNING
Patient and sling MUST be removed from the lift during ALL installation proce-
dures.
1. PositiontheloadcellassemblyoftheReliantScaleintotheboommountingbracket.
RefertoDetailʺAʺinFIGURE 8.2.
NOTE:Use1/4‐inchnylonwasher.
2. SecuretheReliantScaletotheboommountingbracketwithashoulderbolt,twonylon
washersandalocknut.Securelytighten.RefertoDetailʺAʺinFIGURE 8.2forwasher
orientation.
NOTE:Ensuretheshaftoftheshoulderboltpassesthroughbothsidesoftheboommounting
bracket.
3. Insertswivelbarpinwithtwonylonwashersthroughtheswivelbar.RefertoDetail
ʺBʺinFIGURE 8.2.
4. Alignthemountingholesintheswivelbarpinwiththemountingholesintheload
cellassembly.RefertoDetailʺBʺinFIGURE 8.2.
5. Secureswivelbarpintotheloadcellassemblywiththeprovidedmountingscrewand
locknut.Securelytighten.RefertoDetailʺBʺinFIGURE 8.2.
WARNING
After ANY adjustments, repair or service and BEFORE use, make sure all attaching
hardware is tightened securely - otherwise injury or damage may occur.
6. Weighthepatient.RefertoOperatingtheScaleonpage 34andWeighingthePatient
onpage 35.
FIGURE 8.2 Installing the Reliant Scale
Locknut
Swivel Bar
Nylon
Washers
Swivel Bar Pin
Mounting
Screw
Boom
Reliant
Scale
Boom
Mounting
Bracket
Reliant
Scale
Nylon
Washer
Load Cell
Assembly
Shoulder
Bolt
DETAIL “B”
DETAIL “A”
Locknut
Nylon
Washer
SECTION 8—ACCESSORIES
Electric Portable Patient Lift - RPA6001E 34 Part No 1078988
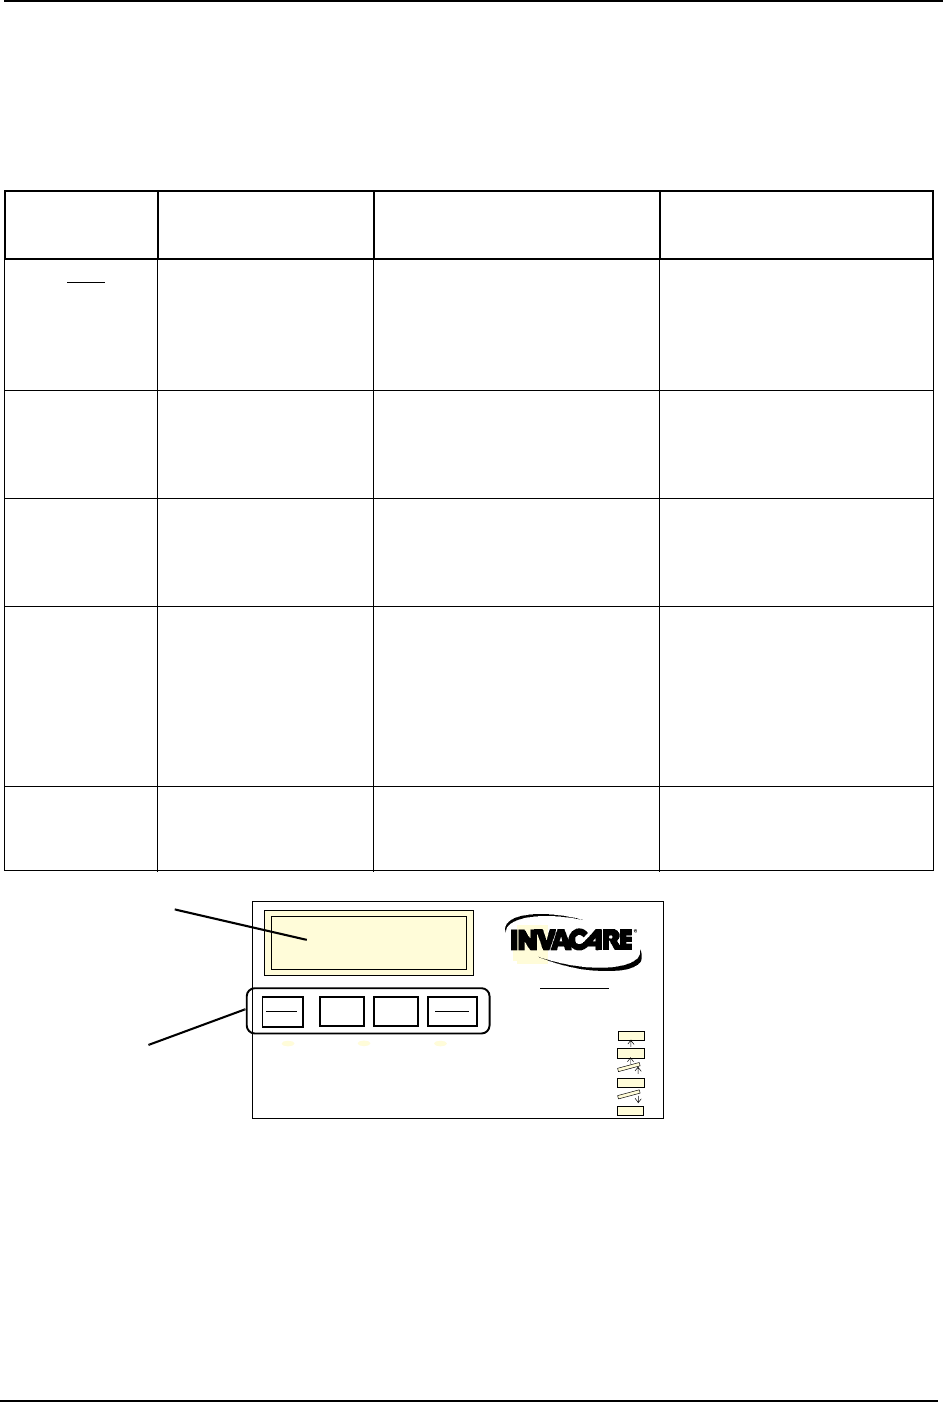
Operating the Scale
Keypad Functions
NOTE:Forthisprocedure,refertoFIGURE 8.3.
FIGURE 8.3 Operating the Scale - Keypad Functions
KEY
INDICATOR
DISPLAYED
INDICATOR
LOCATION DEFINITION
ON
OFF
OFF Center of Display Window Pressing this key will apply
power to the scale and turn
the unit on. When the scale is
already on, pressing the button
will turn the unit off.
ZERO ZERO Lower Left Corner of the Dis-
play Window
Pressing this key when the
scale is on will reset the weight
shown in the display window
to zero.
UNITS lb or kg Upper Right Corner of the Dis-
play Window
The function of this key is to
change the unit of measure-
ment from pounds (lb) to kilo-
grams (kg).
LOCK
UNLOCK
LOCK Lower Right Corner of the Dis-
play Window
This key is used to lock or
unlock a weight value in the
display window.
NOTE: Weight displayed is a
STORED weight and not the cur-
rent weight when the key is used
in the lock position.
N/A LO BAT Center of Display Window Indicator is shown in the dis-
play window to notify when
battery is low.
ON
OFF ZERO
Reliant Scale
Model RLS6
CAPACITY 600 LB, 272 KG
To Operate:
1. Attach sling.
2. Press ON key.
3. Press ZERO key.
4. Lift patient.
5. Press LOCK key
6. Lower Patient
7. Read Weight
UNITS UNLOCK
ON
By DETECTO
ZERO
LOCK
LOCK
ZERO LOCK
lb kg
WEIGHT
Operation
Keys
Display
Window

SECTION 8—ACCESSORIES
Part No 1078988 35 Electric Portable Patient Lift - RPA6001E
Weighing the Patient
WARNING
The weight capacity is limited to the lowest rated capacity of any one of the compo-
nents in use (e.g. Patient Lift, Sling or Scale). The patient's weight MUST not
exceed the lowest rated capacity of any component.
1. Attachslingstrapstotheswivelbar.Forproperattachmentinstructionsreferto
AttachingaSlingtotheSwivelBaronpage 20.
NOTE:ForimprovedaccuracyontheReliantlifts,attachallslingstrapstothecenterhookson
bothsidesoftheswivelbar.However,patientcomfortmayrequireadifferentconfigurationofsling
straps.
2. PresstheON/OFFkey.
WARNING
DO NOT operate key strokes with pointed objects (e.g. pencils, pens, fingernails,
etc.) Otherwise damage to the key pad will result.
NOTE:Thedisplaywillindicatethelastweightthatwasmeasured.ThewordʺLOCKʺwillbe
seeninthedisplaybox.
NOTE:TheZEROkeyispressedinordertoavoidcapturingtheweightoftheslingandthe
hardware.IftheZEROkeyisnotpressedtheweightoftheslingandtheweightofthehardware
willbeincludedintheweightdisplayed.NOTZERO‐INGOUTWILLGIVEAFALSE
READINGOFTHEUSERʹSTRUEWEIGHT.
3. PresstheZEROkey.WhentheZEROkeyispushedthefollowingwillhappen:
A. ThescalewillresettozeroandthewordʺZEROʺwillappearinthedisplay.
B. ThelockfunctionwillthenbeturnedoffandthewordʺLOCKʺwilldisappear
fromthedisplay.
NOTE:Thescaleisnowactiveandcontinuallyupdatingtheweightdisplay.
4. Placethepatientinthesling.ForpatientplacementinstructionsrefertoOperationon
page 14.
5. Activatetheliftmechanismtoraisethepatientuntiltheyarecompletelysupportedby
thelift.Forpatientliftinginstructions,refertoLiftingthePatientonpage 19.
6. Notetheweightdisplay.
7. WhentheweightdisplaybecomesstablepresstheLOCKbuttontolocktheweight
display.ThiswillbeindicatedbythewordʺLOCKʺappearinginthedisplaywindow.
NOTE:Shoulditbenecessarytounlocktheweightwhilethepatientisstillsupportedbythelift,
theUNLOCKbuttonmaybepressed.TheweightwillunlockandthewordʺLOCKʺwilldisappear
fromthedisplaywindow.Theweightvaluewillthenbeupdated.Oncetheweightbecomesstable
theweightcanbelockedagainbypressingtheLOCKbutton.
SECTION 8—ACCESSORIES
Electric Portable Patient Lift - RPA6001E 36 Part No 1078988
NOTE:Stablebeingdefinedastheweightfluctuatingtwotenthsofapound.Forexample,a
patientweighingonehundredpounds,thescalewillfluctuatebetween99.8and100.2untilthe
LOCKkeyispressed.Fluctuationoftheweightdisplayedisnormalasnotedabove.Pressthe
LOCKbuttontolocktheweight.
NOTE:TheUNITSbuttoncanbepressedtotogglebetweenunitsofpoundsandkilograms.This
isindicatedbylborkgappearinginthedisplaywindow.
8. Theliftmaynowbeloweredandtheslingremovedfromthepatient.
NOTE:Thepatientʹsweightwillcontinuetobeseeninthedisplaywindow.Thedisplaywillturn
offautomaticallyafteratwominuteperiodofnon‐use[nochangesinweightexceedingfivepounds
(twokilograms)].Yo ucanNOTadjustthetimedelayforautomaticshutoff.Afterthedisplayhas
turnedoff,theweightmayberecalledbypressingtheON/OFFbutton.Theunitcanbeturnedoff
bypressingtheON/OFFbuttonasecondtime.
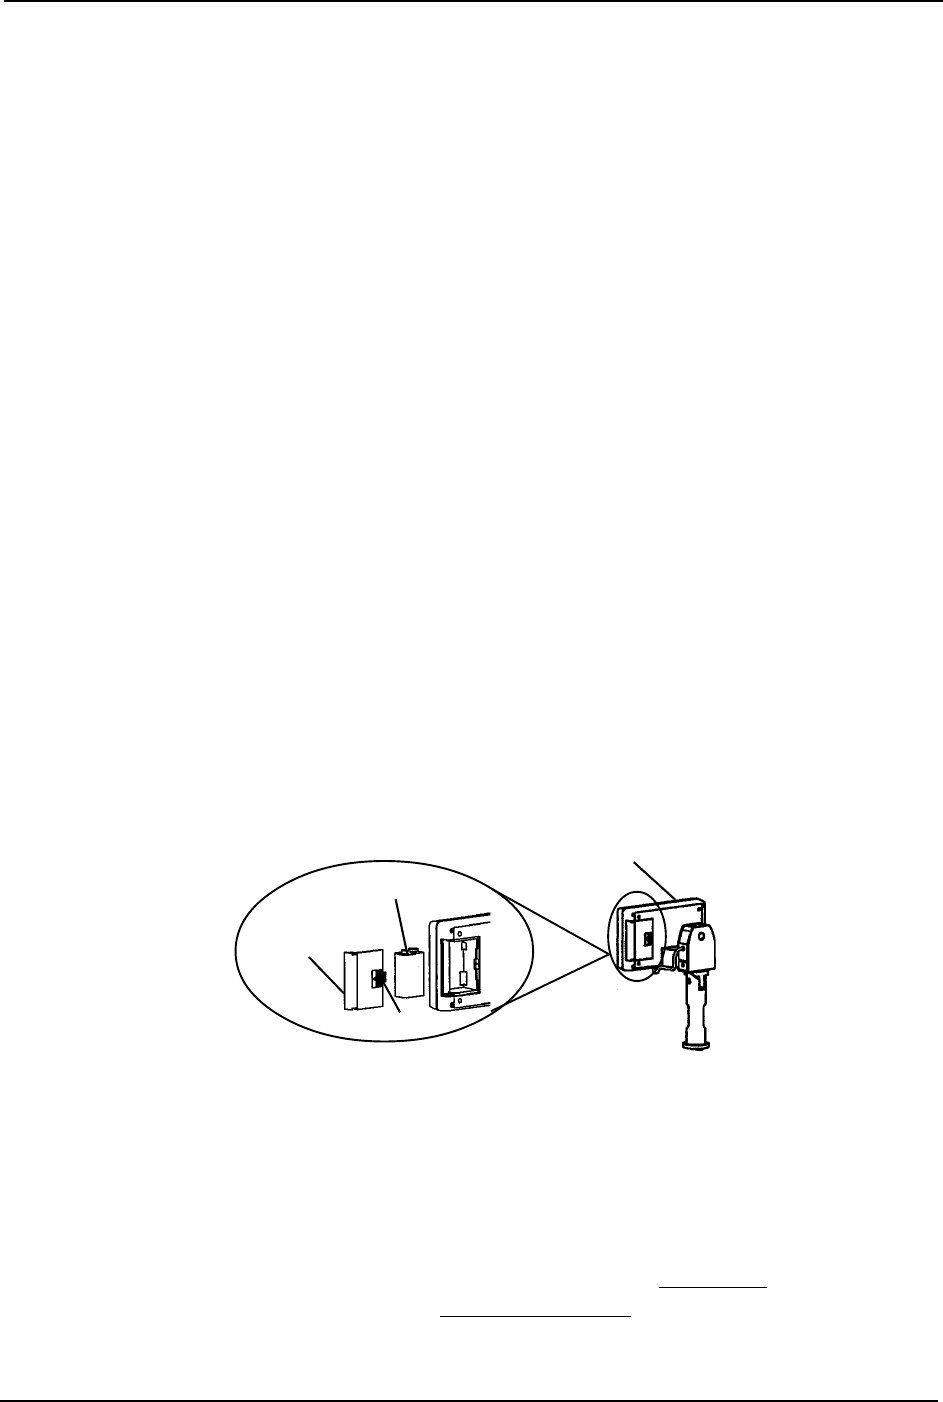
Replacing the Battery
NOTE:Forthisprocedure,refertoFIGURE 8.4.
NOTE:Thescaleispoweredbyaninevoltalkalinebatterythatshouldprovideapproximately1500
readingsbeforeneedingreplacement.
Whenbatteryreplacementisneeded,LOBATwillappearonthedisplay.Performthe
following:
1. Slidethebatterydooropeninthedirectionofthearrow.
2. Removeexistingbattery.
3. Installthenewbattery.
4. Reinstallthebatterydoor.
FIGURE 8.4 Replacing the Battery
Calibrating the Reliant Scale
NOTE:TheReliantScalewillbepre‐calibratedatthefactorywiththeloadcell.Shoulditbe
necessarytore‐calibratethescale,followtheinstructionsoutlinedbelow.
1. Thepatientandtheslingmustberemovedfromthescaletoproperlycalibratethe
ReliantScale.ForremovingthepatientinstructionsrefertoOperationonpage 14.For
slingdetachmentinstructionsrefertoLiftingthePatientonpage 19.
2. WiththeReliantScaleon,removethefourscrewsonthebackoftheenclosureand
removethefrontcovertoexposethePCboard.
Battery
Door
9V Battery
Assembled
Scale
Arrow

SECTION 8—ACCESSORIES
Part No 1078988 37 Electric Portable Patient Lift - RPA6001E
3. PresstheCALbuttonlocatedonthePCboard.TheCALswitchisnotlabeledbutis
theonlybuttononthePCboardlocatedinthelowerrightcorner.OncetheCAL
buttonispushedʺCAL1ʺwillbeseeninthedisplaywindow.
NOTE:CAL1selectsthecalibrationmodeusing50poundsofcalibratedweight.CAL2selectsthe
calibrationmodeforusewith200poundsofcalibratedweight.PressingtheUNITSkeytoggles
betweenCAL1andCAL2.
4. Whenthedesiredcalibrationmodeisdisplayed,presstheLOCK/UNLOCKkey.
NOTE:ThedisplaywindowwillnowshowUnLd.
5. EnsurethatthereisnoloadonthescaleandpresstheZEROkey.
6. Thedisplaywindowwillshowadashedline(‐‐‐‐‐‐)scrollingacrossandthentheword
LOADwillappearinthedisplaywindow.
7. Performoneofthefollowing:
A. FORCAL1OPTION‐support50poundsofcalibratedweightfromthescaleand
presstheZEROkey.
B. FORCAL2OPTION‐support200poundsofcalibratedweightfromthescaleand
presstheZEROkey.
8. Thedisplaywindowwillshowadashedline(‐‐‐‐‐‐)scrollingacrossandthentheword
DONEwillappearinthedisplaywindow.
9. RemovetheweightfromthescaleandpresstheLOCK/UNLOCKkey.
NOTE:Theunitwillnowbeinatemporarytestmodeandwillnotlocktheweightdisplay.This
willallowweighttobeloadedandunloadedtocheckthecalibration.
10. TurntheunitoffbypressingtheON/OFFkey.
11. TurntheunitonbypressingtheON/OFFkey.
NOTE:Scalewillnowbeinnormaloperation.
Troubleshooting
Display Codes
CALIBRATIONREQUIRED‐Indicatesimproperstoredcalibrationdata,calibrationis
necessary.
OVERCAPACITY‐Indicatesaweightexceedingthecapacityhasbeenloadedonthescale.
SYMPTON PROBABLE CAUSE SOLUTIONS
Unit does NOT work properly. Battery failure. Check battery. Replace if necessary.
Battery has been replaced and unit
still does NOT work properly.
Contact Invacare for Service at 1-800-333-
6900
CAL
OCAP


Invacare Corporation www.invacare.com
USA
One Invacare Way
Elyria, Ohio USA
44036-2125
800-333-6900
Canada
570 Matheson Blvd. E Unit 8
Mississauga Ontario
L4Z 4G4 Canada
800-668-5324
All rights reserved. Trademarks are
identified by ™ and ®. All trademarks
are owned by or licensed to Invacare
Corporation unless otherwise noted.
©2008 Invacare Corporation
Part No 1078988
Rev B - 09/08
