Inventec Appliances CT7668 GSM MOBILE PHONE User Manual USERS MANUAL
Inventec Appliances Corp. GSM MOBILE PHONE USERS MANUAL
USERS MANUAL
Philips 766
User Guide
Index
1. Discover your phone ....................................................................................3
2. Menu Tree....................................................................................................5
3. Getting started ...........................................................................................10
4 Input methods .............................................................................................13
5 Stylus operations.........................................................................................14
6 Call functions ..............................................................................................15
7. Call services...............................................................................................20
8 Contacts......................................................................................................22
9 WAP............................................................................................................25
10 Organiser ..................................................................................................28
11 Multimedia.................................................................................................35
12 Messages .................................................................................................37
13 Camera .....................................................................................................46
14 Settings.....................................................................................................52
15 STK...........................................................................................................60
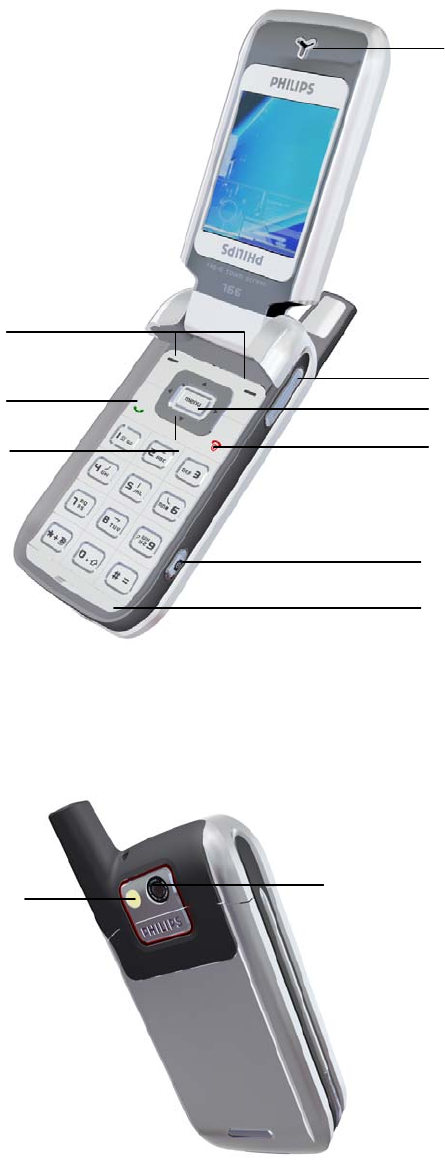
1. Discover your phone
Earpiece
Volume keys
OK key
Hang up and
on/off key
Soft keys
Micro
p
hohe
Camera key
Lens
Pick up key
Navigation keys
Flashlight
Keypad description
OK
• In idle screen, press to access the main menu.
• Function list screen: select the highlighted function
• Others: 1st press to access the option menu, 2nd press to confirm a selection.
Left soft key
• In idle mode, locked to be shortcut for the main menu.
• In other screens, press to perform the function indicated at the bottom left the screen.
Right soft key
• In idle screen, default to be the shortcut for Dictionay, which can be changed by user.
• In other screens, press to perform the function indicated at the bottom right of the screen.
Pick up key
• Dial an outging call or answer an incmong call.
• In idles creen, short press to display the latest outgoing calls, long press to display IP call
pre-dial screen.
Hang up and On/Off key
• In idle screen, long press to switch the phone On/Off.
• End or reject an incoming call.
• Go back to previous menu.
Navigation keys
[Up]
• Cursor up..
• In idle screen, short press to to access Call list (can be user defined).
[Down]
• Cursor down.
• In idle screen, short press to access Names list (can be user defined).
[Left]
• Cursor left
• In idle screen, short press the access MMS (can be user defined)

[Right]
• Cursor right.
• In idle screen, short press the access new SMS (can be user defined)
Number keys
• In idle screen, short press 0-9 to enter numberes.
• In idle screen, long press to fast access a designated function or flash dial a designated
phone number (“0” is locked to set language, “1” is locked for voice mail, others can be
user defined)
• In menu list or options list, press a number to enter a numbered menu item or option item
directory.
[*]
• In idle screen, shor press to enter “*”, long press to enter “+”.
• In Calculator, press to enter the decimal point.
[#]
• In idle screen, short press to enter “#”, long press to access WAP.
• Editor: access a table of symbols and punctuations.
Volume keys
• Volume up/down.
• In idle screen (backlight off), press one of the volume keys to light the backlight.
• In idle screen (backlight on), press one of the volume keys to access Profiles.
Camera key
• In idle screen (when flip closed), long press to turn on the flashlight as torch.
• In idle screen (when flip open), short press the enter preview mode of still camera.
• In preview mode of still camera, press to take a picture.
• In preview mode of video camera, press to start recording a video clip.
2. Menu Tree
Level 1 Level 2 Level 3 Level 4 Level 5
1 Call services 1 Call list 1 Missed calls
2 Incoming calls

3 Outgoing calls
2 Call Settings 1 Call forward 1 All calls
2 If busy
3 If not answered
4 If not reached
2 Call barring 1 Incoming 1 All
2 When roaming
2 Outgoing 1 All
2 International
3 Intl. exc. Home
3 Fixed dial 1 Settings
2 Fixed dial list
4 Caller ID 1 Show identity
2 Hide identity
3 Status
5 Voice mail no.
6 Call waiting 1 On
2 Off
3 Status
3 Call counters 1 GEM counters
2 GPRS counters 1 All connections
2 Last connection
3 Clear logs
4 IP prefix
2 Contacts 1 Names list
2 Settings 1 Copy all
2 Delete all
3 Contacts select
4 Group
5 Status
3 WAP 1 Homepage
2 Bookmark
3 Go to URL
4 History
5 Settings
6 Push Inbox
4 Organiser 1 Calendar

2 Dictionary 1 Eng-Chi
2 Chi-Eng
3 Calculator
4 Alarm 1 Alarm 1
2 Alarm 2
3 Alarm 3
4 Alarm 4
5 PC
communication
6 Others 1 Notepad
2 Anniversary
3 World clock
4 Currency
converter
5 Multimedia 1 Picture album 1 Own pictures
2 Standard
pictures
2 Sound album 1 Own melodies
2 Standard
melodies
3 Video
4 Games 1 Intris
2 Traffic police
3 Puzzle bobble
4 Box
5 Five chess
6 Linker
6 Messages 1 SMS 1 New SMS
2 Inbox 1 SMS unread
2 SMS read
3 SIM SMS
3 Outbox 1 SMS unsent
2 SMS sent
3 SIM SMS
4 User folder
5 SMS guard
2 MMS 1 New MMS

2 Outbox 1 MMS unread
2 MMS read
3 Outbox 1 MMS unsent
2 MMS sent
3 Broadcast SMS
4 Settings 1 SMS settings
2 MMS settings
3 Message groups 1 SMS groups
2 MMS groups
4 Broadcast SMS
7 Camera 1 Still camera
2 Video camera
8 Settings 1 Language
2 Time and date
3 Sounds 1 Ringtone 1 Call ringtone
2 Group ringtone
3 Ringtone volume
2 Message ringer 1 Ringer
2 Alert mode
3 Ringer volume
3 Key tones
4 Screen tap tone
5 Sound alerts
6 Profiles
4 Display 1 Main display 1 Wallpaper
2 Idle screen
3 Backlight
4 Folding setting
5 Stylus calibration
2 Sub display 1 Wallpaper
2 Clock
3 LED 1 Call indicator
2 Event indicator
5 Phone settings 1 Answering 1 Any key answer
2 Active flip
3 Headset answer
2 Phone guard 1 None

2 Answer
3 Reject
3 Security 1 Phone code
2 PIN code
3 Data protection
4 Edit phone code
5 Edit PIN
6 Edit PIN2
4 Shortcuts 1 Right soft key
2 Navigation keys
3 Hotkeys
5 Factory defaults
6 Netwk. services 1 Network info 1 Select network
2 Frequency
2 Preferred
network
7 Phone data 1 Phone info 1 Own number
2 IMEI
2 Memory status
3 Serial number
8 Switch on/off 1 Switch on
2 Switch off
9 STK
3. Getting started
Insert the SIM card
To user your phone, you must insert a valid SIM card supplied by your GSM operator or
retailer.The SIM card contains your subscription, your mobile number, and memory in which
you can store phone numbers and messages.
Insert the SIM card
1. With the back of the phone facing you, push the release button and remove the battery
cover and remove the battery.
2. Insert the SIM card: slide the SIM card it into the card slot carefully. Make sure that the
clipped corner is in the correct corner and the metal contacts are facing down.
3. Slide the battery into its slots, metallic connectors downwards, until it stops. Then lock it by
pushing it downwards.
4. Replace the back cover of your phone: slide it upwards until it locks into its place.
Charge the battery
Your phone is powered by a rechargeable battery. A new battery is partially chaged and an
alarm will warn you when the battery is low.
1. Once the battery and battery cover are clipped on the phone, plug the connector of the
charger (supplied with the phone) into the socket at the the base of the phone, then plug
the charger into a main AC power socket.
2. When charging, a charging animation will be displayed on the main dislay as well as the
sub display. When the charge is completed, an alert sound will be heard with the LED
indicator changed from red to green.
3. When the battery is fully chaged, disconnect the charger.
Note: you can also charge the battery when the phone is switched on.
Switch on the phone
1. Long press [On/Off] key to switch on the phone. The prompt message “Please insert SIM
card” means the SIM card has not been inserted correctly. Please check whether the SIM
card has been inserted correctly and is valid.
2. You will be required to enter the PIN code (i.e. the 4 to8-digit secret code of your SIM card)
if it is set. PIN code is preconfigured and communicated to you by your ooperator or
retailer. To personalize the PIN code, please refer to Settings>Phone settings>Security.

If you enter a wrong PIN code 3 times, your SIM card will be blocked. To unlock it, you
must require the PUK code rom your operator.
Set date and time
As prompted by the phone at first switch on, set the date by pressing the appropriate nueric
keys (press [Hang up key] to erase a number), and then set the time.
Calibration
This feature allows you to calibrate your screen, in order to obtain a better accuracy when
using it with the stylus pen. You must tap all three “+” signs one after the other to complete the
process.
Copy the SIM phonebook
When the mobile phone detects a SIM card that already contains names, a prompt message
will ask you if you want to copy your SIM phonebook onto the built-in phonebook. Press [Hang
up key] to cancel or press [OK] to accept. The phone phonebook is set as your default
Icons and symbols for idle mode
Idle mode refers to the status when the mobile phone is switched on and ready for use (when
there is not a call in progress and no key presses have been made). The following indicators
and icons advise you of the operational status of your phone:
Icons and symbols for main display
• Battery - The bars indicate the battery level. The more bars are
shown, the more power are left.
• Signal – The bars indicate the signal strength, The more bars are
shown, the better the singl strength.
• Roaming – Displayed when your phone is registered to a network other than your own
(especially when you’re abroad).
• Call Forward Unconditional to number – All your incoming voice calls are being
forwarded to a number other than voice mail.
• GPRS attach – Your phone is connected to the GPRS network (to be displayed above
the singal icon).
• Vibra – Your phone will vibrate when receiving a call.
• Silent – Your phone will not ring when receiving a call.
• Headset – The headset is inserted to your phone.
• Alarm – The alarm clock is activated.
• Missed call – You have a missed call.
• SMS message – You have received a new SMS message.

• SMS full – Memory for SMS is full. Delete old messages to receive new ones.
• MMS message – You have received a new multimedia message.
• MMS full – Memory of MMS is full. Delete old messages to receive new ones.
• Memeory full – The phone’s memeory is full. Delete items to store new ones.
Icons and symbols for sub display
• Battery - The bars indicate the battery level. The more bars are
shown, the more power are left.
• Signal – The bars indicate the signal strength, The more bars are
shown, the better the singl strength.
• Roaming – Displayed when your phone is registered to a network other than your
own (especially when you’re abroad).
• Call Forward Unconditional to number – All your incoming voice calls are being
forwarded to a number other than voice mail.
• Vibra – Your phone will vibrate when receiving a call.
• Silent – Your phone will not ring when receiving a call.
• Missed call – You have a missed call.
• Alarm – The alarm clock is activated.
• SMS message – You have received a new SMS message.
• MMS message – You have received a new multimedia message.
LED indicators
• Roaming – purple light flash slowly.
• Low battery – red light flashing slowly.
• Charging steady red light (changed into green light when charging is done).
4 Input methods
Keypad input methods
Your phone provides you with the following keypad input methods:
• T9 Pinyin
• T9 Stroke
• T9 English
• ABC
• 123
In text editors, you can press the left soft key to switch from one input method to another.
On-screen keyboard
An on-screen keyboard will appear in any text edition contexts when entering your PIN code,
typing a message, entering a name in the phonebook, etc. This allows you to enter text using
the stylus pen, like you would do on a PC keyboard. Using the stylus is equivalent to pressing
the actual keys of the phone.
Handwriting recognition
You can enter Chinese charaters, English letter, numbers, symbols and punctuations via
handwriting recognition. To enter the handwriting mode, tap the handwriting icon or area on the
screen.
5 Stylus operations
The main display of your phone is a touch screen, which is a faster and more intuitive way of
navigating through lists and menus. It becomes available as soon as you operate with the
stylus located on the side of your phone.
Basic operations
1 In menu lists, double tap a menu/icon to enter/activate it, and then apply a reasonable
pressure, as if you were writing on paper.
2 In the change list field marked by 3/4, tap the left/right arrow to change your selection.
3 When the screen content is longer than one page, tap the scroll bar at the right side of
the screen to turn pages.
Enter text
In handwriting recognition mode, you can enter Chinese, English, numbers and symbols
(including punctuations) by means of handwriting recognition.
The on-screen keyboard allows you to enter text using the stylus pen, just like you would do on
a PC keyboard. Using the stylus pen is equivalent to pressing the actual keys of the phone.
Perform functions
1 Tap the on-screen functions icons to perform the corresponding functions.
2 In most contexts, an arrow , in the upper right corner of the screen or a red cross mark
together with a prompt message allows you to cancel the last action or go back one level. The
OK or a green check mark will let you validate your choice or action. Using these
touchscreen items are similar to pressing the [Hang up key] or [OK] key on the keypad.
3 In idle screen, tap any point on the screen (except the top bar and bottom bar) to enter
an on-screen keyboard for entering a phone number.
6 Call functions
Make or answer calls
Make calls
In idle screen, enter the phone number using the number key.
Press [Pick up key] or the left soft key to dial the number.
Press [Hang up key] to end or cancel the call.
Note:
- In idle screen, long press [Pick up key] to display IP call pre-dial screen.
- When enter the phone number, you can press the right soft key [Clear] to delete
any chracters or digits before the cursor.
- When enter the phone number, you can press [OK]-[1] to save the number.
- When enter the phone number, you can press [OK]-[2] to access the names list.
- When enter the phone number, you can press [OK]-[3] to switch on/off the handsfree
function.
Make intanational calls
To make an international call, you can enter the international prefix “+” and the country code
and the area code before the phone number.
1 Long press [*] until “+” appears.
2 Enter the country code and area code directly.
Or, you can press the left soft key [Area] to display the world city list, and then select a
desired entry and press [OK] to insert the corresponding country code and area code
automatically.
3 Enter the phone number, or press [OK] and select Contacts from the menu to find a
desired phone number from the phonebook.
4 Press [Pick up key] to dial the number.
Redial
If a call attempt fails, you can press the left soft key [Redial] to redial the phone number, ore
press the right soft key [back] to go back to the idle screen.
Dial from names list
1 In idle screen, press6to view Names list, or press[OK] to access the main menu and
then press [2]-[1] to view the names list.
2 Press [5/6] to select a desired name and then a desired number.
3 Press the [Pick up key] to dial the number.
Dial a number set in schedule alarm
If you have set a phone number as an alarm in Schedule, the phone number will be displayed
on the screen when the alarm rings. You can press [Pick up key] to dial the number, or press
any key (exept [Pick up key]) to turn the alarm off.
Dialing a phone number as an alarm
If you have set a phone number as an alarm in Schedule, you can see the title and phone
number on the screen when the alarm sounds. You can:
1 Press [OK] to dial the number.
2 Press any key (except [OK]) to turn the alarm off.
Dial from call list
1 In idle screen, press [Pick up key] to display the last dialed numbers.
Press [5/6] to select a desired number.
Press [Pick up key] to dial the selected number.
2 In idle screen, press [OK] to enter the main menu.
Press [1]-[1] to enter the call list.
Press [1] to access the list of Missed calls, or press [2] to access the list of Incoming
calls, or press [3] to access the list of Outgoing calls.
Press [5/6] to select the desired phone number.
Press [Pick up key] to dial the selected number.
Make an emergency call (with or without a SIM card inserted)
In idle screen, enter the emergency call number directly and press [Pick up key] or the left soft
key to dial.
Flash dial
Numver keys (2~9) can be used to flash dial a phone number.
Once you have assigned a phone number to one of the number keys, you can press and hold
the key in idle mode to flash dial the corresponding phone number.
Answer incoming calls
When the flip is open, the information about the call will be displayed on the main display, you
can:
Press [Pick up key] or the left soft key to answer the call.
Press [Hang up key] or the right soft key to reject the call.
Note:
- If Call forward (If busy) is set to be On, incoming calls will be forward to
designated number for Call forward.
- If the caller hangs up the call before you answer it, a missed call icon will be
displayed on the subdisplay, while a missed call icon and prompt will be displayed
on the main display.
Any key answer
If you have activate Any key answer in Settings>Phone settings>Ansering, then you can
press any key (excep the right soft key and the hang up key) to answer an incoming call.
Active flip
If you have activated Active flip in Settings>Phone settings>Ansering, then you can open the
flip (if the flip is closed when the call comes) to answer an incoming call.
Headset auto answer
If you have activated Auto answer in Settings>Phone settings>Ansering and inserted the
headset to your phone, then you can answer an incoming call automatically..
Adjust the earpiece volume
During a call, if you want to adjust the earpiece volume, press Vol_Up/Vol_Down keys at the
right side of the phone to increase/decrease the earpiece volume.
Functions during a call
During a call, your phone provides with many functions including accessing the names list,
using handsfree function, call waiting, multiparty call and sending SMS. Some of the functions
are subscription dependent and specific to operators.
Call waiting
Call waiting is a subscription dependent feature alerts you when someone is calling you while
you are on another call. You need to activate call waiting in Call services/Call settings/Call
waiting .
Press the left soft key or [Pick up key] to answer the second incoming call, while the first one is
put on hold. After answering the second incoming call, you can press the left soft key to toggle
between the calls (one is put on hold and the other is then activated), or you can press the
right soft key to toggle between mute/normal mode for the current active call.
Press the right soft key to reject the second incoming call, while the caller hearing a busy tone.
Meanwhile the first incoming call is still active.
Conference call
You can activate a conference call by making several outgoing calls. You may have up to five
members at the same time.
Make a first call with someone, then a second one. Press [OK] and select Multiparty->Join all
and press [OK] to confirm. Repeat the process until other members are connected.
During a conference call, you can press [OK] and select Multiparty->Private to have a private
call with the selected member only (other members are put on hold). To end the private call,
press the [Hang up key].
To end all calls, you can press [OK] and select Multiparty->End all calls and press [OK] to
confirm.
Handsfree
This menu allows you to actiate or deactive the handsfree function.
To activate, press [OK] during a call and select Handsfree, and then press [OK].
To deactivate, press [OK] during a call (while handsfree is set to be on) and select No
handsfree, and then press [OK]
Note:
- This function willnot be available when the headset is inserted.
Send DTMF
To control an answering machine or use telephone banking, you need to use codes. These
codes are sent as tone signals (also known as DTMF - Dual Tone Multiple Frequency tones).
DTMF is set to be on by default.
To deactivate the function, press [OK] during a call and select DTMF off, and then press [OK].
To activate the function again, press [OK] during a call and select DTMF on, and then press
[OK].
Send SMS
During a call, you can write a SMS message and send it out.
1 During a call, press [OK] and select New SMS, and press [OK].
2 Edit the SMS message and send it out.
Access the main menu
During a call, you can access the main menu.
1 During a call, press [OK] and select Main menu,and the press [OK] to enter the main
menu.
2 Plese be noted that you can not access Call settings, WAP, Multimedia, MMS,
Camera, PC communication and Settings during a call.
7. Call services
Call list
The last 30 missed calls/incoming calls/outgoing call are stored in corresponding folders in Call list.
In the call list menu list, you can press [1] to access Missed calls, press [2] to access
Incomingcalls or press [3] to access Outgoing calls. Meanwhile, you can move cursor to select
item, and then press the left soft key [Select] to view the corresponding information.
In the list screen of Missed call/Incoming call/Outgoing call, you can press the [Pick up key] to
dial a selected number directly.
View
In the list screen of Missed call/Incoming call/Outgoing call, you can press the left soft key
[View] to view the details of the selected record.
Save
In the list screen of Missed call/Incoming call/Outgoing call, you can press the right soft key
[Save] to save the selected number into Contacts.
Delete
In the list screen of Missed call/Incoming call/Outgoing call, you can press [OK] and select
Delete to delete a selected record and then press [OK] to confirm. To delete all the records in a
selected folder, you can press [OK] in the list screen and select Delete all, and then press [OK]
to confirm.
Call settings
Call forward
Call forward is a subbscription dependent feature, it enables you to divert incoming calls to a
designaged phone number with the following options:
— All calls: to divert all the incoming calls
— If busy: to divert an incoming call only when your phone is busy
— If now answered: to divert an incoming call only when it is now answered
— If not reacheable: to divert an incoming call when your phone is power off or out of the
network service area.
Call barring
Call barring is a subscription dependent feature, it enables you to restrict incoming calls to and
outgoing calls from your phone with the following options:
— Incoming (All) - All incoming calls are forbidden.
— Incoming (When roaming) - All incoming roaming calls are forbidden.
— Outging (All) – All outgoing calls are forbidden.
— Outgoing (International) - All outging international calls are forbidden.
— Outgoing (Intl. exc. Home) – Only outgoing calls to numbers of subscription country are
allowed.
Fixed dial
Fixed dial is is a subscription dependent feature, it enables you to restrict outgoing calls to
designated phone numbers. PIN2 code is required to activate this function.
Caller ID
This feature enables you to show or hide your identity to your correspondent. The status option
will inform you if this function is activated or not.
Voice mail number
This menu enables you to enter the voice mail number.
Call waiting
Call waiting is a subscription dependent feature alerts you when someone is calling you while
you are on another call. The status option will inform you if this function is activated or not.
Call counters
GSM counter
This menu gives you access to the following information: duration of last call, duration of
incoming calls, durations of outgoing calls and total call duration. You can press the left soft
key [Reset] to set all the duration to zero.
GPRS counter
This menu gives you access to the following information concering transfer volume of your
phone during WAP connections over GPRS.
All connections: transfer volume of all connections(inclusing Sent, Received and Total)
Last connection: transfer volume of the last connection (including Sent, Received and Total)
Clear logs: You can select Yes to clear the history records, or select No to keep the history
records.
8 Contacts
There are two available phonebooks: the one on your SIM card (number of entries depending
on SIM card capacity) and the one in your phone (up to 500 entries), whick is the default
selected phonebook.
Add an entry in a phonebook
1 In the list screen of the names list, select <New> and press [OK]; or in the browse screen
of the Names list, press [OK] and select Add, and then press [OK].
2 In the Category field, press [3/4] to select a category. Categories available are:
General, Family, Friends, Business, VIP and SIM. To save an entry on your SIM card,
you have to put it in the SIM category (the SIM category will be available only when the
SIM card is inserted).
3 Enter the following information to the entry: last name, first Name, company name,
mobile phone numer, home phone number, office phone number, IM (Instant Messaging)
number, Fax number and Email address.
4 In the Photo field, you can link a picture to the entry. Press [3/4] to select a picture,
or press the left soft key to enter the picture list to choose one.
5 In the Melody field, you can linka melody the the entry. Press [3/4] to select a picture,
or press the left soft key to enter the melody list to choose one.
6 In the Security field, you can activate/deactivate number protection function. Once
activated, the entry will be displayed as ******** in the phonebook and you will be asked
to enter the phone to view its details. When there is an incoming call from a protected
number, the number will also be displayed as ******** and the corresponding picture will
not be shown.
7 In the Notes field, enter any further information you want to add.
8 After entering all the information, press [OK] to confirm and save the entry.
Edit an entry in a phonebook
To edit an entry in a phonebook, press [OK] in the list screen (or in the browse screen of a
selected entry) and press Edit, and then press [OK] to enter the edit screen of the selected
entry.
Groups settings
You can create call groups, edit them and rename them.
To create a user-defined call group, press [4] in the Settings menu of Contacts and select
Group to enter the list screen, press the left soft key [Add] enter the name editor, enter the
desired name and press [OK] to confirm. At most 8 user-defined groups can be added.
To rename a user-defined call group, move the cursor to select a group and press the right soft
key [Rename] to enter the name editor, change the group name and press [OK] to confirm.
To delete a user-defined call group, move the cursor the select a group, and then press [OK]
and select Delete.
Use the phonebook
Dial from phonebook
In the names list screen of the phonebook, press [Pick up key] to dial a number in the selected
entry. If there are more than one number stored in the entry, you will be required to select a
desired one before dialing out.
View an entry
In the names list screen of the phonebook, press the left soft key [View] to view the details of
the selected entry. In the browse screen of the selected entry, you can press the left soft key to
view the details of the previous entry or press the right soft key to view the details of the next
entry.
Search for an entry
Your phone provides you with the following searching methods:
- Search by initial letter
In the names list screen of the phonebook, enter the initial letter of the entry you want to
search for (small letters to be matched for English entries, capital letters to be matched
for Chinese entries), and then the cursor will be located at the first one of the matched
entries.
- Search by keyword
In the names list screen of the phonebook, press [OK] and select Search to enter a text
editor, enter the keyword and then press [OK] to search for the entries containing the
keyword. The matching entries will be displayed as a list.
Copy phonebook
Copy a single entry
In the names list of a phonebook, move the cursor to select an entry, press [OK] and select
Copy. You will be required to choose between Copy to phone and Copy to SIM, make your
choice and press [OK] to confirm.
Copy all entries
To copy all the entries in a phonebook, you can select Copy all in the Settings menu of
Contacts. You will be required to choose between Copy to phone and Copy to SIM, make
your choice and press [OK] to confirm.
Delete entries
Delerte a single entry
In the names list of the phonebook, move the cursor to select an entry, press [OK] and select
Delete, or you can press [OK] and select Delete in the browse screen of a selected entry. At
the prompt message “Delete?”, press [OK] to confirm or press [Hang up key] (or the right soft
key) to cancel.
Delete all
In the Setting menu of Contacts, you can select Delete all in the Settings menu of Contacts. At
the prompt message “Delete all?”, press [OK] to confirm or press [Hang up key] (or the right
soft key) to cancel. Please be noted that Delete all is not available for SIM phonebook.
Send phonebook entries
You can send out phonebook entries via SMS (using Smart Message format). In the names list
of a phonebook, move the cursor to select an entry, press [OK] and select Send via SMS, or
you can press [OK] and select Send via SMS in the browse screen of a selected entry. And
then you will be required to enter the receiver’s phone number, enter the number and press
[OK] to confirm.
Contacts select
This menu allows you to choose one of the following display options for phonebook:
Phone: display the phone phonebook only.
SIM phonebook: display the SIM phonebook only.
Phone + SIM: display both the phone phonebook and the SIM phonebook.
Status
This menu allows you to access the status information of the phonebooks in status bar as well
as in text.
SIM phonebook status: stored entries/total entries.
Phone phonebook status: stored entries/total entries.
9 WAP
Your mobile phone supports services based on the Wireless Application Protocol
(WAP). The built-in WAP browser allows you to access services supplied with your network,
such as news, sports, weather, etc.
Your mobile phone readily supports the WAP function if it is included in your subscription; if your phone
was pre-configured, it shouldn’t be necessary for you to change the settings described in this section.
With some operators, WAP parameters can be set remotely. Please check directly with your operator for
detailed information.
This main menu of the WAP browser allows you to configure the settings related to WAP, connect to your
operator’s homepage, define bookmarks for direct and faster connections, etc.
Launch a WAP session
1 To launch a WAP session, on the main menu screen, select WAP>Homepage
2. Your mobile phone will connect to the network and according to the Access settings you have
defined in the Settings.
3 The browser is launched and your phone connects to your operator’s homepage.
4 Move the cursor to navigate the on-line pages, and press the left soft key [Select] to select a
highlighted item.
5. Press [OK] and select Exit to return to the previous page.
Homepage
The Homepage is the link to the first WAP site you will access when launching WAP from the idle screen.
In most cases, this menu item of the WAP services menu is preconfigured and will connect directly to
your operator’s WAP homepage.
To change this default homepage see Settings in this section.
Bookmarks
This menu allows you to store your favourite WAP site addresses, rename them if desired and access
them quickly from the list. the Options, then select Bookmarks.
Adding bookmarks
1 Select WAP > Bookmark > Add bookmark and then press the left soft key [Add].
2 Eenter the new name and the address..
3. Press [OK] and select Save to save the record..
Managing bookmarks
On the bookmark list screen, press [OK] to access the following options.
--Add : to add new bookmarks.
--View: to view and or edit the select bookmark.
--Delete: to delete the select bookmark.
--Delete All: to delete all the bookmarks
Using bookmarks
To connect to a WAP site you have stored as a bookmark, simply select it in the list and press the left soft
key to launch the connection.
Go to URL
This menu allows you to enter a WAP site address, to which you can connect directly when selecting it
and pressing [OK]. This is a quick way to access WAP addresses without saving them as bookmarks.
1 Enter the URL address of the desired homepage.
2 Press the left soft key to connect to this page.
History
The information or services you have accessed are recorded in the history..
To connect to a WAP site stored in the history, simply select it in the list and press the left soft key to
launch the connection.
To clear the records, on the history list screen, press [OK] and select Delete All Press [OK] for the
confirmation.
Settings
WAP connection
Allows you to select the type of network used by the selected profile when launching a connection.
GPRS or CSD: your mobile will only use the GPRS or the CSD network for WAP connections.
Access profiles
Once your SIM card is inserted, the phone will automatically take and use the default WAP service
settings on the card. You can also enter the settings manually if you wish to add more profiles.
The phone provides you with five options of connection profiles; you can choose and activate your
desired profile.
1 Move the cursor to select a setting group.
You can only select and use one setting group on each occasion.
2 Press the right soft key to enter WAP connection setting screen. The following options are available:
CSD Settings – settings for CSD connection
WAP Settings
Homepage: the homepage address of the WAP service that you would like to use
IP Address: the gateway IP address
Delay Time: time delay for auto shut-down of WAP connection
CSD connect
Dial Number: the phone number for WAP connection
User Name: the user name for WAP login
Password: the password for WAP login
Link Type: ISDN/PSTN
GPRS Settings (where service is available) – settings for GPRS connection.
WAP Settings
Homepage: the homepage address of the WAP service that you would like to use
IP Address: the gateway IP address
GPRS connect
APN: the Access Point Name address
User Name: the user name for GPRS connection
Password: the password for GPRS connection
Push inbox
This menu allows you to read and manage messages automatically sent to you by the network and / or
by your operator.
1 If you have been informed that you received a push message, press the left soft key to read it.
2 Otherwise, select WAP > Push inbox, press the left soft key to view the push message.
.
Options while Browsing pages on the Internet
After you have made a connection to the Internet, you can start browsing web pages.
To select a highlighted item, press [OK].
Use the navigation key to browse the page.
While browsing, press [OK] to access:
Press [OK] to display the option list, scroll to the desired option and press [OK].
Homepage: To go back to the Virgin homepage
Refresh: To reload the current web page
Add Bookmark.: To add the current Internet address to Bookmarks
Go to URL: To enter the address of another Internet service you would like to access
Send by SMS: To send out the URL of the current website as an SMS
Same image: To save the image in the current WAP page,
Exit: To quit browsing and end the WAP Internet connection
10 Organiser
To access the Organiser function:In dle mode, press [OK] and then press [4].
Calendar
Calendar makes it quick and easy for you to record your daily appointments, agenda and work plans (up
to 200 records can be added).
Before arranging the calendar, check that you have set the correct date, time and display format in
Settings. The records stored in the Calendar will then have the correct time and date displayed.
Adding a schedule record
1 On the month view screen (or Day view screen), select a date, press [OK] and select
Add schedule, then press [OK].
2 Move the cursor to scroll through the following fields.
Date: date for the schedule record
Time: time for the schedule record
Ringer: ringer type for the alarm of the schedule record
Alarm: alarm to remind you of an upcoming event.
Repeat: If an event recurs regularly, you can set it to repeat automatically.
Title: title of the schedule record
Phone No.: phone number related to the schedule record
Notes: notes for the schedule record.
3 After entering the required data, press [OK] to save the record.
Note:
— The Alarm clock will ring even if you turned off your phone.
— If you have set a phone number as an alarm in Schdule, you can see tne title and
phone number on the screen whe the alarm sounds.
Viewing a schedule record
Month view
On the ORGANISER screen, select Calendar to enter the current month.
The current date is marked with a box surrounding it.
Dates shown in bold have diary notes assigned.
Press [Prev/Next] to display the previous/next month.
Day view
On the Month view screen, press [OK], select Today , then press [OK] to display all the schedules of the
current date. Press the left soft key to view the details.
If there are no scheduled records, a blank list will be displayed.
Searching for a schedule
1 On the Month view screen, press [OK], select For schedule, then press [OK].
2 Enter a keyword and press [OK] to start searching.
3 The schedule record or records that include(s) the keyword will be displayed.
Searching by solar calendar/ lunar calendar
1. On the Month view screen, press [OK] and select Search by solar/Search by lunar, press [OK] to
pop-iup an input box.
2. Enter the desired date and press [OK].
Viewing the whole schedule list
On the Month view screen, press [OK] and select Schedules to display the whole schedule list. I
Move the cursor to select a desired record and press the left soft key to vew the details.
Modifying a schedule record
On the schedule list screen scroll to a record you would like to modify, press the right soft key[Edit] to
enter the editing screen..
Deleting a scheduled event
On the Schedule list screen, scroll to a record you would like to delete, press [OK], select Delete, and
then press [OK].
Sending a schedule via text
On the Schedule list screen, scroll to a record you would like to send , press [OK], select Send SMS, and
then press [OK]. Enter the recipient’s phone number and press [OK].
Dictionary
The Dictionary function includes English-Chinese dictionary and Chinese-English Dictionary.
Looking up a word in the dictionary
1. On the word list screen, enter the word you would like to look up or press 【5/6】to
select a desired word.
-Press the left soft key to change the input method.
-Press the right soft key to delete a character before the cursor.
2. Press [OK] to display the definition. Press the left/right soft key to display the
previous/next word and press【3/4】to scroll through pages.
Calcular
On the ORGANISER screen, select Calculator, and press [OK] to enter the Calculator screen.
Simple calculations
1 When 0 is displayed on the screen, enter the first number in the calculation.
2 To add, press the up button of the navigation key.
To subtract, press the down button of the navigation key.
To multiply, press the left button of the navigation key.
To divide, press the right button of the navigation key.
To add a decimal, press [*].
To convert to a percentage, press [#].
3 To enter the second number, repeat these steps as many times as necessary.
To erase the current display, press [C/CE].
4 To calculate the answer, press [OK] or the left soft key.
Memory calculations
On the Calculator screen, press [OK] to display a list of functions for complex calculations.
Press the navigation key to select the function you would like to use.
MR (memory recall) displays the current number stored in the memory.
MC (memory clear) clears the memory.
M+ completes the current calculation and will add this to the current number stored in the memory; this
new total is then stored in the memory.
M- completes the current calculation and will subtract this from the current number stored in the memory;
this new total is then stored in the memory.
Other operations
Other operations include Percentage,Square root and Square
Alarm
Alarm
You can set up to four alarms. To set the alarm, you can:
In the Ring Format field, press the left/right button of the navigation key to select one of
the following format choices: Off, Ring tones, Virate and Rihg&Virate.
In the Time field, enter the time you would like to set for the alarm.
In the Ring Tone field, press the left/right button of the navigation key to choose a ring
tone you like. Or press the left soft key to display a ring tone list, move the cursor to
select a desired one and then press [OK].
In the Ring Tone Volume field, press the left/right button of the navigation key to adjust
the volume.
In the Alarm mode field, press the left/right button of the navigation key to choose a mode.
- Once: activates the alarm at a set hour on a set day.
- Recurrent: activates the alarm at a set hour every day of the week. If you choose
the Recurret mode, you can press the left soft key to display a list, and then select
the day/days when the alarm is unnecessary by pressing the the left soft
key[Cancel].
Press [OK] to save the alarm setting.
The alarm clock will ring even if you turned off your phone. The alarm will stip ringing
temporarily whenyou press any key (excep the right soft key and the volume keys) or when the
ring time is out, then it will ring again around 5 minutes later. To stop the alarm repetition, press
the right soft key when it rings. (The snooze mode is automactcally deactivatedafter 3 alarm
repetitions。)
PC communiction
You can use the i-Sync software supplied with your phone to synchronise with your PC.
Others
Notepad
You can write notes to be stored in your phone.
Adding a notepad entry
1 If you have previously saved some entries in the Notepad, press [OK], select Add, and press [OK]. If
there are no existing entries, press Add.
2 Enter the information in the Title and Notes fields.
3 Press [OK] to save the record.
Searching for a notepad entry
1 On the Notepad screen, press [OK], select Search, and press [OK].
2 Enter the keyword and press [OK] to start searching.
3 The entry or entries that include(s) the keyword will be displayed.
Modifying a notepad entry
1 On the Notepad screen, scroll to the entry you would like to edit.
Or, on the browsing screen of a notepad entry, press [OK] and select Edit.
2 Press [OK].
3 Modify the contents of the entry.
4 Press [OK] to save the modification.
Deleting a notepad entry
Deleting a single entry
On the Notepad screen, scroll to the entry you would like to delete, press the right soft key[Delete].
The display will prompt “Deleteit?”. Press [OK] to confirm.
Or, on the browsing screen of a selected entry, press [OK] , select Delete and press [OK]. The
display will prompt “Delete?”. Press [OK] to confirm.
Deleting all the entries
On the Notepad screen, press [OK], select Delete all and press [OK]. The display will prompt
“Delete all?”. Press [OK] to confirm.
Send a schedule via text
On the Notepad list screen, scroll to a record you would like to send , press [OK], select Send SMS, and
then press [OK]. Enter the recipient’s phone number and press [OK].
Anniversary
This meu allows you to view the built-in Anniversary entries, You can also add new anniversary
entries.
To view the Anniversary entries: On the ANNIVERSARY screen, move the cursor to select a
desired anniversary and press the left soft key to view the details.
Adding a new Anniversary entry
1 On the Anniversary list screen, press [OK], select [Add] and then press [OK].输入日期。
2 In the date field, enter the date. Move the cursor to the next field, press 【[/4】to select
Solar Day or Lunar day.
3 Enter the title for the anniversary.
4 In the picture field, press the left soft key to display a picture list, select a desired picture
for the current anniversary entry and press [OK] to return to the editing screen.
5 Press [OK] to save the entry.
Searching an anniversary entry
1 On the Anniversary list screen, press the right soft key[Delete].
2 Enter the keyword and press [OK] to start searching.
3 Press the left soft key to view the details.
Modifying an anniversary entry
1 On the Anniversary list screen, press [OK] and select Edit.
2 Modify the content of the entry.
3 Press [OK] to save the modification.
Deleting an anniversary entry
On the Anniversary list screen, scroll to a record you would like to delete, press [OK], select
Delete, and then press [OK]. The display will prompt “Delete all?”. Press [OK] to confirm.
World Clock
World Clock displays the time of your local city and that of a world city simultaneously.
The local time is displayed on the top of the screen; the name and time of the world city are displayed on
the bottom of the screen. You can press the left/right button of the navigation key to change the world
city.
Setting the local city
You can set the city you are in now as a local city and the time will be automatically adjusted to that of
your time zone.
1 On the World Clock screen, press [OK] and select change local city and press [OK].
Or Move the cursor to highlight the local city (on the top of the screen) and press the left soft key.
2 Scroll to your local city.
--Press the left soft key to check the information about the selected city.
--You can quickly find the city by entering the first letter of that city name and then move the cursor
the select the city.
3 Press [OK].
Viewing a world city
1 On the World Clock screen, move the cursor to highlight the world city (on the bottom of the screen)
and press the left soft key.
2 Scroll to the desired city.
--Press the left soft key to check the information about the selected city.
--You can quickly find the city by entering the first letter of that city name and then move the cursor
the select the city.
Setting the local time
1 On the World Clock screen, press [OK], select Set time and press [OK].
2 Enter the current date and time of the local city.
3 Press [OK] to save the setting.
Currency
Selecting a currency
On the Currency screen, move the cursor to highlight either of the currency unit fields, press the
left/right button of the navigation key to select a desired currency unit; OR
press [Unit] to display a list of currency units, select a desired one from the list, and then press
[OK].
Setting the exchange rate
It is recommended that you change the default exchange rate for your chosen currency unit before
continuing with currency conversion.
1 On the Currency screen, press the right soft key [Rate].
2 Change the base unit if necessary.
3 Press the the left soft key to save the change.
Making a currency conversion
After setting the appropriate exchange rate, you can make a currency conversion as follows:
1 On the currency screen, press the up/down key to move the cursor to either of the input boxes.
2 Key in the amount to be converted.
3 Press the left soft key to make the conversion. Press the right soft to clear the result.
11 Multimedia
Picture album
This menu allows you to mange and display the pictures stored in your mobile phone, in Own
pictures or Standard pictures. When entering one of the available sub menus, the picrtures
stored in your phone are displayed as a text list. To access the graphical display, select a
picture in the list and press the left soft key [View]. To access the options menu, press [OK].
In the list view screen or browsing screen of Own pictures, you can press [OK] to access the
following options:
• Set wallpaper – to set the selected picture as the wallpaper for the main display.
• Set subwallpaper – to set the selected picture as the wallpaper for the sub display.
• Rename – to change the name of the selected picture.
• Send by MMS – to send the selected picture via an MMS.
• Delete – to delete the selected picture.
• Delete all – to deleta all the picture in Own pictures.
• Properties – to display the details of the selected picture.
• Back to idle – to go back to the idle screen.
In the list view screen or browsing screen of Standard pictures, you can press [OK] to
accessthe folloing options:
• Set wallpaper – to set the selected picture as the wallpaper for the main display.
• Set subwallpaper – to set the selected picture as the wallpaper for the sub display
• Properties – to display the details of the selected picture.
• Back to idle – to go back to the idle screen.
Sound album
This menu allows you to manage and listen to the sounds stored in your mobile phone, in Own
melodies or Standard melodies. When entering one of the available sub menus, the
melodies stored in your phone are displayed as a text list, and the highlighted one will be
played automatically, you can press volume keys to adjust the volume of the melodies or press
【5/6】to play the presious/next melody or press the right soft key to stop the playing of the
current melody.
In Own melodies, you can press [OK] to access the following options:
• Delete – to delete the selected sound.
• Delete all – to delete all the sounds in Own melodies.
• Rename – to change the name of the selected sound.
• Set as ringer – to set the selected sound as call ringer.
• Set as message ringer – to set the selcted sound as message ringer.
• Send by MMS – the send the selected sound via MMS.
• Back to idle – to go back to the idle screen.
In Standard meloeis, you can press [OK] to access the following options:
• Set as ringer – to set the selected sound as call ringer
• Set as message ringer – to set the selected sound as message ringer.
• Back to idle – to go back to the idle screen.
Video
This menu allows you to manage and play the video clips recorded by the built-in camera..
Please refer to Camera>Video camera for reference.
Games
There are 6 built-in games in your mobile phone . You can press a number key to enter the
corresponding game directly, or move the cursor to select a game and press the left soft key to
enter.
Sound Settings
In the function menu of a selected game, move the cursor and select Sound to enter its sound
settings screen. You can turn the sound On or Off, and adjust the sound volume when it is set
to be On.
Top five list
In the function menu of a selected game, move the cursor and select Top five to view the Top
five list of the game.
Help Infomation
In the function menu of a selected game, move the cursor and select Help to view the help
information of the game.
12 Messages
Your phone supports three types of messaging service: SMS, EMS and MMS.
SMS (Short Message Service) messages are text messages sent and received via the network
operator’s message centre. When a text message has pictures, sounds and animations inserted, it
becomes an EMS (Enhanced Message Service).
MMS (Multimedia Message Service) messages: A multimedia message can contain text, graphics,
animations, photographic images and ring melodies.
A single text message can consist of up to 160 characters.
To access Messages function: In idle mode, press [Menu] and then [6],
SMS
You can send text messages as well as EMS messages. Before sending a SMS, you need to make sure
that the Service Centre number has been set.
Writing and sending a text message
On the SMS screen, highlight Write SMS and press the left soft ky Select] or [OK].
Write your message.
1 When writing a message, you can access the option list by pressing [OK]. Scroll to the desired option
and press [OK].
Send: To send the message to the desired recipient(s). Enter the recipient’s phone number (or
recall it from the Contacts by pressing [Find]) and press [OK]. At the prompt “Send message?”,
press [OK].
Save: To save the message in the SMS Unsent folder.
Insert row: To insert a blank line below the current line. Press [OK].
Contacts: To insert an entry in the Contacts into the message. Select the desired entry and press
[OK].
Insert symbol: To insert symbols into the message. Select the desired symbol and press [OK].
Insert expression: To insert expression characters into the message. Scroll to the desired
expression, press [OK]. To change the expressions, press [Modify], enter the characters, and
then press [OK].
Insert template: To insert or use preset messages saved in your phone. Select the desired
template and press [OK]. (To create a new template: On the Template Browsing screen, press
[OK], select Add, and then press [OK].
Insert graphic: To insert graphics into the message. Select the desired graphic and press [OK].
Insert animation: To insert animations into the message. Select the desired animation and press
[OK].
Insert Sound: To insert sounds into the message. Select the desired sounds and press [OK].
Back to idle: To go back to the idle screen.
2 After writing a message, press the left soft key. Enter the recipient’s phone number (or recall it from
the Contacts by pressing the left soft key ) and press [OK].
3 Select Send and press [OK].
To send a message to several recipients
After entering a recipient’s phone number, press [OK], select Separator, then press [OK]. Add a “;” after
the phone number. Repeat this to add further recipients.
Or, on the Phone Number screen, press [Menu], select Group, and then press [OK].
Select the desired Group and press [OK].
Reading a message
When you receive a new text message, you will hear a message alert tone (if set), and the text message
icon will be displayed on the external display. On the internal display, the message “X new SMS(s)” will
be displayed.
1 Press [View] to view the list of new messages. (Or, on the main menu screen, select [6]>[1]>[2] )
2 Select the desired message and press [OK].
3 Press the navigation key to scroll through the messages.
4 Press [Prev./Next] to view the previous/next message.
Replying to a message
When reading a message, press [OK] to display the option list.
Select Reply orReply with history and press [OK].
Reply will leave out the original message when replying to the sender.
Reply with history will keep the original message when replying to the sender.
To edit or send a reply message, see Writing and sending a text message.
Forwarding a message
When reading a message, press [OK] to display the option list.
Select Forward and press [OK].
Erasing a message
1 When reading a message, press [OK] to display the option list. Select Deleteand press [OK] to
delete it. Or
On the Message List screen, scroll to the message you would like to delete. Press [Delete].
2 At the prompt “Delete?”, press [OK].
To erase all the messages in a text folder:
1 On the Message List screen, press [OK] to display the option list.
2 Select Delete All and press [OK]. The display will prompt “Delete all?”. Press [OK] to delete all the
messages.
Saving a phone number from a message
You can save the sender’s phone number in the Contacts or on the SIM card.
1 When reading a message, press [OK] and select Call Back.
2 Press [OK], select Save number, and press [OK].
3 Press the left soft key and select As New Record ( create a new entry) or Into Old Record
(Replace the old record)..
To add a new entry, see Adding an entry in the Directory.
Calling back from a message
You can call the sender’s phone number.
1 When reading a message, press [OK] and select Call Back.
2 The sender’s number and the numbers that appears in the text a message re displayed.
3 Scroll to the desired number and press [OK] to dial the number.
Moving a message
1 Select a message from the Message List, press [OK] and select Move to.
2 Select a folder from the list.
3 Press [OK] to move the message to the selected folder.
SMS Folders
If you have set to save text messages on the SIM card, all the messages will be stored in the SIM folder.
Otherwise, all the messages will be stored in the folders on your phone.
Your phone memory can store up to 500 messages. The maximum number that you can store on the SIM
card memory depends on the type of your SIM Card.
All the messages are stored in the corresponding folder /sub-folder according to their storage locations
(SIM card/phone) and states (SMS unread/read/unsent/sent).
To enter a Folder
--Press the navigation key to select a folder and press [Select] or press [OK].
--Press the navigation key to select a sub-folder.
When scrolling through the folder list, the number of messages stored in the highlighted folder is
displayed at the bottom of the screen. (except SIM folder)
--Press the left soft key or press [OK] to enter the folder/sub-folder.
To create a new folder
You can add up to 8 of your own folders.
1 Select User Folder and press [OK].
2 Press the left soft key [Add] and then enter the folder name.
If there are already some folders, press the right soft key [Add].
3 Press [OK] to add the new folder to the User Folder list.
To rename the user folder
1 On the User Folder list screen, press [OK] and select Rename, press [OK].
2 Enter the name and press [OK].
To delete the user folder
1 On the User Folder list screen, press [OK] and select Delete, press [OK].
2 At the promt “Delete?” , press [OK] to delete the folder and the messages stored in the folder.
SMS guard
Allows you to manage a specific names list, and restrict messages to this list and store them in
the spam folder
SMS guard setting
On the SMS GUARD screen, select SMS Firewall and press [OK]
Three options are available. Press the the left soft key to select/deselect the option.
Off (default) : deactivate the SMS guard function.
Receive Only : To receive text messages sent by specific phone numbers (while messages
from other numbers are automatically rejected).
To set the specific number(s): Press the right soft key[Add], enter the desired number(s) or
recall the numbers) from the Contacts by pressing the left soft key[Find]. Up to 10 numbers can
be set.
Reject: to filter the text messages sent by specific phone number(s).
To set reject mothed: move the cursor to the Reject option, press the left soft key to activate
the option, then press【5/6】to chosee the reject mothed.
Manual – spam messages are to be stored in the Spam folder of SMS Guard.
Auto delete –spam messages are to be deleted automatically upon reception.
To set blacklist: Press the right soft key[Add], enter the desired number(s) or recall the
numbers) from the Contacts by pressing the left soft key[Find]. Up to 10 numbers can be set.
MMS
The Multimedia Message Service (MMS) enables you to send text, pictures (also photos) and
sounds in a combined message to another mobile phone or e-mail address. Your phone
supports MMS messages that are up to 50 KB in size To set the settings for multimedia messages,
see MMS Setting..
For availability and a subscription to a multimedia message service, contact your network
operator or service provider.
Writing and sending an MMS message
An MMS message can consist of up to10 pages. A typical page will consist of a picture, some text and a
sound byte.
1 On the messages screen, select MMS > New MMS.
2 The rst page of the new message is now displayed. Press [OK] to display a function list.
Insert image: To insert a picture into the page. Press [OK] to display a picture list. Scroll to the
desired picture, press the right soft key [View] to view the desired picture. Press the left soft key
[Select] to insert the picture.
Insert text: To insert text into the page. Press [OK]. Enter the text. To insert an entry from the
Contacts, press [OK], select Contacts and then press [OK]. Scroll to the desired entry and press
[OK]. To insert a blank line below the current line, press [OK], select Insert row, and then press
[OK]. To insert a template, press [OK], select Insert template, and then press [OK]. To
Insert Sound: To insert a ring tone into the page. Press [OK] to display a ring tone list. Scroll to the
desired ring tone. Press [OK] to insert the ring tone.
Insert page: To add a new page behind the current one. Press [OK]. A new page on which you can
insert items is displayed.
Preview: To view the current page. Press [OK] to playback the current page and scroll through the
pages by pressing the navigation (up/down) keys.
Save: To save the MMS message in the Outbox/MMS Unsent.
Send: To send the MMS to another mobile phone or e-mail address. See step 5.
MMS Setting: See MMS Setting.
Back to Idle: To go back to the idle screen.
Note: If you would like to check and delete an inserted item before sending an MMS message, you can
move the cursor to highlight the desired item (text/ image/ ring).
Text: Press the left soft key [Edit] to display the content of text; you can then edit the text.
Image: Press the left soft key [View] to view the picture. Press the right soft key [Delete] to delete
the picture.
Ring: Press the left soft key [Play] to play the music. Press the right sof t key [Delete] to delete the
ring tone. To scroll through pages, press the navigation (left/right) key.
3 After writing an MMS message, press [OK] and select Send..
4 Press 【5/6】to scroll through the input fields and enter the following required data.
To: Enters the phone number/e-mail address of recipient(s). To send a message to several
recipients: After entering a recipient’s phone number, press [OK], select Separator, then press [OK].
Add a “;” after the phone number. Repeat this to add further recipients.
Subject: Enters MMS heading.
Cc: Enters the phone number/e-mail address of recipient(s). A copy of the message is sent to the
recipient(s).
6 After entering the required data, press [OK] and select Send..
The screen prompts: “Sending”. It takes more time to send an MMS message than to send a text
message.
Note:
MMS messages support the following formats:
Picture: jpeg/gif/wbmp
Sound: mmf/I-melody/midi
Receiving and reading MMS messages
When you have a new MMS message, the MMS message icon will be displayed on the external display
and the message “X new MMS(s)” will be displayed on the internal display.
If Auto download setting is set to On.
1 In idle screen, press the left soft key to display the MMS list.
2 Move the cursor to select a desired MMS, and press the left softy key to view the details. To sroll
through pages, press 【5/6】.
If the Auto download setting is set to Off.:
1 In idle screen, press the left soft key to display the MMS list. Move the cursor to select a desired
MMS. To read the MMS later: In idle mode, press [OK], select Messages>MMS>>Inbox>MMS
unread to view the MMS.
2 Pressh the left soft to download the selected MMS.
3 The screen prompts: Downloading.
4 Once the MMS is downloaded, press the left soft key to view the details. . To sroll through pages,
press
【5/6】.
Replying to an MMS message
1 On the MMS list screen or when viewing the MMS message, press [OK], select Reply by MMS or
Reply by SMS..
2 Press [OK] and edit your new MMS or SMS message.
Forwarding an MMS message
1 On the MMS message list screenor when viewing the MMS message, press [OK], select Forward.
2 Press [OK] to display the items inserted in the MMS.
3 Press [OK] and select Send.
4 Move the cursor to scroll through the input fields. Enter the required data.
5 Press [OK] and Send, and then press [OK].
Saving a phone number from an MMS message
1 On the MMS message list screen, scroll to the phone number you would like to save, press [OK],
and then select Save number.
2 Press [OK]. Move the cursor to select As New Record ( create a new entry) or Into Old Record
(Replace the old record)..
To add a new entry, see Adding an entry in the Directory.
Saving a picture from an MMS message
1 When viewing the MMS message, press [OK], select Save image.
2 Press [OK] to save the image in the Multimedai>Picture>Own picture.
Saving a ring tone from an MMS message
1 When viewing the MMS message, press [OK], select Save Sound and then press [OK].
2 Press [OK] to save the ring tone in the Multimedia > Sound album > Own album.
Erasing an MMS message
1 On the MMS list screen, scroll to the MMS you would like to delete, and press the right soft key
[Delete].
Or when view the MMS message, press [OK] and select Delete.
2 The screen prompts: “Delete?”.
3 Press [OK] to confirm the deletion.
To erase all the MMS messages in an MMS folder
1 On the MMS list screen, press [OK], and select Delete all.
2 The screen prompts: Delete.
3 Press [OK] to confirm the deletion.
MMS folders
All the MMS messages are stored in the corresponding folder according to their status in the phone
memory. Your phone can store up to 100 MMS messages.
New messages are stored in the sub-folder of MMS Unread in the Inbox.
Messages that have been read are stored in the sub-folder of MMS Read in the Inbox.
Messages that have been sent are stored in the sub-folder of MMS Sent in the Outbox.
Messages that you wish to send later are stored in the sub-folder of MMS Unsent in the Outbox.
Note:
The phone memory capacity is limited. You may have to delete old messages before you can receive
new ones when the memory is full.
Broadcast messages
Your service provider may offer information services such as weather, traffic conditions, etc. Your phone
can only receive a cell broadcast message when it is in idle mode. For available information topics and
related channel numbers, contact your service provider.
If you’ve activated Auto Display (See CB settings), the received CB messages will be automatically
displayed on the idel screen, Otherwise, you can enter Messages>Broadcast SMS to view the received
CB message.
Message Settings
SMS Setting
Scroll to the item that you would like to set.
SMS centre NO. to enter the number of the service centre advised by your network operator.
Validity: to select the length of time the service centre should keep and attempt to deliver your text
messages.
Type to select the type of your outgoing messages.
Or, press [Select], scroll to the desired type and press [OK].
Location: Press the navigation key to select the storage location of SMS(s).
Notification: to select On or Off. Select On to request a delivery report on your message.
Location: to select the storage location of SMS(s).
Press [OK] to confirm the settings.
MMS Setting
WAP Setting
Homepage: the homepage address of the WAP service that you would like to use
IP Address: the gateway IP address
GPRS Setting
APN: the Access Point Name address
User Name: the user name for GPRS connection
Password: the password for GPRS connection
Other Setting: Scroll to the item that you would like to set.
Validity: to select the period in which the multimedia message centre is to try to deliver your MMS
message.
Delivery Report: to select On or Off. Select On to request a delivery report of the received MMS
message.
Auto download: to select receiving the complete MMS message or only notification of arrival.
On: Your phone automatically downloads messages to your phone as soon as they come to
your operator’s server. (This function is not available when you have a call in progress, an active
WAP connection, an MMS message in sending/receiving process, or application running.)
Off: Only the notification of arrival is received. You need to download the message manually.
(This is the default setting.)
Priority: to select the send priority: Normal, High, Low.
Anonymous send : to select whether hide your phone number.
Receive AD MMS. to select whether receiving ad MMS.
Groups
You can create up to9 groups of recipients. Each group consists of up to 10 numbers (email addresses).
You can then send a SMS/MMS message to all members of a selected group at the same time.
To set up a group
1 On the Message groups screen, select SMS groups or MMS groups.
2 Press the left soft key [Add].
(If there are already some groups, press the right soft key [Add].)
3 Enter a title for the group in the Title field.
4 Move the cursor to the Member field, enter a phone number (or recall the phone number from the
Contact by pressing the left soft key [FInd]). You can enter up to 10 phone numbers (For MMS
groups, you can enter both phone numbers and email addresses)
5 To save the setting, press [OK].
To modify a group
1 On the SMS/MMS group list screen, select the group you would like to modify.
2 Press [OK] and select Modify, and then press [OK].
3 You can modify the title or the members.
To delete a group
1 On the SMS/MMS group list screen, select the group you would like to delete.
2 Press [OK] and select Delete.
3 The display will prompt “Delete”.
4 Press [OK].
To delete all groups
1 On the SMS/MMS group list screen, press [OK] and select Delete all.
2 The display will prompt: “Delete all?”.
3 Press [OK].
Broadcast SMS settings
To access the Broadcast SMS settings: In idle mode, press [Menu], select Messages > Settings >
Broadcast SMS.
1 Press the navigation key to select the desired option.
2 Press [Select] to check the highlighted option, which means to activate it.
Deactivate CB: Turn CB service off.
Channel Index: This option allows you to select up to five different channels for receiving cell
broadcast messages.
Auto Display: The received cell broadcast messages will be automatically displayed on the idle
screen.
To set a CB channel
Scroll to the Channel Index and press [OK].
Press the left soft key [Add].
13 Camera
Your mobile phone feartuers a digital camera that aloows you to take picture, store them in
your phone, use them as wallpaper or send them to your friends. Meanwhile, you can also
record short video clips without sound using the buit-in camera.
Still camera
How to …
Activate the camera
In idle screen, press the camera key.
In idle screen, swivel the main display out the close the flip.
In main menu screen, press [7]-[1].
I
Zoom in/out
In SXGA(1280*960)/VGA(640*480)/QVGA(320*240) mode, press [3/4]; In Wallpaper
(128*160)/Foto call(96*64) mode, press [5/6].
Change the vision mode
Press [*] to toggle between Night and Normal mode.
Change the camera mde
Press [#] to switch from Wallpaper to QVGA to VGA to SXGA to Fotocall.
Change the special effects
In SXGA(1280*960)/VGA(640*480)/QVGA(320*240) mode,press [5/6]; In Wallpaper
(128*160)/Foto call(96*64) mode, press [3/4] to switch from one special effect to another.
Access the camera settings
Press [OK] when the camera is active.
Take a picture
Press the left soft key or the camera key when the camera is active.。
Save the picture
Press the camera key right after the shot.
Delete the picture
Press [Hang up key] right after the shot.
Access the shot options
Press [OK] right after the shot.
Activate/deactivate the self-timer
Press [0].
Settings
Preview mode settings
Once the camera is activated, the lens of the camera is automatically focused and functions
icons are displayed in the bottom (Zoom, Effect, Camear mode, Vision Mode) and top (Option
menu and Back icon).
Camera mode
There are altogether 5 options: SXGA(1280*960)、VGA(640*480)、QVGA(320*240)、Wallpaper
(128*160) and Fotocall(96*64). In SXGA/VGA/QVGA mode, please turn the mobile phone to a
90°angle to the left and hold it horizontally to obtain a fullscreen preview, with the navigation
keys to be automatically adapted to horizontal position; in Wallpaper / Fotocall mode, please
hold the mobile phone horizontally in its normal position.
Zoom mode
This option is available in all modes: two-level (*2 and *3) zoom for Wallpaper mode, two-level
(*2 and *4) zoom for QVGA and Fotocall modes, one-level (*2) zoom for VGA and SXGA
modes. In Wallpaper and Fotocall modes, press 5 or 6 to zoom in or out; in QVGA, VGA and
SXGA modes, hold the phone horizontally and press 5 or 6 (which are actually 3 and 4 of
the navigation key when you hold the phone vertically) to zoom in or out.
Speical effects
Allows you to choose one of the available effects. In Wallpaper and Fotocall modes, press 3
and 4 to zoom in or out; in QVGA, VGA and SXGA modes, hold the phone horizontally and
press 3 and 4 (which are actually 5 or 6of the navigation key when you hold the phone
vertically) to zoom in or out.
Vision mode
Two vision modes are available: Normal and Night mode (reflected by the moon icon at the
bottom right of the preview screen). You can press [*] to toggle between these two modes.
Self-timer
Allows you to set the Self-timer option On or Off. You can press [0] to toggle between the two
modes.
In preview screen, you can also press [OK] to access further settings other than the ones
available directly within the preview screen.
General settings
Camera mode
Allows you to choose a camera mode among the five available modes, the default being
Wallpaper. In the camera mode list screen, press [5/6] to move the cursor and press the left
soft key to select a desired mode.
Brightness
Allow you to choose the brightness level from the 7 available levels, the default being Level 4.
In the brightness level list screen, press [5/6] to move the cursor and press the left soft key to
select a desired level.
Photo quality
Allow you to choose a quality available among the following: Super fine, Fine, Normal, the
default being Super fine. In the photo quality list screen, press [5/6] to move the cursor and
press the left soft key to select a desired quality.
Sounds
Allows you to set the Shoot sound for taking a picture and the alert sound for Self-timer, the
defaults both being On.
White balance
Allow you to choose a white balance mode among the following: Auto, Lamp, Daylight, Sunny
and Cloudy, the default being Auto.
Frequency
Allow you to choose a electricity frequency value among the following: Auto, 50Hz, 60Hz, the
default being 50Hz.
Flashlight
Allow you to choose a flashlight mode among the following: Automatic falsh, Always on, Off,
the defaut being Off.
Default settings
This menu is used to reset all the values to the default ones.
Frame
To choose a frame and apply to the picture you take. This function is only available in
Wallpaper mode.
Own pictures
This menu allows you to access Own pictures folder to view the pictures taken by the built-in
camera.
Comic photo
Set this option to On to take a 4-in-one picture.
Burst capture
Set this option to On to take burst pictures. This option is only available for VGA/QVGA/
Wallpaper modes. In VGA mode, you can take at most 10 continuous pictures; in QVGA and
Wallpaper modes, you can take at most 15 continuous pictures. You can set the number of
pictures from 4 to the top limit.
Effects
To choose an effect and apply to the pictrure you take: Normal, B&W, Blue, Green, Brown, Red,
Negative and Oil.
Vision mode
To choose one of the two modes available: Normal and Night. The default mode is Normal.
Self-timer
Set this option to On to activate it and press [OK] to go back to the preview mode to take a
picture in self-timer mode.
Take a picture
1 If the self-timer option is set to be Off, and once the camera is activated, press the
camera key or the left soft key (when the flip is open) to take a picture.
2 If the self-timer option is set to be On, the self-timer icon will be shown on the screen,
press the camer key or the left soft key (when the flip is open) to take a picture in the
self-timer mode. The countdown starts at 5 sedonds (this value cannot be changed). An
alert sound is played 2 seconds before the picture is taken, then the shoot sound is
played when it is actually taken.
After the picture is taken and displayed on the screen, you can:
- press the camera key (or tap the corresponding icon using the stylus) to save the picture
and go back to the preview screen.
- press the [Hang up key] (or tap the corresponding icon using the stylus) to delete the
picture and go back to the preview screen.
- Press [OK] (or tap the option menu icon on the screen) to access the following list of
available ooptions: Rotate (Left 90°, Right 90°, 180°, Horizontal mirror or Vertical flip),
Save picture, Send via MMS, Take a new picture or Back to idle.
The number of pictures you can save varies according to the settings: the higher the resolution,
the bigger the file size.
View the pictures
The pictures you save are automatically stored in the Multimedia>Picture album >Own
pictures menu, and are automatically named after the date and time when they are taken.
Receive a call
When receiving a call while using the camera, answering or rejecting it will quit the camera
context and bring you back to the camera function list screen. If the picture has not been saved,
it will be lost.
Make a call
To make a call, you must first go back to the idle screen.
Video camera
This menu allows you to record at most 10 video clips, the time limit for a single video clip is
about 45 seconds.
Record new video clips
When there are no records in Video Camera, you can press the left soft key is [Add] to add a
new record, or press the right soft key [Back] to go back to the previous menu.
As soon as an entry is added, the left soft key is remained as [Add] while the right soft key is
changed into [Play], you can press the left soft key to add a new record, or press the right soft
key to play a selected video clip.
In the preview mode, you can :
- press the [5/6] to zoom in/out, or press [3/4] to switch from one available effect to
another.
- press the left soft key (or camera key) or tap the green dot on the upper left corner of the
screen to begin recording, and then the green dot will be changed into a red dot with
“Recording…” to be displayed at the right side of it.
- Press [Hang up key] (or camera key) or tap the red dot on the upper left corner of the
screen to terminate recording. The recorded video clip will be automatically saved and
named after the recording date and time. If not stopped by user, the recording will
automatically terminated when the time limit (about 45 sedonds) is reached, and the
recorded video clip will be automatically saved and named after the recording date and
time. The saved video clips will be automatically stored in the Multimedia>Video.
Play video clips
In the list screen of video clips, move the cursor to select a video clip and press the right soft
key [Play] to play it. During the play process, you can press [Hang up key] to stop it.
Manage video clips
In the list screen of video clilps, you can press the left soft key to add a new video clip, or press
the right soft key to play the selected video clip, or press [OK] to access the following options:
Add – add a new video clip.
Rename – rename the selected video record.
Delete – delete the selected video record.
Delete all – delete all the video records.
Back to idle – go back to idle screen.
14 Settings
The different functions of your phone can be customized to suit your own preferences via the
Setting functions.
To access the Setting functions, you can:
In main menu screen, move the cursor to Settings icon and press [OK].
In main menu screen, press [8].
In main menu screen, tap Settings icon using the stylus.
Then, you can press [1]-[7] to access Language, Time and Date, Sounds, Display, Phone
settings, Network Services, Phone data and Switch on/off respectively.
Language
Press [Select] to select a language.
When the cursor is moved to 简体中文(simplified Chinese), press the right soft key to
select input methods for simplified Chinese.
Time and Date
You can change the current date and time as follows:
For date formats, you have three options: Year/Month/Day (default), Day/Month/Year,
and Month/Day/Year. Press / to select the desired format.
In the Date field, enter the current date.
In the Time field, enter the current time.
Note:
Effective date input range: 1951/01/01~2050/12/31.
Time format: 24-hour.
The right soft key is a shortcut for Alarm function.
Sounds
You can set the Ringtone for incoming calls, Message ringer, Key tones, Screen tap tone,
Sound alerts and Profiles. You can press [1]-[6] to access the above functions respectively.
Ringtone
—Call ringtone
In the Melody field: press / to select the desired one.Or, press [Select] to display the
melody list and move the cursor to select the desired one and press [OK].
In the Alert field: there are four choices: Ring, Vibrate, Ring&Vibrate and Silent mode.
Press / to select the desired one.
In the Ring mode field:: press / to select Normal or Ascending.
—Group Ringtone
You can set a unique ring tone for a Contacts group.
In the Use group field: press [Select] to activate the group ringtone ..
In the Group field: press / to select a desired group from General, Family, Friends,
Business, VIP, SIM and user-defined groups.
In the Melody field: press / to select the desired one.Or, press [Select] to display the
melody list and move the cursor to select the desired one and press [OK].
—Ringtone volume
Press / to adjust the volume.
Message ringer
In the Ringer options, press / to select the desired one.Or, press [Select] to display
the melody list and move the cursor to select the desired one and press [OK].
In the Alert mode field: there are four choices: Ring, Vibrate, Ring&Vibrate and Silent
mode. Press / to select the desired one.
In the Ringer volume field: press / to adjust the volume.
Key tones
To set the key tone: move the cursor to select a desired key tone and press [Select].
Screen tap tone
To set the screen tap tone: move the cursor to select a desired tone and press [Select].
Sounds alerts
In the Battery low tone field: press / to select the desired one from Low, High and
Off.
In the Beep interval field: press [Select] to activate the function. Then move the corsor to
the time input option, clear the old numberand enter the new number (During a call, you
will hear a beeping sound at regular interval you have set.)
Profiles
This menu allows you to access a group of predefined settings, which let you quickly adapt
your phone to your environment by changing several settings at once.
To change the profiles: move the cursor to select a desired profile and press the left soft key
[Select]
Display
Main display
On the Main display option list screen, press [1]-[5] to access Wallpaper, Idle screen,
Backlight, Fold setting and Stylus calibration setting respectively.
—Wallpaper
On the image list screen, press [OK] and select Set wallpaper to set the selected image
as the main display wallpaper for the phone in idle mode.
On the image list screen, press [OK] and select Set subwallpaper to set the selected
image as the sub display wallpaper for the phone in idle mode.
On the image list screen, press [OK] and select Properties to display the detailed
information about the select image, such as image type, dimension and size etc.
On the image list screen, press [view] to display the selected image. (When viewing an
image, press to back to the image list screen, press5/6 to display the previous/next
image.)
—Idle screen
You can set the clock display mode on the main display and adjust the screen contrast.
On the Clock option list screen, press [select] to select the clock display mode from
Analogue, Digital, Tiny digital. You can also select No clock to hide the clock display
on the idle screen.
On the Screen contrast setting screen, press / to adjust the screen contrast.
—Backlight
In the Backlight level field, press / to adjust the brightness of the backlight.
In the Backlight timing field, press / to select the interval of backlight off.
—Folding setting
Press [Select] to select On/Off to enable/disable the phone to automatically return to idle mode after the
phone has been folded.
—Stylus calibration
When the stylus is not pointing accurately on the display, it is time to calibrate it. Use the stylus and follow
the on-screen instructions to calibrate the touch screen.
Sub display
—Wallpaper
On the image list screen, press [OK] and select Set subwallpaper to set the selected
image as the sub display wallpaper for the phone in idle mode.
On the image list screen, press [OK] and select Set wallpaper to set the selected image
as the main display wallpaper for the phone in idle mode.
On the image list screen, press [OK] and select Properties to display the detailed
information about the select image, such as image type, dimension and size etc.
On the image list screen, press [view] to display the selected image. (When viewing an
image, press to back to the image list screen, press5/6 to display the previous/next
image.)
—Clock
You can set the clock display mode on the sub display.
On the option list screen, press [select] to select the clock display mode from Simple, Full and
World clock.
Simple mode: displays the current time in HH:MM format in the middle of the sub display.
Full: displays signal strength, battery level, current time and week at the same time.
World clock: displays the current time of the local city and the current time of the remote
city at the same time.
Note:
If wallpaper of the sub display is set to be on, the selected wallpaper will be displayed as
the background.
LED
—Call indicator
You can make different LED settings for different groups (including user-defined groups) of
callers.
Press [Select] to select a desired group and then press [Edit] to enter the related Set LED

screen.
Press [Select] to select a desired colour.
Note:
When the caller’s number is not matched in the phonebook, the LED will flash in all
colour.
—Event indicator
You can set LED to be On/Off in case of events (roaming, battery low, etc.).
Press [Select] to select On or Off.
Phone Settings
Answering
You can set the answering mode for the incoming call.
Press [Select] to select the desired one from the following options:
Any key answer: Enables you to answer a call by pressing any key (except for the right
soft key and ).
Active flip: Enables you to answer a call by opening the flip.
Auto answer: Enables you to answer a call automatically when the headset is plugged in.
Phone Guard
You can restrict incoming calls by automatically barring designated numbers from calling your
phone.
—Answer
If you only would like to answer calls from designated numbers, you can press / to
choose Answer in the Guard method option, and then press [1] to set the phone
numbers you would like to answer.
Then you can enter the phone number directly or press [Find] to access the Directory and
select a number from it.
Note:
If you don’t enter any phone number in the above setting, the phone will reject all
incoming calls.
—Reject
If you only would like to reject calls from designated numbers, you can press / to
choose Reject in the Guard method option, and then you can press [1] to set the phone
numbers you would like to reject, or press [2] to set the reject method.
Set reject number: You can enter the number directly or press [Find] to access the
Directory and select a number from it.
Set reject method: Press [Select] to select the desired one from the following options:
Reply by SMS: the incomging calling(s) will be rejected while the phone will send a
SMS as a reply to the caller automatically. If you select Reply by SMS, you can
move the cursor the the message selection field and press / to select a
message.
Auto hangup: the incoming call will be rejected automatically and without alerts.
Note:
If you haven’t set the reject method, the reject function will be invalid.
—None
To disable the phone guard function, you can just press / to choose No in the Guard
method option.
Security
In the Security function, you can activate/deactivate Phone Code, PIN Code and Data
protection, as well as edit phone code, PIN and PIN2 code.
—Phone Code: a code protects your phone against unauthorized use. If activated, you will be
asked to enter your phone code each time you turn on your phone. The phone code is
supplied with the phone and the factory default is 1234.
To set the phone code, you can move cursor to Phone Code, and press [Select] to
access the phone code setting screen. After entering the phone code, you can press [OK]
to save the setting and exit the phone code setting screen, and the checkbox before
Phone Code will be checked.
To disable the phone code, you can mover the cursor to Phone Code, and press [Cancel]
to prompt the phone code input screen. After the correct phone code has been entered,
you can press [OK] to confirm and go back to the previous screen, and then the
checkbox before Phone Code will become unchecked.
In case you forget the phone code, you can press [Help] to display the following screen.
The serial No. displayed is a prompt code randomly generated by the phone, you can ask
for the relevant super code from the local service center to unblock the phone code.
—PIN Code: a code protects your SIM card against unauthorized use, also known as a
Personal Identification Number. If activated, you will be asked to enter your PIN each time you
make a call. Your PIN is usually supplied with the SIM card. If you enter an incorrect PIN code
three times in succession, the code is disabled and cannot be used until you re-enable it by
entering the PUK.
To set PIN code, you can move the cursor to PIN Code, and press [Select] to access the
PIN code setting screen. After entering the PIN code, you can press [OK] to save the
setting and exit the PIN code setting screen, and the checkbox before PIN Code will be
checked.
To deactivate the PIN code, you can move the cursor to PIN Code and press [Cancel] to
access the PIN code input screen (at most 3 tries), and then you can enter the PIN code
you has set before and press [OK] to go back to the previous screen, and then the
checkbox before PIN Code will become unchecked.
Note:
PIN2: a code supplied with specific SIM cards, which is required to access specific
functions, such as setting the maximum cost of a call.
PUK: a number key which is required to unblock a blocked PIN, also known as the
Personal Unblocking Key. The PUK may be supplied with the SIM card. If not supplied or
it is lost, please contact your service provider.)
—Data Protection: enables you to protect personal data such as your directory, call records,
and so on. If activated, you will be asked to enter the phone code before accessing the
protected data.
To activate Date protection, you can move the cursor to Data protection, and press
[Select] to access the data protection type list. To protect a certain type of data, you can
move the cursor to the desired type and press [Select], and then press [OK] to save the
setting.
Note:
To disable data protection, you will also be required to enter the phone code.
—Edit Phone Code
To edit the phone code, you can move the cursor to the Phone Code and press [OK], the
screen will prompt “Old code:” for entering the old code, and then prompt “New code:” if the
correct old code has been entered, and then prompt “Re-enter:” for entering the new code
again. After re-entering the new code again, you can press [OK] to save the new phone code.
—Edit PIN
When the PIN code has been activated, you can move the cursor to Edit PIN and press
[OK] to edit the PIN code. The screen will display the following prompt message: ”Enter
old PIN, Left times: 3”. If the correct old PIN code has been entered within 3 tries, the
screen will display the following prompt message: “Enter new PIN”, and the “Re-enter” for
entering the new PIN code again. After re-enter the new PIN code, you can press [OK] to
save new PIN code and exit the PIN code editing screen.
If the correct old PIN code has not been entered with 3 tries, the screen will display
following prompt:”Enter PUK, Left times: 10”. If the correct PUK number has been
entered within 10 tries, you will be prompt to enter the new PIN code. In case the number
of tries exceeds 10 times, the SIM will be blocked and the screen will prompt “SIM not
usable.”
—Edit PIN2
To edit PIN2, you can move the cursor to Edit PIN2, and the screen will display the
following prompt message:”Enter old PIN2, Left times: 3”. If the correct old PIN2 code
has been entered within 3 tries, the screen will display the following prompt message:
“Enter new PIN2”, and the “Re-enter” for entering the new PIN2 code again. After
re-enter the new PIN2 code, user can press [OK] to save new PIN2 code and exit the
PIN2 code editing screen.
If the correct old PIN2 code has not been entered with 3 tries, the screen will display
following prompt:”Enter PUK2, Left times: 10”.If the correct PUK2 number has been
entered within 10 tries, you will be prompt to enter the new PIN2 code. In case the
number of tries exceeds 10 times, the PIN2 code is blocked and the functions related to
PIN2 code will be unaccessible.
Factory defaults
The function enables you to restore all the original settings of the phone.
Phone code is requested before restoring the factory defaults. The default phone code is 1234.
Note:
All the factory default settings are to be restored except for time & date.
Shortcuts
Instead of entering the various menus and browsing the lists, you can set up direct access to a
specific function by linking it to a key.
—Right soft key
You can change the definitions for the right soft key:
press / to change the setting, or
press [Select] to display a function list, select a function and press [OK].
—Navigation keys
You can change the definitions for the four directions on the navigation key. Scroll to Up, Down,
Left or Right, indicated by an arrow, and then:
press / to change the setting, or
press [Select] to display a function list, select a function and press [OK].
—Hotkeys
You can only program keys 2 to 9 as 0 (select language),1 (call voice mailbags), # (access
WAP) and * (enter international prefix) are predefined and locked, preventing reprogramming.
Depending on your service provider, other hotkeys may be predefined and locked.
1 Select a key from 2 to 9 and press the left soft key.
2 Browse the list to select the function you wish ton associate with this key. Press the left soft
key, to confirm your choice.
To use the hotkeys, simply press and hold the key corresponding to the function you want to
launch or to the number you want to dial while in idle mode.
Network Services
The function enables you to make networking settings. Press [1]-[2] to access Network Info
and Preferred network respectively.
Network Info
—Network select: enables you to make network settings in the following ways: select Auto
Selection and the phone automatically selects one of the mobile networks available in your
area, or you can select a network from the network list by yourself.
—Frenqucency: Press [Select] to select the desired frequency from GSM900/DCS1800 and
1900.
Preferred Network: enables you to set up to 10 preferred networks in the following ways:
press [Insert] to display a network list, select a network, and then press [OK] to insert the
network in the selected place on the list; or press [Append] to display a network list, select a
network, and then press [OK] to add the selected network at the end of the network list.
You can press [Delete] to delete the selected network from the preferred network list you
have set.
Phone Data
On the Phone Data screen, there are three available options as follows:
Phone Info: enables you to view or modify the phone information (own number and IMEI).
Memort status: shows the percentage of memory used/free, and the phone’s total memory in
KB.
Serial Number: displays the serial number of the phone.
Switch on/off
Switch on time
A checkbox is displayed to enable you to select the function. Press [Select] to select Switch on
and then you can enter the switch on time in the format of hh:mm.
Switch off time
A checkbox is displayed to enable you to select the function. Press [Select] to select Switch off
and then you can enter the switch off time in the format of hh:mm.
15 STK
Function items of this menu are subscription dependent and specific to operators. For
details,please contact your network operator.
FCC Regulations:
zThis mobile phone complies with part 15 of the FCC Rules. Operation is subject to the
following two conditions: (1) This device may not cause harmful interference, and (2) this
device must accept any interference received, including interference that may cause undesired
operation.
zThis mobile phone has been tested and found to comply with the limits for a Class B digital
device, pursuant to Part 15 of the FCC Rules. These limits are designed to provide reasonable
protection against harmful interference in a residential installation. This equipment generates,
uses and can radiated radio frequency energy and, if not installed and used in accordance with
the instructions, may cause harmful interference to radio communications. However, there is
no guarantee that interference will not occur in a particular installation If this equipment does
cause harmful interference to radio or television reception, which can be determined by
turning the equipment off and on, the user is encouraged to try to correct the interference by
one or more of the following measures:
-Reorient or relocate the receiving antenna.
-Increase the separation between the equipment and receiver.
-Connect the equipment into an outlet on a circuit different from that to which the receiver is
connected.
-Consult the dealer or an experienced radio/TV technician for help.
Changes or modifications not expressly approved by the party responsible for compliance
could void the user‘s authority to operate the equipment.

4RF Exposure Information (SAR)
This model phone meets the government’s requirements for exposure to radio waves.
This phone is designed and manufactured not to exceed the emission limits for exposure to
radio frequency (RF) energy set by the Federal Communications Commission of the U.S.
Government.
The exposure standard for wireless mobile phones employs a unit of measurement known as
the Specific Absorption Rate, or SAR. The SAR limit set by the FCC is 1.6W/kg. *Tests
for SAR are conducted using standard operating positions accepted by the FCC with the
phone transmitting at its highest certified power level in all tested frequency bands.
Although the SAR is determined at the highest certified power level, the actual SAR level of
the phone while operating can be well below the maximum value. This is because the
phone is designed to operate at multiple power levels so as to use only the poser required to
reach the network. In general, the closer you are to a wireless base station antenna, the
lower the power output.
The highest SAR value for the model phone as reported to the FCC when tested for use at the
ear is 0.212 W/kg and when worn on the body, as described in this user guide, is 0.393 W/kg
(Body-worn measurements differ among phone models, depending upon available
enhancements and FCC requirements.)
While there may be differences between the SAR levels of various phones and at various
positions, they all meet the government requirement.
The FCC has granted an Equipment Authorization for this model phone with all reported
SAR levels evaluated as in compliance with the FCC RF exposure guidelines. SAR
information on this model phone is on file with the FCC and can be found under the Display
Grant section of http://www.fcc.gov/oet/fccid after searching on FCC ID: POT-CT7668.
For body worn operation, this phone has been tested and meets the FCC RF exposure
guidelines for use with an accessory that contains no metal and the positions the handset a
minimum of 1.5 cm from the body. Use of other enhancements may not ensure compliance
with FCC RF exposure guidelines. If you do no t use a body-worn accessory and are not
holding the phone at the ear, position the handset a minimum of 1.5 cm from your body when
the phone is switched on.