Inventec Appliances CT8688 GSM Multimedia Phone User Manual Manual
Inventec Appliances Corp. GSM Multimedia Phone Manual
UserManual.wiki
>
Inventec Appliances
>
CT8688 User Manual
Manual
Navigation menu
Upload a User Manual
Namespaces
Wiki Guide
HTML
PDF
Info
Views
User Manual
Discussion / Help
Navigation
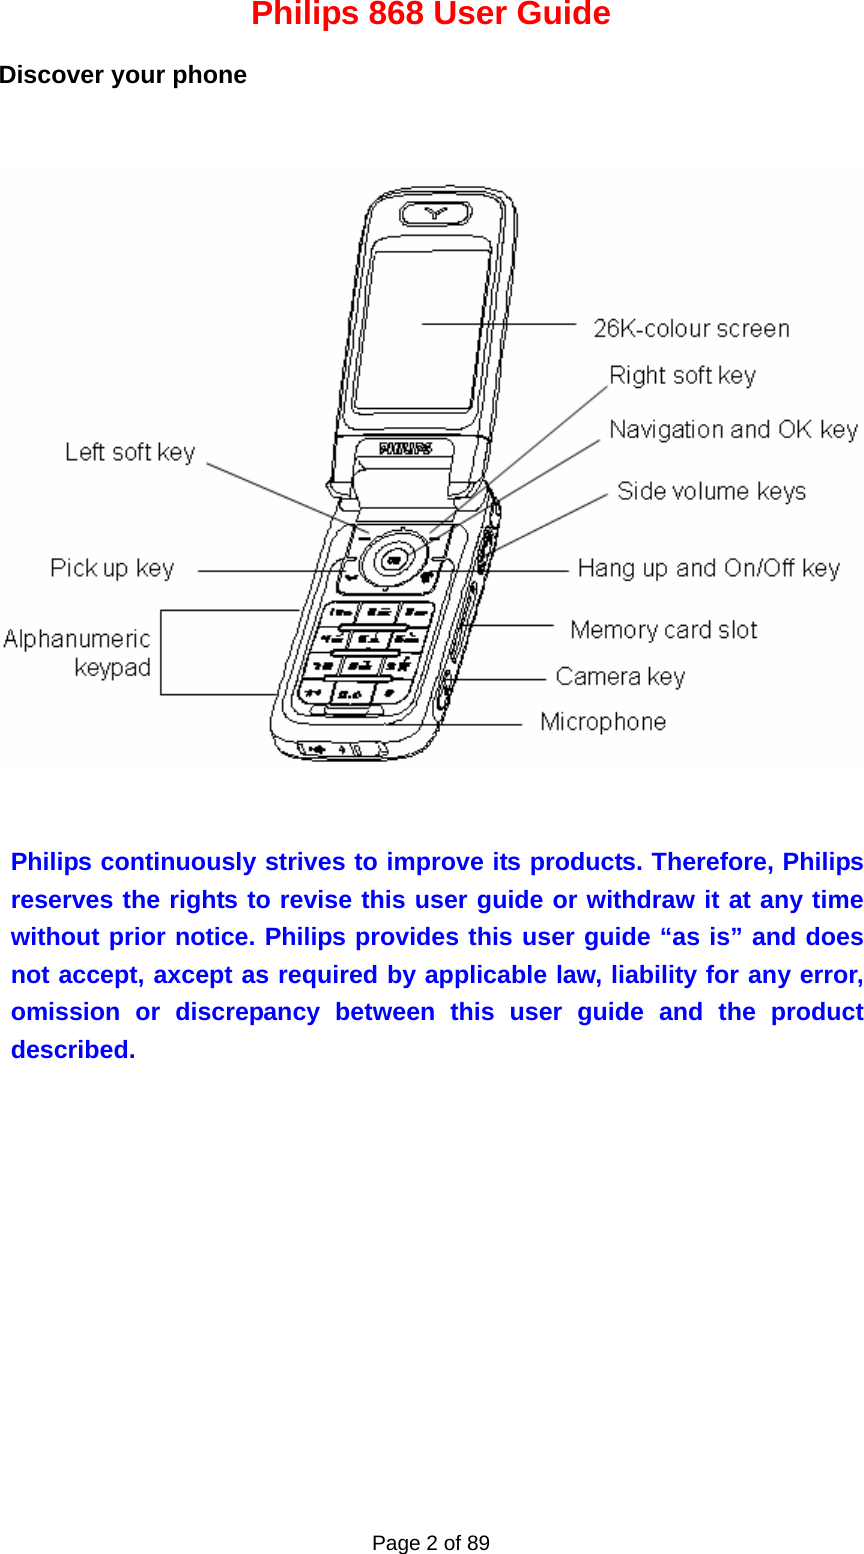
![Philips 868 User Guide Page 3 of 89 Keypad description OK key • In idle screen, press to access the main menu. • Validate the current operation or confirm the current selections. • In other screens: press to perform the function indicated by the icon in the middle of the bottom bar. Left soft key • In idle screen, it is a preset shortcut key to acess the main menu. You can not change this shortcut key. • In other screens, press to perform the function indicated at the bottom left of the screen. Right soft key • In idle screen, it is a defalt shortcut key to access Messages. You can change this shortcut key in Settings. • In other screens, press to perform the function indicated at the bottom right of the screen. Pick up key • To dial an outgoing call or answer an incoming call. • In idle screen, press to access call list. Hang up and On/Off key • In idle screen, long press to switch the phone On/Off. • To end or reject an incoming call. • In other screens, press to return to the idle screen. Navigation keys [Up] 5 • Cursor up. • In idle screen, short press to acess Quick call (can be user defined).](https://usermanual.wiki/Inventec-Appliances/CT8688/User-Guide-584416-Page-3.png)
![Philips 868 User Guide Page 4 of 89 [Down] 6 • Cursor down • In idle screen, short press to acess Contacts list (can be user defined). [Left] 3 • Corsor left. • In idle screen, short press to Create new message (can be user defined). • In tab view, move to the previous tab. [Right] 4 • Corsor right. • In idle screen, short press to access Dictionary (can be user defined). • In tab view, move to the next tab. Numeric keys • In idle screen, short press [0]-[9] to enter numberes. • In idle screen, long press to quick access a designated function or flash dial a designated phone number (can be user defined, except for key [0] which has been preset to access languge setting screen, and key [1] which has been preset to access voice dial) • In menu or function list screens, press a numeric key to enter a numbered menu item or function item. • In abc input mode, short press key [0] to shift case, long press [0] to input “0”. Key [*] • In idle screen, short press to enter “*”, long press to enter “+”. • In text editors: short press to toggle among available input modes. • In list screens, short press to page up. Key [#] • In idle screen, short press to enter “#”, long press the access WAP. • In text editors (except for 123 input mode), press to access a table of symbols and punctuations.](https://usermanual.wiki/Inventec-Appliances/CT8688/User-Guide-584416-Page-4.png)


![Philips 868 User Guide Page 15 of 89 3. Input methods Keypad input methods Your phone provides with the following input methods: • T9 Pinyin • T9 Stroke • T9 English • ABC • 123 • Symbols & punctuations In the text editors, you can press key [*] to switch from one available input mode to another. T9 Pinyin input mode T9 Stroke input mode T9 English text input mode Multitap English text input mode Number input mode Meanwhile, you can press [#] in any text text input mode (except [123] input mode) to access a table of symbols and punctuations. T9 Pinyin input A Chinese character is made up of one or several Pinyin letters. Press the numeric keys corresponding to the required Pinyin letters to enter the Chinese Pinyin (Please be noted that the Pinyin “ü” is represented by “v” on the keypad). Each Pinyin letter is represented by one of the numeric keys as described in the following table. Number key Pinyin letter 2 abc 3 def 4 ghi 5 jkl 6 mno 7 pqrs 8 tuv 9 wxyz](https://usermanual.wiki/Inventec-Appliances/CT8688/User-Guide-584416-Page-15.png)
![Philips 868 User Guide Page 16 of 89 Input process: 1. Input Pinyin: when you use number keys to input Pinyin letters, there will be two lines at the bottom of the screen: the first line is the input area showing the proposed Pinyin combinations corresponding to your input, the second line is the candidate area showing the candidate Chinese characters corresponding to the highlighted Pinyin combination in the input area. During the input process, the Pinyin combinations displayed in the input area keep changing until the last Pinyin letter has been entered. 2. Select Pinyin combination: When there are several proposed Pinyin combinations in the input area, use 3/4 to select a desired one and press [OK] to display all the corresponding Chinese characters matched to the selected Pinyin combination in the candidate area, with the first candidate being highlighted and all the candidates being numbered. 3. Select the desired Chinese character: press 3/4 to move the cursor in the candidate area, or press 5/6 to view the previous/next line of the candidate characters. 4. Enter a selected character: press [OK] or corresponding number key. - Press [OK] to enter a highlighted character. - Press the number key corresponding to the number of the desired character to enter it. As soon as a Chinese character has been entered, the input area will disappear and the association characters for the entered character will be shown in the candidate area. 5. Select and enter an association character or press number keys to enter a new character as described in Step 1. If the desired association character is not found in the first line of suggested association characters, press 6 to view the next line of association characters. If the desired association character is the first one in the line, press [OK] to enter it; if not, press 4 to activate association character list (then the association characters will be numbered with the second candidate in the line being highlighted), and then users can press the number key corresponding to the number of the desired association character to enter it or move the cursor to select a desired one and then press [OK] to enter it. Note: — To go back one step to modify the Pinyin input after the a candidate character list has been displayed, users can press the right soft key. When entering Pinyin letters, users can press the right soft key to delete the last entered Pinyin letter. After the last Pinyin letter has been deleted, the input area will disappear, and then the right soft key can be used to delete the character before the cursor. Long press the right soft key to delete all the charaters before the cursor at once. After entering the desired characters, users can press the right soft key to exit association character list and press [OK] to confirm the text input.](https://usermanual.wiki/Inventec-Appliances/CT8688/User-Guide-584416-Page-16.png)
![Philips 868 User Guide Page 17 of 89 T9 Stroke Input A Chinese character can also be built up with strokes, In your mobile phone, the strokes are grouped into 5 categories. Each category is represented by one of the numeric keys described in the following table. The Wild Card key [9] is used when you are unsure of which stroke to use. Numeric key Stroke category Basic strokes Example character 十、慧 七、冰、骏2 Horizontal stroke 羽、输、泰4 Left-falling stroke 人、川、牛 小、常 十 5 Vertical stroke 了、小、利 入、边 6 Right-falling stroke 主、心、家乙 亿 买、安 口、习、内 除、建 与、鸟 语、凹 儿、飞 各 以、饭、能、云、好 独 8 Over-down 代、心 Input process 1. Press the numeric keys corresponding to the required strokes. 2. Press 3/4 to select the desired character in the candidate area, or press5/6 to view the previous/next line of proposed characters.。 3. When you have found the desired character, you can mover the cursor to highlight it and](https://usermanual.wiki/Inventec-Appliances/CT8688/User-Guide-584416-Page-17.png)
![Philips 868 User Guide Page 18 of 89 then press [OK] to enter it, or you can press the corresponding numeric key to enter it directly. 4. After the character has been entered, the input area will disappear and its corresponding association characters will be displayed in the candidate area. You can select and enter a desired character or press the numeric keys to enter a new character as described in Step 1. Example: 1. 木 【2】 + 【5】 + 【4】 + 【6】 2. 田 【5】 + 【8】 + 【2】 + 【5】 + 【2】 + 4 3. 加 【9】 + 【4】 + 【5】 + 【8】 + 【2】 4. 凉 【6】 + 【9】 + 【6】 + 【2】 + 【5】 + 【8】 + 【2】 + 【9】 + 【4】 + 【6】 5. 陈 【9】 + 【5】 + 【2】 + 【9】 + 【9】 + 【4】 + 【6】 +4(4 presses) Generally, you will be able to find a desired character before you have finished entering all of its strokes. After entering the desired characters, press the right soft key to exit the association character list and press [OK] to confirm the text input. T9® Text Input T9® predictive Text Input is an intelligent editing mode for messages, including a comprehensive dictionary. It allows you to quickly enter text. Press only one key corresponding to each letter needed to spell a word: keystrokes input are analysed and the word suggested by T9® will be displayed in the edit screen. If several words are available according to the keys used, the word you have entered will be highlighted: press 3or4 to browse the list and to choose from those proposed by the T9® built-in dictionary. (See example below) How to use it? Alphebets and symbols represented by each key are as follows: [2] to [9] To key in letters. 3or4 To browser the list of candidate words. [OK] To confirm entry. Right soft key Short press to clear one entry, long press to clear all text. [0] Shift case. [*] Shift from one available input mode to another. [#] Shift to symbols and punctuation mode.](https://usermanual.wiki/Inventec-Appliances/CT8688/User-Guide-584416-Page-18.png)
![Philips 868 User Guide Page 19 of 89 Example: how to enter the word "home" 1. Press 【4】【6】【6】【3】. The screen display the first word of a list: good. 2. Press4 to scroll and select home. 3. Press【OK】to confirm the selection of he word home. Basic text input If you wish to access the basic text input, press [*]. This method requires multiple key presses to reach the desired character: the letter “h” is the second letter on the [4] key, so you must press it twice to enter “h”. Example: how to enter the word “home”: Press [4], [4] (GHI) [6], [6], [6] (MNO), [6](MNO), [3], [3] (DEF) 。Press [OK] when the message is completed.【OK】键确认编辑完成。 During the input process, you can short press [0] to shift case or long press [0] to enter “0”, or press [#] to access a table of symbols and punctuations. Letters, numbers and symbols are located on each key as follows: Numeric key Shor press Long press space . , @ / : ; “ ` ! ¡ ? ¿# + - * = % <> ( ) & £ $ ¥ € 1 abc2 2 def3 3 ghi4 4 jkl5 5 Mno6 6 Pqrs7 7 tuv8 8 wxyz9 9 Shift case 0](https://usermanual.wiki/Inventec-Appliances/CT8688/User-Guide-584416-Page-19.png)
![Philips 868 User Guide Page 24 of 89 5. Call functions Make or answer calls Make calls 1. In idle screen, enter the phone number using the keypad. 2. Press the pick up key or the left soft key to dial the number your have just entered. 3. Press the hang up key to end of cancel the call. Note:In the phone number input screen, you can press: 1) the right soft key [Clear] to delete any digits are characters before the cursor. 2) [OK] and then select [1] to save the number into the phonebook. 3) [OK] and then select [2] to send message to the phone number. 4) [OK] and then select [3] to access the contacts list. 5) [OK] and then select [4] to dial the number in handsfree mode. 6) [OK] and then select [5] to dial the number by IP call. Make international calls To make and international call, you need to enter the international prefix “+”, the country code, followed by the area code before the phone number. 1 Long press [*] until “+” appears. 2 Enter the country code and area code directly. Or, you can press the left soft key [Area] to display the world city list. Press 6/5 to select a desired entry and press [OK] to insert the corresponding country code and area code automatically. 3 Enter the phone number, or press [OK] and then select [3] to find a desired phone number in the Contacts. 4 Press the pick up key or the left soft key to dial the number your have just entered. Redial If a call attempt fails, you can press the left soft key [Redial] to redial the phone number, or press the right soft key [Back] to return to the idle screen. Dial from the contacts list 1 In idle screen, press 6 to view the contacts list, or press [OK] and then press [1]-[1] to view the contacts list. 2 Press 5/6 to select a desired contact, and then press 3/4 to select the desired number of the selected contact.](https://usermanual.wiki/Inventec-Appliances/CT8688/User-Guide-584416-Page-24.png)
![Philips 868 User Guide Page 25 of 89 3 Press the pick up key to dial the selected phone number. Quick call In idle screen, press5 or press [OK] and then press [1]-[4] to access the quick call screen, which can be customised to show pictures of up to four friends stored in contacts. To make a quick call, you can move the cursor onto the desired picture and press the pick up key, or you can press the number key corresponding to the picture number to dial the corresponding phone number directly. Dial from the call list 1 In idle screen, press the pick up key or press [OK] and then press [2]-[1] to access the call list. 2 Press 3/4 to toggle among the five tabs: All calls, Missed calls, Answered calls, Outgoing calls and Rejected calls. 3 Press 5/6 to select a desired phone number in the current tab. 4 Press the pick up key to dial the selected number. Make an emergency call (with or without a SIM card inserted) 1 In idle screen, enter the emergency call number directly and press the pick up key or the left soft key to dial. 2 In idle screen, press [OK] and then press [1]-[3]-[3] to view the SOS number, and then press the pick up key to dial. Flash dial You may set your frequently called numbers as Flash dial numbers in Settings>General> Shortcuts>Hotkeys menu. Number keys ([2]-[9]) can be used to flash dial a phone number. Once you have assigned a phone number to one of he number keys, you can press and hold the key in idle screen to flash dial the corresponding phone number. Answering incoming calls When the clamshell is open, information about the incoming call will be displayed on the main display. You can press: - the pick up key, or press the left soft key [Options] and select [1] (Accept) to answer the call. - the hang up key or the right soft key [Reject] to reject the call. Note: If the caller hangs up the call before you answer it, a missed call icon will be displayed on the sub display, while a missed call and a text prompt will be displayed on the main display.](https://usermanual.wiki/Inventec-Appliances/CT8688/User-Guide-584416-Page-25.png)
![Philips 868 User Guide Page 28 of 89 6. Contacts There are two available phonebooks: one on your SIM card (number of entries depending on SIM card capacity) and one in your phone (up to 500 entries), which is the default selected phonebook. Contacts list Add an entry into a phonebook 1 In the contacts list screen, move the cursor onto <New contact> and then press OK key or the left soft key [Add] to enter the edit mode of a new contact. You can press 3/4 to shift among the four available tabs: General, Picture and sound, Group and Info. 2 In General tab, move the corsor onto a desired fied and then press the left soft key to enter the corresponding edit screen. In this tab, the following fieds are available: Name, Mobile phone number, Home number, Work number, Fax number, e-mail account. 3 In Picture and sound tab, move the cursor the desired field and then press left soft key to enter the edit screen. In this tab, you can assign the photo and call ringtone for the contact recorod. 4 In Group tab, you can link the current the contact to a contact group. There are 6 pre-defined groups: General, Familuy, Friends, Businesss, VIP and SIM. You can also define your own groups. 5 In Info tab, you can press the left soft key to enter the edit screen to enter the detailed information about the current contact. 6 After entering all the information, press [OK] to confirm and save the contact entry. Note: — Contact records which are grouped as General, Family, Friends, Business, VIP or user-defined groups will be saved in the phone memory, while those grouped as “SIM” to be saved in SIM card. Add a new group 1 In contacts list screen, press 5/6 to select <New group> at the bottom of the list, and then press OK key or the left soft key [Add] to enter the edit screen of the group name. After enter the desired group name, press OK key to save and exit. 2 In group list screen, press 5/6 to select <New group>, and then press OK key or the left soft key [Add] to enter the edit screen of the group name. After the desired group name, press OK key to save and exit.](https://usermanual.wiki/Inventec-Appliances/CT8688/User-Guide-584416-Page-28.png)
![Philips 868 User Guide Page 29 of 89 Note:At mot 8 user-defined groups can be added. Dial from contacts list In the contacts list screen, press the pick up key to dial a number of the selected entry. If there is more than one number stored in the entry, press 3/4 to select a desired one and then press the pick up key (or press the left soft key [Options] and select Dial) to dial the selected number. Note:To dial a number via IP call, you can long press the pick up key or press the left soft key [Options] and select IP call. View and edit a contact entry In the contacts list screen, press 3/4 to select a desired entry, and then press OK key (or press the left soft key [Options] and select View and edit) to view and edit the details of the selected entry. Search for an entry Your phone provides you with the following search methods: - Search by initial letter In the contacts list screen, enter the initial letter of the entry you want to search (small letters are to be matched with English entries, capital letters are to be matched with Chinese entries.) The cursor will be positioned at the first matched entry. - Search by keyword In the contacts list screen, press 5/6 to select <Search> and press OK key or the left soft key (or press the left soft key [Options] and select Search) to enter the keyword search mode. Enter the keyword and then press OK key to search for the contact entries containing the keyword you have entered. The matching entries will be displayed as a list. Copy a single contact entry In the contacts list screen, press 5/6 choose the entry you want to copy, and then press the left soft key [Options] and select Copy. You will be required to choose between Copy to phone and Copy to SIM, make your choice and then press OK key to confirm. Delete a single contact entry In the contacts list screen, press 5/6 choose the entry you want to delete, and then press the left soft key [Options] and select Delete. At the prompt message “Delete?”, you can press the left soft key or OK key to confirm, or press the right soft key to cancel.](https://usermanual.wiki/Inventec-Appliances/CT8688/User-Guide-584416-Page-29.png)
![Philips 868 User Guide Page 30 of 89 Send contact You can send a selected contact via SMS (using vCard format). In the contacts list screen, press 5/6 choose the entry you want to send, and then press the left soft key [Options] and select Send contact. You will be required to choose between Send by infrared and Send via SMS, make your choice and then press OK key to confirm. View goups Add a new group In group list screen, press 5/6 to select <New group>, and then press OK key or the left soft key [Add] to enter the edit screen of the group name. After the desired group name, press OK key to save and exit. Note:At mot 8 user-defined groups can be added. Reame a group In group list screen, press 5/6 choose the group you want to rename, and then press the left soft key [Options] and select Rename. In the group name edit screen, enter a new group name you desire, and then press OK key to save and exit. Delete a group In group list screen, press 5/6 choose the group you want to delete, and then press the left soft key [Options] and select Delete. At the prompt message “Delete?”, you can press the left soft key or OK key to confirm, or press the right soft key to cancel. Special numers In this menu, you can access the following list of special numers: Own number:to view and edit your own mobile phone number. Voice mail number:to view and edit your voice mail number. SOS number:to view or dial the emergency number. Advanced Contacts select This menu allows you to choose one of the following display options for your phonebook: Phone: dislay the phone phonebook only. SIM phonebook: display the SIM phonebook only. Phone+SIM: display both the phone phonebook and the SIM phonebook.](https://usermanual.wiki/Inventec-Appliances/CT8688/User-Guide-584416-Page-30.png)
![Philips 868 User Guide Page 32 of 89 7. Calls Call list The last 30 missed calls, answered calls, outgoing calls, rejected calls are stored in their corresponding tabs in the call list. You can press 3/4 to toggle among the five available tabs: All calls, Missed calls, Answered calls, Outgoing calls, Rejected calls. In a selected tab, you can press 5/6 to select a desired record and press the pick up key to dial the number directly. View In the All calls/Missed calls/Answered calls/Outgoing calls/Rejected calls list screen, press 5/6 to select a record, and then press the left soft key [Options] and select View to view the details of the selected record. Save In the All calls/Missed calls/Answered calls/Outgoing calls/Rejected calls list screen, press 5/6 to select a record, and then press the left soft key [Options] and select Save to save the selected number into Contacts. Delete In the All calls/Missed calls/Answered calls/Outgoing calls/Rejected calls list screen, press 5/6 to select a record, and then press the left soft key [Options] and select Delete to delete selected record. The phone will prompt “Delete?” You can press the left soft key or OK key to confirm, or press the right soft key to cancel. To delete all the records in a selected tab, press the left soft key [Options] and select Delate all. The phone will prompt “Delete all?” You can press the left soft key or OK key to confirm, or press the right soft key to cancel. Call counters GSM counters This menu gives you the access to the following information: duration of the last call, duration of incoming calls, duration of outgoing calls, and total call duration. You can press the left soft key [Reset] to set all the duration counters to zero. GPRS counters This menu gives you the access to the following information concerning the transfer volume of your phone during WAP connections over GPRS.](https://usermanual.wiki/Inventec-Appliances/CT8688/User-Guide-584416-Page-32.png)
![Philips 868 User Guide Page 34 of 89 Phone answering You can set the answering mode for incoming calls. Press the left soft key [Select] to select the desired one from the following list and press OK key to confirm. — Any key answer: enables you to answer an incoming call by pressing any key (except for the hangup key and the right soft key). — Active flip: enables you to answer an incoming call by opening the flip. — Headset auto answer: enables you to answer an incoming call automatically when the headset is plugged in. Call firewall You can make a choice among the three firewall modes: activate accept list, activate reject list, and Off. If you select activate accept list, you can only answer the calls from the designated number in the accept list; if you select activate the reject list, the calls from the designated numbers in the reject list will be rejected automatically. - Call firewall status: let you make a choice among three firewall modes. - Accept calls: lets you to edit the accept list and set the reject indication. - Reject calls: lets you to edit the reject list and set the reject indication. Note: if Reject with indication is set to be On, the rejected call icon and text prompts “* rejected call(s)” will be displayed in the idle screen when there are incoming calls rejected automatically by the call firewall. IP prefix This menu enables you to enter or edit the IP prefix you want to use when make an IP call.](https://usermanual.wiki/Inventec-Appliances/CT8688/User-Guide-584416-Page-34.png)
![Philips 868 User Guide Page 35 of 89 8. WAP Your mobile phone supports services based on the Wireless Application Protocol (WAP). The built-in WAP browser allows you to access services supplied with your network, such as news, sports, weather, etc. If your phone was pre-configured, it isn’t necessary for you to change the settings decribed in this section. With some operators, WAP parameters can be set remotely. Please check your operator for detailed information. To launch a WAP session, select WAP>Homepage. Homepage This is the link to the first WAP site you access when launching a WAP session. In most cases, this menu item is preconfigured and will connect to your operator’s WAP homepage. To change this default homepage, see “Settings” in this section. Bookmarks This menu allows you to store your favourite WAP site addresses, rename them if desired and access them quickly from the list. The options accessed via the left soft key in the bookmark list screen will allow you to Delete or Edit a selected bookmark. Enter address This menu allows you to enter a WAP site address, to which you connect directly when selecting it (a quick way to access WAP addresses without saving them as bookmarks). History The menu allows you to view all the WAP site addresses you have visited, to which you connect directly when selecting it. Push inbox This menu allows you to read and manage messages automatically sent to you by the network and / or by your operator. If it contains a WAP address, press [OK] to connect to the WAP site. Settings 1. WAP profiles](https://usermanual.wiki/Inventec-Appliances/CT8688/User-Guide-584416-Page-35.png)
![Philips 868 User Guide Page 37 of 89 a) Dial up number b) Time out (30s/60s/120s) c) Data call type (Analogue/ISDN) d) Data call speed (4800/9600/14400) 3. Cache 1) Enable cache (On/Off) 2) Delete 4. Cookies 1) Enable cookies (On/Off) 2) Delete 5. Security 1) Security warning (On/Off) 2) Security certificate (list of trusted certificate) 6. Statistics 1) Total bytes sent: 2) Total bytes received: 7. Settings 1) Graphics (On/Off) 2) Scroll speed (Slow/Medium/Fast/Page) 3) Reset settings 4) Push Settings a) Service indication (On/Off) b) Service loading (On.Off) Browser WAP pages While browsing WAP pages, you can press 5/6 to move the cursor one line up/down, press [OK] to select a highlighted item, ore press the right soft key to return to the previous page. Meanwhile, you can press the left soft key [Options] to access the following options. 1 Homepge: to access the default homepage. 2 Back: to bring you back to the previously browsed page. 3 Forward: to take you to the next browsed page. 4 Refresh: to reload the currently browsed page from its original server. 5 Save as homepage: to save the currently browsed WAP page as he default homepage.](https://usermanual.wiki/Inventec-Appliances/CT8688/User-Guide-584416-Page-37.png)
![Philips 868 User Guide Page 39 of 89 9. Messages Your phone supports three types of messaging services: SMS, EMS and MMS. SMS (Short Message Sercie) messages are text messages sent and received via the network operator’s message centre. When a text message has pictures, sounds and animations inserted, it becomes an EMS (Enhanced Message Serive) message. MMS (Multimedia Message Service) messages can contain text, graphics, animations, sounds, videos and other attachments. Create new message SMS You can create text messages as well as EMS messages. Before sending a SMS message, you need to make sure that the SMS centre number has been set. 1 In message function list screen, select New message and then select SMS to enter the text message editor. 2 Input the text message. In the text editor, you can press [*] to shift from one available input mode to another one. Press [OK] to confirm the text input and go back to the message editor. 3 In the message editor, you can access the following options via the left soft key [Options]. 1) Done: to finish the editing of message content and go to the recipient input screen (only available when text and/or an object has been added)。 2) Apply template: to display a list of pre-defined text message template for you to choose a desired on to insert iinto the current message. 3) Insert objects: to insert an object (picture/video/sound/attachment) into the current message. 4) Save: to save the current message into Drafts. You can press [OK] in the message editor to to finish the editing of message content and go to the recipient input screen directly. 4 In the recipient input screen, you can select Look in Contacts to find a phone number from the Contacts list, or select New number to enter a phone number by yourself, or select Message groups to input a group of numbers via a selected message group. In the recipient list screen, you can move the cursor onto “To:” and press the left soft key to add a new recipient, or you can move the cursor onto a recipient and press the left soft](https://usermanual.wiki/Inventec-Appliances/CT8688/User-Guide-584416-Page-39.png)
![Philips 868 User Guide Page 40 of 89 key to access the following options: Delete, Edit and Replace. 5 Press OK key to confirm the recipient list and send out the message. MMS MMS (Multimedia Message Service) enables you to sent text, pictures, sounds, videos, and attachments to a mobile phone number or an e-mail address. Please confirgure the settings for MMS before sending out an MMS message. 1 In message function list screen, select New message and then select MMS to enter the MMS editor. 2 The first page of a new MMS message is displayed. You can press the number keys to enter the text editor for the first page and press OK key to confirm the text input and go back to the message editor. Meanwhile, you can press the left soft key [Options] to access the following options: - Done: to confirm the message content and go to the recipient input screen. - Objects: to access a list of options concering objects z Add picture: to insert a picture into the curret page of the message. z Add video: to insert a video clip into the current page of the message. z Add sound: to insert a sound into the current page of the message. z Add attachment: to insert an attachment into the current page of the message. z Delete object: to delete a selected object from the current page of the message. z Properties: the display the detailed information of a selected object. - Pages: to access a list of options concering the pages of the messages z Add page: to add a new page into the current message. z Delete page: to delete a selected page from the current message. z Page layout: to set the page layout of the current message. z Page duration: to set the page duration of the current message page. z Position: to set the position of the current message page. z Page up: to go back to the previous page of the message. z Page down: to go to the next page of the message. - Apply templage: to access a list of pre-defined MMS message templates - Preview: to preview the current MMS message. - Save: to save the save the current message into Drafts. 3 After editing the message content, you can press OK key (or press the left soft key [Options] and select Done) to go to the recipient input screen. 4 In the recipient input screen, you can select look in Contacts to find a phone number](https://usermanual.wiki/Inventec-Appliances/CT8688/User-Guide-584416-Page-40.png)
![Philips 868 User Guide Page 41 of 89 from the Contacts list, or select New number to enter a phone number by yourself, or select New e-mail to enter a e-mail account by yourself, or select Message groups to input a group of numbers via a selected message group. In the recipient list screen, you can 1) move the cursor onto “To:”/“CC:”/ “BCC:” and press the left soft key to add a new recipient, 2) move the cursor onto a recipient and press the left soft key to access the following options: Delete, Edit and Replace. 3) Move the cursor onto “Priority:” and press the left soft key to access the priority setting screen. 4) Move the cursor onto “Subject:” and press the left soft key to access the edit screen of the subject of the MMS message. 5 Press OK key to confirm the recipient list and send out the message. Inbox Inbox stores all the received messages (including SMS, MMS, MMS delivery notice and broadcast SMS) displayed in a list with differenct icons for message type indication. All the messages are chronologically ordered, from the most recent message to the oldest one. You can quickly access a selected message by pressing OK key. You can press the left soft key [Options] to access the following options: The following options are available for message list screen: Open: the read/play the selected message. (this options is changed into “Download” for MMS delivery notices) Forward: to forward the selected message. Message can be edited before sending. Reply: to reply to the selected message. You can choose between Reply by SMS and Reply by MMS. Delete: to delete the selected message. Move to SIM/phone: to move the selected message in phone to SIM, or move a selected message in SIM to phone. Details: to view the detailed information of the selected message. Delete all: toe delete all in messages in Inbox. The following optioins are available for browse screens of SMS messages: Delete: to delete the current SMS message. Reply: to reply to the current message. You can choose between Reply by SMS and Reply by MMS.](https://usermanual.wiki/Inventec-Appliances/CT8688/User-Guide-584416-Page-41.png)
![Philips 868 User Guide Page 42 of 89 Forward: to forward the current SMS message. The message can be edited before sending. Call sender: to call the sender back. Save number: to save number(s) available in the current SMS message. Save as template: to save the current SMS message as an SMS template. Details: to view the detailed information of the current SMS message. The following options are available for browse screens of MMS messages: Play: to play the current MMS message. Page down: to go to the next page of the current MMS message. Page up: to to go to the previous page of the current MMS message Reply: to reply to the current message. You can choose between Reply by SMS and Reply by MMS. Forward: to forward the current MMS message. The message can be edited before sending. Save objects: to save the objects contained in the current MMS message. Details: to view the detailed information of the current MMS message. Delete: to delete the current MMS message. Outbox Outbox stores messages waiting to be sent (including delivery failure and sending in progress), displayed in list with differenct icons for message type indication. All the messages are chronologically ordered, from the most recent message to the oldest one. You can press the left soft key [Options] to access the following options: The following options are available for message list screen: Open: the read/play the selected message. (this options is changed into “Download” for MMS delivery notices) Edit: to edit the selected message. Send: to send out the selected message. Delete: to delete the selected message. Details: to view the detailed information of the selected message. Delete all: toe delete all in messages in Inbox. The following optioins are available for browse screens of SMS messages: Edit: to edit the current message. Delete: to delete the current message. Save as template: to save the current SMS message as an SMS template. Details: to view the detailed information of the current SMS message.](https://usermanual.wiki/Inventec-Appliances/CT8688/User-Guide-584416-Page-42.png)
![Philips 868 User Guide Page 43 of 89 The following options are available for the browse screens of MMS messages: Play: to play the current MMS message. Page down: to go to the next page of the current MMS message. Page up: to to go to the previous page of the current MMS message. Edit: to edit the current MMS message. Delete: to delete the current MMS message. Save as template: to save the current MMS message as an MMS template. Save objects: to save the objects contained in the current MMS message. Details: to view the detailed information of the current MMS message. Drafts Drafts stores all the unfinished SMS and MMS messages, displayed in a list with different icons for type indication. You can press the left soft key [Options] to access the following options: The following options are available for draft message list screen: Open: to read/play the selected draft message. Edit: to edit the selected draft message. Send: to send out the selected draft message. Delete: to delete the selected draft message. Move to SIM/phone: to move a draft message in phone into SIM, or move a draft message on SIM into phone. Delete: to delete all the draft messages in Drafts. The following options are available for browse screens of draft SMS messages: Edit: to edit the current draft SMS message. Delete: to delete the current draft SMS message. Save as template: to save the current draft SMS message as a SMS template. The following options are available for browse screens of draft MMS messages: Play: to play the current draft MMS message. Page down: to go to the next page of the current draft MMS message. Page up: to to go to the previous page of the current draft MMS message. Edit: to edit the current draft MMS message. Delete: to delete the current draft MMS message.](https://usermanual.wiki/Inventec-Appliances/CT8688/User-Guide-584416-Page-43.png)
![Philips 868 User Guide Page 44 of 89 Save as template: to save the current draft MMS message as an MMS template. Save objects: to save the objects contained in the current draft MMS message. Sent Sent stores all the send messages (including SMS and MMS messages), displayed in a list with different icons for type indication. You can press the left soft key [Options] to access the following options. The following options are available for sent message list screen: Open: the read/play the selected message. Send: to resend the selected message. Forward: to forward the selected message. Message can be edited before sending. Delete: to delete the selected message. Details: to view the detailed information of the selected message. Delete all: toe delete all in messages in Inbox. The following options are available for browse screens of sent SMS messages: Delete: to delete the current SMS message. Forward: to forward the current SMS message. The message can be edited before sending. Save as template: to save the current SMS message as a SMS template. Details: to view the detailed information about the current SMS message. The following options are available for browser screens of sent MMS messages: Play: to play the current MMS message. Page down: to go to the next page of the current MMS message. Page up: to to go to the previous page of the current MMS message. Delete: to delete the current MMS message. Forward: to forward the selected message. Message can be edited before sending. Save as template: to save the current MMS message as an MMS template. Save objects: to save the objects contained in the current MMS message. Details: to view the detailed information of the current MMS message. Template Template stores all the message templates (including SMS templates and MMS templates), displayed in a list with different icons for type indication. You can press the left soft key](https://usermanual.wiki/Inventec-Appliances/CT8688/User-Guide-584416-Page-44.png)
![Philips 868 User Guide Page 45 of 89 [Options] to access the following optons. The following options are available for template list screen: Open: to read/play the selected message template. Edit: to edit the selected message template. Send: to send the selected message template. Delete: to delete the selected message template. Create new: to create a new template message. Delete all: to delete all the messages templates. The following options are available for browse screens of SMS templates: Edit: to edit the current SMS template. Delete: to delete the current SMS template. Details: to view the details of the SMS template. The following options are available for browse screens of MMS templates: Edit: to edit the current MMS template. Delete: to delete the current MMS template. Save objects: to save the objects contained in the current MMS template. Details: to view the detailed information of the current MMS template. Spam Spam stores all the SMS messages automatically rejected by the SMS firewall. You can press the left soft key to access the following option list. The following options are available for the list screen of spam messages: Open: to open the selected spam message. Delete: to delete the selected spam message. Delete all: to delete all the spam messages. The following optons are available for the browse screens of spam messages: Delete: to delete the selected spam message. Settings 1 Save sent messages: whether to save a copy of sent messages in Sent foleder (Yes/No). 2 Background send: whether to allow sending messages at background (Yes/No).](https://usermanual.wiki/Inventec-Appliances/CT8688/User-Guide-584416-Page-45.png)
![Philips 868 User Guide Page 47 of 89 10. Media player MP3 This menu allows you to manage and listen to the MP3 tracks stored in your mobile phone and the external memory card, diaplayed as a list with different icons to identify storage location. You can press OK to play a selected MP3 file, or press the left soft key [Options] to further access other available options. The following options are available for MP3 files: ‧ Play mode: to play the highlighted track. ‧ Play mode: to choose playing the tracks in Continuous (default mode), Loop or Random mode. ‧ Send: to send the highlighted track via infrared or MMS. (this option is not available for built-in mp3) ‧ Set as ringer: to set the highlighted track as call ringer. (this option is not available for built-in mp3) ‧ Set as message ringer: to set the highlighted track as message ringer. (this option is not available for built-in mp3) ‧ Add to contacts: to set the track as call ringer for a selected contact record. ‧ Add to play list: to add highlighted track to the built-in playlist. ‧ Rename: to rename the highlighted track. (this option is not available for built-in mp3) ‧ Delete: to delete the highlighted track. (this option is not available for built-in mp3) ‧ Details: to view the detailed information of the highlighted track. ‧ Arrange: to choose the sorting order of files and folders (by name or by date). The following options are available for mp3 folders: ‧ Open: to open the highlighted folder. ‧ Rename: to rename the highlighted folder. ‧ Delete: to delete the highlighted folder. (this options is not available for built-in folders) ‧ Details: to view the detailed information of the highlighted folder. ‧ Arrange: to choose the sorting order of files and folders (by name or by date). The following options are available for the built-in playlist: ‧ View: to view the playlist ‧ Play: to play the playlist](https://usermanual.wiki/Inventec-Appliances/CT8688/User-Guide-584416-Page-47.png)
![Philips 868 User Guide Page 48 of 89 ‧ Play mode: to choose playing the tracks in Continuous (default mode), Loop or Random mode. In the view screen of the built-in playlist, you can press the left soft key [Options] to access the following options: ‧ Play: to play the highlighted mp3. ‧ Play mode: to choose playing the tracks in Continuous (default mode), Loop or Random mode. ‧ Delete: to delete the highlighted mp3 track indexes from the current playlist ‧ Delete all: to delete all the mp3 track indexes from the current playlist. In the play screen of a MP3 track, you can use the following six on screen icons to control the play of the track: to pause the play of the current track (the icon then is changed into the play icon ) to go to the play screen of the previous track available. to go to the play screen of he next track available. to rewind to fast forward to stop the playback of the current track Meanwhile, you can press the left soft key to access the following options: ‧ Play/pause: to play or pause the highlighted track (depending on current status). ‧ Play mode: to choose playing the tracks in Continuous (default mode), Loop or Random mode. ‧ Set as ringer: to use the highlighted track as call ringer. ‧ Set as message ringer: to use the highlighted track as message ringer. ‧ Add to play list: to add highlighted track to the built-in playlist. ‧ Details: to see details of the highlighted track. Sounds This menu allows you to manage and listen to the sounds (except MP3) stored in your mobile phone and the external memory card, diaplayed as a list with different icons to identify storage location. You can press OK to play a selected MP3 file, or press the left soft key [Options] to further access other available options. The following options are available for sound files: ‧ Play: to play the highlighted sound track. ‧ Send: to send the highlighted sound track via infrared or MMS. (this option is not available](https://usermanual.wiki/Inventec-Appliances/CT8688/User-Guide-584416-Page-48.png)
![Philips 868 User Guide Page 49 of 89 for built-in files) ‧ Set as ringer: to set the highlighted sound track as call ringer. ‧ Set as message ringer: to set the highlighted sound track as message ringer. ‧ Add to contacts: to set the track as call ringer for a selected contact record. ‧ Rename: to rename the highlighted sound track. (this option is not available for built-in files) ‧ Delete: to delete the highlighted sound track. (this option is not available for built-in files) ‧ Details: to view details of the highlighted sound track. ‧ Arrange: to choose the sorting order of files and folders (by name or by date). The following options are available for folders: ‧ Open: to open the highlighted folder. ‧ Rename: to rename the highlighted folder (this options is not available for built-in folders). ‧ Delete: to delete the highlighted folder (this options is not available for built-in folders) . ‧ Details: to show the detailed information of the highlighted folder. ‧ Arrange: to choose the sorting order of files and folders (by name or by date). Videos This menu allows you to manage and play the video clips stored in your mobile phone and the external memory card, diaplayed as a list with different icons to identify storage location. You can press OK to play a selected video clip, or press the left soft key [Options] to further access other available options. The following options are available for files: ‧ Play: to play the selected video clip. ‧ Send: to send the highlighted clip by infrared, or MMS. (this option is not available for built-in files) ‧ Rename: to change the name of the selected clip. (this option is not available for built-in files) ‧ Delete: to delete the selected clip. Then goes back to clips list. (this option is not available for built-in files) ‧ Details : to view the detailed information of the highlighted clip. Opens details screen. ‧ Arrange: to choose the sorting order of files and folders (by name or by date). The following options are available for folders: ‧ Open: to open the highlighted folder. ‧ Rename: to rename the highlighted folder. (this options is not available for built-in folders) ‧ Delete: to delete the highlighted folder. (this options is not available for built-in folders)](https://usermanual.wiki/Inventec-Appliances/CT8688/User-Guide-584416-Page-49.png)
![Philips 868 User Guide Page 50 of 89 ‧ Details: to show the detailed information of the highlighted folder. ‧ Arrange: to choose the sorting order of files and folders (by name or by date). In the play screen of a selected video clip, you can use the following four icons to control the play of the clip: to pause the play of the current clip (the icon then is changed into the play icon ). to stop the playback of the current clip. to rewind. to fast forward. You can either press the left/right navigation key to loop among the icons and then press [OK] to confirm the selection, or tap a desired icon using the stylus pen. Pictures This menu allows you to manage and browse the pictures stored in your mobile phone and the external memory card, diaplayed as a list with different icons to identify storage location. You can press OK to view a selected picture, or press the left soft key [Options] to further access other available options. The following options are available for list screens of picture files: ‧ View: to view the selected picture in full screen. ‧ Send: to send the highlighted picture by infrared or MMS. (this option is not available for built-in files) ‧ Set as wallpaper: to set the highlighted picture as the wallpaper for the main display. ‧ Set as sub wallpaper: to set the highlighted picture as the wallpaper for the sub display. ‧ Add to contacts: to highlighted picture to a selected contact entry. ‧ Tag It: to enter Tag It function to modify the highlighted picture. ‧ Slideshow: to view all the pictures one by one like a slideshow. ‧ Rename : to rename the highlighted picture. (this option is not available for built-in files) ‧ Delete: to delete the selected picture. (this option is not available for built-in files) ‧ Details : to view the detailed information of the highlighted picture. ‧ View Preference: to choose viewing the pictures in a matrix or in a list. ‧ Arrange: to choose the sorting order of files and folders (by name or by date). The following options are available for browse screen (full screen view) of picture files: ‧ Send: to send the highlighted picture by infrared or MMS. (this option is not available for built-in files) ‧ Set as wallpaper: to set the highlighted picture as the wallpaper for the main display.](https://usermanual.wiki/Inventec-Appliances/CT8688/User-Guide-584416-Page-50.png)
![Philips 868 User Guide Page 52 of 89 11. Camera Your mobile phone features a built-in digital camera that allows you to take pictures and record video clips, and store them in your phone or on the external memory card for later use. Activate the camera To activate the camera, you can: 1 In idle screen, open the camera door at the back of your phone. 2 In idle screen, press the camera key. 3 In the main menu screen, press [6] (or move the cursor to the Camera icon and then press [OK]). How to… There are two types of mode for the built-in camera: 1 Phone mode: when your clamshell is open with the main display in its normal position. 2 PDA mode: when the clamshell is closed with the main display turned outside. Phone mode In phone mode, you can press the left/right navigation key to shift between the still camera mode and the video camera mode. Take pictures Preview mode settings Zoom in/out: to press the up/down navigation key (5/6) . Adjust the brightness: to press the volume keys at the right side of the phone. Meanwhile, you can press the left soft key [Options] to access the following options: ‧ View all: Allows you to view all the pictures taken by the built-in camera. ‧ Picture size: Allows you to select a desired pictures size among 6 available sizes (UXGA (1600 *1200)/ SXGA(1280*960)/VGA(640*480)/ QVGA(320*240)/Wallpaper(176*224)/Foto call(96*64)). ‧ Picture quality: Allows you to choose a quality level among the following: Superfine, Fine (default) and Normal. ‧ Flash: Allows you to set the flashlight On or Off. When set to be On, the flash is triggered when taking a picture.](https://usermanual.wiki/Inventec-Appliances/CT8688/User-Guide-584416-Page-52.png)
![Philips 868 User Guide Page 53 of 89 ‧ Night mode: Allows you to set the night mode On or Off. When set to be On, the camera sensor is more sensitive to the light. ‧ Picture mode: Allows you to chose a desired picture mode from the following list. - Normal: to take a normal picture without frame. - With frame: to take a picture with frame. Open an exclusive list so users can select a desired frame. The frame selected is then shown in the viewfinder. (Note: This option is only available for wallpaper pictures.) - Multishot: to take multiple pictures by keeping the OK key pressed when in the viewfinder. Open an On/Off screen. (This option is only available for VGA/QVGA mode. At most 10 continuous frames can be taken.) (Note: pictures taken by multishots can only be saved on the external memory card.) ‧ Self-timer: Allows you to set the Self-timer option On or Off. The countdown starts at 5 seconds (this value can not be changed). A sound is played 2 seconds before the picture is taken, then again when it’s actually shot. ‧ Special effects: Allow you to choose one of the available effects: “No effect”, “Sepia”, “Negative”, “B&W”, “Blue” and “Edge”. ‧ White Balance: Allows you to choose one of the available white balance modes: Auto, Sunny, Cloudy, Incandescent, and Fluorescent. ‧ Shooting sound: Allows you to select the shooting sound for taking a picture. ‧ Storage location [available only when memory card is present]: Allows you to define where to store the camera pictures. You are offered to choose between Memory card and Phone memory. ‧ Date and time: Alllows you to set whether to add date and time on the bottom right of a taken picture. ‧ Electricity frequency: Allows you to choose the electricity frequency for taking pictures. You can choose between 50 Hz and 60 Hz. Take a picture If the self-timer option is set to be Off, once the camera is activated, press the OK key or the camera key to take a picture. The taken picture is to be automatically saved in the storage location you have set under the default name picture_date_time(seconds).jpg. After the picture is saved automatically and displayed on the screen, you can press the left soft key [Options] to further access the following options: ‧ Send: to send the picture by infrared or MMS. ‧ Set as wallpaper: to set the highlighted picture as the wallpaper for the main display. ‧ Set as sub wallpaper: to set the highlighted picture as the wallpaper for the sub display. ‧ Add to contacts: to attach the taken pictures to a contract entry.](https://usermanual.wiki/Inventec-Appliances/CT8688/User-Guide-584416-Page-53.png)
![Philips 868 User Guide Page 54 of 89 ‧ Rotate: to rotate the taken picture. You will be offered with an exclusive list to rotate the picture 90° lockwise, 90° counter clockwise, 180°, Flip horizontal, Flip vertical. (Note: this option is only available for Wallpaper and Fotocall pictures) ‧ Tag It: to enter Tag It function to modify the picture. ‧ Delete: to delete the taken picture. ‧ View all: to go to the Camera pictures folder in Media player to view all the pictures taken by camera. ‧ Take a new picture: to go back to the preview screen to take a new picture. Record video clips Preview mode settings Zoom in/out: to press the up/down navigation key (5/6) . Adjust the brightness: to press the volume keys at the right side of the phone. Meanwhile, you can press the left soft key [Options] to access the following options: ‧ View all: Allows you to go to Camera videos folder in Media Player to view all the video clips recorded by the built-in camera. ‧ Video resolution: Allows you to set the size of the video. You can choose between QVGA(320*240 pixels) and QCIF (176*144 pixels). ‧ Maximum size: Allows you to set the duration of the video. You can choose between “MMS length” and “Unlimited”. ‧ White Balance: Allows you to choose one of the available white balance modes: Auto, Sunny, Cloudy, Incandescent, and Fluorescent. ‧ Night mode: Allows you to set the night mode On or Off. When set to be On, the camera sensor is more sensitive to the light. ‧ Storage location [available only when memory card is present]: Allows you to define where to store the camera videos. You are offered to choose between Memory card and Phone memory. Record a video clip In the preview screen, press the OK key or the camera key to start recording a video clip. The video duration will be shown on the screen. You can press the left soft key [Stop] or the OK key to stop recording, and the recorded video clip will be automatically saved in the storage location you have set under the default name picture_date_time(seconds).3gp. You can also press the right soft key to exit video recording screen without saving the recorded video. After the video clip is saved with the first frame of it displayed on the screen, you can press the](https://usermanual.wiki/Inventec-Appliances/CT8688/User-Guide-584416-Page-54.png)
![Philips 868 User Guide Page 55 of 89 left soft key [Options] to access the following options: ‧ Play: to play the recorded video. ‧ Send: to send the video by infrared or MMS. ‧ Delete: to delete the recorded video. ‧ View all: to go to the Camera videos folder in Media Player to access the recorded videos. ‧ Record new: to start recording a new video Meanwhile, you can press the right soft key [Back] to go to the preview screen. PDA mode In PDA mode, please turn you mobile phone at 90° angle to the left and hold it horizontally to obtain a fullscreen preview. You tap the correspong icon at top of the screen to shift between the still camera mode and the video camera mode. Take pictures Preview mode settings In PDA mode, you can press the volume keys to zoom in/out. Meanwhile, you can tap the text prompt “Options” at the bottom right of the screen to pop up the option menu bar, in which you can use the volume keys to loop among the option items while using the camera key to confirm a selection. Meanwhile users can tap the on screen icons to select the desired option. Once an option is selected, you can press the camera key to confirm and go back to the preview screen. ‧ View all: Allows you to view all the pictures taken by the built-in camera. ‧ Picture size: Allows you to select a desired pictures size among 6 available sizes (UXGA (1600 *1200)/ SXGA(1280*960)/VGA(640*480)/ QVGA(320*240)/Wallpaper(176*224)/Foto call(96*64)). ‧ Picture quality: Allows you to choose a quality level among the following: Superfine, Fine (default) and Normal. ‧ Flash: Allows you to set the flashlight On or Off. When set to be On, the flash is triggered when taking a picture. ‧ Night mode: Allows you to set the night mode On or Off. When set to be On, the camera sensor is more sensitive to the light. ‧ Picture mode: Allows you to chose a desired picture mode from the following list. - Normal: to take a normal picture without frame. - With frame: to take a picture with frame. Open an exclusive list so users can select a desired frame. The frame selected is then shown in the viewfinder. (Note: This option is only available for wallpaper pictures.)](https://usermanual.wiki/Inventec-Appliances/CT8688/User-Guide-584416-Page-55.png)
![Philips 868 User Guide Page 56 of 89 - Multishot: to take multiple pictures by keeping the OK key pressed when in the viewfinder. Open an On/Off screen. (This option is only available for VGA/QVGA mode. At most 10 continuous frames can be taken.) (Note: pictures taken by multishots can only be saved on the external memory card.) ‧ Self-timer: Allows you to set the Self-timer option On or Off. The countdown starts at 5 seconds (this value can not be changed). A sound is played 2 seconds before the picture is taken, then again when it’s actually shot. ‧ Special effects: Allow you to choose one of the available effects: “No effect”, “Sepia”, “Negative”, “B&W”, “Blue” and “Edge”. ‧ White Balance: Allows you to choose one of the available white balance modes: Auto, Sunny, Cloudy, Incandescent, and Fluorescent. ‧ Shooting sound: Allows you to select the shooting sound for taking a picture. ‧ Storage location [available only when memory card is present]: Allows you to define where to store the camera pictures. You are offered to choose between Memory card and Phone memory. ‧ Date and time: Alllows you to set whether to add date and time on the bottom right of a taken picture. ‧ Electricity frequency: Allows you to choose the electricity frequency for taking pictures. You can choose between 50 Hz and 60 Hz. Take a picture If the self-timer option is set to be Off, once the camera is activated, press the camera key to take a picture. The taken picture is to be automatically saved in the storage location you have set under the default name picture_date_time(seconds).jpg. After the picture is saved automatically and displayed on the screen, and there are will be four on screen option icons at the left side of the screen for you to choose with the volume keys and confirm with the camera key. ‧ Send by MMS: to send the picture by MMS. ‧ Delete: to delete the taken picture. ‧ View all: to go to the Camera pictures folder in Media player to view all the pictures taken by camera. ‧ Back: to go back to the preview screen. Record video clips Preview mode settings](https://usermanual.wiki/Inventec-Appliances/CT8688/User-Guide-584416-Page-56.png)
![Philips 868 User Guide Page 57 of 89 In PDA mode, you can press the volume keys to zoom in/out. Meanwhile, you can tap the text prompt “Options” at the bottom right of the screen to pop up the option menu bar, in which you can use the volume keys to loop among the option items while using the camera key to confirm a selection. Meanwhile users can tap the on screen icons to select the desired option. Once an option is selected, you can press the camera key to confirm and go back to the preview screen. ‧ View all: Allows you to go to Camera videos folder in Media Player to view all the video clips recorded by the built-in camera. ‧ Video resolution: Allows you to set the size of the video. You can choose between QVGA(320*240 pixels) and QCIF (176*144 pixels). ‧ Maximum size: Allows you to set the duration of the video. You can choose between “MMS length” and “Unlimited”. ‧ White Balance: Allows you to choose one of the available white balance modes: Auto, Sunny, Cloudy, Incandescent, and Fluorescent. ‧ Night mode: Allows you to set the night mode On or Off. When set to be On, the camera sensor is more sensitive to the light. ‧ Storage location [available only when memory card is present]: Allows you to define where to store the camera videos. You are offered to choose between Memory card and Phone memory. Record a video clilp In the preview screen, press the camera key to start recording a video clip. The video duration will be shown on the screen. You can press the camera key to stop recording, and the recorded video clip will be automatically saved in the storage location you have set under the default name picture_date_time(seconds).3gp. After the recording has been stopped, there are will be five on screen option icons at the left side of the screen for you to choose with the volume keys and confirm with the camera key. ‧ Play: to play the recorded video. ‧ Send by MMS: to send the video by MMS. ‧ Delete: to delete the recorded video. ‧ View all: to go to the Camera videos folder in Media Player to access the recorded videos. ‧ Back: to go back to preview screen.](https://usermanual.wiki/Inventec-Appliances/CT8688/User-Guide-584416-Page-57.png)
![Philips 868 User Guide Page 58 of 89 12. Organiser To access Organiser, you can: - In main menu screen, move the cursor to Organiser icon and press [OK]. - In main menu screen, press [7]. - In main menu screen, tap Organiser icon using the stylus. 10.1 Agenda Agenda makes it quick and easy for you to record your daily appointments, agenda and work plans (up to 100 agenda records can be added). Before arranging the agenda, make sure that you have set the current date, time and display format in Settings. The agenda records stored in this function will then have he correct time and date displayed Create a new agenda 1 In the month view screen, select a desired date and then press the left soft key [Options] and select New event to enter the edit screen of a new event. Or, you can move the cursor onto <New event> in the day view screen and press the OK key to enter the edit screen of a new event. 2 Enter the corresponding data into all the following fields at the screen prompts. Start date: the start date of the scheduled event. End date: the end date of the scheduled event. Start time: the start time of the scheduled event. End time: the end time of the scheduled event. Subject: the subject of the scheduled event. (at most 32 characters can be entered) Content: the detailed information of the scheduled event. (at most 64 characters can be entered) Reminders: to set the reminder for the schedule event. You can choose among the following options: No reminder, At event time, 5 minutes before, 15 minutes before, 1 hour before, 1 day before, and Others. Repeat: to set the repetition of the scheduled event. You can choose among the following options: None, Day, Week, and Month. 3 After entering all the required data, you can press the OK key to save the event.](https://usermanual.wiki/Inventec-Appliances/CT8688/User-Guide-584416-Page-58.png)
![Philips 868 User Guide Page 59 of 89 View and manage agenda events Month view 1 When you enter Agenda function, the current month is opened in month view by default. The current date is marked with a box surrounding it. Dates shown in green have agenda events assigned. 2 You can use the navigation key to highlight a desired date and then press the left soft key [Options] to access the following options: View day: to enter the day view screen. View week: to enter the week view screen. New event: to enter the edit screen of a new event. Go to date: to search for a date. Previous month: to go to the month view of the previou month. Next month: to go to the month view of the next month. Schedules: to view the list of all the scheduled events. Advanced: to further access the following advanced setting options. - Find: to search for a scheduled event by keyword. - Delete all: to delete all the scheduled events with three options (All events/ One day old/One week old) - Reminders: to set the reminder mode of the event alarm. You can choose among Always, Never, and If phone is on. - Starting day: to set the starting day of the days of week. Day view 1 The Day view is accessible from the Month and Week views. In the month view, you can select a desired date and then press the OK key (ore press the left soft key [Options] and select View day) to enter the day view screen of the date. In the week view, select a desired date and the press the OK key to enter the day view screen of the date. 2 The day view screen shows the list all the events planned for the selected date. The item <New event> shown at the top of the event list enables you to quicky access the edit screen of a new event. Meanwhile, you can press the left soft key [Options] to access the following options: View: to view the detailed information of the selected event. Eidt: to enter the edit screen of the selected event. Send: to send out the selected event. You can choose between Send by infrared and Send by SMS. Delete: to delete the selected event.](https://usermanual.wiki/Inventec-Appliances/CT8688/User-Guide-584416-Page-59.png)
![Philips 868 User Guide Page 60 of 89 Week view 1 You can select View week from the month view options list to enter the week view of a selected date, with the current month and week indicated on the top of the screen. 2 In the week view screen, you can press the left/right navigation key to shirft to the previoius/next day, or press the up/down navigation key to shift to the previous/next time slot. Meanwhile, you can press the left soft key [Options] to access the following options: View day: to enter the day view screen. View month: to enter the month view screen. New event: to enter the edit screen of a new event. Go to date: to search for a date. Schedules: to view the list of all the scheduled events. Advanced: to further access the following advanced setting options. - Find: to search for a scheduled event by keyword. - Delete all: to delete all the scheduled events with three options (All events/ One day old/One week old) - Reminders: to set the reminder mode of the event alarm. You can choose among Always, Never, and If phone is on. - Starting day: to set the starting day of the days of week. 10.2 To-do To-do makes it quick and easy for you to take notes the tasks you need to accomplish in the near future. All the to-do tasks are displayed in a list, with the item <New> displayed at the top for you to quick access the edit screen of a new to-do task. You can press the up/down navigation key to select a desired to-do task and press the OK key to view its details. Meanwhile, you can press the left soft key [Options] to access the following options:: ‧ View: to view detailed information of the selected entry. ‧ Edit: to enter the edit screen of the of the selected entry. ‧ Delete: to delete the selected entry. ‧ Delete all: to delete all the to-do entries. ‧ Mark as done: to mark the selected to-do as done. (To-dos marked as done are displayed with an icon with a red tick) Add a new to-do entry 1 In list screen of to-do enties, move the cursor onto <New> and press the OK key. - When the list empty with the cursor located on <New>, press the left soft key [Add] or the OK key.](https://usermanual.wiki/Inventec-Appliances/CT8688/User-Guide-584416-Page-60.png)
![Philips 868 User Guide Page 61 of 89 2 Enter the required data for the following fields of in the edit screen of the new entry. Subject: to enter the subject of the to-do task (at most 32 characters can be entered.) Due date: to enter the due date of the to-do task. Priority: to set the priority of the to-do task. You can choose among High, Normal and Low. 3 Press the OK key to save the entry. View a to-do entry 1 In the list screen of to-do entries, move the cursor to select a desired entry. 2 Press the OK key (or press the left soft key [Options] and select View) to view the detailed information of the selected entry. Edit a to-do entry 1 In the list screen of to-do entries, move the cursor to select a desired entry. 2 Press the left soft key [Options] and select Edit, and then press the OK key to enter the edit screen of the selected entry. 3 Press the OK key to save the modified entry. Mark as done 1 In the list screen of to-do entrires, move the cursor to select a desired entry. 2 Press the left soft key [Options] and select Mark as done. The entry then will be marked by a red tick when you go back to the list screen. Delete a to-do entry 1 In the list screen of to-do entrires, move the cursor to select a desired entry. 1 Press the left soft key [Options] and select Delete. The phone will prompt “Delete?” You can press the left soft key or OK key to confirm, or press the right soft key to cancel. Delete all the to-do entries In the list screen of to-do entries, press the left soft key [Options] and select Delete all. The phone will prompt: “Delete all?” You can press the left soft key or OK key to confirm, or press the right soft key to cancel. 10.3 Dictionary The Dictionary function includes both English-Chinese dictionary and Chinese-English dictionary. You can press 3/4 to shift between the two dictionaries.](https://usermanual.wiki/Inventec-Appliances/CT8688/User-Guide-584416-Page-61.png)
![Philips 868 User Guide Page 62 of 89 1 In the hearword input area, enter the word you wish to look for, or you can press 5/6 to select a desired word in the wordlist displayed on the screen. - You can press [*] to shift from one available input mode to another one. - You can press the right soft key to clear the character before the cursor. 2 Press the OK key to view the definition of the entered word. In the view screen, you can press the left soft key to access the following options: - Previous: to view the definition of the previous word of the wordlist - Next: to view the definition of the next word of the wordlist. 10.4 Alarm You can set up to three alarms. To set an alarm, you can: 1 press 5/6 to select an alarm and press the OK key, or press the corresponding number key to directly enter the setting screen of the desired alarm. 2 In the settings screen, the following fieds are available: - alarm mode: to choose between simple alarm and recurrent alarm. - alarm tone: to choose an alarm tone among all the sounds available in your phone. - snooze: to choose whether to set the snooze mode On or Off. 3 When simple alarm is selected, you only need to enter the due time of the alarm; when recurrent alarm is selected, you need to choose the alarm-on days after entering the due time for the alarm. The alarm closk will ring even if you switched off your phone. If the snooze mode is set to be on, the alarm will stop ringing temporarily when you press any key (except the right soft key and the volume keys) or when the ring time is out, then it will ring again 5 minutes later. To stop the alarm repetition, press the left soft key when it rings. (The snooze mode is automatically deactivated after 5 alarms repetition.) 10.5 Calculator In the calculator function, you can: 1 Press the number keys (or tap the number key on the virtual keypad) to enter numbers. 2 Long press [0] (or tap the corresponding icon on the virtual keypad) to enter a numeric dot. 3 Press the navigation keys (or tap the corresponding icons) to enter the mathematical symbols:5 for “x”, 6 for “/”, 3 for “-“ , 4 for “+”. 4 Press the right soft key to clear the digit before the cursor. 5 Press the OK key to compute. 6 Tap “C/CE” icon on the virtual keypad to clear the screen.](https://usermanual.wiki/Inventec-Appliances/CT8688/User-Guide-584416-Page-62.png)
![Philips 868 User Guide Page 63 of 89 Meanwhild, you can press the left soft key to access the following options: ‧ %: to select % sign. ‧ +/-: to select positive sign + (if negative sign activated), or negative sign – (if positive sign activated). ‧ M+(Memory Add): to complete the current calculation and add it to the number stored in the memory. ‧ M-(Memory Subtract): to complete the current calculation and subtract it from the current number stored in the meory. ‧ MC (Memrory Clear): to clear the memory ‧ Clear screen: to cllear the screen. ‧ Back: to go back to previous menu screen. 10.6 Converter There six types of converters in your phone: Currency, Length, Area, Volume, Weight and Temperature. Currency Select a currency 1 In the Currency screen, move the cursor to highlight either of the currency unit fields. 2 Press3/4 to select a desired currency unit or press the left soft key to enter the currency unit list screen to select a desired one an press [OK] to confirm. Set the exchange rate 1 In the Currency screen, select the two desired currency unit for conversion. 2 Press the right soft key [Rate] to enter the exchange rate setting screen. 3 Enter the current rate and press the left soft key [Save] to save and exit. Make a currency conversion After setting the appropriate exchange rate of the two currency units you have selected, you can carry out the currency conversion according to the following steps: 1 Press 5/6 to move the cursor to either one of the currency amount input boxes. 2 Key in the amount to be converted. 3 Press the left soft key of the OK key to carry out the conversion. 4 Press the right soft key to clear the result.](https://usermanual.wiki/Inventec-Appliances/CT8688/User-Guide-584416-Page-63.png)
![Philips 868 User Guide Page 64 of 89 Length Select a length unit 1 In the Length screen, move the cursor to highlight either of the length unit fields. 2 Press3/4 to select a desired length unit or press the left soft key to enter the length unit list screen to select a desired one an press [OK] to confirm Make a length conversion After selecting the two length units you desired, you can carry out the conversion according to the following steps: 1 Press 5/6 to move the cursor to either one of the length amount input boxes. 2 Key in the amount to be converted. 3 Press the left soft key of the OK key to carry out the conversion. 4 Press the right soft key to clear the result. Area Please refer to Length. Volume Please refer to Length. Weight Please refer to Length. Temperature Please refer to Length. 10.7 Stopwatch It is a simple stopwatch. You can press the left soft key to start. During the running of the stopwatch, you can press the left soft key [Stop] to stop it and then the left soft key will be changed into [Continue] while the right soft key will become [Reset], and then you can press the left soft key to resume the time counting, or press the right soft key to reset the stopwatch. 10.8 World clock World clock displays the time of your local city and that of a world city simultaneously. The local city is displayed at the head bar of the screen with the corresponding date and time of the local city displayed under it, the remote city is displayed right above the bottom bar with the](https://usermanual.wiki/Inventec-Appliances/CT8688/User-Guide-584416-Page-64.png)
![Philips 868 User Guide Page 66 of 89 13. Settings The different functions of your phone can be customized to suit your own preferences via the Settiing menu, which are divided into four tab: General, Sounds, Display, and Network.You can press 3/4 to shift among the four tabs. General Language This menu is used to change the display language of your phone There are three display languages available for your phone: simplified Chinese, traditional Chinese, and English. Press 5/6 to select the language of your choice and press the left soft key to select, then press [OK] to confirm. Date and time Set date: to enter the current date. Date format: to choose a desire date format. Set time: to enter the current time. Time format: to choose a desire time format. You can choose between 12 hours and 24 hours. Daylight saving: to choose whether to set the daylight saving mode On or Off. Note: The effective date input range is 1951/01/01to 2050/12/31. Security In the Security function, you can activate/deactivate phone & privacy Code, PIN Code and Privacy protection, as well as edit phone & privacy code, PIN and PIN2 code. Phone & privacy code: a code protects your phone against unauthorized use. If activated, you will be asked to enter your phone code each time you turn on your phone. The phone & privacy code is supplied with the phone and the factory default is 1234. z To set the phone & privacy code, you can move cursor to Phone Code, and press the left soft key [Select] to access the phone code setting screen. After entering the phone code, you can press [OK] to save the setting and exit the phone code setting screen, and the checkbox before Phone & privacy code will be checked. z To disable the phone code, you can mover the cursor to Phone & privacy code, and press the left soft key [Cancel] to prompt the phone code input screen. After the correct phone & privacy code has been entered, you can press [OK] to confirm and go back to the previous screen, and then the checkbox before Phone Code will become unchecked. z In case you forget the phone & privacy code, you can press [Help] to display a help screen with a prompt code randomly generated by the phone, then you can ask for the relevant super code from the local service center to unblock the phone & privacy code.](https://usermanual.wiki/Inventec-Appliances/CT8688/User-Guide-584416-Page-66.png)
![Philips 868 User Guide Page 67 of 89 PIN Code: a code protects your SIM card against unauthorized use, also known as a Personal Identification Number. If activated, you will be asked to enter your PIN each time you make a call. Your PIN is usually supplied with the SIM card. If you enter an incorrect PIN code three times in succession, the code is disabled and cannot be used until you re-enable it by entering the PUK. z To set PIN code, you can move the cursor to PIN Code, and press [Select] to access the PIN code setting screen. After entering the PIN code, you can press [OK] to save the setting and exit the PIN code setting screen, and the checkbox before PIN Code will be checked. z To deactivate the PIN code, you can move the cursor to PIN Code and press [Cancel] to access the PIN code input screen (at most 3 tries), and then you can enter the PIN code you has set before and press [OK] to go back to the previous screen, and then the checkbox before PIN Code will become unchecked. Note: 1) PIN2: a code supplied with specific SIM cards, which is required to access specific functions, such as setting the maximum cost of a call. 2) PUK: a number key which is required to unblock a blocked PIN, also known as the Personal Unblocking Key. The PUK may be supplied with the SIM card. If not supplied or it is lost, please contact your service provider.) Privacy Protection: enables you to protect personal data such as your directory, call records, and so on. If activated, you will be asked to enter the phone & privacy code before accessing the protected data. z To activate Privacy protection, you can move the cursor to Privacy protection, and press [Select] to access the data protection type list. To protect a certain type of data, you can move the cursor to the desired type and press the left soft key [Select], and then press [OK] to save the setting. Note: To disable privacy protection, you will also be required to enter the phone code. Edit Phone & privacy code To edit the phone & privacy code, you can move the cursor to the Phone Code and press [OK], the screen will prompt “Old code:” for entering the old code, and then prompt “New code:” if the correct old code has been entered, and then prompt “Re-enter:” for entering the new code again. After re-entering the new code again, you can press [OK] to save the new phone code. Edit PIN code z When the PIN code has been activated, you can move the cursor to Edit PIN and press [OK] to edit the PIN code. The screen will display the following prompt message: ”Enter old PIN, Left times: 3”. If the correct old PIN code has been entered within 3 tries, the screen will display the following prompt message: “Enter new PIN”, and the “Re-enter” for entering the new PIN code again. After re-enter the new PIN code, you can press [OK] to save new PIN code and exit the PIN code editing screen. z If the correct old PIN code has not been entered with 3 tries, the screen will display following prompt:”Enter PUK, Left times: 10”. If the correct PUK number has been](https://usermanual.wiki/Inventec-Appliances/CT8688/User-Guide-584416-Page-67.png)
![Philips 868 User Guide Page 68 of 89 entered within 10 tries, you will be prompt to enter the new PIN code. In case the number of tries exceeds 10 times, the SIM will be blocked and the screen will prompt “SIM not usable.” Edit PIN2 code z To edit PIN2, you can move the cursor to Edit PIN2, and the screen will display the following prompt message:”Enter old PIN2, Left times: 3”. If the correct old PIN2 code has been entered within 3 tries, the screen will display the following prompt message: “Enter new PIN2”, and the “Re-enter” for entering the new PIN2 code again. After re-enter the new PIN2 code, user can press [OK] to save new PIN2 code and exit the PIN2 code editing screen. z If the correct old PIN2 code has not been entered with 3 tries, the screen will display following prompt:”Enter PUK2, Left times: 10”.If the correct PUK2 number has been entered within 10 tries, you will be prompt to enter the new PIN2 code. In case the number of tries exceeds 10 times, the PIN2 code is blocked and the functions related to PIN2 code will be unaccessible. Shortcuts Instead of entering the various menus and browsing the lists, you can set up direct access to a specific function by linking it to a key. Right soft key You can change the definitions for the right soft key: z press 3/4 to change the setting, or z press the left soft key [Select] to display a function list, select a function and press [OK]. Navigation keys You can change the definitions for the four directions on the navigation key. Scroll to Up, Down, Left or Right, indicated by an arrow, and then: z press 3/4 to change the setting, or z press the left soft key [Select] to display a function list, select a function and press [OK]. Hotkeys You can only program keys 2 to 9 as 0 (select language),1 (call voice mailbags), # (access WAP) and * (enter international prefix) are predefined and locked, preventing reprogramming. Depending on your service provider, other hotkeys may be predefined and locked. 1 Select a key from 2 to 9 and press the left soft key [Edit]. 2 Browse the list to select the function you wish to associate with the selected number key. Press the left soft key, to confirm your choice. To use the hotkeys, simply press and hold the key corresponding to the function you want to launch or to the number you want to dial while in idle mode. Memory status This menu allows you to view the current memory status of the phone memory and the external memory card by way of bar type figure and text prompts. - phone memory: used memory/total memory - memory card: used memory/total memory](https://usermanual.wiki/Inventec-Appliances/CT8688/User-Guide-584416-Page-68.png)
![Philips 868 User Guide Page 69 of 89 Mater reset This menu enables you to restore most of the original settings of the phone. You will be required to enter the phone & privacy code. The default phone & privacy code is 1234. Switch On/Off This menu allow you activate/deactivate auto switch on/off function ane set the time for auto switch on/off. 1 Move the cursor to select Swich on or Switch off, and then press the left soft key [Select] to activate. 2 Move the cursor to the field of switch on time or switch off time, and enter the desired time. 3 Press [OK] to confirm. Sounds Ringer volume By default the ringer volume can be set to Medium. You can choose a desired one from the following options: Silent, Low, Medium, High, Increasing. Ringer Call ringer Allows you to select a ringer tone for incoming calls. Press the left soft key or OK key to access the list of available ringers, select a desired one and press OK key to confirm. Group ringer Allows you to select a unique ring tone for a Contacts group. z In the Use group ringer field: press [Select] to activate the group ringtone .. z In the Group field: press Å/Æ to select a desired group from General, Family, Friends, Business, VIP, SIM and user-defined groups. z In the Melody field: press 3/4 to select the desired one.Or, press [Select] to display the list of available ringers, and move the cursor to select the desired one and press [OK]. Message ringer Allows you to select a ringer tone for incoming messages. Press the left soft key or OK key to access the list of available ringers, select a desired one and press OK key to confirm. Key tones Allows you to set the key tones to be Low, Noral, High, or Off.](https://usermanual.wiki/Inventec-Appliances/CT8688/User-Guide-584416-Page-69.png)
![Philips 868 User Guide Page 70 of 89 Screen tap tones Allows you to set the screen tap tones to be Low, Noral, High, or Off. Sounds alerts Allows you to set alert beeps On of Off for the following items: — when an event programmed in your Agenda is due,, — when the Battery low alert requires charging, — to manage the duration of your calls with a Minute alert (the beep can not be heasrd by the caller) — when playing the Welcome animation. Vibra alert Allows you to set the vibra alert On or Off when receiving a call, when an even set in Agenda is due, when you receive a message and when the alarm rings. Display Wallpaper Allows you to set the wallpaper of the main display as well as the sub display. Press the left soft key [Select] to view the lists of available pictures, select a desired one by pressing the left soft key [Select] and the press OK key to confirm. Screensaver Allows you to set the default screensaver to be On or Off.幕保护的开启时间。 Backlight Allows you to set the backlight level and duration for the main display and sub display. z In the Backlight level field, press 3/4 to adjust the brightness of the backlight. z In the Backlight duration field, press 3/4 to select the duration of backlight. Press OK key to confirm the settings. Sub display mode Allows you to set the clock display mode on the sub display. In the list screen, press the left soft key [select] to select a desired display mode among Simple, Full and World clock. z Simple mode: displays the current time in HH:MM format in the middle of the sub display. z Full: displays signal strength, battery level, current time and week at the same time. z World clock: displays the current time of the local city and the current time of the remote city at the same time.](https://usermanual.wiki/Inventec-Appliances/CT8688/User-Guide-584416-Page-70.png)
![Philips 868 User Guide Page 71 of 89 Sub display contrast Allows you to adjust the contrast level of the sub display. Press 3/4 to adjust the contrast, and then press [OK] to confirm and exit. Calibartion When the stylus is not pointing accurately on the display, it is time to calibrate it. Use the stylus and follow the on-screen instructions to calibrate the touch screen. Network Select network This menu is used to let the phone automatically selects one of the mobile networks available in your area, or you can also select a desired network from the network list by yourself. Select frequency This menu allows you to choose a desired frequency among Auto, 900/1800 and 1900. Preferred network This menu allows you to set up to 10 preferred networks. You can press the left soft key to access the following options: Insert: to select a desired network from the network list, and then press [OK] to insert the network in the selected place on the list; Append: to select a desired network from the network list, and then press [OK] to add the selected network at the end of the network list. Delete: to delete the selected network from the preferred network list you have set.](https://usermanual.wiki/Inventec-Appliances/CT8688/User-Guide-584416-Page-71.png)
![Philips 868 User Guide Page 72 of 89 14. Entertainment Games There are 6 built-in games in your mobile phone . You can press a number key to enter the corresponding game directly, or move the cursor to select a game and press the left soft key to enter. Sound Settings In the function menu of a selected game, move the cursor and select Sound to enter its sound settings screen. You can turn the sound On or Off, and adjust the sound volume when it is set to be On. Top five list In the function menu of a selected game, move the cursor and select Top five to view the Top five list of the game. Help Infomation In the function menu of a selected game, move the cursor and select Help to view the help information of the game. Java When entering this menu, the splash screen is displayed immediately. “Please wait” animation will be shown. The screen content is a list of function menu options as follows: 1. Java application In the list of java applications, you can press the left soft key [Options] to access the following options: 1) Run: to run the highlighted Java application. 2) Bookmarks: to access the user-defined list of websites for download Java applications. 3) Delete: to delete the highlighted Java application. 4) Delete all: to delete all of the Java applications. 5) Details: to show the detailed information of the highlighted Java application. 6) Upgrade: to upgrade the highlighted Java application.](https://usermanual.wiki/Inventec-Appliances/CT8688/User-Guide-584416-Page-72.png)
![Philips 868 User Guide Page 74 of 89 15. Connectivity Infrared Your mobile phone integrates the infrared technology, which allows you to send or receive data to and from other infrared-compliant devices through a wireless link (e.g. another mobile phone, a PC or PDA, a printer, etc.). Note: 1 Files that are copyright protected cannot be sent. When connecting with a PC, make sure you have activated its infrared optioin. 2 Before sending or receiving data to and from another device, they must be correctly positioned in relation to your mobile phone. Make sure that the infrared ports are facing each other and are a maximum of 50 cm away from each other. Also make sure that nother obstructs the infrared beam. Send data To send data via infrared from your mobile phone, you must first select the item to be sent: when selecting a picture, a sound, a video clip, a name card, or an agenda event, a sub-menu then gives you access to the Send by infrared option. As soon as your phone finds anoher infrared-compliant device to communicate with, the sending automatically takes place. Message are displayed on the screen, for you to follow the process. If the phone finds several devices, a list is displayed on the screen for you to choose a desired one. Press [OK] to confirm and to send the selected data. Sending is cancelled if your phone cannot find another device before the time out is reached, if the infrared link is broken, or if you cancel the process. Receive data To receive data, select Infrared>Infrared receive. Your phone is then ready to receive an item and waits for aother infrared-compliant device to send it. When sending, messages are displayed on the screen to allow you to follow the process. Receiving is cancelled if your phone isn’t contacted by another device before the time out is reached, if the infrared link is broken, if the size of the file sent is too large or if you cancel the process.](https://usermanual.wiki/Inventec-Appliances/CT8688/User-Guide-584416-Page-74.png)