Inventec 4005TE FIXED WIRELESS PHONE User Manual 4005
Inventec Corporation FIXED WIRELESS PHONE 4005
Inventec >
Users Manual
Pacific 4005 User Manual

4005 User Manual
1
Copyright © 2010 INVENTEC All Rights Reserved.
No part of this manual, including the product and software described in it, may be reproduced,
transmitted, transcribed, stored in a retrieval system, or translated into any language in any form, by any
means, without prior written permission from INVENTEC.
INVENTEC provides this publication “as is” without warranty of any kind. This information could include
technical inaccuracies or typographical errors.
INVENTEC may make improvements and/or changes in the product. Information and specifications
contained in this document are subject to change at any time without notice.
The information contained in this document does not affect or change the product specifications or
warranties. INVENTEC is not liable for any damages resulting from the use of this product.
Trademark Information
Opera®Browser from Opera Software ASA. Copyright 1995-2010 Opera Software ASA. All rights
reserved.
All other trademarks are property of their respective owners.
All right reserved

4005 User Manual
2
Safety Information and Precautions
General Cautions
z Do not service any product yourself. Service needed on components inside these compartments
should be done by an authorized service technician or provider.
z Turn off the device and remove the battery before inserting SIM card. Make sure the SIM card snaps
correctly into the SIM socket.
z Do not press hard on this product, as it may cause damage to the screen or the internal components.
z Do not open or tamper with the device cover, as this will void your warranty.
z Do not strike, shake, or heat the device, the battery, and power adapter in a way which may cause
battery leakage or rupture and damage to the device.
z Do not push objects of any kind into cabinet slots or other openings in the device.
z If there are noticeable signs of overheating, unplug the device from the electrical outlet immediately
and refer servicing to an authorized service provider.
z Do not remove or damage the warranty void label on the device, as this will void your warranty.
z Before cleaning the device, turn off the device, and then disconnect the power supply and take out
the battery. Before moving the device, disconnect the external power supply.
All right reserved

4005 User Manual
3
z Do not place sharp metal objects such as pins near the earpiece. The earpiece may attract these
objects and hurt you when you are using the device.
z Put the device, battery, and power adapter in places beyond the reach of children. Do not allow
children to use the device, battery, or power adapter without guidance.
z Do not touch the antenna when a call is going on. Touching the antenna may affect call quality and
cause the device to operate at a power level higher than needed.
z The device is designed to conform to the authoritative international radio frequency (RF)
specifications. Use manufacturer-specified accessories only.
z Please observe the national local regulations in the location where product is to be used. This
product may be restricted for use in some or all countries of European Union.
z Please abide by the local laws in proposing of the package materials of the device, consumed
batteries and used device, and try to recycle them.
Health and Hospital
z This device may cause medical equipment to malfunction. Such equipment include hearing aids, fire
alarm, pacemakers, automatic gate, and other automatic-control devices. The use of this device is
All right reserved

4005 User Manual
4
forbidden in most hospital and medical clinics.
z If you are using an electronic medical device, consult the device manufacturer and confirm whether
the radio waves affect the operation of the electronic device.
z Do not take the device into the operating room (OR), intensive care unit (ICU), or coronary care unit (CCU).
z Power off the device when it is close to medial devices.
z Observe any instructions wherever the use of wireless device is prohibited.
Traffic Safety
z Observe the rules and regulations of airline companies. Turn off the device before boarding an aircraft.
z The device may interfere with the navigation and/or communication systems on aircraft. The use of
the device on an aircraft is prohibited by laws in most countries.
z Do not use the device while driving. Do not place the device on the seat or other places where it can
get loose in a sudden stop or collision.
z Do not place the device in the area over the air bag or in the air bag deployment area. Otherwise, the
device may hurt you owing to the strong force when the air bag inflates.
All right reserved

4005 User Manual
5
Operating Environment
z Do not place the product on an unstable base.
z Do not use the device at gas or refueling stations, chemical plants, and places containing explosives
or flammable materials. The product should be placed away from heat sources such as radiators,
stoves, or other products that produce heat.
z Do not expose the device to prolonged direct sunlight, or leave the device in a humid environment for
extended periods of time, as this may cause damage to the device and battery.
z Do not immerse the device in water. Never use the product in a wet location.
z Do not place magnetic storage media such as magnetic cards and floppy disks near the device.
Radiation from the device may erase the information stored on them.
z Do not put the device in containers with strong magnetic field, such as the microwave oven, as this
may cause circuit failure, fire, or explosion.
z Because the device needs to eliminate heat during working, put the device and the power supply in a
ventilated and shadowy place. Never airproof the device or put something on it or place it near water,
fire as well as inflammable and explosive materials.
z In raining and lightning, disconnect the power adapter from external power supply and turn off the
All right reserved

4005 User Manual
6
device. In this case, if the outdoor antenna is used, do not touch the device and antenna.
z The network signal condition will directly affect the quality and stability of the call. Do not put the
device in a building with an iron or metal roof. The distance between the device and other metal
materials (such as metal doors and windows) should be greater than 25 cm and the distance
between other Fixed Wireless Terminals should be greater than 30 cm.
z This device is compliance with SAR for general population /uncontrolled exposure limits in
ANSI/IEEE C95.1-1999 and had been tested in accordance with the measurement methods and
procedures specified in OET Bulletin 65 Supplement C. This device was tested for contacting directly
to the human body to the back side of the Fixed wireless phone. To maintain compliance with FCC
RF exposure compliance requirements, avoid direct contact to the transmitting antenna during
transmitting.
Accessories
z Do not use batteries which have not been specified by the manufacturer, as this may cause leakage or
rupture. Damage caused by using batteries not specified by the manufacturer is not covered under warranty.
z If the battery fluid gets into eyes, do not rub them. Wash with clean water and seek medical
assistance immediately.
All right reserved

4005 User Manual
7
z If the battery fluid contacts skin or cloth, wash with clean water immediately to avoid irritation to the skin.
z Do not dispose of the battery in fire. Otherwise, the battery may ignite or explode.
z When installing the battery on the device, do not push the battery by force as this may cause battery
fluid leak out or the battery crack.
z Do not connect two poles of the battery with metallic materials such as cables.
z Do not disassemble the battery or solder the battery poles. Otherwise, fluid leakage, overheat, fire, or
explosion may result.
z If there is battery leakage, smoke, or strange smell, stop using the battery and keep it away from
open flame to avoid fire or explosion.
z Disconnect the power adapter and take out the battery when the device is not used for a long time.
z When discarding the batteries, dispose of them in a proper manner, according to the battery
manufacturer’s instructions and your local laws.
z Use AC power as specified for the power adapter. Any violation of this rule may result in fire or
malfunction of the power adapter.
z Do not short-circuit the power adapter. Short-circuiting the power adapter may cause fire or
malfunction of the power adapter.
All right reserved

4005 User Manual
8
z Remove the dust on the power plug regularly.
z Do not use worn-out power cords. Otherwise, electric shock, short-circuiting of the power adapter, or
fire may result.
z Do not put the power adapter near the container filled with liquid such as water. If the liquid comes
into the power adapter, electrical leakage or other faults may result.
z If the liquid such as water comes into the power adapter accidentally, remove the plug of the power
adapter from the socket immediately.
z Disconnect the power adapter from the socket before cleaning or maintaining it. Otherwise, electric
shock or short-circuiting of the battery or power adapter may result.
z Ensure the plug of the power adapter is properly inserted into the power socket when charging the
battery. Improper insertion may result in electric shock, fire, or explosion.
z Do not place any heavy object on the power cord of the power adapter. Do not damage, change, or
pluck the power cord.
Federal Communications Commission Notice
This device complies with part 15 of the FCC Rules. Operation is subject to the following two conditions:
(1) This device may not cause harmful interference, and (2) this device must accept any interference
All right reserved

4005 User Manual
9
received, including interference that may cause undesired operation. This equipment has been tested
and found to comply with the limits for a Class B digital device, pursuant to Part 15 of the FCC Rules.
These limits are designed to provide reasonable protection against harmful interference in a residential
installation. This equipment generates, uses, and can radiate radio frequency energy and, if not installed
and used in accordance with the instructions, may cause harmful interference to radio communications.
However, there is no guarantee does cause harmful interference to radio or TV reception, which can be
determined by turning the equipment on and off, the user is encourage to try to correct the interference
by one or more of the following measures:
• Reorient or relocate the receiving antenna.
• Increase the separation between the equipment and receiver.
• Connect the equipment into an outlet on a circuit different from that to which the receiver is connected.
• Consult the dealer or an experienced radio or television technician for help. Changes or modifications not expressly
approved by the party responsible for compliance could void the user‘s authority to operate the equipment.
Changes or modifications not expressly approved by the party responsible for compliance could void the
user‘s authority to operate the equipment.
The antenna(s) used for this transmitter must not be co-located or operating in conjunction with any other
All right reserved

4005 User Manual
10
antenna or transmitter.
All right reserved

4005 User Manual
11
Nonionizing Radiation
The device may have internal and external antennas. As with any radio transmitting device, avoid
touching the antenna area unnecessarily while the antenna is transmitting or receiving. Contact with
such an antenna affects the communication quality and may cause the device to operate at a high power
level than otherwise needed and may cause more power consumption.
Antenna
location
All right reserved

4005 User Manual
12
Table of Contents
Safety Information and Precautions ...........................................................................................................2
Chapter 1. Introduction.............................................................................................................................17
1.1 Front View and Rear View.......................................................................................................17
1.2 Side Views...............................................................................................................................20
1.3 Accessories .............................................................................................................................22
1.4 Installation Procedure..............................................................................................................23
Chapter 2. Getting Started........................................................................................................................31
2.1 Standby Mode..........................................................................................................................31
Reading Missed Calls.........................................................................................................33
Reading New Messages.....................................................................................................34
2.2 Input Methods..........................................................................................................................35
All right reserved

4005 User Manual
13
Multi-tap Input Method........................................................................................................36
Indicators ............................................................................................................................36
2.3 Making/Receiving a Call..........................................................................................................37
Making a Call......................................................................................................................37
Receiving a Call..................................................................................................................37
Managing a Call Waiting.....................................................................................................38
2.4 Setting a Speed Dial................................................................................................................39
Creating a Speed Dial from the Phonebook .......................................................................39
Making a Call from Speed Dial ...........................................................................................40
2.5 Basic Settings..........................................................................................................................40
Setting Date and Time ........................................................................................................40
Chapter 3. Basic Operations ....................................................................................................................41
All right reserved

4005 User Manual
14
3.1 Phonebook ..............................................................................................................................41
Creating a Contact..............................................................................................................41
Viewing a Contact...............................................................................................................42
Copying Contacts ...............................................................................................................43
Deleting All Contacts...........................................................................................................44
3.2 Call History ..............................................................................................................................44
3.3 SMS.........................................................................................................................................46
Creating a Text Message....................................................................................................46
Viewing Messages..............................................................................................................47
Editing a Draft Message .....................................................................................................48
Deleting All Messages ........................................................................................................49
3.4 Changing Settings ...................................................................................................................50
All right reserved

4005 User Manual
15
Adjusting Brightness and Contrast .....................................................................................50
Activating the PIN Security .................................................................................................51
Factory Reset .....................................................................................................................52
Chapter 4. Using Applications ..................................................................................................................54
4.1 Installing External Devices ......................................................................................................54
4.2 Browser ...................................................................................................................................59
Navigating a Web Page......................................................................................................65
Using Speed Dial ................................................................................................................65
Browsing the Tabs Tray ......................................................................................................66
4.3 Setting .....................................................................................................................................68
4.4 File Explorer ............................................................................................................................70
4.5 Media Center...........................................................................................................................72
All right reserved

4005 User Manual
16
4.6 Photo Album ............................................................................................................................73
4.7 SMS.........................................................................................................................................75
4.8 Phonebook ..............................................................................................................................77
Specification .............................................................................................................................................79
All right reserved
4005 User Manual
17
Chapter 1. Introduction
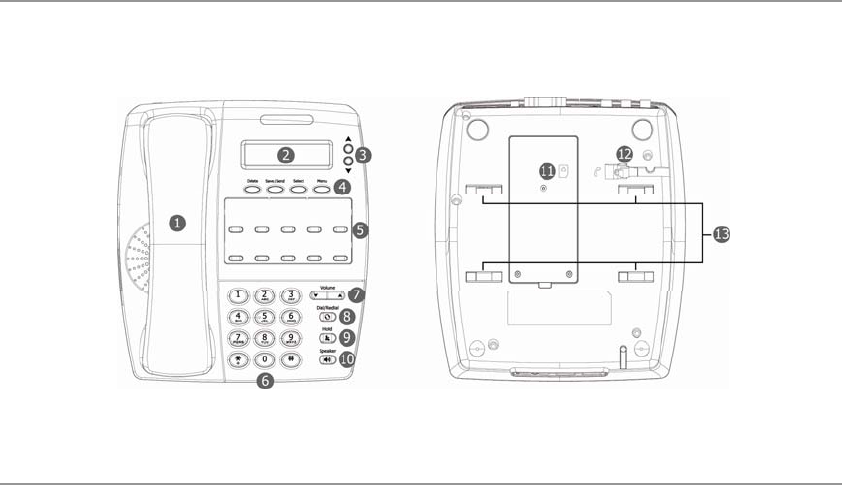
1.1 Front View and Rear View
All right reserved

4005 User Manual
18
No. Item Description
1 Handset Lift the handset to speak privately.
2 Screen Interactive LCD display.
3 Up/Down Keys Lets you scroll through the main menu and sub-menus
in the device.
4 Function Keys Press to perform the functions showed above the keys.
5 Speed Dial Keys Allows you to dial frequently called numbers by
pressing a single key.
6 Number Keys Enter numbers and characters.
7 Volume Key Press to adjust ringing volumes. When having a phone
call, press to adjust the handset volumes. When having
a phone call hands-free, press to adjust the
All right reserved

4005 User Manual
19
speakerphone volumes.
8 Dial/Redial Key In standby mode, press to redial the last number. In
Phonebook or Call History list, press to make a call.
9 Hold Key Press to hold a phone call.
10 Speaker Key Press to speak and listen to a phone call hands-free.
11 Back Cover Remove the back cover to install batteries and the SIM
card. (Refer to chapter 1.4 for more information.)
12 Phone Cord Jack Connect the handset and the main device with the
supplied coiled phone cord.
13 Wall-mounting Brackets Allows the device to be wall mounted.
All right reserved

4005 User Manual
20
1.2 Side Views
No. Item Description
1 External Antenna Jack Connect an external antenna.
2 Reset Insert a straightened paper clip into the reset hole to soft
reset the device.
3 DC Jack Connect the supplied power adapter.
4 D-Sub Socket Connect a monitor with an adequate cable.
All right reserved

4005 User Manual
21
5 USB Ports Connect the supplied mouse, keyboard, or other
compatible devices. *
6 Video/Audio Output Connecters Connect a monitor’s video/audio input connectors with
an adequate cable.
7 USB Ports Connect the supplied mouse, keyboard, or other
compatible devices. *
8 Audio Jack Connect an external headset.
9 Microphone Jack Connect an external microphone.
* Please do not connect a Hard Disk Drive to the device or charge any devices, such as cellular phones,
through the USB ports on the device.
All right reserved

4005 User Manual
22
1.3 Accessories
The product package includes:
2
13
1. Main Device
2. Handset
3. USB Keyboard
4. USB Mouse
5. Coiled Phone Cord
4
6. Power Adapter 5 7
6
7. User Manual
All right reserved
4005 User Manual
23
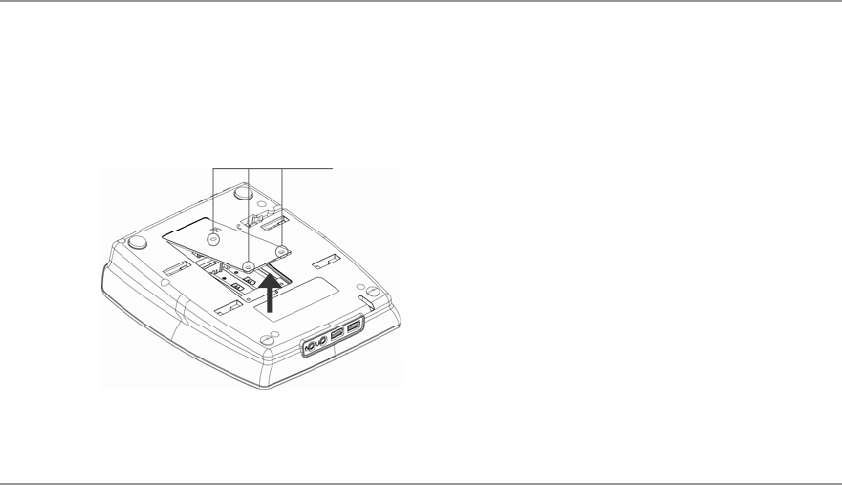
1.4 Installation Procedure
Complete the following steps before you start using the device.
1. Remove the screws fixed on the back cover with a screw driver.
2. Lift the back cover as shown.
Screwholes
All right reserved
4005 User Manual
24
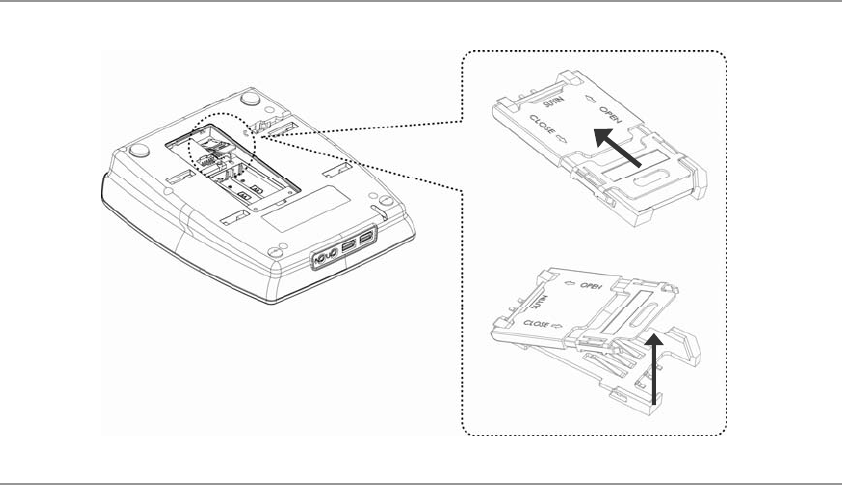
3. Slide the latch of the SIM card case in the direction of the embossed arrow, and then lift the SIM card case.
1
2
All right reserved
4005 User Manual
25
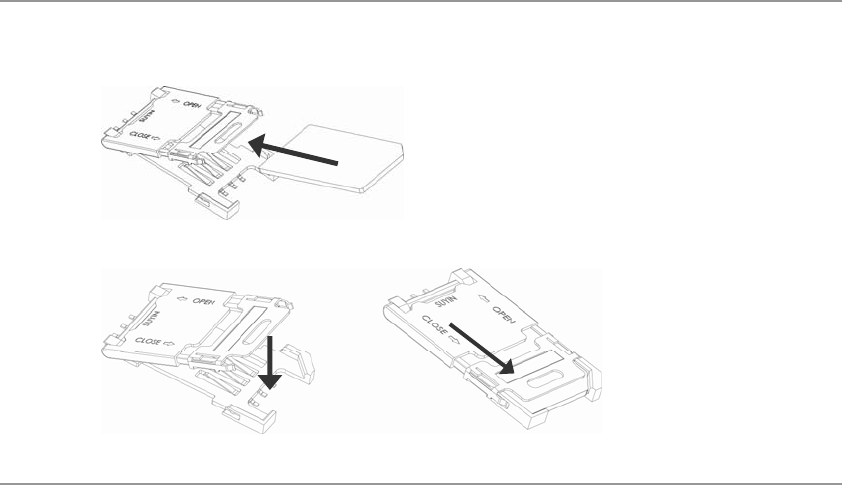
4. Make sure that the gold contact on the SIM card is facing down, and then insert the SIM card.
5. Push the SIM card case back and then lock the latch of the SIM card case.
2
1
All right reserved
4005 User Manual
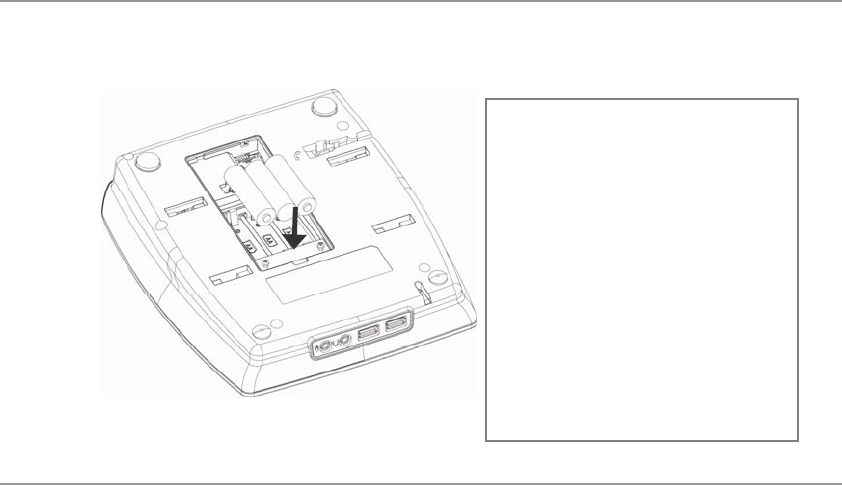
26
6. Place three Alkaline batteries (No.3 battery) in the battery holder. (Refer to the diagrams
embossed in the battery holder, make sure that you insert batteries in correct directions).
Please check the power capacity of the
installed alkaline batteries regularly and
replace them when the power level is l
o
w.
NOTE Batteries are for emergency use (e.g.
accidently power failure), please avoid relying
on the battery power solely when operating
the device. It can work for around 10 minutes
when using the battery power, depending on
the signal strength, the operation environment
and the features you use…etc.
All right reserved
4005 User Manual
27
7. Replace the back cover and fix the screws. (Please keep the back cover closed and make sure
the SIM card latch is locked every time after you install/replace the SIM card or batteries, in case
internal components are damaged by accident.)
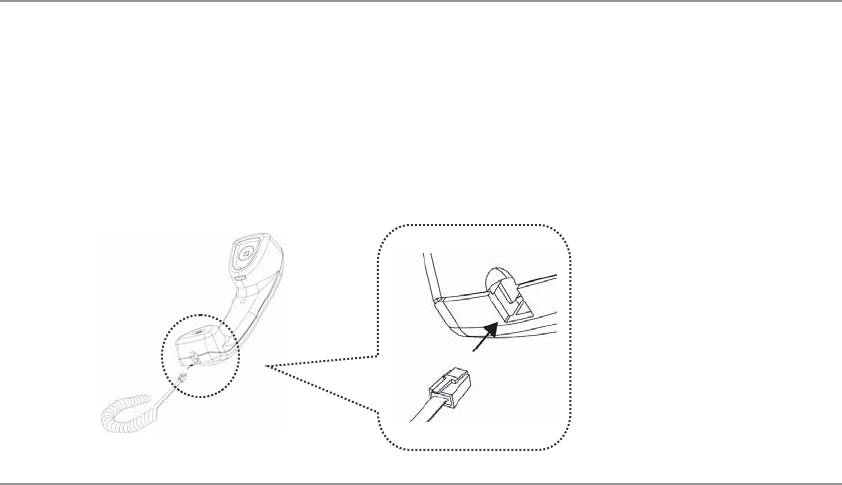
8. Take out the handset and the coiled phone cord from the package.
9. Plug one end of the supplied phone cord to the handset. Make sure the direction is correct, and
push until it clicks.
All right reserved
4005 User Manual
28
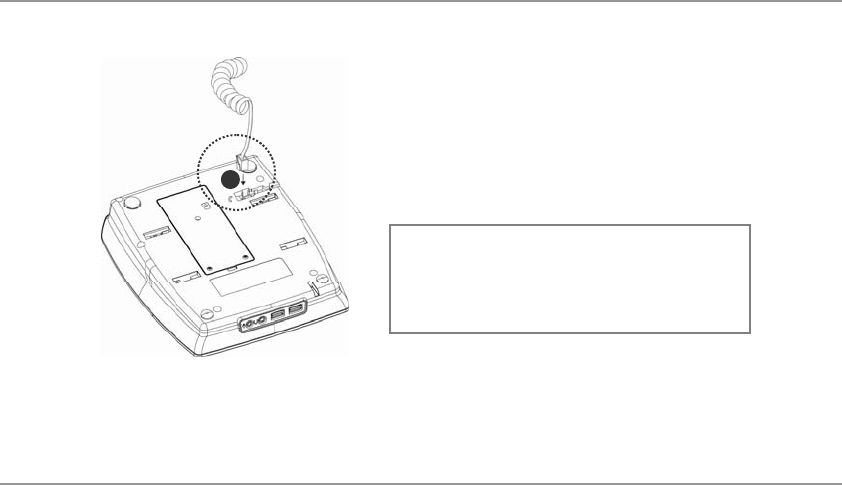
10. Plug the other end of the phone cord to the phone cord jack, which is on the back of the device.
12
NOTE To remove/unplug the phone cord,
press the clip on the plug and then pull it.
11. Fix the phone cord in the slot, which is located next to the phone cord jack.
12. Take out the power adapter from the package.
All right reserved
4005 User Manual
29
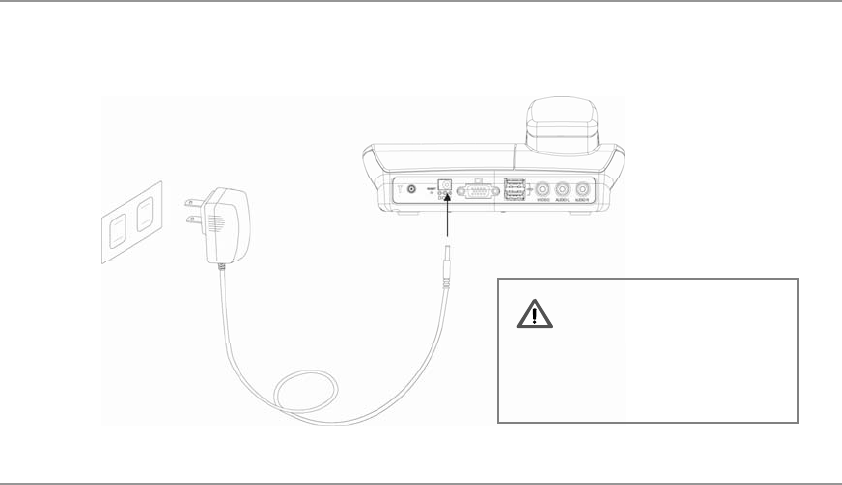
13. Insert one end of the power adapter into the DC jack on the top side of the device, and then insert
the other side into a functioning power outlet.
If you want to replace batteries
or SIM card, disconnect the device
from the power adapter first.
All right reserved

4005 User Manual
30
14. You are now complete the basic installation and ready to use basic features of the device such as
making a call and sending a text message. Refer to chapter two and three for more information on
how to operate the device.
All right reserved
4005 User Manual
All right reserved
31
Chapter 2. Getting Started
After installing a valid SIM card, you can start using phone features such as making/receiving calls,
viewing/editing Call History and creating contacts…etc.
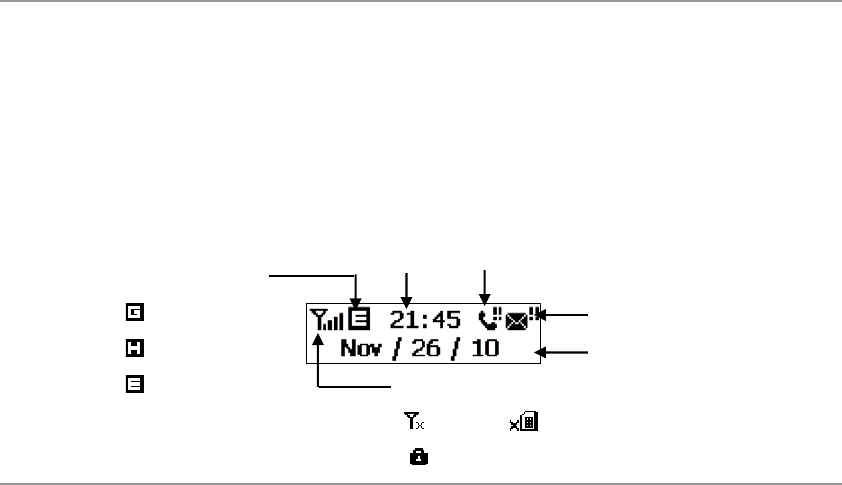
2.1 Standby Mode
In standby mode, you can see information showed on the screen as below.
MissedCall
Time
Date
NewMessage
ConnectionStatus
:GPRSavailable
:HSPAavail leab
SignalStrength
:EDGEavail leab
:Nosignal:NoSIMcard
:SIMblocked
4005 User Manual
32
z Press Menu to display the main menu: Call History, Phonebook, SMS and Setting. Press Up/Down
to scroll through the main menu, when a desired item is highlighted by a triangle icon ( ), press
Select to go to the sub-menu or enter editing mode.
z If there are further sub-menus, repeat steps described above. (Pressing Up/Down to scroll through
menus and then press Select to make a selection.)
z In sub-menus or the editing mode, press Menu to stop your operations and go back to the standby mode.
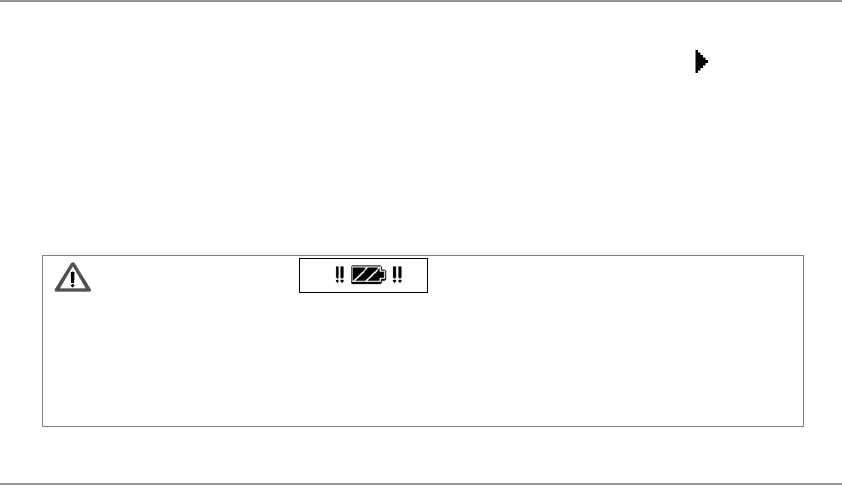
If you see the battery icon displaying on the screen, it means the device has
no external power supply and only rely on the backup alkaline batteries installed in the device. Please
check and install the power adapter as soon as possible when this icon shows.
All right reserved

4005 User Manual
33
NOTE You can only make emergency calls when the SOS icon displays on the screen.
If No SIM Card icon displays ( ), refer to chapter 1.4 and make sure that the SIM card is installed correctly.
Reading Missed Calls
When there is a missed call ( ), press Up/Down and select Missed to view the missed call list. The
following options are available:
z Press Delete. A highlighted entry will be deleted immediately.
z Press Dial/Redial. Make a call to a highlighted entry.
z Press Save/Send. If you select Save, enter a name and then press Save again, this entry will be
saved to the Phonebook. If you select Send, you can create and send a message from the Missed
Call entry.(Press Send again when you finish entering the message.).
All right reserved

4005 User Manual
34
Reading New Messages
When there is a new message ( ), press s Up/Down and select Unread. Scroll to a new message and
press Select to read it. The following options are available when viewing a new text message:
z Press Delete. The message you are reading will be deleted immediately.
z Press Dial/Redial. Make a call to the sender of this message.
z Press Save/Send. If you select Save, enter a name and then press Save again, this sender will be
saved to the Phonebook. Select Send if you want to forward or reply the message. (Press Send
again when you finish entering the message.).
All right reserved
4005 User Manual
35
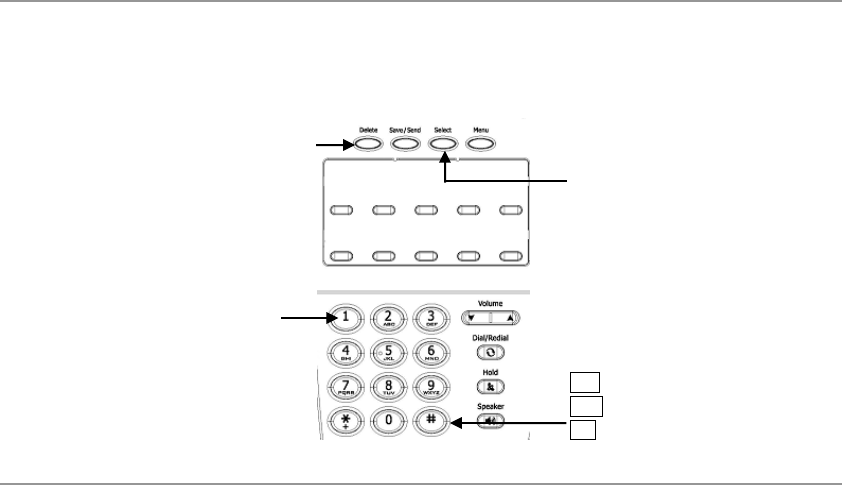
2.2 Input Methods
When you need to enter a contact’s name or a message, the device will switch to editing mode
automatically. You can then enter numbers or characters by using the keypad.
Press to delete the last
character you enter. Press to select a character.
Press to toggle between
uppercase and lowercase input.
Three options are available:
Abc (first letter capitalized),
ABC (all uppercase) and
abc (all lowercase).
Press to enter symbols.
All right reserved

4005 User Manual
36
Multi-tap Input Method
Press a numeric key to enter the number or characters that it carries. Press a key repeatedly until the
desired character or number shows, and then press Select.
For instance, press 2 to toggle between a, b, c and 2 under English input mode, and then press Select
when the desired one appears. If the characters you want to input are in the same key, select a character
first, and then repeat the same steps.
Indicators
When the device is in editing mode, you can see the following indicators showing on the lower-left corner
of the screen. Refer to the indicators for which input method you are using.
: English multi-tap input method. All letters are capitalized.
: English multi-tap input method. Only first letter is capitalized.
: English multi-tap input method. All letters are lowercase.
All right reserved

4005 User Manual
37
2.3 Making/Receiving a Call
Making a Call
z If you want to speak and listen to a call hands-free, press Speaker, and then enter a phone number
by using the keypad. (You can still lift the handset during a call to have a private conversation.)
z If you want to speak privately, lift the handset, and then enter a phone number by using the keypad.
Receiving a Call
When there is an incoming call, you can:
z Lift the handset.
z Press Speaker.
z If the device is connected to an external monitor, click Answer on the pop-up window.
All right reserved

4005 User Manual
38
Managing a Call Waiting
When there is a call waiting, you can hear a notification sound and see a Yes/No selection displaying on
the screen. (Consult with your service provider to see if the call waiting feature is enabled.) Press
Up/Down to scroll to Yes or No, and then press Select.
z If you select Yes, the first call will be put on hold. Press Delete to end the second call, otherwise,
press Hold to switch to the first call
z If you select No, the second call will be rejected.
All right reserved

4005 User Manual
39
2.4 Setting a Speed Dial
You can set at most ten speed dial numbers in the device. After assigning a phone number to a speed
dial key, write down the contact’s name on the attached paper board for your reference.
z Short press a speed dial key to show its assigned phone number.
z Long press a key to enter a phone number or edit the assigned number. Press Save when finish editing.
Creating a Speed Dial from the Phonebook
1. In standby mode, press Menu.
2. Press Up/Down to scroll to Phonebook, and then press Select.
3. Scroll to View, and then press Select.
4. Scroll to the desired contact, and then press a Speed Dial key.
5. Press Save.
All right reserved

4005 User Manual
40
NOTE If you place a number in a Speed Dial key which is already used, the new number will replace
the existing number.
Making a Call from Speed Dial
z Lift the handset or press Speaker, and then press a speed dial key.
2.5 Basic Settings
Setting Date and Time
1. In standby mode, press Menu.
2. Press Up/Down to scroll to Setting, and then press Select.
3. Scroll to Time/Date, and then press Select.
4. Enter the time and date by using the keypad, and then press Save.
All right reserved

4005 User Manual
41
Chapter 3. Basic Operations
3.1 Phonebook
Creating a Contact
1. In standby mode, press Menu.
2. Press Up/Down to scroll to Phonebook, and then press Select.
3. Scroll to Add, and then press Select.
4. Enter the contact’s name, and then press Save.
5. Enter the phone number, and then press Save.
The new contact will be saved to the device. You can save up to 500 contacts.
All right reserved

4005 User Manual
42
Viewing a Contact
1. In standby mode, press Menu.
2. Press Up/Down to scroll to Phonebook, and then press Select.
3. Scroll to View, and then press Select.
4. Scroll to the desired contact, and do any of the following steps:
z Press Delete. The contact’s information will be deleted permanently.
z Press Dial. You can make a call immediately.
z Press Select. You can edit the contact’s information. Press Save when finish editing the
contact’s name. Press Save again after editing the contact’s phone number.
z Press Save/Send. You can create a message and send it to the selected contact.
z Press a Speed Dial key. This key will be assigned as the contact’s Speed Dial key. Press Save
to save this setting.
All right reserved

4005 User Manual
43
Copying Contacts
You can copy your contacts from the Phonebook to the SIM card, and copy SIM contacts to the
Phonebook as well.
1. In standby mode, press Menu.
2. Press Up/Down to scroll to Phonebook, and then press Select.
3. Scroll to Backup, and then press Select.
4. Scroll to Device to SIM or SIM to Device, and then press Select. All the contacts in the device or in
the SIM card will be copied immediately.
NOTE Before copying the phonebook contacts to your SIM card, please make sure that the storage
capacity in the SIM card is enough. Please consult with your wireless service provider for the SIM
storage capacity.
All right reserved

4005 User Manual
44
Deleting All Contacts
1. In standby mode, press Menu.
2. Press Up/Down to scroll to Phonebook, and then press Select.
3. Scroll to Delete, and then press Select.
4. Scroll to SIM Contacts or Device Contacts, and then press Select.
5. Follow the prompts on the screen, press Up/Down and Select to complete all steps.
3.2 Call History
In Call History, you can view the calls you missed ( ), received ( ) and made ( ).The Call
History entries are stored in the device; each of the categories can store 10 entries at most. The oldest
entry will be deleted automatically when the new entry comes.
All right reserved

4005 User Manual
45
1. In standby mode, press Menu.
2. Press Up/Down to scroll to Call History, and then press Select.
3. Scroll to Missed, Incoming or Outgoing, and then press Select. Alternatively, you can select Vies All
to see all of them.
4. Press Up/Down to view the list (entries will be listed in time sequence, if the call is made by a
contact, you will see the contact’s name; otherwise, you will see a phone number), and do any of the
following steps:
z Press Dial to call a call immediately.
z Press Delete to delete this entry.
z Press Save/Send. If you select Save, enter a name and then press Save again, this entry will be
saved to the Phonebook. If you select Send, you can create and send a message from the Call
History entry.
All right reserved

4005 User Manual
46
NOTE To delete all Call History items, select Clear All in the sub-menu of Call History, and then follow
the prompts on the screen.
3.3 SMS
In SMS, you can create and send a text message; moreover, you can view the unread ( ), read ( )
and sent ( ) text messages.
Creating a Text Message
1. In standby mode, press Menu.
2. Press Up/Down to scroll to SMS, and then press Select.
3. Scroll to Create New, and then press Select.
All right reserved

4005 User Manual
47
4. Select Phonebook if you want to send the message to an existing contact; select Number if you want
to enter a phone number directly.
5. Press Save after selecting a contact or entering a phone number.
6. When entering your message, the following options are available:
z Press Save/Send and select Save. This message will be saved as a draft. You can edit and
send it later.
z Press Save/Send and select Send. This message will be sent to the recipient immediately.
Viewing Messages
1. In standby mode, press Menu.
2. Press Up/Down to scroll to SMS, and then press Select.
3. Scroll to View, and then press Select.
All right reserved

4005 User Manual
48
4. Scroll to Unread, Read or Sent, and then press Select. Alternatively, you can select View All to see
all of them.
5. Scroll to the desired message, and do any of the following steps:
z Press Delete. This message will be deleted permanently.
z Press Dial. You can make a call immediately.
z Press Save/Send. If you select Save, enter a name and then press Save again, this sender or
recipient will be saved to the Phonebook. Select Send if you want to forward or reply the
message.
Editing a Draft Message
If you create a new message but not send it to the recipient, save it as a draft and edit it later. (Please refer to
“Creating a Text Message” section in this chapter if you need more information on how to save a message.)
All right reserved

4005 User Manual
49
1. In standby mode, press Menu.
2. Press Up/Down to scroll to SMS, and then press Select.
3. Scroll to Draft, and then press Select.
4. Scroll to the desired draft message, and do any of the following steps:
z Press Delete. This message will be deleted permanently.
z Press Dial. You can make a call immediately.
z Press Select. You can edit this draft message. When finished, press Save and then select Send
to send the message. Otherwise, select Save to save the messages as a draft message.
Deleting All Messages
1. In standby mode, press Menu.
2. Press Up/Down to scroll to SMS, and then press Select.
All right reserved

4005 User Manual
50
3. Scroll to Clear All, and then press Select.
4. Follow the prompts on the screen, press Up/Down and Select to complete all steps.
NOTE Your text message will be sent as one message if contains less than 160 character. If this
number is exceeded, the message will be divided into several messages and sent one by one.
All messages, including received and sent message, will be stored in the device. You can store up to 200 messages.
3.4 Changing Settings
Adjusting Brightness and Contrast
1. In standby mode, press Menu.
All right reserved

4005 User Manual
51
2. Press Up/Down to scroll to Setting, and then press Select.
3. Scroll to Brightness or Contrast, and then press Select.
4. Press Up/Down to adjust the level, and then press Save when finished.
Activating the PIN Security
Most SIM cards are preset with a personal identification number (PIN) that is provided by your wireless
service provider. When PIN security is activated, you need to enter the PIN whenever you use the
device.
1. In standby mode, press Menu.
2. Press Up/Down to scroll to Setting, and then press Select.
3. Scroll to PIN, press Select, and then do any of the following steps:
z Scroll to Enable/Disable (only one of the options will be showed, depending on the PIN security
All right reserved
4005 User Manual
52
is activated or not), press Select, enter your PIN, and then press Save.
z Scroll to Change, and then press Select. Enter the old PIN and press Save, and then enter the
new PIN and press Save. Your PIN will be changed immediately.
NOTE If your PIN is entered incorrectly three times, the SIM card will be blocked. If this happens, you
can unblock it with the PIN Unblocking Key (PUK) obtained from your wireless service provider.
Factory Reset
You can reset all settings to the manufacturer defaults.
1. In standby mode, press Menu.
2. Press Up/Down to scroll to Setting, and then press Select.
3. Scroll to Factory Reset, and then press Select.
All right reserved

4005 User Manual
53
4. Scroll to Yes and then press Select to perform a factory reset. Otherwise, scroll to No and then press
Select to back to the sub-menu of Setting.
5. When the screen shows a confirmation message, press Select to continue.
6. Scroll to Yes, press Select, and then enter the PIN. The system will be reset to its default
immediately. (Please note that the SIM card will be blocked if you enter incorrect PIN three times.)
All right reserved

4005 User Manual
54
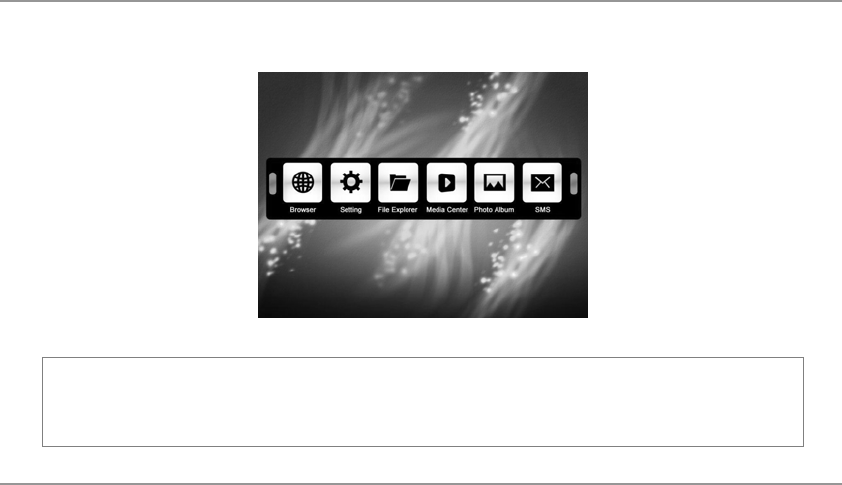
Chapter 4. Using Applications
There are seven applications pre-installed on the device: Browser, Setting, File Explorer, Media Center,
Photo Album, Phonebook and SMS. After connecting an external display to the device, these
applications will be showed on the screen. You can then access these applications using keyboard and
mouse.
4.1 Installing External Devices
Complete the following steps before using the applications:
1. Refer to chapter 1.4, make sure that the basic installation is completed.
2. Connecting an external display (not included in the package). There are two types of external
display you can use: one is television with RGB-input support, another is computer monitor or
projector with VGA-input support.
All right reserved
4005 User Manual
55
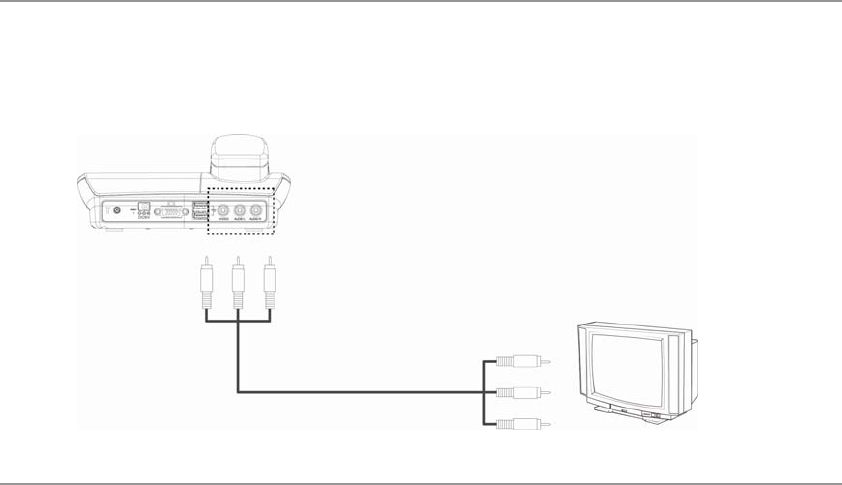
If you want to connect to a television:
Prepare a TV cable (not supplied), connect the device and your TV as the diagram shown. (If there are
color coded jacks in your TV, you can match the plug and jack colors when installing the cable.)
TV (not supplied)
TV Cable (not supplied)
All right reserved
4005 User Manual
56
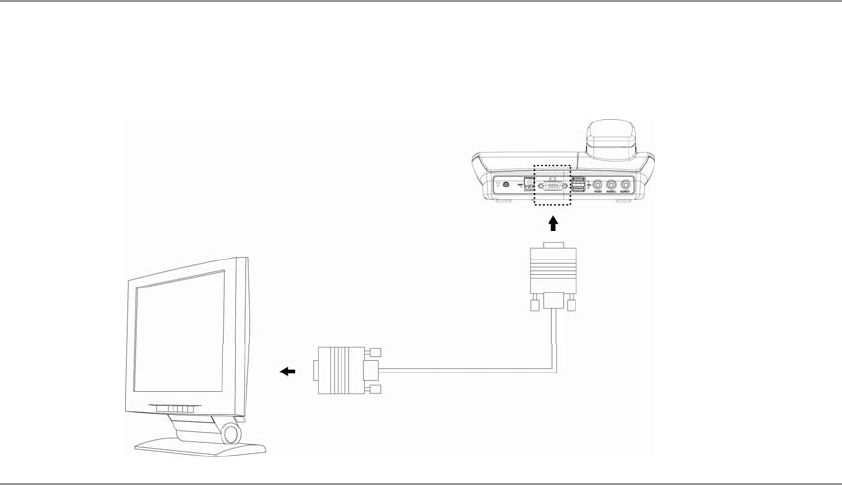
If you want to connect to a computer monitor or projector:
Prepare a VGA cable (not supplied), connect the device and the monitor as shown. Make sure that the
D-sub connectors are locked correctly on both the device and your monitor.
All right reserved
4005 User Manual
57
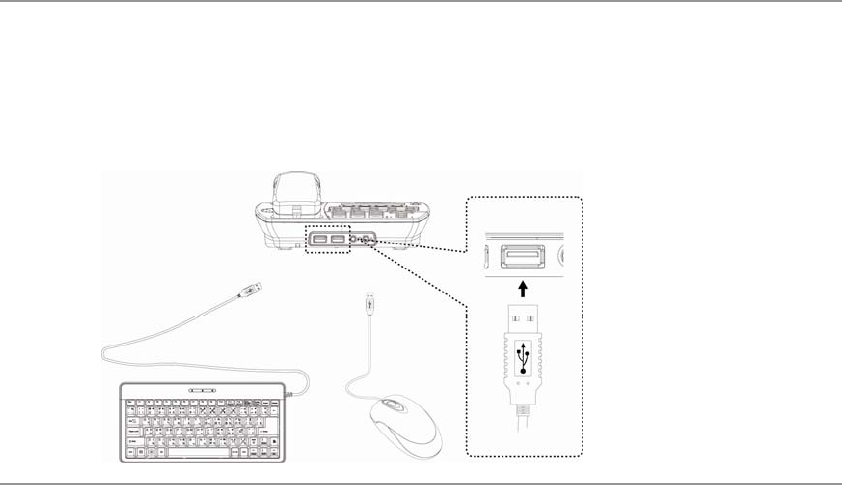
3. Take out the supplied keyboard and mouse from the package.
4. There are four USB ports on the device, according to your preference or convenience, select any
two of them to connect the keyboard and mouse.
5. Plug the USB end into the USB port on the device. Make sure that it is plugged in the right
direction with the logo side up.
All right reserved
4005 User Manual
58
6. You are now ready to use the applications. You can see the main screen as below. Click any one
of the icons to access the programs.
NOTE You may find the images on your monitor is not exactly the same as the illustrations on chapter
four, because the TV-Out GUI image and VGA-Out image may vary in pixel quality, font size, layout and
screen resolution.
All right reserved
4005 User Manual
59
4.2 Browser
Click on the screen to open the Internet browser.
You may need to pay extra fees for accessing the Internet, depending on the data plan
purchased from your wireless service provider. Please contact your wireless service provider for more
information.
NOTE You cannot have a phone call and Internet connection at the same time when only 2G (GPRS or
EDGE) data connection is available. The device will disconnect the Internet connection automatically
when there is an incoming call.
Data connection status affects your Internet browsing speed. If you find the browsing speed is low or the
Internet connection is failed, check the connection status (G, E, 3G or H) and signal strength on the
embedded LCD and then consult with your operator.
All right reserved
4005 User Manual
60
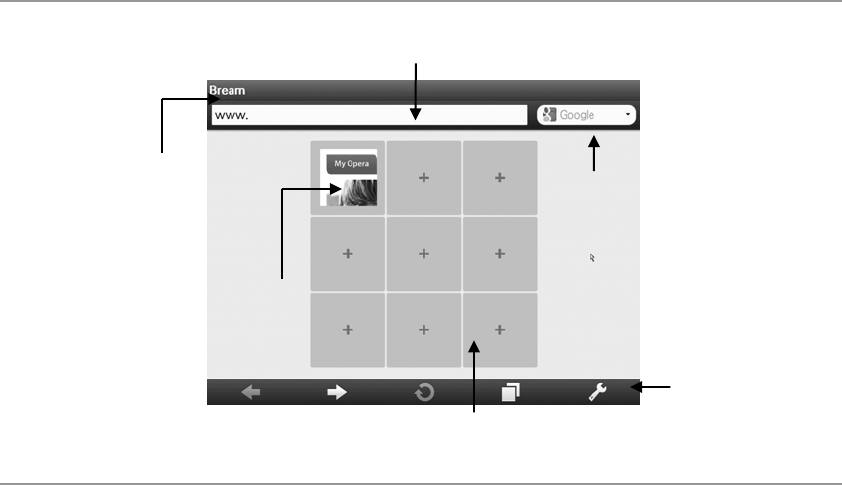
Empty Dial: click to add a speed dial.
To search a Web site, click
the search field, enter a
search term (e.g.
INVENTEC), and then press
the Enter key.
Speed Dial area: click to
open a saved Web page.
Title bar: showing the
title of the Web page
that is displayed.
Enter an Internet address in the address bar, and then press the Enter key.
Navigation Bar
All right reserved

4005 User Manual
61
You can open several Web sites and manage them by clicking the buttons on the navigation bar.
: Click to go back.
: Click to go forward.
: Click to reload or stop the current Web page.
: Click to browse the tabs tray.
Click to access tools as below.
Button This button…
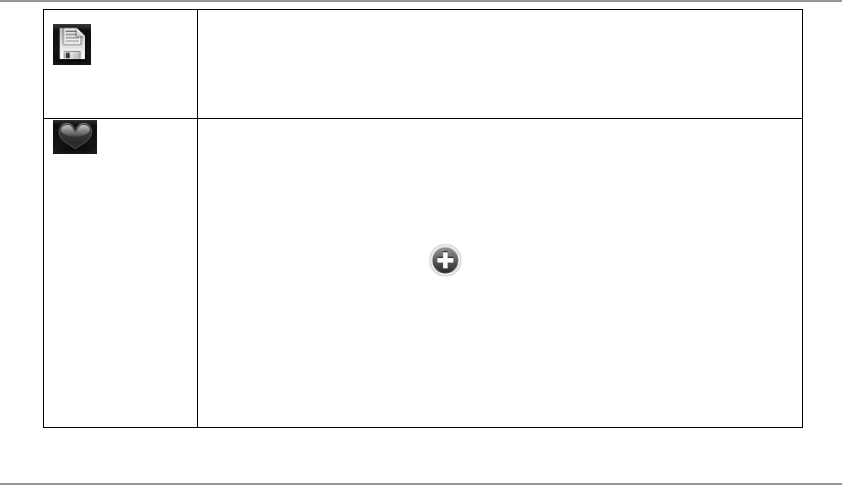
Open Page
Opens a file. A file picker allows you to browse and select a file. Browse using the
mouse wheel. You can also change file names, create new directories, or delete
files.
All right reserved
4005 User Manual
62
Save Page
Saves a file. A file picker allows you to browse and select where you want to save
the file. Browse using the mouse wheel. You can also change file names, create
new directories, or delete files.
Bookmarks
Saves bookmarks, which are links to Web pages that you want to view again.
To add a bookmark:
1. Select this button. The current Web page is usually shown at the top.
2. Select the Add icon
3. In the Add Bookmarks dialog, you can edit the title or the folder to store it.
4. Select Add at the bottom of the dialog. The bookmark is saved.
5. To return to browsing, press the “ESC” key.
To manage bookmarks, select Manage from the Bookmarks menu.
All right reserved
4005 User Manual
63
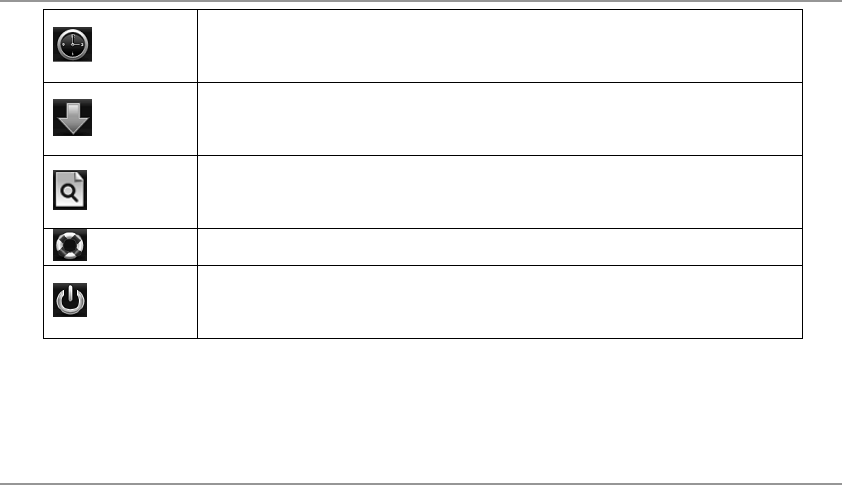
History
Displays a history of the Web pages you have browsed. To clear it, select Clear
All.
Downloads
Displays a list of recent downloads.
Find in Page
Allows you to search for text within in a Web page
Help Provides a guide to shortcuts and information about the browser.
Exit
Closes the browser when you have finished browsing the Internet.
All right reserved

4005 User Manual
64
Settings
Allows you to change the default settings, for example:
Load images - Use this setting to toggle the loading of images. For faster browsing
and lower cost, choose not to load new images.
Full screen mode – This mode clears the entire screen for browsing.
Zoom – Select a percentage to expand the page.
Privacy – Manage passwords, cookies and private data using this setting:
• Password Manager – When enabled, the Password Manager
remembers your usernames and passwords for sites you often use.
• Accept cookies – When enabled, the browser will accept cookies from
Web sites.
• Delete private data – If you want to protect your privacy, for example, if
you share your device, use this option to delete history, cookies and
passwords.
Advanced – Control plug-ins, pop-ups and inline editing with this setting.
All right reserved

4005 User Manual
65
Navigating a Web Page
z To navigate a Web page, roll the mouse wheel to move up or down.
z Press the CTRL key and roll the wheel of the mouse to zoom in on the Web page. Alternatively, click
Tools > Settings > Zoom and select a percentage to expand the page.
z Click the Zoom out button to return to the normal page view.
z Right-click an item, such as a link, an image, a Speed Dial, or text, to display more options for the
item.
Using Speed Dial
To save a Web address to your Speed Dial, which gives you easy access to your favorite Web sites,
follow these steps:
All right reserved

4005 User Manual
66
1. Select an empty dial, shown by a plus sign.
2. Either enter the Web address in the address field, or select an address from the history list.
3. Once added, it will appear in the dial you chose; just click the dial to access it.
4. To edit or clear a dial, right-click it.
Browsing the Tabs Tray
Click the Tabs button to displays the tabs tray, where you can switch to, add new, or close tabs.
To add a new tab:
1. In the tabs tray, select the empty tab, denoted by a plus sign , on the right side of the tray.
2. Go to a new Web page.
All right reserved

4005 User Manual
67
To close a tab:
1. In the tabs tray, select the Close button of the tab you want to close. The close button
expands.
2. Select the Close button again to close the tab.
All right reserved
4005 User Manual
68
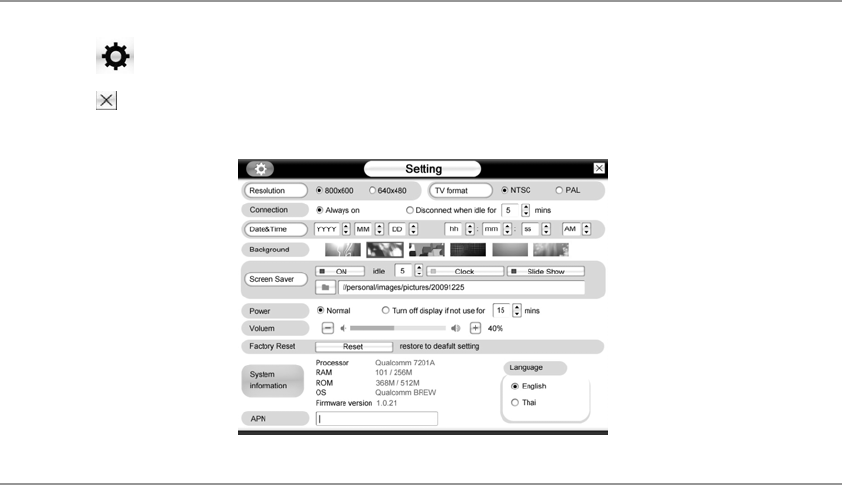
4.3 Setting
Click to open the Setting window. You can view system information and change settings here.
Click in the top-right corner of the window to close it.
All right reserved

4005 User Manual
69
z Resolution. Select the resolution you want to use.
z TV format. Depending on the monitor type you connect to the device, select “NTSC” or “PAL”.
z Connection. Automatically disconnect your Internet connection if the device has been idled for a
preset amount of time. Select “Always on” if you want to disable this function.
z Date and Time. Click the up and down selection arrows to set date and time. Click OK to save
settings; click Cancel if you do not want to save it.
z Background. Click to switch the background pictures.
z Screen Saver. Click “ON” to open this function. Select a screen saver type and an amount of time
that the screen saver will be enabled after the device idled for a specific time.
z Power. For power saving, you can turn off the display or/and switch it to sleep mode in a specific time.
z Volume. Drag tag or click on the bar to adjust volume.
z Factory Reset. Reset all settings to the manufacture defaults.
All right reserved

4005 User Manual
70
z System Information. Display detailed system information.
z APN. Enter APN (Access Point Name) here if needed.
z Language. Select a language.
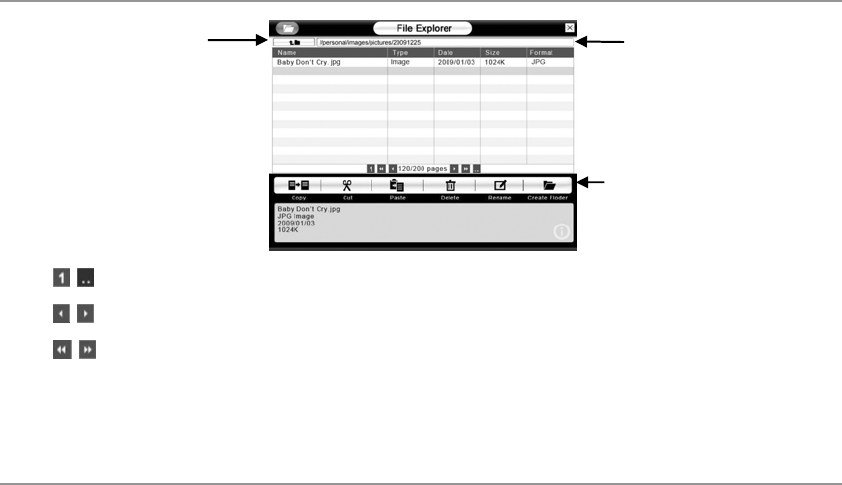
4.4 File Explorer
Click to open the File Explorer window. You can view and manage all files stored in the device. If
there is a USB flash disk (or other compatible devices) connected, you can view and manage data stored
in it as well. When finished, click in the top-right corner of the window to close it.
All right reserved
4005 User Manual
71
Click to go one
directory level up
File
.
Click to perform the
corresponding
functions.
: Click to go to the first or last page directly.
: Click to go to the previous or next page.
: Click to go to the previous or next five pages.
All right reserved
4005 User Manual
72
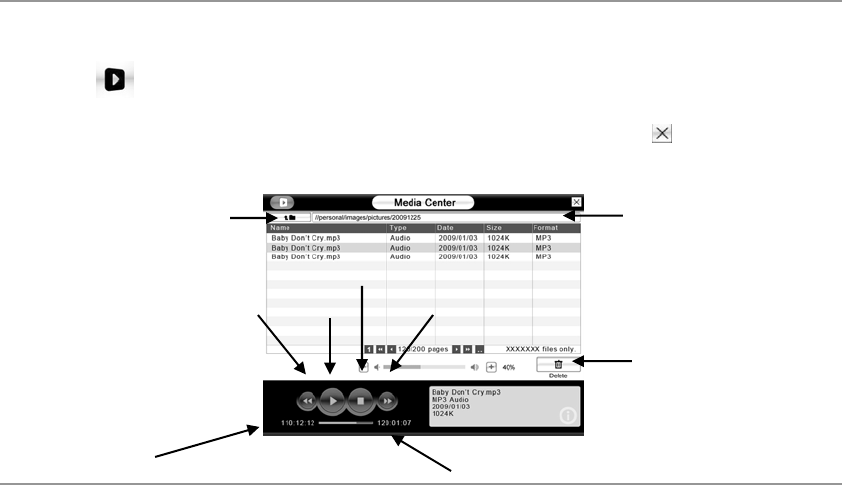
4.5 Media Center
Click to open the Media Center window. You can view and play media files stored in the device
and/or a connected device (e.g. mp3 player or USB flash disk). When finished, click in the top-right
corner of the window to close it.
File path
Clicktogoonedirectory
levelup.
/ Stop
Play
Pause Next Previous
Click to delete
the selected
item.
Elapsed time
Playtime
All right reserved

4005 User Manual
73
: Click to go to the first or last page directly.
: Click to go to the previous or next page.
: Click to go to the previous or next five pages.
: Click to adjust volumes when playing music.
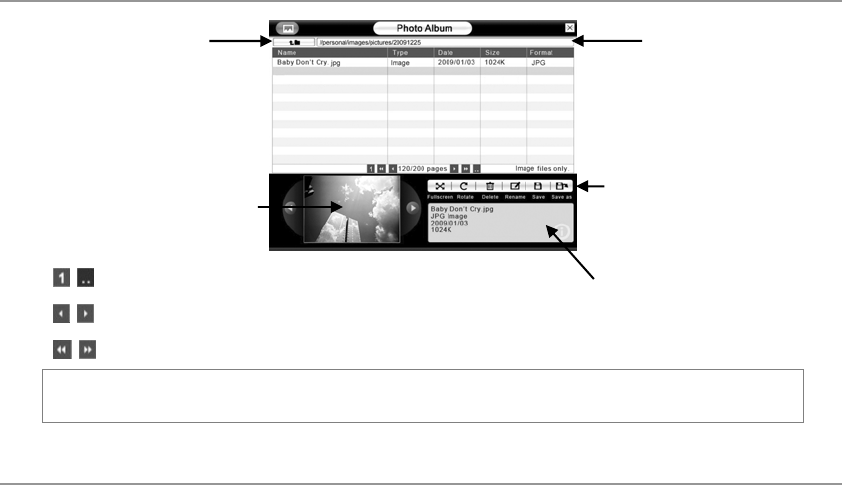
4.6 Photo Album
Click to open the Photo Album window. You can view and manage image files stored in the
device and/or a connected device (e.g. USB flash disk). When finished, click in the top-right corner of
the window to close it.
All right reserved
4005 User Manual
74
: Click to go to the first or last page directly.
: Click to go to the previous or next page.
: Click to go to the previous or next five pages.
NOTE When viewing photos in full screen mode, click any part on the screen to back to the Photo
Album window.
Click to go one
directory level up.
File path
Click to perform the
corresponding
Preview window
Photo information
All right reserved
4005 User Manual
75
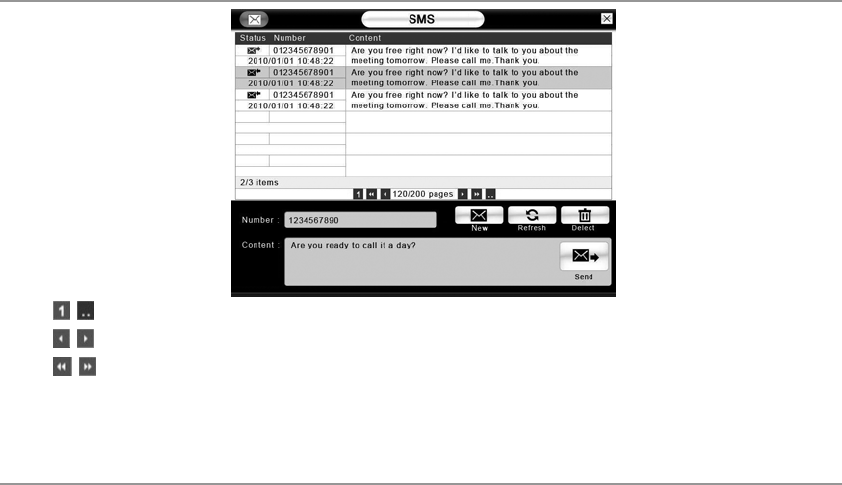
4.7 SMS
Click to open the SMS window, you can then view and send text messages from here. When
finished, click in the top-right corner of the window to close it.
NOTE You have to install a valid SIM card into the device in order to use the SMS function.
You can do any or more of the following steps:
z Click a message to show its content on the lower part of the screen.
z Click Refresh to receive new messages.
z Click Delete to delete the selected message.
z Click New to edit a message, when finished, click Send.
All right reserved
4005 User Manual
76
: Click to go to the first or last page directly.
: Click to go to the previous or next page.
: Click to go to the previous or next five pages.
All right reserved
4005 User Manual
77
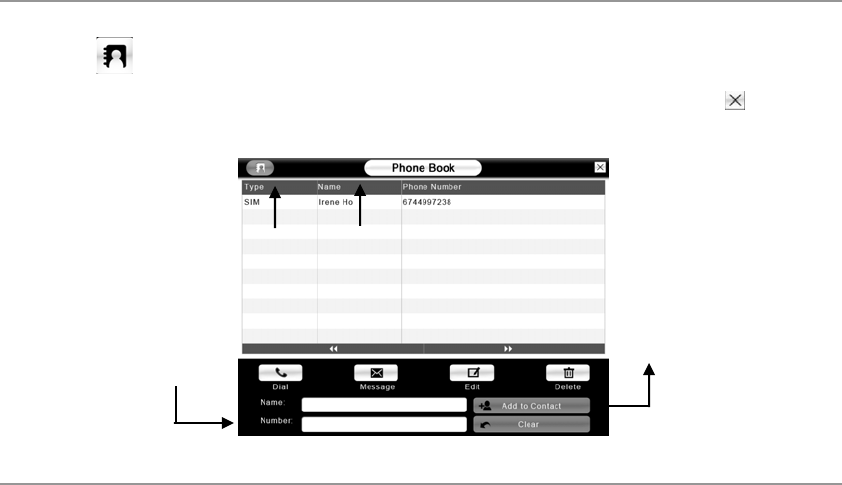
4.8 Phonebook
Click to open the Phonebook window, you can manage contacts stored in both the SIM card and
the device; moreover, you can make a call or send a message from here. When finished, click in the
top-right corner of the window to close it.
Enter a new
contact’s name and
phone number in
the text fields. Click
the “Add to
Contact” button on
the right side to
save it.
Click “Add to Contact”
button to add a new
contact to the
Phonebook. Click
“Clear” if you want to
empty both Name and
Number text fields.
Click “Type” or “Name”
to sort contacts.
All right reserved

4005 User Manual
78
: Click to view more contacts on the previous or next page.
Dial. Select a contact and then click the Call button to make a call.
Message. Select a contact and then click the Message button to launch the SMS program. The selected
contact will be passed as the recipient automatically.
Edit. Select a contact and then click the Edit button to edit this contact’s information.
Delete. Click to show the Delete window. Select contacts that you want to delete and then click the
Delete button; otherwise, click Cancel to close the window.
All right reserved

4005 User Manual
79
Specification
Item Description
HW Platform Qualcomm MSM7200A 65nm@528MHz
Dimension 217 x 194 x 53 mm
Weight 821g
Antenna Embedded, plus optional external antenna (MCX)
USB USB port x 4; 2.0 high speed host
SIM Card SIM/USIM
Handset
Connector
RJ-9 connector
Video output D-sub, TV RCA
Audio output Support stereo 3.5mm
All right reserved

4005 User Manual
80
Microphone Mono 3.5mm
DC-Charge Wall outlet type, AV-100 ~ 240 Hz/ DC5V 2A
Backup Battery Alkaline battery (No.3 AA battery) x3 (not included)
Reset Supported
External Display VGA-out supported, up to 800x600 (SVGA)@60Hz, 24-bit true color
Embedded LCD Graphic type, Resolution 128x32 dots
Memory Flash:256 MB; RAM:128 MB
Frequency
Bands
GSM850/PCS1900
UMTS850/1900
All right reserved