Inventec DMP3000 Digital Media Bridge User Manual
Inventec (Shanghai) Corporation Digital Media Bridge Users Manual
Inventec >
Users Manual
MediaBridge
Digital Media Player
User’s Guide
Model DMP3000
1662616C_01.indd 1 12/14/05 3:56:48 PM

Important Information
2
WARNING
To reduce the risk of fire or electric shock, do not expose
this product to rain or moisture. The apparatus shall
not be exposed to dripping or splashing. No objects
filled with liquids, such as vases, shall be placed on the
apparatus.
This symbol indicates "dangerous voltage" inside
the product that presents a risk of electric shock or
personal injury.
This symbol indicates important instructions
accompanying the product.
RISK OF ELECTRIC SHOCK.
DO NOT OPEN.
Caution: To reduce the risk of
electric shock, do not remove cover
(or back). No user serviceable parts
inside. Refer servicing to qualified
service personnel.
CAUTION
Important Safety Instructions
1. Read these instructions.
2. Keep these instructions.
3. Heed all warnings.
4. Follow all instructions.
5. Do not use this apparatus near water.
6. Clean only with dry cloth.
7. Do not block any ventilation openings. Install in
accordance with the manufacturer’s instructions.
8. Do not install near any heat sources such as radiators,
heat registers, stoves, or other apparatus (including
amplifiers) that produce heat.
Caution: The power supply cord is used as the main
disconnect device. Ensure that the socket-outlet is located/
installed near the equipment and is easily accessible.
CAUTION!
• Do not install or place this unit in a bookcase, built-in
cabinet or in another confined space. Ensure the unit is
well ventilated. To prevent risk of electric shock or fire
hazard due to overheating, ensure that curtains and any
other materials do not obstruct the ventilation vents.
• Do not obstruct the unit’s ventilation openings with
newspapers, tablecloths, curtains, and similar items.
• Do not place sources of naked flames, such as lighted
candles, on the unit.
• Dispose of batteries in an environmentally-friendly
manner.
CAUTION: To prevent electric shock, match the wide blade
of the plug to the wide slot of the electrical outlet and fully
insert.
FCC Regulations state that unauthorized changes or
modifications to this equipment may void the user’s
authority to operate it.
Operating Temperature: 40ºF to 120ºF (5ºC to 50ºC)
Storage Temperature: -5ºF to 150ºF (-20ºC to 65ºC)
Net Weight: 5.75 lbs (approx.)
1662616C_01.indd 2 12/14/05 3:56:49 PM

Important Information
Product Registration
Please fill out the product registration card (packed
separately) and return it immediately. Returning the card
allows us to contact you if needed.
Product Information
Keep your sales receipt to obtain warranty parts and
service and for proof of purchase. Attach it here and
record the serial and model numbers in case you need
them. These numbers are located on the product.
Model No.: ___________________________________________
Serial No.: ____________________________________________
Purchase Date: ________________________________________
Dealer/Address/Phone:_________________________________
Specifications and features are subject to change without
notice. Product may vary from that shown.
Logos are registered trademarks of their respective
companies.
NOTE: This product incorporates copyright protection
technology that is protected by U.S. patents and other
intellectual property rights. Use of this copyright
protection technology must be authorized by Macrovision
Corporation, and is intended for home and other
limited consumer uses only unless otherwise authorized
by Macrovision. Reverse engineering or disassembly is
prohibited.
3
9. Protect the power cord from being walked on or
pinched particularly at plugs, convenience receptacles,
and the point where they exit from the apparatus.
10. Unplug this apparatus during lightning storms or
when unused for long periods of time.
11. Refer all servicing to qualified service personnel.
Servicing is required when the apparatus has been
damaged in any way, such as power-supply cord or
plug is damaged, liquid has been spilled or objects
have fallen into the apparatus, the apparatus has
been exposed to rain or moisture, does not operate
normally, or has been dropped.
1662616C_01.indd 3 12/14/05 3:56:49 PM

FCC Declaration of Conformity
This device complies with Part 15 of the FCC Rules. Operation is subject to the following two conditions: (1) this device may
not cause harmful interference, and (2) this device must accept any interference received, including interference that may
cause undesired operation.
Trade Name: Acoustic Research
Model(s): DMP3000
Equipment Classification: TV/Computer Interface Device
Responsible Party:
Thomson Inc.
10330 N. Meridian Street
Indianapolis, IN 46290
Telephone: (317) 587-3569
This equipment has been tested and found to comply with the limits for a Class B digital device, pursuant to Part 15 of
the FCC Rules. These limits are designed to provide reasonable protection against harmful interference in a residential
installation. This equipment generates, uses, and can radiate radio frequency energy and, if not installed and used
in accordance with the instructions, may cause harmful interference to radio communications. However there is no
guarantee that interference will not occur in a particular installation. If this equipment does cause harmful interference to
radio or television reception, which can be determined by turning the equipment off and on, the user is encouraged to try
and correct the interference by one or more of the following measures:
• Reorient or relocate the receiving antenna.
• Increase the separation between the equipment and receiver.
• Connect this equipment into an outlet on a circuit different from that to which the receiver is connected.
• Consult the dealer or an experienced radio/TV technician for help.
FCC Radiation Exposure Statement
This equipment complies with FCC radiation exposure limits set forth for an uncontrolled environment. This
equipment should be installed and operated with minimum distance 20cm between the radiator and your body.
Important Information
4
1662616C_01.indd 4 12/14/05 3:56:49 PM

Graphics contained within this publication are for representation only.
5
Welcome to MediaBridge!
Your AR MediaBridge allows you to take digital music files,
photos, and videos stored on your computer network and play
them on a home entertainment system. Instead of crowding
around a computer to look at pictures, watch them on your TV,
even in HD. Listen to your music the way it was meant to be
heard—on your home entertainment system.
You can even stream videos from your computer network to the
TV by using the MediaBridge remote control. You can experience
music, movies, or photos in the comfort of your living room,
family room, or bedroom.
As the MediaBridge streams your digital files from your computer
network, it leaves your computer free to perform other functions
such as e-mail or surfing the web. Bridging the gap is seamless—
wirelessly or wired—the choice is yours.
In This Guide ...
Welcome to MediaBridge! .......................5
Setting Up Your MediaBridge ..................8
Using Your MediaBridge ........................16
Using Your Remote Control ....................22
Troubleshooting ......................................29
Limited Warranty ....................................34
1662616C_01.indd 5 12/14/05 3:56:50 PM

6
Welcome to MediaBridge!
What’s in the Box
Before you start setting up, make sure your MediaBridge package
includes the following parts:
• Acoustic Research Digital MediaBridge (DMP3000)
• Power supply and AC cable
• Remote control
• Two AA batteries for the remote
• Wireless networking antenna
• Composite video cable
• Analog audio cable
• Software installation CD
• Registration card
The first step in setting up your MediaBridge is installing the
batteries in the remote.
IMPORTANT: Do not turn on your MediaBridge yet! Wait
until you’ve connected it to your home entertainment system and
computer network—connection instructions start on page 8.
Installing the Batteries in the Remote Control
1. Remove the battery compartment cover
from the back of the remote by pushing
the tab and lifting off the cover.
2. Insert 2 “AA” fresh batteries. Make
sure the polarities (+ and -) are aligned
correctly.
3. Replace the cover.
Using the Remote to Operate Other Devices
The MediaBridge remote control is already programmed to
operate the MediaBridge. You can program the remote to operate
up to 5 other devices in your entertainment center. See pages 22-
28 for instructions on how to program and use the remote.
1662616C_01.indd 6 12/14/05 3:56:51 PM

7
Welcome to MediaBridge
Power switch
Network connection indicator
Power indicator
IR receiver (for remote)
Wi-Fi® antenna jack
USB port
Component video output jacks for HDTV
or standard-definition televisions
Composite
video jack
Power cord
jack
Ethernet jack Digital coaxial
audio jack
Digital optical
audio jack
Analog stereo
audio jacks
S-video jack
DVI video
jack
HD/SD
switch
Front of the MediaBridge
Back of the MediaBridge
RESET
button
Wi-Fi is a registered trademark of the Wi-Fi Alliance.
1662616C_01.indd 7 12/14/05 3:56:52 PM

Graphics contained within this publication are for representation only.
8
Setting Up Your MediaBridge
There are four steps to setting up your MediaBridge:
1. Connect the MediaBridge to your Home Entertainment
System.
2. Connect the MediaBridge to your Computer Network.
3. Install the Software on the PCs in your network.
4. Run the MediaBridge Setup Wizard.
Step 1: Connect the MediaBridge to
your Home Entertainment System
You will need to make two connections between the MediaBridge
and your entertainment system: one for video and one for audio.
Important: The MediaBridge uses on-screen menus for guiding
your selections, so you need to connect it either directly to a TV or
to a video input on an A/V receiver. It is recommended that you use
Acoustic Research cables for best picture and sound performance.
Video Connection
The MediaBridge works with both High-Definition and
Standard-Definition TVs. How you connect the MediaBridge to
your TV depends upon the type of TV you have.
Note: You must have a High-Definition television or monitor in
order to watch video in High-Definition.
1662616C_01.indd 8 12/14/05 3:56:52 PM
9
Setting Up Your MediaBridge
Connecting the MediaBridge to an HDTV or HDTV Monitor
1. Move the HD/SD switch on the back of
the MediaBridge to the HD position.
Note: When the switch is in the HD
position, there will be no video signal
from the composite or S-video jacks.
2. Using either component video cables or a DVI video cable,
connect the MediaBridge to the corresponding input on your
HDTV or A/V receiver (HD video is available through both
component video and DVI connections).
DMP3000
MediaBridge
DVI-HDTV?INPUT
COMPONENT?VIDEO?INPUT
HDTV or HDTV Monitor
Y PBPR
OR
Connecting the MediaBridge to a Standard-Definition TV
1. Move the HD/SD switch on the back of
the MediaBridge to the SD position.
Note: When the switch is in the SD position,
there will be no video signal from the DVI
connector.
2. Using one of the following connections to connect the
MediaBridge to your TV:
• Component video (best quality)
• S-Video (better quality)
• Composite video (good quality)
Connect the cable from the back of the MediaBridge to the
corresponding input on your TV or A/V receiver.
DMP3000
MediaBridge
Y PB PR
COMPONENT VIDEO INPUT VIDEO INPUT S-VIDEO INPUT
Standard-Definition TV
OR OR
1662616C_01.indd 9 12/14/05 3:56:56 PM
10
Setting Up Your MediaBridge
Audio Connections
Your MediaBridge offers three audio output options: two digital
outputs and one pair of analog stereo outputs. These outputs
can be used to play audio through your TV, an A/V receiver, or a
dedicated amplifier. Any of these outputs can be used to connect
the MediaBridge to your TV or A/V device. If your device has a
digital input jack, use one of the digital connection options for
the best sound quality.
Connection Options for Audio
The MediaBridge offers three types of audio connections:
• Digital Coaxial (excellent quality)
• Digital Optical (excellent quality)
• Analog Stereo (good quality)
DMP3000
MediaBridge
L R
AUDIO INPUT
COAXIAL DIGITAL
INPUT
Device with
Coaxial Digital
Input
OPTICAL DIGITAL
INPUT
Device with
Optical Digital
Input
Device with
Analog
Stereo Inputs
OROR
When connecting the audio cables, remember to connect the
AUDIO OUT jacks on the back of the MediaBridge to the
AUDIO IN jacks on your device.
1662616C_01.indd 10 12/14/05 3:56:58 PM
11
Setting Up Your MediaBridge
Step 2: Connecting the MediaBridge
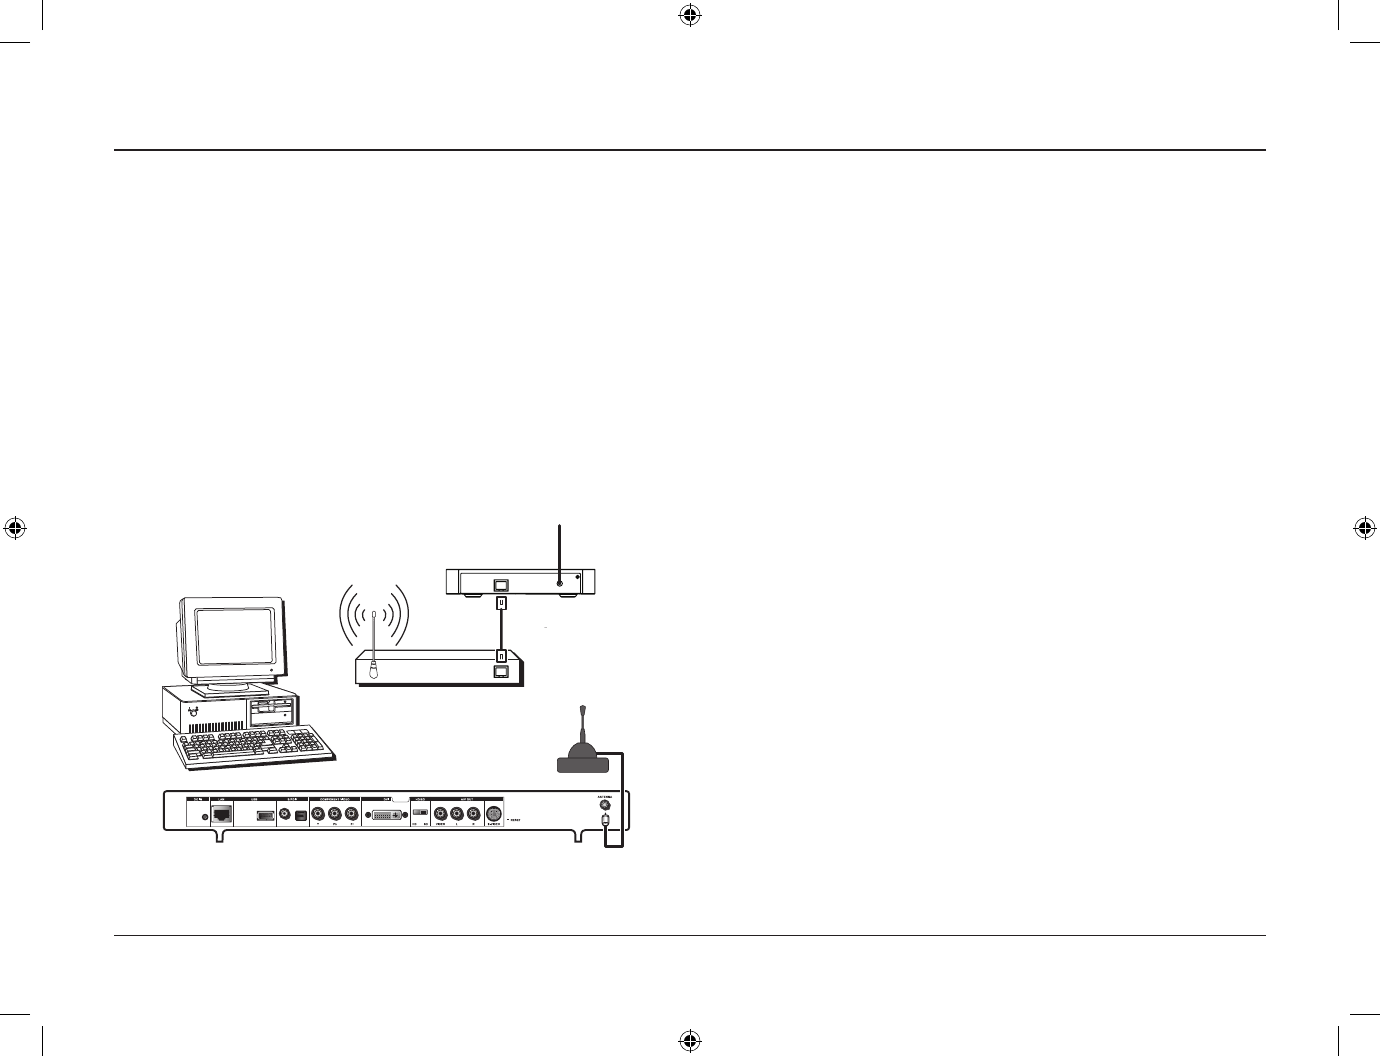
to your Computer Network
The MediaBridge must be connected to your computer or
computer network in order to play your digital music, movies,
and pictures.
You can connect the MediaBridge to your computer in one of two
ways:
• Using a wired network
The MediaBridge can connect to a wired computer network
using a standard Ethernet cable connected to the Ethernet port
on the back of the unit.
• Using a wireless network
The MediaBridge has a built-in 802.11g wireless card and can
work with an existing 802.11g or 802.11b wireless network.
Because wireless computer networks are subject to interference
from devices likes cordless phones, microwave ovens, and
neighboring wireless networks, the quality of the connection
between your MediaBridge and your computer can vary
throughout the day. For the best performance, use the wired
Ethernet connection, particularly when playing high-definition
video.
Note: If you’re using a wireless connection to the network, use the
802.11g-only option on your router, especially if you plan to use
the MediaBridge for video streaming. See the users manual that
came with your wireless router for more information.
Connecting the MediaBridge using the
wired Ethernet connection
To attach your MediaBridge to a wired computer network,
connect a standard Ethernet cable (Cat5 or better) between the
MediaBridge and your Ethernet hub/switch/router.
The following diagram shows a typical wired home network with
a MediaBridge connected using a wired Ethernet connection.
Please note that your wired network might be different.
DMP3000 MediaBridge
Wired Ethernet
Hub/Switch/Router
WAN 1 2 3 4
ETHERNET
Modem
Signal from Internet
Service Provider
Computer
A sample wired network with a MediaBridge connected. This diagram shows
a typical configuration—your network and devices might be different.
1662616C_01.indd 11 12/14/05 3:57:00 PM
12
Setting Up Your MediaBridge
Step 3: Install the Software
Once you’ve connected the MediaBridge to your computer
network, you are ready to install the MediaBridge software.
You must install this software on your computer in order for
the MediaBridge to work with your computer.
Turn on your computer and insert the software CD into the drive.
The setup program should start automatically after a few
moments. (If it does not start automatically, browse to the top
directory on the CD and double-click on the Setup icon.)
On-screen instructions will guide you through the setup process.
Important Notes
• The MediaBridge software is not compatible with Apple
Macintosh® computers.
• When installing the MediaBridge, you must be logged in with
administrator privileges on your computer. Otherwise, the
software will not install correctly. You do not have to be an
administrator to run the software once it’s installed, but to
install, you must have administrative privileges.
• The MediaBridge is not designed to work with VPN (Virtual
Private Network) software. If VPN software is installed on a
computer in the network, the MediaBridge may not be able to
see that computer.
Macintosh is a registered trademark of Apple Computer, Inc.
Connecting the MediaBridge using a
wireless Ethernet connection
For the best reception, the MediaBridge includes an external
antenna which must be attached to the unit before it can receive
the wireless signal.
Connect the antenna to the ANTENNA jack on the back of the
MediaBridge and place the antenna in an unobstructed location.
The following diagram shows a typical wireless home network
with a MediaBridge. Please note that your network might be
different.
DMP3000 MediaBridge
Wireless Hub/Switch/Router
WAN
ETHERNET
Modem
Signal from Internet
Service Provider
Computer with
wireless capability
Antenna for
wireless network
(included)
A sample wireless network with a MediaBridge. This diagram shows a typical
configuration—your network and devices might be different.
1662616C_01.indd 12 12/14/05 3:57:02 PM

13
Setting Up Your MediaBridge
Step 4: Run the MediaBridge Setup
Wizard
The MediaBridge Setup Wizard takes you through the steps to get
your MediaBridge up and running. The Setup Wizard lets you set
the following options:
• Language • Screen resolution
• Display type • Network type
The last screen of the Setup Wizard confirms your Network Status
information.
How to Use the Remote Control in the Menu System
To move around in the Setup Wizard and other on-screen menus,
use the arrow buttons on the MediaBridge remote. When an item
is highlighted, you can select it by pressing the OK button. If an
item has arrows, you can use the left and right arrow buttons on
the MediaBridge remote to change that item’s setting.
Press the HOME button to display the Main Menu. Use the GO
BACK button to retrace your steps in the menu system.
Using the MediaBridge with a Firewall
If you have firewall software installed on your network, you may
need to reconfigure the firewall software to allow the MediaBridge
to access your network computers.
The MediaBridge software setup installs a background program
on your computer called “MediaStreamer.exe.” It is safe to allow
this program to operate on the network. If the MediaStreamer
program is blocked, the MediaBridge will not see any computers
on the network, so the MediaBridge’s media libraries will be
empty.
If you’re still having problems getting the MediaBridge to work
with your firewall software, try making the following adjustments
to your firewall settings:
• Port 6070 must be open for UDP-type network traffic
• Port 40001 must be open for TCP-type network traffic
• Port 40002 must be open for TCP-type network traffic
Continues on the next page...
1662616C_01.indd 13 12/14/05 3:57:02 PM

14
Setting Up Your MediaBridge
To run the Setup Wizard:
1. Press the MEDIA button on the MediaBridge remote to turn
the MediaBridge on.
2. Turn on your TV or A/V tuner. Select the correct input on
your TV or tuner to display the signal from your MediaBridge.
The first screen of the Setup Wizard should be displayed. Press
OK to continue. If you see a different menu screen, you can
start the Setup Wizard through the Settings menu. See page 21
for more information.
3. In each Setup Wizard screen, press the up or down arrow on
the remote to highlight any settings you’d like to change. Then,
use the left and right arrows to scroll through the options for
that setting.
When you’re done with a setting, press the up or down arrow
to highlight Continue. Press OK to go to the next screen.
You can change any of these settings or run the Setup Wizard again
through the Settings menu. See page 21 for more information.
Special Note for Wireless Network Users
The Network Type screen in the Setup Wizard lets you set up
a wireless network if you have one. If you’re using a wireless
network, you must tell the MediaBridge the name of your
wireless network. Also, if you’re using encryption on your wireless
network, you must enter your security key.
Note on Network Configuration: The MediaBridge is
configured to work with DHCP (Dynamic Host Configuration
Protocol) servers incorporated in most routers. If you do not have
a DHCP server in your router or elsewhere on your network,
the MediaBridge will assign itself an IP address in the range of
169.254.xxx.xxx automatically.
Note: If you have turned on the encryption features of your wireless
network, you need to have your WEP (Wired Equivalent Privacy)
key before going any further. The MediaBridge only supports WEP.
If you have turned off the broadcast of your SSID (Service Set
Identifier), you also need that information before continuing.
1662616C_01.indd 14 12/14/05 3:57:02 PM

15
Setting Up Your MediaBridge
To configure the MediaBridge for your wireless network:
1. In the Setup Wizard’s Network Type screen, use the remote’s up
and down arrows to highlight the Network Type option.
2. If the Network Type option is set to Wireless, you don’t need to
change it. Highlight Continue and press OK to continue.
If the Network Type option is set to Wired, highlight the
Network Type option and use the left or right arrow buttons to
change the option to Wireless (it may take a few seconds for the
item to change on the screen).
Then, highlight Continue and press OK to continue.
3. The next screen in the Setup Wizard displays a list of wireless
networks the MediaBridge can detect.
4. Select your network from the list.
Note: If you have disabled the SSID broadcast feature on your
wireless access point, you need to select the Private option and type
in the name of your network using the virtual keyboard. To use the
virtual keyboard:
1. Press MENU on your remote to display the virtual keyboard.
2. Use the arrow buttons to highlight letters and numbers, and
press OK to select them.
3. Press MENU again to remove the keyboard from the screen.
4. Highlight the on-screen Continue button and press OK to
continue.
5. If you have enabled encryption on your wireless network,
highlight Encryption type. Use the left and right arrows to select
the type of encryption your network uses. Then, highlight
Continue and press OK to continue.
6. Select the Encryption Key option and type in your WEP key or
passphrase using the virtual keyboard. When you’ve finished,
press the MENU button on your remote to remove the virtual
keyboard from the screen.
Confirm that the “link” indicator on the front of the unit is lit.
If it is, highlight the on-screen Continue button and press OK
to continue.
The next screen of the Setup Wizard shows your network status.
Select Continue to see the final screen of the Setup Wizard, or
select Back to change your network settings.
1662616C_01.indd 15 12/14/05 3:57:03 PM

Graphics contained within this publication are for representation only.
16
Using Your MediaBridge
With the MediaBridge, you can play music from your hard drive,
photos from your digital camera, or movies from your digital
camcorder on your home entertainment system.
You can also access media files from USB devices via the USB port
on the MediaBridge back panel.
The MediaBridge menu system displays all of the playable files
available on your network. Files are listed by more than just their
computer filenames—the MediaBridge menu system offers many
ways of finding and sorting movies, music, and pictures.
At the bottom of the main menu, the MediaBridge offers Help
and Off icons:
• Highlight and select the Help icon if you need directions or
information on a specific screen.
• Highlight and select the Off icon to turn the MediaBridge off.
The Main Menu
To access the MediaBridge main menu, press the MEDIA
button on the MediaBridge remote to put the remote control in
MediaBridge mode. Then, press the HOME button.
The MediaBridge main menu has four options:
• Watch Movies
Browse through your library of movies.
• Listen to Music
Browse through your library of music.
• View Pictures
Browse through your library of pictures and picture albums.
• Settings
Change network and video settings and choose preferences.
1662616C_01.indd 16 12/14/05 3:57:03 PM

17
Using Your MediaBridge
Watch Movies
The MediaBridge can play movies created by digital camcorders
or created by PC-based tuner cards that record over-the-air digital
broadcast television to your computer.
Note: If you have more than one computer on your network, the first screen
in the Video library will ask you to choose which computer you want to
browse.
The MediaBridge offers two ways of browsing through your video
library:
• By the date the movie was recorded
• By the directory of folders on your computer
Choosing Files
You can play individual movies, or you can play all of the movies
in a given folder or recorded in a given year. You can also tell
the MediaBridge to play all of the movies in the library for the
selected hard disc.
Use the arrow buttons and the OK button to navigate through
your library. Then, press OK or PLAY to start playing a single
movie or a group of movies (depending on what’s highlighted).
Note: A red exclamation mark next to a video file in the library means that
the MediaBridge cannot play that particular file. There are several possible
reasons for this—the file may have a name that the MediaBridge has trouble
recognizing, or the file may be corrupt.
Playing Files
You can use these remote control buttons during movie playback:
INFO Displays available information for the
current file.
PAUSE Pauses the movie.
PLAY Continues the movie after a pause.
PREV or NEXT Go to the previous or next movie in
the list.
REVERSE and
FORWARD Provide transport control for standard-
definition videos.
STOP Stops the movie and returns to the
Video library.
Note: If the movie you’re playing on the MediaBridge has multi-channel
audio, audio will only be available from the digital audio outputs. There
will be no audio signal from the MediaBridge’s other audio outputs.
To hear multichannel audio, use one of the MediaBridge’s digital audio
outputs to connect it to multichannel-capable receiver.
More Options...
Press the GUIDE button to access more options for playback or
browsing. Press GUIDE again to clear the option list from the
screen.
Press the HOME button to go to the main menu from anywhere
in the MediaBridge menu system.
Press the GO BACK button to retrace your steps in the menu system.
1662616C_01.indd 17 12/14/05 3:57:03 PM

18
Using Your MediaBridge
Listen to Music
The MediaBridge offers five ways of browsing through your music
library:
• By artist • By album
• By genre • Alphabetically, by song or file title
• By your computer’s folder organization
The MediaBridge also lists any m3u or WPL playlists it finds in
your network.
Note: If you have more than one computer in your network, the first screen
in the Music library will ask you to choose which computer you want to
browse.
Choosing Files
You can play individual songs, or you can play all of the songs by
a given artist, on a given album, or in a given genre. You can also
choose playlists that the MediaBridge finds in your network or
tell the MediaBridge to play all of the songs in the library for the
selected hard disc.
Use the arrow buttons and the OK button to navigate through
your library. Then, press OK or PLAY to start playing a single
song or a group of songs (depending on what’s highlighted).
Playing Files
You can use these remote control buttons during music playback:
INFO Displays available information for the
current file.
PREV or NEXT Go to the previous or next song in the
list.
REVERSE, PLAY,
FORWARD, STOP,
and PAUSE
Provide transport control, just as they
would with a CD player.
More Options...
Press the GUIDE button to access more options for playback or
browsing. Press GUIDE again to clear the option list from the
screen.
Press the HOME button to go to the main menu from anywhere
in the MediaBridge menu system.
Press the GO BACK button to retrace your steps in the menu
system.
1662616C_01.indd 18 12/14/05 3:57:03 PM

19
Using Your MediaBridge
View Pictures
The MediaBridge offers three ways of browsing through your photos:
• By the date the photo was taken
• By the directory of folders on your computer
• Within picture albums you’ve created
Note: If you have more than one hard disc in your network, the first screen in
the Picture library will ask you to choose which computer you want to browse.
The MediaBridge menu system displays thumbnails of your
images to you help find pictures.
You can also create and view picture albums on your MediaBridge.
Choosing Pictures
You can view individual pictures, or you can start a slideshow with
all of the pictures in the list or category on the screen (by date or
by folder).
Use the arrow buttons and the OK button to navigate through
your library. Then, press OK or PLAY to view a single picture
or a slideshow of a group of pictures (depending on what’s
highlighted).
Note: A red exclamation mark next to a picture file’s name means that the
MediaBridge cannot play that particular file.
Special note for plasma monitor owners: To avoid uneven phosphor
aging (or “burn-in”), avoid displaying the same image on your plasma
monitor for a prolonged period of time. Do not turn the MediaBridge’s
screensaver off (by default the screensaver is on). See page 21 for more
information about the MediaBridge’s screensaver.
Viewing Pictures and Slideshows
You can use these remote control buttons while viewing individual
pictures or during a slideshow:
CH+ or CH- Zoom in on or out of the current
picture.
CLEAR Deletes the current picture from your
network.
FORWARD or REVERSE Rotate the current picture clockwise or
counterclockwise.
INFO Displays available information for the
current file.
PAUSE Pauses the slideshow.
PLAY Continues the slideshow after a pause.
PREV or NEXT Go to the previous or next picture.
STOP Stops the slideshow and returns to the
Picture library.
Note: The Rotate Picture function does not work with read-only content.
More Options...
Press the GUIDE button to access more options for playback or
browsing. Press GUIDE again to clear the option list from the
screen.
Press the HOME button to go to the main menu from anywhere
in the MediaBridge menu system.
Press the GO BACK button to retrace your steps in the menu system.
1662616C_01.indd 19 12/14/05 3:57:04 PM

20
Using Your MediaBridge
Creating and Viewing Picture Albums
From the Pictures menu you can browse through the picture
albums you’ve already created, organize existing albums, or create
a new one.
• Choose View Picture Albums to see the picture albums you’ve
already created and play one as a slideshow.
• Choose Organize Albums to create a new picture album or
organize an existing album.
To create a new picture album:
1. Choose View Pictures from the main menu. If you have more
than one source for media in your network, choose the source
you want to browse for pictures.
2. Choose Organize Albums from the Pictures menu.
3. Choose Create new album from the Organize Album menu.
4. Browse through your picture library by year and month—the
menu shows you thumbnails of the images for that year and
month.
5. Use the arrow buttons to highlight a thumbnail, and press OK to
include that image in the album (a checkmark appears above the
images in the album).
Note: If you want to customize your album’s name, choose Rename
this album from the Album browse screen. Then, press MENU and
use the on-screen keyboard to enter a name—you’ll need to delete the
existing name first. Press MENU again to clear the keyboard from the
screen. Then, press GO BACK to return to the Album browse screen.
6. Press the GO BACK button when you’ve finished compiling
the pictures in your album. The album appears in the list of
albums available for organizing or viewing.
Playing Slideshows with Music
You can have the MediaBridge play music while you watch a
slideshow.
To start the music during the slideshow:
1. While a slideshow is running, press the MUSIC button on the
remote to bring up the music menu.
2. Browse and select the music or playlist you want to play. Press
OK to start playback of the file(s).
3. Press the PICS button.
4. Select Resume Slideshow and press OK.
You can also start the music playlist first and add the slideshow
later. Start the playlist (steps 1 and 2 here). Then, press the PICS
button, find the slideshow you want to see, and press OK or
PLAY to select it.
1662616C_01.indd 20 12/14/05 3:57:04 PM

21
Using Your MediaBridge
Settings
The Settings menu lets you customize your MediaBridge to fit
your preferences and home entertainment/computer network
configuration. There are three kinds of options you can set:
General Settings, Library Settings, and System Settings.
General Settings
Select General Settings in the Settings menu to set your preferences
for the following options:
• screensaver delay • USB media auto-play
• closed captioning • menu system look and feel
• language
The General Settings menu also lets you repeat the Setup
Wizard, restore the MediaBridge’s default settings, or update the
MediaBridge’s software.
Note: The MediaBridge must have access to an internet connection
in order to run the software update.
To repeat the Setup Wizard:
1. Choose Settings from the main menu.
2. Choose General Settings from the Settings menu.
3. Choose Repeat setup wizard from the General Settings menu.
4. Follow the on-screen instructions to complete the Setup
Wizard, or press the HOME button to exit.
Library Settings
Select Library Settings in the Settings menu if you want to scan a
media library in your network.
System Settings
Select System Settings in the Settings menu to set your preferences
for Display and Network Settings.
Accessing USB Devices
You can access the media from a USB storage device by
connecting it to the USB port on the back of the MediaBridge.
The MediaBridge will recognize the device and scan it
automatically—this will take a few moments.
A Removable Media menu item will appear in the movies, music,
and pictures libraries until you disconnect the device. Choose this
item to browse through the USB device’s media contents.
Notes:
• The MediaBridge recognizes only certain kinds of USB devices:
USB thumb drives, USB memory card readers, and USB hard
drives. Please note that not all USB devices are compatible with
the MediaBridge.
• If you’re connecting an RCA Lyra to the MediaBridge using a
USB connection, make sure the Lyra’s USB Protocol is set to
Mass Storage Class.
• USB devices should be formatted as NTFS or FAT32 in order
for the MediaBridge to play files from them. If your USB device
is not recognized by the MediaBridge, check its formatting type.
1662616C_01.indd 21 12/14/05 3:57:04 PM
Graphics contained within this publication are for representation only.
22
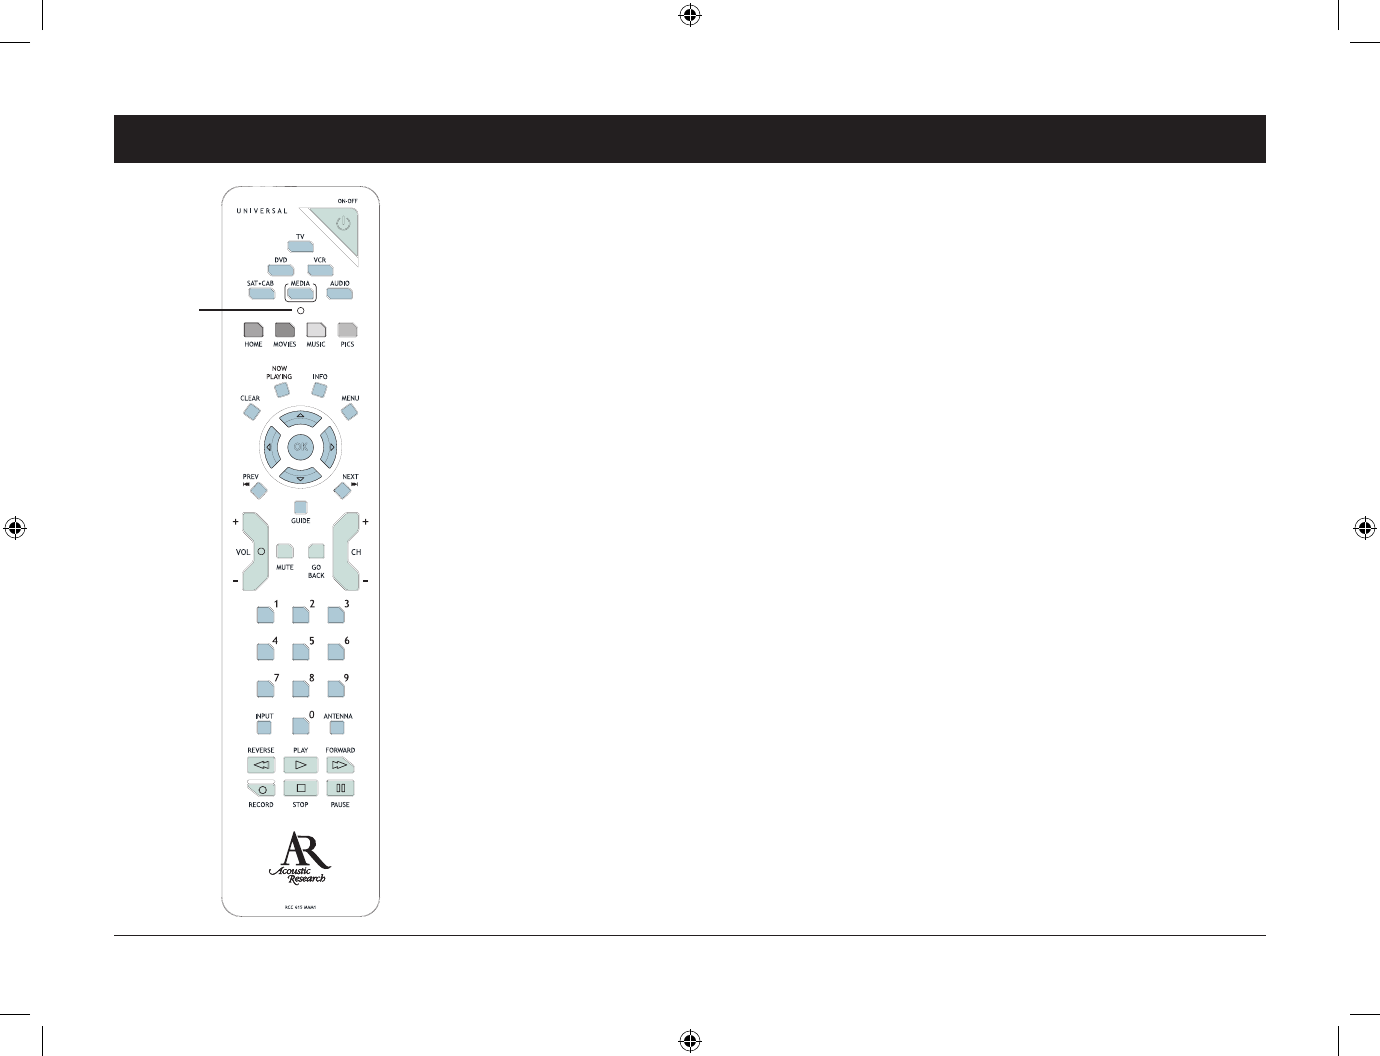
Using Your Remote Control
The Remote Control
The MediaBridge includes a 6-device universal remote control. The remote already operates the
MediaBridge and many RCA, GE, and Proscan devices. It must be programmed to work with other
devices (see pages 24-25 for more information on programming).
The Buttons on the Remote
(0-9) Number buttons You can enter some settings directly with the number buttons.
ANTENNA In VCR mode (if programmed), this button works as a TV/VCR button for some
VCRs. In SAT•CAB mode (if programmed), this button works as a TV/SAT button for some
satellite receivers.
Arrow buttons Used to navigate through on-screen menus and to highlight options.
CH + or CH - While viewing pictures from your MediaBridge, this button zooms in on or zooms
out of the current picture. Changes channels in TV, VCR, or SAT•CAB mode.
CLEAR While viewing pictures from your MediaBridge, this button deletes the current picture
from the network (except for read-only pictures). For some other devices, this button removes menus
or displays from the screen.
Device buttons Device buttons are used to set the remote to operate a certain device. For example,
if you want to use the MediaBridge, press the MEDIA button. This tells the remote you are using
the MediaBridge, and the remote communicates with the MediaBridge.
AUDIO Puts the remote in Audio mode so the remote (if programmed) operates the audio device.
DVD Puts the remote in DVD mode so the remote (if programmed) operates the DVD player.
MEDIA Puts the remote in MediaBridge mode so the remote operates the MediaBridge.
SAT•CAB Puts the remote in satellite/cable box mode so the remote (if programmed) operates a satellite
receiver or cable box.
TV Puts the remote in TV mode so the remote (if programmed) operates the TV.
VCR Puts the remote in VCR mode so the remote (if programmed) operates the VCR.
Indicator
1662616C_01.indd 22 12/14/05 3:57:09 PM

23
Using Your Remote Control
picture in a playlist or slideshow. In DVD mode, goes to the next
chapter.
NOW PLAYING This button has no functionality with the
MediaBridge.
OK When in the menu system, selects highlighted items.
ON•OFF Turns the MediaBridge on and off. If the remote is
in another device mode (TV, DVD, etc.) and programmed to
control that device, this button will turn the device on and off.
PICS Accesses the MediaBridge’s Pictures Media Library screen
or Pictures Main Menu.
PLAY, STOP, and PAUSE Provide transport control for movie,
music, and slideshow playback. Also provides transport control for
many DVD players and VCRs.
PREV (Previous) In MediaBridge mode, goes to the previous
song/movie/picture in a playlist or slideshow. In DVD mode, goes
to the previous chapter.
RECORD Starts recording for some VCRs, DVD recorders, or
hard disk recorders.
REVERSE and FORWARD Provide transport control for
music and standard-definition movie playback. Rotate pictures
counterclockwise and clockwise (except for read-only pictures).
Also provides transport control for many DVD players and VCRs.
VOL – or VOL + Decreases or increases the volume.
GO BACK Returns you to the previous menu or screen.
GUIDE When you’re controlling the MediaBridge, this button
accesses the options available for viewing pictures or movies
or listening to music (press again to clear the options from the
screen).
HOME Brings up the main menu for the MediaBridge from
any point in the MediaBridge media system.
Indicator Flashes when you press a remote control button. Also
flashes during the remote control programming procedure (see the
following pages for more information).
INFO Displays available information for an image, song, or
movie.
INPUT Press to toggle through the available input sources for
TVs, satellite receivers, or VCRs.
MENU Brings up the MediaBridge’s on-screen keyboard (when
available). For some devices, this button accesses a main menu.
MOVIES Accesses the MediaBridge’s Video Media Library
screen or Videos Main Menu.
MUSIC Accesses the MediaBridge’s Music Media Library screen
or Music Main Menu.
MUTE Reduces volume to its minimum level. Press again to
restore the volume.
NEXT In MediaBridge mode, goes to the next song/movie/
1662616C_01.indd 23 12/14/05 3:57:09 PM

24
Using Your Remote Control
Using the Universal Remote with Other
Devices
The universal remote can be programmed to operate many brands
of remote controllable TVs, VCRs, audio devices, DVD players,
cable boxes, satellite receivers, and other devices. This remote is
already programmed to control many RCA, GE, and Proscan
devices.
Find Out If You Need to Program the Remote
To determine whether the universal remote needs to be
programmed to operate one of the devices in your home
entertainment system:
1. Turn on the device (your TV, for example).
2. Point the remote at the device.
3. Press the corresponding device button (in this example, TV).
4. Press ON•OFF to see if the device responds. If the device
doesn’t respond, you need to program the remote to operate it.
Programming the Remote
There are two ways to program the remote control to operate other
devices: Automatic Code Search and Direct Entry.
Using Automatic Code Search
The following instructions can be used to program the remote to
operate each of your devices. If you want to stop the automatic
code search without programming any of your devices, press and
hold CLEAR until the indicator on the remote turns off.
1. Turn on the device you want to operate (VCR, DVD player,
etc.).
2. Press and hold the device button you want to program (VCR,
DVD, etc.). While holding the device button, press and hold
ON•OFF until the indicator on the remote turns on, then
release both buttons.
3. Point the remote at the device.
Important Note: The remote may not be compatible with all models
of all brands of devices. It also may not operate all functions of your
device.
4. Press and release PLAY, then wait 5 seconds or until the
indicator stops flashing.
At this point the remote is searching for the correct code to
program. If, after 5 seconds, the device you want to operate does
not turn off, press PLAY again to tell the remote to search the next
set of codes.
1662616C_01.indd 24 12/14/05 3:57:09 PM

25
Using Your Remote Control
How to Use the Remote After You’ve
Programmed It
Because this universal remote can control several different
devices (TV, DVD, VCR, satellite receiver, etc.), the remote uses
operational modes triggered by the device buttons.
1. Press the appropriate device button (DVD, TV, VCR,
SAT•CABLE, AUDIO, AUX•HD) to set the remote to control
the device.
2. Press ON•OFF to turn the device on or off.
3. Use the remote buttons that apply to that device.
Notes: The remote control may not be compatible with all brands
and models of devices.
If you keep pressing buttons and nothing happens, the remote is
probably in the wrong mode. You must press the device button that
matches the device you want to operate (i.e., if you want to operate
the VCR, press VCR on the remote control to put the remote in
VCR mode).
Continue pressing and releasing PLAY until the device turns off or
you have searched through all of the codes. The indicator flashes
when all codes have been searched; then, the indicator turns off,
and the remote exits Automatic Code Search.
If the device you want to control does turn off:
1. Press and release REVERSE, then wait 2 seconds. Repeat this
step until the device turns back on.
2. To finish, press and hold STOP until the indicator on the
remote turns off.
Using Direct Entry
1. Turn on the device you want to operate (VCR, DVD player,
etc.).
2. Look up the brand and code number(s) for the device on the
code list on pages 26-28.
3. Press and hold the device button you want to program on the
remote.
4. Enter the 4-digit code from the remote control code list on the
following pages. If the indicator flashes, you have either entered
an invalid code or the button isn’t programmable.
5. Release the device button, point remote at device, and then
press ON•OFF to see if the device responds to the command.
If it doesn’t, try pressing the device button and then ON•OFF
again.
• If you get no response, repeat these steps using the next
code listed for your brand, until the device responds to the
remote commands.
• If you try all the codes for your device brand and none
work, try the automatic code search method. If automatic
code search doesn’t find the code, the remote is not
compatible with your device.
1662616C_01.indd 25 12/14/05 3:57:09 PM

26
Remote Control Codes
Audio Codes
Audio (General)
GE........................................................................................4000
Proscan ................................................................................4000
RCA .....................................................................................4000
Amplier
GE........................................................................................4003
Proscan ................................................................................4003
RCA .....................................................................................4003
Audio Cassette
GE........................................................................................4006
Proscan ................................................................................4006
RCA .....................................................................................4006
CD
ADC ................................................................. 4055, 4056, 4066
Aiwa .......................................................................... 4039, 4057
Akai .....................................................................................4058
Denon .................................................................................4060
Emerson ..............................................................................4040
Fisher ............................................................... 4041, 4063, 4064
GE........................................................................................4065
GE........................................................................................4007
Hitachi .................................................................................4042
JVC ......................................................................................4043
Kenwood ........................................................4044, 4067, 4068
Luxman ............................................................................... 4069
Marantz ...............................................................................4046
MCS .....................................................................................4070
Mitsubishi ..................................................................4071, 4072
NEC .....................................................................................4045
Onkyo .................................................................................4047
Panasonic ............................................................................4048
Pioneer ................................................................................4049
Proscan ................................................................................4007
RCA ...........................................................................4050, 4062
RCA .....................................................................................4007
Sears ....................................................................................4059
Sony ..........................................................................4051, 4061
Technics .............................................................................. 4052
Toshiba ................................................................................4073
Yamaha ..................................................................... 4053, 4054
Phono
GE........................................................................................4005
Proscan ................................................................................4005
RCA .....................................................................................4005
Receiver/Tuner
Aiwa .................................. 4008, 4009, 4010, 4011, 4012, 4021
Denon .................................................................................4027
Harman Kardon .................................................................. 4020
JBL ....................................................................................... 4020
JVC ......................................................................................4013
Kenwood ............................................................................4014
Onkyo .................................................................................4022
Optimus .............................................................................. 4028
Panasonic .................................................................. 4023, 4024
Pioneer ................................................................................4074
RCA .................................................................4015, 4029, 4030
Sherwood ............................................................................4026
Sony ................................................................4016, 4017, 4025
Technics .................................................................... 4023, 4024
Yamaha ..................................................................... 4018, 4019
Cable Box Codes
ABC ............................................. 5002, 5003, 5004, 5006, 5045
Archer ........................................................................5009, 5010
Cableview ........................................................................... 5007
Contec .................................................................................5015
Eastern ................................................................................5016
GE.............................................................................. 5002, 5003
Gemini ......................................................................5017, 5018
General Instruments ........................................................... 5003
Hamlin......................................... 5019, 5020, 5021, 5026, 5033
Hitachi .................................................................................5003
Jerrold ............................... 5003, 5017, 5022, 5023, 5039, 5045
Magnavox............................................................................5024
Motorola .............................................................................. 5076
Movie Time .........................................................................5025
NEC .....................................................................................5005
NSC ......................................................................................5025
Oak ............................................................................5015, 5027
Panasonic .................................................................. 5041, 5044
Philips ..5011, 5012, 5013, 5014, 5018, 5024, 5028, 5029, 5030
Pioneer ...................................................................... 5031, 5032
Proscan ......................................................................5002, 5003
RCA ....................................................... 5007, 5040, 5042, 5044
Realistic ...............................................................................5009
Samsung ..............................................................................5032
Scientific Atlanta ..... 5006, 5034, 5035, 5036, 5073, 5074, 5075
Signature .............................................................................5003
Sprucer ................................................................................ 5044
Standard Component................................................ 5037, 5038
Starcom ..................................................................... 5017, 5045
Stargate ................................................................................5017
Tocom ....................................................................... 5004, 5022
United Cable ....................................................................... 5045
Universal ......................................................... 5008, 5009, 5010
View Star ......................................................... 5015, 5024, 5025
Zenith ..................................................................................5043
Combo Codes
DVD/VCR DVD VCR
Broksonic ...............................................3075 .....................2075
Emerson .................................................3076 .....................2076
Go Video ......................................3077, 3081 .....................2077
JVC .........................................................3078 .....................2078
RCA ........................................................3079 .....................2079
Samsung .................................................3080 ........... 2080, 2081
Sanyo ......................................................3082 ..................... 2082
Sony .......................................................3083 .....................2083
Zenith .....................................................3084 .....................2084
TV/DVD
Broksonic ............................................................................1143
Sansui .................................................................................. 1149
Toshiba ................................................................................1145
TV/DVD/VCR
Panasonic .................................................................. 1152, 1153
Sylvana ................................................................................ 1154
TV/VCR
Broksonic ............................................................................1151
DVD Codes
Aiwa ................................................................ 3010, 3021, 3022
Apex .......................................................................... 3023, 3024
Broksonic .................................................................. 3027, 3075
Daewoo ...............................................................................3028
Denon ..................... 3029, 3030, 3031, 3042, 3062, 3063, 3064
Emerson .......................................................... 3032, 3033, 3076
Funai ................................................................................... 3033
GE.............................................................................. 3000, 3034
Go Video ...................................................................3077, 3081
Hitachi ......................................... 3009, 3067, 3068, 3069, 3070
JVC ..................................................................3003, 3011, 3078
Kenwood ............................................................................3071
Konka ........................................................................ 3012, 3013
Lasonic ................................................................................3087
Magnavox.................................................................. 3004, 3036
Memorex ............................................................................. 3037
Mintek .................................................................................3038
Mitsubishi ............................................................................3005
NAD.....................................................................................3032
Norcent .....................................................................3039, 3040
Onkyo .................................................................................3041
Oritron.................................................................................3047
Panasonic ............................................................................3014
Philips .......................................................................3004, 3020
Pioneer .................................................. 3006, 3043, 3044, 3045
Proscan .................................................. 3000, 3035, 3046, 3048
1662616C_01.indd 26 12/14/05 3:57:10 PM

27
Remote Control Codes
DVD Codes (continued)
Qwestar ...............................................................................3047
RCA ....................................................... 3000, 3002, 3079, 3086
Samsung ................................................ 3072, 3073, 3074, 3080
Sansui .................................................................................. 3049
Sanyo .........................................................................3015, 3082
Sharp ............................................................... 3050, 3052, 3053
Sony ........................ 3007, 3016, 3017, 3054, 3055, 3056, 3083
Sylvania ............................................................................... 3033
Teac ..................................................................................... 3057
Technics .............................................................................. 3058
Toshiba ........................................ 3008, 3018, 3059, 3060, 3061
Zenith .............................................................. 3019, 3065, 3084
Portable DVD
Audiovox................................................................... 3025, 3026
RCA .....................................................................................3066
Sharp ...................................................................................3051
Home-Theater-In-A-Box (HTIB) Codes
Audio DVD
JBL ..........................................................4031 .....................3088
JVC .........................................................4032 .....................3089
Koss ........................................................4033 ........... 3085, 3090
Onkyo ....................................................4034 .....................3091
Panasonic ...............................................4035 .....................3092
Pioneer ...................................................4036 .....................3093
RCA ........................................................4037 .....................3094
Venturer ..................................................4038 .....................3095
PVR Codes
RePlay .................................................................................2086
Tivo .....................................................................................2085
Satellite Receiver Codes
Alphastar .............................................................................5064
Chaparral ...................................................................5046, 5047
Dishnet ................................................................................5063
Drake......................................................................... 5048, 5049
Echostar...............................................................................5070
GE.................................................................... 5000, 5001, 5072
General Instruments ....................................... 5050, 5051, 5052
Hitachi .......................................................................5066, 5067
Hughes Network Systems ........................................ 5062, 5071
JVC ......................................................................................5065
Panasonic ............................................................................5060
Philips .................................................................................5068
Primestar .............................................................................5061
Proscan ............................................................ 5000, 5001, 5072
RCA .................................................................5000, 5001, 5072
Realistic ...............................................................................5053
Sony ....................................................................................5058
STS1 .....................................................................................5054
STS3 .....................................................................................5055
STS4 .....................................................................................5056
Toshiba ......................................................................5057, 5059
Uniden ................................................................................5069
TV Codes
Admiral, ........................................................... 1002, 1097, 1118
Aiko .....................................................................................1015
Akai .....................................................................................1003
Amtron ................................................................................1026
Anam National ............................ 1004, 1026, 1110, 1111, 1112
AOC ................................... 1005, 1006, 1007, 1099, 1100, 1113
Apex ................................................................ 1140, 1148, 1150
Audiovox.............................................................................1026
Bell & Howell ................................................. 1002, 1029, 1045
Broksonic .................................................................. 1143, 1151
Celebrity ..............................................................................1003
Centurion ............................................................................1009
Citizen ........................................ 1005, 1007, 1008, 1015, 1026,
1045, 1063, 1095, 1119
Colortyme .......................................................1005, 1007, 1010
Contec/Cony ......................................... 1011, 1012, 1013, 1026
Craig .................................................................................... 1026
Crown........................................................................ 1026, 1038
Curtis Mathes ............................. 1001, 1005, 1007, 1014, 1029,
1045, 1063, 1095, 1119, 1130, 1157
Daewoo ...................................... 1005, 1006, 1007, 1015, 1016,
1017, 1080, 1095, 1108
Daytron ........................................................... 1005, 1007, 1095
Dimensia ......................................................... 1001, 1130, 1157
Dumont ..................................................................... 1005, 1084
Electroband .........................................................................1003
Electrohome ............ 1003, 1004, 1005, 1007, 1018, 1019, 1020
Emerson ........................... 1005, 1007, 1011, 1021, 1022, 1023,
1024, 1025, 1026, 1027, 1029, 1045,
1078, 1095, 1101, 1102, 1109, 1127, 1131, 1138
Envision ....................................................................1005, 1007
Fisher ........................................... 1028, 1029, 1030, 1045, 1103
Fujitsu .................................................................................. 1027
Funai ......................................................................... 1026, 1027
GE........1000, 1001, 1004, 1005, 1007, 1020, 1031, 1032, 1054,
1104, 1120, 1130, 1132, 1157, 1158
Goldstar .........1005, 1006, 1007, 1011, 1018, 1033, 1034, 1035,
1087, 1088, 1095, 1096
Hallmark ...................................................................1005, 1007
Hisense ................................................................................1141
Hitachi .................... 1005, 1007, 1011, 1012, 1013, 1036, 1037,
1102, 1126, 1134, 1135, 1136, 1137, 1138
Infinity .................................................................................1038
Janeil ................................................................................... 1098
JBL ....................................................................................... 1038
JC Penney .....1001, 1005, 1006, 1007, 1008, 1012, 1020, 1031,
1032, 1034, 1035, 1044, 1054, 1062, 1063, 1081,
1095, 1096, 1104, 1130, 1132, 1147, 1157
Jensen ........................................................................1005, 1007
JVC ................................... 1011, 1012, 1013, 1032, 1037, 1039,
1089, 1090, 1105, 1127, 1146
Kawasho .........................................................1003, 1005, 1007
Kenwood ........................................................1005, 1007, 1018
Kloss Novabeam ................................... 1026, 1040, 1041, 1098
KTV ....................................................... 1026, 1042, 1095, 1101
LG ........................................................................................1006
Loewe ..................................................................................1038
Logik ...................................................................................1002
Luxman ..................................................................... 1005, 1007
LXI .......................... 1001, 1007, 1029, 1038, 1043, 1044, 1045,
1104, 1116, 1130, 1132, 1147, 1157
Magnavox......1005, 1007, 1008, 1018, 1038, 1040, 1041, 1046,
1047, 1048, 1055, 1082, 1083, 1124, 1125, 1129, 1139
Majestic ...............................................................................1002
Marantz ....................................... 1005, 1007, 1036, 1038, 1049
Megatron ................................................................... 1007, 1036
Memorex ..................................... 1002, 1006, 1007, 1029, 1045
MGA ...............1005, 1006, 1007, 1018, 1020, 1030, 1050, 1051
Mitsubishi ......................... 1005, 1006, 1007, 1018, 1020, 1030,
1050, 1051, 1052, 1079
Montgomery Ward ..............................................................1002
Motorola .................................................................... 1004, 1097
MTC ....................................................... 1005, 1006, 1007, 1063
Multitech .............................................................................1026
NAD................................... 1007, 1043, 1044, 1106, 1126, 1147
NEC ............................................. 1004, 1005, 1006, 1007, 1010
Nikko......................................................................... 1007, 1015
Onwa...................................................................................1026
Optimus .................................................................... 1106, 1126
Optonica ................................................................... 1061, 1097
Orion ......................................................................... 1025, 1109
Panasonic .......1004, 1032, 1038, 1094, 1121, 1128, 1152, 1153
Philco ............................... 1004, 1005, 1006, 1007, 1008, 1011,
1018, 1038, 1040, 1041, 1046, 1048
Philips .............................. 1004, 1005, 1008, 1011, 1018, 1038,
1040, 1041, 1046, 1053, 1054, 1055, 1056
Pioneer ............................. 1005, 1007, 1057, 1058, 1059, 1102,
1106, 1126, 1138
Portland ....................................... 1005, 1006, 1007, 1015, 1095
Price Club ...........................................................................1063
Prima ...................................................................................1142
Prism ................................................................................... 1032
Proscan .................... 1000, 1001, 1104, 1130, 1132, 1157, 1158
Proton.............................................................. 1005, 1007, 1011
Quasar ......................................... 1004, 1032, 1042, 1060, 1121
Radio Shack .......................................... 1029, 1045, 1130, 1157
1662616C_01.indd 27 12/14/05 3:57:11 PM

28
Remote Control Codes
Radio Shack/Realistic ...... 1001, 1005, 1007, 1011, 1026, 1029,
1045, 1061, 1095, 1096
RCA .....1000, 1001, 1004, 1005, 1006, 1007, 1018, 1102, 1104,
1108, 1130, 1132, 1138, 1144, 1155, 1157, 1158
Realistic ................................................. 1029, 1045, 1130, 1157
Runco ..................................................................................1084
Sampo ......................................... 1005, 1007, 1095, 1096, 1156
Samsung ........1005, 1006, 1007, 1011, 1014, 1018, 1062, 1063,
1064, 1095, 1096, 1114, 1133
Sansui ........................................................................ 1109, 1149
Sanyo ....1005, 1028, 1029, 1045, 1051, 1065, 1066, 1093, 1103
Scott ......................... 1005, 1007, 1011, 1021, 1025, 1026, 1027
Sears ....................... 1001, 1005, 1007, 1012, 1013, 1018, 1027,
1028, 1029, 1030, 1039, 1043, 1044, 1045,
1067, 1068, 1103, 1104, 1107, 1130, 1132, 1147, 1157
Sharp ................................ 1005, 1007, 1011, 1022, 1023, 1061,
1069, 1070, 1071, 1077, 1095, 1097
Signature ................................................................... 1002, 1072
Sony ...................................................... 1003, 1115, 1122, 1123
Soundesign ................................. 1005, 1007, 1008, 1026, 1027
Starlite .................................................................................1026
Supre-Macy .........................................................................1098
Sylvania .........1005, 1007, 1008, 1018, 1038, 1040, 1041, 1046,
1047, 1048, 1055, 1073, 1092, 1154
Symphonic ...................................................... 1024, 1026, 1107
Tandy ..................................................................................1097
Tatung .................................................................................1004
Technics .............................................................................. 1032
Techwood ....................................................... 1005, 1007, 1032
Teknika .........1002, 1005, 1006, 1007, 1008, 1011, 1012, 1013,
1015, 1026, 1027, 1047, 1063, 1094, 1095, 1121, 1128
Telecaption .........................................................................1074
Toshiba ............................. 1029, 1043, 1044, 1045, 1063, 1067,
1074, 1075, 1091, 1092, 1145, 1147
Totevision............................................................................1095
Universal ................................................................... 1031, 1054
Wards ............................... 1001, 1002, 1005, 1006, 1007, 1018,
1021, 1024, 1027, 1031, 1038, 1040,
1041, 1046, 1047, 1054, 1055, 1061, 1076, 1130, 1157
Yamaha ................................................. 1005, 1006, 1007, 1018
Zenith ................................ 1002, 1005, 1084, 1085, 1086, 1117
VCR Codes
Admiral ................................................................................2068
Aiko .....................................................................................2023
Aiwa ....................................................................................2022
Akai ................................... 2002, 2003, 2004, 2057, 2058, 2059
Audiovox.............................................................................2010
Bell & Howell .....................................................................2007
Broksonic ........................................................ 2008, 2021, 2075
Calix ....................................................................................2010
Canon ........................................................................2017, 2018
Capehart .................................................................... 2016, 2056
Carver ..................................................................................2037
CCE ............................................................................2023, 2036
Citizen ............2009, 2010, 2011, 2012, 2013, 2014, 2015, 2023
Colortyme ...........................................................................2005
Craig ...................................................... 2009, 2010, 2019, 2036
Curtis Mathes .2005, 2009, 2012, 2014, 2017, 2018, 2020, 2060
Daewoo ................... 2011, 2013, 2015, 2021, 2022, 2023, 2056
Daytron ...............................................................................2056
Electrohome .............................................................. 2010, 2024
Emerson ................. 2002, 2008, 2010, 2011, 2017, 2020, 2021,
2022, 2024, 2025, 2026, 2027, 2028, 2039,
2059, 2061, 2067, 2069,2076
Fisher ..................................................... 2007, 2019, 2029, 2030
Fuji................................................................... 2003, 2017, 2062
Funai ................................................................................... 2022
Garrard ................................................................................2022
GE.........2000, 2001, 2009, 2017, 2018, 2060, 2063, 2072, 2073
Go Video ................................................................... 2074, 2077
Goldstar ....................................... 2005, 2010, 2014, 2032, 2035
Gradiente ............................................................................2022
Harman Kardon .................................................................. 2005
Harwood .............................................................................2036
Hitachi ............................... 2033, 2034, 2035, 2053, 2057, 2063
JC Penney .....2005, 2006, 2007, 2008, 2009, 2010, 2017, 2018,
2030, 2033, 2034, 2036, 2037, 2053
Jensen .............................................................. 2033, 2034, 2057
JVC .......................... 2005, 2006, 2007, 2014, 2057, 2064, 2078
Kenwood ................ 2005, 2006, 2007, 2012, 2014, 2057, 2064
KLH .....................................................................................2036
Kodak ........................................................................ 2010, 2017
LG ........................................................................................2010
Logik ...................................................................................2036
LXI ....................................................................................... 2010
Magnavox................ 2017, 2018, 2037, 2038, 2052, 2054, 2065
Marantz ................... 2005, 2006, 2007, 2012, 2014, 2017, 2037
Matsushita ...........................................................................2017
Memorex ........2007, 2009, 2010, 2017, 2019, 2022, 2052, 2068
MGA ................................................................ 2024, 2039, 2059
Minolta ............................................................ 2033, 2034, 2053
Mitsubishi .......2024, 2033, 2034, 2039, 2040, 2041, 2059, 2064
Montgomery Ward ..............................................................2068
Motorola .................................................................... 2017, 2068
MTC .....................................................................................2009
Multitech ..................................... 2009, 2012, 2022, 2031, 2036
NEC ......................... 2005, 2006, 2007, 2012, 2014, 2057, 2064
Nikko...................................................................................2010
Noblex ................................................................................. 2009
Olympus..............................................................................2017
Optimus .................................................................... 2010, 2068
Optonica .............................................................................2047
Panasonic .............................................. 2017, 2018, 2055, 2066
Pentax ......................................... 2012, 2033, 2034, 2053, 2063
Pentex Research ................................................................. 2014
Philco .................................................... 2017, 2018, 2037, 2038
Philips ................................................... 2017, 2037, 2047, 2065
Pioneer .................................................. 2006, 2033, 2042, 2064
Portland ................................................. 2012, 2013, 2015, 2056
Proscan .................................................. 2000, 2001, 2072, 2073
Quasar ............................................................. 2017, 2018, 2066
Radio Shack .................................................... 2010, 2047, 2068
Radio Shack/Realistic ...... 2007, 2009, 2010, 2017, 2018, 2019,
2022, 2024, 2029, 2047
Radix ...................................................................................2010
RCA .....2000, 2001, 2002, 2009, 2017, 2033, 2034, 2043, 2044,
2045, 2053, 2060, 2063, 2066, 2070, 2072, 2073, 2079
Realistic .........2007, 2009, 2010, 2011, 2017, 2018, 2019, 2022,
2024, 2029, 2047, 2068
Ricoh ...................................................................................2071
Runco ..................................................................................2052
Samsung .........2004, 2009, 2011, 2027, 2031, 2058, 2080, 2081
Sansui .................................................... 2006, 2046, 2057, 2064
Sanyo ..................................................... 2007, 2009, 2019, 2082
Scott ......................... 2008, 2011, 2021, 2026, 2028, 2039, 2061
Sears .....2007, 2010, 2017, 2019, 2029, 2030, 2033, 2034, 2053
Sharp ........................................... 2013, 2024, 2047, 2048, 2068
Shintom ................................................. 2003, 2034, 2036, 2049
Signature .............................................................................2068
Singer .............................................................. 2017, 2036, 2071
Sony ............................................ 2003, 2049, 2050, 2062, 2083
STS ............................................................................. 2017, 2053
Sylvania ................... 2017, 2018, 2022, 2037, 2038, 2039, 2065
Symphonic ..........................................................................2022
Tandy ..................................................................................2007
Tashiko ................................................................................2010
Tatung .................................................................................2057
Teac ........................................................................... 2022, 2057
Technics .................................................................... 2017, 2055
Teknika ................................................. 2010, 2017, 2022, 2051
Toshiba .............................. 2011, 2029, 2030, 2033, 2039, 2059
Totevision.................................................................. 2009, 2010
Unitech ................................................................................ 2009
Vector Research .................................... 2005, 2006, 2011, 2012
Video Concepts .......................... 2005, 2006, 2011, 2012, 2059
Wards ..2009, 2010, 2011, 2017, 2019, 2022, 2024, 2033, 2034,
2036, 2047, 2053, 2061, 2068, 2070
XR-1000 ........................................................... 2017, 2022, 2036
Yamaha ....................................... 2005, 2006, 2007, 2014, 2057
Zenith ................................ 2003, 2049, 2052, 2062, 2071, 2084
1662616C_01.indd 28 12/14/05 3:57:12 PM

Graphics contained within this publication are for representation only.
29
Troubleshooting
Many problems you encounter with your MediaBridge can be
resolved by consulting the following troubleshooting list.
Network problems
No connection to the wireless network.
Check to make sure the wireless antenna is properly attached to
the back of the MediaBridge.
Also, check the “link” indicator on the front panel of the
MediaBridge. If the “link” indicator is not lit, the MediaBridge
has not obtained an IP address. Check your router and network
settings.
The MediaBridge displays duplicate wireless network names.
Wireless access points come configured with a default wireless
network name. For example, wireless routers and access points
made by Linksys default to “linksys” as the network name. If
the MediaBridge is displaying duplicate names, it is receiving a
wireless signal from two different routers which happen to use
identical names. Change the name of your wireless network, or try
both networks.
Unsure which wireless network is yours.
Your wireless access point or wireless router determines the name
of your wireless network. Refer to the manual of your access point
or router to determine the network name (also called the SSID).
The MediaBridge can’t find one of the computers in my
network.
If VPN (Virtual Private Network) software is installed on a
computer in your network, the MediaBridge may not be able to
see that computer. The MediaBridge is not designed to work with
VPN software.
Firewall problems
All of the MediaBridge media libraries are empty.
If you have firewall software installed on your network, you
may need to reconfigure that firewall software to allow the
MediaBridge to access your network computers.
The MediaBridge software setup installs a background program on
your computer(s) called “MediaStreamer.exe.” It is safe to allow this
program to operate on the network. If the MediaStreamer program
is blocked, the MediaBridge will not see any computers on the
network, so the MediaBridge’s media libraries will be empty.
If you’re still having problems getting the MediaBridge to work
with your firewall software, try making the following adjustments
to your firewall settings:
• Port 6070 must be open for UDP-type network traffic.
• Port 40001 must be open for TCP-type network traffic.
• Port 40002 must be open for TCP-type network traffic.
1662616C_01.indd 29 12/14/05 3:57:12 PM

30
Troubleshooting
Remote control problems
Unit does not respond to remote.
Make sure the remote is in the right “mode” to control the
MediaBridge: press the MEDIA button, then try using the remote
with the MediaBridge.
If that doesn’t work, check the following items:
• Make sure the batteries in the remote are fresh.
• Point the remote directly at the remote sensor on the front
panel of the MediaBridge.
• Make sure the path between the remote control and the
MediaBridge is clear.
• Try moving closer to the MediaBridge.
If the MediaBridge still does not respond, press the power button
on the MediaBridge front panel to turn the MediaBridge off. Wait
a minute or two, then press the power button on the front panel
of the MediaBridge again to turn the MediaBridge on.
If the MediaBridge does not turn off, unplug the AC power cord
from the wall outlet and wait a minute or two. Then, plug the
unit back in and turn it back on.
MediaBridge problems
The MediaBridge power button doesn’t turn the unit off.
Unplug the AC power cord from the wall outlet and wait a
minute or two. Then, plug the unit back in and turn it back on.
USB device problems
The MediaBridge can’t find my USB device.
It might take the MediaBridge a few moments to recognize and
scan your USB device once you’ve connected it to the USB port.
If you’re connecting an RCA Lyra to the MediaBridge using a
USB connection, make sure the Lyra’s USB Protocol is set to Mass
Storage Class.
Please note that USB devices should be formatted as NTFS or
FAT32 in order for the MediaBridge to play files from them. If
your USB device is not recognized by the MediaBridge, check its
formatting type.
Not all USB devices are compatible with the MediaBridge. The
MediaBridge recognizes only certain kinds of USB devices: USB
thumb drives, USB memory card readers, and USB hard drives.
1662616C_01.indd 30 12/14/05 3:57:13 PM

31
Troubleshooting
DivX is a registered trademark of DivX Networks, Inc.
iTunes is a registered trademark of Apple Computer, Inc.
Windows Media is a registered trademark of the Microsoft Corporation in the
United States and/or other countries.
Manufactured under license from Dolby Laboratories. “Dolby” and the
double-D symbol are trademarks of Dolby Laboratories.
DTS is a registered trademark of Digital Theater Systems, Inc.
Media library problems
Files recently saved on networked media source don’t
appear on MediaBridge.
You may need to refresh the MediaBridge’s browser.
First, press the HOME button on the MediaBridge’s remote.
From the main menu, select the library you want to browse.
Then, look for the recently saved files again.
If these files still don’t show up in the library, wait about 60
seconds and press the HOME button again. From the main
menu, select the library you want to browse. Then, look for the
recently saved files again.
If you still don’t see the recently saved files in the library, restart
the MediaBridge and browse the media library again.
If you still have trouble viewing files, make sure your files match
the supported formats (see “My images, music files, or video files
won’t play or display”).
File problems
My images, music files, or video files won’t play or display
Make sure the MediaBridge supports the file format or encoding
you’re trying to play. The MediaBridge may not support all music
and movie files purchased from online music or movie sites.
The MediaBridge supports the following types of file formats and
codecs (in the next column):
File Container Formats
• MPEG Program (ISO 11172-1 and ISO/IEC 13818-1)
• MPEG Transport (ISO/IEC 13818-1)
• AVI (DivX® 3, 4, 5; DivX HD, XviD, MJPEG, DV Type 2)
• ASF, WMV (Windows Media® Video)
• ASX, WMA (Windows Media® Audio), MP3, WAV, M4A
• IFO, VOB
Video Codecs
• MPEG1 (ISO 11172-2) • MPEG2 (ISO 13818-2)
• MPEG4 (ISO/IEC 14496-2) • DV (requires wired link)
• MJPEG (requires wired link) • WMV (V7, V8 Partial, V9) (non-drm)
Audio Codecs
• MPEG1/2 Layers 1,2 and 3 (MP3) (ISO 11172-3)
• SPDIF passthru for Dolby® Digital and DTS® audio
• WMA (Standard, Pro and Lossless) (non-drm)
• WAV (LPCM)
• AAC (except for protected files from the iTunes® music store)
Image Formats
• JPEG w/ JFIF (ISO DIS10918-1) • BMP
• PNG (ISO 15948:2003) • Uncompressed TIFF
If higher-definition video does not play back over a wireless
connection, try a wired connection.
1662616C_01.indd 31 12/14/05 3:57:13 PM

32
Troubleshooting
I can’t hear the audio from my movie.
If the movie you’re playing on the MediaBridge has multichannel
audio, audio will only be available from the digital audio outputs.
There will be no audio signal from the MediaBridge’s other audio
outputs.
To hear multichannel audio, use one of the MediaBridge’s digital
audio outputs to connect it to multichannel-capable receiver.
There’s a red exclamation mark next to one of the video or
picture files in my library.
The MediaBridge displays a red exclamation mark next to video
or picture files it has tried unsuccessfully to play.
The red exclamation mark means that the MediaBridge cannot
play that particular file. There are several possible reasons for
this—the file may have a name that the MediaBridge has trouble
recognizing, or the file may be corrupt.
Please note that Windows Media Center Edition PCs use a
proprietary file format for recording, and the MediaBridge cannot
play these files.
Display problems
Only the “AR” (Acoustic Research) screen appears when I
turn on the MediaBridge. I don’t see the main menu.
Make sure the SD/HD switch on the back of the MediaBridge is
set to the right position for the type of connection you’re using
between the MediaBridge and your TV or monitor.
If you used the MediaBridge’s VIDEO or S-VIDEO output jacks,
set the SD/HD switch to SD.
If you used the MediaBridge’s DVI output jack, set the SD/HD
switch to HD.
If you used the MediaBridge’s COMPONENT VIDEO jacks, set
the SD/HD switch to match the kind of TV or monitor you have:
SD for a standard-definition monitor or HD for a high-definition
monitor.
1662616C_01.indd 32 12/14/05 3:57:13 PM

33
Troubleshooting
Picture Appears, But Colors Are Wrong.
• If using an S-Video or a VGA connection, ensure that the
cables are firmly connected to both the MediaBridge and the
display.
• If using a component video connection, unplug each of the
three (red, green, blue) connectors from the MediaBridge
and verify that the color of the plug matches the color of the
connector on the MediaBridge. Swapping the red and blue
connectors accidentally will result in improper color display.
If this does not solve the problem, do the same check on the
display connectors.
• You may have a defective cable. Try another cable of the same
type.
Problems going between media types
I am viewing images and would now like to listen to music.
How do I go back to the Music Player?
Press the MUSIC button on the remote to access the Music
Media Library. Use the arrow buttons and OK to browse through
the library and choose the song(s) you want to hear.
To listen to music and view images at the same time, see the next
troubleshooting item.
I am listening to music and would like to view images. How
do I go back to the Picture Viewer?
With your music playing, press the PICS button on the remote to
access the Pictures Media Library. Use the arrow buttons and OK
to find the picture(s) you want to view (even in slideshow mode).
If you would like to view images without listening to music, press
PAUSE while you’re viewing the slideshow/pictures. Then, press
MUSIC and press STOP while the Music Media Library is on the
screen. Press PICS and then select Resume Slideshow to return to
the pictures/slideshow.
1662616C_01.indd 33 12/14/05 3:57:13 PM

34
Limited Warranty
Media Bridge LIMITED WARRANTY
What your warranty covers:
• Any defect in materials or workmanship.
For how long after your purchase:
• 1 Year - Unit exchange, which includes parts and labor.
What we will do:
• Exchange the defective portion of your Media Bridge with a
new or, at our option, refurbished unit.
How you get service:
• Call 1-800 464 7022 and have your unit’s date of purchase
and model/serial number ready. The model/serial number
information is on the back or bottom of your unit.
• A representative will troubleshoot your problem over the phone.
• If the representative determines that you should receive a
replacement unit you will be provided with a Service Request
(SR) number and instructions on how to obtain the exchange.
No returns will be accepted without the SR number.
What your warranty does not cover:
• Acts of nature, such as but not limited to lightning damage.
• Damage from misuse or neglect.
• A unit that has been modified or incorporated into other
products or is used for institutional or other commercial
purposes.
• Batteries.
• Installation.
• Shipping damage if the unit was not packed and shipped in the
manner prescribed by Thomson.
Product Registration:
• Please complete and mail the Product Registration Card packed
with your unit. It will make it easier to contact you should it
ever be necessary. The return of the card is not required for
warranty coverage.
Limitation of Warranty:
• THE WARRANTY STATED ABOVE IS THE ONLY
WARRANTY APPLICABLE TO THIS PRODUCT.
ALL OTHER WARRANTIES, EXPRESS OR IMPLIED
(INCLUDING ALL IMPLIED WARRANTIES
OF MERCHANTABILITY OR FITNESS FOR A
PARTICULAR PURPOSE) ARE HEREBY DISCLAIMED.
NO VERBAL OR WRITTEN INFORMATION GIVEN
BY THOMSON INC., ITS AGENTS OR EMPLOYEES
SHALL CREATE A GUARANTY OR IN ANY WAY
INCREASE THE SCOPE OF THIS WARRANTY.
1662616C_01.indd 34 12/14/05 3:57:13 PM

35
Limited Warranty
• REPAIR OR REPLACEMENT AS PROVIDED UNDER
THIS WARRANTY IS THE EXCLUSIVE REMEDY OF
THE CONSUMER. THOMSON INC. SHALL NOT BE
LIABLE FOR INCIDENTAL OR CONSEQUENTIAL
DAMAGES RESULTING FROM THE USE OF THIS
PRODUCT OR ARISING OUT OF ANY BREACH OF
ANY EXPRESS OR IMPLIED WARRANTY ON THIS
PRODUCT. THIS DISCLAIMER OF WARRANTIES
AND LIMITED WARRANTY ARE GOVERNED BY THE
LAWS OF THE STATE OF INDIANA. EXCEPT TO
THE EXTENT PROHIBITED BY APPLICABLE LAW,
ANY IMPLIED WARRANTY OF MERCHANTABILITY
OR FITNESS FOR A PARTICULAR PURPOSE ON
THIS PRODUCT IS LIMITED TO THE APPLICABLE
WARRANTY PERIOD SET FORTH ABOVE.
How state law relates to warranty:
• Some states do not allow the exclusion nor limitation of
incidental or consequential damages, or limitations on how long
an implied warranty lasts, so the above limitations or exclusions
may not apply to you.
• This warranty gives you specific legal rights, and you also may
have other rights that vary from state to state.
If you purchased your product outside the United States:
• This warranty does not apply. See your dealer for warranty
information.
1662616C_01.indd 35 12/14/05 3:57:14 PM

The MediaBridge PC application, user’s guide, and warranty
are available for download at www.acoustic-research.com.
All open-source GPL code that has been modified is also
available at that website.
Thomson Inc.
10330 North Meridian Street
Indianapolis, IN 46290
© 2005 Thomson Inc.
Trademark(s) Registered
Marca(s) Registrada(s)
Printed in China
TOCOM 1662616C
1662616C_01.indd 36 12/14/05 3:57:14 PM