Inventec MINERVA3107 USB Dongle User Manual 3107 Eng UM Ver 1
Inventec Corporation USB Dongle 3107 Eng UM Ver 1
Inventec >
Users Manual

1
Minerva 3107 User Manual

2
Copyright © 2008 Inventec Corp. All Rights Reserved.
No part of this manual, including the product and software described in it, may be reproduced,
transmitted, transcribed, stored in a retrieval system, or translated into any language in any
form, by any means, without prior written permission from Inventec Corp.
Inventec Corp. provides this publication “as is” without warranty of any kind. This information
could include technical inaccuracies or typographical errors. Inventec Corp. may make
improvements and/or changes in the product. Information and specifications contained in this
document are subject to change at any time without notice.
The information contained in this document does not affect or change the product
specifications or warranties. Inventec Corp. is not liable for any damages resulting from the use
of this product.
IMPORTANT SAFETY INFORMATION
Please read the following information carefully before you start using the Inventec Minerva
3107 to avoid any damages caused by improper usage:
Do not open or tamper with the device cover, as it will void your warranty.
Do not press hard on this product, as it may cause damage to the internal components.
Do not strike, shake, or heat the device in a way which may cause damage to the device.
Do not expose the device to direct sunlight, or leave the device in a humid environment,
for extended periods of time, as this may cause damage to the device.
Do not immerse the device in water.
The device may interfere with the navigation and/or communication systems on aircraft.
The use of the device on aircraft is prohibited by laws in most countries.
Interference with Medical Equipment Functions
This product may cause medical equipment to malfunction. The use of this device is forbidden
in most hospitals and medical clinics.
Nonionizing Radiation
This product should be operated in the suggested normal condition only to ensure the radiative
performance and safety of the interference. As with other mobile radio transmitting equipment,
users are advised that for satisfactory operation of the equipment and for the safety personnel,
it is recommended that no part of the human body be allowed to come too close to the antenna
during operation of the equipment.

3
FCC Regulations
This device complies with part 15 of the FCC Rules. Operation is subject to the following two
conditions: (1) This device may not cause harmful interference, and (2) this device must accept
any interference received, including interference that may cause undesired operation.
This device has been tested and found to comply with the limits for a Class B digital device,
pursuant to Part 15 of the FCC Rules. These limits are designed to provide reasonable
protection against harmful interference in a residential installation. This equipment generates,
uses and can radiated radio frequency energy and, if not installed and used in accordance with
the instructions, may cause harmful interference to radio communications. However, there is no
guarantee that interference will not occur in a particular installation If this equipment does
cause harmful interference to radio or television reception, which can be determined by turning
the equipment off and on, the user is encouraged to try to correct the interference by one or
more of the following measures:
-Reorient or relocate the receiving antenna.
-Increase the separation between the equipment and receiver.
-Connect the equipment into an outlet on a circuit different from that to which the receiver is
connected.
-Consult the dealer or an experienced radio/TV technician for help.
Changes or modifications not expressly approved by the party responsible for compliance could
void the user‘s authority to operate the equipment.
This transmitter must not be co-located or operating in conjunction with any other antenna or
transmitter.
FCC Radiation Exposure Statement
This equipment complies with FCC radiation exposure limits set forth for anuncontrolled
environment . End users must follow the specific operatinginstructions for satisfying RF
exposure compliance. To maintain compliance with FCC RF exposure compliance
requirements, please follow operation instruction asdocumented in this manual.
FCC Body SAR Max. 0.067 W/kg
GSM850:
GSM1900:

4
Table of Contents
Copyright © 2008 Inventec Corp. All Rights Reserved...................... 2
IMPORTANT SAFETY INFORMATION ................................................. 2
Interference with Medical Equipment Functions............................... 2
Nonionizing Radiation ....................................................................... 2
FCC Regulations................................................................................. 3
Chapter 1. Knowing Your Device ....................................................... 6
1.1 Introduction...............................................................................................7
Views of the Device................................................................................7
1.2 Installing SIM Card.................................................................................7
Chapter 2. Getting Ready ..................................................................9
2.1 System and OS Requirements...........................................................10
2.2 Software Installation ...........................................................................10
2.3 Launching Mobile Connect.................................................................10
Chapter 3. Using Mobile Connect.....................................................11
3.1 Main Screen .............................................................................................12
Main Function Bar.................................................................................12
System Button Bar................................................................................12
Functional Display.................................................................................12
MENU Button...........................................................................................13
SETTING Button.....................................................................................13
3.2 Messaging.................................................................................................13
Writing New Text Messages..............................................................14
Replying Messages ...............................................................................15
Forwarding Messages..........................................................................15
Deleting Messages................................................................................15
3.3 Accessing the Internet.........................................................................16
Sending/Receiving E-mails ...............................................................16
3.4 Managing Your Phonebook................................................................17
Adding Entries........................................................................................17
Editing Entries........................................................................................17
Deleting Entries .....................................................................................18
Searching Contacts...............................................................................18
Sending Messages.................................................................................18
3.5 Changing Settings.................................................................................19
Internet settings ...................................................................................19
Setting PIN Security.............................................................................19
Changing PIN code...............................................................................20

5
SMS Settings...........................................................................................21
Chapter 4. Quitting and Uninstalling ...............................................23
4.1 Quitting and Removing........................................................................24
Quitting Mobile Connect.....................................................................24
Removing the Wireless Device from your PC.............................24
4.2 Uninstalling Mobile Connect..............................................................24
Appendix.......................................................................................... 25
A.1 Specifications..........................................................................................26
A.2 Troubleshooting.....................................................................................26

6
Chapter 1. Knowing Your Device
7
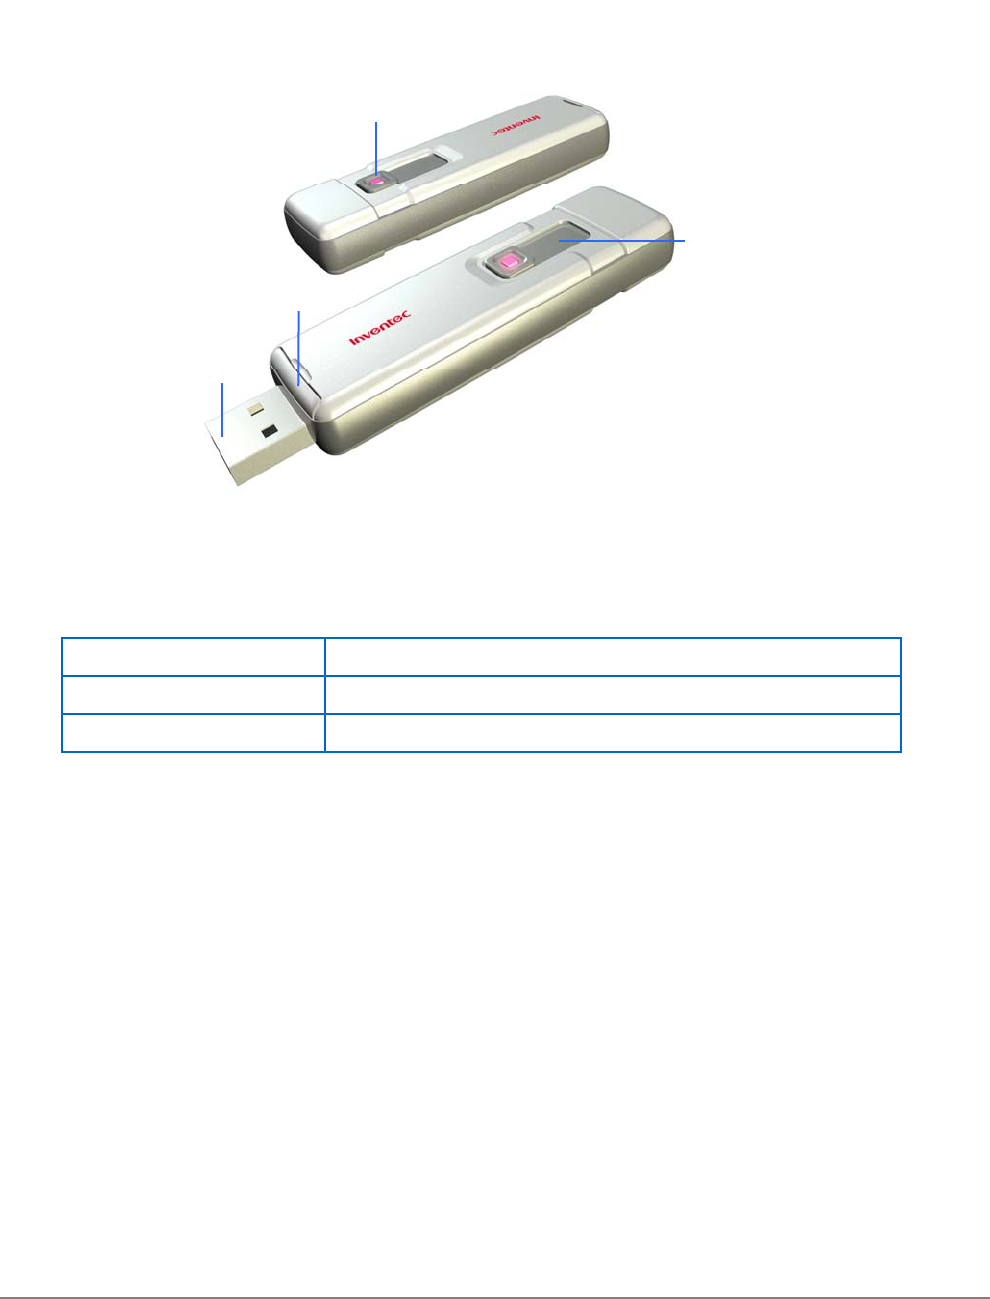
1.1 Introduction
Views of the Device
Notification LED
The notification LED indicates the status of your device:
LED Color/Status Meaning
Solid green In service.
Solid red The device is out of service.
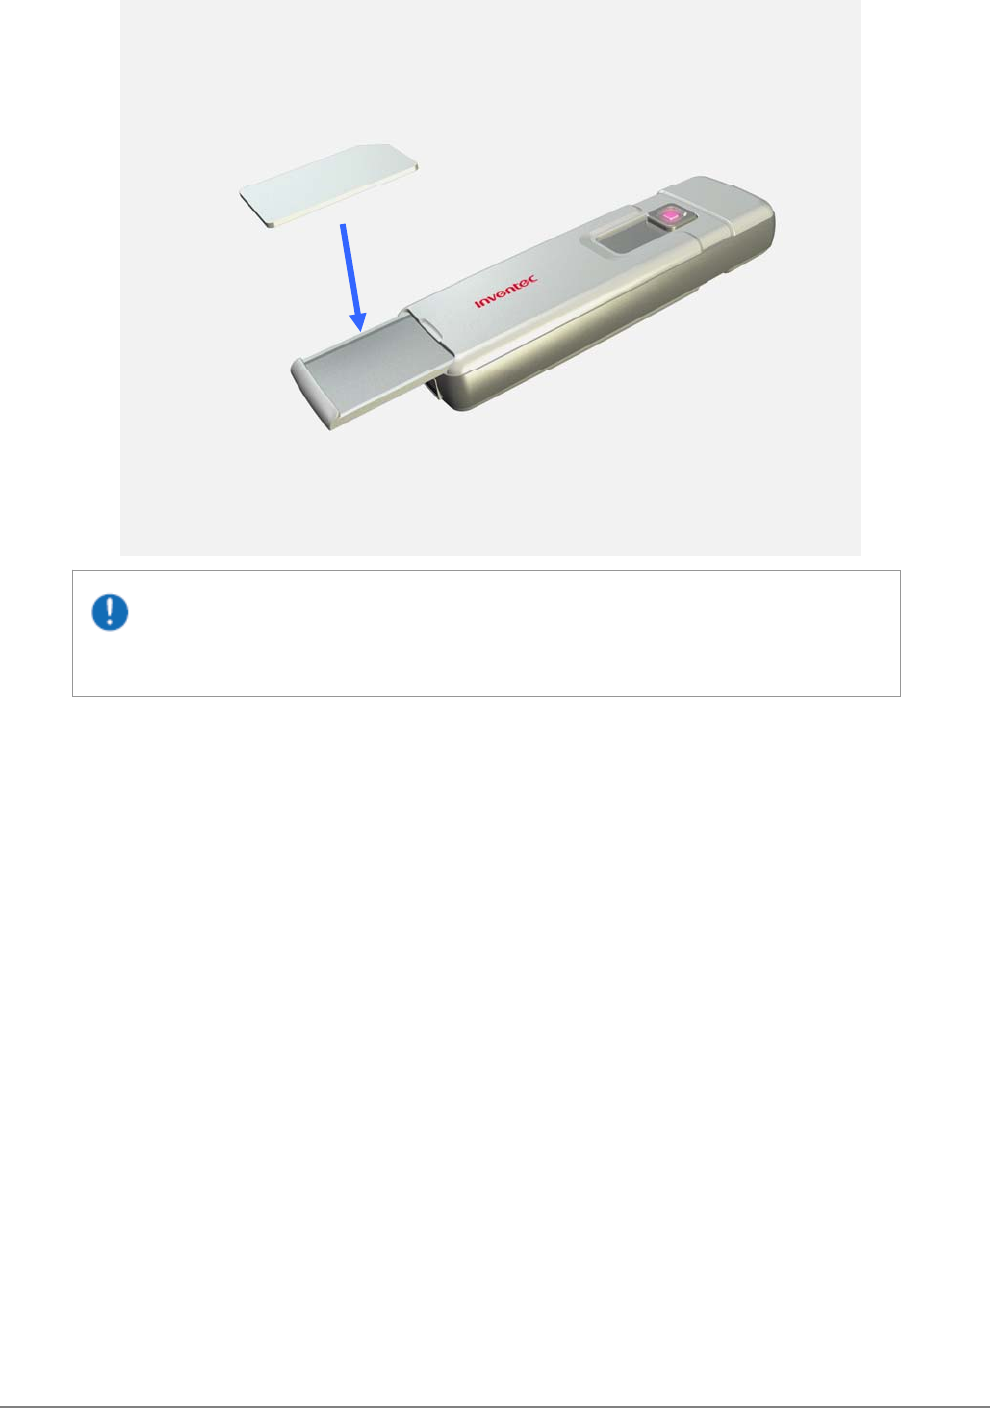
1.2 Installing SIM Card
A valid SIM (Subscriber Identity Module) card is required to use your wireless device.
Pull the SIM card tray outward.
Place the SIM card with the logo side up and then push the SIM card tray back.
LED Indicator
SIM Card Slot
USB Plug
USB Plug Slider
8
SIM cards can only be installed in one direction. Inserting the card in the wrong
direction by force can cause damage to the card and the card slot.

9
Chapter 2. Getting Ready
10
2.1 System and OS Requirements
To use your wireless device, the following are required for your computer:
10 MB free hard disk space or above
32MB RAM or above
Screen resolution 800x600 pixels or above
Color quality 16 bits or higher
Free USB slot
Microsoft Windows 2000
Microsoft Windows XP
Microsoft Windows Vista 32 bit / 64 bit
Administrator rights on your PC to install and use a new software
2.2 Software Installation
Your wireless device comes with an application software named Mobile Connect which helps
you to manage your wireless device and monitor your connection. Simply connect your wireless
device to a free USB port on your PC and follow the steps of the install wizard, the installation
will be run automatically. Once the installation is completed, a shortcut icon shows on the
desktop.
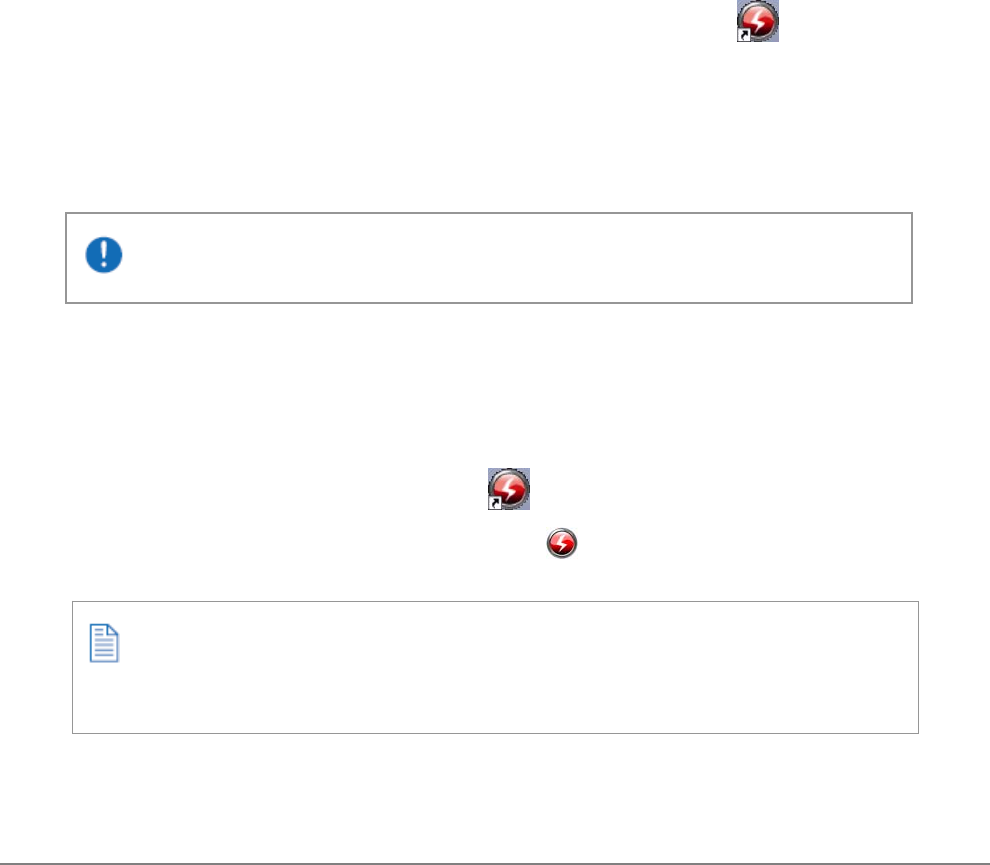
2.3 Launching Mobile Connect
You can start to use Mobile Connect after the installation described above is completed.
1. Plug in the wireless device containing a valid SIM card into one of the USB ports in
your PC.
2. Do one of the following to launch Mobile Connect.
Select Start > Programs > Data Card > Mobile Connect.
Double-click the shortcut icon on the desktop.
3. Once Mobile Connect is launched, an icon for Mobile Connect appears in your
computer’s taskbar.
Please turn off Bluetooth on your PC, or it may conflict with the Mobile Connect.
If you have activated PIN (Personal Identity Number) security on your SIM card, the
system will prompt you to input a PIN code.

11
Chapter 3. Using Mobile Connect
12
Mobile Connect allows you to use the following features:
Sending/receiving text messages and E-mails
Getting connected/disconnected
Using phonebook
Browsing the Internet
Changing system settings
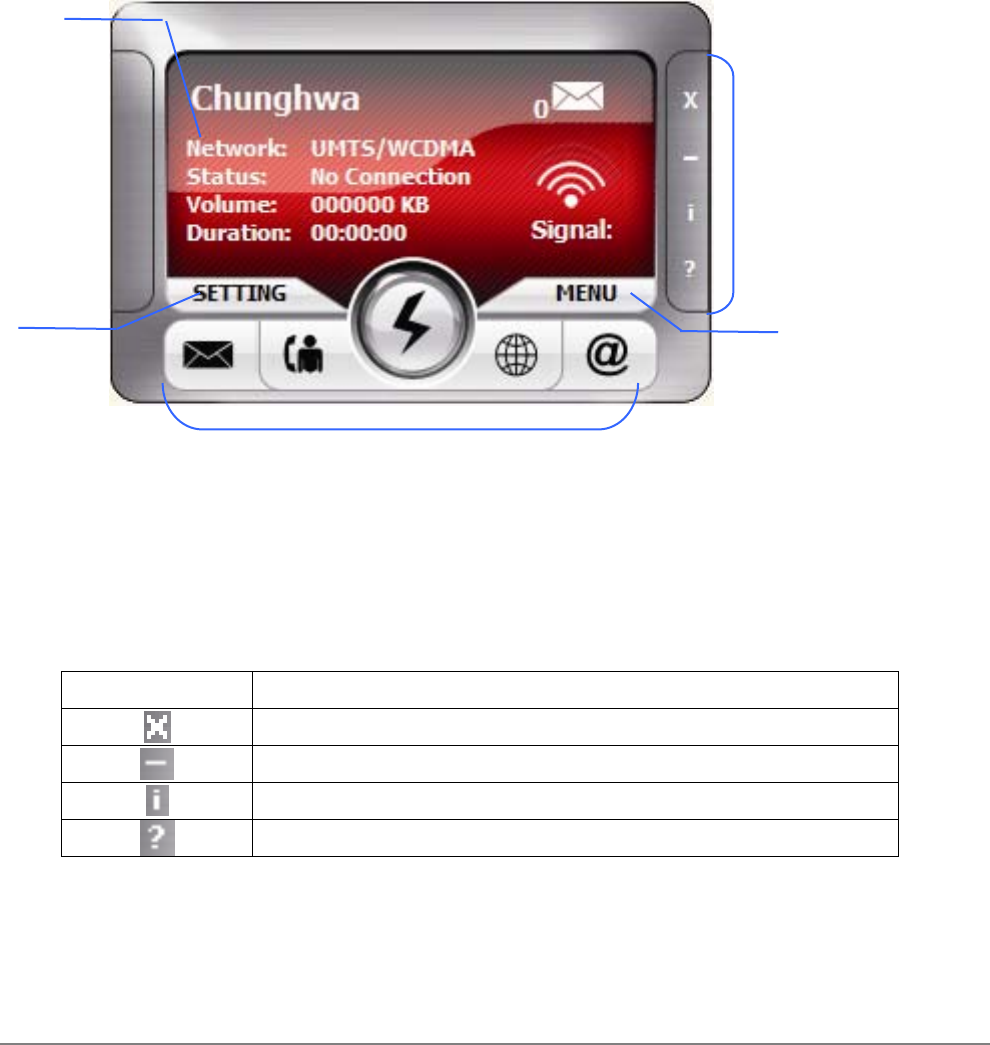
3.1 Main Screen
The initial screen of Mobile Connect is as follow:
Main Function Bar
There are five items in the main function bar: SMS, Phonebook, Connect/Disconnect, Brower
and Email. Simply click one of them to active its function.
System Button Bar
Item Description
Close: click the item to close Mobile Connect.
Minimize: click the item to minimize Mobile Connect.
About: click the item to show software information.
Help: click the item to show the user manual.
Functional Display
Functional
display
Setting
button
System button bar
Menu
button
Main function bar
13
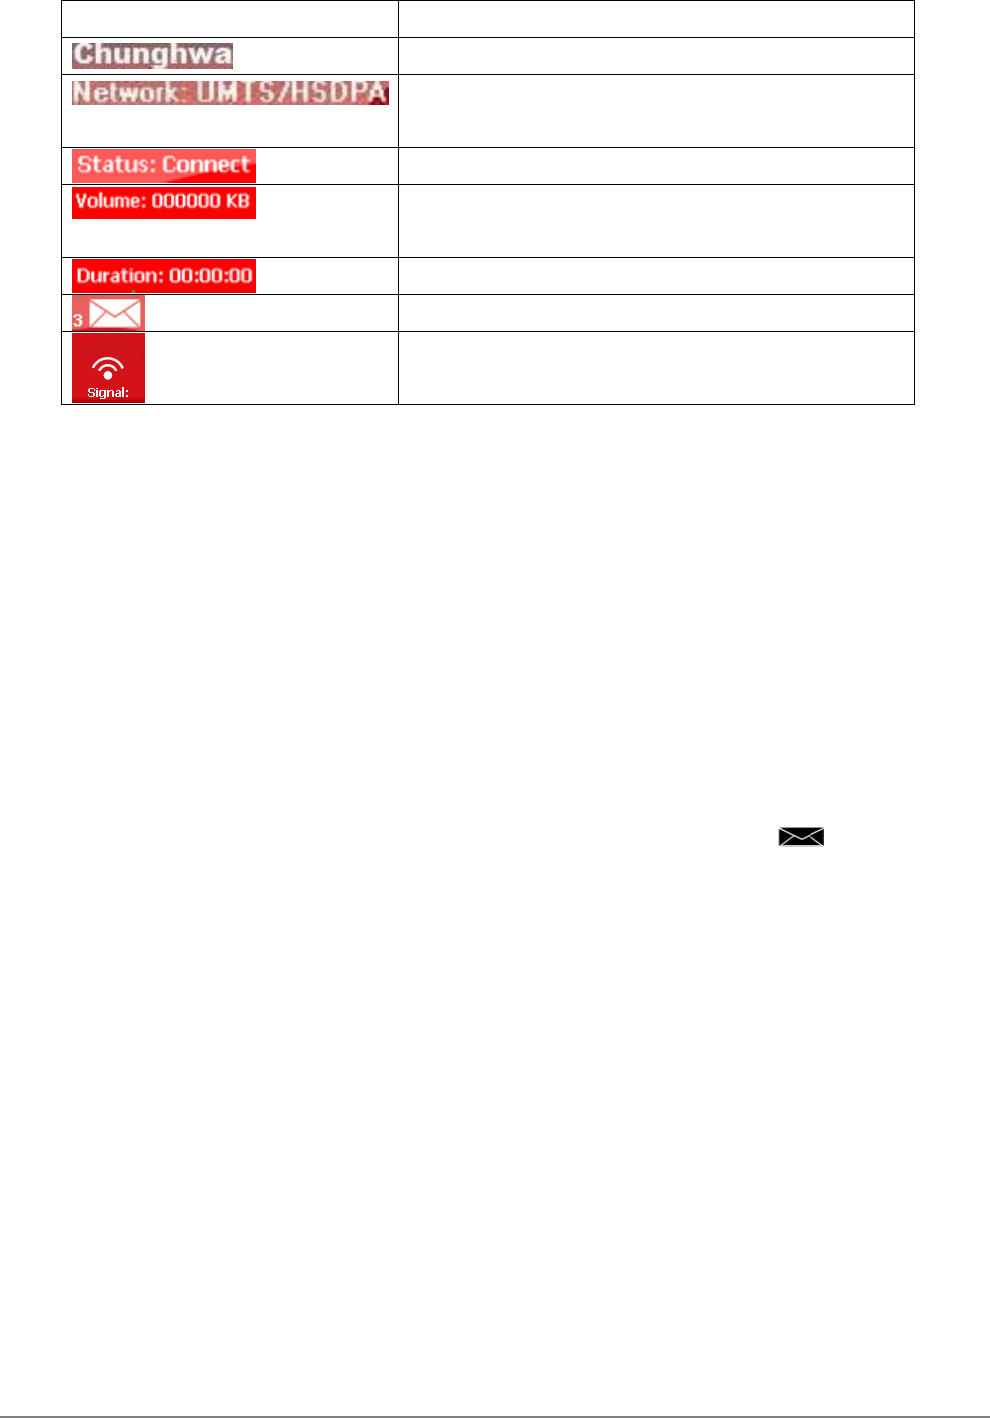
Item Description
Shows the information about the network operator.
Shows the network type that you are connecting to, e.g.
HSDPA, UMTS, WCDMA, GPRS, EDGE … etc.
Shows connected or disconnected status.
Shows the volume information for the current
connection.
Shows the duration of an active connection.
Shows the number of unread text messages in real time.
Shows the signal strength.
MENU Button
A drop-down menu shows up when you click on the Menu button. Apart from the functions
listed in the main function bar, you can quickly enable/disable PIN security, select languages,
read/create short messages and search/add contacts in this menu as well.
SETTING Button
To set APN information, PIN security status and maximum SMS length limitation, click this
button and make changes. Please refer to chapter 3.5 for more details.
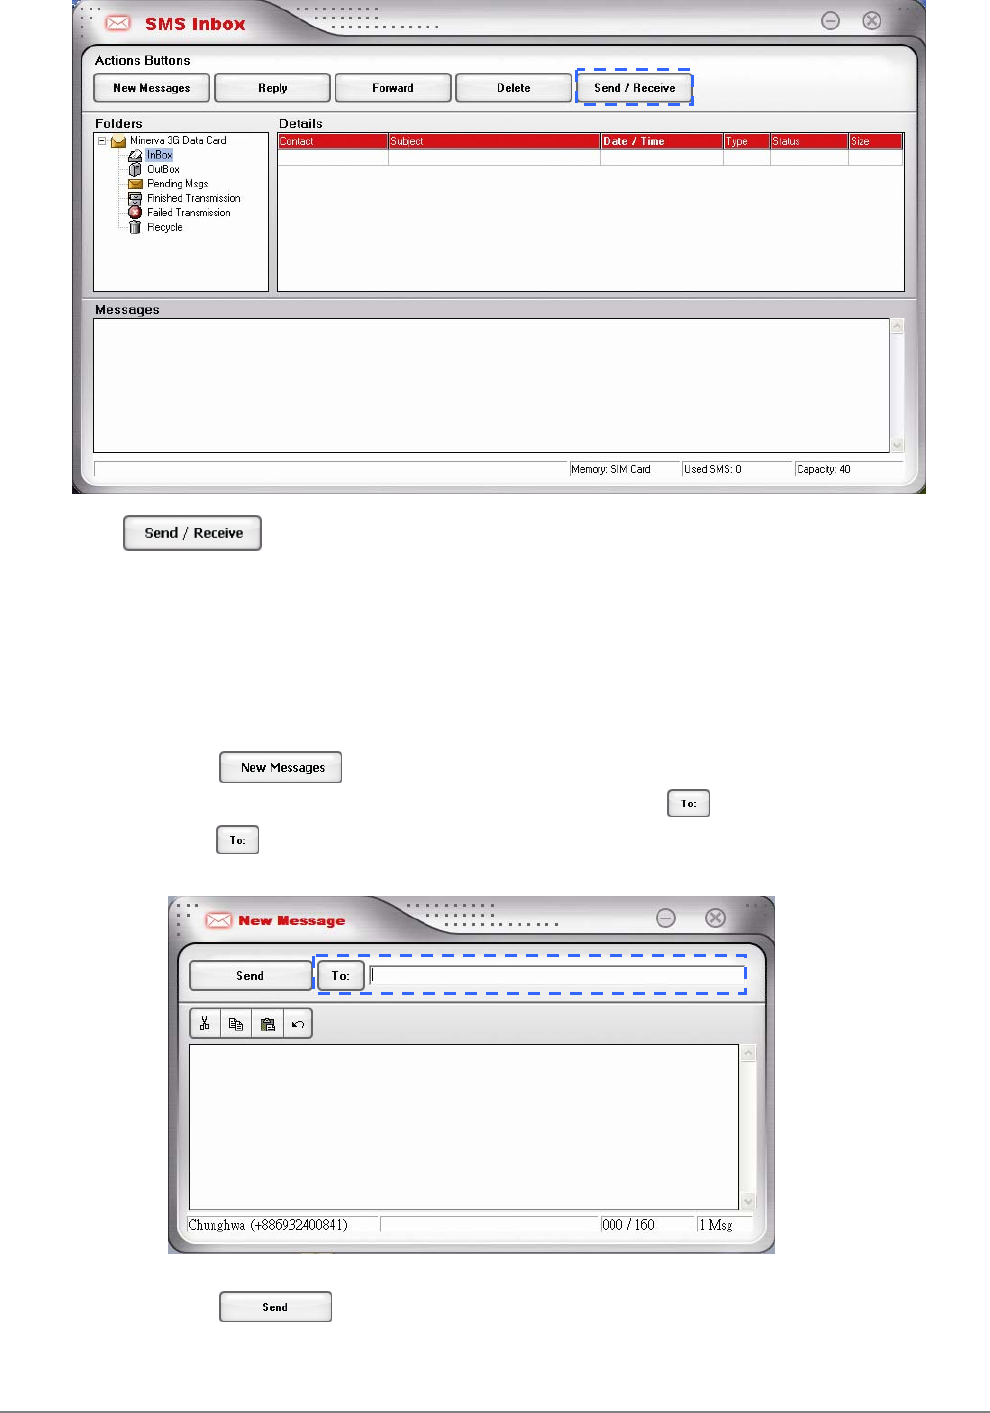
3.2 Messaging
To start using various functions of SMS, launch Mobile Connect and click SMS ( ) in the
main screen of Mobile Connect. The SMS screen as below displays:
14
Click to check if there are any new messages. You can see the abstracts of
received massages in the InBox folder. The detailed content of the massage you select is
shown on the lower-half of the SMS screen. You can double-click a massage to view its detailed
content as well.
Writing New Text Messages
1. Click in the SMS screen, a New Message screen will be shown.
2. Enter a phone number directly in the blank field behind ; otherwise, you can
click to show the phonebook and then select a contact. Double-click on the
desired contact to select it or press Ctrl to make multi-selection.
3. Input the text message.
4. Click when you complete the text message. This message is saved
automatically to the Finished Transmission folder after it is sent out.
15
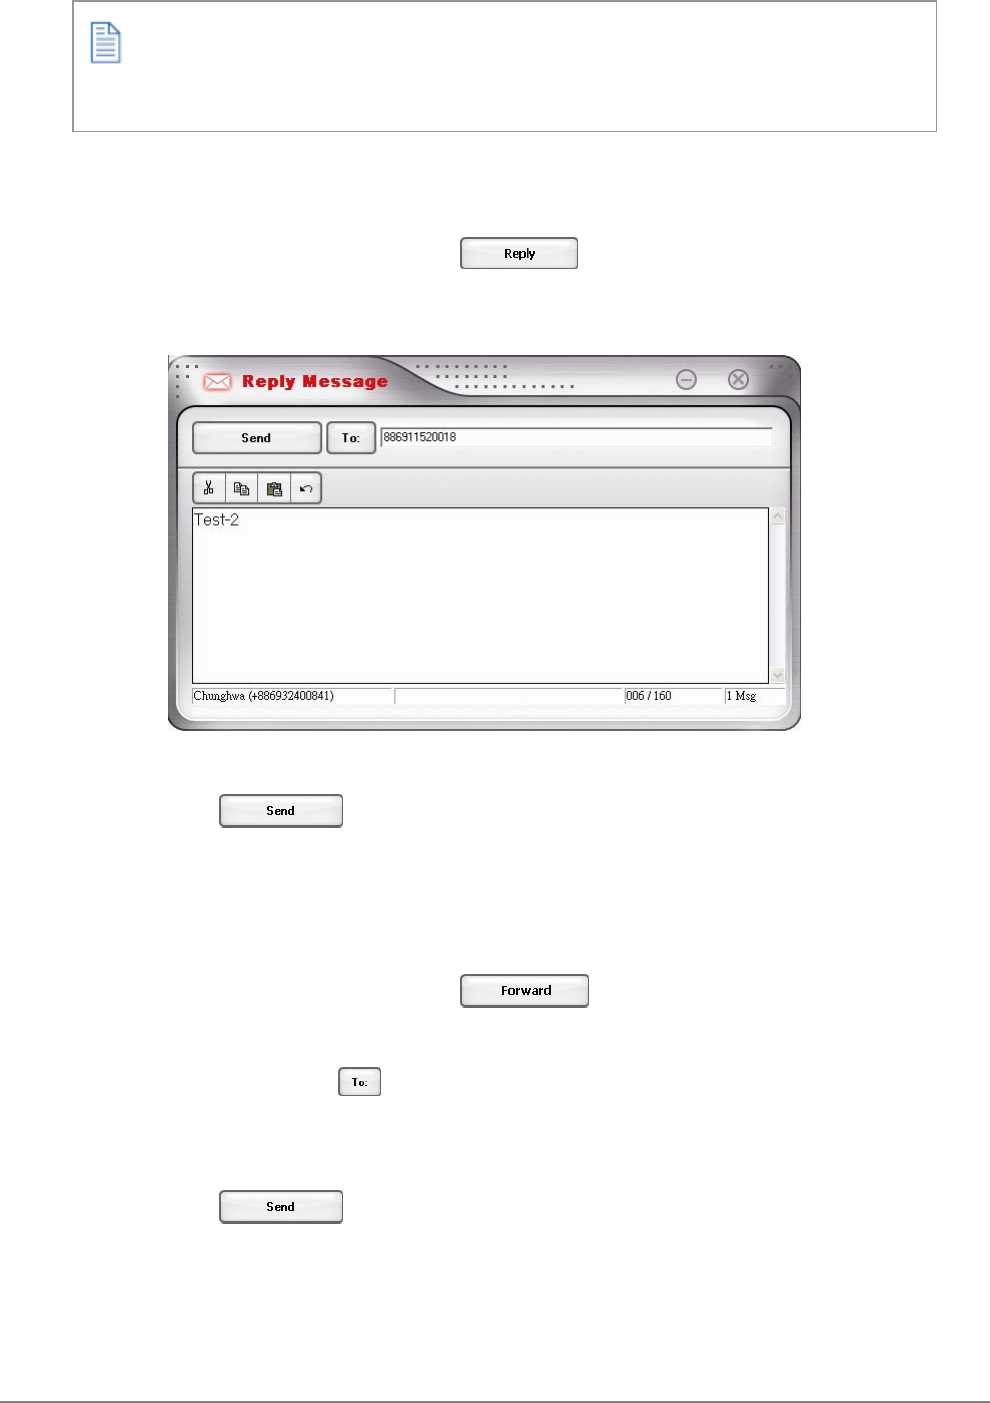
Replying Messages
To reply to a sender directly, do as the following:
1. Select a message and then click .
2. A Reply Message screen with the sender’s phone number automatically filled in will
be shown.
3. Input the content for the massage you want to reply.
4. Click to reply.
Forwarding Messages
To forward massages, do as the following:
1. Select a massage and then click .
2. A Forward Message screen will be shown, enter the phone number you want to
forward to or click to select the phone number.
3. The content of the original message appears in the screen automatically, you can
edit it if needed.
4. Click to forward the message.
Deleting Messages
To delete the messages you have received, do as the following:
Your text message is sent as one message if it contains less than 160 characters. If this
number is exceeded, the message is divided into several messages and sent one by one.
16
1. Select one or more massages and click .
2. The message(s) will be removed to the Recycle folder.
3.3 Accessing the Internet
Your wireless device allows you to access the Internet through an established 3G or GPRS
connection. Once the connection is established, you can connect to any website available on
the Internet, or access other Internet services such as sending/receiving E-mails. Do the
following to get connected and browse the Internet.
1. Click Connect () in the main screen of Mobile Connect. Your wireless device
will search for available connections automatically.
2. When the connection is established, corresponding information about the connected
network will be displayed on the right-hand side of the main screen.
3. Click Browser ( ) to start the Explorer on your PC, you can then access the
Internet.
4. Click Disconnect ( ) when you want to disconnect the connection.
Sending/Receiving E-mails
You can send/receive E-mails via MS outlook after establishing a connection. Click Connect in
the main screen to get connected, you can then click E-mail ( ) to open MS outlook and
send/receive E-mails.
For deleting a message permanently, go to the Recycle folder, select the massage and
click Delete.
Mobile Connect is capable of automatically configuring the wireless device; however, you
can manually change some settings by clicking the Setting button to enter the setting page.
SMS and Phonebook are unavailable while the connection is established.
17
3.4 Managing Your Phonebook
Connect Mobile can help you to manage the entries in your SIM card. You can add, edit and
delete entries in the Phonebook; moreover, you can send text massages directly from the
Phonebook.
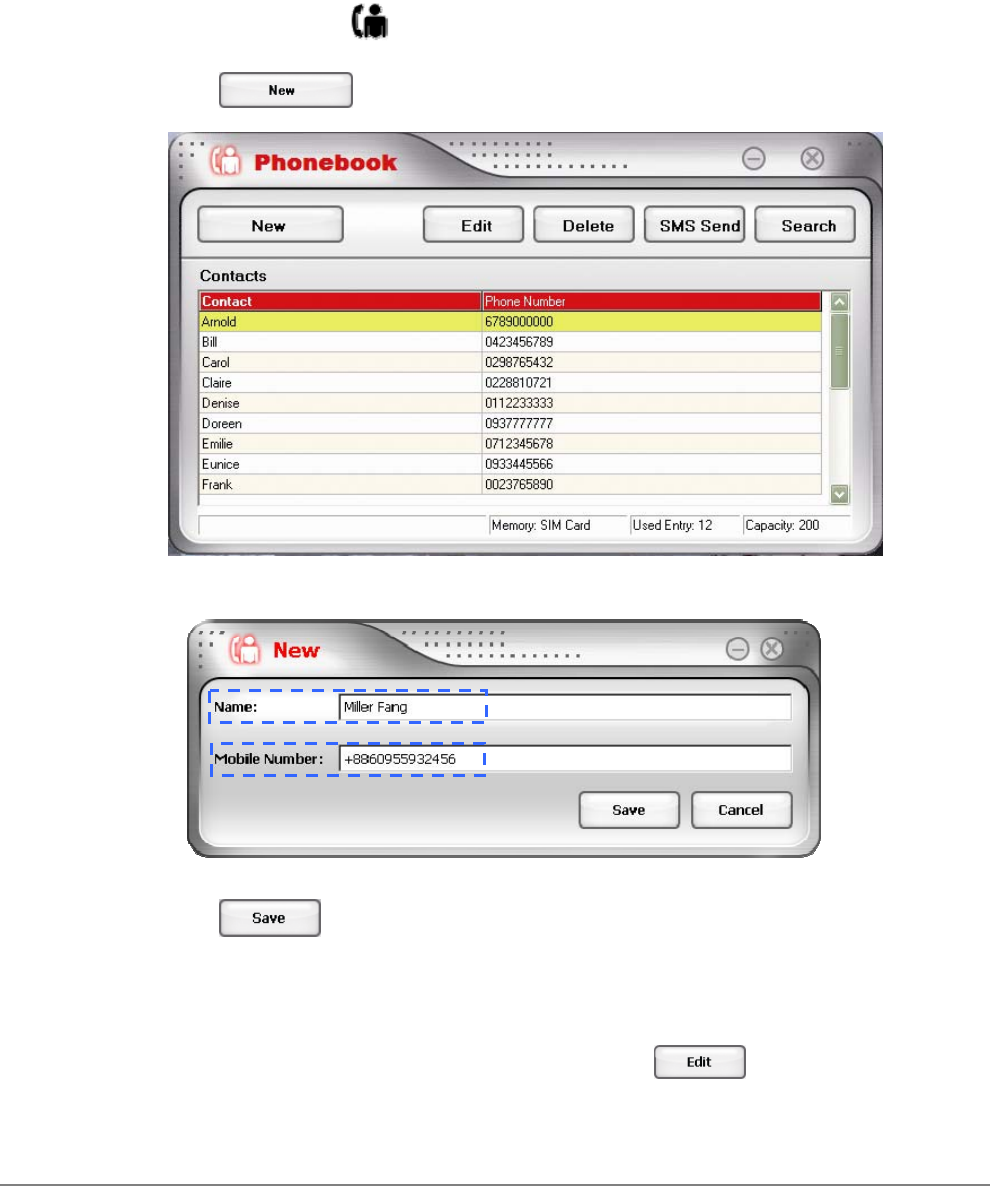
Adding Entries
1. Click Phonebook ( ) in the main screen.
2. Click to open the screen for creating a new entry.
3. Fill in the name and the mobile number.
4. Click to save the new entry to the Phonebook.
Editing Entries
1. In the Phonebook screen, select one contact and click .
2. Modify the name and the mobile number in the Edit screen.
18
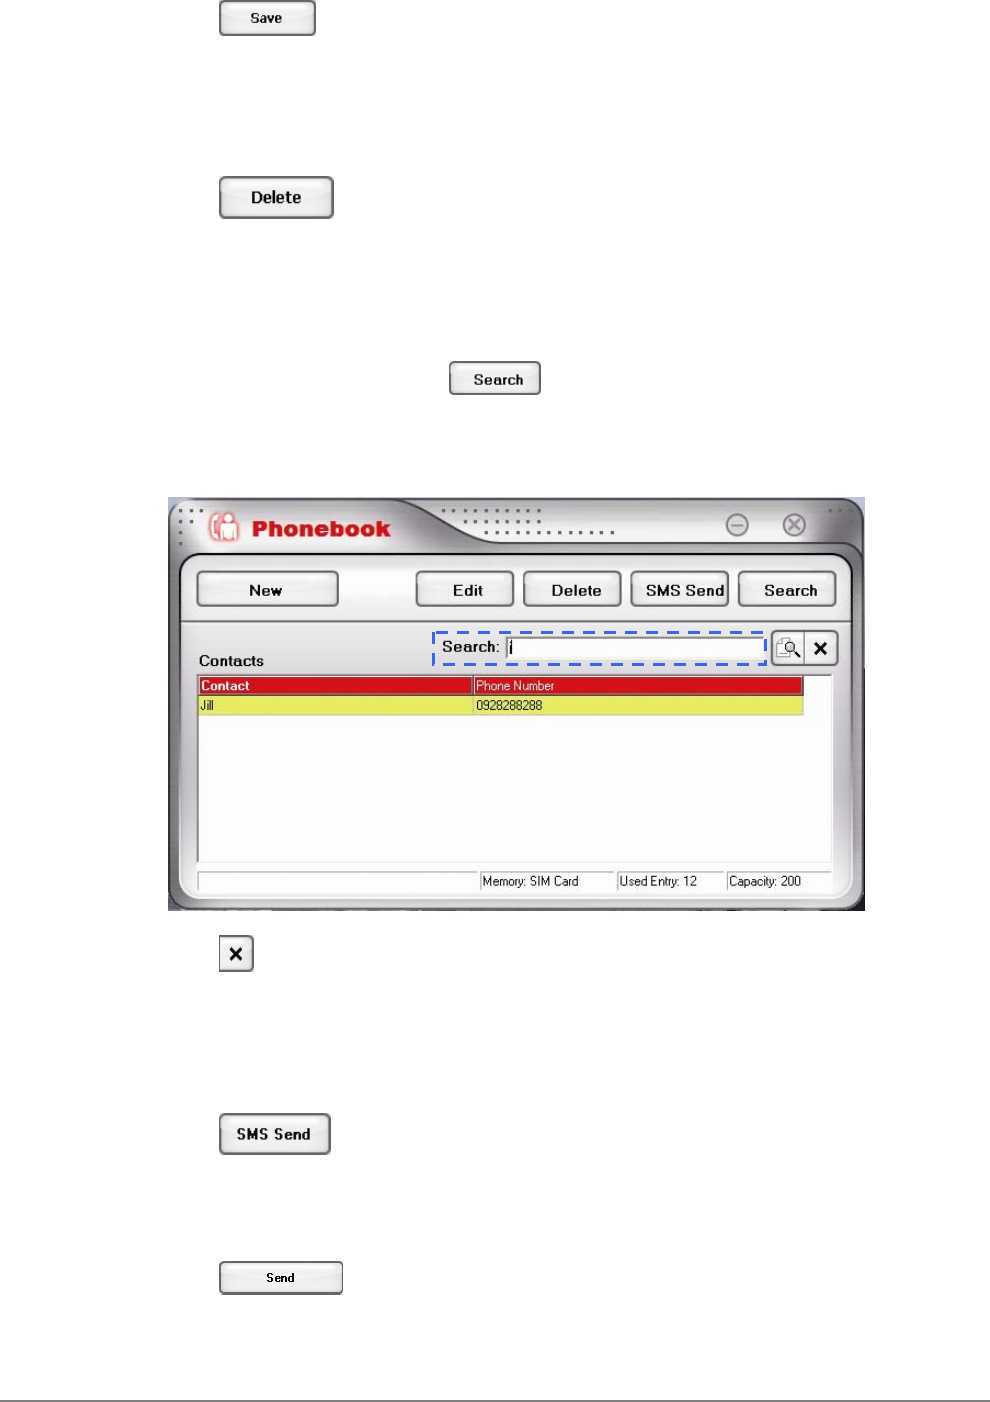
3. Click to save the modified entry.
Deleting Entries
1. Select one or more entries to be removed from the Phonebook.
2. Click to permanently delete the entry/entries.
Searching Contacts
1. In the Phonebook screen, click .
2. Start entering a contact’s name in the blank field, matching items will be listed. You
can then double-click the desired contact to send him/her a message.
3. Click if you want to close the search box.
Sending Messages
1. Select the contact you want to send a text massage to.
2. Click to show a New Message screen with the contact’s phone number
automatically filled in. Alternatively, you can double-click on the contact.
3. Input the text message.
4. Click when you complete the text message.
19
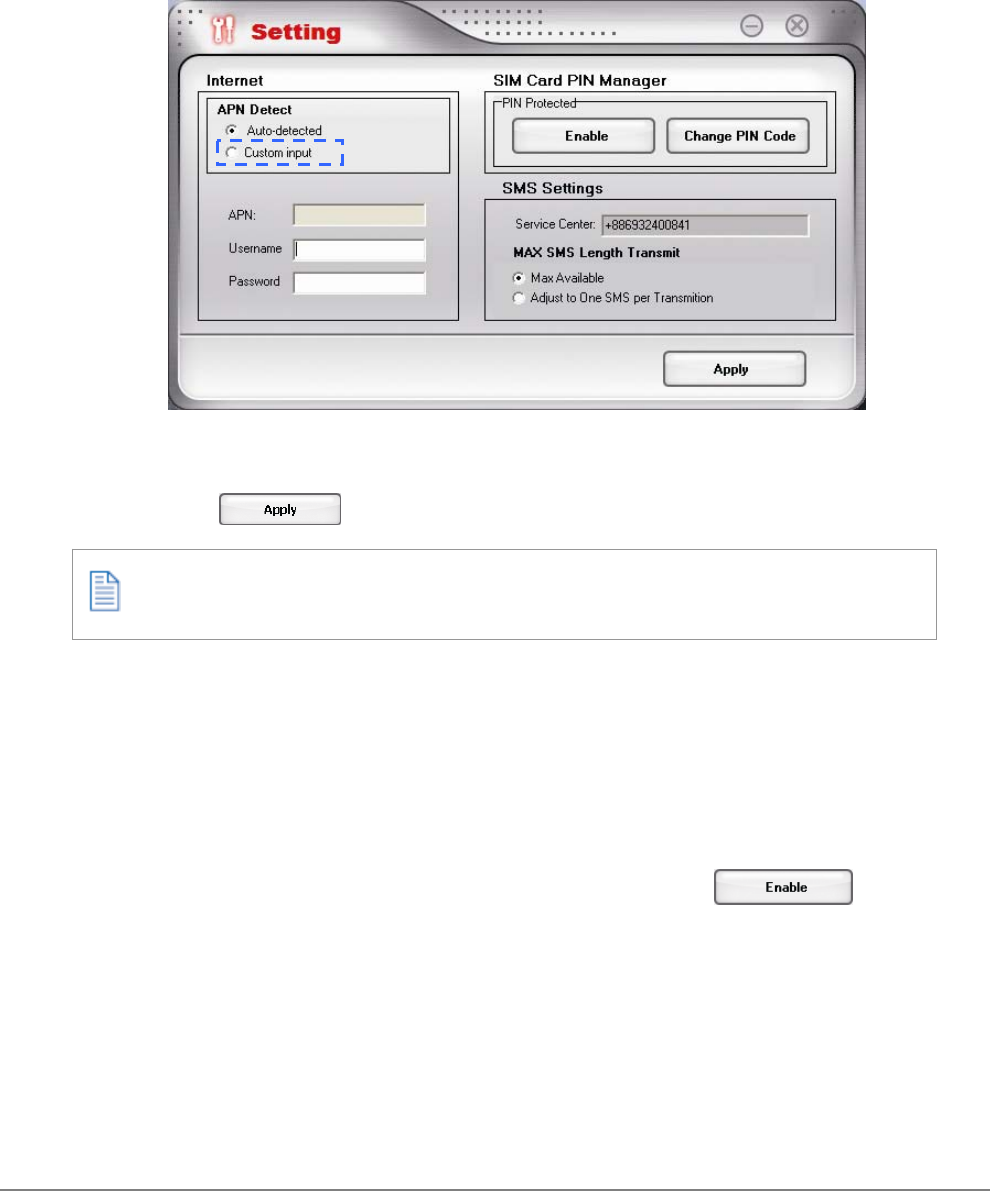
3.5 Changing Settings
Internet settings
By default, your wireless device searches for a network automatically when you click on
Connect. However, you can make the search manually:
1. In the main screen of Mobile Connect, click the SETTING button.
2. A Setting screen will be shown. Select Custom Input.
3. Enter requirement information for the setting items of APN, username and
password.
4. Click to save your settings.
Setting PIN Security
For security purpose, SIM cards are preset with a personal identification number (PIN) that is
provided by your wireless service provider. When PIN security is activated, you need to enter a
PIN code when you launch Mobile Connect. To active the PIN feature, do the following:
1. In the main screen of Mobile Connect, click the SETTING button.
2. A Setting screen will be shown. In PIN Protected box, click .
Please contact your network operator to obtain APN, Username and Password.
20
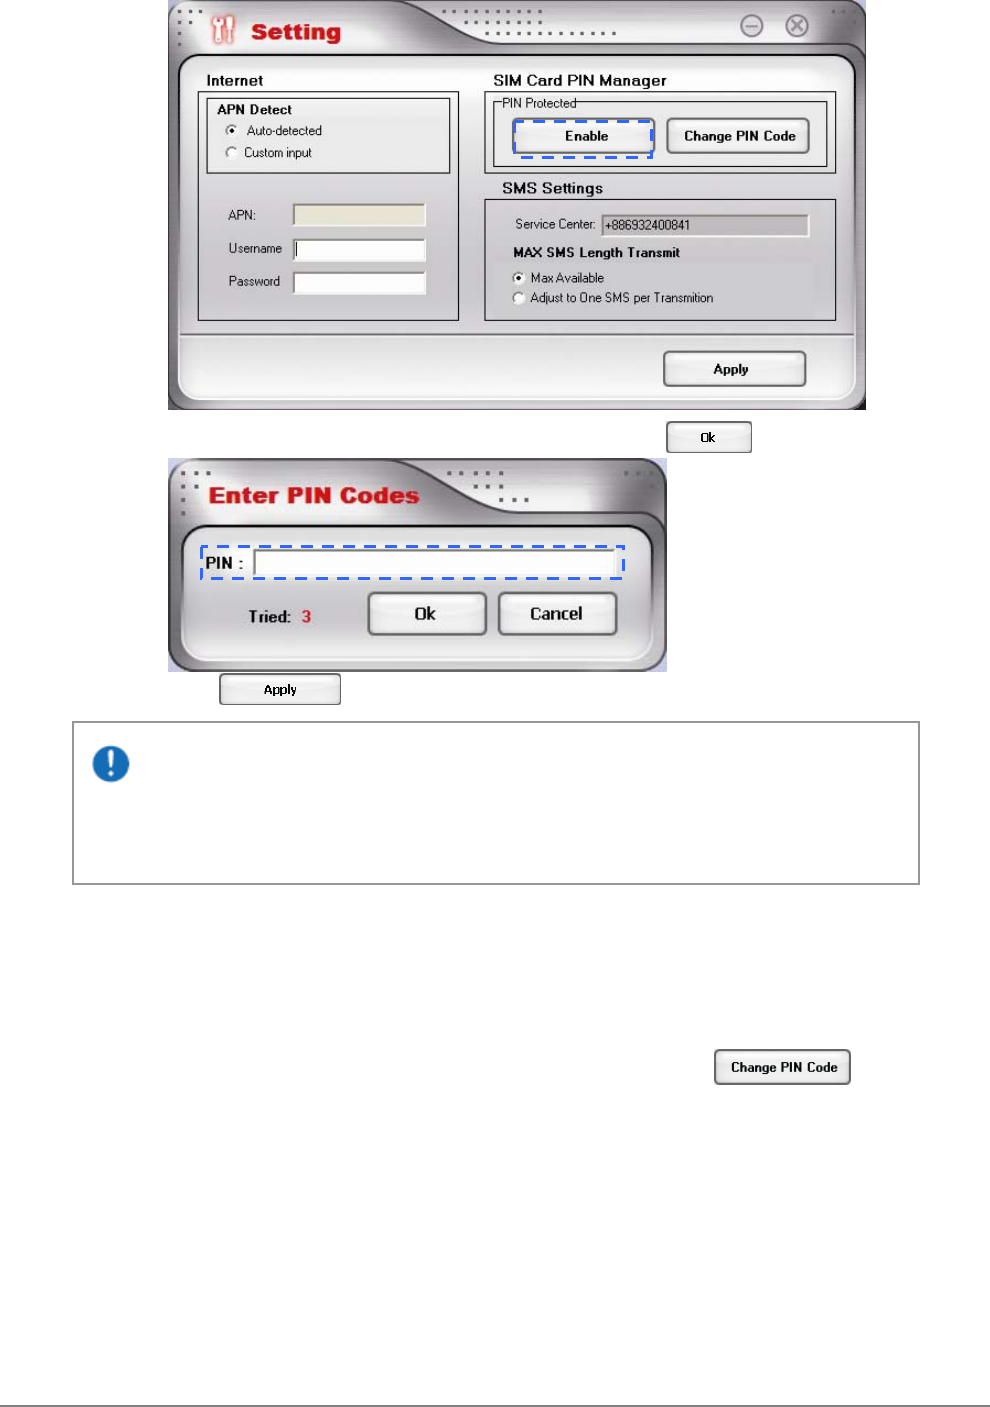
3. Enter the PIN code according to the prompt. Then click .
4. Click in the Setting screen to save this setting.
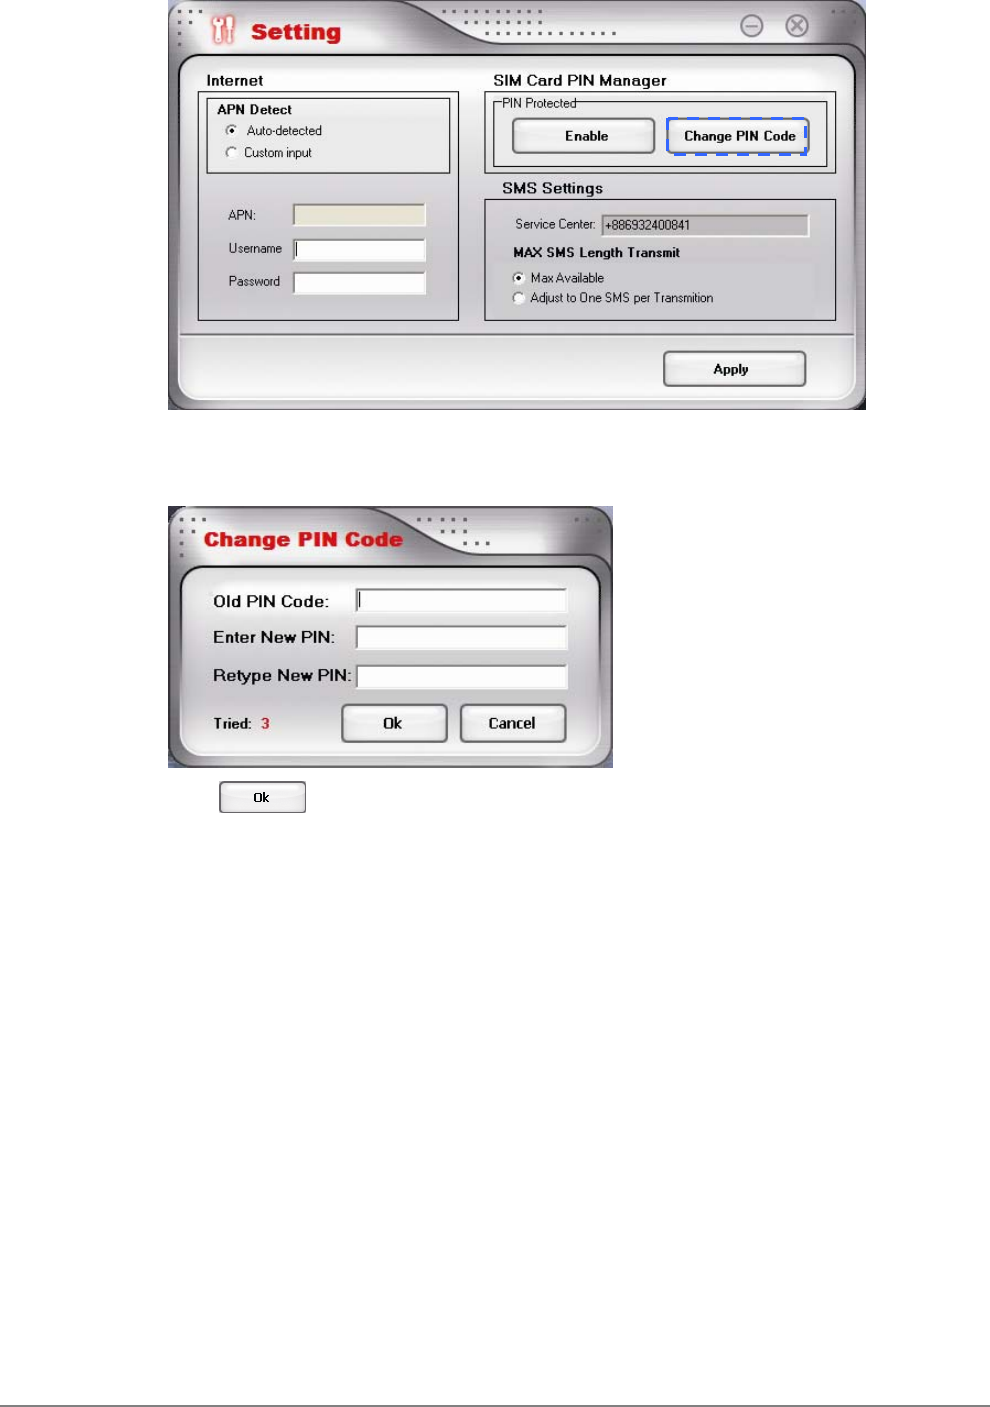
Changing PIN code
You have to activate PIN security before changing the PIN code.
1. In the main screen of Mobile Connect, click the SETTING button.
2. A Setting screen will be shown. In PIN Protected box, click .
If your PIN is entered incorrectly three times, the SIM card will be blocked. If this
happens, you can unlock it with the PIN Unblocking Key (PUK) obtained from your wireless
service provider.
21
3. Enter the current PIN code and the new PIN code, and then enter the new code
again to confirm it.
4. Click to modify it.
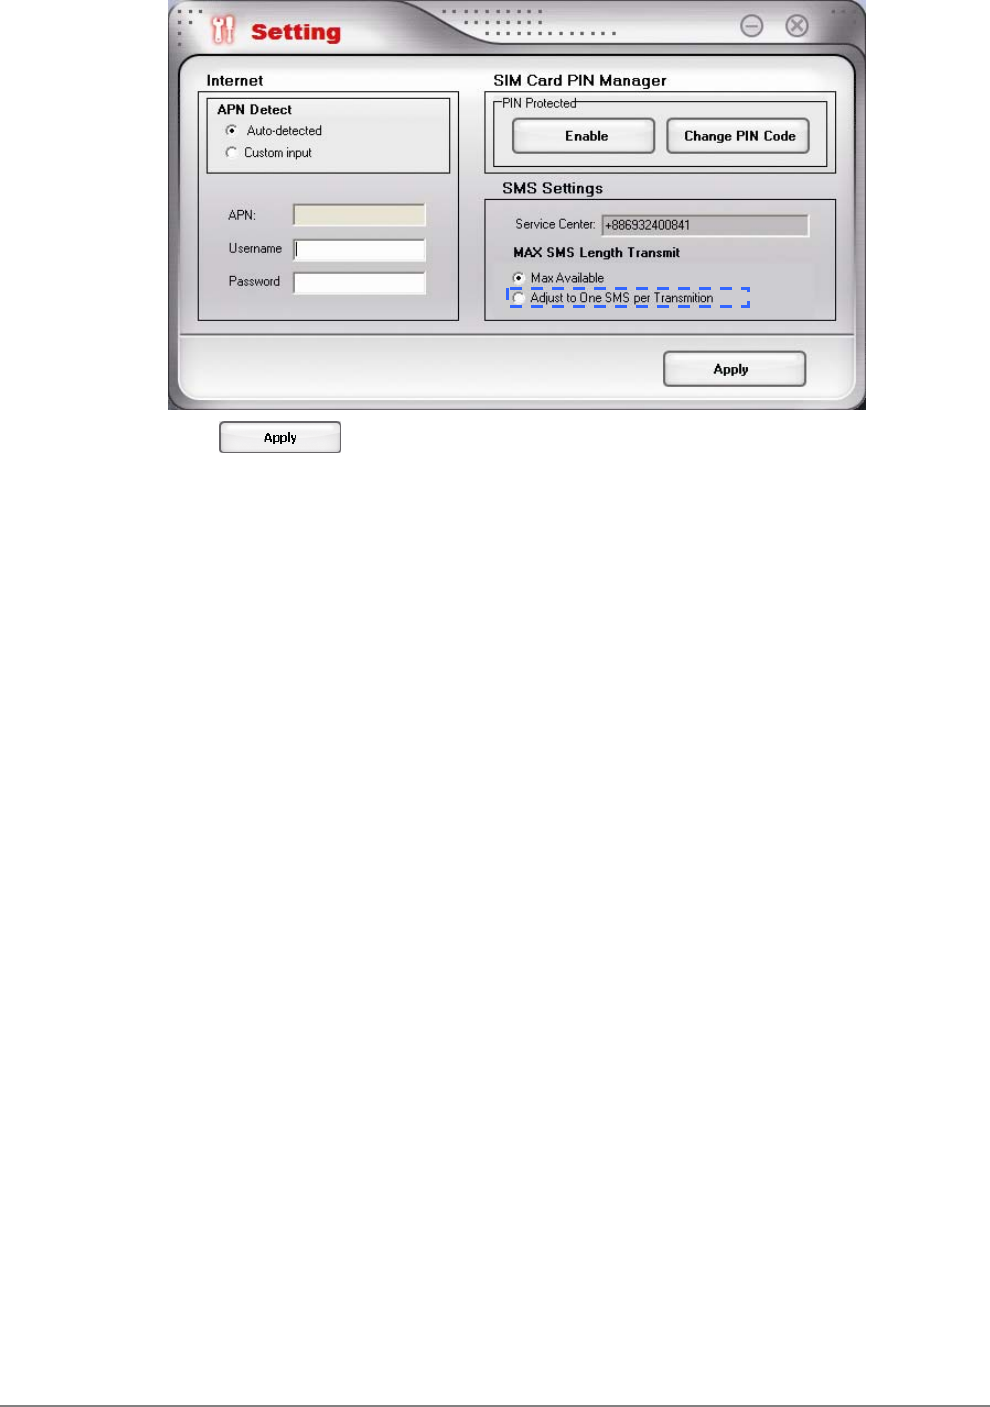
SMS Settings
If your text message contains more than 160 characters, it is divided into several messages and
sent one by one. You can set the maximum massage length to 160 characters to prevent this
kind of situation. Once you adopt this setting, the character amount of every text message you
send can not exceed 160.
1. In the main screen of Mobile Connect, click the SETTING button.
2. Select Adjust to One SMS per Transmission.
22
3. Click to save this setting.

23
Chapter 4. Quitting and Uninstalling
24
4.1 Quitting and Removing
Quitting Mobile Connect
If you wish to quit Mobile Connect, do either of the following:
1. Click the close button in the upper right of the main screen.
2. Right-click the Mobile Connect icon in your computer’s taskbar, and select Exit in the
pop-up screen.
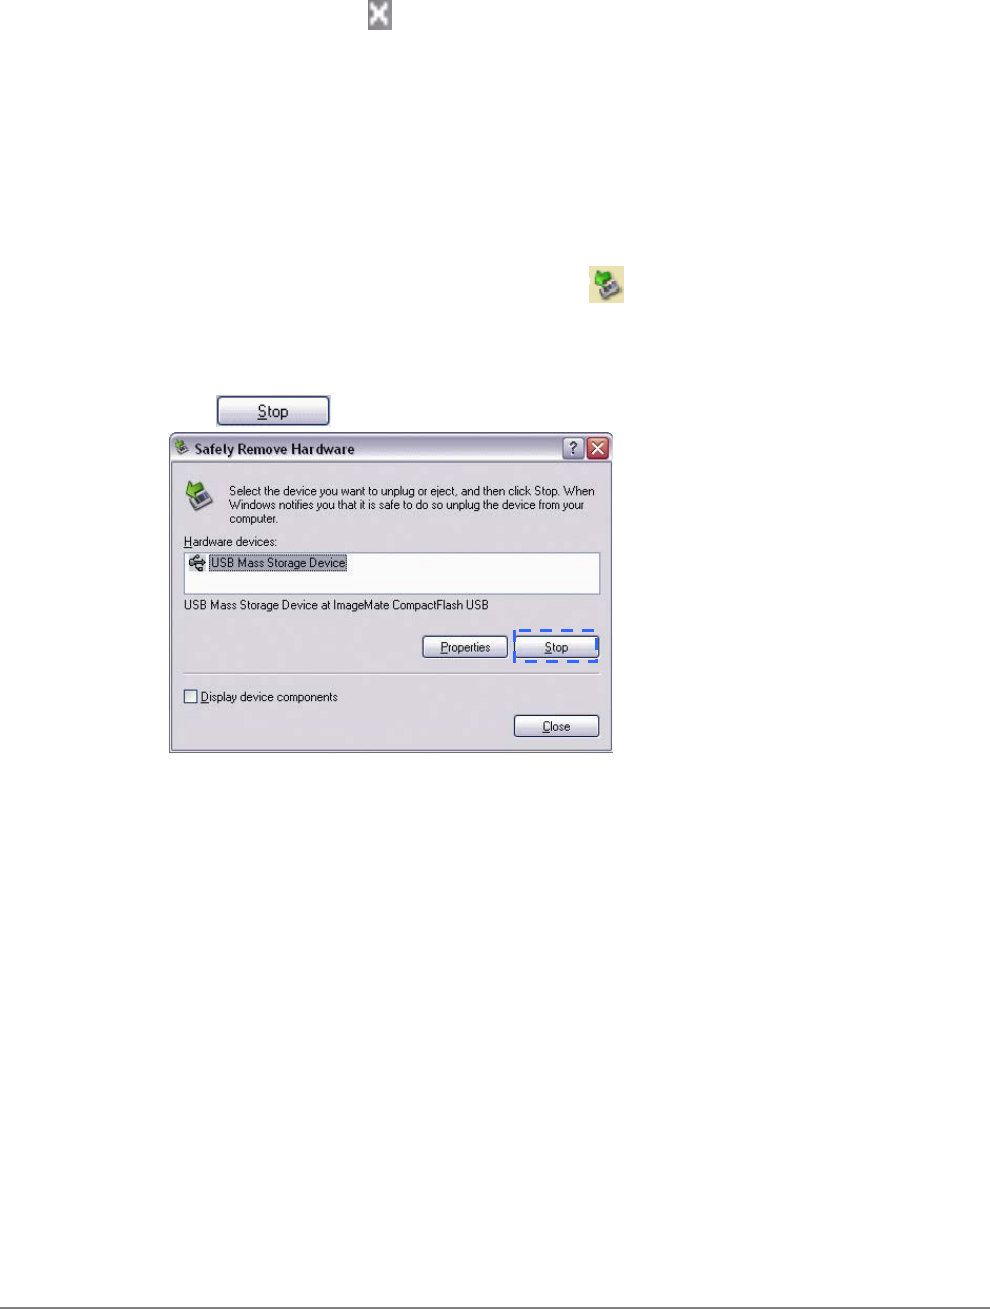
Removing the Wireless Device from your PC
If you want to remove the wireless device from your PC, please do it through the hardware
removing function provided by Windows.
1. Double-click the Safely Remove Hardware icon in the notification area of
Windows taskbar.
2. You will be given a list of USB devices that are active. Select your wireless device and
click .
3. Windows will confirm that your wireless device can be safely removed, you can then
Unplug it from the USB port of your PC.
4.2 Uninstalling Mobile Connect
To remove Mobile Connect from your PC, select Start > Programs > Data Card > Uninstall
Mobile Connect. You can then uninstall Mobile Connect by following the on-screen uninstall
Wizard steps.

25
Appendix
26
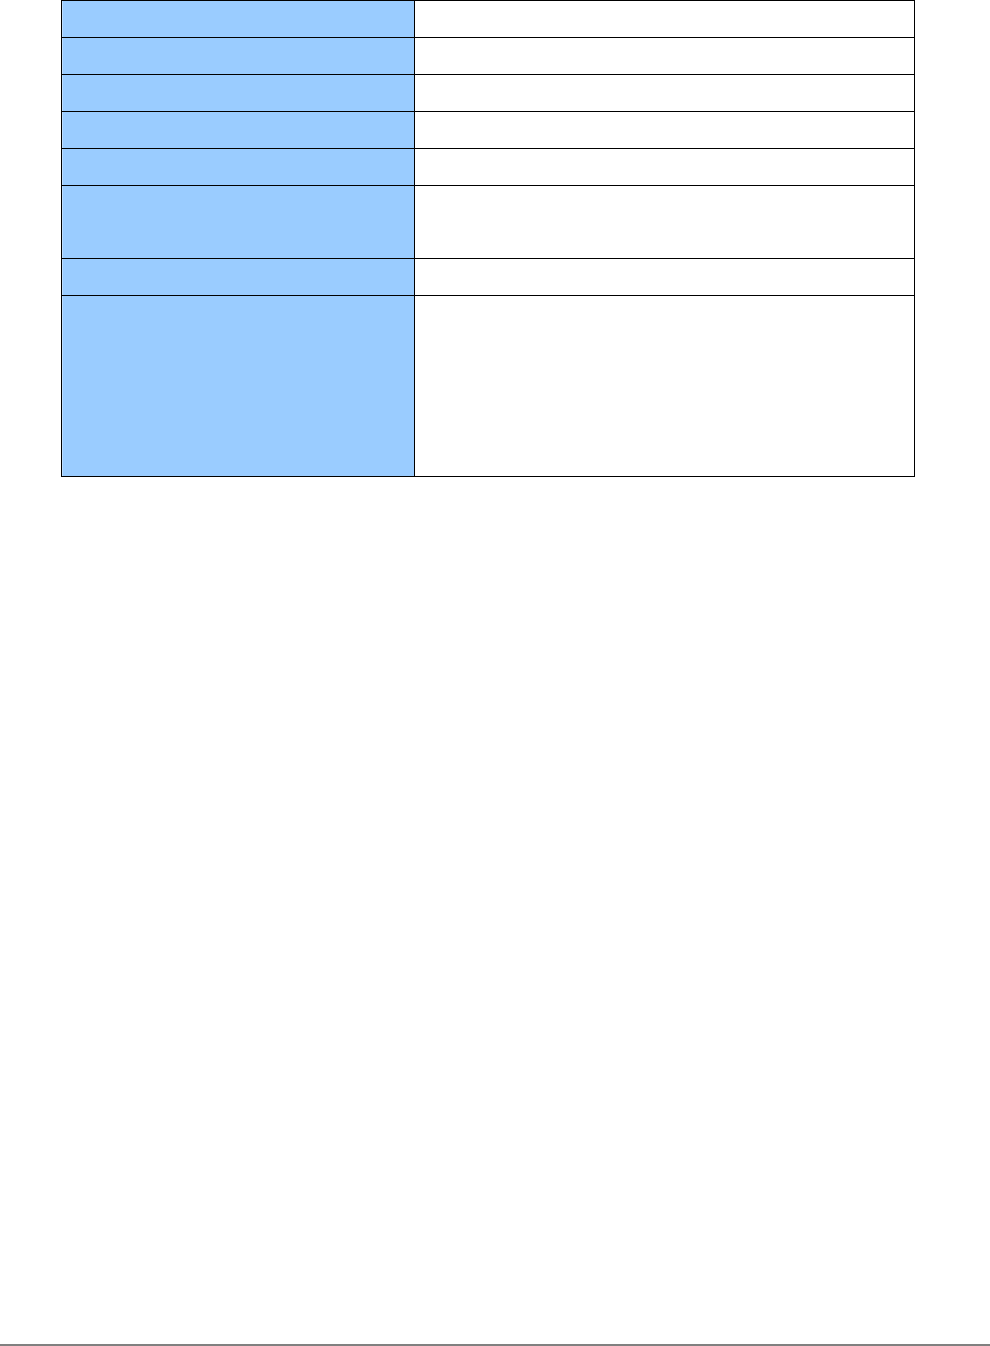
A.1 Specifications
Model Type HSDPA USB Dongle
Dimensions 80 x 28 x 13 mm
Weight 35g (estimated)
Power Supply +5V±10%, +3.3V±5%
Power Consumption 2.5 W
Data Rate Uplink: up to 384kbps (UMTS)
Downlink: up to 3.6Mbps (HSDPA)
Auto Installer Yes, Driver pre-load in flash with auto-exe.
Frequency Bands GSM/GPRS/EDGE
850, 900, 1800, 1900 MHz
Class 10 GPRS/EDGE service
UMTS/HSDPA
850, 1900, 2100 MHz
A.2 Troubleshooting
Minerva 3107 cannot be detected by my PC.
Make sure the Minerva 3107 is fully inserted into a USB port on your PC and check if the
USB port is valid.
I cannot establish a connection.
Check if the signal strength is stable, if not, move your PC and Minerva 3107 to a location
with a stronger strength and try again.
Minerva 3107 stopped working suddenly.
Please check if the USIM card is inserted properly.
The USIM card is locked.
The USIM card will be locked if you enter incorrect PIN three times. If this happens, please
contact your wireless service provider for PIN unblocking Key (PUK).