Iradio Electronics DP-168 DMR Digital Radio User Manual DP 168 English manual
Iradio Electronics Co., Ltd. DMR Digital Radio DP 168 English manual
User Manual
Foruser
For optimum performance from this product. please read this
manual and the supplied Safety Information Booklet carefully
before use.
Do not use this radio or charge the battery in an explosive
environment, such as gas, dust, smoke, etc. Do not leave the radio
in a dusty or wet environment. It is very important for the user to
understand all instructions before using the radio
ATTENTION
Pleasereadthefollowingbriefinstructions,non‐compliancewiththeseinstructions
maycausedangerorbeunlawful.
1.Obeythegovernmentregulationbeforeusingthisradio,improperoperationmay
violatethelaw.
2.Donotuseinexplosiveareas.
3.Donotchargeorchangethebatteryinexplosiveareas.
4.Donotusetheradiowithadamagedantenna,touchingadamagedantennawill
causeheatinjury.
5.Donotattempttoopentheradio:themaintenanceworkmustbedoneby
technicalexpertsonly.
6.Toavoidtroublescausedbyelectromagneticinterferenceorelectromagnetic
compatibility,pleaseturnofftheradioinplaceswheresigned:Usingradio
equipmentclosetoelectronicequipmentcancauseittomalfunction.
7.Inacarwithasafetyairbag,donotputtheradiowithinthescopeoftheairbag.
8.Donotplacetheradiounderthedirectsunlightorveryhotlocations.
9.Whentransmittingkeepantennaawayfrominternalbodyparts.
10.Ifyousmellburning,pleaseswitchoffradio’spowerimmediatelyandcontact
yourlocalsupplier.
CONTENTS
Unpacking and device checking................................................01
Supplied accessories...............................................................01
Battery information................................................................02-03
Charging Li-ion battery............................................................02
Applicable battery type............................................................02
The procedure of charging.................................................02-03
Warning...................................................................................03
Care and cleaning.......................................................................04
Product Care............................................................................04
Product cleaning......................................................................04
Preparation before using......................................................05-06
Assembling the antenna.........................................................05
Assembling the battery......................................................05-06
Install belt clip.........................................................................06
Be familiar with the radio......................................................07-10
Schematic diagram of the whole radio...............................07-10
Basic operations....................................................................11-13
Turning the radio on/off............................................................11
Adjusting the volume................................................................11
Transmitting/Receiving .......................................................11
Monitor(Analog).......................................................................11
Selecting a channel.............................................................11-12
Keyboard lock..........................................................................12
Scan.........................................................................................12
Low battery alert......................................................................13
Battery strength indicator........................................................13
Function setting.....................................................................14-20
(Setting by programming software)
Squelch level settings..............................................................14
Transmit power level settings..................................................14
Voice reporting number settings..............................................14
Time-out-timer (TOT)...............................................................14
Transmit authority settings..................................................14-15
Battery save........................................................................15-16
VOX settings............................................................................16
Screen display and settings.....................................................16
Read/Write frequency password settings.................................17
Digital relay function settings...................................................17
Digital communication function settings...................................17
Digital channel communication encryption function............18-19
QT and DQT selective........................................................19-20
Troubleshooting ....................................................................21-22
Technical specifications........................................................23-24
UNPACKINGANDDEVICECHECKING
Thankyouforpurchasingtheiradiodigitalhandheldtransceiver.
Beforeusing:
1.Pleasecheckwhetherthepackingboxisdamaged..
2.Pleaseunpackpackingboxcarefully,andconfirmthefollowinglistof
itemsareinthebox.Ifanyitemsaremissingorhavebeendamaged
duringshipment,pleasecontactradiosupplierimmediately.
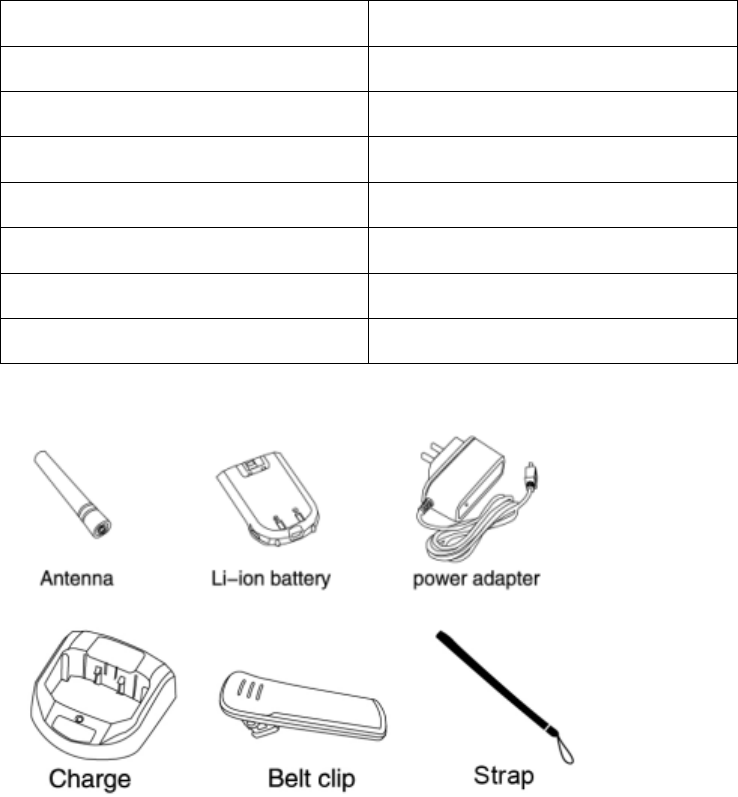
SuppliedAccessories
ITEMQTY
Antenna1
Li‐ionBatter
y
1
PowerAda
p
ter1
Char
g
er1
BeltCli
p
1
Stra
p
1
Manual1
Note:
Thepicturesaboveareforreferenceonly.
BATTERYINFORMATION
ChargingLi‐ionBattery
Pleasechargethebatterybeforeusing.Charge‐dischargecycletwotimes
canmakethebatterycapacityachievebetterperformance.Whenthe
batterypowerislow,pleaserechargethebatteryorreplacewithaspare
battery.
ApplicableBatteryType
PleaseuseLibertydesignatedbatteryasanyotherbatterymaycause
explosion.
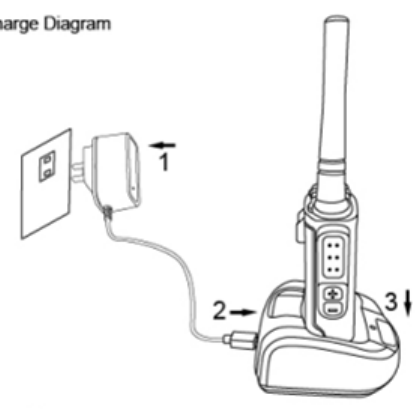
Theprocedureofcharging:
Useonlythedesignatedchargerandbattery,theLEDonchargercan
indicatethechargingstage.
ChargeDiagram
Procedures
1.ConnectthepoweradaptertoACsocket,”1”.

2.Plugthepoweradapterintotherearjackofthecharger,”2”.
3.Placetheradiowiththebatteryattached,intothecharger,“3”
LEDIndicatorStatus
RedCharging
GreenFullycharged
Warning:
Forsafetythelithiumbatteryisnotchargedbeforeshipment.
○
1Whencharging,itisbettertoturnofftheradio..
○
2ChargebatterybydesktopchargerorUSBplug.
○
3Whilecharging,theindicatorlightwillturnred.
○
4Itneedsatleast4to5hourstochargethebatteryfully.Whencharging
iscompleted,theindicatorlightwillturngreen.
Ifchargingthebatteryforalongtime,itwillshortentheservicelifeofthe
lithiumbattery.Whenthebatteryisfull,pleasestopcharging.
thechargerisonlyforthismodelradio.
Thebatteryshouldbeplacedinacool,dryplaceafterfullcharge.Donotexpose
toheatsourceorexposuretothesun.
Youcannottransmitwhilecharging.
Thebatterywillheatupwhilecharging,thisisanormalphenomenon.

CARE AND CLEANING
To guarantee optimal performance as well as a long service life of
the product. please follow the tips below.
Product Care
Do not pierce of scrape the product with any sharp instruments.
Keep the product far away from substances that can corrode the circuit.
Do not hold the product by its antenna or earpiece cable directly.
Attach the accessory jack cover when the product is not in use.
Product Cleaning
Clean up the radio and charger with a clean and dry lint-free cloth.
Use neutral cleanser and a non-woven fabric to clean the keys control
knobs and front case after long-time use. Do not use chemicals such as
stain removers, alcohol sprays or oil preparations, to avoid surface case
damage. Make sure the product is completely dry before use.
Caution: Power off and remove the battery before cleaning.
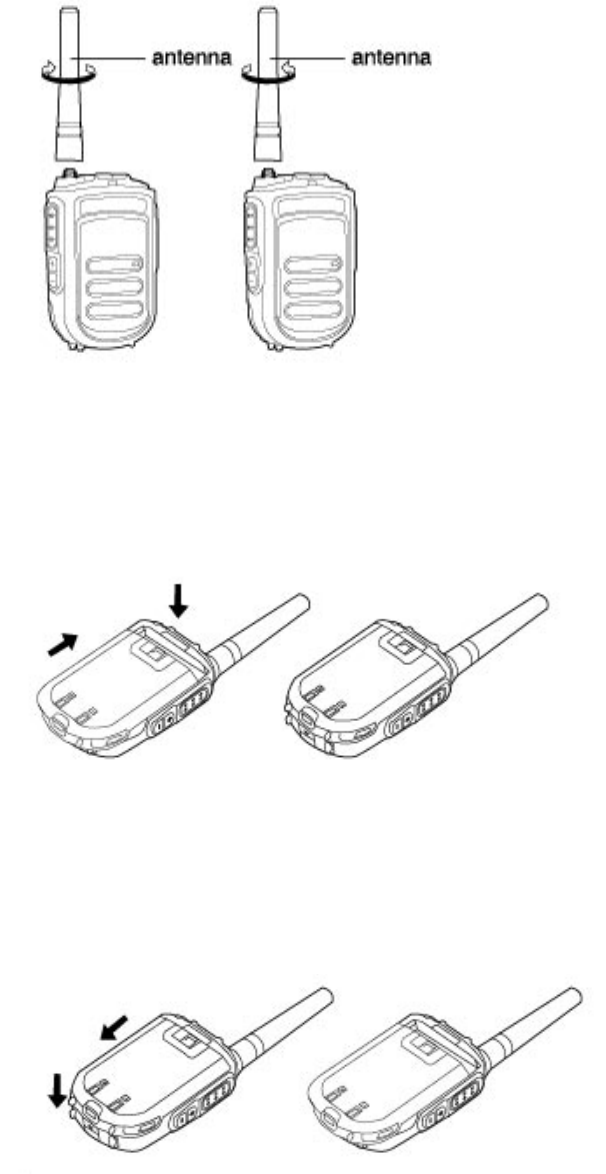
PREPARATIONBEFOREUSING
Assemblingtheantenna
Turntheantennaclockwisetofastenit.
Assemblingthebattery
1.Slidethebatteryintotheradio`sslot.
2.Toremovethebattery,turnofftheradio.Pressreleasebuttonand
slidethebatterylatchupwardtoreleasethebattery.
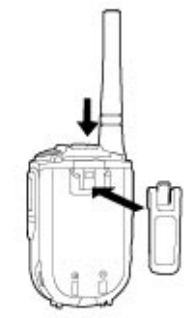
Installbeltclip
Slidethebeltclipintotheslotuntilitclicks.
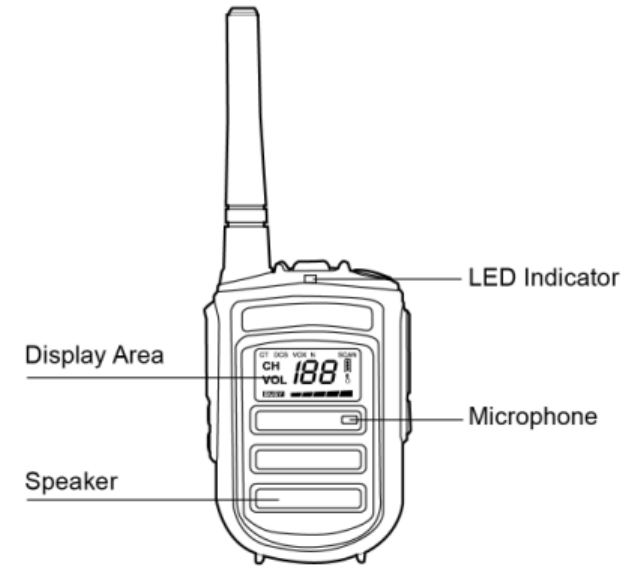
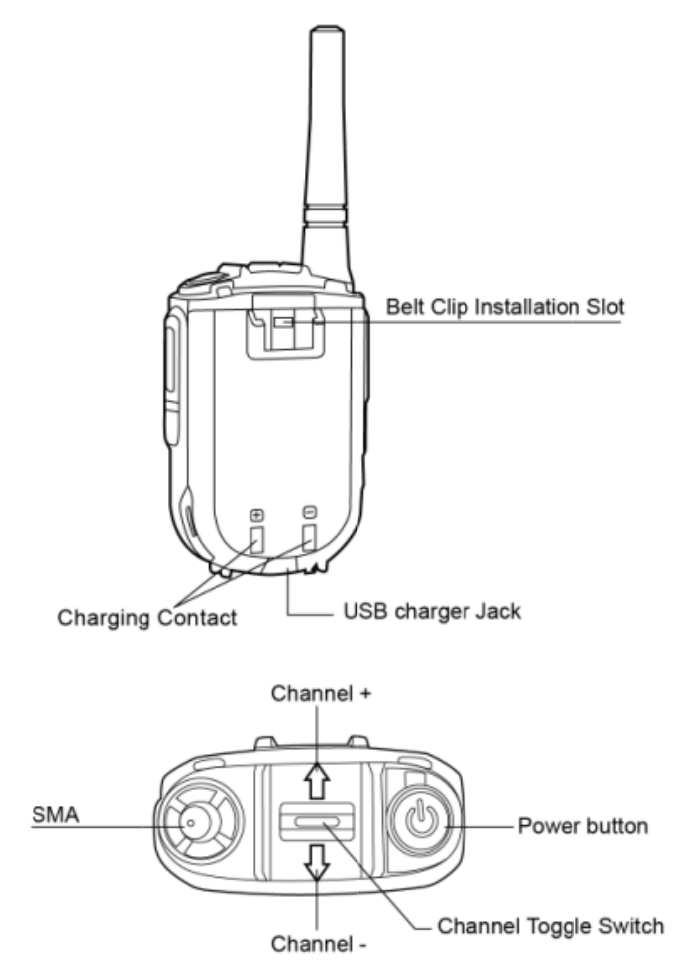
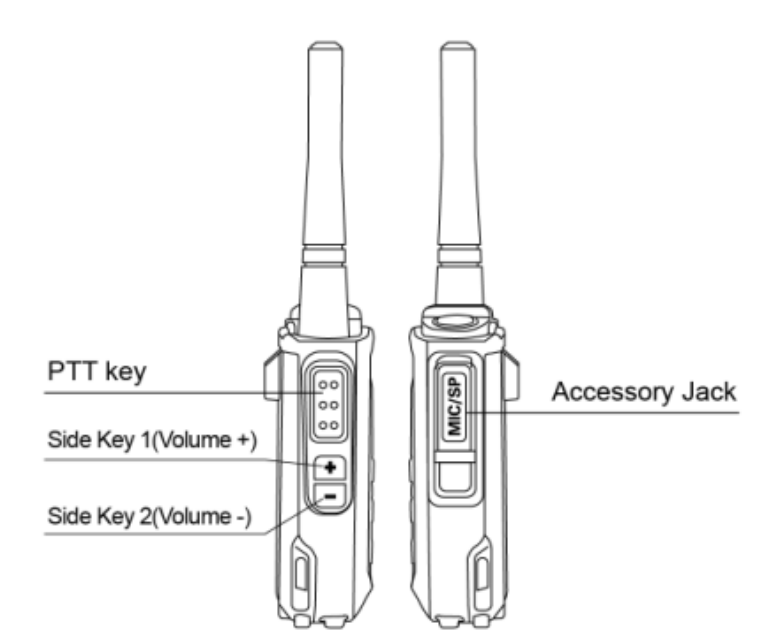
Befamiliarwiththeradio
Schematicdiagramofthewholeradio
Side key function:
No set ; Volume + ; Volume - ; Analog monitor ; Scan ; VOX ; Repeater/Talk around ;
High/Low power ; Turn on/off screen display.

BASICOPERATIONS
Turningtheradioon/off
Intheshutdownstatus,longpresstheredpowerbuttonuntilaclickis
heardtoturntheradioon/off.
Adjustingthevolume
Aftertheradioispoweredon,press[sidekey1]toincreasethevolume,
press[sidekey2]todecreasethevolume,atotalof10levelstochoose,
level0isturnoffthecommunicationvoice.
Transmitting/Receiving
Totransmitaudiosignals,pressandholddownthe[PTT]button,and
speakintothemicrophone.Duringtransmission,theLEDglowsred.
Toreceive,justreleasethe[PTT]button.Whenanyaudiosignalis
received,theLEDglowsgreen.
Note:
1.Toensureoptimalvolumeofthereceivingradio,holdtheradioapproximately2.5to5
centimetersawayfromyourmouth.
2.Communicationrangemaygetaffectedinrainydaysorforestlocations.
Monitor(Analog)
Thisfeatureallowsyoutolowertheconditionsforincomingsignal
match.
Longpress[sidekey1]2seconds,andthanyoucanmonitorthecurrent
channelsignal,thestatusofthelightisgreen.Itwillexitthemonitor
statusafterreleasedthe[sidekey1].

Selectingachannel
Pushup[channelselectionkey]tochoosemorelowerchannel,andpush
downtochoosemorehigherchannel.Orlongpressdowntochoosethe
channelrapidly.
Note:
Whentheradioiscurrentlyonablankchannel,itwillsoundbeeptonescontinuously.
Keyboardlock
Longpress[channelselectionkey]2seconds,thedevicepromptsthe
beepsoundandkeyboardwillbelocked,thescreenwilldisplay"".At
thesametime,thedevicecannotswitchthechannelandadjustthe
volume.Thenpress[channelselectionkey]2secondstounlockkeyboard
lock.
Scan
Thisfeatureallowsyoutolistentocommunicationactivitiesonother
channelssothatyoucankeepaclosetrackofyourteammembers.The
scanlistcanbesetbyyourdealer.
1.Inbootstatus,press[sidekey2]2secondstoenterchannelscanmode,
screendisplays[SCAN]andvoiceprompt"scan".Whileinscanningmode,
thedevicewilldetectthereceivedsignalsofeachchannel,anditwill
stopscanuntilthesignalisfound.
2.Whenthedeviceisscannedintoanactivesignal,thedevicewillremain
onthecurrentchanneluntilthesignaldisappears.Thescanstatuswillbe

recoveredaftersignaldisappeared5seconds.
3.Inscanstatus,press[sidekey2]2secondsagaintoexitthescanmode,
screendisplay[SCAN]willdisappearwhilevoiceprompts"scanoff".
Note:Youcannotenterthescanmodeuntilatleast2active
channelshavebeenstored.
Lowbatteryalert
Thisfeaturesallowsyoutoknowthelowbatterystatus.Whenbattery
powerlowerthan25±5,theLEDwillflashred,andthetone“Please
chargethebattery”willsoundperiodically.Inthiscase,pleasereplaceor
chargethebattery.
1.Whenthebatteryvoltageis0,thedevicewillshutdownautomatically
toprotecttheradio.Andlimittheusertoboot.pleasereplacethenew
batteryorchargethebattery.
2.Whentheoperatingvoltageofthedeviceishigherthan4.5V,the
machinewillautomaticallyshutdowntoprotecttheradio,andlimitthe
usertoboot.Pleasepayattentiontothenormaloperatingvoltagerange
oftheequipment:3.3V~4.2V.
Batterystrengthindicator
Thisfeaturesallowsyoutoknowthecurrentbatterystrength.
Doublepresstheredpowerbutton,itwilldisplaythepercentageof
batterystrength.

FUNCTIONSETTING(byprogrammingsoftware)
Squelchlevelsettings
Thisradioprovide0‐9gradeleveltoselect,Usersneedtomake
reasonablesettingsaccordingtotheactualoperationenvironment.The
higherthegradeis,thehigherthestrengthofthecommunicationsignal
need.Pleasedonotsetarbitrarily,soasnottoaffecttheeffective
communicationdistance.
Note:
0levelisequaltoclosethesquelchlevelsetting,devicewillalwaysopen
thereceivingchannel.Thefactorysettingislevel5.
Transmitpowerlevelsettings
Equipmentprovidehigh/lowpowerforusertochoose,pleaseselectand
setaccordingtotheactualusingenvironment.
Voicereportingnumbersettings
ThisradioprovideChinese/Englishandnonumberreporting,please
selectandsetaccordingtotheactualusingenvironment.
Time‐out‐timer(TOT)
ThepurposeofTOTistopreventanyuserfromoccupyingachannelfor
anextendedperiod.Thisfunctionwilllimitthetransmittime,whenit
exceedsettingtime,radiowillstoptransmitandkeepbeeping.Tostop
beeping,YoucanPress[PTT]againtoresumethetransmitstatus.This
radioprovide15‐600secondsforuserreferenceinanalogchannel.And

provide30‐270secondsindigitalchannel.
Programmingprocedure:
“Channel”→”More”→“TXSetting”→“Time‐outtimer(s)”
Transmitauthoritysettings
Whenthecurrentchannelisinareceivestate,ifthelaunchpermission
functionisset,thedevicewilllimitthetransmittingoperationaccording
tothesettriggercondition,meanwhileifuserpress[PTT]key,radiowill
promptaalarmthenbacktoreceivestate.
Programmingprocedure:
“Channel”→”More”→“TXSetting”→“Txauthority”→”A d m i t
criteria/Channelfree”
Note:
Indigitalchannel,”Incallcriteria”settingswilldeterminewhethertoactivateemissionlimits.
Batterysave
Instandbymode,whennosignalisreceived/transmittedornooperation
(keypress)isperformedfor10seconds(canprogrammingby
software),theradiowillautomaticallyenterbatterysavemodetoreduce
powerconsumption.Theradiomayexitthebatterysavemodeandget
activatedassoonasanykeyispressedoranysignalisreceived.
Userscanturnon/offthebatterysavefunctionbysoftware.Specific
startuptimeandpowersavingmode,pleaseselectaccordingtothe
specificuseenvironment.
Suggestion:itisrecommendedtoturnonthepower‐savingfunction,
andthepower‐savingmodeisbestwithinthe"1:2"!Ifyousetuptoo
higherwillresultingindelaythecall,butcanreducethestandbypower
consumption.Pleaseselectaccordingtothespecificuseenvironment.
VOXsettings
Thisfeatureallowsyoutotransmityourvoicewithnoneedtopressthe
[PTT].However,youmustemployadedicatedearpiecetorealizethe
function.
1.Usercanturnon/offtheVOXfunctionbyprogramsoftware.Useralso
cansetthesidekeyfunctioninto“VOX”,thenyoucanturnontheVOX
bypresssidekey.Afterturnonthisfunction,thescreenwilldisplay
“VOX”.
2.Ithas9levelsforuserstochoose,amongthem,level1isthehighest
sensitivity,level9isthelowest.IfyouturnonVOXfunction,pleaseturn
offthelaunchendpromptifwithoutuseexternalheadset.
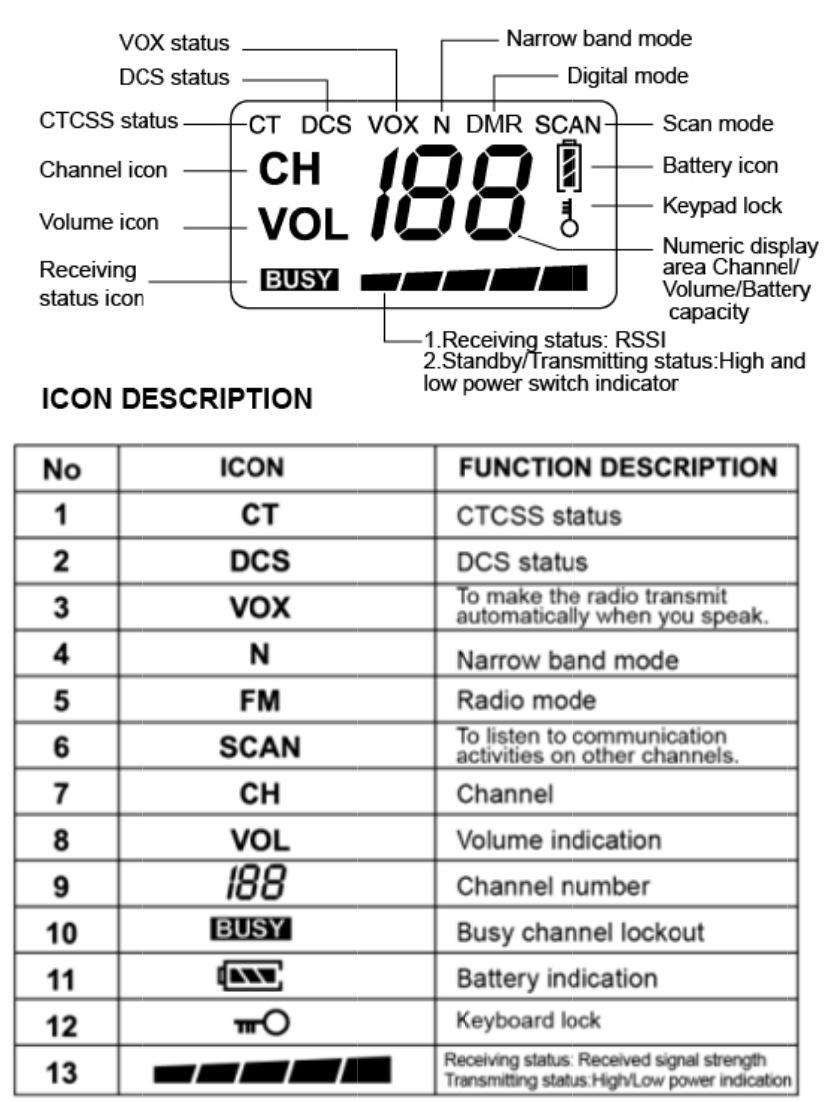
Screendisplayandsettings
Displayfunctioncanbeturnedon/offbyprogramsoftware.Thescreen
displaytimecanbesetbyprogramsoftware.Useralsocansettheside
keyfunctioninto“Display”,thenyoucanturnon/offthescreendisplay
bypresssidekey.Afterexceedthesettingtime,thescreendisplaywill
turnoffautomatically.

Read/Writefrequencypasswordsettings
Thedevicehasreadandwritefrequencyencryptionsettings.Whenthe
optionisopened,pleasekeepthepasswordinmindOtherwise,ifyou
forgetthepassword,youwillnotbeabletocommunicatewiththe
devicebyprogrammingsoftware!
Theinitialpasswordforthesoftwareis:000000.Userscanchangeinto
anyvalidpasswordwhicharecontaining6digits.
Digitalrelayfunctionsettings
Thissettingwillvalidwhenthedigitalchannel`sTX/RXfrequencyis
different.
Userscansetthefrequencyofrepeaterbypress“Channel”→”More”,
thenmakingtickat“relay”toturnonrelayfunction.Youcanalso
customizethesidekeyfunctionforquickoperation.
Afterturnontherelayfunction,cansetthenumberofrepeated
transmissionswhenthedeviceisaccessingtherelaybypress“Basic
Setting”→”Setting”→”RelayRetransmission”.Therecommendedvalueis
notlessthan5times,andtheusercanadjustthesettingsaccordingto
theuseenvironment.
Note:Thisdevicesupportsdigitalchannelwhichisnotrequireaccesstotherepeaterthen
canberealizedinonechannelwithdifferentfrequencyundertheconditionofdirectcall.Ifthe
userisindifferentstate,ifnotopen"relay"function,theequipmentwillcontinuetomaintaina
normaldigitalcommunicationmode.
Digitalcommunicationfunctionsettings
1.Contacts
Thedeviceprovides64digitalcontacttosetting.
Whenaddingacontactperson,thesoftwarewillconfigureanIDto
theuserbydefault.TheusercanalsodefinetheIDnumberofthe
currentcontactpersonwithintherangeof0‐16776415.TheIDnumber
ofthiscontactcorrespondstotheIDnumberofthedeviceyouwantto
call,andthemachineIDnumberissetin"Basic
Setting"→"Setting"→"SerialNo."→"Machinenumber".
The"calltype"determinesthecallmodeofthecurrentcontact,and
thedeviceprovidesthreeoptions:"groupcall","singlecall"and"allcall".
Theusercansetaccordingtothespecificsituation.In"allcall"mode,the
IDwillbesetbythedevice,theuserdoesnotneedtodefinetheirown.
Inthedigitalchannel,Press”more”→"ContactsNo.",cansetthe
correspondingcall.Ifyousetthe"contactsNo."to:“none”,thedevice
willnotbeabletotransmitsignal.
2.RXGroupLists
Thedevicesupportsupto32contactlists,andtheusercanusesthe
rightmousebuttontoclickthe"RXGroupLists"menuforediting.
3.Digitalchannelcommunicationencryptionfunction
Thedeviceprovides10groupswithalengthof10hexadecimal(0~f)
passwordset.Donotsetthepasswordtooclose,atleasttoensurethat

morethanfivecharactersaredifferent.
Inthedigitalchannel,Press”more”→"Encryption"canselectwhether
toactivate,andthespecific“EncryptionKeyNo.”Inthecaseof
activation,onlythepasswordisconsistent,thedevicecanreceivethe
signalnormally.
QTandDQTselective
ThisdeviceprovideQT*39andDQT*83foruserreference.Pleasesetting
byprogramsoftware.
QTcode
1 62.5Hz 11 91.5Hz 21 127.3Hz 31 167.9Hz 41 199.5Hz 51 254.1Hz
2 67.0Hz 12 94.8Hz 22 131.8Hz 32 171.3Hz 42 203.5Hz
3 69.3Hz 13 97.4Hz 23 136.5Hz 33 173.8Hz 43 206.5Hz
4 71.9Hz 14 100.0Hz 24 141.3Hz 34 177.3Hz 44 210.7Hz
5 74.4Hz 15 103.5Hz 25 146.2Hz 35 179.9Hz 45 218.1Hz
6 77.0Hz 16 107.2Hz 26 151.4Hz 36 183.5Hz 46 225.7Hz
7 79.7Hz 17 110.9Hz 27 156.7Hz 37 186.2Hz 47 229.1Hz
8 82.5Hz 18 114.8Hz 28 159.8Hz 38 189.9Hz 48 233.6Hz
9 85.4Hz 19 118.8Hz 29 162.2Hz 39 192.8Hz 49 241.8Hz
10 88.5Hz 20 123.0Hz 30 165.5Hz 40 196.6Hz 50 250.3Hz

DQTcode
1 D023N 17 D116N 33 D243N 49 D365N 65 D546N 81 D734N
2 D025N 18 D125N 34 D244N 50 D371N 66 D565N 82 D743N
3 D026N 19 D131N 35 D245N 51 D411N 67 D606N 83 D754N
4 D031N 20 D132N 36 D251N 52 D412N 68 D612N
5 D032N 21 D134N 37 D261N 53 D413N 69 D624N
6 D043N 22 D143N 38 D263N 54 D423N 70 D627N
7 D047N 23 D152N 39 D265N 55 D431N 71 D631N
8 D051N 24 D155N 40 D271N 56 D432N 72 D632N
9 D054N 25 D156N 41 D306N 57 D445N 73 D654N
10 D065N 26 D162N 42 D311N 58 D464N 74 D662N
11 D071N 27 D165N 43 D315N 59 D465N 75 D664N
12 D072N 28 D172N 44 D331N 60 D466N 76 D703N
13 D073N 29 D174N 45 D343N 61 D503N 77 D712N
14 D074N 30 D205N 46 D346N 62 D506N 78 D723N
15 D114N 31 D223N 47 D351N 63 D516N 79 D731N
16 D115N 32 D226N 48 D364N 64 D532N 80 D732N

Trouble shooting
PhenomenaAnalysisSolution
Theradiocan
notbepowered
on.
Thebatterymaybeimproperly
installed.
Removethebatteryandattach
itagain.
Thebatterymaysufferfrom
poorcontactcausedbydirtied
ordamagedbatterycontacts.
Cleanthebatterycontacts.If
theproblemcannotbesolved,
contactyourdealerorour
authorizedservicecenterfor
inspectionandrepair.
Thebatterymayrunout.Rechargeorreplacethe
battery.
Duringreceiving
signals,thevoice
isweak,
discontinuousor
totallyinactive.
Thebatterystrengthmaytoo
low.
Rechargeorreplacethe
battery.
Thevolumemaybesettoalow
lever.
Increasethevolumebypress
the[+]button.
Theantennamaygetlooseor
maybeimproperlyinstalled.
Powerofftheradio,re‐install
theantennaandpoweronthe
radioagain.
Thespeakermaybeblockedor
damaged.
Cleansurfaceofthespeaker.If
theproblemcannotbesolved,
contactyourdealerorour
authorizedservicecenterfor
inspectionandrepair.
Youcannot
communicate
withother
members.
Thefrequencyorsignalingmay
beinconsistentwiththatof
othermembers.
SetyourTX/RXfrequencyand
signalingtothesameasthatof
othermembers.
Youmaybetoofarawayfrom
thegroupmembers.
Movetowardsothermembers.
Andmakesurethatyouare
withinthecommunication
range.
Irrelevant
communication
activitiesor
Youmaybeinterruptedby
radiosusingthesame
frequency.
Changethefrequency,oradjust
thesquelchlevel.

noisesareheard
onthechannel.Theradiomaysetwithno
signaling.
Setsignalingforallmember
radiostoavoidinterferenceat
thesamefrequency.
Thenoiseistoo
loud.
Youmaybetoofarawayfrom
othermembers.
Movetowardsothermembers.
Andmakesurethatyouare
withinthecommunication
range.
Youmaybeatanunfavorable
position.Forexample,your
communicationmaybeblocked
byhighbuildingsorfrustrated
intheundergroundareas.
Movetoanopenandflatarea,
andrestarttheradio.
Youmaysufferfromexternal
disturbance(suchas
electromagneticinterference).
Stayawayfromequipmentthat
maycauseinterference.
Note:
Iftheabovesolutionscannotfixyourproblems,oryoumayhavesome
otherqueries,pleasecontactusoryourlocaldealerformoretechnical
support.

TECHNICALSPECIFICATIONS
GENERAL
Frequencyrange400~470MHz
Channelcapacity128channel
(Sharebydigitalandanalogmode)
WorkingvoltageDC3.7V
Antennaimpedance50Ω
FrequencyStability±2.5ppm
WorkingcurrentofwholemachineTX:≤1.4ALowpower:0.7A
RX:≤0.7A
Standby:≤0.1A
WorkingmodeThesamefrequencysimplex
/Differentfrequencysimplex
BatteryCapacity1500mAh
Workingtemperature‐20~+50℃
Weight135g(notcontainantenna&belt
clip)
Dimension(L*W*H)90mm*61mm*30mm(notcontain
antenna&beltclip)

Transmitter
OutputpowerHighpower:2W±20%
Lowpower:0.5W±20%
ModulationmodeAnalog:FM
Digital:4FSK
Modulationerrorrate≤5%
Modulationdeviation≤2.5KHz(N)
Spuriousradiation≤7.5uW
Adjacentchannelpower≤‐60dB(N)
Receiver
AnalogRFsensitivity(12dBSINAD)≤0.25uV/12.5KHz
DigitalRFsensitivity0.22uV(BER5%)
Audiodistortion≤10%
Audiopower1W
Cluttersuppression≥65dB
Note:Theaboveparametersaresubjecttochangewithoutpriornotice!
Guarantee
Model Number:
Serial Number:
Purchase Date:
Dealer: Telephone:
User`s Name: Telephone:
Address: Post Code:
Remarks:
1.This guarantee card to be kept by user, we will not re offer if lost.
2.This guarantee card should be filled by dealer, otherwise it`s
invalid.
3.Do not alter the guarantee card, please confirm that the serial
number on the guarantee card is the same with radio.
4.One-year guarantee for radio, half a year guarantee for
accessory.
5.Users can get maintenance service from following ways:
Go to the shop where you bought the radio
Find our local maintenance agent
Send back to our company
FCC Statement
INFORMATION TO THE DIGITAL DEVICE USER REQUIRED BY THE FCC
This equipment has been tested and found to comply with the limits for a Class B digital device,
pursuant to Part 15 of the FCC Rules. These limits are designed to provide reasonable protection
against harmful interference in a residential installation. This equipment generates, uses and can
generate radio frequency energy and, if not installed and used in accordance with the instructions,
may cause harmful interference to radio communications. However, there is no guarantee that the
interference will not occur in a particular installation. If this equipment does cause harmful
interference to radio or television reception, which can be determined by turning the equipment
off and on, the user is encouraged to try to correct the interference by one or more of the following
measures:
• Reorient or relocate the receiving antenna.
• Increase the separation between the equipment and receiver.
• Connect the equipment to an outlet on a circuit different from that to which the receiver is connected.
• Consult the dealer for technic
FCC WARNING
This equipment generates or uses radio frequency energy. Changes or modifications to this
equipment may cause harmful interference unless the modifications are expressly approved
by the party responsible/Iradio Electronics Co., Ltd. The user could lose the authority to operate
this equipment if an unauthorizedchange or modification is made.
This Iradio transceiver has been tested and complies with the standards listed below, in regards
to Radio Frequency (RF) energy and electromagnetic energy (EME) generated by the transceiver.
• FCC 47 CFR 1.1307, 1.1310 & 1.1093 RF exposure limits for Occupational Use Only. RF
Exposure limits adopted by the FCC are generally based on recommendations from the National
Council on Radiation Protection and Measurements & the American National Standards Institute.
• American National Standards Institute (ANSI)/Institute of Electrical and Electronic Engineers
(IEEE) C95.1: 2005
The following list provides you with the information required to ensure that you are aware of RF
exposure and of how to operate this transceiver so that the FCC RF exposure limitations are not
exceeded.
• While transmitting (holding the PTT switch or speaking with VOX enabled), always keep the
antenna and the radio at least 2.5cm (1 inch) from your body or face, as well as from any bystanders.
• Do not transmit for more than 50% of the total transceiver use time; transmitting over 50% of
the total use time may exceed the limits in accordance to the FCC RF exposure requirements.
Nominal transceiver operation is 5% transmission time, 5% reception time, and 90% stand-by time.
• Use only the specified antenna for this transceiver; this may be either the antenna provided with
the transceiver or another antenna authorized by Iradio. Use only Iradio authorized accessories
(antennas, battery packs, belt clips, Speaker/Mics or headsets etc.): When worn on the body,
always place the radio in a Iradio recommended clip or carrying case meant for this product.
The use of other than recommended or approved body-worn accessories may result in RF exposure
levels which exceed the FCC’s occupational/controlled environment RF exposure limits.
To control your exposure and ensure compliance with the occupational/controlled environment exposure
limits always adhere to the following procedures.
Guidelines:
Do not remove the RF Exposure Label from the device.
User awareness instructions should accompany device when transferred to other users.
Do not use this device if the operational requirements described herein are not met.
• Use only the specified antenna for this transceiver; this