IrriGreen 6001 600101 User Manual GeniusTM Irrigation System Training Manual
IrriGreen, Inc. 600101 GeniusTM Irrigation System Training Manual
User Manual
IrriGreen, Inc.
2014
GeniusTM Irrigation System
Training Manual
IrriGreenTM manufactures and sells landscape irrigation systems that
save water and simplify installation. We use digital technology to water
the exact landscape shape cutting installation time in half and reducing
wasted water by 50%. IrriGreen certified contractors generate more
profit per installation and greater ownership value to end users.
IrriGreen, Inc.
5250 W. 73rd St., Suite I, Edina, MN 55439
Phone: 612-238-7575
www.irrigreen.com

IrriGreen Genius Irrigation System – Training Manual Page 1
Changing the way we water the world™
TABLE OF CONTENTS
Introduction 2
Comparison of the Genius Irrigation System to Conventional Systems 3
Key Features and Benefits of the Genius Irrigation System 4
Selling the Genius Irrigation System 5
Designing & Estimating the Genius Irrigation System 6
Installing the Genius Irrigation System 8
Programming the Genius Irrigation System 12
Replacing the Genius Nozzle and Filter System 23
Warranty 24
Per FCC 15.19 (a) (3) and (a) (4): This device complies with part 15 of the FCC Rules.
Operation is subject to the following two conditions: (1) This device may not cause harmful
interference, and (2) this device must accept any interference received, including interference
that may cause undesired operation.
Per FCC 15.21: The user and installer of the IrriGreen Genius Irrigation System shall not make
any modifications to the system not expressly approved by IrriGreen. Unauthorized
modifications will void the warranty and void the user's authority to operate the equipment per
FCC rules.

IrriGreen Genius Irrigation System – Training Manual Page 2
Changing the way we water the world™
IrriGreen™ Genius™ Irrigation System Training Manual
Introduction
The Genius irrigation system combines digital technology with a patent pending nozzle design to produce an irrigation
system capable of distributing water in patterns that fit the shape of the landscape. The Genius irrigation system does
this while both reducing the water required to irrigate the landscape and saving significant installation time and
materials.
The Genius irrigation system is designed to significantly reduce the labor required to install in-ground irrigation systems
while at the same time reducing water required to sufficiently water the lawn. The center of the system is the Genius
sprinkler that can be programed to water a wide variety of shapes and sizes. This sprinkler reduces the need for
distribution pipe by up to 85%, significantly cuts the number of sprinkler heads required and reduces the amount of
water typically wasted to irrigate the lawn by up to 50%. While the cost of the water is born by the property owner, it is
still a barrier that can be turned into an opportunity when selling the benefits of Genius irrigation systems to consumers.
Reducing installation labor for contractors and reducing end user water bills are compelling reasons for irrigation
contractors to sell the Genius irrigation system. You will be able to address business in more price sensitive areas by
offering services at a reduced price while maintaining profitability on every installation. Your customers will be happier
with green, hassle free lawns and lower water bills than those customers with conventional irrigation systems.
This training manual is a component of a training program developed to train experienced irrigation contractors on the
techniques unique to installing the Genius irrigation system. This program is intended for licensed (if required by local
and/or state code), experienced irrigation contractors for residential and commercial in-ground irrigation systems. It is
not intended as a complete or comprehensive training program for installing in-ground irrigation systems.
THIS TRAINING PROGRAM IS INTENDED FOR IRRIGATION CONTRACTORS THAT ARE ALREADY LICENSED AND/OR
EXPERIENCED IRRIGATION PROFESSIONALS. (NOTE: PROFESSIONAL IRRIGATION TRAINING RECOMMENDED.)
The following points will be covered by this training program and manual:
Comparison of the Genius irrigation system to conventional sprinkler systems.
Key features and benefits of the Genius irrigation system.
Selling the Genius irrigation system.
Installation techniques unique to the Genius irrigation system.
Programming the Genius sprinklers.
System warranty information.
IrriGreen Genius Irrigation System – Training Manual Page 3
Changing the way we water the world™
Comparison of the Genius Irrigation System to Conventional Systems
1. System similarities, the Genius irrigation system:
Designed to be permanently installed into the landscapes of residential and commercial properties.
Designed for use with conventional irrigation controllers, rain sensors, etc. – a hybrid system.
Requires the same 24 VAC low voltage power source for Genius Server as conventional controllers.
Uses similar distribution pipe and fittings currently being used to install conventional in-ground
irrigation systems, but significantly less pipe length and fewer fittings.
Requires the same maintenance for spring start-up and fall blow-outs as conventional irrigation systems,
and is compatible with regular sequencing for typical blow-out procedures.
Irrigates in watering zones – 1 sprinkler for 1 zone.
Works in conjunction with standard industry controllers/schedulers.
Uses the same water source as conventional systems.
2. System differences, the Genius irrigation system:
Connects off the main line, no need for laterals and valve boxes.
Uses software in sprinklers, servers and programmers so the water pattern for each individual Genius
sprinkler can be programmed to fit the exact landscape it is watering.
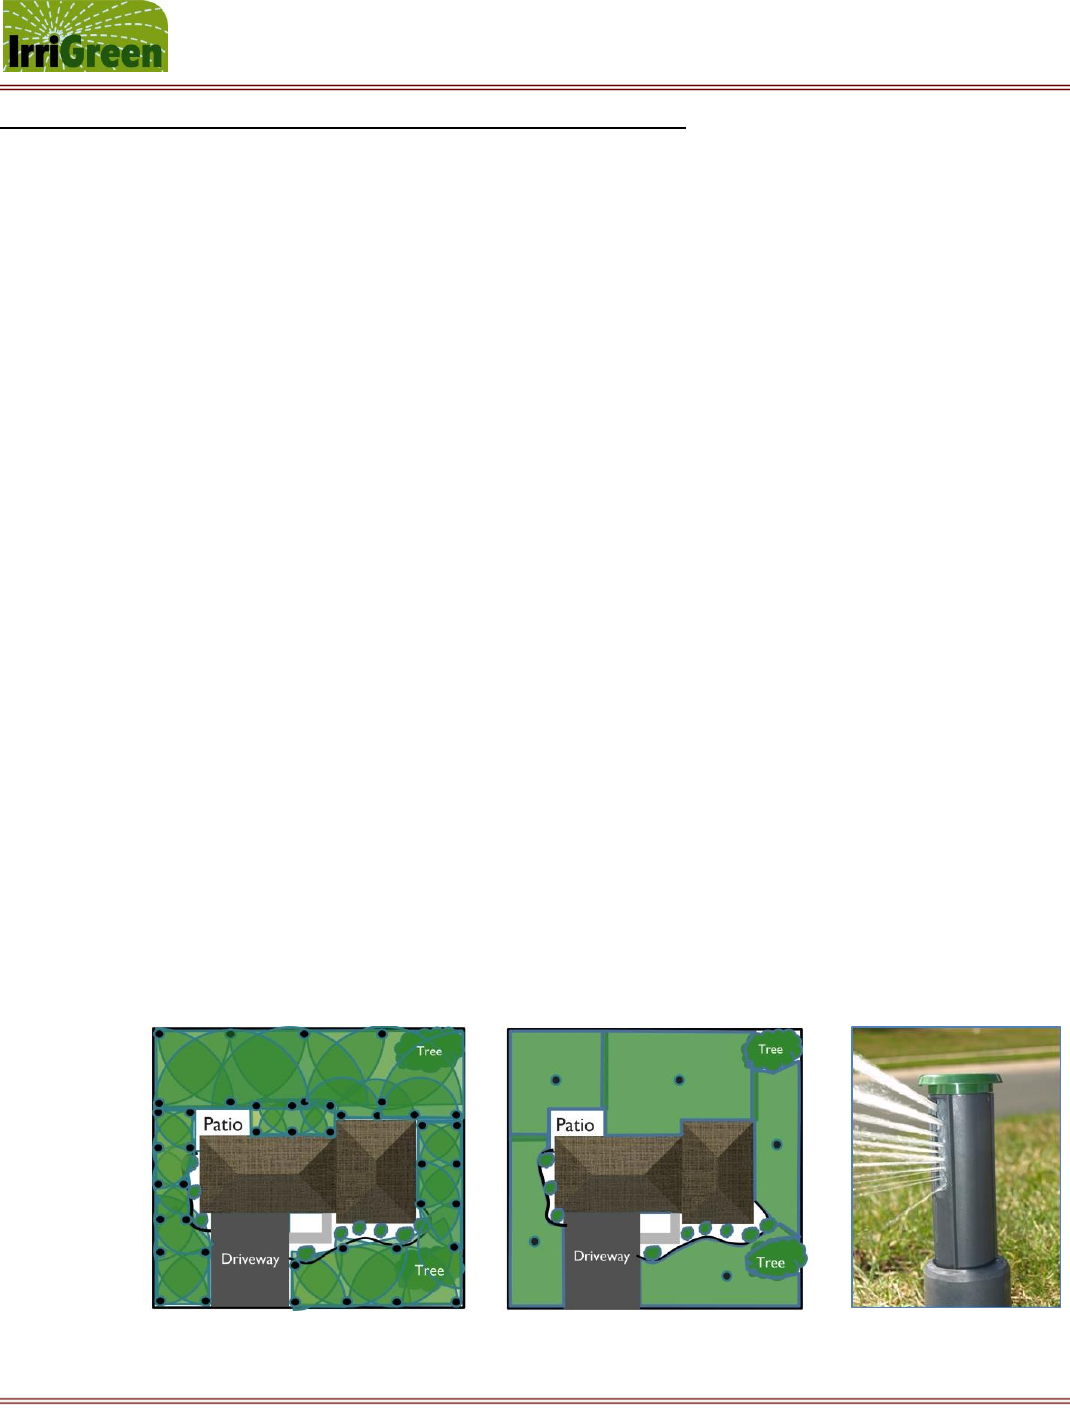
Eliminates the need for head-to-head watering overlap (see graphics below, Conventional vs. IrriGreen).
Genius Sprinklers digitally control the water distance and rotational speed of the multi-stream nozzle.
Uses 12 VDC to power and communicate with each Genius Sprinkler, so distances up to 700 feet away
from the Genius Server.
Requires the watering pattern for each Genius sprinkler be programmed (using IrriGreen’s Genius
Programmer) to fit the individual landscape shape being watered in each zone.
Includes an IrriGreen Genius Server which is electrically connected to a 3rd party irrigation clock and to
each sprinkler plus a wireless Genius Programmer for mapping each watering zone.
The Genius Programmer can be used for mapping each watering zone up to 200 feet away from the
Genius Server.
We recommend a master shutoff valve be installed between the water source and the Genius sprinklers.
Conventional System IrriGreen System IrriGreen Nozzle

IrriGreen Genius Irrigation System – Training Manual Page 4
Changing the way we water the world™
Key Features and Benefits of the Genius Irrigation System
Because the Genius sprinklers are individually programmable, each sprinkler can be programmed to water the specific
landscape shape within the watering zone it is located. During the installation process, the water throw distances are
programmed for each individual sprinkler to match the landscape shape it will irrigate. Minimum watering overlap is
recommended between Genius sprinklers, and the need for head-to-head sprinkler watering coverage is eliminated.
This elimination of required head-to-head coverage can result in saving as much as 50% of the wasted water.
Since each sprinkler has its own self-contained flow control valve, the need for valve boxes servicing multi-head zones is
no longer necessary. This in turn reduces the amount of distribution pipe required to install a system, in many cases by
85%, which also reduces the time required to pull or trench the pipe. The result is a significant savings in installation
labor, reducing the time required to install a given system by 50% or more.
Key Feature: Digitally controlled water distribution at individual sprinkler heads
Reduces the labor required to install the entire system.
Capability to program the watering pattern to fit the shape of the landscape.
Minimizes over watering by eliminating the need for head-to-head coverage.
Ensures accuracy of water delivery precipitation rate.
Provides accurate watering times and precipitation rates during installation.
Reduces the amount of distribution pipe required for installation.
Reduces the number of irrigation sprinklers required for installation – 1 sprinkler for 1 zone.
Reduces the water typically wasted due to overlap while irrigating turf areas by up to 50%.
Key Feature: Unique streaming nozzle design (patents pending)
Irrigates watering zone using streams of water, reducing wind drift and increasing soil moisture.
Increased droplet size from streams rather than spray or mist, which drives water into soil.
Creates a more even distribution uniformity over entire watering zone.
Reduces the potential for dry spots and minimizes over spraying onto hardscape areas.
Uses less water and waters more accurately.
Key Feature: Standard industry design components
Works with typical irrigation water sources with standard pipe/tube fittings and electrical connectors.
Works in conjunction with standard industry controllers/schedulers.
Compatible with rain and/or moisture sensors and other water saving technologies.
Capable of functioning in a hybrid system with conventional watering zones using spray, rotor or drip.

IrriGreen Genius Irrigation System – Training Manual Page 5
Changing the way we water the world™
Selling the Genius Irrigation System
Your customers will likely be attracted to the Genius irrigation system because of the financial aspect of the water
savings while others may want it because it is “green”.
1. Target Customers
Residential homeowners
Commercial property owners
Real estate management firms, consultants and homeowner associations
“Green” and Cleantech customers
Customers concerned about the cost of water
Early “technology” adopters
2. Why will residential and commercial end users want to buy a Genius irrigation system?
Cost savings from lower water bills (vs. conventional systems)
Water savings (being green)
Less mess and hassle due to torn up landscape
Reduced installation time
21st Century technology
3. Environmentally conscious customers and early adopters will also want to buy a Genius irrigation system.
They want a green lawn
They want to be “green”
They want to save money
They want to be sustainable
They like to try new things
IrriGreen Genius Irrigation System – Training Manual Page 6
Changing the way we water the world™
Designing & Estimating the Genius Irrigation System
Use the following steps to plan your design:
1. Measure water supply pressure and capacity in GPM at the proposed site.
Use a water pressure gauge and record the pressure in PSIG at an outdoor spigot.
Most city water systems supply between 10-12 GPM at each spigot – please check if uncertain.
A 1” pipe diameter (or larger) is recommended for distribution of the main water supply line for the Genius
irrigation system. A ¾” main line pipe may provide enough GPM at pressures above 60 PSI, but will
experience more pressure drop and shorter throw distances. A ½” pipe or smaller is not recommended for
main lines. A short run of funny pipe or swing pipe is used from the main line to individual sprinkler heads.
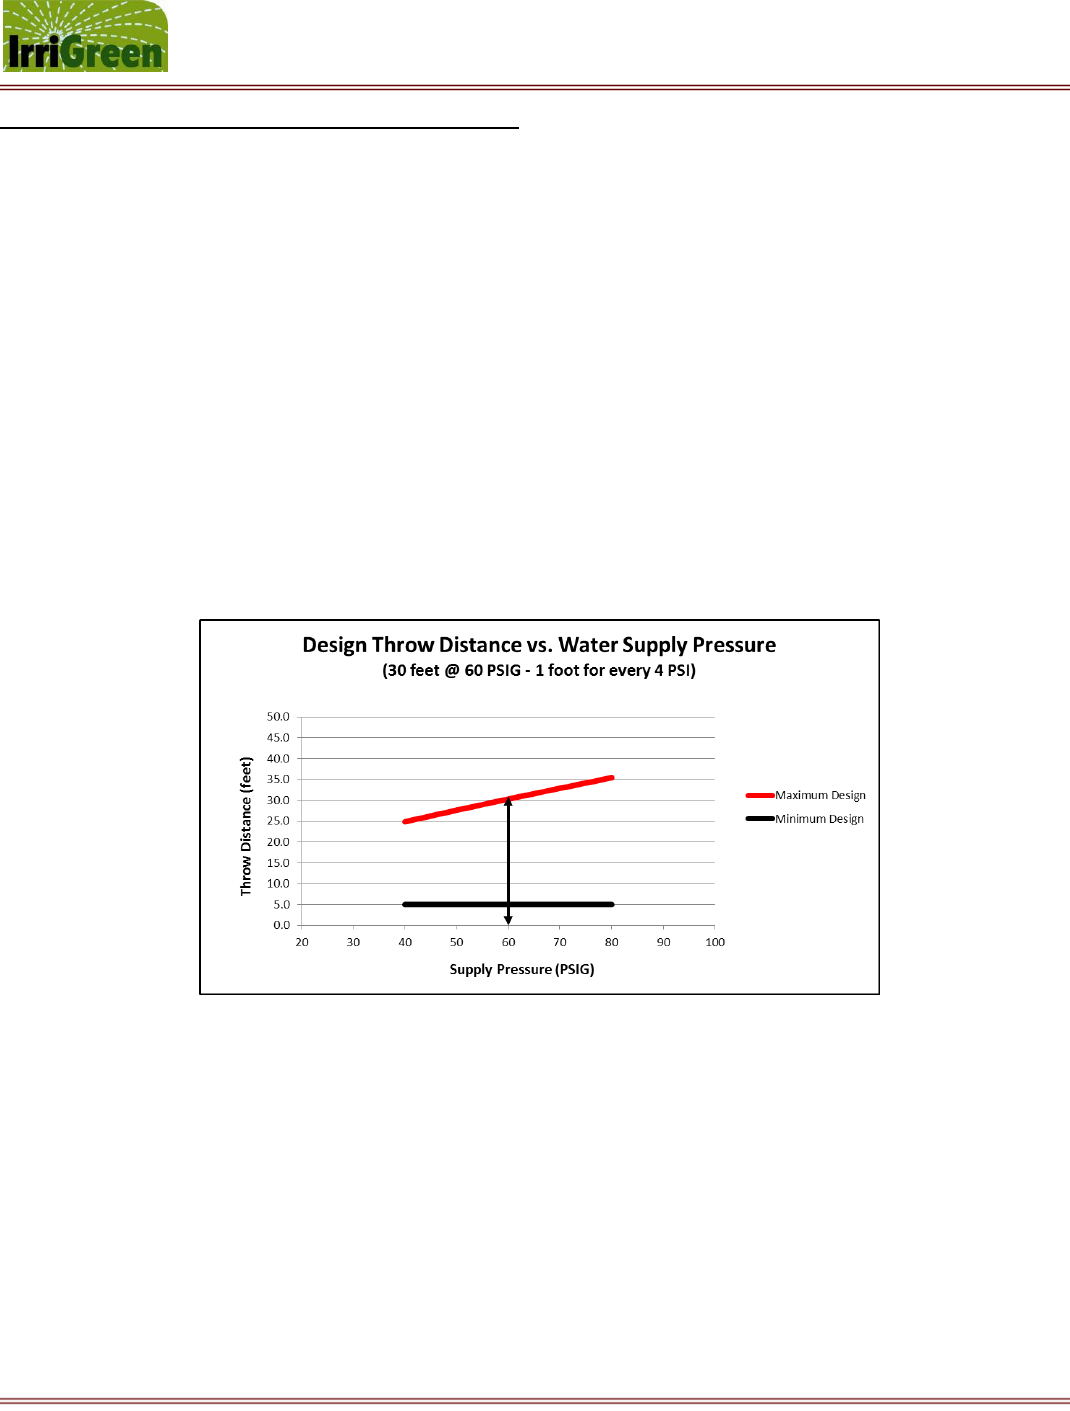
The chart below can be used to plan the Genius sprinkler head spacing, and illustrates the maximum design
water throw distance from a sprinkler head based on water supply pressure. (NOTE: it is important that
calculations for additional pressure drop due to elevation changes, length of main line and use of anti-
syphon valves be subtracted from the water supply pressure to each sprinkler head.)
2. Locating the Genius sprinkler heads for each watering zone
The maximum distance that a Genius sprinkler will uniformly throw water depends on water supply pressure
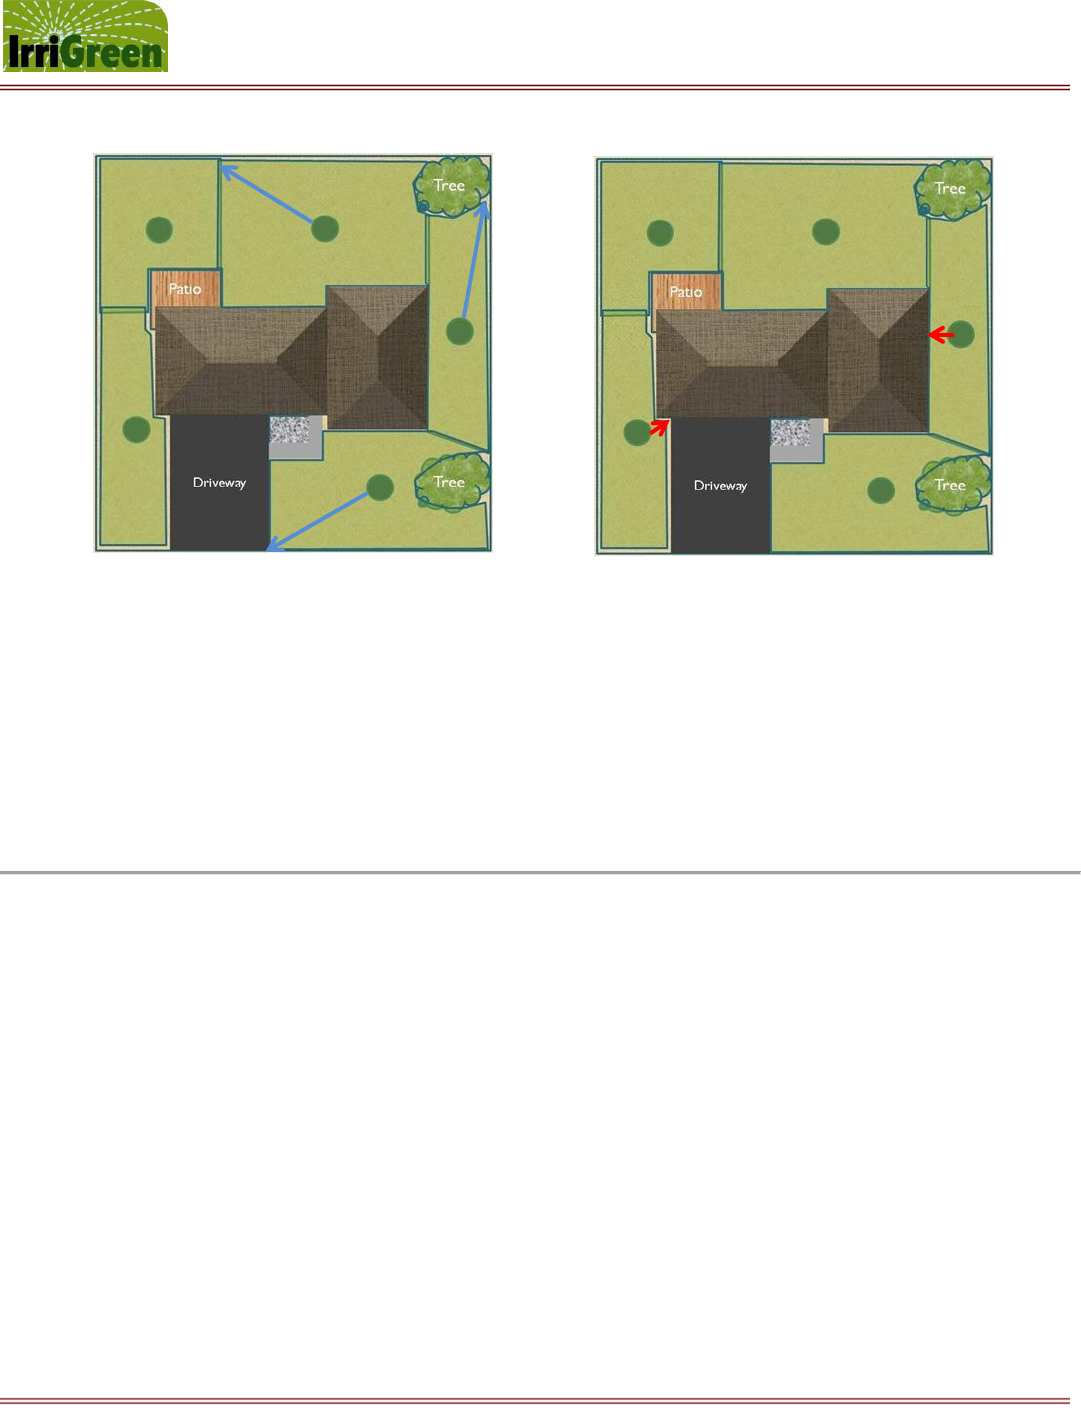
and pressure drop to the sprinkler head. Since Genius sprinklers will often be placed near the center of an area
of landscape, the diagonal distance to the corners will determine the maximum distance. For instance, in a 42 x
42 foot square or a 24 x 55 foot rectangle, the diagonal distance to the corners is 30 feet. The minimum design
distance that a Genius sprinkler will uniformly throw water is 5 feet. See examples of maximum throw distance
(in blue) and minimum throw distance (in red) below.
IrriGreen Genius Irrigation System – Training Manual Page 7
Changing the way we water the world™
3. Consider other site specific issues and regulations
Local, state and HOA regulations
Rain sensor requirements (Note: may be required in some states)
Soil type may determine how deep to bury the pipe and whether to pull poly pipe or trench in PVC pipe
Presence of landscape obstacles like trees, fences, and elevation changes may inhibit watering patterns
IrriGreen Genius Irrigation System – Training Manual Page 8
Changing the way we water the world™
Installing the Genius Irrigation System
Use the following installation steps:
1. Install plumbing as required by installation and regulations.
2. Install back-flow preventer (anti-syphon valve).
3. Install a master shut off valve (necessary for power outages).
4. Mark sprinkler placement per design plan.
5. Install main line pipe along with multi-wire cable to marked locations.
6. Installing each Genius Sprinkler:
Before connecting sprinklers – flush out the system laying flexible pipe outside each sprinkler hole.
Connect the sprinkler fitting (¾ inch FPT) to the main water line using funny pipe or swing pipe.
Install the flexible pipe to the main line and connect the sprinkler with a ¾ inch fitting and Teflon tape.
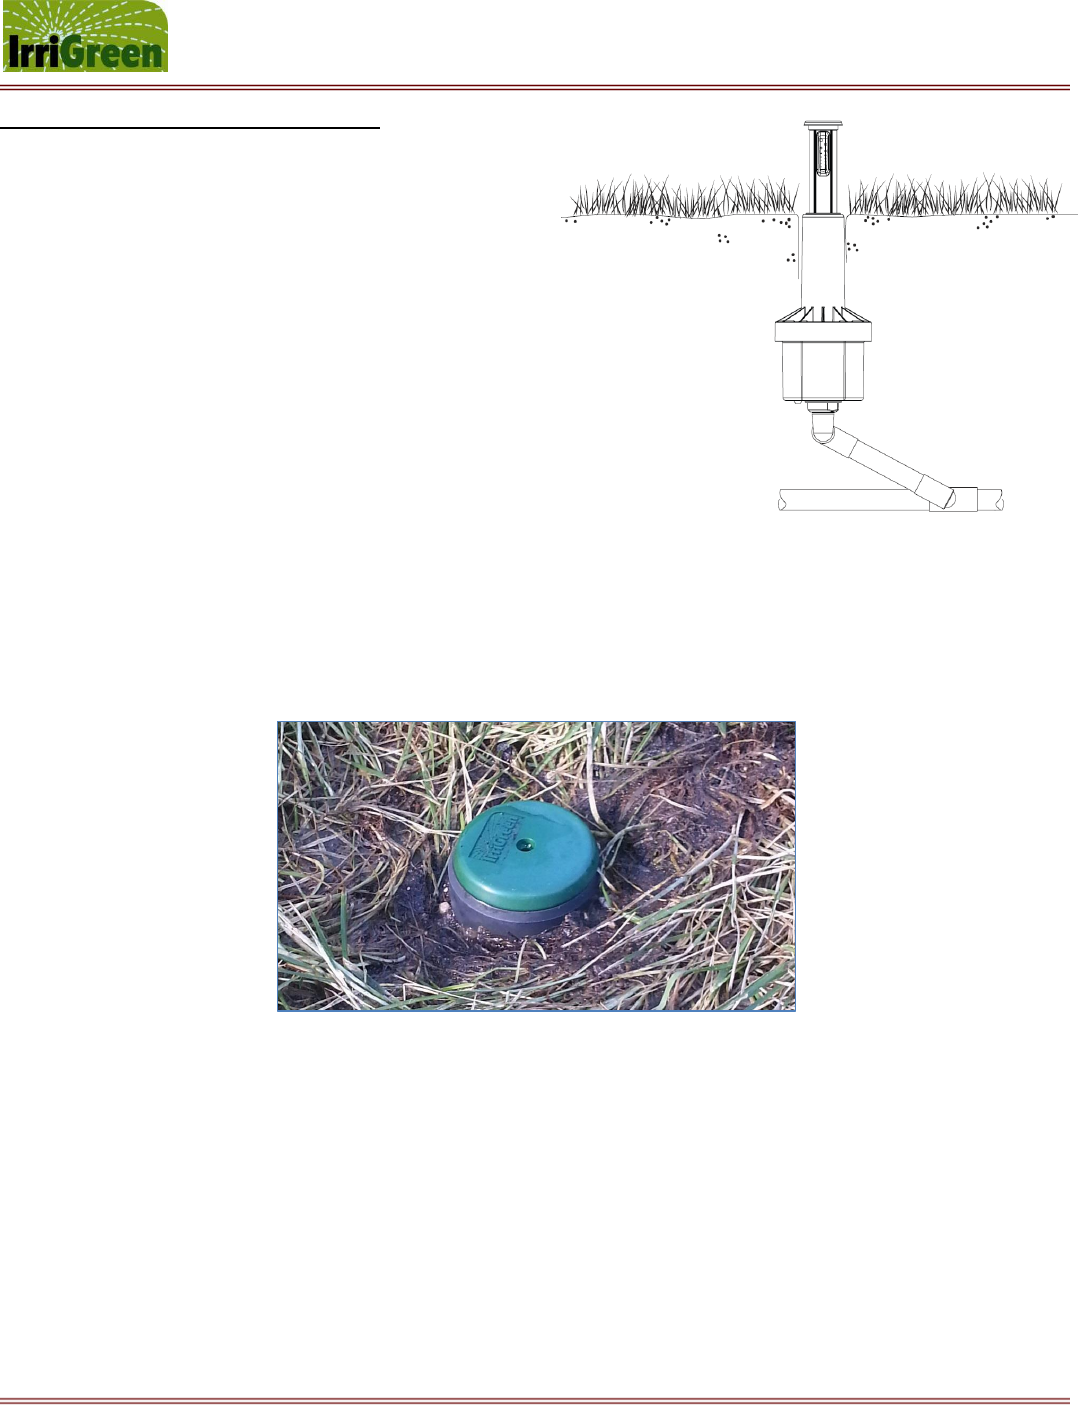
Position sprinkler so the top cap is about ½ inch above the ground (dirt portion of the sod layer – see photo).
Connect the white sprinkler wire to the white common wire in the multi-wire cable using waterproof
connectors. Continue the white wire connection (common) to all other sprinklers.
Connect the red sprinkler wire to another colored wire in the multi-wire cable using waterproof connectors.
Record the color wire connected to each sprinkler for each numbered watering zone.
7. Installing the Genius Server:
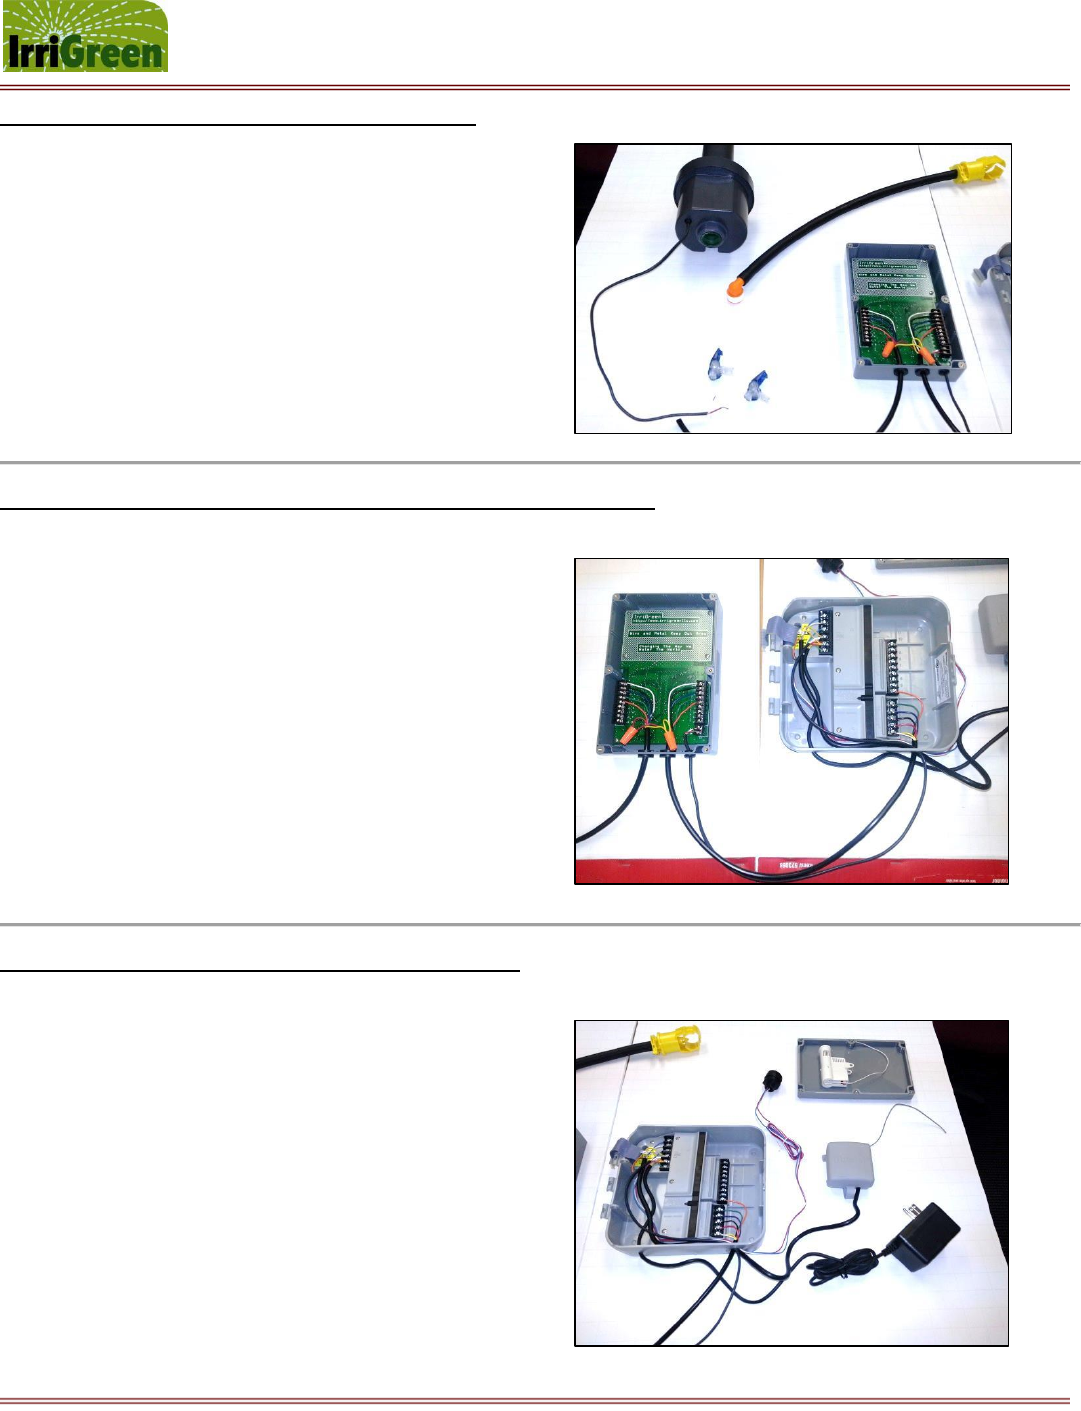
Feed the multi-wire cable coming in from the field through the grommet on the bottom left of the server
closest to the terminal strip located on the left. (See photos and notes on following 2 pages.)
Connect the white wire of the multi-wire cable to the COMMON terminal (top) of the left terminal strip.
Connect the remaining colored wires to individual OUT terminals numbered 1 – 8 matching the coloring of
individual sprinklers from each watering zone connected in step 6 above.
IrriGreen Genius Irrigation System – Training Manual Page 9
Changing the way we water the world™
Wiring coming into the Genius Server from the field:
IrriGreen Genius Sprinkler
¾” MPT to swing pipe fitting
Connector from main line to funny pipe
Run of funny pipe to 1” main poly
2-pair conductor wire pigtail (on sprinkler)
Waterproof connectors to hook up sprinkler
Multi-conductor wire to IrriGreen server
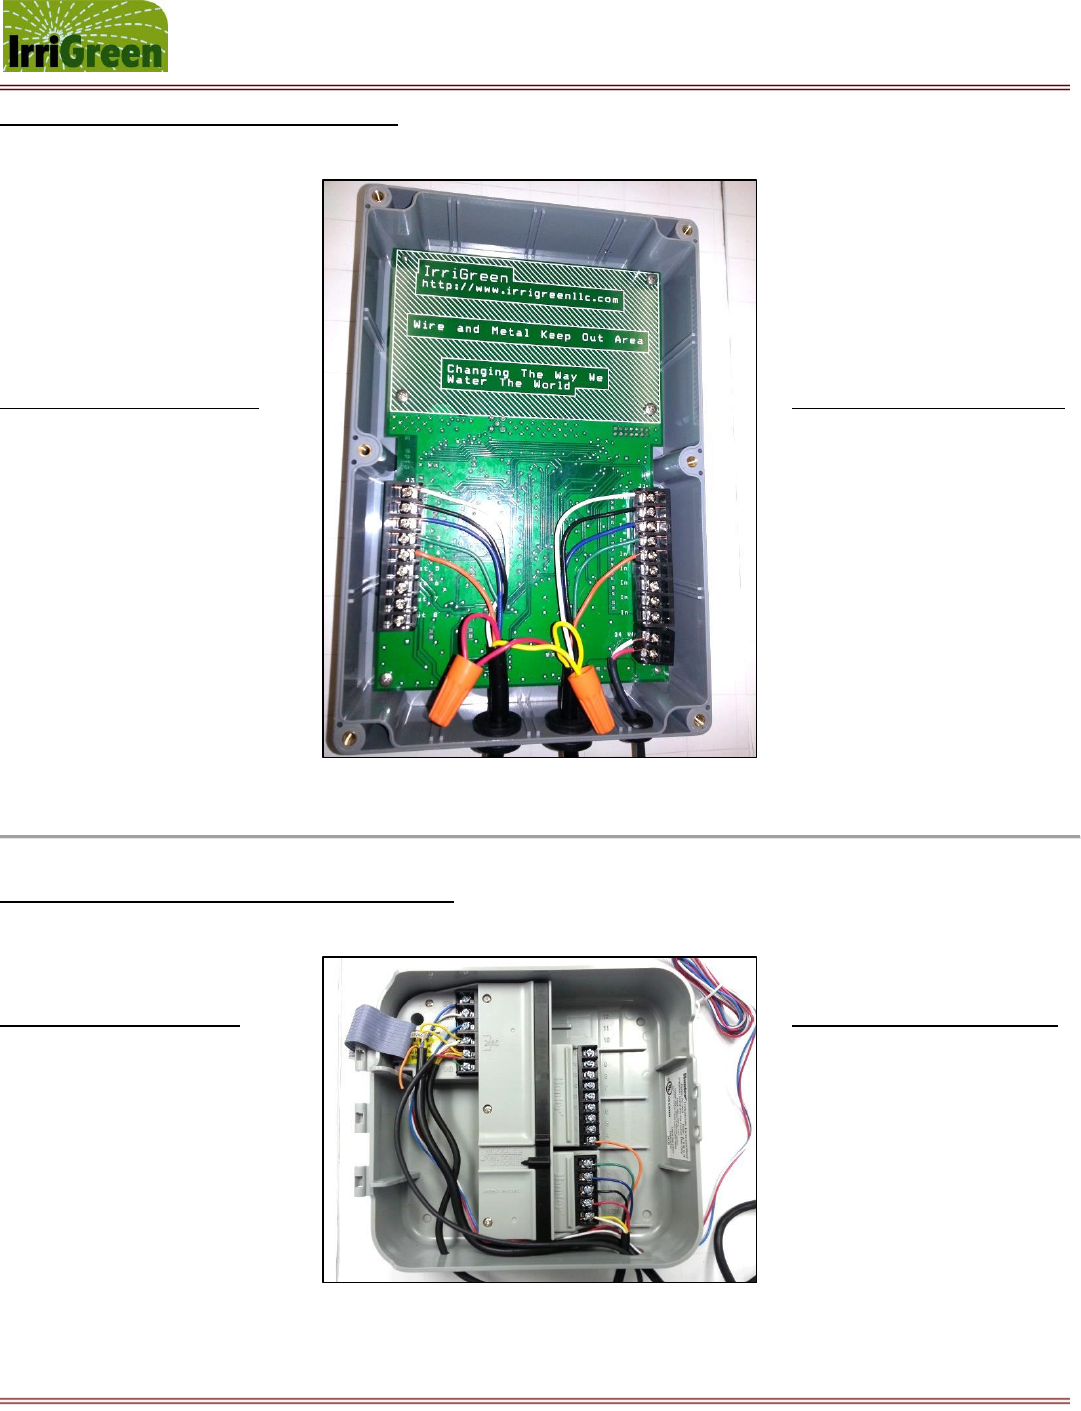
Wiring going out from Genius Server to a 3rd party controller/scheduler:
Left side IrriGreen Server – OUT to field 12 VDC
Right side IrriGreen Server – IN from clock 24 VAC
Bottom right IrriGreen Server – 24 VAC power
Left side 3rd party controller
o Top left – rain (or moisture) sensor leads
o Next lead – remote control lead
o Next 3 leads – 24 VAC power
Right side 3rd party controller
o Bottom lead – common
o Next lead up – ACV shut-off valve (or pump)
o Next 8 leads – Zones 1 through 8
Wiring additional items to 3rd party controller/scheduler:
Connect the 24 VAC transformer for power
Run 2-pair conductor to IrriGreen for 24 VAC power
Connect the rain (or moisture) sensor to the controller
o Install sensor as indicated by manufacturer
o Install wireless receiver inside building
o Connect leads to controller
Connect the remote control to the controller
o Install remote key (plug) outside
o Run wire leads through wall
o Connect leads to controller
IrriGreen Genius Irrigation System – Training Manual Page 10
Changing the way we water the world™
Wiring diagram for IrriGreen Genius Server:
(in this example) (in this example)
7 leads OUT to field (12 VDC) 7 Leads IN from clock (24 VAC)
Common (white) → ← Common (white)
Zone 1 (black) → ← Zone 1 (black)
Zone 2 (blue) → ← Zone 2 (blue)
Zone 3 (green) → ← Zone 3 (green)
Zone 4 (orange) → ← Zone 4 (orange)
Zone 5 – Zone 8 (open, no wires) ← Zone 5 – Zone 8 (no wires)
← 24 VAC power (white)
← 24 VAC power (red)
ACV shut-off (red wires) → ← ACV shut-off (red wires)
24 VAC com (yellow wires) → ← 24 VAC com (yellow wires)
Wiring diagram for 3rd party controller/scheduler:
Multi-leads in to controller 7 Leads in from Genius Server
Rain Sensor 1 (blue) → ← Zone 5 – Zone 8 (no wires)
Rain Sensor 2 (white) → ← Zone 4 (orange)
Remote control (blue) → ← Zone 3 (green)
24 VAC power (white) → ← Zone 2 (blue)
24 VAC power (red) → ← Zone 1 (black)
24 VAC Com (yellow) → ← ACV shut-off (red)
← Common (white/yellow)
*NOTE: Run 24 VAC power from 3rd party controller to Genius Server using 2-conductor irrigation wire.

IrriGreen Genius Irrigation System – Training Manual Page 11
Changing the way we water the world™
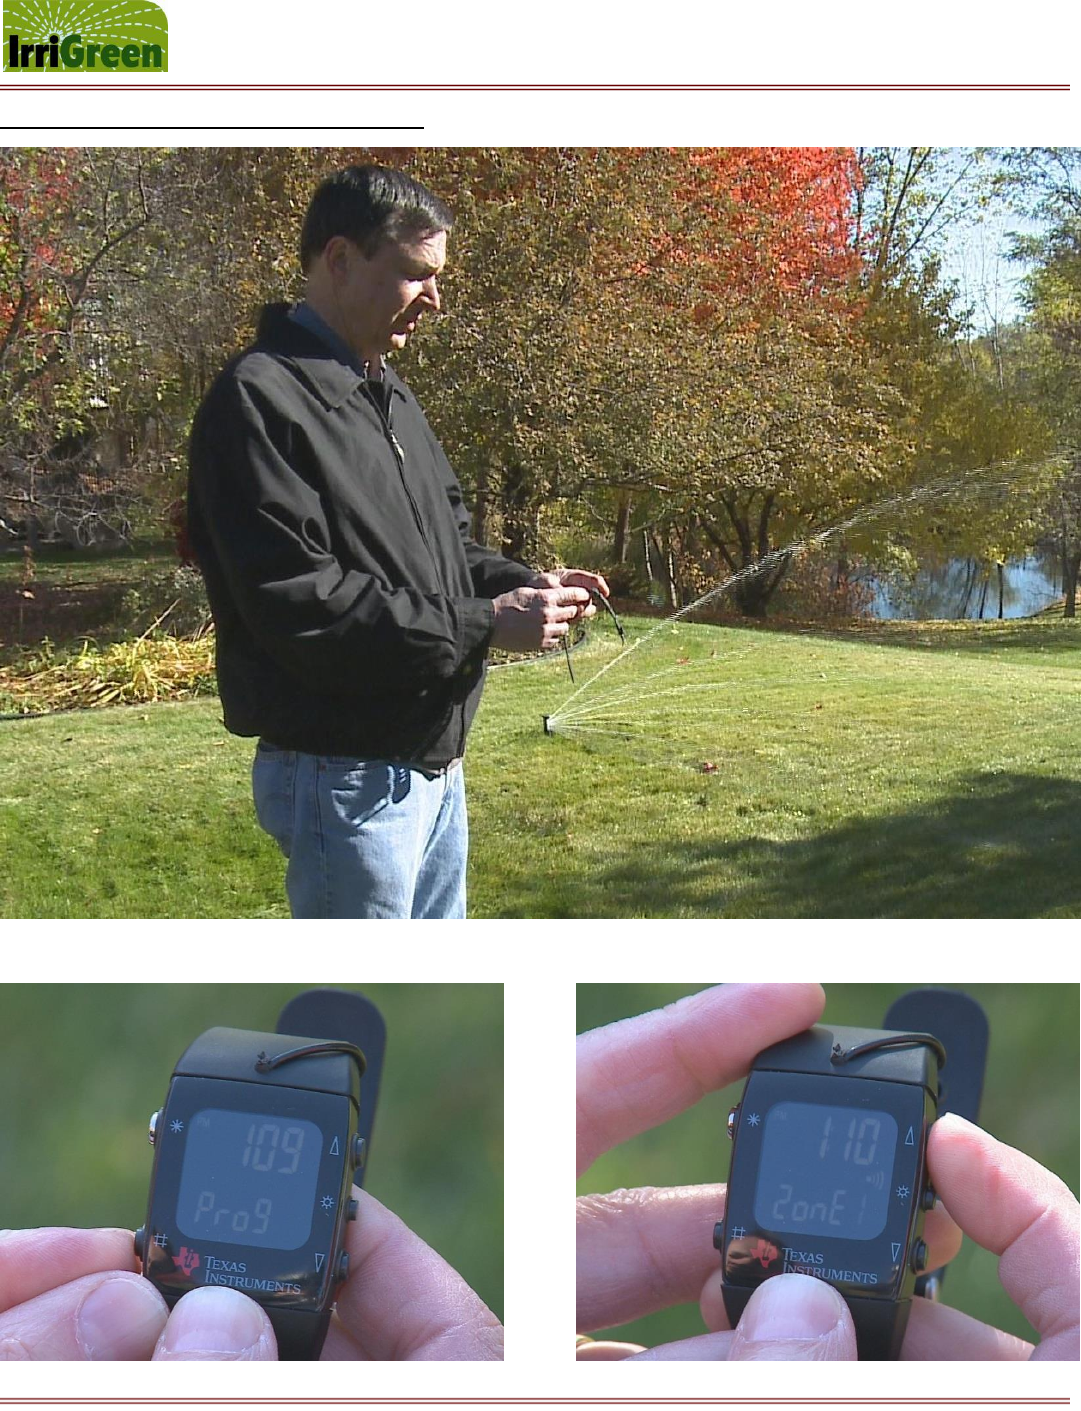
8. Before covering the Genius sprinklers, test each sprinkler using the Genius Programmer:
[Please refer to Step 2 on page 14 to set the programmer to the address on the server.]
[Please refer to Step 3 on page 15 – the first 5 bullet points – for best practices to check for good
electrical connections between the sprinkler and server.]
When the PSI reading appears on the top line (e.g. 60), press and hold the # number key to exit.
After the word ZONE stops flashing, another zone can be selected and tested in the same fashion.
Press and release the * star key at this point to exit the CAL program.
You should test all sprinklers in this manner to be certain all electrical connections are working.
9. Before burying the Genius sprinklers, test for leaks at all fittings by turning on the water. (NOTE: If you are
using an ACV for emergency shut-off, then you will need to open this valve for proper water supply.)
10. Connect accessory devices like rain and moisture sensors to a conventional 3rd party controller.
IrriGreen Genius Irrigation System – Training Manual Page 12
Changing the way we water the world™
Programming the Genius Irrigation System
IrriGreen Genius Irrigation System – Training Manual Page 13
Changing the way we water the world™
4:30
Prog
#
*
҉
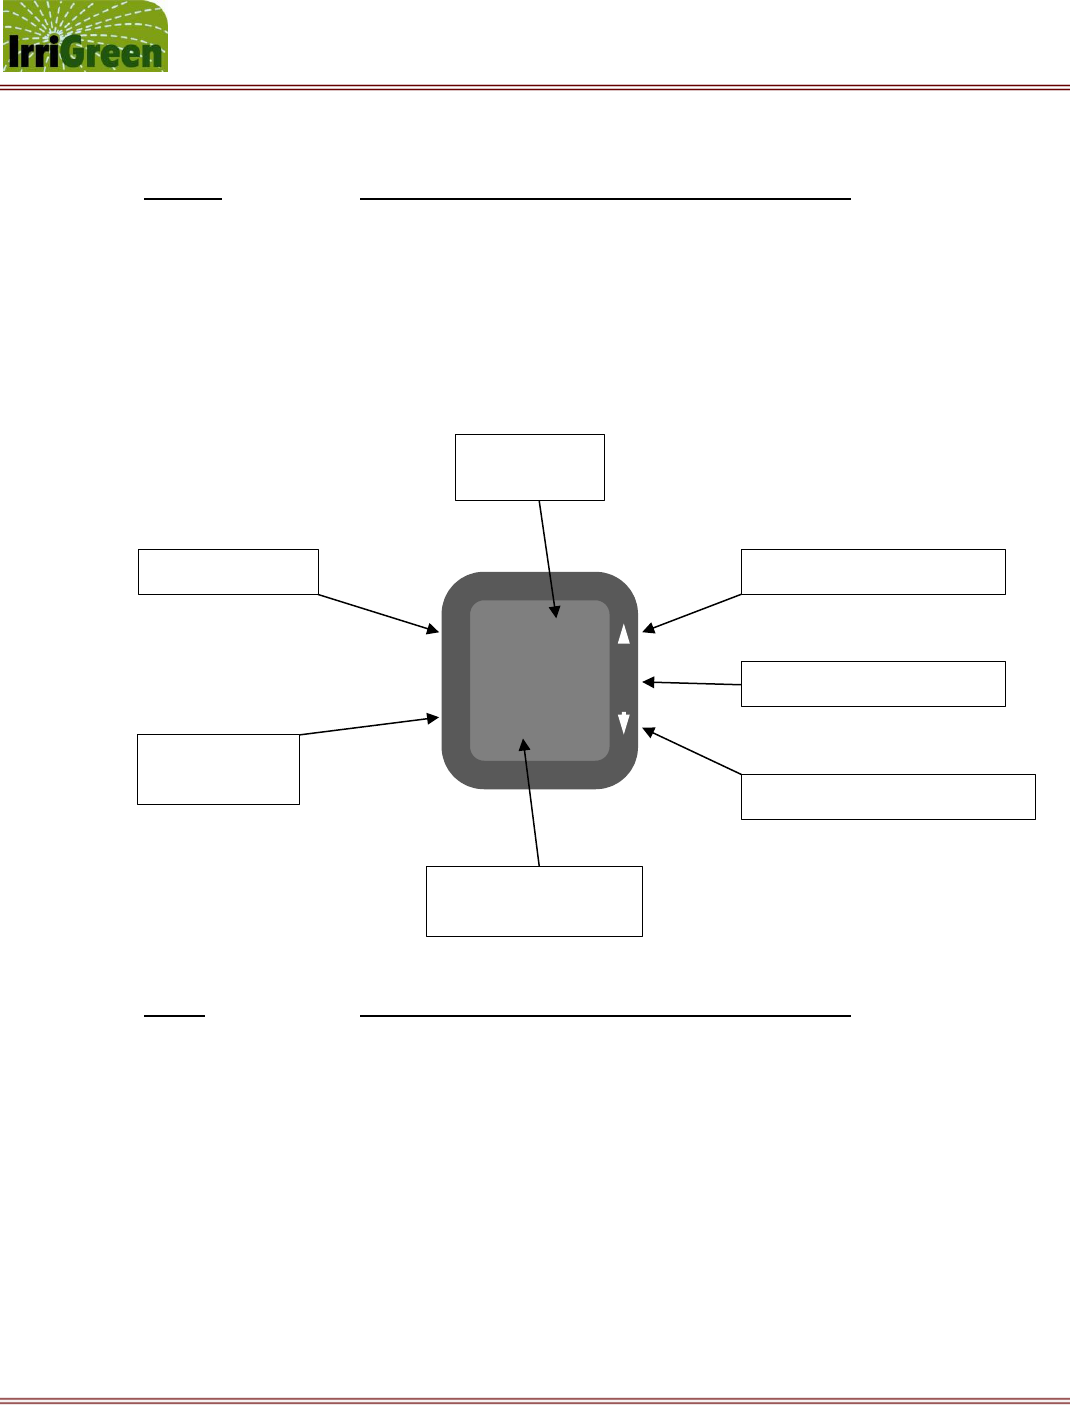
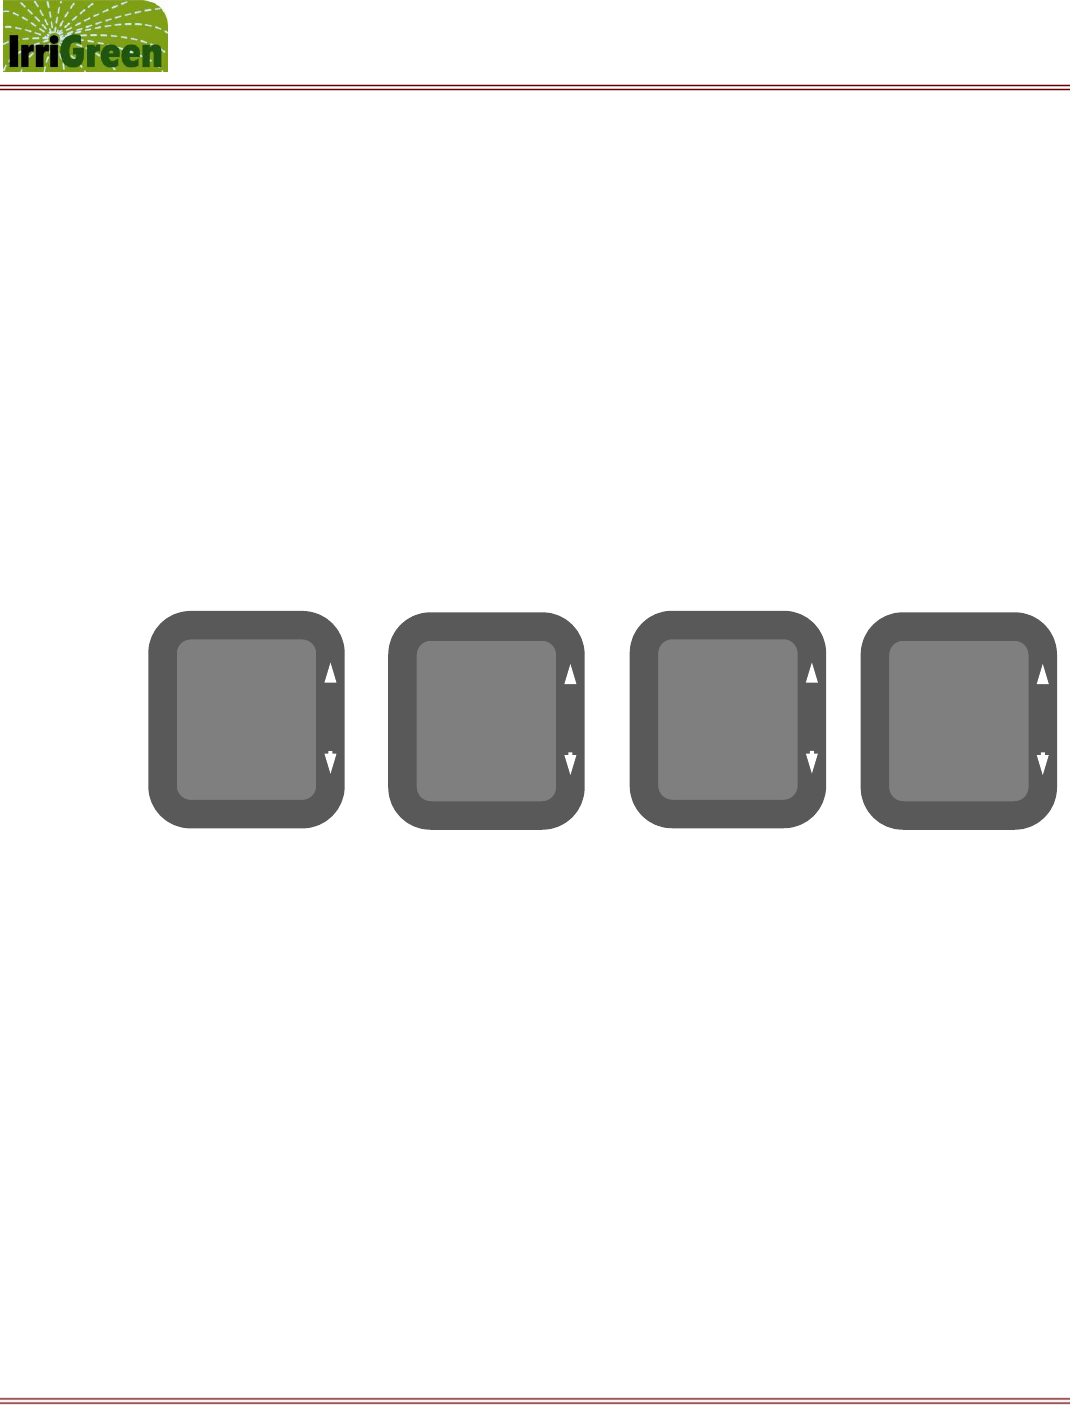
1. Overview of Programmer Software functions and Typical Button commands
Function Description of commands and settings in each function
SET Sets programmer to communicate with the correct server address
CAL Calibrates sprinkler water supply pressure, flow distance and compensation
PROG Programs sprinkler to the exact landscape shape (up to 50 positions)
RUN Selects the run time commands for the precipitation rate and watering time
DATE Shows time of day and date (use * star key to enter date function)
BATT Shows level of battery power remaining (change if below 2.60 volts)
Button Description of commands and settings in each function
* star key Press and release * star key to exit a watering zone or to exit a function, and
Press and release * star key to cycle through a function
# number key Press and release # number key to move between functions, and
Press and release # number key to enter a watering zone or to save a point
҉ sun key Press and release ҉ sun key to rotate sprinkler nozzle direction (clockwise)
↑ up arrow Press and release ↑ up arrow to increase setting or lengthen water stream
↓ down arrow Press and release ↓ down arrow to decrease setting or shorten water stream
hold # number key Hold down # number key to enter SET, CAL, PROG or RUN function
hold * star key Hold down * star key to erase mapping data for zone while in PROG function
* star key - exit
# number key
enter or save
top display
value or time
bottom display
function or zone no.
up arrow - increase value
҉ sun key - rotate nozzle
down arrow - decrease value
IrriGreen Genius Irrigation System – Training Manual Page 14
Changing the way we water the world™
2. Set the programmer to a server address for communication and scheduling
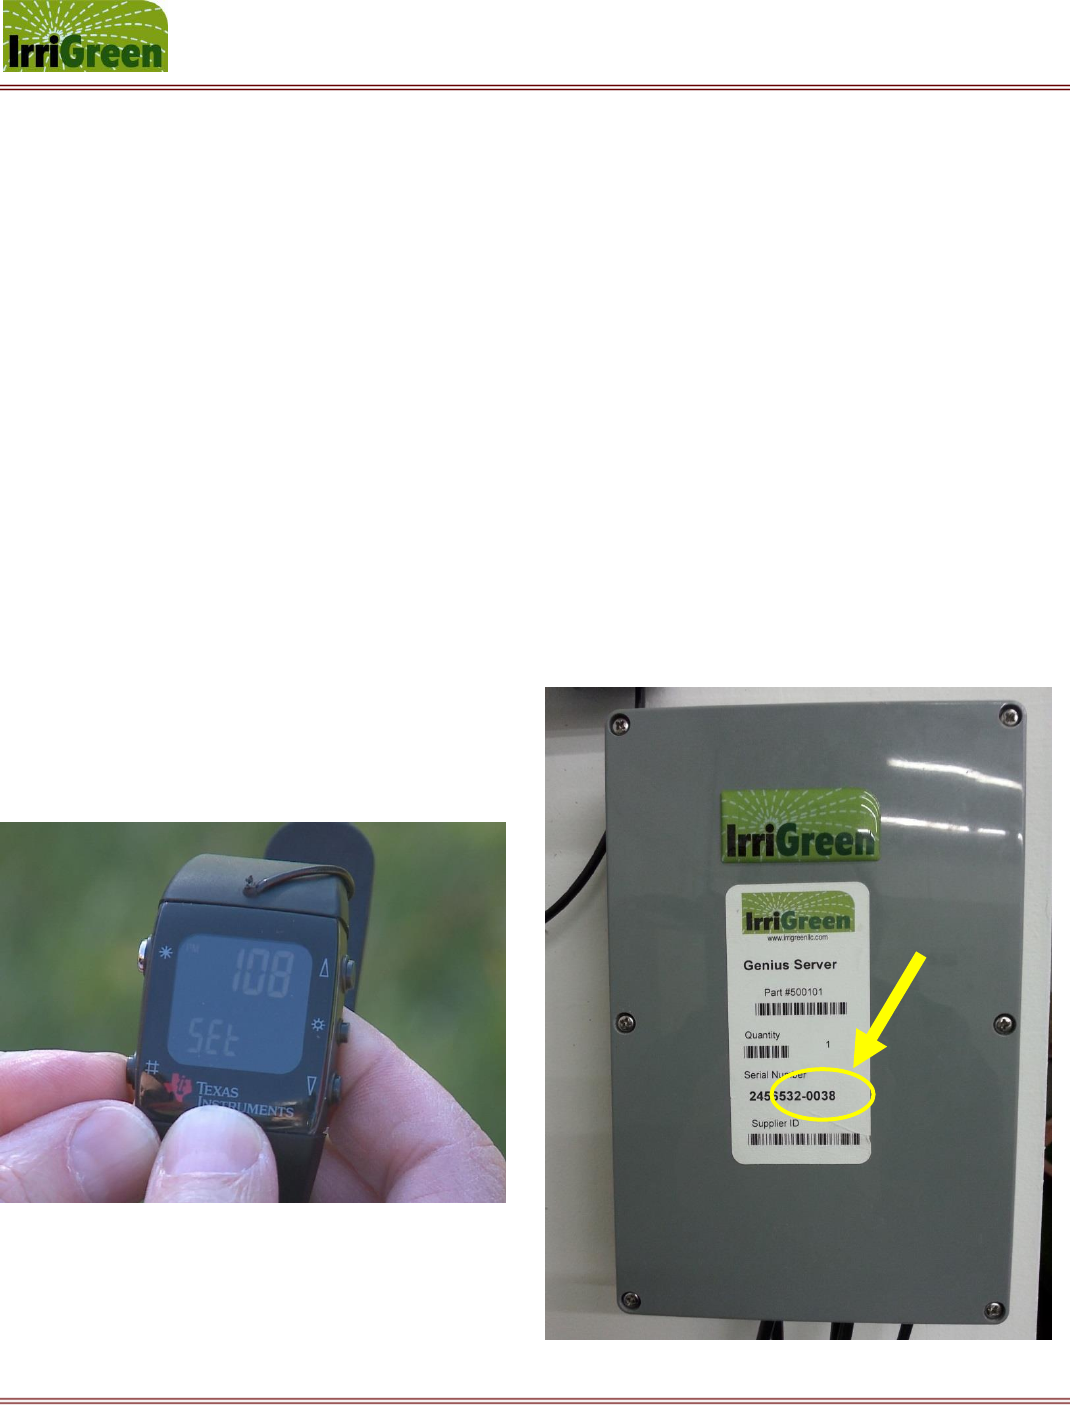
Press and release the # number key on the Genius programmer until the word SET appears. (NOTE: you
may see CAL, PROG, RUN, the date and the battery power before you see SET.)
Press and hold the # number key until the word ADDR appears at the bottom of the display and a set of
4-digits appear across the top of the display.
Press and release the # number key until you get to a digit that needs to be changed, then select the
correct digit by pressing ↑ up or ↓down arrows while that digit is flashing.
Continue to follow this procedure until the address in the 4-digit display matches the last four
digits on the server address label. (NOTE: this address number can be found on the inside and
the outside of the Genius Server case – see server serial number address - 0038 below.)
Press and release the * star key when you have the correct address to save the SET address number.
The scheduling calendar will appear – see advanced options manual
Press and release the * star key when you have the schedule selected to save the watering schedule.
The current program version and date will be displayed, then Press and release the * star key to exit the
SET function.
IrriGreen Genius Irrigation System – Training Manual Page 15
Changing the way we water the world™
3. Calibrate the sprinkler water supply pressure, flow and compensation settings
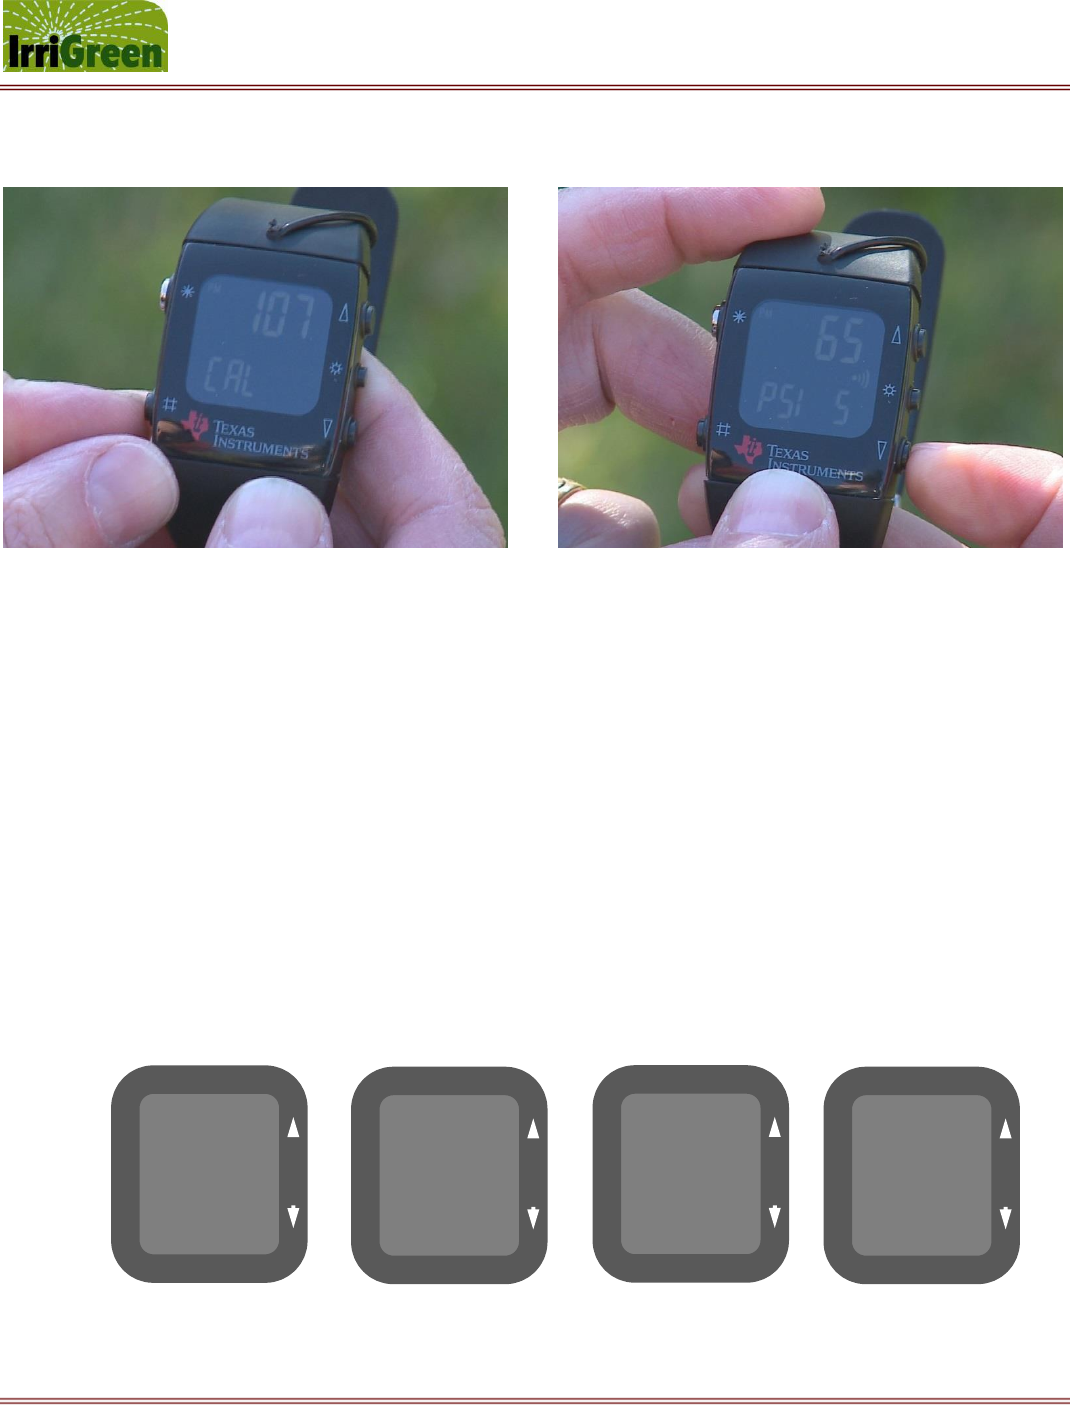
Press and release the # number key on the Genius programmer until the word CAL appears.
Press and hold the # number key until the word ZONE starts flashing to enter the CAL function.
(NOTE: if the display is blinking you cannot give it another command at that time – except for when a
choice for the number of the zone is blinking on the bottom right hand side of the display.)
After the word ZONE stops flashing, select the zone number by pressing ↑ up or ↓down arrows.
Press and release the # number key to enter the ZONE, and the word PSI flashes for 15 seconds.
When the rotation symbol appears [R] in the center of the display, the sprinkler will rotate to the
starting position, and this may take up to 23 additional seconds.
Select the PSI value by pressing ↑ up or ↓down arrows after the word PSI stops flashing.
The PSI value is the static water supply pressure (PSI) for the sprinkler. (Default is 60 PSI.)
Press and release the # number key to save the PSI value. The word SAVE appears.
NOTE: You have now completed the calibration for the water supply pressure.
4:30
CAL
#
*
4:30
ZONE 5
#
*
60
PSI 5
#
*
65
SAVE 5
#
*
҉
҉
҉
҉
IrriGreen Genius Irrigation System – Training Manual Page 16
Changing the way we water the world™
15.00ft
FLO 1
#
*
13.00ft
FLO 1
#
*
13.00ft
SAVE 1
#
*
15.00ft
FLO 1
#
*
҉
҉
҉
҉
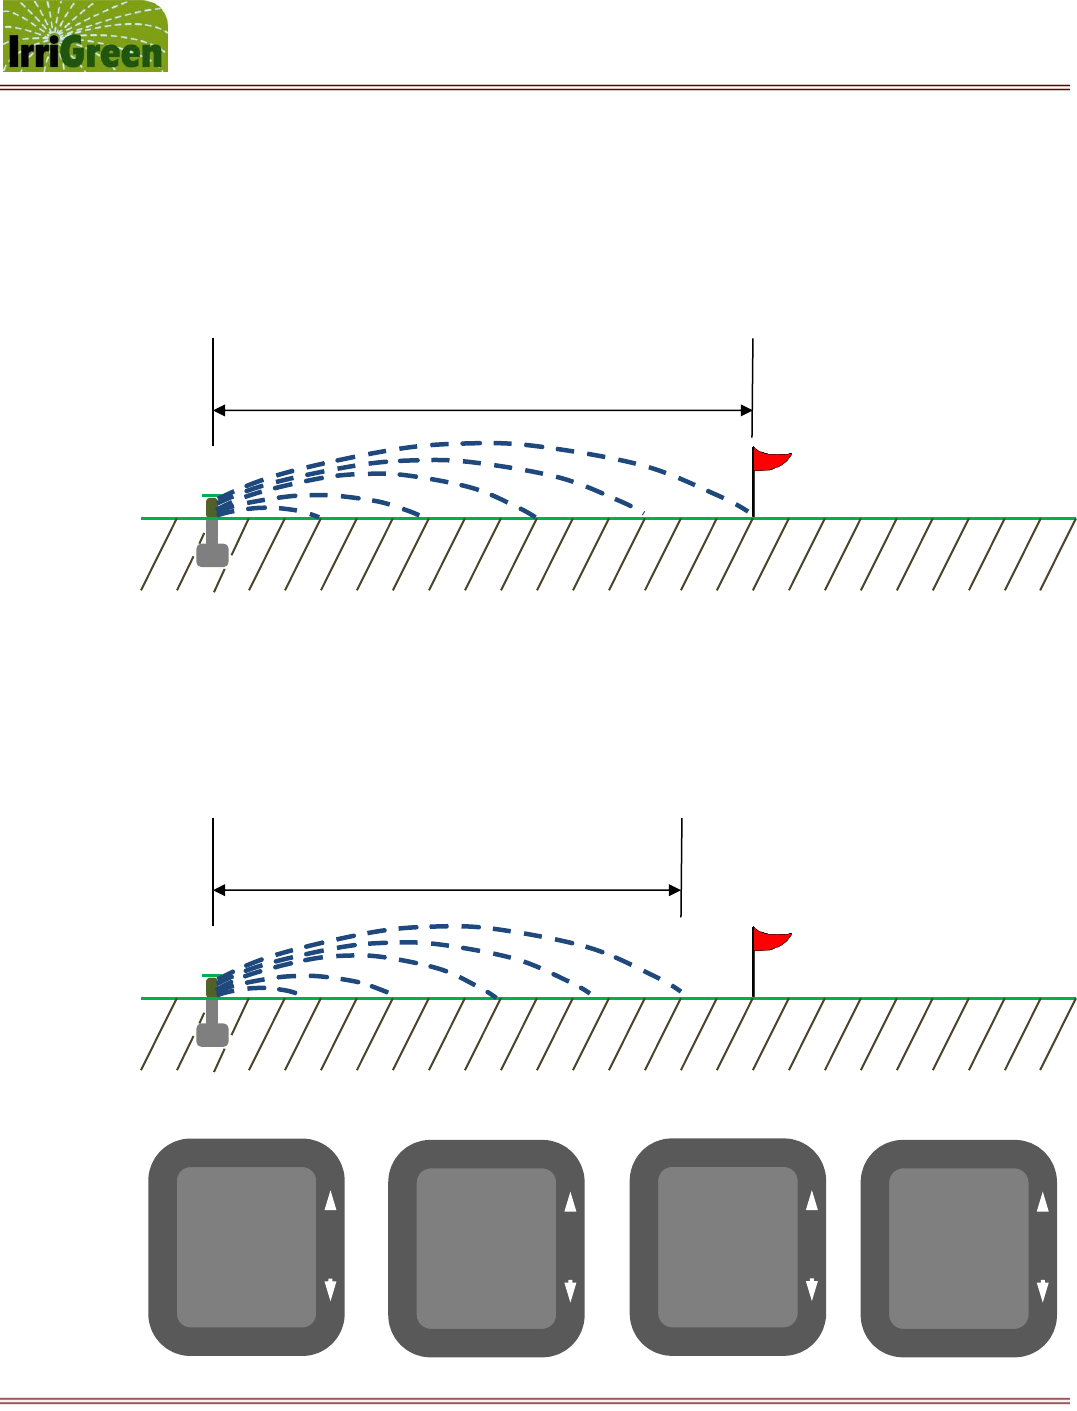
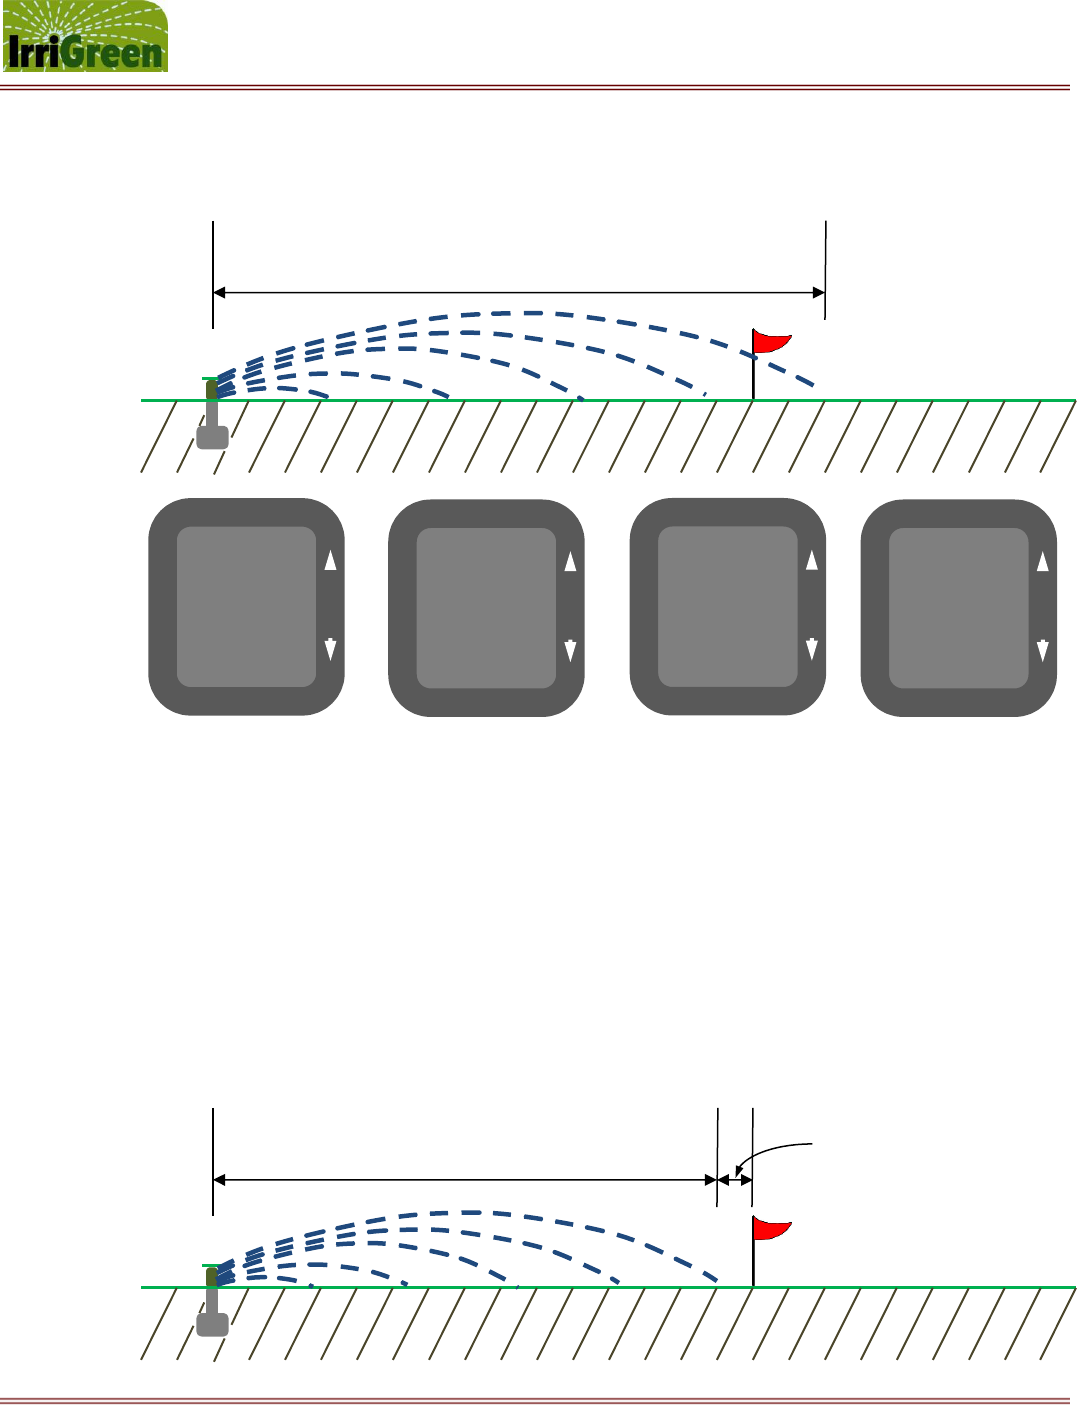
Press and release the * star key on the Genius programmer to calibrate the flow distance setting (FLO)
The valve will open and water streams will emerge as the display shows FLO on the bottom and
counts up to 15.00 feet on the top. (NOTE: You can immediately change the flow direction of the
streams by holding down the ҉ rotate key if water is streaming towards an area not suitable
for measuring. Release the ҉ rotate key to stop the stream from rotating.)
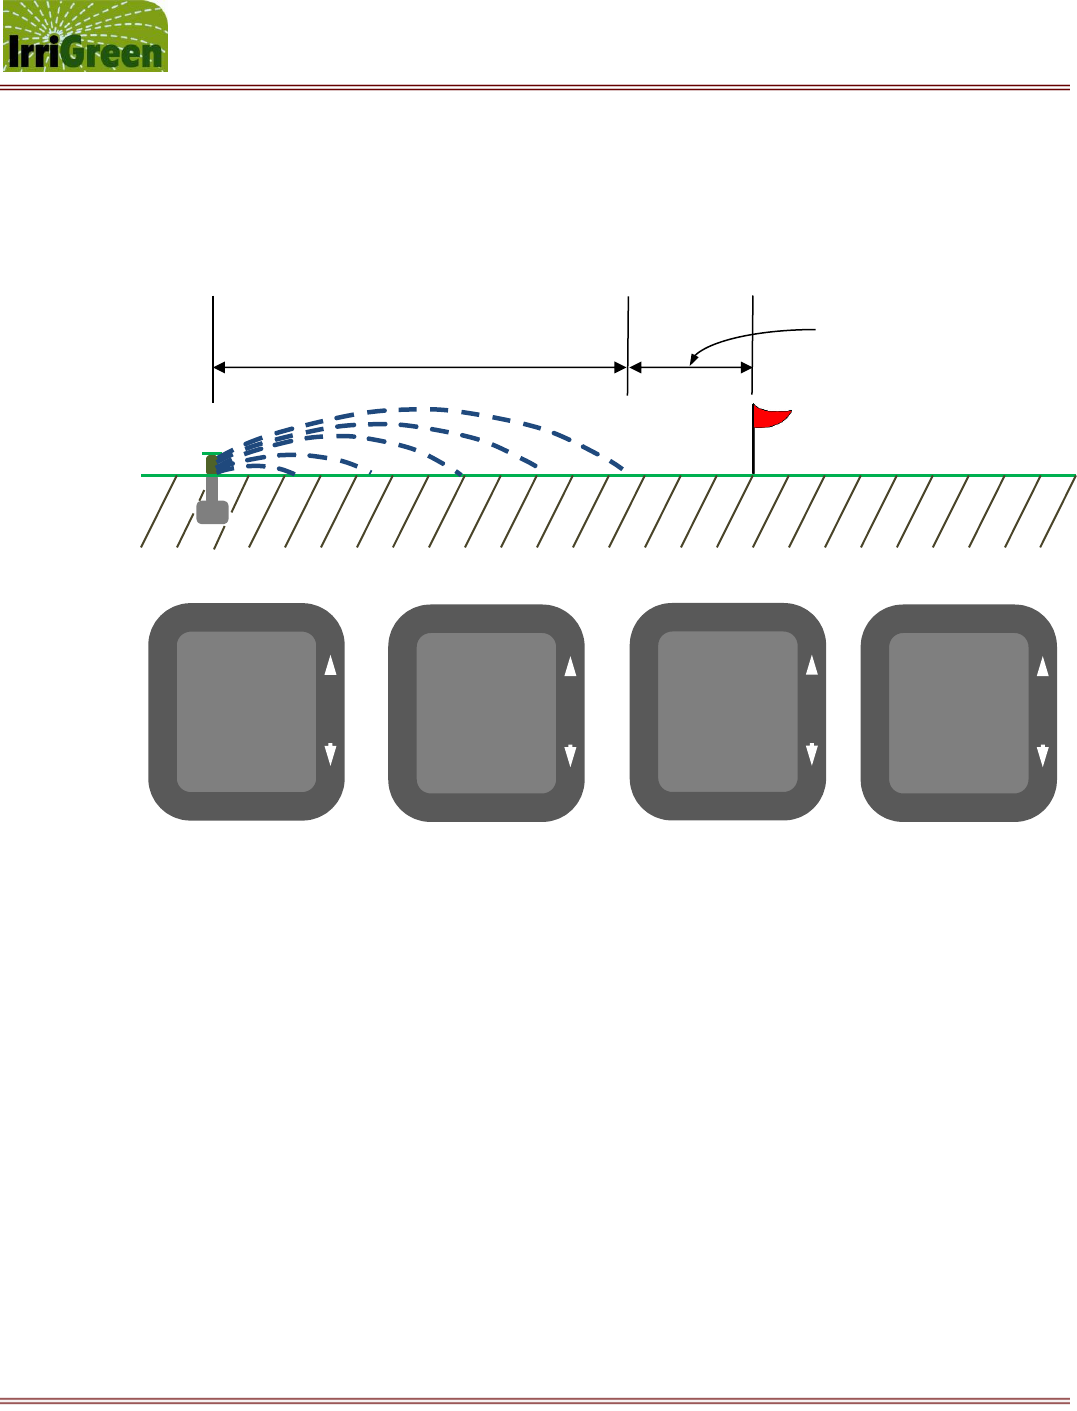
Measure the distance from the farthest water stream to the sprinkler – this is the FLO value.
If this distance is 15.00 feet, then press and release the * star key to calibrate the compensation (RCO)
If this distance is less than 15.00 feet (example 13.00 feet), then adjust the FLO value by
pressing ↓down arrow to 13.00 feet and then press and release the # number key. The word
SAVE appears and the water streams will stop and re-emerge at 15 feet as the display counts up
to 15.00 feet.
15.00 feet
13.00 feet
IrriGreen Genius Irrigation System – Training Manual Page 17
Changing the way we water the world™
15.00ft
FLO 1
#
*
17.00ft
FLO 1
#
*
17.00ft
SAVE 1
#
*
15.00ft
FLO 1
#
*
҉
҉
҉
҉
14.00 feet
-1.00 foot
If this distance is more than 15.00 feet (example 17.00 feet), then adjust the FLO value by pressing ↑ up
arrow to 17.00 feet and then press and release the # number key. The word SAVE appears and the water
streams will stop and re-emerge at 15 feet as the display counts up to 15.00 feet.
If this distance is not 15 feet, then repeat this process until this distance is 15.00 feet, then press
and release the * star key to begin calibration for the compensation setting.
NOTE: You have now completed the calibration for the stream flow distance setting.
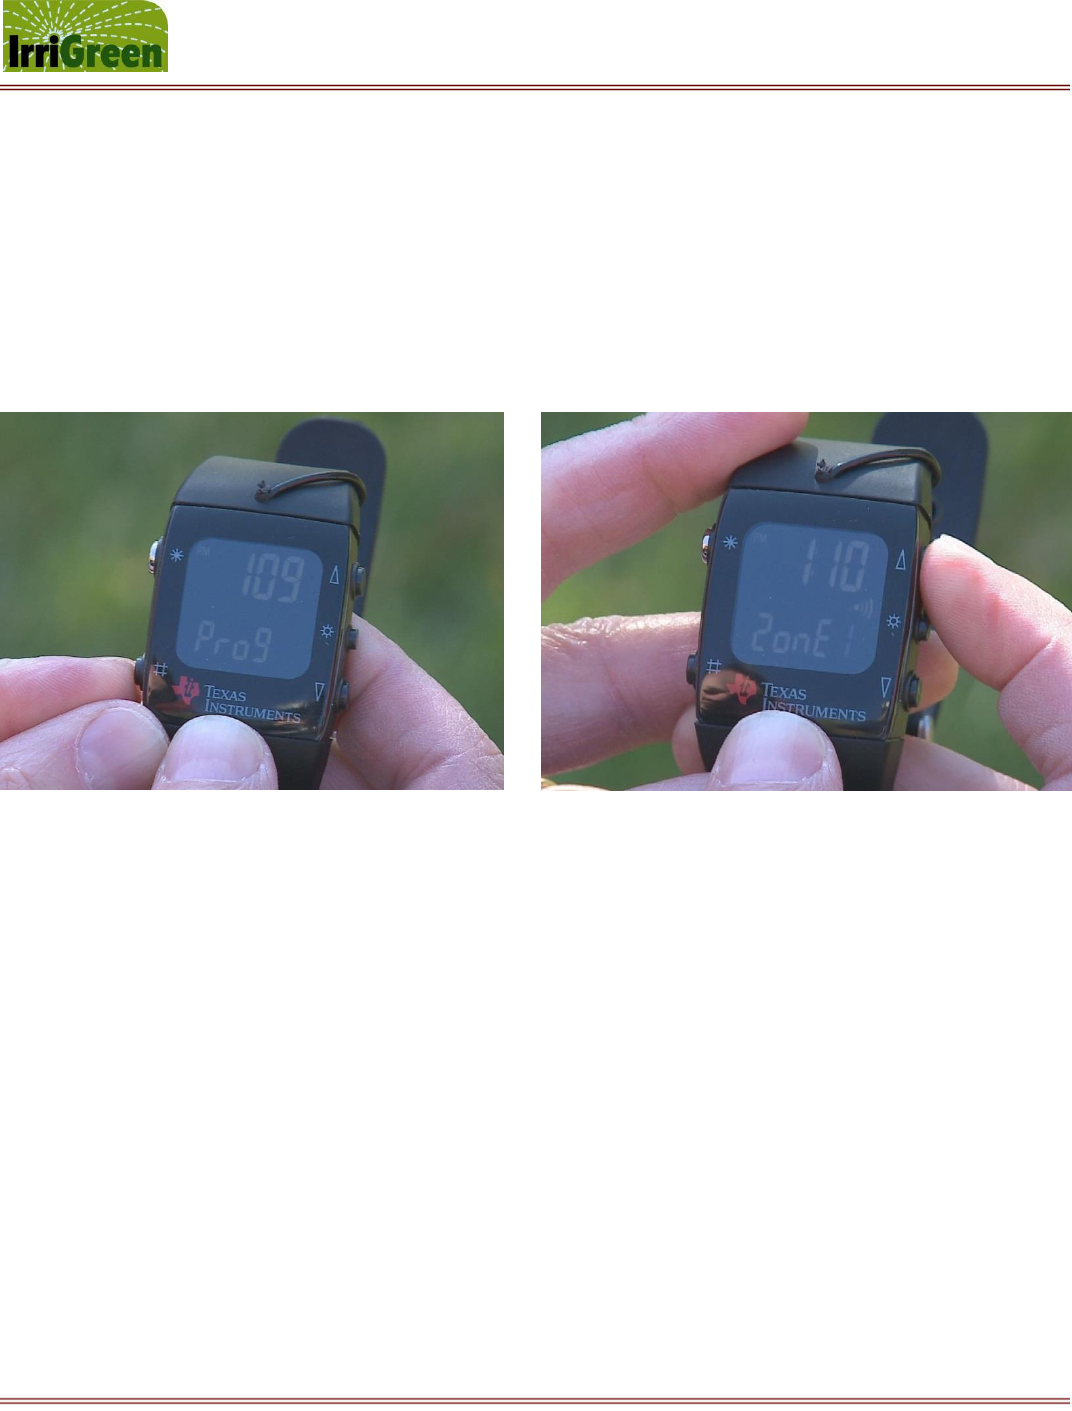
As previously described in the steps above, when you press and release the * star key on the Genius
programmer after calibrating the flow distance, you then begin calibrating compensation (RCO).
The water streams will stop and re-emerge as the display counts up to 15.00 feet.
After a delay of 3 seconds, RCO on the display will stop blinking and the water streams should
shorten the throw distance from 15.00 feet to about 14.00 feet.
Measure the shortened distance from the water stream to the sprinkler (example 14.00 feet).
17.00 feet
IrriGreen Genius Irrigation System – Training Manual Page 18
Changing the way we water the world™
15.00ft
RCO 1
#
*
11.50ft
RCO 1
#
*
11.50ft
SAVE 1
#
*
15.00ft
RCO 1
#
*
҉
҉
҉
҉
11.50 feet
-3.50 feet
If this shortened distance is 14.00 feet, then press and release the * star key to exit the zone.
If this shortened distance is less than 14.00 feet (example 11.50 feet), then adjust the RCO value
by pressing ↓down arrow to 11.50 feet and then press and release the # number key. The
word SAVE appears and the water streams will stop and re-emerge at 15 feet as the display
counts up to 15.00 feet.
If this distance does not shorten but remains at 15 feet, then adjust the RCO value by pressing
↑ up arrow to 16.00 feet and then press and release the # number key. The word SAVE
appears and the water streams will stop and should re-emerge at 15 feet as the display counts
up to 15.00 feet.
If this distance still does not shorten to 14.00 feet, then adjust the RCO value to 16.00 feet again
and save. Repeat as necessary, and eventually you will see the stream distance shorten to 14.00
feet.
NOTE: You have now completed the calibration for the compensation setting.
Press and release the * star key on the Genius programmer to exit the zone.
After the word ZONE stops flashing, another zone can be selected and calibrated in the same
fashion.
Press and release the * star key on the Genius programmer to exit the CAL function.
IrriGreen Genius Irrigation System – Training Manual Page 19
Changing the way we water the world™
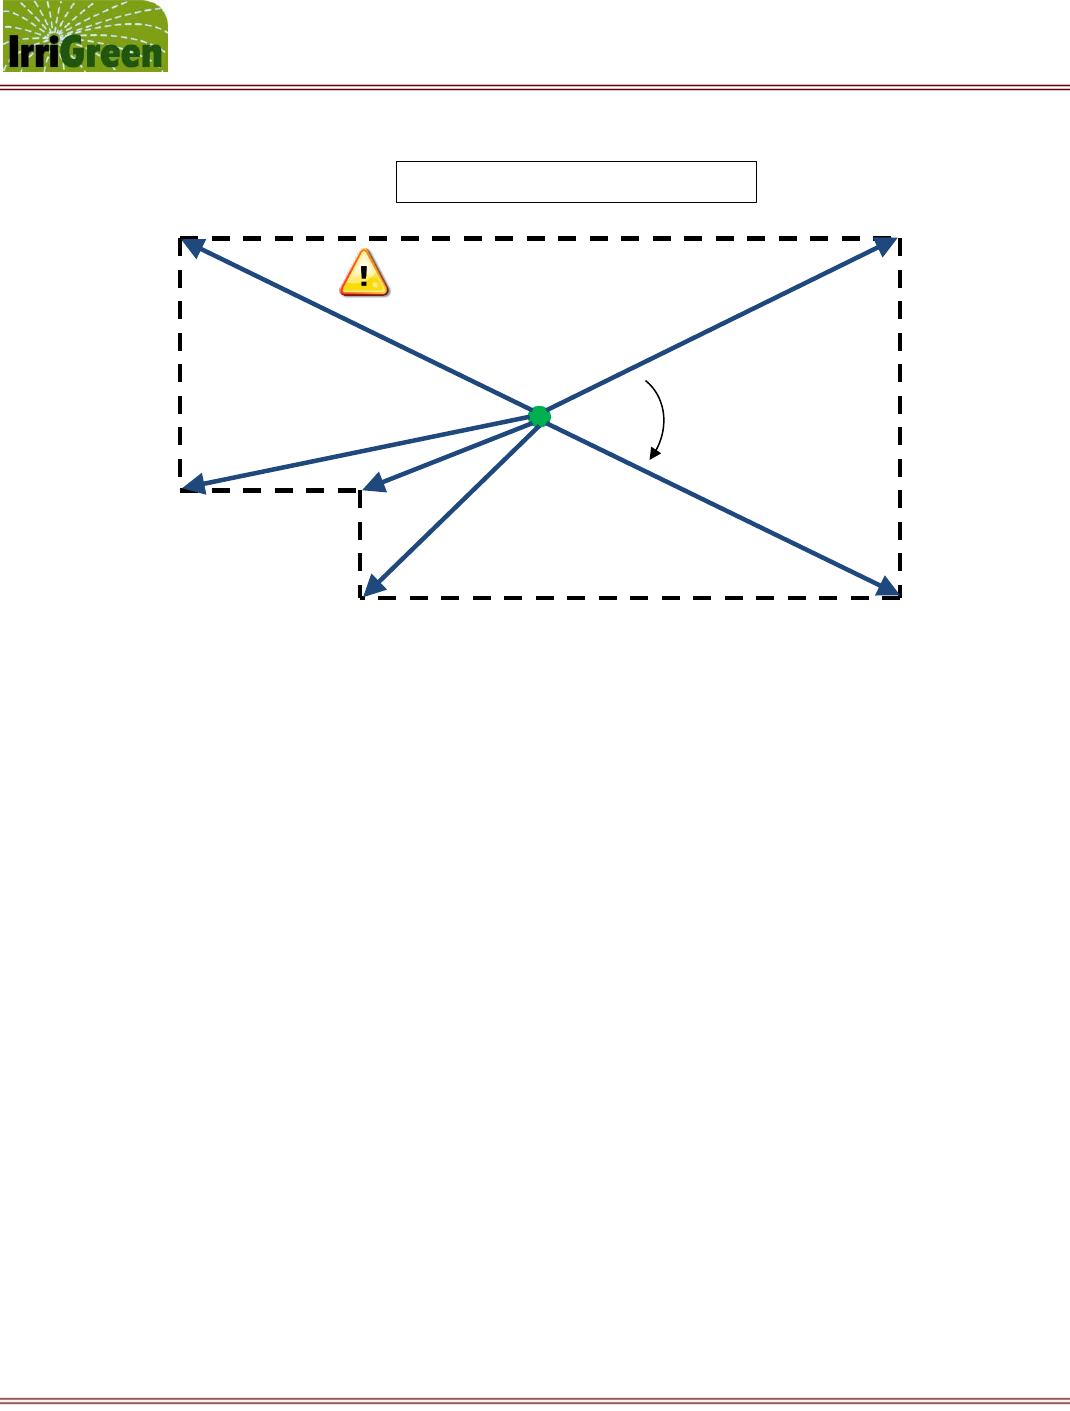
4. Program watering zones to the landscape shape (map up to 50 points – usually you will map 10-15 points)
Press and release the # number key on the Genius Programmer until the word PROG appears.
Press and hold the # number key until the word ZONE starts flashing to enter the PROG mode.
After the word ZONE stops flashing, select the zone number by pressing ↑ up or ↓down arrows.
Press and release the # number key to enter the ZONE, and the word P00 flashes for 15 seconds.
When the rotation symbol appears [R] in the center of the display, the sprinkler will rotate to the
starting position, and this may take up to 23 seconds.
The valve will open and water streams will emerge as the display shows P00 on the bottom and counts up to
15.00 feet on the top. (NOTE: You can immediately change the flow direction of the streams by pressing the ҉
rotate key if water is streaming towards an area not suitable for a good starting position. This can be your 1st
mapped point to be saved – or you can continue to rotate and/or change the stream distance.)
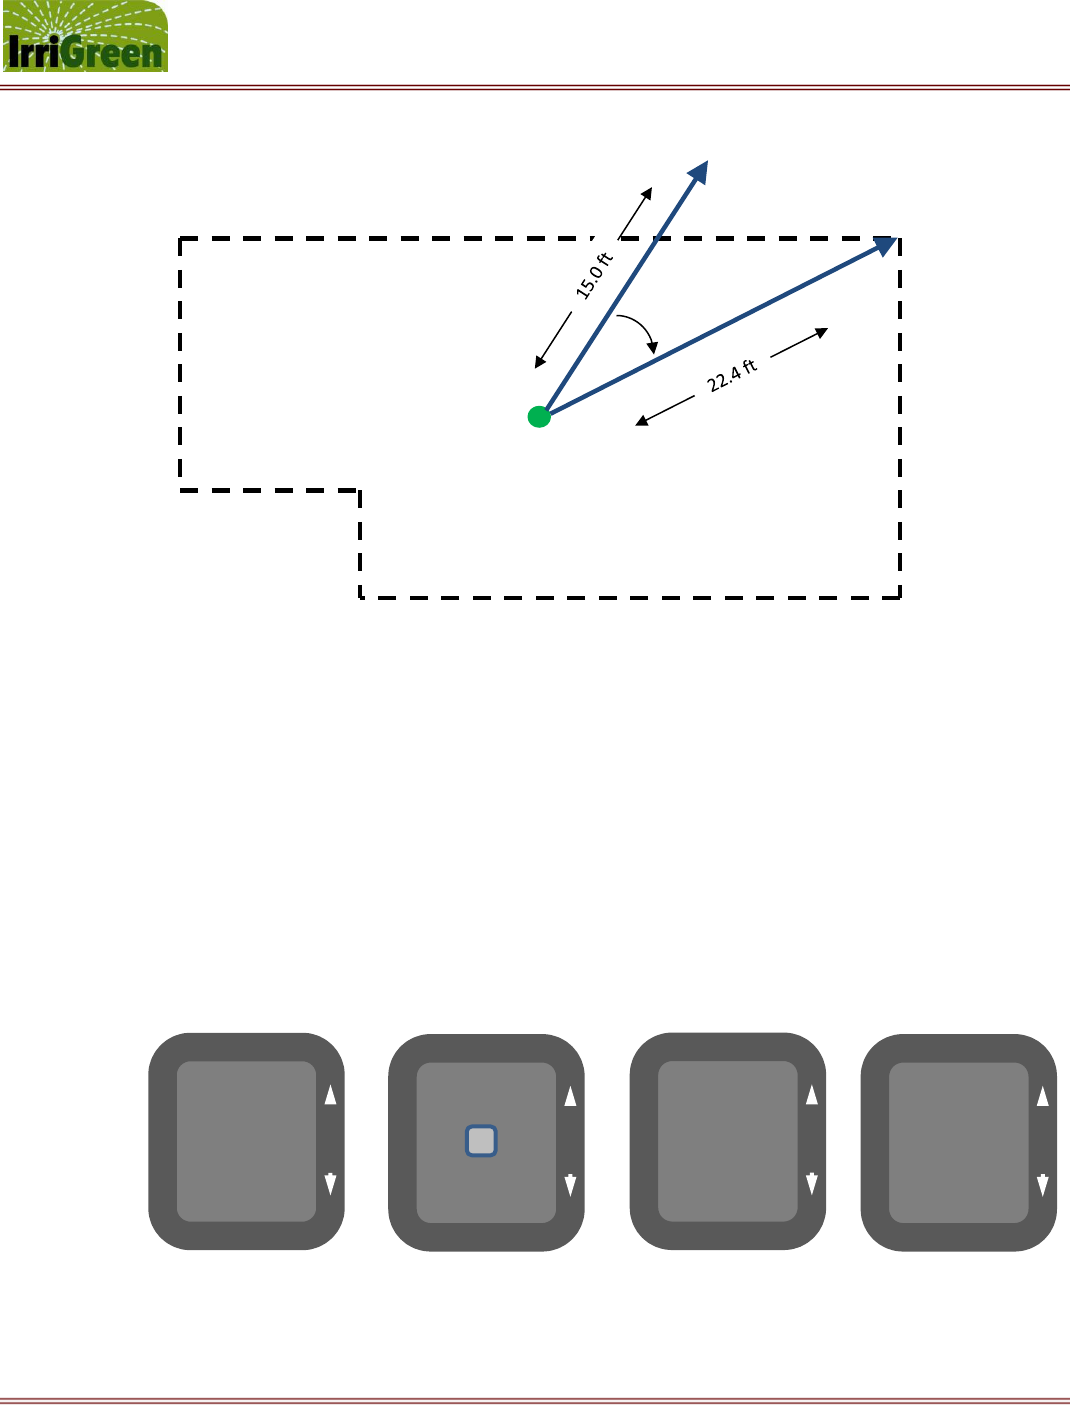
If this distance is correct and the flow direction is correct, then press and release the # number key to
map this first position – Point 1 (P01).
If this flow direction is not correct, then press and release the ҉ rotate key to rotate the angle
of the flow direction a step in the clockwise direction. If this flow direction is still not correct,
then press and release the ҉ rotate key until the flow direction lines up with the mapping point
you are trying to save.
(NOTE: You can press and hold the ҉ rotate key to very quickly repeat the rotation angle of the
flow direction in the clockwise direction, and the rotation will stop upon letting go. However, be
careful not to over rotate your desired flow direction position, or you will have to rotate 360⁰ to
start again.)
IrriGreen Genius Irrigation System – Training Manual Page 20
Changing the way we water the world™
If this distance is not correct, then adjust the distance by pressing ↑ up or ↓down arrows.
(NOTE: You can press and hold the ↑ up or ↓down arrows to very quickly repeat the change in
distance, and the stream distance will then change upon letting go. Once you release either
the↑ up or ↓down arrows the display will show the actual stream distance in feet.)
If this distance is not correct (i.e. – you want 22.40 ft.) then repeat this process until this
distance and flow direction is correct, then press and release the # number key to map this
point.
Continue moving from point to point (clockwise) to map all points in this watering zone (see below).
15.00ft
P00 1
#
*
22.40ft
P00 1
#
*
22.40ft
SAVE 1
#
*
22.40ft
P01 1
#
*
R
҉
҉
҉
҉
Rotate
P01 1
P00 1
IrriGreen Genius Irrigation System – Training Manual Page 21
Changing the way we water the world™
Once all of the desired points have been mapped press and release the * star key on the Genius
Programmer to exit zone mapping. The first and last points will automatically be connected.
After the word ZONE stops flashing, another zone can be selected and programmed in the same fashion.
Press and release the * star key on the Genius Programmer to exit the PROG program.
Once a zone is programmed it can also be edited by re-entering the zone in PROG mode to edit
distances at set mapped points or insert/add new map points. (NOTE: you cannot delete a point.)
(NOTE: If necessary while in PROG mode, you can erase all of the previously mapped points by
pressing and holding the * star key until the word ERASE appears. All of the mapped points for
this zone will then be erased and you can start again from the beginning.)
Rotate to next point
P01 1
P06 1
P04 1
P05 1
P03 1
P02 1
Watering Zone 1 – 6 Mapping Points
Save and exit after last point is mapped (P06)
IrriGreen Genius Irrigation System – Training Manual Page 22
Changing the way we water the world™
4:30
RUN
#
*
0.05
R01 1
#
*
0.30
R06 1
#
*
20
R06 1
#
*
҉
҉
҉
҉
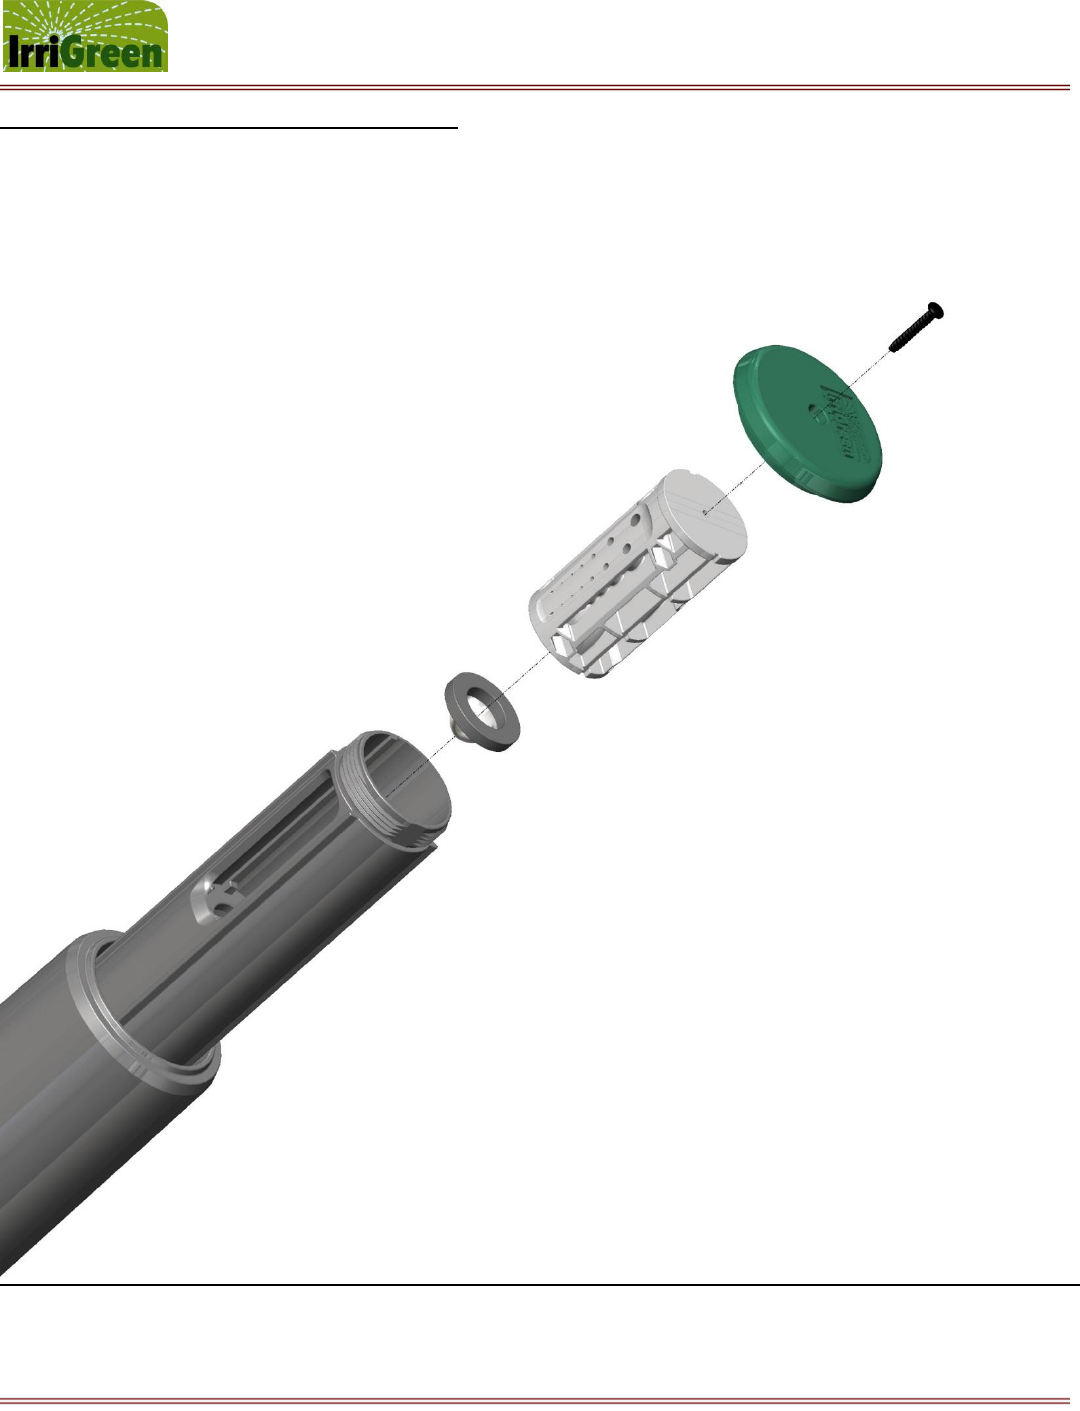
5. Select runtime precipitation rate and calculate watering zone times
Press and release the # number key on the Genius Programmer until the word RUN appears.
Press and hold the # number key until the word ZONE starts flashing to enter the RUN mode.
After the word ZONE stops flashing, select the zone number by pressing ↑ up or ↓down arrows.
Press and release the # number key to enter the ZONE, and the word R01 appears indicating 1
revolution with .05 on the top line indicating .05 inches of precipitation.
Press the ↑ up or ↓down arrows to set the desired number of revolutions. The total number of
inches of precipitation is listed on the top line for the total number of revolutions set. (See example
below for 6 revolutions showing 0.30 inches of precipitation.)
Press and release the # number key to save the number of revolutions. The word SAVE appears.
Press and release the * star key to calculate and display the zone watering time for the selected
precipitation rate and number of revolutions. This will appear as minutes in the top display.
The number of revolutions can still be changed by pressing the ↑ up or ↓down arrows and saved
by pressing and releasing the # number key. This will immediately update and display the new
watering zone time in minutes (top display – see “20” in example) while showing the new number of
revolutions (bottom display – see “r 06” in example). This watering zone time should be entered into
the 3rd party clock/scheduler for this zone.
NOTE: If you want to run the watering zone from this point, you can press and hold down the #
number key until the display flashes “run” and it automatically exits RUN mode. The sprinkler will
then reset itself and run the number of revolutions saved. You can always stop the sprinkler during
its run time at any time simply by entering back into run mode, and then exiting again.
Press and release the * star key again on the Genius Programmer to exit the watering zone.
After the word ZONE stops flashing, another zone can be selected and run in the same fashion.
Press and release the * star key again on the Genius Programmer to exit the RUN mode.
YOU ARE NOW READY TO RUN THE SYSTEM FROM THE 3RD PARTY CLOCK/SCHEDULER.
IrriGreen Genius Irrigation System – Training Manual Page 23
Changing the way we water the world™
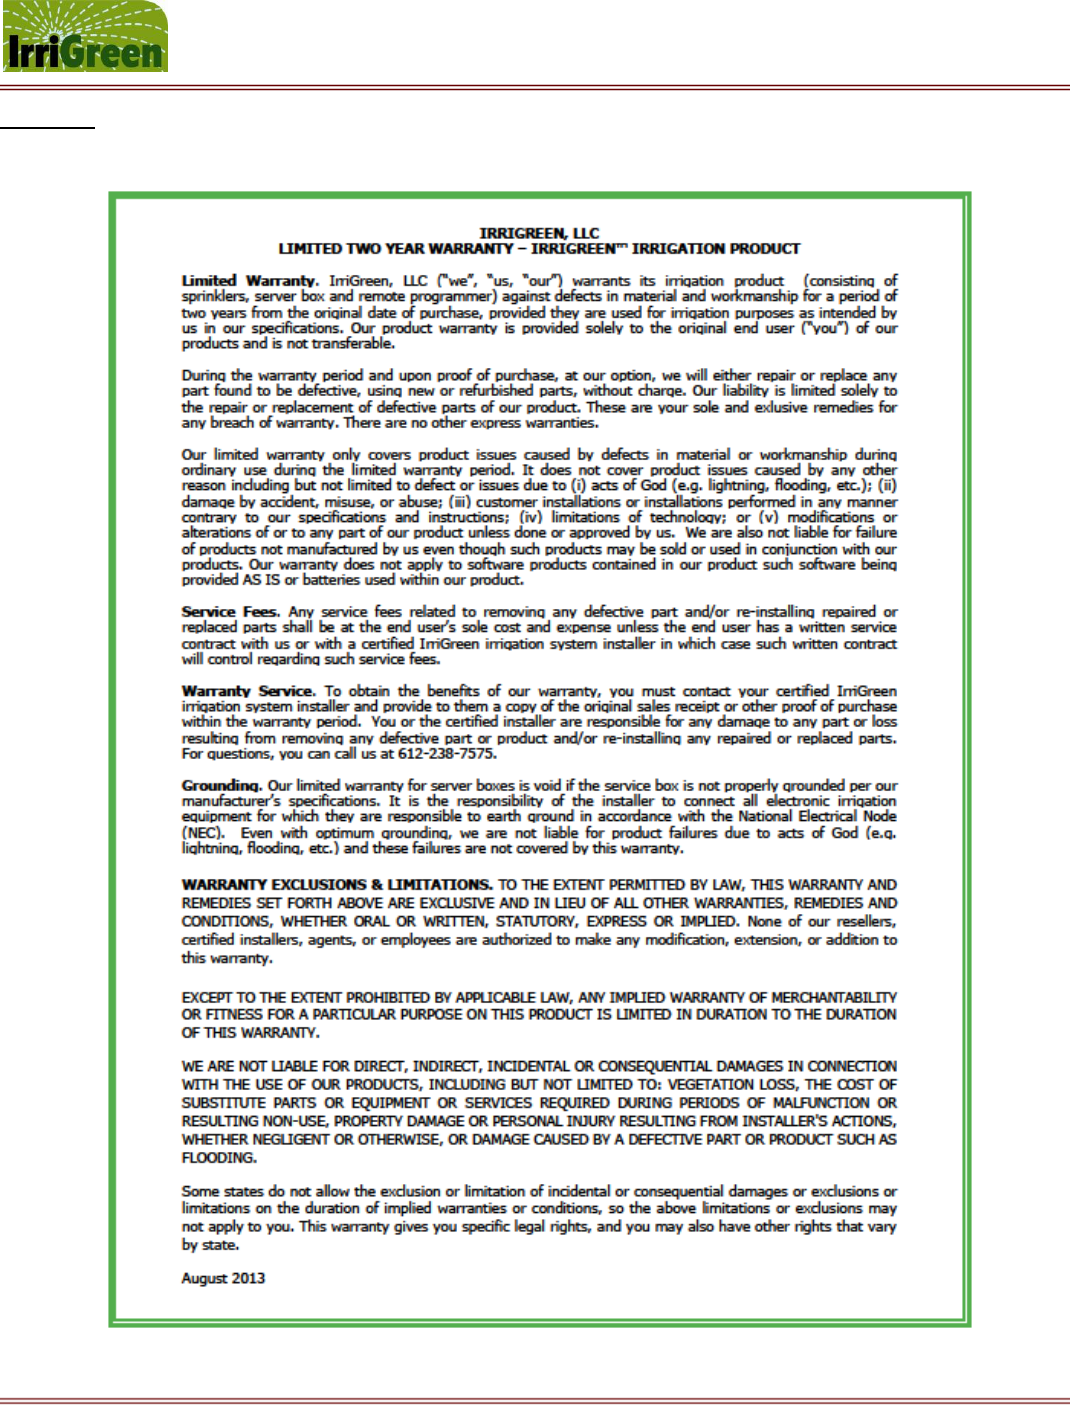
Replacing the Genius Nozzle and Filter System
IrriGreen Genius Irrigation System – Training Manual Page 24
Changing the way we water the world™
Warranty