Itron FC300SR AMR transceiver device for utility meters User Manual Getting Started Guide
Itron, Inc. AMR transceiver device for utility meters Getting Started Guide
Itron >
Contents
- 1. Users Manaul
- 2. Users Manual
Users Manaul

FC300 Handheld
Getting Started Guide
FC300
Identification
FC300 Handheld Getting Started Guide
12/19/2011 TDC-0898-004
Copyright
© 2009-2011 Itron, Inc. All rights reserved.
Confidentiality Notice
The information contained herein is proprietary and confidential and is being provided subject to the condition that (i) it be
held in confidence except to the extent required otherwise by law and (ii) it will be used only for the purposes described
herein. Any third party that is given access to this information shall be similarly bound in writing.
Trademark Notice
Itron is a registered trademark of Itron, Inc.
All other product names and logos in this documentation are used for identification purposes only and may be trademarks or
registered trademarks of their respective companies.
Suggestions
If you have comments or suggestions on how we may improve this documentation, send them to
TechnicalCommunicationsManager@itron.com
If you have questions or comments about the software or hardware product, contact Itron Technical Support:
Contact
Corporate
• Internet: www.itron.com
• E-mail: support@itron.com
• Phone: 1.877.487.6602
Customer Support
• Internet: support.itron.com
• For a list of supporting offices, click Support Service > Contact
Customer Support.
Compliance
This device complies with Part 15 of the FCC Rules. Operation is subject to the following two conditions:
• This device may not cause harmful interference.
• This device must accept any interference that may cause undesirable operation.
USA, FCC Class B - Part 15
This equipment has been tested and found to comply with the limits for a Class B digital device, pursuant to Part 15 of the
FCC Rules. These limits are designed to provide reasonable protection against harmful interference in a residential
installation. This equipment generates, uses, and can radiate radio frequency energy and, if not installed and used in
accordance with the instructions, may cause harmful interference to radio communications. However, there is no guarantee
that interference will not occur in a particular installation.
If this equipment does cause harmful interference to radio or television reception, which can be determined by turning the
equipment off and on, the user is encouraged to try to correct the interference by one or more of the following measures:
• Reorient or relocate the receiving antenna.
• Increase the separation between the equipment and receiver.
• Connect the equipment into an outlet on a circuit different from that to which the receiver is connected.
• Consult the dealer or an experienced radio or TV technician for help.

Compliance Statement Canada
This device complies with Industry Canada licence-exempt RSS standard(s). Operation is subject to the following two
conditions: (1) this device may not cause interference, and (2) this device must accept any interference, including
interference that may cause undesired operation of the device.
Déclaration de Conformité
Le présent appareil est conforme aux CNR d'Industrie Canada applicables aux appareils radio exempts de licence.
L'exploitation est autorisée aux deux conditions suivantes : (1) l'appareil ne doit pas produire de brouillage, et (2) l'utilisateur
de l'appareil doit accepter tout brouillage radioélectrique subi, même si le brouillage est susceptible d'en compromettre le
fonctionnement.
RF Exposure
This device must be held away from the body such that it retains a minimum distance of 20 centimeters (7.87 inches) from
all persons in order to comply with FCC and IC RF exposure levels.
Specific Absorption Rate Data
The FCC ID:EO9FC300SR/IC:864A-FC300SR model of this handheld meets the government’s requirements for exposure to
radio waves.
Your FC300 SRead has a radio transmitter and receiver. It is designed and manufactured not to exceed limits for exposure
to radio frequency (RF) energy set by the Federal Communications Commission (FCC) of the U.S. government and by the
Canadian regulatory authorities. These limits are part of comprehensive guidelines and establish permitted levels of RF
energy for the general population. The guidelines are based on standards that were developed by independent scientific
organizations through periodic and thorough evaluation of scientific studies. The standards include a substantial safety
margin designed to assure the safety of all persons, regardless of age or health.
The exposure standard for wireless mobile and/or portable devices employs a unit of measurement known as the specific
absorption rate, or SAR. The SAR limit set by the FCC and by the Canadian regulatory authorities is 1.6 W/kg1. Tests for
SAR are conducted using standard operating positions accepted by the FCC and by Industry Canada with the FC300
SRead transmitting at its highest certified power level in all test frequency bands. Although the SAR is determined at the
highest certified power level, the actual SAR level of the FC300 SRead while operating can be well below the maximum
level. This is because the FC300 SRead is designed to operate at multiple power levels, depending on the needs of the
customer.
Before an FC300 SRead model is available for sale to the public in the U.S. and Canada, it must be tested and certified to
the FCC and Industry Canada that it does not exceed the limit established by each government for safe exposure. The tests
are performed in positions and locations (for example, worn on the body) and reported to the FCC and made available for
review by Industry Canada. The highest SAR value for this FC300 SRead model when tested for use when worn on the
body as described in this document is 0.721 W/kg. While there may be differences between the SAR levels of various
FC300 SRead models and at various positions, they all meet the government requirements for safe exposure. Please note
that improvements to this product model could cause differences in the SAR value for later products; and in all cases,
products are designed to be within the guidelines.
----------------------
1 In the United States and Canada, the SAR limit for wireless mobile and/or portable devices used by the public is 1.6 W per
kilogram averaged over 1 g of tissue. The standard incorporates a substantial margin of safety to get additional protection
for the public and to account for any variations in measurements.
Warning Use this device only in a manner consistent with this document.
Electromagnetic Compatibility
Use only approved accessories with this equipment. Unapproved modifications or operation beyond or in conflict with these
instructions for use, may void authorization by the authorities to operate the equipment.

Lithium Ion Battery Warning
Warning Follow these procedures to avoid injury to yourself or others:
• The lithium battery may cause a fire or chemical burn if it is not disposed of properly.
• Do not recharge, disassemble, or heat above 158° Fahrenheit (70° Celsius), or
incinerate the lithium battery.
• Keep the lithium battery away from children.
• Replace the lithium battery only with batteries meeting Itron specifications. Any other
battery may cause a fire or explosion.
Laser Warning
Warning The imager uses laser light.
• Do not look into the laser's lens.
• Do not stare directly into the laser beam.
• Do not remove the laser caution labels from the FC300.
• Do not connect the laser bar code aperture to any other device. The laser bar code
aperture is certified for use with the FC300 only.
• Avoid exposure; laser radiation is emitted from the imager aperture.
• Laser radiation is possible when open. Please read the caution labels. Use of controls,
adjustments or performance of procedures other than those specified herein may result
in hazardous radiation exposure.
Waste Electrical and Electronic Equipment
Important This symbol is placed on the product to remind users to dispose of Waste
Electrical and Electronic Equipment (WEEE) appropriately, per Directive 2002-96-EC.
In most areas, this product can be recycled, reclaimed and re-used when properly
discarded. Do not discard labeled units with trash.
Support and Maintenance
For questions about your FC300, contact Itron Technical Support at 1.877.487.6602.
To return for maintenance, an RMA (return materials authorization) can be obtained at http://support.itron.com.

FC300 Getting Started Guide v
Proprietary and Confidential
Contents
Introduction .................................................................................................................. 1
Unpacking the FC300 Handheld Computer .............................................................. 1
Getting Familiar with Your FC300 ............................................................................ 2
Front View ........................................................................................................... 2
Back View with Hand Strap ................................................................................. 3
Back View of Battery Compartment .................................................................... 3
Top View ............................................................................................................. 4
Bottom View ........................................................................................................ 5
LED Status Indicators ............................................................................................... 5
Battery Charging LED ......................................................................................... 6
Bluetooth LED ..................................................................................................... 6
System Status LED ............................................................................................. 7
Setting Up a New FC300 .......................................................................................... 7
Hand Strap ............................................................................................................... 8
Installing the Battery ................................................................................................. 9
Charging the Battery ........................................................................................... 9
External Power Supply ........................................................................................... 10
USB Client Y Cable ........................................................................................... 11
Applying External Power to the FC300 ............................................................. 12
Power On/Suspend/Off the FC300 ......................................................................... 12
Resetting the FC300 ............................................................................................... 13
Batteries ..................................................................................................................... 15
Backup Battery ....................................................................................................... 16
Replacing the Battery ............................................................................................. 17
Controls ...................................................................................................................... 19
Keypad ................................................................................................................... 19
Modifier Keys..................................................................................................... 20
Keys and Key Sequence ................................................................................... 21
Accented Keys .................................................................................................. 24
Taskbar Icons ......................................................................................................... 25
Calibrating the Touch Screen ................................................................................. 26
Calibrating the Double-Tap ..................................................................................... 28

Contents
vi FC300 Getting Started Guide
Proprietary and Confidential
Disabling/Enabling the Touch Screen .................................................................... 29
Input Panel ............................................................................................................. 31
Setting Owner Information ...................................................................................... 32
Setting the Device Name ........................................................................................ 35
Setting the Date/Time ............................................................................................. 36
Setting Power Schemes ......................................................................................... 37
Setting Speaker Sounds and Volume .................................................................... 40
Using the Flashlight ................................................................................................ 43
Backlight Settings ................................................................................................... 44
Keypad Backlight .............................................................................................. 44
Touch Screen Backlight .................................................................................... 45
Accessories ............................................................................................................... 47
Setting the Radio .................................................................................................... 47
Antenna Types .................................................................................................. 48
Attaching the Antenna ....................................................................................... 49
Wireless Wide Area Network (WWAN) .................................................................. 49
Setting Up Wi-Fi ..................................................................................................... 50
Bluetooth Devices .................................................................................................. 54
Setting Up a Bluetooth Device .......................................................................... 54
GPS ........................................................................................................................ 59
Imager .................................................................................................................... 60
Holster .................................................................................................................... 61
Holster Belt ........................................................................................................ 62
Attaching Holster to Belt .................................................................................... 62
Carry Case ............................................................................................................. 65
Front and Back Views ....................................................................................... 66
Top and Bottom Views ...................................................................................... 67
Charging an FC300 from a Vehicle ........................................................................ 67
Applying the Touch Screen Protective Film ........................................................... 68
Maintenance ............................................................................................................... 69
Cleaning ................................................................................................................. 69
Batteries ................................................................................................................. 69
Exposure to Moisture ............................................................................................. 70
Troubleshooting ........................................................................................................ 70
SD Card .................................................................................................................. 70

Contents
FC300 Getting Started Guide vii
Proprietary and Confidential
Itron Applications ...................................................................................................... 70
Index ........................................................................................................................... 71

Contents
viii FC300 Getting Started Guide
Proprietary and Confidential

FC300 Getting Started Guide 1
Proprietary and Confidential
Introduction
This document contains information to help you get started using
your Itron FC300 series (FC300 and FC300 with SRead radio)
handheld computer. For additional information, refer to the FC300’s
online help (select Windows logo > Help), or the
documentation/online help for your FC300 Itron software application
(MV-RS, Field Collection System, Endpoint-Link, Endpoint-Link
Pro, Field Deployment Manager).
Refer to the FC300 Docks User Guide for information on installing
and using the FC300 desk dock, the FC300 multi-dock, and the
FC300 vehicle dock.
Note Except where otherwise stated, this guide uses the
terms FC300 and handheld inclusively, to refer to the
FC300 and FC300 with SRead radio computers.
Unpacking the FC300 Handheld Computer
Make sure you have these items in your FC300 package:
• FC300 handheld computer
• One tethered stylus (attached)
• One tethered system I/O (input/output) port cover (attached)
• Hand strap (installed)
• Lithium-ion battery pack
Optional items:
• SRead radio (installed)
• 8¼ inch SRead antenna (included with SRead units)
• 2½ inch SRead antenna (included with SRead and imager units)
• GPS (internal installation)
• Imager (internal installation)
• Laser warning labels (only if imager is included) are already
applied to the FC300 in the appropriate language; discard the
remaining laser warning labels in other languages if not needed.
Introduction
2 FC300 Getting Started Guide
Proprietary and Confidential
Note Communication docks, power supply, and cabling
are ordered and packaged separately; see the FC300 Docks
User Guide.
Getting Familiar with Your FC300
The following illustrations identify the main features of the FC300.
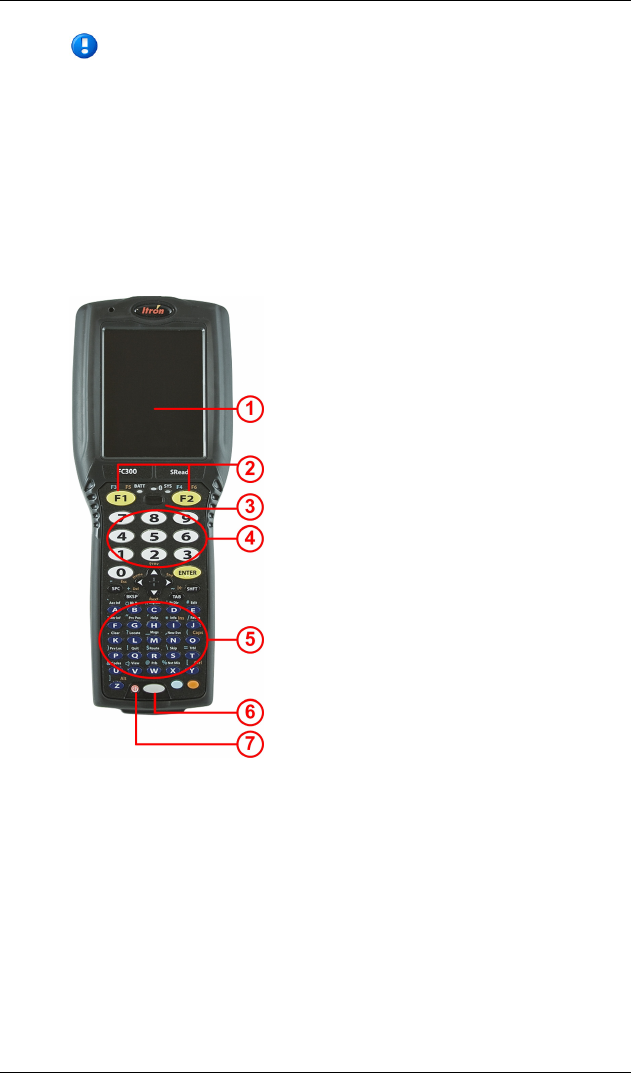
Front View
1 Touch screen 5 Alpha keys
2 F1 and F2 buttons 6 Flashlight toggle on/off
3 Speaker 7 Power/suspend/resume key
4 Numeric keys
Introduction
FC300 Getting Started Guide 3
Proprietary and Confidential
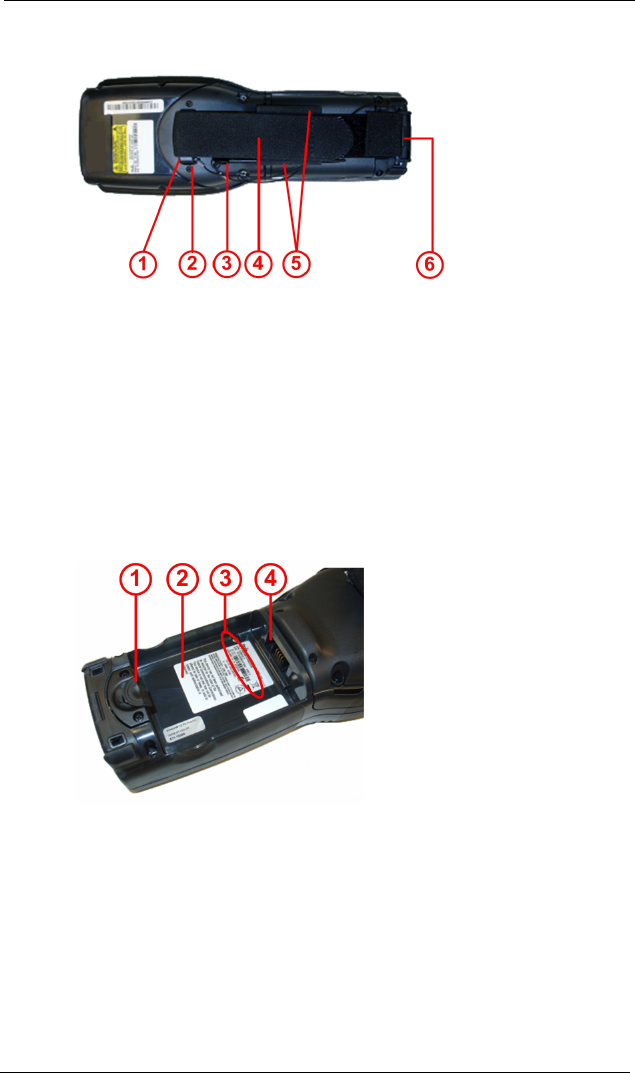
Back View with Hand Strap
1 Hand strap, upper connector on hand strap base
2 Stylus tether (using hand strap upper connector as anchor)
3 Stylus
4 Hand strap (adjustable end)
5 Stylus holders on hand strap (available on both left and right sides)
6 Hand strap, lower connector inserts into opening on bottom of FC300
Back View of Battery Compartment
1 Battery well access tab
2 Battery well
3 FC300 serial number
4 Battery well terminals
Introduction
4 FC300 Getting Started Guide
Proprietary and Confidential
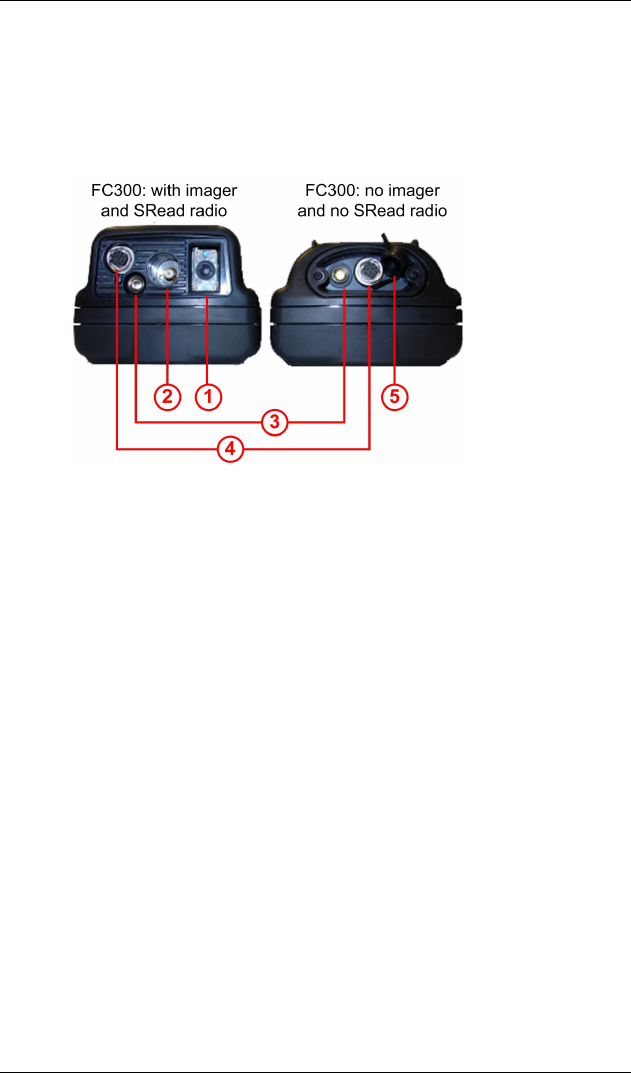
Top View
The following picture shows top views of two FC300s with different
options. Note the difference in depth (front to back) of the two
examples.
1 Imager (optional)
2 Antenna connection (only FC300s with SRead radio or imager)
3 Flashlight
4 Hirose connector (uncovered)
5 Outlet cover
Introduction
FC300 Getting Started Guide 5
Proprietary and Confidential
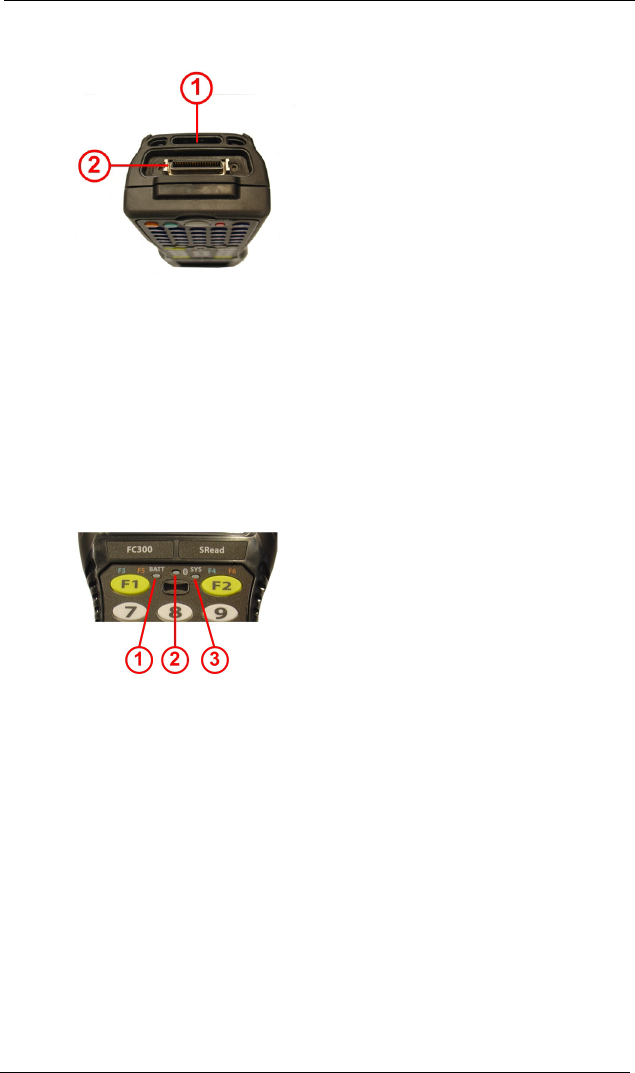
Bottom View
1 Opening for lower hand strap connector
2 IO (input/output) connector (uncovered)
LED Status Indicators
The FC300 has three light-emitting diode (LED) status indicators
located at the top of the keypad. The LEDs light up when a particular
function of the computer is active.
1 Battery charging status LED indicator
2 Bluetooth status LED indicator
3 System status LED indicator

Introduction
6 FC300 Getting Started Guide
Proprietary and Confidential
Battery Charging LED
The Battery Charging Status LED indicates the main battery charging
status.
Light
Description
Off No charge. The battery is not being charged
by AC power or is not present.
Blinking red Fault. The battery pack has faulted or failed.
Yellow/amber Standby. The battery pack temperature is out
of range.
Red Charging. The battery pack is charging (icon
on touch screen).
Green Charged. The battery pack is fully charged
and connected to external power.
Bluetooth LED
The Bluetooth Status LED applies to Bluetooth functions.
Light
Description
Blinking slow
(~ every 4 seconds)
Bluetooth is active, but not connected to a
device.
Blinking medium
(~ every 2 seconds)
Bluetooth is paired and connected to a device.
Blinking fast
(~ every 1 second)
Bluetooth is discovering other Bluetooth
devices.
Not lit Bluetooth hardware is turned off.

Introduction
FC300 Getting Started Guide 7
Proprietary and Confidential
System Status LED
The System Status LED indicates power management status.
Light
Description
Blinking red Battery power failure; critical suspend.
Solid red Main battery is low.
Blinking green FC300 is in System Idle. The display is turned
off, but the FC300 is still powered on. For
details, see Setting Power Schemes on page
37.
Yellow/amber Initial few seconds when Power key is
pressed.
off None of the above.
Setting Up a New FC300
There are several hardware and software setup tasks to complete prior
to using a new FC300. Use the following checklists to perform the
task, in the order provided.
Hardware Setup Checklist
√
Task
Description
See
1 Connect or apply
optional accessories.
• Attaching the Antenna on page 49
(optional).
• Applying the Touch Screen
Protective Film on page 68
(optional).
2 Connect cables. External Power Supply on page 10.
3 Insert the battery. Installing the Battery on page 9.
4 Charge the battery. Charging the Battery on page 9.
5 Power on the FC300. Power on/suspend/off the FC300 on
page 12.

Introduction
8 FC300 Getting Started Guide
Proprietary and Confidential
Software Setup Checklist
√
Task
Description
See
1 Calibrate the touch
screen.
Calibrating the Touch Screen on page
26.
2 Set device name. Setting the Device Name on page 35.
3 Set owner information. Setting Owner Information on page
32.
4 Set date and time zone. Setting the Date/Time on page 36.
5 Set power scheme
timers.
Setting Power Schemes on page 37.
6 Set speaker sounds and
volume.
Setting Speaker Sounds and Volume
on page 40.
7 Set peripheral options. • Using the Flashlight on page 43.
• Enabling GPS on page 59.
• Setting up a Bluetooth Device on
page 54.
Hand Strap
A lightweight elastic hand strap provides a means to secure the
FC300 to your hand. The hook and loop fabric strap is adjustable to
fit most hands.
The hand strap covers the battery well and must be temporarily
unattached at the bottom of the FC300 to provide access.
To detach the hand strap
1. Hold the FC300 firmly with one hand and grasp the bottom of
the hand strap just above the clip pins.
2. Firmly pull away from the FC300 until the hand strap is free of
the bottom.

Introduction
FC300 Getting Started Guide 9
Proprietary and Confidential
Installing the Battery
The FC300’s lithium-ion (Li-Ion) battery is sealed in a separate bag
during shipping. Remove the battery from its packing before
installation. A spare main battery can be ordered from Itron to carry
and replace while in the field, if necessary. For more details, see
Batteries on page 15.
Be sure to fully charge the battery before powering on the FC300; see
Charging the Battery on page 9.
To install the battery
1. Detach the bottom hook of the hand strap.
2. Tilt the end (with the extended terminals) of the fully charged
battery into the upper end of the battery well. Press and slide the
battery locking latch toward the bottom of the unit and seat the
battery until it clicks into place and is firmly seated in the battery
well. Release the battery locking latch.
3. Reattach the hand strap.
Charging the Battery
Before you power on the FC300, the main battery must be fully
charged. You can charge the battery while it is in the FC300 or while
in the spare battery charging compartment available on the desk
dock.
To charge the battery
1. Apply power to the FC300—with battery installed—through
direct cabling (see External Power Supply on page 10) or by
using a dock (see the FC300 Docks User Guide).
• A new battery or fully depleted battery completely charges in
approximately four hours.
• If using a desk dock, the battery in the FC300 and a spare
battery in the spare battery charging compartment are
charged at the same time.
2. When the battery LED is green, the battery is fully charged; see
Battery Charging LED on page 6.
Introduction
10 FC300 Getting Started Guide
Proprietary and Confidential
After you have turned on the FC300, you can check battery
status details (see Batteries on page 15).
• Double-click the battery gauge icon in the FC300's
system tray.
or
• Select Windows logo > Settings > Control Panel > Battery.
Note From within an Itron software application, the
battery gauge icon or the Control Panel may not be
accessible. Check the Itron software application
documentation for how to view battery status from within
the application.
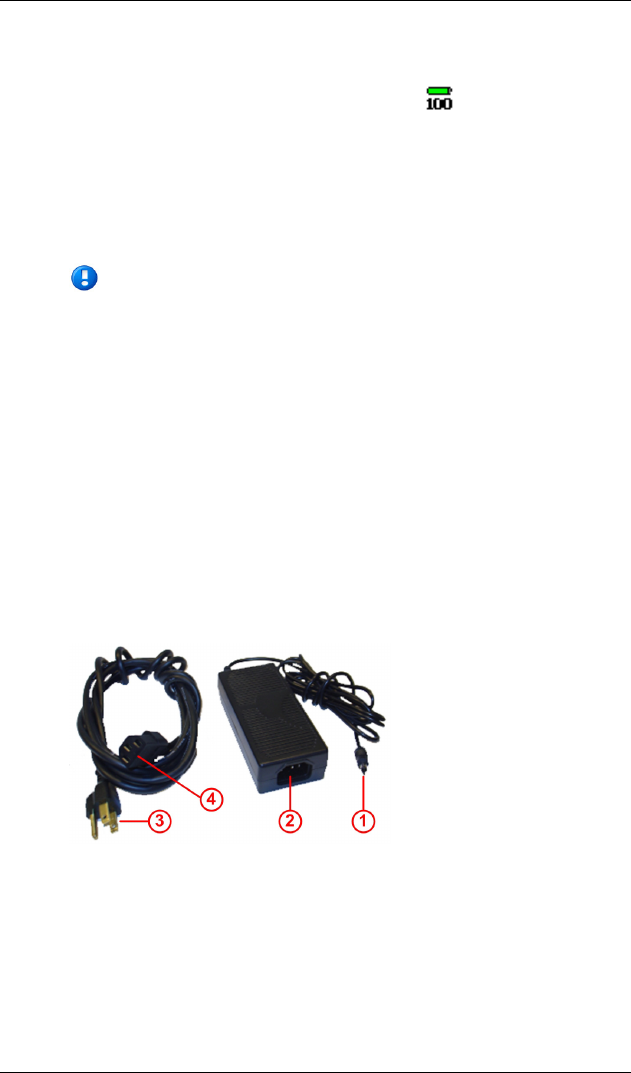
External Power Supply
The FC300 receives AC power from the AC power unit. This
external power supply can be used with the USB client Y cable to
charge the FC300 battery and communicate via synchronization
software (for Windows XP or earlier operating systems, use
ActiveSync; for Windows Vista or later operating systems, use
Windows Mobile Device Center) with a host PC.
1 Single-pin cable end of AC power unit.
2 AC receptacle for AC power unit.
3 Wall plug to power the AC power unit.
4 Connector to AC power unit (insert into 2).
Introduction
FC300 Getting Started Guide 11
Proprietary and Confidential
To assemble the AC power unit
1. Plug the connector to AC power supply (4) into the AC
receptacle for the AC power unit (2).
2. Plug the wall plug (3) into a wall outlet.
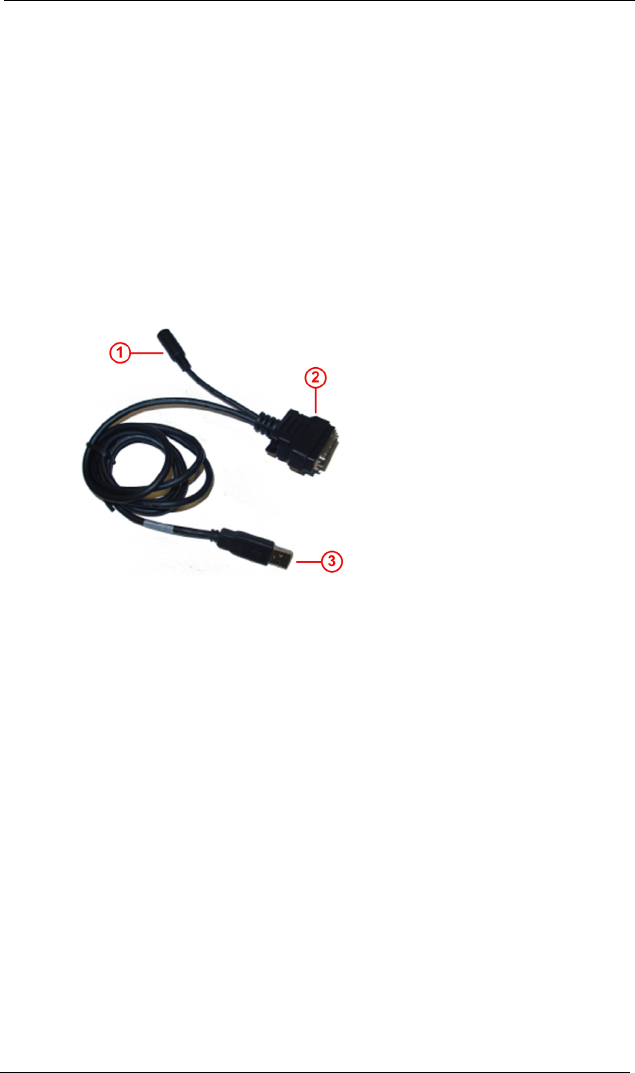
USB Client Y Cable
The USB client Y cable provides a connection between the host PC
via USB (using synchronization software) and the FC300. An AC
adapter pin provides the connector to external power.
This cable setup can be used if not using a dock.
1 Single-pin AC adapter to connect to external power
2 I/O connector for the FC300
3 USB type A plug to connect to the host PC

Introduction
12 FC300 Getting Started Guide
Proprietary and Confidential
Applying External Power to the FC300
Before beginning, review the setup for the AC power unit (see
External Power Supply on page 10) and the features of the USB
client Y cable on page 11.
To apply external power to the FC300
1. Using the USB client Y cable, pinch the catch/release latches on
the I/O connector until they are open.
2. Connect the I/O connector to the bottom of the FC300, matching
the shape of the connectors.
3. Release the catch/release latches.
4. Insert the single-pin cable end of the AC power unit into the
single-pin AC adapter from the USB client Y cable.
5. Plug the AC power unit into a wall outlet power source.
6. Insert the USB type A plug from the USB client Y cable into the
USB host port on the PC.
Power On/Suspend/Off the FC300
The FC300 has three power modes.
• On. The keyboard, touch screen, and all peripherals function
normally. The touch screen backlight is on until the User Idle
timer expires. The touch screen does not turn off until the
System Idle timer expires. For information about the idle timers,
see Setting Power Schemes on page 37. The FC300 remains in
the On state as long as any of the following activity occurs:
• Pressing any key on the keypad, except Power.
• Tapping the touch screen.
• Incoming data through the scanner port.

Introduction
FC300 Getting Started Guide 13
Proprietary and Confidential
• Suspend. Occurs when the FC300 is inactive for a
predetermined period of time (see Setting Power Schemes on
page 37), the user presses Power when the FC300 is already on,
or selects Windows logo > Suspend. The FC300 remains in the
Suspend state until any of these wake-up events occur:
• Pressing Power.
• External power is applied.
• Off. Occurs when the main battery and the backup battery are
depleted. You never turn off the FC300; you only suspend it.
To power on the FC300
• Press Power.
To suspend the FC300
• Press Power, or from the FC300 desktop, select Windows logo
> Suspend.
Resetting the FC300
If your FC300 does not respond as expected (such as locks up or fails
to operate), a reset may correct the issue. There are two types of
reset:
• Soft Reset—also referred to as a warm boot—does not affect the
operating system and no saved data is lost. If done within an
application, that application closes any data that was not saved
prior to the soft reset.
• Hard Reset—also referred to as a cold boot—returns the
handheld to its original configuration. Data that was not
previously saved may be lost.

Introduction
14 FC300 Getting Started Guide
Proprietary and Confidential
Caution When you perform a hard reset, you may
lose some settings saved in the operating system,
as well as non-saved data stored in RAM. (This is
not an issue with Itron software applications as they
are installed in non-volatile memory and data is
written to the disk when entered). When you restart,
you may have to reenter the time, date, and
personal data, and recalibrate your touch screen.
Because of the extreme nature of a hard reset, you
should consider it an emergency procedure only—
use a soft reset instead, whenever possible.
To perform a soft reset
• Press the Orange Z F1 keys sequentially. The screen dims
while the FC300 carries out the soft reset.
To perform a hard reset
• Hold down Power for approximately 15 seconds or until the
screen dims. The FC300 is powered off; press Power to it turn
on.

Batteries
FC300 Getting Started Guide 15
Proprietary and Confidential
Batteries
The FC300 uses a replaceable Lithium-Ion (Li-Ion) battery pack from
Itron as the main battery. Under normal conditions, a fully charged
battery should last for a full eight hour work shift before requiring a
recharge.
A battery gas gauge icon resides in the FC300's system tray—if
enabled—and shows four levels of charge: 100%, 75%, 50%, and
25%. At any level below 25%, the system status LED and the battery
gas gauge icon turn red indicating low battery. A depleted battery can
be replaced in the field with a fully charged battery; see Replacing
the Battery on page 17.
The main battery is charged/recharged when the FC300 is seated in a
powered dock or directly cabled to an external power source.
Tip Frequent connection to an external power source—
through a dock or a cable—is recommended to maintain
the backup battery charge. The backup battery cannot be
recharged by a dead or missing main battery.
The FC300 main battery well is on the back of the unit. The battery
case serves as the back cover for the battery well.
To display the battery gas gauge icon
1. Select Windows logo > Settings > Control Panel > Battery.
2. Select the Battery Toolbar Icon so the battery gas gauge
displays in the FC300 system tray.
If cleared, the icon does not appear.
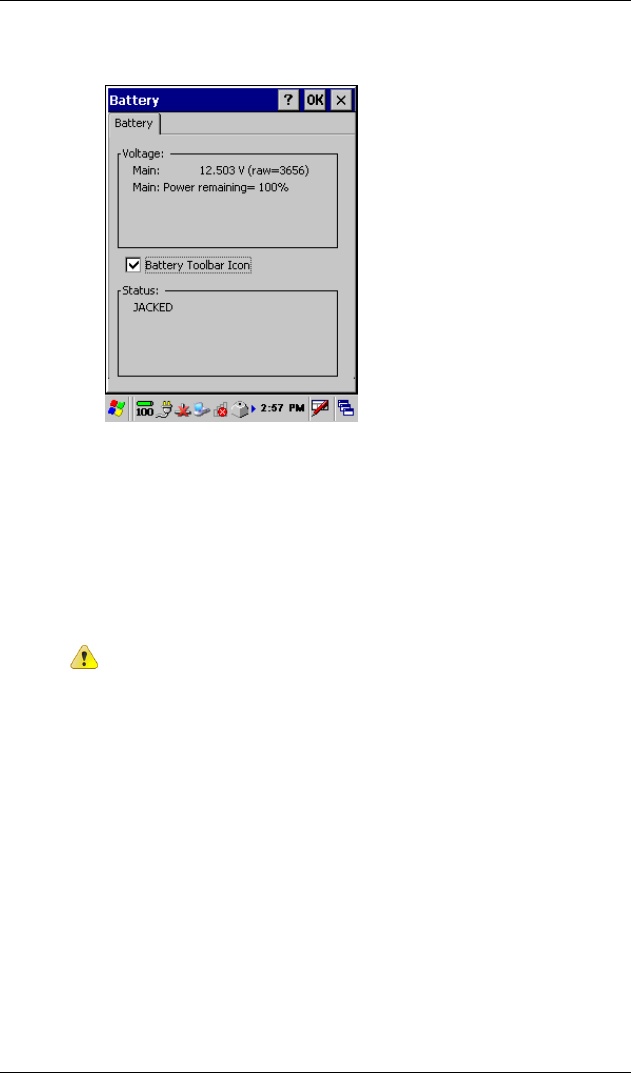
Batteries
16 FC300 Getting Started Guide
Proprietary and Confidential
The Status area shows JACKED if the main battery is receiving
external power.
3. Select OK.
4. Close the Control Panel to return to the desktop.
Backup Battery
The FC300 uses an internal backup battery to retain data for five
minutes while the depleted main battery is removed and replaced
with a fully charged battery.
Caution
If the backup battery charge is Low, there is a risk
of losing data when replacing the main battery (though
Itron software applications do not lose data due to a power
loss or low battery charge). Before replacing the main
battery, see To check the backup battery status on page
16.
The backup battery draws power from the main battery to maintain a
charge. If there is no main battery in the unit, the backup battery
temporarily provides power to maintain RAM and other vital
settings. After the main battery is installed, the backup battery begins
to draw power from the main battery again.

Batteries
FC300 Getting Started Guide 17
Proprietary and Confidential
To check the backup battery status
1. From the desktop, double-tab the battery icon ( ) or select
Windows logo > Settings > Control Panel > Power.
2. Select the Battery tab.
3. View the Backup battery status. If Low or Very Low, do not
replace the main battery unless on external power.
4. Select OK.
5. Close the Control Panel to return to the desktop.
Replacing the Battery
Before replacing the battery, you must:
• Have a fully charged battery as a replacement.
• Be sure the backup battery charge is greater than Low. If not,
connect the unit to external power before removing the depleted
battery. See "To check the backup battery status" on page 16.
• Save any work in progress.
To replace the battery
1. Detach the bottom hook of the hand strap, if installed.
2. Press and slide the battery locking latch toward the bottom of the
unit to release the main battery pack.
3. Pull the battery up and out of the battery well with a hinge
motion.

Batteries
18 FC300 Getting Started Guide
Proprietary and Confidential
4. Tilt the end (with the extended terminals) of the fully charged
battery into the upper end of the battery well. Press and slide the
battery locking latch toward the bottom of the unit and seat the
battery until it clicks into place and is firmly seated in the battery
well. Release the locking latch.
5. Reattach the hand strap, if installed.
6. Check the battery status by selecting Windows logo > Settings
> Control Panel > Battery or as defined from within your Itron
software application.
Controls
FC300 Getting Started Guide 19
Proprietary and Confidential
Controls
Once the FC300 is running, get familiar with the keypad and how to
use modified keys. Several settings should also be defined based on
your needs.
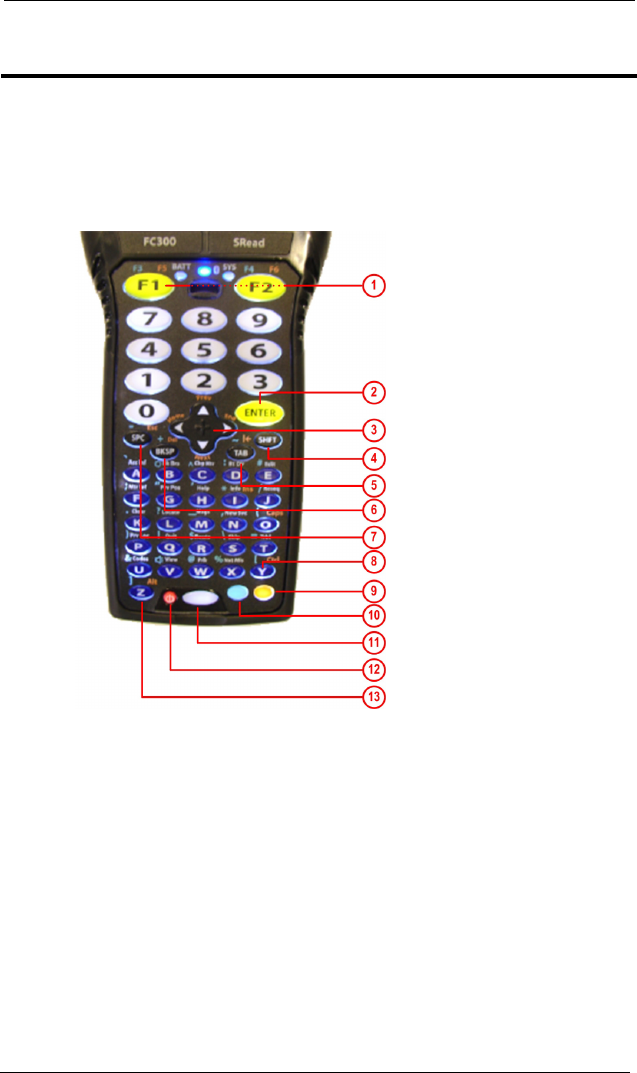
Keypad
1 Function keys (F1 and F2) 8 Y/Control key (CTRL)
2 Enter key (ENTER) 9 Orange key
3 Arrow keys 10 Blue key
4 Shift key (SHFT) 11 Flashlight key
5 Tab/Backtab key (TAB) 12 Power key
6 Backspace/Delete key (BKSP/DEL) 13 Z/Alternate key (ALT)
7 Space/Escape key (SPC/ESC)

Controls
20 FC300 Getting Started Guide
Proprietary and Confidential
Modifier Keys
The SHFT (shift), Orange, and Blue keys are considered modifier
keys; they modify the action of another key. For example:
Key
initial key with Orange key with Blue key
Action
SPC (space) Esc (escape) - (hyphen or
minus)
Usually a modifier key is used sequentially with another key; the
keys are not pressed simultaneously unless indicated in this document
with a + between the keys.
The following icons appear in the taskbar to indicate usage.
Icon
Indicates
CapsLock is active.
No modifier key is active.
Blue modifier key is active.
Orange modifier key is active.
Shift key is active.
If a modifier key is active, it remains active until another key is
pressed. For example:
1. Press Blue I to enter an *.
2. Press I again and the letter i (lowercase) appears.
or
1. Press SHFT H to enter an uppercase H.
2. Press H again and a lowercase h appears.

Controls
FC300 Getting Started Guide 21
Proprietary and Confidential
In some cases of a modifier key sequence—such as Caps
(CapsLock)—the state is active until the key sequence is toggled off.
For example:
1. Press Orange O to activate Caps (uppercase).
2. Press A, the A is uppercase; press B, the B is uppercase.
3. Press Orange O to deactivate Caps.
4. Press C, the c is lowercase.
Keys and Key Sequence
Press multiple keys sequentially.
To get this function
Press keys in this order
Results/comments
Windows Start Menu Orange Y Orange
SPC
Standard Windows Start
menu (usually CTRL+ESC)
Flashlight Flashlight
key
Toggles flashlight on/off
Warm boot (soft reset) Orange Z F1 Resets the FC300
Enter ENTER Complete a process, enter or
select a value
On (when off) Power Powers on the FC300
Suspend (when on) Power Suspend or Resume mode
Volume up Blue V
(up arrow)
Increases volume
Volume down Blue V
(down
arrow)
Decreases volume
Touch screen backlight
lighter
Blue B
(up arrow)
Touch screen backlight is
lighter
Touch screen backlight
darker
Blue B
(down
arrow)
Touch screen backlight is
darker
ALT mode Orange Z Alternate (ALT) mode
CTRL mode Orange Y Control (CTRL) mode
Escape Orange SPC Escape
Space SPC Space
Caps Lock Orange O (letter) Toggles Caps Lock on/off

Controls
22 FC300 Getting Started Guide
Proprietary and Confidential
To get this function
Press keys in this order
Results/comments
Uppercase letter SHFT Toggles letter to uppercase
or lowercase
Backspace BKSP Moves back a space
Tab TAB Tabs to next field or item
Back Tab SHFT
or
Orange
TAB Tabs backwards to previous
field or item
Cursor up Up arrow Moves cursor up a line
Cursor down Down
arrow
Moves cursor down one line
Cursor right Right arrow Moves cursor one space to
the right
Cursor left Left arrow Moves cursor one space to
the left
Insert Orange I (letter) Insert mode
Delete Orange BKSP Deletes one character
Home Orange
(left
arrow)
Home
End Orange
(right
arrow)
End
Previous Orange
(up arrow)
Navigates to previous screen
Next Orange
(down
arrow)
Navigates to next screen
F1 F1 F1
F2 F2 F2
F3 Blue F1 F3
F4 Blue F2 F4
F5 Orange F1 F5
F6 Orange F2 F6
. (period) Blue K Period
' (single quote) Blue H Single quotation mark
" (double quote) Blue G Double quotation mark
' (apostrophe) Blue 8 Apostrophe
, (comma) Blue N Comma

Controls
FC300 Getting Started Guide 23
Proprietary and Confidential
To get this function
Press keys in this order
Results/comments
; (semicolon) Blue F Semicolon
: (colon) Blue D Colon
! (exclamation) Blue Q Exclamation point
? (question mark) Blue L Question mark
( (left parenthesis) Blue O (letter) Left or open parenthesis
) (right parenthesis) Blue P Right or close parenthesis
_ (underscore) Blue M Underscore or horizontal bar
/ (forward slash) Blue J Forward slash
\ (back slash) Blue S Backward slash
` (grave accent) Blue A Grave accent
@ (at) Blue W At sign
# (number) Blue E Number sign
$ (dollar) Blue R Dollar sign
% (percent) Blue X Percent sign
^ (caret) Blue C Caret
& (ampersand) Blue U Ampersand
* (asterisk) Blue I (letter) Asterisk
| (pipe) Orange R Pipe or vertical bar
< (less than) Blue 7 Less than sign
> (greater than) Orange 7 Greater than sign
- (hyphen or minus) Blue SPC Hyphen, dash, or minus sign
+ (plus) Blue BKSP Plus sign
= (equal) Blue T Equal sign
[ (left bracket) Blue Y Left square bracket
] (right bracket) Blue Z Right square bracket
{ (left curly bracket) Orange S Left curly bracket
} (right curly bracket Orange T Right curly bracket
€ (Euro) Orange 3 Euro sign
£ (British pound) Blue 3 British pound sign

Controls
24 FC300 Getting Started Guide
Proprietary and Confidential
Accented Keys
To get this result
Press keys in this order
à è ì ò ù Orange A A or the appropriate
letter
À È Ì Ò Ù Orange A SHFT A or the appropriate
letter
á é í ó ú ý Orange 8 A or the appropriate
letter
Á É Í Ó Ú Ý Orange 8 SHFT A or the appropriate
letter
â ê î ô û Orange C A or the appropriate
letter
Â Ê Î Ô Û Orange C SHFT A or the appropriate
letter
ã ñ õ Orange N A or the appropriate
letter
Ã Ñ Õ Orange N SHFT A or the appropriate
letter
ä ë ï ö ü ÿ Orange 6 A or the appropriate
letter
Ä Ë Ï Ö Ü Orange 6 SHFT A or the appropriate
letter
¡ Blue 9
¿ Orange 9
ç Blue 4
Ç Orange 4
œ Blue 2
ΠOrange 2
ß Blue 6
ø Blue 0 (zero)
Ø Orange 0 (zero)
å Blue 5
Å Orange 5
æ Blue 1
Æ Orange 1
Controls
FC300 Getting Started Guide 25
Proprietary and Confidential
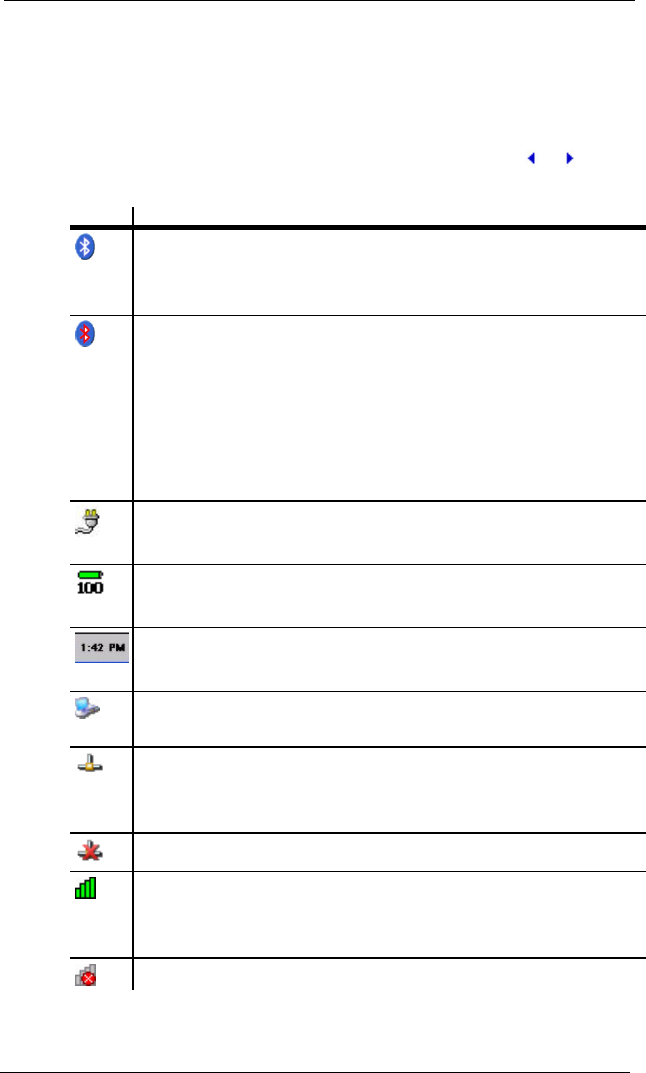
Taskbar Icons
The following icons may appear in the FC300 taskbar. In most cases,
double-tapping the icon in the taskbar opens the related application or
properties screen.
Up to six icons can display in the taskbar. A blue arrow or
indicates that more icons are available.
Icon
Indicates
Bluetooth module is connected to one or more of the targeted
Bluetooth devices.
See Bluetooth on page 54.
Any of the following conditions:
• Bluetooth is off.
• The FC300 is not connected to any Bluetooth device.
• The FC300 is ready to connect to a Bluetooth device.
• The FC300 is out of range for all paired Bluetooth
devices; the connection is inactive.
FC300 is using external power.
See Setting Power Schemes on page 37.
Charge status of the main battery.
See Batteries on page 15.
Current time.
See Setting the Date/Time on page 36.
Synchronization software connection, such as ActiveSync or
Windows Mobile Device Center.
Active TCP/IP connection.
Note You may see more than one icon if you have a WLAN
(802.11) and Ethernet connection enabled at the same time.
Inactive TCP/IP connection.
Wi-Fi available and enabled with a good signal. Yellow bars
indicate a weak signal.
See Setting Up Wi-Fi on page 50.
Wi-Fi available, but may be disabled and no signal.
Controls
26 FC300 Getting Started Guide
Proprietary and Confidential
Icon
Indicates
Tap the switchpad icon to access the desktop or a list of open
applications.
Input method: keyboard/input panel/transcriber.
See Input Panel on page 31.
Calibrating the Touch Screen
The FC300 touch screen should be calibrated for first time use. At
any time, you can recalibrate the touch screen if it is not responding
properly to stylus taps.
Calibration involves tapping the center of a target. If you miss the
target, keep the stylus on the screen, slide it over the target's center,
and then lift the stylus.
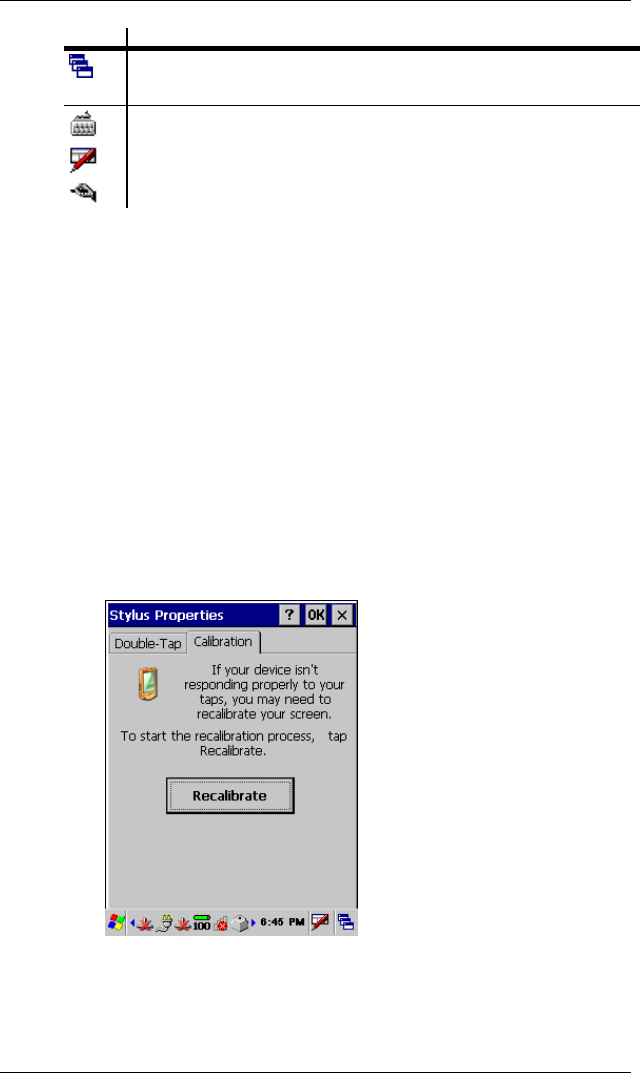
To calibrate the touch screen
1. Select Windows logo > Settings > Control Panel > Stylus.
2. Select the Calibration tab.

Controls
FC300 Getting Started Guide 27
Proprietary and Confidential
3. Select Recalibrate.
4. Follow the instructions on the screen. Press ENTER to save the
calibration settings or press Esc to cancel or quit.
Controls
28 FC300 Getting Started Guide
Proprietary and Confidential
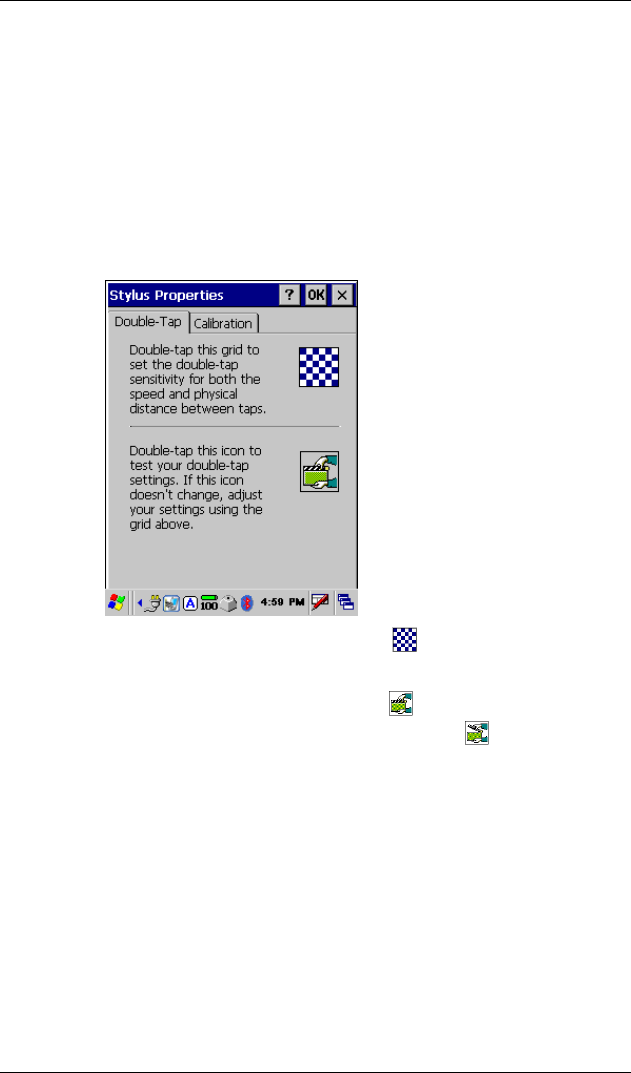
Calibrating the Double-Tap
The FC300 touch screen responds to stylus double-taps. Use this
procedure to set the sensitivity of the double-taps and test the setting.
To calibrate the double-tap
1. Select Windows logo > Settings > Control Panel > Stylus.
2. Select the Double-Tap tab.
3. Double-tap the checkered grid icon to set the sensitivity for
speed and distance between taps.
4. Double-tap the movie clapper icon to test the setting. The
icon should change to show an open clapper .
If the icon doesn't change, repeat steps 3-4.
5. Select OK.
6. Exit the Control Panel to return to the desktop.
Controls
FC300 Getting Started Guide 29
Proprietary and Confidential
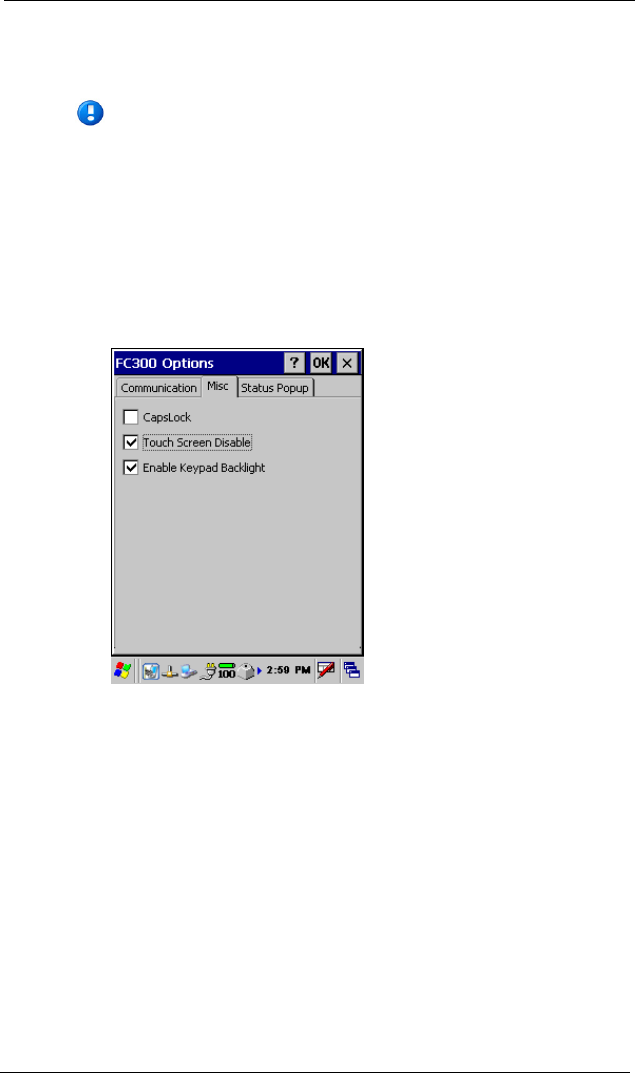
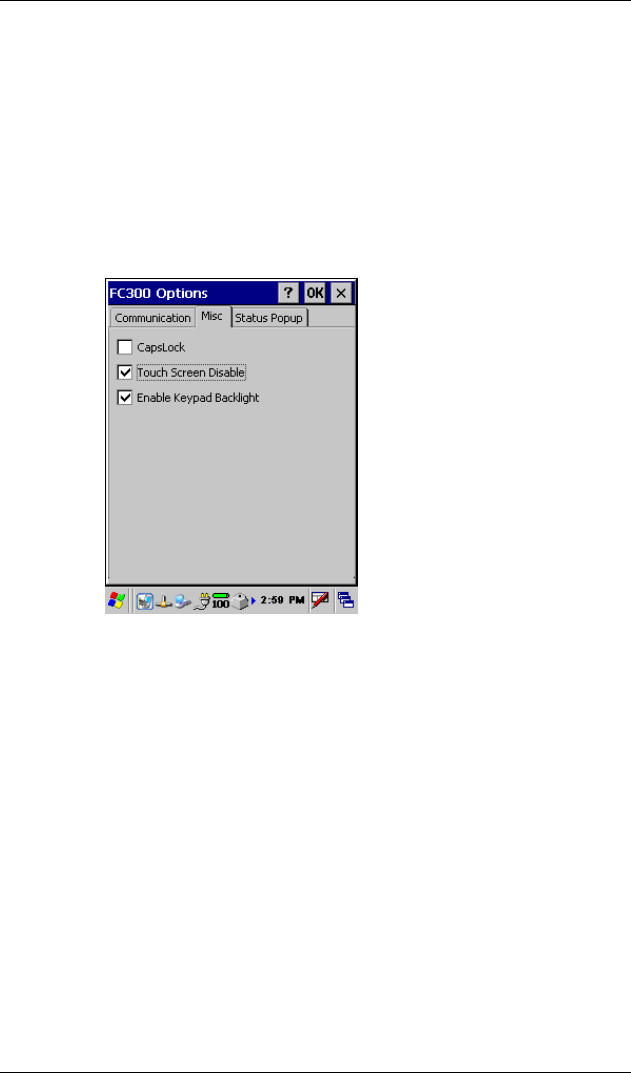
Disabling/Enabling the Touch Screen
Note Be sure you know how to enable the touch screen
before you disable it; see To enable the touch screen on
page 29.
To disable the touch screen
1. Select Windows logo > Settings > Control Panel > FC300
Options.
2. Select the Misc tab.
Select or clear the Touch Screen Disable option as needed.
3. Select OK. A Restart message appears; select Yes to restart the
FC300 and have the touch screen disabled. The touch screen
display shows the desktop.
Controls
30 FC300 Getting Started Guide
Proprietary and Confidential
To enable the touch screen
1. Using the keypad, press CTRL ESC (key sequence is Orange
Y Orange SPC) to access the Start menu.
2. Use the arrow keys to select Settings > Control Panel and press
ENTER.
3. Use the arrow keys to locate FC300 Options and press ENTER.
4. Use the right arrow key to access to Misc tab.
Use the down arrow key to highlight the Touch Screen Disable
field. Press SPC to clear the check box. Press ENTER.
5. A Restart message appears; use the arrow keys to select Yes and
press ENTER. The FC300 restarts and the display shows the
desktop.
Controls
FC300 Getting Started Guide 31
Proprietary and Confidential
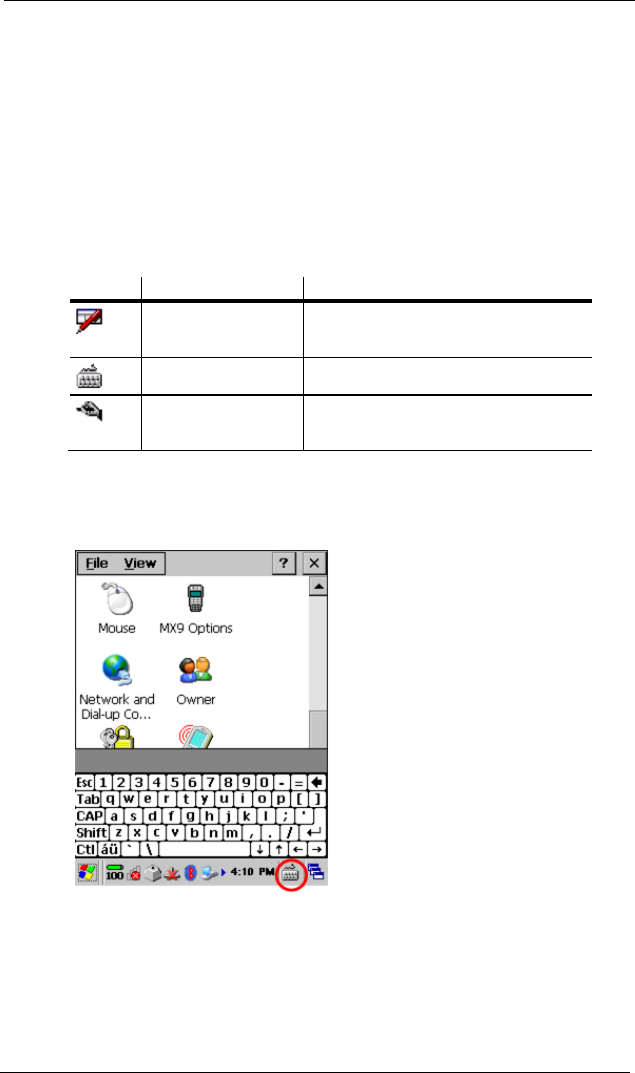
Input Panel
The FC300 has two input methods:
• Keyboard. For using the physical keypad and the on-screen
keyboard.
• Transcriber. Uses Microsoft Transcriber as the handwriting
recognition solution for the FC300 touch screen.
Icon
Input method
Description
Input panel Tap to access the different input
methods.
Keyboard Indicates Keyboard input method.
Transcriber Indicates transcriber input
method.
Example of the Control Panel using the Keyboard (on-screen
keyboard) input method. Notice the Keyboard icon.

Controls
32 FC300 Getting Started Guide
Proprietary and Confidential
Example of the Control Panel using the Transcriber input method.
Notice the Transcriber icon.
Setting Owner Information
Owner information includes:
• Identification. Name, company, address, work and home phone
numbers, and whether to display this information when powered
on.
• Notes. Allows you to enter specific notes and whether to display
the note when powered on.
• Network ID. User name, password, and domain to access
defined network resources.
Controls
FC300 Getting Started Guide 33
Proprietary and Confidential
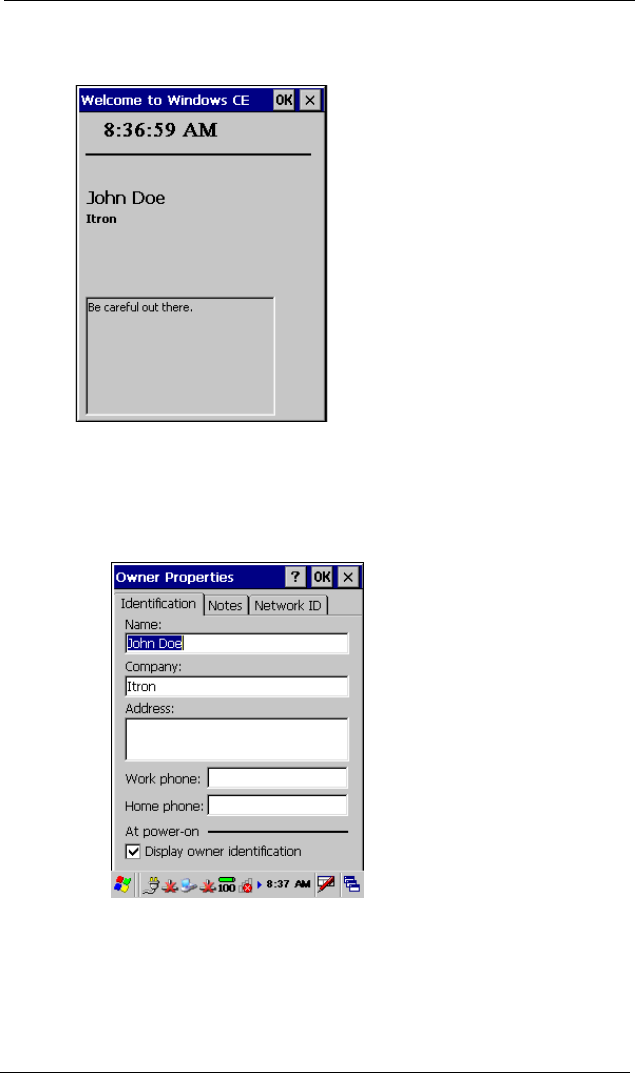
The following is an example of owner identification and notes
displayed when powered on.
To set owner information
1. Select Windows logo > Settings > Control Panel > Owner.
2. Select the Identification tab.
Enter information as desired. To display the information when
powered on, select Display owner identification.
Controls
34 FC300 Getting Started Guide
Proprietary and Confidential
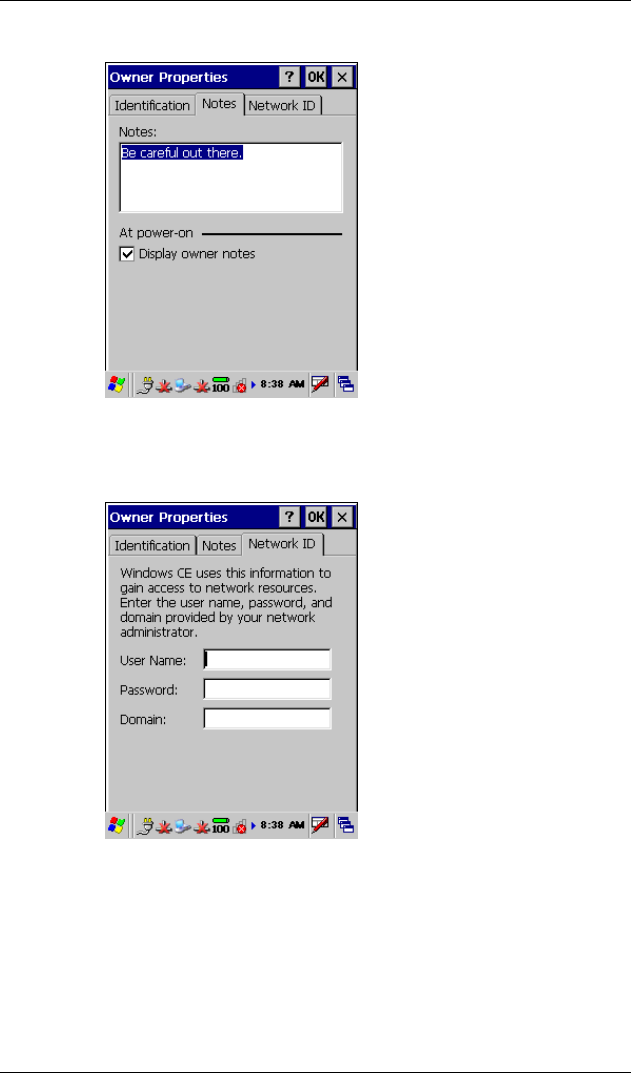
3. Select the Notes tab.
Enter information in the Notes field if desired. To display the
information when powered on, select Display owner notes.
4. Select the Network ID tab.
If accessing network resources, enter the appropriate user name,
password, and domain information.
5. Select OK.
6. Exit the Control Panel to return to the desktop.
Controls
FC300 Getting Started Guide 35
Proprietary and Confidential
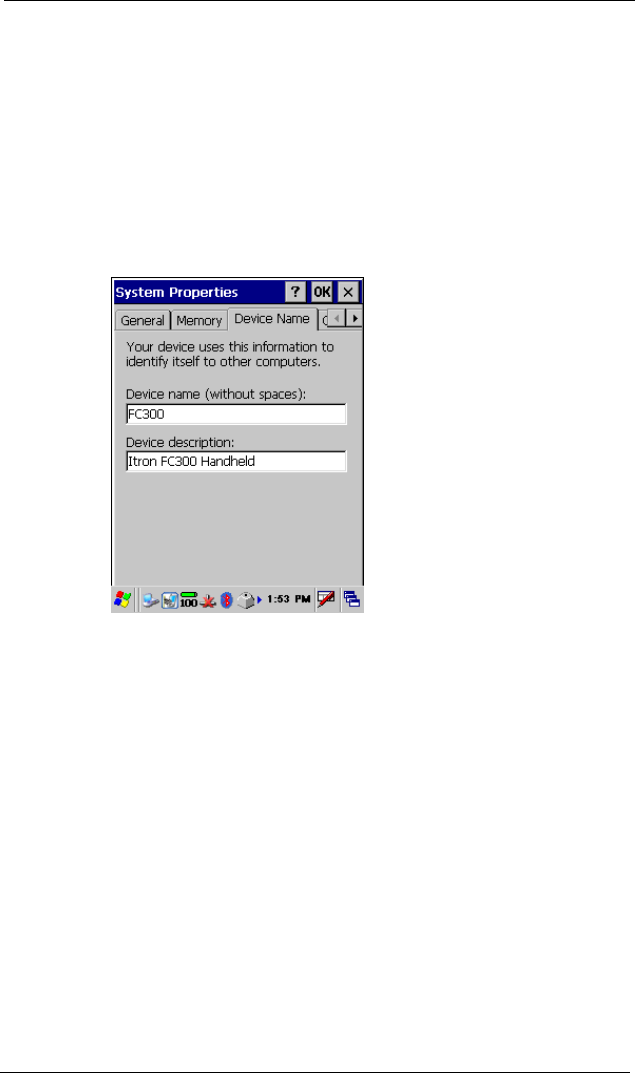
Setting the Device Name
Set up the FC300's device name before starting other applications.
This device name may be used as a default name when setting up for
other applications and when setting up a Bluetooth device.
To set the FC300 device name
1. Select Windows logo > Settings > Control Panel > System.
2. Select the Device Name tab.
Enter the desired name in the Device name field.
• The default name may be used when setting up for other
applications; for naming conventions, see documentation for
the specific application.
• This is the default name that displays in the Computer
Friendly Name field when setting up a Bluetooth device.
3. Enter information in the Device description field.
4. Select OK.
5. Exit the Control Panel to return to the desktop.
Controls
36 FC300 Getting Started Guide
Proprietary and Confidential
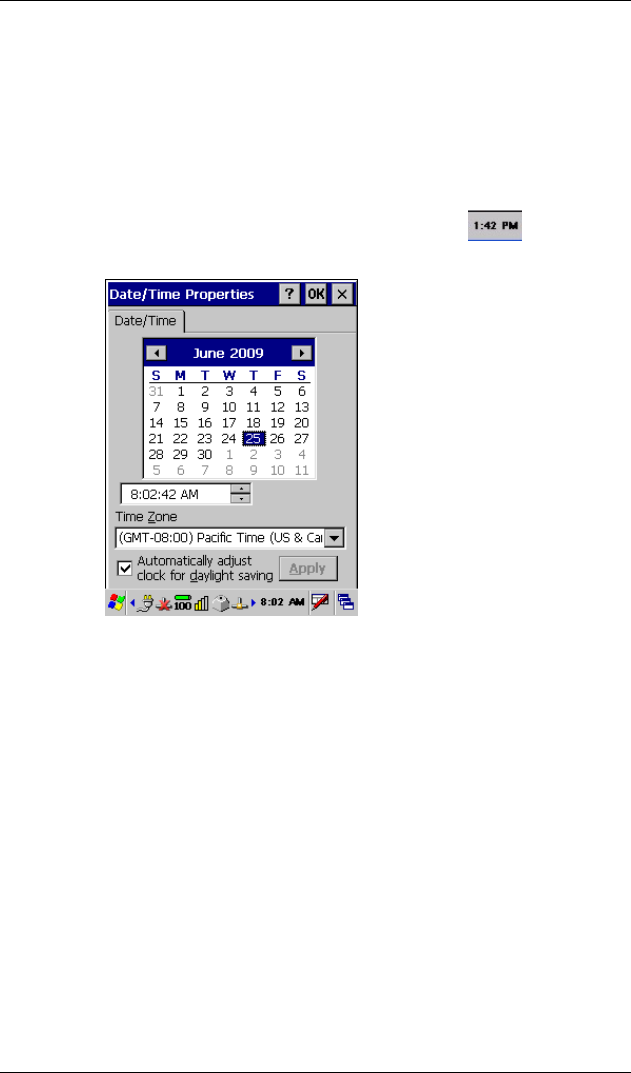
Setting the Date/Time
Set the date, time, time zone, and whether the system automatically
adjusts for Daylight Saving Time (DST).
To set the date/time
1. From the desktop, double-tap the Time icon ( ), or select
Windows logo > Settings > Control Panel > Date/Time.
2. Select the correct month:
• Tap the month name and select the desired month from the
pop-up menu.
or
• Tap the left arrow or right arrow beside the month name to
step through the months.
3. Select the correct year. Tap the year and use the field's up/down
arrows to select the correct year.
4. Tap the correct date in the displayed calendar.

Controls
FC300 Getting Started Guide 37
Proprietary and Confidential
5. To set the time, tap the parameter to change (hours, minutes, or
seconds).
• Use the numeric keypad to type the correct value.
or
• Use the field's up/down arrows to locate the correct value.
or
• Press the up/down arrows on the keypad to locate the correct
value.
6. Tap AM or PM to toggle between the two values.
7. Select your time zone from the drop-down menu.
8. Select Automatically adjust clock for daylight saving, if
desired.
9. Select OK.
10. Exit the Control Panel to return to the desktop.
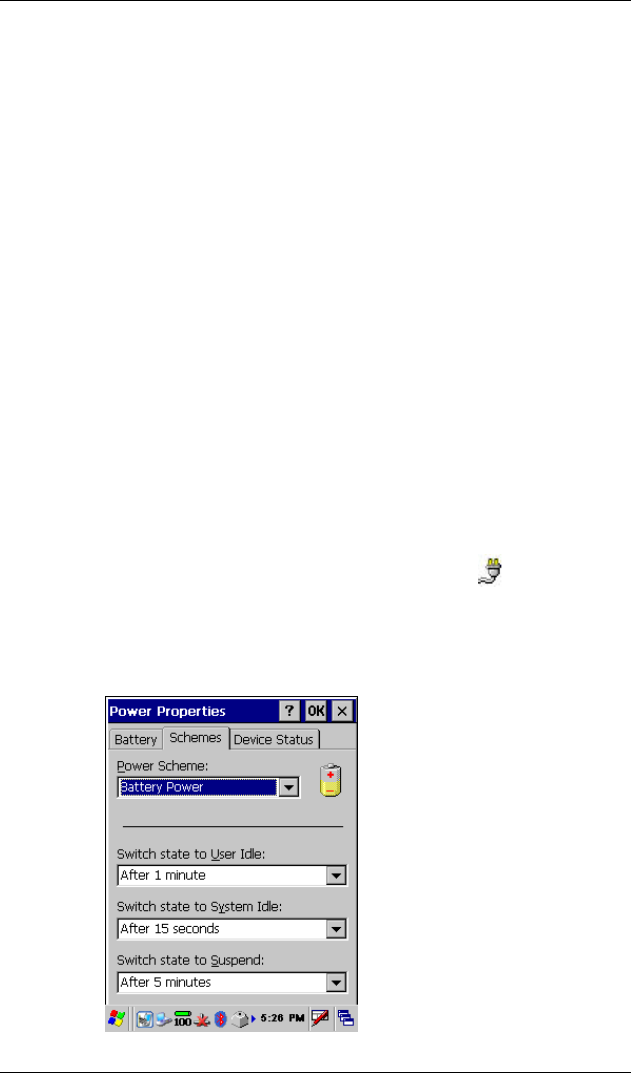
Setting Power Schemes
There are two Power Schemes for the FC300:
• Battery Power. Used when running on battery power; can be
set to conserve battery power.
• AC Power. Used when running on AC power.
Each scheme has three settings available.
Caution Changes you make to the following settings may
affect your battery life.
• User Idle. After the set time passes without activity, the system
shuts down a minimum number of services, such as backlight.
However, the FC300 is running and the touch screen is on. (This
setting is the same as the touch screen backlight timeout on page
45.)
• System Idle. After the set time passes without activity , the
system shuts down more services, such as the touch screen
display. The FC300 is still running though. The SYS light at the
top of the keyboard flashes green. Tap the touch screen or press
any key (except the Power key) to turn on the touch screen.
Controls
38 FC300 Getting Started Guide
Proprietary and Confidential
• Suspend. After the set time passes without activity or the Power
key is pressed, the system is suspended. When suspended, the
touch screen is off, the SYS light is not flashing green, and
the FC300 will not respond to regular key presses. Press the
Power key to resume using the FC300.
The time is cumulative. When the User Idle time has expired, the
System Idle time begins. When the System Idle time has expired, the
Suspend time begins. If the User Idle time is set to Never, settings for
System Idle time and Suspend time are ignored. If the System Idle
time is set to Never, the Suspend time is ignored.
Example of cumulative time, based on battery scheme default
settings:
• The backlight turns off after 1 minute of inactivity.
• The touch screen display turns off after 1 minute, 15 seconds of
inactivity (15 seconds + 1 minute).
• The FC300 enters Suspend mode after 6 minutes and 15 seconds
of inactivity (5 minutes + 15 seconds + 1 minute).
To set the power schemes
1. From the desktop, double-tap the Power icon ( ), or select
Windows logo > Settings > Control Panel > Power.
2. Select the Schemes tab.
3. In the Power Scheme field, select Battery Power.
Controls
FC300 Getting Started Guide 39
Proprietary and Confidential
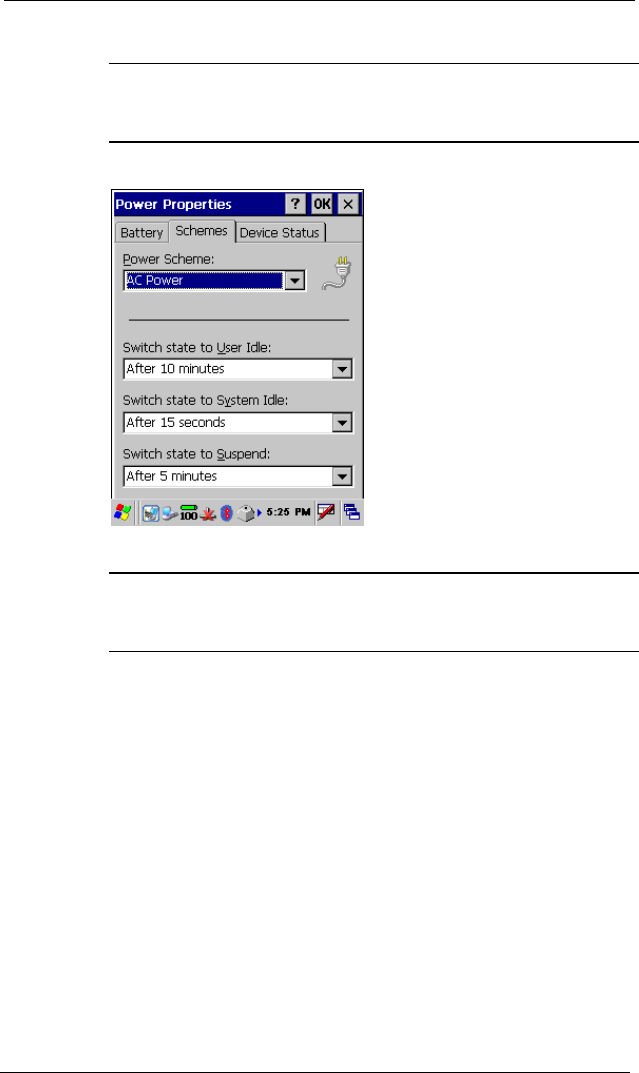
4. In each field, select the desired time.
Note The Switch state to User Idle setting here is the same for
the backlight's Battery power, and device is idle for more than
setting (see Touch Screen Backlight on page 45).
5. In the Power Scheme field, select AC Power.
In each field, select the desired time.
Note The Switch state to User Idle setting here is the same for
the backlight's External power, and device is idle for more
than setting (see Touch Screen Backlight on page 45).
6. Select OK.
7. Exit the Control Panel to return to the desktop.
Controls
40 FC300 Getting Started Guide
Proprietary and Confidential
Setting Speaker Sounds and Volume
The FC300 speaker is located under the LED status indicators. You
can enable sounds for system events, applications, notifications
(alarms, reminders), key clicks, and screen taps. You can also select a
specific sound for an individual event.
Once a sound is enabled, adjust the volume from the Control Panel
setting or from the keyboard. There are six volume level settings;
they are the same for keypad use and Volume & Sound properties.
Note These sound settings may not have any effect within
an Itron software application. For details, see the
documentation for the Itron software application.
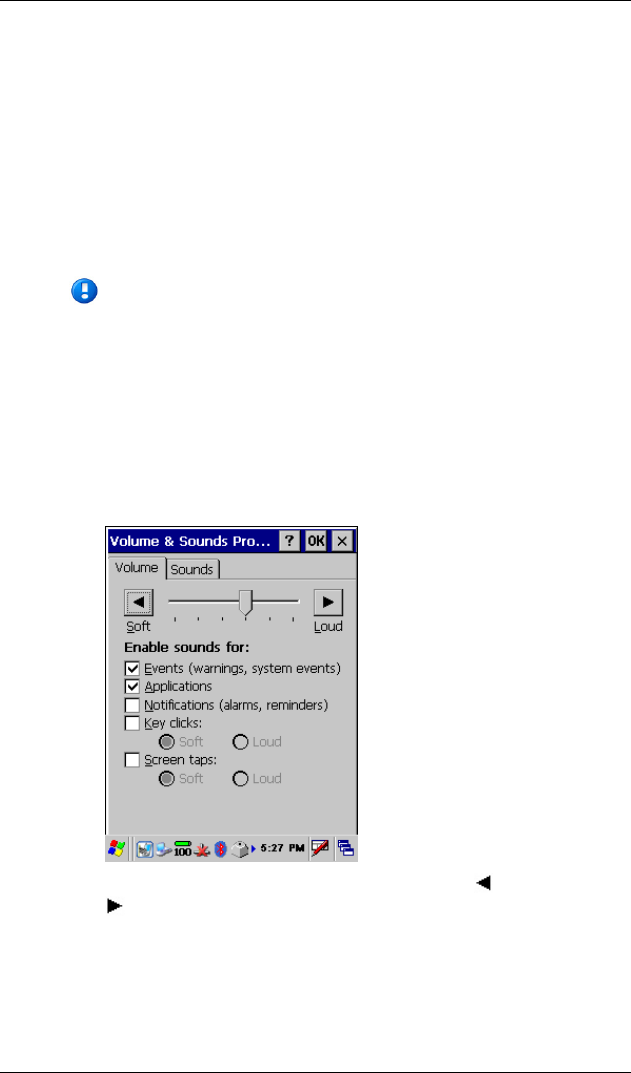
To enable sounds
1. Select Windows logo > Settings > Control Panel > Volume &
Sound.
2. Select the Volume tab.
Set the volume on the slider bar. Tap the Soft key and Loud
key for a sound example.
Controls
FC300 Getting Started Guide 41
Proprietary and Confidential
Select which items will have sounds enabled.
• If Applications is cleared, Notifications is unavailable for
selection.
• For Key clicks and Screen taps, select for Soft or Loud
sound.
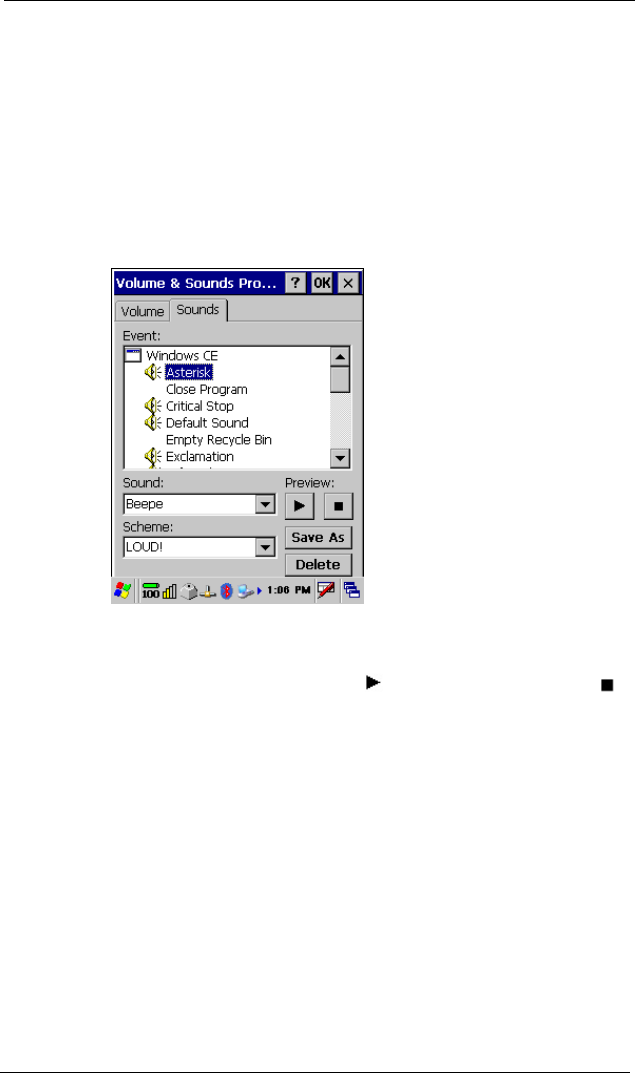
3. Select the Sounds tab. You can make changes to a current
scheme or create a new one. If changing a current scheme, select
that scheme from the Scheme list.
Select an Event.
Select a Sound; several sounds are already included such as
Beepe, Beeph, and Buzzh. Tap to preview the sound. Tap to
stop the sound example.
Repeat this step for each Event as needed.
4. If saving changes to a current scheme, select that Scheme if
needed.
Tap Save As. The Save Scheme As dialog box appears.
• If saving changes to a current scheme, the current Scheme
name appears.
• If creating a new scheme, enter a new Scheme name.

Controls
42 FC300 Getting Started Guide
Proprietary and Confidential
Select OK. The Save Scheme As dialog box closes.
• If replacing a current scheme, a Change Scheme dialog
appears. Make an appropriate selection.
• If you no longer want a specific scheme, select it in the
Scheme list and tap Delete. A Scheme dialog box appears;
make an appropriate selection.
5. When completely done, select OK from the Volume & Sounds
Properties screen.
6. Exit the Control Panel to return to the desktop.
To adjust speaker volume from the keyboard
Action
Key sequence
Decrease volume Blue V
Increase volume Blue V
Exit volume action Press any key except the Blue V
volume adjust keys.
Controls
FC300 Getting Started Guide 43
Proprietary and Confidential
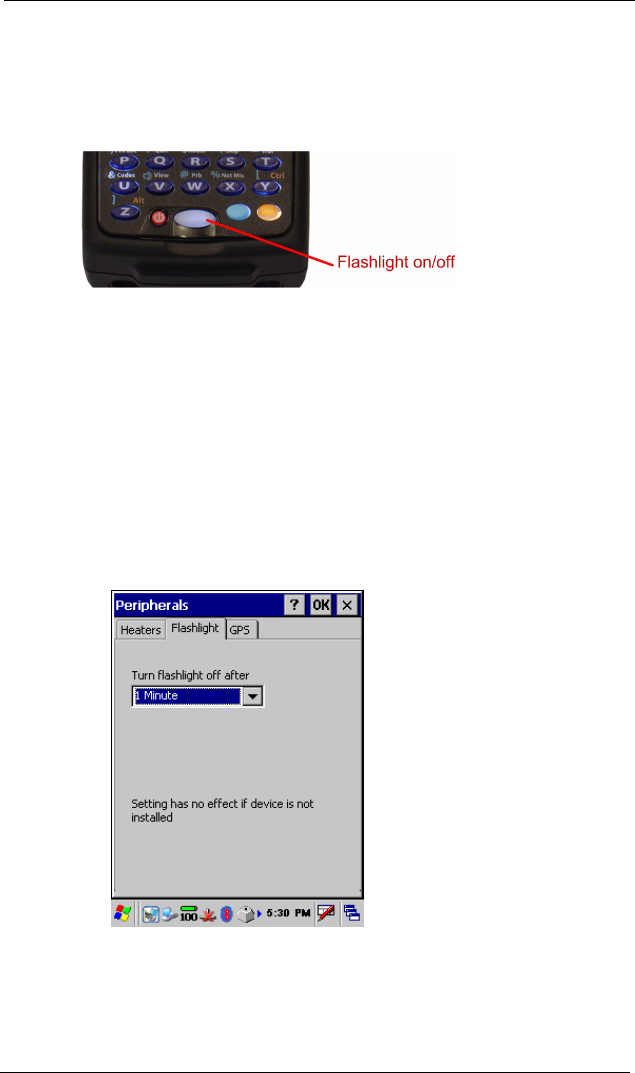
Using the Flashlight
The FC300 has an LED flashlight in the top of the unit. The
flashlight on/off key is located at the bottom of the keypad.
A Control Panel setting defines the time-out period before the FC300
shuts off the flashlight.
The flashlight timer starts when the flashlight key is toggled on. The
flashlight remains on until the flashlight key is toggled off, the
flashlight timer expires, or the FC300 enters Suspend mode.
To set the flashlight timer
1. Select Windows logo > Settings > Control Panel >
Peripherals.
2. Select the Flashlight tab.
Select the desired setting.
3. Select OK.
4. Exit the Control Panel to return to the desktop.
Controls
44 FC300 Getting Started Guide
Proprietary and Confidential
Backlight Settings
The FC300 has two types of backlights:
• Keypad backlight
• Touch screen backlight
Keypad Backlight
The keypad backlight is white and can be enabled (default) or
disabled. If enabled, the keypad backlight follows the touch screen
backlight settings for when to turn off. If disabled, the keypad
backlight does not turn on during a suspend, restart, or reboot.
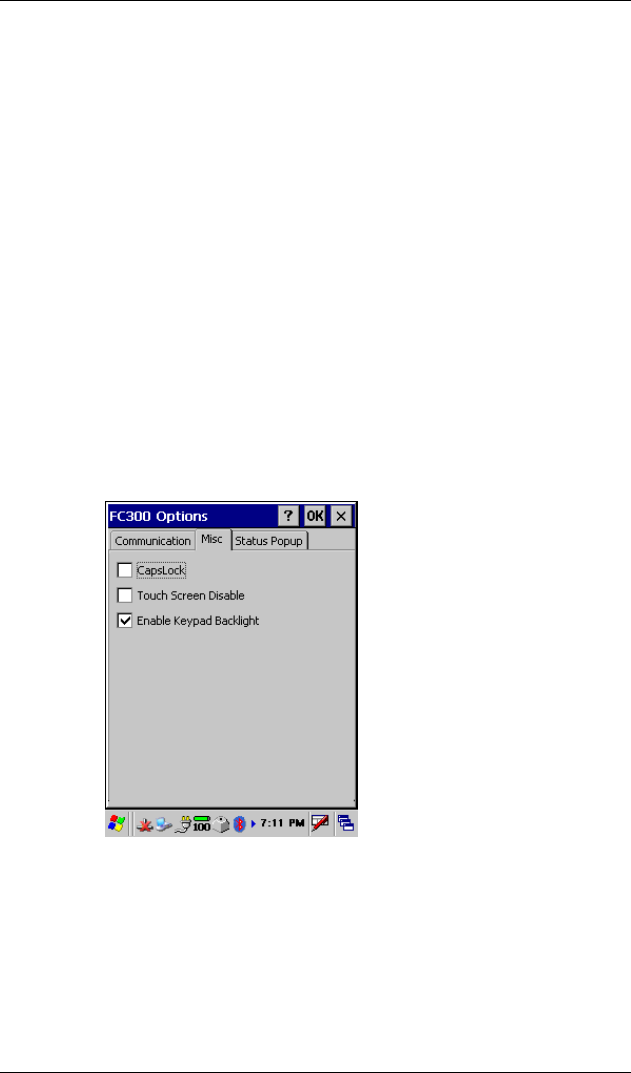
To set the keypad backlight option
1. Select Windows logo > Settings > Control Panel > FC300
Options.
2. Select the Misc tab.
Select or clear the Enable Keypad Backlight field as needed.
3. Select OK.
4. Exit the Control Panel to return to the desktop.
Controls
FC300 Getting Started Guide 45
Proprietary and Confidential
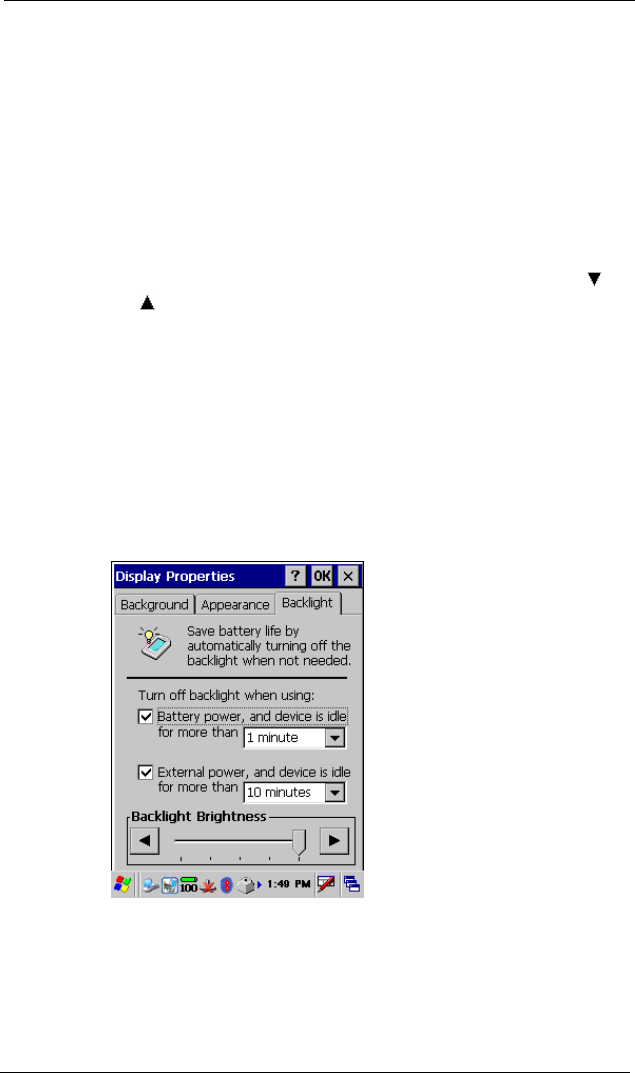
Touch Screen Backlight
The touch screen backlight settings control dimming of the backlight
when the FC300 is idle after a user-defined time for battery use and
external power use (see Setting Power Schemes on page 37). When
the backlight timer expires, the touch screen backlight is dimmed, not
turned off. Any action on the FC300 returns the brightness setting.
The keypad backlight also uses these time settings, but turns off
instead of dimming.
This option also defines the default brightness setting for the touch
screen. This can be manually adjusted with keystrokes (Blue B or
Blue B ).
To set the touch screen backlight options
1. Select Windows logo > Settings > Control Panel > Display.
2. Select the Backlight tab.
3. Define settings as needed. If the Battery power field and the
External power field are cleared, the touch screen backlight
never dims, keypad backlight never turns off, and the FC300 will
not Suspend.

Controls
46 FC300 Getting Started Guide
Proprietary and Confidential
Note The Battery power, and device is idle for more than
setting here is the same for the Power Scheme: Battery Power
setting in Switch state to User Idle. The External power, and
device is idle for more than setting here is the same for the
Power Scheme: AC Power setting in Switch state to User Idle.
For more details, see Setting Power Schemes on page 37.
4. Select OK.
5. Exit the Control Panel to return to the desktop.

Accessories
FC300 Getting Started Guide 47
Proprietary and Confidential
Accessories
The following optional accessories can be set up for the FC300:
• SRead radio with antenna
• Wireless Wide Area Network (WWAN)
• Wi-Fi
• Bluetooth devices
• GPS (an embedded GPS module)
• Imager (an embedded imager for 2D barcode and monochrome
imager)
• Holster
• Carry case
• Charging FC300 in a vehicle
• Touch screen protective film
Setting the Radio
The FC300 is optionally equipped with an SRead radio which is
connected via an internal serial port and integrated into the FC300.
An external antenna is attached at the top of the FC300 and can be
removed or replaced as needed.
Caution Use this device only in a manner consistent with
this document. For details, see RF Exposure on page iii
and Specific Absorption Rate Data on page iii.

Accessories
48 FC300 Getting Started Guide
Proprietary and Confidential
Antenna Types
If you ordered the FC300 with SRead, or the FC300 with SRead +
Imager, you need to attach the appropriate antenna to the top of the
FC300.
Length
Part number
Description
Gain
Type
Impedance
8¼ inch
antenna
FC3277ANTENNA
Use this antenna when reading endpoints at
long range, more than six feet (1.8 meters)
away. This antenna can also be used for
endpoint programming and reading endpoints
at short range, less than six feet (1.8 meters)
away.
2.1 dBi Vertical
omni
50-ohm
2½ inch
antenna
FC3280ANTENNA
Use this antenna when scanning/imaging is
required during endpoint programming, and
when reading endpoints at short range, less
than six feet (1.8 meters) away.
Unity Vertical
Omni
50-ohm
This device has been designed to operate with the antennas listed
above, and having a maximum gain of 2.1 dB. Antennas not included
in this list or having a gain greater than 2.1 dB are strictly prohibited
for use with this device. The required antenna impedance is 50-ohms.
To reduce potential radio interference to other users, the antenna type
and its gain should be so chosen that the equivalent isotropically
radiated power (e.i.r.p.) is not more than that permitted for successful
communication.
Industry Canada Conformity
Under Industry Canada regulations, this radio transmitter may only
operate using an antenna of a type and maximum (or lesser) gain
approved for the transmitter by Industry Canada. To reduce potential
radio interference to other users, the antenna type and its gain should
be so chosen that the equivalent isotropically radiated power (e.i.r.p.)
is not more than that necessary for successful communication.
This radio transmitter (IC:864A-FC300SR, IC:864A-HHSR3) has
been approved by Industry Canada to operate with the antenna types
listed above with the maximum permissible gain and required
antenna impedance for each antenna type indicated. Antenna types
not included in this list, having a gain greater than the maximum gain
indicated for that type, are strictly prohibited for use with this device.
Accessories
FC300 Getting Started Guide 49
Proprietary and Confidential
Conformément à la réglementation d'Industrie Canada, le présent
émetteur radio peut fonctionner avec une antenne d'un type et d'un
gain maximal (ou inférieur) approuvé pour l'émetteur par Industrie
Canada. Dans le but de réduire les risques de brouillage
radioélectrique à l'intention des autres utilisateurs, il faut choisir le
type d'antenne et son gain de sorte que la puissance isotrope rayonnée
équivalente (p.i.r.e.) ne dépasse pas l'intensité nécessaire à
l'établissement d'une communication satisfaisante.
Le présent émetteur radio (IC:864A-FC300SR, IC:864A-HHSR3) a
été approuvé par Industrie Canada pour fonctionner avec les types
d'antenne énumérés ci-dessus et ayant un gain admissible maximal et
l'impédance requise pour chaque type d'antenne. Les types d'antenne
non inclus dans cette liste, ou dont le gain est supérieur au gain
maximal indiqué, sont strictement interdits pour l'exploitation de
l'émetteur.
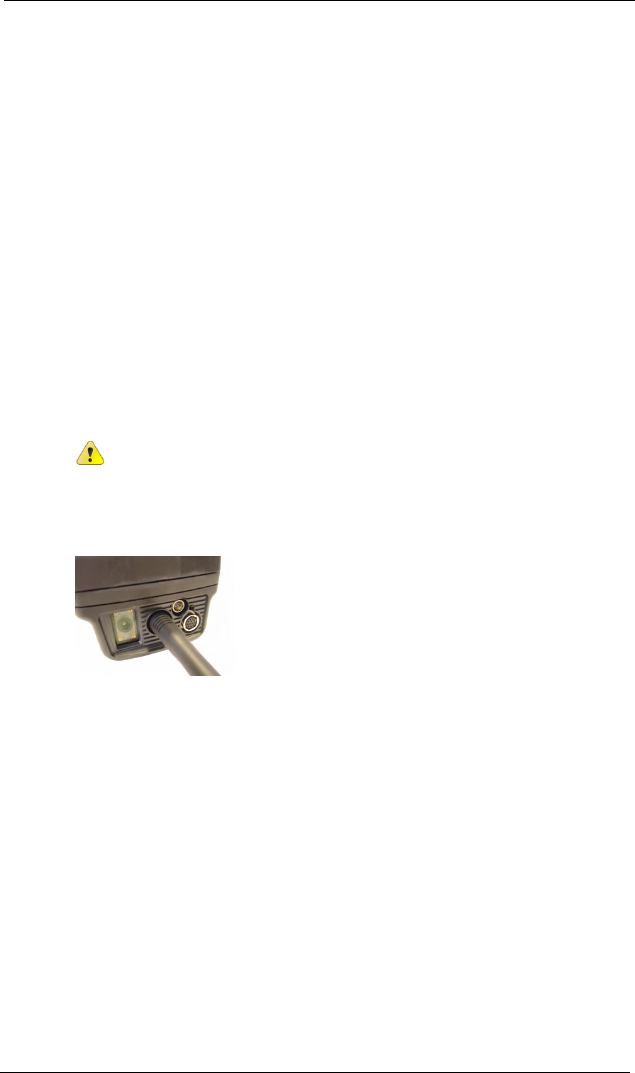
Attaching the Antenna
Caution Do not pick up the FC300 by the antenna.
Both types of antennas are attached the same way. The following
picture shows where the antenna is attached at the top of the FC300.
To attach the antenna
1. Carefully insert the base of the antenna into the antenna port
located at the top of the FC300.
2. When initially seated, gently hand-tighten the antenna by turning
the antenna to the right.
Wireless Wide Area Network (WWAN)
WWAN is not supported on the FC300 at this time.
Accessories
50 FC300 Getting Started Guide
Proprietary and Confidential
Setting Up Wi-Fi
If your company uses a wireless network, you can set up the FC300
handheld—if it has a Wi-Fi card—to access that wireless network.
If you don't see the Wi-Fi icons ( or ) in the taskbar, the FC300
may not be enabled for Wi-Fi. Another way to check for Wi-Fi is to
access the Summit Client Utility screen (steps 1 and 2 in the
following procedure). If the Radio Type field is blank (--), the FC300
is not enabled for Wi-Fi.
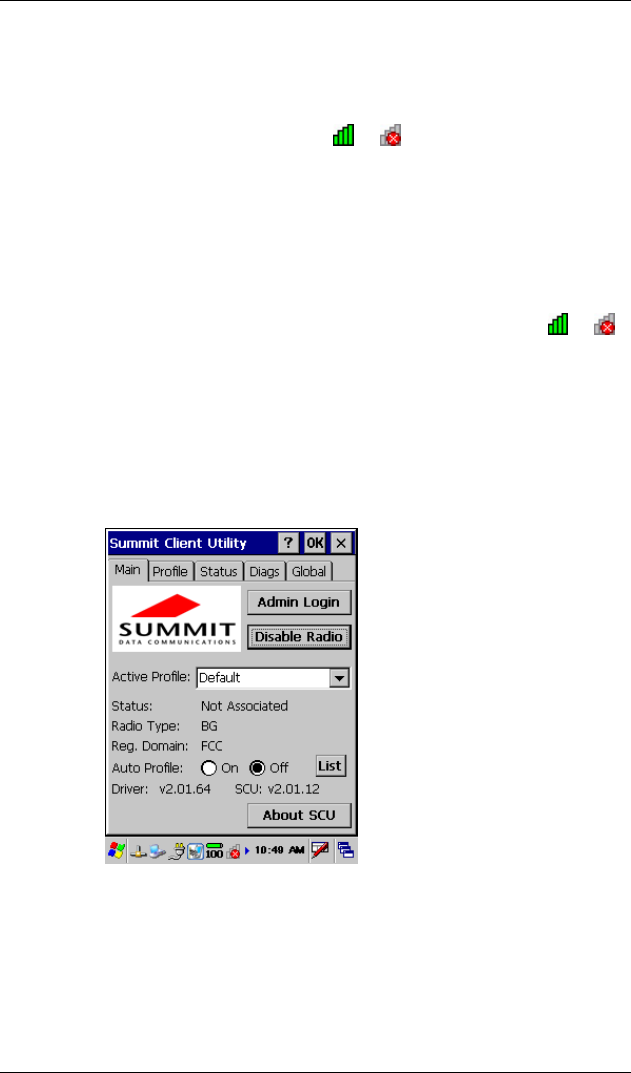
To set up Wi-Fi
1. From the FC300 status bar, double-tap the Wi-Fi icon ( or ).
Or you can select Windows logo > Control Panel > Settings >
Wi-Fi.
2. The Summit Client Utility screen appears.
• Tap Enable Radio to turn the radio on; if you see Disable
Radio, the radio is already on.
• Tap Admin Login.
Accessories
FC300 Getting Started Guide 51
Proprietary and Confidential
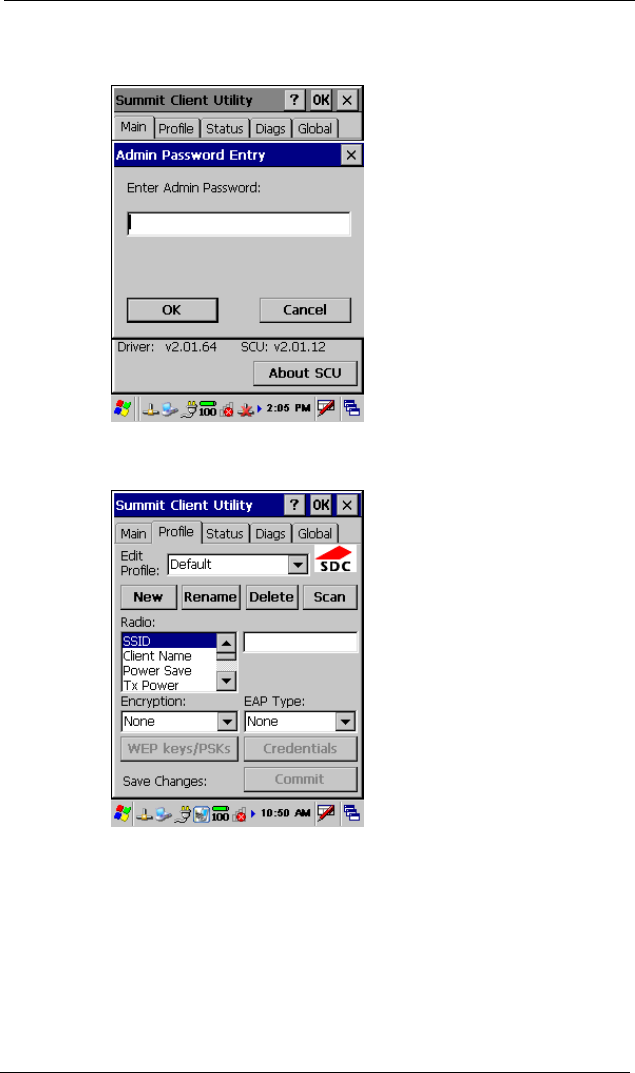
3. In the Admin Password Entry screen, type SUMMIT (all
uppercase) and then tap OK.
4. From the Summit Client Utility screen, select the Profile tab and
then tap Scan.
Accessories
52 FC300 Getting Started Guide
Proprietary and Confidential
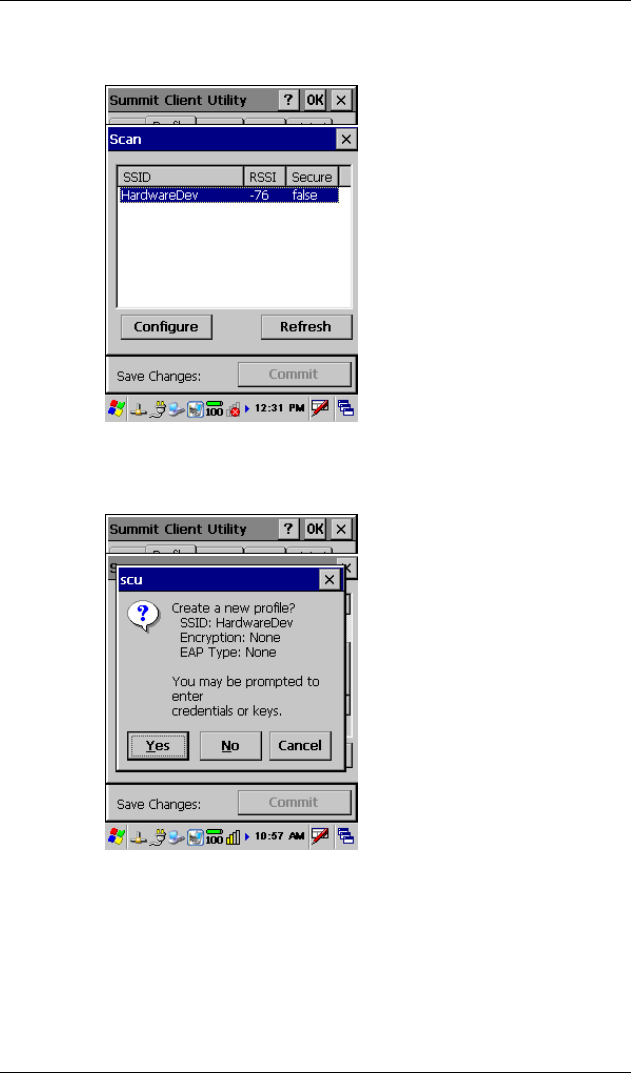
5. From the Scan screen, select the desired wireless network and
then tap Configure.
6. An SCU screen appears asking if you want to create a new
profile; the name is based on the wireless network you selected
earlier. Tap Yes.
Accessories
FC300 Getting Started Guide 53
Proprietary and Confidential
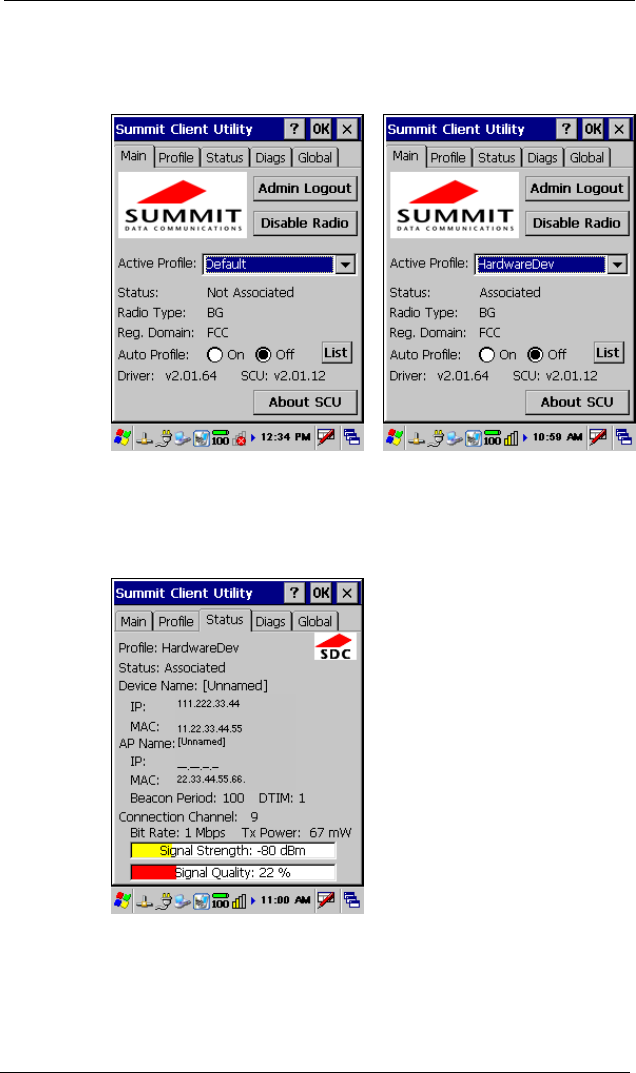
7. Select the Main tab and change the Active Profile field to the
new profile you just created. The Status field changes from Not
Associated (first example) to Associated (second example).
In the Radio Type field, BG indicates an 802.11 b/g radio; ABG
indicates an 802.11 a/b/g radio.
8. Select the Status tab and check to be sure an IP address is shown
in the IP field.
Tap OK to exit the Summit Client Utility screen.
9. Exit the Control Panel to return to the desktop.
You now have access through the wireless network.
Accessories
54 FC300 Getting Started Guide
Proprietary and Confidential
Bluetooth Devices
The FC300 includes Bluetooth capability and supports a bar code
scanner, Itron belt clip radios, and GPS receivers. Pairing can occur
at line-of-sight distances up to 32.8 feet (10 meters).
Setting Up a Bluetooth Device
To use a Bluetooth device, the FC300 must first discover and pair
with that device. Pairing occurs when two Bluetooth devices agree to
communicate with each other and establish a connection. For
example, the FC300 (one Bluetooth device) discovers and pairs with
a GPS device (a second Bluetooth device).
To initially set up a Bluetooth device
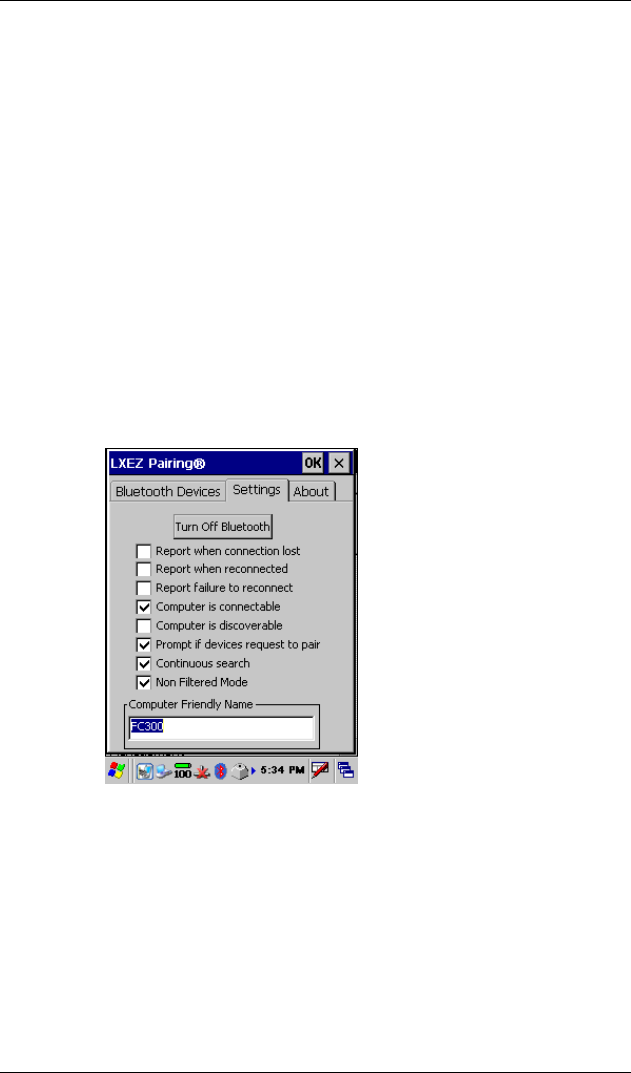
1. Select Windows logo > Settings > Control Panel > Bluetooth.
2. Select the Settings tab.
• If Bluetooth is already on, the screen shows Turn Off
Bluetooth. If the screen shows Turn On Bluetooth, tap the
button. Bluetooth is enabled and the button should now be
Turn Off Bluetooth.
• Enter a Computer Friendly Name. This defaults to the
Device Name (see Setting the Device Name on page 35) and
resets to the Device Name after a soft reset.
Accessories
FC300 Getting Started Guide 55
Proprietary and Confidential
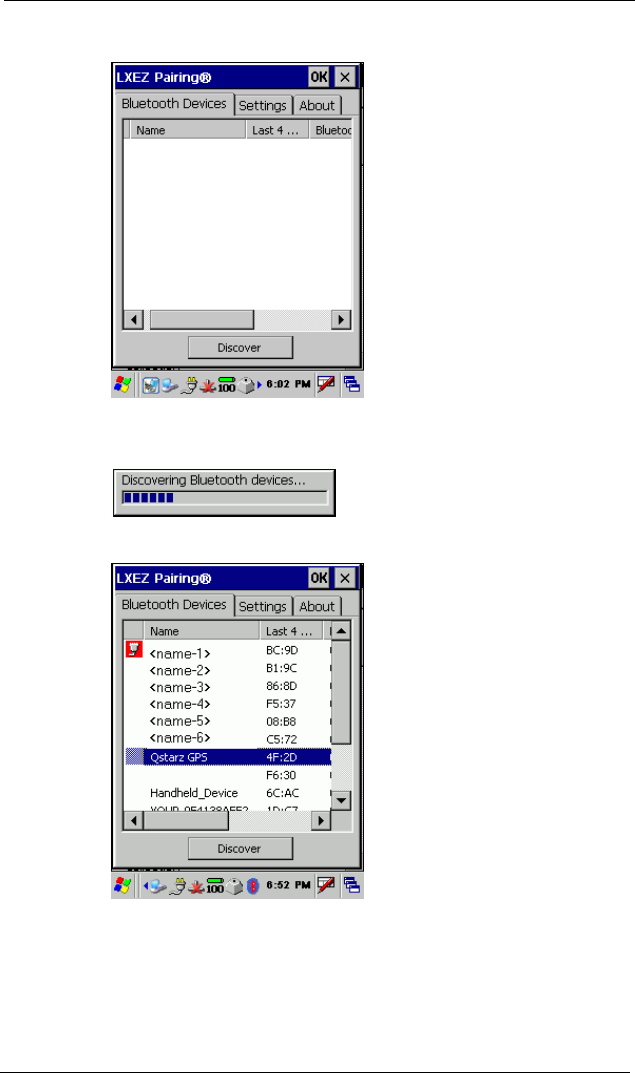
3. Select the Bluetooth Devices tab.
Be within line-of-sight range of the desired Bluetooth device to
pair. Select Discover.
All discoverable Bluetooth devices in the vicinity are listed.

Accessories
56 FC300 Getting Started Guide
Proprietary and Confidential
4. Select the desired device. Double-tap and select the correct
pairing; select Pair as Serial Device for a GPS receiver.
5. Check the pairing properties. Select the device again. Double-tap
and select Properties.
6. The paired device now shows a connected icon.

Accessories
FC300 Getting Started Guide 57
Proprietary and Confidential
Discovered and paired devices may be identified with an icon
which is assigned by the system.
Icons in the left column provide information about the device.
White background indicates the device is connected and the
Bluetooth connection is active.
Red background indicates the Bluetooth connection is
inactive.
7. Select OK to close this screen and return to the Control Panel.
After a successful Bluetooth discovery and pairing, the following is
visible.
• The Bluetooth LED blinks at a medium speed indicating the
Bluetooth device is paired and connected. For LED information,
see Bluetooth LED Status Indicators on page 6.
• The Bluetooth icon in the task bar indicates the Bluetooth
module is connected to one or more Bluetooth device. For icons
in the taskbar, see Taskbar Icons on page 25.
If a Bluetooth device becomes unintentionally disconnected—for
example if the device is out of range or powers off—the FC300
attempts to reconnect. It continues to attempt to reconnect
• For 30 minutes, if the Continuous search field (as seen in step 2)
is cleared.
• Forever, if the Continuous search field (as seen in step 2) is
checked.
To stop the FC300 from attempting to reconnect, you must delete the
device from the list; see To delete a Bluetooth device on page 57.
The FC300 can only have four connections (either active or inactive)
at one time. If you want to connect to a device and all the connections
are taken up, you must delete one of the previous connections; see To
delete a Bluetooth device on page 57.

Accessories
58 FC300 Getting Started Guide
Proprietary and Confidential
To delete a Bluetooth device
1. Select Windows logo > Settings > Control Panel > Bluetooth.
2. Select the Bluetooth Devices tab.
3. Double-tap the device to delete and select Disconnect.
The icon to the left of the device name changes to inactive .
4. Double-tap the device again and select Delete.
5. A Bluetooth message appears stating that the pairing will be
deleted the next time you open the Bluetooth screen. Select OK.
6. Exit the Control Panel to return to the desktop.
Accessories
FC300 Getting Started Guide 59
Proprietary and Confidential
GPS
The FC300 has an optional embedded (internal) GPS (Global
Positioning System) module to work with a GPS-enabled application,
including any Itron GPS-enabled software application. The
embedded GPS module must be enabled before use. For details, see
the documentation for the Itron software application.
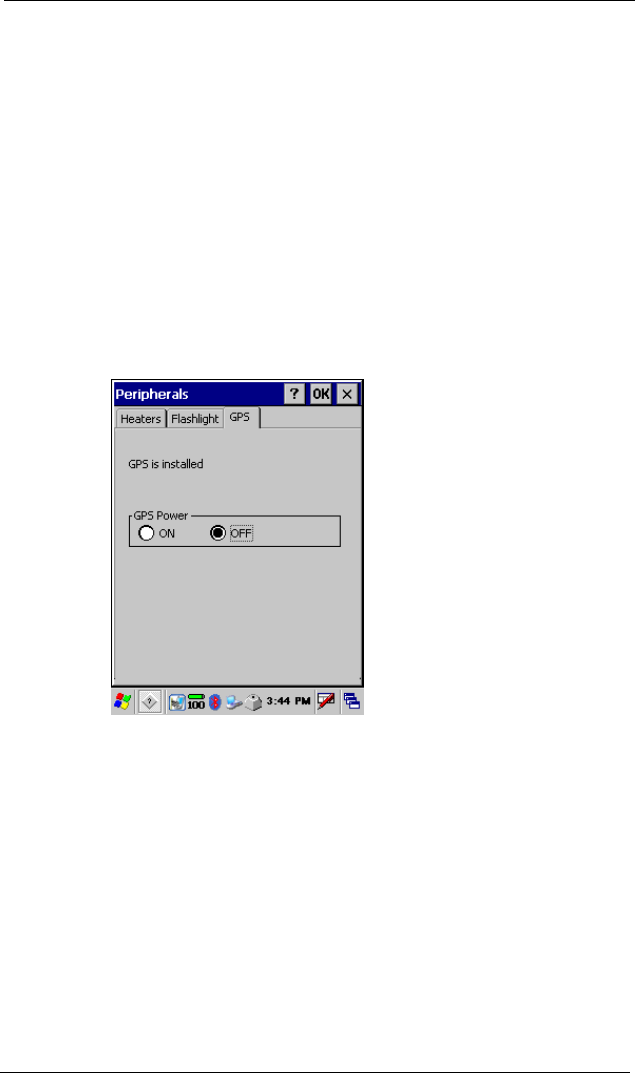
To enable the embedded GPS
1. Select Windows logo > Control Panel > Settings >
Peripherals.
2. Select the GPS tab.
By default, GPS Power = OFF.
Select ON to enable the embedded GPS functionality.
3. Select OK.
4. Exit the Control Panel to return to the desktop.

Accessories
60 FC300 Getting Started Guide
Proprietary and Confidential
Imager
The FC300 has an optional embedded imager. The imager can only
be used from within an Itron application which supports an imager,
such as Endpoint-Link. For details on using the imager within an
Itron software application, see the documentation for that software
application.
The imager has two functions:
• Monochrome image capture
• Built-in imager for linear and 2D (two dimensional) barcode
scanning
Warning The imager uses laser light.
• Do not look into the laser's lens.
• Do not stare directly into the laser beam.
• Do not remove the laser caution labels from the
FC300.
• Do not connect the laser barcode aperture to any
other device. The laser barcode aperture is certified
for use with the FC300 only.
• Avoid exposure; laser radiation is emitted from the
imager aperture.
• Laser radiation is possible when open. Please read
the caution labels. Use of controls, adjustments or
performance of procedures other than those specified
herein may result in hazardous radiation exposure.
For more details about using the imager, see the FC300 Imager Best
Practices and Troubleshooting (TDC-0957-xxx)
Accessories
FC300 Getting Started Guide 61
Proprietary and Confidential
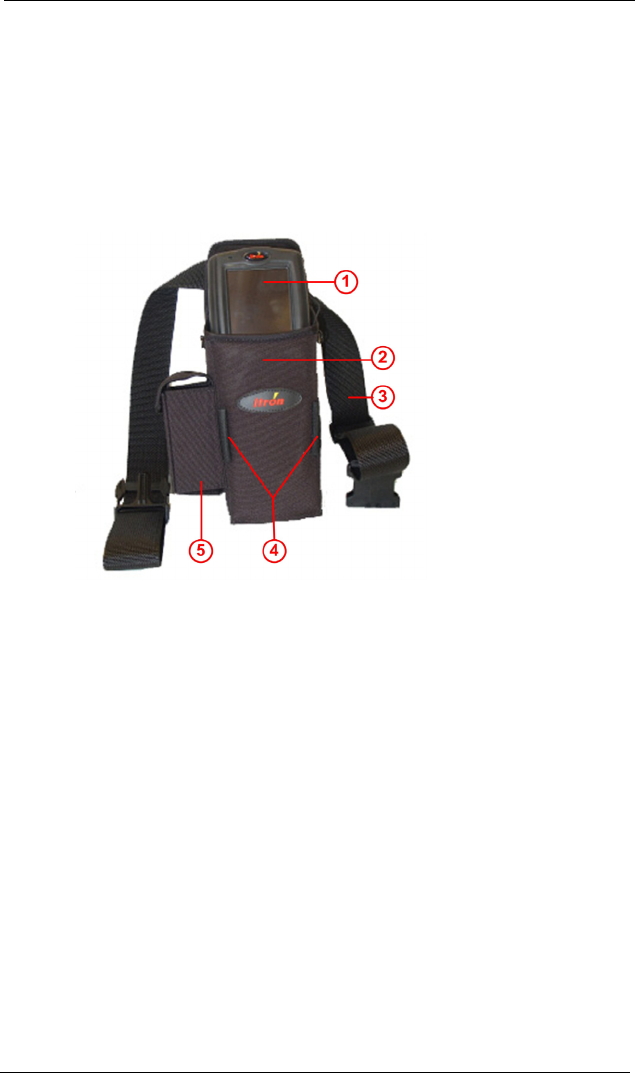
Holster
The FC300 has an optional holster available. The holster can be worn
on the left or right side in conjunction with the Itron holster belt. The
holster can also be used with a shoulder strap.
The holster has an accessory pocket that can be used to carry a probe,
a spare main battery, or whatever you want.
1 FC300
2 Holster
3 Holster belt
4 Stylus holders
5 Accessory pocket

Accessories
62 FC300 Getting Started Guide
Proprietary and Confidential
Holster Belt
The holster belt has a quick-release buckle and is adjustable.
1 Adjustable slider
2 Webbing doubled-end
3 Slider clip
4 Three-prong buckle end
5 Buckle clasp
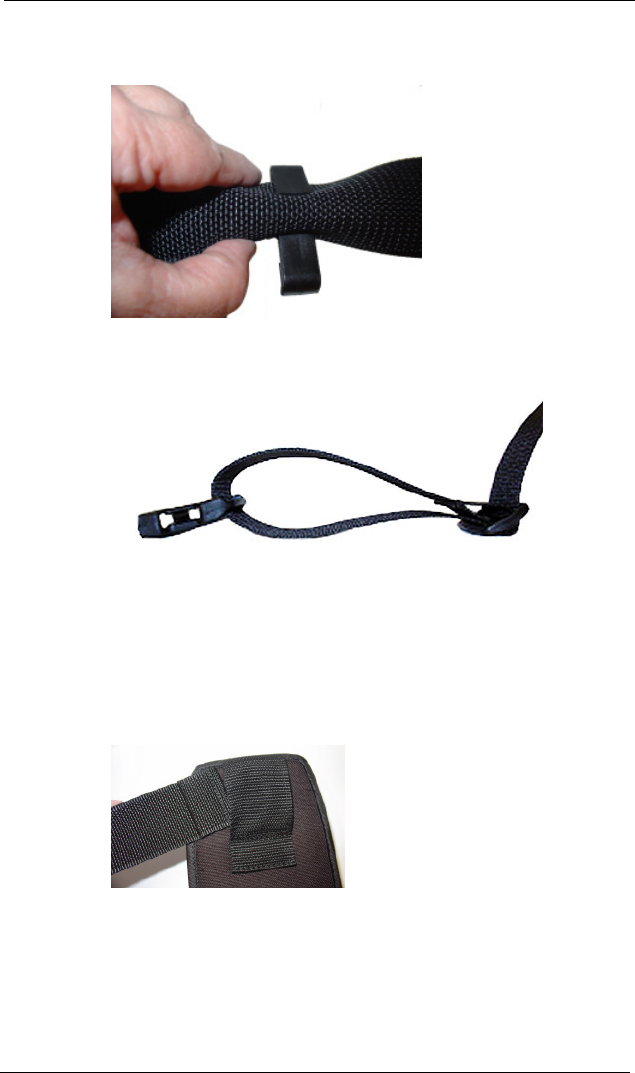
Attaching Holster to Belt
The holster belt must be partially unassembled so it can slip through
the holster belt loop on the holster. It is then reassembled. Red
numbers—such as (1)—refer to parts in the labeled picture preceding
this procedure.
To attach the holster belt to the holster
1. Lift the webbing doubled-end (2) up and out of the slider clip
(3).
2. Unthread the webbing from the three-prong buckle end (4) by
pushing the doubled-end through the top slot of the buckle.
3. Continue unthreading the webbing through the bottom slot of the
three-prong buckle end.
Accessories
FC300 Getting Started Guide 63
Proprietary and Confidential
4. Remove the slider clip by pinching the webbing and sliding it
out of the clip ends.
5. Lay out the belt so that the front of the remaining buckle end (5)
is down, as is the adjustable slider (1).
Stretch out the rest of the belt so it is flat. The doubled-end of the
belt (from which you just removed the three-prong buckle end)
should be facing up.
6. Grab the unthreaded doubled-end and thread it through the
holster's belt loop so the webbing doubled-end is facing away
from the holster.
7. Try on the belt with attached holster to make sure the front of the
buckle clasp and the adjustable slider is on the side of the belt
away from your body.
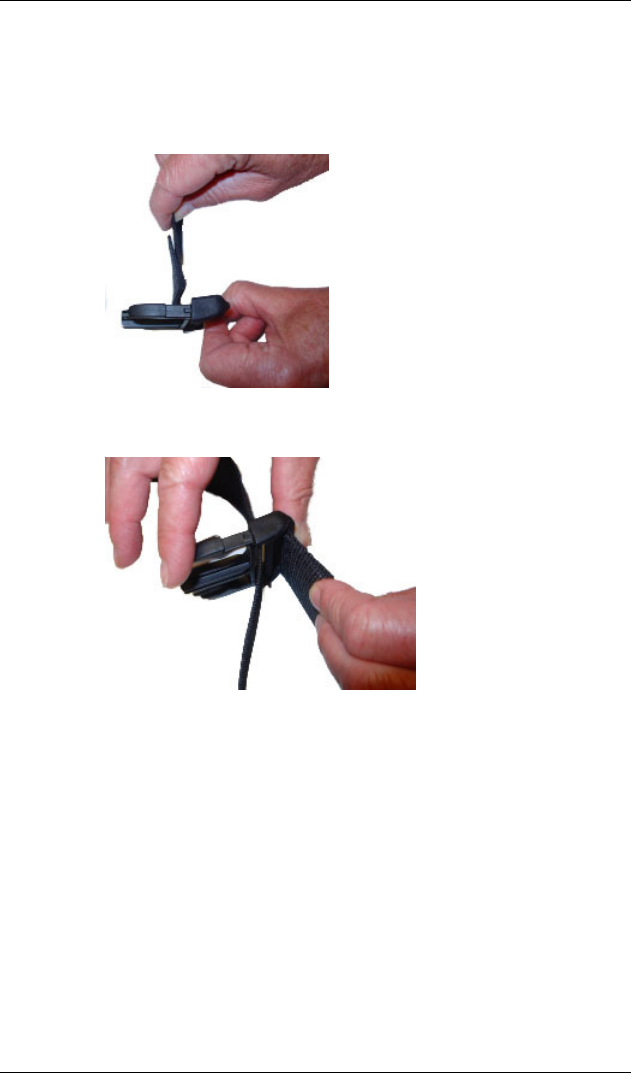
Accessories
64 FC300 Getting Started Guide
Proprietary and Confidential
8. To rethread the three-prong buckle end with the webbing, grasp
the webbing doubled-end and insert it through the bottom slot of
the three-prong buckle end. Be sure you insert from the back of
the buckle; there is a slight curvature to the buckle. Insert the
webbing doubled-end into the concave curved side.
9. Loop the webbing and insert the webbing doubled-end into the
top slot of the three-prong buckle end.
10. Pull the webbing so there is a tight fit on the three-prong buckle
end.
11. Reattach the slider clip by pinching the webbing and sliding the
clip in pace. Be sure the clip opening is up.

Accessories
FC300 Getting Started Guide 65
Proprietary and Confidential
12. Grasp the end of the webbing and slide it into the clip opening.
This keeps webbing doubled-end semi-attached to the belt.
13. The holster is now attached to the belt and ready to use.
Carry Case
The FC300 has an optional carry case to provide extra protection.
The touch screen and keypad are still accessible as is the top of the
FC300 for the flashlight, and antenna and imager (if installed). The
FC300 main battery compartment remains easily available. The carry
case can be used with an attached hand strap (for right or left hand
use) or a removable shoulder strap. The shoulder strap allows the
FC300 to hang upside down.
There are two styles of carry cases:
• For an FC300 with SRead radio
• For an FC300 without the radio
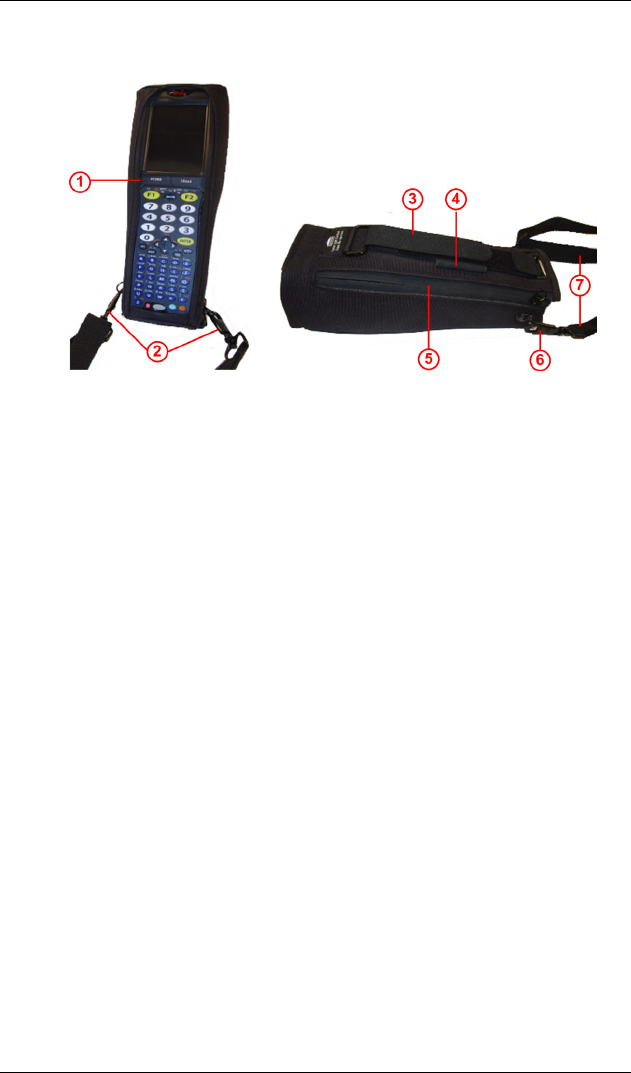
Accessories
66 FC300 Getting Started Guide
Proprietary and Confidential
Front and Back Views
1 Clear plastic holding strap
2 Latches for shoulder strap
3 Hand strap
4 Stylus holder (on other side too)
5 Zipper for enclosing FC300 (on other side too)
6 Latch for attaching shoulder strap (on other side
too)
7 Shoulder strap
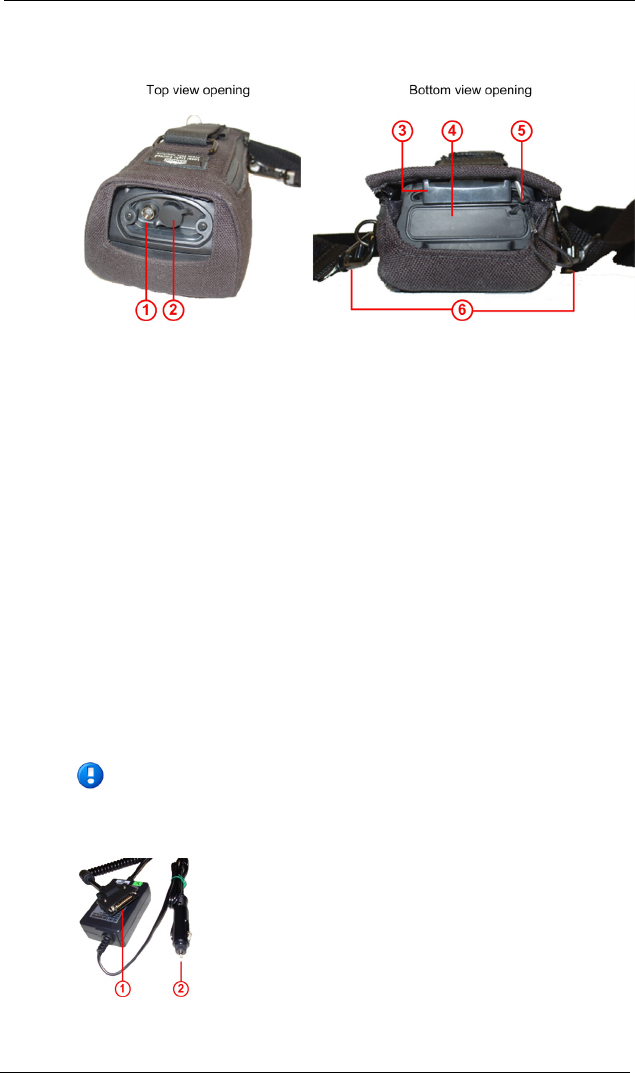
Accessories
FC300 Getting Started Guide 67
Proprietary and Confidential
Top and Bottom Views
1 Flashlight
2 Hirose connector, covered
3 Hand strap bottom connector, attached
4 I/O (input/output) connector, covered
5 Tether for I/O connector cover
6 Latches for shoulder strap
Charging an FC300 from a Vehicle
The FC300 can be charged in a vehicle without using the vehicle
dock. The FC300 charger cable consists of a 12 volt DC power
supply adapter to plug into the vehicle's 12 volt DC power supply
receptacle (cigarette lighter), and a connector to plug into the I/O
(input/output) connector on the bottom of the FC300.
Note This charger cable is only for direct charging to an
FC300. Do not use this cable with a vehicle dock.

Accessories
68 FC300 Getting Started Guide
Proprietary and Confidential
To provide power to the FC300
1. Using the FC300 charger cable, plug the (1) end into the I/O
(input/output) connector on the bottom of the FC300.
2. Plug the (2) end into the vehicle's 12 volt DC power supply
receptacle (cigarette lighter).
Applying the Touch Screen Protective Film
(Optional) Apply the touch screen protective film to extend the life of
the touch screen.
To apply the touch screen protective film
1. Clean the touch screen from fingerprints, lint particles, dust, and
smudges. See Cleaning on page 69.
2. Remove the protective film from its container
3. Remove the protective backing from the film sheet by lifting the
backing from a corner of the film. Discard the backing.
4. Apply the film to the touch screen starting at one side and
smoothing it across the display area until it covers the glass
surface of the display.
• If air bubbles appear, raise the film slightly and continue
smoothing the film across the display area.
• If dust, lint, or smudges are trapped between the protective
film and the glass display, remove the film, clean the display
area, and apply the film again.

Maintenance
FC300 Getting Started Guide 69
Proprietary and Confidential
Maintenance
Consider the following maintenance issues:
• Cleaning the FC300
• Batteries
• Exposure to moisture
Cleaning
The FC300 should only be cleaned as needed.
Do
• Remove lint and dust with clean, filtered canned air.
• If needed, apply a small amount of a mild household cleaning
chemical to a soft, non-abrasive cloth and gently wipe the soiled
touch screen surface or imager window.
Don't
• Do not spray any cleaning chemical directly onto the FC300.
• Do not use harsh chemicals such as hand creams or insect
repellent on the FC300 as they can damage the materials and
void the warranty.
• Do not scrub the touch screen surface or imager window.
Batteries
While attached to an external power source, the FC300's main battery
and backup battery are recharged. Frequent connection to an external
power source is recommended to maintain the backup battery charge
status as the backup battery cannot be recharged by a dead or missing
main battery.

Troubleshooting
70 FC300 Getting Started Guide
Proprietary and Confidential
Exposure to Moisture
While the FC300 is designed to handle moisture, it is a best practice
to keep the handheld as dry as possible. If moisture occurs due to
inclement weather such as rain or snow, be sure to gently dry the
FC300 when you return to the office. Use compressed air to dry the
handheld, taking special care to dry the terminal contacts on the
bottom. If compressed air is not available, use a soft towel.
Troubleshooting
SD Card
Caution
The SD card is only accessible by certified Itron service
representatives. Please contact Itron Customer Support (at
1.877.ITRON.02) if you have questions or concerns related to
accessing the SD card and its data.
You may be charged repair fees if you attempt to access the SD
card without Itron customer service approval and assistance.
Itron Applications
The following Itron applications can be installed on the FC300:
• Endpoint-Link (EPL),: v5.5 or greater
• Endpoint-Link Pro (EPLP), v5.5 or greater
• Field Deployment Manager (FDM), v2.1 or greater
• Field Collection System (FCS), v2.1 or greater
• MV-RS, v8.0 or greater
For details about how the application runs on the FC300, see the
documentation for that specific application.

FC300 Getting Started Guide 71
Proprietary and Confidential
Index
A
ActiveSync • 10
antenna • 48
attaching • 49
long range antenna • 48
short range antenna • 48
B
backlight • 44
keypad • 44
touch screen • 45
barcode reader • 60
barcode scanner • 60
battery • 15
backup battery • 16
checking backup battery status • 17
conserving battery power • 37
installing • 9
maintaining the battery • 69
replacing • 17
setting battery icon • 15
Bluetooth • 54
discovery • 54
LED indicators • 6
pairing • 54
task bar icons • 25
C
carry case • 65
cleaning the FC300 • 69
cold boot • 13
computer friendly name • 54
D
date/time settings • 36
device name • 35
disable touch screen • 29
double-tap sensitivity • 28
E
enable touch screen • 30
F
flash card • 70
flashlight • 43
G
GPS • 59
H
hand strap • 8
detaching • 8
view (hand strap) • 3
hard reset • 13
holster • 61
attaching belt to holster • 62
holster belt • 62
I
imager • 60
input methods • 31
Itron software applications • 70
K
keyboard • 31
L
LED status indicators • 5
Battery • 6
Bluetooth • 6
System • 7
M
maintaining the battery • 69

Index
72 FC300 Getting Started Guide
Proprietary and Confidential
maintenance • 69
cleaning the FC300 • 69
drying the FC300 • 70
maintaining the battery • 69
modifier keys • 20
O
owner information • 32
P
power scheme settings • 37
R
resetting the FC300 • 13
S
scanner • 60
SD card • 70
serial number • 3
soft reset • 13
sounds • 40
synchronization software • 10
T
task bar icons • 25
touch screen protective film • 68
touch screen
applying protective film • 68
backlight • 45
calibrating • 26
disable/enable • 29
double-tap sensitivity • 28
enable • 30
transcriber • 31
Troubleshooting • 70
V
vehicle charger • 67
volume • 40
W
warm boot • 13
Wi-Fi • 50
setting up • 50
taskbar icons • 25
Windows Mobile Device Center • 10
WWAN • 49