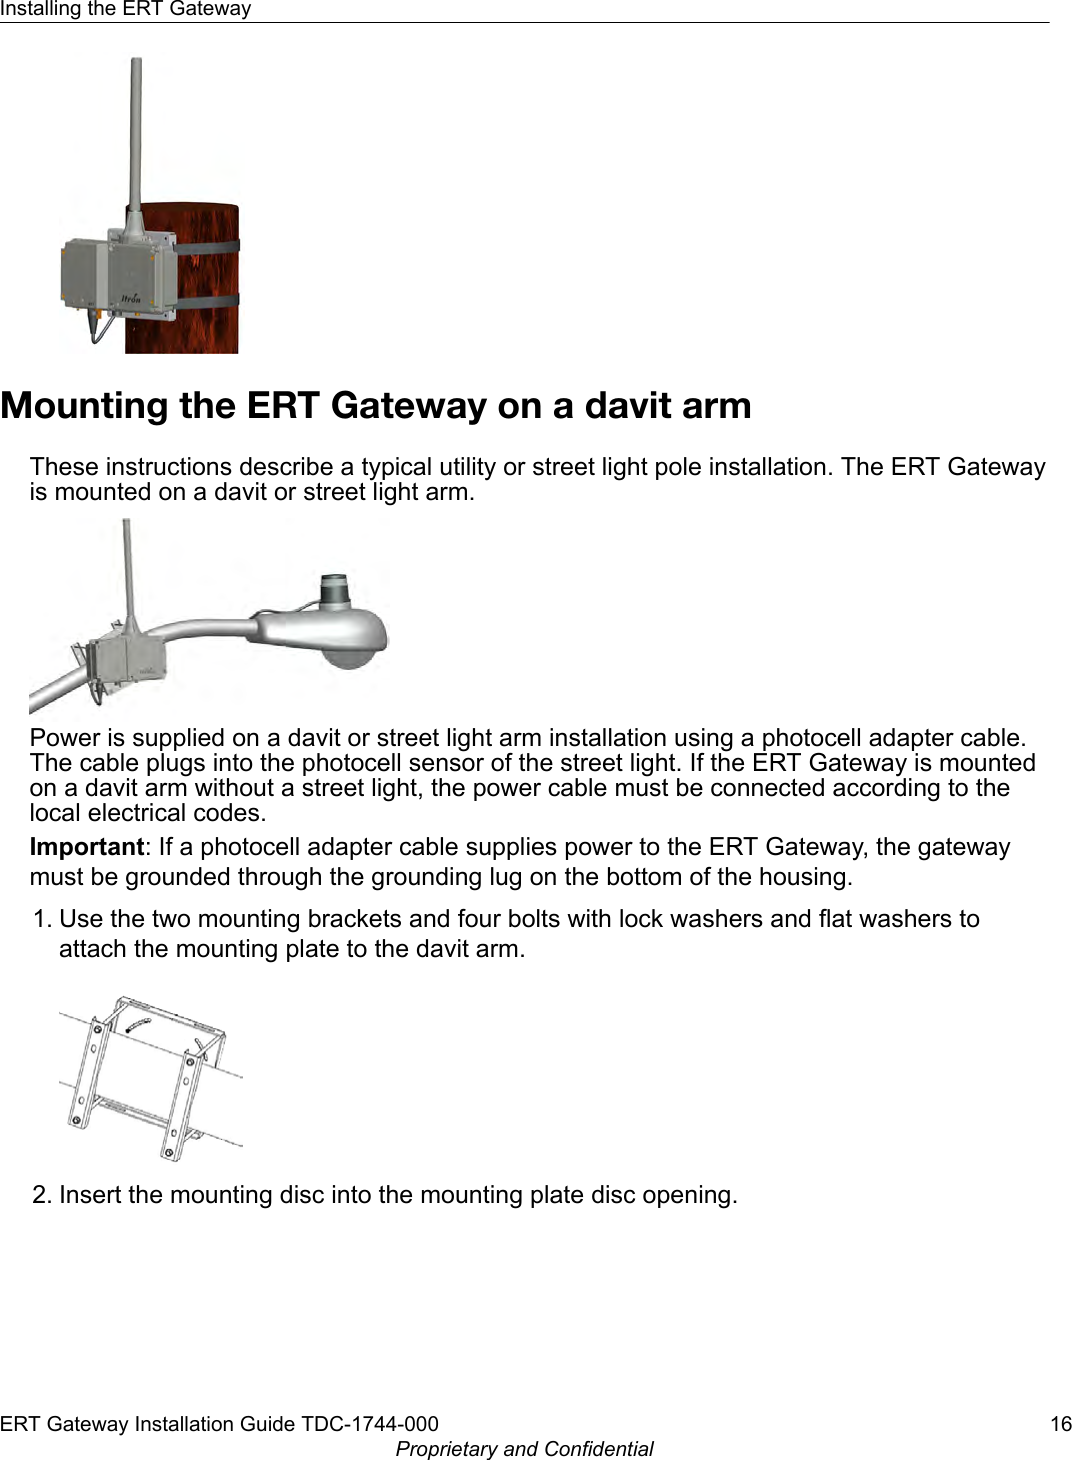
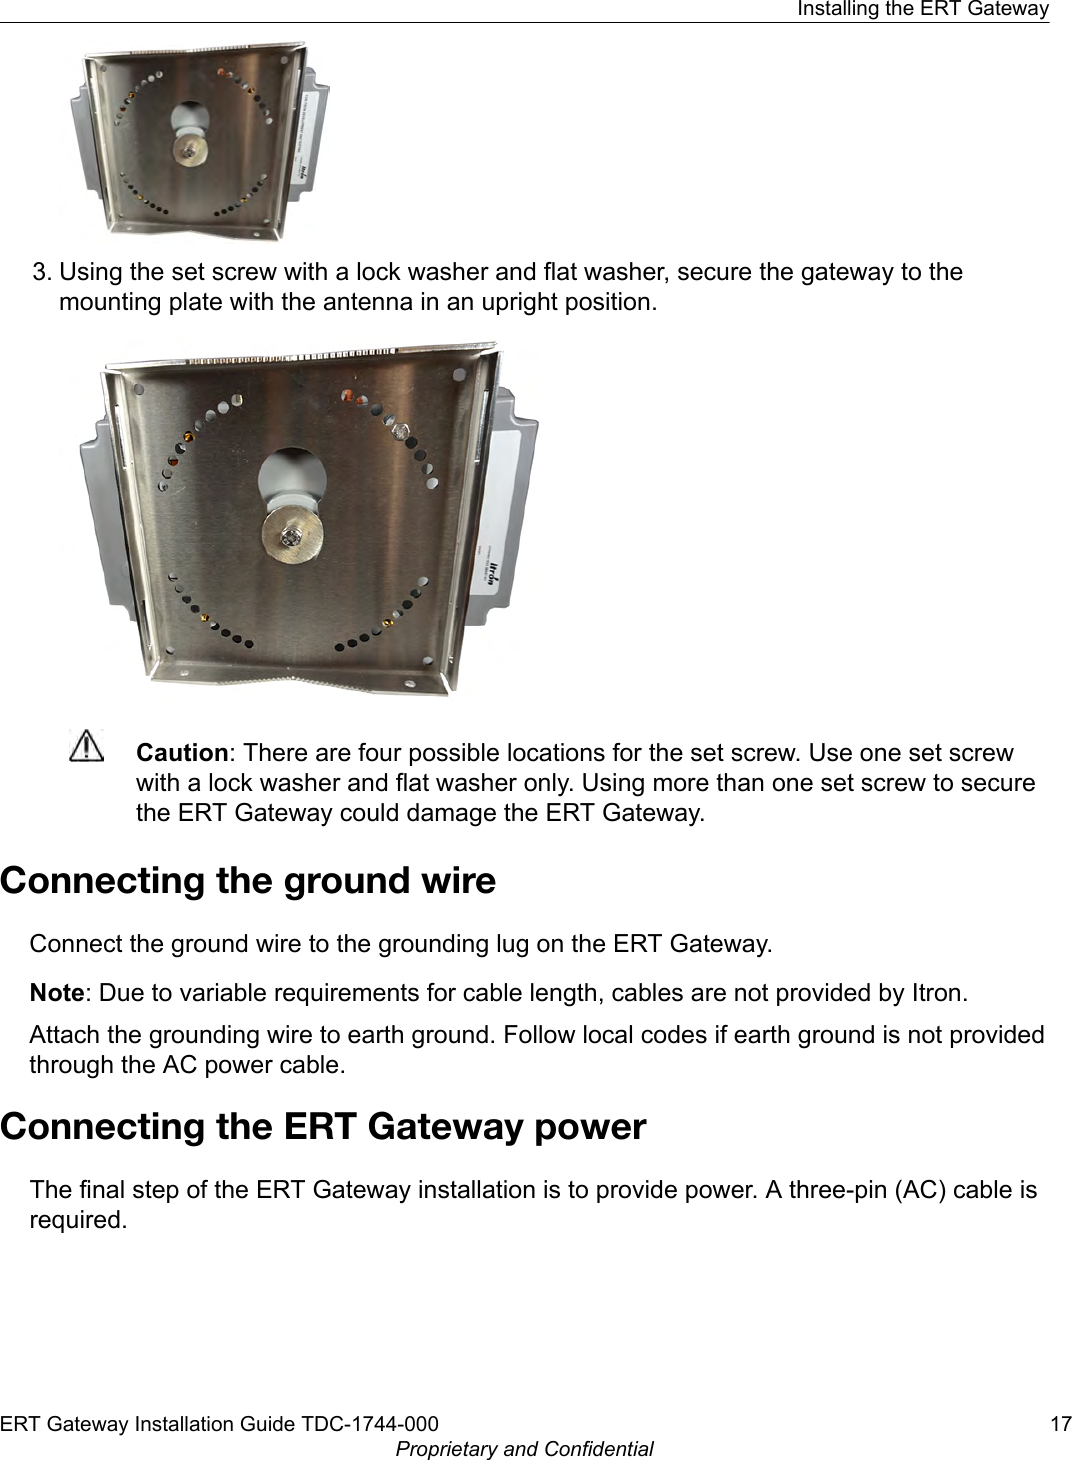
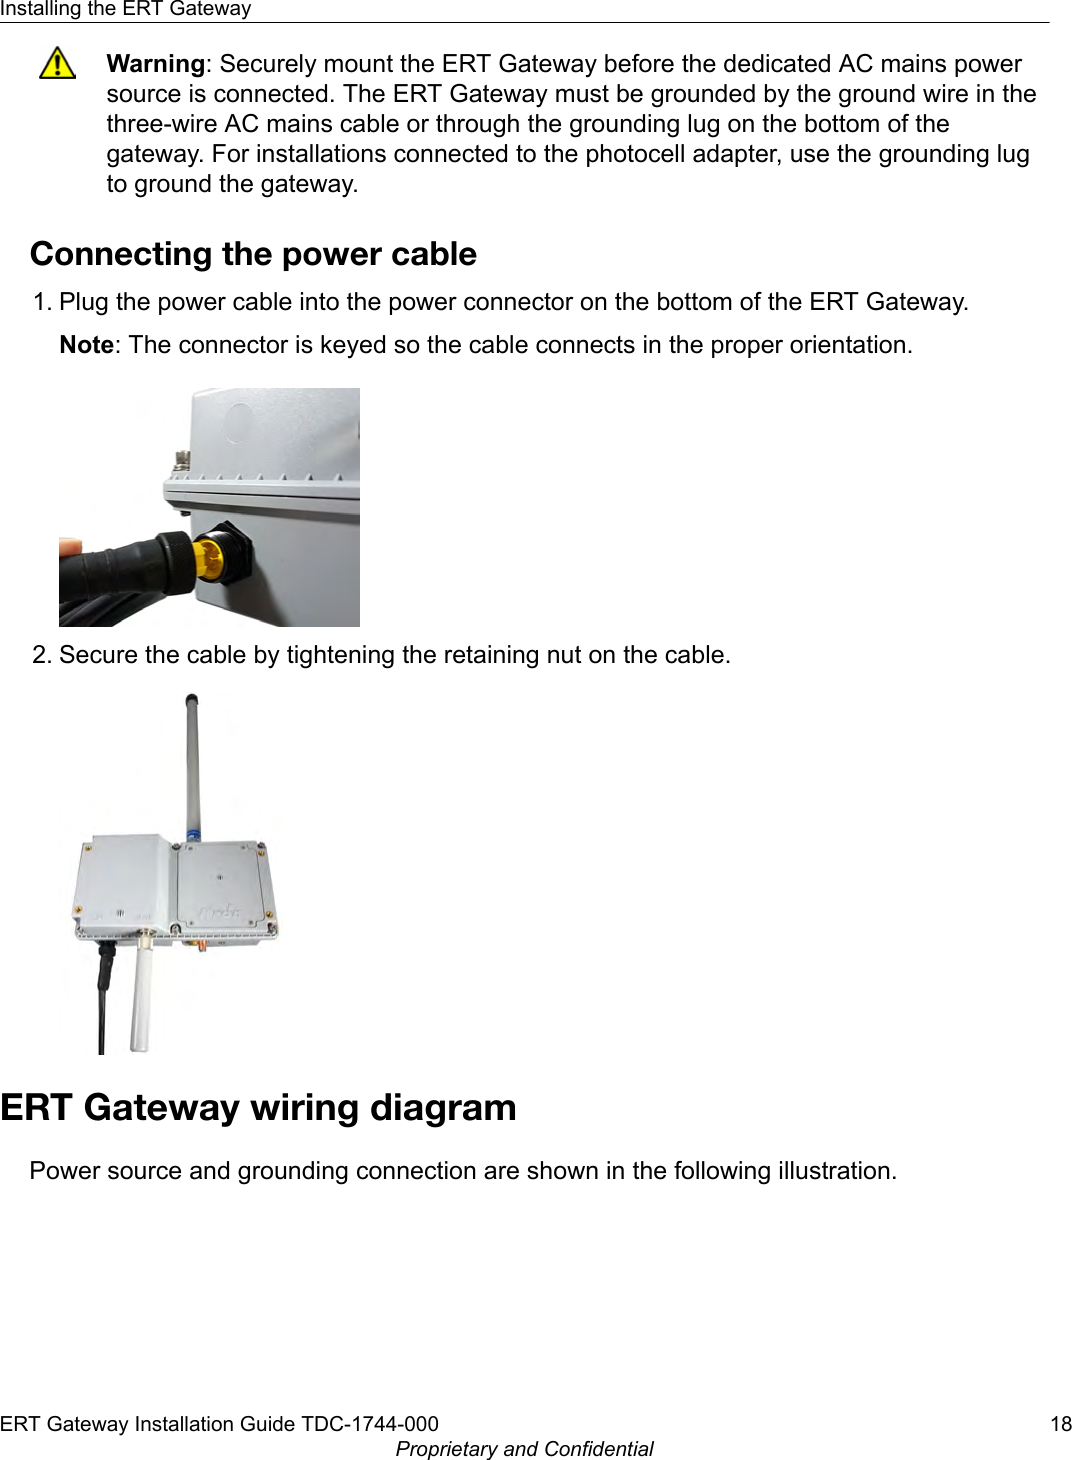
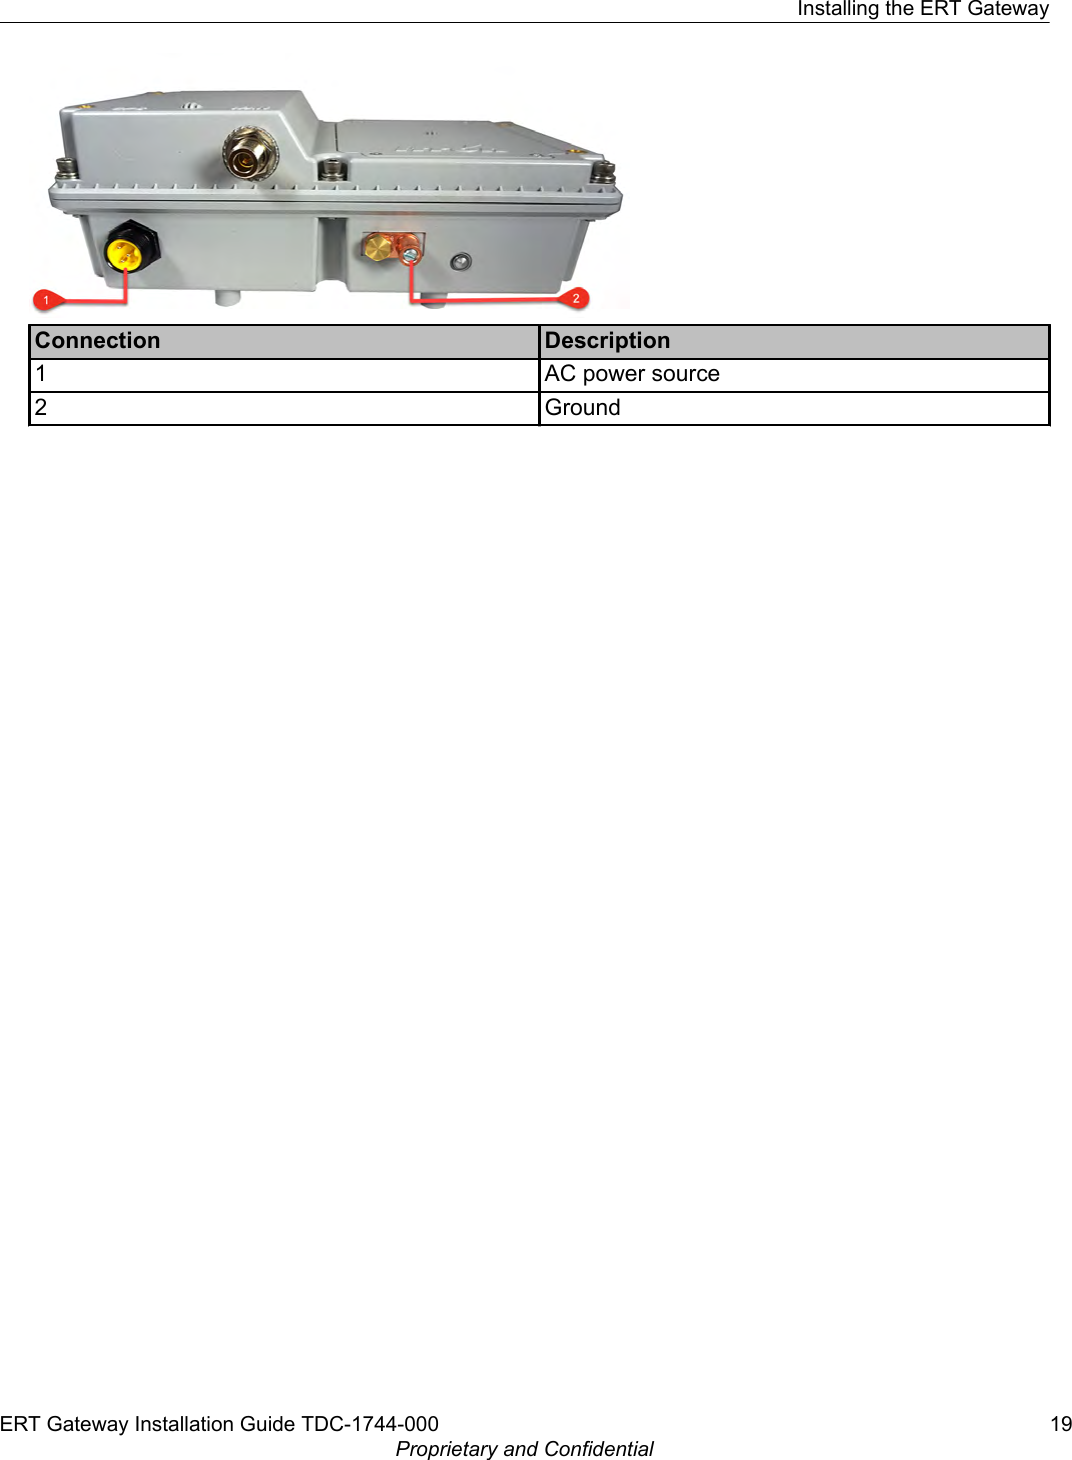
Itron ORRNA Automatic Meter Reading Network Transciever User Manual ERT Gateway Installation Guide

Itron, Inc. Automatic Meter Reading Network Transciever ERT Gateway Installation Guide
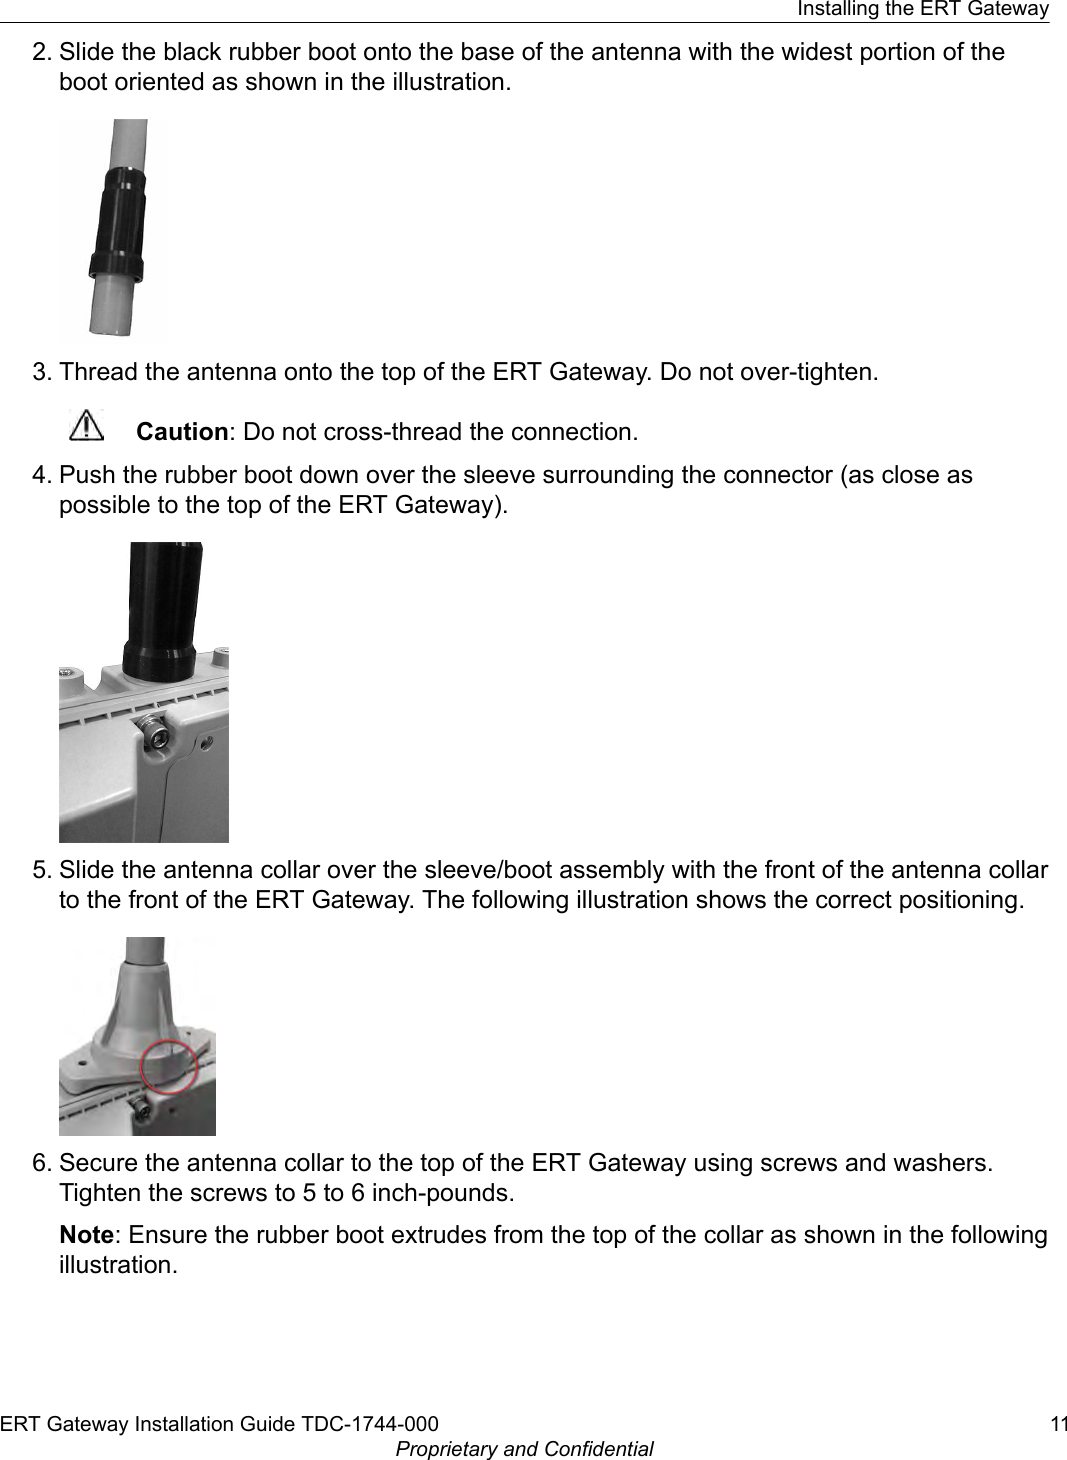
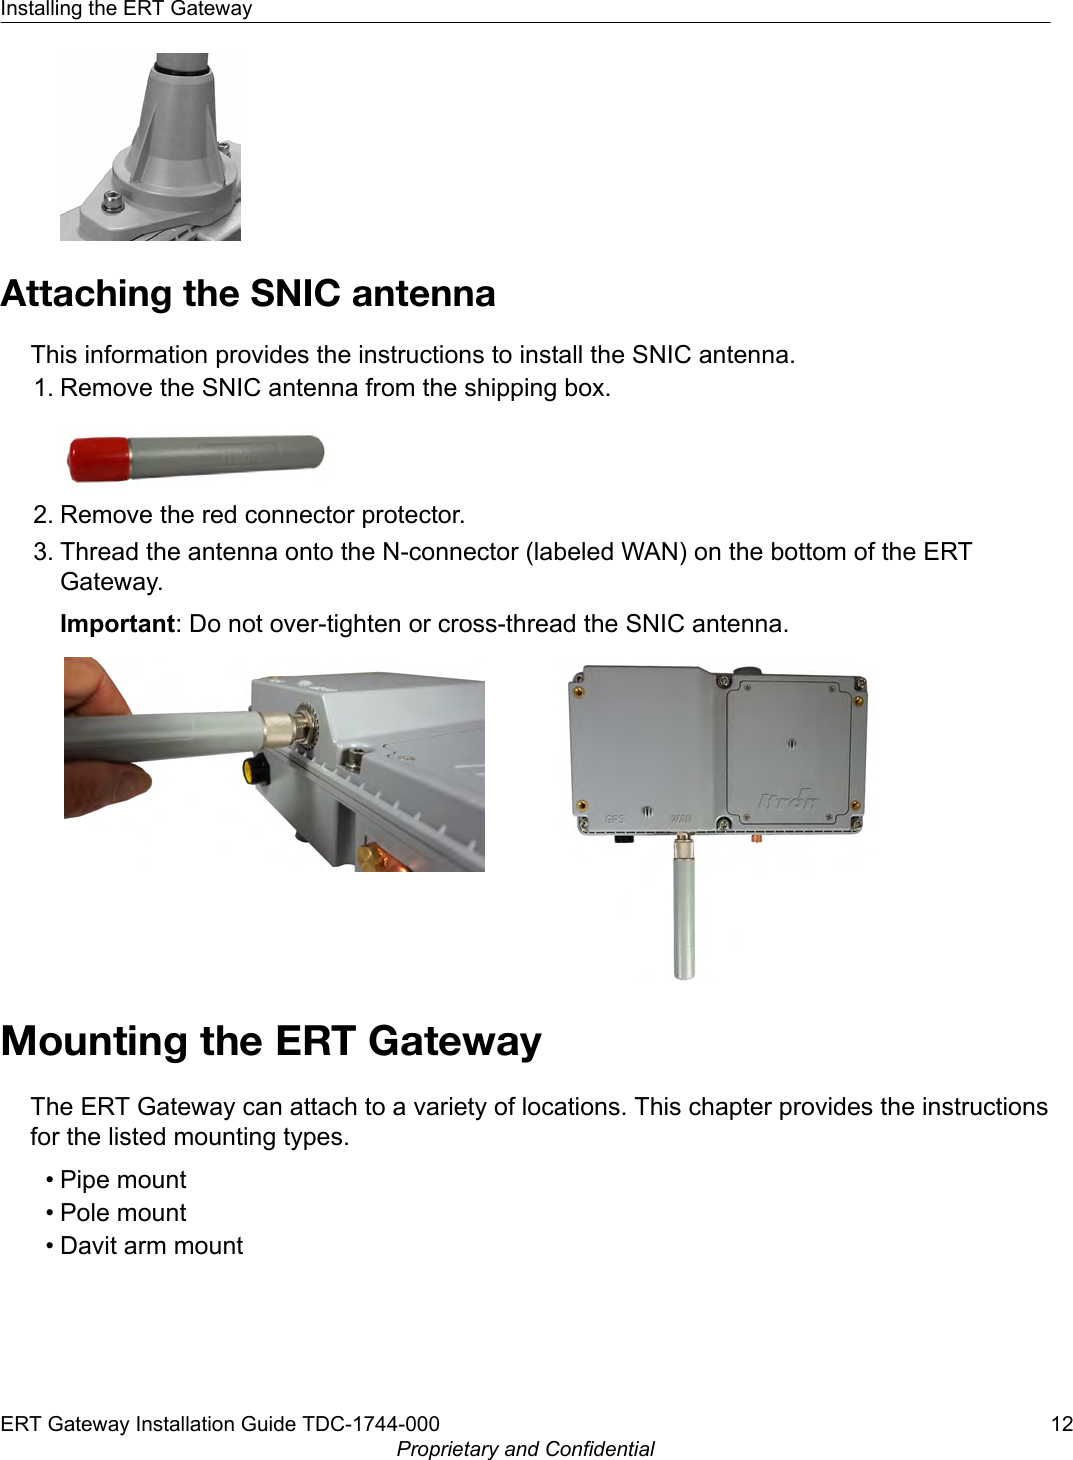
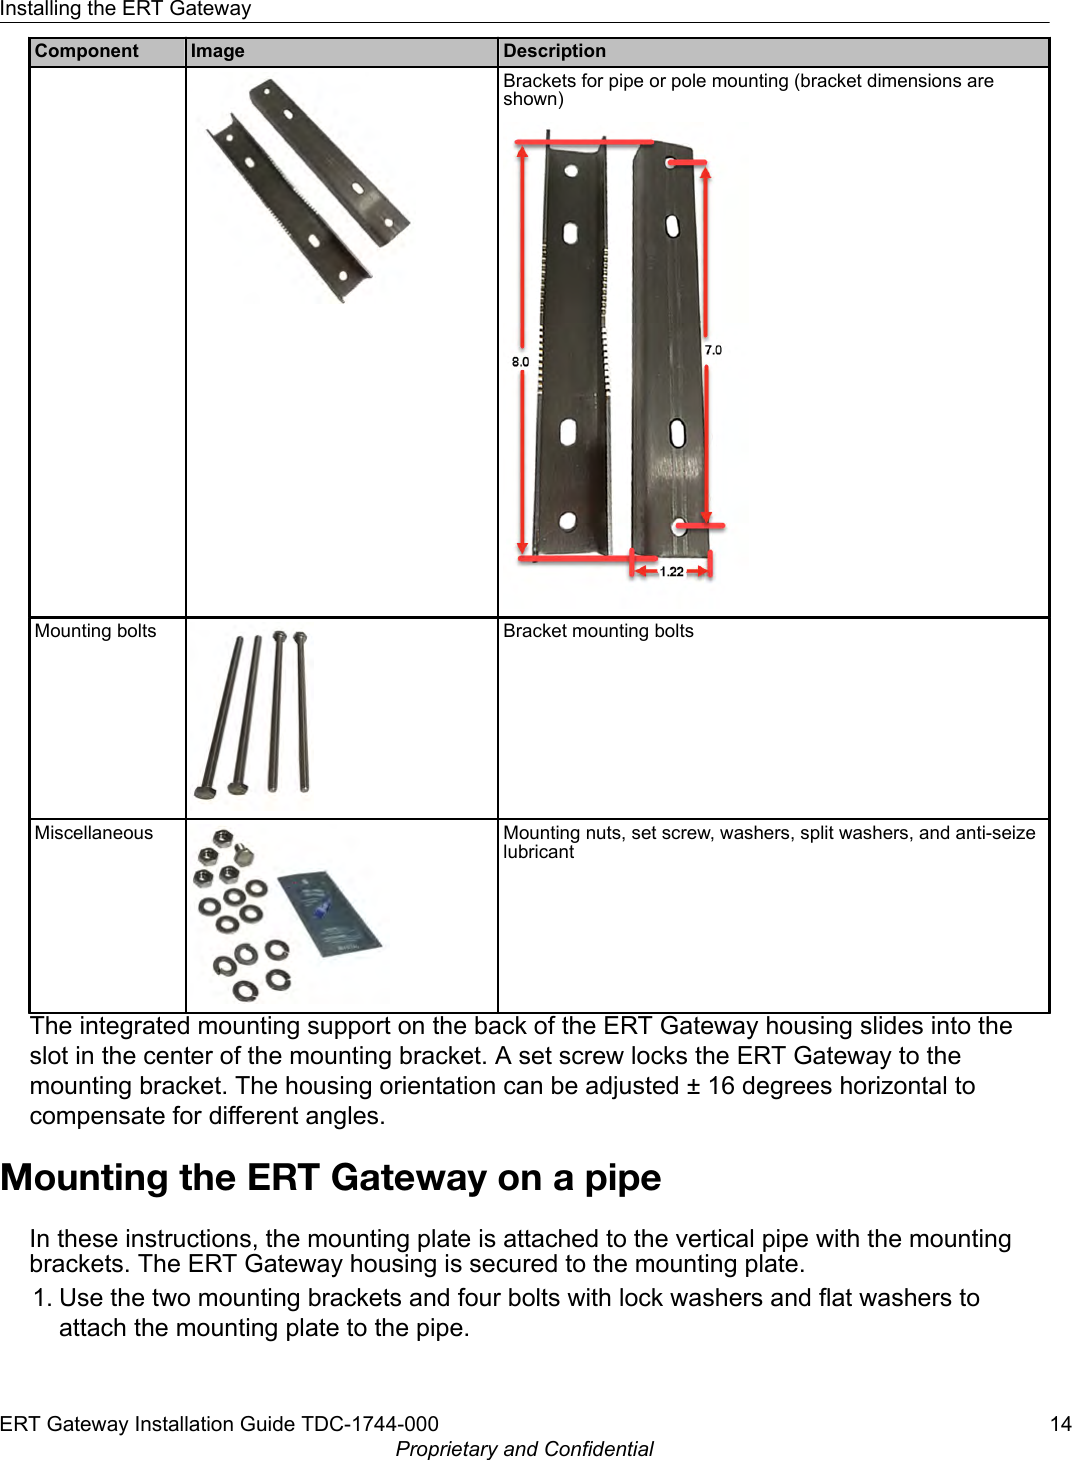
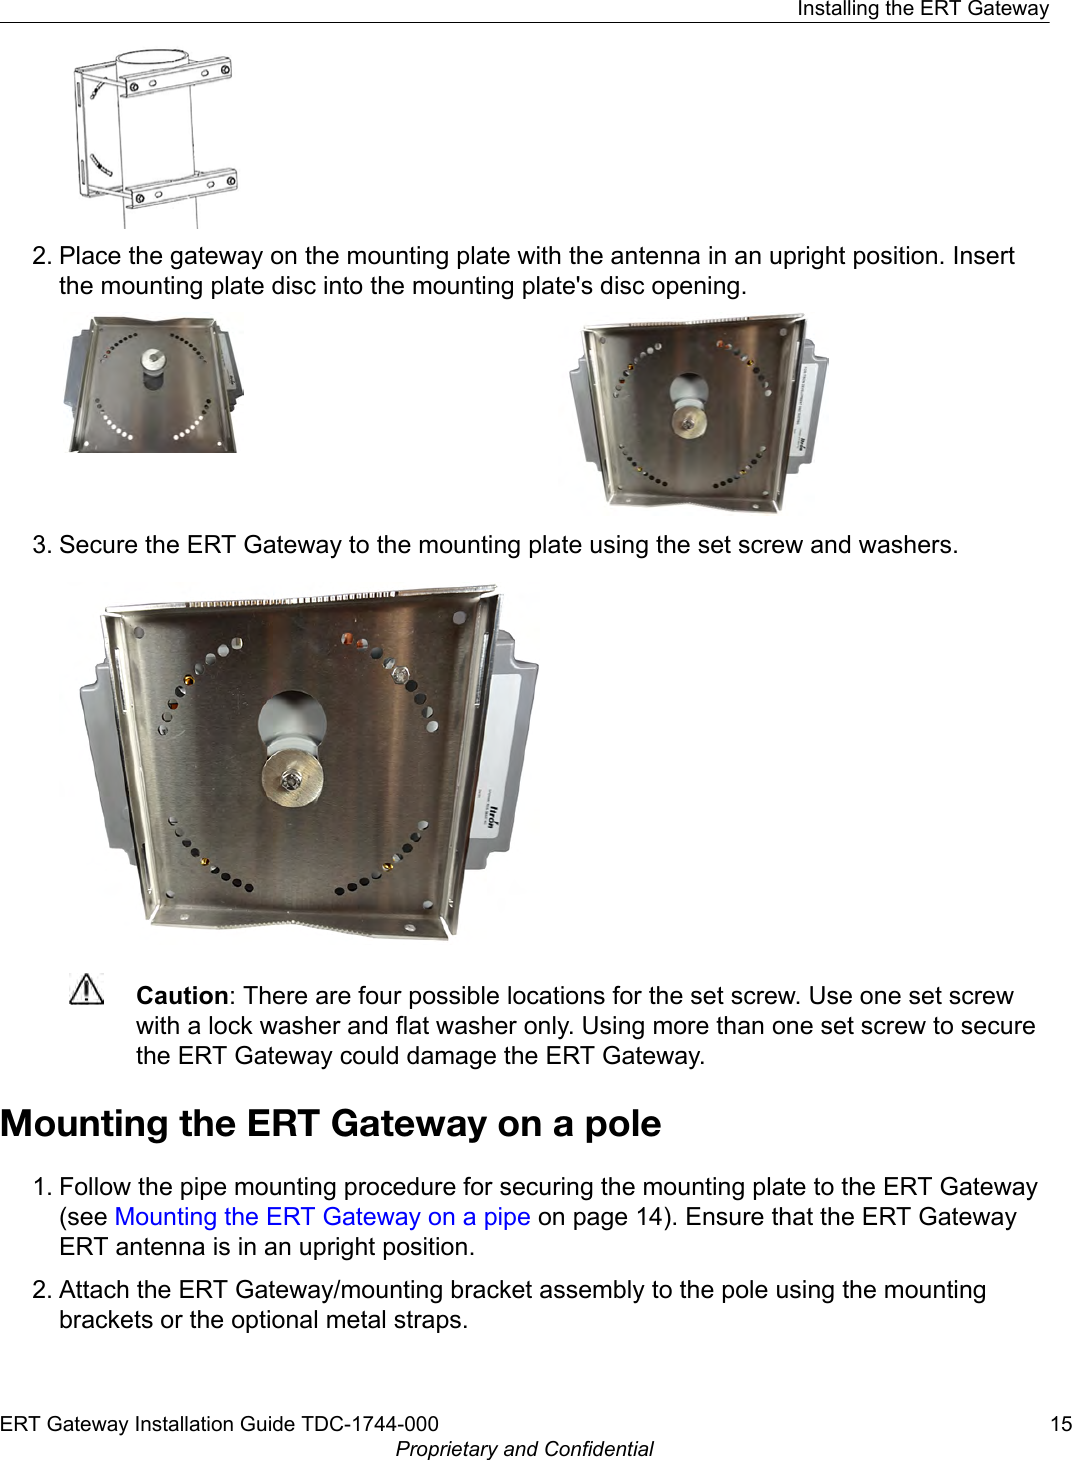
Users Manual

OpenWay® Riva Routing NodeERT Gateway Installation GuideTechnicalCommunicationsknowledge to shape your future
IdentificationOpenWay® Riva Routing Node-ERT Gateway Installation Guide25 January 2018TDC-1744-000Copyright© 2018 Itron, Inc. All rights reserved.Confidentiality NoticeThe information contained herein is proprietary and confidential and is being providedsubject to the condition that (i) it be held in confidence except to the extent requiredotherwise by law and (ii) it will be used only for the purposes described herein. Any thirdparty that is given access to this information shall be similarly bound in writing.Trademark NoticeItron is a registered trademark of Itron, Inc.All other product names and logos in this documentation are used for identification purposesonly and may be trademarks or registered trademarks of their respective companies.SuggestionsFor more information about Itron or Itron products, see www.itron.com.If you have questions or comments about the software or hardware product, contact ItronTechnical Support Services.Contact• Email: support@itron.com• Internet: support.itron.com• Telephone Itron Technical Support North America: 1-877-487-6602For technical support contact information by region, go to www.itron.com and select yourcountry and language.
ContentsChapter 1  Important Safety and Compliance Information.............................. 1USA, FCC Part 15 compliance............................................................................................................................. 1Canada, ISED compliance.................................................................................................................................... 2RF Exposure (FCC/ISED)...................................................................................................................................... 2Electromagnetic compatibility...............................................................................................................................2Chapter 2  Getting Started: OpenWay® Riva Routing Node-ERT Gateway.... 3ERT Gateway related documents......................................................................................................................... 3Installation location information............................................................................................................................ 4ERT Gateway components................................................................................................................................... 4ERT Gateway housing................................................................................................................................5ERT Gateway antennas..............................................................................................................................6Chapter 3  Planning an ERT Gateway Installation.............................................7Installation proles................................................................................................................................................ 7Siting the ERT Gateway........................................................................................................................................ 7Propagation study for the ERT Gateway installation site ..........................................................................8AC power requirements............................................................................................................................. 8AC mains power....................................................................................................................................................8Mounting hardware requirements......................................................................................................................... 9Chapter 4  Installing the ERT Gateway.............................................................10Installation overview............................................................................................................................................10Mounting the ERT Gateway antennas................................................................................................................ 10Attaching the standard 915MHz ERT antenna.........................................................................................10Attaching the SNIC antenna.....................................................................................................................12Mounting the ERT Gateway................................................................................................................................ 12Mounting hardware.................................................................................................................................. 13Mounting the ERT Gateway on a pipe..................................................................................................... 14Mounting the ERT Gateway on a pole..................................................................................................... 15Mounting the ERT Gateway on a davit arm............................................................................................. 16Connecting the ground wire.....................................................................................................................17Connecting the ERT Gateway power.......................................................................................................17Connecting the power cable.............................................................................................................18ERT Gateway wiring diagram...................................................................................................................18Chapter 5  OpenWay Riva Routing Node Communications Software...........20Appendix A  ERT Gateway Specifications........................................................21Dimensions and weight.......................................................................................................................................21Antenna specications........................................................................................................................................21Environmental specications.............................................................................................................................. 22ERT Gateway power operating range.................................................................................................................22ERT Gateway Installation Guide TDC-1744-000 iiiProprietary and Confidential
Chapter 1 Important Safety and ComplianceInformationThis section provides important information for your safety and product compliance.USA, FCC Part 15 complianceThis device complies with Part 15 of the FCC Rules. These limits are designed to providereasonable protection against harmful interference in a residential installation.Operation is subject to the following two conditions:• This device may not cause harmful interference.• This device must accept any interference that may cause undesirable operation.This device must be installed to provide a separation distance of at least 20 centimeters (7.9inches) from all persons to be compliant with regulatory RF exposure.USA, FCC Class B-Part 15This equipment has been tested and found to comply with the limits for a Class B digitaldevice, pursuant to Part 15 of the FCC Rules. These limits are designed to providereasonable protection against harmful interference in a residential installation. Thisequipment generates, uses, and can radiate radio frequency energy and, if not installed andused in accordance with the instructions, may cause harmful interference to radiocommunications. However, there is no guarantee that interference will not occur in aparticular installation. If this equipment does cause harmful interference to radio or televisionreception, which can be determined by turning the equipment off and on, the user isencouraged to try to correct the interference by one or more of the following measures:• Reorient or relocate the receiving antenna.• Increase the separation between the equipment and receiver.• Connect the equipment into an outlet on a circuit different from that to which the receiveris connected.• Consult the dealer or an experienced radio or TV technician for help.Modifications and RepairsTo ensure system performance, this device and antenna shall not be changed or modifiedwithout the express approval of Itron. Per FCC rules, unapproved modifications or operationbeyond or in conflict with these instructions for use could void the user's authority to operatethe equipment.ERT Gateway Installation Guide TDC-1744-000 1Proprietary and Confidential
Canada, ISED complianceCompliance Statement Canada Déclaration de ConformitéThis device complies with Innovation, Scienceand Economic Development Canada (ISED)license-exempt RSS standard(s). Operation issubject to the following two conditions: (1) thisdevice may not cause interference, (2) thisdevice must accept any interference, includinginterference that may cause undesired operationof the device.Under Innovation, Science and EconomicDevelopment Canada (ISED) regulations, thisradio transmitter may only operate using anantenna of a type and maximum (or lesser) gainapproved for the transmitter by Industry Canada.To reduce potential radio interference to otherusers, the antenna type and its gain should be sochosen that the equivalent isotropically radiatedpower (e.i.r.p.) is not more than that necessaryfor successful communication.Le présent appareil est conforme aux CNRd'Industrie Canada applicables aux appareilsradio exempts de licence. L'exploitation estautorisée aux deux conditions suivantes: (1)l'appareil ne doit pas produire de brouillage, (2)l'utilisateur de l'appareil doit accepter toutbrouillage radioélectrique subi, même si lebrouillage est susceptible d'en compromettre lefonctionnement.Conformément à la réglementation d'IndustrieCanada, le présent émetteur radio peutfonctionner avec une antenne d'un type et d'ungain maximal (ou inférieur) approuvé pourl'émetteur par Industrie Canada. Dans le but deréduire les risques de brouillage radioélectrique àl'intention des autres utilisateurs, il faut choisir letype d'antenne et son gain de sorte que lapuissance isotrope rayonnée équivalente (p.i.r.e.)ne dépasse pas l'intensité nécessaire àl'établissement d'une communicationsatisfaisante.RF Exposure (FCC/ISED)This equipment complies with radiation exposurelimits set forth for an uncontrolled environment.This equipment should be installed and operatedwith minimum distance 20 cm between theradiator and your body. This transmitter must notbe co-located or operating in conjunction withany other antenna or transmitter.Cet équipement est conforme aux limitesd'exposition aux radiations dans unenvironnement non contrôlé. Cet équipement doit être installé et utilisé à distance minimum de 20cm entre le radiateur et votre corps. Cet émetteurne doit pas être co-localisées ou opérant enconjonction avec tout autre antenne outransmetteur.Electromagnetic compatibilityCaution: Use only approved accessories with this equipment. All cables must behigh quality, shielded, and correctly terminated. Unapproved modifications oroperation beyond or in conflict with these use instructions may void the authority'sauthorization to operate the equipment.Important Safety and Compliance InformationERT Gateway Installation Guide TDC-1744-000 2Proprietary and Confidential
Chapter 2 Getting Started: OpenWay® RivaRouting Node-ERT GatewayThe OpenWay Riva Routing Node-ERT Gateway provides a unified means of reading Itron100G series and 100W series devices over an IPv6 network. The OpenWay Riva RoutingNode ERT Gateway can be deployed in one of two network configurations designated in thefirmware. The ERT Gateway Star operates over a Star network to collect the Itron 100Series gas and water ERT module reads.Note: The ERT Gateway does not support 100W Series modules operating in ExtendedRange Mode (Geo Mode) or 100W+ and 100G DLS modules operating with enhancedsecurity (ISM).The ERT Gateway Mesh (future release) will operate over a Mesh network.The network configuration is selected on the specification form at the time the system isordered.The ERT Gateway communicates directly with the Connected Grid Router (CGR). Thegateway utilizes RF links with optimized modulation rates. The CGR then transmits the datato the OpenWay Operations Center (a part of the head-end system) over the utility'sbackhaul communication solution. The ERT Gateway's flexible design provides installationoptions for a variety of wall-mounted or pole-mounted locations. This flexibility providesoptimal communication effectiveness and range and minimizes installation costs.Important: Installation must be completed by professional installers to ensure trouble-freeoperation of the Itron OpenWay system. Follow these product installation instructions toensure proper operation of your OpenWay Riva Routing Node ERT Gateway Star.Use the ERT Gateway shipping packaging to transport the ERT Gateway. The shippingmaterials protect the ERT Gateway from damage.ERT Gateway related documentsThe listed documents provide additional information for ordering and working with theOpenWay Riva Routing Node ERT Gateway Star.Document Itron part numberOpenWay Riva Routing Node-ERT Gateway Ordering Guide PUB-1306-001OpenWay Collection Manager Installation and Configuration Guide TDC-1675-XXXERT Gateway Installation Guide TDC-1744-000 3Proprietary and Confidential
Document Itron part numberOpenWay® Operations Center Performance Manager Integration GuideIntegration GuideTDC-1718-XXXNote: The -XXX refers to the revision level of the document. The revision level is subject tochange without notice.Installation location informationThe ERT Gateway is designed for the listed installation locations:• Wood, concrete, or metal utility pole• Wall (indoor or outdoor)• Pipe or mast (between 2 and 3.5" in diameter)• RoofNote: Roof installation requires a 3rd-party, non-penetrating mounting kit (for example,Tessco #461587)• Other vertical structuresIntegrated mounting and coupling brackets secure the device in high winds and underheavy ice loads. Consult a professional engineer with concerns about your ERT Gatewaymounting location.The ERT Gateway consists of several components in a single, weatherproof device.Electrical components are encased in a plastic enclosure that provides optimum safety forthe installer.Warning: In accordance with FCC rules, unapproved modifications or operationbeyond or in conflict with these use instructions could void the user's authority tooperate the equipment. Only authorized Itron personnel may open the ERTGateway. Unauthorized access or modifications to the ERT Gateway will void thewarranty.ERT Gateway componentsThe ERT Gateway (Star) has three antennas. Two of the antennas are mounted directly onthe gateway housing.• SNIC antenna• ERT antennaThe third antenna is the internal WiFi antenna.Since the ERT Gateway can be installed in outdoor environments, each component of thegateway is weather-tight and able to withstand wind speeds in excess of 100 miles per hour.Note: Review the ERT Gateway Ordering Guide (PUB-1306-001) for specific part numbersand component options to determine the ERT Gateway configuration.Getting Started: OpenWay® Riva Routing Node-ERT GatewayERT Gateway Installation Guide TDC-1744-000 4Proprietary and Confidential
ERT Gateway housingThe ERT Gateway housing contains the electronic components and radio boards. The radioantennas are included with the gateway and are directly mounted to the housing.Caution: Only authorized Itron personnel may open this device. Unauthorizedaccess or modifications to this product voids the warranty. Per FCC rules,unapproved modifications or operation beyond or in conflict with the installationinstructions in this guide could void the user's authority to operate the equipment.Designator Component Description1 ERT Gateway The ERT Gateway processes data received through the antennas and relays it to theOpenWay Operations Center (OWOC). Only authorized Itron personnel may open thisproduct housing.2 ERT antenna A 915MHz antenna that receives messages from the 100 series ERT modules in thenetwork. The connection for this antenna is type N female.3 ERT GatewaylabelThe label displays the identification number, model number, and other associatedgateway information.4 PowerconnectorThe power connector supplies power to the ERT Gateway. A three-pin cable connectsthe ERT Gateway to the AC mains power supply.5 SNIC antenna A 915MHz antenna that provides a connection to the STAR or MESH network. Theconnection for this antenna is a type N female.6 Ground lug The ground lug is provided for utilities that require a separate earth ground.Note: When the ERT Gateway is powered from a photocell adapter cable, there is noground connection in the cable. Use the ground lug in this configuration.7 LED Statusindicator The status indicator displays the current operational status of the ERT Gateway.The LED indicator is located on the bottom of the housing. The list shows the LED'snormal operation.• Unpowered (off)• Initializing (green blink)• Running (green)• Error (yellow)The LED is configurable for the following display modes:• None (no light)• Error only• NormalGetting Started: OpenWay® Riva Routing Node-ERT GatewayERT Gateway Installation Guide TDC-1744-000 5Proprietary and Confidential
ERT Gateway antennasThe ERT Gateway utilizes three antennas.•ERT antenna The ERT antenna is a standard, higher gain, vertically polarized antennathat mounts directly to the top of the ERT Gateway housing.•SNIC antenna The SNIC antenna is a standard, lower gain, vertically polarized antennathat mounts directly to the bottom of the ERT Gateway housing to support the customer'sbackhaul data requirements.Caution: This equipment has been designed and approved per FCC rules tooperate with these ERT Gateway antennas. The required antenna impedance is50 ohms. To reduce potential radio interference to other users, the antenna typeand its gain were chosen so that the equivalent isotropically radiated power(EIRP) is not more than that permitted for successful communication. Antennasnot approved by Itron are strictly prohibited for use with this device. Installing theOpenWay Riva Routing Node ERT Gateway with an unapproved antenna will voidthe product warranty and can void the user's authority to operate this equipment.•Internal Wi-Fi antennaThe Wi-Fi antenna is used for local access to the device. The effective range isapproximately 100 feet from the front (1) of the ERT Gateway and approximately 50 feetto the rear (2) of the device. The shown coverage area assumes the device is mounted ata height of 25 feet with a clear line-of-sight path between the ERT Gateway and theprogramming device. Positioning the ERT Gateway observing the coverage areaguidelines ensures safe personnel positioning for device programming.Getting Started: OpenWay® Riva Routing Node-ERT GatewayERT Gateway Installation Guide TDC-1744-000 6Proprietary and Confidential
Chapter 3 Planning an ERT Gateway InstallationThis chapter describes ERT Gateway installation preparation and planning.Installation profilesThe ERT Gateway may be installed in a variety of configurations and locations (for moreinformation, see Installation location information on page 4). Itron identified the followingprofiles for ERT Gateway installations.Location Location descriptionUtility pole The ERT Gateway is installed on a utility pole. Mount the ERT Gateway at aminimum of 20 feet to a maximum height of 35 feet high on the utility pole foroptimum reception.Light pole/street lightThe ERT Gateway is installed on either a light pole or the davit arm of the streetlight. Mount the ERT Gateway at a minimum of 20 feet to a maximum height of 35feet high on the light pole/street light for optimum reception.Pipe or mast The ERT Gateway is secured/installed to a pipe or fence railing (from 2 to 3.5inches in diameter). Mount the ERT Gateway at a minimum of 20 feet to amaximum height of 35 feet high on the pipe or fence for optimum reception.Siting the ERT GatewayERT Gateways can be installed in the field on a variety of surfaces. The listed surfaces areexamples of surfaces that support the ERT Gateway.• Wooden or metal walls• Metal pipes• Fence railings• Utility polesIn determining the ERT Gateway placement, observe the following primary considerationsas placement best practices.• For optimum RF reception.• In a location where there is a power connection.• On a structure on in a location that can physically support the weight of the ERT Gateway(and its mounting hardware).Caution: Always get permission to install the ERT Gateway at the selected site priorto installation. If you have questions or need help, contact Itron Support.ERT Gateway Installation Guide TDC-1744-000 7Proprietary and Confidential
Propagation study for the ERT Gateway installation sitePrior to the ERT Gateway field installation, contact Itron to perform a propagation study.Itron performs these tasks during the propagation study to determine the exact ERTGateway installation location and the best mounting surface.• Evaluate the quantity and types of network endpoints.• Assess the environmental and geographical considerations for the ERT Gatewayinstallation.• Optimize the ERT Gateway placement within the network to get the best possiblereception.• Assess the physical and structural implications of the selected mounting surface.This iterative process may be repeated as the final installation parameters are determined.AC power requirementsThe ERT Gateway requires an 85-264 VAC source defined as a 10 Amp, 15 Amp, or 20Amp branch circuit that must be protected by a certified branch circuit breaker.Warning: Do not connect the ERT Gateway to a circuit protected by a GFCI breaker.The wiring must be sized in accordance with the National Electrical Code, ANSI/NFPA 70and, where applicable, the Canadian Electrical Code, Part I, CSA C22.1 or the prevailinglocal code.AC mains powerThe AC mains wiring to the ERT Gateway utilizes a three-conductor cable. Terminate thecable with either a NEMA L5-15 (125V, 15A), NEMA L6-15 (250V, 15A) locking plug, or bydirectly splicing to the secondary power to meet electrical codes.Warning: Verify the 85-264 VAC power source. Do not connect the ERT Gateway tothe wrong voltage during installation. Supplying the wrong voltage could result in theERT Gateway not functioning properly or damage to the device.The ERT Gateway must be protected by a certified branch circuit breaker. Do not connectthe ERT Gateway to a circuit protected by a GFCI breaker. Size the wiring in accordancewith the National Electrical Code, ANSI/NFPA 70, and where applicable, the CanadianElectrical Code, Part 1 CSA C22.1 or the prevailing local code. Power wiring on the Itron-supplied power cable follows conventional color coding for AC wiring: green (ground), white(neutral), and black (hot).Planning an ERT Gateway InstallationERT Gateway Installation Guide TDC-1744-000 8Proprietary and Confidential
Warning: Securely mount the ERT Gateway before connecting the dedicated ACmains power source. The ERT Gateway must be grounded using either the groundwire in the three-conductor cable or the grounding lug on the bottom of the ERTGateway. For installations that use the photocell adapter, the grounding lug must beused to ground the ERT Gateway.Mounting hardware requirementsMounting hardware requirements are based on the installation location and your systemconfiguration. The installer must supply the following mounting hardware to properly attachthe ERT Gateway to the mounting surface.Caution: Each installation is unique. You must ensure that the mounting hardwaresecurely supports the ERT Gateway. Reference Appendix A: Dimensions and weighton page 21 for the dimensions and weight specifications of the ERT Gateway. Itronrecommends that you consult a qualified engineer to verify load requirements andsafety issues. Installers must comply with local codes when the ERT Gateway isinstalled.Profile Mounting surface Suggested hardware/sizingUtility pole Wood or steel pole High-strength stainless steel strapsLight pole Steel light pole High-strength stainless steel strapsPipe 2.5" to 5.5"galvanized steelpipeTwo pipe mount brackets for pipes up to 5.5" indiameter. Pipe mount brackets are available from Itron(part number FAB-0192-001). Two brackets arerequired for each ERT Gateway.Planning an ERT Gateway InstallationERT Gateway Installation Guide TDC-1744-000 9Proprietary and Confidential
Chapter 4 Installing the ERT GatewayCaution: Do not move or transport the ERT Gateway without first disconnecting thepower. Use the ERT Gateway shipping packaging to transport the device to protectthe equipment.This chapter provides the Itron-approved instructions to install an ERT Gateway in the field.The ERT Gateway can be installed in a variety of locations. This installation profile uses anAC mains power.Note: Before the ERT Gateway installation, ensure that the selected location will support theweight of the gateway and its mounting hardware. Engage a registered engineer to conducta structural analysis of the installation location prior to the installation. Itron is notresponsible for improper installation or for installation at a site that cannot adequatelysupport the ERT Gateway.Installation overviewThis ERT Gateway installation profile describes installation mounting the gateway to a 2-inch vertical pipe. The ERT Gateway power source is a 110V AC mains supply. Duringinstallation, the listed tasks are completed.1. Attaching the 915MHz ERT module antenna.2. Attaching the 915MHz SNIC antenna.3. Attaching the ERT Gateway to the mounting surface.4. Connecting the power cable.5. Supplying power.Mounting the ERT Gateway antennasAttach the 915MHz antenna prior to mounting the ERT Gateway in a permanent location.Attaching the standard 915MHz ERT antenna1. Remove the antenna from the shipping package.ERT Gateway Installation Guide TDC-1744-000 10Proprietary and Confidential
2. Slide the black rubber boot onto the base of the antenna with the widest portion of theboot oriented as shown in the illustration.3. Thread the antenna onto the top of the ERT Gateway. Do not over-tighten.Caution: Do not cross-thread the connection.4. Push the rubber boot down over the sleeve surrounding the connector (as close aspossible to the top of the ERT Gateway).5. Slide the antenna collar over the sleeve/boot assembly with the front of the antenna collarto the front of the ERT Gateway. The following illustration shows the correct positioning.6. Secure the antenna collar to the top of the ERT Gateway using screws and washers.Tighten the screws to 5 to 6 inch-pounds.Note: Ensure the rubber boot extrudes from the top of the collar as shown in the followingillustration.Installing the ERT GatewayERT Gateway Installation Guide TDC-1744-000 11Proprietary and Confidential
Attaching the SNIC antennaThis information provides the instructions to install the SNIC antenna.1. Remove the SNIC antenna from the shipping box.2. Remove the red connector protector.3. Thread the antenna onto the N-connector (labeled WAN) on the bottom of the ERTGateway.Important: Do not over-tighten or cross-thread the SNIC antenna.Mounting the ERT GatewayThe ERT Gateway can attach to a variety of locations. This chapter provides the instructionsfor the listed mounting types.• Pipe mount• Pole mount• Davit arm mountInstalling the ERT GatewayERT Gateway Installation Guide TDC-1744-000 12Proprietary and Confidential
Mounting hardwareThe mounting hardware for the ERT Gateway can be adapted to mount the gateway inmany different locations.Pole or pipe mount profiles require the listed mounting hardware.• The mounting plate• Two mounting brackets• Four bolts• The set screw• (optional) Metal bands (not provided by Itron)Note: If the vertical pipe or pole exceeds 6.75" in diameter, you may use metal bandsinstead of the mounting brackets to secure the mounting plate to the pipe or pole. Two1.5" long slots are included on the mounting plate to accommodate the metal bands.The following list describes the required hardware to complete the wall mount profile.• Two metal mounting brackets• Four mounting bolts• Four mounting nuts• Four lock washersTable : Mounting HardwareComponent Image DescriptionMounting plate Mounting plate dimensionsMountingbracketsBrackets for wall-mountingInstalling the ERT GatewayERT Gateway Installation Guide TDC-1744-000 13Proprietary and Confidential
Component Image DescriptionBrackets for pipe or pole mounting (bracket dimensions areshown)Mounting bolts Bracket mounting boltsMiscellaneous Mounting nuts, set screw, washers, split washers, and anti-seizelubricantThe integrated mounting support on the back of the ERT Gateway housing slides into theslot in the center of the mounting bracket. A set screw locks the ERT Gateway to themounting bracket. The housing orientation can be adjusted ± 16 degrees horizontal tocompensate for different angles.Mounting the ERT Gateway on a pipeIn these instructions, the mounting plate is attached to the vertical pipe with the mountingbrackets. The ERT Gateway housing is secured to the mounting plate.1. Use the two mounting brackets and four bolts with lock washers and flat washers toattach the mounting plate to the pipe.Installing the ERT GatewayERT Gateway Installation Guide TDC-1744-000 14Proprietary and Confidential
2. Place the gateway on the mounting plate with the antenna in an upright position. Insertthe mounting plate disc into the mounting plate's disc opening.3. Secure the ERT Gateway to the mounting plate using the set screw and washers.Caution: There are four possible locations for the set screw. Use one set screwwith a lock washer and flat washer only. Using more than one set screw to securethe ERT Gateway could damage the ERT Gateway.Mounting the ERT Gateway on a pole1. Follow the pipe mounting procedure for securing the mounting plate to the ERT Gateway(see Mounting the ERT Gateway on a pipe on page 14). Ensure that the ERT GatewayERT antenna is in an upright position.2. Attach the ERT Gateway/mounting bracket assembly to the pole using the mountingbrackets or the optional metal straps.Installing the ERT GatewayERT Gateway Installation Guide TDC-1744-000 15Proprietary and Confidential
Mounting the ERT Gateway on a davit armThese instructions describe a typical utility or street light pole installation. The ERT Gatewayis mounted on a davit or street light arm.Power is supplied on a davit or street light arm installation using a photocell adapter cable.The cable plugs into the photocell sensor of the street light. If the ERT Gateway is mountedon a davit arm without a street light, the power cable must be connected according to thelocal electrical codes.Important: If a photocell adapter cable supplies power to the ERT Gateway, the gatewaymust be grounded through the grounding lug on the bottom of the housing.1. Use the two mounting brackets and four bolts with lock washers and flat washers toattach the mounting plate to the davit arm.2. Insert the mounting disc into the mounting plate disc opening.Installing the ERT GatewayERT Gateway Installation Guide TDC-1744-000 16Proprietary and Confidential
3. Using the set screw with a lock washer and flat washer, secure the gateway to themounting plate with the antenna in an upright position.Caution: There are four possible locations for the set screw. Use one set screwwith a lock washer and flat washer only. Using more than one set screw to securethe ERT Gateway could damage the ERT Gateway.Connecting the ground wireConnect the ground wire to the grounding lug on the ERT Gateway.Note: Due to variable requirements for cable length, cables are not provided by Itron.Attach the grounding wire to earth ground. Follow local codes if earth ground is not providedthrough the AC power cable.Connecting the ERT Gateway powerThe final step of the ERT Gateway installation is to provide power. A three-pin (AC) cable isrequired.Installing the ERT GatewayERT Gateway Installation Guide TDC-1744-000 17Proprietary and Confidential
Warning: Securely mount the ERT Gateway before the dedicated AC mains powersource is connected. The ERT Gateway must be grounded by the ground wire in thethree-wire AC mains cable or through the grounding lug on the bottom of thegateway. For installations connected to the photocell adapter, use the grounding lugto ground the gateway.Connecting the power cable1. Plug the power cable into the power connector on the bottom of the ERT Gateway.Note: The connector is keyed so the cable connects in the proper orientation.2. Secure the cable by tightening the retaining nut on the cable.ERT Gateway wiring diagramPower source and grounding connection are shown in the following illustration.Installing the ERT GatewayERT Gateway Installation Guide TDC-1744-000 18Proprietary and Confidential
Connection Description1 AC power source2 GroundInstalling the ERT GatewayERT Gateway Installation Guide TDC-1744-000 19Proprietary and Confidential
Chapter 5 OpenWay Riva Routing NodeCommunications SoftwareThe OpenWay Riva Routing Node ERT Gateway Star communicates using the OpenWayOperations Center Collection Manager. The OpenWay Operations Center CollectionManager sends a request to the ERT Gateway Star requesting the data from the previous 8hours. The ERT Gateway Star responds with the data that it stored over the past 8 hours.For more information, see the OpenWay Operations Center Collection Managerdocumentation (ERT Gateway related documents on page 3).ERT Gateway Installation Guide TDC-1744-000 20Proprietary and Confidential
Appendix A ERT Gateway SpecificationsThis section provides OpenWay Riva Routing Node ERT Gateway product specifications.Dimensions and weightThe ERT Gateway weight is listed in pounds. The dimensions are shown in inches.Component WeightERT Gateway 5.5 lbs (with antennas)Pole mounting kit 3 lbsWall mounting kit 2 lbsAntenna specificationsThis section provides the specifications for the 915MHz and SNIC antennas. The ERTGateway is designed to operate with the antennas listed here. Antennas not listed here arestrictly prohibited for use with the ERT Gateway. The required antenna impedance is 50ohms.Specification 915 MHz ERT antenna 915 MHz SNIC antennaItron part number* MSE-0330-001 MSE-0453-001 514618-001 MSE-0452-001Frequency range 902-932 MHz 902-928 MHz 902-928 MHz 902-928 MHzMaximum gain 5.15 dBi 5.5 dBi 1 dBi 2.6 dBiHorizontalbeamwidthOmnidirectional Omnidirectional Omnidirectional OmnidirectionalImpedance 50 ohms 50 ohms 50 ohms 50 ohmsTermination Type N male Type N Male Type N male Type N maleOverall length 18 in. 18.8" 5.6" 8"Radome diameter 1" OD 1" OD 0.84" OD 1" OD*See the OpenWay Riva Routing Node Ordering Guide (PUB-1306-001) for the full list ofpart numbers and availability or contact your Itron representative.ERT Gateway Installation Guide TDC-1744-000 21Proprietary and Confidential
To reduce potential radio interference to other users, select an antenna type with gain suchthat the equivalent isotropically radiated power (e.i.r.p.) is not more than that permitted forsuccessful communication.Innovation, Science, and Economic Development Canada (ISED) ConformityThis radio transmitter (IC: 864A-ORRNA) hasbeen approved by Innovation, Science andEconomic Development Canada (ISED) tooperate with the antenna types listed previouslywith the maximum permissible gain and requiredantenna impedance for each antenna typeindicated. Antenna types not included in this list,having a gain greater than the maximum gainindicated for that type, are strictly prohibited foruse with this device.Le présent émetteur radio (IC: 864A-ORRNA) estconforme aux CNR d'Industrie Canada pourfonctionner avec les types d'antenne énumérésci-dessus et ayant un gain admissible maximal etl'impédance requise pour chaque type d'antenne.Les types d'antenne non inclus dans cette liste,ou dont le gain est supérieur au gain maximalindiqué, sont strictement interdits pourl'exploitation de l'émetteur.Environmental specificationsThe ERT Gateway meets the listed environmental specifications.Specification ValueOperating temperature -40°C to 60°CStorage temperature -40°C to 85°CHumidity 0 to 90% non-condensingERT Gateway power operating rangeThe ERT Gateway meets the listed power operating ranges.Specification ValueVoltage (AC) 85 VAC to 264 VACFrequency 47 to 63 HzAverage power 5 wattsERT Gateway SpecificationsERT Gateway Installation Guide TDC-1744-000 22Proprietary and Confidential

Navigation menu