JACS Solutions TG800 8 inch Tablet User Manual E 1
JACS Solutions LLC 8 inch Tablet E 1
User Manual
USER MANUAL
Read before using
Thank you for purchasing this Tablet PC. This manual will help you to
know the functions and applications that come with the product. Please
read carefully before using the Tablet PC for the first time.
Content
1. information... 4
2. introduction... 5
2.1 function keys... 5
2.2 General characteristics... 5
2.3 specs... 5
3. GUIDE QUICK... 6
3.1 about the touch panel... 6
3.2 power on and off... 6
3.3 saving mode and lock screen... 6
3.4 Administration battery and load... 6
3.5 explanation of function items... 7
3.6 USB HOST function... 7
3.7 TF card storage Card... 8
4. network access ... 8
4.1 access to networks Wi-Fi... 8
4.2 access to 3G networks... 8
5. store and copy files... ……………………………………… 8
6. main functions ... …………………………………………… 9
6.1 Audio feature... 9
6.2 function of Video... 10
6.3 photo function... 10
6.4 recording function... 10
6.5 Admin. De
Archivos…………………………………………………………………......... 11
6.6 E-book function... 11
6.7 Internet browsing... 11
6.8 E-mail function... 12
6.9 calendar... 12
6.10 calculator... 12
6.11 alarm... 12
6.12 installation applications... 13
6.13 photos and Videos... 13
7. configuration system... 1 5
8 questions and answers...
1. Information
1. Please protect the product against dust and moisture.
2. Do not leave the product in environments of high temperatures, especially autos
closed under the Sun on hot days.
3. Do not hit or drop the product.
4. Do not violently shake the product since the components, especially the LCD
screen, may begin to fail.
5. Please be sure to carefully adjust the volume of the headphones since they can
cause damage to your ears and loss of hearing.
6. Please load the tablet pc when:
(1) The battery icon to alert that this next to run out
(2) The tablet pc to automatically shut off and not turn back
(3) No response when pressing the buttons on the tablet pc
IMPORTANT: Please use only the charger provided or authorized by the
manufacturer to avoid problems on load or damage to your product.
Input: 100-240V ~ 50/60 Hz
Output: 5V 2000 mA
7. Not unplug this product from the PC while this transferring or copying files or
formatting the memory since this can cause errors in the files or malfunction of
the product.
8. Do not disassemble the product yourself. Only use a qualified technician to do this.
9. Do not use alcohol, benzene or any other product based on these components to
clean the surface or screen of your product
10. Do not use the product in places prohibited such as aircraft
11. Always make sure you make a backup copy of your product information. Neither
the manufacturer nor the importer responsible is made for loss of information or
damage to the files that may occur in the case of repair of the product.
12. The manufacturer reserves all rights to the technology and design of the product
and does not have any obligation to inform about changes in the versions or
designs of the same
13. This product is not waterproof or liquids. Please keep away from humidity at
all times
The product takes approximately 20 seconds to turn on. Do not attempt to use it
during this process
2. Introduction
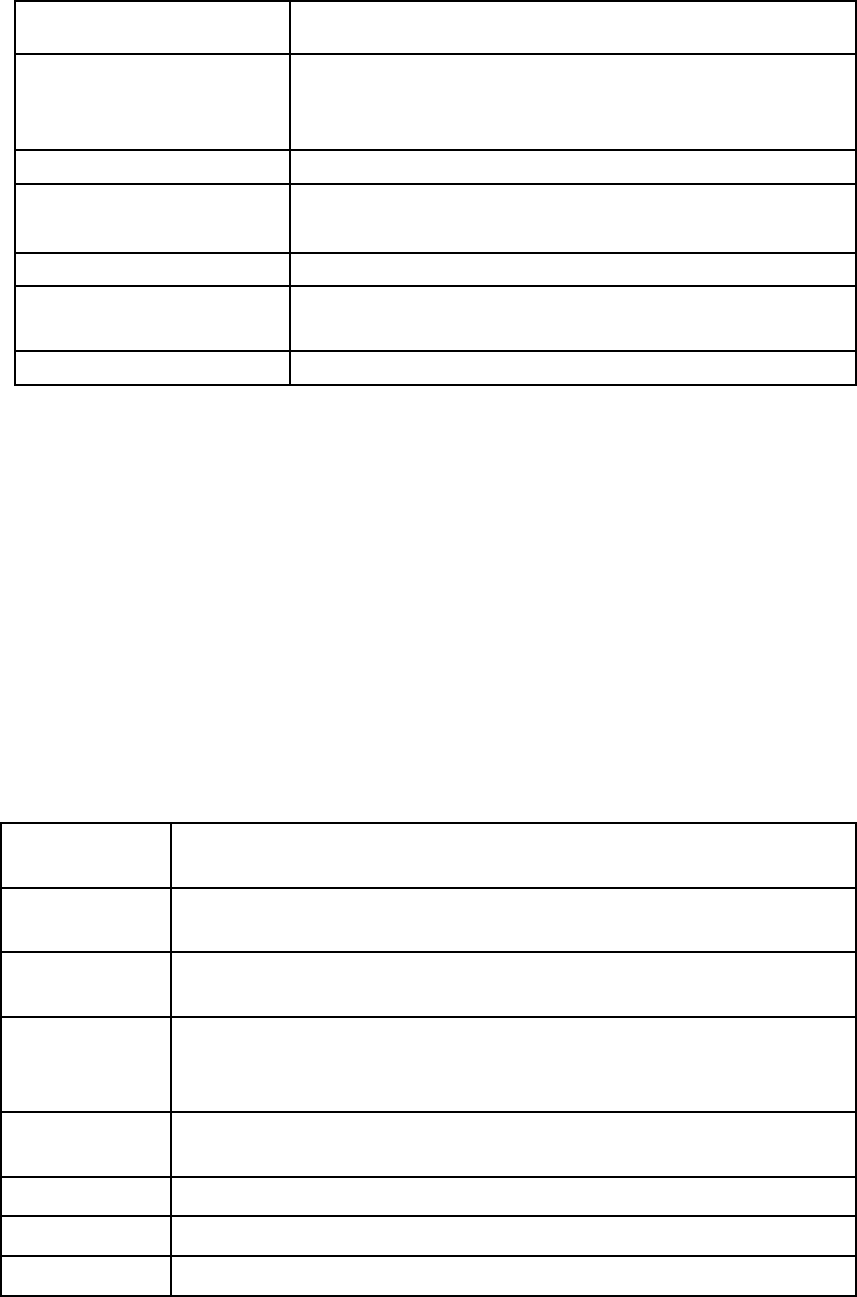
Key functions
Name Description
POWER
Press this button briefly to wake up or send to sleep
mode. Press for several seconds if you want to turn off
or turn on your tablet
Slot TF Card TF memory, 32 MB to 128 MB
Headphones Stereo headphone connector
USB port Micro USB 5-pin charging port
USB Host port External USB port for external accessories, 3G dongle,
mouse, keyboard, etc. (2.0)
Screen HD screen area
General characteristics
CPU: Rockchip 3128 Cortext A7, 1. 3 GHz. operating system ANDROID 5. 1.
7 screen " " LCD touch screen, resolution 1024 * 600 pixels.
16 GB of memory for storage supports 128MB - 32GB external memory TF.
Support for video, audio, pictures, E-books, etc.
Support for WiFi over 3 G WI FI USB or Dongle.
Dual camera: front: 0.3 m pixels; Trasera: 2. 0 M pixel
Several applications are available for the operating system ANDROID 5.0.
Record sound through the built-in microphone
Supports g-sensor screen that detects when the screen is rotated to adjust the image
Supports several languages.
Product can be used as a portable hard drive USB. Drives are not required for
Windows 2000 or higher.
Technical specifications
Screen 7 inch capacitive touch screen.
Resolution: 1024 * 600
CPU Chipset: ROCKCHIP 3128 ; Processor: Cortex A7; Frequency: 1. 3
GHz
RAM
MEMORY DDR3: 1 GB
Storage
16GB
Increase its capacity with external TF memory from 128MB to 32
GB.
Operating
system Android 5. 1
Network Wi-Fi : Integrated Wi-Fi module. IEEE 802.11a/b/g/n.
Applications Applications in APK format
Video AVI, MOV, MP4, ASF, 3GP, TS, MKV, MPEG, etc.
Music MP3, APE, FLAC, AAC, OGG, etc.
Photos JPG, BMP, PNG, TIFF, etc.
E-books TXT, PDF, CHM, HTML, PDB, UMD, FB2, LRC, EPUB.
Office
formats Supported formats: Word, Excel, PDF, etc.
PC
connection micro USB2.0 x 1
Battery Lithium battery: 2500 mAh.
3 Guide fast
3.1 About the touch Panel
The screen is touch capacitive; you can use the five fingers to touch the screen at the
same time.
3.2 power on/off.
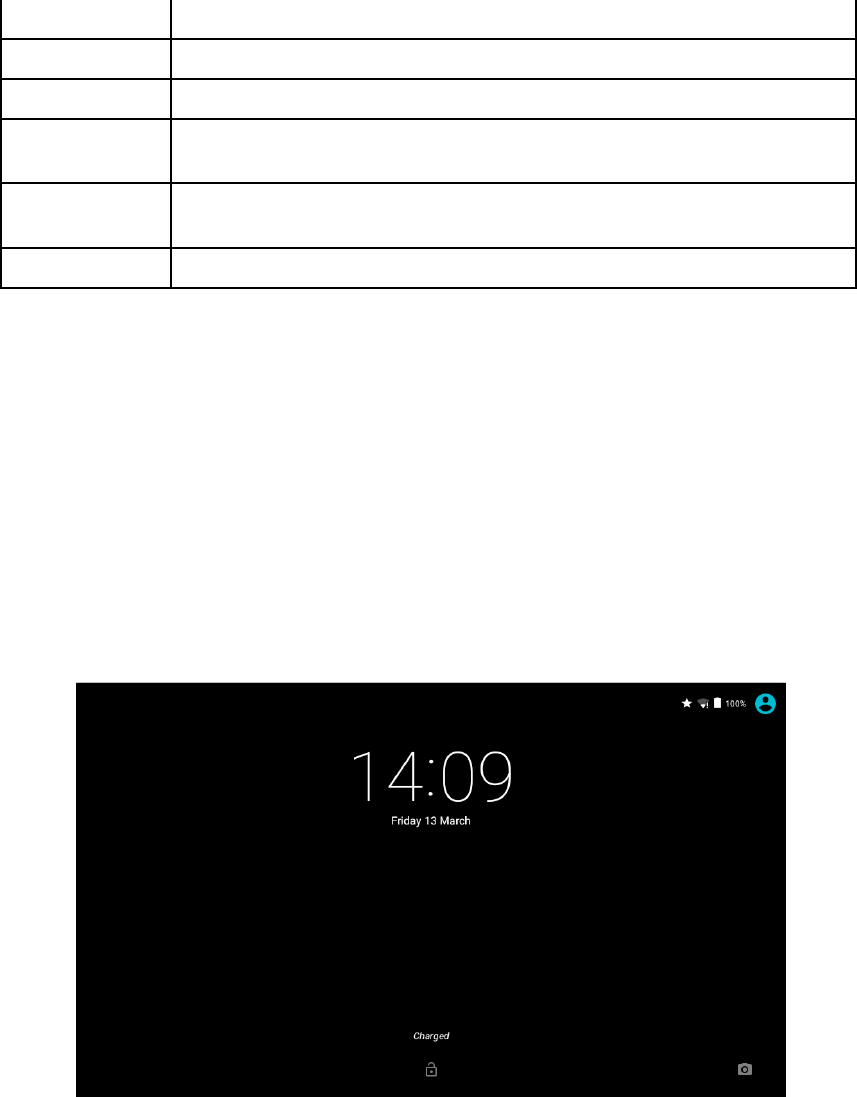
Ignition and lock: when the product is off press and holds for 3 seconds so that the
Android system begins to boot; will appear the bar of progress that takes 20 seconds
to make it complete the boot. When the product is in lock mode press and drag the
icon to the area of green to unlock your tablet as shown below:
3.3. Saving energy and lock modes.
2 Briefly press the 'POWER' button, once you have booted the system to start
saving energy or lock mode.
2 Briefly press the 'POWER' button or on the touch screen and the system will light
up in 1 second
2 The main functions of the product such as : listening to music, watching movies, etc -
not is will stop during the saving mode. Only the LCD display is turned off and
shows black.
2 Shutdown: when the product is on and press the 'POWER' button for 3 seconds,
the display will show the shutdown interface. Selection POWER OFF or
SHUTDOWN to confirm and begin the automatic shut-off
【 】 Note 【 】 When the battery is low the system will show a continuous alarm
message and will turn off automatically. After charging the battery tries to light it
again
3.4 battery and load management.
3.4.1 By using the device first purr time charge a12 8 hours battery to give you time
which is fully charged.
3.4.2. Insert charger MICRO USB connector MICRO USB port of tablet pc and the
other end to the power outlet to begin charging for your product. The icon of the
tablet that appears on the desktop began to show that the tablet is being charged.
Please wait until it fully charged to disconnect it from the electrical outlet. The icon
on the desktop will show you when this is fully charged.
【 】 Important 【 】 To achieve an optimum performance please take into account the
following:
z Do not charge the battery at high temperatures.
z Do not need to completely discharge the battery. The battery can be charged even
when still fits some load...
z To ensure an optimal state of battery charge it at least 1 time every two weeks when
the device is not used for long periods of time
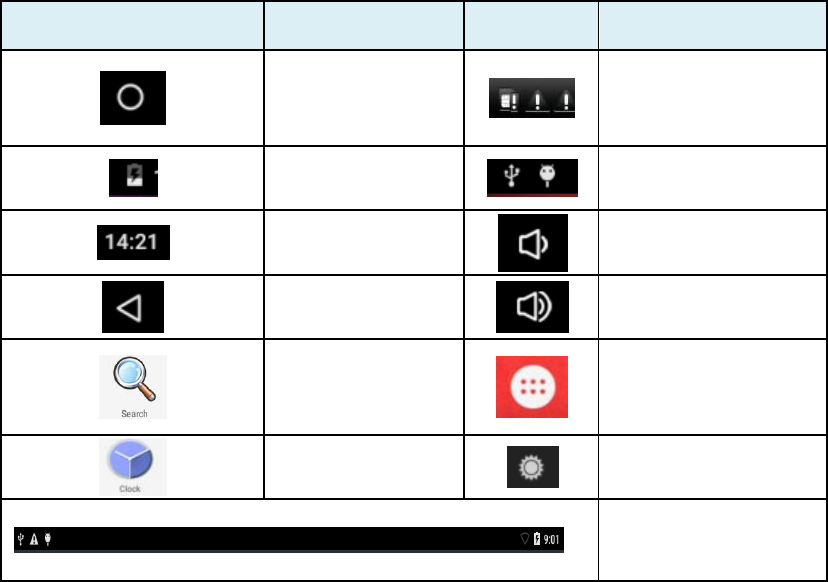
3.5. Explanation of the icons of functions
Icon Function Icon Function
Return to the
main menu
Notice when the
system finds a new
device.
Sample load
current
USB connection
Current time
Volume down
Return
Volume up
Search Google
Menu lock function.
Clock system
Adjust brightness
screen
Status bar
3.6 USB HOST function
3.6.1 definition USB HOST
The Mini USB port on the tablet can be used as a USB Host.
3.6.2 Read U-disk:
Insert the U-disk into the USB HOST port; click Resource Manager on the desktop,
press then on USB and entering the u-disk.
3.6.3 3G USB Dongle external. (See Guide for access to networks in item 4)
3.7 Storage in TF card
The tablet has a port for TF card and supports reading files stored in it.
Insert the card TF card into the slot on the tablet (Solo can be inserted in a way); to
remove the TF card press again and release. The card will come out of the slot.
3.7.1 Insert TF card on the right side of the tablet.
3.7.2. Do not remove the card while this being used by the system (reading, copying)
may cause errors and damage to the same.
3.7.3. Do not use the TF card at high temperatures
3.7.4 Protect card TF of liquids and corrosive materials
4. Network access
The tablet supports Wi-Fi networks and external networks 3G.
4.1 access to Wi-Fi networks
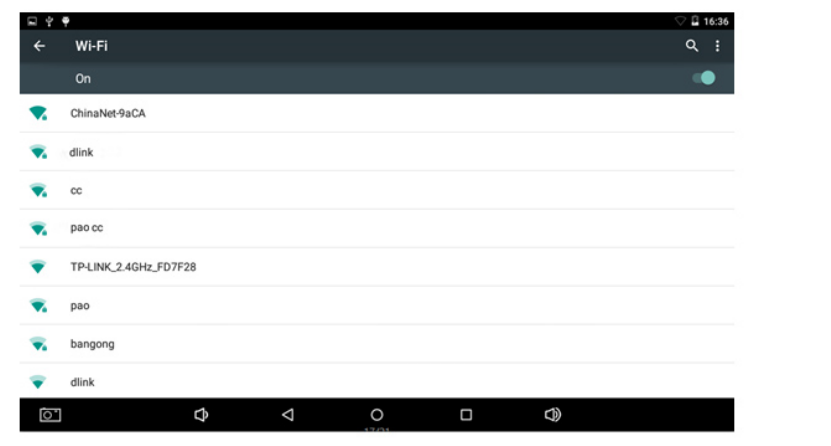
4.1.1 Turn on the Wi-Fi network and access to Wi-Fi setting. The tablet will
automatically detect Wi-Fi networks available in the area.
4.1.2 Select Wi-Fi network you want to connect.
4.1.3 Press connect. Some networks may require the entry of a password to
connect.
4.1.4. in the configuration of Wi-Fi networks screen press menu, and then click
Advanced. This will show you more configuration options.
4.2 access to 3G networks
4.2.1 Turn off Wi-Fi if this starter.
4.2.2 Enter Networks mobile configuration and make sure that the Data enabled
are selected. Then back to network LAN and wireless.
4.2.3 Insert external 3G USB host.
4.2.4 Select the mobile network and wait for the 3G this link available. After
which you can access via 3G network.
5 Copy and Storage of files
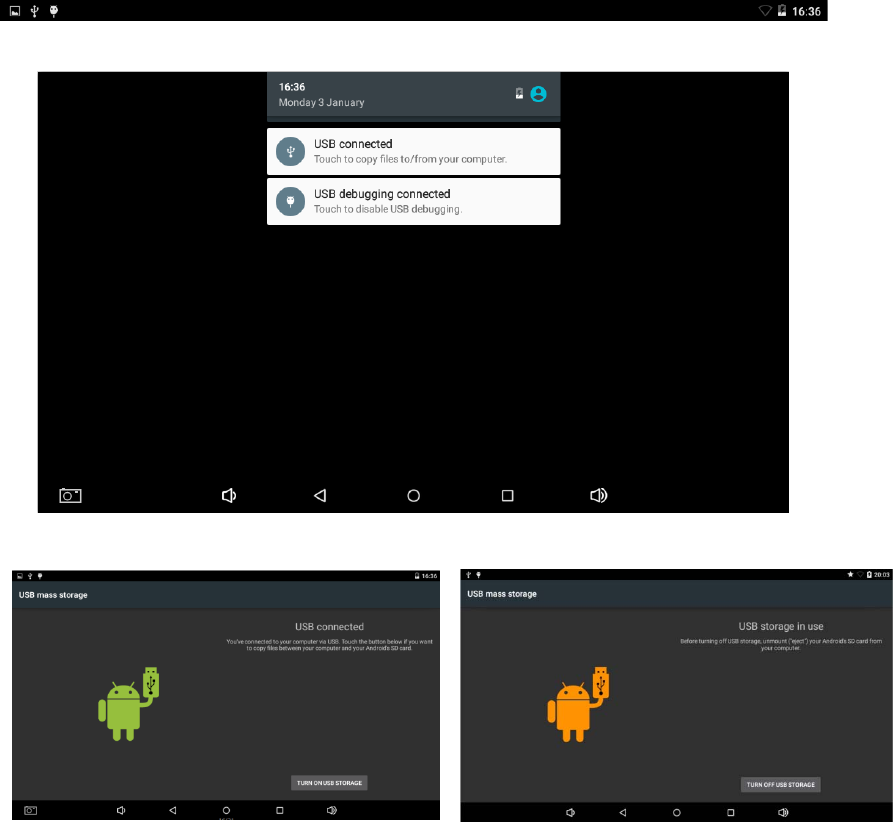
A) Connect the device to your computer using the USB cable; the status bar you tools
message USB connected.
(B) select the USB connected disposition
C) Then click on the USB storage device.
The image on the left shows you the contents in the USB storage that can be displayed or
modified from the PC.
The image on the right shows you the content storage that cannot be modified from the PC
USB.
6. Main functions
6.1 Audio function
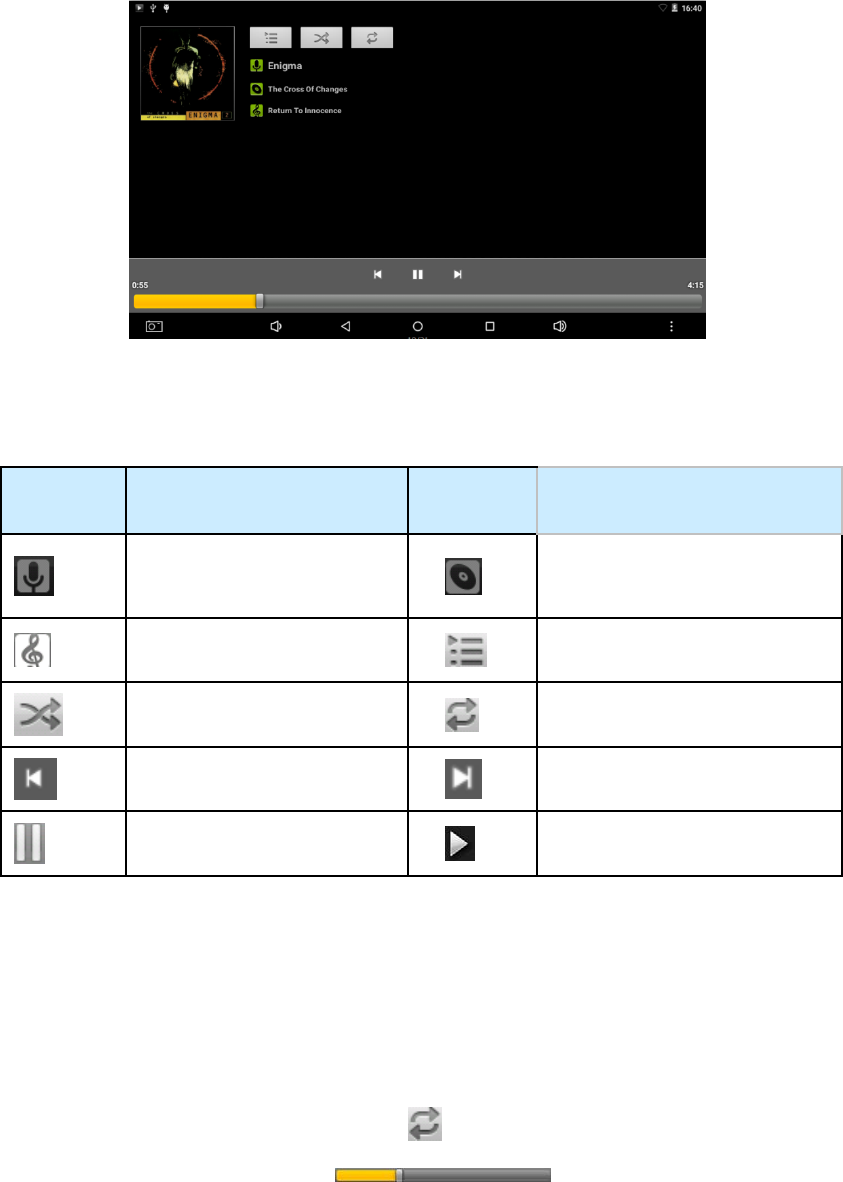
To access the music player : in music play mode double click of the mouse in the
choice of playlist that you want to listen, as shown in the following image
Drag the music progress bar to adjust the same progress.
Explanation of the buttons on the music player
Button Function button Function
Artist
Album
Song
List playback
Play. Random
Play. Continuous
Listen to previous song
Next song
Pause
Play
z If no song in the selected playlist system automatically load any song available in
memory to the playlist when the player (the product supports the following audio
formats: mp3, midi). Playlist is displayed in the image above
z If there is 2 or more songs in the playlist of music slide your finger up or down to
go through page up or down
z Make double customer in the song from the playlist that you want to listen
z On the music player interface touch on to access playlist
z Drag the playback progress bar to adjust the pregreso
6.2 Video function
z Press on the icon of video to enter the interface and select the desired videos
z
P
r
V
z
I
f
v
i
z
D
6.3
Cli
c
z
A
If n
o
the
Op
e
Sel
e
6.4
Pre
s
hi
m
an
o
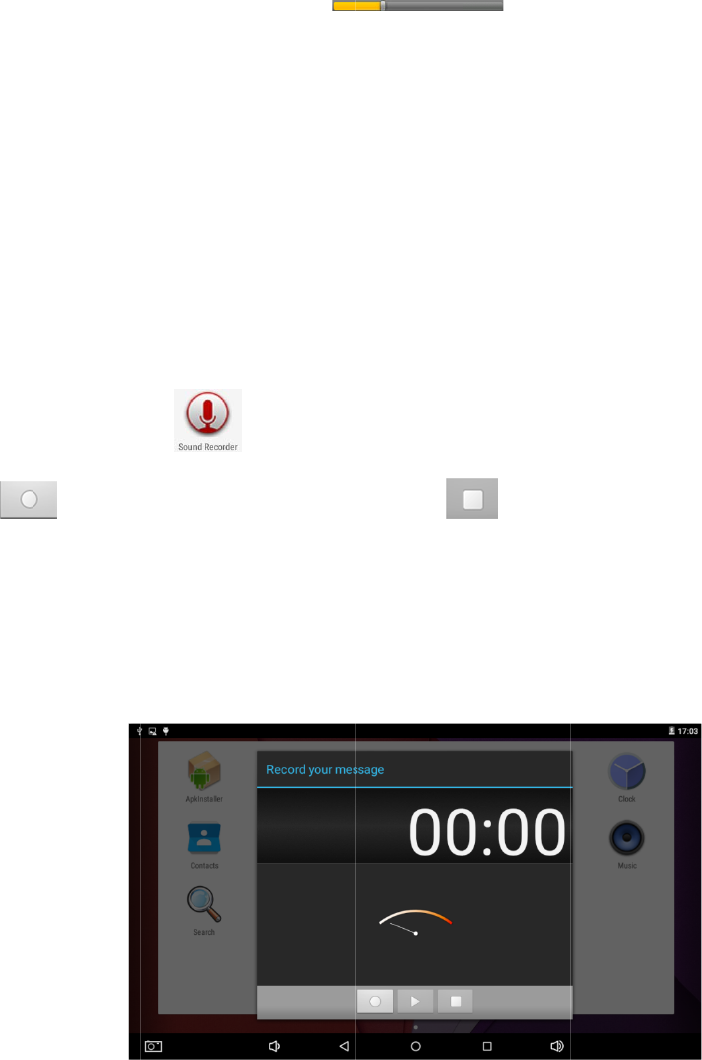
Re
c
the
ple
a
6.5
In t
h
the
or
v
6.6
r
oduct sup
p
V
OB
、
D
A
f
there is n
o
i
deo files fr
o
D
rag the pla
y
function p
h
c
k on the H
D
A
dd the des
GIF
o
t selected
p
tablet whe
n
e
n the direc
t
e
ct the "set
recordin
g
s
s on the ic
o
to start r
e
m
, then if yo
u
o
ptio
n
c
ording pla
y
file Explor
e
a
se go to th
e
file mana
g
h
e adminis
t
internal m
e
v
ideos
applicatio
n
p
orts the fo
l
A
T
、
FL
V
o
music file
s
o
m the me
m
y
back prog
r
h
otos
D
video pl
a
ired ima
ge
p
hoto files
n
it is execu
t
ory or fol
d
as wallpap
e
function
o
n
t
e
cording, t
h
u
want to s
a
y
back: run t
e
r recordin
g
e
section A
u
g
er
t
rato
r
of fil
e
e
mory or m
e
n
s E-book.
l
lowing vid
e
V
、
3GP
、
s
selected i
n
m
ory of the
r
ess ba
r
a
yer to load
e
)
Supports
t
w
ere syste
m
t
e
d
d
er, select t
h
e
r"
t
o load the
a
h
en press th
a
ve or dele
t
h
e Audio P
g
and then
p
u
dio featur
e
e
s you visu
a
e
mories yo
u
eo formats:
etc.
n
the playli
s
tablet as s
o
the applic
a
t
he followi
n
m
cargadra
h
e image an
a
pplication
h
e button
t
e the recor
d
P
layer to lis
t
p
ress the m
o
e
a
lize can al
l
u
have add
e
MKV
、
s
t system w
i
o
on as the v
i
to adju
a
tion
n
g formats:
a
utomatica
l
d agreguel
a
of recordin
g
to stop
r
d
ing made.
Y
t
en to the r
e
o
use to star
t
folders an
d
e
d. Also yo
u
AVI
、
M
i
ll load aut
o
i
deo player
s
t the progr
BMP
,
JPG
,
l
ly any of t
h
a
.
g
, then pre
s
r
ecording.
T
Y
ou must
m
cordings m
t
playbac
k
;
f
d
files, incl
u
u
can previ
e
M
P4
、
M
O
o
matically
to ru
n
r
ess
,
JPEG
,
PN
G
h
e memory
s
s the butto
n
T
he system
m
anually se
m
ade. First s
e
for details,
u
ding files
i
e
w faster p
h
O
V
、
G
,
of
n
as
k
lect
e
lect
i
n
h
otos
Supports the following formats: TXT 、 LRC 、 PDF 、 HTML 、 HTM 、 EPUB,
etc.
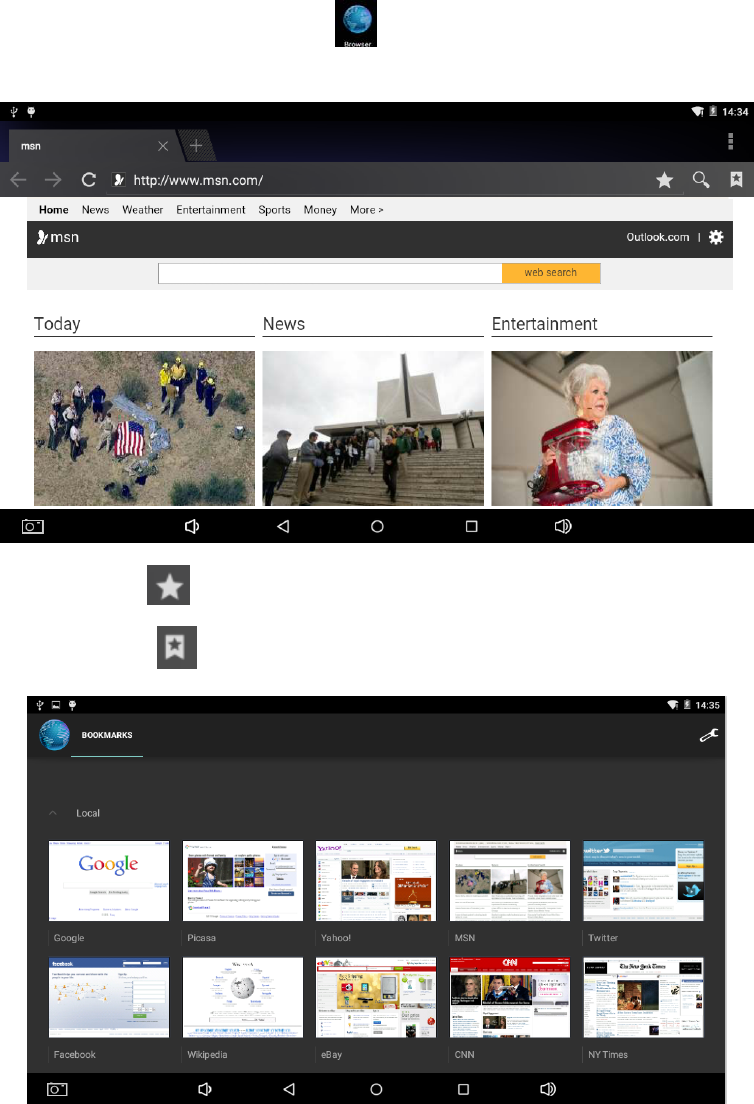
6.7. Web browser
z Before using the browser please make sure you are connected to a network. Go
wing section this manual network access
z Press on the icon on the IE browser to run the application, click on URL and
tippe address bar the address you want. Then click on the GO button.
z Press on the icon to see the history and Favourites
z Press on the icon to access the configuration
z The tablet supports other browsers; please see the instructions in the section of
questions
6.8 applications E-mail

z Before using this application please make sure you are connected to a network. Go
to the networking of this manual section
z When you run this application for the first time the system asked you to create an
email account. The tablet supports various formats such as email accounts:
z Webmail: both personal and corporate Internet mail-based applications
Add an e-mail portal. (Example: Gmail, MSN, Yahoo, etc.)
We will take as example Gmail here.
Account: 123456@gmail.com
Password: *
z For mail portals, enter your address and password, then continue
z After having connected successfully enter the account and your full name. The
name of the account means the name with which to recognize the connection or
created email account, His name means the name that will be displayed when the
recipient receives your mail
z Can now access your account. Click on each email for your cone. Press and hold to
view the options for each email access
z Press on the icon to access the configuration
Reference screen: Press to load the new mail received.
Write: Press to write a new email.
Folders: Manage / move emails to different folders
Accounts: See accounts created on your tablet, add or delete new accounts and
select the default account
Configuration: More options for e-mail accounts
6.9 calendars
Click the calendar icon to run the application
z Mode calendar, press and drag the screen up or down to move between the different
months or pass of page
z When the months change from December to January the calendar will change
automatically the year.
z Run the application; the number in Orange on the screen is the current date. You
can change the date from the configuration application
Press on the icon to return to the main menu
6.10 calculator Press on the icon calculator to run the program
6.11 alarm
z Click on the clock icon to run the application in time, then press clock to enter the
alarm function; can now add or edit new alarms
z Press and hold to activate or deactivate the selected alarm, edit it or delete it.
z You can edit the alarm time, repeat it, change the name or the sound
z In the application of the alarm press the icon to access configuration.
6.12 Installer application (APK)
z Your tablet supports third-party apps (APK format) based on ANDROID operating
systems. Many applications can be downloaded or copied from other devices
z If not downloading the app from the Google store should follow the following steps
prior to installation. "Unknown sources" check the Configuracion-aplicaciones
section and make sure that selected the option
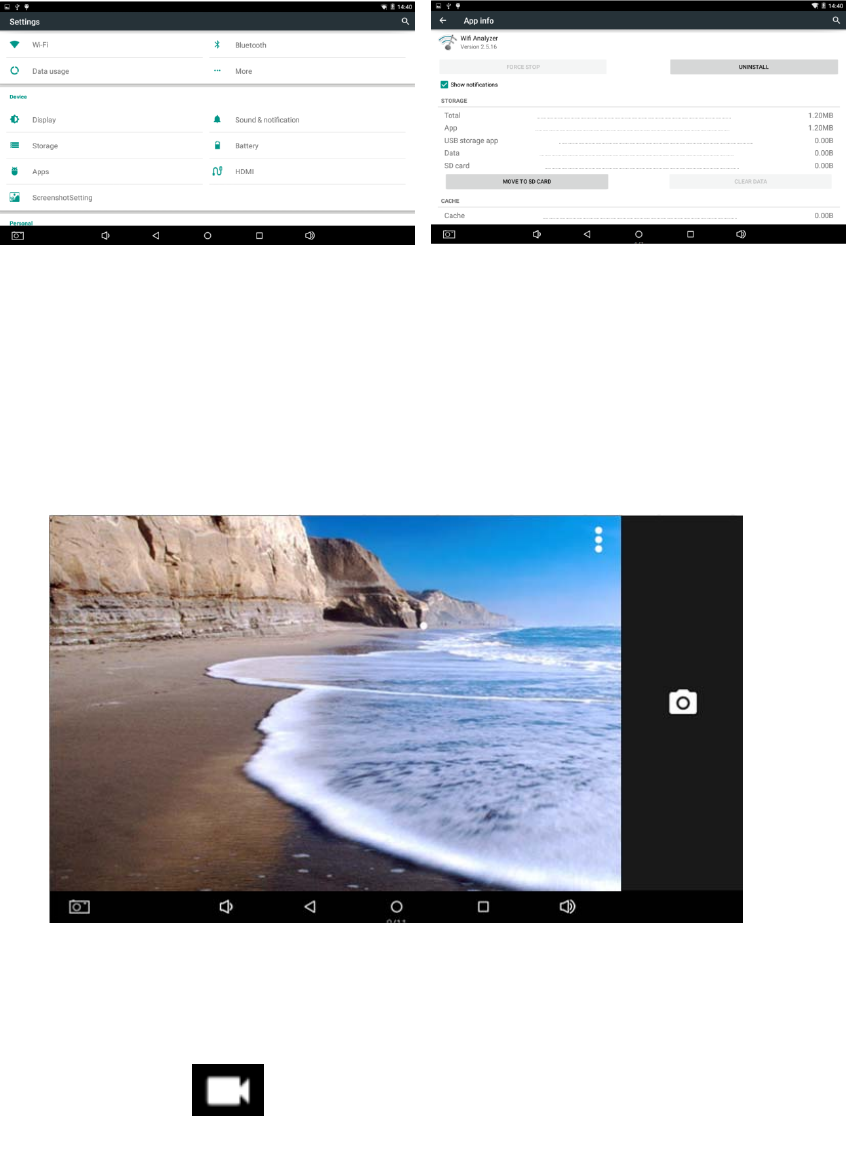
z Press the scan icon and select the application that you want to install, then
select install and follow the instructions
6.12.1 Installation: Press install to run the application installer
2 Internal memory means the on-board FLASH memory and EXTERNAL
memories are displayed as t-Flash;
2 After login, select the configuration setting for the application on the right
side, click on the application to install, return to the main application when this
operation has been completed, when the installation finished versa icon of the
application in the list
6.12.2 Manager: Click on settings and select the application
2 Click on the application and select the file/program that you want to install
2 Click on the program and then desistalelo
6.12.3 Exit: Return to the main application
Note: All installed applications can be displayed in the menu list. These
applications may include games, messaging, Internet browsers, players of content,
tools, etc.
6.13 PHOTOS AND VIDEOS
The tablet has rear and a front camera; you can take photos and record videos,
etc.
2 Press on the tab of the application to see all tools. Then select photo or Video
settings according to desired.
2 Before taking photos or videos, you can press on the configuration for settings
such as white balance, size, quality, mode, etc.
2 Press the button to start or stop video recording
2 Photos or videos can be previewed in the previsualization window
2 If you want to play some video which has print run the video player and select
the file you want to play
2 If you want to see pictures Select photo and press on it to view it.
2 Within the camera application, press on the screen with 2 fingers to bring the
scale of pixels, then sliding two fingers forward or back can adjust the pixel scale.

7. System configuration
Press on the icon to adjust the configuration of the system. Can now change
network aalmbricas and Wi-Fi, sounds; configure your screen, location, security,
applications, accounts, privacy, etc
7.1 configuration of wired and wireless networks, See point 4.
7.2 configuration of sound. You can adjust volume, silent mode, ringtones, sounds,
screen, etc.
7.3 configuration screen. You can adjust brightness, auto-rotation, animation, time of
ignition, etc.
7.4 location & Security. Here can set the screen lock and manage the tablet and set
key for TF memory
7.5 configuration applications. Here can manage your applications, verify the free
space and battery use
Important: If you want to install applications, which has not come down from the
Google store, you must make sure select the option "Unknown sources" first.
7.6 accounts and sync. Here you can manage accounts of the device and synchronize
it with your PC or Notebook
7.7 privacy settings. Here you can regarded your information, backup or load the
configuration from factory
7.8 configuration storage. Here you can review the space free, insert and delete
memory TF
Important: Before removing your TF memory card (if inserted some), please use the
button "remove safely" before removing your tablet to avoid damage or loss of
information
7.9 language and keyboard settings. Here can set and change the language of the
keyboard layout and the system
Important: If you have installed a new distribution and want to use it please remember
to activate it (all input devices can be activated from here).
7.10 setting date and time: Here can adjust the date and time of the system
7.11 product. Check your product information

8 Questions and answers
(1) How do I change the language if I selected one wrong?
·Select the icon to access the configuration
·Then select the icon to enter language and keyboard. The first option is the
language
(2) How do I change the keyboard input when I'm typing?
Press and hold the leaf vacuum in any space. A drop-down menu will be displayed
where you can choose the correct distribution
(3) I have installed an application but I cannot find it. That may be due to?
·Some applications are by default install external memories TF. If he has removed it
you might not find the application
(4) I cannot activate a device
·Check the battery and the load of the device to see if it does not receive power
·Connect a charger or AC adapter.
·Contact the vendor of the device if the problem persists
(5) I cannot hear any sound through the headphones
·Check if the device is in silent mode
·Check the setting of the volume in case that this zero
·Check the headset connector
(6) By that I cannot install applications?
Please review the section settings - applications, make sure that the Sources
unknown option selected
(7) Appears a code error on the screen
· System error: reset the device
(8) I'm having system errors, I get various error messages
2 Restart the tablet by holding down the button POWER for 10 seconds, the
product will restart
FCC Warning:
This equipment has been tested and found to comply with the limits for a Class B
digital device, pursuant to part 15 of the FCC Rules. These limits are designed to
provide reasonable protection against harmful interference in a residential
installation. This equipment generates, uses and can radiate radio frequency energy
and, if not installed and used in accordance with the instructions, may cause harmful
interference to radio communications. However, there is no guarantee that
interference will not occur in a particular installation. If this equipment does cause
harmful interference to radio or television reception, which can be determined by
turning the equipment off and on, the user is encouraged to try to correct the
interference by one or more of the following measures:
• Reorient or relocate the receiving antenna.
• Increase the separation between the equipment and receiver.
• Connect the equipment into an outlet on a circuit different from that to which the
receiver is connected.
• Consult the dealer or an experienced radio/TV technician for help.
Caution: Any changes or modifications to this device not explicitly approved by
manufacturer could void your authority to operate this equipment.
This device complies with part 15 of the FCC Rules. Operation is subject to the
following two conditions: (1) This device may not cause harmful interference, and (2)
this device must accept any interference received, including interference that may
cause undesired operation.
FCC RF Exposure Information and Statement
The SAR limit of USA (FCC) is 1.6 W/kg averaged over one gram of tissue. Device
types: Tablet PC (FCC ID: 2AGCDTG800) has also been tested against this SAR limit.
This device was tested for typical body-worn operations with the back of the Tablet
PC kept 0cm from the body. To maintain compliance with FCC RF exposure
requirements, use accessories that maintain a 0cm separation distance between the
user's body and the back of the Tablet PC. The use of belt clips, holsters and similar
accessories should not contain metallic components in its assembly. The use of
accessories that do not satisfy these requirements may not comply with FCC RF
exposure requirements, and should be avoided.