JADAK a business unit of Novanta 01070001 RFID Tag Reader User Manual
SkyeTek, Inc RFID Tag Reader
user manual
SkyeReader 300
User Guide v1.0

SkyeReader 300 User Guide 3
Copyright 2009 SkyeTek, Inc. All Rights Reserved.
Error! No table of contents entries found.
SkyeReader 300 User Guide 4
Copyright 2009 SkyeTek, Inc. All Rights Reserved.
Chapter 1: Overview
The SkyeTek SkyeReader 300 is a versatile UHF desktop reader. With the SkyeReader
300 and SkyeWare software, you will be able to easily read and encode EPC C1G2 tags
from your desk in very little time.
Insert picture of skyereader
Note Regarding RF Exposure
This equipment complies with FCC radiation exposure limits set forth for an uncontrolled
environment. This equipment should be installed and operated with minimum distance
20cm between the radiator and your body. This transmitter must not be co-located or
operating in conjunction with any other antenna or transmitter.
FCC Notice and Cautions
The users’ manual or instruction manual shall caution the user that changes or
modifications not expressly approved by SkyeTek, Inc. could void the user's authority to
operate the equipment.
This device complies with Part 15 of the FCC Rules. Operation is subject to the following
two conditions: (1) This device may not cause harmful interference, and (2) this device
must accept any interference received, including interference that may cause undesired
operation.
This equipment has been tested and found to comply with the limits for a Class B digital
device, pursuant to part 15 of the FCC Rules. These limits are designed to provide
reasonable protection against harmful interference in a residential installation. This
equipment generates, uses and can radiate radio frequency energy and, if not in-stalled
and used in accordance with the instructions, may cause harmful interference to radio
communications. However, there is no guarantee that interference will not occur in a
particular installation. If this equipment does cause harmful interference to radio or
television reception, which can be determined by turning the equipment off and on, the
user is encouraged to try to correct the interference by one or more of the following
measures:
—Reorient or relocate the receiving antenna.
—Increase the separation between the equipment and receiver.
—Connect the equipment into an outlet on a circuit different from that to which the
receiver is connected.
—Consult the dealer or an experienced radio/TV technician for help.
SkyeReader 300 User Guide 5
Copyright 2009 SkyeTek, Inc. All Rights Reserved.
About This Guide
This guide contains all of the information you need to get started with your SkyeTek
SkyeReader 300.
Chapter 1: Overview – Introduces the contents of this guide, describes SkyeTek’s
Advanced Universal Reader Architecture, and lists the benefits of working with SkyeTek
readers.
Chapter 2: Setup and Installation – Lists the contents of the SkyeReader 300 kit and
guides you through initial setup and configuration of your system. Provides instructions
for installing the SkyeReader Demo Application that you will use to evaluate the
SkyeReader 300.
Chapter 3: SkyeWare Capabilities – Walks through each of the features of the SkyeWare
application, including read range, anti-collision, tag memory, and SkyeTek Protocol.
Chapter 4: SkyeWare Configuration – Shows the user how to update firmware and
configure different types of tags.
SkyeReader 300 User Guide 6
Copyright 2009 SkyeTek, Inc. All Rights Reserved.
Chapter 2: Setup and Installation
Prerequisites
•Host Computer running Microsoft Windows XP or Vista
•Available USB port
Contents
Your SkyeReader 300 kits contains the following items
•The SkyeReader 300
•USB cable
•CD with SkyeWare, documentation and software libraries
•Tag Samples
Setting Up Your SkyeReader 300
To setup your SkyeReader 300, first you will need to install SkyeWare. Insert the CD that
came with your kit, and an installation wizard should run automatically. (If it does not,
open the main directory of the CD and run setup.exe.)
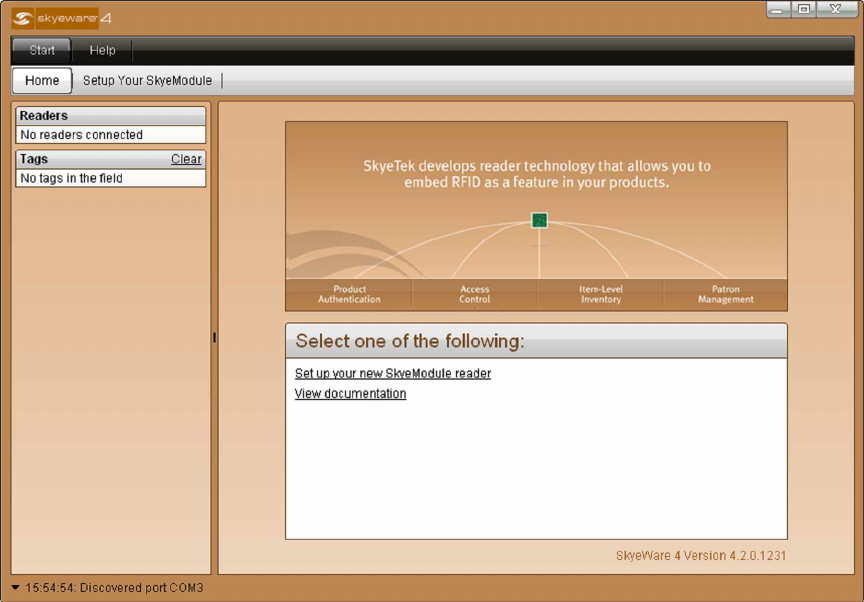
1. After the installation completes, run SkyeWare. This will display the home
screen.
SkyeReader 300 User Guide 7
Copyright 2009 SkyeTek, Inc. All Rights Reserved.
2. Attach your SkyeReader 300 to your computer with the supplied USB Cable.
Insert picture
3. After a few moments your computer and SkyeWare will recognize the
SkyeReader and you are ready to go.
Note that any tags in the field will also be displayed.
Note also that under Readers, the display will read SkyeReader 300 USB.
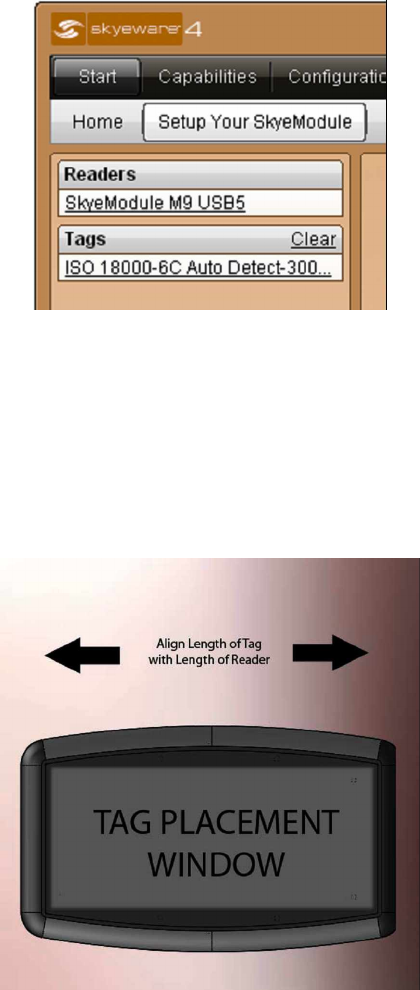
4. To read a tag, place an EPC Class 1 Generation 2 tag directly on the SkyeReader.
The antenna in the SkyeReader 300 is linearly polarized, which means that tag
orientation will have a significant impact on performance. Align the tag as shown
in the picture people.
Tag Placement
SkyeReader 300 User Guide 8
Copyright 2009 SkyeTek, Inc. All Rights Reserved.
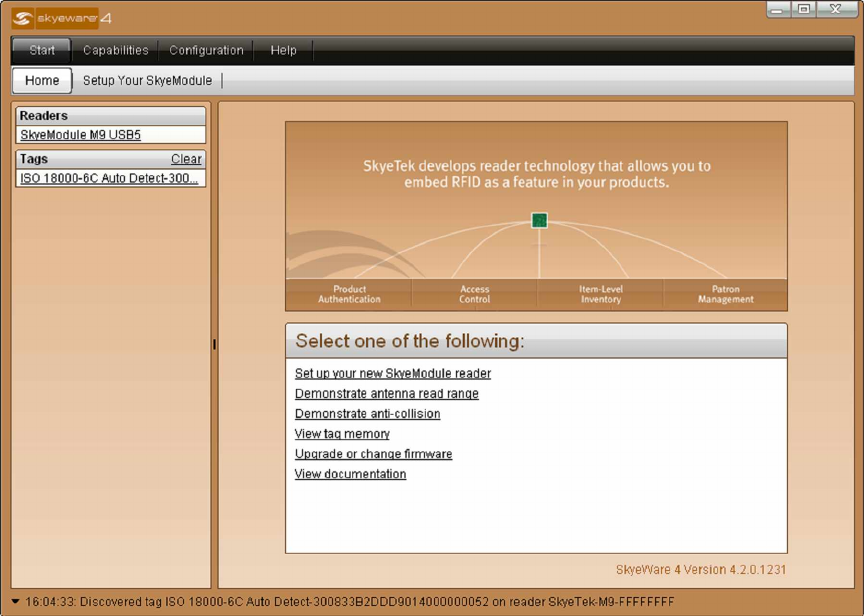
Exploring SkyeWare 4
After you install and configure your SkyeReader 300, you can use the various tab
functions of SkyeWare 4 to explore the reader’s capabilities.
The home screen displays function tabs that let you set up, demonstrate, configure, and
test your SkyeReader 300. Use these tabs to access different functions with your reader.
(See the following chapters for detailed information on each function chapters.)
SkyeWare Screen After Reader Setup
Capabilities Tab
This tab contains sub-tabs that let you perform high-level demonstrations of the basic
functionality of your SkyeReader. This includes:
•Read Range—lets you test the distance at which the reader first detects a tag.
•Anti-collision—shows how the reader can distinguish multiple tags at once.
•Memory—performs basic tag memory functions (read, write, load, save).
•Protocol—lets you develop and test SkyeTek Protocol v3 commands. You can
construct commands in either ASCII or Binary format, based on the tag type and
selected flags. This lets you quickly and easily send commands and view
responses from your reader.
See Chapter 3 “SkyeWare Capabilities” for more information.
SkyeReader 300 User Guide 9
Copyright 2009 SkyeTek, Inc. All Rights Reserved.
Configuration Tab
Sub-tabs for this tab let you quickly update firmware and configure tag settings:
•Firmware—allows you to reload or upgrade SkyeReader 300 firmware.
•Tag—lets you configure tag formation.
See Chapter 4, “SkyeWare Configuration” for more information.

SkyeReader 300 User Guide 10
Copyright 2009 SkyeTek, Inc. All Rights Reserved.
Chapter 3: SkyeWare Capabilities
Overview
The SkyeWare 4 Capabilities tab gives you high-level evaluation tools that demonstrate
basic features of your SkyeReader. SkyeWare 4 recognizes the reader and firmware and
adjusts the demonstration functions accordingly. This chapter discusses each
demonstration function.
SkyeWare 4 Capabilities Tab
Read Range
The Read Range demonstration lets you check the range at which the antenna can detect
individual tags of different types. To access this screen, click on the Capabilities tab, then
the Read Range sub-tab.
SkyeReader 300 User Guide 11
Copyright 2009 SkyeTek, Inc. All Rights Reserved.
How to Use:
1. (Optional) Select a specific tag type from the pull-down menu. (The default value
is Auto Detect, which detects all tags.)
2. Adjust the radio settings to improve the read range:
a. Select a compliance region from the Region pull-down menu.
b. Click and drag the Minimum or Maximum sliders in the Frequency field
to adjust the detection range.
c. Use the up or down arrows in the Modulation Depth field to adjust the
percentage for the modulation depth in increments of 10—or—type a
number between 0 and 100 directly into the field.
d. Select a power level region from the Output Power pull-down menu.
(Possible values range from 9-24 dBm in 3 dBm increments.)
3. Place a single tag in the read field.
4. Click on the Start button.
5. Move the tag around in the field. As the reader detects the tags, it displays the tag
information and flashes the green light. A tag error flashes the red light.
6. Click on the Stop button to stop the test.
SkyeReader 300 User Guide 12
Copyright 2009 SkyeTek, Inc. All Rights Reserved.
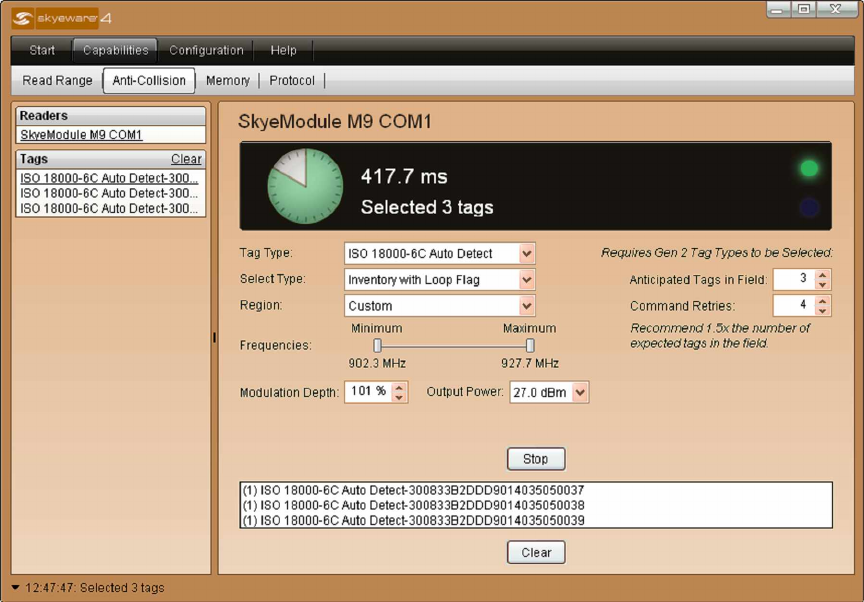
Anti-Collision
The Anti-Collision demonstration lets you test the reader’s ability to detect multiple tags,
also known as inventory mode. This capability indicates how quickly the reader can read
multiple tags held in the read field at the same time while performing the appropriate
anti-collision functions. You can also set the reader to continuously detect tags as you
move them in and out of the detection field.
To access this screen, click on the Capabilities tab, then the Anti-Collision sub-tab.
Anti-Collision Demonstration Function
How to Use:
1. (Optional) To limit this function to specific tags, select a tag type from the pull-
down menu. (The default value is Auto Detect, which detects all tags.)
2. In the Select Type field, use the pull-down menu to select either Inventory or
Inventory with Loop Flag.
•Inventory instructs the reader to scan once for all tags in the field.
•Inventory with Loop Flag places the reader in loop mode, which scans
continuously for any new tags entering the detection field. The reader
continues reading tags in this fashion until you exit the demonstration or click
Stop.
3. Adjust the radio settings to improve the read range:
a. Select a compliance region from the Region pull-down menu.
SkyeReader 300 User Guide 13
Copyright 2009 SkyeTek, Inc. All Rights Reserved.
b. Click and drag the Minimum or Maximum sliders in the Frequency field
to adjust the detection range.
c. Use the up or down arrows in the Modulation Depth field to adjust the
percentage for the modulation depth in increments of 10—or—type a
number between 0 and 100 directly into the field.
d. Select a power level region from the Output Power pull-down menu.
(Possible values range from 9-24 dBm in 3 dBm increments.)
4. (Optional for C1Gen2 tags) Adjust the inventory settings to improve the read
range:
a. Use the up or down arrows in the Anticipated Tags in Field field to match
the number of tags you want to detect. This automatically adjusts the
Command Retries field to a corresponding number.)
b. Use the up or down arrows in the Command Retries field to match the
number set the number of times the reader will repeat the command before
timing out. (This automatically adjusts the Anticipated Tags in Field field
to a corresponding number.)
5. Hold multiple tags in the read field.
6. Click the Start button once. SkyeWare 4 displays the detected tags in the data
display area. When complete, SkyeWare 4 also displays a green light and the
length of time required for the inventory and anti-collision process. A tag error
flashes the red light.
7. (Optional) If you selected Inventory with Loop Flag:
a. Move additional tags into the detection field and observe the reader’s
ability to detect them. (The reader rereads any tags that you leave in the
detection area.)
b. Click on the Stop button to end the loop.
8. When you finish testing, clear the data area by clicking the Clear button at the
bottom of the screen.
SkyeReader 300 User Guide 14
Copyright 2009 SkyeTek, Inc. All Rights Reserved.
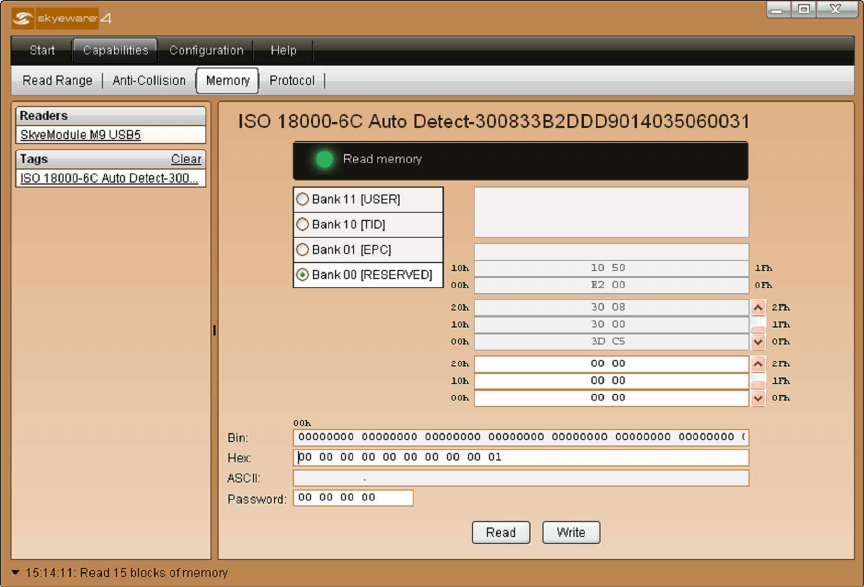
Memory
The Memory demonstration lets you check your reader’s ability to read and write to tag
memory. To access this screen, click on the Capabilities tab, then the Memory sub-tab.
Memory Demonstration Function
How to Use:
1. Place a tag or tags in the read field. The SkyeReader 300 automatically reads the
tag memory. The green Select tag light indicates the tag is successfully detected,
and the green Read memory light and progress indicator that the memory is being
read.
Note – The specific fields displayed for the tag memory display depend on the memory
layout of the tag you use for this demonstration.
2. (Optional) If you are using multiple tags in the field, click on the tag you wish to
work with in the tag list on the left side of the screen.
3. (Optional) To read or reread all of the tag memory, click on the Read button.
4. (Optional) To write to memory:
a. Click on one of the editable fields in the memory display (User Bank, Bin,
Hex or ASCII).
b. Type a new data value into the selected field. As the edit field changes, the
memory display updates with the memory for the selected mode.
c. Click on the Write button write the new data values to the tag.
SkyeReader 300 User Guide 15
Copyright 2009 SkyeTek, Inc. All Rights Reserved.
5. (Optional) To load the current tag memory with the contents of a previously saved
binary (.bin) file:
a. Click on the Load button. This opens a file selection window for the
SkyeWare 4 firmware directory.
b. Select a binary file (.bin) that contains the memory data from a compatible
tag.
c. Click Open. This loads the stored memory onto the current tag. If the file
is incompatible with the tag (for example, if the file has more memory
than the tag can hold), the read operation fails.
6. (Optional) To save the current tag memory contents to a binary (.bin) file:
a. Click on the Save button. This opens a file selection window for the
SkyeWare 4 firmware directory.
b. Enter a filename with a .bin extension in the file name field.
c. Click the Save button. You can now load the file onto other tags using the
Load button on the memory screen.
SkyeReader 300 User Guide 16
Copyright 2009 SkyeTek, Inc. All Rights Reserved.
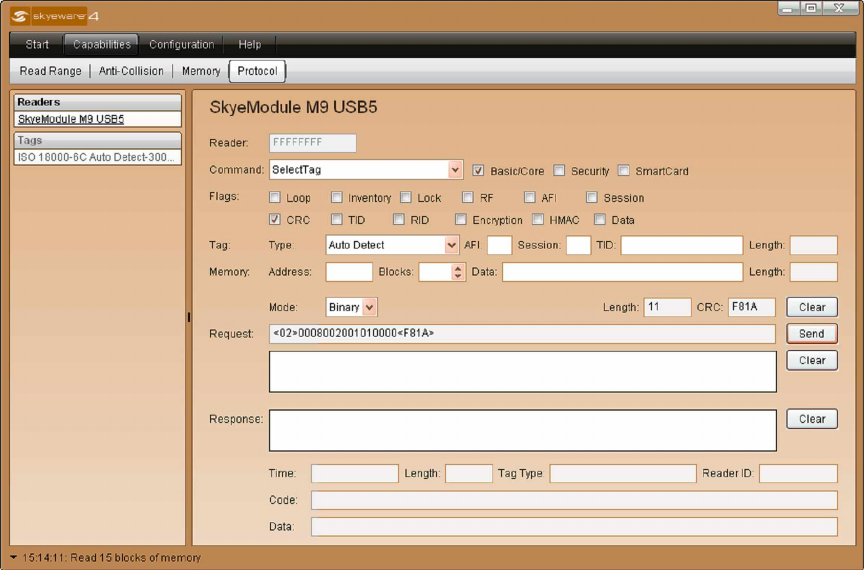
Protocol
The Protocol tab lets you send specific SkyeTek Protocol v3.0 (STPv3) commands to the
reader so that you can develop and test software to support your specific application.
•For detailed information on understanding and using STPv3 commands, flags,
fields, and responses, refer to the SkyeTek Protocol v3 Reference Guide.
•Refer to the reference guide for your SkyeModule reader for reader-specific
examples of using STPv3 commands.
Protocol Panel
How to Use:
To execute a command:
1. Click on the arrow next to the Command field. This displays a pull-down list of
all reader and tag commands.
2. Click on a command on the list.
3. Enter additional values for the command parameters:
•Reader—Lets you specify a reader ID if you click the RID flag checkbox.
•Flags: SkyeWare automatically highlights the available flags for each
command that you select from the command list.
oLoop—enables loop mode for tag selection.
oInventory—enables Inventory mode for tag selection
oLock—the command will lock tags or blocks of tag memory
SkyeReader 300 User Guide 17
Copyright 2009 SkyeTek, Inc. All Rights Reserved.
oRF—keep the RF detection field activated after the command
executes
oAFI—the command will use the Application Field Identifier
(AFI) field to select tags
oSession—use the Session Field to select tags
oCRC—CRC required for the request or response
oTID—Tag ID (TID) present in the request
oRID—Reader ID (RID) present in the Request (see Reader field
above)
oEncryption—write or read data will be encrypted
oHMAC—verify the HMAC for read and write commands
oData—data is present in the command
(Required flags for each command and flag combinations are
described in the SkyeTek Protocol v3 Reference Guide.)
•Tag parameters:
oType—Specifies the type of tag with which the reader module
communicates (select from pull-down list)
oAFI value—specifies the Application Field Identifier (AFI) used
to detect a tag in the RF field
oSession—specifies the session number to be used with a series of
commands
oTID—specifies the tag ID to which the command is directed
oTID Length—the length of the Tag ID
oMemory parameters:
oAddress—specifies the address
oBlocks—specifies the amount of data to be written by or read
from the reader module. (The location of the data is specified by
the Address field.)
oData—the data being sent with the command
oData Length— the exact number of bytes required by the data
field
oMode (binary or ASCII)
oLength—the length of the command in bytes (automatically
calculated)
oCRC (automatically calculated; mandatory in binary mode, and
optional in ASCII mode)
4. Click the Send button to send the command to the reader to be executed. The
response is displayed in the Response area.
You can also:
•Click the Clear button to clear the screen and reset the screen to its default
values.
SkyeReader 300 User Guide 18
Copyright 2009 SkyeTek, Inc. All Rights Reserved.
•Read and write to all system parameters supported by the reader. (See the
reference guide for your SkyeModule reader for more information on
which parameter address and values are supported.)
•Perform all tag commands supported by the reader, including
communications with specific tag types. (See the protocol document for
supported commands and the reference guide for specific tag examples.)
•Use the memory field for writing to system parameters or when reading
and writing to tag memory. (See the reference guide for your SkyeModule
reader for the address, number of blocks and valid data values for different
system parameters.)
•Select whether data is transmitted in ASCII or binary format – when using
binary mode, the CRC flag is required.
The Response section displays all responses to commands in the text field
with a time stamp of when the response was received. You can also:
•Click the Clear button to clear the screen and reset the defaults.
•View the response received from the reader in the Code field.
•View contents of the Tag Type field which is valid when sending tag
commands only and provides the tag type being used.
•View the contents of the Data field, which contains the data stored in the
specified address or the tag id when issuing a Select Tag command.
SkyeReader 300 User Guide 19
Copyright 2009 SkyeTek, Inc. All Rights Reserved.
Chapter 4: SkyeWare Configuration
Overview
SkyeWare 4’s Configuration tab lets you easily customize the full functionality of the
SkyeReader 300 and the tags it supports. This chapter discusses each configuration
function.
SkyeWare 4 Capabilities Tab
You can:
•Upgrade firmware
•Configure tag settings

SkyeReader 300 User Guide 20
Copyright 2009 SkyeTek, Inc. All Rights Reserved.
Firmware
The Firmware tab lets you display firmware information and upgrade or reload firmware
for your SkyeModule. To display the Firmware tab, click on the Configuration tab and
then on the Firmware sub-tab.
Firmware Configuration Panel
How to Use:
1. Check the SkyeTek support portal at support.skyetek.com for announcements of
updates to the SkyeModule M2, M4, M7, or M9 firmware. SkyeTek will provide
an updated SkyeTek hex format (.shf) file.
2. Save the .shf file to the folder:C:\\Program Files\SkyeWare 4 \Firmware
3. Start SkyeWare 4.
4. Click on the Configuration tab and then the Firmware subtab.
5. Click on the Browse... button to open a file selection window.
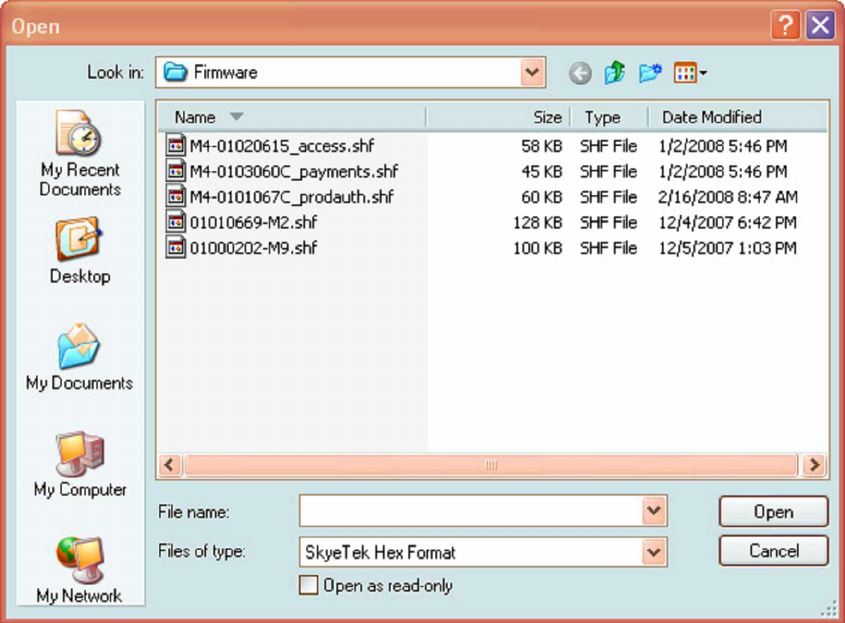
SkyeReader 300 User Guide 21
Copyright 2009 SkyeTek, Inc. All Rights Reserved.
Firmware File
6. Click on the new firmware file in the file list.
7. Click Open. This closes the file selection window and displays the filename in
SkyeWare 4.
8. Click Upgrade to start the upgrade process. The panel displays the update
information and a progress meter. When the update is complete, the panel
refreshes the reader information by querying the reader again. The personality is
displayed on the Firmware Configuration panel title and information box.
9. Check the display area to verify that the new firmware information is correct.
You can also create your own firmware update utility. For more information:
1. Log on to the SkyeTek support portal at http://support.skyetek.com. (Contact
SkyeTek to get an authorized login.)
2. Under the Firmware heading, click on Creating Custom Update Utilities for
SkyeModule Readers. This PDF document contains the specifications you will
need to create your own firmware update application.
SkyeReader 300 User Guide 22
Copyright 2009 SkyeTek, Inc. All Rights Reserved.
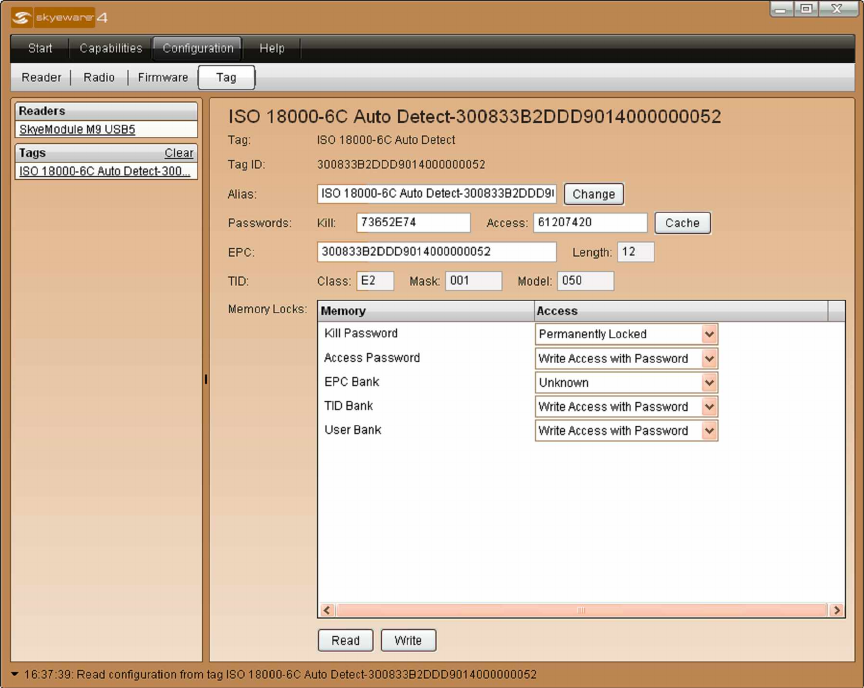
Configuring Tags
The Tag panel lets you set the various settings for configurable tags. To display the Tag
Configuration panel, click on the Configuration tab and then on the Tag subtab.
Typical UHF Tag Configuration Panel
Note – SkyeWare displays a different screen for each tag type, showing only the fields
that are configurable for that tag type.
How to Use (UHF tags):
1. Place a configurable tag in the read field. SkyeWare. The screen displays the
configurable fields for the tag.
2. Specify new values using the editable fields. Typical configurable fields for EPC
Class 1 Gen 2 tags are as follows:
•Alias—When you assign an alias to a tag, SkyeWare uses the alias instead
of the TID in all tag lists and data lists. Type a name in the Alias field, and
then click the Change button. (This is the only configurable parameter for
many tags.)
•Passwords—Lets you set the kill and access passwords (requires that you
have access permission).
SkyeReader 300 User Guide 23
Copyright 2009 SkyeTek, Inc. All Rights Reserved.
oTo enter a new password, type the password in the Kill or Access
field., and then click the Write button. This writes the password
to the tag. for future use.
oSkyeWare 4 can memorize passwords so that you don’t have to
issue a password command each time you use a password-
protected tag with SkyeWare. To store the access password for
the tag, click the Cache button.
•EPC—Lets you edit Electronic Product Code information:
oNSI—Number System Identifier, identifies the
oUII—Unique Item Identifier
•Oscillator bias—(Read-only) displays the tag’s current oscillator bias
setting. The oscillator supplies a clock to the tag logic and defines the
transmit data rate.
•TID—(Read only) Displays the tag Class, Mask, and Model.
•Memory Locks—lets you set access permissions for the access and kill
passwords and for the EPC, TID, and User memory banks. For example,
you can configure the tag so that it requires entry of the access password
before any data is written to the EPC bank. The following permissions are
available:
oUnknown—Indicates that a permission setting has not been
applied.
oRead, Write, or Read/Write— Grants read, write, or read/write
access permission.
oPermanent Read/Write— Permanently grants read, write, or
read/write access to the tag.
oWrite with Password— Requires entry of the access password
before data can be written to the tag.
oNo Access— Password or memory block is not readable or
writable.
3. (Optional) Click on the Write button to apply the changes to the tag.
4. (Optional) You can view actual memory contents block by block by clicking on
the Capabilities Tab and Memory subtab. See ‘‘Memory’’ on page 28.