JADAK a business unit of Novanta MERCURY5EC RFID Module User Manual MercuryEmbedMods UserGuide
Trimble Navigation Limited RFID Module MercuryEmbedMods UserGuide
UserManual.wiki
>
JADAK a business unit of Novanta
>
MERCURY5EC User Manual
Manual
Navigation menu
Upload a User Manual
Namespaces
Wiki Guide
HTML
PDF
Info
Views
User Manual
Discussion / Help
Navigation


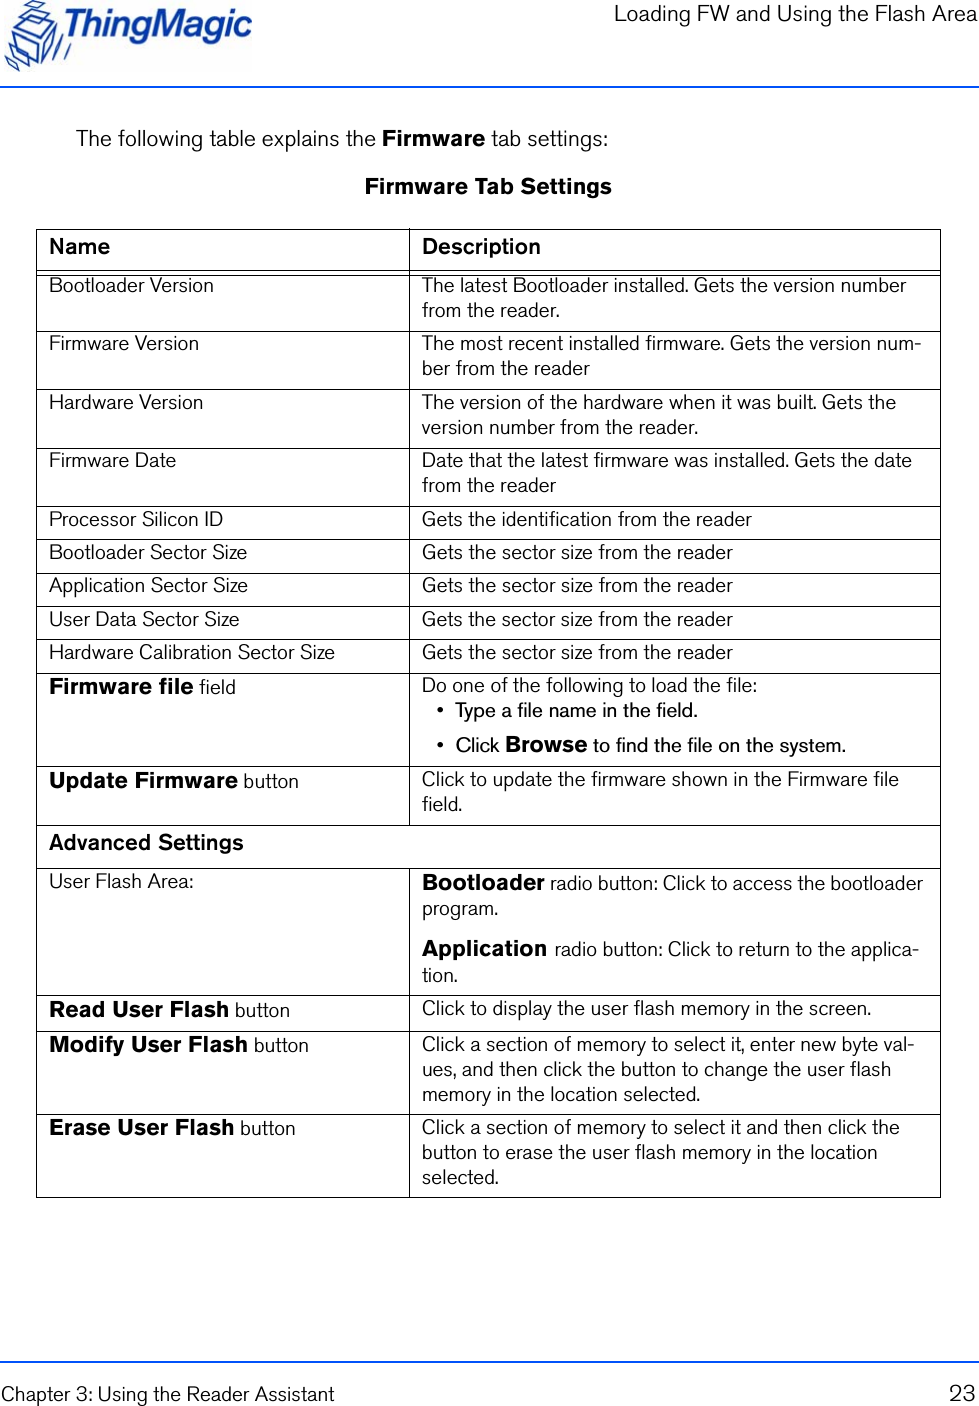

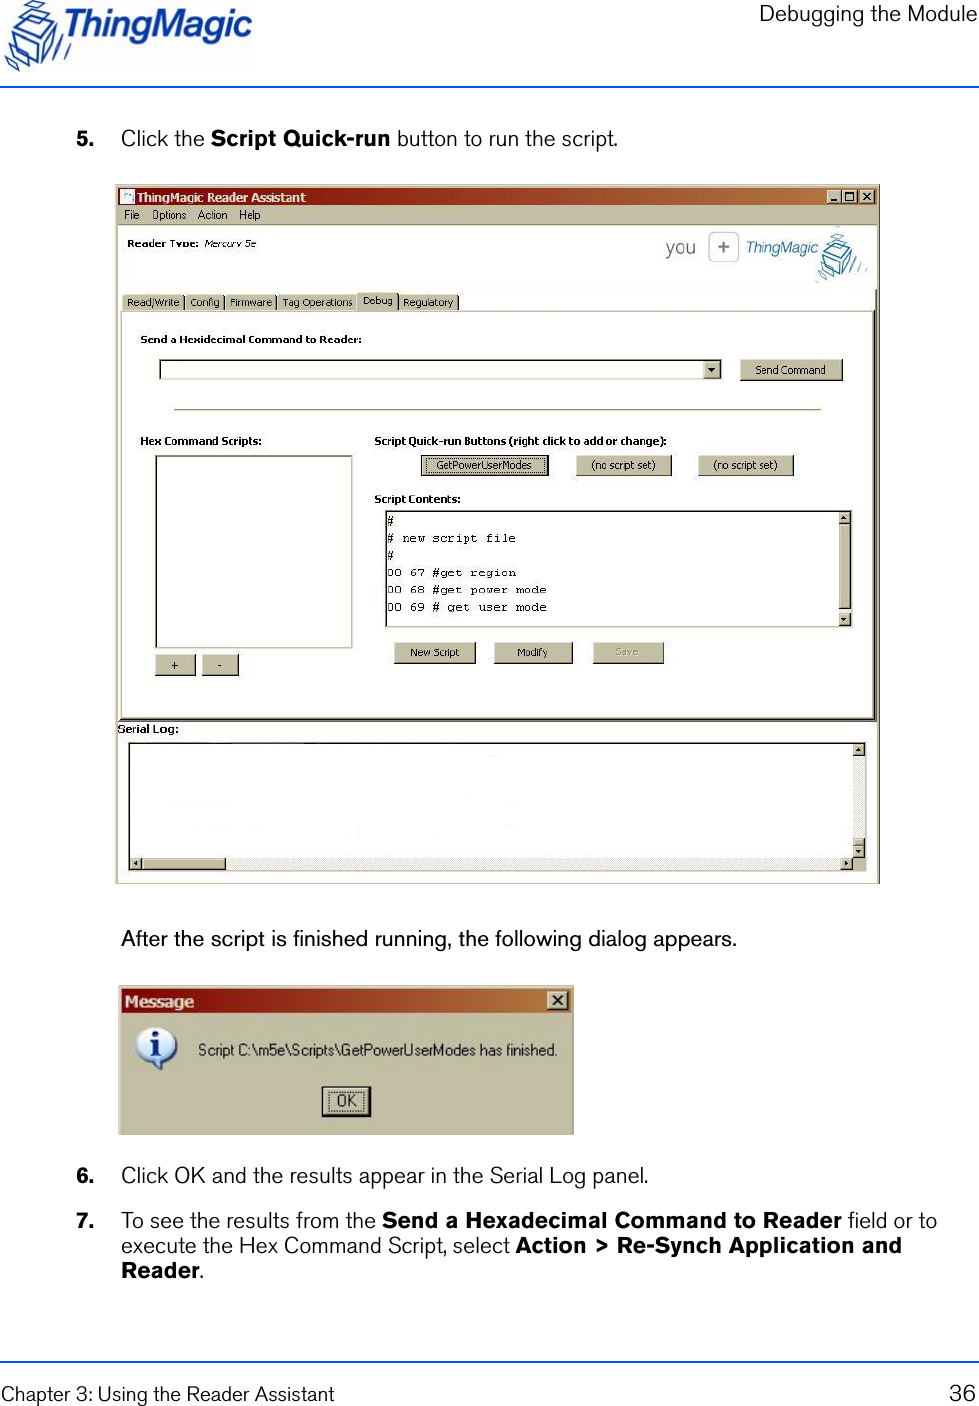


![b. Limitations on Modification: You may not copy, modify, adapt, or translate the Firmware, or createderivative works based on the Firmware. c. Limitations on Reverse Engineering, Decompilation and Disassembly: You may not reverseengineer, decompile, or disassemble the Products, except and only to the extent that such activity ispermitted by applicable law notwithstanding this limitation. d. Assignment and Resale: You may not transfer or assign this Agreement (by operation of law orotherwise) without the advance, written approval of ThingMagic which approval may be withheld forany reason. You agree not to resell, lease, distribute or otherwise transfer the Products to any thirdparty at any time. If you are a potential reseller of the Products, you may demonstrate the Products toyour customers solely for evaluation purposes, provided that notwithstanding anything to the con-trary in this Agreement, (i) any such use will be “AS IS” with no warranty whatsoever, as more fullyset forth in Section 10 below, and (ii) may only be done in countries where ThingMagic has receivedthe necessary regulatory certifications (for a list of countries, please email [customersupport@thingmagic.com]. You may not, however, resell, lease, distribute or otherwise transfer the Productsto your customers until you have signed ThingMagic’s Reseller Agreement.e. Additional Restrictions Applicable to Original Equipment Manufacturers (OEMs).If you purchased embedded Products under this Agreement, you may only use such Prod-ucts for testing and evaluation purposes, provided that any such use will be “AS IS” with notwarranty whatsoever, as muore fully set forth in Section 10 below. Prior to incorporating theembedded Products into production units which you will deliver to your customers, youmust sign ThingMagic’s OEM Agreement.4. SUPPORT SERVICES: ThingMagic provides support to authorized resellers of its Products. ThingMagicmay provide you with direct support services related to the Products (“Support Services”), in its solediscretion. Use of Support Services, if any, is governed by the ThingMagic policies and programs describedin the Documentation, and/or other ThingMagic provided materials.5. TERMINATION: Without prejudice to any other rights, ThingMagic may terminate this Agreement if you failto comply with the terms and conditions of this Agreement The provisions of this Agreement, other thanyour license to use the Firmware, shall survive the termination of this Agreement. Upon termination, yourright to use the Products shall cease. Depending on your location, there may be rules or regulationsregarding the disposal of the Products. Please contact ThingMagic for further information.6. U. S. GOVERNMENT RESTRICTED RIGHTS: Distribution and use of the Products and derivative worksthereof to and by the United States Government will be subject to the RESTRICTED RIGHTS as set forth inthe Federal Acquisitions Regulations Systems (FAR) at 48 CFR 252.7015, as amended from time to time..Any licensed Firmware described or referenced in this Agreement is a commercial computer softwareprogram developed at private expense. Use, duplication or disclosure by the Government is subject torestrictions as set forth in FAR 48 CFR 52.227-19(c) where applicable or the applicable provisions of theDOD FAR 48 CFR 227.7202-3, as amended from time-to-time.7. EXPORT RESTRICTIONS: The Products are subject to regulation by agencies of the U.S. Government,including without limitation the Department of Commerce, which prohibit or restrict export or diversion ofcertain technical products and technical data to certain countries and may be subject to export or importregulations in other countries. You shall comply with such laws and regulations governing use, import,export, re-export, and transfer of the Products and acknowledge your responsibility to obtain such licensesas may be required after delivery to you.8. LIMITED WARRANTY: Subject to the conditions in the following paragraph, ThingMagic warrants for aperiod of twelve (12) months from the date of original shipment the Products will be free from defects inmaterial and workmanship and will operate in substantial conformance with applicable specifications and](https://usermanual.wiki/JADAK-a-business-unit-of-Novanta/MERCURY5EC/User-Guide-923749-Page-77.png)