JBL File For Apps 6x6 Format View: 8992cell Eng
User Manual: JBL View: Cellsheet™ Guidebook for TI-89 / TI-92 Plus / Voyage™ 200
Open the PDF directly: View PDF ![]() .
.
Page Count: 87
- TI-89/TI-92 Plus/Voyage™ 200 CellSheet™
- Important Information
- What Is the CellSheet™ Application?
- Overview
- Navigating and Selecting Cells
- File Management
- Entering Numbers
- Entering Text
- Entering Symbolic Expressions
- Formulas
- Functions
- Editing Data
- Going Beyond the Basics
- Importing and Exporting Data
- Plotting Data
- Using Statistics
- Sorting Data
- Formatting
- Blank Cells
- Archiving Spreadsheets
- Key Shortcuts
- Enter a value or symbolic expression in a cell
- Enter a formula in a cell
- Enter a string (text) in a cell
- Use a variable in a cell
- Navigate rapidly in a spreadsheet
- Select a range of cells
- Select one or more rows
- Select one or more columns
- Insert a cell
- Insert a row
- Insert a column
- Delete a cell
- Delete a row
- Delete a column
- Clear data without deleting the cell, row, or column
- Cut, copy, and paste
- Quick fill
- Grab a cell reference
- Grab a range reference
- Change format settings for an entire spreadsheet
- Example — Interest and Principal Paid
- Example — Linear Regression
- Example — Maximum Area
- Errors, Error Messages, and Restrictions
- Action will remove data from spreadsheet. Press Enter to proceed or ESC to abort.
- Cannot complete operation due to CellSheet size limitations. Operation aborted.
- Cannot export. Blank cells or errors in cells.
- Cannot paste to a range of different size than original range.
- Cannot sort a range containing formulas.
- Cannot use commands in cells.
- Circular References. Cannot recalculate properly until circular references are resolved.
- Invalid cell or cell range.
- KeyCol not in selected sorting range.
- Memory. Cannot store data. Data item contains too many characters.
- Problem with Spreadsheet file. Please delete the variable.
- Spreadsheet cannot maintain excessive references to the same cell. Recalculation canceled.
- Syntax
- Unable to properly update one or more plot definitions.
- Variable is locked, protected, or archived. Turning AutoCalc format option off.
- CellSheet™ App Menu Map
- Installing the CellSheet™ App
- Starting and Quitting the Application
- Deleting an Application
- Texas Instruments (TI) Support and Service Information
- End-User License Agreement
2/7/02 © 2001, 2002 Texas Instruments
TI-89/TI-92 Plus/Voyage™ 200
CellSheet™
How To…
Navigate in Spreadsheets Format Spreadsheets
Cut, Copy, and Paste Select, Insert, or Delete
Manipulate Data
Enter Data Edit Data
Sort Data Plot Data
Use Statistics Import and Export Data
Examples
Sort by Key Column Linear Regression
Interest and Principal Paid Maximum Area
More Information
Customer Support Error Messages
Menu Map Key Shortcuts
TI

TI-89 / TI-92 Plus / Voyage™ 200 PLT CellSheet™ App Page 2
Important Information
Texas Instruments makes no warranty, either expressed or
implied, including but not limited to any implied warranties of
merchantability and fitness for a particular purpose, regarding
any programs or book materials and makes such materials
available solely on an “as-is” basis.
In no event shall Texas Instruments be liable to anyone for
special, collateral, incidental, or consequential damages in
connection with or arising out of the purchase or use of these
materials, and the sole and exclusive liability of Texas
Instruments, regardless of the form of action, shall not exceed
the purchase price of this product. Moreover, Texas Instruments
shall not be liable for any claim of any kind whatsoever against
the use of these materials by any other party.
Graphing product applications (Apps) are licensed. See the
terms of the license agreement for this product.
The instructions in this guidebook refer to this Flash application
only. For help using the TI-89 / TI-92 Plus / Voyage™ 200 PLT,
refer to the comprehensive guidebook at
education.ti.com/guides.
Microsoft, Windows, Windows NT, Apple, Macintosh, Mac, and Mac OS are trademarks
of their respective owners.

TI-89 / TI-92 Plus / Voyage™ 200 PLT CellSheet™ App Page 3
What Is the CellSheet™ Application?
The CellSheet application (App) is a spreadsheet in the palm of
your hand. It combines spreadsheet functionality with the power
of a calculator and supplements other calculator software
applications. The application is useful in classes such as math,
social studies, business, and science.
Cells can contain:
•Real or complex numbers
•Formulas
•Expressions
•Variables
•Text strings
•Functions that evaluate to expressions
Each spreadsheet contains 999 rows and 64 columns. A
spreadsheet variable can be no larger than 64 kilobytes (KB).

TI-89 / TI-92 Plus / Voyage™ 200 PLT CellSheet™ App Page 4
You can use a unit-to-unit cable to share spreadsheets with
other TI-89 and TI-92 Plus / Voyage™ 200 PLT units. A
CellSheet™ computer-based utility is available separately. The
utility lets you share TI-89 and TI-92 Plus / Voyage 200 PLT
spreadsheets with Excel and other programs. You can also use
the utility to convert and share spreadsheets with TI-83 Plus and
TI-83 Plus Silver Edition units. Please see education.ti.com for
more information about the CellSheet computer-based utility.
Languages
This application is available in English, Danish, Dutch, Finnish,
French, German, Italian, Norwegian, Portuguese, Spanish,
Swedish. The corresponding language localization software
must also be installed and running.
TI-89 / TI-92 Plus / Voyage™ 200 PLT CellSheet™ App Page 5
Overview
The 64 columns are labeled A through BL. Rows are numbered
1through 999. Although you may insert and delete columns and
rows, columns will always be labeled A-BL and rows will always
be numbered 1-999. You cannot change the alphabetical column
labels or row numbers.
Individual cells are referred to by their column letter and row
number. For example, B25 refers to the 25th cell in column B.
Cell ranges are separated by a colon. For example, A1:C5 refers
to the rectangular range that has the 1st cell in column A as its
top left corner and the 5th cell in column C as its bottom right
corner.
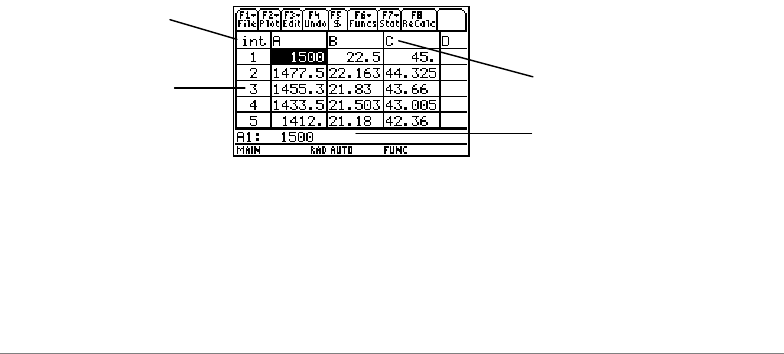
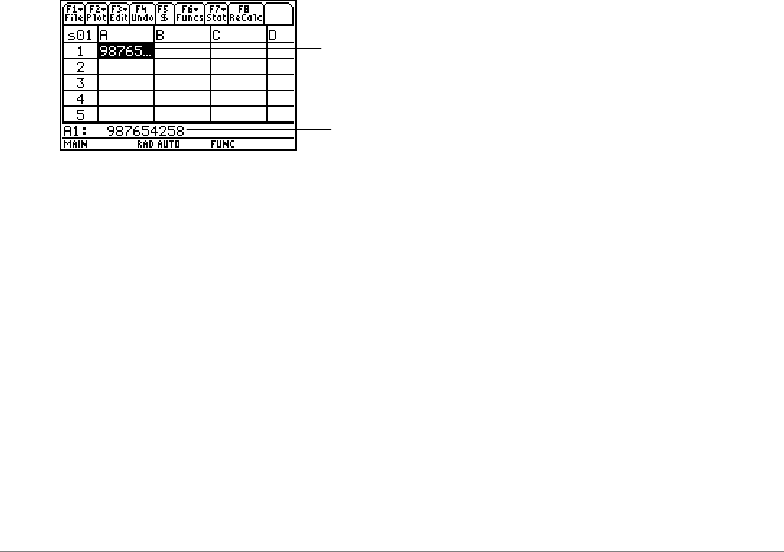
Spreadsheet
name
Row number Column letter
Edit line

TI-89 / TI-92 Plus / Voyage™ 200 PLT CellSheet™ App Page 6
Navigating and Selecting Cells
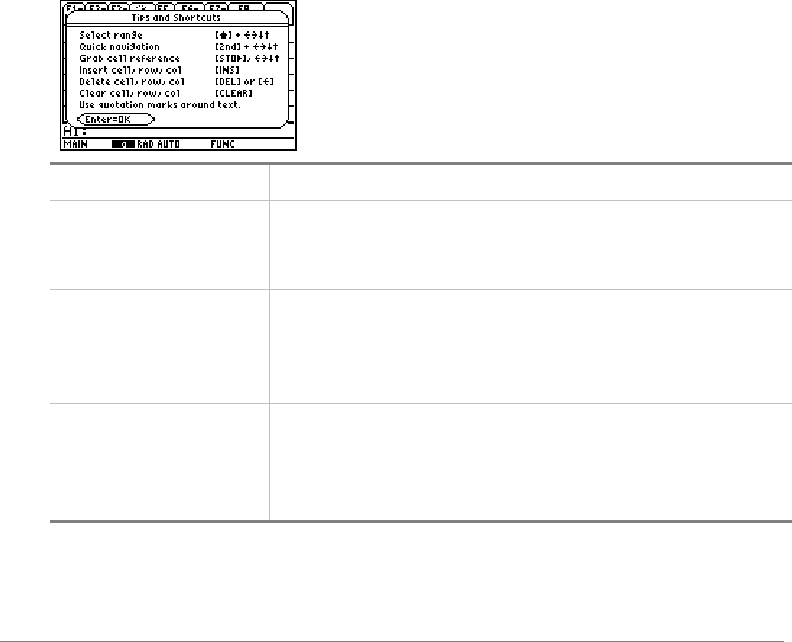
Press ƒB:Help for a help screen that shows key shortcuts for
navigating and selecting.
Navigating
•A,B,C,or Dmoves the cursor from the current cell to an
adjacent cell.
•¥ C or ¥ D moves the cursor to the first or last cell in a
column.
•¥Aor ¥Bmoves the cursor to the first or last cell in a
row.
•2 C or 2 D moves the cursor several rows up or down.
•2 B or 2 A moves the cursor several columns to the
right or left.
•…1:GoTo moves the cursor to the cell you indicate.
Tip For the TI-89 only, press jin the CellSheet™ App dialog
boxes before typing letters.

TI-89 / TI-92 Plus / Voyage™ 200 PLT CellSheet™ App Page 7
Selecting multiple cells, rows, or columns
•…2:Select Range lets you select a range of cells by entering
the range in the dialog box. You can also press and hold ¤
while pressing A,B,C,or Din the spreadsheet.
•¥AAor ¥CCselects the entire row or column from the
current cursor location. You can hold ¤and press A,B,C,
or Dto select multiple rows or columns.
Inserting a cell, row, or column
Select a cell, row, or column. 2 / inserts a cell, row, or
column above (for cells or rows) or to the left (for columns) of the
current selection.
Deleting a cell, row, or column
•¥ 8 or 0deletes a selected cell, row, or column and
shifts the remaining cells, rows, or columns up or left one
space.
•Mclears the contents of the selected cell or range of
cells without deleting the cell, row, or column.

TI-89 / TI-92 Plus / Voyage™ 200 PLT CellSheet™ App Page 8
File Management
Pressing ƒallows you to:
•Open an existing spreadsheet
•Save a copy of the current spreadsheet under a different
name
•Create a new spreadsheet
•Cut, copy, and paste cells in a spreadsheet
•Clear the spreadsheet
•Format the appearance of data and set cursor movement
direction
•Display a help screen with navigation and editing tips
Opening an existing spreadsheet
1. Press ƒ1:Open.
2. Select the folder.
3. Select the name of the spreadsheet you want to open
and press ¸.

TI-89 / TI-92 Plus / Voyage™ 200 PLT CellSheet™ App Page 9
Tips You can open only one spreadsheet at a time. If a spreadsheet is
archived, you must unarchive it before you can edit it.
Saving a spreadsheet
The spreadsheet is automatically saved in Random Access
Memory (RAM) as you work. You do not have to save your work
manually. However, you can save the current spreadsheet with a
new file name.
1. Press ƒ2:Save Sheet As.
2. Select the folder.
3. Type the variable name for the spreadsheet, and press
¸ ¸.You are still working in the current
spreadsheet, not the one you just saved.
Tips The spreadsheet name can contain:
•Letters, numbers, and symbols, but must begin with a letter
•Up to 8 characters, but no spaces.
To access the saved spreadsheet, press ƒ1:Open and select
the name of the spreadsheet you just saved.
Creating a new spreadsheet
1. Press ƒ3:New.

TI-89 / TI-92 Plus / Voyage™ 200 PLT CellSheet™ App Page 10
2. Select the folder.
3. Type the variable name for the spreadsheet, and press
¸ ¸.
—or –
Accept the suggested variable name and press ¸.
Using cut, copy, and paste
•ƒ4:Cut removes contents from the currently selected cell or
range and places these contents on the clipboard to be
pasted into other cells.
TI-89 shortcut: ¥ 5.TI-92 Plus / Voyage™ 200 PLT
shortcut: ¥X.
•ƒ5:Copy copies the contents of the currently selected cell
or range and places them on the clipboard to be pasted into
other cells.
TI-89 shortcut: ¥ 6.TI-92 Plus / Voyage 200 PLT
shortcut: ¥C.
•ƒ6:Paste pastes the contents of the clipboard into the
currently selected cell or range.
TI-89 shortcut: ¥ 7.TI-92 Plus / Voyage 200 PLT
shortcut: ¥V.
TI-89 / TI-92 Plus / Voyage™ 200 PLT CellSheet™ App Page 11
You can cut, copy, and paste from cell to cell and from edit line
to edit line, but not from cell to edit line or vice versa. If you copy
or cut a cell reference from a cell and then paste it to another
cell, the cell reference changes accordingly, but does not change
if you copy from edit line to edit line.
Example
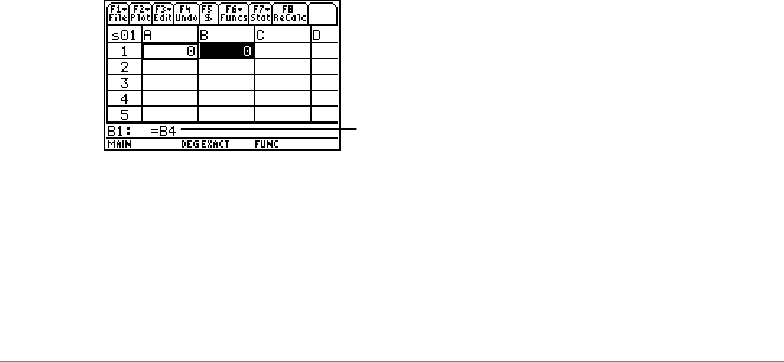
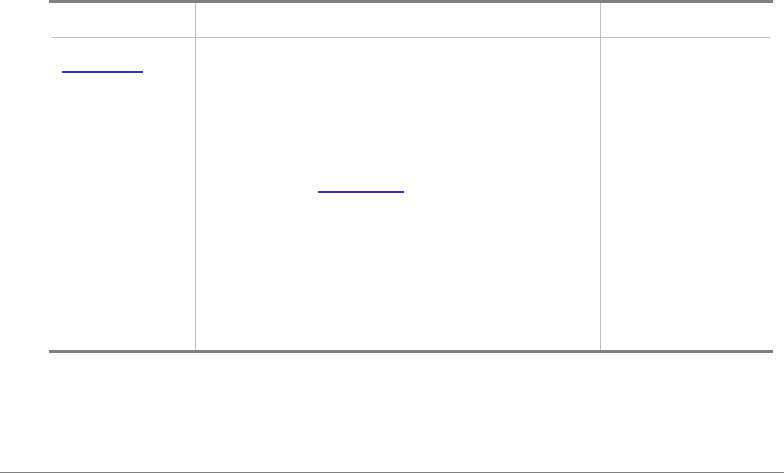
1. In cell A1, enter =a4.
2. Select cell A1 and press ƒ5:Copy.
3. Select cell B1 and press ƒ6:Paste.Your spreadsheet
should look like this:
4. In cell A2, enter =a5.
5. Go to the edit line for cell A2. Select =A5 and press
ƒ5:Copy.
Notice that A4 has automatically
changed to B4.
TI-89 / TI-92 Plus / Voyage™ 200 PLT CellSheet™ App Page 12
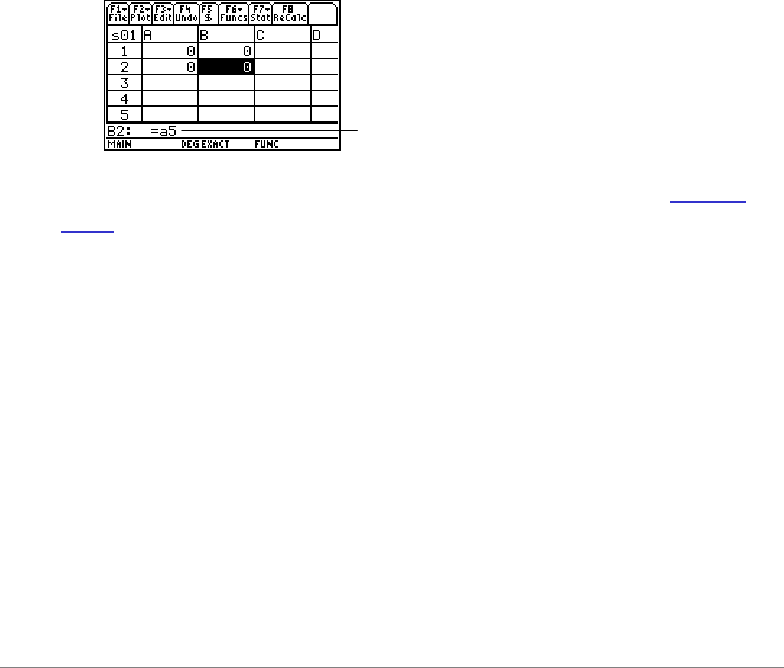
6. Exit the edit line for cell A2 and access the edit line for
cell B2. Press ƒ6:Paste and then ¸.Your
spreadsheet should look like this:
For more information about cut, copy, and paste, go to Editing
Data.
Clearing a spreadsheet
To delete all the contents of a spreadsheet, Press ƒ8:Clear
Sheet.This action cannot be undone.
Formatting data
Formatting allows you to choose:
Notice that A5 has stayed the same and has
not changed to B5.

TI-89 / TI-92 Plus / Voyage™ 200 PLT CellSheet™ App Page 13
•To have values calculated automatically as you enter data or
to calculate the value for the active cell only. AutoCalc
automatically recalculates the entire spreadsheet as you
work. When AutoCalc is set to NO,cells with formulas
containing references to other cells do not recalculate when
you make changes to the referred cells.
•Whether the cursor automatically moves down or to the right
as you enter data in cells.
•Whether a formula or a value is displayed in the edit line.
Example
1. Press ƒ9:Format.
2. Select
1:YES or 2:NO for AutoCalc.
3. Select the cursor movement (1:DOWN,2:RIGHT,or 3:OFF).
4. Select what the edit line will display (1:FORMULA or
2:VALUE).
5. Press ¸.

TI-89 / TI-92 Plus / Voyage™ 200 PLT CellSheet™ App Page 14
Recalculating a spreadsheet
When you start the CellSheet™ App, the AutoCalc feature is
turned on by default. If you turn it off, you must recalculate the
spreadsheet manually.
To recalculate the spreadsheet, press 2 Š (TI-89) or Š.
TI-89 / TI-92 Plus / Voyage™ 200 PLT CellSheet™ App Page 15
Entering Numbers
Type the number on the edit line and press ¸.If the number
is too large to fit in the cell, the partial number and an ellipsis (…)
appear in the cell. Select the cell containing a truncated number
to view the complete number on the edit line. The following
screen contains an example of a truncated number.
Example
1. On the edit line, enter 14/16.
2. Press ¸.The cell displays 7/8.
—or —
Press ¥ ¸.The cell displays .875.
Truncated number
appears in cell
Complete number
appears on edit line

TI-89 / TI-92 Plus / Voyage™ 200 PLT CellSheet™ App Page 16
Entering Text
To ensure that text is treated as a string and not as a variable,
type quotation marks at the beginning and end of the string. Text
strings continue past the cell boundary as long as the next cell is
blank. If the next cell contains information, the text is truncated in
the cell. Select the cell containing truncated text to view the
complete text string on the edit line.
To type letters on the TI-89, press jand then the letter key.
Press 2 ™ to turn on alpha-lock and jto turn off alpha-
lock.

TI-89 / TI-92 Plus / Voyage™ 200 PLT CellSheet™ App Page 17
Entering Symbolic Expressions
Symbolic expressions involve variables and other symbols such
as pand ˆ.You can enter symbolic expressions into cells and
use them in formulas.
The CellSheet™ App handles variables in the following manner.
•You can use defined and undefined variables.
•If a variable is defined, its value will be substituted for the
variable.
•If you use a variable in a symbolic expression and then
change the variable’s value outside of the CellSheet App,
any cells using that variable will include the new value once
those cells have been recalculated.
•You can use variables that are stored in any folder on your
unit by including the folder name with the variable name.
•When cell names and defined variables are not part of a
formula, they are replaced by their value.
•If a variable has the same name as a cell name, the value of
the cell will be used unless you type the folder name and
variable name, even if the variable is in the current folder.

TI-89 / TI-92 Plus / Voyage™ 200 PLT CellSheet™ App Page 18
Example 1
The variable x does not have a value.
1. Type 3x^2+2x on the edit line.
2. Press ¸.The cell displays 3*x^2…, and the edit line
displays 3x^2+2*x.
Example 2
Assume that the variable PV (Present Value) is stored in a folder
named FINANCE and its value is 12.
On the edit line, enter =finance\PV. The cell displays 12.
—or —
Enter = on the edit line, press 2 °,and select PV in the
finance folder. Press ¸.The edit line displays finance\PV.
Press ¸and the cell displays 12.
Example 3
1. On the edit line of cell A1, enter finance\PV. Do not
precede the entry with =. Press ¸.

TI-89 / TI-92 Plus / Voyage™ 200 PLT CellSheet™ App Page 19
2. Go to the Home screen by pressing "(TI-89),
¥"(TI-92 Plus), or ¥ "
(Voyage™ 200 PLT).
3. On the Home screen, change the value of PV from 12 to
14 by entering 14 §finance\pv and pressing ¸.
4. Press 2 a to return to the CellSheet™ App. Notice
that the value in cell A1 has remained as 12.

TI-89 / TI-92 Plus / Voyage™ 200 PLT CellSheet™ App Page 20
Formulas
Aformula is an equation that performs operations on
spreadsheet data. Formulas can:
•Perform mathematical operations, such as addition and
multiplication
•Refer to other cells in the same spreadsheet
When you enter a formula, the formula and the evaluation of the
formula are both saved in the cell.
The following example adds 15 to the value in cell C4 and then
divides the result by the sum of the values in cells B4, B5, and
B6.
Always precede a formula with = or + so the formula is saved to
that cell and values can be recalculated as variable values
change. Formulas in cells are re-evaluated after changes are
made in other cells and upon returning to the CellSheet™ App.
Cell reference
=(C4+15)/sum(B4:B6)
Numeric constant Spreadsheet function
Range reference

TI-89 / TI-92 Plus / Voyage™ 200 PLT CellSheet™ App Page 21
Note If a formula references a blank cell directly (e.g., =A1+2), the cell
is treated as a 0 (zero). If a formula references a blank cell as
part of a range (e.g., =sum(A1:A3)), the blank cell is ignored.
If AutoCalc is set to YES,the spreadsheet is automatically
recalculated as you enter or edit data in the spreadsheet.
Tip You may want to turn off the AutoCalc feature if your
spreadsheet is large. Large spreadsheets can take a minute or
more to recalculate.
When a cell is selected, its formula appears on the edit line, and
the formula value appears in the cell. To view formula values in
the edit line, press ¥Í(TI-89) or ¹Fto display the FORMATS
dialog box. Select Show:2:Value.The cell displays the formula
value. Pressing ¸returns the edit line to edit mode and the
formula displays on the edit line. Press …9:Show Pretty Print to
display in a pop-up box cell values that are larger than can be
displayed in a cell.

TI-89 / TI-92 Plus / Voyage™ 200 PLT CellSheet™ App Page 22
Functions
Afunction is a predefined command that performs calculations
by using specific values in a particular order. The values are
called arguments. The arguments can be numbers, lists, cell
names, cell ranges, etc., depending on what the function
requires. The arguments are enclosed in parentheses, and a
comma separates the arguments.
If ƒ9:Format is set to show formulas, functions from
CellSheet™ App menus, the Catalog, or calculator keys display
on the edit line.
You can use any function on the calculator in a cell, as long as
the end result is an expression.
=sum(A3:A25)
Function name Argument

TI-89 / TI-92 Plus / Voyage™ 200 PLT CellSheet™ App Page 23
Example
The variable x is not defined in the current folder.
1. In cell A1, enter x^2+5x.
2. In cell A2, enter =2 = (a1,x). Cell A2 displays 2x+5,
which is the derivative of the function in cell A1, with
respect to x.
Commands with multiple outputs are not allowed in cells and
display as the word “Error” in the cell.
Entering a function
•If a function's argument is a list, a cell range is also a valid
argument.
•If a function's argument is a value, a cell name is also a valid
argument.
•When a function is not used as part of a formula, only the
resulting value of the function is saved in the cell.

TI-89 / TI-92 Plus / Voyage™ 200 PLT CellSheet™ App Page 24
To enter a function:
1. Press Á,if you want the function to be re-evaluated.
2. Press 2 ˆ (TI-89) or ˆto display a list of some
commonly used spreadsheet functions and select the
function.
—or —
Select a function from the Catalog or Math menu.
—or —
Press a function key.
3. Enter the argument(s) for the function, and then press
Í.
The following section describes the functions available from the
ˆFuncs menu.

TI-89 / TI-92 Plus / Voyage™ 200 PLT CellSheet™ App Page 25
The cellIf( Function
The cellZf( function returns trueResult or falseResult,depending
on whether the condition is true or false.
TICSHEET.cell[f(condition,trueResult,
falseResult)⇒expression
For example:
Press 2 ˆ (TI-89) or ˆ1:cellZf(.
The cell If condition, trueResult,and falseResult may contain cell
references.
=TICSHEET.cellΙ
ΙΙΙf(A3‚100,100,0)
If condition
statement
True result
False result

TI-89 / TI-92 Plus / Voyage™ 200 PLT CellSheet™ App Page 26
The count( Function
The count( function counts how many cells in a range contain
expressions. It does not count cells that contain strings. Its
syntax is:
TICSHEET.count(range)⇒expression
Notes •TICSHEET stands for TI CellSheet™ and is the internal
software name of the App.
•The list may be entered as a cell range.
1. Enter 1 in cell A1, 2 in cell A2, and go to cell A4.
2. Press 2 ˆ (TI-89) or ˆ2:count(.The edit line
displays TICSHEET.count(.
3. Type a1:a3) and press ¸.The number 2 displays in
cell A4 because two cells (A1 and A2) in the range
contain data.

TI-89 / TI-92 Plus / Voyage™ 200 PLT CellSheet™ App Page 27
The mean( function
The mean( function returns the average of a list. When used in
the CellSheet™ App, you may enter either a list or a cell range
as the argument.
The rand( function
The rand( function returns a randomly generated number. In the
CellSheet App, you may enter a cell containing an integer as an
argument.
The sum( function
The sum( function returns the sum of the elements of a list. In
the CellSheet App, you may enter either a list or a cell range as
the argument.

TI-89 / TI-92 Plus / Voyage™ 200 PLT CellSheet™ App Page 28
Editing Data
You can access the following directly from within the
CellSheet™ App:
•CellSheet App menus by pressing the appropriate function
keys
•The Catalog and other menus by pressing the appropriate
keys
Edit a cell by selecting it and entering the new data. M
deletes the contents of a single cell or a range of cells. †allows
you to undo the last action.
Tip If you have not yet pressed ¸to change a cell’s contents,
you can press Nto revert to the cell’s previous contents.
Using cut, copy, and paste
1. Select the cell or range of cells you want to cut or copy.
Tip Hold ¤and press the arrow keys to select a range of cells, or
use …2:Select Range.
2. Press one of the following key combinations to cut or
copy.
-Cut: ¥5(TI-89) or ¥X(TI-92 Plus /
Voyage™ 200 PLT)

TI-89 / TI-92 Plus / Voyage™ 200 PLT CellSheet™ App Page 29
-Copy: ¥ 6 (TI-89) or ¥C(TI-92 Plus /
Voyage™ 200 PLT)
3. Select the individual cell, the top left cell in a range, or the
entire range where you want to paste the information.
4. Press ¥ 7 (TI-89) or ¥V(TI-92 Plus /
Voyage 200 PLT).
Notes •When cutting and pasting a range of cells, you must paste to a
range of the same size.
•You may paste a single cell to a cell range. If the copied cell
contains a formula with a cell reference, the cell reference will
be adjusted throughout the range.
•If the material to be pasted is from another application, you
must be on the edit line to paste.
•Use the CellSheet™ computer-based utility to copy or cut
something from one spreadsheet and then paste it into another
spreadsheet.
Undo an edit
Press †to undo only the last edit. Any changes made before
the last edit cannot be undone. Certain edits, such as Clear
Sheet, cannot be undone.
TI-89 / TI-92 Plus / Voyage™ 200 PLT CellSheet™ App Page 30
Going Beyond the Basics
Absolute references
If you do not want a cell reference to be changed when you copy
or move a formula to a different cell, use an absolute reference.
(Relative references are updated when the cell is copied or cut
and pasted into a new location.) You can enter the following
types of absolute references:
Reference Description
$A$1 Absolute column and absolute row
$A1 Absolute column and relative row
A$1 Relative column and absolute row
To enter an absolute cell reference, press ‡to place a dollar
sign ($) on the edit line.
Specifying units
1. On the edit line, enter a value.
2. Press 2 9 (TI-89) or ¥9.

TI-89 / TI-92 Plus / Voyage™ 200 PLT CellSheet™ App Page 31
3. Select the desired unit and press ¸.
4. Press ¸to place the value in the spreadsheet.
The value is converted and displayed automatically in the current
default unit for that category. For example, if your default unit
system is set to SI (scientific) and you enter 2_cm, the
CellSheet™ App will return .02*_m. To maintain units other than
the default, follow the entry with the conversion operator (ú)and
the units you want.
Grabbing a cell reference
Grabbing a cell reference copies a cell name onto the edit line.
While editing or entering information, press §.Use the arrow
keys to move the cursor to the cell whose reference you would
like to enter into the formula. Press ¸.
Grabbing a range reference
Grabbing a range reference copies a range of cells onto the edit
line. While editing or entering information, press §.Use the
arrow keys to move the cursor to the first cell in a range you
want to reference. Press and hold ¤while pressing the arrow
keys until the range is selected. Press ¸,and the range is
entered into the formula or function.
TI-89 / TI-92 Plus / Voyage™ 200 PLT CellSheet™ App Page 32
Example
1. Enter 5 in cell A1, 6 in cell A2, and 7 in cell A3.
2. In cell A4, determine the sum of A1:A3 by pressing
2 ˆ (TI-89) or ˆ5:sum(.
3. Press §and then select A1:A3 by pressing ¤and the
appropriate arrow keys. Press ¸.
4. Press d.The edit line should look like this: sum(A1:A3).
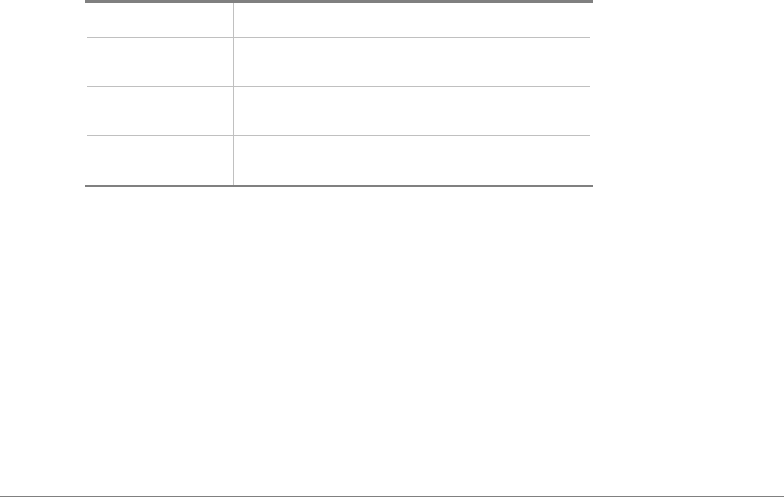
Displaying in Pretty Print
Pretty Print displays expressions in the same form in which they
are written on the board or in textbooks.
To display the value of a cell in Pretty Print, select the cell and
press …9:Show Pretty Print.
Cell contents displayed as
Pretty Print
Cell contents

TI-89 / TI-92 Plus / Voyage™ 200 PLT CellSheet™ App Page 33
Filling a range
You can fill an entire range of cells with a formula or other data
at the same time. Note that if you fill a range with a formula, any
cell reference in the formula is automatically updated, unless it
has been assigned an absolute reference.
1. Select the range that you would like to fill.
2. Press …3:Fill Range and enter the data for the top left
cell of the range. If you want to fill the range with a
formula, make sure to leave = in the Initial Formula field.
If not, delete = before entering the data for the range you
wish to fill.
It is necessary to use a formula if you need to refer to a
cell updated over a range. If you omit the =, the cell
reference is evaluated for the first cell in the range, and
this value is used throughout the range.
3. Press ¸ ¸.

TI-89 / TI-92 Plus / Voyage™ 200 PLT CellSheet™ App Page 34
If you are filling a range with a formula, the application may take
some time to fill the range and then evaluate the formulas. To
save time, press ƒ9:Format and turn off AutoCalc. With
AutoCalc turned off, cells with formulas containing references to
other cells do not recalculate when you make changes to the
referred cells.
Entering a sequence
Sequence increments a variable from a low value through a high
value by step increments, evaluates the expression for each
value, and returns the results in a range of cells. The upper left
cell, designated by 1st cell, contains the first element of the
sequence. The other elements of the sequence extend through
the row or column based on the direction you choose, down or
right.
1. Select the cell where you want to begin the sequence and
press …4:Sequence.
2. Type an expression and specify the variable in the
expression to be incremented.
3. Type the low and high values of the variable.
4. Type the step increment. The default increment is 1.

TI-89 / TI-92 Plus / Voyage™ 200 PLT CellSheet™ App Page 35
5. Type the location of the first cell where the sequence is to
begin, if it is different from the cell you previously
selected.
6. Choose
1:DOWN or 2:RIGHT for the direction of the
sequence on the spreadsheet.
7. Press ¸.
For more information about using a sequence, see the linear
regression or maximum area example.

TI-89 / TI-92 Plus / Voyage™ 200 PLT CellSheet™ App Page 36
Importing and Exporting Data
Importing
You can import data variables, expressions, lists, matrices, and
strings.
1. Press …5:Import.
2. Select the type of data you want to import, the name of
the folder, and the variable name.
3. Type in the cell where you want to place the imported
information. If you are importing a data variable, list, or
matrix, the first cell will be the top left cell of the range you
are importing to.
4. For a list, choose 1:DOWN or 2:RIGHT for the display
direction.
5. Press ¸.
Exporting
You can export data variables, expressions, lists, and matrices.

TI-89 / TI-92 Plus / Voyage™ 200 PLT CellSheet™ App Page 37
1. Select the cell or range of cells you want to export. Press
…6:Export.
2. Select the type of data and name of the destination
folder.
3. Type the name of the variable to be stored.
4. If necessary, edit the cell or range of cells you want to
export. Press ¸.
Note You cannot export blank cells in expressions, lists, or matrices.

TI-89 / TI-92 Plus / Voyage™ 200 PLT CellSheet™ App Page 38
Plotting Data
Plot types and marks are the same as those used by other Apps
such as the Data/Matrix Editor. Plots share the Graph screen
with other plots and functions and are displayed using the same
algorithms. Plots are automatically saved as lists and are
automatically updated if you change the values in the
spreadsheet.
If you create a plot using a spreadsheet and then open a new
spreadsheet, your previous plot data are visible in Plot Setup as
list variables rather than range references. This is so the new
spreadsheet will not overwrite the previous plot definitions.
Defining a plot
1. Press „1:Plot Setup.
2. Select the plot number that you want to define and
press ƒ.
3. Specify applicable settings for the active items in the
Define Plot dialog box. You can input a range or a list in
the xRange, yRange, Frequency, and Category fields.
4. Press ¸.

TI-89 / TI-92 Plus / Voyage™ 200 PLT CellSheet™ App Page 39
Field Name Description
Plot Type Select one of the following:
•Scatter
•xyline
•Box Plot
•Histogram
•Modified Box Plot
Mark Select the symbol used to plot the data
points: Box (è), Cross (x), Plus (+),
Square (é), or Dot (·).
xRange Type the range for x values, the
independent variable.
yRange Type the range for y values, the
dependent variable.
Hist. Bucket Width Specify the width of each bar in a
histogram. The default is 1.
Use Freq and
Categories? Select NO or YES. Note that Freq,
Category, and Include Categories are
active only when Use Freq and
Categories? is set to YES. Freq is active
only when Plot Type is set to Box Plot or
Histogram.

TI-89 / TI-92 Plus / Voyage™ 200 PLT CellSheet™ App Page 40
Field Name Description
Freq Type the range of cells that contains a
weight value for each data point. If you
do not enter a range, all data points are
assumed to have the same weight (1).
Category Type the range of cells that contains a
category value for each data point.
Include Categories If you specify a Category, you can use
this item to limit the calculation to
specified category values.
Graphing a plot
You can graph any defined plot by selecting the plot and
pressing ‡or by selecting the Graph App on your unit.
Selecting or deselecting a plot
From Plot Setup, select the plot and press †to toggle it on or
off. Deselect a plot to prevent it from graphing.
Copying a plot definition
1. From Plot Setup, select the plot and press „.

TI-89 / TI-92 Plus / Voyage™ 200 PLT CellSheet™ App Page 41
2. Press Band select the plot number to which you want to
paste. This is the destination plot.
3. Press ¸.
Clearing a plot definition
From Plot Setup, highlight the plot and press ….
Turning plots and functions off
•„2:PlotsOff turns off all stat plots and spreadsheet plots.
•„3:FnOff turns off all function graphs.

TI-89 / TI-92 Plus / Voyage™ 200 PLT CellSheet™ App Page 42
Using Statistics
Warning If you are in split screen mode and calculate statistics using the
CellSheet™ App and then switch screens to calculate a one-
variable statistic with the Data/Matrix Editor, an internal error
may appear. An internal error means you will have to reset your
calculator. Avoid this error in the Data/Matrix Error by changing
the Calculation Type from OneVar to TwoVar and then back to
OneVar.
All of the statistical calculations available in the Data/Matrix
Editor are also available in the CellSheet App. You can also use
the stat variables stored as system variables.
1. Select a range of cells for analysis.
2. Press 2 ‰ (TI-89) or ‰1:Calculate.
3. Include all necessary information for the type of statistical
analysis you want. Edit the ranges for the x and y values,
frequency, and category data as needed.
4. Press ¸.
2 ‰ (TI-89) or ‰2:Show Stats displays the statistics you just
generated.

TI-89 / TI-92 Plus / Voyage™ 200 PLT CellSheet™ App Page 43
2 ‰ (TI-89) or ‰3:Variables inserts the value of a particular
statistical variable into the selected cell.
Note Since the CellSheet™ App shares statistics variables with other
applications, it is not advisable to use them in formulas. If you
wish to save a particular statistics variable, a better option
would be to paste it into a non-formula cell.

TI-89 / TI-92 Plus / Voyage™ 200 PLT CellSheet™ App Page 44
Sorting Data
You can sort columns of data whose cells contain numbers or
text. If any cell in the range to be sorted contains formulas, the
range cannot be sorted. You can export arange containing
formulas as a list or matrix, then import the data that now
contains no formulas, and then sort the imported range.
Sorting data in a column or row
1. Select the range of cells to be sorted.
2. Press …7:Sort and select 1:Ascending or 2:Descending
order.
3. Press ¸.
Sorting by key column
Sometimes columns along the same row contain related
information, such as a student’s first name, last name, and test
scores. In such a case, sorting only a single column would
destroy the relationship between the columns. You can sort by
key column to keep that relationship. All columns must have the
same length.
TI-89 / TI-92 Plus / Voyage™ 200 PLT CellSheet™ App Page 45
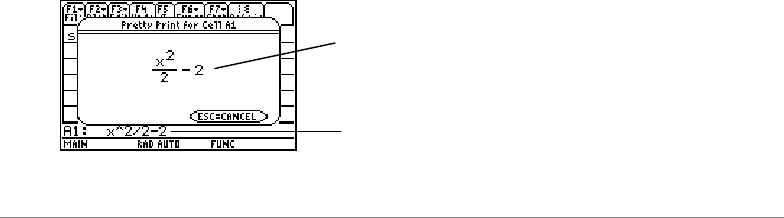
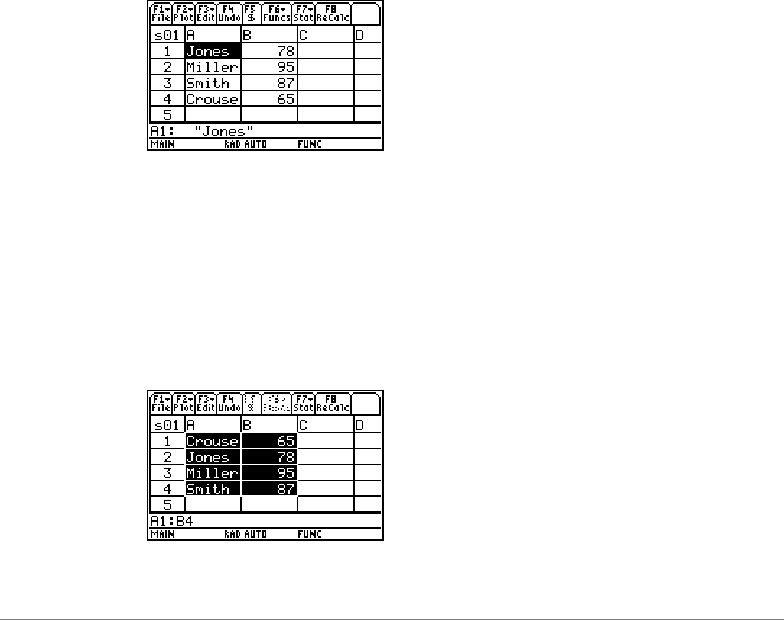
Example
Sort a grade sheet by last name.
1. Enter the information as shown.
2. Select the entire range of cells (A1:B4).
3. Press …7:Sort.
4. For Order, select 3:Asc by Key.
5. For the Key Col, enter A. Press ¸ ¸.
TI-89 / TI-92 Plus / Voyage™ 200 PLT CellSheet™ App Page 46
Formatting
Format information is retained after the CellSheet™ App is
closed.
Formatting an entire spreadsheet
To format the entire spreadsheet, press ƒ9:Format and then
change any of the following settings in the FORMATS dialog box.
The changes apply only to the current spreadsheet.
Field Name Description Default Setting
AutoCalc Automatically recalculates the entire
spreadsheet as you work.
Select 1:YES or 2:NO.
Note: When AutoCalc is set to NO, cells
with new formulas that you create will
display a value determined using the
current values in the other cells.
Because the current cell is the only one
that is evaluated, other cells may be
incorrect.
YES
TI-89 / TI-92 Plus / Voyage™ 200 PLT CellSheet™ App Page 47
Field Name Description Default Setting
Cursor
Mvmt Controls the direction that the cursor
moves after you press Íon the edit
line.
Select 1:DOWN, 2:RIGHT, or 3:OFF.
DOWN
Show Controls what information is displayed
on the edit line – formulas or resultant
values. If you have chosen to show
values and a selected cell contains a
formula, the formula displays on the edit
line when you press ¸so that you
can edit it.
Select 1:FORMULA or 2:VALUE.
FORMULA
Formatting a column
Formatting selected columns changes the way that data is
viewed. Press …8:Column Format,and then change any of the
following settings in the COLUMN FORMAT dialog box. Changes
apply only to the current spreadsheet.
Field Name Description Default Setting
Column The column you wish to format. The column(s)
currently selected

TI-89 / TI-92 Plus / Voyage™ 200 PLT CellSheet™ App Page 48
Field Name Description Default Setting
Display
Digits Determines how many digits, up to
12, are displayed in the column.
The default is FLOAT 6, which
means that results are rounded to a
maximum of six digits. Changing
the mode screen setting does not
affect data displayed in the
CellSheet™ App.
FLOAT 6
Col Width Determines how many characters
are displayed in the column’s cells.
You can view 1 to 12 characters in
acell.
6
Justification Choose 1:DEFAULT, 2:LEFT, or
3:RIGHT. Numeric values
are right-justified
in the cell; text is
left-justified.

TI-89 / TI-92 Plus / Voyage™ 200 PLT CellSheet™ App Page 49
Blank Cells
If a blank cell is referenced directly in a formula, it is treated as a
0(zero). For example, if A1 is blank and A2 contains the formula
=A1x2, A2 will evaluate to 0 (zero). If a range of cells contains a
blank cell, the blank cell is ignored in calculations.
Example
1. Leave cell A1 blank. Enter 3 in A2 and 1 in A3.
2. In A4, enter =mean(A1:A3). A4 evaluates to 2.

TI-89 / TI-92 Plus / Voyage™ 200 PLT CellSheet™ App Page 50
Archiving Spreadsheets
You cannot change cell entries or format settings in an archived
spreadsheet.
1. Exit the CellSheet™ App.
2. Press 2 ° and select the spreadsheet to be
archived.
3. Press ƒ8:Archive Variable.
Note Archived and locked spreadsheets can be opened for viewing
purposes only. Only unarchived/unlocked spreadsheets can be
opened for editing.
TI-89 / TI-92 Plus / Voyage™ 200 PLT CellSheet™ App Page 51
Key Shortcuts
Press ƒB:Help for a help screen showing navigation, selecting,
and editing key shortcuts.
To… Do this…
Enter a value or
symbolic expression
in a cell
1. Enter a value or symbolic expression.
2. Press ¸.
Enter a formula in a
cell 1. From a selected cell, press Áif you need the cell
content to be updated.
2. Type the formula.
3. Press ¸.
Enter a string (text)
in a cell 1. While in a cell, press 2 É.
2. Type the string (text).
3. Press 2 É.
4. Press ¸.

TI-89 / TI-92 Plus / Voyage™ 200 PLT CellSheet™ App Page 52
To… Do this…
Use a variable in a
cell 1. From outside the application, store a value to a
variable. (Example: 5 §x)
2. In the application, type the variable (such as x). Do
not surround the variable with quotation marks. If the
variable has the same name as a cell or if it is in a
different folder, include the path name.
Tip:Type = or + before the variable if you would like
the value in the cell to change when the variable’s
value changes.
3. Press ¸.The variable's value appears in the
cell.
Navigate rapidly in a
spreadsheet •A,B,C,or Dmoves the cursor from the
current cell to an adjacent cell.
•¥ C or ¥ D moves the cursor to the first or last
cell in a column.
•¥ A or ¥ B moves the cursor to the first or last
cell in a row.
•2 C or 2 D moves the cursor several rows
up or down.
•2 B or 2 A moves the cursor several
columns to the right or left.
•…1:GoTo moves the cursor to the cell you
indicate.
Note:For the TI-89 only, press jin the
CellSheet™ App dialog boxes before typing alpha
characters.

TI-89 / TI-92 Plus / Voyage™ 200 PLT CellSheet™ App Page 53
To… Do this…
Select a range of
cells 1. In a cell, press and hold ¤while pressing C,A,B,
or D.
2. Release ¤.
Tip:For a large range, it might be faster to use
…2:Select Range.In the dialog box, type the
column/row of the beginning and end of the range
and press ¸(Example: a6:m53). Press Bor N
to deselect the range.
Select one or more
rows 1. Press ¥ A to go to the first cell in the row.
2. Press Ato select the row.
3. Press and hold ¤while pressing Cor D.
4. Release ¤.
Tip:Press Bto deselect the range.
Select one or more
columns 1. Press ¥ C to go to the first cell in the column.
2. Press Cto select the column.
3. Press and hold ¤while pressing Aor B.
4. Release ¤.
Tip:Press Dto deselect the range.
Insert a cell 1. Select a cell.
2. Press 2 / to insert a cell above the selected
cell.
Insert a row 1. Select a row.
2. Press 2 / to insert a row above the selected
row.
Tip:Press Bto deselect a row.

TI-89 / TI-92 Plus / Voyage™ 200 PLT CellSheet™ App Page 54
To… Do this…
Insert a column 1. Select a column.
2. Press 2 / to insert a column to the left of the
selected column.
Tip:Press Dto deselect a column.
Delete a cell 1. Select one or more cells.
2. Press 0or ¥ 8.Cells below the deleted area
move up by the number of cells deleted.
Delete a row 1. Select one or more rows.
2. Press 0or ¥ 8.Rows below the deleted area
move up by the number of rows deleted.
Delete a column 1. Select one or more columns.
2. Press 0or ¥ 8.Columns to the right of the
deleted area move to the left by the number of
columns deleted.
Clear data without
deleting the cell,
row, or column
1. Select one or more cells, rows, or columns.
2. Press M.

TI-89 / TI-92 Plus / Voyage™ 200 PLT CellSheet™ App Page 55
To… Do this…
Cut, copy, and paste To cut:
1. Select one or more cells.
2. Press:
TI-89: ¥ 5
TI-92 Plus / Voyage™ 200 PLT: ¥X
To copy:
1. Select one or more cells.
2. Press:
TI-89: ¥ 6
TI-92 Plus / Voyage 200 PLT: ¥C
To paste:
1. Select one or more cells.
2. Press:
TI-89: ¥ 7
TI-92 Plus / Voyage 200 PLT: ¥V
Note:If you are pasting to a range, the destination
range must have the same dimensions as the cut or
copied range.

TI-89 / TI-92 Plus / Voyage™ 200 PLT CellSheet™ App Page 56
To… Do this…
Quick fill 1. Select a cell that contains information.
2. Press:
TI-89: ¥ 6
TI-92 Plus / Voyage™ 200 PLT: ¥C
3. Select a range of cells.
4. Paste the copied information:
TI-89: ¥ 7
TI-92 Plus / Voyage 200 PLT: ¥V.
Note:Cell references in formulas are updated in the
pasted range. You can also use …3:Fill Range.
Grab a cell reference 1. While editing or entering a formula or function, press
§.
2. Use the arrow keys to move the cursor to the cell
whose reference you would like to enter into the
formula.
3. Press ¸.
Grab a range
reference 1. While editing or entering a formula, press §.
2. Use the arrow keys to move the cursor to the first
cell in a range you want to reference.
3. Press and hold ¤while pressing the arrow keys
until the range is selected.
4. Press ¸.
Change format
settings for an entire
spreadsheet
Press ¥Í(TI-89) or ¥Fto display the FORMATS
dialog box.

TI-89 / TI-92 Plus / Voyage™ 200 PLT CellSheet™ App Page 57
Example — Interest and Principal Paid
Margaret used her QuickCash credit card to purchase a $1500
item. QuickCash charges 1.5 percent interest that is
compounded monthly. The required minimum monthly payment
is 3 percent of the balance. Assuming that Margaret makes the
minimum monthly payment, how much interest and principal will
she have paid in six months?
8Start the CellSheet™ App and change column settings to
show money entries.
1. Select columns A, B, and C.
2. Press …8:Column Format.Select FIX 2 for display digits
and change the column width to 7.
TI-89 / TI-92 Plus / Voyage™ 200 PLT CellSheet™ App Page 58
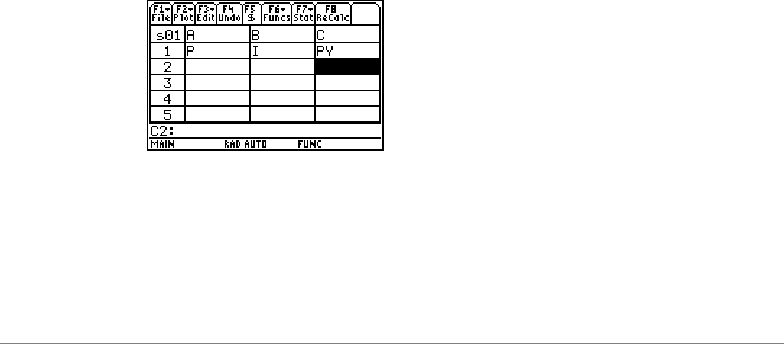
8Enter these column headings:
P = principal
I = interest accrued
PY = minimum monthly payment
1. With the cursor in cell A1, enter the principal column
heading, P (2["] P 2["] ).
2. Move the cursor to cell B1, and enter the interest accrued
column heading, I (2["] I 2["]).
3. Move the cursor to cell C1, and enter the minimum
monthly payment column heading, PY (2["] PY 2["]).
Your spreadsheet should look like this:
TI-89 / TI-92 Plus / Voyage™ 200 PLT CellSheet™ App Page 59
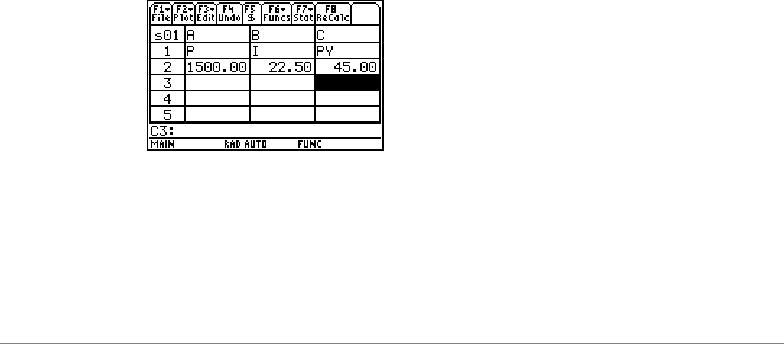
8Enter the initial data for the spreadsheet in cells A2, B2,
and C2:
P = 1500.
I = .015 QP
PY = .03 QP
1. Move the cursor to cell A2, and enter 1500. (1500. Í)
2. Move the cursor to cell B2, and enter the interest formula
as =A2 p.015 (use the multiplication key, not an x).
3. Move the cursor to cell C2, and enter the payment
formula as =A2 p.03.Your spreadsheet should look like
this:
TI-89 / TI-92 Plus / Voyage™ 200 PLT CellSheet™ App Page 60
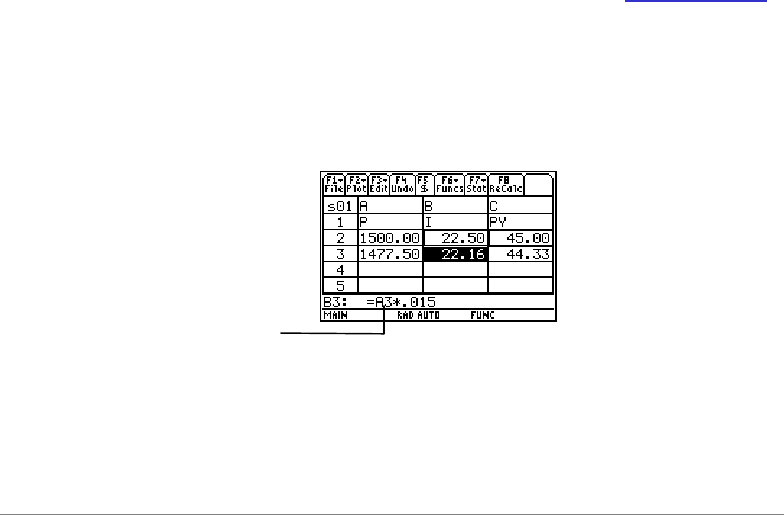
8At the beginning of each month, the new principal is
calculated using the formula P2= P1–(PY – I). The interest
accrued and minimum monthly payment are calculated exactly
as they were for the first month.
1. Move the cursor to cell A3, and enter the formula for the
new principal amount as =A2–(C2–B2).
2. To copy the formulas from B2:C2 to B3:C3, select B2:C2
and press ¥ 6 (TI-89) or ¥C.
3. Select B3, and then press ¥ 7 (TI-89) or ¥Vto
paste the formula from this range of cells. Your
spreadsheet should look like this:
Notice that the relative
reference to A2
automatically changes
to A3.
TI-89 / TI-92 Plus / Voyage™ 200 PLT CellSheet™ App Page 61
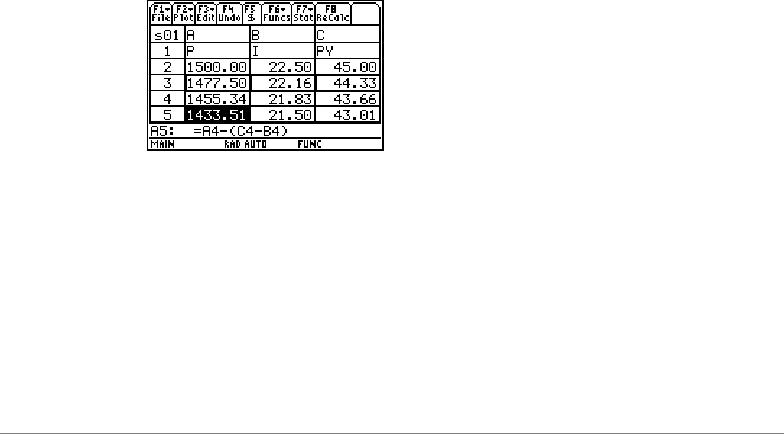
8Enter the data for the remaining four months by copying the
formulas from A3:C3 to rows 4 through 7.
1. Select A3:C3 and press ¥ 6 (TI-89) or ¥Cto copy
the formulas from A3:C3.
2. Move the cursor to cell A4, and then press
¥ 7 (TI-89) or ¥Vto paste the formulas into A4:C4.
3. Paste the formulas to A5:C5, A6:C6, and A7:C7. Your
spreadsheet should look like this:
TI-89 / TI-92 Plus / Voyage™ 200 PLT CellSheet™ App Page 62
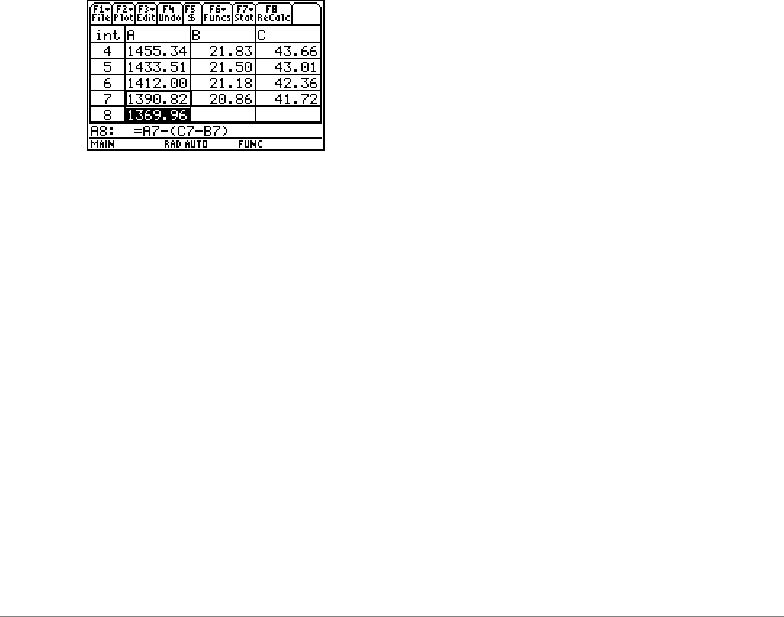
8Find the amount of principal left to be paid after six payments
have been made.
Move the cursor to cell A7, copy the formula, and paste it in
cell A8. Your spreadsheet should look like this:

TI-89 / TI-92 Plus / Voyage™ 200 PLT CellSheet™ App Page 63
8Using the following formulas, calculate how much interest and
principal Margaret will have paid after six months.
Total principal paid = 1500.00–A8.
Total interest paid = the sum of B2 through B7 (=sum(B2:B7)).
Total of the payments made = the sum of C2 through C7
(=sum(C2:C7)).
1. Move the cursor to cell A9 and enter the formula for the
total principal paid as =A2–A8.
2. Move the cursor to B9 and press Á.
3. Press 2 ˆ (TI-89) or ˆ5:sum(.
4. To put B2:B7 on the edit line, press §,select B2:B7,
and press ¸.Press dto complete the formula and
then press ¸.
TI-89 / TI-92 Plus / Voyage™ 200 PLT CellSheet™ App Page 64
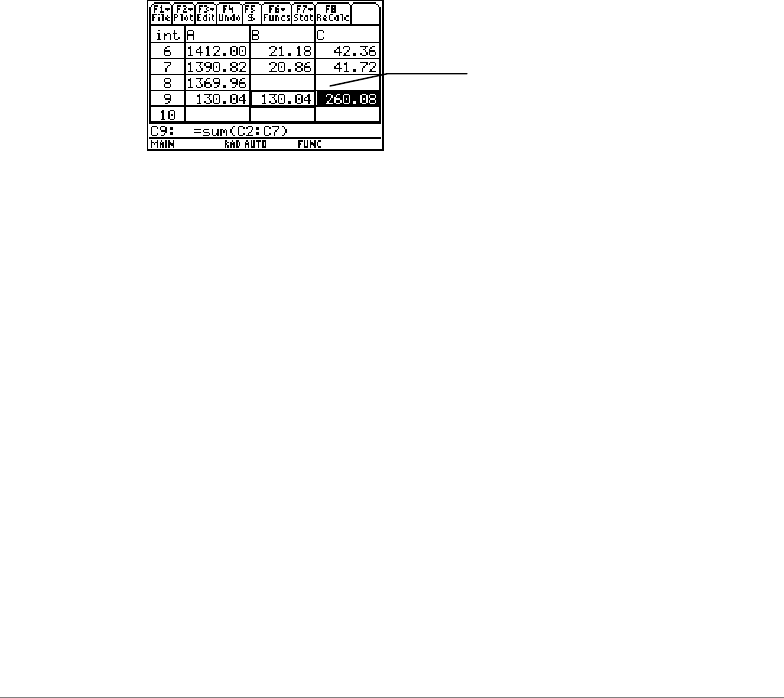
5. Move the cursor to cell B9, copy the formula, and paste it
in cell C9. Your spreadsheet should look like this:
To see how many months it will take Margaret to repay the credit
card company completely, copy and paste the range A7:C7 down
the rows until the amount in column A goes to zero.
After 6 months, Margaret will
have paid $260.08, which
includes $130.04 in interest
and $130.04 in principal. She
still owes $1369.96.

TI-89 / TI-92 Plus / Voyage™ 200 PLT CellSheet™ App Page 65
Example — Linear Regression
Asurvey examined the relationship between the age (in years)
and the average height (in centimeters) of a young person.
Age is given by the list {1, 3, 5, 7, 9, 11, 13}.
Average height is given by the list {75, 92, 108, 121, 130,
142, 155}.
8Start the CellSheet™ App. Then set up the column headings,
and enter the data.
1. Enter the column headings AGE and HEIGHT in cells A1
and B1.
2. Move the cursor to cell A2.
TI-89 / TI-92 Plus / Voyage™ 200 PLT CellSheet™ App Page 66
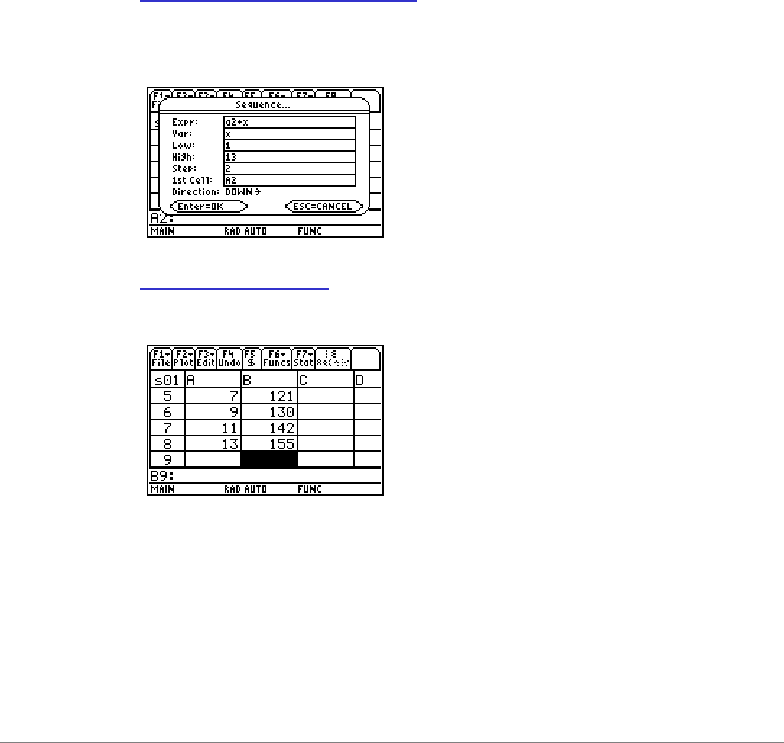
3. Use the sequence option (…4:Sequence)to enter the list
of ages in cells A2 through A8. The Sequence dialog box
should look like this:
4. Enter the heights in cells B2 through B8. Your
spreadsheet should look like this:
8Plot the data and determine the linear regression correlation.
1. Select the range A2:B8.
2. Select „1:Plot Setup.
TI-89 / TI-92 Plus / Voyage™ 200 PLT CellSheet™ App Page 67
3. Plot 1 should be highlighted on the Plot Setup screen.
Press ƒ.
4. Select
Scatter for the Plot Type.
5. Press Dand select the type of Mark you want.
6. The xRange is A2:A8, and the yRange is B2:B8.
Press ¸ ¸.
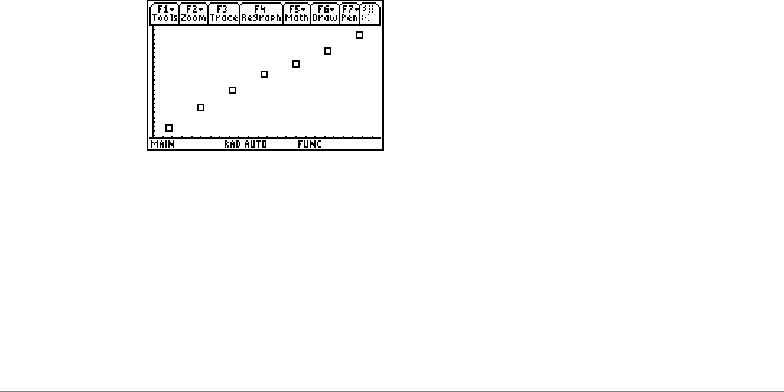
7. On the Plot Setup screen, press ‡to show the graph.
The following graph appears. (This graph uses the Box
mark.)
8. Press 2 a to return to the spreadsheet.
9. Press 2 ‰ (TI-89) or ‰1:Calculate.
10. Select 5:LinReg for Calculation Type.
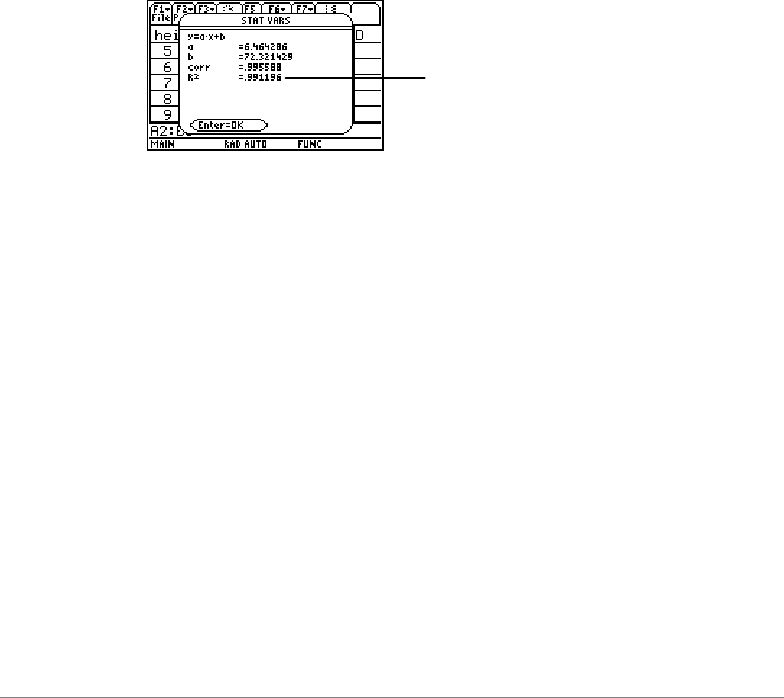
TI-89 / TI-92 Plus / Voyage™ 200 PLT CellSheet™ App Page 68
11. Press ¸. A correlation of .995588 shows that the
data fit a linear regression well.
The closer this number is to 1, the
better the data fit a linear regression.

TI-89 / TI-92 Plus / Voyage™ 200 PLT CellSheet™ App Page 69
Example — Maximum Area
Farmer Brown has 60 meters (m) of fencing material. What is
the estimated maximum area of rectangular pasture he can
enclose?
8Start the CellSheet™ App. Then enter 60 m (the amount of
fencing material) in cell A1.
1. On the entry line, type 60.
2. Press 2 9 (TI-89) or ¥9and select _m for
length.
3. Press ¸.
8Enter the measurements for one side (L1) of the enclosure
using the sequence option.Assume that the measurements
start at 5 m and go up to 30 m in 5-m increments.
1. Select cell A2 and press …4:Sequence.
2. In the dialog box, enter x pfor Expr. Then press
29 (TI-89) or ¥9 and select _m for length.
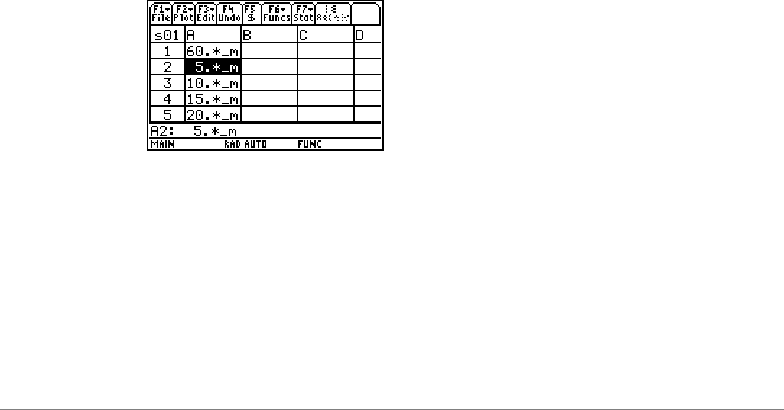
TI-89 / TI-92 Plus / Voyage™ 200 PLT CellSheet™ App Page 70
3. Enter the following:
-xfor Var
-5for Low
-30 for High
-5for Step
-A2 for 1st Cell
-Direction should be DOWN.
4. Press ¸.Your spreadsheet should look like this:
TI-89 / TI-92 Plus / Voyage™ 200 PLT CellSheet™ App Page 71
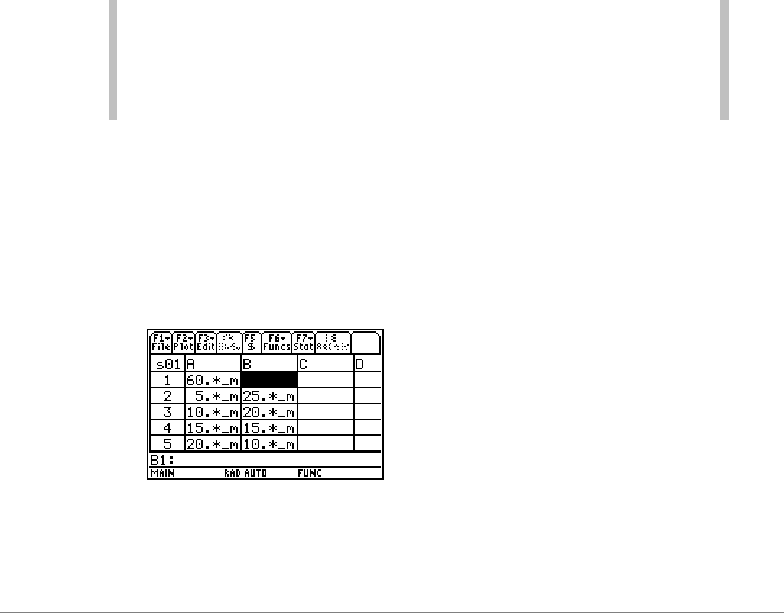
8Enter measurements for the other side of the enclosure (L2).
L2=60/2-L1.
1. In cell B2, enter =($a$1e2)–a2 for the formula for the
length.
Tip $a$1 means that this particular cell reference will not change,
regardless of where it is in the spreadsheet. It is an absolute
reference. Press ‡for the $ sign. The relative reference to cell
A2 should update as it fills down to determine the length of the
remaining side.
2. Select cell B2 and press ¥ 6 (TI-89) or ¥Cto copy
the formula
3. Select B3:B7 and then press ¥ 7 (TI-89) or ¥Vto
paste the formula into the range. Your spreadsheet
should look like this:

TI-89 / TI-92 Plus / Voyage™ 200 PLT CellSheet™ App Page 72
8Determine the possible areas that can be enclosed with the
fencing material.
1. Enter =A2 pB2 in cell C2.
2. Copy cell C2 and paste it to C3:C7. Your spreadsheet
should look like this:
Notice that the maximum area for the lengths that we determined
(225 m2)occurs when the length of the area equals its width.
The maximum area to be enclosed would be shaped like a
square. What happens if you change cell A1 to 45 m? What
happens if you pick a different step size in the sequence?

TI-89 / TI-92 Plus / Voyage™ 200 PLT CellSheet™ App Page 73
Errors, Error Messages, and Restrictions
Message Description
Action will remove data
from spreadsheet. Press
Enter to proceed or ESC to
abort.
This error message appears when you
have data in a far right corner or in a far
down row of the spreadsheet and you wish
to insert a range that will cause some of
the data to move beyond the spreadsheet’s
999 rows or 64 columns.
Cannot complete operation
due to CellSheet size
limitations. Operation
aborted.
This occurs when an operation would
make the spreadsheet exceed its 64k size
limit.
Cannot export. Blank cells
or errors in cells. The CellSheet™ App does not export
ranges that contain blank cells or formulas
that evaluate to an error.
Cannot paste to a range of
different size than original
range.
This message appears when you try to
paste a range of cells into an area where it
cannot fit in its entirety or when you try to
paste a range into a different sized range.
For example, if you copied A1:B3 and tried
to paste to BL1, this error message would
appear because there is no column
after BL1.
Cannot sort a range
containing formulas. The CellSheet App does not sort ranges
that contain formulas.

TI-89 / TI-92 Plus / Voyage™ 200 PLT CellSheet™ App Page 74
Message Description
Cannot use commands in
cells. You cannot enter an instruction in a cell.
You can enter functions that return values.
Instructions initiate actions.
Circular References.
Cannot recalculate properly
until circular references are
resolved.
This occurs when a cell formula results in a
loop, for example when A1 is set to =A1.
Invalid cell or cell range. This occurs when you enter an invalid cell
or range such as A0, BZ12, or A1:A1000 or
when you enter a single cell where a range
is required. Valid cells are A1 to BL999.
KeyCol not in selected
sorting range. This error appears when the key column is
not in the range you have selected to sort.
Memory. Cannot store data.
Data item contains too
many characters.
This error occurs when you have too many
characters in a cell to store, for example an
exceptionally long formula. Break up the
information into two or more cells.
Problem with Spreadsheet
file. Please delete the
variable.
The current spreadsheet file variable is
corrupted. To correct this problem, delete
the variable.
1. Press 2 °.
2. Select the variable for the current
spreadsheet file.
3. Press 0and ¸to delete the variable.

TI-89 / TI-92 Plus / Voyage™ 200 PLT CellSheet™ App Page 75
Message Description
Spreadsheet cannot
maintain excessive
references to the same cell.
Recalculation canceled.
This occurs when you have referred to a
single cell too many times. You can correct
this error by making another cell refer to
the needed cell and using both cell
references in formulas.
Syntax This occurs when you enter an invalid cell
reference (e.g., A0) or if you delete a cell
that is referred to by another cell.
Unable to properly update
one or more plot
definitions.
This error message appears when the app
is unable to update a list associated with a
plot. Example:
1. Create a plot with the xRange as A1:A3
and the yRange B1:B3.
2. Return to the spreadsheet, and create an
error in A3.
3. Return to the plot you created. Press ‡
to graph it.
The error message appears.

TI-89 / TI-92 Plus / Voyage™ 200 PLT CellSheet™ App Page 76
Message Description
Variable is locked,
protected, or archived.
Turning AutoCalc format
option off.
The spreadsheet that you are trying to
open has been archived or locked, so you
cannot make any changes. To unlock or
unarchive the spreadsheet:
1. Press 2 K to exit the app.
2. Press 2 °.
3. Select the archived variable.
4. Press ƒ9:Unarchive Variable.

TI-89 / TI-92 Plus / Voyage™ 200 PLT CellSheet™ App Page 77
CellSheet™ App Menu Map
F1 File
1:Open
2:Save Sheet As
3:New
4:Cut
5:Copy
6:Paste
7:(no option available)
8:Clear Sheet
9:Format
A:About
B:Help
F2 Plot
1:Plot Setup
2:PlotsOff
3:FnOn
F3 Edit
1:GoTo
2:Select Range
3:Fill Range
4:Sequence
5:Import
6:Export
7:Sort
8:Column Format
9:Show Pretty Print
F4 Undo
(no menu items)

TI-89 / TI-92 Plus / Voyage™ 200 PLT CellSheet™ App Page 78
F5 $
(no menu items)
F6 Funcs
1:cellZf(
2:count(
3:mean(
4:rand(
5:sum(
F7 Stat
1:Calculate
2:Show Stats
3:Variables 8
(depends on type of statistical
analysis)
F8 ReCalc
(no menu items)

TI-89 / TI-92 Plus / Voyage™ 200 PLT CellSheet™ App Page 79
Installing the CellSheet™ App
Detailed Flash application installation instructions are available
from education.ti.com/guides.
You will need:
•ATI-89 / TI-92 Plus / Voyage™ 200 PLT with the latest
Advanced Mathematics Software Operating System.
Download a free copy from
education.ti.com/softwareupdates.
•Acomputer using either MicrosoftëWindowsëor Appleë
Macintoshëoperating system software.
•ATI-GRAPH LINK™ computer-to-calculator cable, available
for purchase from the TI Online Store at
education.ti.com/buy.
• Either TI Connect™ software or TI-GRAPH LINK connectivity
software for the TI-89 / TI-92 Plus. Download a free copy
from education.ti.com/softwareupdates.

TI-89 / TI-92 Plus / Voyage™ 200 PLT CellSheet™ App Page 80
Starting and Quitting the Application
The instructions in this guidebook refer to this Flash application
only. For help using this product, refer to the comprehensive
guidebook at education.ti.com/guides.
1. Press Œand select CellSheet.
2. Select the spreadsheet type from the menu.
-Current returns to the last spreadsheet when you left
the CellSheet™ App.
-Open lets you select an existing spreadsheet.
-New creates a new spreadsheet. Select a folder in
which to store the spreadsheet. You may accept the
default spreadsheet name or overwrite it. Names must
be eight characters or fewer.
Quitting the CellSheet App
Press 2 K from any screen.

TI-89 / TI-92 Plus / Voyage™ 200 PLT CellSheet™ App Page 81
Deleting an Application
Deleting an application removes it from the handheld device and
increases space for other applications. Before deleting an
application, consider storing it on a computer for reinstallation
later.
1. Quit the application.
2. Press 2 ° to display the VAR-LINK [ALL] screen.
3. Press 2 ‰ (TI-89) or ‰to display the list of installed
applications.
4. Select the application you want to delete.
5. Press ƒ1:Delete.The VAR-LINK delete confirmation
dialog box displays.
6. Press ¸to delete the application.

TI-89 / TI-92 Plus / Voyage™ 200 PLT CellSheet™ App Page 82
Texas Instruments (TI) Support and Service
Information
For general information
E-mail: ti-cares@ti.com
Phone: 1.800.TI.CARES (1.800.842.2737)
For US, Canada, Mexico, Puerto Rico, and
Virgin Islands only
Home page: education.ti.com
For technical questions
Phone: 1.972.917.8324
For product (hardware) service
Customers in the US, Canada, Mexico, Puerto Rico, and
Virgin Islands: Always contact TI Customer Support before
returning a product for service.
All other customers: Refer to the leaflet enclosed with your
product (hardware) or contact your local TI retailer/distributor.

TI-89 / TI-92 Plus / Voyage™ 200 PLT CellSheet™ App Page 83
End-User License Agreement
Calculator Applications
IMPORTANT - Read this agreement (“Agreement”) carefully before installing the software program(s) and/or
calculator application(s). The software program(s) and/or calculator program(s) and any related
documentation (collectively referred to as the Program) are licensed, not sold, by Texas Instruments
Incorporated (TI) and/or any applicable licensors (collectively referred to as Licensor). By installing or
otherwise using the Program, you agree to be bound by the terms of this license. If the Program was
delivered to you on diskette(s) or CD and you do not agree with the terms of this license, return this package
with all its contents to the place of purchase for a full refund of any license fee paid. If the Program was
delivered to you over the Internet and you do not agree with the terms of this license do not install or use the
Program and contact TI for instructions on obtaining a refund of any license fee paid.
Specific details of the license granted depend upon the license fee you paid and are set forth below. For purposes of
this Agreement, a site (“Site”) consists of one entire physical campus of an educational institution accredited by an
association recognized by the U.S. Department of Education or the State Board of Education, or by their equivalents
in other countries. All additional terms of the Agreement apply regardless of the license granted.
SINGLE USER LICENSE
If you paid a license fee for a Single User License, Licensor grants to you a personal, non-exclusive, non-transferable
license to install and use the Program on a single computer and calculator. You may make one copy of the Program
for backup and archival purposes. You agree to reproduce all copyright and proprietary notices shown in the Program
and on the media. Unless otherwise expressly stated in the documentation, you may not duplicate such
documentation.
EDUCATIONAL MULTIPLE USER LICENSE
If you paid a license fee of an Educational Multiple User License, Licensor grants you a non-exclusive, non-
transferable license to install and use the Program on the number of computers and calculators specified for the
license fee you paid. You may make one copy of the Program for backup and archival purposes. You agree to
reproduce all copyright and proprietary notices shown in the Program and on the media. Except as expressly stated
herein or in the documentation, you may not duplicate such documentation. In cases where TI supplies the related
documentation electronically you may print the same number of copies of the documentation as the number of
computers/calculators specified for the license fee you paid. All the computers and calculators on which the Program
is used must be located at a single Site. Each member of the institution faculty may also use a copy of the Program
on an additional computer/calculator for the sole purpose of preparing course materials.
EDUCATIONAL SITE LICENSE
If you paid a license fee for an Educational Site License, Licensor grants you a non-exclusive, non-transferable
license to install and use the Program on all institution, teacher, or student owned, leased or rented computers and
calculators located or used at the Site for which the Program is licensed. Teachers and students have the additional
right to use the Program while away from the Site. You may make one copy of the Program for backup and archival
purposes. You agree to reproduce all copyright and proprietary notices shown in the Program and on the media.

TI-89 / TI-92 Plus / Voyage™ 200 PLT CellSheet™ App Page 84
Except as expressly stated herein or in the documentation, you may not duplicate such documentation. In cases
where TI supplies the related documentation electronically you may print one copy of such documentation for each
computer or calculator on which the Program is installed. Each member of the institution faculty may also use a copy
of the Program on an additional computer/calculator for the sole purpose of preparing course materials. Students
must be instructed to remove the Program from student owned computers and calculators upon the end of their
enrollment in the institution.
Additional Terms:
WARRANTY DISCLAIMER AND DAMAGES EXCLUSIONS AND LIMITATIONS
Licensor does not warrant that the Program will be free from errors or will meet your specific requirements. Any
statements made concerning the utility of the Program are not to be construed as express or implied warranties.
LICENSOR MAKES NO CONDITIONS OR WARRANTIES, EITHER EXPRESS OR IMPLIED, INCLUDING BUT
NOT LIMITED TO ANY IMPLIED CONDITIONS OR WARRANTIES OF MERCHANTABILITY, FITNESS FOR A
PARTICULAR PURPOSE, OR NON-INFRINGEMENT REGARDING THE PROGRAM AND MAKES THE
PROGRAM AVAILABLE ON AN "AS IS" BASIS.
Although no warranty is given for the Program, the media, if the Program was delivered to you on diskette(s) or CD,
will be replaced if found to be defective during the first ninety (90) days of use, when the package is returned postage
prepaid to TI. THIS PARAGRAPH EXPRESSES LICENSOR'S MAXIMUM LIABILITY AND YOUR SOLE AND
EXCLUSIVE REMEDY FOR DEFECTIVE MEDIA.
LICENSOR SHALL NOT BE RESPONSIBLE FOR ANY DAMAGES CAUSED BY THE USE OF THE PROGRAM,
OR SUFFERED OR INCURRED BY YOU OR ANY OTHER PARTY INCLUDING BUT NOT LIMITED TO SPECIAL,
INDIRECT, INCIDENTAL OR CONSEQUENTIAL DAMAGES, EVEN IF LICENSOR HAS BEEN ADVISED OF THE
POSSIBILITY OF SUCH DAMAGES. IN JURISDICTIONS WHICH ALLOW TEXAS INSTRUMENTS TO LIMIT ITS
LIABILITY, TI’S LIABILITY IS LIMITED TO THE APPLICABLE LICENSE FEE PAID BY YOU.
Because some states or jurisdictions do not allow the exclusion or limitation of incidental or consequential damages
or limitation on how long an implied warranty lasts, the above limitations or exclusions may not apply to you.
GENERAL
This Agreement will immediately terminate if you fail to comply with its terms. Upon termination of this Agreement,
you agree to return or destroy the original package and all whole or partial copies of the Program in your possession
and so certify in writing to TI.
The export and re-export of United States original software and documentation is subject to the Export Administration
Act of 1969 as amended. Compliance with such regulations is your responsibility. You agree that you do not intend
to nor will you, directly or indirectly, export, re-export or transmit the Program or technical data to any country to which
such export, re-export or transmission is restricted by any applicable United States regulation or statute, without the
proper written consent or license, if required of the Bureau of Export Administration of the United States Department
of Commerce, or such other governmental entity as may have jurisdiction over such export, re-export or transmission.

TI-89 / TI-92 Plus / Voyage™ 200 PLT CellSheet™ App Page 85
If the Program is provided to the U.S. Government pursuant to a solicitation issued on or after December 1, 1995, the
Program is provided with the commercial license rights and restrictions described elsewhere herein. If the Program is
provided to the U.S. Government pursuant to a solicitation issued prior to December 1, 1995, the Program is provided
with "Restricted Rights" as provided for in FAR, 48 CFR 52.227-14 (JUNE 1987) or DFAR, 48 CFR 252.227-7013
(OCT 1988), as applicable.
Manufacturer is Texas Instruments Incorporated, 7800 Banner Drive, M/S 3962, Dallas, Texas 75251.

TI-89 / TI-92 Plus / Voyage™ 200 PLT CellSheet™ App Page 86
Page Reference
This PDF document contains electronic bookmarks designed for easy on-
screen navigation. If you decide to print this document, please use the page
numbers below to find specific topics.
Important Information............................................................................................ 2
What Is the CellSheet™ Application?................................................................... 3
Overview............................................................................................................... 5
Navigating and Selecting Cells ............................................................................. 6
File Management .................................................................................................. 8
Entering Numbers............................................................................................... 15
Entering Text ...................................................................................................... 16
Entering Symbolic Expressions .......................................................................... 17
Formulas............................................................................................................. 20
Functions ............................................................................................................ 22
Editing Data ........................................................................................................ 28
Going Beyond the Basics.................................................................................... 30
Importing and Exporting Data............................................................................. 36
Plotting Data ....................................................................................................... 38
Using Statistics ................................................................................................... 42
Sorting Data........................................................................................................ 44
Formatting........................................................................................................... 46

TI-89 / TI-92 Plus / Voyage™ 200 PLT CellSheet™ App Page 87
Blank Cells.......................................................................................................... 49
Archiving Spreadsheets...................................................................................... 50
Key Shortcuts...................................................................................................... 51
Example — Interest and Principal Paid .............................................................. 57
Example — Linear Regression........................................................................... 65
Example — Maximum Area................................................................................ 69
Errors, Error Messages, and Restrictions........................................................... 73
CellSheet™ App Menu Map ............................................................................... 77
Installing the CellSheet™ App ............................................................................ 79
Starting and Quitting the Application................................................................... 80
Deleting an Application ....................................................................................... 81
Texas Instruments (TI) Support and Service Information................................... 82
End-User License Agreement............................................................................. 83
