JBL My Getting Started With TI Nspire™ Navigator™ Teacher Software (English) Nspire Navigator EN
User Manual: JBL Getting Started with TI-Nspire™ Navigator™ Teacher Software (English) TI-Nspire™ Navigator™ Teacher Software Guidebook
Open the PDF directly: View PDF ![]() .
.
Page Count: 381 [warning: Documents this large are best viewed by clicking the View PDF Link!]
- Important Information
- Setting up the TI‑Nspire™ Navigator™ Teacher Software
- Before You Begin
- Charging the Cradles
- Updating the Handheld Operating System
- Connecting the TI‑Nspire™ Navigator™ Access Point
- Confirming Handheld OS Version
- Naming the Class Network
- Adding Wireless Clients to the Network
- Connecting the Handhelds to the Wireless Adapters
- Connecting the Handhelds to Cradles
- Creating and Managing Your Teacher Account
- Logging In to the TI‑Nspire™ Navigator™ System from the Handheld
- Storing the Wireless Adapters and Cradles
- Using TI‑Nspire™ Network Manager
- Troubleshooting
- Getting Started with TI‑Nspire™ Navigator™ Teacher Software
- Tracking and Reporting System Use
- Using the Content Workspace
- Working with Connected Handhelds
- Using the Class Workspace
- Adding Classes
- Adding Students to Classes
- Removing Students from Classes
- Updating Class Rosters
- Managing Classes
- Beginning and Ending a Class Session
- Changing the Student View
- Arranging the Seating Chart
- Checking Student Login Status
- Sorting Student Information
- Changing the Classes Assigned to a Student
- Changing Student Names and Identifiers
- Moving Students to Another Class
- Copying Students to Another Class
- Exploring the Class Record
- Sending Files to a Class
- Collecting Files from Students
- Managing Unprompted Actions
- Saving Files to a Portfolio Record
- Deleting Files from Class Folders
- Checking the Status of File Transfers
- Canceling File Transfers
- Viewing File Properties
- Resetting Student Passwords
- Capturing Screens
- Accessing Screen Capture
- Using Capture Class
- Setting Teacher Preferences for Capture Class
- Setting View Options in Capture Class
- Creating Stacks of Student Screens
- Comparing Selected Screens
- Using Make Presenter
- Saving Screens When Using Capture Class
- Printing Captured Screens
- Using Capture Page
- Using Capture Selected Handheld
- Viewing Captured Screens
- Saving Captured Pages and Screens
- Copying and Pasting a Screen
- Using Live Presenter
- Using the Documents Workspace
- Using Question in the Teacher Software
- Polling Students
- Working with TI‑Nspire™ Documents
- Creating a New TI‑Nspire™ Document
- Opening an Existing Document
- Saving TI‑Nspire™ Documents
- Deleting Documents
- Closing Documents
- Formatting Text in Documents
- Using Colors in Documents
- Setting Page Size and Document Preview
- Working with Multiple Documents
- Working with Applications
- Selecting and Moving Pages
- Working with Problems and Pages
- Printing Documents
- Viewing Document Properties and Copyright Information
- Working with PublishView™ Documents
- Creating a New PublishView™ Document
- Saving PublishView™ Documents
- Exploring the Documents Workspace
- Working with PublishView™ Objects
- Working with TI-Nspire™ Applications
- Working with Problems
- Organizing PublishView™ Sheets
- Using Zoom
- Adding Text to a PublishView™ Document
- Using Hyperlinks in PublishView™ Documents
- Working with Images
- Working with Video Files
- Converting Documents
- Printing PublishView™ Documents
- Using the Review Workspace
- Using the Portfolio Workspace
- Exploring the Assignments Pane
- Exploring the Workspace Views
- Saving an Item to the Portfolio Workspace
- Importing an Item to the Portfolio Workspace
- Editing Scores
- Exporting Results
- Sorting Information in the Portfolio Workspace
- Opening a Portfolio Item in Another Workspace
- Opening a Master Document
- Adding a Master Document
- Redistributing a Portfolio Item
- Collecting Missing Files from Students
- Sending Missing Files to Students
- Renaming a Portfolio Item
- Removing Columns from Portfolio
- Removing Individual Files from Portfolio
- Summary of File Type Options
- Working with Images
- Writing Lua Scripts
- Regulatory Information
- Support and Service
- Index


2
Important Information
Except as otherwise expressly stated in the License that accompanies a
program, Texas Instruments makes no warranty, either express or implied,
including but not limited to any implied warranties of merchantability and
fitness for a particular purpose, regarding any programs or book materials and
makes such materials available solely on an "as-is" basis. In no event shall
Texas Instruments be liable to anyone for special, collateral, incidental, or
consequential damages in connection with or arising out of the purchase or
use of these materials, and the sole and exclusive liability of Texas
Instruments, regardless of the form of action, shall not exceed the amount set
forth in the license for the program. Moreover, Texas Instruments shall not be
liable for any claim of any kind whatsoever against the use of these materials
by any other party.
License
Please see the complete license installed in C:\Program Files\TI
Education\<TI-Nspire™ Product Name>\license.
Adobe®, Mac®, Microsoft®, PowerPoint®, SMART® Notebook, Vernier
DataQuest™, Windows®, and Windows® XP are trademarks of their respective
owners.
© 2011 - 2014 Texas Instruments Incorporated

Contents
Important Information 2
Setting up the TI-Nspire™ Navigator™ Teacher Software 9
Before You Begin 11
Charging the Cradles 11
Updating the Handheld Operating System 14
Connecting the TI-Nspire™ Navigator™ Access Point 16
Confirming Handheld OS Version 19
Naming the Class Network 20
Adding Wireless Clients to the Network 24
Connecting the Handhelds to the Wireless Adapters 28
Connecting the Handhelds to Cradles 29
Creating and Managing Your Teacher Account 32
Logging In to the TI-Nspire™ Navigator™ System from the Handheld 35
Storing the Wireless Adapters and Cradles 37
Using TI-Nspire™ Network Manager 38
Troubleshooting 45
Getting Started with TI-Nspire™ Navigator™ Teacher Software 49
Exploring the TI-Nspire™ Navigator™ Teacher Software 51
Exploring Workspaces 52
Exploring the Status Bar 53
Changing Language 54
Tracking and Reporting System Use 57
Creating the SessionLogs Folder 57
Managing Session Logs 58
Packaging and Sending Session Logs 60
Using the Content Workspace 63
Exploring the Content Workspace 63
Exploring the Resources Pane 64
Using the Preview Pane 66
Accessing Computer Content 67
Using Shortcuts 70
Working with Links 70
Using Web Content 73
3

4
Sending Files to Class 77
Working with Connected Handhelds 79
Viewing Content on Connected Handhelds 79
Managing Files on a Connected Handheld 82
Sending Files to Handhelds 84
Checking for an OS Update 87
Installing an OS Update 88
Renaming Handhelds 90
Using Identify Selected to Locate Handhelds 91
Using the Class Workspace 93
Adding Classes 93
Adding Students to Classes 99
Removing Students from Classes 101
Updating Class Rosters 101
Managing Classes 104
Beginning and Ending a Class Session 105
Changing the Student View 106
Arranging the Seating Chart 107
Checking Student Login Status 108
Sorting Student Information 108
Changing the Classes Assigned to a Student 109
Changing Student Names and Identifiers 111
Moving Students to Another Class 112
Copying Students to Another Class 113
Exploring the Class Record 113
Sending Files to a Class 115
Collecting Files from Students 118
Managing Unprompted Actions 121
Saving Files to a Portfolio Record 122
Deleting Files from Class Folders 123
Checking the Status of File Transfers 124
Canceling File Transfers 125
Viewing File Properties 125
Resetting Student Passwords 126
Capturing Screens 129
Accessing Screen Capture 130

Using Capture Class 130
Setting Teacher Preferences for Capture Class 132
Setting View Options in Capture Class 133
Creating Stacks of Student Screens 138
Comparing Selected Screens 139
Using Make Presenter 140
Saving Screens When Using Capture Class 140
Printing Captured Screens 141
Using Capture Page 143
Using Capture Selected Handheld 144
Viewing Captured Screens 145
Saving Captured Pages and Screens 146
Copying and Pasting a Screen 148
Using Live Presenter 149
Hiding and Showing Student Names 149
Hiding and Showing the Presenter Handheld 150
Viewing Keypress History 151
Showing the Handheld Screen Only 153
Recording the Live Presentation 154
Stopping Live Presenter 156
Using the Documents Workspace 157
Exploring the Documents Workspace 157
Using the Documents Toolbox 158
Exploring Document Tools 158
Exploring the Page Sorter 159
Exploring the TI-SmartView™ Feature 160
Exploring Utilities 162
Exploring Content Explorer 164
Using the Work Area 166
Changing Document Settings 167
Changing Graphs & Geometry Settings 169
Using Question in the Teacher Software 173
Understanding the Question Tools 174
Using the Teacher Tool Palette 175
Understanding the Configuration Tool 176
Formatting Text and Objects 177
5

6
Adding Images to Questions 178
Adding Questions 178
Polling Students 197
Opening the Quick Poll Tool 198
Sending a Quick Poll 200
Stopping Polls 201
Resending Polls 201
Sending Polls to Missing Students 202
Saving Polls 202
Viewing Poll Results 203
Working with TI-Nspire™ Documents 205
Creating a New TI-Nspire™ Document 205
Opening an Existing Document 206
Saving TI-Nspire™ Documents 207
Deleting Documents 208
Closing Documents 209
Formatting Text in Documents 209
Using Colors in Documents 211
Setting Page Size and Document Preview 211
Working with Multiple Documents 213
Working with Applications 214
Selecting and Moving Pages 217
Working with Problems and Pages 219
Printing Documents 221
Viewing Document Properties and Copyright Information 222
Working with PublishView™ Documents 225
Creating a New PublishView™ Document 226
Saving PublishView™ Documents 230
Exploring the Documents Workspace 232
Working with PublishView™ Objects 236
Working with TI-Nspire™ Applications 244
Working with Problems 248
Organizing PublishView™ Sheets 251
Using Zoom 257
Adding Text to a PublishView™ Document 257
Using Hyperlinks in PublishView™ Documents 260

Working with Images 267
Working with Video Files 270
Converting Documents 271
Printing PublishView™ Documents 274
Using the Review Workspace 275
Using the Review Toolbox 275
Exploring the Data View Pane 281
Opening Documents for Review 284
Viewing Data 286
Changing the Aspect Ratio 288
Organizing Responses 289
Hiding and Showing Responses 295
Marking Responses as Correct or Incorrect 297
Adding Teacher Data 303
Saving to the Portfolio Workspace 306
Saving Data as a New Document 307
Using the Portfolio Workspace 309
Exploring the Assignments Pane 309
Exploring the Workspace Views 310
Saving an Item to the Portfolio Workspace 313
Importing an Item to the Portfolio Workspace 314
Editing Scores 315
Exporting Results 317
Sorting Information in the Portfolio Workspace 318
Opening a Portfolio Item in Another Workspace 319
Opening a Master Document 320
Adding a Master Document 320
Redistributing a Portfolio Item 321
Collecting Missing Files from Students 321
Sending Missing Files to Students 322
Renaming a Portfolio Item 322
Removing Columns from Portfolio 323
Removing Individual Files from Portfolio 323
Summary of File Type Options 323
Working with Images 325
Working with Images in the Software 325
7

8
Writing Lua Scripts 329
Overview of the Script Editor 329
Exploring the Script Editor Interface 330
Using the Toolbar 331
Inserting New Scripts 333
Editing Scripts 333
Changing View Options 334
Setting Minimum API Level 335
Saving Script Applications 335
Managing Images 336
Setting Script Permissions 338
Debugging Scripts 338
Regulatory Information 341
USA FCC Information Concerning Radio Frequency Interference 341
FCC Statement 343
Canadian IC Information 343
European Union and EFTA Regulatory Compliance 346
Warning Statements 352
Important for Safe AC Adapter Operation 353
Support and Service 357
Texas Instruments Support and Service 357
Service and Warranty Information 357
Index 359
Setting up the TI-Nspire™ Navigator™ Teacher
Software
The TI-Nspire™ Navigator™ System provides the hardware and software tools
needed to set up a wireless classroom network. In a wireless classroom
environment, the TI-Nspire™ Navigator™ Teacher Software enables you to:
• Use Quick Poll to send polls to students, receive student responses, and
review the poll results with students.
• Use Screen Capture to capture screens from student handhelds or
computers automatically, or at specific time intervals.
• Use Live Presenter to display work as it is being performed on your
handheld screen, or on a student handheld screen.
• Use the Review Workspace to collect and review student assignments,
watch results in real time as students answer questions, and analyze data
for the entire class or for individual students.
About the Hardware
Depending on classroom requirements, your TI-Nspire™ Navigator™ System
may include the following hardware, which is used to create a wireless
communications network so that your computer can communicate with student
handhelds:
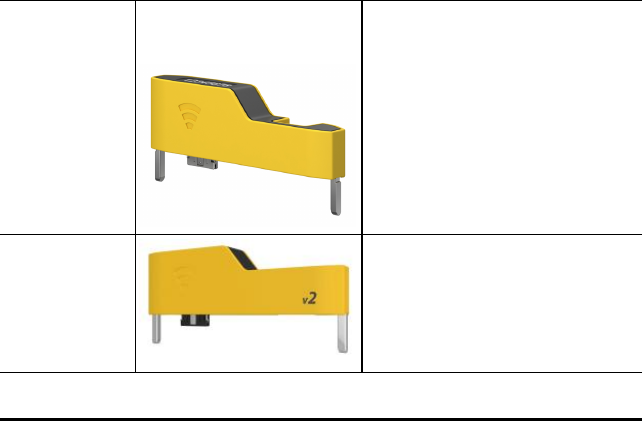
Hardware
Name Image Use
TI-Nspire™
Wireless
Network
Adapter
Attaches to the TI-Nspire™ CX
and TI-Nspire™ CXCAS
handhelds to enable wireless
communication over a 2.4GHz
band.
TI-Nspire™ CX
Wireless
Network
Adapter –
v2
Attaches to the TI-Nspire™ CX
and TI-Nspire™ CXCAS
handhelds to enable wireless
communication over a 2.4GHz or
5GHz band.
Setting up the TI-Nspire™ Navigator™ Teacher Software 9
10 Setting up the TI-Nspire™ Navigator™ Teacher Software
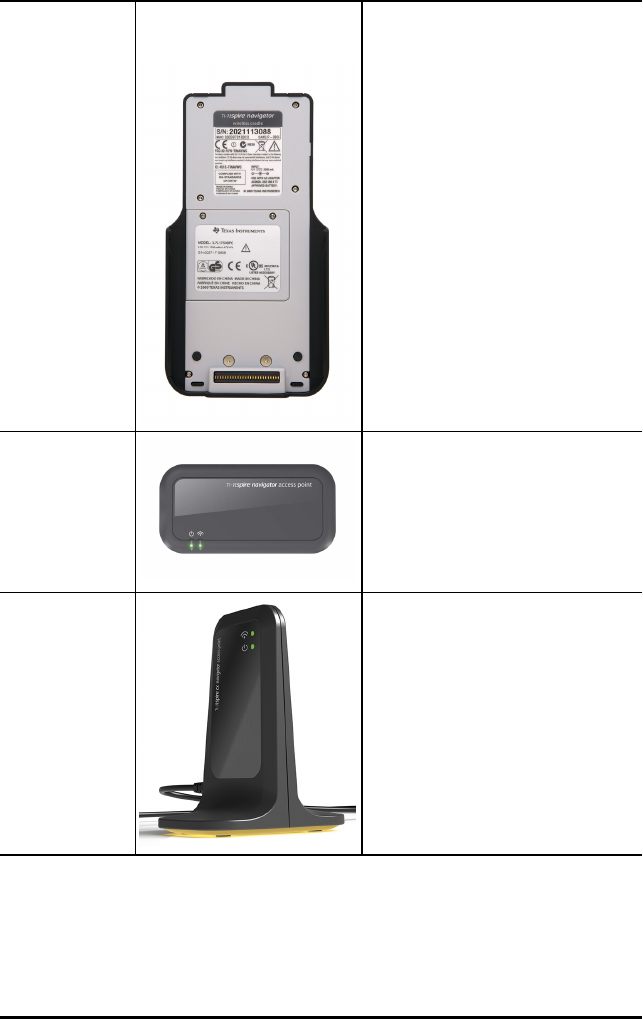
Hardware
Name Image Use
TI-Nspire™
Navigator™
wireless cradle
Attaches to all TI-Nspire™ CX
and TI-Nspire™ handhelds to
enable wireless communication
over a 2.4GHz band.
TI-Nspire™
Navigator™
access point
Connects to the teacher
computer to provide a 2.4GHz
wireless communication link.
TI-Nspire™ CX
Navigator™
access point
Connects to the teacher
computer to provide either a
2.4GHz or 5GHz wireless
communication link.

Before You Begin
When you launch a new version of the TI-Nspire™ Navigator™ Teacher
Software for the first time, the TI-Nspire™ Navigator™ System Startup wizard
opens and guides you through the automated process to set up your wireless
classroom. Before you begin the wireless set up process:
• Make sure you have installed and activated the TI-Nspire™ Navigator™
Teacher Software on your computer.
• If you are using TI-Nspire™ Navigator™ wireless cradles, make sure each
cradle is charged ( LEDis solid amber or solid green).
Note:If you are using TI-Nspire™ wireless network adapters, you do not
need to charge them. The wireless network adapters are powered by the
handhelds.
• Disconnect the TI-Nspire™ Navigator™ access point or TI-Nspire™ CX
Navigator™ access point from your computer.
Automated System Startup
When you launch the software, the Startup wizard guides you through the steps
needed to:
• Update all student and classroom handhelds to the latest operating system
(OS)version. The OS on the handhelds must match the software version
installed on your computer.
Important! When updating the OS, handhelds must be connected to the
computer using a USB cable or TI-Nspire™ CXDocking Station.
• Connect the access point and, if needed, update the access point
firmware.
• Name the class network.
• If required, select a channel for the access point.
• Add wireless clients to your network.
• Create a backup copy of the class network configuration.
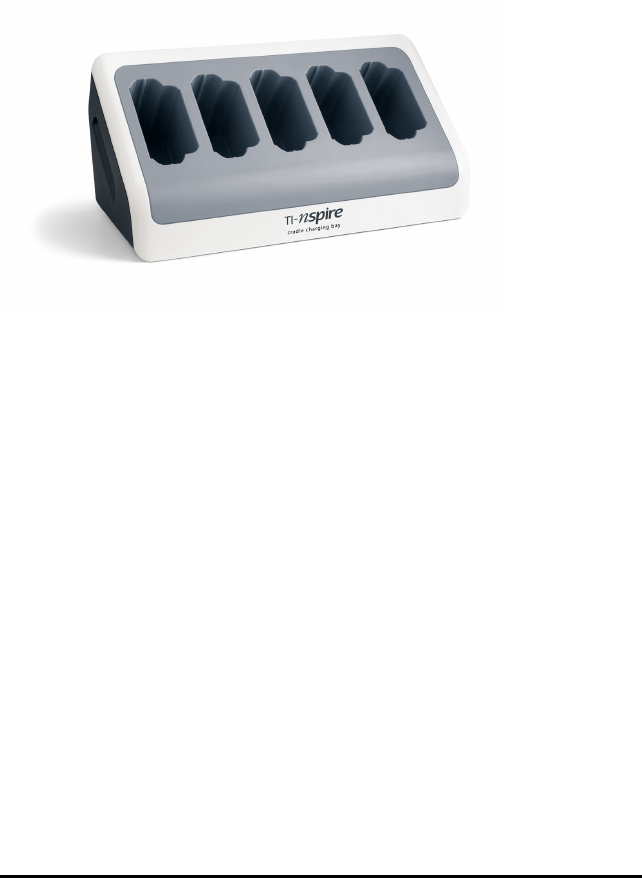
Charging the Cradles
The TI-Nspire™ Navigator™ wireless cradles contain rechargeable batteries.
You must charge the batteries overnight before using them in class. When the
cradles are fully charged, they will function all day under continuous use. You
Setting up the TI-Nspire™ Navigator™ Teacher Software 11
12 Setting up the TI-Nspire™ Navigator™ Teacher Software
should recharge them each night.
The TI-Nspire™ Navigator™ Cradle Charging Bay can hold from one to five
cradles. After you place the cradles in the charging bay, they are charged
simultaneously until all are fully charged. If the batteries are fully discharged, it
may take up to 12 hours to fully charge the batteries.
Note: You cannot damage the batteries by leaving them in the charging bay
beyond the time needed to fully charge them. Also, it is not necessary to fully
discharge the batteries before recharging them.
Make sure you have enough (3 to 4) power outlets for the equipment you
received. If necessary, obtain a power strip so that you have plenty of grounded
outlets.
1. Insert the small end of the AC9940 power adapter cord into the charging
bay’s power jack.
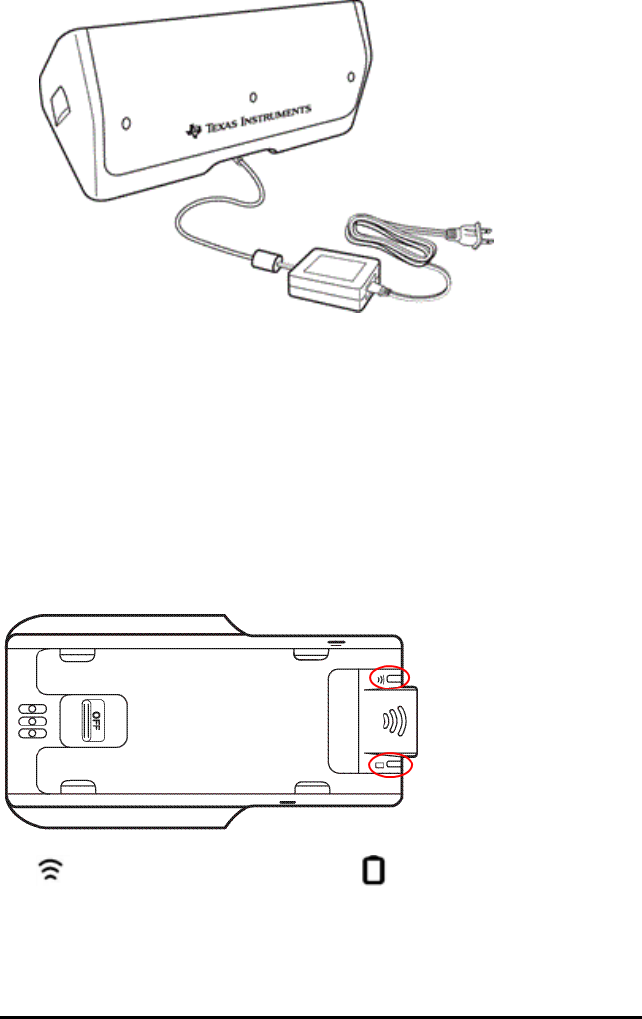
2. Plug the other end of the adapter into a power outlet.
3. Insert each TI-Nspire™ Navigator™ Cradle into the TI-Nspire™ Navigator™
Cradle Charging Bay. Make sure the LED is amber.
Note: You can charge a single wireless cradle using an AC9926 adapter (sold
separately).
Checking the LEDs
Two LEDs (small lights) at the top of each TI-Nspire™ Navigator™ wireless
cradle blink or change colors to indicate various operations or status.
LEDs
The LED indicates network activity. The LED indicates battery-
charging status.
When the cradles are still in the TI-Nspire™ Navigator™ Cradle Charging Bay:
Setting up the TI-Nspire™ Navigator™ Teacher Software 13
14 Setting up the TI-Nspire™ Navigator™ Teacher Software
• A solid amber LED means the wireless cradle is currently recharging.
• A solid red LED means the wireless cradle does not have good contact
with the charging bay. Reposition the cradle to establish good contact and
the LED turns amber.
• A solid green LED means the wireless cradle is fully charged.
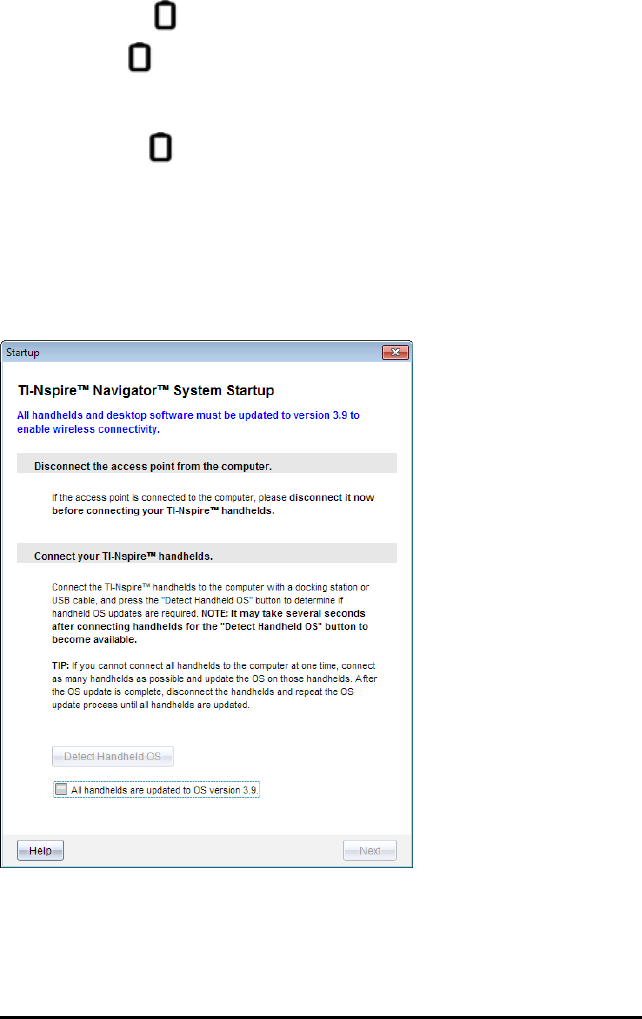
Updating the Handheld Operating System
When you install or update the TI-Nspire™ Navigator™ Teacher Software, the
Startup dialog box opens when you launch the software for the first time. You
must update all student and classroom handhelds to the latest operating
system.
Complete the following steps to ensure all handhelds are updated.
1. Disconnect the access point if it is connected to your computer.
2. Connect the handhelds to the computer.
You must connect handhelds using a USB cable or connect multiple
handhelds using TI-Nspire™ docking stations.
3. Click Detect handheld OS.
• If the OS for all connected handhelds matches the software version,
the Handheld OS Update dialog box is displayed informing you that
all handhelds are up to date. Click Close to return to the Startup dialog
box.
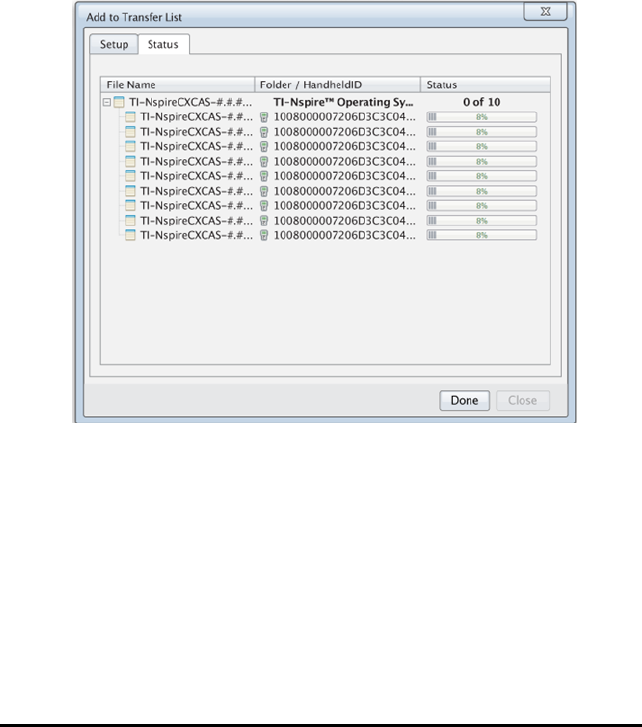
• If the OS on the connected handhelds is not current, the Handheld
OSUpdate Required dialog box is displayed. Click Update OS.
The Add to Transfer List dialog box opens.
The matching OSfiles are transferred to the connected handhelds.
You can update TI-Nspire™ CX handhelds and TI-Nspire™ handhelds
at the same time. If you cannot connect all handhelds at one time,
connect as many as possible and update the OS. After the OS update
is complete, disconnect the handhelds and repeat the OS update
process until all handhelds are updated. The software will detect the
OS needed and begin the transfer as you connect the handhelds.
• Click Done to stop the transfer process when all handhelds are
updated.
Setting up the TI-Nspire™ Navigator™ Teacher Software 15
16 Setting up the TI-Nspire™ Navigator™ Teacher Software
- The Add OS Transfer List closes.
- The Start Up dialog box is displayed.
4. Select the All handhelds are updated to OS version 3.9 check box.
5. Click Next.
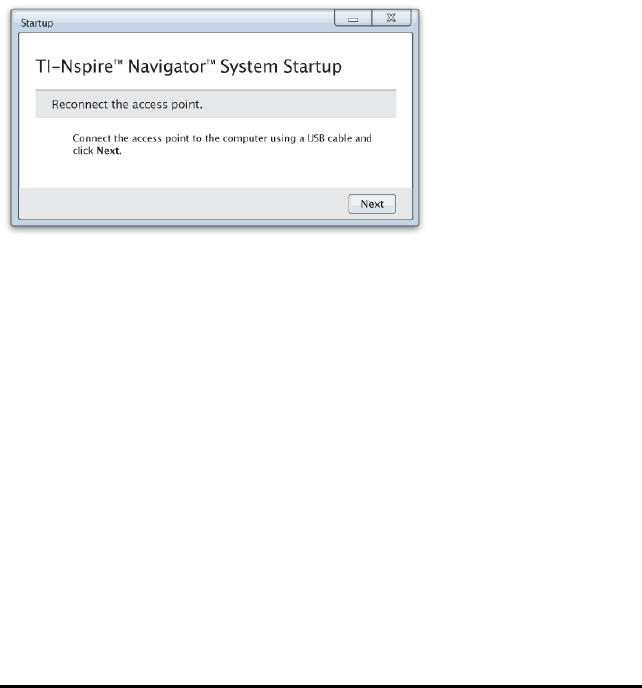
The ConnectAccess Point dialog box opens.
Connecting the TI-Nspire™ Navigator™ Access Point
When the operating system update on all handhelds is complete, the next step
in the system startup process is to connect the access point. When you connect
the access point to your computer, it is powered on and ready to communicate
with wireless network adapters and cradles.
1. Connect the access point to the computer using a USB cable.
a) Connect the small end of the USB cable to the access point.
Connect the access point directly to your computer. Do not connect
the access point to a USB hub or docking station.
b) Connect the other end of the cable to the USB port on your computer.
c) Make sure the access point power light is on. The power light
indicates that the access point is receiving power from the computer.
The signal light indicates wireless link activity.

TI-Nspire™ Navigator™ access point TI-Nspire™ CX Navigator™ access point
Note:If the software does not detect a connected access point within one
minute, an error message is displayed. Close the error message, and then
disconnect and reconnect the access point.
2. Click Next.
The software detects the access point type and checks the firmware
version on the access point. If a newer firmware version is available, the
software updates the firmware.
Note: It may take up to 60 seconds for the software to detect the access
point.
Important! Do not stop the update process or disconnect the access point
until the firmware update is complete.
When the update is complete, the software checks the access point for a
configured classroom network.
• If a classroom network exists, the software reminds you that you can
keep the current setup or make changes.
Setting up the TI-Nspire™ Navigator™ Teacher Software 17

18 Setting up the TI-Nspire™ Navigator™ Teacher Software
• If no classroom network exists, the software guides you through the
Class Network Setup wizard.
3. Select Back up my class network to save a copy of your classroom network
configuration.
The saved network information includes the list of wireless client IDs, the
network name, and the channel and country selected on the access point.
Saving a network enables you to reload the configuration at a later time
using the Network Manager. By default, the file is saved in the My
Documents/TI-Nspire/Navigator Network folder.
To finish without saving a backup copy, select Skip backup.
4. Click Finish to complete the setup.
Note: You can set up a network at any time, or make edits to an existing
network, by using the Network Manager.
Troubleshooting
If the firmware update fails, the OSWarning dialog box opens.
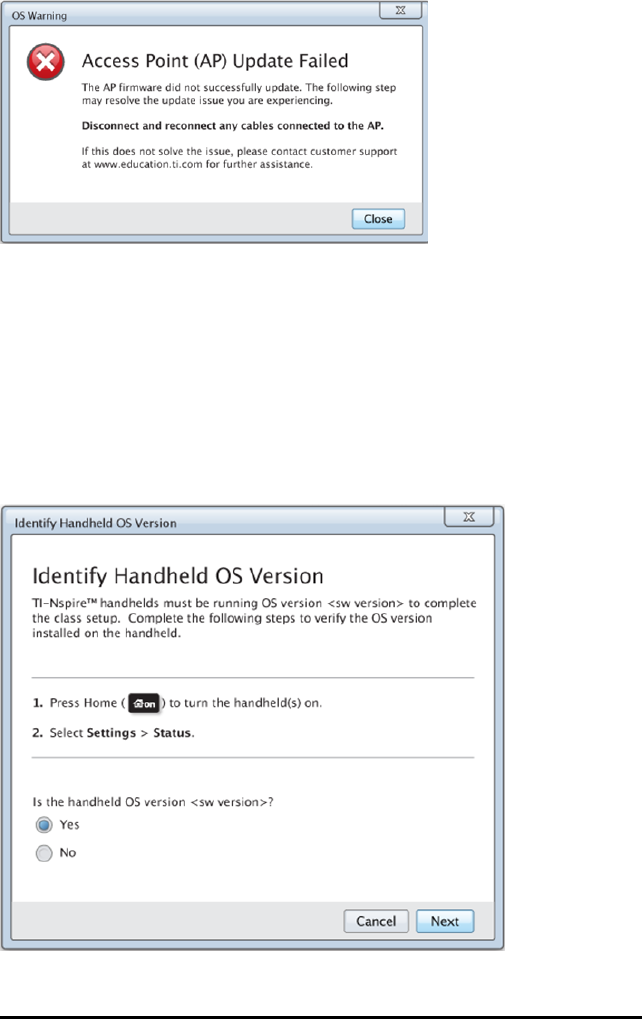
To resolve the problem, disconnect and reconnect any cables connected to the
access point, and the software will automatically start the update process. If this
does not resolve the issue, contact Customer Support.
Confirming Handheld OS Version
If you did not update handhelds during startup, the wizard asks you to confirm
that classroom and student handhelds are updated to the latest OSversion.
The OS version on the handhelds must match the software version before you
can set up the class network.
To check the OSversion on a handheld,
Setting up the TI-Nspire™ Navigator™ Teacher Software 19
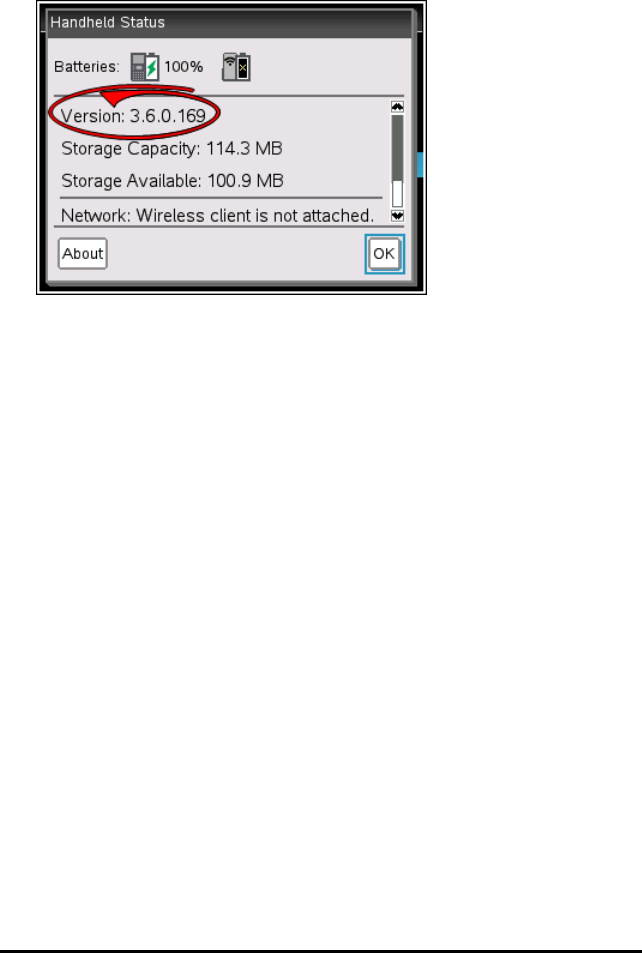
20 Setting up the TI-Nspire™ Navigator™ Teacher Software
1. Press cto turn the handheld on.
2. Select Settings >Status to open the Handheld Status window.
3. Make sure the OSon the handheld matches the software version on your
computer.
• If the OS version is current, select Yes.
• If the OS version is not current select No.
4. Click Next.
• If the OS version was not current, the Handheld OSUpdate Required
dialog box is displayed. Click Update OS to open the Add OSTransfer
Tool and update the handhelds.
• If the OS version is current, the Class Network Name dialog box opens
and you can continue the process to set up the class network.
Naming the Class Network
When the Class Network Name dialog box opens, complete the following steps
to name your class network.
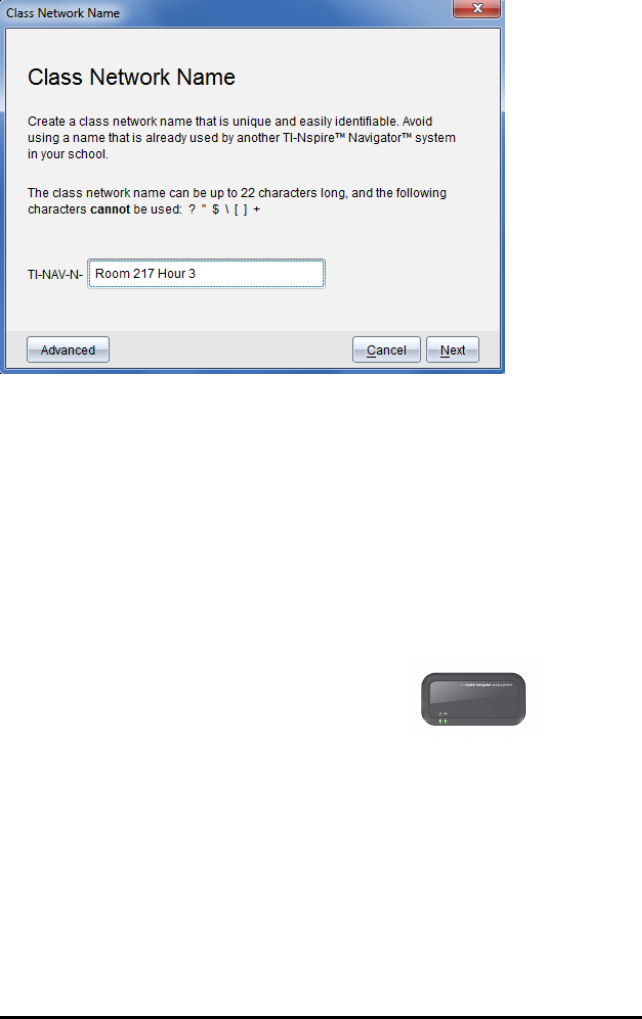
1. Type the name you want to assign to the class network in the TI-NAV-N
field.
Use a name that is unique, easy to remember, and easy for you to identify.
The class network name can be up to 22 characters long. Names can
consist of letters, numbers, and spaces; but cannot contain special
characters such as ?"$\![]+.
2. Click Next to configure the access point with no changes.
—or —
3. Click Advanced to select a different band or operating channel.
• If the TI-Nspire™ Navigator™ access point is
connected, you can select a different operating channel.
Setting up the TI-Nspire™ Navigator™ Teacher Software 21
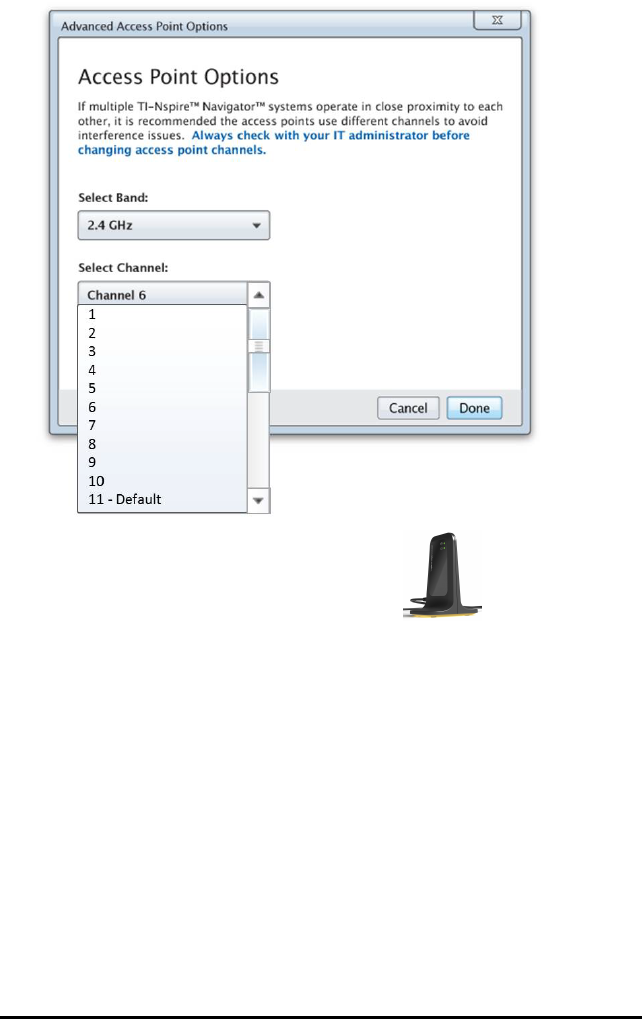
22 Setting up the TI-Nspire™ Navigator™ Teacher Software
• If the TI-Nspire™ CX Navigator™ access point is connected, you
can select either a 2.4GHz band or 5GHz band, and you can select a
different operating channel.
Note: Operating channels available for selection are determined by the
installed software version.
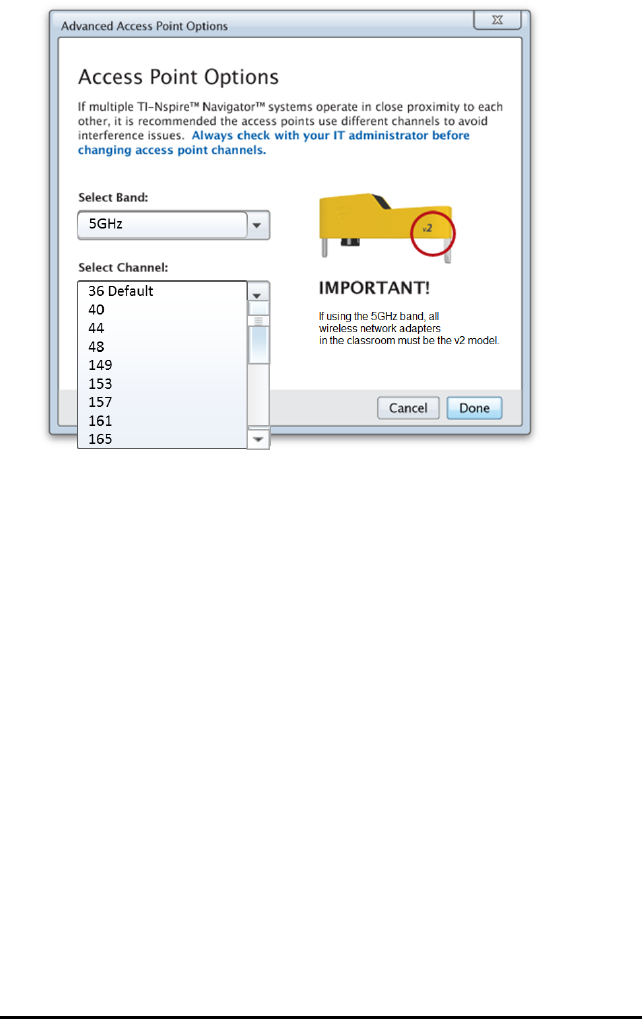
Important! If you are using the TI-Nspire™ CX Wireless Network Adapter –
v2
adapters, you can select either the 2.4GHz or 5GHz band. If you have a
mixture of wireless network adapters, you must select the 2.4GHz band.
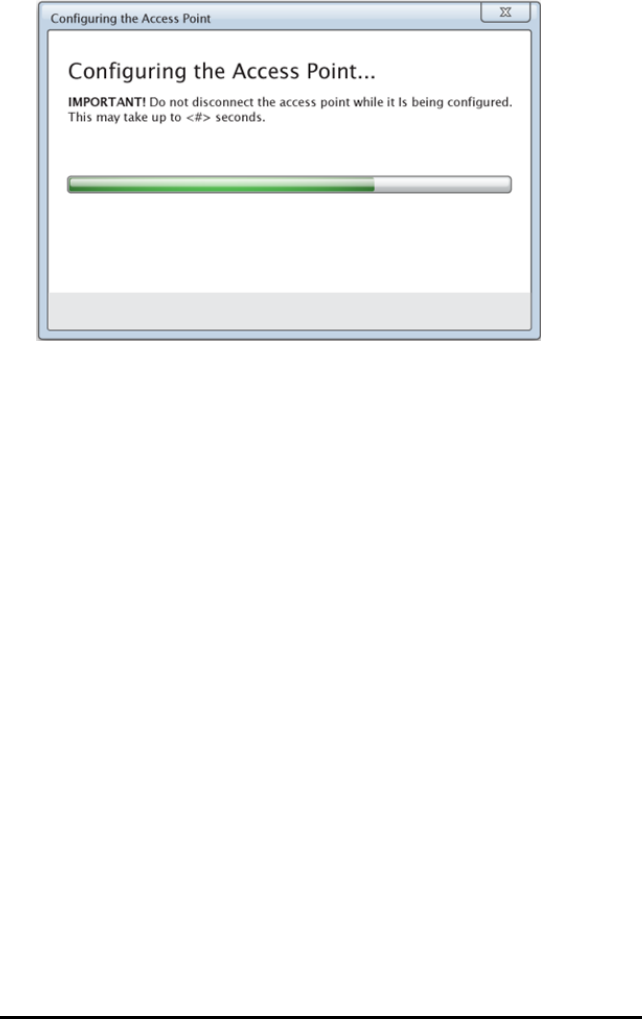
4. Click Done.
The Configuring the Access Point dialog box opens and the software
configures the access point and applies the class network name.
Important! Do not disconnect the access point while it is being configured.
Setting up the TI-Nspire™ Navigator™ Teacher Software 23
24 Setting up the TI-Nspire™ Navigator™ Teacher Software
When the configuration process is complete, you can associate your wireless
clients.
Adding Wireless Clients to the Network
After you assign a name to your class network and the access points are
configured, you must associate your wireless clients (wireless adapters and
wireless cradles) with the network. How you complete this process depends on
whether you have docking stations that enable you to work with multiple
handhelds and wireless clients at one time.
• If you have a docking station, attach the adapters to the handhelds, and
then insert the handhelds into a docking station that is connected to your
computer. You can link two additional docking stations to the connected
docking station.
• If you do not have a docking station, attach the wireless adapters or
cradles to the handhelds.
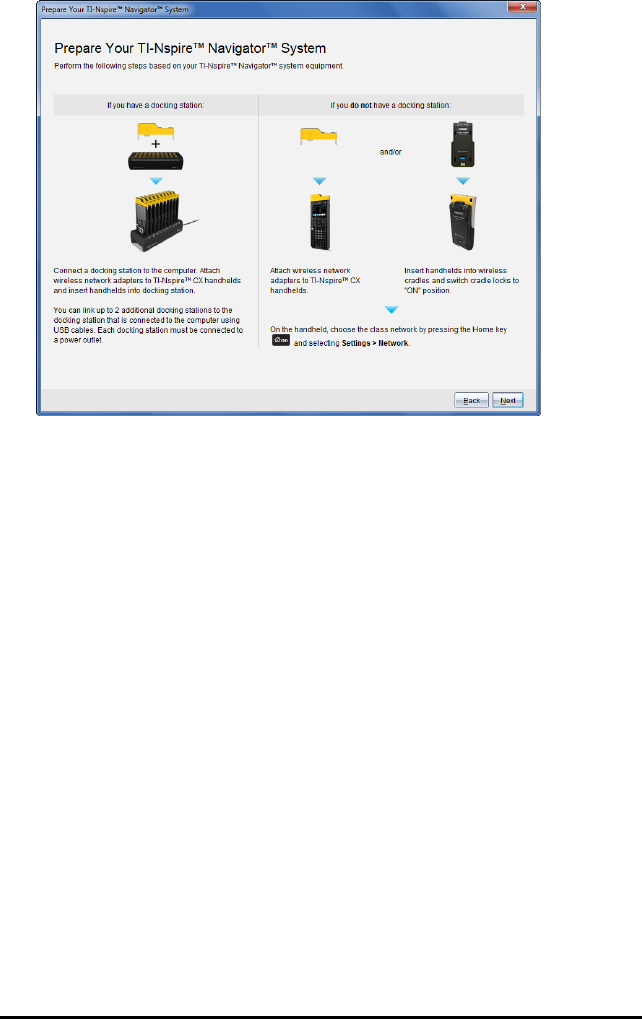
1. Follow the on-screen instructions to connect the handhelds to their
wireless adapters, cradles, and/or docking stations, and then click Next.
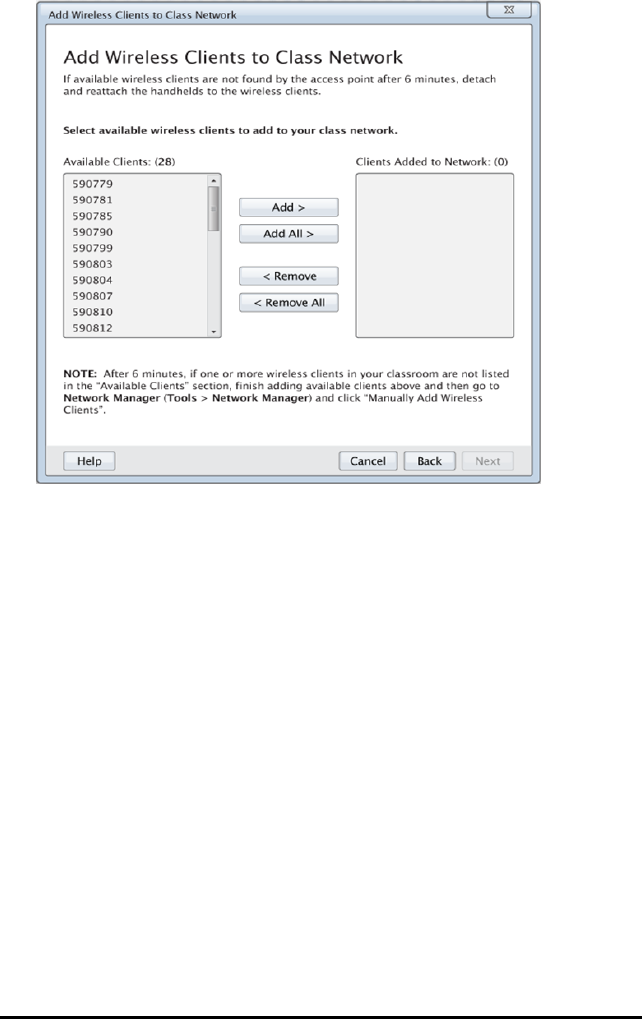
The Add Wireless Clients to Class Network dialog box opens.
The access point finds the available clients and lists them in the Available
Clients box. It can take up to six minutes for the access point to find all
available clients. Check the number of available clients to ensure all
clients are listed.
Setting up the TI-Nspire™ Navigator™ Teacher Software 25
26 Setting up the TI-Nspire™ Navigator™ Teacher Software
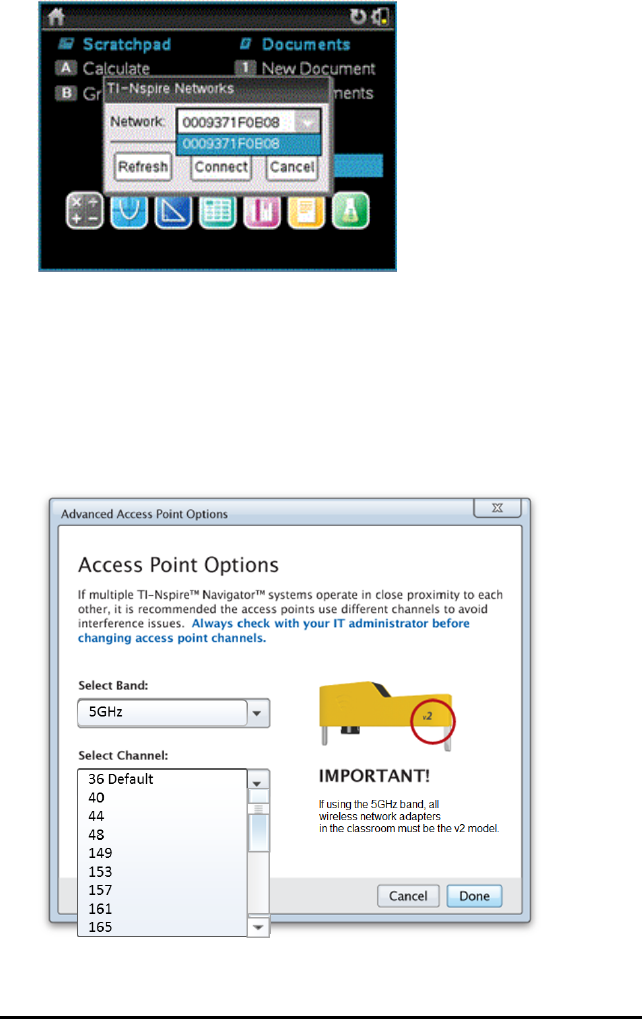
2. Follow steps a,b, and con all TI-Nspire™ handhelds that are not inserted
into a docking station.
a) Turn on each handheld.
b) From the Home screen of the handheld, select Settings > Network. The
handheld lists the available networks that are within range.
c) Select the name that you assigned to your class network, and click
Connect.
3. On the Add Wireless Clients to Class Network screen, select the wireless
clients you want to add.
• To add all available clients listed, click Add All.
• To add specific clients, select one client ID at a time, and then click
Add.
Important! Clients are not part of the class network until you complete this
step to add them.
4. Click Next to associate the wireless clients with the classroom network.
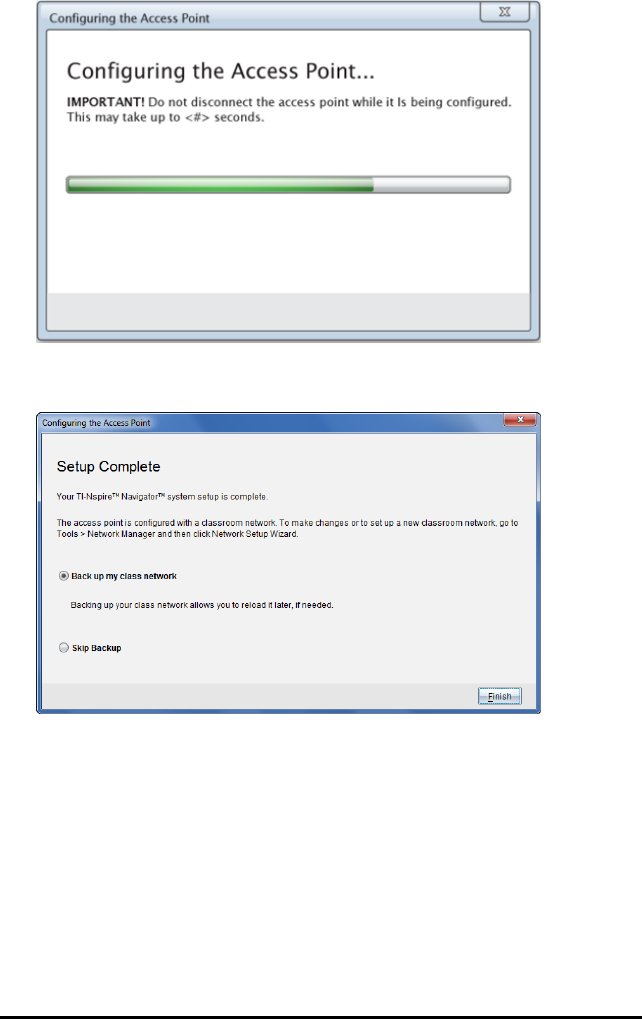
The software associates the attached wireless clients with the classroom
network. When the process is complete, the Setup Complete dialog opens.
5. Select Back up my class network to save a copy of your classroom network
configuration.
The saved network information includes the list of wireless client IDs, the
network name, and the channel and country selected on the access point.
Saving a network enables you to reload the configuration at a later time
using the Network Manager. By default, the file is saved in the My
Documents/TI-Nspire/Navigator Network folder.
To finish without saving a backup copy, select Skip backup.
6. Click Finish to complete the setup.
Setting up the TI-Nspire™ Navigator™ Teacher Software 27
28 Setting up the TI-Nspire™ Navigator™ Teacher Software
Note:You can add more wireless adapters or cradles to the class network at a
later time using the NetworkManager.
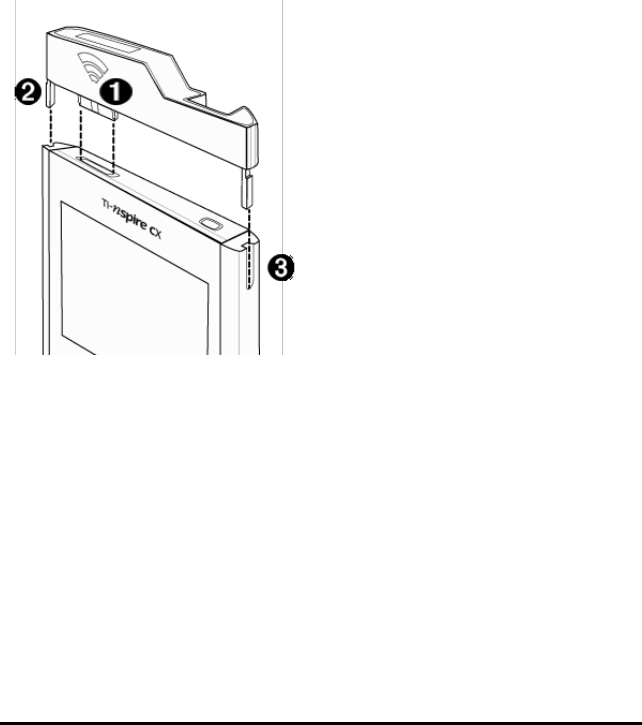
Connecting the Handhelds to the Wireless Adapters
The wireless network adapters work with the TI-Nspire™ CX and TI-Nspire™ CX
CAS handhelds. To connect the handheld to a wireless adapter, follow these
steps.
1. Position the wireless adapter on top of the handheld so the connector on
the adapter lines up with the connector on top of the handheld.
ÀConnector
ÁGuides for aligning with handheld
ÂGrooves to align wireless adapter
2. Slide the adapter into position, making sure the guides on the sides of the
adapter slide into the grooves on the sides of the handheld.
3. Firmly press the adapter into place.
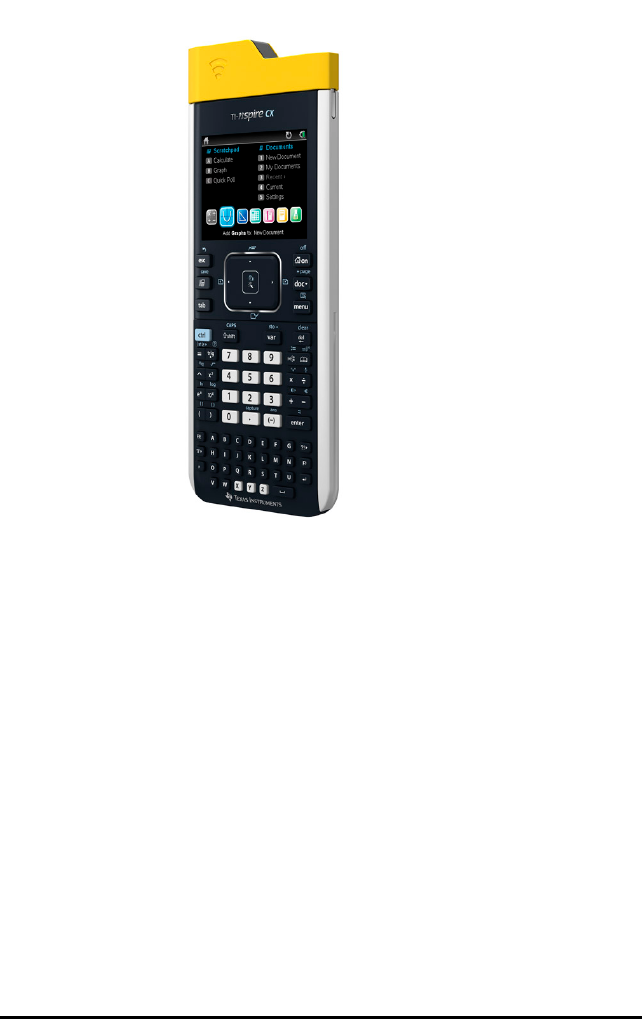
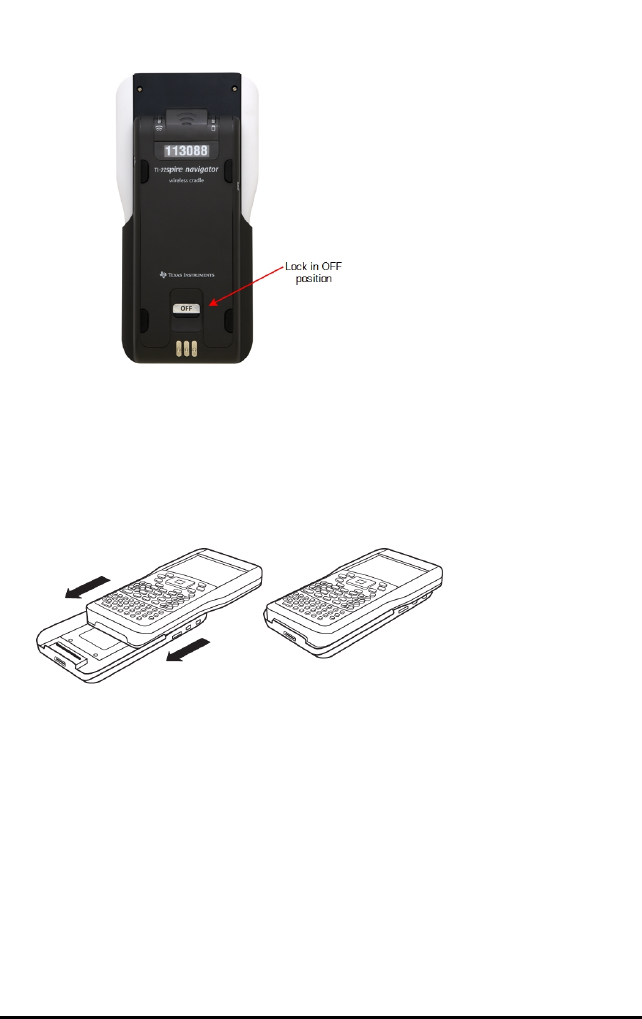
Connecting the Handhelds to Cradles
The wireless cradles work with the TI-Nspire™, TI-Nspire™ CAS, TI-Nspire™ CX
and TI-Nspire™ CX CAS handhelds. To connect the handheld to a cradle,
follow these steps.
1. Slide the lock on the back of the cradle to the OFF position.
Setting up the TI-Nspire™ Navigator™ Teacher Software 29
30 Setting up the TI-Nspire™ Navigator™ Teacher Software
2. To attach the handheld, face the screen upward and slide the handheld
onto the top of the wireless cradle. Be sure that both sides of the handheld
are inserted into both of the side guides.
3. Press firmly to make a good connection. When properly connected, the
handheld appears to be sitting on top of the cradle.
4. Lock the handheld in place by sliding the lock on the back of the cradle to
the ON position.
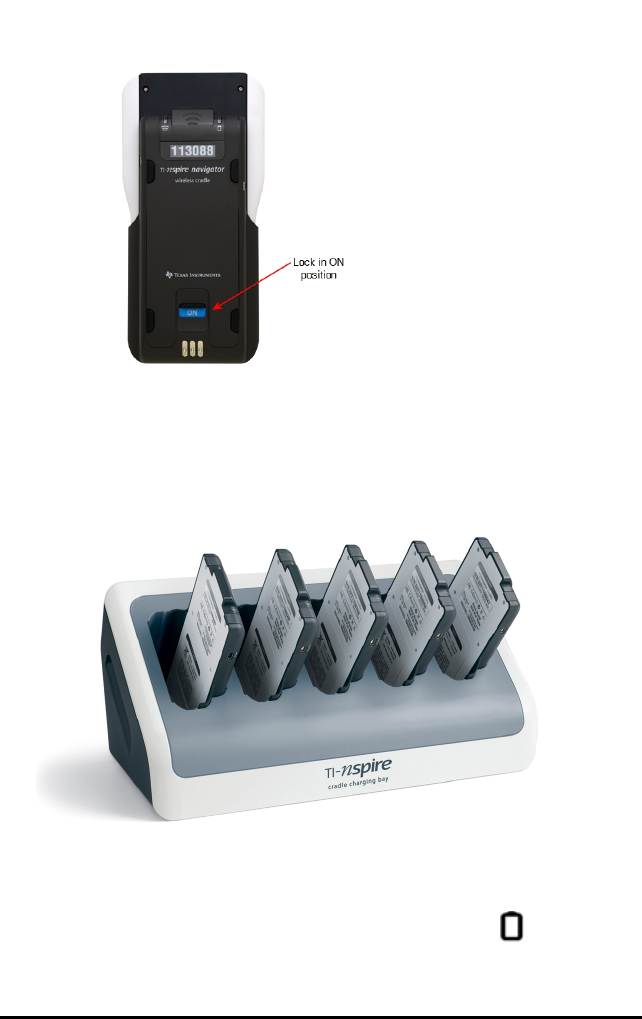
5. Insert each cradle into the charging bay. Make sure the LED is amber.
At the end of the school day, return the wireless cradle to the charging bay and
charge them overnight. The cradles are charged when all the (power
status) LEDs are solid green or amber.
Setting up the TI-Nspire™ Navigator™ Teacher Software 31
32 Setting up the TI-Nspire™ Navigator™ Teacher Software
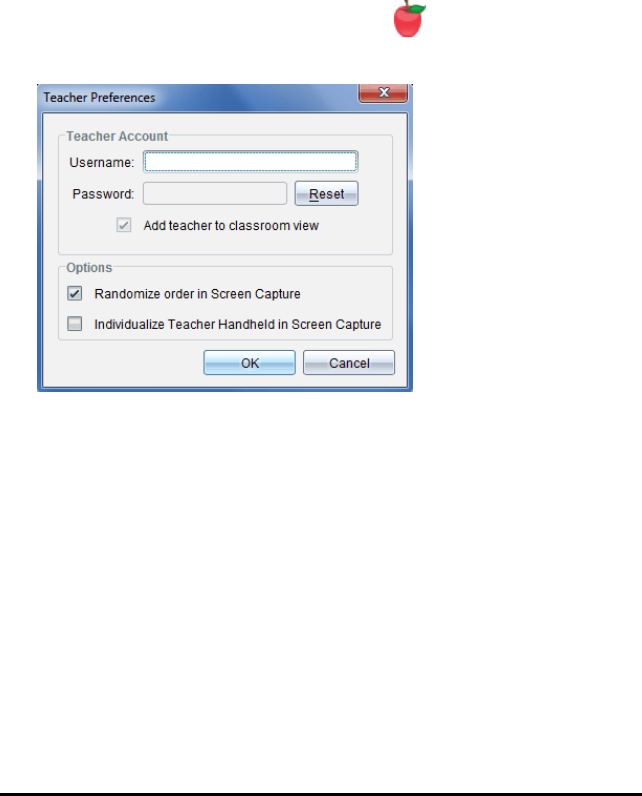
Creating and Managing Your Teacher Account
Create your teacher account in the Teacher Preferences section of the
TI-Nspire™ Navigator™ Teacher Software. A teacher account lets you log in to
the TI-Nspire™ Navigator™ network from your handheld. After you create a
teacher account, you can later change your password or your user name.
Creating Your Teacher Account
1. Use the Workspace selector to choose the Class workspace.
2. Click File> Settings> Teacher Preferences .
The Teacher Preferences dialog box opens.
3. Type a username.
4. Type a password.
5. Select or clear the preference for the teacher icon to appear in the
classroom view.
If you select this preference, the teacher icon will appear in the classroom
view, and you will be included as a recipient in Send to Class, Collect from
Class, and Delete from Class operations. The teacher handheld screen
will be included in screen captures of the class.
6. Select or clear the options to randomize the order in Screen Capture, and
to individualize the teacher handheld in Screen Capture.
•Randomize order in Screen Capture. Selecting this option captures and
displays student screens in a random order, not the order on the class
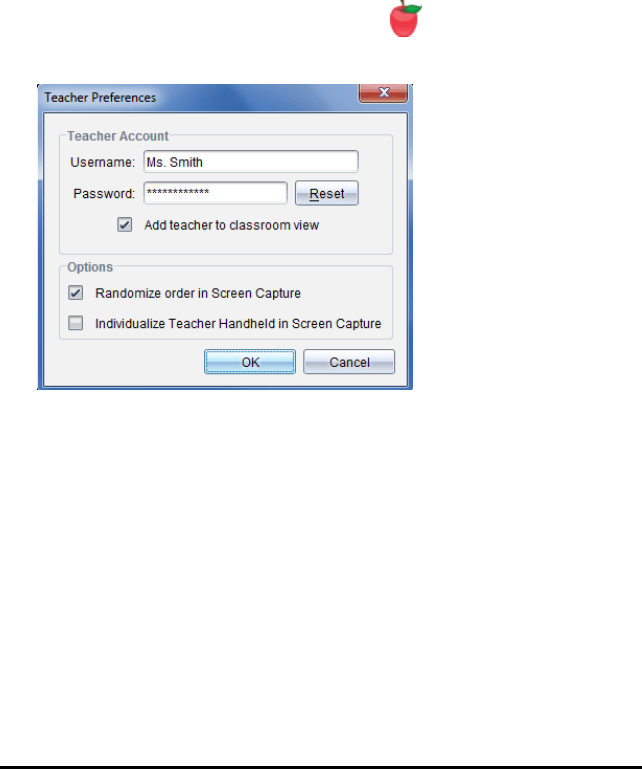
listing. This enables students to concentrate on the assignment, not
whose screen they are viewing.
•Individualize Teacher Handheld in Screen Capture. Selecting this option
shows the teacher’s screen in the screen capture.
7. Click OK.
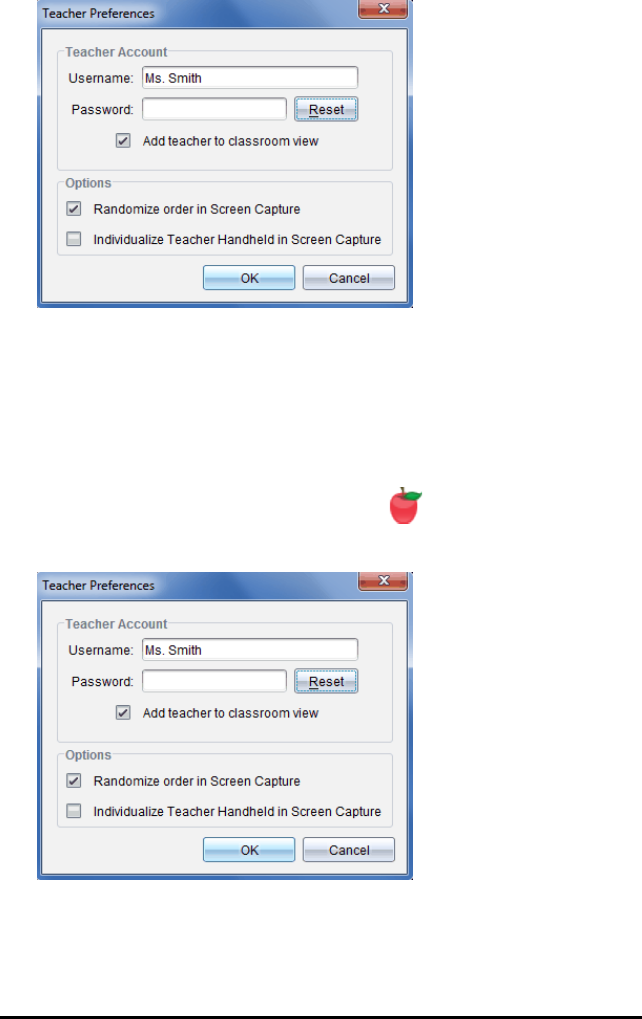
Changing the Password of Your Teacher Account
1. Make sure you are not logged in to the TI-Nspire™ Navigator™ network on
your handheld.
2. Click File> Settings> Teacher Preferences .
The Teacher Preferences dialog box opens.
3. Click Reset.
TI-Nspire™ Navigator™ software clears the current password.
Setting up the TI-Nspire™ Navigator™ Teacher Software 33
34 Setting up the TI-Nspire™ Navigator™ Teacher Software
4. Type a new password.
5. Click OK.
Changing the User Name of Your Teacher Account
1. Make sure you are not logged in to the TI-Nspire™ Navigator™ network on
your handheld.
2. Click File> Settings> Teacher Preferences .
The Teacher Preferences dialog box opens.
3. Enter a new user name.
4. Click OK.

Logging In to the TI-Nspire™ Navigator™ System from the
Handheld
The TI-Nspire™ Navigator™ classroom learning system uses both your
computer and student handhelds. For you and your students to communicate
using the TI-Nspire™ Navigator™ network, students must log in to the network
from their handhelds.
Note: You do not have to log in to communicate with student handhelds; you
can use the Transfer Tool to delete files or send files and operating systems to
student handhelds. However, if you plan to participate from your handheld
during the TI-Nspire™ Navigator™ class session, then you must log in to the
TI-Nspire™ Navigator™ network from your handheld.
For more information on using a handheld, refer to the handheld guidebooks
available at education.ti.com/guides.
Before you log in, make sure these items are ready:
• You have created your teacher account in Teacher Preferences.
• You have started a class session on your computer.
• The TI-Nspire™ handheld is ready for login. (The icon is blinking.)
Before your students log in, make sure you complete these items:
• Create student accounts.
• Provide students with the class network name, their user names and, if
necessary, their passwords.
Logging In to the TI-Nspire™ Navigator™ Network
1. To log in, do one of the following:
• From the Home screen of your TI-Nspire™ handheld, select
5:Settings> 5:Login.
• From a screen other than the Home screen, press ~> 8:Login.
The last network the wireless client was associated with appears on the
handheld screen.
Note: If the handheld is connected to the computer with the USB cable, no
network names appear on the screen, and you can continue logging in.
Setting up the TI-Nspire™ Navigator™ Teacher Software 35
36 Setting up the TI-Nspire™ Navigator™ Teacher Software
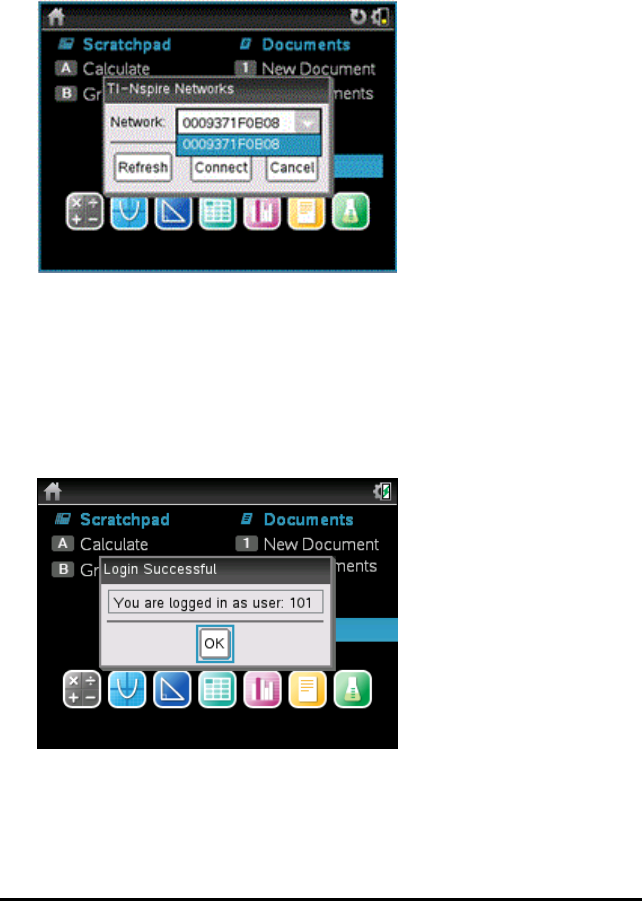
2. If the name of the network that appears is correct, continue with login. If the
network is not correct, click Network.
The handheld screens displays all networks it has been connected to, and
also displays other networks within range.
3. Select the network from the list, and then click Connect.
The login screen shows the connection status and displays the network
name when the connection is successful.
4. Type your username and password.
5. Select Login.
The Login Successful screen opens.
6. Click OK.
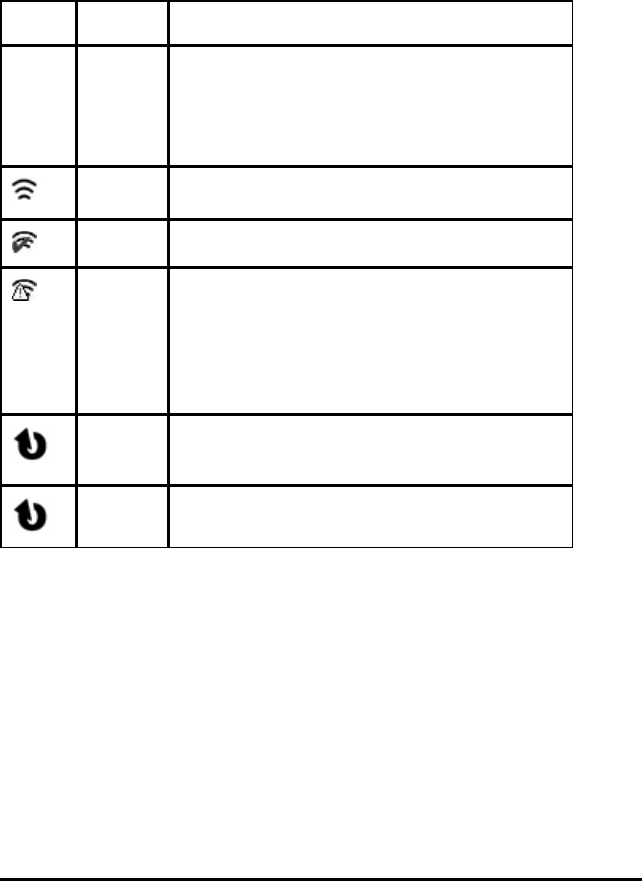
TI-Nspire™ Handheld Login Status Icons
The icons on the TI-Nspire™ CX, TI-Nspire™ CX CAS, TI-Nspire™, and
TI-Nspire™ CAS handheld screens indicate the communication status between
the handheld and the access point, wireless adapter, wireless cradle, or
TI-Navigator™ network. The icons indicate status as follows.
Icon Status Meaning
No
icon
If no icon appears on the handheld, the
handheld is not searching for an access point.
Unattach and reattach the wireless adapter or
cradle.
Blinking The handheld is searching for an access point.
Solid The handheld has found an access point.
Solid The handheld is not communicating with the
adapter or cradle. Remove the handheld from
the adapter or cradle, wait for the icon to
disappear, and then reattach the handheld to
the adapter or cradle.
Blinking The handheld is connected to the network and
is ready to login.
Solid The handheld is logged in to the network.
Storing the Wireless Adapters and Cradles
When you charge the handhelds overnight, you can leave the wireless network
adapters attached to the handhelds before placing the handhelds in the
TI-Nspire™ CX Docking Station. When you are ready to use the handhelds the
next morning, the handheld should be fully charged, and the adapter is ready
for use.
You can remove the wireless adapter from the handheld, and store the
adapters in the adapter storage case overnight.
Setting up the TI-Nspire™ Navigator™ Teacher Software 37
38 Setting up the TI-Nspire™ Navigator™ Teacher Software
If you need to store the wireless adapters for more than two weeks, remove the
wireless adapter from the handheld, and store the adapters in the adapter
storage case. Place the storage case in a cool, dry place.
If you need to store the TI-Nspire™ Navigator™ wireless cradles for more than
two weeks, remove the handhelds from the cradles, and store the cradles in a
cool, dry place. You cannot damage the batteries by leaving them in the
charging bay beyond the time needed to fully charge them, or by leaving them
in the charging bay while the charging bay is unplugged.
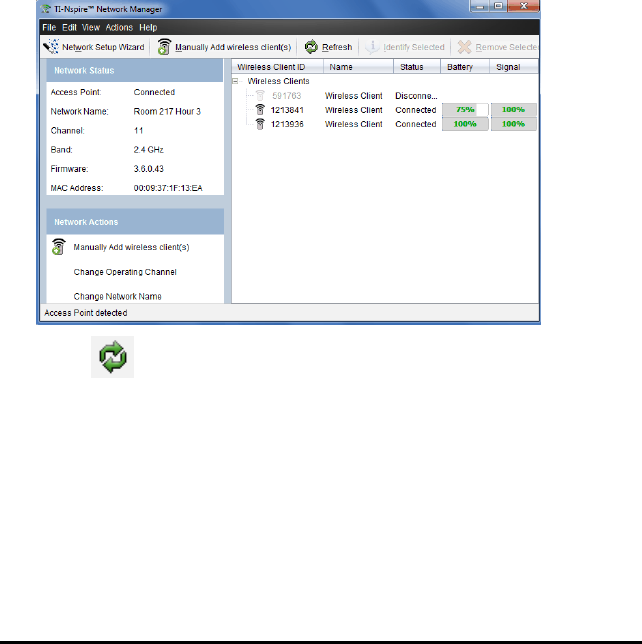
Using TI-Nspire™ Network Manager
Accessing the TI-Nspire™ Network Manager
▶Click Tools >Network Manager.
The TI-Nspire™ Network Manager opens.
Note: Click Refresh at any time to refresh the TI-Nspire™ Network Manager
window.
Opening the Network Setup Wizard
You can set up or edit a classroom network at any time using the Network
Setup Wizard.
▶In the TI-Nspire™ Network Manager window, click Network Setup Wizard.
The wizard guides you through the process of setting up a classroom
network, including:
• Update all student and classroom handhelds to the latest operating
system (OS)version. The OS on the handhelds must match the
software version installed on your computer.
• Connect the access point and, if needed, update the access point
firmware.
• Name the class network.
• If required, select a channel for the access point.
• Add wireless clients to your network.
• Create a backup copy of the class network configuration.
Checking Network Status
The network status is shown in the side bar of TI-Nspire™ Network Manager
window.
Note:If the sidebar is hidden, click View >Sidebar. Click Refresh to update the
status if the Network Manager is already open.
The network status shows the following information:
•Access Point. Shows whether the AP is connected or disconnected.
•Network Name. The name you gave the network when you set it up.
•Channel. The access point operating channel for the current network.
•Band. The selected communication link.
•Firmware. The version of the access point.
Setting up the TI-Nspire™ Navigator™ Teacher Software 39
40 Setting up the TI-Nspire™ Navigator™ Teacher Software
•MAC Address. The Media Access Control address that identifies the access
point.
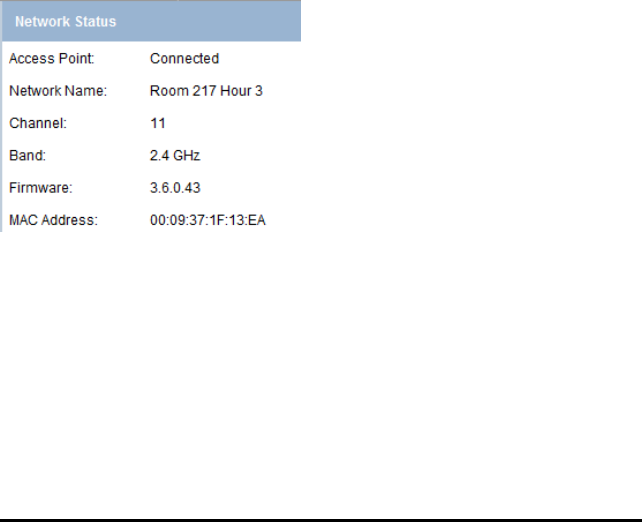
After you have set up the network, all of the adapters or cradles you added
appear in the TI-Nspire™ Network Manager window. If the wireless adapter or
cradle is charged and attached to a TI-Nspire™ handheld that is powered on,
TI-Nspire™ Network Manager shows the status as connected. It may take up to
30 seconds to recognize the wireless client and show its status as connected.
The status window also displays the battery status and signal strength.
If the cradle is not charged, or the adapter or cradle is not connected to a
TI-Nspire™ handheld that is powered on, TI-Nspire™ Network Manager displays
the status as disconnected. TI-Nspire™ Network Manager remembers the
adapter and cradle IDs you added, and the next time you turn on a handheld
that is connected to the adapter or cradle, TI-Nspire™ Network Manager
recognizes it.
Cradle LEDs
The LEDs on each TI-Nspire™ Navigator™ wireless cradle use various colors
and blink patterns to indicate data activity or power status. This can occur either
when the cradles are seated in the charging bay or when they are outside the
charging bay.
The LEDs indicate status as follows.
Activity LED
Color and pattern Meaning
Blinking green Indicates data transfer to and from the access point.
Battery (Power Status) LED

Color
and
pattern
Meaning
In the charging bay
Solid
amber
The battery is charging.
Solid
green
Power on; charged and powered by a charging bay or power
adapter.
Solid
red
The battery is charging, but does not have good contact with the
charging bay. Reposition the cradle so it has good contact. The
LED should then turn amber to indicate it is recharging.
Outside the charging bay
Blinking
green
Power on; battery powered. The battery is 30% to 99% charged.
Blinking
amber
Low battery (less than 30% charged).
Blinking
red
Battery is critically low (less than 8% charged).
Manually Adding Wireless Clients
You can manually add wireless adapters or wireless cradles at any time.
When you add a wireless adapter or cradle manually, it immediately appears in
the TI-Nspire™ Network Manager window.
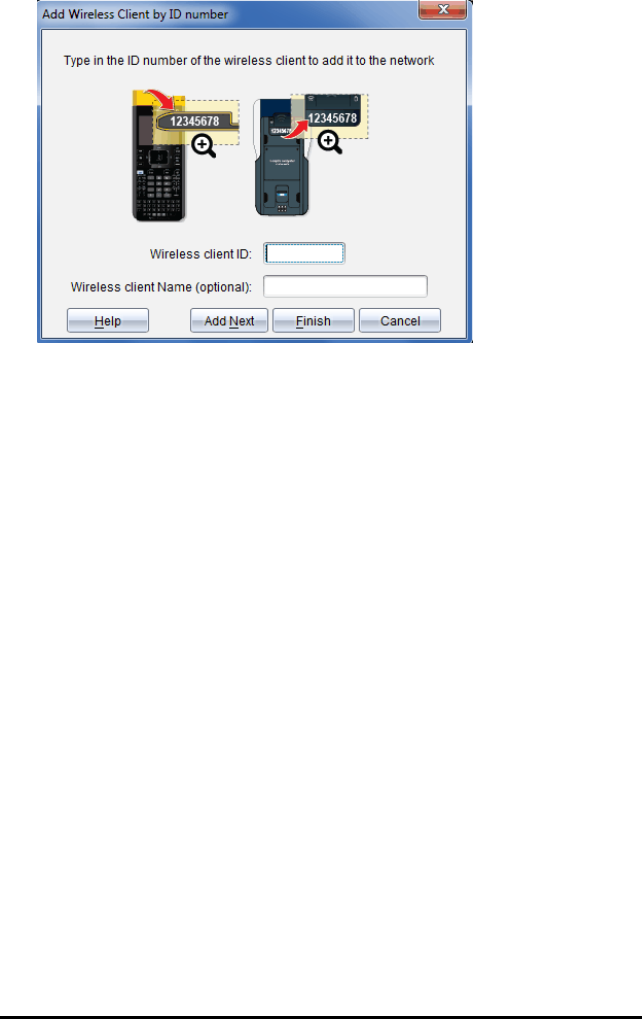
1. In the TI-Nspire™ Network Manager window, click Manually Add Wireless
Client(s).
The Add Wireless Clients by ID Number dialog box opens.
Setting up the TI-Nspire™ Navigator™ Teacher Software 41
42 Setting up the TI-Nspire™ Navigator™ Teacher Software
2. For each wireless adapter or cradle you are adding, find the ID number on
the back of the adapter or cradle, and type it in the Wireless Client ID box.
The ID is the last six digits of the eight-digit number (ignore the first two
zeros).
3. Enter a nickname in the Wireless Client Nickname box (optional).
Nicknames can consist of letters, spaces, and numbers. A nickname must
contain a minimum of 1 character and can contain a maximum of 64
characters.
4. Click Add Next to add another adapter or cradle if you have more than one
wireless client to add.
5. When you are finished adding all the adapters and cradles, click Finish.
After you manually add wireless clients, you need to associate them to the
network using the handhelds.
6. Turn on each TI-Nspire™ handheld.
7. Attach the wireless adapter or the wireless cradle to each handheld. (See
the instructions for connecting wireless adapters or cradles to a TI-Nspire™
handheld.)
8. From the Home screen of the TI-Nspire™ handheld, select 5:Settings>
6:Network.
The handheld lists the available networks that are within range.
9. Select the network you added the wireless clients to, and click Connect.
The wireless clients are now associated with the access point.
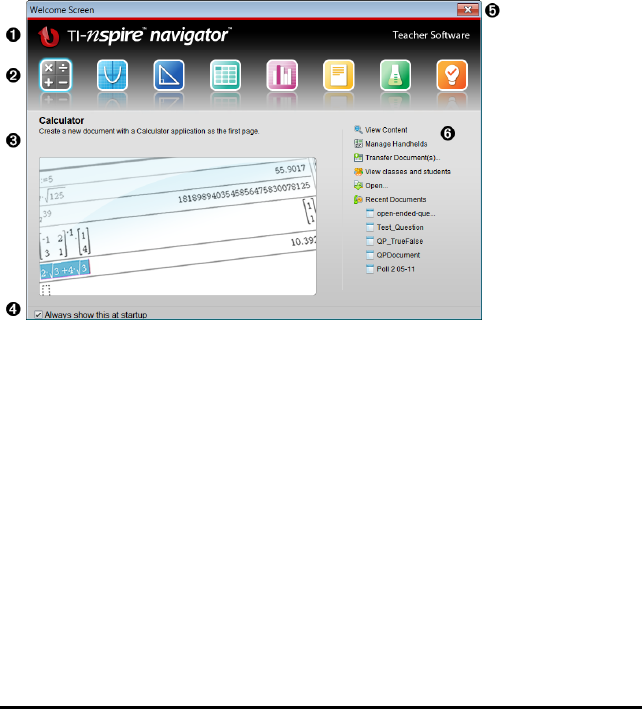
Changing the Operating Channel
1. In the TI-Nspire™ Network Manager window, click Change Operating
Channels.
The Advanced Access Point Options dialog box opens.
Setting up the TI-Nspire™ Navigator™ Teacher Software 43

44 Setting up the TI-Nspire™ Navigator™ Teacher Software
Important! If you are using the TI-Nspire™ CX Navigator™ network adapter
–
v2
adapters, you can select either the 2.4GHz or 5GHz band. If you have
a mixture of wireless network adapters, you must select the 2.4GHz band.
2. Select a different channel from the drop-down box.
3. Click Done.
The Configuring the Access Point dialog box opens and the software
configures the access point.
Saving a Network Setup
Saving a network setup enables you to reload the configuration at a later time
using the TI-Nspire™ Network Manager. The saved network information
includes the list of wireless client IDs, the network name, and the channel and
country selected on the access point. By default, the file is saved in the My
Documents/TI-Nspire/Navigator Network folder.
1. In the TI-Nspire™ Network Manager window, click Actions >Save Network
Setup.
The Save dialog box opens.
2. Name the network and then click Save. You can save the file to another
location, if desired.
Reusing a Saved Network
Reusing a saved network enables you to reload the configuration of a saved
network. Reusing a network can save time because you do not have to set up
the network again.
1. In the TI-Nspire™ Network Manager window, click Actions >Apply Saved
Network Setup.
The Apply a Network dialog box opens.
2. Select the network and then click Apply a Network.
3. The access point is configured with the saved network configuration.
Identifying Wireless Clients
To identify wireless clients that are not responding, complete the following
steps.

1. From the list of hardware components in the TI-Nspire™ Network Manager
window, click to select the wireless clients. To select more than one
wireless client, press and hold the Shift or Ctrl key (Mac®:“key), and
click the items you want to select.
2. Click Actions > Identify Selected.
3. Look around your classroom.
• If you are using cradles, both LEDs on the cradles that you selected
will blink rapidly with a green color.
• If you are using a docking station, both LEDs on the docking station
will blink rapidly with a green color.
You can identify the wireless clients that are not working because their
LEDs are not blinking.
Now that you know where the non-working wireless clients are, you can add
them to the network again.
Removing Wireless Clients
To remove adapters or cradles from the class network, complete the following
steps.
1. In the TI-Nspire™ Network Manager window, select the wireless adapters
and cradles that you want to remove from the network.
2. Click Actions > Removed Selected, or click .
3. When prompted, click Remove.
The selected wireless clients are removed from the list.
Resetting the Access Point to Factory Default Settings
1. In the TI-Nspire™ Network Manager window, click Actions > Set Default
Factory Settings to Access Point.
The access point is reconfigured to the default factory settings.
2. Click OKwhen the confirmation message is displayed.
Troubleshooting
This section describes some problems you may encounter and gives
suggestions on how to resolve the problem.
Setting up the TI-Nspire™ Navigator™ Teacher Software 45

46 Setting up the TI-Nspire™ Navigator™ Teacher Software
If you need more assistance, contact Customer Support.
The software does not detect all of the handhelds that are connected.
USB 3.0 technology limits the number of handhelds that can be detected by a
computer.
To find out if you have a USB3.0 port:
• On Windows®, go to Device Manager in the Control Panel.
• On Mac®, go to Apple > About this Mac > More Info > System Report, and
then select Hardware > USB on the left panel.
You can connect and update one handheld at a time using a USBcable, or up
to 10 handhelds at a time using a TI-Nspire™ CXDocking Station.
During the software setup, the access point update failed.
Disconnect and reconnect any cables connected to the access point. The
software automatically starts the update process again.
The updated operating system does not install on the handheld.
Make sure the handheld is fully charged before you start an OSupdate.
The software did not accept the class network name.
The class network name can be up to 22 characters long. Names can consist of
letters (A...Z, a...z), (0...9), and spaces; but cannot contain special characters
such as ?"$\![]+. Use a name that is unique, easy to remember, and easy for
you to identify. For example:Ms. Smith Math Rm 65
The access point is experiencing connectivity problems.
Make sure no other objects are near the access point when it is plugged in.
The access point operating channel or band may affect connectivity.
Important! Always check with your ITadministrator before changing access
point channels.
• If the TI-Nspire™ Navigator™ access point is connected, you can select
operating channel 1, 6, or 11.
• If the TI-Nspire™ CX Navigator™ access point is connected, and you are
using the TI-Nspire™ CX Wireless Network Adapter –
v2
adapters, you can
select either a 2.4GHz band or 5GHz band, and you can select a different
operating channel.

• If you have a mixture of wireless network adapters, you must select the
2.4GHz band.
The default operating channel for 5GHz in the United States, Canada, and
China is 36. The default operating channel for 5GHz in other countries is
149.
To select a different band or operating channel, go to Tools >Network Manager
and then click Change Operating Channel.
The wireless network is not working.
The OS on the handhelds must match the TI-Nspire™ software version on the
computer in order to use the wireless network.
Setting up the TI-Nspire™ Navigator™ Teacher Software 47

48
Getting Started with TI-Nspire™ Navigator™
Teacher Software
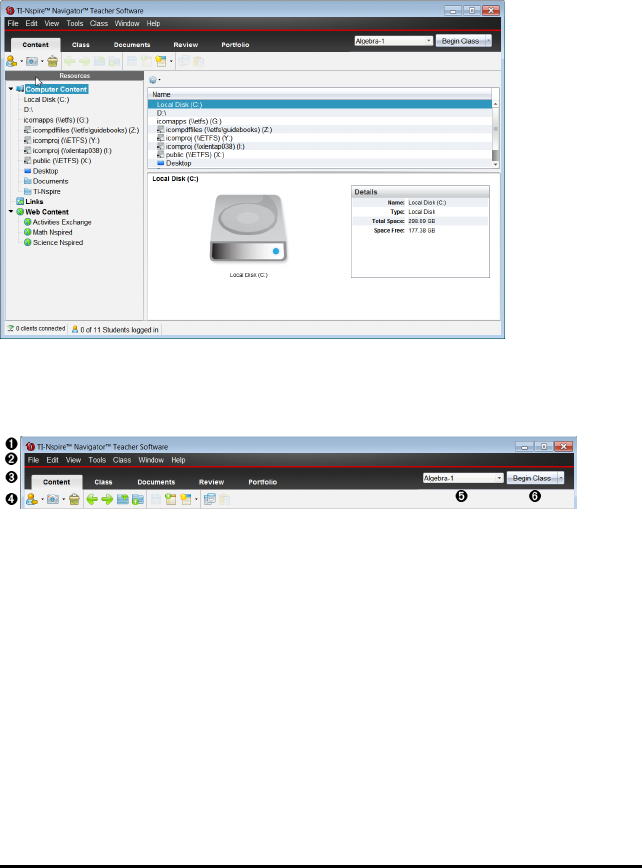
The Welcome Screen opens the first time you start the software after
installation and setup are complete.
To begin working with documents, click an icon or link, or close this screen
manually.
Note: Depending on how your software was installed, you might see a Product
Improvement screen the first time you start the software.
ÀName. Shows software name.
ÁQuick Start icons. Click one of these icons to create a new document in the
chosen application. The icon applications are Calculator, Graphs,
Geometry, Lists & Spreadsheet, Data & Statistics, Question, Notes, and the
Vernier DataQuest™ app. The Welcome Screen automatically closes and
the chosen application opens.
ÂPreview area. When your mouse is hovering over an application icon or a
link in Teacher Tools, this area shows a preview of the application or tool.
A brief description of the icon or link is also displayed at the top of the
area.
ÃAlways show this at startup. Clear this check box to skip this screen when
Getting Started with TI-Nspire™ Navigator™ Teacher Software 49

50 Getting Started with TI-Nspire™ Navigator™ Teacher Software
you open the software.
ÄClose the Welcome Screen. Click here to close this screen and begin
working in the software.
ÅTeacher Tools. Click one of these links to close the Welcome Screen and
open the software in the chosen tool.
•View content. Opens the Content Workspace, where you can find
content on your computer, the web, or connected handhelds.
•Manage handhelds. Opens the Content Workspace where you can
see every handheld connected to your computer as well as the status
of each.
•Transfer documents. Opens the Transfer Tool application in the
Content Workspace, where you can send documents, folders, or new
handheld OS files to the connected handhelds.
•View classes and students. Opens the Class Workspace where you
can see the students in a class, or add new classes and students.
•Open. Opens a dialog box where you can select an existing file on
your computer to open.
•Recent Documents. Lists the names of recently opened documents.
As your mouse hovers over each document name, the first page of
that document is displayed in the Preview pane. Click the name of a
document in the list to open that document.
Navigating Through the Welcome Screen Icons
▶Press Tab to navigate through the icons.
▶Press Shift+Tab to go backward through the icons.
▶Click to act on the selected icon.
As you move through the icons, the Preview area shows a preview of the
application.
Opening the Welcome Screen Manually
The Welcome Screen opens automatically when you open the software. To
open the screen manually, do the following:
▶Click Help > Welcome Screen.
Exploring the TI-Nspire™ Navigator™ Teacher Software
When you close the Welcome Screen, the TI-Nspire™ Navigator™ Teacher
Software is open to the last workspace you used. If this is your first time using
the software, the Content Workspace is open by default. Workspaces are
explained in more detail below.
The tools described below are available in all workspaces of the TI-Nspire™
Navigator™ Teacher Software. For more information on other areas of the
software, see the chapter for each workspace.
ÀTitle bar. Shows the name of the current document and the name of the
software. The minimize, maximize, and close buttons are located in the
right corner.
ÁMenu bar. Contains tools for working with documents in the current
workspace, and for modifying system settings.
ÂWorkspace Selector. Use these tabs to switch between the Content, Class,
Documents, Review, and Portfolio Workspaces.
Note: Some tasks you perform may prevent you from immediately
changing workspaces. If a dialog box awaits a response from you, type
your response and then change workspaces.
Getting Started with TI-Nspire™ Navigator™ Teacher Software 51

52 Getting Started with TI-Nspire™ Navigator™ Teacher Software
ÃTools menu. Shows tools frequently used when working in each
workspace. Every workspace has the Quick Poll, Screen Capture, and
Student Name Format icons. Other tool menu options change depending
on which workspace is open. Those tools are covered in their respective
chapters.
• Student Name Format lets you choose how student names are
displayed; either by Last Name, First Name, User Name, Display
Name, Student ID, or hidden.
• The Screen Capture tool lets you take a picture of an active document
on the computer, or capture the screen of one or all connected
handhelds. You can take several pictures, and you can copy/paste
and save the images. For more information, see
Capturing Screens
.
• The Quick Poll tool lets you send a poll to students that they
immediately receive on their handhelds, and receive student
responses. For more information, see
Polling Students
.
ÄClass list. Lists classes that are currently available.
ÅClass Actions button. Use this to begin, pause, resume, or end a class.
Exploring Workspaces
The TI-Nspire™ Navigator™ Teacher Software uses workspaces to help you
easily access the tasks you most commonly perform. The TI-Nspire™
Navigator™ Teacher Software has five predefined workspaces. Each
workspace is explained in additional detail in their respective chapters.
•Content Workspace. Find and manage content on your computer, links to
websites, connected handhelds, or Texas Instruments web content.
•Class Workspace. Manage classes and students, use the class record
panel, and exchange files with students. You can use a mix of
TI-Nspire™CX, TI-Nspire™CX CAS, TI-Nspire™, and TI-Nspire™CAS
handhelds in the same class.
•Documents Workspace. Author documents and demonstrate mathematical
concepts.
•Review Workspace. Review a collected set of documents; mark, show, or
hide student responses; switch data views; and organize data.
•Portfolio Workspace. Save, store, review, and manage class assignments
from students.
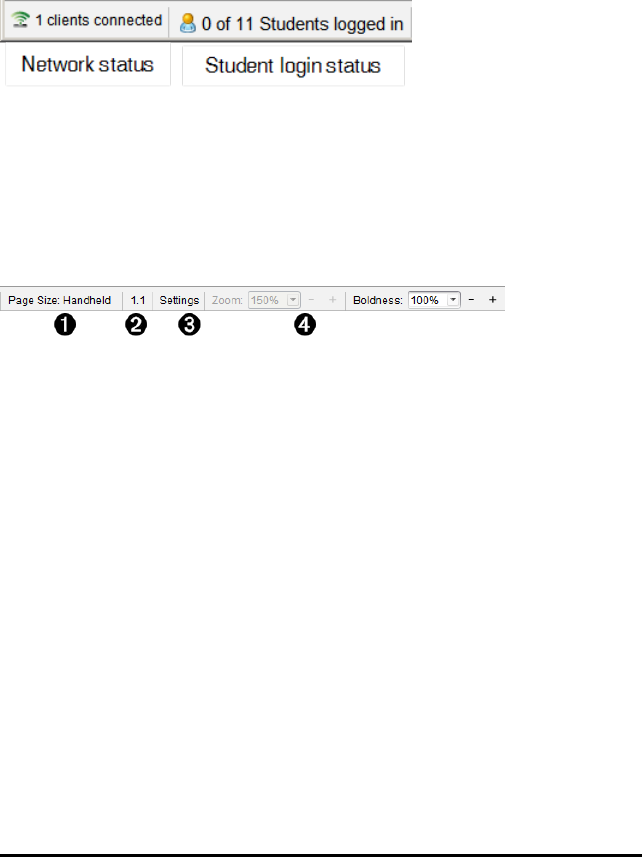
Exploring the Status Bar
Some information in the status bar changes, depending on which workspace is
open.
In all workspaces, the status bar gives you information about the network status
and the student login status.
The network status shows how many TI-Nspire™ CX Wireless Network
Adapters and TI-Nspire™ Navigator™ Cradles are currently connected to the
system. You can click here to launch the Network Manager window.
The student login status shows how many students are currently logged into
class, and how many students are assigned to the current class.
In the Documents Workspace, the status bar gives additional information.
ÀPage Size. Shows whether the document is in Handheld or Computer
page size. Click here to view document properties. For more information
on page size and document preview, see
Working with TI-Nspire™
Documents
.
ÁProblem and page number. References the current document. In this
example, 1.1 indicates problem 1, page 1 of the active document.
ÂSettings. Click here to view or change Document settings.
ÃZoom/Boldness. When working with a document in Handheld page size,
use the Zoom scale to zoom the active document in or out from 10% to
500%. To set a zoom, type a specific number, use the + and - buttons to
increase or decrease by increments of 10%, or use the drop-down box to
choose preset percentages.
When working with a document in Computer page size, use the Boldness
scale to increase or decrease the boldness of text and line thickness
within applications. To set the boldness, type a specific number, use the +
and - buttons to increase or decrease by increments of 10%, or use the
Getting Started with TI-Nspire™ Navigator™ Teacher Software 53
54 Getting Started with TI-Nspire™ Navigator™ Teacher Software
drop-down box to choose preset percentages.
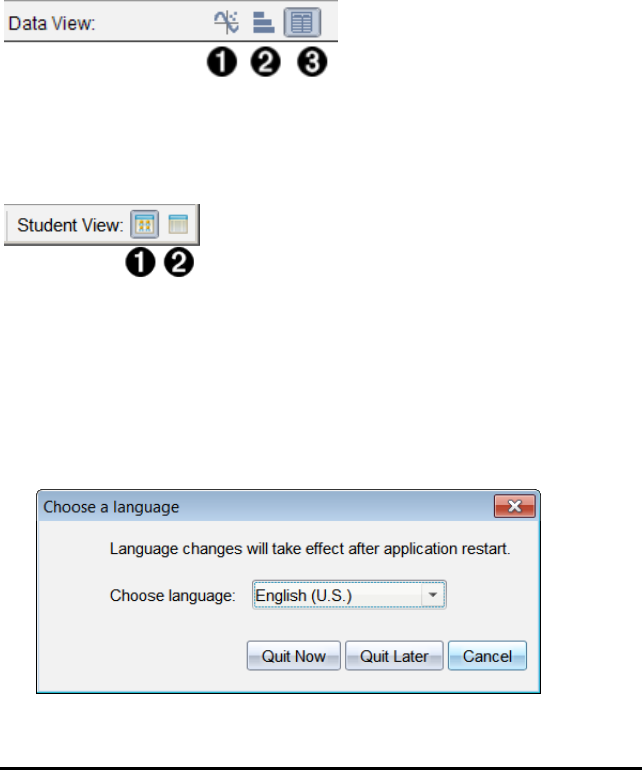
In the Review Workspace, the status bar information changes, depending on
the view in the Page Sorter.
• If you are in the document view, the status bar provides the same
information as the Documents Workspace status bar.
• If you are in the student response view, the status bar has Data View icons.
Use the icons to change between bar chart, table, and graph views. See
Using the Review Workspace
for more information on the Data Views.
ÀGraph
ÁBar chart
ÂTable
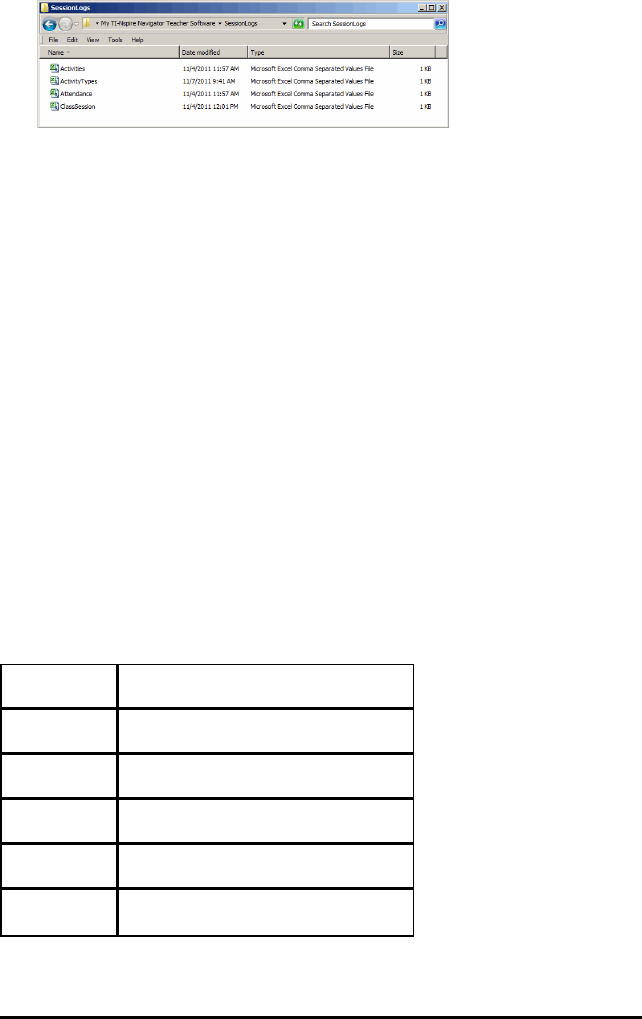
In the Class Workspace, the status bar has Student View icons. Use the icons
to change between Seating Chart view or Student List view. See
Using the
Class Workspace
for more information on the Student Views.
ÀSeating chart
ÁStudent List
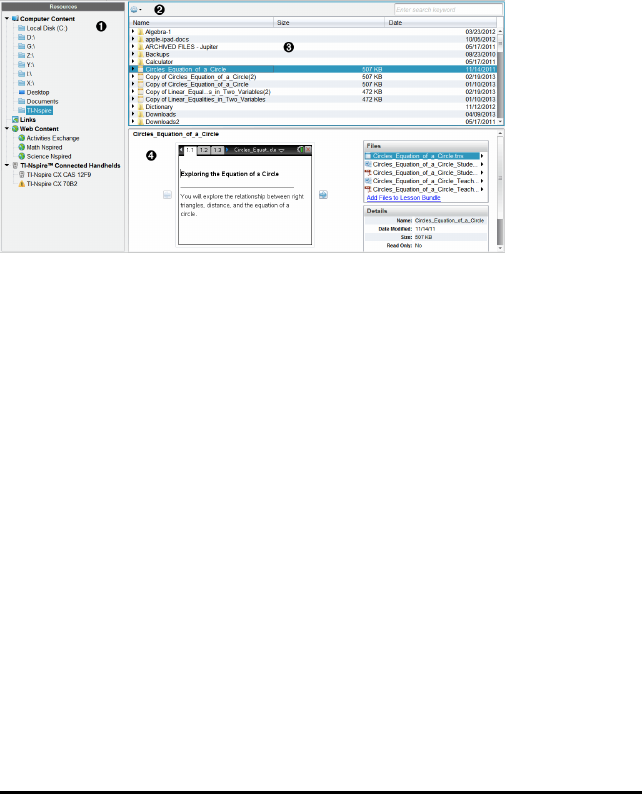
Changing Language
Use this option to select a preferred language. You must restart the software for
the language to take effect.
1. Click File >Settings >Change Language.
The Choose a Language dialog box opens.
2. Click ¤to open the Choose language drop-down list.

3. Select the desired language.
4. Click Quit Now to close the software immediately. You will be prompted to
save any open documents. When you restart the software, the language
change is effective.
—or—
Click Quit Later to continue your work. The language change is not applied
until you close and restart the software at a later time.
Note: If you select Simplified Chinese or Traditional Chinese as the language
in the TI-Nspire™ software, you should see Chinese characters in the menus
and dialogs. If your computer uses the Windows® XP operating system and
you do not see Chinese characters, you may need to install the Windows® XP
East Asian Language Support package.
Getting Started with TI-Nspire™ Navigator™ Teacher Software 55

56

Tracking and Reporting System Use
Schools participating in research-based programs or schools receiving money
from funding initiatives must track student use of the TI-Nspire™ Navigator™
systems and provide reports for auditing purposes.
To automatically track student usage of the TI-Nspire™ Navigator™ systems,
teachers must create a folder named "SessionLogs" within the appropriate
TI-Nspire™ Navigator™ software folder on their computer. If the SessionLogs
folder is present, the software generates the files needed for tracking activity
types, attendance, class session information, and activities that take place
during a class session. The files are dependent on each other and must be
kept together in the SessionLogs folder so that usage information is tracked
and reported accurately.
After the SessionLogs folder is created, the system automatically captures
system usage data and appends the information for each new class session in
the appropriate file. If the system does not find a SessionLogs folder, data is not
tracked.
Creating the SessionLogs Folder
Using the Windows® Explorer (or Finder if using a Mac®), complete the
following steps to create the SessionLogs folder.
1. Go to the My Documents (or Documents) folder on your computer.
2. Open the folder that corresponds to the software you installed. This is the
default folder created when you installed your TI-Nspire™ Navigator™
software.
• My TI-Nspire™ Navigator™ Teacher Software
• My TI-Nspire™ CAS Navigator™ Teacher Software
• My TI-Nspire™ Navigator™ NC Teacher Software
• My TI-Nspire™ CAS Navigator™ NC Teacher Software
3. Create a folder named SessionLogs.
Note: The folder name is case sensitive and must be named as described.
When you start the TI-Nspire™ software, the system creates the session
files and saves them in the SessionLogs folder.
Tracking and Reporting System Use 57
58 Tracking and Reporting System Use
Managing Session Logs
The system automatically generates the following comma-separated variable
(csv) files and stores them in the SessionLogs folder. Each time you start the
TI-Nspire™ software, logs are appended to the previous day’s log to keep a
complete record.
Note: Users are responsible for managing the size of the files.
•ActivityTypes.csv file. This file is the lookup table that the system
references when generating a usage report.
•Attendance.csv file. Information for each student who logs into a session is
recorded in this file.
•ClassSession.csv file. Information for all class sessions is recorded in this
file.
•Activities.csv file. Activities that take place during class sessions are
recorded in this file.
Using the ActivityTypes File
The ActivityTypes file is a look-up table that includes codes for identifying
activity types and a short description of each activity.
Activity ID Description
SC Screen Capture
CF Collect File
DF Delete File
SF Send File
RD Redistribute

Activity ID Description
SP Save to Portfolio
CM Collect Missing
SM Send Missing
US Umprompted Send
LP Live Presenter
QP-MC Quick Poll - Multiple Choice
QP-OR Quick Poll - Open Response
QP-EQ Quick Poll - Equations
QP-CE Quick Poll - Chemical Expression
QP-EX Quick Poll - Expressions
QP-IL Quick Poll - Image with labels
QP-IP Quick Poll - Image with point(s)
QP-CP Quick Poll - Coordinate Points
QP-LS Quick Poll - Lists & Spreadsheet
Using the Attendance File
The system records information for each student who logged into a session in
the Attendance file. Information includes:
•Class ID. The Class ID number unique to the funding program.
•Class Name. Name of the class as defined in the software.
•Last Name. Last name of the student.
•First Name. First name of the student.
•Date and Time. Date and time when student logged in. Used to identify
students who logged in on time versus late.
Tracking and Reporting System Use 59

60 Tracking and Reporting System Use
Using the Class Session File
The system records information for each class session by Class ID. Information
includes:
•Class ID. The Class ID number unique to the funding program.
•Class Name. Name of the class as defined in the software.
•Start. Time the class started as recorded when the teacher clicks Begin
Class.
•End. Time the class ended as recorded when the teacher clicks End Class.
•NumStudent. Number of students who logged in during the class session.
Using the Activities File
The system records information about the activities that took place during the
class session in this file. Information includes:
•Class Session ID. Class ID number unique to the funding program.
•Class Name. Name of the class as defined in the software.
•Activity Type ID. Type of activity that took place during the class. The ID
correponds to the activity types defined in the Activity Type file.
•Activity Detail. Additional data about the activity type if available.
•Activity Start. Time the activity started.
•Activity End. Time the activity ended.
•NumStudent. Number of students who participated in this activity.
Packaging and Sending Session Logs
The district administrator must report usage to the funding source for auditing
purposes at regular intervals. When files are requested, teachers can easily
package the session files into a zip file and send the file to the administrator.
The zip file preserves the format and dependencies of the activity files, and
includes a default file name that identifies the zip file for the administrator.
Complete the following steps to package the files in the SessionLogs folder
into a zip file and send the file to the administrator.
1. From the Content Workspace, click File > Package Session Logs.
Note: This menu item is only available if the SessionLogs folder was
created.

The software packages the files into a zip file and assigns a default name
(TI_PKG_SessionLogs_MMDDYYYY). The Logs package dialog box
opens.
2. Click Yes to go to the location where the zip file was saved.
Windows® Explorer (or Finder) opens. The zip file is saved in the same
location as the SessionLogs folder. For example, if you have TI-Nspire™
Navigator™ NC Teacher Software, the SessionLogs folder is stored in the
following location:
PC:
...\My Documents\My TI-Nspire™ Navigator™ NC Teacher Software\
Mac®
.../Documents/My TI-Nspire™ Navigator™ NC Teacher Software/
3. Email the zip file to the administrator.
Data is appended to the existing file each time you start a new session. If
you no longer need the information after the files are sent to the
administrator, remove them from the SessionLogs folder and keep the zip
file. The system will generate new files the next time you start a new
session.
Tracking and Reporting System Use 61

62
Using the Content Workspace
The Content Workspace provides access and navigation to folders and files
stored on your computer, network, and external drives, allowing you to open,
copy, and transfer files to students.
Exploring the Content Workspace
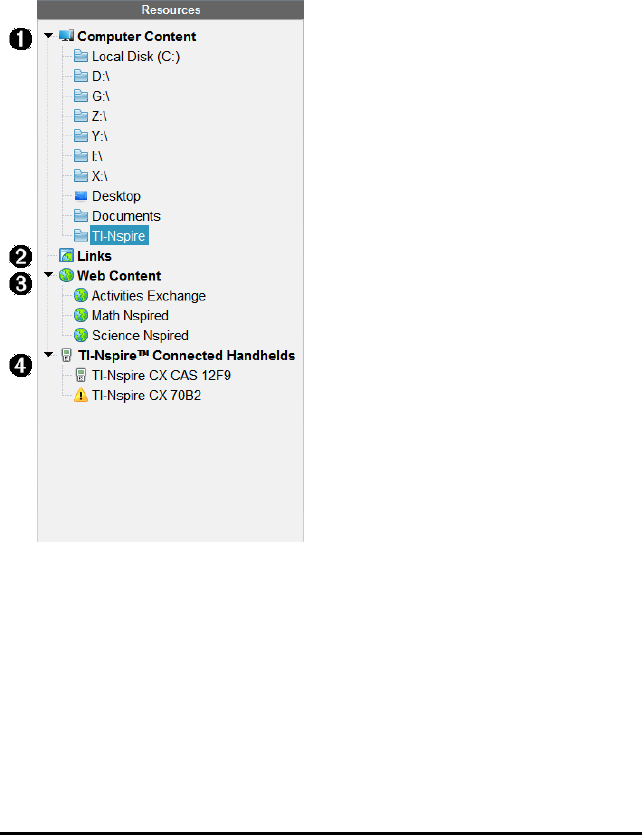
ÀResources pane. Select content here. You can select folders and
shortcuts on your computer, network drives, external drives, or web
content. If you are using software that supports TI-Nspire™
handhelds, the Connected Handhelds heading is visible when
handhelds are connected.
Note: You can add new links to your favorite Web sites in the Links
section. You can access these new links in the Content pane. New
links may not be added to the Web content section.
ÁNavigation bar. Navigate to any location on your computer by clicking
an item in the breadcrumb trail. When you select a resource, the
options shown are specific to that resource.
ÂContent pane. By default, the folders on your desktop are displayed.
Use this space to locate and view files on your computer. You can
locate and access files on a connected handheld if using software
that supports handhelds. Use the top half of the space as you would
a file manager. The Content pane is able to display the contents of
only one selected item at a time. Avoid selecting more than one item
at a time.
Using the Content Workspace 63
64 Using the Content Workspace
ÃPreview pane. Shows details about the selected file or folder.
Exploring the Resources Pane
Use the Resources pane to locate documents on a computer, access web
content, and communicate with connected handhelds if using TI-Nspire™
software that supports connected handhelds.
ÀComputer Content. Enables navigation to all files on a computer,
network drives, and external drives. Computer Content expands and
collapses to provide access to the following default shortcuts:
• Local Disk
• External drives
• Network drives
• Desktop
• Documents or My Documents

When you select an item in Computer Content, the file structure
appears in the Content pane. When you select a folder or supported
file, the detail is displayed in the Preview pane.
ÁLinks. By default, links to Texas Instruments sites are listed. When
you click Links, it shows a list of links in the Content pane. Then when
you click a link there, it launches in your web browser. You can add
your own links to this section. Links from the latest version of the
TI-Nspire™ software are added when you upgrade.
Users located in the United States can search U.S. standards or
textbooks by selecting the search option from Links.
ÂWeb Content. Lists links to Texas Instruments sites that contain
TI-Nspire™-supported activities. Web Content is available if you are
connected to the Internet. You can save material you find on these
sites to your computer and share items through the Computer
Content pane or Connected Handhelds if using software that
supports handhelds. You cannot save links to websites in the Web
Content section.
Note: The web content that is available varies depending on region. If
there is no online content, this section is not visible in the Resources
pane.
When you select an item in Web Content, the list of activities is
displayed in the Content pane, and a preview of the selected activity
is displayed in the Preview pane.
ÃConnected Handhelds. Lists handhelds connected to your computer.
Click the Connected Handhelds label to view information about each
handheld in the Content pane. To see folders and files on a specific
handheld, click the handheld name. A warning sign next to a
handheld name indicates that the OS on the handheld does not
match the software version. The handheld OS release version must
match the TI-Nspire™ software release version to work in a classroom
environment. Move your mouse over the warning sign to open a tool
tip for more information.
Note:Connected Handhelds are not shown if there are no handhelds
connected or if you are using TI-Nspire™ Navigator™ NC Teacher
Software.
Using the Content Workspace 65
66 Using the Content Workspace
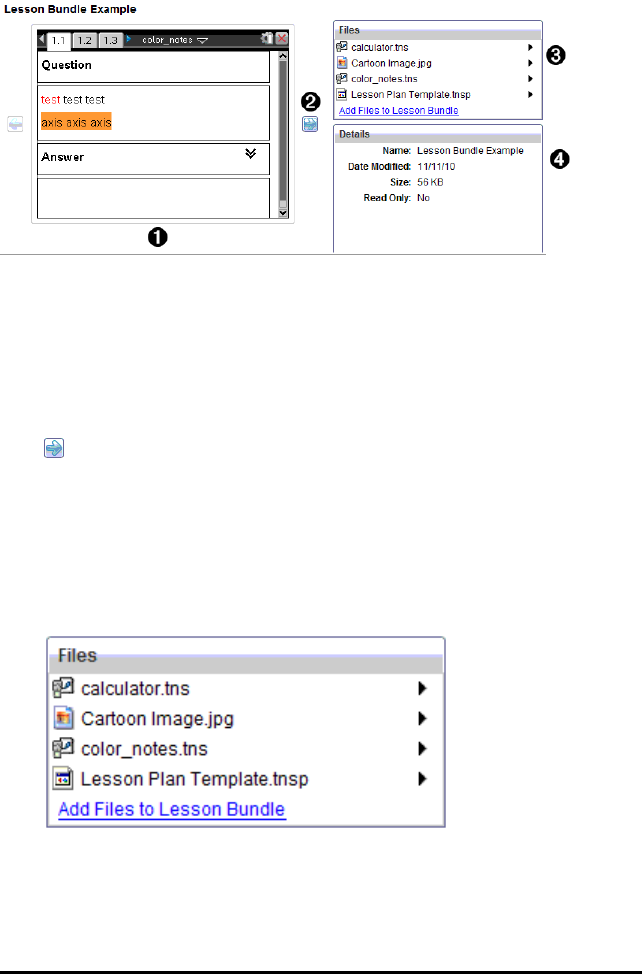
Using the Preview Pane
ÀA thumbnail preview of the selected folder, .tns file, file-type icon, or
lesson bundle. Double-click a file-type icon to open the file in its
associated application.
Note: If a lesson bundle is empty and this space is blank, you have
the option to add files.
ÁIf a TI-Nspire™ document has multiple pages, use the forward arrow
to preview the next page. The backward arrow becomes active so
you can move backward through the pages. If working with a lesson
bundle, you can choose to preview a TI-Nspire™ document within the
bundle by this method.
ÂIf a lesson bundle is selected, the Files dialog box opens above the
Details window listing the files in the lesson bundle. Double-click any
file in a lesson bundle to open the file in its associated application.
ÃIf a folder is selected, the Details window shows the name of the
folder, the path where the folder is located, and the date modified.
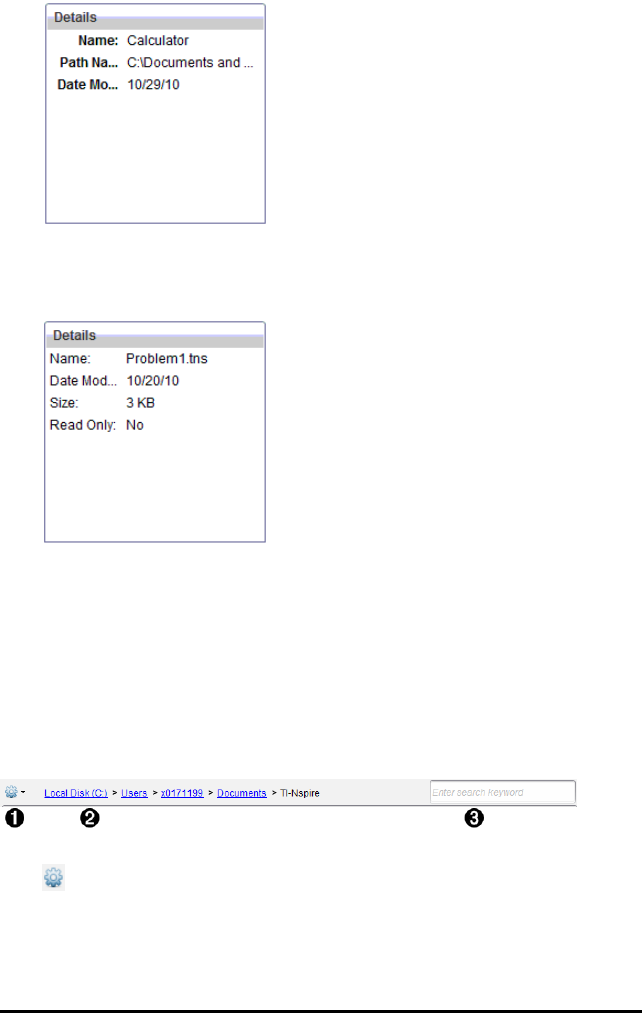
For document files and lesson bundle files, the Details window shows
the name, the date the file was modified, the file size, and whether or
not the file is read only.
Accessing Computer Content
Computer Content provides access to all information stored on your computer,
network, and external drives.
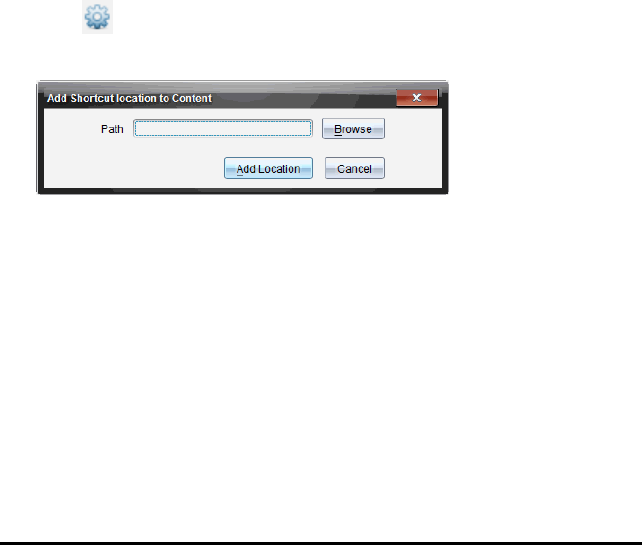
Using the Navigation bar
The Content pane Navigation bar provides tools needed to locate folders and
files.
ÀOptions. Click ¤to open the menu to access options for working
with files and folders.
ÁCurrent path: Contains a clickable breadcrumb trail of the current
Using the Content Workspace 67
68 Using the Content Workspace
location. Click a breadcrumb to navigate to any section in the path.
ÂSearch. Enter a search keyword and press Enter to find all files within
the selected folder containing that word.
Filtering Computer Content
Use this filtering option for easy access and selection of your teaching content.
You can select show TI-Nspire™ content only or to show all content.
1. Select a folder in Computer Content in the Resources pane.
2. From the Menu bar, select View > Filter by.
3. Choose one of the following options.
•Show TI-Nspire™ content only
•Show all content
Mapping a Network Drive
Complete the following steps to map a network drive.
1. Select Computer Content from the Resources list.
2. Click , and then click Create Shortcut.
The Add Shortcut location to Content dialog box opens.
3. Click Browse.
Note: You can also type the full path name for the network drive.
The Select Shortcut Folder dialog box opens.
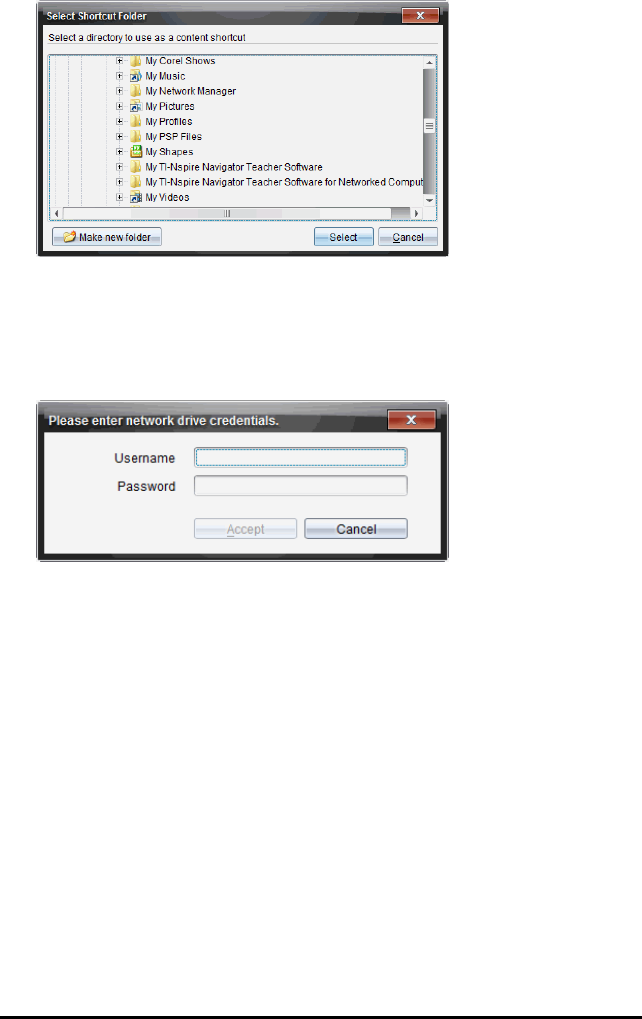
4. Navigate to the network drive.
5. Click Select.
6. Click Add Location.
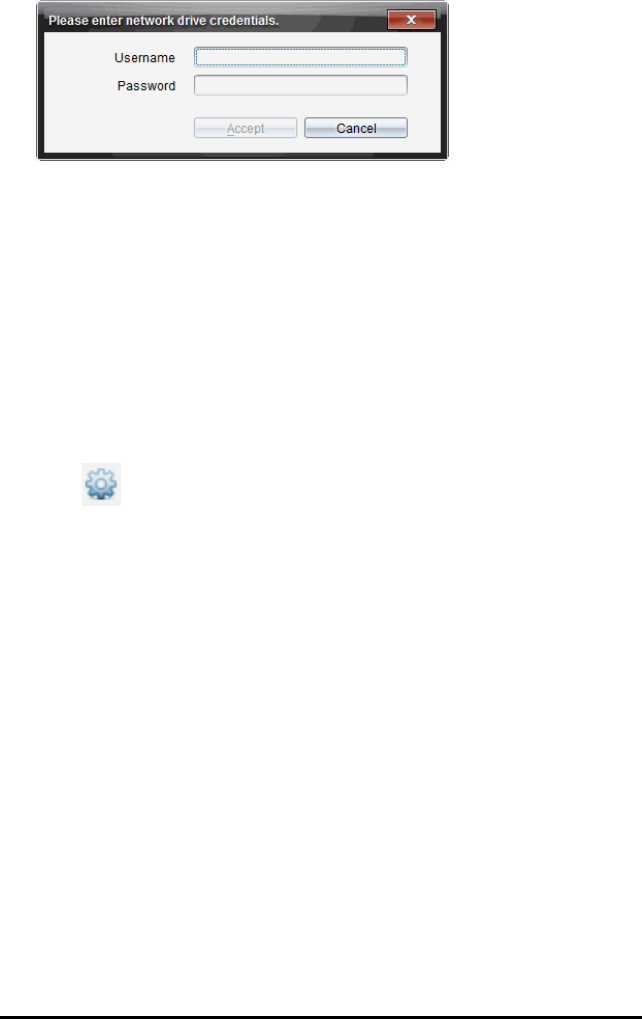
The Please enter network drive credentials dialog box opens.
7. Type the username and password given to you by your system
administrator.
8. Click Accept.
The network drive is added to the list of folders under the Computer
Content heading in the Resources pane.
Accessing a Secured Network Drive
If access to a network drive requires authentication, complete the following
steps to access secured network.
1. Click the drive you want to access in the Resources pane.
The Please enter network drive credentials dialog box opens.
Using the Content Workspace 69
70 Using the Content Workspace
2. Type your username and password.
3. Click Accept.
Using Shortcuts
Use this option to add folders or lesson bundles containing frequently used
files to the Computer Content list.
Adding a Shortcut
To add a shortcut to a folder containing files you access often:
1. Navigate to the folder where the files are located.
2. Click , and then click Create Shortcut.
The folder is added to the list of folders under Computer Content in the
Resources pane.
Deleting a Shortcut
To delete a shortcut:
1. From the Computer Content list, select the folder to be deleted.
2. Right-click the selected folder, and then click Remove Shortcut.
The folder is removed from the list of shortcuts.
Note: You cannot remove default shortcuts.
Working with Links
By default, the Links list contains a list of links to Texas Instruments websites.
Click a link to launch your web browser and access the website.
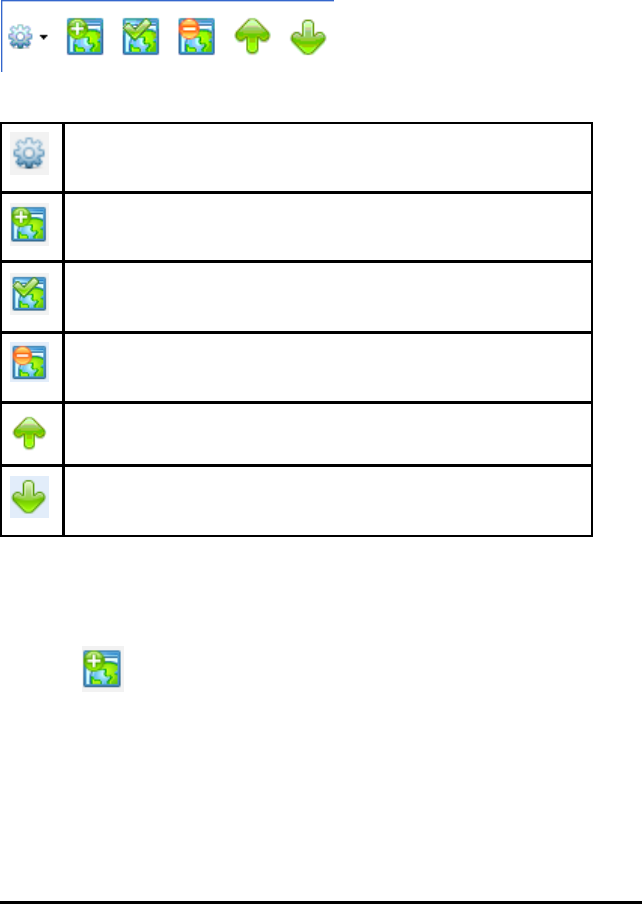
Using the Links Toolbar
When you select Links in the Resources pane, the tools on the navigation bar
are specific to working with links. Use these tools to add, edit, or delete links
from the list. You can also move a link up or down in the list.
Options. Click ¤to open the menu to access options for
working with links.
Click this icon to add a link to the list.
Select an existing link, and then click this icon to edit the link’s
attributes. You cannot edit a default link.
Click this icon to delete a link. You cannot delete a default
link.
Select a link and click this icon to move the link up in the list.
Select a link and click this icon to move the link down in the
list.
Adding a Link
Complete the following steps to add a link to the list of Links in the Resource
pane.
1. Click .
The Add Link dialog box opens.
Using the Content Workspace 71
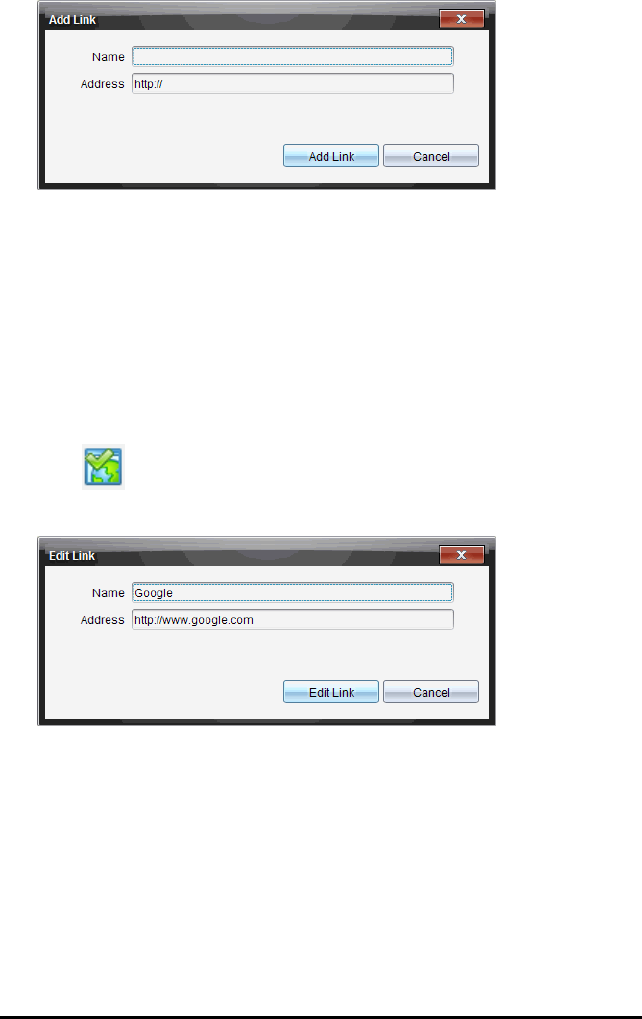
72 Using the Content Workspace
2. Type the name of the link.
3. Type the URL in the Address field.
4. Click Add Link.
The link is added to the bottom of the list of existing links.
Editing an Existing Link
Complete the following steps to edit an existing link.
1. Select the link you want to change.
2. Click .
The Edit Link dialog box opens.
3. Make needed changes to the name of the link or to the URL.
4. Click Edit Link.
The changes are applied to the link.
Removing a Link
Complete the following steps to delete a link.
1. Select the link you want to delete.

2. Click .
The confirmation dialog box opens.
3. Click Remove.
The link is removed from the list.
Note: You cannot delete a default link.
Moving Links Up or Down in the List
You can change the order of the links in the list to suit your needs.
▶Click to move a selected link up one place in the list.
▶Click to move a selected link down one place in the link.
▶Click , and then select Move to Top of List to relocate a selected link to
the top of the list.
▶Click , and then select Move to Bottom of List to relocate a selected link
to the bottom of the list.
Using Web Content
Web Content provides links to online materials on Texas Instruments websites.
You can save material found on these websites to your computer and share
them using the Computer Content pane and Connected Handhelds.
Information provided for each activity includes the name of the activity, the
author, the date the activity was posted, the size of the file, and the source.
Using the Content Workspace 73
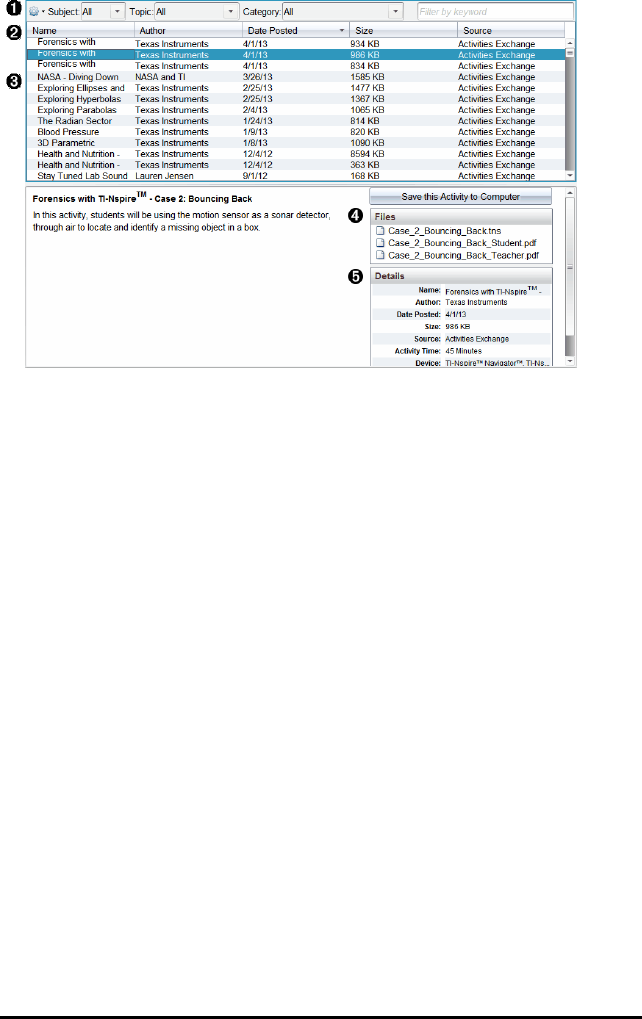
74 Using the Content Workspace
ÀNavigation toolbar.
ÁColumn headings.
ÂList of available activities.
ÃList of the files contained in the activity.
ÄDetails about the selected activity.
Note: An Internet connection is required to access Texas Instruments websites.
Sorting the List of Activities
Use the column headings to sort the information in the list of activities. By
default the list is displayed in alphabetical order by Name.
• Click the Name heading to list activities in reverse alphabetical order. Click
the heading again to return to A to Z order.
• Click the Author heading to list the activities in alphabetical order by author
name.
• Click the Date Posted heading to list the activities in order from newest to
oldest or from oldest to newest.
• Click the Size heading to list the activities according to file size.
• Click the Source heading to list the activities in order by source.
• Right-click the column heading row to customize displayed column
headings.

Filtering the List of Activities
By default, all available activities are listed in the Content pane. Options on the
Navigation bar enable you to filter the activities by subject, topic, and category.
You can also search for an activity using a keyword search.
To find all activities related to a particular subject:
1. In the Subject field, click ¤to open the drop-down list.
2. Select a subject.
All activities related to the selected subject are listed.
3. To narrow the search, click ¤in the Topic field to view and select a topic
related to the subject selected.
4. Use the Category field to narrow the search even further. Click ¤to select
a category related to the selected subject and topic.
Using Keywords to Search for an Activity
Complete the following steps to search for an activity using a keyword or
phrase.
1. Type a keyword or phrase in the Filter by Keyword field.
2. Press Enter.
All activities that contain the keyword or phrase are listed.
Opening an Activity
1. Select the activity you want to open.
2. Click , and then select Open.
The Open Activity dialog box opens with a list of all documents related to
the selected activity.
You can open a .tns or .tsnp file in the TI-Nspire™ software. Other files such
as Microsoft® Word and Adobe® PDF files open in their respective
applications.
Using the Content Workspace 75
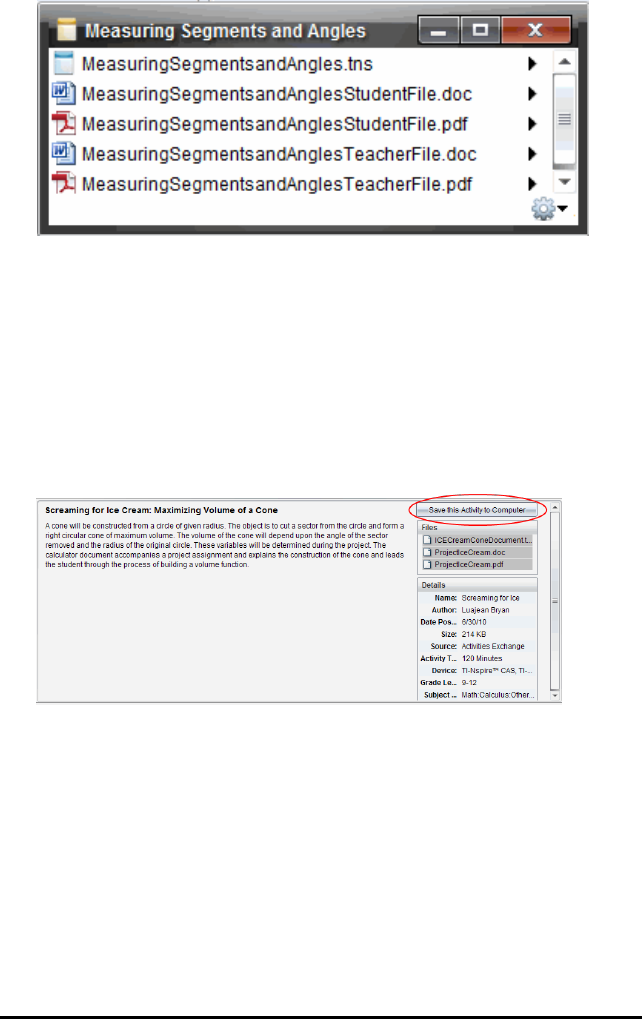
76 Using the Content Workspace
3. Select the file and click ¢, and then select Open.
• The .tns file opens in the Documents Workspace.
• The .doc or .pdf file opens in its associated application.
Saving an Activity to Your Computer
Complete the following steps to save an activity to your computer.
1. Select the activity you want to save. The file details are displayed in the
bottom half of the window.
2. Click Save this Activity to Computer in Preview pane, above Files.
Note: You can also right-click on the selected activity and choose Save to
Computer.
The Save Selected files dialog box opens.
3. Navigate to the folder where you want to save the file.
4. Click Save.
The activity is saved to your computer as a lesson bundle.

Copying an Activity
Complete the following steps to copy an activity. Once the activity is copied to
the Clipboard, you can paste the activity into a folder on your computer, and
then drag the activity to your list of shortcuts in the Local Content pane.
1. Click the activity you want to copy to select it.
2. Use one of the following methods to copy the activity to the Clipboard:
• Select the activity and drag it to a folder in the Local Content list.
• Click , and then click Copy.
• Right-click on a file in the Files list, and then click Copy.
• Click (Copy icon), which is located in the toolbar.
The activity is copied to the Clipboard.
3. Open a folder on your computer, and then click Edit > Paste to copy the
activity to the selected folder.
Sending Files to Class
You can send files and folders to your whole class, members of the class
currently logged in, or to individual students. Class must be in session for you
to send the files.
When you send a file to the whole class, all students currently logged in will
receive the file immediately. Students not logged in will receive the file when
they log in.
Notes:
• Only TI-Nspire™ (.tns) and PublishView™ (.tnsp) file types open in the
TI-Nspire™ software.
• Other file types (if supported) such as images, word processing, or
spreadsheet files, open in the application the operating system has
associated with the file type.
Sending Files from the Content or Documents Workspaces
1. Select the file you want to send to the class.
• From the Content Workspace, click the file in the Content pane.
• From the Documents Workspace, click the file in the Content Explorer.
Using the Content Workspace 77
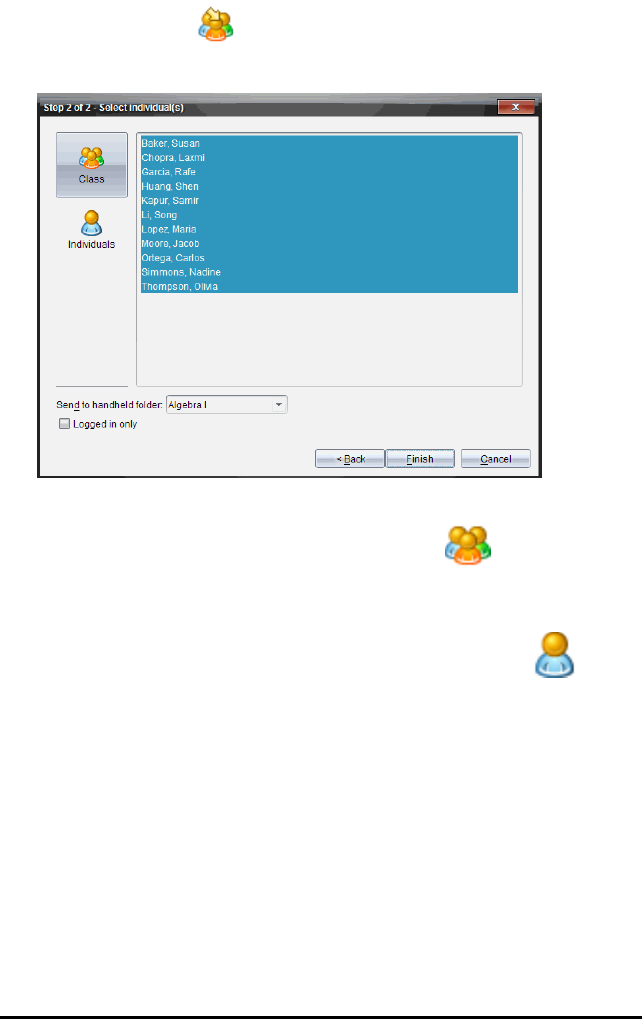
78 Using the Content Workspace
2. Click Send to Class , or click File>Send to> Send to Class.
The Select individual(s) dialog box opens.
3. Select the student(s) to whom you want to send the file:
• To send the file to the whole class, click Class . To send the file
only to class members who are currently logged in, select the Logged
in only check box.
• To send the file to an individual student, click Individuals and
then click the student.
Note: If you had any students selected in the classroom area, the
software already has them selected.
• Use the Send to handheld folder drop-down list to choose from the
current class folder, the top level folder on the handheld, or the last 10
folders that files were sent to. (Available only on TI-Nspire™ software
that supports handhelds.)
4. Click Finish.
The file transfer appears in the Class Record in the Class Workspace.
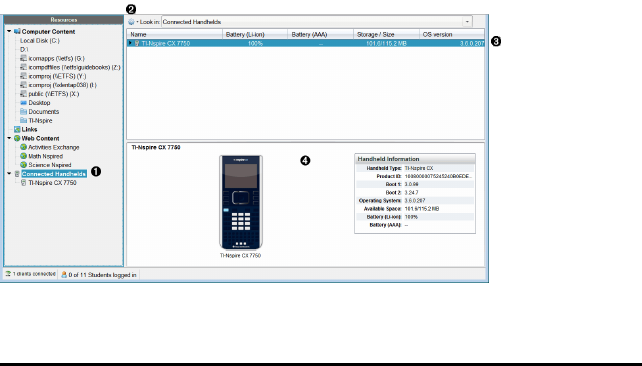
Working with Connected Handhelds
The TI-Nspire™ software enables you to view content, manage files, and install
operating system updates on handhelds connected to the computer.
To use the features described in this chapter, handhelds must be turned on
and connected by one of these means:
• TI-Nspire™ Docking Station or TI-Nspire™ CXDocking Station
• TI-Nspire™ Navigator™ Cradle and access point
• TI-Nspire™ CX Wireless Network Adapter and access point
• TI-Nspire™ CX Wireless Network Adapter -
v2
and access point
• A direct connection through a standard USB cable
Note: The tasks in this section can only be performed using TI-Nspire™
handhelds. In order to enable wireless connectivity, the TI-Nspire™ Navigator™
Teacher Software for Handhelds and the OS installed on the TI-Nspire™
handhelds must be version 3.9 or later.
Viewing Content on Connected Handhelds
When you select a handheld in the Resources pane in the Content Workspace,
all files and folders on the handheld appear in the Content pane. To preview
the document contents, select Click here to preview document in the Preview
pane.
Working with Connected Handhelds 79

80 Working with Connected Handhelds
ÀConnected Handhelds - Lists all handhelds that are connected and turned
on.
Note:A warning symbol next to the handheld name indicates that the OS
installed on the handheld does not match the software version installed on
the computer and that an OSupdate is needed.
ÁOptions - Available options vary depending on the task you select under
Resources.
ÂContent pane - When Connected Handhelds is selected, the Content pane
shows details about handhelds that are connected and turned on:
•Name
•Battery (Li-ion) - Li-ion (rechargeable) battery charge (Critical 2%,
25%, 50%, 75%, 100%, or "--" to indicate no battery is present).
•Battery (AAA) - AAA battery charge (Critical 2%, 25%, 50%, 75%,
100%, or "--" to indicate no battery is present).
•Storage Size
•OS Version
ÃPreview pane - Provides information on a handheld when you click
Connected Handhelds in the Resources pane and then a handheld in the
Content pane. If you select a TI-Nspire™ file in the Content pane, the
Preview pane shows a preview available for that file.
•Handheld Type: Names of handhelds.
•Product ID: Handheld product identification.
•Boot 1: Internal bootstrap that performs lower level operation for
booting up device.
•Boot 2: External bootstrap that performs lower level operation for
booting up device.
•Operating System: The operating system in use.
•Available Space: The amount of space left and available on the
handheld.
When you select a handheld, all files and folders on the handheld appear in
the Content pane. When a file or folder is selected, the details are displayed in
the Preview pane. Click the icon to preview the document.
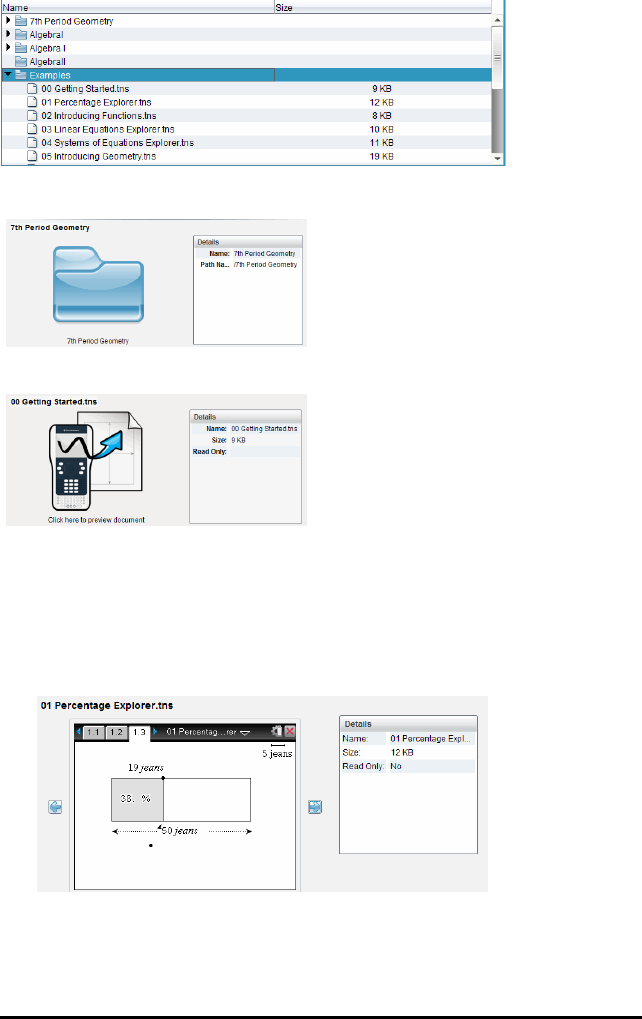
Details about the selected folder or file are shown in the Preview pane.
Details for selected folder
Details for selected file
▶To view the files in a folder, double-click the folder name in the Content
pane. The files in the folder are listed in the Content pane.
▶To preview the contents of a .tns file, select Click here to preview document
in the Preview pane.
Working with Connected Handhelds 81

82 Working with Connected Handhelds
Managing Files on a Connected Handheld
When working with files on connected handhelds in the Content Workspace,
use the Options menu or the context menu to manage files.
Note: If you select a file type that is not supported on the handheld, some
selections in Options menu are not active.
Option How it Works
Open Open a file on a connected handheld:
• Click the file you want to open.
• Click Open. The document opens in the Documents
Workspace.
Save to
Computer
Save a copy of the selected file on your computer:
• Click the file you want to save.
• Click Save to Computer. The Save Selected Files dialog
box opens.
• Navigate to the folder where you want to save the file.
• Click Save.
Copy/Paste Create a copy of a file:
• Click the file you want to copy.
• Click Options > Copy to copy the file to the Clipboard.
• To paste the file in another location, navigate to the new
location, and then click Options > Paste.
Note: If you don’t select a new location, the copied file is
pasted with a new name "Copy of ..."
Delete Delete a file on a connected handheld:
• Click the file you want to delete.
• Click Delete.
• Click Yes when the Warning dialog box opens. Click No
to cancel.
Refresh To refresh the list of files, click Options > Refresh.
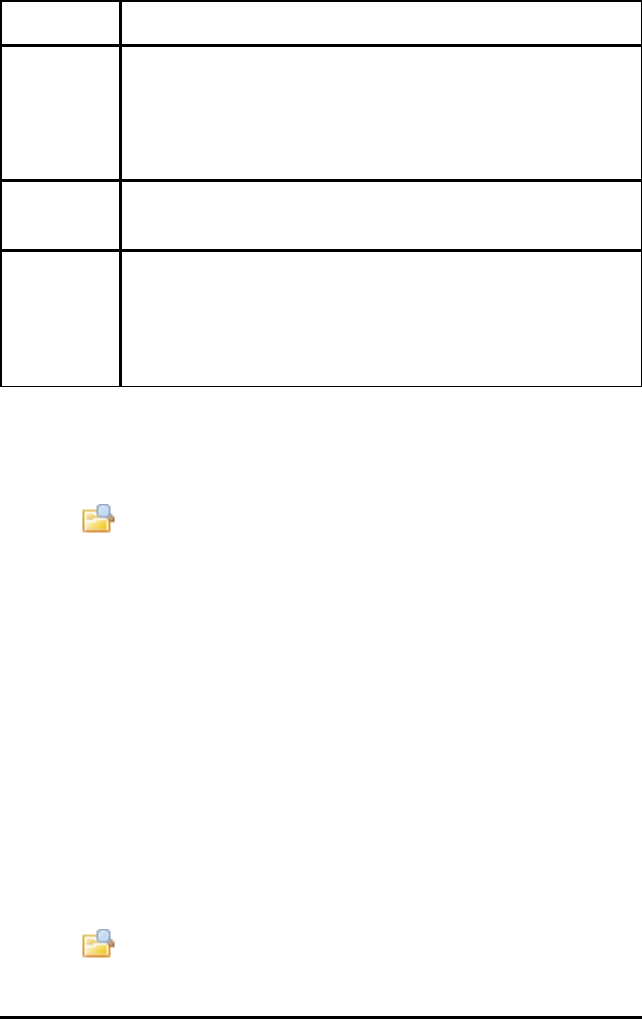
Option How it Works
Rename To rename a file on a connected handheld:
• Click the file you want to rename.
• Click Options > Rename.
• Type the new name and press Enter.
Up a Level Go up a level in the folder hierarchy. This option is available
when you select a file inside a folder.
New Folder Create a new folder:
• Click New Folder.
• Type a name for the new folder.
• Press Enter.
Opening Documents on a Connected Handheld
To open a document on a connected handheld in the TI-Nspire™ software:
1. Ensure the handheld is connected to your computer.
2. Click to open Content Explorer.
The connected handheld name is listed in the Connected Handhelds
pane.
3. Double-click the handheld name.
The folders and documents on the handheld are listed.
4. Navigate to the document you want to open, and then double-click the file
name.
The document opens in the Documents Workspace.
Saving Files to a Connected Handheld
When you save a file from your computer to a handheld, files are converted to
TI-Nspire™ documents (.tns files). (See
Sending Files to Handhelds
)
To save a file on your computer to a connected handheld:
1. Ensure the handheld is connected to your computer.
2. Click to open Content Explorer.
Working with Connected Handhelds 83

84 Working with Connected Handhelds
The folders and files on your computer are listed in the Computer pane.
3. Navigate to the folder or file you want to save to the handheld.
4. Click the file to select it.
5. Drag the file to a connected handheld listed in the Connected Handheld
pane.
The file is saved to the connected handheld.
Note: To save the file in a folder on the handheld, double-click the
handheld name to list the folders and files, and then drag the file to a folder
on the handheld.
If the file already exists on the handheld, a dialog box opens asking if you
want to replace the file. Click Replace to overwrite the existing file. Click No
or Cancel to abandon the save.
Sending Files to Handhelds
You can transfer activities, folders, lesson bundles, and supported files from a
computer to connected handhelds, from one connected handheld to another,
or from one connected handheld to all connected handhelds.
Items you can transfer include:
• Folders
• Supported files
.tcc
.tco
.tilb
.tnc
.tno
.tns
Sending an Activity to a Connected Handheld
In the Content Workspace, you can send an activity from the Web Content link
to connected handhelds.
1. Use the Workspace selector to select the Content Workspace.
2. Click Web Content in the Resources pane.
3. Click the activity you want to send to connected handhelds.
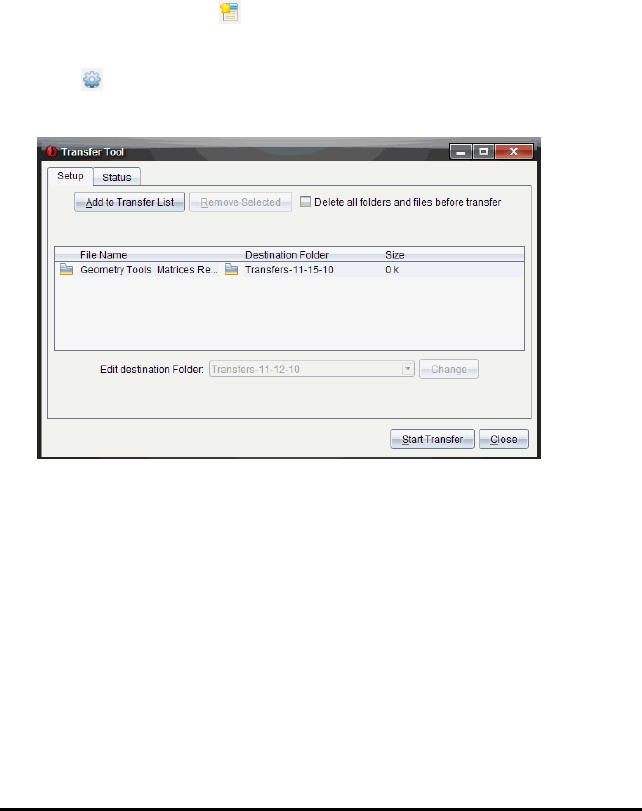
4. Use one of the following options to send the file to the selected handhelds:
• Drag the file to the Selected Handhelds label to transfer to the file to
all connected handhelds. To transfer the file to a specific handheld,
drag the file to a specific handheld name.
• To transfer the file using Transfer Tool:
Note: You cannot use the Transfer Tool to transfer files to handhelds
while a class is in session.
5. From the toolbar, click , and then select Send to Connected Handhelds.
—or—
Click , and then select Send to Connected Handhelds.
The Transfer Tool opens.
6. Select the file, and then click Start Transfer.
The selected files and folders are transferred to the selected handhelds.
7. When the transfer is complete, close the Transfer Tool.
Sending Files to all Connected Handhelds
You can send a file to all connected handhelds when a class is not in session.
To transfer files or folders from a connected handheld or from the computer to
all connected handhelds, complete the following steps:
1. Use the Workspace selector to select the Content Workspace.
2. Select the files or folders you want to transfer from the Resources pane.
Working with Connected Handhelds 85
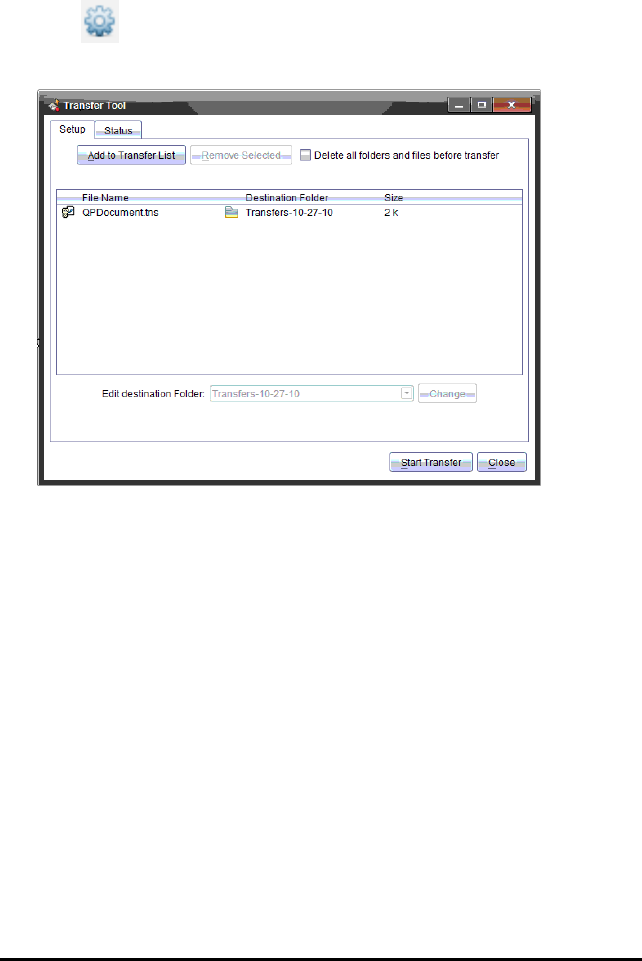
86 Working with Connected Handhelds
Note: You can choose files from Computer Content, Web Content, or
Connected Handhelds.
3. Click , and then click Send to Connected Handhelds.
The Transfer Tool window opens.
4. Click Start Transfer.
Note: To add additional files to the transfer list, click Add to Transfer List.
The selected files and folders are transferred to the connected handhelds.
By default, the files are transferred to a folder on the handheld titled
Transfers-mm-dd-yy
.
Transferring Files Between Handhelds
If multiple handhelds are connected, you can send a folder or file from one
handheld to another handheld in the Connected Handhelds list in the
Resources pane.
1. Use the Workspace selector to select the Content Workspace.
2. In the Resources pane, click the handheld that contains the files you want
to transfer. The files on the handheld are listed in the Content pane.
3. Click the folder or file you want to send.
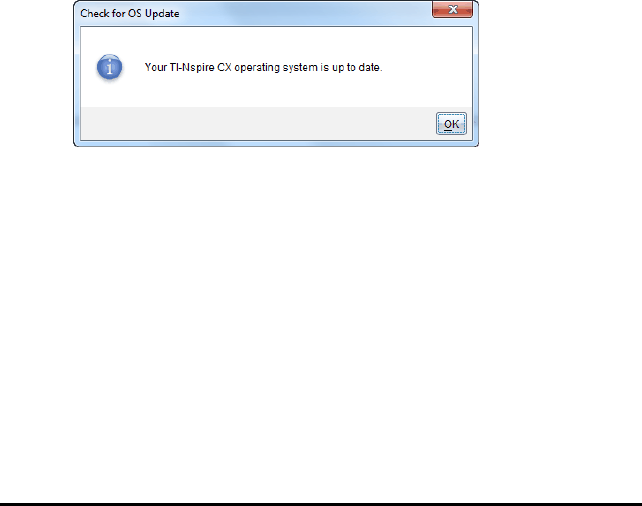
4. Drag the file to another handheld in the Connected Handhelds list.
Note: You can also copy and paste a file from one handheld to another.
Checking for an OS Update
When handhelds are connected, you can check for OS updates from the
Content Workspace or from the Documents Workspace.
Note: Your computer must be connected to the Internet.
1. Show all connected handhelds.
• In the Content Workspace, click Connected Handhelds in the
Resources pane.
• In the Documents Workspace, open the Content Explorer and click
Connected Handhelds.
2. Click the handheld you want to check, and then right-click and select
Check for OSUpdate.
• If the operating system is current, the Check for Handheld OS Update
dialog box opens indicating that the operating system on the
handheld is current.
• If the operating system is not current, the TI-Nspire™ software prompts
you to install the latest OS now, with the option to download the OS to
your computer.
Working with Connected Handhelds 87
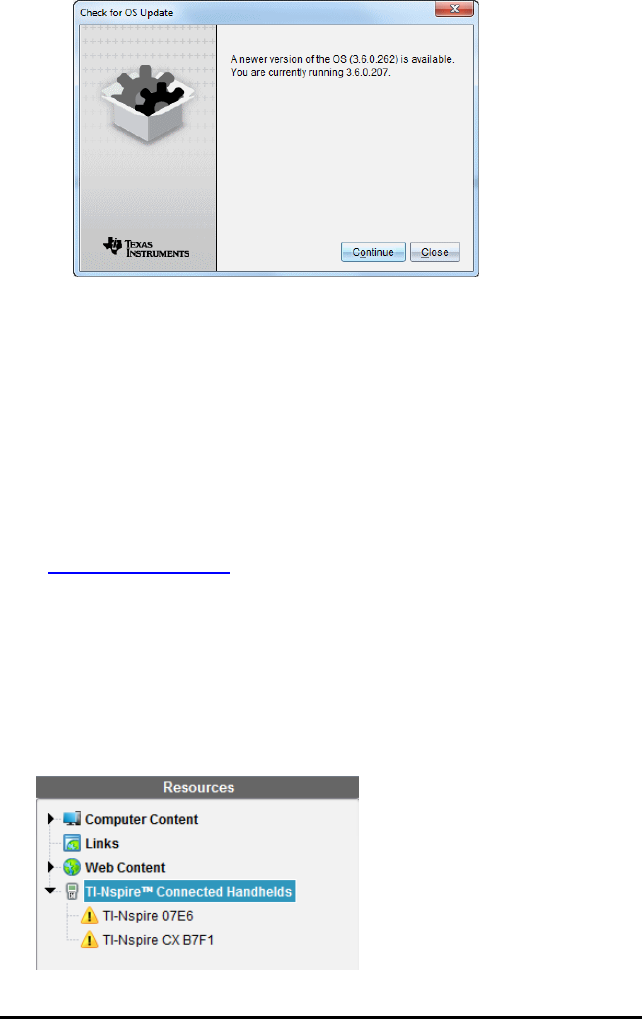
88 Working with Connected Handhelds
3. Click Close to close the dialog box, or click Continue and follow the
prompts to install the OS on the handheld.
Installing an OS Update
Note: To avoid losing unsaved data, close all documents on the handheld
before updating its operating system (OS). Updating the OS does not replace
or remove previously saved documents.
The OS on a new handheld comes bundled with the installer, which places the
OS in a default location such as: C:\mydocuments\TI-Nspire\downloads.
Go to education.ti.com/latest to download the latest OS files.
Note: You can install OS updates on connected handhelds from the Content
Workspace at any time.
Updating the OS on a Single Handheld
1. Ensure that your computer is connected to the internet.
2. Show all connected handhelds by clicking the arrow next to TI-Nspire™
Connected Handhelds in the Resources pane.
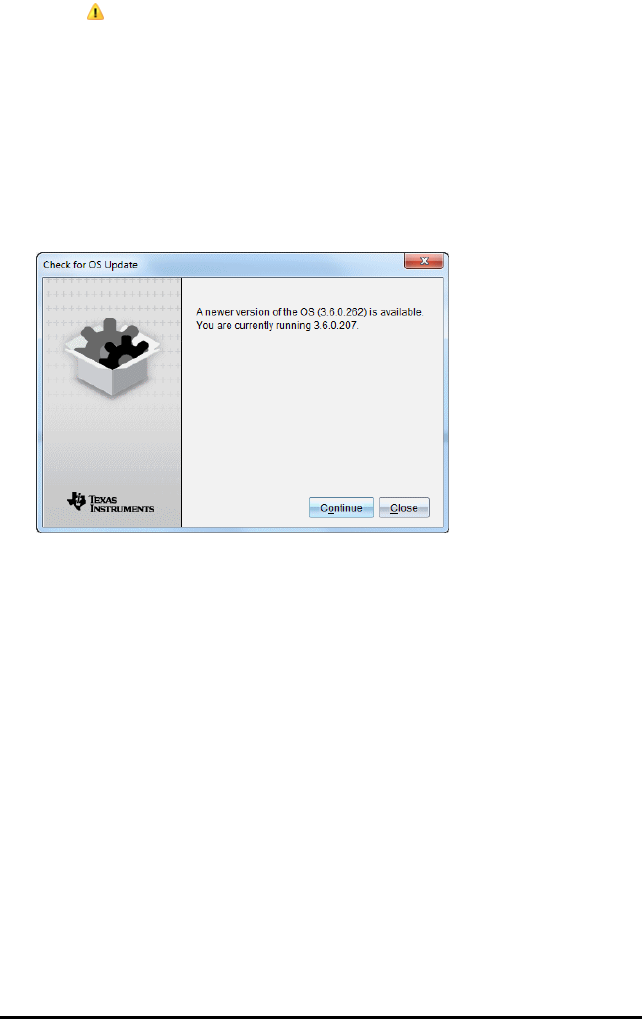
Note: The symbol indicates either:
• A student's handheld needs an OS update.
—or—
• A student's handheld has a newer OS than the teacher's.
3. Hover your mouse over the TI-Nspire™ handheld you want to update, and
then right-click.
4. Click Check for OS Update.
The Check for OS Update dialog box opens.
5. Click Close to cancel the installation, or click Continue and follow the
prompts to install the OS on the handheld.
When the update is complete, the handheld restarts automatically.
Updating the OS on Multiple Handhelds
Note: To avoid losing unsaved data, close all documents on the handheld
before updating its operating system (OS). Updating the OS does not replace
or remove previously saved documents.
1. Click TI-Nspire™ Connected Handhelds in the Resources pane.
2. Select all handhelds you want to update in the Content Pane.
3. Click Tools > Install OS.
The OS Installation dialog box opens.
4. Click Add OS file.
The Add to Transfer List dialog box opens.
Working with Connected Handhelds 89
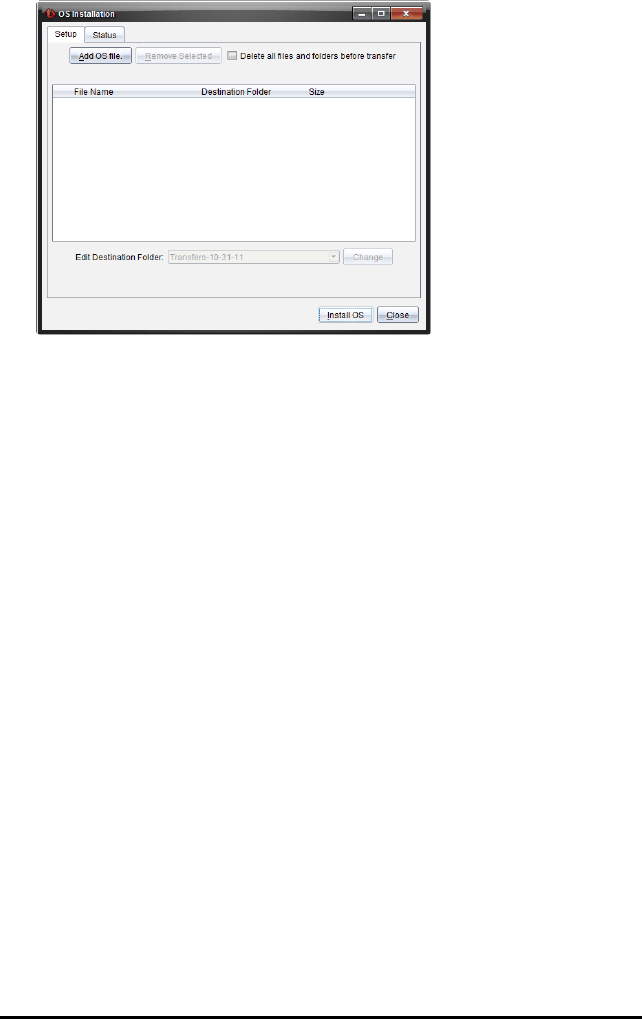
90 Working with Connected Handhelds
5. Select the applicable OS files.
• To upgrade a TI-Nspire™ CX handheld, select TI-Nspire.tco.
• To upgrade a TI-Nspire™ CX CAS handheld, select TI-Nspire.tcc.
• To upgrade a TI-Nspire™ handheld, select TI-Nspire.tno.
• To upgrade a TI-Nspire™ CAS handheld, select TI-Nspire.tnc.
6. Click Select.
The OS Installation redisplays with your selected OS files.
7. Click Install OS.
The OS version information updates, and the Select OS Handheld File
dialog redisplays for further selection.
Renaming Handhelds
You can rename the handhelds from the Content Workspace.
Note: Renaming a handheld does not affect student login information.
1. Right-click the handheld name in the Content pane.
2. Click Rename.
3. Type the new name.
4. Press Enter to go to the next name to change.
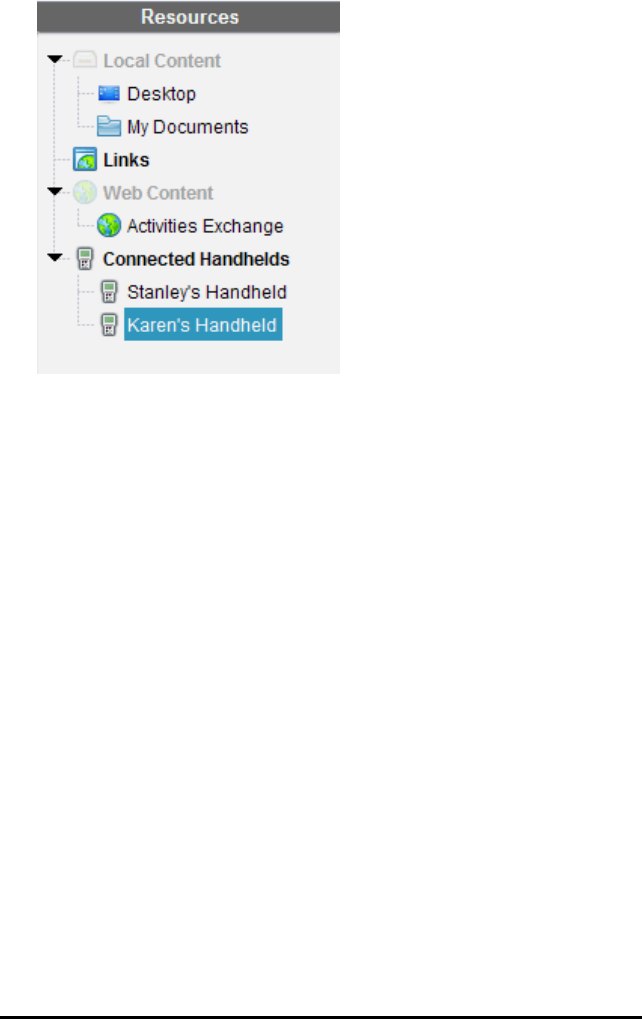
5. To exit the Edit mode, click an area of the screen outside the handheld
names. You will also leave the Edit mode after you press Enter on the last
name you edit.
Using Identify Selected to Locate Handhelds
If you are using the TI-Nspire™ Docking Station or the TI-Nspire™ CX Docking
Station, use this feature to locate handhelds.
1. Be sure that the handhelds are turned on and that the docking station is
connected to your computer.
2. Use the Workspace selector to select the Content Workspace.
3. Click Tools > Identify Selected Handheld/Lab Cradle.
Note:Youcan also right-click the handheld name in the Content pane, and
then select Identify Selected Handheld/Lab Cradle.
Both LED lights on the docking station under the slot where the handheld
is located will blink for 30 seconds.
Working with Connected Handhelds 91

92
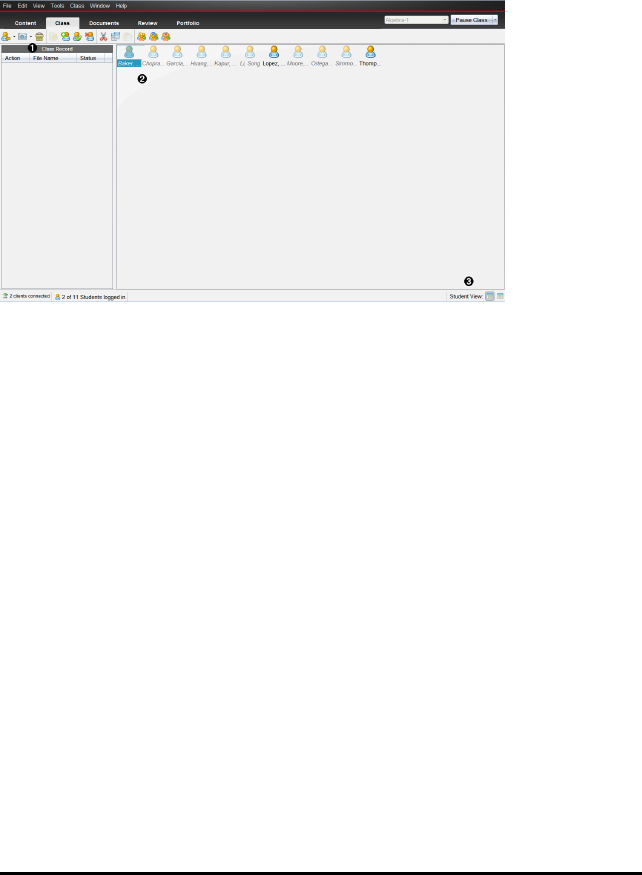
Using the Class Workspace
Use this workspace to add and manage classes and students, and to
exchange files with students.
ÀClass Record. Document actions are shown here. You can open a
document in the Review Workspace; save a document to the Portfolio
Workspace; collect files from the Class Record Workspace; send and
delete files using the toolbar, and view document properties in Record
Item Properties.
ÁClassroom area. Shows the students in your class, which ones are logged
in, and the status of file transfers for selected files in the Class Record. You
can view the students by Seating Chart or by Student List.
ÂStudent View. Lets you show the students in the classroom area in Seating
Chart view or Student List view.
Adding Classes
When you start using the TI-Nspire™ software, one of the first things you should
do is create your classes. Make sure you create a class for each of the class
periods you plan to teach.
If this is your first time using the TI-Nspire™ software, the classroom area may
be empty. You can complete the following steps at any time.
Using the Class Workspace 93
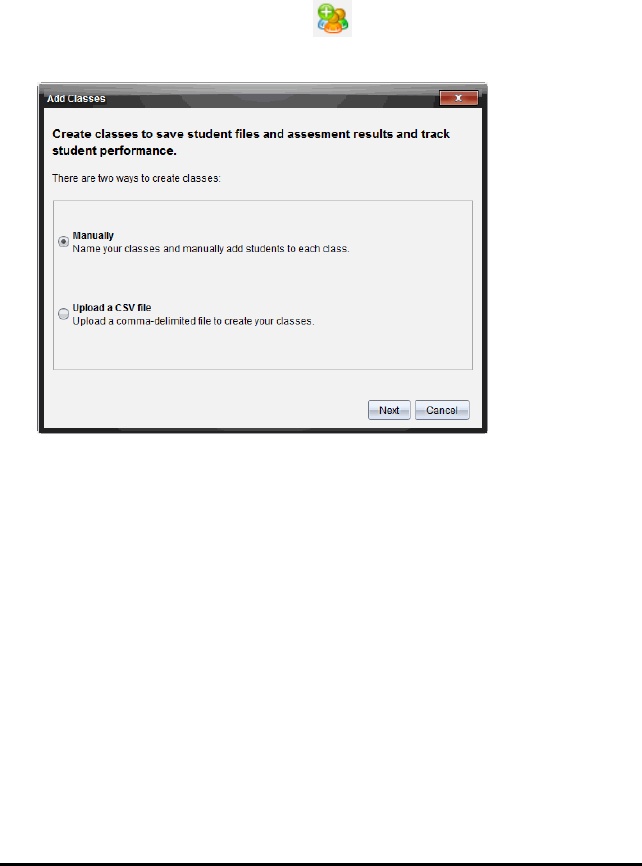
94 Using the Class Workspace
The Add Classes Wizard guides you through the process of setting up classes.
The software prompts you to add a class, and to add students to the class. You
can choose to add classes manually or using a CSV file.
Adding Classes Manually
1. Use the Workspace selector to select the Class Workspace.
2. Click Class > Add Classes or click .
The Add Classes dialog box opens.
3. Select Manually from the Add Classes dialog box.
4. Click Next.
The Add Classes Manually dialog box opens.
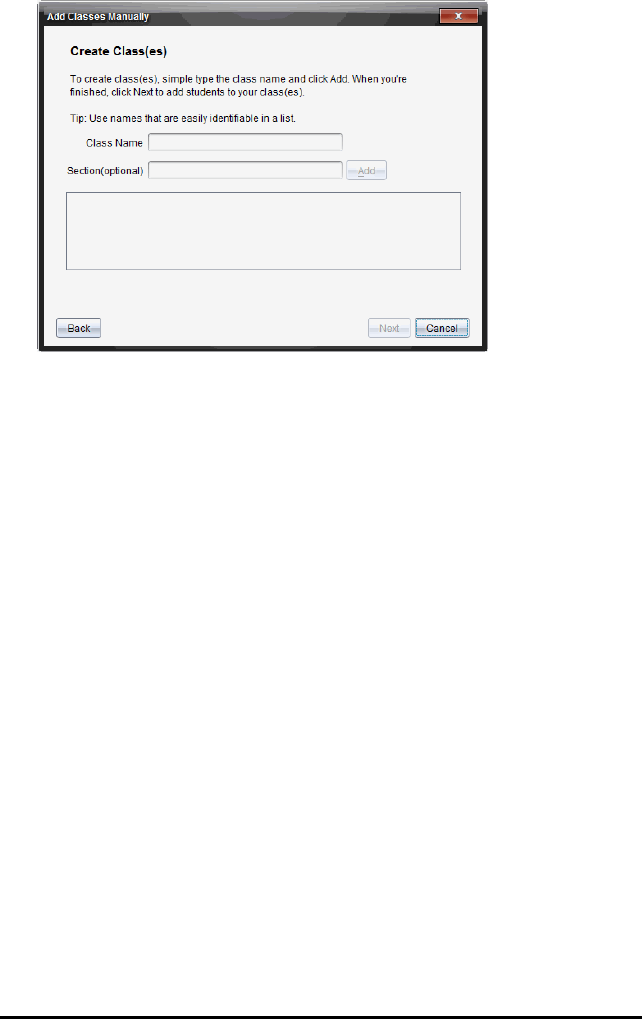
5. Type a Class Name. If needed, you can also provide a Section.
A class name must be between 3 and 32 alphanumeric characters. The
class name cannot contain the special characters / \ : " | * ? < > , and
cannot contain these words:
lpt1, lpt2, lpt3, lpt4, lpt5, lpt6, lpt7, lpt8, lpt9, com1, com2, com3, com4,
com5, com6, com7, com8, com9, aux, con, prn, nul.
Note: In the TI-Nspire™ Navigator™ NCTeacher Software, it is a good idea
to append a unique identifier such as the course ID or the teacher name to
the class name. This helps the student select the correct class if there are,
for example, multiple AlgebraI classes running.
6. Click Add.
The Add Classes Manually dialog box shows the class listed.
7. Continue adding classes, and click Next when you are done.
A dialog box displays showing successful class creation and asking if you
want to add students.
Using the Class Workspace 95

96 Using the Class Workspace
8. Click Add Student.
Note: Click Finish to Add Students later.
Adding Classes with a CSV Upload
You can add classes with a CSV upload, and import a list of students into the
class. Use the CSV upload option to import student information from a comma-
separated values (CSV) file or a text (.txt) file.
The CSV or .txt file should have this information:
Class Name
Section Name (optional)
Student First Name
Student Last Name
Student User Name
Student ID (optional)
Password (optional)
1. Use the Workspace selector to select the Class Workspace.
2. Click Class > Add Classes or click .
The Add Classes dialog box opens.
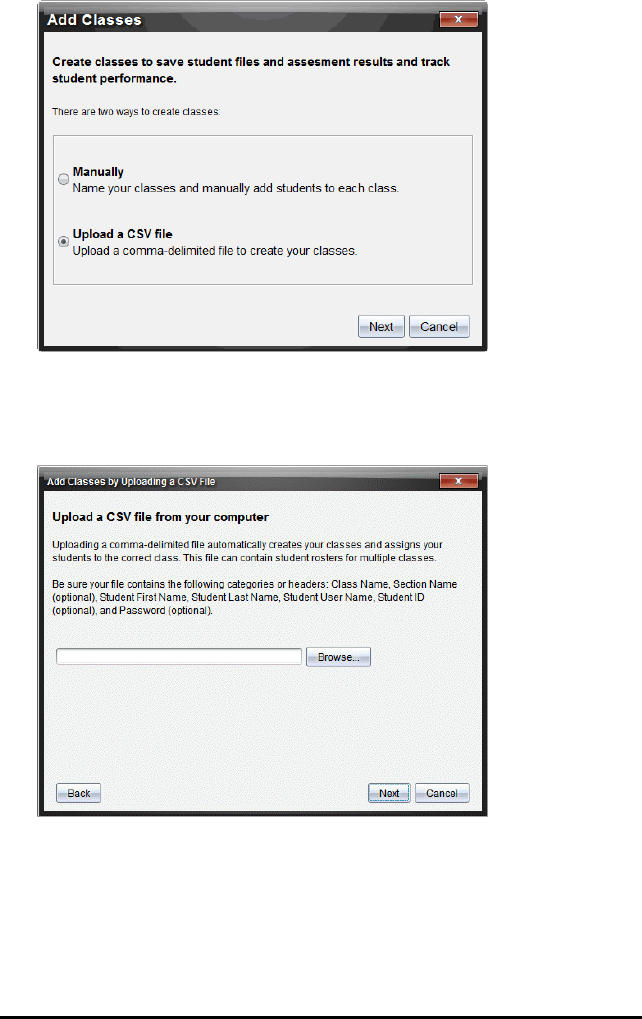
3. Select Upload a CSV file from the Add Classes dialog box.
4. Click Next.
The Add Classes by Uploading a CSV File dialog box opens.
5. Click Browse to navigate to the file on your computer.
6. Select the file that contains the students you want to import.
7. Click Open.
The Add Classes by Uploading a CSV File dialog box shows the file.
8. Click Next.
Using the Class Workspace 97
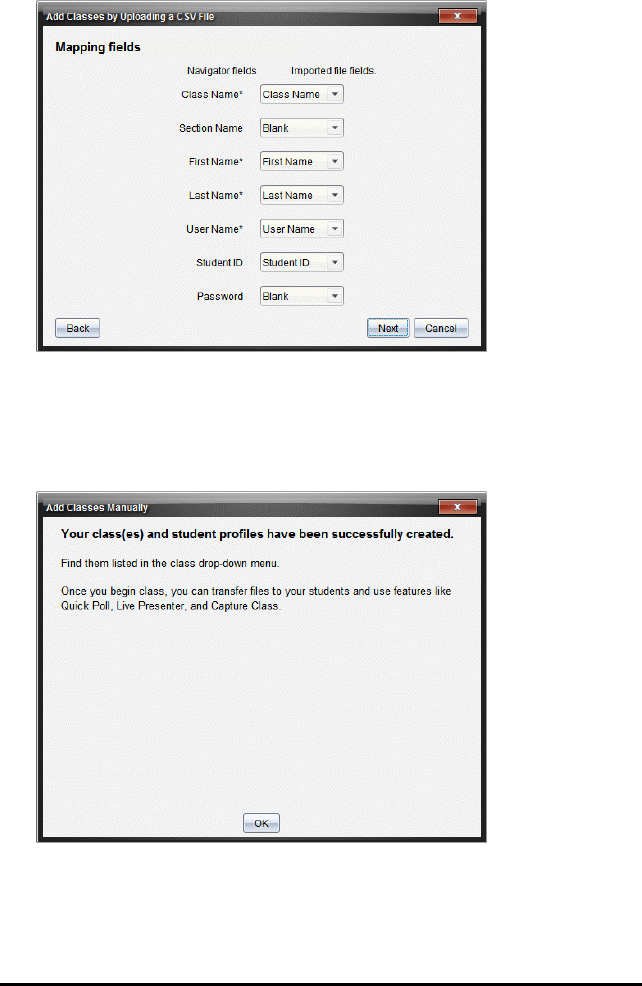
98 Using the Class Workspace
The Mapping fields dialog box opens.
9. Click ¤and select a field from the drop-down lists to map the headings in
your comma-delimited file.
10. Click Next.
A dialog box opens showing completion status.
11. Click OK to close
Note: If some students did not import successfully, click View Details to
determine the problem.
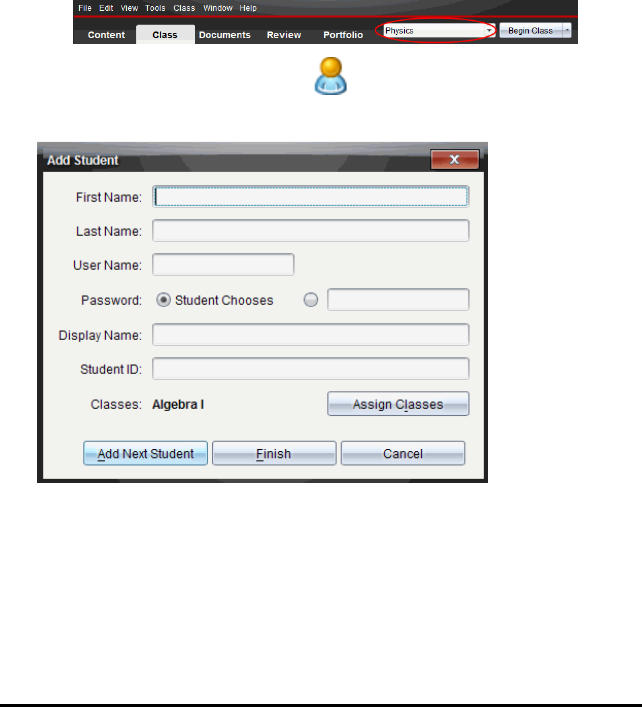
Adding Students to Classes
After you create classes, you need to add students to the classes. You can add
students to an active class session, or you can add students to any class at any
time.
Note: These instructions explain how to add students after you create a class.
1. Select the class to which you want to add students.
• If class is in session, the student will be added to the current class.
You have the option of adding the student to other classes.
• If class is not in session, use the Class Session controls to select the
class to which you want to add the student.
2. Click Class > Add Student or click .
The Add Student dialog box opens.
3. Type the student’s first name and last name.
4. Type a user name.
Note: The user name you choose must be unique. It cannot exist in the
current class or any other class.
Using the Class Workspace 99

100 Using the Class Workspace
5. If you want your student to create their own password, select Student
Chooses.
—or—
If you want to create a password for your student, select the blank
password entry box and type a new password.
6. (Optional) Type a display name.
Note: If you leave the display name blank, the software uses the student’s
first name as the display name.
7. (Optional) Type a student ID.
8. (Optional) Assign the student to other classes:
• Click Assign Classes.
The Assign Classes dialog box opens.
• Select the check boxes of the student’s classes.
• Clear the check boxes of the classes to which the student does not
belong.
• Click OK.
The Add Student dialog box opens.
9. If you need to add another student, click Add Next Student and repeat
steps 3 – 8.
10. When all students are added, click Finish.
Removing Students from Classes
As necessary, you can remove students from your classes. When you remove
students, the TI-Nspire™ software only removes them from the selected class. If
the students are in other classes, they remain in those classes until you remove
them.
Notes:
• You cannot remove students who are logged in to the TI-Nspire™
Navigator™ network.
• You cannot undo the removal of students.
• You can access many of the student account items by right-clicking the
student icon in the classroom area and choosing an action from the menu.
To remove a student from a class:
1. Click the student you want to remove.
2. Click Class > Remove Student, or click .
The software asks if you are sure you want to remove the student.
3. Click Yes.
The software removes the student.
Updating Class Rosters
You can update a single roster or multiple class rosters with new student
information by importing a CSV file with updates.
Note: You cannot change existing student information or remove students
already in the TI-Nspire™ Navigator™ database.
You can import a comma-separated value (CSV) file or a *.txt file. The CSV or
.txt file should have this information:
Class Name
Section Name (optional)
Student First Name
Student Last Name
Using the Class Workspace 101
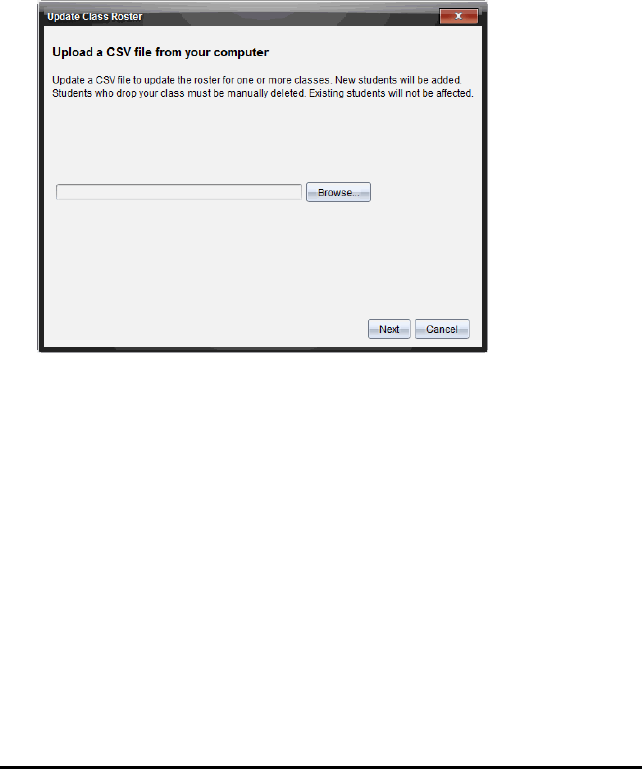
102 Using the Class Workspace
Student User Name
Student ID (optional)
Password (optional)
1. Use the Workspace selector to select the Class Workspace.
2. Select the class for which you want to update the roster.
Note: Class cannot be started.
3. Click Class > Update Class Roster.
The Update Class Roster dialog box opens.
4. Click Browse to navigate to the file on your computer.
5. Select the file that contains the new students you want to import.
6. Click Open.
The Update Class Roster dialog box shows the file.
7. Click Next.
The Mapping fields dialog box opens.
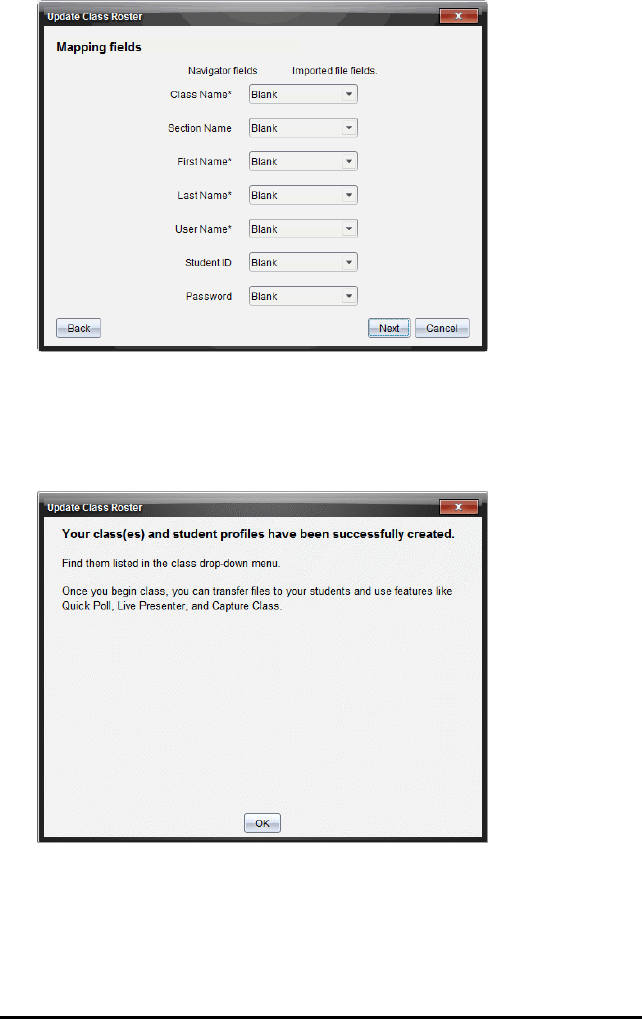
8. Click ¤and select a field from the drop-down lists to map the headings in
your comma-delimited file.
9. Click Next.
A dialog box displays showing completion status.
10. Click OK to close.
Note: If some students did not import successfully, click View Details to
determine the problem.
Using the Class Workspace 103
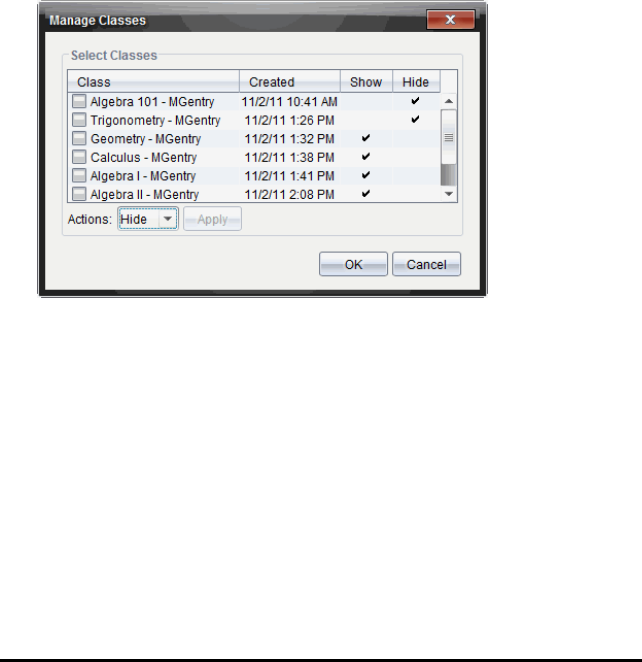
104 Using the Class Workspace
Managing Classes
You can delete classes and remove all class information from the TI-Nspire™
Navigator™ database. You can also choose to hide or show classes in menus
and views.
Deleting a Class
When you delete a class, the software removes the class and removes the files
on the hard drive that correspond to that class.
Note: You cannot undo the removal of a class.
1. If you have a class session running, end it.
2. Click Class > Manage Classes.
The Manage Classes dialog box opens.
3. From the Class list, select the class you want to remove.
4. Select Delete from the Actions list.
5. Click Apply.
The software asks if you are sure you want to remove the class.
6. Click OK.
Hiding a Class
When you hide a class, the class is removed from all workspace views and
menus except for the Manage Classes dialog box.
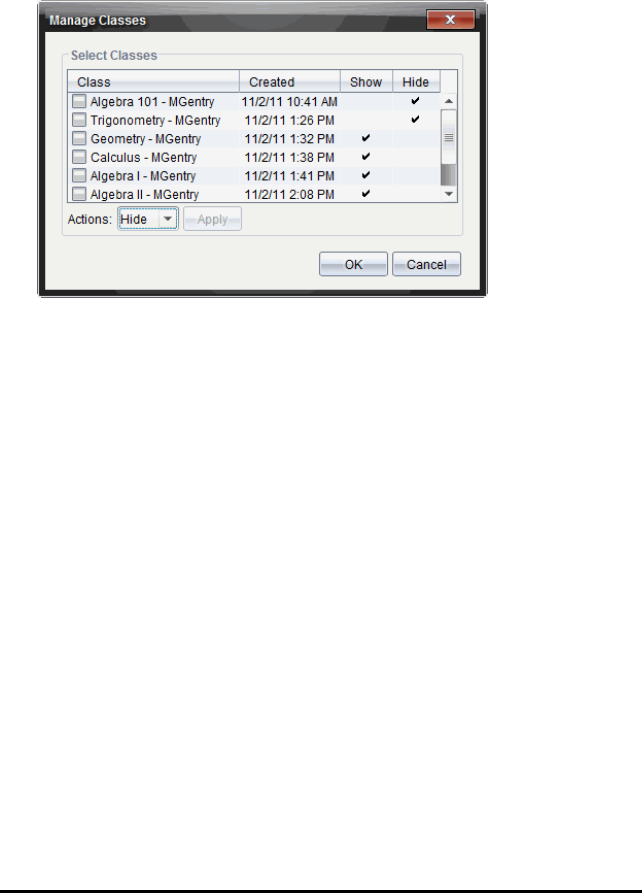
Note: Hidden classes are not deleted from the TI-Nspire™ Navigator™
database.
1. Click Class > Manage Classes.
The Manage Classes dialog box opens.
2. From the Class list, select the class you want to hide.
3. Select Hide from the Actions list.
4. Click Apply.
The software asks if you are sure you want to hide the class.
5. Click OK.
Note: Select Show from the Actions list when you want the class to show
again.
Beginning and Ending a Class Session
A class session is the period of time the TI-Nspire™ software is active for a
specific class. While a class session is running, you can perform
communication functions with the selected class. You cannot use software to
interact with your class until you begin a class session, and you cannot begin
another class until you end the current one.
Beginning a Class Session
1. Click Class> Select Class, or click the Classroom Session list.
A list of available classes opens.
Using the Class Workspace 105

106 Using the Class Workspace
2. Select the class you want to begin.
3. Click Begin Class.
Ending a Class Session
When class is over, or before you start another class, you need to end the
current class session. Ending a class stops all communication between your
computer and student handhelds or computers. When you end a class,
students receive a message saying class is ended, and students are
automatically logged off.
▶To end a current class session, select End Class from the Class Actions
drop down list.
Pausing a Class Session
This function is available only on TI-Nspire™ software that supports handhelds.
There are times you may want to pause a class. If using TI-Nspire™ software
that supports handhelds, pausing a class suspends all activity on student
handhelds, and they receive a message telling them class is paused. When
you resume class, the message clears and students are able to use their
handhelds. The students remain logged in when you pause a class.
1. To pause a class in session, click Pause Class.
2. To resume the class, click Resume Class.
Changing the Student View
In the classroom area, you can view the students in the selected class in either
the Student List view or the Seating Chart view. The Student List view shows
students in a table that contains their display names, first name, last name, user
name, and student ID. The Seating Chart view shows students as student icons
with display names. You can change the class view at any time.
In either view, the warning sign next to a student icon indicates that the OS on
the student's handheld does not match the software version on the teacher
computer. Moving your mouse over the warning sign opens a tool tip indicating
that an OSupdate is required.
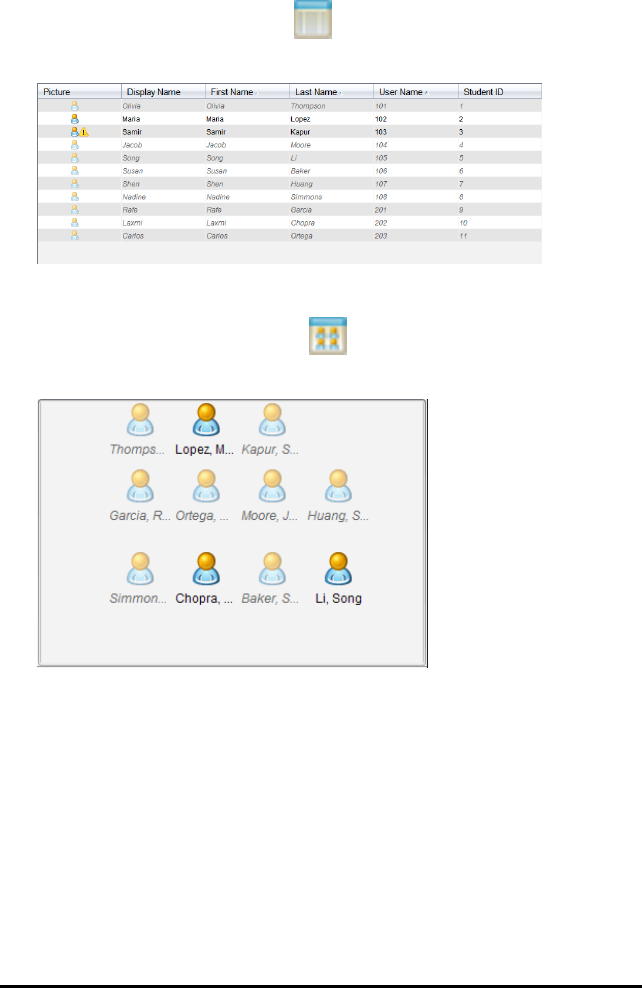
Changing the Class View to Student List
▶Click View > Student List or click in the status bar.
The view changes to Student List.
Changing the Class View to Seating Chart
▶Click View > Seating Chart or click in the status bar.
The view changes to Seating Chart view.
Arranging the Seating Chart
Initially, students are arranged in the Seating Chart view in the order that you
added them. However, you can rearrange the students so that they have the
same seating arrangement in the Class Workspace as they do in your actual
classroom. You can rearrange the seating chart at any time.
Arranging Students in the Seating Chart
1. Select the class from the Class Session list.
2. Click View > Seating Chart.
Using the Class Workspace 107

108 Using the Class Workspace
The classroom area shows your class in the Seating Chart view.
3. Within the classroom area, drag each student icon to the location that you
want.
The software moves the student icons to the new locations.
The software remembers the student positions the next time you start the
same class.
Note: Do not place one student icon on top of another student icon. If you
do this, you will only be able to see one of the student’s icons.
Checking Student Login Status
You can view the students’ login status from the Seating Chart view. The color
of the icon by the student display names indicates their login status as well as
the class status:
Icon Class status Student status Color
Class session
not started.
N/A Grey
Class session
started.
Student not logged in. Light
blue
Class session
started.
Student logged in. Dark
blue
Class session
started.
Student OS does not match software
version on teacher computer.
Dark
blue
Sorting Student Information
The Student List view in the classroom area shows the information for students
in the selected class. It includes display names, first names, last names, user
names, and student IDs. In the Student List view, you can sort student
information by each of these categories. Information is sorted alphabetically
from A-Z or Z-A and numerically from 1-9 or 9-1. You can sort student
information at any time.
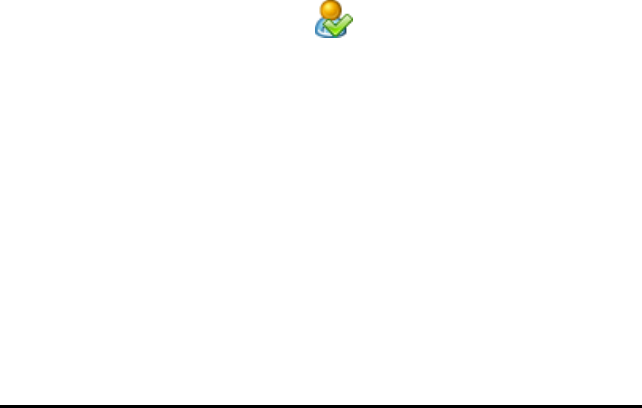
Sorting Student Information
1. Click Class >Select Class and select the class that contains the student
information you want to sort.
Note: If you have a class session running, you must end it to select the
class.
2. In the menu, click View > Student List.
3. Click the column title of the list you want to sort.
The software sorts the selected list.
4. To sort the selected information in the opposite order, click the column title
again.
Changing the Classes Assigned to a Student
Occasionally your students may move to a different class, or they may take
more than one of your classes. You can change student classes when
necessary.
Note: You cannot change the classes of students who are logged in to the
TI-Nspire™ Navigator™ network.
Changing a Student’s Class
1. Select a class to which the student belongs.
2. Click the student you want to edit.
3. Click Class > Edit Student, or click .
The Student Properties dialog box opens.
Using the Class Workspace 109
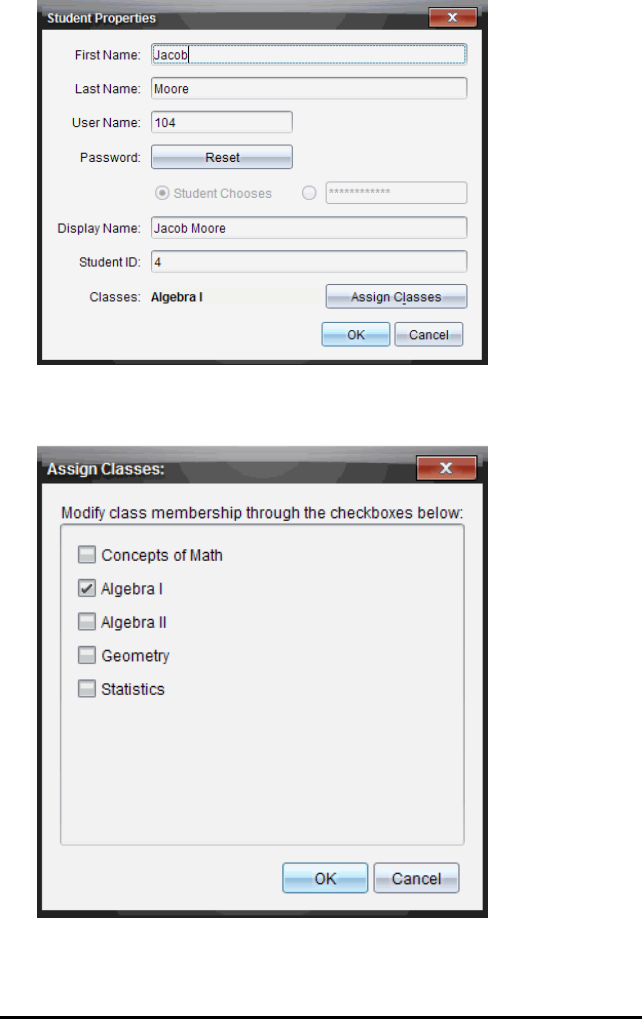
110 Using the Class Workspace
4. Click Assign Classes.
The Assign Classes dialog box opens.
5. Select the check boxes of the student’s classes.
6. Clear the check boxes of the classes to which the student does not belong.

7. Click OK.
8. In the Student Properties dialog box, click OK.
Changing Student Names and Identifiers
After you add students, you may find that you need to change one of their
names or identifiers. There are five different names and identifiers associated
with your students, including:
• First name
• Last name
• User name
• Display name
• Student ID
This section covers how to change any of these types of names and identifiers.
Note: You cannot change the account information of students who are logged
in to the TI-Nspire™ Navigator™ network.
Note: You can access many of the student account items by right-clicking the
student and choosing an action from the menu.
Changing Student Names or Identifiers
1. Select a class to which the student belongs.
Note: If you have a class session running, you must end it to select the
class.
2. Click the student you want to edit.
3. Click Class > Edit Student, or click .
The Student Properties dialog box opens.
Using the Class Workspace 111
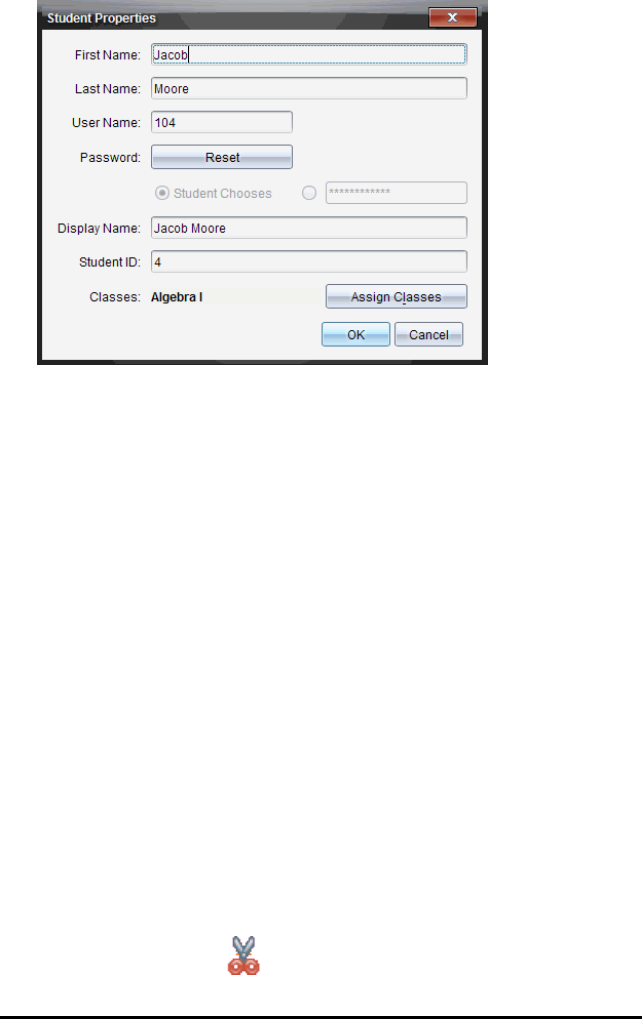
112 Using the Class Workspace
4. Click the field of the name or identifier you want to change.
5. Make the necessary changes.
6. Repeat steps 4 and 5 for any other names or identifiers you want to
change.
7. Click OK.
Moving Students to Another Class
If any of your students move to a different class, you can move them within the
TI-Nspire™ software as well.
Note: You cannot move students who are logged in to the TI-Nspire™
Navigator™ network.
Note: You can access many of the student account items by right-clicking the
student and choosing an action from the menu.
Moving a Student to Another Class
1. Select a class to which the student belongs.
Note: If you have a class session running, you must end it to move the
student.
2. Click the student you want to move.
3. Click Edit > Cut or click .
The software removes the student from the class and moves the student
account information to the Clipboard.
4. From the Class Session list, select the class where you want to move the
student.
5. Click Edit > Paste or click .
The software moves the student to the selected class.
Copying Students to Another Class
When you have students in more than one of your classes, you may find it
convenient to copy them from one class to another. Copying students saves
you the time of entering all of their information again.
Note: You cannot copy students who are logged in to the TI-Nspire™
Navigator™ network.
Note: You can access many of the student account items by right-clicking the
student and choosing an action from the menu.
Copying a Student to Another Class
1. Select a class to which the student belongs.
Note: If you have a class session running, you must end it to select the
class.
2. Click the student you want to copy.
3. Click Edit > Copy or click .
The software copies the student to the Clipboard.
4. From the Current Class dropdown list, select the class to which you want to
copy the student.
5. Click Edit > Paste or click .
The software copies the student to the selected class.
Exploring the Class Record
From the Class Record, you can open a document in the Review Workspace;
save a document to the Portfolio Workspace; collect files from the Class Record
Workspace; send and delete files using the toolbar; and view document
Using the Class Workspace 113
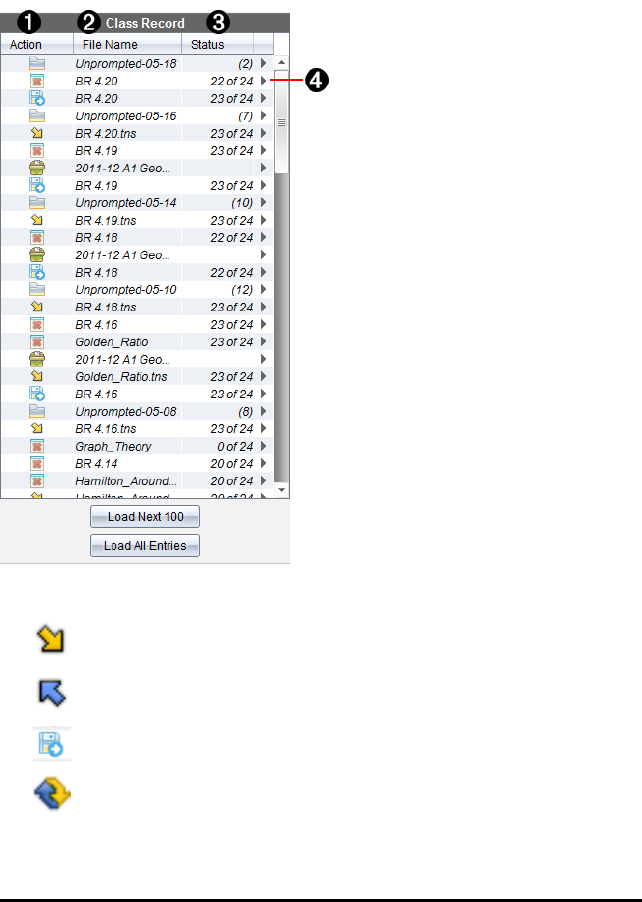
114 Using the Class Workspace
properties in Record Item Properties for all TI-Nspire™ documents, except
Quick Poll files.
By default, 100 records are listed. To see additional records, click Load Next
100 or click Load All Entries.
ÀFile action. The icons indicate the status of a file.
Sent to class
Collected from class
Saved to portfolio
Redistributed to class
Quick Poll
Unprompted
Deleted
ÁFile name. The names of files used in this class.
ÂStatus. The progress of an action. For example, "23 of 25" indicates that 23
out of 25 students have received a file.
ÃMenu options. Click ¢for quick access to certain menu items. This icon
gives you the same options as a right-click.
Sending Files to a Class
You can send files and folders to your whole class, members of the class
currently logged in, or to individual students. Class must be in session for you
to send the files.
When you send a file to the whole class, all students currently logged in will
receive the file immediately. Students not logged in will receive the file when
they log in.
Notes:
• Only TI-Nspire™ (.tns) and PublishView™ (.tnsp) file types open in the
TI-Nspire™ software.
• Other file types (if supported) such as images, word processing, or
spreadsheet files, open in the application the operating system has
associated with the file type.
Sending Files
1. Click Tools > Send to class or click .
The Select file(s) to send dialog box opens.
Using the Class Workspace 115
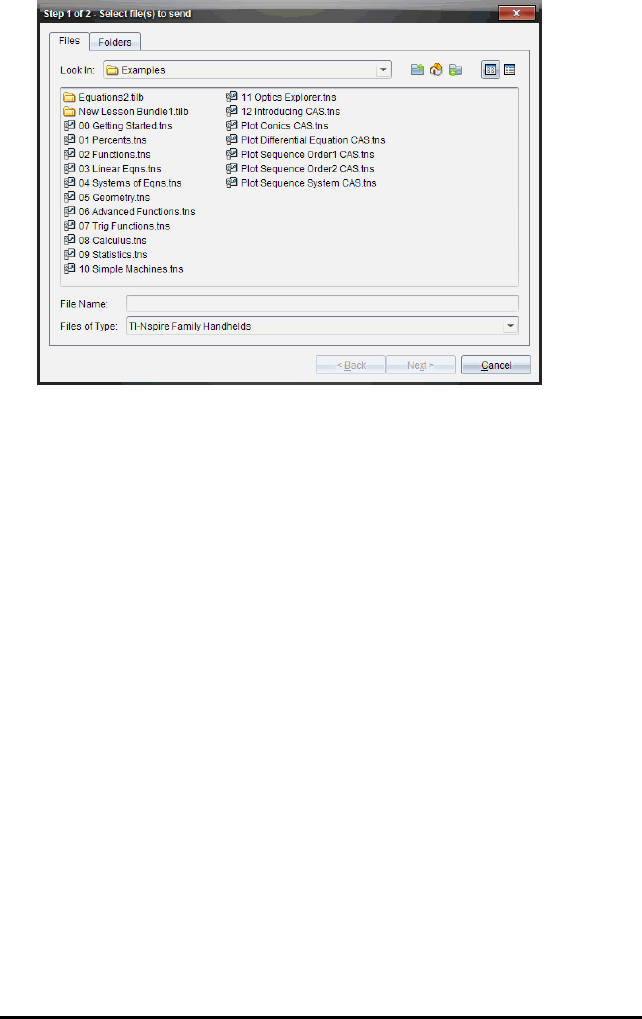
116 Using the Class Workspace
2. Click the Files tab to choose files, or click the Folders tab to choose folders.
Note: You can send only files or folders, not a combination of files and
folders.
• TI-Nspire™ Navigator™ Teacher Software for handhelds transfers only
.tns files.
• TI-Nspire™ Navigator™ Teacher Software for network computers
transfers all files.
3. To choose the files or folders you want to send, do one of the following:
• Navigate to the file or folder you want to send and click it. To select
multiple files or folders, press and hold the Ctrl key (Mac®: “) while
clicking each file name.
• Type the name of the file or folder in the File name or Folder name
box. Folder names may use alphanumeric characters, but cannot
contain the special characters / \ : " | * ? < > , and cannot contain these
words:
lpt1, lpt2, lpt3, lpt4, lpt5, lpt6, lpt7, lpt8, lpt9, com1, com2, com3, com4,
com5, com6, com7, com8, com9, aux, con, prn, nul.
Note: You can also drag files from a file browser window to the Class
Record to send files.
4. Click Next.
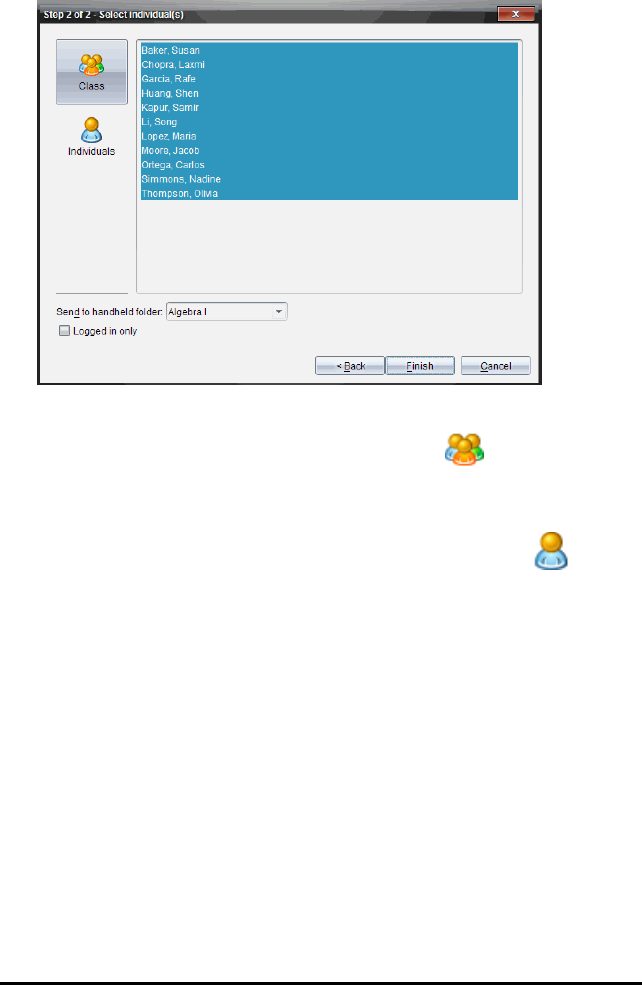
The Select individual(s) dialog box opens.
5. Select the student(s) to whom you want to send the file:
• To send the file to the whole class, click Class . To send the file
only to class members who are currently logged in, select the Logged
in only check box.
• To send the file to an individual student, click Individuals , and
then click the student.
Note: If you had any students selected in the classroom area, the
software already has them selected.
• Use the Send to handheld folder drop-down list to choose from the
current class folder, the top level folder on the handheld, or the last 10
folders that files were sent to. (Available only in TI-Nspire™ software
that supports handhelds.)
- You can also enter a folder name path in the drop-down list.
6. Click Finish.
The file transfer appears in the Class Record.
Using the Class Workspace 117

118 Using the Class Workspace
Sending Missing Files
The Send Missing function becomes active after you have completed the
original transfer. This function resends files to only those students who were
not logged in or targeted for the original transfer.
1. From the Class Record, select the send action of file that was sent to class.
Note: The send action cannot be active.
2. Click File > Send Missing.
Redistributing Selected Files to Class
The Redistribute Selected to Class function allows you to review, modify, and
send selected assignments back to your students.
1. From the Class Record, select the collect action of the modified original file
or files.
2. Click File > Redistribute Selected to Class.
Note: It will only send files back to student’s collected from.
Collecting Files from Students
You can collect any previously sent files located in student class folders by
using the Class Record. You can also collect new files from students by typing
the full file name.
When you collect files from the menu or icon, you have the option of deleting
the collected files from student class folders.
Note: If a student deleted a file, renamed a file, or stored it in another location,
the file cannot be collected.
To collect files, class must be in session. If any students are not logged in, files
you collect are automatically transferred when they log in.
Collecting Files from the Class Record
1. From the Class Record, choose the file or files that have been sent to
class.
Note:By default, the first 100 records are listed. To display additional
records, click Load Next 100 or click Load AllEntries.

2. Click ¢next to any of the highlighted files and choose Collect Selected
from Class.
The file transfer appears in the Class Record.
Collecting Files from the Menu or Icon
1. Click Tools > Collect from Class or click .
The Select file(s) to collect dialog box opens.
2. To choose the files or folders you want to collect, do one of the following:
• Click Recent Files and navigate to the file you want to collect and click
it. To select multiple files or folders, press and hold the Ctrl key (Mac®:
“) while clicking each file name.
• Click Enter Filename and type the name of the file in the File name
box, and then click Add.
3. Click Next.
The Select individual(s) dialog box opens.
Using the Class Workspace 119
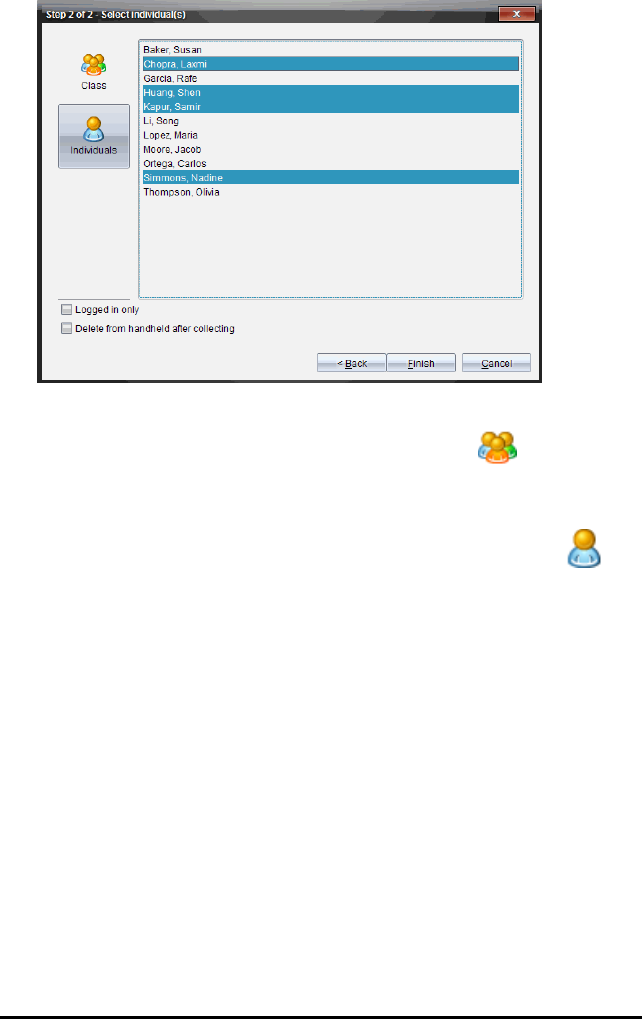
120 Using the Class Workspace
4. Select the student(s) from whom you want to collect the file:
• To collect the file from the whole class, click Class . To collect the
file only from class members who are currently logged in, select the
Logged in only check box.
• To collect the file from an individual student, click Individuals ,
and then click the student.
Note: If you had any students selected in the classroom area, the
software already has them selected.
5. If you want to remove the file from student class folders after you collect it,
select the check box next to the option to delete the file after it is collected.
6. Click Finish.
The collected file appears in the Class Record.
Collecting Missing Files
The Collect Missing function becomes active for files that have not been
received from students.
1. From the Class Record, select the collect action of file that was sent to
class.
2. Click File > Collect Missing.

Note: The collection action cannot be active.
Managing Unprompted Actions
When a student logged into a class session sends you a file outside of a
collection, an Unprompted action is created.
These files, which are stored in a database, are shown in the Class Record
until they are removed.
Reviewing and Opening Unprompted Actions
Unprompted actions are named "Unprompted" followed by the month and date.
Each class session contains all .tns and .tnsp files sent from students in one
Unprompted folder.
The latest Unprompted action appears at the top of the Class Record for the
most recent files sent by a student during a class session. During the next class
session, more recent Unprompted actions appear in the Class Record above
the previous action.
To open the Unprompted action:
1. Double-click the action or right-click and choose Record Item Properties.
The Unprompted dialog box opens. By default, no items in the
Unprompted action are selected.
2. In the Unprompted dialog box, you can view one or more items, save the
items to the Portfolio Workspace, remove the items, export the items to
another file location, or do nothing.
Viewing Items in an Unprompted Action
1. From the Unprompted dialog box, select the check box to the left of the
item(s) you want to view.
Note: You can also click the View icon beside an item to quickly access the
item.
2. Click View.
The items open as read-only files.
Using the Class Workspace 121

122 Using the Class Workspace
Removing Individual Items from an Unprompted Action
Unprompted actions remain in the Class Record until you remove them. Even if
you have exported or saved items, its Unprompted action continues to show
until you remove it. To remove items from an Unprompted action:
1. In the Class Record, double-click the Unprompted action to open it.
2. From the Unprompted dialog box, select the check box to the left of the
item(s) you want to remove.
3. Click Remove.
Exporting Unprompted Action Items
You can export items from the database to the file system. To export items from
an Unprompted action:
1. In the Class Record, double-click the Unprompted action to open it.
2. Select the files you want to export.
3. Click Export.
A file browser opens.
4. Select the location for the export.
5. Click Select Folder.
Saving Files to a Portfolio Record
You can save collected and unprompted files to a Portfolio record.
1. From the Class Record, select the files.
2. Click ¢and select Save selected to Portfolio.
The Save to Portfolio dialog box opens.
3. Select to save the files to a new Portfolio column or add them to an existing
Portfolio column.
• To add the files to a new Portfolio column, click Add as new portfolio
column and type the name for the new Portfolio column.
• To save the files to an existing Portfolio column, click Add to existing
portfolio column and select the column name you want from the drop-
down list.
4. Click Save.

Note: The files you saved in the Portfolio Workspace are shown in the
Class Record until you remove them using the Remove command.
Deleting Files from Class Folders
When necessary, you can delete files from student class folders. You can
delete files that were sent to the class or collected from the class. Class must
be in session for you to delete files.
Note: Deleting a file only removes the specified file from the class folder. If the
student saved a copy with another name, or copied the file to another location,
the student still has access to the file.
1. Click Tools > Delete from class or click .
The Select file(s) to delete dialog box opens.
2. To choose the files you want to delete, do one of the following:
• Click Recent Files and navigate to the file you want to delete and click
it. To select multiple files or folders, press and hold the Ctrl key (Mac®:
“) while clicking each file name.
• Click Enter Filename and type the name of the file in the File name
box, and then click Add.
3. Click Next.
The Select individual(s) dialog box opens.
Using the Class Workspace 123
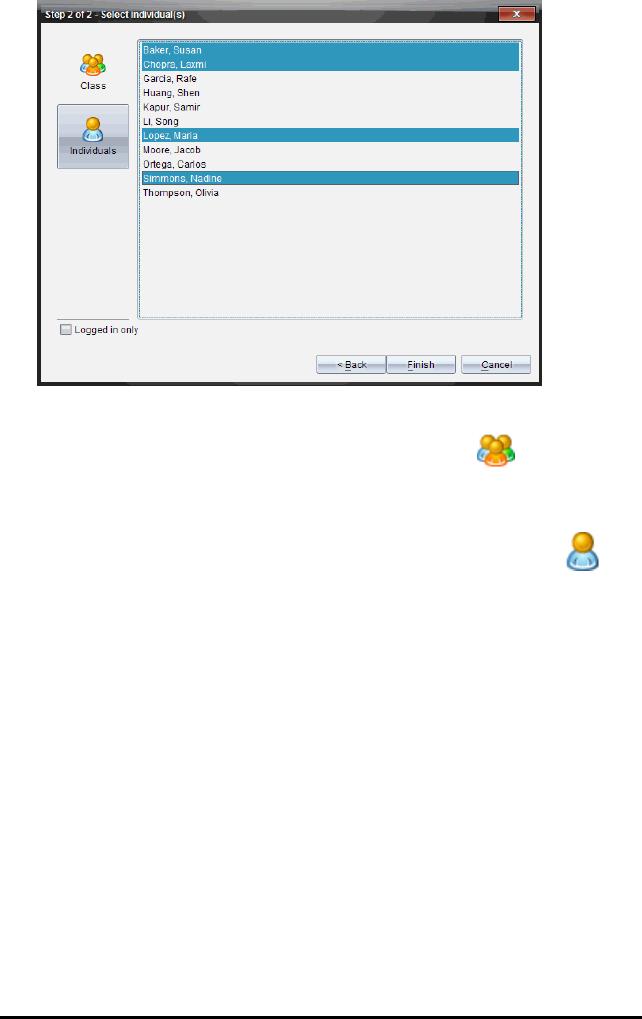
124 Using the Class Workspace
4. Select the student(s) whose files you want to delete.
• To delete the file from the whole class, click Class . To delete the
file only from class members who are currently logged in, select the
Logged in only check box.
• To delete the file from an individual student, click Individuals , and
then click the student name.
Note: If you had any students selected in the classroom area, the
software already has them selected.
5. Click Finish.
The file deletion appears in the Class Record.
Checking the Status of File Transfers
When you send, collect, or delete files, you may want to check to see which of
your students have received or sent their files.
▶In the Class Record, click the file whose status you want to check.
In the classroom area, the software indicates the status of students as
follows:

• A green background indicates that students have
sent/received/deleted the file.
• A yellow background indicates that students received the collect
or delete action, but they do not have the file in their class folder.
• A red background indicates that students have not yet
sent/received/deleted the file.
Note: You can also see the file transfer status in the file’s Properties dialog box.
Canceling File Transfers
If you change your mind about a file transfer, you can cancel the transfer in the
Class Record. Canceling file transfers stops the software from transferring
more files. Any files that transfer before you cancel remain in student class
folders.
1. In the Class Record, click the file whose transfer you want to cancel.
2. Click Edit > Remove from Class Record.
The software asks if you are sure you want to remove the action.
3. Click Remove.
The software stops the file transfer and removes the file from the Class
Record list.
Viewing File Properties
Each file that you send or collect has a set of properties that you can view,
except for Quick Poll files. File properties include name, size, date sent, and
status. You can view the file properties at any time.
1. Select the file in the Class Record.
2. Right-click the file name and select Record Item >Properties.
The Statistics Properties dialog box opens showing the file properties.
Using the Class Workspace 125
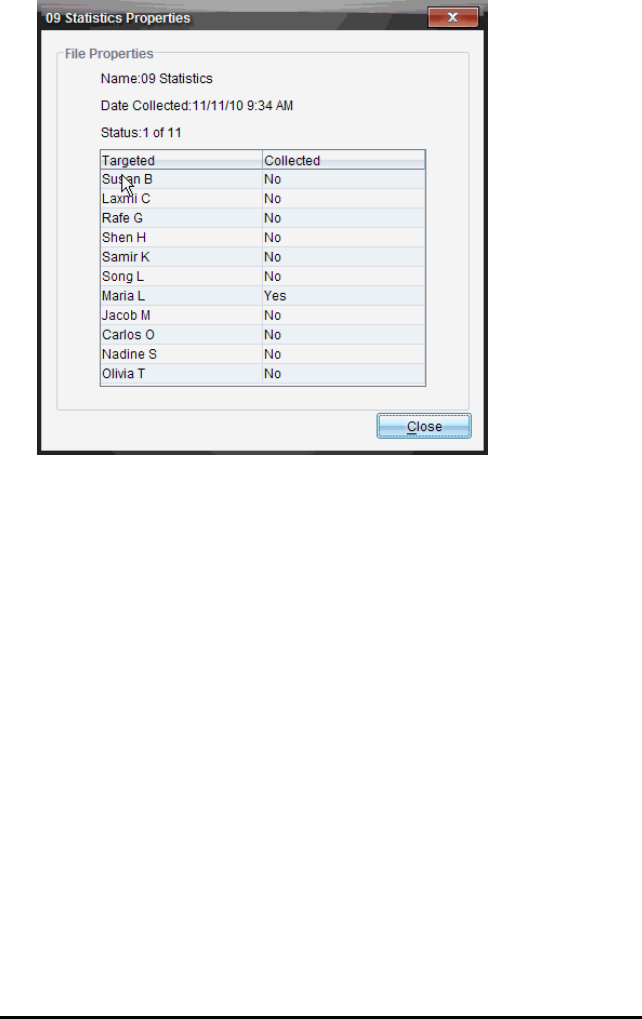
126 Using the Class Workspace
Resetting Student Passwords
Because the TI-Nspire™ software maintains the privacy of student passwords,
you cannot retrieve passwords for your students if they forget them. However,
you can reset student passwords. You can reset passwords for all of the
students in a class or for individual students.
Note: You cannot reset the passwords of students who are currently logged in
to the TI-Nspire™ Navigator™ network.
Resetting Passwords for all Students in a Class
1. Select the class.
Note: Student(s) must be selected to perform a successful reset of the
password.
2. Click Class > Reset Student Password(s).
The Confirm Reset Student Passwords dialog box opens.
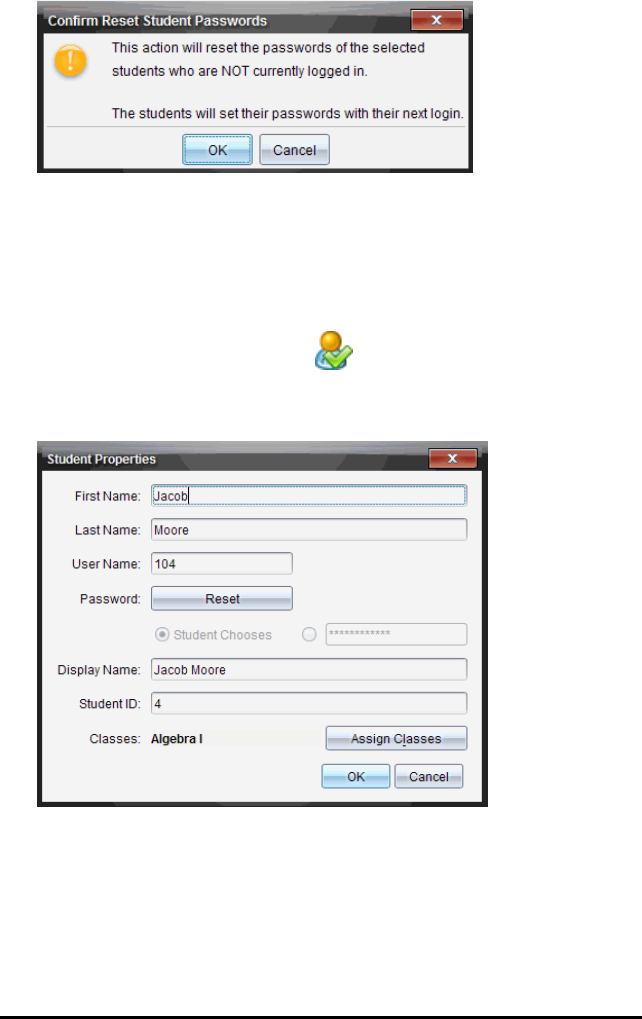
3. Click OK.
4. The next time students log in, instruct them to type a new password.
Resetting Passwords for Individual Students
1. Click the student you want to edit.
2. Click Class > Edit Student, or click , or right-click the student name and
choose Edit Student from the menu.
The Student Properties dialog box opens.
3. Click the Reset button next to Password.
4. If you want a student to create their own password, select Student
Chooses.
—or—
Using the Class Workspace 127

128 Using the Class Workspace
If you want to create a specific password for the student, select the blank
password entry box and type a new password.
5. Click OK.
The software resets the student’s password.
6. The next time the student logs in:
• If you selected Student Chooses, instruct the student to type a
password.
• If you created a password for the student, tell the student the new
password.

Capturing Screens
Screen Capture enables you to:
•Capture Class
- View and monitor all student screens at one time, which allows you to
ensure all students are on track with an assignment.
- Capture one or several student screens for discussion in the
classroom. You can hide student names to focus the discussion on the
lesson or concept, and not on individuals.
- Select and display an individual student screen and view work as a
live presentation.
- Capture screen stacks that enable you to check student progress or
collect student assignments for later review.
- Save captured images as .jpg, .gif, or .png files, which can be inserted
into TI-Nspire™ applications that allow images.
•Capture Page
- Capture the active page in a TI-Nspire™ document from the software
or from the TI-SmartView™ emulator as an image.
- Save captured images as .jpg, .gif, .png, or .tif files, which can be
inserted into TI-Nspire™ applications that allow images.
- Copy and paste images into another application such as Microsoft®
Word.
•Capture Selected Handheld
- Capture the current screen on a connected handheld as an image.
- Save captured images as .jpg, .gif, .png, or .tif files, which can be
inserted into TI-Nspire™ applications that allow images.
- Copy and paste images into another application such as Microsoft®
Word
•Capture Images in Handheld Mode
- In the Documents Workspace, use the DragScreen feature to capture
the emulator screen or side screen when the TI-SmartView™ Emulator
is active.
Capturing Screens 129
130 Capturing Screens
- Teachers can use this feature to drag and paste an image to
presentation tools such as SMART® Notebook, Promethean’s
Flipchart, and Microsoft® Office applications including Word and
PowerPoint®.
Accessing Screen Capture
The Screen Capture tool is available from all workspaces. To access Screen
Capture:
▶From the menu bar, click Tools >Screen Capture.
▶From the toolbar, click .
Using Capture Class
In the classroom, use the Screen Capture tool to view and capture student
screens. You can capture the screen of one selected student, of multiple
selected students, or of all the students in the class.
If using TI-Nspire™ Navigator™ NC Teacher Software, you can select to view
only the work area of the student software on the student screens, or the entire
computer screen, which may include all applications the student has open at
the time.
Note: To view and capture student screens, they must be logged into class.
Capturing Student Screens
1. If you have not already done so, begin the class session and ask your
students to log in.
2. Click , and then click Capture Class.
The Select Individual(s) dialog box opens. If you selected students in
Class Workspace, those student names are highlighted. If no students
were selected, all student names in the class are selected.
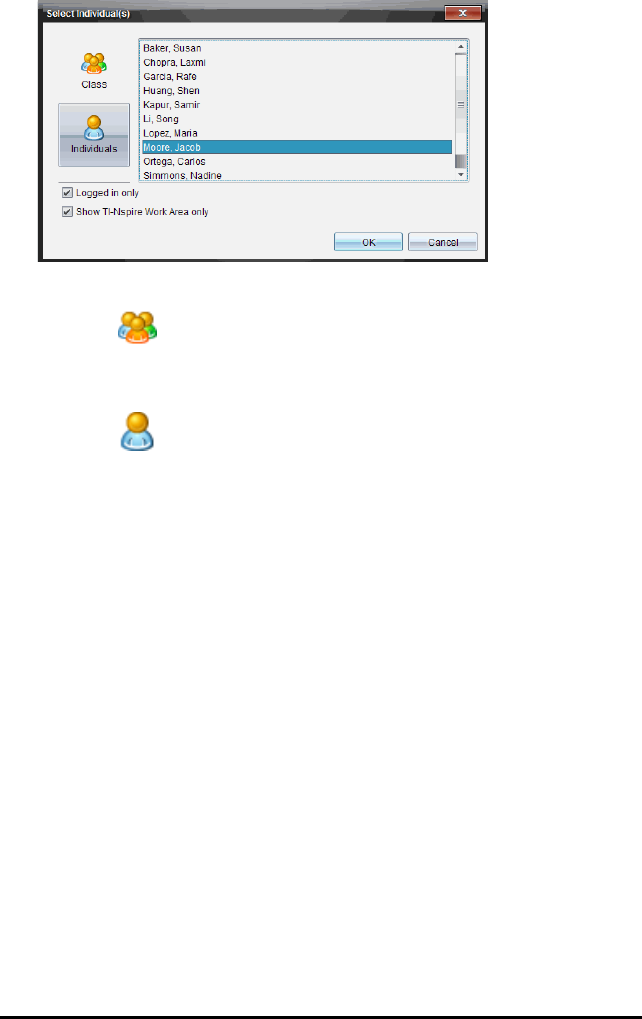
3. To change the selected student or add more students:
• Click to display the screens of all students in the class. If a
student is not logged in, the handheld display indicates "
Not Logged
In
." As students log in, click refresh to update your screen.
• Click , and then click the name of each student to display the
screens of individual students. To select multiple students, hold down
the Shift key. To select students in random order, hold down the Ctrl
key (Mac®: “) and click each student name.
• Select the Logged in only check box under the left pane to display
screens from only those students currently logged in. When you
refresh your screen, any students who log in after the initial screen
capture will be listed at the end of the Class Screen Capture window.
4. Click OK.
To view only the work area and not the entire student screen, select Show
TI-Nspire Work Area Only.
The screens of the selected students are displayed in the Class Screen
Capture window.
Note: The following example shows the screens from two selected
students who are logged in. The default view is Tiled, which shows all
screens captured in the window.
Capturing Screens 131
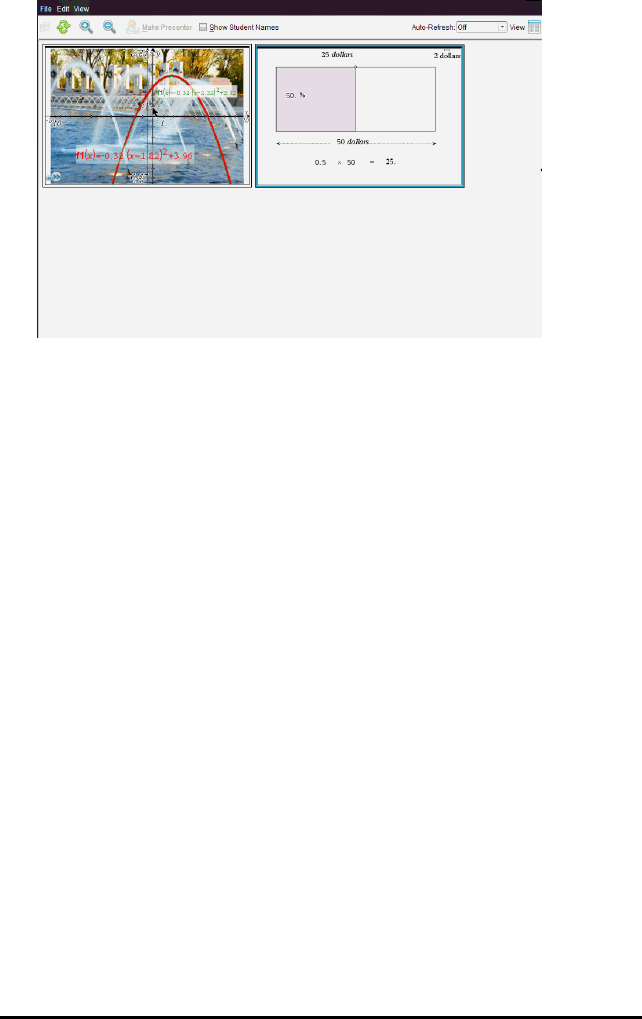
132 Capturing Screens
5. Decide if you want to display or hide the student names. To hide or show
student names, select the check box on the toolbar to toggle between hide
and show or click View > Show Student Names.
Note: Your selection to show or hide student names remains in effect until
you change it. For example, if you select to hide student names, the
student names will remain hidden when you close the Class Screen
Capture window and return to the Class Workspace. If you select to hide
student names in the Class Workspace, they will be hidden when the
Class Screen Capture window opens.
Setting Teacher Preferences for Capture Class
Use the Teacher Preferences option to set preferences for using the randomize
screen option and for displaying the teacher handheld. Creating a user name
and password enables teachers to log in to an active class.
1. From the Class Workspace, click File> Settings > Teacher Preferences.
The Teacher Preferences dialog box opens.
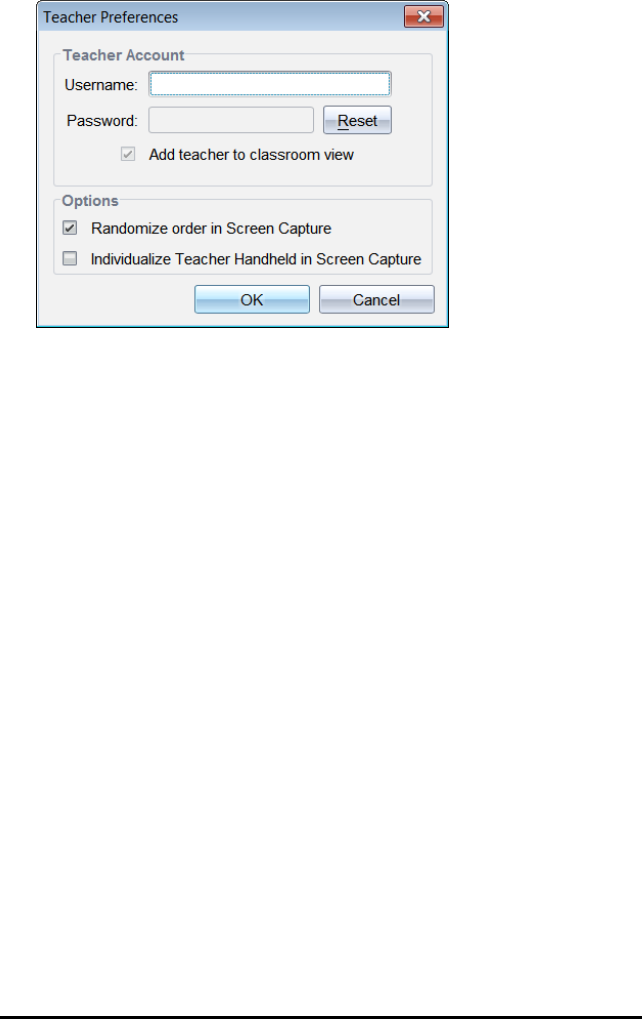
2. If you haven’t already done so, create a Username and Password.
3. Select "
Add teacher to classroom view
" to show your handheld in the
Class Screen Capture window.
4. To randomize the order in which screens are captured, select "
Randomize
order in Screen Capture
."
5. Select the "
Individualize Teacher Handheld in Screen Capture
" option so
that a captured screen from the teacher handheld appears differently in the
Class Screen Capture window than screens captured from student
handhelds.
6. Click OK to save the settings.
Setting View Options in Capture Class
When working with captured screens in the Class Screen Capture window, you
have several options for optimizing the view of the screens for presentation to a
classroom, including:
• Toggling between a tiled view and a gallery view.
• Comparing selected screens in a side-by-side view.
• Refreshing the view as needed or setting the auto-refresh feature to
automatically refresh the view at timed intervals.
• Zooming in or out to increase or decrease the size of the captured screens
in the window. You can also select the percentage at which the size of the
screen will be increased or decreased.
Capturing Screens 133
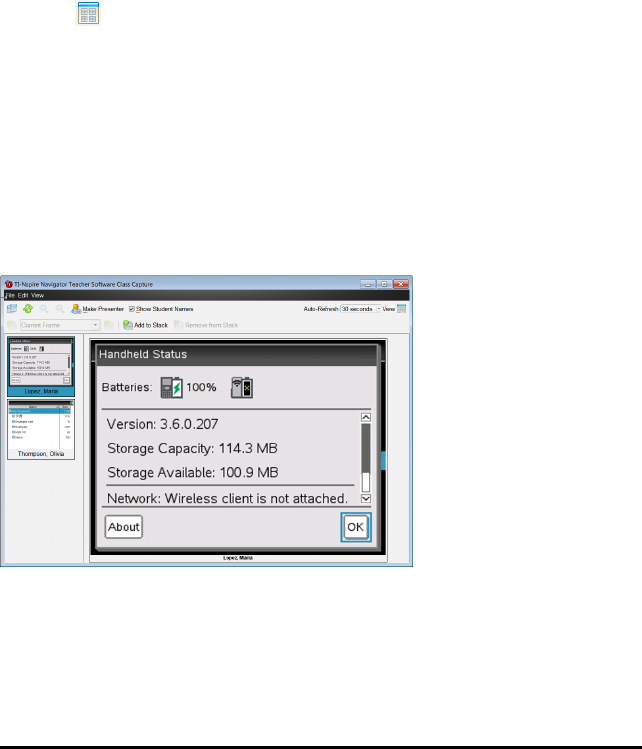
134 Capturing Screens
• Showing or hiding student names.
• Accessing Live Presenter options. For more information, see
Using Live
Presenter
.
Toggling Between Tiled and Gallery Views
When you capture student screens, the default view for the Class Screen
Capture window is Tiled. Switch to Gallery view to show an enlarged view of a
selected screen. Thumbnail views of all the captured screens are shown in the
left pane, enabling you to find and select screens.
To toggle between Tiled and Gallery views:
▶Click , and then click Gallery or Tiled.
—or—
▶Select View > Gallery or select View > Tiled.
—or—
▶For Gallery view, press Ctrl + G. (Mac®: “+ G). For Tiled view, press Ctrl +
T (Mac®:“+T).
In Gallery view, thumbnail images of captured screens are displayed in a
column in the left pane of this view. An enlarged view of a selected screen is
displayed in the right pane.
• Captured screens appear in the same order as in Tiled View.
• If you select multiple thumbnails to view in the left pane, they are displayed
in the right pane.

• If you select more than four thumbnails, view the additional screens by
scrolling down the right pane.
• If you selected to show student names, names are centered under each
student’s captured screen.
• Zoom functions are disabled in Gallery View.
• You can change the order of the screens in the Gallery View.
• The width of the thumbnail pane cannot be changed.
Rearranging Captured Screens
Complete the following steps to change the order of the captured screens
within the Class Screen Capture window.
1. Click the desired screen to select it.
2. Holding the left mouse button down, drag the screen to the desired
location and release.
Refreshing Captured Screens
As students log in to class and work on their screens, you can update the view
of the captured screens. When you refresh the view in the Class Screen
Capture window, the latest student screens are displayed. You can refresh the
view as needed, or you can set the auto-refresh option to refresh the view
automatically at timed intervals.
Refreshing the View as Needed
▶Click .
The latest screens from the connected handhelds are captured and
displayed in the Class Screen Capture window.
Note: If a student has lost connection and a screen cannot be refreshed, it
is outlined in yellow.
Capturing Screens 135
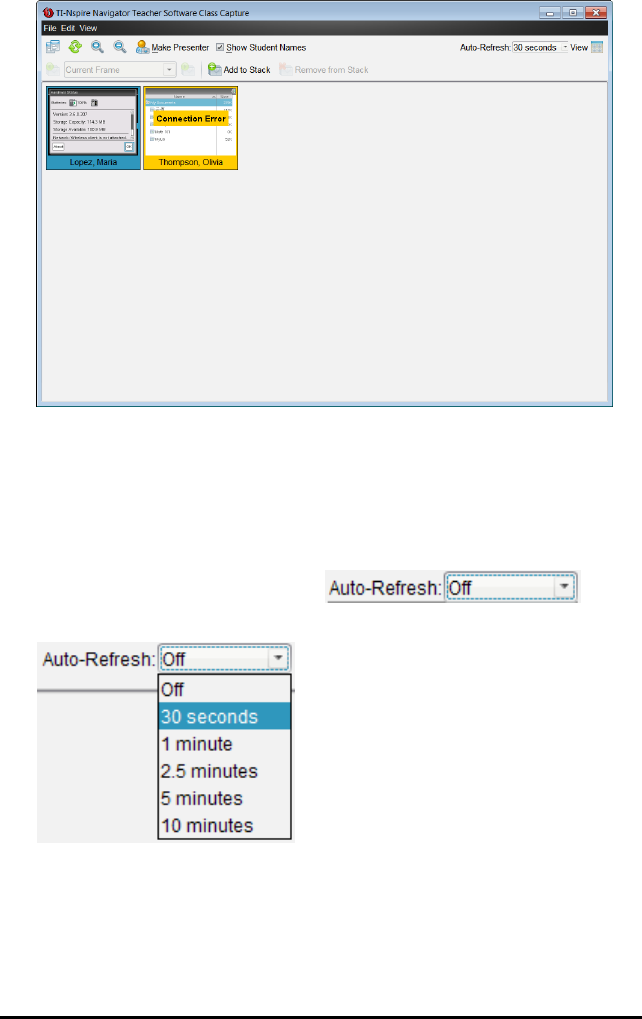
136 Capturing Screens
Enabling the Auto-Refresh Screen Capture Feature
The auto-refresh feature is useful for monitoring class performance. This
feature enables you to automatically refresh the view of captured screens at
timed intervals. The default setting for the auto-refresh feature is Off. To enable
auto-refresh:
1. Click View > Auto Refresh or select on the
toolbar.
2. Click one of the available time interval options.
Note: Auto-refresh is available when using either the Tiled or Gallery view. It is
not available in Live Presenter mode.
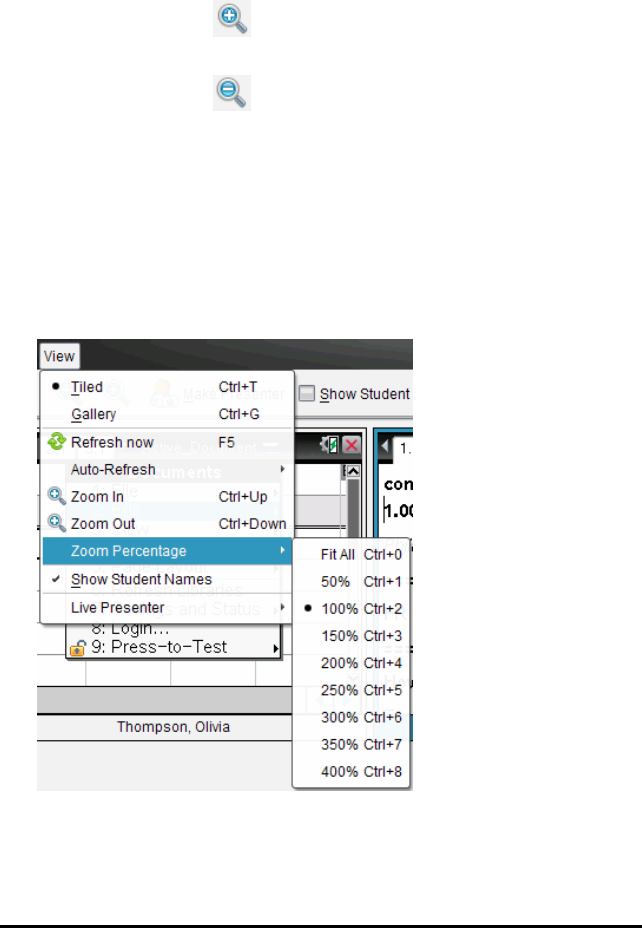
Using Zoom in and Zoom out
In the Class Screen Capture window, use the zoom in and zoom out options to
increase or decrease the size of the captured screens.
▶From the toolbar, click to increase the size of the screens in the view.
You can also select View > Zoom In from the menu.
▶From the toolbar, click to decrease the size of the screens in the view.
You can also select View > Zoom Out from the menu.
Setting a Zoom Percentage
The Zoom Percentage option enables you to select the percentage by which
the screen image is increased or decreased when zooming in or out. To select
a percentage:
1. From the Class Screen Capture window, click View > Zoom Percentage.
The drop-down list of available percentages opens.
2. Click one of the available percentages.
Capturing Screens 137
138 Capturing Screens
Creating Stacks of Student Screens
This feature enables you to collect a history of one or more students’ screens
captured in the Capture Class option. These collections are called stacks, and
you can add or remove screens from each student’s stack, as well as navigate
within and through student stacks. Using stacks is a convenient way to check
progress in a lesson, collect student presentations or assignments to review
and grade later, or to show performance and progress in parent/teacher
meetings.
You add, remove, navigate, and save stacks from the Class Capture window,
which becomes available when you use the Capture Class option.
▶To open the Class Capture window, click Window> Class Capture Window.
Adding Screens to a Stack
▶In the Class Capture window, click View> Stacks > Add to Stack, or click
.
▶To add another set of screens, first click Refresh and then add the stack.
When the first set of screens is added to a new stack, it is labeled Frame1.
Each subsequent addition increases the number by one; for example, Frame2,
Frame3, and so forth.
Removing Frames from a Stack
1. Select the frame you want to remove.
2. Click View> Stacks > Remove from Stack, or click .
As frames are removed from a stack, their names are adjusted to remain
sequential and reflect the deletion. For example, if Frame6 is deleted, Frame7
is renamed to Frame6 and all subsequent frame numbers are adjusted
downward by one digit.
Navigating Through Stacks
You can navigate a stack of frames from either the tiled or gallery view.
▶To view different frames in a stack, use one of these options:
• Click the drop-down arrow, and then click the desired frame from the
list.

•View > Stacks > Next Frame, or click .
•View > Stacks > Previous Frame, or click .
Note: These options are available only if there is a next or previous frame to
view.
Saving Stacks
When you close the Class Capture window, the software asks if you want to
save the stacks.
1. Click Yes to save the stacks.
The Select or Create Folder to Save Stacks dialog box opens.
2. Click Save to save the stacks in the default folder, or create or navigate to
another folder and then click Save.
The stacks are saved as individual screen captures with the student’s name,
image number, date, and time. For example:
Laxmi Chopra_image1_10-21-2011_11-50
Laxmi Chopra_image2_10-21-2011_11-57
Use the Content Workspace or your computer’s file management system to
locate and open the saved screens.
The screens open in the default photo viewer on your computer.
Comparing Selected Screens
This feature enables you to compare student screens side-by-side.
1. Select the student screens you want to compare. To select multiple
consecutive screens, hold down the Shift key. To select screens in random
Capturing Screens 139

140 Capturing Screens
order, hold down the Ctrl key (Mac®: “) and click each image you want to
save. When you select each screen, the border changes color.
Note: If you select more than four screens, scroll down the viewing pane to
see them.
2. Click Edit > Compare Selected.
If you are in Tiled view, the view switches to Gallery view and the selected
screens are listed in the order selected.
Note: This option is disabled when in Gallery view.
3. To exit comparison mode, click outside the screen in the left pane of the
Gallery view.
Using Make Presenter
Select a captured screen from the Class Screen Capture window, and then
click the Make Presenter option on the toolbar to launch Live Presenter and
present a student screen to the class. You can only choose one student at a
time to be the Live Presenter. For more information, see
Using Live Presenter
.
Saving Screens When Using Capture Class
You can save captured screens for use in other TI-Nspire™ documents that
allow images or for use in another application such as Microsoft® Word. You
can save images in the following formats: .jpg, .png, or .gif. You can save one
image at a time, select multiple images to save, or save all captured images.
Saving Screen Images
To save screen images captured when using Capture Class, complete the
following steps.
1. In the Class Screen Capture window, select the screen or screens you
want to save as image files.
• To select multiple consecutive screens, click the first image, and then
hold down the Shift key and click the additional images. To select
screens in random order, hold down the Ctrl key (Mac®: “)and click
each image you want to save.
• To select all captured screens, click Edit > Select All.
2. Click File > Save Selected Screen(s) or press Ctrl+S (Mac®:“+S).
The Save dialog box opens.
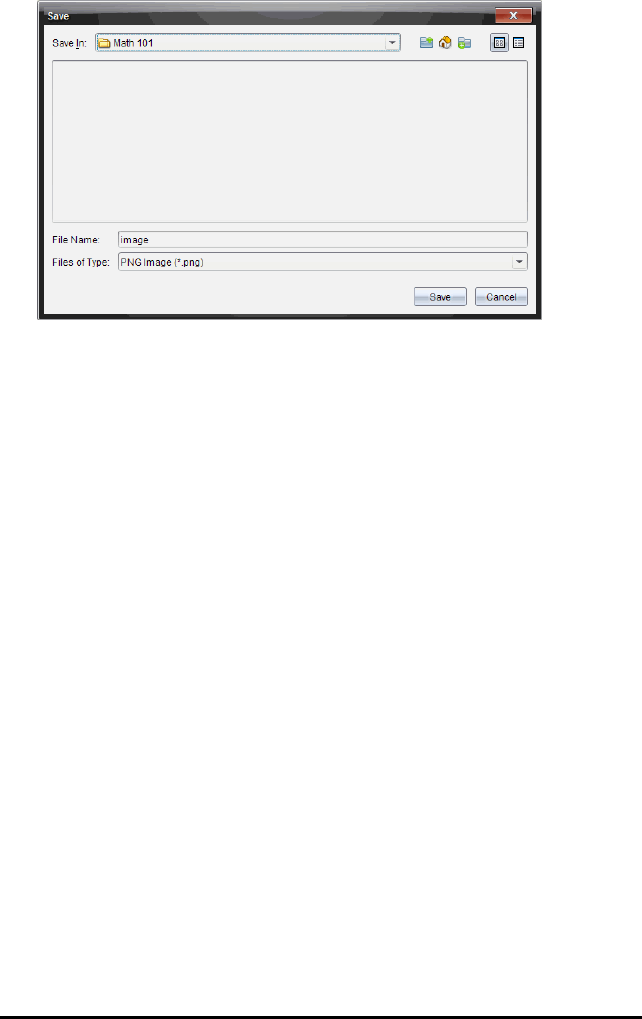
3. Navigate to the folder on your computer where you want to save the file(s).
4. Type a name for the file or files in the File Name field.
The default file name is
Image
.
5. In the Files of Type field, click ¤, and then select the file type: .png, .jpg, or
.gif. The default file type is .jpg.
6. Click Save.
The file or files are saved in the designated folder.
• If you saved one image, the file is saved with the name as specified in
the File Name field.
• If you saved multiple images, the files are saved with the name
specified in the File Name field with a number appended to the file
name to make each file name unique. For example,
Image1, Image 2
,
and so on.
Printing Captured Screens
You can print screens captured using the Capture Class option. You can print
one, multiple, or all captured screens. For each printed page, the class name is
printed in the page header, and the date and page number are printed in the
page footer.
Note: The print option is not available when using the Capture Page or Capture
Selected Handheld options.
To print a captured screen:
Capturing Screens 141
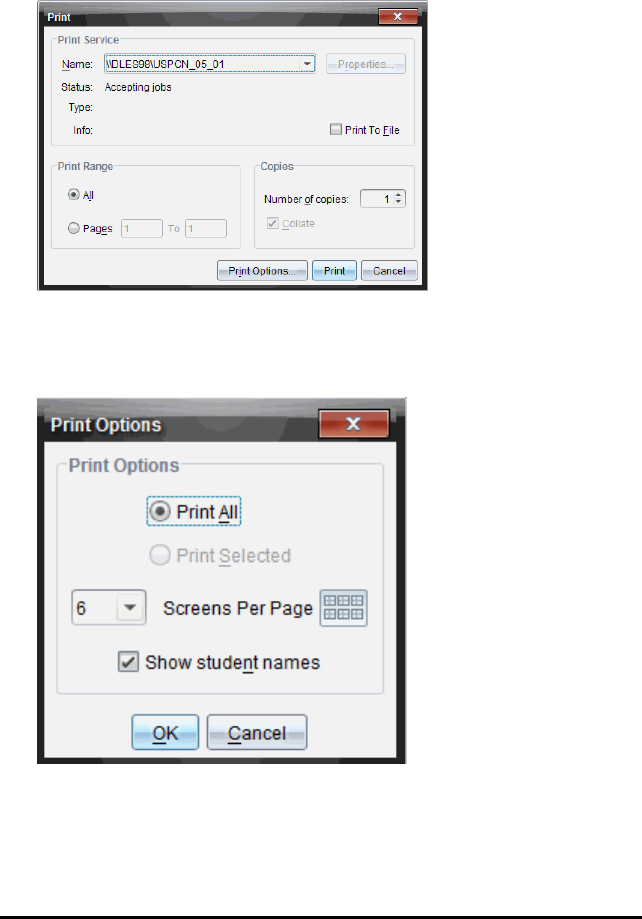
142 Capturing Screens
1. Select the screen you want to print.
2. Click File > Print.
The Print dialog box opens.
3. If you selected more than one screen, click Print Options to select the
number of screen captures that you want per page.
The Print Options dialog box opens.
4. Select options as needed. You can select to print one screen per page, six
screens per page, or all screens on the page. You can also select whether
to print student names.
5. Click OK to return to the Print dialog box.
6. Select the individual printer options for your printer.
7. Select the number of copies you want to print.
8. Click Print to send the print job to the selected printer.
Using Capture Page
Use the Capture Page option to capture an image of an active page in a
TI-Nspire™ document. You can save images in the following file formats: .jpg,
.gif, .png, and .tif. Saved images can be inserted into TI-Nspire™ applications
that allow images. The image is also copied to the Clipboard and can be
pasted into other applications such as Microsoft® Word or PowerPoint.
Capturing a Page
Complete the following steps to capture an image of an active page.
1. In the Documents Workspace, open a document and navigate to the page
you want to capture to make it active.
2. Click , and then click Capture Page.
The image of the active page is copied to the Clipboard and to the Screen
Capture window. The dialog box opens
in the lower right corner of your desktop when the screen capture is
complete.
3. Click View it.
The Screen Capture window opens.
You can also click Window > Screen Capture Window to open the Screen
Capture window.
Capturing Screens 143
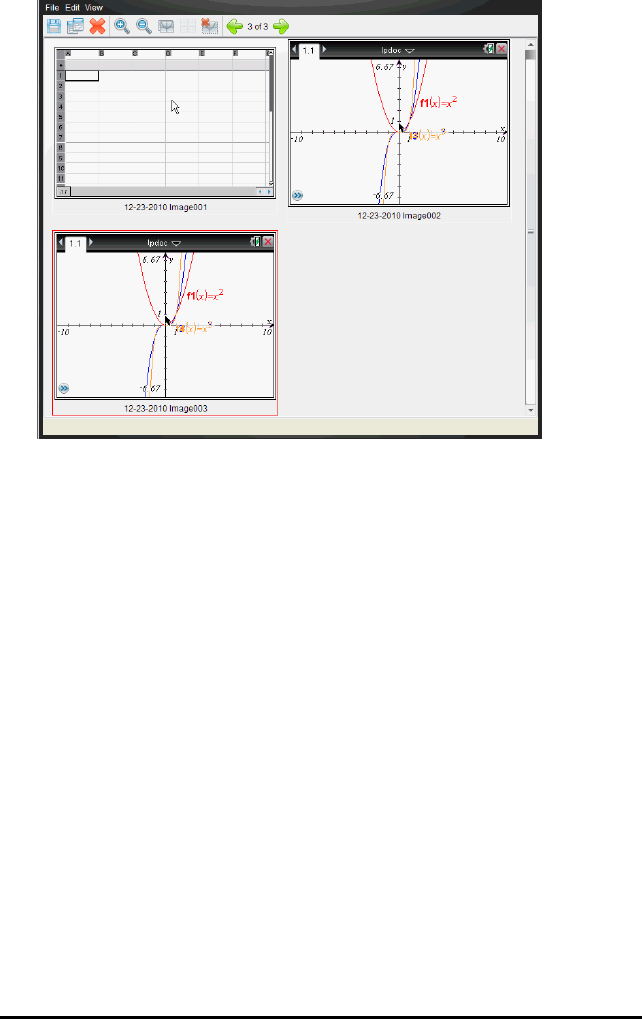
144 Capturing Screens
4. To capture additional pages, move to another page in the current
document or open a new document to select a page.
As you capture additional pages, the images are copied to the Screen
Capture window, which holds multiple images. The last page captured
replaces the contents of the Clipboard.
Using Capture Selected Handheld
Use the Capture Selected Handheld option to capture the active screen on a
connected handheld.
1. On a connected handheld, navigate to the menu or to a page in a
document you want to capture.
2. In the software, select the connected handheld:
• In the Content Workspace, select the handheld from the list of
Connected Handhelds in the Resources pane.
• In the Documents Workspace, open Content Explorer from the
Documents Toolbox, and then select the handheld from the list of
Connected Handhelds.
• In the Class Workspace, select a logged in student.
3. Click , and then click Capture Selected Handheld.
—or—
Click , and then click Capture Selected Handheld.
The screen is copied to the Clipboard and to the TI-Nspire™ Screen
Capture window. The dialog
box opens in the lower right corner of your desktop when the screen
capture is complete.
4. Click View it.
The Screen Capture window opens.
You can capture additional screens from an open document on a
connected handheld or open another document on a connected handheld
to capture screens from that document.
As you capture additional screens, the images are copied to the Screen
Capture window, which holds multiple images. The last screen captured
replaces the contents of the Clipboard.
Viewing Captured Screens
When you capture a page or screen, it is copied to the Screen Capture window.
Capturing Screens 145
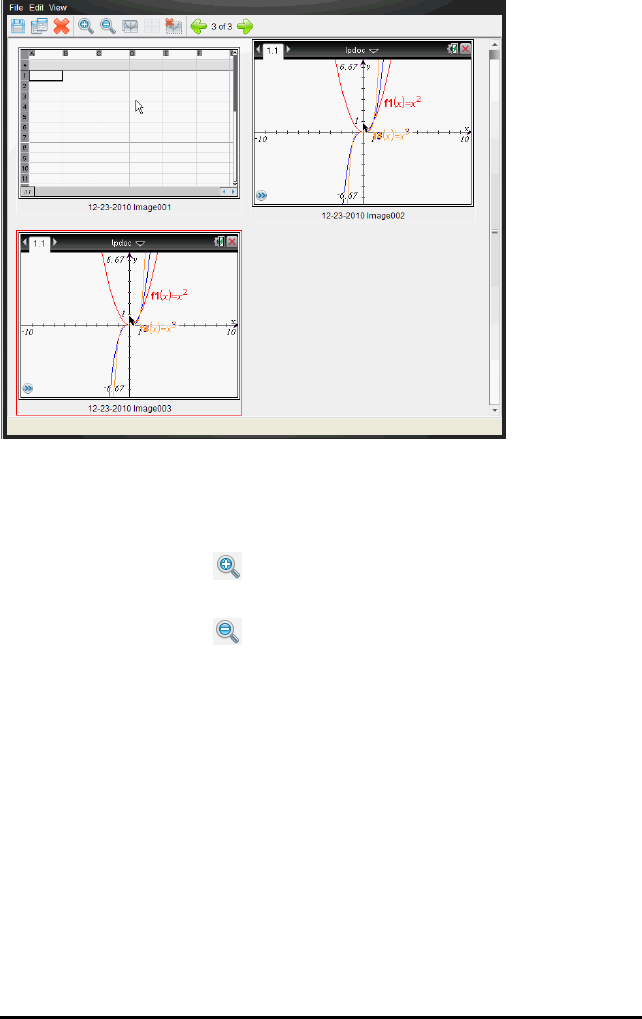
146 Capturing Screens
Zooming the View of Captured Screens
In the Screen Capture window, use the zoom in and zoom out options to
increase or decrease the size of the captured screens.
▶From the toolbar, click to increase the size of the screens in the view.
You can also click View > Zoom In from the menu.
▶From the toolbar, click to decrease the size of the screens in the view.
You can also click View > Zoom Out from the menu.
Saving Captured Pages and Screens
You can save captured pages and screens captured as images for use in other
TI-Nspire™ documents that allow images or for use in other applications such
as Microsoft® Word. You can save one image at a time, select multiple images
to save, or save all captured images.
Saving Selected Screens
1. In the Screen Capture window, select the screen image you want to save.
2. Click File > Save Selected Screen(s).
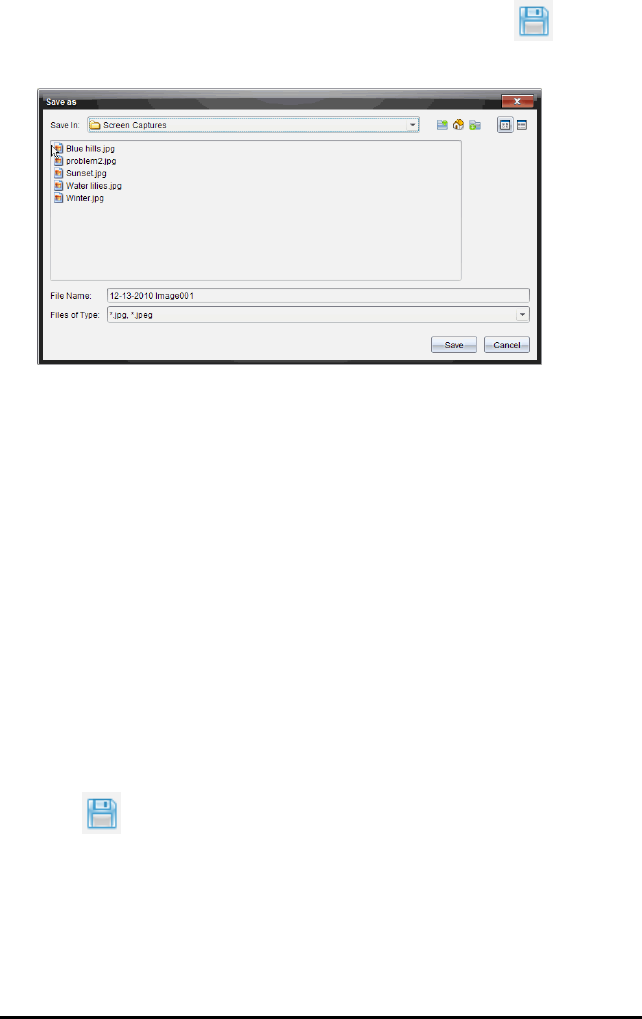
Note: From the Screen Capture window, you can also click .
The Save as dialog box opens.
3. Navigate to the folder on your computer where you want to save the file.
4. Type a name for the file.
Note: The default file name is
MM-DD-YYYY Image ###
.
5. Select the file type for the image file. The default format is .jpg. Click¤to
select another format: .gif, .tif, or .png.
6. Click Save.
The file is saved in the designated folder.
Saving Multiple Screens
1. In the Screen Capture window, select the screens you want to save.
To select multiple consecutive screens, click the first image, and then hold
down the Shift key and click the additional images. To select screens in
random order, press Ctrl (Mac®: “) and click each image you want to
save.
2. Click or select File > Save Selected Screen(s). To save all captured
screens, select File > Save All Screens.
Note: The "Save All Screens" option is not available when using Capture
Class.
The Save as dialog box opens.
Capturing Screens 147

148 Capturing Screens
3. In the Save In field, navigate to the folder where you want to save the
images.
4. In the File Name field, type a new folder name. The default folder name is
MM-DD-YYYY Image
, where
MM-DD-YYYY
is the current date.
5. Select the file type for the image files. The default format is .jpg. Click¤to
select another format: .gif, .tif, or .png.
6. Click Save.
The images are saved in the specified folder with system-assigned names
reflecting the current date and a sequence number. For example,
MM-DD-
YYYY Image 001.jpg
,
MM-DD-YYYY Image 002.jpg
and so on.
Copying and Pasting a Screen
You can select a captured screen and copy it to the Clipboard for inclusion into
other documents or applications. You can also print copied screens. Copied
screens are captured at 100% zoom level, and they are copied in the order of
selection.
Copying a Screen
1. Select the screen to copy.
2. Click or Edit > Copy.
The selected screen is copied to the Clipboard.
Pasting a Screen
Depending on the application you are pasting to, click Edit > Paste.
Note: You can also drag a screen capture to another application. This functions
as a copy and paste.

Using Live Presenter
In the TI-Nspire™ Navigator™ Teacher Software, Live Presenter enables
teachers to project and present actions on a selected handheld in real-time.
Teachers can choose to project their own handheld screen or any student’s
handheld screen to show work as it is being performed and discuss the step-
by-step process with the class. During the live presentation, you can show the
TI-Nspire™ handheld being displayed and show the keys as they are pressed
by the presenter.
Teachers can also control what appears on the presentation screen: student’s
name, handheld display, or keypress history. Teachers can also record the
Live Presenter session and save the file as a movie for later use.
While Live Presenter is active, all other student handhelds are unaffected by
the presentation and can be used.
Hiding and Showing Student Names
If showing, the student name is shown under the handheld screen in Live
Presenter.
Using Live Presenter 149
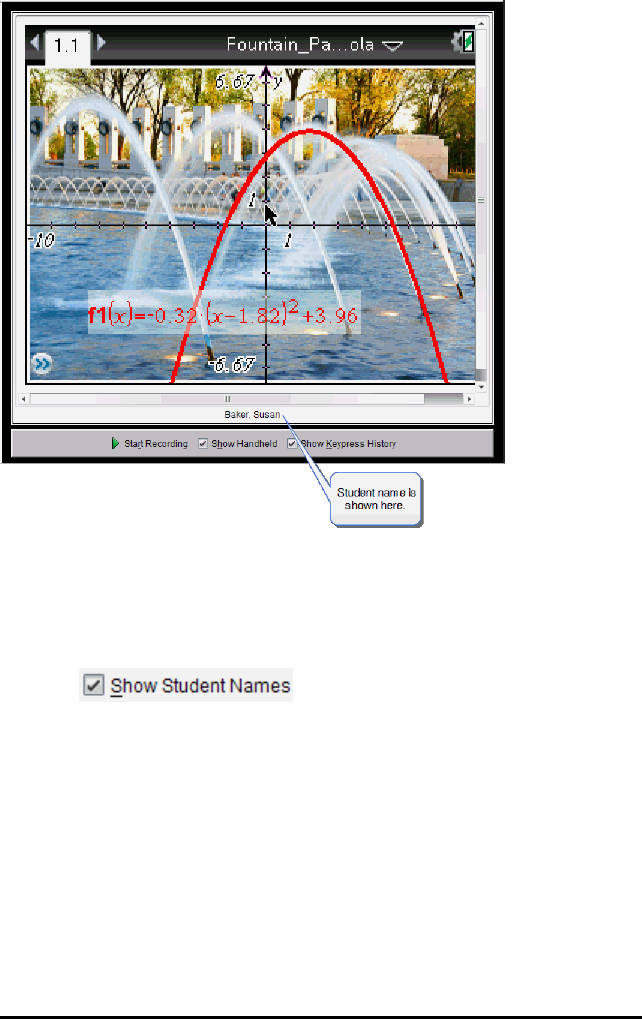
150 Using Live Presenter
The student name is shown in the same format selected in Capture Class. If
you select to show or hide student names in Capture Class, the student name
will be shown or hidden when you start Live Presenter.
To hide the student name in Live Presenter:
▶Clear .
The student name is hidden.
Hiding and Showing the Presenter Handheld
By default, the handheld is shown when you start Live Presenter. Showing the
handheld enables the class to see which keys are pressed during the
presentation. When the handheld is shown:
• The key turns red in the display so that the class can follow along when the
presenter presses a key.
• The last key pressed remains highlighted until a different key is pressed.
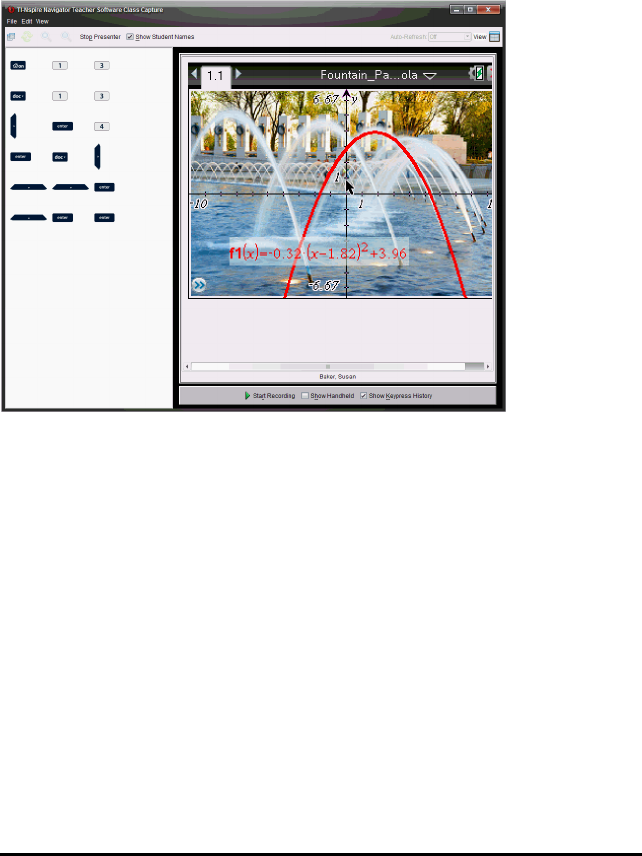
• The keys on the handheld display cannot be pressed or clicked. This
visual display only shows what the presenter presses on their handheld.
Hiding the Handheld Display
▶To hide the handheld, clear Show Handheld in the View Options bar.
The handheld is hidden and the Keypress History is shown in the left pane.
Showing the Handheld
▶If the handheld is hidden, click Show Handheld to show the presenter’s
handheld in the left pane.
The handheld is displayed in the left pane and the Keypress History pane
opens under the handheld screen if selected.
Viewing Keypress History
By default, the Keypress History pane is open under the handheld screen
when you start Live Presenter.
• As keys are pressed during the live presentation, they appear in the
Keypress History pane.
• As keys are pressed, they are displayed from left-to-right, and then top-to-
bottom.
Using Live Presenter 151
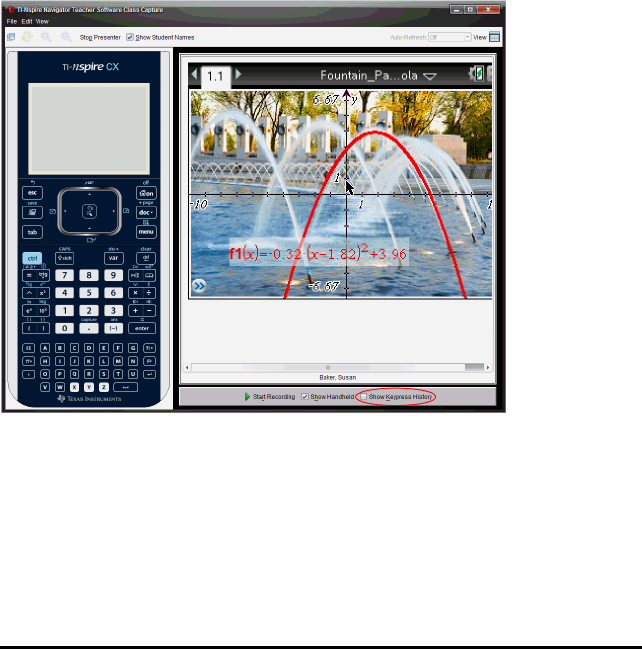
152 Using Live Presenter
• If the presenter presses the same key more than once, each repeated key
press is shown in the Keypress History pane. If the presenter presses and
holds one key (as when moving the cursor), the key is recorded only one
time.
• You can copy the keys captured in the Keypress History pane to the
Clipboard, and then paste the images into another document. You can
also clear the Keypress History pane. (Students are not able to do this.)
• During lengthy live presentation sessions, the keys pressed may expand
beyond the display area. When this happens, a scroll bar appears so you
can review all keys pressed during the session.
Hiding Keypress History
▶To hide the Keypress History pane, clear Show Keypress History.
The Keypress History pane closes.
Showing Keypress History
▶If the Keypress History pane is hidden, check Show Keypress History.
• If the handheld is shown, the Keypress History pane opens below the
presenter’s handheld screen.

• If the handheld is hidden, the Keypress History is displayed in the
pane to the left of the presenter’s handheld screen.
Copying Keypress History
You can copy the keys captured in the Keypress History pane to the Clipboard
then paste the images of the keys into a Microsoft® Word document or
PowerPoint presentation.
1. In the Keypress History pane, select the keys you want to copy.
2. Click Edit > Copy.
—or—
Press Ctrl + C.
Mac®: “+ C
Images of the keys are copied to the Clipboard.
Clearing Keypress History
To clear the Keypress History pane:
▶Click View > Live Presenter > Clear Keypress History.
The keys displayed in the Keypress History pane are removed.
Showing the Handheld Screen Only
To show only the presenter’s handheld screen during the Live Presenter
session:
▶Clear the Show Handheld and the Show Keypress History options.
The Handheld and Keypress History panes close and the handheld
screen is displayed in the window.
Using Live Presenter 153

154 Using Live Presenter
Recording the Live Presentation
You can record and save the live presentation as a movie (.avi file). Movies are
a useful way to present demonstrations to a class, provide additional tutoring
for difficult concepts, or provide a way for students who missed the class to
review the lesson. When you record the presentation, only the handheld
screen is captured. The handheld display and the keys pressed are not
recorded. When you save a recorded presentation, the file is saved with the
Audio Video Interleave (.avi) file extension.
Starting the Recording
▶Click .
—or—
Click View > Live Presenter > Start Recording.
Recording begins. When clicked, the button changes to Stop Recording.
All of the presenter’s work on the handheld screen is recorded until you
stop the recording.
Stopping and Saving the Recording
Complete the following steps to stop the recording and save the movie file.

1. Click .
—or—
Click View > Live Presenter > Stop Recording.
The Save dialog box opens. The default name for the movie is
“presentation” and the default save location is the class folder for the class
that is active. You can change both the file name and the storage location.
Note: If you don’t want to save the recording, click Cancel.
2. Navigate to the folder where you want to save the .avi file if different from
the default folder.
3. Type a new name for the file.
4. Click Save.
The file is saved in the designated folder.
Playing and Sharing the Recording
Once the recording is saved as an .avi file, you can play it on your computer.
You can also send the file to others as an email attachment.
To play the recording on your computer:
1. Using your file browser, navigate to the folder where you saved the
presentation (.avi) file.
2. Double-click the .avi file name.
Using Live Presenter 155
156 Using Live Presenter
Your default media player opens and the movie plays.
Note: If the .avi file format is not compatible with your default player, an
error message is displayed.
Stopping Live Presenter
▶To stop Live Presenter, click .
—or—
Click View > Live Presenter > Stop Presenter.
The presentation window closes and the Class Workspace is displayed.
The class is still active. When you are ready to end the class, click
.
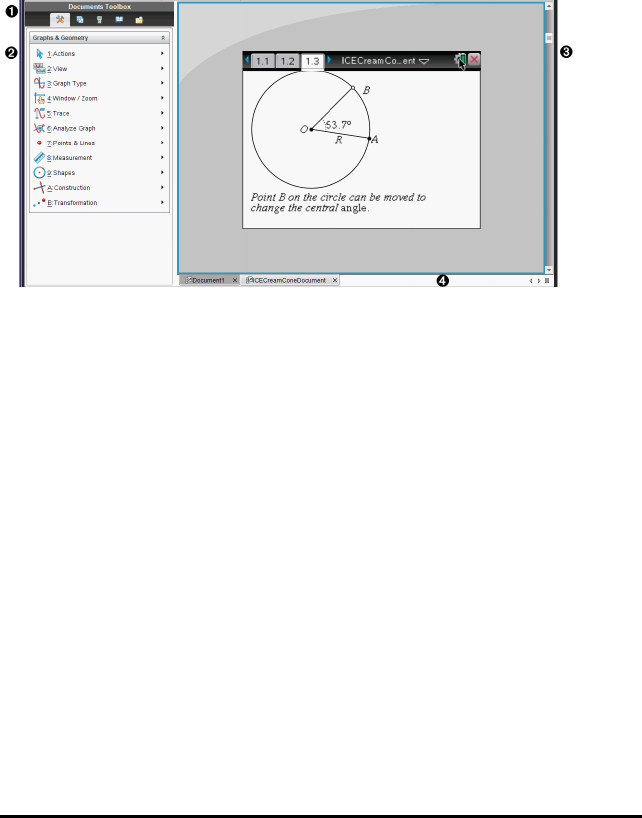
Using the Documents Workspace
Use this workspace to create, modify, and view TI-Nspire™ and PublishView™
documents, and to demonstrate mathematical concepts.
Exploring the Documents Workspace
ÀDocuments Toolbox. Contains tools such as the Document Tools
menu, Page Sorter, TI-SmartView™ emulator, Utilities, and Content
Explorer. Click each icon to access the available tools. When you are
working in a TI-Nspire™ document, the tools available are specific to
that document. When you are working in a PublishView™ document,
the tools are specific to that document type.
ÁToolbox pane. Options for the selected tool are displayed in this area.
For example, click the Document Tools icon to access tools needed
to work with the active application.
Note: In the TI-Nspire™ Teacher Software, the tool for configuring
questions opens in this space when you insert a question. For more
information, see
Using Question in the TI-Nspire™ Teacher Software
.
ÂWork area. Shows the current document and enables you to perform
calculations, add applications, and add pages and problems. Only
one document at a time is active (selected). Multiple documents
appear as tabs.
ÃDocument information. Shows the names of all open documents.
Using the Documents Workspace 157
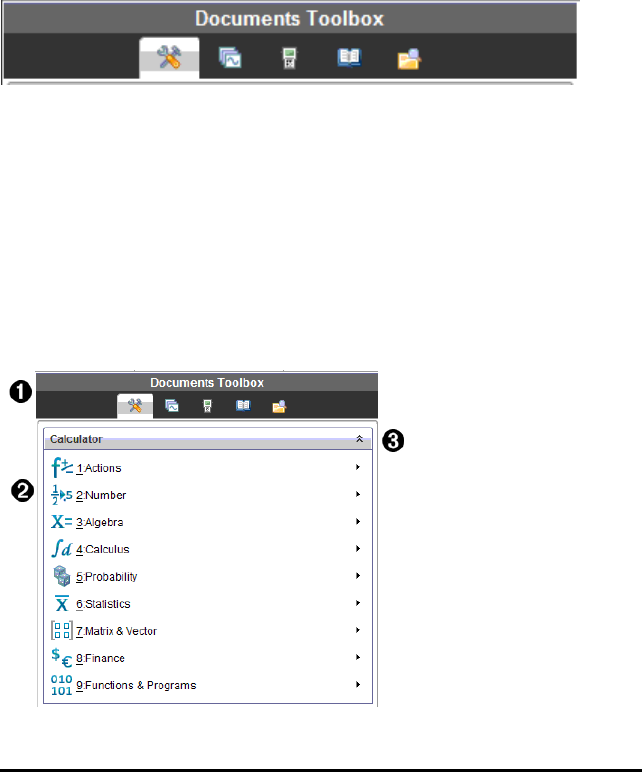
158 Using the Documents Workspace
When there too many open documents to list, click the forward and
backward arrows to scroll through the open documents.
Using the Documents Toolbox
The Documents Toolbox, located on the left side of the workspace, contains
tools needed for working with both TI-Nspire™ documents and PublishView™
documents. When you click a toolbox icon, the associated tools appear in the
Toolbox pane.
Exploring Document Tools
In the following example, the Document Tools menu is open showing the
options for the Calculator application. In TI-Nspire™ documents, the Document
Tools menu contains tools available for working with an application. The tools
are specific to the active application.
In PublishView™ documents, the Document Tools menu contains tools needed
to insert TI-Nspire™ applications and TI-Nspire™ documents, as well as
multimedia objects such as text boxes, images, and links to websites and files.
For more information, see
Working with PublishView™ Documents
.

ÀThe Documents Toolbox menu.
ÁTools available for the Calculator application. Click ¢to open the
submenu for each option.
ÂClick to close and click to open Document Tools.
Exploring the Page Sorter
The following example shows the Documents Toolbox with the Page Sorter
open. Use the Page Sorter to:
• See the number of problems in your document and where you are.
• Move from one page to another by clicking on the page you want.
• Add, cut, copy, and paste pages and problems within the same document
or between documents.
Note: When you are working in a PublishView™ document, the Page Sorter is
not available in the Documents Toolbox.
Using the Documents Workspace 159
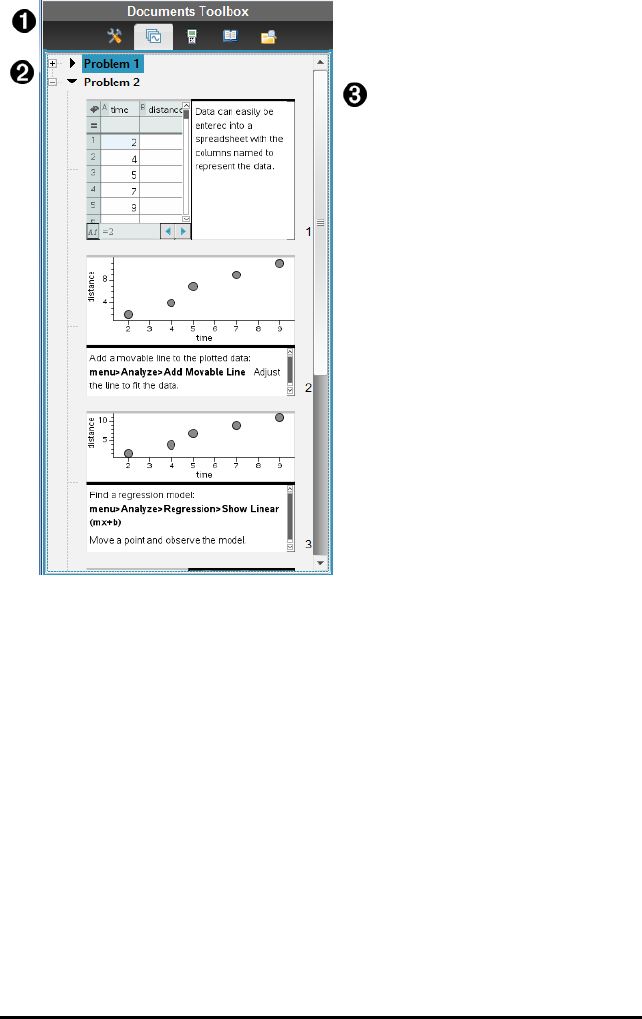
160 Using the Documents Workspace
ÀThe Documents Toolbox menu.
ÁClick the minus sign to collapse the view. Click the + sign to open the
view and show pages in the document.
ÂScroll bar. The scroll bar is only active when there are too many
pages to show in the pane.
Exploring the TI-SmartView™ Feature
The TI-SmartView™ feature emulates how a handheld works. In the teacher
software, the emulated handheld facilitates classroom presentations. In the
student software, the emulated keypad gives students the ability to drive the
software as if using a handheld.
Note: Content is displayed on the TI-SmartView™ small screen only when the
document is in Handheld view.
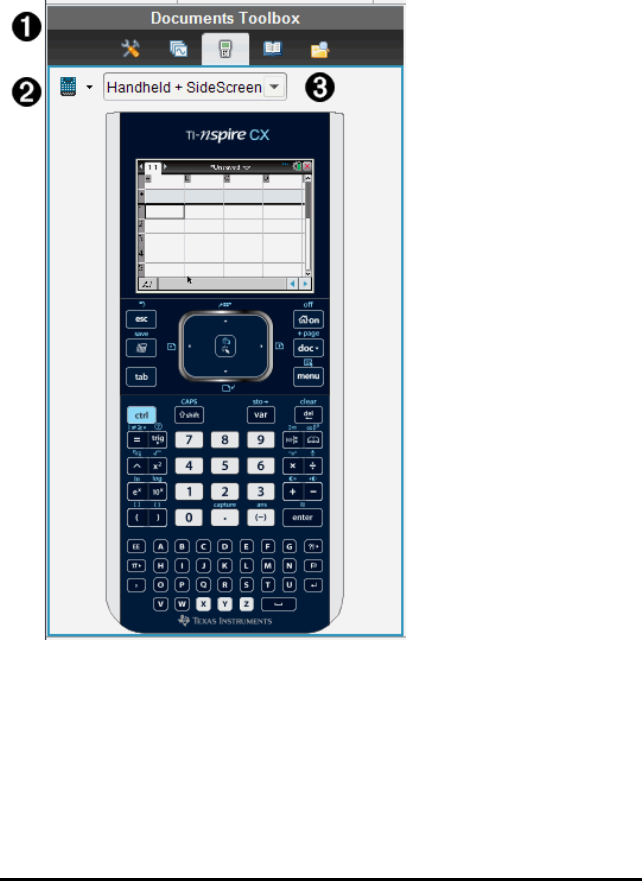
When working in a PublishView™ document, TI-SmartView™ emulator is not
available.
Note: The following illustration shows the TI-SmartView™ panel in the teacher
software. In the Student Software, only the keypad is shown. For more
information, see Using the TI-SmartView™ Emulator.
ÀThe Documents Toolbox menu.
ÁHandheld Selector. Click ¤to select which handheld to show in the
pane:
• TI-Nspire™ CX or TI-Nspire™ CX CAS
• TI-Nspire™ Touchpad or TI-Nspire™ CAS with Touchpad
Using the Documents Workspace 161

162 Using the Documents Workspace
• TI-Nspire™ Clickpad or TI-Nspire™ CAS with Clickpad
Then, select how to show the handheld:
• Normal
• High contrast
• Outline
ÂView selector. In the teacher software, click ¤to select the handheld
view:
• Handheld only
• Keypad plus side screen
• Handheld plus side screen
Note: You can also change these options in the TI-SmartView™
Options window. Click File> Settings > TI-Smartview™ Options to
open the window.
Note: The view selector is not available in the student software.
When the Handheld Only display is active, select Always in Front to
keep the display in front of all other open applications. (Teacher
software only.)
Exploring Utilities
Utilities provides access to the math templates and operators, special symbols,
catalog items, and libraries that you need when working with documents. In the
following example, the Math templates tab is open.
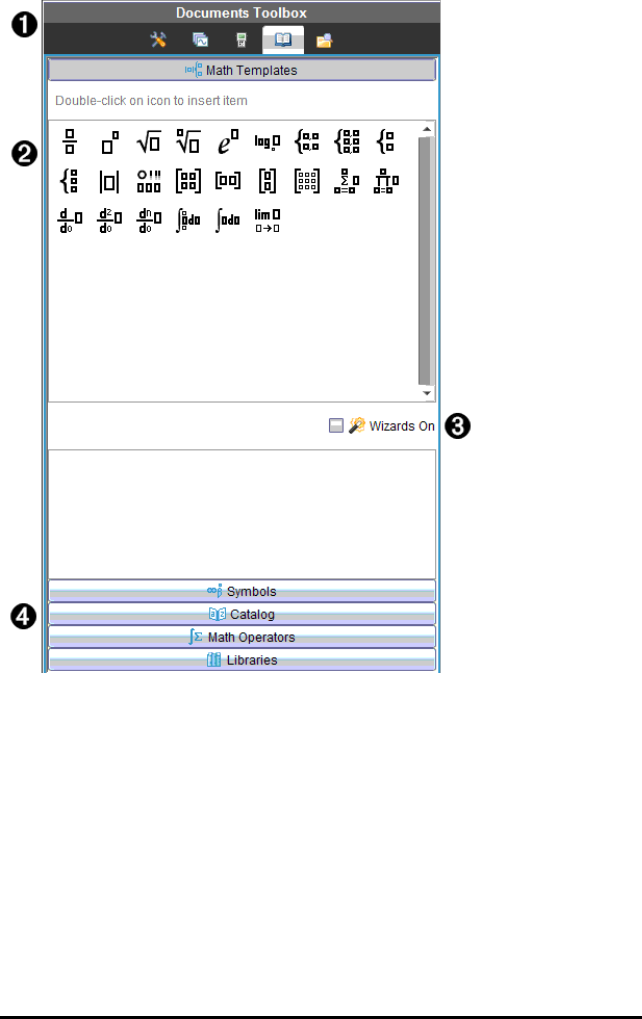
ÀThe Documents Toolbox menu.
ÁMath Templates are open. Double-click a template to add it to a
document. Click the Math Template tab to close the template view.
To open the Symbols, Catalog, Math Operators, and Libraries, click
the tab.
ÂWizards On check box. Select this option to use a wizard to enter
function arguments.
ÃTabs for opening views where you can select and add symbols,
catalog items, math operators, and library items to a document. Click
the tab to open the view.
Using the Documents Workspace 163

164 Using the Documents Workspace
Exploring Content Explorer
Use Content Explorer to:
• See a list of files on your computer.
• Create and manage lesson bundles.
• If using software that supports connected handhelds, you can:
- See a list of files on any connected handheld.
- Update the OS on connected handhelds.
- Transfer files between a computer and connected handhelds.
Note: If you are using TI-Nspire™ software that does not support connected
handhelds, the Connected Handheld heading is not shown in the Content
Explorer pane.
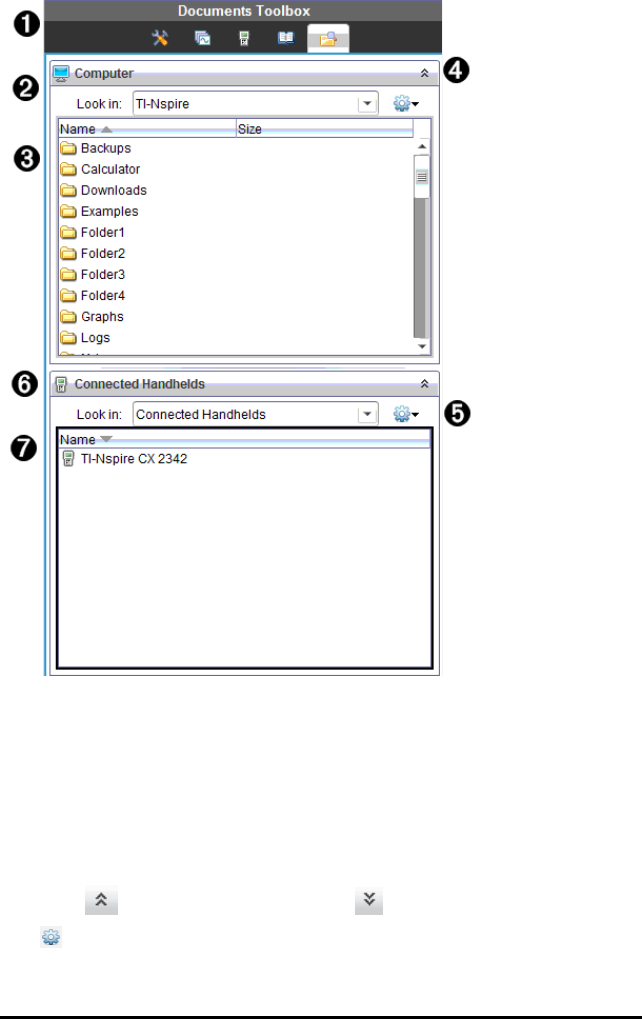
ÀThe Documents Toolbox menu.
ÁShows files on your computer and the name of the folder where the files
are located. Click ¤to navigate to another folder on the computer.
ÂThe list of folders and files within the folder named in the Look In: field.
Right-click on a highlighted file or folder to open the context menu listing
available actions for that file or folder.
ÃClick to close the list of files. Click to open the list of files.
ÄOptions menu. Click ¤to open the menu of actions you can perform
on a selected file:
Using the Documents Workspace 165

166 Using the Documents Workspace
• Open an existing file or folder.
• Move (navigate) up one level in the folder hierarchy.
• Create a new folder.
• Create a new lesson bundle.
• Rename a file or folder.
• Copy selected file or folder.
• Paste file or folder copied to Clipboard.
• Delete selected file or folder.
• Select all files in a folder.
• Package lesson bundles.
• Refresh the view.
• Install OS.
ÅConnected handhelds. Lists the connected handhelds. Multiple
handhelds are listed if more than one handheld is connected to the
computer or when using the TI-Nspire™ Docking Stations.
ÆThe name of the connected handheld. To show the folders and files on a
handheld, double-click the name.
Click ¤to navigate to another folder on the handheld.
Using the Work Area
The space on the right side of the workspace provides an area for creating and
working with TI-Nspire™ and PublishView™ documents. This work area
provides a view of the document so that you can add pages, add applications,
and perform all work. Only one document at a time is active.
When you create a document, you specify its page size as Handheld or
Computer. This is how the page is displayed in the work area.
•Handheld page size is optimized for the smaller screen of a handheld. This
page size can be viewed on handhelds, computer screens, and tablets.
The content is scaled when viewed on a larger screen.
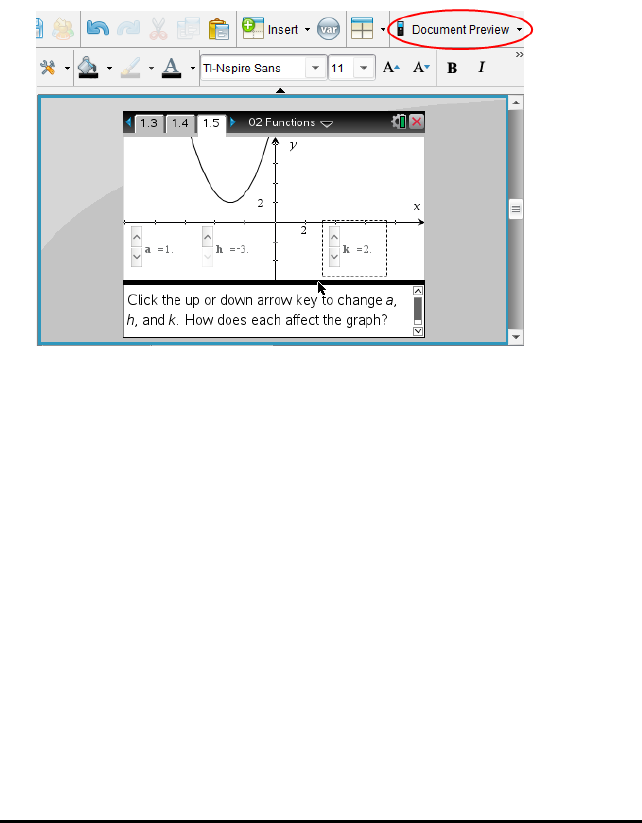
•Computer page size takes advantage of the larger space of a computer
screen. These documents can show details with less scrolling required.
The content is not scaled when viewed on a handheld.
You can change the page preview to see how the document will look in a
different page size.
▶To change the page preview, click Document Preview on the toolbar, and
then click Handheld or Computer.
For more information on page size and document preview, see
Working with
TI-Nspire™ Documents
.
Changing Document Settings
Document settings control how all numbers, including elements or matrices
and lists, are displayed in TI-Nspire™ and PublishView™ documents. You can
change the default settings at anytime and you can specify settings for a
specific document.
Changing Document Settings
1. Create a new document or open an existing document.
2. From the TI-Nspire™ File menu, select Settings>DocumentSettings.
The Document Settings dialog box opens.
When you open Document Settings the first time, the default settings are
displayed.
Using the Documents Workspace 167

168 Using the Documents Workspace
3. Press Tab or use your mouse to move through the list of settings. Click ¤
to open the drop-down list to view the available values for each setting.
Field Value
Display
Digits
• Float
• Float1 - Float12
• Fix0 - Fix12
Angle • Radian
• Degree
• Gradian
Exponential
Format
• Normal
• Scientific
• Engineering
Real or
Complex
Format
• Real
• Rectangular
• Polar
Calculation
Mode
• Auto
• CAS: Exact
• Approximate
Note: Auto mode shows an answer that is not a whole
number as a fraction except when a decimal is used in the
problem. Exact mode (CAS) shows an answer that is not a
whole number as a fraction or in symbolic form, except when
a decimal is used in the problem.
Vector
Format
• Rectangular
• Cylindrical
• Spherical
Base • Decimal
• Hex
• Binary
Unit System
(CAS)
• SI
• Eng/U.S.
4. Click the desired setting.

5. Choose one of the following options:
• To apply the customized settings to ALL documents, click Make
Default.
• To apply the settings to the open document only, click OK.
• To restore default settings, click Restore.
• Click Cancel to close the dialog box without making changes.
Changing Graphs & Geometry Settings
Graphs & Geometry settings control how information is displayed in open
problems and in subsequent new problems. When you change the Graphs &
Geometry settings, the selections become the default settings for all work in
these applications.
Complete the following steps to customize the application settings for graphs
and geometry.
1. Create a new graphs and geometry document or open an existing
document.
2. In the Documents Toolbox, click to open the Graphs & Geometry
application menu.
3. Click Settings > Settings.
The Graphs & Geometry Settings dialog box opens.
Using the Documents Workspace 169
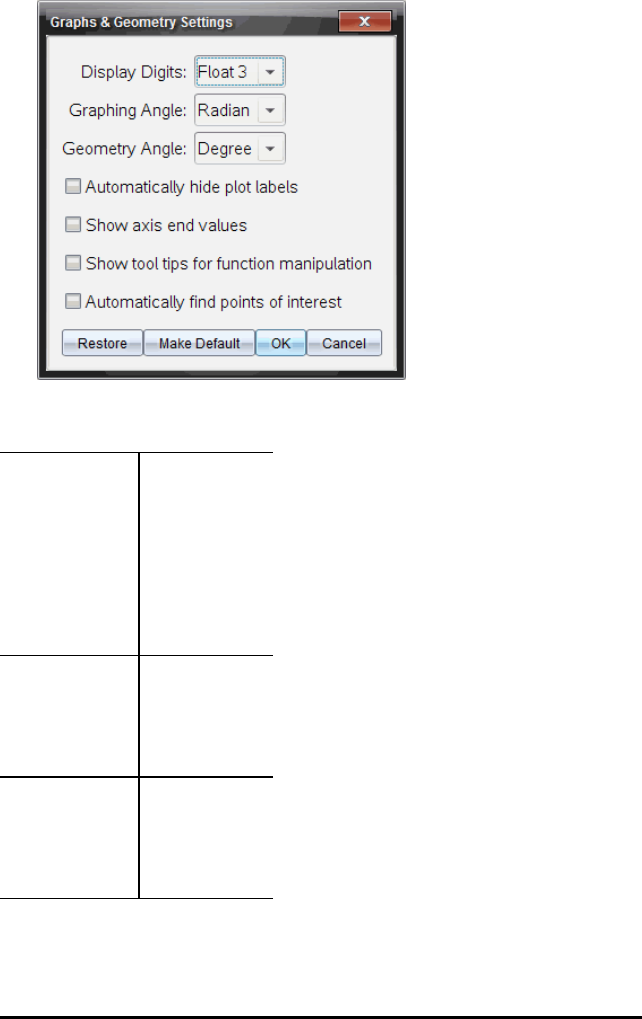
170 Using the Documents Workspace
4. Press Tab or use your mouse to move through the list of settings. Click ¢to
open the drop-down list to view the available values for each setting.
Field Values
Display Digits • Auto
• Float
• Float1 -
Float12
• Fix0 -
Fix12
Graphing Angle • Auto
• Radian
• Degree
• Gradian
Geometry Angle • Auto
• Radian
• Degree
• Gradian
5. Select the desired setting.

6. Select a check box to enable an option or clear a check box to disable an
option.
Check box Operation when selected
Automatically hide
plot labels
Plot labels are displayed only when selected,
grabbed, or hovered.
Show axis end
values
A numeric label is displayed at the least and greatest
values visible on an axis
Show tool tips for
function
manipulation
Shows helpful information as you manipulate
function graphs
Automatically find a
point of interest
Shows zeros, minima, and maxima for graphed
functions and objects while tracing function graphs.
7. Choose one of the following options:
• To apply the customized settings to ALL graphs and geometry
documents, click Make Default.
• To apply the settings to the open document only, click OK.
• To restore default settings, click Restore.
• Click Cancel to close the dialog box without making changes.
Using the Documents Workspace 171

172
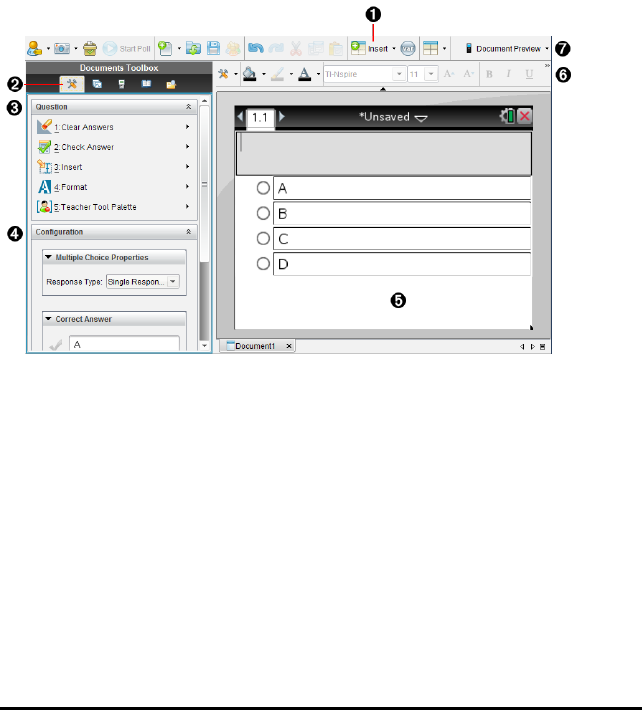
Using Question in the Teacher Software
The Question application in the Teacher Software allows you to author multiple
choice, open response, equation, expression, coordinate points, lists, image,
and chemistry questions.
Although students cannot author questions, they can open documents
containing questions, answer these questions, and, in Self-Check mode, check
their work.
The Question application is located on the Insert menu in the Documents
Workspace.
ÀInsert menu. Click Insert and select Question to add a question, or select
Image to add an image to a question.
ÁDocument Tools. Click this icon to open the toolbox pane.
ÂQuestion tool. Provides a menu of tools available for working with the
Question application.
ÃConfiguration tool. Allows you to set certain properties for each question
you insert.
ÄQuestion area. This is where you type questions and view student
responses.
ÅFormatting toolbar. Allows you to apply formatting to text.
Using Question in the Teacher Software 173
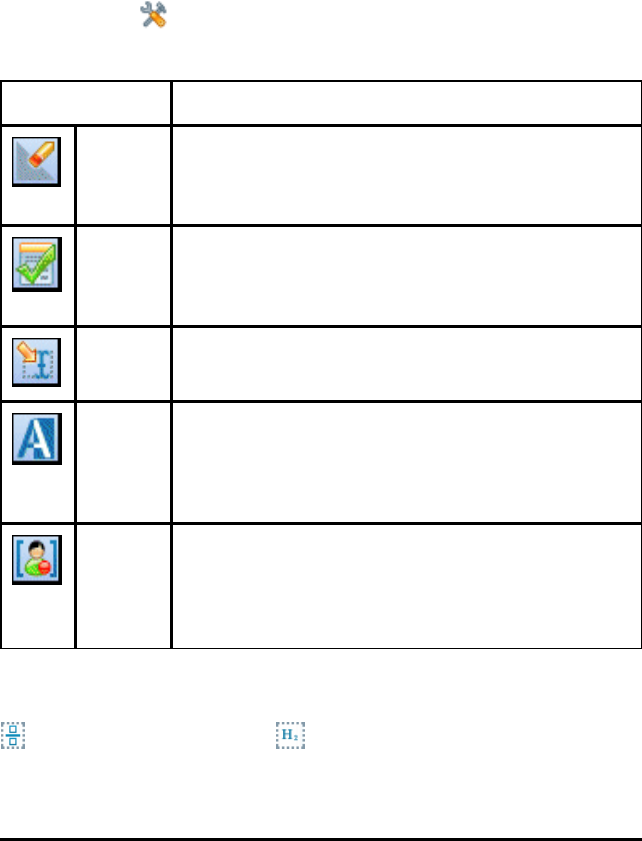
174 Using Question in the Teacher Software
ÆDocument Preview. View the document in Handheld or Computer mode.
The preview changes, but the page size does not. For more information
on Document Preview, see
Working with TI-Nspire™ Documents
.
Understanding the Question Tools
When you add a question, the Question application opens. If necessary, click
Document Tools to open the tools menu.
Note: The Teacher Tool Palette is not available to students.
Tool name Tool function
Clear
Answers
Lets teachers or students clear the answers in the
current question or in the document.
Check
Answer
If you select Self-Check as the document type in the
Question Properties dialog box, students can check
their answer to the question.
Insert Lets teachers or students insert an expression box or
chemical equation box into the question or answer.
Format Lets teachers or students format the selected text as
subscript or superscript. (The chemical equation box
uses its own formatting tool, so this Format tool does
not work in the chemical equation box.)
Teacher
Tool
Palette
Lets you add copyright information and set the
document type as Self-Check or Exam.
Using the Insert Menu
The Insert menu in the Document Tools lets you add math expression boxes
and chemical equation boxes to the Question area, Suggested
Response area, or Correct Answer area of some question types. When you are
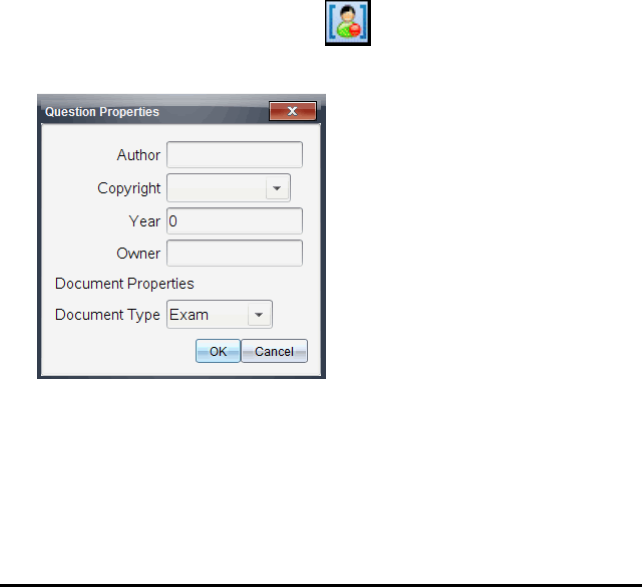
in question types that allow math expressions or chemical equations, place
your cursor where you want to insert the box, and then follow these steps.
1. Open the Question tool.
2. Click Insert > Expression Box or Chem Box.
The software inserts a blank box where your cursor is positioned.
3. Type the desired math expression or chemical equation, and then click
outside of the box to continue typing text.
Using the Teacher Tool Palette
The Teacher Tool Palette allows you to add copyright information and set the
document type as Self-Check or Exam.
Adding Copyright Information
Use the Question Properties dialog box to add copyright information to the
current question.
1. Click the Teacher Tool Palette icon > Question Properties.
The Question Properties dialog box opens.
2. Type the author’s name and move to the Copyright field.
Note: TI-Nspire™ software allows you to use questions from more than one
author in the same document. Therefore, the information that you enter
about the author and copyright is not global. You must enter the relevant
information for each different question.
Using Question in the Teacher Software 175
176 Using Question in the Teacher Software
3. Select whether the question is public domain or has a copyright assigned
to it and move to the Year field.
4. Type the year the question was copyrighted and move to the Owner field. If
you are copyrighting a new question, type the current year (example:
2012).
5. Type the name of the person or entity that owns the copyright.
6. Click OK.
Setting Self-Check and Exam Document Types
When you define a document as Self-Check or Exam, all of the questions in
that document will be either Self-Check or Exam.
• When you define the document type as Self-Check, students can check the
answers against the answers provided by the teacher.
• In Exam mode, when you enter a suggested response to a question,
students cannot check the answers. You can use Exam mode to
automatically grade student responses.
1. Click the Teacher Tool Palette icon > Question Properties.
2. In the Document Type field, click Exam or Self-Check.
3. Click OK.
Understanding the Configuration Tool
The Configuration tool allows you to set properties specific to each question
type you insert. Properties include the response type, the number of responses
(if applicable), the correct answer, and other options.
For example, you can specify the correct answer to a question, and set the
scale, axes, and grid on a graph. You can add a 2D math expression on the
question types that contain a Correct Answer field.
Each question type has a unique set of options. The options are explained for
each question type in the
Adding Questions
section.
The configuration settings are retained when you copy and paste a question
from one document to another.
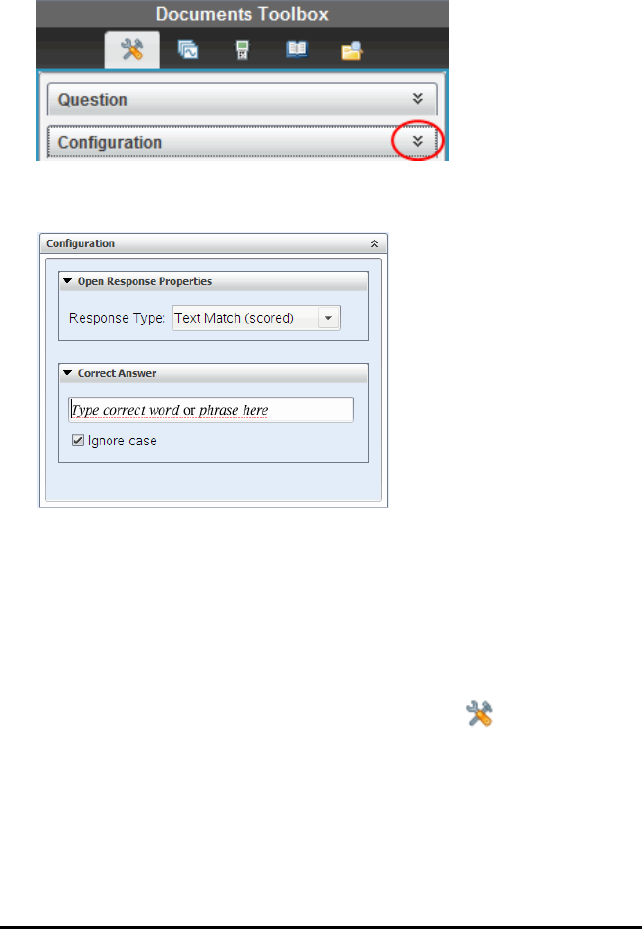
Adding Configuration Options
1. Click the down arrow on the Configuration bar in the Documents Toolbox
to open the Configuration tool.
2. Click the down arrow next to the choices you want to edit, and type the
applicable text.
3. Close the Configuration panel. The options you chose are saved when
you save the document.
Formatting Text and Objects
Use the text formatting tools to format text in sections of questions that allow
text input.
The formatting toolbar also contains the Document Tools icon to provide
easy access to the Question and Configuration tools.
For more information on formatting text and objects, see
Working with
TI-Nspire™ Documents
.
Using Question in the Teacher Software 177

178 Using Question in the Teacher Software
Adding Images to Questions
You can add images to the Question Text Area of most questions. On some
question types, you can add an image in the Student Answer or Suggested
Response Area of a question.
Adding images provides a visual aid to help explain the context of the question,
or as a background on a graph.
Choose the image from a set of images on your computer, or copy and paste
an image from a different application into the Question Text Area. For more
information, see
Working with Images
.
Image Types Available
The following file types can be used in the Question application:
• .jpg
• .jpeg
• .bmp
• .png
Note: The transparency feature of .png is not supported. Any transparent
.png backgrounds will appear as white.
Adding Images Using the Insert Command
1. Click Insert > Image.
The Insert Image dialog box opens.
2. Navigate to the location of the image and select it.
3. Click Open.
The image appears in the question.
Adding Images Using the Clipboard
To copy an image to the Clipboard from a TI-Nspire™ document, image file, or
another program, press Ctrl+C (Mac®: “+C).
To paste the image into the question, press Ctrl+V (Mac®: “+V).
Adding Questions
You can add the following types of questions:
• Multiple Choice

- Custom
- ABCD
- True/False
- Yes/No
- Always/Sometimes/Never
- Agree/Disagree
- Strongly Agree...Strongly Disagree
• Open response
- Explanation (not auto-graded)
- Text Match (auto-graded)
• Equations and Expressions
- y=
- f(x)=
- Expression
• Coordinate Points and Lists
- (x,y) numerical input
- Drop Point(s)
- List(s)
• Image
- Label
- Point on
• Chemistry
When you select a question type, a brief explanation of the question is
displayed at the bottom of the Choose Question Type dialog box.
Using Question in the Teacher Software 179
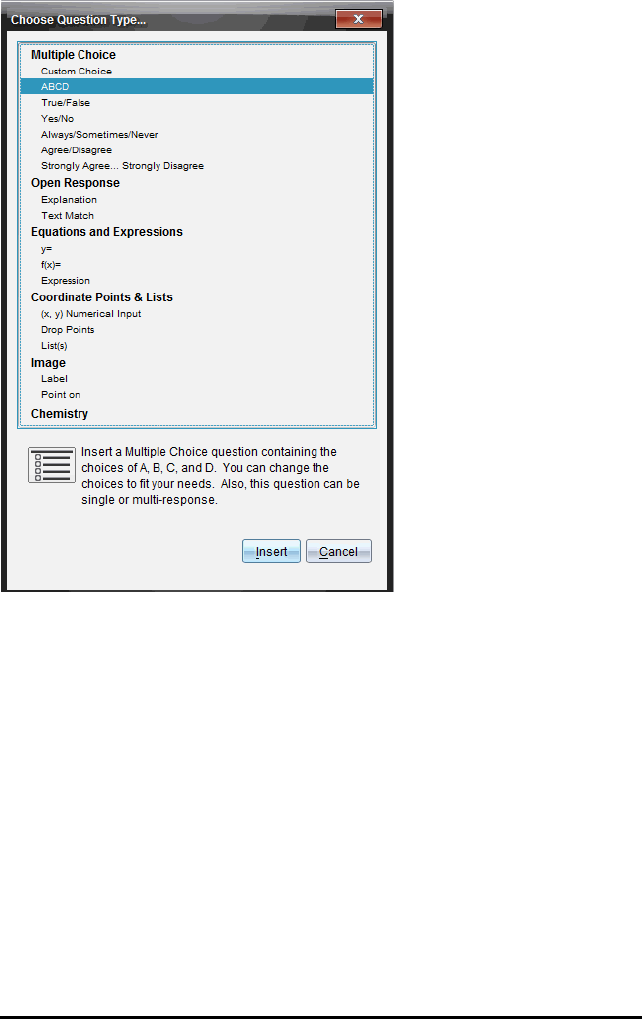
180 Using Question in the Teacher Software
When you open a question template, the cursor is in the Question text area.
Adding a Multiple Choice Question
This example shows how to add a custom multiple choice question. A custom
multiple choice question allows you to specify answers your students can
select. You can then select one or more responses as correct to help you when
grading or to help students check questions that are in Self-Check mode.

To add a custom multiple-choice question:
1. Click Insert > Question.
The Choose Question Type dialog box opens.
2. Click Custom Choice under the Multiple Choice heading.
3. Click Insert.
The Custom Choice template opens with the cursor in the Question text
area.
Two response options exist in the template by default.
4. Type the question.
• You can type any combination of text, math expressions, and chemical
equations in the Question Area and Suggested Response area.
• You can add an image in the question text area.
5. Press Enter to add another question line, or press Tab to go to the first
Correct Answer button.
6. Type the response options. Add an image, if desired.
7. Press Enter to add other response options, and add the response text.
• Press Delete to clear or delete a response.
• Press Backspace to delete an empty response line.
8. Click the option next to a suggested response, if desired.
Note: In Self-Check mode, the student can check their answer against the
suggested response.
Using Question in the Teacher Software 181
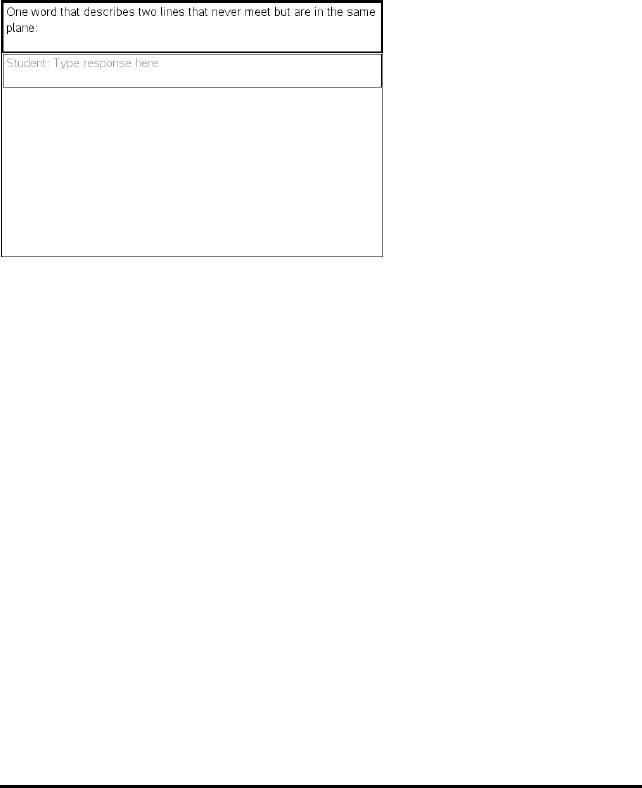
182 Using Question in the Teacher Software
9. Open the Configuration tool. Choose the response type, and click the
option that corresponds to the correct answer.
Adding an Open Response Question
An open response question prompts the student to write a response. An
explanation question type allows students to respond without any predefined
answers. A text match question type allows the teacher to specify an answer for
the student response. Text match questions are automatically graded; open
response questions are not automatically graded.
This example shows how to add an explanation question.
1. Click Insert > Question.
The Choose Question Type dialog box opens.
2. Click Explanation under Open Response.
3. Click Insert.
The Open Response template opens with the cursor in the Question text
area.
4. Type the question.
• You can type any combination of text, math expressions, and chemical
equations in the Question Area and Suggested Response area.
• You can add an image in the question text area.
• Press Tab or use the mouse pointer to navigate between fields.
5. Open the Configuration tool. Select the response type as Explanation or
Text Match, and type the correct answer.
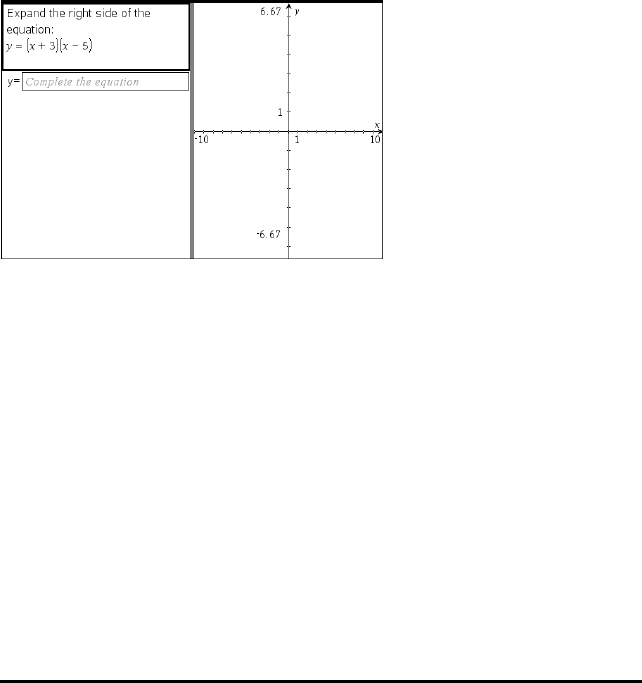
• The Explanation response type allows students to give answers that
closely match your suggested response.
• The Text Match response type requires students to exactly match your
suggested response. Select the Ignore Case check box if
capitalization is not important.
• You can type any combination of text, math expressions, and chemical
equations in the Correct Answer area.
Adding an Equation Question
An equation question prompts the student to write an equation in the form of y=
or f(x)=, or to respond with a number or expression.
This example shows how to add a y=question.
1. Click Insert > Question.
The Choose Question Type dialog box opens.
2. Select y= under Equations and Expressions.
3. Click Insert.
The equation template opens with the cursor in the Question text area.
4. Type the question.
• You can type any combination of text, math expressions, and chemical
equations in the Question Area.
• You can add an image in the question text area.
• Press Tab or use the mouse pointer to navigate between fields.
5. Enter a suggested response, if desired.
6. Press Enter to add other response options, and add the response text.
Using Question in the Teacher Software 183
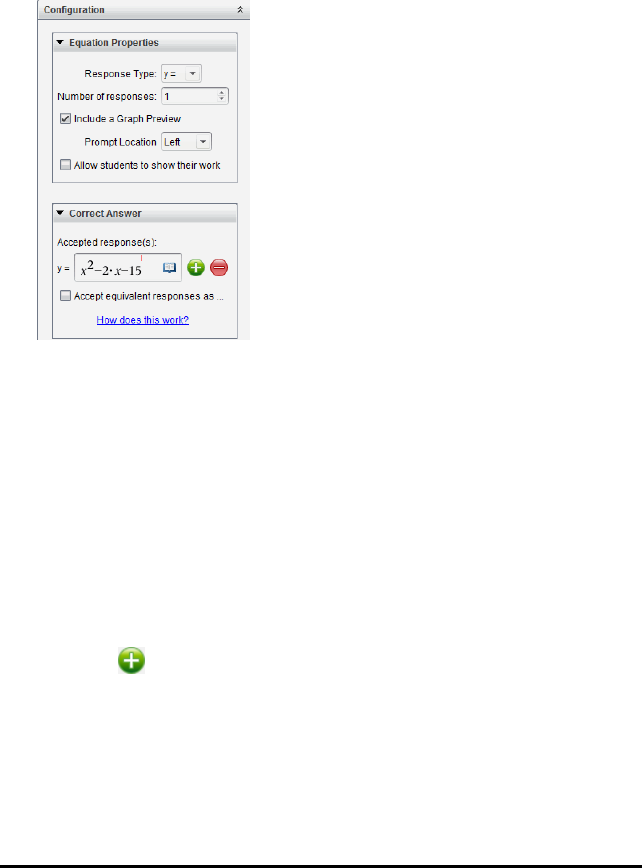
184 Using Question in the Teacher Software
• Press Delete to clear or delete a response.
• Press Backspace to delete an empty response line.
7. Open the Configuration tool to set the number of responses, the correct
answer, and whether the students should show their work. You can also
add a graph that will show in the Question area.
• The number of responses can range from 1 to 5.
• The Show your work option includes areas for the students to write
their starting point, their steps, and their final answer. The option to
show work is disabled if multiple responses are allowed.
• To add a graph in the Question area, check Include a Graph Preview.
The Question text area splits to show a graph on the right.
• When you are in the graph, the Graphs & Geometry toolbox is
available to allow you to add functions.
Note: Only the teacher can edit the graph. Students can only view and
zoom the graph.
• Click to add additional fields for multiple correct answers. For
example, you might want to accept both y=(x+1)(x+2) and y=(x+2)
(x+1) as correct answers.
• Select whether or not to accept equivalent responses as correct.
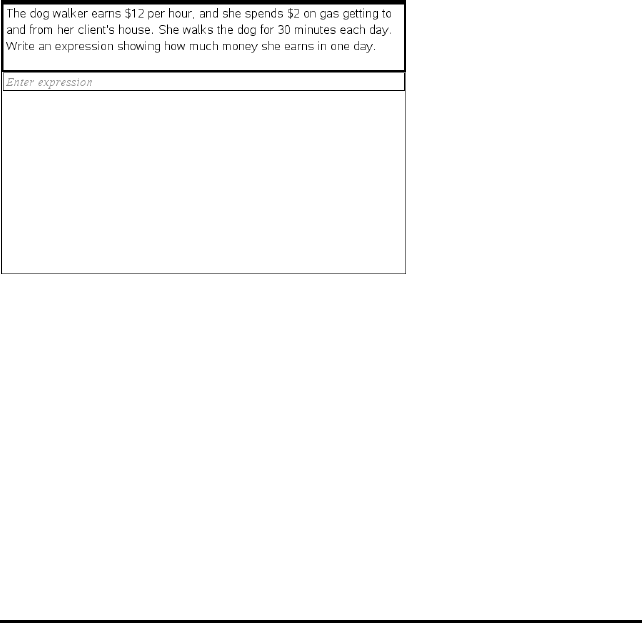
- If you
do not
check Accept equivalent responses as correct, the
student response is marked correct if it is an exact text match to
one of the accepted responses you entered.
- If you
do
check Accept equivalent responses as correct, the
student response is marked correct if it is equivalent to any
accepted response you entered. For example, if you typed x+2 as
the correct answer, and the student submits 2+x, this response is
equivalent to the accepted response and is automatically graded
as correct. Spaces, case differences, and extra parentheses are
ignored when the software evaluates student answers. For
example, y=2x+1 is evaluated the same as Y=2X+1.
Adding an Expression Question
An expression question prompts the student to respond with a number value or
an expression.
1. Click Insert > Question.
The Choose Question Type dialog box opens.
2. Click Expression under Equations and Expressions.
3. Click Insert.
The expression template opens with the cursor in the Question text area.
4. Type the question.
• You can type any combination of text, math expressions, and chemical
equations in the Question area.
• You can add an image in the Question area.
Using Question in the Teacher Software 185
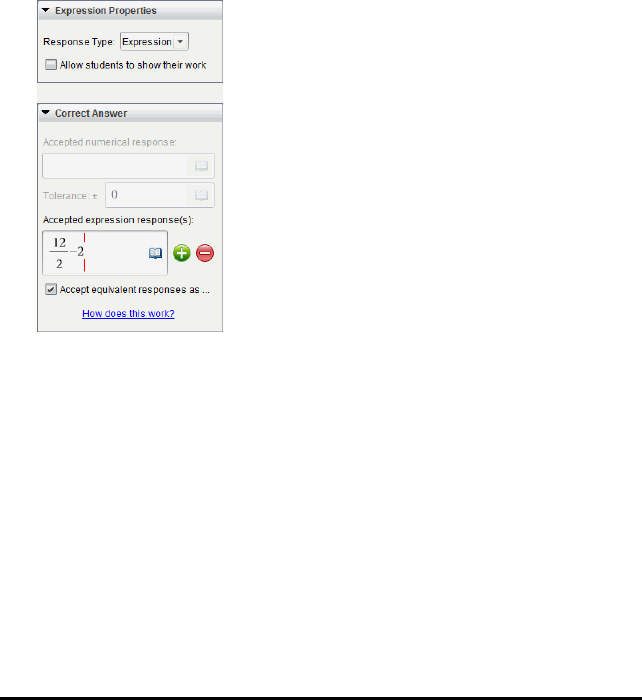
186 Using Question in the Teacher Software
5. In the Expression type response, enter a starting expression, if desired.
The student sees the starting expression.
6. Enter a suggested response, if desired.
• If you set the response type as Number, the response fields are math
boxes and accept only number values such as 1/3.
• If you set the response type as Expression, the response fields are
expression boxes and accept only expression inputs such as 2(3+5).
7. Open the Configuration tool to set the response type as Number or
Expression, set whether or not the students should show their work, and
enter a correct answer. You can also set a tolerance for Number types, or
equivalent responses for Expression types.
• The Show your work option includes areas for the students to write
their starting point, their steps, and their final answer.
• In the Number type response, enter the accepted numerical response
and the tolerance. Student responses are marked correct if they fall
within the tolerance interval you specify.
• Specifying a tolerance of zero indicates you are looking for the exact
number answer. Not specifying a tolerance is the same as specifying
a tolerance of zero.
• Student answers are considered correct if they are numerically
equivalent to the correct answer. Spaces, case differences, and extra

parentheses are ignored when the software evaluates student
answers.
• In the Expression type response, you can add additional fields (up to
10) for multiple correct answers.
• In the Expression type response, click to open the Templates and
Symbols catalog that allows you to enter 2D math expressions.
• In the Expression type response, you can select whether or not to
accept equivalent responses as correct.
- If you
do not
check Accept equivalent responses as correct, the
student response is marked correct if it is an exact text match to
one of the accepted responses you entered.
- If you
do
check Accept equivalent responses as correct, the
student response is marked correct if it is equivalent to any
accepted response you entered. For example, if you typed x+2 as
the correct answer, and the student submits 2+x, this response is
equivalent to the accepted response and is automatically graded
as correct. Spaces, case differences, and extra parentheses are
ignored when the software evaluates student answers. For
example, x+2 is evaluated the same as X+2.
Important: Students can enter the starting expression you supply
and have this response automatically graded as correct. For
example, if you ask students to factor x2-7x+12 and stipulate the
correct answer is (x-3)(x-4), the student can submit a response of
x2-7x+12. This response is automatically graded as correct
because it is equivalent to the accepted answer. You must
manually mark this student response as incorrect in either the
Review or Portfolio Workspaces. See the chapters for those
workspaces for more information on marking and grading
responses.
Adding an (x,y) Numerical InputQuestion
An (x,y) numerical input question prompts the student to respond with a
coordinate.
Using Question in the Teacher Software 187

188 Using Question in the Teacher Software
1. Click Insert > Question.
The Choose Question Type dialog box opens.
2. Click (x,y) Numerical Input under Coordinate Points & Lists.
3. Click Insert.
The template opens with the cursor in the Question text area.
4. Type the question.
• You can type any combination of text, math expressions, and chemical
equations in the Question area.
• You can add an image in the Question area.
• Press Tab or use the mouse pointer to navigate between fields.
5. Enter a suggested response, if desired.
• The response fields are expression boxes and accept only expression
inputs.
6. Press Enter to add other response options (up to five), and add the
response text.
• Press Delete to clear or delete a response.
• Press Backspace to delete an empty response line.
7. Open the Configuration tool to set the number of points, add a graph
preview, enter a correct answer, and set equivalent responses as correct.
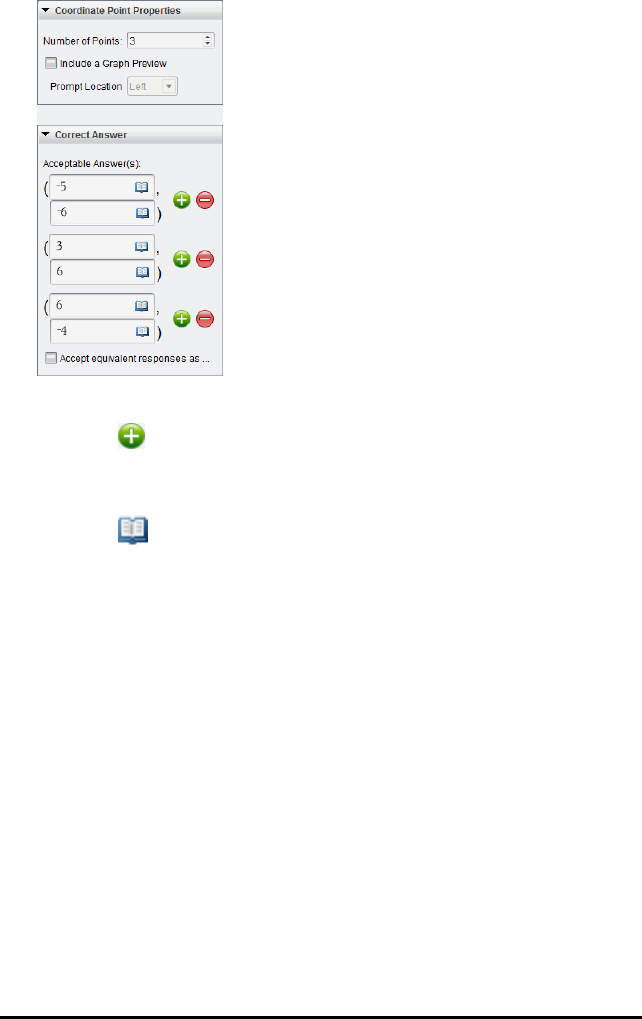
• The number of points can range from 1 to 5.
• Click to add additional fields for multiple correct answers. You can
type any combination of text, math expressions, and chemical
equations in the correct answer fields.
• Click to open the Templates and Symbols catalog that allows you
to enter 2D math expressions.
• To add a graph in the Question area, select Include a Graph Preview.
The Question text area splits to show a graph on the right and the
student prompt area on the left. To change the location of the graph,
click the down arrow next to Prompt Location and choose the desired
location for the graph in the student prompt area.
• When you are in the graph, the Graphs & Geometry tools are available
to allow you to add functions.
Note: Only the teacher can edit the graph. Students can only view and
zoom the graph.
• Select whether or not to accept equivalent responses as correct.
- If you
do not
check Accept equivalent responses as correct, the
student response is marked correct if it is an exact text match to
one of the accepted responses you entered.
Using Question in the Teacher Software 189
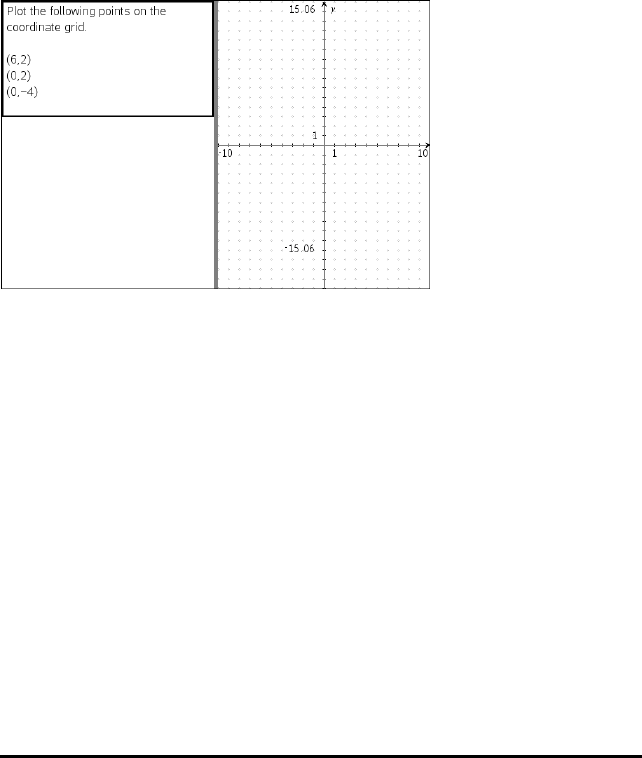
190 Using Question in the Teacher Software
- If you
do
check Accept equivalent responses as correct, the
student response is marked correct if it is equivalent to any
accepted response you entered. For example, if you typed
(-0.5,.75) as the correct answer, and the student submits (-.5,.75)
or (-1/2,3/4), and so forth, the student response is equivalent to
the accepted response and is automatically graded as correct.
Adding a Drop Points Question
A drop points question inserts a graph and prompts the student to drop points
on the graph in response to your question.
1. Click Insert > Question.
The Choose Question Type dialog box opens.
2. Select Drop Points under Coordinate Points & Lists.
3. Click Insert.
The drop points template opens with the cursor in the Question text area.
The graph is in the Student answer area.
• When you are in the graph, the Graphs & Geometry tools are available
to allow you to add functions.
Note: Only the teacher can edit the graph. Students can only view,
zoom, or place points on the graph.
4. Type the question.
• You can type any combination of text, math expressions, and chemical
equations in the Question area.
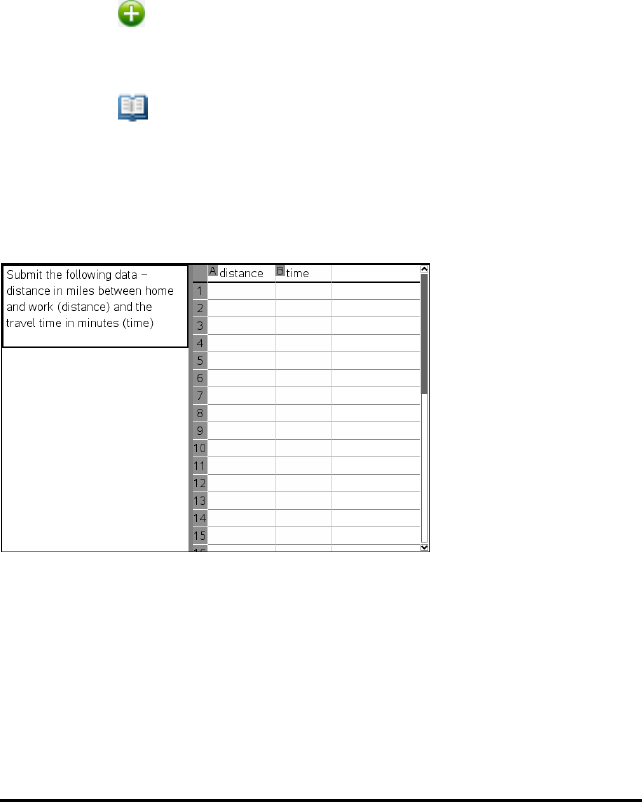
• You can add an image in the Question Area.
• Press Tab or use the mouse pointer to navigate between fields.
5. Open the Configuration tool to set the number of points, hide or show
coordinates, and enter a correct answer.
• The number of points can range from 1 to 5.
• Showing coordinates is turned off by default. Select the check box to
display coordinate labels on the graph.
• Click to add additional fields for multiple correct answers. You can
type any combination of text, math expressions, and chemical
equations in the correct answer fields.
• Click to open the Templates and Symbols catalog that allows you
to enter 2D math expressions.
Adding a Lists Question
A Lists question inserts a list and prompts students to enter data in the lists in
response to your question.
1. Click Insert > Question.
The Choose Question Type dialog box opens.
2. Select List(s) under the Coordinate Points & Lists question from the
Choose Question Type dialog box.
3. Click Insert.
The List template opens with the cursor in the Question text area.
Using Question in the Teacher Software 191
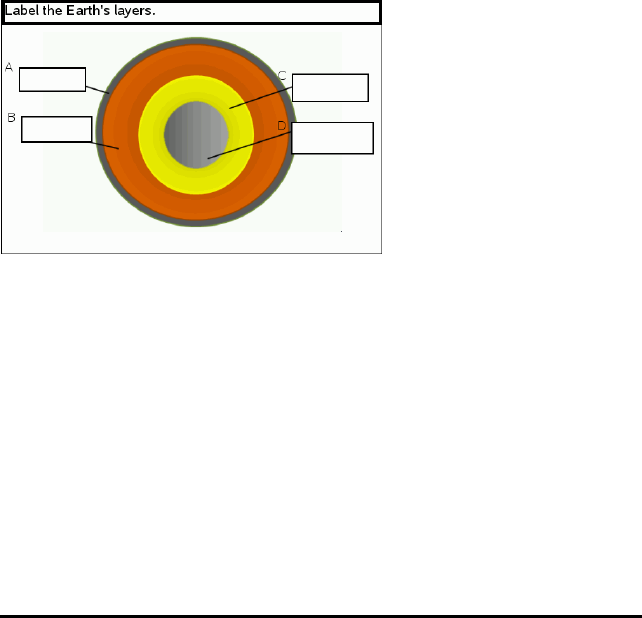
192 Using Question in the Teacher Software
4. Type the question.
• You can add columns or rows, change the name of the lists, and input
data in the lists, using the same functions allowed in the Lists &
Spreadsheet application.
5. Enter initial data in the lists, if desired.
6. Open the Configuration tool to set the number of lists for the student
responses.
• The number of lists can range from 1 to 5.
• Lists must have names. The default names are List1,List2, and so
forth.
Adding an Image: Label Question
An Image: Label question inserts an image. You can add blank fields to the
image and have students fill in the blanks in response to your question.
1. Click Insert > Question.
The Choose Question Type dialog box opens.
2. Select Label under Image.
3. Click Insert.
The Image: Label template opens with a blank background and one label.
This is where the image for the question is inserted.
4. Type the question.
• You can type any combination of text, math expressions, and chemical
equations in the Question area.
• Press Tab or use the mouse pointer to navigate between fields.
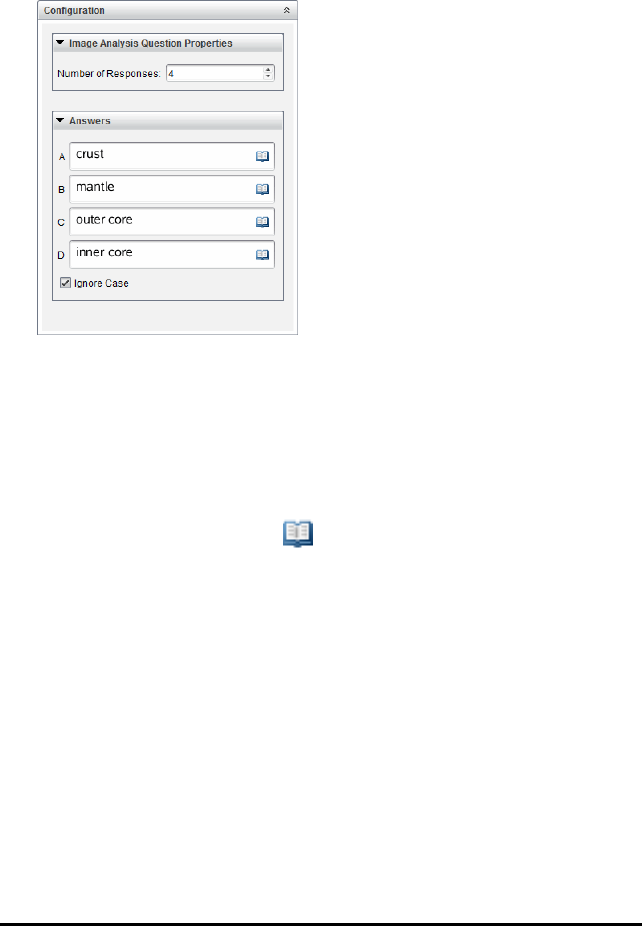
5. Insert an image in the bottom portion of the question template.
6. Open the Configuration tool to set the number of responses and to enter
answers for each label.
• The number of responses determines the number of labels on the
image. Each new response gives the label a unique identifier, such as
A, B, C, and so forth. Drag the labels to the desired location on the
image.
Note: If you set more than 26 responses, the labels are identified with
numbers, starting with 1. You can insert a maximum of 35 labels.
• In the answers area, click to open the Templates and Symbols
catalog that allows you to enter 2D math expressions.
• If the label text is too large to fit in the default label size, grab and drag
the borders of the label to resize it.
7. Type a suggested response in the labels, if desired. Select the Ignore case
check box if capitalization is not important.
• You can type any combination of text, math expressions, and chemical
equations in the response area.
• As you type the suggested response, a ghosted image of your answer
appears in the respective label on the image. If the suggested
response is too large for the default label size, grab and drag the
borders of the label to resize it.
Using Question in the Teacher Software 193
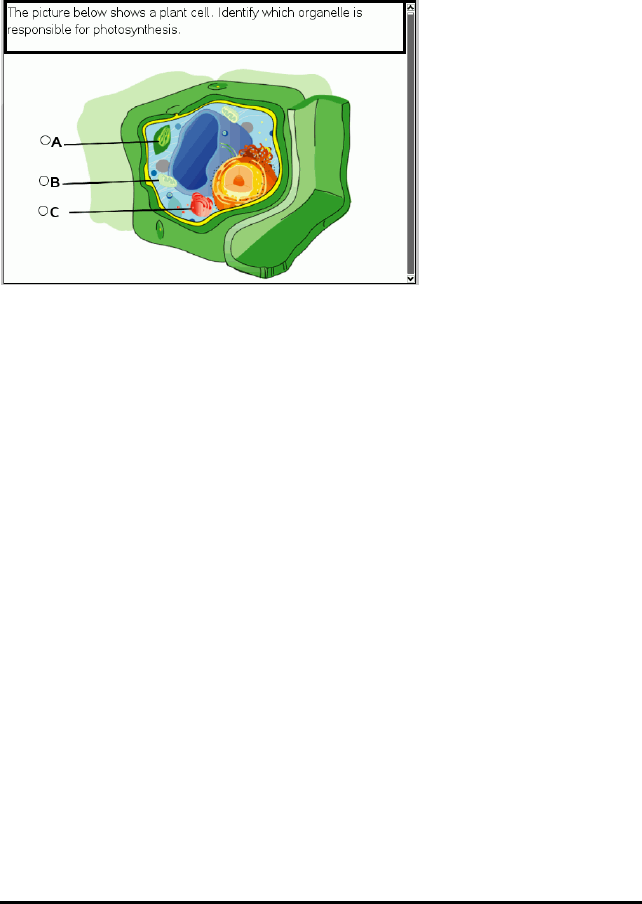
194 Using Question in the Teacher Software
Adding an Image: Point on Question
An Image: Point on question inserts an image. Add check boxes to the image
and have students place a check mark in the correct boxes in response to your
question.
1. Click Insert > Question.
The Choose Question Type dialog box opens.
2. Select Point on under Image.
3. Click Insert.
The Image: Point on template opens with a blank background and one
point. This is where the image for the question is inserted.
4. Type the question.
• You can type any combination of text, math expressions, and chemical
equations in the Question area.
• Press Tab or use the mouse pointer to navigate between fields.
5. Open the Configuration tool to set the response type, number of
responses, and correct answer.
• The Response Type makes the point a circle for Single Reponse and
changes to a square for Multiple Responses to indicate students can
select more than one box.
• The number of responses determines the number of points on the
image. Each new response gives the point a unique identifier, such as
A, B, C, and so forth. Drag the points to the desired location on the
image.
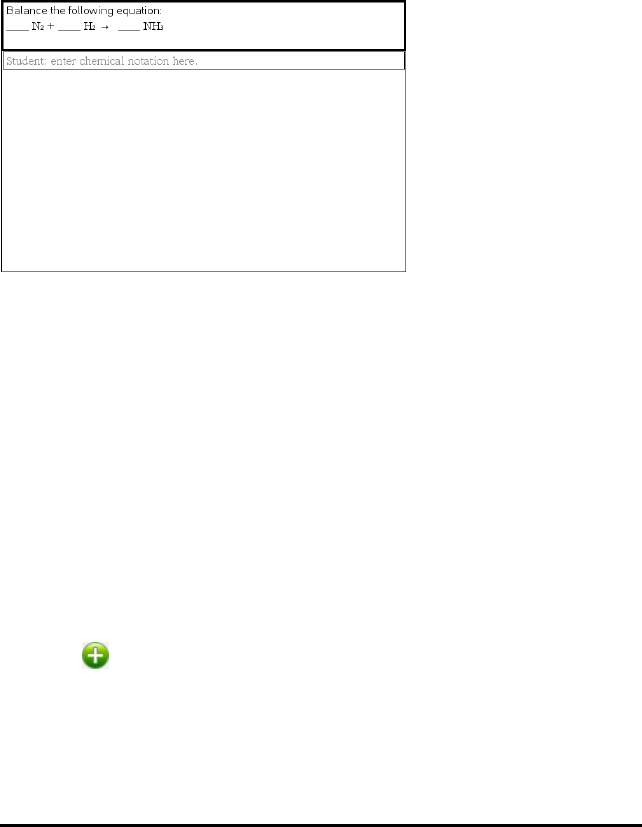
Note: If you set more than 26 responses, the points are identified with
numbers, starting with 1. You can insert a maximum of 35 points.
6. Click a point or points as a suggested response, if desired.
Adding a Chemistry Question
When you add a Chemistry question, students respond with a chemical formula
or equation.
1. Click Insert > Question.
The Choose Question Type dialog box opens.
2. Click Chemistry.
3. Click Insert.
The Chemistry template opens with the cursor in the Question text area.
4. Type the question.
• You can type any combination of text, math expressions, and chemical
equations in the Question area.
• You can add an image in the Question area.
5. Enter a suggested response, if desired.
6. Open the Configuration tool to enter a correct answer.
Click to add additional fields for multiple correct answers. You should
enter all possible answers. The software does not evaluate equivalency for
Chemistry answers.
Using Question in the Teacher Software 195

196
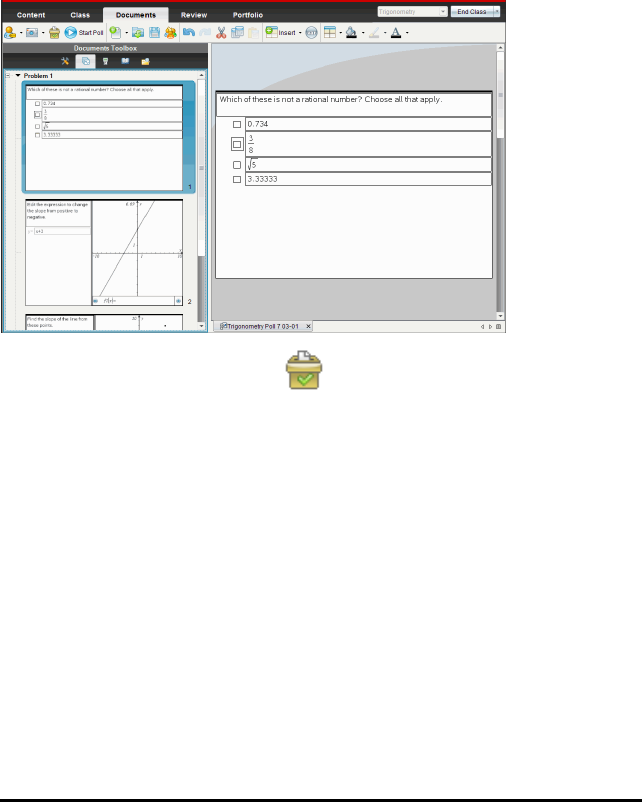
Polling Students
The Quick Poll tool lets you “poll” your students. A poll is a survey you send to
students that they immediately receive on their handhelds or laptops. After
students receive the poll, they can send responses back to your computer.
Quick Poll is available from all workspaces. As you receive student responses,
use the Review Workspace to review the responses.
When you click the Quick Poll icon from any workspace, the Documents
Workspace opens, and you can start the Quick Poll. Starting the Quick Poll
opens the Review Workspace. You can switch to any workspace while a poll is
in progress, but you can only stop the poll from the Documents or Review
Workspaces.
You can send the following types of questions:
• Multiple Choice
- Custom Choice
- ABCD
- True/False
- Yes/No
- Always/Sometimes/Never
- Agree/Disagree
Polling Students 197

198 Polling Students
- Strongly Agree...Strongly Disagree
• Open response
- Explanation (not auto-graded)
- Text Match (auto-graded)
• Equations and Expressions
- y=
- f(x)=
- Expression
• Coordinate Points and Lists
- (x,y) Numerical Input
- Drop Points
- List(s)
• Image
- Label
- Point on
• Chemistry
When you select a question type, a brief explanation of the question is
displayed at the bottom of the Choose Question Type dialog box.
Opening the Quick Poll Tool
You can open the Quick Poll tool from any workspace. You can send a poll
from an existing document, or open a new document to start a poll.
Before you begin, make sure a class is in session.
1. Click Tools > Quick Poll or click .
The Choose Question Type dialog box opens.
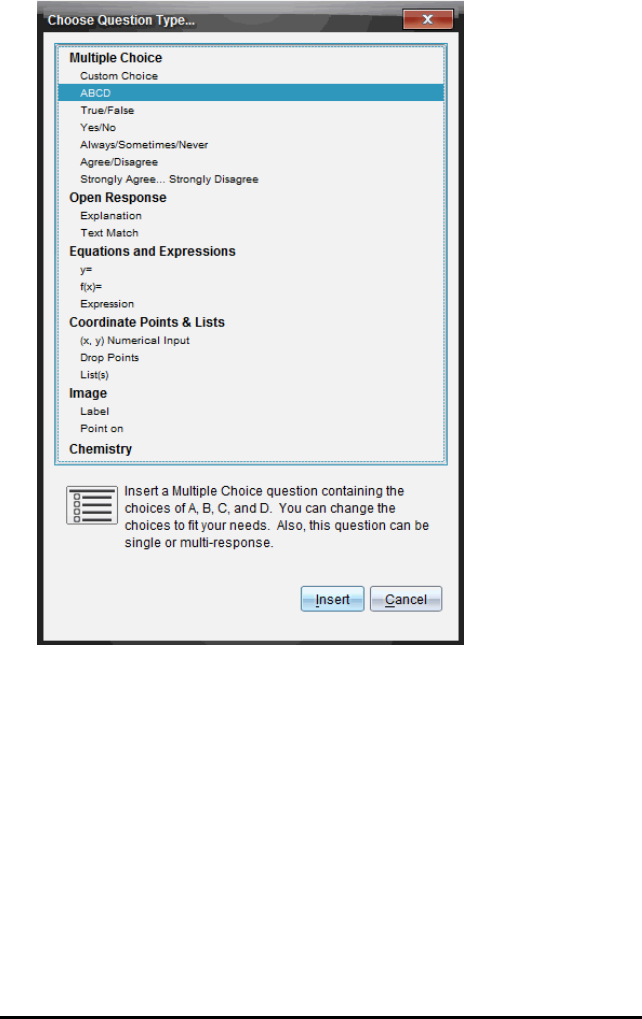
2. Select a question type and click Insert.
A new document opens with the question template open and the cursor in
the Question text area.
Polling Students 199
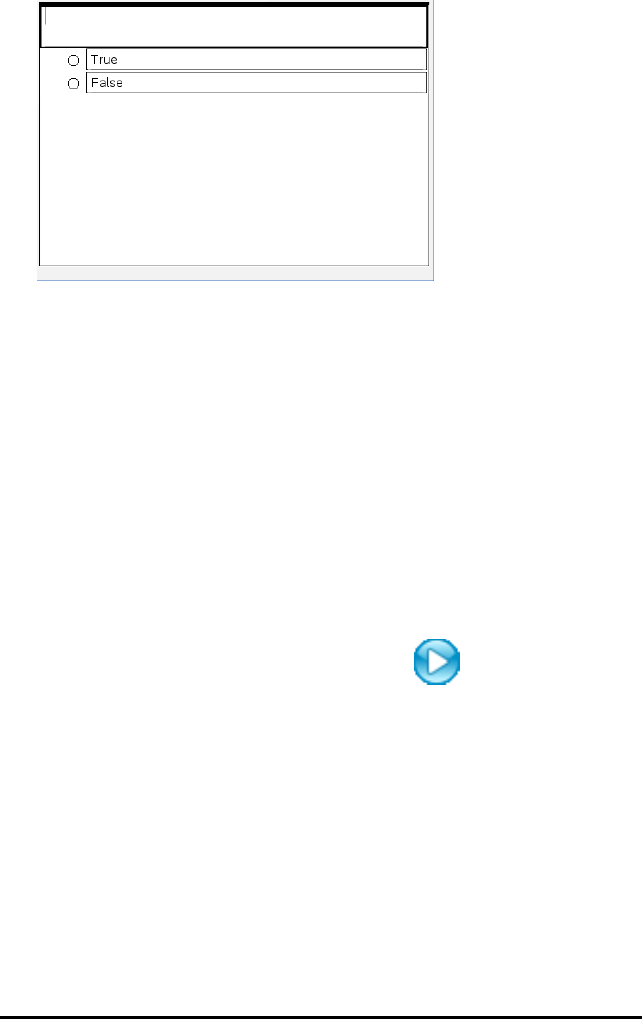
200 Polling Students
Quick Poll documents are named <
Class name, Quick Poll Set#,
mm-dd
.tns>. For example: Algebra1 - Mrs. Smith QP2 10-26.tns. You can
rename the poll when you save it.
Note: All Quick Polls for one class session are contained in one tab in the
Documents Workspace. A new tab is started when the number of
questions in the poll exceeds 30, or when you start a new class session.
Note: For more information about question types and about creating and
configuring questions, see
Using Question in the Teacher Software
.
Sending a Quick Poll
After you have selected the Quick Poll question, entered the information, and
selected options, you are ready to send the poll to your students.
▶To send the Quick Poll question, click Start Poll .
The poll is immediately sent to students. The Quick Poll interrupts the active
TI-Nspire™ document, and the poll becomes the active document.
You can stop a poll and restart it at any time.
Using Quick Poll Options
When Quick Poll is active, the Tools > Quick Poll Options menu is enabled.
Available options differ depending on whether you are using software that
supports connected handhelds or connected laptops. The Allow Document
Access option is not available in the TI-Nspire™ Navigator™ NC Teacher
Software.
•Allow Document Access. Allows you to grant or deny students access to
the Scratchpad and any documents on their handheld. The students may
access a document, do some math, and copy the results back into the poll.
Note: If a data collection sensor is attached to the computer or handheld
during a Quick Poll that does not have Allow Document Access turned on,
the Quick Poll is dismissed and the data collection console becomes
active.
•Allow Resubmit. Allows the students to submit their responses several
times.
Stopping Polls
You can stop polls at any time. Your students do not need to do anything on
their handhelds or computers to stop the poll. When you stop a poll, the
students can no longer submit answers.
▶To stop a poll, click Stop Poll .
Note: If you pause a class while a Quick Poll is running, the Quick Poll remains
on the students’ handhelds, but students are not able to answer or submit the
poll until you resume the class. Pausing class is not available in TI-Nspire™
Navigator™ NC Teacher Software.
Resending Polls
You can resend a poll from the Review Workspace, without switching
workspaces or starting a new question.
The software treats the resent poll like a new poll. Students receive a new poll
on top of the open document on their handheld or laptop.
The data from the poll is treated as new data, and does not overwrite any data
from the original poll.
▶To resend the same poll you just sent, click Start Poll .
▶To resend a previous poll, click the poll in the page sorter and then click
Start Poll .
The poll is added to the page sorter in the order it was sent. The page sorter
indicates it was resent.
Polling Students 201
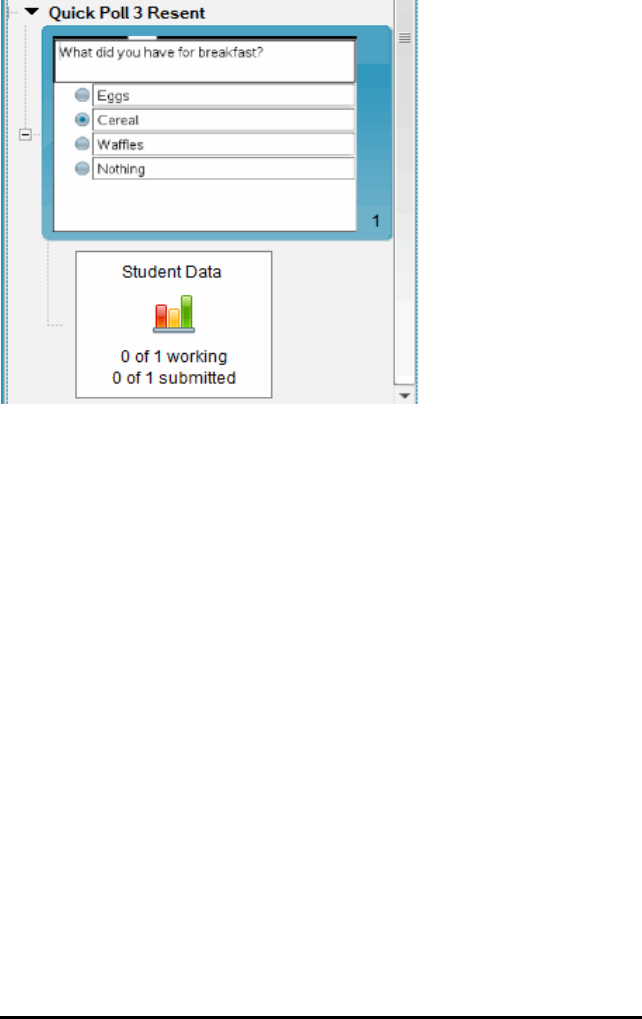
202 Polling Students
Sending Polls to Missing Students
You can send the most recent poll to students who were not logged in before
the poll was stopped.
Note: The Send to Missing option can only be used with the last poll that was
sent.
1. In the page sorter, click the last poll that was sent.
2. Click File> Send to Missing.
The poll is immediately sent to students who were not logged in when the poll
was sent previously, but are currently logged in.
The data gathered from the missing students is added to the data from the last
poll.
Saving Polls
You can save Quick Poll results to the Portfolio Workspace while the poll is still
in progress, or you can save a completed set of Quick Poll documents as a .tns
file.
You can save to the Portfolio Workspace from either the Class Workspace or
the Review Workspace.

When you save the results to the Portfolio Workspace, the polls sent in one
class session are saved in one column.
A new column is started when a poll exceeds 30 questions, or when you start a
new class session.
▶To save a Quick Poll to the Portfolio Workspace, click File > Save to
Portfolio.
Note: After the first save, subsequent changes to the poll are automatically
updated in the Portfolio Workspace until you stop the poll.
You can also save a set of Quick Polls as a Master Document (.tns file). A
Master Document contains information that can be used as the answer key for
evaluating responses collected from students.
▶To save a Quick Poll as a Master Document, click File > Save Quick Poll Set
as Document.
Note: After you save as a .tns file, any subsequent changes to the poll are
not
updated in the .tns document.
Viewing Poll Results
Review Quick Poll results in the Review Workspace.
Polls sent in one class session are contained in a Quick Poll tab in the Review
Workspace. Each new question is added as a new problem in the page sorter,
and the software automatically opens to the last question that was sent. A new
tab is started when a poll exceeds 30 questions.
Polling Students 203

204 Polling Students
You can view the results as a bar chart, graph, or table. The results
automatically update as students send their responses, until you stop the poll.
The following example shows the poll results listed in a table.
For more information about viewing and sorting poll results, see
Using the
Review Workspace
.

Working with TI-Nspire™ Documents
All work that you create and save using TI-Nspire™ applications is stored as a
document, which you can share with others using TI-Nspire™ software and with
those using handhelds. There are two types of documents:
• TI-Nspire™ document (.tns file)
• PublishView™ document (.tnsp file)
TI-Nspire™ Documents
A TI-Nspire™ document consists of one or more problems. Each problem can
contain one or more pages. A single page is displayed in the work area. All
work occurs in the applications within pages.
Because the TI-Nspire™ software and handhelds share the same functionality,
you can transfer TI-Nspire™ documents between computers and handhelds.
When you create a document, you select one of two page sizes.
•Handheld. Size: 320 ×217 pixels. This size allows documents to be viewed
on all platforms. The content will be scaled when viewed on a tablet or
larger screen.
•Computer. Size: 640 ×434 pixels. The content will not be scaled when
viewed on smaller platforms. Some content may not be visible on a
handheld device.
You can convert a document from one page size to the other anytime.
PublishView™ Documents
PublishView™ documents can be printed on a standard piece of paper or
published to a website or blog. PublishView™ documents can include formatted
text, images, and hyperlinks as well as all TI-Nspire™ applications.
For more information, see
Working with PublishView™ Documents
Creating a New TI-Nspire™ Document
When you open the software, the Documents Workspace opens with a blank
document containing one problem. You can add applications and content to
this problem to create a document.
Working with TI-Nspire™ Documents 205
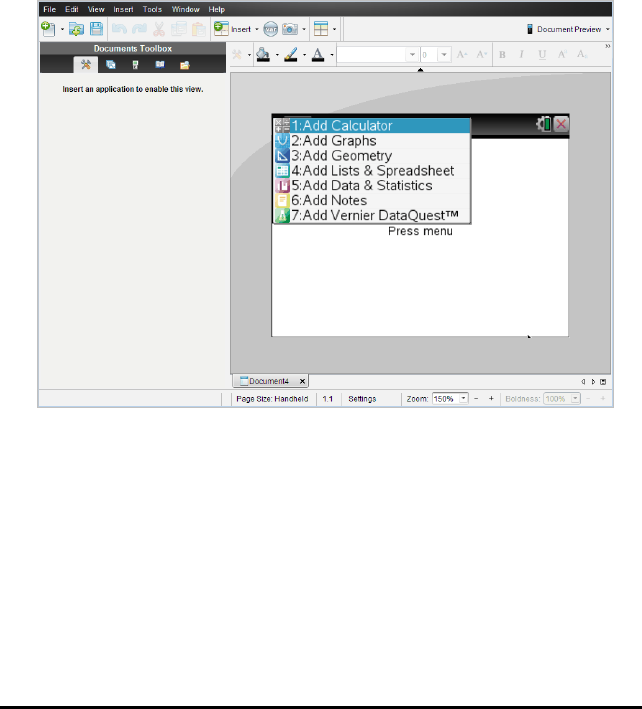
206 Working with TI-Nspire™ Documents
Note: The Welcome Screen is displayed when you open the software if the
"always show this at startup" option is selected. Click an application icon to add
a problem with an active application to a new document.
To create a new document, complete the following steps:
1. On the TI-Nspire™ File menu,
• Select New TI-Nspire™ Document - Handheld Page Size.
-or-
• Select New TI-Nspire™ Document - Computer Page Size.
The new document opens in the Documents Workspace, and you are
prompted to select an application.
2. Select an application to add a problem to the document.
The problem is added to the document.
Opening an Existing Document
To open an existing document:
1. Click File > Open Document.
—or—
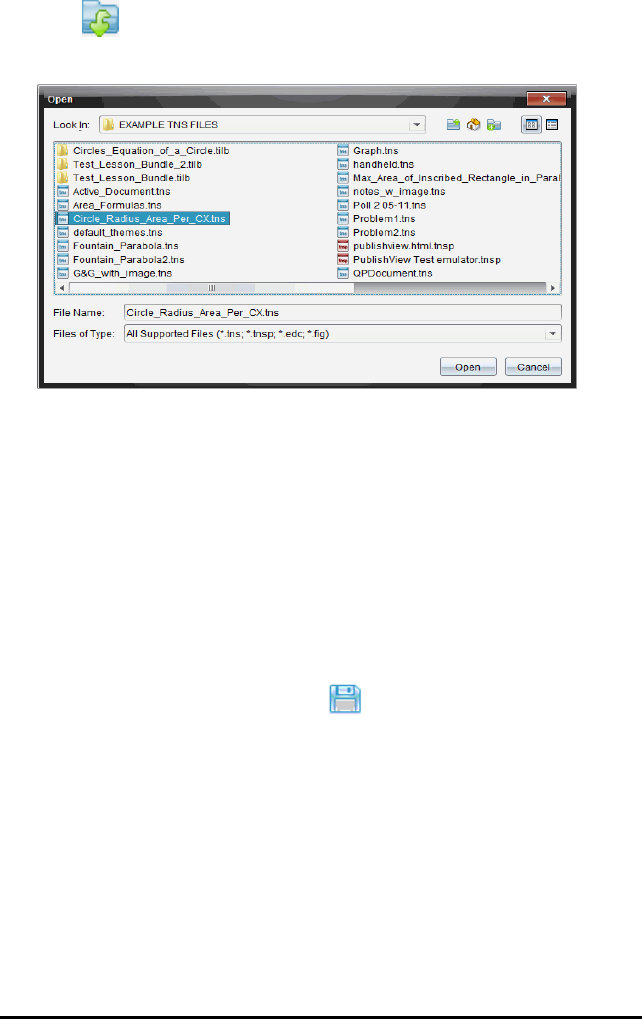
Click .
The Open dialog box opens.
2. Use the file browser to locate the file you want to open and click the file to
select it.
3. Click Open.
The document opens in the work area.
Note: To select from your 10 most recent documents, click File > Recent
Documents and select a document from the drop-down list.
Saving TI-Nspire™ Documents
To save a new document:
1. Click File > Save Document or click .
The Save TI-Nspire™ Document dialog box opens.
Working with TI-Nspire™ Documents 207
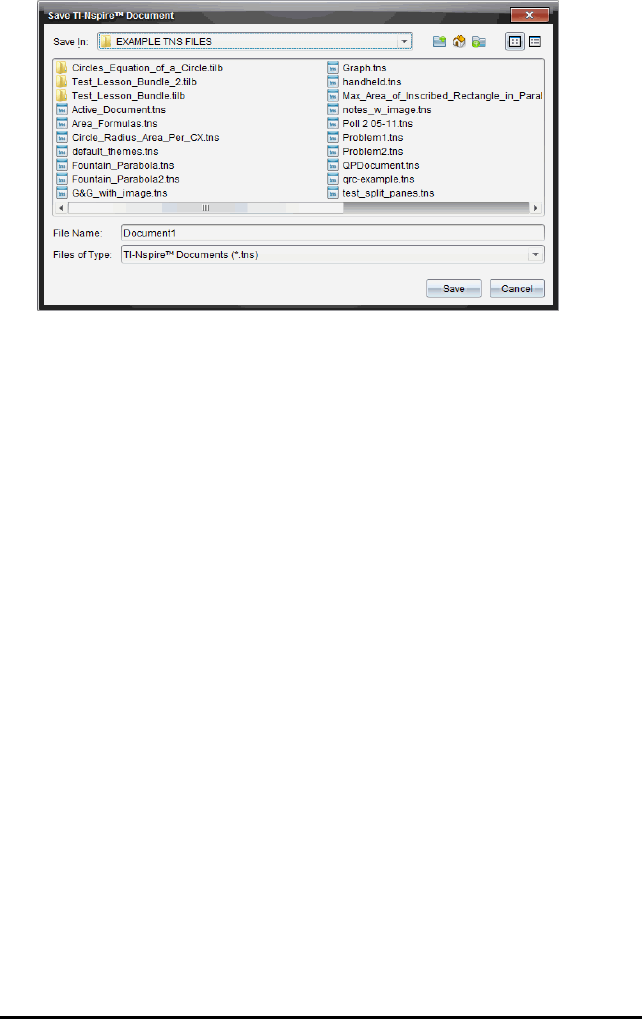
208 Working with TI-Nspire™ Documents
2. Navigate to the folder where you want to save the document or create a
folder in which to store the document.
3. Type a name for the new document.
4. Click Save to save the document.
The document closes and is saved with the extension .tns.
Note: When you save a file, the software looks in the same folder the next time
you open a file.
Saving a Document with a New Name
To save a previously saved document in a new folder and/or with a new name:
1. Click File > Save As.
The Save TI-Nspire™ Document dialog box opens.
2. Navigate to the folder where you want to save the document or create a
folder in which to store the document.
3. Type a new name for the document.
4. Click Save to save the document with a new name.
Deleting Documents
File deletions on your computer are sent to the Recycle bin and can be
retrieved if the Recycle bin has not been emptied.
Note: File deletions on the handheld are permanent and cannot be undone, so
be sure that you want to delete the file that you select.
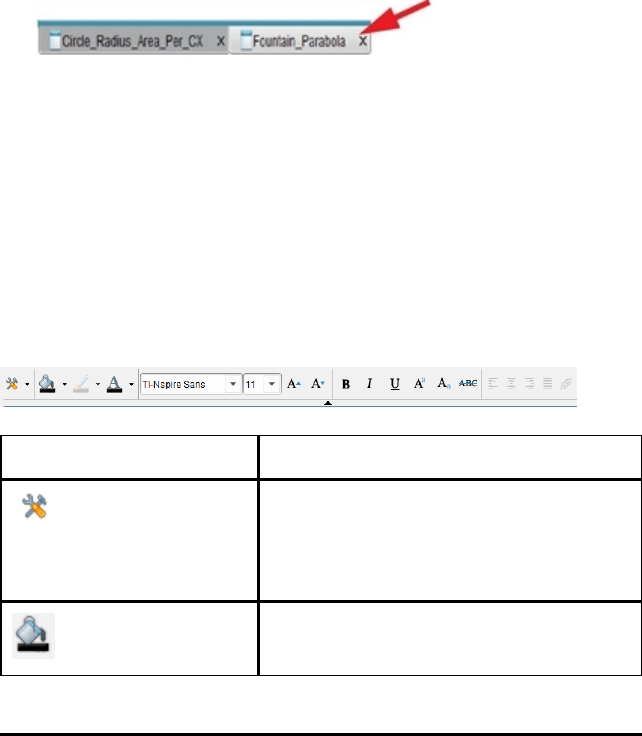
1. Select the document you want to delete.
2. Click Edit > Delete or press Delete.
The Warning dialog box opens.
3. Click Yes to confirm the delete.
The document is deleted.
Closing Documents
▶To close a document, click File > Close or click the Close icon on the
document tab at the bottom of the document.
▶If working in tiled view, click the Close icon in the upper right corner of the
document window.
Formatting Text in Documents
Use the text formatting tools to format text in TI-Nspire™ applications that allow
text input, and to format text in PublishView™ documents. By default, the text
formatting toolbar opens in the area above an active document. Options on the
toolbar are enabled or disabled depending on the active application.
For example, the following image shows options available in an active
Graphs&Geometry document.
Option Function
Click ¤to open the menu for the active
application. This tool enables you to open
an application menu regardless of the
option selected in the Documents Toolbox.
Click ¤to select a background color for
highlighting text or choose a fill color for a
Working with TI-Nspire™ Documents 209
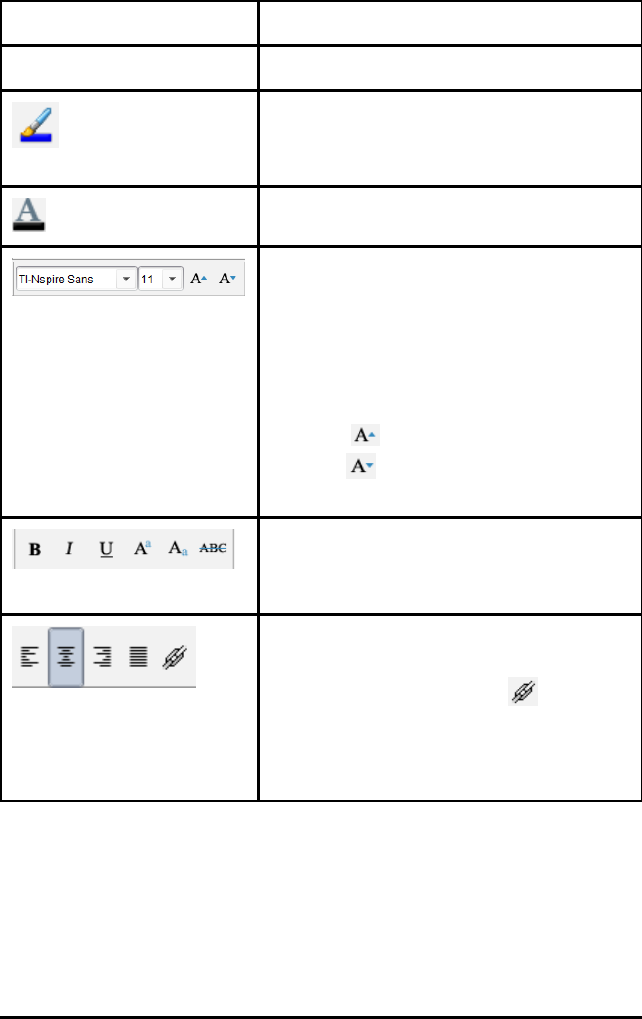
210 Working with TI-Nspire™ Documents
Option Function
selected cell.
Click ¤to select the line color for an object.
For example, in Graphs&Geometry, you
can choose a color for a selected shape.
Click ¤to select a color for selected text.
Use these tools to choose a font and set the
size of the font.
• Click ¤to select a different font from
the drop-down box.
• To select as specific font size, click ¤to
select a size from the drop-down box.
• Click to increase the font size or
click to decrease the font size
incrementally.
Click the appropriate tool to apply bolding,
italics, or underlining; apply superscript or
subscript; or strike out text.
In a PublishView™ document, use these
tools to position text within the header or
footer, or in text box. Clicking opens the
Hyperlink dialog box.
For more information, see
Working with
PublishView™ Documents
.
Hiding and Showing the Formatting Toolbar
▶When the formatting toolbar is visible, click £(located under the toolbar) to
hide the toolbar.
▶Click ¤to show the toolbar when the formatting toolbar is hidden.

Using Colors in Documents
In the TI-Nspire™ applications that allow formatting, you can use color in filled
areas of an object, or in lines or text, depending on the application you are
using and how you have selected the item. If the icon or menu item that you
want to use is not available (dimmed) after you have selected an item, color is
not an option for the selected item.
Colors appear in documents opened on your computer and on the TI-Nspire™
CX handheld. If a document containing color is opened on a TI-Nspire™
handheld, colors are displayed in shades of gray.
Note: For more information about using color in a TI-Nspire™ application, see
the chapter for that application.
Adding Color from a List
To add color to a fill area, line, or text, complete the following steps:
1. Select the item.
2. Click Edit > Color or select where you want to add color (fill, line, or text).
3. Select the color from the list.
Adding Color from a Palette
To add color using the palette, complete the following steps:
1. Select the object.
2. Click the appropriate toolbar icon.
3. Select the color from the palette.
Setting Page Size and Document Preview
When you ceate a document, you specify its page size as Handheld or
Computer, depending on how you expect the document to be used.
Documents of both page sizes can be opened on either platform, and you can
convert the page size anytime.
•Handheld. Size: 320 ×217 pixels. This size allows documents to be viewed
on all platforms. The content will be scaled when viewed on a tablet or
larger screen.
Working with TI-Nspire™ Documents 211

212 Working with TI-Nspire™ Documents
•Computer. Size: 640 ×434 pixels. The content will not be scaled when
viewed on smaller platforms. Some content may not be visible on a
handheld device.
Note: Page size is independent of document preview. That is, you can view
documents of either page size using Handheld or Computer preview.
Converting the Current Document's Page Size
▶On the main TI-Nspire™ File menu, select Convert to, and then select the
page size.
The software saves the current document and creates a copy that uses the
requested page size.
Viewing the Document in Handheld Preview
1. On the application toolbar, click DocumentPreview, and select Handheld.
The preview changes. This does not change the document's underlying
page size.
2. (Optional) Click the Zoom tool beneath the work area, and select a
magnification value for the preview.
Viewing the Document in Computer Preview
1. On the application toolbar, click DocumentPreview, and select Computer.
The preview changes. This does not change the document's underlying
page size.
2. (Optional) Click the Boldness tool beneath the work area, and select a
value to increase or decrease the boldness of text and other items.
Setting a Default Preview
By default, when you open a document, it is automatically displayed using the
preview that matches its page size. You can override this rule and specify a
preview that you prefer.
1. On the main TI-Nspire™ File menu, select Settings > Preview Settings.
2. Select the preview that you want documents to use when you open them.
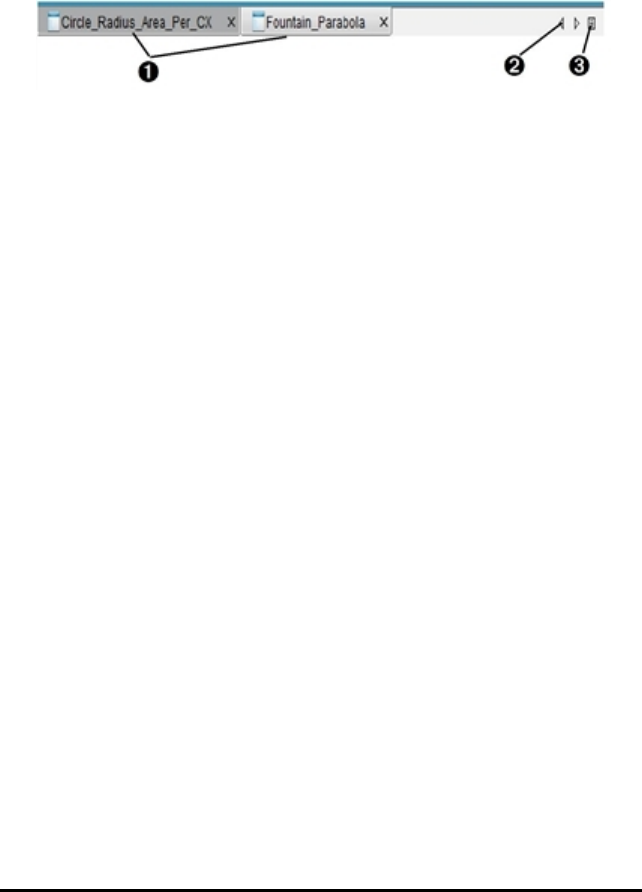
Working with Multiple Documents
When multiple documents are open, document names are listed in tabs at the
bottom of the work area. Only one document is active at a time, and only the
active document is affected by commands from menus or tools.
To switch between documents:
ÀClick the tab to show a document in the work area. This
document becomes the active document. If the Show
Documents in Tiles view is open, these tabs are not shown.
ÁUse the right and left arrows to scroll through the list of
documents. These arrows are active only when there are too
many documents to fit in the window.
ÂClick the Show List icon to list all open documents. This is
useful when you have a large number of documents open and
documents names on the tabs may be truncated.
Working with Multiple Documents in Tiled View
When multiple documents are open, you can view thumbnails of the
documents in the work area. To change the view:
▶Click Window > Show Documents in Tiles.
Open documents are shown as thumbnails in the work area, and the scroll
bar becomes active.
Working with TI-Nspire™ Documents 213
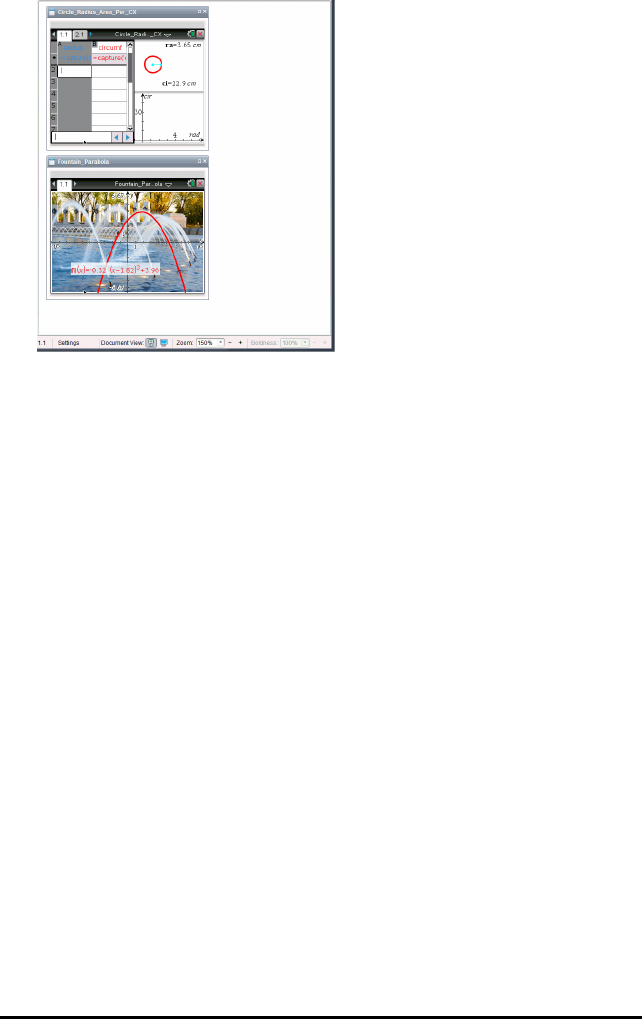
214 Working with TI-Nspire™ Documents
The status bar remains available; however, document names now appear in
the thumbnail view. Click Select Window > Show Documents in Tabs to view
one document at a time in the work area.
Working with Applications
When you first open a new document or add a new problem to a document,
select an application from the menu.
The following illustration shows how a problem with the Lists&Spreadsheet
application appears in the work area on the right side of the window.
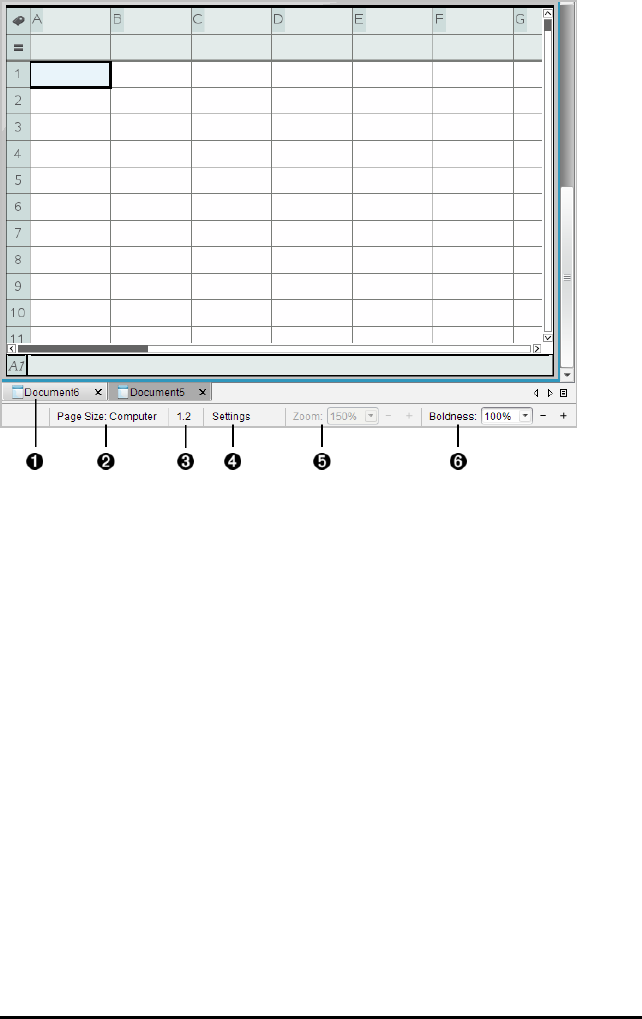
ÀDocument name. Tabs show the names of open documents.
Click a name to make it the active document.
ÁPage Size. Shows the document's page size as Handheld or
Computer. You can use the TI-Nspire™ File menu to convert a
document from one page size to the other.
ÂProblem/Page counter. The first value represents the problem
number of the active page, and the second value tells you the
page number within the problem. In the example, the counter
reads 1.2, indicating Problem 1, Page 2.
ÃSettings. Double-click to view or change the Document Settings
for the active document or to change the default Document
Settings.
ÄZoom. Enabled in Handheld preview only (click
DocumentPreview on the toolbar and select Handheld). Click
▼and select a magnification value for the preview.
ÅBoldness. Enabled in Computer preview only (click Document
Working with TI-Nspire™ Documents 215
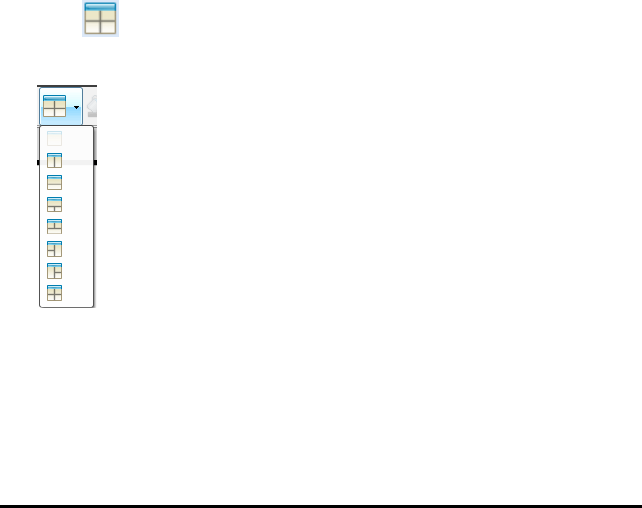
216 Working with TI-Nspire™ Documents
Preview on the toolbar and select Computer). Click ▼and
select a value to increase or decrease the boldness of text and
other items.
Working with Multiple Applications on a Page
You can add up to four applications to a page. When you have multiple
applications on a page, the menu for the active application is displayed in the
Documents Toolbox. Using multiple applications involves two steps:
• Changing the page layout to accommodate multiple applications.
• Adding the applications.
You can add multiple applications to a page even if an application is already
active.
Adding Multiple Applications to a Page
By default, each page contains space to add one application. To add additional
applications to the page, complete the following steps.
1. Click Edit > Page Layout > Select Layout.
—or—
Click .
The page layout menu opens.
There are eight page layout options available. If an option is already selected,
it is dimmed.
2. Highlight the layout you want to add to the problem or page, and then click
to select it.
The new layout is displayed with the first application active.

3. In Handheld preview, click Press menu to select an application for each
new section in the problem or page. In Computer view, select Click here to
add an application.
Swapping Applications
To change the position of applications on a page with multiple applications,
“swap“the positions of two applications.
1. Click Edit > Page Layout > Swap Application.
Note: The last active application you worked on is automatically selected
as the first application to be swapped.
2. Click the second application to swap.
This action performs the swap.
Note: When there are only two work areas, the selected application
automatically swaps position with the other application in the work area.
To cancel a swap, press Esc.
Selecting and Moving Pages
To quickly move and rearrange pages in a document that contains multiple
pages, use the Page Sorter to list thumbnail views of all pages in the
document.
Working with TI-Nspire™ Documents 217
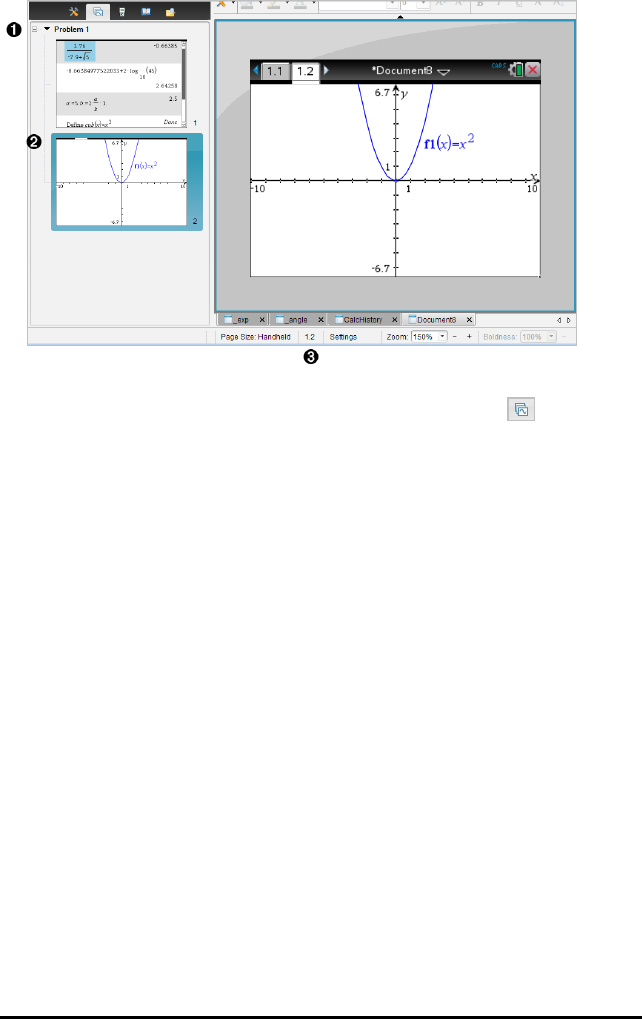
218 Working with TI-Nspire™ Documents
ÀPage Sorter. Show by clicking the Page Sorter button ( ) on
the Documents Toolbox. Displays thumbnail sketches of all
pages in all problems in the current document. Use the scroll
bar to view pages off the screen.
ÁActive page. The page currently highlighted in the Page Sorter
and active in the work area.
ÂProblem/Page counter. Displays the problem number followed
by the page number.
Selecting Pages
The Page Sorter always indicates the active page in the work area.
• If you are working on a page in the work area, this page is indicated in the
Page Sorter by a color border.
• If you are actively using the Page Sorter, the active page displayed in the
work area has a color border in the Page Sorter pane.
• Clicking on any page in the Page Sorter makes it the active page, and it is
displayed in the work area.
Rearranging Pages
Use the Page Sorter to change the order of pages within a problem.
1. Click to select the thumbnail view of the page in the Page Sorter.
2. Drag the page to the desired position, and release to drop it in the new
location.
Grouping Applications
To group up to four pages into a single page:
1. Click the first page in the series.
2. Click Edit > Page Layout > Group.
The next page is grouped with the first page. The page layout
automatically adjusts to display all the pages in the group.
To ungroup pages:
1. Click the grouped page.
2. Click Edit > Page Layout > Ungroup.
The material becomes individual pages and applications.
Deleting an Application from a Page
1. Click the application you want to delete.
2. Click Edit > Page Layout > Delete Application.
The application is deleted.
To undo the delete, press Ctrl + Z (Mac®: “+Z).
Deleting Pages
1. Select the page you want to delete.
2. Click Edit > Delete.
—or—
Click .
—or—
Right-click and click Delete.
Working with Problems and Pages
When you create a new document, a problem is added with one page. When a
document has a problem with multiple pages or multiple problems, click to
open the page sorter view in the Documents Toolbox to view the problems and
Working with TI-Nspire™ Documents 219
220 Working with TI-Nspire™ Documents
pages.
Adding a Problem to a Document
A document can contain up to 30 problems.
1. Click Insert > Problem.
—or—
Click .
2. Click Problem.
A new problem with one new page is added to your document.
Adding a Page to a Problem
Each problem can contain up to 50 pages.
1. Click Insert > Page.
—or—
Click
2. Click Page.
A new page is added to the problem.
3. Select an application to add to the page.
Copying and Pasting a Problem
You can copy and paste a single problem from one location to another within
the same document or a different document.
1. Click to open the Page Sorter.
2. Click a problem name to select it.
3. Click Edit > Copy or press Ctrl +C(Mac®: “+C).
4. Go to the location where you want the problem to appear.
5. Click Edit > Paste or press Ctrl + V (Mac®: “+V).
The problem is copied to the new location.
Deleting a Problem
To delete a problem from the document:

1. Click a problem name to select it.
2. Click Edit > Delete or press Ctrl+X (Mac®: “+X).
The problem is deleted from the document.
Renaming a Problem
To rename a problem:
1. Using the Page Sorter, select the problem name.
2. Right-click and click Rename.
The problem name box clears.
3. Type the new name and press Enter.
The new name appears in bold to indicate that it has been changed.
Printing Documents
1. Click File > Print.
The Print dialog box opens.
2. Set options for the print job.
• Printer — Select from your list of available printers
• Print What:
- Print All — prints each page on a separate sheet
- Viewable Screen — prints selected pages with additional layout
options (see Layout, below)
• Print Range — Click All Pages, or click Page range and set the starting
and ending pages.
• Layout:
- Orientation (portrait or landscape)
- The number of TI-Nspire™ pages (1, 2, 4, or 8) to be printed on
each sheet (available in Viewable Screen option only). The
default is 2 pages per sheet.
- Whether to allow space below each printed TI-Nspire™ page for
comments (available in Viewable Screen option only)
- Margins (from .25 inches to 2 inches). The default margin is .5
inches on all edges.
Working with TI-Nspire™ Documents 221

222 Working with TI-Nspire™ Documents
• Documentation information to include:
- Problem name, including the option to group the pages physically
by problem
- Page label (such as 1.1 or 1.2) under each page
- Page header (up to two lines)
- Document name in the footer
3. Click Print, or click Save As PDF.
Note: To restore the Print defaults, click Reset.
Using Print Preview
• Click the Preview check box to toggle the preview pane.
• Click the arrows at the bottom of the preview pane to page through the
preview.
Viewing Document Properties and Copyright Information
Note: Most of these instructions apply only to the Teacher Software.
Checking Page Size
1. In the Teacher Software, go to the TI-Nspire™ File menu and select
Document Properties.
2. Click the Page Size tab.
3. A checkmark indicates the document's current page size.
Viewing Copyright Information
The Teacher Software and Student Software let you view copyright information
that has been added to a document.
1. On the TI-Nspire™ File menu, select View Copyright Information.
The Copyright Information dialog box opens.
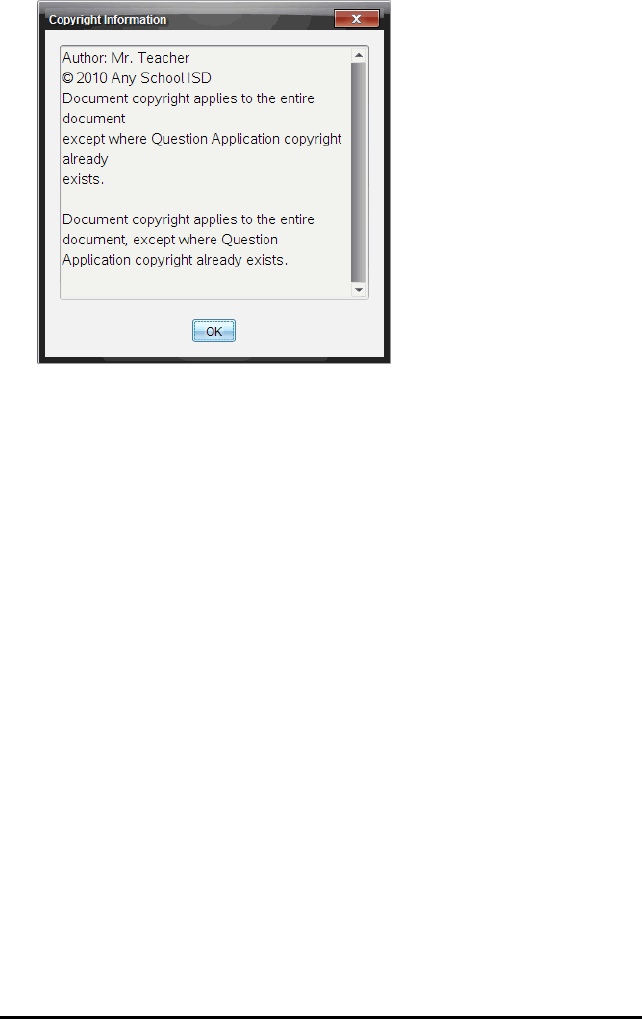
2. Click OK to close the dialog box.
Adding Copyright Information to a Document
Using the Teacher Software, you can add copyright information to individual
documents that you create, or you can apply the same copyright information to
all new documents.
1. Open the document.
2. On the TI-Nspire™ File menu, select Document Properties.
3. Click the Copyright tab.
4. Edit the following fields to define the copyright details:
• Author
• Copyright (select Public Domain or Copyright).
• Year (disabled if you selected Public Domain)
• Owner (disabled if you selected Public Domain)
• Comments
5. To add the supplied information to all new documents from this point
forward, select Apply this copyright to all new documents.
6. Click OK to apply the copyright information to the document.
Working with TI-Nspire™ Documents 223

224 Working with TI-Nspire™ Documents
Protecting a Document (making a document read-only)
Teachers can protect documents to create a document for distribution to your
students or for other use. A student who receives a read-only document and
makes changes to it will be prompted to save the document as a new file.
1. Open the document.
2. On the TI-Nspire™ File menu, select Document Properties.
3. Click the Protection tab.
4. Select the Make this document Read Only check box.
5. Click OK.

Working with PublishView™ Documents
Use the PublishView™ feature to create and share interactive documents with
teachers and students. You can create documents that include formatted text,
TI-Nspire™ applications, images, hyperlinks, links to videos, and embedded
videos in a format that is suitable for printing on a standard piece of paper,
publishing to a website or blog, or for use as an interactive worksheet.
PublishView™ features provide layout and editing features for presenting math
and science concepts in a document where TI-Nspire™ applications can be
interactively and dynamically linked with supporting media, enabling you to
bring the document to life. Using the PublishView™ feature:
• Teachers can create interactive activities and assessments used on
screen.
• Teachers can create printed materials to complement documents used on
TI-Nspire™ handhelds.
• When working with lesson plans, teachers can:
- Create lesson plans from existing handheld documents or convert
lesson plans to handheld documents.
- Link to related lesson plans or documents.
- Embed explanatory text, images, video, and links to web resources.
- Build or interact with TI-Nspire™ applications directly from the lesson
plan.
• Students can create reports or projects such as lab reports containing data
playback, curve fits, pictures, and video—all on the same sheet.
• Students can print and turn in assignments on a standard piece of paper.
• Students taking exams can use one tool to create a document that
contains: all problems on the exam, text, images, hyperlinks, or videos,
interactive TI-Nspire™ applications, screen shots, and layout options
needed to print a document.
Note: PublishView™ documents can be exchanged using the TI-Nspire™
Navigator™ NC system. PublishView™ documents can reside in the Portfolio
Workspace, and TI-Nspire™ questions within a PublishView™ document can be
automatically graded by the TI-Nspire™ Navigator™ system.
Working with PublishView™ Documents 225
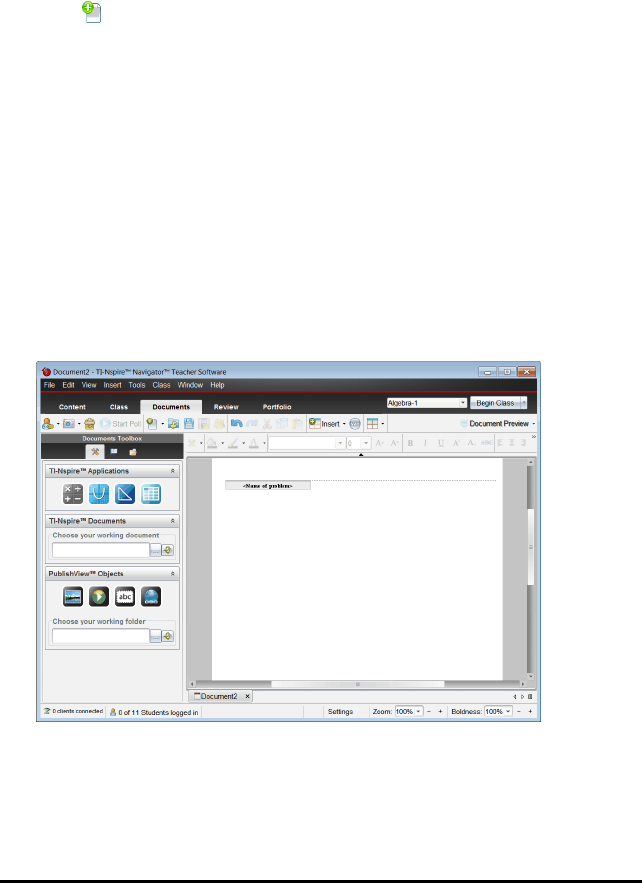
226 Working with PublishView™ Documents
Creating a New PublishView™ Document
1. From the Documents Workspace, click File > New PublishView™
Document.
—or—
Click , and then click New PublishView™ Document.
• A blank letter-size document opens in the Documents Workspace. The
orientation is portrait, which cannot be changed.
• The default margin settings for the top and bottom margins are one-
inch. There are no settings for side margins.
• By default, a problem is added to the document.
• By default, the document contains the page number in a # of # format
at the bottom of the sheet.
• The scroll bars on the right side of the screen and at the bottom of the
screen are active.
2. Add TI-Nspire™ applications and PublishView™ objects as needed to
complete the document.
About PublishView™ Documents
When working with PublishView™ documents, it is important to keep the
following points in mind:

• PublishView™ documents are saved as .tnsp files, which distinguishes
them from TI-Nspire™ documents (.tns files).
• When inserting PublishView™ objects into a document, the text, image,
hyperlink, or embedded video are contained in boxes that can be moved
and resized.
• When you insert TI-Nspire™ applications, they work the same way as
pages in a TI-Nspire™ document.
• In a PublishView™ document, objects can overlap each other and you can
control which object is on top or bottom.
• Objects can be placed and positioned in a PublishView™ document in a
free-form fashion.
• You can convert an existing TI-Nspire™ document to a PublishView™
document (.tnsp file).
• When you convert a PublishView™ document to a TI-Nspire™ document
(.tns file), TI-Nspire™ applications are converted. PublishView™ objects
containing text, hyperlinks, videos, and images are not converted.
• You cannot create or open a PublishView™ document on a handheld. You
must convert a PublishView™ document to a TI-Nspire™ document before
sending it to a handheld.
Exploring a PublishView™ Document
The following example shows how you might use TI-Nspire™ applications and
PublishView™ objects to build a PublishView™ document. In this example,
borders are turned on to show the boundaries around the objects. Showing
borders enables you to work with objects easily while building a document.
When you are ready to print or publish the document to the web, you can select
to the hide borders.
Working with PublishView™ Documents 227
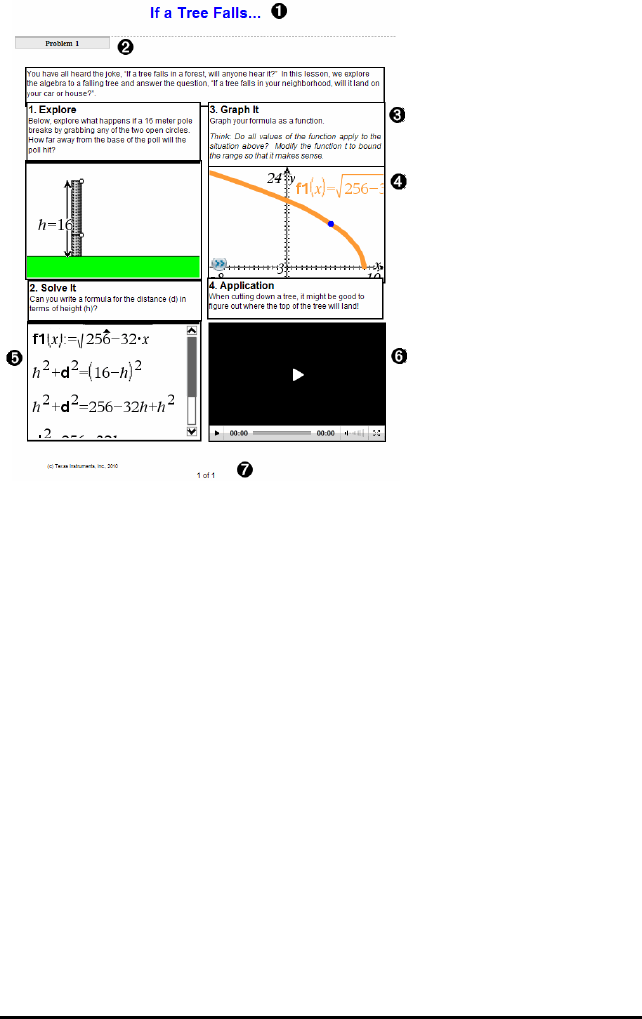
228 Working with PublishView™ Documents
ÀHeader. In this example, the header contains the title of the document.
When the header area is active, you can type and format text as needed.
ÁProblem break and name. In PublishView™ documents, use problem
breaks to control the page layout. You can select to hide or show problem
breaks. Deleting a problem removes the contents of the problem and
removes the space between problems when there are multiple problems.
Problem breaks also enable you to use variables in PublishView™
documents. Variables that have the same name are independent of one
another if they are used in different problems.
ÂText boxes. In this example, the introduction text and the text in boxes 1, 2,
3, and 4 is contained in text boxes. You can insert text and hyperlinks into
a PublishView™ document using a text box. Text boxes can be resized and
positioned as needed. PublishView™ text boxes are not retained when you
convert a PublishView™ document to a TI-Nspire™ document.
ÃTI-Nspire™ applications. In this example, the author uses Graphs &
Geometry to show the math functions. When a TI-Nspire™ application is
active in a PublishView™ document, the appropriate application menu
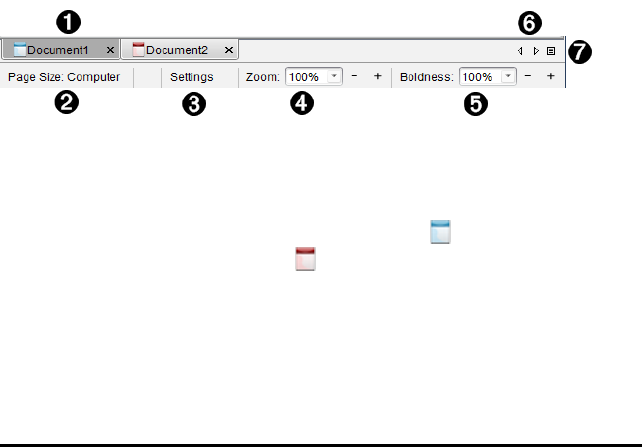
opens in the Documents Toolbox. You can work in a TI-Nspire™
application just as you would in a TI-Nspire™ document. When you convert
a PublishView™ document to a TI-Nspire™ document, applications are
retained.
ÄNotes application. You can also use the TI-Nspire™ Notes application to
add text to a PublishView™ document. Because Notes is a TI-Nspire™
application, it will be retained when you convert the PublishView™
document to a TI-Nspire™ document. Using the Notes application enables
you to use an equation editor and can contain TI-Nspire™ math templates
and symbols.
ÅVideo. This is an example of a video that is embedded in a PublishView™
document within a frame. Users can start and stop the video using the
controls. Frames containing videos and images can be resized and
positioned in the document as needed.
ÆFooter. By default, the footer area contains the page number, which cannot
be edited. You can add other text above the page number if needed. Like
the header, you can format text as needed.
Using the Status Bar in a PublishView™ Document
When a PublishView™ document is open, options on the status bar are different
than when working in a TI-Nspire™ document.
ÀDocument names are displayed in tabs. If multiple documents are open,
the document names are listed. You can have TI-Nspire™ and
PublishView™ documents open at the same time. In this example,
Document 1 is an inactive TI-Nspire™ document ( ). Document 2 is the
active PublishView™ document ( ). Click the X to close a document.
ÁPage Size. Shows the document's page size as Handheld or Computer.
You can use the TI-Nspire™ File menu to convert a document from one
page size to the other.
ÂClick Settings to change Document Settings. You can specify settings that
Working with PublishView™ Documents 229
230 Working with PublishView™ Documents
are specific to an active document or set default settings for all
PublishView™ documents. When you convert a TI-Nspire™ document into
a PublishView™ document, the settings in the TI-Nspire™ document
convert to the settings defined for PublishView™ documents.
ÃUse the Zoom scale to zoom the active document in or out from 10% to
500%. To set a zoom, type a specific number, use the + and - buttons to
increase or decrease by increments of 10%, or use the drop-down box to
choose preset percentages.
ÄIn TI-Nspire™ applications, use the Boldness scale to increase or decrease
the boldness of text and line thickness within applications. To set the
boldness, type a specific number, use the + and - buttons to increase or
decrease by increments of 10%, or use the drop-down box to choose
preset percentages.
For PublishView™ objects, boldness is used to match text within
TI-Nspire™ applications to other text on the PublishView™ sheet. It can also
be used to increase the visibility of TI-Nspire™ applications when
presenting a document to a class.
ÅWhen there are too many open document names to show in the status bar,
click the forward and backward arrows ( ) to move through the
documents.
ÆClick to see a list of all open documents.
Saving PublishView™ Documents
Saving a New Document
1. Click File > Save Document.
—or—
Click .
The Save TI-Nspire™ Document dialog box opens.
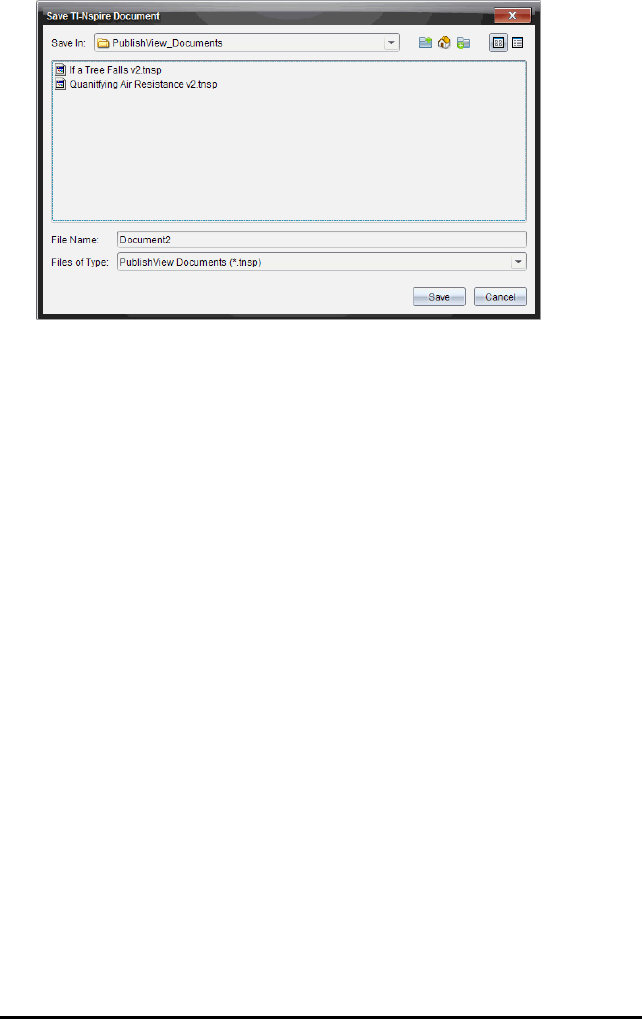
2. Navigate to the folder in which you want to save the document.
—or—
Create a folder in which to store the document.
3. Type a name for the new document.
4. Click Save.
The document closes and is saved with the extension .tnsp.
Note: When you save a file, the software first looks in the same folder the next
time you open a file.
Saving a Document with a New Name
To save a previously saved document in a new folder and/or with a new name:
1. Click File > Save As from the menu.
The Save TI-Nspire™ Document dialog box opens.
2. Navigate to the folder in which you want to save the document.
—or—
Create a folder in which to store the document.
3. Type a new name for the document.
4. Click Save to save the document with a new name.
Working with PublishView™ Documents 231

232 Working with PublishView™ Documents
Note: You can also use the Save As option to convert documents from
TI-Nspire™ files to PublishView™ files or convert PublishView™ files to
TI-Nspire™ files.
Exploring the Documents Workspace
When you create or open a PublishView™ document, it opens in the
Documents Workspace. Use the menu options and the toolbar just as you
would when working with a TI-Nspire™ document to:
• Navigate to existing folders and documents using Content Explorer
• Open existing documents
• Save documents
• Use the copy, paste, undo, and redo options
• Delete documents
• Access TI-Nspire™ application-specific menus
• Open the Variables menu in TI-Nspire™ applications that allow variables
• Access and insert math templates, symbols, catalog items, and library
items into a PublishView™ document
Note: For more information, see
Using the Documents Workspace
.
Exploring the Documents Toolbox
When a PublishView™ document is active, the Documents Toolbox contains
tools needed for working with PublishView™ documents. You can add
TI-Nspire™ applications to a problem, insert parts of existing TI-Nspire™
documents into a problem, and add PublishView™ objects.
The Documents Toolbox opens when you create a new PublishView™
document or open an existing PublishView™ document. When working in a
PublishView™ document, Page Sorter and TI-SmartView™ emulator are not
available.
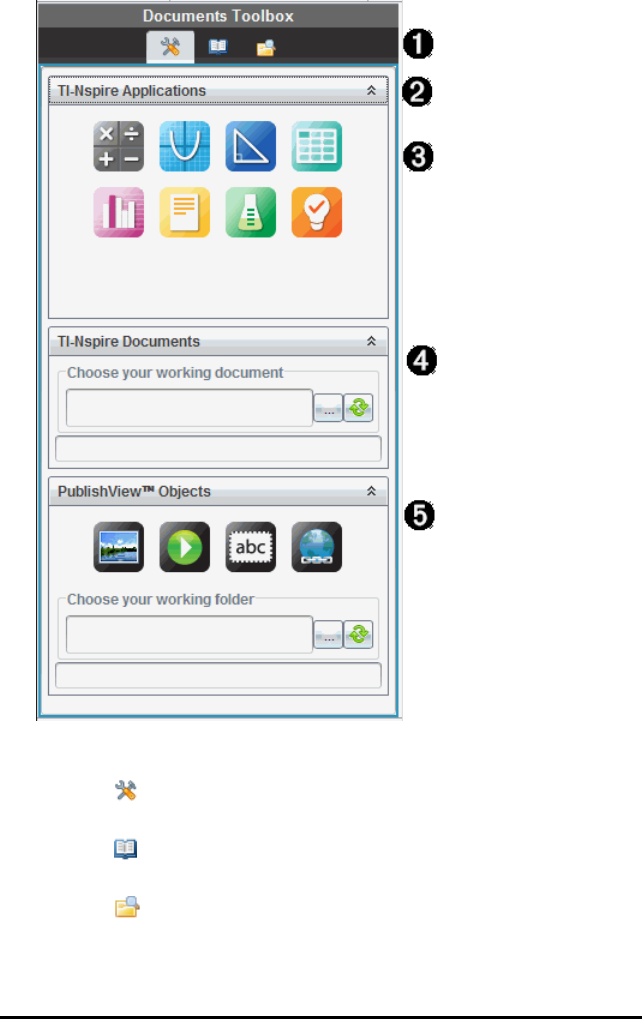
ÀIn a PublishView™ document:
• Click to open the application menu and tools needed to work with
TI-Nspire™ applications and PublishView™ objects.
• Click to open the Utilities panel where you can access Math
Templates, Symbols, the Catalog, Math Operators, and Libraries.
• Click to open Content Explorer.
Note: For more information, see
Using the Documents Workspace
.
Working with PublishView™ Documents 233

234 Working with PublishView™ Documents
ÁClick to collapse a pane containing a menu. Click to expand a
pane.
ÂTI-Nspire™ applications. Move an icon to a problem to insert an
application:
Calculator
Graph
Geometry
Lists & Spreadsheet
Data & Statistics
Notes
Vernier DataQuest™
Question (Available in TI-Nspire™ Teacher Software, TI-Nspire™
Navigator™ Teacher Software, and TI-Nspire™ Navigator™ NC Teacher
Software).
ÃTI-Nspire™ Documents. Use this tool to locate and insert existing
TI-Nspire™ documents (.tns files) into a problem.
ÄPublishView™ Objects. Use this tool to move the following objects into a
problem:
Image
Video
Text box

Hyperlink
Using Menus and the Toolbar
When working in a PublishView™ document, select options from the menus or
the toolbar in the Documents Workspace to work with content and objects.
When you insert an object into a PublishView™ document, you can manipulate
it using the same tools as you would when working with a TI-Nspire™
document. In PublishView™ documents, you can:
• Right-click on an object to open a context menu, which displays the
actions that can be performed on that object.
• Use add, insert, and paste to add objects to a PublishView™ document.
• Use delete and cut to remove objects from a PublishView™ document.
• Move objects from one place to another within a PublishView™ document.
• Copy objects from one document and paste them into another
PublishView™ document.
• Resize and scale objects such as text boxes and images.
• Change the font face and size and apply formatting such as italics, bold,
underline, and color to text.
Note: For more information, see
Using the Documents Workspace
.
Using Context Menus
In TI-Nspire™ applications and in PublishView™ documents, context menus
provide a list of options specific to the task you are working on. For example,
when you right-click a cell while working in the TI-Nspire™ Lists & Spreadsheet
application, a context menu opens providing a list of actions that you can
perform on that cell. When you right-click the border of a text box in a
PublishView™ document, the context menu provides actions that can be
performed on the text box.
Context Menus in TI-Nspire™ Applications
When you insert a TI-Nspire™ application into a PublishView™ document, the
application menu and the context menus associated with that application are
available and work the same way they work in a TI-Nspire™ document.
Context Menus in PublishView™ Documents
In PublishView™ documents, context menus provide shortcuts to frequently
Working with PublishView™ Documents 235
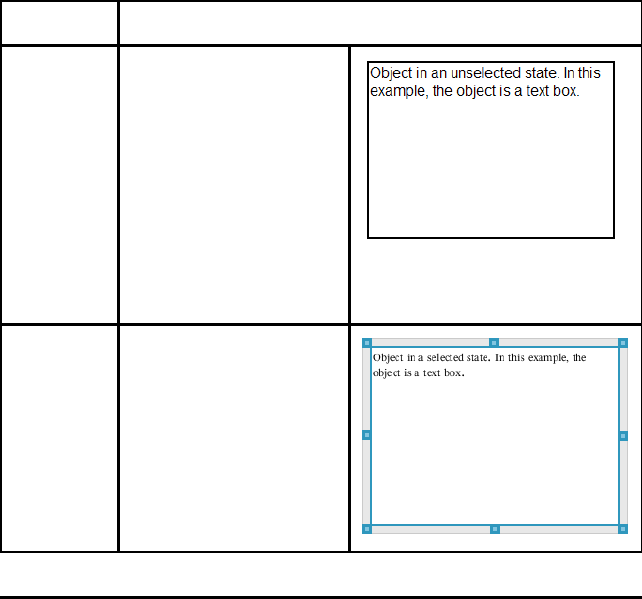
236 Working with PublishView™ Documents
performed tasks. Context menus are specific to an object or area:
• The Sheet context menu provides options for working with the layout of the
sheet and document.
• Object context menus provide options for manipulating the object.
• Content-sensitive context menus provide options for working with the
content inside the object such as text or a video.
Working with PublishView™ Objects
In a PublishView™ document, text, hyperlinks, images, and videos are
contained in PublishView™ objects. You can move, resize, copy and paste, and
delete an object within a PublishView™ document. Objects can also be
positioned so that one overlaps the other.
Within a document, PublishView™ objects can exist in three states: unselected,
selected, and interactive.
State Description
Unselected When unselected, an
object does not have
handles for repositioning
and sizing. To deselect
an object, left-click or
right-click outside the
object.
In this example, borders
around the object are
showing.
Selected When selected, an object
will have eight square
handles framing the
object. To select an
object, click the object’s
border. When selected,
objects can be moved
and resized.
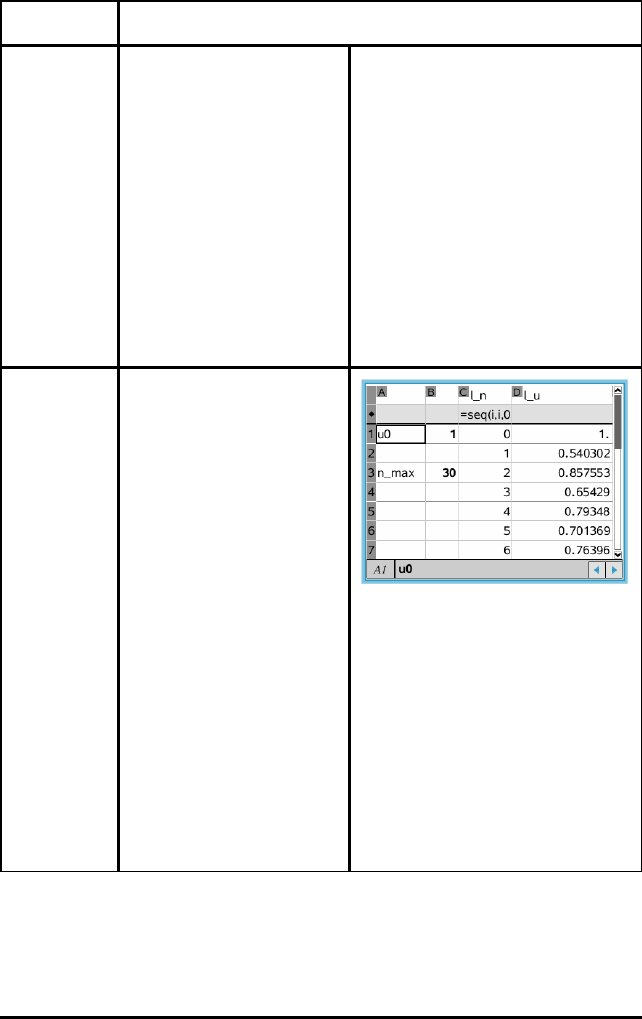
State Description
• To move an object,
click a border and
drag the object to its
new location.
• To resize an object,
grab a handle.
• Right-click the
border to open a
context menu with
options for
manipulating the
object.
Interactive An interactive state is
indicated by a blue frame
around the object. To
enter interactive state,
left-click or right-click
anywhere in the body of
the object. When in an
interactive state, you can
work with the contents of
the object. For example,
you can add or edit text
in a text box or complete
math functions in a
TI-Nspire™ application.
When in an interactive
state, context menus
contain options specific
to the contents of an
object.
Working with PublishView™ Documents 237

238 Working with PublishView™ Documents
Inserting an Object
1. In the Documents Toolbox, ensure the PublishView™ Objects menu is
open.
2. Use your mouse to click an icon and drag it to the document.
3. Release the mouse button to drop the object into the document.
Selected text boxes and
frames can be resized,
moved, copied, pasted,
and deleted.
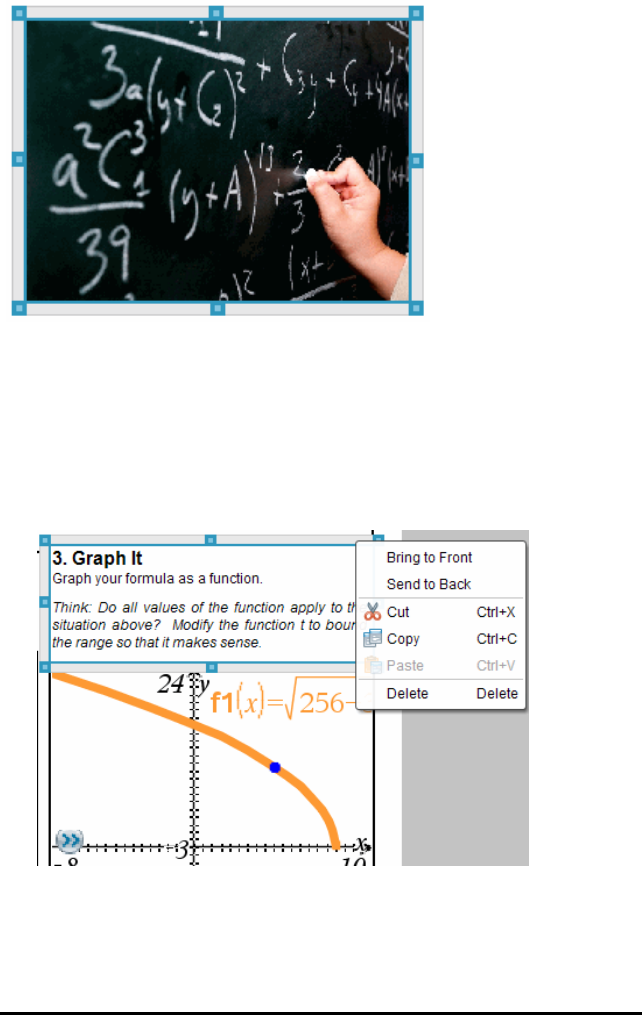
4. Using the mouse, grab the handles to resize the object and drag it to
position the object in the document as needed.
Opening Object Context Menus
▶Right-click the border of any object in a PublishView™ document.
The context menu opens to provide access to delete, copy/paste, cut, and
bring to front/send to back actions.
Working with PublishView™ Documents 239
240 Working with PublishView™ Documents
Resizing an Object
1. Click any border around the object to select it. The border becomes a bold
blue line and the handles are active.
2. Move your mouse over one of the handles to activate the resizing tool.
3. Grab one of the handles and drag in the direction needed to make the
object larger or smaller.
4. Click outside the object to save the new size.
Moving an Object
To move an object to another location on the page:
1. Click any border around the object to select it. The border becomes a bold
blue line and the handles are active.
2. Move your cursor over one of the borders to activate the positioning tool
.
3. Click to grab the object. The horizontal and vertical alignment guides are
activated at the top and bottom of the object. Use the grid lines to position
the object on the page.
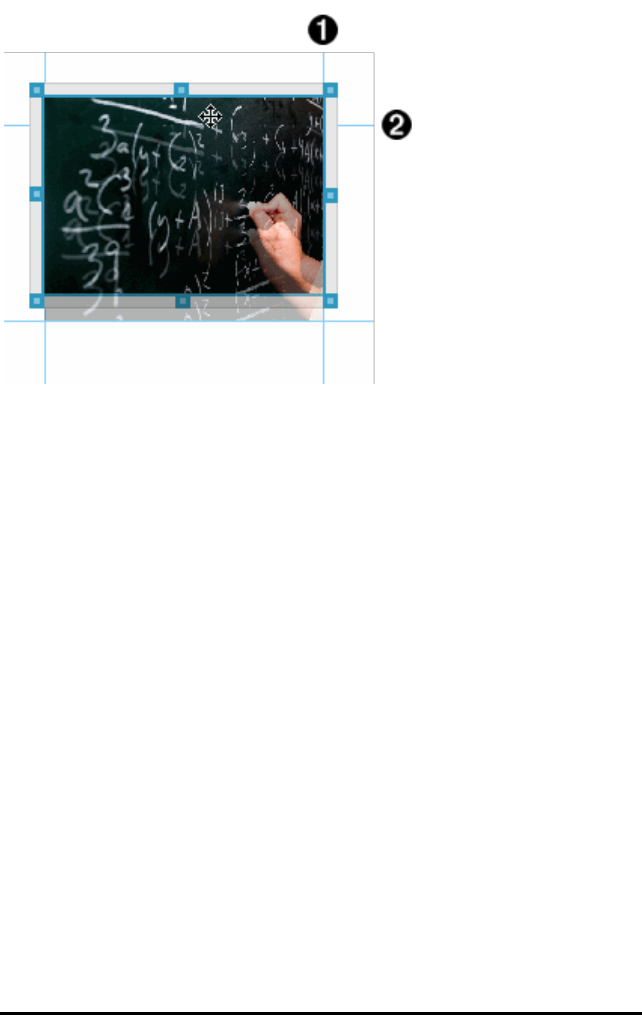
Àvertical alignment guide
Áhorizontalalignment
guide
4. Drag the object to a new location on the page.
5. Release the mouse button to drop the object in its new location.
Overlapping Objects
You can position objects so that one is on top of another. You can control the
stacking order to specify which object is positioned in front or behind the other.
Overlapping objects have many practical uses when presenting information in
the classroom. For example, you can create a "curtain control" by placing an
empty text box over other objects. Then, you can move the text box to reveal
the items below it one at a time.
Working with PublishView™ Documents 241
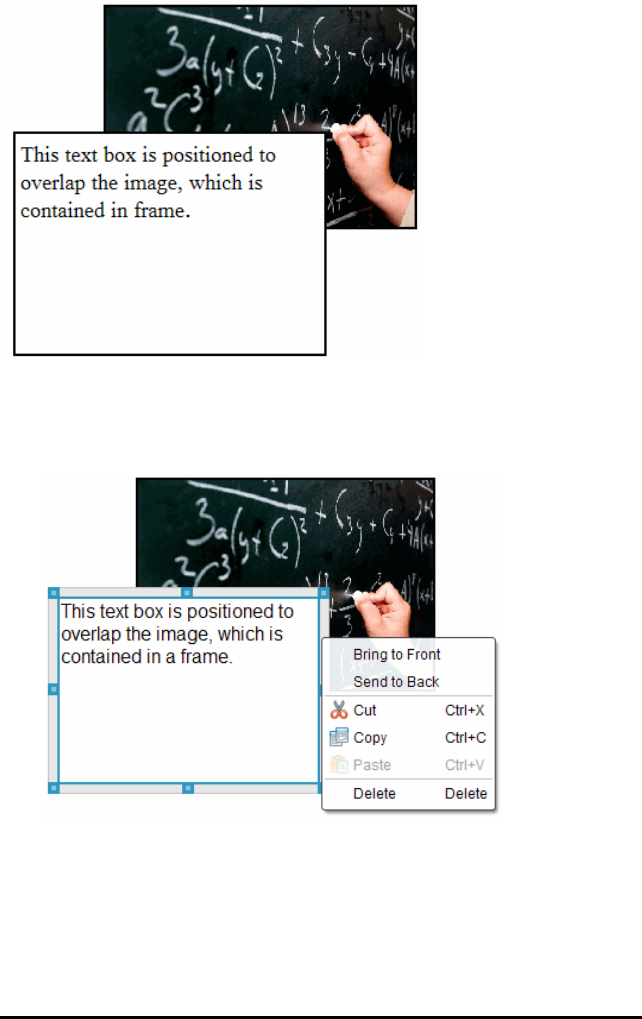
242 Working with PublishView™ Documents
To change the position of an object in the stacking order:
1. Click the border of the object you want to position to select it, and then
right-click to open the context menu.
2. Click Send to back or Bring to front to move the selected object to the
desired position.
Deleting an Object
To delete an object from a sheet:
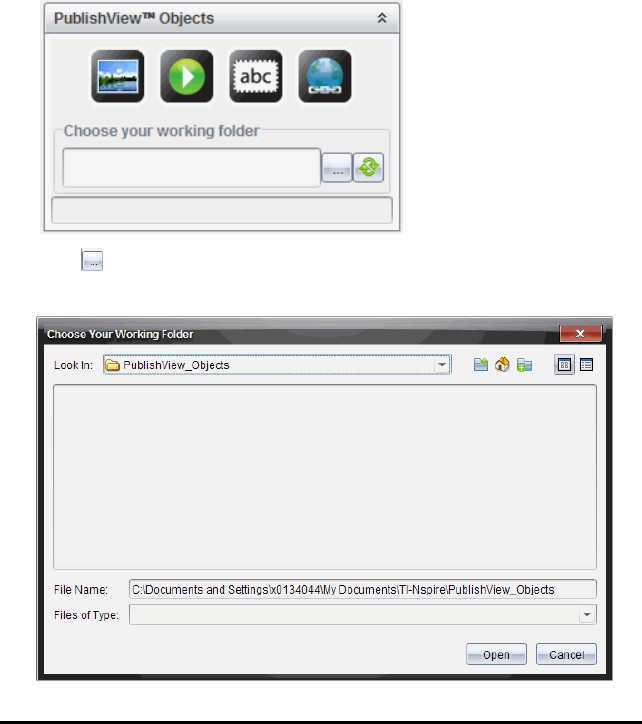
1. Click any border of the object to select it. When an object is selected, the
border is blue and the handles are active.
2. Press the Delete key to delete the text box.
—or—
Right-click a border, and then click Delete from the context menu.
Choosing a Working Folder for PublishView™ Objects
Use the Choose Your Working Folder field in the PublishView™ Objects pane
to select a folder for storing PublishView™ documents and related files.
1. Ensure the PublishView™ Objects pane is open.
2. Click .
The Choose Your Working Folder dialog box opens.
Working with PublishView™ Documents 243
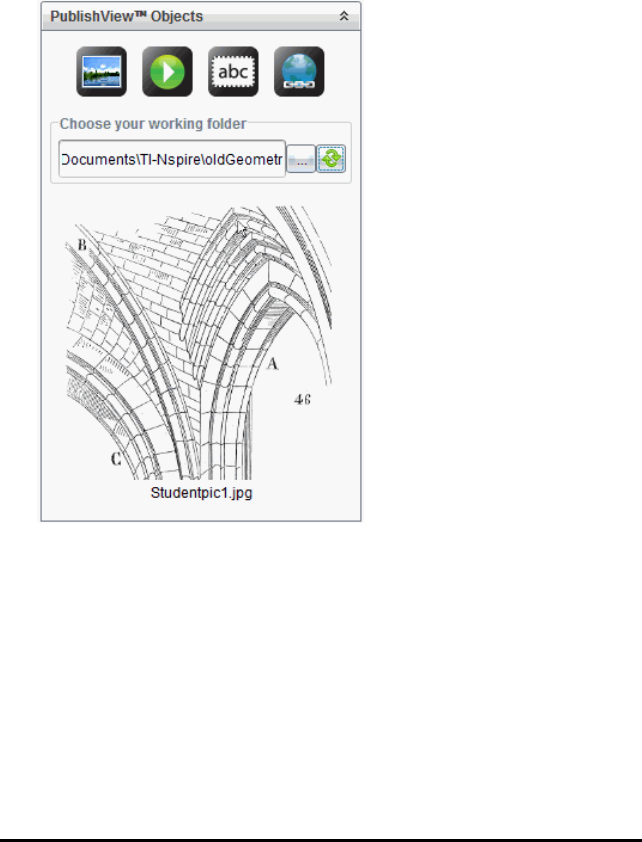
244 Working with PublishView™ Documents
3. Navigate to the folder where you want to store video and image files.
4. Click Open to choose the working folder.
The selected folder becomes the working folder and the folder name is
displayed in the Choose your working folder field. Previews of supported
images and video files in the folder are shown in the PublishView™ objects
pane.
5. To add an image or video file to a PublishView™ document, select the file
and move it onto the active sheet.
Working with TI-Nspire™ Applications
Note: For more information, see the appropriate chapter in this guidebook.
Adding an Application to a Problem
To add a TI-Nspire™ application to a problem in a PublishView™ document:
1. Choose one of the following actions to select an application:
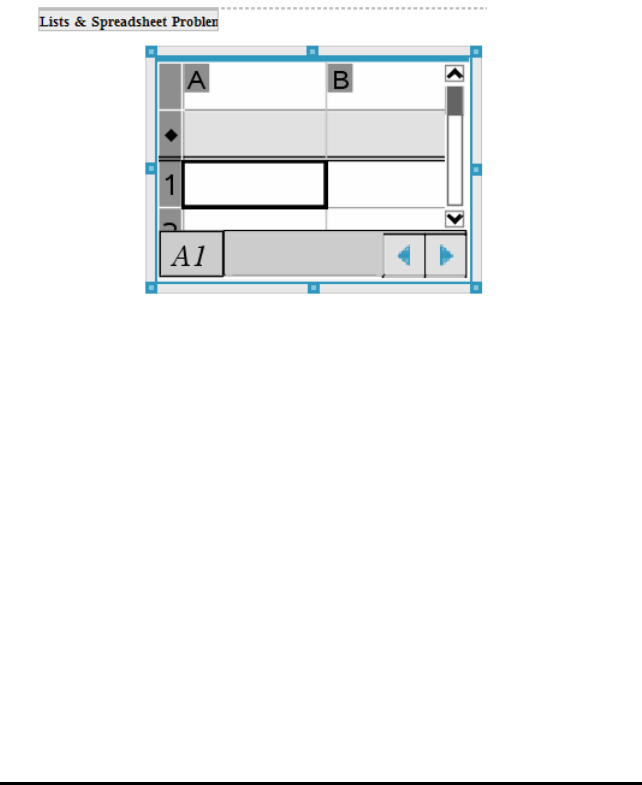
• From the TI-Nspire™ Applications pane in the Documents Toolbox,
use the mouse pointer to point to the application and drag it to the
problem.
• From the menu bar, click Insert and choose an application from the
drop-down menu.
• Right-click inside the sheet to open the context menu, click Insert and
choose an application from the menu.
The application is added to the sheet.
2. Using your mouse, grab the handles to resize or position the application
object as needed.
3. Click outside the application frame to accept the dimensions.
4. To open the menu for the active TI-Nspire™ application, click inside the
application.
The menu opens in the Documents Toolbox above the TI-Nspire™
Applications pane.
Right-click on an application element, such as a cell or function to open
the context menu for that item.
Working with PublishView™ Documents 245
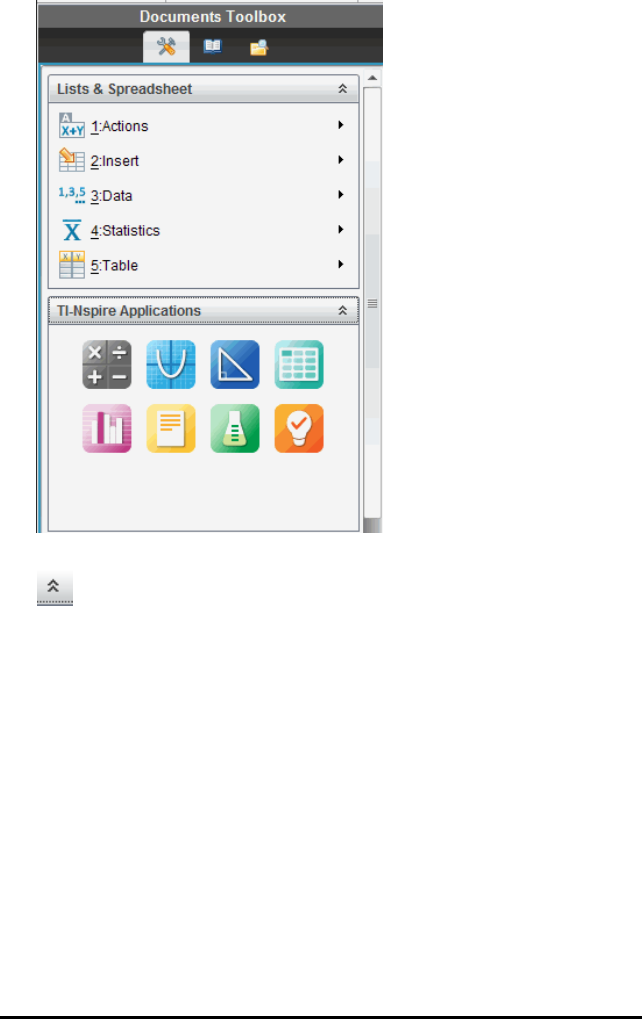
246 Working with PublishView™ Documents
5. To work in the application, click an option from the application menu. Click
to collapse the application menu pane.
Adding Existing TI-Nspire™ Documents
Use the TI-Nspire™ Documents pane to open an existing TI-Nspire™ document
to add to a PublishView™ document. When you open an existing TI-Nspire™
document, all pages of the document appear in the preview pane. You can
move complete problems or individual pages onto the PublishView™ sheet.
Choosing a Working TI-Nspire™ Document
To choose a working document:
1. In the Documents Toolbox, ensure the TI-Nspire™ Documents pane is
open.
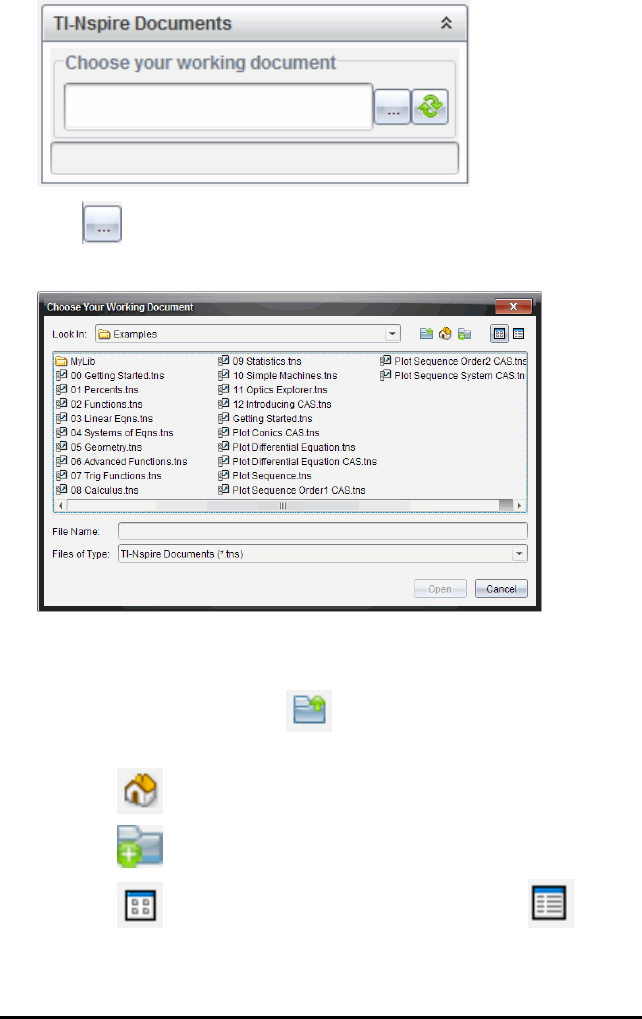
2. Click .
The Choose Your Working Document dialog box opens.
3. Navigate to the folder in which the TI-Nspire™ document is stored:
• Click ¤in the Look in: field to use a file browser to locate a folder.
• From an open folder, click to move up a level in the folder
hierarchy
• Click to return to the default home folder
• Click to add a new folder to open folder on your computer.
• Click to list folders and files. To show details, click .
4. Select the file, and then click Open.
Working with PublishView™ Documents 247
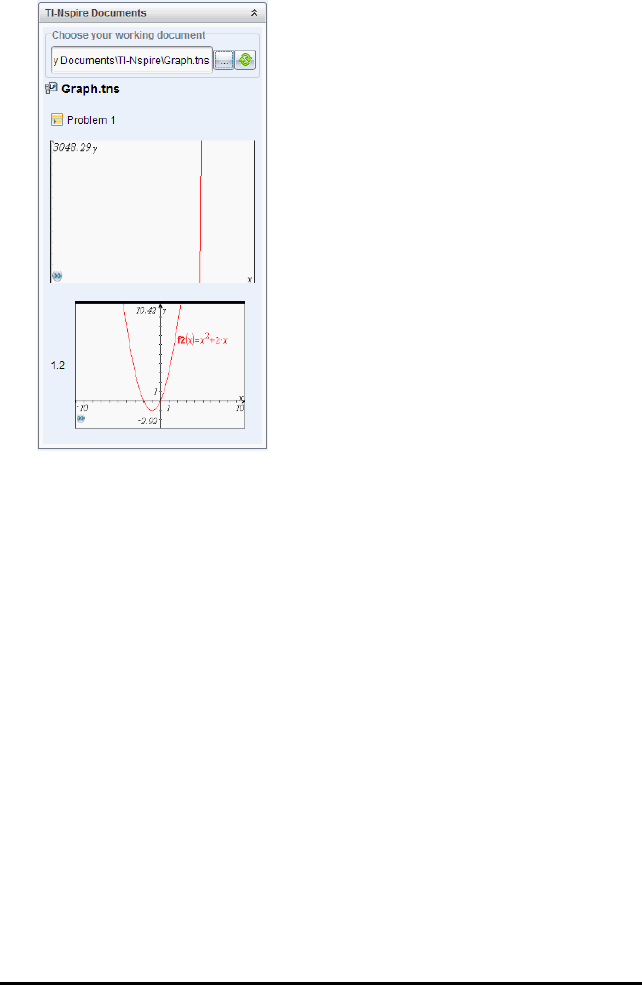
248 Working with PublishView™ Documents
The TI-Nspire™ document opens in the TI-Nspire™ Documents pane.
5. To add the TI-Nspire™ document to the PublishView™ document, move
one page at a time or one problem at a time to the PublishView™ sheet.
If you are adding a problem with multiple pages, the pages are stacked on
top of each other on the PublishView™ sheet. Move the top page to see the
other pages.
Working with Problems
Like a TI-Nspire™ document, a PublishView™ document consists of one or
more problems.
Problems are used to control the layout of a PublishView™ document so that
you can isolate variables. When variables with the same name are used in
multiple problems, variables can have different values. To add problems to
PublishView™ documents, open the Sheet context menu or use the options on
the Insert menu in the Documents Workspace. When adding problems, keep
the following guidelines in mind:
• By default, a new PublishView™ document contains one problem.
• You can insert a problem after any existing problem.
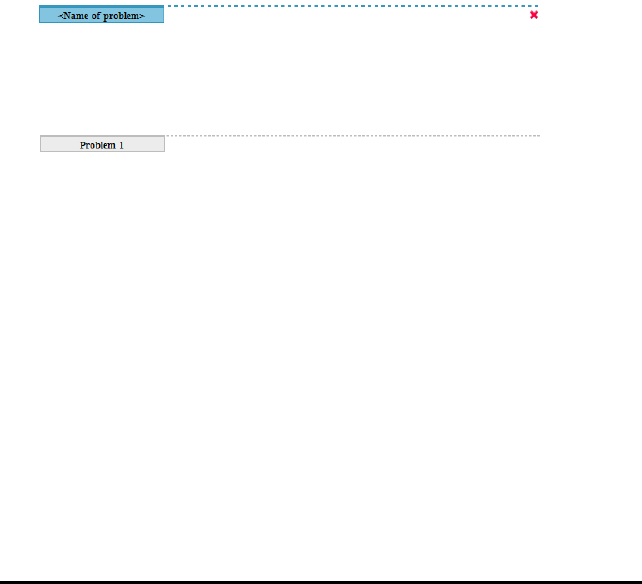
• You cannot insert a problem in the middle of an existing problem.
• A new problem break is always inserted after the selected problem.
• Inserting a problem break adds empty space below the break.
• Any object between two problem breaks is part of the problem above the
break.
• The last problem includes all sheets and objects below the last problem
break.
• Problem breaks are not relative to any object, which lets you move objects
within a problem without affecting the problem break location.
Adding a Problem
To add a problem to an open PublishView™ document:
1. Right-click anywhere on the sheet, and then click Insert > Problem.
The problem is added to the document below any existing problems. The
problem break provides a visible divider between problems.
2. To name the problem, highlight the default text, type a name, and then
click outside the text box to save the name.
The problem break is saved.
If a document has multiple problems, use the scroll bar on the right side of
the document to move up and down through the problems.
Managing Problem Breaks
Problem breaks are used to separate problems and variable sets.
• Every problem has a problem break.
• A problem break becomes visible when a problem is added to a
document.
• A problem break is represented by a dashed line with the name of the
problem positioned on the left side of the sheet.
• By default, the problem name is shown as <Name of problem>. Highlight
the default text to type a new name for the problem.
Working with PublishView™ Documents 249
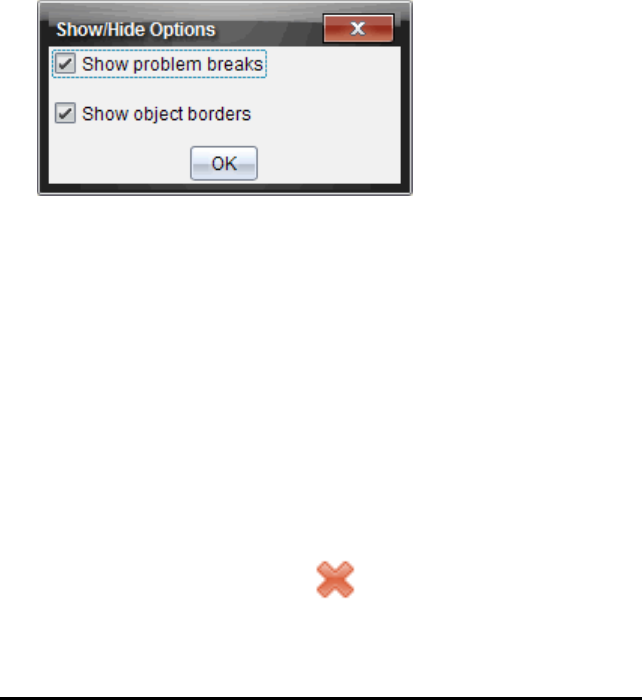
250 Working with PublishView™ Documents
• Problem names do not have be unique. Two problems can have the same
name.
Hiding and Showing Problem Breaks
You can select to hide or show problem breaks in a PublishView™ document.
By default, problem breaks are shown.
1. Right-click in any blank area of the document (outside of any object) to
open the sheet context menu.
2. Click Layout Options.
The Show/Hide Options dialog box opens.
Note: You can also click View > PublishView™ Layout Options.
3. Clear the Show problem breaks option to hide problem breaks in the
document. Select the option to return to the default setting and show the
problem breaks.
4. Click OK to close the dialog box.
Renaming a Problem
1. Click the existing problem name on the problem break line.
2. Type a new name for the problem.
3. Click outside the text box to save the new name.
Deleting a Problem
To delete a problem, complete one of the following actions:
▶Select the problem break and click on the right side of the break.
▶Click Edit > Delete.
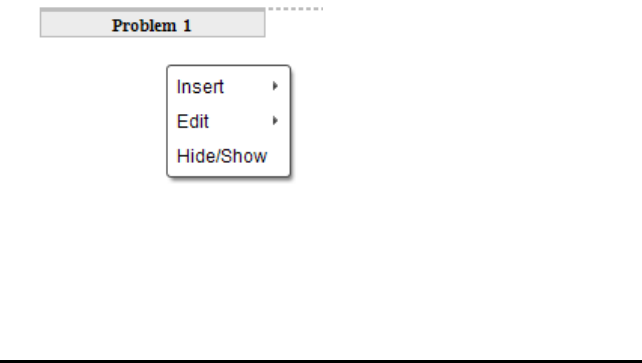
▶Right-click the problem break and click Delete.
▶Select the problem break and press the Delete or Backspace key.
When you delete a problem, all objects contained in the problem are removed
and the space between the selected problem break and the next problem
break is removed.
Organizing PublishView™ Sheets
A PublishView™ document can have multiple sheets. A single sheet is
displayed in the workspace on your screen. All work occurs in the
PublishView™ objects and TI-Nspire™ applications within sheets.
Adding Sheets to a Document
To add a sheet to a document:
▶Click Insert > Sheet.
The sheet is added to the document and the numbering increments by
one.
Opening the Sheet Context Menu
▶Right-click in any blank area (outside of any object) in a PublishView™
sheet.
A context menu opens with options for inserting problems, pages,
applications, and PublishView™ objects, edit options for removing space or
deleting a page, and options for hiding and showing problem breaks and
object borders.
Page Numbering
In a PublishView™ document, page numbering is displayed in the bottom
margin (footer). By default, numbering is placed in the center of the
Working with PublishView™ Documents 251

252 Working with PublishView™ Documents
PublishView™ sheet in a # of # format. You cannot edit or delete page
numbering.
Working with Headers and Footers
PublishView™ documents contain space at the top and bottom of a sheet to add
a header or a footer. Headers and footers can contain the date, the document
name, the lesson plan name, the class name, your school’s name, or any other
information needed to identify a document.
By default, headers and footers do not contain content and boundaries for the
header and footer are hidden. To activate a header or footer for editing, click
inside the top or bottom margin. When activated, a text box with a light gray
border is displayed.
Inserting and Editing Text in Headers and Footers
1. Click inside the top or bottom margin.
The text box borders in the margin become visible and the object space is
disabled. The cursor is placed in the header or footer space and the
formatting toolbar becomes active.
2. Type the text.
• The default font is TI-Nspire™ true type, 12 pt, normal.
• By default, text is centered horizontally and vertically.
• Text can be aligned: left, center, right, or justified.
• Text that does not fit within the text box horizontally will wrap to the
next line.
• Text that does not fit within the text box vertically will not be shown, but
text is retained. (If you delete text, the hidden text will appear.)
3. Complete one of the following actions to save the text:
• Single-click anywhere outside the header or footer text box to save the
text.
• Press Esc to save the text.
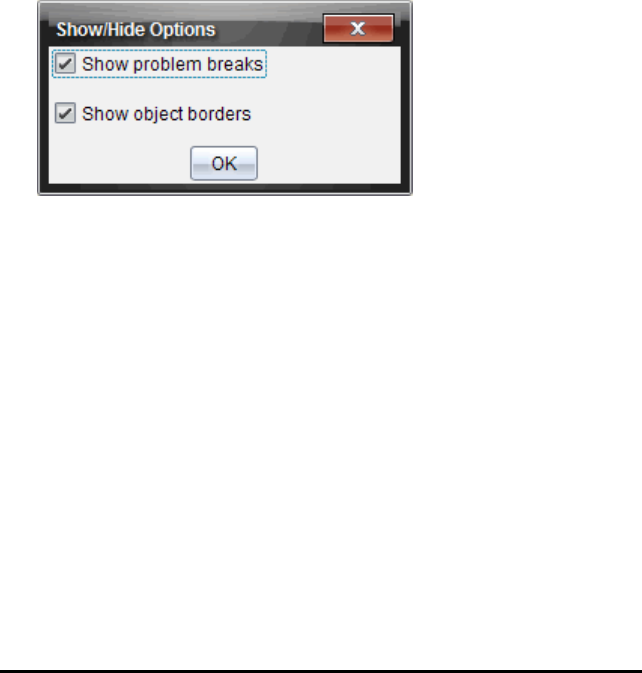
The PublishView™ sheet becomes active and the formatting menu
closes.
Showing and Hiding Borders
By default, borders are displayed when you insert an object into a problem.
When you select to hide borders, the selection applies to all objects in the
document and to objects that you add to the document. To hide the border:
1. Right-click in any blank area of the sheet (outside of any object) to open
the context menu.
2. Click Layout Options.
The Layout Options dialog box opens.
Note: You can also click View > PublishView™ Layout Options.
3. Clear the Show object borders option to hide the borders around the
objects in the problem. Select the option to return to the default setting and
show borders.
4. Click OK to close the dialog box.
Adding and Removing Space
To manage how PublishView™ objects appear on a sheet, you may need to
add or delete space between objects.
Note: You can add and remove vertical space between objects using this
method. To add or remove horizontal space between objects, move the object.
Adding Space
1. Right-click in the area outside of any object where you want to add space.
The context menu opens.
Working with PublishView™ Documents 253
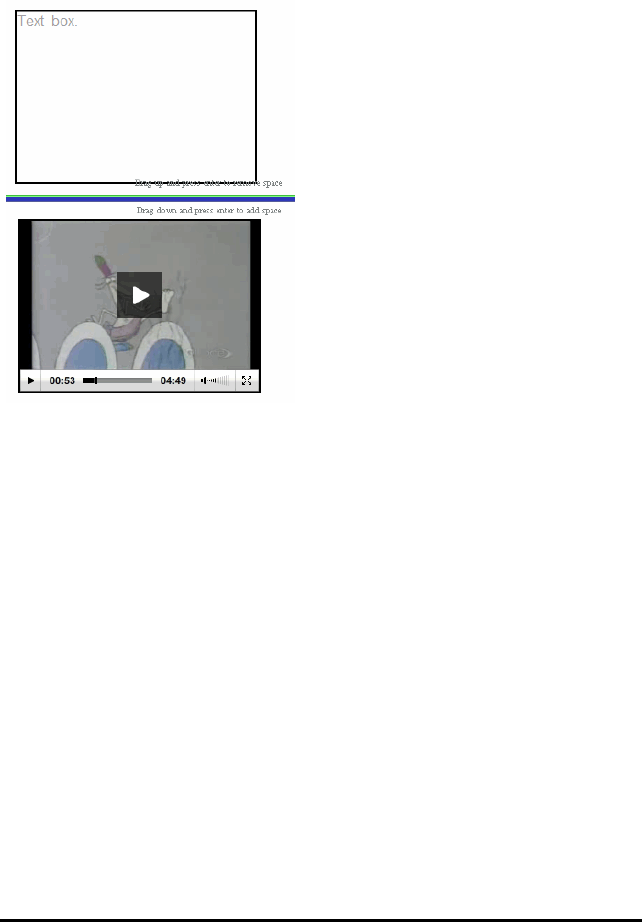
254 Working with PublishView™ Documents
2. Click Edit > Add/Remove Space. The Add/Remove Space tool becomes
active.
Add/Remove
Space tool
3. Use your mouse to position the tool to the exact place where you want to
add space.
4. Click the tool, and then drag down to select the amount of space you want
to add. As you select the amount of space to be added, it is indicated in
green.
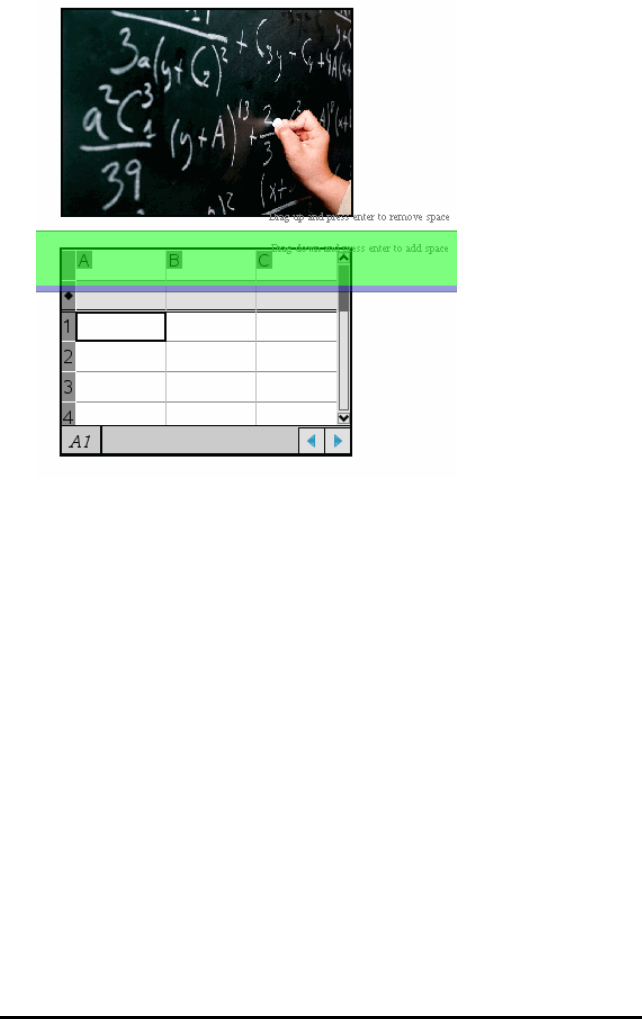
5. Press the Enter key to add the space in between the objects. You can
adjust the amount of space by dragging up and down before you press
Enter.
Removing Space
1. Right-click in the area outside of any object where you want to remove
space.
The context menu opens.
2. Click Edit > Add/Remove Space.
The Add/Remove Space tool becomes active.
Working with PublishView™ Documents 255
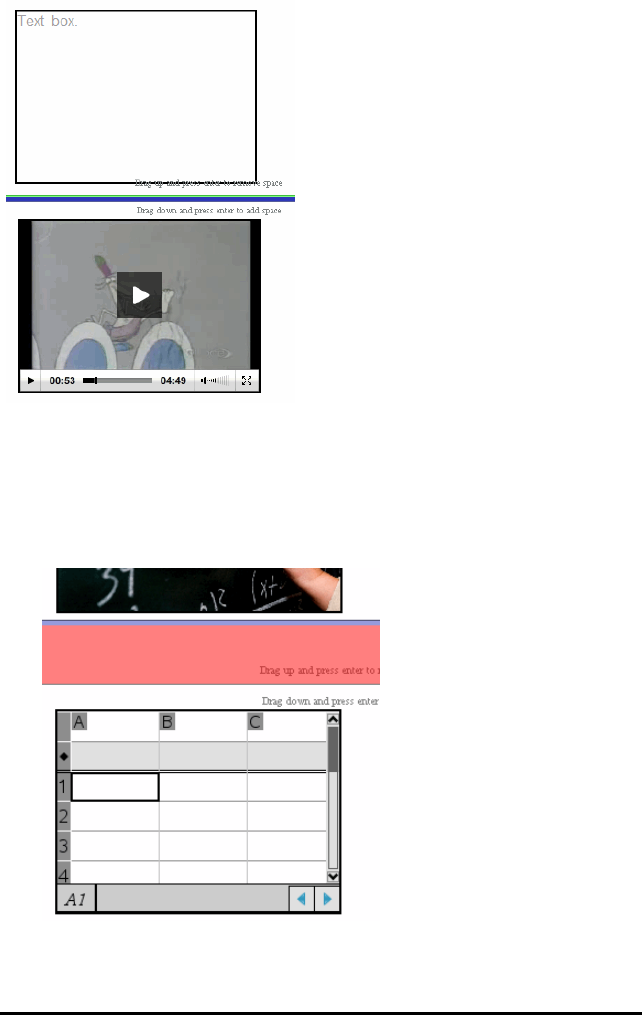
256 Working with PublishView™ Documents
Add/Remove
Space tool
3. Use your mouse to position the tool to the exact place where you want to
remove space.
4. Click the tool, and then drag up to select the amount of space you want to
remove. As you select the amount of space to be removed, it is indicated in
red.

5. Press the Enter key to remove the space in between the objects. You can
adjust the amount of space by dragging up and down before you press
Enter.
Note: If there is not enough space on the sheet to accommodate the
objects, the objects won’t be moved when space is removed.
Deleting Blank Sheets from Problems
You can delete a sheet that does not contain any TI-Nspire™ applications or
PublishView™ objects from a problem. To delete a blank sheet from a problem:
1. Delete any TI-Nspire™ applications, PublishView™ objects, move or delete
any problem breaks from the sheet.
2. Place your cursor inside the sheet you want to delete.
3. Right-click inside the blank sheet to open the context menu.
4. Click Edit > Delete Sheet.
The blank sheet is removed from the problem.
Using Zoom
The zoom feature lets you zoom in on any object or area on the PublishView™
document for discussion, and zoom out to see an overview of the lesson. The
zoom uses the center point of the viewable area to zoom in.
The default zoom setting is 100%.
▶To change the zoom percentage, do one of the following:
• Type the number in the box and press Enter.
• Use the - and + buttons to decrease or increase the percentage in
10% increments.
• Use the drop-down arrow to choose a preset percentage.
The zoom settings are retained when you save the document.
Adding Text to a PublishView™ Document
In a PublishView™ document, there are three ways to add text:
• Insert a PublishView™ text box to enter free-form text or copy text from
other sources into the document. For example, you can place a
PublishView™ text box next to an image and type a description in a text
Working with PublishView™ Documents 257
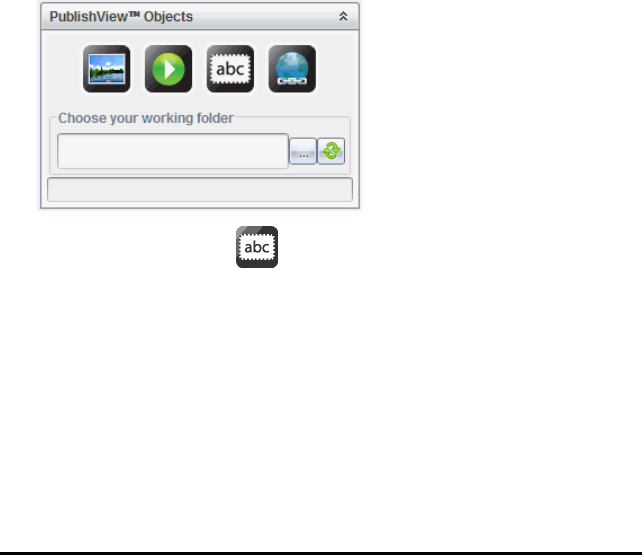
258 Working with PublishView™ Documents
box. You can also copy and paste text from .doc, .txt, and .rtf files. Use
PublishView™ text boxes when you need options for emphasizing and
formatting text. PublishView™ text boxes are not converted when you
convert a PublishView™ document to a TI-Nspire™ document. You may
want to use a PublishView™ text box to add text that you don’t want
handheld users to see.
• Use the TI-Nspire™ Notes application. You should use the Notes
application when you need an advanced equation editor and when you
need to use TI-Nspire™ math templates and symbols. Superscript and
subscript are also easier to use in the Notes application. You should also
use Notes when you are planning to convert the PublishView™ document
to a TI-Nspire™ document for use on a handheld and you want handheld
users to see the text.
• Add text in TI-Nspire™ applications that allow text just as you would in a
TI-Nspire™ document.
Inserting Text into a Text Box
1. Ensure the PublishView™ Objects pane is open.
2. Use your mouse to click and drag it to the problem.
3. Release the mouse button to drop the text box into the problem.
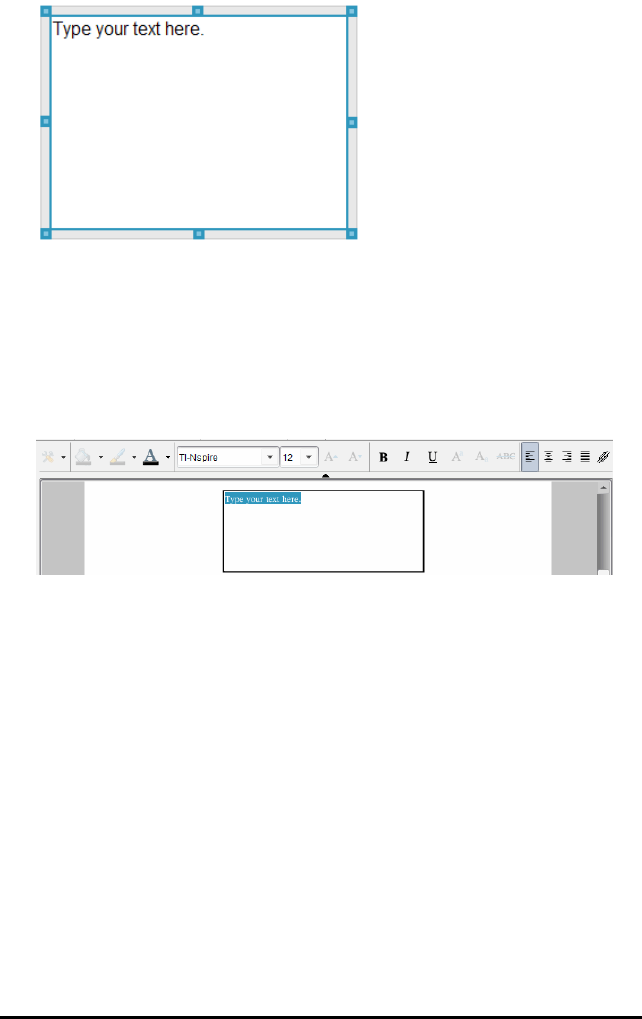
4. Using the mouse, grab the handles to resize the text box or position in the
problem as needed.
5. Click outside the text box to save the size and position.
6. Click "Type your text here."
The formatting toolbar becomes active. The text box is in an interactive
state for adding or editing text.
7. Type the new text.
—or—
Copy and paste text from another file.
8. Apply formatting as needed.
9. Click outside the text box to save the text.
Formatting and Editing Text
The options for editing and formatting text are located on a formatting toolbar at
the top of the active document. Formatting options for editing text include:
• Changing the font, font size, and font color.
• Applying bold, italics, and underline formatting.
• Applying the following text horizontal alignment options: left, right,
centered, and justified.
Working with PublishView™ Documents 259

260 Working with PublishView™ Documents
• Inserting hyperlinks.
Launching Edit Mode
▶Click inside a text box to launch edit mode.
• The formatting menu opens.
• The text is selectable for editing.
Opening the Content Context Menu
▶Right-click inside a text box containing text or a hyperlink.
The formatting menu and context menu open providing shortcuts to cut,
copy, and paste.
Using Hyperlinks in PublishView™ Documents
In PublishView™ documents, use hyperlinks to:
• Link to a file
• Link to a website on the Internet
You can add a hyperlink to an open document or you can convert any text
within a text box to a hyperlink. When a hyperlink is added, the formatting of the
text is underlined and the font color is blue. You can change the formatting of
the hyperlinked text without losing the hyperlink.
If a link is broken, an error message is displayed when you click the link:
• Cannot open the specified file
• Cannot open the specified web page
PublishView™ text boxes support both absolute and relative links.
Absolute links contain the complete location of the linked file and do not
depend on the location of the main document.
Relative links contain the location of the linked file relative to the main
document. If you have multiple lessons in a single folder and they are all linked
using relative addressing, you can move the folder to any other location
(another local folder, datashare, flash drive, online) without breaking the links.
The links also stay intact if you bundle the documents into a lesson bundle or
zip them into a zip file and share them.
Note: The PublishView™ document must be saved before you can insert a
relative hyperlink.
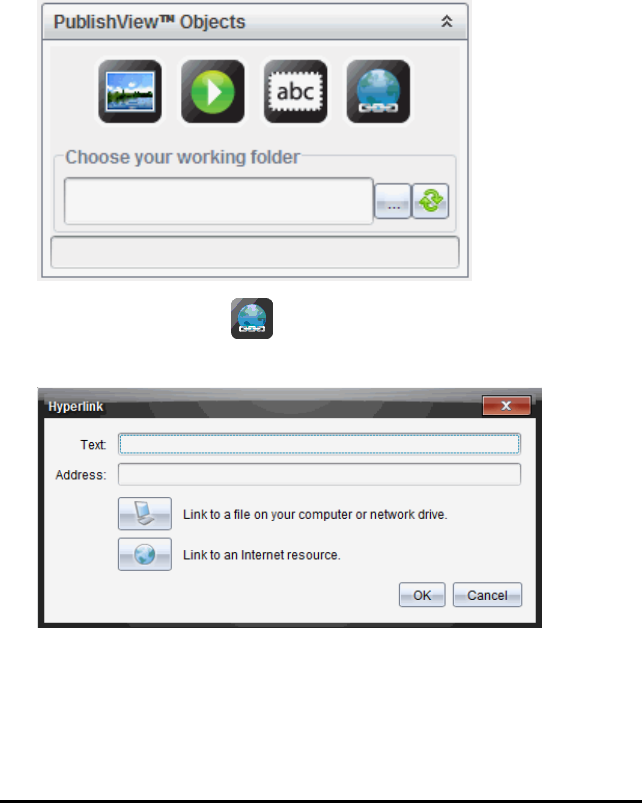
Linking to a File
You can link to any file on your computer. If the file type is associated with an
application on your computer, it will launch when you click the link. There are
two ways to link to a file; by typing or pasting a file address into the Address
field, or by browsing to a file.
Linking to a File by Using an Address
1. Ensure the PublishView™ Objects pane is open.
2. Drag the hyperlink icon onto the document.
The Hyperlink dialog box opens.
3. Type the name of the link in the Text field. For example, this can be the
name of the document.
Working with PublishView™ Documents 261
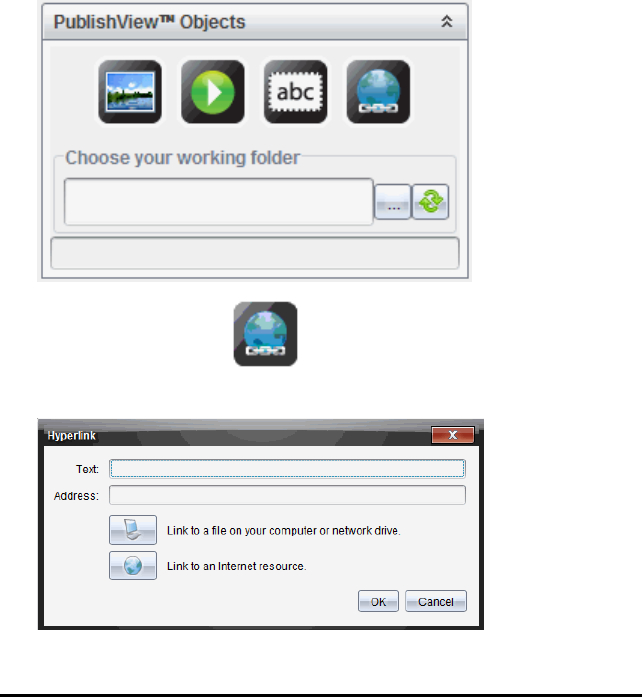
262 Working with PublishView™ Documents
4. Copy the location of the file path you want to link to, and paste it in the
Address field.
—or—
Type the location of the file in the Address field.
Note: Type ../ to designate parent directories. For example:
../../lessons/mathlesson2.tns
5. Click OK to insert the link.
A text box containing the hyperlink is added to the PublishView™ document.
Linking to a File by Browsing
1. Ensure the PublishView™ Objects pane is open.
2. Drag the hyperlink icon onto the document.
The Hyperlink dialog box opens.
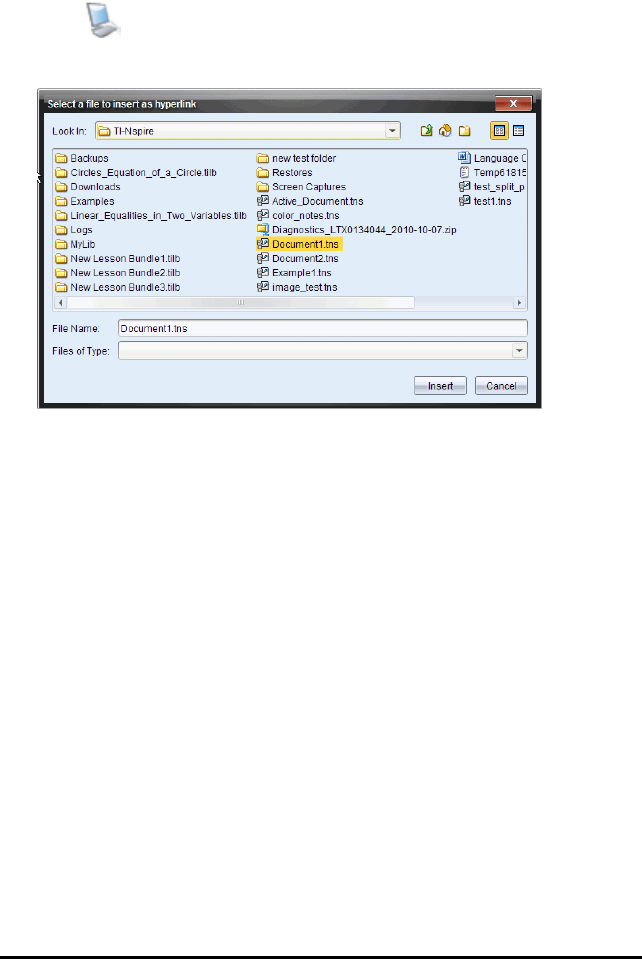
3. Type the name of the link in the Text field. For example, this can be the
name of the document.
4. Click to select Link to a file on your computer or network drive.
The Select file to insert as hyperlink dialog box opens.
5. Navigate to and select the file you want to link to, and then click Insert.
The path name is inserted into the Address field in the Hyperlink dialog
box.
If the software is unable to determine if the link is a relative or absolute
address, the Hyperlink dialog box opens with an option to change the type
of link.
To change the link, click the appropriate option:
•Change to absolute address.
•Change to relative address.
6. Click OK to insert the link.
—or—
Click Start Over to go back to the Hyperlink dialog box and choose a
different file to link, or to edit the Text or Address fields.
A text box containing the hyperlink is added to the PublishView™ document.
Working with PublishView™ Documents 263
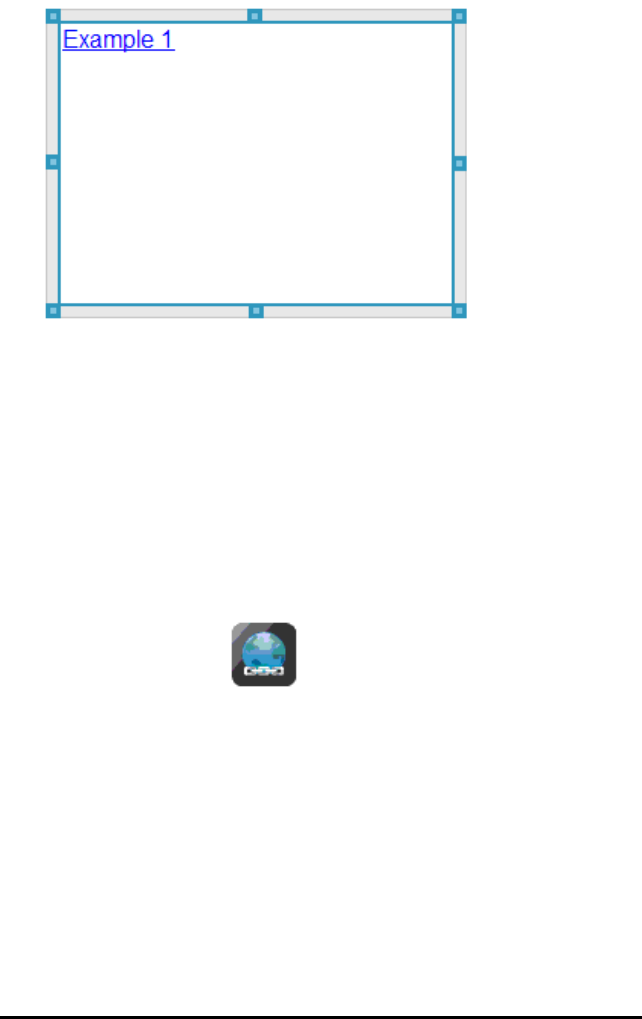
264 Working with PublishView™ Documents
7. Using the mouse, grab the handles to resize the text box.
—or—
Grab any border to position the text box in the document as needed.
Linking to a Website
There are two ways to link to a website; by typing or pasting the URL into the
Address field, or by browsing to a file.
Linking to a Website by Using an Address
1. Ensure the PublishView™ Objects menu is open.
2. Drag the hyperlink icon onto the document to open the Hyperlink
dialog box.
3. Type or paste the URL you want to link to in the Address field.
4. Click OK.
A text box containing the hyperlink is added to the PublishView™
document.
Linking to a Website by Browsing
1. Ensure the PublishView™ Objects menu is open.
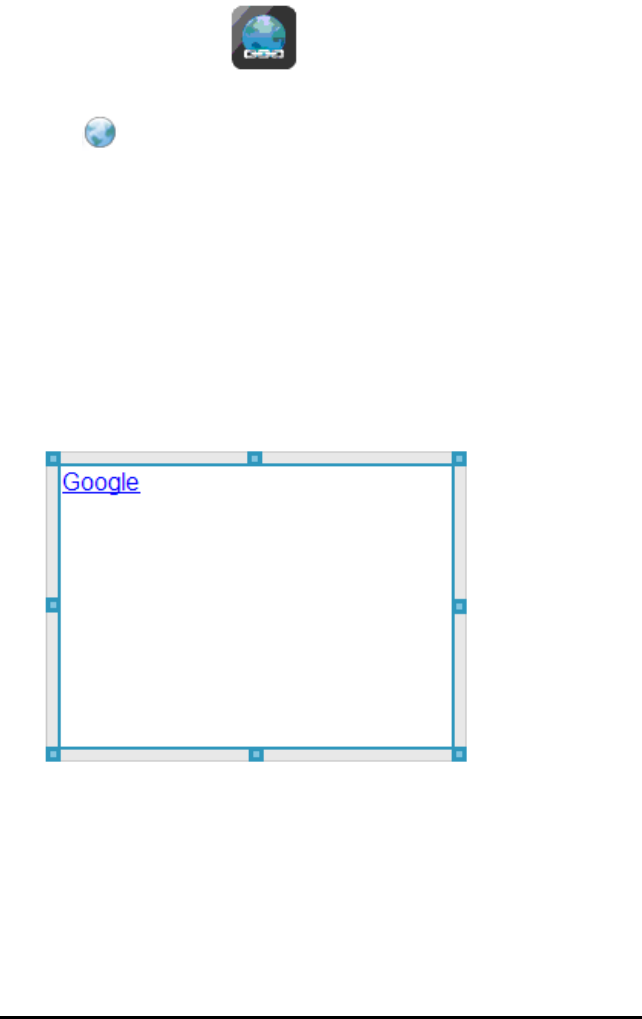
2. Drag the hyperlink icon onto the document to open the Hyperlink
dialog box.
3. Click to select Link to an Internet resource.
The browser opens to your default website.
4. Navigate to the website or file on a website that you want to link to.
5. Copy the URL, and then paste it in the Address field in the Hyperlink
dialog box.
—or—
Type the URL in the Address field.
6. Click OK.
A text box containing the hyperlink is added to the PublishView™
document.
7. Using the mouse, grab the handles to resize the text box.
—or—
Grab any border to position the text box in the document as needed.
Working with PublishView™ Documents 265
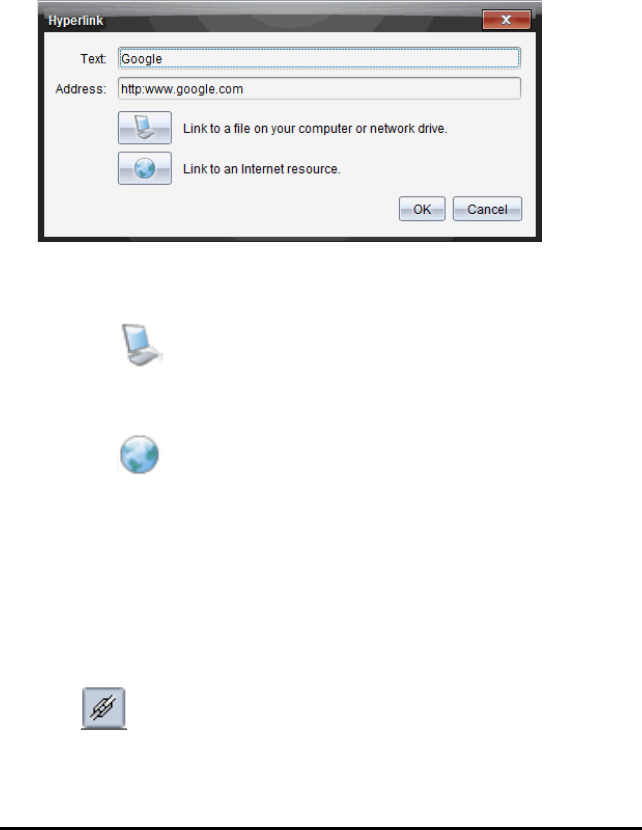
266 Working with PublishView™ Documents
Editing a Hyperlink
To change the name of a hyperlink, change the path, or change the URL,
complete the following steps.
1. Using your mouse, right-click the hyperlink text, and then click Edit
hyperlink.
The Hyperlink dialog box opens.
2. Make corrections as needed:
• Type corrections to the hyperlink name in the Text field.
• Click to open the Select a file to add as a hyperlink dialog box
and use the file browser to navigate to the folder where the file is
located.
• Click to open a browser and navigate to a website to copy and
paste the correct the URL in the Address field.
3. Click OK to save the changes.
Converting Existing Text to a Hyperlink
1. Click inside the text box to activate edit mode and open the formatting
menu.
2. Select the text you want to convert to a hyperlink.
3. Click .
The Hyperlink dialog box opens with the selected text in the Text field.

4. Click to create a link to a file.
—or—
Click to create a link to page on a website.
Removing a Hyperlink
Use this process to remove a link from text inside a text box. The text remains in
the document.
1. Using your mouse, right-click the hyperlink text.
2. Click Remove hyperlink.
The hyperlink formatting is removed from the text and the text is no longer
clickable.
Note: To remove both the text and hyperlink, delete the text. If a text box
contains only the linked text, delete the text box.
Working with Images
Images can be added to PublishView™ documents as PublishView™ objects or
can be added inside TI-Nspire™ applications that support images. Supported
files types are .bmp, .jpg, and .png files.
Note: If a TI-Nspire™ application is active in the PublishView™ document, the
image is added to the TI-Nspire™ page if you click Insert>Image from the
menu bar or context menu. If there is no TI-Nspire™ document active, the image
is added as a PublishView™ object. Only images inside TI-Nspire™ applications
convert to TI-Nspire™ documents (.tns files).
Inserting an Image
1. Ensure the PublishView™ Objects pane is open.
Working with PublishView™ Documents 267
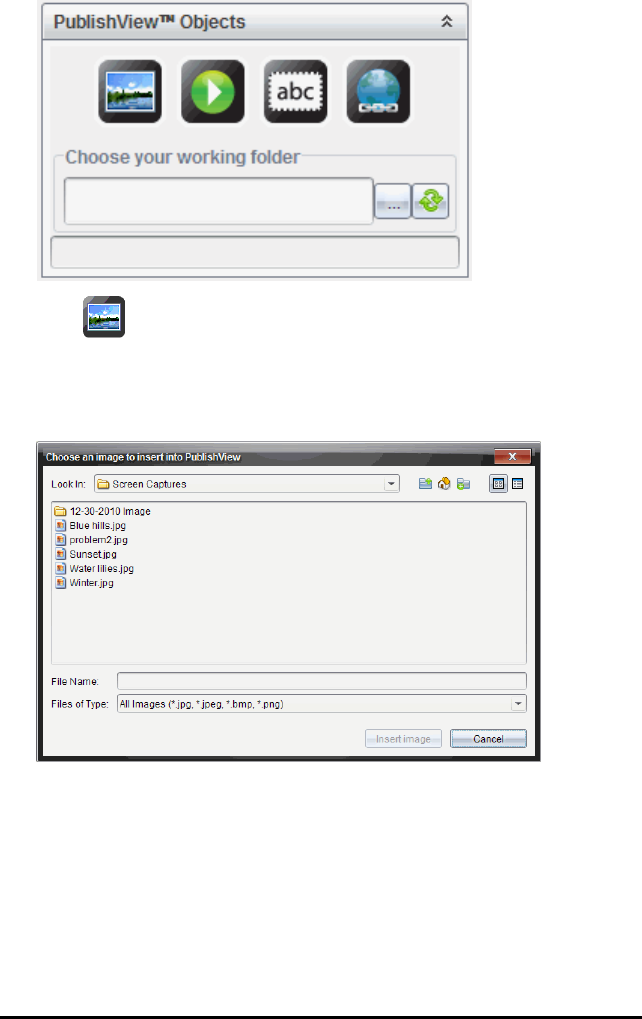
268 Working with PublishView™ Documents
2. Click , and then drag the icon to the document.
The Choose an image to insert into PublishView™ dialog box opens.
Note: By default, the Texas Instruments preloaded images folder is
displayed.
3. Navigate to the folder where the image file you want to insert is located,
and then highlight the file name.
4. Click Insert image.
The image is added to the PublishView™ sheet.
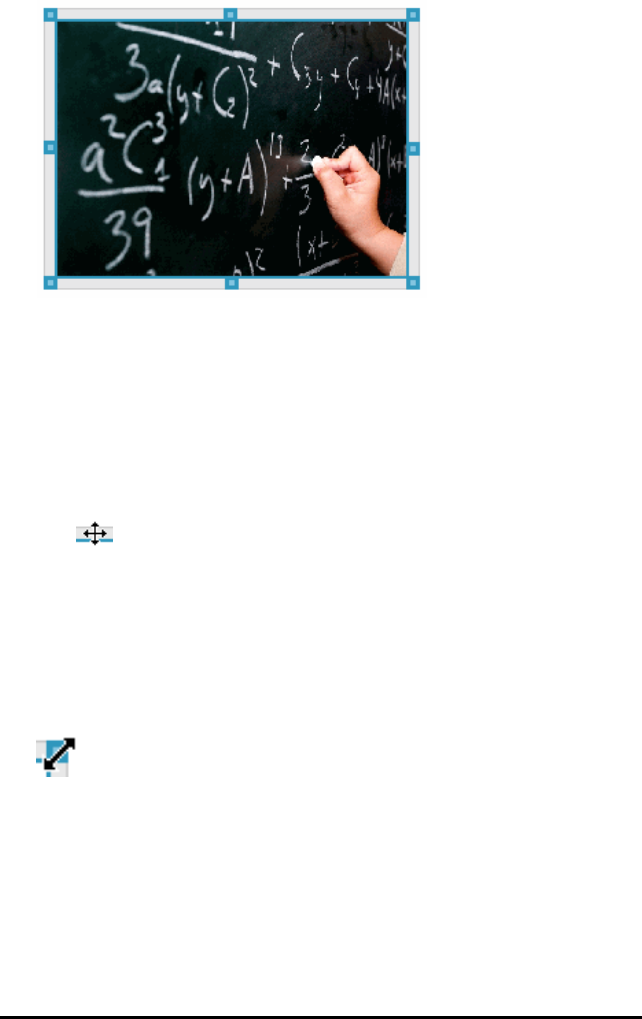
5. Using the mouse, grab the handles to resize the text box,
—or—
Grab any border to position the text box in the document as needed.
Moving Images
1. Click the frame containing the image to select it.
2. Move your cursor over the edge of the image to activate the positioning
tool.
3. Move the image to its new location on the PublishView™ sheet.
Note: Objects can overlap each other on a PublishView™ sheet.
Resizing Images
1. Click the frame containing the image to select it.
2. Move your cursor over one of the blue handles to activate the resizing tool.
3. Drag the handle to make the image smaller or bigger.
Deleting Images
▶Click the image to select it, and then press the Delete key.
—or—
▶Right-click a handle to open the context menu, and then click Delete.
Working with PublishView™ Documents 269
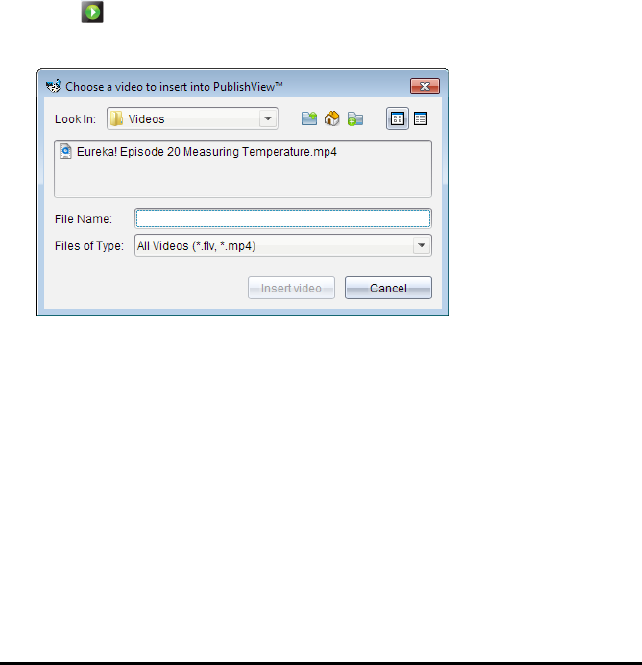
270 Working with PublishView™ Documents
Working with Video Files
You can embed video files in a PublishView™ document and play the videos
directly from the PublishView™ document. Supported video formats include:
• Flash® (.flv) video files with VP6 video and MP3 audio.
• MP4 (MPEG-4 multimedia container) with H264/AVC (Advanced Video
Coding) video compression and AAC audio.
Note: You can also insert a link to a video that will launch in a new browser
window or media player window. For more information, see
Working with
Hyperlinks
.
Inserting a Video
1. Ensure the PublishView™ Objects pane is open.
2. Click , and then drag the icon to the document.
The Choose a video to insert into PublishView™ dialog box opens.
3. Navigate to the folder where the video file you want to insert is located,
and select the file name.
4. Click Insert video.
An object containing the embedded video is added to the PublishView™
sheet. By default, the resizing and positioning handles are active.
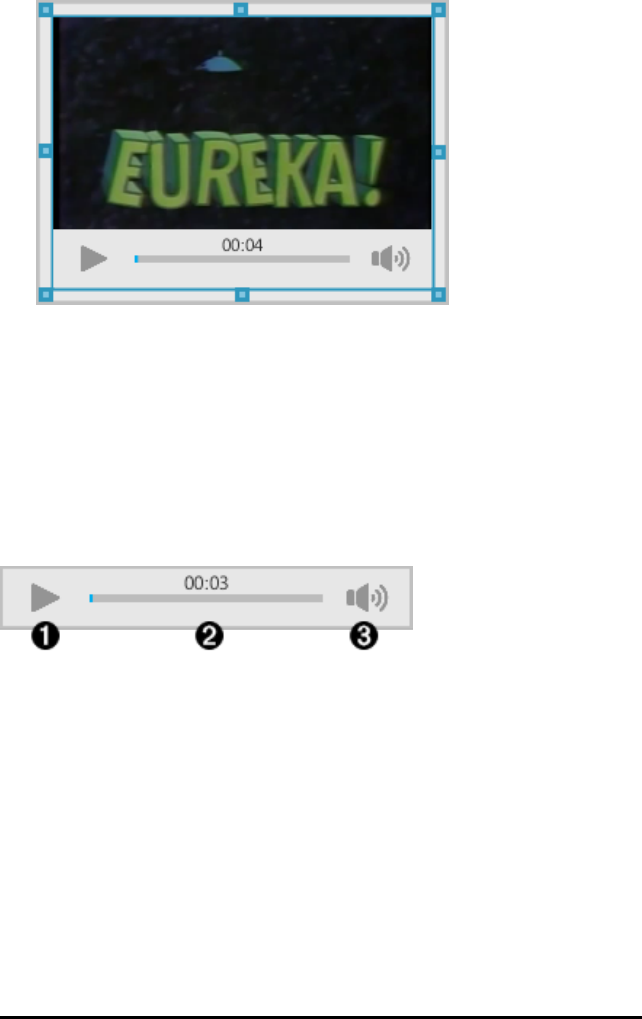
5. Using the mouse, grab the handles to resize the object or grab any border
to position the object in the document as needed. For example, you may
want to position the object containing the video above or below a text box
that contains text introducing the video.
6. To play the video, click the forward arrow, or click anywhere in the viewing
window.
Using the Video Console
The video console lets users control the video.
ÀStarts or stops the video.
ÁShows the elapsed time as the video plays.
ÂMutes or unmutes the audio.
Converting Documents
You can convert PublishView™ documents (.tnsp files) to TI-Nspire™
documents (.tns files) for display on handhelds. You can also convert
TI-Nspire™ documents to PublishView™ documents.
Working with PublishView™ Documents 271

272 Working with PublishView™ Documents
Converting a document creates a new document—the original document
remains intact and is not linked to the new document. If you make changes to
one document, the changes are not reflected in the other document.
Converting PublishView™ Documents to TI-Nspire™ Documents
You cannot open a PublishView™ document (.tnsp file) on a handheld.
However, you can convert the PublishView™ document to a TI-Nspire™
document that can be transferred to and opened on a handheld. When you
convert a PublishView™ document to a TI-Nspire™ document:
• Only the TI-Nspire™ applications become part of the TI-Nspire™ document.
• PublishView™ objects such as text boxes, images, hyperlinks, and videos
are not converted.
• Text contained in PublishView™ text boxes is not converted; however, text
in a TI-Nspire™ Notes application is converted.
• If images are contained in a TI-Nspire™ application, they are converted;
however, images contained in PublishView™ objects are not converted.
Complete the following steps to convert a PublishView™ document (.tnsp file) to
a TI-Nspire™ document (.tns file).
1. Open the PublishView™ document to be converted.
2. Click File > Convert to > TI-Nspire™ Document.
• The new TI-Nspire™ document opens in the Documents Workspace.
• All supported TI-Nspire™ applications are part of the new TI-Nspire™
document.
• Starting from top to bottom, and then left to right, the layout of the
TI-Nspire™ document is based on the order of the TI-Nspire™
applications in the PublishView™ document.
- Every TI-Nspire™ application in a PublishView™ document will
appear as a page in the converted TI-Nspire™ document. The
order of the pages in the TI-Nspire™ document is based on the
layout of the TI-Nspire™ applications in the PublishView™
document.
- If two or more problems are at the same level, the order is left to
right.
• Problem breaks are maintained.
• The new TI-Nspire™ document is not linked to the PublishView™
document.
3. When work in the document is complete, click to save the document
in the current folder.
—or—
Click File > Save As to save the document in a different folder.
Note: If the document has never been saved, both the Save and Save as
options allow saving in a different folder.
Note: You can also use the Save as option to convert a PublishView™
document to a TI-Nspire™ document.
Note: If you try to convert a PublishView™ document that does not contain TI-
Nspire™ pages or applications, an error message is displayed.
Converting TI-Nspire™ Documents to PublishView™ Documents
You can convert existing TI-Nspire™ documents to PublishView™ documents,
which enables you to take advantage of the richer layout and editing features
for printing, generating student reports, creating worksheets and assessments,
and publishing documents to a website or blog.
Complete the following steps to convert a TI-Nspire™ document to a
PublishView™ document:
1. Open the TI-Nspire™ document you want to convert.
2. Click File > Convert to > PublishView™ Document.
• The new PublishView™ document opens in the Documents
Workspace.
• By default, there are six objects per page.
• When converted, each problem from the TI-Nspire™ document will
start a new sheet in the PublishView™ document.
• Problem breaks are maintained.
3. When work in the document is complete, click to save the document
in the current folder.
—or—
Working with PublishView™ Documents 273

274 Working with PublishView™ Documents
Click File > Save As to save the document in a different folder.
Note: You can also use the Save as option to save a TI-Nspire™ document
as a PublishView™ document.
Printing PublishView™ Documents
You can print reports, worksheets, and assessments created using the
PublishView™ feature. To print a document:
1. Click File > Print.
The Print dialog box opens. A preview of the document is shown on the
right side of the dialog box.
2. Select a printer from the menu.
Note: The Print what field is disabled.
3. Select Paper Size from the menu. Options are:
• Letter (8.5 x 11 inches)
• Legal (8.5 x 14 inches)
• A4 (210 x 297 mm)
4. Select or type the number of Copies you want to print.
5. In the Print Range area, select to print all sheets in the document, a range
of sheets, or the current sheet only.
Note: By default, top and bottom margins are set to one-inch and are
maintained when printing a PublishView™ document. There are no side
margins. PublishView™ sheets print just as they appear in the workspace.
6. If needed, select or clear the boxes to:
• Print problem breaks and names.
• Print headers
• Print footers
• Print object borders
7. Click Print, or click Save As PDF.
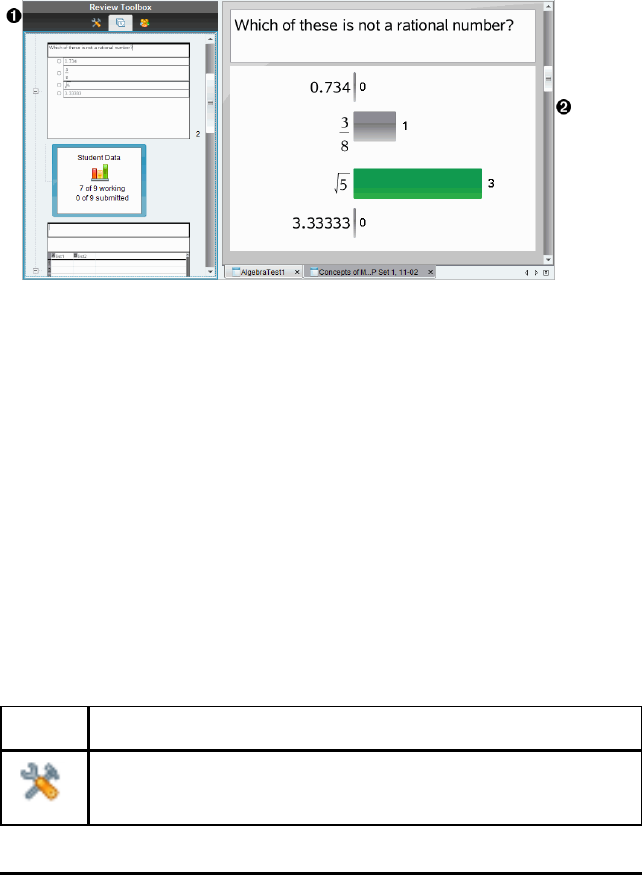
Using the Review Workspace
Use this workspace to review a collected set of documents, manage student
responses, run live activities, and organize data.
ÀReview toolbox. Contains the Review Tools, Page Sorter, and Student
Response tools. Click each icon to access the available tools. Options for
the selected tool are displayed in the toolbox pane.
ÁData View pane. Shows the data and options from the poll or document you
have selected in the Review Toolbox. You can switch the data view
between bar chart, table, and graph (if available).
The software retains the data view that was set for each question when
you close and reopen the Review Workspace. All hidden and unhidden
data, settings in graph view, table view, bar chart view, and Show Your
Work are retained when you close the Review Workspace.
Using the Review Toolbox
The Review toolbox contains tools needed for working with collected
documents, Question results, and Quick Poll results.
Icon What you can do
The Review tools let you organize the response data, use graph
tools, hide or show responses, and mark Question and Quick
Using the Review Workspace 275

276 Using the Review Workspace
Icon What you can do
Review
tools
Poll responses as correct or incorrect.
Page
sorter
Displays all the problems in a document or Quick Poll, all the
pages in each problem, and the student responses for each
question in the document.
Student
pane
Displays the student names and responses in the Data View
pane.
Exploring the Review Tools
ÀOrganize. Click ¢to organize the data in different views.
ÁGraph Tools. Click ¢to access the graph tools when you are in coordinate
graph view.
ÂShow Selected. Shows selected responses for review in the Data View
pane.
ÃHide Selected. Hides selected responses in the Data View pane.
ÄMark Selected Correct. Select a response from the Data View pane and
click Mark Selected Correct to mark that response as the correct answer.
You can mark more than one answer as a correct answer.
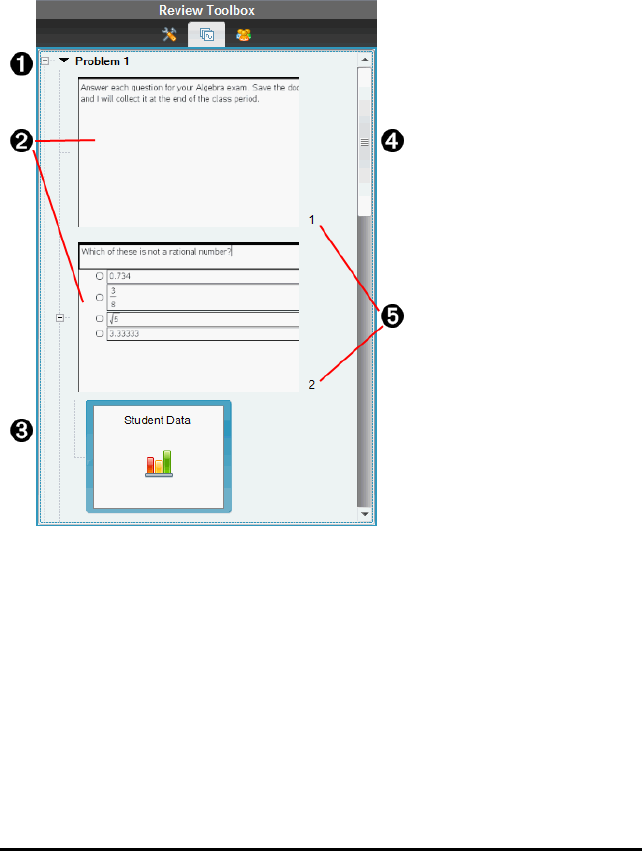
ÅMark Selected Incorrect. Select a response from the Data View pane and
click Mark Selected Incorrect to mark that response as an incorrect
answer. You can mark more than one answer as an incorrect answer.
Exploring the Page Sorter
Use the Page Sorter to view student responses to any question in a document.
ÀClick the minus sign (–) to collapse the view. Click the plus sign (+) to
expand the view and show all the pages in a problem, and all the
problems in a document.
ÁThe pages in a problem. Click a page to open it in the Data View pane.
ÂStudent responses. A student data icon follows each question in the
document. Click the icon to view the student responses for the question in
the Data View pane.
In Quick Polls, the icon shows the number of students who were logged in
when the poll was started, the number who have responded, and the
Using the Review Workspace 277

278 Using the Review Workspace
number who have submitted their answer. In the example below, nine
students received the poll, seven students responded to the poll, and no
students have submitted their answer.
Note: If you send a poll to students who were missing, the numbers may
change.
ÃScroll bar. The scroll bar is active when there are too many pages to show
in the panel.
ÄPage numbers. Click a page number to open the page in the Data View
pane.
Exploring the Student Pane
Use the Student pane to:
• Display the students to whom the file was sent
• View the students who responded
• View student responses
• Mark responses as correct or incorrect
• Sort the responses by student or response, or by time in Quick Polls
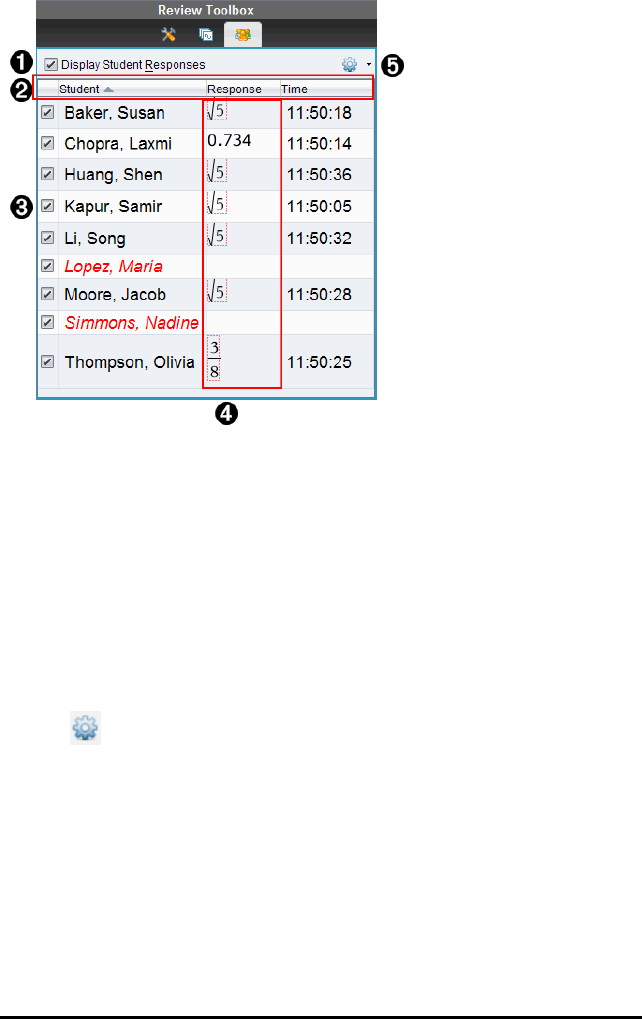
ÀDisplay Student Responses. Select this check box to show the responses
of each student. Clear the check box to hide the student responses.
ÁStudent, Response, and Time columns. The Time column is available only
in Quick Poll reviews.
• Click the Student column to list the students in alphabetical order.
Click again to list in reverse alphabetical order.
• Click the Response column to list the responses in alphabetical or
numerical order. Click again to list the responses in reverse order.
• To add the Time column in Quick Poll reviews, click the Options menu
, and then click Time.
• Click the Time column to list the responses in order of the time they
were answered (first response on top). Click again to list the
responses with the first response on the bottom.
ÂStudent names. Lists all students in the class associated with the
document currently opened for review. The student names are displayed
as chosen in the Class>Student Name Format menu.
Student names in red text indicate students who did not receive the file or
respond to the Quick Poll.
Using the Review Workspace 279

280 Using the Review Workspace
ÃResponses. Lists all responses next to the student’s name. A student may
be listed several times if they gave multiple responses. The Response
column may change if the review document is an active Quick Poll or a
question document that has not been saved yet.
• A response is shown if the student responded.
• The response area is blank if the student did not respond.
• "Responded" is displayed if the student responded and the responses
are hidden.
• "No Response" is displayed if the student has not yet responded to
the open question or active Quick Poll.
• "Working" is displayed if the student has modified their response to a
Quick Poll, but has not submitted it.
ÄOptions menu. Click ¤to open the menu of options you can perform on
the student responses:
• Display student responses.
• Display student names only.
• Display responses only.
• Display a Time column for Quick Poll results.
• Select all items in the list.
• Show the selected item.
• Hide the selected item.
• Mark one or more responses as correct.
• Mark one or more responses as incorrect.
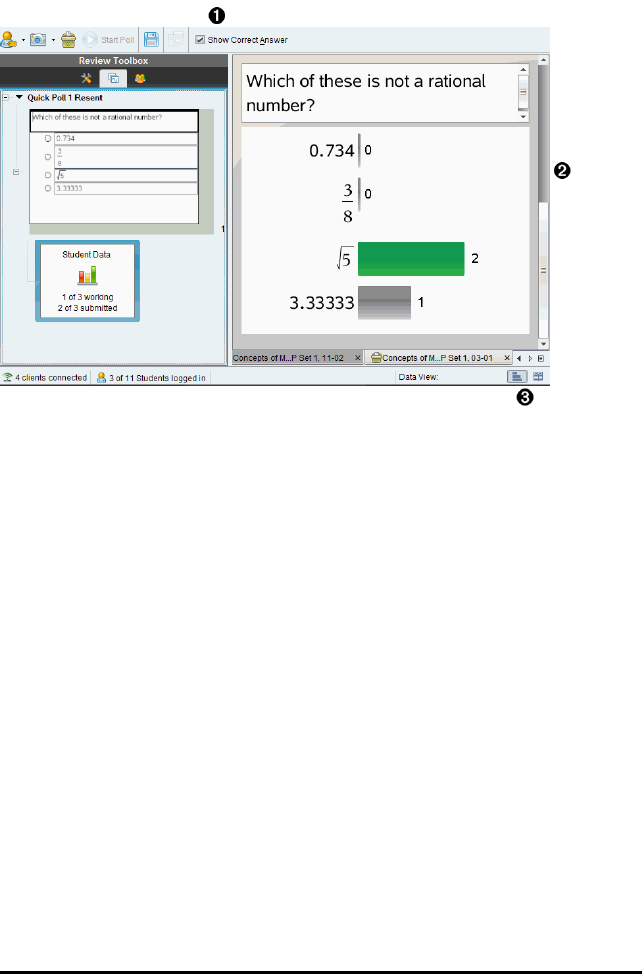
Exploring the Data View Pane
ÀShow Correct Answer. Select this check box to display the answer you
marked as the correct answer in the Data View pane. The correct answer
is highlighted in green.
ÁResponses. Shows the information chosen in the Page Sorter. This
example shows the responses from a selected Student Response icon.
You can show or hide responses, and mark responses as correct or
incorrect.
ÂData View. Click an icon to view the data in different formats: bar chart,
graph, or table. A "Show Your Work" option is available for expression and
equation questions.
Understanding the Data View
The Data View pane displays the question in the open document, as well as
the responses to that question. You can view live results in the Data View
pane. The data is updated in real time as students respond to Quick Poll and
Open Response questions, graph functions, or move points on a graph.
Using the Review Workspace 281
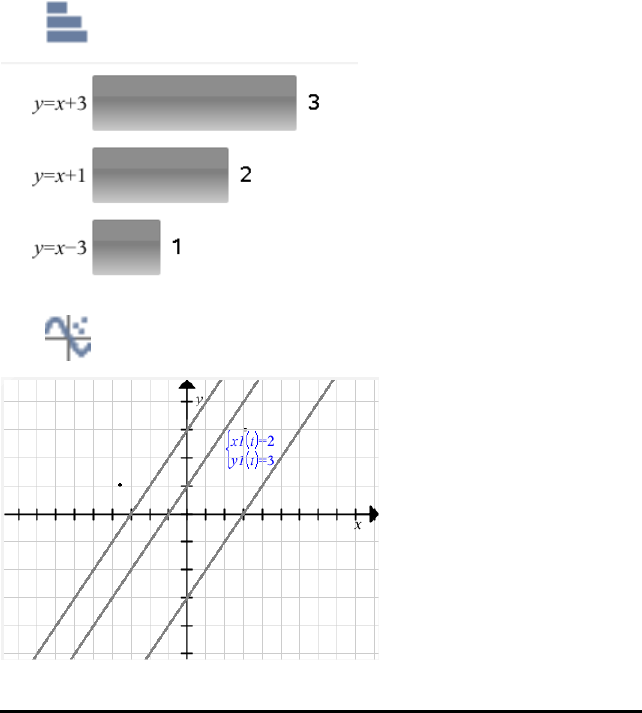
282 Using the Review Workspace
The Data View icons allow you to view responses in the Data View pane as a
bar chart, graph, or table. Each view shows the student responses and the
frequency of each response.
The bar chart and table views are available for all question types and Quick
Poll documents. The graph view is available in equation, coordinate points,
and list questions.
Expression and equation questions have an additional "Show Your Work" data
view available, if you marked the question for students to show their work. The
"Show Your Work" data view is retained when you close and reopen the
Review Workspace.
The following examples show the same data displayed in different data views.
Click to view the data in bar chart form.
Click to view the data in graph form.

When you are in graph view, the Graph Tools are available to allow you to
work with the graph. The settings in the graph are retained when you close and
reopen the Review Workspace.
In the bar chart and graph views, hover your mouse pointer over a response to
see a list of students who gave that response.
Click to view the data in table form.
The table view is available as a frequency table or as a student table.
▶To view data in different table views, click the Organize tool in the Review
toolbox, and then click Frequency Table or Student Table.
A frequency table shows the responses with the number of times the response
occurred. Click the Response heading to sort the responses in ascending
order, descending order, or question order. Click the Frequency heading to sort
by frequency of response.
Using the Review Workspace 283
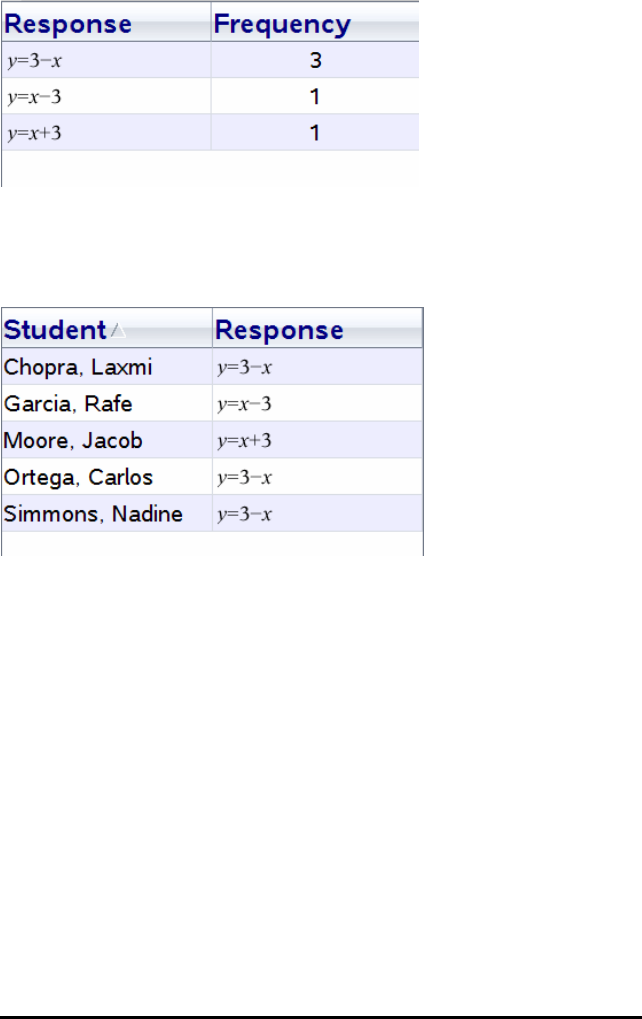
284 Using the Review Workspace
A student table shows the student names with their responses. Click the
Student heading to sort the responses in ascending or descending
alphabetical order. Click the Response heading to sort the responses in
ascending order, descending order, or question order.
The settings for sorting and sizing columns are retained for each document
when you close and reopen the Review Workspace.
Opening Documents for Review
You can review a document that has been collected from the class, a Quick
Poll in progress, or a saved Quick Poll. You cannot review a document that
does not have questions.
When you start a Quick Poll, the software automatically switches to the Review
Workspace, and you can review the data as the students are responding.
When you stop and save the poll, you can open it in the Review Workspace to
review the saved responses.
If this is your first time using the software, the Data View pane may be empty.
Complete the following steps to open a document for review.
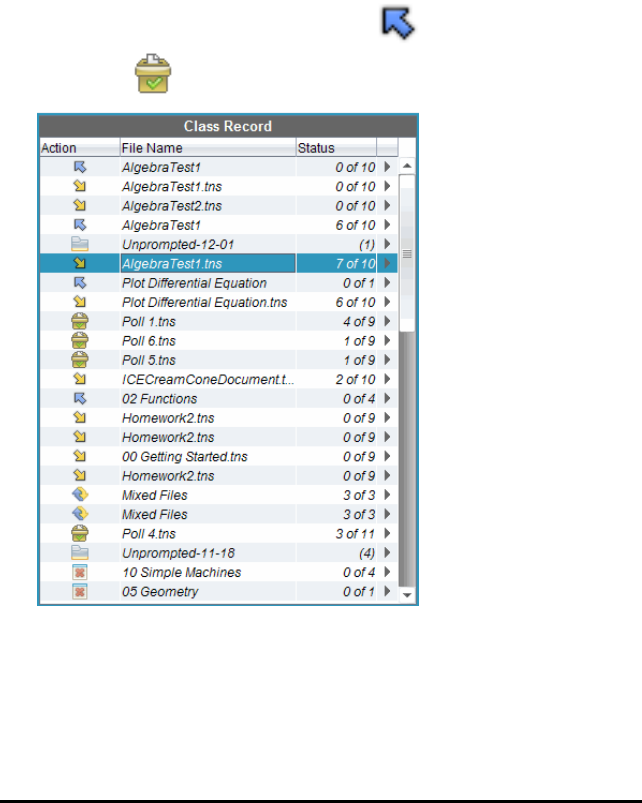
Opening a Document from the Class Workspace
To open a document for review from the Class Workspace:
1. Use the Workspace selector to select the Class Workspace.
2. Right-click a file from the Class Record, and then click Open in Review
workspace.
The software automatically switches to the Review Workspace with the
selected document open.
Note: You can open collected documents that contain questions and
QuickPolls for review in the Class Record.
Opening a Document from the Portfolio Workspace
To open a document for review from the Portfolio Workspace, follow these
steps:
1. Use the Workspace selector to select the Portfolio Workspace.
Using the Review Workspace 285

286 Using the Review Workspace
2. Right-click a column cell or a cell in a student row, and then click Open in
Review workspace.
The software automatically switches to the Review Workspace with the
selected document open.
Viewing Data
You can view data in the Student pane or in the Data View pane. You can
choose a student to view their answer, or you can choose an answer to view
which students gave that answer.
Viewing Data from the Student Pane
▶Click a student name in the Student pane to view that answer in the Data
View pane. You can select more than one student at a time.
The software highlights the selected student’s answer in blue.
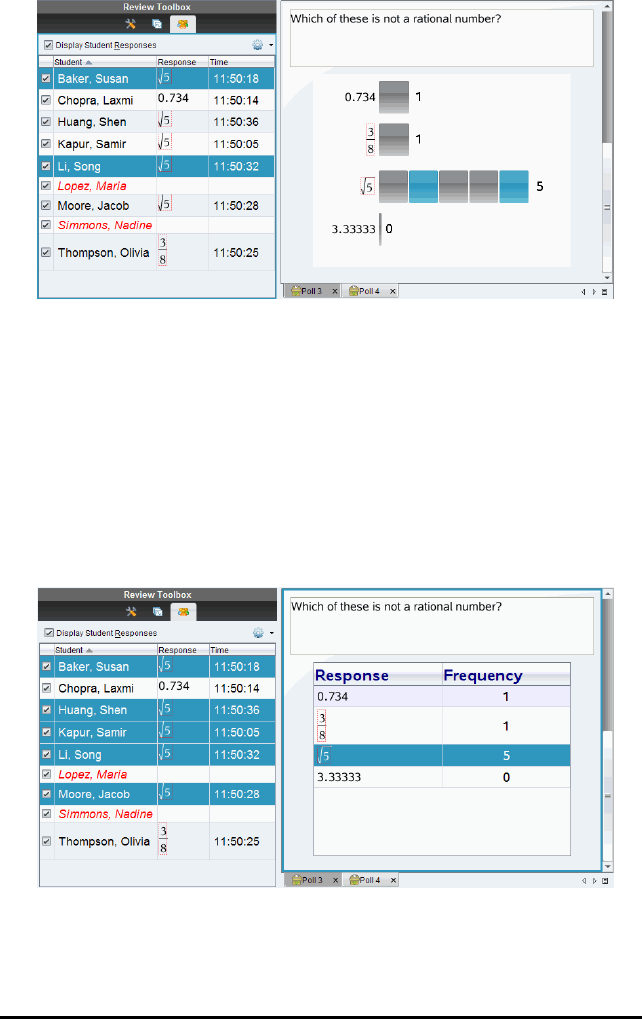
If you switch between bar chart, table, and graph views, the software retains the
selected information and highlights the responses from the selected students.
Note: Since student responses can vary for List questions, the software does
not show List answers for selected students in the Data View pane.
Viewing Data from the Data View Pane
▶Click a response in the Data View pane to view the students who gave that
response in the Student pane. You can select more than one response at a
time.
The software highlights the corresponding student names in blue.
If you switch between bar chart, table, and graph views, the software retains the
selected information and highlights the students who answered the selected
response.
Using the Review Workspace 287
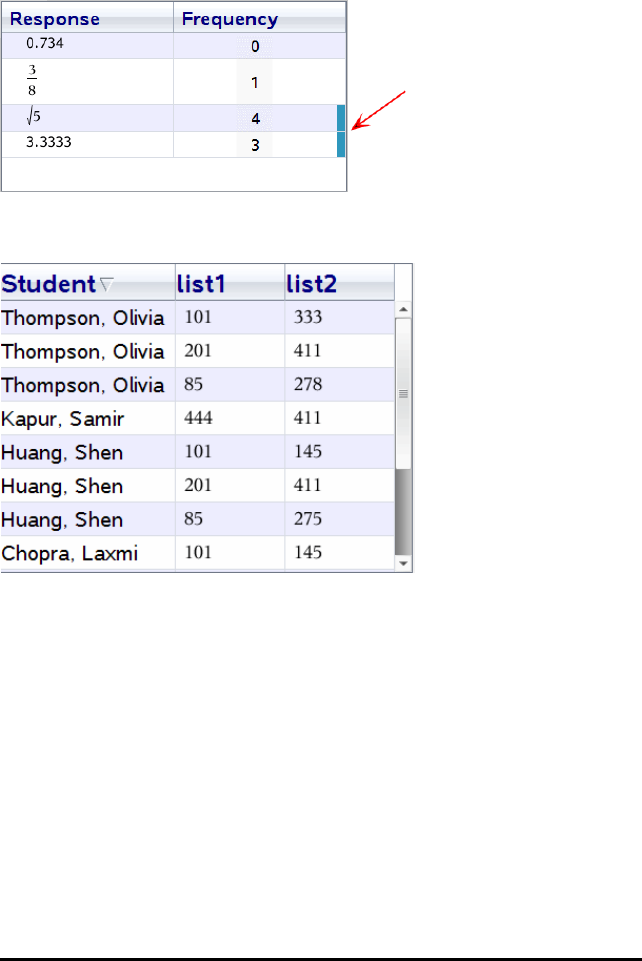
288 Using the Review Workspace
Note: If Multiple Choice questions have multiple responses, a blue area is
displayed next to all responses from the selected student.
Note: For List questions, right-click anywhere in the table view, and then click
Show Student Column to show student names next to their responses.
Changing the Aspect Ratio
The Review Workspace displays graphs in a question application as they
appear on the students’ handhelds or computers. At times, the graphs may
appear stretched, since the graph may have changed the aspect ratio to fit on
the handheld.
You can select to view the graphs as they come in from students, or you can
preserve the aspect ratio of the graph as it appeared when it was inserted in
the question application.
By default, the Review Workspace displays graphs in a question application as
they appear when the students submit them.
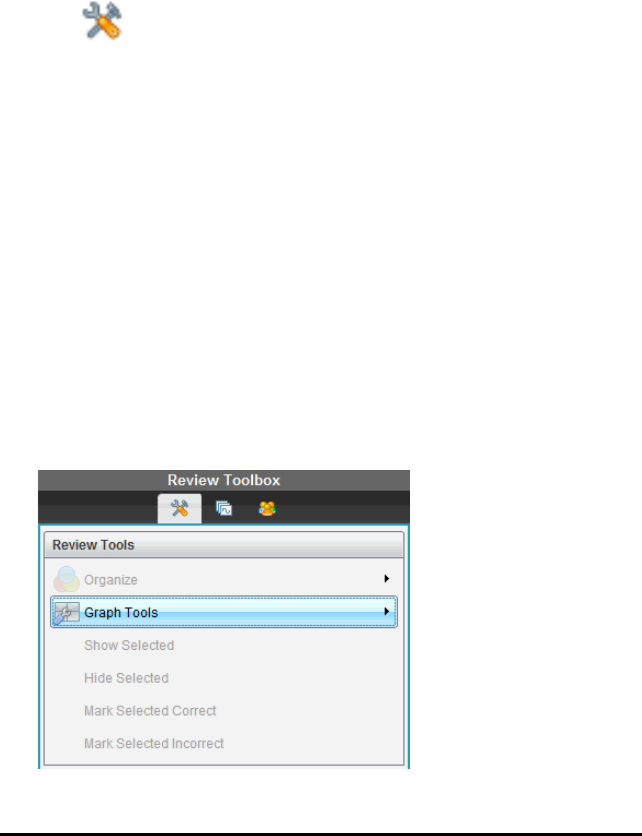
To preserve the aspect ratio of a graph as it appeared when it was inserted in
the question, follow these steps:
1. View the data in graph view.
2. Right-click on the graph in the Data View pane, and then click Graph
Tools> Aspect Ratio.
— or —
3. Click in the Review Toolbox and then click Graph Tools> Aspect
Ratio.
When the Aspect Ratio box is checked, the aspect ratio is preserved.
When the box is not checked, the aspect ratio may change.
Organizing Responses
You can configure a plot list for List questions, organize bar chart data and
table views, individualize student responses, and organize Multiple Choice
questions that have multiple responses into separate, group, or equivalent
responses.
Configuring a Plot List
The plot list settings let you set different shapes for the different plots to help
you follow separate lines or responses on a graph.
To set the plot list settings, follow these steps.
1. While in graph view, click Graph Tools in the Review toolbox.
Using the Review Workspace 289
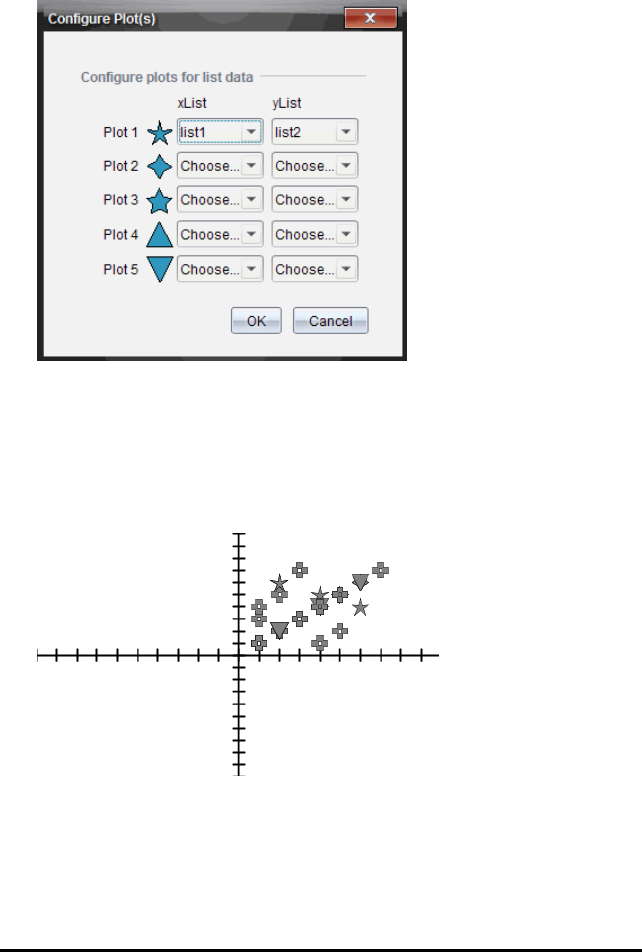
290 Using the Review Workspace
2. Click Plot List Settings.
The Configure Plot(s) dialog box opens.
3. Click the down arrow next to a shape to choose which list to represent
(list1, list2, and so forth) for the xList and yList.
Note: You can choose more than one shape for each list.
4. Click OK.
The graph view is updated with the shapes you selected.
When you change plot list settings in the graph view, and then change to
bar chart view, the software asks you to choose which lists to show in the
bar chart. You can choose an individual list, or a list for the Category and
Frequency.
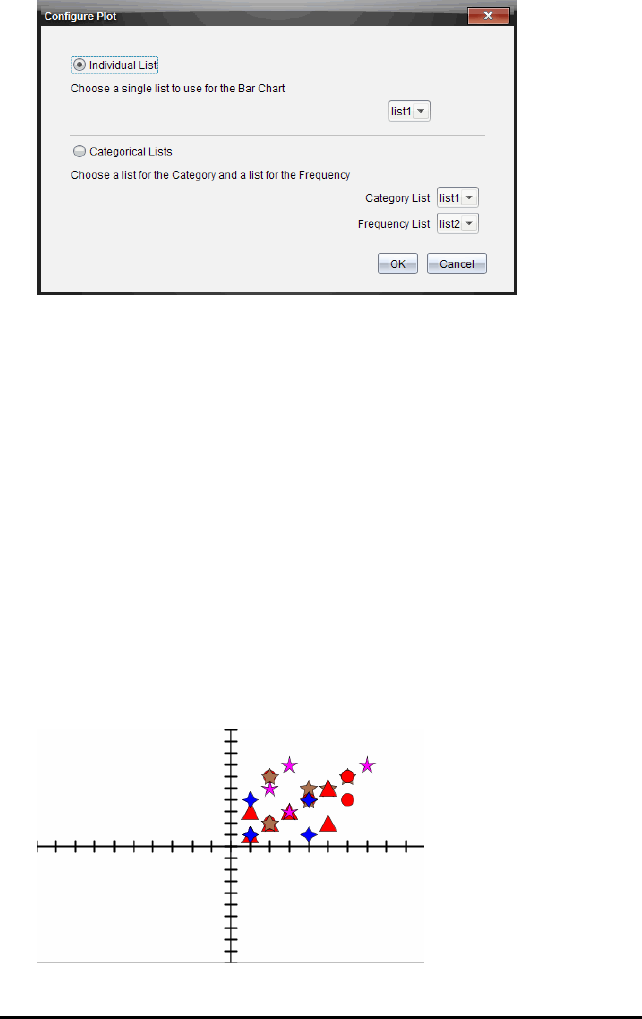
5. Select the applicable options and click OK.
If you click Cancel, the software shows the bar chart as an individual list,
using list1 as the default.
You can configure the plot list at any time while in bar chart view.
Note: To configure the plot list from the bar chart view, click Organize in the
Review toolbox and click Plot List Settings.
Individualizing Student Responses
You can change the colors of each student response in a graph so you can
identify the separate responses. This is useful when you are running a live
activity; you can view the progress of individual students as they graph
functions, move points on a graph, or respond to Quick Poll questions.
▶To change the color of student responses, click Graph Tools in the Review
toolbox, and then click Individualize Student Responses.
The responses are displayed in different colors in the Data View pane.
Using the Review Workspace 291
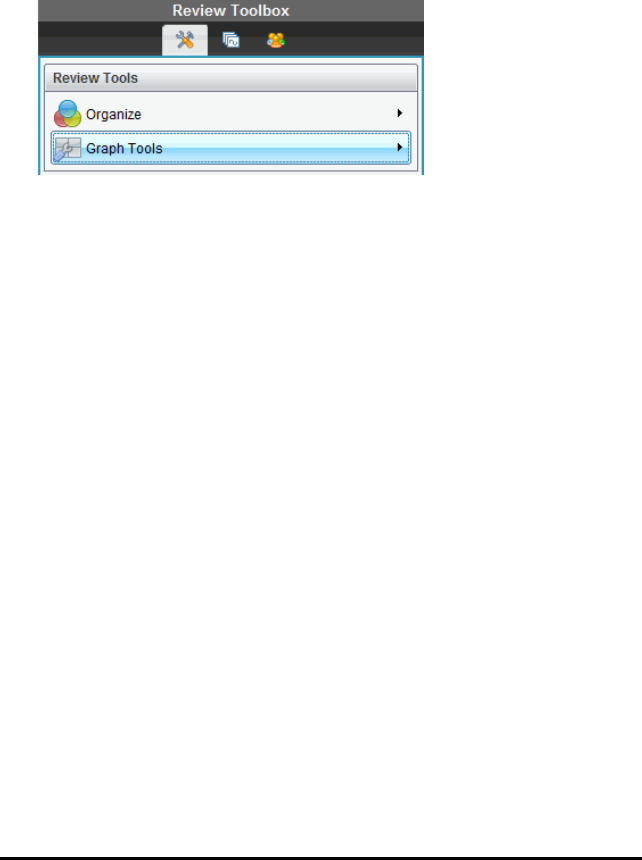
292 Using the Review Workspace
Organizing List Data
In bar chart view, you can organize list data by Frequency, Numeric Value, or
Alphabetically.
To organize list data, follow these steps.
1. In bar chart view, click Graph Tools.
2. Select to sort the bars by Frequency, Numeric Value, or Alphabetically.
The bar chart view is updated in the Data View pane.
Organizing Bar Chart Data
Organizing by separate responses shows the results for each individual
response. For example, all of the A responses, all of the Bs, all of the Cs, and
so forth. Organizing by group responses shows all multiple responses from the
students. For example, all of the A plus B responses, all of the A plus C
responses, and so forth.
Organizing by equivalency combines similar results into one bar. For example,
y=4Mx, y=Mx+4, and y=M(xM4) would all be combined into one bar or table row.
By default, Multiple Response questions are displayed as separate responses
in the bar chart view.
Settings for organizing by separate or group responses and for organizing by
equivalency are retained when you close and reopen the Review Workspace.
To organize by grouped responses, follow these steps.
1. Click the Organize tool in the Review toolbox.
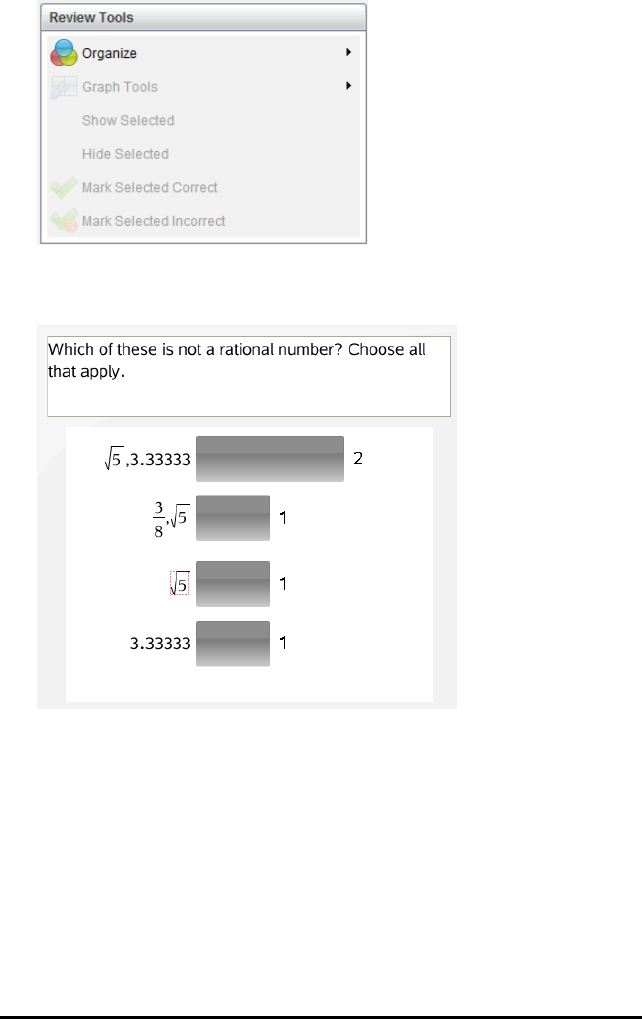
2. Click Show Student Responses Grouped Together.
The Data View pane shows the grouped responses.
3. To return to the default view, click the Organize tool, and then click Show
Student Responses Separated.
The Data View pane shows the data as separate responses.
Using the Review Workspace 293
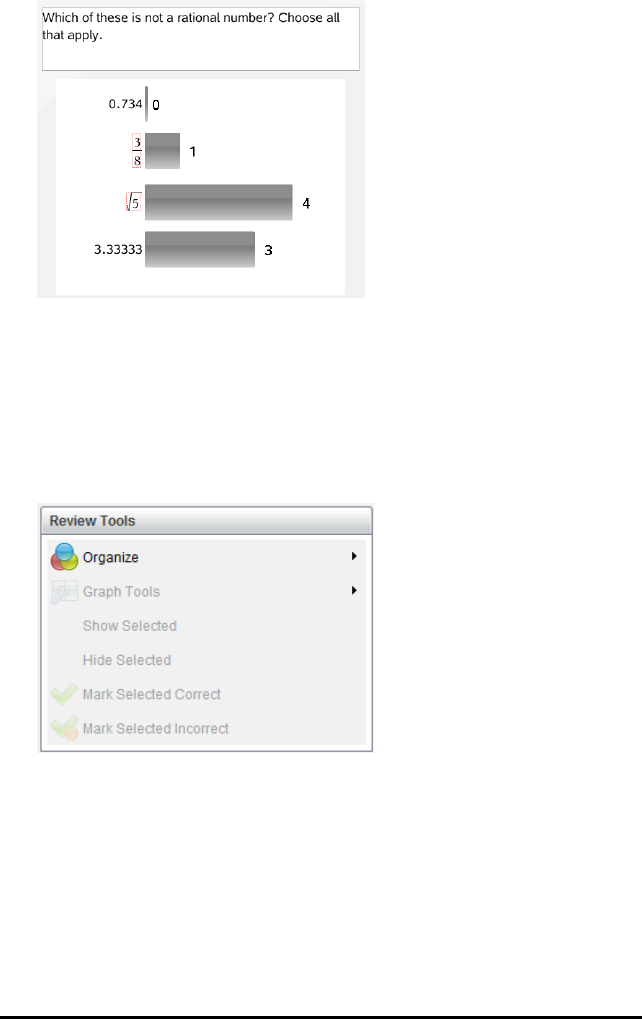
294 Using the Review Workspace
Organizing by Equivalency
Organizing by equivalency groups all similar responses together in one bar or
row. In bar chart view, you can still see separate responses by clicking on the
bar.
To organize by equivalency, follow these steps.
1. Click the Organize tool in the Review toolbox.
2. Click Group Responses by Equivalence.
The Data View pane shows the grouped responses.
3. To return to the default view, click the Organize tool, and then click Group
Responses by Exact Matches.
The Data View pane shows the data as separate responses.
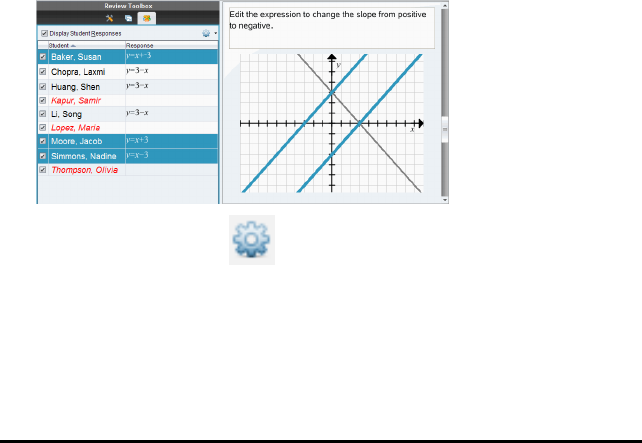
Hiding and Showing Responses
You can hide one or more student responses in the Student pane or in the
Data View pane. When you hide a response, the corresponding data updates,
and the Data View pane does not show the hidden data. Settings for hiding or
showing data are retained when you close and reopen the Review Workspace.
When you hide responses, the following actions occur in the different views.
•Bar chart view. The bar chart is updated and re-sorted using the current
data.
•Table view. The table is updated and re-sorted using the current data.
•Graph view. The graph is updated using the current data. Any regression
that was added is automatically recalculated and the new values are
displayed.
•Show your work. The selected student’s work is hidden from view.
Hiding Responses from the Student Pane
To hide responses, follow these steps.
1. In the Student pane, select the students whose responses you want to
hide.
The selected student responses are highlighted in blue in the Data View
pane.
2. Click the Options menu , and then click Hide Selected, or clear the
check box next to the student name.
The Data View pane hides the responses of the students you selected,
and shows the responses of the remaining students.
The student names you selected are displayed in gray text.
Using the Review Workspace 295
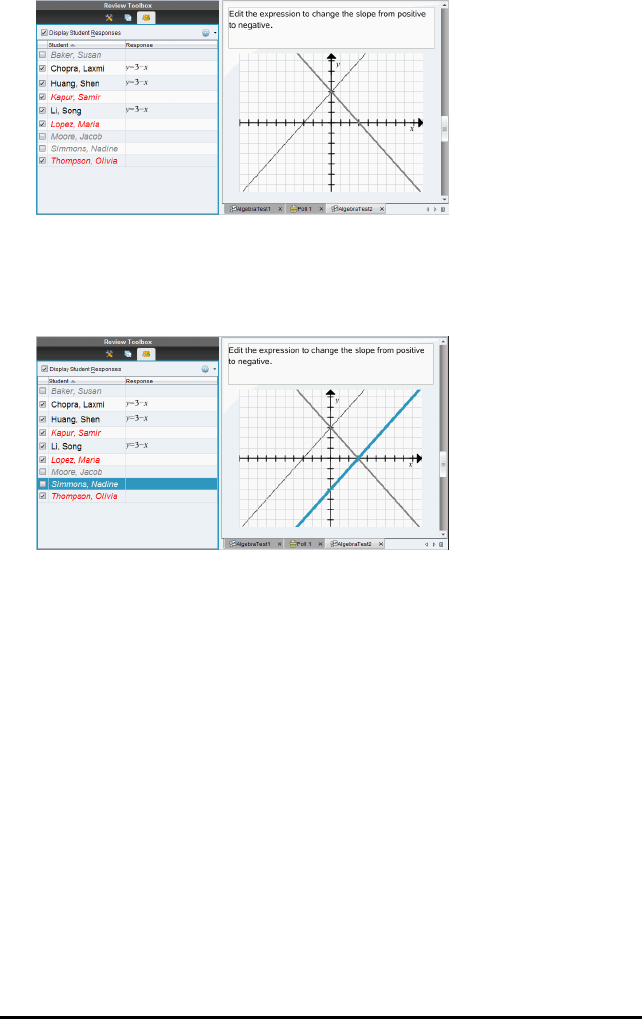
296 Using the Review Workspace
Note: If a response is hidden, click a student name to show the response.
The response is displayed in blue in the Data View pane. All bar chart,
table, and graph views are updated with the selected data. The response
stays in view until you select a different student.
Hiding Responses from the Data View Pane
You can hide responses in the bar chart, graph, or table views. When you hide
responses, the Data View pane updates the data and does not show the
hidden responses. In the Student View, student names are displayed in gray. In
Page Sorter view, the software does not change the documents or icons.
To hide responses, follow these steps.
1. In the Data View pane, select the responses you want to hide.
The selected students are highlighted in blue in the Student pane.
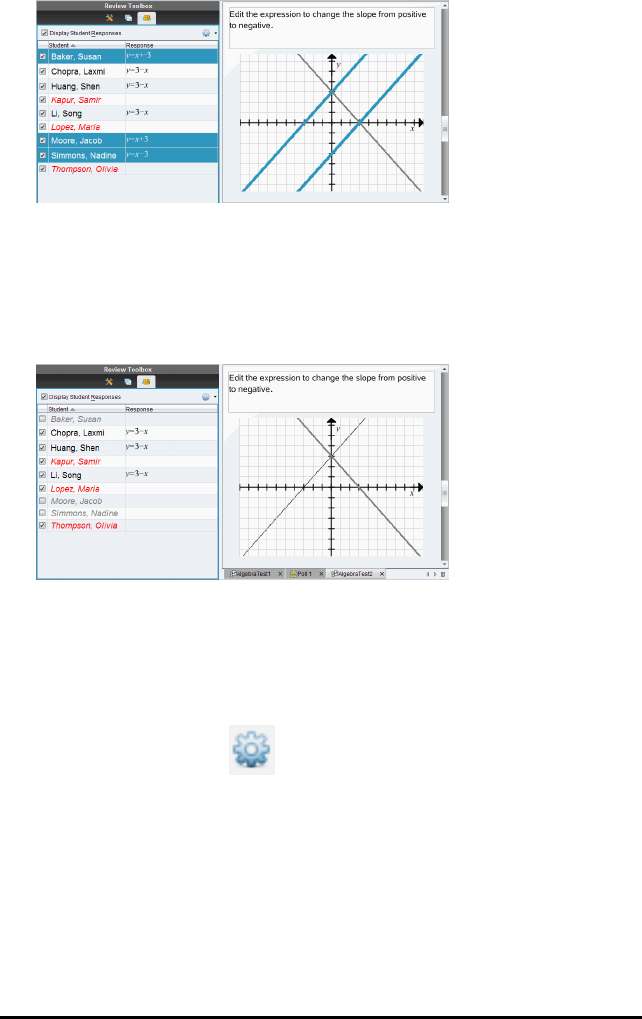
2. Right-click the response and click Hide Selected.
The Data View pane hides the responses you selected, and shows the
responses of the remaining students.
The student names that correspond with the responses you selected are
displayed in gray text.
Showing Responses
To show the hidden responses, follow these steps.
1. In the Student pane, select the students whose responses you want to
show.
2. Click the Options menu , and then click Show Selected.
The student names are displayed in black and student responses are
shown in the Data View pane.
Marking Responses as Correct or Incorrect
You can use the Review Workspace to mark selected answers as correct or
incorrect. If you are reviewing a document with a correct answer already
marked, you can change the correct answer. In a Multiple Choice question with
Using the Review Workspace 297

298 Using the Review Workspace
multiple responses, you can add additional correct answers.
If the Show Correct Answer box is checked, answers marked as correct are
highlighted in green.
The software reevaluates the data based on the correct responses, and the
Data View pane updates the view to reflect the changes.
To mark a response as correct:
▶In the Student pane, right-click a student and click Mark as Correct.
▶In the Data View pane, right-click a response and click Mark Selected
Correct.
▶In the Data View pane, click a response and click Mark Selected Correct in
the Review Tools pane.
In Multiple Choice questions with multiple answers, check marks are displayed
next to the responses.
▶Click a check mark to mark a response as correct.
When you mark a response as incorrect, the software removes the green
highlight.
To mark a response as incorrect:
▶In the Student pane, right-click a student and click Remove as Correct.
▶In the Data View pane, right-click a response and click Mark Selected
Incorrect.
▶In Multiple Choice questions with multiple answers, click the green check
mark.
Note: If you change an answer to correct or incorrect, any points you already
manually awarded students for correct or incorrect answers will not be
changed.
When you mark responses, the following actions occur in the different question
types.
Question Types Action
Multiple Choice, Single Response
Image: Label, Single Response
Image: Point on, Single Response
Adding a new answer replaces
the current answer. Removing
an answer leaves the question

Question Types Action
with no correct answers.
Multiple Choice, Multiple Responses
Image: Label, Multiple Responses
Image: Point on, Multiple Responses
Adding a new answer
increases the correct answer
set. For example, an answer of
"A and B" becomes "A and B
and C." Removing an answer
decreases the correct answer
set.
Open Response: Explanation
Open Response: Text Match
Equation: f(x) and y=
Coordinate Points
Expression: Variable
Chemical
Adding a new answer
increases the correct answer
set. Removing an answer
leaves the question with no
correct answers.
Expression: Numerical Adding a new answer, with or
without tolerance, replaces the
current answer. Removing an
answer leaves the question
with no correct answers.
The following examples show answers marked as correct in different data
views.
Using the Review Workspace 299
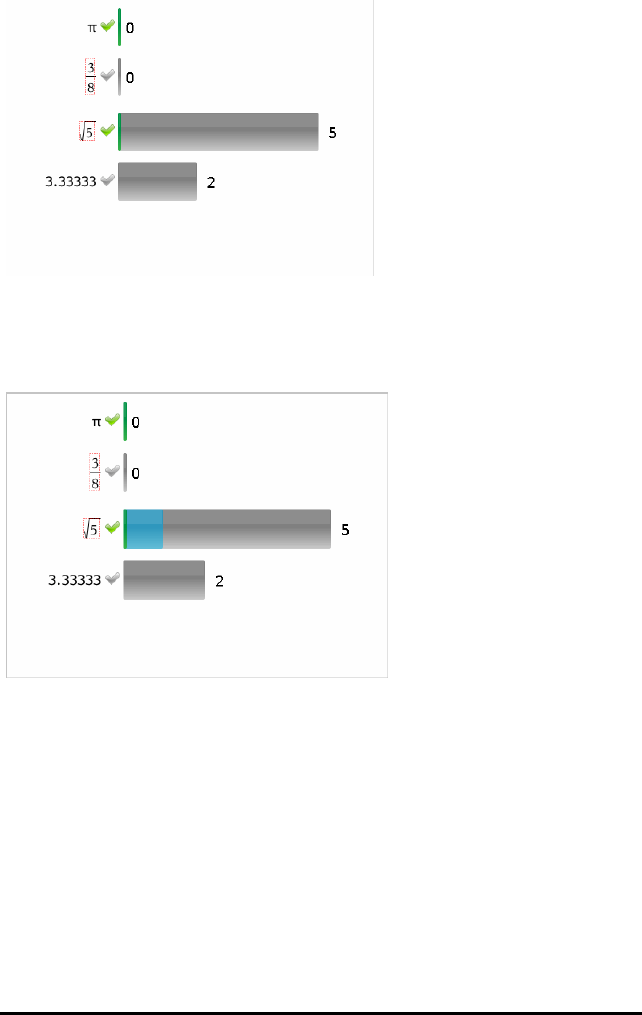
300 Using the Review Workspace
Bar chart view, Multiple Choice question with multiple responses and two correct
answers, organized by Show Student Responses Separate, and no student
selected in the Student pane.
Bar chart view, Multiple Choice question with multiple responses and two correct
answers, organized by Show Student Responses Separate, and one student
selected in the Student pane.
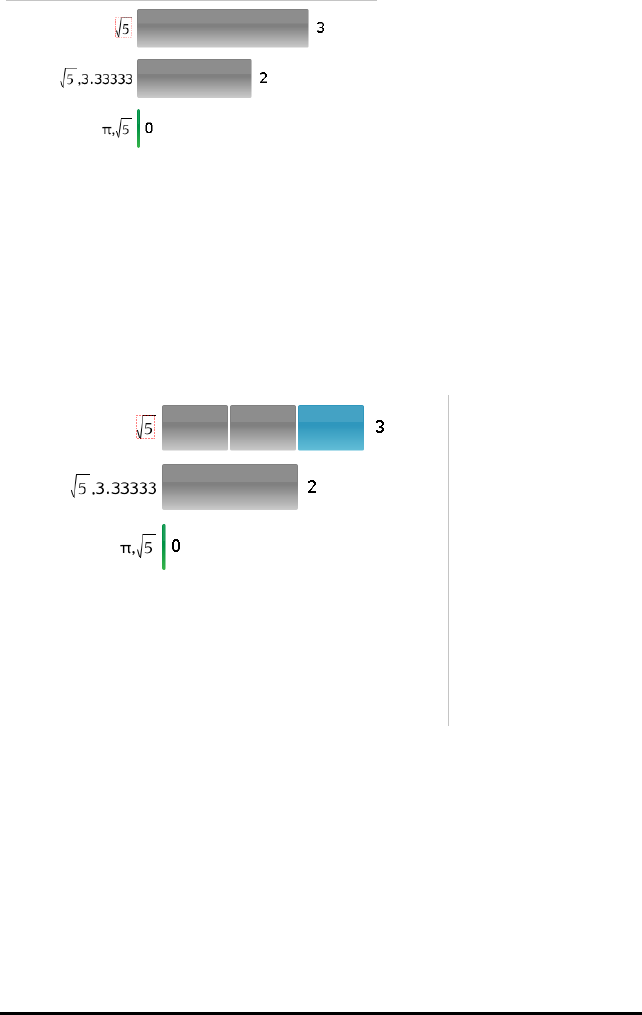
Bar chart view, Multiple Choice question with multiple responses and two correct
answers, organized by Show Student Responses Grouped Together, and no
students selected in the Student pane.
Bar chart view, Multiple Choice question with multiple responses and two correct
answers, organized by Show Student Responses Grouped Together, and one
student selected in the Student pane.
Using the Review Workspace 301
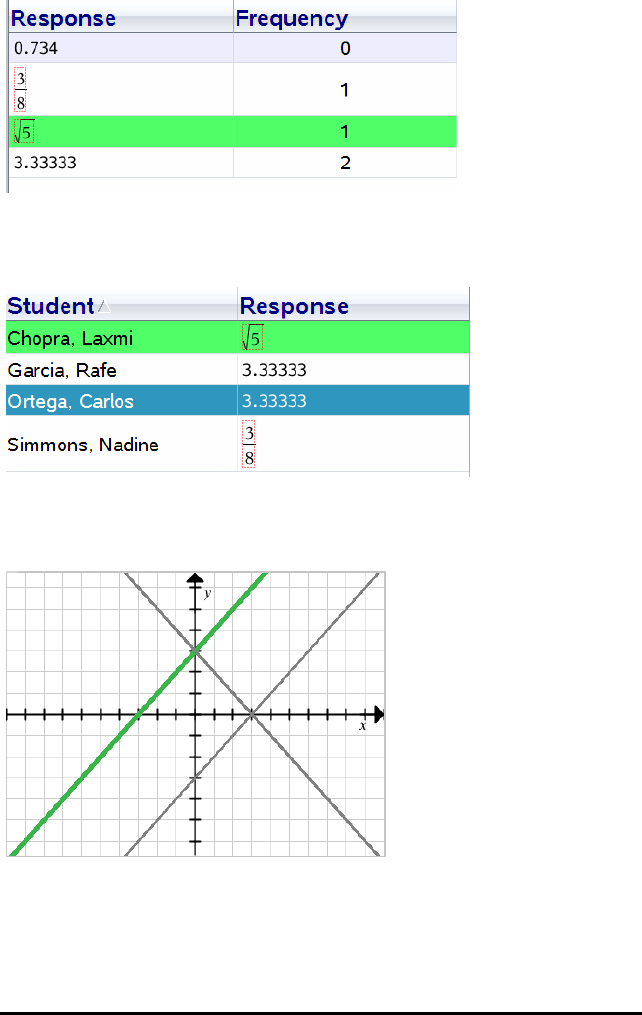
302 Using the Review Workspace
Frequency table view, Multiple Choice question with one correct answer, and no
student selected in the Student pane.
Student table view, Multiple Choice question with one correct answer, and one
student selected in the Student pane.
Graph view, Equation y= question with one correct answer, and no student
selected in the Student pane.

Graph view, Equation y= question with one correct answer, and one student
selected in the Student pane.
Adding Teacher Data
There may be times you want to add your own data to a graph you are
reviewing in class. The Graph Tools allow you to add teacher points and
teacher equations to a graph, and to set the plot list settings and individualize
student responses.
Teacher data is displayed larger than student data, and in a different color.
When you add teacher data, the software reevaluates the data, and the Data
View pane updates the view to reflect the changes.
You can hide and show teacher data, but you cannot mark a teacher response
as correct or incorrect.
Adding Teacher Points
1. Click Graph Tools in the Review toolbox.
Using the Review Workspace 303
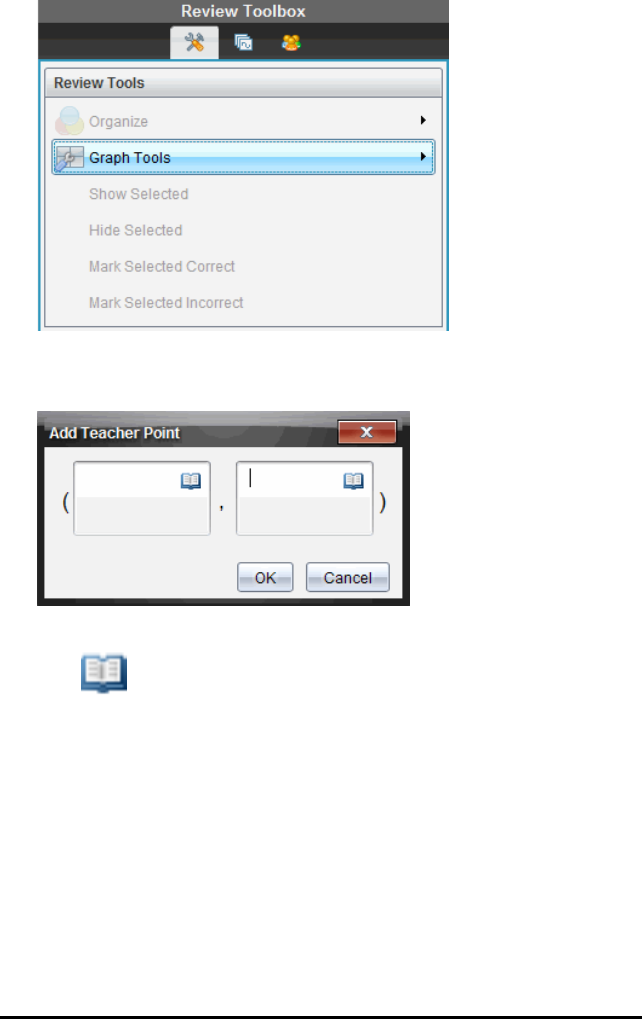
304 Using the Review Workspace
2. Click Add Teacher Point.
The Add Teacher Point dialog box opens.
3. Type your information in the fields.
Click to open math templates and symbols that you can add to the
fields.
4. Click OK.
Your point is displayed on the graph, and the name Teacher is added to
the list of names in the Student pane.
Note: The teacher may have multiple entries.
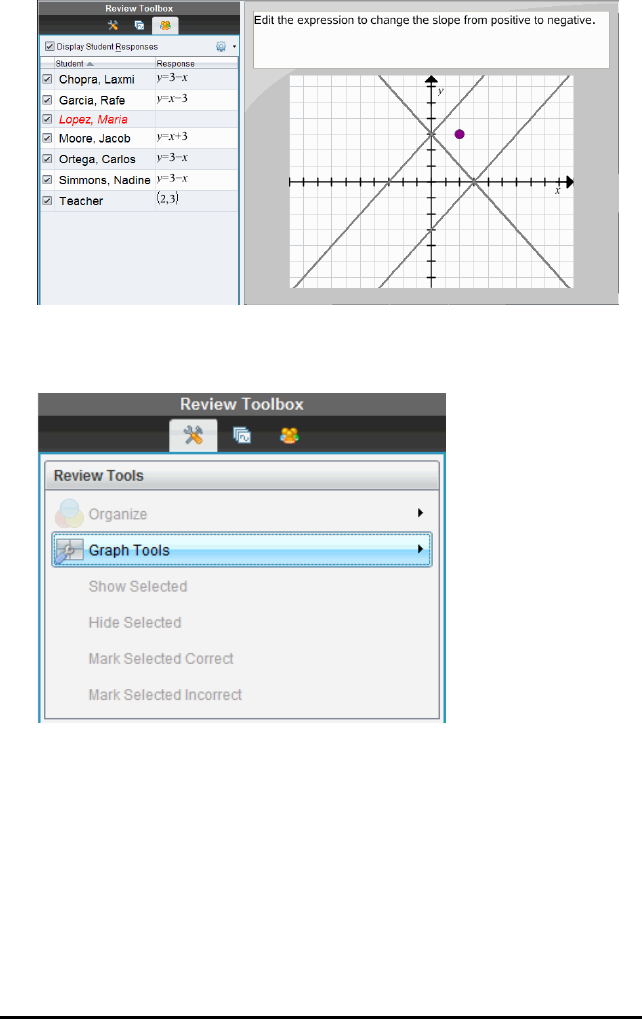
Adding Teacher Equations
1. Click Graph Tools in the Review toolbox.
2. Click Add Teacher Equation.
The Add Teacher Equation dialog box opens.
Using the Review Workspace 305
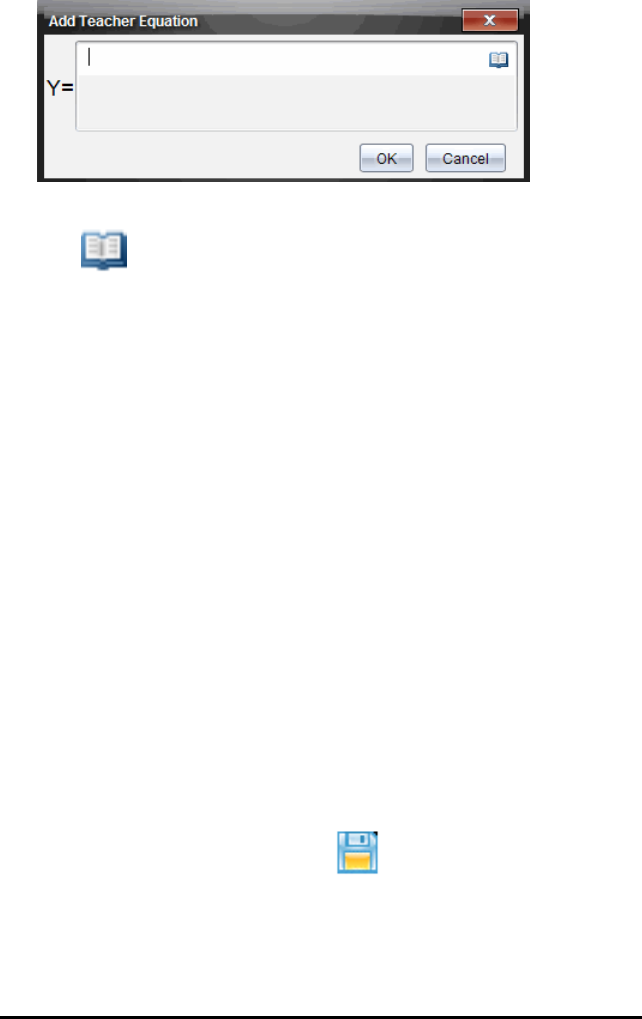
306 Using the Review Workspace
3. Type your information in the field.
Click to open math templates and symbols that you can add to the
fields.
4. Click OK.
Your line is displayed on the graph, and the name Teacher is added to the
list of names in the Student pane.
Note: The teacher may have multiple entries.
Saving to the Portfolio Workspace
You can save documents that contain questions and Quick Polls to the Portfolio
Workspace, where you can review and analyze individual responses, and
assign or change a student’s grade.
When you save Quick Polls to Portfolio, students can continue to submit
answers to the Quick Poll until you stop the poll. The saved Quick Poll in
Portfolio automatically updates without you having to save it again.
Note: If you opened the file from the Portfolio Workspace, or if you have already
saved the file to Portfolio, the software does not ask you for a file name. The
software saves the file to the Portfolio Workspace with the existing file name,
and updates any grades you had given students. You can go to the Portfolio
Workspace and change a grade at any time.
To save a file to the Portfolio Workspace:
1. Click File> Save to Portfolio, or click .
The Save to Portfolio dialog box opens. By default, the name of the file is
shown in the Portfolio name box. If the file is a Quick Poll you have not
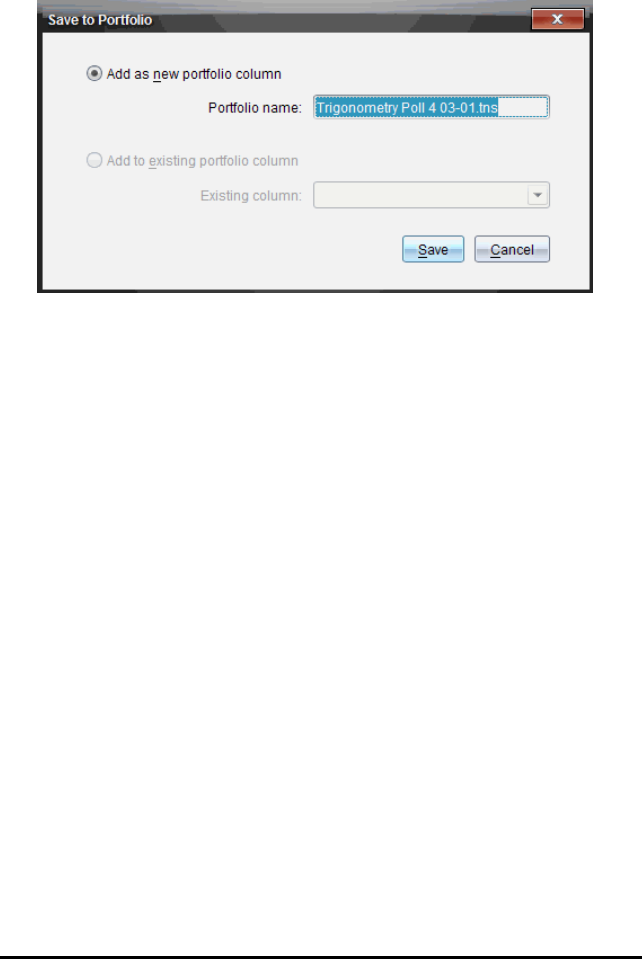
saved yet, the default name is <
Class name, Quick Poll Set#, mm-dd
.tns>.
For example: Algebra1 - Mrs. Smith, QP Set 2, 10-26.tns.
• To add a new Portfolio column, select Add as new portfolio column.
You can use the existing name or type a new name.
• To add the file to an existing portfolio column, select Add to existing
portfolio column. Click the down arrow to select the column.
Note: Quick Polls cannot be added to existing columns.
2. Click Save.
The file is saved in the Portfolio Workspace.
Saving Data as a New Document
You can take data collected from students, view it in table form, and save it as a
Lists & Spreadsheet document. This document can be used as an instructional
aid or sent to the students for further analysis.
Note: If the data comes from a Lists question, the column titles in the Table
View are used as the names for the list variables. If the variable names are not
usable, the software renames them. For instance, if the name has a space, the
software replaces it with an underscore.
1. To save data to a new Lists & Spreadsheet document, make sure you are
viewing the data in table view.
2. Right-click anywhere in the table, and then click Send Table to New
Document.
Using the Review Workspace 307

308 Using the Review Workspace
Note: Hidden data is not sent. If data is sorted, the sort order is retained in
the new document.
The Lists & Spreadsheet document opens in the Documents Workspace.
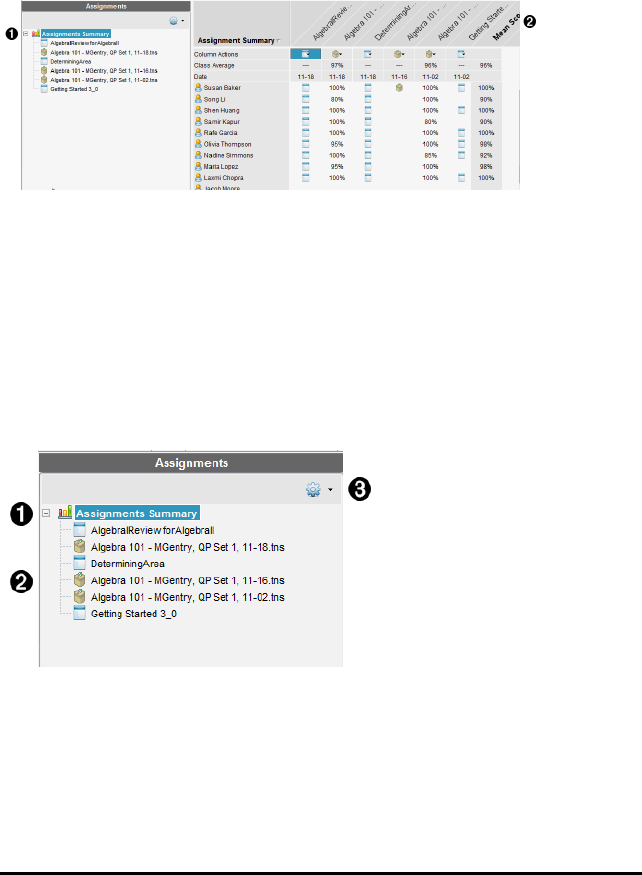
Using the Portfolio Workspace
Use this workspace to save, review, modify grades, and manage class
assignments from students.
ÀAssignments pane. Select assignments to view student information and
scores. You can redistribute, rename, or remove an assignment.
ÁWork area. Lists the students in the selected class and shows the scores
received for each assignment. Enables you to view class or student
assignments; sort by assignment, score, or student; and edit assignment
scores.
Exploring the Assignments Pane
ÀAssignments Summary. Lists the names of the assignments
that you saved to the Portfolio Workspace. Shows a class and
student average in the workspace.
• Click the minus sign (–) to collapse the list of individual
assignments and view only the Assignments Summary.
Using the Portfolio Workspace 309
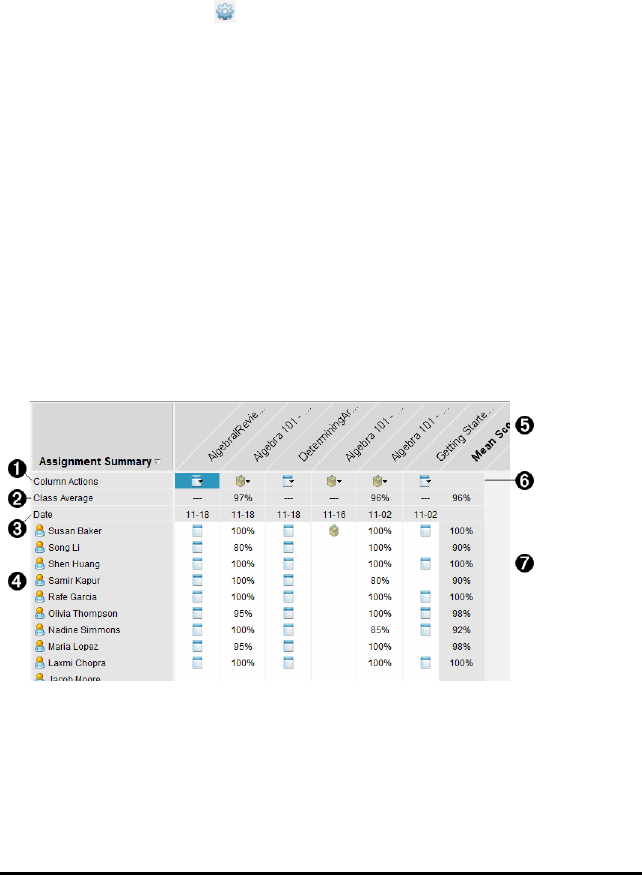
310 Using the Portfolio Workspace
• Click the plus sign (+) to show the list of individual
assignments.
ÁIndividual assignments. Click an assignment to see the
student scores for that assignment.
ÂOptions menu. Available when you select an individual
assignment. Click to open a menu that allows you to:
• Open the document in the Review Workspace.
• Redistribute the assignment to the current class.
• Remove the assignment from the Portfolio Workspace.
The assignment still exists in other workspaces.
• Rename the assignment.
Exploring the Workspace Views
The appearance of the workspace changes depending on what you selected in
the Assignments pane.
Assignments Summary View
This work area opens when you select Assignments Summary in the
Assignments pane.
ÀColumn Actions. Lets you perform certain actions on a column. Click a file
icon anywhere in this row to:
• Open an assessment for review in the Review Workspace.
• Sort assignments in ascending or descending order by student.

• Open the Master in the Review Workspace.
• Remove from Portfolio.
• Rename the assignment.
ÁClass Average. Shows the average score of the class for the assignment in
that column.
ÂDate. Shows the date the file was collected. The date the last file was
collected is shown in the first column on the left.
ÃStudents. Lists all students in the class.
ÄColumn Header. Shows the name of the assignment saved to the Portfolio
Workspace. You can perform the same actions on the column header as
you can on the column actions. Right-click the column header to open the
menu.
The column header Mean Score shows the mean score for all assignments
and the mean score for all assignments per student. Right-click the Mean
Score column to sort by ascending or descending scores.
ÅFile icon. Shows the type of file. The file types shown are:
Quick Poll
PublishView™ file
(Shown only in the TI-Nspire™ Navigator™ NC Teacher Software)
TI-Nspire™ file
Other file types
(Shown only in the TI-Nspire™ Navigator™ NC Teacher Software)
ÆStudent scores. If questions are automatically graded, the scores are
shown. You can change a student’s score for an assignment.
Individual Assignment View
This work area opens when you select a single assignment in the Assignments
pane. To view this work area, the assignment you select must be a .tns file that
contains one or more questions.
Note: In the TI-Nspire™ Navigator™ NC Teacher Software, you can also open
.tnsp files.
Using the Portfolio Workspace 311
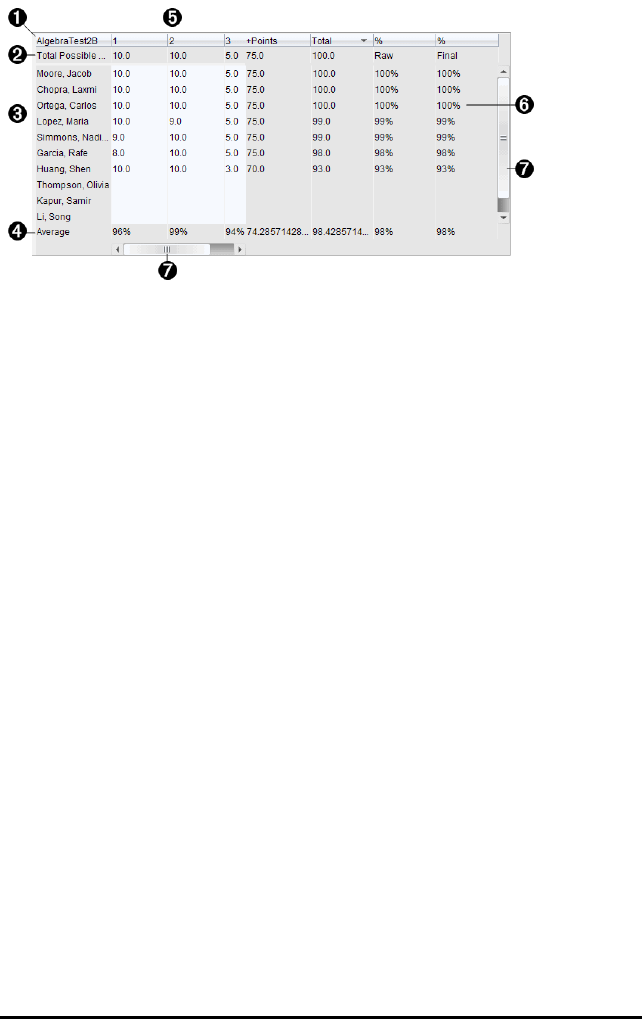
312 Using the Portfolio Workspace
ÀName of the selected assignment.
ÁTotal Possible. This row shows the points for these categories:
• Total possible points for each question in the assignment.
You can edit this number.
• Total number of extra points possible for the assignment.
You can edit this number.
• Total points for the assignment.
• Raw score based on the number of points the student
received divided by total possible points.
• Final percentage. This number updates when you edit
possible points or extra points. You can edit this score.
The final score is the same as the raw score, unless you
change it.
If you edit the final score, it no longer updates if the other
points change.
ÂStudent names. All students who received the selected
assignment. Right-click to open and edit the document in the
Documents Workspace, or to open the document for review in
the Review Workspace.
ÃAverage. Shows the average score for all students, as well as
average total points, raw score, and final score.
ÄQuestions in the assignment. If the document contained
multiple questions, each question is displayed here, along with
the total possible score for that question.
ÅScores. Lists the score each student received for the selected
assignment. Each page in an assignment may have a
separate score. Right-click to edit the score, open the
assignment in the Documents Workspace, or open the
document in the Review Workspace.
ÆScroll bar. Appears when there are more questions in the
assignment to view, or more students to view.
Saving an Item to the Portfolio Workspace
If you are using the TI-Nspire™ software for the first time, the Portfolio
Workspace may be empty. You need to save files to the Portfolio Workspace to
view and edit scores, and perform other work on the files.
You can save collected, unprompted, and Quick Poll files to the Portfolio
Workspace. You can save to the Portfolio Workspace from the Class and
Review Workspaces.
When you save Quick Polls to Portfolio, students can continue to submit
answers to the Quick Poll until you stop the poll. The saved Quick Poll
automatically updates without you having to save it again.
Note: If you opened the file from the Portfolio Workspace, or if you have already
saved the file to the Portfolio Workspace, the software does not ask you for a
file name. The software saves the file to the Portfolio Workspace with the
existing file name, and updates any grades you had given students. You can
change a grade in the Portfolio Workspace at any time.
To save a file to the Portfolio Workspace, follow these steps.
1. Select the files you want to save.
• From the Class Record in the Class Workspace, click , and then
click Save selected to Portfolio.
• From an open file in the Review Workspace, click File> Save to
Portfolio, or click
The Save to Portfolio dialog box opens.
Using the Portfolio Workspace 313
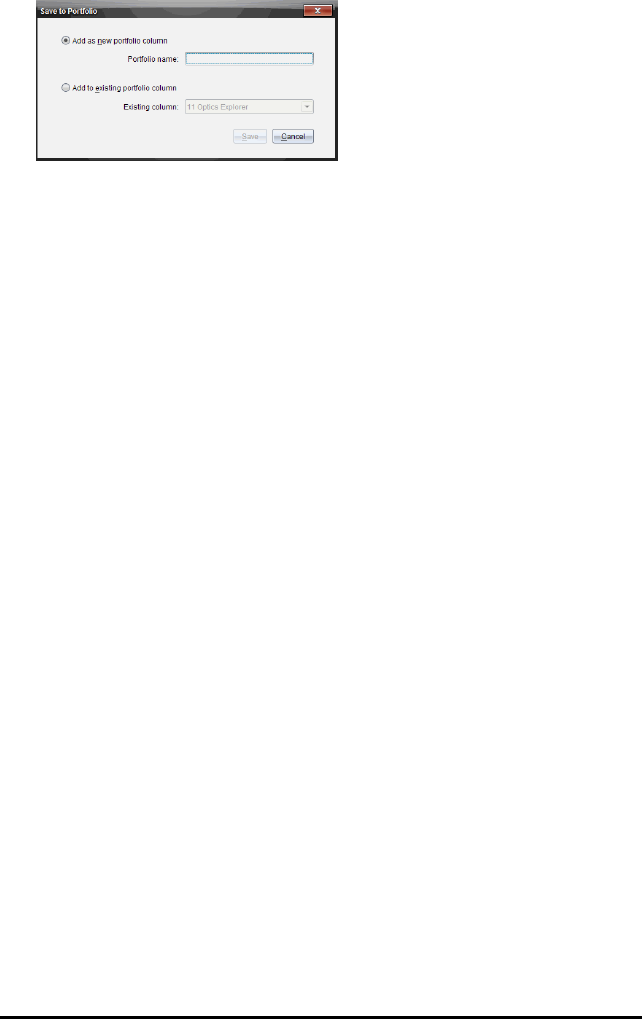
314 Using the Portfolio Workspace
2. Save the files to a new Portfolio column or add them to an existing Portfolio
column.
• To add the files to a new Portfolio column, select Add as new portfolio
column. You can use the existing name, or type a new name.
• To save the files to an existing Portfolio column, select Add to existing
portfolio column. Click the down arrow to select the desired column
from the drop-down list.
Note: Quick Polls cannot be added to existing columns.
3. Click Save.
The file is saved in the Portfolio Workspace.
Note: The files you saved in the Portfolio Workspace remain in the Class
Record until you remove them using the Remove command.
If a file is deleted from the Class Record, that delete action does not affect the
file copy in the Portfolio Workspace. The copy remains in the Portfolio
Workspace until it is deleted.
Importing an Item to the Portfolio Workspace
You can import a .tns file from your computer to a student’s Portfolio entry.
1. Click Assignments Summary.
2. Highlight a cell in the student row where you want to import the file.
Note: You can import a file for only one student at a time.
3. Click File> Import Item.
The Open dialog box is displayed.
4. Navigate to the file you want to import and click it.
5. Click Import.

If a file already exists in that cell, you are prompted to confirm the file
replacement.
• Click Replace to save your imported file over the existing file.
• Click Keep Existing to keep the existing file and cancel the import file
function.
Editing Scores
There may be times when you want to edit a student’s score. For example, an
Open Response assignment contains a question that requires the word
“Autumn” as the correct answer. One student has entered “Fall.” If you want to
give the student full or partial credit, you can do so by changing the student’s
score for the question.
In addition to editing an individual student score, you can edit the total possible
points for each question, the extra points, and the final percentage.
▶Use whole numbers to edit the scores. For example, type 75 to give a score
of 75%, type 100 to give a score of 100%, and so forth.
Note: If you type a score and do not press Enter, the change is not made, and
the previous score remains in place.
Previewing a Student’s Answer
You can preview a student’s answer to an individual assignment question in
the Preview Pane. This provides a quick, easy, and efficient method for the
review of questions, answers, and the modification of scores.
Note: The assignment must contain at least one question to be previewed.
1. Click an individual assignment in the Assignments Summary list.
2. Select the question cell you want to preview.
The following information is shown in the Preview Pane.
•Q#Question. Original question with icon showing correct or incorrect
response
Using the Portfolio Workspace 315
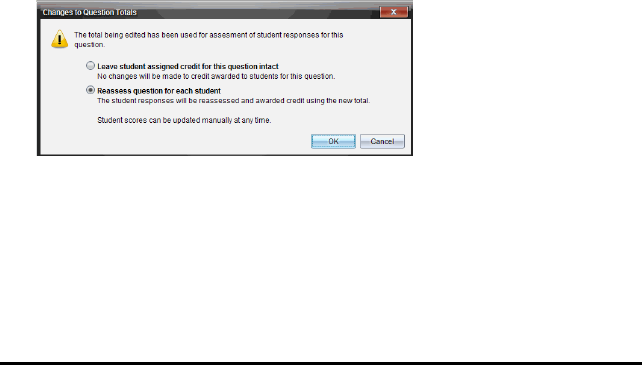
316 Using the Portfolio Workspace
•Student's Answer. Student’s response
•Correct Response. Teacher’s correct response (blank if there is no
correct response)
Note: Depending on the question posted, additional information may be
displayed.
Modifying a Student’s Score for an Assignment
You can edit the score for an assignment from the Assignments Summary view,
or you can edit the score for individual questions in an assignment from the
Individual Assignments view. These steps describe how to change a score
from either view.
1. In the student row, select the score you want to edit.
2. Right-click the cell and click Edit Score.
3. Type the replacement score, and press Enter. To cancel, press Esc.
Changing the Total Possible Points for a Question
You can edit the total possible score for individual questions or extra points.
1. Select a cell in the Total Possible row.
2. Right-click the cell and click Edit Score.
3. Type the points for the question or for extra points, and press Enter.
The software asks if you want to keep the student scores for the question, or
reassess the scores for each student. The default setting is to reassess the
scores for each student.
• To keep the student scores without making changes, select Leave
student assigned credit for this question intact.
• To reassess the score for each student, select Reassess question for
each student.
4. Click OK.

Changing the Final Percentage Score
1. In the Individual Assignments view, select the student whose score you
want to edit.
2. Right-click the cell in the Final column, and click Edit Score.
3. Type the replacement score and press Enter. To cancel, press Esc.
Note: If you edit the final score, it retains the edited value and no longer
updates if you edit other values in the row.
Exporting Results
If you or your school district use electronic gradebook software and reporting,
you may want to export scores to these programs. You can export scores from
Portfolio Workspace as a .csv formatted file. The export action includes all
scores for all students on the selected assignment, or for all assignments.
The .csv file contains all the columns and rows in the workspace except for the
Column Actions row. If a student had an empty cell with no score, the .cvs file
displays a cell that is empty.
Exporting the Current View
This allows you to export all data shown in the Portfolio Workspace for a single
assignment.
1. Choose an assignment from the list.
2. Click File > Export Data click .
3. Select Export Current View.
The Export Data dialog box opens.
• The default location is the My Documents folder.
• The default name is the name of the assignment.
Using the Portfolio Workspace 317
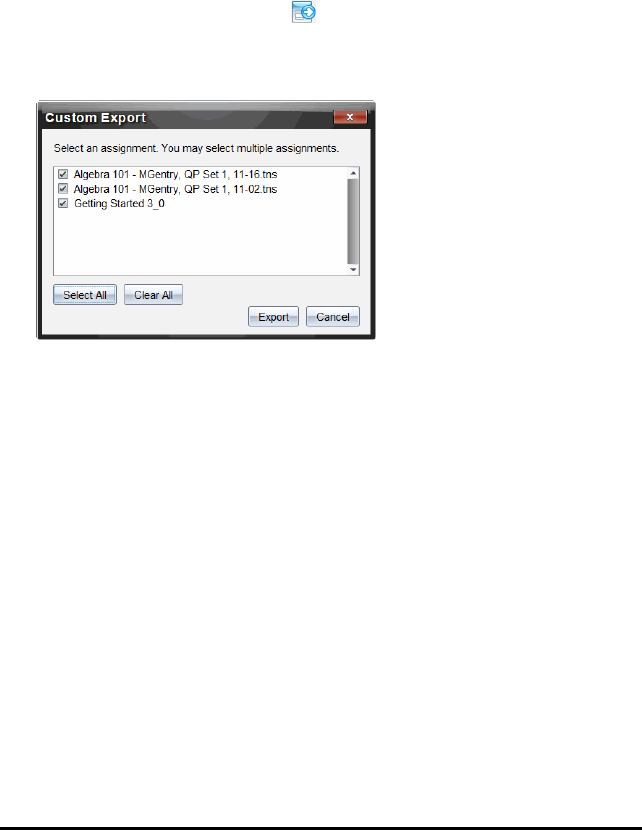
318 Using the Portfolio Workspace
4. Navigate to the location where you want to save the file.
5. Click Save.
Customizing an Export
Custom Export allows you to export the final scores for one or more
assignments. This is useful for reporting scores over a date range with only the
student name and final score exporting.
1. Click File > Export Data or click .
2. Select Custom Export.
The Custom Export dialog box opens.
3. Choose the assignments you want to export.
• Select the check box by assignment name.
• Click Select All to select all assignments.
• Click Clear All to clear selections.
4. Click Export.
The Export Data dialog box opens.
• The default location is the My Documents folder.
• The default name is the name of the assignment.
5. Navigate to the location where you want to save the file.
6. Click Save.
Sorting Information in the Portfolio Workspace
1. Click the column header of the list you want to sort.

The selected list can be sorted in ascending, descending, or student name
order.
2. Click the column header again to sort in another order.
Opening a Portfolio Item in Another Workspace
You can open a .tns file in the Documents Workspace to edit it; or you can open
a .tns or Quick Poll file in the Review Workspace to view student responses in
bar chart, table, or graph views.
Note: In the TI-Nspire™ Navigator™ NC Teacher Software, you can also open
.tnsp files.
Opening an Item in the Documents Workspace
1. Click the file you want to open.
To open a file for all students:
• From the Assignments Summary list, click the file.
• From the Assignments Summary view, click the icon in the Column
Actions row, or click the Column Header.
To open a file for selected students:
• From the Assignments Summary view, select a cell in a selected
student’s row. You can open more than one file in a column, but you
cannot open multiple files from different columns.
• From the Individual Assignments view, select a cell in the selected
student’s row.
2. Click File> Open for Editing or right-click and click Open for Editing.
The file opens in the Documents Workspace.
Opening an Item in the Review Workspace
1. Click the file you want to open using one of these methods:
• From the Assignments Summary list, select the file.
• From the Assignments Summary view, click the icon in the Column
Actions row, or click the Column Header.
• From the Assignments Summary view, click a cell in a selected
student’s row. You can open more than one file in a column, but you
cannot open multiple files from different columns.
Using the Portfolio Workspace 319

320 Using the Portfolio Workspace
• From the Individual Assignments view, click a cell in the selected
student’s row.
Note: Any method you choose in the Review Workspace opens the file with
all student responses. You cannot open a file for just one student.
However, you can select review responses for an individual student in the
Review Workspace.
2. Click File> Open in Review Workspace or right-click and click Open in
Review Workspace.
The file opens in the Review Workspace.
Opening a Master Document
A Master Document is the original document that was sent to students, and it
contains the answer key for evaluating the responses collected from students.
When you save a document to a column in the Portfolio Workspace, there is
usually a Master Document associated with that file.
You can open the Master Document from the Portfolio Workspace in the
Assignments Summary view. When you open the Master Document, it opens in
the Documents Workspace as a read-only file.
1. In the Column Actions row, click the icon corresponding to the file you want
to open.
2. Right-click the icon and click Open Master Document.
The document opens in the Documents Workspace as a read-only file.
Adding a Master Document
There may be times when you want to replace an existing Master Document, or
add a Master Document to an assignment that does not have one. For
example, a question was marked with an incorrect answer and students did not
receive credit for that answer. You can give students credit by changing the
answer to that question, and retain the Master Document as a permanent
record of the correct answer key.
Note: You can add or replace a Master Document for a .tns file, but not for a
Quick Poll file.
The new Master Document is used to evaluate student scores. The evaluation
works as follows:

• If a question changed, student answers are evaluated for the new
question.
• If the new Master Document has questions that were not in the old Master
Document, those questions are evaluated. Students may receive zero
credit for those questions if they have not seen them.
To add or replace a Master Document, follow these steps:
1. In the Column Actions row, click the icon corresponding to the .tns file you
want to open.
2. Click File> Add Master Document.
A dialog box opens where you can select a file.
3. Navigate to the .tns file you want to use as the new Master Document and
click Open.
The software displays a message warning that replacing the Master
Document will cause the software to reevaluate the student scores.
4. Click Add/Replace Master to assign the new Master Document, or click
Cancel to cancel the action.
Redistributing a Portfolio Item
Redistributing a file to the class is a useful way to return graded assignments or
to return assignments for additional work. Class must be in session to
redistribute a file.
Note: You cannot redistribute a Quick Poll file.
1. Right-click the item you want to redistribute.
2. Click Redistribute to Class, or click .
The system sends the file to each student logged onto the TI-Nspire™
Navigator™ network.
Collecting Missing Files from Students
There may be times when you store a set of student files to the Portfolio
Workspace and the collection is incomplete because not all students were
present, had the file ready for collection, or were not logged on. Class must be
in session to collect a file.
Using the Portfolio Workspace 321

322 Using the Portfolio Workspace
1. Select an individual file, or click a file icon on the Column Actions row to
select all files in that column.
Note: You can collect only one column of files at a time.
2. Click Collect Missing.
Missing files are collected from those students who are logged in to the
network and whose files were not initially collected.
Sending Missing Files to Students
There may be times when you send a set of files to students and the send is
incomplete because not all students were present, or logged on, or a new
student was added to the class. Class must be in session to send a missing file.
1. Select an individual file, or click a file icon on the Column Actions row to
select all files in that column.
Note: You can only send files contained in one column at a time.
2. Click Send Missing.
Missing files are sent to those students who are logged in to the network
and who did not initially receive the files.
Renaming a Portfolio Item
You can rename an assignment from the Assignments pane or from the column
header.
1. Click the assignment name or column header you want to rename.
2. Right-click and click Rename.
The Rename Portfolio Column dialog box opens.
3. Type the new name.
4. Click Rename. Click Cancel to cancel the request.
The column appears in the column header and in the Assignments pane
with the new name.

Removing Columns from Portfolio
There may be times you want to delete files from Portfolio. For example, an
incorrect file was sent to or collected from a class. You can remove an
assignment from the Assignments pane or from the column header.
1. Click the assignment name or column header you want to remove.
2. Right-click and click Remove From Portfolio.
The Remove from Portfolio dialog box opens.
3. Click Remove to delete the file. Click Cancel to cancel the request.
Note: If a file is saved to the Portfolio Workspace and later deleted from the
Class Record, that delete action does not affect the file copy in the Portfolio.
The copy remains in the Portfolio Workspace until it is deleted.
Removing Individual Files from Portfolio
There may be times you want to delete a single file or a few files from a column
list, but not all of the files. For example, an incorrect file was collected from a
student. Remove individual files from the work area in the Assignments
Summary view.
1. Click the file or files within a single column that you want to delete.
2. Press Delete.
The Remove Selected Document(s) dialog box opens.
3. Click Remove to delete the files. Click Don’t Remove to cancel the request.
Summary of File Type Options
.tns .tns with
questions
.tnsp Quick
Poll
Other
file
types
Save to Portfolio ŸŸ ŸŸŸ
Save Selected to
Portfolio
ŸŸ ŸŸŸ
Using the Portfolio Workspace 323

324 Using the Portfolio Workspace
Edit Score Ÿ Ÿ Ÿ Ÿ
Open in Review
Workspace
Ÿ Ÿ
Open for Editing Ÿ Ÿ Ÿ Ÿ*
Redistribute to
class
Ÿ Ÿ Ÿ Ÿ
Open Master
Document
ŸŸ ŸŸŸ
Add Master
Document
Ÿ Ÿ
Export Data Ÿ** Ÿ** Ÿ** Ÿ** Ÿ**
Send/Collect
Missing
Ÿ Ÿ Ÿ Ÿ
Rename Portfolio
Column of files
ŸŸ ŸŸŸ
Remove Portfolio
Column of Files
ŸŸ ŸŸŸ
Ÿ* The file opens in the program the operating system
has associated with the file type.
Ÿ** Empty, non-graded, and “Other file types” show “No
score” in the cell when exported.

Working with Images
Images can be used in TI-Nspire™ applications for reference, assessment, and
instructional purposes. You can add images to the following TI-Nspire™
applications:
• Graphs & Geometry
• Data & Statistics
• Notes
• Question, including Quick Poll
In the Graphs & Geometry and Data & Statistics applications, images are set in
the background behind the axis and other objects. In the Notes and Question
applications, the image is set at the cursor location inline with the text (in the
foreground).
You can insert the following image file types: .jpg, .png, or .bmp.
Note: The transparency feature of a .png file type is not supported. Transparent
backgrounds are displayed as white.
Working with Images in the Software
When working in the TI-Nspire™ software, you can insert, copy, move, and
delete images.
Inserting Images
In the Notes and Question applications, and in Quick Poll, you can insert more
than one image on a page. You can only insert one image on a page in the
Graphs & Geometry and Data & Statistics applications.
1. Open the document where you want to add an image.
2. Click Insert > Image.
The Insert Image dialog box opens.
Working with Images 325
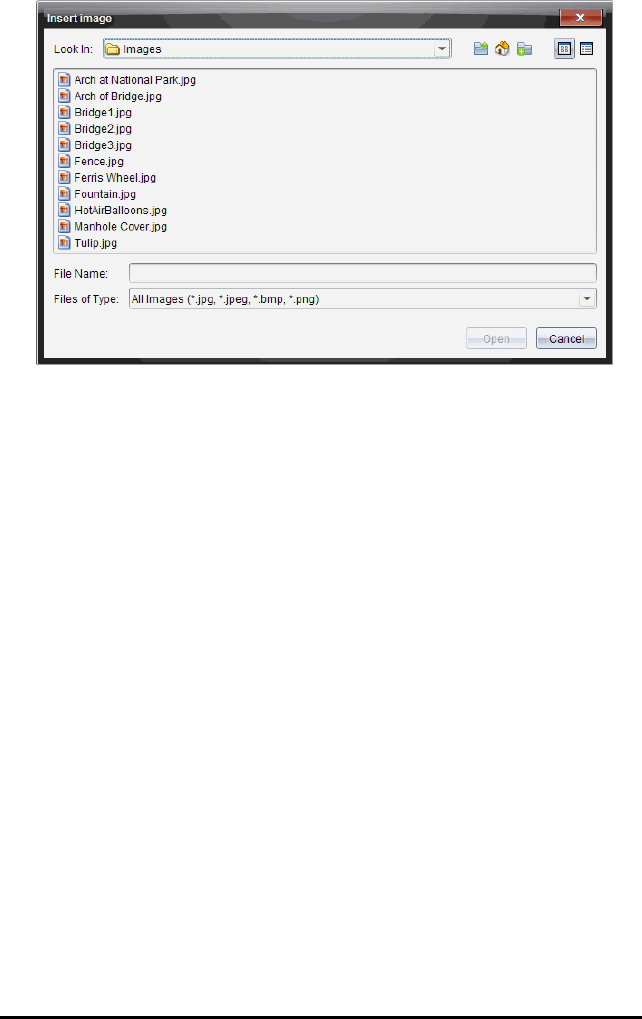
326 Working with Images
3. Navigate to the folder where the image is located and select the image.
4. Click Open.
• In the Graphs & Geometry and Data & Statistics applications, the
image is inserted in the background behind the axis.
• In Notes, Question, and Quick Poll, the image is inserted at the cursor
location. You can type text above or below the image, and you can
move the image up or down on the page.
Note: You can also insert images by copying an image to the Clipboard and
pasting it into the application.
Moving Images
In applications such as Notes and Question where the image is set at the
cursor location, you can reposition the image by moving the image to a new
line or blank space, or by placing the image within a line of text. In the Graphs
& Geometry and Data & Statistics applications, images can be moved to any
position on the page.
1. Select the image.
• In the Notes and Question applications, click the image to select it.
• In the Graphs & Geometry and Data & Statistics applications, right-
click the image, and then click Select > Image.
2. Click the selected image and hold the mouse button.
• If an image is in the foreground, the cursor changes to .
• If an image is in the background, the cursor changes to .
3. Drag the image to the new location and release the mouse button to place
the image.
If an image is in the foreground, the cursor changes to when you hover
your mouse pointer over a location where there is a new line or space.
Images in the background can be moved and placed anywhere on the
page.
Resizing Images
To retain the aspect ratio of an image, resize by grabbing the image at one of
the four corners.
1. Select the image.
• In the Notes and Question applications, click the image to select it.
• In the Graphs & Geometry and Data & Statistics applications, right-
click the image, and then click Select > Image.
2. Move the cursor to one of the corners of the image.
The cursor changes to (a four-sided directional arrow).
Note: If you drag the cursor to an edge of the image, the cursor changes to
(a two-sided directional arrow). If you drag an image from one of its
edges to resize it, the image becomes distorted.
3. Click the corner or edge of the image.
The tool is enabled.
4. Drag in to make the image smaller or drag out to make the image larger.
5. Release the mouse when the image size is correct.
Deleting Images
To delete an image from an open document, complete the following steps.
1. Select the image.
• If an image is in the foreground, click the image to select it.
• If an image is in the background, right-click the image, and then click
Select > Image.
Working with Images 327

328 Working with Images
2. Press Delete.
The image is removed.

Writing Lua Scripts
The Script Editor allows you to create and deliver dynamically linked
simulations, powerful and flexible utilities, and other educational content for
exploring math and science concepts. When you open a document containing
a script, the script runs automatically as programmed. To see the running script
application, the page containing the script application must be active.
The Script Editor is directed toward teachers and other authors who are
comfortable working in a Lua scripting environment. Lua is a powerful, fast,
lightweight scripting language that is fully supported in TI-Nspire™ and
PublishView™ documents. Documents containing script applications can be
opened on TI-Nspire™ handhelds and in the TI-Nspire™ Document Player. The
script application runs on a handheld or in Document Player, but you cannot
view or edit the script.
Note these resources for using the Script Editor and creating scripts:
• Press F1 to access the TI-Nspire™ help, which includes the Script Editor
help.
• Press F2 for additional TI-Nspire™ resources such as scripting samples
and a link to the TI-Nspire™ Scripting API library. (This information is also
available at education.ti.com/nspire/scripting.)
• Go to lua.org for more information about Lua.
Overview of the Script Editor
With the Script Editor, you can insert, edit, save, run, and debug script
applications inTI-Nspire™ (.tns files) and Publishview™ (.tnsp files) documents.
• Script applications function within documents, problems, and pages the
same way that other TI-Nspire™ applications do.
• When you create a new document or open an existing document, you can
insert or edit a script application within a page or within a work area of a
split page.
• In a split page layout, you can add a script application to each work area of
a page. A page can be split into a maximum of four quadrants.
• Images can be added to script applications. See the
Inserting Images
section.
Writing Lua Scripts 329
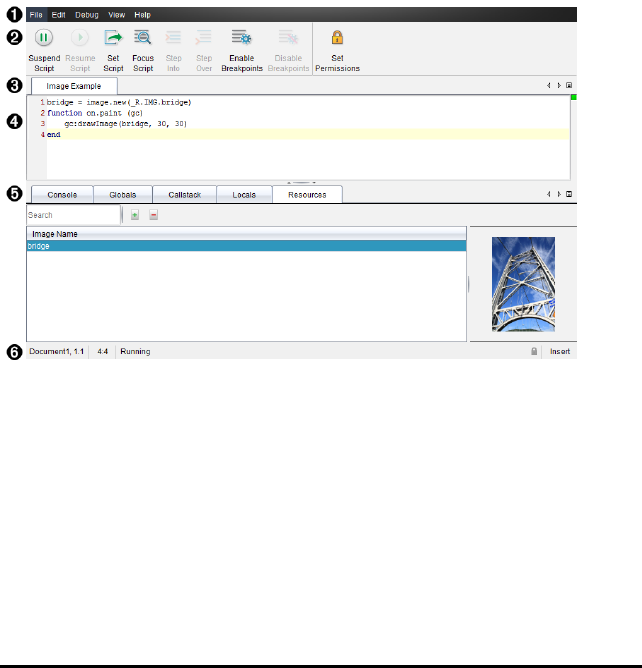
330 Writing Lua Scripts
• All work done in the Script Editor is lost if you close the TI-Nspire™ or
PublishView™ document without saving it.
Exploring the Script Editor Interface
The Script Editor window opens when you insert a new script application or
edit an existing script application in a TI-Nspire™ or PublishView™ document.
Select options for creating new scripts or editing scripts from the Insert menu in
the Documents Workspace when a document is open.
Note: Although not labeled, the Documents Workspace is the default
workspace in the TI-Nspire™ Student Software and TI-Nspire™ CAS Student
Software.
The following figure shows the Script Editor with an existing script.
ÀMenu bar. Contains options for working with the Script Editor.
ÁToolbar. Provides tools for common Script Editor functions. See the
Using
the Toolbar
section.
ÂScript title. Shows script title. Right-click the title to change it or by clicking
Edit >Set Script Title.
ÃText box.Provides a space to type script text.
ÄTools panel. Shows script data. See the
Using the Tools Panel
section.
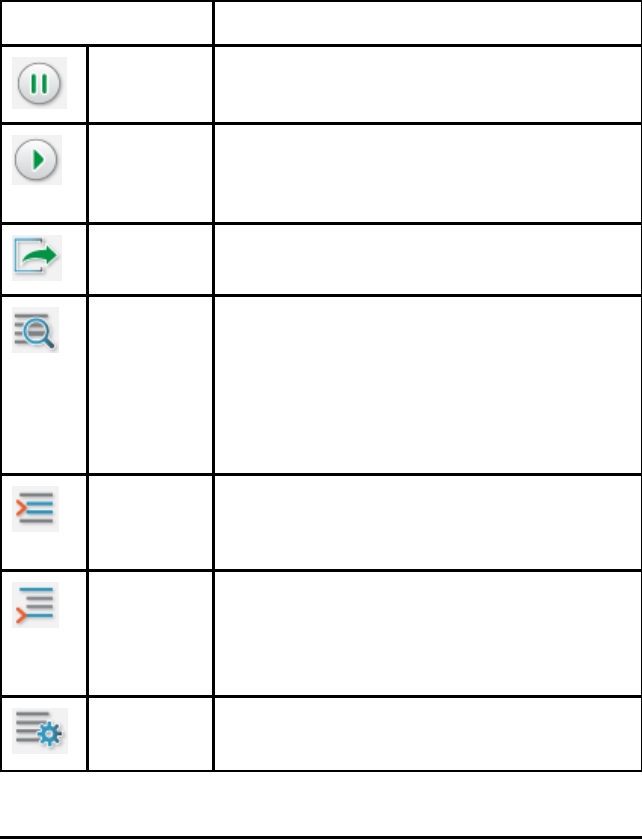
ÅStatus bar. Displays the operational state of the script. See the
Using the
Status Bar
section.
Using the Toolbar
The following table describes the toolbar options.
Tool name Tool function
Suspend
Script
Pauses the script execution.
Resume
Script
Resumes the script execution.
While debugging, the script continues to execute
until the next breakpoint or the end of the script.
Set Script Starts the script execution.
Focus Script Sets the focus to the page in the document where
the script application is attached:
• In a TI-Nspire™ document, sets the focus to
the page.
• In a PublishView™ document, sets the focus
to the frame on the page.
Step Into While debugging, executes the current statement.
If the statement calls any functions, the debugger
stops at the first line of each function.
Step Over While debugging, executes the current statement.
If the statement calls any functions, the debugger
does not stop within the function unless the
function contains a breakpoint.
Enable
Breakpoints
Switches from normal mode to debugging mode.
Writing Lua Scripts 331
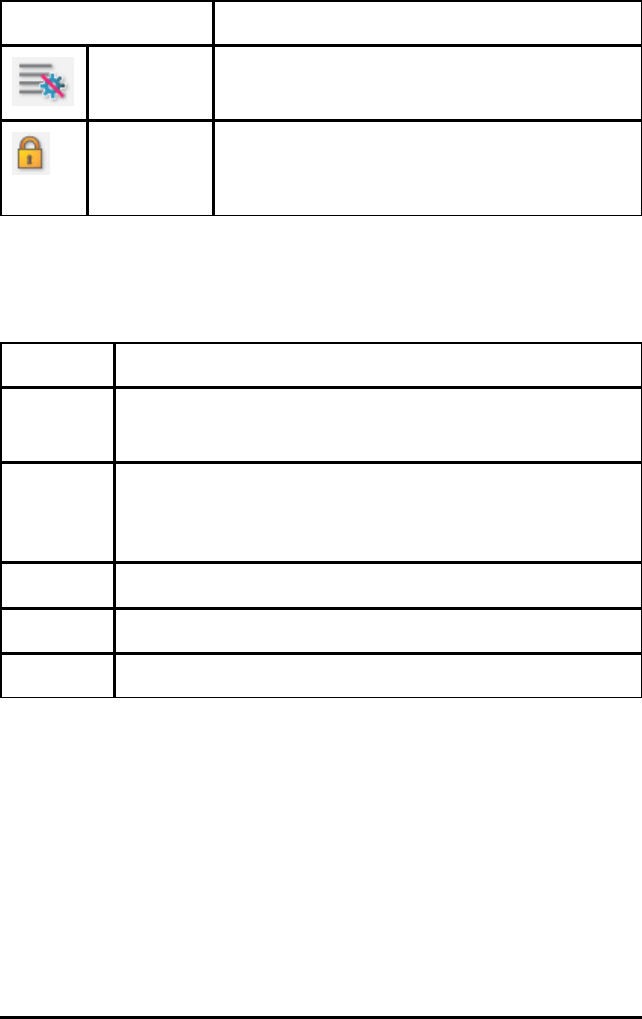
332 Writing Lua Scripts
Tool name Tool function
Disable
Breakpoints
Switches back from debugging mode to normal
mode and resumes the script.
Set
Permissions
Sets permission levels to Protected, View Only, or
Unprotected and allows you to set a password for
the script.
Using the Tools Panel
At the bottom of the window, the Tools panel shows the scripting data. For more
information, see the
Debugging Scripts
section.
Tab Window Display
Console Script errors are printed here.
Print statements embedded in the script also print here.
Globals Selected global variables are displayed.
To select a global variable for display, select Click to add new
watch variable at the bottom of the Tools panel.
Call Stack Displays the call tree for the currently executing function.
Locals Local variables in the current function’s scope are displayed.
Resources Upload, insert, and manage images here.
Using the Status Bar
The status bar at the bottom of the window shows basic script data, as
described in this example: stopwatch, 1.1,4:1,Running.
• Name of the document that the script application is attached to
(stopwatch)
• Problem and page number (1.1)
• Script line and character, (4:1 describing line 4 and character 1)
• Operational state of the script (Running). Note the possible states:
- Normal mode: Running, Paused, or Error

- Debugging mode: Running (debugging), Paused, or Error
Inserting New Scripts
To insert a new script application and script, follow these steps.
1. Open the document where you want to insert the script. It can be a new or
existing document.
2. Click Insert > Script Editor > Insert Script.
A script application is inserted, and the Script Title dialog box opens.
Note: The TI-Nspire™ Student Software and the TI-Nspire™ CAS Student
Software open automatically within the Documents Workspace.
3. Type a script title. (The maximum number of characters is 32.)
4. Click OK.
The Script Editor window opens showing a blank script.
5. Type your text in the script lines.
Note: Some nonstandard UTF-8 wide characters may not be displayed
correctly. For these characters, it is highly recommended that you use the
string.uchar function.
6. When the script is complete, click Set Script to execute it.
• In a TI-Nspire™ document, the script application is inserted in a new
page. When the page containing the script application is active, the
Documents Toolbox is empty.
• In a PublishView™ document, a frame containing the script application
is added to the active page. You can move or size this frame just as
you would any other PublishView™ object, and you can add other
PublishView™ objects to the page.
7. To view the script application, click Focus Script.
Editing Scripts
To edit an existing script, follow these steps.
1. Open the TI-Nspire™ or PublishView™ document that contains the script.
The page containing the script must be active.
2. Select the page and the work area that contains the script.
Writing Lua Scripts 333

334 Writing Lua Scripts
3. Click Insert > Script Editor > EditScript.
The Script Editor opens showing the script. If the selected work area on the
page does not contain a script, Edit Script is dimmed.
If the script is password protected, the Password Protected dialog box
opens prompting for a password.
4. Make any desired changes.
• To designate comments, use double hyphens (--) at the start of each
comment line.
• To change the title, click Edit >Set Script Title or right-click the title and
click Set Script Title.
Notes:
• Some nonstandard UTF-8 characters may not be displayed correctly.
For these characters, it is highly recommended that you use the
string.uchar function.
• The print function may yield unexpected results for non–UTF-8
characters.
• Some nonprintable characters returned by the on.save function will be
discarded.
5. To execute the script, click Set Script.
Any errors are displayed in the Console area in the Tools panel.
6. To view the script application (running script), click Focus Script.
Changing View Options
To change viewing options:
▶To clear the scripting data in the Tools panel and restore the editor defaults,
click View >Restore Editor to Defaults.
▶To view the script title in the document and before each print statement in
the Console, click View >Title in Document View.
▶To hide or show toolbar labels, click View >Toolbar Text Labels.
▶To show or hide the Tools panel or its areas, click View >Tools Panel and
click the appropriate option.
▶To create tab groups when multiple scripts are open, right-click one of the
titles and click New Horizontal Group or New Vertical Group.

Setting Minimum API Level
Each release of the T-Nspire™ software includes API support for a specific set
of Lua scripting features. Setting the minimum API level for a script lets you
specify a minimum set of features that you require for your script.
If a user tries to run the script on a system that does not meet the script's
minimum API level, a message notifies the user and prevents the script from
running.
To Set the Minimum API Level for a Script:
1. Determine the minimum level that you want your script to require.
- Setting the level too low for the script's feature set can result in a script
error on older software.
- Setting the level too high can result in the script refusing to start on
older software that supports the feature set.
2. On the Script Editor File menu, select Set Minimum API Level.
3. In the dialog box, type the minimum level using the format major.minor.
For example, you might type 2.3.
This API level or higher will be required for running the script.
Saving Script Applications
Clicking Set Script resets (updates) a script application in a TI-Nspire™ or
PublishView™ document. However, the script and script application are not
saved until you save the document. If you close the document or close the
TI-Nspire™ software without saving, work on the script is lost.
To ensure the script application is saved after all work is complete, follow these
steps.
1. From the Script Editor window, click Set Script to reset (update) the script
application in the document.
2. From an open document, click File > Save Document to save changes to
the TI-Nspire™ or PublishView™ document.
Note: To ensure work is backed up, set the script and save the document
frequently.
Writing Lua Scripts 335

336 Writing Lua Scripts
Managing Images
To insert an image into a script application, follow these steps.
Add an Image to Resources
1. Click the Resource tab.
2. Click the button.
3. Click on an image file name.
4. Click Open.
5. Accept the default image name or rename the image by typing a new
name into the box. (Ex: newimage)
6. Click OK.
Note: You will see the image thumbnail in the bottom-right corner of your
screen. Your image file name will appear in a list of images at the bottom-
left of your screen.
7. Right-click an image name to Rename, Copy Name, Preview, or Remove
the image. You may also click the button to remove an image.
Add Multiple Images to Resources
1. Click the Resource tab.
2. Click the button.
3. Select Comma Separated Values (*.csv) from the Files of Type menu.
4. Select your .csv file.
Note: The .csv format consists of two comma-separated columns. The first
column is the local name of the image resource used in the code. The
second column is the absolute path to the image on the current system.
Example for Windows:
bridge,C:\images\bridge.jpg
house,C:\images\house.jpg
5. Click Open.
6. Right-click an image name to Rename, Copy Name, Preview, or Remove
the image. You may also click the button to remove an image.

Create a Script to Call Up an Image
1. Type a script in the script line box as follows:
myimage = image.new(_R.IMG.img_1)
function on.paint (gc)
gc:drawImage (myimage, 30, 30)
end
Note:Replace img_1 (above) with the name of your image.
2. Click Set Script to save the script. You will see your image in the Document
Preview screen.
3. Click Focus Script to set the focus to the page in the document where you
want to attach the script application.
Note: A TI-Nspire document sets the focus to the page; A PublishView™
document sets the focus to the frame on the page.
Create a Script to Call Up Multiple Images
1. Type a script in the script line box as follows:
myimg = {}
for name, data in pairs (_R.IMG)
myimg [name] = image.new(data)
end
function on.paint (gc)
gc:drawImage (myimg[imagename], 30, 30)
end
2. Click Set Script to save the script. You will see your image in the Document
Preview screen.
3. Click Focus Script to set the focus to the page in the document where you
want to attach the script application.
Note: A TI-Nspire document sets the focus to the page; A PublishView™
document sets the focus to the frame on the page.
Writing Lua Scripts 337

338 Writing Lua Scripts
Setting Script Permissions
You can set permission levels for a script and specify a password to protect a
script. Follow these steps.
1. In the Script Editor window, click File >Set Permissions.
The Set Permissions dialog box opens.
2. In the Permissions Level area, select the appropriate security level:
•Protected. The script can be run, but not viewed or edited.
•View only. The script can be viewed, but not edited.
•Unprotected. The script can be viewed and edited.
3. To secure a script, designate a password in the Security area.
Note: Use caution when setting passwords because they cannot be
recovered.
4. Click OK.
The next time you click Insert > Script Editor > EditScript, a Password Protected
dialog box opens prompting for the password. Choose one of these options:
• To edit the script, enter the password and click OK.
• To view the script only, do not enter the password and click View.
Debugging Scripts
You can debug your script to investigate runtime errors and trace the execution
flow. While debugging, data is displayed in the Tools panel.
▶To enable debugging mode or disable it and return to normal mode, click
Debug >Enable Breakpoints or Disable Breakpoints.
Note: Disabling breakpoints always resumes the script execution.
▶While debugging, click Step Into and Step Over as appropriate. See the
Exploring the Script Editor interface
section.
▶To set breakpoints, double-click in the space to the far left of the line
number. Breakpoints are disabled until you click EnableBreakpoints.
▶Note these factors when debugging:
• Breakpoints in coroutines are not supported.

• If a breakpoint is set in a function that is a callback, the debugger may
not stop at the breakpoint.
• The debugger may not stop at functions such as on.save, on.restore,
and on.destroy.
On the toolbar, Step Into and Step Over are enabled when breakpoints are
enabled.
▶To suspend and resume the script execution, click Suspend Script and
Resume Script. When the script resumes, it runs until the next breakpoint is
encountered or to the end of the script. A script can be suspended in normal
mode or debugging mode.
Writing Lua Scripts 339

340

Regulatory Information
USA FCC Information Concerning Radio Frequency
Interference
Product Name FCCID
TI-Nspire™ Navigator™ Wireless Cradle V7R-TINAVWC2
TI-Nspire™ Navigator™ Access Point V7R-TINAVAP2
TI-Nspire™ CX Wireless Network Adapter V7R-TINAVWNA
TI-Nspire™ CX Navigator™ Access Point V7R-TINAVAP3
TI-Nspire™ CX Navigator™ Wireless Network Adapter –
v2
V7R-TINAVWNA2
Federal Communication Commission Interference Statement
This equipment has been tested and found to comply with the limits for a Class
B digital device, pursuant to Part 15 of the FCC Rules. These limits are
designed to provide reasonable protection against harmful interference in a
residential installation. This equipment generates, uses, and can radiate radio
frequency energy and, if not installed and used in accordance with the
instructions, may cause harmful interference to radio communications.
However, there is no guarantee that interference will not occur in a particular
installation. If this equipment does cause harmful interference to radio or
television reception, which can be determined by turning the equipment off and
on, the user is encouraged to try to correct the interference by one or more of
the following measures:
• Reorient or relocate the receiving antenna.
• Increase the separation between the equipment and receiver.
• Connect the equipment into an outlet on a circuit different from that to
which the receiver is connected.
• Consult the dealer or an experienced radio/TV technician for help.
FCC Caution: The following products comply with Part 15 of the FCC Rules.
• TI-Nspire™ CX Wireless Network Adapter
• TI-Nspire™ CX Wireless Network Adapter – v2
• TI-Nspire™ Navigator™ Wireless Cradle
Regulatory Information 341

342 Regulatory Information
• TI-Nspire™ Navigator™ Access Point
• TI-Nspire™ CX Navigator™ Access Point
Operation is subject to the following two conditions: (1) These devices may not
cause harmful interference, and (2) these devices must accept any interference
received, including interference that may cause undesired operation.
The device for the band 5150-5250 MHz is only for indoor usage to reduce
potential for harmful interference to co-channel mobile satellite systems.
RF Radiation Exposure and Hazard Statement:
To ensure compliance with Federal Communications Commission (USA)
requirements, (SAR limit is 1.6 W/kg averaged over one gram of tissue), the
products listed in the following table have been evaluated under FCC Bulletin
OET 65C and found to be compliant with the requirements in 47 CFR Part
2.1093 for RF exposure from radio frequency devices. The highest SAR value
reported under this standard during product certification when worn on the
body:
Product Name SARValue
TI-Nspire™ Navigator™ Wireless Cradle 0.562 W/kg
TI-Nspire™ Navigator™ Access Point 0.995 W/kg
TI-Nspire™ CX Wireless Network Adapter 0.994 W/kg
TI-Nspire™ CX Navigator™ Access Point 0.433 W/kg
TI-Nspire™ CX Navigator™ Wireless Network Adapter –
v2
0.716 W/kg
Using higher gain antennas and types of antennas not covered under the FCC
certification of this product is not allowed. Installers of the radio and end users
of the product must adhere to the installation instructions provided in this
manual.
This transmitter must not be co-located or operating in conjunction with any
other antenna or transmitter.
Non-modification Statement:
Use only the integral antenna supplied by the manufacturer when operating
these devices. Unauthorized antennas, modifications, or attachments could
damage the TI-Nspire™ Navigator™ Cradle, TI-Nspire™ Navigator™ Access
Point, TI-Nspire™ CX Wireless Network Adapter, TI-Nspire™ CX Navigator™
Access Point, or TI-Nspire™ CX Navigator™ Network Adapter –
v2
and violate

FCC regulations. Any changes or modifications not expressly approved by the
party responsible for compliance could void the user's authority to operate this
equipment.
Deployment Statement:
This product is certified for indoor deployment only. Do not install or use this
product outdoors.
FCC Statement
Note: This equipment has been tested and found to comply with the limits for a
Class B digital device, pursuant to Part 15 of the FCC Rules. These limits are
designed to provide reasonable protection against harmful interference in a
residential installation. This equipment generates, uses and can radiate radio
frequency energy and, if not installed and used in accordance with the
instructions, may cause harmful interference to radio communications.
However, there is no guarantee that interference will not occur in a particular
installation.
If this equipment does cause harmful interference to radio or television
reception, which can be determined by turning the equipment off and on, the
user is encouraged to try to correct the interference by one or more of the
following measures:
• Reorient or relocate the receiving antenna.
• Increase the separation between the equipment and receiver.
• Connect the equipment into an outlet on a circuit different from that to
which the receiver is connected.
• Consult the dealer or an experienced radio/TV technician for help.
Modifications not expressly approved by the manufacturer could void the user’s
authority to operate the equipment under FCC rules.
Canadian IC Information
Product Name IC
TI-Nspire™ Navigator™ Wireless Cradle 451E-TINAVWC2
TI-Nspire™ Navigator™ Access Point 451F-TINAVAP2
TI-Nspire™ CX Wireless Network Adapter 451E-TINAVWNA
Regulatory Information 343

344 Regulatory Information
TI-Nspire™ CX Navigator™ Access Point 451F-TINAVAP3
TI-Nspire™ CX Navigator™ Wireless Network Adapter –
v2
451F-TINAVWNA2
Industry Canada Statement:
This device complies with Industry Canada license-exempt RSS standard(s).
Operation is subject to the following two conditions:
1. This device may not cause interference, and
2. This device must accept any interference, including interference that may
cause undesired operation of the device.
To ensure compliance with Industry Canada requirements, (SAR limit is
1.6 W/kg averaged over one gram of tissue), these products have been
evaluated and found compliant in accordance with Industry Canada RSS-
102 with respect to the Safety Code 6 for Human Exposure to RF Fields.
The highest SAR value reported under this standard during product
certification when worn on the body:
Product Name SARValue
TI-Nspire™ Navigator™ Wireless Cradle 0.562 W/kg
TI-Nspire™ Navigator™ Access Point 0.995 W/kg
TI-Nspire™ CX Wireless Network Adapter 0.994 W/kg
TI-Nspire™ CX Navigator™ Access Point 0.433 W/Kg
TI-Nspire™ CX Navigator™ Wireless Network Adapter –
v2
0.716 W/Kg
Equipment (or its transmit antenna) that is installed outdoors is subject to
licensing and not supported by the listed products.
More information may be found in RSS-102
(http://www.ic.gc.ca/eic/site/smt-gst.nsf/eng/sf01904.html) and in Canada’s
Safety Code 6 (http://www.hc-sc.gc.ca/ewh-semt/pubs/radiation/radio_
guide-lignes_direct-eng.php).
Under Industry Canada regulations, this radio transmitter may only operate
using an antenna of a type and maximum (or lesser) gain approved for the
transmitter by Industry Canada. To reduce potential radio interference to other
users, the antenna type and its gain should be so chosen that the equivalent
isotropically radiated power (e.i.r.p.)is not more than that necessary for
successful communication.
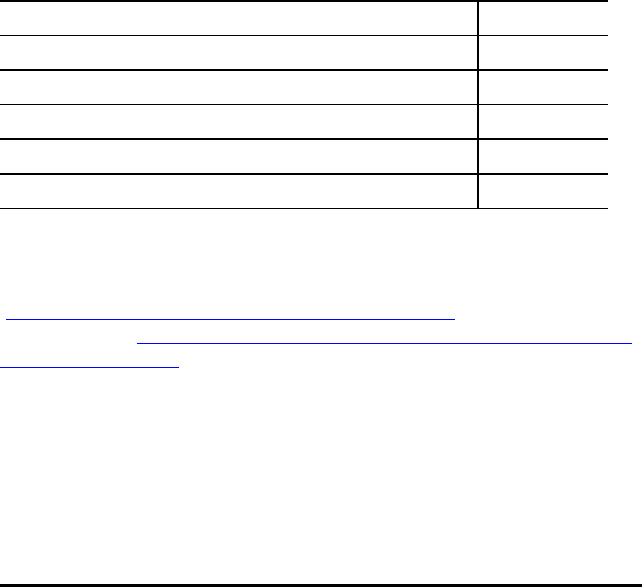
The device for the band 5150-5250 MHz is only for indoor usage to reduce
potential for harmful interference to co-channel mobile satellite systems.
Industrie Canada Déclaration :
Ce dispositif est conforme à la norme (s) RSS de la licence-exonéré Industrie
Canada. Opération est soumise aux deux conditions suivantes :
1. Ce dispositif ne peut pas causer de brouillage, et
2. Ce dispositif doit accepter toute interférence, y compris le brouillage qui
peut causer intempestif de fonctionnement du dispositif.
Pour assurer la conformité avec les exigences d'Industrie Canada, (limite
de Das est de 1,6 W/kg en moyenne pour un gramme de tissu), ces
produits ont été évalués et jugés conformes conformément à Industrie
Canada, CNR-102 en ce qui concerne le Code de sécurité 6 pour
l'exposition humaine aux champs RF. La valeur SAR la plus élevée
signalée en vertu de cette norme lors de la certification du produit lorsqu'il
est porté sur le corps :
Nom du produit SARVerdien
TI-Nspire™ Navigator™ Wireless Cradle 0.562 W/kg
TI-Nspire™ Navigator™ Access Point 0.995 W/kg
TI-Nspire™ CX Wireless Network Adapter 0.994 W/kg
TI-Nspire™ CX Navigator™ Access Point 0.433 W/Kg
TI-Nspire™ CX Navigator™ Wireless Network Adapter –
v2
0.716 W/Kg
Équipement (ou son antenne de transmission) qui est installé à l'extérieur est
soumis à licence et pas pris en charge par les produits énumérés.
On trouvera plus d'informations dans le CNR-102
(http://www.ic.gc.ca/eic/site/smt-gst.nsf/eng/sf01904.html) et dans Code de
sécurité 6 notre (http://www.hc-sc.gc.ca/ewh-semt/pubs/radiation/radio_guide-
lignes_direct-eng.php).
En vertu de la réglementation d'Industrie Canada, cet émetteur radio risquera
uniquement à l'aide d'une antenne de type et de gain maximum (ou moins)
pour l'émetteur a été approuvé par Industrie Canada. Pour réduire les
interférences radio potentielles à d'autres utilisateurs, le type d'antenne et son
gain doivent être choisie que la puissance isotrope rayonnée équivalente
(p.i.r.e.) n'est pas plus que celui nécessaire à une communication efficace.
Regulatory Information 345

346 Regulatory Information
Le dispositif pour la bande 5150-5 250 MHz est seulement pour utilisation
intérieure réduire le risque de brouillage préjudiciable aux systèmes mobiles
par satellite dans la même voie.
European Union and EFTA Regulatory Compliance
This equipment may be operated in the countries that comprise the member
countries of the European Union and the EFTA(European Free Trade
Association). These countries, listed in the following paragraph, are referred to
as The European Community throughout this document:
AUSTRIA, BULGARIA, CZECH REPUBLIC, DENMARK, FINLAND, FRANCE,
GERMANY, GREECE, IRELAND, ITALY, LUXEMBOURG, NETHERLANDS,
NORWAY, PORTUGAL, SLOVAKIA, SLOVENIA, SPAIN, SWEDEN,
SWITZERLAND, UNITED KINGDOM
The TI-Nspire™ Navigator™ Access Point communicates with either a
TI-Nspire™ Navigator™ wireless cradle or TI-Nspire™ CX Wireless Network
Adapter via a wireless 802.11b/g link to provide wireless local area networking
(WLAN) capabilities and with a personal computer using a USB cable.
TI-Nspire™ Navigator™ Access Point includes one 802.11b/g/n radio.
The TI-Nspire™ Navigator™ CXAccess Point communicates with either a
TI-Nspire™ Navigator™ wireless cradle, TI-Nspire™ CX Wireless Network
Adapter, or TI-Nspire™ CX Wireless Network Adapter –
v2
via a wireless
802.11b/g link to provide wireless local area networking (WLAN) capabilities
and with a personal computer using a USB cable. TI-Nspire™ Navigator
CXAccess Point supports 2.412GHz to 2.462GHz for 802.11b/g/n 2.4GHz
operation + 5.150 GHz to 5.250GHz for 802.11 a/n 5GHz operation.
Declaration of Conformity
Marking by this symbol:
indicates compliance with the Essential Requirements of the R&TTE Directive
of the European Union (1999/5/EC).
This equipment meets the following conformance standards:
Safety: EN 60950-1:2006 + A11:2009

EMC: EN 55022:2006, EN 55024:1998 + A1:2001 + A2:2003, N 301 489-1
V1.8.1/2008-4, EN 301 489-17 V2.1.1/2009-5, CISPR22:1997, CISPR24
Including: EN 61000-3-2, -3-3, -4-2, -4-3, -4-4, -4-5, -4-6 and -4-11. The product
is also licensed as required for additional country specific standards as
required for the International Marketplace.
Radio: EN 300-328 v.1.7.1 (2006-10)
Electromagnetic compatibility and Radio spectrum Matters (ERM); Wideband
transmission systems; Data transmission equipment operating in the 2,4 GHz
ISM band and using wide band modulation techniques. Certifications are
harmonized to the EN standards covering essential requirements under article
3.2 of the R&TTE Directive. Compliance includes testing with the supplied
integral antenna.
SAR: EN62209-2:2010
European Community Declaration of Conformity
Hereby, Texas Instruments declares that the following products are in
compliance with the essential requirements and other relevant provisions of
Directive 1999/5/EC.
• TI-Nspire™ Navigator™ Access Point
• TI-Nspire™ Navigator™ Wireless Cradle
• TI-Nspire™ CX Wireless Network Adapter
• TI-Nspire™ CX Wireless Network Adapter –
v2
• TI-Nspire™ CX Navigator™ Access Point
English Hereby, Texas Instruments declares that the TI-Nspire™
Navigator™ Access Point, TI-Nspire™ Navigator™ wireless cradle,
and TI-Nspire™ CX Wireless Network Adapter, TI-Nspire™ CX
Wireless Network Adapter -
v2
, and TI-Nspire™ CX Navigator™
Access Point are in compliance with the essential requirements
and other relevant provisions of Directive 1999/5/EC.
The Declaration of Conformity may be consulted in the Product
Stewardship page at education.ti.com.
България Texas Instruments декларира, че TI-Nspire™ Navigator™ точка
за достъп, безжичен люлка TI-Nspire™ Navigator™ и TI-Nspire™
CX безжична мрежова карта, TI-Nspire™ CX безжична
мрежова карта -
v2
и точка за достъп на TI-Nspire™ CX
Regulatory Information 347

348 Regulatory Information
Navigator™ са в съответствие с основните изисквания и
другите съответни разпоредби на Директива 1999/5/ЕО.
Декларацията за съответствие може да бъде консултиран в
страницата на продукта стопанисване в education.ti.com.
Česká
republika
Texas Instruments tímto prohlašuje, že TI-Nspire™ Navigator™
přístupový bod, bezdrátový stojan TI-Nspire™ Navigator™ a
TI-Nspire™ CX bezdrátový síťový adaptér, TI-Nspire™ CX
bezdrátový síťový adaptér -
v2
a TI-Nspire™ CX Navigator™
přístupový bod jsou v souladu se základními požadavky a
dalšími příslušnými ustanoveními směrnice 1999/5/ES.
Prohlášení o shodě může být konzultován v na stránce Product
Stewardship education.ti.com.
Dansk Texas Instruments erklærer hermed, at TI-Nspire™ Navigator™
adgangspunktet, den trådløse TI-Nspire™ Navigator™ holder,
den TI-Nspire™ CXNavigator™ adgangspunktet, den trådløse
TI-Nspire™ CX netværksadapter og den trådløse TI-Nspire™ CX
netværksadapter -
v2
er i overensstemmelse med de essentielle
krav og andre relevante bestemmelser i direktiv 1999/5/EF.
Du kan læse overensstemmelseserklæringen på
produktforvaltningssiden på education.ti.com.
Norsk Texas Instruments erklærer herved at TI-Nspire™ Navigator™
tilgangspunkt, TI-Nspire™ CXNavigator™ tilgangspunkt,
TI-Nspire™ Navigator™ trådløs bordholder, TI-Nspire™ CX
Wireless Network Adapter og TI-Nspire™ CX Wireless Network
Adapter -
v2
overholder de vesentlige kravene og andre
relevante bestemmelser i direktivet 1999/5/EC.
Samsvarserklæringen kan leses på siden Produktforvaltning på
education.ti.com.
Suomi Texas Instruments vakuuttaa, että TI-Nspire™ Navigator™-
liityntäpiste, TI-Nspire™ CXNavigator™-liityntäpiste, langaton
TI-Nspire™ Navigator™-kelkka, TI-Nspire™ CX Wireless Network
Adapter ja TI-Nspire™ CX Wireless Network Adapter -
v2
täyttävät direktiivin 1999/5/EY oleelliset vaatimukset ja ja muut
asianmukaiset ehdot.
Vaatimustenmukaisuusvakuutus on tarkasteltavissa

tuotevastuusivulla osoitteessa education.ti.com.
Français Texas Instruments déclare que le point d’accès TI-Nspire™
Navigator™, le point d’accès TI-Nspire™ CX Navigator™, le socle
de synchronisation TI-Nspire™ Navigator™, l’adaptateur de
réseau sans fil TI-Nspire™ CX et l’adaptateur de réseau sans fil
TI-Nspire™ CX -
v2
sont conformes aux exigences essentielles et
aux autres clauses applicables de la Directive 1999/5/CE.
La Déclaration de conformité peut être consultée à la page
Gérance du produit à education.ti.com.
Deutsch Texas Instruments erklärt hiermit, dass der TI-Nspire™
Navigator™ Zugangspunkt, TI-Nspire™ CXNavigator™
Zugangspunkt, die drahtlose TI-Nspire™ Navigator™
Basisstation, der drahtlose TI-Nspire™ CX Netzwerkadapter
drahtlose und der TI-Nspire™ CX Netzwerkadapter -
v2
mit den
wesentlichen Anforderungen und anderen relevanten
Bestimmungen der Richtlinie 1999/5/EG konform sind.
Die Konformitätserklärung kann auf der Seite “Engagement für
die Umwelt” unter education.ti.com angezeigt werden.
Ελλάδα Με την παρούσα, Texas Instruments δηλώνει ότι το σημείο
πρόσβασης TI-Nspire™ Navigator™, ασύρματο λίκνο πλοηγός
TI-Nspire™ και TI-Nspire™ CX ασύρματο προσαρμογέα δικτύου,
TI-Nspire™ CX ασύρματο προσαρμογέα δικτύου - v2, και σημείο
πρόσβασης TI-Nspire™ CX Navigator™ είναι σύμφωνα με τις
βασικές απαιτήσεις και τις λοιπές σχετικές διατάξεις της οδηγίας
1999/5/εκ.
Δήλωσης συµµόρφωσης μπορούν να συμβουλεύονται στη
σελίδα Διαχείριση προϊόντων στο education.ti.com.
Italiano Con la presente, Texas Instruments dichiara che il punto di
accesso TI-Nspire™ Navigator™, il punto di accesso TI-Nspire™
CXNavigator™, la base di ricarica wireless TI-Nspire™
Navigator™, la basetta wireless TI-Nspire™ CX e la basetta
wireless TI-Nspire™ CX -
v2
sono conformi ai requisiti
fondamentali e ad altri provvedimenti della Direttiva 1999/5/CE.
È possibile consultare la Dichiarazione di conformità alla pagina
Product Stewardship (Gestione responsabile del prodotto),
Regulatory Information 349

350 Regulatory Information
all’indirizzo education.ti.com.
Nederlands Hierbij verklaart Texas Instruments dat het TI-Nspire™
Navigator™ accesspoint, de TI-Nspire™ CX Navigator™
accesspoint, de TI-Nspire™ Navigator™ draadloze slede, de
TI-Nspire™ CX draadloze netwerkadapter en de TI-Nspire™ CX
draadloze netwerkadapter -
v2
voldoen aan de essentiële
vereisten en andere relevante bepalingen van Richtlijn
1999/5/EC.
De verklaring van overeenstemming kan worden geraadpleegd
op de pagina Product Stewardship (Productbeheer) op
education.ti.com.
Português A Texas Instruments declara, pela presente, que o ponto de
acesso TI-Nspire™ Navigator™, o ponto de acesso TI-Nspire™
CXNavigator™, a base sem fios TI-Nspire™ Navigator™, o
adaptador de rede sem fios TI-Nspire™ CX e o adaptador de
rede sem fios TI-Nspire™ CX -
v2
estão em conformidade com os
requisitos essenciais e outras disposições relevantes da
Directiva 1999/5/CE.
A Declaração de Conformidade pode ser consultada na página
Administração do Produto em education.ti.com.
Español Mediante el presente documento, Texas Instruments declara
que el punto de acceso TI-Nspire™ Navigator™, el punto de
acceso TI-Nspire™ Navigator™ CX, el soporte inalámbrico
TI-Nspire™ Navigator™, el adaptador de red inalámbrica
TI-Nspire™ CX y el el adaptador de red inalámbrica TI-Nspire™
CX -
v2
cumplen con los requisitos esenciales y otras
disposiciones relevantes de la directiva 1999/5/CE.
Puede consultar la declaración de conformidad en la página
Administración de producto en education.ti.com.
Svenska Texas Instruments deklarerar härmed att TI-Nspire™ Navigator™
anslutningspunkt, TI-Nspire™ CX Navigator™ anslutningspunkt,
TI-Nspire™ Navigator™ trådlös tillkopplingsenhet, TI-Nspire™ CX
trådlös nätverksadapter och TI-Nspire™ CX trådlös
nätverksadapter -
v2
uppfyller de väsentliga kraven och övriga
relevanta bestämmelser enligt direktivet 1999/5/EG.

Deklarationen om överensstämmelse kan läsas på sidan
Produktansvar på webbplatsen education.ti.com.
Slovensko Texas Instruments vyhlasuje, že TI-Nspire™ Navigator™ Access
Point, bezdrôtový kolísky TI-Nspire™ Navigator™ a TI-Nspire™ CX
bezdrôtový sieťový adaptér, TI-Nspire™ CX bezdrôtový sieťový
adaptér -
v2
a TI-Nspire™ CX Navigator™ prístupový bod sú v
súlade so základnými požiadavkami a inými príslušnými
ustanoveniami smernice 1999/5/EC.
Vyhlásenie o zhode k nahliadnutiu na stránke produktu
správcovstvo v education.ti.com.
Slovenija Texas Instruments izjavlja, da TI-Nspire™ Navigator™ dostopno
točko, TI-Nspire™ Navigator™ wireless zibelka in TI-Nspire™ CX
brezžično omrežno kartico, TI-Nspire™ CX brezžično omrežno
kartico -
v2
in TI-Nspire™ CX Navigator™ vstopne točke so v
skladu z bistvenimi zahtevami in drugimi ustreznimi doloèbami
Direktive 1999/5/ES.
Izjava o skladnosti se lahko posvetuje nadzor izdelkov na strani
education.ti.com.
Countries of Operation and Restrictions of Use in the European
Community
Operation Using the 2.400 to 2.4835 GHz Channels in the European
Community
The installer and/or end user should use the configuration utility provided with
this product to verify the current channel of operation, the expected transmit
power level, and to confirm that the device is operating in conformance with the
spectrum usage rules for the selected European Community country. If
operation is occurring outside of the allowable channels as indicated in this
guide, then operation of the product must cease immediately and the installer
must consult with the local technical support staff responsible for the wireless
network.
These devices are intended to be operated in all countries of the European
Community. The frequencies associated with channels 1 to 13 in the 2.400 to
2.4835 GHz band are allowed to be used either indoors or outdoors in all
countries of the European Community, except where noted:
Regulatory Information 351

352 Regulatory Information
• In Greece, Italy, Latvia, and Spain, the end-user must apply for a license
from the national spectrum authority to operate this device outdoors.
• Please consult the TI-Nspire™ Navigator™ Teacher Software Guidebook for
further information regarding restrictions and operating conditions for
outdoor configurations.
Warning Statements
Warning! Install the TI-Nspire™ Navigator™ Access Point or TI-Nspire™ CX
Navigator™ Access Point in such a manner as to maintain a minimum of 20 cm
(7.9 inches) separation distance between the radiating element(s) and all
persons. This safety warning conforms to FCC radio frequency exposure limits.
Warning! Do not touch or move the TI-Nspire™ Navigator™ Access Point or or
TI-Nspire™ CX Navigator™ Access Point when the antennas are transmitting or
receiving.
Warning! The TI-Nspire™ Navigator™ Access Point, TI-Nspire™ Navigator™
Wireless Cradle, TI-Nspire™ CX Wireless Network Adapter, TI-Nspire™ CX
Navigator™ Access Point, and TI-Nspire™ CX Wireless Network Adapter -
v2
are intended for indoor use only. Do not install the device nor operate it
outdoors.
Warning! Intentional radiators, such as the TI-Nspire™ Navigator™ Access
Point, TI-Nspire™ Navigator™ Wireless Cradle, TI-Nspire™ CX Wireless Network
Adapter. TI-Nspire™ CX Navigator™ Access Point, and TI-Nspire™ CX Wireless
Network Adapter -
v2
are not intended to be operated with any antenna(s) other
than those furnished by Texas Instruments. An intentional radiator may only be
operated with the antenna(s) with which it is authorized.
Warning! The TI-Nspire™ Navigator™ Access Point radio(s) and TI-Nspire™ CX
Navigator™ Access Point radio(s) are disabled by default and can be enabled
only by the system administrator using the Management software application.
Warning! The radio frequency band, operating channels, and transmit power
depend on the country of operation specified by the system administrator
during setup and configuration using the Management software.
Warning! Only qualified personnel must perform installation. Read and follow
all warning notices and instructions marked on the product or included in the
documentation

Important for Safe AC Adapter Operation
In addition to the careful attention devoted to quality standards in the
manufacture of your TI product, safety is a major factor in the design of every
product. However, safety is your responsibility as well. This section lists
important information that will help assure your enjoyment and proper use of
this TI product and accessory equipment. Please read it carefully before
operating and using your product.
Installation
• Read and follow Instructions: You should read all the safety and operating
instructions before operating the product. Follow all operating instructions.
• Retain Instructions: You should save all the safety and operating
instructions for future reference.
• Heed Warnings: Comply with all warnings on the product and in the
operating instructions.
• Use the Recommended AC adapter: You must use the adapter that comes
with your product.
• Check Power Sources: The AC adapter for your TI product must be used
with an AC100V-230V 50Hz/60Hz supply outlet. If you are not sure of the
type of power supplied to your home, consult your dealer or local power
company.
• Be Careful of Overloading: Do not overload wall outlets or extension cords,
as this can result in a risk of fire or electric shock. Overloaded AC outlets,
extension cords, frayed power cords, damaged or cracked wire insulation,
and broken plugs are dangerous. Periodically examine the cord, and if its
appearance indicates damage or deteriorated insulation, have it replaced
by your service technician.
• Protect Power Cords: Route power supply cords so that they are not likely
to be walked on or pinched by items placed upon or against them. Pay
particular attention to cords where they are attached to plugs and
convenience receptacles, and examine the point where the power cord
attaches to the TI product.
• Check Ventilation: Slots and openings in the enclosure are provided for
ventilation to ensure reliable operation of the TI product and to protect it
from overheating. Do not block or cover these openings. Never block these
openings by placing the TI product on a bed, sofa, rug, or other similar
surface. Never place the TI product near or over a radiator or heat register,
Regulatory Information 353

354 Regulatory Information
or any other head source (including amplifiers). Do not place the TI
product in a built-in installation, such as a bookcase or equipment rack,
unless you provide proper ventilation.
• Do Not Use Accessories: Do not use attachments, unless they are
recommended by TI, as they may cause electrical or fire hazards.
• Do Not Use Near Water: Do not use the TI product near water; for example,
near a bathtub, sink or laundry tub, in a wet basement or near a swimming
pool.
• Do Not Place Near a High Temperature Source: Do not use the TI product
near a source of heat such as a kitchen range, a fireplace, or a radiator.
• Use Caution in Mounting the TI Product: Do not place the TI product on an
unstable surface. The TI product may fall, causing serious injury to a child
or adult, as well as serious damage to the TI product.
• Do Not Use Near Medical Equipment: Do not operate the product near
equipment that is susceptible to electrical interference, or is used for
medical purposes. Do not use the product near a pacemaker or a patient
care area in a hospital.
Important Information
• Wait at least 10 seconds between disconnecting and reconnecting the TI
product with the AC power adapter.
• Unplug the product from the wall outlet carefully, as the AC adapter may
be hot.
Use and Maintenance
• Unplug Power Before Cleaning: Do not used liquid or aerosol cleaners.
Use a damp cloth for cleaning.
• Keep Objects Out of Openings: Never push objects of any kind into the TI
product through openings such as the ventilation holes, as they may touch
high voltage circuits and "short out" parts, which could result in a fire or
electric shock. Never spill liquid on the TI product.
• Protect From Lightning: Unplug the TI product during a lightning storm, or
when leaving it unattended and unused for a long period. Remove the
power adapter from the wall outlet, and disconnect the cable system. This
will prevent damage to the TI product due to lightning and power line
surges. Take care not to touch the metal portion of the TI product or cables
in a lightning storm.

Service
• Refer Servicing to Qualified Service Personnel under the Conditions
Listed Below:
- If the power supply cord or plug is damaged.
- If liquid has been spilled or objects have fallen into the product.
- If the product has been exposed to rain or water.
- If the product does not operate normally as per the operating
instructions.
- If the product has been dropped or the case has been damaged.
- When the product exhibits a distinct change in operation, such as the
inability to complete its self-check.
• Require Safety Check: Upon completion of any service or repairs to the
product, ask the service technician to perform the recommended safety
checks to verify that the product is in a safe operating condition.
Regulatory Information 355

356

Support and Service
Texas Instruments Support and Service
General Information: North and South America
Home Page: education.ti.com
KnowledgeBase and e-mail inquiries: education.ti.com/support
Phone: (800) TI-CARES / (800) 842-2737
For North and South America and
U.S. Territories
International contact information: education.ti.com/support/worldwide
For Technical Support
Knowledge Base and support by e-mail: education.ti.com/support or
ti-cares@ti.com
Phone (not toll-free): (972) 917-8324
For Product (Hardware) Service
Customers in the U.S., Canada, Mexico, and U.S. territories: Always contact
Texas Instruments Customer Support before returning a product for service.
For All Other Countries:
For general information
For more information about TI products and services, contact TI by e-mail or
visit the TIInternet address.
E-mail inquiries: ti-cares@ti.com
Home Page: education.ti.com
Service and Warranty Information
For information about the length and terms of the warranty or about product
service, refer to the warranty statement enclosed with this product or contact
your local Texas Instruments retailer/distributor.
Support and Service 357

358

Index
A
account, teacher 32
activities
copying 77
filtering 75
keyword searches 75
opening 75
saving 76
Activities file 60
ActivityTypes file 58
adapter
adding to network 41-42
connecting to handhelds 28
adding
(x,y) numerical input questions 187
applications 216
applications (PublishView™ documents) 244
classes 93
colors 211
copyrights 175
copyrights to documents (.tns) 223
drop points questions 190
equation questions 183
images in Quick Poll 325
images to pages 325
images to questions 178
links 71
lists questions 191
Master Documents 320
open response questions 182
pages 220
problems 220
Index 359

360 Index
questions 178, 180
shortcuts 70
students to classes 99
teacher equations to graphs 305
teacher points to graphs 303
text (PublishView™ documents) 258
API level, setting for scripts 335
applications
adding 216
deleting 219
grouping 219
inserting images 325
Question 173
swapping 217
arranging
captured screens 135
aspect ratio
changing (Review Workspace) 288
assignments
exporting 317
redistributing 321
removing 323
renaming 322
saving 313
viewing individual 311
viewing summary 310
associating handhelds with a network 24
Attendance file 59
B
bar charts
organizing 292
viewing (Review Workspace) 282
batteries
charging 11

beginning class sessions 105
borders (PublishView™ documents), hiding/showing 253
C
Capture Class
printing screens 141
saving screens 140
view options 133
capture class tool 130
capture page option 143
Capture Selected Handheld option 144
captured screens
rearranging 135
refreshing 135
capturing
active pages in documents 143
images in handheld mode 129
pages in active documents 129
screen stacks 138
student handhelds 130
changing
class views 106
colors 291
General Settings 167
Graphs & Geometry settings 169
language 54
links 72
passwords 126
scores 317
charging
batteries 11
cradles 11
Class Record 113
canceling file transfers 125
checking file transfer status 124
Index 361

362 Index
viewing file properties 125
Class Session file 60
class sessions
beginning 105
ending 105
Class Workspace 93
classes
adding classes 93
adding students 99
assigning students 109
changing views 106
Class Record 93, 113
copying student information 113
creating classes 93
moving students to 112
removing classes 104
removing students from 101
seating charts 106-107
sending files 77
student lists 107
clearing
Live Presenter keypress history 153
closing
Live Presenter 156
closing documents (.tns) 209
collecting
files 118
missing files 321
colors
changing for student responses 291
colors, adding 211
comparing
screens 139
configuring plot lists 289
connecting
handhelds to cradles 29

handhelds to wireless adapters 28
content
viewing on handhelds 79
Content Explorer 164
content workspace
exploring 63
Content Workspace 63
converting
.tns files to .tnsp files 273
.tnsp files to .tns files 272
page size; page size, converting; preview, setting document; setting
document preview 211
text to hyperlinks 266
copying
activities 77
images 143
images in handheld mode 129
Live Presenter keypress history 153
screens 148
student information 113
copying problems 220
copyrights
adding 175
adding to documents (.tns) 223
cradles
adding to network 42
charging 11
checking LEDs 13
connecting to handhelds 29
creating
classes 93
passwords 128
PublishView™ documents 226
SessionLogs folder 57
creating documents (.tns) 205
Index 363

364 Index
D
data
viewing in tables (Review Workspace) 283
viewing student responses 287
defining
settings 54
deleting
applications 219
classes 104
documents (.tns) 208
files (Portfolio Workspace) 323
hyperlinks (PublishView™ documents) 267
images 327
images (PublishView™ documents) 269
keypress history in Live Presenter 153
pages 219
problems 220
PublishView™ objects 242
shortcuts 70
student information 101
displaying
student responses 279
teacher handhelds 132
document
settings 53
documents
creating .tnsp files 226
printing .tnsp files 274
saving .tnsp files 230
documents (.tns)
changing General Settings 167
closing 209
creating 205
deleting 208

opening 83, 206
opening (Class Workspace) 285
opening (Portfolio Workspace) 285
printing 221
properties 222
protecting 224
read-only 224
saving 83, 207-208
switching between 213
viewing 213
documents (.tns, .tnsp)
opening (Content Workspace) 75
Documents Workspace 157
DragScreen feature 129
drop points questions
adding 190
E
editing
scores 316-317
emulator, See TI-SmartView™ emulator 160
ending class sessions 105
equation questions
adding 183
exploring
content workspace 63
resources pane 64
exporting
data 317
student scores (Portfolio Workspace) 317
F
features
refreshing screen captures 136
Index 365

366 Index
files
canceling transfers 125
checking transfer status 124
collecting 118
collecting missing 321
image file types 325
importing (Portfolio Workspace) 314
previewing (Portfolio Workspace) 315
properties 125
redistributing (Portfolio Workspace) 321
removing (Portfolio Workspace) 323
saving (Portfolio Workspace) 306, 313
sending 77, 115
sending missing 322
viewing properties 125
working with files on connected handhelds 82
filtering activities 75
final scores, changing 317
Flash (.flv) files 270
folders
storing PublishView™ objects 243
footers in PublishView™ documents 252
formatting
text (PublishView™ documents) 259
formatting text 209
formatting toolbar
hiding 210
showing 210
G
Gallery view 134
graphs
adding teacher equations 305
adding teacher points 303
viewing data (Review Workspace) 282

Graphs & Geometry settings 169
grouping
responses 292
grouping applications 219
H
handhelds
associating with a network 24
capturing selected handhelds 144
capturing student screens 130
checking for OS updates 87
connecting to adapters 28
connecting to cradles 29
installing OS update 88
locating using Identify Selected 91
renaming 90
transferring files 86
viewing content on connected 79
working with files on connected 82
headers in PublishView™ documents 252
hiding
handheld display in Live Presenter 151
Live Presenter keypress history 152
presenter handheld 150
responses 279, 295
student names 132
student names in Live Presenter 149
hiding format toolbar 210
hyperlinks (PublishView™ documents)
converting text to 266
editing 266
linking to files 261
linking to websites 264
Index 367

368 Index
I
Identify Selected 91
images
adding to questions 178
deleting 327
file types 325
inserting 325
moving 326
Quick Poll 325
resizing 327
saving 129, 143
selecting 326
TI-Nspire™ applications 325
images (PublishView™ documents) 267, 269
importing files (Portfolio Workspace) 314
inserting
hyperlinks (PublishView™ documents) 261
images (PublishView™ documents) 267
images in questions 178
images in Quick Poll 325
images to pages 325
PublishView™ objects 238
text (PublishView™ documents) 258
installing a handheld OS update 88
K
keypress history
copying 153
hiding in Live Presenter 152
showing in Live Presenter 152
viewing in Live Presenter 151
keyword searches 75

L
language
changing 54
LED
cradles 13, 40
status on cradles 13
linking
to files 261
to websites 264
links 70
adding 71
changing 72
moving 73
removing 72
lists
organizing data 292
lists questions
adding 191
Live Presenter 149
clearing keypress history 153
copying keypress history 153
hiding keypress history 152
hiding presenter handheld 150
hiding student names 149
hiding the handheld display 151
playing a recording 155
recording the live presentation 154
save recording 154
sharing recordings 155
showing keypress history 152
showing presenter handheld 150
showing student names 149
showing the handheld 151
showing the handheld screen 153
Index 369

370 Index
start recording 154
stop recording 154
stopping 156
viewing keypress history 151
Live Presenter keypress history
clearing 153
live results 281
logging in to network 35
logging system use
session logs 57
login status 108
Lua, scripts 329
M
Make Presenter option 140
managing
session logs 58
marking responses 297
Master Documents 320
minimum API level for scripts 335
moving
images 326
images (PublishView™ documents) 269
links 73
PublishView™ objects 240
students to classes 112
multiple choice questions
adding 180
N
network
associating handhelds 24
logging in 35

numerical input questions
adding 187
O
objects
(PublishView™ documents) 236, 244
open response questions
adding 182
opening
activities 75
documents (.tns) 83
Master Documents 320
Portfolio items 319
opening documents (.tns) 206
options
capture page 143
Capture Selected Handheld 144
Make Presenter 140
randomize screens 132
organizing
bar chart data 292
list data 292
responses 289, 294
organizing PublishView™ sheets 251
OS update
installing on a handheld 88
overlapping PublishView™ objects 241
overview
software 51
TI-Nspire(TM) Navigator(TM) Teacher Software 51
P
packaging session logs 60
page numbers (PublishView™ documents) 251
Index 371

372 Index
Page Sorter 159, 217, 277
pages
adding 220
deleting 219
grouping 219
rearranging 218
selecting 218
ungrouping 219
panes
resource 64
passwords
changing for teacher 33
resetting for students 126
setting 128
pasting
images 143
images in handheld mode 129
screens 148
pasting problems 220
PDF
save document as 221
playing
Live Presenter recording 155
plots
configuring lists 289
points
adding to graphs (Review Workspace) 303
polling students 200
polls
stopping 201
viewing results 203
Portfolio Workspace 309
preview, printed document 222
print preview 222
printing
captured screens 141

PublishView™ documents 274
printing documents (.tns) 221
problems
adding 220
copying/pasting 220
deleting 220
renaming 221
problems (PublishView™ documents) 248, 250
protecting documents (.tns) 224
PublishView™ documents 225
applications 244, 248
converting 271, 274
creating 226
hyperlinks 260, 267
images 267, 269
objects 236, 243
printing 274
problems 248
problemsdeleting
problems (PublishView™ documents) 250
saving 230
sheets 251, 257
text 257, 260
video files 270
Q
questions
(x,y) numerical input 187
adding 178
adding images 178
drop points 190
equation 183
lists 191
multiple choice 180
open response 182
Index 373

374 Index
Self Check mode 181
suggested responses 183
using the Question application 173
Quick Poll
images 325
opening 198
polling students 200
saving polls 202
stopping polls 201
viewing results 203
R
randomize screen option 132
read-only documents (.tns) 224
rearranging
captured screens 135
recording
Live Presenter presentation 154
starting Live Presenter recording 154
redistributing assignments 321
refreshing
captured screens 135
removing
classes 104
files 323
hyperlinks from text 267
images 327
links 72
students from classes 101
renaming
items (Portfolio Workspace) 322
problems (PublishView™ documents) 250
renaming problems 221
reponses
adding suggested 183

reporting system use 57
repositioning images 326
resetting student passwords 126
resizing
images 327
images (PublishView™ documents) 269
PublishView™ objects 240
resources pane
exploring 64
responses
hiding 295
marking 297
organizing 289
showing 295, 297
showing correct 281
sorting 284
Review tools 276
Review Workspace 275
S
Save
document as PDF 221
saving
activities to your computer 76
captured images 129
captured pages 146
data as new document (Review Workspace) 307
documents (.tns) 83
files to Portfolio Workspace 306
handheld screens 146
images 143
Live Presenter recording 154
Portfolio items 313
PublishView™ documents 230
PublishView™ document as PDF 274
Index 375

376 Index
saving documents (.tns) 207-208
scaling 53
scores, editing 316
screen capture tool 130
screen captures
Capture Class 129
comparing screens 139
copying 148
Gallery view 134
hiding student names 132
Make Presenter option 140
pasting 148
showing student names 132
stacks 138
teacher preferences 132
Tiled view 134
zoom percentages 137
zooming in/out 137
screen stacks 138
screens
comparing 139
scripts
setting API level 335
scripts, Lua 329
searching for activities 75
seating charts 107
selecting
images 326
working folder (PublishView™ objects) 243
selecting pages 218
self-check
document types 176
Self-Check mode 181
sending
files to class 77, 115
missing files 322

sending session logs 60
session logs
Activities 60
activity types 58
Attendance file 59
Class Session 60
packaging 60
sending 60
setting
minimum API level for scripts 335
zoom percentages 137
settings
defining 54
language 54
teacher preferences 107
sharing
Live Presenter recording 155
shortcuts 70
showing
correct responses 281
handheld in Live Presenter 151
Live Presenter handheld screen 153
Live Presenter keypress history 152
presenter handheld 150
responses 295
student names 132
student names in Live Presenter 149
student responses 279, 297
showing format toolbar 210
software
overview 51
sorting
Portfolio items 318
responses 284
student information 108
Index 377

378 Index
starting
Live Presenter recordings 154
status
of file transfers 124
stopping
Live Presenter 156
Live Presenter recording 154
polls 201
student handhelds
capturing 130
student responses
individualizing 291
marking correct/incorrect 297
organizing 289
showing/hiding 295, 297
viewing 277
students
adding to classes 99
arranging in seating charts 107
changing classes 109
changing names 111
changing student IDs 111
checking login status 108
copying information 113
creating passwords 128
deleting information 101
displaying responses 279
moving information 112
polling 200
removing from classes 101
resetting passwords 126
responses 279
setting passwords 128
viewing student list 107
suggested response 176

T
teacher account 32
changing password 33
changing user name 34
teacher data, adding 303, 305
teacher handhelds
displaying 132
teacher preferences 107
Teacher Tool Palette 175
text formatting 209
TI-Nspire(TM) Navigator(TM) Teacher Software
overview 51
TI-Nspire(TM) Screen Capture Window 145
zooming in/out 146
TI-Nspire™ CX Wireless Network Adapter
adding to network 41-42
connecting to handhelds 28
TI-Nspire™ Navigator™ Cradle
adding to network 42
checking the LED 13
TI-SmartView™
capturing images 129
DragScreen feature 129
TI-SmartView™ emulator 160
Tiled view 134
toolbar
text formatting 209
tools
capture class 130
screen capture 130
tools menu 52
tracking system use 57
transferring files
canceling 125
Index 379

380 Index
checking transfer status 124
transferring files to connected handhelds 86
U
ungrouping
applications 219
pages 219
user name, changing for teacher 34
Using the Preview Pane 66
V
videos (PublishView™ documents)
inserting files 270
video console 271
viewing
answers 286
assignment summaries 309
bar charts/graphs (Review Workspace) 282
capture class options 133
captured screens 145
data (Review Workspace) 282-283
documents (.tns) 213
individual assignments 311
Live Presenter keypress history 151
live results 281
poll results 203
student responses 277, 287
views
seating chart 106
student list 106
table (Review Workspace) 283

W
Welcome Screen
navigating 50
opening 50
windows
TI-Nspire(TM) Screen Capture 145
wireless adapter
adding to network 41-42
connecting to handhelds 28
wireless clients, adding to a network 24
workspaces 51
Class Workspace 93
Content Workspace 63
Documents Workspace 157
exploring 63
Portfolio Workspace 309
Review Workspace 275
Z
zoom percentages 137
zooming
in/out 137, 146
PublishView™ documents 257
Index 381
