JCM Technologies RB3T916 Transmitter for Automatic Door Safety Edges User Manual
JCM Technologies, S.A. Transmitter for Automatic Door Safety Edges
User Manual
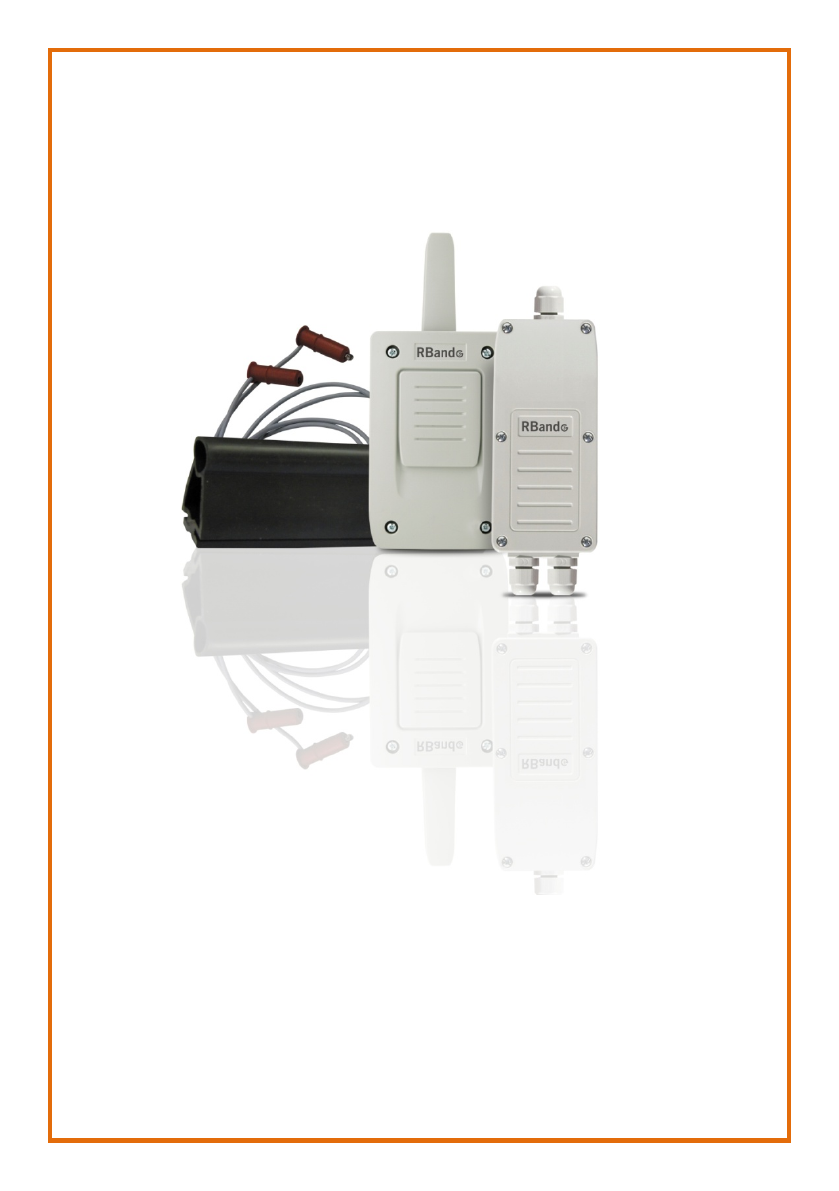
RADIOBAND 3G
RB3 T916
RB3 R916
USER'S MANUAL

1248121_Rev1.0 RB3 916 System Página 2/24
Index
INTRODUCTION ............................................................................ 3
Operating .......................................................................................................... 3
Receiver RB3 R916 ............................................................................................ 4
Transmitter RB3 T916 ........................................................................................ 5
ASSEMBLY AND INSTALLATION .................................................... 6
1 Installation of the equipment ..................................................................... 6
2 Connecting the receiver to the control panel ............................................... 7
2.1 Adjustment of the receiver / Operating modes. ........................................................... 8
2.2 ON/WORK mode ..................................................................................................... 8
2.3 ATEST signal .......................................................................................................... 9
3 Connecting the safety edge to the transmitter (connection examples) ............... 10
PROGRAMMING ......................................................................... 12
4 Programming ....................................................................................... 12
4.1 MODE 1: Safety edge connected to IN1 activates R1 .............................................. 13
4.2 MODE 2: Safety edge connected to IN1 activates R2 .............................................. 14
4.3 MODE 3: Safety edge connected to IN1 activates R1 and R2 ................................... 15
4.4 MODE 4: Safety edge connected to IN1 activates R1 and safety edge connected to IN2
activates R2 ................................................................................................................ 16
CHECKING AND MAINTENANCE .................................................. 17
5 Does the equipment work properly? ......................................................... 17
6 CHECK function .................................................................................... 18
7 Troubleshooting ..................................................................................... 19
8 Total reset ............................................................................................ 20
9 Batteries ............................................................................................... 20
Technical data summary ................................................................................... 21
Important safety instructions.............................................................................. 22
Notes .............................................................................................................. 23
Regulations ...................................................................................................... 24

1248121_Rev1.0 RB3 916 System Página 3/24
INTRODUCTION
Operating
The RadioBand system is designed for Domestic, Commercial and Industrial door and
gate applications where a safety edge is used.
The system provides a wireless system replacing spiral cables or energy chain systems to
provide the safety signal to the door or gate control panel.
The receiver continuously monitors the status of transmitters connected to it.
With the system you can support 8,2 KOhm safety edges and also optical low power
systems. Additionally you can connect 0 Ohm contacts for slack ropes and wicket doors.
The signal will be transferred by radio.
When an obstacle is detected, the RadioBand system turns its output in a safety state,
changing the state of the receiver relay.
Up to three transmitters per output can be connected to the receiver. There are two
outputs on each receiver that can be connected to the control panel as 8k2 or NC
(normally closed) contact.
The system complies with EN ISO 13849-1:2008, category 2, PLd.
1248121_Rev1.0 RB3 916 System Página 4/24
Receiver RB3 R916
1248121_Rev1.0 RB3 916 System Página 5/24
Transmitter RB3 T916

1248121_Rev1.0 RB3 916 System Página 6/24
ASSEMBLY AND
INSTALLATION
1 Installation of the equipment
1248121_Rev1.0 RB3 916 System Página 7/24
2 Connecting the receiver to the control panel
Connecting the safety outputs to control panel.
Example: connection to control panel with safety contact / STOP input
Example: connection to control panel with input for safety edge 8k2
The equipment can be connected to the control panel with input for safety edge 8k2 or
directly into a safety input normally closed contact as if it were a photocell or stop
signal.
This connectivity exists for R1 and R2 outputs.
1248121_Rev1.0 RB3 916 System Página 8/24
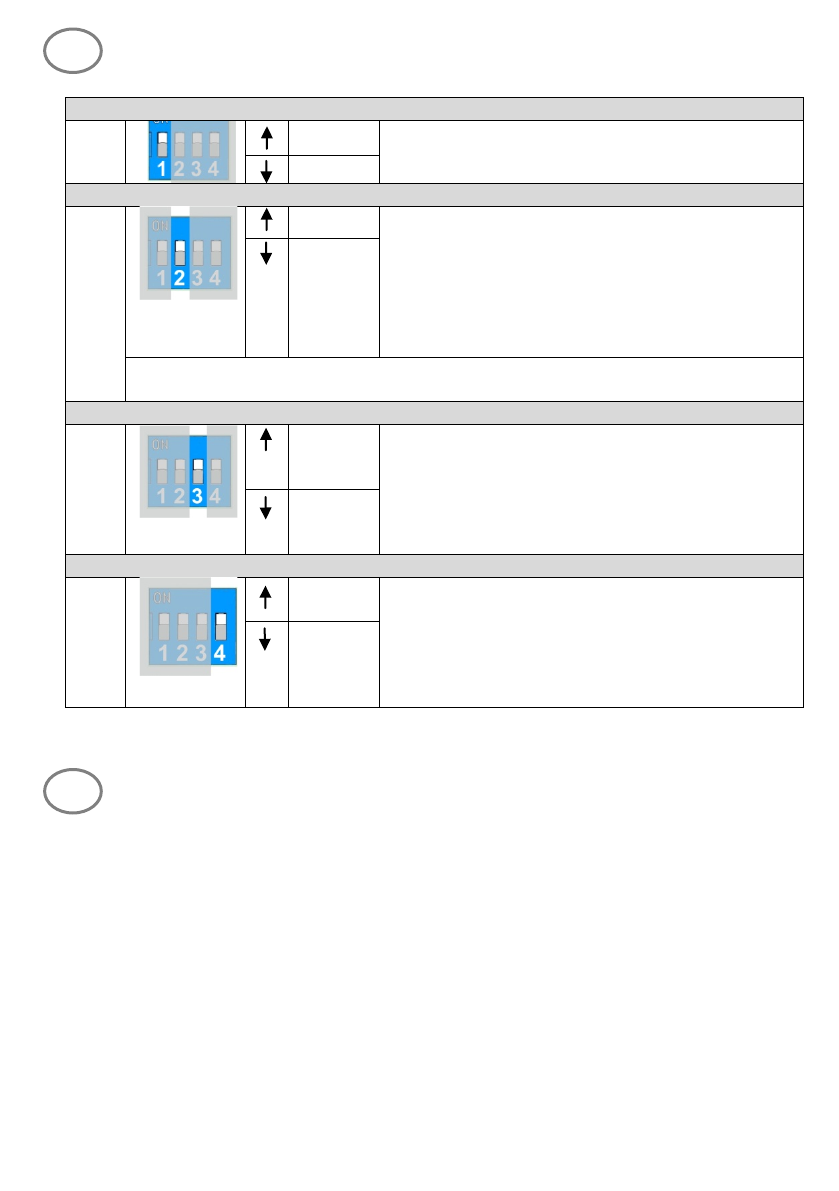
2.1 Adjustment of the receiver / Operating modes.
In case of operating without ATEST signal, it is necessary to work in ATEST positive way. In order to comply
with the EN ISO 13849-1: 2008 safety standard, you must connect this signal to test the system.
2.2 ON/WORK mode
The operating mode is selected by the SW2 of the receiver. This selector is necessary
when working with optical safety edges. All transmitters in the receiver work in the
same way. It will be necessary to reset the receiver when changing the operating
mode with transmitters already memorized.
With standard optical safety edges, WORK mode must be used due to high
consumption of the optical elements.
With OSE-S7502 "always on" optical safety edges, both modes are allowed. In ON
mode, the system becomes universal for any control panel. In WORK mode the battery
life is maximized thanks to the shutdown of the optical elements.
Autocheck period
SW1
7 s
The system performs a complete test of the
equipment, including radio communication.
30 s
Operating mode with optical safety edges
SW2
ON
In ON mode, only "always on" optical safety edges
(OSE-S7502) are permitted, as the optical element
always is on.
In WORK
mode, the optical elements are OFF
meanwhile
the ATEST signal is active. So it is
necessary to disconnect this ATEST signal during
the door movement.
WORK
With resistive or mechanical safety edges, the selector does not work because it is not
necessary to activate the sensors.
R3 function
SW3
Low
battery
In low battery indication mode, the relay contact is
closed when any of the transmitters has an
insufficient level of battery.
In
ALARM mode, the relay contact is closed to
indicate that any of the safety edges stored in the
receiver are active.
Alarm
ATEST signal polarity (depends on the control panel)
SW4
Negative
ATEST negative: ATEST signal is a fixed 12 or 24V
signal that the control panel sets to 0V to make the
system check.
ATEST positive: ATEST signal is disconnected and
when the control panel makes a testing gives a 12
or 24V signal.
Positive
1248121_Rev1.0 RB3 916 System Página 9/24
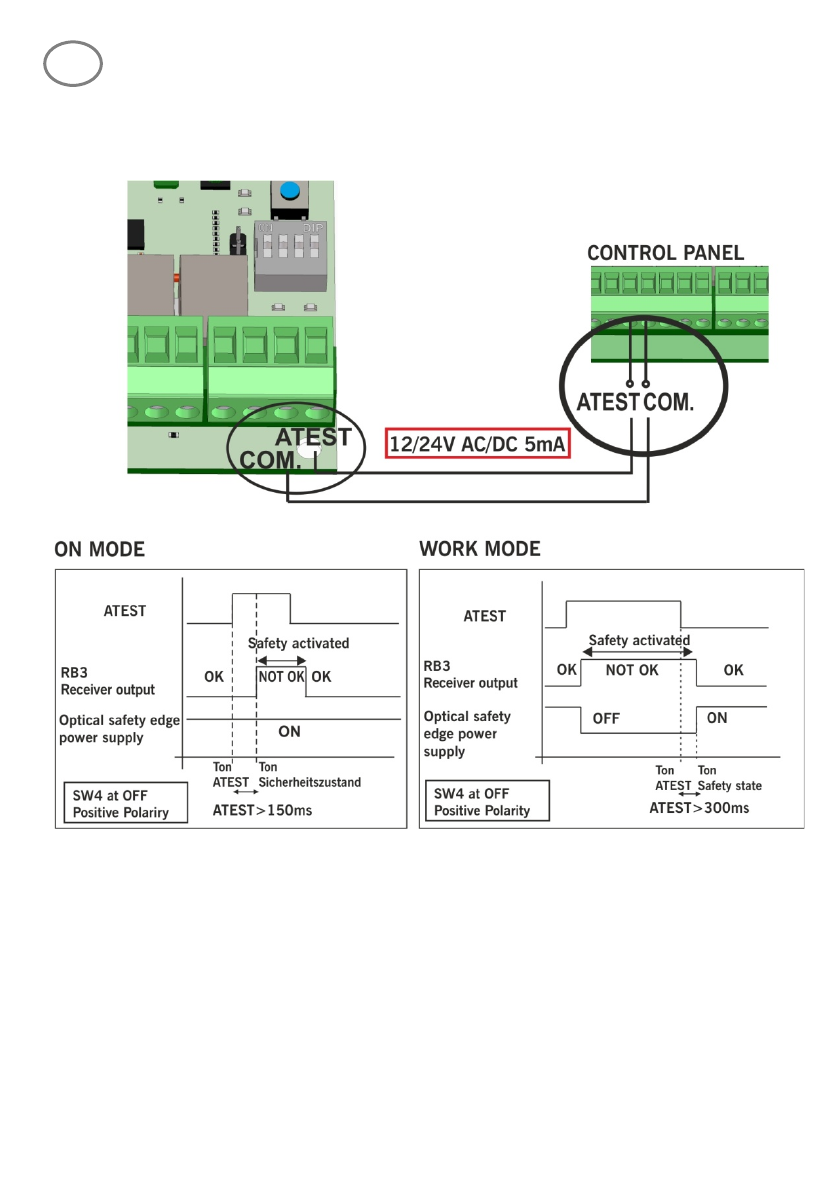
2.3 ATEST signal
In order to comply with EN ISO 13849-1: 2008 safety standard, a signal to test the
system must be connected.
When working with optical safety edges, in ON mode, only OSE-S7502 are allowed as
they are kept always active. The radio communication is tested every 7 or 30 seconds
depending on the selector SW1 of the receiver.
In WORK mode, the ATEST signal is used to power up and down the optical safety
edges. The radio communication is tested as in ON mode and when the optical elements
are powered up and down.
1248121_Rev1.0 RB3 916 System Página 10/24
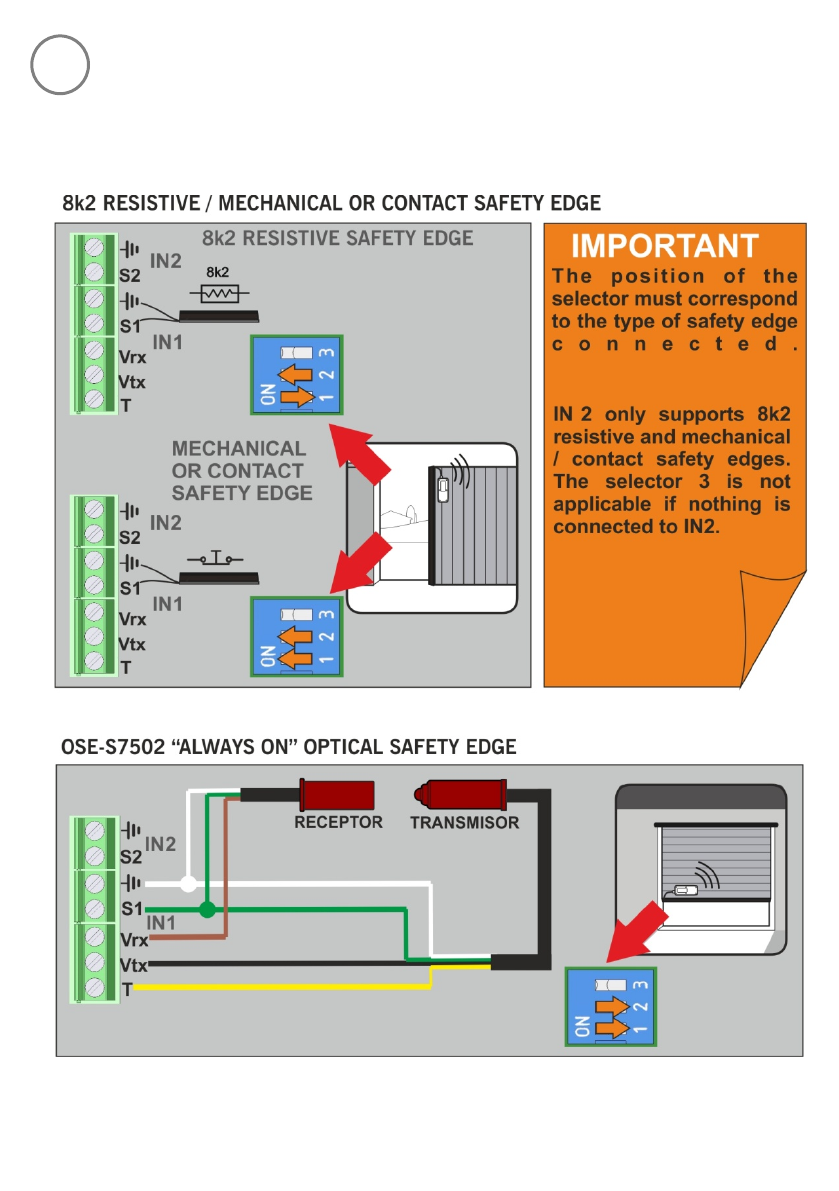
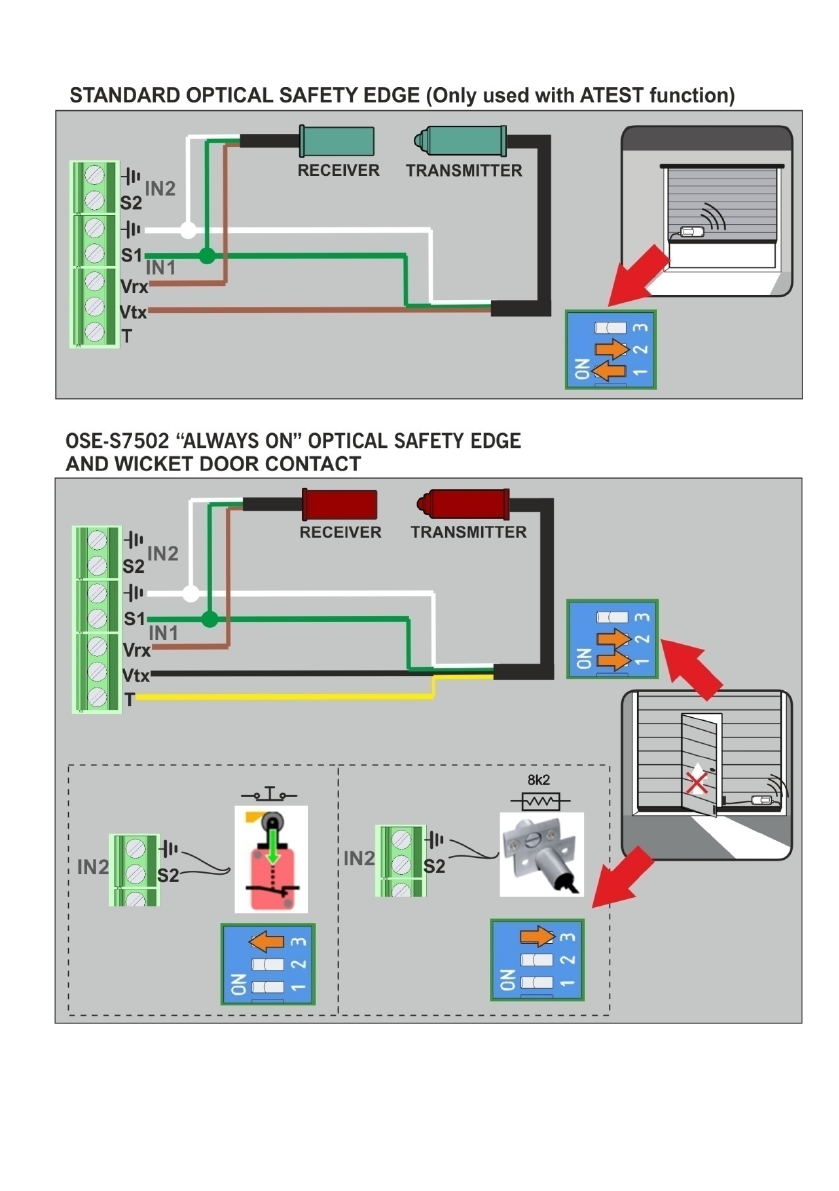
3 Connecting the safety edge to the transmitter
(connection examples)
1248121_Rev1.0 RB3 916 System Página 11/24
1248121_Rev1.0 RB3 916 System Página 12/24
PROGRAMMING
4 Programming
• Working with one safety edge, it must be connected to IN1 of the transmitter. IN2
does not work.
This band can work on R1 (mode 1) or R2 (mode 2) or simultaneously on the 2
relays (mode 3).
• Working with two safety edges (mode 4), the safety edge connected to IN1 act on
R1 and the safety edge IN2 connected on R2.
In IN2 only mechanical band / contact or 8k2 band is allowed.
Before programming, place the options selectors at the desired position. Any subsequent
change will require a receiver reset and reprogramming.
Press the PROG button and hold it until the desired mode is selected. LED's for R1 & R2
will flash in sequence to select the correct operation mode.
There are four programming modes, depending on the inputs you wish to use of
the transmitter and the outputs required to activate on the receiver.
1248121_Rev1.0 RB3 916 System Página 13/24
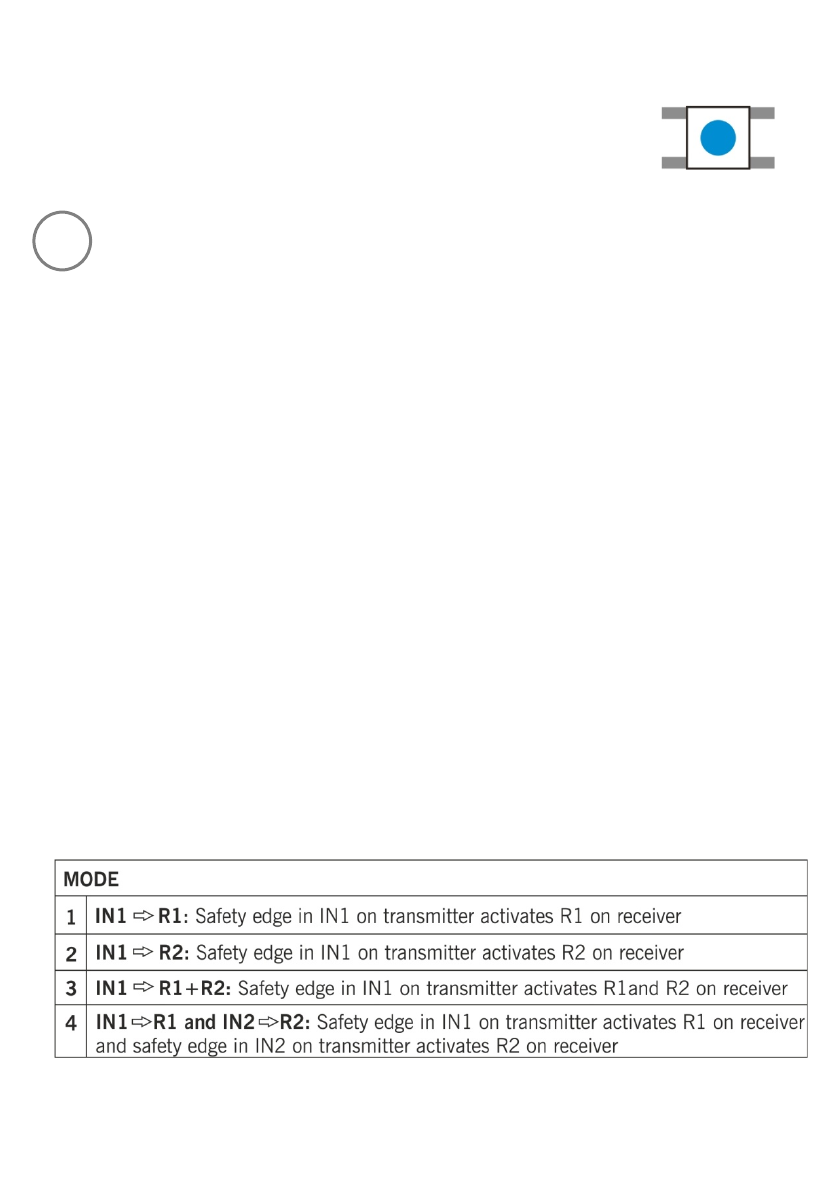
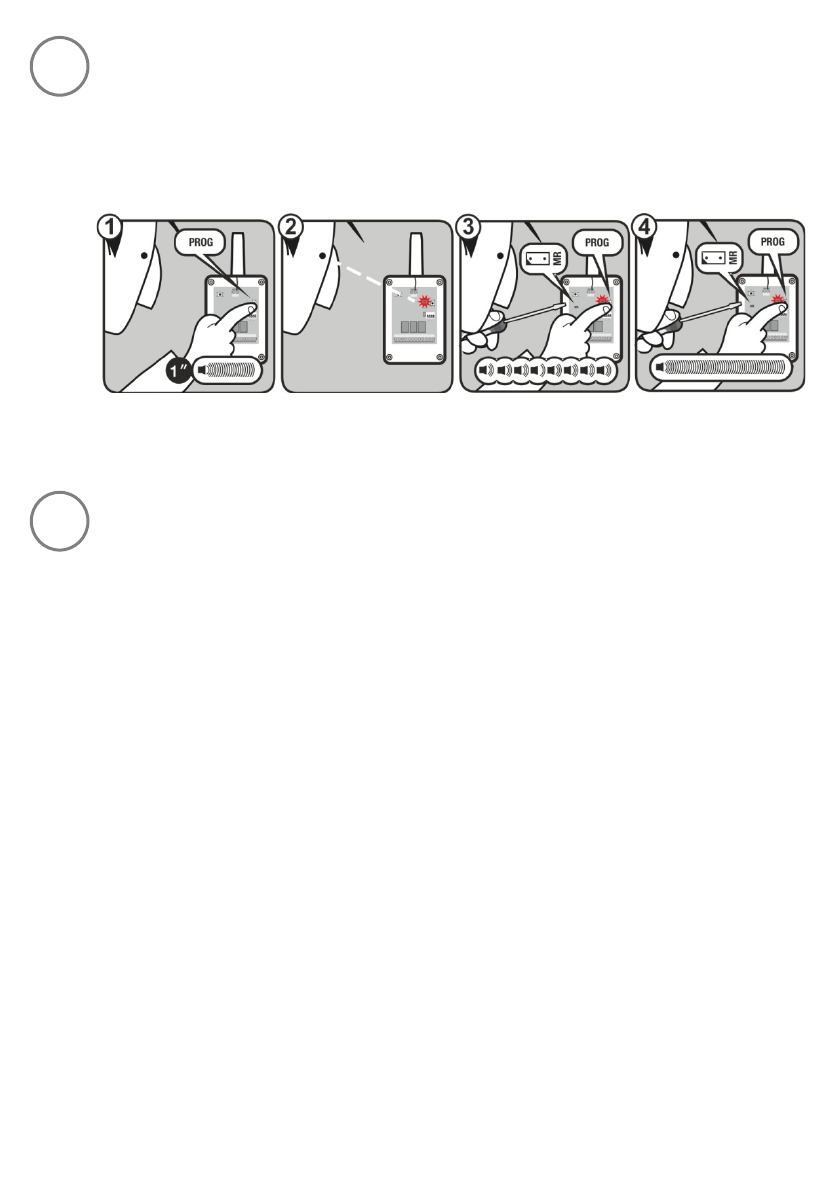
4.1 MODE 1: Safety edge connected to IN1 activates R1
Safety edge connected in IN1 will activate R1.
Employed receiver memory = 1 transmitter
Programming sequence:
• Press PROG button on the receiver (1) until R1 LED lights (2).
• Press PROG button on the transmitter (3).
• A beep will be heard on the receiver indicating the transmitter is properly
programmed (4).
• To exit programming mode, wait for 10 seconds or press PROG button on the
receiver. Two beeps will be heard.
1248121_Rev1.0 RB3 916 System Página 14/24
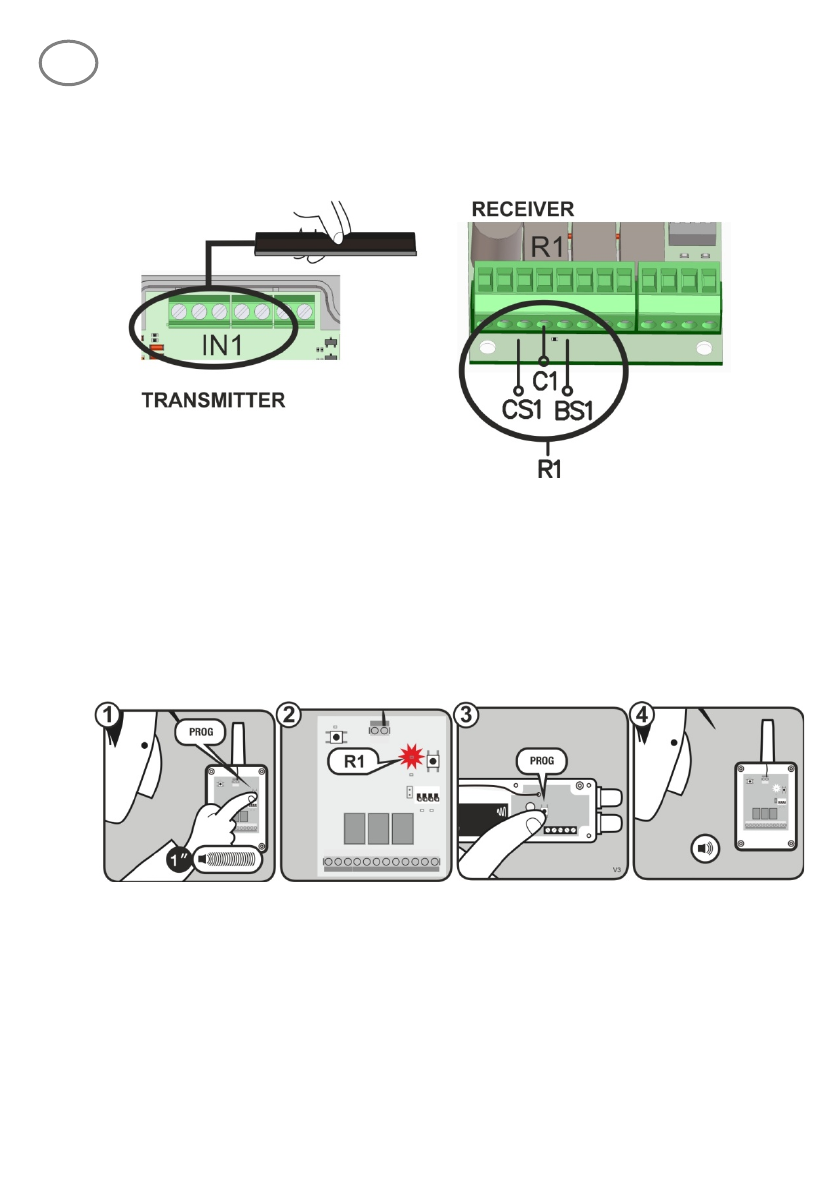
4.2 MODE 2: Safety edge connected to IN1 activates R2
Safety edge connected in IN1 will activate R2.
Employed receiver memory = 1 transmitter
Programming sequence:
• Press PROG button on the receiver (1) until R2 LED lights (2).
• Press PROG button on the transmitter (3).
• A beep will be heard on the receiver indicating the transmitter is properly
programmed (4).
• To exit programming mode, wait for 10 seconds or press PROG button on the
receiver. Two beeps will be heard.

1248121_Rev1.0 RB3 916 System Página 15/24
4.3 MODE 3: Safety edge connected to IN1 activates R1 and
R2
Safety edge connected in IN1 will activate R1 and R2.
Employed receiver memory = 2 transmitters
Programming sequence:
• Press PROG button on the receiver (1) until R1 LED and R2 LED light (2).
• Press PROG button on the transmitter (3).
• A beep will be heard on the receiver indicating the transmitter is properly
programmed (4).
• To exit programming mode, wait for 10 seconds or press PROG button on the
receiver. Two beeps will be heard.
1248121_Rev1.0 RB3 916 System Página 16/24
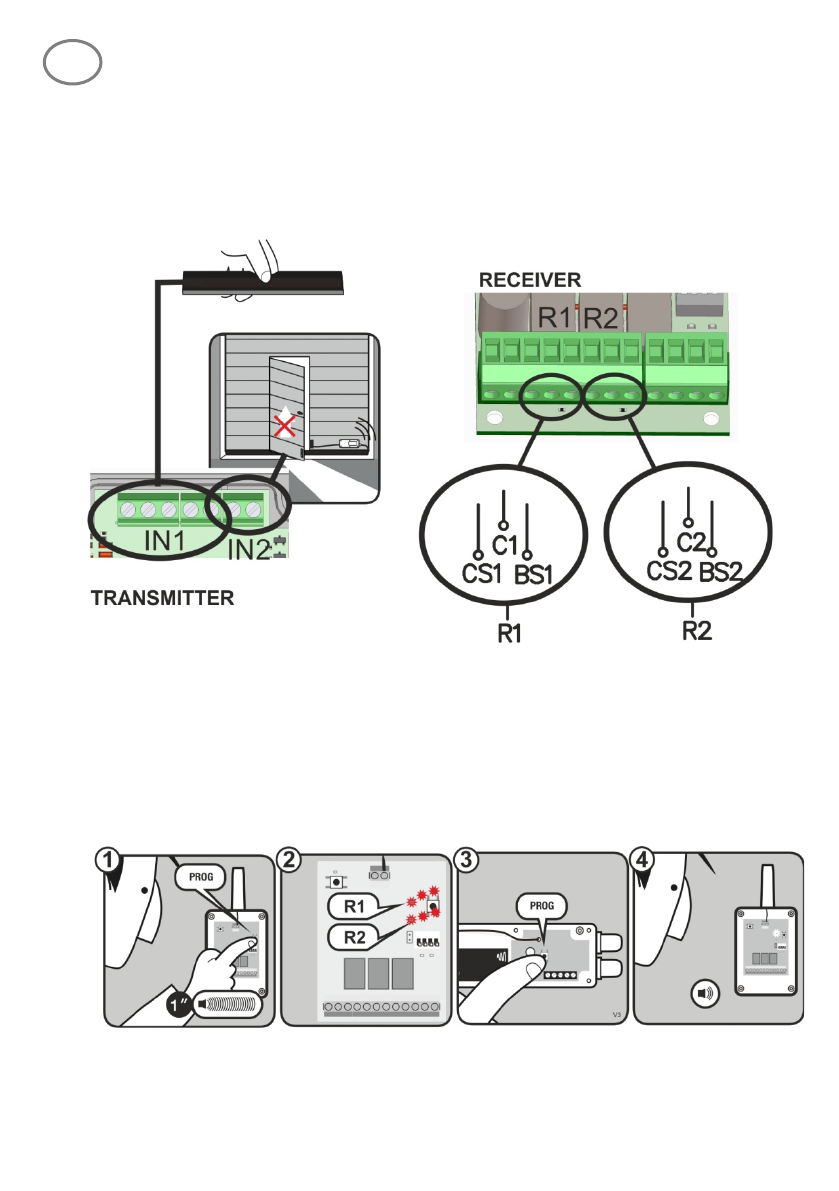
4.4 MODE 4: Safety edge connected to IN1 activates R1 and
safety edge connected to IN2 activates R2
Safety edge connected in IN1 will activate R1 and IN2 will activate R2.
Employed receiver memory = 2 transmitters
Programming sequence:
• Press PROG button on the receiver (1) until R1 LED and R2 LED flash (2).
• Press PROG button on the transmitter (3).
• A beep will be heard on the receiver indicating the transmitter is properly
programmed (4).
• To exit programming mode, wait for 10 seconds or press PROG button on the
receiver. Two beeps will be heard.

1248121_Rev1.0 RB3 916 System Página 17/24
CHECKING AND
MAINTENANCE
5 Does the equipment work properly?
Once the safety edge is wired and programmed into the receiver, R1 and / or R2
(according to programming mode) is at standby state (off), also IN1 and IN2 at the
transmitter.
If the safety edge has been programmed in R1 and R1 LED is at ON, check that the
safety edge is not pushed/detecting (IN1 LED at ON on the transmitter) or it is not
properly configured (IN1 LED flashing on the transmitter). If IN1 LED is at OFF and R1
LED is at ON, check status of other transmitters memorized.
The IN1 and IN2 LEDs of the transmitter will pass to battery saving mode (off) 5
minutes after pressing PROG on the transmitter. They can re-awaken again pressing the
PROG button on the transmitter.
If there is no safety edge programmed in R1 and / or R2, it will be in safety mode
(opened and LED at ON)
If R1 / R2 LEDs are at OFF, but the door does not move, check that the wiring to the
control panel is made correctly as safety contact or 8k2 input resistive safety edge.
1248121_Rev1.0 RB3 916 System Página 18/24
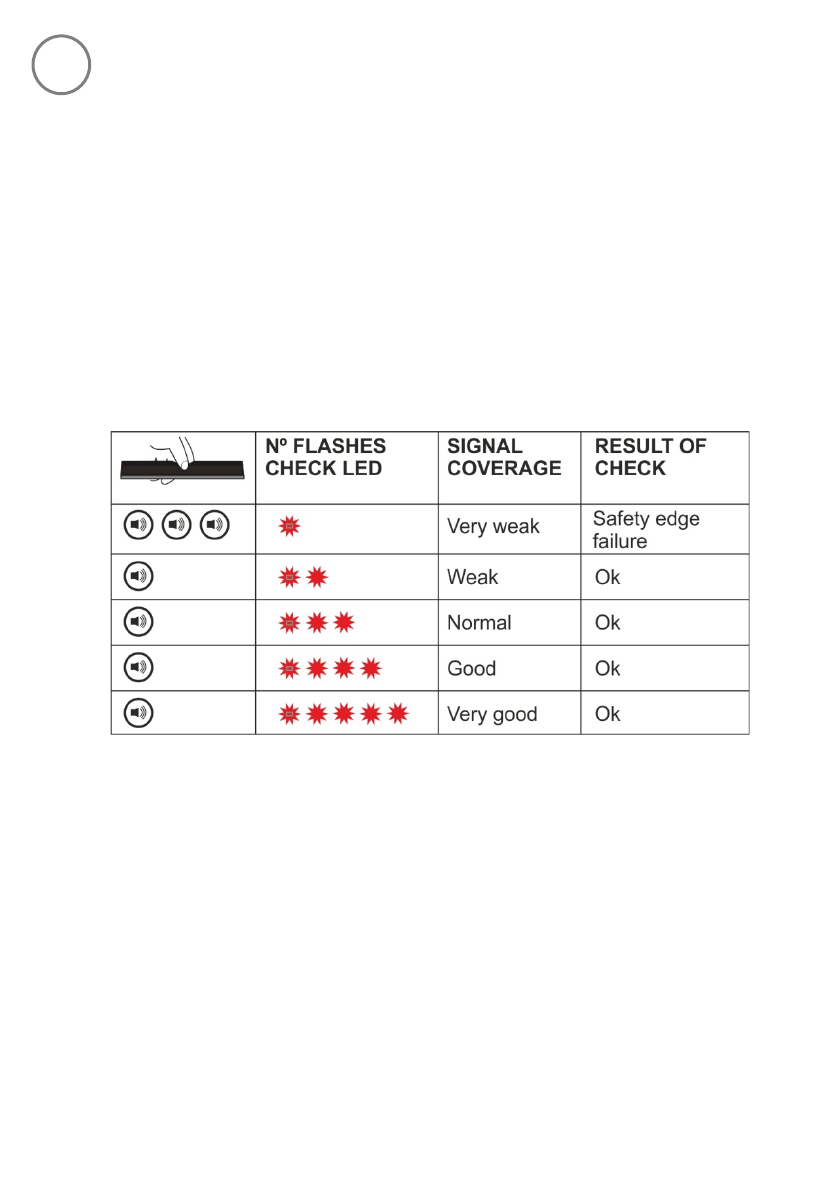
6 CHECK function
Ideal to know the radio coverage of the installation.
Press the receiver’s CHECK button for at least 1 second to enter check mode. The
indicator light will come on and four beeps will be heard.
Perform a complete door opening and closing manoeuvre. During the system check a
beep will be heard every 1,5 seconds. If you have not heard any other acoustic signal at
the end of the manoeuvre, the system works properly. If during the verification, the
communication with a transmitter fails or the communication is poor, the receiver emits
three consecutive beeps indicating that an error occurred.
Press all the safety edges installed to detect which one has failed.
Low signal coverage increases battery consumption.
To exit Check mode, press the CHECK button or wait 5 minutes. On exiting check mode,
seven consecutive beeps will be heard and the indicator light will flash continuously in
case of failure.
It is recommended to perform a CHECK function at the end of the installation process to
ensure a proper system operation.
1248121_Rev1.0 RB3 916 System Página 19/24
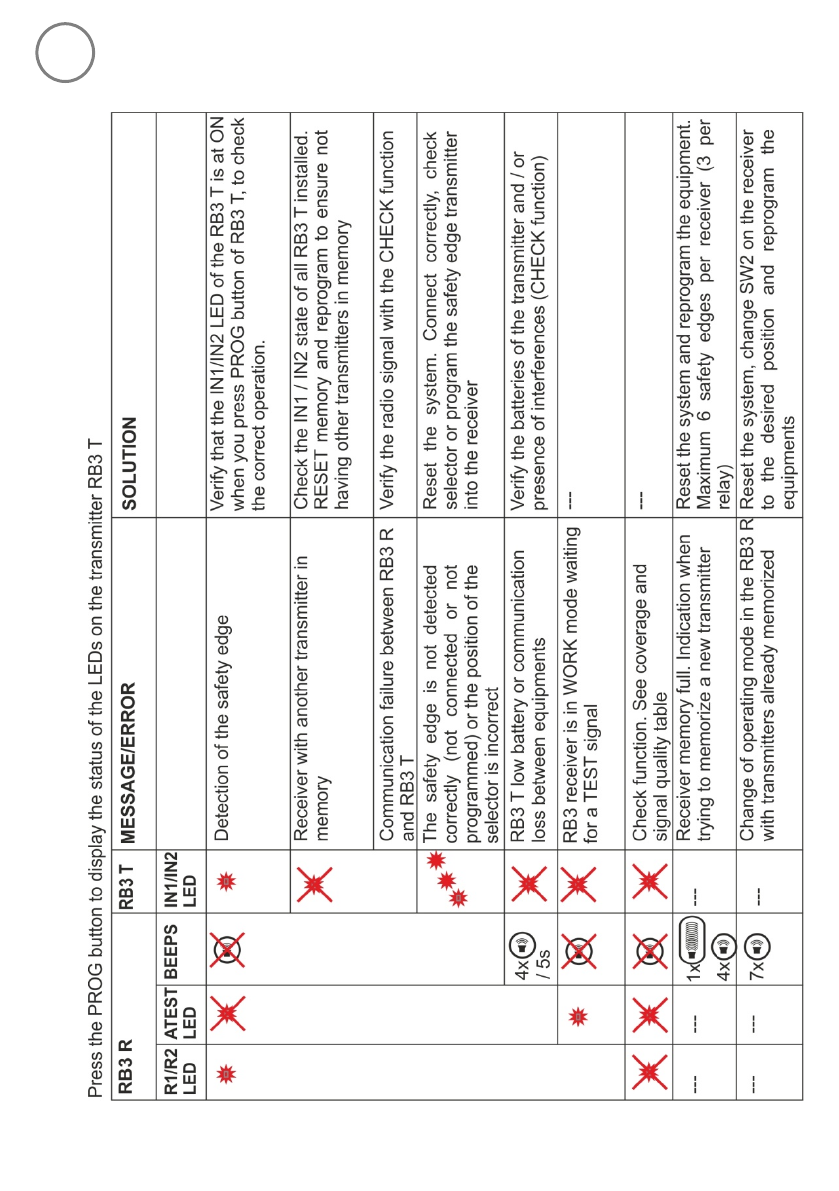
7 Troubleshooting
1248121_Rev1.0 RB3 916 System Página 20/24
8 Total reset
• Press PROG button on the receiver (1) until the R1 LED lights on (2).
• Keep the programming PROG button pressed down and make a bridge with the “MR”
reset jumper (3).
• The receiver will emit 10 warning sound signals (3), and then more at a faster
frequency, indicating that the operation has been carried out (4).
• To exit programming mode, wait for 10 seconds or press PROG button on the receiver.
Two beeps will be heard.
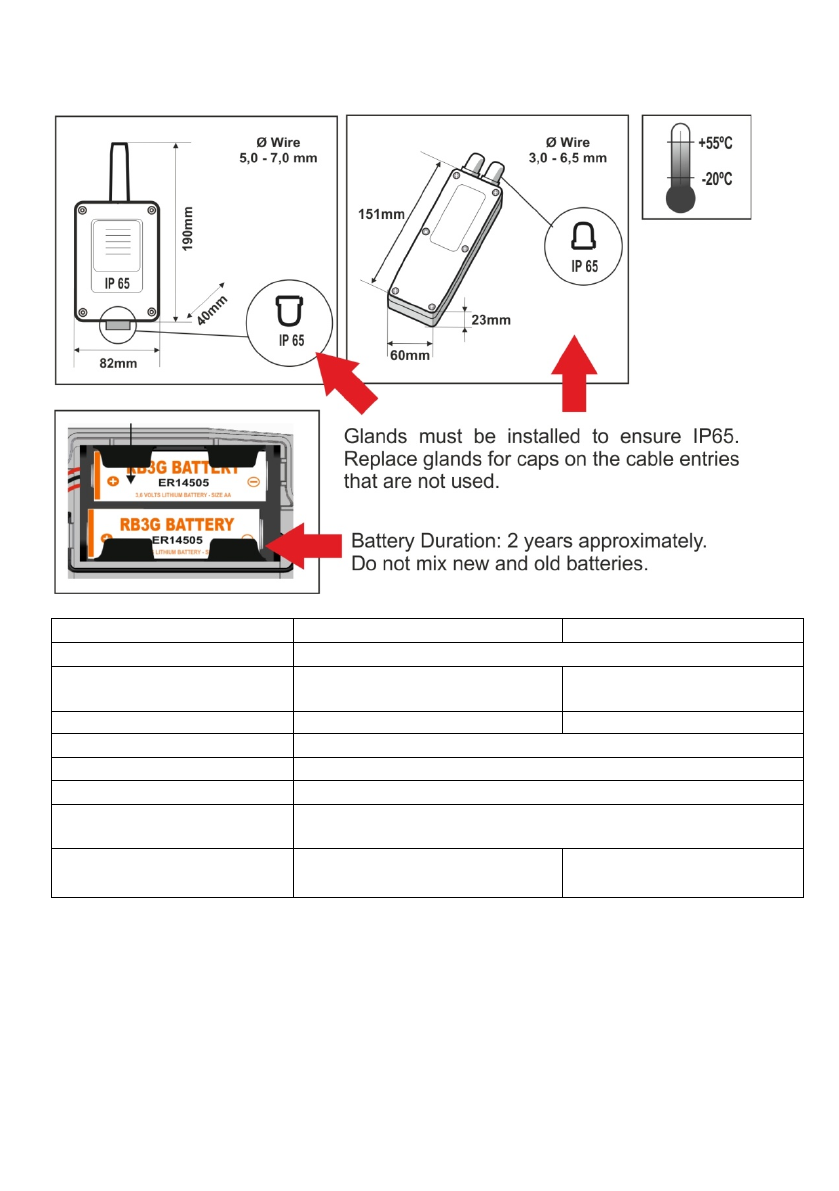
9 Batteries
Storage
· Store the lithium cells in a cool, dry and ventilated area far from fires and heating sources.
· It is recommended the use of a non-combustible structure and keep adequate clearance between
walls and batteries.
· The maximum temperature suggested for the storage is +30°C.
· Higher temperatures are allowed but cause an increase in the self discharge of the battery and
speed up the process of passivation.
· In any case, never go over 100°C, as the batteries can break and cause a leakage.
· Arrange adequate protections to avoid possible damages to the batteries.
· Keep the batteries in their original packages until they are used.
· Do not expose the batteries directly to the sun light.
· Do not put a higher number of cartons one on another (respect what indicated).
· If in the same place are storage batteries with a total capacity >50,000Ah, it is suggested to
install an alarm for smoke and gas.
Usage
· If the battery is integral, store and handle with care (it is suggested to handle the batteries in a
ventilated place, do not smoke, eat or drink during the assembly).
· Do not expose at temperature higher than 100°C (it is recommended <85ºC).
· Avoid short circuit, crush, and exposition to heat sources.
· Do not disassemble the batteries or the battery packs, do not throw them in the fire, do not
perforate them, do not overheat or wet them.
· Material to avoid: water, oxidizing agents, alkalis.
1248121_Rev1.0 RB3 916 System Página 21/24
Technical data summary
RB3 R916
RB3 T916
Frequency
Multifrequency system 916MHz / 433MHz auto-adjustable
Memory
6 transmitters (3 on relay 1, 3
on relay 2)
---
Operating consumption
Max 255mA
12mA
Radiated power
< 25mW
Range (in open field)
50 m
Reaction time (typical)
35ms
Maximum reaction time
when interferences
220ms
Compatible equipments
RB3 T916
RB3 R916 and
RB3 OSE916
The manufacturer reserves the right to change the specification of the equipment
without prior warning.

1248121_Rev1.0 RB3 916 System Página 22/24
Important safety instructions
Disconnect the power supply whenever you proceed to the installation or repair of the
control panel.
In accordance with the European low voltage directive, you are informed of the following
requirements:
· For permanently connected equipment, an easily accessible connection device must be
incorporated into the cabling.
· This system must only be installed by a qualified person that has experience with
automatic doors/gates and knowledge of the relevant EU standards.
· The instructions for use of this equipment must always remain in the possession of the
user.
· The frequency of the RadioBand system does not interfere in any way with the 916
MHz remote control systems.
• Follow all recommendations given in this manual to prevent serious danger to
people.
More tips, interactive demos
and online videos

1248121_Rev1.0 RB3 916 System Página 23/24
Notes

1248121_Rev1.0 RB3 916 System Página 24/24
Regulations
EC Declaration of conformity
See web www.jcm-tech.com/en/declarations/
JCM TECHNOLOGIES, S.A. declares herewith that the product RB3 R916 and RB3
T916 complies with the requirements of the 1999/5/ CEE R&TTE Directive, and
complies with the fundamental requirements of the 2006/42/CE Machine Directive,
2004/108/EC Directive on electromagnetic compatibility and 2006/95/EC on low
voltage, insofar as the product is used correctly.
In order to comply with the EN 12978:2003 product standard and assure the correct
operation of the system, it is mandatory to follow the instructions below, to avoid serious
dangerous to persons.
· SW1:1 is allowed to be set at ON, only if the door cycle is between 7s and 30s.
· SW1:1 is allowed to be set at OFF, only if the door cycle is greater than 30s.
Note: If the door cycle is smaller than 7s, the system must be used only in WORK
mode.
The system complies with EN ISO 13849-1:2008, category 2, PLd.
FCC Information
This device complies with Part 15 of the FCC Rules. Operation is subject to the
following two conditions: (1) this device may not cause harmful interference, and (2)
this device must accept any interference received, including interference that may
cause undesired operation.
IMPORTANT! Any changes or modifications not expressly approved by the part
responsible for compliance could void the user’s authority to operate this equipment.