JCO Electronic Technology H265N40F H.265 WIFI User Manual
JCO Electronic Technology Co.,LTD H.265 WIFI Users Manual
User Manual
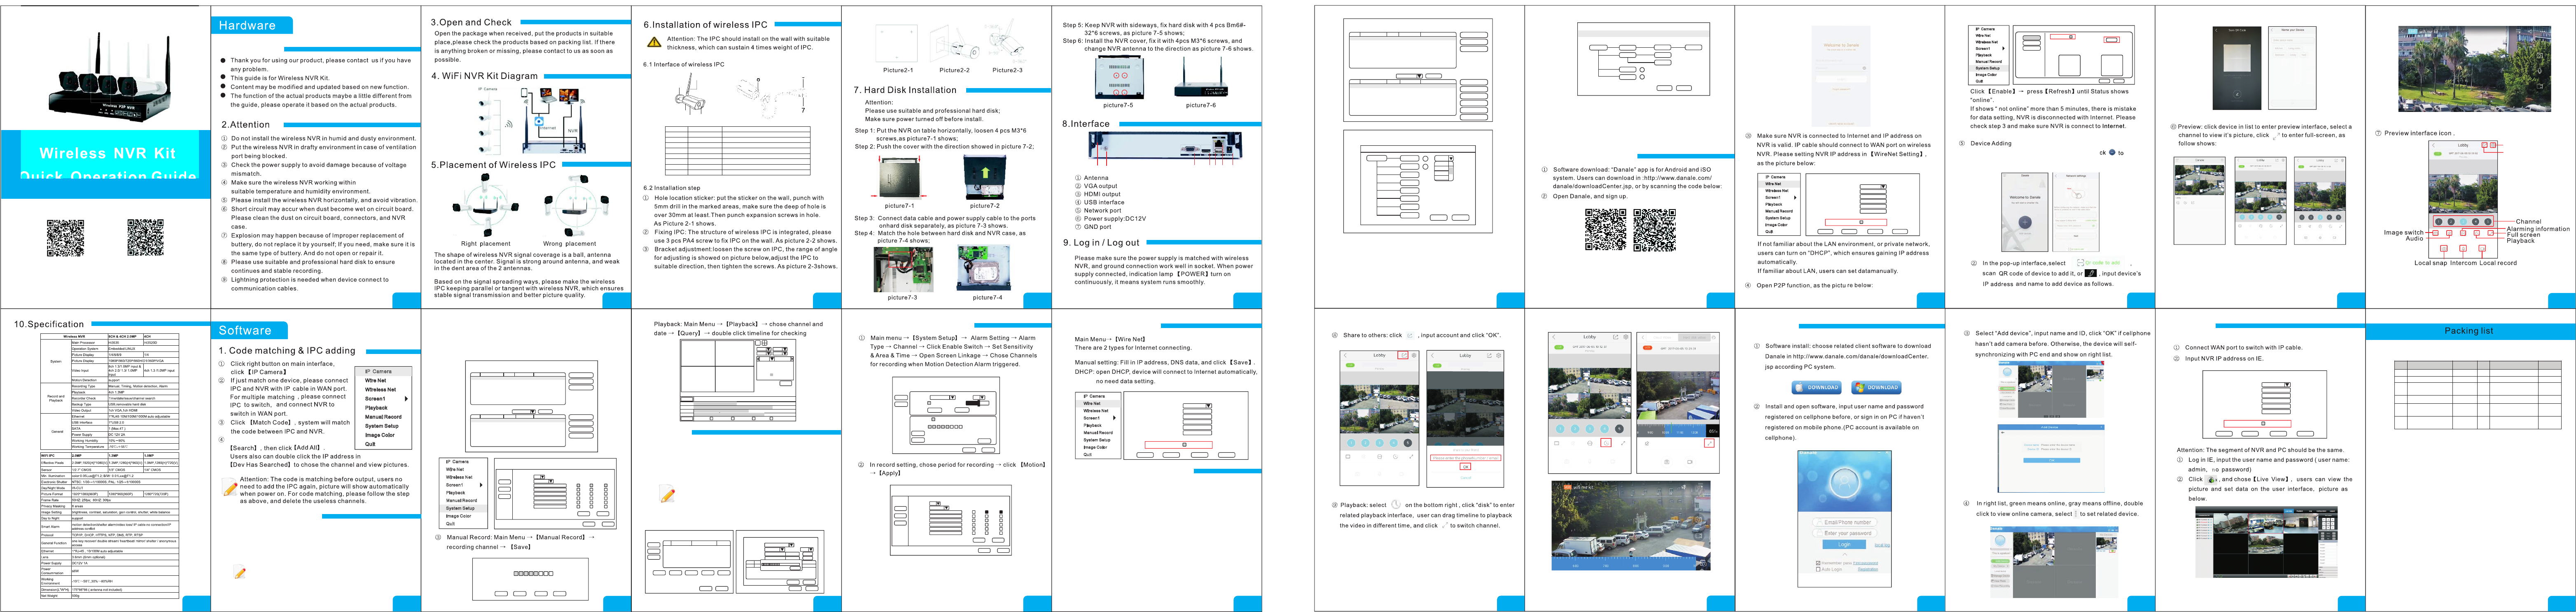
Please read the guide or user manual carefully before using
No. Name Description
1 Bracket Support 3 axis adjustment
2 Antenna Transfer and receive wireless signal
3 Rear cover Rear cover of the case
4 Front cover Front cover of the case
5 Double loop glass Prevent inside light-leaking of lens
6 Power supply DC 12V
7 Ethernet port connect to Ethernet IP cable, 10/100M auto-adjustable
8 Antenna interface Connect to IPC antenna
When finished code matching, click
No. Name Quantity No. Name Quantity
1 Wireless NVR 1 7 Quick Operation Guide 1
2 Wireless IPC 4/8 8 Screw for hard disk 1
3IP Cable(1M) for
matching code 1 9 Screw for IPC 4/8
4 USB Mouse 1 10 Power supply for NVR 1
5Antenna for NVR
(black) 2 11 Power supply for IPC 4/8
6Antenna for IPC
(white) 4/8 12 IPC installation sticker 4/8
1234
10
9
6
512 13 14 15
18 21 22
1.Statement
12
34
1
2
4
3
① ⑦ ② ③④ ⑤ ⑥
16
Main menu →【System Setup】→ Recording Setting →
【Backup】→ choose channel and time → select target file →
【Backup】→ pull out mouse and insert backup device in 20s
Attention: If target file can not be searched out, click
【clean】→【Add】. Please remove files which no
need before backupping.Ensure insert device( like
USB) in 20s,as system reserved searching time for
it is 20s.
IP Camera
Wire Net
Wireless Net
Screen1
Playback
Manual Record
System Setup
Image Color
Quit
2016-04-2 0 8:30:59
System Setup
Recor d
Disk
Backu p
Num Nam e Residual/Rot al State
1 /dev/sda1(usb) 28.76G/2 8.8 5G Id le
QuitApply
Detec tion
Remov eForma t
Unins tall
Backu p Query
Quit
Apply
Backu pRemov e
Devic e
Recor d Type
Start Tim e
End Time
Backu ping
cance l
6 3 2 9 . 0 0 M B
/dev/s dc1(usb)
All
2016-0 4-20 8:00:00
chann el All
clean
Add
Size(K B)
Num
System Setup
Backu p
Rec ord Set tings ,disk m anage ment, video f ile bac kup.
nee d/rem ainin g space :2.30 G/28. 86G
Rec ord Set tings ,disk m anage ment, video f ile bac kup.
12
34
Apr 2016
SUN MON T UE W ED T HU F RI S AT
1 2 3 4 5
6 7 8 9 10 11 12
13 14 15 1 6 17 18 19
20 21 23 24 25 2 6
27 28 29 3 0 31
22
Query
zoom in
zoom out
channel01
Manual Scheduie Motio n Alarm
10:1 7:55 10 :22:5 5 10:27 :55 1 0: 32: 55 10:3 7:55 10 :42:5 5 10:47 :55
channel02
channel03
channel04
System Setup
Quit
Channel
Local
Alarm Type Channel
Enable Sensitivity 50
Motion date 1
Set Area Set Time
Linkage Screen
Record
All
Clean Copy
Apply
√
√
Rec ord Set tings ,disk m anage ment, video f ile bac kup.
Record Setting
Chann el
Perio d
1
2
3
4
5
6
Perio d
Perio d
Perio d
Perio d
Perio d
Perio d
1
Wed Video type n ormal notion A lar m
00:00: -23:59
00:00: -23:59
00:00: -23:59
00:00: -23:59
00:00: -23:59
00:00: -23:59
Defau lt Co py
Backu o
Disk
Recor d
Apply Q uit
Record Sett ings,disk man agem ent,video fil e backup.
Stop video playback
to Query
√√ √ √
Network Setting
Net Card
IP Address
Subnet
Gateway
Main NDS
Sub NDS
MAC
DHCP
Net Card1
192.168. 0 .166
255.255.255. 0
192.168. 0. 1
8 . 8 . 8 . 8
8 . 8 . 8 . 4
00:00:01:02:03:08
Default Save Refresh Cancel
6. Repeater Function Setting
With latest repeater function, wireless NVR kit offer a new IPC
signal connection type with further transmission distance ,
wider coverage area. IPC in further area can be connected to
near IPC via WiFi signal and connect to NVR finally.
Steps
• Right-click to enter [Net Channel] interface, select
[Repeater];
• Click [+] to set bridging relationship.
Net Channel
Dev Has Add
Num IP Addr Prot Protocol Co nnect Status Remove
Remove All
Edit Dev
Dev Has Searched
Add All
Manual Add
Set NVR
Match Code
PRIVATE search
Num IP Addr Prot Prot Device
1
2
3
4
5
6
7
8
9
172.25.123 .4 554 Private Connecte d
1
2
3
4
5
6
7
8
9
172.25.123 .3 554 Private 20:f4:1b:b a:5e:5d
Pepeater
Modify IP
Net Channel
Dev Has Add
Repeater
NVR Ch1
Ch2
Ch3
Ch4
Ch5
Ch6
Ch7
Ch8
+
+01
02
03
04
Refresh Save
Picture below shows 3 connect models
• One by one: CH3→CH2→CH1→NVR
• Two to one: CH5 and CH6→CH4→NVR
• Directly connected to NVR: CH7→NVR,CH8→NVR
Dev Has Add
NVR Ch1
Ch4
Ch2 Ch3
Ch5
Ch6
Ch7
Ch8
+
+
Refresh Save
Repeater
Delete
• Click repeater to enter interface above→ put mouse in camera
needed to delete→ left click→ delete→ save.
• The camera which is deleted will connected to NVR
automatically after 30S.
2.Record and Playback
① Check the hard disk. Click right button on main interface
shows main menu, and chose 【System Setup】→ Record
Setting → Disk. Make sure the hard disk is connected and
runs normally.
Attention : please format hard disk, it can come into
use after showing capability.
3. Backup
711
8
iOS Android
IP Camera
Wire Net
Wireless Net
Screen1
Playback
Manual Record
System Setup
Image Color
Quit
Wireless NVR Kit
Quick Operation Guide
4.Motion Detection Record 8.PC View 9.IE View
17
GMT 2016-7- 25 20:44:28 GMT 2016-7- 25 20:44:28
① For logging in Danale for the first time, click to add
device.
IP Camera
Wire Net
Wireless Net
Screen1
Playback
Manual Record
System Setup
Image Color
Quit
Syetem Setup
Enab le
Stat us Not onl ine
Devi ce ID 6 44a20 35b 7c255 400 71d42 a
P2P
Network
QuitAppl y
Port
Refr esh
Device ID APP Client
√
Network services
IP Camera
Wire Net
Wireless Net
Screen1
Playback
Manual Record
System Setup
Image Color
Quit
Network Setting
Net Card
IP Address
Subnet
Gateway
Main NDS
Sub NDS
MAC
DHCP
Net Card1
192.168. 0 .1 66
255.255.2 55. 0
192.168. 0. 1
8 . 8 . 8 . 8
8 . 8 . 8 . 4
00:00:01: 02:03:08
Default Save Refresh Cancel
c
k
t
o a
Setting
Sharing device
19 23
20
② Timing and alarm record: Main Menu →【System Setup】
→ Record Setting→ Record →chose channel and record
type → apply. Users can click 【Copy】, copy to other
channels with the same mode.
Net Channel
Dev Has Add
Num IP Addr Prot PROTC OL Co nne ct St atus Remove
Remove All
Edit Dev
Dev Has Searched
Add All
Manual Add
Set NVR
Match Code
PRIVATE search
Num IP Addr Prot Prot Device
1
2
3
4
5
6
7
8
9
192.168. 93. 212 8 0 Onv if Co nnected
1
2
3
4
5
6
7
8
9
172.25.1 23. 3 554 P riv ate 20:f4:1b:ba:5e:5d
Record Setting
Chann el
Perio d
1
2
3
4
5
6
Perio d
Perio d
Perio d
Perio d
Perio d
Perio d
1
Fri Vi deo type No rma l Motion Al arm
00:00:- 23:59
00:00:- 23:59
00:00:- 23:59
00:00:- 23:59
00:00:- 23:59
00:00:- 23:59
Defau lt Copy
Backu p
Disk
Recor d
Defau lt Copy
Record Sett ings,disk managem ent,video file back up.
Manual Record
Channel 1 2 3 4 5 6 7
clear
All Return
Save
8
IP Camera
Wire Net
Wireless Net
Screen1
Playback
Manual Record
System Setup
Image Color
Quit
choose
IP Camera
Wire Net
Wireless Net
Screen1
Playback
Manual Record
System Setup
Image Color
Quit
Network Setting
Net Card
IP Address
Subnet
Gateway
Main NDS
Sub NDS
MAC
DHCP
Net Card1
192.168. 0 .166
255.255.255. 0
192.168. 0. 1
8 . 8 . 8 . 8
8 . 8 . 8 . 4
00:00:01:02:03:08
Default Save Refresh Cancel
iOS Android
5.Internet Connecting
7.Mobile Phone View
W
i
r
e
l
e
s
s
N
V
R
K
i
t
Q
u
i
c
k
O
p
e
r
a
t
i
o
n G
u
i
d
e
1
2
345
6
7
8
6
7
8
FCC Statement
This equipment has been tested and found to comply with the limits for a Class
B digital device, pursuant to part 15 of the FCC rules. These limits are
designed to provide reasonable protection against harmful interference in a
residential installation. This equipment generates, uses and can radiate radio
frequency energy and, if not installed and used in accordance with the
instructions, may cause harmful interference to radio communications.
However, there is no guarantee that interference will not occur in a particular
installation. If this equipment does cause harmful interference to radio or
television reception, which can be determined by turning the equipment off and
on, the user is encouraged to try to correct the interference by one or more of
the following measures:
-Reorient or relocate the receiving antenna.
-Increase the separation between the equipment and receiver.
-Connect the equipment into an outlet on a circuit different from that to which
the receiver is connected.
-Consult the dealer or an experienced radio/TV technician for help.
To assure continued compliance, any changes or modifications not expressly
approved by the party.
Responsible for compliance could void the user’s authority to operate this
equipment. (Example- use only shielded interface cables when connecting to
computer or peripheral devices).
This equipment complies with Part 15 of the FCC Rules. Operation is subject
to the following two conditions:
(1) This device may not cause harmful interference, and
(2) This device must accept any interference received, including interference
that may cause undesired operation.
FCC Radiation Exposure Statement:
The equipment complies with FCC Radiation exposure limits set forth for
uncontrolled enviroment. This equipment should be installed and operated with
minimum distance 20cm between the radiator and your body.
.