JETOP ICB284 Bluetooth Speaker with Clock User Manual
JETOP INDUSTRIAL LIMITED Bluetooth Speaker with Clock
JETOP >
User manual
Any Changes or modications not expressly approved by the party responsible for
compliance could void the user’s authority to operate the equipment.
Note: This equipment has been tested and found to comply with the limits for a Class B
digital device, pursuant to part 15 of the FCC Rules. These limits are designed to provide
reasonable protection against harmful interference in a residential installation. This
equipment generates uses and can radiate radio frequency energy and, if not installed
and used in accordance with the instructions, may cause harmful interference to radio
communications. However, there is no guarantee that interference will not occur in a
particular installation.
If this equipment does cause harmful interference to radio or television reception, which can
be determined by turning the equipment off and on, the user is encouraged to try to correct
the interference by one or more of the following measures:
• Reorient or relocate the receiving antenna.
• Increase the separation between the equipment and receiver.
• Connect the equipment into an outlet on a circuit different from that to which the
receiver is connected.
• Consult the dealer or an experienced radio/TV technician for help.
Snooze/Dimmer
Press to snooze the alarm after it sounds.
Press and hold to dim the brightness of the LED display.
Press to set the Sleep Timer.
Bluetooth Speaker with Clock
User’s Guide for Model ICB284S v982-01
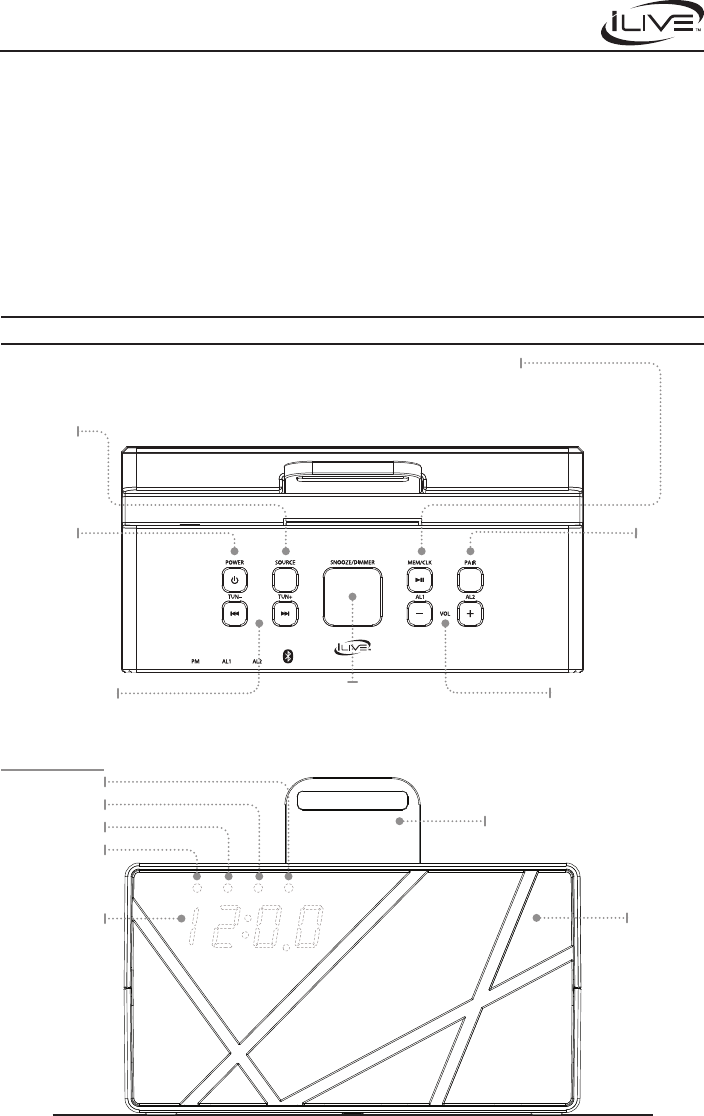
FUNCTIONS AND CONTROLS
Volume +/- /AL1/AL2
Press to adjust the volume, or
to set Alarm 1 or Alarm 2.
TUN +/-
Press to tune the radio, or set
the time for the clock/alarm.
Power
Press to power the
radio on or o.
Mem/Clock
With the Radio on, press it and TUN +/-
to cycle through preset radio stations. In o mode, press and
hold to adjust the clock. While paired to a Bluetooth device,
press to play or pause media from the speaker.
LED Display
Source
Press to switch
between Radio,
Line In, and
Bluetooth
Pair
Press to pair
Bluetooth devices
to the unit.
Bluetooth
Indicator Lights
Alarm 1
Speaker
Removable
Back Stand
Alarm 2
PM
Additional Warnings
• The apparatus shall not be exposed to dripping or splashing and that no objects lled
with liquids, such as vases, shall be placed on apparatus.
• Do not place the unit on top of any soft, porous, or sensitive surfaces to avoid
damaging the surface. Use a protective barrier between the unit and surface to
protect the surface.
• Keep new and used batteries away from children. If the battery compartment does
not close securely, stop using the product and keep it away from children.
• If you think batteries might have been swallowed or placed inside any part of the
body, seek immediate medical attention.
• Do not mix old and new batteries.
• Do not mix alkaline, standard (carbon-zinc), or rechargeable
(ni-cad, ni-mh, etc) batteries.
• Batteries should be recycled or disposed of as per state and local guidelines.
RF Warnings
The device has been evaluated to meet general RF exposure requirement. The device can be
used in portable exposure condition without restriction.
FCC Caution
This device complies with part 15 of the FCC Rules. Operation is subject to the following two
conditions: (1) This device may not cause harmful interference, and (2) this device must accept
any interference received, including interference that may cause undesired operation.
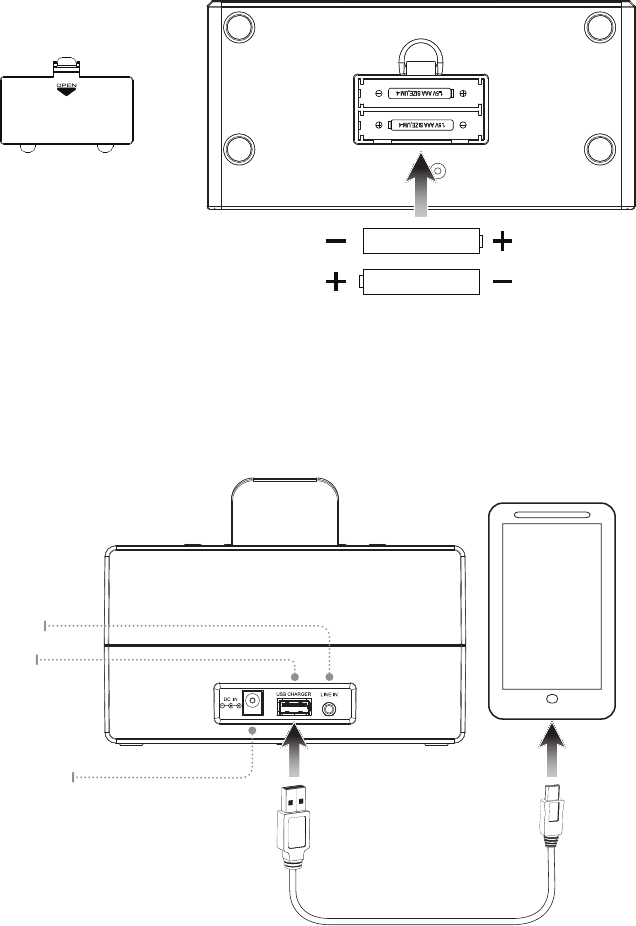
AAA
AAA
Battery Backup
The battery backup is intended for short power outages only. The clock radio’s primary functions
cannot run o of the battery backup alone. Requires 2, AAA-size, batteries (not included).
Bottom View
Rear View
Power
Plug the AC/DC power adapter (included) into the DC Power Input on the unit, and a standard power
outlet. The unit can be used to charge mobile devices through a USB charging port in the rear, as seen
on the below (USB cable not included).
DC Power Input
USB
Charging Port
Line In

Setting the Clock
1. With the unit o, press and hold the MEM/CLK button until the display begins ashing.
2. Press the TUN ± buttons to adjust the time in hours. The PM indicator will light when the
hour is set in the PM.
3. While the display is still ashing, press MEM/CLK again to switch to minutes, then press
the TUN ± buttons to set the time in minutes.
4. Press MEM/CLK to nish, or wait for the display to stop ashing.
Saving a Station as a Preset
1. With the radio on, tune to your desired frequency, press and hold the MEM/CLK button
until the screen ashes.
2. Press the TUN ± buttons to choose the desired preset station, 1 though 20.
3. Press MEM/CLK again to set the frequency to that preset station.
4. Once set, press MEM/CLK to select your presets (Pxx will apear on the display), then
press the TUN ± buttons to cycle through your preset stations.
CLOCK
RADIO
LINE IN AND BLUETOOTH
Radio Reception
An FM antenna is built into the clock radio. To improve FM radio reception, adjust the position
of the clock radio.
Tuning the FM Radio
1. Power on the radio by pressing the Power button.
2. Press the Source button to select radio mode, then press the TUN ± buttons to nd the
desired radio frequency.
3. Press the VOL ± buttons to adjust the volume of the radio.
Line In
An auxiliary line in port is built into the rear of the unit and can be used to play media directly from
a mobile device using a 3.5mm audio cable (not included). To do this, simply plug the cable into the
Line In port on the unit and on your device. Press the Source button to select AU on the display, and
your music should be heard through the speaker.
Pairing a Bluetooth Device
Refer to the user’s manual for your specic device for instructions on pairing and connecting Bluetooth
devices. When pairing, the device should remain within 3 feet of the speakers.
1. Press the Source button to select bt on the display. A blue light above the display will
also indicate this.
2. Press the PAIR button. The blue light will begin to ash quickly.
3. Using the native controls on your Bluetooth device, scan for and select ICB284 in your
Bluetooth settings to pair.
4. If your device requests a password, enter 0 0 0 0.
5. When successfully paired, the indicator will stop ashing and remain solid.
6. After initial pairing, the unit will stay paired unless unpaired manually by the user, or
erased due to a reset of the device.
7. If any pairing issues should occur, un-pair the unit on your Bluetooth device and follow
the above steps again.
Setting Alarm 1/Alarm 2
1. With the radio o, press and hold the AL1 or AL2 buttons until the display begins
ashing. Note the white indicator light above the display.
2. Press the TUN ± buttons to select bb (buzzer) or Fr7 (radio) on the display.
3. Press AL1 or AL2 to set.
4. Press the TUN ± buttons to adjust the time in hours. The PM indicator will light when the
hour is set in the PM.
5. While the display is still ashing, press AL1 or AL2 again to switch to minutes, then
press the TUN ± buttons to set the time in minutes.
6. Press the AL1 or AL2 buttons again to nish, or wait for the display to stop ashing
Setting the Sleep Timer
1. While powered on, press the Snooze/Sleep/Dimmer button repeatedly to set the sleep
timer ( 90, 80, 70, 60, 50, 40, 30, 20, 10 min, or O ).
2. Once the set sleep time has expired the clock radio will automatically power o.
ALARM
SLEEP TIMER
Snooze and Alarm Reset
After the alarm sounds:
Press the Snooze button to delay the alarm for an additional 9 minutes,
OR
Press the Power button to turn the alarm o until the set alarm time is reached again.
Cancelling the Alarm
Press the AL1 or AL2 button until the indicator is no longer lit.
To download this User’s Guide in English, Spanish,
or French, or to get answers to frequently asked
questions, visit the support section at:
www.iLiveElectronics.com
Pour télécharger ce guide de l’utilisateur en anglais,
espagnol ou français, ou pour obtenir des réponses
à des questions fréquemment posées, consultez la
rubrique d’assistance sur:
www.iLiveElectronics.com
Para descargar este Manual del Usuario en inglés,
español y francés, o para obtener respuestas a preguntas frecuentes, visite la sección de apoyo en:
www.iLiveElectronics.com
INTERNATIONAL SUPPORT
For Warranty Information and the most up-to-date version of this User’s Guide, go to www.iLiveElectronics.com
Customer Service: 1-888-999-4215 | Email Support: prodinfo@dpiinc.com | Email Parts: partsinfo@dpiinc.com
Copyright © 2013 Digital Products International (DPI, Inc.) All other trademarks appearing herein are the property of their respective owners.
Specications are subject to change without notice.