JLT Mobile Computers 1213 Vehicle Mount Computer User Manual
JLT Mobile Computers AB Vehicle Mount Computer
Contents
- 1. User Manual
- 2. Users Manual
User Manual
JLT1213
User manual
JLT Mobile Computers AB
Isbjörnsvägen 3
SE-352 45 Växjö, SWEDEN
Phone: +46 470 530300
Fax: +46 470 445 29
E-mail: mailbox@jltmobile.com
www.jltmobile.com
JLT1213, User manual Rev 0
© 2008, JLT Mobile Computers AB

Note!
This equipment has been tested and found to comply with the limits for a Class
B digital device, pursuant to part 15 of the FCC Rules. These limits are
designed to provide reasonable protection against harmful interference in a
residential installation.
This equipment generates, uses and can radiate radio frequency energy and, if
not installed and used in accordance with the instructions, may cause harmful
interference to radio communications. However, there is no guarantee that
interference will not occur in a particular installation. If this equipment does
cause harmful interference to radio or television reception, which can be deter-
mined by turning the equipment off and on, the user is encouraged to try to
correct the interference by one or more of the following measures:
- Reorient or relocate the receiving antenna.
- Increase the separation between the equipment and receiver.
- Connect the equipment into an outlet on a circuit different from that to which
the receiver is connected.
- Consult the dealer or an experienced radio/TV technician for help.
Changes or modifications not expressly approved by JLT Mobile Computers
could void the user's authority to operate the equipment.

Content
Content
Content ..............................................................................................1
General...............................................................................................1
JLT1213..............................................................................................1
Front view.......................................................................................1
Rear view .......................................................................................2
Features..............................................................................................2
Accessories.........................................................................................3
Function buttons .................................................................................3
Using the JLT1213 ............................................................................4
Turning on the JLT1213......................................................................4
Shutting down the JLT1213 ................................................................4
Reset...................................................................................................4
Screen brightness...............................................................................4
Instant blanking...................................................................................4
Touch screen ......................................................................................5
External device connections ...............................................................6
USB 2.0..........................................................................................6
Ethernet port...................................................................................6
PC Card Slot ..................................................................................6
Boot Media .....................................................................................7
Suspend modes..................................................................................7
Stand by mode ...............................................................................7
Suspend to Disk mode ...................................................................7
Resume from suspend mode .........................................................7
Maintenance ......................................................................................8
Cleaning..............................................................................................8
Intel Celeron 1 GHz ..........................................................................10
Touch screen................................................................................10
UPS Operation .............................................................................10
UPS..............................................................................................10
UPS battery warning ....................................................................10
Interface specification....................................................................12
Power cable ......................................................................................12
Switch buttons...................................................................................12
Technical specification ..................................................................13

Content
Physical dimensions...................................................................... 14
1
General
General
JLT1213
The JLT1213 is a compact high performance and low weight rugged PC.
The 1213 can withstand severe environmental conditions including vibration, shock,
moisture and temperature variations.
The 1213 is suitable for use in harsh environments such as construction sites, ware-
housing, defense and manufacturing.
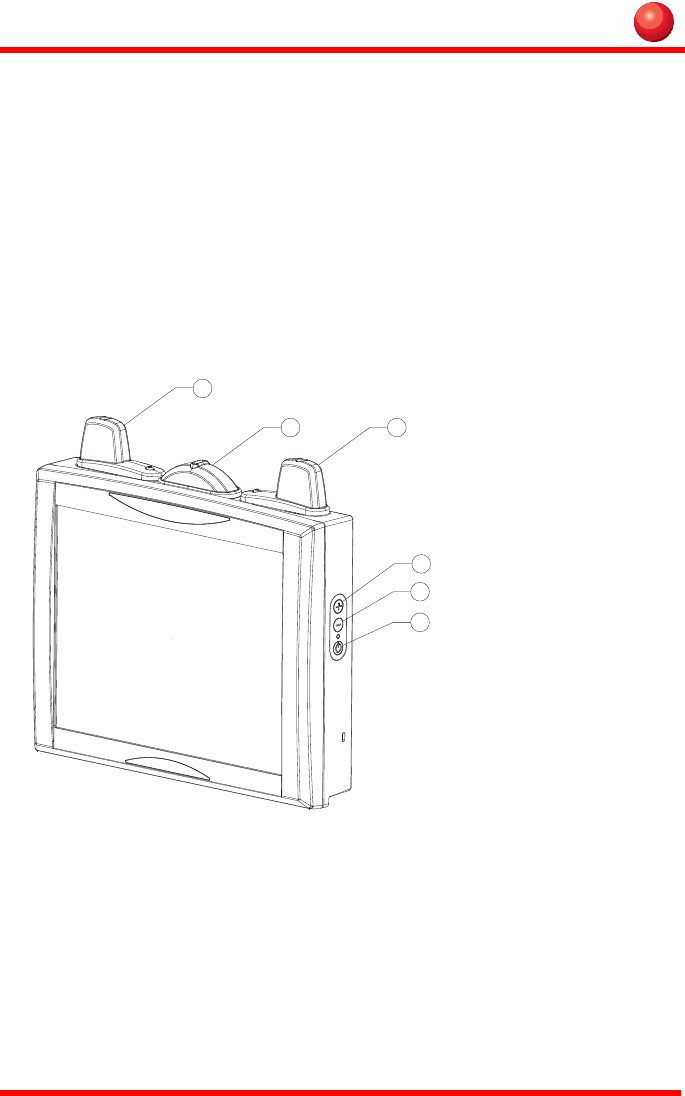
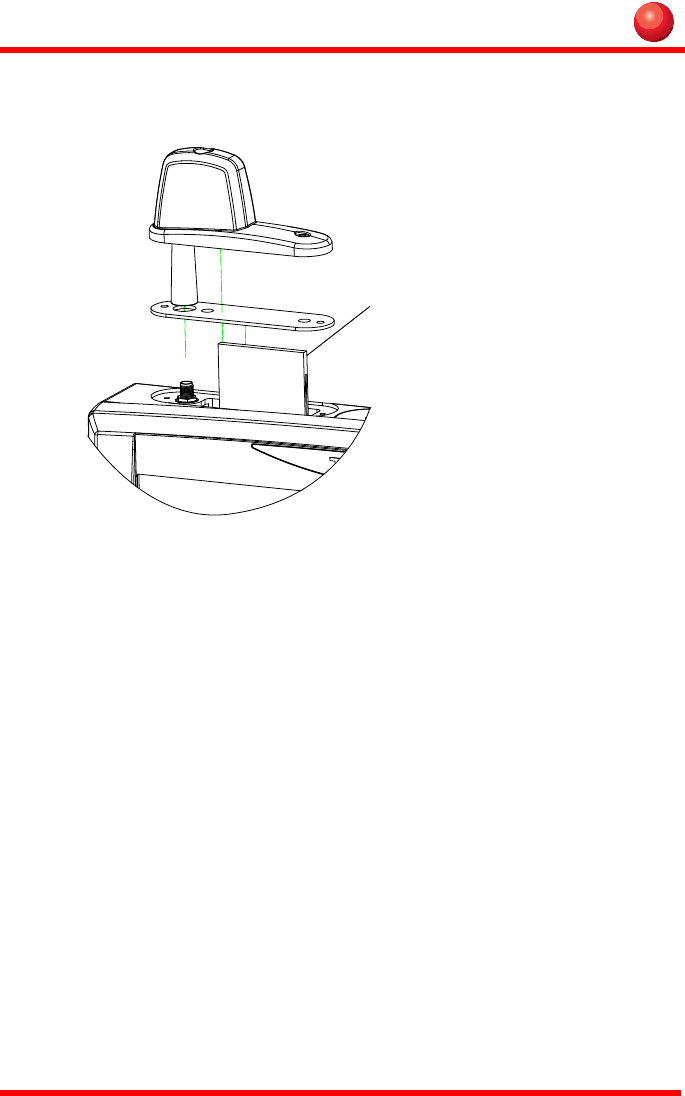
Front view
1. Aux wlan-antenna
2. BT antenna
3. Main wlan-antenna
4. Increase brightness
5. Decrease brightness
6. Power button
4
32
1
5
6
2
General
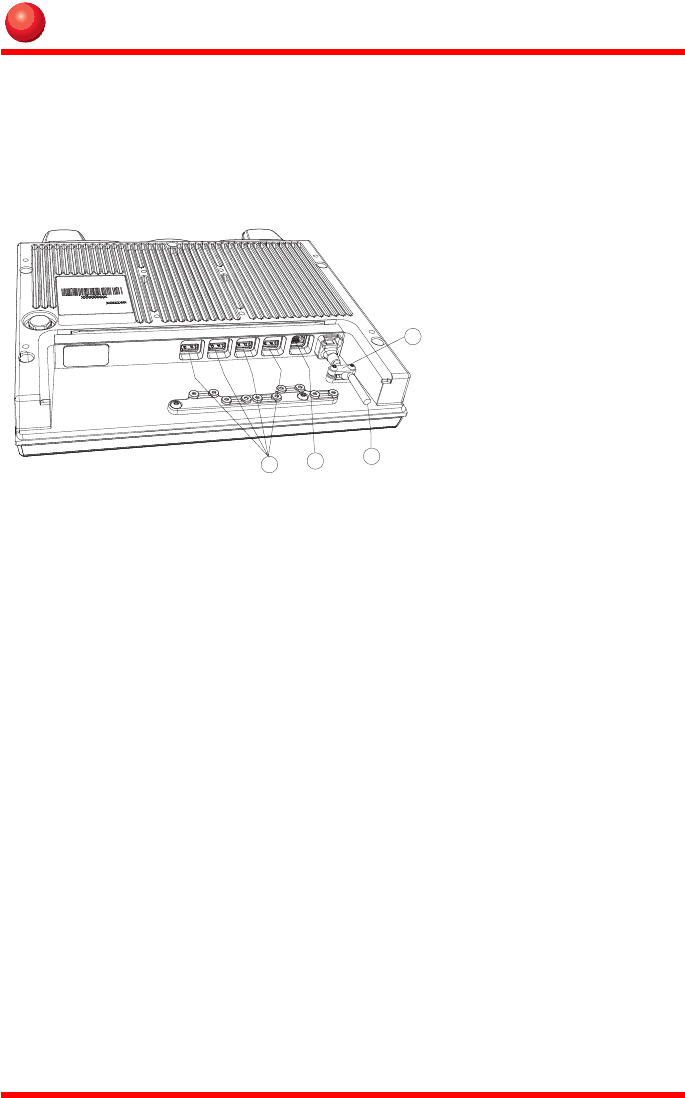
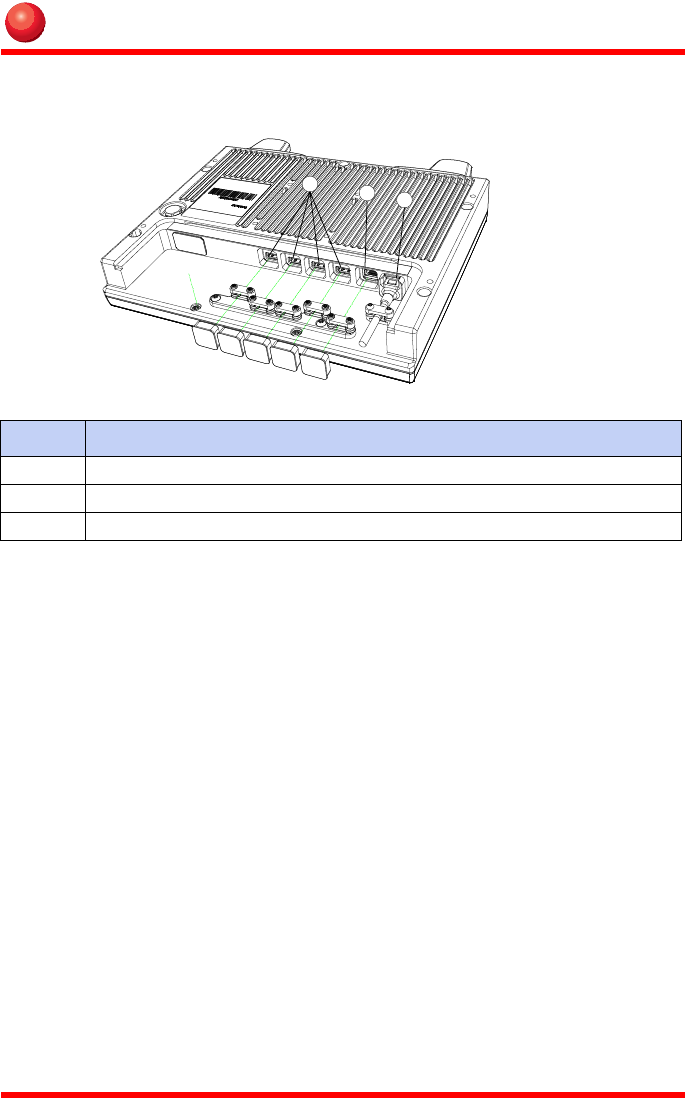
Rear view
Features
• Rugged, ergonomic, 1-piece design makes the 1213 ideal for all vehicle appli-
cations.
• 4x USB 2.0 ports
123
4
1.) USB Connector
2.) Ethernet connector
3.) Power cable
4.) Cable strain relief
3
General
Accessories
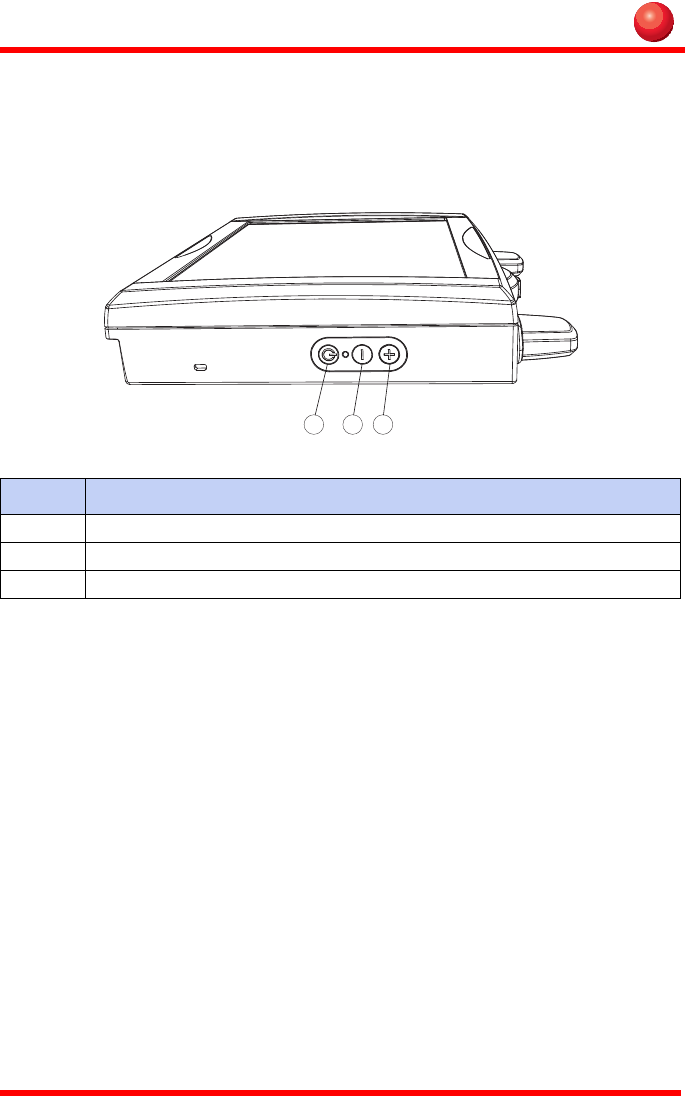
Function buttons
No Function
1 Decrease brightness
2 Power button with power LED
3 Increase brightness
2 1 3

4
Using the JLT1213
Using the JLT1213
This chapter covers information about using the JLT1213. The use of the JLT1213
does not differ from normal PC use.
Turning on the JLT1213
To turn on the JLT1213 press the power button for one second, see chapter “Function
buttons” on page 3. The power LED lights up.
Shutting down the JLT1213
Before shutting down the system save your work and close all running programs.
To shut down the system press the power button or choose Shut Down from the Win-
dows Start menu.
Reset
If the JLT1213 is not responding to commands, the system or application may have
crashed. To restart the system press and hold the power button until the power LED is
switched off.
Screen brightness
The screen brightness can be adjusted for indoor or outdoor use.
To increase or decrease the screen brightness push the brightness push button on the
side of the JLT1213.

5
Using the JLT1213
Touch screen
The JLT1213 has a resistive 4-wire Touch Screen for easy integration, which allows
the user to work with gloves.
!
WARNING!
Do not use sharp objects when operating the touch screen.
Selecting
To select an object on the screen tap the object once.
Double click
To double click tap the object twice.
Drag object
To drag an object on the screen, press and hold down on the object while dragging it
to the new position. Release the object when it is in place.
Calibrate
When used for the first time or when users work in different angles, the touch screen
may require calibration.
To calibrate the touch screen do the following:
1. Open the Control Panel from the Windows Start menu.
2. Double-tap the Pointer Devices icon.
3. Select the Calibration tab and click the Calibrate button to start calibra-
tion.
4. Follow the instructions on the screen.
To test the new settings click the Test button.
6
Using the JLT1213
External device connections
USB 2.0
The JLT1213 is equipped with four USB ports that can be used to connect external de-
vices. Connected devices may require additional drivers or software which usually is
included with the device. The port supports 500 mA.
Ethernet port
The local area network (LAN) connector allows the connection of the JLT1213 to a
local area network with 10/100 IEEE 802.3 (Ethernet) Interface. Connect the JLT1213
using a RJ45 Ethernet cable.
No Description
1 USB 2.0 ports
2 Ethernet 10/100
3 Power connector 18-72V
1
23
7
Using the JLT1213
Boot Media
Compact flash beneath left lid from front (display)
Suspend modes
The operating system makes it possible to suspend system operation of the JLT1213
without closing programs. The suspend modes are used to reduce power consumption.
The JLT1213 can be configured to suspend operation automatically when inactive.
Stand by mode
In stand by mode the power to unnecessary functions are turned off.
Suspend to Disk mode
In the suspend to disk mode, the current data is saved to the disk and the JLT1213 is
powered off. When the JLT1213 is in suspend to disk mode the power consumption is
the same as in the off state.
Resume from suspend mode
To resume from the suspend modes, press the power button described in “Function
buttons” on page 3.
Compact Flash Card
8
Maintenance
Maintenance
The JLT1213 is maintenance-free, except for normal cleaning. All setting, i.e. date and
time etc, should be done through the interface of the operating system, just like on any
non-rugged PC.
Cleaning
The display/touch screen should be cleaned with glass cleaning agent, made for that
purpose.
!
Caution!
You must avoid oil on the Touch Screen because it can be difficult to
remove.
Keep the JLT1213 clean and free from dust and dirt by using a soft, lint-free cloth reg-
ularly. If available, you can also use compressed air (maximum pressure 2 bar) but
some caution is to be observed.
!
WARNING!
No sharp objects or tools should be used when cleaning.

9
Maintenance

10
Intel Celeron 1 GHz
Touch screen
The touch screen interface on JLT1213 is built with the UPDD screen coder version
04.00.06 (Valid: 2008-08-28)
Normally calibration is necessary only once, calibration data is stored in Windows
Registry files.
UPS Operation
UPS
Device
Processor Intel Celeron 1 GHz
Memory Up to 1 GB
Graphics Intergrated with Intel Graphics Media Accelerator.
Boot media Compact Flash
Ethernet Intel 82562 10/100Base-T Fast Ethernet
Controller
The JLT 1213 is equipped with a UPS battery, which is located under the right hand
side top lid. The purpose of UPS battery is to supply power during a short loss of pow-
er eg. when a battery is changed on the forklift. During operation on UPS the screen
brightness is set to minimum to conserve battery power. It is not possible to start com-
puter on UPS supply. Empty to Full charge time is approx. 4 hours.
The UPS is equipped with a low battery warning system. Keyboard Sleep button is
sent as a first warning of low battery level. Keyboard power button is sent when power
level is critical.
UPS battery warning

11

12
Interface specification
Interface specification
Power cable
Note!
The JLT 1213 have separated power grounds. The cabinet and power return
(0V) are not connected together, negative ground. Switch buttons on the side.
Pin No. I/O Description
1 1 I Power 18 to 72 V, nominal 25 W, max 45 W
22I GND
3 3 - Power return (0 V).

13
Technical specification
Technical specification
Base system
Processor: 1 GHz Celeron
RAM Memory: Up to 1GB
Display: 12.1" SVGA 400 nit
Graphics: Integrated with Intel Graphics Media Accelerator
(82852GME)
Dual Independent Display Support
Storage: Compact Flash
Interfaces: Four USB 2.0
One Ethernet 10/100-TP, RJ45
Power supply: 18-72 VDC (Standard wide input)
5W standby / 20W operating, Max 45W
Dimensions: 305 mm (w) x 240 mm (h) x 59 mm (d)
Weight: 3.6 kg
Environment: Operating -20°C (-4F) to 50°C (122F)
Storage -30°C (-22F) to 70°C (158 F)
Humidity: 10 - 90% RH, non-condensing
Storage: 5 - 95% (Non condensing)
14
Physical dimensions
Physical dimensions
262,96
238,76
141,25
16
24 24 24
28,7
59,3
61,5
75
36,5(2x)
135(2x)
240
7,5
75115
290(2x)
305
29,5
14,4
M6 (4x) deep 8,5mm
M6 (4x) deep 15mm

JLT Mobile Computers AB
Isbjörnsvägen 3
SE-352 45 Växjö, SWEDEN
Phone: +46 470 533000
Fax: +46 470 445 29
E-mail: mailbox@jltmobile.com
www.jltmobile.com
JLT1213, User manual, Rev 0
© 2005, JLT Mobile Computers AB