JSW Pacific APC23 Network Camera User Manual Exhibit 08
JSW Pacific Corporation Network Camera Exhibit 08
Exhibit 08 User Manual
Network Camera
Installation and Operating Instructions
Version 1.0
Model: APPCAM23
These instructions should be retained in a safe place for future reference.
1
CONTENTS
1. INTRODUCTION..............................................................................2
PLEASE READ BEFORE YOU START ........................................2
WIRELESS DEVICES OPERATING RANGE..............................2
IMPORTANT SAFETY PRECAUTIONS.......................................2
2. KIT CONTENT..................................................................................4
3. SAFETY AND INSTALLATION TIPS ............................................5
Planning your layout..........................................................................6
Camera Installation............................................................................7
Connection Diagram ..........................................................................8
4. CAMERA OVERVIEW.....................................................................9
5. DOWNLOAD AND USE THE APP ...............................................10
Download the App ............................................................................10
App Setup..........................................................................................10
App Operation..................................................................................15
Advanced Setting..............................................................................16
Admin Password.......................................................................17
Time Zone..................................................................................17
Device Password .......................................................................17
Video Setting .............................................................................18
WiFi Setting ..............................................................................18
Sensitivity Setting .....................................................................19
Email Setting.............................................................................19
SD Card Format.......................................................................19
Device Information...................................................................20
6. TROUBLE SHOOTING..................................................................21
7. ABOUT DIGITAL WIRELESS TECHNOLOGY........................23
8. PRODUCTION SPECIFICATION ................................................24
9. STORAGE MEDIA MANAGEMENT...........................................25

2
1. INTRODUCTION
The WIP APP Camera is a wireless security system designed for easily creating your
home security network. Downloading the free App, you can view and capture video
clips of any motion detected by the wireless camera(s) and store them onto the
memory card via smart phones and/or tablets running iOS/Android. Snapshot
function captures images and stored them directly to smart phones and/or tablets.
Guarding your love ones and properties, the wireless camera offers superior quality
video with true-color. It is weatherproof, suitable for day/night use and reliable that
you can trust for your home security.
PLEASE READ BEFORE YOU START:
Always use discretion when installing CCTV equipment, especially when there is
perceived policy. Enquire relevant local regulations applicable to the lawful
installation of video recording/surveillance. Third party consent may be required.
WIRELESS DEVICES OPERATING RANGE:
Ensure the signal reception viewed from the wireless camera(s) is the best possible
reception between the camera(s) and the WiFi router. If necessary, reduce the
distance between the camera(s) and the WiFi router to improve overall system
performance. Wireless Color Camera Recordable CCTV Kit operating on a secure
digital 2.4GHz frequency which could greatly reduce interference from product such
as wireless routers, cordless phones or microwave ovens.
IMPORTANT SAFETY PRECAUTIONS:
Please read before installing and using this product.
Damages caused by non-compliance with this operating manual will void the
warranty! We will not assume any liability for damages to items or persons caused by
improper handling or non-compliance with the safety notices! Any warranty claim
will be null and void in such cases.
(1) Do not drop, puncture or disassemble the camera; otherwise the warranty will be
voided.
(2) Avoid all contact with water, and dry hands before using.
(3) Never tug on the power cords. Use the plug to unplug it from the wall outlet.
(4) Do not expose the camera to high temperature or leave it in direct sunlight.
Doing so may damage the camera or cause camera temporary malfunction.
(5) Use the devices with care. Avoid pressing hard on the camera body.
(6) For your own safety, avoid using the camera or power off the camera when there
is a storm or lightning.
(7) Remove the power adapter during long periods between usages.
(8) Use only the accessories and power adapters supplied by the manufacturer.
(9) To meet the regulations pertaining to parental responsibility, keep the devices out
of the reach of infants.
3
(10) Check power cables, do not get crushed or damaged by sharp edges whenever the
devices are in operation.
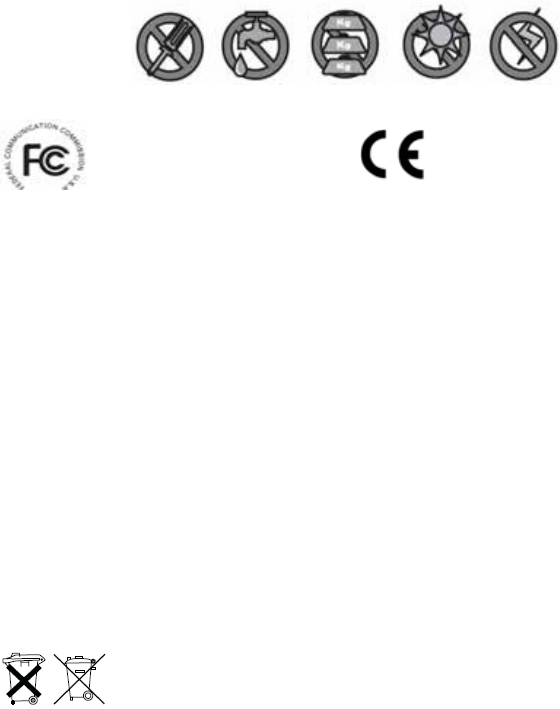
FCC Compliance Statement: This
device complies with Part 15 of the
FCC rules. Operation is subjected
to the following two conditions: (1)
this device may not cause harmful interference,
and (2) this device must accept any interference
received, including interference that may cause
undesired operation.
Products with CE Marking comply with
EMC Directive (2004/108/EC); Low
Voltage Directive (73/23/EEC);
R&TTE(1999/5/EC) issued by the
Commission of the European Community.
Compliance with these directives implies conformity
to the following European Norms:
EMC: EN 301 489
LVD: EN 60950
Radio: EN 300 328
FCC/CE WARNING
This equipment has been tested and found to comply with limits for a Class B digital device, pursuant to Part
15 of the FCC rules and ETSI(EN) 300328. These limits are designed to provide reasonable protection against
harmful interference in residential installations. This equipment generates, uses, and can radiate radio
frequency energy, and if not installed and used in accordance with the instructions, may cause harmful
interference to radio communications. However, there is no guarantee that interference will not occur in a
particular installation. If this equipment does interference to radio or television equipment reception, which
can be determined by turning the equipment off and on, the user is encouraged to try to correct the
interference by one or more of the following measures: -Reorient or relocate the receiving antenna.-Move the
equipment away from the receiver.-Plug the equipment into an outlet on a circuit different from that to which
the receiver is connected.-Consult the dealer or an experienced radio/television technician for additional
suggestions. You are cautioned that any change or modifications to the equipment not expressly approved by
the party responsible for compliance could void your authority to operate such equipment.
DISPOSAL
If the camera system no longer functions or can no longer be repaired, it must be disposed
of according to the valid statutory regulations. Disposal of spent batteries/accumulators:
You are required by law (Battery Ordinance) to return all spent batteries and accumulators.
Disposing of spent batteries/accumulators with common household waste is prohibited!
Batteries/accumulators that contain hazardous substances are marked with the symbols on the side. These
symbols indicate that it is prohibited to dispose of these batteries/accumulators in the household waste. The
abbreviations for the respective heavy metals are: Cd=cadmium, Hg=mercury, Pb=lead. Y ou can return
spent batteries and accumulators that can no longer be charged to the designated collection points in your
community, outlets or wherever batteries or accumulators are sold. Following these instructions will allow
you to fulfill the legal requirements and contribute to the protection of our environment!
Changes or modifications not expressly approved by the party responsible for compliance could void the
user’s authority to operate the equipment
4
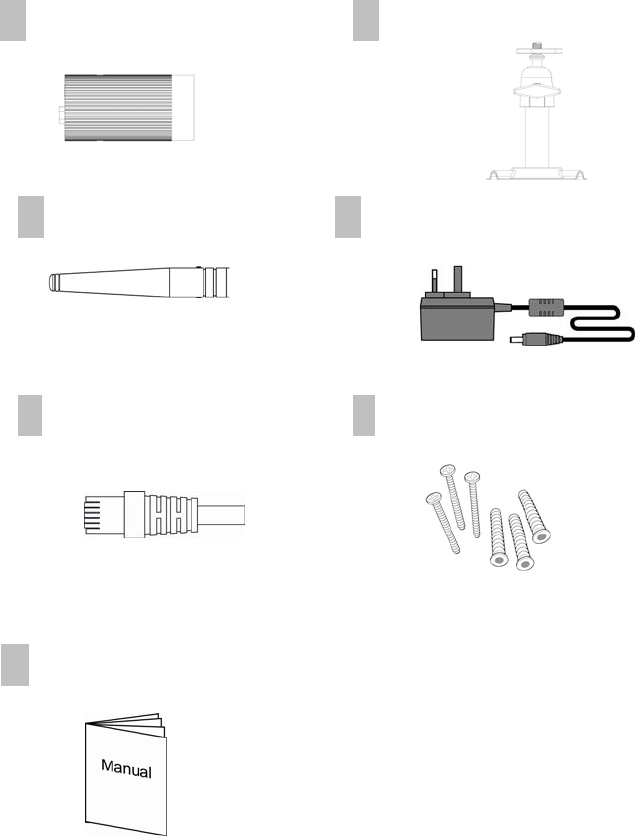
2. KIT CONTENT
A App Camera x 1
B Camera Stand x 1
C Camera Antenna x 1
D 5V/1A Power Adapter for Camera
E Ethernet Cable x 1
F Screw Bag x 1
G Manual x 1
Tools Required:
Electric drill
5mm masonry drill bit
15mm masonry drill bit
No. 2 Philips screwdriver
5
3. SAFETY AND INSTALLATION TIPS
Do not attempt to open the units with the power adaptor plug connected to avoid any risk of
personal injury.
When installing CCTV camera(s), always follow manufacturer's advice when using power
tools, steps, ladders, etc. and wear suitable protective equipment (e.g. safety goggles) when
drilling holes. Before drilling holes through walls, check for hidden electricity cables and
water pipes. The use of cable/pipe detector is advisable.
It is also advisable to avoid exposing any cameras to extreme weather conditions (e.g, under a
gutter which is prone to any water leaks). When installing any cameras with this unit, it is
advisable to use cable conduit to protect any video/power extension cables from being
exposed externally and to prevent/reduce the chances of the cables being tampered with. After
drilling any hole though an external wall for a cable, ensure the hole is sealed up around the
cable using a sealant to prevent drafts.
To prevent a fire or electrical shock hazard, do not attempt to open the housing while the unit
is exposed to rain, water or wet conditions. There are no user serviceable parts inside. Refer
servicing to qualified service personnel. Avoid pointing the camera(s) directly at the sun or
any bushes, tree branches or moving objects that might unnecessarily cause the camera to
record.
6
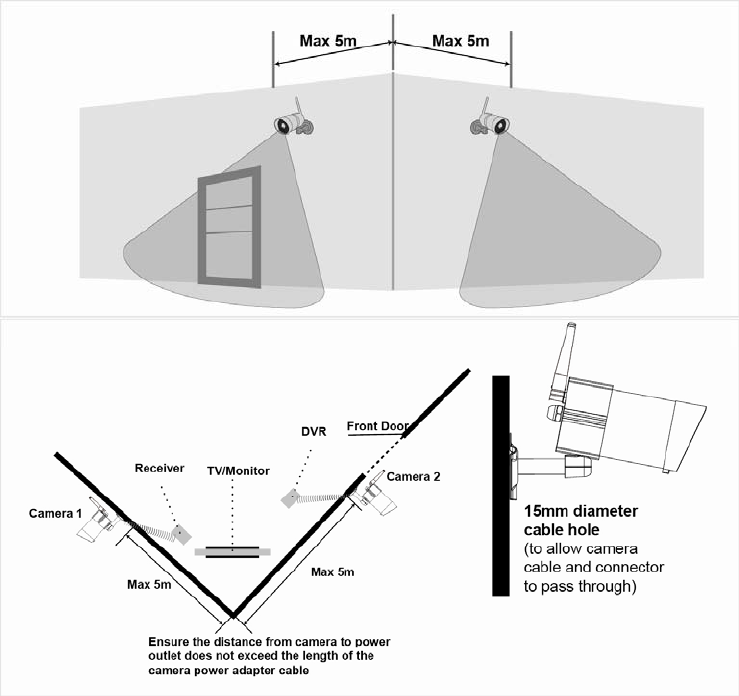
Planning your layout
Night Vision
The camera has built-in infra-red LEDs to allow you to view at night for 24hrs
surveillance. The LEDs will automatically activate at night and the picture viewed will
turn to black and white. The night viewing range is up to 5 meters.
7
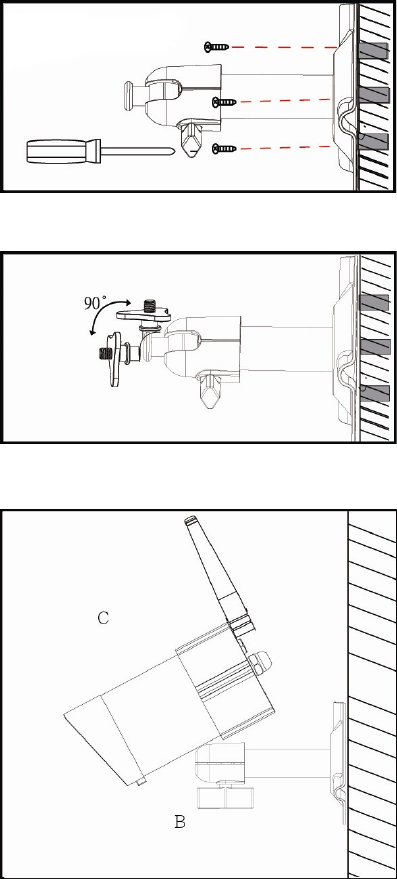
Camera Installation
A. Secure camera stand on the
wall
B. Loosen up the Thumb screw
C. Adjust proper view angle then
secure the joint with T-bolt.

8
Connection Diagram
9
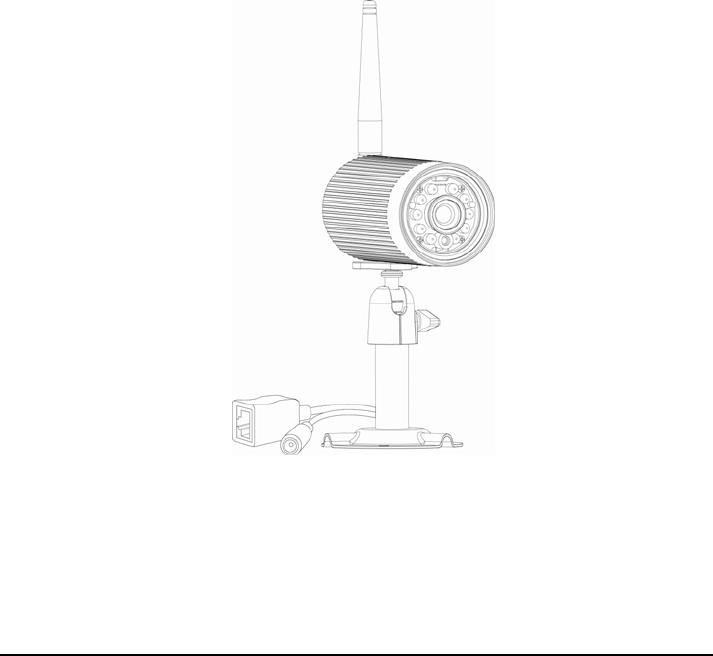
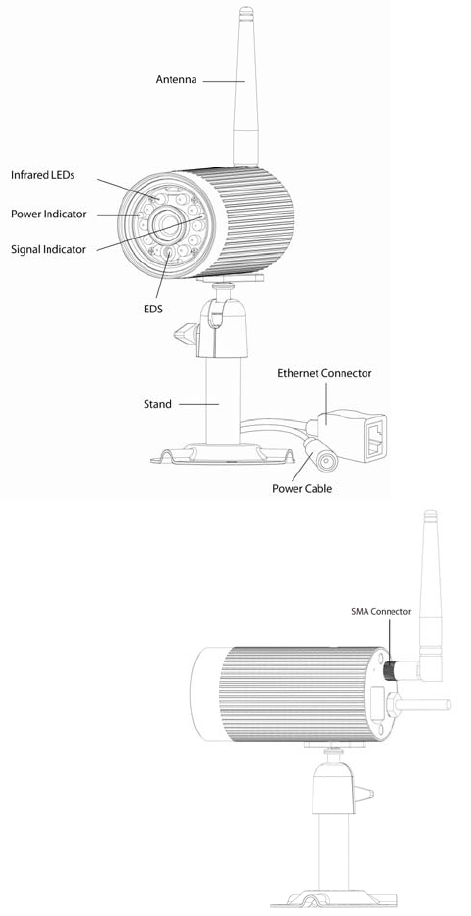
4. CAMERA OVERVIEW

10
5. DOWNLOAD AND USE THE APP
The WAPP CAM is designed to remotely view the live
camera video with your smart phone or tablet device.
Please follow these steps to download, setup and use
the App.
Download the App
1. From you Android smart phone or tablet device, click the
Android Market.
2. Tap on the search icon and type in “APPCAM.” The icon appears
as a square with an orange emblem.
3. Click on the App to choose and click the download button.
4. Press the “Accept and Download” button to begin your
download.
5. Once the download completed, you’ll see the App icon appears
on your smart phone and/or tablet panel.
App Setup
1. Ensure your camera has been correctly connected
to the Internet. (page 8)
2. Connect your smart phone or tablet device to WiFi.
You can also wire the Ethernet cable to connect
your device to the Internet. (see page 8)
3. Locate the APPCAM icon in your applications and
click the icon to launch the App. The boot screen
appears.
4. Tap the ADD CAMERA icon to add the camera to the
App.
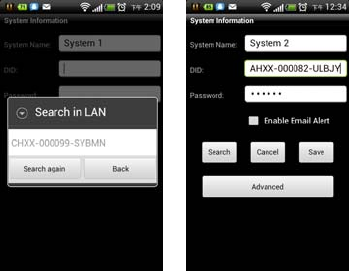
5. The System Information panel appears. You can specify a name or
use the default system name for your camera in the SYSTEM
NAME field.
6. Enter the DID code that provided with your camera in the DID
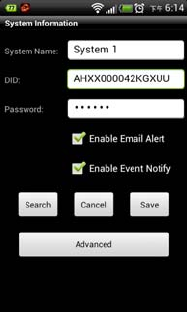
11
field.
7. Enter the default password 123456 in the PASSWORD field.
“Enable Email Alert” option will send an
email alert to your smart phone or tablet
whenever the motion detection is triggered.
“Enable Event Notify” option will notify you
whenever any recording event is produced.
Note: When you type in the default password, the system will alarm
you to change it. Please follow the instruction of the
DEVICE PASSWORD section to change the default
password into your personal security code. (page 16)
8. Click SAVE to complete the camera settings.
12
You can also use the SEARCH feature for a quick setup. This feature
will automatically search for your camera(s) on your local area network
(LAN). Please follow the steps below.
1. Connect your smart phone or tablet device to WiFi which the
camera is used.
2. Click SEARCH button in the App. The system will automatically
find the available camera on the local area network (LAN) and
carry out the DID code in the DID field. You only need to enter the
default password 123456.
3. Follow the instruction of the DEVICE PASSWORD section to
change the default password into your personal security code. (page
16)
13
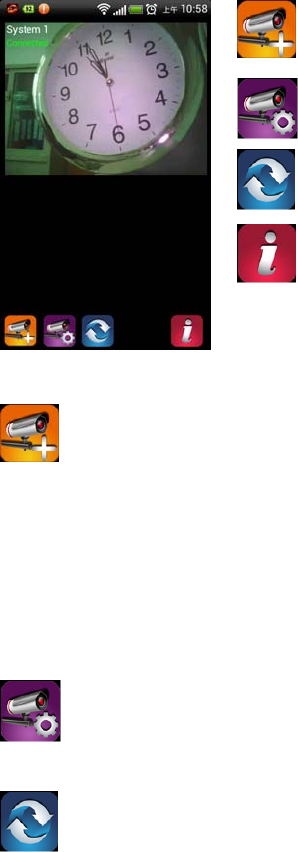
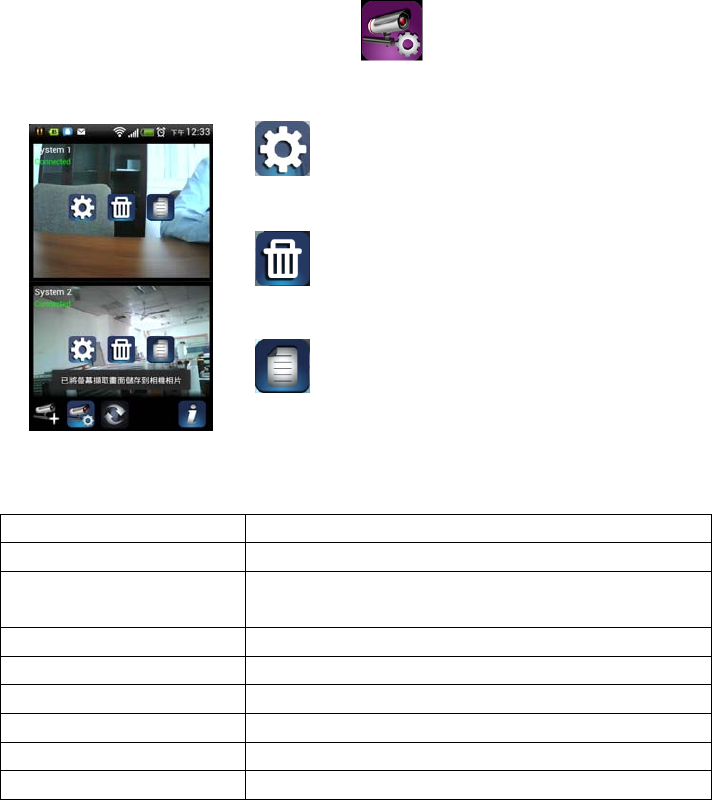
Once the camera is connected, the App will show the video as below.
You can tap the icons to add more cameras or configure the advanced
settings.
Tap to add more camera(s).
Tap to setup the camera configuration.
Tap to update the status of camera(s).
Tap to enable PIN lock or enter the
INFORMATION page.
The ADD CAMERA icon allows you to add more cameras.
The systems supports up to 4 concurrent cameras. Tap the
ADD CAMERA icon and follow the steps of App setup to add
more cameras. (page 10)
Note: If you have multiple cameras connected to the system,
the App will arrange the cameras vertically. Scroll down the
list and tap the camera panel to enlarge the video you want to
view.
The CAMERA SETTING icon allows you to setup the detail
configuration of the camera. Please refer to the ADVANCED
SETTING section. (page 15)
The UPDATE icon will refresh the status of camera
connection(s).
14
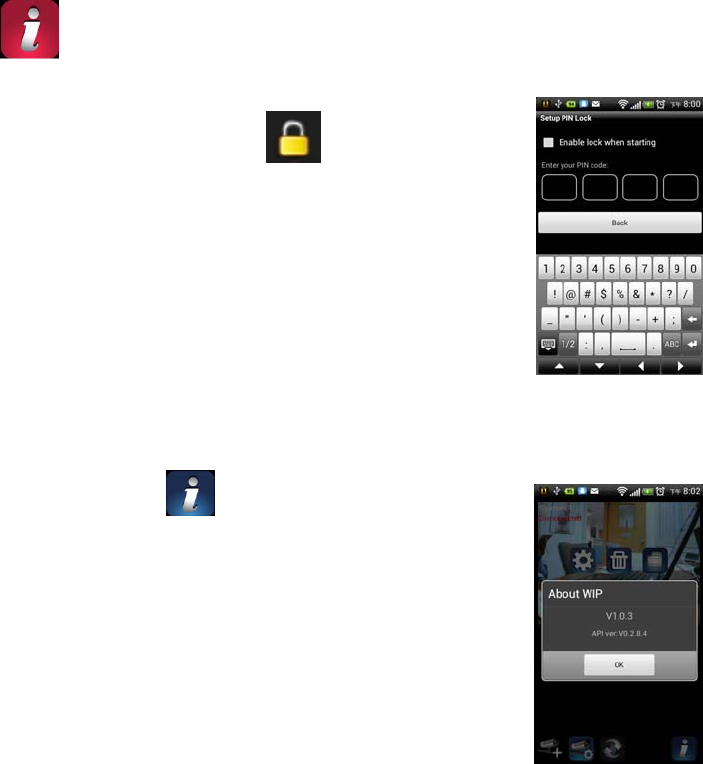
The INFORMATION icon allows you to enable PIN lock or
check the App information.
Setup PIN Lock
If you enable PIN Lock, the user will be
asked to enter the PIN code when you turn
on your mobile device.
1. Click the “Enable lock when starting”
then type in your PIN code.
2. Confirm your PIN code again.
About
Tap the ABOUT icon to check the WIP and
API Kernel version information.
15
App Operation
When you launch the App on the smart phone or tablet, the image
displayed on the main screen is the latest captured camera image from
previously established session. The App then updates the status of all
cameras automatically.
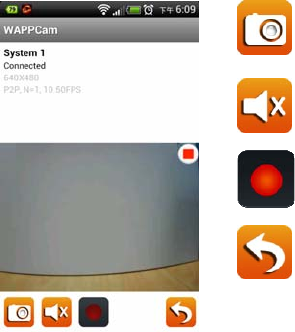
You can take a snapshot or record a video clip with the icons below.
Tap the SNAPSHOT icon to capture
screen images.
Tap the MUTE icon to turn on/off the
volume when playback the video.
Tap the RECORD icon to record and
tap again to stop recording.
Tap the RETURN icon to return to
previous level.
When you take snapshots, the App will save the images into the camera
roll of your mobile device.
When the system starts recording, the video clips will be saved into the
memory card.
Tip: You can turn the device sideways for a horizontal view.
16
Advanced Setting
The Advanced setting allow you to setup the time zone, device
password, video setting, WiFi setting, sensitivity setting, and email
setting. You can also format the SD card or check the device
information here.
Tap the CAMERA SETTING icon . The following icons appear
on the panel.
Tap the ADVANCED SETTING icon
to setup camera configuration. Press
to enter the advanced settings
Tap the DELETE icon to remove
current camera.
Tap the EVENT LIST icon to check
the recorded events.
ADVANCED SETTING sub-menu:
Admin Password The security code for your advanced settings.
Time Zone Setup the time zone for your system.
Device Password Change the default password into personal
security code
Video Setting Configure the screen resolution
WiFi Setting Build up your WiFi connection
Sensitivity Setting Choose the configuration of motion detection
Email Setting Setup your email for email alert
SD Card Format Format SD card
Device Information Check the App and API Kernel version
17
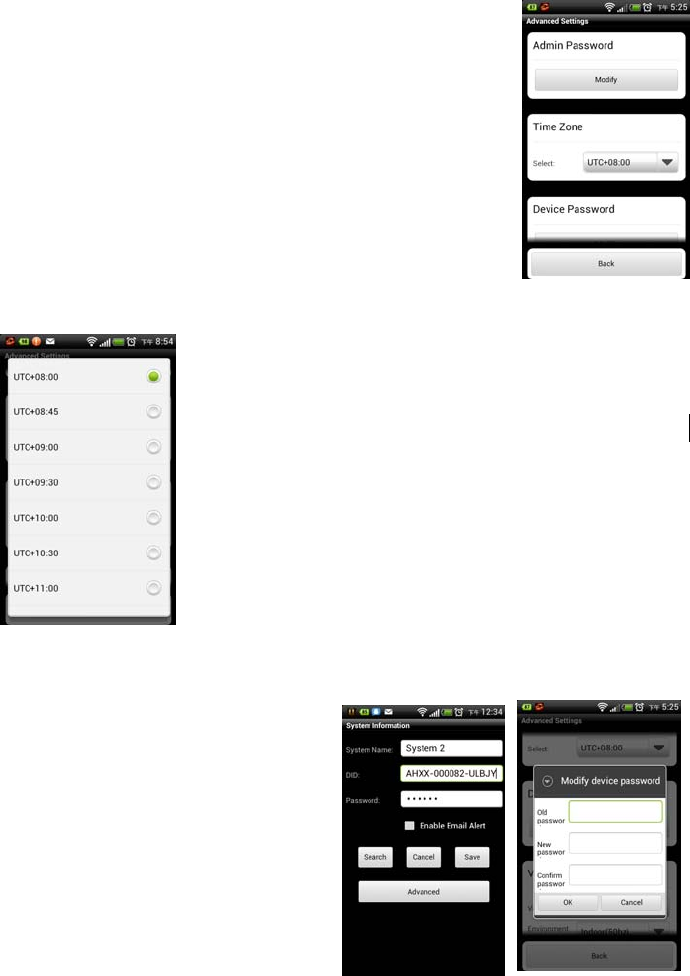
Admin Password
The Admin Password is a specific security code for
your advanced settings. The default password is
123456. Please use this function to change the
default password into your personal admin
password. For the protection of your system
configuration, every time you change the advanced
settings, you need to enter the admin password.
Time Zone
The drop-down list shows the world time zone.
Select the time zone that will work the best for you.
Device Password
The default password of the
camera is 123456. Please use this
function to change the default
password into your personal
security code.
1. Click the MODIFY button.
2. Type in the old password
once and new password twice.
Then press OK to confirm.
18
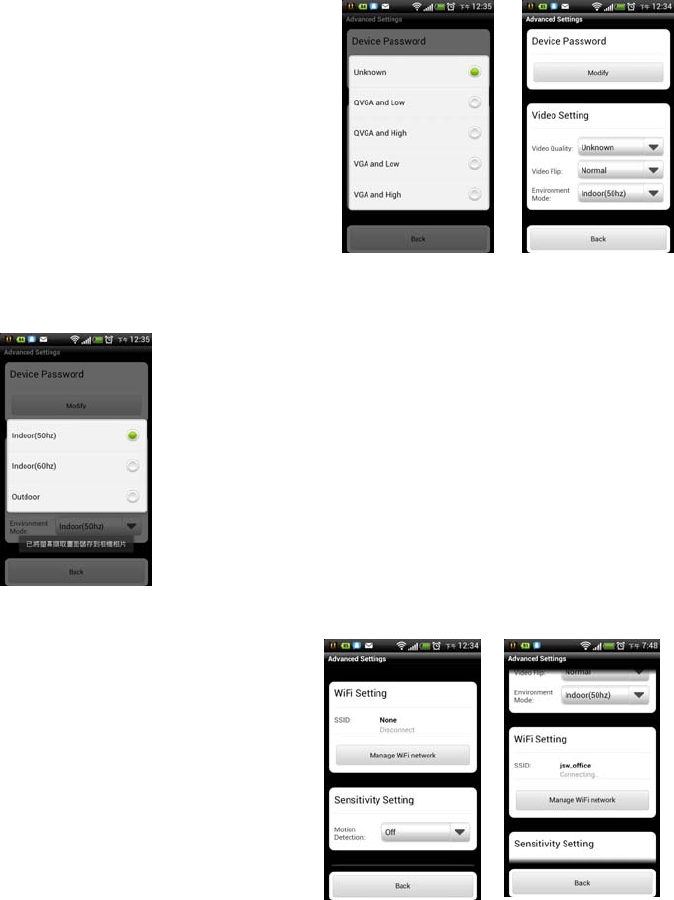
Video Setting
The video setting section allows
you to configure the video
quality and environment mode.
Video Quality
Set up the video format to
VGA/QVGA with High/Low
resolution.
Environment Mode
Choose the appropriate option in accordance with
local power frequency.
WiFi Setting
The WiFi setting allows you to
choose the WiFi connection
that you wish to use and setup
the WiFi environment.
19
Sensitivity Setting
Set up the sensitivity of motion sensor from OFF,
LOW to HIGH.
If you set OFF the sensitivity setting, the system
will turn off the motion detection function.
If you configure the sensitivity setting into LOW
or HIGH, the system will start recording when
any movement occurs within the viewing angle of
the camera. Please adjust the setting to acquire the expected motion
detection.
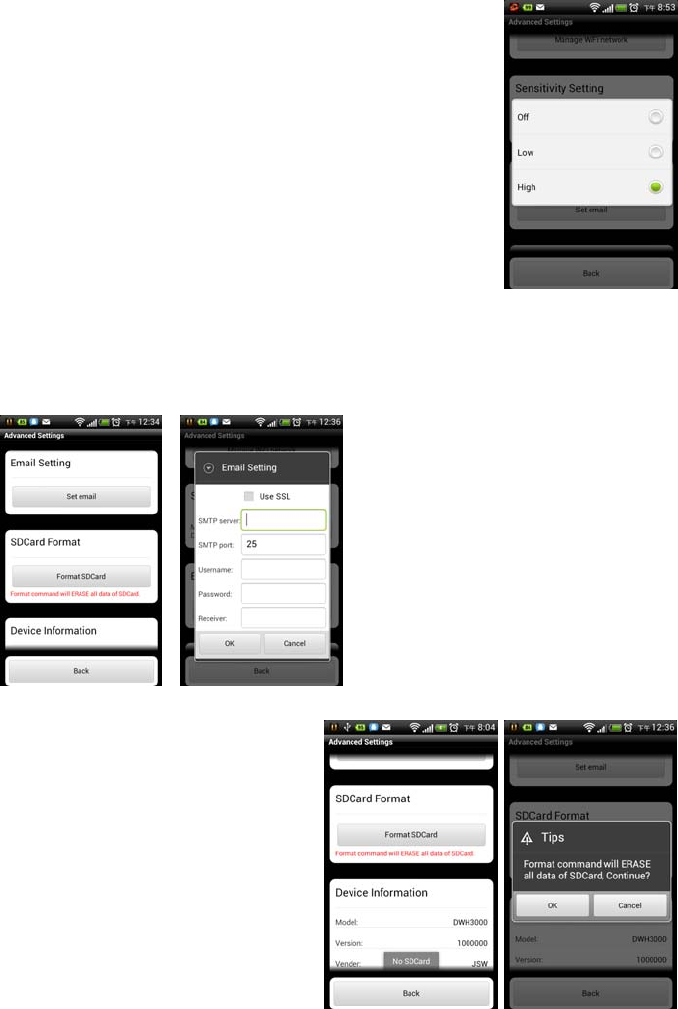
Email Setting
The email setting allows you to
configure the email environment,
email account and password.
Click the “Use SSL” check box
will transmit the data in
encryption.
SD Card Format
This function will erase all data
of the SD card. Click OK to
continue.
Note: Please backup the data
before formatting.
20
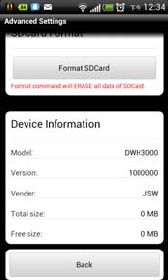
Device Information
This section contains the model number, device
version, vendor name, total size and available size
of the memory card.

21
6. TROUBLE SHOOTING
IF… SOLUTION
No image appears Make sure the power adaptor is not damaged
or defective and plugged into an electrical
outlet with power.
Relocate the camera to obtain the best
reception of wireless signals.
Make sure the camera is properly configured
in App.
Low wireless signal
Poor image quality
Wireless devices such as wireless home stereo
system may reduce the signal strength. Leave
as much space as possible between the
camera/mobile device and these wireless
devices.
Clean the camera lens using lens cleaning
cloth. Spots or dust on the lens can also cause
image quality problems.
Motion detection is
not working
Make sure the sensitivity setting is not turned
OFF. (page 17).
Adjust the sensitivity of the motion sensor.
(page 17)
In motion detection mode, a moving object
within the camera viewing angle is necessary
to trigger the motion sensor for recording
Make sure the system date and time have been
correctly setup.

22
Bright white spots
appear at night time
The camera's infrared LEDs produce invisible
light that reflects off surfaces such as glass.
Install the camera on the other side of
windows or place the lens flush against the
surface to improve the night vision. It is
suggested to install camera(s) under well lit
area.
Note: Please check the environment rating
(Ingress) of the camera(s) before installing
outdoors.
Memory card error Make sure the memory card is correctly
inserted and formatted.
Use the provided memory card within the
package to ensure proper operation.
Note: Please backup the data before
formatting. Format function will erase all the
data on the memory card.
Wrong data and time
are shown.
Wrong date and/or time will result in
unexpected record schedule. Make sure
you’ve selected the correct time zone. (page
17)
Confirm the system date/time of the mobile
device to ensure correct operation.
23
7. ABOUT DIGITAL WIRELESS TECHNOLOGY
This section offers some helpful information to overcome most of the problems you
may encounter. We hope this section can help you to enjoy a pleasant setup.
About 2.4GHz Digital Wireless Signal
This innovative digital wireless solution integrates advance Frequency Hopping
Spread spectrum (FHSS) technology. This technology greatly reduce the interference
that comes from other devices using the same radio frequency (2.4GHz), e.g. WIFI,
Bluetooth, Zigbee, cordless phone...etc. You now can enjoy a more pleasant wireless
surveillance quality without flicking and noisy image. However, weaker signal (lag or
still image) can be observed yet from time to time, depending on the environment
where the system is installed. Complied with FCC part 15.247,ETSI(EN)300 328,
audio / video signals transmitted out about or over 500 foot / 150meter in line of sight
should be supported. Line of sign installation, though, is usually not a common
practice. Factors affecting transmission include microwave ovens or other high
frequency electromagnetic waves. Reinforced concrete walls, large scale metal
products and metal furniture should not be located near the camera or the receiver.
Water creates an obstacle and should not be placed near. Human bodies such as a
person passing through may cause unstable signal quality
How to improve the wireless signal quality?
If possible, remove obstacles in between camera and receiver that might reflect the
signal. These could include furniture, cabinets, and walls. If you feel the wireless
signal is not improvement. Or simply relocate the camera closer to the receiver.
Why Image Compression?
In order to provide a private and interference free wireless service, this digital
wireless solution works on a 2Mb narrow hopping band. Different from traditional
2.4GHz analog signal, this digital wireless signal is compressed and presented as
Motion JPEG (MJPEG) format. By digitalizing and compressing the raw analog data,
the bandwidth is used more efficiently and securely. Consequentially, you might
observe an indent image line on a larger display receiver or plasma TV.

24
8. PRODUCTION SPECIFICATION
Networking Parameter
Wireless Technology IEEE 802.11 b/g
Network Connection Ethernet (10/100 Base-T/Base -TX); Wifi
Network Protocols TCP/IP, UDP, SMTP, NTP, DHCP, ARP
Simultaneous Viewers 4 concurrent sessions
Security WPA /WPA2 (TKIP, 128 bit AES)
Camera Parameter
Image Sensor 1/4” CMOS
Antenna 3dBi Waterproof Dipole
Housing Weather resistance metal
Environment Rating
(Ingress) IP66
Camera Environment Indoor (50Hz); Indoor(60Hz); Outdoor
Storage Memory T Flash memory (not included in the package)
Viewing Angle H: 60° V: 43°
Min. Illumination 1~8 lux
Lowlight resolution 10 IR LEDs with IR switcher
Lowlight visibility 5 meters above
Video Audio Parameter
Image Compression H.264
Image Resolution VGA 640x480 / QVGA 320x240
Recording Frame Rate max 30 FPS
Supported Mobile Internet Device
iOS requirement V5.01X or above
Android requirement Android 2.3X or above
Hardware requirement Cortex A6 800MHz or above;
1GB internal memory or above
General Parameter
Power Requirements 100~240V switching power supply DC 5V 1A
Power Consumption 650mA max
Camera Body Dimension 42*42*92mm
Weight (Main Body) 210 g

25
Operating Temperature -10°~+50°C
9. STORAGE MEDIA MANAGEMENT
Micro SD Card Capacity 640 x 480 (VGA)
1G 60 Minutes
2G 110 Minutes
8G 400 Minutes
16G 950 Minutes
32G 1880 Minutes