JTECH an HME IQBASE-N IQ TRANSMITTER User Manual 1 revised IQBASE N MANUAL
HME WIRELESS, INC. IQ TRANSMITTER 1 revised IQBASE N MANUAL
Contents
- 1. Users Manual
- 2. User Manual - revised
- 3. User Manual
User Manual
IQBASE-N
User Manual
HME Wireless, Inc
Customer Service 800.925.8091
1400 Northbrook Parkway Suite #320 • Suwanee, GA 30024

THIS DEVICE COMPLIES WITH PART 15 OF THE FCC RULES.
OPERATION IS SUBJECT TO THE FOLLOWING TWO CONDITIONS :
(1) THIS DEVICE MAY NOT CAUSE HARMFUL INTERFERENCE, AND
(2) THIS DEVICE MUST ACCEPT ANY INTERFERENCE RECEIVED,
INCLUDING INTERFERENCE THAT MAY CAUSE UNDESIRED OPERATION.
TRANSCEIVER MANUAL
NOTICE
This manual, software and electronic circuitry are copyrighted. All rights reserved. Under the
copyright laws, this manual, software and electronic circuitry may not be copied, in whole or in
part without written prior consent of Lee Technology.
All information provided in this document is carefully prepared and offered in good faith as a
guide in the installation, use and servicing of our products. Installers must ensure that the final
installation operates satisfactorily within the relevant regulatory requirements. Lee Technology
accepts no responsibility for incorrect installation. Lee Technology reserves the right to change
products, specifications and installation data at any time without notice.
Lee Technology makes certain limited warranties with respect to defective diskettes,
documentation and electronic circuitry. Please see the associated information contained on this
page.
LIMITED WARRANTY
With respect to the physical documentation and physical electronic circuitry enclosed herein, Lee
Technology warrants the same to be free of defects in materials and workmanship for a period of
one year from the date of purchase. In the event of notification within the warranty period of
defects in material or workmanship, Lee Technology will replace the defective diskettes,
documentation and electronic circuitry. The remedy for breach of this warranty shall be limited to
replacement and shall not encompass any other damages including but not limited to loss of
profit and special incidental, consequential, or other similar claims.
Lee Technology Korea specifically disclaims all other warranties, expressed or implied, including
but not limited to implied warranties of merchantability and fitness for a particular purpose with
respect to defects in the documentation and electronic circuitry and the program license granted
herein, in particular, and without limiting operation of the program license with respect to any
particular application, use or purpose.

IMPORTANT SAFETY INFORMATION
NOTE : The manufacturer is not responsible for any radio or TV interference
caused by unauthorized modifications to this equipment. Such modifications
could void the user's authority to operate the equipment.
CAUTION :
RISK OF EXPLOSION IF BATTERY IS REPLACED BY AN INCORRECT TYPE.
DISPOSE OF USED BATTERIES ACCORDING TO THE INSTRUCTIONS.
RF EXPOSURE STATEMENT
Your Pager Transmitter contains a radio frequency
transmitter. When the button is pushed the transmitter
sends our RF signals.
CAUTION: To comply with FCC RF exposure
compliance requirements, a separation distance of at
least 8 inches (20 cm) must be maintained between the
antenna of this trasmitter and all persons, during normal
operation.
The antenna uesd for this transmitter must not be colocated
or operating in conjunction with any other
antenna of transmitter.
Unauthorized antennas, modifications, of attachments
could damage the transceiver and may violate FCC
regulations.
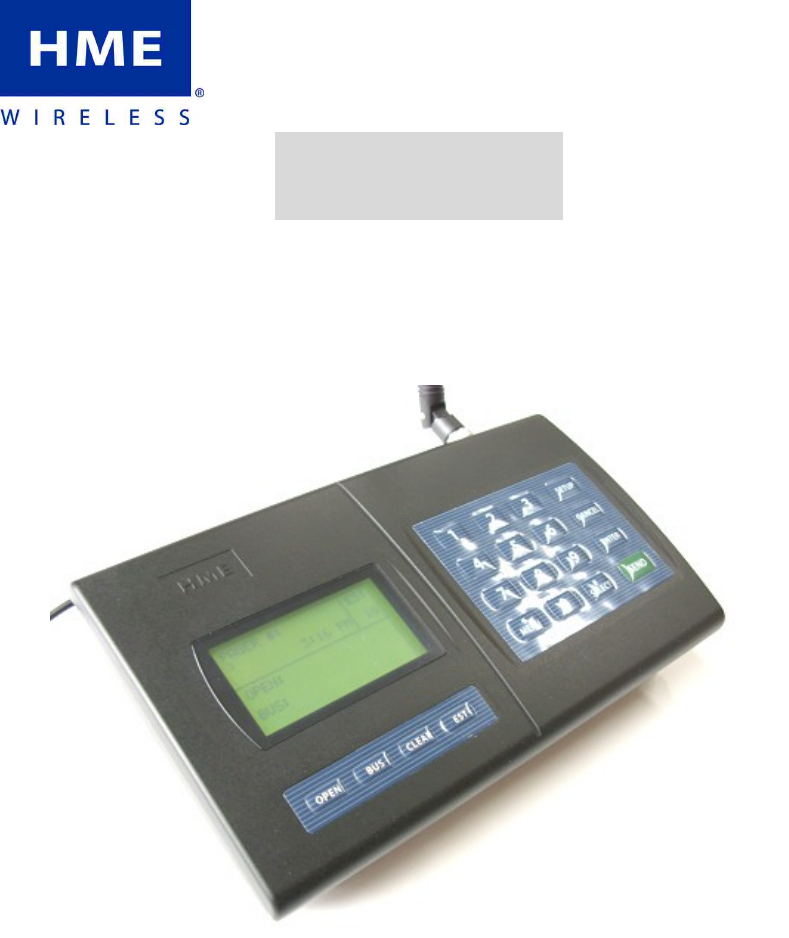
Thank you for purchasing our brand-new “IQ Paging System”
We are confident our cutting edge products and first rate service will satisfy your needs
for years to come. Please read these instructions carefully before setting up your IQ
Paging System!
1. Equipment Setup
1) Keypad Sending Unit
Unwrap all sending unit components. Lock the antenna into the hole in the upper
right hand corner of the sending unit. Plug the power supply with the large tip into a
standard 110 outlet and plug into the back of the sending unit. We recommend
some type of surge suppressor on the power supply for protection. Power surges are
not covered under system warranty.
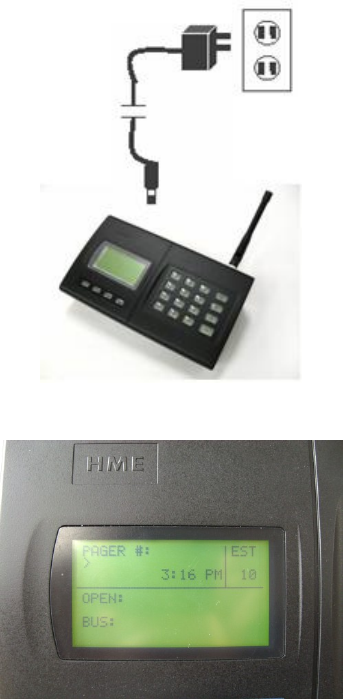
2) Initial Display
2. Placement & Mounting Instructions

1) DESKTOP
You can use your transmitter with the 20 degree wedge attached or remove the
wedge and lay the transmitter flat.
2) WALL MOUNT
To mount your transmitter on a wall
Remove the plastic bracket (included) under the transmitter unit by
unlocking the 2 latches
Place the plastic bracket against the wall and with the aid of a pencil, mark
the position of the mounting holes. (Refer to figure below) Mount the
transmitter in a convenient location where a power outlet is available.
Drill a hole on the market position. Install the 3 mounting screws (and use
anchors where necessary) Ensure that the screws are not fully tightened so
that the unit can be easily removed from the wall.
Place the transmitter onto the wall (without the plastic bracket) Plug the 2-
amp wall transformer into any suitable AC outlet. Plug the power connector
into the power jack on the top left hand side of the unit. Transmitter is now
ready for use. Be certain to mount the transmitter away from phones, heat,
moisture and exposed power circuits. These items can damage your system
and shorten transmission range.
3) SYSTEM CONFIGURATION
Your system was set at the factory and will function as soon as it is powered up.
Default setup is as below:
Current time
Sleep shutdown - OFF
Range Test - OFF
Default Alert Type - Vibe only
Duty Alert - OFF
Out of Range – OFF
Baud Rate – 1200 BPS
Transmission Frequency - 9 kinds selectable
3. System Programming (Transmitter Version 1.01A)
To enter programming mode, press the “SETUP” button and enter the password
‐ This device doesn't support two‐way paging.

“2580” followed by “ENTER” If the password is accepted, the display will show “use *
to scroll to menu options”
1) Set Current Time
At the “Set Current Time” menu, set the hour then press “ENTER” key.
Set the minutes and press “ENTER” key.
Use the “#” key to select AM or PM
After the time is set, press the “ENTER”, and “Time Saved” will show on
display. If the time is not correct, press the “CANCEL” key twice to exit the
system programming menu.
2) Set Sleep Shutdown Time (Factory Default: OFF)
This system has an “ALL SLEEP” function that turns off all battery pagers at once
automatically.
To turn this feature off
Press “#” key to turn the sleep shutdown “OFF”
Press “ENTER” to go back to the main menu.
To change the shutdown time
Press “#” key to turn the sleep shutdown “ON”
Set the hour then press “ENTER” key.
Set the minutes and press “ENTER” key.
Use “#” key to select AM or PM.
After the time is set, press the “ENTER”, and “Time Saved” will show on
display. If the time is not correct, press the “CANCEL” key twice to exit the
system programming menu,
3) Range Test (Factory Default: OFF)
With this feature, you can determine what distance your transmitter will cover.
Remove a couple of pagers from the charger base.
At the range test menu, press “#” key to turn range test “ON”
Press “ENTER” to start the range test. As soon as range test is activated,
you’ll notice the IQ pagers flash once every 10 seconds. Walk around your
property. When you reach the point where the pagers do not flash
consistently, this is your maximum range.
Press the “CANCEL” key to stop the range test. Press the “CANCEL” key again
to exit the system programming menu.
4) Button Select (Factory Default: Function)
With this feature, you can select button function type.
(1) Open Table
If “Open Table” is set, “OPEN”, “BUS”, “CLEAR” and “EST” keys are available.
- OPEN, BUS, CLEAR: These buttons will display Table Status.
- EST: This button will setup Estimated Waiting Time.
(2) Preset Message
①Beep
If “Beep” is set on, 4 buttons are recognized as “F1”, “F2”, “F3” and “F4” buttons
instead of OPEN, BUS, CLEAR and EST buttons and the buttons will be functioned
as Predefined Messages
②Num Code
If “Number Code” is set on, 4 buttons are recognized as, for example, “11”, “22”,
“33” and “44” buttons instead of OPEN, BUS, CLEAR and EST buttons and the
buttons will be functioned as Predefined Messages
(3) Manager Pager
If “Manager Pager” is set on, 4 buttons are recognized as shortcuts of “Manager
No# 1”, “Manager No#2”, “Manager No#3” and “Manager No#4” buttons instead
of OPEN, BUS, CLEAR and EST buttons and the buttons will be functioned as
Predefined Messages
5) Set Pager Alert (Factory Default: Vibe Only)
With this feature, you have the option of changing the way your pagers alert the
guest.

Be sure that all pagers are returned before performing this procedure.
To change the alert mode of your pagers follow these instructions
Remove all the pagers from the charger base or unplug the power supply
that is connected to the charger bases.
At the “Set Pager Alert” menu, press the “#” key to scroll through the
different alert options.
After making a selection, press the “ENTER” key 3 times. After sending the
code, the pagers will now respond with your new selection.
Press “CANCEL” key to exit the system programming menu.
Return all the pagers to the charger base or plug the power supply. The
pagers are ready to receive the page with the new alert.
6) Duty Alert (Factory Default: OFF)
This feature enables your transmitter to send a page, at a preset time, to a certain
pager to remind them of a duty required of them. For example, a buzzer can receive
a page every 60 minutes to remind him to check the restrooms.
You can assign up to 3 different pagers to be duty alert pagers.
Programming the duty alert
At the “Duty Alert” menu, “Duty Pager(1-3) is displayed and you can select
Duty Pager # among up to 3.
Select Duty Pager # using “#” key and press “ENTER” key.
If you choose Duty Pager #1, then “Duty Pager #1: OFF” is displayed.
You can select ON/OFF using “#” key and then press “ENTER” key.
You can setup Duty Pager #2 and #3 as same way as Duty Pager #1
7) Out of Range (Factory Default: OFF)
With this feature, the pager will play a melody when taken out of range of the
transmitter to inform the guest that they are out of range and will miss their page.
The melody will only stop when they return back within range.
Setting up the Out of Range “ON”
At the “Out of Range” menu, “OUT OF RANGE:” is displayed and you can
select ON/OFF using “#” key.

Make it “ON” and then press “ENTER” key.
“Are All Pagers Returned??” is displayed and then press “ENTER” key.
“Unplug All Coasters” is displayed and then press “ENTER” key.
“Message Sent Plug In Pagers” is displayed and transmit message twice.
Cf) Out of Range ON (Message 9494), Out of Range OFF (Message 9393)
8) Set DEFAULT MSG
With this feature, you can setup the default message.
Setting up the DEFAULT MSG
At the “Set DEFAULT MSG” menu, “TX DEFAULT MSG:” is displayed and you
can select ON/OFF using “#” key.
Input Default message and then press “ENTER” key.
9) Set EST Time
With this feature, you can setup the initial EST Time and also modifying EST Time.
Setting the EST Start Time
At the “Set EST Time” menu, input the initial EST Time among 000-200
minutes and then press “ENTER” key.
Setting the EST Add Time
With this feature, you can setup the EST incremental time which is increased
whenever press the “EST” key to increase the EST Time on the transmitter.
At the “EST Add Time” menu, input the EST incremental time among 000-
200 minutes and then press “ENTER” key.
Note. After setting the initial EST Time, you can enter into the “EST Add Time”
Auto Decrease EST Time
Every time you page the pagers, the EST Time will be decreased as much as
the EST incremental time.
10) SET Base ID
With this feature, you can setup the Base ID of each transmitter.

Setting the Base ID
At the “SET Base ID” menu, “SYSTEM BASE ID:” is displayed.
Input the Base Id and then press “ENTER” key.
11) GROUP CALL ID
With this feature, you can setup the GROUP CALL ID.
Setting the Group Call ID
At the “GROUP CALL ID” menu, “GROUP CALL ID(1-2):” is displayed and you
can select among 1-2.
If you want to input Group ID #1, press “1+ENTER” and then “Set Group ID
#1” is displayed.
Input Group Call ID #1 and then press “ENTER” key.
Group ID #2 can be set as same way as Group ID #2.
12) OUT OF RANGE ID
With this feature, you can setup Out of Range ID.
Setting Out of Range ID
At the “OUT OF RANGE ID” menu, “Set Out of Range ID:” is displayed.
Input out of range ID and then press “ENTER” key.
13) SET BAUD RATE
With this feature, you can setup the baud rate you want.
Setting Baud Rate
At the “SET BAUD RATE” menu, you can select the baud rage using “#” key.
Baud Rate List
(1) 512 BPS
(2) 1200 BPS
14) SET FREQUENCY
With this feature, you can select the frequency you want.

Setting Frequency
At the “SET FREQUENCY” menu, you can select the frequency using “#” key.
Frequency List
(1) 450.0250 MHZ
(2) 450.3750 MHz
(3) 457.5750 MHz
(4) 458.6625 MHz
(5) 461.2625 MHz
(6) 461.4750 MHz
(7) 462.5750 MHz
(8) 463.6375 MHz
(9) 469.9750 MHz
4. How to Use
1) Page
(1) “Pager #” + “SEND”
- If the Default Msg is ON, preset default message will be sent.
- If the Default Msg is OFF, No Message will be sent.
(2) “Pager #” + “ENTER” + Numeric Message + “ENTER(SEND)”
- It’ll send numeric message to the pagers.
2) OPEN / BUS / CLEAR Button (This can be activated when “Button Select” is turned
to “Function”)
(1) OPEN / BUS
Press “Table #” and then press “OPEN(BUS)”
The data of table # will be transmitted and the Table # will be displayed onto
the “OPEN / BUS” setion
※Max 9 Table # can be displayed onto the each section and Max 19 Table # can
be stored.
※When the number of received Table # is over 9, you can scroll the table # by
pressing “OPEN” button shortly.
※To remove the list of “OPEN” or “BUS”, press and hold the “OPEN” or “BUS”
button for more than 4 seconds.
(2) CLEAR
Press “Table #” and then press “CLEAR”
The data of Table # will be transmitted and remove the corresponding table
# on the both section, OPEN/BUS.
※To remove the all the lists of “OPEN” and “BUS”, press and hold the “CLEAR”
for more than 6 seconds.
(3) EST
Every time you press the “EST” key, the EST incremental time will be added
to the current EST time.
LEE TECHNOLOGY KOREA CO., LTD
FCC ID: WDCIQBASEN
This device complies with part 15 of the FCC Rules. Operation is subject to the following two conditions:
(1) This device may not cause harmful interference, and (2) this device must accept any interference received,
including interference that may cause undesired operation.
Any changes or modifications (including the antennas) made to this device that are not expressly approved
by the manufacturer may void the user's authority to operate the equipment.
Note : This equipment has been tested and found to comply with the limits for a Class B digital device,
pursuant to part 15 of the FCC Rules. These limits are designed to provide reasonable protection against
harmful interference in a residential installation This equipment generates, uses and can radiate radio
frequency energy and, if not installed and used in accordance with the instructions, may cause harmful
interference to radio communications, However, there is no guarantee that interference will not occur in
a particular installation. If this equipment does cause harmful interference to radio or television reception,
which can be determined by turning the equipment off and on, the user is encouraged to try to correct the
interference by one or more of the following measures:
Reorient or relocate the receiving antenna.
Increase the separation between the equipment and receiver.
Connect the equipment into an outlet on a circuit different from that to which the receiver is connected.
Consult the dealer or an experienced radio/TV technician for help.
Modifications not expressly approved by the manufacturer could void the user’s authority to operated the
equipment under FCC rules.
IC : 7752AIQBASEN
Operation is subject to the following two conditions:
(1) this device may not cause interference, and (2) this device must accept any
interference, including interference that may cause undesired operation of the device.
L'exploitation est autorisée aux deux conditions suivantes : (1) l'appareil ne doit pas produire
de brouillage, et (2) l'utilisateur de l'appareil doit accepter tout brouillage radioélectrique subi, même si le
brouillage est susceptible d'en compromettre le fonctionnement.