JTECH an HME RTAG RFID tag User Manual Vuze Table Location System
HME WIRELESS, INC. RFID tag Vuze Table Location System
User Manual
Vuze ® Table
Location
System
Installation Manual
HME Wireless, Inc.

© Copyright 2014, HME Wireless, Inc. www.hmewireless.com | 800-919-9903 2 of 21
Table of Contents
CONCEPT ....................................................................................................................................... 3
COMPONENTS ............................................................................................................................... 3
GuestTag ................................................................................................................................ 3
ReferenceTag ........................................................................................................................ 4
Vuze Reader .......................................................................................................................... 4
VUZE SOFTWARE ............................................................................................................................ 4
Vuze Waitlist ........................................................................................................................... 4
DEPLOYMENT ................................................................................................................................. 5
Hardware Setup .................................................................................................................... 6
TESTING ........................................................................................................................................... 8
Testing Activate and Deactivate Tags............................................................................... 8
Testing Delivery Zones or Table Tags ................................................................................... 9
MOUNTING ................................................................................................................................... 10
SYSTEM USE ................................................................................................................................... 11
Vuze Management Software ................................................................................................... 12
COMPLIANCE .............................................................................................................................. 15
Radio Frequency Compliance Statement ...................................................................... 15
FCC Compliance ................................................................................................................ 15
Industry Canada Compliance .......................................................................................... 15
Vuze Installation Files .................................................................................................................. 17
© Copyright 2014, HME Wireless, Inc. www.hmewireless.com | 800-919-9903 3 of 21
Vuze ® Table Location System
CONCEPT
The Vuze Table Location System provides users the ability to quickly identify where a party is
located in a restaurant in order to deliver food in a timely and efficient manner.
By using Vuze by HME Wireless ("HMEW") users will have the ability to craft their system to fit their
needs and budget. Unlike other systems, HMEW’s active RFID technology allows users to create
Delivery Zones or, by adding additional tags, have a tag per Table. Delivery Zones allow food
runners to eliminate a majority of the restaurants floor space when locating a guest. Food
runners can be fully engaged with diners and ensure the best experience is offered, while
quickly delivering the order.
Vuze provides users multiple view options; list, image, or map; for finding their customer, as well
as, the ability to cater Delivery Zone or Table names to whatever they desire like Window, Patio,
or Booths. This flexibility offers quicker training and eliminates the need for learning or referencing
a floor map full of foreign numbers.
COMPONENTS
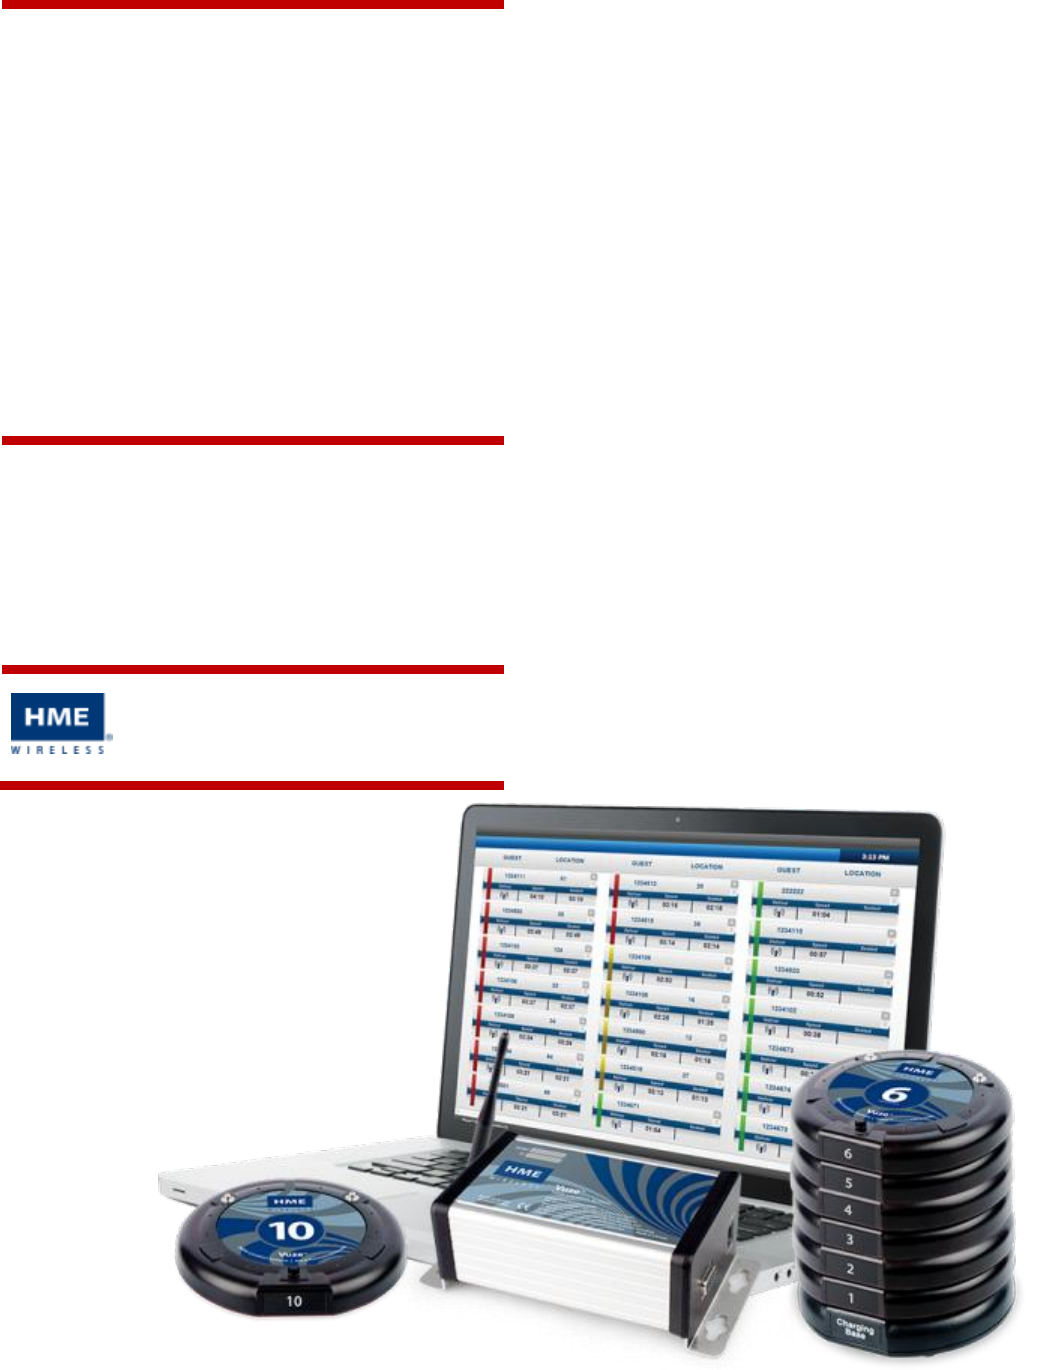
Your Vuze Table Location System is comprised of three hardware elements; the GuestTag, the
ReferenceTag, the Reader, and two software elements; the Vuze Waitlist and Vuze
Management Software
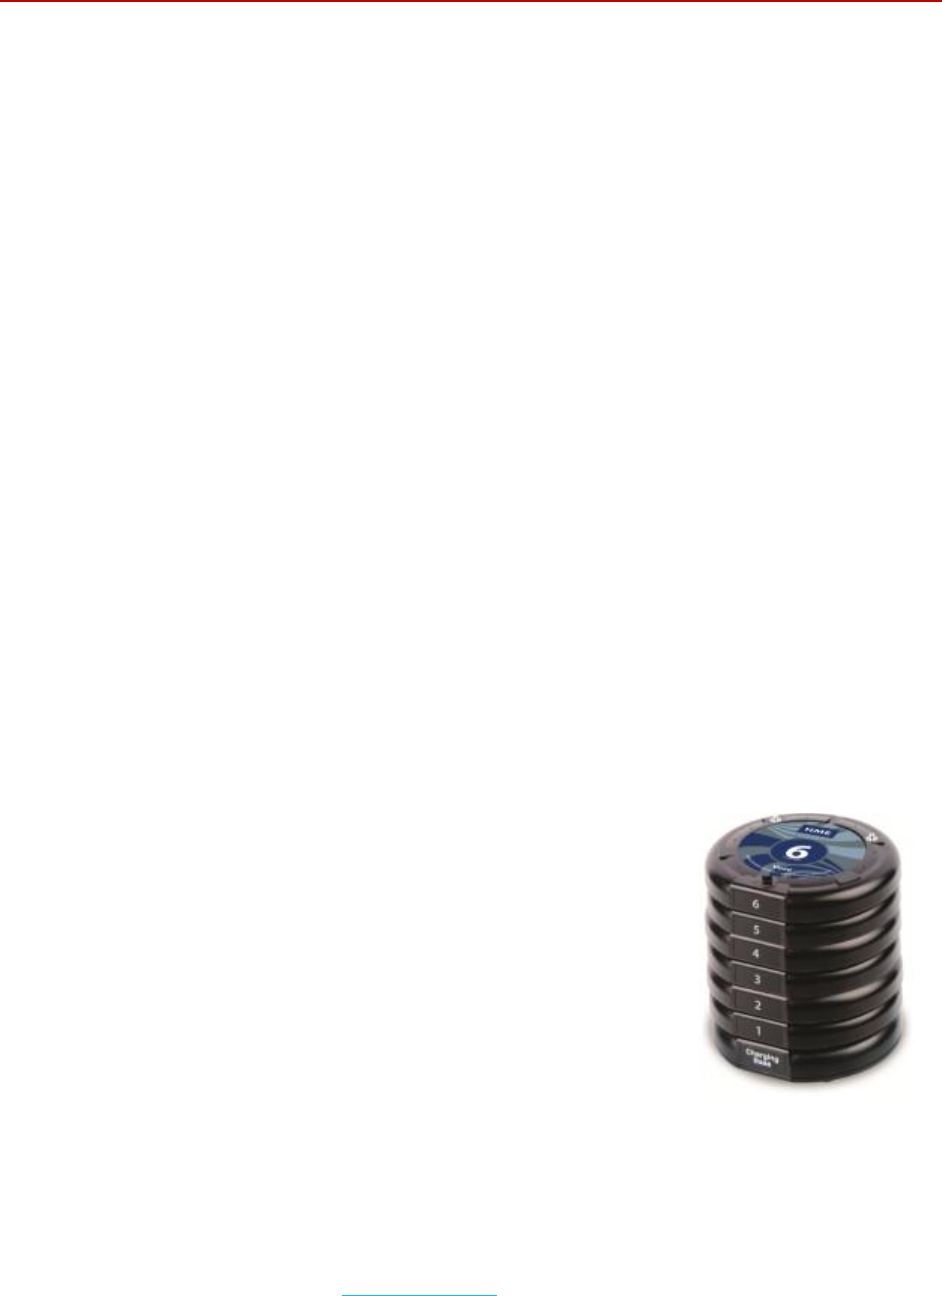
GuestTag
• A numbered coaster style device that is handed to a guest to determine their location.
• Runs on a rechargeable battery pack and can hold a charge for
up to 15 hours between charges.
• Stacks on the GuestTag charger for recharging. For best results, do
not stack more than 15 tags high.
• GuestTag charger looks similar to the GuestTag with two
exceptions; 1) does not have number on the top face and 2) has
two charging holes in the back case for the power supply and to
"daisy chain" multiple chargers together with a "jumper wire."
(Available from HMEW, part# JMP).
© Copyright 2014, HME Wireless, Inc. www.hmewireless.com | 800-919-9903 4 of 21
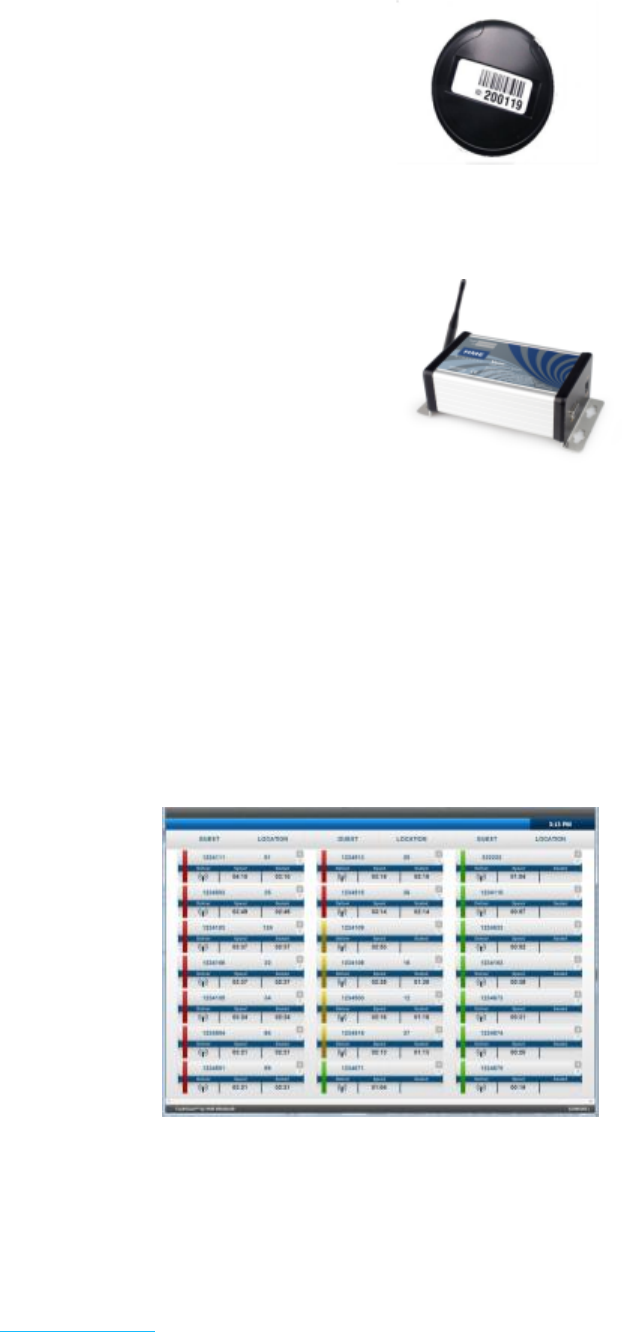
ReferenceTag
• A three part, weather resistant tag that will be secured to a location
or object in the restaurant.
• Runs on two "A" cell Lithium Ion batteries (contact HME Wireless for
replacements, part# ALITH). Expect 12-24 months battery life,
depending on delivery volume.
• Reference Tags identify specific points in the restaurant that will be displayed on screen as
locations.
Vuze Reader
• The "engine" of the Vuze system; catches all traffic from the GuestTags
and pushes it to the appropriate location for processing.
• Requires a clear line of sight to the dining room. For the best
experience, it is recommended that the Reader be placed
approximately 6 - 10 feet from the floor with the antenna pointing up.
A common location is to mount the reader to a swing arm in a Hybrid
installation or in the office in a Cloud installation.
VUZE SOFTWARE
The Vuze Management software handles all of the back end setup for the Vuze system. In
Management, you will be able to add or make adjustments to the different tags, as well as, pull
reports showing the latest activity of each of the tags in the system for troubleshooting; images
are available in Appendix A. Vuze Waitlist allows users to quickly identify the location of a
GuestTag (customer) based on information received by the Reader.
Vuze Waitlist
• Shows a "paddle" for each GuestTag that is
active.
• Paddles are displayed in the order GuestTags
become active.
• Paddle record shows the GuestTag number,
the Location, and two optional Timers.
• One represents the amount of time that the
GuestTag has been active.
• The other represents that amount of time that
the GuestTag has been at the most recent location.
• Each Paddle has three user defined color thresholds based on how long the Paddle has
been on screen; green, yellow and red.

© Copyright 2014, HME Wireless, Inc. www.hmewireless.com | 800-919-9903 5 of 21
DEPLOYMENT
The Vuze Table Location system utilizes a technology called
Active RFID. Active RFID allows the tags to be in constant
communication with each other and aids in ensuring that the
system is as real-time as possible.
To ensure the best experience when using Vuze, it is important
to understand one core ideal throughout.
A GuestTag MUST hear the same ReferenceTag two times
in a row (2x) for it to register an update on the display.
For example: GuestTag # 10 is handed to a guest and they go
to sit down.
As that guest is moving through the dining room #10 is calling
out and listening for any ReferenceTag responses. After the
Reference Tags respond, #10 collects all of that information
and transmits it to the Reader for processing. The
ReferenceTag that is considered the LOUDEST is what the
system considers to be the closest, regardless of distance.
Since the guest is moving, each time #10 responds back to
the system it is hearing a different ReferenceTag as the
loudest (since it is not 2x in a row, the system is not updated).
When the guest sits down in Zone 4 or by the Window or on
Table 12, the GuestTag will continue to call. Since the guest is
no longer moving it will hear the ReferenceTag marking that
area 2x or more in a row and will update the screen to show
the appropriate location.
The same concept applies when handing out a GuestTag
("Activating"), or returning a GuestTag ("Deactivating"); the
specific GuestTag MUST hear the same ReferenceTag 2x in a
row before the system will update.
Metal Surfaces or
obstructions may deflect the
Reference Tag signal
resulting in a tag being the
closest BUT not being the
LOUDEST.
When moving, the Guest
Tag will call out every four (4)
seconds and when at rest,
every twelve (12) seconds.
As a result, you will see a
slight delay on the display.
Guest Tags will need to
charge a minimum of one
hour prior to use.
The system relies on the
GuestTag assuming that the
closest Reference Tag is also
the loudest. It is important to
ensure that obstructions do
not prevent that from being
the case.

© Copyright 2014, HME Wireless, Inc. www.hmewireless.com | 800-919-9903 6 of 21
Hardware Setup
• Unpack and identify all GuestTags and GuestTag chargers. Place in designated locations
near or around register or primary distribution area.
• Ensure adequate power is available for the chargers. HMEW recommends that all
components be plugged into surge protection devices.
• Plug power supplies into chargers and place GuestTags on chargers.
• Utilizing the previously completed Pre-Installation Worksheet and floor map (copies provided
in packaging) determine where the PC or device(s) that will display the Vuze software will be
located, typically in the "expo" area. Ensure that there is adequate power available for the
device(s); giving consideration for the Reader.
• Unpack, identify, and separate each of the Reference Tags according to the tag "type".
Each tag will be labeled based on information provided during the sales process.
• There are three "types" for Reference Tags:
o Activate - located where the GuestTags are distributed to guests; i.e. Register,
Host Stand
o Zone or Table - labeled by name to indicate the location in the dining room; i.e.
Window, Table 14
o Deactivate - located where the GuestTags are collected after food has been
delivered; i.e. Expo
• Confirm that all equipment that is anticipated is accounted for. HMEW will provide in the
packaging recommended wood screws for mounting Reference Tags as well as plastic zip
ties if Patio tables were identified on the Site Survey or floor map. Commercial grade Velcro®
(not included) is recommended if mounting is not possible with provided screws or ties.
• Utilizing the floor map previously provided place the Reference Tags in their marked
locations.
DO NOT mount the Reference Tags at this point.
TOUCH SCREEN PC
• Vuze PC instructions assume the PC was purchased from HMEW as part of the Vuze system.
Details may vary if PC is sourced elsewhere.
• Each Vuze PC is Wifi capable, optional Remote PC Support is available, contact HMEW for
pricing.
• Prior to shipment, HMEW has fully staged, configured, and tested your Vuze PC with your
tags.
• Ensure proper power is available and place PC in pre-determined location.
• Once on, the PC will automatically load Vuze. A review of the interface is detailed later in
this document.

© Copyright 2014, HME Wireless, Inc. www.hmewireless.com | 800-919-9903 7 of 21
READER
• The Reader requires a direct connection to the Vuze PC's Ethernet or network connector.
• Ensure proper power is available for both the Reader and the PC.
o HMEW recommends all components be plugged into surge protection devices.
• Install Reader in a location that is between 6 - 10 feet off the ground with the antenna
pointing up. Be sure to avoid stainless steel or other metallic surfaces.
• To confirm the Reader connection is active:
o Select PING Reader from the Desktop
o If successful, you should see the following:
o If unsuccessful, check all connections and retry PING Reader.
PC and Reader setup is complete.

© Copyright 2014, HME Wireless, Inc. www.hmewireless.com | 800-919-9903 8 of 21
TESTING
The Vuze software is designed to allow a user to quickly
identify the location of a GuestTag (customer) based on
information received by the tags.
As mentioned previously, the Vuze system is Active RFID and
constantly calling; as a result, there will be moments when the
system will display a location that is adjacent to the intended
location. This is an expected consequence of the constant
communication going on with the system. During the testing
phase, users and installers can work to reduce these instances
by testing the ReferenceTag locations and making slight
adjustments to the tag placement detailed on the map
provided.
There are three types of possible actions that occur in a
GuestTag "transaction"
• Activate - begins the transaction when the order is taken.
• Seat - a GuestTag hears the same ReferenceTag 2x at a
Delivery Zone or Table.
• Deactivate - ends the transaction after the food is
delivered.
Testing Activate and Deactivate Tags
The Activate and Deactivate tags have the most influence on
your system performance.
• When placing Activate tags near the cash register keep in
mind some of the following:
o The tag signal will be deflected by metal
surfaces so try not to place directly next to
object like cash drawers, coolers, or wire metal
racks.
o It is important to have a 6 - 12 inch space
between the Activate tag location and the
GuestTags.
• To ensure Activation on each transaction, make sure that
the GuestTag is taken off of the charger early enough in
the POS entry to ensure that the GuestTag has time to call
2x and hear the Activate Tag. Rushing this process and
The system is developed
and intended to eliminate a
majority of the dining room
from consideration when
delivering food.
While delivering food, staff
should be fully engaged and
scan the area for the
intended guest as well as
other opportunities for
service.
A "transaction" is defined
as the time from when a
GuestTag is handed to a
guest until the time that the
GuestTag is returned to the
deactivate area after food
delivery.
For testing, utilize two
GuestTags from the charger
with the Reference Tags
placed in the dining room as
described on page 7.
When a GuestTag is
charging, the tag is in Sleep
Mode and will not send any
updates. When Activating or
Deactivating ensure that the
tag has enough time to hear
the nearby ReferenceTag 2x
(approx 10 seconds).

© Copyright 2014, HME Wireless, Inc. www.hmewireless.com | 800-919-9903 9 of 21
taking the tag off of the charger too late will cause the
system to not hear the Activate command and impact
the records on screen.
To ensure the GuestTags are hearing the Activate and
Deactivate tags perform the following test:
• Remove a GuestTag from the charger. When the tag is
removed and coming out of Sleep Mode you will see the
red LED on the tag flash twice, this indicates that the tag is
awake and active.
• Wait approximately 10 seconds then take the GuestTag
into the dining room and place it at a location adjacent
to a ReferenceTag.
• After a few seconds the Vuze display will show the paddle
for that tag on screen with the name of the ReferenceTag
that it is sitting next to.
• Once that is seen on screen, remove the GuestTag and
take it to the Deactivate area.
• When it has been in the Deactivate area for
approximately 10 seconds the paddle will automatically
drop off of the screen.
• Testing is complete for the Activate and Deactivate tags.
• Should you see different results, adjust the location of the
Activate or Deactivate tags to ensure they are clear of
any metal surfaces and have adequate distance from the
GuestTags and retry.
Testing Delivery Zones or Table Tags
After completing the test for Activate and Deactivate tags,
you are ready to test the Reference Tags used for identifying
Delivery Zones or Tables. To accomplish this perform the
following test:
• Follow the steps above for testing the Activate tag.
• Test the GuestTag(s) at each area marked on the
provided floor map to ensure that each ReferenceTag is
showing as expected.
• Once the Reference Tags locations have been tested and
confirmed, place the Reference Tags under the object or
table like on a seat and perform the above test a second
time.
When moving GuestTags
from the Deactivate area to
the Activate area or
chargers, be aware of the
following:
If GuestTags are
collected in a basket or bin
at the Deactivate area,
move the entire basket to
the Activate area before
placing tags on the charger.
GuestTags placed on the
charger go into Sleep mode
immediately. Prior to placing
GuestTags on the charger
ensure that they have
adequate time to hear the
Activate tag 2x. Failure to do
this results in an action we
call "Ghosting."
A location is based on
the LOUDEST ReferenceTag
being heard 2x. That may
not always be the closest. It
is important when placing
Reference Tags that
diligence is taken in ensuring
they are not mounted next
to items that will cause the
signal to be deflected or
impacted; such as, walls or
snug against table legs.

© Copyright 2014, HME Wireless, Inc. www.hmewireless.com | 800-919-9903 10 of 21
o This second test will ensure that objects below
table top level like walls, booth seats or
adjacent high top tables do not adversely
affect the previous test.
o Adjust ReferenceTag placement by hand until
the desired results are achieved.
o It is not necessary to test every inch of the
tabletop but it is important to factor where a
guest may place a GuestTag when waiting.
• Once you are comfortable with the location of the
Reference Tags and have an understanding of what area
will display on screen, the test is complete.
• Return the GuestTags to the Deactivate area to clear the
records on screen.
MOUNTING
When all testing is complete and you are satisfied with the
results and location of each of the Reference Tags it is time to
mount them. Each ReferenceTag is comprised on three
pieces; the mounting plate which mounts to the table or
object, the face or bottom plate, and the tag or bubble. The
face plate and tag snap into the mounting plate on it is on
the table or object.
• For wood tables and objects: place mounting plate onto
object and secure to table. Only two screws are
necessary to ensure a quality installation, additional
screws can be added as desired. HMEW will provide an
allotment to install two screws with each tag.
• For wire mesh patio tables: if possible, HMEW recommends
mounting the ReferenceTag on the table top. If not
possible, utilize two plastic zip ties (included) to secure the
mounting plate to the table. Once secured snap in the
ReferenceTag (may require a bit or force) and trim the
excess ends of the plastic ties.
• For solid metal or dense surfaces (concrete, marble): these
surfaces will cause significant deflection of the RFID signals
and HMEW does not recommend mounting the
ReferenceTag underneath these types of surfaces.
If a ReferenceTag does
not respond, check the
batteries by unscrewing the
top "bubble" piece of the
tag and resetting the
batteries.
RECOMMENDED TOOLS
• Drill with Phillips screw bit
• Needle nose pliers
• Cutter
Wire Mesh tables used on
patios cause deflection of
RFID signals. HMEW
recommends Zone
installations for Patios and, if
possible, secure the tag to
an object that will not
deflect the signal as much
like planter boxes or security
fences.
Table placement AND
ORIENTATION are very
important for optimal use.
After mounting a tag, place
a sticker on the table leg or
table edge to display the
proper orientation.
Be certain after tables
have been moved that they
are returned to the proper
LOCATION AND
ORIENTATION to prevent
incorrect readings.
Once all tags are
mounted installation is
complete.
© Copyright 2014, HME Wireless, Inc. www.hmewireless.com | 800-919-9903 11 of 21
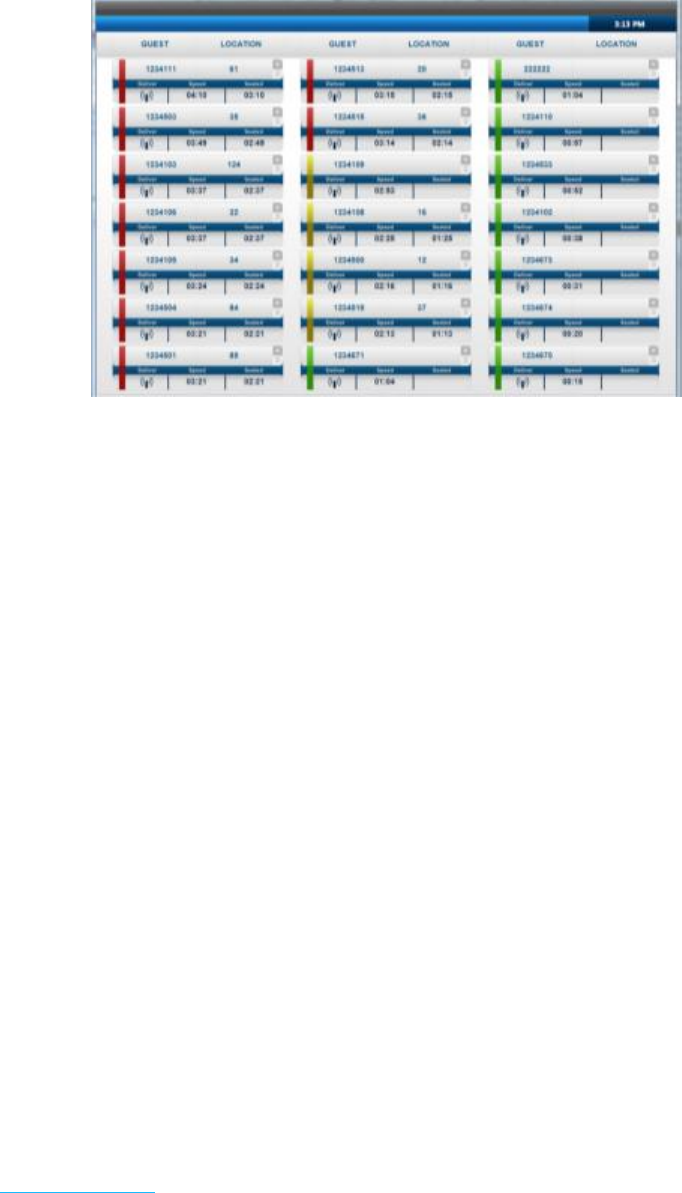
SYSTEM USE
As GuestTags are distributed to customers and they are seated, you start to the see the Vuze
display updating. Each record carries four (4) potential pieces of information about that
customer.
• GuestTag - the number distributed to
the customer and to be found when
delivering food.
• Location - the name assigned to the
Delivery Zone or Table when the
GuestTag is located.
• Timers - time since the last Location
has been registered and/or total
transaction time (user adjustable).
• Threshold Color Bar - displays if the
Seated time is within user defined
parameters.
On the Vuze Waitlist, this information is provided in a "paddle" format listed by the first record on
screen at the top. Each paddle displays the GuestTag on the left, followed by the Location, with
the Timer below. Colors are determined by a threshold set in Vuze Management.
• The Vuze display is designed to not show a paddle until it is in motion away from the register
area; therefore, the timer will not read 0:00 when the record first appears.
• The Waitlist software requires specific events to occur to function as intended.
o Guest Tag MUST hear the Activate Tag 2x (approx. 10 seconds) before leaving the
register area to display on screen.
o Guest Tag must hear a Delivery Zone or Table tag 2x in a row to display a location
on the screen.
o Guest Tag MUST hear the Deactivate Tag 2x in a row to remove the record from
the screen.
• As mentioned during the Testing phase on page 6, it is crucial that the Guest Tag is given
ample time to hear the Activate Tag prior to being handed out. Failure to do this will result in
the Guest Tag not appearing on screen.
© Copyright 2014, HME Wireless, Inc. www.hmewireless.com | 800-919-9903 12 of 21
Appendix A
Vuze Management Software
The Vuze Management software tells your system what tags that it is listening for. If you
purchased a PC from HMEW all of the following has already been completed prior to shipment.
1. Open the Vuze Management Application on your Windows Menu.
2. Use the following steps to configure the system.
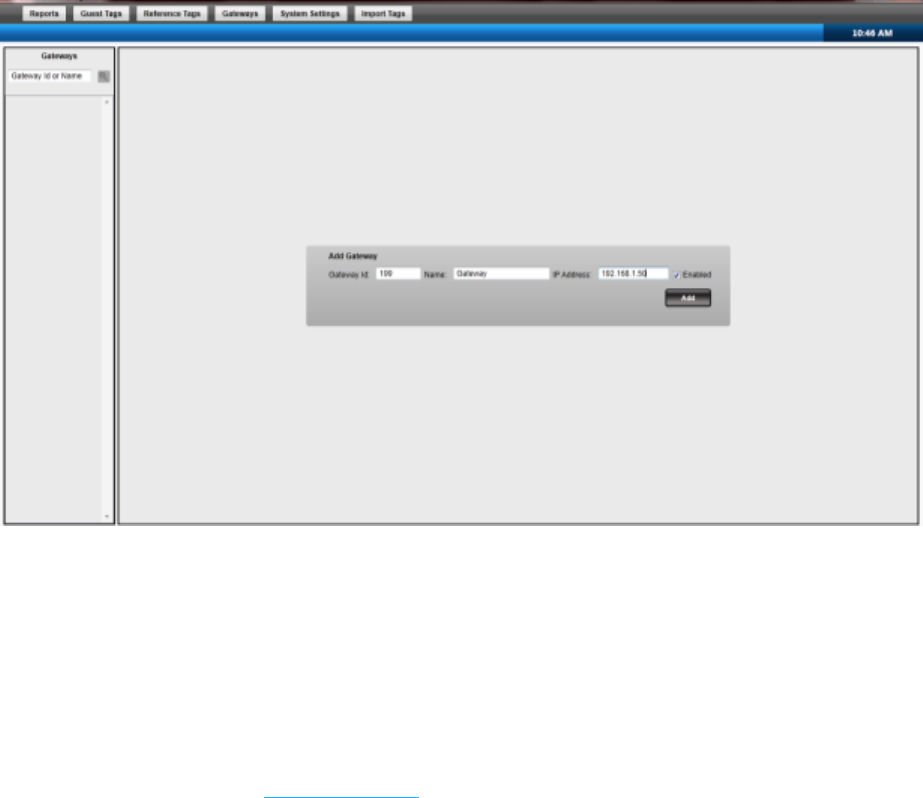
3. First item to configure is the Reader.
4. Choose Reader from the buttons on the top.
5. Enter the Reader ID (this is the number on the Reader front label)
6. Create a name for it
7. Enter the IP address for the Reader. The default address is 192.168.1.50.
8. Ensure that the ‘Enabled’ box is checked and click ADD.
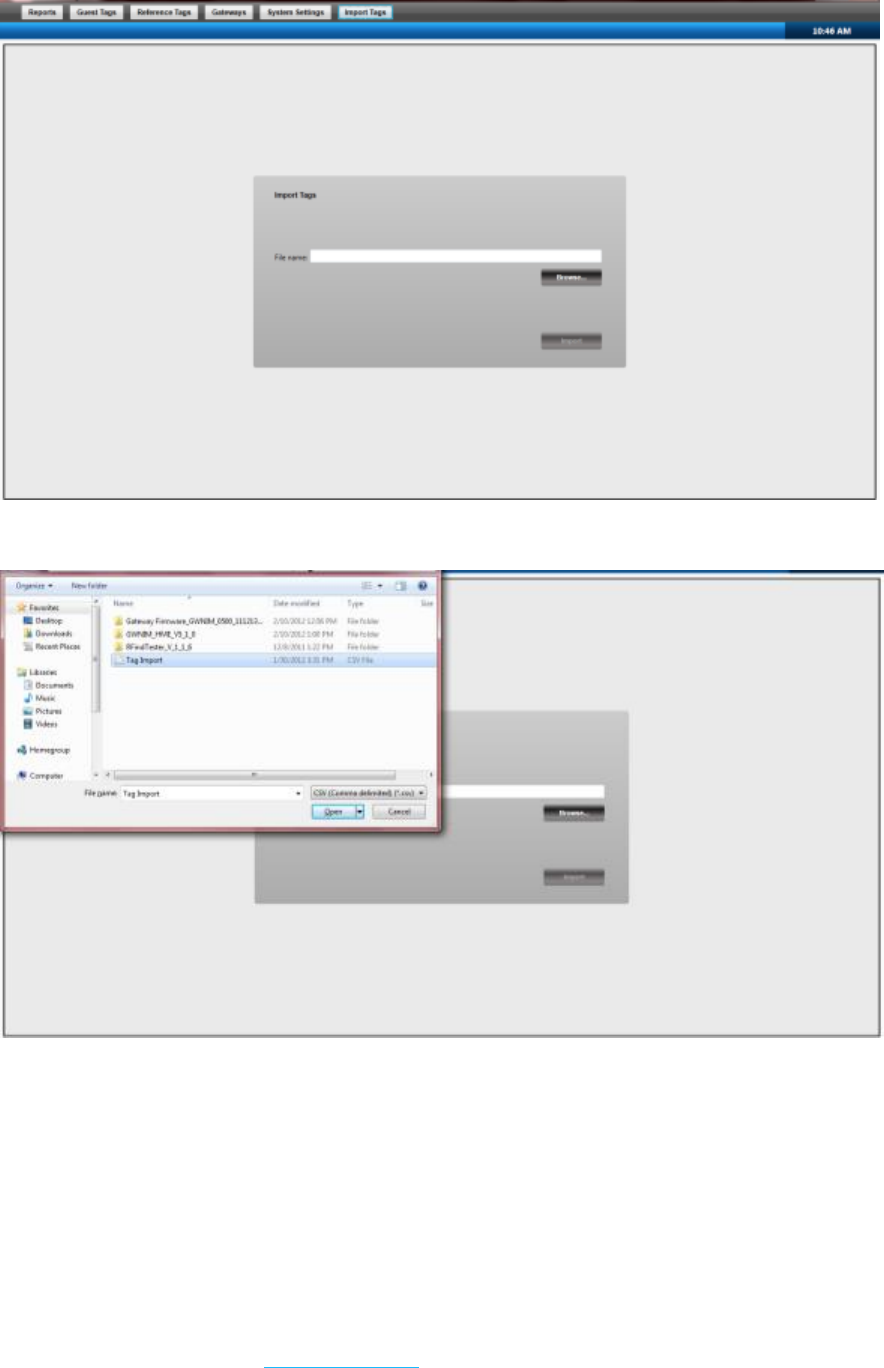
9. Next, you will need to import the tags into the system.
10. Select the Import Tags button on the top of the screen.
© Copyright 2014, HME Wireless, Inc. www.hmewireless.com | 800-919-9903 13 of 21
11. Click Browse and locate the file called Tag_Import.csv from the USB drive.
12. Click Open, you should see the file’s path and name in the File Name window.

© Copyright 2014, HME Wireless, Inc. www.hmewireless.com | 800-919-9903 14 of 21
13. When you have verified that is correct, click Import. You should see a box popup
confirming what has been successfully imported.
14. Close the Vuze Management application.
15. CONGRATULATIONS!! The system is ready to use.

© Copyright 2014, HME Wireless, Inc. www.hmewireless.com | 800-919-9903 15 of 21
Appendix B
COMPLIANCE
Radio Frequency Compliance Statement
The user(s) of this product is cautioned to only use accessories and peripherals approved, in
advance, by HME Wireless, Inc. The use of accessories and peripherals, other than those
approved by HME Wireless, Inc., or unauthorized changes to approved products, may void the
compliance of these products and may result in the loss of the user(s) authority to operate the
equipment.
This device complies with Part 15 of the FCC Rules. Operation is subject to the following
two conditions: (1) this device may not cause harmful interference, and (2) this device
must accept any interference received, including interference that may cause
undesired operation.
The antenna(s) used for the Reader transmitter must be installed to provide a separation
distance of at least 20 cm from all persons and must not be co-located or operating in
conjunction with any other antenna or transmitter.
This device has been designed to operate with the antennas or antenna included with the
product. The use of any other antenna(s) is strictly prohibited.
FCC Compliance
This equipment has been tested and found to comply with the limits for a Class A digital device,
pursuant to Part 15 of the FCC Rules. These limits are designed to provide reasonable protection
against harmful interference when the equipment is operated in a commercial environment. This
equipment generates, uses, and can radiate radio frequency energy and, if not installed and
used in accordance with the instruction manual, may cause harmful interference to radio
communication. Operation of this equipment in a residential area is likely to cause harmful
interference in which case the user will be required to correct the interference at his/her own
expense.
Warning: Changes or modifications to this unit not expressly approved by the party responsible
for compliance could void the user’s authority to operate the equipment.
Industry Canada Compliance
This device complies with Canadian ICES-3(A).
Cet appareil est conforme à la norme NMB-3(A) du Canada.

© Copyright 2014, HME Wireless, Inc. www.hmewireless.com | 800-919-9903 16 of 21
This device complies with Industry Canada license-exempt RSS standard(s). Operation is subject
to the following two conditions: (1) this device may not cause interference, and (2) this device
must accept any interference, including interference that may cause undesired operation of
the device.
Cet appareil est conforme la norme d’Industrie Canada exempts de license RSS (s). Son
fonctionnement est soumis aux deux conditions suivantes: (1) cet appareil ne peut pas
provoquer d’interférences, et (2) cet appareil doit accepter toute interférence, y compris les
interférences qui peuvent causer un mauvais fonctionnement de la appareil.
© Copyright 2014, HME Wireless, Inc. www.hmewireless.com | 800-919-9903 17 of 21
Appendix C
Vuze Installation Files
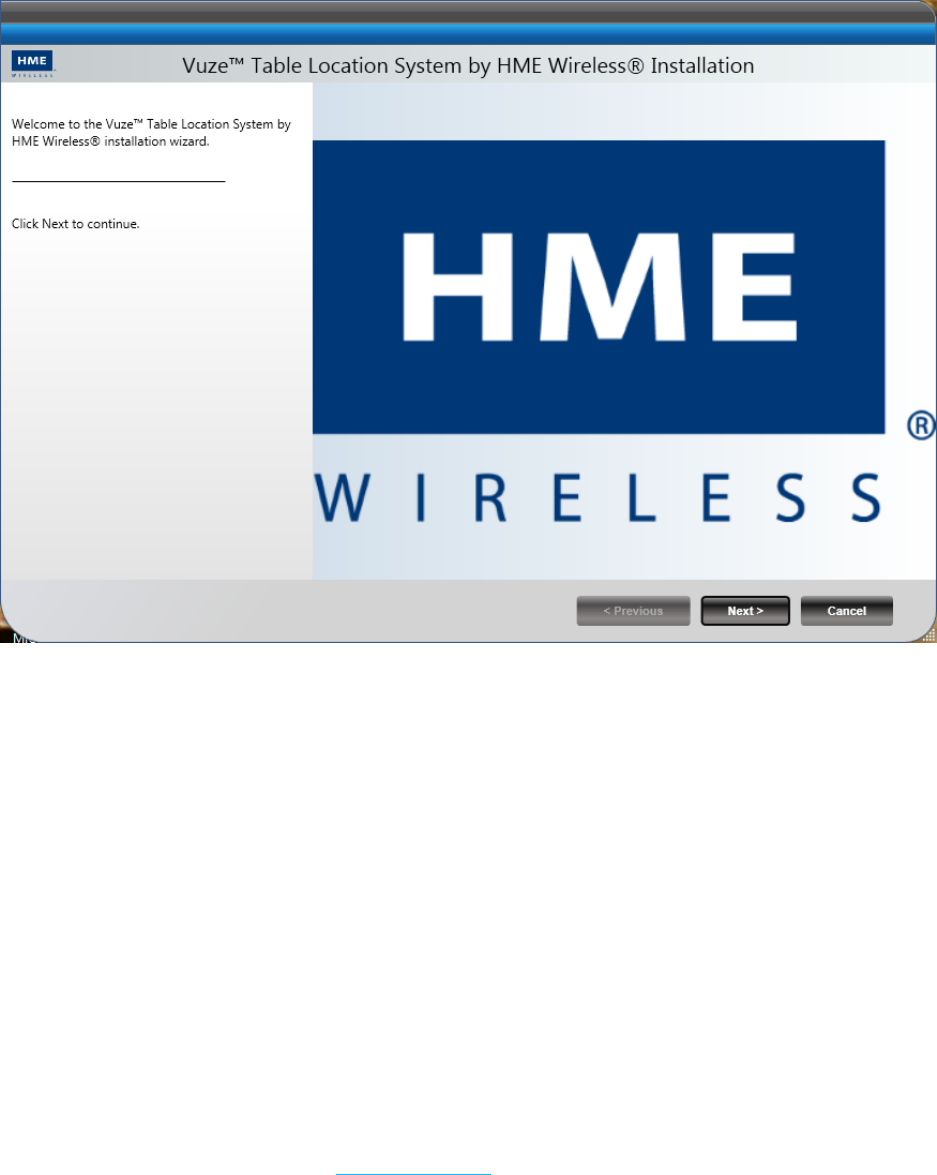
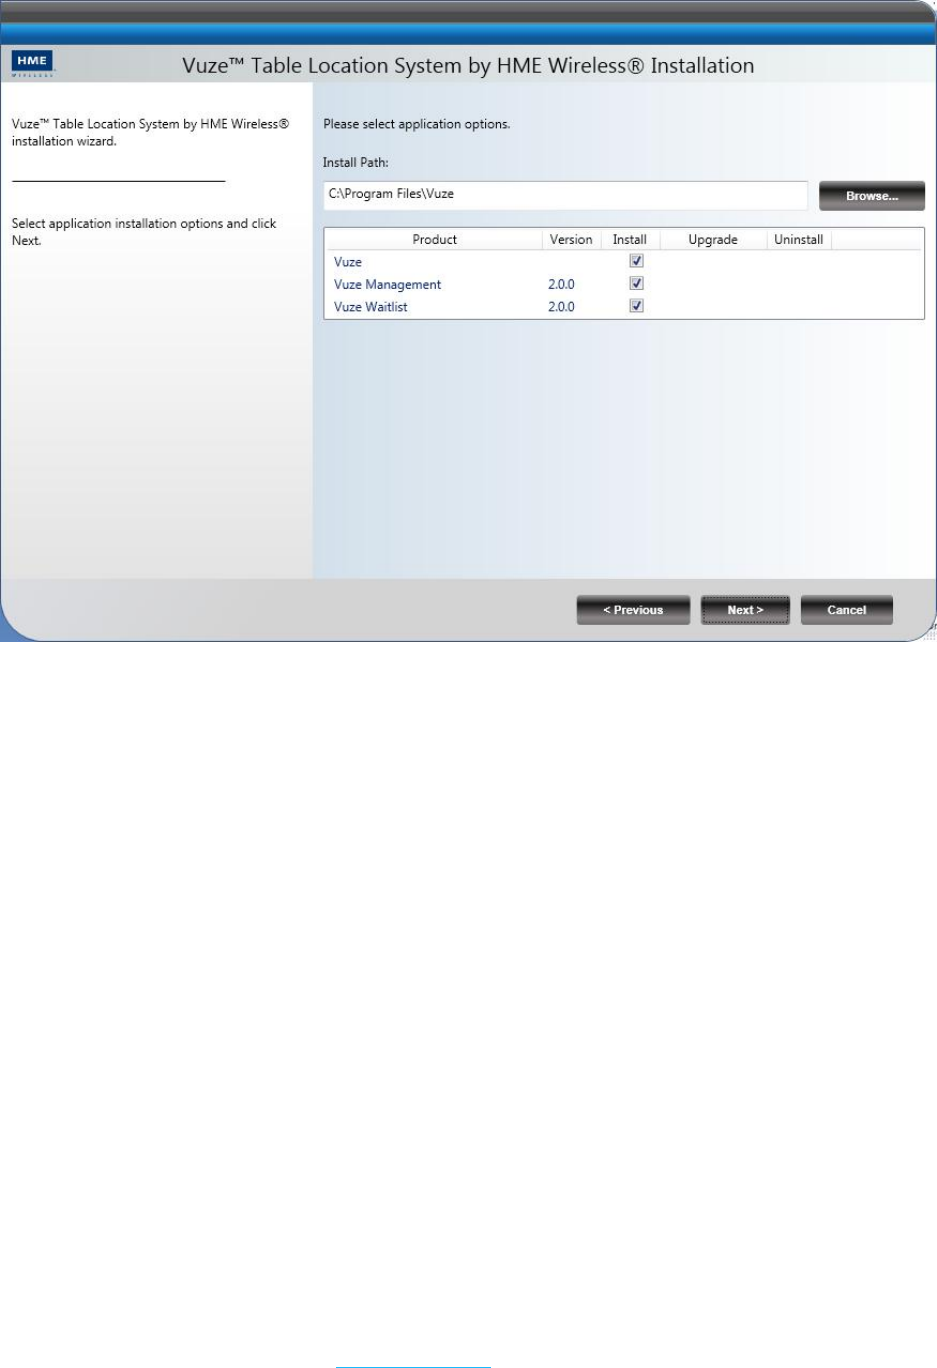
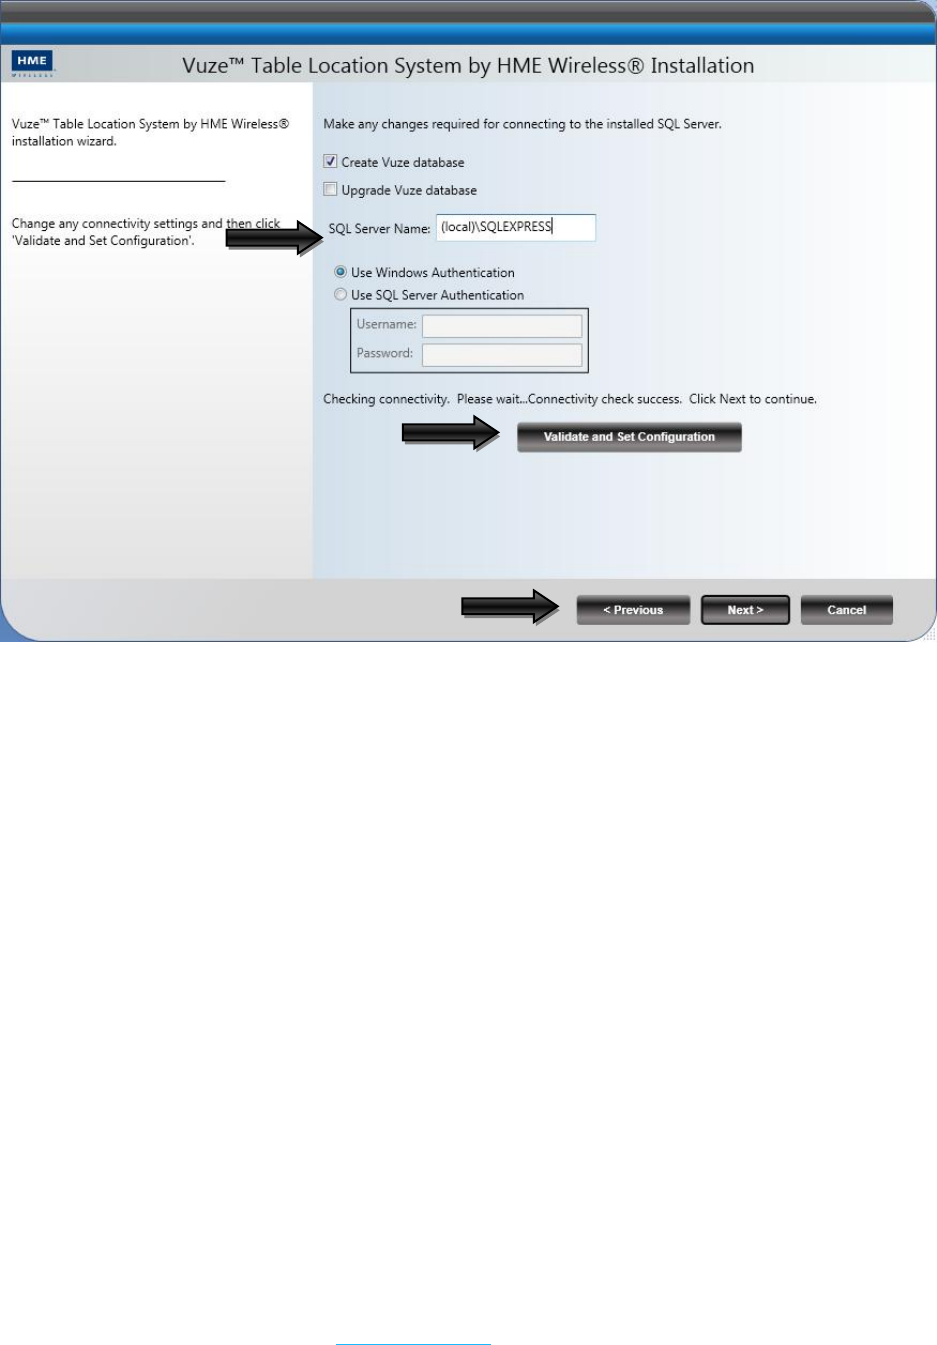
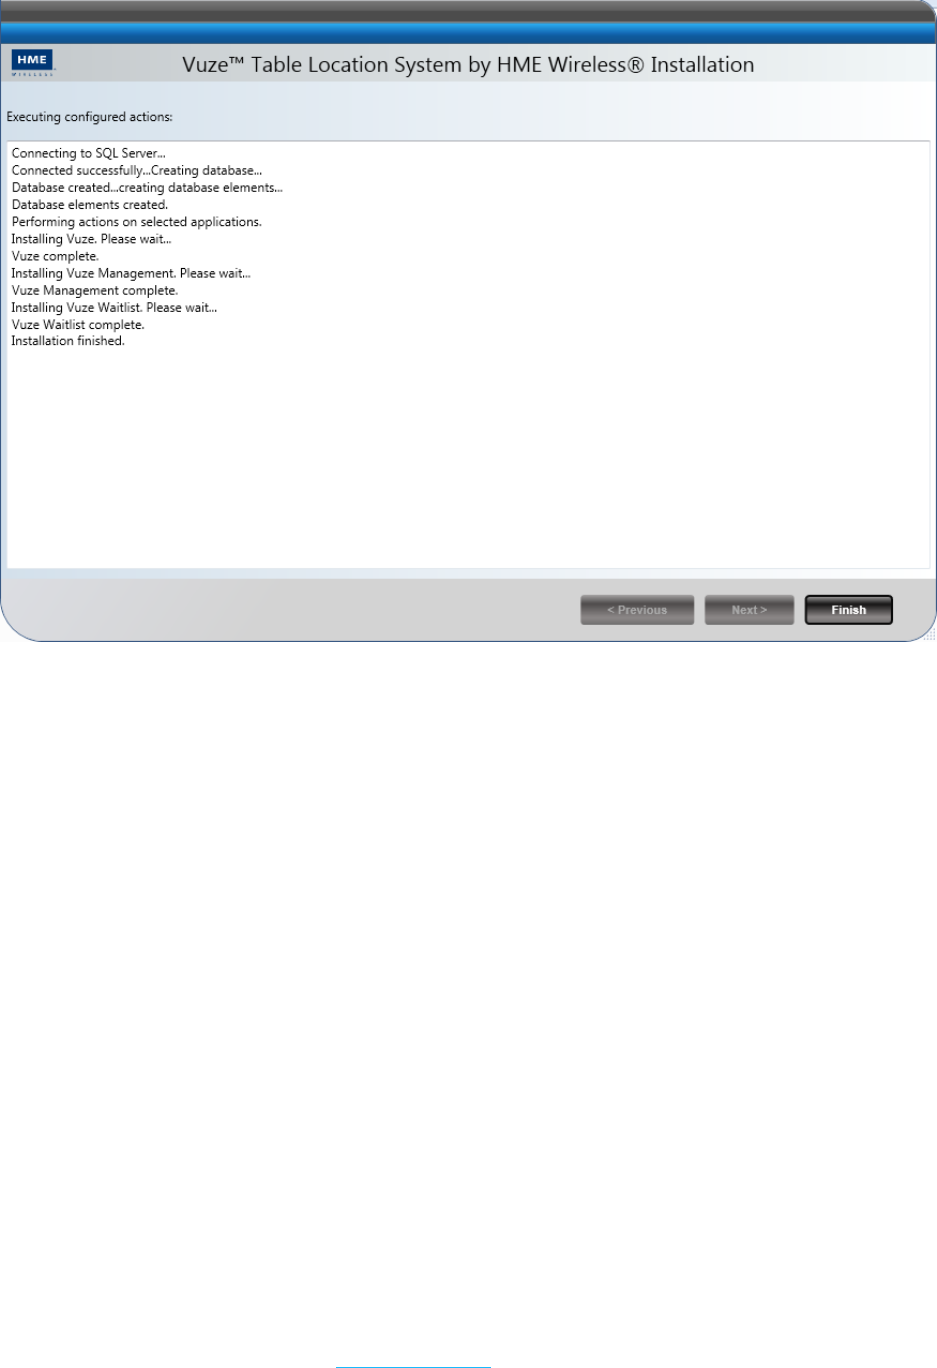
The following are images of each installation page for reference.
Click NEXT.
© Copyright 2014, HME Wireless, Inc. www.hmewireless.com | 800-919-9903 18 of 21
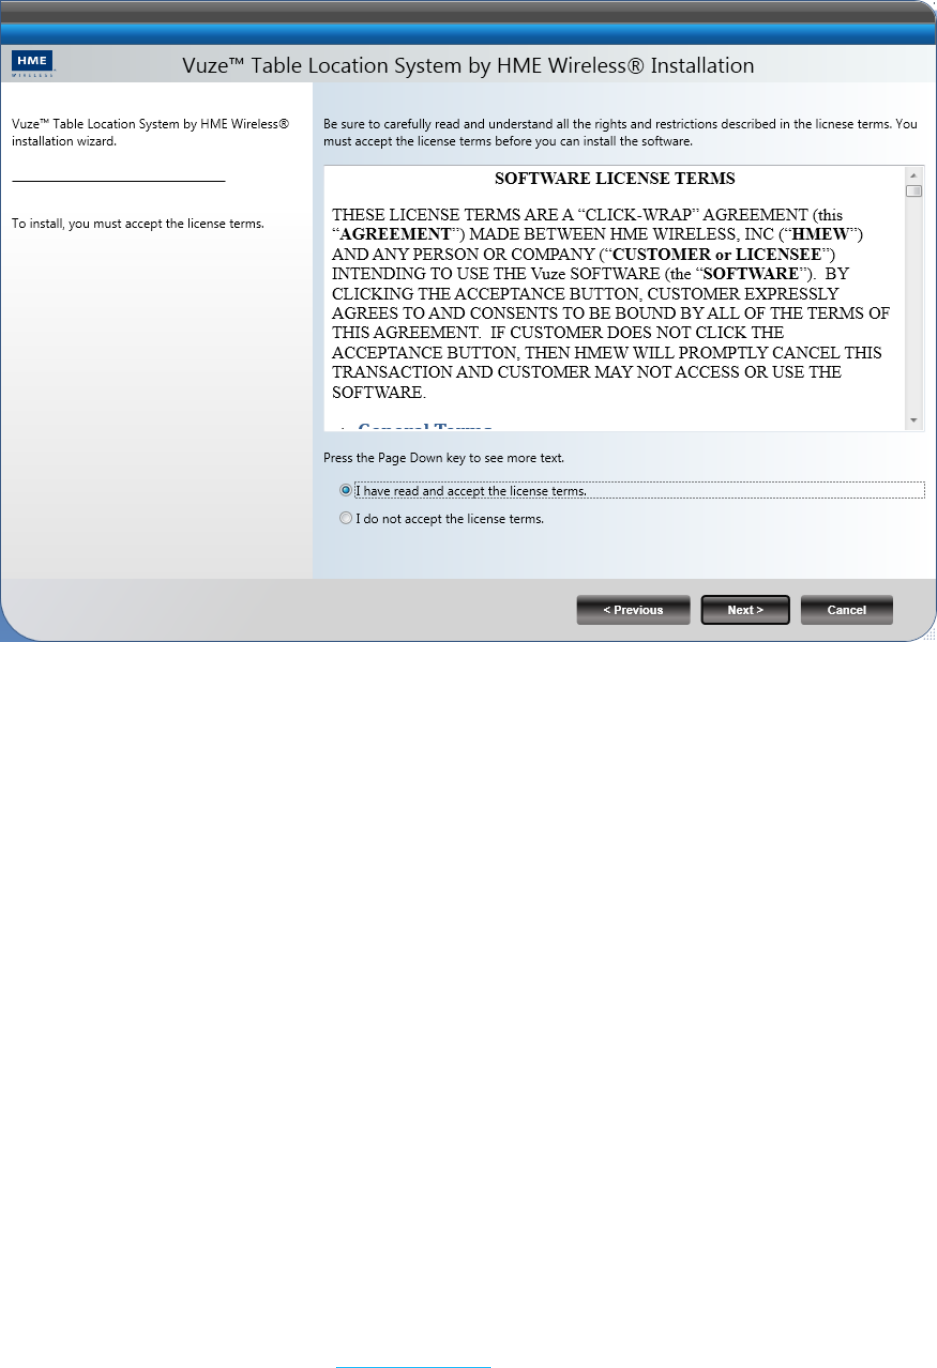
Click that you have accepted the terms and click NEXT.
© Copyright 2014, HME Wireless, Inc. www.hmewireless.com | 800-919-9903 19 of 21
Ensure all three items are checked and path is correct, click NEXT.
© Copyright 2014, HME Wireless, Inc. www.hmewireless.com | 800-919-9903 20 of 21
Click on VALIDATE AND SET CONFIGURATION, wait for confirmation to appear.
When it says Connectivity check success, click NEXT.
Once you have confirmed everything, click NEXT to start the installation.
Type (local)\SQLEXPRESS
STEP 1: Type SQL Name
STEP 2: Click Validate and
Set Configuration
STEP 3: Click NEXT
© Copyright 2014, HME Wireless, Inc. www.hmewireless.com | 800-919-9903 21 of 21
Click FINISH, installation is complete.