JTS Professional Co MH-35 UHF PLL Handheld Transmitter User Manual Exhibit 8 Users Manual
JTS Professional Co Ltd UHF PLL Handheld Transmitter Exhibit 8 Users Manual
Exhibit 8 Users Manual

ALL-IN-ONE
PORTABLE WIRELESS ACTIVE SPEAKER
WA-35 /Mh-35
www.jts.com.tw
PROFESSIONAL CO., LT D
59508-050-01
1. Precautions
2. Features
3. Specication
3-1 All-in-One portable wireless active speaker // WA-35
3-2 UHF PLL Handheld Transmitter // Mh-35
4. Function Description
4-1 Multi-functional Wireless Portable Loud Speaker System //WA-35
4-2 Handheld transmitter // Mh-35
4-3 Accessories
5. Connection
6. Operation
7. Important notice on product
8. Important Notice
1
2
3
3
4
5
5
7
8
9
10
15
16
INDEX
ank you for choosing the JTS wireless system. In order to obtain the best eciency from the system,
you are recommended to take a few minutes to read this instruction manual carefully.

1
2
Please read the User Instructions carefully before use. •
Please keep the User Instructions properly. •
Never place the device near a heat source, such as an oven, electric •
heater or other heating facility, so as to avoid the hazard of fire.
Never let the device in a moist, dusty environment of use for •
prolonged period; otherwise, it is likely to cause short circuit in the
device.
Do not continue to use the product under weather with lightning •
in order to prevent lightning strike which would cause injuries to
persons or damages to the device.
Store the device in appropriate places, preventing from accidental •
drop, which would cause injuries to persons or damages to the device.
Never continue to operate the device when an anomaly arises in its
operation. Turn off the power immediately and contact the distributor
as soon as possible.
1.Smoke or smell of burn comes from the device;
2.Water or any liquid flows into the device;
3.The device actuates abnormally due to accidental damage;
4.The device operates with abnormal noises or the speaker does not
sound;
5.The sound is distorted out of tune.
Keep the socket or plug of the device clean at all time to avoid excessive
built-up dust, which would otherwise tend to cause poor contact in the
device or lead to fire from wire overload.
Careful use of cord•
1. Do unplug the plug by holding its head instead of the lead to
prevent broken cord, which would result in a fire.
2. Do not cut or wind the cable, as such behavior tends to damage
the cord. Place the cord flat in a ventilated place with flammable
objects at a distance.
Go green. Do not dispose of the battery indiscreetly. Make a habit •
of recycling.
1. Precautions
WARNING NOTICE
2. Features
In order to reduce the risk of fire or
device damage, do not put the device in
high-temperature or moist environment
for prolonged period. Also, do not use
this product under weather with lightning.
To reduce the risk of electric shock, do
not remove the housing from the device
without permission. Users are requested to
seek assistance from a qualified technician
or the dealer, in case of need.
TechniqueofClassDAudioPowerAmplifier
•
The amplifier of WA-35 uses the up-to-date technique of Class D Audio Power
Amplifier, able to provide higher efficiency in power use for the system as well
as offer outstanding audio output.
PoweredbyLithiumbattery•
The system incorporates 14.8V lithium battery*1, able to provide the system
with higher output power and reduce the unit weight by about 30%, enabling
the use by carrying for long hours. Continuous music playback can last 7 hours;
continuous voice speech can last 10 hours*2.
Splash-proofdesign,• enables use in severe environment*3.
UPSdesign• :when power supply in DC is inputted/removed, the unit switches
to DC/Battery supply mode automatically without affecting the system operation.
Energyconservingdevice:• when the sound source devices are not in use*4, the
system automatically switches off the amplifying circuit, which saves 60% of the
energy, effectively lengthening the standby time of the system.
Wirelessmicrophonesystem:• incorporates a built-in wireless microphone system
with UHF band, which works with Mh-35 handheld wireless microphones
(powered by one single AA cell) to provide 100M non-interfered transmission
and 16 channels to choose from.*5, *6
Built-inalarmsoundandLEDlighting•
Provides SOS visual call for help, lighting and two types of pre-recorded
alarm sound which is suitable for use in school or other application in
emergency evacuation.
Built-inaudio:• supports music playback via USB/SD, and 20 programmable
channels of FM radio stations.
※Notes:
1. The system operates on 14.8V power supplied by lithium battery which is 16.8V fully charged. When
the battery is below 12V, the system switches off forcibly to avoid over-discharge.
2. The above-stated time of device use are for reference only. They vary according to the volume
adjustment.
3. The description refers to spills which may happen in everyday life.
4. Sound source devices refer to “wireless microphone system”, “built-in audio” and “input from
microphone with cord”.
5. The low power radio device has passed the type approval; any firm, vendor or user may not tamper
with by changing its frequency, amplifying its power or altering its originally designed features and
functions without permission.
6. The use of low power radio device may not affect aviation safety or interfere with legal
telecommunication. The use should be stopped immediately when any interference is found; no
use may be resumed until interference is eliminated by improvement. The above-mentioned legal
telecommunication refers to radio communication operated under telecom regulations. The low power
radio device tolerates interference from legal telecommunication or radioactive devices for industrial,
scientific and medical use.
3
4
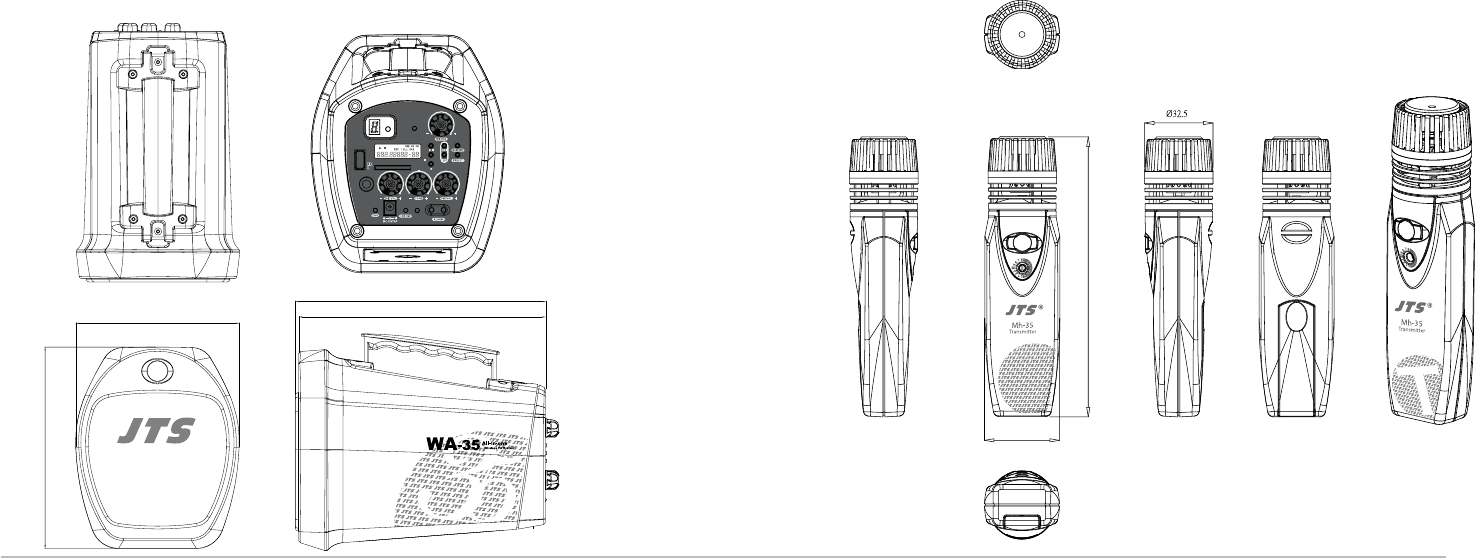
3. Specication
3-1 All-in-One portable wireless active speaker // WA-35
Frequency Preparation.........
Carrier Frequency Range.....
LED Display.........................
DC power.............................
Li-od Battery........................
Speaker ................................
Buid-in Audio.......................
MIC input impedance..........
THD+N ...............................
Power Output(RMS)............
S/N Ratio ............................
T.H.D. .................................
Frequency Response............
Dimension(m/m)..................
Weight .................................
Others...................................
PLL Synthesized Control
502~960MHz
0~F
19~20V (48Wor above is recommend)
14.8V/2300mAh(Averaging of 4 hours charging time)
4“【4Ω full range driver】
【USB/SD】MP3/FM
10KΩ
<0.1% (1KHz @ 1W)
35W (4Ω @ THD10%)
>98 dB
±8dB @ 1KHz
50~20,000Hz
145.5mm(W)*179.4mm(H)*223mm(D)
1.75Kg
Alarm、LED light
3-2 UHF PLL Handheld Transmitter // Mh-35
Frequency Preparation............
Carrier Frequency Range.......
Number of Channels..............
RF Outputs.............................
Stability..................................
Frequency Deviation..............
LED Display..........................
Controls..................................
Spurious Emissions................
Audio Frequency Response...
Battery....................................
Dimension(m/m)....................
PLL Synthesized Control
502~960MHz
16
Max:10mW
±10KHz
±48KHz
Power、Low Battery
Power On/Off, CH,AF Level
<-60 dBc
50~16,000Hz
UM3,AA 1.5V*1
35.6(W)*133mm(H)*32.5mm(D)
179.4
145.5
220
223
USB
SD
RF
BAT LOW
MIC IN
/MP3/FM
CH SET
133
35.6
ON / OFF
ON / OFF
T
5
6
Receiver switch/volume :
receiver power switch and independent volume control are provided.
Channel setting :
Hold the button down till the ‘Dot’ blinks. Then, press the setting
button to set the channel of use one by one between 0 to F.
Channel indication: indicates the current set channel for use.
RF indicator lamp:
this lamp is lit to show that the RF signals of an effective channel are
received.
Refer to the section “6-1.2 Operation of built-in audio” of User Instructions (p.10)
USB
SD
RF
BAT LOW
MIC IN
/MP3/FM
CH SET
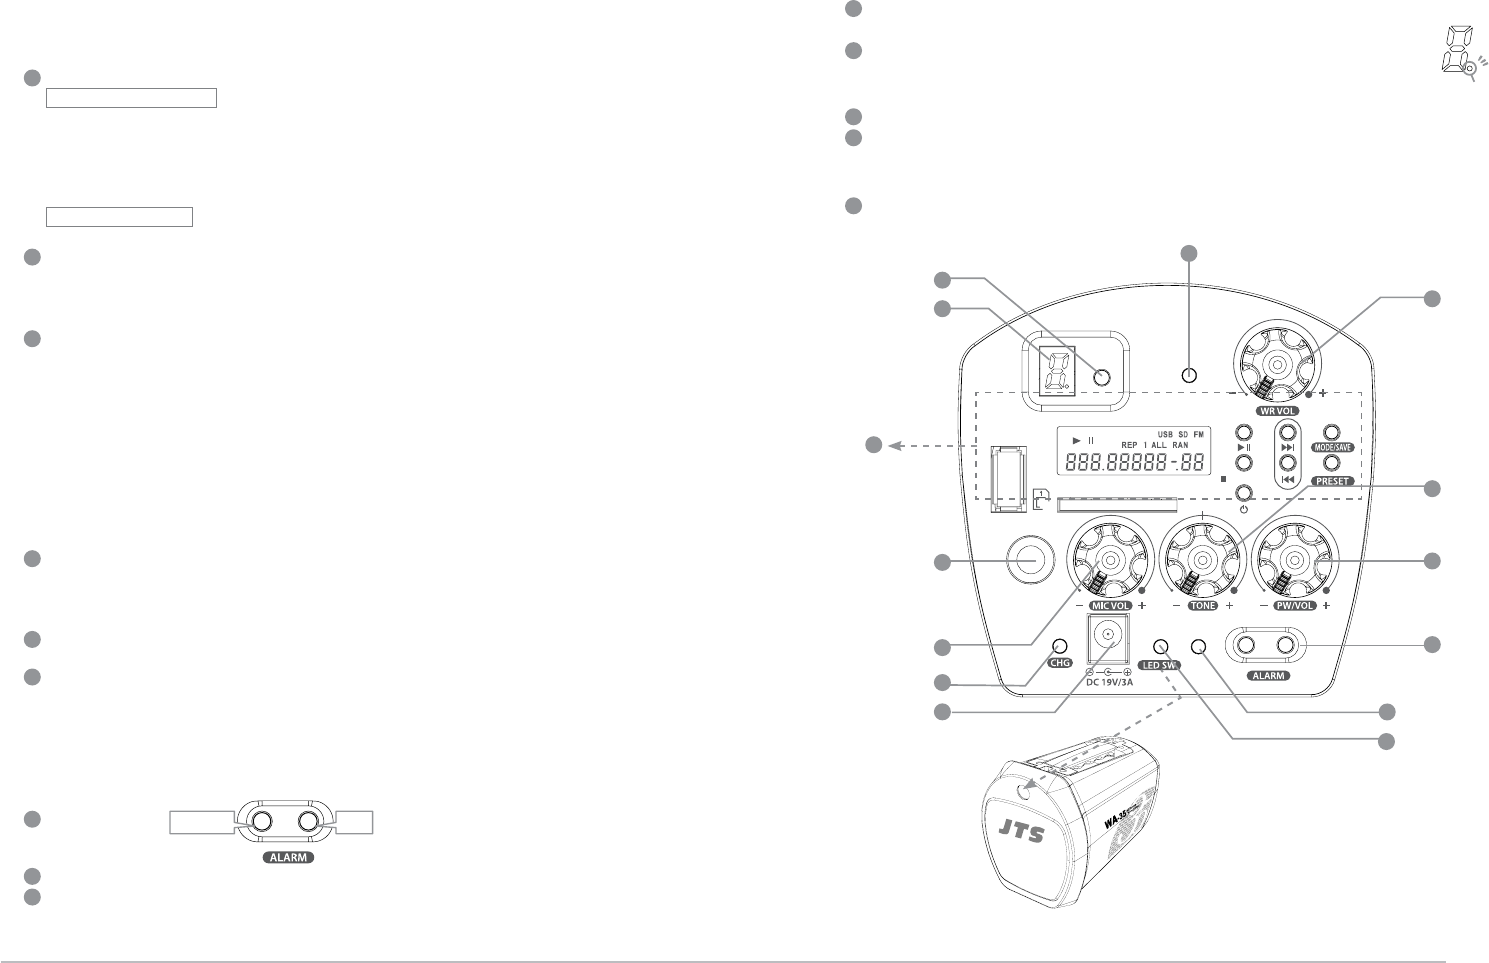
4. Function Description
4-1 Multi-functional Wireless Portable Loud Speaker System //WA-35
1.Functiondescriptionofsystempanel
Power switch/Volume
System power switch:the power switch on the main unit that controls
the power to system; when it is turned Off, the other devices all are
inoperable.
■ ON : turn clockwise to switch on the power to main unit.
■ OFF:turn counterclockwise all the way till a ‘click’ sound.
With the voltage indicator lamp out, the switching off is complete.
System volume : turn clockwise to increase volume and counterclock-
wise to reduce volume.
Tone adjustment: allows the user to adjust the pitch as preferred; by
default, the knob in middle position indicates 0dB.
■ Turning to the right all the way: +8dB at 1KHz
■ Turning to the left all the way: -8dB at 1KHz
Battery indication :
By the indicator lamp, the user can determine the current battery status
and whether to recharge.
When the battery is being recharged, the system switches automatically
to DC power supply.
■ Green lamp lit: the battery is in safe working range
■ Red lamp lit intermittently: low battery
■ Red lamp lit: the system battery should be recharged immediately
※Important: When the red lamp warning is given for prolonged time, the system forc-
ibly turns off if it is used continuously, in order to avoid over-discharge, which affects
the service life of the battery.
DC input port:
Plug the power supply kit, which is supplied as accessory to the main
unit, to the DC port on the main unit and the system recharges the bat-
tery immediately.
Recharge indicator lamp: continuous red light: recharging / continuous
green light: recharge completed.
Lighting switch:
Pressing once: Continuously lit
Pressing twice: SOS signal
Pressing three times: Blinking
Pressing four times: Turning off
※Remarks: International code for SOS is expressed by 3 short, 3 long and 3 short
strokes.
Alarm button
Microphone socket: for use of microphone with ψ6.3 plug and cord
Microphone volume: independent control of volume of wired microphone
1
1
4
4
2
2
5
5
3
3
6
6
7
7
8
8
9
14
14
10
10
11
11
12
12
13
9
Refer to
“Operation of built-in
audio”
13
LED lamp
Dot
First aid Fire
7
8
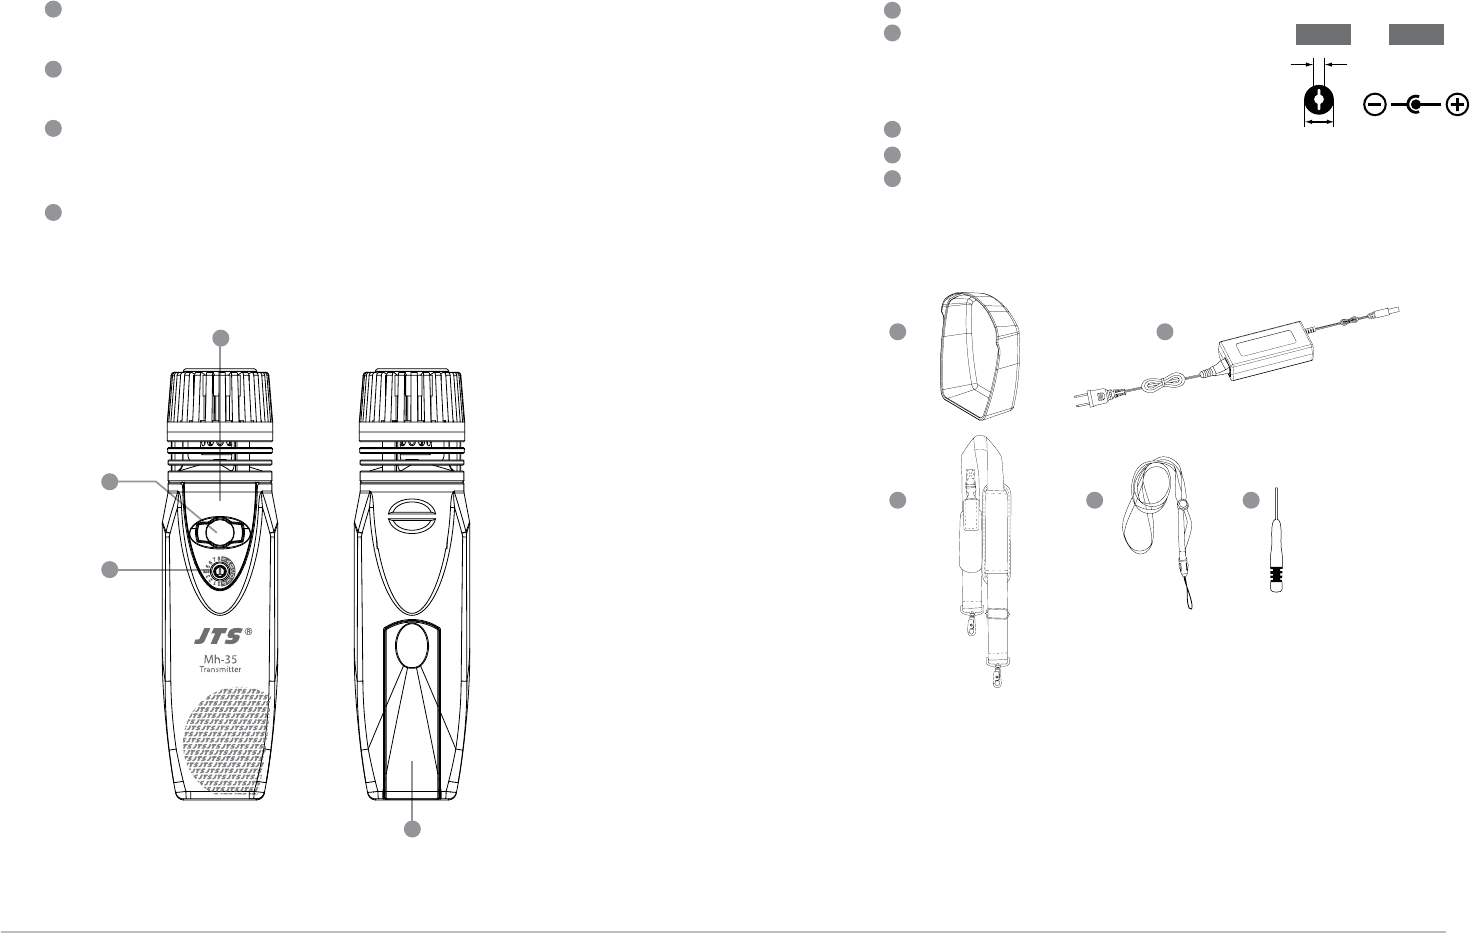
Power switch :
Press once to switch on. Press again for 3 seconds to switich off.
Channel select knob :
Turn this rotational knob to point the arrow at the desired channel.
Battery status indicator lamp :
Green–battery full
Red–low battery; battery change is needed.
Battery compartment
4-2 Handheldtransmitter//Mh-35
18
19
19
21
21
22
22 23
23
16
17
20
20
15 Waterproof cover
AC/DC adapter (with AC power cord): /Spec of
plug/ /Polarity/
AC IN: AC100-240V, 1.5A 50/60Hz
DC OUT: 19V, 2.52A
Strap
Neck Strap
Flat head screwdriver
4-3 Accessories
15
18
16
17
※Note:
■If to use any other poweradapter, while the spec of plug and polarity should
be consistent, the rated output power is recommended over 48W in order to ensure of
the proper system operation.
2.5
5.5
Spec of plug Polarity
ON / OFF
T
9
10
1.For basic operations, refer to the section “4-1.1 Function description of
system panel” (p.5).
2.Operation of built-in audio
(1)Turning on/off the player
Turning On– In the status of main power switch being On, press the
Power key . When the back light of the LCD display is illuminated,
the turning on of the player is complete.
Turning Off -In the turned-on status, press the Power key; when the back
light of the LCD display is out, the player is turned off.
※Note: In order to avoid the user from mistaken touch which starts/closes the player, the Power
key takes certain time to actuate for safety.
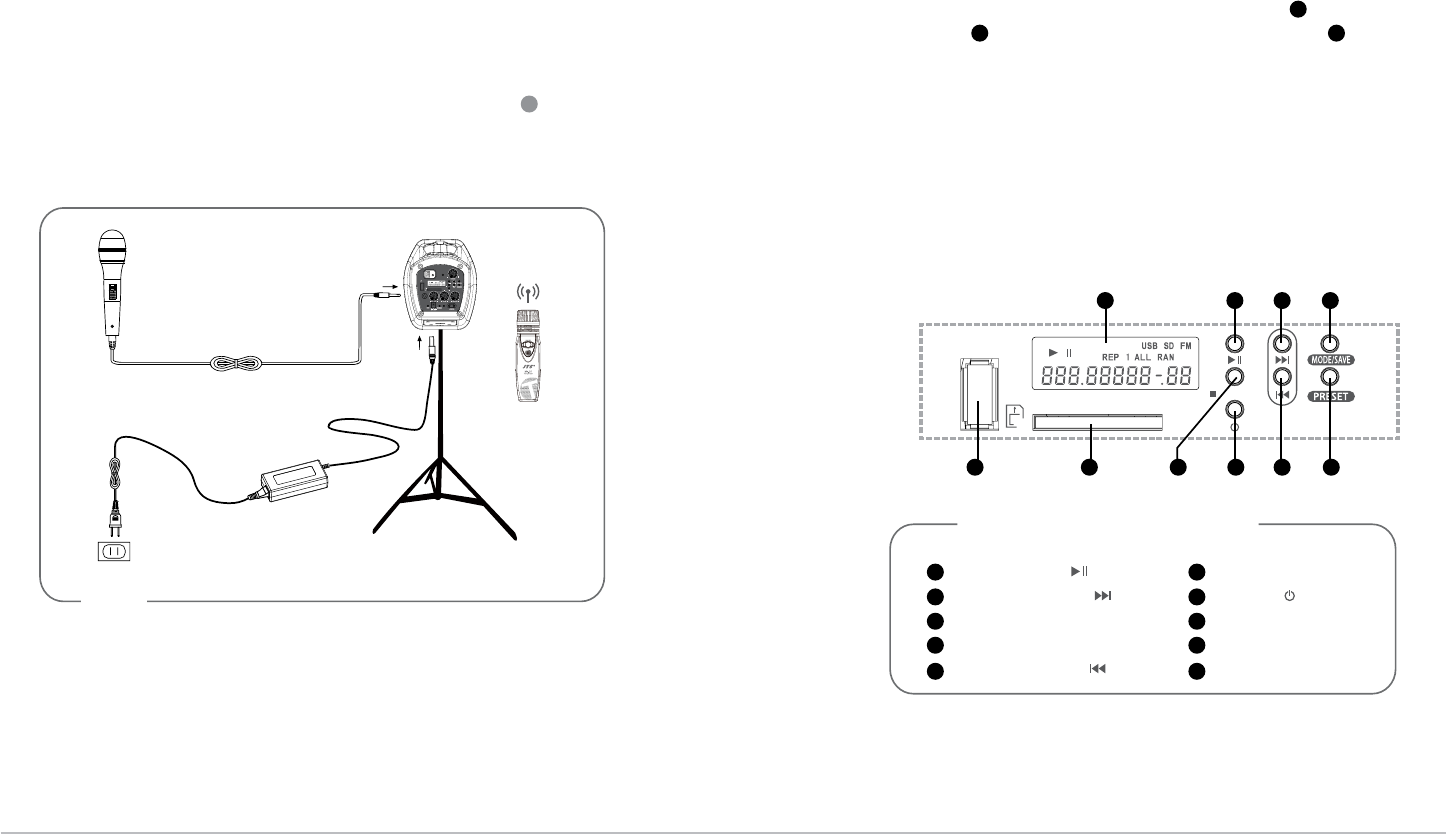
(2)Description of operation
The player starts in the music playback mode by default; through audio
source switching, reception of FM broadcast is enabled.
Play/Pause【 】key
Next/Forward【 】key
PlayMode/Save key
Stop/MP3/FM key
Prev/Reverse【 】key
Preset key
Power【 】key
USB connection port
SD connection port
LCD display
5. Connection
5-1 Systemconnection
1.WA-35 wireless microphone system:
Provides 16 preset UHF channels; built-in noise mute and tone key squelch,
working with Mh-35 Handheld transmitter, able to operation distance of 100M.
2.Microphone wired:
When the microphone with ψ6.3 plug is plugged in mode, an auto-detection
device enables the system to enter from satand by mode into working mode
automatically.
3.Connect the AC/DC transformer:
Connect one end to the “DCV Input socket” on the receiver first, and con-
nect the other to an AC power socket.
6. Operation
6-1 WA-35 System settings
※Note:
Standby mode:
When the system is switched on and the sound source devices, including microphone system, built-in
audio and alarm, are not in use, the system enters Standby mode automatically.
Working mode:
When the use of any sound source device begins, the amplifier of the main unit is awaked and the
system enters working mode.
4
Diagram1
USB
SD
/MP3/FM
1
1
1
4
4
2
2
5
5
3
3
6
6
7
7
7
8
8
10
10
10
9
9
AC/DC transformer
Sound output
Power socket
Find out the detailed message
descriptions by the operation mode
MIC IN
11
12
Music playback mode
In the Music playback mode, the playback of music files in USB/SD storage
devices is supported, providing the user with handy selection.
USB connection port :supports portable storage devices of Type-A USB port.
SD card connection port :supports standard-size SD/MMC multimedia
memory cards.
1. Device selection
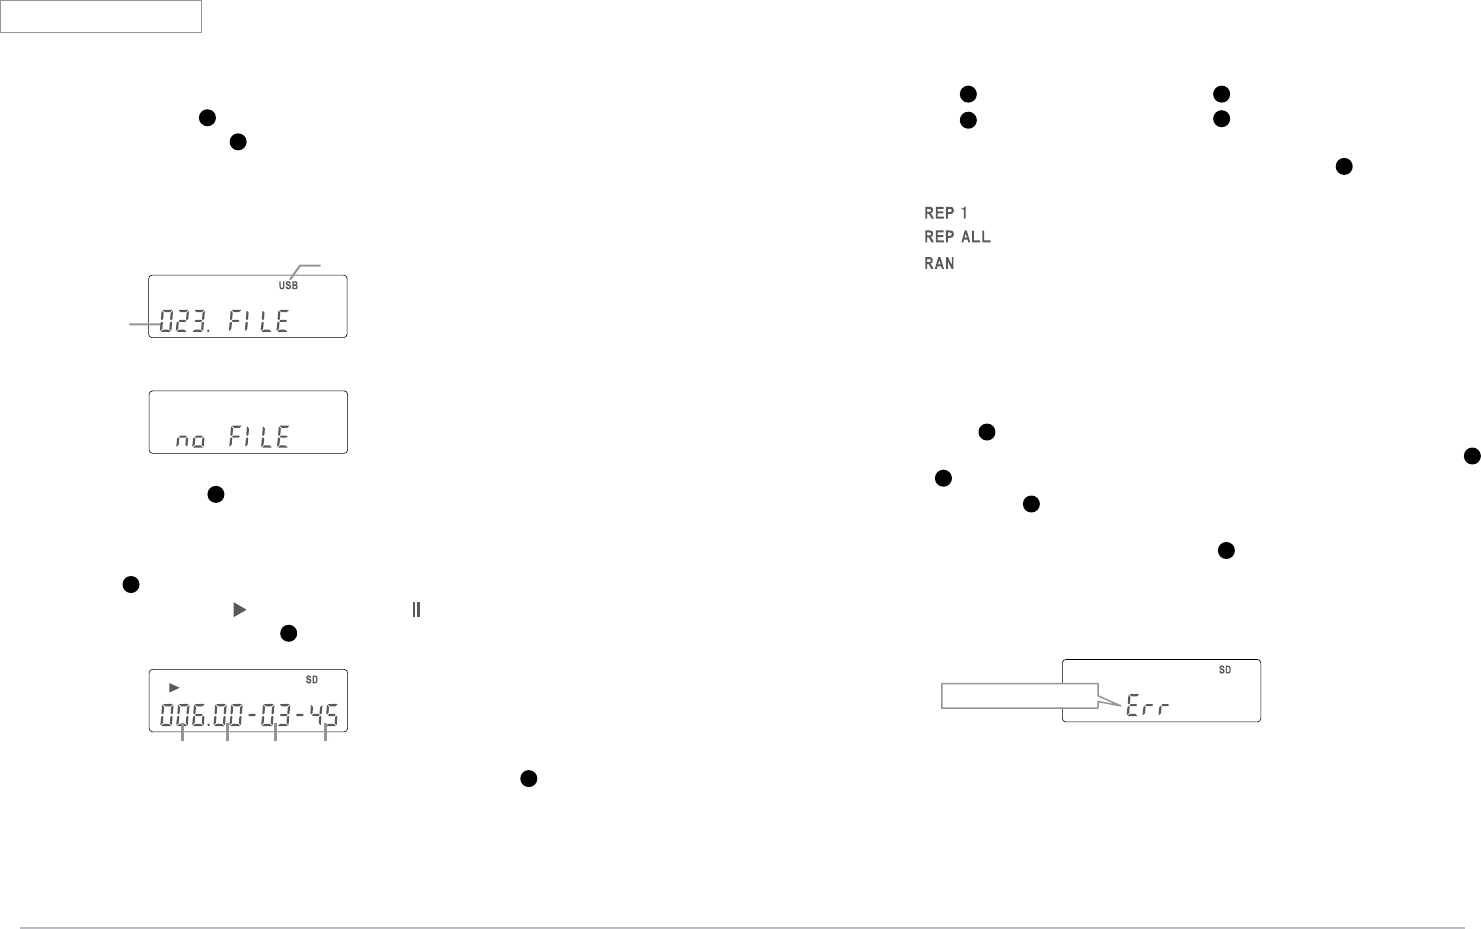
The priority for the player is to read from USB. When no such device is
present, the program reads from SD card automatically.
The screen displays ‘NO FILE’ when neither device is detected.
When both connection ports are connected by storage device: Press ■/
MP3/FM button to switch from USB to SD.
3. Playback settings
Title select/Fast forward–During playback,
press :to a next title press :to the previous title
hold down:fast forward hold down:fast reverse
Repeated playback – Pressing MODE/SAVE key repeatedly can select
repeated playback modes in the order, by display, of
:to repeat the current title
:to repeat all titles
:to play the titles at random
4. Playback of preset titles
The player has a function of playback of preset titles, which allows the
user to fast select the titles desired.
When the playback is stopped,
(1)press : the three digits on the left of the screen display ‘001’ by
default, with the digit for the hundreds blinking; at this point, press or
to select the digit of the hundreds place of the desired title number.
(2)Then press , and follow Step (1) to set the digits for the tens and the
ones one by one.
(3)When the setting is complete, press and the program starts to play the
preset titles automatically.
(4)If the set value exceeds the total title number in the device, the screen
displays Err (Error) indicating an error message.
2. Title Playback/Pause/Stop
Press and the playback of the title begins.
The screen displays during playback and when paused.
Stop title playback: Press to stop playback of the current title.
8
9
4
4
2
2
2
5
5
5
3
1
Remarks: If the storage device contains multiple music folders, pressing during playback
can skip to the title at the beginning of a next folder.
6
1
6
6
Device name
Total title number
Title Hour Minute Second
Total title number is exceeded
13
14
ON / OFF
Broadcast listening mode
With the built-in FM tuner, you can save your preferred radio stations in the pre-
set channels for ease of listening to your desired stations subsequently.
※Tuner bands: 87-108MHz in areas other than Japan; 76-90MHz in Japan
1.Using the tuner:
In the state of Stop in music mode:
press ■/MP3/FM button on the tuner to
switch signal sources in the order of:
USB→SD→FM.
At current frequency of reception:
In manual modulating mode: increase or decrease the frequency at 100KHz
increment.
Press Next/Forward key :to increase frequency
Press Prev/Reverse key :to decrease frequency
In Auto-tuning mode: the tuner moves forward/reverse automatically to
search for radio stations. When a valid station is found, the screen stops at
the corresponding frequency.
Hold Next/Forward key down:to increase the frequency
Hold Prev/Reverse key down:to decrease the frequency
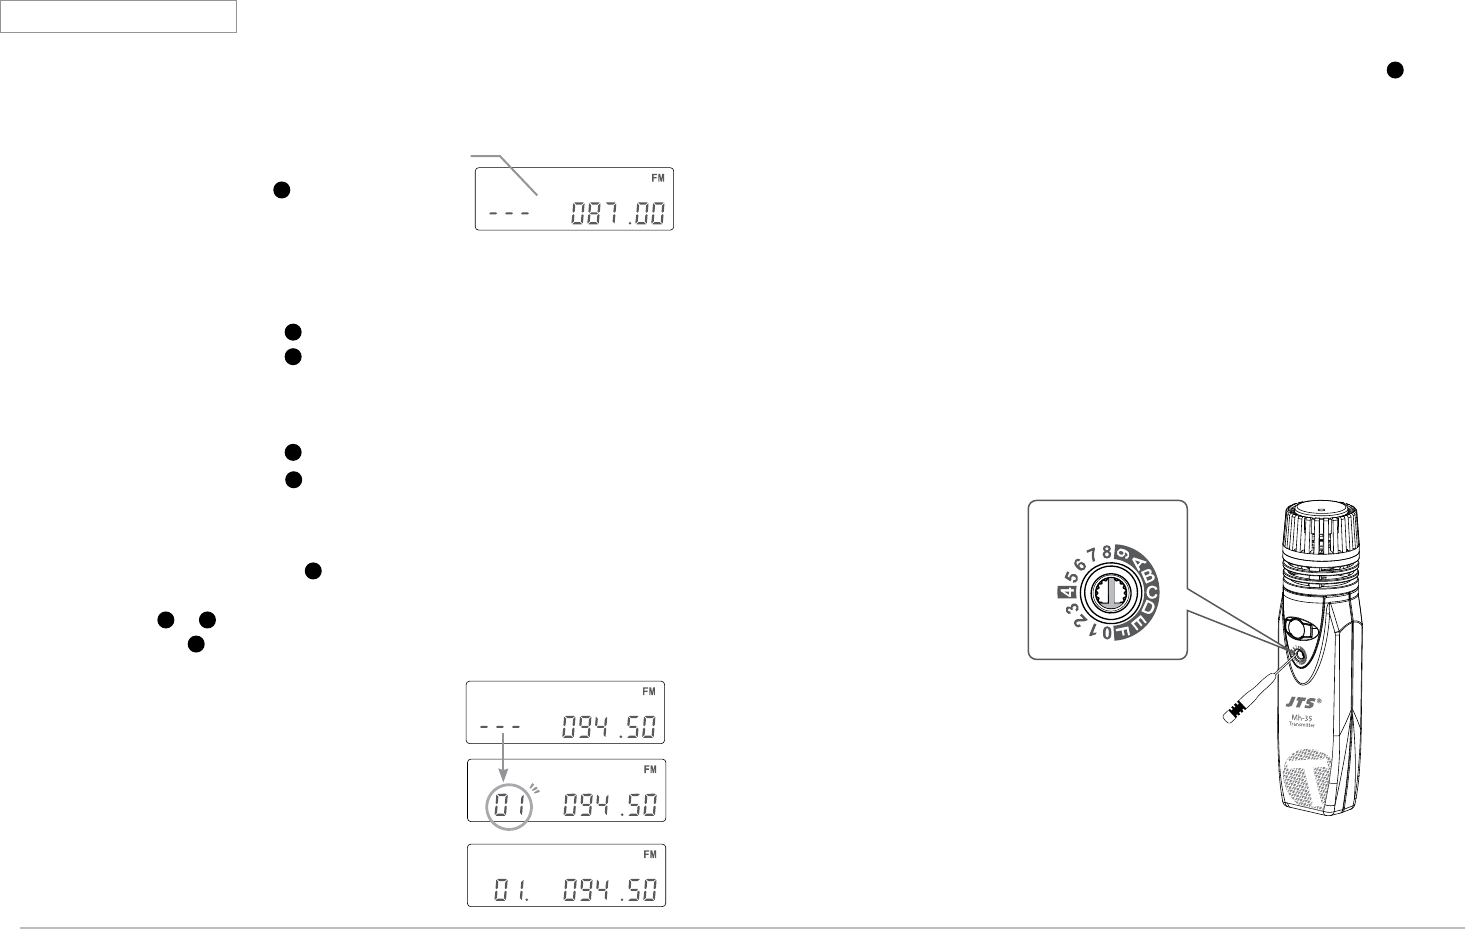
2. Saving stations: the user can save 20 preferred radio stations as preset
channels.
(1)Tune to a radio station which is desired to save.
(2)Hold MODE/SAVE key down and the channel number blinks on the
left of the screen.
(3)Press or key to freely choose the channel numbers to be saved.
(4)Hold key down again till the dot indicator appears and the channel
number blinks for three seconds. The channel saving is complete.
3. Select a preset channel:
To listen to preset channels, the user can press PRESET key repeatedly to
select a radio station in a repeatable cycle from 01 to 20.
4
2
2
5
5
2 5
3
3
Remarks: When Save key is pressed, the system
automatically shows a preset channel last selected.
※ Note: :
1. If no radio stations are saved, the initial frequency of each preset channel is the lowest
frequency in the tunable range.
2. To save a radio station, it is necessary to press the Save key twice.
Though a station desired to be saved as a specific channel is selected and the user press
the Save key only once, after a while, the saving process cancels the selection
automatically and the channel returns to the original status.
6
For basic operation, please refer to the section “4-2 Handheld transmitter
// Mh-35” (p.7).
6-2 Mh-35 Setting of Handheld transmitter
Channel selection::
Turn the rotational setting knob such that
the arrow points at a desired channel.
Icon points at Channel 0
Initial screen
Blinks
Station saving complete

15
16
7. Important notice on product
Please make sure to recharge the battery for 8 hours before the initial use.•
It is advised to keep the battery in workable condition at all times in order to •
avoid recharging a dead battery.To ensure best function and optimal time of use,
it is recommended to recharge the device before using each time.
If the device is not in use for a prolonged period, recharge the battery on regular •
basis (or every 3 months) to prevent reducing its service life.
Please remove the battery (Fig.2-4) and contact the dealer of the device in case •
of battery anomalies, such as impossible to recharging effectively or obvious
reduced time of service, which may be a result of defective battery.
Do not put the speaker too close to a person’s ears when operating the device •
in fear of impairing his hearing with high volume.
Use soft cloth with clean water or mild detergent to clean the device. To avoid •
causing damage to the device’s surface or printed characters falling off, do not
use alcohol or any other chemical solvent.
Use the transformer supplied as accessory to the product when drawing on DC •
power, or it is recommend to use a transformer of the same specification and
safety certified as power supply kit.
When using the LED lighting, do not look directly at the light emitted, as the •
light intensity is high.
Remove the battery if the device will not be used for a prolonged period, so as
•
to prevent battery fluid leakage which would damage the transmitter.
To avoid howl from the device due to feedback, do not place the transmitter •
close to the main unit or the speaker when the main unit is set at high level of
volume.
Make sure to adjust the transmitter and the main unit at the same frequency •
when using the device.
WA-35
Mh-35
Fig.2 Fig.3 Fig.4
To begin with, unscrew the
battery cover at the bottom.
Remove the battery from its
cavity.
Remove the PVC wire
of the battery from the
terminal.
8. Important Notice
(1) JTS oers wireless systems in a selection of bands that conform to the dierent government
regulations of specic nations or geographic regions. ese regulations help limit radio
frequency (RF) interference among dierent wireless devices and prevent interference with
local public communications channels, such as television and emergency broadcasts.
(2) For information on bands available in your area, consult your local dealer or phone JTS.
More information is also available at JTS’s website (www.jts.com.tw).
(3) is Radio apparatus may be capable of operating on some frequencies not authorized in
your region. Please contact your national authority to obtain information on authorized
frequencies and RF power levels for wireless microphone products.
(4) e changes or modications not expressly approved by the party responsible
for compliance could void the user’s authority to operate the equipment.
(5) To comply with the FCC RF exposure compliance requirements, no change to the antenna
or the device is permied. Any change to the antenna or the device could result in the device
exceeding the RF exposure requirements and void user’s authority to operate the device.