JVC KENWOOD 39576 MONITOR WITH DVD RECEIVER User Manual DNX DDX8 instr K p1 63 r1 indd
JVC KENWOOD Corporation MONITOR WITH DVD RECEIVER DNX DDX8 instr K p1 63 r1 indd
User manual
GPS NAVIGATION SYSTEM
DNX8120
MONITOR WITH DVD RECEIVER
DDX812
DDX8032BT
INSTRUCTION MANUAL
© B64-4089-00/01 (KW/RW)
Take the time to read through this instruction manual.
Familiarity with installation and operation procedures will help you obtain the best
performance from your new GPS Navigation System/ DVD Receiver.
For your records
Record the serial number, found on the back of the unit, in the spaces designated on the
warranty card, and in the space provided below. Refer to the model and serial numbers
whenever you call upon your Kenwood dealer for information or service on the product.
Model DNX8120/DDX812/DDX8032BT Serial number
US Residence Only
Register Online
Register your Kenwood product at
www.Kenwoodusa.com

2 DNX8120/DDX812/DDX8032BT English 3
Contents
Basic Operations 10
Radio Listening 29
Functions While Displaying the Control
Screen 29
Seek Mode 30
Auto Memory 30
Manual Memory 31
Preset Select 31
Radio Text 32
Set Station Name 32
Traffic Information 33
Search for Program Type 33
Video File/Picture Watching 26
Function During Playback Screen 26
Functions When Displaying the Easy Control
Panel 26
Functions While Displaying the Control
Screen 27
Picture Control 28
Folder Select 28
Setup Menu 64
Setup Menu 64
Audio Setup 64
Speaker Set Up 65
Channel Level 66
DTA Setup 67
Crossover Network Setup 68
DVD Setup 69
Language Setup 70
Parental Level Setup 71
System Setup 72
AV Interface Setup 73
User Interface 74
Direct Source Button Setup 76
Entering Background 76
Background Delete 77
Background Select 77
Touch Panel Adjustment 78
Clock Setup 78
Monitor Setup 79
Security Code Setup 80
Deactivating Security Code 82
iPod Setup 82
Sirius Setup 83
Sirius Parental Code Setup 83
Sirius Parental Lock Setup 84
Sirius Parental Lock Channel Select 85
Bluetooth Setup 86
Registering Bluetooth Unit 86
Registering Bluetooth Unit PIN Code 87
Registering Special Bluetooth Unit 88
Bluetooth Unit Connection 88
Deleting Bluetooth Unit 89
DivX Setup 89
Setup Memory 90
EXT SW Setup 91
DVD Language Codes 104
Help? Troubleshooting 105
Help? Error 106
Specifications 108
How to read this manual 4
Before Use 6
Notes 7
Navigation Control 14
Using the Navigation System 14
Control of Other Sources While Displaying the
Navigation Screen 14
Accessing the SD Memory Card Insertion Slot
(DNX8120 only) 16
Music Disc & Audio File Listening 23
Functions While Displaying the Control
Screen 23
Set Disc Name 25
Folder Select (Function of Audio File) 25
Audio Control 92
Audio Control Menu 92
Audio Control 92
Equalizer Control 93
Graphic Equalizer Setup 93
Zone Control 94
SRS WOW Control 94
SRS WOW User Setup 95
Surround Control 95
Surround Control Adjustment 96
Position 96
Position Fine Control 97
iPod Control 34
Connecting an iPod 34
Functions when Displaying the Easy Control
Panel 34
Functions while Displaying the Control
Screen 35
iPod List 36
Watching DVD/VCD & DVD Audio
Listening 18
Functions During the Playback Screen 18
Functions When Displaying the Easy Control
Panel 19
Functions While Displaying the Control
Screen 20
DVD Disc Menu 21
VCD Zoom Control 22
USB Device Control 37
Functions while displaying the Control
Screen 37
USB List 38
Folder Select 38
TV Watching 39
Function During TV Screen 39
Functions When Displaying the Easy Control
Panel 39
Functions While Displaying the Control
Screen 40
Seek Mode 41
Auto Memory 41
Manual Memory 42
Preset Select 42
Set Station Name 43
SIRIUS/XM Control (North American
sales area only) 44
Functions While Displaying the Control
Screen 44
Channel Search 45
Channel Memory 45
Direct Channel Search 46
Bluetooth Audio Control 47
Before Use 47
Functions While Displaying the Control
Screen 47
Character Entry 50
How To Use the Character Entry Screen 50
Screen Control 51
Hands Free Unit Control 52
Before Use 52
Downloading the Phonebook 52
Control Screen Function 52
When Received a Call 53
Calling by Entering a Phone Number 54
Quick Dialing 54
Controlling tone-based services 55
Calling by Phonebook 55
Making a Call Using Outgoing/Incoming Call
Records 57
Calling by Voice Recognition 57
Setting Up the Hands Free Phone 58
Voice Registration 59
Key Word Voice Registration 60
Phone Number Preset 61
SMS (Short Message Service) 62
Remote Controller 98
Battery installation 98
Remote Controller mode switch 98
Common operations (AUD mode) 99
DVD/DVD Audio/VCD/CD/Audio files
(DVD mode) 100
Radio (AUD mode) 101
NAVI (NAVI mode) 102
TV (TV mode) 103
Muting Audio Volume upon Reception
of Phone call 49
External Device Power Supply Control
48

4 DNX8120/DDX812/DDX8032BT English 5
How to read this manual
Manual Memory
Stores the current receiving station in memory.
1 Select a station you wish to store in
memory
2 Store in memory
Continue to touch until the memory number
appears.
Seek Mode
Sets a station selection.
The mode is switched in following order each
time you touch the button.
Display Setting
"AUTO1" Tunes in a station with good reception
automatically.
"AUTO2" Tunes in stations in memory one after another.
"MANU" Switches to the next frequency manually.
Next page 3
This manual uses illustrations to explain its
operations.
The displays and panels shown in this manual
are examples used to provide clear explanations
of the operations.
For this reason, they may be different from the
actual displays or panels used, or some display
patterns may be different.
The above operation example with the mark
differs from the actual operation.
6 DNX8120/DDX812/DDX8032BT English 7
2WARNING
To prevent injury or fire, take the following
precautions:
• To prevent a short circuit, never put or leave any
metallic objects (such as coins or metal tools) inside
the unit.
• Do not watch or fix your eyes on the unit’s display
when you are driving for any extended period.
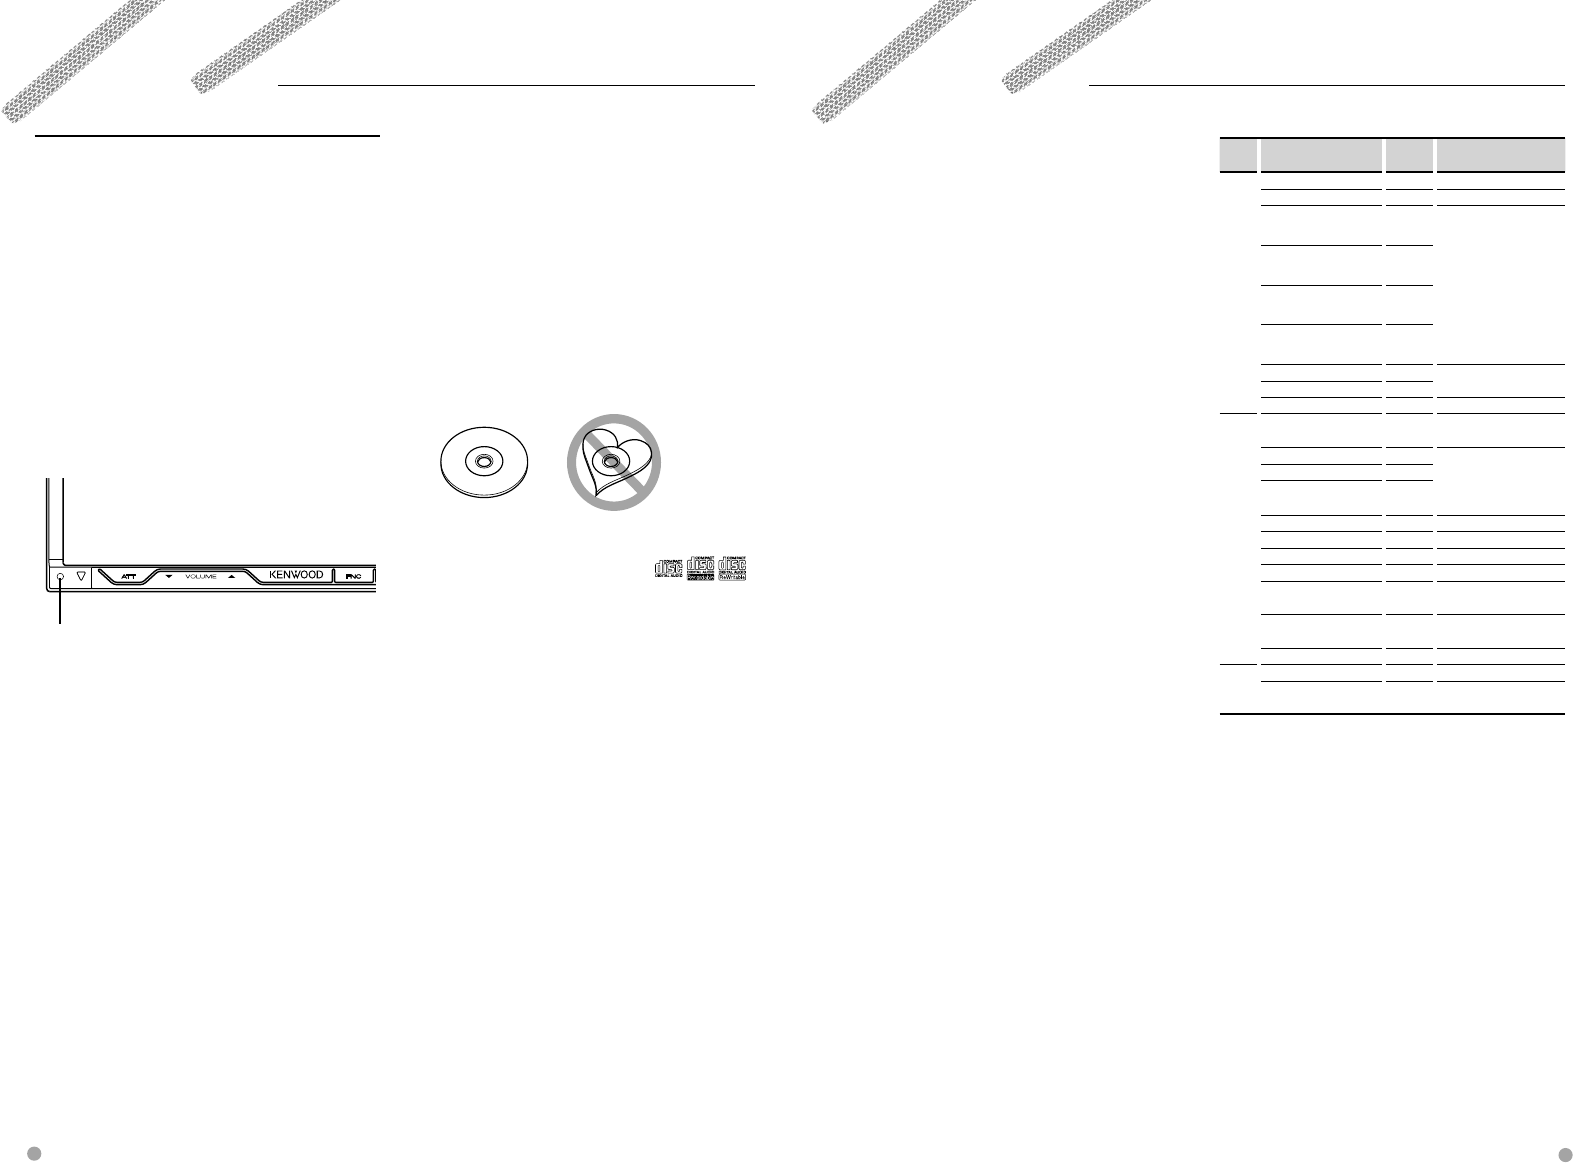
How to reset your unit
• If the unit or the connected unit fails to operate
properly, press the Reset button. The unit returns to
factory settings when the Reset button is pressed.
• Remove the USB device before pressing the Reset
button. Pressing the Reset button with the USB
device installed can damage the data contained in
the USB device. For how to remove the USB device,
refer to <Playing a USB device> (page 10).
Reset button
Cleaning the Unit
If the faceplate of this unit is stained, wipe it with a
dry soft cloth such as a silicon cloth.
If the faceplate is stained badly, wipe the stain off
with a cloth moistened with neutral cleaner, then
wipe it again with a clean soft dry cloth.
¤
• Applying spray cleaner directly to the unit may affect its
mechanical parts. Wiping the faceplate with a hard cloth
or using a volatile liquid such as thinner or alcohol may
scratch the surface or erases characters.
Lens Fogging
When you turn on the car heater in cold weather,
dew or condensation may form on the lens in the
disc player of the unit. Called lens fogging, this
condensation on the lens may not allow discs to play.
In such a situation, remove the disc and wait for the
condensation to evaporate. If the unit still does not
operate normally after a while, consult your Kenwood
dealer.
Navigation units that can be connected to
this unit (DDX812/DDX8032BT only)
• KNA-G510* • KNA-DV4100
• KNA-DV3100 • KNA-DV2100
* Update the navigation software to the latest
version. For how to update the software, refer to the
instruction manual of the navigation unit.
iPod that can be connected to this unit
You can control an iPod from this unit by connecting
an iPod (commercial product) with Dock connector
using an optional accessory iPod connection cable
(KCA-iP300V).
The following iPods can be controlled from this unit.
• iPod nano
• iPod nano (Second Generation)
• iPod nano (3rd Generation)
• Fifth Generation iPod (iPod with video)
• iPod classic
• iPod touch
Update iPod software to the latest version.
Supports audio only on iPod Touch.
By connecting your iPod to this unit with an optional
accessory iPod connection cable (KCA-iP300V), you
can supply power to your iPod as well as charge it
while playing music. However, the power of this unit
must be on.
TV tuner that can be connected to this unit
• KTC-V300N
About Satellite Radio tuner
This unit supports Satellite Radio tuners which are
released by SIRIUS and XM.
Optional accessories below are necessary for
connection.
SIRIUS tuner : Conversion cable CA-SR20
XM tuner : XM interface Box KCA-XM100
Refer to the instruction manual of Satellite Radio
tuner.
About HD Radio
When you connect an HD Radio, Tuner features of
the unit are disabled and changed to HD Radio tuner
features.
With the HD Radio tuner, you can use the similar
functions of Tuner features. Refer to Tuner features for
how to use the functions.
List of playable discs
Disc
types
Standard Support Remark
DVD DVD Video ‡
DVD Audio ‡
DVD-R ‡
MP3/WMA/AAC/JPEG/
MPEG/DivX Playback
Multi-border/Multisession/
(Playback depends on
authoring conditions)
Compatible with 8-cm (3
inch) discs
DVD-RW ‡
DVD+R ‡
DVD+RW ‡
DVD-R DL (Dual layer) ‡Only video format
DVD+R DL (Double layer) ‡
DVD-RAM ×
CD Music CD ‡CD-TEXT/8-cm (3 inch)
discs supported.
CD-ROM ‡MP3/WMA/AAC/JPEG
playback
Multisession supported
Packet write not supported.
CD-R ‡
CD-RW ‡
DTS-CD ‡
Video CD (VCD) ‡
Super video CD ×
Photo CD ×
CD-EXTRA %Only music CD session can
be played.
HDCD %Sound quality of normal
CD music
CCCD ×
Others Dualdisc ×
Super audio CD %Only CD layer can be
played.
‡ : Playback is possible.
% : Playback is partly possible.
× : Playback is impossible.
⁄
• When buying DRM enabled contents, check the
Registration Code in the <DivX Setup> (page 89).
Registration Code changes each time a file with the
displayed Registration Code is played to protect against
copying.
Use of "DualDisc"
When playing a "DualDisc" on this unit, the surface
of the disc that is not played may be scratched
while the disc is inserted or ejected. Since the music
CD surface does not conform to the CD standard,
playback may be impossible.
(A "DualDisc" is a disc with one surface containing
DVD standard signals and the other surface
containing music CD signals.)
Before Use
Handling discs
• Do not touch the recording surface of the disc.
• Do not stick tape etc. on the disc, or use a disc with
tape stuck on it.
• Do not use disc type accessories.
• Clean from the center of the disc and move
outward.
• When removing discs from this unit, pull them out
horizontally.
• If the disc center hole or outside rim has burrs,
use the disc only after removing the burrs with a
ballpoint pen etc.
Discs that cannot be used
• Discs that are not round cannot be used.
• Discs with coloring on the recording surface or
discs that are dirty cannot be used.
• This unit can only play the CDs with .
This unit may not correctly play discs which do not
have the mark.
• You cannot play a CD-R or CD-RW that has not
been finalized. (For the finalization process refer to
your CD-R/CD-RW writing software, and your CD-
R/CD-RW recorder instruction manual.)
• If you try to load a 3-inch-disc with its adapter into
the unit, the adapter might separate from the disc
and damage the unit.
Other notes
• If you experience problems during installation,
consult your Kenwood dealer.
• When you purchase optional accessories, check
with your Kenwood dealer to make sure that they
work with your model and in your area.
• The characters conforming to ISO 8859-1 character
set can be displayed.
• The RDS or RBDS feature won’t work where the
service is not supported by any broadcasting
station.
Notes
8 DNX8120/DDX812/DDX8032BT English 9
About Audio files
• Playable Audio file
AAC-LC (.m4a), MP3 (.mp3), WMA (.wma)
⁄
• If music of normal CD and other playback systems are
recorded in the same disc, only the playback system
recorded at the first setout is played.
• Playable disc media
CD-R/RW/ROM, DVD±R/RW
• Playable disc file format
ISO 9660 Level 1/2, Joliet, Romeo, Long file name.
• Playable USB device
USB mass storage class, iPod with KCA-iP300V
• Playable USB device file system
FAT16, FAT32
Although the audio files are complied with the standards
listed above, the play maybe impossible depending on
the types or conditions of media or device.
• Playing order of the Audio file
In the example of folder/file tree shown below, the
files are played in the order from ① to ⑩.
CD
v
()
<: Folder
v: Audio
v
v
v
v.
v
Folder
Audio file
An online manual about audio files is put on the
site, www.kenwood.com/audiofile/. On this online
manual, detailed information and notes which are
not written in this manual are provided. Make sure
to read through the online manual as well.
⁄
• In this manual, the word "USB device" is used for flash
memories and digital audio players which have USB
terminals.
• The word "iPod" appearing in this manual indicates the
iPod connected with the KCA-iP300V (optional accessory).
About Video files
• Acceptable video files
MPEG1, MPEG2, DivX
• Extensions
mpg, mpeg, m1v, m2v, divx, div, avi
• Acceptable media
CD-R/RW/ROM, DVD±R/RW, VCD,
Notes
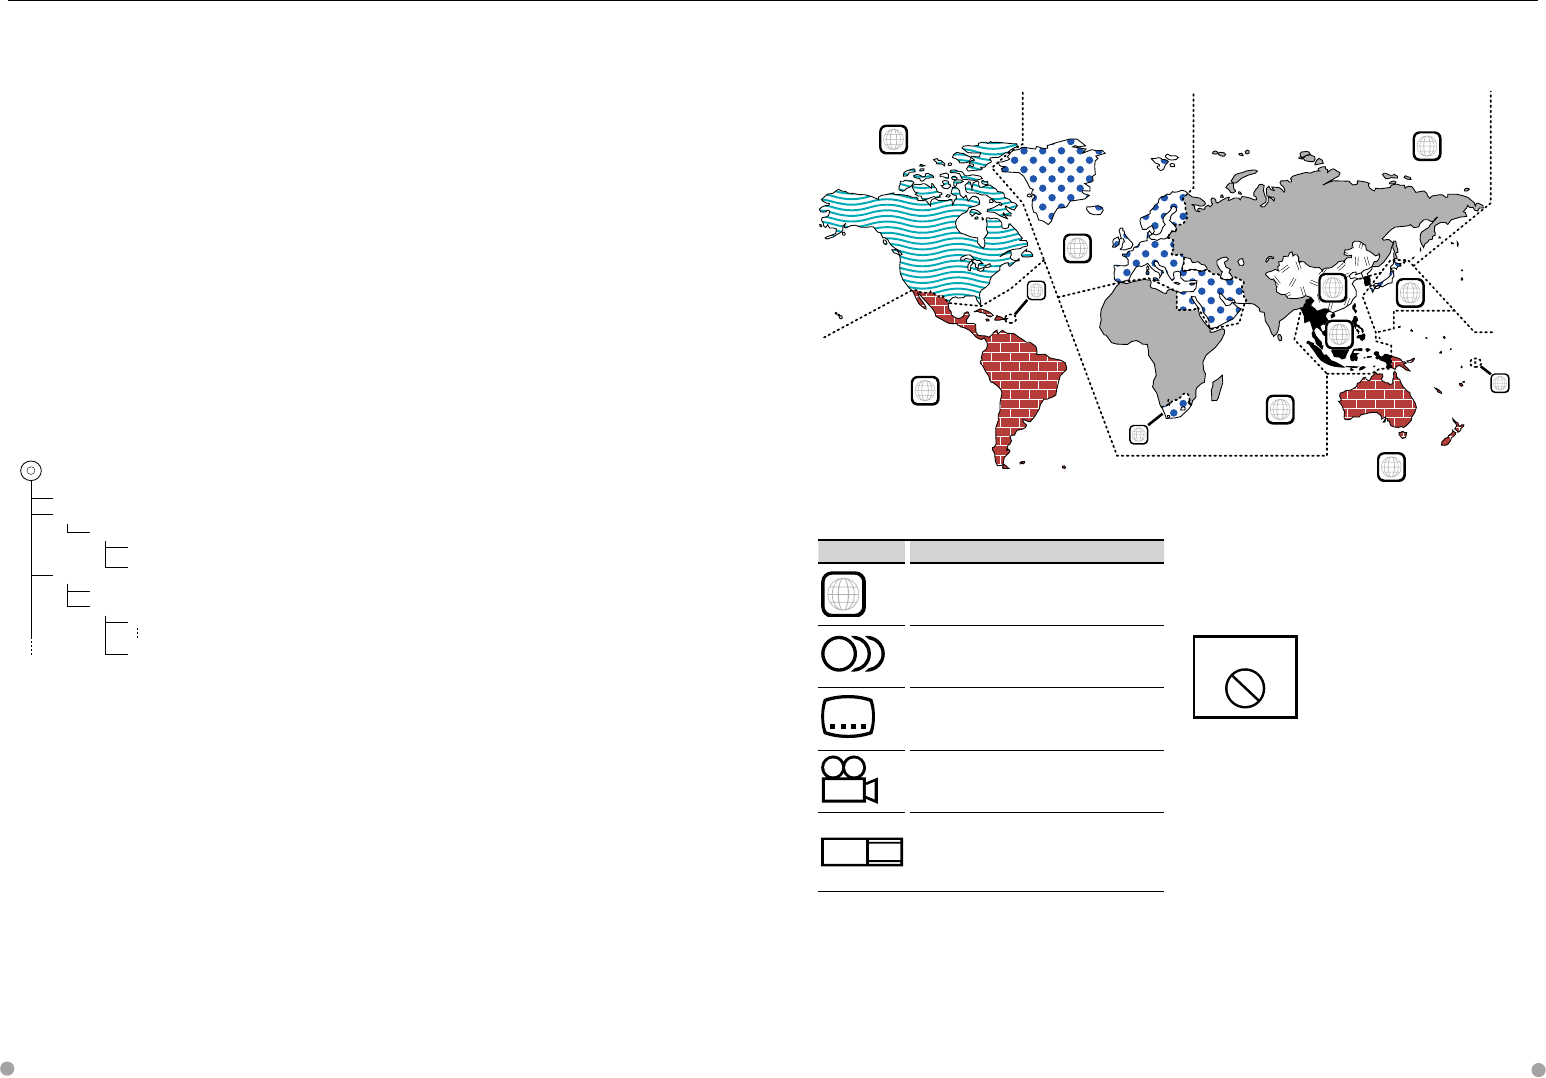
Region codes in the world
The DVD players are given a region code according to the country or area it is marketed, as shown in the
following map.
Operation regulatory marks
With this DVD, some functions of this unit such as the
play function may be restricted depending on the
location where the DVD is playing. In this case, the
following marks will appear on the screen. For more
information, refer to the disc manual.
禁止マーク
Prohibition Mark
Discs with limited period of use
Do not leave discs with a limited period of use in this
unit. If you load an already expired disc, you may not
be able to remove it from this unit.
1
2
4
1
5
4
5
2
1
2
6
3
DVD disc marks
Symbol Description
ALL
Indicates a region number. The discs with this mark can
be played with any DVD player.
8
Indicates the number of audio languages recorded. Up
to 8 languages can be recorded in a movie. You can
select a favorite language.
32
Indicates the number of subtitled languages recorded.
Up to 32 languages can be recorded.
9
If a DVD disc has scenes shot from multiple angles, you
can select a favorite angle.
16:9 LB
Indicates the type of screen for the image. The left mark
indicates that a wide image picture (16:9) is displayed
on a standard TV set screen (4:3) with a black band at
both the top and bottom of the screen (letter box).
iPod with KCA-iP300V
Acceptable discs, disc formats, file and folder names
and playing order are the same as those for audio
files. Refer to <About Audio files>.
About Picture files
• Acceptable picture files
JPEG
• Extensions
jpg, jpeg
• Acceptable media
CD-R/RW/ROM, DVD±R/RW,
Acceptable discs, disc formats, file and folder names
and playing order are the same as those for audio
files. Refer to <About Audio files>.
About USB device
• If you start playback after connecting the iPod, the
music that has been played by the iPod is played
first.
In this case, "RESUMING" is displayed without
displaying a folder name, etc. Changing the browse
item will display a correct title, etc.
• When the iPod is connected to this unit,
"KENWOOD" or "✓" is displayed on the iPod to
indicate that you cannot operate the iPod.
• When the USB device is connected to this unit,
it can be charged up provided that this unit is
powered.
• Install the USB device in the place where it will not
prevent you from driving your vehicle properly.
• You cannot connect a USB device via a USB hub
and Multi Card Reader.
• Take backups of the audio files used with this unit.
The files can be erased depending on the operating
conditions of the USB device.
We shall have no compensation for any damage
arising out of erasure of the stored data.
• No USB device comes with this unit. You need to
purchase a commercially available USB device.
• When connecting the USB device, usage of the CA-
U1EX (option) is recommended.
Normal playback is not guaranteed when a cable
other than the USB compatible cable is used.
Connecting a cable whose total length is longer
than 5 m can result in abnormal playback.
ABCDE
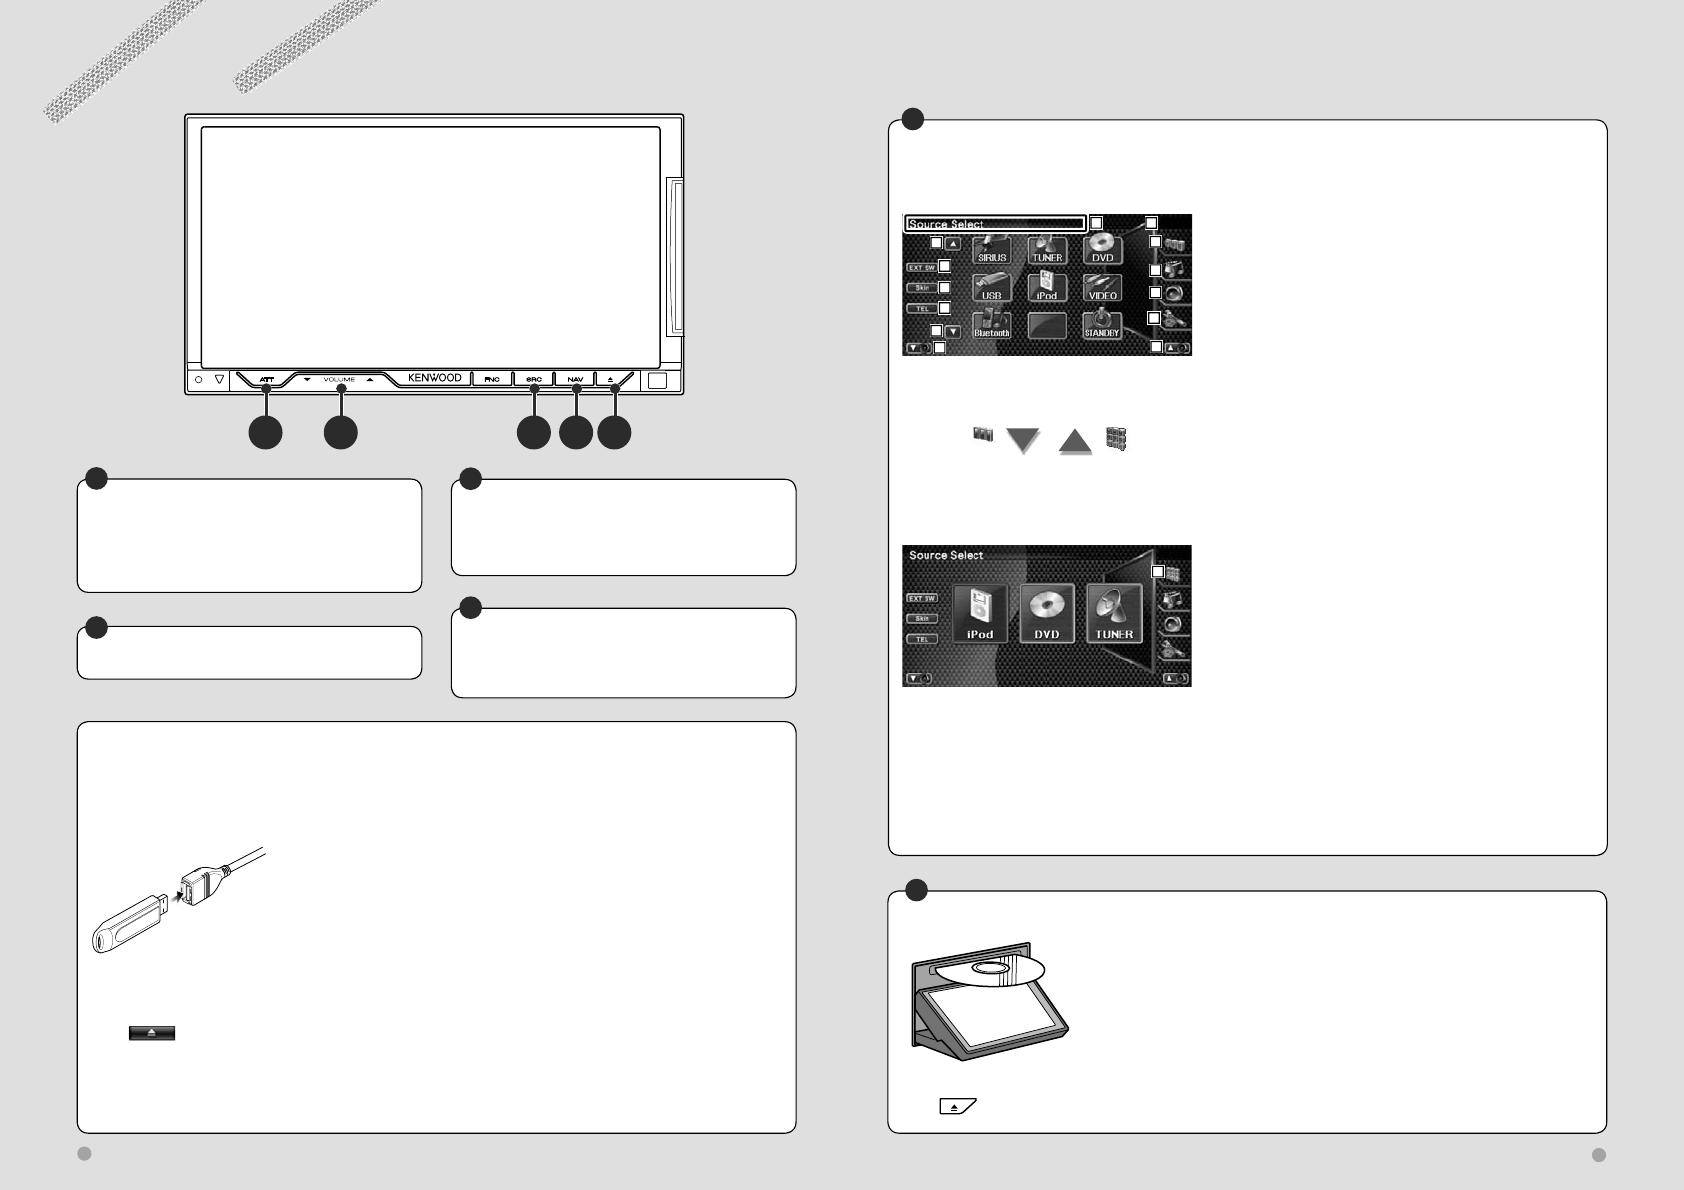
10 DNX8120/DDX812/DDX8032BT English 11
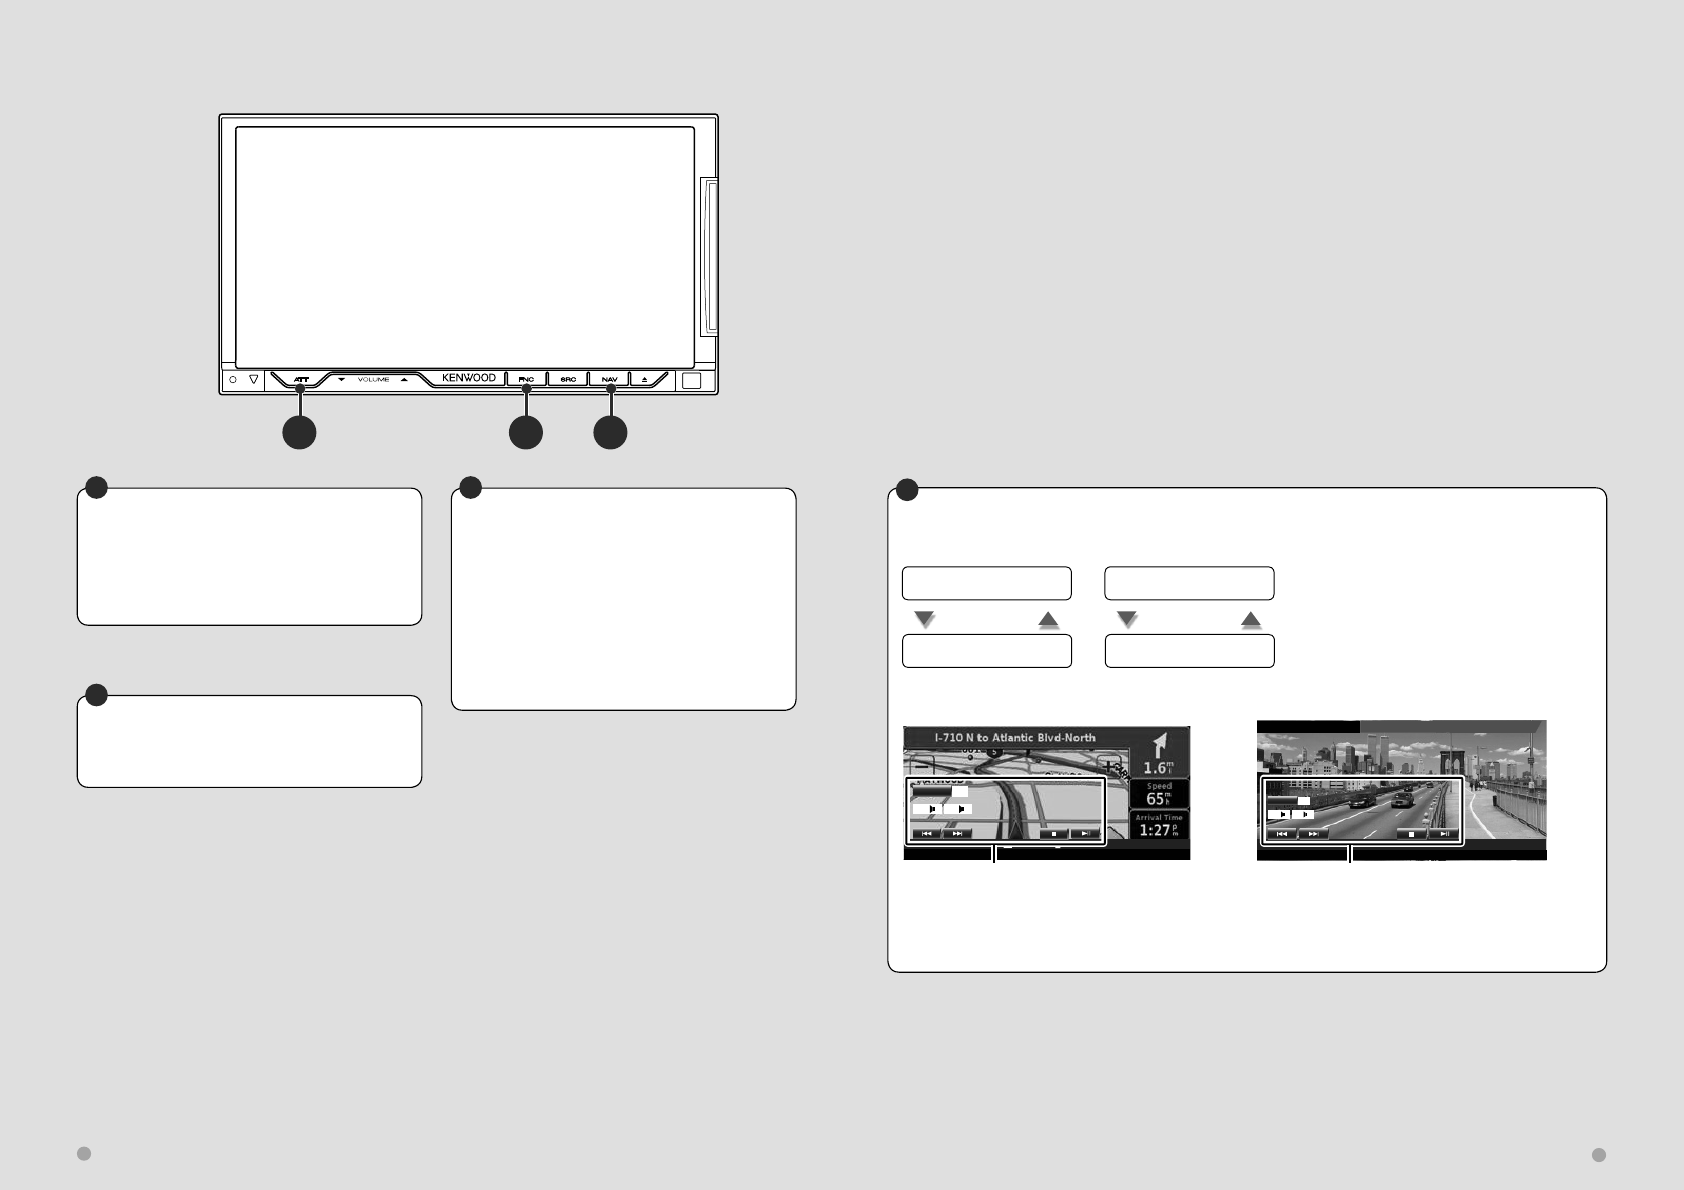
Basic Operations
Adjusts the volume
DAttenuates the volume
Press it to attenuate the volume.
Press it again to cancel muting.
E
Turns power ON/OFF
Press the button to turn on the power.
When the button is pressed and held down for
1 second or more, the power is turned off.
C
Switches to the Navigation system
Press the button to switch the display to the
navigation system screen.
B
Playing a disc
When you load a disc into disc loading slot, the disc starts playing.
If a menu appears, when playing a video disc, select the desired item.
⁄
• See <List of playable discs> (page 7) for a list of supported discs and formats.
Removing a disc
Press (Eject) button.
A
Playing a USB device
When connecting a USB device, playback starts automatically.
You must update the database if you are using a USB device that is different from the one you used
before or if you have replaced the audio files in the USB device. For information on how to update the
database, refer to <Function while displaying the Control Screen> in USB Device Control (page 37).
Removing the USB device
Press on the USB control screen to enter the USB suspend mode, and then remove the USB
device. Refer to <USB Device Control> (page 37).
¤
• Removing the USB device before entering the USB suspend mode may result in damaging the data in the USB device.
⁄
• If the USB source is selected when a USB device is not connected, "No Device" is
displayed.
• When the playback is stopped and then restarted, the playback will start from
the point where it was stopped at the last time. Even if the USB is removed and
connected again, the playback will start from the last stopped point unless the
contents in the USB device is changed.
• Make sure that the USB device is connected firmly.
Selecting a source
Press it to display the source select screen. Touch the source button to select the source.
Full Source Select screen
6
1
1
7
8
9
10
2
3
4
11 11
5
Favorite Source Select screen
12
C
1 Scrolls the source display.
2 Displays the external device control screen. See
<External Device Power Supply Control> (page 78).
3 Changes the screen skin each time it is pressed.
4 Displays the Hands Free screen. (page 52)
5 Press for at least 2 seconds to erase the buttons. Touch
the screen to redisplay the buttons.
⁄
• The displayed source depends on the type of device
connected. In addition, you cannot press the button of
currently unavailable source.
The following buttons are always displayed on the
source select screen and source control screen.
6 Clock display
7 Displays the Source Select screen.
The display switches between Favorite Source Select
screen and Full Source Select screen by touching the
button.
8 Displays Source Control screen.
9 Displays the Audio Control Menu screen. (page 92)
p Displays the SETUP Menu screen. (page 64)
q Adjust the volume.
w Displays the full source screen.
⁄
• For how to register the frequently used source buttons to
Favorite Source Select screen, see <Direct Source Button
Setup> (page 76).
ABC
12 DNX8120/DDX812/DDX8032BT English 13
Basic Operations
Switching the function screen
The function control screen switches in the following order each time you press the button.
Navigation screen
Easy Control buttons
appear.
[FNC] button
Picture or Video playback
screen
Easy Control buttons
appear.
[FNC] button
Navigation screen Picture or Video playback screen
P 0:00:05
DVD MEDIA
INPICTURE
21
SCRN
O
O
Easy Control button
Mode:Full AV Out:AV–IN
T 0:00:05
Title
1
Chap
1
DVD VIDEO
DVD VIDEO
IN
SCRN
O
O
Easy Control button
⁄
• For the functions of Easy Control buttons, see <Control of Other Sources While Displaying the Navigation Screen> (page
14).
B
Switches to the rear view
Press it for more than 1 second to switch to
rear view.
Press it again for more than 1 second to
resume the normal display.
⁄
• Functions of the [NAV] button can be changed to
Display Off function. See <System Setup> (page 72)
for the function setting of the [NAV] button.
A
Switches to the Hands Free control
Press it for more than 1 second to the Hands
Free control screen.
Press it again for more than 1 second to
resume the normal display.
B
Switches the Seek mode
Press it for more than 1 second to switch the
Seek mode.
C
52 DNX8120/DDX812/DDX8032BT English 53
Before Use
• To use the Phonebook, it must be downloaded to this
unit in advance. For details, see <Downloading the
Phonbook> (page 52).
• You need to register your cell-phone before using it with
this unit. For more details, see <Registering Bluetooth
Unit> (page 86).
• If you have registered two or more cell-phones, you need
to select one of them. For more details, see <Bluetooth
Unit Connection> (page 88).
Downloading the Phonebook
Downloads the phonebook data from the
cell-phone to this unit so that you can use the
Phonebook of this unit.
1 By operating the cell-phone, send the
phonebook data to this unit.
2 By operating the cell-phone, start the
hands-free connection.
⁄
• For the cell-phones which support auto-download of
phonebook:
If the phonebook is not downloaded automatically for
some reasons, follow the procedure above to download
manually.
• For how to operate the cell-phone, refer to the
Instruction Manual that comes with your cell-phone.
• Up to 1000 phone numbers can be registered for each
registered cell-phone.
• Up to 32 digits can be registered for each phone number
along with up to 40 characters representing a name.
• Depending on the type of your cell-phone, the following
restrictions are placed:
- The phonebook data cannot be downloaded normally.
- Characters in the Phonebook are garbled.
- The phonebook data cannot be downloaded normally
if it contains images. It may take several hours to a full
day to download the phone book depending on the
total image size.
• To cancel downloading of the phonebook data, operate
the cell-phone.
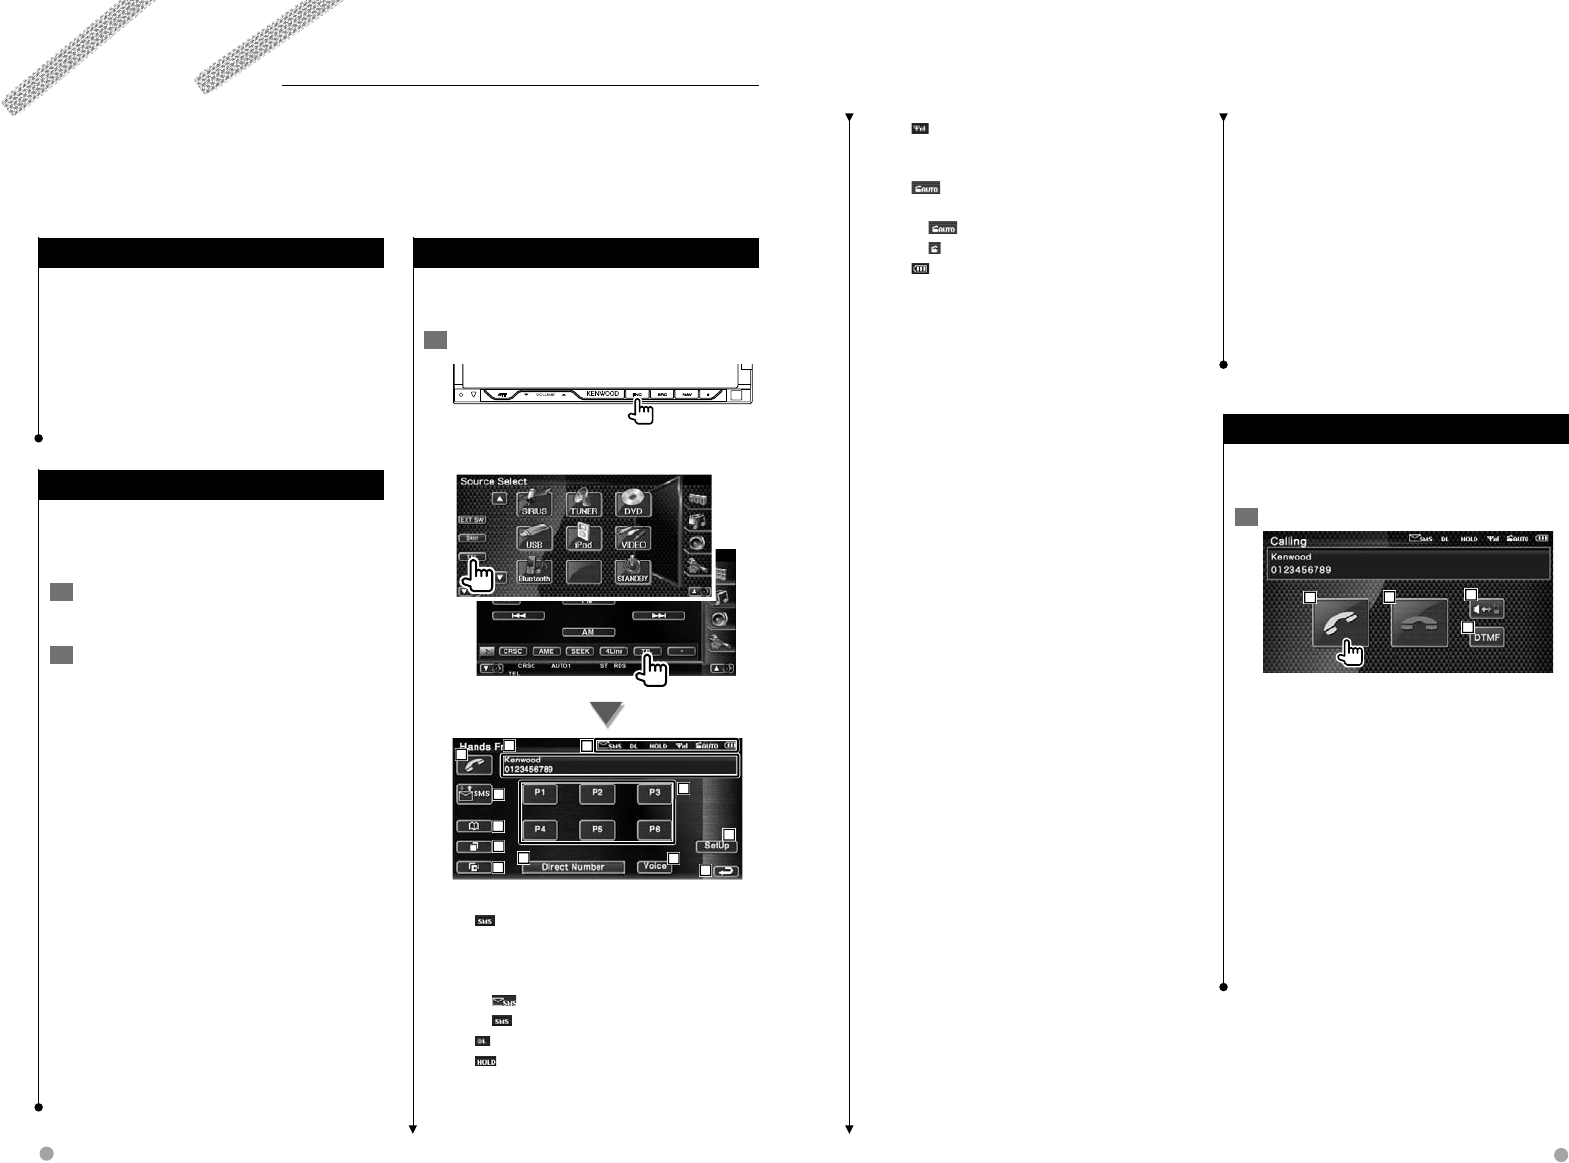
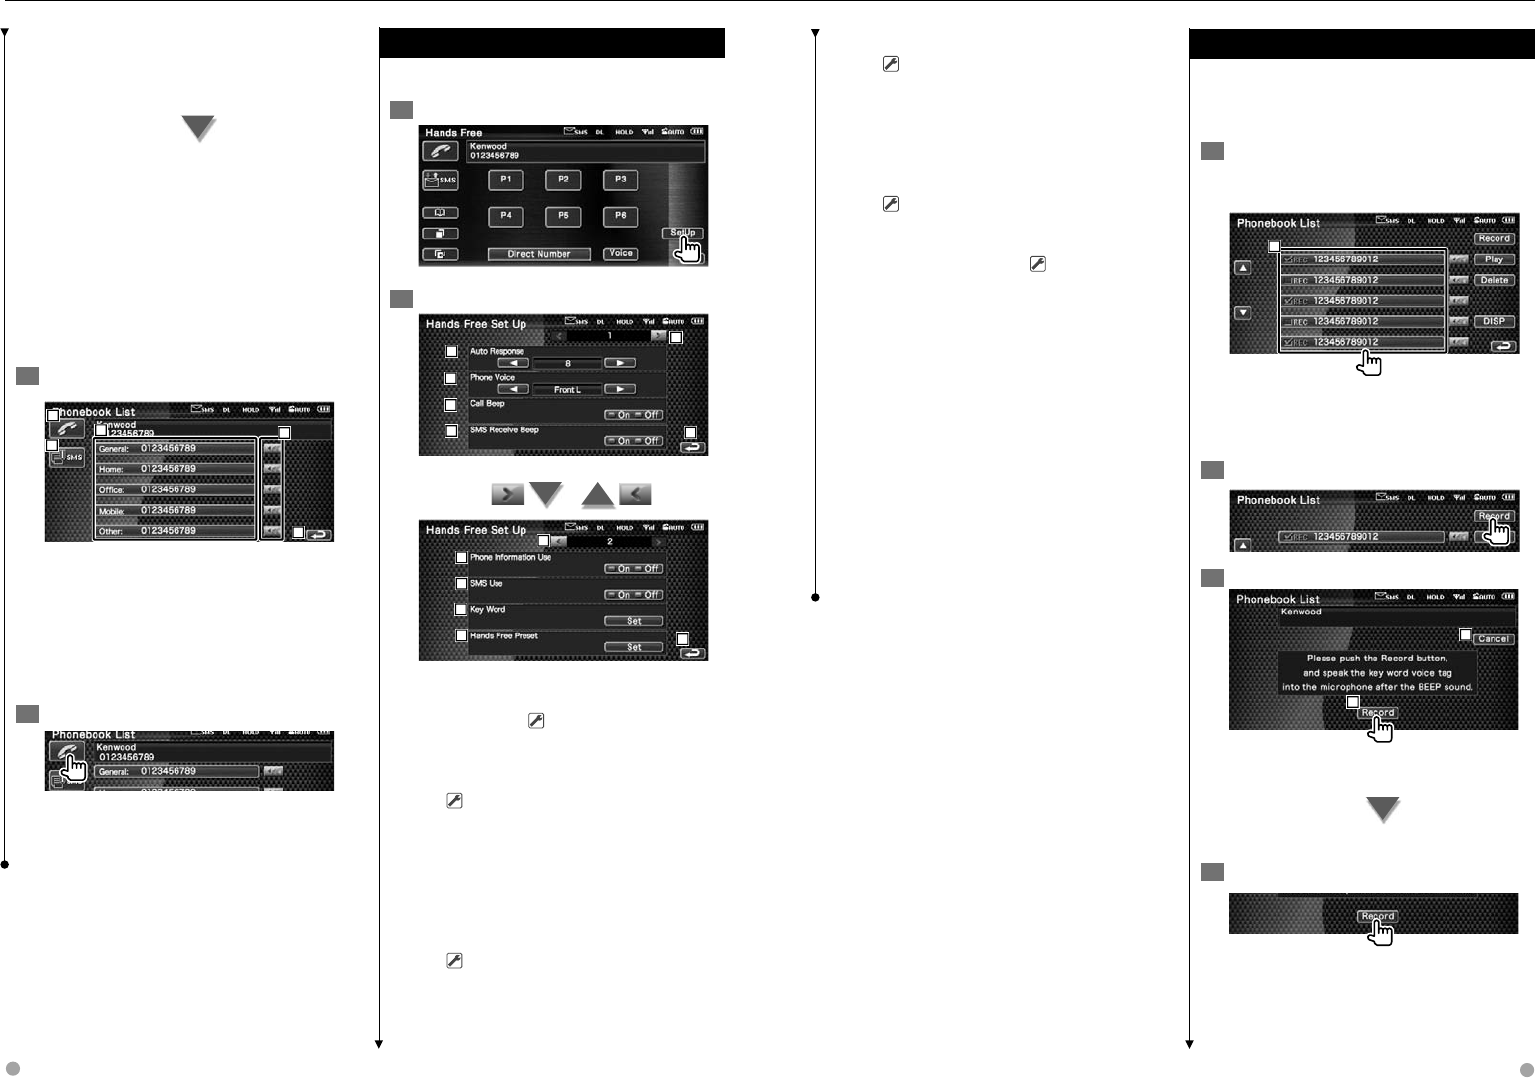
Various functions can be used in the Hands Free control mode.
Control Screen Function
Displaying the control screen and using various
functions.
1 Display the Hands Free Control screen
Press the [FNC] button for more than 1 second.
or
1
2
3
4
5
6
7
8
9
10 11
12
1 Displays the various conditions.
: Displays short message status. If a cell-
phone which supports SMS function
is not connected, this mark does not
appear.
: There is unread short message.
: There is no unread short message.
: Downloading Phonebook.
: Indicates there is a call on hold.
: Displays the signal strength.*
The more the number of bar segments,
the stronger the signal.
: Displays the present Auto Answering
status
: When Auto Answering is on
: When Auto Answering is off
: Displays the battery drain of the cell-
phone.*
The more the number of bar segments,
the higher the battery level.
2 Displays the called phone numbers.
If you have registered a phone number in
the Phonebook, the destination person
name is displayed.
3 Calls the displayed preset phone number.
4 Displays the SMS Select screen.
See <SMS (Short Message Service)> (page
62).
5 Displays the Search for Phonebook screen.
See <Calling by Phonebook> (page 55).
6 Displays the Outgoing Calls screen.
See <Making a Call Using Outgoing/
Incoming Call Records> (page 57).
7 Displays the Incoming Calls screen.
See <Making a Call Using Outgoing/
Incoming Call Records> (page 57).
8 Calls the preset phone number.
For information on how to preset a phone
number, see <Phone Number Preset> (page
61).
9 Displays the Hands Free Set Up screen.
See <Setting Up the Hands Free Phone>
(page 58).
p Displays the Dialing Display screen.
See <Calling by Entering a Phone Number>
(page 54).
q Starts voice recognition.
See <Calling by Voice Recognition> (page
57).
w Returns to the previous screen.
⁄
• While your car is moving, some functions are disabled for
safety’s sake. The buttons associated with the disabled
functions become ineffective if pressed.
• When the Hands Free Control screen appears, the name
of the connected cell-phone is displayed for 5 seconds.
• * Since the number of steps of the control unit is different
from that of the cell-phone, the statuses displayed on
the control unit may discord from those displayed on
the cell-phone. No status is displayed if information
about it cannot be obtained.
• Setting the cell-phone in the private mode can disable
the hands free function.
When Received a Call
When you receive a call, you can use the hands
free phone.
1 Respond to a call
23
4
1
When a call arrives, the Talking screen appears
automatically.
1 Starts conversation with a person called.
Switches the call destination if you hear a
tone of call-waiting.
Resumes conversation with the person on
hold after completed conversation with the
other party.
2 Disconnects the phone.
The Hand Free screen reappears.
3 Switches the voice output between phone
and speaker.
4 Outputs dial tone.
See <Controlling Tone-based Services>
(page 55).
Hands Free Unit Control
54 DNX8120/DDX812/DDX8032BT English 55
Next page 3
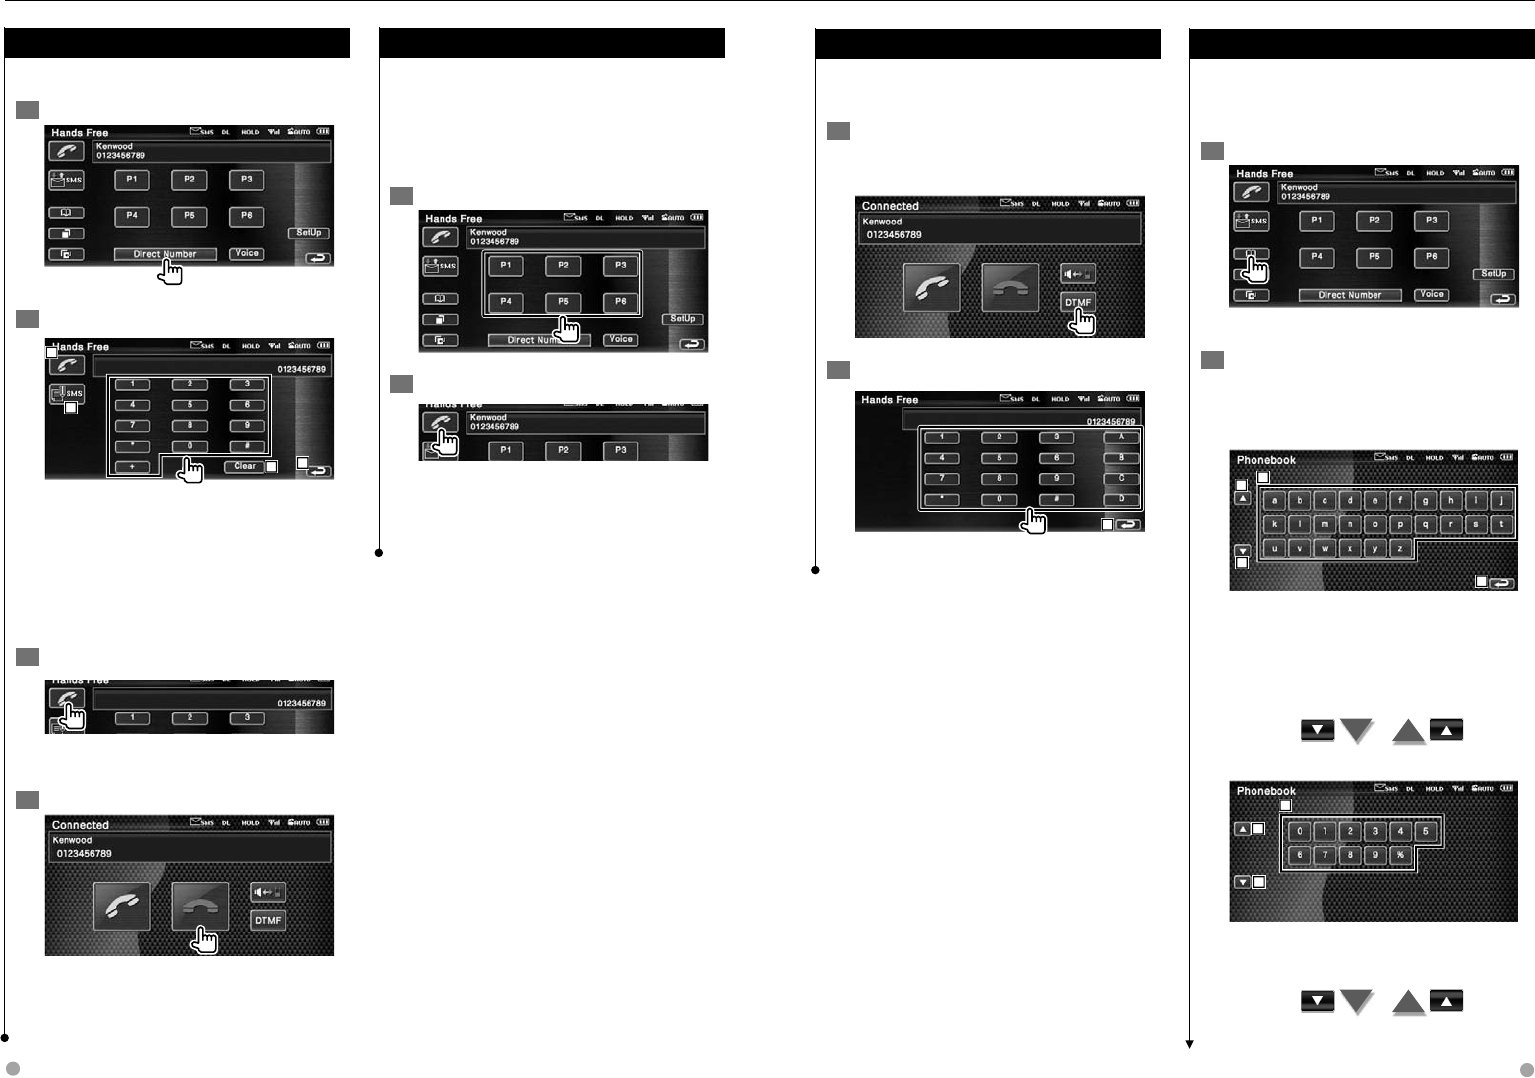
Calling by Entering a Phone Number
Make a call by entering a phone number.
1 Display the number input screen
2 Enter a phone number
1
2
34
1 Calls the entered phone number.
2 Creates an SMS for the entered phone
number.
See <SMS (Short Message Service)> (page
62).
3 Clears the number.
4 Returns to the previous screen.
3 Make a call
You can start talking when the destination
responds.
4 End the call
The Hand Free screen reappears.
⁄
• You can input max 32 digits.
Quick Dialing
You can register up to 6 phone numbers for quick
dialing.
⁄
• Phone numbers must be registered in advance.
See <Phone Number Preset> (page 61).
1 Recall the phone number
2 Make a call
⁄
• Only the phone numbers can be registered for Quick
Dialing. Therefore, the destination subscriber name and
others are not displayed during dialing.
Hands Free Unit Control
Controlling tone-based services
Uses tone base service using DTMF (Dual Tone
Multi Frequency).
1 Display the DTMF input screen
Display the Talking screen. See <Calling by
Entering a Phone Number> (page 54).
2 You can send tones during a call
1
1 Returns to the previous screen.
Calling by Phonebook
You can call a person using his/her phone
number that you have registered in the
Phonebook.
1 Display the Phonebook screen
The Initial Input screen appears.
2 Select the Phonebook search method
You can search by the initial of the Phonebook
data.
Initial alphabet screen
1
2
2
3
1 Displays the Phonebook beginning with
the name whose first character you have
touched.
2 Scrolls the character array display.
3 Returns to the Hands Free Control screen.
Initial number screen
2
2
4
4 Displays a list of numbers in the Phonebook
starting with the selected number.
56 DNX8120/DDX812/DDX8032BT English 57
Cyrillic alphabet search screen
А
О
5
2
2
3
5 Displays the Phonebook beginning with
the name whose first character you have
touched.
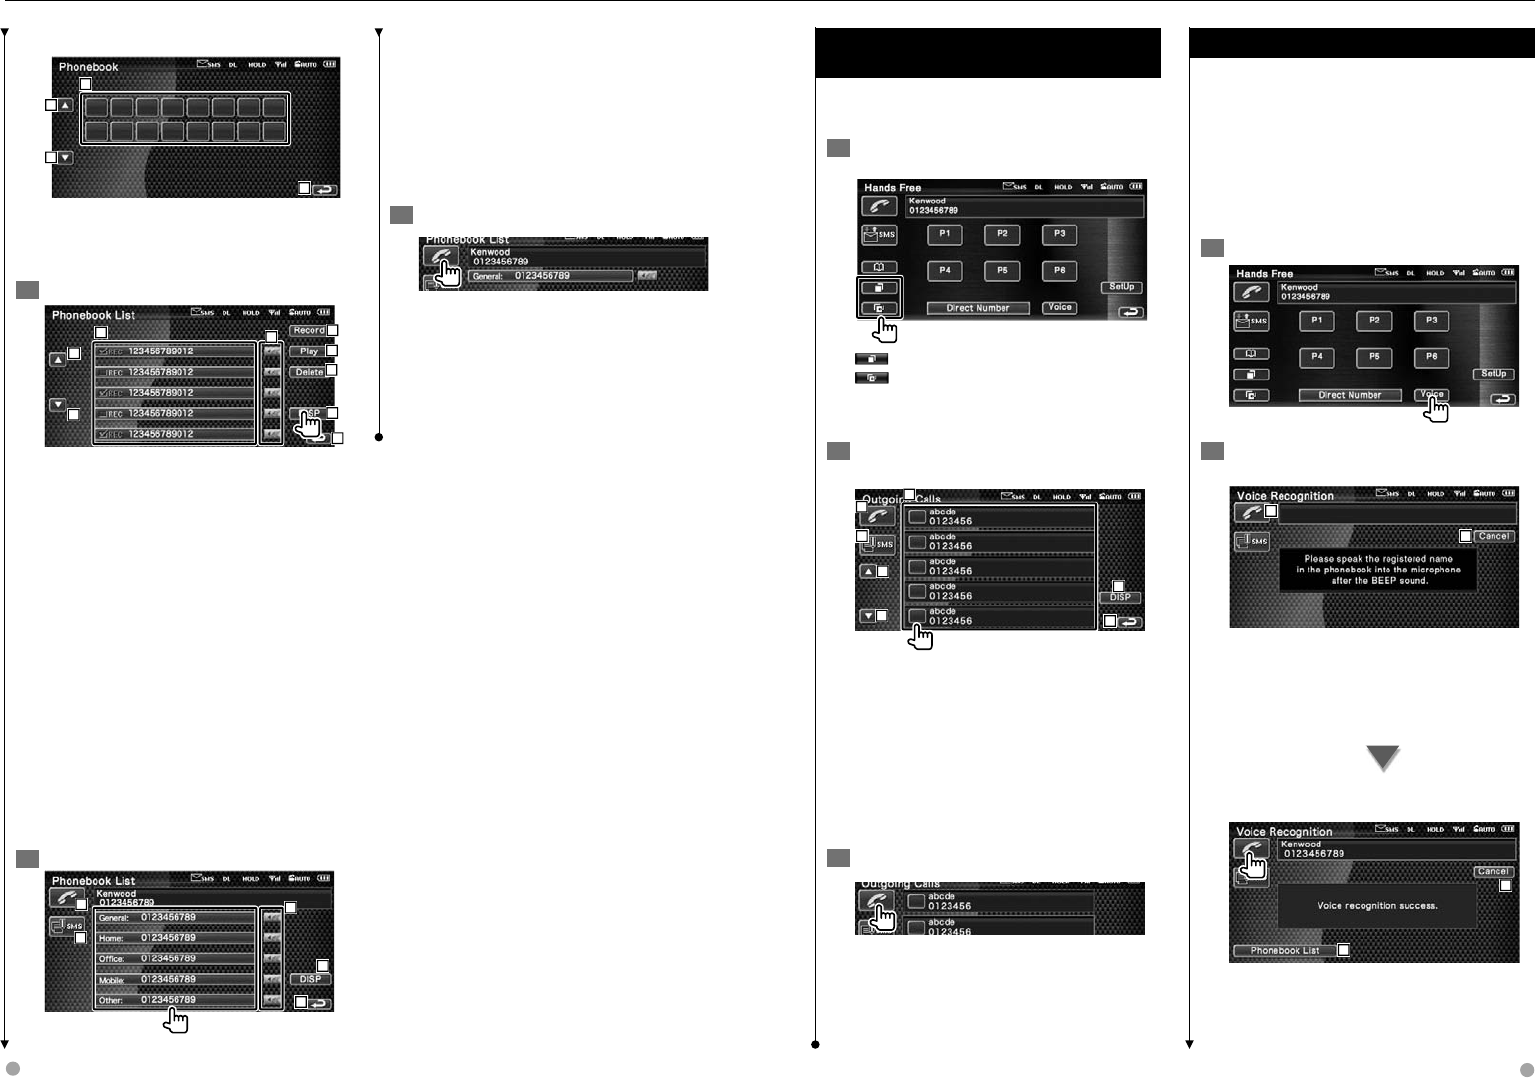
3 Select the name to call
7
7
69
10
11
13
8
12
6 Phonebook data list.
"REC" turns on for data with voice for voice
recognition already registered.
7 Scrolls the Phonebook data list.
8 Scrolls the name.
9 Registers the voice for voice recognition to
the selected Phonebook. If there are already
35 voice tag registered in the same cell-
phone, [Record] button is deactivated.
See <Voice Registration> (page 59).
p Plays the voice registered in the selected
Phonebook data.
q Deletes the voice registered in the selected
Phonebook data.
Touch to display the confirmation screen.
Touch [YES] to delete or [NO] to cancel.
w Displays the detail of the selected
Phonebook data.
e Returns to the Hands Free Control screen.
4 Select the phone number to call
15
14
18
16
17
r Calls the selected phone number.
t Creates an SMS for the displayed phone
number.
See <SMS (Short Message Service)> (page
62).
y Scrolls the phone number.
u Returns to the Name List screen.
i Returns to the Hands Free Control screen.
5 Make a call
⁄
• To use the Phonebook, it must have been downloaded
from the cell-phone.
• Initials including no corresponding name will not be
displayed.
• During search, a non-accent character such as "u" is
searched for instead of an accent character such as "ü".
Hands Free Unit Control
Making a Call Using Outgoing/Incoming
Call Records
Calls by selecting a phone number from the
outgoing or incoming calls list.
1 Display the Outgoing Calls or Incoming
Calls screen
: Outgoing Calls
: Incoming Calls
The Outgoing Calls or Incoming Calls list screen
appears.
2 Select from calls list
Example : Outgoing Calls screen
1
2
2
3
4
5
6
1 Outgoing Calls list.
2 Scrolls the list.
3 Makes a call to the selected number.
4 Creates an SMS for the selected phone
number. See <SMS (Short Message
Service)> (page 62).
5 Displays the detail of the selected phone
number.
6 Returns to the Hands Free Control screen.
3 Make a call
⁄
• The Outgoing Calls list screen or Incoming Calls list
screen shows the list of the calls originated from or
received at this unit. They are not the ones stored in the
cell-phone memory.
Calling by Voice Recognition
Calls by recognizing the registered voice.
⁄
• In order to perform voice recognition, voice must
be registered in the Phonebook data. See <Voice
Registration> (page 59). Or, to perform voice recognition
by Phone number category (Home, Office, Mobile etc.)
of Phonebook data, a key word voice must be registered.
See <Key Word Voice Registration> (page 60).
1 Display the Voice Recognition screen
2 Utter the voice registered in the
Phonebook
1
2
Utter within 2 seconds after the Beep.
1 Displays the recognized phone number or
address.
2 Cancels voice recognition.
If the voice recognition is succeeded and
there is only one phone number found:
3
2
Make a call.
2 Cancels voice recognition.
3 Displays the phonebook list.
Next page 3
58 DNX8120/DDX812/DDX8032BT English 59
If you hear another Beep sound:
Speak the key word within 2 seconds after the
Beep, or touch the [Phonebook List] button to
select the phone number.
Make a call.
⁄
• If there are more than one phone numbers registered
under the same name, and the key word voice is
registered for each phone number, you will hear another
beep. For how to register key word, see <Key Word Voice
Registration> (page 60).
If there are more than one phone numbers
registered under the same name, go to step
3.
3 Select a Phone number category
5
4
8
7
6
4 Calls the displayed phone number.
5 Creates an SMS to the displayed address.
See <SMS (Short Message Service)> (page
62).
6 Selects the Phone number category.
7 Scrolls the phone number.
8 Returns to the Hands Free Control screen.
4 Make a call
⁄
• A message is displayed if the voice is not recognized.
Read the message for the further operation.
Setting Up the Hands Free Phone
The Hands Free system can be set as follows.
1 Display the Hands Free Setup screen
2 Setup each item
1
2
4
3
56
7
8
9
10
11 12
1 Moves to the "Hands Free Setup 2" screen.
2 Sets an automatic response time after call
termination. ( "8")
"Off": This function can not use.
"0-99": Sets to calling ring time (second).
3 Sets a ringing tone output position.
( "Front R")
"Front L": Outputs the tone from the front
left-hand side speaker.
"Front R": Outputs the tone from the front
right-hand side speaker.
"Front All": Outputs the tone from the both
front speakers.
4 Sets the beep of the incoming call.
( "On")
"On": Beep is heard.
"Off": Beep is canceled.
Hands Free Unit Control
Next page 3
5 Sets the beep of the incoming SMS.
( "On")
"On": Beep is heard.
"Off": Beep is canceled.
6 Returns to the "Hands Free Control" screen.
7 Returns to the "Hands Free Setup 1" screen.
8 Sets whether to use cell-phone phonebook,
outgoing calls list and incoming calls list.
( "On")
"On": Yes.
"Off": No.
9 Sets the SMS function. ( "On")
"On": Use SMS function.
"Off": SMS not available.
p Registers the voice to select phone number
category with voice recognition.
See <Key Word Voice Registration> (page
60).
q Registers the phone number to Hands Free
Control screen preset button.
See <Phone Number Preset> (page 61).
w Returns to the Hands Free Control screen.
⁄
• Either the time interval for automatic answer set on this
unit or the time interval set on the cell-phone, whichever
is shorter, takes effect.
• Select the speaker which is further from the microphone
in order to prevent howling or echoes.
Voice Registration
Registers voice for voice recognition in
Phonebook. Up to 35 voices can be recorded in
one cell-phone.
1 Select the name to register
Go through the procedure of <Calling by
Phonebook> (page 55).
1
1 Selects a name.
"REC" turns on for data with voice for voice
recognition already registered.
2 Display the voice registration screen
3 Utter the voice to register (1st try)
3
2
2 Registers the voice.
3 Cancels voice registration.
Utter within 2 seconds after the Beep.
4 Utter the voice to register (2nd try)
60 DNX8120/DDX812/DDX8032BT English 61
5 End voice registration
⁄
• A message is displayed if the voice is not recognized.
Read the message for the further operation.
• Repeat from 1st try if the voice is different from the 1st
try.
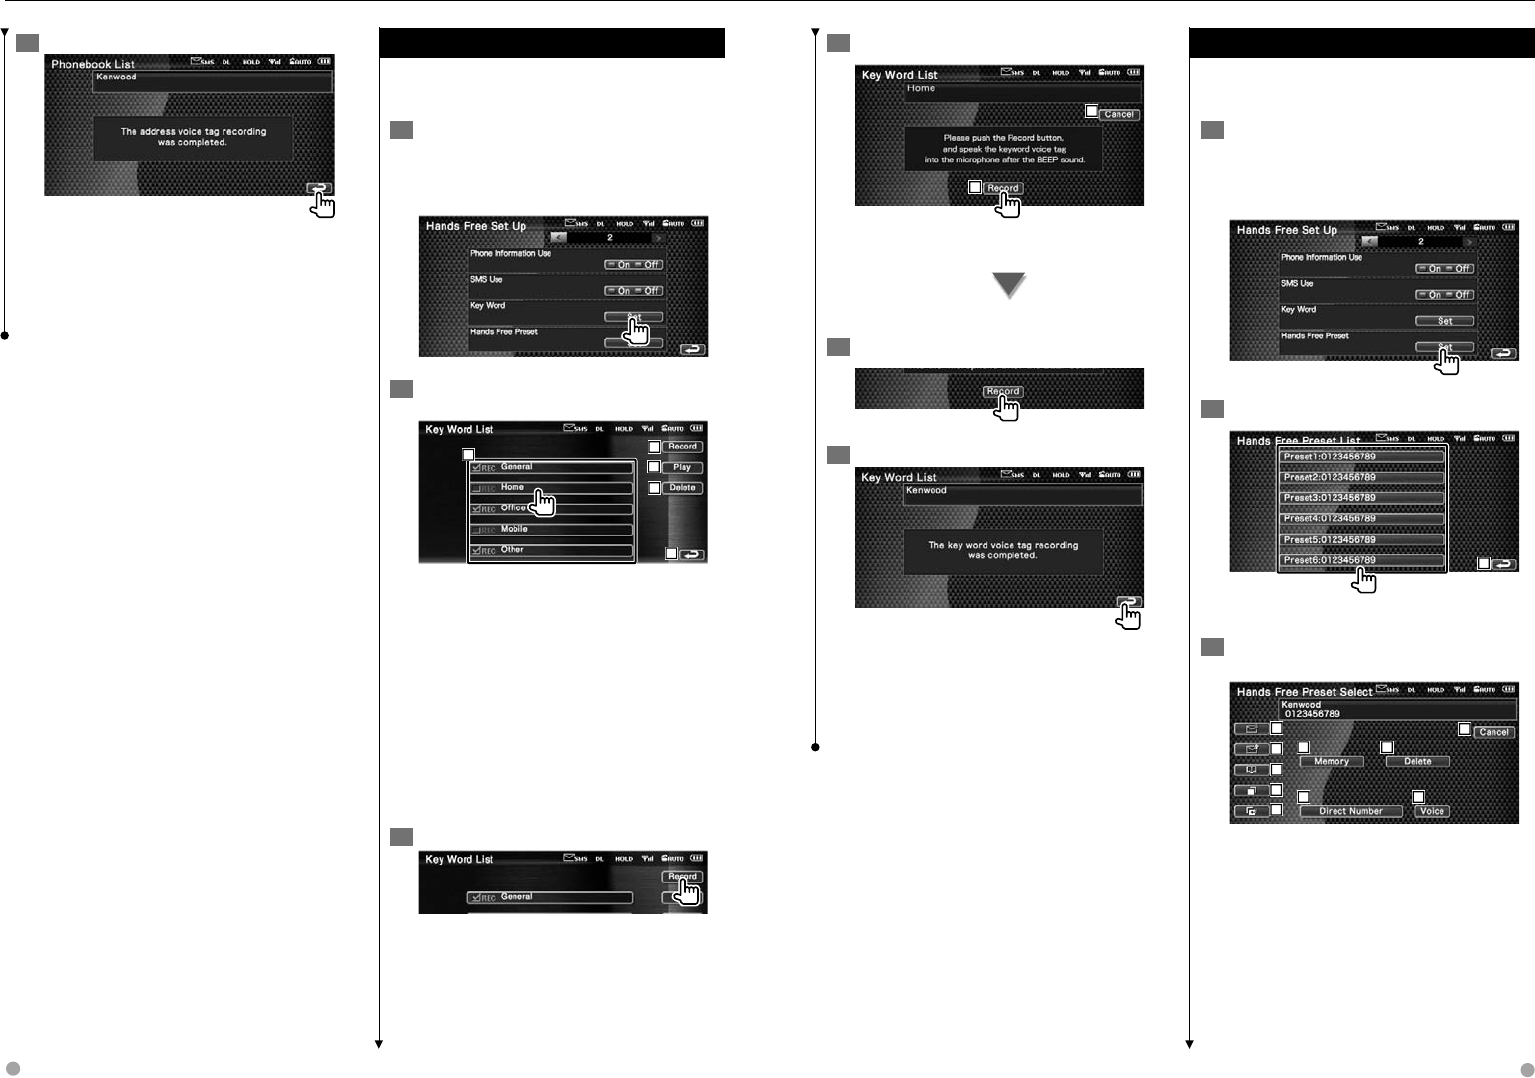
Key Word Voice Registration
Registers the voice to select the Phone number
category by Voice Recognition.
1 Display the Key Word List screen
Display the "Hands Free" screen and touch
[Setup]. See <Control Screen Function> (page
52).
2 Select the Phone number category to
register
2
3
4
5
1
1 Selects the Phone number category. "REC"
turns on for data with voice for voice
recognition already registered.
2 Registers voice for the selected Phone
number category.
3 Plays voice registered for the selected
Phone number category.
4 Deletes voice registered for the selected
Phone number category. Touch to display
the confirmation screen. Touch [YES] to
delete or [NO] to cancel.
5 Returns to the Hands Free Set Up screen.
3 Display voice registration screen
Hands Free Unit Control
4 Utter the voice to register (1st try)
7
6
6 Registers the voice.
7 Cancels voice registration.
Utter within 2 seconds after the Beep.
5 Utter the voice to register (2nd try)
6 End voice registration
⁄
• A message is displayed if the voice is not recognized.
Read the message for the further operation.
• Repeat from 1st try if the voice is different from the 1st
try.
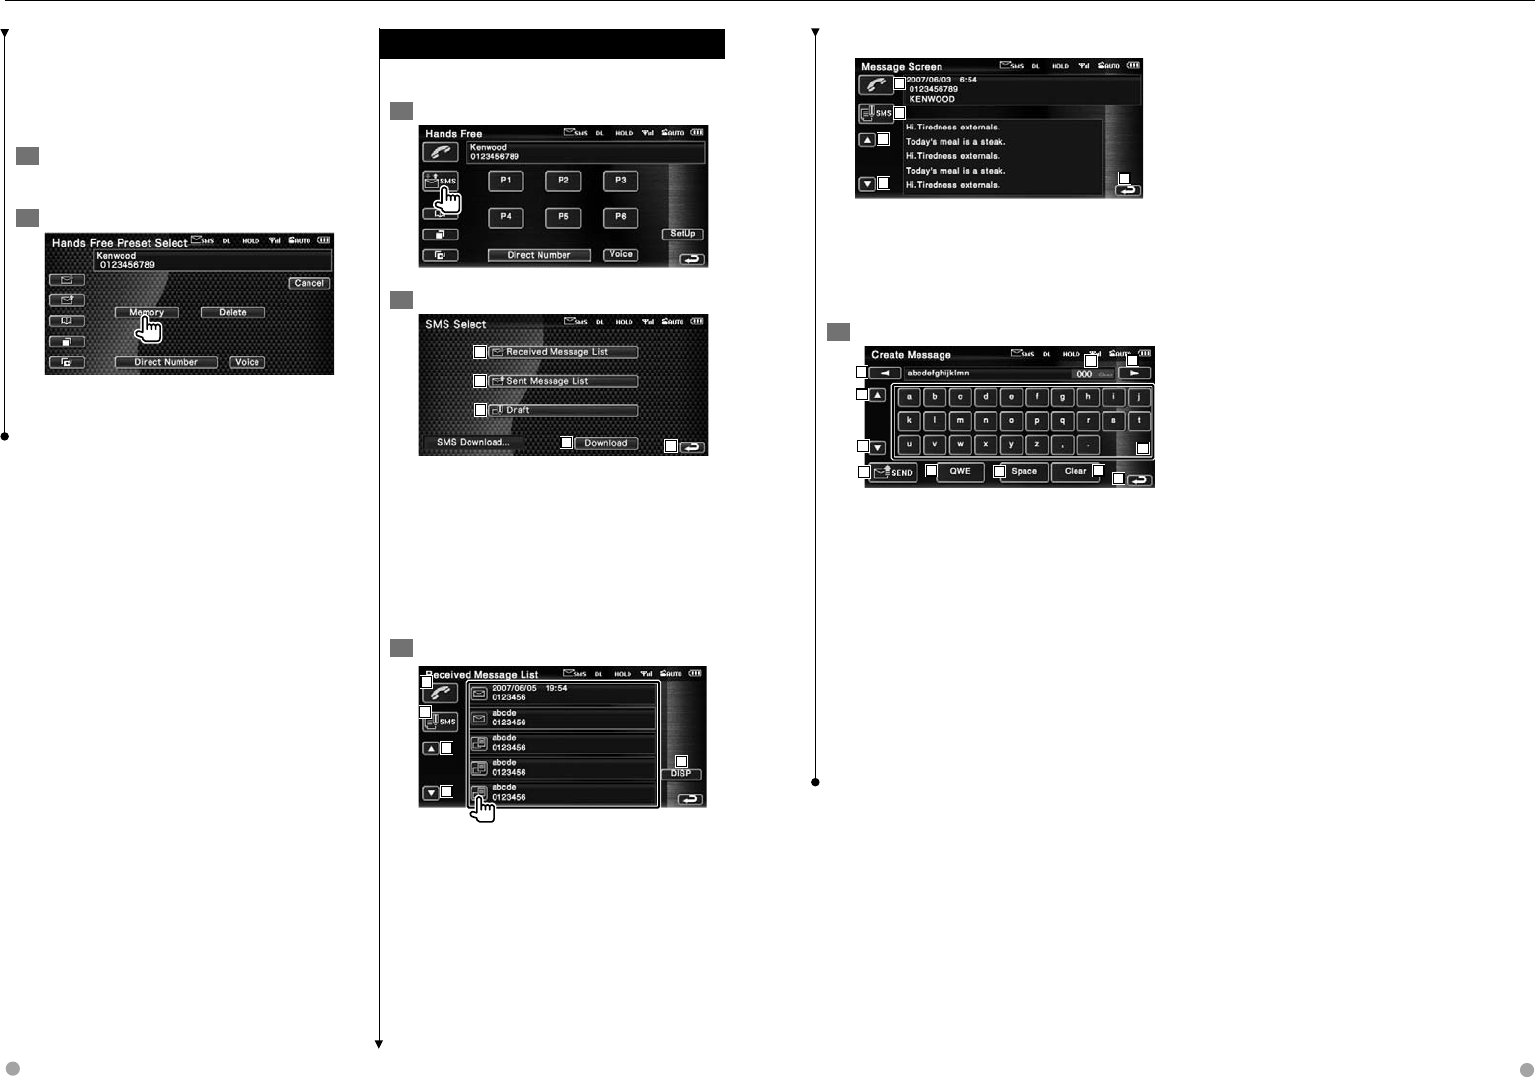
Phone Number Preset
Registers frequently used phone number to
Hands Free control screen preset button.
1 Display the Hands Free Preset List screen
Display the "Hands Free" screen and touch
[Setup]. See <Control Screen Function> (page
52)
2 Select the Preset number to register
1
1 Returns to the Hands Free Set Up screen.
3 Select the search destination of the
number to register
2
4
3
5
6
7 8
9 10
11
2 Registers from SMS incoming calls list.
3 Registers from SMS outgoing calls list.
4 Registers from Phonebook.
5 Registers from outgoing calls list.
6 Registers from incoming calls list.
7 Registers by entering phone numbers.
8 Registers voice for voice recognition to
preset number.
Next page 3
62 DNX8120/DDX812/DDX8032BT English 63
9 Registers the currently displayed phone
number.
p Deletes the currently displayed phone
number.
q Returns to the previous screen.
4 Search phone number to register with
each function
5 Register phone number
⁄
• Press [Delete] to delete the registered phone number.
SMS (Short Message Service)
Uses SMS function.
1 Display the SMS Select screen
2 Select a function
1
5
4
2
3
1 Displays received message list.
2 Displays sent message list.
3 Displays the Message screen. If there is an
unfinished message, the button will be
active.
4 Retrieves SMS messages from the cell-
phone.
5 Returns to the Hands Free screen.
3 Select message to display
6
7
8
8
9
6 Calls the number in the selected message.
7 Creates a new message for the selected
message.
8 Scrolls the list.
9 Displays the selected message.
Hands Free Unit Control
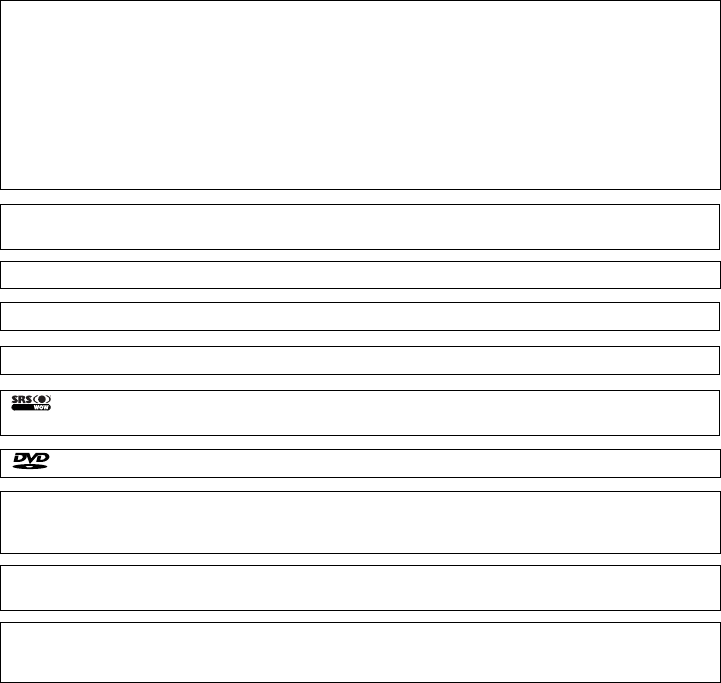
SMS Message screen
10
11
12
12 13
p Calls the number in the selected message.
q Creates a new message for the selected
message.
w Scrolls the message.
e Returns to the previous screen.
4 Create a message
14
14
16
17
17
18 19 20 21 22
15
r Moves the cursor.
t Displays remaining number of characters
allowed.
y Enters character.
u Changes keyboard character type.
i Sends the message.
o Sets the key layout of the character buttons.
ABC : Alphabetical key layout.
QWE : Qwerty key layout.
; Enters space.
a Erases the entered character.
If pressed more than 1 second, all the input
characters are erased.
s Returns to the previous screen.

108 DNX8120/DDX812/DDX8032BT English 109
Specifications
Monitor section
Picture Size
: 6.95 inches (diagonal) wide
: 156.2 mm (W) x 82.4 mm (H)
Display Sytem
: Transparent TN LCD panel
Drive System
: TFT active matrix system
Number of Pixels
: 336,960 (480H x 234V x RGB)
Effective Pixels
: 99.99 %
Pixel Arrangement
: RGB striped arrangement
Back Lighting
: Cold Cathode Fluorescent Tube
DVD player section
D/A Converter
: 24 bit
Audio Decoder
: Linear PCM/ Dolby Prologic II/ Dolby Digital/ dts/
MLP/ MP3/ WMA/ AAC
Video Decoder
: MPEG1/ MPEG2/ MPEG4 (DivX)
Wow & Flutter
: Below Measurable Limit
Frequency Response
Sampling frequency; 192 kHz : 20 – 88,000 Hz
Sampling frequency; 176.4 kHz : 20 – 80,000 Hz
Sampling frequency; 96 kHz : 20 – 44,000 Hz
Sampling frequency; 88.2 kHz : 20 – 40,000 Hz
Sampling frequency; 48 kHz : 20 – 22,000 Hz
Sampling frequency; 44.1 kHz : 20 – 20,000 Hz
Total Harmonic Distortion
: 0.008 % (1 kHz)
S/N Ratio (dB)
: 98 dB (DVD-Audio 192 kHz)
Dynamic Range
: 98 dB (DVD-Audio 192 kHz)
Disc Format
: DVD-Audio/Video/ VIDEO-CD/ CD-DA
Sampling Frequency
: 44.1/ 48/ 88.2/ 96/ 176.4/ 192 kHz
Quantifying Bit Number
: 16/ 20/ 24 bit
USB interface section
USB Standard
: USB 1.1/ 2.0
File Sytem
: FAT 16/ 32
Maximum Power Supply Current
: 500 mA
D/A Converter
: 24 Bit
Audio Decoder
: MP3/ WMA/ AAC
FM tuner section
Frequency Range (200 kHz)
: 87.9 MHz – 107.9 MHz
Usable Sensitivity (S/N : 30 dB)
: 9.3 dBf (0.8 μV/ 75 Ω)
Quieting Sensitivity (S/N : 50 dB)
: 15.2 dBf (1.6 μV/ 75 Ω)
Frequency Response (± 3.0 dB)
: 30 Hz – 15 kHz
S/N Ratio (dB)
: 70 dB (MONO)
Selectivity (± 400 kHz)
: ≥ 80 dB
Stereo Separation
: 40 dB (1 kHz)
AM tuner section
Frequency Range (10 kHz)
: 530 kHz – 1700 kHz
Usable Sensitivity
: 28 dBμ
Video section
Color System of External Video Input
: NTSC
External Video Input Level (mini jack)
: 1 Vp-p/ 75 Ω
External Audio Max Input Level (mini jack)
: 2 V/ 25 kΩ
Video Output Level (RCA jacks)
: 1 Vp-p/ 75 Ω
Audio Output Level (RCA jacks)
: 1.2 V/ 10 kΩ
Analog RGB input (DDX812/DDX8032BT only)
: 0.7 Vp-p/ 75 Ω
Audio section
Maximum Power (Front & Rear)
: 50 W x 4
Full Bandwidth Power (Front & Rear)
(4 Ω, 14.4 V, 1 % THD)
: 22 W x 4
Preout Level (V)
: 5 V/ 10 kΩ
Preout Impedance
: 80 Ω
Speaker Impedance
: 4 – 8 Ω
External SW
Maximum Power Supply Current
: 500 mA
Bluetooth section
Technology
: Bluetooth Ver.1.2 Certified
Frequency
: 2.402 – 2.480 GHz
Output Power
: +4dBm (MAX), 0dBm (AVE), Power Class2
Maximum Communication range
: Line of sight approx. 10m (32.8 ft)
Profile
HFP (Hands Free Profile), SPP (Serial Port Profile),
HSP (Headset Profile), A2DP (Advanced Audio
Distribution Profile), AVRCP (Audio/Video
Remote Control Profile), OPP (Object Push
Profile), PBAP (Phonebook Access Profile), SYNC
(Synchronization Profile)
DSP Section
Graphics equalizer
Band: 13 Band
Frequency (BAND1 – 13): 62.5/100/160/250/400/
630/1k/1.6k/2.5k/4k/
6.3k/10k/16k Hz
Front/ Rear/ Center
Gain
: -9/-7/-5/-3/-2/-1/0/1/2/3/5/7/9dB
X'over
High pass filter:
Frequency: Through, 30/40/50/60/70/80/90/100/1
20/150/180/220/250Hz
Slope: 12/18/24dB/Oct
Low pass filter:
Frequency: 30/40/50/60/70/80/90/100/120/
150/180/220/250Hz
Slope: 12/18/24dB/Oct
Time alignment
Front/ Rear/ Sub Woofer : 0~6.1m (5cm Step)
0~20.3ft (0.17ft Step)
Center : 0~3.4m (5cm Step)
0~11.3ft (0.17ft Step)
Channel level
: ±10dB

110 DNX8120/DDX812/DDX8032BT
2CAUTION
Use of controls or adjustments or performance of procedures other than those specified herein may result in hazardous radiation
exposure.
In compliance with Federal Regulations, following are reproductions of labels on, or inside the product relating to laser product
safety.
Kenwood Corporation
2967-3, ISHIKAWA-MACHI,
HACHIOJI-SHI
TOKYO, JAPAN
KENWOOD CORP. CERTIFIES THIS EQUIPMENT
CONFORMS TO DHHS REGULATIONS N0.21 CFR
1040. 10, CHAPTER 1, SUBCHAPTER J.
Location : Bottom Panel
FCC WARNING
This equipment may generate or use radio frequency energy. Changes or modifications to this equipment may cause harmful
interference unless the modifications are expressly approved in the instruction manual. The user could lose the authority to
operate this equipment if an unauthorized change or modification is made.
NOTE
This equipment has been tested and found to comply with the limits for a Class B digital device, pursuant to Part 15 of the
FCC Rules. These limits are designed to provide reasonable protection against harmful interference in a residential installation.
This equipment may cause harmful interference to radio communications, if it is not installed and used in accordance with the
instructions. However, there is no guarantee that interference will not occur in a particular installation. If this equipment does
cause harmful interference to radio or television reception, which can be determined by turning the equipment off and on, the
user is encouraged to try to correct the interference by one or more of the following measures:
• Reorient or relocate the receiving antenna.
• Increase the separation between the equipment and receiver.
• Connect the equipment into an outlet on a circuit different from that to which the receiver is connected.
• Consult the dealer or an experienced radio/TV technician for help.
Specifications
Navigation section (DNX8120 only)
Receiver
: High-sensitivity GPS receiver
Reception Frequency
: 1575.42 MHz (C/A code)
Acquisition Times
Cold : < 38 seconds
Factory Reset : < 45 seconds
(On average for a stationary receiver with a clear
view of the sky)
Accuracy
Position : < 10 meters typical
Velocity : 0.05 m/sec. RMS
Position Method
: GPS
Antenna
: External GPS antenna
General
Operating voltage
: 14.4 V (10.5 – 16 V allowable)
Maximum Current Consumption
: 15 A
DImensions (W × H × D)
: 182 × 112 × 163 mm
7-3/16 x 4-7/16 x 6-7/16 inch
Operational Temperature Range
: -10 °C – +60 °C
Storage Temperature Range
: -20 °C – +85 °C
Weight (DNX8120)
: 2.6 kg (5.7 lbs)
Weight (DDX812/DDX8032BT)
: 2.55 kg (5.6 lbs)
Although the effective pixels for the liquid crystal panel is given as 99.99% or more, 0.01% of pixels may not light or may light
incorrectly.
Specifications subject to change without notice.
is a trademark of DVD Format/Logo Licensing Corporation registered in the U.S., Japan and other countries.
This product incorporates copyright protection technology that is protected by U.S. patents and other intellectual property
rights. Use of this copyright protection technology must be authorized by Macrovision, and is intended for home and other
limited viewing uses only unless otherwise authorized by Macrovision. Reverse engineering or disassembly is prohibited.
Manufactured under license from Dolby Laboratories.
"Dolby", "ProLogic", and the double-D symbol are trademarks of Dolby Laboratories.
Manufactured under license under U.S. Patent #’s: 5,451,942; 5,956,674; 5,974,380; 5,978,762; 6,487,535 & other U.S. and
worldwide patents issued & pending. DTS and DTS Digital Surround are registered trademarks and the DTS logos and Symbol
are trademarks of DTS, Inc. © 1996-2007 DTS, Inc. All Rights Reserved.
DivX, DivX Certified, and associated logos are trademarks of DivX, Inc. and are used under license.
Apple, the Apple logo, and iPod are trademarks of Apple Inc., registered in the U.S. and other countries.
About DivX
DivX is a popular media technology created by DivX, Inc. DivX media Files contain highly compressed video
with high visual quality that maintains a relatively small file size. DivX files can also include advanced media
features like menus, subtitles, and alternate audio tracks. Many DivX media files are available for download
online, and you can create your own using your personal content and easy-to-use tools from DivX.com.
About DivX Certified
DivX Certified products are officially tested by the creators of DivX and guaranteed to play all versions of DivX
video, including DivX 6. Certified products qualify for one of several DivX Profiles that designate the type of
video the product supports, from compact portable video to high-definition video.
The "AAC" logo is trademark of Dolby Laboratories.
The Bluetooth word mark and logos are owned by the Bluetooth SIG, Inc. and any use of such marks by Kenwood Corporation
is under license. Other trademarks and trade names are those of their respective owners.
is a trademark of SRS Labs, Inc.
WOW technology is incorporated under license from SRS Labs, Inc.